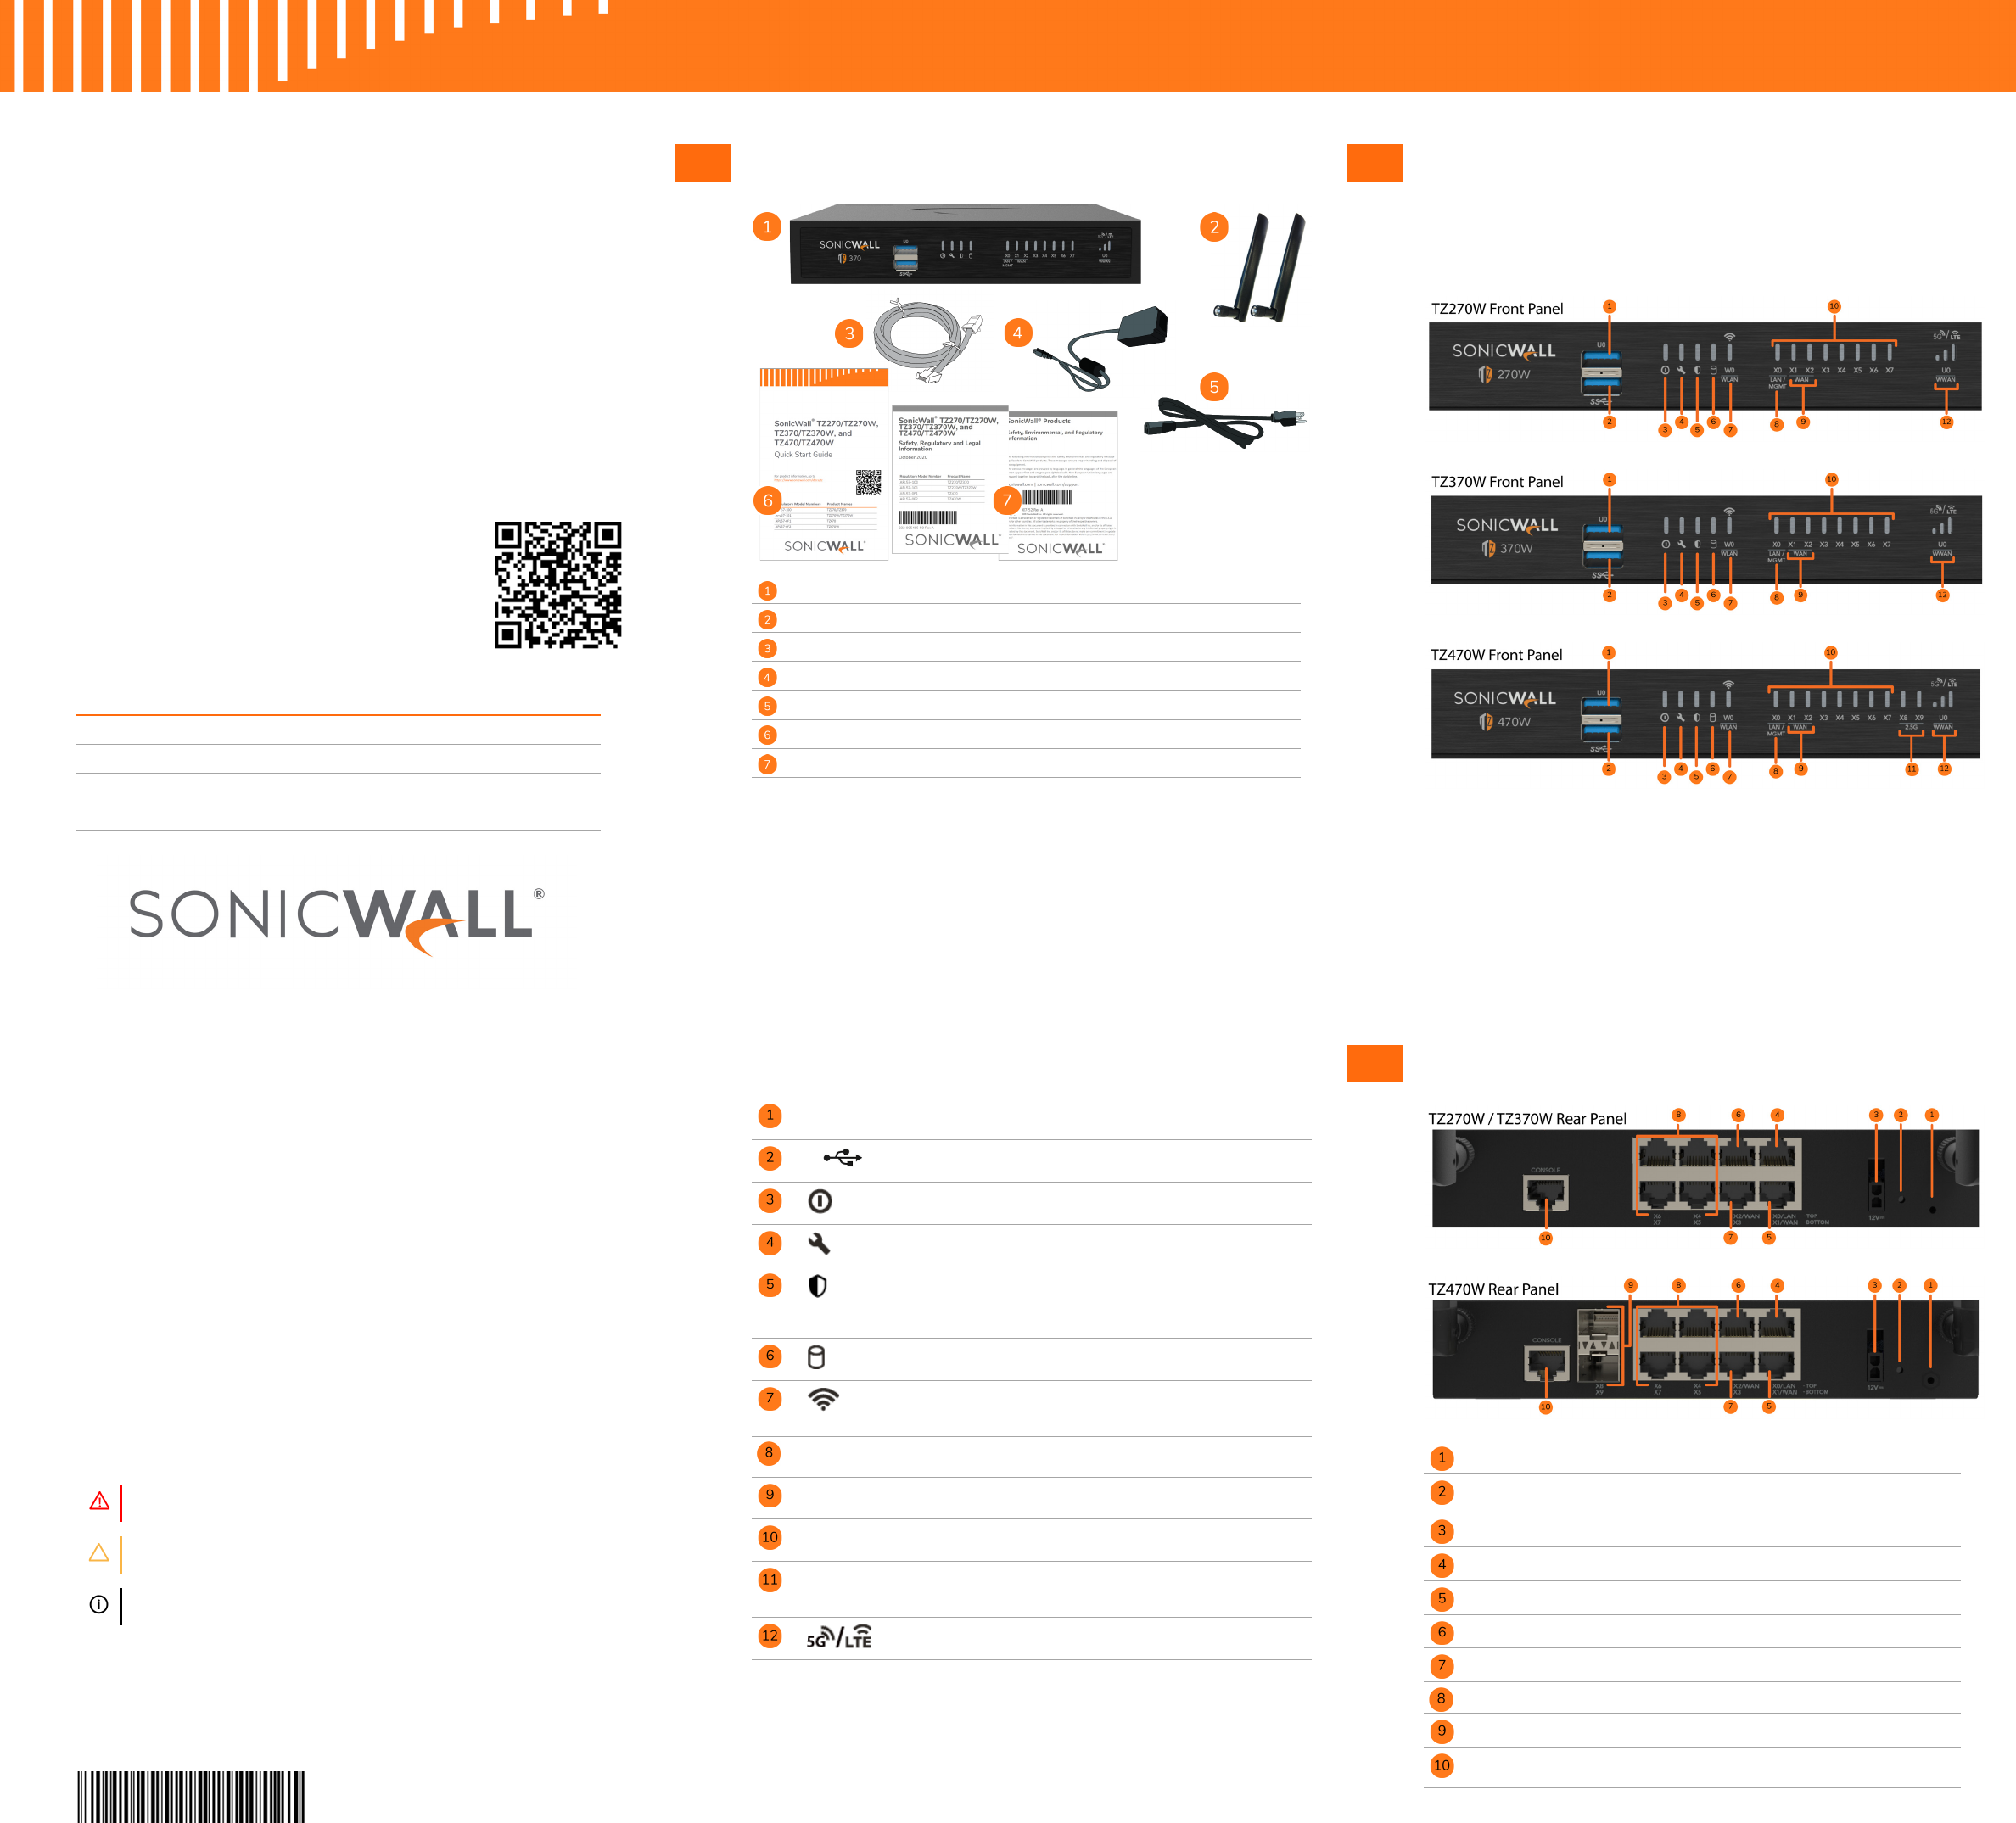
1 Package Contents
NOTE: The included power cord is approved for use only in specific countries or regions. Before
using a power cord, verify that it is rated and approved for use in your location. The power cord
is for AC mains installation only. Refer to the TZ270/TZ370/TZ470 Series Safety, Regulatory, and
Legal Information document for minimum power cord rating and additional safety information.
メモ: 添付の電源コードに関して電気安全を確保するために、弊社製品にご使用い
ただく電源コードは必ず製品同梱の電源コードをご使用ください。この電源コー
ドは他の製品では使用できません。
Items missing? Contact SonicWall Technical Support at:
https://www.sonicwall.com/support/contact-support
TZ Series appliance
Antennas (2) (Wireless
TZs only)
Ethernet cable
12VDC/36W Power adapter
Power cord
SonicWall TZ270/TZ370/TZ470 Series Quick Start Guide
Safety, Environmental, and Regulatory Information documents
2 Front Panels
The wired and wireless TZs for each model have the same
ports and LEDs, except that the wireless TZs have an
additional W0 WLAN LED.
Front Panel Ports and LED Descriptions
U0
U0 Port: USB 3.0 SuperSpeed (SS) Port for WWAN
SS
USB SS 3.0 Port: For Configuration, Recovery, Re-imaging the TZ
Power LED: Blue = Powered on,
Yellow = Defective adapter
Test LED: Yellow = Initializing,
Blinking Yellow = SafeMode
Security LED: Green = All Security Services Licensed,
Blinking Yellow = Security Services License Expired
Security Services monitored by this LED:
Gateway Anti-Virus, Intrusion Prevention, Anti-Spyware
Storage LED: Solid Green = Extended Storage module present,
Blinking Green = Activity, Yellow = Storage warning
Wireless W0 WLAN LED (Wireless TZs only):
Solid Green = Wireless radio is active,
Blinking Green = Activity
X0
LAN/MGMT X0 Port LED: Solid Green = 1G link,
Blinking Green = 1G activity
X1 / X2
WAN X1 and X2 Port LEDs: Solid Green = 1G link,
Blinking Green = 1G activity
X0 – X7
RJ45 Port LEDs: Solid Green = 1G link,
Blinking Green = 1G activity
X8 / X9
SFP/SFP+ Port LEDs (TZ470/TZ470W only):
Solid Orange = 2.5G link,
Blinking Orange = 2.5G activity
U0 WWAN LEDs for USB 5G/LTE:
Green = 5G/LTE signal strength
3 Back Panels
SSD Storage Module – The TZ supports an optional, field-upgradable
SSD storage module, accessible by a removable panel on the bottom
of the appliance. To order, refer to the price list for available SKUs.
Grounding Screw
SafeMode Button: Press and hold until the Test LED begins blinking to
set the TZ into SafeMode
Power Input: 36W 100~240VAC - 12VDC power adapter
X0 LAN RJ45 Port: 1 Gbps
X1 WAN RJ45 Port: 1 Gbps
X2 WAN RJ45 Port: 1 Gbps
X3 RJ45 Port: 1 Gbps
X4/X5/X6/X7 RJ45 Ports: 1 Gbps
SFP/SFP+ Ports X8/X9 – (TZ470/TZ470W only): 2.5 / 1 Gbps
RJ45 Console Port
SonicWall
®
TZ270/TZ270W,
TZ370/TZ370W, and
TZ470/TZ470W
Quick Start Guide
For product information, go to
https://www.sonicwall.com/docs/tz
Regulatory Model Numbers Product Names
APL57-100 TZ270/TZ370
APL57-101 TZ270W/TZ370W
APL57-0F1 TZ470
APL57-0F2 TZ470W
Copyright ©
2023 SonicWall Inc. All rights reserved.
SonicWall is a trademark or registered trademark of SonicWall Inc. and/or its affiliates in
the U.S.A. and/or other countries. All other trademarks and registered trademarks are
property of their respective owners.
The information in this document is provided in connection with SonicWall Inc. and/or its
affiliates' products. No license, express or implied, by estoppel or otherwise, to any
intellectual property right is granted by this document or in connection with the sale of
SonicWall products. EXCEPT AS SET FORTH IN THE TERMS AND CONDITIONS AS SPECIFIED
IN THE LICENSE AGREEMENT FOR THIS PRODUCT, SONICWALL AND/OR ITS AFFILIATES
ASSUME NO LIABILITY WHATSOEVER AND DISCLAIMS ANY EXPRESS, IMPLIED OR
STATUTORY WARRANTY RELATING TO ITS PRODUCTS INCLUDING, BUT NOT LIMITED TO,
THE IMPLIED WARRANTY OF MERCHANTABILITY, FITNESS FOR A PARTICULAR PURPOSE,
OR NON- INFRINGEMENT. IN NO EVENT SHALL SONICWALL AND/OR ITS AFFILIATES BE
LIABLE FOR ANY DIRECT, INDIRECT, CONSEQUENTIAL, PUNITIVE, SPECIAL OR INCIDENTAL
DAMAGES (INCLUDING, WITHOUT LIMITATION, DAMAGES FOR LOSS OF PROFITS,
BUSINESS INTERRUPTION OR LOSS OF INFORMATION) ARISING OUT OF THE USE OR
INABILITY TO USE THIS DOCUMENT, EVEN IF SONICWALL AND/OR ITS AFFILIATES HAVE
BEEN ADVISED OF THE POSSIBILITY OF SUCH DAMAGES. SonicWall and/or its affiliates
make no representations or warranties with respect to the accuracy or completeness of
the contents of this document and reserves the right to make changes to specifications
and product descriptions at any time without notice. SonicWall Inc. and/or its affiliates do
not make any commitment to update the information contained in this document.
For more information, visit https://www.sonicwall.com/legal/.
To access the Support Portal, go to https://www.sonicwall.com/support.
SonicWall TZ270/TZ370/TZ470 Series Quick Start Guide
Updated - February 2023
232-005484-51 Rev A
Legend
WARNING: A WARNING icon indicates a potential for property damage,
personal injury, or death.
CAUTION: A CAUTION icon indicates potential damage to hardware or loss of
data if instructions are not followed.
IMPORTANT, NOTE, TIP, MOBILE, or VIDEO: An information icon indicates
supporting information.
4 Mounting Options
Flat Surface Option
Place the TZ on a flat surface. Allow unrestricted airflow
around the unit, leaving atleast one inch (25.44mm)
clearance on all sides.
Rack Mounting Option
SonicWall offers a rack mount tray kit to mount your TZ
and power adapter in a standard 19-inch rack.
Ordering information:
02-SSC-3113 - SONICWALL TZ470/TZ370/TZ270 RACKMOUNT KIT
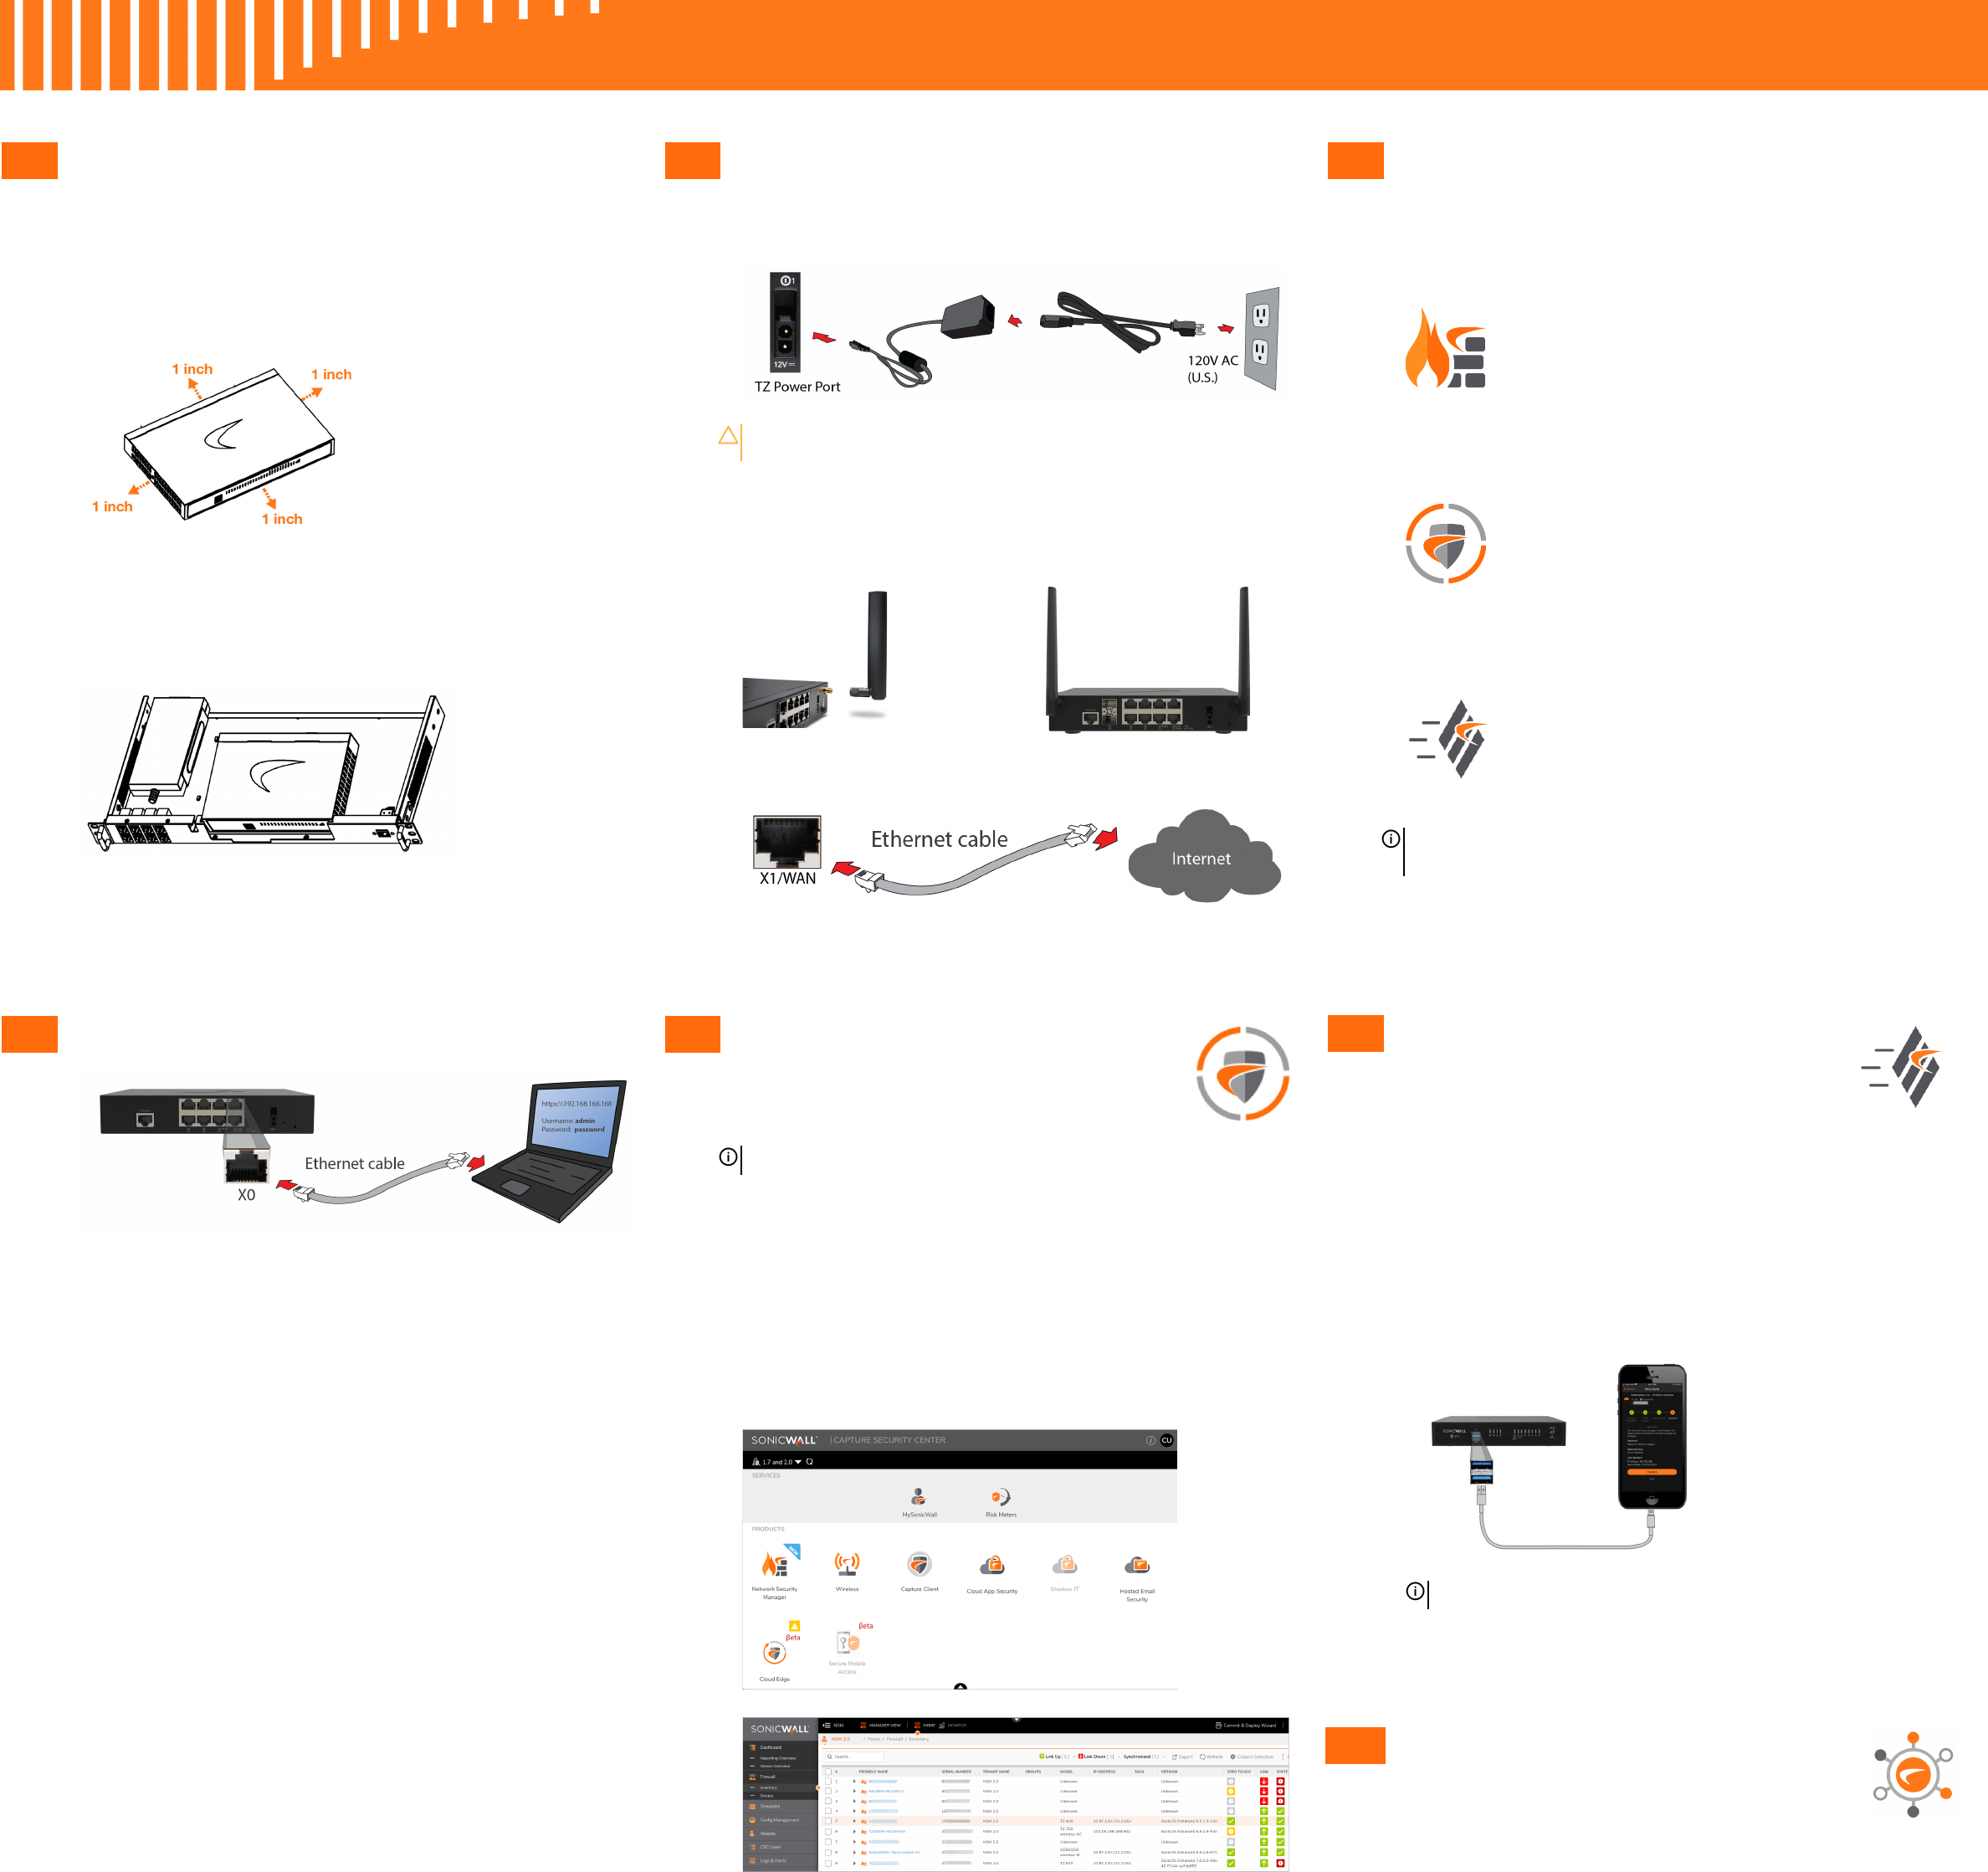
5 Connectivity and Power
1. Connect Power
2. Connect Interfaces
For a wireless TZ, connect the antennas to your TZ.
Connect the TZ WAN interface (X1 or X2) to the Internet.
CAUTION: Only use the power adapter included with this appliance. Do
not use a power adapter that is damaged or from another appliance.
6 Setup Options
Setup using Local Management
Set up and manage your TZ by connecting it to a
management computer with an Ethernet cable.
To minimize scrolling, set your screen resolution
to at least 1920 x 1080 pixels.
Setup using Cloud Management
Use SonicWall Capture Security Center (CSC)
with Zero Touch to manage and configure your
TZ.
Setup using SonicExpress App
Use SonicWall SonicExpress on your
smartphone to register and configure your TZ.
NOTE: After initial setup, be sure to download the latest
firmware from MySonicWall and upgrade your TZ.
7 Local Management
1 Connect the TZ LAN interface (X0) to your computer.
Your computer should be configured to accept DHCP
addressing.
2Navigate to https://192.168.168.168 in your web
browser and log in with the default credentials:
3Username: admin
Password: password
4 On successful login with default password, you are then
prompted to change the password.
NOTE: The default password must be changed at the time
of your first log in and the new password to be used for
future login attempts.
5 Launch the Setup Guide wizard or manually configure
to complete initial configuration.
6 Using SonicOS, click Register and log in with your
MySonicWall credentials to register your TZ.
Your TZ is now initialized and ready for use!
8 Cloud Management
Use Capture Security Center (CSC) with Zero
Touch to manage and configure your TZ.
1 Log into CSC at cloud.sonicwall.com
using your MySonicWall credentials.
2 Select the mySonicWall tile to register your TZ.
3 Enable Zero Touch and NSM licensing on your TZ in
MySonicWall.
4 Select the Network Security Manager tile in CSC to
manage your TZ from the cloud.
NOTE: This option requires a Cloud Management license.
9 SonicExpress App
Use SonicExpress on your smartphone to
register and configure your TZ.
1 Download and launch the SonicExpress App on your iOS
or Android device.
2Tap Login and log in with your MySonicWall credentials,
then select the tenant for the TZ. Tenants can contain
multiple SonicWall appliances.
3 Connect your iOS/Android device to the TZ with your
smartphone USB cable (not supplied with the TZ).
4Use the SonicExpress Setup Guide to register the TZ,
synchronize service licenses, change the password, and
configure essential interface settings.
10 Secure SD-Branch
SD-Branch combines SD-WAN, SD-LAN, unified
security and centralized management for
distributed enterprises. For more information, see:
https://www.sonicwall.com/solutions/use-cases/secure-sd-branch
NOTE: Use your mobile device USB cable.
