
© 2024 Cisco and/or its affiliates. All rights reserved. This document is Cisco Public. Page 1 of 21
CSPC Quick Start Guide
Cisco CSPC
Quick Start Guide 2.11
March 2024
Updated: May 29, 2024

CSPC Quick Started Guide
© 2024 Cisco and/or its affiliates. All rights reserved. This document is Cisco Public Information. Page 2 of 21
Table of Contents
INTRODUCTION TO CSPC ........................................................................................................................ 3
PREREQUISITES ....................................................................................................................................................3
CSPC SUPPORTED BROWSERS ...............................................................................................................................3
VIRTUAL PLATFORM REQUIREMENTS ...................................................................................................... 4
IMPORTANT NOTE .................................................................................................................................. 5
DOWNLOAD THE VIRTUAL MACHINE IMAGE ........................................................................................... 5
CONFIGURE APPLIANCE IP ADDRESS ....................................................................................................... 5
CONFIGURE IPV4 ADDRESS ....................................................................................................................................5
CONFIGURE IPV6 ADDRESS ...................................................................................................................................7
SETUP THE SOFTWARE APPLIANCE FOR THE FIRST TIME .......................................................................... 9
CONFIGURE CSPC USING THE WIZARD................................................................................................... 10
INSTALL ........................................................................................................................................................... 10
REGISTER......................................................................................................................................................... 12
ADD DEVICES ................................................................................................................................................... 13
ACCESS CREDENTIALS ........................................................................................................................................ 14
COLLECT .......................................................................................................................................................... 16
PORT USAGE INFORMATION ................................................................................................................. 16
ACCESS CSPC USER INTERFACE .............................................................................................................. 18
UPDATE DEVICES, CREDENTIALS AND COLLECTION SETTINGS ................................................................................... 19
VIEW STATUS OF DISCOVERY, COLLECTION AND UPLOADS....................................................................................... 19
LEGAL INFORMATION ........................................................................................................................... 21

CSPC Quick Started Guide
© 2024 Cisco and/or its affiliates. All rights reserved. This document is Cisco Public Information. Page 3 of 21
Introduction to CSPC
The Cisco Common Service Platform Collector (CSPC) is an SNMP-based tool that discovers and collects
information from the Cisco devices installed on your network. The CSPC software provides an extensive
collection mechanism to gather various aspects of customer device data. Information gathered by the collector is
used by several Cisco Service offers, such as Smart Net Total Care, Partner Support Service, and Business
Critical Services. The data is used to provide inventory reports, product alerts, configuration best practices,
technical service coverage, lifecycle information, and many other detailed reports and analytics for both the
hardware and operating system (OS) software.
This document provides information about how to download, install and configure a new CSPC collector on a
virtual machine that is running ESXi 6.7 (20497097) and above.
If you are using the ISO image for the CSPC, please refer to the CSPC ISO Image Installation Guide for
instructions.
In order to configure a CSPC and ensure a successful setup, a workflow wizard which simplifies the CSPC
configuration is included with the CSPC 2.11 and later releases. You should know the SNMP credentials that are
set up on your devices.
This document will walk you through the steps for a basic first time CSPC setup.
Prerequisites
Register to the required services:
• How to register SNTC Service
• To register for PSS portal access, please click to open a new mail, copy the below and provide the
requested details.
Please open a case to assign a Super Admin for my Company. (please submit the information below.)
Partner Company Name:
Partner Location:
Super Admin Name:
Super Admin Cisco.com ID:
Super Admin Email:
Technical Contact Phone Number:
Technical Contact Cisco.com ID:
Technical Contact Email:
Technical Contact Phone Number:
Existing PSS contract number:
CSPC Supported Browsers
•
Firefox version 80
•
Internet Explorer (IE) version 11
•
Chrome 85
CSPC Quick Started Guide
© 2024 Cisco and/or its affiliates. All rights reserved. This document is Cisco Public Information. Page 4 of 21
Note: Allocate 2-4 hours for the installation, depending on your network size. The algorithm runs only once to
optimize storage and reduces the time required in future upgrades. The system will automatically reboot after
installing the patch.
Virtual Platform Requirements
This section provides information about the virtual platform requirements. This guide does not provide
directions on how to install the different virtual platforms.
As of CSPC 2.11 release, there is a single configurable OVA image that supports multiple configurations.
Below are listed the minimum system requirements for the collector images that run on a ESXi 7.0 virtual
platform:
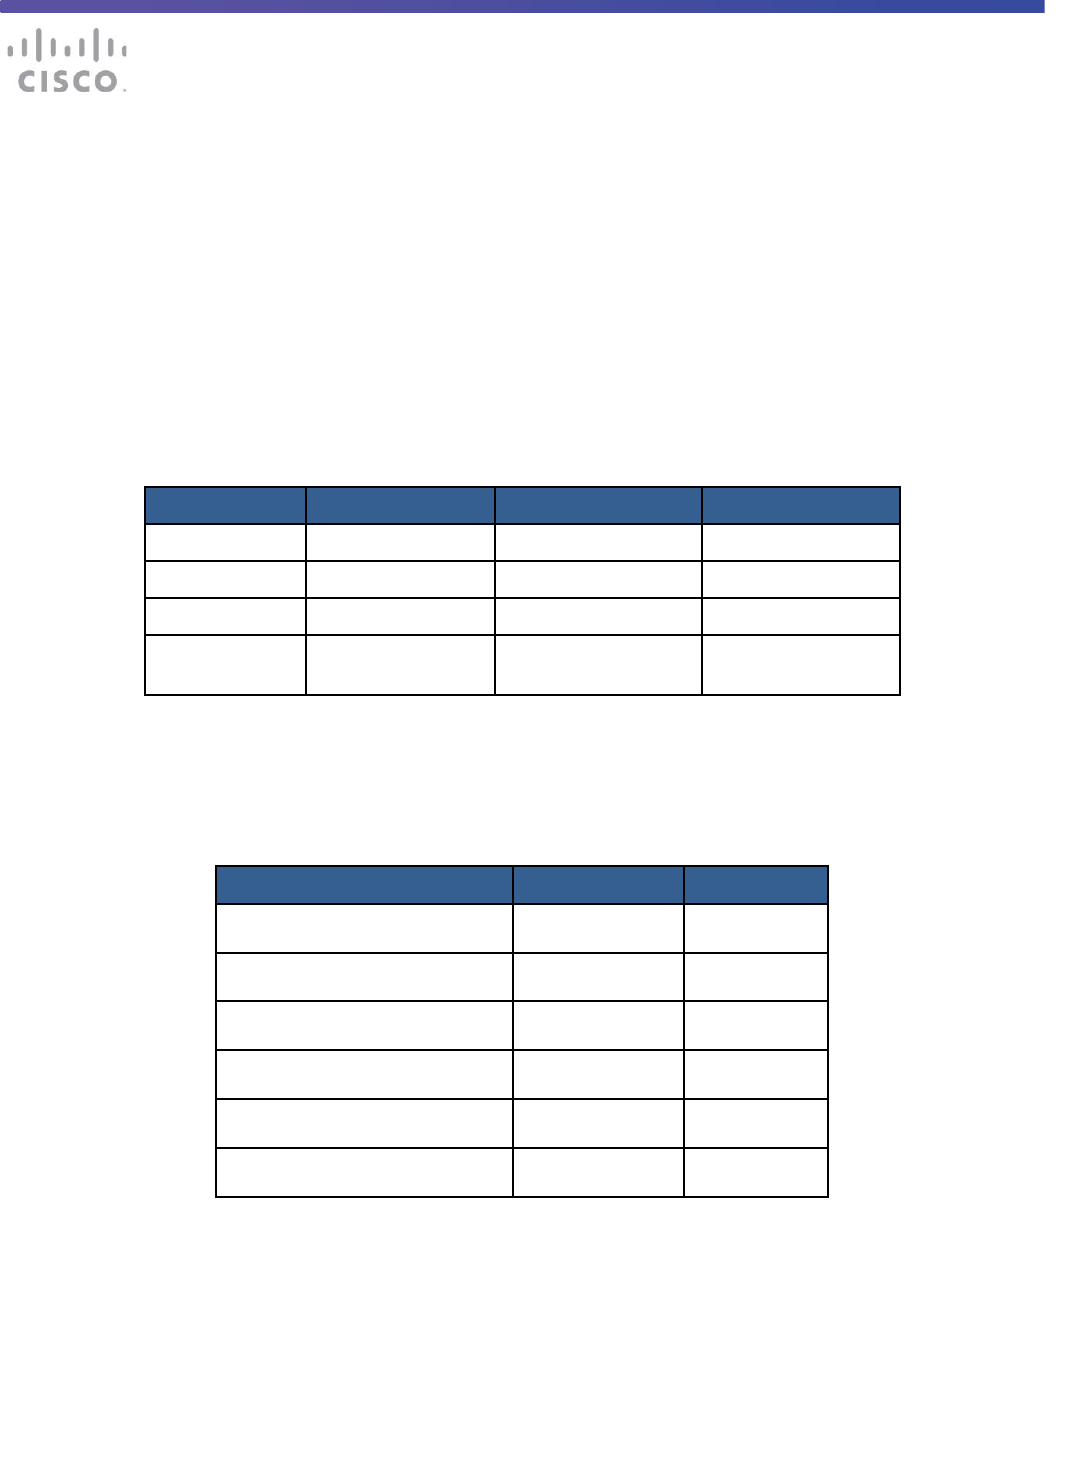
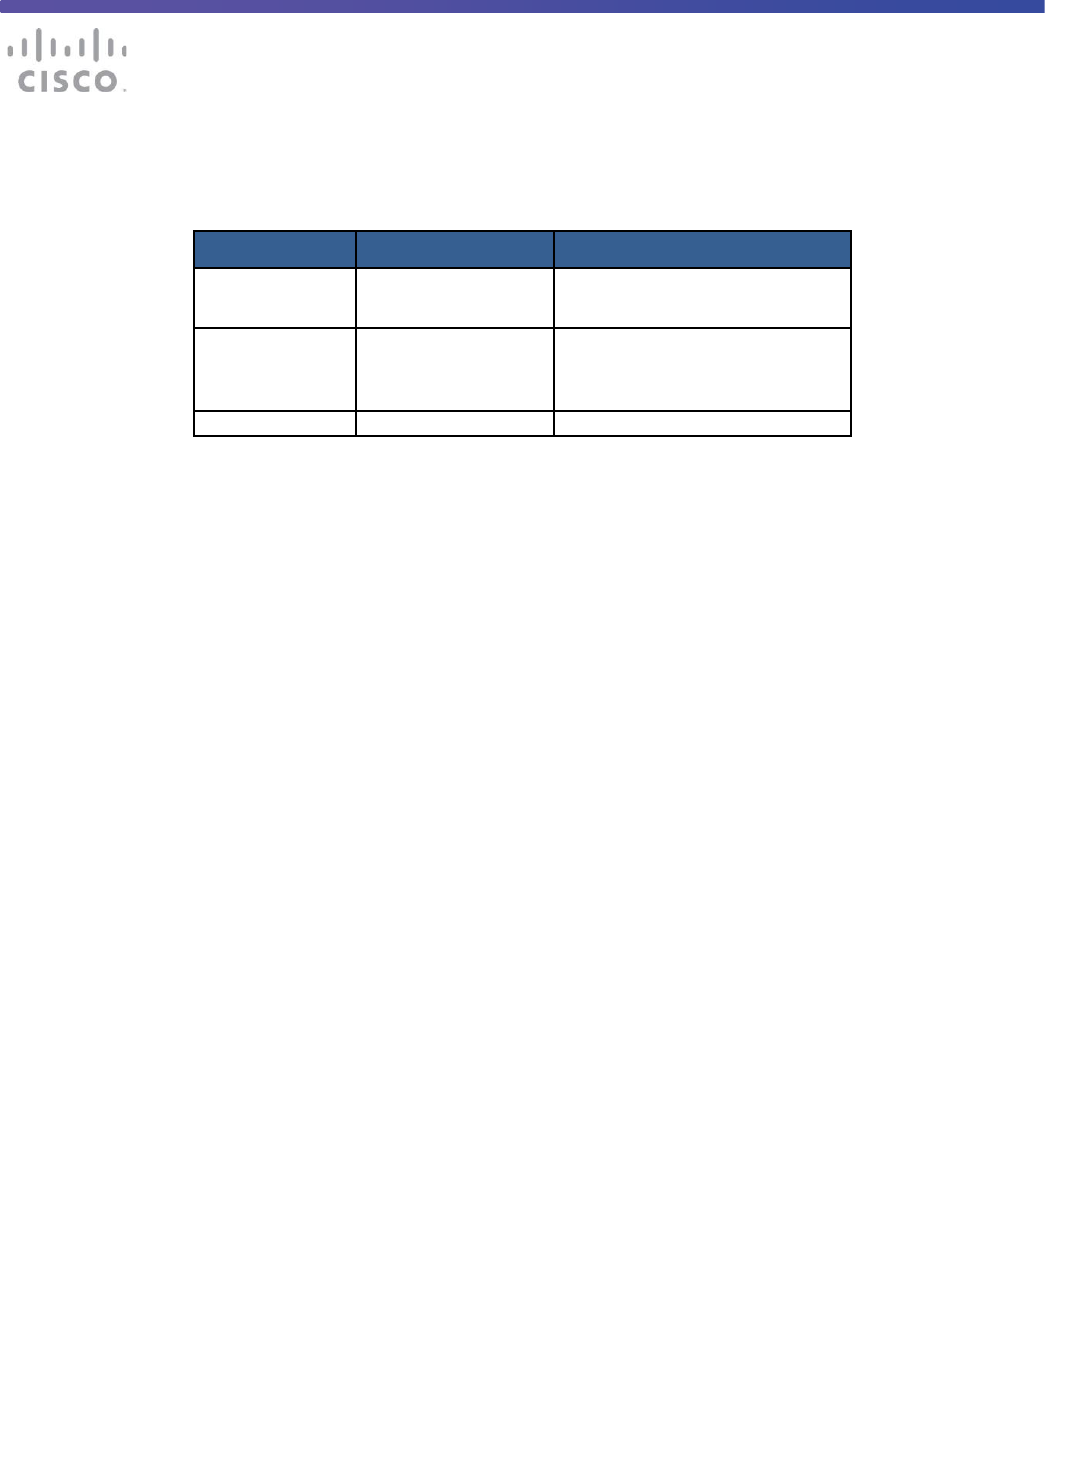
Table 1: VM Specification for SNTC/PSS Customer
Specification
Small
Medium
Large
vCore count
4
8
12
RAM
4 GB
8 GB
16 GB
HDD (GB)
250
500
1000
Number of
Devices
Up to10,000
20K or less
40K or less
A minimum of one virtual NIC is needed for all configurations. The number of NICs required is
dependent upon the network topology.
Table 2: VM Specification for BCS Customer
Specification
Medium CSPC
Large CSPC
Number of Devices
<10,000
Up to 40,000
Physical Core Count (Cores)
4
6
Core to vCore Count
2
2
vCore Count (Cores)
8
12
RAM (GB)
8 GB
16 GB
Hard Disk Space
500 GB
1 TB
CSPC Quick Started Guide
© 2024 Cisco and/or its affiliates. All rights reserved. This document is Cisco Public Information. Page 5 of 21
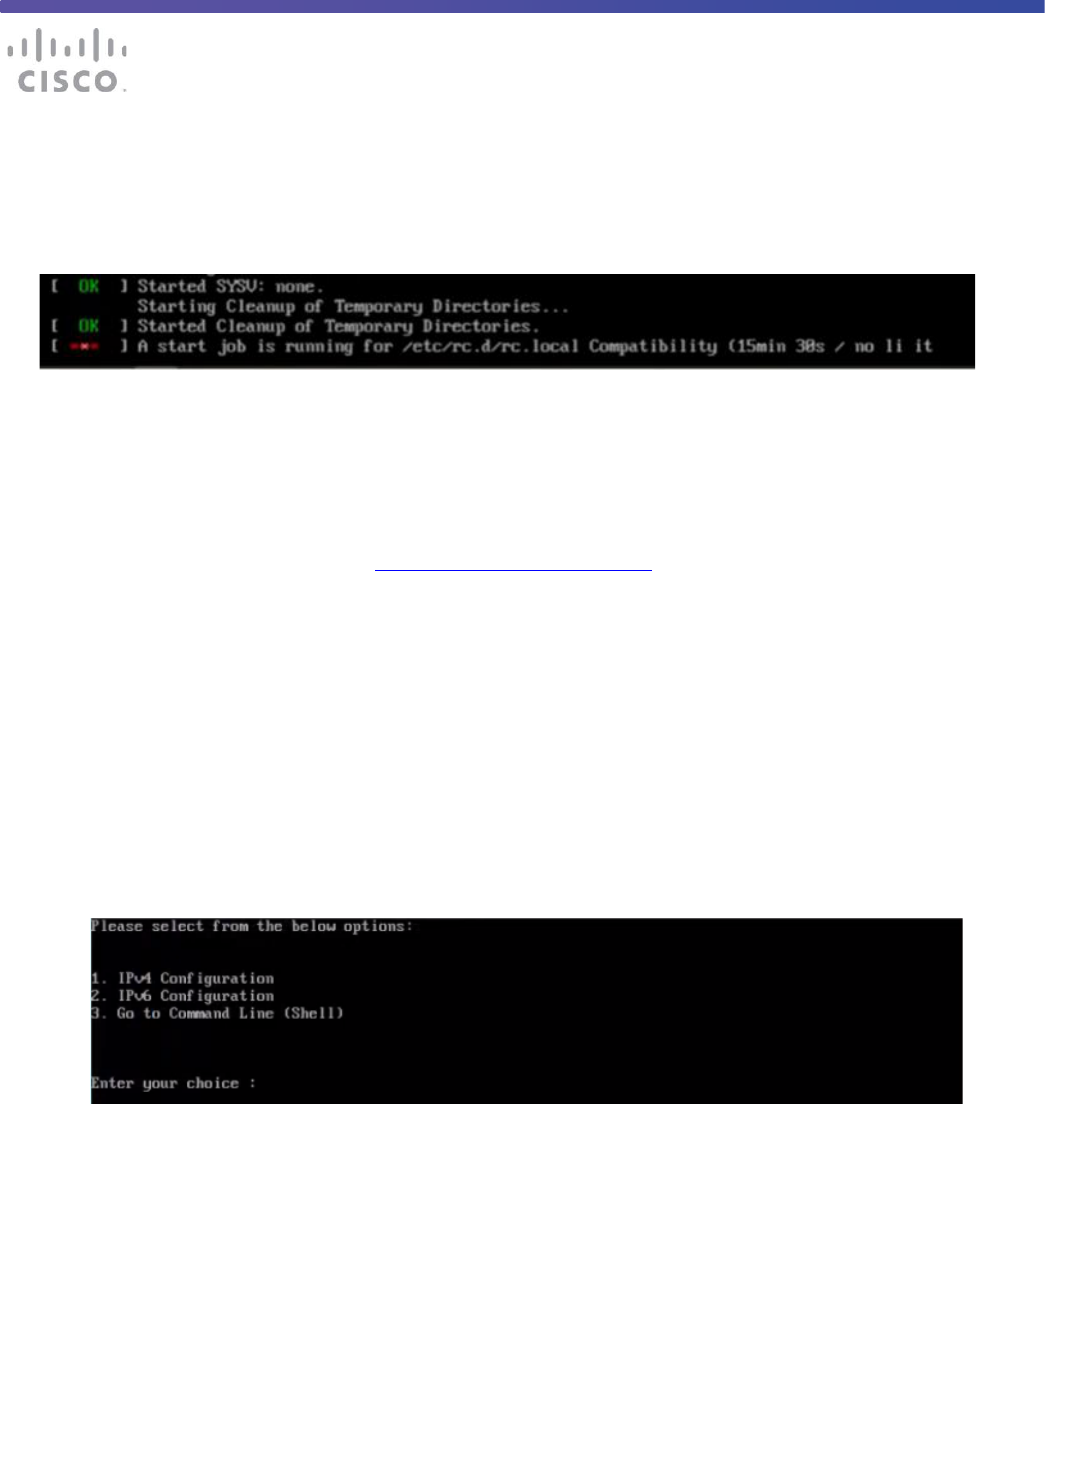
Important Note
On Installation: If 2.11 startup job(/etc/rc.d/rc.local) is running for more than 20 mins then try
pressing Alt+F1 through Alt+F6 to shift to alternate virtual terminals and you may see one of them
waiting for with the admin password prompt. (if so, enter password)
Download the Virtual Machine Image
After ensuring that your virtual environment can provide the needed resources, the next step is to download the
CSPC collector image. The most recent software image can be obtained from the download center.
To access the CSPC collector image, perform the following steps:
•
Go to the following URL: CSPC Image Download Center
•
Login with your CCO Credential if requested.
•
Select the required image and click Download. Accept the Terms and Conditions to start the
image
download.
•
Deploy this image to your environment.
Configure Appliance IP Address
After the OVA has been installed, you are prompted to enter an IP Address for the collector. Choose one of the
three options:
Configure IPv4 address
1. Select 1 to configure IPv4 address
2. Select any one option:
a. Select 1 to fetch IP address automatically.
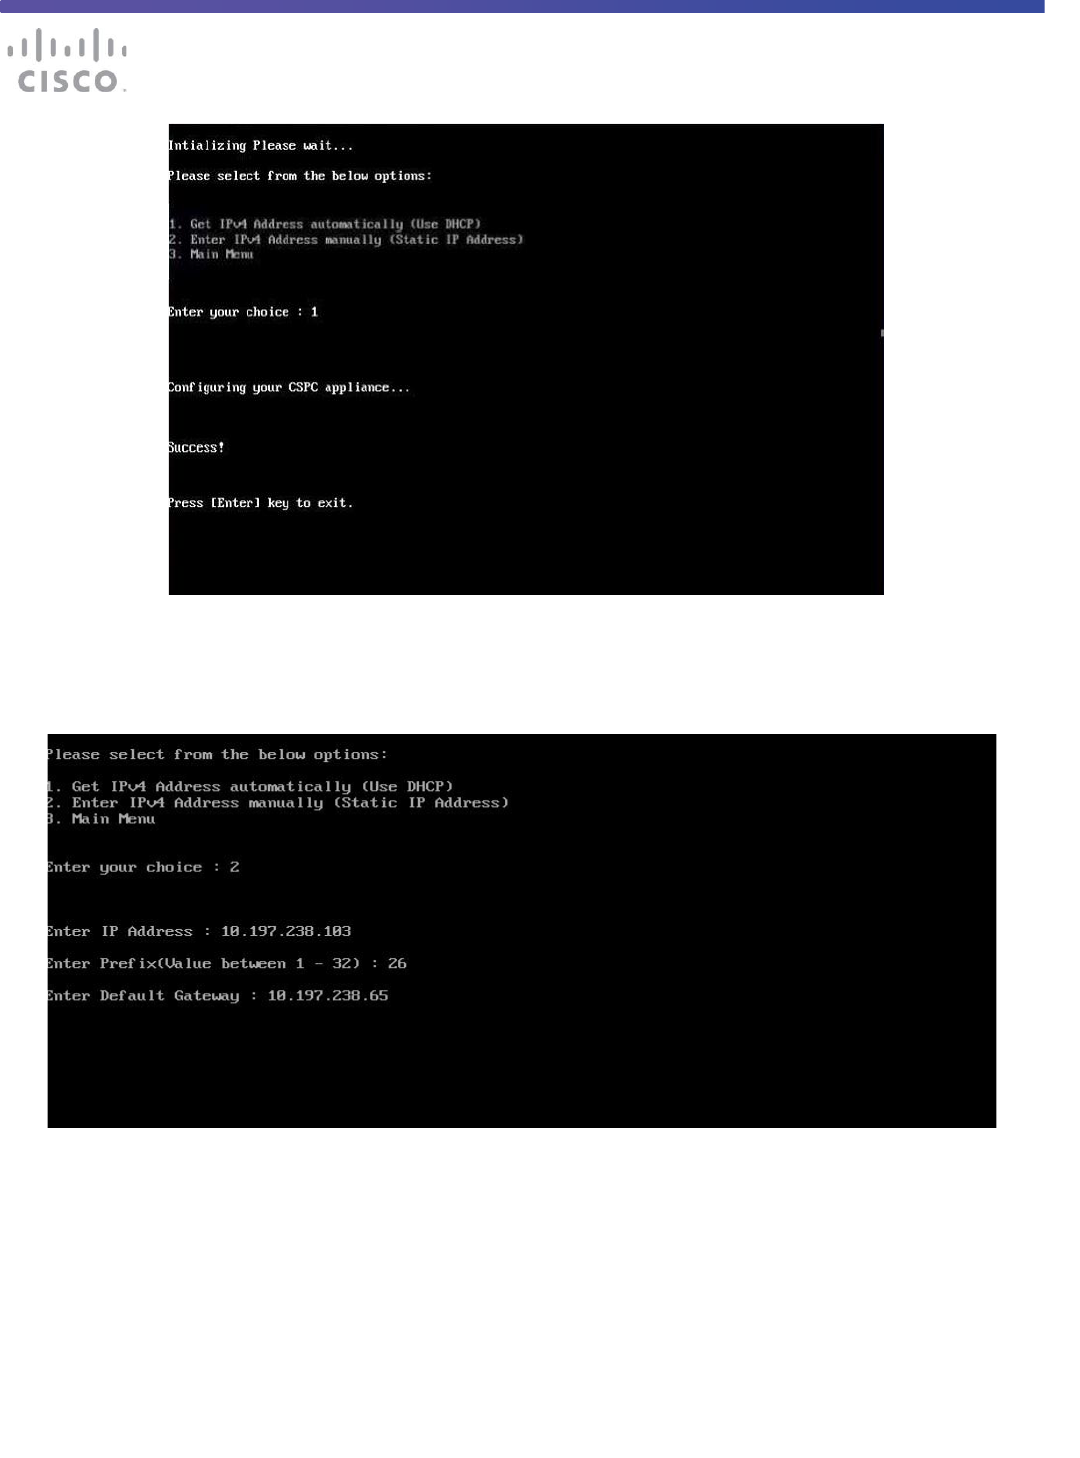
CSPC Quick Started Guide
© 2024 Cisco and/or its affiliates. All rights reserved. This document is Cisco Public Information. Page 6 of 21
b. Select 2 to enter a static IP Address for your appliance. Enter the Net Mask and Default
Gateway.
3. Select 3 to go back to main menu.
CSPC Quick Started Guide
© 2024 Cisco and/or its affiliates. All rights reserved. This document is Cisco Public Information. Page 7 of 21
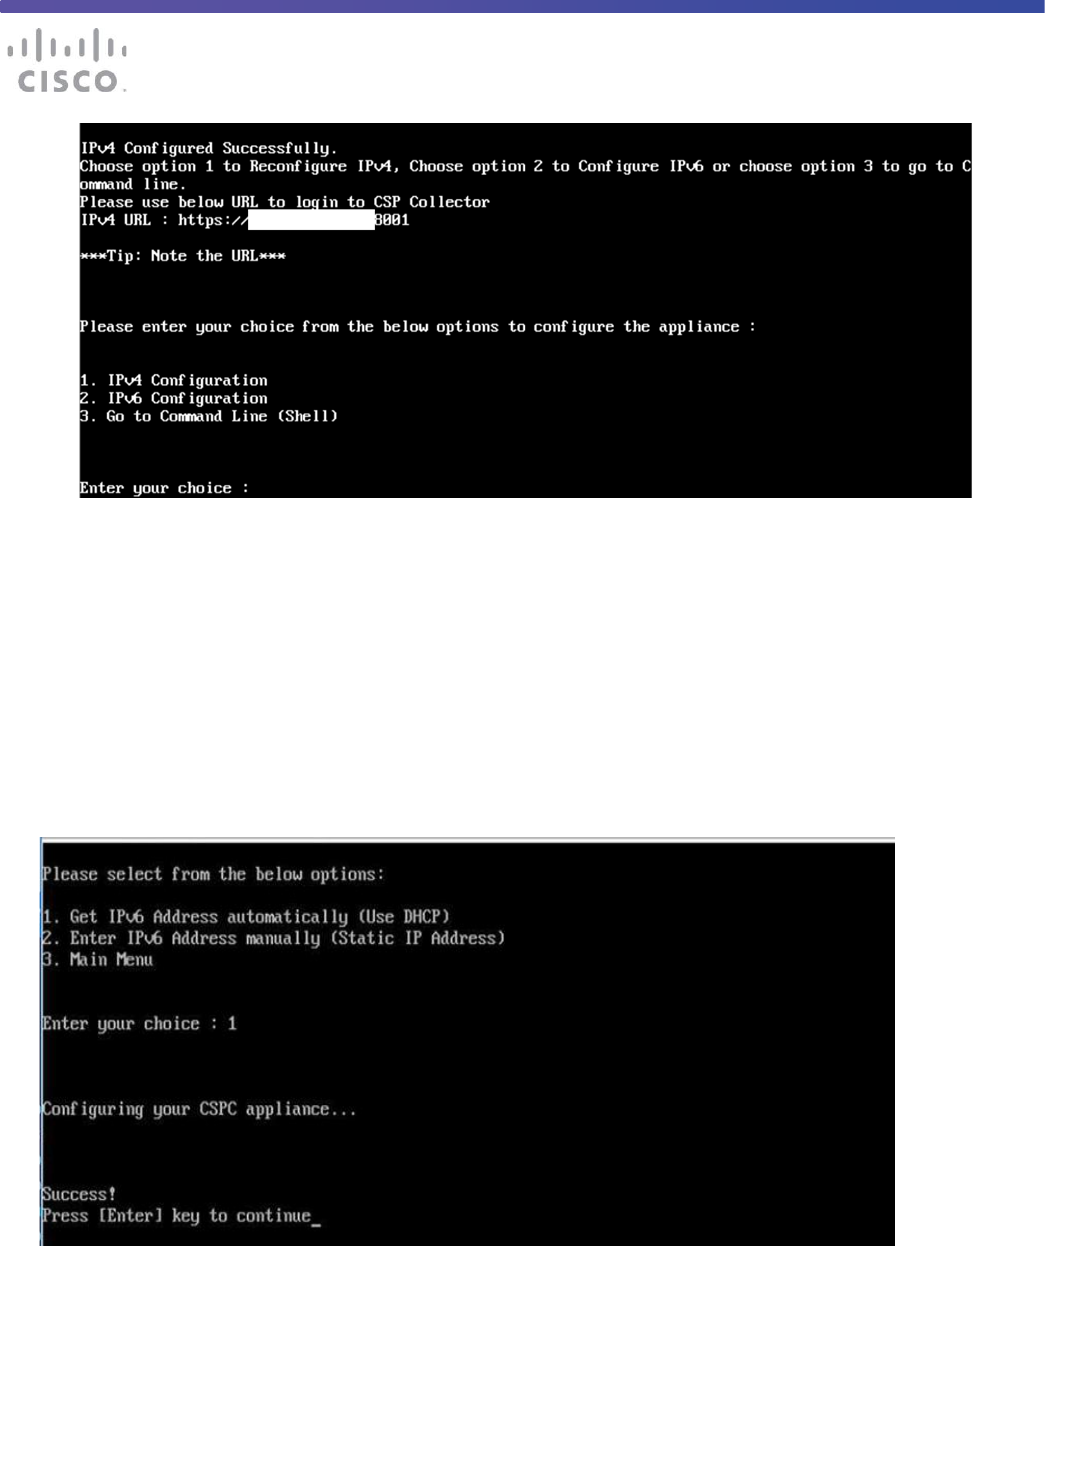
Choose option 1 to reconfigure IPv4 address, choose option 2 to reconfigure IPv6 address or choose option 3
to go to command line.
After selecting option 3, ssl certificate will be generatedduring installation instead of static certificates.
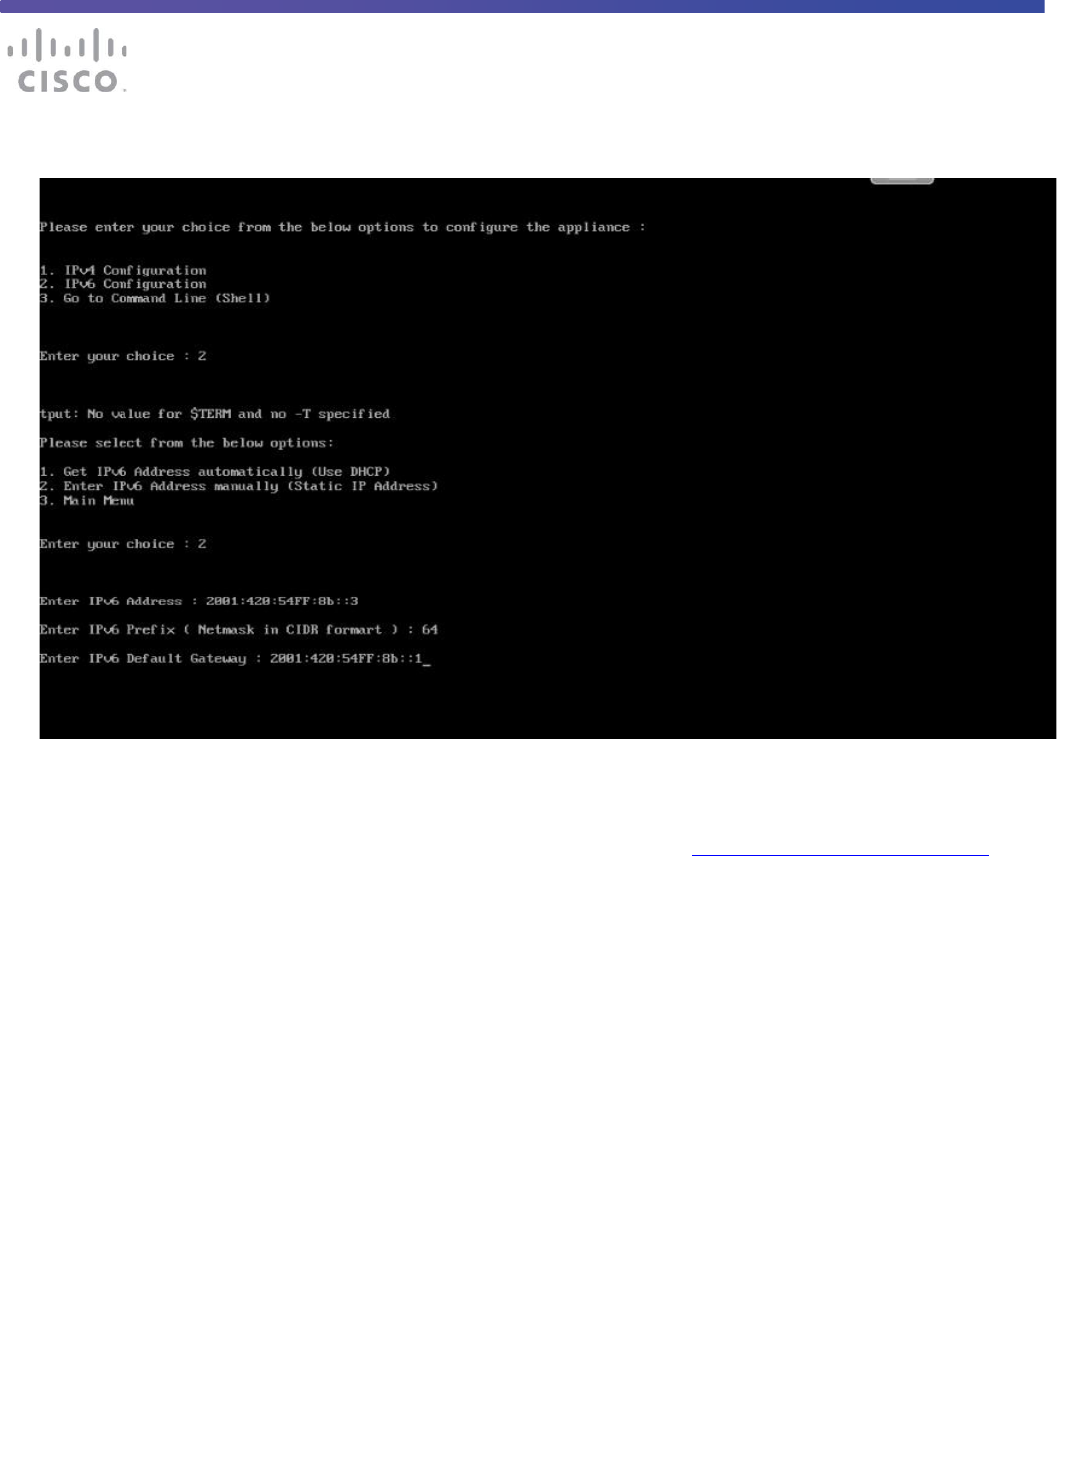
Configure IPv6 Address
1. Select 2 to configure IPv6 address
2. Select any one option:
a. Select 1 to fetch IP address automatically.
CSPC Quick Started Guide
© 2024 Cisco and/or its affiliates. All rights reserved. This document is Cisco Public Information. Page 8 of 21
b. Select 2 to enter the IP Address manually.
3. Select option 3 to go to the Command Line (Shell) if you would like to use CLI commands to configure
the collector IP address instead of using the installation wizard. Refer to Configure CSPC appliance via CLI
for instructions.
CSPC Quick Started Guide
© 2024 Cisco and/or its affiliates. All rights reserved. This document is Cisco Public Information. Page 9 of 21
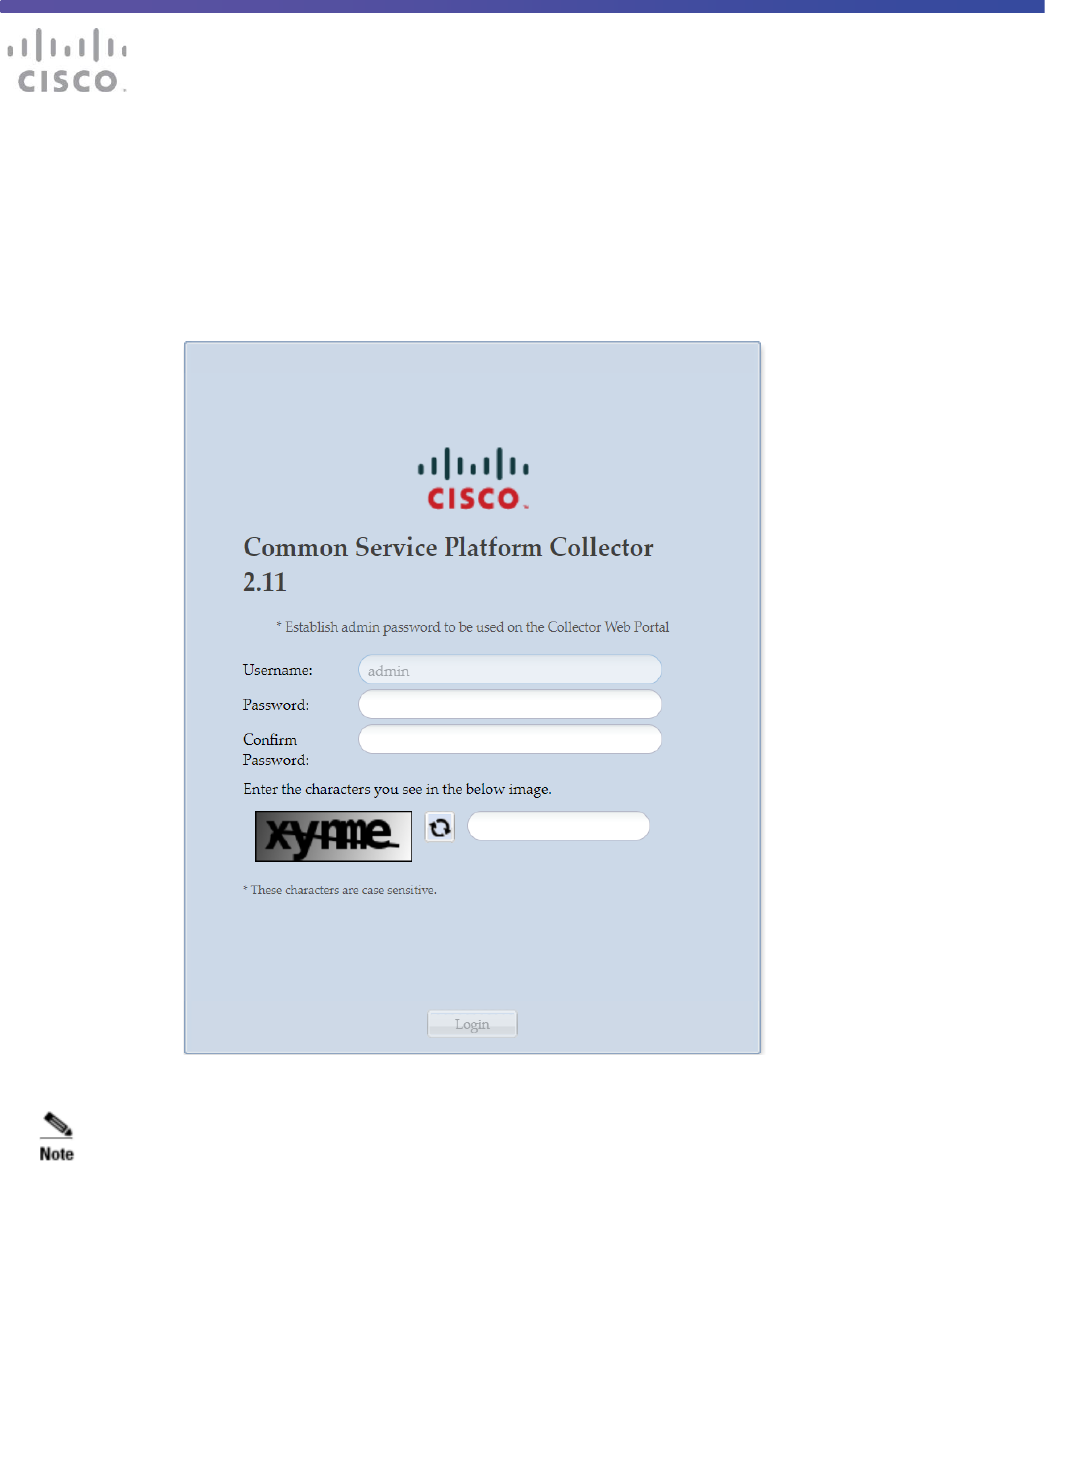
Setup the Software Appliance for the First Time
Open the browser and enter the URL displayed at the bottom of the last screen in the previous step using the
following URL format: https://<cspc-server-ip>:8001/.
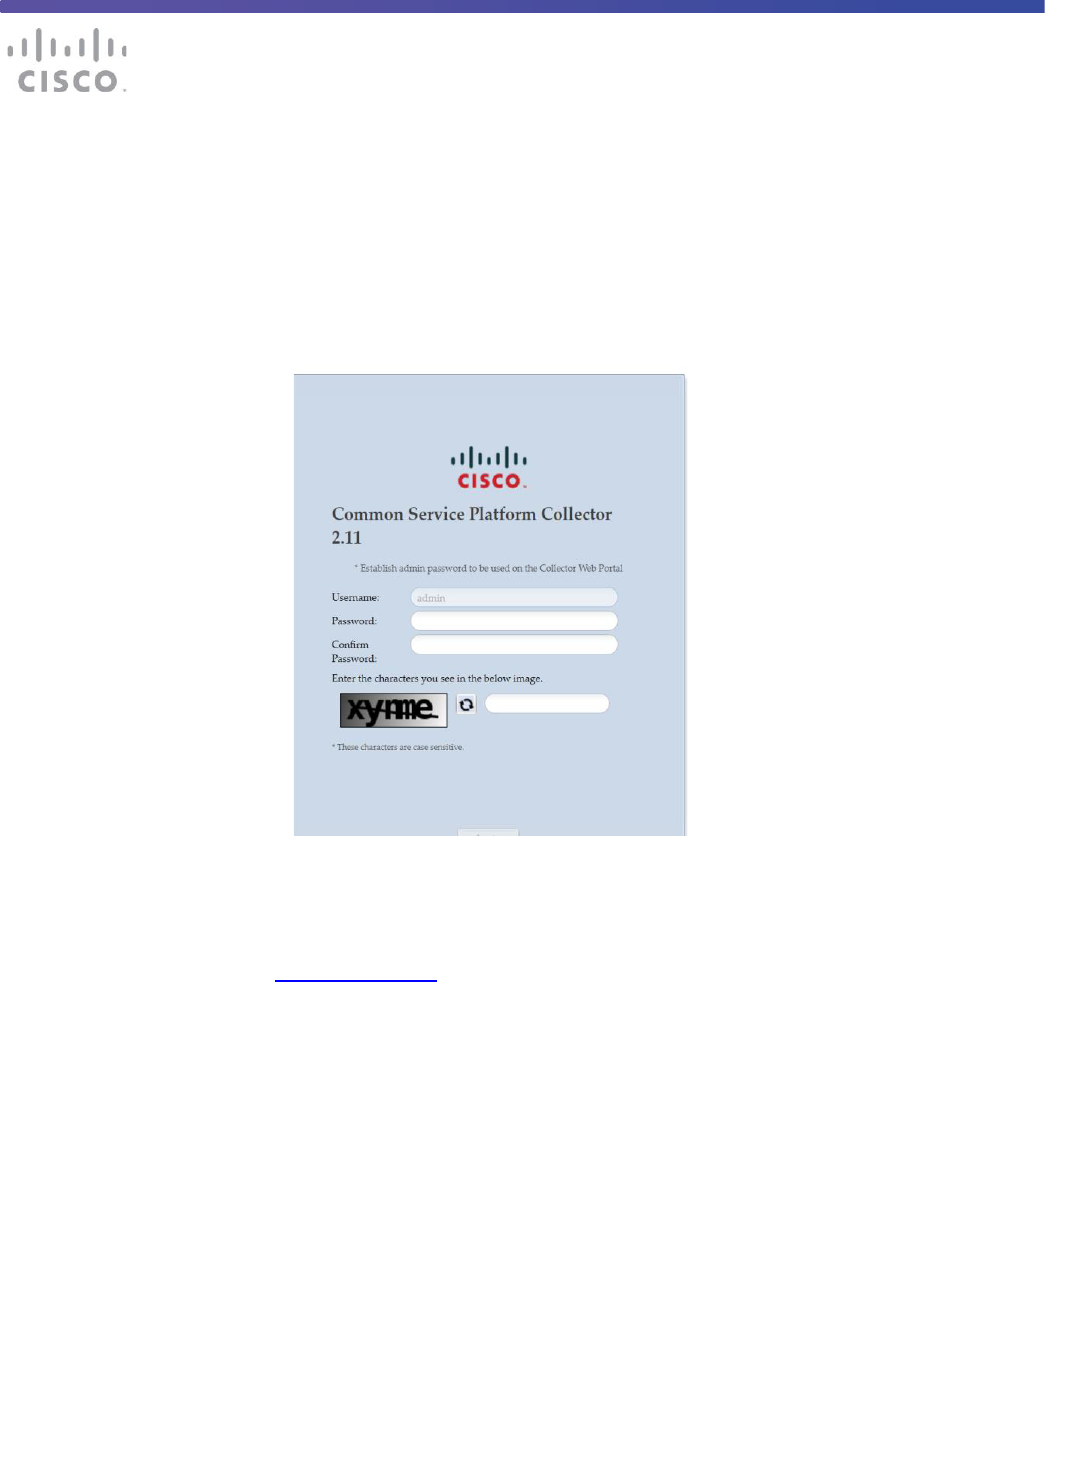
The first time you log in, the installation wizard will prompt you to establish an admin password.
•
Enter an admin password and confirm it.
Passwords must be at least (8) characters long and must contain
• At least one lowercase letter (a, b, c, d...z)
• At least one Uppercase letter (A, B, C, D…Z)
• At least one number (0, 1, 2, 3…9)
• At least one special characters - ,@#!$%^&*()_+|~-=\`{}[]:”;’<>?,/).
CSPC Quick Started Guide
© 2024 Cisco and/or its affiliates. All rights reserved. This document is Cisco Public Information. Page 10 of 21
•
Enter the characters shown in the grey captcha box. Click Login.
This will create a new admin password which will be used to access the collector UI via browser.
Record the admin password!
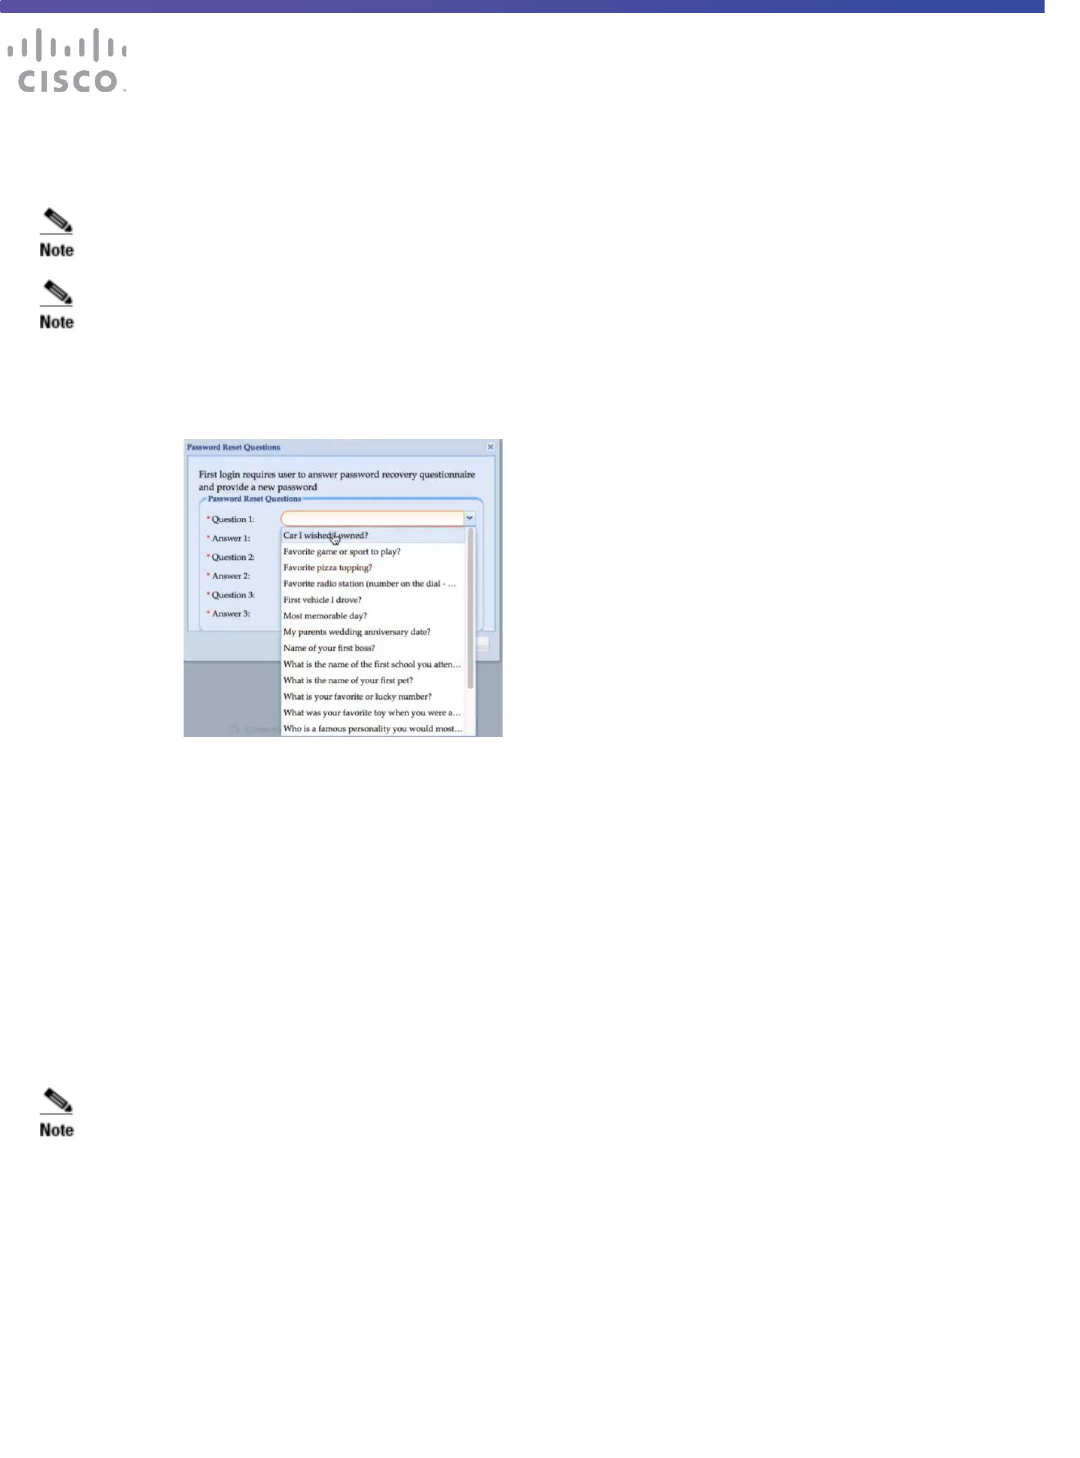
• You will be prompted to login again. Enter the credentials you just created, and the captcha
characters. Click Login.
• Select and answer the password reset questions when prompted and click OK.
• Read and accept the Cisco Systems - End User License Agreement. The Install screen for the
collector is displayed.
Configure CSPC using the Wizard
In this section, you will see how to use the workflow provided by the wizard to configure the CSPC to collect
device information.
Install
The Install and Register screens appear only the first time you log into the CSPC. The red asterisk * indicates
a required field.
Do not skip these frist two configuration steps because they do not appear with subsequent logins to the
wizard.

CSPC Quick Started Guide
© 2024 Cisco and/or its affiliates. All rights reserved. This document is Cisco Public Information. Page 11 of 21
Enter time in 24-hour format and always ensure the date and time of the collector appliance is accurate with
respect to the installed location time zone or else the appliance might be at risk to fail communicating with Cisco.
Proxy server is optional. It will take up to 30 seconds to finish installing the collector followed by a
configuration summary.
• Review the Initial Appliance Setup, and click OK to finish the setup or click Cancel to go back to
the - Install step and make any necessary corrections.
CSPC Quick Started Guide
© 2024 Cisco and/or its affiliates. All rights reserved. This document is Cisco Public Information. Page 12 of 21
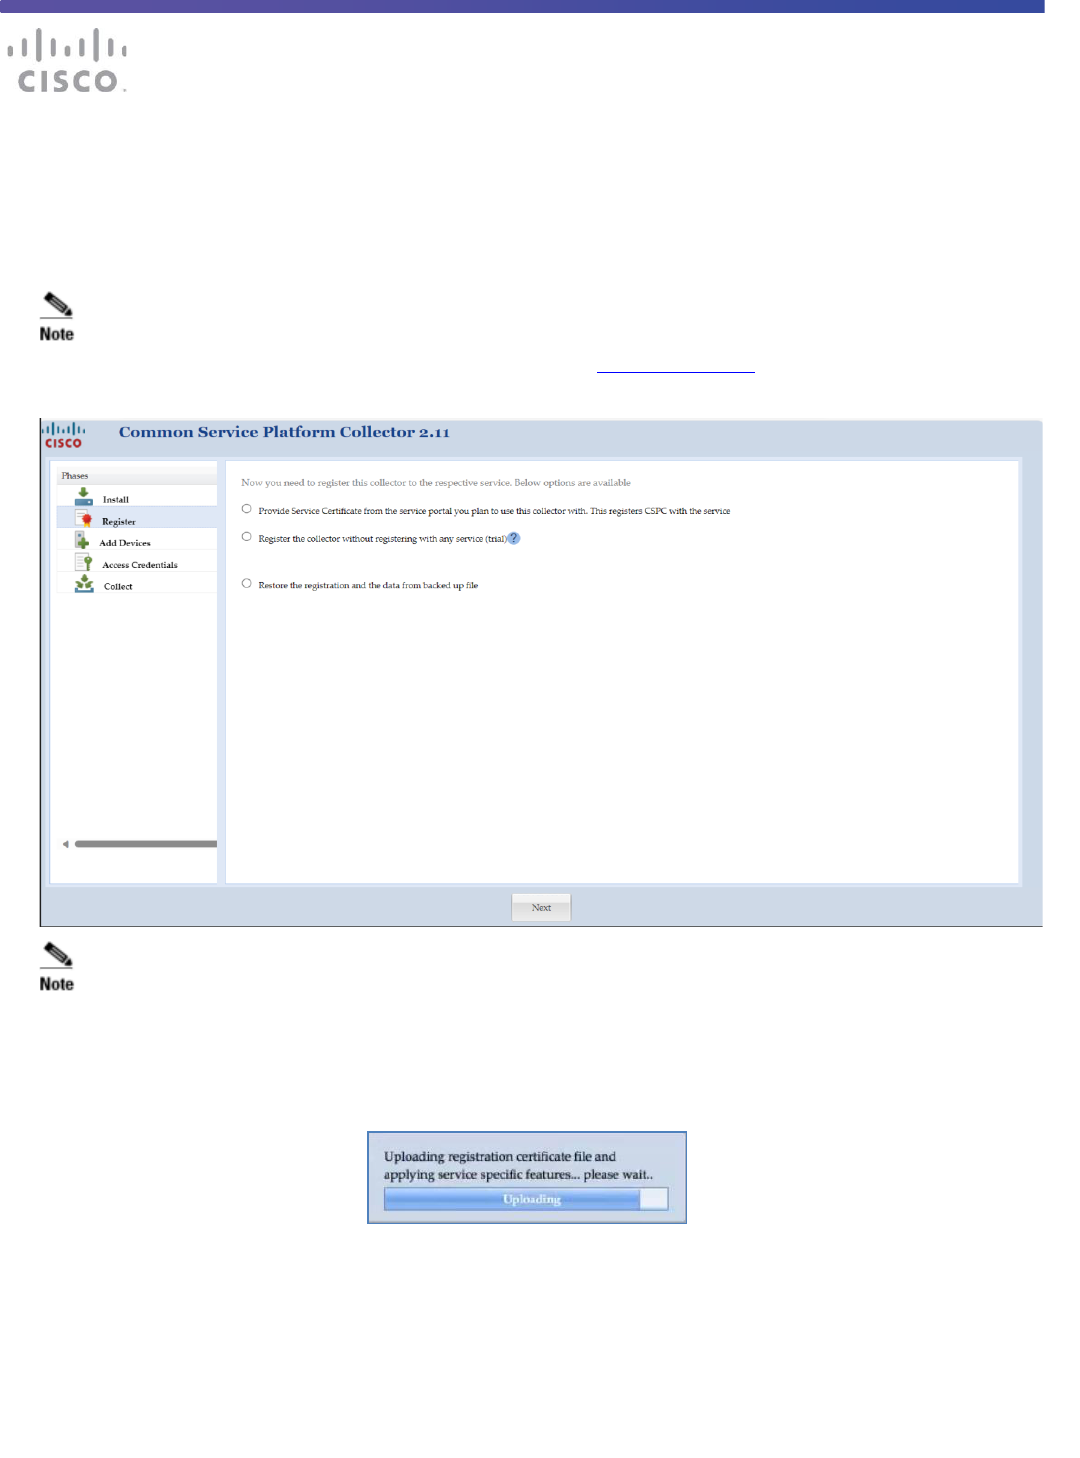
Register
It is a leading practice to register the collector to a service such as Partner Support Service or Smart Net Total
Care during the initial software installation. You should have generated and saved a Registration Certificate file
from the specific service portal. In the Register screen of the wizard you will apply the registration certificate to
the collector.
If you skip this configuration step and choose to register the collector without registering with a service,
you will need to follow the registration upgrade instructions in the CSPC User Guide in order to be able to upload
collected data to Cisco. The Register screen does not appear with subsequent logins to the wizard.
You must be connected to the Internet in order to register the collector to Cisco.
• Select the first option, Provide Service Certificate from the service portal you plan to use this
collector with, to register the CSPC to the Service.
• Browse to the Service Certificate file you downloaded earlier.
• Click Next at the bottom of the screen to continue with registration.
• This takes several minitues, wait till the wizard uploads the registration certificate file and applies
service specific rules package and components. Click OK when the successful upload message
is displayed.
CSPC Quick Started Guide
© 2024 Cisco and/or its affiliates. All rights reserved. This document is Cisco Public Information. Page 13 of 21
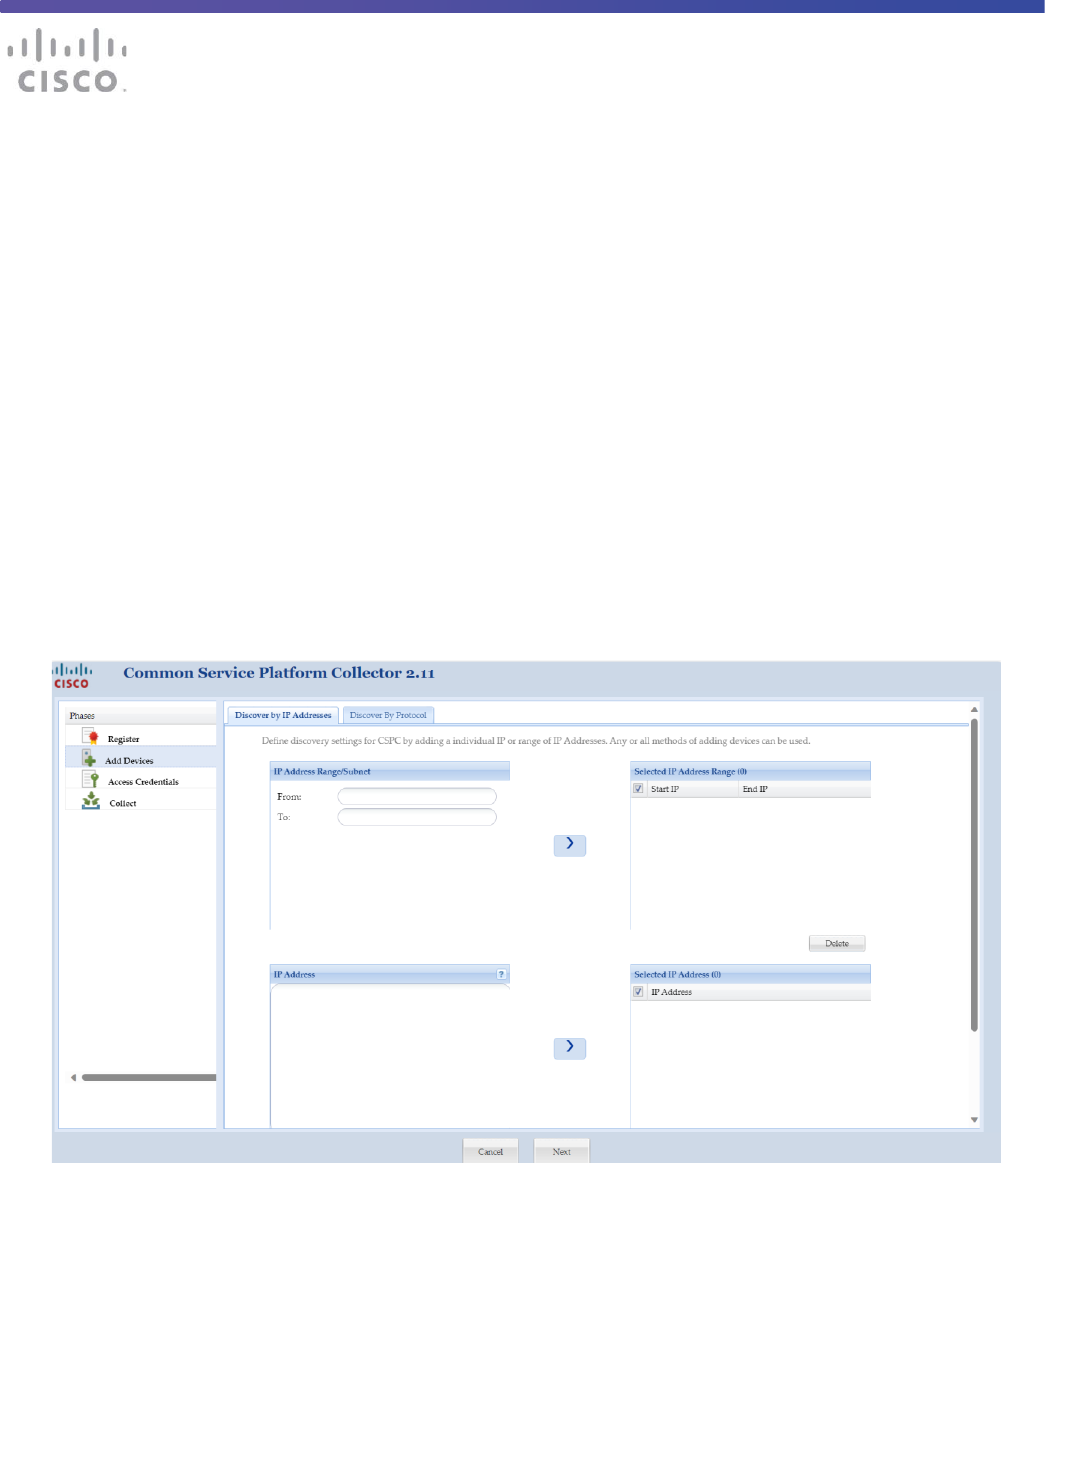
Add Devices
In order to discover network devices and collect device data, you must enter the device credentials. In this
section, you will see the process of configuring the CSPC Collector to discover by IP Address or by Protocol
from the Add Devices screens.
The IP addresses that are referenced should be as tight or as restrictive as possible, while
allowing coverage
for all required devices.
➢ The two lists specify which IPs the CSPC may use for collector operations
such as discoveries or data collection.
➢ Specific IPs can be provided or wildcards can be used to replace octets of
an IP
to create a range.
➢ If an IP or range of IPs is not included in these fields, the CSPC will not
communicate with a device that has such an IP.
➢ Entering *.*.*.* will allow CSPC to use the credential with any IP. For
example: 172.16.*.* would
only allow the credentials to be used for devices
in the 172.16.0.0/16 subnet.
As your network changes, you can return to the CSPC installation wizard and modify the list of devices.
You can add devices by entering a specific IP address or an IP address range. Use > to add your entries to
the selected IP Address or selected IP Address Range lists.
CSPC Quick Started Guide
© 2024 Cisco and/or its affiliates. All rights reserved. This document is Cisco Public Information. Page 14 of 21
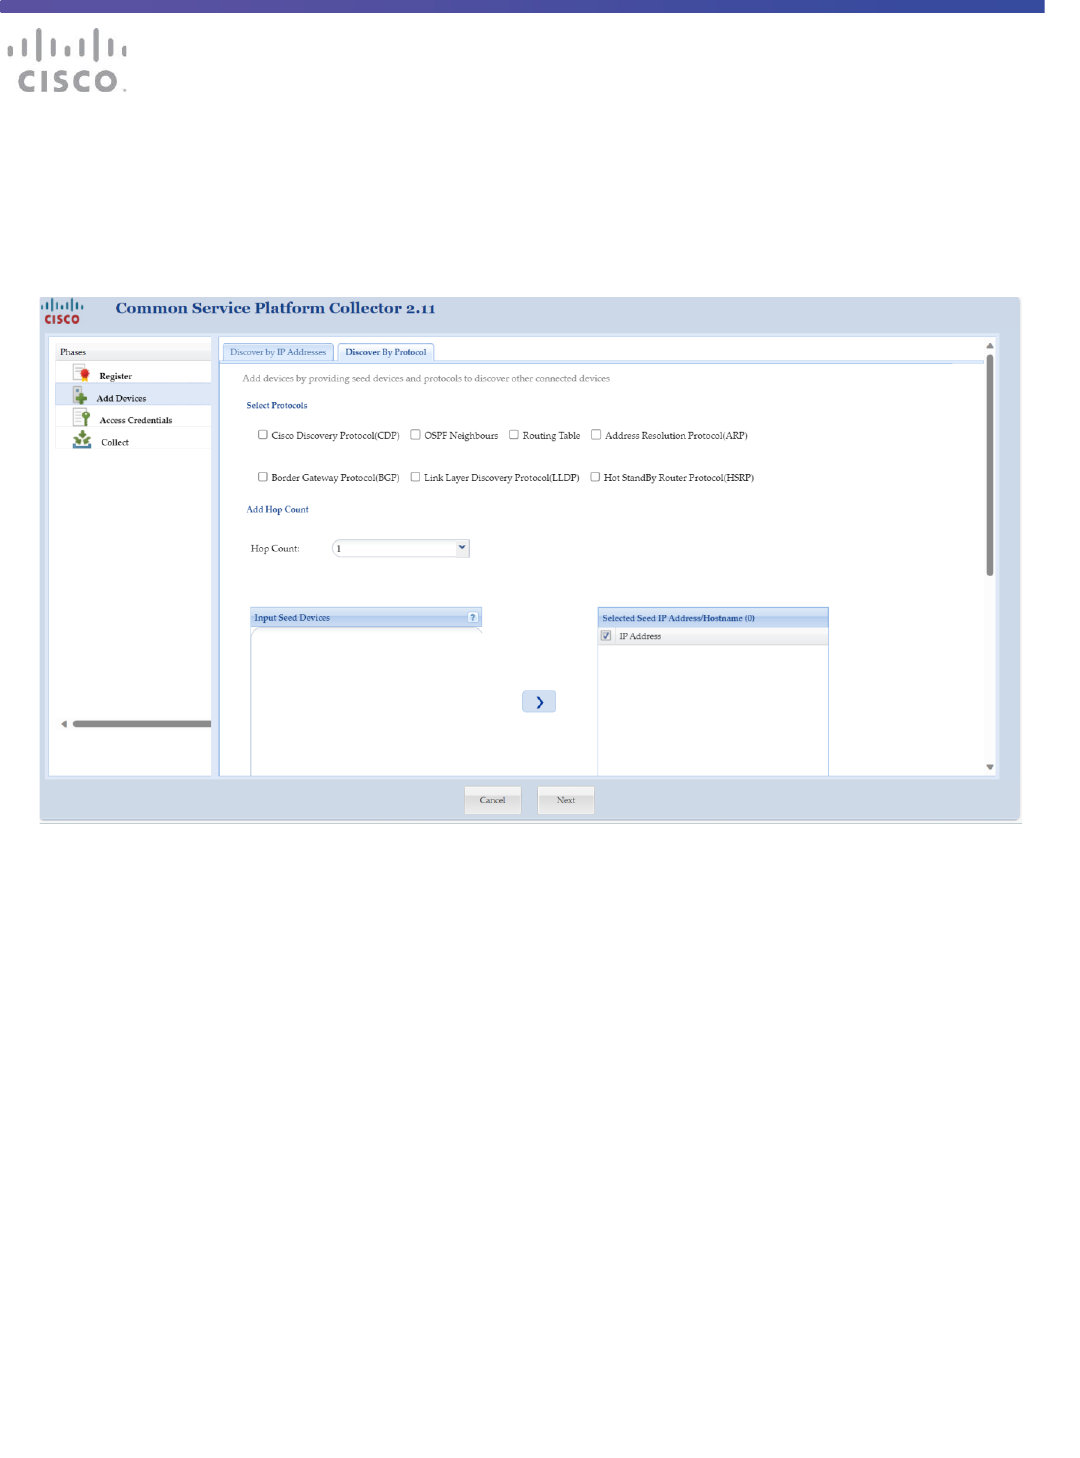
• Click the Discover by Protocol tab if you have seed devices or want to discover other connected
devices using protocols. Discovering devices by protocol will take longer than Discover by IP
Address.
• Select the required Protocol(s), HOP Count, and Seed IP Address. Use > to add the devices to
the selected Seed IP Address list.
• When done specifying devices, click Next.
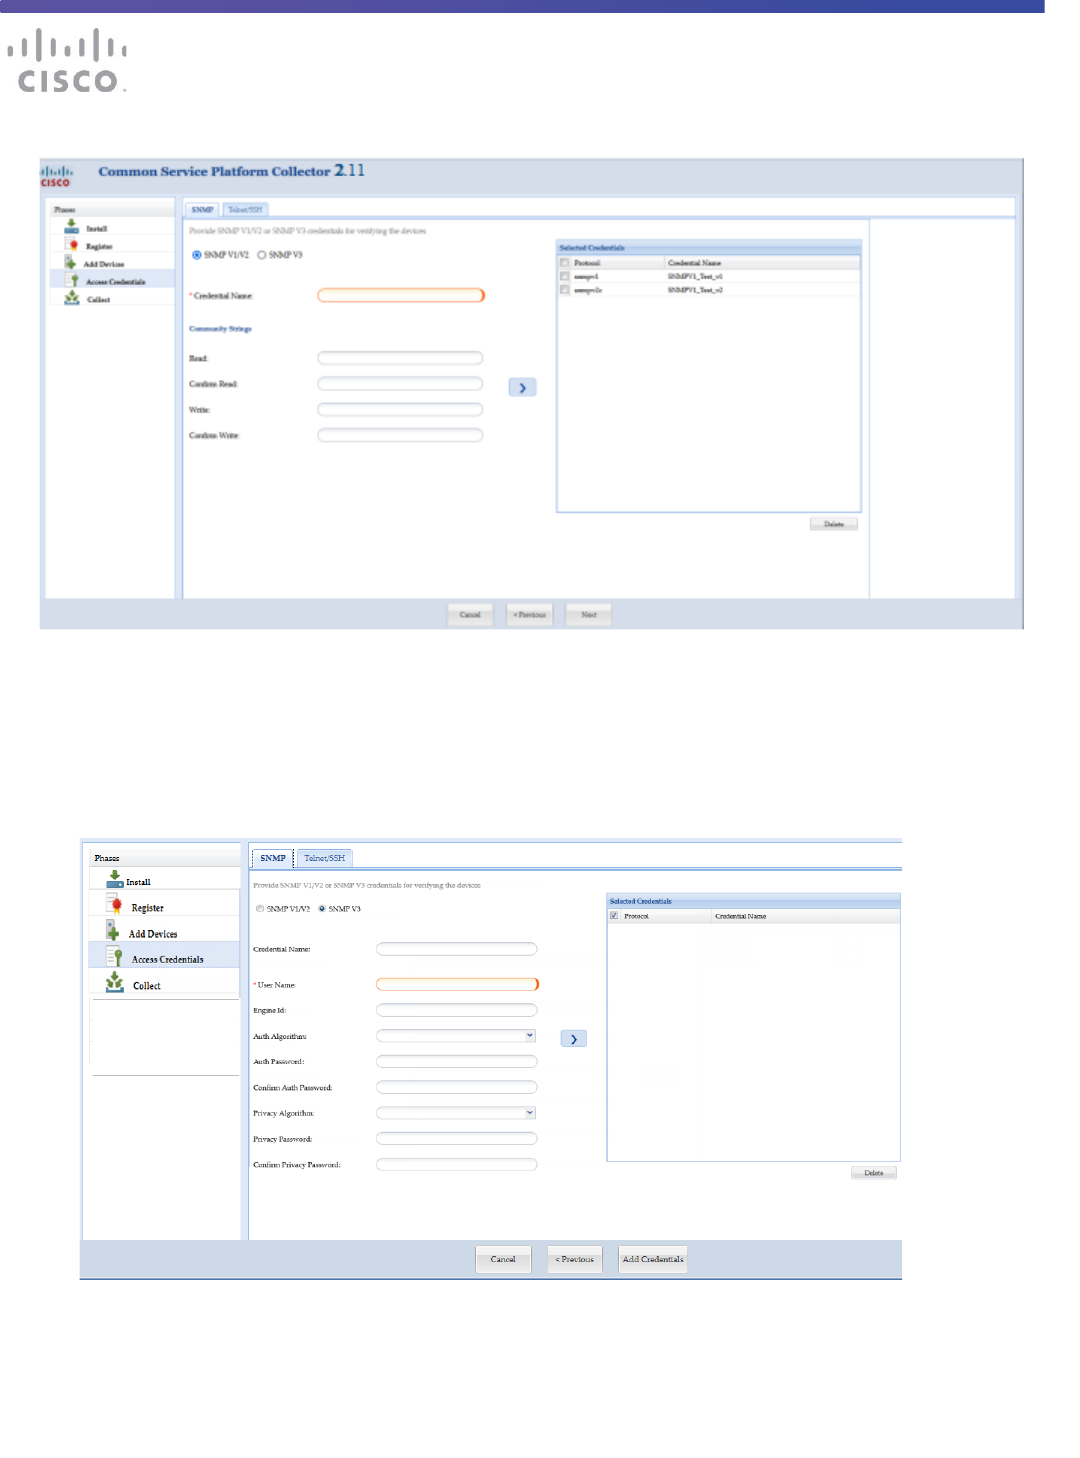
Access Credentials
Collector operation requires that you enter the CSPC device credentials in order to discover network
devices and collect device data. The setup of device credentials in CSPC is used for two purposes:
• SNMP credentials are used for the initial discovery of the devices, and for data collection.
• In addition to SNMP, the remaining credentials (Telnet or SSH) are used for data collection from
the discovered devices.
You can return to the wizard workflow to make changes to the Access Credentials as your network
changes.
CSPC Quick Started Guide
© 2024 Cisco and/or its affiliates. All rights reserved. This document is Cisco Public Information. Page 15 of 21
• You can add credential using one of following and click Next:
• If you select SNMPV1/V2 enter Credential Name, and Read String. Use > to add the credential to
the Selected Credentials list.
• If you select SNMPV3 enter Credential Name, User Name, Auth Algorithm, Password,
Privacy Algorithm, and Password. Use > to add the credential to the Selected Credentials list.
CSPC Quick Started Guide
© 2024 Cisco and/or its affiliates. All rights reserved. This document is Cisco Public Information. Page 16 of 21
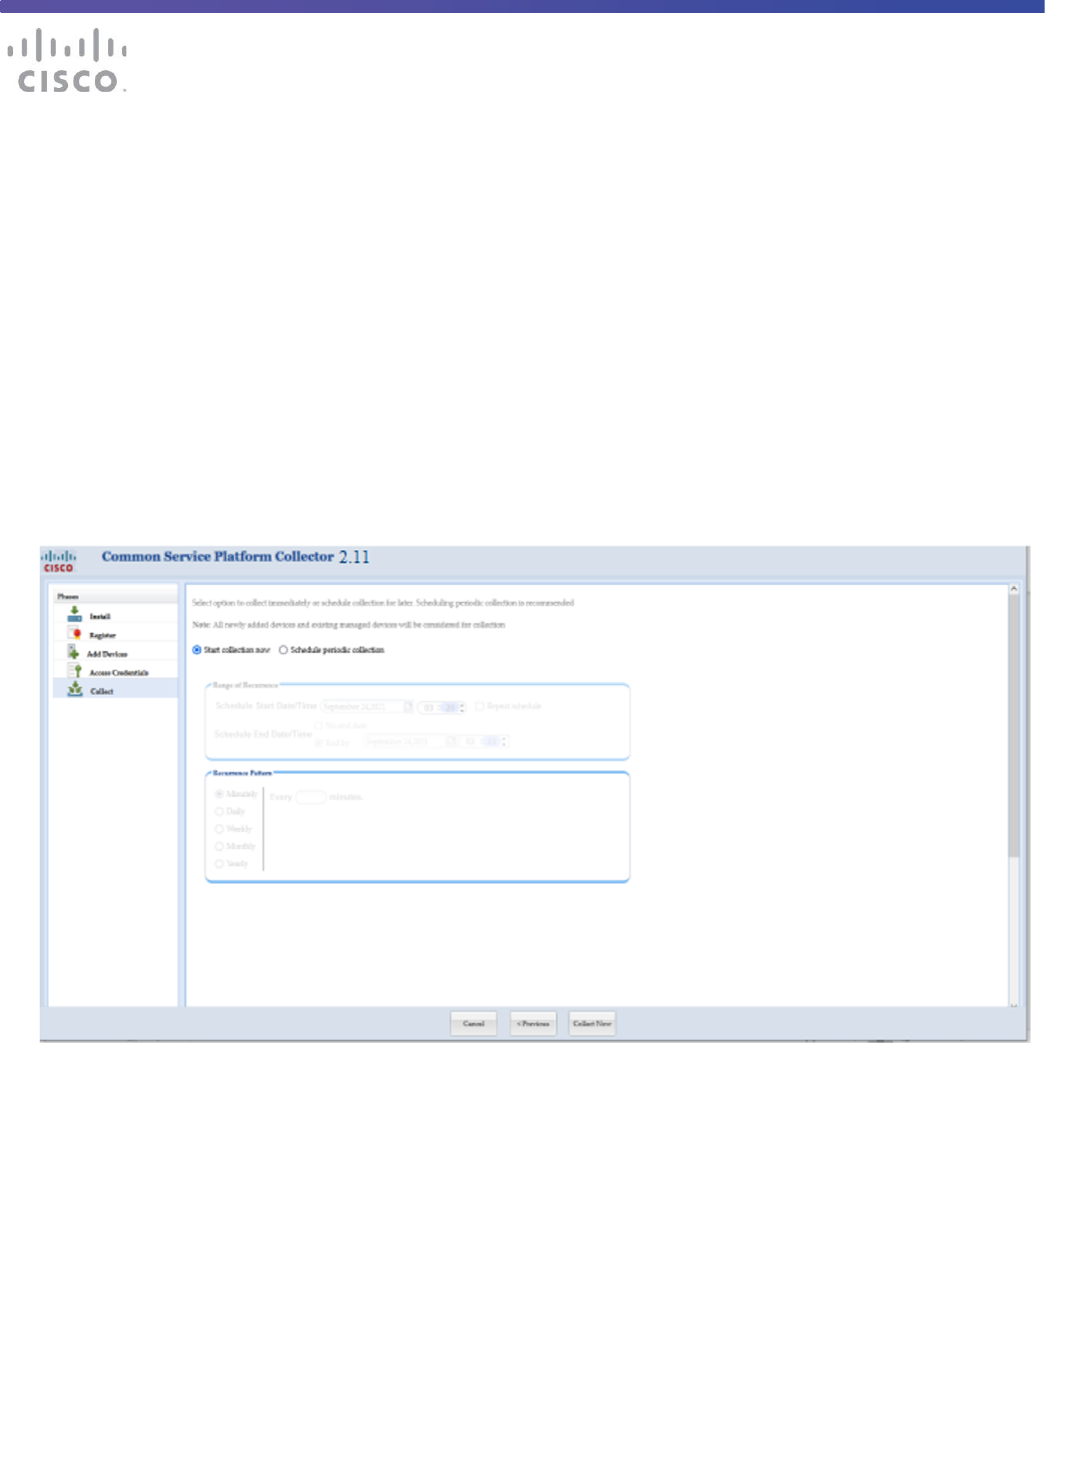
Collect
The final step of installing a CSPC Collector is to complete the process of discovering devices, collecting device
information and uploading the inventory to the Cisco Data Center. From the CSPC wizard Collect screen, two
options are available for device discovery, inventory collection and upload.
• Start the discovery, collection, and upload on demand right now.
• Create a collection schedule that recurs on a periodic basis.
Scheduling periodic collections is a leading practice.
Select Start Collection now and click Collect Now to start collection instantly or click Schedule Periodic
Collection and click Schedule to collect at a later time. You can schedule Start and End Date/Time or select the
Recurrence pattern as Minutely, Daily, Weekly, Monthly, or Yearly as shown in figure below.
It is recommended to schedule once a week.
Port Usage Information
Connection to the list of Cisco servers (IP's and ports) in the below table is needed for the collector to
communicate with them. In addition, the CCO login credentials that is registered and associated to the
service contract is also needed. The CSPC uses SSL for uploading to the Cisco Data Center. ACL’s on
your firewall might need to be configured to allow the CSPC to upload successfully.
CSPC Quick Started Guide
© 2024 Cisco and/or its affiliates. All rights reserved. This document is Cisco Public Information. Page 17 of 21
The CSPC collector supports on demand and automatic upgrades.
Note: By default, the auto-update feature is disabled. You should enable the auto-update feature to reduce
the maintenance time of the collector.
Host Name
IP Address
Port
concsoweb-
prd.cisco.com
72.163.7.113
HTTPS (TCP/443) outbound
dl.cisco.com
dl1.cisco.com
dl2.cisco.com
72.163.7.60
72.163.7.60
173.37.146.12
HTTPS (TCP/80) and HTTPS
(TCP/443) outbound
sso.cisco.com
173.37.144.208
HTTPS (TCP/443) outbound
Note : If customer is registered with smart service account (such as SNTC, PSS, or SC) and want to install
CPSC 2.8.1.4 or upgrading to 2.8.1.5 or 2.8.1.6 then, follow below steps to check connectivity is properly
configured for uploading data to Cisco backend.
Execute below command as root user
grep nettools /opt/ConcsoTgw/tail-end-gateway-decoupled/conf/csof_config.xml
If above command returns the output then, follow below steps to configure connectivity as default to upload data
to Cisco backend
sed -i ':a;N;$!ba;s/file/#file/1' /opt/ConcsoTgw/tail-end-gateway-
decoupled/bin/run.sh
sed -i 's/nettools-upload.cisco.com/72.163.7.113/g' /opt/ConcsoTgw/tail-end-
gateway-decoupled/conf/csof_config.xml
service concsotgw restart
CSPC Quick Started Guide
© 2024 Cisco and/or its affiliates. All rights reserved. This document is Cisco Public Information. Page 18 of 21
Access CSPC User Interface
In this section, you will see how to access the CSPC, following the above intial set-up..
Access the CSPC in a browser window by completing the following steps:
• Enter into the browser the IP Address of your collector using the following URL format:
https://<cspc-server-ip>:8001/
• Enter the username, password and the text in the image, Click Login.
After all software is loaded, the CSPC graphical user interface (GUI) appears. From here you have access to
all collector functions. Our CSPC User Guide provides details.
CSPC Quick Started Guide
© 2024 Cisco and/or its affiliates. All rights reserved. This document is Cisco Public Information. Page 19 of 21
Update Devices, Credentials and Collection Settings
Click the Workflow button in the toolbar to open the installation wizard to apply updates and changes to
devices, credentials and collection settings.
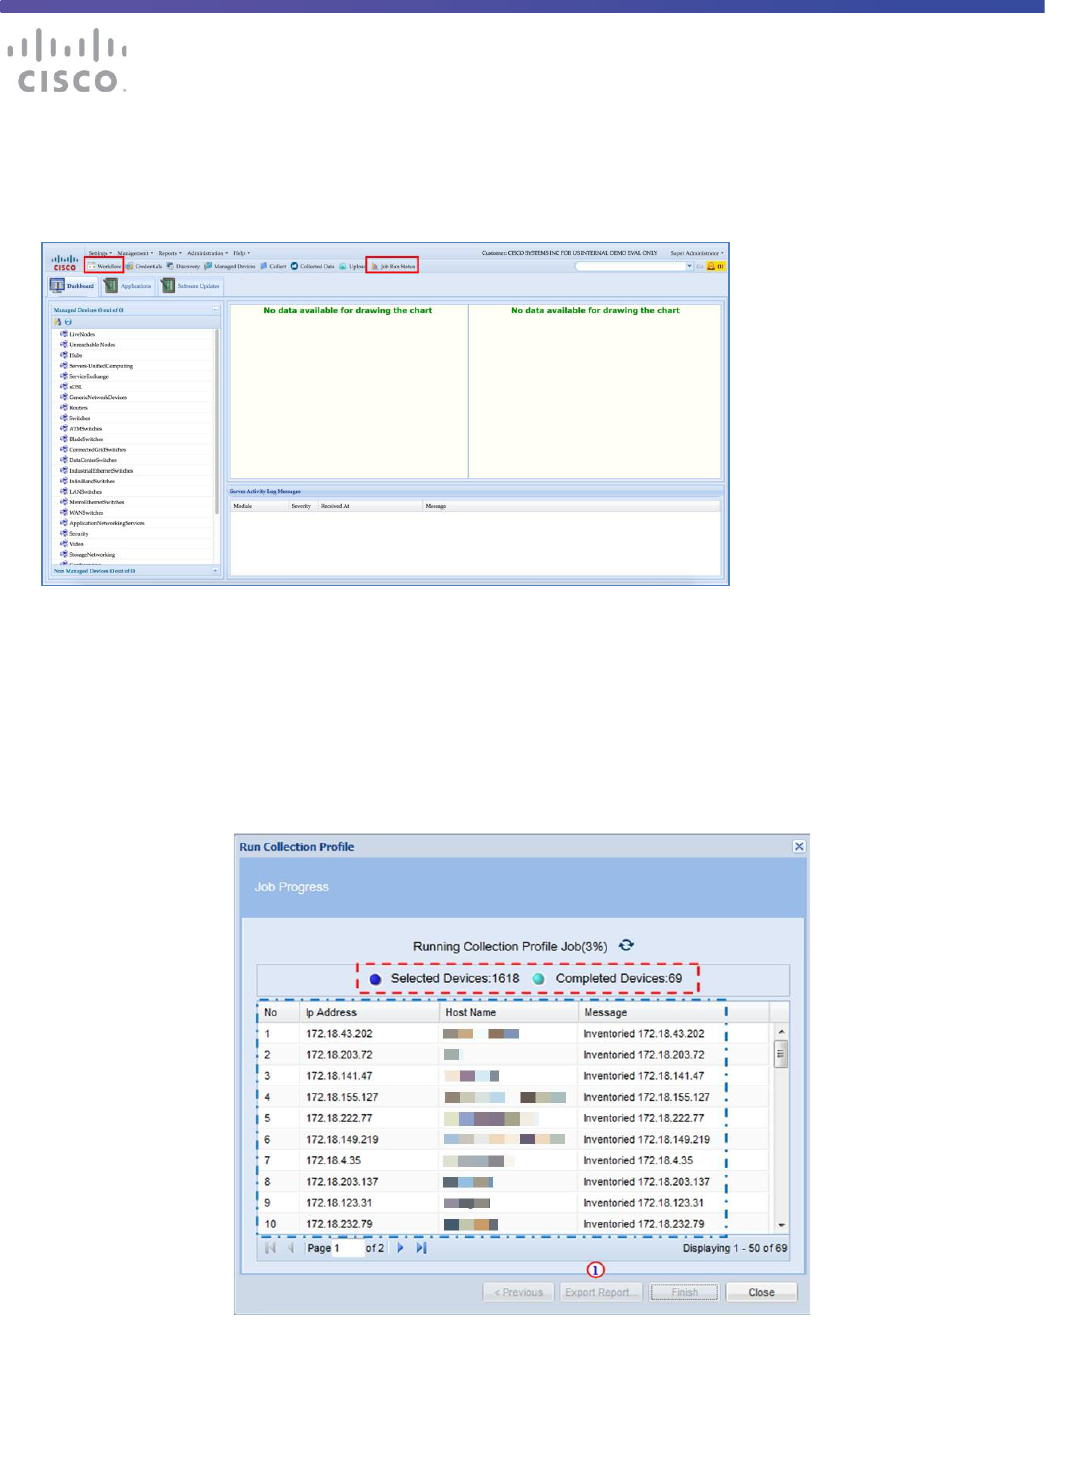
View Status of Discovery, Collection and Uploads
You can view status of collector jobs, click the Job Run Status button in the toolbar to view the results of
discovery, collection and upload.

CSPC Quick Started Guide
© 2024 Cisco and/or its affiliates. All rights reserved. This document is Cisco Public Information. Page 20 of 21
The details of the data collection are filled in. A summary is above and the details are
below.
• You can review the collection report after the process has finished,, click Export Report.
• Click Close when you are finished. The job will continue to Collection run in the background.
Once you have registered the collector with a service certificate, when the collection job completes, inventory will
run, then the upload will automatically be sent to the Cisco Data Center. It may take up to 24 hours before your
upload will be processed and available in the portal.
After the initial upload is processed, you can view device details in the portal: https://services.cisco.com
Subsequent uploads can be viewed by going to the service’s portal.
• For SNTC select Library > Administration > Upload Processing
• For PSS select Library > Inventory > Inventory Collection

CSPC Quick Started Guide
© 2024 Cisco and/or its affiliates. All rights reserved. This document is Cisco Public Information. Page 21 of 21
Legal Information
THE SPECIFICATIONS AND INFORMATION REGARDING THE PRODUCTS IN THIS MANUAL ARE SUBJECT TO
CHANGE WITHOUT NOTICE. ALL STATEMENTS, INFORMATION, AND RECOMMENDATIONS IN THIS MANUAL
ARE BELIEVED TO BE ACCURATE BUT ARE PRESENTED WITHOUT WARRANTY OF ANY KIND, EXPRESS OR
IMPLIED. USERS MUST TAKE FULL RESPONSIBILITY FOR THEIR APPLICATION OF ANY PRODUCTS.
THE SOFTWARE LICENSE AND LIMITED WARRANTY FOR THE ACCOMPANYING PRODUCT ARE SET FORTH IN
THE INFORMATION PACKET THAT SHIPPED WITH THE PRODUCT AND ARE INCORPORATED HEREIN BY THIS
REFERENCE. IF YOU ARE UNABLE TO LOCATE THE SOFTWARE LICENSE OR LIMITED WARRANTY, CONTACT
YOUR CISCO REPRESENTATIVE FOR A COPY.
The Cisco implementation of TCP header compression is an adaptation of a program developed by the University of
California, Berkeley (UCB) as part of UCB’s public domain version of the UNIX operating system. All rights reserved.
Copyright © 1981, Regents of the University of California.
NOTWITHSTANDING ANY OTHER WARRANTY HEREIN, ALL DOCUMENT FILES AND SOFTWARE OF THESE
SUPPLIERS ARE PROVIDED “AS IS” WITH ALL FAULTS. CISCO AND THE ABOVE-NAMED SUPPLIERS DISCLAIM
ALL WARRANTIES, EXPRESSED OR IMPLIED, INCLUDING, WITHOUT LIMITATION, THOSE OF
MERCHANTABILITY, FITNESS FOR A PARTICULAR PURPOSE AND NONINFRINGEMENT OR ARISING FROM A
COURSE OF DEALING, USAGE, OR TRADE PRACTICE.
IN NO EVENT SHALL CISCO OR ITS SUPPLIERS BE LIABLE FOR ANY INDIRECT, SPECIAL, CONSEQUENTIAL,
OR INCIDENTAL DAMAGES, INCLUDING, WITHOUT LIMITATION, LOST PROFITS OR LOSS OR DAMAGE TO
DATA ARISING OUT OF THE USE OR INABILITY TO USE THIS MANUAL, EVEN IF CISCO OR ITS SUPPLIERS
HAVE BEEN ADVISED OF THE POSSIBILITY OF SUCH DAMAGES.
Any Internet Protocol (IP) addresses and phone numbers used in this document are not intended to be actual addresses
and phone numbers. Any examples, command display output, network topology diagrams, and other figures included in
the document are shown for illustrative purposes only. Any use of actual IP addresses or phone numbers in illustrative
content is unintentional and coincidental.
All printed copies and duplicate soft copies are considered un-Controlled copies and the original on-line version should
be referred to for latest version.
Printed in USA 5/29/24
