

Headquarters Support Sales
5453 Great America Parkway
Santa Clara, CA 95054
USA
+1-408-547-5500
+1-408-547-5502
+1-866-476-0000
+1-408-547-5501
+1-866-497-0000
© Copyright 2024 Arista Networks, Inc. All rights reserved. The information contained herein is subject to change
without notice. The trademarks, logos, and service marks ("Marks") displayed in this documentation are the property
of Arista Networks in the United States and other countries. Use of the Marks is subject to the Arista Networks
Terms of Use Policy, available at www.arista.com/en/terms-of-use. Use of marks belonging to other parties is for
informational purposes only.
Contents
1 CloudVision as-a-Service............................................................................1
1.1 Onboarding at a Glance....................................................................................................................1
1.2 Checklist............................................................................................................................................ 2
1.3 User Onboarding Prerequisites.........................................................................................................4
1.3.1 Invitation URL...................................................................................................................... 4
1.3.2 Authentication Details.......................................................................................................... 6
1.4 User Onboarding Workflow............................................................................................................... 7
1.5 Onboarding Authentication Providers................................................................................................7
1.5.1 Onboarding using an Arista Provided SAML Provider........................................................ 7
1.5.2 Adding or Changing Authentication Providers After the Initial Setup...................................8
1.6 Onboarding User Accounts............................................................................................................... 8
1.7 Login to CloudVision....................................................................................................................... 10
1.8 Device Onboarding Prerequisites....................................................................................................11
1.8.1 Software Requirements..................................................................................................... 11
1.8.2 Connectivity Requirements................................................................................................ 11
1.9 Device Onboarding Workflow..........................................................................................................12
1.10 Onboarding Devices: Token-Based Authentication.......................................................................12
1.11 Onboarding Devices: ZTP as-a-Service Requirements.................................................................16
1.11.1 Device Onboarding using ZTPaaS: Embedded Token....................................................18
1.11.2 Device Onboarding using ZTPaaS: Alternative Methods................................................ 19
1.11.3 Using Hardware Authentication with ZTP as-a-Service...................................................22
1.12 Connecting CloudVision Wifi Tenant.............................................................................................22
1.13 Troubleshooting............................................................................................................................. 24
1.13.1 Troubleshooting Connectivity Issues............................................................................... 24
1.13.2 Troubleshooting Device Onboarding Issues....................................................................24
1.13.3 Troubleshooting Streaming Telemetry Latency Issues....................................................25
1.13.4 Troubleshooting ZTP as-a-Service Issues.......................................................................25
1.13.5 Troubleshooting Switch Provisioning and Configuration Issues...................................... 25
1.14 Automation with CloudVision as-a-Service................................................................................... 27
1.15 CloudVision as-a-Service Support.................................................................................................29
ii

1 CloudVision as-a-Service
1 CloudVision as-a-Service
CloudVision as-a-Service is a SaaS-based delivery for the Arista CloudVision management plane platform
offering modern telemetry and analytics, network-wide automation, and orchestration. As a complement to
the on-premises offering, the CloudVision as-a-Service platform offers cloud-based onboarding and feature
delivery, using secure state-streaming to an Arista managed cloud-native architecture.
This document is a quick start guide for customers who seek to onboard to the CloudVision as-a-Service
platform.
1.1 Onboarding at a Glance
Use the following steps and checklist to simplify the onboarding process.
1. Configure the CloudVision as-a-Service specific information in the respective IdP authentication provider
portal (Authentication provider specific setup information can be found at: https://aristanetworks.force.com/
AristaCommunity/s/article/CloudVision-Authentication-Provider-OAuth-SAML-Configuration).
2. Access CloudVision as-a-Service using the welcome email link.
3. Click on Log in with Email and fill in the form using your organization name and your email address.
4. Log in to the CloudVision cluster using the Invitation URL.
5. Configure an Authentication Provider.
6. Onboard Users.
7. Onboard EOS Devices.
1

1.2 Checklist
2

1 CloudVision as-a-Service
Checklist Item Description
Configure the CloudVision
Service specific information in the
authentication system.
CloudVision as-a-Service currently
supports SP-initiated and IDP
initiated login.
Cloudvision as-a-Service does
not support Microsoft ADFS.
Customers can use Azure Active
Directory (Azure AD) Connect
to configure federation with
on-premises Active Directory
Federation Services (ADFS) and
Azure AD.
Welcome Email Arista will send you a welcome
email. Generate the invitation
URL by accessing the cluster and
clicking on Log in with Email
button. (Valid for only 1 hour and
can be regenerated on-demand
after the expiration using the
“Log in with Email” process.)
User Onboarding Prerequisites
Authentication Details Authentication provider specific
setup information (both OAuth &
SAML) can be found at:
https://aristanetworks.force.com/
AristaCommunity/s/article/
CloudVision-Authentication-
Provider-OAuth-SAML-
Configuration
All supported EOS versions based
on: https://www.arista.com/en/
support/product-documentation/
eos-life-cycle-policy
TerminAttr 1.19.6+
Connectivity Requirements: Port
443 access to apiserver.arista.io
& www.arista.io
Refer to the Connectivity Details
section for more information.
Device Onboarding
Prerequisites
Valid NTP server configuration To configure NTP use the
following command:
switch(config)#ntp
server <vrf> <vrf-
name> <ntp server>
https://www.arista.com/en/um-
eos/eos-system-clock-and-time-
protocols
3
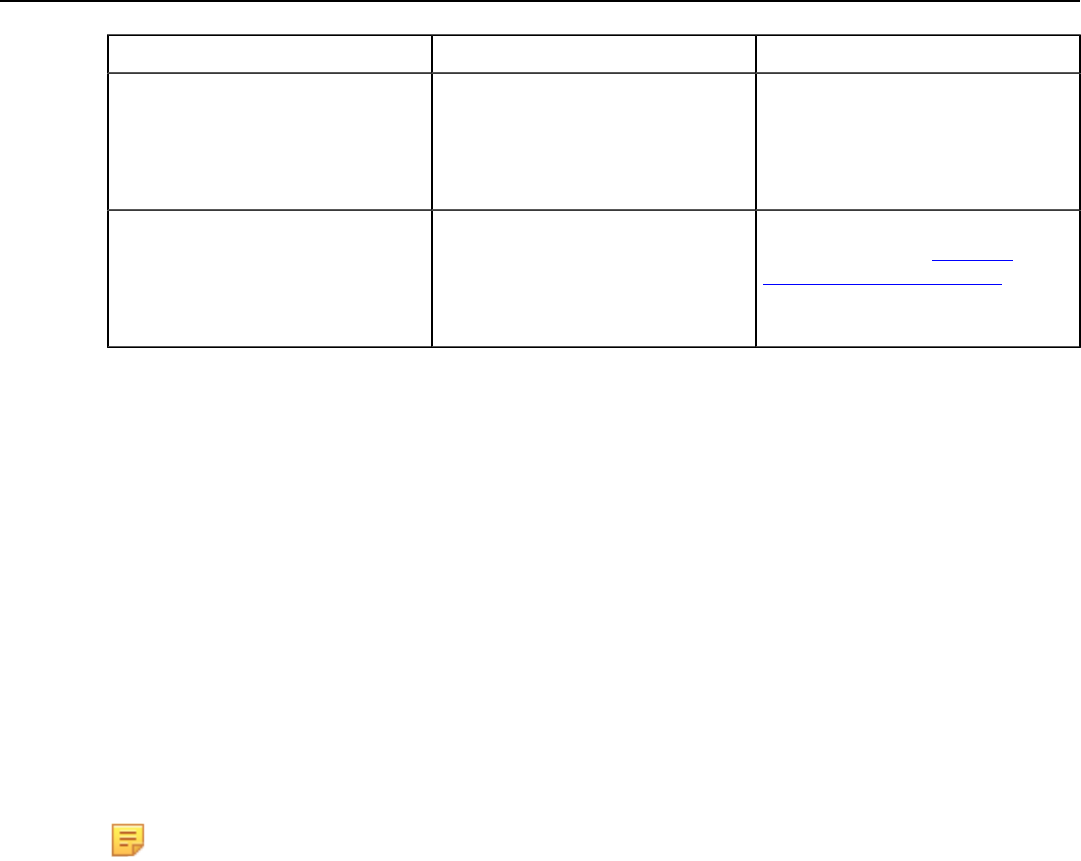
Checklist Item Description
ZTP as-a-Service Prerequisites
For User-Generated Token with
USBKey or Bootstrap Script:
• EOS-4.25.5 or
• EOS-4.26.1
No platform dependency for
the USB Key and Bootstrap
Script method. Supported in all
Hardware Platforms.
For Embedded Token Support
• EOS-4.26.1
• Preferred: EOS 4.30.0F or
newer
Supported with specific platforms.
Please refer to the Platform-
Specific Feature Set Guide
1.3 User Onboarding Prerequisites
1.3.1 Invitation URL
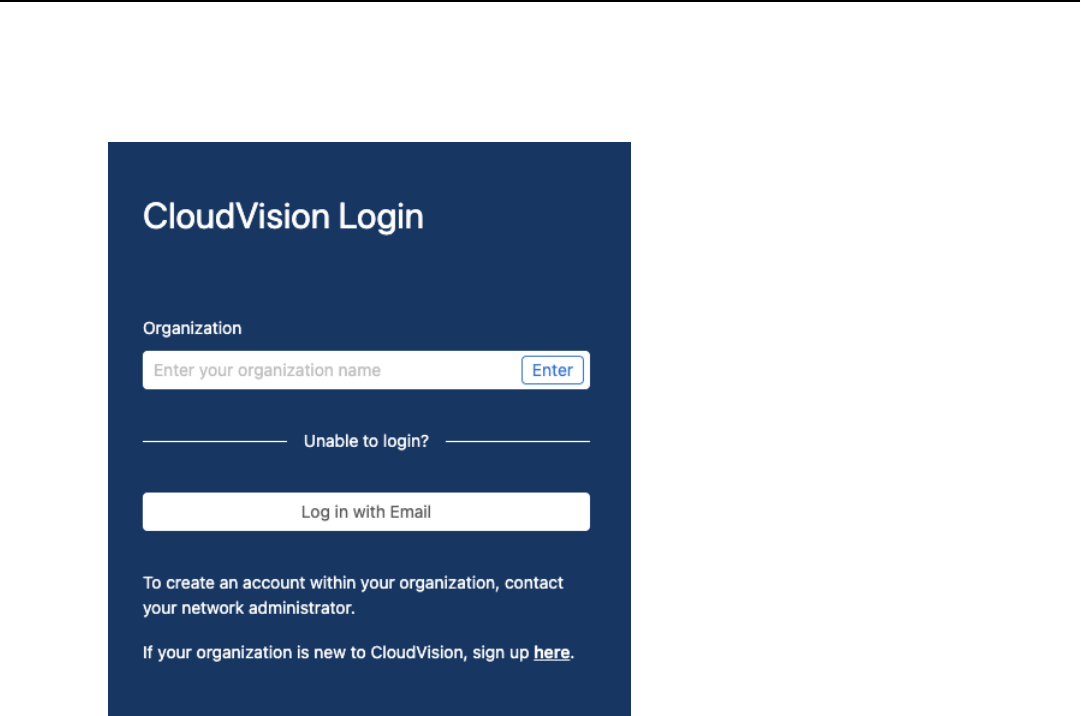
The welcome email link sent by Arista contains a link for initial access to CloudVision as-a-Service. Click on
the Log in with Email button and fill in the form using your organization name (Case Sensitive) and your
email address. After completion of this process you will receive another email containing an Invitation URL to
login to CloudVision as-a-Service.
Please complete the authentication IdP provider selection and user onboarding for the administrator account
before the Invitation URL expires. Please refer to the authentication provider specific documentation for
further details: https://aristanetworks.force.com/AristaCommunity/s/article/CloudVision-Authentication-
Provider-OAuth-SAML-Configuration
Optionally, you can skip the SSO provider setup and start adding users; however, your only method to log in
to CVaaS will be to login with email, until you setup a SSO provider.
Note: If the invitation URL expires, you can request a new invitation using the Log in with Email.
If you are having trouble with this process, please double check the case-sensitive organization
name and request the Invitation URL. If you are still having issues please reach out to cvaas-
[email protected] or if urgent please contact please contact Arista TAC.
4
1 CloudVision as-a-Service
For users who already have a user registered within CloudVision as-a-Service for your organization, you can
use the Log in with Email self-service feature to obtain an invitation link.
Figure -1: Log in with Email
5

1.3.2 Authentication Details
Your authentication administrator will need to configure CloudVision as-a-Service using the following
authentication information in their respective IdP provider portal.
Setting up OIDC/OAuth provider
Configure the OIDC/OAuth provider of choice. You will need to configure the IdP provider using the
following information:
• Redirect URL: https://<hostname>/api/v1/oauth
• Login URL: https://<hostname>
Please refer to the following table:
Table 1:
Region OAuth Base URL OAuth Redirect URL
United States 1a https://www.arista.io /api/v1/oauth
United States 1b https://www.cv-prod-us-central1-b.arista.io /api/v1/oauth
United States 1c https://www.cv-prod-us-central1-c.arista.io /api/v1/oauth
Japan https://www.cv-prod-apnortheast-1.arista.io /api/v1/oauth
Germany https://www.cv-prod-euwest-2.arista.io /api/v1/oauth
Australia https://www.cv-prod-ausoutheast-1.arista.io /api/v1/oauth
Canada https://www.cv-prod-na-northeast1-b.arista.io /api/v1/oauth
UK https://www.cv-prod-uk-1.arista.io/ /api/v1/oauth
Setting up SAML provider
Obtain the entityID and location from CloudVision’s metadata file at the below-listed URL.
Example Metadata URL: https://<hostname>/api/v1/saml_sp_metadata
Please refer to the following table for relevant base SAML URLs:
Table 2:
Region SAML EntityID/Logout URL
United States 1a https://www.arista.io
United States 1b https://www.cv-prod-us-central1-b.arista.io
United States 1c https://www.cv-prod-us-central1-c.arista.io
Japan https://www.cv-prod-apnortheast-1.arista.io
Germany https://www.cv-prod-euwest-2.arista.io
Australia https://www.cv-prod-ausoutheast-1.arista.io
Canada https://www.cv-prod-na-northeast1-b.arista.io
UK: https://www.cv-prod-uk-1.arista.io/
SAML SP Metadata URL: /api/v1/saml_sp_metadata
6
1 CloudVision as-a-Service
SAML Sign-on and Reply URL (Location): /api/v1/saml_callback
Please refer to the SAML Provider documentation on how to obtain this information. For more detailed
configuration information, please refer to:
https://aristanetworks.force.com/AristaCommunity/s/article/CloudVision-Authentication-Provider-
OAuth-SAML-Configuration
1.4 User Onboarding Workflow
The standard onboarding workflow is:
1. Onboarding Authentication Providers
2. Onboarding User Accounts
3. Login to CloudVision
1.5 Onboarding Authentication Providers
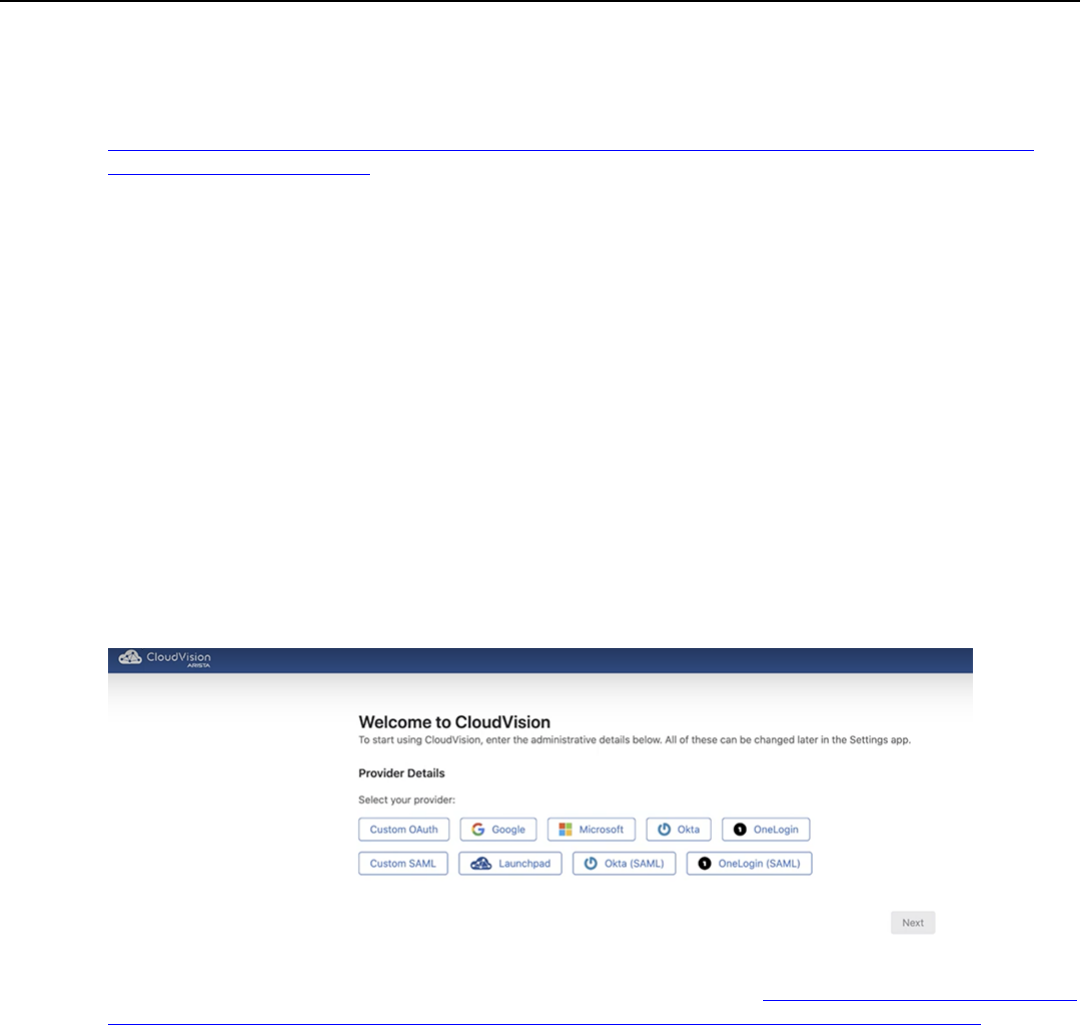
Once the CloudVision as-a-Service instance is set up, access the CloudVision Service using the welcome
email and use the Log in with Email button to generate and Invitation URL specific to your cluster.
Select a preferred authentication provider from the list.
Figure -2: Welcome to CouldVision - Provider Details
Follow the configuration guidance for your IdP from the following location; https://aristanetworks.force.com/
AristaCommunity/s/article/CloudVision-Authentication-Provider-OAuth-SAML-Configuration
1.5.1 Onboarding using an Arista Provided SAML Provider
Customers can request an Arista-hosted SAML provider option if they do not have access to an SSO
provider. An SSO Provider is required to login to CloudVision as-a-Service.
You can request an Arista-hosted SAML provider option named Launchpad by requesting this service via
an Arista support request. If you already have Cognitive Wifi and access to Launchpad, you can also use
the SAML SSO with CloudVision as-a-Service,. You will still need to open a TAC case with attention to the
Wifi Ops team with your Organization (tenant) name and the region where your service is deployed. The
Cognitive Wifi operations team will set up the SAML provider information with this information. Please contact
your Arista representative to set up Launchpad access for your organization.
After you have the Launchpad authentication configured, you can configure Launchpad as a Provider in
CloudVision. Select Launchpad SAML as your SSO provider, select shared provider, and click Add.
7
If you manually configure this provider, please use the following settings.
Note: Launchpad use needs to be coordinated before setting up with the Arista TAC.
• Provider: Launchpad
• Identity Provider Issuer: https://login.mojonetworks.com/idp/shibboleth
• Identity Provider Metadata URL:https://login.wifi.arista.com/casui/idp-metadata.xml
• Email Attribute Name: User.email
• Authorization Request Binding: HTTP-Redirect SAML protocol binding
1.5.2 Adding or Changing Authentication Providers After the Initial Setup
To make changes to authentication providers or add new authentication providers after the initial onboarding
process click on the Settings and Tools icon and navigate to Access Control > Providers.
Note: CloudVision as-a-Service does not support adding the same Authentication provider twice on
the same cluster. However, you can add multiple providers (without any duplicates) if required.
1.6 Onboarding User Accounts
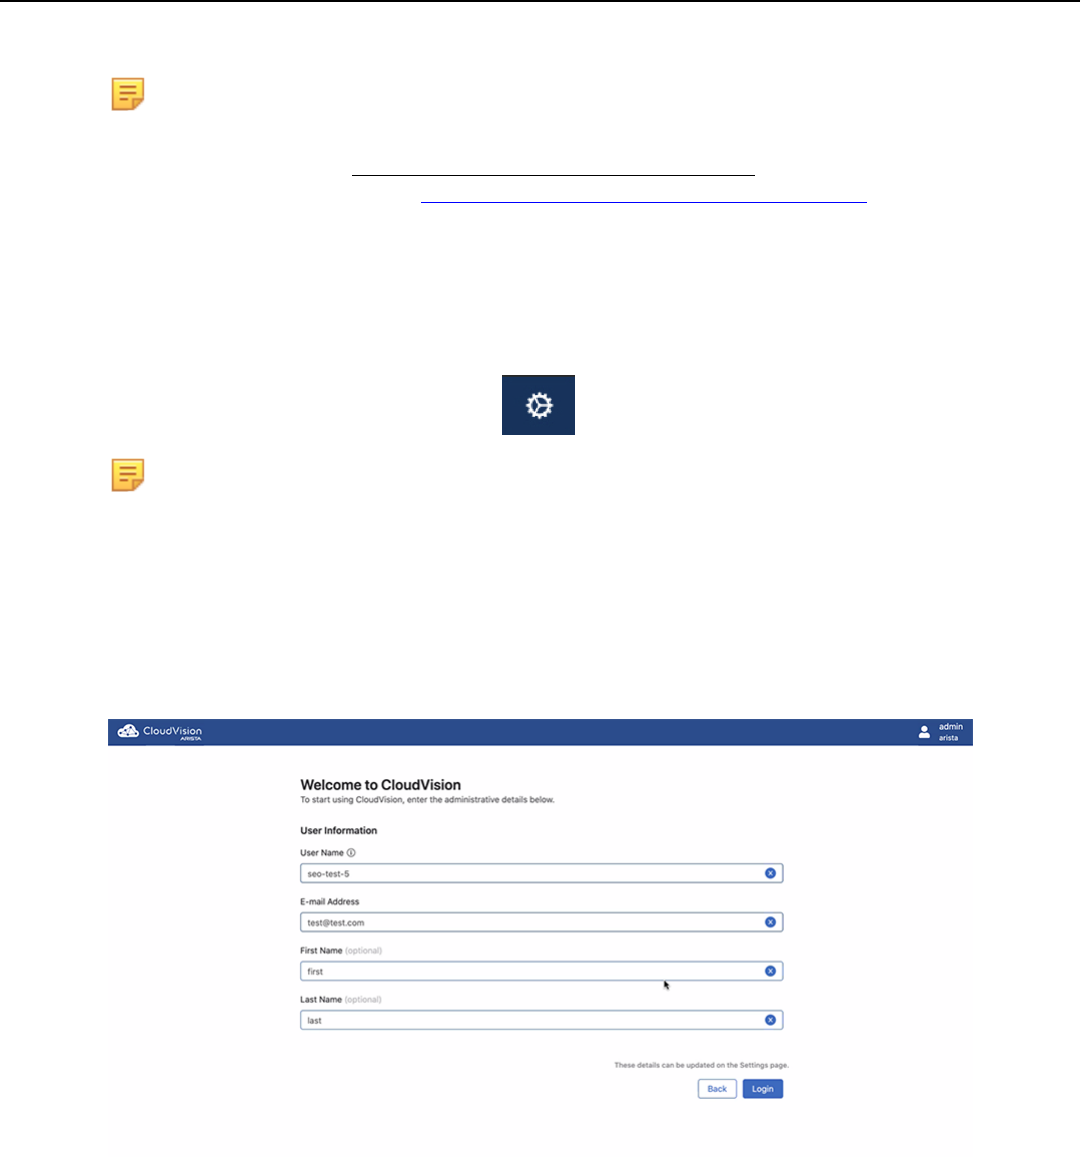
Once the authentication provider is set up, add the admin user account in the User Information screen. Make
sure the email address matches with the email address maintained in the SSO.
Figure -3: User Information Screen
8
1 CloudVision as-a-Service
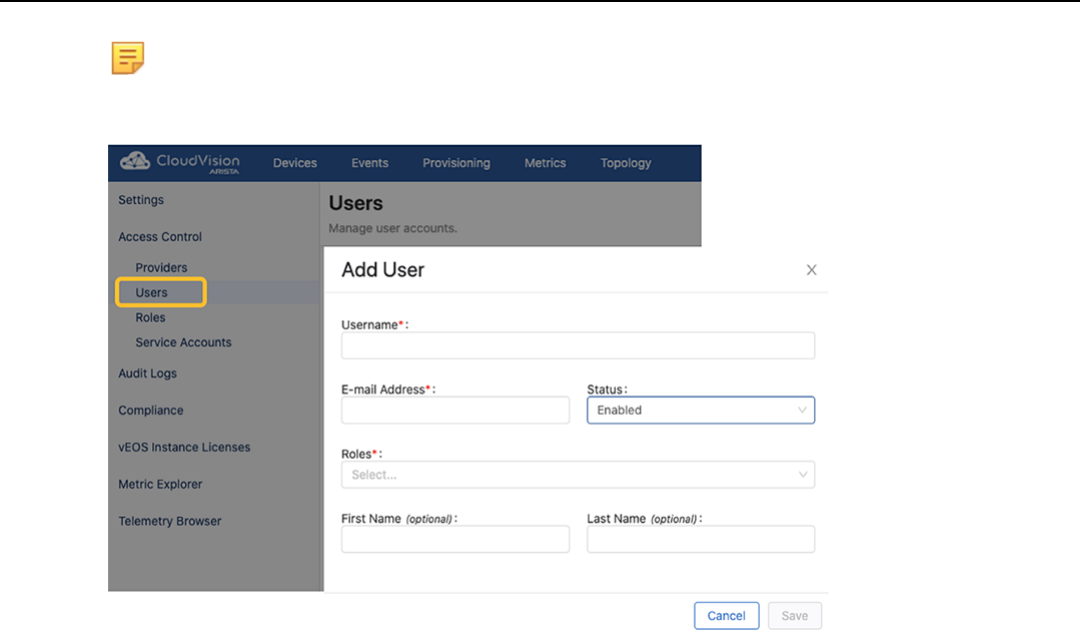
Note: To make changes or add new users to CloudVision after the initial on-boarding, navigate to
Access Control > Users under the CloudVision Settings.
Figure -4: Add User
9
1.7 Login to CloudVision
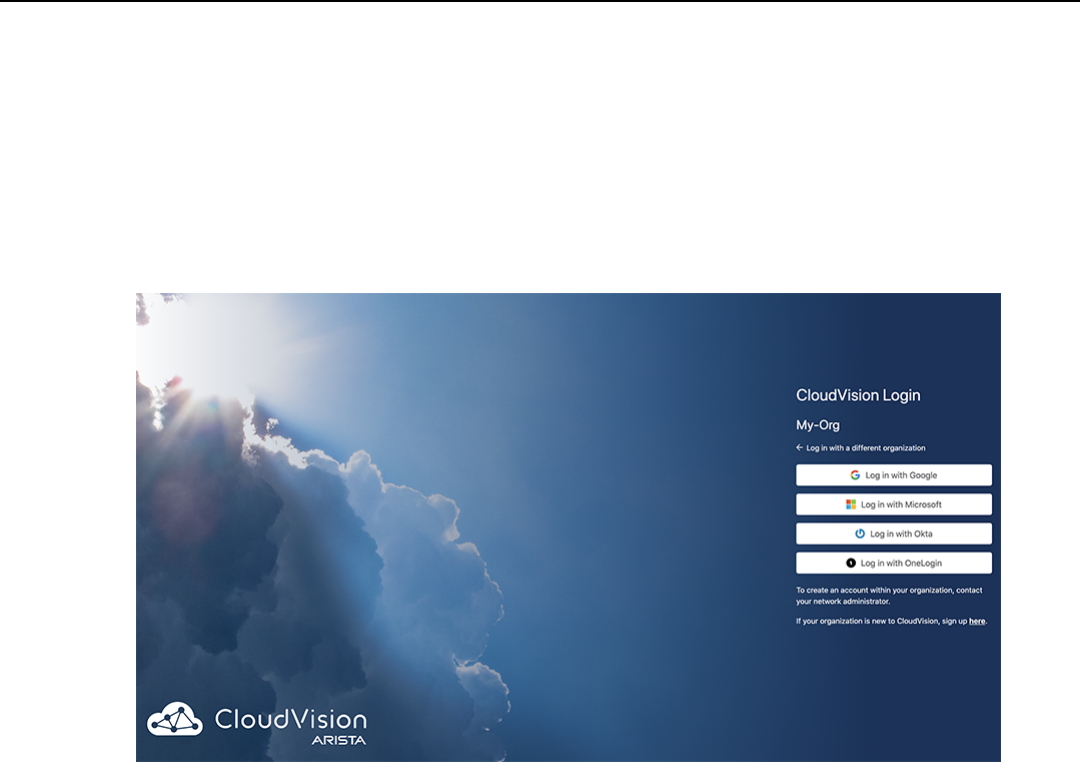
1. After selecting Finish you will be redirected to https://arista.io.
2. Enter the name of the Organization that was provided during the initial cluster setup. You can find the
organization name in the welcome email.
3. Select the provider and log in using the user account created in the previous section.
Figure -5: CloudVision Login
10

1 CloudVision as-a-Service
1.8 Device Onboarding Prerequisites
1.8.1 Software Requirements
Current minimum software requirements are:
• All supported EOS versions based on: https://www.arista.com/en/support/product-documentation/eos-life-
cycle-policy
• TerminAttr 1.19.1+ (TerminAttr is the Streaming Telemetry Agent that is responsible for streaming the
telemetry data to the CloudVision Service.)
Software can be downloaded from: https://www.arista.com/en/support/software-download. Streaming
Telemetry Agent is available under the CloudVision -> CloudVision Portal:
Figure -6: Software Download
1.8.2 Connectivity Requirements
EOS devices need to be able to connect to www.arista.io & apiserver.arista.io on port 443.
Verify connectivity to CloudVision Service using the Ncat command:
HQ-DC-leaf1#bash
[admin@HQ-DC-leaf~]$ nc -zv apiserver.arista.io 443
[admin@HQ-DC-leaf~]$ nc -zv apiserver.<regionalUrl> 443
Ncat: Version 7.50 ( https://nmap.org/ncat )
Ncat: Connected to 35.221.29.186:443.
Ncat: 0 bytes sent, 0 bytes received in 0.08 seconds.
[admin@HQ-DC-leaf~]$ nc -zv apiserver.arista.io 443
If you have multiple VRFs configured, change the VRF context. For eg. to change the VRF Context for a VRF
named “MGMT”:
[admin@HQ-DC-leaf~]$ sudo ip netns exec ns-MGMT nc -zv www.arista.io 443
11

Connectivity Issues
1. Verify proper DNS resolution:
HQ-DC-leaf1#bash nslookup apiserver.arista.io
NOTE: If this is unsuccessful please check your DNS server configuration.
If no DNS servers present please add the “ip name-server” configuration as
follows:
HQ-DC-leaf1(config)# ip name-server 8.8.8.8
2. If you have multiple VRFs configured, first change the VRF context:
[admin@HQ-DC-leaf~]$ sudo ip netns exec ns-MGMT nc -zv apiserver.arista.io
443
[admin@HQ-DC-leaf~]$ sudo ip netns exec ns-MGMT nc -zv
apiserver.<regionalUrl> 443
1.9 Device Onboarding Workflow
Select the device onboarding option appropriate for your configuration:
• Onboarding Devices: Token-Based Authentication
• Onboarding Devices: ZTP as-a-Service Requirements
• ZTP as-a-Service: Using a USB Key
• ZTP as-a-Service: Using a Bootstrap Script
• ZTP as-a-Service: Using Embedded Token
1.10 Onboarding Devices: Token-Based Authentication
To onboard a device without going through ZTP as-a-Service, users can use the token-based authentication
mechanism. Please follow the below steps to get devices onboarded using the token-based authentication
mechanism.
Onboarding Devices: Token-Based Authentication requires the following steps
1. Onboard devices
2. Create and use token for onboarding
3. Provision devices
12
1 CloudVision as-a-Service
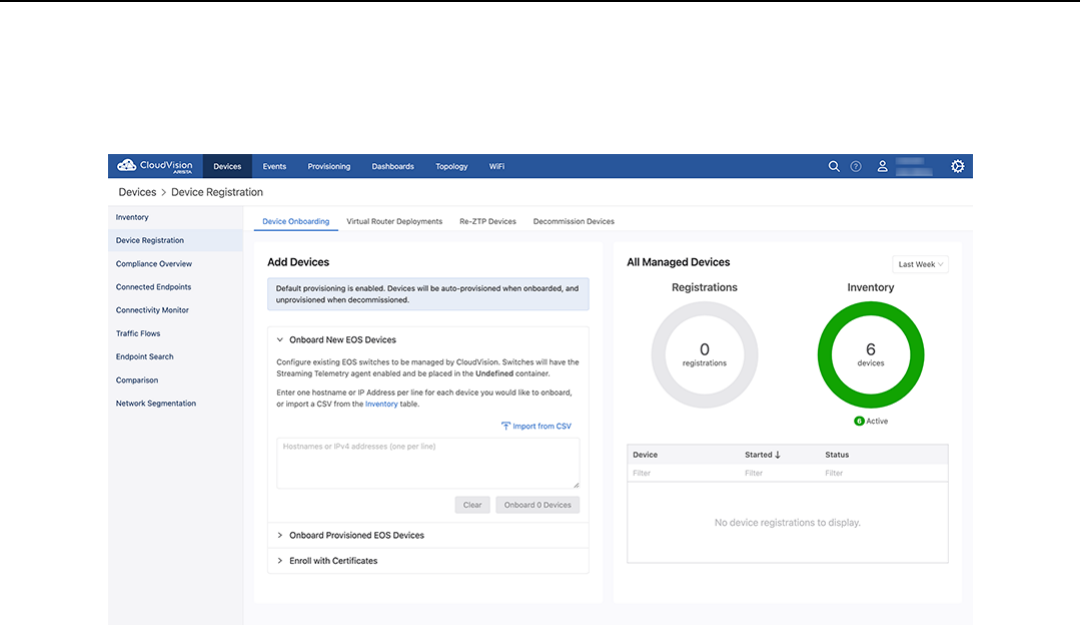
Step 1: Onboard devices
To onboard the devices, navigate to: Devices > Inventory > Onboard Devices
Figure -7: Onboard Devices
Step 2: Create and use token for onboarding
Details on how to create a token, and using that token to onboard the devices are listed under
Onboard Devices. Please follow the directions to create a token and get your devices onboarded to
CloudVision Service.
13
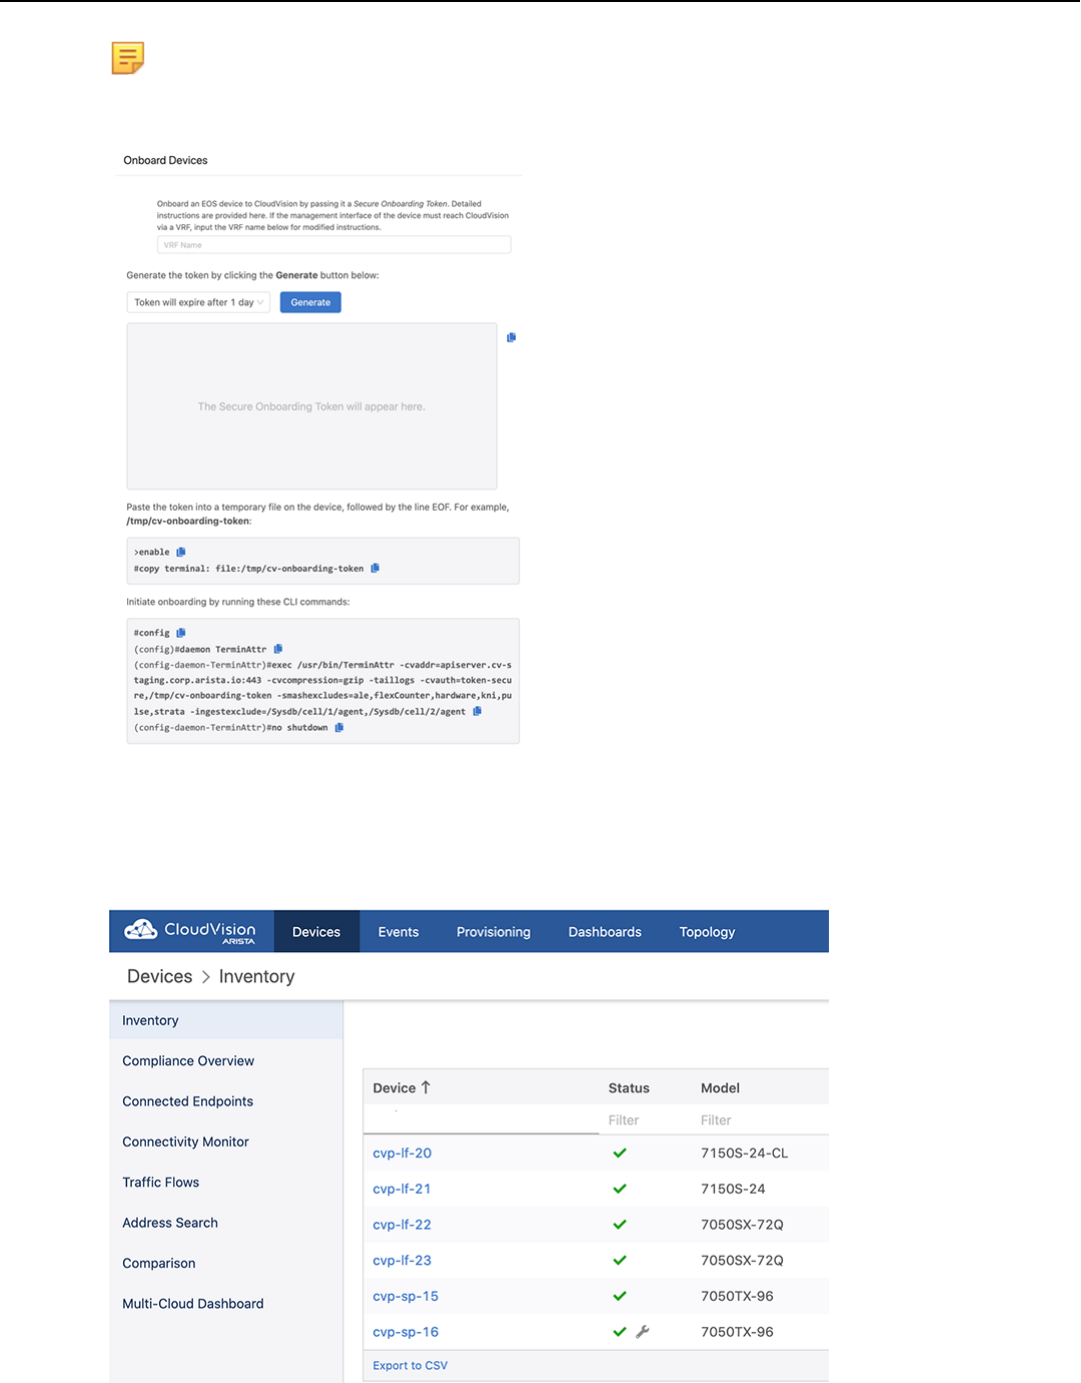
Note: The same token can be used to onboard multiple devices. CloudVision Service will use the
device serial number to correctly identify the device.
Figure -8: Generate a Token
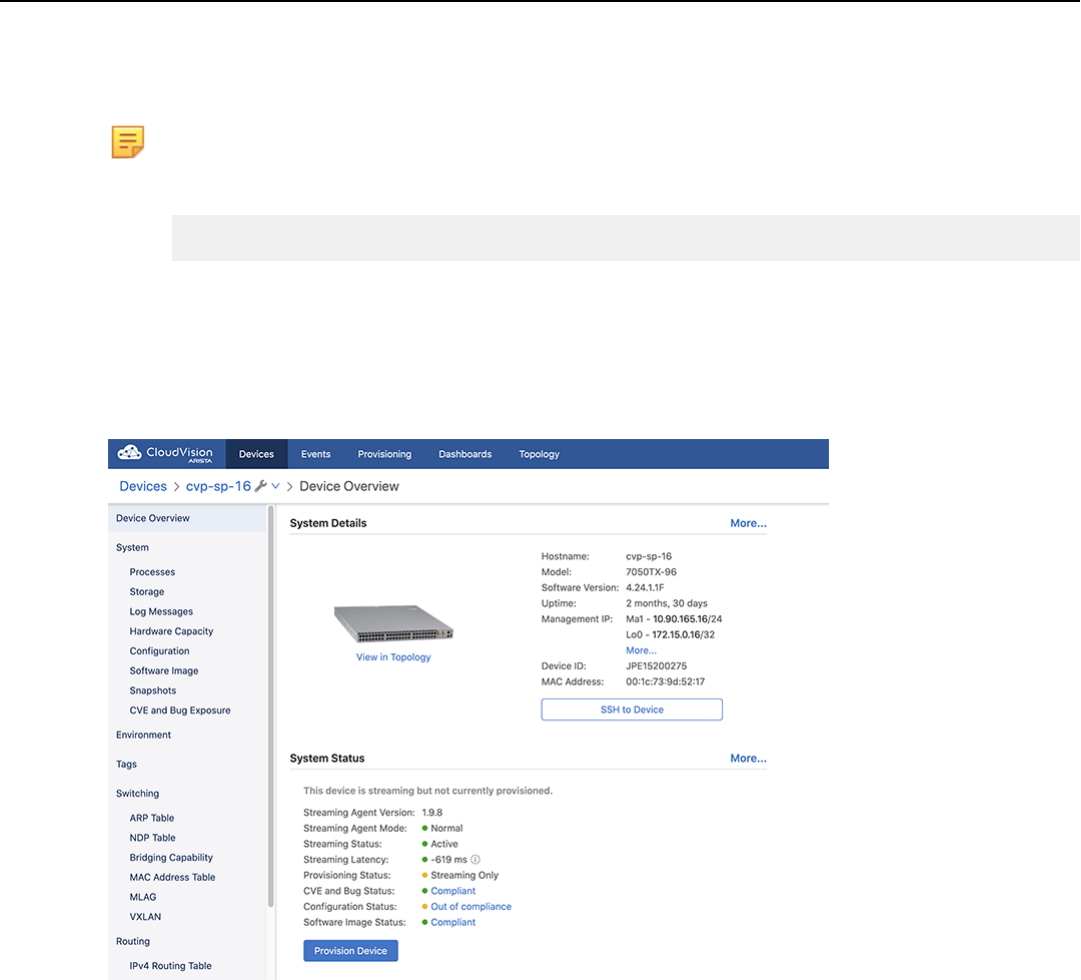
Step 3: Provision devices
After successfully onboard the devices, they should appear under the Devices tab.
Figure -9: Devices - Inventory
14
1 CloudVision as-a-Service
Click on the wrench icon (#) to provision the device. This will take you to the device-specific page. Click on the
Device Overview tab and then click on the Provision Device button to provision the device in CloudVision
Service.
Note: Prior to clicking Provision Device, make sure the user account exists in the EOS device.
For example: Assuming [email protected] is the email address used to login to CloudVision
as-a-Service you need to have john.smith as a user configured in the device (or in TACACS+ server):
sw(config)#username john.smith privilege 15 <nopassword/secret>
If you have TACACS+ configured for authentication, in order for CloudVision as-a-Service to properly
provision the device, the exact user account should already exist in the TACACS+ Server.
If you have a Radius server for EOS authentication, you need to add the --disableaaa argument
into the TerminaAttr config.
Figure -10: Device Overview
15
1.11 Onboarding Devices: ZTP as-a-Service Requirements
Arista’s Zero Touch Provisioning is used to configure a switch without user intervention. Built to fully leverage
the power of Arista’s Extensible Operating System (EOS), ZTP as-a-Service provides a flexible solution to
onboard EOS devices into CloudVision as-a-Service.
Requirements
1. DHCP Server
EOS device should be able to reach www.arista.io by obtaining valid IP settings from a DHCP server. The
device in ZTP should receive the following information from the DHCP offer:
• IP Address
• DNS Servers
• Gateway
• NTP (Highly recommended)
• If running EOS < 4.30.0F Option 67 (bootfile-name) with a bootstrap URL (Please refer to the detailed
section for the exact CVaaS cluster URL for your specific region)
2. EOS Version
• Supported with the following versions >=4.25.5 OR >=4.26.1
• Preferred versions: For platforms with EOS 4.30.0F or newer, EOS will automatically reach out to
www.arista.io to enroll itself using the ZTPaaS Embedded Token. No need to specify the following
www.arista.io URL.
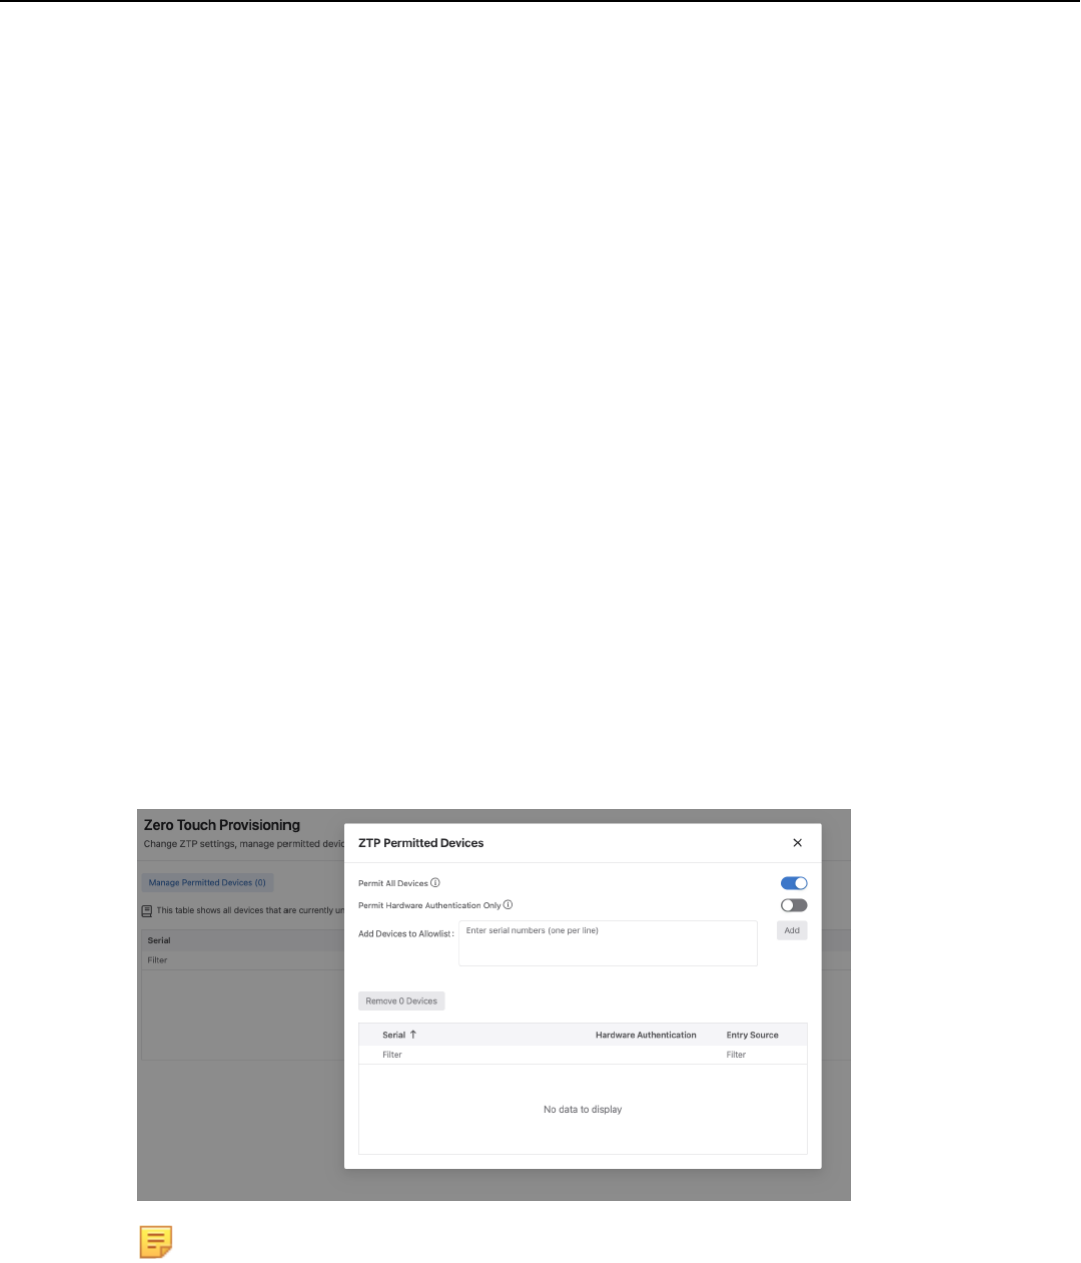
3. Permit ZTP in CloudVision as-a-Service Cluster
ZTP as-a-Service should be enabled in the CVaaS cluster via: Provisioning-> Zero Touch Provisioning-
> Manage Permitted Devices.
Figure -11: ZTP Permitted Devices
Note: ZTP can be enabled globally for all devices or it can be managed per-device level using
Serial Numbers.
4. Compliance Token
a. Navigate to the Settings -> Compliance Updates section.
b. Follow the link on the page to go to your www.arista.com dashboard and copy the token.
16
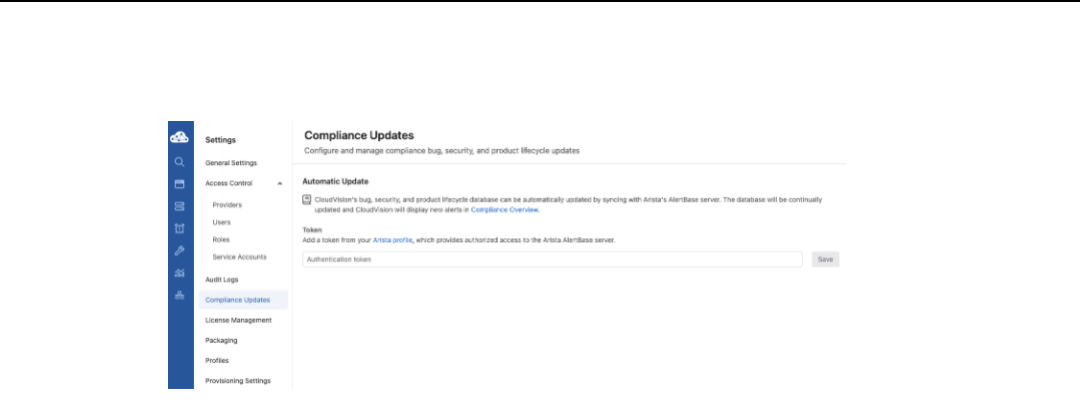
1 CloudVision as-a-Service
c. Paste the token on the CloudVision Compliance page and click Save.
Figure -12: Compliance Updates
After making sure all these requirements are satisfied, please proceed to the next section to continue
the device onboarding process.
5. NTP Settings
Please make sure your DHCP server has the NTP option set in the configuration to properly set the time
on the EOS devices (for example: option ntp-servers time.google.com). Without proper NTP
Sync, you may run into registration issues with CloudVision as-a-Service.
17

1.11.1 Device Onboarding using ZTPaaS: Embedded Token
For platforms with EOS 4.30.0F or newer, after obtaining a routable DHCP IP, EOS will automatically contact
www.arista.io to enroll itself using the ZTPaaS Embedded Token. There is no need to specify/configure any
other parameters on the EOS device or in CVaaS.
Once the device is powered on and obtains the DHCP IP address, it should automatically reach CloudVision
as-a-Service. Registration should happen automatically, and once registered, the device should also
appear in the Undefined Container on the Network Provisioning page. At this point, either use the Static
Configuration Studios or move the device into a named container and apply appropriate configlets. After
submitting the change control, the device should reboot and complete the ZTP as-a-Service process. The
device will reboot twice if a target container has an image bundle attached to it.
Please refer to Table-1 of the Platform-Specific Feature Set Guide (Link) for the formal list of devices that
have Embedded Token support.
You can use the following command to verify whether the device has the Embedded token support:
Leaf-1A#show hardware eeprom
<truncated>
ZtpToken: xxxx
For devices running an older EOS version than 4.30.0F, please use the following regional CVaaS URLs in the
DHCP server bootfile-name option (Option-67). The device will not automatically connect to CVaaS when it is
running an older EOS version. .
• United States 1a: https://www.arista.io/ztp/bootstrap
• United States 1c: https://www.cv-prod-us-central1-c.arista.io/ztp/bootstrap
• Japan: https://www.cv-prod-apnortheast-1.arista.io/ztp/bootstrap
• Germany: https://www.cv-prod-euwest-2.arista.io/ztp/bootstrap
• Australia: https://www.cv-prod-ausoutheast-1.arista.io/ztp/bootstrap
• Canada: https://www.cv-prod-na-northeast1-b.arista.io/ztp/bootstrap
• United Kingdom: https://www.cv-prod-uk-1.arista.io/ztp/bootstrap
Example ISC DHCP configuration:
subnet 10.10.1.1 netmask 255.255.255.0 {
range 10.10.1.1 10.10.1.253;
option domain-name "example.customer_domain.com";
option routers 10.10.1.250;
option domain-name-servers 10.10.1.5;
option ntp-servers time.google.com;
host leaf-1A {
hardware ethernet fc:bd:67:aa:22:33;
fixed-address 10.10.1.180;
option host-name "leaf-1A";
option bootfile-name "https://www.arista.io/ztp/bootstrap";
}
Note: By default, a device will be mapped to the primary CVaaS tenant of the customer. For
customers that have multiple CVaaS tenants, in order to update the device to tenant mapping for a
device, please create a support ticket with Arista TAC.
18

1 CloudVision as-a-Service
1.11.2 Device Onboarding using ZTPaaS: Alternative Methods
If your device does not support Embedded Token, you can use the following alternative methods for ZTP
as-a-Service. For the formal list of devices that support Embedded Token, please refer to Table-1 of the
Platform-Specific Feature Set Guide (Link).
Using a Bootstrap Script
ZTP as-a-Service can be enabled via a custom bootstrap script and a DHCP server option that points to that
bootstrap script. This method can be used when onboarding a large number of devices.
Please follow the following steps to enable ZTP as-a-Service using a Bootstrap Script.
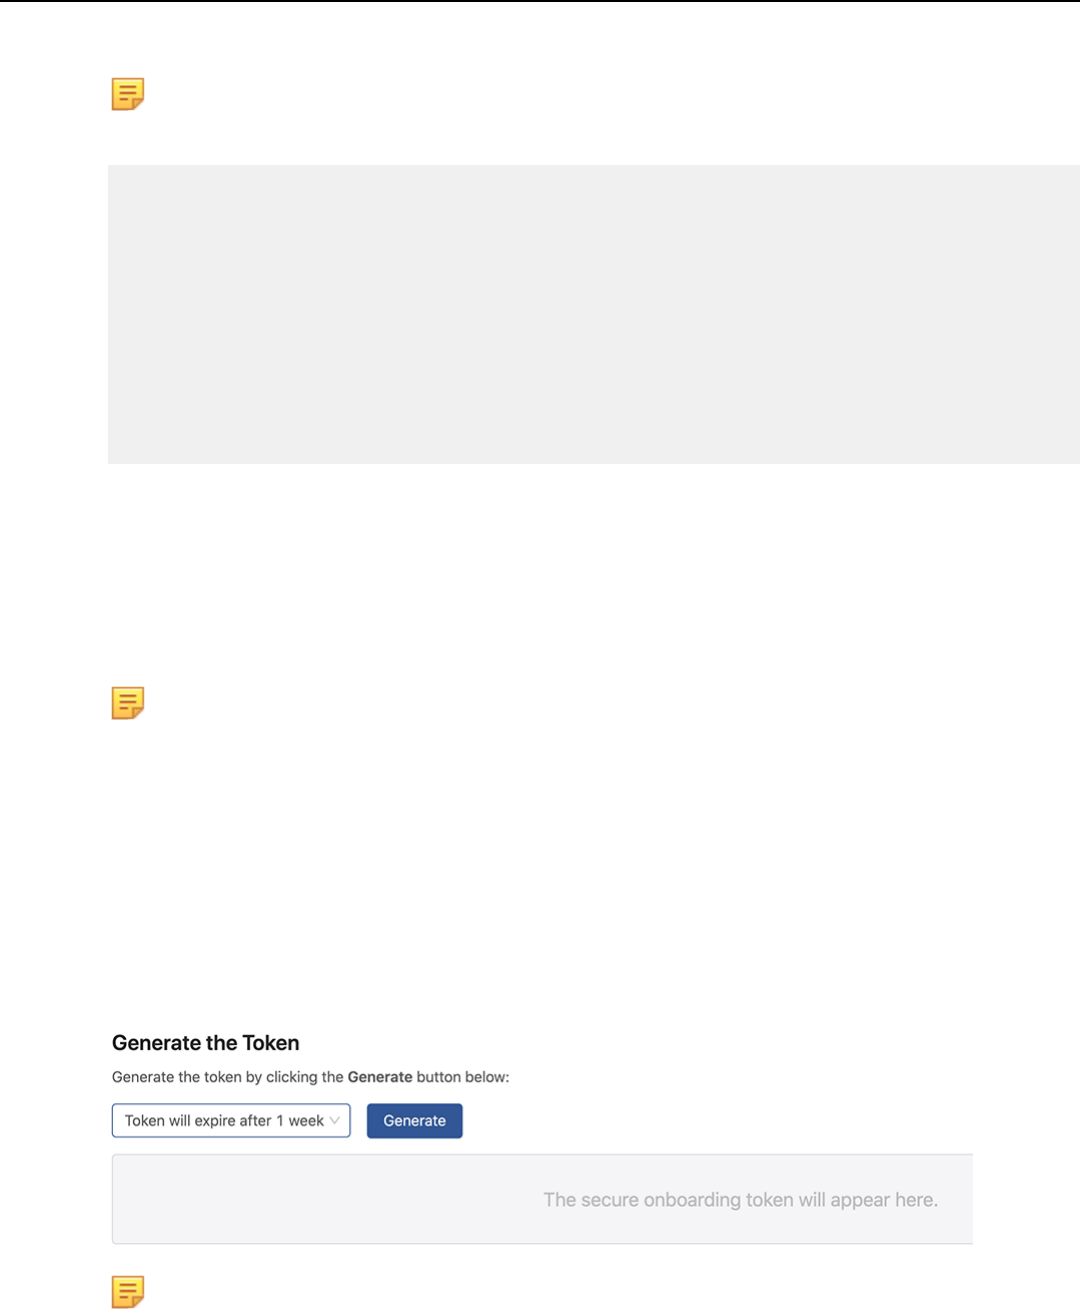
Step-1: Log in to the CloudVision as-a-Service cluster and generate a token using Devices > Onboard
Devices > Generate.
Step-2: Prepare a bootstrap script and host it on an HTTP server. A sample script can be obtained
by through:https://github.com/aristanetworks/cloudvision-ztpaas-utils. Please make sure to use the latest
script version.
Note: If you are using a Windows machine, please watch out for the unnecessary characters when
downloading this file. To troubleshoot whether unwanted characters are presented in the downloaded
bootstrap script file, login to the switch bash prompt and open the file using the command: vi /tmp/
zt-download
Make sure to provide the updated token information and other information in the bootstrap script.
For example:
############## USER INPUT #############
cvAddr = "www.arista.io"
enrollment_token = "eyJhbGciOiJSUzI1Nixxx..."
############## USER INPUT #############
Note: For devices running an older EOS version than 4.30.0F please use the following regional
CVaaS URLs for the cvAddr field depending on your specific CVaaS region:
• United States 1a: https://www.arista.io/ztp/bootstrap
• United States 1c: https://www.cv-prod-us-central1-c.arista.io/ztp/bootstrap
• Japan: https://www.cv-prod-apnortheast-1.arista.io/ztp/bootstrap
• Germany: https://www.cv-prod-euwest-2.arista.io/ztp/bootstrap
• Australia: https://www.cv-prod-ausoutheast-1.arista.io/ztp/bootstrap
• Canada: https://www.cv-prod-na-northeast1-b.arista.io/ztp/bootstrap
• United Kingdom: https://www.cv-prod-uk-1.arista.io/ztp/bootstrap
Note: If the device is behind a non-transparent proxy please use the following cvproxy option:
# Add proxy url if device is behind proxy server, leave it as an empty string
otherwise
cvproxy = ""
Note: You can start an HTTP server using python (python3 -m http.server 8000 &), and host
the bootstrap.py file, and then point the DHCP server to download from this server location.
For detailed information about the process please refer to:
https://aristanetworks.force.com/AristaCommunity/s/article/A-Practical-Guide-to-Zero-Touch-
Provisioning-ZTP-in-Cloud-Vision-as-a-Service-CVaaS
19
Step-3: Direct the DHCP server to point to the bootstrap script via option-67/bootfile-name option:
Note: Make sure the ntp-servers option is set in your DHCP configuration.
For example:
subnet 10.10.1.1 netmask 255.255.255.0 {
range 10.10.1.1 10.10.1.253;
option domain-name "dev.aristanetworks.com";
option routers 10.10.1.250;
option domain-name-servers 10.10.1.5;
option ntp-servers time.google.com;
host leaf-1A {
hardware ethernet fc:bd:67:aa:22:33;
fixed-address 10.10.1.180;
option host-name "leaf-1A";
option bootfile-name "http://10.10.1.10:8000/bootstrap.py";
}
Step-4: Boot up the EOS device into ZTP provisioning mode.
At this point, the ZTP process should begin and the device should be displayed in Provisioning > Zero
Touch Provisioning.
Step-5: Once properly registered the device should also show up in the Undefined Container on the
Network Provisioning page. Move the device into a named container and use the studios or apply appropriate
configlets. After submitting the changes, the device should reboot and complete the ZTP as-a-Service
process.
Note: Same bootstrap script and token can be used to onboard multiple EOS devices. Make sure the
token has not expired before proceeding.
Using a USB Key
A USB key can be used to provide the onboarding token and other information required for the ZTP
process. Since the USB method can be cumbersome and needs to be used on one device at a time, it is
recommended to use the Bootstrap Script methods for ZTP as-a-Service.
Please follow the following steps to enable ZTP as-a-Service using a USB Key.
Step 1: Log in to the CloudVision as-a-Service cluster and generate a token using Devices > Onboard
Devices > Generate.
Figure -13: Onboard Devices: Generate the Token
Note: The same token can be used to onboard multiple devices. There is no need to generate
multiple tokens.
Step-2: Prepare a USB key.
• Create a directory called ztp inside the USB.
20

1 CloudVision as-a-Service
• Copy the token generated in step-1 into a file named token.tok in ztp directory.
• Create a file named ztpConfig.yaml (ztp/ztpConfig.yaml) and add the following content:
The configuration (/mnt/usb1/ztp/ztpConfig.yaml) should look like this:
bootstrapUrl: 'https://www.arista.io/ztp/bootstrap'
serverCaCertificate: ../../../etc/pki/tls/certs/ca-bundle.crt
enrollmentToken: token.tok
version: '1.0'
Note: For devices running an older EOS version than 4.30.0F please use the following regional
CVaaS URLs for the bootstrpUrl field depending on your specific CVaaS region:
• United States 1a: https://www.arista.io/ztp/bootstrap
• United States 1c: https://www.cv-prod-us-central1-c.arista.io/ztp/bootstrap
• Japan: https://www.cv-prod-apnortheast-1.arista.io/ztp/bootstrap
• Germany: https://www.cv-prod-euwest-2.arista.io/ztp/bootstrap
• Australia: https://www.cv-prod-ausoutheast-1.arista.io/ztp/bootstrap
• Canada: https://www.cv-prod-na-northeast1-b.arista.io/ztp/bootstrap
• United Kingdom: https://www.cv-prod-uk-1.arista.io/ztp/bootstrap
Step-3: Setup a DHCP server to serve routable IP settings (Note: Device should be able to reach
apiserver.arista.io).
Example configuarion for DHCPD:
subnet 10.10.10.128 netmask 255.255.255.128 {
range 10.10.10.170 10.10.10.185;
option domain-name "test.aristanetworks.com";
option routers 10.10.10.129;
option domain-name-servers 10.10.10.6;
option ntp-servers time.google.com;
host Switch-01 {
hardware ethernet 94:8e:11:22:02:33;
fixed-address 10.10.10.181;
option host-name "Switch-01";
option bootfile-name "tftp://none";
}
}
Step-4: Plug in the USB to the EOS device and boot up into the ZTP provisioning mode. (The USB key will be
mounted on the /mnt/usb1 directory).
Note: If the device is not in the ZTP mode, delete the following files (from bash) and reboot: rm /mnt/
flash/startup-config & rm /mnt/flash/zerotouch-config
At this point, the ZTP process should begin, and the device should show up under the Provisioning > Zero
Touch Provisioning.
Step-5: Once properly registered, the device should also show up in the Undefined Container on the
Network Provisioning page. Move the device into a named container and apply appropriate configlets. After
submitting the change control, the device should reboot and complete the ZTP as-a-Service process.
Note: Same USB key and token can be used to onboard multiple EOS devices. Make sure the token
has not expired before proceeding.
21

1.11.3 Using Hardware Authentication with ZTP as-a-Service
During ZTP as-a-Service, it is possible to enable an additional layer of authentication using the Hardware
Authentication feature. EOS devices should have a Trusted Platform Module (TPM) chip for Hardware
Authentication to work. Please refer to Table-2 of the Platform-Specific Feature Set Guide (Link) for the list
of devices that have Hardware Authentication support with the TPM Module.
Hardware authentication can be enabled globally (for all the devices) or on a per-device basis.
To enable Hardware Authentication, navigate to the Provisioning > Zero Touch Provisioning > Manage
Permitted Devices.
1.12 Connecting CloudVision Wifi Tenant
To connect your CloudVision Wifi tenant to CloudVision as a Service, to enable wifi visibility within
CloudVision as-a-Service you must create a new key within the administrative section of the wifi portal.
This enables viewing of the Wifi devices in Compliance view, Device view and Topology.
Provisioning and management of wifi devices must be done on the Wifi portal.
Instructions:
1. Go to your Launchpad portal, and navigate Admin, then click on New Key.
Figure -14: Launchpad Portal - New Key
2. Create your key and save the Key ID and Value.
Note: If the newly created key Active Profile defaults to value Custom this must be updated to
Admin.
3. Select Service Privileges in the drop down to the right of the active profile.
Figure -15: Service Privileges
4. Change the profile from Custom to Admin and save the new setting.
Figure -16: Change Profile
5. Go to CloudVision Service (Arista.io) and log in. Click the settings wheel on the upper right side of the
screen. In General settings, you can add the Wifi Cloud Connector.
22
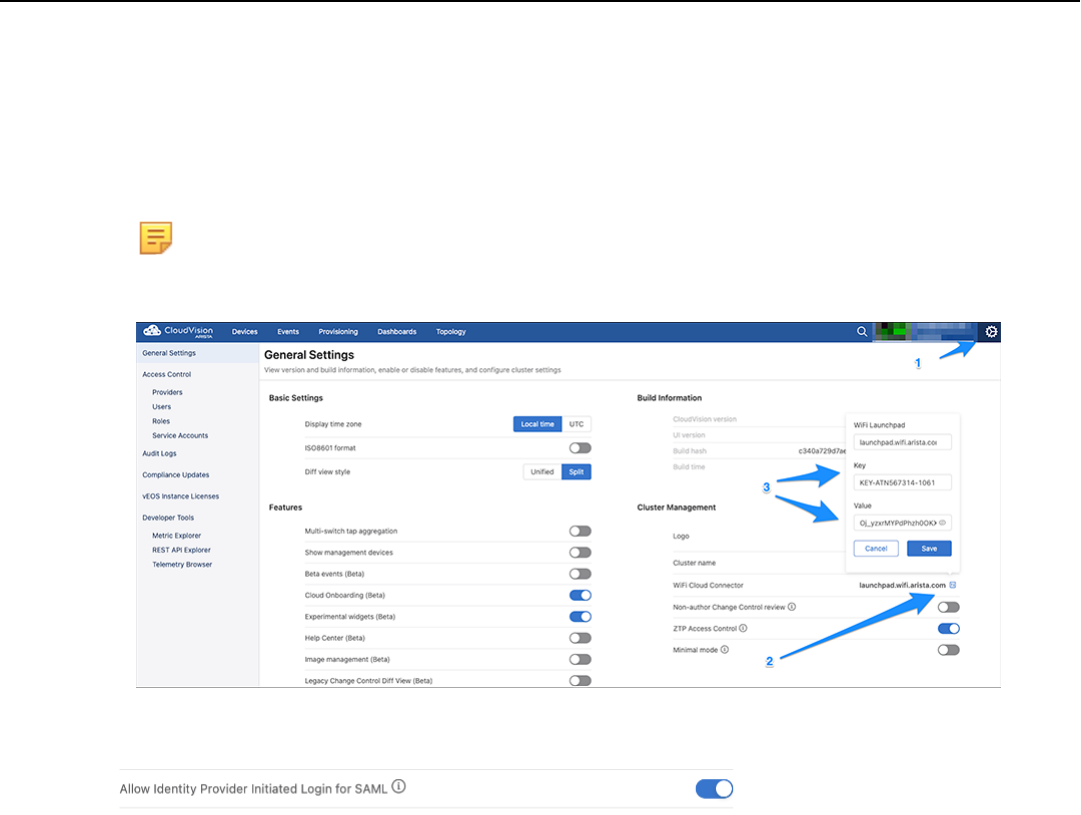
1 CloudVision as-a-Service
a. Click the settings wheel upper right.
b. Click the settings wheel upper right and select the Wifi Cloud Connector configuration button.
c. Input the URL, Key ID, and Value.
• URL: launchpad.wifi.arista.com (do not include https:// or trailing /)
• KeyID: from Launchpad
• Key Value: from Launchpad.
Note: Once the Key value has been saved in CloudVision, this field will show the encrypted value,
if you need to add the key again, you must copy it from the LaunchPad portal.
Figure -17: Launch Pad - Settings
Under Cluster Management, if Allow Identity Provider Initiated Login for SAML displays as an option, it
must be toggled to enabled.
23

1.13 Troubleshooting
1.13.1 Troubleshooting Connectivity Issues
Verify connectivity to CloudVision Service
Verify connectivity to CloudVision Service using the Ncat command:
HQ-DC-leaf1#bash
[admin@HQ-DC-leaf~]$ nc -zv apiserver.arista.io 443
Ncat: Version 7.50 ( https://nmap.org/ncat )
Ncat: Connected to 35.221.29.186:443.
Ncat: 0 bytes sent, 0 bytes received in 0.08 seconds.
[admin@HQ-DC-leaf~]$ nc -zv www.arista.io 443
If you have multiple VRFs configured, first change the VRF context:
[admin@HQ-DC-leaf~]$ sudo ip netns exec ns-MGMT
nc -zv apiserver.arista.io 443
Verify proper DNS resolution
HQ-DC-leaf1#bash nslookup apiserver.arista.io
Note: If this is unsuccessful please check your DNS server configuration. If no DNS servers present
please add the ip name-server configuration as follows:
HQ-DC-leaf1(config)# ip name-server 8.8.8.8
1.13.2 Troubleshooting Device Onboarding Issues
TerminAttr Agent Version issues
One of the common causes for Device Onboarding issues is the Streaming Telemetry agent (aka: TerminAttr
agent) version incompatibilities. Please verify the switch TerminAttr agent version is greater than or equal to
the supported agent version for CloudVision Service.
Other issues
• TerminAttr agent log files might provide additional information to enhance the troubleshooting process.
You can access the TerminAttr logs using following commands:
===== Output from /usr/bin/TerminAttr
['-cvaddr=apiserver.arista.io:443', '-cvcompression=gzip', '-cvvrf=MGMT',
'-taillogs', '-cvauth=token-secure,/tmp/cv-onboarding-token',
'-smashexcludes=ale,flexCounter,hardware,kni,pulse,strata',
'-ingestexclude=/Sysdb/cell/1/agent,/Sysdb/cell/2/agent'] (PID=2223)
started Mar 14 21:01:03.638345 ===
I0314 21:01:03.666579 2223 libmain.go:94] TerminAttr Version: v1.13.3
go1.15.8 386
24

1 CloudVision as-a-Service
• Additional commands to access the TerminAttr logs:
Switch-01#bash ls /var/log/agents/TerminAttr-*
/var/log/agents/TerminAttr-2223
Switch-01#bash cat /var/log/agents/TerminAttr-2223
1.13.3 Troubleshooting Streaming Telemetry Latency Issues
NTP Issues: If the switch clock is too far off the actual timing, this can lead in to streaming latency related
problems. Verify NTP settings using show ntp status.
To configure NTP use the command: switch(config)#ntp server <vrf> <vrf-name>
time.google.com
https://www.arista.com/en/um-eos/eos-system-clock-and-time-protocols
1.13.4 Troubleshooting ZTP as-a-Service Issues
Symptom:
Failing to download the startup-config from arista.io: Failed to download the startup-config from https://
www.arista.io/ztp/bootstrap. Error: HTTP response code said error”:
Possible resolution:
Check whether the compliance token is added to the CVaaS account:
• Navigate to the Settings -> Compliance section.
• Follow the link on the page to go to your arista.com dashboard and copy the token.
• Paste the token on the CVaaS Compliance page and click Save.
Other common reasons for ZTP as-a-Service issues:
• EOS version related issues: EOS version should be 4.26.1 or newer for ZTPaaS
• NTP issues: Make sure your DHCP server has the NTP option set in the configuration (eg: option ntp-
servers time.google.com)
• Unnecessary character issues with Windows machines: If you are using a Windows machine, please
watch out for the unnecessary characters when downloading this file. To troubleshoot whether unwanted
characters are presented in the downloaded bootstrap script file, login to the switch bash prompt and open
the file using the: vi / tmp/zt-download command.
1.13.5 Troubleshooting Switch Provisioning and Configuration Issues
If the Provision Device is failing, or if any configuration or change control actions are failing, please make
sure the current user’s user account that is used to login to the CloudVision as-a-Service exists in the EOS
device.
For example: Assuming [email protected] is the email address used to login to CloudVision
as-a-Service you need to have john.smith as a user configured in the device (or in TACACS+ server):
sw(config)#username john.smith privilege 15 <nopassword/secret>
If you have TACACS+ configured for authentication, in order for CloudVision Service to properly provision the
device, the exact user account should already exist in the TACACS+ Server.
If you have a Radius server for EOS authentication, you need to add the --disableaaa argument into the
TerminaAttr config.
25

Following sample switch configuration shows how to configure commonly used CloudVision features such
as sflow/aaa-authentication. Please refer to the EOS user manual (https://www.arista.com/en/um-eos/eos-
overview) for more information.
!
daemon TerminAttr
exec /usr/bin/TerminAttr -cvaddr=apiserver.arista.io:443
-cvcompression=gzip -cvvrf=MGMT <truncated>
no shutdown
!
hostname Leaf-7050SX3-211
ip name-server!
ntp server vrf MGMT time.google.com
!
aaa authorization exec default local
!
username admin privilege 15 role network-admin secret <>
username john.smith privilege 15 role network-admin secret <>
!
vrf instance MGMT
!interface Management1
vrf MGMT
ip address 10.240.129.211/25
!
ip route vrf MGMT 0.0.0.0/0 10.240.129.129
!
!
sflow sample 65536
sflow polling-interval 120
sflow destination 127.0.0.1
sflow source-interface Loopback0
sflow run
!
interface Loopback0
!
interface Management1
vrf MGMT
ip address 10.240.129.211/25
!
26
1 CloudVision as-a-Service
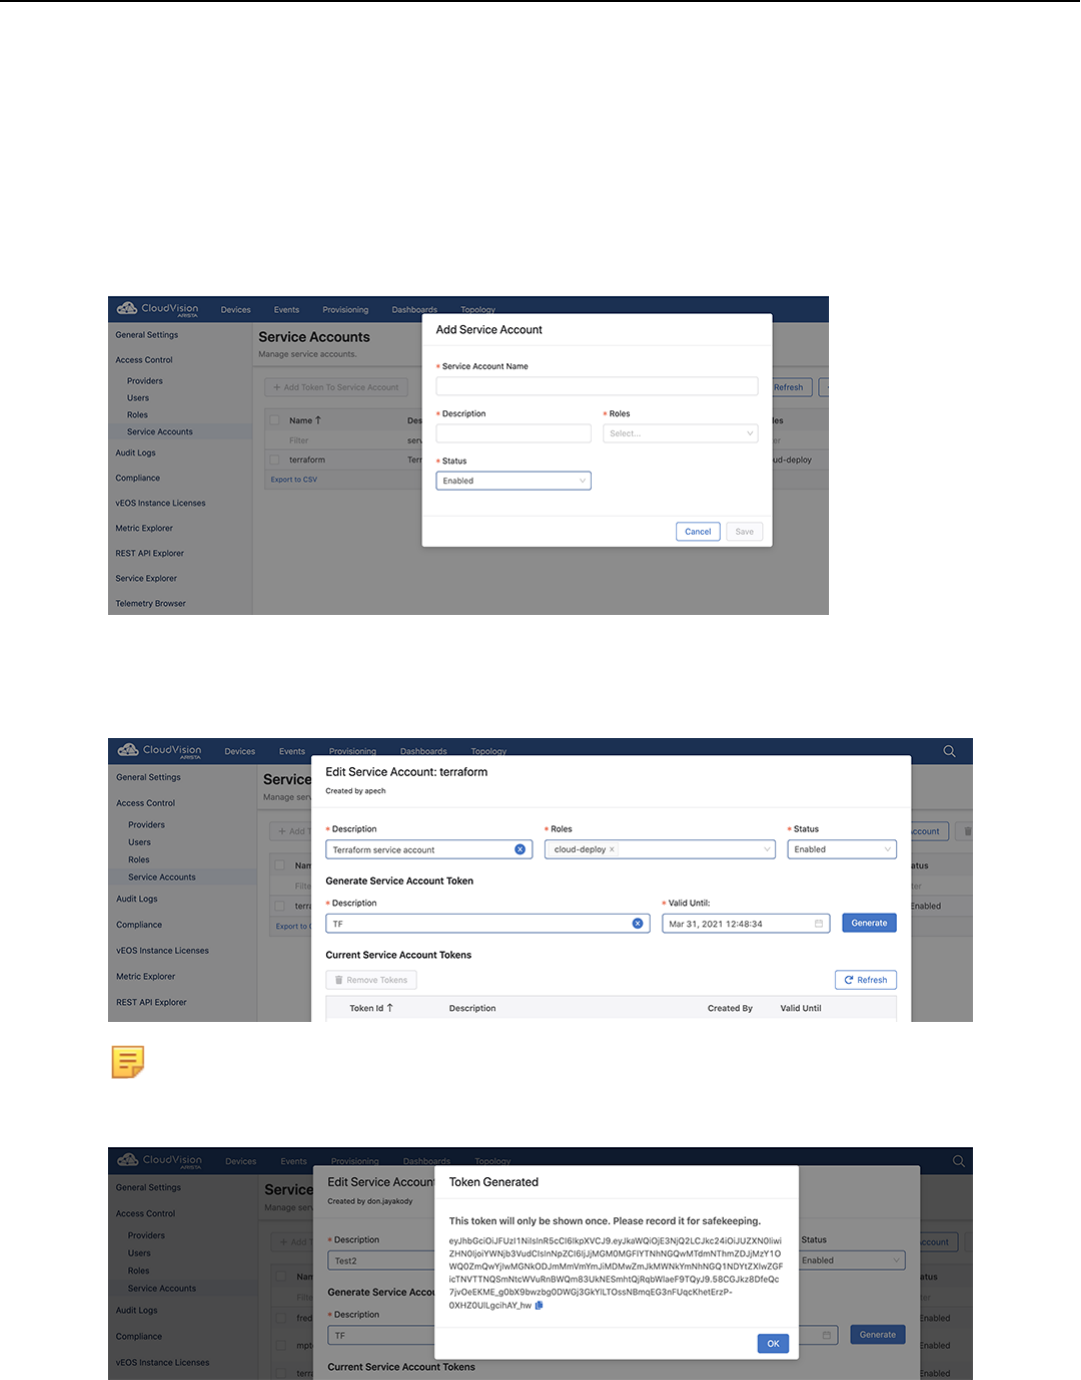
1.14 Automation with CloudVision as-a-Service
Generating a Service Account Token
In order to access the CloudVision as-a-Service and send API requests Service Account Token is needed.
Navigate to the Settings -> Access Control -> Service Accounts to add a Service Account.
Figure -18: Add Service Account
Use the Generate Service Account Token section to create a new token by providing a description and an
expiration date. This token can be used to send API calls to the CloudVision Service instance.
Figure -19: Edit Service Account Token
Note: The token will only be shown once. Make sure to copy this to a local file. During automation this
token file will be used to send API calls to the CloudVision Service.
Figure -20: Token Generated
27

Accessing CloudVision Service REST API
CloudVision Service REST API swagger-ui cab be accessed by navigating to: Settings -> REST API
Explorer.
Figure -21: REST API Explorer
Sending API Calls
According to your specific CVaaS region, please use the following regional CVaaS URLs to send API calls:
• United States 1a: https://www.arista.io
• United States 1b: https://www.cv-prod-us-central1-b.arista.io
• United States 1c: https://www.cv-prod-us-central1-c.arista.io
• Japan: https://www.cv-prod-apnortheast-1.arista.io
• Germany: https://www.cv-prod-euwest-2.arista.io
• Australia: https://www.cv-prod-ausoutheast-1.arista.io
• Canada: https://www.cv-prod-na-northeast1-b.arista.io
• UK: https://www.cv-prod-uk-1.arista.io/
Using Curl
Service account token can be used to login to the CloudVision Service and query the REST APIs using Curl
commands:
Note: For this example create a file called token and copy and paste the service account token
in there.
bash-3.2$ curl -X GET --header 'Accept: application/json'
'https://www.cv-staging.corp.arista.io/cvpservice/configlet/getConfigletByNam
e.do?name=CloudTracer'
-b access_token=`cat token`
{"key":"configlet_843806b0-a015-491b-af2b-12486a38d05f","name":"CloudTracer"}
Using Python
28
1 CloudVision as-a-Service
Python based CVPRAC module (https://github.com/aristanetworks/cvprac) provides a REST API client for
Cloudvision. Install CVPRAC using pip or directly from the source as described in the Installation section. To
send API calls to the CloudVision Service using CVPRAC module set the is_cvaas option to True as follows.
Note: Token is needed to send API calls to the CloudVision Service. Obtain a token using a Service
Account as shown in the previous section.
>>> from cvprac.cvp_client import CvpClient;
>>> clnt = CvpClient()
>>> clnt.connect(nodes=['www.arista.io'], username='',
password='', is_cvaas=True,
cvaas_token='eyJhbGciOi<truncated>')
>>> print(clnt.api.get_configlet_by_name('CloudTracer')){'key':
'configlet_843806b0-a015-491b-af2b-12486a38d05f', 'name': 'CloudTracer',
'reconciled': False, 'config': 'monitor connectivity\n host aws-us-east-1\n
ip 52.216.227.10\n, <truncated> 'typeStudioConfiglet': False}
Using Ansible
Starting with the release 2.1.1 Ansible CVP supports CloudVision as-a-Service.
CloudVision Ansible bundle can be downloaded from here: https://github.com/aristanetworks/ansible-cvp. To
authenticate with a CloudVision as-a-Service instance update the authentication steps as follows:
# Default Ansible variables for authentication
ansible_host: < IP address or hostname to target >
ansible_user: cvaas # Shall not be changed. ansible will switch to cvaas mode
ansible_ssh_pass: < User token to use to connect to CVP instance >
ansible_connection: httpapi
ansible_network_os: eos
For additional details please refer to: https://github.com/aristanetworks/ansible-cvp/pull/235
1.15 CloudVision as-a-Service Support
If you require any assistance during the onboarding process please reach out to cvaas-
29
