General Ledger
ADI Journal Worksheet Guide
Author: Sharon Olson
Revision Date 27-OCT-2023 For Harvard Business Use Only Page 1
HARVARD
UNIVERSITY
ADI Journal Worksheet Guide
Revision Date: 27 October 2023
Use this guide to assist when
processing an Oracle Application
Desktop Integrator (ADI) Journal.

General Ledger
ADI Journal Worksheet Guide
Author: Sharon Olson
Revision Date 27-OCT-2023 For Harvard Business Use Only Page 2
HARVARD
UNIVERSITY
Contents
1.0 CREATE AN ADI JOURNAL WORKSHEET ........................................................................ 4
1.1 Introduction ..................................................................................................................... 4
1.1.1 Prerequisites ................................................................................................................................ 4
1.1.2 Features of ADI ............................................................................................................................ 4
1.1.3 ADI Process Overview .................................................................................................................. 4
1.1.4 Recommended Software ............................................................................................................. 4
1.2 Settings ............................................................................................................................ 5
1.3 Procedure ........................................................................................................................ 6
2.0 POPULATE AN ADI JOURNAL WORKSHEET ................................................................... 9
2.1 Introduction ..................................................................................................................... 9
2.2 Procedure ........................................................................................................................ 9
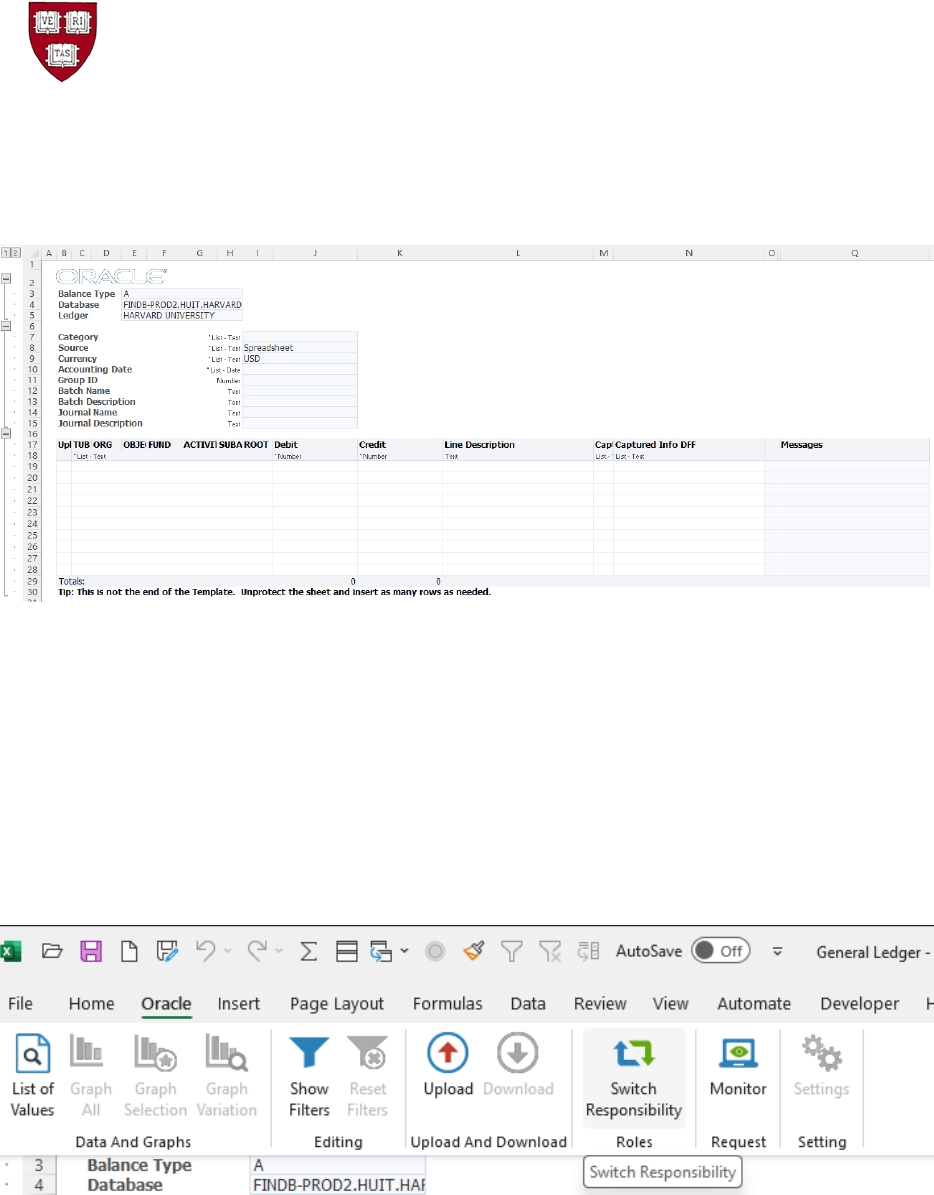
2.2.1 Open your ADI journal worksheet in MS Excel. ........................................................................... 9
2.2.2 ADI Template Areas: .................................................................................................................... 9
2.2.3 ADI Template Input: .................................................................................................................. 10
2.2.4 Data Entry - Batch Header Fields ............................................................................................... 11
2.2.5 Data Entry - Pick Lists ................................................................................................................ 12
2.2.6 Harvard naming convention: ..................................................................................................... 12
2.2.7 Data Entry: – Journal Line Fields ............................................................................................... 13
2.2.8 Invalid Data Entry: ..................................................................................................................... 14
2.2.9 Global Descriptive Flexfields ..................................................................................................... 14
2.2.10 Additional Descriptive Flexfields ............................................................................................. 15
2.2.11 DFF Requirements ................................................................................................................... 16
3.0 UPLOAD AN ADI JOURNAL WORKSHEET ..................................................................... 17
3.1 Introduction ................................................................................................................... 17
3.1.1 Helpful Hints .............................................................................................................................. 17
3.2 Procedure ...................................................................................................................... 17
3.2.1 Establish a connection between Excel and Oracle ..................................................................... 17
3.2.2 Populate the new worksheet or open an old worksheet .......................................................... 18
3.2.3 ADI Journal Upload to the GL Interface table ........................................................................... 18
3.2.4 Journal Upload Error in the Journal Header .............................................................................. 20

General Ledger
ADI Journal Worksheet Guide
HARVARD
UNIVERSITY
3.2.5 Journal Upload Error in the Journal Lines ................................................................................. 21
3.2.6 Journal Upload Confirmation .................................................................................................... 22
4.0 VERIFY AN ADI JOURNAL WORKSHEET ....................................................................... 24
4.1 Introduction ................................................................................................................... 24
4.1.4 Helpful Hints .............................................................................................................................. 24
4.2 Procedure ...................................................................................................................... 24
4.2.1 Confirmation of upload received .............................................................................................. 24
4.2.2 GL Journal Import ...................................................................................................................... 25
4.2.3 Journal Import status ................................................................................................................ 25
4.2.4 View General Ledger Output File .............................................................................................. 26
4.2.5 Output File with Success ........................................................................................................... 27
4.2.6 Output File with Warning – Flexfield ......................................................................................... 28
4.2.7 Output File with Warning – No records .................................................................................... 31
4.2.8 Contacting the help desk ........................................................................................................... 32
4.2.9 Success – Journal Created ......................................................................................................... 32
5.0 DELETE AN ADI JOURNAL WORKSHEET ...................................................................... 33
5.1 Introduction ................................................................................................................... 33
5.1.1 Helpful Hints .............................................................................................................................. 33
5.2 Procedure ...................................................................................................................... 33
General Ledger
ADI Journal Worksheet Guide
HARVARD
UNIVERSITY
1.0 Create an ADI Journal Worksheet
1.1 Introduction
Use this process to create a journal template to input data for upload to the General Ledger. The user
has a journal to enter in the General Ledger.
1.1.1 Prerequisites
• User has an Oracle General Ledger responsibility
•
User has basic knowledge of MS Excel.
1.1.2 Features of ADI
ADI combines the power of Oracle Applications with the ease and use of a spreadsheet. You can:
• Enter journals directly into an Excel worksheet
• Take advantage of Excel data entry shortcuts such as
o Copying and pasting
o Drag and drop
• Upload many rows of journals simultaneously and easily
• Determine which journal lines cannot be loaded because of errors (i.e. bad coding)
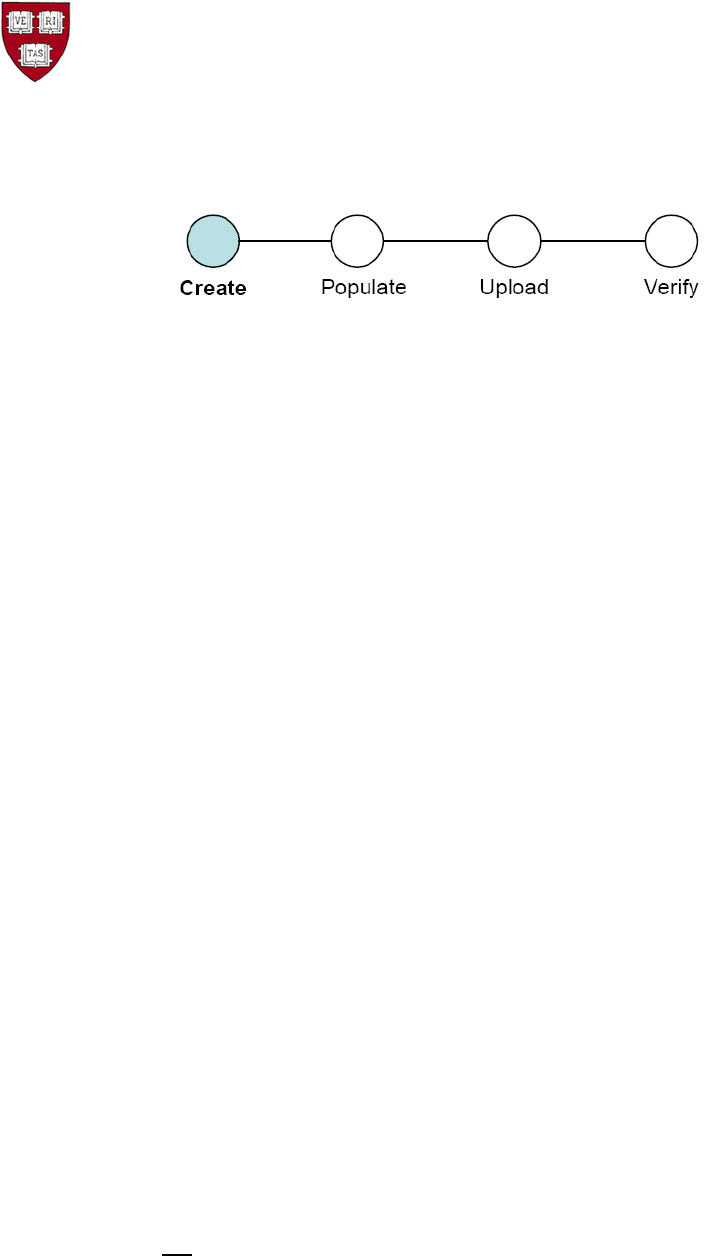
1.1.3 ADI Process Overview
Note the ADI process consists of four parts:
1. Create / Generate
2. Populate
3. Upload / Import
4. Verify
1.1.4 Recommended Software
The recommended MS Excel version is 2016 (includes 365).
Please upgrade your software if the version is lower.
Oracle Web ADI is certified with web browsers: Firefox ESR, Chrome, or MS Edge.
Web ADI is currently not certified with a Mac.

General Ledger
ADI Journal Worksheet Guide
HARVARD
UNIVERSITY
1.2 Settings
This setting will fix “Runtime Error 1004”.
1. Open Excel
2. On the Menu bar go to File, then [Excel] Options, then Trust Center, then Trust Center Settings,
then Macro Settings
3. In the top section, select the radio button for “Disable all macros with notification”.
4. In the bottom section, check the box for “Trust access to VBA project object model”.
5. Click OK to save the settings.
6. Close Excel.
7. In the spreadsheet which is being created, Excel will then ask if the Macros should be allowed to run.
8. Only enable macros from trusted sources.
This setting will fix when an WEBADI upload “hangs” on the Processing: Create Document screen.
1. In your Windows computer, search for “Control Panel”,
2. Open Control Panel > (Windows 11: Network and Internet ) > Internet Options > Security (tab)
> click on the Trusted sites icon >
3. Click the “Sites” button >
4. Uncheck the box “Require server verification (https:) for all sites in this zone”
5. Then, click in the box, under “Add this Web site to the zone:”
6. Type *.harvard.edu > Click Add, The line should drop from the top box to the bottom box.
7. Recheck the box “Require server verification (https:) for all sites in this zone”
8. Click Close > Click OK.)
This setting will fix Excel error of “Security Risk Microsoft has blocked macros from running because the
source of this file is untrusted" message when trying to use WebADI.
1. Open MS Excel
2. Navigate to Options > Trust Center > Trust Center Settings… > Trusted Locations
3. Click on the "Add new location" button and browse to add the appropriate path where you
plan to download / save the WebADI document. Please note at times ADI has issues with
uploading journals from share drives because of the long path names. If your ADI is on a share
drive, you may want to try adding your desktop to upload from instead. But, some users have
had success if they sync their SharePoint site with their One Drive and then add it as a Trusted
Location in Excel.
4. Click the “Subfolders of this location are also trusted”, if desired.
5. Click "OK", "OK", "OK" to exit and save the setting.
Note: Alternatively, users can unblock a single document at a time. The user will be able to go to the
Properties dialog for the file and select Unblock which will allow the macros to run, as long as no policy or
Trust Center setting is blocking.
General Ledger
ADI Journal Worksheet Guide
HARVARD
UNIVERSITY
1.3 Procedure
1. To access the Oracle E-Business Suite go to https://huit.harvard.edu/finance , then click Oracle
System Applications, Personal Homepage.
2. Log in with your Harvard Key. The Oracle E-Business Suite Home Page will open.
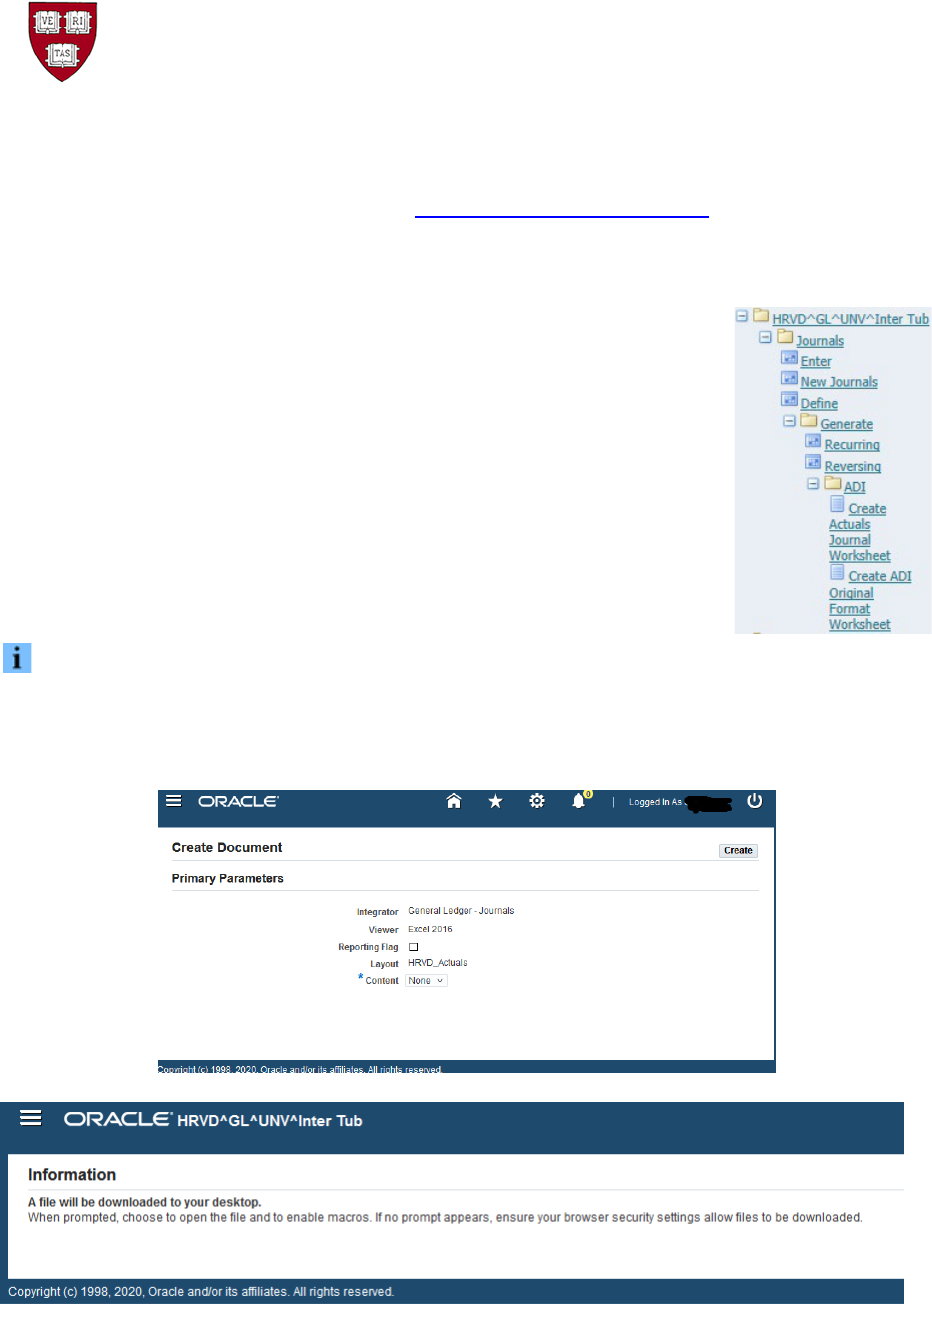
3. From the Main Menu, select your General Ledger Responsibility, then
Journals, then Generate, then ADI.
4. Select one of the ADI spreadsheets:
• Create Actuals Journal Worksheet – has two header columns
• Create ADI Original Format Worksheet – has one header column
For this example, the first worksheet, Create Actuals Journal Worksheet, will be
shown.
Note that you can also select the ADI worksheet within General Ledger from the Navigator screen.
5. The Create Document screen will appear. Click Create.
6. The worksheet will download in your web browser. Click to Open.
General Ledger
ADI Journal Worksheet Guide
HARVARD
UNIVERSITY
7. The worksheet will begin to be generated. (If needed, hold down the Control key to disable pop-up blockers.)
8. This action will launch Microsoft Excel. (Generating a worksheet works best when Excel is closed.)
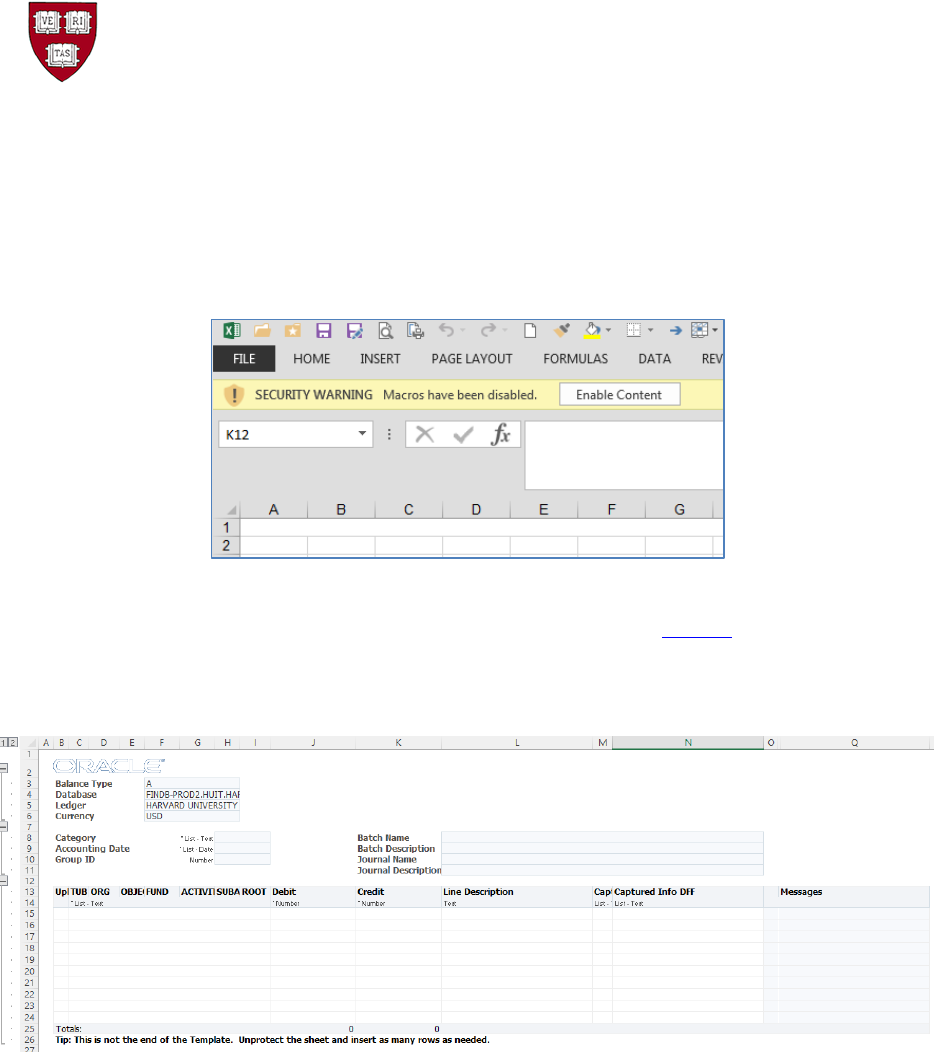
9. A security warning may appear in Excel. Click Enable Content
10. The worksheet will be created. Let this process complete, it may take a few moments.
Note: It should not take more than a minute, if it does check your settings
.
11. Below is how the resulting worksheet should look, for Create Actuals Journal Worksheet:
General Ledger
ADI Journal Worksheet Guide
HARVARD
UNIVERSITY
12. … and for Create ADI Original Format Worksheet:
Note: The difference between the two worksheets is the header area.
This worksheet has one header, the previous worksheet has two headers.
13. You have successfully generated an ADI journal worksheet.
14. NEW with Oracle 12.2.10
Prior to populating the ADI journal worksheet, choose your responsibility by going to the menu bar:
click on Oracle > Switch Responsibility > Choose your appropriate GL responsibility
General Ledger
ADI Journal Worksheet Guide
HARVARD
UNIVERSITY
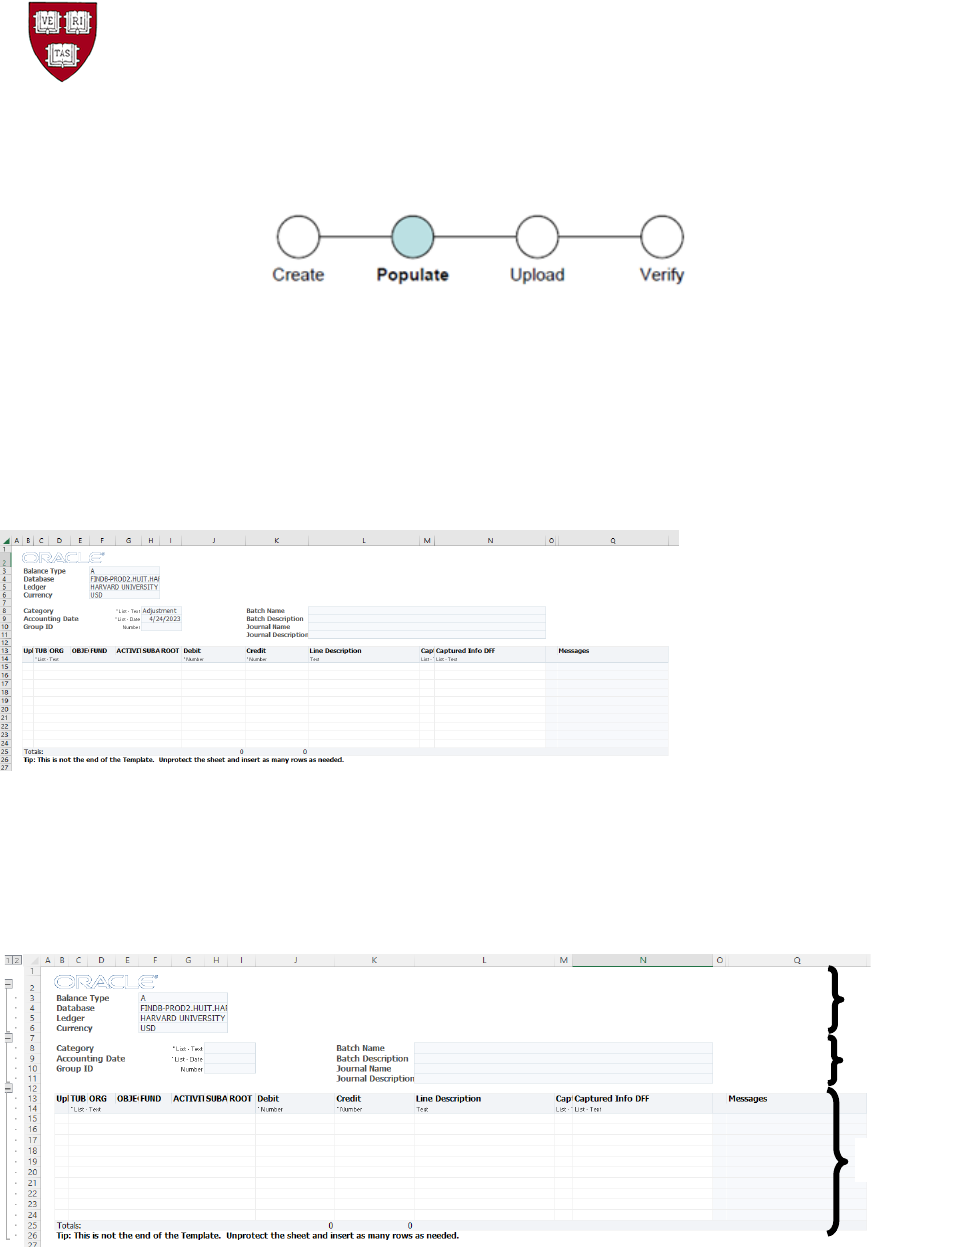
2.0 Populate an ADI Journal Worksheet
2.1 Introduction
Use this section to learn about inputting data into an ADI journal worksheet for upload to the
General Ledger. At this point in the process, t
he user has created an ADI journal worksheet
and needs to populate it with data for upload to the General Ledger.
2.2 Procedure
2.2.1 Open your ADI journal worksheet in MS Excel.
The correct database is: FINDB-PROD2.HUIT.HARVARD.EDU.CFINPROD
2.2.2 ADI Template Areas:
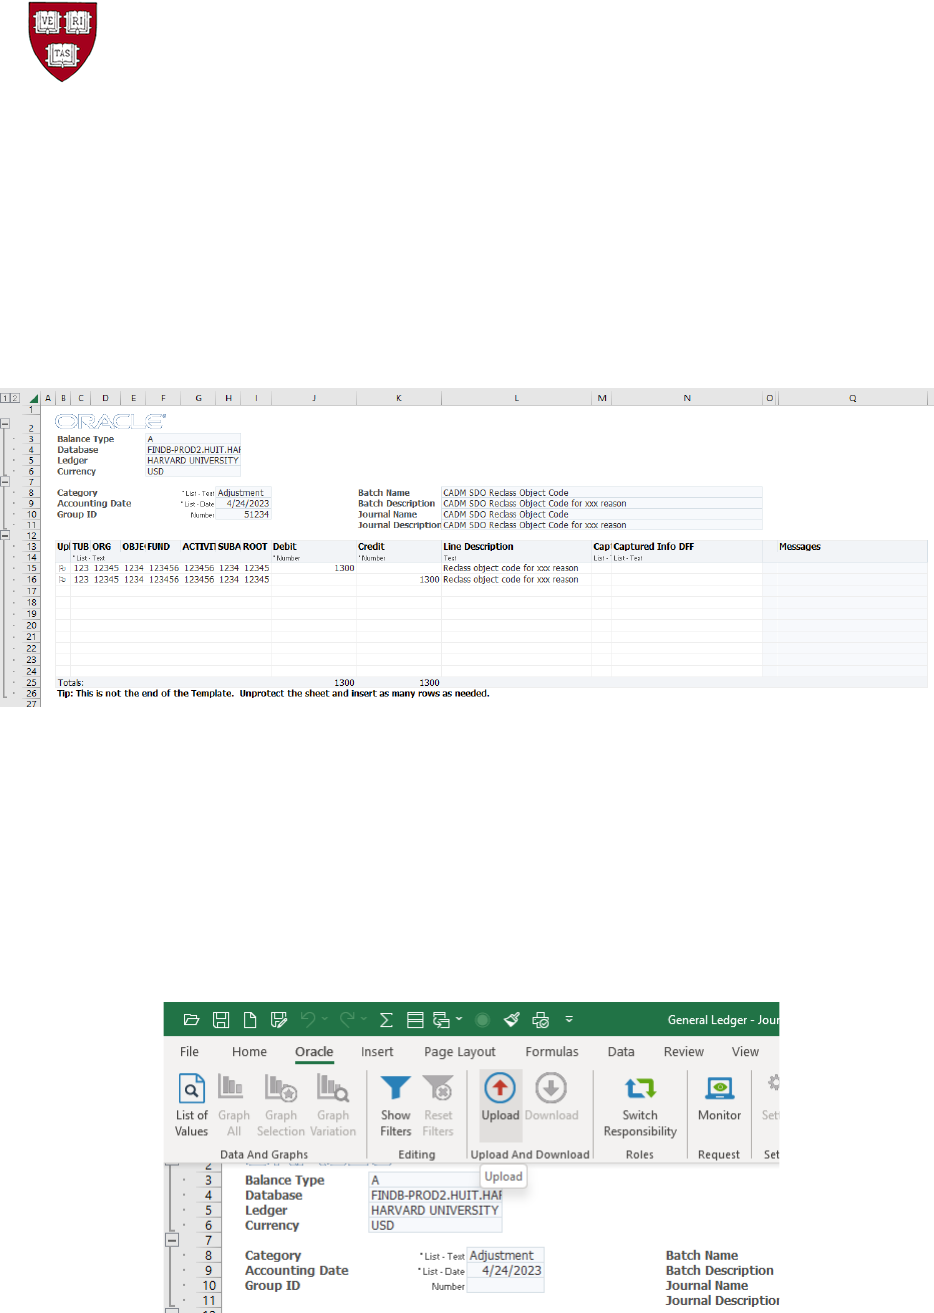
The areas of the worksheet are the Context (Excel lines 4-7), the Header (Excel lines 9-12), the Lines
(Excel lines 14 through the Totals line, in this example line 26).
The outline groups at the left side of the worksheet can be used to quickly collapse/un-collapse these
areas.
Context
Header
Lines
General Ledger
ADI Journal Worksheet Guide
HARVARD
UNIVERSITY
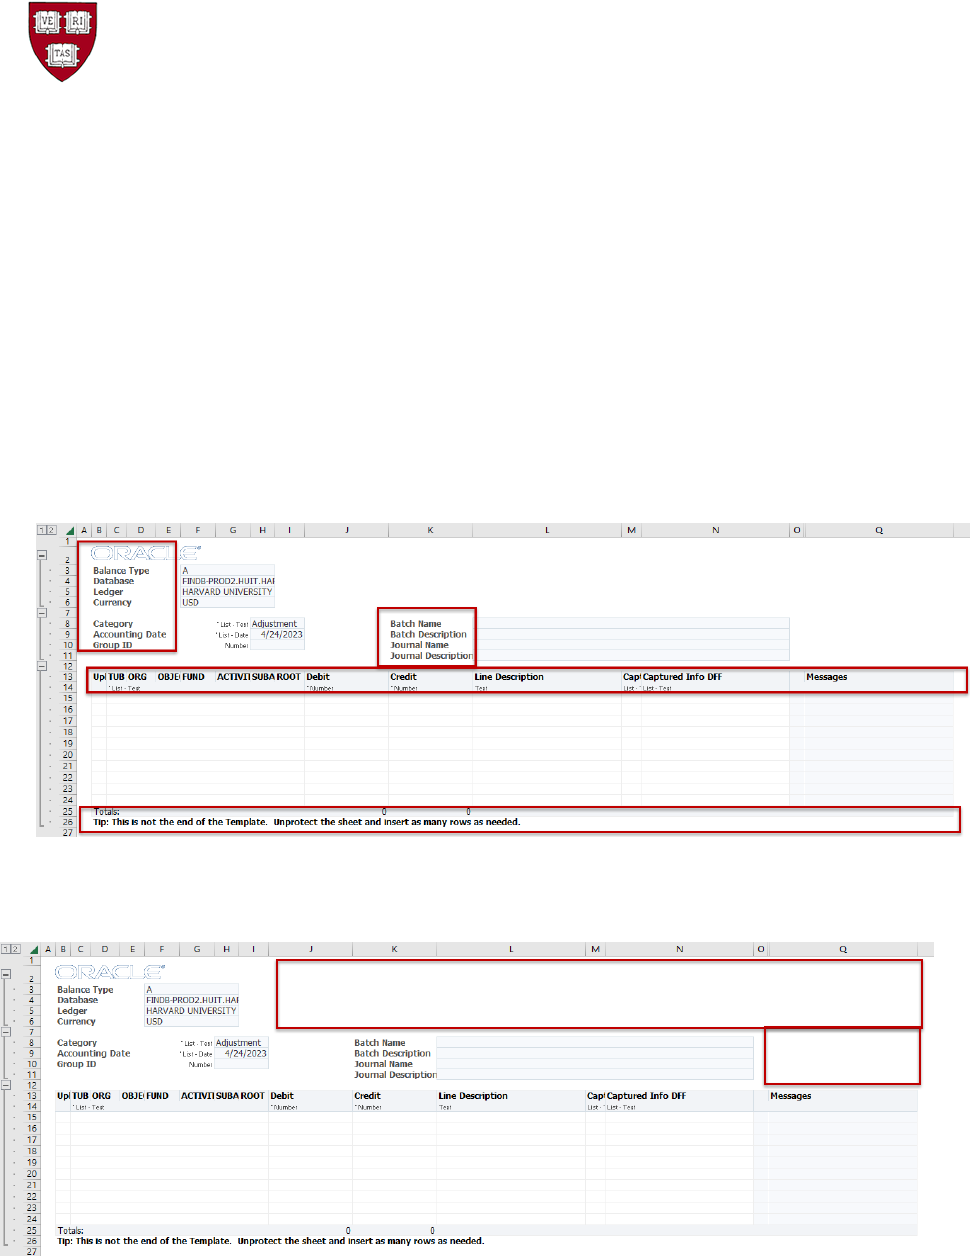
2.2.3 ADI Template Input:
The template expects users to input into the white fields of the template. These fields are available for
immediate input by the user.
To make any other changes, requires the user to unprotect the template.
• On the Excel menu bar, select Review, then Unprotect Sheet
One of the most common reasons to unprotect the worksheet, is to add rows to the lines area of the
template. Best practice is to insert rows between lines 15 and 24 (on this worksheet).
Another best practice is to not alter the fields which Oracle is using for their macros. The areas in the
red boxes should not be altered. Columns should not be inserted, until past the “Messages”, column Q.
The area to the right of the context, header, and lines is okay for any input (in red boxes below).
Additionally, users may add new sheets to the workbook.

General Ledger
ADI Journal Worksheet Guide
HARVARD
UNIVERSITY
2.2.4 Data Entry - Batch Header Fields
Field
Data Entry Convention
Category
Must be spelled correctly and is case-sensitive
*List - double clicking in the white field will produce a pop-up window with a list of values
Accounting Date
Manual format: DD-MMM-YYYY; pick list format: MM-DD-YY
*List - double clicking in the white field will produce a pop-up window with a list of values
Group ID
Your 5, 7, or 10-digit phone number with no dash
Batch Name
Follow Harvard naming conventions (see below), 50-character limit
(Best practice)
During Journal Import, Oracle will append to the user’s batch name,
the Journal Source, A (for Actuals), Group ID, and the Concurrent
Request ID number.
Please note users can currently put up to 85 characters in this field, with
Oracle only appending the concurrent request number to the end. As the
concurrent request number gets larger, the amount of characters will be
reduced accordingly.
Batch Description
Description of your batch, 240-character limit.
Journal Name
Follow Harvard naming conventions (see below), 25-character limit
Journal Description
Description of your journal, 240-character limit
General Ledger
ADI Journal Worksheet Guide
HARVARD
UNIVERSITY
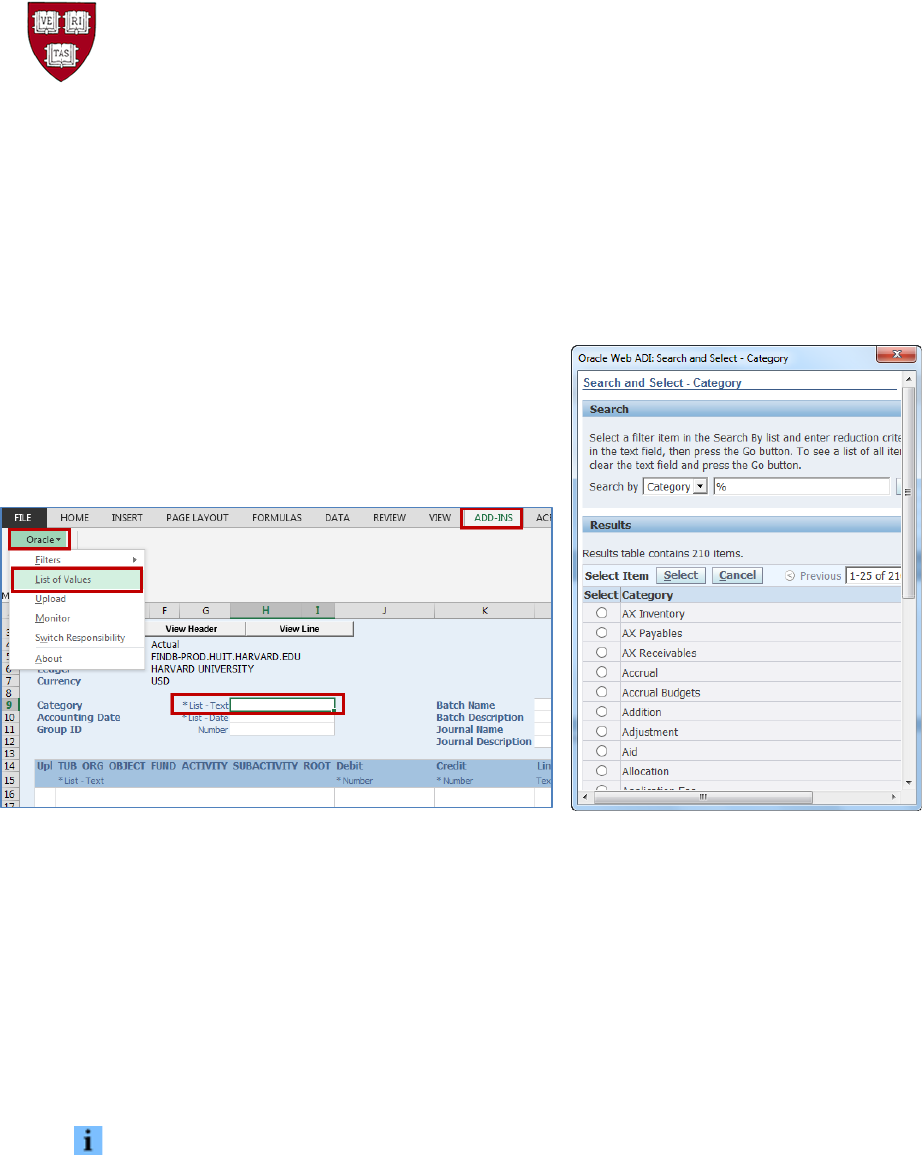
2.2.5 Data Entry - Pick Lists
Certain fields offer a pick list. Those fields are noted as *List. The ADI worksheet must be connected to
Oracle Financials to enable the pop-up windows to work. (To connect to Oracle Financials, see section
1.0 above.) For example, the Category field has a pick list. (The word “Adjustment” will be auto filled.)
• Double click on the white field to the right
Or
• Single click on the white field to the right, then on the
Menu Bar, select Add-Ins, then Oracle, then List of
Values.
2.2.6 Harvard naming convention:
TUB^Your Initials^Description
Provide your phone number in the batch name for journals which may affect other users; i.e.
CADM^SDO^6-4692 Reclass Objects
If more detail is desired, the batch description holds up to 240 characters.
Remember to provide a good audit trail - more details in a journal saves you time in the future!
Note that the caret (^) is used to indicate only one space. It is not required.
Remember to not use commas (,) as they parse your data in csv format.

General Ledger
ADI Journal Worksheet Guide
HARVARD
UNIVERSITY
2.2.7 Data Entry: – Journal Line Fields
Field
Data Entry Convention
Upl
Upload flag; Indicates this line should be uploaded, it usually is a flag
when any change is made to the line. If a line is not desired, un-flag it
for it to not be uploaded.
The font in this field is “Wingdings”, a capital letter O will turn into a flag.
Account Coding
(Tub, Org, Object, Fund,
Activity, Subactivity, Root)
All 33 digits in 7 segments.
*List - double clicking in the white field will produce a pop-up window with a list of values
In these fields, type “0” or “01” and tab then the rest of the zeros will
automatically fill in.
Debit & Credit
Number field, use two decimals only – formulas often work, but are
not recommended – use the value.
• Best practice for formulas – use the fields on the right of the
spreadsheet, past column R, then copy and paste value to the
fields in the lines section
• Either the Debit or the Credit amounts should be filled in.
• The Debit and Credit amounts must be on separate lines.
• Placing zeros in both the Debit and Credit amount fields will cause
an error.
• If the line is not desired, un-flag it in the “Upl” field for it to not be
uploaded.
Line Description
Add information about this journal line, 240-character limit.
Captured Info Context
Input Object Code if adding a Descriptive FlexField (DFF) in the next
column, Captured Info DFF. See section 2.2.11 DFF Requirements.
Captured Info DFF
Pop-up window which provides fields to add more information about
the journal line. See section 2.2.11 DFF Requirements to determine
which object codes have these additional DFF fields.
Messages
Field where Oracle returns green success faces, yellow warning faces,
or red error faces with descriptive error messages after attempting to
upload the worksheet.
General Ledger
ADI Journal Worksheet Guide
HARVARD
UNIVERSITY
2.2.8 Invalid Data Entry:
Try not to use characters which have other meaning in Oracle, such as
the wildcard or delimiters.
Using the percent sign in descriptions is confusing to users, since this
is Oracle’s wildcard symbol.
Using the comma, period, single quote and double quote can affect
how your data is parsed in reports.
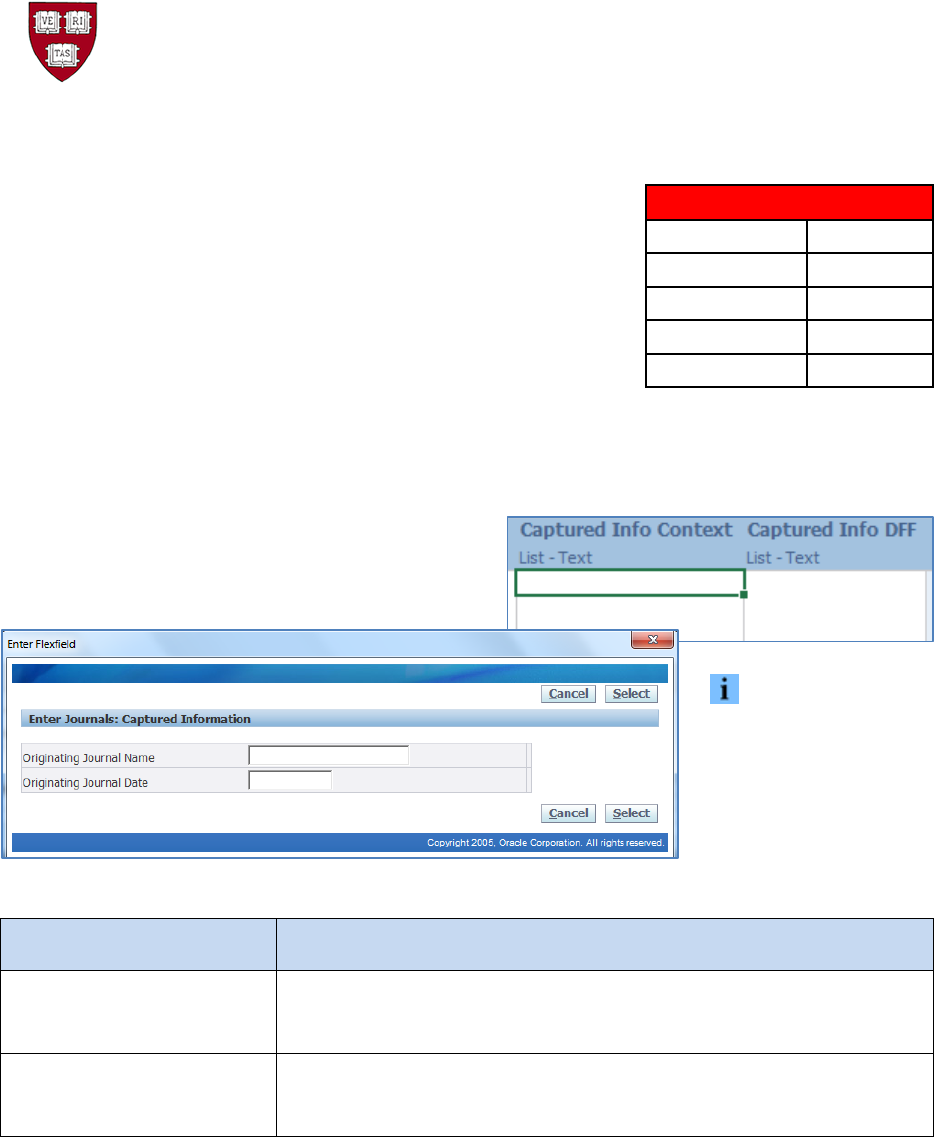
2.2.9 Global Descriptive Flexfields
Two global descriptive flexfields (DFFs) are available for use with any object code. DFFs provide
additional information about the journal line.
Double-clicking in either the Captured Info Context or
the Captured Info DFF field opens a window for the
global DFFs.
There is no need to
type the Object Code in
the “Captured Info
Context” column to get
these fields (applies to
Global DFFs only).
Field
Data Entry Convention
Originating Journal Name
Optional text field with 100-character limit; should be used for all
adjusting entries with information to identify the original transaction
Originating Journal Date
Optional date field with DD-MON-YYYY format; should be used for all
adjusting entries with information to identify the original transaction
DO NOT USE
Percent
%
Comma
,
Period
.
Single Quote
‘
Double Quote
“
General Ledger
ADI Journal Worksheet Guide
HARVARD
UNIVERSITY
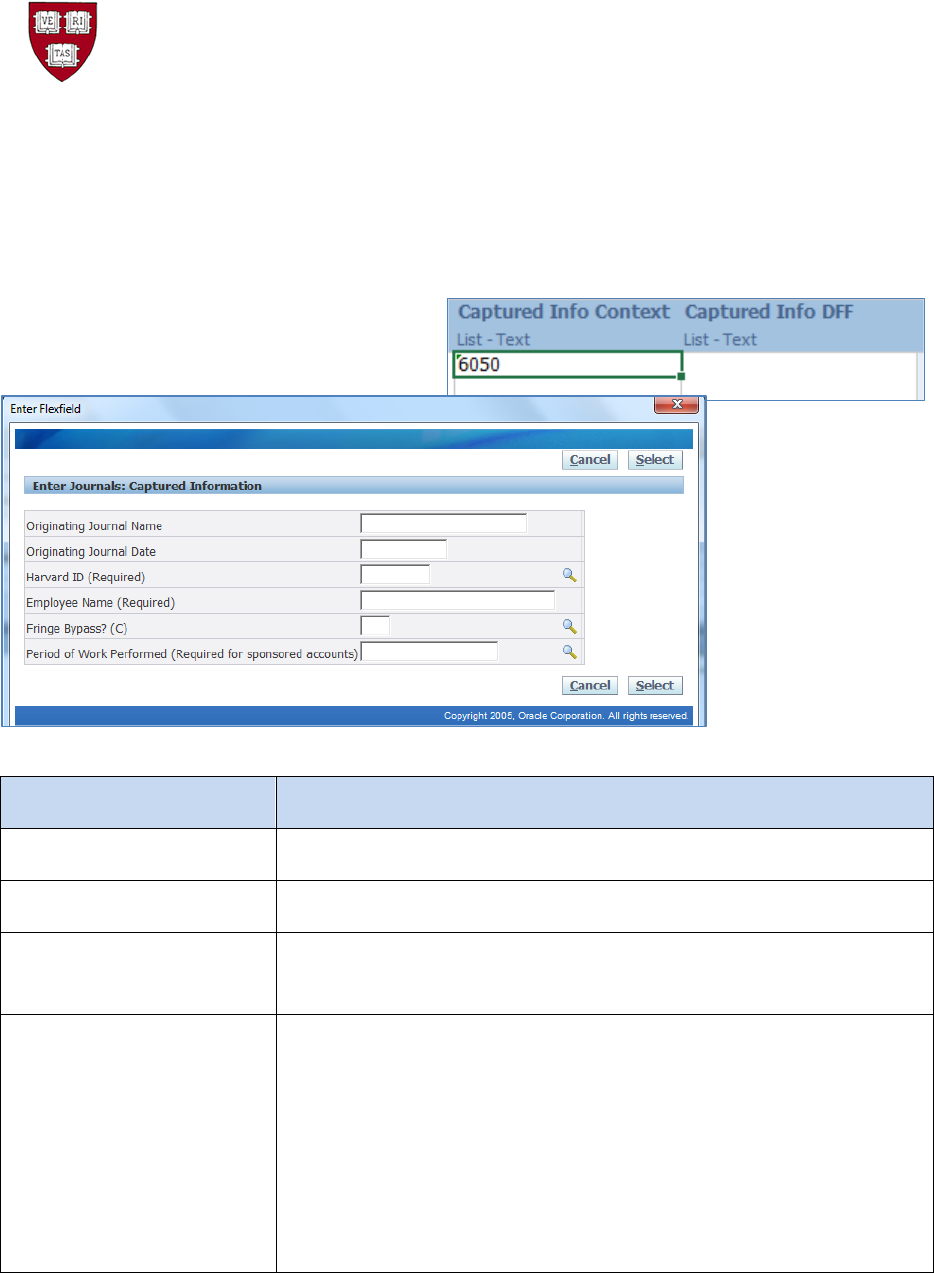
2.2.10 Additional Descriptive Flexfields
Additional descriptive flexfields (DFFs) are available for use with specific object codes. DFFs provide
additional information about the journal line.
When an Object Code that has associated DFFs is entered in the Captured Info Context column,
double-click in the Captured Info Context or
the Captured Info DFF field. A window pops up
with additional DFF fields available for use.
Field
Data Entry Convention
Harvard ID
First 8 digits of HUID; use 99999999 for Bulk Payroll Transfers
Employee or Student Name
Text field with 40-character limit
Fringe By-pass
For payroll codes: a capital “C” tells the system to not move the fringe
automatically
Period of Work Performed
For payroll codes: month and quarter in the fiscal year, for which
the transaction amount value is accounted. This is only required when
an adjustment journal has been created for specific payroll object
codes used in conjunction with Sponsored Funds or Activity.
(see section 2.2.11 below for specific payroll object codes)
It is desired that this DFF be filled in for both sides of the transaction
(debit & credit).
General Ledger
ADI Journal Worksheet Guide
HARVARD
UNIVERSITY
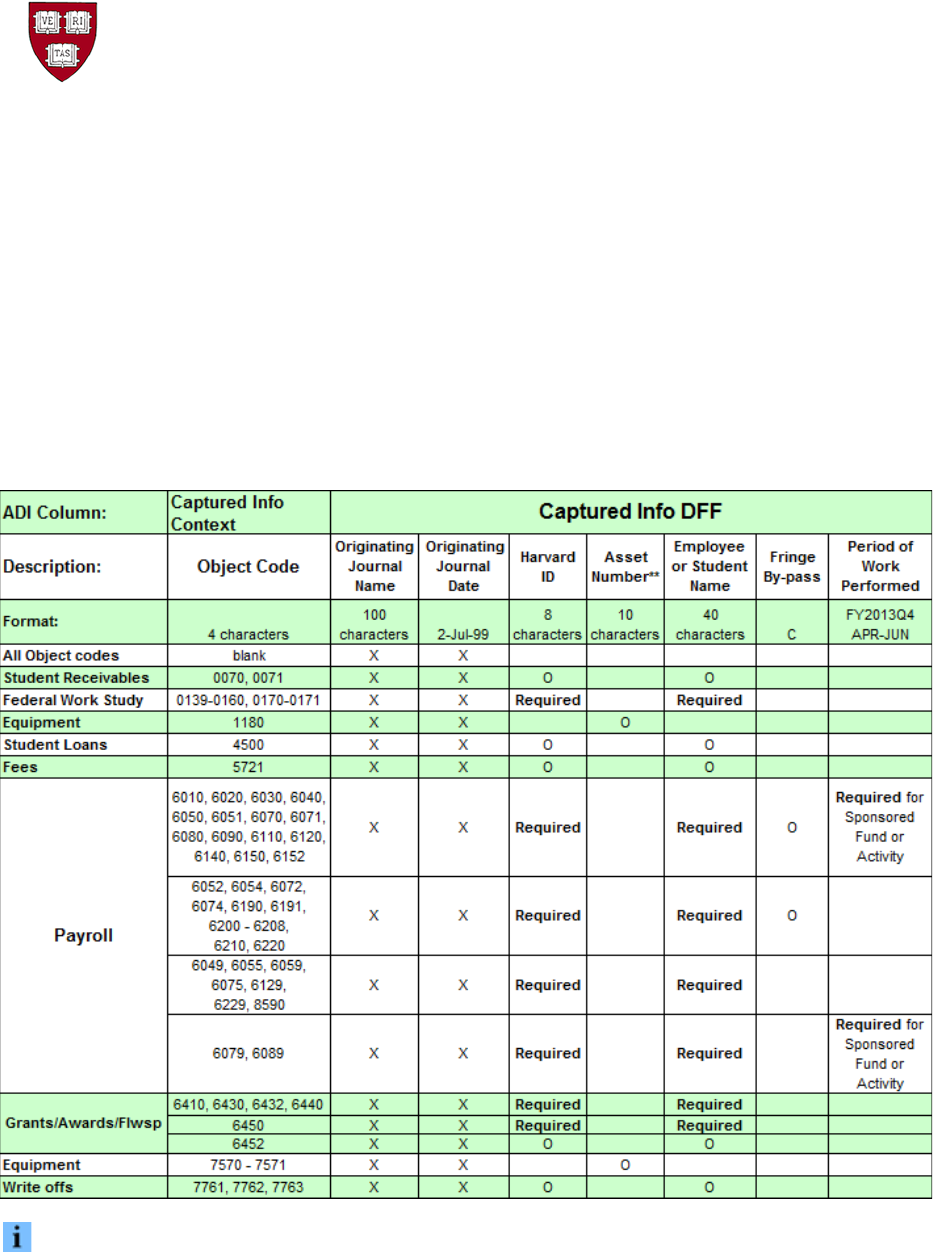
2.2.11 DFF Requirements
Below is a list of Object Codes and their associated DFF requirements. This list does not include any
Central Only object codes.
The “X” indicates a field which is suggested to be filled in for an adjustment journal line. The “O”
indicates and optional field available for use. Those fields marked with “Required” must be filled in by
the end user in order for the journal to import properly to the General Ledger.
For example, object code 6010 in the Payroll range, the chart below shows the Originating Journal Name
and Originating Journal Date are suggested to be filled in; Harvard ID and Employee Name are required;
Fringe By-pass is Optional; and Period of Work Performed is Required for a Sponsored Fund or Activity
Note GL-PCR should be used for Payroll object codes as of FY22.
General Ledger
ADI Journal Worksheet Guide
HARVARD
UNIVERSITY
3.0 Upload an ADI Journal Worksheet
3.1 Introduction
Use this section to upload a completed journal worksheet to the General Ledger Interface table. An ADI
spreadsheet has been created and populated and needs to upload it to the General Ledger.
3.1.1 Helpful Hints
The General Ledger Journal Posting program runs each business day at 6:30pm. Any journal imported
after the program begins would not be posted until the next business day.
Journals posted at 6:30pm will be subsequently updated in the Harvard Data Warehouse that night
and available for reports the following day.
3.2 Procedure
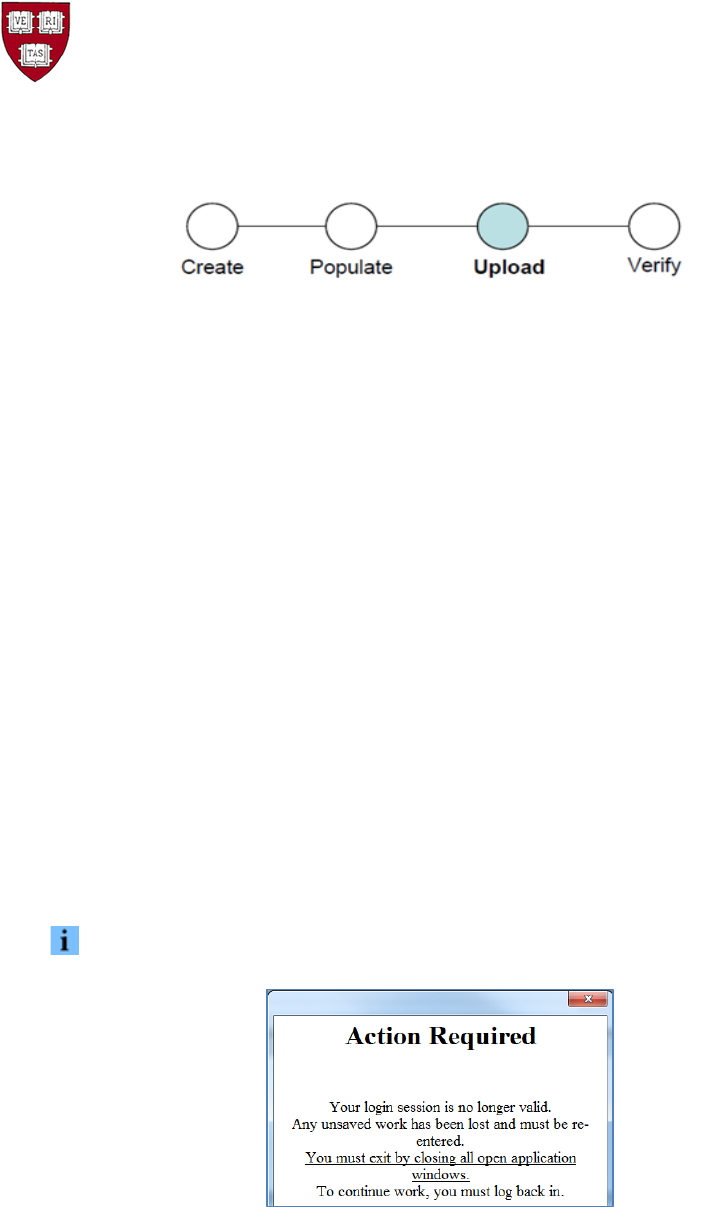
3.2.1 Establish a connection between Excel and Oracle
Create a new ADI journal worksheet. This establishes a secure connection between Excel & Oracle.
To check your connection at any time, use the Oracle List of Values on the Category or Accounting
Date fields. If the worksheet is connected, a list of values will appear in a pop-up window.
If at any time the screen below is shown, you are not connected into Oracle.
If you are not connected, close Excel and create a new worksheet.
General Ledger
ADI Journal Worksheet Guide
HARVARD
UNIVERSITY
3.2.2 Populate the new worksheet or open an old worksheet
After establishing a connection, populate your worksheet or open a previously saved (*.xls or *.xlsm)
worksheet with data. For assistance, please see section 2.0 Populate an ADI Journal Worksheet above.
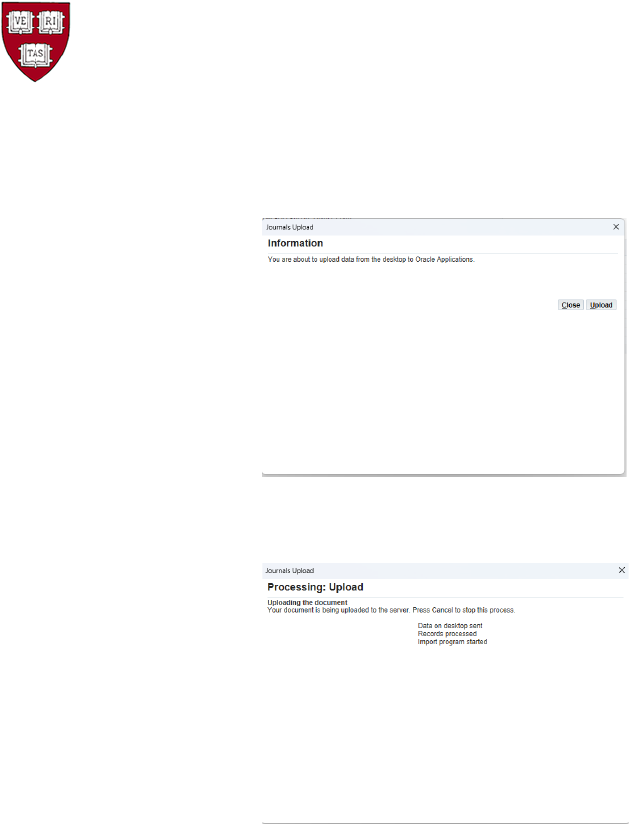
3.2.3 ADI Journal Upload to the GL Interface table
The journal above in MS Excel is filled in completely. It is ready for upload to the General Ledger
Interface table.
Best Practice is to save the worksheet before the upload is attempted. Using the yellow disk, File > Save,
or Ctrl-S, save the worksheet as an Excel Macro-Enabled Workbook (*.xlsm).
On the menu bar, click…
Oracle > Upload
General Ledger
ADI Journal Worksheet Guide
HARVARD
UNIVERSITY
The following window will open. Click the Upload button.
Resulting screen:
General Ledger
ADI Journal Worksheet Guide
HARVARD
UNIVERSITY
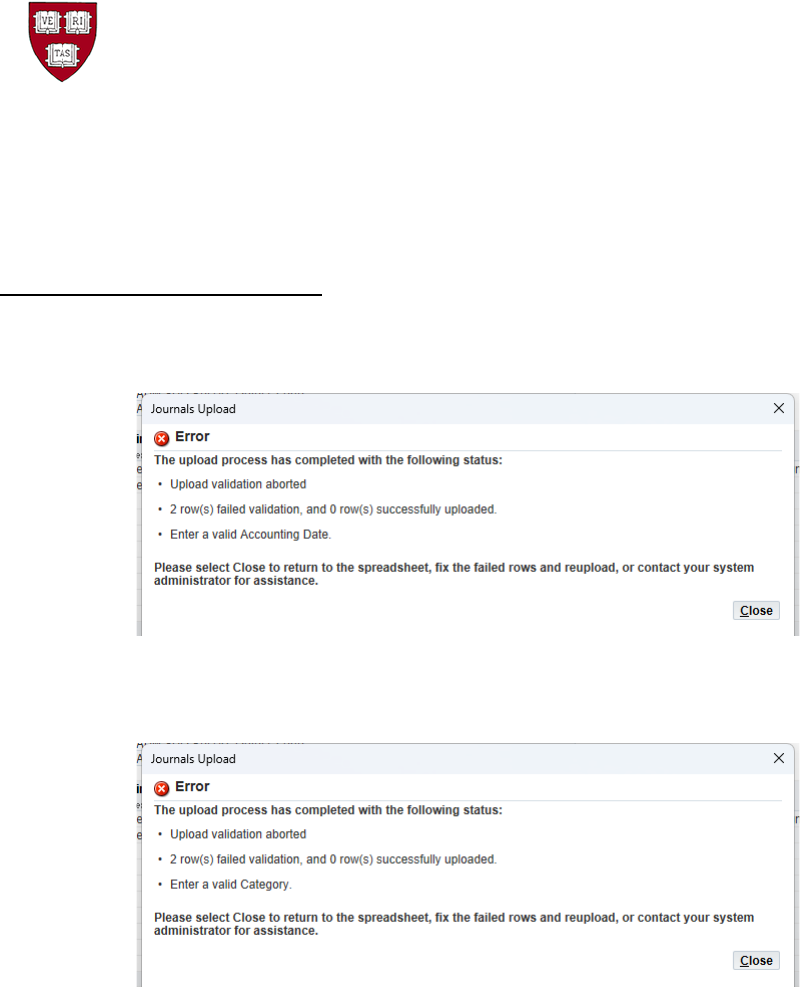
3.2.4 Journal Upload Error in the Journal Header
ADI uploads the data to the GL Interface table and gives real time feedback.
During the upload, the Journal Header is validated.
Below are some examples of Errors.
In this example, Accounting Date, a field in the Journal Header, is invalid:
In this example, Category, another field in the Journal Header, is invalid
Repeat the below for all errors received, until there are no errors:
• Correct the worksheet in Excel
• Save the changes - Remember to save the worksheet using the yellow disk on the toolbar, File >
Save, or Ctrl-S, as an Excel Macro-Enabled Workbook (*.xlsm).
• Upload the corrected journal (Section 3.2.3 above)
General Ledger
ADI Journal Worksheet Guide
HARVARD
UNIVERSITY
3.2.5 Journal Upload Error in the Journal Lines
ADI uploads the document to the GL Interface table and gives real time feedback. During
the upload, after the journal header, the journal lines are validated.
The feedback in this pop-up window informs the user that there are two invalid rows.
The exact error message is shown within each journal line under the Messages, which is the last column
to the right on the worksheet. The worksheet will also indicate that the line has an error with the red
frown face, also found on a column to the right on the worksheet:
Repeat the below for all errors received, until there are no more errors:
• Correct the worksheet in Excel
• Save the changes - Remember to save the worksheet using the yellow disk on the toolbar, File >
Save, or Ctrl-S, as an Excel Macro-Enabled Workbook (*.xlsm).
• Upload the corrected journal (Section 3.2.3 above)
General Ledger
ADI Journal Worksheet Guide
HARVARD
UNIVERSITY
The following are some types of line errors/warnings with some examples/explanations:
•
Disabled / Invalid values
o OBJECT: Value xxxx has been disabled
o ORG: Value xxxxx for the flexfield segment HARVARD_ORG does not exist in the value set HRVD_ORG
•
Cross Validation Rules (CVR)
o ACTIVITY: Object Code not valid with this ACTIVITY^ (6000 - 8999) ^OBJ 6000+ 3-5
•
Debit / Credit fields
o You must enter a value in either the Debit column or the Credit column
o You cannot enter a value in both the Debit and Credit columns
•
Total debits equal total credits
o Entered amounts for Journal 1 are not balanced
This error often shows when the worksheet has another error and the calculation of
debit to credits has removed the error line. After the error line is corrected, the
balance is often restored.
•
Flexfield Security Rules (FSR)
o OBJECT: Value secured: This Responsibility cannot access Central Only Object Codes^OBJ - No Central Only
•
Descriptive Flexfields (DFF)
o The descriptive flexfield is not valid. Values have not been entered for one or more required segments
This warning indicates additional descriptive flexfield information is missing in
the Capture Info DFF field.
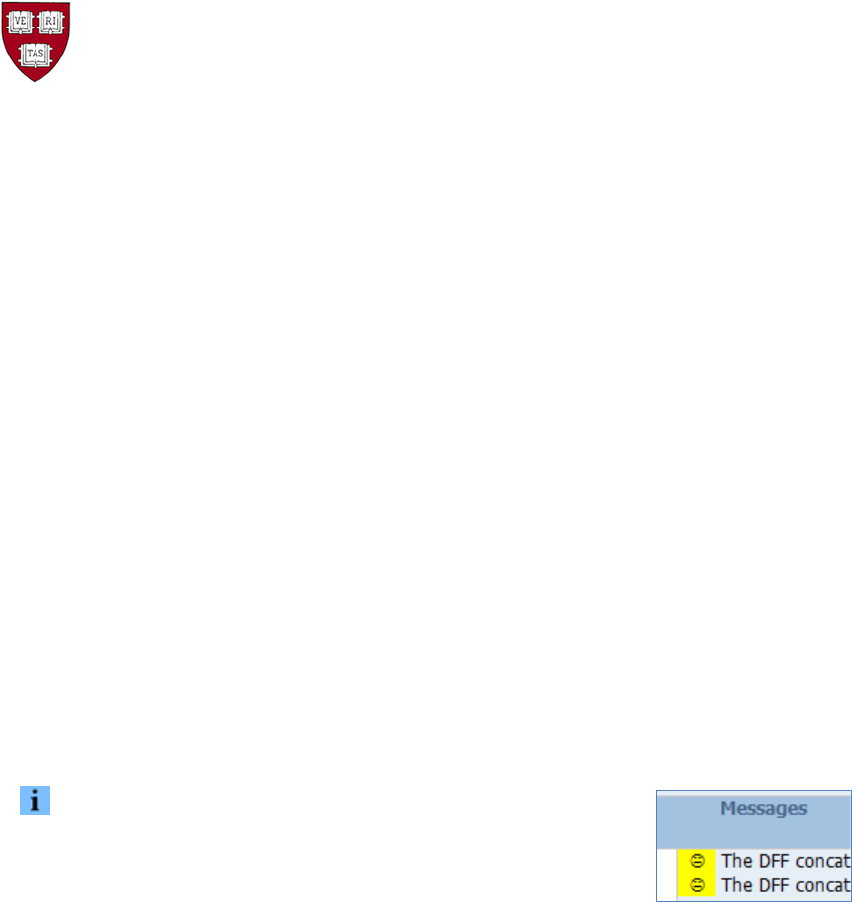
o The DFF concatenated context value does not match the separate context value
This warning indicates an object code was entered in the Captured Info Context
field which does not have any additional descriptive flexfields assigned to it.
Warnings are shown with a yellow neutral face. They indicate
that the program found an issue, but the journal can still be
imported with it.
3.2.6 Journal Upload Confirmation
When the upload is successful, a confirmation screen will appear instead of an error screen. This
indicates that the worksheet has successfully moved to the GL Interface table.
General Ledger
ADI Journal Worksheet Guide
HARVARD
UNIVERSITY
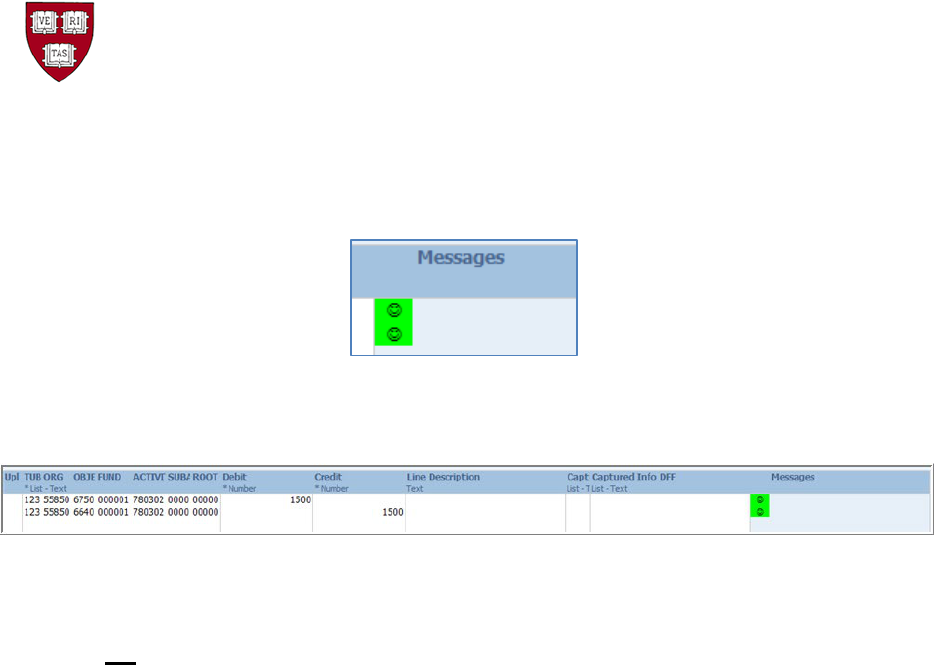
After closing the Journal Upload window, each line that was uploaded successfully will show a green
smiley face in the Messages column.
Lines which were not uploaded will not have a smiley face on it. This can occur if the upload flag (in
column UPL) was removed or the macros are not working on that line.
The Journals Upload Confirmation informs the user that the upload to the GL Interface table is
complete. But, so far, the data is only in the GL Interface table.
A journal is not created at this point.
General Ledger
ADI Journal Worksheet Guide
HARVARD
UNIVERSITY
4.0 Verify an ADI Journal Worksheet
4.1 Introduction
Use this section to verify an import of a completed spreadsheet to the General Ledger has become a
journal. At this point in the process, an ADI worksheet has been created, populated, and uploaded
and needs to verify it became a journal in the General Ledger.
4.1.4 Helpful Hints
The HUGL ADI Interface Delete program which removes data from the GL Interface table runs daily
every 5 minutes.
After a successful import, the journal in the General Ledger can be deleted if the time is before 6:30pm
on the same day as the import, on business days. See section 5.0 Delete an ADI Journal Worksheet
below.
4.2 Procedure
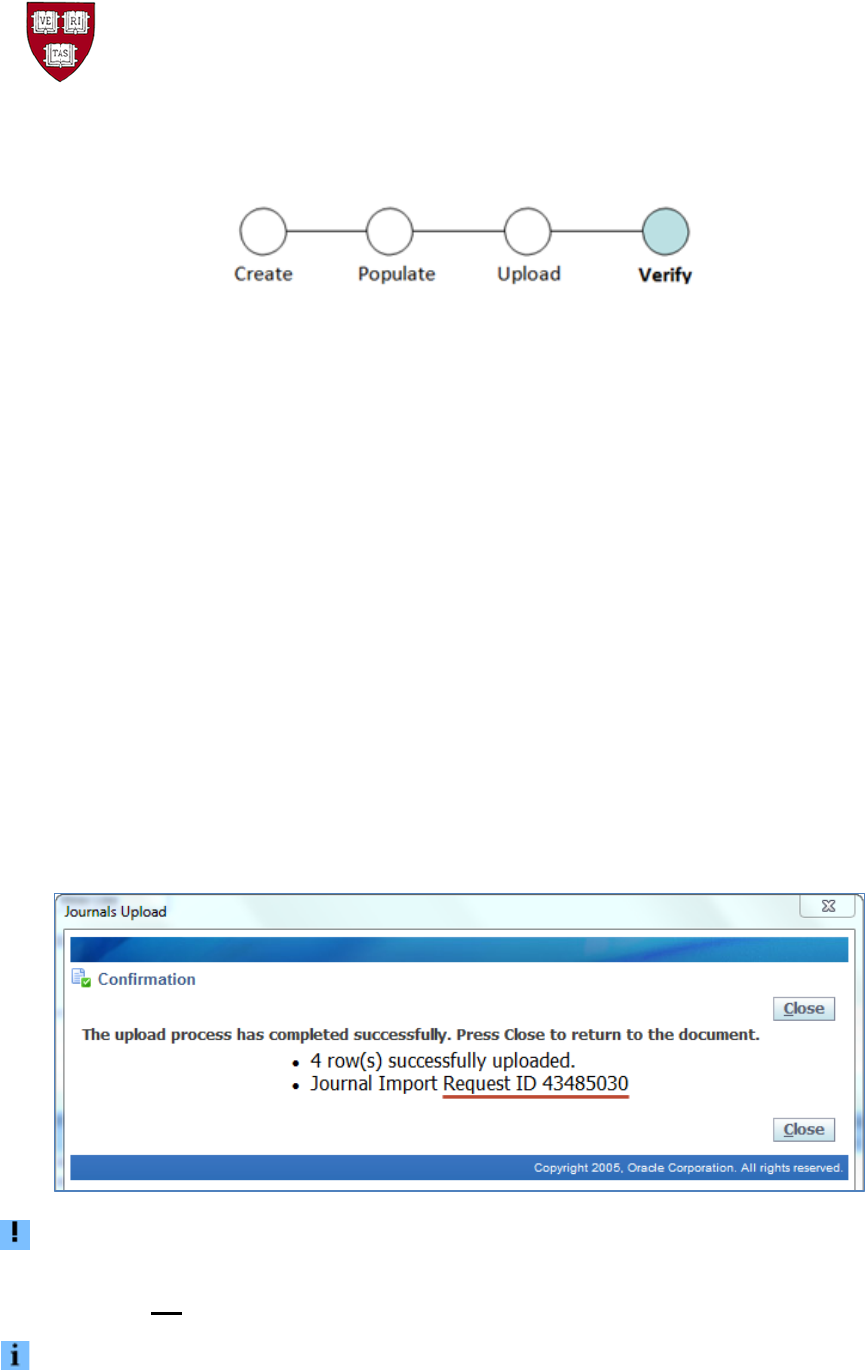
4.2.1 Confirmation of upload received
The worksheet has successfully moved to the GL Interface table. A window similar to the below is
visible.
The Journals Upload Confirmation informs the user that the upload to the GL Interface table is
complete. But, so far, the data is only in the GL Interface table.
A journal is not created at this point.
A best practice is to notate the Request ID for the Journal Import Program with this journal
worksheet for any future reference.
General Ledger
ADI Journal Worksheet Guide
HARVARD
UNIVERSITY
4.2.2 GL Journal Import
After the ADI upload to the GL Interface table, the GL Journal Import program runs. The Journal
Import program moves the data from the GL Interface table to the Journal Batch, Journal Header
and Journal Lines tables within the General Ledger.
The journal import performs checks on additional GL requirements at this time.
4.2.3 Journal Import status
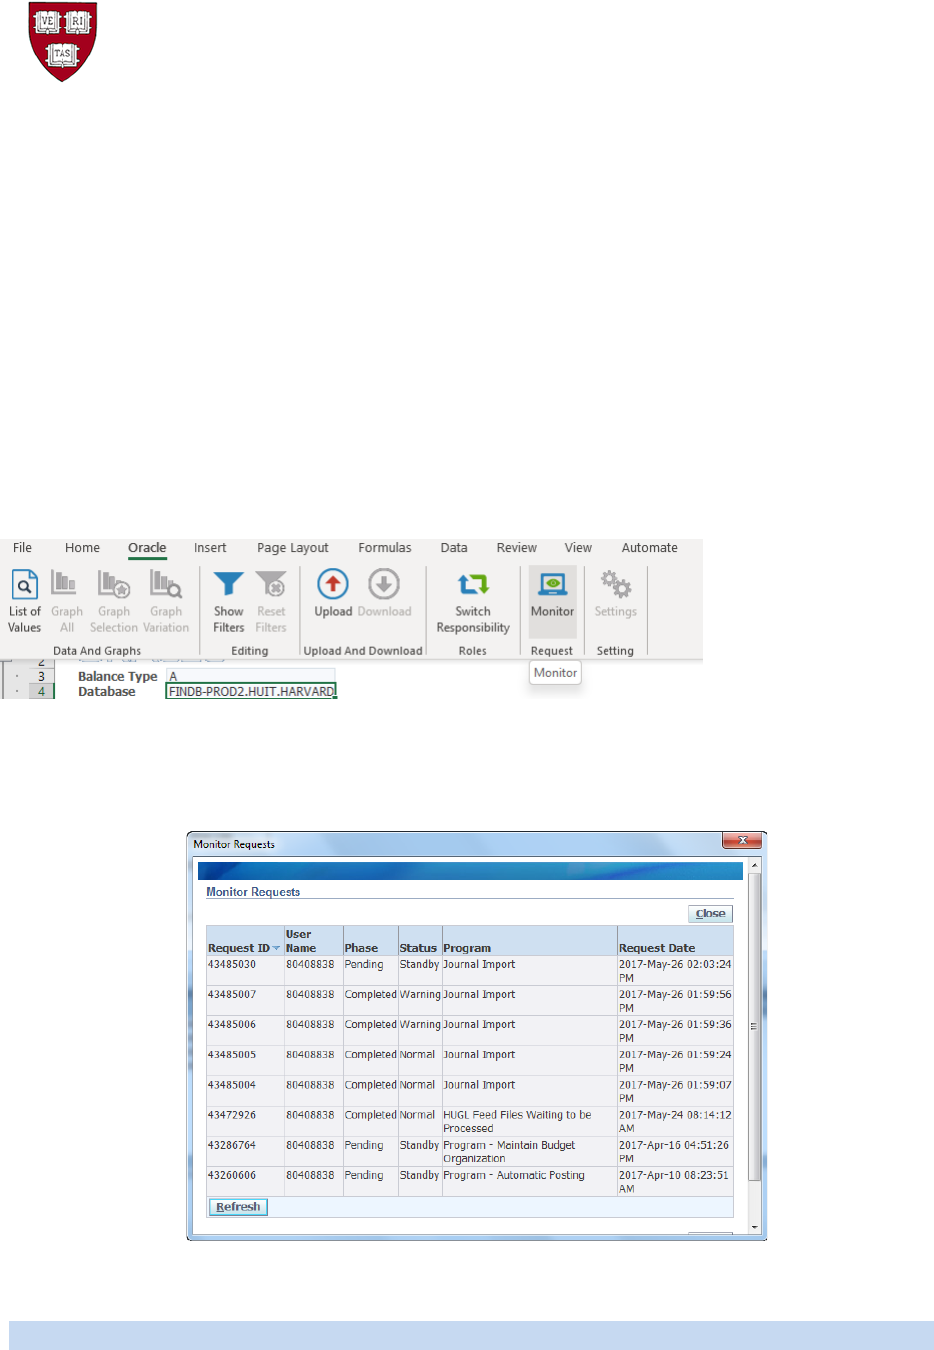
Check the Journal Import program status:
• In Excel select Add-Ins, then Oracle, then Monitor
Look for the Request ID of the Upload. For example, based on the Confirmation of the
Journals Upload
above, the user would look for the Journal Import Request ID 43485030.
It may be in one of the statuses below:
Phase
Status
Result
Pending
Standby
The program has not started running yet.
Pending
Normal
The program has not started running yet
Running
Normal
The program is running
General Ledger
ADI Journal Worksheet Guide
HARVARD
UNIVERSITY
On the Monitor Requests screen, in the lower left-hand corner, click Refresh until the Phase equals
Completed.
Phase
Status
Result
Completed
Normal
A journal has been created
Completed
Warning
This particular journal import did not create a journal
Completed
Error
There may be a technical issue
Notate the Request ID for the Journal Import Program. Click Close on the Monitor screen.
4.2.4 View General Ledger Output File
To see more information about your request immediately, the output file of
the request, in the General Ledger, provides detail of the journal import.
Note that the HUGL Web ADI Notification program
runs every 5 minutes and will send the ADI output
files to the email address of the person who
uploaded the worksheet.
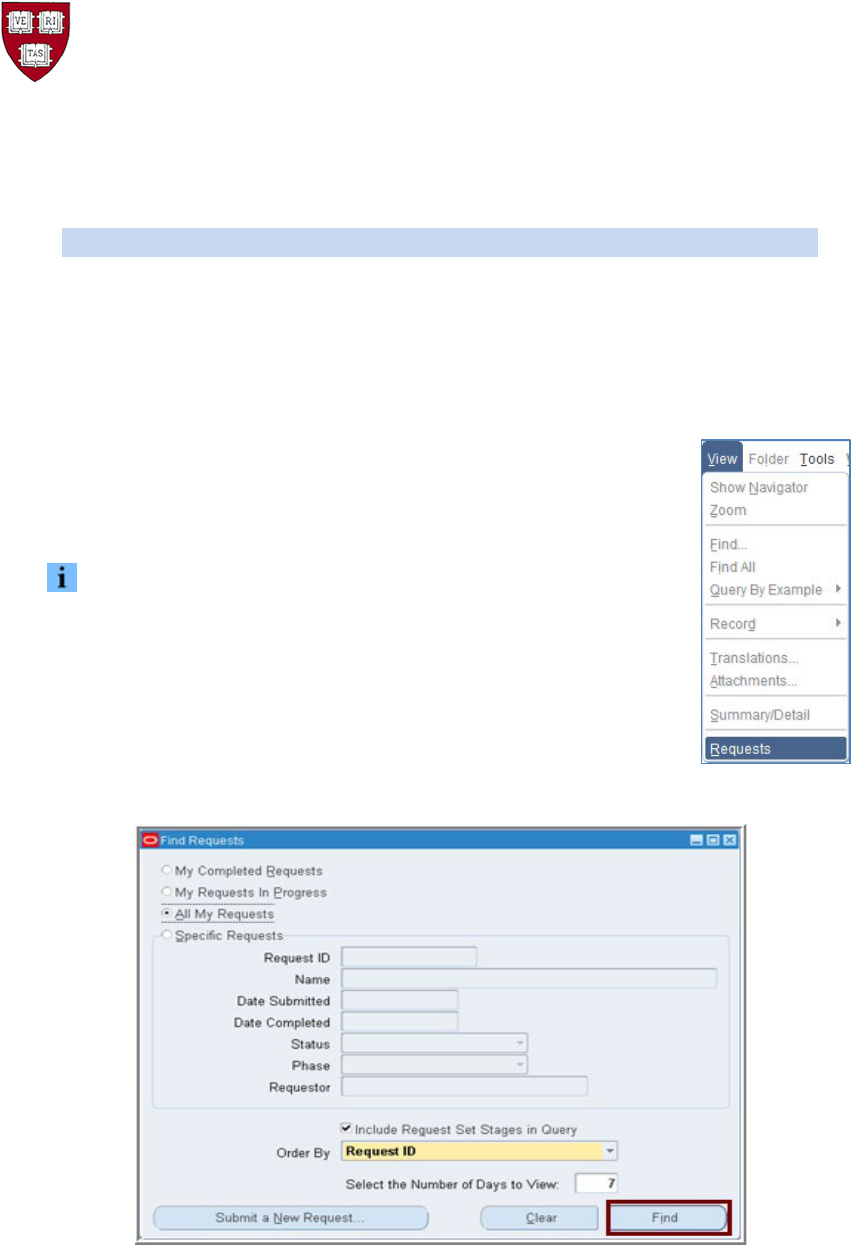
Log on to the General Ledger. Select the View menu, then Requests
On the Find Requests screen, click Find in the lower right-hand corner.
On the Requests screen, place your cursor on the request number which matches your ADI journal
upload/import request id number. Click View Output. Another window will be opened which
contains the Journal Import Execution Report.
General Ledger
ADI Journal Worksheet Guide
HARVARD
UNIVERSITY
If the program completes
with a Status of Warning, the
Phase and Status appear
highlighted in yellow.
If the Journal Import program
completes with a Status of Error,
the Phase and Status appear
highlighted in red
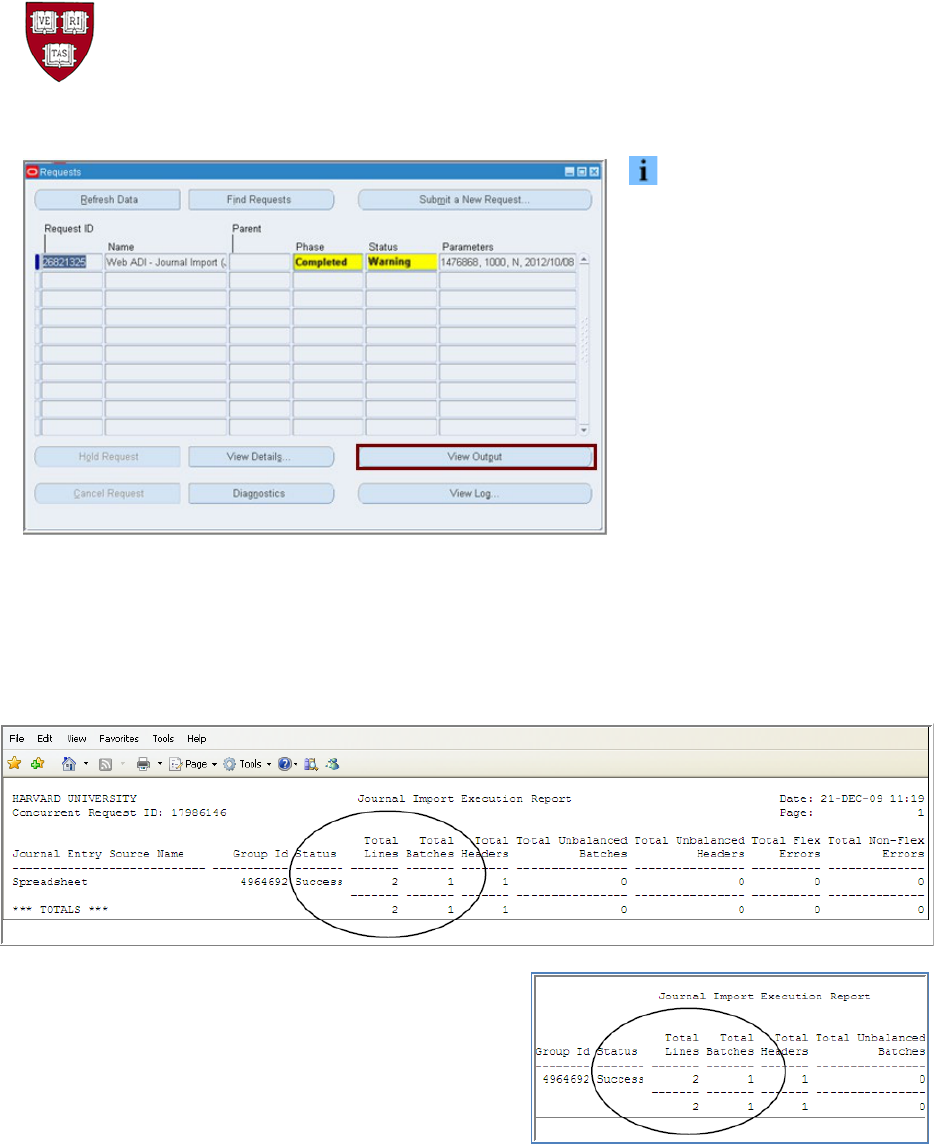
4.2.5 Output File with Success
The example below shows the top of the Journal Import Execution Report. In the report, the user
should review the Status, Total Lines, and Total Batches.
In this example, the report shows a successful import of
one journal batch with two journal lines in it:
If your output file shows Success with the correct
number of lines and batches, continue with step 7.
General Ledger
ADI Journal Worksheet Guide
HARVARD
UNIVERSITY
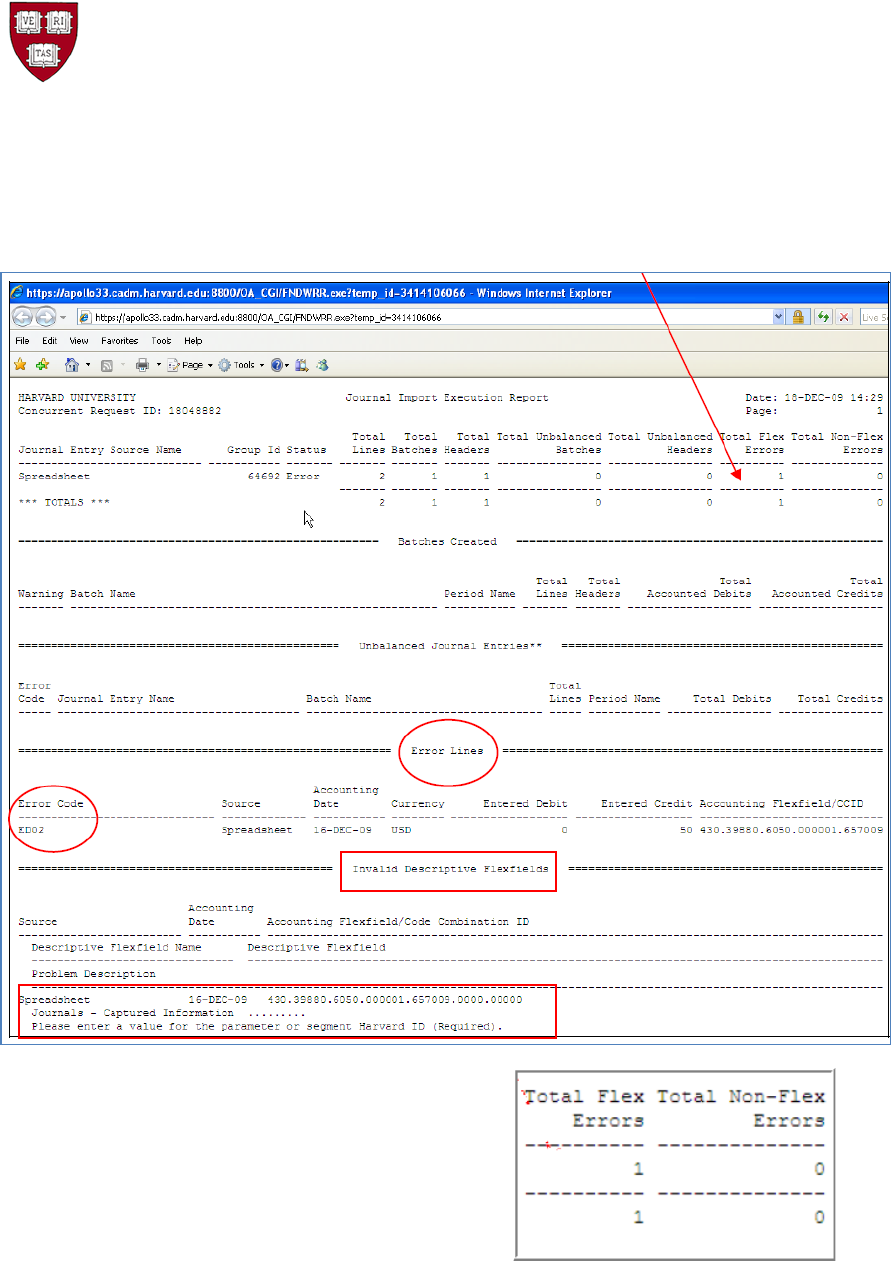
4.2.6 Output File with Warning – Flexfield
In this example, the worksheet shows a flex-field error in a single journal batch with two lines in it.
Moving towards the right, the reports states there is one
Total Flexfield Error.
General Ledger
ADI Journal Worksheet Guide
HARVARD
UNIVERSITY
Looking further down on the report, under the header
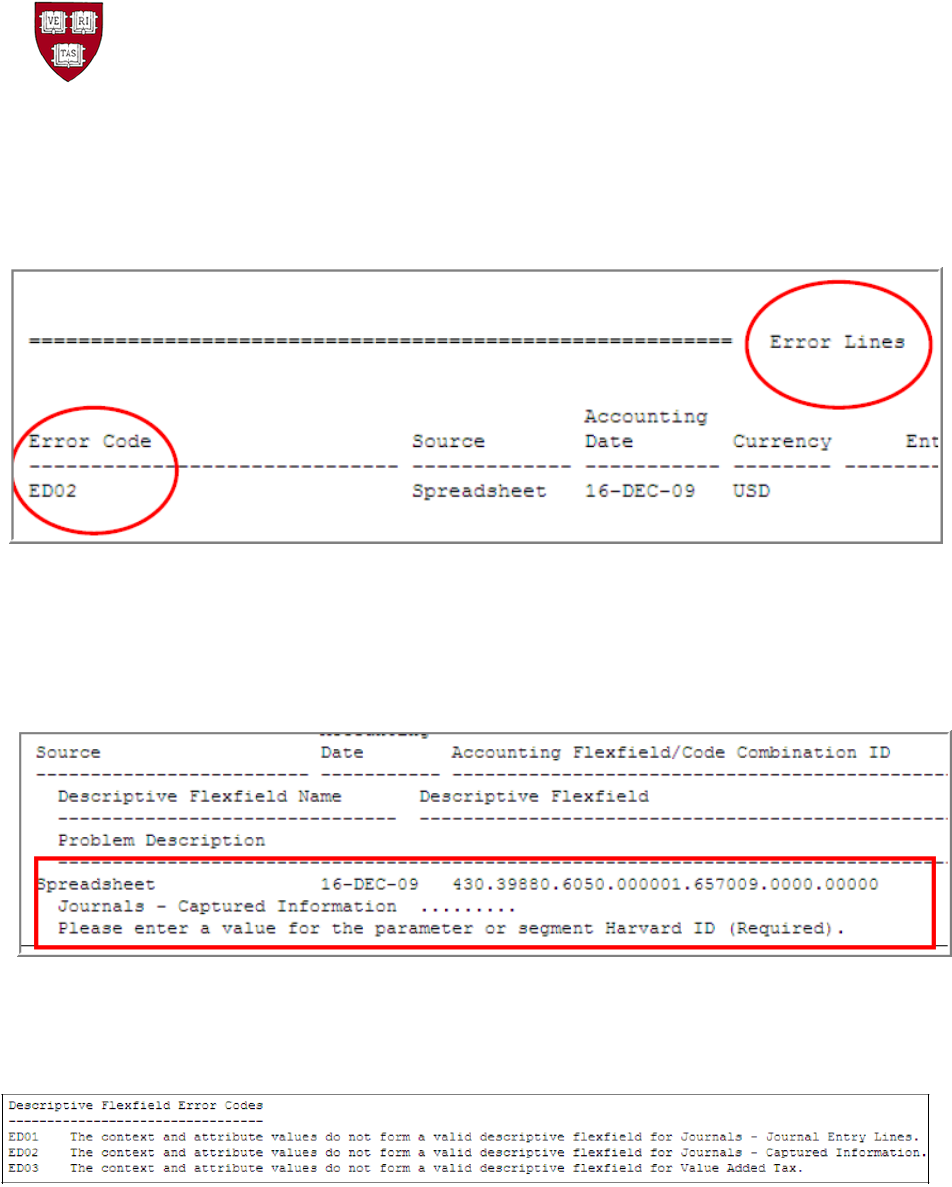
*** Error Lines *** the Error Code is “ED02” and some of the line information is given. This
information assists the end user determine which line(s) in the journal is/are in error.
Moving down a bit more on the report, additional information is given for Descriptive Flexfields under
the header *** Invalid Descriptive Flexfields ***. The full Accounting Coding Combination and a
Problem Description is shown. In this example, the Problem Description states “Please enter a value
for the parameter or segment Harvard ID (Required)”.
Towards the end of the report, the Error Code ED02 can be looked up under the header
*** Error Key ***. Below are some examples, these are the explanations for Error Code ED01, ED02,
and ED03:

General Ledger
ADI Journal Worksheet Guide
HARVARD
UNIVERSITY
If the journal import completed in warning, the data needs to be removed from the GL Interface
table.
There is an automated program which clears the GL Interface table. Currently, this program runs
daily every 5 minutes. When the program completes, it sends an email, to the person who uploaded,
informing that the data in the GL Interface has been deleted.
The email from the automated program will feature this header information:
From: fdc@harvard.edu
Subject: ADI Journal Upload Error
The contents will include:
• Request ID number
• Date of attempted upload
• Name of Batch
• Information that the attempt was unsuccessful and that no journal was created
• Information on how to review the request within the General Ledger
After the data in the GL Interface is removed (as the email will indicate), correct your error in
your ADI worksheet and repeat the upload process until the journal import is a success.
If the GL Interface table is not cleared before the next upload, any journal data sent with the same
Group ID number for the same accounting period is added to the existing data in the GL Interface table
and will cause another failure upon journal import.
General Ledger
ADI Journal Worksheet Guide
HARVARD
UNIVERSITY
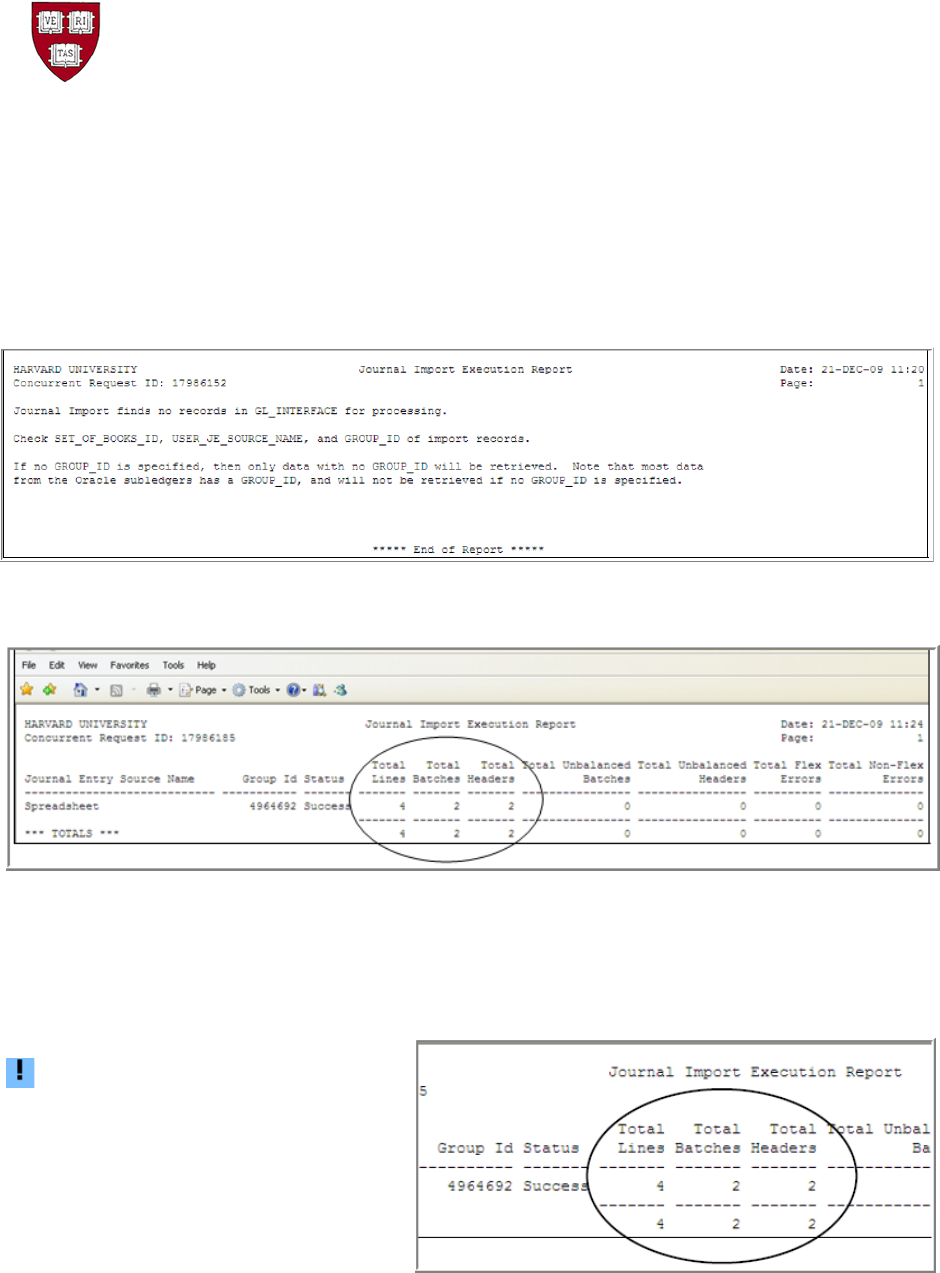
4.2.7 Output File with Warning – No records
Another common reason for a journal import to complete with Warning is when no records are found.
The output file, Journal Import Execution Report, states, “Journal Import finds no records in
GL_INTERFACE for processing”. This often happens when users are continuously uploading journals
without allowing each journal import submission to complete before sending another journal import.
If this occurs, take a look at the output file of the Journal Import directly before this request.
It may have two batches imported instead of just one. In the example below, four lines and two batches
were successfully uploaded. In this case, the journal was imported with the prior journal import request.
The journals were created. There is no problem. The user can continue uploading journals.
Users should take the time to let each
journal import complete before
uploading the next to avoid confusion.

General Ledger
ADI Journal Worksheet Guide
HARVARD
UNIVERSITY
4.2.8 Contacting the help desk
If there are any questions, contact the HUIT Support Center for assistance. Ask for a support ticket to
be opened in the General Ledger/ADI area. Give them the Request ID number and inform them of your
question.
The HUIT Support Center phone number 617-495-7777 or email ii[email protected]
4.2.9 Success – Journal Created
When the data uploaded into the GL Interface table has been imported into the General Ledger and the
output file shows “Success”, a
journal has been created.
If any subsequent changes are desired to the journal, please adjust the journal in the General Ledger,
noting any changes on your spreadsheet for your records.
Alternatively, the journal in the General Ledger can be deleted, if prior to 6:30 PM on a business day,
and the spreadsheet can be adjusted and re-imported. If it is not a business day, the user has until 6:30
PM on the next business day to adjust/delete.
General Ledger
ADI Journal Worksheet Guide
HARVARD
UNIVERSITY
5.0 Delete an ADI Journal Worksheet
5.1 Introduction
Use this process to delete an ADI journal in the General Ledger. An ADI worksheet has been
imported to the General Ledger, it is not posted, and it is no longer desired.
5.1.1 Helpful Hints
• A journal must be deleted before 6:30 PM on business days in order to avoid posting.
o If it is not a business day, the user has until 6:30 PM on the next business day
• If the journal has been posted, it can only be reversed rather than deleted.
• You should only delete journals you created or have permission from the Creator to delete.
• If you delete a journal batch, the General Ledger deletes all journals within the batch.
• You can delete just one journal entry in a batch of many journals.
• When doing a search, the percent sign (%) is Oracle’s wildcard
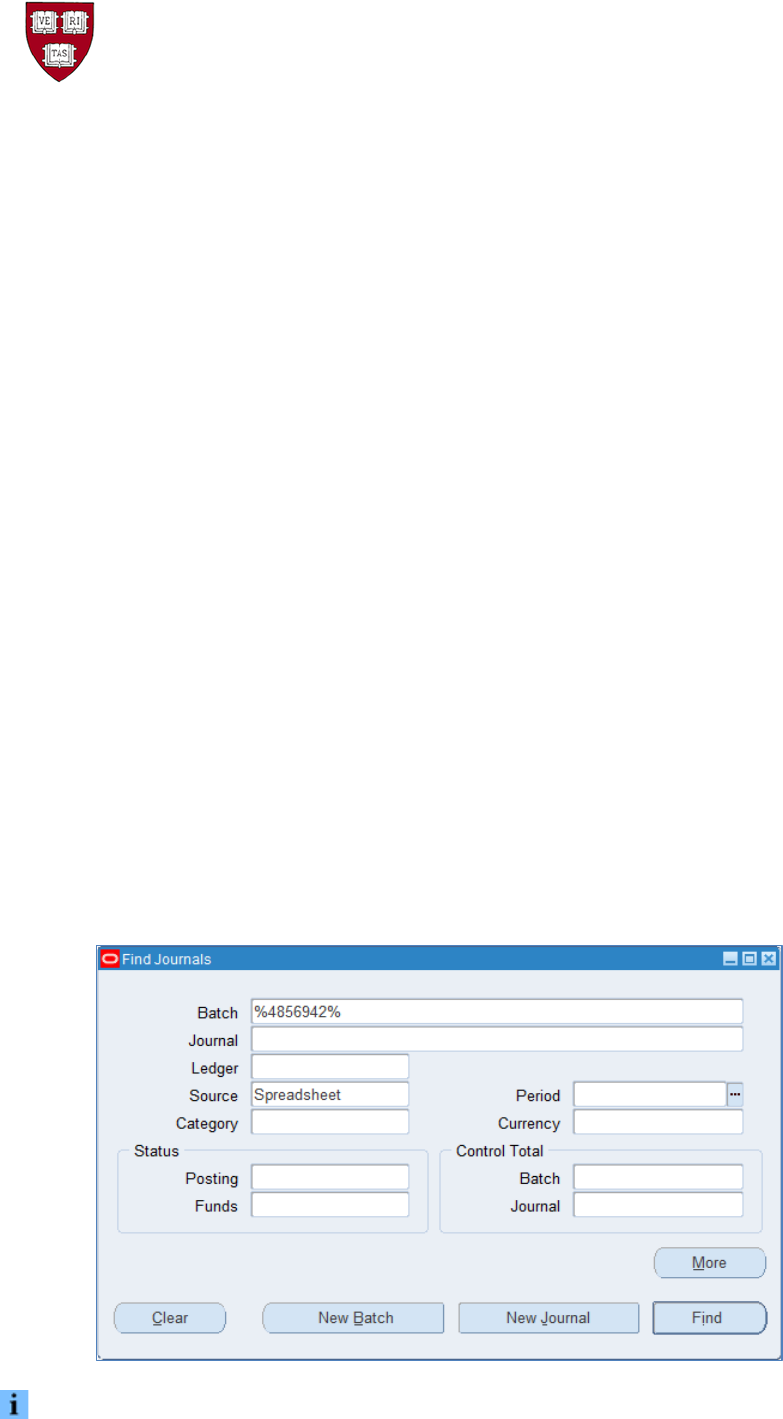
5.2 Procedure
1. Log into General Ledger, select Journals, and then Enter
2. On the Find Journals screen, fill in the appropriate criteria to reduce your search. Click Find.
For an ADI import, place the Request ID number in the Batch Name field surrounded by percent
signs, add the Source = Spreadsheet. See the example below of the Find Journals screen.
If needed, clicking the More button will show some additional search fields.
General Ledger
ADI Journal Worksheet Guide
HARVARD
UNIVERSITY
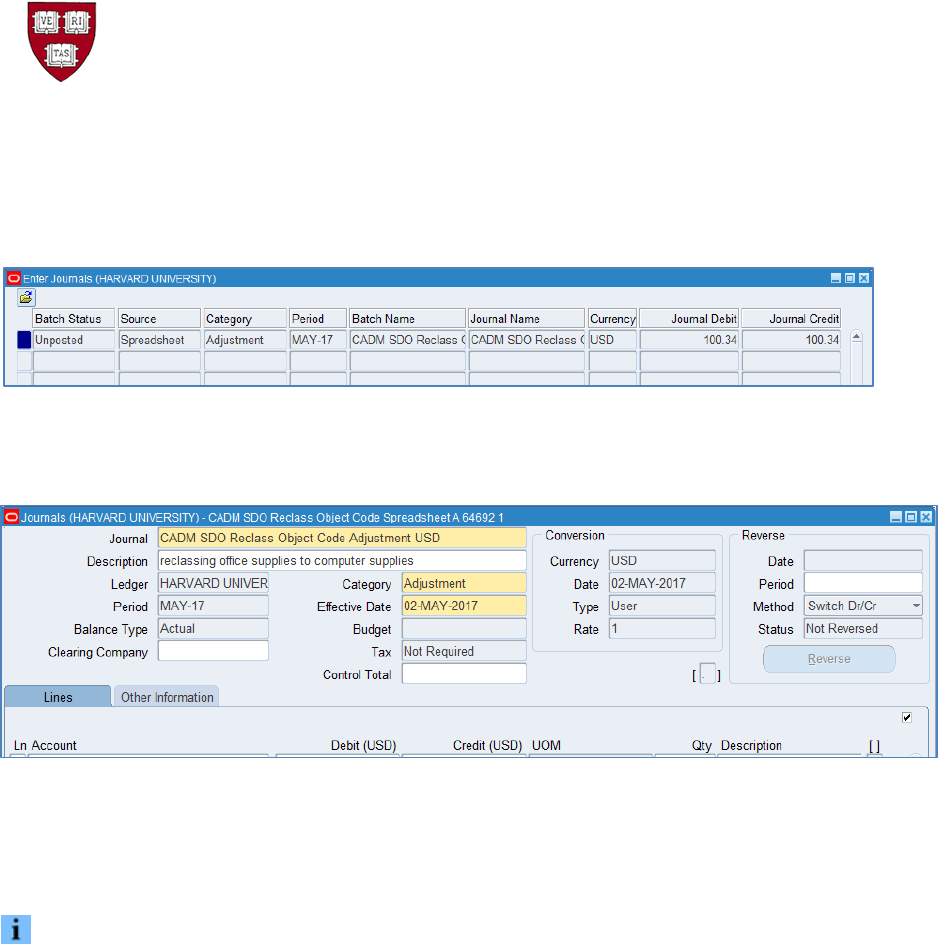
3. The journal batch should appear on the Enter Journals screen.
4. Click the Review Journal button to see the journal lines.
Once it is determined that this is the journal to remove, close the journal by clicking the X in the
upper right-hand corner. You will return to the Enter Journals screen.
If it is decided this journal is not desired to be removed, simply close the journal,
locate the correct journal, and place your cursor on the batch/journal name.
General Ledger
ADI Journal Worksheet Guide
HARVARD
UNIVERSITY
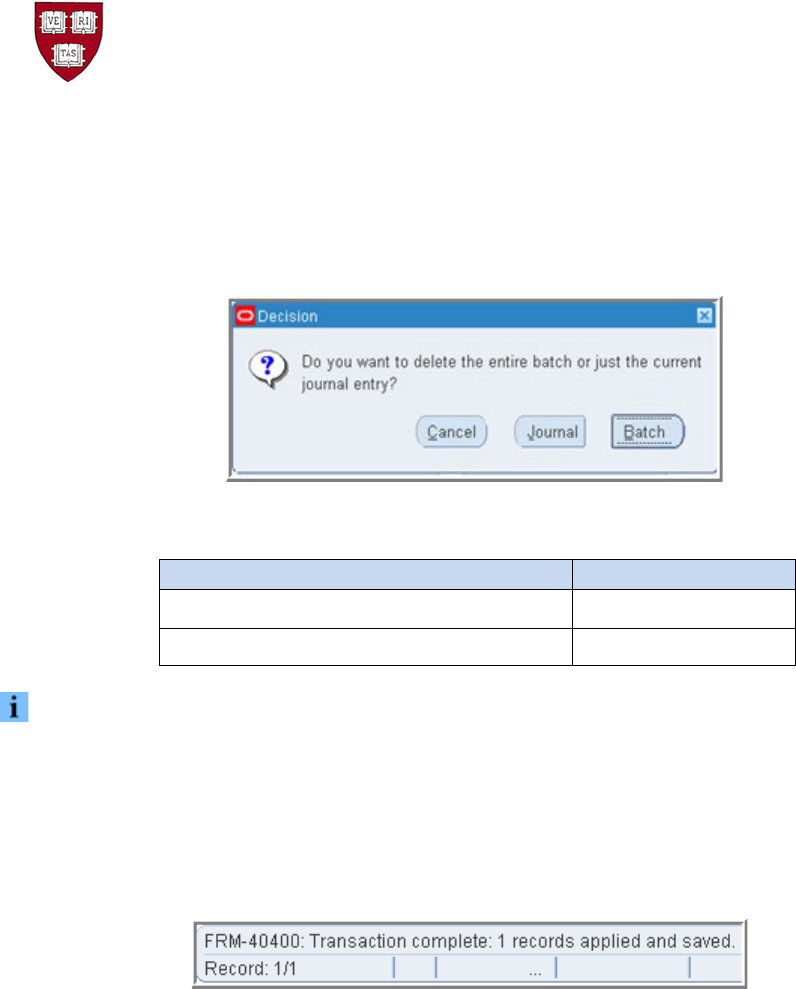
5. From the toolbar select the Delete icon (red X ), or from the menu bar select Edit, then Delete
A decision window will appear:
6. Select whether to delete the one journal or all of the journals in the batch.
If You Want To
Then Click
Delete a journal within a batch
Journal
Delete a batch and all of its journals
Batch
If there is one journal to one batch, it does not matter which button is selected.
7. From the toolbar select the Save icon (yellow disk), or from the menu bar select File, then Save
(or, if using keyboard equivalents, Ctrl + S).
8. Check the status bar in the lower left-hand corner of the screen for the record to be applied and saved.
9. With the record applied and saved, the journal has been deleted.
