
July 2015
Building Blocks to Creating Accessible
Word Documents and PowerPoint Slides
There are simple techniques you can use to improve the accessibility of your documents as you create
them. Use these best practices to greatly improve the accessibility of Word documents and PowerPoint
slides for individuals with disabilities. Another benefit is that accessibility improvements made in the
original will generally remain when converted to PDF or HTML.
This document is specific to Word and PowerPoint for Windows. Currently, the Windows Operating
System (OS) offers content creators more opportunity to create accessible Word and PowerPoint
content than the Mac OS. Please contact us with questions about using Word and PowerPoint for Mac.
Word
Headings
A good heading structure is probably the most important accessibility consideration. Use built-in Styles
to identify Heading 1, Heading 2, etc., rather than simply increasing the font size and making it bold. This
provides structure that is used to navigate through the document when using assistive technology like a
screen reader.
Added benefits
It is possible to generate a table of contents automatically using document headings
Can update the look of headings by changing them in one location, then updating heading to
match selection
Word 2013 and 2010
Select the text, and then select the appropriate heading style from the Styles ribbon.
By default, Heading 1 and Heading 2 are available in the ribbon. Word will automatically add Heading 3
to the menu after Heading 2 is used in the document, and so on for additional heading levels.
July 2015 Page 2 of 20
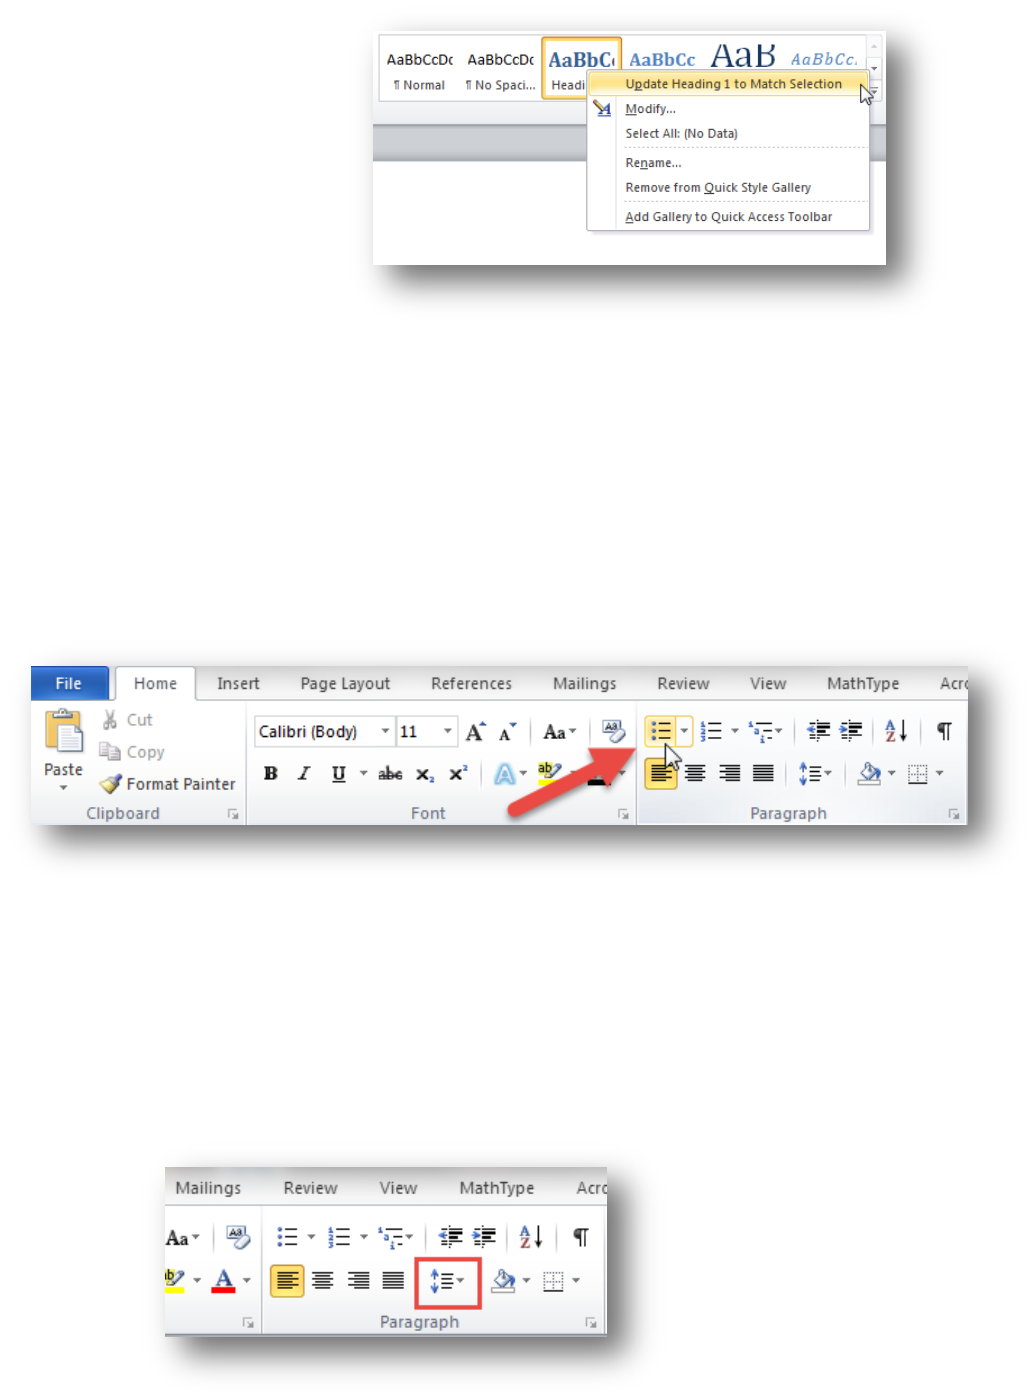
If you have already formatted the
text you want to make into a
heading, and would like to preserve
the appearance, right-click the
heading level in the Styles ribbon
and select Update Heading to
Match Selection.
Lists
Use built-in features to create bulleted and numbered lists. This provides navigational structure that is
important to users of assistive technology. Manually typing numbers or dashes before items is not
sufficient.
Word 2013 and 2010
On the Home tab, select either bulleted or numbered list and begin typing the list. If you have already
typed the text you want to make into a list, highlight the existing text and then select a bulleted or
numbered list.
Spacing within lists
Avoid using a blank line to add space between list items – this can be confusing to a screen reader user.
A screen reader reads a list of 4 items with a blank line between as 4 separate lists of 1 item. Instead,
use the built-in Line and Paragraph Spacing feature.
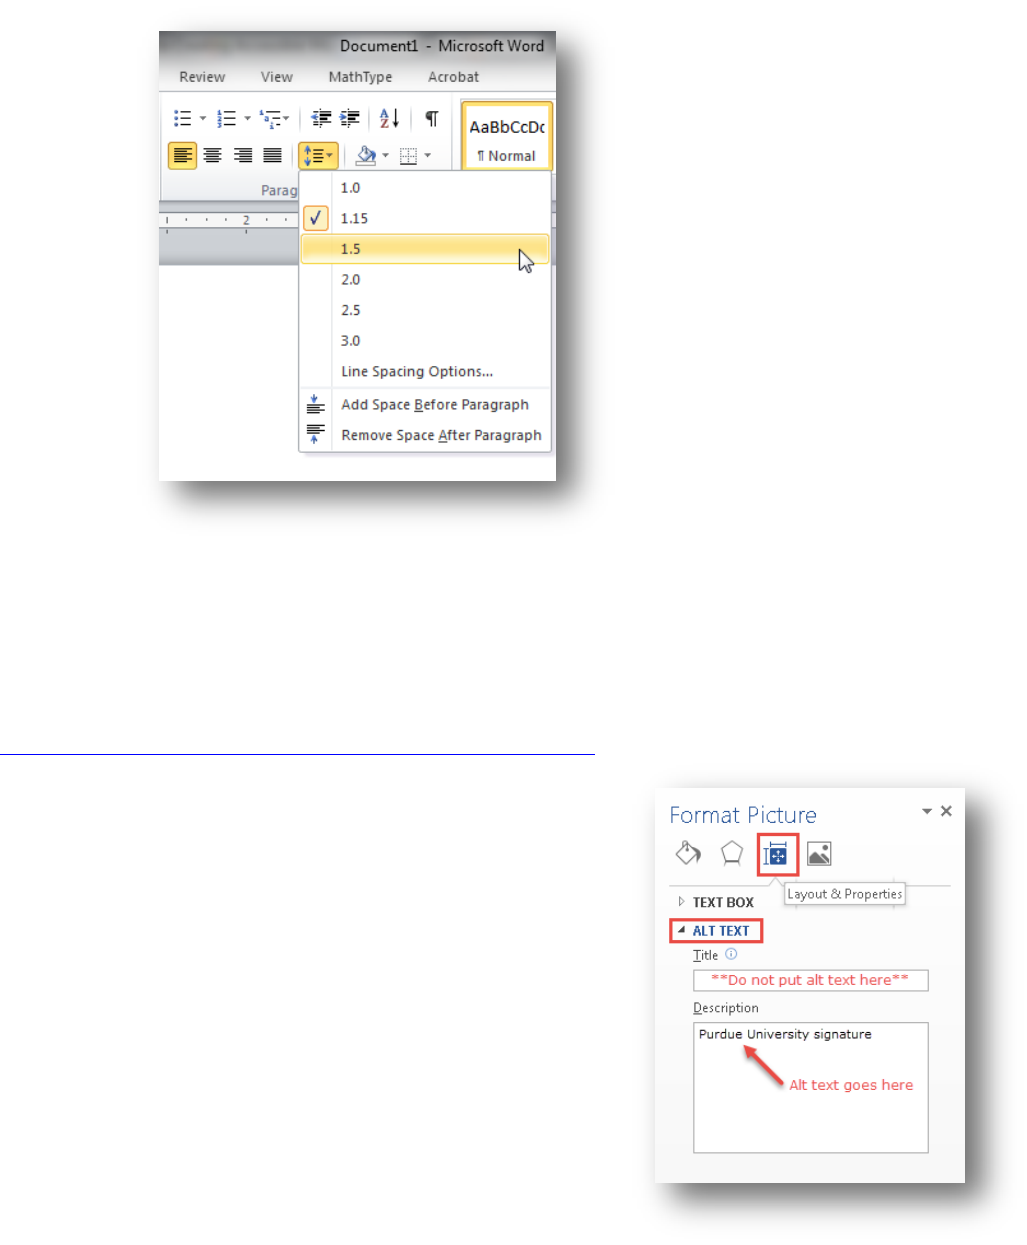
Word 2013 and 2010
1. Select the list items
2. On the Home tab, select the Line and Paragraph Spacing tool
July 2015 Page 3 of 20
3. Select the desired spacing between list items
Images
Add alternative text (alt text) to images. Alt text is the way to convey information about images to users
who can’t see them.
Writing good alt text is a skill that can be developed. An excellent article on alt text is available at
WebAIM Alternative Text (http://webaim.org/techniques/alttext/).
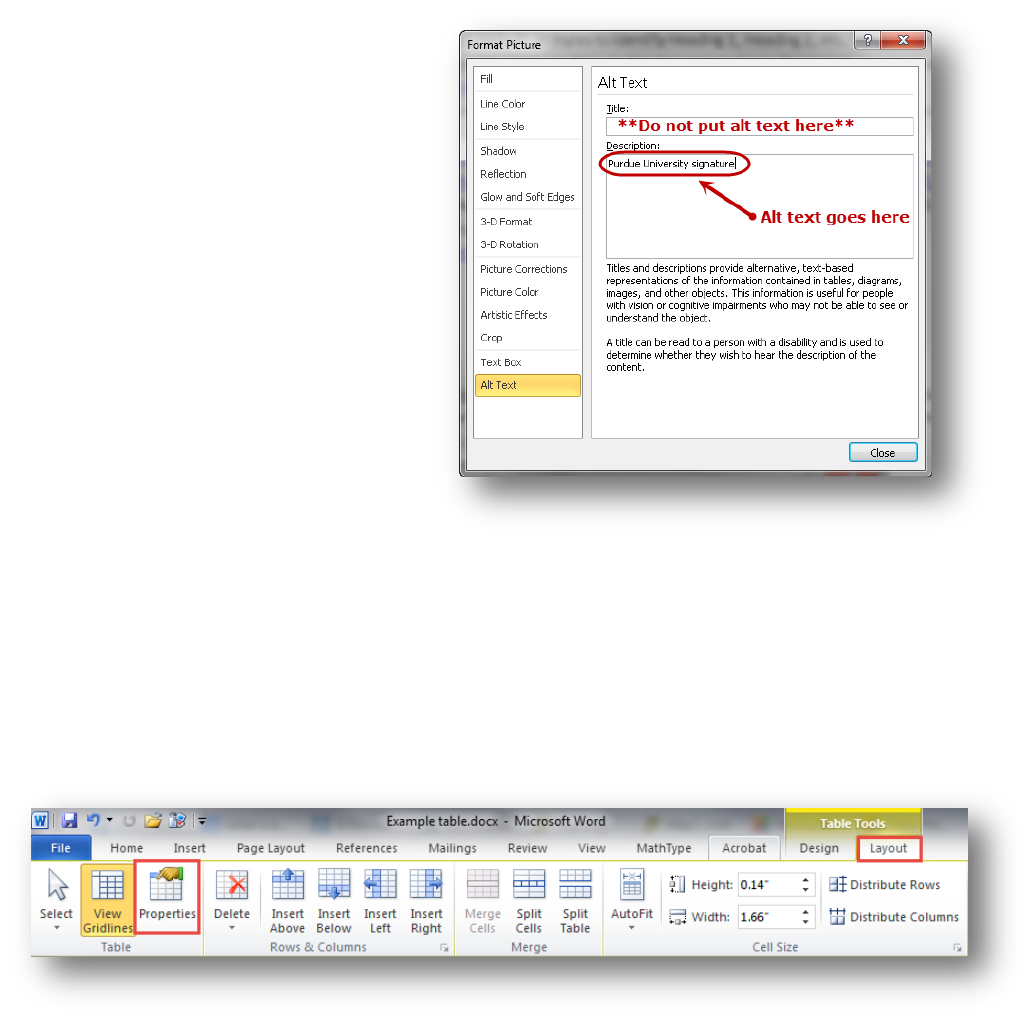
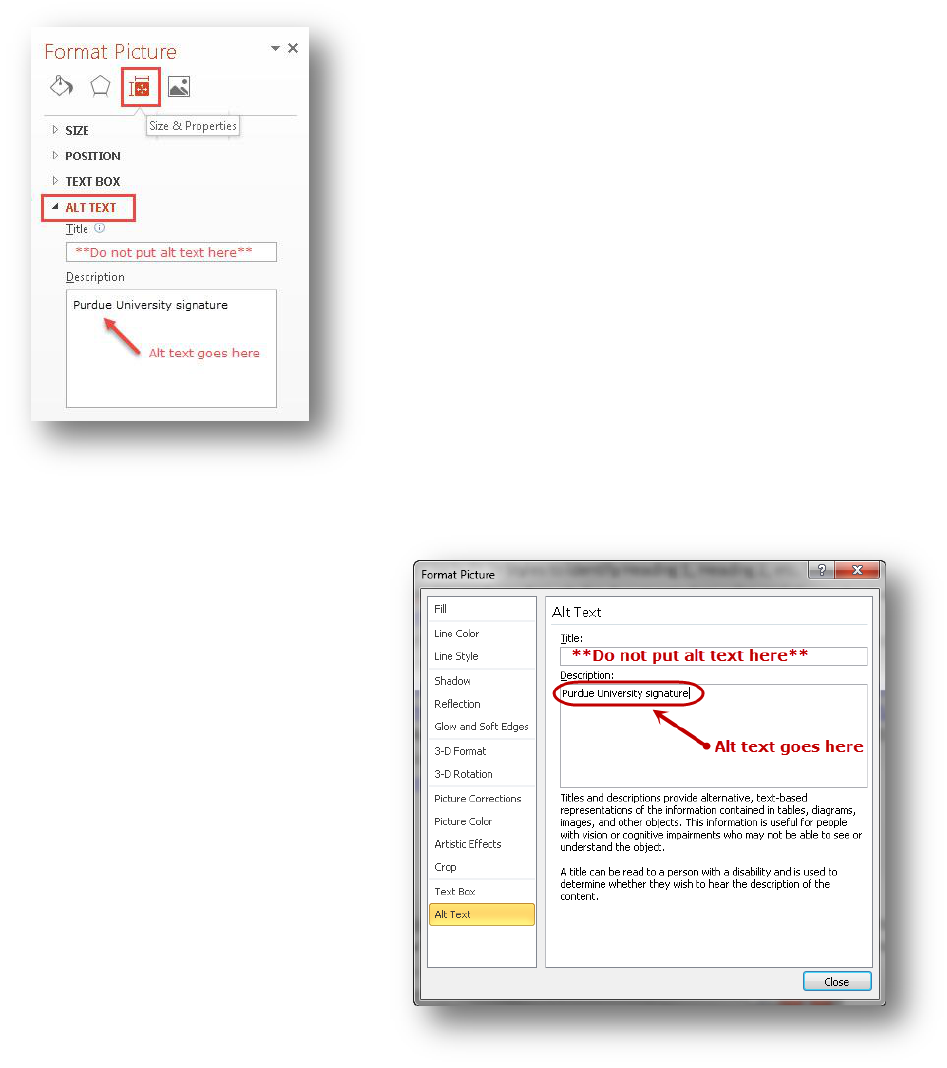
Word 2013
1. Right-click on the image and select Format Picture
2. Select Layout and Properties and then select Alt Text
3. Enter alt text into the Description field. Do not put alt text
into the Title field.
July 2015 Page 4 of 20
Word 2010
1. Right-click on the image and select
Format Picture
2. Select Alt Text
3. Enter alt text into the Description
field. Do not put alt text into the Title
field.
Tables
Use column headers in tables and explicitly identify the header row. Headers provide information
necessary to navigating the table for users of assistive technology.
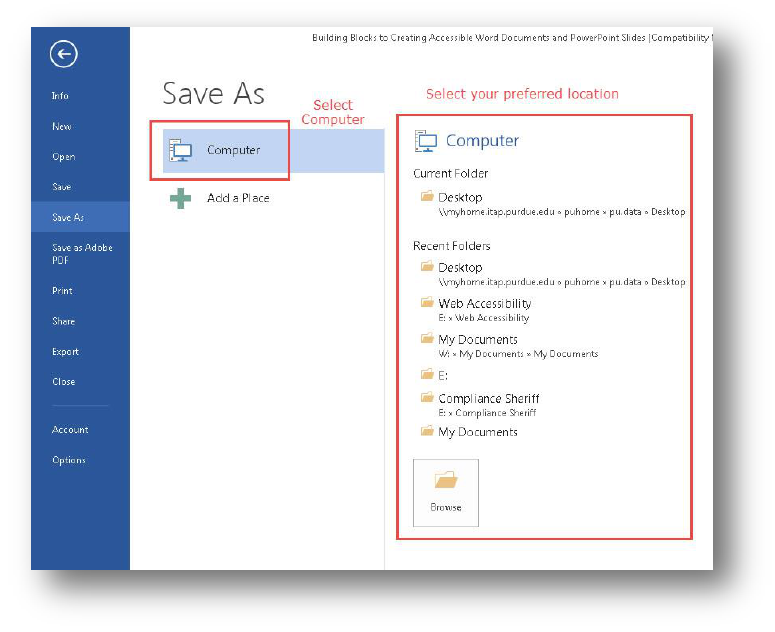
Word 2013 and 2010
1. Click anywhere in the header row
2. Select the Layout tab (look for the Table Tools section in the ribbon at the top of the page)
3. Select Properties

July 2015 Page 5 of 20
4. Select the checkbox “Repeat as header row at the top of each page”
Use Word Accessibility Checker
Word 2013 and 2010 have a built-in tool that checks your document for accessibility problems. The
Accessibility Checker makes it much easier to identify and repair accessibility issues. To use the tool,
select File > Info > Check for Issues > Check Accessibility.
July 2015 Page 6 of 20
Save as Accessible PDF
Not every method of saving creates an accessible PDF. In Word 2013, 2010 or 2007, if a PDF file is
created by “printing to Adobe PDF”, it will not be tagged for accessibility. Use the following method to
ensure accessibility features will remain when converted.
Word 2013
1. Follow the recommendations in this handout to create an accessible Word document
2. From the File menu, select Save As
3. Select the Computer option, then select your preferred location for saving the file
July 2015 Page 7 of 20
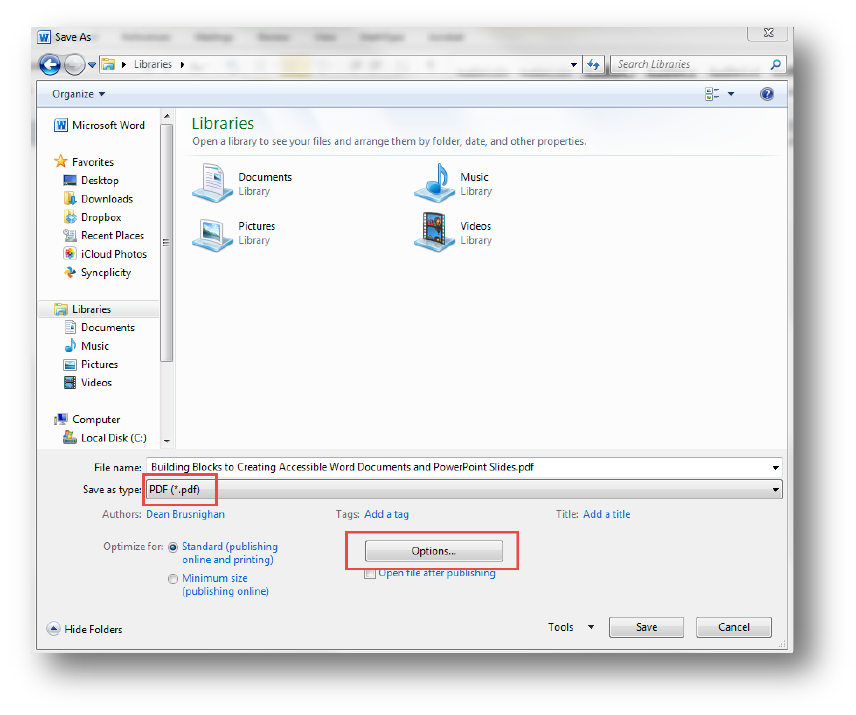
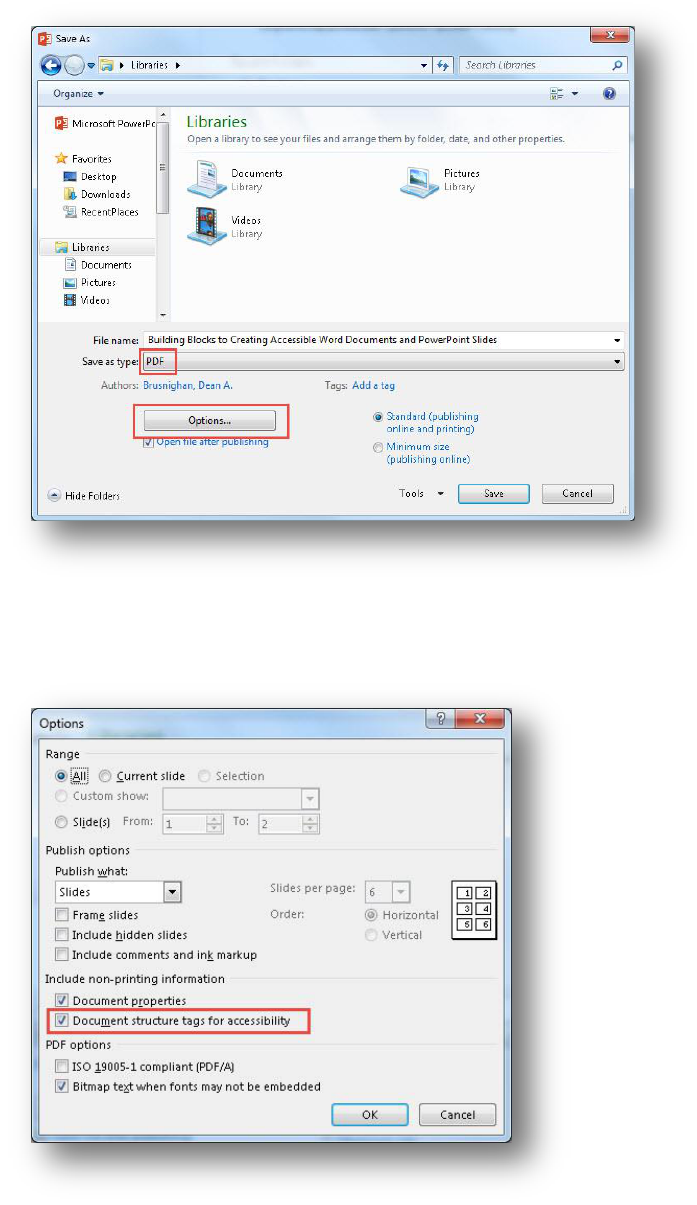
4. Choose to Save as type: PDF
5. Select the Options button
July 2015 Page 8 of 20
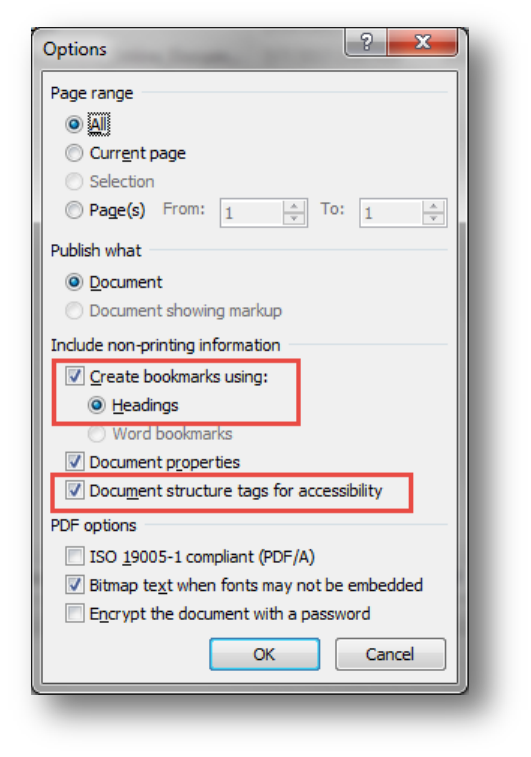
6. In the new Options window, ensure that the “Document structure tags for accessibility” option
is checked
7. Select the option for “Create bookmarks using:”
8. Select the Headings option
9. Select OK to close the Options window
10. Select Save to finish saving the file

July 2015 Page 9 of 20
Word 2010
1. Follow the recommendations in this handout to create an accessible Word document
2. From the File menu, select Save As
3. Choose to Save as type: PDF
4. Select the Options button

July 2015 Page 10 of 20
5. In the new Options window, ensure that the “Document structure tags for accessibility” option
is checked
6. Select the option for “Create bookmarks using:”
7. Select the Headings option
8. Select OK to close the Options window
9. Select Save to finish saving the file
July 2015 Page 11 of 20
PowerPoint
Slide Layouts
The correct use of PowerPoint’s slide layout templates is probably the most significant thing you can do
to ensure that your content is accessible. The templates are accessible. Using them properly will ensure
that your slides have correctly-structured headings, lists, and other features.
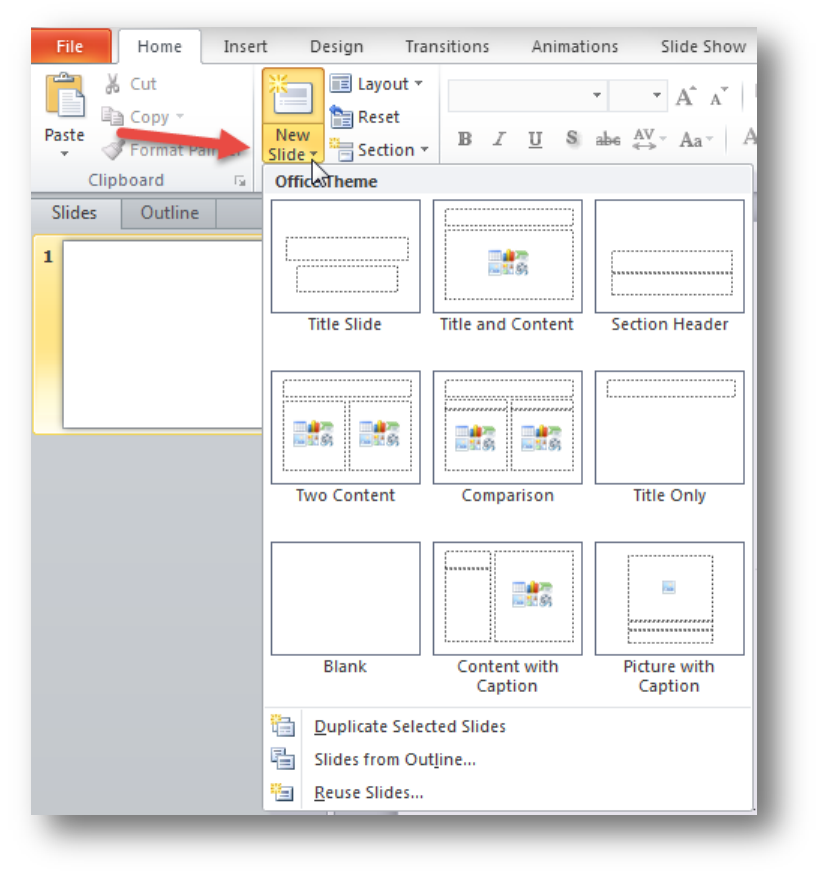
PowerPoint 2013 and 2010
Select Home > New Slide to open a menu of slide types.
July 2015 Page 12 of 20
Slide Titles
Slide titles are necessary to allow easy navigation through the slides by users of assistive technology.
Make sure the slide title is entered into the title area of the layout
Use unique titles for each slide
Slide Lists
Use slide template lists to ensure the list is accessible
Spacing within lists
Avoid using a blank line to add space between list items – this can be confusing to a screen reader user.
A screen reader reads a list of 4 items with a blank line between as 4 separate lists of 1 item. Instead,
use the built-in Line and Paragraph Spacing feature.
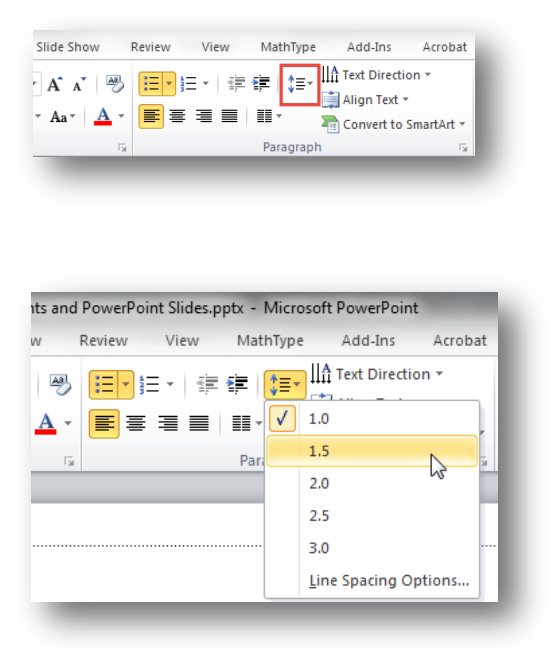
PowerPoint 2013 and 2010
1. Select the list items
2. On the Home tab, select the Line and Paragraph Spacing tool
3. Select the desired spacing between list items
July 2015 Page 13 of 20
Slide Images
Add alternative text (alt text) to images. Alt text is the way to convey information about images to users
who can’t see them.
PowerPoint 2013
1. Right-click on the image and select Format Picture
2. Select Size and Properties and then select Alt Text
3. Enter alt text into the Description field. Do not put alt text into the Title field.
PowerPoint 2010
1. Right-click on the image and select
Format Picture
2. Select Alt Text
3. Enter alt text into the Description field.
Do not put alt text into the Title field.
July 2015 Page 14 of 20
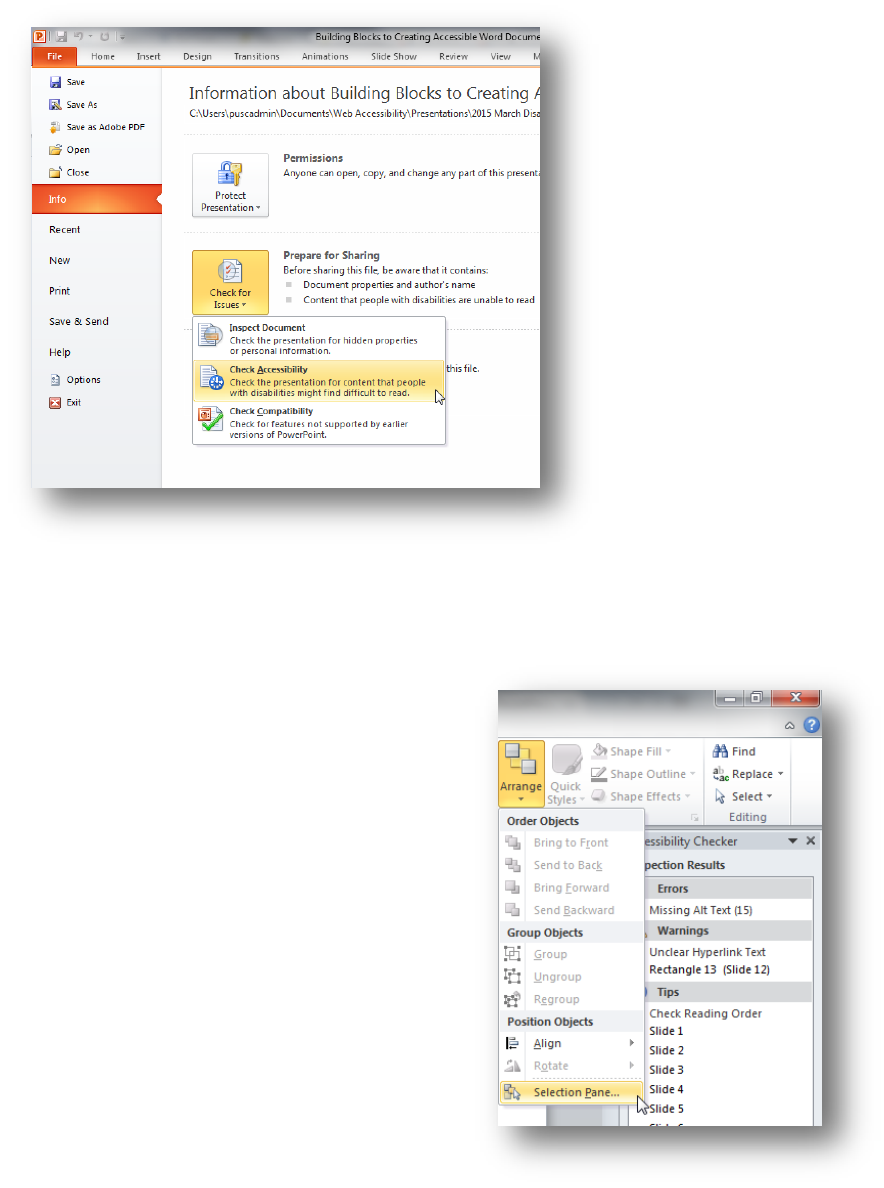
Use PowerPoint Accessibility Checker
PowerPoint 2013 and 2010 have a built-in tool that checks your document for accessibility problems.
The Accessibility Checker makes it much easier to identify and repair accessibility issues. To use the tool,
select File > Info > Check for Issues > Check Accessibility.
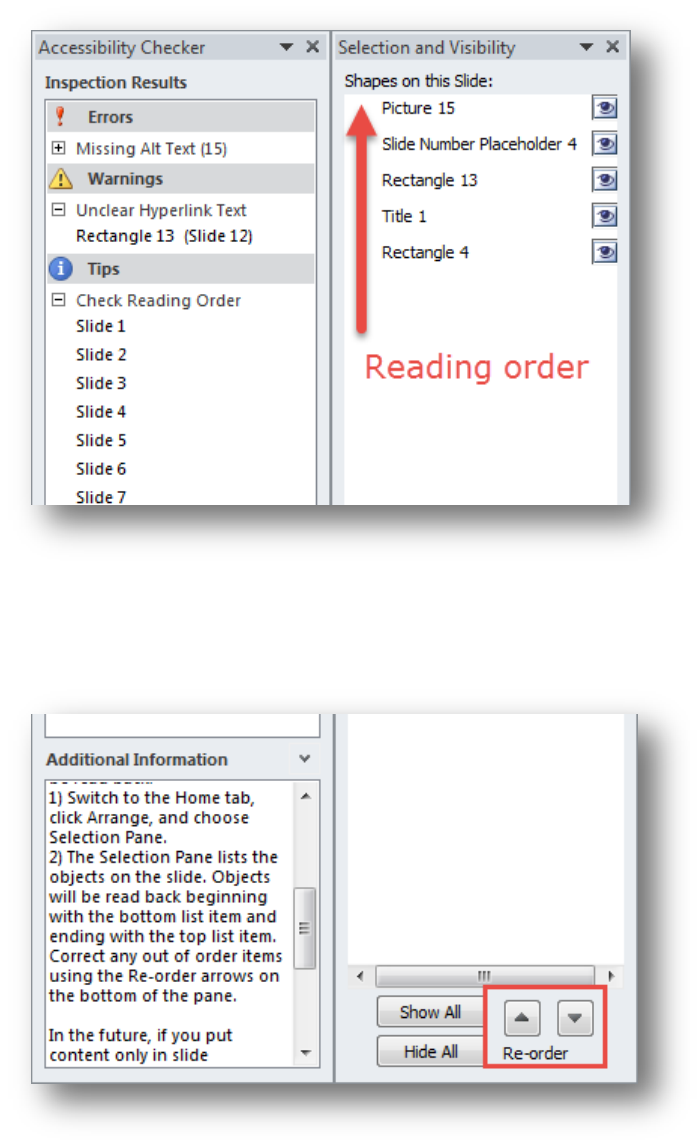
Check Reading Order
People who cannot view the slide will hear slide text, shapes, and content read back in a specific order.
Verify that the reading order will make sense by following these steps:
1. On the Home tab, select Arrange (found in the
Drawing group) and choose Selection Pane
July 2015 Page 15 of 20
2. The Selection Pane lists the objects on the slide. The reading order starts with the bottom list
item and ends with the top list item.
3. Correct any out of order items using the Re-order arrows at the bottom of the Selection Pane.
July 2015 Page 16 of 20
Save as Accessible PDF
Not every method of saving creates an accessible PDF. In Word 2013, 2010 or 2007, if a PDF file is
created by “printing to Adobe PDF”, it will not be tagged for accessibility. Use the following method to
ensure accessibility features will remain when converted.
PowerPoint 2013
1. Follow the recommendations in this handout to create an accessible PowerPoint document
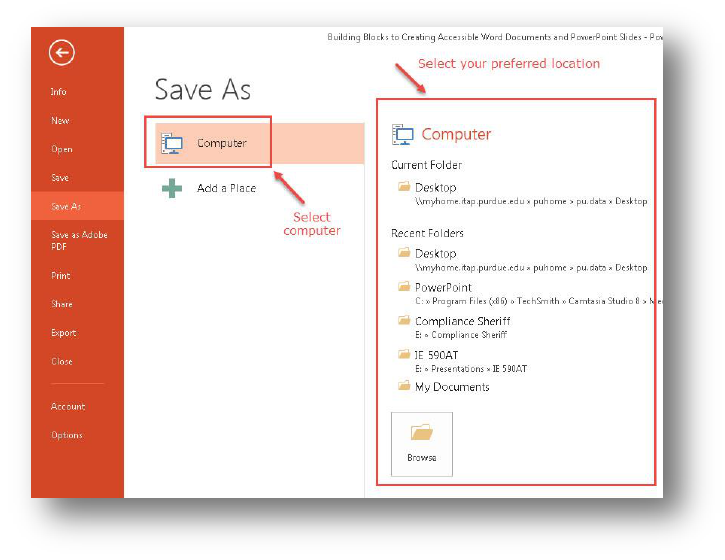
2. From the File menu, select Save As
3. Select the Computer option, then select your preferred location for saving the file
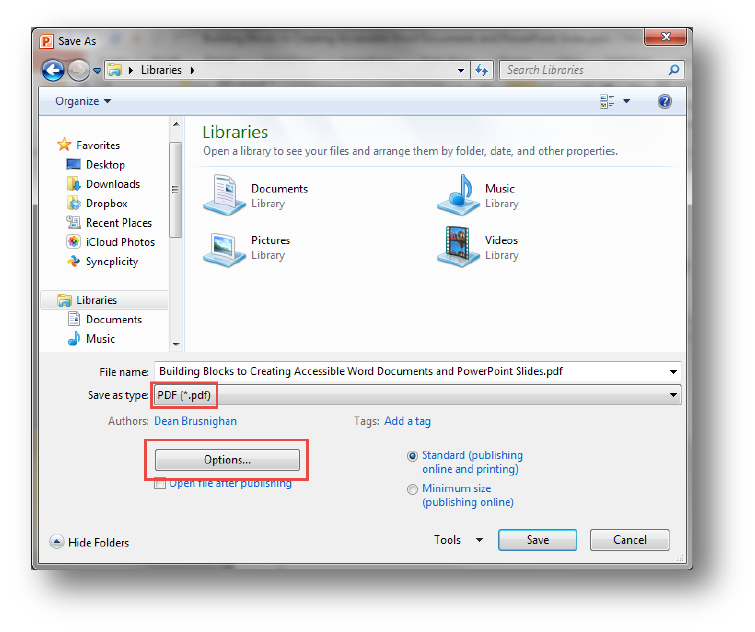
4. Choose to Save as type: PDF
5. Select the Options button
July 2015 Page 17 of 20
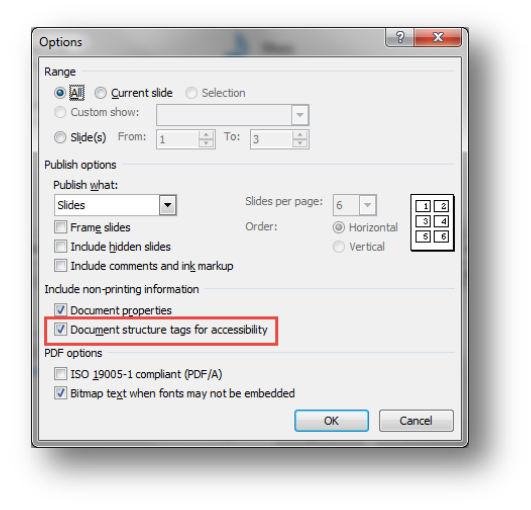
6. In the new Options window, ensure that the “Document structure tags for accessibility” option
is checked
7. Select OK to close the Options window
8. Select Save to finish saving the file
July 2015 Page 18 of 20
PowerPoint 2010
1. Follow the recommendations in this handout to create an accessible PowerPoint document
2. From the File menu, select Save As
3. Choose to Save as type: PDF
4. Select the Options button
July 2015 Page 19 of 20
5. In the new Options window, ensure that the “Document structure tags for accessibility” option
is checked
6. Select OK to close the Options window
7. Select Save to finish saving the file

July 2015 Page 20 of 20
Definition
Screen reader: a software tool that reads aloud information on a computer screen. Typically used by
individuals who are blind or visually impaired.
Sources
The Web Accessibility Committee expresses our gratitude to these authors whose work has been
referenced in this document:
Michigan State University (http:/webaccess.msu.edu/Tutorials/index.html)
Penn State University AccessAbility (http://accessibility.psu.edu/)
Purdue Web Accessibility Committee (http://www.purdue.edu/webaccessibility/)
WebAIM (http:/webaim.org/)
Contact Us
Dean Brusnighan, ITaP
(765) 494-9082, dabrus@purdue.edu
