©2015 Backstop Solutions Group, LLC
BUC: Handout – BUC: Backstop User Conference 2015 | page 1
Reporting Workshop for Investor Relations & Marketing – Part 1 & 2
Become a Backstop reporting rock star! These back-to-back, primarily workshop-style, sessions will work through multiple
reporting scenarios (some common, some more challenging) for investor relations and marketing users, using combinations
of the Report Builder and the Excel Toolkit.
Workshop Resources
Handouts and Sample Reports: https://support.backstopsolutions.com/buc15 (see name badge for login info).
Excel Toolkit Download and Resources: https://support.backstopsolutions.com/etk
Workshop Format
These two sessions are workshop-style and we assume prior knowledge of Report Builder. If you have any questions during
these sessions, please do not hesitate to ask or raise your hand, and a Backstop rep will assist.
Tip: Check out these Support Site resources, regarding reporting: https://support.backstopsolutions.com/um_toc#reports.
Workshop Scenarios Overview
In these two sessions, we will be launching a mock Product (Westeros Flagship Fund, LP) for our firm, Seven Kingdoms
Capital, utilizing Backstop Report Builder, in conjunction with our Excel Toolkit. We will cover using these resources to identify
promising prospective investors (both current investors and prospects), managing our team as they market the fund, and
touching base with our investors once the fund has been established.
Scenario 1: Identifying Potential Investors for our Fund
Our firm has been utilizing a custom layout on contacts (i.e. People and Organizations) to track the likelihood of future
investments from current and prospective investors. Tip: Check out our Study Hall: Custom Layouts,
https://support.backstopsolutions.com/ssh#customlU and our Custom Layouts: User Guide,
https://support.backstopsolutions.com/um_toc#customLO.
We will be using these custom data points in conjunction with data in Backstop-standard fields to determine who may be a
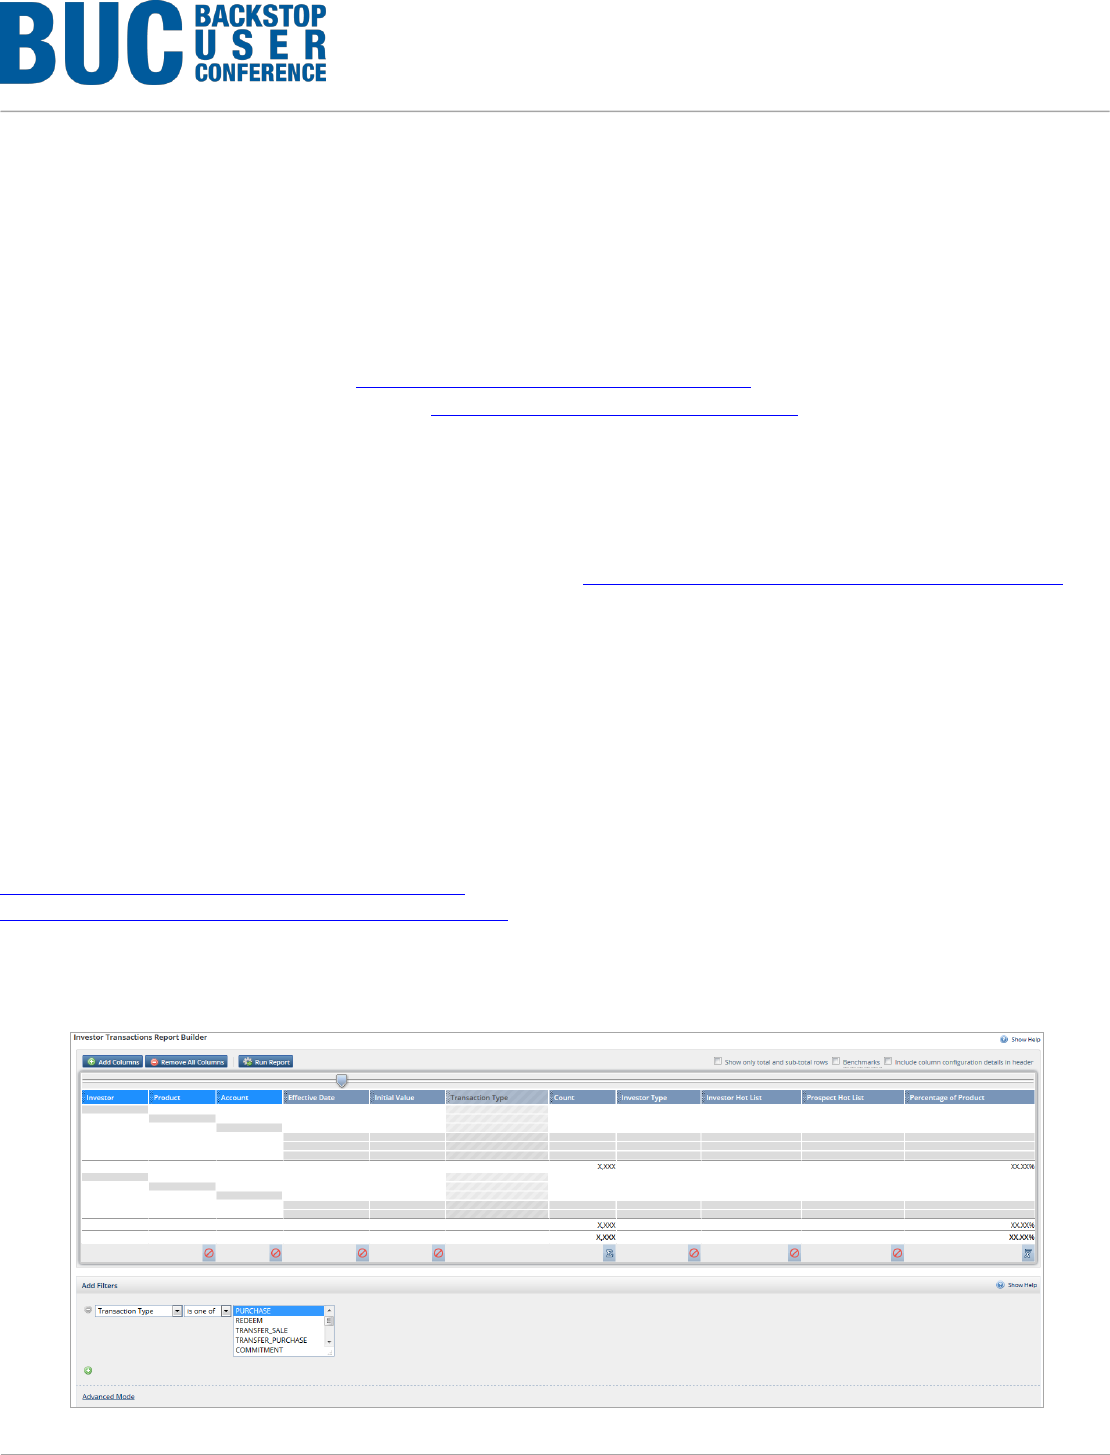
good fit for our new fund. Our first report checks for current investors (see Figure 1).
Figure 1 - Quick Links: Report Center > Shared Reports: RWIRM – Subscriptions by Investor

©2015 Backstop Solutions Group, LLC
BUC: Handout – BUC: Backstop User Conference 2015 | page 2
Specifically, we are interested in our contacts that have invested multiple times (signified by having multiple accounts or
multiple subscriptions within their accounts). This is accomplished using our Investor Transactions Report Builder (see Figure
1 and navigate to Quick Links: Report Center > Shared Reports: RWIRM – Subscriptions by Investor).
This report breaks down our subscriptions by Investor and Account, including a “Count” column, so we get a quick snapshot
of which investors are investing with us the most. Note: We have also utilized a simple People and Organizations report to pull
prospective organizations in particular categories and their Prospect Hot List Ranking (one of our aforementioned custom
fields).
This data is, of course, very useful on its own, but we have also built an Excel workbook that utilizes pivot tables to help us
visualize this data in a more immediate and configurable manner.
For this, we have pulled our above reports into an Excel workbook using Backstop’s Excel Toolkit and pulled the
named ranges for those reports into PivotTables.
o This ensures that, should the reports expand or contract for any reason (data changes, etc), these
PivotTables are faithfully pulling all of the data we want to tie in. The PivotTable functionality will allow us to
see our totals for certain Investor Types and individual investors, in terms of both the potential amount of
money invested and number of investments made to other funds from our firm thus far.
o We can then add various report filters so we can view the information in whichever way we please, whether it
be by Product or one of our custom field values. We can pull similar information for our prospects, based on
potential investment amount rather than current investment.
Please refer to the available Fund Launch Dashboard Excel document for both the finished version and the
template, to play around with our data. The steps below cover the areas we covered:
PivotTables:
o By selecting the data we wish to see in our 3 PivotTables for “BSG_Subscriptions by Investor”, we then
navigated to the “Insert” ribbon within Excel and selected PivotTable. We added the tables at cells B10, F10,
and I10 in our “Current Investors (FINISHED)” worksheet.
o Within the PivotTable process, we added in 3 filters (top-right box when creating a PivotTable):
Product
Investor Hot List (the priority level of our current investors)
Prospect Hot List (the level in which the prospect might be interested in investing)
o For the “Top 10” tables, we created these by clicking on the arrow drop-down for the Investor column header,
and hovered over “Value Filters” and then chose “Top 10.” This filtering options allows us to see the top 10
results within the data set, which we can then sort further (we sorted ours by largest to smallest amount).
Conditional Formatting:
o Each of our PivotTables on this dashboard have conditional formatting to visually give us a better
understanding of how much the investors have given us.
When using conditional formatting and filters, you will first want to make sure all data rows within the
PivotTables are un-filtered to then be able to see the formatting continue down when we select a
specific filtering option (i.e. Product = Backstop Partners LP).
This means:
Since we have the Top 10 PivotTables essentially shortened, we’ll want to expand the
filtering option to show the entire list, use our conditional formatting all the way down (except
Grand Total), and then collapse back into the Top 10 filtering.

©2015 Backstop Solutions Group, LLC
BUC: Handout – BUC: Backstop User Conference 2015 | page 3
For our conditional formatting example, we selected our data we wish to format, and then within the
Home ribbon, selected “Conditional Formatting.” We have several options to choose from, but we
used the data bars > gradiant fill.
Scenario 2: Managing our Team
While we are in the process of launching our fund and gathering investors for this fund, it’s important that leadership is able to
track their team’s activity and progress on prospective and current investors.
We can do this via several reports, which we have assembled in Backstop:
An Opportunities Report Builder that pulls opportunity and prospect information. This also includes our last contact
with the prospect and our days since that last contact (a Formula field that subtracts the last contact date from the
current date).
o Report Center: Shared Reports > RWIRM – Opportunity Report
An Activity Report Builder that pulls in Meetings and Calls, who the activity is regarding, and the Author/Rep for the
activity.
o Report Center: Shared Reports > RWIRM – Activity Report
An additional Opportunities Report Builder that includes further information about our most recent contact.
o Report Center: Shared Reports > RWIRM – Prospects to Call
Again, these reports are of course useful on their own, but we want to work smarter, not harder. Since we
have done all of this work up front, we can easily use the methods described in the first scenario to pull a
useful pipeline and activity dashboard, which can be updated with fresh data at the click of a button, and
thus displays all of the pertinent information in these reports in a convenient dashboard.
The dashboard we looked at for this example is, “Managing Our Team.” We already have our PivotTables available
in this dashboard, but now we have added in some pretty graphs and other ways to take our data to the next level.
Things like: having a “values as of date” available to let us know how current our data is helps us stay within our
processes. Also, by utilizing functional formulas, such as VLookup and Countifs, aids us in pulling data that’s
connected to PivotTable output.
o To create these, we simply added columns to the right of our PivotTable rows, and copied over the formulas
listed in our Formulas worksheet of the Excel document. That way, our PivotTables will update once we
refresh, and we will also see refreshed data that connects to those rows from the reports in Backstop.
o We also created some functional PivotCharts that connect to PivotTables added to the “Tables” worksheet in
the workbook. By using PivotCharts, we only need to refresh all charts in the workbook (after refreshing the
data in Backstop via the Excel Toolkit) and our charts will automatically update.
When using PivotCharts, there will be some buttons that are added to the chart, and if you don’t
require or need those, you can right-click on one of the buttons to either hide all buttons or just those
that relate to horizontal or vertical axis’.
o And lastly, we added our values as of date to cell D3 with the formula: =BSG_AsOfDate() and made sure to
update the values as of date available within the Backstop ribbon.
Tip: For more information about Vlookup, check out the VLookup in Excel guide on the Support Site:
https://support.backstopsolutions.com/um_toc#reports.

©2015 Backstop Solutions Group, LLC
BUC: Handout – BUC: Backstop User Conference 2015 | page 4
Scenario 3: Investor Outreach, Post Launch
Our fund has been launched for more than a year now and we are looking to retain and expand the investments that made
this fund’s launch possible. Of course, a major part of this effort involves investor outreach. There are a number of factors that
may contribute to how and when we reach out to our investors.
Common situations we hear of are upcoming liquidity on investments and longer gaps in outreach. Also, our outreach efforts
can certainly be affected by the percentage of capital a given investor has in our fund. Per these examples, we have built out
three reports:
An Investor Transactions Report Builder that looks at “Next Notice Dates” for the Accounts in Westeros Flagship
Fund, LP that are within the next few months. This gives us the ability to preemptively reach out to our investors
before they start thinking about redeeming capital.
o Report Center: Shared Reports > RWIRM – Accounts w/Upcoming Notice
An Accounts Report Builder that includes “days since last contact” (described above) and performance information on
the Accounts in our Fund. This allows us to see which investors we may not have reached out to one-on-one in some
time and gives us a quick snapshot of their Account’s performance (so we can brag about it, of course).
o Report Center: Shared Reports > RWIRM – Investor Outreach: Westeros
An additional Accounts Report Builder that looks at our investor rankings and includes additional account information,
namely earnings and returns (expanding on the other accounts report without creating too massive of a dataset).
o Report Center: Shared Reports > RWIRM – Investor Rankings: Westeros
Again, all of these reports are very nice to have on their own, and dynamically adjusted as time goes on (both the Notice
report and the report with Days Since Last Contact utilize the current date, so we don’t have to worry about adjusting the
reports). But again, it would be very useful to have all of this information in a format that we can share easily across
users/colleagues in one place, which can be refreshed with the click of a button. The Excel document we looked at is entitled
“Investor Relations Dashboard.”
Since we have already added in the PivotTables, conditional formatting, and graphs with our previous scenarios, we
are now ready to learn some beneficial formulas and how to create a slicer to filter our entire dashboard by each
Investor.
o To create a slicer, we must first have our PivotTables created (which are all housed in our Tables worksheet
within our workbook).
o Once we have the PivotTables, we will click into one of the PivotTables we wish to connect, and in PivotTable
options, select “Insert Slicer.” With this, we used the PivotTable within cell G1 (PivotTable 8).
A pop-up will appear and we will select the field(s) we wish to use as a filtering option.
For this case, we’re going to use the Investor Name since we want to see an entire dashboard for
each investor and their information.
o Once we have this created, we’ll cut and paste it to our main dashboard.
o Now, we have it connected to one of the PivotTables (the one we added it to), but what if we have multiple
PivotTables that our dashboard data is coming from?
Well, we can easily connect the slicer to multiple PivotTables from the same worksheet. To do this,
we’ll click into the slicer and we’ll see a new ribbon appear.
We’ll click “options” under that ribbon and then select “PivotTable Connections.” A pop-up
with all PivotTables within the workbook will show up and we can select all that apply.
However, if we want to connect multiple PivotTables from different worksheets, we will have to add
some background developer VBA code, which we’ve added here to allow us to do just that.
To view this code, you will have to turn-on the Developer ribbon, which can be done by going
to: File > Options > Customize Ribbon > and checking the box for “Developer” on the right.

©2015 Backstop Solutions Group, LLC
BUC: Handout – BUC: Backstop User Conference 2015 | page 5
Once you have this ribbon enabled, you can click on the ribbon at the top, and clicking
“Visual Basic” on the left of the ribbon.
o This pop-out window looks daunting, but once you double-click on Sheet4 (Tables),
you’ll notice that we have added an IF code to update PivotTable8 if PivotTable7 (cell
P1) changes. If you make any changes to this code, simply click “Save” and then exit
the window.
o We also have formulas that we’ll be using within this document, which are available in the Formulas tab of the
workbook. These formulas all serve a different purpose, but in terms of the BSG_GetRefreshableCell, we can
use this in place of a Vlookup when needing to reference a specific data point but not a specific cell.
We are using this type of formula within the Investor Profiles tab in the “Upcoming Notices” section
because, if our RWIRM – Upcoming Notice report happens to change, the data being pulled will
remain the same since we’re not referencing a specific cell (which would need to happen with a
Vlookup formula).
We have one more tip and trick for you, which aids us in completing our tasks efficiently in Excel.
o Let’s say, a colleague of ours built this lovely dashboard and also created the Backstop reports, which are
pulled in via the Excel Toolkit. However, when working around the document, we noticed that one of the
reports did not include the “Investor Type” field. As long as this field is available in another report pulled into
the same Excel document, we can easily add it by using the same BSG_GetRefreshableCell formula.
Within this same Excel dashboard, we directed to the tab “BSG_RWIRM – Upcoming Notice” and
noticed that the Investor Type column is not present in this report. To add this:
We clicked into cell, J2 and added the following formula:
=BSG_GetRefreshableCell("BSG_Subj_RWIRM___Investor_Rankings__Westeros",[@[Acco
unt Name]],"Investor Type","*")
o This might look a bit different from a Vlookup. This is because, instead of locating to
a specific Excel worksheet and column/cell, we are using the quotations to direct to
that particular worksheet and column header.
o Also, the final part of the formula can either be left blank or have something within
quotations (whichever your preference) if there is no value.
Once we have this formula completed, we’ll click enter and see that the entire column has
been updated.
This is beneficial to us if we need to see certain information all in one place, but especially if we don’t
want to get lost in background VBA within Excel. We previously mentioned why we’d need to use
background VBA, but if we want to create multiple PivotTables from one data source, and need more
data added to that data source, this will be the easiest solution.
Additional Questions
If you have any questions following this workshop, see us at the BackChat Bar or the Excel Toolkit room. If you have
questions after the conference, feel free to visit our Support site (https://support.backstopsolutions.com/), or reach out to
Support: +1-312-277-7702 (support@backstopsolutions.com).
Additional Resources
Check out the Support Site (https://support.backstopsolutions.com) for additional resources, in particular:
Reporting Guides - https://support.backstopsolutions.com/um_toc#reports
Custom Layouts and Uploads Study Hall Video - https://support.backstopsolutions.com/ssh#customlU
Reporting Study Hall Videos - https://support.backstopsolutions.com/ssh#rbB
Custom Layouts User Guide: https://support.backstopsolutions.com/um_toc#customLO
Excel Toolkit Download and Resources - https://support.backstopsolutions.com/etk
