How$to$Create$an$eBook$
Copyright 2017 Emily Buehler
In 2014, I converted Bread Science into an ebook. I did the entire process myself because I
wanted to save money. I could not find a set of guidelines that answered all my questions, so I
typed up my notes to share. I initially published using Kindle Direct Publishing (KDP) simply
because it was easiest. By the time I finished, I was exhausted and temporarily gave up on other
retailers.
In 2016, I resumed the process because I wanted to sell my ebook directly from my website. I
also reformatted the KDP version to fix a faulty table of contents. (KDP now has much better
documentation online. They also respond pretty well when you submit a request for help.) I read
that most ebook sales are through KDP and decided not to pursue other retailers at that time.
This document contains (Part 1) my notes about formatting my ebook for Kindle Direct
Publishing, and (Part 2) my notes about selling the book from my own website. I’m not an
expert, so there may be better ways; I’m just sharing my experience.
Table&of&Contents&
Part%1:%Formatting%Your%eBook%for%Kindle%Direct%Publishing%....................................................%2$
ISBNs%................................................................................................................................................%2$
Do%a%test%document%(optional)%..........................................................................................................%2$
Process%images%.................................................................................................................................%2$
Make%a%cover%....................................................................................................................................%3$
Layout%and%format%content%in%a%word%processing%program%................................................................%3$
Formatting%tips%.................................................................................................................................%5$
Convert%and%publish%the%document%with%Kindle%Direct%Publishing%.....................................................%7$
Part%2:%Publishing%Your%eBook%on%Your%Own%...........................................................................%8$
Thoughts%on%direct%sales%...................................................................................................................%9$
Finding%a%digital%distributor%..............................................................................................................%9$
Thoughts%on%ebook%piracy%..............................................................................................................%11$
File%types%and%converting%files%for%upload%.......................................................................................%11$
Uploading%and%final%steps%...............................................................................................................%13$
Part&1:&Formatting&Your&eBook&for&Kindle&Direct&Publishing&
ISBNs&
The ISBN is a number that identifies your book—it is universal in the book world. Do you need
an ISBN for an ebook? This is uncertain, but Amazon no longer requires one.
There is only one place to buy an ISBN in the United States (Bowker, http://www.isbn.org), and
the price drops drastically if you buy several at once. You can buy one ISBN from a reseller, but
the ISBN will always be registered in the reseller’s name. According to Bowker, each version of
the book needs its own ISBN: versions include hard cover, soft cover, EPUB, MOBI (the Kindle
format), and PDF. Other sites say that all ebooks can share an ISBN as long as the content is the
same.
At Bowker’s website, you can log in and assign the ISBNs you own to your books or ebooks
using a fill-in form. Note that you’ll need your publishing company name and address (perhaps a
P.O. Box?) to do this.
Do&a&test&document&(optional)&
I made a miniature document with a sampling of all parts of my book (images of various sizes,
styles, bookmarks and links, various kinds of formatting). Then I went through the conversion
process with this test document to see what worked and what didn’t, before I invested time in
doing the whole book. There are a few ways to preview a Kindle file, some of which work more
consistently than others; these are discussed below. Doing the process with the test document
made me feel more comfortable. If your ebook is not super complicated, you might skip this
step.
Process&images&
I could not find consistent parameters to use. Even for one platform (Kindle), on the platform’s
own website, I could not find clear instructions. The instructions below are what I did and what
seems like common sense.
• Balance a smaller size (for fast loading) with higher quality.
• Save the originals in case you need to redo this (as technology improves).
• Resize images to 300 dpi and 1000 pixels on the longer side.
Here are some notes from the Kindle Direct Publishing website (circa 2016):
• use gif, png, bmp, jpeg
• use color or 16 shades of gray
• each image must be less than 5 MB
• the total manuscript must be less than 650 MB
• for maximum screen coverage, use a ratio of 9:11
Make&a&cover&
The cover is uploaded separately from the rest of the book; it should not be part of your main
document. I found the following specs to use (in 2016):
• jpeg or tiff, no compression
• RGB
• less than 50 MB
• 72 dpi
• ideal ration is 1.6 to 1
• 2500 pixels long, therefore 1562 pixels wide
Layout&and&format&content&in&a&word&processing&program&&
With print books, layout is done in a program like InDesign, with images and text positioned in a
permanent location on each page. The PDF format preserves this layout. You can self-publish a
PDF ebook; it will work fine for readers using a computer.
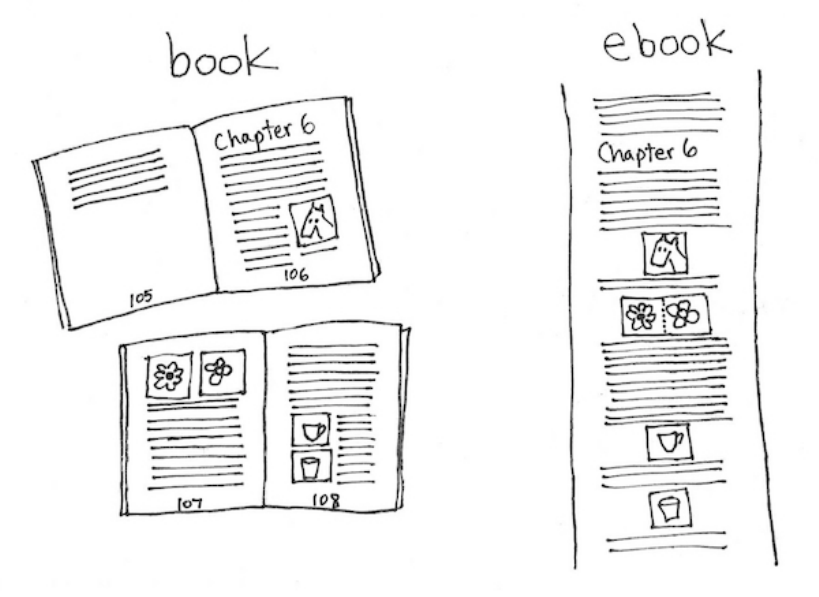
To create an ebook that works well on devices like a Kindle, you must stop thinking in these
terms and instead think of a “flowing” document, with images positioned in-line with the text.
This is because the ebook will be read on a variety of devices, with different screen sizes; having
the image appear in the correct location within the text is the most important concern. (The
ebook does have pages, but you do not know the page size or what content will fall on each
page.)
If a PDF were used on an e-reader, the person reading might have to zoom in to read and then
move right and left to see all the text, which would not be easy. Do not think of the ebook as
pages; think of it as one long scroll.
To prepare a manuscript for e-publishing, you need a word processing program. There are free
programs (like Open Office) and programs you buy (like Word). KDP will allow you to upload a
Word document, but sometimes the document does not convert perfectly. They recommend that
you export your file as HTML, zip the resulting files into a folder, and upload the whole folder.
(Complicated personal note: In 2014, KDP instructed me to upload a Word document. I had Mac
Pages 09, so I exported my file as a .DOC and uploaded it. [Note that the current Mac Pages is
free but lacks the ability to add bookmarks and internal links, which is needed in an ebook.] In
2016, I discovered that on some e‑readers, the links didn’t work and spaces were randomly
missing between words. KDP now recommended saving the Word DOC as an HTML file before
uploading. Pages 09 didn’t have this ability, so I used Word to do it and updated my ebook in
KDP. This solved the problems.)
You must format the document correctly so that the styles transfer to the ebook. For example, if
you use tabs, multiple line breaks, or multiple spaces to position text, they will not be preserved
in the ebook, and your text will not look good. I also had bold text that disappeared in the ebook.
KDP has a lot of instructions on dozens of pages on their website. They now offer a free ebook
of instructions (available as a PDF as well) that I find much easier to follow. Note that this ebook
assumes you are using Word; there is a separate version for Word for Mac users. As of March
2016, you can access the ebooks and PDFs here:
https://kdp.amazon.com/help?topicId=A2MB3WT2D0PTNK?ref_=pe_390220_166678400_kdp
gp_e_us_en_fn_l12
Formatting&tips&
Here are some simple formatting guidelines that I worked out:
At the end of a chapter, insert a page break; this should result in a new page in the Kindle file.
(It did not when I uploaded a Word DOC in 2014, but did when I uploaded an HTML file in
2016). Note: if you plan to sell your own ebooks (see Part 2), it may be important to use heading
styles at the starts of chapters and sections.
At the end of sections, if you don’t want a page break, you can insert centered characters (such
as * * *) in the text.
Between paragraphs, use a single paragraph break (i.e., the return key).
Apply a style to the document to get the paragraphs indented, if you wish; do not use a tab at the
start of each paragraph. However: I tested all the styles and decided I liked “Body Style” best
because it put small spaces between paragraphs instead of indenting, but the final book has small
indents instead, so I’m not sure it makes much difference which style you use.
Do not use multiple spaces or paragraph breaks, as they will be removed.
Insert an image in-line (embedded, not floating) in the text: insert it on its own line (i.e., hit
Return to get to a new line, then insert the image, then hit Return again). You don’t want the
image moving location or text wrapping around the image.
If you want two images side-by-side, create one jpeg with both images in it.
Image captions and in-text descriptions: If you use a caption, it might not stay with the image,
so that the reader will arrive at the image and not have the caption there, until he or she scrolls
down. You could make the caption be part of the jpeg to keep it with the image, but this is not a
great solution as the caption may not be readable by screen readers for the visually impaired. It
might be best to refer to images in the text (e.g., “In the image below, the horse is seen as it eats
oats”). If the reference always comes before the image, readers will always know what the image
is about when they reach it.
My book had one section with about twenty images, each with a caption. When I previewed, I
saw that each image appeared on a new page, with the NEXT caption after it. No matter that
each caption had “in the following image,” it was still confusing. I added a page break after each
image, to bump the unrelated caption to a new page, even though this resulted in a lot of extra
pages.
In general, make sure that your text works, regardless of the e-reader: If the print book text reads
“the image at the right,” it won’t be accurate in the ebook; even if you do allow text wrapping,
the image might no longer be at the right on some e-readers (which is why you should avoid text
wrapping). If you insert images as described above, you can safely use “above” and “below.”
Recipes and tables: I created a jpeg of each recipe and table in my book instead of using tabs or
a Word table to ensure that the recipe or table would look right.
eBooks do not have page numbers! Don’t refer to page numbers in the text. I numbered all my
sections (e.g., chapter 1, section 1.1, section 1.2, etc.) to give myself an easy way to refer to parts
of the book.
Position footnotes thoughtfully:
• I didn’t know if footnotes inserted using Word’s capabilities would appear in a logical place in
an ebook.
• I chose to put a footnote at the end of its paragraph.
• You could put footnotes at the end of the chapter and insert a pair of links (so that the reader
can get to the footnote and back).
• You could use endnotes if the notes are less immediate.
Create a table of contents (TOC) that links into the ebook. KPD has very specific instructions
for doing this, which I recommend reading. (Although as of March 2016, item #4 in their
instructions for Mac seems to be a mistake.) There are different instructions for Word and Word
for Mac; I’m not sure about Open Office.
• In Word on a PC, you apply the style “Heading1” (H1) to each chapter title; then you create the
automatic TOC, which finds all H1 text and pulls it into a TOC that links into the document;
finally, you delete the page numbers in this TOC (which are irrelevant). Note: H1 will make text
look a certain way (size, color, font); you can adjust this. Also note: I don’t have a PC so I did
not test this.
• In Word for Mac, you must manually type the TOC and then link each entry in the TOC to the
correct place in the text. KDP’s instructions involve applying the H1 style to chapter heads and
then creating hyperlinks from the TOC entries to the H1 places in the ebook. You also must
create a bookmark at the TOC so that you can link back to it from within the ebook.
• I created the TOC manually but used an alternate method for linking, in which I created
bookmarks in the ebook and hyperlinks to the bookmarks. This worked fine.
Here are instructions to manually insert bookmarks and links:
• Go to the start of a chapter or section (for example, Section 2.1).
• Insert a bookmark and name the bookmark “Section 2.1.”
• Go to the TOC.
• Highlight the entry “Section 2.1” and insert a hyperlink that links to the bookmark “Section
2.1.”
At the end of each chapter or section, include “Return to Table of Contents” text and insert a link
back to the TOC; this will help readers navigate your ebook.
Note: some e-readers support links in the document and some don’t.
Create a linked index (or not). I decided to link my index entries into the document to aid the
reader. I replaced the page numbers in the index with section numbers, so that if an e‑reader
does not support links, the reader will know approximately where to go.
I created a bookmark in the text for each index item. I named each bookmark to match its index
entry so that when I created the link (from index entry to bookmark), it was clear which
bookmark went with which entry.
This was a huge hassle and involved hundreds of bookmarks. There were also complications
when two entries linked to the same place: I could not create more than one bookmark at one
location, so I had to re-use bookmarks, which meant keeping track of which what went where. It
was best to use one word [not a whole sentence] when creating each bookmark, so that a second
bookmark could be created in the sentence if necessary.
I think an index is important, but doing this is not for the faint of heart.
Include your website URL in the ebook so that people can find you directly. (I put mine in the
front matter.)
Convert&and&publish&the&document&with&Kindle&Direct&Publishing&
Amazon’s Kindle Direct Publishing (KDP) program was the most approachable, so I started
there. Amazon offers a free app that enables Kindle books to be read on any device. (Look for
the link to download the app on the sale page of any ebook on Amazon.) Because of this, I
thought my ebook would be universally available. I have since learned that Kindles and Kindle
content are not available for sale in some countries by law; readers in those countries look to
other websites where they can buy non-Kindle ebooks.
KDP offers something called Digital Rights Management (DRM) that is supposed to protect
ebooks from piracy. Initially, this seemed like a good thing, which was another reason that I felt
comfortable publishing with KDP. However, I have since read articles opposed to DRM,
including one by well-known publisher Bill O’Reilly. The reasons are many, including ethical
considerations, the fact that hackers can evade DRM, and statistics that show piracy doesn’t hurt
sales and might even help them. (Read more thoughts on DRM in the next section.) You will be
given the option to turn DRM on or off.
The Amazon conversion is very easy:
Create an account at Kindle Direct Publishing. Note that there are a few websites that you
might get confused:
• Kindle Direct Publishing is for publishing and selling an ebook on Amazon; you are the
publisher of the book, but not necessarily the author.
• Amazon Seller Central is for selling print books on Amazon; these don’t have to be your
books—you may not be the author or publisher.
• Amazon Author Central is for managing your author profile and linking to the books and
ebooks you’ve written (for sale on Amazon); you can also link to your own website, so this is
free advertising.
When you create a seller account, Amazon will link your buyer and seller accounts; this can be
annoying if you want to use different emails (such as personal for buying, business for selling).
Their rules say you cannot have multiple accounts.
Also, you are only allowed to have one author account. You are, however, able to create
pseudonyms and separate author profiles for your pseudonyms.
Once in KDP, add a book and follow the steps! You can upload a Word DOC, but KDP (and
I) recommend converting it to HTML format before uploading.
I have had difficulty previewing my ebook; there should be a final step to allow you to preview
it, but I swear it is missing sometimes. Recently when I uploaded an updated version, the
preview step was missing; I went ahead and uploaded, but this might not be wise if it is a brand
new ebook. I was then told to download the Kindle Previewer (which involved installing a
legacy version of Java) to enable me to view a preview online, but the program wouldn’t work.
Instead, I downloaded the free Kindle app, and then I was able to download a MOBI file of my
ebook from KDP that I could open in the Kindle app; but again, this was AFTER the book had
been published.
If you reach the point of publishing and have not been able to preview, I recommend saving your
work and contacting KDP for help. They are very responsive; they’ll probably tell you to do
what you just did, only this time when you do it, the preview button will be there!
Ahead of time, you’ll read about the royalty rates Amazon pays (35% for $0.99 ebooks, 70% for
ebooks priced $2.99–$9.99). When it comes down to it (at least in my experience), Amazon
deducts fees that result in the amount you earn for a $2.99+ ebook being ~50%. There are also
different fees for sales in different countries; my ebook is $6.99 and I sometimes receive royalty
payments of $1.98.
There is a program called KDP Select that Amazon will offer enrollment in. There are some
benefits to enrolling (like certain customers can read your book for free, and Amazon still pays
you some royalty), but you are not allowed to sell your book anywhere else.
Remember that you must have the rights to all content (e.g., the image on your cover).
Advertise your ebook. Once the ebook is live on Amazon (which happens pretty quickly), put a
link to the ebook’s sale page on your website to help customers find it.
Part&2:&Publishing&Your&eBook&on&Your&Own
&
I initially planned to make my ebook available at as many retailers as I could, as well as my own
website. I ended up publishing only on Amazon’s KDP. After a year, I resumed the process,
starting with selling from my own website.
Thoughts&on&direct&sales&
I first thought I would sell ebooks from my website with no middlemen. I encountered several
problems, however.
I would still need someone to process the credit card payments (e.g., Paypal).
People expect immediate access to an ebook; therefore, the sale process would involve the
customer paying and then being sent to a page to download the ebook. I have two ebooks, and I
wasn’t sure how to deliver two ebooks—the only solution I could find was to use a button for
each purchase instead of a shopping cart, which is clunky and inconvenient for the customer.
The download page would not be protected; buyers could share it with others, and people might
find it on their own. I could take steps to secure it but none that would be foolproof:
• I could try to hide the page from search engines.
•
I could change the page’s URL frequently.
• I could use a long, weird URL that no one would guess.
• I could email the buyer a password, needed to do the download; this would involve figuring out
how to do that.
It seemed easiest and safest to use a digital distributor to handle the distribution of the ebook.
Finding&a&digital&distributor&
Googling “digital distributor” is very confusing. There are tons of companies offering a variety
of services; some of them convert your file and send it to retail sites like Amazon, while others
just sell it. Some have an upfront fee, while others take a percentage of each sale.
For example, (in 2016) BookBaby charges an upfront fee to format and convert your Word DOC
and distribute the ebook to sale sites and their own BookShop. You receive “100% of net sales.”
However, the sale site (e.g., Amazon) presumably takes their cut, and BookBaby’s BookShop
only pays 85%. Smashwords, in contrast, will convert your Word DOC to various formats and
upload it to many sale sites, including its own store, for no fee. You receive 60% of sales from
the other sites and up to 80% from the Smashwords store. (This info is based on a scan of the
company websites; I have not used these companies to verify the accuracy of their claims.)
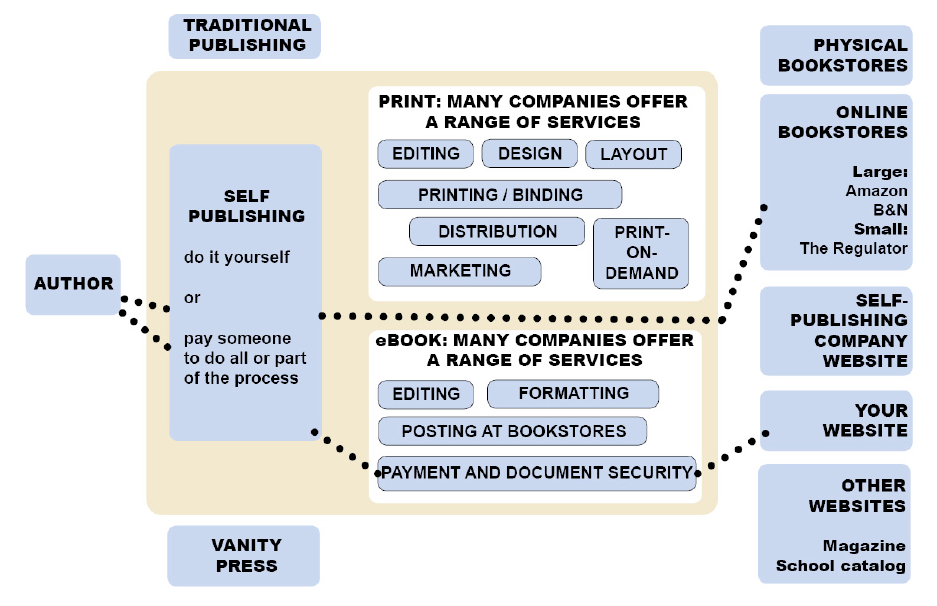
I created the following image of the publishing world to clarify all these companies in my head.
In this image, the author is at the left and sales outlets are at the right. The world of self-
publishing is enclosed in the tan box, with print books on top and ebooks underneath. The two
cases presented in this document are represented by the dotted lines: Doing it all yourself and
publishing with KDP (Part 1) is the top line; you can see that it bypasses all of the ebook
services. Using a distributor to sell from your own website (but otherwise doing it yourself; Part
2) is the bottom dotted line; you can see that it bypasses all services except “payment and
document security.”
If you are at the start of this process, it might be worth it to pay one of these companies. They
definitely have the benefit of getting your ebook out on many retail sites with no additional
work. I do not have a recommendation of which to use.
I had already formatted my document and knew I could convert it myself, so I chose to use a
digital distributor that only collects payment and distributes the final product. Someone
recommended Gumroad. I had also heard of E-junkie. I looked into these two companies, but
there may be many more.
I found this 2014 blog post by Jeremiah Shoaf that compares the two platforms:
http://www.jeremiahshoaf.com/blog/gumroad-vs-e-junkie-whats-the-best-way-to-sell-your-
digital-products
I decided to use Gumroad:
• Someone I trusted had recommended it.
•
It looked nice and seemed simple to use.
•
Customers can pay with a credit card without having a Paypal or other such account.
•
I am comfortable with paying a small fee to Gumroad with each sale, and I like that the fee
includes any credit card fees.
I also decided to direct customers from my website to Gumroad’s to buy the ebook, rather than
having a popup appear on my website. I needed an SSL certificate to do the popup, and I thought
customers might feel more secure buying at Gumroad.
Thoughts&on&ebook&piracy&
As I prepared my files for upload to Gumroad, I began to think more about DRM and ebook
piracy. For starters, it is possible to pay someone to apply DRM to your ebook, but googling
turns up more sites that say “remove DRM from your ebooks” than sites selling DRM, so it
doesn’t seem worth it. Also, I like the idea of not using DRM because it seems to create hassle
for legitimate readers, whereas people who steal will know how to remove it.
Although I can accept that piracy will happen, and I like the idea that piracy can help authors get
exposure, I felt nervous about what could go wrong (in increasing order of terribleness): no one
buys my ebook because they can get it free on a sharing site, someone starts selling the ebook as
their own, someone uses the files to create a print version that they sell, someone claims they
wrote my book and contacts my website host to shut me down or sues me for copyright
infringement.
I wanted to feel good about moving forward with the non-Amazon ebook. I spent some time
considering the issue and came up with these ideas:
Some people steal ebooks at sharing sites. They might not realize they are stealing or might
justify it as a victimless crime. The comments at such sites indicate that users think the sharing
sites are the greatest thing ever. This is super annoying, and I considered inserting a message
aimed at these people in the front matter of the book, something akin to “If you stole this, please
consider buying a copy,” but I decided that that might leave a bad feeling with legitimate buyers
so I abandoned the idea.
Some people might steal the book to sell it themselves. I do not want to start monitoring for this
(or for illegal sharing), which would result in a lot of stress, or to get into an online battle with
anyone, which might result in them retaliating (see list of terrible situations above). I decided
that if I moved forward with publishing on Gumroad, I would not spend time searching the
Internet for stolen ebooks.
These thieves could probably remove the DRM from my Amazon version anyway.
I considered adding my website and copyright information at various locations throughout the
ebook, to make it more identifiable as mine.
I considered that having DRM-free ebooks might cause people to buy the ebooks from me
instead of from Amazon.
File&types&and&converting&files&for&upload&
There is a thorough list of ebook file types on Wikipedia, and which e-readers support them. The
main three file types seem to be PDF, EPUB, and MOBI. As described previously, PDFs can be
difficult to view on e-readers. If you just sell EPUB and MOBI, your book will be readable on all
devices. (MOBI is Amazon’s format for Kindles, and EPUB is the universal-except-for-Amazon
format that works for other devices.) So, you need to convert your word processing document to
an EPUB and a MOBI.
Supposedly Mac Pages can export an EPUB. This turned problematic: Only 11 MB are allowed
per chapter, so you need to use Apple’s template to separate your content into chapters; my
chapters were not recognized, and all the images disappeared after the 11 MB limit was reached.
Even had I used Apple’s template, the number of images in my book would have put individual
chapters over the limit.
I also considered using the MOBI version that I had downloaded from Amazon, but I thought it
might have DRM applied to it or some other problem that I could not see.
There are programs to convert between formats. I used Calibre, a free program that was
recommended by online reviews. Calibre can be used simply as an e-reader that maintains a book
library on your computer, or it can be used for conversions. There are instructions for
downloading the program at its website.
Using Calibre is somewhat straightforward, although it has so many capabilities that the interface
can be confusing to look at. There is a button to add an ebook to the library and a button to
convert. (Choose the output format at the top right of the conversion window.) Calibre converts
to and from dozens of filetypes, although it recommends some over others, because the results
turn out better. So, I could upload my Word document (note: DOCX type, not DOC!) and
convert to both EPUB and MOBI. After adding an ebook to Calibre or doing a conversion, the
files can be found on your computer in a folder called Calibre Library.
Use the Metadata tab to update the author, title, and cover of your ebook.
MOBI notes: Calibre detects chapters (by finding H1 and H2 styles) and page breaks; the
default setting is to insert a page break at both of these places (chapters and page breaks). I had
not used H1 or H2 to denote my chapters, so I turned off the detection of chapters (on the
Convert window, under Structure Detection, replace the long string of code at the top with “/”).
It probably wouldn’t have made a difference but seemed safer.
I encountered a bug where Calibre inserted the page break AFTER my chapter titles instead of
before; I was able to solve the problem by making sure there was always a line break before a
page break.
I opened the MOBI file in the Kindle app to make sure it looked okay; to do this, I had to
navigate to the file in the Calibre Library folder and choose “Open With” Kindle (i.e., I could not
seem to add it to the Kindle library from within the Kindle app). My MOBI file caused Calibre to
crash if I tried to read it in Calibre, maybe because of its size.
Finally, if you are working through several updates of your files, make sure you delete old
versions from Calibre and Kindle before importing the new version.
EPUB notes: The EPUB also had the bug of misplaced page breaks, but it was solved as
described above. I opened the EPUB file in iBooks to make sure it looked okay. Again, if you
are working through several updates of your files, make sure you delete old versions from
Calibre and iBooks before importing the new version.
Uploading&and&final&steps&
The basic steps of using Gumroad are the following:
• Create a free account; add your bank info.
•
Create a product, set the price, and upload the relevant files.
•
Publish the product.
•
Share the link to the product on your own website.
When customers buy the product, they receive a link to download it.
Gumroad pays you every two weeks.
Gumroad is so straightforward that there really aren’t any more-detailed instructions.
One final concern is that customers might not know how to transfer a file from their computer to
their e-reader. You might include basic instructions like these (adapted from Amazon,
https://www.amazon.co.uk/gp/help/customer/display.html?nodeId=201243040):
• Connect your device to your computer with a USB cable.
•
Open the device folder, and then open the Documents or Internal Documents folder.
•
Locate the ebook file on your computer, and drag and drop the file into the folder. The
appropriate folder varies with device.
•
Safely disconnect your device from your computer once the transfer is complete.
