
Mobile Application Development Lab
LABORATORY MANUAL
&
RECORD
B.TECH (R18)
(III YEAR – II SEM)
(2020-21)
DEPARTMENT OF
COMPUTER SCIENCE AND ENGINEERING
MALLA REDDY COLLEGE OF ENGINEERING &
TECHNOLOGY
(Autonomous Institution – UGC, Govt. of India)
Recognized under 2(f) and 12 (B) of UGC ACT 1956
(Affiliated to JNTUH, Hyderabad, Approved by AICTE - Accredited by NBA & NAAC – ‘A’ Grade - ISO 9001:2015 Certified)
Maisammaguda, Dhulapally (Post Via. Hakimpet), Secunderabad – 500100, Telangana State, India
DEPARTMENT OF COMPUTER SCIENCE AND ENGINEERING
Vision
To acknowledge quality education and instill high patterns of discipline making the
students technologically superior and ethically strong which involves the
improvement in the quality of life in human race.
Mission
To achieve and impart holistic technical education using the best of infrastructure,
outstanding technical and teaching expertise to establish the students into
competent and confident engineers.
Evolving the center of excellence through creative and innovative teaching learning
practices for promoting academic achievement to produce internationally accepted
competitive and world class professionals.
PROGRAMME EDUCATIONAL OBJECTIVES (PEOs)
PEO1 – ANALYTICAL SKILLS
1. To facilitate the graduates with the ability to visualize, gather information, articulate, analyze, solve
complex problems, and make decisions. These are essential to address the challenges of complex
and computation intensive problems increasing their productivity.
PEO2 – TECHNICAL SKILLS
2. To facilitate the graduates with the technical skills that prepare them for immediate employment
and pursue certification providing a deeper understanding of the technology in advanced areas of
computer science and related fields, thus encouraging to pursue higher education and research
based on their interest.
PEO3 – SOFT SKILLS
3. To facilitate the graduates with the soft skills that include fulfilling the mission, setting goals,
showing self-confidence by communicating effectively, having a positive attitude, get involved in
team-work, being a leader, managing their career and their life.
PEO4 – PROFESSIONAL ETHICS
To facilitate the graduates with the knowledge of professional and ethical responsibilities by
paying attention to grooming, being conservative with style, following dress codes, safety
codes,and adapting themselves to technological advancements.
PROGRAM SPECIFIC OUTCOMES (PSOs)
After the completion of the course, B. Tech Computer Science and Engineering, the graduates will
have the following Program Specific Outcomes:
1. Fundamentals and critical knowledge of the Computer System:- Able to Understand the working
principles of the computer System and its components , Apply the knowledge to build, asses, and
analyze the software and hardware aspects of it .
2. The comprehensive and Applicative knowledge of Software Development: Comprehensive skills of
Programming Languages, Software process models, methodologies, and able to plan, develop,
test, analyze, and manage the software and hardware intensive systems in heterogeneous
platforms individually or working in teams.
3. Applications of Computing Domain & Research: Able to use the professional, managerial,
interdisciplinary skill set, and domain specific tools in development processes, identify the
research gaps, and provide innovative solutions to them.
PROGRAM OUTCOMES (POs)
Engineering Graduates will be able to:
1.
Engineering knowledge
: Apply the knowledge of mathematics, science, engineering
fundamentals, and an engineering specialization to the solution of complex engineering
problems.
2.
Problem analysis
: Identify, formulate, review research literature, and analyze complex
engineering problems reaching substantiated conclusions using first principles of
mathematics, natural sciences, and engineering sciences.
3.
Design / development of solutions
: Design solutions for complex engineering problems and
design system components or processes that meet the specified needs with appropriate
consideration for the public health and safety, and the cultural, societal, and environmental
considerations.
4.
Conduct investigations of complex problems
: Use research-based knowledge and research
methods including design of experiments, analysis and interpretation of data, and synthesis
of the information to provide valid conclusions.
5.
Modern tool usage
: Create, select, and apply appropriate techniques, resources, and modern
engineering and IT tools including prediction and modeling to complex engineering activities
with an understanding of the limitations.
6.
The engineer and society
: Apply reasoning informed by the contextual knowledge to assess
societal, health, safety, legal and cultural issues and the consequent responsibilities relevant
to the professional engineering practice.
7.
Environment and sustainability
: Understand the impact of the professional engineering
solutions in societal and environmental contexts, and demonstrate the knowledge of, and
need for sustainable development.
8.
Ethics
: Apply ethical principles and commit to professional ethics and responsibilities and
norms of the engineering practice.
9.
Individual and team work
: Function effectively as an individual, and as a member or leader in
diverse teams, and in multidisciplinary settings.
10.
Communication
: Communicate effectively on complex engineering activities with the
engineering community and with society at large, such as, being able to comprehend and
write effective reports and design documentation, make effective presentations, and give and
receive clear instructions.
11.
Project management and finance
: Demonstrate knowledge and understanding of the
engineering and management principles and apply these to one’s own work, as a member
and leader in a team, to manage projects and in multi disciplinary environments.
12.
Life- long learning
: Recognize the need for, and have the preparation and ability to engage
in independent and life-long learning in the broadest context of technological change.

MALLA REDDY COLLEGE OF ENGINEERING & TECHNOLOGY
Maisammaguda, Dhulapally Post, Via Hakimpet, Secunderabad – 500100
DEPARTMENT OF COMPUTER SCIENCE AND ENGINEERING
GENERAL LABORATORY INSTRUCTIONS
1. Students are advised to come to the laboratory at least 5 minutes before (to the starting time),
those who come after 5 minutes will not be allowed into the lab.
2. Plan your task properly much before to the commencement, come prepared to the lab with the
synopsis / program / experiment details.
3. Student should enter into the laboratory with:
a. Laboratory observation notes with all the details (Problem statement, Aim, Algorithm, Procedure,
Program, Expected Output, etc.,) filled in for the lab session.
b. Laboratory Record updated up to the last session experiments and other utensils (if any) needed in
the lab.
c. Proper Dress code and Identity card.
4. Sign in the laboratory login register, write the TIME-IN, and occupy the computer system allotted to
you by the faculty.
5. Execute your task in the laboratory, and record the results / output in the lab observation note
book, and get certified by the concerned faculty.
6. All the students should be polite and cooperative with the laboratory staff, must maintain the
discipline and decency in the laboratory.
7. Computer labs are established with sophisticated and high end branded systems, which should be
utilized properly.
8. Students / Faculty must keep their mobile phones in SWITCHED OFF mode during the lab
sessions.Misuse of the equipment, misbehaviors with the staff and systems etc., will attract severe
punishment.
9. Students must take the permission of the faculty in case of any urgency to go out ; if anybody found
loitering outside the lab / class without permission during working hours will be treated seriously
and punished appropriately.
10. Students should LOG OFF/ SHUT DOWN the computer system before he/she leaves the lab after
completing the task (experiment) in all aspects. He/she must ensure the system / seat is kept
properly.
Head of the Department Principal
INDEX
S.NO
Nameof the experiment
Page.no
1
Installation of Android studio.
1
2
Development Of Hello World Application
13
3
Create an application that takes the name from a text
box and shows hello message along with the name
entered in text box, when the user clicks the OK
button
18
4
Create a screen that has input boxes for User Name,
Password, Address, Gender(radio buttons for male
and female), Age (numeric), Date of Birth (Date
Picket), State (Spinner) and a Submit button. On
clicking the submit button, print all the data below
the Submit Button (use any layout)
25
5
Design an android application to create page using
Intent and one Button and pass the Values from one
Activity to second Activity
30
6
Design an android application Send SMS using Intent
40
7
Create an android application using Fragments
50
8
Design an android application Using Radiobuttons
56
9
Design an android application for menu.
60
10
Create a user registration application that stores the
user details in a database table.
65
EXPERIMENT NO.1
INSTALLING AND RUNNING APPLICATIONS ON ANDROID STUDIO
Step 1 - System Requirements
The required tools to develop Android applications are open source and can be downloaded from
the Web. Following is the list of software's you will need before you start your Android application
programming.
Java JDK5 or later version
Java Runtime Environment (JRE) 6
Android Studio
Step 2 - Setup Android Studio
Android Studio is the official IDE for android application development.It works based on IntelliJ
IDEA, You can download the latest version of android studio from Android Studio 2.2 Download, If
you are new to installing Android Studio on windows,you will find a file, which is named
as android-studio-bundle-143.3101438-windows.exe.So just download and run on windows
machine according to android studio wizard guideline.
If you are installing Android Studio on Mac or Linux, You can download the latest version
from Android Studio Mac Download,or Android Studio Linux Download, check the instructions
provided along with the downloaded file for Mac OS and Linux. This tutorial will consider that you
are going to setup your environment on Windows machine having Windows 8.1 operating system.
Installation
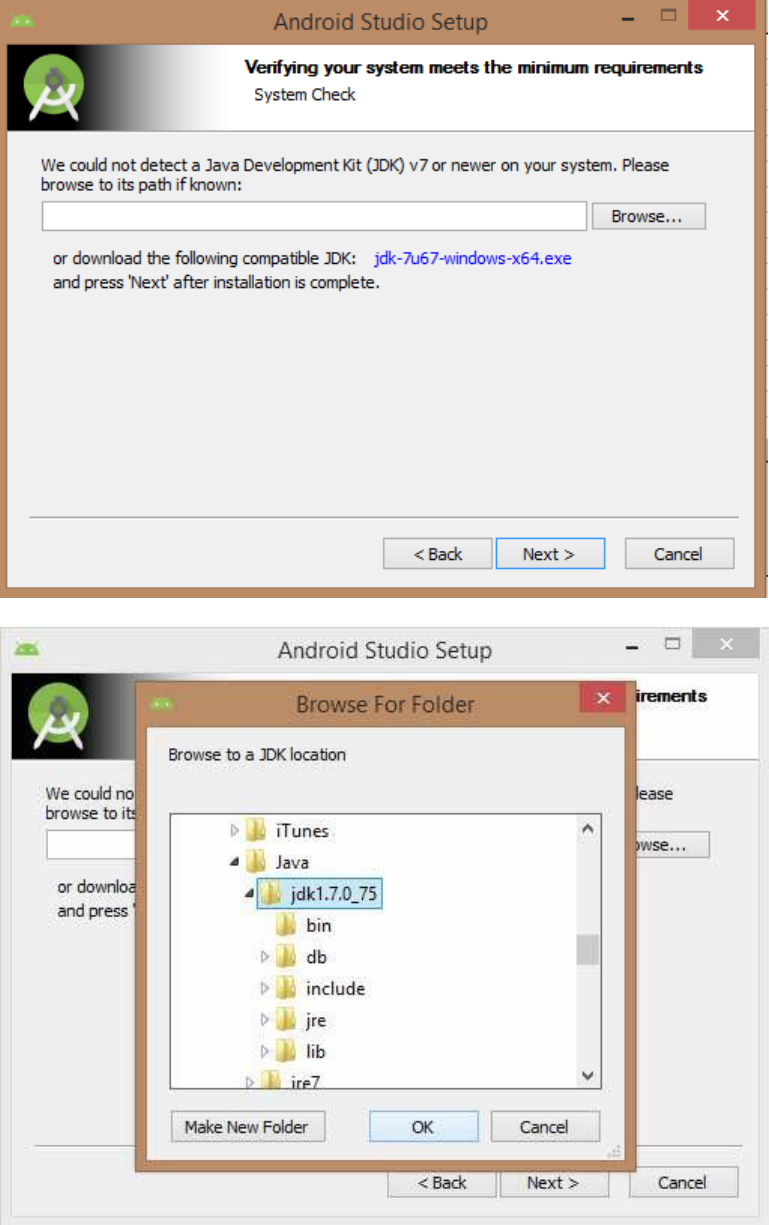
So let's launch Android Studio.exe,Make sure before launch Android Studio, Our Machine should
required installed Java JDK. To install Java JDK,take a references of Android environment setup
Once you launched Android Studio, its time to mention JDK7 path or later version in android
studio installer.
Below the image initiating JDK to android SDK
Need to check the components, which are required to create applications, below the image has
selected Android Studio, Android SDK, Android Virtual Machine and performance(Intel chip).
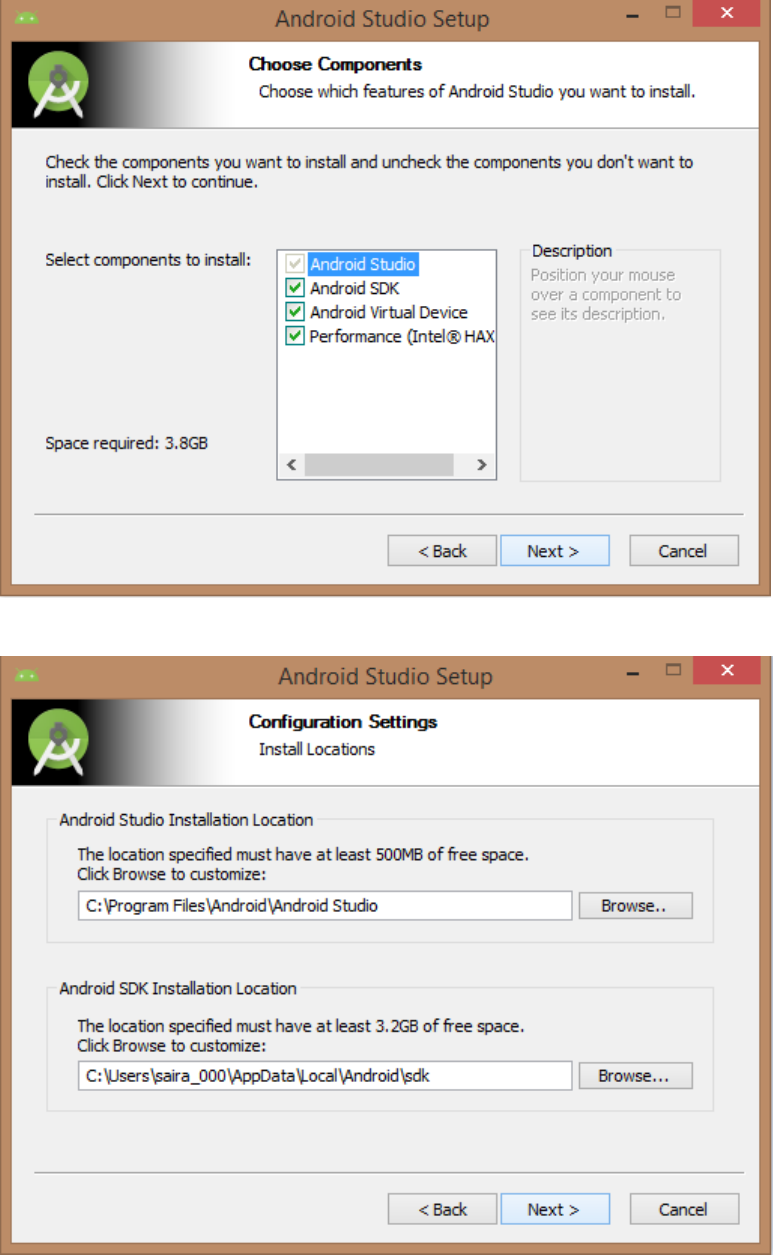
Need to specify the location of local machine path for Android studio and Android SDK, below the
image has taken default location of windows 8.1 x64 bit architecture.
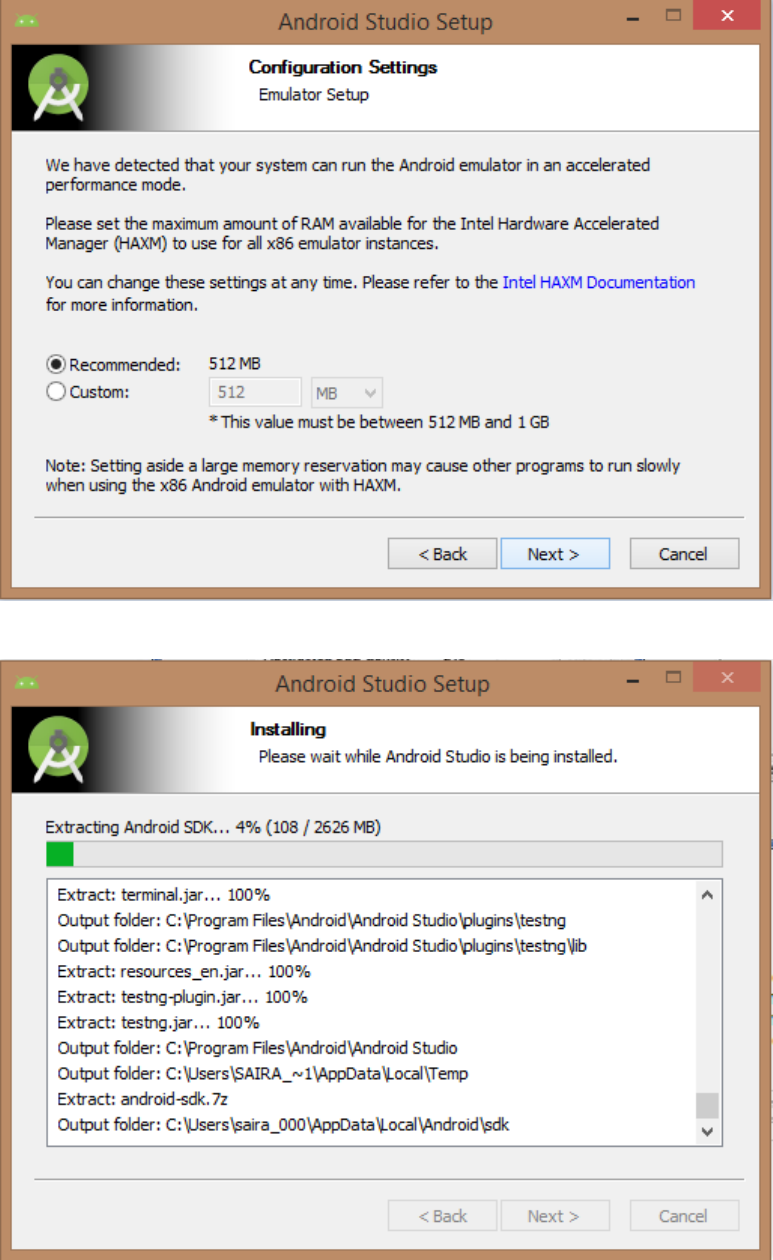
Need to specify the ram space for Android emulator by default it would take 512MB of local
machine RAM.
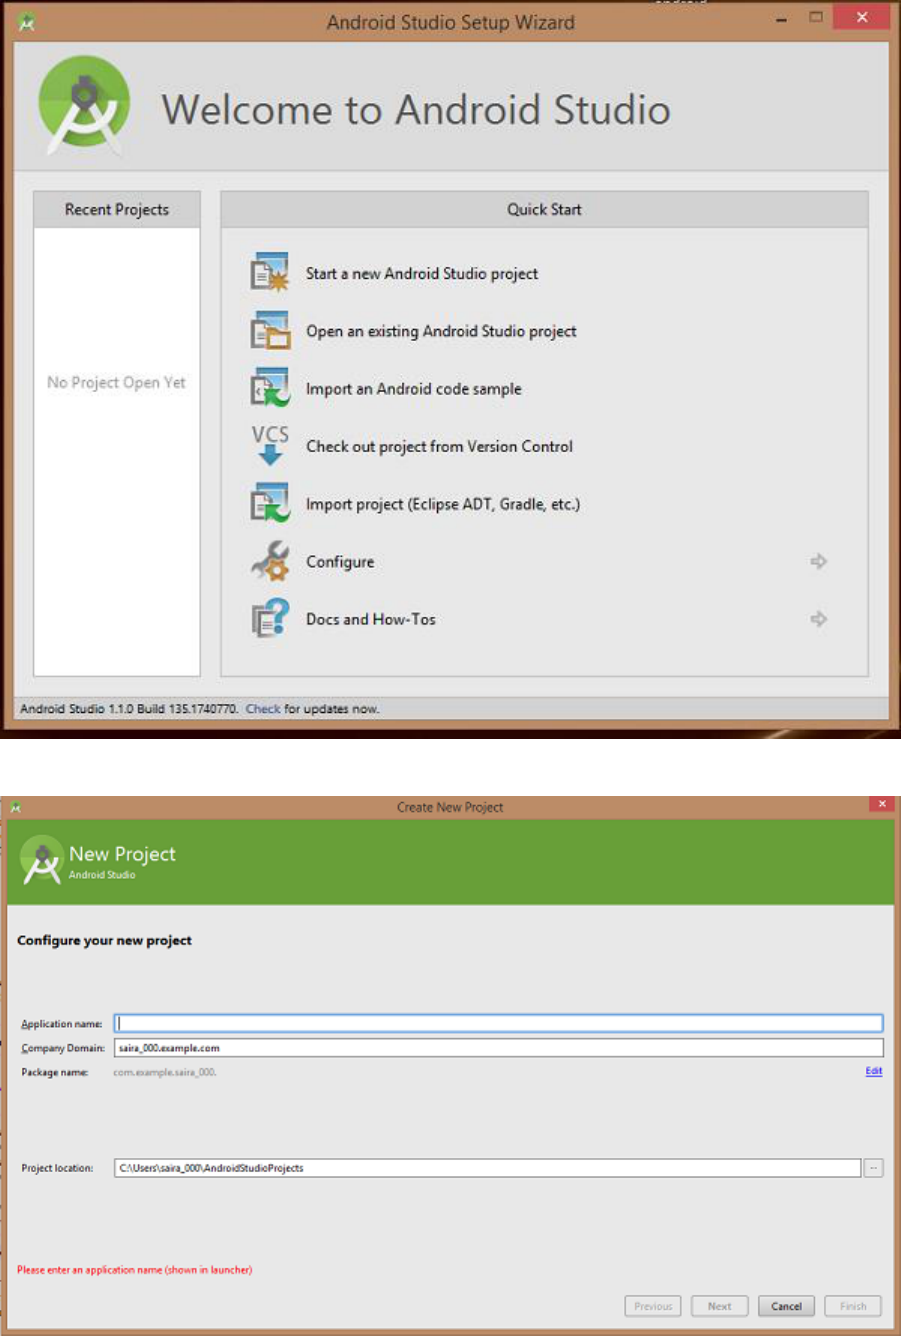
At final stage, it would extract SDK packages into our local machine, it would take a while time to
finish the task and would take 2626MB of Hard disk space.
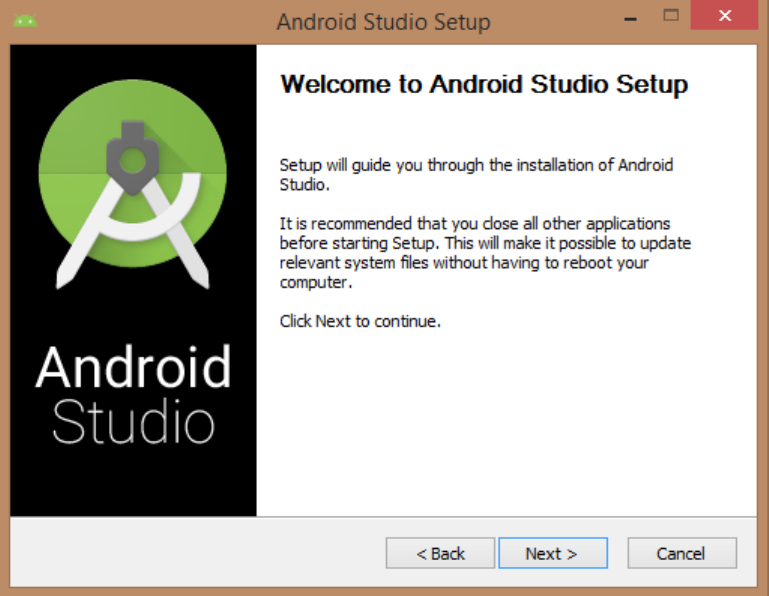
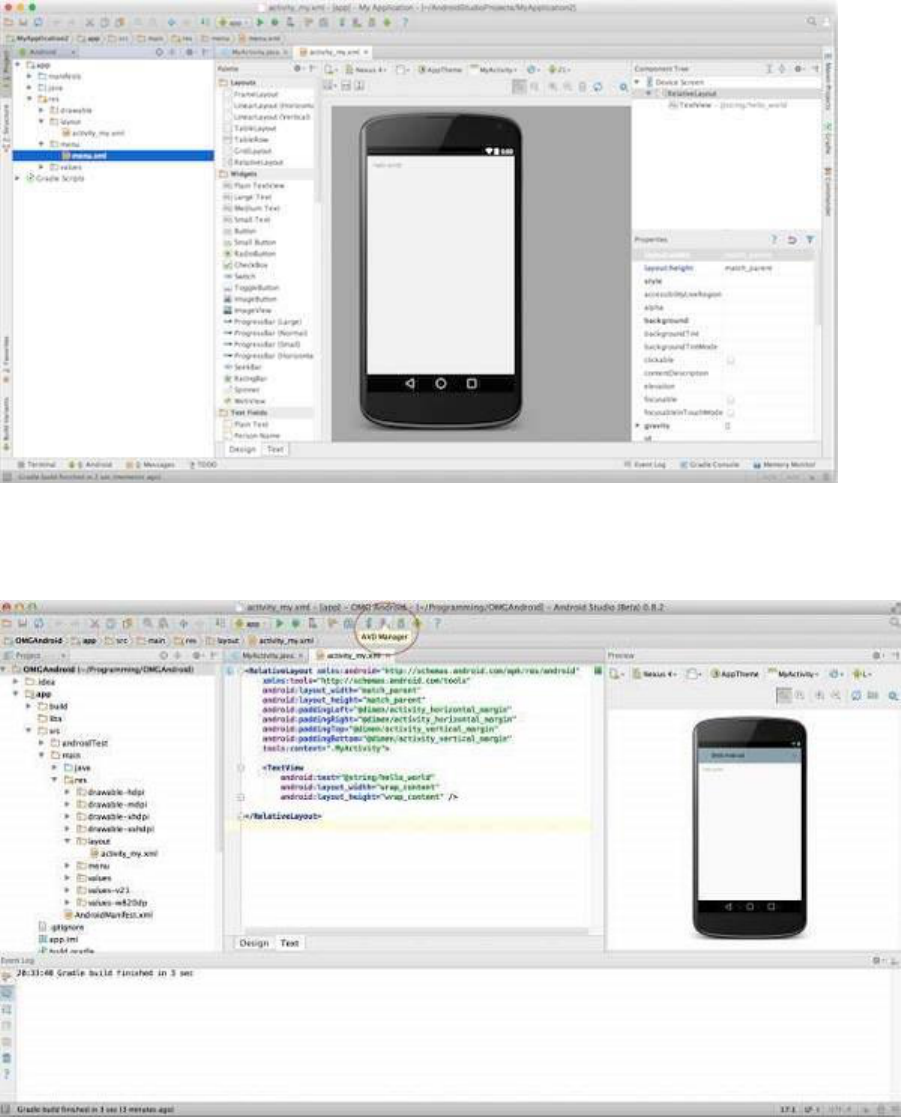
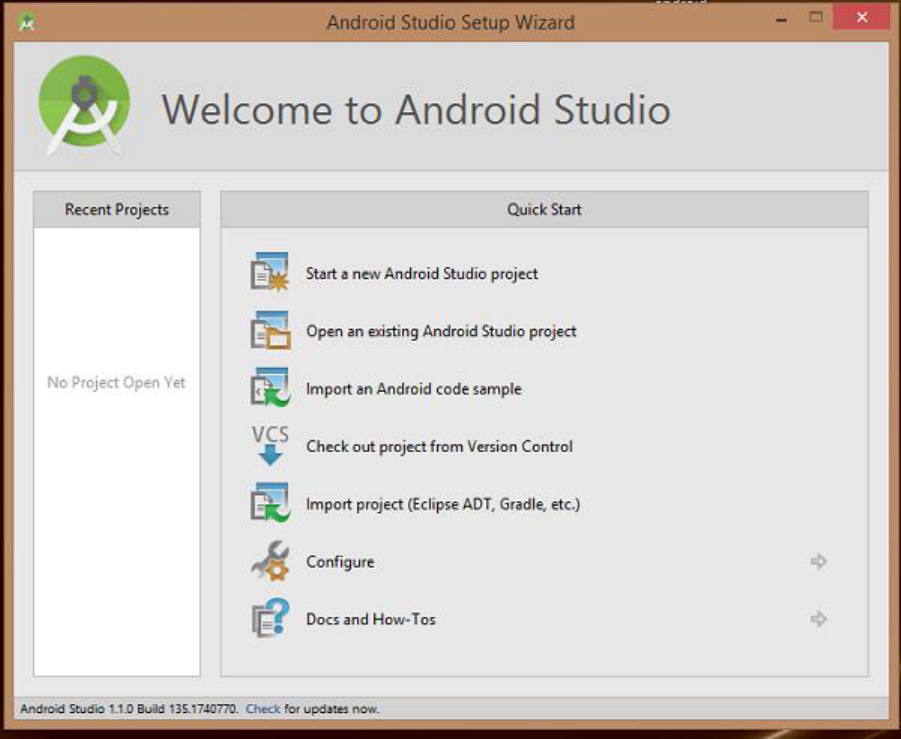
After done all above steps perfectly, you must get finish button and it gonna be open android
studio project with Welcome to android studio message as shown below
You can start your application development by calling start a new android studio project. in a new
installation frame should ask Application name, package information and location of the project.
After entered application name, it going to be called select the form factors your application runs
on, here need to specify Minimum SDK, in our tutorial, I have declared as API23: Android
6.0(Mashmallow)

The next level of installation should contain selecting the activity to mobile, it specifies the default
layout for Applications
At the final stage it going to be open development tool to write the application code.
Step 3 - Create Android Virtual Device
To test your Android applications, you will need a virtual Android device. So before we start
writing our code, let us create an Android virtual device. Launch Android AVD Manager Clicking
AVD_Manager icon as shown below
After Click on a virtual device icon, it going to be shown by default virtual devices which are
present on your SDK, or else need to create a virtual device by clicking Create new Virtual
device button
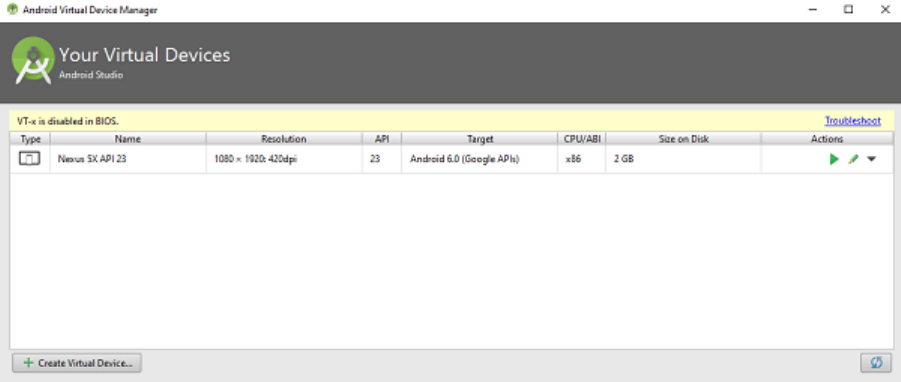
If your AVD is created successfully it means your environment is ready for Android application
development. If you like, you can close this window using top-right cross button. Better you re-
start your machine and once you are done with this last step, you are ready to proceed for your
first Android example but before that we will see few more important concepts related to Android
Application Development.
Exercise Program
Write the steps in installing Android Studio in Windows and Linux.
Record Notes
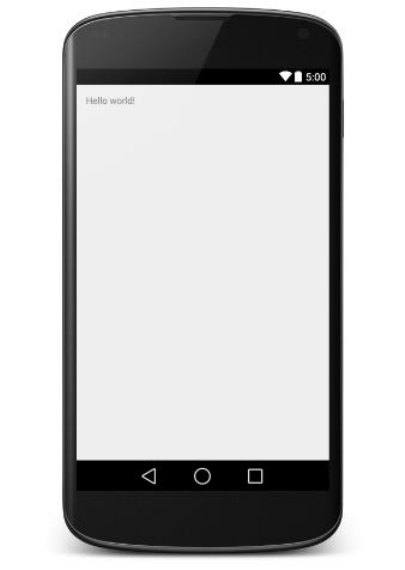
2. DEVELOPMENT OF HELLO WORLD APPLICATION
AIM: To design an android application to display Hello World
First step is to create a simple Android Application using Android studio. When you click on
Android studio icon, it will show screen as shown below
You can start your application development by calling start a new android studio project. in a new
installation frame should ask Application name, package information and location of the project.−
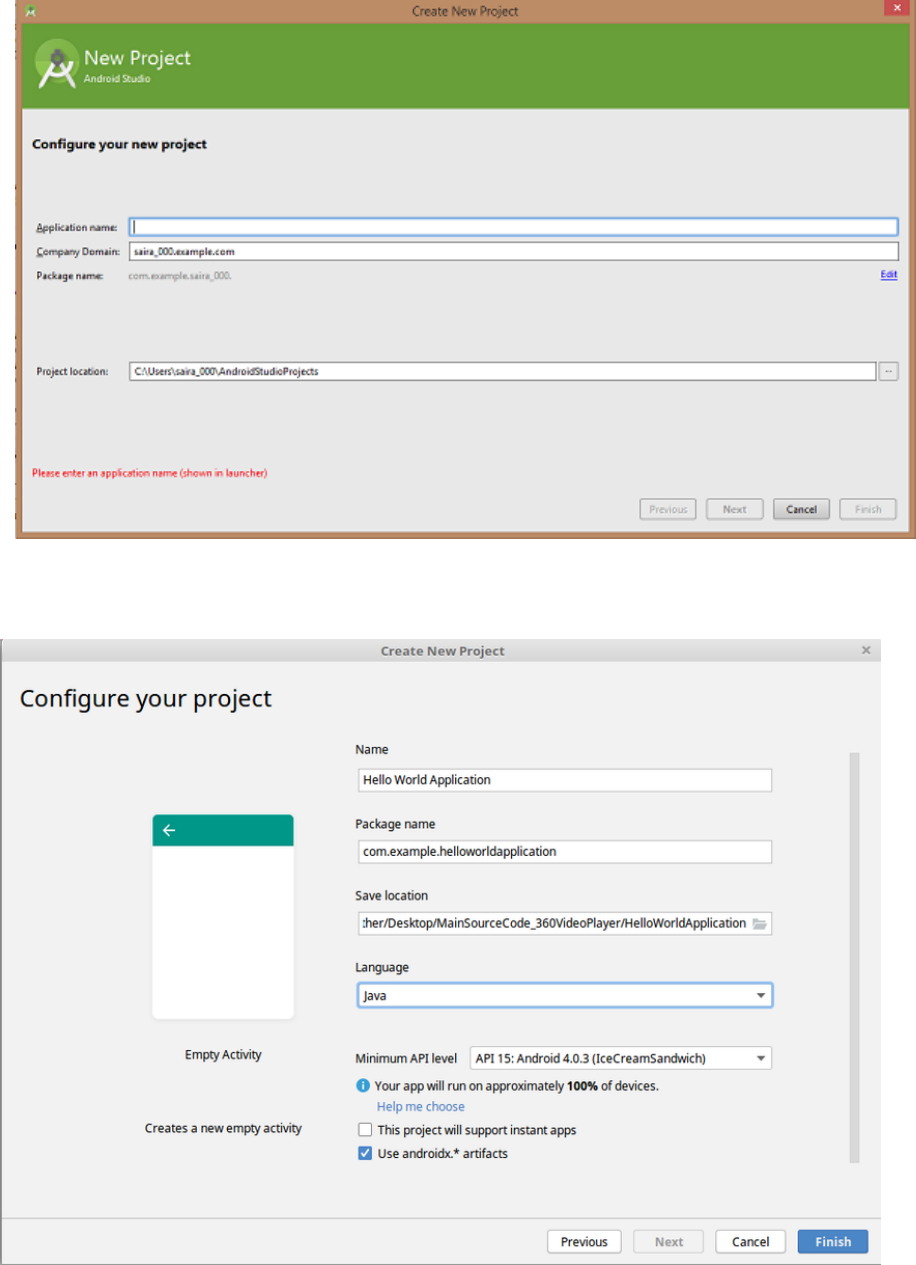
Configure the Hello World Project Details
We'll finish creating the project by configuring some details about its name, location, and the API
version it
Change the name of the application. Change the default Project location to your preferred
directory or just leave it as the default location.
On the minimum API level, ensure that API 15: Android 4.0.3 IceCreamSandwich is set as the
Minimum SDK. This ensures that your application runs on almost all devices.
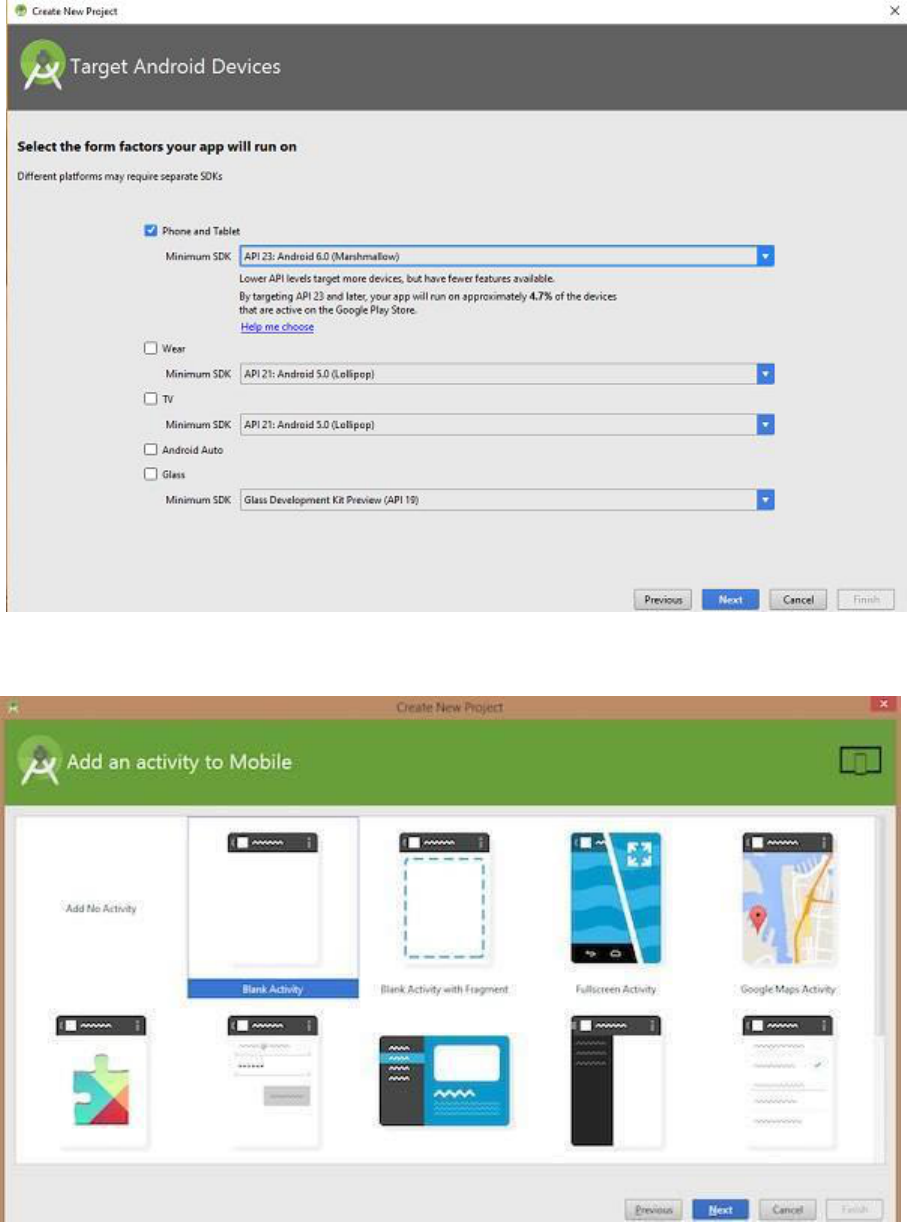
The next level of installation should contain selecting the activity to mobile, it specifies the default
layout for Applications.

SOURCE CODE :
The Main Activity File
The main activity code is a Java file MainActivity.java. This is the actual application file which
ultimately gets converted to a Dalvik executable and runs your application
package com.example.helloworldapplication;
import androidx.appcompat.app.AppCompatActivity;
import android.os.Bundle;
public class MainActivity extends AppCompatActivity {
@Override
protected void onCreate(Bundle savedInstanceState) {
super.onCreate(savedInstanceState);
setContentView(R.layout.activity_main);
}
}
The Layout File
The activity_main.xml is a layout file available in res/layout directory, that is referenced by your
application when building its interface. You will modify this file very frequently to change the
layout of your application. For your "Hello World!" application, this file will have following content
related to default layout −
<RelativeLayout xmlns:android="http://schemas.android.com/apk/res/android"
xmlns:tools="http://schemas.android.com/tools"
android:layout_width="match_parent"
android:layout_height="match_parent" >
<TextView
android:layout_width="wrap_content"
android:layout_height="wrap_content"
android:layout_centerHorizontal="true"
android:layout_centerVertical="true"
android:padding="@dimen/padding_medium"
android:text="@string/hello_world"
tools:context=".MainActivity" />
I )Running app on Phone:
Connect your Phone to Computer
Plug in your device to your computer with a USB cable. If you're developing on Windows, you might need
to install this universal ADB USB driver or find your specific USB driver for your device.
Enable USB Debugging
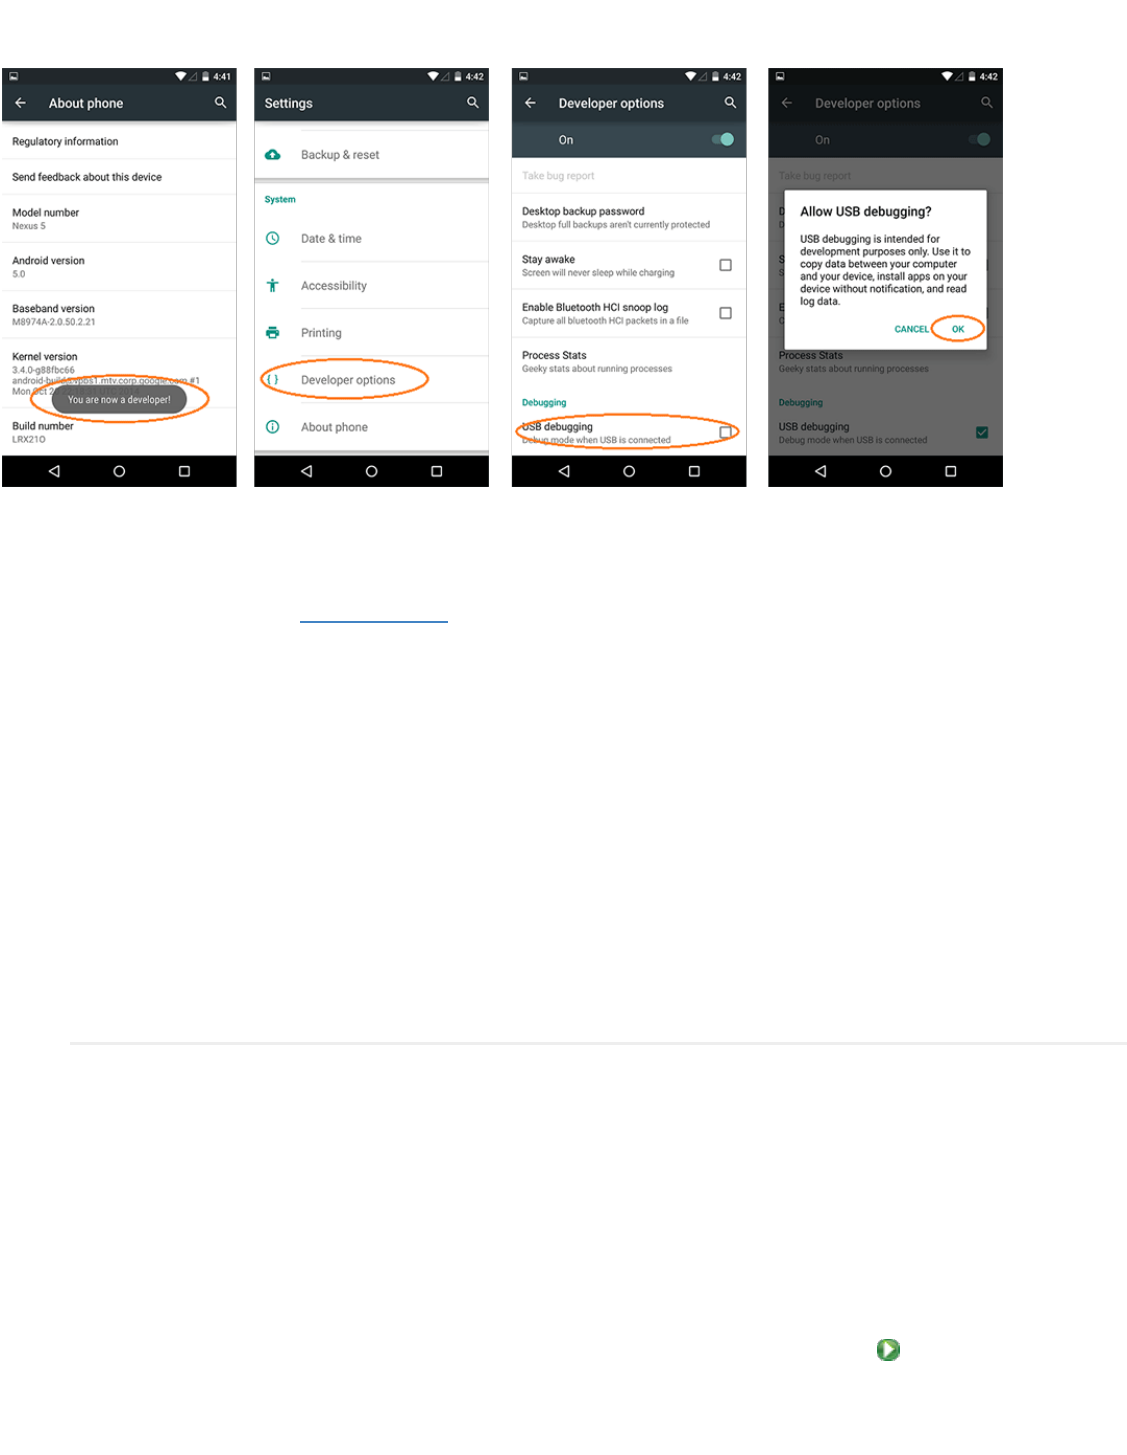
The next step is to enable USB debugging so your phone can interact with your computer in a developer mode.
The following steps are needed:
1. (Windows Only) Install this ADB Driver
2. Plug-in your Android Device to Computer via USB
3. Open the "Settings" App on the Device
4. Scroll down to bottom to find "About phone" item
5. Scroll down to bottom to find "Build number" section
6. Tap on "Build Number" 7 times in quick succession
7. You should see the message "You are now a developer!"
8. Go back to main "Settings" page
9. Scroll down bottom to find "Developer options" item
10. Turn on "USB Debugging" switch and hit "OK"
11. Unplug and re-plug the device
12. Dialog appears "Allow USB Debugging?"
13. Check "Always allow from this computer" and then hit "OK"
Running your App
Now, we can launch apps from Android Studio onto our device:
1. Select one of your projects and click "Run" from the toolbar.
2. In the "Choose Device" window that appears, select the "Choose a running device" radio button, select the
device, and click OK.
II) Running app on Emulator(AVD)
To run the app from Android studio, open one of your project's activity files and click Run icon from the tool
bar. Android studio installs the app on your AVD and starts it and if everything is fine with your set-up and
application, it will display following Emulator window −Once Gradle finishes building, Android Studio should install
the app on your connected device and start it.
Exercise Program:
Design an android application to display Name, Class, College , Address etc of a student.
Record Notes
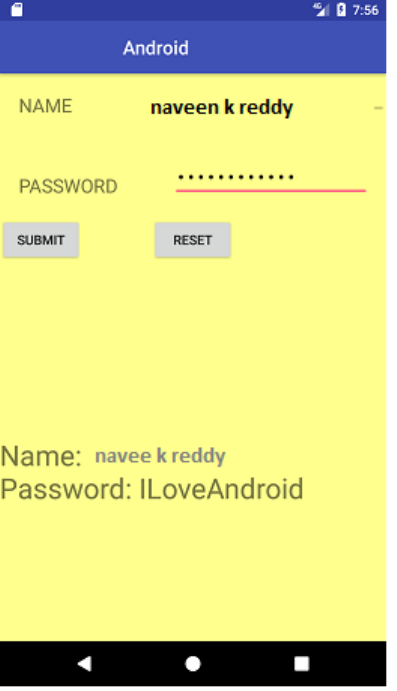
3. Create an application that takes the name from a text box and shows hello message along with the name
entered in text box, when the user clicks the OK button.
Code for MainActivity.java
package com.example.akshay.mrcet;
import android.os.Bundle;
import android.support.v7.app.AppCompatActivity;
import android.view.View;
import android.widget.Button;
import android.widget.EditText;
import android.widget.TextView;
public class MainActivity extends AppCompatActivity {
// These are the global variables
EditText editName, editPassword;
TextView result;
Button buttonSubmit, buttonReset;
@Override
protected void onCreate(Bundle savedInstanceState) {
super.onCreate(savedInstanceState);
setContentView(R.layout.activity_main);
editName = (EditText) findViewById(R.id.editName);
editPassword = (EditText) findViewById(R.id.editPassword);
result = (TextView) findViewById(R.id.tvResult);
buttonSubmit = (Button) findViewById(R.id.buttonSubmit);
buttonReset = (Button) findViewById(R.id.buttonReset);
/*
Submit Button
*/
buttonSubmit.setOnClickListener(new View.OnClickListener() {
@Override
public void onClick(View v) {
String name = editName.getText().toString();
String password = editPassword.getText().toString();
result.setText("Name:\t" + name + "\nPassword:\t" + password );
}
});
/*
Reset Button
*/
buttonReset.setOnClickListener(new View.OnClickListener() {
@Override
public void onClick(View v) {
editName.setText("");
editPassword.setText("");
result.setText("");
editName.requestFocus();
}
});
}
}
activity_main.xml
<?xml version="1.0" encoding="utf-8"?>
<RelativeLayout xmlns:android="http://schemas.android.com/apk/res/android"
xmlns:app="http://schemas.android.com/apk/res-auto"
xmlns:tools="http://schemas.android.com/tools"
android:layout_width="match_parent"
android:layout_height="match_parent"
android:background="#FFFF8D"
tools:context="com.example.akshay.mrcet.MainActivity">
<TextView
android:id="@+id/textView"
android:layout_width="wrap_content"
android:layout_height="wrap_content"
android:layout_alignParentLeft="true"
android:layout_alignParentStart="true"
android:layout_alignParentTop="true"
android:text="NAME"
android:textSize="20sp"
android:layout_margin="20dp" />
<TextView
android:id="@+id/textView2"
android:layout_width="wrap_content"
android:layout_height="wrap_content"
android:textSize="20sp"
android:text="PASSWORD"
android:layout_marginTop="38dp"
android:layout_below="@+id/textView"
android:layout_alignLeft="@+id/textView"
android:layout_alignStart="@+id/textView" />
<EditText
android:id="@+id/editName"
android:layout_width="wrap_content"
android:layout_height="wrap_content"
android:ems="10"
android:inputType="textPersonName"
android:hint="Enter Name"
android:layout_alignParentTop="true"
android:layout_alignParentRight="true"
android:layout_alignParentEnd="true"
android:layout_alignLeft="@+id/editPassword"
android:layout_alignStart="@+id/editPassword" />
<EditText
android:id="@+id/editPassword"
android:layout_width="wrap_content"
android:layout_height="wrap_content"
android:ems="10"
android:hint="Enter Password"
android:inputType="textPassword"
android:layout_alignBottom="@+id/textView2"
android:layout_alignParentRight="true"
android:layout_alignParentEnd="true"
android:layout_marginRight="18dp"
android:layout_marginEnd="18dp" />
<Button
android:id="@+id/buttonSubmit"
android:layout_width="wrap_content"
android:layout_height="wrap_content"
android:layout_alignParentLeft="true"
android:layout_alignParentStart="true"
android:layout_below="@+id/textView2"
android:layout_marginTop="20dp"
android:text="SUBMIT" />
<Button
android:id="@+id/buttonReset"
android:layout_width="wrap_content"
android:layout_height="wrap_content"
android:text="RESET"
android:layout_alignBaseline="@+id/buttonSubmit"
android:layout_alignBottom="@+id/buttonSubmit"
android:layout_centerHorizontal="true" />
<TextView
android:id="@+id/tvResult"
android:layout_width="wrap_content"
android:layout_height="wrap_content"
android:layout_alignParentBottom="true"
android:layout_alignParentLeft="true"
android:layout_alignParentStart="true"
android:layout_marginBottom="143dp"
android:textSize="30sp" />
</RelativeLayout>
Exercise Program:
Design an android application to read Employee details from text boxes and display when
clicked on submit button.
Record Notes
4. Create a screen that has input boxes for User Name, Password, Address, Gender(radio buttons for male
and female), Age (numeric) and a Submit button. On clicking the submit button, print all the data below the
Submit Button (use any layout)
Code for MainActivity.java
package com.example.nkredy.mrcet;
import android.os.Bundle;
import android.support.v7.app.AppCompatActivity;
import android.view.View;
import android.widget.Button;
import android.widget.EditText;
import android.widget.TextView;
public class MainActivity extends AppCompatActivity {
// These are the global variables
EditText editName, editPassword,editAddress,editAge;
TextView result;
RadioGroup radioGenderGroup;
ivate RadioButton radioGenderButton;
Button buttonSubmit;
@Override
protected void onCreate(Bundle savedInstanceState) {
super.onCreate(savedInstanceState);
setContentView(R.layout.activity_main);
editName = (EditText) findViewById(R.id.editName);
editPassword = (EditText) findViewById(R.id.editPassword);
editAddress = (EditText) findViewById(R.id.editAddres);
editAge = (EditText) findViewById(R.id.editAge);
radioSexGender = (RadioGroup) findViewById(R.id.radioGender);
result = (TextView) findViewById(R.id.tvResult);
buttonSubmit = (Button) findViewById(R.id.buttonSubmit);
buttonSubmit.setOnClickListener(new View.OnClickListener() {
@Override
public void onClick(View v) {
String name = editName.getText().toString();
String password = editPassword.getText().toString();
String address= editAddress.getText().toString();
int selectedId = radioGenderGroup.getCheckedRadioButtonId();
// find the radiobutton by returned id
gen = (RadioButton) findViewById(selectedId);
result.setText("Name:\t" + name + "\nPassword:\t" + password+ "\nAddredd:\t" +
address+ "\nAGE:\t" + age+ "\nGender:\t" + gen);
}
});
}
}
activity_main.xml
<?xml version="1.0" encoding="utf-8"?>
<RelativeLayout xmlns:android="http://schemas.android.com/apk/res/android"
xmlns:app="http://schemas.android.com/apk/res-auto"
xmlns:tools="http://schemas.android.com/tools"
android:layout_width="match_parent"
android:layout_height="match_parent"
android:background="#FFFF8D"
tools:context="com.example.akshay.mrcet.MainActivity">
<TextView
android:id="@+id/textView"
android:layout_width="wrap_content"
android:layout_height="wrap_content"
android:layout_alignParentLeft="true"
android:layout_alignParentStart="true"
android:layout_alignParentTop="true"
android:text="NAME"
android:textSize="20sp"
android:layout_margin="20dp" />
<TextView
android:id="@+id/textView2"
android:layout_width="wrap_content"
android:layout_height="wrap_content"
android:textSize="20sp"
android:text="PASSWORD"
android:layout_marginTop="38dp"
android:layout_below="@+id/textView"
android:layout_alignLeft="@+id/textView"
android:layout_alignStart="@+id/textView" />
<EditText
android:id="@+id/editName"
android:layout_width="wrap_content"
android:layout_height="wrap_content"
android:ems="10"
android:inputType="textPersonName"
android:hint="Enter Name"
android:layout_alignParentTop="true"
android:layout_alignParentRight="true"
android:layout_alignParentEnd="true"
android:layout_alignLeft="@+id/editPassword"
android:layout_alignStart="@+id/editPassword" />
<EditText
android:id="@+id/editPassword"
android:layout_width="wrap_content"
android:layout_height="wrap_content"
android:ems="10"
android:hint="Enter Password"
android:inputType="textPassword"
android:layout_alignBottom="@+id/textView2"
android:layout_alignParentRight="true"
android:layout_alignParentEnd="true"
android:layout_marginRight="18dp"
android:layout_marginEnd="18dp" />
<EditText
android:id="@+id/editAddress"
android:layout_width="wrap_content"
android:layout_height="wrap_content"
android:layout_marginRight="18dp"
android:layout_marginEnd="18dp" />
<EditText
android:id="@+id/editAge"
android:layout_width="wrap_content"
android:layout_height="wrap_content"
android:layout_marginRight="18dp"
android:layout_marginEnd="18dp" />
<RadioGroup
android:id="@+id/radioGender"
android:layout_width="wrap_content"
android:layout_height="wrap_content" >
<RadioButton
android:id="@+id/radioMale"
android:layout_width="wrap_content"
android:layout_height="wrap_content"
android:text="@string/radio_male"
android:checked="true" />
<RadioButton
android:id="@+id/radioFemale"
android:layout_width="wrap_content"
android:layout_height="wrap_content"
android:text="@string/radio_female" />
</RadioGroup>
<Button
android:id="@+id/buttonSubmit"
android:layout_width="wrap_content"
android:layout_height="wrap_content"
android:layout_alignParentLeft="true"
android:layout_alignParentStart="true"
android:layout_below="@+id/textView2"
android:layout_marginTop="20dp"
android:text="SUBMIT" />
<TextView
android:id="@+id/tvResult"
android:layout_width="wrap_content"
android:layout_height="wrap_content"
android:layout_alignParentBottom="true"
android:layout_alignParentLeft="true"
android:layout_alignParentStart="true"
android:layout_marginBottom="143dp"
android:textSize="30sp" /></RelativeLayout>
Excersise program: Create a screen that has input boxes for User Name, Password, Address, Gender(radio
buttons for male and female), Age (numeric), Date of Birth (Date Picket), State (Spinner) and a Submit
button. On clicking the submit button, print all the data below the Submit Button (use any layout)
Record Notes:

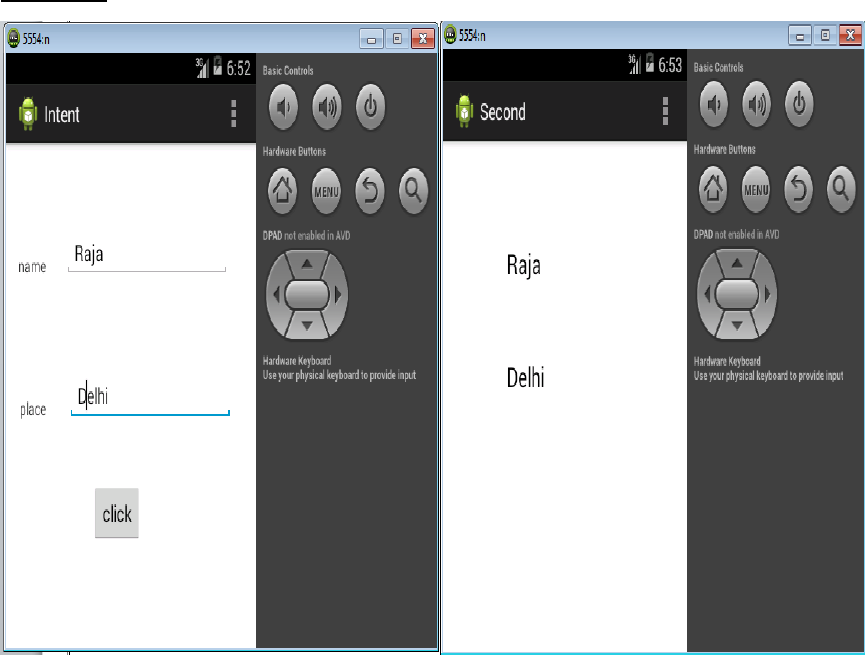
5.Design an android application to create page using Intent and one Button and pass the Values from
one Activity to second Activity.
AIM: To design an android application to design a page using Intent and one Button and pass the Values
from one Activity to second Activity.
Main Activity Java File
package com.example.transferofdata;
import android.os.Bundle;
import android.app.Activity;
import android.content.Intent;
import android.view.Menu;
import android.view.View;
import android.view.View.OnClickListener;
import android.widget.Button;
import android.widget.EditText;
public class MainActivity extends Activity
{
@Override
protected void onCreate(Bundle savedInstanceState)
{
super.onCreate(savedInstanceState);
setContentView(R.layout.activity_main);
final EditText et=(EditText)findViewById(R.id.editText1);
final EditText et1=(EditText)findViewById(R.id.editText2);
Button send=(Button)findViewById(R.id.button1);
send.setOnClickListener(new OnClickListener()
{
@Override
public void onClick(View arg0)
{
String s=et.getText().toString();
String s1=et1.getText().toString();
Intent it=new Intent(MainActivity.this,Second.class);
it.putExtra("uname", s);

it.putExtra("pwd", s1);
startActivity(it);
}
});
}
@Override
public boolean onCreateOptionsMenu(Menu menu)
{
getMenuInflater().inflate(R.menu.main, menu);
return true;
}
}
SecondActivity.java
package com.example.transferofdata;
import android.os.Bundle;
import android.app.Activity;
import android.view.Menu;
import android.widget.TextView;
public class Second extends Activity
{
@Override
protected void onCreate(Bundle savedInstanceState)
{
super.onCreate(savedInstanceState);
setContentView(R.layout.activity_second);
TextView tv=(TextView)findViewById(R.id.textView1);
TextView tv1=(TextView)findViewById(R.id.textView2);
tv.setText(getIntent().getExtras().getString("uname"));
tv1.setText(getIntent().getExtras().getString("pwd"));
}
@Override
public boolean onCreateOptionsMenu(Menu menu)
{

getMenuInflater().inflate(R.menu.second, menu);
return true;
}
}
MainActivity.xml
<RelativeLayout xmlns:android="http://schemas.android.com/apk/res/android"
xmlns:tools="http://schemas.android.com/tools"
android:layout_width="match_parent"
android:layout_height="match_parent"
android:paddingBottom="@dimen/activity_vertical_margin"
android:paddingLeft="@dimen/activity_horizontal_margin"
android:paddingRight="@dimen/activity_horizontal_margin"
android:paddingTop="@dimen/activity_vertical_margin"
tools:context=".MainActivity" >
<Button
android:id="@+id/button1"
android:layout_width="wrap_content"
android:layout_height="wrap_content"
android:layout_alignParentLeft="true"
android:layout_alignParentTop="true"
android:layout_marginLeft="78dp"
android:layout_marginTop="154dp"
android:text="send" />
<EditText
android:id="@+id/editText1"
android:layout_width="wrap_content"
android:layout_height="wrap_content"
android:layout_alignParentTop="true"
android:layout_alignRight="@+id/button1"
android:layout_marginTop="18dp"
android:ems="10" ><requestFocus /></EditText>
<EditText
android:id="@+id/editText2"

android:layout_width="wrap_content"
android:layout_height="wrap_content"
android:layout_alignRight="@+id/button1"
android:layout_below="@+id/editText1"
android:layout_marginTop="37dp"
android:ems="10"
android:inputType="textPassword" /></RelativeLayout>
SecondActivity.xml
<RelativeLayout xmlns:android="http://schemas.android.com/apk/res/android"
xmlns:tools="http://schemas.android.com/tools"
android:layout_width="match_parent"
android:layout_height="match_parent"
android:paddingBottom="@dimen/activity_vertical_margin"
android:paddingLeft="@dimen/activity_horizontal_margin"
android:paddingRight="@dimen/activity_horizontal_margin"
android:paddingTop="@dimen/activity_vertical_margin"
tools:context=".Second" >
<TextView
android:id="@+id/textView1"
android:layout_width="wrap_content"
android:layout_height="wrap_content"
android:layout_alignParentLeft="true"
android:layout_alignParentTop="true"
android:layout_marginLeft="42dp"
android:layout_marginTop="70dp"
android:text="uname" />
<TextView
android:id="@+id/textView2"
android:layout_width="wrap_content"
android:layout_height="wrap_content"
android:layout_alignLeft="@+id/textView1"
android:layout_below="@+id/textView1"
android:layout_marginLeft="15dp"
android:layout_marginTop="37dp"
android:text="password" />
</RelativeLayout>
OUTPUT:
Exercise Program: Design an android application to create page using Intent and one Button and
pass the Values from one Activity to second Activity and then to the Third activity.
Record Notes

6.Design an android application Send SMS using Intent
AIM : To design an android application Send SMS using Intent.
MainActivity.java
package com.example.sms;
import android.os.Bundle;
import android.app.Activity;
import android.telephony.gsm.SmsManager;
import android.view.Menu;
import android.view.View;
import android.view.View.OnClickListener;
import android.widget.Button;
public class MainActivity extends Activity
{
@Override
protected void onCreate(Bundle savedInstanceState
{
super.onCreate(savedInstanceState);
setContentView(R.layout.activity_main);
Button bt=(Button)findViewById(R.id.button1);
bt.setOnClickListener(new OnClickListener()
{
@Override
public void onClick(View v)
{
// TODO Auto-generated method stub
SmsManager sms=SmsManager.getDefault();
sms.sendTextMessage("5554", null, "hai", null, null);
}
});
}

public boolean onCreateOptionsMenu(Menu menu)
{
// Inflate the menu; this adds items to the action bar if it is present.
getMenuInflater().inflate(R.menu.main, menu);
return true;
}
}
MainActivity.xml
<RelativeLayout xmlns:android="http://schemas.android.com/apk/res/android"
xmlns:tools="http://schemas.android.com/tools"
android:layout_width="match_parent"
android:layout_height="match_parent"
android:paddingBottom="@dimen/activity_vertical_margin"
android:paddingLeft="@dimen/activity_horizontal_margin"
android:paddingRight="@dimen/activity_horizontal_margin"
android:paddingTop="@dimen/activity_vertical_margin"
tools:context=".MainActivity" >
<Button
android:id="@+id/button1"
android:layout_width="wrap_content"
android:layout_height="wrap_content"
android:layout_alignParentLeft="true"
android:layout_alignParentTop="true"
android:layout_marginLeft="54dp"
android:layout_marginTop="166dp"
android:text="send" />
</RelativeLayout>
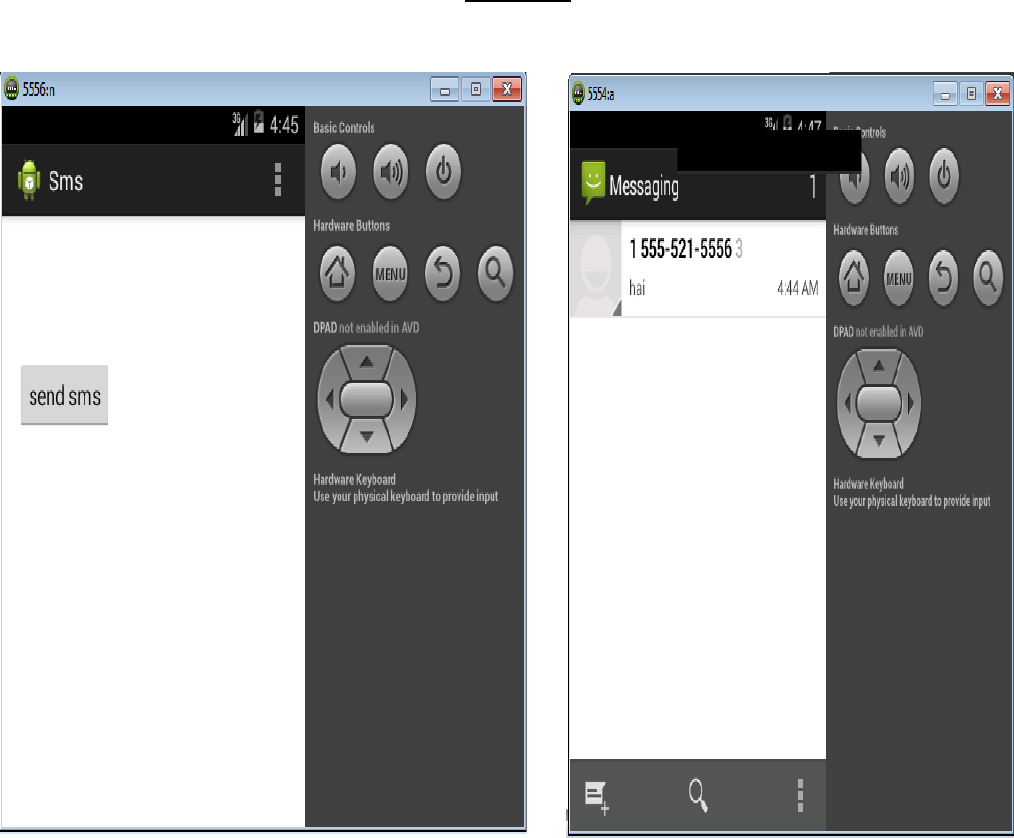
OUTPUT:
Record Notes:
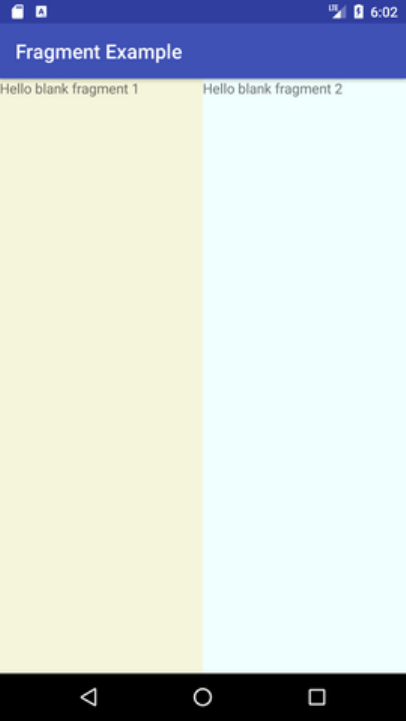
7..Create an android application using Fragments
activity_main.xml
<?xml version="1.0" encoding="utf-8"?>
<LinearLayout xmlns:android="http://schemas.android.com/apk/res/android"
xmlns:app="http://schemas.android.com/apk/res-auto"
xmlns:tools="http://schemas.android.com/tools"
android:layout_width="fill_parent"
android:layout_height="fill_parent"
tools:context="example.javatpoint.com.fragmentexample.MainActivity">
<fragment
android:id="@+id/fragment1"
android:name="example.javatpoint.com.fragmentexample.Fragment1"
android:layout_width="0px"
android:layout_height="match_parent"
android:layout_weight="1"
/>
<fragment
android:id="@+id/fragment2"
android:name="example.javatpoint.com.fragmentexample.Fragment2"
android:layout_width="0px"
android:layout_height="match_parent"
android:layout_weight="1"
/>
</LinearLayout>
fragment_fragment1.xml
<FrameLayout xmlns:android="http://schemas.android.com/apk/res/android"
xmlns:tools="http://schemas.android.com/tools"
android:layout_width="match_parent"
android:layout_height="match_parent"
android:background="#F5F5DC"
tools:context="example.javatpoint.com.fragmentexample.Fragment1">
<!-- TODO: Update blank fragment layout -->
<TextView
android:layout_width="match_parent"
android:layout_height="match_parent"
android:text="@string/hello_blank_fragment" />
</FrameLayout>
File: fragment_fragment2.xml
<FrameLayout xmlns:android="http://schemas.android.com/apk/res/android"
xmlns:tools="http://schemas.android.com/tools"
android:layout_width="match_parent"
android:layout_height="match_parent"
android:background="#F0FFFF"
tools:context="example.javatpoint.com.fragmentexample.Fragment2">
<!-- TODO: Update blank fragment layout -->
<TextView
android:layout_width="match_parent"
android:layout_height="match_parent"
android:text="@string/hello_blank_fragment" />
</FrameLayout>
MainActivity class
File: MainActivity.java
package example.javatpoint.com.fragmentexample;
import android.support.v7.app.AppCompatActivity;
import android.os.Bundle;
public class MainActivity extends AppCompatActivity {
@Override
protected void onCreate(Bundle savedInstanceState) {
super.onCreate(savedInstanceState);
setContentView(R.layout.activity_main);
}
}
File: Fragment1.java
package example.javatpoint.com.fragmentexample;
import android.os.Bundle;
import android.support.v4.app.Fragment;
import android.view.LayoutInflater;
import android.view.View;
import android.view.ViewGroup;
public class Fragment1 extends Fragment {
@Override
public void onCreate(Bundle savedInstanceState) {
super.onCreate(savedInstanceState);
}
@Override
public View onCreateView(LayoutInflater inflater, ViewGroup container,
Bundle savedInstanceState) {
// Inflate the layout for this fragment
return inflater.inflate(R.layout.fragment_fragment1, container, false);
}
}
File: Fragment2.java
package example.javatpoint.com.fragmentexample;
import android.os.Bundle;
import android.support.v4.app.Fragment;
import android.view.LayoutInflater;
import android.view.View;
import android.view.ViewGroup;
public class Fragment2 extends Fragment {
@Override
public void onCreate(Bundle savedInstanceState) {
super.onCreate(savedInstanceState);
}
@Override
public View onCreateView(LayoutInflater inflater, ViewGroup container,
Bundle savedInstanceState) {
// Inflate the layout for this fragment
return inflater.inflate(R.layout.fragment_fragment2, container, false);
}
}
Output:

8.. Design an android application Using Radiobuttons.
AIM: To design an android application Using Radiobuttons.
MainActivity.java
package com.example.radiobutton;
import android.os.Bundle;
import android.app.Activity;
import android.view.View;
import android.view.View.OnClickListener;
import android.widget.Button;
import android.widget.RadioButton;
import android.widget.RadioGroup;
import android.widget.RadioGroup.OnCheckedChangeListener;
import android.widget.TextView;
import android.widget.Toast;
public class MainActivity extends Activity
{
private RadioGroup radioGroup;
private RadioButton sound, vibration, silent;
private Button button;
private TextView textView;
@Override
protected void onCreate(Bundle savedInstanceState)
{
super.onCreate(savedInstanceState);
setContentView(R.layout.activity_main);
radioGroup = (RadioGroup) findViewById(R.id.myRadioGroup);
radioGroup.setOnCheckedChangeListener(new OnCheckedChangeListener()
{
@Override
public void onCheckedChanged(RadioGroup group, int checkedId)
{
// find which radio button is selected
if(checkedId == R.id.silent)
{
Toast.makeText(getApplicationContext(), "choice: Silent",
Toast.LENGTH_SHORT).show();
}
else if(checkedId == R.id.sound)
{
Toast.makeText(getApplicationContext(), "choice: Sound",
Toast.LENGTH_SHORT).show();
}
else
{
Toast.makeText(getApplicationContext(), "choice: Vibration",
Toast.LENGTH_SHORT).show();
}
}
});
sound = (RadioButton) findViewById(R.id.sound);
vibration = (RadioButton) findViewById(R.id.vibrate);
silent = (RadioButton) findViewById(R.id.silent);
textView = (TextView) findViewById(R.id.textView1);
button = (Button)findViewById(R.id.button1);
button.setOnClickListener(new OnClickListener()
{
@Override
public void onClick(View v) {
int selectedId = radioGroup.getCheckedRadioButtonId();
// find which radioButton is checked by id
if(selectedId == sound.getId())
{
textView.setText("You chose 'Sound' option");
}
else if(selectedId == vibration.getId())

{
textView.setText("You chose 'Vibration' option");
}
else
{
textView.setText("You chose 'Silent' option");
}
}
});
}
}
MainActivity.xml
<RelativeLayout xmlns:android="http://schemas.android.com/apk/res/android"
xmlns:tools="http://schemas.android.com/tools"
android:layout_width="match_parent"
android:layout_height="match_parent"
android:paddingBottom="@dimen/activity_vertical_margin"
android:paddingLeft="@dimen/activity_horizontal_margin"
android:paddingRight="@dimen/activity_horizontal_margin"
android:paddingTop="@dimen/activity_vertical_margin"
tools:context=".MainActivity" >
<RadioGroup
android:id="@+id/myRadioGroup"
android:layout_width="wrap_content"
android:layout_height="wrap_content"
android:layout_alignParentLeft="true"
android:layout_below="@+id/textView1"
android:layout_marginLeft="27dp"
android:layout_marginTop="28dp" >
<RadioButton
android:id="@+id/sound"
android:layout_width="wrap_content"

android:layout_height="wrap_content"
android:checked="true"
android:text="Sound" />
<RadioButton
android:id="@+id/vibrate"
android:layout_width="wrap_content"
android:layout_height="wrap_content"
android:text="Vibration" />
<RadioButton
android:id="@+id/silent"
android:layout_width="wrap_content"
android:layout_height="wrap_content"
android:text="Silent" />
</RadioGroup>
<TextView
android:id="@+id/textView1"
android:layout_width="wrap_content"
android:layout_height="wrap_content"
android:layout_alignParentLeft="true"
android:layout_alignParentTop="true"
android:text="Choose one of the following modes"
android:textAppearance="?android:attr/textAppearanceLarge" />
<Button
android:id="@+id/button1"
android:layout_width="wrap_content"
android:layout_height="wrap_content"
android:layout_alignLeft="@+id/myRadioGroup"
android:layout_below="@+id/myRadioGroup"
android:layout_marginLeft="42dp"
android:layout_marginTop="53dp"
android:text="choose" />
</RelativeLayout>
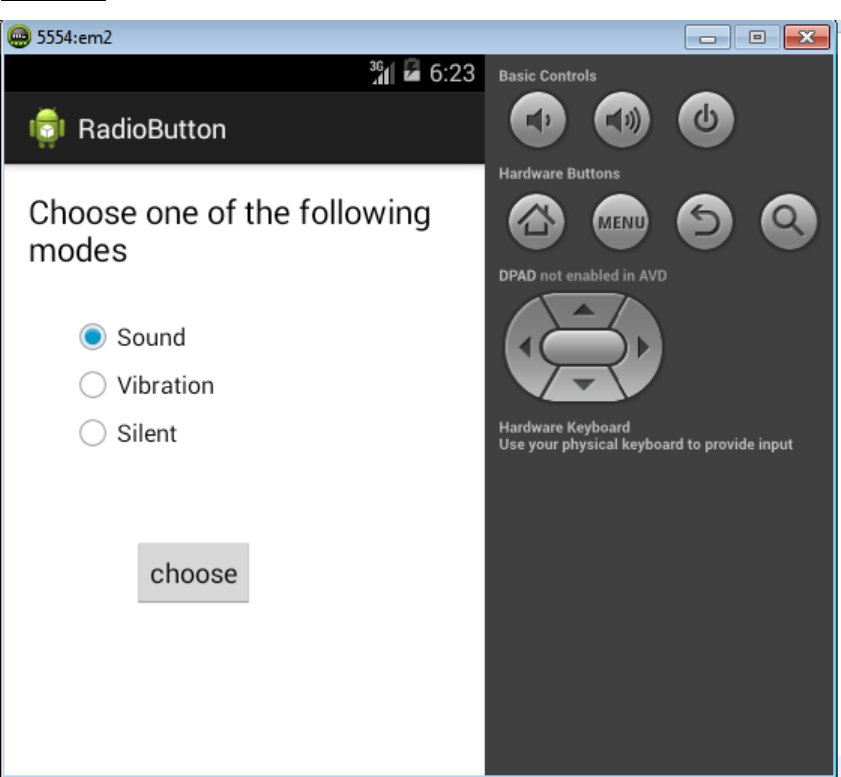
OUTPUT:
Record Notes:

9. Design an android application for menu.
AIM: To design an application options menu.
MainActivity.java
package com.javatpoint.optionmenu;
import android.os.Bundle;
import android.app.Activity;
import android.view.Menu;
import android.view.MenuItem;
import android.widget.Toast;
public class MainActivity extends Activity
{
@Override
protected void onCreate(Bundle savedInstanceState)
{
super.onCreate(savedInstanceState);
setContentView(R.layout.activity_main);
}
@Override
public boolean onCreateOptionsMenu(Menu menu)
{
// Inflate the menu; this adds items to the action bar if it is present.
getMenuInflater().inflate(R.menu.main, menu);//Menu Resource, Menu
return true;
}
@Override
public boolean onOptionsItemSelected(MenuItem item)
{
switch (item.getItemId())
{
case R.id.item1:
Toast.makeText(getApplicationContext(),"Item 1 Selected",Toast.LENGTH_LONG).show();
return true;
case R.id.item2:
Toast.makeText(getApplicationContext(),"Item 2 Selected",Toast.LENGTH_LONG).show();

return true;
case R.id.item3:
Toast.makeText(getApplicationContext(),"Item 3 Selected",Toast.LENGTH_LONG).show();
return true;
default:
return super.onOptionsItemSelected(item);
}
}
}
MainActivity.xml
<RelativeLayout xmlns:androclass="http://schemas.android.com/apk/res/android"
xmlns:tools="http://schemas.android.com/tools"
android:layout_width="match_parent"
android:layout_height="match_parent"
android:paddingBottom="@dimen/activity_vertical_margin"
android:paddingLeft="@dimen/activity_horizontal_margin"
android:paddingRight="@dimen/activity_horizontal_margin"
android:paddingTop="@dimen/activity_vertical_margin"
tools:context=".MainActivity" >
<TextView
android:layout_width="wrap_content"
android:layout_height="wrap_content"
android:text="@string/hello_world" />
</RelativeLayout>
SecondActivity.xml
<menu xmlns:androclass="http://schemas.android.com/apk/res/android" >
<item android:id="@+id/item1"
android:title="Item 1"/>
<item android:id="@+id/item2"
android:title="Item 2"/>
<item android:id="@+id/item3"
android:title="Item 3"/>
</menu>
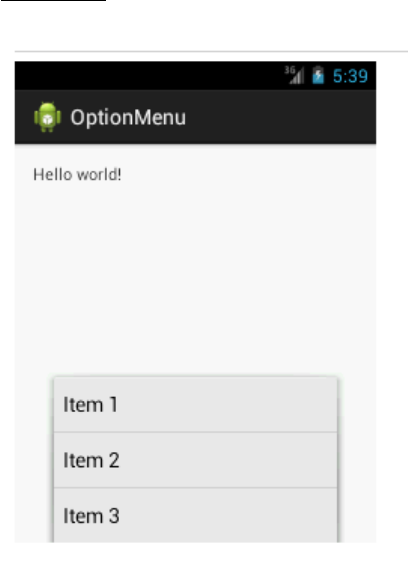
OUTPUT:
Record Notes:
10 Create a user registration application that stores the user details in a database table.
DbHandler.java
package com.tutlane.sqliteexample;
import android.content.ContentValues;
import android.content.Context;
import android.database.Cursor;
import android.database.sqlite.SQLiteDatabase;
import android.database.sqlite.SQLiteOpenHelper;
import java.util.ArrayList;
import java.util.HashMap;
/**
* Created by tutlane on 06-01-2018.
*/
public class DbHandler extends SQLiteOpenHelper {
private static final int DB_VERSION = 1;
private static final String DB_NAME = "usersdb";
private static final String TABLE_Users = "userdetails";
private static final String KEY_ID = "id";
private static final String KEY_NAME = "name";
private static final String KEY_LOC = "location";
private static final String KEY_DESG = "designation";
public DbHandler(Context context){
super(context,DB_NAME, null, DB_VERSION);
}
@Override
public void onCreate(SQLiteDatabase db){
String CREATE_TABLE = "CREATE TABLE " + TABLE_Users + "("
+ KEY_ID + " INTEGER PRIMARY KEY AUTOINCREMENT," + KEY_NAME + " TEXT,"
+ KEY_LOC + " TEXT,"
+ KEY_DESG + " TEXT"+ ")";
db.execSQL(CREATE_TABLE);
}
@Override
public void onUpgrade(SQLiteDatabase db, int oldVersion, int newVersion){
// Drop older table if exist
db.execSQL("DROP TABLE IF EXISTS " + TABLE_Users);
// Create tables again
onCreate(db);
}
// **** CRUD (Create, Read, Update, Delete) Operations ***** //
// Adding new User Details
void insertUserDetails(String name, String location, String designation){
//Get the Data Repository in write mode
SQLiteDatabase db = this.getWritableDatabase();
//Create a new map of values, where column names are the keys
ContentValues cValues = new ContentValues();
cValues.put(KEY_NAME, name);
cValues.put(KEY_LOC, location);
cValues.put(KEY_DESG, designation);
// Insert the new row, returning the primary key value of the new row
long newRowId = db.insert(TABLE_Users,null, cValues);
db.close();
}
// Get User Details
public ArrayList<HashMap<String, String>> GetUsers(){
SQLiteDatabase db = this.getWritableDatabase();
ArrayList<HashMap<String, String>> userList = new ArrayList<>();
String query = "SELECT name, location, designation FROM "+ TABLE_Users;
Cursor cursor = db.rawQuery(query,null);
while (cursor.moveToNext()){
HashMap<String,String> user = new HashMap<>();
user.put("name",cursor.getString(cursor.getColumnIndex(KEY_NAME)));
user.put("designation",cursor.getString(cursor.getColumnIndex(KEY_DESG)));
user.put("location",cursor.getString(cursor.getColumnIndex(KEY_LOC)));
userList.add(user);
}
return userList;
}
// Get User Details based on userid
public ArrayList<HashMap<String, String>> GetUserByUserId(int userid){
SQLiteDatabase db = this.getWritableDatabase();
ArrayList<HashMap<String, String>> userList = new ArrayList<>();
String query = "SELECT name, location, designation FROM "+ TABLE_Users;
Cursor cursor = db.query(TABLE_Users, new String[]{KEY_NAME, KEY_LOC, KEY_DESG}, KEY_ID+
"=?",new String[]{String.valueOf(userid)},null, null, null, null);
if (cursor.moveToNext()){
HashMap<String,String> user = new HashMap<>();
user.put("name",cursor.getString(cursor.getColumnIndex(KEY_NAME)));
user.put("designation",cursor.getString(cursor.getColumnIndex(KEY_DESG)));
user.put("location",cursor.getString(cursor.getColumnIndex(KEY_LOC)));
userList.add(user);
}
return userList;
}
// Delete User Details
public void DeleteUser(int userid){
SQLiteDatabase db = this.getWritableDatabase();
db.delete(TABLE_Users, KEY_ID+" = ?",new String[]{String.valueOf(userid)});
db.close();
}
// Update User Details
public int UpdateUserDetails(String location, String designation, int id){
SQLiteDatabase db = this.getWritableDatabase();
ContentValues cVals = new ContentValues();
cVals.put(KEY_LOC, location);
cVals.put(KEY_DESG, designation);
int count = db.update(TABLE_Users, cVals, KEY_ID+" = ?",new String[]{String.valueOf(id)});
return count;
}
}
If you observe above code, we implemented all SQLite Database related activities to perform CRUD
operations in android application.
Now open activity_main.xml file from \res\layout folder path and write the code like as shown below.
activity_main.xml
<?xml version="1.0" encoding="utf-8"?>
<LinearLayout xmlns:android="http://schemas.android.com/apk/res/android"
android:orientation="vertical" android:layout_width="match_parent"
android:layout_height="match_parent">
<TextView
android:id="@+id/fstTxt"
android:layout_width="wrap_content"
android:layout_height="wrap_content"
android:layout_marginLeft="100dp"
android:layout_marginTop="150dp"
android:text="Name" />
<EditText
android:id="@+id/txtName"
android:layout_width="wrap_content"
android:layout_height="wrap_content"
android:layout_marginLeft="100dp"
android:ems="10"/>
<TextView
android:id="@+id/secTxt"
android:layout_width="wrap_content"
android:layout_height="wrap_content"
android:text="Location"
android:layout_marginLeft="100dp" />
<EditText
android:id="@+id/txtLocation"
android:layout_width="wrap_content"
android:layout_height="wrap_content"
android:layout_marginLeft="100dp"
android:ems="10" />
<TextView
android:id="@+id/thirdTxt"
android:layout_width="wrap_content"
android:layout_height="wrap_content"
android:text="Designation"
android:layout_marginLeft="100dp" />
<EditText
android:id="@+id/txtDesignation"
android:layout_width="wrap_content"
android:layout_height="wrap_content"
android:layout_marginLeft="100dp"
android:ems="10" />
<Button
android:id="@+id/btnSave"
android:layout_width="wrap_content"
android:layout_height="wrap_content"
android:layout_marginLeft="100dp"
android:text="Save" />
</LinearLayout>
Now we will create another layout resource file details.xml in \res\layout path to show the details in
custom listview from SQLite Database for that right click on your layout folder à Go to New à select Layout
Resource File and give name as details.xml.
Once we create a new layout resource file details.xml, open it and write the code like as shown below
details.xml
<?xml version="1.0" encoding="utf-8"?>
<LinearLayout xmlns:android="http://schemas.android.com/apk/res/android"
android:layout_width="fill_parent"
android:layout_height="fill_parent"
android:orientation="vertical" >
<ListView
android:id="@+id/user_list"
android:layout_width="fill_parent"
android:layout_height="wrap_content"
android:dividerHeight="1dp" />
<Button
android:id="@+id/btnBack"
android:layout_width="wrap_content"
android:layout_height="wrap_content"
android:layout_gravity="center"
android:layout_marginTop="20dp"
android:text="Back" />
</LinearLayout>
Create an another layout file (list_row.xml) in /res/layout folder to show the data in listview, for that right
click on layout folder à add new Layout resource file à Give name as list_row.xml and write the code like
as shown below.
list_row.xml
<?xml version="1.0" encoding="utf-8"?>
<RelativeLayout xmlns:android="http://schemas.android.com/apk/res/android"
android:layout_width="fill_parent"
android:layout_height="wrap_content"
android:orientation="horizontal"
android:padding="5dip" >
<TextView
android:id="@+id/name"
android:layout_width="wrap_content"
android:layout_height="wrap_content"
android:textStyle="bold"
android:textSize="17dp" />
<TextView
android:id="@+id/designation"
android:layout_width="wrap_content"
android:layout_height="wrap_content"
android:layout_below="@id/name"
android:layout_marginTop="7dp"
android:textColor="#343434"
android:textSize="14dp" />
<TextView
android:id="@+id/location"
android:layout_width="wrap_content"
android:layout_height="wrap_content"
android:layout_alignBaseline="@+id/designation"
android:layout_alignBottom="@+id/designation"
android:layout_alignParentRight="true"
android:textColor="#343434"
android:textSize="14dp" />
</RelativeLayout>
Now open your main activity file MainActivity.java from \java\com.tutlane.sqliteexample path and write
the code like as shown below
MainActivity.java
package com.tutlane.sqliteexample;
import android.content.Intent;
import android.support.v7.app.AppCompatActivity;
import android.os.Bundle;
import android.view.View;
import android.widget.Button;
import android.widget.EditText;
import android.widget.Toast;
public class MainActivity extends AppCompatActivity {
EditText name, loc, desig;
Button saveBtn;
Intent intent;
@Override
protected void onCreate(Bundle savedInstanceState) {
super.onCreate(savedInstanceState);
setContentView(R.layout.activity_main);
name = (EditText)findViewById(R.id.txtName);
loc = (EditText)findViewById(R.id.txtLocation);
desig = (EditText)findViewById(R.id.txtDesignation);
saveBtn = (Button)findViewById(R.id.btnSave);
saveBtn.setOnClickListener(new View.OnClickListener() {
@Override
public void onClick(View v) {
String username = name.getText().toString()+"\n";
String location = loc.getText().toString();
String designation = desig.getText().toString();
DbHandler dbHandler = new DbHandler(MainActivity.this);
dbHandler.insertUserDetails(username,location,designation);
intent = new Intent(MainActivity.this,DetailsActivity.class);
startActivity(intent);
Toast.makeText(getApplicationContext(), "Details Inserted
Successfully",Toast.LENGTH_SHORT).show();
}
});
}
}
OUTPUT:

Record Notes:
