Android App Quick Start Guide
We have made this app available FREE to all members of entities that have a current subscription to
IamResponding.com. If you are not a member of an entity with a current IamResponding.com subscription,
then the app will not work for you.
The iamresponding.com Services, including those provided through the IamResponding app, are provided only
as a supplement to existing dispatch, communication and response systems. These Services are not intended,
and should not be used by you, as a primary dispatch system for emergency events or situations, as a
substitute for existing emergency communication systems, or as a substitute for the exercise of reasonable
judgments made by you or reasonable emergency services providers. Use your good, reasonable common
sense when using the Services, do not substitute the Services for such common sense, and obey all applicable
laws and regulations.
The Terms of Use and Privacy Policy which govern all of the iamresponding.com Services, including those made
available to you through the IamResponding app, are available: by clicking the “Terms of Use” button on our
website at www.iamresponding.com; upon your initial access of the IamResponding app, and by requesting
the same in writing from IamResponding.com.
For any technical support needs or inquiries, please contact us at support@emergencysmc.com, or during
regular business hours (M-F, 9am-5:50pm ET) at 315-701-1372. Please note that we do NOT monitor our
Facebook page for technical support issues, and we cannot reply to support issues posted as user reviews in
iTunes™ or in the App Store.
Please Note: if your dispatch messages are not currently processed through your department’s
IamResponding system, that is a free configuration that can be done in most jurisdictions. Your app will have
more complete functionality if we enable that feature for you. Have your local system administrator contact
our customer support team at 315-701-1372 to set this up.

Let’s get started!
Step 1: Install the IamResponding iPhone ™ app from the Google Play™. The app is simply called
“IamResponding.”
Please note that this app is optimized for the most current version of the Android operating
system, but should work on OS version 2.3 or newer.
Please understand that newer phones, with newer operating system versions, will work better
than older phones with older operating system versions. Also, unlike iPhones, there are many,
many different phones that run the Android operating system. Some are frankly better than
others, with better processors, and those will work better with this app than lesser phones.
Step 2: This is the screen that you will see when you first access the IamResponding app:
Enter your agency log-in name, user name and password.
All fields must be entered case sensitive.
Clicking the “Show” check-box will enable you to see your
password as you type it.
Master administrative user names and passwords will NOT
work. You must use your own user name and password. If
you do not remember your log in credentials, ask your local
system administrator to re-send them to you by clicking
“Update” within your member profile online.
If you are a member of more than one entity that
subscribes to IamResponding, log into any one of those
entities here, and you will then be able to enter the others
in a later step.
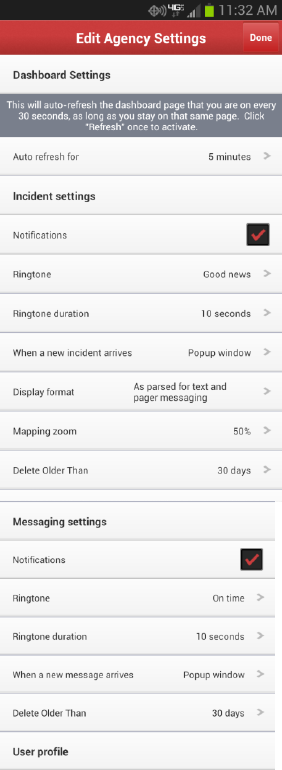
Step 3: After logging in correctly, the “Agency Settings” (preferences) page will automatically open:
Here, you can view, but not edit, your member profile , by
tapping at the bottom of the page (member profiles can
only be edited from the website).
If your dispatches are currently processed through
IamResponding, you can select here whether to receive
push notifications of those to your app.
PLEASE NOTE: To receive push notifications of your
dispatches, you MUST ALSO make a change to your online
member profile as described in Step 6!
You can also select a unique ringtone, the format to
receive your dispatches in, how long you want to keep
them within your app, and the format in which you want
to receive push notifications (pop-up window, or normal
notification).
To receive the notifications without a ringtone, simply
choose the “silent” ringtone.
There is also an auto-refresh duration option that you can
set for the main dashboard pages of the App, which are
described later in this document.
You can also select here whether you want to receive
intra-department messages, sent through your entity’s
IamResponding system, via push notification, and you can
again select a custom ringtone for those messages.
Tap “Done” in the upper right corner when you are done.
Please note: if your dispatch messages are not currently processed through your department’s
IamResponding system, that is a free configuration that can be done in most jurisdictions.
Have your local system administrator contact our customer support team at 315-701-1372 to
set this up.
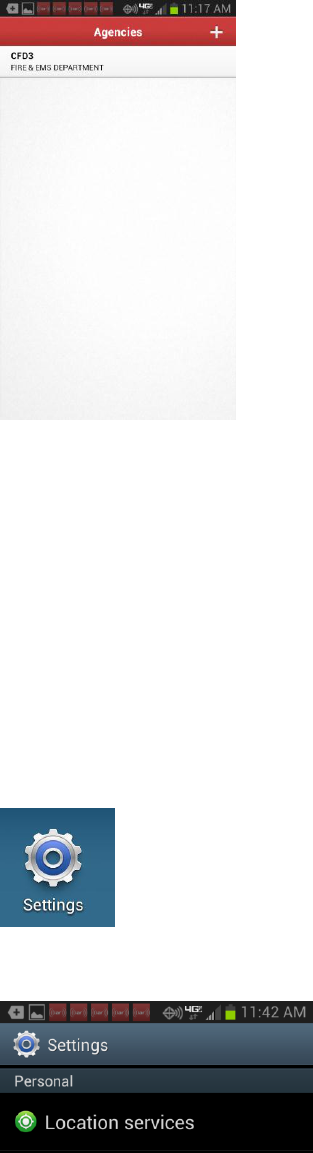
Step 4: You will then be brought to the “Agencies” page:
Here, you can:
1. Access the app for the entity that you have already
logged into, by tapping on that entity; or
2. Add an additional log-in for as many entities as you
belong to, by tapping the “+” symbol in the upper right
corner, and starting over for each new entity.
Remember, each entity must have an active
subscription to IamResponding.com!
3. Edit your settings for each entity, at any time. To edit
your settings for a particular entity, touch and hold for
a few seconds the name of the agency that you want to
edit your preferences in. The preferences page will
then open.
If you tap an entity’s name, the app for that entity will
launch
You can also access the Agencies page from various other
control features within other pages of the app, using the
telephone’s Menu button to the left of the phone’s
“Home” button. Where available, simply select “Agencies.”
Step 5: Certain Mapping Services within the app require location services to be “On” within your
phone’s general settings. Location services can be turned on or off by tapping the “Settings”
icon on your phone:
Tap Location Services:
Set your Location Services to “On.”
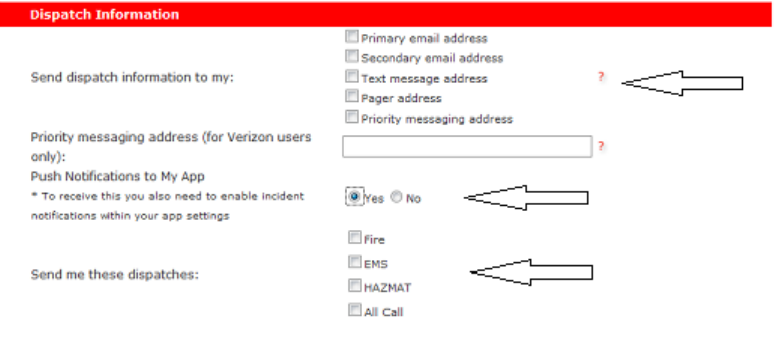
Step 6: In order to receive push notifications to your phone of dispatch messages (if such messages
are currently processed through your department’s IamResponding system), you need to go
into your member profile (on-line via a desktop computer; not via the app), and make 3 entries
in the “Dispatch Information” section of your member profile:
1. Select where else you want your dispatch messages sent. You must choose at least one
other destination, in addition to push notifications to your app.
2. Click “Yes” to have push notifications sent to your app.
3. Select the type(s) of dispatches you want pushed to your app.
Step 7: In order for the turn-by-turn navigation feature to function, you must also download the free
Google Maps™ app to your phone from the App Store (if that is not already loaded on your
phone).
Please Note: Your privileges within the App are determined from the settings in your user profile in the web-
based IamResponding.com system accessible via desktop computers. You may view, but cannot change, your
membership profile information from within the App. You can do this in the “Agencies” page, by touching and
holding the agency to for which you want to view your profile. Then select “User Profile.”
That’s it! You should now be all set to start using the app!
Please note: if at any time your app should lock up or stop functioning, go into your phone’s settings page,
select Application manager, then tap on the IaR app icon. There should then be a button called “Force Stop.”
Tap on that to re-set the app.
Android App Overview
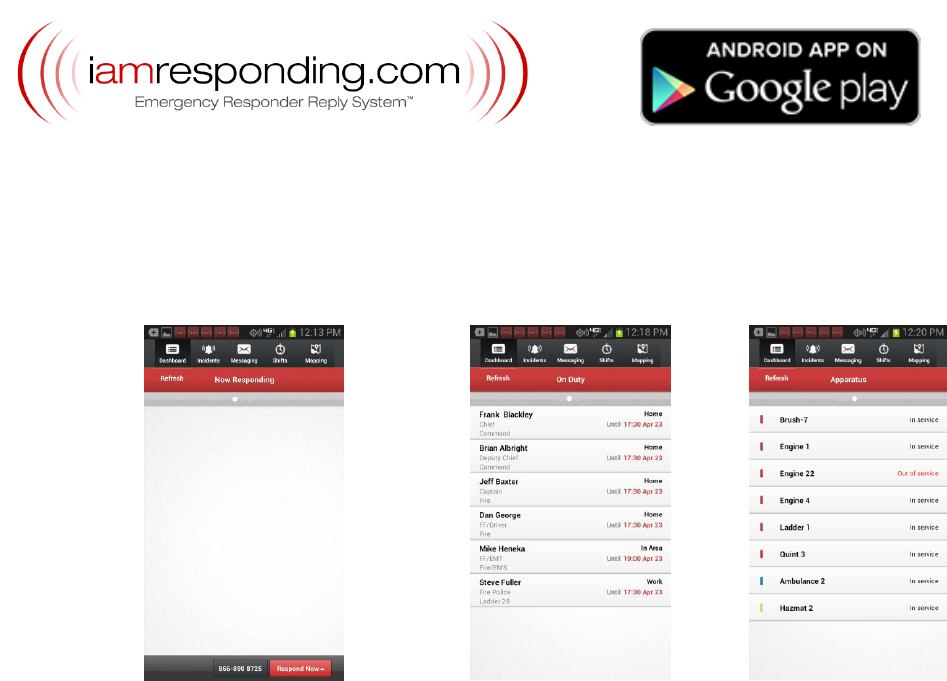
Dashboard: The 3-screen Dashboard slides right and left, and displays who is responding, who is on duty,
and the status of your apparatus.
This page displays who is responding,
where and when. You can indicate
your response either by tapping the
telephone number to speed-dial your
assigned number, or by using the
“Respond Now” button to indicate
your response status directly
through the app.
You can manually refresh this screen
to update the list of responders, or
enable an auto re-fresh option (via
your preferences page).
You can sort the list of responders,
and clear the list (if you have
permission to do so) by selecting
those options after tapping your
phone’s menu button. There, you
can also return to the Agencies page
to switch agencies or edit your
preferences. (Note: clearing the
screen clears the data for all
members of your department, on all
devices.)
This page will display a list of
who is on duty, who is
available, and who is not
available.
You can sort the order of the
list by selecting the Sort
feature after tapping your
phone’s menu button. There,
you can also return to the
Agencies page to switch
agencies or edit your
preferences.
You can manually refresh this
screen to update the list of
who is on duty, or enable an
auto re-fresh option (via your
preferences page).
This page will display the
current status of all of your
apparatus
By touching and holding an
apparatus, you will be able to
change the status of that
apparatus (if you have
permission to do so), after
entering the reason for the
change.
After tapping your phone’s
menu button, you can also
return to the Agencies page
to switch agencies or edit
your preferences.
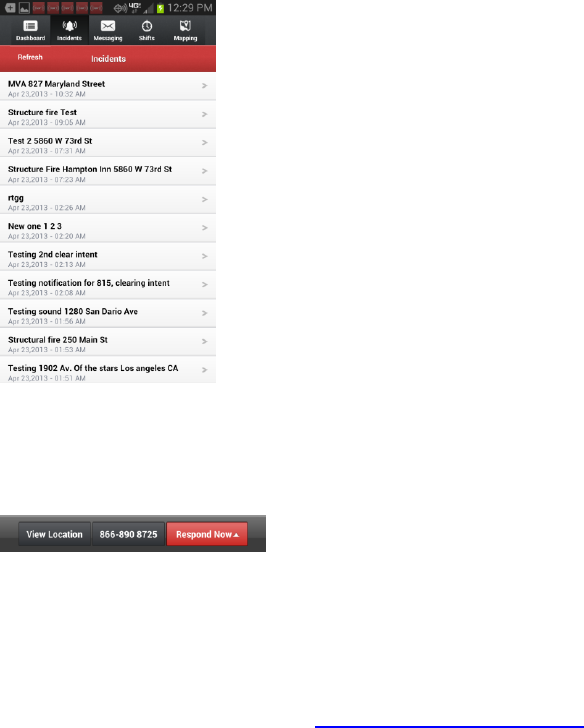
Incidents This page will list your most recent incidents, if your department’s dispatches are processed
through your department’s IamResponding.com system. If your dispatch messages are not
currently processed through your department’s IamResponding system, that is a free
configuration that can be done in most jurisdictions. Have your local system administrator
contact our customer support team at 315-701-1372 to set this up.
Tapping on any incident will open that incident, showing
the incident details.
On your Preferences page, you can select which format to
view that information in (these choices relate to the
dispatch parsing settings available in the Administrative
Functions page of your desktop-based IamResponding
system).
Incidents are stored here for however long you set within
your preferences page.
After selecting an incident, the bottom of the screen displaying the incident details provides
you with 3 options:
Tapping “View Location” will open a Google Map™,
displaying the location of the incident, as long as there is a
valid address in the incident notification.
If the incident location that is extracted from your incident
notification is not correct, please send the incident
notification, and the incorrectly extracted address to
support@emergencysmc.com. You can snap a screen shot
of the incident detail page, and the mapping page by
simultaneously pressing the on/off button at the top of
your phone and the round “Home” button at the bottom
center of the face of your phone. Sending those to us will
be very helpful.
From here, you can also call in directly to your assigned
number, or indicate your response status directly through
the app.
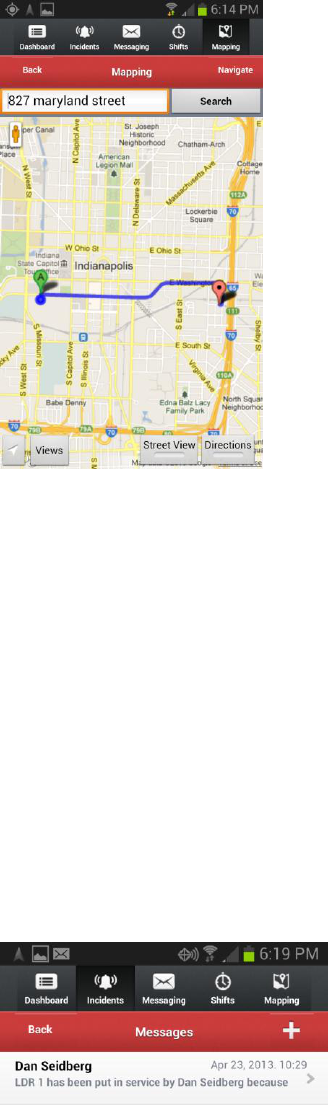
Mapping Mapping can be opened either by tapping “View Location” from within your incident details
page, or by tapping “Mapping” on the top menu bar (if you are not navigating to that page
from a specific incident notification).
The map will display the incident location (whether
automatically when accessed through the incident details
page, or manually entered when accessed through the
“Mapping” icon).
If you have location services correctly enabled, the map will
show you one available route to the incident location.
With the “Views” button, you can modify the map view to
see a Satellite, Terrain or Hybrid map view.
You can zoom in or out by using your fingers to pinch or
expand the map.
If Google has a street view of the incident location, you can
view that by tapping Street View. Tap that again to go back
to the ordinary map view.
If you have location services enabled, you can review turn-
by-turn directions of one route to the incident by tapping
the “Directions” button. Tap that again to go back to the
ordinary map view.
If you have location services correctly enabled, and also
have the Google Maps™ app on your phone, tapping the
“Navigate” button will launch the Google Maps™ app,
automatically input your locations and the incident address
shown on your map, and provide access to audible turn-by-
turn navigation.
Messaging A listing of the intra-department messages manually sent to you through your department’s
IamResponding system via email, text and/or pager can be viewed and sent from this page.
Some automated messages will NOT be available on this list.
To Read a message: Tap the message you want to review

To write a new message: Tap the button.
Select who you want to send the message to by tapping and then select who you want
to send the message to (members of a group, individual members, or both), tap the “OK”
button in the upper right corner, and then select “mail”, “text”, and/or “pager” as your
method of delivery. Note that selecting any one of the delivery methods will also cause the
message to be sent to all recipients via the app (if they have selected within their app to
receive such notifications. Tap “send”.
Note that you must have permission to send messages within your member profile, or you will
not be able to do so.
Shifts This page lets you add, edit and view your schedule, and lets you view the upcoming schedule
for your department.
Deleting shifts from the app is not presently available.
When viewing your schedule, you will be shown shifts from the present date forward. To view
past shifts, select “My Schedule,” and then tap the “Edit” button in the upper right corner.
That will allow you to select a date in the past or future, and the result will show you shifts
beginning with that selected date.
Alerts
delivered
to your phone If you have selected to receive dispatch notifications and/or intra-department messages to
your app (this is done within your app’s Edit Agency’s Settings page, then so long as all of your
settings are correct, you will receive push notifications of those to your phone.
When you receive them, you will hear the applicable ring tone that you selected, for the
duration that you have selected. You will receive either a pop-up notification on your phone,
or a traditional notification, depending on what you have selected on your preferences page.
If you selected to receive traditional notifications, the IaR icon will appear at the top of your
phone’s screen. Swipe down on your phone’s screen from top to bottom to open your
phone’s notification screen. This is an Android phone function separate from this app. On
that notification screen, you will see the most recent alert(s) that you received from your
department through this app. Tap on that, and the app will automatically open to the
applicable screen.
