
RTI Connext
Core Libraries
Getting Started Guide
Addendum for Android Systems
Version 7.2.0

© 2015-2022 Real-Time Innovations, Inc.
All rights reserved.
October 2023.
Trademarks
RTI, Real-Time Innovations, Connext, Connext Drive, NDDS, the RTI logo, 1RTI and the phrase,
“Your Systems. Working as one.” are registered trademarks, trademarks or service marks of Real-Time
Innovations, Inc. All other trademarks belong to their respective owners.
Copy and Use Restrictions
No part of this publication may be reproduced, stored in a retrieval system, or transmitted in any form
(including electronic, mechanical, photocopy, and facsimile) without the prior written permission of
Real-Time Innovations, Inc. The software described in this document is furnished solely under and sub-
ject to RTI's standard terms and conditions available at https://www.rti.com/terms and in accordance
with your License Acknowledgement Certificate (LAC) and Maintenance and Support Certificate
(MSC), except to the extent otherwise accepted in writing by a corporate officer of RTI.
Third-Party Software
RTI software may contain independent, third-party software or code that are subject to third-party
license terms and conditions, including open source license terms and conditions. Copies of applicable
third-party licenses and notices are located at community.rti.com/documentation. IT IS YOUR
RESPONSIBILITY TO ENSURE THAT YOUR USE OF THIRD-PARTY SOFTWARE COMPLIES
WITH THE CORRESPONDING THIRD-PARTY LICENSE TERMS AND CONDITIONS.
Notices
Deprecations and Removals
Any deprecations or removals noted in this document serve as notice under the Real-Time Innovations,
Inc. Maintenance Policy #4220 and/or any other agreements by and between RTI and customer regard-
ing maintenance and support of RTI’s software.
Deprecated means that the item is still supported in the release, but will be removed in a future release.
Removed means that the item is discontinued or no longer supported. By specifying that an item is
deprecated in a release, RTI hereby provides customer notice that RTI reserves the right after one year
from the date of such release and, with or without further notice, to immediately terminate maintenance
(including without limitation, providing updates and upgrades) for the item, and no longer support the
item, in a future release.

Technical Support
Real-Time Innovations, Inc.
232 E. Java Drive
Sunnyvale, CA 94089
Phone: (408) 990-7444
Email: [email protected]
Website: https://support.rti.com/
Contents
Chapter 1 Android Systems
1
Chapter 2 Installing Connext for Android Development
2
Chapter 3 Using DDSSpy and Ping on Android Platforms
3.1 RTI DDS Spy App
3
3.2 RTI DDS Ping App
4
Chapter 4 Generating Example Code and a Makefile from IDL
6
Chapter 5 Building and Running a Hello World Example with C/C++ or Java
11
Chapter 6 Additional Considerations
6.1 Output when Running Connext Applications on Android Devices and Emulators
17
6.1.1 DDS Log Messages from Core Libraries
17
6.1.2 Output from rtiddsgen-Generated Examples or User Applications
17
6.1.3 Output from Connext Utilities
18
6.2 Communication between Connext Applications on Emulator and Host
19
6.3 Loading XML-Specified QoS Settings
21
6.4 Using DDS C++ Libraries for Android Applications
22
6.5 Android Threads
23
6.6 Setting Permission in the App Manifest
23
Chapter 7 Third-Party Licenses
25
iv
Chapter 1 Android Systems
Android™ is not supported in release 7.2.0.
This document provides instructions to install and configure RTI® Connext® for Android™
development and run Connext applications on Android systems. Please refer to the doc-
umentation provided by Google® for more information on the Android operating system and
Android platform: https://developer.android.com/develop/index.html.
This document will guide you through the process of generating, compiling, and running a
Hello World application on an Android system, as well as using Connextutilities.
Installing Connext for Android Development (Chapter 2 on page2) describes how to install and
configure Connext for Android development.
If you want to use the Connext Ping or Spy utilities, please read Using DDSSpy and Ping on
Android Platforms (Chapter 3 on page3).
These sections will guide you through the steps to generate, modify, build, and run an example
HelloWorld application on an Android target:
l
Generating Example Code and a Makefile from IDL (Chapter 4 on page6)
l
Building and Running a Hello World Example with C/C++ or Java (Chapter 5 on
page11)
The last section describes some additional considerations for Android development:
l
Additional Considerations (Chapter 6 on page17)
1

Chapter 2 Installing Connext for Android
Development
You will need to install a host archive and a target archive. The host archive contains doc-
umentation, header files, and other files you need for development; the target archive contains
the libraries and other files you need for deployment. Unpack them as described in the instruc-
tions for Linux systems in the RTI Connext Installation Guide.
2
Chapter 3 Using DDSSpy and Ping on
Android Platforms
You can use the rtiddsspy and rtiddsping utilities either as Android Apps or as command-line
programs. When running as Android Apps on a real Android device, there is no command
prompt for entering parameters and no shell for outputting data. So to facilitate their use, the util-
ities come with a simple GUI.
For information on using rtiddsspy and rtiddsping from the command-line, see the RTI DDS
Spy User's Manual and RTI DDS Ping User's Manual.
Before installing these utilities: the adb install command requires that you connect the
device to a host machine and enable USB debugging on the device. For details on how
to do this, see these instructions (http://developer.android.com/tools/device.html#setting-
up).
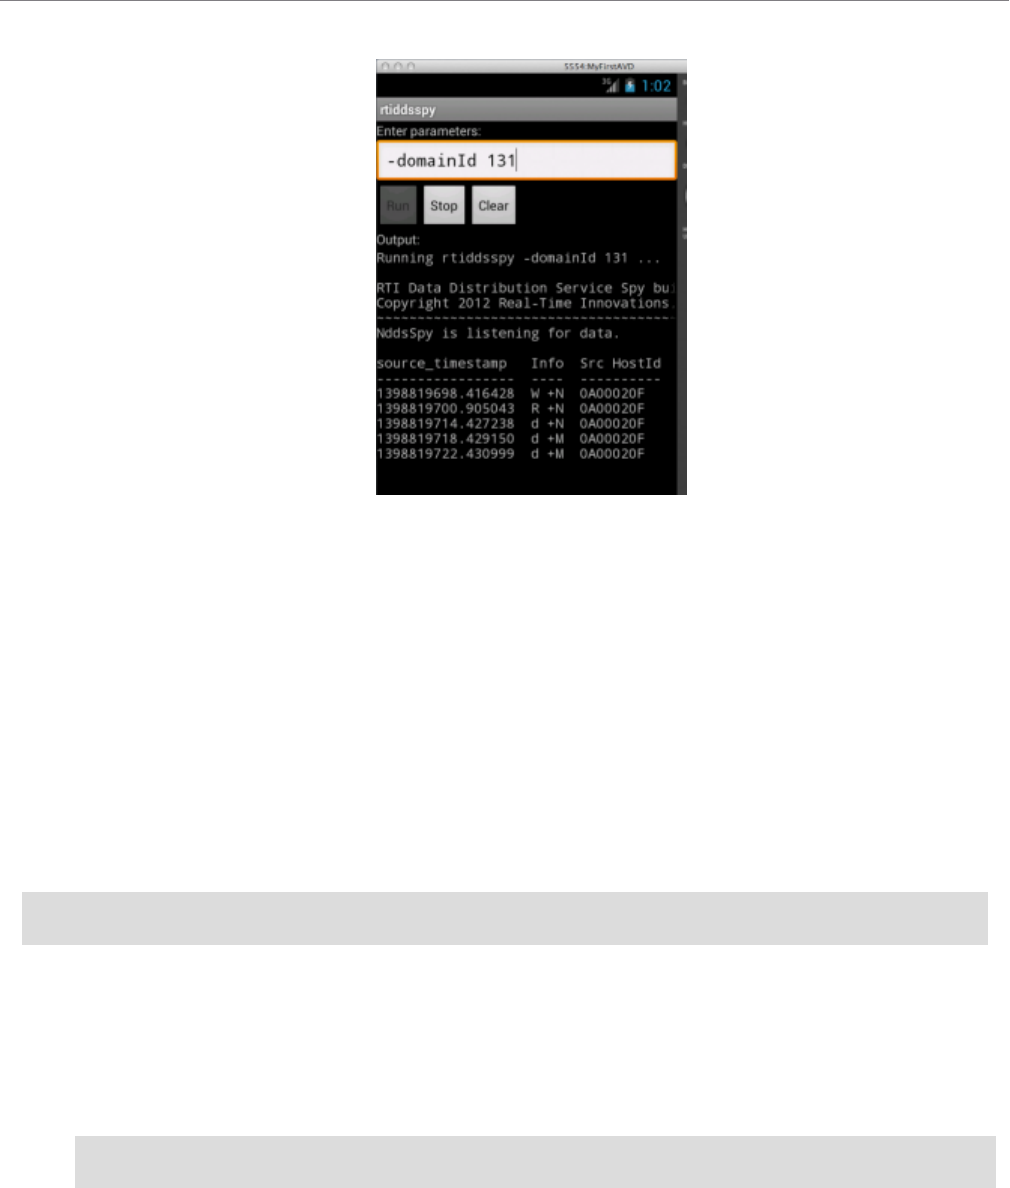
3.1 RTI DDS Spy App
To install and use rtiddsspy on an Android device:
1. Install rtiddsspy with this command (replace <arch> with your architecture name):
adb install $NDDSHOME/resource/app/bin/<arch>/rtiddsspy.apk
2. Touch or click the rtiddsspy icon.
3. On the displayed screen, enter parameters exactly as they would be entered on the com-
mand line when using rtiddsspy on other platforms.
3
3.2 RTI DDS Ping App
4
4. Click or touch Run. Data is displayed in the output panel.
You may need to scroll the panel to the right to see the full output.
Note that when running rtiddsspy as an App on Android, the -printSample option is not sup-
ported.
5. Note that the Run button will be disabled until the Spy process is finished (i.e., if you have spe-
cified a -timeout value in the parameters). To stop a running Spy process gracefully, click or
touch the Stop button. Once the Spy process is finished, the Run button will be enabled again.
6. (Optional) Click or touch the Clear button to clear the current output.
To uninstall rtiddspy from the Android device through the adb shell, use this command:
adb uninstall com.rti.dds.rtiddsspy
3.2 RTI DDS Ping App
To install and use rtiddsping on an Android device:
1. Install rtiddsping with this command (replace <arch> with your architecture name)
adb install $NDDSHOME/resource/app/bin/<arch>/rtiddsping.apk
2. Touch or click the rtiddsping icon.
3. On the displayed screen, enter parameters exactly as they would be entered on the command line
when using rtiddsping on other platforms.

3.2 RTI DDS Ping App
4. Note that the Run button will be disabled until the Ping process is finished (i.e., if you have spe-
cified (in the parameters) a -numSamples value with the publisher, or a -timeout value with the
subscriber). To stop a running Ping process gracefully, click or touch the Stop button. Once the
ping process is finished, the Run button will be enabled again.
5. (Optional) Click or touch the Clear button to clear the current output.
To uninstall rtiddsping from the Android device through the adb shell, use this command:
adb uninstall com.rti.dds.rtiddsping
5

Chapter 4 Generating Example Code and
a Makefile from IDL
This section describes how to generate example code and a makefile from IDL using RTI Code
Generator (rtiddsgen). The generated code will run without modification. The generated make-
files contain recipes for performing various Android SDK and NDK tasks to simplify the pro-
cess of building and running a HelloWorld example. They also contain default settings for
certain variables. These defaults are chosen to get the Hello World examples to run out of the
box for as wide a range of SDK and NDK configurations as possible. However for real devel-
opment, these default values should be reviewed.
To create the example applications:
1. Set up the environment on your development machine:
l
Set the NDDSHOME environment variable and update your PATH as described in
Set Up Environment Variables (rtisetenv), in "Hands-On 1" of Introduction to Pub-
lish/Subscribe, in the RTI Connext Getting Started Guide.
l
The PATH environment variable should also include the SDK’s tools, build-tools,
and platform-tools directories. Set the ANDROID_SDK_ROOT (for Android 12
systems) or ANDROID_SDK_HOME (for Android 9 systems) and add it to the
PATH.
For example:
export ANDROID_SDK_ROOT=<path where Android SDK is installed>
export PATH=$(ANDROID_SDK_ROOT)/tools:$(ANDROID_ROOT_HOME)/build-
tools/<build tool version>:$(PATH)
(Replace <build tool version> to match the one in your installation.)
6

Chapter 4 Generating Example Code and a Makefile from IDL
7
l
For Android 9 systems:When building Android Apps (*.apk), PATH should include the
bin directory of an Apache® Ant™ installation, such as Ant 1.8.2.
For example:
export ANT_HOME=<path where Ant is installed>
export PATH=<ANT_HOME>/bin:$(PATH)
l
For Android 12 systems: When building Android Apps (*.apk), set the GRADLE_
HOME environment variable to your Gradle® installation directory. RTI Code Generator
(rtiddsgen) will leverage Gradle to create the necessary resources and directory structure to
build and create APKs.
export GRADLE_HOME=<path where Android NDK is installed>
l
When building Java examples or Android Apps, the PATH should include AdoptOpenJDK
17.0.6.
For example:
export JAVA_HOME=<path where Java is installed>
export PATH=$(JAVA_HOME)/bin:$(PATH)
l
When building C and C++ examples, both as executables and as Android Apps, the PATH
should include the Android NDK (ANDROID_NDK_HOME for Android 9 systems;
ANDROID_NDK_ROOT for Android 12 systems).
For example:
export ANDROID_NDK_ROOT=<path where Android NDK is installed>
export ANDROID_NDK_TOOLCHAIN_PATH=<path where Android NDK toolchain is
installed>
export PATH=$(ANDROID_NDK_TOOLCHAIN_PATH)/bin:${PATH}
1. Create a directory to work in. In this example, we use a directory called myhello.
2. In the myhello directory, create a file called HelloWorld.idl that contains a user-defined data
type. For example:
// Temperature data type
struct Temperature {

Chapter 4 Generating Example Code and a Makefile from IDL
// ID of the sensor sending the temperature
string<256> sensor_id;
// Degrees in Celsius
int32 degrees;
};
3. Use Code Generator (rtiddsggen) to generate sample code and a makefile. Choose Java, C, or
C++.
Examples for each language:
$(NDDSHOME)/bin/rtiddsgen -language C -example <arch> HelloWorld.idl
$(NDDSHOME)/bin/rtiddsgen -language C++ -example <arch> HelloWorld.idl
$(NDDSHOME)/bin/rtiddsgen -language Java -example <arch> -package
com.rti.hello.idl HelloWorld.idl
Replace <arch> (following -example) with a supported Android architecture name. For example,
<arch> may be arm64Android9.0clang8.0ndkr19b. See the RTI Connext DDS Core Libraries
Platform Notes for the supported Android architectures for each language.
Android Apps (*.apk) require the Java code generated by rtiddsgen to be in a package. You can
achieve this by using either the modules keyword in IDL or the -package command-line option
with rtiddsgen. The IDL used here does not have modules, so the -package option is used
instead.
4. See if you need to change any of the default settings in the generated makefile:
l
DEVICE
The generated makefile assumes that the computer on which you are building and running
these examples only has a single Android device or emulator attached. If this is not the
case, you will need to set the DEVICE variable in the makefile. By default, this variable is
not set. To see what devices are attached and what value to set DEVICE to, run this
command:
adb devices
8

Chapter 4 Generating Example Code and a Makefile from IDL
9
l
TARGET_ID (only for Android 9 systems)
If you are building an Android App (*.apk), TARGET_ID should be set to the build target
for your application. It corresponds to an Android platform library that you would like to
build your project against. Run this command to print a list of available Android platforms
that you have downloaded for your SDK and their corresponding IDs.
android list targets
By default, TARGET_ID is set to 1. TARGET_ID will be used in the generated makefile
for Android 9 systems.
l
ANDROID_PACKAGE_PREFIX
If you are building an Android App (*.apk), the application needs an Android package
name prefix. The default prefix is com.rti.example<language>.<IDL filename>.
The prefix will eventually be used to generate two Android applications with these package
names:
l
com.rti.<IDL filename>example.publisher
l
com.rti.<IDL filename>example.subscriber
(where <language> is Java, C, or C++; <IDL filename> is the name of the IDL file that
you used for your example).
The ANDROID_PACKAGE_PREFIX is also used in the generated makefile for unin-
stalling APKs. If you change the ANDROID_PACKAGE_PREFIX value, you will need to
update the package name in these generated files:
l
objs/<arch>/publisher/src/main/java/com/rti/example<language>/<IDL file-
name>/publisher/<IDL filename>PublisherActivity.java
l
objs/<arch>/subscriber/src/main/java/com/rti/example<language>/<IDL file-
name>/subscriber/<IDL filename>SubscriberActivity.java
l
objs/<arch>/publisher/src/main/AndroidManifest.xml
l
objs/<arch>/subscriber/src/main/AndroidManifest.xml
l
ANDROID_PUSH_DEST
If you want to run the example directly on an emulator or in a device shell, ANDROID_
PUSH_DEST should be set to the location where files are copied to. The default value is
/data/data/com.rti.example<language>.<IDL filename>, where <IDL filename> is the
name of the IDL file that you are using.

Chapter 4 Generating Example Code and a Makefile from IDL
5. If you modify the publisher or subscriber code, the makefile, or QoS file, be careful if you re-run
rtiddsgen: do not use –replace in conjunction with –example, as that would overwrite those
modifications.
10
Chapter 5 Building and Running a Hello
World Example with C/C++ or
Java
This section will guide you through the steps required to successfully run an rtiddsgen-gen-
erated example application, written in C/C++ or Java on an Android target, as an Android App
(*.apk).
Note that the C and C++ Android App examples use a Java wrapper class with JNI. It is also
possible to write pure C and C++ native code to build Android Apps; see the Android doc-
umentation for details (https://developer.android.com/tools/sdk/ndk/index.html).
1. Compile the generated C/C++ or Java code. The auto-generated makefile will create the
executables HelloWorld_publisher and HelloWorld_subscriber in the objs/<arch>/ dir-
ectory for C/C++, or it will generate Java code and archive it into HelloWorld.jar. You
should link with libc++_shared.so.
2. See Chapter 4 Generating Example Code and a Makefile from IDL on page6 regarding
the ANDROID_ PACKAGE_PREFIX and TARGET_ID variables; if you want to change
these variables in the makefile, do so now. Note that TARGET_ID is only used in the
makefile for Android 9 systems.
3. Create shared libraries (*.so) and build the Android projects with the resulting shared lib-
raries. For example (all on one line):
make -f makefile_HelloWorld_arm64Android9.0clang8.0ndkr19b
HelloWorld.so
11
Chapter 5 Building and Running a Hello World Example with C/C++ or Java
12
The above command will do the following:
l
Generate separate shared libraries for the publisher and subscriber examples.
l
Generate separate JNI source code files for both the publisher and subscriber.
l
Compile and link the JNI code into separate JNI shared libraries, one for the publisher and
one for the subscriber.
4. Only for Android 9 systems Create the Android project directory structure:
make -f makefile_HelloWorld_arm64Android9.0clang8.0ndkr19b
HelloWorld.projects
5. Create the .apk files that will contain the applications. By running the following command, you
will build an APK for the publisher and an APK for the publisher. These APKs will be used later
to deploy the Apps:
make -f makefile_HelloWorld_arm64Android9.0clang8.0ndkr19b HelloWorld.apks
6. Install (via adb) the two Apps on a connected consumer device or an emulator.
For example (all on one line):
make -f makefile_HelloWorld_arm64Android9.0clang8.0ndkr19b
HelloWorld.installapks
7. Run the example on an emulator with a GUI (i.e., not started with the –no-window flag) or on a
consumer device:
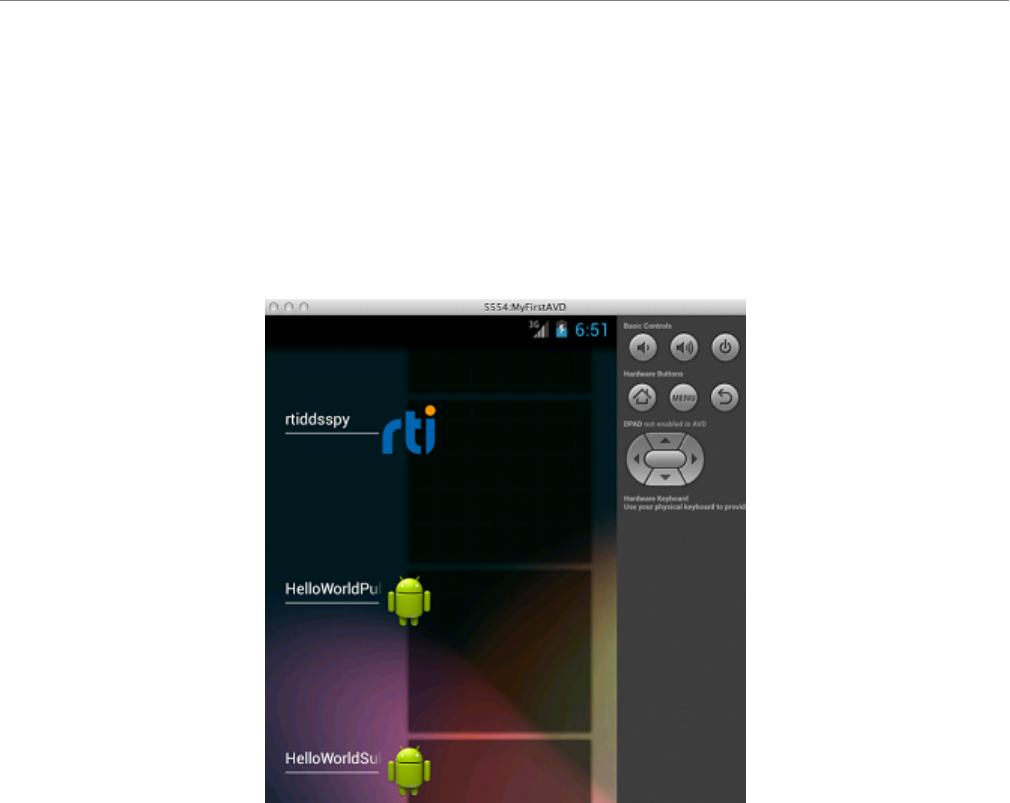
a. Navigate to the Apps screen displaying icons, it should show HelloWorld_publisher
and HelloWorld_subscriber.
Chapter 5 Building and Running a Hello World Example with C/C++ or Java
b. Touch (on a device) or click (on an emulator) the HelloWorld_subscriber icon.
c. Optionally, enter a single number for the DDS Domain ID as a parameter.
d. Touch or click Run.
e. Navigate to the Apps icons (via the Home button) and launch HelloWorld_pub-
lisher.
13
Chapter 5 Building and Running a Hello World Example with C/C++ or Java
14
f. Optionally, for parameters, enter the DDS Domain ID (use the same ID you entered
for the subscriber) as the first number. Optionally, you can enter the number of
samples to be published as the second parameter.
g. Touch or click Run.
h. Navigate to the Apps icons and return to HelloWorld_subscriber. Note the samples
received.
Chapter 5 Building and Running a Hello World Example with C/C++ or Java
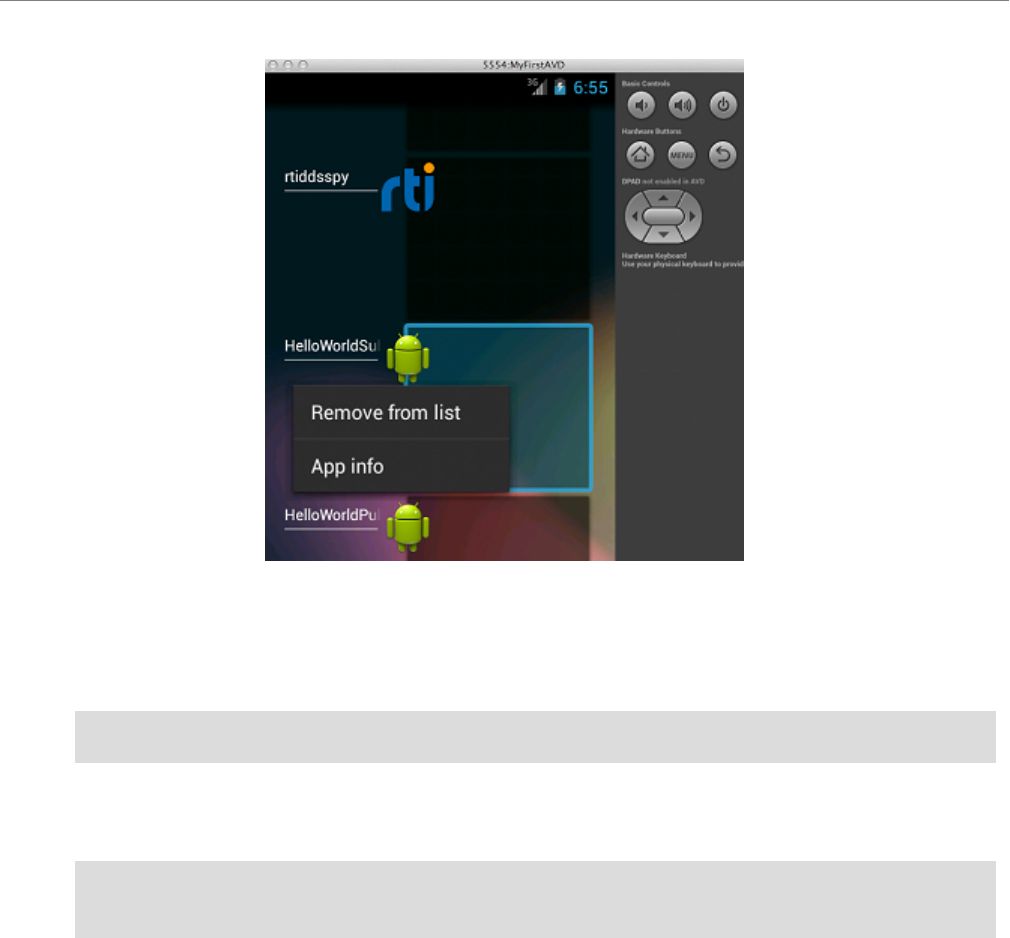
8. An Android App will continue to run in the background when the focus is given to another App.
How to stop a running Android App without uninstalling it depends on the device or the virtual
device within the emulator. For example, on the emulator hold the Home button until a list of
applications is shown. Stop an App by swiping it left or right. For example, on a Nexus 7 tablet,
touch the Recent Apps button (a soft key with an overlapping rectangle) and swipe the App you
want to stop. Alternatively, open Settings, choose Apps, in the subheadings swipe to Running,
select Show cached processes, and lastly touch and Stop the App.
On an emulator, press the Home button to see a list of running Apps.
15
Chapter 5 Building and Running a Hello World Example with C/C++ or Java
16
Touch the desired App, then select 'Remove from list'.
9. If you want to see DDS log messages or values of the samples being printed on the subscriber,
run adb logcat with a filter from a host machine shell. For example:
adb logcat -v tag RTIConnextLog:I *:S
10. Uninstall (via adb) the two Apps on the connected consumer device or emulator. For example
(all on one line):
make -f makefile_HelloWorld_arm64Android9.0clang8.0ndkr19b
HelloWorld.uninstallapks
Chapter 6 Additional Considerations
6.1 Output when Running Connext Applications on Android
Devices and Emulators
6.1.1 DDS Log Messages from Core Libraries
All DDS log messages from the provided core C and C++ libraries are printed using the
Android logging system as "information" using the RTIConnextLog tag. Log messages from
the Connext Java files are printed to System.out and System.err. The adb logcat command
without the -v option will print all logged messages. To view any of the DDS log messages in
real time, use the Android logcat tool with the appropriate filter through adb. For example:
adb logcat -v tag RTIConnextLog:I System.out:I System.err:I *:S
Note that if you are calling the TypeSupport_print_data() method of any of the rtiddsgen-gen-
erated data types in C or C++, the value of the samples will also be logged using the Android
logging system as stated above.
Refer to the Android documentation for details:
l
http://developer.android.com/tools/debugging/debugging-log.html
6.1.2 Output from rtiddsgen-Generated Examples or User Applications
For the rtiddsgen-generated Java publisher/subscriber examples, System.out.println() is used
for printing output.
For the rtiddsgen-generated C/C++ examples, printf() is used for printing output.
By default, Android systems send stdout and stderr output to /dev/null. If you are running the
generated publisher/subscriber with the adb shell (typically on a device on which you have root
access), you should be able to see the example output directly in the shell.
17

6.1.3 Output from Connext Utilities
18
If you are using the Android project files generated by the rtiddsgen-generated makefile to compile the
publisher and subscriber examples as Android Apps, the generated source code for the application is
doing something special to redirect the output to allow them to show up in the Android App.
For the Java example scenario, all the System.out output is redirected to the TextView in the GUI of
the Android App. Refer to the generated Java Activity class source code under the project src directory
for details on how this is done.
For the C/C++ example scenario, a special RTIAndroid_registerOnPrintf() method can be found in
the generated publisher and subscriber example source code to redirect all printf() calls to a function
callback. The RTIAndroid_registerOnPrintf() method is called when the example is run for the first
time. Each time printf() is called from the generated publisher and subscriber example source code, the
registered function callback, implemented in JNI, will be called. In the JNI method, we first attach the
current thread to the Dalvik VM if it has not been done, then we call a method in the Java Activity
class to display the message in the TextView UI. The native thread will be detached from the Dalvik
VM, if necessary, before we return to the native publisher/subscriber example code. Refer to the gen-
erated Java Activity class source code under the project src directory, JNI code, and pub-
lisher/subscriber C/C++ code in the example’s main directory for details on how this is done.
Note that when running the rtiddsgen-generated examples as an Android App, DDS logging messages
and the printing of the Samples in the C or C++ subscriber will still need to be viewed using logcat—
they will not show up in the GUI of the Android App.
Alternatively, you can change the generated example code to cause all the output to go to logcat. For C
and C++, replace all calls to printf() with __android_log_print() with your desired priority and tag.
For Java, use methods in the android.util.Log class instead of the System.out class.
Refer to Android SDK documentation for details:
l
http://developer.android.com/tools/debugging/debugging-log.html
6.1.3 Output from Connext Utilities
The Connext rtiddsspy andrtiddsping utilities are implemented with Connext core libraries. As a result,
DDS log messages must be viewed with logcat.
If you run rtiddsping and rtiddsspy in a shell, all the output from the utility will show up in the shell
(even though DDS log messages still need to be viewed with logcat).
If you run rtiddsping and rtiddsspy as Android Apps, most of the utility output will show up on the
App UI, with the following exceptions. When running rtiddsspy with the
-printSample option as an Android App, the value of the received sample is printed to stdout and there-
fore will not show up in either the UI or in logcat. The rest of the output from the utility itself will
show up in the App UI as expected. DDS log messages still need to be viewed with logcat.

6.2 Communication between Connext Applications on Emulator and Host
6.2 Communication between Connext Applications on Emulator and
Host
The emulator has its own virtual LAN: 10.0.2.*. In particular, 10.0.2.15 is the emulator's address for
the host's NIC and 10.0.2.2 is the emulator's address for the host's loopback interface (localhost). To
reach addresses outside of its virtual LAN, the emulator will route packets through its virtual network
interface, 10.0.2.15 (the host's NIC). For communication from host to emulator, packets must be sent to
the host's loopback interface, 127.0.0.1. The emulator can be directed to open ports on the host
127.0.0.1.
The emulator does not (for the version used at time of writing) support multicast. Therefore, discovery
will be over unicast UDP. The number of participants within the host + emulator is limited due to the
need to allocate ports for each participant. By default, that limit is five participants. In normal Connext
usage, the participants would acquire ports automatically. (The assignment would be implicitly based
on the order of start up). The emulator that encapsulates one or more participants needs to explicitly
acquire the ports that its contained participants will use. Therefore, it is necessary to explicitly manage
the ports used.
Connext determines ports for unicast communication based on Domain and Participant IDs. (For the
algorithm used to calculate port numbers, see Ports Used for Communication, in the Getting Applic-
ations to Discover Each Other chapter of the RTI Connext Core Libraries User's Manual.
Consider the following example: A Hello_simple subscriber on the host is communicating with a
Hello_simple publisher (Android) on an emulator.
Assuming Domain ID 0, the subscriber is given a Participant ID of 3. As there will be no contention,
the publisher can assume the Participant ID is 0. The publisher will use ports 7410 for meta-traffic and
7411 for user-traffic. The subscriber will use ports 7416 for meta-traffic and 7417 for user-traffic.
To cause the emulator to open ports 7410 and 7411 on behalf of the publisher, it is necessary to set up
some redirections. Use the “adb devices” command on the host to get the name of the emulator (e.g.,
"emulator-5554") and determine its control port (5554).
If the control port is 5554, enter this at the host to determine that no redirections are currently in place:
telnet localhost 5554
redir list
Then enter the following to set up redirections:
redir add udp:7410:7410
redir add udp:7411:7411
19

6.2 Communication between Connext Applications on Emulator and Host
20
These redirections apply for 127.0.0.1 on the host, redirected to 10.0.2.2 in the emulator. The redir
command causes the emulator to open the host port (the first of the two ports specified in the com-
mand) on the 127.0.0.1 interface. If another process already has that port, redir will report an error.
The publisher, running in the emulator, requires the following settings, shown below in a snippet of a
QoS file’s domain_participant_qos section:
<discovery>
<initial_peers>
<element>builtin.udpv4://10.0.2.2</element>
</initial_peers>
</discovery>
<property>
<value>
<element>
<name>dds.transport.UDPv4.builtin.public_address</name>
<value>127.0.0.1</value>
</element>
</value>
</property>
The above sets the locators provided by the publisher; these locators instruct the subscriber to direct
traffic to the host's loopback interface. The virtual LAN address that would otherwise be used is not
accessible to the subscriber running on the host.
Set the environment for the publisher (on the emulator) so that NDDS_QOS_PROFILES points to the
QoS file. Note that the initial_peers can alternatively be set via the NDDS_DISCOVERY_PEERS
environment variable.
Note that for an Android App (*.apk), these settings can be made programmatically.
The subscriber, running on the host, requires the following settings, shown below in a snippet of a QoS
file’s domain_participant_qos section:
<discovery>
<initial_peers>
<element>builtin.udpv4://127.0.0.1</element>
</initial_peers>
</discovery>
<transport_builtin>
<mask>UDPv4</mask>
</transport_builtin>
<wire_protocol>
<participant_id>3</participant_id>
</wire_protocol>
Explicitly attempting to communicate the participant ID prevents the subscriber from implicitly using
participant ID 0 (which would cause a later attempt to set redirections for the emulator to fail).

6.3 Loading XML-Specified QoS Settings
Explicitly setting the builtin transport to be UDPv4 only will prevent the host from communicating
with the emulator via shared memory.
Set the environment for the subscriber (on the host) so that NDDS_QOS_PROFILES points to the QoS
file. Note that you can also set initial_peers via the NDDS_DISCOVERY_PEERS environment vari-
able. All these settings can also be made programmatically.
Finally, if you need to run rtiddsspy on the host to communicate with DDS applications running on the
emulator, be careful when specifying its transports, discovery addresses, and participant ID. For
example:
$(NDDSHOME)/bin/rtiddsspy -peer 127.0.0.1 -transport 1 -index 1
There are many variation on this theme to achieve communication between host and emulator. This
example illustrates the issues that need to be addressed.
6.3 Loading XML-Specified QoS Settings
If you have root access to the device or you are running on an emulator, you can run your Connext
application in the Android shell and set up environment variables in the shell, just as you would for any
other Linux system. In this scenario, XML QoS profiles can be loaded in the usual ways.
If you want to run Connext through an Android App, there is no support for environment variables,
which limits the ways that can be used to load XML-specified QoS settings. However, it can still be
done by specifying one of the following fields in the ProfileQosPolicy in the DomainPar-
ticipantFactoryQos:
l
url_profile
l
string_profile
See the PROFILE QosPolicy in the RTIConnext Core Libraries User's Manual (Section 9.4.2 in the
version for release 6.1.2).
When running an Android App on a non-rooted consumer device, if you want to use url_profile to spe-
cify the location of the file that contains the XML-specified QoS settings, it will work only if the file is
in Android external storage (for example, under /sdcard). You will also need to make sure the project's
AndroidManifest.xml has specified the correct permission to allow reading from external storage.
For example, use the following command to put the file in external storage:
adb push <host-qos-file> /sdcard/<target-qos-file>
21
6.4 Using DDS C++ Libraries for Android Applications
22
In the source code generated for your application, specify the location of the file in the external storage
in the url_profile field of the ProfileQosPolicy in DomainParticipantFactoryQos. For example, in Java,
you can do the following before creating DDS entities:
DomainParticipantFactoryQos factoryQos = new DomainParticipantFactoryQos();
DomainParticipantFactory factory = DomainParticipantFactory.get_instance();
factory.get_qos(factoryQos);
factoryQos.profile.url_profile.add("file:///sdcard/USER_QOS_PROFILES.xml");
factory.set_qos(factoryQos);
In the project's AndroidManifest.xml, add the following permission:
l
For Android 9 systems:
<uses-permission android:name="android.permission.READ_EXTERNAL_STORAGE" />
l
For Android 12 systems:
<uses-permission android:name="android.permission.MANAGE_EXTERNAL_STORAGE" />
Note that this may not be enough, and you might still be prompted with a security confirmation
in your device or emulator to confirm this permission at runtime. Starting with Android 11, apps
now require running permissions to be granted by the user, including reading a file from the
/sdcard. For this to happen, the app's manifest must have a new permission enabled named
MANAGE_EXTERNAL_STORAGE, and the user must be prompted to grant this permission.
However, for development purposes, you can pre-grant this permission for testing. To do so, run
this command after the app is installed (all on one line):
adb -s <device_id> shell appops set --uid <package_name>
MANAGE_EXTERNAL_STORAGE allow
For more up to date documentation, please refer to the official Android online documentation.
6.4 Using DDS C++ Libraries for Android Applications
The Connext C++ libraries are built and linked against the C++ runtime. The Connext libraries for
Android 9 systems require the shared version of the C++ runtime. This is due to the way Connext lib-
raries are built.
The rtiddsgen-generated makefile for C++ examples builds a shared library (.so) that is used by the
Android App. When building this shared library, we are also linking against the C++ runtime. The
C++ runtime is not included as part of the Connext bundles. You can obtain these libraries as part of
the Android NDK.
6.5 Android Threads
The static C++ runtime can be used only if it is linked into a single binary. If your project contains mul-
tiple shared libraries that are linked with the C++ runtime, you should use the shared version of the
C++ runtime. Note that if you use the shared version of the C++ runtime in the project for your
Android App, you will not be able to write pure native code by just using the Android Native Activity
class in your App’s manifest file. Instead, you will need to write Java code and call Sys-
tem.loadLibrary() to explicitly load the C++ runtime first, before loading the shared library of your
project. For example, for Android 9:
static {
System.loadLibrary(“c++_shared”);
System.loadLibrary(“HelloWorld_publisher”);
}
Please, also pay attention to the license for LLVM libc++ libraries before using that in your project.
Refer to the Android NDK documentation under "C++ Library Support" for more details:
https://developer.android.com/ndk/guides/cpp-support.
6.5 Android Threads
When an Android application is launched, the system creates a thread of execution for the application,
called "main." This main thread is also sometimes called the UI thread. Due to Android's single thread
model, one should never block the UI thread and one should not access the Android UI toolkit from out-
side the UI thread.
The project files generated by the rtiddsgen-generated makefile has taken care of this for you. If you
click the Run button to run the publisher/subscriber example, a new thread is created to handle the exe-
cution of the example, so that the UI thread will not be blocked. Similarly, if the Android UI needs to
be updated (for example, to display output of the publisher/subscriber example in the TextView UI),
runOnUiThread() is called to make sure the display is always updated in the UI thread. See the gen-
erated Java Activity class source code under the project src directory for details.
6.6 Setting Permission in the App Manifest
When using Connext on an Android platform as an App, you need to grant the proper permissions for
networking in your project's AndroidManifest.xml:
<uses-permission android:name="android.permission.INTERNET" />
<uses-permission android:name="android.permission.CHANGE_WIFI_MULTICAST_STATE" />
<uses-permission android:name="android.permission.CHANGE_WIFI_STATE" />
If you want to use Android external storage to load XML-specified QoS settings for your Connext-
based Android App, you also need to grant the proper permissions to read the external storage:
23
6.6 Setting Permission in the App Manifest
24
l
For Android 9 systems:
<uses-permission android:name="android.permission.READ_EXTERNAL_STORAGE" />
l
For Android 12 systems:
<uses-permission android:name="android.permission.MANAGE_EXTERNAL_STORAGE" />
Note that this may not be enough, and you might still be prompted with a security confirmation
on your device or emulator to confirm this permission at runtime. Starting with Android 11, Apps
now require running permissions to be granted by the user, including reading a file from the SD
card. For this to happen, the App's manifest must have a new permission enabled, named
MANAGE_EXTERNAL_STORAGE, and the user must be prompted to grant this permission.
However, for development purposes, you can pre-grant this permission for testing. To do so, run
this command (all on one line) after the App is installed:
adb -s <device_id> shell appops set --uid <package_name>
MANAGE_EXTERNAL_STORAGE allow
Refer to Android documentation for more details:
http://developer.android.com/reference/android/Manifest.permission.html

Chapter 7 Third-Party Licenses
The libc++ library is dual licensed under both the University of Illinois "BSD-Like" license and
the MIT license. As a user of this code you may choose to use it under either license. As a con-
tributor, you agree to allow your code to be used under both.
Full text of the relevant licenses is included below.
________________________
University of Illinois/NCSA
Open Source License
Copyright (c) 2009-2019 by the contributors listed in CREDITS.TXT
All rights reserved.
Developed by:
LLVM Team
University of Illinois at Urbana-Champaign
http://llvm.org
Permission is hereby granted, free of charge, to any person obtaining a copy of this software
and associated documentation files (the "Software"), to deal with the Software without restric-
tion, including without limitation the rights to use, copy, modify, merge, publish, distribute, sub-
license, and/or sell copies of the Software, and to permit persons to whom the Software is
furnished to do so, subject to the following conditions:
l
Redistributions of source code must retain the above copyright notice, this list of con-
ditions and the following disclaimers.
25

Chapter 7 Third-Party Licenses
26
l
Redistributions in binary form must reproduce the above copyright notice, this list of conditions
and the following disclaimers in the documentation and/or other materials provided with the dis-
tribution.
l
Neither the names of the LLVM Team, University of Illinois at Urbana-Champaign, nor the
names of its contributors may be used to endorse or promote products derived from this Software
without specific prior written permission.
THE SOFTWARE IS PROVIDED "AS IS", WITHOUT WARRANTY OF ANY KIND, EXPRESS
OR IMPLIED, INCLUDING BUT NOT LIMITED TO THE WARRANTIES OF
MERCHANTABILITY, FITNESS FOR A PARTICULAR PURPOSE AND NONINFRINGEMENT.
IN NO EVENT SHALL THE CONTRIBUTORS OR COPYRIGHT HOLDERS BE LIABLE FOR
ANY CLAIM, DAMAGES OR OTHER LIABILITY, WHETHER IN AN ACTION OF CONTRACT,
TORT OR OTHERWISE, ARISING FROM, OUT OF OR IN CONNECTION WITH THE
SOFTWARE OR THE USE OR OTHER DEALINGS WITH THE SOFTWARE.
________________________
Copyright (c) 2009-2014 by the contributors listed in CREDITS.TXT
Permission is hereby granted, free of charge, to any person obtaining a copy of this software and asso-
ciated documentation files (the "Software"), to deal in the Software without restriction, including
without limitation the rights to use, copy, modify, merge, publish, distribute, sublicense, and/or sell cop-
ies of the Software, and to permit persons to whom the Software is furnished to do so, subject to the fol-
lowing conditions:
The above copyright notice and this permission notice shall be included in all copies or substantial por-
tions of the Software.
THE SOFTWARE IS PROVIDED "AS IS", WITHOUT WARRANTY OF ANY KIND, EXPRESS
OR IMPLIED, INCLUDING BUT NOT LIMITED TO THE WARRANTIES OF
MERCHANTABILITY, FITNESS FOR A PARTICULAR PURPOSE AND NONINFRINGEMENT.
IN NO EVENT SHALL THE AUTHORS OR COPYRIGHT HOLDERS BE LIABLE FOR ANY
CLAIM, DAMAGES OR OTHER LIABILITY, WHETHER IN AN ACTION OF CONTRACT,
TORT OR OTHERWISE, ARISING FROM, OUT OF OR IN CONNECTION WITH THE
SOFTWARE OR THE USE OR OTHER DEALINGS IN THE SOFTWARE.
