
AngularJS Essentials
Design and construct reusable, maintainable, and
modular web applications with AngularJS
Rodrigo Branas
BIRMINGHAM - MUMBAI
AngularJS Essentials
Copyright © 2014 Packt Publishing
All rights reserved. No part of this book may be reproduced, stored in a retrieval
system, or transmitted in any form or by any means, without the prior written
permission of the publisher, except in the case of brief quotations embedded in
critical articles or reviews.
Every effort has been made in the preparation of this book to ensure the accuracy
of the information presented. However, the information contained in this book is
sold without warranty, either express or implied. Neither the author, nor Packt
Publishing, and its dealers and distributors will be held liable for any damages
caused or alleged to be caused directly or indirectly by this book.
Packt Publishing has endeavored to provide trademark information about all of the
companies and products mentioned in this book by the appropriate use of capitals.
However, Packt Publishing cannot guarantee the accuracy of this information.
First published: August 2014
Production reference: 1140814
Published by Packt Publishing Ltd.
Livery Place
35 Livery Street
Birmingham B3 2PB, UK.
ISBN 978-1-78398-008-6
www.packtpub.com

Credits
Author
Rodrigo Branas
Reviewers
Andrei M. Eichler
Cleberson C. C. Faccin
Ruoyu Sun
Felipe Trevisol
Commissioning Editor
Pramila Balan
Acquisition Editor
Harsha Bharwani
Content Development Editor
Sharvari Tawde
Technical Editors
Shiny Poojary
Kirti Pujari
Akash Rajiv Sharma
Copy Editors
Roshni Banerjee
Mradula Hegde
Alda Paiva
Project Coordinator
Aboli Ambardekar
Proofreaders
Simran Bhogal
Maria Gould
Ameesha Green
Paul Hindle
Indexers
Mariammal Chettiyar
Rekha Nair
Priya Subramani
Graphics
Ronak Dhruv
Disha Haria
Production Coordinator
Alwin Roy
Cover Work
Alwin Roy
Cover Image
Yuvraj Mannari
About the Author
Rodrigo Branas is a software architect, author, and international speaker on
software development based in Brazil, with more than 12 years of experience in
developing enterprise applications.
Lately, he has been participating in the development of many successful products
based on the AngularJS framework. A major part of these applications were made
available to the education industry, and are now used by thousands of users across
the country.
He is also the founder of Agile Code, a consultancy and training company that works
effectively with architects, developers, designers, and testers in order to produce
high-quality products.
He graduated in Computer Science and has an MBA degree in Project Management.
He is certied in SCJA, SCJP, SCJD, SCWCD, and SCBCD from Sun Microsystems;
PMP from Project Management Institute; MCP from Microsoft; and CSM from
Scrum Alliance.
In the past few years, he has dedicated himself to spreading knowledge in the
software development community. Also, he is the author of Java Magazine, one of the
most recognized technical publications in Brazil. His website address is http://www.
can follow him on Twitter at @rodrigobranas.
Acknowledgments
Writing this book was an incredible challenge! Throughout this time, I had the
pleasure to count on my lovely wife, Rosana Branas, who provided me with all the
inspiration, motivation, and affection that I needed.
Also, I am very happy and glad about sharing this experience with my reviewers:
Felipe Trevisol, Cleberson Faccin, Andrei Eichler, and Ruoyu Sun. They provided me
with their views, which I feel were quite important, and advice that helped improve
the text considerably.
I also would like to thank my great friend, Rafael Nami, who introduced me to the
AngularJS world, helping me during my rst steps with this amazing technology.
Special thanks to the outstanding editorial team at Packt Publishing: Ankita Goenka,
Aboli Ambardekar, Harsha Bharwani, Sharvari Tawde, Shiny Poojary, Kirti Pujari,
and Veena Manjrekar.
Finally, this book would not be complete without the support of my family! I would
especially like to thank my mom and dad, for the continuous love, education,
support, and encouragement that they have always provided me!

About the Reviewers
Andrei M. Eichler is a young developer with a great passion for learning. His
main experiences include working with large Postgres databases and Java, and he is
now venturing into Scala, performant JavaScript, and web application development.
Cleberson C. C. Faccin is a graduate in Systems Information from Universidade
Federal de Santa Catarina, Brazil. Since 2004, he has been working in the eld
of software development. During these 10 years, he has worked with several
technologies, from mainframes to applications of mobile devices. Currently, his
focus is on his work in JavaScript, where he is building applications for mobiles
with JavaScript.
Ruoyu Sun is a designer and developer living in Hong Kong. He is passionate
about programming and has contributed to several open source projects. He is the
founder of several tech start-ups using a variety of technologies before working in
the industry. He is the author of Designing for XOOPS, O'Reilly Media.
I would like to thank all my friends and family who have always
supported me.
Felipe Trevisol is a software architect who loves research, travel, and playing
guitar. He has worked with SOA and systems integration.

www.PacktPub.com
Support les, eBooks, discount offers,
and more
You might want to visit www.PacktPub.com for support les and downloads related to
your book.
Did you know that Packt offers eBook versions of every book published, with PDF and ePub
les available? You can upgrade to the eBook version at www.PacktPub.com and as a print
book customer, you are entitled to a discount on the eBook copy. Get in touch with us at
[email protected] for more details.
At www.PacktPub.com, you can also read a collection of free technical articles, sign up for a
range of free newsletters and receive exclusive discounts and offers on Packt books and eBooks.
TM
http://PacktLib.PacktPub.com
Do you need instant solutions to your IT questions? PacktLib is Packt's online digital book
library. Here, you can access, read and search across Packt's entire library of books.
Why subscribe?
• Fully searchable across every book published by Packt
• Copy and paste, print and bookmark content
• On demand and accessible via web browser
Free access for Packt account holders
If you have an account with Packt at www.PacktPub.com, you can use this to access
PacktLib today and view nine entirely free books. Simply use your login credentials
for immediate access.

Table of Contents
Preface 1
Chapter 1: Getting Started with AngularJS 7
Introduction to AngularJS 8
Architectural concepts 9
Setting up the framework 10
Organizing the code 12
Four ways to organize the code 13
The inline style 13
The stereotyped style 13
The specic style 14
The domain style 15
Summary 15
Chapter 2: Creating Reusable Components with Directives 17
What is a directive? 18
Using AngularJS built-in directives 19
The ngApp directive 19
The ngController directive 20
Nested controllers 21
The ngBind directive 21
The ngBindHtml directive 22
The ngRepeat directive 22
The ngModel directive 24
The ngClick directive and other event directives 25
The ngDisable directive 26
The ngClass directive 27
The ngOptions directive 28
The ngStyle directive 30
The ngShow and ngHide directives 30

Table of Contents
[ ii ]
The ngIf directive 31
The ngInclude directive 31
Refactoring application organization 32
Creating our own directives 34
template 35
templateUrl 36
replace 36
restrict 37
scope 38
transclude 42
link 43
require 44
controller 46
compile 47
Animation 48
How it works? 48
Animating ngRepeat 49
Animating ngHide 50
Animating ngClass 50
Summary 51
Chapter 3: Data Handling 53
Expressions 53
Filters 55
Basic usage with expressions 55
currency 55
date 56
lter 56
json 57
limitTo 58
lowercase 58
number 58
orderBy 59
uppercase 60
Using lters in other places 60
Creating lters 61
Form validation 62
Creating our rst form 62
Basic validation 63
Understanding the $pristine and $dirty properties 65
The $error object 65
Summary 66
Table of Contents
[ iii ]
Chapter 4: Dependency Injection and Services 67
Dependency injection 68
Creating services 69
Creating services with the factory 70
Creating services with the service 74
Creating services with the provider 75
Using AngularJS built-in services 76
Communicating with the backend 76
HTTP, REST, and JSON 76
Creating an HTTP facade 82
Headers 84
Caching 85
Interceptors 85
Creating a single-page application 87
Installing the module 87
Conguring the routes 87
Rendering the content of each view 88
Passing parameters 91
Changing the location 92
Resolving promises 93
Logging 96
Timeout 96
Asynchronous with a promise-deferred pattern 98
The deferred API 100
The promise API 101
Summary 101
Chapter 5: Scope 103
Two-way data binding 103
$apply and $watch 104
Best practices using the scope 106
The $rootScope object 110
Scope Broadcasting 110
Summary 113
Chapter 6: Modules 115
Creating modules 115
The UI module 116
The search module 118
The parking application module 119
Recommended modules 120
Summary 120
Table of Contents
[ iv ]
Chapter 7: Unit Testing 121
The Jasmine testing framework 122
Testing AngularJS components 124
Services 125
Controllers 126
Filters 128
Directives 129
Creating the element with the directive 130
Compiling the directive 130
Calling the link function with the scope 130
Invoking the digest cycle 130
Mocking with $httpBackend 132
Running tests with Karma 140
Installation 140
Conguration 141
Running tests 142
Summary 143
Chapter 8: Automating the Workow 145
Automating the workow with Grunt 145
Installation 146
Conguration 146
Creating a distribution package 147
Executing the workow 155
Managing packages with Bower 156
Installation 156
Finding packages 156
Installing packages 157
Using packages 157
Cache 158
Summary 158
Index 159
Preface
For more than 12 years, I have been developing all kinds of web applications,
and along the way, I have had the opportunity to experience the vast majority of
frameworks on the Java platform. In 2008, I moved from an architecture highly based
on backend web frameworks such as Struts and JSF to experience new challenges at
the frontend. I think the main goal was to stop creating those old-school and
hard-to-use web applications, investing on interactivity and usability.
At that time, I adopted the Google Web Toolkit, also known as GWT, building some
web applications for almost 2 years. The results were pretty amazing in terms of user
experience; however, I felt very upset about low productivity and also the amount of
code that I had to write every day.
After that, in 2010, I decided to change drastically, adopting a much simpler
approach by using just HTML, CSS, and JavaScript to write the frontend code. The
experience was fantastic, which provided me with a very fast feedback cycle. The
only problem was the lack of a layered architecture, which was unable to provide a
clear separation of concerns while working with the JavaScript language. Also, I was
missing things such as a strong dependency injection mechanism that would allow
me to create reusable and testable components.
While looking for a solution, a very experienced JavaScript developer and also a
great friend of mine, Rafael Nami, introduced me to AngularJS. In the following
weeks, I started to read everything about it and also writing some code. After a
few weeks, I was thrilled because it had never been so easy to create amazing web
applications with so little code!

Preface
[ 2 ]
Only 2 months later, I launched my rst web application based entirely on
AngularJS, and honestly, I cannot imagine writing this same application using
another kind of technology in this short period of time. I was so excited about it that I
wrote an article on using AngularJS with Spring MVC and Hibernate for a magazine
called Java Magazine. After that, I created an AngularJS training program that already
has more than 200 developers who enrolled last year.
This book, AngularJS Essentials, is the result of that experience. This is a very practical
guide, lled with many step-by-step examples that will lead you through the best
practices of this amazing framework.
We are going to start, after a brief introduction, by learning how to create reusable
components with directives. Then, we will take a look at many data handling
techniques, discovering a complete set of technologies that are capable to accomplish
any challenge related to present, transform, and validate data on the user's interface.
After that, we will explore the secrets of the dependency injection mechanism
and also learn how to create services in order to improve the application's design.
Also, we are going to discover the best way to deal with the scope and how to
break up the application into separate modules, giving rise to reusable and
interchangeable libraries.
Finally, we are going to learn how to test each component of the framework using
Jasmine and also how to automate the workow, creating an optimized distribution
package with Grunt.
Rodrigo Branas
Software Architect, Author and International Speaker
Agile Code
What this book covers
Chapter 1, Getting Started with AngularJS, introduces the framework and its
architectural model. After that, we will start coding our rst application
and also understand how to organize our project.
Chapter 2, Creating Reusable Components with Directives, explains how the directives
are one of the most important features of the framework. With them, we will
understand how to extend the HTML language vocabulary, creating new behaviors
and reusable components.
Chapter 3, Data Handling, explains how the framework provides a complete set of
technologies to fulll any requirement about presenting, transforming, synchronizing,
and validating data on the user's interface. We will go through all of these technologies
in order to improve the user experience with our applications.

Preface
[ 3 ]
Chapter 4, Dependency Injection and Services, explains how we are going to create
reusable and decoupled components by implementing services and using the
dependency injection mechanism.
Chapter 5, Scope, discusses how scope is one of the main concepts of the framework.
In this chapter, we will discover the best practices to deal with scope.
Chapter 6, Modules, briefs us on how the framework is strongly based on the modules.
In this chapter, we will understand how to break up our application into modules.
Chapter 7, Unit Testing, shows how we will dive deeply into testing techniques. We
are going to understand how to test each framework component using Jasmine.
Chapter 8, Automating the Workow, discusses how we will create an optimized
distribution package for our application using Grunt and its plugins. Also, we will
discover how to manage our dependencies with Bower.
What you need for this book
To implement the code in this book, you will need to use your favorite development
interface and a web browser. I would recommend sublime text, but you may use
Aptana (which is based on Eclipse), WebStorm, or any other IDE.
AngularJS is compatible with the most browsers such as Firefox, Chrome, Safari, and
Internet Explorer. Feel free to choose the one you are used to.
Who this book is for
If you have a passion for web development and are looking for a framework that
could provide a reusable, maintainable, and modular way to create applications,
and at the same time, help increase your productivity and satisfaction, this is the
book for you.
Conventions
In this book, you will nd a number of styles of text that distinguish between
different kinds of information. Here are some examples of these styles, and an
explanation of their meaning.
Code words in text, database table names, folder names, lenames, le extensions,
pathnames, dummy URLs, user input, and Twitter handles are shown as follows:
"The $http service wraps the low-level interaction with the XMLHttpRequest object,
providing an easy way to perform AJAX calls without headaches."

Preface
[ 4 ]
A block of code is set as follows:
$http.get("/cars")
.success(function(data, status, headers, config) {
$scope.car = data;
})
.error(function(data, status, headers, config) {
console.log(data);
});
When we wish to draw your attention to a particular part of a code block, the
relevant lines or items are set in bold:
$http.get("/cars")
.success(function(data, status, headers, config) {
$scope.car = data;
})
.error(function(data, status, headers, config) {
console.log(data);
});
Any command-line input or output is written as follows:
bower install angular
New terms and important words are shown in bold. Words that you see on the
screen, in menus or dialog boxes for example, appear in the text like this: "What
happens when we change the plate and click on the Show Plate button?".
Warnings or important notes appear in a box like this.
Tips and tricks appear like this.

Preface
[ 5 ]
Reader feedback
Feedback from our readers is always welcome. Let us know what you think about
this book—what you liked or may have disliked. Reader feedback is important for us
to develop titles that you really get the most out of.
To send us general feedback, simply send an e-mail to [email protected],
and mention the book title via the subject of your message.
If there is a topic that you have expertise in and you are interested in either writing
or contributing to a book, see our author guide on www.packtpub.com/authors.
Customer support
Now that you are the proud owner of a Packt book, we have a number of things to
help you to get the most from your purchase.
Downloading the example code
You can download the example code les for all Packt books you have purchased
from your account at http://www.packtpub.com. If you purchased this book
elsewhere, you can visit http://www.packtpub.com/support and register to have
the les e-mailed directly to you.
Errata
Although we have taken every care to ensure the accuracy of our content, mistakes
do happen. If you nd a mistake in one of our books—maybe a mistake in the text or
the code—we would be grateful if you would report this to us. By doing so, you can
save other readers from frustration and help us improve subsequent versions of this
book. If you nd any errata, please report them by visiting http://www.packtpub.
com/submit-errata, selecting your book, clicking on the errata submission form link,
and entering the details of your errata. Once your errata are veried, your submission
will be accepted and the errata will be uploaded on our website, or added to any list of
existing errata, under the Errata section of that title. Any existing errata can be viewed
by selecting your title from http://www.packtpub.com/support.

Preface
[ 6 ]
Piracy
Piracy of copyright material on the Internet is an ongoing problem across all media.
At Packt, we take the protection of our copyright and licenses very seriously. If you
come across any illegal copies of our works, in any form, on the Internet, please
provide us with the location address or website name immediately so that we can
pursue a remedy.
Please contact us at [email protected] with a link to the suspected
pirated material.
We appreciate your help in protecting our authors, and our ability to bring
you valuable content.
Questions
You can contact us at [email protected] if you are having a problem with
any aspect of the book, and we will do our best to address it.

Getting Started with
AngularJS
HyperText Markup Language (HTML) was created in 1990 by Tim Berners-Lee—a
famous physics and computer scientist—while he was working at CERN, the
European Organization for Nuclear Research. He was motivated about discovering
a better solution to share information among the researchers of the institution. To
support that, he also created the HyperText Transfer Protocol (HTTP) and its rst
server, giving rise to the World Wide Web (WWW).
In the beginning, HTML was used just to create static documents with hyperlinks,
allowing the navigation between them. However, in 1993, with the creation of
Common Gateway Interface (CGI), it became possible to exhibit dynamic content
generated by server-side applications. One of the rst languages used for this
purpose was Perl, followed by other languages such as Java, PHP, Ruby, and Python.
Because of that, interacting with any complex application through the browser
wasn't an enjoyable task and it was hard to experience the same level of interaction
provided by desktop applications. However, the technology kept moving forward,
at rst with technologies such as Flash and Silverlight, which provided an amazing
user experience through the usage of plugins.
At the same time, the new versions of JavaScript, HTML, and CSS had been growing
in popularity really fast, transforming the future of the Web by achieving a high level
of user experience without using any proprietary plugin.
AngularJS is a part of this new generation of libraries and frameworks that came to
support the development of more productive, exible, maintainable, and testable
web applications.

Getting Started with AngularJS
[ 8 ]
This chapter will introduce you to the most important concepts of AngularJS. The
topics that we'll be covering in this chapter are:
• Introduction to AngularJS
• Understanding the architectural concepts
• Setting up the framework
• Organizing the code
Introduction to AngularJS
Created by Miško Hevery and Adam Abrons in 2009, AngularJS is an open source,
client-side JavaScript framework that promotes a high-productivity
web development experience.
It was built on the belief that declarative programming is the best choice to construct
the user interface, while imperative programming is much better and preferred to
implement an application's business logic.
To achieve this, AngularJS empowers traditional HTML by extending its current
vocabulary, making the life of developers easier.
The result is the development of expressive, reusable, and maintainable application
components, leaving behind a lot of unnecessary code and keeping the team focused
on the valuable and important things.
In 2010, Miško Hevery was working at Google on a project called Feedback. Based
on Google Web Toolkit (GWT), the Feedback project was reaching more than 17.000
lines of code and the team was not satised with their productivity. Because of that,
Miško made a bet with his manager that he could rewrite the project in 2 weeks
using his framework.
After 3 weeks and only 1.500 lines of code, he delivered the project! Nowadays, the
framework is used by more than 100 projects just at Google, and it is maintained by
its own internal team, in which Miško takes part.
The name of the framework was given by Adam Abrons, and it was inspired by the
angle brackets of the HTML elements.

Chapter 1
[ 9 ]
Architectural concepts
It's been a long time since the famous Model-View-Controller (MVC) pattern
started to gain popularity in the software development industry and became one of
the legends of the enterprise architecture design.
Basically, the model represents the knowledge that the view is responsible for
presenting, while the controller mediates the relationship between model and view.
However, these concepts are a little bit abstract, and this pattern may have different
implementations depending on the language, platform, and purpose of the application.
After a lot of discussions about which architectural pattern the framework follows,
its authors declared that from now on, AngularJS would adopt Model-View-
Whatever (MVW). Regardless of the name, the most important benet is that the
framework provides a clear separation of the concerns between the application
layers, providing modularity, exibility, and testability.
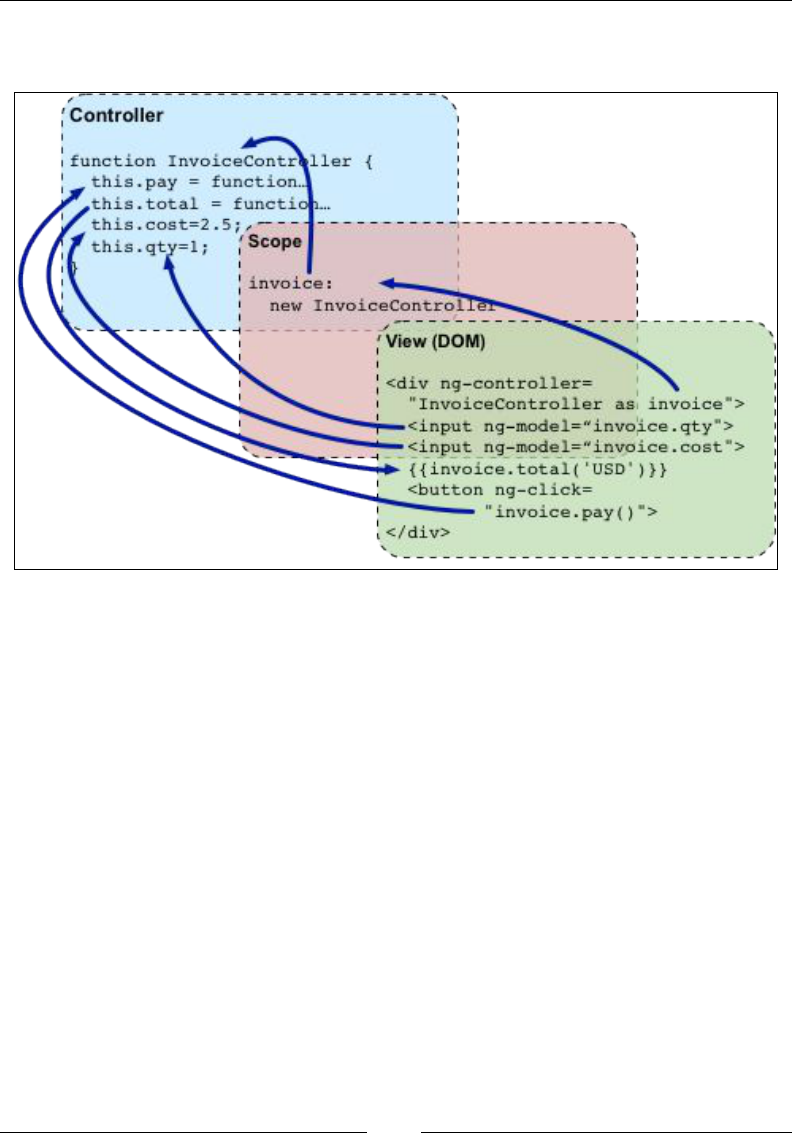
In terms of concepts, a typical AngularJS application consists primarily of a view,
model, and controller, but there are other important components, such as services,
directives, and lters.
The view, also called template, is entirely written in HTML, which provides a great
opportunity to see web designers and JavaScript developers working side by side. It
also takes advantage of the directives mechanism, which is a type of extension of the
HTML vocabulary that brings the ability to perform programming language tasks
such as iterating over an array or even evaluating an expression conditionally.
Behind the view, there is the controller. At rst, the controller contains all the
business logic implementation used by the view. However, as the application grows,
it becomes really important to perform some refactoring activities, such as moving
the code from the controller to other components (for example, services) in order to
keep the cohesion high.
The connection between the view and the controller is done by a shared object
called scope. It is located between them and is used to exchange information
related to the model.
The model is a simple Plain-Old-JavaScript-Object (POJO). It looks very clear and
easy to understand, bringing simplicity to the development by not requiring any
special syntax to be created.
Getting Started with AngularJS
[ 10 ]
The following diagram exhibits the interaction between the AngularJS
architecture components:
Source: Official documentation (www.angularjs.org)
Setting up the framework
The conguration process is very simple and in order to set up the framework, we
start by importing the angular.js script to our HTML le. After that, we need to
create the application module by calling the module function from the Angular's API,
with its name and dependencies.
With the module already created, we just need to place the ng-app attribute with
the module's name inside the html element or any other element that surrounds the
application. This attribute is important because it supports the initialization process
of the framework that we will study in the later chapters.
In the following code, there is an introductory application about a parking
lot. At rst, we are able to add and also list the parked cars, storing its plate in
memory. Throughout the book, we will evolve this parking control application by
incorporating each newly studied concept.

Chapter 1
[ 11 ]
Downloading the example code
You can download the example code les for all Packt books you have
purchased from your account at http://www.packtpub.com. If you
purchased this book elsewhere, you can visit http://www.packtpub.
com/ support and register to have the les e-mailed directly to you.
index.html – Parking Lot Application
<!doctype html>
<!-- Declaring the ng-app -->
<html ng-app="parking">
<head>
<title>Parking</title>
<!-- Importing the angular.js script -->
<script src="angular.js"></script>
<script>
// Creating the module called parking
var parking = angular.module("parking", []);
// Registering the parkingCtrl to the parking module
parking.controller("parkingCtrl", function ($scope) {
// Binding the car's array to the scope
$scope.cars = [
{plate: '6MBV006'},
{plate: '5BBM299'},
{plate: '5AOJ230'}
];
// Binding the park function to the scope
$scope.park = function (car) {
$scope.cars.push(angular.copy(car));
delete $scope.car;
};
});
</script>
</head>
<!-- Attaching the view to the parkingCtrl -->
<body ng-controller="parkingCtrl">
<h3>[Packt] Parking</h3>
<table>
<thead>
<tr>
<th>Plate</th>
</tr>

Getting Started with AngularJS
[ 12 ]
</thead>
<tbody>
<!-- Iterating over the cars -->
<tr ng-repeat="car in cars">
<!-- Showing the car's plate -->
<td>{{car.plate}}</td>
</tr>
</tbody>
</table>
<!-- Binding the car object, with plate, to the scope -->
<input type="text" ng-model="car.plate"/>
<!-- Binding the park function to the click event -->
<button ng-click="park(car)">Park</button>
</body>
</html>
Apart from learning how to set up the framework in this section, we also introduced
some directives that we are going to study in the Chapter 2, Creating Reusable
Components with Directives.
The ngController directive is used to bind the parkingCtrl controller to the view,
whereas the ngRepeat directive iterates over the car's array. Also, we employed
expressions such as {{car.plate}} to display the plate of the car. Finally, to add
new cars, we applied the ngModel directive, which creates a new object called car
with the plate property, passing it as a parameter of the park function, called
through the ngClick directive.
To improve the loading page's performance, you are recommended to use the
minied and obfuscated version of the script that can be identied by angular.min.
js. Both minied and regular distributions of the framework can be found on the
ofcial site of AngularJS (http://www.angularjs.org) or in the Google Content
Delivery Network (CDN).
Organizing the code
As soon as we start coding our views, controllers, services, and other pieces of
the application, as it used to happen in the past with many other languages and
frameworks, one question will certainly come up: "how do we organize the code?"
Most software developers struggle to decide on a lot of factors. This includes guring
out which is the best approach to follow (not only regarding the directory layout, but
also about the le in which each script should be placed), whether it is a good idea to
break up the application into separated modules, and so on.

Chapter 1
[ 13 ]
This is a tough decision and there are many different ways to decide on these
factors, but in most cases, it will depend simply on the purpose and the size of
the application. For the time being, our challenge is to dene an initial strategy
that allows the team to evolve and enhance the architecture alongside application
development. The answers related to deciding on the factors will certainly keep
coming up as time goes on, but we should be able to perform some refactoring
activities to keep the architecture healthy and up to date.
Four ways to organize the code
There are many ways, tendencies, and techniques to organize the project's code
within les and directories. However, it would be impossible to describe all of
them in detail, and we will present the most used and discussed styles in the
JavaScript community.
Throughout the book, we will apply each of the following styles to our project as far
as it evolves.
The inline style
Imagine that you need to develop a fast and disposable application prototype.
The purpose of the project is just to make a presentation or to evaluate a potential
product idea. The only project structure that we may need is the old and good
index.html le with inline declarations for the scripts and style:
app/ -> files of the application
index.html -> main html file
angular.js -> AngularJS script
If the application is accepted, based on the prototype evaluation, and becomes a new
project, it is highly recommended that you create a whole structure from scratch
based on one of the following styles.
The stereotyped style
This approach is appropriate for small apps with a limited number of components
such as controllers, services, directives, and lters. In this situation, creating a single
le for each script may be a waste. Thus, it could be interesting to keep all the
components in the same le in a stereotyped way as shown in the following code:
app/ -> files of the application
css/ -> css files
app.css -> default stylesheet
js/ -> javascript application components

Getting Started with AngularJS
[ 14 ]
app.js -> main application script
controllers.js -> all controllers script
directives.js -> all directives script
filters.js -> all filters script
services.js -> all services script
lib/ -> javascript libraries
angular.js -> AngularJS script
partials/ -> partial view directory
login.html -> login view
parking.html -> parking view
car.html -> car view
index.html -> main html file
With the application growing, the team may choose to break up some les by
shifting to the specic style step by step.
The specic style
Keeping a lot of code inside the same le is really hard to maintain. When the
application reaches a certain size, the best choice might be to start splitting the scripts
into specic ones as soon as possible. Otherwise, we may have a lot of unnecessary
and boring tasks in the future. The code is as follows:
app/ -> files of the application
css/ -> css files
app.css -> default stylesheet
js/ -> javascript application components
controllers/ -> controllers directory
loginCtrl.js -> login controller
parkingCtrl.js -> parking controller
carCtrl.js -> car controller
directives/ -> directives directory
filters/ -> filters directory
services/ -> services directory
app.js -> main application script
lib/ -> javascript libraries
angular.js -> AngularJS script
partials/ -> partial view directory
login.html -> login view
parking.html -> parking view
car.html -> car view
index.html -> main html file

Chapter 1
[ 15 ]
In this approach, if the number of les in each directory becomes oversized, it is
better to start thinking about adopting another strategy, such as the domain style.
The domain style
With a complex domain model and hundreds of components, an enterprise
application can easily become a mess if certain concerns are overlooked. One of the
best ways to organize the code in this situation is by distributing each component in
a domain-named folder structure. The code is as follows:
app/ -> files of the application
application/ -> application module directory
app.css -> main application stylesheet
app.js -> main application script
login/ -> login module directory
login.css -> login stylesheet
loginCtrl.js -> login controller
login.html -> login view
parking/ -> parking module directory
parking.css -> parking stylesheet
parkingCtrl.js -> parking controller
parking.html -> parking view
car/ -> car module directory
car.css -> car stylesheet
carCtrl.js -> car controller
car.html -> car view
lib/ -> javascript libraries
angular.js -> AngularJS script
index.html -> main html file
Summary
Since the creation of the Web, many technologies related to the use of HTML and
JavaScript have evolved. These days, there are lots of great frameworks such as
AngularJS that allow us to create really well-designed web applications.
In this chapter, you were introduced to AngularJS in order to understand its
purposes. Also, we created our rst application and took a look at how to
organize the code.
In the next chapter, you will understand how the AngularJS directives can be used
and created to promote reuse and agility in your applications.

Creating Reusable
Components with Directives
The Document Object Model (DOM) is a convention created by W3C in 1998
for documents written in HTML, XHTML, and XML in an object tree, which is
used by the browsers throughout the rendering process. By means of the DOM
API, it is possible to traverse the hierarchical structure of the tree to access and
manipulate information.
Every time we access a web page, the browser sends a request to the server and
then waits for the response. Once the content of the HTML document is received,
the browser starts the analysis and the parse process in order to build the DOM tree.
When the tree building is done, the AngularJS compiler comes in and starts to go
through it, looking into the elements for special kinds of attributes known
as directives.
Creating Reusable Components with Directives
[ 18 ]
The following diagram describes the bootstrapping process of the framework that is
performed during the compilation process:
Browser
AngularJS
Dynamic
DOM
(view)
Static
DOM
$injector
$rootScope
ng-app="module"
DOM
Content
Loaded
Event
HTML
$compile
$compile
(dom)
($rootScope)
Source: Official documentation (www.angularjs.org)
This chapter will present everything about directives, which is one of the most
important features of AngularJS. Also, we will create our own directives step
by step. The following are the topics that we'll be covering in this chapter:
• What is a directive?
• Using built-in directives of AngularJS
• Refactoring application organization
• Creating our own directives
• Animation
What is a directive?
A directive is an extension of the HTML vocabulary that allows us to create
new behaviors. This technology lets the developers create reusable components
that can be used within the whole application and even provide their own
custom components.

Chapter 2
[ 19 ]
The directive can be applied as an attribute, element, class, and even as a comment,
using the camelCase syntax. However, because HTML is case insensitive, we can use
a lowercase form.
For the ngModel directive, we can use ng-model, ng:model, ng_model,
data-ng-model, and x-ng-model in the HTML markup.
Using AngularJS built-in directives
By default, a framework brings with it a basic set of directives such as iterate over an
array, execute a custom behavior when an element is clicked, or even show a given
element based on a conditional expression, and many others.
The ngApp directive
The ngApp directive is the rst directive we need to understand because it denes the
root of an AngularJS application. Applied to one of the elements, in general HTML
or body, this directive is used to bootstrap the framework. We can use it without
any parameter, thereby indicating that the application will be bootstrapped in the
automatic mode, as shown in the following code:
index.html
<!doctype html>
<html ng-app>
<head>
<title>[Packt] Parking</title>
<script src="angular.js"></script>
</head>
<body>
</body>
</html>
However, it is recommended that you provide a module name, dening the entry
point of the application in which other components such as controllers, services,
lters, and directives can be bound, as shown in the following code:
index.html
<!doctype html>
<html ng-app="parking">
<head>
<title>[Packt] Parking</title>
<script src="angular.js"></script>

Creating Reusable Components with Directives
[ 20 ]
<script>
var parking = angular.module("parking", []);
</script>
</head>
<body>
</body>
</html>
There can be only one ngApp directive in the same HTML document that will be
loaded and bootstrapped by the framework automatically. However, it's
possible to have others as long as you manually bootstrap them.
The ngController directive
In our rst application in Chapter 1, Getting Started with AngularJS, we used a controller
called parkingCtrl. We can attach any controller to the view using the ngController
directive. After using this directive, the view and controller start to share the same
scope and are ready to work together, as shown in the following code:
index.html
<!doctype html>
<html ng-app="parking">
<head>
<title>[Packt] Parking</title>
<script src="angular.js"></script>
<script>
var parking = angular.module("parking", []);
parking.controller("parkingCtrl", function ($scope) {
});
</script>
</head>
<body ng-controller="parkingCtrl">
</body>
</html>
There is another way to attach a controller to a specic view. In the following
chapters, we will learn how to create a single-page application using the $route
service. To avoid undesired duplicated behavior, remember to avoid the
ngController directive while using the $route service.

Chapter 2
[ 21 ]
Nested controllers
Sometimes, our controller can become too complex, and it might be interesting to
split the behavior into separated controllers. This can be achieved by creating nested
controllers, which means registering controllers that will work only inside a specic
element of the view, as shown in the following code:
<body ng-controller="parkingCtrl">
<div ng-controller="parkingNestedCtrl">
</div>
</body>
The scope of the nested controllers will inherit all the properties of the outside scope,
overriding it in case of equality.
The ngBind directive
The ngBind directive is generally applied to a span element and replaces the content
of the element with the results of the provided expression. It has the same meaning
as that of the double curly markup, for example, {{expression}}.
Why would anyone like to use this directive when a less verbose alternative is
available? This is because when the page is being compiled, there is a moment
when the raw state of the expressions is shown. Since the directive is dened by the
attribute of the element, it is invisible to the user. We will learn these expressions in
Chapter 3, Data Handling. The following is an example of the ngBind directive usage:
index.html
<!doctype html>
<html ng-app="parking">
<head>
<title>[Packt] Parking</title>
<script src="angular.js"></script>
<script>
var parking = angular.module("parking", []);
parking.controller("parkingCtrl", function ($scope) {
$scope.appTitle = "[Packt] Parking";
});
</script>
</head>
<body ng-controller="parkingCtrl">
<h3 ng-bind="appTitle"></h3>
</body>
</html>

Creating Reusable Components with Directives
[ 22 ]
The ngBindHtml directive
Sometimes, it might be necessary to bind a string of raw HTML. In this case, the
ngBindHtml directive can be used in the same way as ngBind; however, the only
difference will be that it does not escape the content, which allows the browser to
interpret it as shown in the following code:
index.html
<!doctype html>
<html ng-app="parking">
<head>
<title>[Packt] Parking</title>
<script src="angular.js"></script>
<script src="angular-sanitize.js"></script>
<script>
var parking = angular.module("parking", []);
parking.controller("parkingCtrl", function ($scope) {
$scope.appTitle = "<b>[Packt] Parking</b>";
});
</script>
</head>
<body ng-controller="parkingCtrl">
<h3 ng-bind-html="appTitle"></h3>
</body>
</html>
In order to use this directive, we will need the angular-sanitize.js dependency.
It brings the ngBindHtml directive and protects the application against common
cross-site scripting (XSS) attacks.
The ngRepeat directive
The ngRepeat directive is really useful to iterate over arrays and objects. It can be
used with any kind of element such as the rows of a table, the elements of a list, and
even the options of select.
We must provide a special repeat expression that describes the array to iterate over
the variable that will hold each item in the iteration. The most basic expression
format allows us to iterate over an array, attributing each element to a variable:
variable in array

Chapter 2
[ 23 ]
In the following code, we will iterate over the cars array and assign each element to
the car variable:
index.html
<!doctype html>
<html ng-app="parking">
<head>
<title>[Packt] Parking</title>
<script src="angular.js"></script>
<script>
var parking = angular.module("parking", []);
parking.controller("parkingCtrl", function ($scope) {
$scope.appTitle = "[Packt] Parking";
$scope.cars = [];
});
</script>
</head>
<body ng-controller="parkingCtrl">
<h3 ng-bind="appTitle"></h3>
<table>
<thead>
<tr>
<th>Plate</th>
<th>Entrance</th>
</tr>
</thead>
<tbody>
<tr ng-repeat="car in cars">
<td><span ng-bind="car.plate"></span></td>
<td><span ng-bind="car.entrance"></span></td>
</tr>
</tbody>
</table>
</body>
</html>
Also, it's possible to use a slightly different expression to iterate over objects:
(key, value) in object

Creating Reusable Components with Directives
[ 24 ]
Beyond iterating, we might need to identify which is the rst or the last element,
what is its index number, and many other things. This can be achieved by using the
following properties:
Variable Type Details
$index
number Number of the element
$first
Boolean This is true if the element is the first one
$last
Boolean This is true if the element is the last one
$middle
Boolean This is true if the element is in the middle
$even
Boolean This is true if the element is even
$odd
Boolean This is true if the element is odd
The ngModel directive
The ngModel directive attaches the element to a property in the scope, thus binding
the view to the model. In this case, the element can be input (all types), select,
or textarea, as shown in the following code:
<input
type="text"
ng-model="car.plate"
placeholder="What's the plate?"
/>
There is an important piece of advice regarding the use of this directive. We must
pay attention to the purpose of the eld that is using the ngModel directive. Every
time the eld is a part of the construction of an object, we must declare the object
in which the property should be attached. In this case, the object that is being
constructed is a car; so, we will use car.plate inside the directive expression.
However, sometimes it may so happen that there is an input eld that is just used to
change a ag, allowing the control of the state of a dialog or another UI component.
In this case, we can use the ngModel directive without any object as long as it will not
be used together with other properties or even persisted.
In Chapter 5, Scope, we will go through the two-way data binding concept. It is very
important to understand how the ngModel directive works behind the scenes.

Chapter 2
[ 25 ]
The ngClick directive and other event
directives
The ngClick directive is one of the most useful kinds of directives in the framework.
It allows you to bind any custom behavior to the click event of the element. The
following code is an example of the usage of the ngClick directive calling a function:
index.html
<!doctype html>
<html ng-app="parking">
<head>
<title>[Packt] Parking</title>
<script src="angular.js"></script>
<script>
var parking = angular.module("parking", []);
parking.controller("parkingCtrl", function ($scope) {
$scope.appTitle = "[Packt] Parking";
$scope.cars = [];
$scope.park = function (car) {
car.entrance = new Date();
$scope.cars.push(car);
delete $scope.car;
};
});
</script>
</head>
<body ng-controller="parkingCtrl">
<h3 ng-bind="appTitle"></h3>
<table>
<thead>
<tr>
<th>Plate</th>
<th>Entrance</th>
</tr>
</thead>
<tbody>
<tr ng-repeat="car in cars">
<td><span ng-bind="car.plate"></span></td>
<td><span ng-bind="car.entrance"></span></td>
</tr>
</tbody>

Creating Reusable Components with Directives
[ 26 ]
</table>
<input
type="text"
ng-model="car.plate"
placeholder="What's the plate?"
/>
<button ng-click="park(car)">Park</button>
</body>
</html>
In the preceding code, there is another pitfall. Inside the ngClick directive, we will
call the park function, passing car as a parameter. As long as we have access to
the scope through the controller, it would not be easy if we just accessed it directly,
without passing any parameter at all.
Keep in mind that we must take care of the coupling level between the view and the
controller. One way to keep it low is to avoid reading the scope object directly from
the controller and replacing this intention by passing everything it needs with the
parameter from the view. This will increase controller testability and also make the
things more clear and explicit.
Other directives that have the same behavior but are triggered by other events are
ngBlur, ngChange, ngCopy, ngCut, ngDblClick, ngFocus, ngKeyPress, ngKeyDown,
ngKeyUp, ngMousedown, ngMouseenter, ngMouseleave, ngMousemove, ngMouseover,
ngMouseup, and ngPaste.
The ngDisable directive
The ngDisable directive can disable elements based on the Boolean value of an
expression. In this next example, we will disable the button when the variable is true:
<button
ng-click="park(car)"
ng-disabled="!car.plate"
>
Park
</button>
In Chapter 3, Data Handling, we will learn how to combine this directive with
validation techniques.

Chapter 2
[ 27 ]
The ngClass directive
The ngClass directive is used every time you need to dynamically apply a class to
an element by providing the name of the class in a data-binding expression. The
following code shows the application of the ngClass directive:
index.html
<!doctype html>
<html ng-app="parking">
<head>
<title>[Packt] Parking</title>
<script src="angular.js"></script>
<script>
var parking = angular.module("parking", []);
parking.controller("parkingCtrl", function ($scope) {
$scope.appTitle = "[Packt] Parking";
$scope.cars = [];
$scope.park = function (car) {
car.entrance = new Date();
$scope.cars.push(car);
delete $scope.car;
};
});
</script>
<style>
.selected {
background-color: #FAFAD2;
}
</style>
</head>
<body ng-controller="parkingCtrl">
<h3 ng-bind="appTitle"></h3>
<table>
<thead>
<tr>
<th></th>
<th>Plate</th>
<th>Entrance</th>
</tr>
</thead>
<tbody>

Creating Reusable Components with Directives
[ 28 ]
<tr
ng-class="{selected: car.selected}"
ng-repeat="car in cars"
>
<td><input type="checkbox" ng-
model="car.selected"/></td>
<td><span ng-bind="car.plate"></span></td>
<td><span ng-bind="car.entrance"></span></td>
</tr>
</tbody>
</table>
<input
type="text"
ng-model="car.plate"
placeholder="What's the plate?"
/>
<button
ng-click="park(car)"
ng-disabled="!car.plate"
>
Park
</button>
</body>
</html>
The ngOptions directive
The ngRepeat directive can be used to create the options of a select element;
however, there is a much more recommended directive that should be used for
this purpose—the ngOptions directive.
Through an expression, we need to indicate the property of the scope from which the
directive will iterate, the name of the temporary variable that will hold the content of
each loop's iteration, and the property of the variable that should be displayed.
In the following example, we have introduced a list of colors:
index.html
<!doctype html>
<html ng-app="parking">
<head>
<title>[Packt] Parking</title>
<script src="angular.js"></script>

Chapter 2
[ 29 ]
<script>
var parking = angular.module("parking", []);
parking.controller("parkingCtrl", function ($scope) {
$scope.appTitle = "[Packt] Parking";
$scope.cars = [];
$scope.colors = ["White", "Black", "Blue", "Red",
"Silver"];
$scope.park = function (car) {
car.entrance = new Date();
$scope.cars.push(car);
delete $scope.car;
};
});
</script>
<style>
.selected {
background-color: #FAFAD2;
}
</style>
</head>
<body ng-controller="parkingCtrl">
<h3 ng-bind="appTitle"></h3>
<table>
<thead>
<tr>
<th></th>
<th>Plate</th>
<th>Color</th>
<th>Entrance</th>
</tr>
</thead>
<tbody>
<tr
ng-class="{selected: car.selected}"
ng-repeat="car in cars"
>
<td><input type="checkbox" ng-
model="car.selected"/></td>
<td><span ng-bind="car.plate"></span></td>
<td><span ng-bind="car.color"></span></td>

Creating Reusable Components with Directives
[ 30 ]
<td><span ng-bind="car.entrance"></span></td>
</tr>
</tbody>
</table>
<input
type="text"
ng-model="car.plate"
placeholder="What's the plate?"
/>
<select
ng-model="car.color"
ng-options="color for color in colors"
>
Pick a color
</select>
<button
ng-click="park(car)"
ng-disabled="!car.plate || !car.color"
>
Park
</button>
</body>
</html>
This directive requires the use of the ngModel directive.
The ngStyle directive
The ngStyle directive is used to supply the dynamic style conguration demand.
It follows the same concept used with the ngClass directive; however, here we can
directly use the style properties and its values:
<td>
<span ng-bind="car.color" ng-style="{color: car.color}">
</span>
</td>
The ngShow and ngHide directives
The ngShow directive changes the visibility of an element based on its
display property:
<div ng-show="cars.length > 0">
<table>

Chapter 2
[ 31 ]
<thead>
<tr>
<th></th>
<th>Plate</th>
<th>Color</th>
<th>Entrance</th>
</tr>
</thead>
<tbody>
<tr
ng-class="{selected: car.selected}"
ng-repeat="car in cars"
>
<td><input type="checkbox" ng-
model="car.selected"/></td>
<td><span ng-bind="car.plate"></span></td>
<td><span ng-bind="car.color"></span></td>
<td><span ng-bind="car.entrance"></span></td>
</tr>
</tbody>
</table>
</div>
<div ng-hide="cars.length > 0">
The parking lot is empty
</div>
Depending on the implementation, you can use the complementary ngHide
directive of ngShow.
The ngIf directive
The nglf directive could be used in the same way as the ngShow directive; however,
while the ngShow directive just deals with the visibility of the element, the ngIf
directive prevents the rendering of an element in our template.
The ngInclude directive
AngularJS provides a way to include other external HTML fragments in our pages.
The ngInclude directive allows the fragmentation and reuse of the application
layout and is an important concept to explore.
The following is an example code for the usage of the ngInclude directive:
<div ng-include="'menu.html'"></div>

Creating Reusable Components with Directives
[ 32 ]
Refactoring application organization
As long as our application grows with the creation of new components such as
directives, the organization of the code needs to evolve. As we saw in the Organizing
the code section in Chapter 1, Getting Started with AngularJS, we used the inline style;
however, now we will use the stereotyped style, as shown in the following code:
index.html
<!doctype html>
<html ng-app="parking">
<head>
<title>[Packt] Parking</title>
<script src="js/lib/angular.js"></script>
<script src="js/app.js"></script>
<script src="js/controllers.js"></script>
<script src="js/directives.js"></script>
<link rel="stylesheet" type="text/css" href="css/app.css">
</head>
<body ng-controller="parkingCtrl">
<h3 ng-bind="appTitle"></h3>
<div ng-show="cars.length > 0">
<table>
<thead>
<tr>
<th></th>
<th>Plate</th>
<th>Color</th>
<th>Entrance</th>
</tr>
</thead>
<tbody>
<tr
ng-class="{selected: car.selected}"
ng-repeat="car in cars"
>
<td>
<input
type="checkbox"
ng-model="car.selected"
/>
</td>
<td><span ng-bind="car.plate"></span></td>

Chapter 2
[ 33 ]
<td><span ng-bind="car.color"></span></td>
<td><span ng-bind="car.entrance"></span></td>
</tr>
</tbody>
</table>
</div>
<div ng-hide="cars.length > 0">
The parking lot is empty
</div>
<input
type="text"
ng-model="car.plate"
placeholder="What's the plate?"
/>
<select
ng-model="car.color"
ng-options="color for color in colors"
>
Pick a color
</select>
<button
ng-click="park(car)"
ng-disabled="!car.plate || !car.color"
>
Park
</button>
</body>
</html>
app.js
var parking = angular.module("parking", []);
controllers.js
parking.controller("parkingCtrl", function ($scope) {
$scope.appTitle = "[Packt] Parking";
$scope.cars = [];
$scope.colors = ["White", "Black", "Blue", "Red", "Silver"];
$scope.park = function (car) {
Creating Reusable Components with Directives
[ 34 ]
car.entrance = new Date();
$scope.cars.push(car);
delete $scope.car;
};
});
Creating our own directives
Now that we have already studied a bunch of built-in directives of a framework, it's
time to create our own reusable components! First, we need to know how to register
a new directive into our module.
Basically, it's the same process that we use for the controller; however, the directives
require the creation of something called Directive Denition Object that will be
used to congure the directive's behavior:
parking.directive("directiveName", function () {
return {
};
});
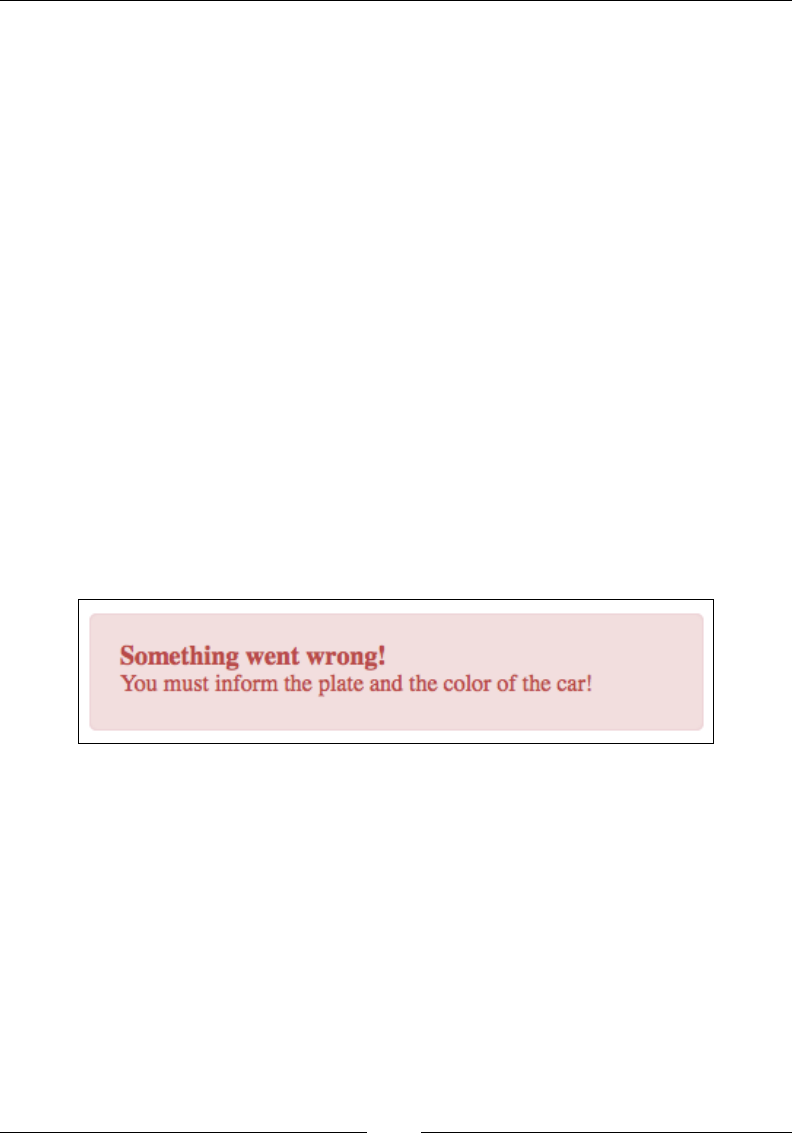
Our rst challenge involves the creation of an alert component. Following this, there
is an image of the component that we are going to create together step by step:
The original code consists of a group of elements associated with some styles.
Our mission is to transform this code into a reusable directive using the following
directive conguration properties: template, templateUrl, replace, restrict,
scope, and transclude:
<div class="alert">
<span class="alert-topic">
Something went wrong!
</span>
<span class="alert-description">
You must inform the plate and the color of the car!
</span>
</div>

Chapter 2
[ 35 ]
template
Imagine the number of times you have had the same snippet of the HTML code
repeated over your application code. In the following code snippet, we are going to
create a new directive with the code to reuse this:
index.html
<div alert></div>
directives.js
parking.directive("alert", function () {
return {
template: "<div class='alert'>" +
"<span class='alert-topic'>" +
"Something went wrong!" +
"</span>" +
"<span class='alert-description'>" +
"You must inform the plate and the color of the car!" +
"</span>" +
"</div>"
};
});
The output, after AngularJS has compiled the directive, is the following:
<div alert="">
<div class="alert">
<span class="alert-topic">
Something went wrong!
</span>
<span class="alert-description">
You must inform the plate and the color of the car!
</span>
</div>
</div>

Creating Reusable Components with Directives
[ 36 ]
templateUrl
There is another way to achieve the same goal with more quality. We just need
to move the HTML snippet to an isolated le and bind it using the templateUrl
property, as shown in the following code snippet:
index.html
<div alert></div>
directives.js
parking.directive("alert", function () {
return {
templateUrl: "alert.html"
});
alert.html
<div class="alert">
<span class="alert-topic">
Something went wrong!
</span>
<span class="alert-description">
You must inform the plate and the color of the car!
</span>
</div>
replace
Sometimes it might be interesting to discard the original element, where the directive
was attached, replacing it by the directive's template. This can be done by enabling
the replace property:
directives.js
parking.directive("alert", function () {
return {
templateUrl: "alert.html",
replace: true
};
});

Chapter 2
[ 37 ]
The following code is the compiled directive without the original element:
<div class="alert" alert="">
<span class="alert-topic">
Something went wrong!
</span>
<span class="alert-description">
You must inform the plate and the color of the car!
</span>
</div>
restrict
We attached our rst directive by dening it as an attribute of the element. However,
when we create a new directive as a reusable component, it doesn't make much
sense. In this case, a better approach can restrict the directive to be an element.
By default, the directives are restricted to be applied as an attribute to a determined
element, but we can change this behavior by declaring the restriction property inside
our directive conguration object. The following table shows the possible values for
the restriction property:
Restriction property Values Usage
Attribute (default)
A <div alert></div>
Element name
E <alert></alert>
Class
C <div class="alert"></div>
Comment
M <!-- directive:alert -->
Now, we just need to include this property in our directive, as shown in the
following snippet:
index.html
<alert></alert>
directives.js
parking.directive("alert", function () {
return {
restrict: 'E',
templateUrl: "alert.html",
replace: true
};
});

Creating Reusable Components with Directives
[ 38 ]
Also, it is possible to combine more than one restriction at the same time by just
using a subset combination of EACM. If the directive is applied without the restrictions
conguration, it will be ignored by the framework.
scope
Our alert component is almost ready but it has a problem! The topic and the
description are hardcoded inside the component.
The best thing to do is to pass the data that needs to be rendered as a parameter.
In order to achieve this, we need to create a new property inside our directive
conguration object called scope.
There are three ways to congure the directive scope:
Prefix Details
@
This prefix passes the data as a string.
=
This prefix creates a bidirectional relationship between a controller's scope
property and a local scope directive property.
&
This prefix binds the parameter with an expression in the context of
the parent scope. It is useful if you would like to provide some outside
functions to the directive.
In the following code snippet, we will congure some parameters inside the
alert directive:
index.html
<alert
topic="Something went wrong!"
description="You must inform the plate and the color of the
car!"
>
</alert>
directives.js
parking.directive("alert", function () {
return {
restrict: 'E',
scope: {
topic: '@topic',
description: '@description'

Chapter 2
[ 39 ]
},
templateUrl: "alert.html",
replace: true
};
});
alert.html
<div class="alert">
<span class="alert-topic">
<span ng-bind="topic"></span>
</span>
<span class="alert-description">
<span ng-bind="description"></span>
</span>
</div>
The left-hand side contains the name of the parameter available inside the directive's
scope to be used in the template. The right-hand side contains the name of the
attribute declared in the element, whose value will contain the expression to link to
the property on the directive's template. By prexing it with @, the literal value will
be used as a parameter.
Following this, we are using the = prex in order to create a bidirectional relationship
between the controller and the directive. It means that every time anything changes
inside the controller, the directive will reect these changes:
index.html
<alert
topic="alertTopic"
description="descriptionTopic"
>
</alert>
controllers.js
parking.controller("parkingCtrl", function ($scope) {
$scope.appTitle = "[Packt] Parking";
$scope.alertTopic = "Something went wrong!";
$scope.alertMessage = "You must inform the plate and the color
of the car!";
});
directives.js

Creating Reusable Components with Directives
[ 40 ]
parking.directive("alert", function () {
return {
restrict: 'E',
scope: {
topic: '=topic',
description: '=description'
},
templateUrl: "alert.html",
replace: true
};
});
The last situation is when we need to execute something within the context of the
parent scope. It could be achieved using the & prex. In the following example, we
are passing a function called closeAlert to the directive, dened by the controller to
close the alert box:
index.html
<alert
ng-show="showAlert"
topic="alertTopic"
description="descriptionTopic"
close="closeAlert()"
>
</alert>
controllers.js
parking.controller("parkingCtrl", function ($scope) {
$scope.appTitle = "[Packt] Parking";
$scope.showAlert = true;
$scope.alertTopic = "Something went wrong!";
$scope.alertMessage = "You must inform the plate and the color of
the car!";
$scope.closeAlert = function () {
$scope.showAlert = false;
};
});
directives.js
parking.directive("alert", function () {
return {
restrict: 'E',

Chapter 2
[ 41 ]
scope: {
topic: '=topic',
description: '=description',
close: '&close'
},
templateUrl: "alert.html",
replace: true
};
});
alert.html
<div class="alert">
<span class="alert-topic">
<span ng-bind="topic"></span>
</span>
<span class="alert-description">
<span ng-bind="description"></span>
</span>
<a href="" ng-click="close()">Close</a>
</div>
Note that if the name of the directive's scope property is the same as of the
expression, we can keep just the prex. By convention, the framework will consider
the name to be the identical to the scope property name. Our last directive can be
written as follows:
directives.js
parking.directive("alert", function () {
return {
restrict: 'E',
scope: {
topic: '=',
description: '=',
close: '&'
},
templateUrl: "alert.html",
replace: true
};
});

Creating Reusable Components with Directives
[ 42 ]
transclude
There are components that might need to wrap other elements in order to decorate
them, such as alert, tab, modal, or panel. To achieve this goal, it is necessary to
fall back upon a directive feature called transclude. This feature allows us to include
the entire snippet from the view than just deal with the parameters. In the following
code snippet, we will combine the scope and transclude strategies in order to pass
parameters to the directive:
index.html
<alert topic="Something went wrong!">
You must inform the plate and the color of the car!
</alert>
directives.js
parking.directive("alert", function () {
return {
restrict: 'E',
scope: {
topic: '@'
},
templateUrl: "alert.html",
replace: true,
transclude: true
};
});
alert.html
<div class="alert">
<span class="alert-topic">
{{topic}}
</span>
<span class="alert-description" ng-transclude>
</span>
</div>
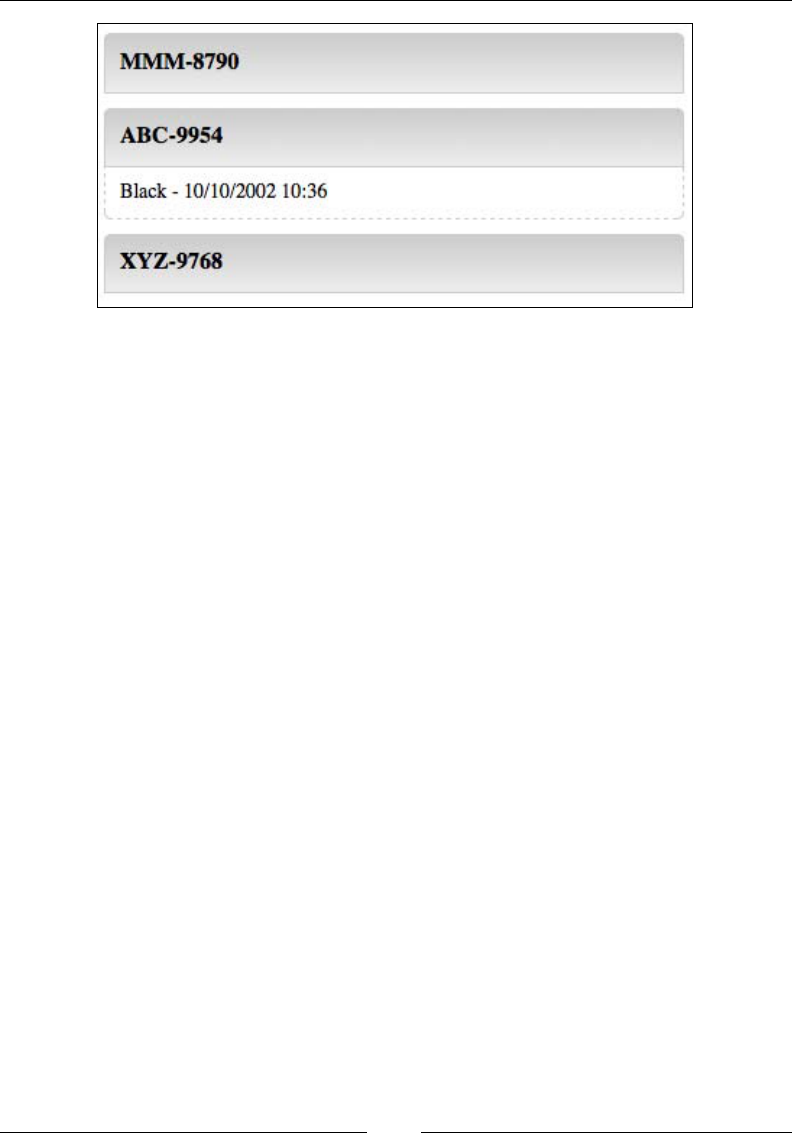
Our second challenge involves the creation of an accordion component.
Chapter 2
[ 43 ]
The next properties that we are going to study are considered more complex and
reserved for advanced components. They are required every time we need to deal
with the DOM or interact with other directives. These properties are link, require,
controller, and compile.
link
Another important feature while creating directives is the ability to access the
DOM in order to interact with its elements. To achieve this mission, we need to
implement a function called link in our directive. The link function is invoked after
the framework is compiled, and it is recommended that you add behavior to the
directive. It takes ve arguments as follows:
• scope: This is the scope object of the directive
• element: This is the element instance of directive
• attrs: This is the list of attributes declared within the directive's element
• ctrl: This is the controller of the require directive, and it will be available
only if it is used with the require property
• transcludeFn: This is the transclude function
The following code shows the accordion directive using the link function:
index.html
<accordion-item title="MMM-8790">
White - 10/10/2002 10:00
</accordion-item>
<accordion-item title="ABC-9954">
Black - 10/10/2002 10:36

Creating Reusable Components with Directives
[ 44 ]
</accordion-item>
<accordion-item title="XYZ-9768">
Blue - 10/10/2002 11:10
</accordion-item>
directives.html
parking.directive("accordionItem", function () {
return {
templateUrl: "accordionItem.html",
restrict: "E",
scope: {
title: "@"
},
transclude: true,
link: function (scope, element, attrs, ctrl, transcludeFn) {
element.bind("click", function () {
scope.$apply(function () {
scope.active = !scope.active;
});
});
}
};
});
accordionItem.html
<div class='accordion-item'>
{{title}}
</div>
<div ng-show='active' class='accordion-description' ng-transclude>
</div>
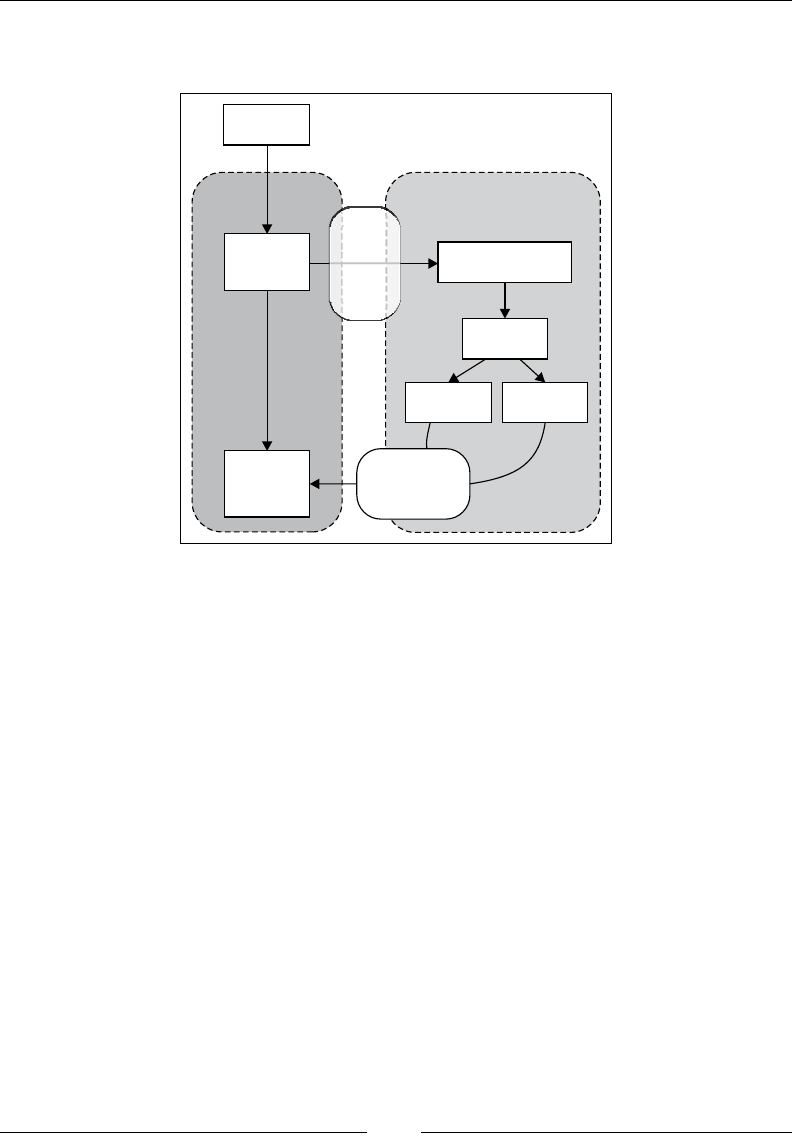
require
The require property is used to inject another directive controller as the fourth
parameter of the link function. It means that using this property, we are able to
communicate with the other directives. Some of the parameters are shown in the
following table:

Chapter 2
[ 45 ]
Prefix Details
(no
prefix)
This parameter locates the controller inside the current element. It throws
an error if the controller is not defined within the require directive.
?
This parameter tries to locate the controller, passing null to the controller
parameter of the link function if not found.
^
This parameter locates the controller in the parent element. It throws an
error if the controller is not defined within any parent element.
?^
This parameter tries to locate the controller in the parent element, passing
null to the controller parameter of the link function if not found.
In our last example, each accordion is independent. We can open and close all of
them at our will. This property might be used to create an algorithm that closes all
the other accordions as soon as we click on each of them:
index.html
<accordion>
<accordion-item title="MMM-8790">
White - 10/10/2002 10:00
</accordion-item>
<accordion-item title="ABC-9954">
Black - 10/10/2002 10:36
</accordion-item>
<accordion-item title="XYZ-9768">
Blue - 10/10/2002 11:10
</accordion-item>
</accordion>
directives.html
parking.directive("accordion", function () {
return {
template: "<div ng-transclude></div>",
restrict: "E",
transclude: true
};
});
parking.directive("accordionItem", function () {
return {
templateUrl: "accordionItem.html",
restrict: "E",
scope: {

Creating Reusable Components with Directives
[ 46 ]
title: "@"
},
transclude: true,
require: "^accordion",
link: function (scope, element, attrs, ctrl, transcludeFn) {
element.bind("click", function () {
scope.$apply(function () {
scope.active = !scope.active;
});
});
}
};
});
Now, we need to dene the controller inside the accordion directive; otherwise, an
error will be thrown that says the controller can't be found.
controller
The controller is pretty similar to the link function and has almost the same
parameters, except itself. However, the purpose of the controller is totally different.
While it is recommended that you use the link to bind events and create behaviors,
the controller should be used to create behaviors that will be shared with other
directives by means of the require property:
directives.html
parking.directive("accordion", function () {
return {
template: "<div ng-transclude></div>",
restrict: "E",
transclude: true,
controller: function ($scope, $element, $attrs, $transclude) {
var accordionItens = [];
var addAccordionItem = function (accordionScope) {
accordionItens.push(accordionScope);
};
var closeAll = function () {
angular.forEach(accordionItens, function (accordionScope) {
accordionScope.active = false;
});

Chapter 2
[ 47 ]
};
return {
addAccordionItem: addAccordionItem,
closeAll: closeAll
};
}
};
});
parking.directive("accordionItem", function () {
return {
templateUrl: "accordionItem.html",
restrict: "E",
scope: {
title: "@"
},
transclude: true,
require: "^accordion",
link: function (scope, element, attrs, ctrl, transcludeFn) {
ctrl.addAccordionItem(scope);
element.bind("click", function () {
ctrl.closeAll();
scope.$apply(function () {
scope.active = !scope.active;
});
});
}
};
});
compile
During the compilation phase, the framework compiles each directive such that it
is available to be attached to the template. The compile function is called once,
during the compilation step and might be useful to transform the template, before
the link phase.
However, since it is not used very often, we will not cover it in this book. To get
more information about this directive, you could go to the AngularJS $compile
documentation at https://docs.angularjs.org/api/ng/service/$compile.

Creating Reusable Components with Directives
[ 48 ]
Animation
The framework offers a very interesting mechanism to hook specic style classes
to each step of the life cycle of some of the most used directives such as ngRepeat,
ngShow, ngHide, ngInclude, ngView, ngIf, ngClass, and ngSwitch.
The rst thing that we need to do in order to start is import the angular-
animation.js le to our application. After that, we just need to declare it in
our module as follows:
app.js
var parking = angular.module("parking", ["ngAnimate"]);
How it works?
The AngularJS animation uses CSS transitions in order to animate each kind of event
such as when we add a new element the array that is being iterated by ngRepeat or
when something is shown or hidden through the ngShow directive.
Based on this, it's time to check out the supported directives and their events:
Event From To Directives
Enter .ng-enter .ng-enter-active
ngRepeat,
ngInclude,
ngIf, ngView
Leave .ng-leave .ng-leave-active
ngRepeat,
ngInclude,
ngIf, ngView
Hide .ng-hide-add .ng-hide-add-active
ngShow, ngHide
Show .ng-hide-remove .ng-hide-remove-
active
ngShow, ngHide
Move .ng-move .ng-move-active ngRepeat
addClass .CLASS-add-
class
.CLASS-add-class-
active
ngClass
removeClass .CLASS-remove-
class
.CLASS-remove-
class-active
ngClass
This means that every time a new element is rendered by an ngRepeat directive,
the .ng-enter class is attached to the element and kept there until the transition
is over. Right after this, the .ng-enter-active class is also attached, triggering
the transition.

Chapter 2
[ 49 ]
This is quite a simple mechanism, but we need to pay careful attention in order to
understand it.
Animating ngRepeat
The following code is a simple example where we will animate the enter event of
the ngRepeat directive:
app.css
.ng-enter {
-webkit-transition: all 5s linear;
-moz-transition: all 5s linear;
-ms-transition: all 5s linear;
-o-transition: all 5s linear;
transition: all 5s linear;
opacity: 0;
}
.ng-enter-active {
opacity: 1;
}
That's all! With this conguration in place, every time a new element is rendered
by an ngRepeat directive, it will respect the transition, appearing with a 5 second,
linear, fade-in effect from the opacity 0 to 1.
For the opposite concept, we can follow the same process. Let's create a fade-out
effect by means of the .ng-leave and .ng-leave-active classes:
app.css
.ng-leave {
-webkit-transition: all 5s linear;
-moz-transition: all 5s linear;
-ms-transition: all 5s linear;
-o-transition: all 5s linear;
transition: all 5s linear;
opacity: 1;
}
.ng-leave-active {
opacity: 0;
}

Creating Reusable Components with Directives
[ 50 ]
Animating ngHide
To animate the ngHide directive, we need to follow the same previous steps,
however, using the .ng-hide-add and .ng-hide-add-active classes:
app.css
.ng-hide-add {
-webkit-transition: all 5s linear;
-moz-transition: all 5s linear;
-ms-transition: all 5s linear;
-o-transition: all 5s linear;
transition: all 5s linear;
opacity: 1;
}
.ng-hide-add-active {
display: block !important;
opacity: 0;
}
In this case, the transition must ow in the opposite way. For the fade-out effect, we
need to shift from the opacity 1 to 0.
Why is the display property set to block? This is because the regular behavior of the
ngHide directive is to change the display property to none. With that property in
place, the element will vanish instantly, and our fade-out effect will not work
as expected.
Animating ngClass
Another possibility is to animate the ngClass directive. The concept is the
same—enable a transition, however this time from the .CLASS-add-class
class to the .CLASS-add-class-active class.
Let's take the same example we used in the ngClass explanation and animate it:
app.css
.selected {
-webkit-transition: all 5s linear;
-moz-transition: all 5s linear;
-ms-transition: all 5s linear;
-o-transition: all 5s linear;
transition: all 5s linear;

Chapter 2
[ 51 ]
background-color: #FAFAD2 !important;
}
.selected-add-class {
opacity: 0;
}
.selected-add-class-active {
opacity: 1;
}
Here, we added the fade-in effect again. You are absolutely free to choose the kind of
effect that you like the most!
Summary
Directives are a strong technology to support the creation of reusable components,
thereby saving a lot of time in the development schedule. In this chapter, we learned
about the AngularJS built-in directives that are really useful in most parts of view
development and also how to create our own directives and learned how to
animate them.
In the next chapter, we will learn how to handle data in AngularJS using
expressions, lters, and forms validation.

Data Handling
Most applications demand an intense development effort in order to provide a better
interaction with its users. Bringing simplicity and usability is a huge challenge, and
as our world is changing at the speed of the light, we must rely on a technology
that really allows us to achieve this mission with the least amount of code and
pain possible.
In terms of data handling, AngularJS offers a complete set of technologies that
are capable of accomplishing any challenge related to presenting, transforming,
synchronizing, and validating data on the user's interface. All this comes with a
very simple syntax that can radically shorten the learning curve.
In this chapter, we will talk about data handling using AngularJS. The following
topics will be covered in this chapter:
• Expressions
• Filters
• Form validation
Expressions
An expression is a simple piece of code that will be evaluated by the framework
and can be written between double curly brackets, for example, {{car.plate}}.
This way of writing expressions is known as interpolation and allows you to easily
interact with anything from the scope.

Data Handling
[ 54 ]
The following code is an example that we have already seen before. Here, we are
using it to retrieve the value of the car's plate, color, and entrance, and this is done
inside the ngRepeat directive:
index.html
<table>
<thead>
<tr>
<th></th>
<th>Plate</th>
<th>Color</th>
<th>Entrance</th>
</tr>
</thead>
<tbody>
<tr
ng-class="{selected: car.selected}"
ng-repeat="car in cars"
>
<td>
<input
type="checkbox"
ng-model="car.selected"
/>
</td>
<td>{{car.plate}}</td>
<td>{{car.color}}</td>
<td>{{car.entrance}}</td>
</tr>
</tbody>
</table>
In our example, for each iteration of the ngRepeat directive, a new child scope is
created, which denes the boundaries of the expression.
Besides exhibiting the available objects in the scope, the expressions also give us the
ability to perform some calculations such as {{2+2}}. However, if you put aside
the similarities with JavaScript's eval() function, which is also used to evaluate
expressions, AngularJS doesn't use the directive explicitly.
The expressions also forgive the undened and null values, without displaying any
error; instead, it doesn't show anything.

Chapter 3
[ 55 ]
Sometimes, it might be necessary to transform the value of a given expression in
order to exhibit it properly, however, without changing the underlying data. In the
next section on lters, we will learn how expressions are well suited for this purpose.
Filters
Filters associated with other technologies, like directives and expressions, are
responsible for the extraordinary expressiveness of the framework. They allow us to
easily manipulate and transform any value, that is, not only just the ones combined
with expressions inside a template, but also the ones injected in other components
such as controllers and services.
Filters are really useful when we need to format dates and currency according to
our current locale, or even when we need to support the ltering feature of a grid
component. They are the perfect solution to easily perform any data manipulation.
Basic usage with expressions
To make lters interact with the expression, we just need to put them inside double
curly brackets:
{{expression | filter}}
Also, the lters can be combined, thus creating a chain where the output of filter1
is the input of filter2, which is similar to the pipeline that exists in the shell of
Unix-based operating systems:
{{expression | filter1 | filter2}}
The framework already brings with it a set of ready-to-use lters that can be quite
useful in your daily development. Now, let's have a look at the different types of
AngularJS lters.
currency
The currency lter is used to format a number based on a currency. The basic usage
of this lter is without any parameter:
{{ 10 | currency}}
The result of the evaluation will be the number $10.00, formatted and prexed with
the dollar sign. We can also apply a specic locale symbol, shown as follows:
{{ 10 | currency:'R$'}}

Data Handling
[ 56 ]
Now, the output will be R$10.00, which is the same as the previous output but
prexed with a different symbol. Although it seems right to apply just the currency
symbol, and in this case the Brazilian Real (R$), this doesn't change the usage of the
specic decimals and group separators.
In order to achieve the correct output, in this case R$10,00 instead of R$10.00,
we need to congure the Brazilian (PT-BR) locale available inside the AngularJS
distribution package. In this package, we might nd locales for most countries, and
we just need to import these locales to our application in the following manner:
<script src="js/lib/angular-locale_pt-br.js"></script>
After importing the locale, we will not have to use the currency symbol anymore
because it's already wrapped inside.
Besides the currency, the locale also denes the conguration of many other
variables, such as the days of the week and months, which is very useful when
combined with the next lter used to format dates.
date
The date lter is one of the most useful lters of the framework. Generally, a date
value comes from the database or any other source in a raw and generic format.
Because of this, such lters are essential to any kind of application.
Basically, we can use this lter by declaring it inside any expression. In the following
example, we have used the lter on a date variable attached to the scope:
{{ car.entrance | date }}
The output will be Dec 10, 2013. However, there are numerous combinations we
can make with the optional format mask:
{{ car.entrance | date:'MMMM dd/MM/yyyy HH:mm:ss' }}
When you use this format, the output changes to December 10/12/2013 21:42:10.
lter
Have you ever tried to lter a list of data? This lter performs exactly this task, acting
over an array and applying any ltering criteria.
Now, let's include a eld in our car parking application to search any parked cars
and use this lter to do the job:
index.html
<input

Chapter 3
[ 57 ]
type="text"
ng-model="criteria"
placeholder="What are you looking for?"
/>
<table>
<thead>
<tr>
<th></th>
<th>Plate</th>
<th>Color</th>
<th>Entrance</th>
</tr>
</thead>
<tbody>
<tr
ng-class="{selected: car.selected}"
ng-repeat="car in cars | filter:criteria"
>
<td>
<input
type="checkbox"
ng-model="car.selected"
/>
</td>
<td>{{car.plate}}</td>
<td>{{car.color}}</td>
<td>{{car.entrance | date:'dd/MM/yyyy hh:mm'}}</td>
</tr>
</tbody>
</table>
The result is really impressive. With an input eld and lter declaration, we did
the job.
json
Sometimes, generally for debugging purposes, it might be necessary to display the
contents of an object in the JSON format. JSON, also known as JavaScript Object
Notation, is a lightweight data interchange format.
In the next example, we will apply the lter to a car object:
{{ car | json }}

Data Handling
[ 58 ]
The expected result if we use it based inside the car's list of our application is
as follows:
{
"plate": "6MBV006",
"color": "Blue",
"entrance": "2013-12-09T23:46:15.186Z"
}
limitTo
Sometimes, we need to display text, or even a list of elements, and it might be
necessary to limit its size. This lter does exactly that and can be applied to a
string or an array.
The following code is an example where there is a limit to the expression:
{{ expression | limitTo:10 }}
lowercase
The lowercase lter displays the content of the expression in lowercase:
{{ expression | lowercase }}
number
The number lter is used to format a string as a number. Similar to the currency and
date lters, the locale can be applied to present the number using the conventions of
each location.
Also, you can use a fraction-size parameter to support the rounding up of
the number:
{{ 10 | number:2 }}
The output will be 10.00 because we used the fraction-size conguration. In this
case, we can also take advantage of the locale conguration to change the
fraction separator.

Chapter 3
[ 59 ]
orderBy
With the orderBy lter, we can order any array based on a predicate expression.
This expression is used to determine the order of the elements and works in
three different ways:
• String: This is the property name. Also, there is an option to prex
+ or – to indicate the order direction. At the end of the day, +plate or
-plate are predicate expressions that will sort the array in an ascending
or descending order.
• Array: Based on the same concept of String's predicate expression, more than
one property can be added inside the array. Therefore, if two elements are
considered equivalent by the rst predicate, the next one can be used, and
so on.
• Function: This function receives each element of the array as a parameter
and returns a number that will be used to compare the elements against
each other.
In the following code, the orderBy lter is applied to an expression with the
predicate and reverse parameters:
{{ expression | orderBy:predicate:reverse }}
Let's change our example again. Now, it's time to apply the orderBy lter using the
plate, color, or entrance properties:
index.html
<input
type="text"
ng-model="criteria"
placeholder="What are you looking for?"
/>
<table>
<thead>
<tr>
<th></th>
<th>
<a href=""ng-click="field = 'plate'; order=!order">
Plate
</a>
</th>
<th>
<a href=""ng-click="field = 'color'; order=!order">

Data Handling
[ 60 ]
Color
</a>
</th>
<th>
<a href=""ng-click="field = 'entrance'; order=!order">
Entrance
</a>
</th>
</tr>
</thead>
<tbody>
<tr
ng-class="{selected: car.selected}"
ng-repeat="car in cars | filter:criteria |
orderBy:field:order"
>
<td>
<input
type="checkbox"
ng-model="car.selected"
/>
</td>
<td>{{car.plate}}</td>
<td>{{car.color}}</td>
<td>{{car.entrance | date:'dd/MM/yyyy hh:mm'}}</td>
</tr>
</tbody>
</table>
Now, we can order the car's list just by clicking on the header's link. Each click will
reorder the list in the ascending or descending order based on the reverse parameter.
uppercase
This parameter displays the content of the expression in uppercase:
{{ expression | uppercase }}
Using lters in other places
We can also use lters in other components such as controllers and services.
They can be used by just injecting $filter inside the desired components.
The rst argument of the filter function is the value, followed by the other
required arguments.

Chapter 3
[ 61 ]
Let's change our application by moving the date lter, which we used to display the
date and hour separated in the view, to our controller:
controllers.js
parking.controller("parkingCtrl", function ($scope, $filter) {
$scope.appTitle = $filter("uppercase")("[Packt] Parking");
});
This approach is often used when we need to transform the data before it reaches the
view, sometimes even using it to the algorithms logic.
Creating lters
AngularJS already comes with a bunch of useful and interesting built-in lters,
but even then, we'll certainly need to create our own lters in order to fulll
specic requirements.
To create a new lter, you just need to register it to the application's module,
returning the filter function. This function takes the inputted value as the rst
parameter and other additional arguments if necessary.
Now, our application has a new requirement that can be developed through the
creation of a customized lter.
This requirement involves formatting the car's plate by introducing a separator after
the third character. To achieve this, we are going to create a lter called plate. It will
receive a plate and will return it after formatting it, after following the rules:
filters.js
parking.filter("plate", function() {
return function(input) {
var firstPart = input.substring(0,3);
var secondPart = input.substring(3);
return firstPart + " - " + secondPart;
};
});
With this lter, the 6MBV006 plate is displayed as 6MB - V006.

Data Handling
[ 62 ]
Now, let's introduce a new parameter to give the users a chance to change the
plate's separator:
filters.js
parking.filter("plate", function() {
return function(input, separator) {
var firstPart = input.substring(0,3);
var secondPart = input.substring(3);
return firstPart + separator + secondPart;
};
});
Form validation
Almost every application has forms. It allows the users to type data that will be sent
and processed at the backend. AngularJS provides a complete infrastructure to easily
create forms with the validation support.
The form will always be synchronized to its model with the two-way data binding
mechanism, through the ngModel directive; therefore, the code is not required to
fulll this purpose.
Creating our rst form
Now, it's time to create our rst form in the car parking application. Until now, we
have been using the plate of the car in any format in order to allow parking. From
now on, the driver must mention the details of the plate following some rules. This
way, it's easier to keep everything under control inside the parking lot.
The HTML language has an element called form that surrounds the elds in order to
pass them to the server. It also creates a boundary, isolating the form as a single and
unique context.
With AngularJS, we will do almost the same thing. First, we need to surround
our elds with the form element and also give a name to it. Without the name, it
won't be possible to refer to it in the future. Also, it's important to assign a name
to each eld.
In the following code, we have added the form to our parking application:
index.html
<form name="carForm">

Chapter 3
[ 63 ]
<input
type="text"
name="plateField"
ng-model="car.plate"
placeholder="What's the plate?"
/>
</form>
For the form, avoid using the name that has already been used inside the ngModel
directive; otherwise, we will not be able to perform the validation properly. It would
be nice to use some sufx for both the form and the eld names as that would help to
make things clearer, thus avoiding mistakes.
Basic validation
The validation process is quite simple and relies on some directives to do the job. The
rst one that we need to understand is the ngRequired directive. It could be attached
to any eld of the form in order to intimate the validation process that the eld is
actually required:
<input
type="text"
name="plateField"
ng-model="car.plate"
placeholder="What's the plate?"
ng-required="true"
/>
In addition to this, we could be a little more specic by using the ngMinlength and
ngMaxlength directives. It is really useful to fulll some kinds of requirements such
as dening a minimum or maximum limit to each eld.
In the following code, we are going to add a basic validation to our parking
application. From now on, the field plate will be a required parameter and
will also have minimum and maximum limits:
<input
type="text"
name="plateField"
ng-model="car.plate"
placeholder="What's the plate?"
ng-required="true"
ng-minlength="6"
ng-maxlength="10"
/>

Data Handling
[ 64 ]
To nish, we can add a regular expression to validate the format of the plate.
This can be done through the ngPattern directive:
<input
type="text"
name="plateField"
ng-model="car.plate"
placeholder="What's the plate?"
ng-required="true"
ng-minlength="6"
ng-maxlength="10"
ng-pattern="/[A-Z]{3}[0-9]{3,7}/"
/>
The result can be evaluated through the implicit object $valid. It will be dened
based on the directives of each eld. If any of these violate the directives denition,
the result will be false. Also, the $invalid object can be used, considering its
usefulness, depending on the purpose:
<button
ng-click="park(car)"
ng-disabled="carForm.$invalid"
>
Park
</button>
If the plate is not valid, the following alert should be displayed:
<alert
ng-show="carForm.plateField.$invalid"
topic="Something went wrong!"
>
The plate is invalid!
</alert>
However, there is a problem with this approach. The alert is displayed even if we
type nothing and this might confuse the user. To prevent such situations, there are
two properties that we need to understand, which are covered in the next section.

Chapter 3
[ 65 ]
Understanding the $pristine and $dirty
properties
Sometimes, it would be useful to know whether the eld was never touched in order
to trigger (or not) some validation processes. This can be done by the means of two
objects with very suggestive names: $pristine and $dirty.
Pristine means purity, and here, it denotes that the eld wasn't touched by anyone.
After it's been touched for the rst time, it becomes dirty. So, the value of $pristine
always starts with true and becomes false after any value is typed. Even if the eld
is empty again, the value remains false. The behavior of the $dirty object is just the
opposite. It is by default false and becomes true after the rst value is typed:
<alert
ng-show="carForm.plateField.$dirty &&
carForm.plateField.$invalid"
topic="Something went wrong!"
>
The plate is invalid!
</alert>
The $error object
In the end, the one that remains is the $error object. It accumulates the detailed list
of everything that happens with the form and can be used to discover which eld
must be proofread in order to put the form in a valid situation.
Let's use it to help our users understand what's exactly going wrong with the form:
<alert
ng-show="carForm.plateField.$dirty && carForm.plateField.$invalid"
topic="Something went wrong!"
>
<span ng-show="carForm.plateField.$error.required">
You must inform the plate of the car!
</span>
<span ng-show="carForm.plateField.$error.minlength">
The plate must have at least 6 characters!
</span>
<span ng-show="carForm.plateField.$error.maxlength">
The plate must have at most 10 characters!
</span>

Data Handling
[ 66 ]
<span ng-show="carForm.plateField.$error.pattern">
The plate must start with non-digits, followed by 4 to 7
numbers!
</span>
</alert>
Summary
In this chapter, we studied how AngularJS provides a complete set of features
related to data handling, allowing the developers to easily present, transform,
synchronize, and validate the data on the user's interface with a simple syntax
and a few lines of code.
In the next chapter, we will study more about services and also understand the
dependency injection mechanism.

Dependency Injection
and Services
Cohesion is one of the most important and perhaps overlooked concepts of the
object-oriented programming paradigm. It refers to the responsibility of each part of
the software. No matter which component we talk about, every time it implements
behavior different from its responsibilities, cohesion is degraded.
Low cohesion applications contain plenty of duplicated code and are hard to unit
test because it is difcult to isolate the behavior, which is usually hidden inside the
component. It also reduces the reuse opportunities, demanding much more effort to
implement the same thing several times. In the long term, the productivity decreases
while the maintenance costs are raised.
With AngularJS, we are able to create services, isolating the business logic of every
component of our application. Also, we can use the framework's dependency
injection mechanism to easily supply any component with a desired dependency.
The framework also comes with a bunch of built-in services, which are very useful in
daily development.
In this chapter, we'll be covering the following topics:
• Dependency injection
• Creating services
• Using AngularJS built-in services

Dependency Injection and Services
[ 68 ]
Dependency injection
In order to create testable and well-designed applications, we need to take care about
the way their components are related to each other. This relationship, which is very
famous in the object-oriented world, is known as coupling, and indicates the level of
dependency between the components.
We need to be careful about using the operator new inside a component. It reduces
the chances of replacing the dependency, making it difcult for us to test it.
Fortunately, AngularJS is powered by a dependency injection mechanism that
manages the life cycle of each component. This mechanism is responsible for creating
and distributing the components within the application.
The easiest way to obtain a dependency inside a component is by just declaring it as
a parameter. The framework's dependency injection mechanism ensures that it will
be injected properly. In the following code, there is a controller with two injected
parameters, $scope and $filter:
controllers.js
parking.controller("parkingCtrl", function ($scope, $filter) {
$scope.appTitle = $filter("uppercase")("[Packt] Parking");
});
Unfortunately, this approach will not work properly after the code is minied and
obfuscated, which is very common these days. The main purpose of this kind of
algorithm is to reduce the amount of code by removing whitespaces, comments, and
newline characters, and also renaming local variables.
The following code is an example of our previous code after it is minied
and obfuscated:
controllers.min.js
x.controller("parkingCtrl",function(a,b){a.appTitle=b("uppercase")
("[Packt] Parking");});
The $scope and $filter parameters were renamed arbitrarily. In this case, the
framework will throw the following error, indicating that the required service
provider could not be found:
Error: [$injector:unpr] Unknown provider: aProvider <- a

Chapter 4
[ 69 ]
Because of this, the most recommended way to use the dependency injection
mechanism, despite verbosity, is through the inline array annotation, as follows:
parking.controller("parkingCtrl", ["$scope", "$filter", function
($scope, $filter) {
$scope.appTitle = $filter("uppercase")("[Packt] Parking");
}]);
This way, no matter what the name of each parameter is, the correct dependency
will be injected, resisting the most common algorithms that minify and obfuscate
the code.
The dependencies can also be injected in the same way inside directives, lters, and
services. Later, in Chapter 7, Unit Testing, we are going to learn other strategies in
order to inject dependencies for testing purposes.
In the following sections, we are going to use these concepts in greater detail while
using and creating services.
Creating services
In AngularJS, a service is a singleton object that has its life cycle controlled by the
framework. It can be used by any other component such as controllers, directives,
lters, and even other services.
Now, it's time to evolve our application, introducing new features in order to
calculate the parking time and also the price.
To keep high levels of cohesion inside each component, we must take care of what
kind of behavior is implemented in the controller. This kind of feature could be the
responsibility of a service that can be shared across the entire application and also
tested separately.
In the following code, the controller is delegating a specic behavior to the service,
creating a place to evolve the business rules in the future:
controllers.js
parking.controller("parkingCtrl", function ($scope, parkingService) {
$scope.appTitle = "[Packt] Parking";
$scope.cars = [];
$scope.colors = ["White", "Black", "Blue", "Red", "Silver"];

Dependency Injection and Services
[ 70 ]
$scope.park = function (car) {
car.entrance = new Date();
$scope.cars.push(car);
delete $scope.car;
};
$scope.calculateTicket = function (car) {
$scope.ticket = parkingService.calculateTicket(car);
};
});
Creating services with the factory
The framework allows the creation of a service component in different ways. The
most usual way is to create it using a factory. Therefore, we need to register the
service in the application module that passes two parameters: the name of the service
and the factory function.
A factory function is a pattern used to create objects. It is a simple function that
returns a new object. However, it brings more concepts such as the Revealing
Module Pattern, which we are going to cover in more detail.
To understand this pattern, let's start by declaring an object literal called car:
var car = {
plate: "6MBV006",
color: "Blue",
entrance: "2013-12-09T23:46:15.186Z"
};
The JavaScript language does not provide any kind of visibility modier; therefore,
there is no way to encapsulate any property of this object, making it possible to
access everything directly:
> console.log(car.plate);
6MB006
> console.log(car.color);
Blue
> console.log(car.entrance);
2013-12-09T23:46:15.186Z

Chapter 4
[ 71 ]
In order to promote encapsulation, we need to use a function instead of an object
literal, as follows:
var car = function () {
var plate = "6MBV006";
var color = "Blue";
var entrance = "2013-12-09T23:46:15.186Z ";
};
Now, it's no longer possible to access any property of the object:
> console.log(car.plate);
undefined
> console.log(car.color);
undefined
> console.log(car.entrance);
undefined
This happens because the function isolates its internal scope, and based on this
principle, we are going to introduce the concept of the Revealing Module Pattern.
This pattern, beyond taking care of the namespace, provides encapsulation. It allows
the implementation of public and private methods, reducing the coupling within
the components. It returns an object literal from the function, revealing only the
desired properties:
var car = function () {
var plate = "6MBV006";
var color = "Blue";
var entrance = "2013-12-09T23:46:15.186Z ";
return {
plate: plate,
color: color
};
};
Also, we need to invoke the function immediately; otherwise, the variable car will
receive the entire function. This is a very common pattern and is called IIFE, which is
also known as Immediately-Invoked Function Expression:
var car = function () {
var plate = "6MBV006";
var color = "Blue";
var entrance = "2013-12-09T23:46:15.186Z ";

Dependency Injection and Services
[ 72 ]
return {
plate: plate,
color: color
};
}();
Now, we are able to access the color but not the entrance of the car:
> console.log(car.plate);
6MB006
> console.log(car.color);
Blue
> console.log(car.entrance);
undefined
Beyond that, we can apply another convention by prexing the private members
with _, making the code much easier to understand:
var car = function () {
var _plate = "6MBV006";
var _color = "Blue";
var _entrance = "2013-12-09T23:46:15.186Z ";
return {
plate: _plate,
color: _color
};
}();
This is much better than the old-school fashion implementation of the rst example,
don't you think? This approach could be used to declare any kind of AngularJS
component, such as services, controllers, lters, and directives.
In the following code, we have created our parkingService using a factory function
and the Revealing Module Pattern:
services.js
parking.factory("parkingService", function () {
var _calculateTicket = function (car) {
var departHour = new Date().getHours();
var entranceHour = car.entrance.getHours();
var parkingPeriod = departHour – entranceHour;
var parkingPrice = parkingPeriod * 10;
return {
period: parkingPeriod,

Chapter 4
[ 73 ]
price: parkingPrice
};
};
return {
calculateTicket: _calculateTicket
};
});
In our rst service, we started to create some parking business rules. From now, the
entrance hour is subtracted from the departure hour and multiplied by $10.00 to get
the parking rate per hour.
However, these rules were created by means of hardcoded information inside the
service and might bring maintenance problems in the future.
To gure out this kind of a situation, we can create constants. It's used to store
congurations that might be required by any application component. We can store
any kind of JavaScript data type such as a string, number, Boolean, array, object,
function, null, and undened.
To create a constant, we need to register it in the application module. In the
following code, there is an example of the steps required to create a constant:
constants.js
parking.constant("parkingConfig", {
parkingRate: 10
});
Next, we refactored the _calculateTicket method in order to use the settings from
the parkingConfig constant, instead of the hard coded values. In the following code,
we are injecting the constant inside the parkingService method and replacing the
hard coded parking rate:
services.js
parking.factory("parkingService", function (parkingConfig) {
var _calculateTicket = function (car) {
var departHour = new Date().getHours();
var entranceHour = car.entrance.getHours();
var parkingPeriod = departHour – entranceHour;
var parkingPrice = parkingPeriod * parkingConfig.parkingRate;
return {
period: parkingPeriod,

Dependency Injection and Services
[ 74 ]
price: parkingPrice
};
};
return {
calculateTicket: _calculateTicket
};
});
The framework also provides another kind of service called value. It's pretty similar
to the constants; however, it can be changed or decorated.
Creating services with the service
There are other ways to create services with AngularJS, but hold on, you might be
thinking "why should we consider this choice if we have already used the factory?"
Basically, this decision is all about design. The service is very similar to the factory;
however, instead of returning a factory function, it uses a constructor function,
which is equivalent to using the new operator.
In the following code, we created our parkingService method using a
constructor function:
services.js
parking.service("parkingService", function (parkingConfig) {
this.calculateTicket = function (car) {
var departHour = new Date().getHours();
var entranceHour = car.entrance.getHours();
var parkingPeriod = departHour – entranceHour;
var parkingPrice = parkingPeriod * parkingConfig.parkingRate;
return {
period: parkingPeriod,
price: parkingPrice
};
};
});
Also, the framework allows us to create services in a more complex and congurable
way using the provider function.

Chapter 4
[ 75 ]
Creating services with the provider
Sometimes, it might be interesting to create congurable services. They are called
providers, and despite being more complex to create, they can be congured before
being available to be injected inside other components.
While the factory works by returning an object and the service with the
constructor function, the provider relies on the $get function to expose its
behavior. This way, everything returned by this function becomes available
through the dependency injection.
In the following code, we refactored our service to be implemented by a provider.
Inside the $get function, the calculateTicket method is being returned and will be
accessible externally.
services.js
parking.provider("parkingService", function (parkingConfig) {
var _parkingRate = parkingConfig.parkingRate;
var _calculateTicket = function (car) {
var departHour = new Date().getHours();
var entranceHour = car.entrance.getHours();
var parkingPeriod = departHour – entranceHour;
var parkingPrice = parkingPeriod * _parkingRate;
return {
period: parkingPeriod,
price: parkingPrice
};
};
this.setParkingRate = function (rate) {
_parkingRate = rate;
};
this.$get = function () {
return {
calculateTicket: _calculateTicket
};
};
});

Dependency Injection and Services
[ 76 ]
In order to congure our provider, we need to use the config function of the
Module API, injecting the service through its function. In the following code, we are
calling the setParkingRate method of the provider, overwriting the default rate
that comes from the parkingConfig method.
config.js
parking.config(function (parkingServiceProvider) {
parkingServiceProvider.setParkingRate(10);
});
The other service components such as constants, values, factories, and services are
implemented on the top of the provider component, offering developers a simpler
way of interaction.
Using AngularJS built-in services
Now, it's time to check out the most important and useful built-in services for
our daily development. In the following topics, we will explore how to perform
communication with the backend, create a logging mechanism, support timeout,
single-page application, and many other important tasks.
Communicating with the backend
Every client-side JavaScript application needs to communicate with the backend. In
general, this communication is performed through an interface, which is exposed by
the server-side application that relies on the HTTP protocol to transfer data through
the JSON.
HTTP, REST, and JSON
In the past, for many years, the most common way to interact with the backend was
through HTTP with the help of the GET and POST methods. The GET method was
usually used to retrieve data, while POST was used to create and update the same
data. However, there was no rule, and we were feeling the lack of a good standard
to embrace.
The following are some examples of this concept:
GET /retrieveCars HTTP/1.1
GET /getCars HTTP/1.1
GET /listCars HTTP/1.1
GET /giveMeTheCars HTTP/1.1
GET /allCars HTTP/1.1

Chapter 4
[ 77 ]
Now, if we want to obtain a specic car, we need to add some parameters to this
URL, and again, the lack of standard makes things harder:
GET /retrieveCar?carId=10 HTTP/1.1
GET /getCar?idCar=10 HTTP/1.1
GET /giveMeTheCar?car=10 HTTP/1.1
Introduced a long time ago by Roy Fielding, the REST method, or Representational
State Transfer, has become one of the most adopted architecture styles in the last few
years. One of the primary reasons for all of its success is the rise of the AJAX-based
technology and also the new generation of web applications, based on the frontend.
It's strongly based on the HTTP protocol by means of the use of most of its methods
such as GET, POST, PUT, and DELETE, bringing much more semantics and providing
standardization.
Basically, the primary concept is to replace the verbs for nouns, keeping the URLs as
simple and intuitive as possible. This means changing actions such as retrieveCars,
listCars, and even getCars for the use of the resource cars, and the method GET,
which is used to retrieve information, as follows:
GET /cars HTTP/1.1
Also, we can retrieve information about a specic car as follows:
GET /cars/1 HTTP/1.1
The POST method is reserved to create new entities and also to perform complex
searches that involve a large amount of data. This is an important point; we should
always avoid transmitting information that might be exposed to encoded errors
through the GET method, as long as it doesn't have a content type.
This way, in order to create a new car, we should use the same resource, cars, but
this time, with the POST method:
POST /cars HTTP/1.1
The car information will be transmitted within the request body, using the
desired format. The major part of the libraries and frameworks works really well
with JSON, also known as JavaScript Object Notation, which is a lightweight data
interchange format.

Dependency Injection and Services
[ 78 ]
The following code shows an object literal after being converted into JSON through
the JSON.stringify function:
{
"plate": "6MBV006",
"color": "Blue",
"entrance": "2013-12-09T23:46:15.186Z"
}
Also, the framework provides a built-in function called angular.toJson that
does the same job of converting an object literal to JSON. To perform the other
way round, we can use the angular.fromJson function, which is equivalent
to the JSON.parse function.
To change any entity that already exists, we can rely on the PUT method, using the
same concepts used by the POST method.
PUT /cars/1 HTTP/1.1
Finally, the DELETE method is responsible for deleting the existing entities.
DELETE /cars/1 HTTP/1.1
Another important thing to keep in mind is the status code that is returned in each
response. It determines the result of the entire operation and must allow us to
implement the correct application behavior in case there is an error.
There are many status codes available in the HTTP protocol; however, we should
understand and handle at least the following:
• 200 OK
• 400 Bad Request
• 401 Unauthorized
• 403 Forbidden
• 404 Not Found
• 500 Internal Server Error
In case of an error, the response must bring the associated message, explaining
what's happening and allowing the developers to handle it.
There are many other concepts involving REST. This is just a brief overview and
as it is not the purpose of this book, you can consider studying it from a more
specic source.

Chapter 4
[ 79 ]
AJAX
AJAX, also known as Asynchronous JavaScript and XML, is a technology that
allows the applications to send and retrieve data from the server asynchronously,
without refreshing the page. The $http service wraps the low-level interaction with
the XMLHttpRequest object, providing an easy way to perform calls.
This service could be called by just passing a conguration object, used to set a lot of
important information such as the method, the URL of the requested resource, the
data to be sent, and many others:
$http({method: "GET", url: "/resource"});
It also returns a promise that we are going to explain in more detail in the
Asynchronous with a promise-deferred pattern section. We can attach the success
and error behavior to this promise:
$http({method: "GET", url: "/resource"})
.success(function (data, status, headers, config, statusText) {
})
.error(function (data, status, headers, config, statusText) {
});
To make it easier to use, the following shortcut methods are available for this service.
In this case, the conguration object is optional:
$http.get(url, [config])
$http.post(url, data, [config])
$http.put(url, data, [config])
$http.head(url, [config])
$http.delete(url, [config])
$http.jsonp(url, [config])
Now, it's time to integrate our parking application with the backend by calling the
resource cars with the GET method. It will retrieve the cars, binding it to the $scope
object. In the case that something goes wrong, we are going to log it to the console:
controllers.js
parking.controller("parkingCtrl", function ($scope, parkingService,
$http) {
$scope.appTitle = "[Packt] Parking";
$scope.colors = ["White", "Black", "Blue", "Red", "Silver"];
$scope.park = function (car) {
car.entrance = new Date();

Dependency Injection and Services
[ 80 ]
$scope.cars.push(car);
delete $scope.car;
};
$scope.calculateTicket = function (car) {
$scope.ticket = parkingService.calculateTicket(car);
};
var retrieveCars = function () {
$http.get("/cars")
.success(function(data, status, headers, config) {
$scope.cars = data;
})
.error(function(data, status, headers, config) {
switch(status) {
case 401: {
$scope.message = "You must be authenticated!"
break;
}
case 500: {
$scope.message = "Something went wrong!";
break;
}
}
console.log(data, status);
});
};
retrieveCars();
});
The success and error methods are called asynchronously when the server returns
the HTTP request. In case of an error, we must handle the status code properly and
implement the correct behavior.
There are certain methods that require a data parameter to be passed inside the
request body such as the POST and PUT methods. In the following code, we are
going to park a new car inside our parking lot:
controllers.js
parking.controller("parkingCtrl", function ($scope, parkingService,
$http) {
$scope.appTitle = "[Packt] Parking";
$scope.colors = ["White", "Black", "Blue", "Red", "Silver"];

Chapter 4
[ 81 ]
$scope.parkCar = function (car) {
$http.post("/cars", car)
.success(function (data, status, headers, config) {
retrieveCars();
$scope.message = "The car was parked successfully!";
})
.error(function (data, status, headers, config) {
switch(status) {
case 401: {
$scope.message = "You must be authenticated!"
break;
}
case 500: {
$scope.message = "Something went wrong!";
break;
}
}
console.log(data, status);
});
};
$scope.calculateTicket = function (car) {
$scope.ticket = parkingService.calculateTicket(car);
};
var retrieveCars = function () {
$http.get("/cars")
.success(function(data, status, headers, config) {
$scope.cars = data;
})
.error(function(data, status, headers, config) {
switch(status) {
case 401: {
$scope.message = "You must be authenticated!"
break;
}
case 500: {
$scope.message = "Something went wrong!";
break;
}
}
console.log(data, status);

Dependency Injection and Services
[ 82 ]
});
};
retrieveCars();
});
Creating an HTTP facade
Now, we have the opportunity to evolve our design by introducing a service that
will act as a facade and interact directly with the backend. The mapping of each
URL pattern should not be under the controller's responsibility; otherwise, it could
generate a huge amount of duplicated code and a high cost of maintenance.
In order to increase the cohesion of our controller, we moved the code responsible to
make the calls to the backend of the parkingHttpFacade service, as follows:
services.js
parking.factory("parkingHttpFacade", function ($http) {
var _getCars = function () {
return $http.get("/cars");
};
var _getCar = function (id) {
return $http.get("/cars/" + id);
};
var _saveCar = function (car) {
return $http.post("/cars", car);
};
var _updateCar = function (car) {
return $http.put("/cars" + car.id, car);
};
var _deleteCar = function (id) {
return $http.delete("/cars/" + id);
};
return {
getCars: _getCars,
getCar: _getCar,
saveCar: _saveCar,

Chapter 4
[ 83 ]
updateCar: _updateCar,
deleteCar: _deleteCar
};
});
controllers.js
parking.controller("parkingCtrl", function ($scope, parkingService,
parkingHttpFacade) {
$scope.appTitle = "[Packt] Parking";
$scope.colors = ["White", "Black", "Blue", "Red", "Silver"];
$scope.parkCar = function (car) {
parkingHttpFacade.saveCar(car)
.success(function (data, status, headers, config) {
retrieveCars();
$scope.message = "The car was parked successfully!";
})
.error(function (data, status, headers, config) {
switch(status) {
case 401: {
$scope.message = "You must be authenticated!"
break;
}
case 500: {
$scope.message = "Something went wrong!";
break;
}
}
console.log(data, status);
});
};
$scope.calculateTicket = function (car) {
$scope.ticket = parkingService.calculateTicket(car);
};
var retrieveCars = function () {
parkingHttpFacade.getCars()
.success(function(data, status, headers, config) {
$scope.cars = data;
})

Dependency Injection and Services
[ 84 ]
.error(function(data, status, headers, config) {
switch(status) {
case 401: {
$scope.message = "You must be authenticated!"
break;
}
case 500: {
$scope.message = "Something went wrong!";
break;
}
}
console.log(data, status);
});
};
retrieveCars();
});
Headers
By default, the framework adds some HTTP headers to all of the requests, and other
headers only to the POST and PUT methods.
The headers are shown in the following code, and we can check them out by
analyzing the $http.defaults.headers conguration object:
{
"common":{"Accept":"application/json, text/plain, */*"},
"post":{"Content-Type":"application/json;charset=utf-8"},
"put":{"Content-Type":"application/json;charset=utf-8"},
"patch":{"Content-Type":"application/json;charset=utf-8"}
}
In case you want to add a specic header or even change the defaults, you can
use the run function of the Module API, which is very useful in initializing
the application:
run.js
parking.run(function ($http) {
$http.defaults.headers.common.Accept = "application/json";
});

Chapter 4
[ 85 ]
After the header conguration, the request starts to send the custom header:
GET /cars HTTP/1.1
Host: localhost:3412
User-Agent: Mozilla/5.0 (Macintosh; Intel Mac OS X 10.8; rv:29.0)
Accept: application/json
Accept-Language: pt-br,pt;q=0.8,en-us;q=0.5,en;q=0.3
Accept-Encoding: gzip, deflate
The headers can also be congured through the conguration object of each request.
It will overwrite the default headers congured here.
Caching
To improve the performance of our application, we can turn on the framework's
caching mechanism. It will store each response from the server, returning the same
result every time the same request is made.
However, take care. Some applications demand updated data, and the caching
mechanism may introduce some undesired behavior. In the following code, we
are enabling the cache mechanism:
run.js
parking.run(function ($http) {
$http.defaults.cache = true;
});
Interceptors
The framework also provides an incredible HTTP intercepting mechanism. It allows us
to create common behaviors for different kinds of situations such as verifying whether
a user is already authenticated or to gather information for auditing purposes.
The rst is the request interceptor. This interceptor is called before the request is
being sent to the backend. It is very useful when we need to add information such
as additional parameters or even headers to the request.
In the following code, we create an interceptor called httpTimestampInterceptor,
which adds the current time in milliseconds to each request that is made by
the application:
parking.factory('httpTimestampInterceptor', function(){
return{
'request' : function(config) {

Dependency Injection and Services
[ 86 ]
var timestamp = Date.now();
config.url = config.url + "?x=" + timestamp;
return config;
}
}
});
Something might happen with the request, causing an error. With the requestError
interceptor, we can handle this situation. It is called when the request is rejected and
can't be sent to the backend.
The response interceptor is called right after the response arrives from the backend
and receives a response as a parameter. It's a good opportunity to apply any
preprocessing behavior that may be required.
One of the most common intercepting situations is when the backend produces
any kind of error, returning a status code to indicate unauthorized access, a bad
request, a not found error, or even an internal server error. It could be handled by the
responseError interceptor, which allows us to properly apply the correct behavior
in each situation.
This httpUnauthorizedInterceptor parameter, in the following code, is
responsible for handling the unauthorized error and changing the login property of
$rootScope, indicating that the application should open the login dialog:
parking.factory('httpUnauthorizedInterceptor', function($q,
$rootScope){
return{
'responseError' : function(rejection) {
if (rejection.status === 401){
$rootScope.login = true;
}
return $q.reject(rejection);
}
}
});
After dening the interceptors, we need to add them to $httpProvider using the
config function of the Module API, as follows:
config.js
app.config(function ($httpProvider) {
$httpProvider.interceptors.push('httpTimestampInterceptor');
$httpProvider.interceptors.push('httpUnauthorizedInterceptor');
});

Chapter 4
[ 87 ]
Creating a single-page application
In the past few years, the single-page application, also known as SPA, has been
growing in popularity among frontend developers. It improves customers' experiences
by not requiring the page to be constantly reloaded, taking advantage of technologies
such as AJAX and massive DOM manipulation.
Installing the module
AngularJS supports this feature through the $route service. Basically, this service
works by mapping URLs against controllers and views, also allowing parameter
passing. This service is part of the ngRoute module and we need to declare it before
using it, as follows:
index.html
<script src="angular-route.js"></script>
After this, the module should be imported to the parking module:
app.js
var parking = angular.module("parking", ["ngRoute"]);
Conguring the routes
With the $routeProvider function, we are able to congure the routing
mechanism of our application. This can be done by adding each route through the
when function, which maps the URL pattern to a conguration object. This object has
the following information:
• controller: This is the name of the controller that should be associated with
the template
• templateUrl: This is the URL of the template that will be rendered by the
ngView module
• resolve: This is the map of dependencies that should be resolved and
injected inside the controller (optional)
• redirectTo: This is the redirected location

Dependency Injection and Services
[ 88 ]
Also, there is an otherwise function. It is called when the route cannot be matched
against any denition. This conguration should be done through the config
function of the Module API, as follows:
config.js
parking.config(function ($routeProvider) {
$routeProvider.
when("/parking", {
templateUrl: "parking.html",
controller: "parkingCtrl"
}).
when("/car/:id", {
templateUrl: "car.html",
controller: "carCtrl"
}).
otherwise({
redirectTo: '/parking'
});
});
Rendering the content of each view
At the same time, we need to move the specic content from the index.html le
to the parking.html le, and in its place, we introduce the ngView directive. This
directive works with the $route service and is responsible for rendering each
template according to the routing mechanism conguration:
index.html
<!doctype html>
<html ng-app="parking">
<head>
<title>[Packt] Parking</title>
<script src="js/lib/angular.js"></script>
<script src="js/lib/angular-route.js"></script>
<script src="js/app.js"></script>
<script src="js/config.js"></script>
<script src="js/run.js"></script>
<script src="js/controllers.js"></script>
<script src="js/directives.js"></script>
<script src="js/filters.js"></script>
<script src="js/services.js"></script>

Chapter 4
[ 89 ]
<link rel="stylesheet" type="text/css" href="css/app.css">
</head>
<body>
<div ng-view></div>
</body>
</html>
parking.html
<input
type="text"
ng-model="criteria"
placeholder="What are you looking for?"
/>
<table>
<thead>
<tr>
<th></th>
<th>
<a href=""ng-click="field = 'plate'; order=!order">
Plate
</a>
</th>
<th>
<a href=""ng-click="field = 'color'; order=!order">
Color
</a>
</th>
<th>
<a href=""ng-click="field = 'entrance'; order=!order">
Entrance
</a>
</th>
</tr>
</thead>
<tbody>
<tr
ng-class="{selected: car.selected}"
ng-repeat="car in cars | filter:criteria | orderBy:field:order"
>
<td>
<input
type="checkbox"

Dependency Injection and Services
[ 90 ]
ng-model="car.selected"
/>
</td>
<td><a href="#/car/{{car.id}}">{{car.plate}}</a></td>
<td>{{car.color}}</td>
<td>{{car.entrance | date:'dd/MM/yyyy hh:mm'}}</td>
</tr>
</tbody>
</table>
<form name="carForm">
<input
type="text"
name="plateField"
ng-model="car.plate"
placeholder="What's the plate?"
ng-required="true"
ng-minlength="6"
ng-maxlength="10"
ng-pattern="/[A-Z]{3}[0-9]{3,7}/"
/>
<select
ng-model="car.color"
ng-options="color for color in colors"
>
Pick a color
</select>
<button
ng-click="park(car)"
ng-disabled="carForm.$invalid"
>
Park
</button>
</form>
<alert
ng-show="carForm.plateField.$dirty && carForm.plateField.$invalid"
topic="Something went wrong!"
>
<span ng-show="carForm.plateField.$error.required">
You must inform the plate of the car!
</span>
<span ng-show="carForm.plateField.$error.minlength">
The plate must have at least 6 characters!
</span>

Chapter 4
[ 91 ]
<span ng-show="carForm.plateField.$error.maxlength">
The plate must have at most 10 characters!
</span>
<span ng-show="carForm.plateField.$error.pattern">
The plate must start with non-digits, followed by 4 to 7 numbers!
</span>
</alert>
Passing parameters
The route mechanism also allows us to pass parameters. In order to obtain the
passed parameter inside the controller, we need to inject the $routeParams service,
which will provide us with the parameters passed through the URL:
controller.js
parking.controller("carController", function ($scope, $routeParams,
parkingHttpFacade, parkingService) {
$scope.depart = function (car) {
parkingHttpFacade.deleteCar(car)
.success(function (data, status) {
$scope.message = "OK";
})
.error(function (data, status) {
$scope.message = "Something went wrong!";
});
};
var retrieveCar = function (id) {
parkingHttpFacade.getCar(id)
.success(function (data, status) {
$scope.car = data;
$scope.ticket = parkingService.calculateTicket(car);
})
.error(function (data, status) {
$scope.message = "Something went wrong!";
});
};
retrieveCar($routeParams.id);
});
car.html
<h3>Car Details</h3>
<h5>Plate</h5>

Dependency Injection and Services
[ 92 ]
{{car.plate}}
<h5>Color</h5>
{{car.color}}
<h5>Entrance</h5>
{{car.entrance | date:'dd/MM/yyyy hh:mm'}}
<h5>Period</h5>
{{ticket.period}}
<h5>Price</h5>
{{ticket.price | currency}}
<button ng-click="depart(car)">Depart</button>
<a href="#/parking">Back to parking</a>
Changing the location
There are many ways to navigate, but we need to identify where our resource is
located before we decide which strategy to follow. In order to navigate within the
route mechanism, without refreshing the page, we can use the $location service.
There is a function called path that will change the URL after the #, allowing the
application to be a single-page one.
However, sometimes, it might be necessary to navigate out of the application
boundaries. It could be done by the $window service by means of the location.href
property as follows:
controller.js
parking.controller("carController", function ($scope, $routeParams,
$location, $window, parkingHttpFacade, parkingService) {
$scope.depart = function (car) {
parkingHttpFacade.deleteCar(car)
.success(function (data, status) {
$location.path("/parking");
})
.error(function (data, status) {
$window.location.href = "error.html";
});
};
var retrieveCar = function (id) {
parkingHttpFacade.getCar(id)
.success(function (data, status) {
$scope.car = data;
$scope.ticket = parkingService.calculateTicket(car);
})
.error(function (data, status) {

Chapter 4
[ 93 ]
$window.location.href = "error.html";
});
};
retrieveCar($routeParams.id);
});
Resolving promises
Very often, the controller needs to resolve some asynchronous promises before
being able to render the view. These promises are, in general, the result of an
AJAX call in order to obtain the data that will be rendered. We are going to study
the promise-deferred pattern later in this chapter.
In our previous example, we gured this out by creating and invoking a function
called retrieveCars directly from the controller:
controllers.js
parking.controller("parkingCtrl", function ($scope, parkingHttpFacade)
{
var retrieveCars = function () {
parkingHttpFacade.getCars()
.success(function(data, status, headers, config) {
$scope.cars = data;
})
.error(function(data, status, headers, config) {
switch(status) {
case 401: {
$scope.message = "You must be authenticated!"
break;
}
case 500: {
$scope.message = "Something went wrong!";
break;
}
}
console.log(data, status);
});
};
retrieveCars();
});

Dependency Injection and Services
[ 94 ]
The same behavior could be obtained by means of the resolve property, dened
inside the when function of the $routeProvider function with much more
elegance, as follows:
config.js
parking.config(function ($routeProvider) {
$routeProvider.
when("/parking", {
templateUrl: "parking.html",
controller: "parkingCtrl",
resolve: {
"cars": function (parkingHttpFacade) {
return parkingHttpFacade.getCars();
}
}
}).
when("/car/:id", {
templateUrl: "car.html",
controller: "carCtrl",
resolve: {
"car": function (parkingHttpFacade, $route) {
var id = $route.current.params.id;
return parkingHttpFacade.getCar(id);
}
}
}).
otherwise({
redirectTo: '/parking'
});
});
After this, there is a need to inject the resolved objects inside the controller:
controllers.js
parking.controller("parkingCtrl", function ($scope, cars) {
$scope.cars = cars.data;
});
parking.controller("parkingCtrl", function ($scope, car) {
$scope.car = car.data;
});

Chapter 4
[ 95 ]
There are three events that can be broadcasted by the $route service and are very
useful in many situations. The broadcasting mechanism will be studied in the next
chapter, Chapter 5, Scope.
The rst event is the $routeChangeStart event. It will be sent when the routing
process starts and can be used to create a loading ag, as follows:
run.js
parking.run(function ($rootScope) {
$rootScope.$on("$routeChangeStart", function(event, current,
previous, rejection)) {
$rootScope.loading = true;
});
});
After this, if all the promises are resolved, the $routeChangeSuccess event is
broadcasted, indicating that the routing process nished successfully:
run.js
parking.run(function ($rootScope) {
$rootScope.$on("$routeChangeSuccess", function(event, current,
previous, rejection)) {
$rootScope.loading = false;
});
});
If any of the promises are rejected, the $routeChangeError event is broadcasted,
as follows:
run.js
parking.run(function ($rootScope, $window) {
$rootScope.$on("$routeChangeError", function(event, current,
previous, rejection) {
$window.location.href = "error.html";
});
});

Dependency Injection and Services
[ 96 ]
Logging
This service is very simple and can be used to create a logging strategy for the
application that could be used for debug purposes.
There are ve levels available:
• info
• warn
• debug
• error
• log
We just need to inject this service inside the component in order to be able to log
anything from it, as follows:
parking.controller('parkingController', function ($scope, $log) {
$log.info('Entered inside the controller');
});
Is it possible to turn off the debug logging through the $logProvider event? We just
need to inject the $logProvider event to our application config and set the desired
conguration through the debugEnabled method:
parking.config(function ($logProvider) {
$logProvider.debugEnabled(false);
});
Timeout
The $timeout service is really useful when we need to execute a specic behavior
after a certain amount of time. Also, there is another service called $interval;
however, it executes the behavior repeatedly.
In order to create a timeout, we need to obtain its reference through the dependency
injection mechanism and invoke it by calling the $timeout service that passes two
parameters: the function to be executed and the frequency in milliseconds.
Now, it's time to create an asynchronous search service that will be called by the
controller every time the user presses a key down inside the search box. It will wait
for 1000 milliseconds until the search algorithm is executed:
parking.factory('carSearchService', function ($timeout) {
var _filter = function (cars, criteria, resultCallback) {
$timeout(function () {

Chapter 4
[ 97 ]
var result = [];
angular.forEach(cars, function (car) {
if (_matches(car, criteria)) {
result.push(car);
}
});
resultCallback(result);
}, 1000);
};
var _matches = function (car, criteria) {
return angular.toJson(car).indexOf(criteria) > 0;
};
return {
filter: _filter
}
});
A very common requirement when creating an instant search is to cancel the
previously scheduled timeout, replacing it with a new one. It avoids an unnecessary
consumption of resources, optimizing the whole algorithm.
In the following code, we are interrupting the timeout. It can be achieved by calling
the cancel method on the $timeout object that is passing the promise reference as
a parameter:
parking.factory('carSearchService', function ($timeout) {
var filterPromise;
var _filter = function (cars, criteria, resultCallback) {
$timeout.cancel(filterPromise);
filterPromise = $timeout(function () {
var result = [];
angular.forEach(cars, function (car) {
if (_matches(car, criteria)) {
result.push(car);
}
});
resultCallback(result);
}, 1000);
};
var _matches = function (car, criteria) {

Dependency Injection and Services
[ 98 ]
return angular.toJson(car).indexOf(criteria) > 0;
};
return {
filter: _filter
}
});
Asynchronous with a promise-deferred
pattern
Nowadays, web applications are demanding increasingly advanced usability
requirements, and therefore rely strongly on asynchronous implementation in order
to obtain dynamic content from the backend, applying animated visual effects, or
even to manipulate DOM all the time.
In the middle of this endless asynchronous sea, callbacks help many developers to
navigate through its challenging and confusing waters.
According to Wikipedia:
"A callback is a piece of executable code that is passed as an argument to other code,
which is expected to callback, executing the argument at some convenient time."
The following code shows the implementation of the carSearchService function.
It uses a callback to return the results to the controller after the search has been
executed. In this case, we can't just use the return keyword because the $timeout
service executes the search in the future, when its timeout expires. Consider the
following code snippet:
services.js
parking.factory('carSearchService', function ($timeout) {
var _filter = function (cars, criteria, successCallback,
errorCallback) {
$timeout(function () {
var result = [];
angular.forEach(cars, function (car) {
if (_matches(car, criteria)) {
result.push(car);
}
});

Chapter 4
[ 99 ]
if (result.length > 0) {
successCallback(result);
} else {
errorCallback("No results were found!");
}
}, 1000);
};
var _matches = function (car, criteria) {
return angular.toJson(car).indexOf(criteria) > 0;
};
return {
filter: _filter
}
});
In order to call the filter function properly, we need to pass both callbacks to
perform the success, as follows:
controllers.js
$scope.searchCarsByCriteria = function (criteria) {
carSearchService.filter($scope.cars, criteria, function (result) {
$scope.searchResult = result;
}, function (message) {
$scope.message = message;
});
};
However, there are situations in which the numerous number of callbacks,
sometimes even dangerously chained, may increase the code complexity and
transform the asynchronous algorithms into a source of headaches.
To gure it out, there is an alternative to the massive use of callbacks—the promise
and the deferred patterns. They were created a long time ago and are intended to
support this kind of situation by returning a promise object, which is unknown while
the asynchronous block is processed. As soon as something happens, the promise is
deferred and noties its handlers. It is created without any side effects and returns
the promise.

Dependency Injection and Services
[ 100 ]
The deferred API
In order to create a new promise, we need to inject the $q service into our component
and call the $q.defer() function to instantiate a deferred object. It will be used to
implement the asynchronous behavior in a declarative way through its API. Some of
the functions are as follows:
• resolve(result): This resolves the promise with the result.
• reject(reason): This rejects the promise with a reason.
• notify(value): This provides updated information about the progress of
the promise. Consider the following code snippet:
services.js
parking.factory('carSearchService', function ($timeout, $q) {
var _filter = function (cars, criteria) {
var deferred = $q.defer();
$timeout(function () {
var result = [];
angular.forEach(cars, function (car) {
if (_matches(car, criteria)) {
result.push(car);
}
});
if (result.length > 0) {
deferred.resolve(result);
} else {
deferred.reject("No results were found!");
}
}, 1000);
return deferred.promise;
};
var _matches = function (car, criteria) {
return angular.toJson(car).indexOf(criteria) > 0;
};
return {
filter: _filter
}
});

Chapter 4
[ 101 ]
The promise API
With the promise object in hand, we can handle the expected behavior of the
asynchronous return of any function. There are three methods that we need to
understand in order to deal with promises:
• then (successCallback, errorCallback, notifyCallback): The
success callback is invoked when the promise is resolved. In the same way,
error callback is called if the promise is rejected. If we want to keep track of
our promise, the notify callback is called every time the promise is notied.
Also, this method returns a new promise, allowing us to create a chain
of promises.
• catch(errorCallback): This promise is just an alternative and is equivalent
to .then(null, errorCallback).
• finally(callback): Like in other languages, finally can be used to ensure
that all the used resources were released properly:
controllers.js
$scope.filterCars = function (criteria) {
carSearchService.filter($scope.cars, criteria)
.then(function (result) {
$scope.searchResults = result;
})
.catch(function (message) {
$scope.message = message;
});
};
Summary
Throughout this chapter, we have studied several ways to evolve the design of
our application through dependency injection and the creation of different kinds
of constants, values, and services. Also, we understood how to use the AngularJS
built-in services in order to communicate with the backend using HTTP, log the
application events, create timeouts, perform routing, handle exceptions, and work
with asynchronous algorithms with the promise-deferred pattern.
In the next chapter, we are going to study the scope in more detail.

Scope
The scope is an object that acts as a shared context between the view and the
controller that allows these layers to exchange information related to the application
model. Both sides are kept synchronized along the way through a mechanism called
two-way data binding.
In this chapter, we are going to cover the following topics:
• Two-way data binding
• Best practices using the scope
• The $rootScope object
• Broadcasting the scope
Two-way data binding
Traditional web applications are commonly developed through a one-way data
binding mechanism. This means there is only a rendering step that attaches the data
to the view. This is done with the following code snippet in the index.html le:
<input id="plate" type="text"/>
<button id="showPlate">Show Plate</button>
Consider the following code snippet in the render.js le:
var plate = "AAA9999";
$("#plate").val(plate);
$("#showPlate").click(function () {
alert(plate);
});

Scope
[ 104 ]
What happens when we change the plate and click on the button?
Unfortunately, nothing.
In order to reect the changes on the plate, we need to implement the binding in the
other direction, as shown in the following code snippet (in the render.js le):
var plate = "AAA9999";
$("#plate").val(plate);
$("#showPlate").click(function () {
plate = $("#plate").val();
alert(plate);
});
Every change that occurs in the view needs to be explicitly applied to the model,
and this requires a lot of boilerplate code, which means snippets of code that
have to be included in many places just to keep everything synchronized. The
highlighted sections in the following code snippet of the render.js le comprise
the boilerplate code:
var plate = "AAA9999";
$("#plate").val(plate);
$("#showPlate").click(function () {
plate = $("#plate").val();
alert(plate);
});
To illustrate these examples, we used the jQuery library that can be easily obtained
through its website at www.jquery.com, or we can use Bower, which we are going to
study in more detail in Chapter 8, Automating the Workow.
With two-way data binding, the view and controller are always kept synchronized
without any kind of boilerplate code, as we will learn in the next topics.
$apply and $watch
During the framework initialization, the compiler walks through the DOM tree
looking for directives. When it nds the ngModel directive attached to any kind of
input eld, it binds its own scope's $apply function to the onkeydown event. This
function is responsible for invoking the notication process of the framework called
the digest cycle.

Chapter 5
[ 105 ]
This cycle is responsible for the notication process by looping over all the watchers,
keeping them posted about any change that may occur in the scope. There are
situations where we might need to invoke this mechanism manually by calling the
$apply function directly, as follows:
$scope.$apply(function () {
$scope.car.plate = '8AA5678';
});
On the other side, the components responsible for displaying the content of any
element present inside the scope use their scope's $watch function to be notied
about the changes on it. This function observes whether the value of a provided
scope property has changed. To illustrate the basic usage of the $watch function,
let's create a counter to track the number of times the value of a scope property has
changed. Consider the following code snippet in the parking.html le:
<input type="text" ng-model="car.plate" placeholder="What's the
plate?"/>
<span>{{plateCounter}}</span>
Also, consider the following code snippet in the controllers.js le:
parking.controller("parkingCtrl", function ($scope) {
$scope.plateCounter = -1;
$scope.$watch("car.plate", function () {
$scope.plateCounter++;
});
});
Every time the plate property changes, this watcher will increment the
plateCounter property, indicating the number of times it has changed. You may
wonder why we are using -1 instead of 0 to initialize the counter, when the value
starts with 0 in the view. This is because the digest cycle is called during the
initialization process and updates the counter to 0.
To gure it out, we can use some parameters inside the $watch function to know what
has changed. When the $watch function is being initialized, newValue will be equal to
oldValue, as shown in the following code snippet (the controllers.js le):
parking.controller("parkingCtrl", function ($scope) {
$scope.plateCounter = 0;
$scope.$watch("car.plate", function (newValue, oldValue) {

Scope
[ 106 ]
if (newValue == oldValue) return;
$scope.plateCounter++;
});
});
Best practices using the scope
The scope is not the model itself—it's just a way to reach it. Thus, the view and
controller layers are absolutely free to share any kind of information, even those that
are not related to the model, and they only exist to fulll specic layout matters such
as showing or hiding a eld under a determined condition.
Be careful about falling into a design trap! The freedom provided by the scope can
lead you to use it in a wrong way. Keep the following advice in mind:
"Treat scope as read-only inside the view and write-only inside the controller
as possible."
Also, we will go through some important advice about using the scope:
Avoid making changes to the scope directly from the view
This means that though it is easy, we should avoid making changes to the scope by
creating or modifying its properties directly inside the view. At the same time, we
need to take care about reading the scope directly everywhere inside the controller.
The following is an example from the faq.html le where we can understand
these concepts in more detail:
<button ng-click="faq = true">Open</button>
<div ng-modal="faq">
<div class="header">
<h4>FAQ</h4>
</div>
<div class="body">
<p>You are in the Frequently Asked Questions!</p>
</div>
<div class="footer">
<button ng-click="faq = false">Close</button>
</div>
</div>

Chapter 5
[ 107 ]
In the previous example, we changed the value of the dialog property directly from
the ngClick directive declaration. The best choice in this case would be to delegate
this intention to the controller and let it control the state of the dialog, such as the
following code in the faq.html le:
<button ng-click="openFAQ()">Open</button>
<div ng-modal="faq">
<div class="header">
<h4>FAQ</h4>
</div>
<div class="body">
<p>You are in the Frequently Asked Questions!</p>
</div>
<div class="footer">
<button ng-click="closeFAQ()">Close</button>
</div>
</div>
Consider the following code snippet in the controllers.js le:
parking.controller("faqCtrl", function ($scope) {
$scope.faq = false;
$scope.openFAQ = function () {
$scope.faq = true;
}
$scope.closeFAQ = function () {
$scope.faq = false;
}
});
The idea to spread a variable across the whole view is denitely dangerous. It
contributes to reducing the exibility of the code and also increases the coupling
between the view and the controller.
Avoid reading the scope inside the controller
Reading the $scope object inside the controller instead of passing data through
parameters should be avoided. This increases the couple between them and makes the
controller much harder to test. In the following code snippet of the login.html le, we
will call the login function and access its parameters directly from the $scope object:
<div ng-controller="loginCtrl">
<input
type="text"

Scope
[ 108 ]
ng-model="username"
placeholder="Username"
/>
<input
type="password"
ng-model="password"
placeholder="Password"/>
<button ng-click="login()">Login</button>
</div>
Consider the following code snippet in the controllers.js le:
parking.controller("loginCtrl", function ($scope, loginService) {
$scope.login = function () {
loginService.login($scope.username, $scope.password);
}
});
Do not let the scope cross the boundary of its controller
We should also take care about not allowing the $scope object to be used far a way
from the controller's boundary. In the following code snippet from the login.
html le, there is a situation where loginCtrl is sharing the $scope object with
loginService:
<div ng-controller="loginCtrl">
<input
type="text"
ng-model="username"
placeholder="Username"
/>
<input
type="password"
ng-model="password"
placeholder="Password"/>
<button ng-click="login()">Login</button>
</div>
Consider the following code snippet in the controllers.js le:
parking.controller("loginCtrl", function ($scope, loginService) {
$scope.login = function () {
loginService.login($scope);
}
});

Chapter 5
[ 109 ]
Consider the following code snippet in the services.js le:
parking.factory("loginService", function ($http) {
var _login = function($scope) {
var user = {
username: $scope.username,
password: $scope.password
};
return $http.post('/login', user);
};
return {
login: _login
};
});
Use a '.' inside the ngModel directive
The framework has the ability to create an object automatically when we introduce
a period in the middle of the ngModel directive. Without that, we ourselves would
need to create the object every time by writing much more code.
In the following code snippet of the login.html le, we will create an object called
user and also dene two properties, username and password:
<div ng-controller="loginCtrl">
<input
type="text"
ng-model="user.username"
placeholder="Username"
/>
<input
type="password"
ng-model="user.password"
placeholder="Password"
/>
<button ng-click="login(user)">Login</button>
</div>
Consider the following code snippet of the controllers.js le:
parking.controller("loginCtrl", function ($scope, loginService) {
$scope.login = function (user) {
loginService.login(user);
}
});

Scope
[ 110 ]
Consider the following code snippet of the services.js le:
services.js
parking.factory("loginService", function ($http) {
var _login = function(user) {
return $http.post('/login', user);
};
return {
login: _login
};
});
Now, the login method will be invoked just by creating a user object, which is not
coupled with the $scope object anymore.
Avoid using scope unnecessarily
As we saw in Chapter 3, Data Handling, the framework keeps the view and the
controller synchronized using the two-way data binding mechanism. Because of this,
we are able to increase the performance of our application by reducing the number
of things attached to $scope.
With this in mind, we should use $scope only when there are things to be shared
with the view; otherwise, we can use a local variable to do the job.
The $rootScope object
The $rootScope object is inherited by all of the $scope objects within the same
module. It is very useful and denes global behavior. It can be injected inside any
component such as controllers, directives, lters, and services; however, the most
common place to use it is through the run function of the module API, shown as
follows (the run.js le):
parking.run(function ($rootScope) {
$rootScope.appTitle = "[Packt] Parking";
});
Scope Broadcasting
The framework provides another way to communicate between components by the
means of a scope, however, without sharing it. To achieve this, we can use a function
called $broadcast.

Chapter 5
[ 111 ]
When invoked, this function dispatches an event to all of its registered child scopes.
In order to receive and handle the desired broadcast, $scope needs to call the $on
function, thus informing you of the events you want to receive and also the functions
that will be handling it.
For this implementation, we are going to send the broadcast through the $rootScope
object, which means that the broadcast will affect the entire application.
In the following code, we created a service called TickGenerator. It informs
the current date every second, thus sending a broadcast to all of its children
(the services.js le):
parking.factory("tickGenerator", function($rootScope, $timeout) {
var _tickTimeout;
var _start = function () {
_tick();
};
var _tick = function () {
$rootScope.$broadcast("TICK", new Date());
_tickTimeout = $timeout(_tick, 1000);
};
var _stop = function () {
$timeout.cancel(_tickTimeout);
};
var _listenToStop = function () {
$rootScope.$on("STOP_TICK", function (event, data) {
_stop();
});
};
_listenToStop();
return {
start: _start,
stop: _stop
};
});

Scope
[ 112 ]
Now, we need to start tickGenerator. This can be done using the run function of
the module API, as shown in the following code snippet of the app.js le:
parking.run(function (tickGenerator) {
tickGenerator.start();
});
To receive the current date, freshly updated, we just need to call the $on function of
any $scope object, as shown in the following code snippet of the parking.html le:
{{tick | date:"hh:mm"}}
Consider the following code snippet in the controllers.js le:
parking.controller("parkingCtrl", function ($scope) {
var listenToTick = function () {
$scope.$on('TICK', function (event, tick) {
$scope.tick = tick;
});
};
listenToTick();
});
From now, after the listenToTick function is called, the controller's $scope
object will start to receive a broadcast notication every 1000 ms, executing the
desired function.
To stop the tick, we need to send a broadcast in the other direction in order to make
it arrive at $rootScope. This can be done by means of the $emit function, shown as
follows in the parking.html le:
{{tick | date:"hh:mm"}}
<button ng-click="stopTicking()">Stop</button>
Consider the following code snippet in the controllers.js le:
parking.controller("parkingCtrl", function ($scope) {
$scope.stopTicking = function () {
$scope.$emit("STOP_TICK");
};
var listenToTick = function () {
$scope.$on('TICK', function (event, tick) {
$scope.tick = tick;
});
};
listenToTick();
});

Chapter 5
[ 113 ]
Be aware that depending on the size of the application, the broadcast through
$rootScope may become too heavy due to the number of objects listening to the
same event.
There are a number of libraries that implement the publish and subscribe pattern
in JavaScript. Of them, the most famous is AmplifyJS, but there are others such as
RadioJS, ArbiterJS, and PubSubJS.
Summary
In this chapter, we studied what exactly $scope and $rootScope are and how the
two-way data binding mechanism works. Also, we went through some of the best
practices about using the scope, and we discovered its broadcasting mechanism.
In the next chapter, we are going to understand how to break up our application
into reusable modules.

Modules
As our application grows, we need to consider the possibility of splitting it into
different modules. It comes with it a lot of advantages, thus helping us to nd the
best way to test and evolve each module separately from the others and also to share
each module with other projects.
In this chapter, we are going to cover the following topics:
• How to create modules
• Recommended modules
Creating modules
By gaining an in-depth understanding of the underlying business inside our
application, we can isolate each group of functionalities (which are correlated) into
a separated module. In the case of our parking application, we can split it into three
different modules:
• UI: This module gives directives that could be used by other projects such as
alert, accordion, modal, tab, and tooltip.
• Search: The search engine we created to lter cars could also be separated as
an individual library and reused in other places.
• Parking: This is the parking application itself, with its own resources such as
views, controllers, directives, lters, and services.
First, we need to create each new module separately and then they need to be
declared inside the parking application module such that they are available.

Modules
[ 116 ]
The UI module
The UI module will contain the directives that we created in Chapter 2, Creating
Reusable Components with Directives.
To create an isolated and easy-to-use module, we should consider placing the entire
code inside a unique le. However, this is not the kind of task that you would want
to perform manually, and the best way to achieve this is by concatenating the les
together through a tool such as Grunt, which we are going to study in Chapter 8,
Automating the Workow, and will learn how to concatenate the les together.
For now, let's start by creating our new module called ui in the app.js le,
as follows:
var ui = angular.module("ui", []);
After that, we will declare each component separated in its own le. This will
improve the maintainability of the module, facilitating the access to the components.
The template is another aspect that we need to take care. In Chapter 2, Creating
Reusable Components with Directives, we separated it from the directive's code.
However, though we want to deliver this library in an easier format, it would be a
good choice to embed its code within the component.
There are plugins for Grunt, such as grunt-html-to-js that may perform this
tough and boring job for us. Consider the following code snippet in the
alertDirective.js le:
ui.directive("alert", function () {
return {
restrict: 'E',
scope: {
topic: '@'
},
replace: true,
transclude: true,
template:
"<div class='alert'>" +
"<span class='alert-topic'>" +
"{{topic}}" +
"</span>" +
"<span class='alert-description' ng-transclude>" +
"</span>" +
"</div>"
};
});

Chapter 6
[ 117 ]
Consider the following code snippet in the accordionDirective.js le:
ui.directive("accordion", function () {
return {
restrict: "E",
transclude: true,
controller: function ($scope, $element, $attrs, $transclude) {
var accordionItens = [];
var addAccordionItem = function (accordionScope) {
accordionItens.push(accordionScope);
};
var closeAll = function () {
angular.forEach(accordionItens, function (accordionScope) {
accordionScope.active = false;
});
};
return {
addAccordionItem: addAccordionItem,
closeAll: closeAll
};
},
template: "<div ng-transclude></div>"
};
});
ui.directive("accordionItem", function () {
return {
restrict: "E",
scope: {
title: "@"
},
transclude: true,
require: "^accordion",
link: function (scope, element, attrs, ctrl, transcludeFn) {
ctrl.addAccordionItem(scope);
element.bind("click", function () {
ctrl.closeAll();
scope.$apply(function () {
scope.active = !scope.active;
});
});

Modules
[ 118 ]
},
template:
"<div class='accordion-item'>" +
"{{title}}" +
"</div>" +
"<div " +
"ng-show='active' " +
"class='accordion-description' " +
"ng-transclude" +
">" +
"</div>"
};
});
Great! Now we are ready to pack our library inside one script le. For this, again,
we may rely on Grunt, through the grunt-contrib-concat plugin, for creating this
concatenation for us. The destination le in this case would be ui.js, and we are
going to declare it inside the index.html le of our parking application.
The search module
The search module will contain carSearchService, which we created in Chapter 4,
Dependency Injection and Services.
Again, we are going to start by declaring the module search in the app.js le,
as follows:
var search = angular.module("search", []);
Because we want to deliver this service as a reusable component, it would be nice to
get rid of the car concept, making it more generic. To do that, let's just change it from
car to entity. Consider the following code snippet in the searchService.js le:
search.factory('searchService', function ($timeout, $q) {
var _filter = function (entities, criteria) {
var deferred = $q.defer();
$timeout(function () {
var result = [];
angular.forEach(entities, function (entity) {
if (_matches(entity, criteria)) {
result.push(entity);
}
});
if (result.length > 0) {

Chapter 6
[ 119 ]
deferred.resolve(result);
} else {
deferred.reject("No results were found!");
}
}, 1000);
return deferred.promise;
};
var _matches = function (entity, criteria) {
return angular.toJson(entity).indexOf(criteria) > 0;
};
return {
filter: _filter
}
});
Now that our search module is ready, we can use it with any project we want! The
name of this script, after the les, concatenation, will be search.js, and we need to
import it to the index.html le.
The parking application module
It's time to create our application module and declare our new modules ui and
search as our dependencies. Also, we need to include the ngRoute and ngAnimate
modules in order to to enable the routing and animation mechanisms. Consider the
following code snippet in the app.js le:
var parking = angular.module("parking", ["ngRoute", "ngAnimate", "ui",
"search"]);
That's it! Now, we just need to import the scripts inside our index.html le,
as follows:
<!doctype html>
<html ng-app="parking">
<head>
<title>[Packt] Parking</title>
<!-- Application CSS -->
<link rel="stylesheet" type="text/css" href="css/app.css">
<!-- Application Libraries -->
<script src="lib/angular.js"></script>
<script src="lib/angular-route.js"></script>
<script src="lib/angular-animate.js"></script>
<script src="lib/ui.js"></script>

Modules
[ 120 ]
<script src="lib/search.js"></script>
<!-- Application Scritps -->
<script src="js/app.js"></script>
<script src="js/constants.js"></script>
<script src="js/controllers.js"></script>
<script src="js/filters.js"></script>
<script src="js/services.js"></script>
<script src="js/config.js"></script>
<script src="js/run.js"></script>
</head>
<body>
<div ng-view></div>
</body>
</html>
A major part of the applications has concepts, which we could think of developing
as a separated module. Beyond this, it is an excellent opportunity to contribute by
opening the source code and evolving it with the community!
Recommended modules
AngularJS has a huge community and thousands of modules available for use.
There are lots of things that we actually don't need to worry about while developing
something by ourselves! From tons of UI components to the integration with many
of the most well-known JavaScript libraries such as Highcharts, Google Maps and
Analytics, Bootstrap, Foundation, Facebook, and many others, you may nd more
than 500 modules on the Angular Modules website, at www.ngmodules.org.
Summary
In this chapter, we understood how to break up our applications in modules.
Also, we discovered the angular module's website, where we can nd hundreds
of modules for our application.
In the next chapter, we are going understand how to automate the tests using
Jasmine and Karma.

Unit Testing
Have you ever stopped to think about how much time we've spent just to
understand and reproduce a defect? After this, we need to spend even more time
looking for, between thousands of lines, the exact piece of the code that is causing
this defect. Many times, the fastest, and perhaps the easiest step is xing it. And
what about manually testing the code repeatedly? Every time anything is changed,
you need to test it again. However, as the nature of software is all about changing,
test automation should be considered as an important long-term investment that will
support a sustainable pace and also improve the quality of each release.
Talking about quality, tests are the seeds of quality. Without that, nobody would
have enough condence, or even courage, to improve the existing code by
refactoring it more often. Therefore, we could accumulate too much technical debt,
affecting the productivity and also bringing down the motivation of the team.
In the case of JavaScript, it is a very dynamic language that provides a strong
combination of both functional and object-oriented paradigms. However, despite
the advantage of being interpreted easily, JavaScript comes with a risk. The lack of a
compiler may lead you to introduce many syntax errors such as unknown variables
or function names, missing semicolons, and many others.
Beyond tools such as JSLint and JSHint that verify our code by looking for the most
common syntax errors, there are many testing frameworks available for JavaScript.
We are going to use Jasmine, which is easy to use and also has a great community
and support.
In order to test the AngularJS components, we'll use a module called ngMock that
supports dependency injection and also comes with a mocking mechanism.

Unit Testing
[ 122 ]
The topics that we'll cover in this chapter are:
• The Jasmine testing framework
• Testing AngularJS components
• Mocking with $httpBackend
• Running tests with Karma
The Jasmine testing framework
Jasmine is an open source testing framework for the JavaScript language developed
by Pivotal Labs. Its syntax is pretty similar to one of the most famous testing
frameworks, RSpec.
Basically, you just need to download it from GitHub at http://jasmine.github.io
and unzip it. Later in this chapter, you'll see how to use it with Karma, a runner that
could offer us many interesting benets.
To clarify our rst step with Jasmine, let's implement a factory function based on our
parkingService example from Chapter 4, Dependency Injection and Services, and use a
Revealing Module Pattern:
parkingFactoryFunction.js
var parkingFactoryFunction = function () {
var _calculateTicket = function (car) {
var departHour = new Date().getHours();
var entranceHour = car.entrance.getHours();
var parkingPeriod = departHour - entranceHour;
var parkingPrice = parkingPeriod * 10;
return {
period: parkingPeriod,
price: parkingPrice
};
};
return {
calculateTicket: _calculateTicket
};
};

Chapter 7
[ 123 ]
Before writing the test, you should take care about the existing dependencies in
your code. In this case, inside the _calculateTicket function, we are creating a
Date object by calling the new operator. This kind of a situation should be avoided,
otherwise you can't write an effective test.
The following code considers the depart property inside the parked car object. In
this way, we could manage the depart property, and thus be able to test it properly:
parkingFactoryFunction.js
var parkingFactoryFunction = function () {
var _calculateTicket = function (car) {
var departHour = car.depart.getHours();
var entranceHour = car.entrance.getHours();
var parkingPeriod = departHour - entranceHour;
var parkingPrice = parkingPeriod * 10;
return {
period: parkingPeriod,
price: parkingPrice
};
};
return {
calculateTicket: _calculateTicket
};
};
The creation of the parkingFactoryFunctionSpec function starts by calling the
describe function. It takes a description of the specication and a function that
contains the test scenarios:
parkingFactoryFunctionSpec.js
describe("Parking Factory Function Specification", function () {
});
Now, we need to create each of our test scenarios through the it function. Here, we
will need to place a description and expectation for each test:
parkingFactoryFunctionSpec.js
describe("Parking Factory Function Specification", function () {
it("Should calculate the ticket for a car that arrives any day at
08:00 and departs in the same day at 16:00", function () {
var car = {place: "AAA9988", color: "Blue"};

Unit Testing
[ 124 ]
car.entrance = new Date(1401620400000);
car.depart = new Date(1401649200000);
var parkingService = parkingFactoryFunction();
var ticket = parkingService.calculateTicket(car);
expect(ticket.period).toBe(8);
expect(ticket.price).toBe(80);
});
});
In order to execute our specication, let's check out Jasmine's built-in HTML-based
runner called SpecRunner.html, which can be congured as follows:
SpecRunner.html
<!DOCTYPE HTML>
<html>
<head>
<title>Jasmine Spec Runner v2.0.0</title>
<link rel="stylesheet" type="text/css" href="lib/jasmine-2.0.0/
jasmine.css">
<script src="lib/jasmine-2.0.0/jasmine.js"></script>
<script src="lib/jasmine-2.0.0/jasmine-html.js"></script>
<script src="lib/jasmine-2.0.0/boot.js"></script>
<script src="js/parkingFactoryFunction.js"></script>
<script src="spec/parkingFactoryFunctionSpec.js"></script>
</head>
<body>
</body>
</html>
After including the parkingFactoryFunction.js and
parkingFactoryFunctionSpec.js les, we just need to open the
SpecRunner.html le in our browser.
Testing AngularJS components
To test any AngularJS component such as controllers, directives, lters, and
services, we need to go beyond the basics and use the ngMock library. It provides a
dependency injection mechanism, allowing us to locate and inject any component of
a specied module. Also, there are services such as $http, $log, and $timeout that
could be mocked in order to allow our code to be more testable.

Chapter 7
[ 125 ]
Services
For now, let's create a service based on our parkingFactoryFunction function,
as follows:
parkingApp.js
var parking = angular.module("parking", []);
parkingService.js
parking.factory("parkingService", function () {
var _calculateTicket = function (car) {
var departHour = car.depart.getHours();
var entranceHour = car.entrance.getHours();
var parkingPeriod = departHour - entranceHour;
var parkingPrice = parkingPeriod * 10;
return {
period: parkingPeriod,
price: parkingPrice
};
};
return {
calculateTicket: _calculateTicket
};
});
To avoid duplicated setup and teardown code, Jasmine provides two important
functions, beforeEach and afterEach, which are executed before and after the
execution of each test. With the module function of ngMock, we can load the desired
module and inject its components through the inject function just by informing
the name of the component. Optionally, we may enclose the name of the component
with underscores. In the following code, we are loading the parking module and
injecting the parkingService specication:
parkingServiceSpec.js
describe("Parking Service Specification", function () {
var parkingService;
beforeEach(module("parking"));
beforeEach(inject(function (_parkingService_) {

Unit Testing
[ 126 ]
parkingService = _parkingService_;
}));
it("Should calculate the ticket for a car that arrives any day at
08:00 and departs in the same day at 16:00", function () {
var car = {place: "AAA9988", color: "Blue"};
car.entrance = new Date(1401620400000);
car.depart = new Date(1401649200000);
var ticket = parkingService.calculateTicket(car);
expect(ticket.period).toBe(8);
expect(ticket.price).toBe(80);
});
});
Controllers
The controller will be the next component that we will test. In the following code,
there is the code of our controller from Chapter 2, Creating Reusable Components
with Directives:
parkingCtrl.js
parking.controller("parkingCtrl", function ($scope) {
$scope.appTitle = "[Packt] Parking";
$scope.cars = [];
$scope.colors = ["White", "Black", "Blue", "Red", "Silver"];
$scope.park = function (car) {
car.entrance = new Date();
$scope.cars.push(car);
delete $scope.car;
};
});
It is more complex to test controllers than services because we need to mock its
$scope. We will start by injecting the $controller dependency, which will be
responsible for instantiating new controllers. Also, we need the $rootScope
dependency in order to create a new $scope object through its $new function.

Chapter 7
[ 127 ]
The expectations of the test should be done over the $scope object and not directly
through the controller itself. This is very important because the view interacts with
the controller through this shared object. Consider the following code snippet:
parkingCtrlSpec.js
describe("Parking Controller Specification", function () {
var $scope;
beforeEach(module("parking"));
beforeEach(inject(function ($controller, $rootScope) {
$scope = $rootScope.$new();
$controller("parkingCtrl", {
$scope: $scope
});
}));
it("The title of the application should be [Packt] Parking",
function () {
var expectedAppTitle = "[Packt] Parking";
expect($scope.appTitle).toBe(expectedAppTitle);
});
it("The available colors should be white, black, blue, red and
silver", function () {
var expectedColors = ["White", "Black", "Blue", "Red", "Silver"];
expect($scope.colors).toEqual(expectedColors);
});
it("The car should be parked", function () {
var car = {
plate: "AAAA9999",
color: "Blue"
};
$scope.park(car);
expect($scope.cars.length).toBe(1);
expect($scope.car).toBeUndefined();
});
});

Unit Testing
[ 128 ]
Filters
Next, we are going to test lters. In the following code, there is the plate lter,
which we developed in Chapter 3, Data Handling:
plateFilter.js
parking.filter("plate", function() {
return function(input, separator) {
var firstPart = input.substring(0,3);
var secondPart = input.substring(3);
return firstPart + separator + secondPart;
};
});
The lter dependency of any service could be obtained in the same way; however,
we need to concatenate its name with Filter. In this case, it could be injected as
plateFilter or _plateFilter_. Also, the $filter service could be used for the
same purpose. Consider the following code snippet:
plateFilterSpec.js
describe("Plate Filter Specification", function () {
var plateFilter;
beforeEach(module("parking"));
beforeEach(inject(function (_plateFilter_) {
plateFilter = _plateFilter_;
}));
it("Should format the plate", function () {
var plate = "AAA9999"
var expectedPlate = "AAA-9999";
expect(plateFilter(plate, "-")).toBe(expectedPlate);
});
});

Chapter 7
[ 129 ]
Directives
The last kind of component that we are going to test is the directive. Let's start with
one of the directives we created in Chapter 2, Creating Reusable Components with
Directives, and converted it into a separated module in Chapter 6, Modules:
uiApp.js
var ui = angular.module("ui", []);
alertDirective.js
ui.directive("alert", function () {
return {
restrict: "E",
scope: {
topic: "@"
},
replace: true,
transclude: true,
template:
"<div class='alert'>" +
"<span class='alert-topic'>" +
"{{topic}}" +
"</span>" +
"<span class='alert-description' ng-transclude>" +
"</span>" +
"</div>"
};
});
The directive is by far the most complex component to be tested. Part of the
complexity comes from the framework's life cycle, which we should understand
before creating any directive specication. In the following section, you will
understand this, step by step.

Unit Testing
[ 130 ]
Creating the element with the directive
The framework's compiler walks through the DOM, looking for elements that match
the directives. In the following code is our directive before being compiled:
<alert topic='Something went wrong!'>
Please inform the plate and the color of the car
</alert>
Compiling the directive
After this, the element is compiled by the $compile service, returning the link
function of the directive. At this moment, the template is already generated,
however, we still need to call the link function, passing the $scope object in order
to bind the template to the $scope service:
<span class="alert-topic">
{{topic}}
</span>
<span class="alert-description" ng-transclude="">
</span>
Calling the link function with the scope
Now, after the link function is executed, we are almost done! The {{topic}}
expression could be retrieved from the $scope object; however, as we saw in Chapter
5, Scope, we need to invoke the digest cycle in order to notify the expression:
<span class="alert-topic ng-binding">
{{topic}}
</span>
<span class="alert-description" ng-transclude="">
<span class="ng-scope">
Please inform the plate and the color of the car
</span>
</span>
Invoking the digest cycle
Finally, we have to call the $digest function to update the view:
<span class="alert-topic ng-binding">
Something went wrong!
</span>

Chapter 7
[ 131 ]
<span class="alert-description" ng-transclude="">
<span class="ng-scope">
Please inform the plate and the color of the car
</span>
</span>
According to the steps that we just followed, you can understand how you can go
from the raw element to the completed, compiled, and rendered directive.
First, you need to create an element that contains the directive you want to test, and
then it will be compiled by the framework in the following steps. Now, you need
to inject the $compile service in order to compile the directive, returning its link
function. After this, you just have to call the link function passing the $scope object.
Finally, the digest cycle should be invoked by calling it through the $digest function
of the $rootScope object. Consider the following code snippet:
alertDirectiveSpec.js
describe("Alert Directive Specification", function () {
var element, scope;
beforeEach(module('ui'));
beforeEach(inject(function ($rootScope, $compile) {
scope = $rootScope;
// Create the element with the directive
element = angular.element(
"<alert topic='Something went wrong!'>" +
"Please inform the plate and the color of the car" +
"</alert>"
);
// Compile the directive
var linkFunction = $compile(element);
// Call the link function with the scope
linkFunction(scope);
// Invoke the digest cycle
scope.$digest();
}));
it("Should compile the alert directive", function () {
var expectedElement =
'<span class="alert-topic ng-binding">' +
'Something went wrong!' +
'</span>' +

Unit Testing
[ 132 ]
'<span class="alert-description" ng-transclude="">' +
'<span class="ng-scope">' +
'Please inform the plate and the color of the car' +
'</span>' +
'</span>'
;
expect(element.html()).toBe(expectedElement);
});
});
Mocking with $httpBackend
The ngMock library also provides the $httpBackend service. It mocks the backend,
allowing us to test components that depend on the $http service. In the following
code, there is the parkingHttpFacade service, which is responsible for integrating
with the car's API at the backend:
parkingHttpFacade.js
parking.factory("parkingHttpFacade", function ($http) {
var _getCars = function () {
return $http.get("/cars");
};
var _getCar = function (id) {
return $http.get("/cars/" + id);
};
var _saveCar = function (car) {
return $http.post("/cars", car);
};
var _updateCar = function (id, car) {
return $http.put("/cars/" + id, car);
};
var _deleteCar = function (id) {
return $http.delete("/cars/" + id);
};
return {
getCars: _getCars,

Chapter 7
[ 133 ]
getCar: _getCar,
saveCar: _saveCar,
updateCar: _updateCar,
deleteCar: _deleteCar
};
});
Inside each test, we dened the expected response to each request. It could be done
through the $httpBackend service, as follows:
parkingHttpFacadeSpec.js
describe("Parking Http Facade Specification", function () {
var parkingHttpFacade, $httpBackend, mockedCars;
beforeEach(module("parking"));
beforeEach(inject(function (_parkingHttpFacade_, _$httpBackend_) {
parkingHttpFacade = _parkingHttpFacade_;
$httpBackend = _$httpBackend_;
mockedCars = buildMockedCars();
}));
it("Should get the parked cars", function () {
$httpBackend.whenGET("/cars").respond(function (method, url, data,
headers) {
return [200, mockedCars.getCars(), {}];
});
parkingHttpFacade.getCars().success(function (data, status) {
expect(data).toEqual(mockedCars.getCars());
expect(status).toBe(200);
});
$httpBackend.flush();
});
it("Should get a parked car", function () {
$httpBackend.whenGET("/cars/1").respond(function (method, url,
data, headers) {
return [200, mockedCars.getCar(1), {}];
});
parkingHttpFacade.getCar(1).success(function (data, status) {
expect(data).toEqual(mockedCars.getCar(1));
expect(status).toBe(200);
});

Unit Testing
[ 134 ]
$httpBackend.flush();
});
it("Should save a parked car", function () {
var car = {
plate: "AAA9977",
color: "Green"
};
$httpBackend.whenPOST("/cars").respond(function (method, url,
data, headers) {
var id = mockedCars.saveCar(angular.fromJson(data));
return [201, mockedCars.getCar(id), {}];
});
parkingHttpFacade.saveCar(car).success(function (data, status) {
expect(car).toEqual(data);
expect(status).toBe(201);
expect(mockedCars.getNumberOfCars()).toBe(3);
});
$httpBackend.flush();
});
it("Should update a parked car with id=1", function () {
var car = {
plate: "AAA9977",
color: "Red"
};
$httpBackend.whenPUT("/cars/1").respond(function (method, url,
data, headers) {
mockedCars.updateCar(1, angular.fromJson(data));
return [204, "", {}];
});
parkingHttpFacade.updateCar(1, car).success(function (data,
status) {
expect(car).toEqual(mockedCars.getCar(1));
expect(data).toBe("");
expect(status).toBe(204);
});
$httpBackend.flush();
});
it("Should delete a parked car", function () {
$httpBackend.whenDELETE("/cars/1").respond(function (method, url,
data, headers) {
mockedCars.deleteCar(1);

Chapter 7
[ 135 ]
return [204, "", {}];
});
parkingHttpFacade.deleteCar(1).success(function (data, status) {
expect(data).toBe("");
expect(status).toBe(204);
expect(mockedCars.getNumberOfCars()).toBe(1);
});
$httpBackend.flush();
});
});
Each response is congured through the respond function which takes a function
that contains the method, url, data, and headers parameters of the request
function. This function returns an array with three elements: the rst is the status
code, the second is the body, and the third is the header inside an object literal.
Also, as the parkingHttpFacade function returns a promise from each operation,
which delegates to the $http service; you have to use the flush function of the
$httpBackend service to dispatch the pending requests.
To simulate the interaction with the database, we also provided a mockedCars object,
created through the buildMockedCars factory function, as follows:
mockedCarsFactoryFunction.js
var buildMockedCars = function () {
var _cars = [
{
plate: "AAA9999",
color: "Blue"
},
{
plate: "AAA9988",
color: "White"
}
];
var _getCars = function () {
return _cars;
};
var _getCar = function (id) {
return _cars[_id(id)];
};

Unit Testing
[ 136 ]
var _saveCar = function (car) {
return _cars.push(car);
};
var _updateCar = function (id, car) {
_cars[_id(id)] = car;
}
var _deleteCar = function (id) {
_cars.splice(_id(id), 1);
};
var _getNumberOfCars = function () {
return _cars.length;
}
var _id = function (id) {
return id - 1;
};
return {
getCars: _getCars,
getCar: _getCar,
saveCar: _saveCar,
updateCar: _updateCar,
deleteCar: _deleteCar,
getNumberOfCars: _getNumberOfCars
};
};
Our last specication will be a combination of the parkingController controller
and the parkingHttpFacade controller at the same time. In Chapter 4, Dependency
Injection and Services, we changed this controller to avoid the interaction with the
$http service directly, leaving it to the parkingHttpFacade controller that we
already created as an entire specication in the last example. The following is
the controller:
parkingCtrlWithHttpFacade.js
parking.controller("parkingCtrlWithParkingHttpFacade", function
($scope, parkingHttpFacade) {
$scope.appTitle = "[Packt] Parking";
$scope.colors = ["White", "Black", "Blue", "Red", "Silver"];

Chapter 7
[ 137 ]
$scope.park = function (car) {
parkingHttpFacade.saveCar(car)
.success(function (data, status, headers, config) {
delete $scope.car;
retrieveCars();
$scope.message = "The car was parked successfully!";
})
.error(function (data, status, headers, config) {
switch(status) {
case 401: {
$scope.message = "You must be authenticated!"
break;
}
case 500: {
$scope.message = "Something went wrong!";
break;
}
}
});
};
var retrieveCars = function () {
parkingHttpFacade.getCars()
.success(function(data, status, headers, config) {
$scope.cars = data;
})
.error(function(data, status, headers, config) {
switch(status) {
case 401: {
$scope.message = "You must be authenticated!"
break;
}
case 500: {
$scope.message = "Something went wrong!";
break;
}
}
});
};
retrieveCars();
});

Unit Testing
[ 138 ]
At the moment, we have instantiated the controller, which calls the retrieveCars
function and interacts with the parkingHttpFacade controller, thus aiming to
interact with the backend and retrieve the cars. The park function also interacts with
the facade in order to park a new car. Also, in case of any error, a property called
message will be dened into the $scope object and will also be tested:
parkingCtrlWithHttpFacadeSpec.js
describe("Parking Controller With Parking Http Facade Specification",
function () {
var $scope, $httpBackend, mockedCars;
beforeEach(module("parking"));
beforeEach(inject(function ($controller, $rootScope, _$httpBackend_)
{
$scope = $rootScope.$new();
$controller("parkingCtrlWithParkingHttpFacade", {
$scope: $scope
});
$httpBackend = _$httpBackend_;
mockedCars = buildMockedCars();
}));
it("The cars should be retrieved", function () {
$httpBackend.whenGET("/cars").respond(function (method, url, data,
headers) {
return [200, mockedCars.getCars(), {}];
});
$httpBackend.flush();
expect($scope.cars.length).toBe(2);
});
it("The user should be authenticated", function () {
$httpBackend.whenGET("/cars").respond(function (method, url, data,
headers) {
return [401, mockedCars.getCars(), {}];
});
$httpBackend.flush();
expect($scope.message).toBe("You must be authenticated!");
});
it("Something should went wrong!", function () {

Chapter 7
[ 139 ]
$httpBackend.whenGET("/cars").respond(function (method, url, data,
headers) {
return [500, mockedCars.getCars(), {}];
});
$httpBackend.flush();
expect($scope.message).toBe("Something went wrong!");
});
it("The car should be parked", function () {
$httpBackend.whenGET("/cars").respond(function (method, url, data,
headers) {
return [200, mockedCars.getCars(), {}];
});
$httpBackend.whenPOST("/cars").respond(function (method, url,
data, headers) {
var id = mockedCars.saveCar(angular.fromJson(data));
return [201, mockedCars.getCar(id), {}];
});
$scope.car = {
plate: "AAAA9977",
color: "Blue"
};
$scope.park($scope.car);
$httpBackend.flush();
expect($scope.cars.length).toBe(3);
expect($scope.car).toBeUndefined();
expect($scope.message).toBe("The car was parked successfully!");
});
});
Now, you just need to add the les to the SpecRunner.html le and open it in
your browser:
SpecRunner.html
<!DOCTYPE HTML>
<html>
<head>
<title>Jasmine Spec Runner v2.0.0</title>
<link rel="stylesheet" type="text/css" href="lib/jasmine-2.0.0/
jasmine.css">
<script src="lib/jasmine-2.0.0/jasmine.js"></script>
<script src="lib/jasmine-2.0.0/jasmine-html.js"></script>
<script src="lib/jasmine-2.0.0/boot.js"></script>

Unit Testing
[ 140 ]
<script src="lib/angular/angular.js"></script>
<script src="lib/angular/angular-mocks.js"></script>
<script src="js/parkingApp.js"></script>
<script src="js/parkingCtrl.js"></script>
<script src="js/plateFilter.js"></script>
<script src="js/parkingService.js"></script>
<script src="js/uiApp.js"></script>
<script src="js/alertDirective.js"></script>
<script src="js/mockedCarFactoryFunction.js"></script>
<script src="js/parkingHttpFacade.js"></script>
<script src="js/parkingCtrlWithHttpFacade.js"></script>
<script src="spec/parkingCtrlSpec.js"></script>
<script src="spec/plateFilterSpec.js"></script>
<script src="spec/parkingServiceSpec.js"></script>
<script src="spec/alertDirectiveSpec.js"></script>
<script src="spec/parkingHttpFacadeSpec.js"></script>
<script src="spec/parkingCtrlWithHttpFacadeSpec.js"></script>
</head>
<body>
</body>
</html>
Running tests with Karma
In comparison with the built-in Jasmine's HTML-based runner that we are using
so far, there is another great option. Actually, one of the most reliable runners,
compatible with Jasmine and many other frameworks, is Karma. It allows many
kinds of congurations to dene the testing framework, the les to be tested, and
also the environment details such as the level of logging and the desired browser.
Also, it could be integrated to our automated workow.
You would be interested and also excited to know that Karma was created by Vojta
Jína, member of the AngularJS development team at Google. The tool is the result of
his Master's thesis called JavaScript Test Runner, for the Czech Technical University in
Prague.
Installation
Before installing Karma, you need to have the NodeJS already installed. It is a quite
simple process, and you just need to visit their website, download the package, and
proceed with installation.

Chapter 7
[ 141 ]
After this, you can use the Node Package Manager, also known as npm. It will
manage the installation of everything that we need to set up our environment,
as follows:
npm install –g karma
Conguration
The conguration is quite simple. It just requires a le called karma.conf.js,
located in the root application directory. The best way to create it is by following the
conguration wizard through the following command:
karma init
Karma's congurator will be shown, and you just have to follow the instructions in
order to generate your conguration le.
The rst question will be regarding the testing framework you would like to use.
Karma supports Mocha and QUnit beyond Jasmine. After that, it will ask you about
RequireJS, adding it depending on our answer. Then, you will be asked a question
about which browser you want to use. There are many options such as Chrome,
Firefox, Opera, Safari, IE, and even PhantomJS.
Take care of the next question about the location of each source and test le. You
should place it in the correct order, otherwise you can have some trouble. For our
application, the best strategy to adopt is to follow the code organization that we
studied in Chapter 1, Getting Started with AngularJS. After this, you could exclude the
les that you don't want to test.
Finally, Karma will ask you about watching the les and running the tests on every
change. It is a very nice feature to enable, bringing with it a very fast feedback
cycle while you are programming. You can also check out the conguration details
generated through Karma's congurator:
karma.conf.js
module.exports = function(config) {
config.set({
basePath: '',
frameworks: ['jasmine'],
files: [
'lib/angular/angular.js',
'lib/angular/angular-mocks.js',
'src/parkingApp.js',
'src/parkingService.js',

Unit Testing
[ 142 ]
'src/parkingCtrl.js',
'src/plateFilter.js',
'src/uiApp.js',
'src/alertDirective.js',
'src/mockedCarsFactoryFunction.js',
'src/parkingHttpFacade.js',
'src/parkingCtrlWithHttpFacade.js',
'spec/parkingServiceSpec.js',
'spec/parkingCtrlSpec.js',
'spec/plateFilterSpec.js',
'spec/alertDirectiveSpec.js',
'spec/parkingHttpFacadeSpec.js'
'spec/parkingCtrlWithHttpFacadeSpec.js'
],
exclude: [
],
reporters: ['progress'],
port: 9876,
colors: true,
logLevel: config.LOG_INFO,
autoWatch: true,
browsers: ['Chrome'],
captureTimeout: 60000,
singleRun: false
});
};
Running tests
Before you run the tests, you need to start the Karma server. It is based on the
browser conguration and can be started with the following command:
karma start
After this, we will be able to run the tests with the following command in another
terminal window:
karma run
However, the behavior of Karma is different based on the autoWatch and singleRun
properties. When the autoWatch property is enabled, Karma watches the source
and test les, running tests every time to check whether anything has changed. The
singleRun property is very useful when you are interested in just a single execution
of the tests, such as when you are in an automated workow.

Chapter 7
[ 143 ]
Every time the autoWatch or singleRun property is enabled, you can use Karma just
by using the karma start command.
Summary
In this chapter, we studied how to automate tests using Jasmine and Karma, adding
productivity and quality to our development process.
You learned how to create tests for each kind of component such as controllers,
directives, lters, and services. Also, you discovered how to mock the $http service
through the $httpBackend service.
In the next chapter, we discuss automating the workow and creating a completely
automated distribution with Grunt.

Automating the Workow
Every time we perform the same activity over and over again, it can be considered
waste, and we stand losing a great opportunity to automate it.
Depending on the complexity of the workow of our product, there are many
steps that have to be performed, such as cleaning the temporary les from the
last distribution, validating the code, concatenating and minifying the JavaScript
les, copying resources such as images and conguration les, running the tests,
and many others. Also, based on the environment, the workow could be very
different—development, staging, or production.
The topics that we'll cover in this chapter are related to workow automation such as
the following:
• Automating the workow with Grunt
• Managing packages with Bower
Automating the workow with Grunt
Grunt is a JavaScript task runner that automates repetitive and boring tasks. Also, it
can group the desired tasks in any sequence, thus creating a workow.
It works over plugins, and there is a huge ecosystem with thousands of choices just
waiting to be downloaded! We also have the opportunity to create our own plugins
and share them within the community.
The warranty is that all of the required tasks of our workow will be fullled!

Automating the Workow
[ 146 ]
Installation
Just like Karma, Grunt requires NodeJS and the Node Package Manager to
be installed. To proceed with the installation, we just need to type in the
following command:
npm install -g grunt-cli grunt
After this, we are ready to congure it!
Conguration
The Gruntfile.js le is the JavaScript le that denes the conguration of each
task, plugin, and workow. Let's take a look at its basic structure:
module.exports = function (grunt) {
// 1 – Configuring each task
grunt.initConfig({
});
// 2 - Loading the plug-ins
grunt.loadNpmTasks('plugin name');
// 3 - Creating a workflow by grouping tasks together
grunt.registerTask('taskName', ['task1','task2','task3']);
}
Also, it's really recommended that you generate the package.jsonfile le. It is
important to track each dependency, and this le can be generated with the
following command:
npm init
After this, you are ready to create your distribution package!

Chapter 8
[ 147 ]
Creating a distribution package
Before being ready for the production environment, you need to create an optimized
distribution package of your product. This is very important for the following reasons:
• Performance: Through the concatenation step, you could drastically reduce
the amount of requests that the browser needs to perform every time the
application is loaded. All the scripts of the application are concatenated in
just one le. After that, the minifying step removes all the white spaces,
line breaks, and comments, and replaces the names of the local variables
and functions and makes them shorter than the original. It contributes to
improving the performance by reducing the amount of bytes that need to be
transferred. Also, the HTML and CSS les can be minied, and the images
can be optimized by specic processors. Grunt has a lot of plugins for
performing its tasks.
• Security: By removing the white spaces, line breaks, comments, and
replacing the local variable names, the JavaScript les become much
harder to understand. However, take care before submitting an AngularJS
application to this kind of process. As we saw in Chapter 4, Dependency
Injection and Services, we should apply the array notation for the dependency
injection mechanism by declaring each dependency as a string; otherwise, the
framework will not nd the expected dependency, throwing an error.
• Quality: There are two steps that improve the quality of the distribution. The
rst one is the validating step. With tools such as JSLint or JSHint, the code
is validated against rules that verify things such as the absence of semicolons,
wrong indentation, undeclared or unused variables and functions, and many
others. Also, the tests are executed, preventing the process from proceeding
in the case of errors.
In order to follow each step of our workow, we are now going to discover how to
install and congure each plugin:
1. Cleaning step: The rst step is about cleaning the les that were created in
the last distribution. This can be done through the grunt-contrib-clean
plugin. Take care about which directory will be congured, avoiding any
accidental deletion of the wrong les. To install this plugin, type in the
following command:
npm install grunt-contrib-clean --save-dev
After this, we just need to congure it inside the Gruntfile.js le,
as follows:
Gruntfile.js
module.exports = function (grunt) {

Automating the Workow
[ 148 ]
grunt.initConfig({
clean: {
dist: ["dist/"]
}
});
grunt.loadNpmTasks("grunt-contrib-clean");
grunt.registerTask("dist", ["clean"]);
}
In this case, we are creating our distribution package inside the dist/
directory; however, you are free to choose another directory.
2. Validating step: Now, it's time to congure the validation step. There
is a plugin called grunt-contrib-jshint that can be installed with the
following command:
npm install grunt-contrib-jshint --save-dev
Next, we need to congure it inside our Gruntfile.js le as follows:
Gruntfile.js
module.exports = function (grunt) {
grunt.initConfig({
clean: {
dist: ["dist/"]
},
jshint: {
all: ['Gruntfile.js', 'js/**/*.js', 'test/**/*.js']
}
});
grunt.loadNpmTasks("grunt-contrib-clean");
grunt.loadNpmTasks("grunt-contrib-jshint");
grunt.registerTask("dist", ["clean", "jshint"]);
}
After we run this step, a report will be shown with the warnings and errors
that it found in our code.

Chapter 8
[ 149 ]
3. Concatenating step: The concatenation step, done by the grunt-contrib-
concat plugin, concatenates the congured source les inside a single
destination le. This plugin can be installed with the following command:
npm install grunt-contrib-concat --save-dev
In order to congure it, we need to inform the source les and the destination
le through the src and dest properties of the concat object, as follows:
Gruntfile.js
module.exports = function (grunt) {
grunt.initConfig({
clean: {
dist: ["dist/"]
},
jshint: {
dist: ['Gruntfile.js', 'js/**/*.js', 'test/**/*.js']
},
concat: {
dist: {
src: ["src/**/*.js"],
dest: "dist/js/scripts.js"
}
}
});
grunt.loadNpmTasks("grunt-contrib-clean");
grunt.loadNpmTasks("grunt-contrib-jshint");
grunt.loadNpmTasks("grunt-contrib-concat");
grunt.registerTask("dist", ["clean", "jshint", "concat"]);
}
4. Minifying step: Now, let's talk about the minifying step. As we mentioned
before, it removes the white spaces, line breaks, comments, and replaces the
names of the variables and functions. This can be done using the grunt-
contrib-uglify plugin, which is installed using the following command:
npm install grunt-contrib-uglify --save-dev
The conguration is very similar to the grunt-contrib-concat plugin and
involves the denition of the src and dest properties of the uglify object,
as follows:
Gruntfile.js
module.exports = function (grunt) {

Automating the Workow
[ 150 ]
grunt.initConfig({
clean: {
dist: ["dist/"]
},
jshint: {
dist: ['Gruntfile.js', 'js/**/*.js', 'test/**/*.js']
},
concat: {
dist: {
src: ["js/**/*.js"],
dest: "dist/js/scripts.js"
}
},
uglify: {
dist: {
src: ["dist/js/scripts.js"],
dest: "dist/js/scripts.min.js"
}
}
});
grunt.loadNpmTasks("grunt-contrib-clean");
grunt.loadNpmTasks("grunt-contrib-jshint");
grunt.loadNpmTasks("grunt-contrib-concat");
grunt.loadNpmTasks("grunt-contrib-uglify");
grunt.registerTask("dist", ["clean", "jshint", "concat",
"uglify"]);
}
5. Copying step: There are many les such as images, fonts, and others that just
need to be copied to the distribution without any change. This can be done
using the grunt-contrib-copy plugin, which is capable of copying les and
folders. The installation process is done with the following command:
npm install grunt-contrib-copy --save-dev
The conguration involves the source and destination of each folder and le,
as follows:
Gruntfile.js
module.exports = function (grunt) {
grunt.initConfig({
clean: {

Chapter 8
[ 151 ]
dist: ["dist/"]
},
jshint: {
dist: ['Gruntfile.js', 'js/**/*.js', 'test/**/*.js']
},
concat: {
dist: {
src: ["js/**/*.js"],
dest: "dist/js/scripts.js"
}
},
uglify: {
dist: {
src: ["dist/js/scripts.js"],
dest: "dist/js/scripts.min.js"
}
},
copy: {
dist: {
src: ["index.html", "lib/*", "partials/*", "css/*"],
dest: "dist/"
}
}
});
grunt.loadNpmTasks("grunt-contrib-clean");
grunt.loadNpmTasks("grunt-contrib-jshint");
grunt.loadNpmTasks("grunt-contrib-concat");
grunt.loadNpmTasks("grunt-contrib-uglify");
grunt.loadNpmTasks("grunt-contrib-copy");
grunt.registerTask("dist", ["clean", "jshint", "concat",
"uglify", "copy"]);
}
6. Testing step: Grunt has a plugin called grunt-karma that works with Karma
by reading its karma.conf.js le and running the tests. It can be installed
with the following command:
npm install grunt-karma --save-dev
After this, we just need to congure the location of Karma's conguration
le, as well as load the plugin and include the task in our workow,
as follows:
Gruntfile.js
module.exports = function (grunt) {

Automating the Workow
[ 152 ]
grunt.initConfig({
clean: {
dist: ["dist/"]
},
jshint: {
dist: ['Gruntfile.js', 'js/**/*.js', 'test/**/*.js']
},
concat: {
dist: {
src: ["js/**/*.js"],
dest: "dist/js/scripts.js"
}
},
uglify: {
dist: {
src: ["dist/js/scripts.js"],
dest: "dist/js/scripts.min.js"
}
},
copy: {
dist: {
src: ["index.html", "lib/*", "partials/*", "css/*"],
dest: "dist/"
}
},
karma: {
dist: {
configFile: "karma.conf.js"
}
}
});
grunt.loadNpmTasks("grunt-contrib-clean");
grunt.loadNpmTasks("grunt-contrib-jshint");
grunt.loadNpmTasks("grunt-contrib-concat");
grunt.loadNpmTasks("grunt-contrib-uglify");
grunt.loadNpmTasks("grunt-contrib-copy");
grunt.loadNpmTasks("grunt-karma");
grunt.registerTask("dist", ["clean", "jshint", "concat",
"uglify", "copy", "karma"]);
}

Chapter 8
[ 153 ]
7. Running step: The last and optional step is about running the application
after the distribution package is built. Grunt has a web server plugin called
grunt-connect, and we just need to type in the following command to
install it:
npm install grunt-contrib-connect --save-dev
After this, we need to congure at least the base directory of the distribution
package and also the port in which the server will run:
Gruntfile.js
module.exports = function (grunt) {
grunt.initConfig({
clean: {
dist: ["dist/"]
},
jshint: {
dist: ['Gruntfile.js', 'js/**/*.js', 'test/**/*.js']
},
concat: {
dist: {
src: ["js/**/*.js"],
dest: "dist/js/scripts.js"
}
},
uglify: {
dist: {
src: ["dist/js/scripts.js"],
dest: "dist/js/scripts.min.js"
}
},
copy: {
dist: {
src: ["index.html", "lib/*", "partials/*", "css/*"],
dest: "dist/"
}
},
karma: {
dist: {
configFile: "karma.conf.js"
}
},
connect: {

Automating the Workow
[ 154 ]
dist: {
options: {
port: 9001,
base: 'dist/'
}
}
}
});
grunt.loadNpmTasks("grunt-contrib-clean");
grunt.loadNpmTasks("grunt-contrib-jshint");
grunt.loadNpmTasks("grunt-contrib-concat");
grunt.loadNpmTasks("grunt-contrib-uglify");
grunt.loadNpmTasks("grunt-contrib-copy");
grunt.loadNpmTasks("grunt-karma");
grunt.loadNpmTasks("grunt-contrib-connect");
grunt.registerTask("dist", ["clean", "jshint", "concat",
"uglify", "copy", "karma", "connect:dist:keepalive"])
}
Note that we need to use the keepalive option with the connect task inside
our workow denition. This is important because, by default, the server will
run only as long as Grunt is running. In the following code, the package.
jsonfile le is installed after the installation of the plugins:
package.json
{
"name": "parking",
"version": "0.1.0",
"devDependencies": {
"grunt": "~0.4.5",
"grunt-contrib-clean": "~0.5.0",
"grunt-contrib-jshint": "~0.10.0",
"grunt-contrib-concat": "~0.4.0",
"grunt-contrib-uglify": "~0.5.0",
"grunt-contrib-copy": "~0.5.0",
"grunt-karma": "~0.8.3",
"karma": "~0.12.16",
"grunt-contrib-connect": "~0.8.0"
}
}

Chapter 8
[ 155 ]
With the package.json le created, we can install the plugins just by typing
in the following command:
npm install
This is very useful when we share the project with other developers, thus
avoiding the installation of each plugin separately.
Executing the workow
In order to execute any specic task or even the entire workow, we just need to type
in the following command:
grunt <name of the task or workflow>
In case we just want to clean the last distribution, we may call only the clean
task as follows:
grunt clean
You could also create more than one conguration for each task. For instance, to
congure two environments for the grunt-contrib-connect plugin, you could
perform the following:
connect: {
production: {
options: {
port: 9001,
base: 'dist/'
}
},
development: {
options: {
port: 9002,
base: '/'
}
}
}
Also, you could generate two concatenated les, one with the sources and another
with the libraries, as follows:
concat: {
js: {
src: ["js/**/*.js"],
dest: "dist/js/scripts.js"

Automating the Workow
[ 156 ]
},
lib: {
src: ["lib/**/*.js"],
dest: "dist/lib/lib.js"
}
}
After this, you can run all the congurations by calling the task directly, as follows:
grunt concat
Or call any specic task by using a colon, as follows:
grunt concat:js
grunt concat:lib
Managing packages with Bower
Bower is a package manager created by Twitter that focuses on frontend
applications. It not only handles JavaScript libraries, but also takes care of the HTML,
CSS, and images. We can consider any kind of encapsulated group of les as a
package that is accessible from a Git repository.
Installation
The installation process is quite simple. You just need to type in the
following command:
npm install –g bower
Finding packages
Bower also comes with search support in order to nd registered packages, and you
can nd anything with the following command:
bower search <package name>
For instance, to nd the packages related to AngularJS, you can use the
following command:
bower search angular

Chapter 8
[ 157 ]
Installing packages
After nding the desired package, you just need to execute the following command
in order to download and install it:
bower install <package name>
To install the package, you just need to use this command with the package name
as follows:
bower install angular --save
The angular package will be downloaded from its Git repository and placed inside
the bower_components/ directory. With the --save option enabled, the bower.json
le will be updated.
We can check which packages are already installed in the application by means of
the following command:
bower list
This command needs to be executed within the application directory, and the result
will be shown in a list with the dependencies and versions of each package. This is
an opportunity to evaluate whether it is possible to update a package.
In order to update a package to its latest version, there is also an update command.
This will try to update the outdated package. However, if there are dependencies to
the outdated package, it will be kept:
bower update<package name>
To uninstall a package, we can follow the same installation procedure, just replacing
the command, as follows:
bower uninstall angularjs-file-upload --save
The package will be removed from the application's bower components directory
and also from the bower.json le.
Using packages
After we have installed a package, we need to update our index.html le in order
to include it in our application. The following code is an example where we included
the angular package in our project:
<script src="bower_components/angular/angular.min.js"></script>

Automating the Workow
[ 158 ]
Cache
The removed packages will be stored cached inside Bower's cache, located in the
cache/bower directory inside the user's home folder. You can retrieve the list of
cached packages using the following command:
bower cache list
Bower also allows for ofine package installation, just in case we do not have an
Internet connection and need to install a cached package. In order to use this feature,
we just need to add the --offline ag with the installation command, as follows:
bower install angular --offline
To clean the cache and delete all the downloaded packages, you can use the
following command:
bower cache clean
Summary
In this chapter, we studied how to automate the workow and created a distribution
package. Also, we learned how to use Grunt by installing plugins and conguring
each task and workow.
Finally, we discovered a great tool to manage our packages called Bower that allows
us to easily nd, install, update, and remove any package from the application.
Index
Symbols
$apply function 104
$broadcast function 110
$compile service 130
$digest function 130
$dirty object 65
$emit function 112
$error object 65
$lter service 128
$httpBackend service
mocking with 132-139
$logProvider event 96
$on function 111
$pristine object 65
$rootScope object 110
$routeProvider function 87
$timeout service
levels 96, 97
$watch function 105
(no prex) parameter 45
^ parameter 45
? parameter 45
?^ parameter 45
A
AngularJS
about 7
architectural concepts 9
built-in services 76
data handling 53
history 8
service, creating 69
URL 12, 120
AngularJS $compile documentation
URL 47
AngularJS animation
about 48
ngClass directive, animating 50
ngHide directive, animating 50
ngRepeat directive, animating 49
working 48
AngularJS built-in directives
ngApp directive 19, 20
ngBind directive 21
ngBindHtml directive 22
ngClass directive 27
ngClick directive 25, 26
ngController directive 20
ngDisable directive 26
ngHide directive 31
ngIf directive 31
ngInclude directive 31
ngModel directive 24
ngOptions directive 28-30
ngRepeat directive 22, 23
ngShow directive 30
ngStyle directive 30
other directives 26
using 19
AngularJS built-in services
$timeout service 96
asynchronous implementation 98
backend communication 76
logging strategy 96
AngularJS components
$httpBackend service,
mocking with 132-139
controller 126

[ 160 ]
directives 129
lters 128
service 125
testing 124
test, running with Karma 140
application organization
refactoring 32
architectural concepts, AngularJS
controller 9
framework, setting up 10, 11
model 9
view 9
array, orderBy lter 59
Asynchronous JavaScript and
XML (AJAX) 79, 80
autoWatch property 142
B
backend communication
about 76
AJAX 79
caching mechanism 85
headers 84
HTTP 76
HTTP facade, creating 82
interceptors 85, 86
JSON 76, 77
REST method 77
best practices, scope object 106
bootstrapping process 18
Bower
about 156
cache 158
installation 156
packages, managing with 156
used, for installing packages 157
used, for searching packages 156
bower.json le 157
C
cache, Bower 158
caching mechanism 85
callback 98
code organization
about 12, 13
ways 13
code organization, ways
domain style 15
inline style 13
specic style 14
stereotyped style 13, 14
cohesion 67
Common Gateway Interface (CGI) 7
compile function
used, for creating directive 47
conguration, Grunt 146
constants 74
Content Delivery Network (CDN)
URL 12
controller, AngularJS components
testing 126
controller function
used, for creating directive 46
coupling 68
currency lter 56
D
date lter 56
deferred API
about 100
notify(value) function 100
reject(reason) function 100
resolve(result) function 100
dependency injection 68, 69
directive 18, 19
directive conguration
compile function, using 47
controller function, using 46
link function, using 43
replace property, using 36
require property, using 44-46
restrict property, using 37, 38
scope property, using 38-41
template property, using 35
templateUrl property, using 36
transclude property, using 42
Directive Denition Object 34
directives, AngularJS components
compiling 130
creating 18, 34
digest cycle, invoking 130
element, creating 130

[ 161 ]
link function, calling with scope 130
testing 129
directive scope
conguring 38
distribution package
creating, for performance improvement 147
creating, for quality improvement 147
creating, for security improvement 147
grunt-connect plugin, installing 153-155
grunt-contrib-clean plugin,
installing 147, 148
grunt-contrib-concat plugin, installing 149
grunt-contrib-copy plugin, installing 150
grunt-contrib-jshint plugin, installing 148
grunt-contrib-uglify plugin, installing 149
grunt-karma plugin, installing 151
Document Object Model (DOM) 17
domain style 15
E
expression
about 53, 54
interpolation 53
F
factory function
about 70
used, for creating services 70-73
lters
about 55
creating 61
interacting, with expression 55
testing 128
using, in other components 60
lter usage, with expression
about 56, 57
currency lter, using 55, 56
date lter, using 56
json format, using 57
limitTo lter, using 58
lowercase lter, using 58
number lter, using 58
orderBy lter, using 59, 60
uppercase lter, using 60
form validation
$dirty object 65
$error object 65
$pristine object 65
about 62
basic validation, adding 63, 64
rst form, creating 62
framework, AngularJS
setting up 10-12
function, orderBy lter 59
G
GET method 76
Git repository 156, 157
Google Web Toolkit (GWT) 8
Grunt
conguration 146
distribution package, creating 147
installing 146
workow, automating with 145
workow, executing 155
grunt-connect plugin
installing 153-155
grunt-contrib-clean plugin
installing 147, 148
grunt-contrib-concat plugin
installing 149
grunt-contrib-copy plugin
installing 150
grunt-contrib-jshint plugin
installing 148
grunt-contrib-uglify plugin
installing 149
Gruntle.js le 146
grunt-karma plugin
installing 151
H
headers, backend communication 84, 85
HyperText Markup Language (HTML) 7
HyperText Transfer Protocol (HTTP) 7
I
Immediately-Invoked Function
Expression (IIFE) 71
inline style 13
installation, Bower 156

[ 162 ]
installation, Grunt 146
installation, grunt-connect plugin 153-155
installation, grunt-contrib-clean
plugin 147, 148
installation, grunt-contrib-concat
plugin 149
installation, grunt-contrib-copy plugin 150
installation, grunt-contrib-uglify plugin 149
installation, grunt-karma plugin 151
installation, packages
Bower used 157
interceptors
httpTimestampInterceptor 85
httpUnauthorizedInterceptor parameter 86
request interceptor 85
response interceptor 86
J
Jasmine 121
Jasmine testing framework
about 122-124
URL 122
JavaScript Object Notation (JSON) 57, 77
jQuery library
URL 104
JSHint 121, 147
JSLint 121, 147
K
Karma
about 140
conguring 141
conguring, browser options 141
installing, prerequisites 140
tests, running with 140-142
L
limitTo lter 58
link function
attrs 43
calling, with scope 130
ctrl 43
element 43
scope 43
transcludeFn 43
used, for creating directive 43
logging strategy
levels 96
low cohesion application 67
lowercase lter 58
M
Mocha, Karma 141
Model-View-Controller (MVC) pattern 9
Model-View-Whatever (MVW) 9
modules
creating 115
parking application 115, 119, 120
search 115, 118, 119
UI 115-118
N
nested controllers, ngController directive 21
new operator 74
ngApp directive 19, 20
ngBind directive 21
ngBindHtml directive 22
ngClass directive
about 27
animating 50
ngClick directive 25, 26
ngController directive
about 20
nested controllers 21
ngDisable directive 26
ngHide directive
about 31
animating 50
ngIf directive 31
ngInclude directive 31
ngModel directive 24
ngOptions directive 28-30
ngRepeat directive
about 22, 23
animating 49
ngShow directive 30
ngStyle directive 30
NodeJS 146
Node Package Manager (npm) 141, 146
number lter 58

[ 163 ]
O
one-way data binding mechanism 103
orderBy lter
about 59, 60
array 59
function 59
string property 59
P
package.jsonle le 146, 154, 155
packages
installing, with Bower 157
managing, with Bower 156
searching, with Bower 156
using 157
parking application module 115, 119, 120
Plain-Old-JavaScript-Object (POJO) 9
POST method 77
prerequisites, Karma installation
NodeJS 140
Node Package Manager(npm) 141
promise API
catch(errorCallback) 101
nally(callback) 101
then (successCallback, errorCallback,
notifyCallback) 101
provider
used, for creating services 75, 76
Q
QUnit, Karma 141
R
recommended modules, AngularJS 120
replace property
used, for creating directive 36
Representational State Transfer
(REST method) 77
RequireJS, Karma 141
require property
used, for creating directive 44-46
restrict property
used, for creating directive 37, 38
Revealing Module Pattern 70, 72, 122
RSpec 122
run function 112
S
scope object
about 103
best practices 106-110
broadcasting 111, 112
scope property
used, for creating directive 38-41
search module 115, 118, 119
services, AngularJS components
creating 69
creating, with AngularJS service 74
creating, with factory function 70-73
creating, with provider 75, 76
testing 125
single-page application. See SPA
singleRun property 142
SPA
about 87
asynchronous promises, resolving 93-95
location, changing 92
module, installing 87
parameters, passing 91
routes, conguring 87
view content, rendering 88
specic style 14
status codes, HTTP protocol 78
stereotyped style 13, 14
string property, orderBy lter 59
T
template property
used, for creating directive 35
templateUrl property
used, for creating directive 36
test
running, Karma used 140-143
TickGenerator service 111
transclude property
used, for creating directive 42

[ 164 ]
two-way data binding
$apply function 104
$watch function 105
about 24, 103, 104
U
UI module 115-118
update command 157
uppercase lter 60
V
value service 74
W
workow
automating, with Grunt 145
executing 155
World Wide Web (WWW) 7
uploaded by [stormrg]

Thank you for buying
AngularJS Essentials
About Packt Publishing
Packt, pronounced 'packed', published its rst book "Mastering phpMyAdmin for Effective
MySQL Management" in April 2004 and subsequently continued to specialize in publishing
highly focused books on specic technologies and solutions.
Our books and publications share the experiences of your fellow IT professionals in adapting
and customizing today's systems, applications, and frameworks. Our solution based books
give you the knowledge and power to customize the software and technologies you're using
to get the job done. Packt books are more specic and less general than the IT books you have
seen in the past. Our unique business model allows us to bring you more focused information,
giving you more of what you need to know, and less of what you don't.
Packt is a modern, yet unique publishing company, which focuses on producing quality,
cutting-edge books for communities of developers, administrators, and newbies alike.
For more information, please visit our website: www.packtpub.com.
About Packt Open Source
In 2010, Packt launched two new brands, Packt Open Source and Packt Enterprise, in order
to continue its focus on specialization. This book is part of the Packt Open Source brand,
home to books published on software built around Open Source licenses, and offering
information to anybody from advanced developers to budding web designers. The Open
Source brand also runs Packt's Open Source Royalty Scheme, by which Packt gives a royalty
to each Open Source project about whose software a book is sold.
Writing for Packt
We welcome all inquiries from people who are interested in authoring. Book proposals should
be sent to [email protected]. If your book idea is still at an early stage and you would like
to discuss it rst before writing a formal book proposal, contact us; one of our commissioning
editors will get in touch with you.
We're not just looking for published authors; if you have strong technical skills but no writing
experience, our experienced editors can help you develop a writing career, or simply get some
additional reward for your expertise.
Dependency Injection with
AngularJS
ISBN: 978-1-78216-656-6 Paperback: 78 pages
Design, control, and manage your dependencies with
AngularJS dependency injection
1. Understand the concept of dependency injection.
2. Isolate units of code during testing JavaScript
using Jasmine.
3. Create reusable components in AngularJS.
AngularJS Directives
ISBN: 978-1-78328-033-9 Paperback: 110 pages
Learn how to craft dynamic directives to fuel your
single-page web applications using AngularJS
1. Learn how to build an AngularJS directive.
2. Create extendable modules for plug-and-play
usability.
3. Build apps that react in real time to changes
in your data model.
Please check www.PacktPub.com for information on our titles
Mastering Web Application
Development with AngularJS
ISBN: 978-1-78216-182-0 Paperback: 372 pages
Build single-page web applications using the power
of AngularJS
1. Make the most out of AngularJS by
understanding the AngularJS philosophy and
applying it to real-life development tasks.
2. Effectively structure, write, test, and nally
deploy your application.
3. Add security and optimization features to your
AngularJS applications.
Instant AngularJS Starter
ISBN: 978-1-78216-676-4 Paperback: 66 pages
A concise guide to start building dynamic web
applications with AngularJS, one of the Web's
most innovative JavaScript frameworks
1. Learn something new in an Instant! A short,
fast, focused guide delivering immediate
results.
2. Take a broad look at the capabilities of
AngularJS, with in-depth analysis of its
key features.
3. See how to build a structured MVC-style
application that will scale gracefully in
real-world applications.
Please check www.PacktPub.com for information on our titles
