
Headings and Subheadings Manual
This manual discusses:
1. The formatting requirements for headings and chapters/ sections.
2. It provides step-by-step instructions on how to set up heading styles (major headings
and subheadings) in Microsoft Word.
This will help with consistently formatting both headings and subheadings. Heading
styles are particularly important because they allow Word to index the location of each
individual heading and subheading. This will then enable Word to automatically
generate a Table of Contents (discussed in the Table of Contents Manual), rather than
having to manually create one. Thus, this will ultimately save you time and ensure that
the headings and subheadings are consistently labeled on your Table of Contents.
Briefly, it is important to note the different types of headings discussed in this manual.
1. Major headings: These include chapter headings as well as the headings for
any other major section in your document (e.g., Abstract, Table of Contents,
Acknowledgements, References, Appendices/Appendix, and Curriculum Vitae).
2. Subheadings: These include the different section headings within your
chapters. You can have primary (first-level) subheadings, secondary (second-level)
subheadings, etc.
Sections:
Section 1: Formatting Requirements for Headings and Chapters/ Sections (p. 2)
Section 2: Formatting Major Headings (p. 3)
Section 3: Formatting Subheadings (p. 6)
Section 4: Clearly Mistakes Related to Style Formatting (p. 7)

Updated by GC SST Summer 2021
2
Section 1: Formatting Requirements for Headings and Chapters/
Sections
Formatting Requirements for Headings:
• Heading sizes and styles must be consistent throughout the document. This
means that all major headings (e.g., Table of Contents, chapter headings,
References, etc.) must have the same style. Similarly each level of subheading
(e.g., primary or first level subheadings, secondary or second level subheadings,
etc.) must also have the same style.
• Headings (such as chapter titles or section titles) can be larger font size than the
standard text, if in accordance with the student’s approved style guide and
advisory committee. This style decision must be applied consistently throughout
the text.
• All major headings must appear on the Table of Contents.
• You can chose whether or not to include all subheading levels on the Table of
Contents; however, they must be consistently included on the Table of Contents.
For example, if you chose to put primary subheadings on the Table of Contents
then all primary subheadings must appear for all chapters/ sections of your
document and so on.
Formatting Requirements for Chapters and Sections:
• Each chapter/ section must start on a new page, separate from the final
paragraph of the preceding chapter.
• Page numbers remain continuous even when starting a new chapter/ section.
• All chapters and sections must be listed on your Table of Contents.
• If chapters are used in your document, introductions and conclusions must be
their own chapters or included in another chapter.
Updated by GC SST Summer 2021
3
Section 2: Formatting Major Headings
General Information on Heading Styles in Microsoft Word:
Similar to Word automatically applying the Normal style to the body text of a document,
Word also automatically creates Heading styles. These can be found in the Styles menu
and include labels such as “Heading 1,” “Heading 2,” “Heading 3,” etc. Word
automatically creates another heading style for you each time you apply a Heading style
to a heading. This means that when you first apply Heading 1, Word automatically
generates Heading 2 style for you.
Steps to Modify the Major Heading Styles:
Similar to modifying the Normal style and applying this to the main text in your
document, you can also modify the Heading 1 style and apply this style to all major
headings. Note: Depending on your version of Microsoft Word, Step 2 may not work.
Instead, you can right click on the style you wish to change and select Modify. This will
bring up the Modify Style box.
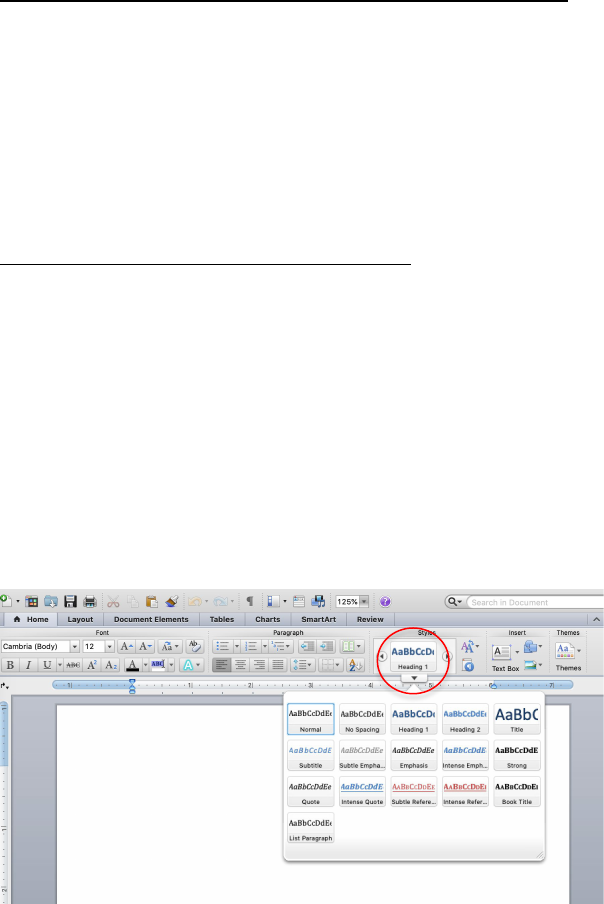
1. On the Home tab, find the Styles section. In this section, locate the style called,
“Heading 1.”
2. Do not click on the “Heading 1.” Click the arrow located at the bottom right of
the Styles box, which brings up the Styles box drop menu.
3. Move your mouse to “Heading 1.” The Paragraph symbol will change to an
arrow. Click on the arrow. Another box will pop up. Click on Modify. The Modify
Style box will pop up.
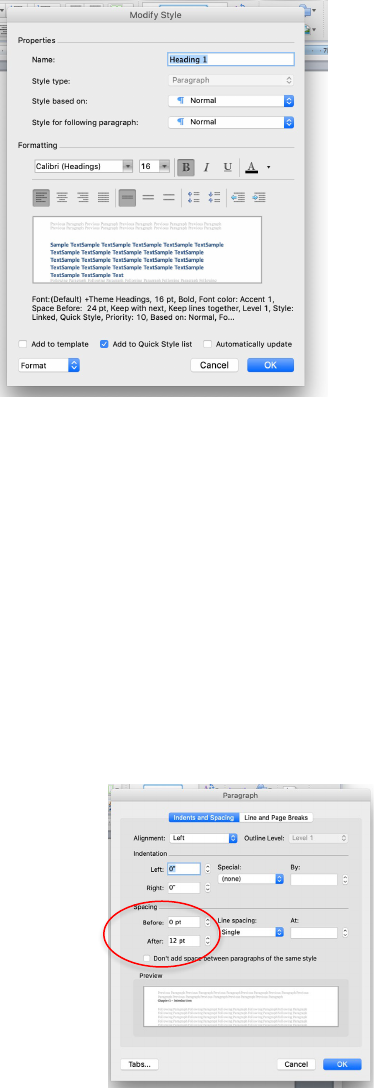
4. As discussed above, the Modify Style box includes all of the same information
found on your toolbar. When we discussed modifying the Normal Style using this
box, we noted you could change the default settings for your font size and font
Updated by GC SST Summer 2021
4
type, spacing, and more for the body text of your document. This time, in
contrast, the Modify Style box only allows you to change items that you have
designated as Heading 1.
Here is where you can change the font size and type, centering, bolding, spacing, color,
etc.
5. Remember to also change the spacing after the heading.
a. The default setting may have too much extra space. Select the format
button located on the lower left hand corner in the Modify Style box for
Heading 1.
b. Select Paragraph from the drop menu that appears.
c. The Paragraph window appears.
d. In the Spacing section, set Before to 0 and After to the font size of the
heading (e.g., 12 pt or 11 pt). For all other headings, Before and after should
be the font size (e.g., both sections would have 12 pt).
e. Line spacing should be set at double.
f. Click OK out of all windows.
Updated by GC SST Summer 2021
5
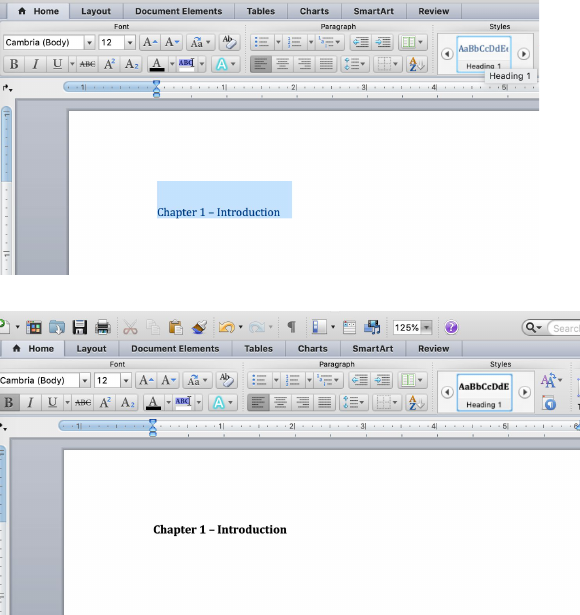
6. The Heading 1 style can now be applied to all major headings in the document.
In order to make these modifications:
a. Place the cursor at the beginning of the heading (you can also highlight it)
then click on Heading 1 in the Styles box.
b. Your heading should take on the characteristics that you created in the
Modify Styles box.
c. Make sure Heading 1 is applied to all major headings in your document.
Note: If you make any changes to the major headings style, it is important that these
changes are not made using the functions on the main Home tab toolbar. Rather, follow
these instructions and make any changes through the Modify Style box. Any changes
that are made using the main Home tab toolbar can result in the creation of extra styles,
resulting in your major headings not being consistent with one another.

Updated by GC SST Summer 2021
6
Section 3: Formatting Subheadings
Steps to Modify the Subheading Styles:
Each level of subheading will be formatted with a different Heading style in the Styles
section. You will have already used Heading 1 for the major headings. Thus, your
primary (first-level subheadings) will use Heading 2, secondary (second-level)
subheadings will use Heading 3, and so forth. Your style guide will dictate your
subheading styles. If your department or discipline does not have a dedicated style
guide, it will be reach by consensus between you and your advisory committee.
To modify your first subheading level (primary or first level subheading):
1. Click the arrow located at the bottom right of the Styles box. This will bring up
the Styles box drop menu.
2. Move your mouse to “Heading 2.” The Paragraph symbol will change to an
arrow. Click on the arrow. Another box will pop up. Click on Modify. The Modify
Style box will pop up.
3. You will make changes to Heading 2 here the same way you modified Heading 1.
4. Once you have made all of the necessary changes, click OK out of all windows.
5. The Heading 2 style can now be applied to all major headings in the document.
Follow the instructions for Heading 1 in order to make these modifications.
6. Make sure Heading 2 is applied to all primary (first-level) headings in your
document.
7. Repeat the process to create each additional subheading level using Heading 3,
Heading 4, and so on.
Remember: If you make any changes to a subheading level style, it is important that
these changes are not made using the functions on the main Home tab toolbar. Rather,
follow these instructions and make any changes through the Modify Style box.
Updated by GC SST Summer 2021
7
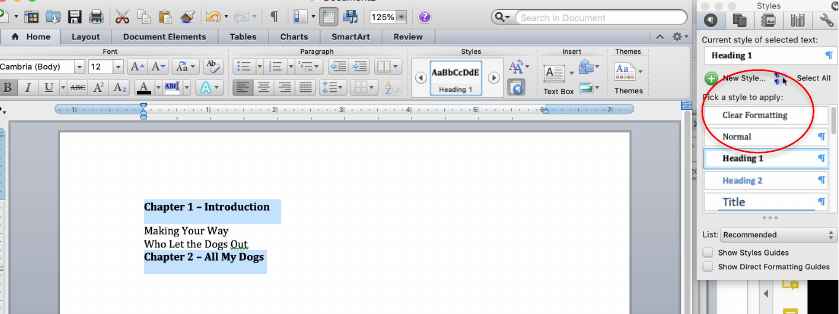
Section 4: Clearly Mistakes Related to Style Formatting
You might accidently attribute a style to a particular section in your document. For
example, a heading style might accidently be applied to the body text which should be
in the Normal style. If this happens, you can clear the formatting in order to remove the
style you incorrectly applied.
1. Highlight the portion of your document that needs to be cleared. At the top of
the Styles box, there should be a “Clear All” option.
2. Click this option.
3. The proper style needed can now be applied.
Remember: Do not try manually changing the section using the main Word toolbar. This
will result in the creation of additional styles, which could make the formats for you
major heading, subheadings, and paragraph style inconsistent.
