
Part Number: 4250M2410 Rev: C
Released: 2017-02
Eos Family Show Control
User Manual

ETC®, and Eos®, are either registered trademarks or trademarks of in the United States and other countries.
All other trademarks, both marked and not marked, are the property of their respective owners.
ETC intends this document, whether printed or electronic, to be provided in its entirety.

Table of Contents
Introduction 5
Help from ETC Technical Services 5
Using this Guide 6
About Eos Family Show Control 7
Show Control Setup 9
Setup Options 9
Port Setup Options 11
Show Control Display 13
Settings 13
Events 13
Event List 14
Creating an Event List 15
Time Code 17
Enabling Time Code 17
Timing Data 17
Timing and Clocks 17
Programming a Time Code Event List 18
Adding Events from the Show Control Display 19
Adding Events From Live 19
Adding Events using Learn Mode 20
Execution While Editing 20
Real Time Clock (RTC) 21
Enabling Real Time Clock 21
Real Time Clock Events 21
Programming Real Time Clock Events 21
Analog Inputs 23
Analog Input Events 23
Actions 24
Relay Outputs 25
sACN Input 27
Using sACN Input 27
MIDI Show Control 29
MIDI Show Control Devices 29
Eos Family Command Interpretation 29
Sending MIDI Show Control 30
Hexadecimal and MIDI Show Control Formatting 31
String Interface 33
Enabling Serial 33
Receiving Eos Serial Commands – RS232, UDP, and ACN EPI Strings 33
Receiving UDP Strings 34
Receiving ACN Strings 34
Bidirectional ACN Strings (Send and Receive) 35
Receiving via the I/O Gateway 35
Receiving Serial Commands to Trigger Events 35
Programming Serial Events 35
Sending Serial Commands – RS232, UDP, and ACN Strings 36
Sending UDP Strings 38
Sending ACN Strings 38
3

Sending via the I/O Gateway 38
MIDI Raw 39
Receiving MIDI 39
Program Change Events 40
Control Change Events 41
System Events (MIDI Show Control) 42
Creating a MIDI Event List and Event 42
Creating a Note On Event 43
Creating a Note Off Event 43
Creating a Program Change Event 44
Creating a Control Change Event 44
Sending MIDI 45
Cues and Subs 45
Sending a MIDI Raw String from a Cue or Sub 45
Macros 45
Open Sound Control (OSC) 47
Using OSC 47
Configuring OSC 47
Supported OSC Input 49
Explicit OSC Output 60
Implicit OSC Output 61
Appendix: Eos Family Show Control Capabilities 63
Appendix: Advanced OSC 65
OSCList Convention 65
OSC UID 65
OSC Numbers and Number Ranges 65
OSC Gel 65
Integrating Your App with Eos 66
Integrating Your App with Eos: Step 1 – Request Eos Software Version 66
Integrating Your App with Eos: Step 2 - Synchronize 66
Integrating Your App with Eos: Step 3 – Staying in Sync 68
Integrating Your App with Eos: Step 4 – Modifying Eos Show Data 70
OSC Troubleshooting 78
Appendix: Eos OSCKeys 79
4

Introduction 5
Introduction
Welcome to the Eos® Family Show Control User Manual. This manual is intended to provide basic information
specific to the Eos Family show control system. You may want to explore additional resources to learn more
about show control.
The following resources are recommended:
John Huntington, Show Networks and Control Systems, (Brooklyn, NY:Zircon Designs Press, 2012)
The ETC Support Articles: http://www.etcconnect.com/Support/
Help from ETC Technical Services
If you are having difficulties, your most convenient resources are the references given in this user guide. To
search more widely, try the ETC Web site at www.etcconnect.com. If none of these resources are sufficient,
contact ETC Technical Services directly at one of the offices identified below. Emergency service is available
from all ETC offices outside of normal business hours.
When calling for help, please have the following information handy:
Console model and serial number (located on rear or right side panel)
Dimmer manufacturer and installation type
Other components in your system (Unison®, other consoles, etc.)
Americas United Kingdom
Electronic Theatre Controls Inc Electronic Theatre Controls Ltd.
Technical Services Department Technical Services Department
3031 Pleasant View Road 26-28 Victoria Industrial Estate
Middleton, WI 53562 Victoria Road,
800-775-4382 (USA, toll-free) London W3 6UU England
+1-608 831-4116 +44 (0)20 8896 1000
service@etcconnect.com service@etceurope.com
Asia Germany
Electronic Theatre Controls Asia, Ltd. Electronic Theatre Controls GmbH
Technical Services Department Technical Services Department
Room 1801, 18/F Ohmstrasse 3
Tower 1, Phase 1 Enterprise Square 83607 Holzkirchen, Germany
9 Sheung Yuet Road +49 (80 24) 47 00-0
Kowloon Bay, Kowloon, Hong Kong techserv-hoki@etcconnect.com
+852 2799 1220
service@etcasia.com
Please email comments about this manual to:TechComm@etcconnect.com
6 Introduction
Using this Guide
In order to be specific about where features and commands are found, the following naming and text con-
ventions will be used:
Facepanel buttons are indicated in bold [brackets]. For example, [Live] or [Enter]. Optional keys are
indicated in <angle brackets>, for example, <Cue> or <Sub>.
Browser menus, menu items, and commands you must perform are indicated in bold text. For
example: In the File menu, click Open. Or: Press [Record] [Enter].
Alphanumeric keyboard buttons are indicated in all CAPS. For example, TAB or CTRL.
Keys which are intended to be pressed or held simultaneously are indicated with the “+” symbol. For
example, [Shift] + [+].
Softkeys and clickable buttons in the Central Information Area (CIA) are indicated in bold {braces}. A
note about <More SK> (more softkeys): this command is always indicated as optional, and is only indic-
ated once in an instruction regardless of how many pages of softkeys exist. This is because there is no
way to predict what softkey page you are on at any given time. Press <More Softkeys> until you find
the required command.
References to other parts of the manual are indicated in blue, for example, Introduction (on the pre-
vious page).When viewing this manual electronically, click on the reference to jump to that section of
the manual.
Note: Notes are helpful hints and information that is supplemental to the main text.
Caution: A Caution statement indicates situations where there may be undefined or unwanted
consequences of an action, potential for data loss or an equipment problem.
Warning: A Warning statement indicates situations where damage may occur, people may be
harmed, or there are serious or dangerous consequences of an action.

About Eos Family Show Control 7
About Eos Family Show Control
Eos Family consoles support a variety of show control protocols. Specific information about using each type of
show control can be found in each type’s section later in this guide. The following is an overview of the show
control types and general setup information.
The Eos Family can use the following show control protocols:
SMPTE - An analog signal indicating time (subdivided into hours, minutes, seconds, and frames)
that is used to sync events between multiple devices. Eos Family consoles receive SMPTE from a
Net3™ Show Control Gateway. The consoles will only receive SMPTE, and do not send it.
MIDI Time Code (MTC) - A digital version of SMPTE sent over MIDI. MTC can be received
through a local MIDI In port or through a Net3 Show Control Gateway. The consoles will only
receive MTC, and do not send it.
Real Time Clock (RTC) - Events can be triggered from the date and time on the console. With the
correct location information, this includes astronomical events like sunrise and sunset.
Analog - 0-10VDC inputs or contact closure inputs through a variety of interfaces. 0-10VDC inputs
are received through a Net3™ I/O Gateway. Contact closures can be received through the built-in
closures on the desk (when available) and through a Net3 I/O Gateway.
Relays - Normally closed and normally open contact closure outputs (SPDT). One relay is available
on consoles that have built-in I/O ports. Multiple relays are available on Net3 I/O Gateways.
MIDI ShowControl - A standardized subset of MIDI System Exclusive (SysEx) commands used for
show control. Eos Family devices can send or receive these messages. MIDI can be sent through
the built-in MIDI ports (when available) and through a Net3 Show Control Gateway.
ASCII String Interface (Serial (RS-232)/Network Serial)- ASCII text strings, also known as plain
text strings. These can be sent or received on the network via a UDP message, or sent via RS-232
serial on a Net3 I/O Gateway.
MIDI Raw- Also known as MIDI Strings, MIDI Notes, or Channelized Event Data. Originally inten-
ded for communication between musical instruments, MIDI has been adapted for a variety of uses
between devices. Eos Family consoles can send or receive MIDI messages through the built-in
MIDI ports (when available). A Net3 Show Control Gateway supports only MIDI Time Code and
MIDI System Exclusive messages (including MSC).
Open Sound Control (OSC) - A network protocol using UDP/IP or TCP/IP over wired or wireless
networks. It is used for communication between varying audio, video, and lighting devices. OSC
can be sent and received from the console.
sACN Input - These incoming levels can be used to trigger show control actions. The console com-
bines all incoming sACN levels for an address and uses the level from the highest priority source. If
there are multiple sources at the same priority, it uses the highest level (HTP). The console will
include its own sACN levels.
Most protocols that are received need to be configured in a Show Control list in the show control display. These
include MTC, SMPTE, Analog Inputs, RTC, MIDI Notes, Serial Strings, and sACN Input. The Show Control list is
accessed by pressing [Displays]>{ShowControl}. See ShowControl Display(on page13) for more inform-
ation.

8 About Eos Family Show Control

Show Control Setup 9
Show Control Setup
In [Setup]>{Show}>{ShowControl}, you can adjust settings for MIDI Show Control, time code (MIDI or
SMPTE), analog, and serial functions.
Setup Options
{SMPTE Time Code Rx}
This touchbutton is used to control whether your console can receive SMPTE time code. Choosing “Disabled”
will disable all time code lists that have a SMPTE source. The default for this setting is “Enabled”.
{MIDI Time Code Rx}
As above, but for MIDI Time Code instead of SMPTE. The default for this setting is “Enabled”.
{Resync Frames}
This touchbutton allows you to configure how many frames need to be synced before time code starts running.
Frames can be from 1-30. Default is 2 frames.
{MSC Receive}
This touchbutton toggles the setting for receiving MIDI Show Control from an external source between
“Enabled” and “Disabled”. The default setting is “Disabled”.
{MSC Receive Channel}
Also known as a “device ID” this setting configures the MIDI channel for the console to receive MIDI Show
Control information. Only MSC data with the same device ID will be received. A device ID can be from 0-126.
MSC commands can be sent to ID 127, which is the All Call device ID. While Eos cannot be set to ID 127, it will
respond to commands sent to the All Call device ID. For example:
{MSC Receive Channel} [5] [0] [Enter]
{ACN MIDI Rx ID(s)}
This setting allows you to choose the devices from which the console will receive MIDI. When set, the console
will respond to MSC data from any Net3 gateway that has a matching “ACN MIDI Rx ID.” Gateways will send
the MIDI data over an ACN connection. When built-in MIDI ports are available, the setting needs to match or
at least contain the MIDI Rx Group ID in the ECU>{Settings}>{Local I/O}>ShowControl Gateway>Group IDs
setting. For example:
{ACN MIDI RxID} [2] [5] [Enter]
{ACN MIDI RxID} [1] [Thru] [1][0] [Enter]
{MSC Transmit}
This setting, when enabled, allows the console to send MSC messages for actions taken on the console, such
as cue actions, macros firing, and submaster bumps. The default setting is “Disabled”.
{MSC Transmit Channel}
Also known as “Device ID” this setting allows you to set the device ID with which your console will transmit
MIDI Show Control information. A device ID can be from 0-127. If set to 127, the console will transmit MSC
data to all devices (All Call). For example:
{MSC Transmit Channel} [5] [0] [Enter]

10 Show Control Setup
{ACN MIDI Tx ID}
This setting allows you to choose the devices through which the console will send MIDI data. When set, the
console will transmit MSC data from any Net3 gateway that has a matching “ACN MIDI Tx ID.” The console
will then send the MIDI data over an ACN connection to the gateways. When built-in MIDI ports are available,
the setting needs to match or at least contain the MIDI Tx Group ID in the ECU>{Settings}>{Local I/O}>Show
Control Gateway>Group IDs setting. For example:
{ACN MIDI TxID} [2][5] [Enter]
{String MIDI TX}
When enabled, this setting will cause the console to send serial strings when certain actions happen at the con-
sole. See Sending from User Events (on page37).
{MIDI Cue List}
MIDI Cue List specifies the cue list that the console will use to send MSC data. If left blank and MSC Tx is
enabled, all cue lists will generate MSC events. Otherwise, only the particular list (or lists) selected will fire
MSC events.
{Analog Inputs}
This is a master setting for receiving analog inputs from a Net3 I/O Gateway or the built-in I/O port (when avail-
able). When disabled, it will no longer trigger any analog input actions on any event lists. Default is “Enabled”.
{Relay Outputs}
This is a master setting for triggering external relays from a Net3 I/O Gateway or the built-in I/O port (when
available). When disabled, will no longer affect any external relays normally triggered from the desk via cues,
submasters, or macros. The default is “Enabled”.
{OSC TX IP Address}
This sets the destination IP address or addresses to which the console will send OSC strings.
Note: Be careful when using a network with a DHCP server. If your external device reboots or is
issued a new IP address from a DHCP server, it will no longer receive OSC strings from Eos until you
change this setting to match your new IP address at your external device.
{OSC TX Port Number}
This sets the UDP destination port to which the console will send OSC strings.
{OSC RX Port Number}
This setting specifies the UDP port that the console will listen to for OSC receiving strings.
Note: ETC recommends using 8000 and 8001 respectively for port numbers. Remember that when
setting port numbers on your external device that they should be set to the opposite of what Eos is
set. For example, if {OSC TX Port Number} on Eos is set to 8000, then the RX (incoming) port on your
external device needs to be set to 8000, and vice versa.
{String RX}
This setting will enable receiving strings on all Serial RX formats and OSC inputs.
{String RX Group IDs}
This setting allows you to choose the Net3 I/O Gateways through which the console will receive serial strings.
When set, the console will receive serial from any Net3 I/O Gateway that has a matching “ACN Serial Group
ID.” The gateway will send serial data over an ACN connection to the console. This only affects serial traffic

Show Control Setup 11
from I/O gateways and not network UDP messages, ACN strings, or OSC. Serial Group IDs can be from 1-32.
Multiple group IDs can be selected by using [Thru] and [+].
{String RX Port}
This setting specifies the UDP port that the console will listen to for receiving strings.
{String TX}
This settings will enable sending strings on all Serial TX and OSC formats.
{String TX Group IDs}
This setting allows you to choose the Net3 I/O Gateways through which the console will transmit serial string
data. When set, the console will transmit serial to any Net3 I/O Gateway that has a matching “ACN Serial
Group ID.” The console will send the serial data over an ACN connection to the gateways. This only affects
serial traffic to I/O gateways and not network UDP messages, ACN strings, or OSC. Serial Group IDs can be
from 1-32. Multiple group IDs can be selected by using [Thru] and [+].
{String TX Port}
Setting for the UDP destination port that the console will send strings.
{String TX IP Address}
Sets the destination IP address or ACN devices supporting the ACN String EPI that the console will use to send
strings. This can contain either an IP address for UDP string destinations or ACN device names.. A combination
of UDP and ACN devices are not supported. Please see String Interface (on page33) for more specific con-
figuration information.
Port Setup Options
Eos Ti, Gio, Eos RPU3, Gio @5, Ion, Ion RPU, Element, and Eos Programming Wing have additional ports and
connectors located on the rear panel for show control. Additional setup options for these ports and connectors
are in the ECU>{Settings}>{Local I/O} and in ECU>{Settings}>{Network} .
Note: The built-in I/O ports on these devices will not broadcast information over the network and
are only used in a local console system.
MIDI Rx and MIDI Tx Group IDs
Allows you to set the group number for the MIDI In and MIDI Out ports. Group numbers can be from 1-32.
Default for both ports is 1.
To receive MIDI from the built-in ports, the ACN MIDI Rx ID in Setup>{Show}>{ShowControl} must match
the MIDI Rx Group ID in the ECU. To transmit MIDI from the local ports, the ACN MIDI Tx ID in Setup>
{Show}>{ShowControl} must match the MIDI Tx Group ID in the ECU.
Note: While Gio@5 has contact closure ports, it does not have local MIDI ports. A Show Control
gateway is required for MIDI input.
Contact Closure (remote trigger connector)
Allows you to set the Group and Address In values for the remote trigger input on the back of your console. The
contact closure only reports on/off even though it is considered an analog input.
Note: The contact closures require DC voltage, which is supplied by the console on pins 14+15. See
the diagram below.

12 Show Control Setup
Relay Out (remote trigger connector)
Allows you to set the Group and Address In values for the remote trigger port on the back of your console.
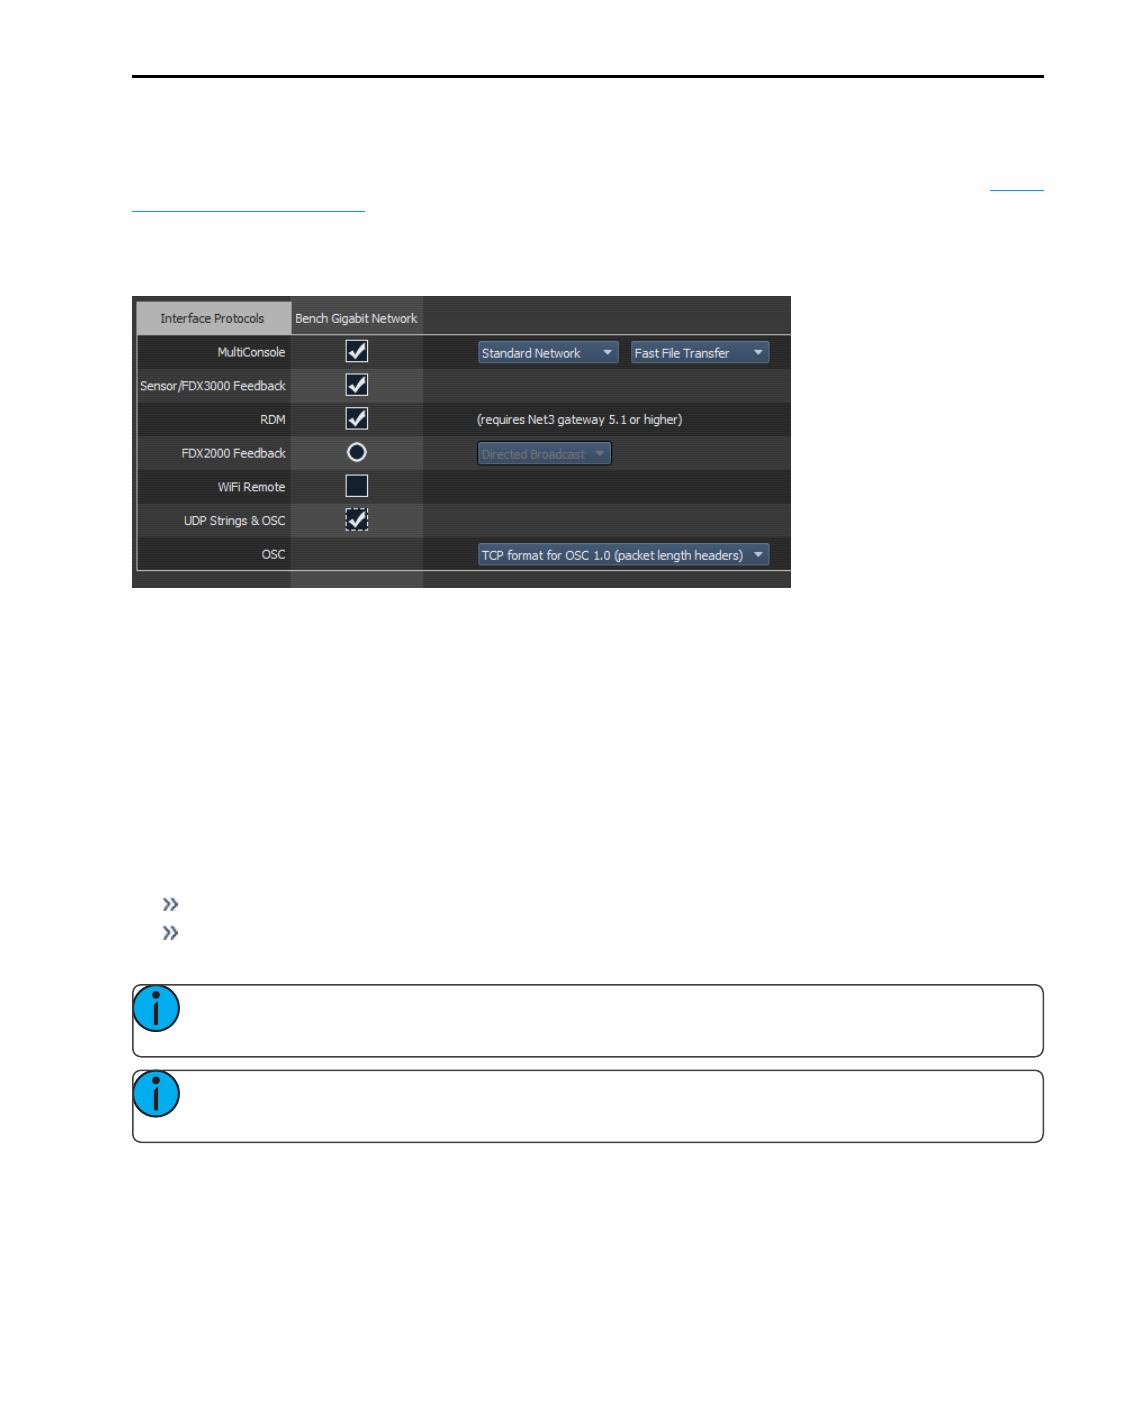
Interface Protocols
Additional settings are found in the ECU>Settings>Network.
See Open Sound Control (OSC) (on page47) for more information.
Show Control Display 13
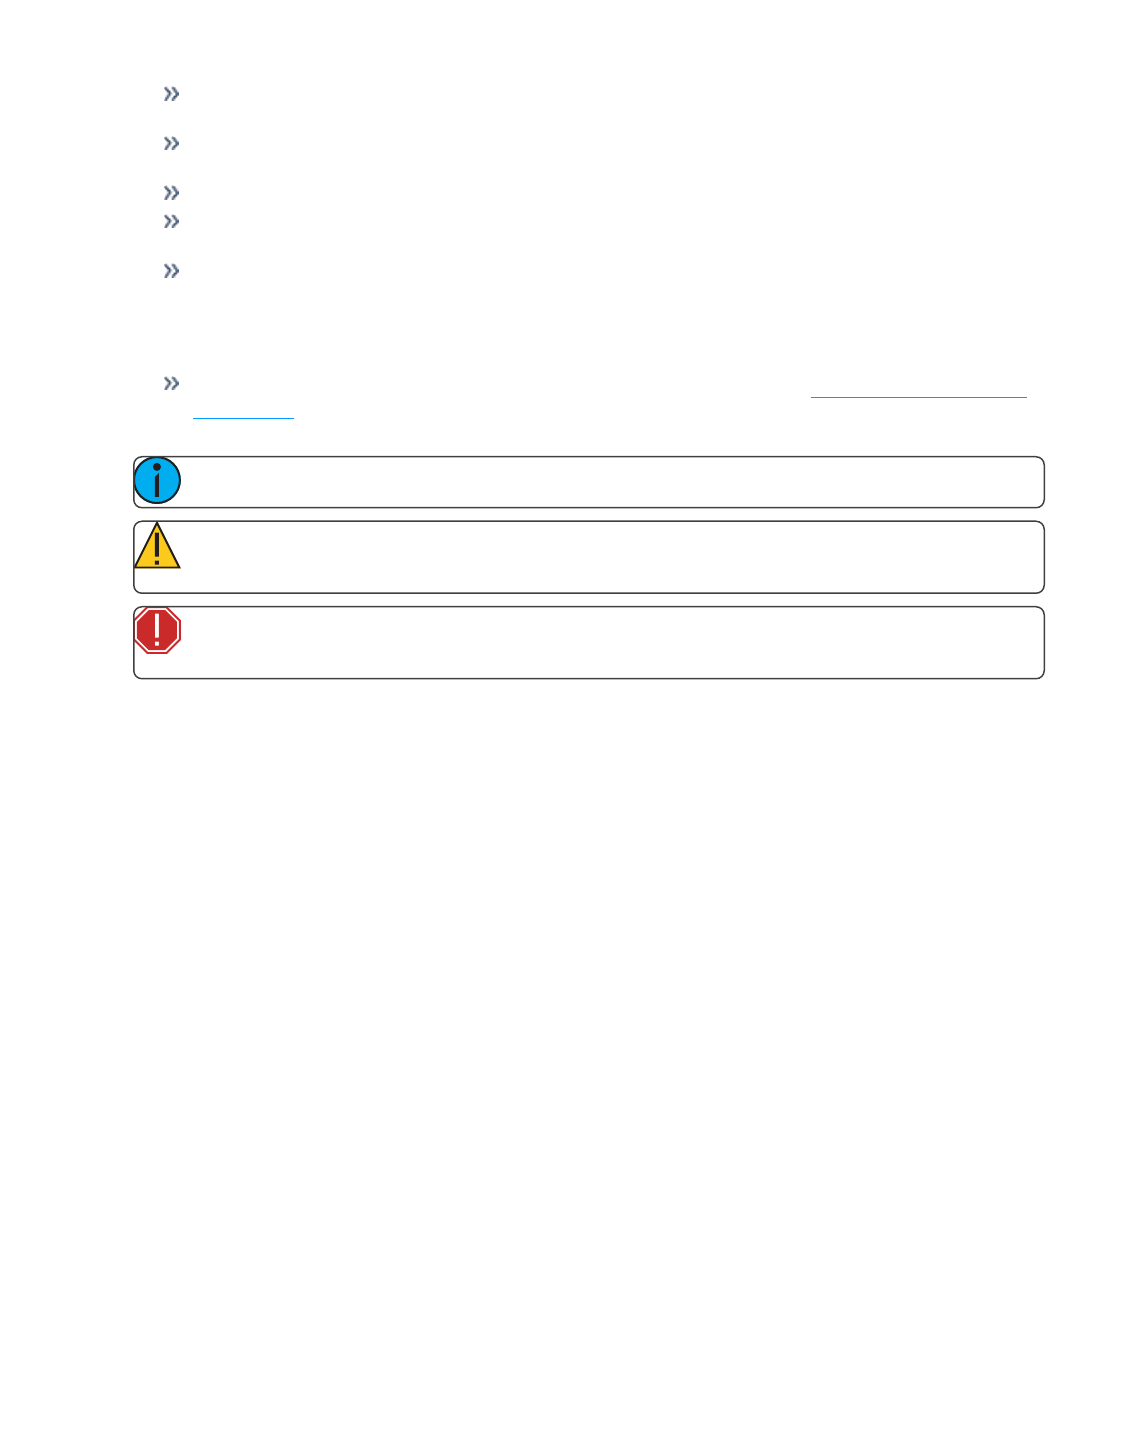
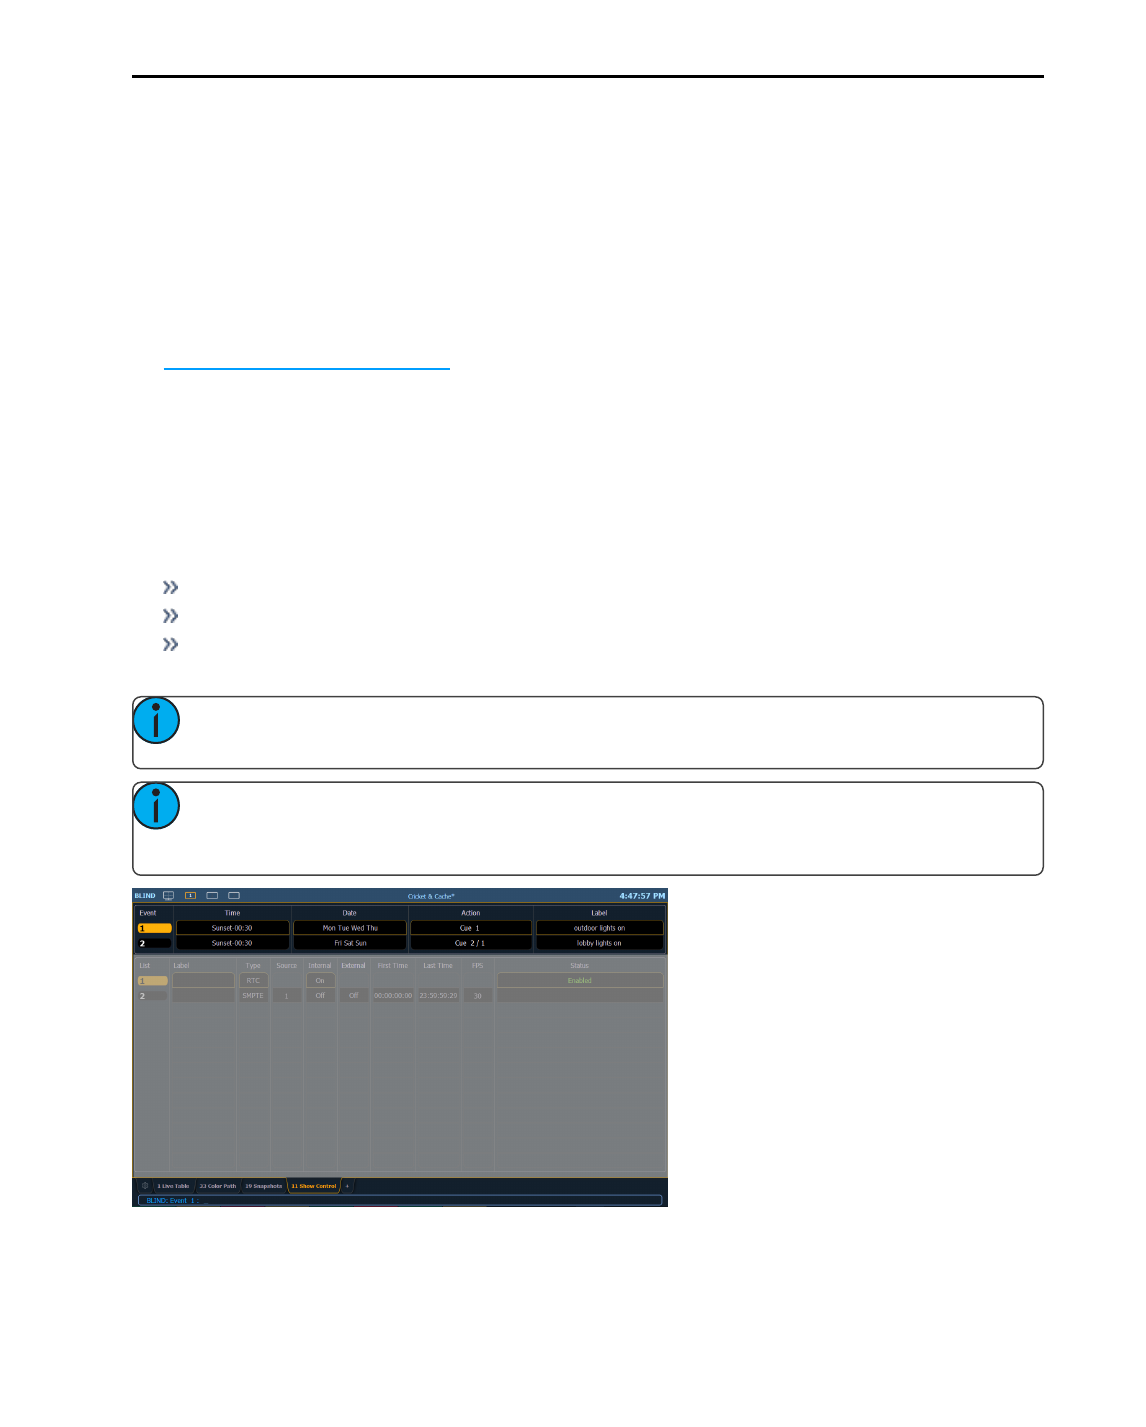
Show Control Display
The Show Control Display allows for the creation of event lists, which are comprised of events. An Event List
defines how incoming show control events are processed by the console – any protocol that can be received by
the console is handled here. Each event list uses a different type of show control at a time (time code, analog
inputs, RTC, or network). Specific information about setting up events for each show control type can be found
later in this guide.
The show control display can be accessed by pressing {ShowControl} on the Display Management Home
Screen.
Settings
In addition to the show control display, your console provides additional user-definable settings for show control
which can be accessed by pressing [Displays]>{Setup}>{Show}>{ShowControl}. For more information, see
the ShowControl Setup (on page9).
Events
The upper portion of the show control display shows the specific events that are contained in each event list.
An event consists of an input condition, such as a timestamp, real time, an address, or input value, and an
action. An event plays back (or “fires”) when the input condition is met (for example, the timecode passes the
given timestamp, or a contact closure at the given address changes). Multiple events can be fired at the same
time; however a single action can only be placed in each event.
Eos Family consoles support three event actions:
Cues can be run.
Submasters can be bumped, faded (via analog only), and turned on and off.
Macros execute without interaction with the command line, unless the macro is set to foreground
mode.
Note: If another macro is fired before the first macro completes, the first macro will finish its action
before the second is started.
Note: If a macro is selected as the intended action, it will fire using the macro mode specified.
Please see the Storing and Using Macros chapter of your console’s manual for information on macro
modes.
Softkeys are available for the various event options:
14 Show Control Display
Event - is the event number, used to select or create a specific event from the command line. Can also
use [Next]/[Last] to select/navigate through the events.
Note: The event number is not fixed, it is just provided as a way to select an event. For example, in
time code lists, the events are always chronological. The event number will change to match the chro-
nology.
Time/Address - used to specify the conditions when the event should trigger the action. This could be
time code, time of day, sACN levels, MIDI input, string input, OSC input, or an address used for analog
inputs.
Date- used to specify when the event should trigger the action, used only for RTC. See Real Time Clock
(RTC) (on page21).
Action - is what the event is going to trigger; can be a cue, submaster, or macro.
Label - names a specific event.
Event List
The lower portion of the show control display contains the event lists used in the console. Events are contained
within a specific event list (like cues within a cue list). Each event list has a specific show control protocol type
that it uses: MIDI, SMPTE, Analog, or RTC. Getting started with an event list is the same regardless of which
show control protocol you are using.
Softkeys are available for the various event list options:
List - is the event list number.
<Event> [1][/][Enter] - creates event list 1.
Label - names the event list.
Type - sets which type of show control protocol to use; MTC, SMPTE, Analog, Network, or RTC. Only
one protocol can be used at a time per list.
Source - should match the Group ID used in the connected Net3 Show Control, I/O Gateway, or the
built-in ports (when available).
Internal - enables the list to use internal timing sources. See Internal vs. External Time (on the facing
page).
External - enables the list to use external timing sources.
First Time - sets the first time that the console will use when using internal timing.
Last Time - sets the last time that the console will use when using internal timing.
FPS - sets how many frames per second (FPS) will be used; 30, 25, 24.
Status - current status of the event list.

Show Control Display 15
Internal vs. External Time
Time code (MIDI or SMPTE) is typically received from an input source, like a show control gateway. This timing
source is referred to as external time, since it is coming from a source external to your console.
If the external time source is not available for any reason, each time code event list within your console has an
internal timing source which will assume control, if enabled. This internal timing source requires three pieces of
information to determine how to generate its timing: first time, last time, and frame rate. When the internal
clock reaches the last time, it will reset to the first time and continue running.
Note: External timing sources may run faster or slower than the console’s internal clock.
Real Time Clock uses internal time only, but the clock can sync with an external time server using SNTP.
Whether using internal time from the console or using external time from a time server, it is important that all
the correct information for time zone, latitude, and longitude are properly setup. Refer to the Configuration Util-
ity appendix in your console’s manual for setup information.
Analog inputs and network inputs use the external setting only as a way to enable and disable the entire list.
Creating an Event List
Getting started with an event list is the same regardless of which show control protocol you are using.
To program an event list, you first must open the show control display.
[Displays]><More SK>>{ShowControl}
Create an event list by specifying it in the command line.
<Event> [1] [/] [Enter]
Specify what the list will respond to (MIDI, SMPTE, Analog, or RTC).
<Event> [1] [/] {Type} {MIDI} [Enter]
Define the group or source.
<Event> [1] [/] {Source} [8] [Enter]
Activate the internal and/or external timing functions (see Internal vs. External Time (above)). These func-
tions are toggle on/off states.
<Event> [1] [/] {Internal} {External} [Enter]
When defining an event list, it is feasible to enter multiple commands in the same command line. This can
speed up your programming of an event list. For example:
<Event> [2] [/] {Type} {MIDI} {Source} [5] [Enter]
Once the list is created, you will then need to create the specific events. Those steps will vary depending on
what protocol is being used.

16 Show Control Display
Time Code 17
Time Code
Eos Family consoles can receive internal or external time code to execute event lists.
Time code lists can receive timing data from either SMPTE or MIDI sources. Eos Family consoles accept up to
32 SMPTE sources and 32 MIDI Time Code (MTC) sources (each are numbered from 1-32). Up to 64 sources
can be received simultaneously.
Enabling Time Code
Eos Family consoles have global settings to enable or disable reception of MIDI Time Code and SMPTE. These
are found in setup, See ShowControl Setup (on page9).
If the MIDI Time Code setting is disabled, all MTC event lists are disabled as well. Each event list can be
enabled/disabled individually using the internal and/or external field. Off is disabled, regardless of the global
setting in the setup screen. The same is true for SMPTE.
Timing Data
Timing data is given in the form of (hours) : (minutes) : (seconds) : (frames). Therefore a timing value of
06:25:15:24 would be 6 hours, 25 minutes, 15 seconds, 24 frames.
The number of frames per second is determined by the timing source and the event list must be set to this
same number of frames when programming. Number of frames can be 24, 25, or 30.
Color coding
The color of the time in the “Status” column of the event list display indicates the source of the timing data.
The colors and indications are:
Green - Valid external timing is being received.
Red - The internal clock is the data source and is running.
Gray - No timecode is being received from internal or external sources.
You will also see an indicator in the upper portion of the main display if valid internal or external time is seen.
By default, list 1 is shown. If a list other than 1 is displayed, it will be shown with the event list number in front
of the current time for the list.
Timing and Clocks
The internal and external clocks can be enabled separately for each time code list. If you enable the external
clock only, events will play back as long as valid timing data is received from an external source. When the tim-
ing data stops, the events will stop.

18 Time Code
When you enable the internal clock only, it starts running immediately and triggers events appropriate to the
time.
When both internal and external clocks are enabled, the internal clock does not start running until the first
valid external time is received. After that, it will run whenever the external time source is absent.
Loop times
First and last times define the overall loop. Times can be set anywhere from 00:00:00:00 to 23:59:59:29.
When external time is being received, your console ignores these times. However, you should still set them to
match whatever loop times the external clock is using. When using internal timing, it is important to set the
first and last times. These set the start and stop or loop points of the sequence.
Internal clock
You can set the internal clock at any time by selecting the event list (<Event List> [1] [/]), pressing [Time], and
entering a time.
To reset the internal clock, select the event list and press [Time] [Enter].
Programming a Time Code Event List
Open the show control display.
[Displays]><More SK>>{ShowControl}
Create a new event list.
<Event> [1] [/] [Enter]
Define the type of input.
<Event> [1] [/] {Type} {MIDI} [Enter]
Define the source of input (this is the source ID number of the Gateway 1-32).
<Event> [1] [/] {Source} {1} [Enter]
Specify if internal and/or external timing is enabled.
<Event> [1] [/] {Internal} {External} [Enter]
Define the first time and last time for the event list (times are given as 00:00:00:00).
<Event> [1] [/] {FirstTime} [2] [0] [1] [5] [Enter]
<Event> [1] [/] {LastTime} [2] [0] [4] [5] [1] [5] [Enter]
Specify the number of frames per second (FPS) used by the timing source (24, 25, or 30).
<Event> [1] [/] {FrameRate} [2] [5] [Enter]
When working in Live, to show the Time Code times in the Cue List, go to the Cue List Display.
[Cue] [Cue]
Select the Cue List to be triggered.
[Cue] [1] [/]
Now associate the Event List to the Selected Cue List.
[Cue] [1] [/] {Execute} {Timecode} {1} [Enter]
Both the Event List and the Cue List are ready for events to be added. There are three ways that events can be
added into the Event List.

Time Code 19
Note: You will notice as events are added in the Event List that the time code will display on the
Playback Status Display.
Note: This is the same process for MIDI and SMPTE Time code.
Adding Events from the Show Control Display
Events can be added directly from the show control display, however a new event number must be specified
for each event action.
Open the show control display.
[Displays]><More SK>>{ShowControl}
Select the event list.
<Event> [1] [/] [Enter]
Specify a new event number.
<Event> [1] [Enter]
Add the action that the event should execute.
<Event> <1> [Cue] [1] [Enter]
Note: As there is no action softkey, pressing [Cue], [Sub], or [Macro] assumes you are posting to
the action field.
Define the time code position of the event.
<Event> <1> [Time] [2][0][1][5] [Enter]
It is possible to enter multiple commands in the same command line. This can speed up your programming.
<Event> [2] [Cue] [1.5] [Time] [2][4][1][3] [Enter]
Event timing can also be modified within a range. Let's say an additional 5 frames needs to be added to mul-
tiple events.
<Event> [1] [Thru] [4] [Time] [+] [5] [Enter]
Note: You will notice as events are added to the event list, the time code will display on the Play-
back Status Display.
Adding Events From Live
Events can be added directly from live using the same conventions used in the Show Control Display. The
advantage to doing this from Live is there is no need to specify the event number, as the console automatically
assigns the number.
From the Live Display Select the cue to execute.
[Cue] [3]
Now define the time code location.
[Cue] [3] {Execute} {Timecode} [3][2][1][5] [Enter]

20 Time Code
Note: You will notice as events are added to the event list, the time code will display on the Play-
back Status Display.
Adding Events using Learn Mode
If you select an event list within the show control display, you can press the [Learn] hardkey to activate learn
mode for that event list. When in learn mode, an event is created with the current list time whenever a cue is
activated, a submaster bump is pressed, or a macro is run. Once in learn mode, the [Learn] key will remain lit
to indicate that it is in learn mode. If the show control display is exited, the console remains in learn mode until
deactivated.
Multiple time code lists can be in learn mode simultaneously, each with their individual times. It is recom-
mended that you associate the event list and cue list together, so events will be learned into the intended time
code list.
To exit learn mode, the console must be in the show control display. Once there, select the event list then press
[Learn] again. If [Learn] is pressed while viewing any other screen than the show control display an empty
event will be placed on all event lists that are in learn mode.
Open the show control display.
[Displays]<More SK>{ShowControl}
Select the event list to enable learning on.
<Event> [1] [/]
Press the [Learn] key.
<Event> [1] [/] [Learn]
In the Status column it now says Learning, and the [Learn] button is illuminated.
Execution While Editing
If the internal or external clock is running, events will fire, even if you are in the edit screen. As soon as an
event is created, the event list is resorted, and the new event is eligible for playback.
Real Time Clock (RTC) 21
Real Time Clock (RTC)
Eos Family consoles have the ability to run Real Time Clock (RTC) events. RTC events are used to run a cue,
submaster, or macro at a specific time on specific days. RTC events can run at a certain time of day, like
5:00pm on Tuesdays, a certain date, or at a time based off of astronomical events, such as sunrise and sunset.
Enabling Real Time Clock
For astronomical (sunrise and sunset) events to work properly, time zone, latitude, and longitude must be set
up correctly. Those settings are found under the General tab in the Eos Configuration Utility (ECU).
Note: In the ECU >Network >Time Service (SNTP), you can configure the SNTPserver or client so
that the console can synchronize time across the network with other devices, such as Paradigm
®
.
For all RTC events, the option for internal must be set to on within the show control display. As long as the
internal option is set to on, the RTC events will execute. However if internal is set to off, then the events will
not trigger. The status in the show control list will indicate whether it is on or off. There is no way to disable a
single event from triggering within the event list, you can only remove the event number.
Real Time Clock Events
RTC events are created using the ShowControl Display(on page13). RTC events consist of a time field, a
day or date field, and an action. Time for RTC events can be specified as local time or as time relative to the
astronomical events, sunrise and sunset. Local time is displayed in the 24 hour format. For example, if you
want an event to run at 2:50pm, you would need to set it for 14:50.
Programming Real Time Clock Events
Open the show control display.
[Displays] <More SK> {ShowControl}
Create a new event list.
<Event> [1] [/]
Specify the event list as RTC.
<Event> [1] [/] {Type} {RTC} [Enter]
Enable the RTC.
<Event> [1] [/] {Internal} [Enter]
Define the Time and Date for each event.
Note: Commands cannot be combined on the same command line.
<Event> [1] [Time] [1] [5] [0] [0] [Enter] - sets the time for 3:00pm.
<Event> [1] {Days} {Mon} {Wed} {Fri} [Enter] - adds on Mondays, Wednesdays, and Fridays.
Note: Days of the week can either be entered in from their softkeys, or you can enter them in from
the keypad using the conventional modifiers (+, -, thru). Monday is 1.
Define the Astronomical Time and Date.
<Event> [2] [Time] {Before Sunset} [3] [0] [Enter] - sets the time for 30 minutes before sunset.

22 Real Time Clock (RTC)
<Event> [2] {Days} [1] [+] [2] [+] [3] [+] [6] [Enter] - adds on Monday, Tuesday, Wednesday, and
Saturday.
Define the Astronomical Time and Date.
<Event> [3] [Time] {After Sunrise} [6] [0] [Enter] - sets the time for an hour after sunrise.
Note: The events will renumber themselves to be in the correct order of execution throughout the
day. Event 3 is now listed as Event 1. The command line will change to Event 1 automatically.
<Event> [1] {Date} [2] [1] {Month} [1] [0] {Year} [2] [0] [1] [5] [Enter] - sets the date to October 21,
2015.
Creating the action for each event is the same as time code. Select the event and specify either cue, sub-
master, or macro.
<Event> [1] [Cue] [1][2] [Enter]
Note: As there is no action softkey, pressing [Cue], [Sub], or [Macro] assumes you are posting to
the action field.

Analog Inputs 23
Analog Inputs
Eos Family consoles can accept analog input through a variety of interfaces. 0-10VDC inputs are received
through a Net3 I/O Gateway. Contact closures can be received through the built-in remote trigger port on the
desk (when available) and through a Net3 I/O Gateway. The I/O Gateway can be set up through the Net3 Con-
cert software. For more information, please refer to the Net3 I/O Gateway Setup Guide. For setting up your
console’s local ports, including the pin-out of the connector, see Port Setup Options, page 7.
Analog inputs are programmed through the show control display, where each analog event in the event list
consists of a port address and an action. Each event list source references a specific Group ID, which needs to
match the ACN Group ID of the I/O Gateway or the Group ID of the built-in remote trigger port, and the events
themselves are assigned addresses for the individual addresses or inputs within the gateway.
To enable the analog event list, the internal time option must be enabled. This is an enable/disable function for
the entire event list. There is also a global enable for all analog inputs found in Setup, see ShowControl
Setup (on page9).
Analog Input Events
There are two types of analog input events – contact closures and 0-10VDC inputs.
Contact closures will fire an event the input circuit is closed. Events that can be triggered this way include run-
ning a cue, controlling a submaster, and firing a macro. The event is only triggered as the closure occurs. It will
not be triggered again as the circuit is opened.
0-10VDC inputs can be used to control a submaster fader proportionally, where 0VDC represents 0% on the
fader and 10VDC represents 100% on the fader. When assigned to a contact closure style of event, like a Sub
Bump, the event will be triggered when the input passes 6.67VDC. The input must then pass below 3.3VDC
and then above 6.67VDC to trigger the event again. This is designed to prevent the event from firing too many
times, in case the input has noise that causes the voltage to fluctuate.
Create an Analog Event List
Open the show control display.
[Displays]><More SK>>{ShowControl}
Create a new event list.
<Event> [4] [/] [Enter]
Define the type of input.
<Event> [4] [/] {Type} {Analog} [Enter]
Define the source of input.
<Event> [4] [/] {Source} {1} [Enter] (This is the Source ID# of the Gateway.)
Specify the event list to be active.
<Event> [4] [/] {Internal} [Enter]
Create an analog input event where an input on address 1 will fire cue 10.
<Event> [4] [/] [1] {Address} [1] [Cue] [1] [0] [Enter]
Note: As there is no action softkey, pressing [Cue], [Sub], or [Macro] assumes you are posting to
the action field.

24 Analog Inputs
Actions
Cues, macros, and submasters can all be triggered from analog inputs (contact closure or analog voltage
above 6.67V).
Cues
Execute the cue with its programmed cue timing.
Create an analog input event where an input on address 2 will fire cue 11.
<Event> [4] [/] [1] {Address} [2] [Cue] [1] [1] [Enter]
Macros
Triggers the macro and begin execution immediately.
Create an analog input event where an input on address 3 will fire macro 1.
<Event> [4] [/] [1] {Address} [3] [Macro] [1] [Enter]
Submasters
There are four modes: On, Off, Bump, and Fader.
On
The submaster will act as if the bump button was pressed and held down. This will toggle, or release the same
state, when activated again.
Create an analog input event where an input on address 4 will set Sub 1 to On.
<Event> [4] [/] [1] {Address} [4] [Sub] [1] {On} [Enter]
Off
Used to release the submaster’s bump button when triggered from a Sub On action elsewhere in a show con-
trol action
Create an analog input event where an input on address 5 will set Sub 1 back Off.
<Event> [4] [/] [1] {Address} [5] [Sub] [1] {Off} [Enter]
Bump
Acts as if the input is directly controlling the bump button. If the submaster is set to have a dwell time of Man
(manual), then it will instantly flash and turn back off. It is generally recommended to set the submaster to
have a dwell time of Hold or a specified time. The first trigger will turn the submaster On. If the submaster is set
to a dwell time of Hold, the second trigger will turn the submaster Off.
Create an analog input event where an input on address 6 will bump Sub 1.
<Event> [4] [/] [1] {Address} [6] [Sub] [2] {Bump} [Enter]
Fader
Acts as if the input is directly controlling the fader on the submaster. A contact closure will move the fader from
0 to 100% instantly. A 0-10VDC input will fade the value proportionally, where 0VDC is the fader at 0%, and
10VDC is the fader at 100%.
Create an analog input event where an input on address 7 will control the fader for Sub 3.
<Event> [4] [/] [1] {Address} [7] [Sub] [3] {Fader} [Enter]

Analog Inputs 25
Relay Outputs
Eos Family consoles can trigger relay outputs on Net3 I/O Gateways and on the built-in relay output (when
available). Relay outputs are also often called remote triggers, contact closures, or contact outputs. Relay out-
puts are controlled by external links in cues and submasters only.
Note: You enter relay information in the live or blind displays. This is not a Show Control display
function.
For Example:
[Live] [Cue] [1] {Execute} {Relay} [1] [/] [2] {On} [Enter] - 1 is the ACN Group ID of the I/O Gate-
way or built-in relay output and the 2 is the relay output address.

26 Analog Inputs

sACN Input 27
sACN Input
Eos Family consoles can receive streaming ACN (sACN) level information from itself and other devices on the
lighting control network. Similar to Analog Inputs, these received sACN input levels can then be used by the
Event List display to execute certain actions.
sACN allows for multiple sources to be present on the network. These sources (configured at the transmitting
device) are each given a priority. The valid priority range is 1 (lowest) to 200 (highest) with 100 as the default.
When determining the winning level for an address, the level with the highest priority will be used. If the
sources have the same priority, the highest level will be used (also known as Highest-Takes-Precedence, or
HTP).
sACN Inputs can be assigned to events. These events can run a cue, control a submaster, or fire a macro. Sub-
masters can be turned On, Off, trigger the Bump button, or control the fader. See Actions (on page24).
With the exception of a submaster fader and bump, sACN Input will fire an event when the level rises above
50% (DMX 127). It does not fire again when the level drops below 50% (DMX 127). It only fires again when
the level drops below 50% and then rises above 50%.
Submaster bump will act as if the bump button was pressed when the level rises above 50% (DMX 127), and
acts as if the bump button was released when the level drops below 50%.
Using sACN Input
Run a Cue Based on sACN Input
Open the Show Control Display
[Displays] > <More SK>> {ShowControl}
Create a new event list
<Event> [8] [/] [Enter]
Define the type of input
<Event> [8] [/] {Type} {Network} [Enter]
Create a new event
<Event> [1] [Enter]
Assign the sACN address using universe/address format
{sACN} [4] [/] [1] [Enter]
Add the action to execute. Actions can be either a cue, submaster, or macro
{Action} {Cue} [1] [Enter]
Control a Submaster Fader Based on sACN Input
Open the Show Control Display
[Displays] > <More SK> > {ShowControl}
Create a new event list
<Event> [8] [/] [Enter]
Define the type of input
<Event> [8] [/] {Type} {Network} [Enter]
Create a new event

28 sACN Input
<Event> [2] [Enter]
Assign the sACN address using universe/address format
{sACN} [4] [/] [2] [Enter]
Add the action to execute. Actions can be either a cue, submaster, or macro
{Action} {Sub} [1] {Fader} [Enter]
MIDI Show Control 29
MIDI Show Control
Eos Family consoles can receive MIDI Show Control (MSC) data from Net3 Show Control Gateways and the
built-in MIDI ports on a console or programming wing (when available). There can be up to 32 sources, and
these sources can be assigned Group IDs between 1 and 32. MIDI Show Control is one of many different types
of MIDI signals – MIDI Time Code and MIDI Notes are supported, but described elsewhere in this document.
All other incoming MIDI is ignored.
Eos Family consoles can also transmit MIDI Show Control data.
MIDI Show Control Devices
MIDI Show Control data carries a device ID (MIDI channel) within the data packet. MSC setup, see ShowCon-
trol Setup (on page9), allows you to specify two device IDs: one for reception and one for transmission. This
is different than the ACN Group Tx and Rx IDs, which are the show control gateway source ID and transmitting
ID. The show control gateway, assigned an ACN Group Tx and Rx ID, can send MIDI messages to and from sev-
eral Device IDs all on the same MIDI line.
Only MSC data that matches the MSC Receive Channel in Setup, or an All Call ID (127), will be interpreted by
your console.
All outgoing MSC data contains the specified transmit device ID, as specified in Setup, see ShowControl
Setup (on page9).
Eos Family Command Interpretation
MIDI Show Control commands contain a Command Format, or device type that is intended to receive a mes-
sage. Eos Family devices will respond to Lighting—General messages. All other command formats are ignored.
Eos Family consoles can receive the following MSC commands:
Go - runs a cue.
Stop - pauses a cue.
Resume - resumes a paused cue.
Set - controls a submaster, playback, or Grandmaster.
Fire - runs a macro.
In addition to the command and command format, the MSC commands also contain places for transmitting
devices to provide additional data, or data fields, which further specify the intended action, like a submaster
number. When Eos Family consoles output MSC, these fields cannot be edited and correspond to the cue, sub-
master, or macro that is being executed.
The cue-related commands (go, stop, resume) have three fields – Cue Number, Cue List, and Cue Path. Cue
Path is not used by the console. Cue Number and Cue List are optional fields – if they are not provided, the con-
sole runs the next cue on the master fader on the console. The Cue List and Cue Number field, if provided,
should match a cue list and/or cue number on the console.
In the command/ effect tables below, if a field is present in the MSC data, the name is indicated (such as
“Cue”). If it is not present in the data, a “-” is indicated.
Go
When accompanying a MIDI “Go” command, data for the following fields will result in the following actions:
Cue Data Field List Data Field Action
Cue List Runs the specified cue in the specified cue list
Cue - Runs the specified cue in cue list 1
- List Runs the next cue in the specified list
- - Runs the next cue in cue list 1
30 MIDI Show Control
Stop
When accompanying a MIDI “Stop” command, data for the following fields will result in the following actions:
Cue Data Field List Data Field Action
Cue List Stops the specified cue & list (if running)
Cue - Stops the running cue in cue list 1
- List Stops the current cue from the specified list
- - Stops the running cue on the master fader of the console that received the command
If a cue is not currently running (or already stopped), the Stop command will trigger Back, fading back to the
previous cue.
Resume
When accompanying a MIDI “Resume” command, data for the following fields will result in the following
actions. If there are no stopped cues, this action is ignored.
Cue Data Field List Data Field Action
Cue List Resumes the specified cue & list (if stopped)
Cue - Resumes the specified cue in the default cue list
- List Resumes the current cue in the specified list
- - Resumes all stopped cues
Set
The “Set” command allows MSC to control specific faders using both a numeric control value (which specifies
the fader number) and a data field (which controls the level: 0-100). Control values are as follows:
Control Value Data Field Indication
1-127 0-100 Submaster 1-127
128 0-100 Primary playback in
129 0-100 Primary playback out
510 0-100 Grandmaster
All other control values are ignored.
Note: See Hexadecimal and MIDI ShowControl Formatting (on the facing page) for inform-
ation on formatting MIDI messages.
Fire
This command fires a macro. MSC supports macros 1 through 127 only. Therefore a numeric value of 1 - 127
followed by 00 (in hex) would accompany this command.
Sending MIDI Show Control
When MSC Transmit is enabled in Setup (see ShowControl Setup (on page9)), the console will send MIDI
Show Control commands to the specified MSC Transmit Channel (or Device ID) that correspond to the con-
sole’s current action. For example, if Cue 1 in List 2 is executed, the console will send a MSC Go command for
Cue 1 List 2.
The console will send the following MSC commands:
Go - runs a cue
Stop - pauses a cue
Resume - resumes a paused cue
Fire - runs a macro

MIDI Show Control 31
Set commands (for submasters, the playback pair, and grandmaster) are not transmitted from Eos Family
devices.
Hexadecimal and MIDI Show Control Formatting
When configuring other devices to send or receive MIDI Show Control, you may need to consider the hexa-
decimal data that is sent as a part of a MIDI Show Control command. Many software packages manage this
formatting for you, but some instances require you to enter this manually. The following notes are intended as
a quick reference for common use cases. For a more exhaustive reference on MIDI Show Control message
formatting, please refer to the book referenced at the beginning of this guide – Show Networks & Control Sys-
tems by John Huntington.
Structure
A MIDI Show Control string can be written as a short hexadecimal message.
An example string would be:
F0 7F 01 02 01 01 31 00 31 F7
There is a structure to these strings – this is what the same string looks like with the parts that can be modified
identified in brackets:
F0 7F[device_ID]02 [command format] [command] [command_data]F7
Note: For Eos Family products, the command format field is always 01, for Lighting – General.
The following commands discussed earlier in this document have the following command codes:
Go - runs a cue = Command 01
Stop - pauses a cue = Command 02
Resume - resumes a paused cue = Command 03
Set - controls a submaster, playback, or Grandmaster = Command 06
Fire - runs a macro = Command 07
The other parts of the string are standardized. F0 7F and the ending F7 are parts of the standard MIDI System
Exclusive message format. The 02 specifies the protocol is MIDI Show Control.
Go, Stop, Resume
The cue commands can target any available cue on the console. Hexadecimal doesn’t natively handle decimal
numbers, so the numbers are sent in a different format (ASCII text encoding).
There are four simple rules for formatting:
1. Specify the cue number first, and then the cue list
2. Place a “3” in front of every digit of the number
3. Place a “2E” wherever there is a decimal
4. Place a “00” when separating a cue number from the cue list
Examples include:
Eos - Cue 1/54
MSC Formatted - 35 34 00 31
Eos - Cue 4/101
MSC Formatted - 31 30 31 00 34
Eos - Cue 10/55.6
MSC Formatted - 35 35 2E 36 00 31 30
Eos - Cue 3/ (no cue number provided – play next cue in list 3)

32 MIDI Show Control
MSC Formatted - 00 33
Eos- Cue 1 (no cue list provided – assumes cue list 1)
MSC Formatted -31 00
For example, sending Device ID 3 a GO command for cue 5.4 in list 99 would be formatted as follows:
F0 7F 03 02 01 01 35 2E 34 00 39 39 7F
Setting Submasters, Playback Masters, or Grandmasters
Submasters from 1-127 are represented as values 01 to 7F
The master playback “up” fader (128) is represented as two hexadecimal numbers in a row - 00 01.
The master playback “down” fader (129) is represented as two hexadecimal numbers in a row – 01 01.
The grandmaster fader (510) is represented as two hexadecimal numbers in a row – 7E 03.
There are three simple rules for formatting:
1. Level values are sent as 0-100 in decimal form, which would be sent as 00-64 in hexadecimal
2. Submasters – send the fader number, followed by 00 (in hex), then the level value, and finally 00 (in
hex).
For example, sending submaster 1 to 100% would be sent as 01 00 64 00.
3. Playback Masters and Grandmasters – send the fader number, followed by 00 (in hex), and then the
level value. You do not need to end the command with 00.
For example, setting the grandmaster to 75% would be sent as 7E 03 00 4B
For example, sending Device ID 3 a SET command for sub 4 to 0% would be formatted as follows:
F0 7F 03 02 01 06 04 00 00 00 7F
As a second example, sending Device ID 10 a SET command for the playback master “up” fader to 100%
would be formatted as follows:
F0 7F 0A 02 01 06 00 01 00 64 7F
Firing Macros
Macros are relatively simple. Only macros 1-127 can be triggered, represented by one hexadecimal byte.
Eos - Macro 12
MSC Formatted - 0C
For example, sending Device ID 5 a FIRE command for macro 17 would be formatted as follows:
F0 7F 05 02 01 07 11 F7
String Interface 33
String Interface
RS-232, UDP serial strings, ACN EPI strings, and OSC commands can be sent and received from the console.
Enabling Serial
You can configure sending and receiving the various serial protocols supported by the desk in Setup, see Show
Control Setup (on page9). Most string protocols are disabled by default.
The Eos Configuration Utility, or ECU, also contains settings that control which network interface is allowed to
send and receive UDP, ACN Strings, and OSC messages. See ECU>Settings>Network>Interface Protocols
for more information.
Receiving Eos Serial Commands – RS232, UDP, and ACN EPI Strings
All text will be queued up until either a carriage return (hex 0D), a “\r”, or a “#”, is encountered in the string to
show the end of the command.
Command Line
If the text begins with a “$”, the text that follows until the carriage return (hex 0D), a “\r”, or a “#” will be sent
to the command line for user 0 and processed as if that user had typed it. Commands can be directed to a spe-
cific user command line by adding <UX> at the beginning of the string, where X is replaced by the intended
user number. The carriage return (hex 0D), a “\r”, or a “#” will also act as the [Enter] key for the command
line.
For Example:
$ Chan 1 Color Palette 1# - puts channel 1 into color palette 1 on the background user (User 0).
<U2> $ Chan 1 Thru 10 At Full /r - sets channels 1 through 10 to full manually on User 2’s command
line.
Note: It is best practice to place spaces after both the <UX> and the $ symbol to ensure the com-
mand is interpreted properly.
Note: Command line text needs to use the same language as your console. Language settings are
found in ECU>General.
Event Handler (Non-Command Line)
All other text that doesn’t start with a “$” will be sent to the console’s event handler. Here are a few
examples:

34 String Interface
Go 1 - fire cue list 1
Cue 1 2 - run cue 2 from list 1, on the appropriate fader
Cue 1 - fire pending cue from list 2
GoCue 0 1 - clear cue list 1 (fires cue 0)
Release 1 - release cue list 1
Off 1 - turn cue list 1 offk
Resume 1 - resume cue list 1
Assert 1 - assert cue list 1
Stop 1 - stop playback 1
Stop Cue 1 2 - stop cue 2 from list 1 if it is running
Stop - stops all
Resume Cue 1 2 - resume cue 2 from list 1 if it is stopped
Resume - resumes all
SubAssert 1 - assert submaster 1
SubUnload 1 - unload sub 1
SubDown 5 - presses sub 5’s bump button down
SubUp 5 - releases sub 5’s bump button
Note: Faders are accessed by adding 1000 to the fader number. This would affect any palettes or
presets assigned to the fader. Subs must be used with their sub number only.
Example:
SubMove 1 25 - moves Sub 1 to 25%
SubMove 1001 50 - moves Fader 1 to 50%
SubMove 1011 75 - moves Fader 11 (fader 1 on page 2) to 75%
SubDown 1101 - presses Fader 101’s bump button down (fader 1 on page 10)
FaderMove_CueList 1 50 - sets cue list 1’s playback fader to 50 percent
Grandmaster 1 100 - set Grandmaster 1 to full (there’s currently only 1 Grandmaster)
Macro 1 - fires Macro 1
Note: Text requires either a carriage return (hex 0d), “\r”, or “#” to terminate the command line.
Receiving UDP Strings
UDP strings must be sent to the console’s IP address (unicast) and designated port to be processed. Multicast
and broadcast UDP strings are not supported. To find your console’s IP address, clear the command line and
press [About]. For more information on About see the About section of your console’s manual. The UDP Rx
port is configured in Setup. Please see ShowControl Setup (on page9) for more setup information.
Receiving ACN Strings
To receive ACN strings, {String RX} must be enabled in Setup>Show>ShowControl, and the ACN com-
ponent name must be set in the {String TX IP Address} field with the R: prefix.
For example, the ACN component name could be Paradigm.

String Interface 35
Bidirectional ACN Strings (Send and Receive)
To send and receive ACN strings from devices such as a Net3 Gateway, both
{String TX} and {String RX} must be enabled, and the ACN component name must be set in the {String TX IP
Address} field with the B: prefix.
For example, the ACN component name could be Net3 4-Port Gateway.
If you have multiple devices sending or receiving strings, separate each entry in the {String TX IP Address} field
with a comma.
Receiving via the I/O Gateway
For your console to receive serial data from a Net3 I/O Gateway, the Serial Port Group ID assigned at the gate-
way must match the String RX Group ID in Setup, and String RX setting in Setup must be Enabled. See Show
Control Setup (on page9).
Receiving Serial Commands to Trigger Events
All text will be queued up until either a carriage return (hex 0D), a “\r”, or a “#”, is encountered in the string to
show the end of the command. The custom string is case-sensitive.
RS232, UDP, and ACN Strings
The sending device needs to add SC (case-sensitive) to the beginning of the string in order for it to be correctly
processed.
For Example:
SC Hello# - sends the string “Hello” to the show control display via RS232, UDP, or ACN
OSC Strings
For OSC commands that are intended to be processed by the Show Control display, the sending device needs
to start the string with /eos/sc/ in order for the console to correctly process it.
For Example:
/eos/sc/Hello – sends the string “Hello” to the show control display via OSC
Event Commands
When a command is received that starts with the prefixes listed above, the console will look for a matching
serial event defined in a Show Control List. Custom string input from any serial source (RS232, UDP, ACN,
OSC) can be used to trigger the following actions:
Cue - fire a cue
Submaster - bumps a submaster, turns a submaster on or off, sets a submaster to a fader percentage.
(Note that OSC cannot be used set fader levels via custom serial commands).
Macro - fire a macro
Programming Serial Events
Open the show control display.
[Displays]><More SK>>{ShowControl} or [Tab] + [1][1]
Create a new event list.
<Event> [9] [/]
Specify the event list as Network.
36 String Interface
<Event> [9] [/] {Type} {Network} [Enter]
Enable the list (External only).
<Event> [9] [/] {External} [Enter]
Select Input String and type the appropriate UDP or OSC command
{Input String} Hello [Enter]
Note:
OSC
Type in the command you want the console to listen for.
The sending device needs to start the command with /eos/sc/ in order for the console to listen
to it. For example, type Hello in the Input String field. On your OSC sending device, have it
send /eos/sc/Hello.
Note:
UDP
Type in the string you want the console to listen for.
The sending device needs to add “SC” (case-sensitive) to the beginning of the string in order
for it to be correctly processed.
The string needs to be terminated with a carriage return (hex 0D), \r, or #. For example, type
Hello in the Input String field. On your UDP sending device, have it send SC Hello#
To set the submaster fader percentage using UDP, you need to include a number (0-100) after
the string. For example, blue 50#.
Then add the action to execute. Actions can be a cue, submaster, or a macro.
{Action} {Cue} [1] [Enter]
Sending Serial Commands – RS232, UDP, and ACN Strings
Eos Family consoles have the ability to send strings, which can be used to send commands to other devices,
such as Paradigm®, Crestron®, and other media servers. The ability to send and receive strings can be done
via RS232 ports (via a Net3 I/O Gateway), network UDP messages, and ACN String EPI. Please see ShowCon-
trol Setup (on page9) for more setup information.
Note: The console can be configured to send either ACN strings or UDP strings, as they share the
String Tx IP Address field. A combination of device names for ACN and IP addresses for UDP is not
supported. Combinations of I/O Gateways and either UDP or ACN Strings are allowed.
Note: If you are trying to control Paradigm via UDP, ACN Strings, or RS-232, please reference the
Paradigm Serial Access Protocol document for additional information.
Sending Strings
There are three ways that your console can send strings: from cues, macros, or user events. String TX must be
set to Enabled in Setup for any strings to be sent.
Termination Characters
All strings sent from Eos Family devices will be appended with a carriage return (CR, 0x0D, or 13).
MIDI String messages will be appended with a line feed and carriage return (LF CR, 0x0A 0x0D, or 10 13).

String Interface 37
Sending from Cues
Cues can be assigned specific user-defined strings to send. When the cue is executed, the string will be sent to
all enabled string interfaces. To assign the string, select the cue and press the {Execute} softkey. A {String}
softkey will be displayed. When {String} is pressed, the alphanumeric keyboard will display. Enter the desired
string, press [Enter] and text entered will be displayed in the external links field of the playback status display.
If there is already a string linked to the selected cue, the string will be displayed for editing. When [Cue] [n]
{Execute} {String} is on the command line, pressing [Next] / [Last] will step through all the strings used in that
show file. You can then modify the displayed string to simplify the process of entering similar strings.
Sending a String to Paradigm
Select the cue that should be executing the string.
[Cue] [1]
Press the {Execute} softkey.
[Cue] [1] {Execute}
New softkeys will appear, press the {Strings} softkey.
[Cue] [1] {Execute} {Strings}
Define the serial string, in this case we will trigger a Macro On in Paradigm.
[Cue] [1] {Execute} {Strings} macro on Lights1 [Enter]
Sending from Macros
A {Send String} softkey is available in the Macro Editor display. Any text entered after the string command in
the macro will be sent to all enabled string interfaces when that macro is fired.
Sending from User Events
{String MIDI TX} is an option in [Setup]>{Show}>{ShowControl}. See ShowControl Setup (on page9).
When {String MIDI TX} is enabled, MIDI Show Control messages will be sent as serial string messages when
certain actions happen at the console.
Those actions are:
A cue is fired.
Example: Cue 1/2 is triggered. The console will send Cue 1 2
A cue is stopped.
Example: Cue 3/1 is stopped. The console will send Stop Cue 3 1
A cue is resumed.
Example: Cue 3/1 is resumed. The console will send Resume Cue 3 1
A sub’s bump button is held down.
Example: Sub 5’s bump button is pressed down. The console will send SubDown 5
A sub’s bump button is released.
Example: Sub 5’s bump button is pressed down. The console will send SubUp 5
A macro is fired.
Example: Macro 1 is fired. The console will send Macro 1
Note: String MIDI Tx is restricted by {MIDI Cue List} in Setup. See ShowControl Setup (on
page9).

38 String Interface
Sending UDP Strings
UDP strings will be sent from the console on an ephemeral (always changing) port number to the destination
port specified in Setup. UDP strings sent to multicast IP addresses are not supported.
Note: The console can be configured to send either ACN strings or UDP strings, as they share the
String Tx IP Address field. A combination of device names for ACN and IP addresses for UDP is not
supported.
Sending ACN Strings
To send ACN strings, {String TX} must be enabled in Setup>Show>ShowControl, and the ACN component
name must be set in the {String TX IP Address} field.
For example, the ACN component name could be Paradigm.
If you have multiple devices sending or receiving strings, separate each entry in the {String TX IP Address} field
with a comma.
Note: The console can be configured to send either ACN strings or UDP strings, as they share the
String Tx IP Address field. A combination of device names for ACN and IP addresses for UDP is not
supported.
Sending via the I/O Gateway
For your console to send serial data to a Net3 I/O Gateway, the Serial Port Group ID assigned at the gateway
must match the String TX Group ID in Setup, and String TX setting in Setup must be Enabled. See ShowCon-
trol Setup (on page9).
MIDI Raw 39
MIDI Raw
Also known as MIDI Strings, MIDI Notes, MIDI Messages, or Channelized Event Data. Originally intended for
communication between musical instruments, MIDI has been adapted for a variety of uses between devices.
Eos Family consoles can send or receive MIDI messages through the built-in MIDI ports (when available).
Net3 Show Control Gateways do not support MIDI RAW Note On/Off, Program Change, and Control Change
functions. Those functions are only supported through the local I/O cards. System exclusive (SysEx) messages,
including MSC, do work with a Show Control Gateway.
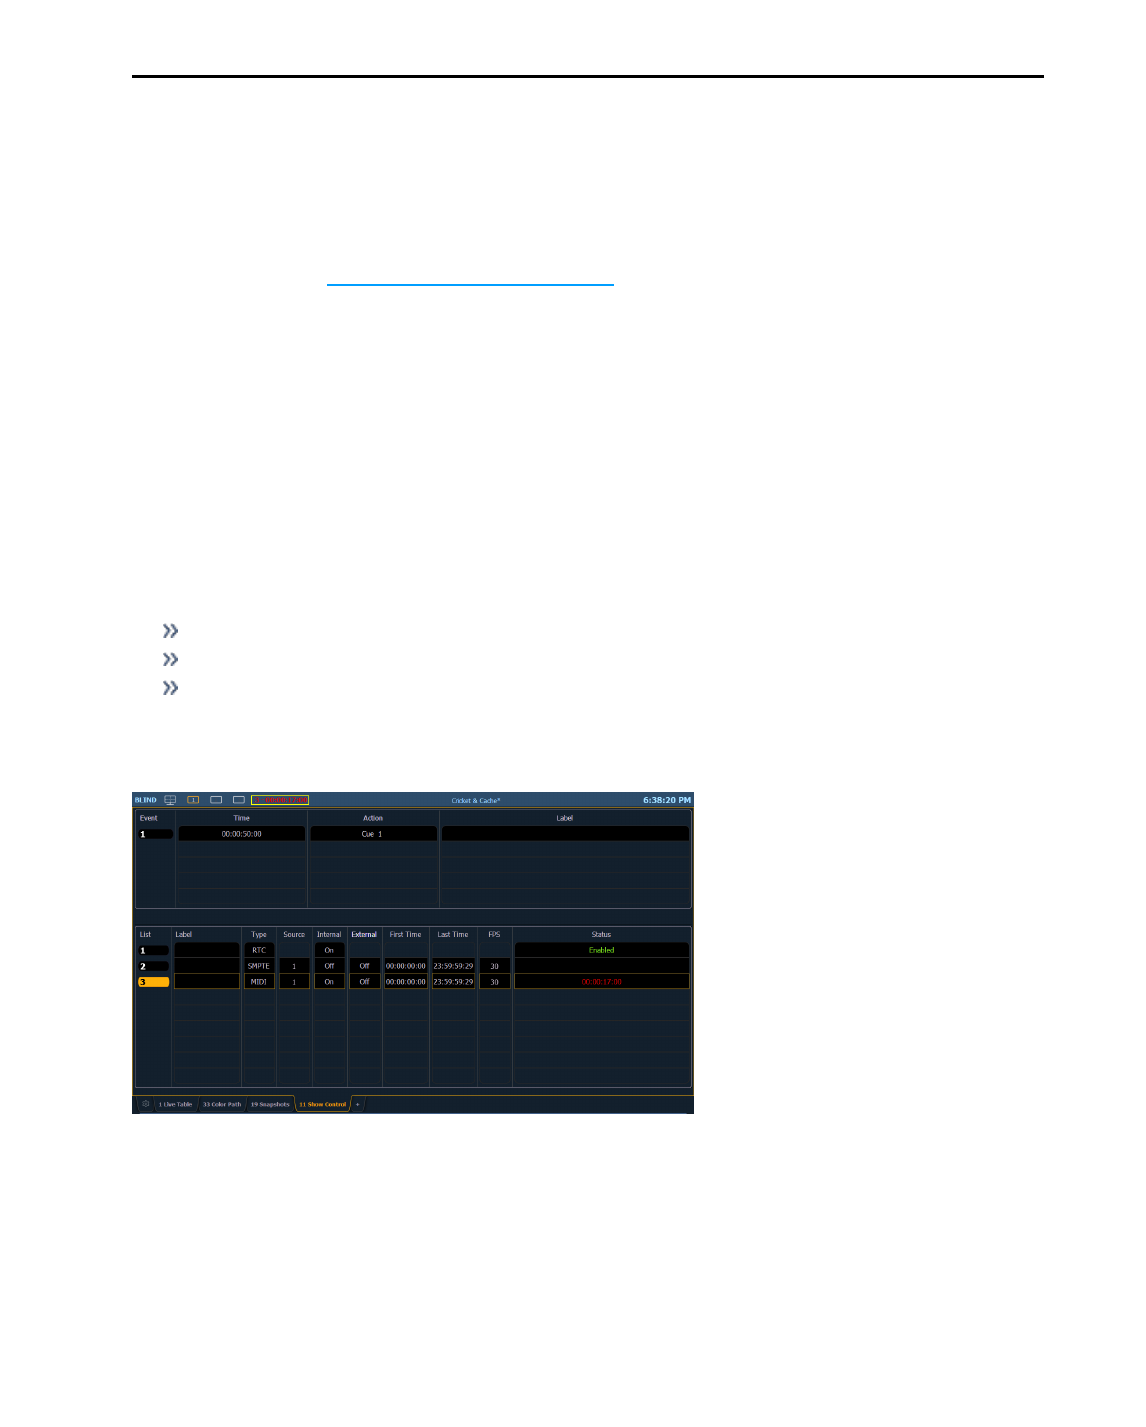
Receiving MIDI
Eos Family consoles can be configured to respond to specific MIDI messages or messages matching a specific
pattern. These are configured in an Event List in the Show Control Display.
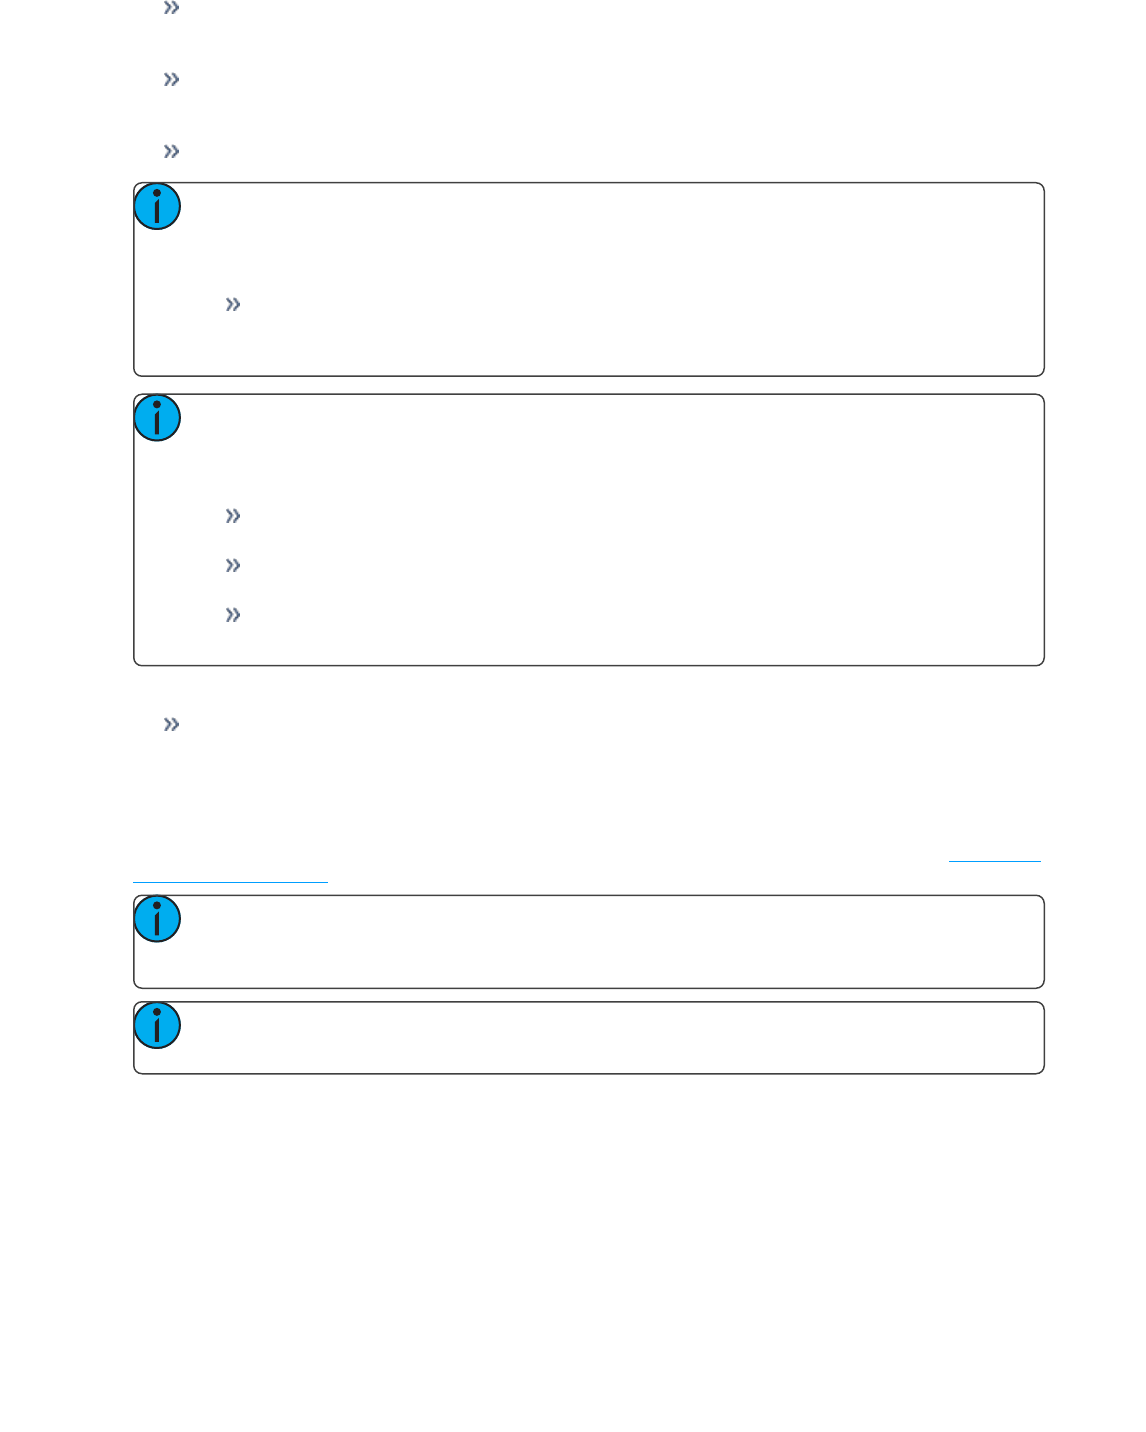
Strings are configured in the MIDI String configuration display, shown below:
MIDI Message Types
The following MIDI messages can be received:
MIDI Note Events (Note On/Note Off) (below)
Program Change Events (on the next page)
Control Change Events (on page41)
System Events (MIDI ShowControl) (on page42)
MIDI Note Events (Note On/Note Off)
Note On and Note Off commands simulate activating (on) and releasing (off) a musical note. The MIDI data
that is expected to be received is shown above the Note selection area, with ‘N’ shown where any valid num-
ber will be considered a match. This display will change as configuration options are selected. When finished
configuring a Note On or Note Off event, press {OK} to store the event. Otherwise, press {Cancel} to undo the
changes.
Message Structure
Note On has a structure of 9A BC DD, where 9 represents the Note On command, A represents the channel
number, B represents the octave of the note, C represents the note value, and DD represents the velocity.
Note Off has a structure of 8A BC DD, where 8 represents the Note Off command, A represents the channel
number, B represents the octave of the note, C represents the note value, and DD represents the velocity.
40 MIDI Raw
Options
The following options are available:
{Note}
You can choose any musical note name (C-B, chromatic).
{Octave}
You can choose the specific octave for the note (octaves 0-10), or chose Any, and the console will respond
when any octave of the selected note is received.
{Channel}
This should match the MIDI Channel for the note command (1-16 or 0-F). If set to Any, the console will respond
when any MIDI channel is sent a note command.
{Velocity} and {VelocityThreshold}
In MIDI, the velocity represents the relative loudness or intensity of the note, where 1 (01) is very soft, or ppp,
and 127 (7F) is very loud, or fff. (A MIDI Note On with a velocity of 0 is a special case and is treated as a Note
Off command).
The Velocity setting specifies the exact velocity in the MIDI Note message that must be received for the action
to be executed. Whenever the exact velocity is received, regardless of threshold, the event will fire.
The Threshold is an optional way to specify the minimum velocity that must be received for the action to be
executed. In other words, the MIDI note velocity must be greater than or equal to the threshold value. If the
threshold is 0, this parameter is ignored.
Examples:
Velocity 127, Threshold 0 – The console is looking for an incoming MIDI note with a velocity of 127 (7F).
The threshold is ignored.
Velocity 127, Threshold 50 – The console is looking for an incoming MIDI note with a velocity that is
greater than or equal to 50 (hex 32)
Velocity 1, Threshold 50 – The console is looking for an incoming MIDI note with a velocity that is
greater than or equal to 50 (hex 32). If the note with a velocity of 1 is received, the event will also fire as
it matches the velocity parameter.
Velocity 0, Threshold 50 - The console is looking for an incoming MIDI note with a velocity that is
greater than or equal to 50 (hex 32). If the note with a velocity of 0 is received, the event will also fire as
it matches the velocity parameter.
Velocity 0, Threshold 0 – The console is looking for an incoming MIDI note that has a velocity of 0.
Threshold is ignored.
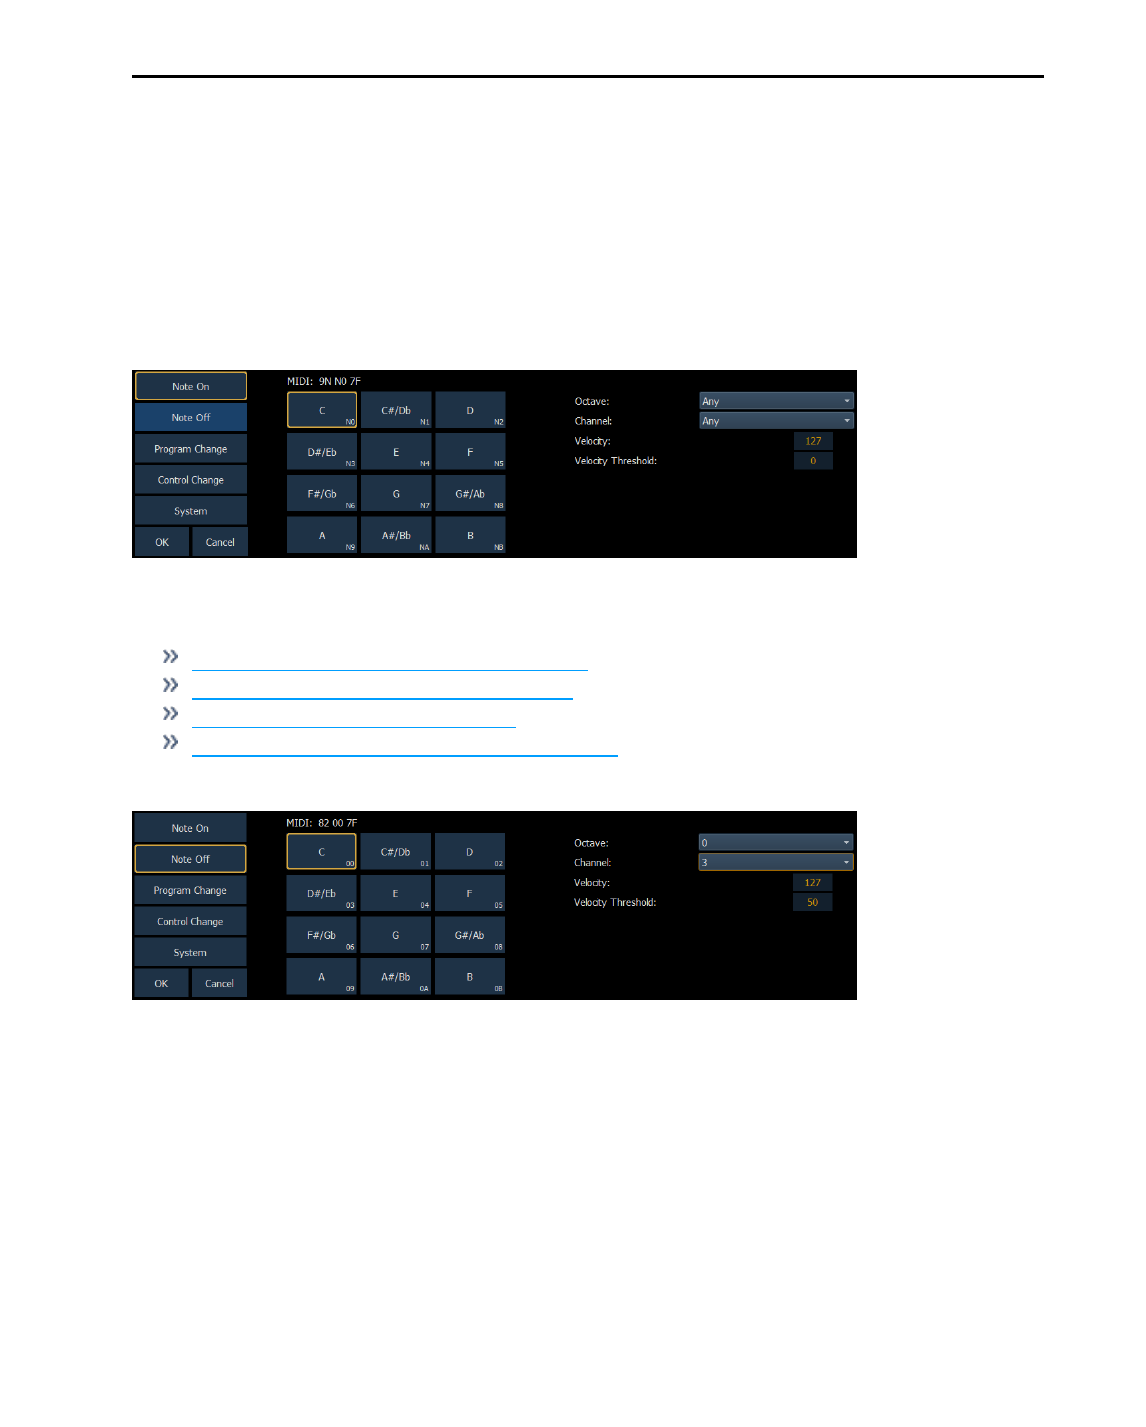
Program Change Events
Program Change commands typically represent a change in the MIDI voice or instrument type that should be
used for a particular MIDI channel. Similar to MIDI Note commands, the MIDI data that is expected to be
received is shown in the CIA and changes as you select event parameters. When finished configuring the pro-
gram change event, press {OK} to store the event. Otherwise, press {Cancel} to undo the changes.
MIDI Raw 41
Message Structure
Program change messages have the structure CN XX, where N represents the MIDI channel number and XX
represents the program number.
Options
The following options are available:
{Channel}
This should match the MIDI Channel for the note command (1-16, 0-F). If set to Any, the console will respond
when any MIDI channel is sent a note command.
{Program Number}
The program number is any value between 0-127 (0-7F). Many devices will display this as 1-128 – if this is the
case for your other device, subtract one from the desired program number.
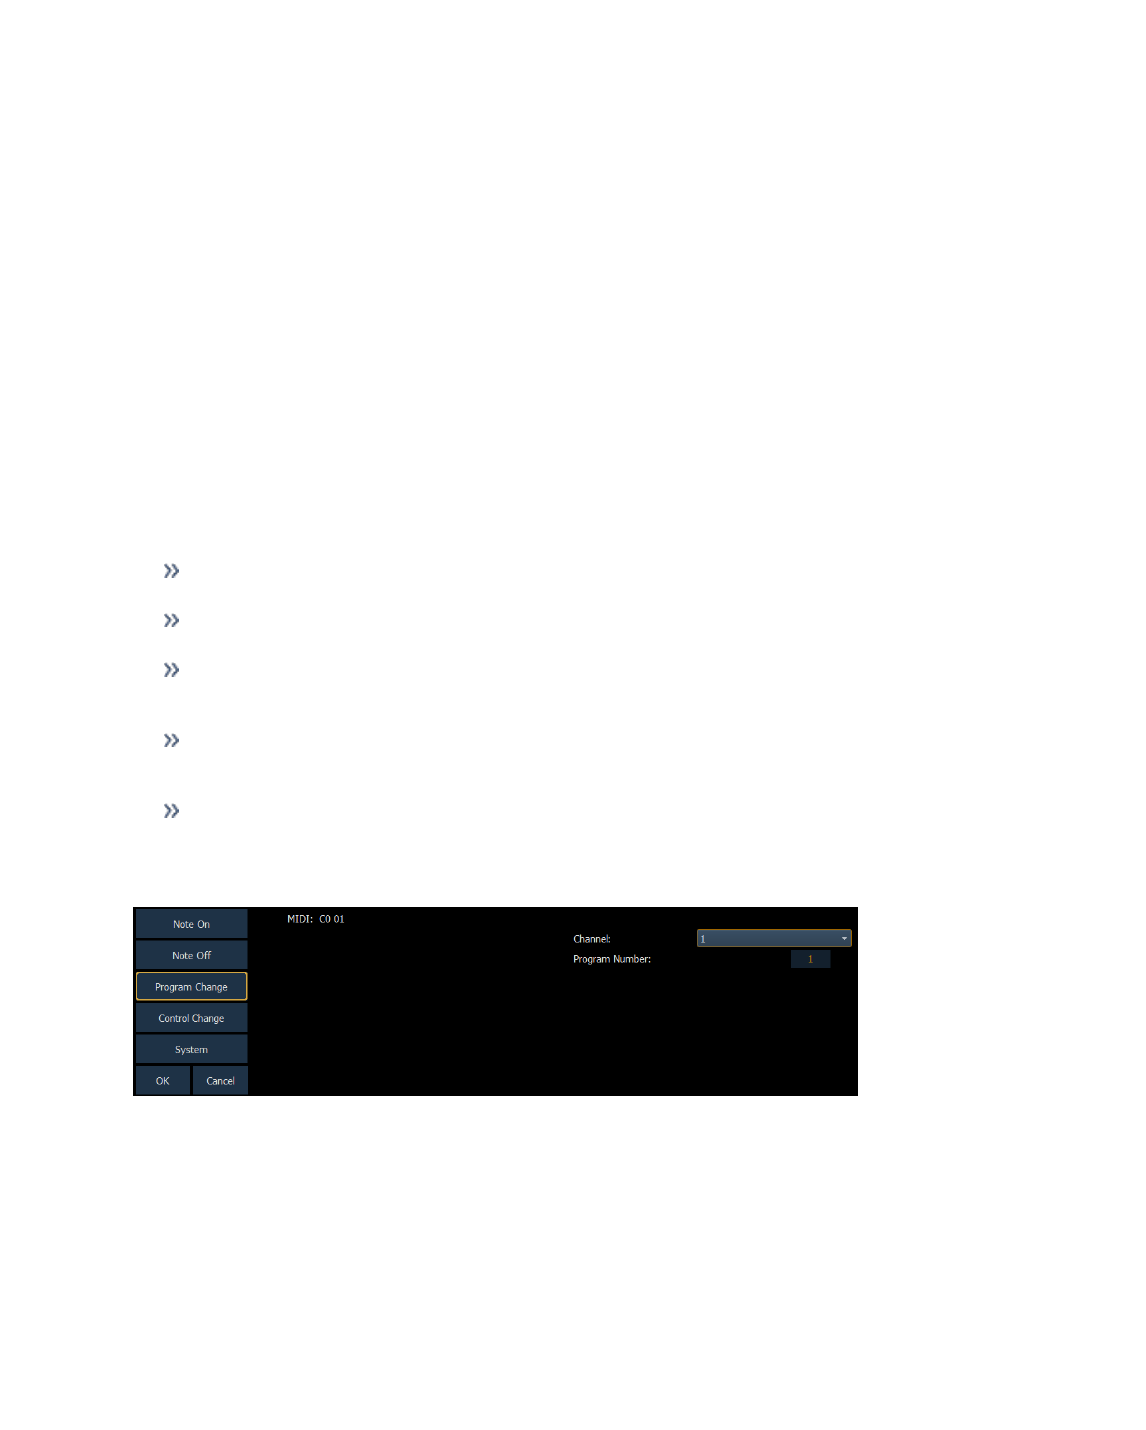
Control Change Events
Control Change commands were designed to represent specific actions on MIDI devices, like pedals actuations
and effects. For example, the Damper Pedal on a keyboard is often represented by controller number 64 (hex
40). Similar to MIDI Note commands, the MIDI data that is expected to be received is shown in the CIA and
changes as you select event parameters. When finished configuring the control change event, press {OK} to
store the event. Otherwise, press {Cancel} to undo the changes.
Message Structure
Program change messages have the structure BN XX YYY, where N represents the MIDI channel number, XX
represents the controller number, and YY represents the data byte.
Options
The following options are available:
{Channel}
This should match the MIDI Channel for the note command (1-16, 0-F). If set to Any, the console will respond
when any MIDI channel is sent a note command.
{Controller Number}
The controller number is any value between 0-127 (00-7F). Many devices will display this as 1-128 – if this is
the case for your other device, subtract one from the desired controller number.
{Data}
The data parameter is any value between 0-127 (00-7F). Many devices will display this as 1-128 – if this is the
case for your other device, subtract one from the desired data byte.
42 MIDI Raw
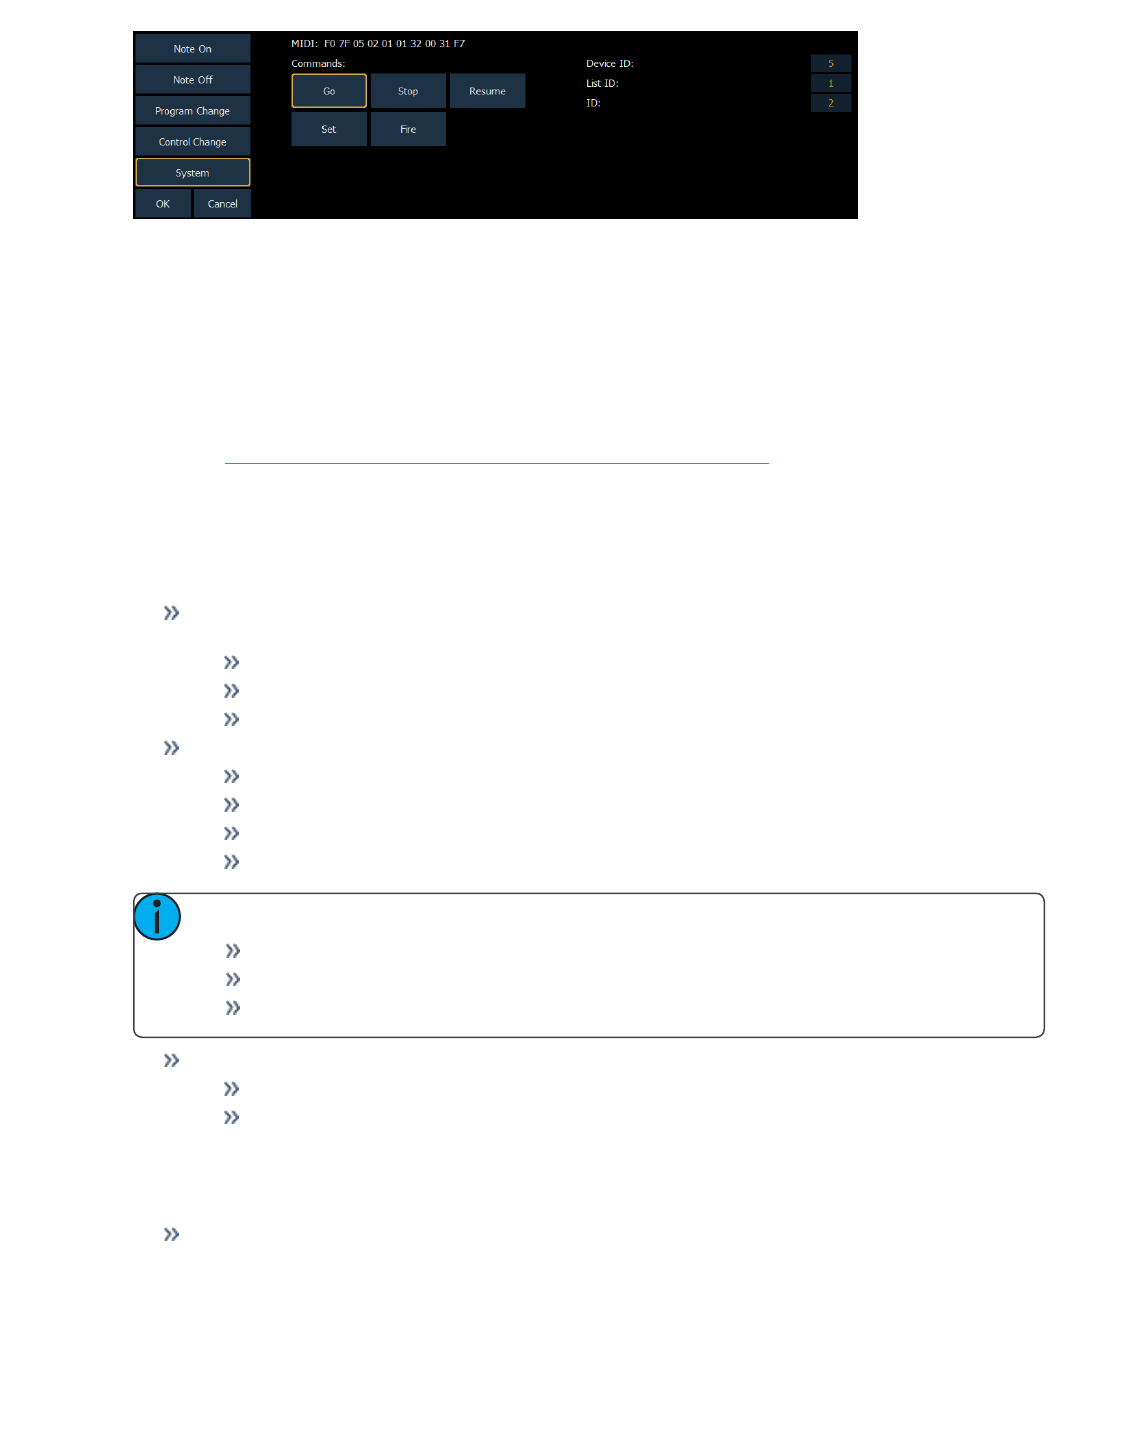
System Events (MIDI Show Control)
System commands allow you to specify specific MIDI Show Control messages that can be received and inter-
preted by the console. While any MIDI Show Control command that matches the configured Device ID will be
executed normally, this type of event setup allows you to respond to messages sent to different device IDs, or
take additional actions based on a show control command.
The MIDI data that is expected to be received is shown in the CIA and changes as you select event parameters.
When finished configuring the system event, press {OK} to store the event. Otherwise, press {Cancel} to undo
the changes.
Message Structure
Please see Hexadecimal and MIDI ShowControl Formatting (on page31) for more information on the
show control message structures.
Options
The following options are available:
{Commands}
Go, Stop, Resume - represents triggering a cue, stopping a cue, and resuming a cue, respectively. The
following fields are available:
Device ID - the MIDI Show Control device ID that should respond to the message
List ID - the cue list
ID - the cue number
Set - represents controlling a fader. The following fader targets are available:
Subs
Grandmaster
Master Fader Up - the level of the Up fader on the master playback pair
Master Fader Down - the level of the Down fader on the master playback pair
Note: The following fields are available for the fader targets:
Device ID – the MIDI Show Control device ID that should respond to the message
ID (subs only) – the number of the submaster fader
Level – the specified level of the fader from 0-100% (0-127 decimal, 00-7F hex)
Fire – represents executing a macro. The following fields are available:
Device ID – the MIDI Show Control device ID that should respond to the message
ID - the macro number to be fired
Creating a MIDI Event List and Event
Open the Show Control Display
[Displays]>[More SK]>{ShowControl}

MIDI Raw 43
Create a new Event List and choose the Network type
<Event> [6] [/] {Type} {Network} [Enter]
Enable the list to respond to {External} sources
<Event> [6] [/] {External} [Enter]
Creating a Note On Event
Create a new event and open the MIDI String configuration screen
<Event> [1] [More SK] {MIDI String}
Select the {Note On} type
{Note On}
Select the MIDI Note value, for example, Bb (B-flat)
{A#/Bb}
Select the MIDI Note octave or leave it as Any. In this example, we’ll choose Any.
<Octave> {Any}
Select the MIDI channel
<Channel> {1}
Select the velocity
<Velocity> {127}
Optionally, select the velocity threshold so that the event will be triggered if the message is above this level. To
disable velocity threshold, leave it at zero.
<VelocityThreshold> {0}
Press {OK} to save the event
{OK}
Specify the action for the event
<Event> [1] [Macro] [1] [Enter]
Creating a Note Off Event
Create a new event and open the MIDI String configuration screen
<Event> [2] [More SK] {MIDI String}
Select the {Note Off} type
{Note Off}
Select the MIDI Note value, for example, Bb (B-flat)
{A#/Bb}
Select the MIDI Note octave or leave it as Any. In this example, we’ll choose Any.
<Octave> {Any}
Select the MIDI channel
<Channel> {1}

44 MIDI Raw
Select the velocity
<Velocity> {0}
Optionally, select the velocity threshold so that the event will be triggered if the message is above this level. To
disable velocity threshold, leave it at zero.
<VelocityThreshold> {1}
Press {OK} to save the event
{OK}
Specify the action for the event
<Event> [2] [Macro] [2] [Enter]
Creating a Program Change Event
Create a new event and open the MIDI String configuration screen
<Event> [3] [More SK] {MIDI String}
Select the {Program Change} type
{Program Change}
Select the MIDI channel
<Channel> {7}
Select the program number
<Program Number> {3}{2}
Press {OK} to save the event
{OK}
Specify the action for the event
<Event> [3] [Cue] [1][0] [Enter]
Creating a Control Change Event
Create a new event and open the MIDI String configuration screen
<Event> [4] [More SK] {MIDI String}
Select the {Control Change} type
{Control Change}
Select the MIDI channel
<Channel> {7}
Select the controller number
<Controller Number> {6}{4}
Specify the data value
<Data> {1}{2}{7}
Press {OK} to save the event
{OK}

MIDI Raw 45
Specify the action for the event
<Event> [4] [Sub] [1] {On} [Enter]
Sending MIDI
MIDI messages can be sent from cues and subs (using {Execute}) or from a Macro.
Cues and Subs
After selecting a cue and pushing {Execute}, the {MIDI Raw} softkey becomes available. Notes can either be
input using hexadecimal values (00-FF) or decimal (0-255) values depending on the connected device. The con-
sole will default to hexadecimal format. To use decimal format, begin the MIDI string with “D”.
The string will be sent any time the cue is executed or the submaster is bumped.
Sending a MIDI Raw String from a Cue or Sub
Hexadecimal Format
Select a cue or sub.
[Cue] [1]
Press the {Execute} softkey.
[Cue] [1] {Execute}
New softkeys will appear, press the {MIDI Raw} softkey.
[Cue] [1] {Execute} {MIDI Raw}
Define the MIDI string, in this case we will use Hexadecimal to send a Note On command for note C3 to chan-
nel 1 with a velocity of 127.
[Cue] [1] {Execute} {MIDI Raw} 91 3C 7F [Enter]
Decimal Format
Select a cue or sub.
[Sub] [1]
Press the {Execute} softkey.
[Sub] [1] {Execute}
New softkeys will appear, press the {MIDI Raw} softkey.
[Sub] [1] {Execute} {MIDI Raw}
Define the MIDI string, in this case we will use decimal to send the same command as before - a Note On com-
mand for note C3 to channel 1 with a velocity of 127.
[Sub] [1] {Execute} {MIDI Raw} D 145 60 127 [Enter]
Macros
A {MIDI Raw} softkey is available in the macro editor display. Any text entered after the string command in the
macro will be sent to all string interfaces when that macro is fired. The same syntax applies in macros as they
would in cues – either hexadecimal or decimal values can be entered.

46 MIDI Raw
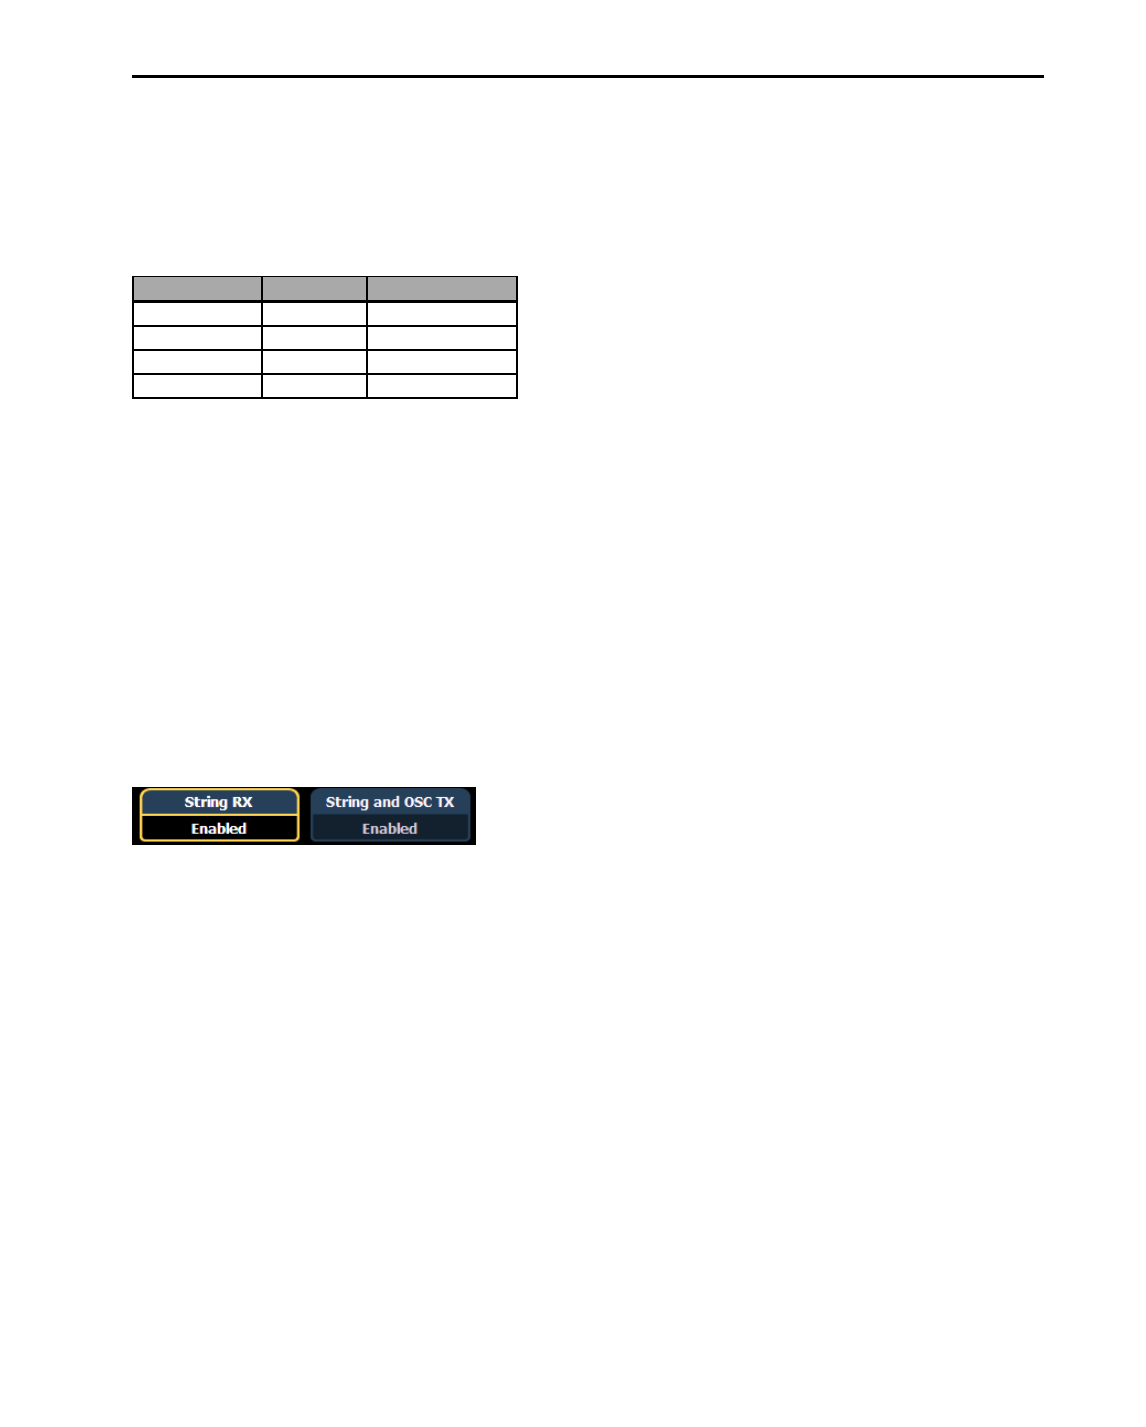
Open Sound Control (OSC) 47
Open Sound Control (OSC)
Open Sound Control (OSC) is a protocol that uses network communication (wired or wireless) to communicate
between varying audio, video and lighting devices.
Using OSC
An OSC command contains a method and an optional list of arguments, or additional data for a particular com-
mand.
For example:
OSC Method Argument Action
/eos/chan 1 [Chan] [1]
/eos/chan/1/full None [Chan] [1] [At] [FL]
/eos/chan/1/at 50 [Chan] [1] [At] [50]
/eos/user/5/chan 1 [Chan] [1] (as User 5)
A device that receives an OSC string will process the command as if the current user on that device typed the
command.
All OSC commands directed to an Eos console must begin with /eos/. To direct an OSC to a particular user for
a single command, the command must begin with /eos/user/<number>/
It is possible to set the OSC User ID via an OSC command, in which case that user ID remains as specified until
changed again.
Configuring OSC
UDP and TCP
Eos supports sending and receiving OSC through a TCP or UDP connection. The specific type used will depend
on the other OSC device or software that you intend to use with Eos. You will need to check that doc-
umentation to confirm the connection types supported.
The console can be set to receive and/or transmit OSC messages. This is configured in Setup>Show>Show
Control with the {String RX} and {String TX} touchbuttons.
In addition, you must enable the {UDP Strings & OSC} option for the network interface you wish to use in the
ECU>Settings>Network>Interface Protocols.
TCP
The preferred method for transmitting and receiving OSC packets is over a TCP connection. Eos will listen for
incoming TCP connections on Port 3032. TCP communication still requires that {String RX} and {String TX} is
enabled in the Show Control section of Setup.
In the ECU>Settings>Network>Interface Protocols, there is an option for changing the OSC TCP mode. By
default, OSC 1.0 is selected. There are two TCP modes available – OSC 1.0 (packet-length headers) and OSC
1.1 (SLIP). Check the documentation for the OSC device you wish to use over a TCP connection to see which
mode it supports.
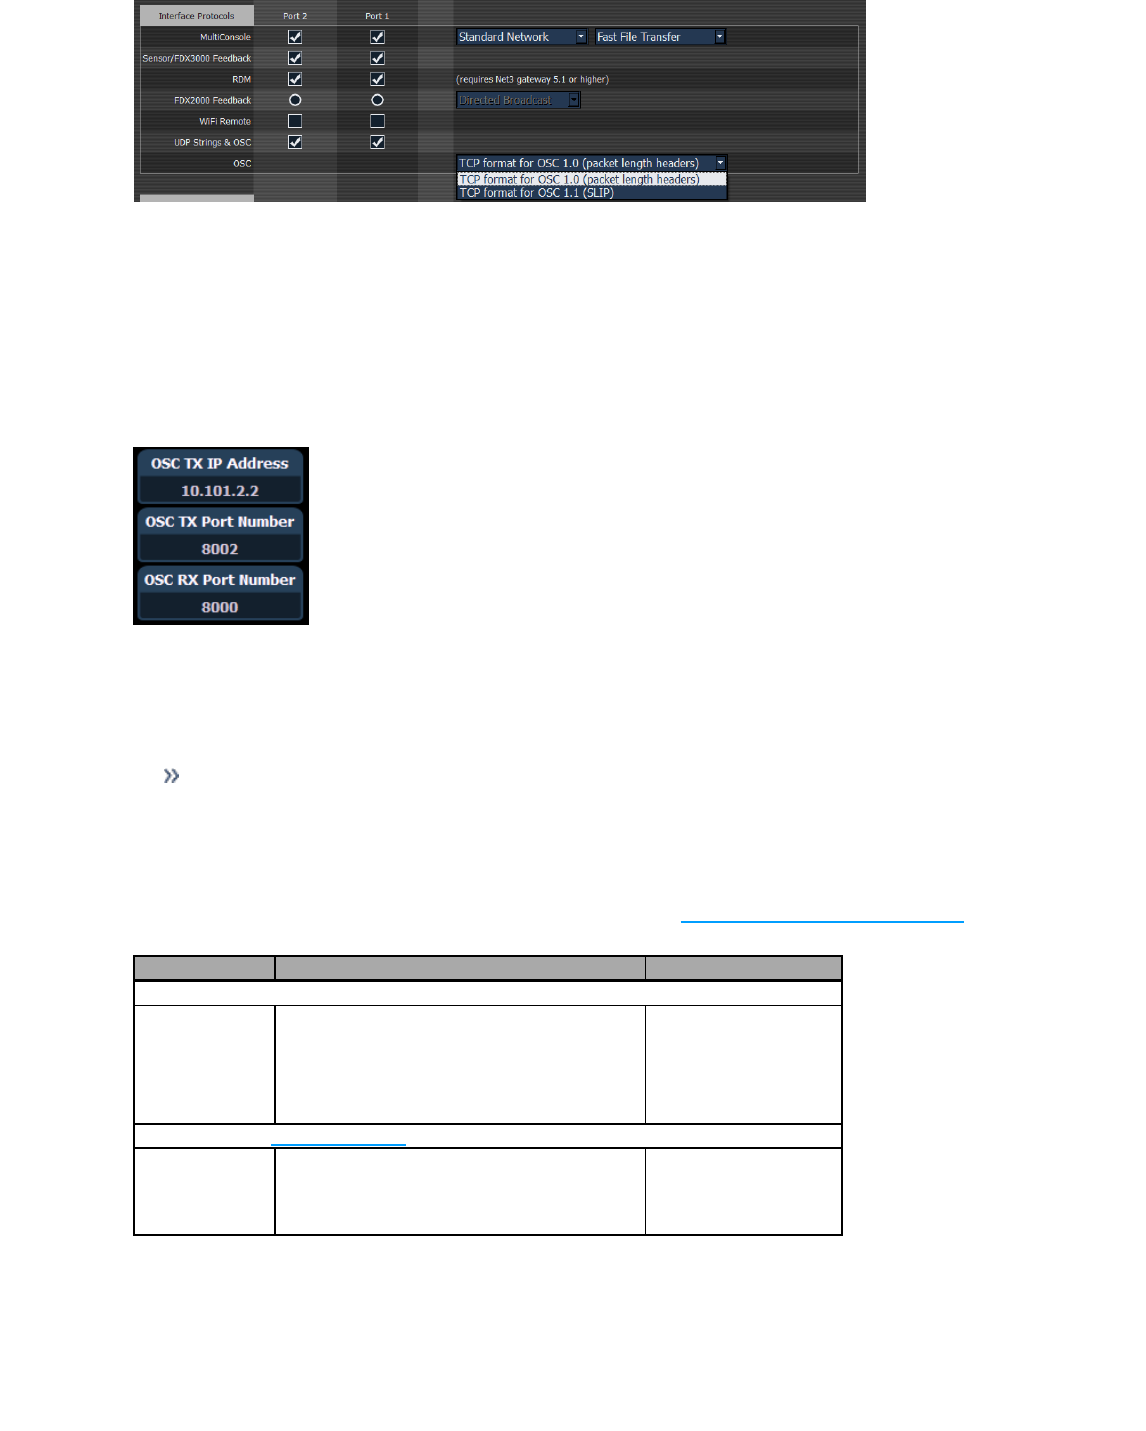
48 Open Sound Control (OSC)
UDP
UDP connections can be used but are not preferred, as messages may be dropped or delivered out of order.
When using UDP, the appropriate IP address and ports must be configured in the Show Control section of
Setup. For systems without specific networking requirements, ETC recommends UDP port assignments in the
range 4703 to 4727 or 8000 and 8001.
The UDP port settings are configured in Setup>Show>ShowControl. In addition to the OSC TX (Transmit)
and RX (Receive) ports, you may wish to set the OSC TX IP address to match the OSC device you are using with
your Eos system so that it can receive OSC messages from the console. It is not currently possible to specify mul-
tiple IP addresses. If you are using TCP OSC, these settings can be ignored.
Local
OSC commands entered in the console (via the Magic Sheet command object) that begin with local: will be
looped back into the console.
For example:
local:/eos/chan/1/at/50
When executed, the console will send itself the OSC command to set Channel 1 to 50%.
Ping
Once you believe that the OSC connection has been established, you can test the connection by sending a
ping message to Eos and it will respond on its configured port. See Implicit OSC Output on page 61 for more
information.
OSC Method Arguments Examples/Comments
Send aping command
/eos/ping None required, any number of arguments can be sent
/eos/ping
/eos/ping=”abcde”
/eos/ping=”abcde”,4
Pingresponse - see Implicit OSC Output for more information
/eos/out/ping Same number of arguments that were sent
/eos/out/ping
/eos/out/ping=”abcde”
/eos/out/ping/=”abcde”,4

Open Sound Control (OSC) 49
Supported OSC Input
All OSC commands must begin with “/eos/...” or “/eos/user/<number>/...”.
Note: All of the command examples given can also use the “/eos/user/<number>/...”. variant.
Chan
Channel commands allow you to select Eos channels. You can directly change the channel level information in
the same command, or use this as a selection tool for other controls like Absolute controls (see below).
OSC Method Arguments Examples/Comments
Select achannel
/eos/chan number for channel to select /eos/chan=1
/eos/chan/<number> number for channel level
/eos/chan/1=75 (useful for mapping to an
OSC slider)
Set channelintensitylevels
/eos/chan/<number>/out
number for button edge: 1.0=down, 0.0=up
(optional)
/eos/chan/1/out
/eos/chan/<number>/home
number for button edge: 1.0=down, 0.0=up
(optional)
/eos/chan/1/home
/eos/chan/<number>/remdim
number for button edge: 1.0=down, 0.0=up
(optional)
/eos/chan/1/remdim
/eos/chan/<number>/level
number for button edge: 1.0=down, 0.0=up
(optional)
/eos/chan/1/level
/eos/chan/<number>/full
number for button edge: 1.0=down, 0.0=up
(optional)
/eos/chan/1/full
/eos/chan/<number>/min
number for button edge: 1.0=down, 0.0=up
(optional)
/eos/chan/1/min
/eos/chan/<number>/max
number for button edge: 1.0=down, 0.0=up
(optional)
/eos/chan/1/max
/eos/chan/<number>/+%
number for button edge: 1.0=down, 0.0=up
(optional)
/eos/chan/1/+%
/eos/chan/<number>/-%
number for button edge: 1.0=down, 0.0=up
(optional)
/eos/chan/1/-%
Set parameter or DMX information
/eos/chan/<number>/dmx number for channel DMX level /eos/chan/1/dmx=255
/eos/chan/<number>/param/
<parameter>
number for parameter level
/eos/chan/1/param/pan=90 (useful for map-
ping to an OSC slider)
/eos/chan/<number>/param/
<parameter 1>/<parameter
2>/...
number for all parameter levels
multiple numbers for each parameter level
/eos/chan/1/param/pan/ tilt=90
(set channel 1 pan & tilt to 90)
/eos/chan/1/param/pan/ tilt=45,90
(set channel 1 pan to 45 & tilt to 90)
/eos/chan/<number>/param/
<parameter>/dmx
number for parameter DMX level /eos/chan/1/param/pan/ dmx=255
/eos/chan/<number>/param/
<parameter 1>/<parameter
2>/.../ dmx
number(s) for parameter DMX level(s) /eos/chan/1/param/pan/tilt/ dmx=255
ChannelOutput Information– see Implicit OSC Output for more information
/eos/out/active/chan
String with active channels (selected) and current
value from first channel
/eos/out/active/chan=
”1-2 [100]”

50 Open Sound Control (OSC)
Absolute Levels
Absolute level commands are used when there is an existing target already selected on the command line of
the OSC user.
OSC Method Arguments Examples/Comments
Set levels
/eos/at number for the level (0-100) /eos/at= 75 (useful for mapping to an OSCfader)
/eos/at/out
number for the button edge 1.0=down, 0.0=up
(optional)
/eos/at/out
/eos/at/home
number for the button edge 1.0=down, 0.0=up
(optional)
/eos/at/home
/eos/at/remdim
number for the button edge 1.0=down, 0.0=up
(optional)
/eos/at/remdim
/eos/at/level
number for the button edge 1.0=down, 0.0=up
(optional)
/eos/at/level
/eos/at/full
number for the button edge 1.0=down, 0.0=up
(optional)
/eos/at/full
/eos/at/min
number for the button edge 1.0=down, 0.0=up
(optional)
/eos/at/min
/eos/at/max
number for the button edge 1.0=down, 0.0=up
(optional)
/eos/at/max
/eos/at/+%
number for the button edge 1.0=down, 0.0=up
(optional)
/eos/at/+%
/eos/at/-%
number for the button edge 1.0=down, 0.0=up
(optional)
/eos/at/-%
Set parameter or DMX information
/eos/at/dmx number for the DMX level
/eos/at/dmx/128 (useful for mapping to an
OSC slider)
/eos/param/<parameter> number for the level
/eos/param/pan=270 (useful for mapping to an
OSC slider)
/eos/param/<parameter>/out
number for the button edge 1.0=down, 0.0=up
(optional)
/eos/param/pan/out
/eos/param/<parameter>/home
number for the button edge 1.0=down, 0.0=up
(optional)
/eos/param/pan/home
/eos/param/<parameter>/level
number for the button edge 1.0=down, 0.0=up
(optional)
/eos/param/pan/level
/eos/param/<parameter>/full
number for the button edge 1.0=down, 0.0=up
(optional)
/eos/param/pan/full
/eos/param/<parameter>/min
number for the button edge 1.0=down, 0.0=up
(optional)
/eos/param/pan/min
/eos/param/<parameter>/max
number for the button edge 1.0=down, 0.0=up
(optional)
/eos/param/pan/max
/eos/param/<parameter>/+%
number for the button edge 1.0=down, 0.0=up
(optional)
/eos/param/pan/+%
/eos/param/<parameter>/-%
number for the button edge 1.0=down, 0.0=up
(optional)
/eos/param/pan/-%
/eos/param/<parameter 1>/
<parameter 2>
number for all parameter levels
multiple numbers for each parameter level
/eos/param/pan/tilt=45 (set pan & tilt to 45)
/eos/param/pan/tilt=45,90 (set pan to 45 & tilt to
90)
Wheel
A wheel can be used to adjust channel levels and parameters.

Open Sound Control (OSC) 51
OSC Method Arguments Examples/Comments
LevelWheel
/eos/wheel/level
number for wheel ticks for the specified
wheel mode (positive or negative)
/eos/wheel/level=1.0 (increase value)
/eos/wheel/level=-1.0 (decrease value)
/eos/wheel/level=4.0 (increase value rapidly)
(defaults to Coarse mode, but wheel mode can be
changed with the /eos/wheel command below)
/eos/wheel number for wheel mode: 0=coarse, 1=fine /eos/wheel=1.0
WheelOutput - see Implicit OSC Output for more information
/eos/out/wheel
number for current wheel mode:
0=coarse, 1=fine
/eos/out/wheel=1.0
IndexedWheels- see Active Parameters
/eos/wheel/<index>/level
number for wheel ticks for the specified
wheel mode (positive or negative)
/eos/wheel/2/level=1.0 (increase value)
/eos/wheel/2/level=-1.0 (decrease value)
/eos/wheel/2/level=4.0 (increase value rapidly)
(defaults to Coarse mode, but wheel mode can be
changed with the /eos/wheel command below)
/eos/wheel/<index> number for wheel mode: 0=coarse, 1=fine /eos/wheel=1.0
Parameter wheelsandencoders
/eos/wheel/<parameter>
number for wheel ticks (positive or neg-
ative)
/eos/wheel/pan=1.0
/eos/wheel/<parameter 1>/
<parameter 2>/...
number for wheel ticks (positive or neg-
ative)
/eos/wheel/pan/tilt=1.0
/eos/wheel/fine/<parameter>
number for fine wheel ticks (positive or
negative)
/eos/wheel/fine/pan=1.0
/eos/wheel/fine/<parameter 1>/
<parameter 2>/...
number for fine wheel ticks (positive or
negative)
/eos/wheel/fine/pan/tilt=1.0
/eos/wheel/course/<parameter>
number for coarse wheel ticks (positive or
nega tive)
/eos/wheel/coarse/pan=1.0
/eos/wheel/course/<parameter
1>/
<parameter 2>/...
number for coarse wheel ticks (positive or
negative)
/eos/wheel/coarse/pan/ tilt=1.0
Switch
Note: Switch is a variant of Wheel with the added functionality of continuously repeating wheel
ticks until a subsequent OSC switch command sets the wheel ticks to zero.
This may be used to continuously tick a wheel while a button is held down, for example. The expec-
ted argument range is -1.0 to 1.0, which affects the tick rate accordingly, but can be a smaller or lar-
ger range for more subtle or rapid movement.

52 Open Sound Control (OSC)
OSC Method Arguments Examples/Comments
Switch/WheelLevel
/eos/switch/level X level wheel ticks
/eos/switch Set OSC wheel mode 0 = Course, 1 = Fine
Switch ModeOutput – see Implicit OSC Output for more information
/eos/out/switch Current OSC wheelmode /eos/out/switch=1.0
Swich/WheelandEncoder Levels
/eos/switch/<parameter> X OSC wheel mode ticks for specified parameter (ex: pan)
/eos/switch/<parameter 1>/
<parameter 2>/...
X OSC wheel mode ticks for specified parameters (ex: red, green,
blue)
/eos/switch/fine/<parameter> X fine wheel ticks for specified parameter (ex: pan)
/eos/switch/fine/<parameter 1>/
<parameter 2>/...
X fine wheelmode ticks for specified parameters (ex: red, green, blue)
/eos/switch/course/<parameter> X course wheel ticks for specified parameter (ex: pan)
/eos/switch/course/<parameter
1>/
<parameter 2>/...
X course wheel mode ticks for specified param- eters (ex: red, green,
blue)
Active Parameters
Note: The parameter <index> is a 1-based index referencing the list of current parameters for the
selected channel(s).Eos will send the parameter name and current value for each active parameter,
so that the wheels on your OSC-enabled device may be labeled appropriately.
OSC Method Arguments Examples/Comments
Wheel
/eos/active/wheel/<index>
number of wheel ticks for the specific
wheel mode (positive or nega- tive)
/eos/active/wheel/1=1.0 (increase value)
/eos/active/wheel/1=-1.0 (decrease value)
/eos/active/wheel/1=4.0 (increase value rapidly)
(defaults to Coarse mode, but wheel mode can be
changed with the /eos/wheel command)
/eos/active/wheel/fine/<index>
number of fine wheel ticks (positive or
nega- tive)
/eos/active/wheel/fine/1=1.0
/eos/active/wheel/course/<index>
number of coarse wheel ticks (positive or
nega- tive)
/eos/active/wheel/coarse/ 1=1.0
Switch
/eos/active/switch/<index>
number of wheel ticks for the specific
switch mode (positive or nega- tive)
/eos/active/switch/1=1.0 (increase value)
/eos/active/switch/1=-1.0 (decrease value)
/eos/active/switch/1=4.0 (increase value rapidly)
/eos/active/switch/1=0.25 (increase value slowly)
(defaults to Coarse mode, but wheel mode can be
changed with the /eos/ switch command)

Open Sound Control (OSC) 53
OSC Method Arguments Examples/Comments
/eos/active/switch/fine/<index>
number of fine wheel ticks (positive or
nega- tive)
/eos/active/switch/fine/1=1.0
/eos/active/switch/coarse/<index>
number of coarse wheel ticks (positive or
nega- tive)
/eos/active/switch/coarse/ 1=1.0
ActiveWheelDataSent byEos- see Implicit OSC Output for more information
/eos/out/active/wheel<number>
2 arguments:
String with parameter name and current
value from first channel
/eos/out/active/wheel/1=
”Intensity”, 100
Direct Selects
OSC direct selects are virtual buttons and are mapped separately than direct selects visible on the console. To
use direct selects, you must first send one of the direct select creation commands. Direct selects are mapped as
a single target type.
Note: Eos will send the description and button labels for all OSC direct selects. See Implicit OSC
Output (on page61)for more information.
OSC Method Arguments Examples/Comments
Direct Select Creation
/eos/ds/<index>/<target type>/
<button count>
/eos/ds/1/chan/10 (create OSC direct select bank
#1 with 10 channel
buttons)
/eos/ds/2/group/25 (create OSC direct select
bank #2 with 25 group but- tons)
/eos/ds/<index>/<target type>/
flexi/<button count>
/eos/ds/1/chan/flexi/10 (create OSC direct select
bank #1 with 10 channel buttons, in flexi mode)
/eos/ds/<index>/<target type>/
<page number>/<button
count>
/eos/ds/1/chan/3/10 (create OSC direct select
bank #1 with 10 channel buttons on page 3)
Can also be used to quick jump to a specific page
/eos/ds/<index>/<target type>/
flexi/<page number>/<button
count>
/eos/ds/1/chan/flexi/3/10 (create OSC direct select
bank #1 with 10 channel buttons on page 3, in
flexi mode)
Can also be used to quick jump to a specific page
Direct Select Paging
/eos/ds/<index>/page/<delta> number for page delta
/eos/ds/1/page/1 (page down by 1)
/eos/ds/1/page/-1 (page up by 1)
/eos/ds/1/page/10 (page down by 10)
UsingDirect Selects
/eos/ds/<index>/<button
index>
number for button edge: 1.0=down, 0.0=up
(optional)
/eos/ds/1/1=1.0 (press first button of OSC
direct select bank #1)
/eos/ds/1/1=0.0 (release first button of OSC
direct select bank #1)
Direct Select Information sent byEos – see Implicit OSC Output for more information
/eos/out/ds/<index>
String argument containing descriptive text for
direct select at <index>: target name, page num-
ber, mode
/eos/out/ds/1/1=
”Channels [1]”
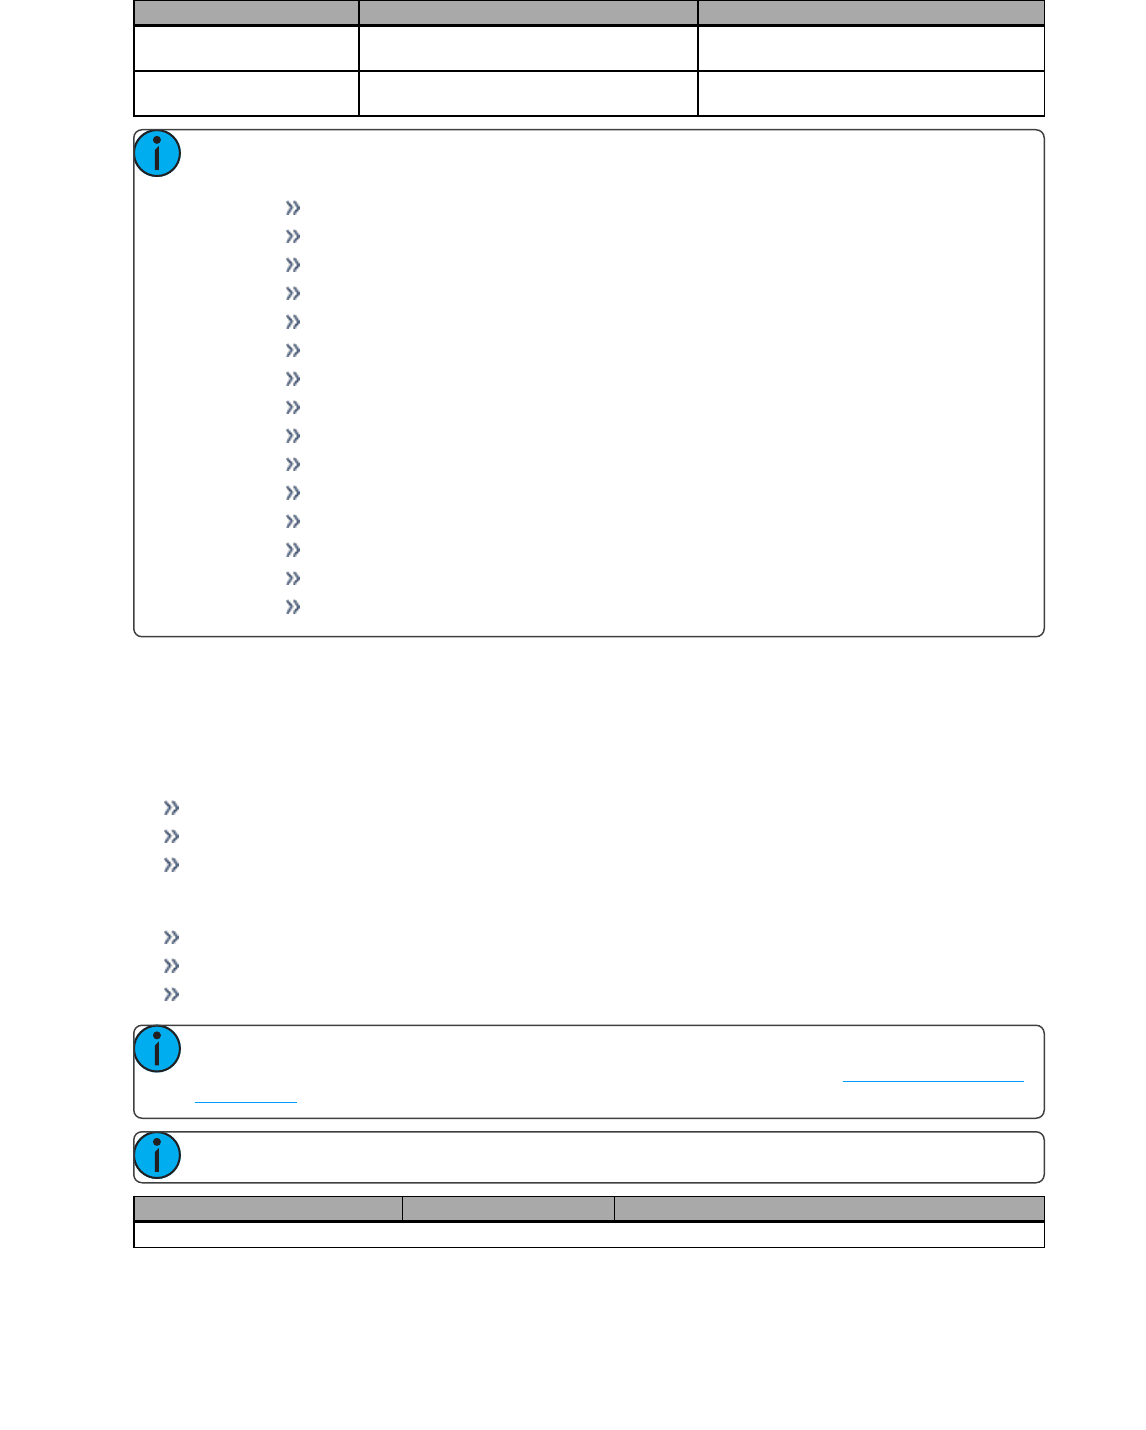
54 Open Sound Control (OSC)
OSC Method Arguments Examples/Comments
/eos/ds/1/1=
”Groups [1 – Flexi]”
/eos/out/ds/<index>/<button
index>
String argument containing target description
(name/number)
/eos/out/ds/1/1=
“Cyc [1]”
Note: <index> is a 1-based index of any number of OSC direct select banks you wish to create.
<target type> may be one of the following:
Chan
Group
Macro
Sub
Preset
IP (intensity palette)
FP (focus palette)
CP (color palette)
BP (beam palette)
MS (Magic Sheet)
Curve
Snap (snapshot)
FX (Effects)
Pixmap
Scene
Fader Banks
Fader banks share fader mapping with Eos, but since an OSC Fader Bank can have any number of faders per
page, the paging will be different. Like Direct Selects, you must first send one of the OSC Fader Bank creation
commands before the fader pages will work. Faders will be mapped to the same fader number as Eos.
Example:
Create an OSC fader bank with 10 faders per page /eos/fader/1/config/10
OSC Fader 1/1 is the same as console fader 1/1.
OSC Fader 2/1 (Fader 11) is the same as console fader 2/1.
Another example:
Create an OSC fader bank with 5 faders per page /eos/fader/1/config/5
OSC Fader 2/1 (Fader 6) is the same as console fader 1/6 (Fader 6)
OSC Fader 3/1 (Fader 11) is the same as console fader 2/1 (Fader 11)
Note: <index> is a 1-based index of any number of discrete sets of OSC fader banks you wish to cre-
ate. Eos will send the description and fader labels for all OSC fader banks. See Implicit OSC Output
on page 61 for more information.
Note: Use an <index> of zero to reference the master fader.
OSC Method Arguments Examples/Comments
Fader Page Creation

Open Sound Control (OSC) 55
OSC Method Arguments Examples/Comments
/eos/fader/<index>/config/<fader
count>
none
/eos/fader/1/config/10 (create OSC fader bank #1 with 10
faders)
/eos/fader/<index>/config/<page num-
ber>/<fader count>
none
/eos/fader/1/config/2/10 (create OSC fader bank #1 with 10
faders on page 2) Can also be used to quick jump to a specific
page
Fader Controls
/eos/fader/<index>/config/<page num-
ber>/<fader count>
none
/eos/fader/1/config/2/10 Jump to a specific fader page (OSC
Fader Map 1, Page 2 of 10 faders)
/eos/fader/<index>/page/<delta> none
/eos/fader/1/page/1 (page down by 1)
/eos/fader/1/page/-1 (page up by 1)
/eos/fader/1/page/10 (page down by 10)
/eos/fader/<index>/<fader index>
floating point number to set
sub percent to
/eos/fader/1/2=0.75 (set the second fader in OSC
fader bank #1 to 75%)
/eos/fader/<index>/<fader index>/
load
none /eos/fader/1/2/load
/eos/fader/<index>/<fader index>/
unload
none /eos/fader/1/2/unload
/eos/fader/<index>/<fader index>/
stop
none /eos/fader/1/2/stop
/eos/fader/<index>/<fader index>/ fire none /eos/fader/1/2/fire
/eos/fader/<index>/<fader index>/ out none /eos/fader/1/2/out
/eos/fader/<index>/<fader index>/
home
none /eos/fader/1/2/home
/eos/fader/<index>/<fader index>/
min
none /eos/fader/1/2/min
/eos/fader/<index>/<fader index>/
max
none /eos/fader/1/2/max
/eos/fader/<index>/<fader index>/ full none /eos/fader/1/2/full
/eos/fader/<index>/<fader index>/
level
none /eos/fader/1/2/level
/eos/fader/<index>/<fader index>/
+%
none /eos/fader/1/2/+%
/eos/fader/<index>/<fader index>/-
%
none /eos/fader/1/2/-%
Fader StatusInformation – see Implicit OSC Output for more information
/eos/out/fader/<index>/<fader>/name
String argument with fader
label for OSC fader
/eos/out/fader/1/1=
“S 1 Label”
Sub 1 with a label “Label”
/eos/out/fader/1/2=
“IP 1 Label”
IP 1 fader labeled “Label”
/eos/out/fader/<index>/<fader>/name
Floating point argument for
fader percent (0.0-1.0)
/eos/out/fader/1/1=0.75
/eos/out/fader/1/2=0.0
/eos/out/fader/<index>
String argument, descriptive
text for OSC fader bank at
index
/eos/fader/1=“1”
Key
Note: For a list of supported key names, see Appendix: Eos OSCKeys (on page79).

56 Open Sound Control (OSC)
OSC Method Arguments Examples/Comments
/eos/key/<name> number for button edge: 1.0=down, 0.0=up (optional)
/eos/key/select active=1.0 (press [Select Active] but- ton)
/eos/key/select active=0.0 (release [Select Active] but- ton)
/eos/key/go 0
(press & release [Go] button)
Note: For the slash key, use a backslash /eos/key/\
Address
OSC Method Arguments Examples/Comments
Selection
/eos/addr number for address to select /eos/addr=513
Set Levels (Parks addresswhileon theOSC command line)
/eos/addr/<address> number for level to set address to (0-100) /eos/addr/513=100 (useful for mapping to an OSC slider)
/eos/addr/<address>/dmx
number for DMX level to set address to (0-
255)
/eos/addr/513/dmx=255 (useful for mapping to an OSC
slider)
Magic Sheet
OSC Method Arguments Examples/Comments
/eos/ms number of the magic sheet to open /eos/ms=1
/eos/ms/<ms number> number of the magic sheet view to open (optional) /eos/ms/1=2
Group
Selects and controls channels in groups.
Note: Same syntax and behavior as Chan.
OSC Method Arguments Examples/Comments
/eos/group number for group to select /eos/group=1
/eos/group/<number> number for channel level /eos/group/1=75
/eos/group/<number>/out
number for button edge:
1.0=down, 0.0=up
(optional)
/eos/group/1/out
/eos/group/<number>/home
number for button edge:
1.0=down, 0.0=up
(optional)
/eos/group/1/home
/eos/group/<number>/level
number for button edge:
1.0=down, 0.0=up
(optional)
/eos/group/1/level
/eos/group/<number>/full
number for button edge:
1.0=down, 0.0=up
(optional)
/eos/group/1/full
/eos/group/<number>/min
number for button edge:
1.0=down, 0.0=up
(optional)
/eos/group/1/min
/eos/group/<number>/max
number for button edge:
1.0=down, 0.0=up
(optional)
/eos/group/1/max

Open Sound Control (OSC) 57
OSC Method Arguments Examples/Comments
/eos/group/<number>/+%
number for button edge:
1.0=down, 0.0=up
(optional)
/eos/group/1/+%
/eos/group/<number>/-%
number for button edge:
1.0=down, 0.0=up
(optional)
/eos/group/1/-%
/eos/group/<number>/dmx
number for dmx level
1.0=down, 0.0=up
(optional)
/eos/group/1/dmx=127
/eos/group/<number>/param/
<parameter>
number for parameter level /eos/group/1/param/pan=90
/eos/group/<number>/param/
<parameter 1>/<parameter 2>/...
number(s) for parameter levels /eos/group/1/param/pan/tilt=90,75
/eos/group/<number>/param/
<parameter>/dmx
number for parameter dmx level /eos/group/1/param/pan=255
/eos/group/<number>/param/
<parameter 1>/<parameter 2>/.../ dmx
number(s) for dmx parameter levels /eos/group/1/param/pan/tilt/dmx=255
Macro
Selects and fires (executes) macros
OSC Method Arguments Examples/Comments
/eos/macro number for macro to select /eos/macro=1
/eos/macro/fire number for macro to run /eos/macro/fire=1
/eos/macro/<number>/fire number for button edge: 1.0=down, 0.0=up (optional) /eos/macro/1/fire=1.0
Sub
OSC Method Arguments Examples/Comments
Select Submaster
/eos/sub number for sub to select /eos/sub=1
ControlSubmaster
/eos/sub/<number> floating point number to set sub percent to
/eos/sub/1=0.75 (useful for mapping to an
OSC slider)
/eos/sub/<number>/out number for button edge: 1.0=down, 0.0=up (optional) /eos/sub/1/out
/eos/sub/<number>/home number for button edge: 1.0=down, 0.0=up (optional) /eos/sub/home
/eos/sub/<number>/level number for button edge: 1.0=down, 0.0=up (optional) /eos/sub/1/level
/eos/sub/<number>/full number for button edge: 1.0=down, 0.0=up (optional) /eos/sub/1/full
/eos/sub/<number>/min number for button edge: 1.0=down, 0.0=up (optional) /eos/sub/1/min
/eos/sub/<number>/max number for button edge: 1.0=down, 0.0=up (optional) /eos/sub/max
/eos/sub/fire number for sub to bump /eos/sub/fire=1
/eos/sub/<number>/fire number for button edge: 1.0=down, 0.0=up (optional)
/eos/sub/1/fire=1.0 (bump sub 1 on)
/eos/sub/1/fire=0.0 (bump sub 1 off)
Preset
OSC Method Arguments Examples/Comments
Select Preset
/eos/preset number of preset to select /eos/preset=1
RecallPreset

58 Open Sound Control (OSC)
OSC Method Arguments Examples/Comments
/eos/preset/fire number of preset to recall /eos/preset/fire=1
/eos/preset/<number>/fire number for button edge: 1.0=down, 0.0=up (optional) /eos/preset/1/fire
Intensity Palette
OSC Method Arguments Examples/Comments
Select IntensityPalette
/eos/ip number of intensity pal- ette to select /eos/ip=1
RecallIntensityPalette
/eos/ip/fire number of intensity pal- ette to recall /eos/ip/fire=1
/eos/ip/<number>/fire number for button edge: 1.0=down, 0.0=up (optional) /eos/ip/1/fire
Focus Palette
OSC Method Arguments Examples/Comments
Select FocusPalette
/eos/fp number of focus palette to select /eos/fp=1
RecallFocusPalette
/eos/fp/fire number of focus palette to recall /eos/fp/fire=1
/eos/fp/<number>/fire number for button edge: 1.0=down, 0.0=up (optional) /eos/fp/1/fire
Color Palette
OSC Method Arguments Examples/Comments
Select Color Palette
/eos/cp number of color palette to select /eos/cp=1
RecallColor Palette
/eos/cp/fire number of color palette to recall /eos/cp/fire=1
/eos/cp/<number>/fire number for button edge: 1.0=down, 0.0=up (optional) /eos/cp/1/fire
Beam Palette
OSC Method Arguments Examples/Comments
Select BeamPalette
/eos/bp number of beam palette to select /eos/bp=1
RecallBeamPalette
/eos/bp/fire number of beam palette to recall /eos/bp/fire=1
/eos/bp/<number>/fire number for button edge: 1.0=down, 0.0=up (optional) /eos/bp/1/fire
Cue
OSC Method Arguments Examples/Comments
Select Cueor CueParts
/eos/cue number of cue to select /eos/cue=1.5
/eos/cue/<list number> number of cue to select (in the specified cue list) /eos/cue/1=1.5
/eos/cue/<list number>/<cue number>
number of cue part to select (in the specified cue
list and cue number)
/eos/cue/1/1.5=2
RunCues
/eos/cue/fire number of cue to run /eos/cue/fire=1
/eos/cue/<cue number>/fire
number for button edge: 1.0=down, 0.0=up
(optional)
/eos/cue/1.5/fire
/eos/cue/<list number>/<cue number>/fire
number for button edge: 1.0=down, 0.0=up
(optional)
/eos/cue/1/1.5/fire
/eos/cue/<list number>/<cue num-
ber>/<part number>/fire
number for button edge: 1.0=down, 0.0=up
(optional)
/eos/cue/1/1.5/2/fire

Open Sound Control (OSC) 59
OSC Method Arguments Examples/Comments
CueInformationSent byEos– see Implicit OSC Output for more information
/eos/out/active/cue/<list>/<cue>
Float argument with percent complete
0.0=started, 1.0 complete
/eos/out/active/cue/5/1=0.75
Updated once per second
/eos/out/active/cue
Float argument with percent complete
0.0=started, 1.0 complete
/eos/out/active/cue=0.75
Updated once per second
/eos/out/active/cue/text
String argument with descriptive text about active
cue
/eos/out/active/cue/text= “1/1 Label
5.00 100%”
/eos/out/pending/cue/<list>/<cue> None /eos/out/pending/cue/5/1.5
/eos/out/pending/cue/<list>/<cue>/text
String argument with descriptive text about active
cue
/eos/out/pending/cue/text= “1/1.5
Label 5.00”
Other Targets - Selection
OSC Method Arguments Examples/Comments
/eos/curve number of curve to select /eos/curve=1
/eos/fx number of effect to select /eos/fx=1
/eos/snap number of snapshot to recall /eos/snap=1
/eos/pixmap number of pixel map to select /eos/pixmap=1
User
Use this command to set the OSC user ID. User 0 represents the background user (used in Background macros
and elsewhere). User -1 represents the current user on the console receiving OSC commands.
OSC Method Arguments Examples/Comments
/eos/user number for OSC user ID
/eos/user=1
(set OSC user ID to 1)
/eos/user=-1
(set OSC user to match con- sole)
/eos/user=0
(set OSC user as background user)
Current User IDOutput – see Implicit OSC Output for more information
/eos/out/user number for current OSC user ID
/eos//out/user=1
Command Line
Command line instructions can be sent directly. String substitution with arguments is also allowed. To add a
substitution, add %1 (or %2, %3, etc…) where the number given is the argument number where the actual
value should be found.
Examples:
“Chan %1 At FL” , 101 - Eos will substitute 101 in place of %1, meaning the command is interpreted
as Chan 101 At FL
“Chan %1 At %2” , 75, 50 - Eos will substitute 75 in place of %1 (as it is the first argument), and 50
in place of %2. The command is interpreted as Chan 75 At 50.

60 Open Sound Control (OSC)
OSC Method Arguments Examples/Comments
Direct commandlineentry
/eos/cmd string with command line text
/eos/cmd=”Chan 1 At 75" (unterminated
command)
/eos/cmd=”Chan 1 At 75#” (terminated
command)
/eos/cmd=”Chan 1 At 75 Enter”
(terminated command)
/eos/cmd
in-line command line /eos/cmd=”Chan 1 At
arguments
%1#”, 75
(results in command line
“Chan 1 At 75#”
/eos/cmd=”Chan %1 At
%2#”, 1, 75
/eos/cmd/<text>/<text>/<text>/... in-line command line arguments (optional)
/eos/cmd/Chan/1/At/75
/eos/cmd/Chan/%1/At/
%2#=1, 75
Clear commandlineeach time
/eos/newcmd
Same behavior as /eos/ cmd, but it resets the com-
mand line first
Direct event entry
/eos/event
Same behavior as /eos/ cmd, but treated as con- sole
event
/eos/newevent
Same behavior as /eos/ cmd, but it resets the com-
mand line first
CommandLineOutput - see Implicit OSC Output for more information
/eos/out/user/<number>/cmd
String with current command line text for current
console user
/eos/out/cmd String with current command line text
Other
OSC Method Arguments Examples/Comments
/eos/reset
clears any active switches resets all persistent OSC set- tings (like OSC user ID & wheel modes)
send ALL implicit OSC out- put commands
Explicit OSC Output
OSC outputs exactly like Serial String outputs, but the string must start with an OSC address (ex: “/ device/-
fader”).
Optionally, you may add arguments by adding “=” to the string, followed by a comma-delimited list of argu-
ments.
For example, to send a Playback fire command to a ColorSource AV console:
/cs/playback/1/fire=1 would send “/cs/playback/1/fire” as the command and 1 as the first (and only) integer
argument
Numeric arguments with a decimal are treated as 32-bit floating point numbers. Numeric arguments without a
decimal are treated as 32-bit integer numbers. Non-numeric arguments are treated as strings.
Examples:
Open Sound Control (OSC) 61
“/device/command” No arguments
“/device/command=1” One integer argument
“/device/command=1.5” One floating point argument
“/device/command=1.5,3.0” Two floating point arguments
“/device/command=1.5,3.0,text” Two floating point arguments, one string argument
Implicit OSC Output
When UDP transmit is enabled, certain OSC commands are sent out as appropriate. These events are typically
generated as the target changes or in response to user input.
Command Lines
“/eos/out/user/<number>/cmd”, <string argument with current command line text for the current con-
sole user>
“/eos/out/cmd”, <string argument with current command line text>
OSC Settings
“/eos/out/user”, <integer argument with current OSC user ID>
“/eos/out/wheel”, <float argument with current OSC wheel mode: 0.0=Coarse, 1.0=Fine>
“/eos/out/switch”, <float argument with current OSC switch mode: 0.0=Coarse, 1.0=Fine>
Active Channels and Parameters:
“/eos/out/active/chan”, <string argument with active channels and current value from the 1st channel>
“/eos/out/active/wheel/<number>, <string argument with parameter name and current value from the
1st channel>
Note: This allows you to create a ML Controls style interface via OSC. For example, on the OSC-
enabled device, setup 10 wheels (/eos/active/wheel/<1-10>) with matching labels.If using in con-
junction with “/eos/active/switch/<number>”, you should still use “/ eos-
/out/active/wheel/<number>” to display feedback for that switch
Active Cue
Note: Updated once per second.
“/eos/out/active/cue/<cue list number>/<cue number>”, <float argument with percent complete (0.0-
1.0)>
“/eos/out/active/cue”, <float argument with percent complete (0.0-1.0)>
“/eos/out/active/cue/text”, <string argument with descriptive text about the active cue, ex: “1/ 2.3
Label 0:05 75%”>
“/eos/out/pending/cue/<cue list number>/<cue number>”
“/eos/out/pending/cue/text”, <string argument with descriptive text about the pending cue, ex: “1/2.4
Label 0:30”>
OSC Direct Select Banks
“/eos/out/ds/<index>”, <string argument with descriptive text for the OSC direct select at <index>: tar-
get name, page number, and mode>>
“/eos/out/ds/<index>/<button index>”, <string argument with button label for OSC direct select at
<index> for button <button index>>
62 Open Sound Control (OSC)
OSC Fader Banks
“/eos/out/fader/<index>”, <string argument with descriptive text for the OSC fader bank at <index>>
“/eos/out/fader/<index>/<fader index>/name”, <string argument with fader label for OSC fader bank
at <index> for fader <fader index>>
“/eos/fader/<index>/<fader index>”, <floating point number for fader percent: 0.0-1.0>
Note: Eos will delay sending fader levels for faders that have been moved via OSC commands for 3
seconds. If you move a fader on an OSC remote control, Eos will send the actual fader level 3
seconds later.
OSC Show Control Events
Show control events are fired as the console executes the corresponding action, much like MIDI Show Control
output events.
“/eos/out/event/cue/<cue list number>/<cue number>/fire”
“/eos/out/event/cue/<cue list number>/<cue number>/stop”
“/eos/out/event/sub/<sub number>”, <integer argument, 0=Bump Off, 1=Bump On>
“/eos/out/event/macro/<macro number>”
“/eos/out/event/relay/<relay number>/<group number>”, <integer argument, 0=On, 1=Off>
“/eos/out/event” (used for time code learn)
Show File Information
“/eos/out/show/name”, <string argument with show title>
“/eos/out/event/show/saved”, <string argument with file path>
“/eos/out/event/show/loaded”, <string argument with file path>
“/eos/out/event/show/cleared”
Miscellaneous Console Events:
“/eos/out/event/state”, <integer argument, 0=Blind, 1=Live>
Note: When Eos receives the command “/eos/ping” it will reply with “/eos/out/ping”. You may
optionally add any number of arguments and Eos will reply with the same arguments. This may be
useful for testing latency.

Appendix: Eos Family Show Control Capabilities 63
Appendix: Eos Family Show Control Capabilities
Note: Net3 Show Control Gateway has been abbreviated to SCGW for this table.
Hardware MIDI
Connections
MIDI Show
Control (MSC)
MIDI Time Code
(MTC)
MIDI Notes SMPTE
Eos Titanium (Ti) Yes, In/Out
Local
In/Out
Also via SC
GW
Local
In Only Also via SC
GW
Local
Out Only Also via
SC GW
Via SC GW In
Only
Eos Console No Via SC GW Via SC GW In Only
Via SC GW Out
Only
Via SC GW In
Only
Eos RPU No Via SC GW Via SC GW In Only
Via SC GW Out
Only
Via SC GW In
Only
Gio Yes, In/Out
Local
In/Out
Also via SC
GW
Local
In Only Also via SC
GW
Local
Out Only Also via
SC GW
Via SC GW In
Only
Gio @ 5 No Via SC GW Via SC GW In Only
Via SC GW Out
Only
Via SC GW In
Only
Ion Yes, In/Out
Local
In/Out
Also via SC
GW
Local
In Only Also via SC
GW
Local
Out Only Also via
SC GW
Via SC GW In
Only
Ion RPU & Eos Family
RPU3
Yes, In/Out
Local
In/Out
Also via SC GW
Or
Programming Wing
(Win7 only)
Local
In Only Also via SC
GW
Or
Programming Wing
(Win7 only)
Local
Out Only Also via
SC GW Or
Programming
Wing (Win7 only)
Via SC GW In
Only
Element Yes, In/Out
Local
In/Out
Also via SC
GW
Local
In Only Also via SC
GW
Local
Out Only Also via
SC GW
Via SC GW In
Only
ETCnomad (PC/Mac)
and ETCnomad Puck
No
Via SC GW
Or
Programmin g Wing
Via SC GW
In Only
Or
Programming Wing
Via SC GW
Out Only
Or
Programming
Wing
Via SC GW In
Only
Eos Programming
Wing
Yes, In/Out
Local
In/Out
Also via SC GW
Local
In Only Also via SC
GW
Local
Out Only Also via
SC GW
Via SC GW In
Only
Net3 Show Control
GW
Yes In/Out/Thru Yes In/Out Yes In Only Yes Out Only Yes In Only

64 Appendix: Eos Family Show Control Capabilities
Hardware MIDI
Connections
MIDI Show
Control (MSC)
MIDI Time Code
(MTC)
MIDI Notes SMPTE
Net3 I/O GW n/a n/a n/a n/a
Analog Contact Closure RelayOut RS-232
UDP
Strings
Eos Titanium (Ti) Via I/O GW
4 closures, others via
I/O
1 local SPDT, others via
I/O
Via I/O GW Rx & Tx
Eos Console Via I/O GW Via I/O GW Via I/O GW Via I/O GW Rx & Tx
Eos RPU Via I/O GW Via I/O GW Via I/O GW Via I/O GW Rx & Tx
Gio Via I/O GW
4 closures, others via
I/O
1 local SPDT, others via
I/O
Via I/O GW Rx & Tx
Gio @ 5 Via I/O GW
4 closures, others via
I/O
1 local SPDT, others via
I/O
Via I/O GW Rx & Tx
Ion Via I/O GW
4 closures, others via
I/O
1 local SPDT, others via
I/O
Via I/O
GW*
Rx & Tx
Ion RPU & Eos Family RPU3 Via I/O GW
4 closures, others via
I/O
1 local SPDT, others via
I/O
Via I/O
GW*
Rx & Tx
ETCnomad (PC/Mac) and ETCnomad
Puck
Via I/O GW Via I/O GW Via I/O GW Via I/O GW Rx & Tx
Eos Programming Wing Via I/O GW
4 closures, others via
I/O
1 local SPDT, others via
I/O
Via I/O GW n/a
Element Via I/O GW
4 closures, others via
I/O
1 local SPDT, others via
I/O
Via I/O GW Rx & Tx
Net3 Show Control GW n/a n/a n/a n/a n/a
Net3 I/O GW
Yes
24 shared circuits- analog or digital
Yes 16 SPDT relays
Yes
n/a
*Ion consoles that have a DVI splitter and any Ion RPU have a local RS-232 port that is not enabled. For ques-
tions, please contact ETC Technical Services. See Help from ETC Technical Services on page 5 to find the
office closest to you.

Appendix: Advanced OSC 65
Appendix: Advanced OSC
OSCList Convention
The OSC List convention is used to send OSC commands that may exceed 512 bytes of data.
To add an OSC List of items to an OSC Command, append the OSC Command Path with /list/<in-
dex>/<count>, where <index> is the zero-based index offset into the entire list and <total> is the total num-
ber of elements in the entire list.
For Example:
OSC List that fits in a single packet
/eos/out/get/curve/901/list/0/3 = <uint32: 0> <string: 0DF9082C-4A39-40FC-9532-6C3AC01BC6B5>
<string: IES Square>
OSC List that spans 2 packets
/eos/out/get/curve/901/list/0/3 = <uint32: 0> <string: 0DF9082C-4A39-40FC-9532-6C3AC01BC6B5> /eo-
s/out/get/curve/901/list/2/3 = <string: IES Square>
OSC UID
UIDs uniquely identify each show data target, and are preserved in the show file. This allows you to syn-
chronize with a show file once and then again at a later time, even if changes were made in between.
UIDs will be specified as strings in the following format:
XXXXXXXX-XXXX-XXXX-XXXX-XXXXXXXXXXXX
For Example:
B0BAE0A0-3BBE-4004-888B-F61CA125D0B0
OSC Numbers and Number Ranges
OSC Arguments that contains numbers or number ranges will be sent as follows:
Eos target numbers will be sent as 32-bit integers when possible. If they are not whole numbers (ex: Cue
1.23), they will be sent as strings.
For Example:
10
“1.23"
When a range numbers contains 2 or more consecutive whole numbers, they will be represented as strings in
the following format:
X-Y
For Example :
“1-100”
OSC Gel
Gels will be represented as strings in the following format:
<Gel Manufacturer Abbreviation><Gel Number>
For Example:
“AP1150” (Apollo 1150)

66 OSCList Convention
“G101” (Gam 101)
“L2” (Lee 2)
“R80” (Rosco 80)
“SG1” (Rosco Super Gel 1)
“E194” (Rosco E Color 194)
“T12” (TokyoBS Poly Color 12)
Integrating Your App with Eos
There are four steps to integrating an OSCApp with Eos.
Those steps are covered in the following topics:
Integrating Your App with Eos: Step 1 – Request Eos Software Version on page 66
Integrating Your App with Eos: Step 2 - Synchronize on page 66
Integrating Your App with Eos: Step 3 – Staying in Sync on page 68
Integrating Your App with Eos: Step 4 – Modifying Eos ShowData on page 70
Integrating Your App with Eos: Step 1 – Request Eos Software Version
Request the version number of the Eos by sending the following command: /eos/get/version.
Eos will reply with:
/eos/out/get/version = <string: X.X.X.X.X.X>
For Example
<string: 2.3.0.1.0.111>
Note: This is useful if future versions of Eos software change the way OSC integration commands
are handled.
Integrating Your App with Eos: Step 2 - Synchronize
Request the number of items of a specific type of data you are interested with one of the following commands:
/eos/get/patch/count
/eos/get/cuelist/count
/eos/get/cue/<cue list number>/count
/eos/get/group/count
/eos/get/macro/count
/eos/get/sub/count
/eos/get/preset/count
/eos/get/ip/count (ip = Intensity Palette)
/eos/get/fp/count (fp = Focus Palette)
/eos/get/cp/count (cp = Color Palette)
/eos/get/bp/count (bp = Beam Palette)
/eos/get/curve/count
/eos/get/fx/count (fx = Effect)
/eos/get/snap/count (snap = Snapshot)
/eos/get/pixmap/count

OSCList Convention 67
/eos/get/ms/count (ms = Magic Sheet)
Eos will reply with the matching command:
/eos/out/get/patch/count = <uint32: count>
/eos/out/get/cuelist/count = <uint32: count>
/eos/out/get/cue/<cue list number>/count = <uint32: count>
/eos/out/get/group/count = <uint32: count>
/eos/out/get/macro/count = <uint32: count>
/eos/out/get/sub/count = <uint32: count>
/eos/out/get/preset /count = <uint32: count>
/eos/out/get/ip/count = <uint32: count>
/eos/out/get/fp/count = <uint32: count>
/eos/out/get/cp/count = <uint32: count>
/eos/out/get/bp/count = <uint32: count>
/eos/out/get/curve/count = <uint32: count>
/eos/out/get/fx/count = <uint32: count>
/eos/out/get/snap/count = <uint32: count>
/eos/out/get/pixmap/count = <uint32: count>
/eos/out/get/ms/count = <uint32: count>
Now you can request detailed information for each item form index 0 to count as follows:
/eos/get/patch/index/<indexnumber>
/eos/get/cuelist/index/<indexnumber>
/eos/get/cue/<cue list number>/index/<indexnumber>
/eos/get/group/index/<indexnumber>
/eos/get/macro/index/<indexnumber> /eos/get/sub/index/<indexnumber>
/eos/get/preset/index/<index number>
/eos/get/ip/index/<indexnumber>
/eos/get/fp/index/<indexnumber>
/eos/get/cp/index/<indexnumber>
/eos/get/bp/index/<index number>
/eos/get/curve/index/<indexnumber>
/eos/get/fx/index/<indexnumber>
/eos/get/snap/index/<indexnumber>
/eos/get/pixmap/index/<indexnumber>
/eos/get/ms/index/<indexnumber>
Eos will reply with the matching command: (detailed OSC arguments for each data type listed below)
/eos/out/get/patch/<channel number>/<part number>/list/<list index>/<list count> = <uint32: list index>
<string: UID> ...
/eos/out /get/cuelist/<cue list number>/list/<list index>/<list count> = <uint32: list index> <string: UID> ...

68 OSCList Convention
/eos/out /get/cue/<cue list number>/<cue number>/<cue part number>/list/<list index>/<list count> =
<uint32: list index> <string: UID> ...
/eos/get/group/<group number>/list/<list index>/<list count> = <uint32: list index> <string: UID> ...
/eos/get/macro/<macro number>/list/<list index>/<list count> = <uint32: list index> <string: UID> ...
/eos/get/sub/<sub number>/list/<list index>/<list count> = <uint32: list index> <string: UID> ...
/eos/get/preset/<preset number>/list/<list index>/<list count> = <uint32: list index> <string: UID> ...
/eos/get/ip/<ip number>/list/<list index>/<list count> = <uint32: list index> <string: UID> ...
/eos/get/fp/<fp number>/list/<list index>/<list count> = <uint32: list index> <string: UID> ...
/eos/get/cp/<cp number>/list/<list index>/<list count> = <uint32: list index> <string: UID> ...
/eos/get/bp/<bp number>/list/<list index>/<list count> = <uint32: list index> <string: UID> ...
/eos/get/curve/<curve number>/list/<list index>/<list count> = <uint32: list index> <string: UID> ...
/eos/get/fx/<fxnumber>/list/<list index>/<list count> = <uint32: list index> <string: UID> ...
/eos/get/snap/<snap number>/list/<list index>/<list count> = <uint32: list index> <string: UID> ...
/eos/get/pixmap/<pixmap number>/list/<list index>/<list count> = <uint32: list index> <string: UID> ...
/eos/get/ms/<ms number>/list/<list index>/<list count> = <uint32: list index> <string: UID> ...
Integrating Your App with Eos: Step 3 – Staying in Sync
Your app can now request all of the show data from Eos, but if a user is editing show data, your app would
become out of sync. The solution to this is to subscribe to Eos show data changes with the following com-
mand: /eos/subscribe = <uint32: X> (where 0=unsubscribe, 1=subscribe)
While subscribed, Eos will send the following commands when Eos show data changes:
In the reply, the first argument will be a sequence number, followed by a list of the targets that changed. The
targets are specified OSC Numbers and/or OSC Number Ranges
/eos/out/notify/patch/list/<list index>/<list count> = <uint32: sequence number>, ...
/eos/out/notify/cuelist/list/<list index>/<list count> = <uint32: sequence number>, ...
/eos/out/notify/cue/<cue list number>/list/<list index>/<list count> = <uint32: sequence number>, ...
/eos/out/notify/group/list/<list index>/<list count> = <uint32: sequence number>, ...
/eos/out/notify/macro/list/<list index>/<list count> = <uint32: sequence number>, ...
/eos/out/notify/sub/list/<list index>/<list count> = <uint32: sequence number>, ...
/eos/out/notify/preset/list/<list index>/<list count> = <uint32: sequence number>, ...
/eos/out/notify/ip/list/<list index>/<list count> = <uint32: sequence number>, ...
/eos/out/notify/fp/list/<list index>/<list count> = <uint32: sequence number>, ...
/eos/out/notify/cp/list/<list index>/<list count> = <uint32: sequence number>, ...
/eos/out/notify/bp/list/<list index>/<list count> = <uint32: sequence number>, ...
/eos/out/notify/curve/list/<list index>/<list count> = <uint32: sequence number>, ...
/eos/out/notify/fx/list/<list index>/<list count> = <uint32: sequence number>, ...
/eos/out/notify/snap/list/<list index>/<list count> = <uint32: sequence number>, ...
/eos/out/notify/pixmap/list/<list index>/<list count> = <uint32: sequence number>, ...
/eos/out/notify/ms/list/<list index>/<list count> = <uint32: sequence number>, ...
When your app receives a notification that Eos show data has changed, you should then request detailed
information about the modified show data. You may request detailed show data via target number or UID.
(From the initial sync, you should be able to build a mapping of each type of show data to correlate target num-
ber with UID)

OSCList Convention 69
Request detailed show data information via target number:
/eos/get/patch/<channel number> (Eos returns ALL parts)
/eos/get/patch/<channel number>/<part number> (specific channel part)
/eos/get/cuelist/<cue list number>
/eos/get/cue/<cue list number>/<cue number> (Eos returns base cue and ALL parts)
/eos/get/cue/<cue list number>/<cue number>/0 (base cue)
/eos/get/cue/<cue list number>/<cue number>/<cue part number> (specific cue part)
/eos/get/group/<group number>
/eos/get/macro/<macro number>
/eos/get/sub/<sub number>
/eos/get/preset/<preset number>
/eos/get/ip/<ip number>
/eos/get/fp/<fp number>
/eos/get/cp/<cp number>
/eos/get/bp/<bp number>
/eos/get/curve/<curve number>
/eos/get/fx/<fxnumber>
/eos/get/snap/<snap number>
/eos/get/pixmap/<pixmap number>
/eos/get/ms/<ms number>
Request detailed show data information via UID:
/eos/get/patch/uid/<UID>
/eos/get/cuelist/uid/<UID>
/eos/get/cue/uid/<UID>
/eos/get/group/uid/<UID>
/eos/get/macro/uid/<UID>
/eos/get/sub/uid/<UID>
/eos/get/preset/uid/<UID>
/eos/get/ip/uid/<UID>
/eos/get/fp/uid/<UID>
/eos/get/cp/uid/<UID>
/eos/get/bp/uid/<UID>
/eos/get/curve/uid/<UID>
/eos/get/fx/uid/<UID>
/eos/get/snap/uid/<UID>
/eos/get/pixmap/uid/<UID>
/eos/get/ms/uid/<UID>
Eos will reply with the same command as if the detailed information were requested via index as shown in Step
2.

70 OSCList Convention
Integrating Your App with Eos: Step 4 – Modifying Eos Show Data
You can modify Eos show data.Typically you should build Eos command lines and send them with the com-
mand /eos/cmd or /eos/newcmd.
However, you can use the following convenience commands for editing the most common show data attrib-
utes:
/eos/set/patch/<channel number>/label = <string: text> (include part number in the path when necessary)
/eos/set/patch/<channel number>/text1 = <string: text>
/eos/set/patch/<channel number>/text2 = <string: text>
/eos/set/patch/<channel number>/text3 = <string: text>
/eos/set/patch/<channel number>/text4 = <string: text>
/eos/set/patch/<channel number>/text5 = <string: text>
/eos/set/patch/<channel number>/text6 = <string: text>
/eos/set/patch/<channel number>/text7 = <string: text>
/eos/set/patch/<channel number>/text8 = <string: text>
/eos/set/patch/<channel number>/text9 = <string: text>
/eos/set/patch/<channel number>/text10 = <string: text>
/eos/set/patch/<channel number>/notes = <string: text>
/eos/set/patch/<channel number>/gel = <string: text>
/eos/set/cuelist/<cue list number>/label = <string: text>
/eos/set/cue/<cue list number>/<cue number>/label = <string: text> (base data)
/eos/set/cue/<cue list number>/<cue number>/<cue part number>/label = <string: text> (part data)
/eos/set/group/<group number>/label = <string: text>
/eos/set/macro/<macro number>/label = <string: text>
/eos/set/sub/<sub number>/label = <string: text>
/eos/set/preset/<preset number>/label = <string: text>
/eos/set/ip/<ip number>/label = <string: text>
/eos/set/fp/<fp number>/label = <string: text>
/eos/set/cp/<cp number>/label = <string: text>
/eos/set/bp/<bp number>/label = <string: text>
/eos/set/curve/<curve number>/label = <string: text>
/eos/set/fx/<fx number>/label = <string: text>
/eos/set/snap/<snap number>/label = <string: text>
/eos/set/pixmap/<pixmap number>/label = <string: text>
/eos/set/ms/<ms number>/label = <string: text>
Detailed Information Packet Contents
Note: < index> is only valid when detailed information is requested via /index (for performance
reasons)
PATCH (1 OF 2):
/eos/out/get/patch/<channel number>/<part number>/list/<list index>/<list count> =

OSCList Convention 71
<uint32: index>
<string: OSC UID>
<string: label>
<string: fixture manufacturer>
<string: fixture model>
<uint32: address>
<uint32: address of intensity parameter> (useful for monitoring streaming output to see live levels)
<uint32: current level>
<string: OSC Gel>
<string: text 1>
<string: text 2>
<string: text 3>
<string: text 4>
<string: text 5>
<string: text 6>
<string: text 7>
<string: text 8>
<string: text 9>
<string: text 10>
<uint32: part count>
For Example:
/eos/out/get/patch/1/1/list/0/20 = 0, “00000000-0000-0000-0000-000000000000”, “My Fixture Label”,
“ETC_Fixtures”, “S4_LED_S2_Lustr_Direct”, 1, 1, 0, “R80”, “My_Text_One”, “My_Text_Two”, “My_Text_
Three”, “My_Text_Four“, “My_Text_Five”, “My_Text_Six”, “My_Text_Seven”, “My_Text_Eight”, “My_
Text_Nine”, “My_Text_Ten”, 1
PATCH (2 OF 2):
/eos/out/get/patch/<channel number>/<part number>/notes =
<uint32: index>
<string: OSC UID>
<string: notes>
For Example:
/eos/out/get/patch/1/1/notes = 0, “00000000-0000-0000-0000-000000000000”, “My Notes”
CUELIST (1 OF 2):
/eos/out /get/cuelist/<cue list number>/list/<list index>/<list count> = <uint32: index>
<string: OSC UID>
<string: label>
<string: playback mode>
<string: fader mode> <bool: independent>
<bool: HTP>
<bool: assert>

72 OSCList Convention
<bool: block>
<bool: background>
<bool: solo mode>
<uint32: timecode list>
<bool: OOS sync>
For Example:
/eos/out/get/cuelist/1/list/0/13 = 0, “00000000-0000-0000-0000-000000000000”, “My Cue List One
Label”, “Master”, “Proportional”, True, False, True, False, False, False, 1, False
CUELIST (2 OF 2):
/eos/out /get/cuelist/<cue list number>/links/list/<list index>/<list count> =
<uint32: index>
<string: OSC UID>
<OSC Number Range: linked cue lists list>
For Example:
/eos/out/get/cuelist/1/links/list/0/3 = 0, “00000000-0000-0000-0000-000000000000”, 2
CUE (1 OF 4):
/eos/out /get/cue/<cue list number>/<cue number>/<cue part number>/list/<list index>/<list count> =
<uint32: index>
<string: OSC UID>
<string: label>
<uint32: up time duration (ms)>
<uint32: up time delay (ms)>
<uint32: down time duration (ms)>
<uint32: down time delay (ms)>
<uint32: focus time duration (ms)>
<uint32: focus time delay (ms)>
<uint32: color time duration (ms)>
<uint32: color time delay (ms)>
<uint32: beam time duration (ms)>
<uint32: beam time delay (ms)>
<bool: preheat>
<OSC Number: curve>
<uint32: rate>
<string: mark>
<string: block>
<string: assert>
<OSC Number: link> or <string: link> (string if links to a separate cue list)
<uint32: follow time (ms)>
<uint32: hang time (ms)>
<bool: all fade>

OSCList Convention 73
<uint32: loop>
<bool: solo>
<string: timecode>
<uint32: part count> (not including base cue, so zero for cues with no parts)
For Example:
/eos/out/get/cue/1/1/0/list/0/27 = 0, “00000000-0000-0000-0000-000000000000”, “My Cue One Label”,
0, 0, 0, 0, 0, 0, 6000, 0, 0, 0, True, 901, 90, “”, “B”, “A”, 3, 0, 0, True, 1, False, “00:00:00:02”, 0
CUE (2 OF 4):
/eos/out /get/cue/<cue list number>/<cue number>/<cue part number>/fx/list/<list index>/<list count>
=
<uint32: index>
<string: OSC UID>
<OSC Number Range: effect list>
For Example:
/eos/out/get/cue/1/1/0/fx/list/0/3 = 0, “00000000-0000-0000-0000-000000000000”, “1-3”
CUE (3 OF 4):
/eos/out /get/cue/<cue list number>/<cue number>/<cue part number>/links/list/<list index>/<list
count> =
<uint32: index>
<string: OSC UID>
<OSC Number Range: linked cue lists list>
ForExample:
/eos/out/get/cue/1/1/0/links/list/0/3 = 0, “00000000-0000-0000-0000-000000000000”, 2
CUE (4 OF 4):
/eos/out /get/cue/<cue list number>/<cue number>/<cue part number>/actions/list/<list index>/<list
count> =
<uint32: index>
<string: OSC UID>
<string: ext link action>
For Example:
/eos/out/get/cue/1/1/0/actions/list/0/3 = 0, “00000000-0000-0000-0000-000000000000”, “Chan 90 At
Full”
GROUP (1 OF 2):
/eos/get/group/<group number>/list/<list index>/<list count> =
<uint32: index>
<string: OSC UID>
<string: label>
For Example:
/eos/out/get/group/1.2/list/0/3 = 0, “00000000-0000-0000-0000-000000000000”, “My Group One Point
Two Label”

74 OSCList Convention
GROUP (2 OF 2):
/eos/get/group/<group number>/channels/list/<list index>/<list count> = <uint32: index>
<string: OSC UID>
<string: label>
For Example:
/eos/out/get/group/1.2/channels/list/0/5 = 0, “00000000-0000-0000-0000-000000000000”, “1-100”, 200,
300
MACRO (1 OF 2):
/eos/get/macro/<macro number>/list/<list index>/<list count> =
<uint32: index>
<string: OSC UID>
<string: label>
<string: mode>
For Example:
/eos/out/get/macro/1/list/0/4 = 0, “00000000-0000-0000-0000-000000000000”, “My Macro One Label”,
“”
MACRO (2 OF 2):
/eos/get/macro/<macro number>/text/list/<list index>/<list count> =
<uint32: index>
<string: OSC UID>
<string: command text> (split into multiple packets via OSC List convention if necessary)
For Example:
/eos/out/get/macro/1/text/list/0/3 = 0, “00000000-0000-0000-0000-000000000000”, “Go_To_Cue Out
Time 0”
SUB (1 OF 2):
/eos/get/sub/<sub number>/list/<list index>/<list count> =
<uint32: index>
<string: OSC UID>
<string: label>
<string: mode>
<string: fader mode>
<bool: HTP>
<bool: exclusive>
<bool: background>
<bool: restore>
<string: priority>
<string: up time>
<string: dwell time>
<string: down time>
For Example:

OSCList Convention 75
/eos/out/get/sub/3/list/0/13 = 0, “00000000-0000-0000-0000-000000000000”, “My Sub Three Label”,
“Additive”, “Proportional”, True, False, True, False, “”, “0”, “Man”, “0”
SUB (2 OF 2):
/eos/get/sub/<sub number>/fx/list/<list index>/<list count> =
<uint32: index>
<string: OSC UID>
<OSC Number Range: effect list>
For Example:
/eos/out/get/sub/3/fx/list/0/3 = 0, “00000000-0000-0000-0000-000000000000”, 10
PRESET (1 OF 4):
/eos/get/preset/<preset number>/list/<list index>/<list count> =
<uint32: index>
<string: OSC UID>
<string: label>
<bool: absolute>
<bool: locked>
For Example:
/eos/out/get/preset/10/list/0/5 = 0, “00000000-0000-0000-0000-000000000000”, “My Preset Ten Label”,
True, True
PRESET (2 OF 4):
/eos/get/preset/<preset number>/channels/list/<list index>/<list count> =
<uint32: index>
<string: OSC UID>
<OSC Number Range: channel list>
For Example:
/eos/out/get/preset/10/channels/list/0/3 = 0, “00000000-0000-0000-0000-000000000000”, “1-5”
PRESET (3 OF 4):
/eos/get/preset/<preset number>/byType/list/<list index>/<list count> =
<uint32: index>
<string: OSC UID>
<OSC Number Range: by type channel list>
For Example:
/eos/out/get/preset/10/byType/list/0/2 = 0, “00000000-0000-0000-0000-000000000000”
PRESET (4 OF 4):
/eos/get/preset/<preset number>/fx/list/<list index>/<list count> =
<uint32: index>
<string: OSC UID>
<OSC Number Range: effect list>
For Example:

76 OSCList Convention
/eos/out/get/preset/10/fx/list/0/0 = 0, “00000000-0000-0000-0000-000000000000”
PALETTE (1 OF 3):
/eos/get/<palette type>/<palette number>/list/<list index>/<list count> =
<uint32: index>
<string: OSC UID>
<string: label>
<bool: absolute>
<bool: locked>
For Example:
/eos/out/get/ip/1/list/0/5 = 0, “00000000-0000-0000-0000-000000000000”, “My IP One Label”, False, False
PALETTE (2 OF 3):
/eos/get/<palette type>/<palette number>/channels/list/<list index>/<list count> =
<uint32: index>
<string: OSC UID>
<OSC Number Range: channel list>
For Example:
/eos/out/get/ip/1/channels/list/0/3 = 0, “00000000-0000-0000-0000-000000000000”, 1-5(s)
PALETTE (3 OF 3):
/eos/get/<palette type>/<palette number>/byType/list/<list index>/<list count> =
<uint32: index>
<string: OSC UID>
<OSC Number Range: by type channel list>
For Example:
/eos/out/get/ip/1/byType/list/0/2 = 0, “00000000-0000-0000-0000-000000000000”
CURVE (1 OF 1):
/eos/get/curve/<curve number>/list/<list index>/<list count> =
<uint32: index>
<string: OSC UID>
<string: label>
For Example:
/eos/out/get/curve/901/list/0/2 = 0, “00000000-0000-0000-0000-000000000000”, “IES Square”
EFFECT (1 OF 1):
/eos/get/fx/<fxnumber>/list/<list index>/<list count> =
<uint32: index>
<string: OSC UID>
<string: label>
<string: effect type>
<string: entry>

OSCList Convention 77
<string: exit>
<string: duration>
<uint32: scale>
For Example:
/eos/out/get/fx/901/list/0/8 = 0, “00000000-0000-0000-0000-000000000000”, “Circle”, “Focus”, “Imme-
diate”, “Immediate”, “Infinite”, 25
SNAPSHOT (1 OF 1):
/eos/get/snap/<snap number>/list/<list index>/<list count> =
<uint32: index>
<string: OSC UID>
<string: label>
For Example:
/eos/out/get/snap/1/list/0/2 = 0, “00000000-0000-0000-0000-000000000000”, “My Snap One Label”
PIXEL MAP (1 OF 2):
/eos/get/pixmap/<pixmap number>/list/<list index>/<list count> =
<uint32: index>
<string: OSC UID>
<string: label>
<uint32: server channel>
<string: interface>
<uint32: width>
<uint32: height>
<uint32: pixel count>
<uint32: fixture count>
For Example:
/eos/out/get/pixmap/1/list/0/9 = 0, “00000000-0000-0000-0000-000000000000”, “My Pixmap One Label”,
100, “sACN”, 32, 32, 1024, 1024
PIXEL MAP (2 OF 2):
/eos/get/pixmap/<pixmap number>/channels/list/<list index>/<list count> =
<uint32: index>
<string: OSC UID>
<OSC Number Range: layer channel list>
For Example:
/eos/out/get/pixmap/1/channels/list/0/3 = 0, “00000000-0000-0000-0000-000000000000”, “101-105”
MAGIC SHEET (1 OF 1):
/eos/get/ms/<ms number>/list/<list index>/<list count> =
<uint32: index>
<string: OSC UID>
<string: label>

78 OSCList Convention
For Example:
/eos/out/get/ms/1/list/0/2 = 0, “00000000-0000-0000-0000-000000000000”, “My MS One Label”
OSC Troubleshooting
In Eos, open the Diagnostics tab (Hold [Tab] and press [9][9]). Click {Incoming OSC} to enable logging of
incoming OSCcommands and {Outgoing OSC} to log outgoing OSC commands.
To verify that basic OSC communication is working, you may send the command /eos/ping and Eos will reply
with /eos/out/ping. You may also add any number of arguments to the command, for example, if you want
to measure latency.

Appendix: Eos OSCKeys 79
Appendix: Eos OSCKeys
The following is a list of the supported key names for use with OSC:
/eos/key/ Internal Eos Command
( CHAN_SUBGROUP_BEGIN
) CHAN_SUBGROUP_END
+ PLUS
- MINUS
. POINT
\ SLASH
: COLON
@ AT
+% PLUS10
-% MINUS10
0 0
1 1
2 2
3 3
4 4
5 5
6 6
7 7
8 8
9 9
100_channel_display 100_CHANNEL_DISPLAY
_last SLOTLAST
_next SLOTNEXT
a DIMMER_A
about ABOUT
absolute ABSOLUTE_EFFECT
acn_device_disconnect ACN_DEVICE_DISCONNECT
action ACTION
add_favorite PATCH_ADD_FAVORITE
addfiltercat ADD_FILTER_CAT
addfilterparam ADD_FILTER_PARAM
additive ADDITIVE
address ADDRESS
after_sunrise RTC_AFTER_SUNRISE
after_sunset RTC_AFTER_SUNSET
all UPDATE_ALL
all_speed ALL_SPEED_PARAMS
all_workspaces ALL_WORKSPACES
allfade ALLFADE

80 Appendix: Eos OSCKeys
/eos/key/ Internal Eos Command
allnps ALL_NIPS
alternate ALTERNATE
always_absolute ABSOLUTE_PALETTE
analog ANALOG
analog_input ANALOG_INPUT
and AND
apply EFFECT_PATTERN_APPLY
arrow_down ARROW_DOWN
arrow_left ARROW_LEFT
arrow_right ARROW_RIGHT
arrow_up ARROW_UP
artnet ARTNET_INTERFACE
ascii_case ASCII_CASE
ascii_delims ASCII_DELIMS
ascii_levels ASCII_LEVELS
ascii_manuf ASCII_MANUF
assert ASSERT
asserttime ASSERT_TIME
at AT_TEXT
attach ATTACH_DEVICE
attribute_mode CIAPATCH_ATTRIB_MODE
attributes EFFECT_ATTRIBUTES
attributewheel ATTRIBUTE_WHEEL
auto_dim COLOR_FADE_AUTO_BRIGHTNESS
autoblock_clean AUTOBLOCK_CLEANUP
automark AUTO_MARK
automark_off AUTOMARK_OFF
autoplayback AUTOPLAYBACK
autosave AUTOSAVE
autosavetime AUTOSAVE_TIME
avab/udp AVAB_INTERFACE
axis AXIS
b DIMMER_B
back BACK
background BACKGROUND_FADER
background_mode MACRO_BACKGROUND
backspace BACKSPACE
backtime BACK_TIME
beam BEAM_CAT
beam_palette BEAM_PALETTE
before_sunrise RTC_BEFORE_SUNRISE
before_sunset RTC_BEFORE_SUNSET
blackout BLACKOUT_BUTTON

Appendix: Eos OSCKeys 81
/eos/key/ Internal Eos Command
blackout_enable BLACKOUT_ENABLE
blind PREVIEW
block BLOCK
bounce BOUNCE
bpm BPM
break_nested BREAK_NESTED
break_nested_off BREAK_NESTED_OFF
build BUILD
bump SC_BUMP
bump_1 BUMP01
bump_10 BUMP10
bump_2 BUMP02
bump_3 BUMP03
bump_4 BUMP04
bump_5 BUMP05
bump_6 BUMP06
bump_7 BUMP07
bump_8 BUMP08
bump_9 BUMP09
by_type BY_TYPE_PALETTE
calibrate CALIBRATE
can't_be CANT_BE
can_be CAN_BE
cancel_command CANCEL
capture CAPTURE
cascade_entry CASCADE_ENTRY
cascade_exit CASCADE_EXIT
center FAN_CENTER
chan CHAN
chan_per_group FAN_CHANNELS_PER_GROUP
channel_filter CHANNEL_FILTER
channelfader CHANNEL_FADER
channelparam CHANNEL_PARAM
check CHANNEL_CHECK
cia_softkey1 CIA_SOFTKEY1
cia_softkey2 CIA_SOFTKEY2
cia_softkey3 CIA_SOFTKEY3
cia_softkey4 CIA_SOFTKEY4
cia_softkey5 CIA_SOFTKEY5
cia_softkey6 CIA_SOFTKEY6
cie_xyy COLOR_FADE_CIE_XYY
cleanup CLEANUP_PALETTE
clear CLEAR_DATA

82 Appendix: Eos OSCKeys
/eos/key/ Internal Eos Command
clear_all CLEAR_ALL
clear_all_tabs CLEAR_ALL_TABS
clear_all_visible_tabs CLEAR_ALL_VISIBLE_TABS
clear_all_workspace_tabs CLEAR_ALL_WORKSPACE_TABS
clear_calibration CLEAR_CALIBRATION
clear_cmd CLEAR
clear_cmdline RESET_COMMAND_LINE
clear_effect EFFECT_PATTERN_CLEAR
clear_errors DIMRACK_CLR_ERRS
clear_filters CLEAR_FILTER_COMMAND
clear_hold_color_point_origin CLEAR_HOLD_COLOR_POINT_ORIGIN
clear_midi CLEAR_MIDI
clear_module SS_CLEAR
clear_patch CLEAR_PATCH
clear_rig_check DIMRACK_CLR_RIG_CHK
clear_show CLEAR_SHOW
clear_smpte CLEAR_SMPTE
clear_subs_1to1_ CLEAR_SUBS_1TO1
clear_targets CLEAR_TARGETS
clear_text CLEAR_TEXT
close OFFSET_CIA_CLOSE
close_fader_controls CLOSE_FADER_CONTROLS
cluster FAN_CLUSTER
cmy COLOR_FADE_CMY
color COLOR_CAT
color_effect COLOR_EFFECT
color_fade_times COLOR_FADE_TIMES
color_fade_type COLOR_FADE_TYPE
color_gel COLOR_GEL
color_gel_match_hybrid COLOR_GEL_MATCH_HYBRID
color_gel_match_spectrum COLOR_GEL_MATCH_SPECTRUM
color_palette COLOR_PALETTE
color_path COLOR_PATH
color_scrub COLOR_SCRUB
color_scrub_replay COLOR_SCRUB_REPLAY
column_move_left COLUMN_MOVE_LEFT
column_move_right COLUMN_MOVE_RIGHT
column_resize_larger COLUMN_RESIZE_LARGER
column_resize_smaller COLUMN_RESIZE_SMALLER
command_history OPENCMDHISTORY
commandline_on_psd CMDLNONPSD
complete GOTO_CUE_COMPLETE
confirm_command CONFIRMED

Appendix: Eos OSCKeys 83
/eos/key/ Internal Eos Command
continuous_run CONTINUOUS_RUN
control CONTROL_CAT
control_cat CONTROL_FILTER
copy_to COPY_TO
create_type NEW_EFFECT_TYPE
create_virtual_hsb CREATE_VIRTUAL_HSB
cue CUE
cue_beam_time SETUP_CUE_BEAM_TIME
cue_color_time SETUP_CUE_COLOR_TIME
cue_down_time SETUP_CUE_DOWN_TIME
cue_focus_time SETUP_CUE_FOCUS_TIME
cue_list SFF_CUELIST
cue_sheet CUE_SHEET
cue_up_time SETUP_CUE_UP_TIME
cueonly Q_ONLY
cueonlytrack CUE_ONLY_TRACK
cues SFF_CUES
curve CURVE
curve_edit EDIT_CONTROL
curves SFF_CURVES
cycles NUM_CYCLES
cycletime CYCLE_TIME
data DATA
data_mode_latch DATA_MODE_LATCH
database_mode CIAPATCH_DB_MODE
date RTC_DATE
days RTC_DAYS
decaytime EFFECT_STEP_OUT_TIME
default DEFAULT_INTERFACE
default_mode MACRO_DEFAULT_MODE
degrees_per_rev ENCODER_DEGREES_PER_REVOLUTION
delay DELAY
delete DELETE
delete_device DELETE_DEVICE
delete_effect DELETE_EFFECT
deleteconfirm DELETE_CONFIRM
desk_settings DESK_SETTINGS
detach DETACH_DEVICE
device_clear_errors DEVICE_CLEAR_ERRORS
device_dimmers CIAPATCH_DEVICE_DIMMERS
device_disconnected DEV_DISCONNECT
device_discovered DEV_DISCOVERED
device_discovery RDM_DISCOVERY_ENABLED

84 Appendix: Eos OSCKeys
/eos/key/ Internal Eos Command
device_errors DEVICE_ERRORS
device_ignore_errors DEVICE_IGNORE_ERRORS
device_lamp_controls DEVICE_LAMP_CONTROLS
device_mode CIAPATCH_DEVICE_MODE
device_properties DEVICE_PROPERTIES
device_rdm CIAPATCH_DEVICE_RDM
device_sensors DEVICE_SENSORS
device_system CIAPATCH_DEVICE_SYSTEM
dimmer_double_offset DIM_DOUBLE_OFFSET
direct_selectdc_recall_from DIRECTSELECTDCRECALLFROM
direct_selects SNAPSHOT_DIRECT_SELECTS
disable DISABLE
disconnect_macro DISCONNECT_MACRO
discrete DISCRETE_PALETTE
display_beam_palettes SS_DISPLAY_GX_PALETTES
display_channels SS_DISPLAY_CHANNELS
display_color_palettes SS_DISPLAY_COL_PALETTES
display_color_path DISPLAY_COLOR_PATH_MODE
display_color_path_mode_latch DISPLAY_COLOR_PATH_MODE_LATCH
display_effects SS_DISPLAY_RCES
display_focus_palettes SS_DISPLAY_POS_PALETTES
display_groups SS_DISPLAY_GROUPS
display_intensity_palettes SS_DISPLAY_INT_PALETTES
display_macros SS_DISPLAY_MACROS
display_magic_sheets SS_DISPLAY_MAGICSHEETS
display_palettes SS_DISPLAY_PALETTES
display_presets SS_DISPLAY_PRESETS
display_snapshots SS_DISPLAY_SNAPSHOTS
display_time_mode_latch DISPLAY_TIME_MODE_LATCH
display_timing DISPLAY_TIME_MODE
displays DISPLAYS
dmx DMX_LEVEL
dmx_ DMX_INTERFACE
dmx_patch SFF_DMXPATCH
done DONE
douse DOUSE
down DOWN
duration EFFECT_DURATION
duration DURATION_NUM_CYCLES
dwell DWELL
earliest EARLIEST
earliest_m EARLIEST_MARK_CUE
edit EDIT

Appendix: Eos OSCKeys 85
/eos/key/ Internal Eos Command
edit_frame EDIT_FRAME
edit_mode EDIT_MODE
edit_target TARGET_EDIT_EVENT
edmx EDMX
effect EFFECT
effect_axis_wheel EFFECT_AXIS_WHEEL
effect_edit EFFECT_PATTERN_EDIT
effect_form_horizontal_wheel EFFECT_FORM_HORIZONTAL_WHEEL
effect_form_vertical_wheel EFFECT_FORM_VERTICAL_WHEEL
effect_rate_wheel EFFECT_RATE_WHEEL
effect_rotate_wheel EFFECT_ROTATE_WHEEL
effect_scale_wheel EFFECT_SCALE_WHEEL
effect_shape_horizontal_wheel EFFECT_SHAPE_HORIZONTAL_WHEEL
effect_shape_vertical_wheel EFFECT_SHAPE_VERTICAL_WHEEL
effect_size_wheel EFFECT_SIZE_WHEEL
effect_time_wheel EFFECT_TIME_WHEEL
effects SFF_EFFECTS
effectsub EFFECT_SUB
element_bump_1 ELEMENT_BUMP_1
element_bump_10 ELEMENT_BUMP_10
element_bump_11 ELEMENT_BUMP_11
element_bump_12 ELEMENT_BUMP_12
element_bump_13 ELEMENT_BUMP_13
element_bump_14 ELEMENT_BUMP_14
element_bump_15 ELEMENT_BUMP_15
element_bump_16 ELEMENT_BUMP_16
element_bump_17 ELEMENT_BUMP_17
element_bump_18 ELEMENT_BUMP_18
element_bump_19 ELEMENT_BUMP_19
element_bump_2 ELEMENT_BUMP_2
element_bump_20 ELEMENT_BUMP_20
element_bump_21 ELEMENT_BUMP_21
element_bump_22 ELEMENT_BUMP_22
element_bump_23 ELEMENT_BUMP_23
element_bump_24 ELEMENT_BUMP_24
element_bump_25 ELEMENT_BUMP_25
element_bump_26 ELEMENT_BUMP_26
element_bump_27 ELEMENT_BUMP_27
element_bump_28 ELEMENT_BUMP_28
element_bump_29 ELEMENT_BUMP_29
element_bump_3 ELEMENT_BUMP_3
element_bump_30 ELEMENT_BUMP_30
element_bump_31 ELEMENT_BUMP_31

86 Appendix: Eos OSCKeys
/eos/key/ Internal Eos Command
element_bump_32 ELEMENT_BUMP_32
element_bump_33 ELEMENT_BUMP_33
element_bump_34 ELEMENT_BUMP_34
element_bump_35 ELEMENT_BUMP_35
element_bump_36 ELEMENT_BUMP_36
element_bump_37 ELEMENT_BUMP_37
element_bump_38 ELEMENT_BUMP_38
element_bump_39 ELEMENT_BUMP_39
element_bump_4 ELEMENT_BUMP_4
element_bump_40 ELEMENT_BUMP_40
element_bump_41 ELEMENT_BUMP_41
element_bump_42 ELEMENT_BUMP_42
element_bump_43 ELEMENT_BUMP_43
element_bump_44 ELEMENT_BUMP_44
element_bump_45 ELEMENT_BUMP_45
element_bump_46 ELEMENT_BUMP_46
element_bump_47 ELEMENT_BUMP_47
element_bump_48 ELEMENT_BUMP_48
element_bump_49 ELEMENT_BUMP_49
element_bump_5 ELEMENT_BUMP_5
element_bump_50 ELEMENT_BUMP_50
element_bump_51 ELEMENT_BUMP_51
element_bump_52 ELEMENT_BUMP_52
element_bump_53 ELEMENT_BUMP_53
element_bump_54 ELEMENT_BUMP_54
element_bump_55 ELEMENT_BUMP_55
element_bump_56 ELEMENT_BUMP_56
element_bump_57 ELEMENT_BUMP_57
element_bump_58 ELEMENT_BUMP_58
element_bump_59 ELEMENT_BUMP_59
element_bump_6 ELEMENT_BUMP_6
element_bump_60 ELEMENT_BUMP_60
element_bump_7 ELEMENT_BUMP_7
element_bump_8 ELEMENT_BUMP_8
element_bump_9 ELEMENT_BUMP_9
element_pos_1 ELEMENT_POS_1
element_pos_2 ELEMENT_POS_2
element_pos_3 ELEMENT_POS_3
element_pps_4 ELEMENT_POS_4
enable ENABLE
encoder_1 ENCODER1
encoder_2 ENCODER2
encoder_3 ENCODER3

Appendix: Eos OSCKeys 87
/eos/key/ Internal Eos Command
encoder_4 ENCODER4
encoder_5 ENCODER5
encoder_6 ENCODER6
encoder_category_color ENCODER_CAT_COLOR
encoder_category_custom ENCODER_CAT_CUSTOM
encoder_category_focus ENCODER_CAT_SPARE
encoder_category_form ENCODER_CAT_BEAM
encoder_category_image ENCODER_CAT_GRAPHIC
encoder_category_intensity ENCODER_CAT_OTHER
encoder_category_shutter ENCODER_CAT_SHUTTER
encoder_ext_1 ENCODER_EXT_1
encoder_ext_2 ENCODER_EXT_2
encoder_ext_3 ENCODER_EXT_3
encoder_ext_4 ENCODER_EXT_4
encoder_ext_5 ENCODER_EXT_5
encoder_ext_6 ENCODER_EXT_6
encoder_flexi ENCODER_FLEXI
encoder_lockout ENCODER_LOCKOUT
encoder_mode_1 ENCODER_MODE_1
encoder_mode_2 ENCODER_MODE_2
encoder_mode_3 ENCODER_MODE_3
encoder_mode_4 ENCODER_MODE_4
encoder_mode_5 ENCODER_MODE_5
encoder_wheel_move ENCODER_WHEEL_MOVE
encoders SNAPSHOT_ENCODERS
end_query QUERY_COMPLETE
enter ENTER
entry ENTRY_MODE
entrytime ENTRY_TIME
escape ESCAPE
even EVEN
even_effect EFFECT_EVEN
event SC_EVENT
eventlist SC_EVENT_LIST
exclusive EXCLUSIVE
execute EXECUTE
exit EXIT_MODE
exittime EXIT_TIME
expand EXPAND
expand_collapse_left EXPAND_COLAPSE_LEFT
expand_collapse_up EXPAND_COLAPSE_UP
expand_down EXPAND_DOWN
expand_right EXPAND_RIGHT

88 Appendix: Eos OSCKeys
/eos/key/ Internal Eos Command
export_file EXPORTFILE
export_folder EXPORTFOLDER
export_media EXPORTMEDIA
external EXTERNAL
external_relationship EXTERNAL_RELATIONSHIP
fade_by_rate FADE_BY_RATE
fade_by_size FADE_BY_SIZE
fade_by_size_and_rate FADE_BY_SIZE_AND_RATE
fader SC_SUB_FADER
fader_1 FADER01
fader_10 FADER10
fader_2 FADER02
fader_3 FADER03
fader_4 FADER04
fader_5 FADER05
fader_6 FADER06
fader_7 FADER07
fader_8 FADER08
fader_9 FADER09
fader_ab FADER_AB
fader_assert SLIDER_ASSERT
fader_control FADER_CONTROLS
fader_display FADER_DISPLAY
fader_mode FADER_MODE
fader_off FADER_OFF
fader_page_back FADER_PAGE_BACK
fader_pages FADER_PAGES
fader_rate FADER_RATE
fadermodule_1_connected SLIDER_MODULE1_CONNECTED
fadermodule_2_connected SLIDER_MODULE2_CONNECTED
fadermodule_3_connected SLIDER_MODULE3_CONNECTED
faderpagepress FADER_PAGE_DOWN
faderpagerelease FADER_PAGE_UP
faders SNAPSHOT_SLIDERS
faderwing_page FADER_PAGE_WING
fan_ FAN
fan_curve FAN_CURVE
feedback_errors SFF_ERRORS
filter FILTER
filter_mode FILTER_MODE
filters SNAPSHOT_FILTERS
fine FINE
finewheel FINE_WHEEL

Appendix: Eos OSCKeys 89
/eos/key/ Internal Eos Command
finewheelandencoderbutton FINE_WHEEL_AND_ENCODER_BUTTON
first_time START_TIME
fixtures SFF_FIXTURELIST
flash DIMMER_FLASH
flash_off FLASH_OFF
flash_on FLASH_ON
flexi_all FLEXI_ALL
flexi_channel_partition_toggle FLEXI_PARTITION_TOGGLE
flexi_in_use FLEXI_ACTIVE
flexi_manual FLEXI_MANUAL
flexi_moved FLEXI_MOVED
flexi_patch FLEXI_PATCH
flexi_selected FLEXI_SEL
flexi_show FLEXI_SHOW
flexi_time FLEXI_TIME
flexichannel_mode FLEXI_MODE
flip FLIP
flip_h PIXELMAP_FLIP_HORIZONTAL
flip_v PIXELMAP_FLIP_VERTICAL
focus FOCUS_CAT
focus_effect FOCUS_EFFECT
focus_palette FOCUS_PALETTE
follow FOLLOW
force_grandmaster_move FORCE_GRANDMASTER_MOVE
foreground_mode MACRO_USER
form FORM_CAT
format FORMAT
forward FORWARD
frame_rate FRAME_RATE
freeze PLAYBACK_FREEZE
friday RTC_FRIDAY
full FULL
gel DB_GEL
gel_ COLOR_FADE_GEL_SIM
gel_match_setting_brightest GEL_MATCH_BRIGHTEST_SETTING
gel_match_setting_hybrid GEL_MATCH_HYBRID_SETTING
gel_match_setting_spectrum GEL_MATCH_SPECTRUM_SETTING
gio_encoder_display GIO_ENCODER_DISPLAY
global GLOBAL_PALETTE
gm_exempt GM_EXEMPT
go PLAYBACK_GO (Master Fader)
go_0 GO (Master Fader)
go_to_cue GO_TO_CUE

90 Appendix: Eos OSCKeys
/eos/key/ Internal Eos Command
go_to_cue_0 FADER_GO_TO_CUE_0
gocue0 PLAYBACK_CUE_ZERO
gotocue PLAYBACK_GOTOCUE
gotocuetime GOTO_CUE_TIME
grandmaster GRANDMASTER_MOVE
greater_than GREATER_THAN
group GROUP
group_channels_by_5 GROUP_CHANNELS_BY_5
grouping GROUPING
groups SFF_GROUPS
hang HANG
haptic_encoder_wheel_move HAPTIC_ENCODER_WHEEL_MOVE
haptic_level_wheel_move HAPTIC_LEVEL_WHEEL_MOVE
haptic_rate_wheel_move HAPTIC_RATE_WHEEL_MOVE
hard_poweroff HARD_POWEROFF
height PIXEL_HEIGHT
help HELP
hform HORIZ_FORM
hide_cia CIA_HIDE
hide_mouse HIDE_MOUSE
high_contrast_displays HIGH_CONTRAST_DISPLAYS
highlight HIGHLIGHT
highlight_append HIGHLIGHT_APPEND
highlight_preset HIGHLIGHT_PRESET
highlight_remdim HIGHLIGHT_REM_DIM
hold HOLD
home HOME
home_preset HOME_PRESET
hs COLOR_FADE_HS
htp HTP
htp_ ONLY_HTP
image IMAGE_CAT
import_all_media IMPORTALLMEDIA
import_ascii_file IMPORTASCIIFILE
import_asciifile_custom IMPORTASCIIFILE_CUSTOM
import_file IMPORTFILE
import_gobo IMPORTGOBO
import_path IMPORT_PATH
import_show_media IMPORTSHOWMEDIA
in_time TIME_EFFECT
include_color_fade INCLUDE_COLOR_FADE
independent INDEPENDENT
infinite EFFECT_INFINITE

Appendix: Eos OSCKeys 91
/eos/key/ Internal Eos Command
inhibitive INHIBITIVE
input_string SC_INPUT_STRING
insert INSERT
insert_after INSERT_AFTER
insert_before INSERT_BEFORE
insert_channel INSERT_CHANNEL
int INT
intensity INTENSITY_CAT
intensity_block INTENSITY_BLOCK
intensity_master INTENSITY_MASTER
intensity_palette INTENSITY_PALETTE
intensitydown INTENSITY_DOWN
intensityup INTENSITY_UP
interface INTERFACE
interleave FAN_INTERLEAVE
internal INTERNAL
interpolate INTERPOLATE
intime EFFECT_STEP_IN_TIME
intime_effect INTIME_EFFECT
invert PIXELMAP_SELECT_INVERT
invert_pan INVERT_PAN
invert_tilt INVERT_TILT
ion_encoder_1 ION_ENCODER_1
ion_encoder_2 ION_ENCODER_2
ion_encoder_3 ION_ENCODER_3
ion_encoder_4 ION_ENCODER_4
is_in IS_IN
isn't_in ISNT_IN
jump FAN_JUMP
keyboard_shortcuts KEYBOARD_SHORTCUTS
keywords KEYWORDS
label LABEL
lamp_control LAMP_CONTROLS
lamp_controls_edit CIAPATCH_LAMPCMDS
lamp_ctrls LAMP_CONTROL_KEYS
lamp_on LAMP_ON
landscape LANDSCAPE
last LAST
last_ref LAST_REF
last_ref_off LAST_REF_OFF
last_time END_TIME
layer_chan LAYER_CHAN
ld_flags PATCH_LD_FLAGS

92 Appendix: Eos OSCKeys
/eos/key/ Internal Eos Command
learn LEARN
learn_time_discrete_steps LEARN_DISCRETE_TIME
learn_time_sample_bpm LEARN_TIME
left_side_sk_1 LEFT_SIDE_SK_1
left_side_sk_2 LEFT_SIDE_SK_2
left_side_sk_3 LEFT_SIDE_SK_3
left_side_sk_4 LEFT_SIDE_SK_4
left_side_sk_5 LEFT_SIDE_SK_5
left_side_sk_6 LEFT_SIDE_SK_6
left_side_sk_7 LEFT_SIDE_SK_7
less_than LESS_THAN
level LEVEL
level_ VALUE
level_wheel_move LEVEL_WHEEL_MOVE
lightwright LW_FIELDS
linear LINEAR_EFFECT
link LINK
list_partition CUE_PARTITION
listview LIST_VIEW
live LIVE
live_ FROM_LIVE
live_remdim_level REM_DIM_LEVEL
load LOAD_PLAYBACK
loadcue LOAD
loadforgo LOAD_AS_ENTER
lock LOCKED_PALETTE
loop LOOP
lowlight_preset LOWLIGHT_PRESET
ltp LTP
luminaire LUMINAIRE
macro MACRO
macro_1 MACRO1
macro_2 MACRO2
macro_3 MACRO3
macro_4 MACRO4
macro_5 MACRO5
macro_6 MACRO6
macro_7 MACRO7
macro_8 MACRO8
macro_801 MACRO_801
macro_802 MACRO_802
macro_803 MACRO_803
macro_804 MACRO_804

Appendix: Eos OSCKeys 93
/eos/key/ Internal Eos Command
macro_805 MACRO_805
macro_806 MACRO_806
macro_807 MACRO_807
macro_808 MACRO_808
macro_809 MACRO_809
macro_810 MACRO_810
macro_811 MACRO_811
macro_812 MACRO_812
macro_813 MACRO_813
macro_814 MACRO_814
macro_815 MACRO_815
macro_816 MACRO_816
macro_817 MACRO_817
macro_818 MACRO_818
macro_819 MACRO_819
macro_820 MACRO_820
macro_button MACRO_STAR
macro_entry_delete MACRO_ENTRY_DELETE
macro_loop_begin MACRO_LOOP_BEGIN
macro_loop_end MACRO_LOOP_END
macro_loop_num MACRO_LOOP_NUM_BEGIN
macro_mode MACRO_MODE
macro_wait MACRO_WAIT
macros SFF_MACROS
magic_sheet MAGIC_SHEET
magic_sheet_apply MAGICSHEET_APPLY
magic_sheet_edit MAGICSHEET_EDIT
magic_sheet_recall MAGICSHEET_RECALL
magic_sheets SFF_MAGICSHEETS
make_absolute MAKE_ABSOLUTE
make_manual MAKE_MANUAL
make_null MAKE_NULL
manual MANUAL
manual_master MANUAL_MASTER
manual_override MANUAL_OVERRIDE
mark MARK
mark_cue_designation MARK_CUE_DESIGNATION
mark_time MARK_TIME
marks DELAY_MARKS
media SFF_RESOURCELIST
midi MIDI
midi_cue_list MIDI_CUELIST
midi_raw MIDI_STRING

94 Appendix: Eos OSCKeys
/eos/key/ Internal Eos Command
miditimecode MIDI_TC
min MIN
minimum RESTORE_MINIMUM
minus_links MINUS_LINKS
mirror_in FAN_MIRROR_IN
mirror_mode MIRROR
mirror_out FAN_MIRROR_OUT
module_1_connected MODULE1_CONNECTED
module_1_disconnected MODULE1_DISCONNECTED
module_2_connected MODULE2_CONNECTED
module_2_disconnected MODULE2_DISCONNECTED
module_3_connected MODULE3_CONNECTED
module_3_disconnected MODULE3_DISCONNECTED
monday RTC_MONDAY
month RTC_MONTH
more_softkeys MORE_SOFTKEYS
move_to MOVE_TO
movefade MOVEFADE
moves_only MOVES_ONLY
msc_acn_rx_ids MSC_ACN_RECEIVE
msc_acn_tx_id MSC_ACN_TRANSMIT
msc_receive MSC_RECEIVE
msc_transmit MSC_TRANSMIT
multi_param MULTI_PARAM
multiconsole_power_off MULTICONSOLE_POWEROFF
multiconsole_power_on MULTICONSOLE_POWERON
native COLOR_FADE_NATIVE
negative NEGATIVE
new_keyword NEW_KEYWORD
new_show NEW_SHOW
next NEXT
next_blind_display NEXT_BLIND_DISPLAY
next_live_display NEXT_LIVE_DISPLAY
no_priority NO_PRIORITY
notes NOTES
num_groups FAN_NUM_GROUPS
numofchannels NUM_OF_CHANS
odd ODD
off BUMP_OFF
offline OFFLINE
offset OFFSET
offstate OFF_STATE
on BUMP_ON

Appendix: Eos OSCKeys 95
/eos/key/ Internal Eos Command
only_active ONLY_ACTIVE
only_labels ONLY_LABELS
only_levels ONLY_LEVELS
only_show ONLY_SHOWDATA
only_text ONLY_TEXT
onstate ON_STATE
oos_sync OOS_SYNC
open_bp_blind OPEN_BEAM_PALETTE_PREVIEW
open_browser OPENBROWSER
open_chan_effect_display OPEN_CHAN_EFFECT_DISPLAY
open_color_path_blind OPEN_COLOR_PATH_PREVIEW
open_color_picker OPENCOLORPICKER
open_cp_blind OPEN_COLOR_PALETTE_PREVIEW
open_cue_blind OPEN_CUE_LIST_INDEX
open_curve_preview OPEN_CURVE_PREVIEW
open_dmx_patch OPEN_DMX_PATCH
open_effect_blind OPEN_EFFECT_PREVIEW
open_effect_status OPENEFFECTSTATUS
open_fader_config OPENSLIDERCONFIGURATION
open_file OPENFILE
open_fp_blind OPEN_FOCUS_PALETTE_PREVIEW
open_group_blind OPEN_GROUP_PREVIEW
open_ip_blind OPEN_INTENSITY_PALETTE_PREVIEW
open_macro_preview OPEN_MACRO_PREVIEW
open_magic_sheet_blind OPEN_MAGIC_SHEET_PREVIEW
open_mirror_dialog OPEN_MIRROR_DIALOG
open_ml_controls OPEN_ML_CONTROLS
open_park_blind OPEN_PARK_PREVIEW
open_partition_preview OPEN_PARTITION_PREVIEW
open_pattern_effects OPEN_PATTERN_EFFECTS
open_preset_blind OPEN_PRESET_PREVIEW
open_setup OPEN_SETUP
open_sub_blind OPEN_SUBMASTER_PREVIEW
or OR
ordered_view ORDERED_VIEW
osc OSC_ENABLED
osc_rx_port_number OSC_RX_PORT_NUMBER
osc_tx_ip_address OSC_TX_IP_ADDRESS
osc_tx_port_number OSC_TX_PORT_NUMBER
out OUT
page_column_1 PAGE_COLUMN_1
page_column_2 PAGE_COLUMN_2
page_column_3 PAGE_COLUMN_3

96 Appendix: Eos OSCKeys
/eos/key/ Internal Eos Command
page_column_4 PAGE_COLUMN_4
page_column_5 PAGE_COLUMN_5
page_column_6 PAGE_COLUMN_6
page_column_7 PAGE_COLUMN_7
page_down PAGE_DOWN
page_encoders_down PAGE_ENCODERS_DOWN
page_encoders_up PAGE_ENCODERS_UP
page_mode SCROLL_MODE
page_up PAGE_UP
palettes SFF_PALETTES
paper_size_a2 PAPER_SIZE_A2
paper_size_a3 PAPER_SIZE_A3
paper_size_a4 PAPER_SIZE_A4
paper_size_legal PAPER_SIZE_LEGAL
paper_size_letter PAPER_SIZE_LETTER
paramcategory PARAM_CAT_PRE_v1_9_8
parameter_view PARAM_VIEW
parameters PARAMETERS
park PARK
part PART
partition PARTITION
partitionedcontrol PARTITIONED_CONTROL
patch PATCH
patch_1_to_1 RESET_PATCH
patch_done CIAPATCH_DONE
patch_manu_tab PATCH_MANU_TAB
patch_mode CIAPATCH_PATCH_MODE
patch_show_tab PATCH_SHOW_TAB
patch_user_tab PATCH_USER_TAB
path COLOR_PATH
pattern PATTERN
pdv_point PDV_POINT
pdv_time PDV_TIME
percent_per_rev ENCODER_PERCENT_PER_REVOLUTION
pixel_map_apply_check PIXELMAP_APPLY_CHECK
pixel_map_column_guides PIXELMAP_COLUMN_GUIDES
pixel_map_delete PIXELMAP_DELETE
pixel_map_direction PIXELMAP_DIRECTION
pixel_map_done PIXELMAP_APPLY
pixel_map_edit PIXELMAP_EDIT
pixel_map_file PIXELMAP_FILE
pixel_map_flash PIXELMAP_FLASH
pixel_map_horizontal_order PIXELMAP_HORIZONTAL_ORDER

Appendix: Eos OSCKeys 97
/eos/key/ Internal Eos Command
pixel_map_last PIXELMAP_LAST
pixel_map_library PIXELMAP_LIBRARY
pixel_map_mask PIXELMAP_MASK
pixel_map_next PIXELMAP_NEXT
pixel_map_overlay PIXELMAP_OVERLAY
pixel_map_overwrite PIXELMAP_OVERWRITE
pixel_map_reorder_files PIXELMAP_REORDER_FILES
pixel_map_reorder_libraries PIXELMAP_REORDER_LIBRARIES
pixel_map_row_guides PIXELMAP_ROW_GUIDES
pixel_map_snapshot PIXELMAP_SNAPSHOT
pixel_map_start_address PIXELMAP_START_ADDRESS
pixel_map_vertical_order PIXELMAP_VERTICAL_ORDER
pixel_maps SFF_PIXELMAPS
pixelmap PIXELMAP
playback_clear_cues PLAYBACK_CLEAR_CUES
playbackassert PLAYBACK_ASSERT
playbackmanual PLAYBACK_MANUAL_OVERRIDE
playbackmove PLAYBACK_MOVE
playbackoff PLAYBACK_OFF
playbackrate PLAYBACK_RATE
playbackrelease PLAYBACK_RELEASE
plus_patch PLUS_PATCH
plus_show ENTIRE_SHOW
popup_virtual_keyboard POPUP_VIRTUAL_KEYBOARD
port_offset PORT_OFFSET
portrait PORTRAIT
positive POSITIVE
post_select_softkeys POST_SELECT_SOFTKEYS
power_off POWEROFF
preheat PREHEAT
preheat_off PREHEAT_OFF
preheat_time PREHEAT_TIME
preserve_blind_cue PRESERVE_BLIND_CUE
preserve_native_on_patch_change PRESERVE_NATIVE_ON_PATCH_CHANGE
preset PRESET
presets SFF_PRESETS
prev_channels RESTORE_CHANNEL_LIST
previous RESTORE_PREVIOUS
print_color_printout PRINT_COLOR_PRINTOUT
print_feedback_errors PRINT_FEEDBACK_ERRORS
print_file PRINTFILE
print_folder PRINTFOLDER
print_summary_view PRINT_SUMMARY_VIEW

98 Appendix: Eos OSCKeys
/eos/key/ Internal Eos Command
print_tracked_levels PRINT_TRACKED_LEVELS
priority SOURCE_PRIORITY
properties PROPERTIES
proportion PROPORTION
proportional_master PROPORTIONAL_MASTER
psd_time_countdown DISPLAY_FADING_CUE_TIME
query QUERY
quit QUIT
random RANDOM
random_groups RANDOM_GROUPS
random_rate RANDOM_RATE
rate RATE
rate_wheel_move RATE_WHEEL_MOVE
ratewheel RATE_WHEEL
rce_channels EFFECT_CHANNELS
rce_insert EFFECT_INSERT
rce_on_off EFFECT_ON_OFF
recall_from RECALL_FROM
receivechan MSC_RECEIVE_CHAN
record RECORD
record_only RECORD_ONLY
record_rig_check DIMRACK_REC_RIG_CHK
recordconfirm RECORD_CONFIRM
redo REDO
ref_only REFERENCES_ONLY
relay RELAY
relay_output RELAY_OUTPUT
release RELEASE_FADER
rem_dim REM_DIM
remfiltercat REM_FILTER_CAT
remfilterparam REM_FILTER_PARAM
remove_favorite PATCH_REMOVE_FAVORITE
reorder REORDER
repeat FAN_REPEAT
repeat_last_command REPEAT_LAST_COMMAND
repeat_on_go EFFECT_REPEAT
replace REPLACE_ADDRESS
replace_with REPLACE_WITH
request_file REQUESTFILE
reset_all_tabs RESET_ALL_TABS
reset_columns RESET_COLUMNS
reset_desk_settings RESET_DESK_SETTINGS
reset_show_settings RESET_SHOW_SETTINGS

Appendix: Eos OSCKeys 99
/eos/key/ Internal Eos Command
reset_system RESET_SYSTEM
reset_update UPDATE_CLEAR
restart_effect REFIRE_EFFECT
restore RESTORE_MODE
resume RESUME
resyncframes RESYNC_FRAMES
reverse REVERSE
reverse_steps REVERSE_STEPS
rfr RFR_ENABLE
rgb COLOR_FADE_RGB
rotate_90 PIXELMAP_ROTATE_90
rpu_1 RPU_1
rpu_10 RPU_10
rpu_11 RPU_11
rpu_12 RPU_12
rpu_13 RPU_13
rpu_14 RPU_14
rpu_15 RPU_15
rpu_16 RPU_16
rpu_17 RPU_17
rpu_18 RPU_18
rpu_19 RPU_19
rpu_2 RPU_2
rpu_20 RPU_20
rpu_21 RPU_21
rpu_3 RPU_3
rpu_4 RPU_4
rpu_5 RPU_5
rpu_6 RPU_6
rpu_7 RPU_7
rpu_8 RPU_8
rpu_9 RPU_9
rtc RTC
rtc_time RTC_TIME
run_cue RUN_CUE
run_rig_check DIMRACK_RUN_RIG_CHK
rvi_settings RVI_SETTINGS
sacn ACN
sat_adjust COLOR_FADE_SAT
saturday RTC_SATURDAY
save SAVE
save_file SAVEFILE
save_folder SAVEFOLDER

100 Appendix: Eos OSCKeys
/eos/key/ Internal Eos Command
save_show SAVE_SHOW
scale SCALE
scroller_frame SCROLLER_FRAME
second_action SECOND_ACTION
security_settings SECURITY_SETTINGS
select SELECT
select_active SELECT_ACTIVE
select_all SELECT_ALL
select_last SELECT_LAST
select_last_params SELECT_LAST_PARAMS
select_live_cue_blind SELECT_LIVE_CUE_BLIND
select_live_cue_live SELECT_LIVE_CUE_LIVE
select_manual SELECT_MANUAL
select_nonsub_active SELECT_NONSUB_ACTIVE
send_midi_raw SEND_MIDI_STRING
send_string SEND_SERIAL_STRING
server_chan MAIN_LAYER_CHAN
set_chan_level SET_CHAN_LEVEL
setup SETUP
shield SHIELDED_SUB
shift SHIFT
show_channels SFF_SHOWCHANNELS
show_control SFF_SHOWCONTROL
show_control_action SC_ACTION
show_park_buffer SHOW_PARK_BUFFER
show_ref_labels SHOW_REF_LABELS
show_reference_labels SHOW_REFERENCE_LABELS
show_settings SHOW_SETTINGS
show_source_data SHOW_SOURCE_DATA
show_stored_data SHOW_STORED_DATA
shutdown_fixture SHUTDOWN_LAMP
shutdown_macro SHUTDOWN_MACRO
shutter SHUTTER_CAT
single_param SINGLE_PARAM
size SIZE
slider_move SLIDER_MOVE
smpte SMPTE
smptetimecode SMPTE_TC
snap CIAPATCH_SNAP
snapshot SNAPSHOT
snapshot_recall SNAPSHOTRECALL
snapshots SFF_SNAPSHOTS
sneak SNEAK

Appendix: Eos OSCKeys 101
/eos/key/ Internal Eos Command
softkey_1 SOFTKEY1
softkey_2 SOFTKEY2
softkey_3 SOFTKEY3
softkey_4 SOFTKEY4
softkey_5 SOFTKEY5
softkey_6 SOFTKEY6
softkey_7 SOFTKEY7
softkey_8 SOFTKEY8
solo EFFECT_SOLO
solo_mode SOLO_MODE
solo_status SOLO_STATUS
source SOURCE
spacebar_go SPACEBAR_DISABLE
split_cue_time SPLIT_CUE_TIME
spread EFFECT_SPREAD
spreadsheet SPREADSHEET
startup_macro STARTUP_MACRO
status EFFECT_STATUS
step STEP
stepbased STEPBASED_EFFECT
steptime STEP_TIME
stop STOP
stop_1 STOP01
stop_10 STOP10
stop_2 STOP02
stop_3 STOP03
stop_4 STOP04
stop_5 STOP05
stop_6 STOP06
stop_7 STOP07
stop_8 STOP08
stop_9 STOP09
stop_all STOP_ALL_EFFECT
stop_and_fade STOP_AND_FADE
stop_and_hold STOP_AND_HOLD
stop_effect STOP_EFFECT
stop_effect_button STOP_EFFECT_BUTTON
stopback PLAYBACK_STOP_BACK
stopeffect STOP_EFFECT
string SERIAL_STRING
string_and_osc_rx SERIAL_RX_ENABLE
string_and_osc_tx SERIAL_TX_ENABLE
string_midi_tx SERIAL_MIDI_TX

102 Appendix: Eos OSCKeys
/eos/key/ Internal Eos Command
string_rx_group_ids SERIAL_RX_GROUP_IDS
string_rx_port SERIAL_RX_PORT_NUMBER
string_tx_group_ids SERIAL_TX_GROUP_IDS
string_tx_ip_address SERIAL_TX_IP_ADDRESS
string_tx_port SERIAL_TX_PORT_NUMBER
sub SUBMASTER
subassert SUB_ASSERT
subdown SUB_BUMP_DOWN
subfreeze SUB_FREEZE
submasters SFF_SUBMASTERS
submove SUB_MOVE
suboff SUB_OFF
subrelease SUB_RELEASE
subtype SUB_TYPE
subup SUB_BUMP_UP
sunday RTC_SUNDAY
sw_go_1 SW_GO_1
sw_go_10 SW_GO_10
sw_go_11 SW_GO_11
sw_go_12 SW_GO_12
sw_go_13 SW_GO_13
sw_go_14 SW_GO_14
sw_go_15 SW_GO_15
sw_go_16 SW_GO_16
sw_go_17 SW_GO_17
sw_go_18 SW_GO_18
sw_go_19 SW_GO_19
sw_go_2 SW_GO_2
sw_go_20 SW_GO_20
sw_go_21 SW_GO_21
sw_go_22 SW_GO_22
sw_go_23 SW_GO_23
sw_go_24 SW_GO_24
sw_go_25 SW_GO_25
sw_go_26 SW_GO_26
sw_go_27 SW_GO_27
sw_go_28 SW_GO_28
sw_go_29 SW_GO_29
sw_go_3 SW_GO_3
sw_go_30 SW_GO_30
sw_go_31 SW_GO_31
sw_go_32 SW_GO_32
sw_go_33 SW_GO_33

Appendix: Eos OSCKeys 103
/eos/key/ Internal Eos Command
sw_go_34 SW_GO_34
sw_go_35 SW_GO_35
sw_go_36 SW_GO_36
sw_go_37 SW_GO_37
sw_go_38 SW_GO_38
sw_go_39 SW_GO_39
sw_go_4 SW_GO_4
sw_go_40 SW_GO_40
sw_go_5 SW_GO_5
sw_go_6 SW_GO_6
sw_go_7 SW_GO_7
sw_go_8 SW_GO_8
sw_go_9 SW_GO_9
sw_stop_1 SW_STOP_1
sw_stop_10 SW_STOP_10
sw_stop_11 SW_STOP_11
sw_stop_12 SW_STOP_12
sw_stop_13 SW_STOP_13
sw_stop_14 SW_STOP_14
sw_stop_15 SW_STOP_15
sw_stop_16 SW_STOP_16
sw_stop_17 SW_STOP_17
sw_stop_18 SW_STOP_18
sw_stop_19 SW_STOP_19
sw_stop_2 SW_STOP_2
sw_stop_20 SW_STOP_20
sw_stop_21 SW_STOP_21
sw_stop_22 SW_STOP_22
sw_stop_23 SW_STOP_23
sw_stop_24 SW_STOP_24
sw_stop_25 SW_STOP_25
sw_stop_26 SW_STOP_26
sw_stop_27 SW_STOP_27
sw_stop_28 SW_STOP_28
sw_stop_29 SW_STOP_29
sw_stop_3 SW_STOP_3
sw_stop_30 SW_STOP_30
sw_stop_31 SW_STOP_31
sw_stop_32 SW_STOP_32
sw_stop_33 SW_STOP_33
sw_stop_34 SW_STOP_34
sw_stop_35 SW_STOP_35
sw_stop_36 SW_STOP_36

104 Appendix: Eos OSCKeys
/eos/key/ Internal Eos Command
sw_stop_37 SW_STOP_37
sw_stop_38 SW_STOP_38
sw_stop_39 SW_STOP_39
sw_stop_4 SW_STOP_4
sw_stop_40 SW_STOP_40
sw_stop_5 SW_STOP_5
sw_stop_6 SW_STOP_6
sw_stop_7 SW_STOP_7
sw_stop_8 SW_STOP_8
sw_stop_9 SW_STOP_9
swap SWAP
swap_address SWAP_ADDRESS
swap_pan/tilt SWAP_FIXTURE
system_settings SFF_SYSTEMSETTINGS
tab SHEET
tab_down TAB_DOWN
tab_up TAB_UP
tb_pan_swap TB_PAN_SWAP
tb_tilt_swap TB_TILT_SWAP
tb_xy_swap TB_XY_SWAP
test_fixture TEST_LAMP
text1 TEXT1
text10 TEXT10
text2 TEXT2
text3 TEXT3
text4 TEXT4
text5 TEXT5
text6 TEXT6
text7 TEXT7
text8 TEXT8
text9 TEXT9
thru THRU
thursday RTC_THURSDAY
time TIME
time_code CUE_TIME_CODE
time_template TIME_TEMPLATE
timing_disable TIMING_DISABLE
timing_disable_back TIMING_DISABLE_BACK
timing_disable_go TIMING_DISABLE_GO
timing_disable_time TIMING_DISABLE_TIME
timingdisable PLAYBACK_TIMING_DISABLE
toggle_accel ENCODER_TOGGLE_ACCELERATION
toggle_effect_shape_mode_for_encoder EFFECT_ENCODER_SHAPE_MODE_TOGGLE

Appendix: Eos OSCKeys 105
/eos/key/ Internal Eos Command
toggle_effects TOGGLE_EFFECTS
trace TRACE
track TRACK
tracking TRACKING_MODE
trail TRAIL
transmitchan MSC_TRANSMIT_CHAN
trckbll_on/off TRACKBALL_PAN_TILT_TOGGLE
tuesday RTC_TUESDAY
type TYPE
undo UNDO
undouble DIMMER_UNDOUBLE
unown UNOWN
unpatch UNPATCH
unpatched UNPATCHED_QUERY
up UP_TIME
update UPDATE
update_lin UPDATE_LIB
update_mode UPDATE_MODE
user_id USER_ID
utilization_reports SFF_UTILREPORTS
vform VERT_FORM
view MAGICSHEET_VIEW
view_channels FLEXI_VIEW_CHANNELS
visible_workspaces SNAPSHOT_MONITORS
vplaybackmove VPLAYBACK_MOVE
vsubmove VIRT_SUB_MOVE
wait_for_enter MACRO_PAUSE_FOR_ENTER
wait_for_input MACRO_PAUSE_FOR_INPUT
wednesday RTC_WEDNESDAY
wheel WHEEL
wheel0 WHEEL0
wheel1 WHEEL1
wheel2 WHEEL2
wheel3 WHEEL3
wheel4 WHEEL4
wheel5 WHEEL5
wheel6 WHEEL6
wheel7 WHEEL7
wheel8 WHEEL8
wheel9 WHEEL9
wheelandencoderbutton WHEEL_AND_ENCODER_BUTTON
white_point PATCH_WHITE_POINT
white_point_xyz PATCH_WHITE_POINT_XYZ

106 Appendix: Eos OSCKeys
/eos/key/ Internal Eos Command
width PIXEL_WIDTH
year RTC_YEAR

Corporate Headquartersn Middleton, WI, USA n Tel +608 831 4116 n Service:(Americas) service@etcconnect.com
London, UK n Tel +44 (0)20 8896 1000 n Service: (UK) service@etceurope.com
Rome, IT n Tel +39 (06) 32 111 683 n Service: service@etceurope.com
Holzkirchen, DE
n
Tel +49 (80 24) 47 00-0
n
Service: (DE) techserv-hoki@etcconnect.com
Hong Kong
n
Tel +852 2799 1220
n
(Asia) service@etcasia.com
Web: www.etcconnect.com
n
Copyright 2017 © Electronic Theatre Controls, Inc.
n
Product information and specifications subject to change. ETC intends this document to be provided in its entirety.
4250M2410 Rev C n Released 2017-02 n
