Basic TI-Nspire™ CX Functionality
The Document Model
1. The TI-Nspire ™ handheld is “document based and
menu driven”. This simply means that everything you
do must be done in a document much like on a
computer, and the tools for every application can be
found in its menus.
•
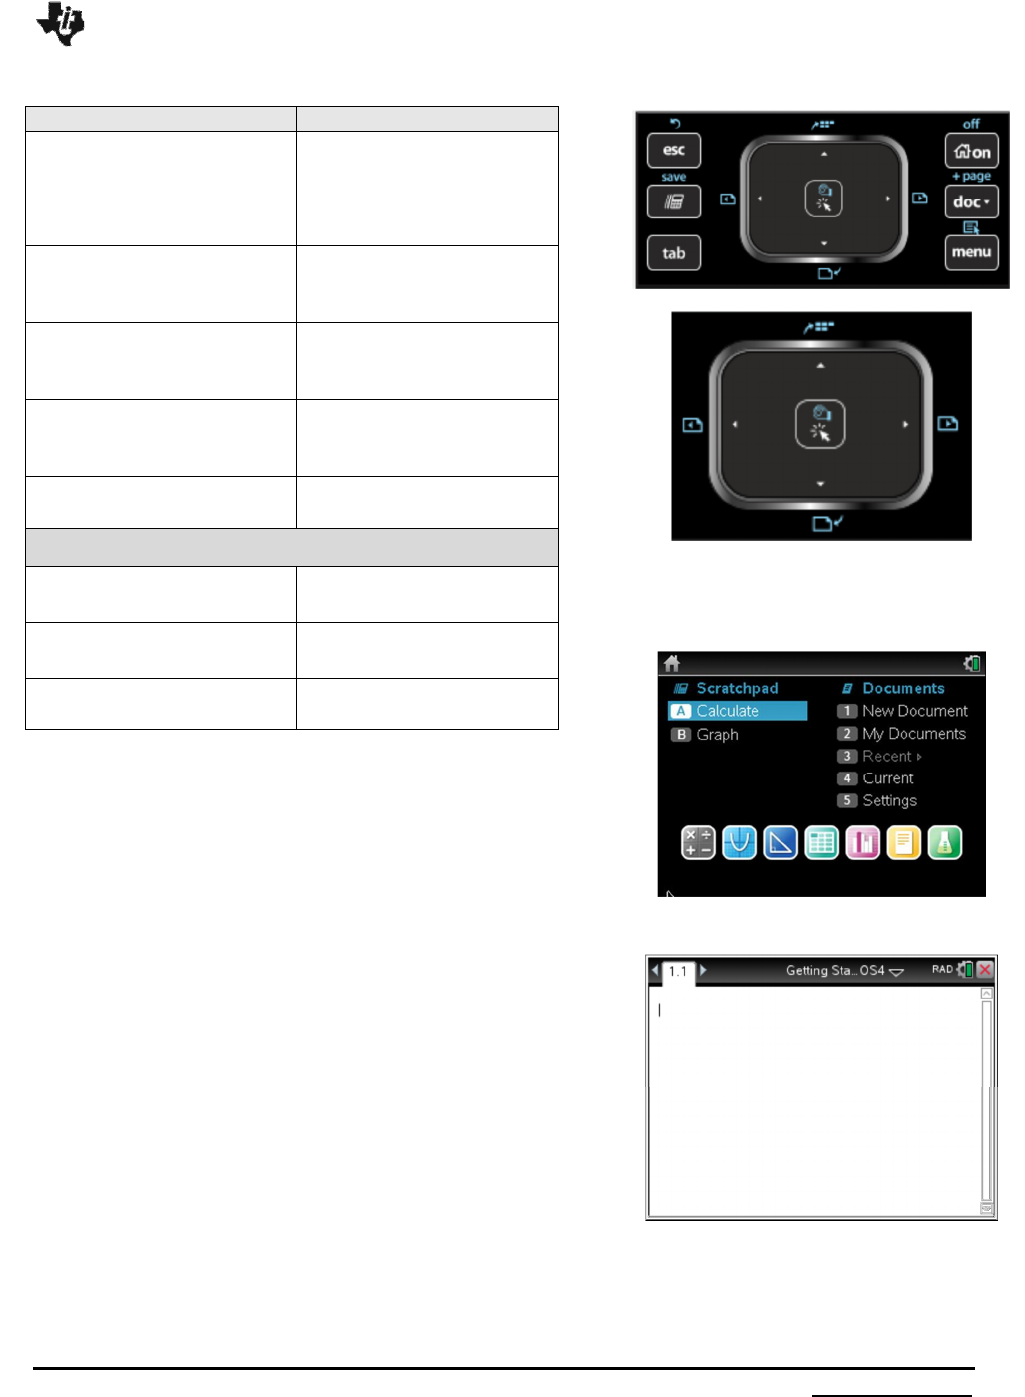
Turn on your TI-Nspire ™. If the screen shown in
Figure 3 is not displayed, press
c
for Home.
Open a new document by selecting 1: New
Document and 1: Add Calculator
to add a new
Calculator application page (Figure 4).
Touchpad Cursor Controls
Figures 1 & 2
Figure 3
Figure 4
Key Name
Function
x
Click Key
(See Figures 1 and 2.)
Selects an object on the
screen.
/
+
x
grabs an
object on the screen.
TouchPad
Slide or Press the arrow
keys to move the
cursor/pointer.
d
Escape Key
Removes menus or
dialog boxes from the
screen.
»
Scratch Pad
Provides a temporary
application ( i.e.
calculator)
e
Tab Key
Moves to the next entry
field.
The Big Three
c
Home Key
Displays the home
menu.
~
Document Key
Controls document
structure
b
Menu Key
Displays application or
context menu.
Basic TI-Nspire™ CX Functionality
The Calculator Application
1. Page 1.1 is a calculator page. (Figure 4).
2. Perform the operations shown in Figures 6 to 13:
Note: To select a menu option, you can highlight the option and
press
·
or
x
. Alternately, you can press the number key for
that option.
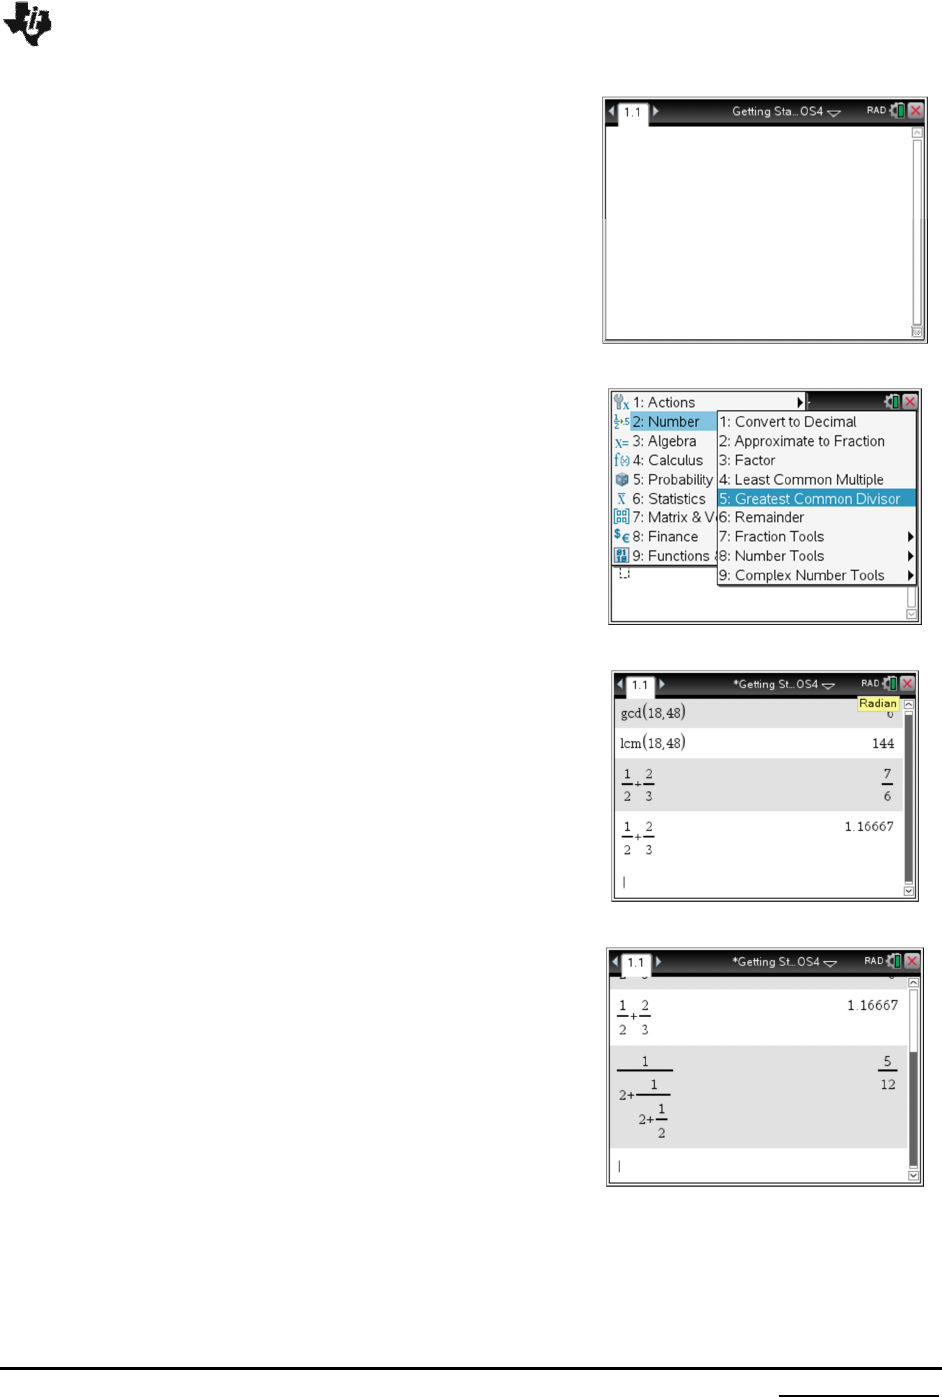
•
To find the gcd of two numbers, press Menu,
Number, Greatest Common Divisor. (
Keystrokes:
b 25
)
(Figures 5 and 6).
• To enter a fraction, type the division key or use the
fraction template by selecting / p (the right
side of the
r p toggle.
•
For an approximate value, press
/
·
(Figure7).
Note: To clear the calculator screen, press for Menu, Actions,
Clear History (Keystrokes
b 1 5
).
Figure 4(Again)
Figure 5
Figure 6
Figure 7
Basic TI-Nspire™ CX Functionality
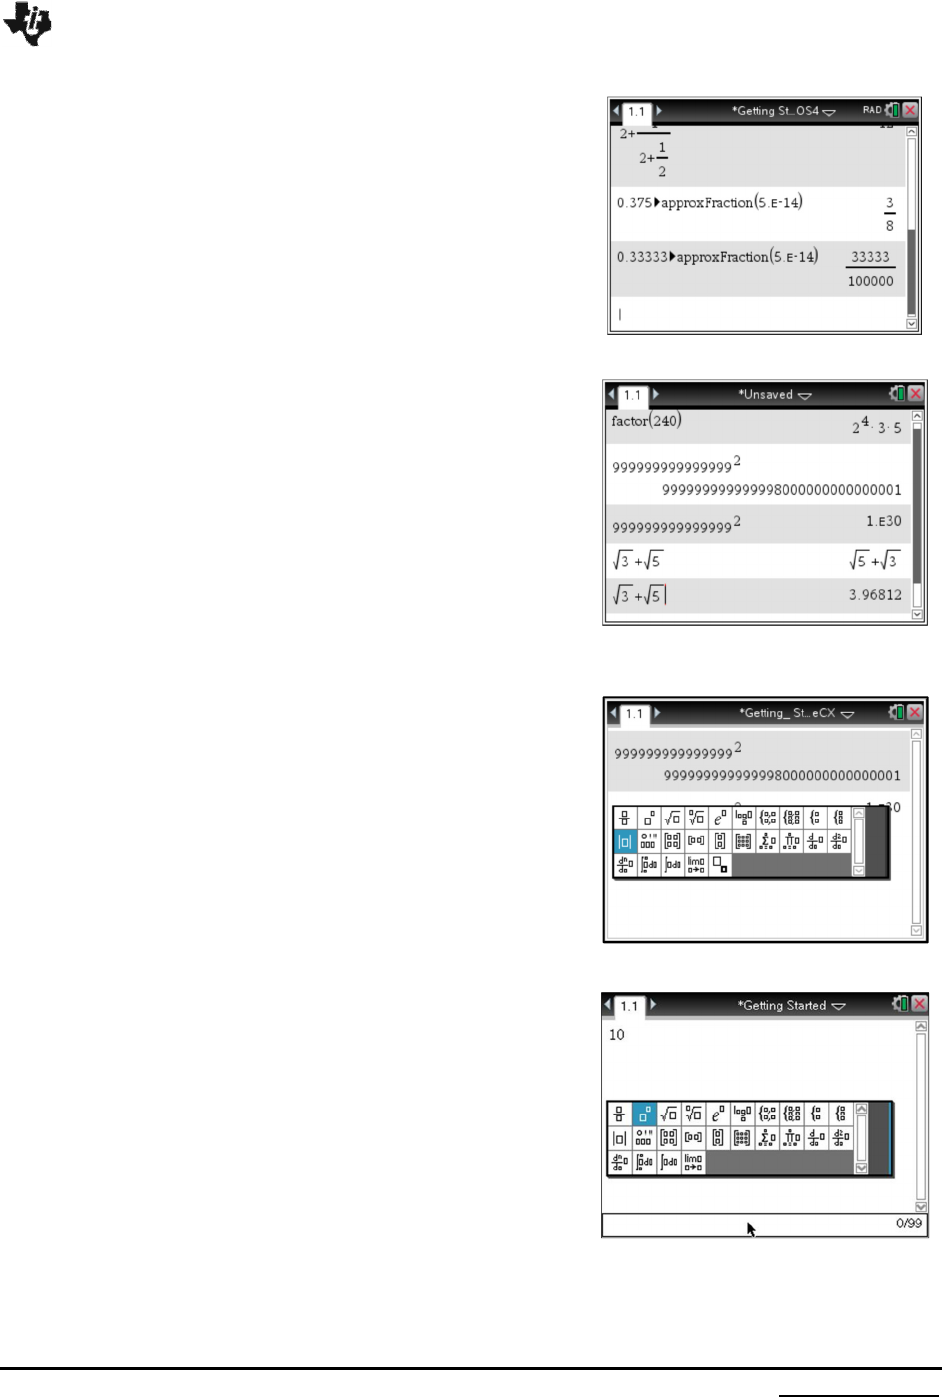
•
To convert a decimal to an approximate fraction
press Menu, Number, Approximate to Fraction.
(
Keystrokes:
b 22
). (Figure 8).
•
To factor a number, press Menu, Number, Factor.
(
Keystrokes
:
b23
).
(Figure 9).
•
To access square root command, press
/
q
or press
t
(the left side of the
tk toggle, or
type sqrt(. (Figure 9).
•
To access the absolute value command, press
t
(the left side of the
tk
toggle), and choose the
absolute value template or type abs( (Figure 10).
•
To raise a number to a power, enter the base, press
t
, and select the template shown in Figure 11.
Enter the power, and press ·
.
(Figure 12.)
Figure 8
Figure 9
Figure 10
Figure 11

Basic TI-Nspire™ CX Functionality
Figure 12
•
To access the degree symbol, press
/ k
for the
symbols menu (Figure 13).
• Move the cursor to the right, and select the
o
(degree) symbol and press
·
.
•
To access the factorial symbol, press Menu,
Probability, Factorial. (
Keystrokes:
b41
) OR
use the symbols menu described above. (Figure 14).
•
To access the templates for matrices, press
t
(the left
side of the
tk
toggle
). (Figure 15).
Figure 13
Figure 14
Figure 15
Basic TI-Nspire™ CX Functionality
• Define function
2
1( )f x x= . (Keystrokes:
Press,
k
,
select Define and type
2
1( )f x x= ) OR simply type the
word Define followed by
2
1( )f x x= .
• Evaluate
1( 5)f −
(Figure 16).
Figure 16
T
he Graphs Application
Basic Graphing
Insert a New Page.
• Add a new page. (
Keystrokes:
~
4:Insert, 2: Page
)
and then select Add Graphs (Figure 1).
Shortcuts: Press
/ ~
or
Press
c
.
The Graphs application is now page 1.2 of the document.
Note: The graphing window shown is the default window setting
with a screen aspect ratio of one.
1. The function notation f2(x) is shown in the entry line.
Explain why. (Figure 2).
2. To see and graph f1(x), Press £ and · (Figure 3).
Note: The Entry line is now hidden. To recall the Entry Line,
Press
/G
.
Note: To edit a function, recall the Entry line and edit OR
double “click” on the equation showing on the screen and edit.
Figure 1
Figure 2
Figure 3
Basic TI-Nspire™ CX Functionality
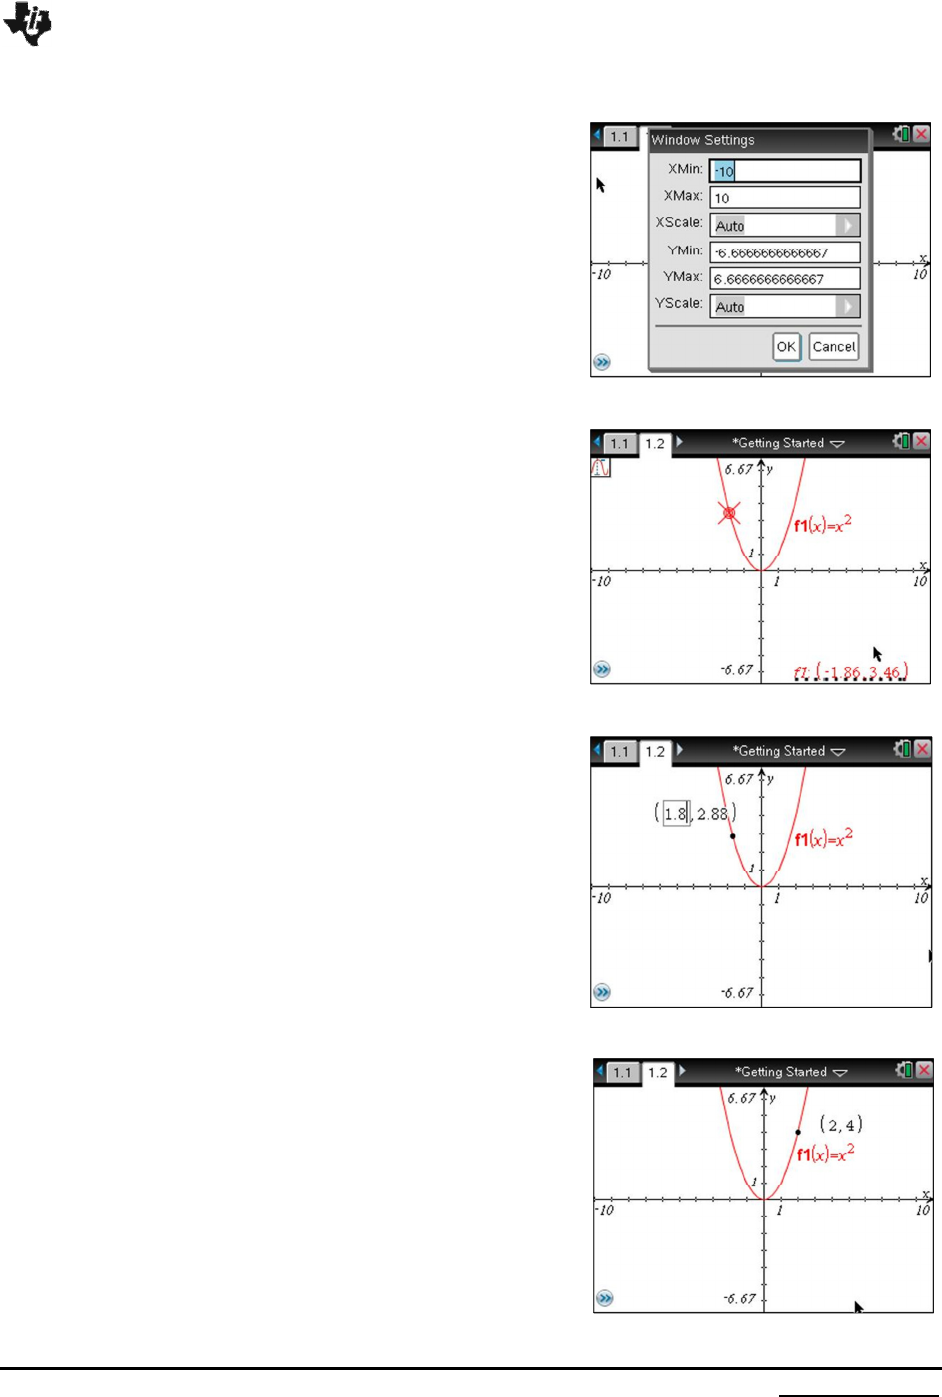
Modifying the Window
• Method 1: Press Menu, Window, Window Settings
(
Keystrokes:
b41
) and enter appropriate values
for xmax, xmin, etc. (Figure 4).
• Method 2: Double “click” on the each of the end
values of the axes and edit appropriately.
Note: These methods will rescale the axes and may not maintain
the 1 to 1 aspect ratio.
Tracing a function
• Press Menu, Trace, Graph Trace (
Keystrokes:
b51
).
Use the Touchpad to move the cursor
(spider) left or right to trace the function. Press
x or
·
to permanently fasten a point and its coordinates on
the graph. (Figure 5).
Note: The x or y coordinate of the point may be edited by double
“clicking” on the entry, typing in a new value and pressing
x
or
·
.
(Figures 6 and 7).
Figure 4
Figure 5
Figure 6
Figure 7

Basic TI-Nspire™ CX Functionality
Actively Manipulating Functions
1. Use the Touchpad arrow keys to move the graph on the
screen.
As you move the pointer close to the graph of a function,
one of two different types of cursors will appear.
• The two-directional arrow stretches the function
(Figure 8). Notice the word graph also appears.
• The four-directional arrow translates the function
(Figure 9).
2. Place the pointer near the graph until the two-directional
arrow appears.
3. Press
/ x
, and use the Touchpad arrow keys to
stretch or translate the function.
Figure 8
Figure 9
Moving Between Pages in a document
1. Press
/
¡ (on the TouchPad) to move back one page
2. To view all of the pages of the problem, press
/
` (on
the TouchPad) (Figure 10).
Note: This screen allows you to move from one page to another.
To open the page that you wish to view, highlight the page
by moving left or right with the Touchpad
.
When the
appropriate page is highlighted, press
·.
Note: To change the order of the pages, highlight the page by
moving left or right with the Touchpad, and hold the x
until the hand closes. Then use the NavPad cursor ¡or ¢
move the page to the desired place, and press ·.
Figure10
Figure 11
Basic TI-Nspire™ CX Functionality
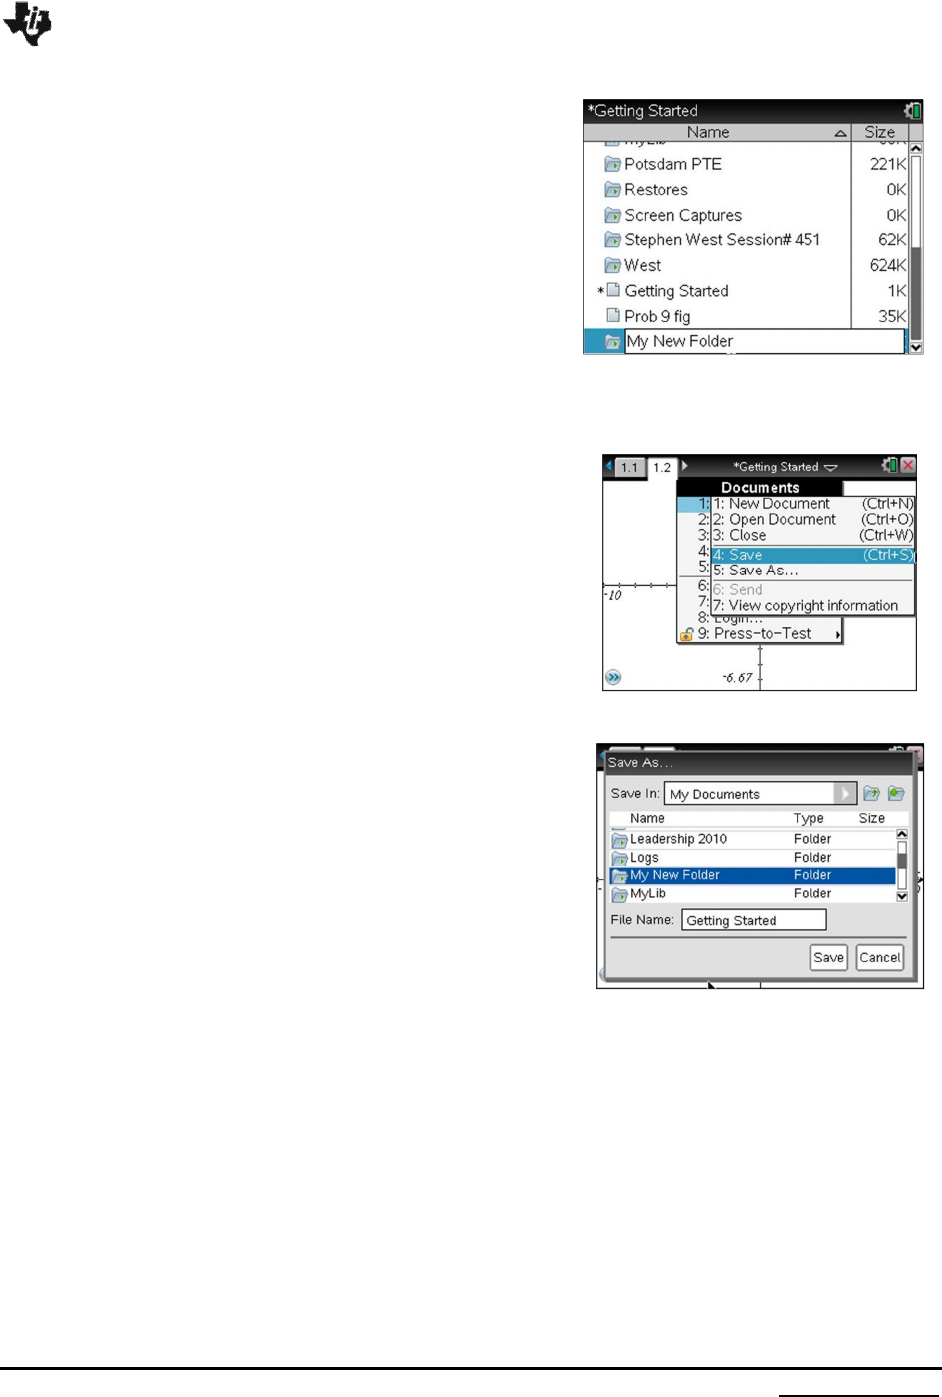
Creating a New Folder
1. Press Home, My Documents. (
Keystrokes:
c 2
).
2. Highlight the folder in which you would like to create
your new folder.
3. Press Menu, New Folder. (
Keystrokes:
b1
), type the
name of the new folder and press ·. (Figures 11 and
12).
Figure 12
Saving a Document
1. To save the current document, press ~, File, Save
(or Save As…) (
Keystrokes:
~
,
1
,
2
)(Figure 1).
2. The Save As…: dialog box appears and will be
highlighted, enter your file name (Figure 2).
3. Recall that TI-Nspire behaves like a computer and that
the Touchpad behaves like a computer touchpad or a
mouse.
• If the folder, that you wish to save the file in is
highlighted, then press
·
.
• However, if the folder that is highlighted is not the
correct one, use the Touchpad to slide the cursor
to the correct folder press click followed by
·
.
Figure 1
Figure 2
Note: Folders on TI-Nspire can be nested like those on a computer. Use the Touchpad to navigate the folders
much in the same way as on your computer.
4. To check to see if your document has been saved. Press c 2 for Home 2: My Documents.
The folder will appear showing the document that you have just saved.
Shortcut: To save the current document, press
/»
for
¾
.
Basic TI-Nspire™ CX Functionality
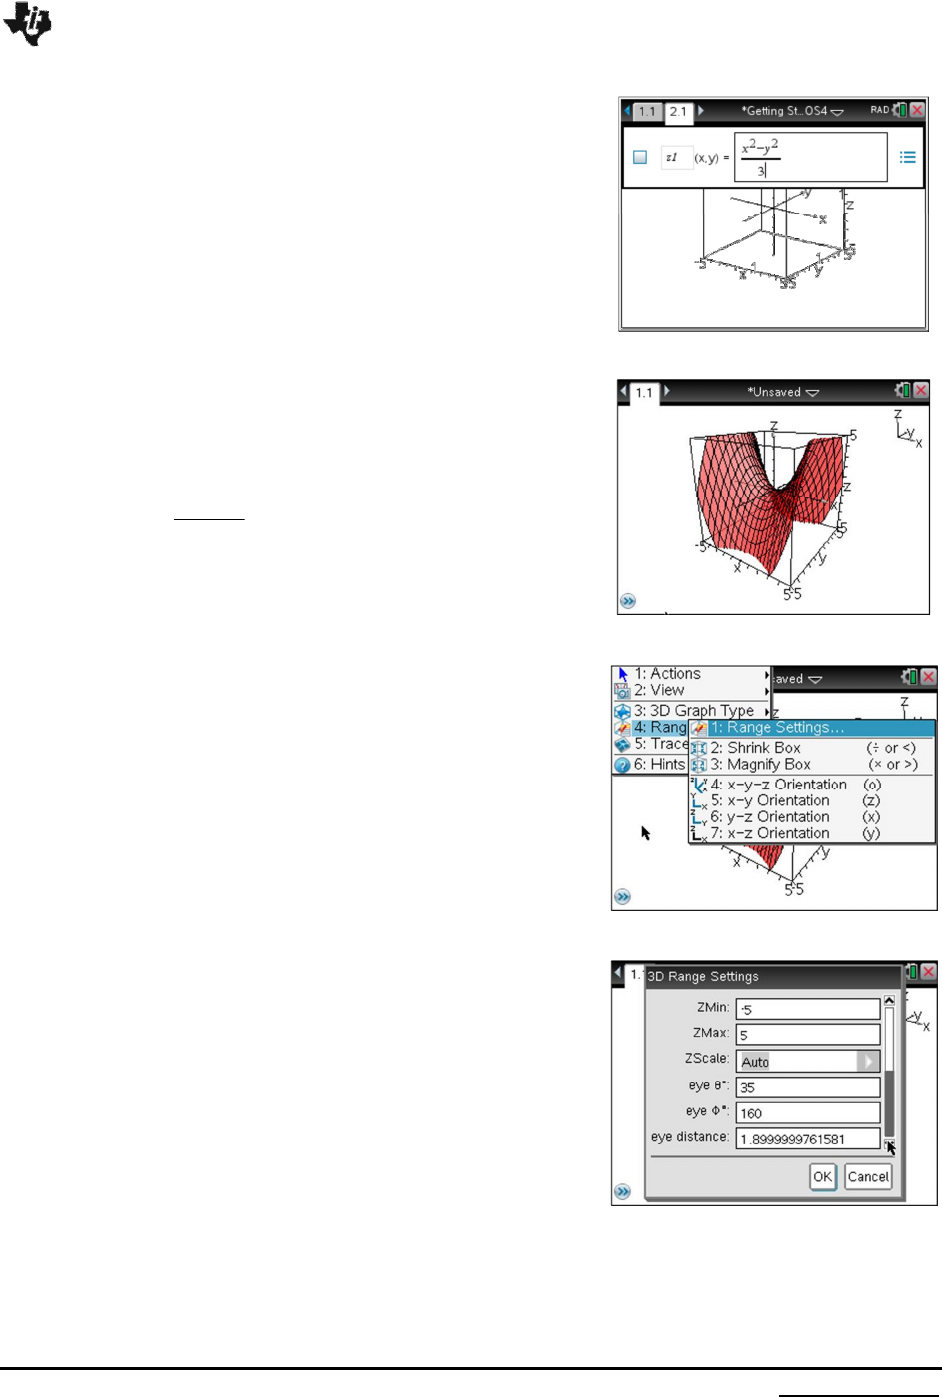
Graphing in 3D
The 3D Graphing view lets you enter functions of the form z(x,y)
and view and explore them in three-dimensional space.
While you are in the 3D Graphing view, you can define, rotate,
resize, and trace 3D graphs. You can set the colors and other
visual attributes of a selected graph, and you can customize the
3D viewing environment.
1. Insert a New Page and select Add Graphs.
2. In the View Menu select 3D Graphing (Figure 1.)
3. In the entry line enter a function for example:
2 2
1( , )
3
x y
z x y
−
= and press Enter.
(Figure 2).
Range Settings
The Range Settings function (Figure 3 and 4) in the same way as
in two dimensional graphing with the following exceptions:
• eye θ: Rotation in degrees around the z-axis clockwise
from positive x-axis
• eye φ: Rotation in degrees clockwise around a line
through the origin and parallel to the screen midline
• eye distance: the distance ( a number between 1 and 100)
from the viewing eye to the graph.
Rotating the 3D view
Press any of the four arrow keys to rotate the graph.
Note: A legend displaying orientation of the axes appears in the upper
right hand corner.
To rotate automatically:
• Auto rotation is equivalent to holding down the right
arrow key.
• From the Actions menu, select Auto Rotation. The Auto
Rotation icon appears, and the graph rotates.
• (Optional) Use the up and down arrow keys to explore
the rotating graph.
• To stop the rotation and return to the Pointer tool, press
ESC.
Figure 1
Figure 2
Figure 3
Figure 4
Basic TI-Nspire™ CX Functionality
To view from specific orientations:
• Press Z, Y, or X to view along the z, y, or x axis.
• Press letter O to view from the default orientation.
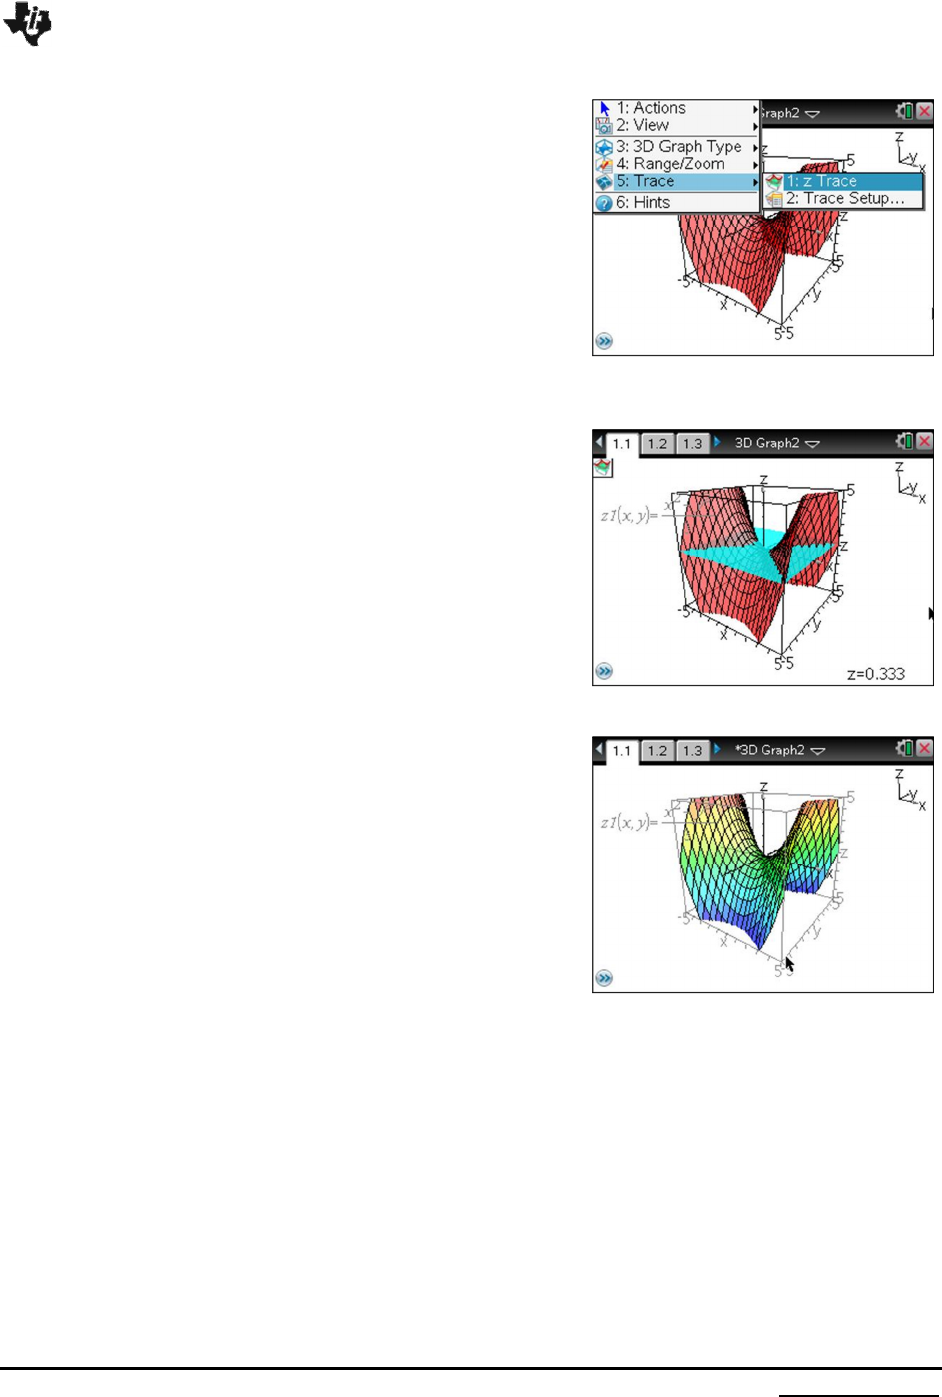
Tracing in the 3D view
1. From the Trace menu, select z Trace.
The z Trace icon and the trace plane appear, along with
a text line showing the current "z=" trace value. (Figure
5.)
2. To move the trace, hold down Shift and press the up or
down arrow key. The "z=" text is updated as you
move.(Figure 6.)
3. (Optional) Use the four arrow keys to rotate the view
and see how the trace plane and the graph intersect.
4. To stop tracing and return to the Pointer tool, press
ESC
To set custom plot colors:
Custom plot colors can make it easier to see the shape
characteristics of the graph. You can assign different colors to
its top and bottom surfaces or choose to have the graph colored
automatically, based on height or steepness. You can also set
the wire color.
1. Display the graph’s context menu, and then select
Color > Custom Plot Color.
2. Select one of the three Surface color options:
Top/bottom color, Vary color by height, or Vary
color by steepness.
• If you choose Top/bottom color, click the color
swatches to select colors for the top and bottom
surfaces.
• If you choose to vary color by height or steepness,
colors are determined automatically. Figure 7.)
3. To set the Wire color, click the color swatch and select
a color
Figure 5
Figure 6
Figure 7
Basic TI-Nspire™ CX Functionality
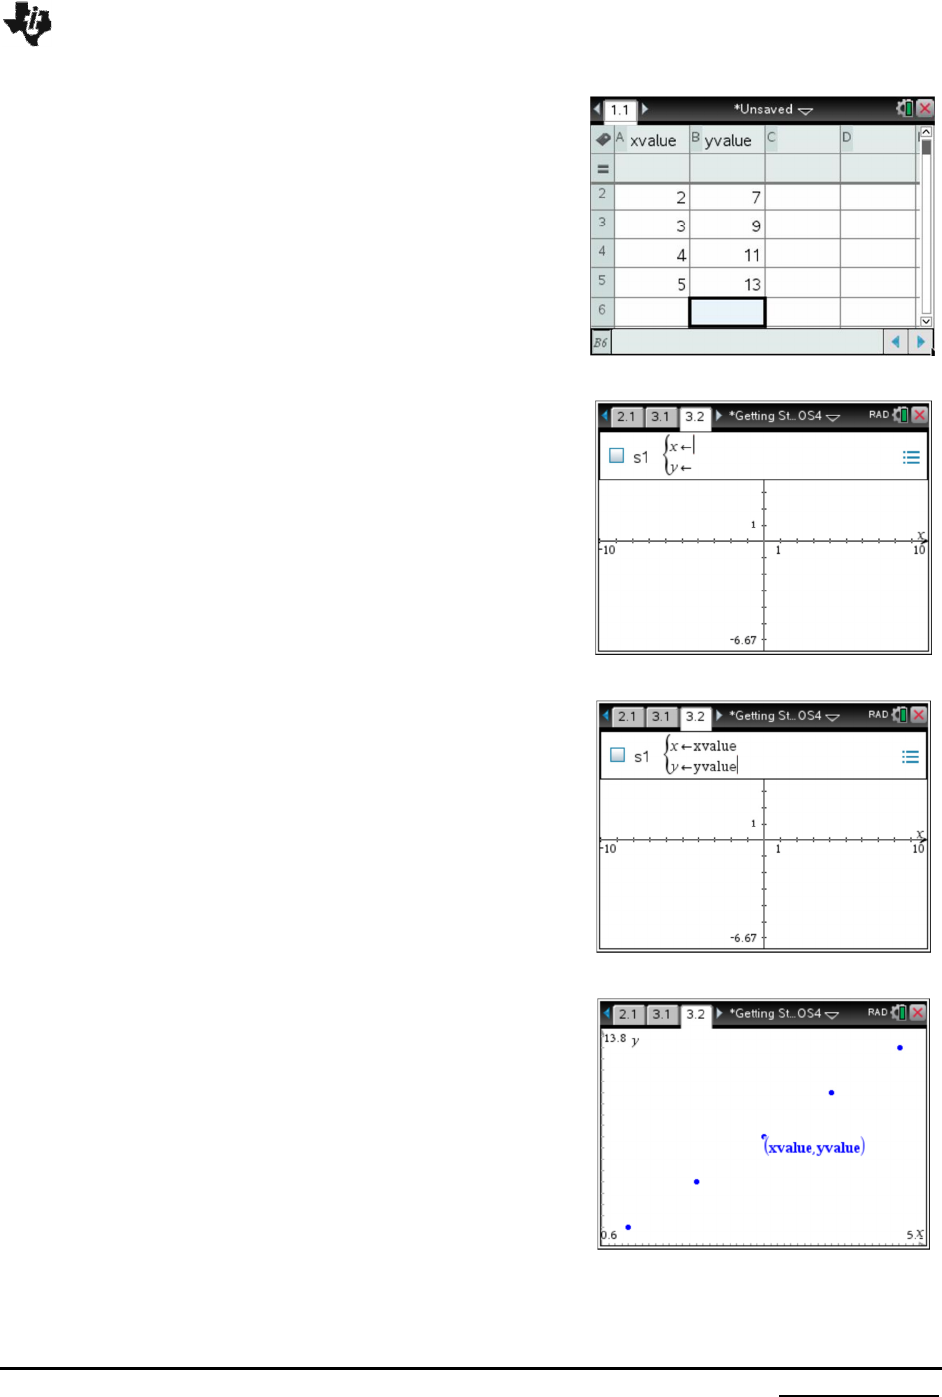
The List & Spreadsheet Application
1. Open a New Document and add a List & Spreadsheet page.
• Move to the top of column A and label the column as
“xvalue”
• Insert data {1,2,3,4,5} into cells A1-A5.
• Move to the top of column B and label the column as
“yvalue”
• Insert data {5,7,9,11,13} into cells B1-B5. (Figure 1).
Note: The Lists and Spreadsheet application works much
like a computer spreadsheet.
2. Create a Scatter Plot.
• Insert a Graphs page.
• Press, Menu, Graph Type, Scatter Plot. (
Keystrokes:
b34
). (Figure 2).
• Press h, select “xvalue” as the input variable and
press ·.
(Figure 3).
• Press e, h
¤
select “yvalue” as the output
variable.
• Select an appropriate window to view the data. (Figure
4).
Figure 1
Figure 2
Figure 3
Figure 4
Basic TI-Nspire™ CX Functionality
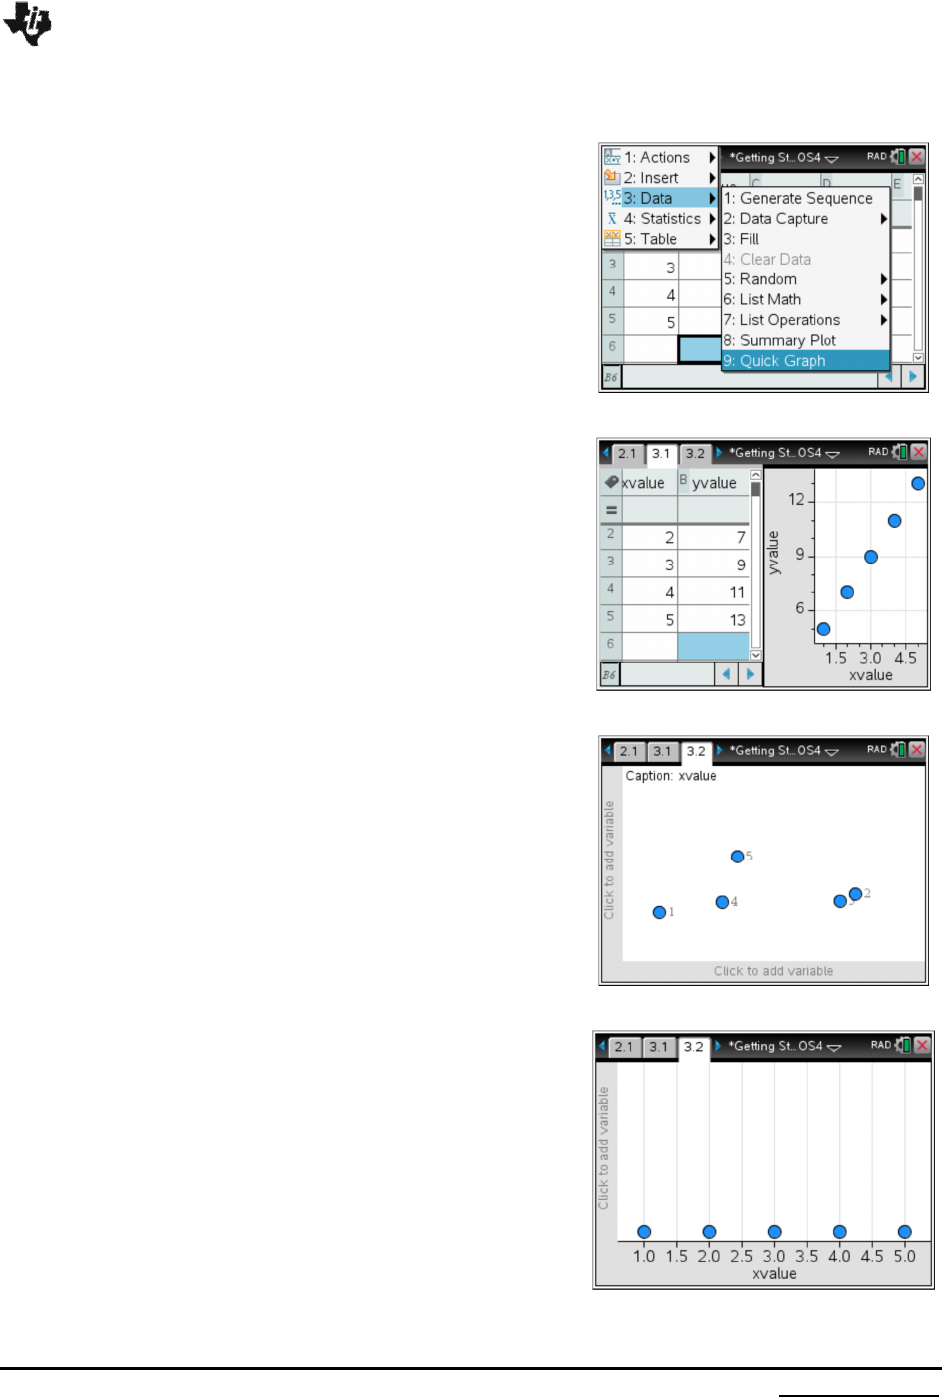
3. Create a Quick Graph.
• Go back to Page 1.1
• Press the Touchpad £ until the entire column A is
highlighted.
• Hold down g and press the Touchpad ¢ to
highlight column B also.
• Press for Menu, Data, Quick Graph, (
Keystrokes:
b36
) then press · (Figures 5 and 6).
The Data and Statistics Application
1. Create a Scatter Plot
• Insert a New Page and add a Data and Statistics
application. (Figure 7).
• Move the cursor to the words “click to add variable” at
the bottom of the page and press x on the rectangle.
• Use the Touchpad £ to select “xvalue” as the input
variable and press ·.
(Figure 8).
• Move the cursor to the left side of the page and press
x
when the words “Click to add variable” appear.
Figure 5
Figure 6
Figure 7
Figure 8
Basic TI-Nspire™ CX Functionality
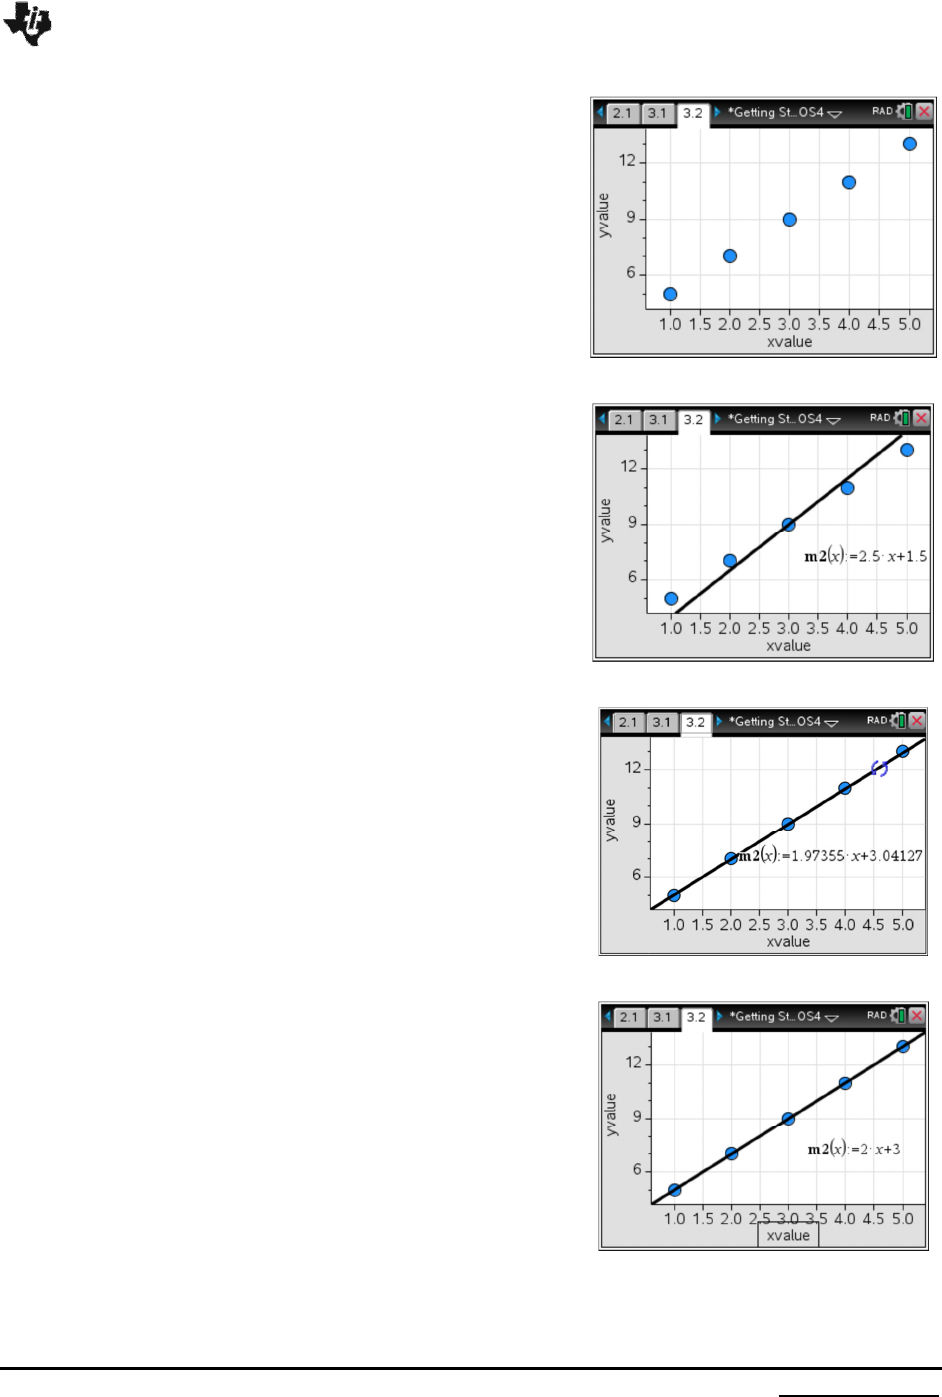
• Use the Touchpad ¤ to select “yvalue” as the output
variable and press ·.
(Figure 9).
2. Add a Movable Line
• Press Menu, Analyze, Add Movable Line. (
Keystrokes:
b42
). (Figure 10).
• Move the cursor close to one end of the line and the
é
cursor will appear (Figure 11).
• Grab the line and drag it until it “fits” the data. (Figure
12.)
Note: You may have to move the
é
cursor from one
end of the line to the other end several times to
achieve a good approximation to the data.
Figure 9
Figure 10
Figure 11
Figure 12
Basic TI-Nspire™ CX Functionality
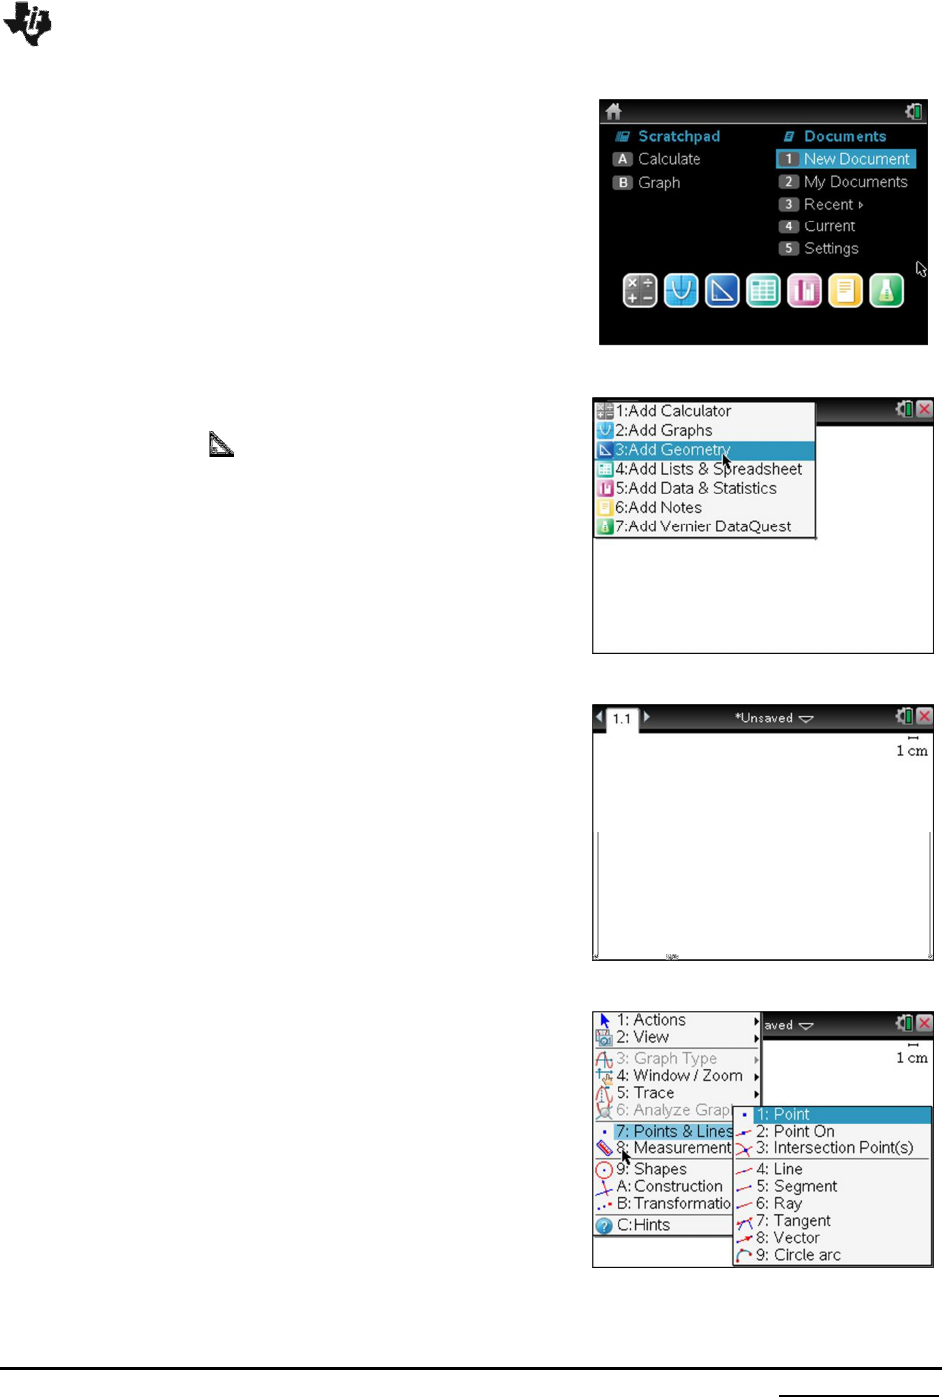
The Geometry Application
1. Start a new document, by pressing Home, New Document
(
Keystrokes:
c 1
). (Figure 1).
Note: If a Save option appears, select Yes or No
to save the document that was open when the
TI-Nspire™ handheld was last used.
2. Press
3
for 3:Add Geometry. (Figure 2).
Note: You could also press
c
and select the
Geometry icon - this will add a Geometry
page to the currently open document.
Explore the Page
1. Use the Touchpad to explore moving around on the page.
(Figure 3).
2. Press b, and look at the options in the following
submenus (Figure 4):
Menu 7:Points & Lines
Menu 8:Measurement
Menu 9:Shapes
Menu A:Construction
Menu B:Transformation
3. After pressing the ¢ key to investigate submenu options in a
particular menu selection, press the d key to exit that
list of menu options.
4. Press d a second time to exit the Menu structure
entirely.
Figure 1
Figure 2
Figure 3
Figure 4

Basic TI-Nspire™ CX Functionality
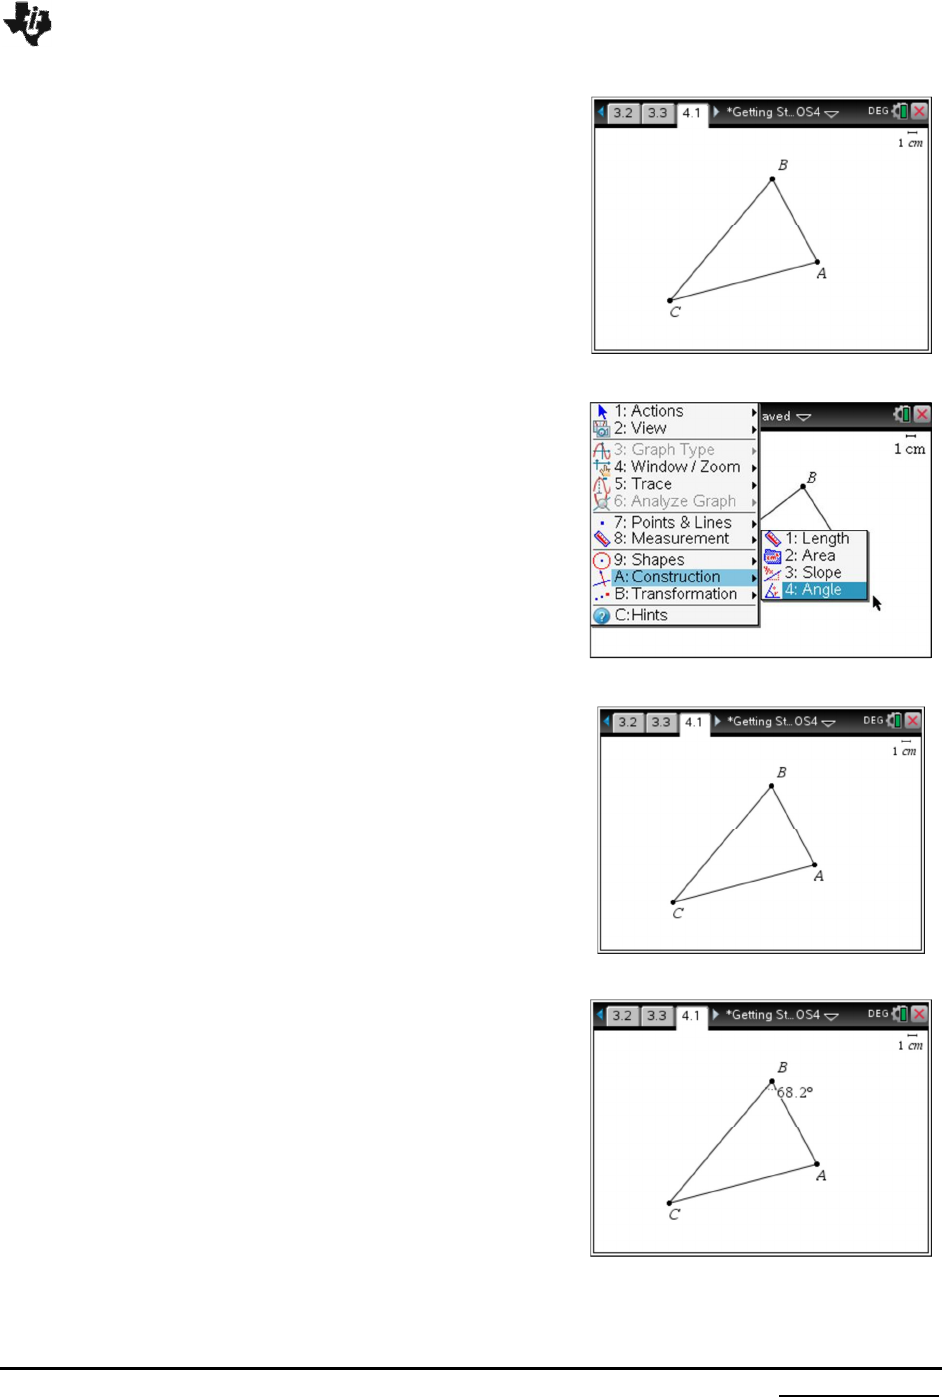
Investigation: Interior Angles of a Triangle
Draw a triangle, ∆ABC.
1. Choose the Triangle tool by pressing Menu, Shapes,
Triangle. (
Keystrokes:
b 9 2
) (Figure 5).
2. Using the Touchpad, position the pointer to construct a
triangle near the center of the screen.
3. Press the
x
or · to place the first vertex on the
screen.
•
One way to label vertices and points is to type the
label immediately after creating the point.
Note:
The point will be flashing.
•
For capital letters, press the
g key before
pressing the letter key (Figure 6).
4. Using the Touchpad again, move the cursor to a second
location for the next vertex.
5. Press x or ·
to place the second vertex.
6. Type the label immediately.
7. Repeat these steps to create a third non-collinear location
for the third vertex, and type its label.
8. Move away from the label, and press the d key to
deselect the triangle tool.
• If you didn’t label one or more of the vertices
when constructing the triangle (as shown in Figure
7), you can label the vertex using the Text tool.
•
Press for Menu, Actions, Text. (Keystrokes
:
b
1 6
).
•
Use the Touchpad to move close to the vertex.
•
The vertex should blink. Be sure that the entire
triangle does not blink.
•
Press
x
or
·
to open a text box
.
(Figure 8).
Figure 5
Figure 6
Figure 7
Figure 8
Basic TI-Nspire™ CX Functionality
•
Press the appropriate letter key, and then press
·
to close the text box.
•
Press the d key to deselect the Text tool.
(Figure 9).
Measuring the Three Interior Angles
1. Press Menu, Measurement, Angle. (
Keystrokes:
b
8 4
). (Figure 10).
2. Move the cursor with the Touchpad to select each
vertex.
Note: To select a vertex, use the Touchpad to move close to
a vertex. The cursor will indicate a point and its label. When
the “pencil” shape on the screen changes to a “hand” shape,
press
·
or
x
to select the vertex. (Figure 11).
• The vertices must be selected in either a clockwise
or counter-clockwise direction, just as angles are
named.
Note: Regardless of direction, the vertex of the angle to
be measured must be selected second. Not only is the angle
drawn, but the angle being measured is marked.
Figure 9
Figure 10
Figure 11
3. After pressing · or x at the third vertex, the angle
value is located near the vertex of the measured angle.
(Figure 12).
Figure 12
Basic TI-Nspire™ CX Functionality
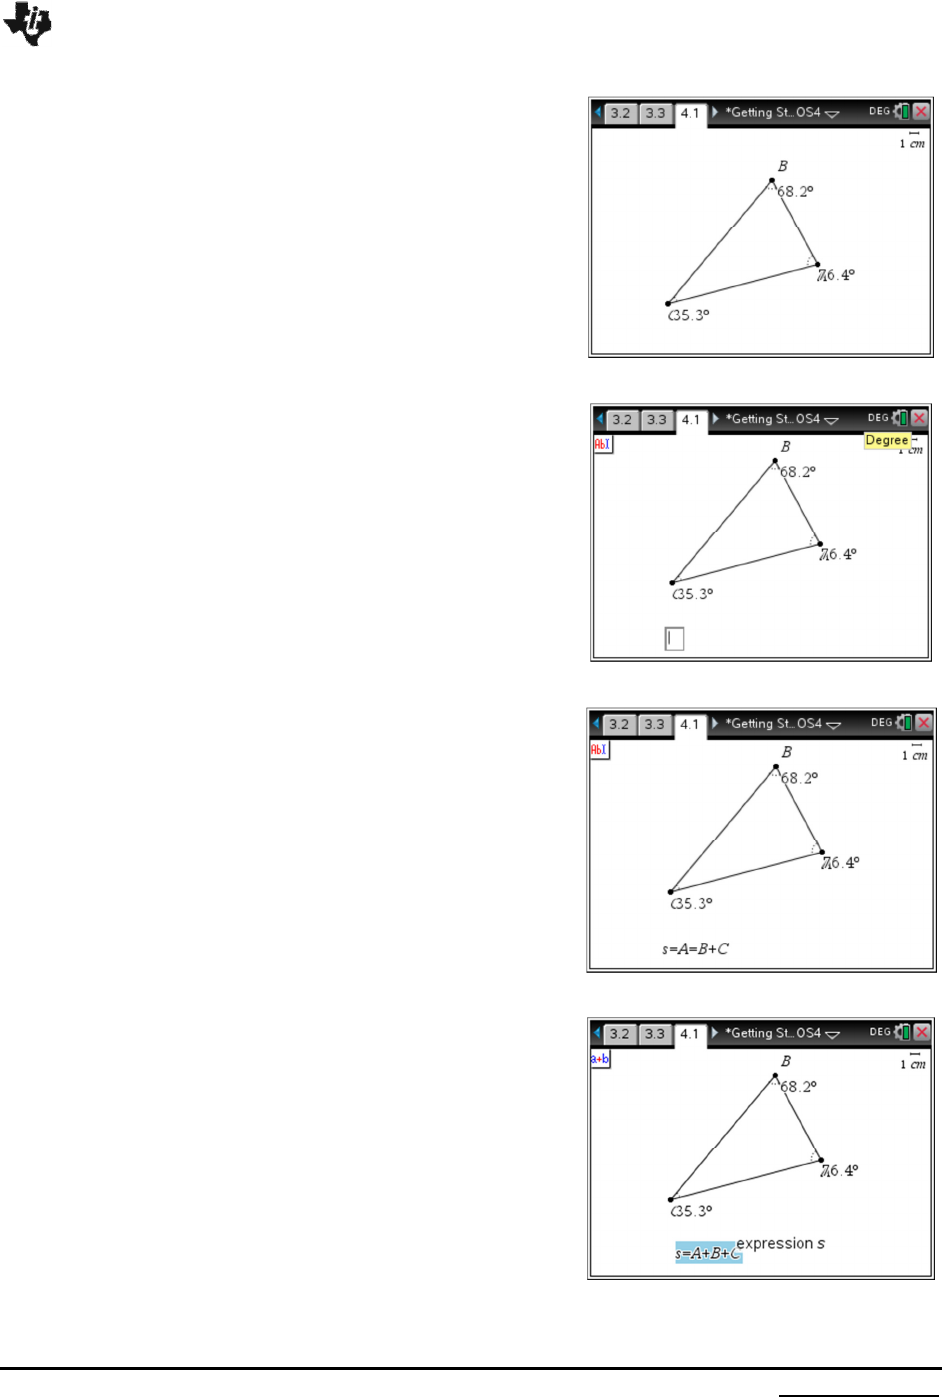
4. Repeat to measure the other two angles (Figure 13).
5. If necessary, drag the measurements to an appropriate
location.
Note: You may wish to save your file before moving on.
Figure 13
Calculating the Sum of the Three Angles
For a calculation, an expression or statement of that
calculation must first be entered on the page.
1. Press for Menu, Actions, Text. (
Keystrokes:
b 1 6
).
2. Position the pointer in an empty location on the screen.
3. Press ·or
x to open the text box (Figure 14).
4. Type the statement s = A + B + C on the screen using the
keypad, and press · to close the text box (Figure 15).
Note: You cannot put an equals sign at the end of this type of
statement, but you can start with a word or letter like ‘s’ as long as it
is not a reserved word like cos.
Figure 14
Figure 15
5. Press Menu, Actions, Calculate to select the Calculation
tool (
Keystrokes:
b 1 8
).
6. Point at the statement s = A + B + C. Press · or x to
select this calculation rule.
7. As you move away from the calculation rule, a box will
appear with a message asking for the first variable in the
calculation. In this example, the message is “Select a ? (or
press VAR)” (Figure 16).
Figure 16
Basic TI-Nspire™ CX Functionality
8. Move near the first measurement.
9. When a “hand” appears, select the angle measurement by
pressing · or x (Figure 17).
10. When you move away from the first angle measurement,
the second variable value is requested.
11. Move to the second angle measurement and, when the
hand appears, select it by pressing · or x.
12. Repeat this procedure to select the remaining angle
measurement.
13. A sum will appear on the screen as you move away from
the last measurement selected. Drag the sum to a
convenient location on the screen, and press · to affix
it (Figure 18).
Note: If desired, use the Text tool to label this numerical result
‘s=’. (Figure 19).
Figure 17
Figure 18
Figure 19
•
Drag one or more of the vertices, and make a
conjecture about the sum of the interior angles of a
triangle. (Figure 20).
Does your conjecture hold for any type of triangle? Explain
your reasoning.
Figure 20

Basic TI-Nspire™ CX Functionality
Measuring Objects
1. Insert a new Geometry page.
2. Draw a Quadrilateral, ∆PQRS.
Note: When using the polygon tool you must return to the initial
point (in this case P) and press
x or
·
to complete your
polygon.
3. Measure the perimeter of the quadrilateral. Press Menu,
Measurement, Length, (
Keystrokes:
b71
) and use
the Touchpad to move to a side of the polygon and press
·. ( Figure 21).
Note: When you move the cursor to the polygon a text box reads
polygon PQRS and the measurement tool produces the
perimeter. If you wish to measure the length of a side of the
polygon you must select each of its endpoints.
4. Draw a circle and measure its circumference. (Figure 22).
Figure 21
Figure 22
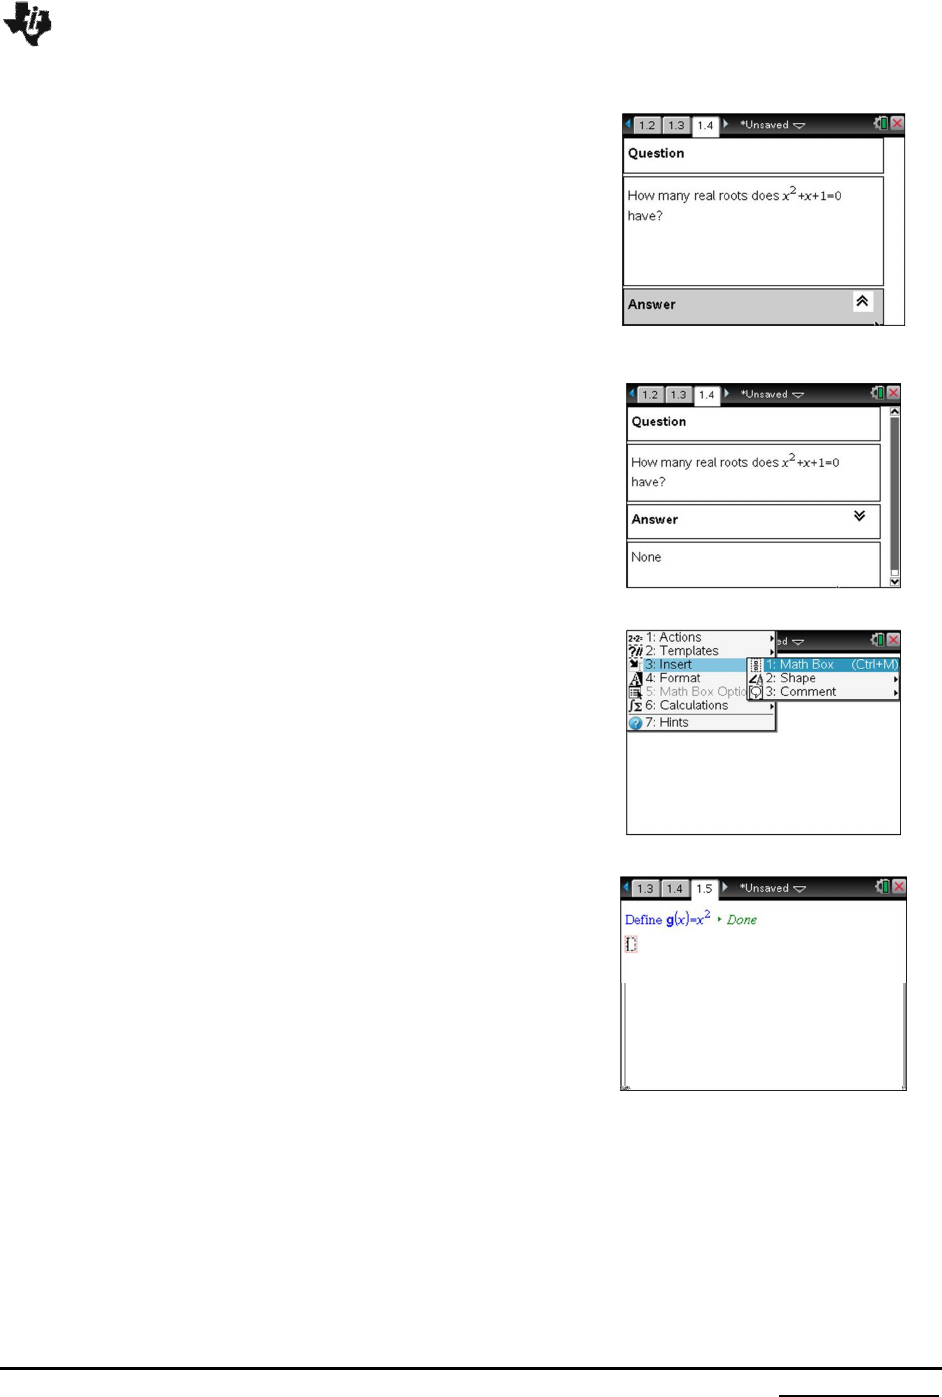
The Interactive Notes Page Application
1. Open a New Document and add a Notes Page.
• An Interactive Notes Page can be used to take
notes, write directions, ask questions, or to interact
with other applications. The Format Menu can be
used to Bold Face, Italicize,
Subscript
and
Superscript
entries. (Figure 1).
Figure 1
Basic TI-Nspire™ CX Functionality
2. Insert a new Notes page. The Templates Menu can be used
to create a Question and Answer page or a Proof page.
(Figure 2 and 3).
3. Insert a new Notes page. This notes page will be used to
interact with a Calculator Page and a Graphs page. Insert a
Math Box by pressing Menu, Insert, Math Box
(
Keystrokes
b, 3, 1
) and use this Math Box to define
2
( )g x x= . (Figures 4 and 5).
Figure 2
Figure 3
Figure 4
Figure 5
Basic TI-Nspire™ CX Functionality
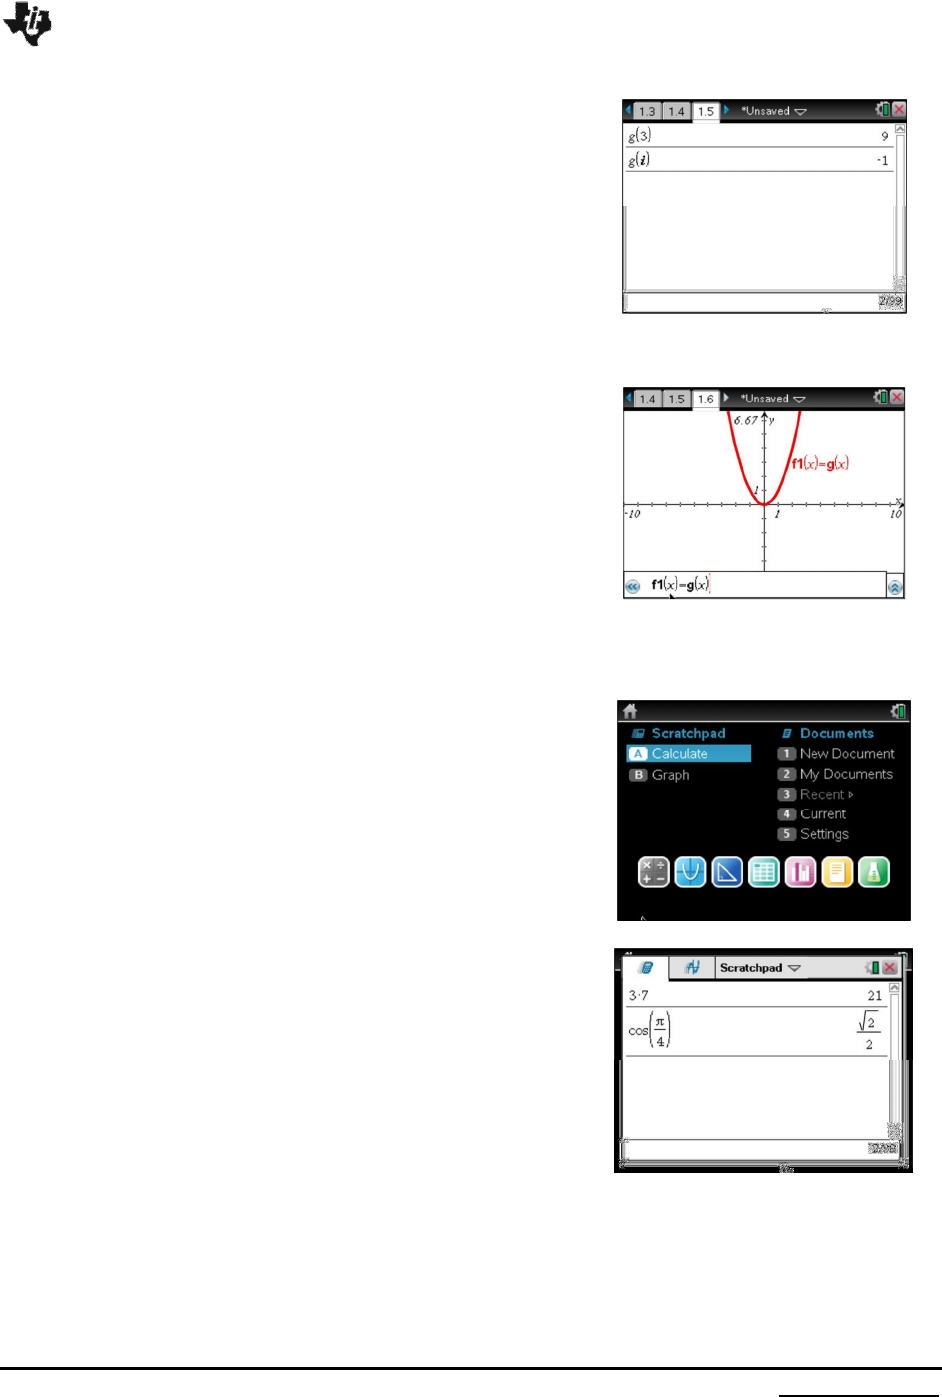
4. Insert a new Calculator page. Evaluate
(3)g
and
( )g i
.
(Figure 6).
5. Insert a new Graphs page. Graph
1( ) ( )f x g x=
.
(Figure 7).
Figure 6
Figure 7
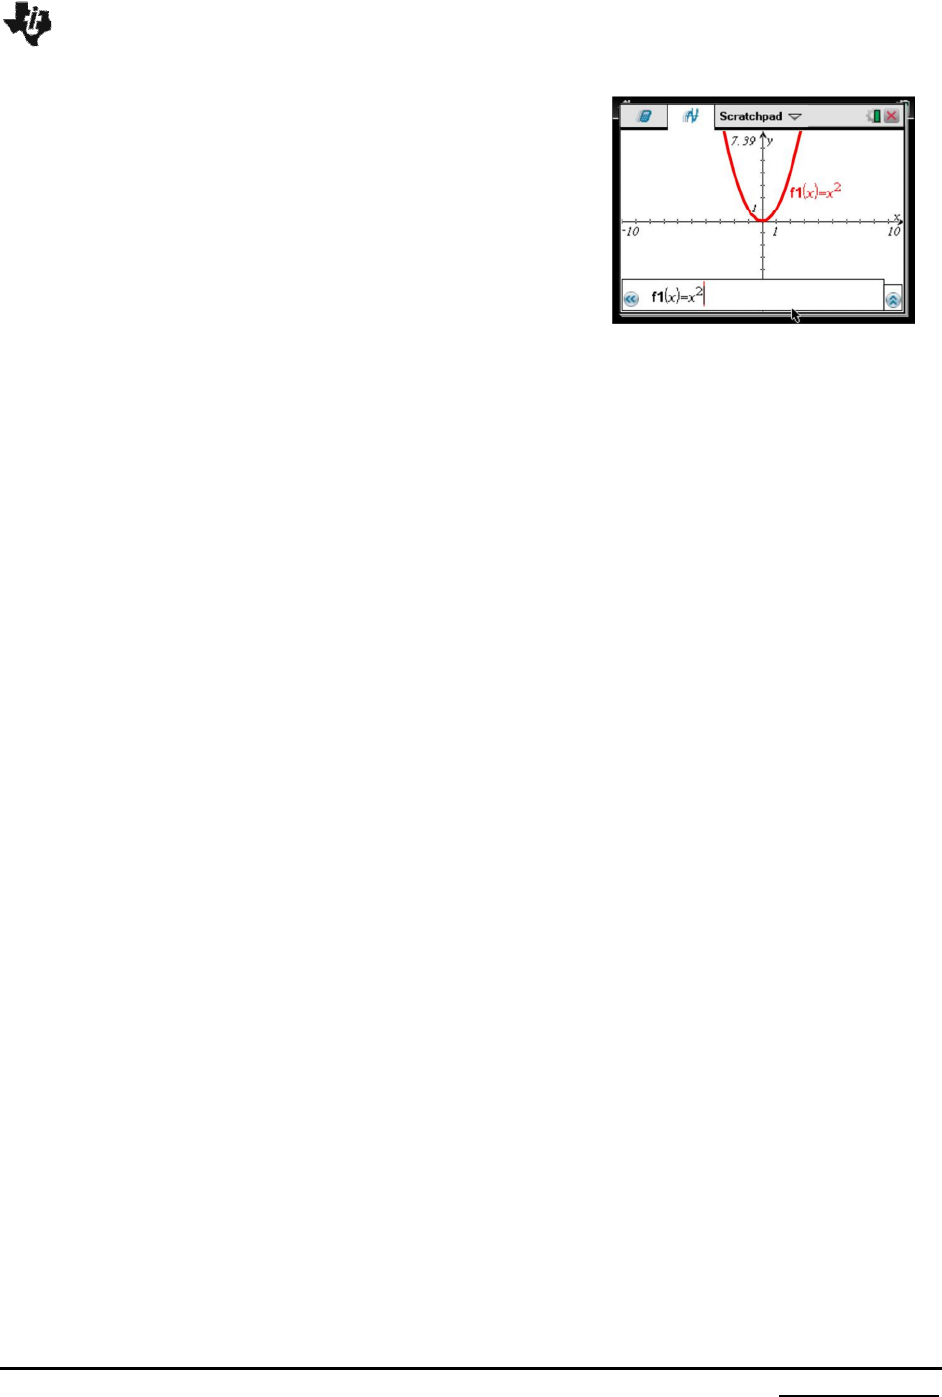
Using the Scratchpad
You may create and use a “temporary” Scratchpad to do
calculations or view a graph while in a document. To open a
Scratchpad:
1. Press Home,
• Press A: Calculate (Figures 8 and 9)
or
• Press B: Graph (Figure 10.)
Note: Shortcut Press
»
Figure 8
Figure 9
Basic TI-Nspire™ CX Functionality
Saving the Scratchpad contents
You can save the Scratchpad Calculate page, the Scratchpad
Graph page, or both as a TI-Nspire™ document.
1. Press ~, then select Save to Document and press
·.
2. The Save to Document dialog box opens.
3. Select the page or pages to save.
4. If a document is open, select either New or Current
document and press Save.
Figure 10
Note: If you selected to save to an open document, the Scratchpad pages are added to the document.
Clearing Scratchpad contents
To delete the calculations and/or graphing work from the Scratchpad application. Press ~, then select
Clear Scratchpad, and press ·.
