Getting Started with the Aloha
Community Template for
Salesforce Identity
Salesforce, Summer ’24
Last updated: July 5, 2024
©
Copyright 2000–2024 Salesforce, Inc. All rights reserved. Salesforce is a registered trademark of Salesforce, Inc., as are other
names and marks. Other marks appearing herein may be trademarks of their respective owners.

CONTENTS
Aloha Identity Template . . . . . . . . . . . . . . . . . . . . . . . . . . . . . . . . . . . . . . . . . . . . . . . . 1
Set Up the App Launcher . . . . . . . . . . . . . . . . . . . . . . . . . . . . . . . . . . . . . . . . . . . . . . . 2
Create Your Community Using the Preconfigured Aloha Template . . . . . . . . . . . . . . . . 3
Aloha Template Pages . . . . . . . . . . . . . . . . . . . . . . . . . . . . . . . . . . . . . . . . . . . . . . . . 5
Login Template Pages . . . . . . . . . . . . . . . . . . . . . . . . . . . . . . . . . . . . . . . . . . . . . . . . . 8
Brand the Login Pages . . . . . . . . . . . . . . . . . . . . . . . . . . . . . . . . . . . . . . . . . . . . . . . . 13
Aloha and Login Template Components . . . . . . . . . . . . . . . . . . . . . . . . . . . . . . . . . . . 14
App Launcher . . . . . . . . . . . . . . . . . . . . . . . . . . . . . . . . . . . . . . . . . . . . . . . . . . . . . . . 15
Change Password . . . . . . . . . . . . . . . . . . . . . . . . . . . . . . . . . . . . . . . . . . . . . . . . . . . . 15
Employee Login Link . . . . . . . . . . . . . . . . . . . . . . . . . . . . . . . . . . . . . . . . . . . . . . . . . . . 16
Forgot Password . . . . . . . . . . . . . . . . . . . . . . . . . . . . . . . . . . . . . . . . . . . . . . . . . . . . . 17
Identity Header . . . . . . . . . . . . . . . . . . . . . . . . . . . . . . . . . . . . . . . . . . . . . . . . . . . . . . 18
Login Form . . . . . . . . . . . . . . . . . . . . . . . . . . . . . . . . . . . . . . . . . . . . . . . . . . . . . . . . . 19
Rich Content Editor . . . . . . . . . . . . . . . . . . . . . . . . . . . . . . . . . . . . . . . . . . . . . . . . . . . . 22
Self-Registration . . . . . . . . . . . . . . . . . . . . . . . . . . . . . . . . . . . . . . . . . . . . . . . . . . . . . . 23
Set Icons for Social Login . . . . . . . . . . . . . . . . . . . . . . . . . . . . . . . . . . . . . . . . . . . . . . . . 24
User Profile Summary . . . . . . . . . . . . . . . . . . . . . . . . . . . . . . . . . . . . . . . . . . . . . . . . . . 26
Index . . . . . . . . . . . . . . . . . . . . . . . . . . . . . . . . . . . . . . . . . . . . . . . . . . . . . . . . . . . . 28
ALOHA IDENTITY TEMPLATE
EDITIONS
Available in: Salesforce
Classic
Available in: Enterprise,
Performance, Unlimited,
and Developer Editions
Give community members Salesforce Identity features, including their own App Launcher.
Community members can access useful applications from other service providers and edit their
profile.
Your customers can have easy access to the apps that they need on one page. In a community
that’s built on the Aloha template, customers launch apps for support, billing, collaboration, or
other services with a single click. They can also edit their own user profile information. As an
administrator of the community, you can manage their access to third-party apps and monitor and
control their usage.
The template supplies all the components to create a community. Simply edit a few components to include information about your
community, add a few images to extend your branding, and you’re ready to go—without any coding!
For more information about creating a community or site with Experience Builder, see “Set Up and Manage Salesforce Communities” in
Salesforce Help.
For more information about Salesforce Identity and setting up the App Launcher, see the Salesforce Identity Implementation Guide.
1

SET UP THE APP LAUNCHER
Before you expose the App Launcher to your community users, make sure that you’ve added connected apps to the community’s parent
org.
The App Launcher is a container that presents users with links to third-party applications and Salesforce apps. To have the applications
appear in the App Launcher for your community, you configure them as connected apps in the parent org.
1. Add connected apps to the community’s parent org.
The minimum requirement for a connected app is a Start URL to link the user to the app. Users see only the connected apps
they have access to in the App Launcher. You can configure specific authorization settings and behavior. For more information, see
Creating a Connected App in the Salesforce online help.
2. Enable the App Launcher for the profile that’s associated with your community members. Or enable the App Launcher with a
permission set, and then assign the permission set to each community member.
Now when you use the Aloha template or add the App Launcher element in Site.com to your community, the installed connected
apps appear. For more information about configuring the App Launcher, see App Launcher Overview in the Salesforce online help.
2
CREATE YOUR COMMUNITY USING THE PRECONFIGURED
ALOHA TEMPLATE
EDITIONS
Available in: both Salesforce
Classic (not available in all
orgs) and Lightning
Experience
Available in: Enterprise,
Performance, Unlimited,
and Developer Editions
USER PERMISSIONS
To create, customize, or
publish a community:
• Create and Manage
Communities
To enable Communities:
• Customize Application
To create, update, or delete
connected apps:
• Customize Application
AND either
Modify All Data
OR
Manage Connected
Apps
To see the App Launcher:
• Use Identity Features
enabled on a profile or
permission set
AND either
App Launcher set to
Visible for the profile
OR
App Launcher enabled
in the Assigned Apps for
the permission set
To quickly start your site, choose Aloha, one of the Experience Builder templates.
1. From Setup, in the Quick Find box, enter Digital Experiences, select Sites, and then
click New.
The Community Creation wizard appears with different template options for you to choose
from.
2. To see more information about a template, select it.
Customer Account Portal
A private and secure place for customers to access and update their account information.
Improve customer relationships and decrease service costs by letting customers work in
the portal. Customers can see and pay invoices, update their account information, and
search your knowledge base for answers to their most frequent questions.
Partner Central
A flexible, responsive template designed for channel sales workflows. Recruit, build, and
grow your partner network to drive channel sales and marketing together in a branded
online space. Easily configure lead distribution, deal registration, and marketing campaigns.
Share training materials and sales collateral in a central space, and use reports to track your
pipeline.
Customer Service
A powerful, responsive self-service template with multiple prebuilt theme options. The
Customer Service template lets users post questions to the community, search for and view
articles, collaborate, and contact support agents by creating cases. Supports Knowledge,
Chatter Questions, and cases.
Help Center
A public-access, self-service community that exposes the articles that you make available
from your knowledge base. You reduce the load on your customer support team, and your
users get the satisfaction of finding their own solutions.
Build Your Own (Aura)
Provides the basic pages that every Experience Builder site needs: Home, Create Record,
Error, Record Detail, Record List, Related Record List, Search, Check Password, Forgot
Password, Login, Login Error, and Register. Add more pages and components as needed
for the experience you’re building. To refine the look of your site, customize your branding
and themes.
Build Your Own (LWR)
Powered by the new Lightning Web Runtime (LWR) platform, this customizable template
delivers unparalleled page performance and improves developer productivity. Quickly build
pixel-perfect pages and develop Lightning web components and themes to match your
unique brand.
Suitable for developers, consulting partners, and ISVs who are familiar with developing
custom Lightning web components, and working with Salesforce DX, User Interface API, and Apex. See the LWR Sites for
Experience Cloud guide.
3
Aloha
A configurable App Launcher template that lets users quickly find applications and access them using single sign-on authentication,
including social logins.
Salesforce Tabs + Visualforce
Standard Salesforce structure and tabs that you can customize using Visualforce. Requires developer experience and advanced
setup skills. Allows full platform access with a flexible configuration and supports most standard objects, custom objects, and
the Salesforce mobile app.
Salesforce Tabs + Visualforce isn’t a Lightning-based template and therefore doesn’t work with Experience Builder.
3. Select the Aloha template, then click Get Started.
4. Enter the name and optional URL for your site.
Selecting this option updates your community’s settings with the URL for the custom pages you create in this step. You can override
this login page with another login page in your community’s settings. For instructions on creating custom login, logout, and
self-registration pages for your community, see the Salesforce Help.
5. Click Create.
The community is created in preview status. Now you’re ready to build and customize, or manage and moderate your community.
4
Create Your Community Using the Preconfigured Aloha
Template
ALOHA TEMPLATE PAGES
The Aloha template gives community members access to the App Launcher, which links to third-party and Salesforce connected apps
that they can use. The Aloha template also includes a change password page and a profile page where community members can manage
their own information.
This section highlights each page of the Aloha template and includes a summary of the components that are contained in each page.
Shared Page Components
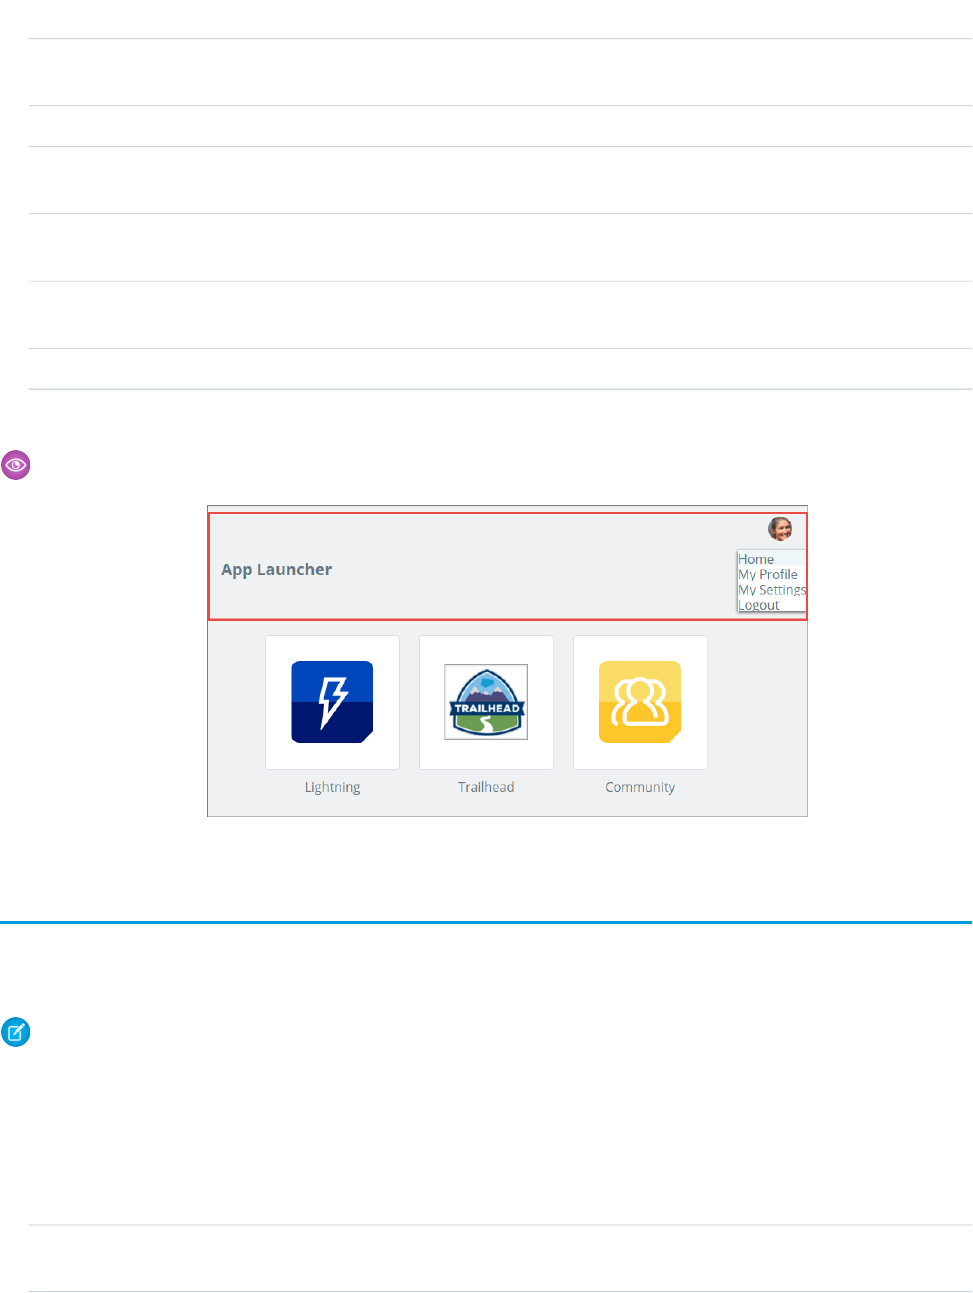
All pages in the Aloha template include the Identity Header. The Identity Header displays header text and the user profile picture with
a drop-down that lets users navigate to their profile and settings and log out.
Home
5
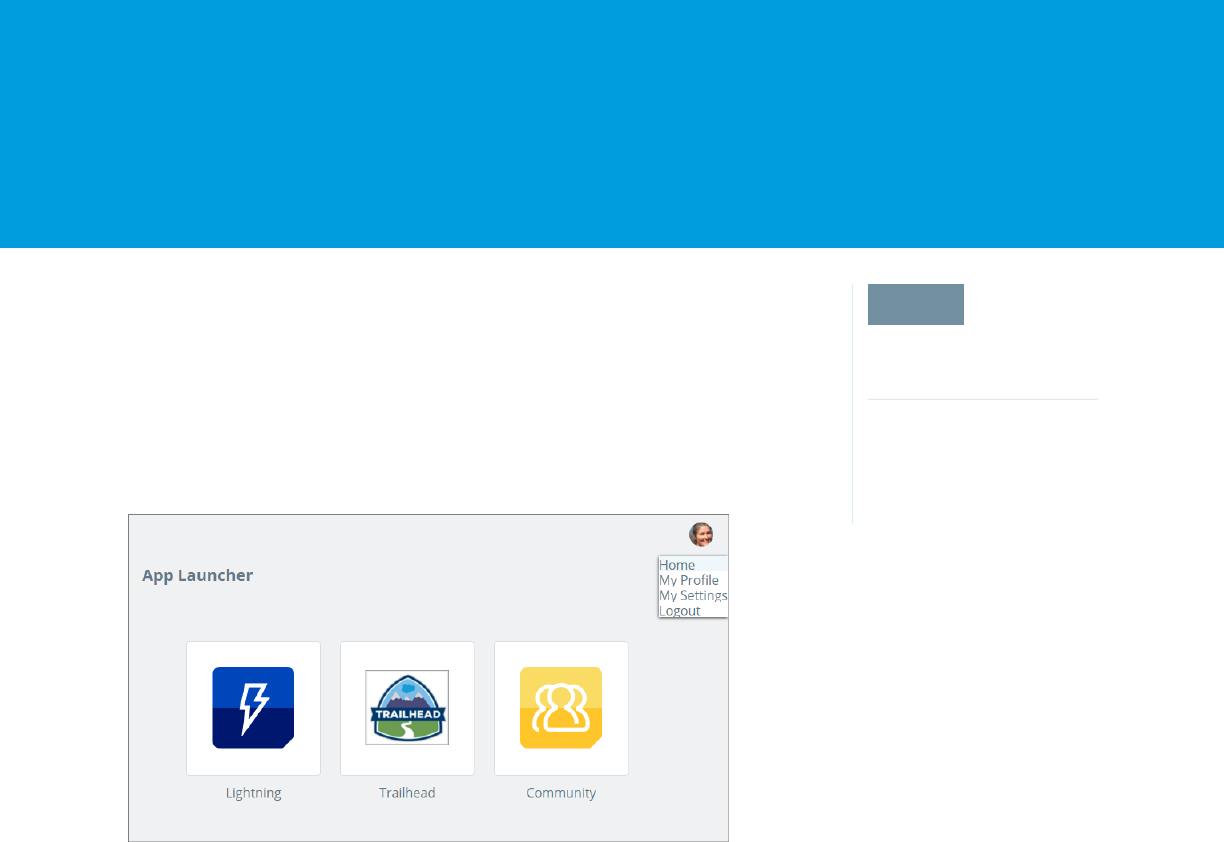
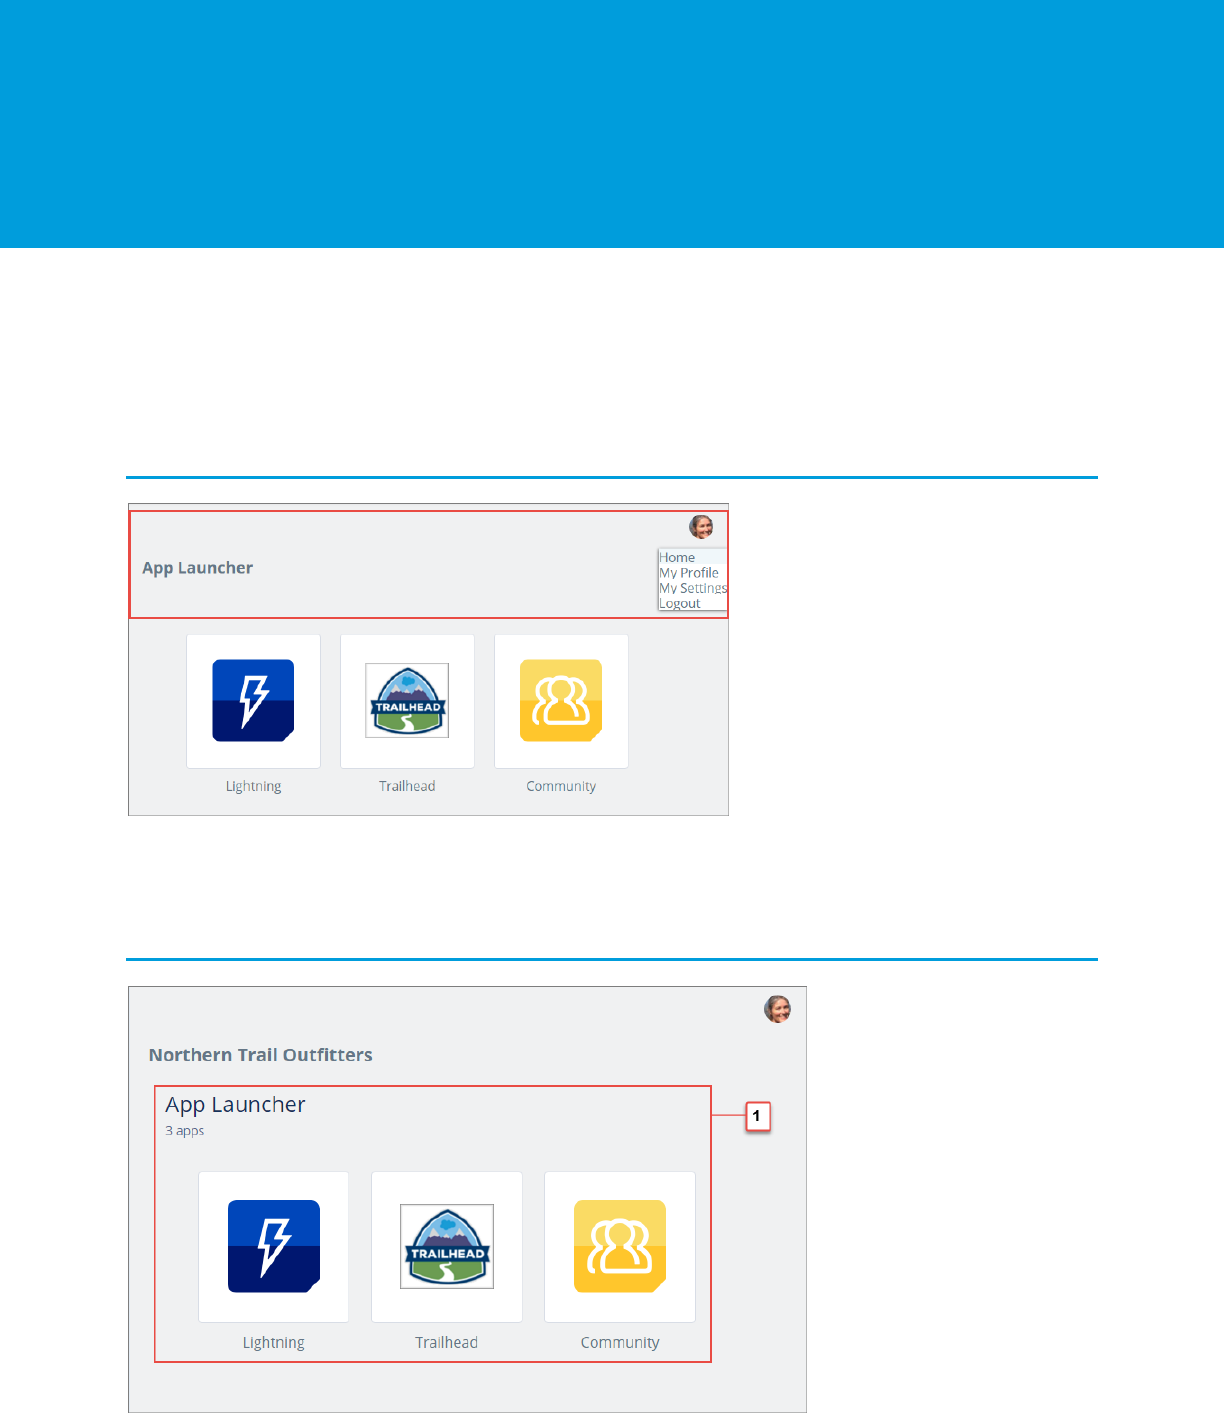
This page contains the App Launcher component (1), which displays an icon for each connected app that the user can access.
Profile
This page contains the User Profile Detail component (1), which provides information about the current user based on the user’s detail
page in the org.
Change Password
This page contains the Change Password Form component (1), which lets users manage their own passwords.
Identity Error
This page displays an error message that you configure by changing the text in a Rich Content Editor component.
6
Aloha Template Pages
Settings
This page contains the User Settings component, which requires no setup. Users can choose their language, location, and time zone.
Also, they can determine if guest users who aren’t logged in to the community can view their profile details and choose which activities
they want to receive email about.
7
Aloha Template Pages

LOGIN TEMPLATE PAGES
The Login template provides a customized user login experience that can include your company’s branding. This template gives users
advanced login options to change their password, complete a self-registration form as a new user, or log in with a third-party account.
Users who use single sign-on to log in to your community do not see this login page.
This section highlights each page of the Login template and includes a summary of the components that are contained in each page.
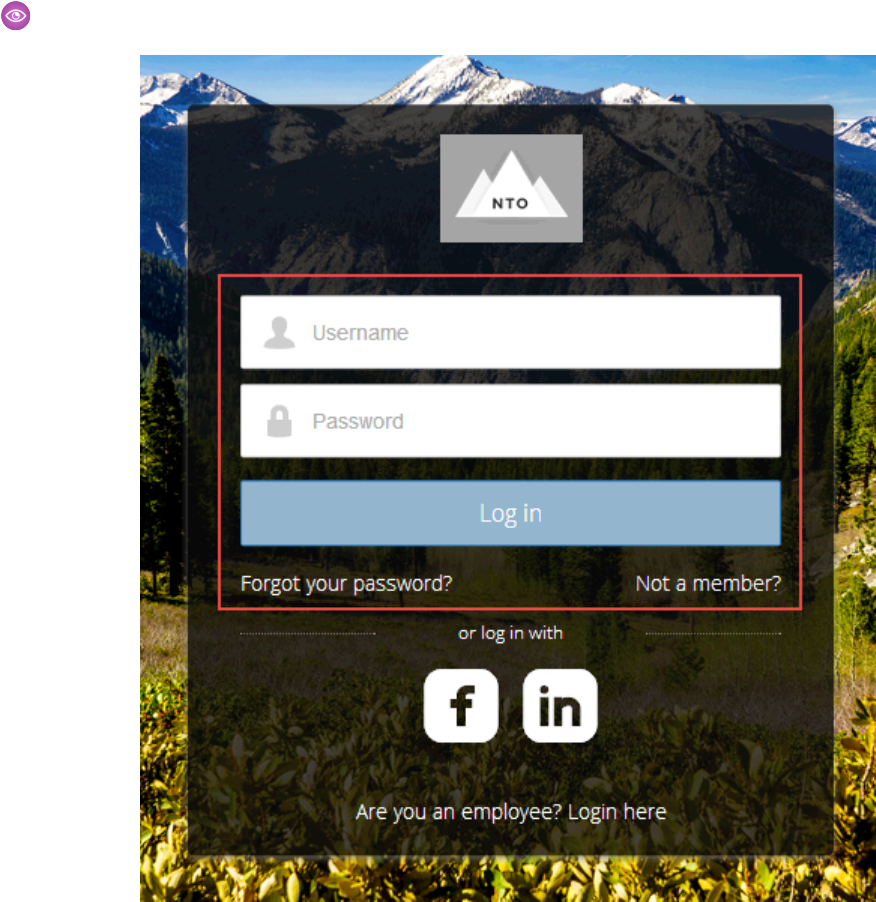
Login
This page contains the following components.
•
Background (1) gives your community’s login pages a unique appearance.
8
•
Community Logo (2) identifies your community brand. Set the logo in the Administration Settings for the community. For more
information, see “Customizing Communities Login” in the Salesforce Help.
•
Login Form (3) allows users to provide their username and password. The Login form includes links to the Forgot Password and
Self-Register pages so that users who are having trouble logging in or who don’t have current accounts have a self-service option.
If the site administrator deselects the username and password checkbox on the Administration > Login & Registration page in
Experience Management, the Login Form doesn’t appear in the published site. For more information, see “Customize Your Experience
Cloud Site’s Login Experience” in the Salesforce Help.
•
Social Login (4) gives users the ability to log in by using their accounts from identity providers such as Facebook
©
or LinkedIn
©
.
•
Employee Login (5) provides a link to log in for users with accounts in the parent organization.
Forgot Password
This page contains the following components.
•
Rich Content Editor (1) identifies the page.
•
Rich Content Editor (2) provides instructions for users.
•
Forgot Password Form (3) provides a field to collect a username and a button to submit the request to reset the password.
•
Rich Content Editor (4) gives users a Cancel link for returning to the Login page.
9
Login Template Pages
Check Password
This page contains the following components.
•
Rich Content Editor (1) identifies the page.
•
Rich Content Editor (2) provides instructions for users.
•
Rich Content Editor (3) gives users a link to return to the Login page.
Login Error
This page displays an error message that you configure by changing the text in a Rich Content Editor component.
10
Login Template Pages
Register
This page contains the following components.
•
Community Logo (1) to identify your community brand. The logo is set in the Administration Settings for the community. For more
information, see “Customizing Communities Login” in the Salesforce Help.
•
Rich Content Editor (2) provides instructions for users.
•
Self Registration Form (3) provides fields for users to enter their own information. The fields can be customized to collect various
information.
•
Rich Content Editor (4) gives users a chance to return to the login page to log in with an existing account.
11
Login Template Pages
•
Social Login (5) gives users the option to log in using their accounts from third-party identity providers, such as Facebook
©
or
LinkedIn
©
.
12
Login Template Pages
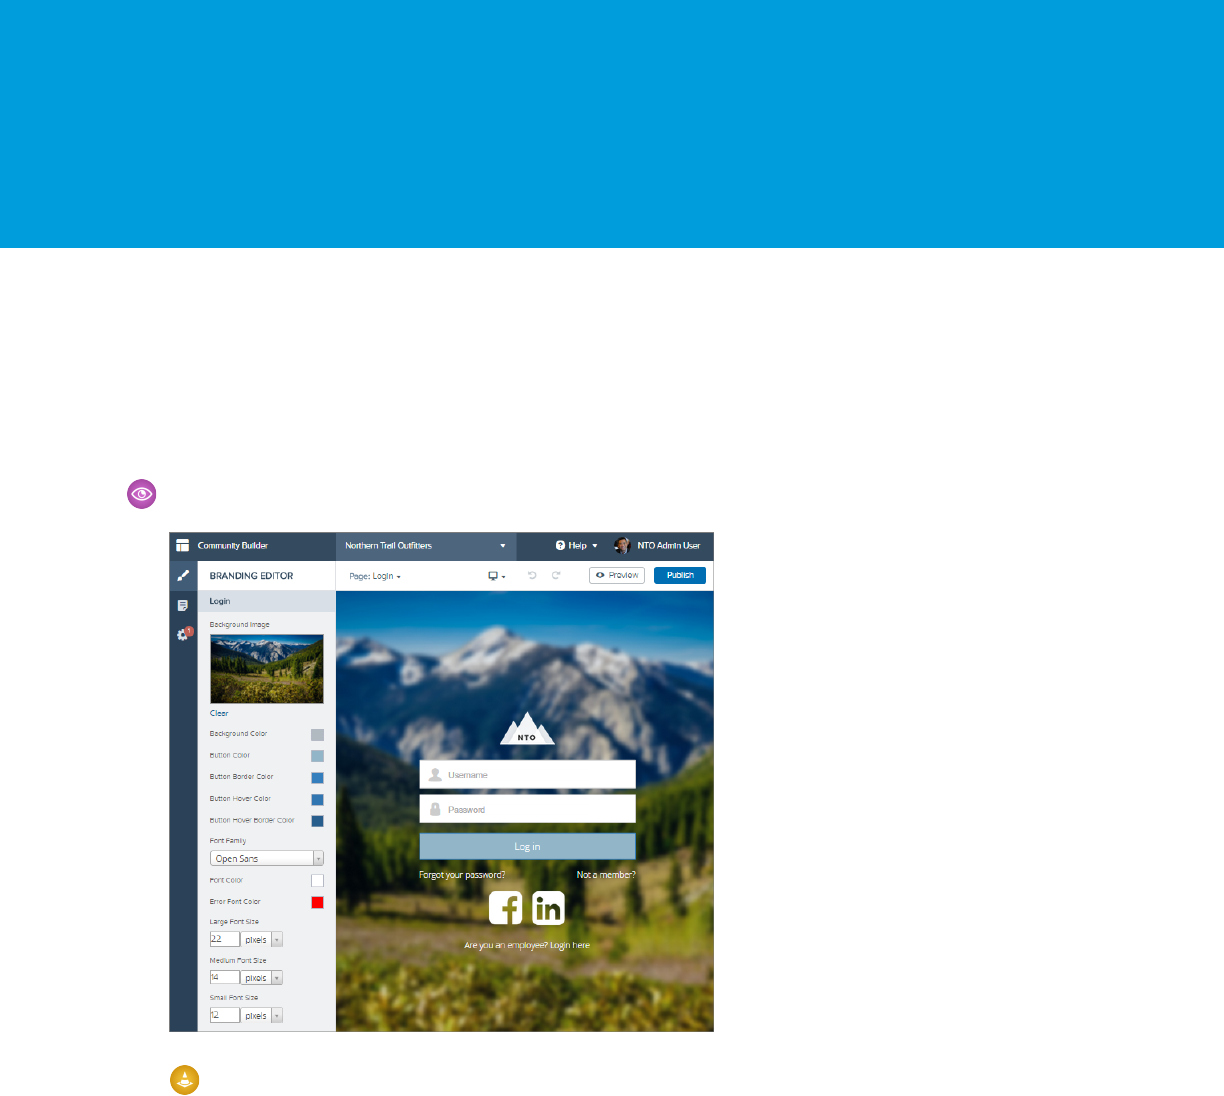
BRAND THE LOGIN PAGES
Use the Experience Builder to customize and brand the login pages with your own design. You can change the appearance of the login
pages with a background image, color scheme, and font settings. Use Experience Builder to set the background. Your preference applies
to all login pages unless you override the settings within an individual page.
1. Select Go To Experience Builder, if you’re not already in it.
2. From the Go To menu, select Login.
3. In the left pane, upload an image for the background, and then set color and text preferences as needed.
Example: The Branding Editor settings in Experience Builder:
Warning: When you customize a login page or any page that includes fields with sensitive or confidential information with
Experience Builder, we recommend that you use only standard components built by Salesforce or components that you
built, customized, or vetted. Use of third-party components and code libraries on a page that includes fields with sensitive
or confidential information can increase your risk for security vulnerabilities.
13

ALOHA AND LOGIN TEMPLATE COMPONENTS
The Aloha and Login templates are each composed of pages, which in turn are made up of customizable components.
Tip: The Page Editor tab in Experience Builder lists all components that can be added to the page that you’re editing.
Communities that use the Salesforce Tabs + Visualforce template don’t use Lightning components.
App Launcher
The App Launcher gives a user quick access to third-party and Salesforce apps all on one page.
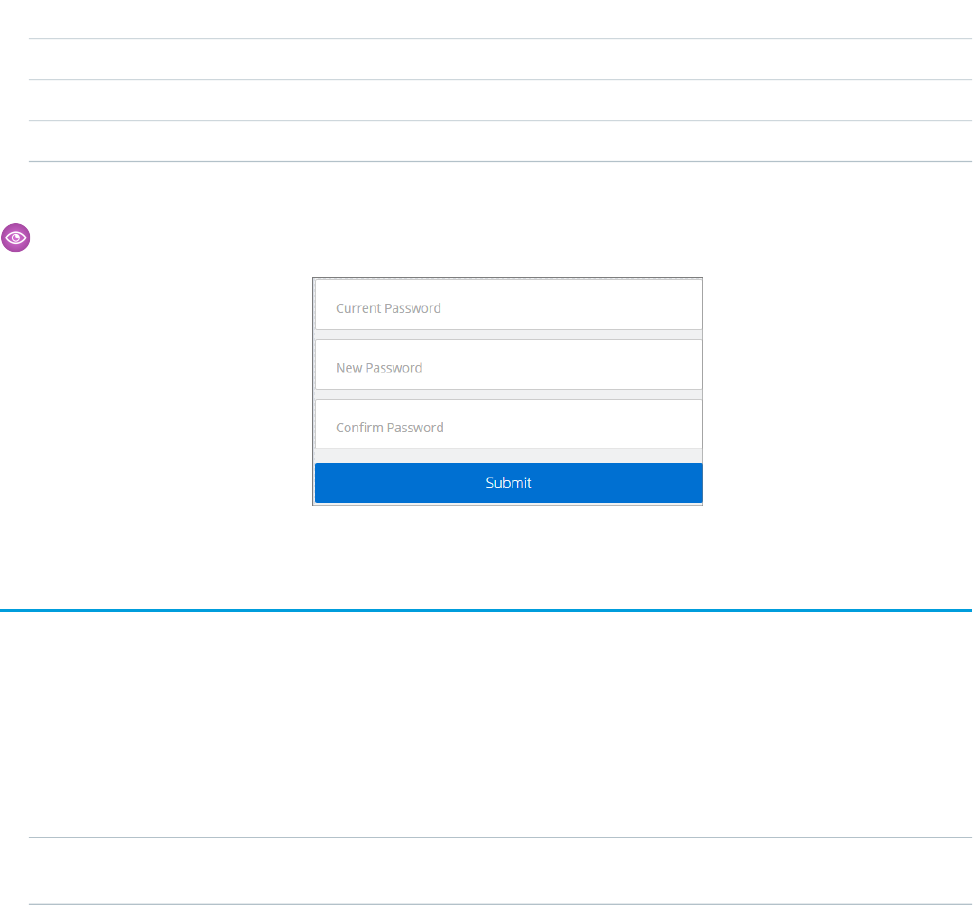
Change Password
Let users set a new password with a simple form. The Change Password component gives users the ability to update a password
without contacting an administrator. You can customize the field and button text in the property editor.
Employee Login Link
Use the Employee Login Link component to direct users with accounts in the site’s parent org to their login page. When your
employees or other users who have accounts in the parent org for the site end up on the site login page, you can redirect them to
their own login page with a link. They can then log in with all the settings and permissions of their org account.
Forgot Password
Use the Forgot Password component to let users request a new password.
Identity Header
Use the Identity Header to give your pages a title, identify the user, and provide navigation to the user’s profile information. The
Identity Header component adds the current user’s name, gives the user a navigation menu to see the Profile and Settings pages
or to log out, and lets you customize the title for your community.
Login Form
Let users log in with login fields for a username and password and a button for submitting both.
Rich Content Editor
The Rich Content Editor component lets you add formatted custom text to your site pages, along with images and videos.
Self-Registration
The Self-Registration component lets users set up their accounts so that you don’t have to add each one manually. Users put their
information into the form fields, and when they click Sign Up, an account is created for them. This component has a basic set of
fields that you can customize, and you can add more fields.
Set Icons for Social Login
The Social Login component provides users with icons that they can click to log in to a third-party account, such as Facebook
©
or
LinkedIn
©
. Set these icons for each authentication provider that you configure for the org.
User Profile Summary
The User Profile Summary component displays the user's contact information, title, address, and manager’s name. If nickname display
is enabled for the site, other users’ nicknames are shown in place of the full name. The full name is shown when users view their
own profiles.
14
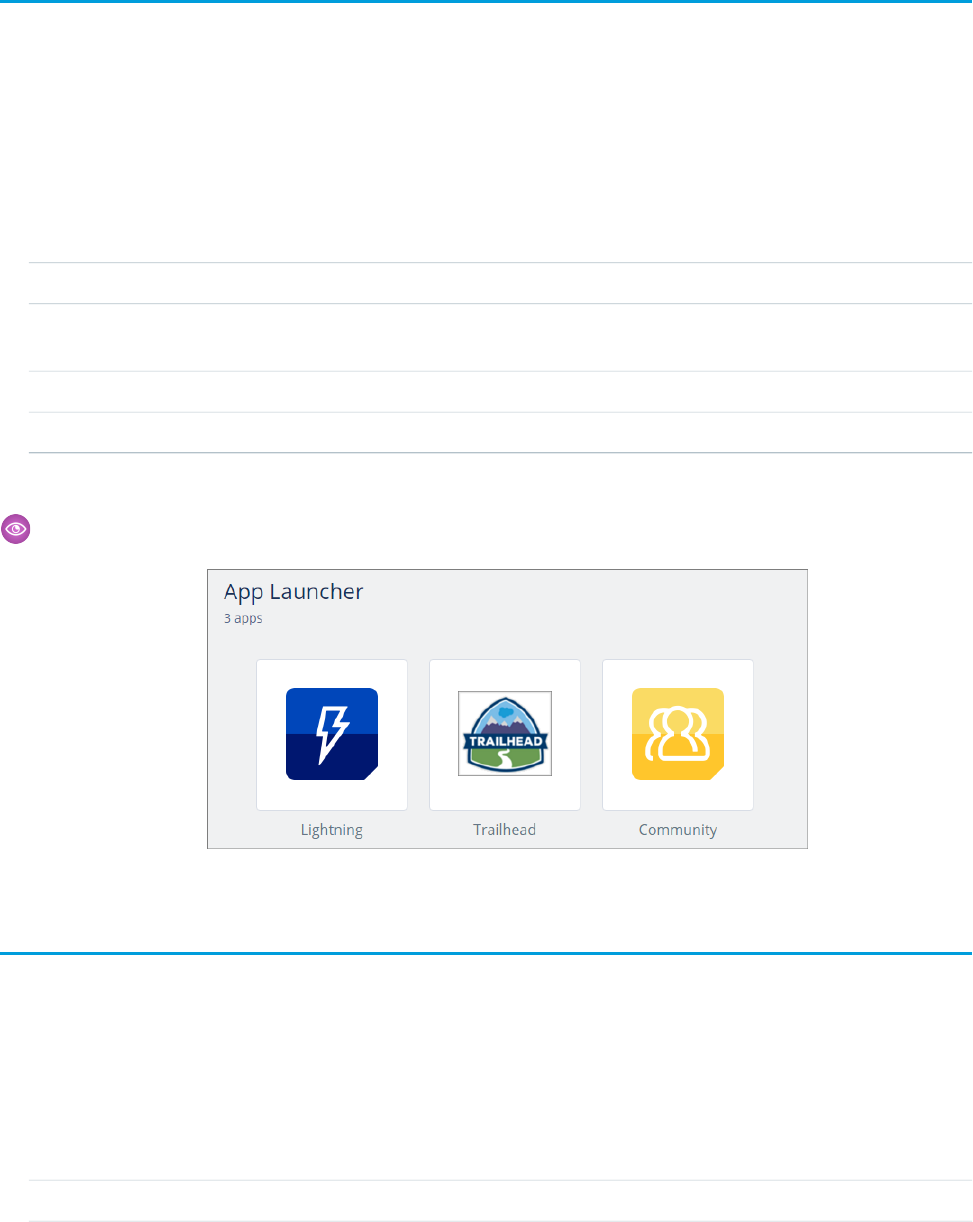
App Launcher
The App Launcher gives a user quick access to third-party and Salesforce apps all on one page.
The App Launcher component displays an icon for each connected app, as configured in Set Up the App Launcher. Connected apps
can provide single sign-on access to third-party services and Salesforce apps or link users to useful destinations on the web.
1. Select the App Launcher component in the page that you’re configuring. If you’re customizing a page by adding this component,
drag the component onto the page from the Lightning Components tab of the Page Editor.
2. In the property editor, configure properties for the component.
DetailsProperty
Enter the maximum number of apps to display in the App Launcher.Max Number of Apps
Enter the maximum height in pixels of the App Launcher component.Max App Launcher
Height (Pixels)
Select this option to show the App Launcher header.Show Header
Select this option to display the apps in a list view instead of tiles.Display as List View
Example: Sample App Launcher component:
Change Password
Let users set a new password with a simple form. The Change Password component gives users the ability to update a password without
contacting an administrator. You can customize the field and button text in the property editor.
1. Select the Change Password component for the page you’re configuring. If you’re customizing a page by adding this component,
drag the component onto the page from the Lightning Components tab of the Page Editor.
2. In the property editor, configure properties for the component:
DetailsProperty
Enter the text for the current password field label.Current Password Label
15
App LauncherAloha and Login Template Components
DetailsProperty
Enter the text for the new password field label.New Password Label
Enter the text for the confirm password field label.Confirm Password Label
Enter the text for the button that the user clicks to submit the change password request.Submit Button Label
Example: Sample Change Password component:
Employee Login Link
Use the Employee Login Link component to direct users with accounts in the site’s parent org to their login page. When your employees
or other users who have accounts in the parent org for the site end up on the site login page, you can redirect them to their own login
page with a link. They can then log in with all the settings and permissions of their org account.
1. Select the Employee Login Link component in the page that you're configuring.
2. In the property editor, configure the properties for the component.
DetailsProperty
Enter text that identifies the login option for employees. The label appears as clickable text
on the page. The default text is Are you an employee? Login here.
Employee Login Link
16
Employee Login LinkAloha and Login Template Components
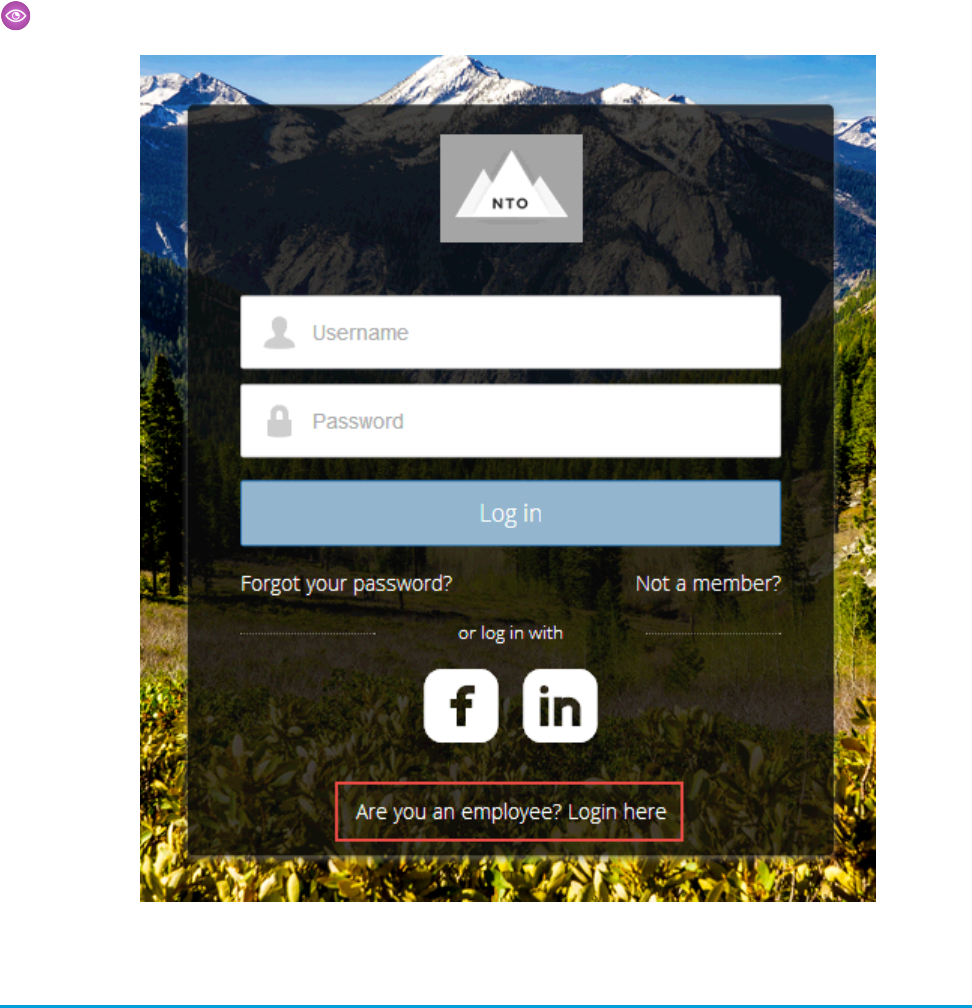
Example: Sample Employee Login Link component:
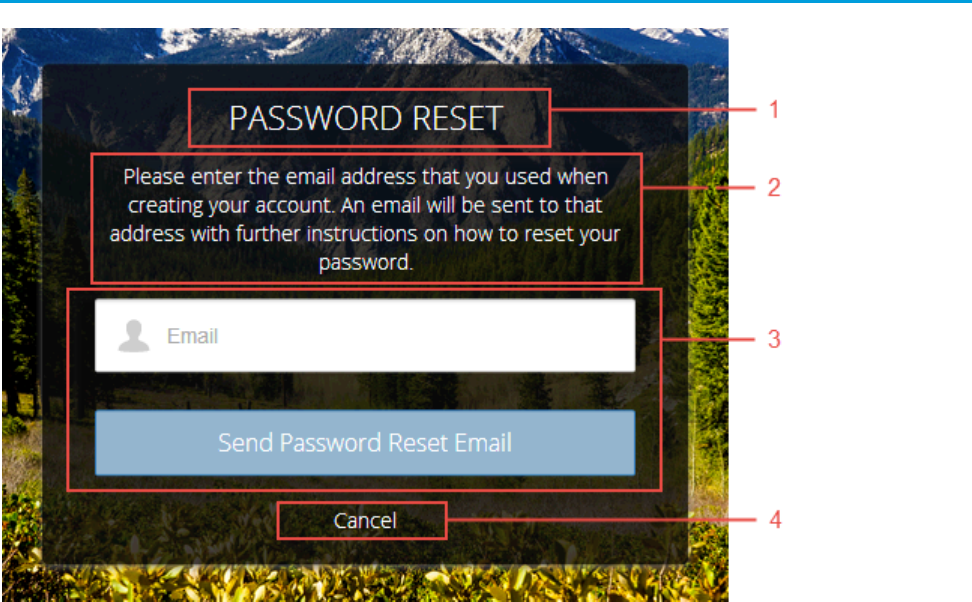
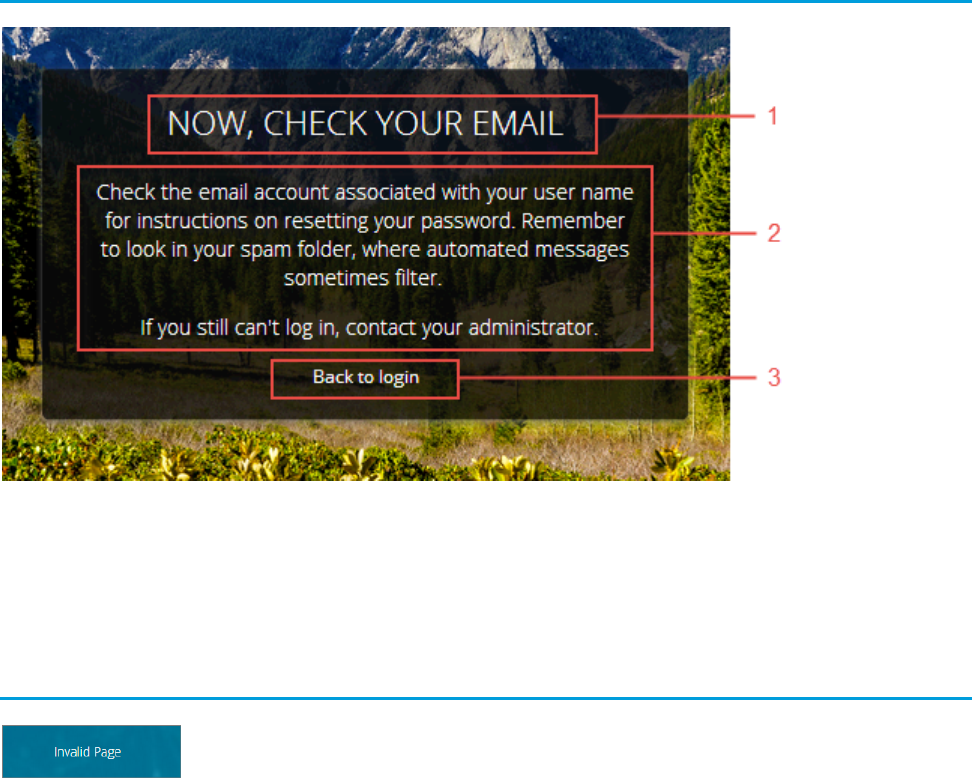
Forgot Password
Use the Forgot Password component to let users request a new password.
Sometimes users forget their existing passwords and need a new one. The Forgot Password component gives users the ability to get
one without contacting an administrator. The user enters the email address that’s associated with the account, clicks the button, and
gets email instructions for resetting the password.
1. Select the Forgot Password component in the page that you're configuring.
2. In the property editor, configure the properties for the component.
17
Forgot PasswordAloha and Login Template Components

DetailsProperty
Enter the view or path to the page that notifies the user when the password has been reset
and an email has been sent.
Check Email URL
Enter the text that appears in the field where the user enters a valid username, which can be
in the form of an email address if users are identified that way.
Username Label
Enter the text for the button that the user clicks to make the password reset request.Submit Button Label
Example: Sample Forgot Password component:
Identity Header
Use the Identity Header to give your pages a title, identify the user, and provide navigation to the user’s profile information. The Identity
Header component adds the current user’s name, gives the user a navigation menu to see the Profile and Settings pages or to log out,
and lets you customize the title for your community.
1. Select the Identity Header component in the page that you’re configuring.
2. In the property editor, configure properties for the component:
18
Identity HeaderAloha and Login Template Components
DetailsProperty
Enter the text you want to show for the link to the community home page from the user
navigation menu. The default is Home.
Home Label
Enter the text you want to show for the link to log in to the community. The default is Login.Login Label
Enter the text you want to show for the link to log out from the community. The default is
Log Out.
Logout Label
Enter the text you want to show for the link to the user profile page. The default is My
Profile.
Profile Label
Enter the text you want to show for the link to the user’s settings page. The default is My
Settings.
My Settings Label
Enter the text you want to show for the title of your page. The default is App Launcher.Header Text
Example: Sample Identity Header component showing the navigation menu:
Login Form
Let users log in with login fields for a username and password and a button for submitting both.
The Login Form component is a simple username and password form that lets users with an existing account log in to the site.
Note: If the site administrator deselects the username and password checkbox on the Administration > Login & Registration
page in Experience Management, the Login Form doesn’t appear in the published site. For more information, see “Customize Your
Experience Cloud Site’s Login Experience” in Salesforce Help.
1. Select the Login Form component in the page that you're configuring.
2. In the property editor, configure the properties for the component.
DetailsProperty
Enter the path to the page that users see after they log in successfully. This page is the home
page for the site.
Start URL
19
Login FormAloha and Login Template Components
DetailsProperty
Enter the text for the username field label. The default text is Username.Username Label
Enter the text for the password field label. The default text is Password.Password Label
Enter the text for the button that the user clicks to submit the login request. The default text
is Log in.
Login Button Label
Enter the text for the link to the page where users can request a password reset. The default
text is Forgot your password?
Forgot Password Link
Label
Enter the page where users can request a password reset.Forgot Password URL
Enter the text for the link to the page where users can complete a self-registration form. The
default text is Not a member?
Self Register Link
Label
Enter the page where users can complete a self-registration form.Self Register URL
20
Login FormAloha and Login Template Components
Example: Sample Login Form component:
21
Login FormAloha and Login Template Components

Rich Content Editor
EDITIONS
Available in: both Salesforce
Classic (not available in all
orgs) and Lightning
Experience
Available in: Enterprise,
Performance, Unlimited,
and Developer Editions
USER PERMISSIONS
To customize an Experience
Cloud site:
• Be a member of the site
AND Create and Set Up
Experiences
OR
• Be a member of the site
AND View Setup and
Configuration AND an
experience admin,
publisher, or builder in
that site
To publish an Experience
Cloud site:
• Be a member of the site
AND Create and Set Up
Experiences
OR
• Be a member of the site
AND an experience
admin or publisher in
that site
The Rich Content Editor component lets you add formatted custom text to your site pages, along
with images and videos.
If you prefer to create and edit your content in HTML, use the HTML Editor component.
1. In Experience Builder, drag the Rich Content Editor component from the Components panel
onto the page.
2. Add and format text (1), and add links (2), images (3), or YouTube or Vimeo videos (4) directly
in the editor.
When you add an image to your site for the first time, an asset file is automatically created and
stored in the Org Asset Library.
Note: If public access is enabled in Experience Builder at the page or site level, the Let
guest users view asset files and CMS content available to the site preference is
enabled in Administration > Preferences. This preference remains enabled as long as
any page has public access enabled. If you upload images for use on site login pages, be
sure that this preference is enabled.
Images and videos are supported only in Rich Content Editor components that were
added after the Spring ’16 release.
3. Optional: To add alt text to an image in the Rich Content Editor component, right-click the image when the component is in edit
mode. Select Add Alt Text, enter your text, and click Add.
22
Rich Content EditorAloha and Login Template Components
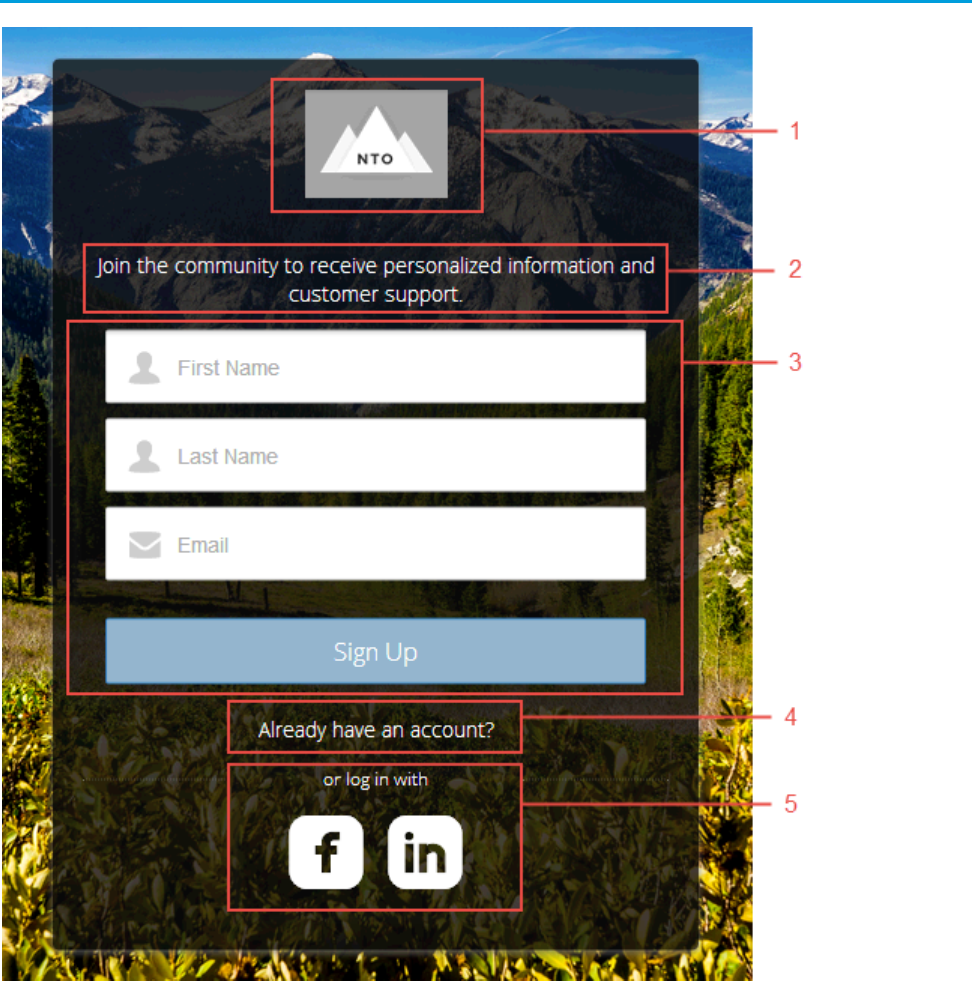
Self-Registration
The Self-Registration component lets users set up their accounts so that you don’t have to add each one manually. Users put their
information into the form fields, and when they click Sign Up, an account is created for them. This component has a basic set of fields
that you can customize, and you can add more fields.
For this component to appear, go to Experience Management and select Administration > Login & Registration > Allow external
users to self-register.
1. Select the Self Registration component in the page that you're configuring.
2. In the property editor, configure the properties for the component.
DetailsProperty
Enter the variable expression for the account ID to associate with new users.Account ID
Enter the path to the page that users see after they log in. This page is the home page for the
site.
Start URL
Enter the path to the page to display after the user submits the self-registration form.Registration
Confirmation URL
Enter the label text for the user’s first name. The default text is First Name.First Name Label
Enter the label text for the user’s last name. The default text is Last Name.Last Name Label
Enter the label text for the user’s email address. The default text is Email.Email Label
Enter the text for the password field label. The default text is Confirm Password.Password Label
Enter the text for the field in which a user confirms the password. This field usually requests
the user to retype the proposed password to make sure that it’s correct.
Confirm Password Label
Enter the text for the button to submit the form values. The default text is Sign Up.Submit Button Label
Select this option if you want self-registering users to pick their own passwords. Otherwise,
password information is provided in the email that they receive after they submit the form.
Include Password
Field?
Optionally, add fields to the form. If you’ve created a field set by using our API, enter the
variable that’s associated with the field set here. For example, you can write code that creates
a field set to collect a phone number or other information.
Extra Fields Field Set
Name
23
Self-RegistrationAloha and Login Template Components

Example: Sample Self-Registration component:
Set Icons for Social Login
The Social Login component provides users with icons that they can click to log in to a third-party account, such as Facebook
©
or
LinkedIn
©
. Set these icons for each authentication provider that you configure for the org.
Some users prefer to use an existing account with a service such as Facebook to log in to the site instead of setting up a new account
and password. The third-party service is an authentication provider that verifies user identification. Use the Social Login component to
24
Set Icons for Social LoginAloha and Login Template Components
add an icon for each supported authentication provider. The user clicks the icon and logs in using the associated account’s username
and password.
Before you add the Social Login component, set up each authentication provider. For more information, see Authentication Providers.
1. Select the Social Login component in the page that you're configuring.
2. In the property editor, configure the properties for the component.
DetailsProperty
To show a text header above the authentication header icons, select this option.Show Header
Enter the text for the header text.Header Text
This option is selected by default in new Experience Builder sites and in new Social Login
components that you add to existing sites. It improves performance and reduces HTTP redirects
Use Experience Builder
site auth provider
URLs
by using site-specific URLs for single sign-on (SSO) for all auth providers for your site. Copy
the site’s callback URL in Auth. Providers in Setup. Update the callback URLs in your identity
provider accordingly. When you deselect this option, Salesforce continues to use
login.salesforce.com or test.salesforce.com to redirect to your site
during SSO, which can result in decreased performance.
If you configure Apple as an external authentication provider, select this option to ensure that
the Social Login component recognizes user information.
25
Set Icons for Social LoginAloha and Login Template Components
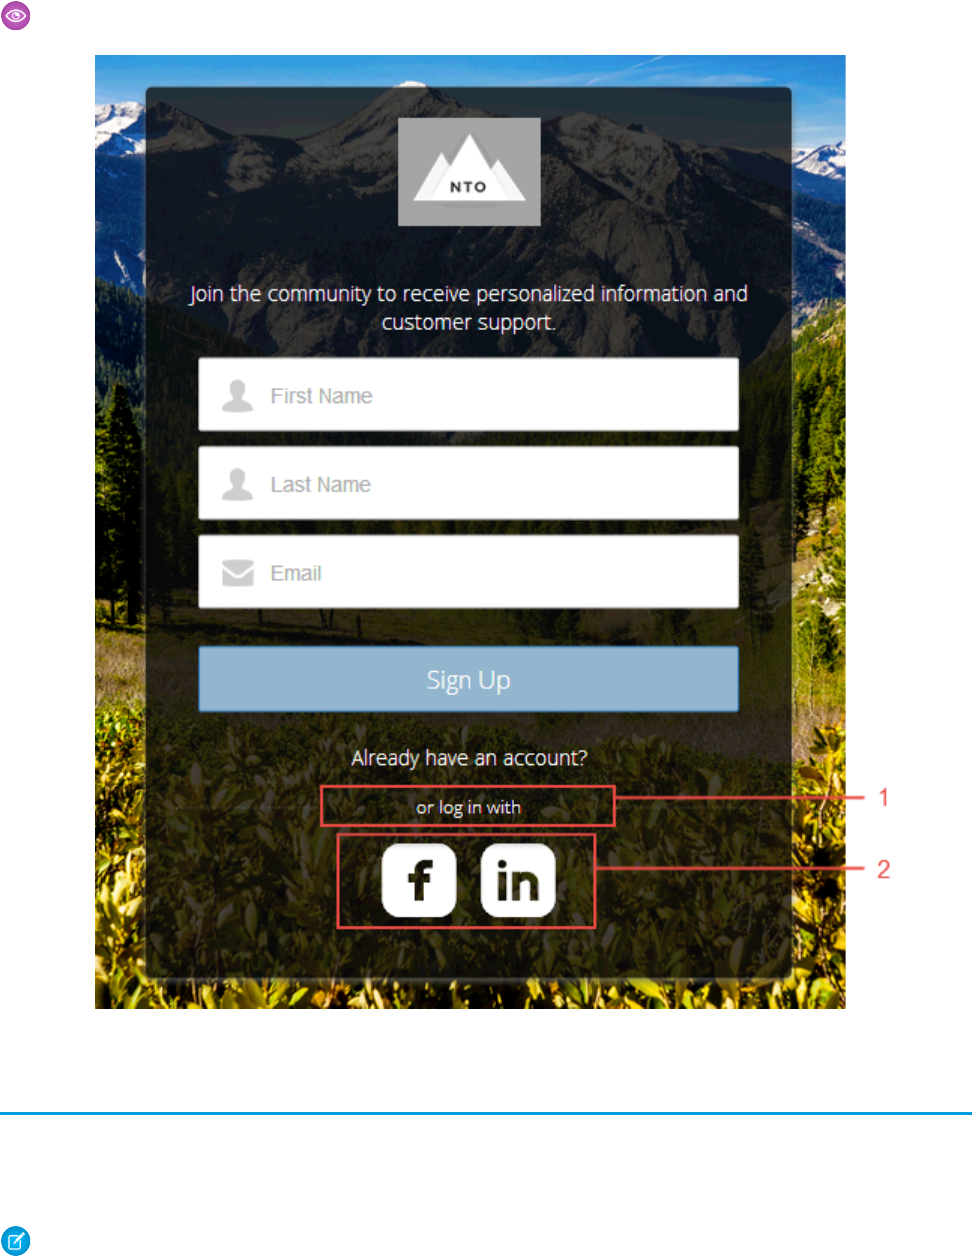
Example: Sample Social Login component with “or log in with” text (1) and authentication provider icons (2).
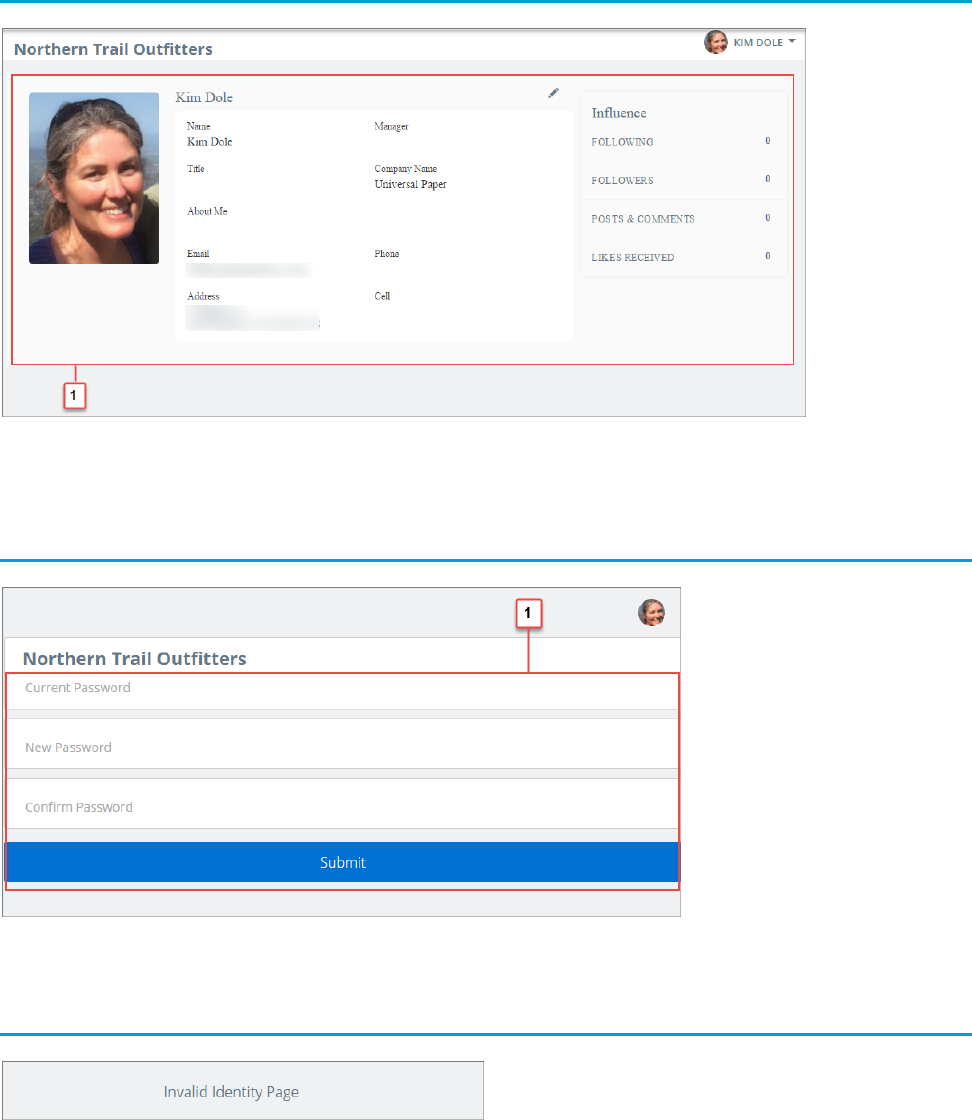
User Profile Summary
The User Profile Summary component displays the user's contact information, title, address, and manager’s name. If nickname display
is enabled for the site, other users’ nicknames are shown in place of the full name. The full name is shown when users view their own
profiles.
Note: The User Profile Summary and the User Profile Image components replace the User Profile Summary & Image component,
which was deprecated in Winter ’21.
26
User Profile SummaryAloha and Login Template Components
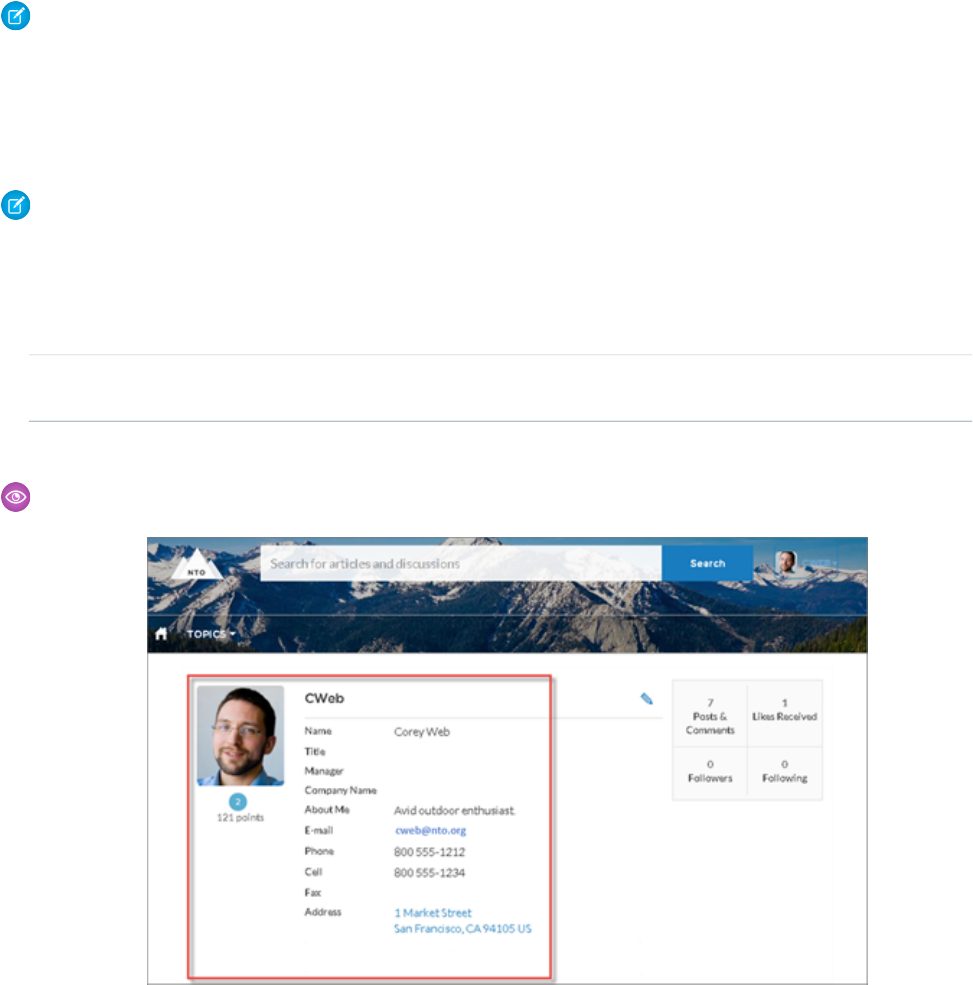
By default, all the information in a user’s profile is visible to all users in the site, including to unlicensed guest users accessing the site. To
limit access to members’ information, use a custom user profile page layout. Hide fields that reveal sensitive information, such as phone,
email, title, and manager.
Note: Showing many user fields in a custom layout affects the performance of the profile view. We recommend showing no
more than 8 fields.
Similarly, consider modifying the fields for unlicensed guest user profiles to show only the necessary information. For example, you could
hide the manager field. For detailed instructions on customizing page layouts, see Salesforce Help.
You can add the User Profile Summary component to the Profile page. This component allows users to edit their profile information
from the site. When viewing another user’s profile, you can click their address to see a Google map of their location.
Note: When viewing a site on a mobile device, the Google map appears below the address.
1. Select the User Profile Summary component in the page you're configuring.
2. To view properties for the component, select the Properties pane:
DetailsProperty
The system supplies this value so that authenticated users can view their own information.
Don’t update this field.
User ID
Example: Sample User Profile Summary component:
27
User Profile SummaryAloha and Login Template Components
