How To Download NASA Data
by
NASA Health and Air Quality Applied Sciences Team (HAQAST)
The following will teach you how to download NASA data from a variety of sources. The instructions
use the OMI-Aura instrument as an example, but the instructions hold true for whatever instrument
you’d like data from.
Note: Though NASA data is free, you will have to register in order to download the data. To do so,
follow the instructions that NASA gives you when you nish choosing your data products.
Find more information: HAQAST.org
Find more information: HAQAST.org
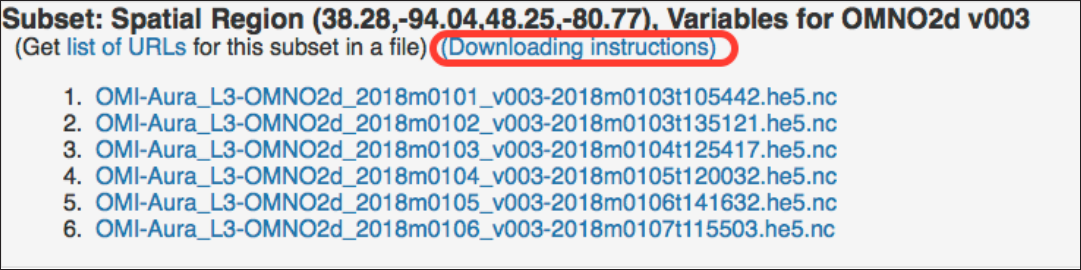
Using GES-DISC to get OMI Data
This strategy allows you to specify the specic places and time ranges for which you’d like data. This
is helpful if you if you do not want an enormous worldwide dataset.
1. Go to https://disc.gsfc.nasa.gov/.
2. Enter your search term (e.g.: NO2).
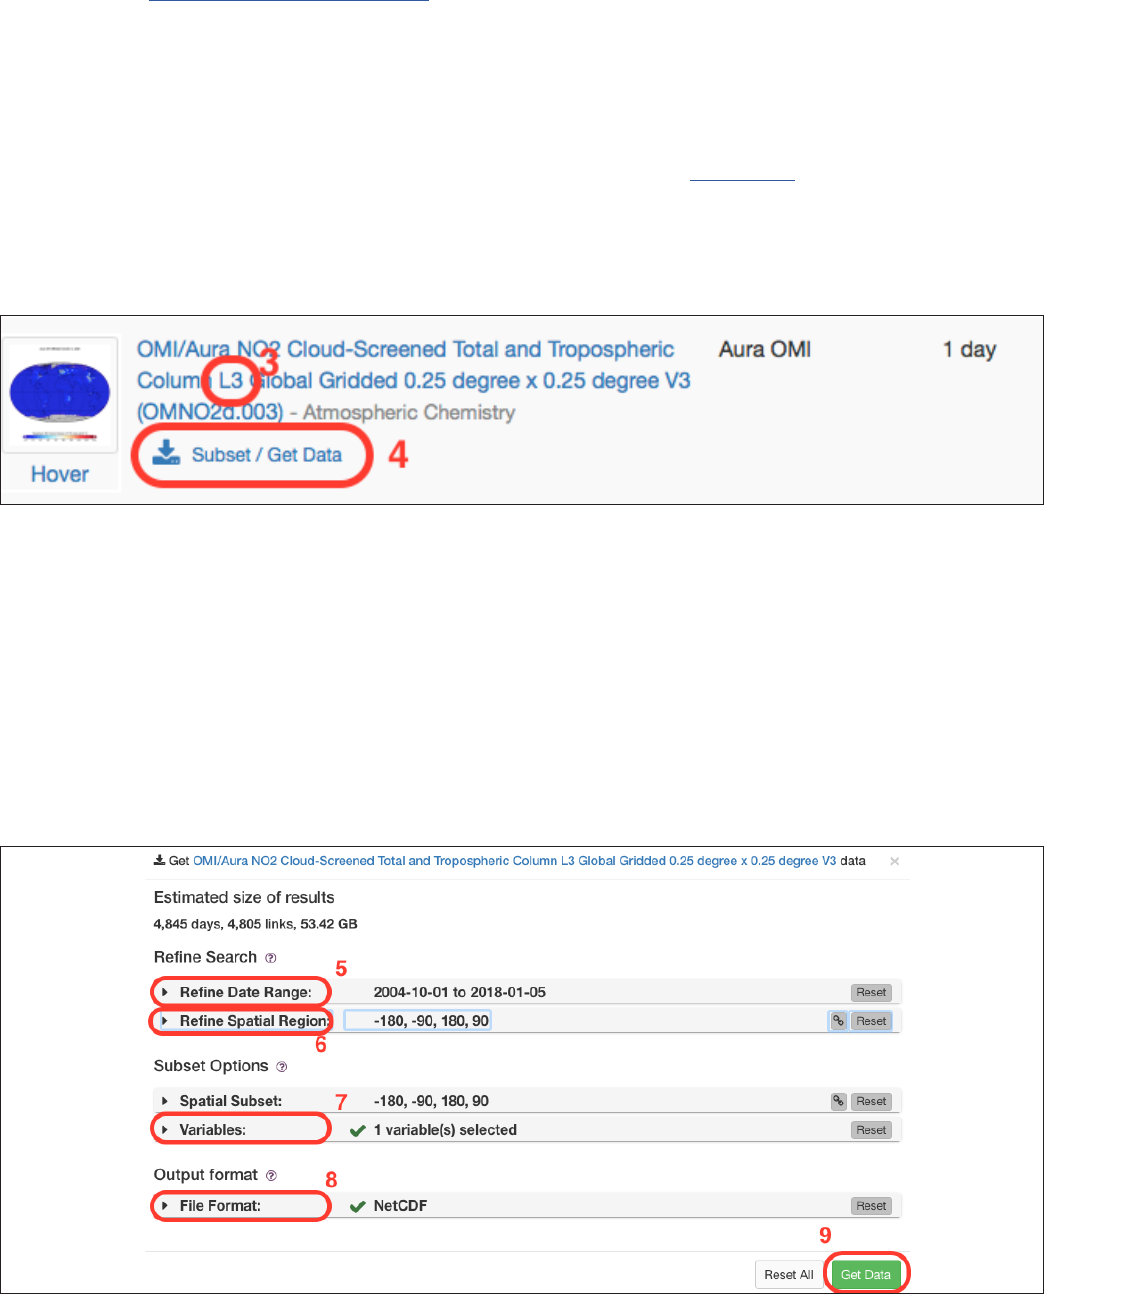
3. Many different results will appear; make sure you nd OMI L3 data to get interpreted &
gridded data.
a. Note: L3 signies that the data has been gridded. Click here for more on data
processing levels.
4. Click on the icon subset/get data. This will allow you to subset your data temporally and
spatially
5. Click Rene Date Range to select the range of dates for which you’d like data.
6. Click Rene Spatial Region to focus on the area for which you’d like data.
a. Note: Rening the spatial region automatically populates the spatial subset and vice
versa.
7. Click the Variables dropdown and choose the variable you’d like to download.
8. Click the File Format dropdown to choose the le you’d like.
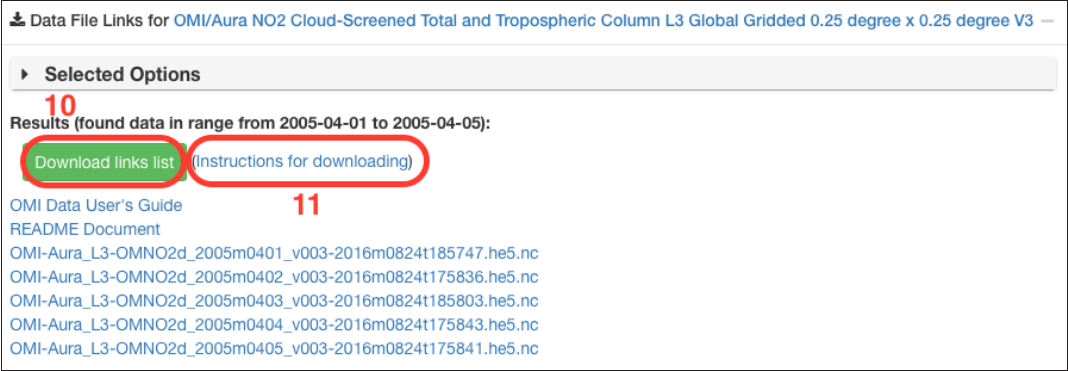
9. Click Get Data to begin downloading your data.

Find more information: HAQAST.org
Using Earthdata to get OMI Data
Earthdata also allows you to subset data temporally—but not spatially—as well as to look at the data
in an interactive manner.
1. Go to: https://earthdata.nasa.gov/.
2. Enter your search parameter (e.g.: NO2, ozone) AND OMI L3 (e.g.: Search “OMI L3 ozone”)
a. Note: L3 signies that the data has been gridded. Click here for more on data
processing levels.
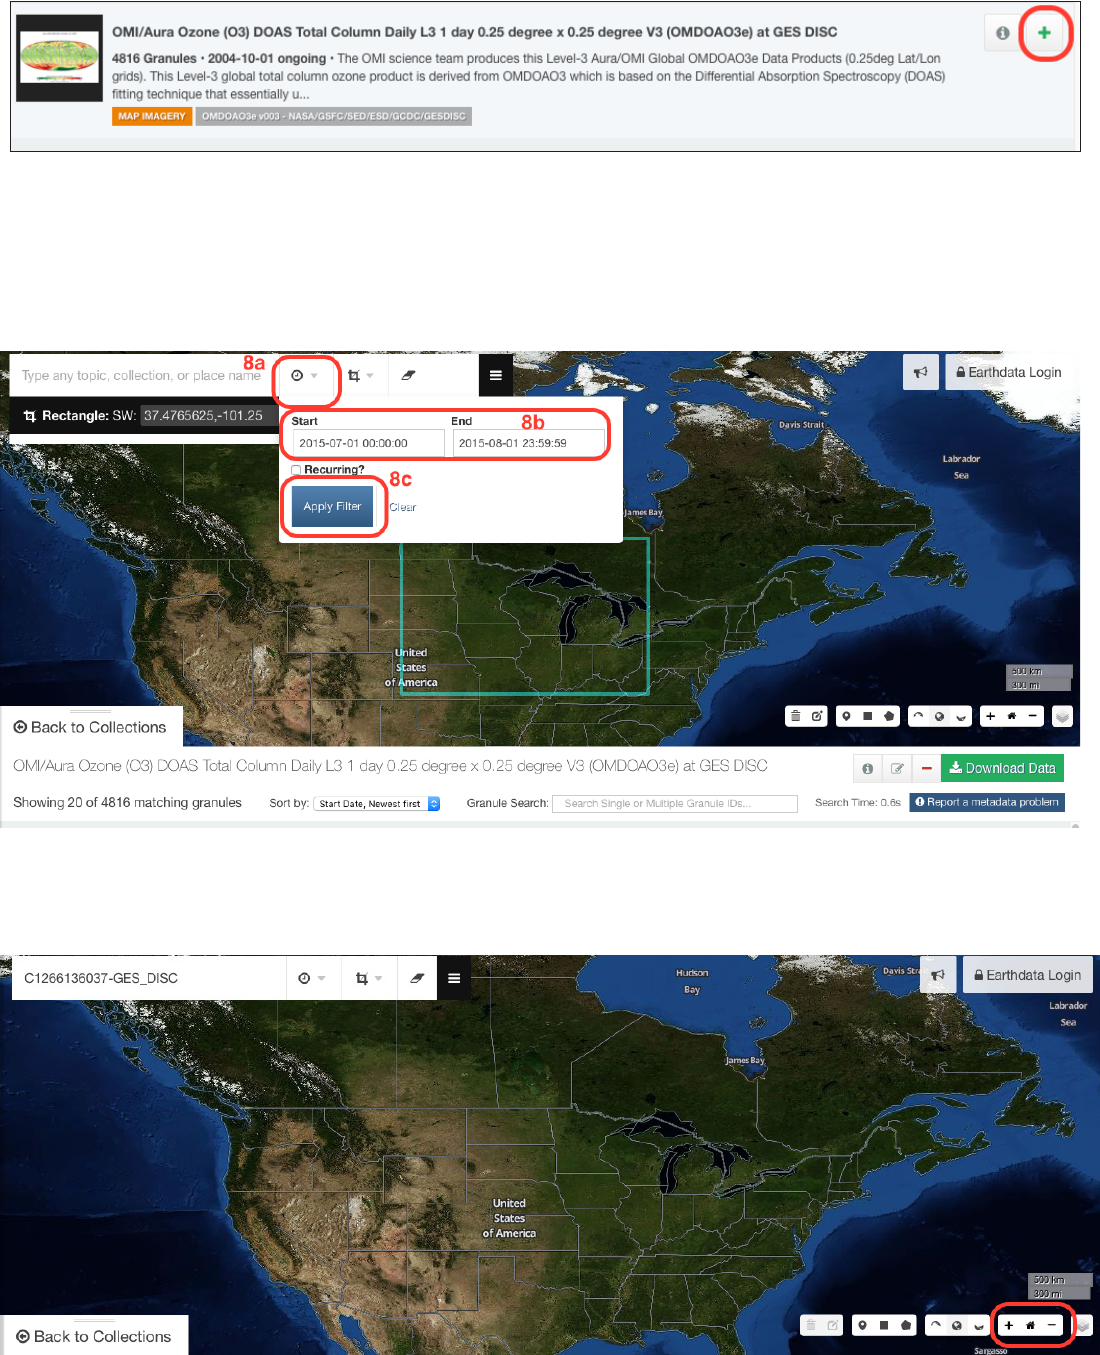
3. There will be 3 boxes at the top of the screen; in the case of searching for OMI L3 ozone,
select OMI/Aura…Daily L3…at GES DISC
4. You will be taken to a screen with the data collection you selected. This collection will
include all the data available for your product—in this case, daily column totals
going back to 10/1/2004.
5. To temporally subset your data, click Back to Collections.
Find more information: HAQAST.org Find more information: HAQAST.org
6. Add this collection to your project by clicking the green + sign.
7. To select the specic temporal granules you want, click your data product.
8. Choose the time range for which you want data by:
a. Clicking the time selection tool
b. Entering Start and End times
c. Clicking Apply Filter
9. Earthdata can visualize your selected data, during the time period you chose, for specic
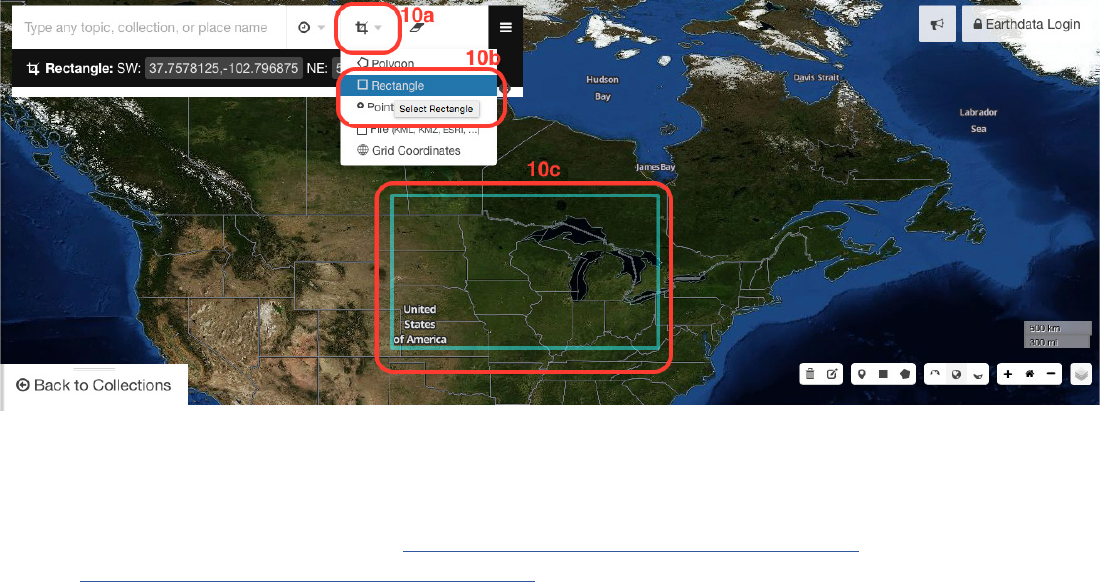
regions. To do so, nd your location by dragging the map and zooming in or out.
Find more information: HAQAST.org
10. Select the area for which you want data by:
a. Clicking the area selection tool
b. Choosing which polygon or point you’ll use for your selection
c. Selecting the area on the map for which you want data.
11. To download your data, click download data.
12. To access your data, go to https://wiki.earthdata.nasa.gov/display/EL/
How+To+Register+With+Earthdata+Login and follow the instructions that best suit
your software.
Find more information: HAQAST.org Find more information: HAQAST.org
Use Simple Subset Wizard
Simple Subset Wizard allows you to easily subset your data by space and time. It has no interactive
features.
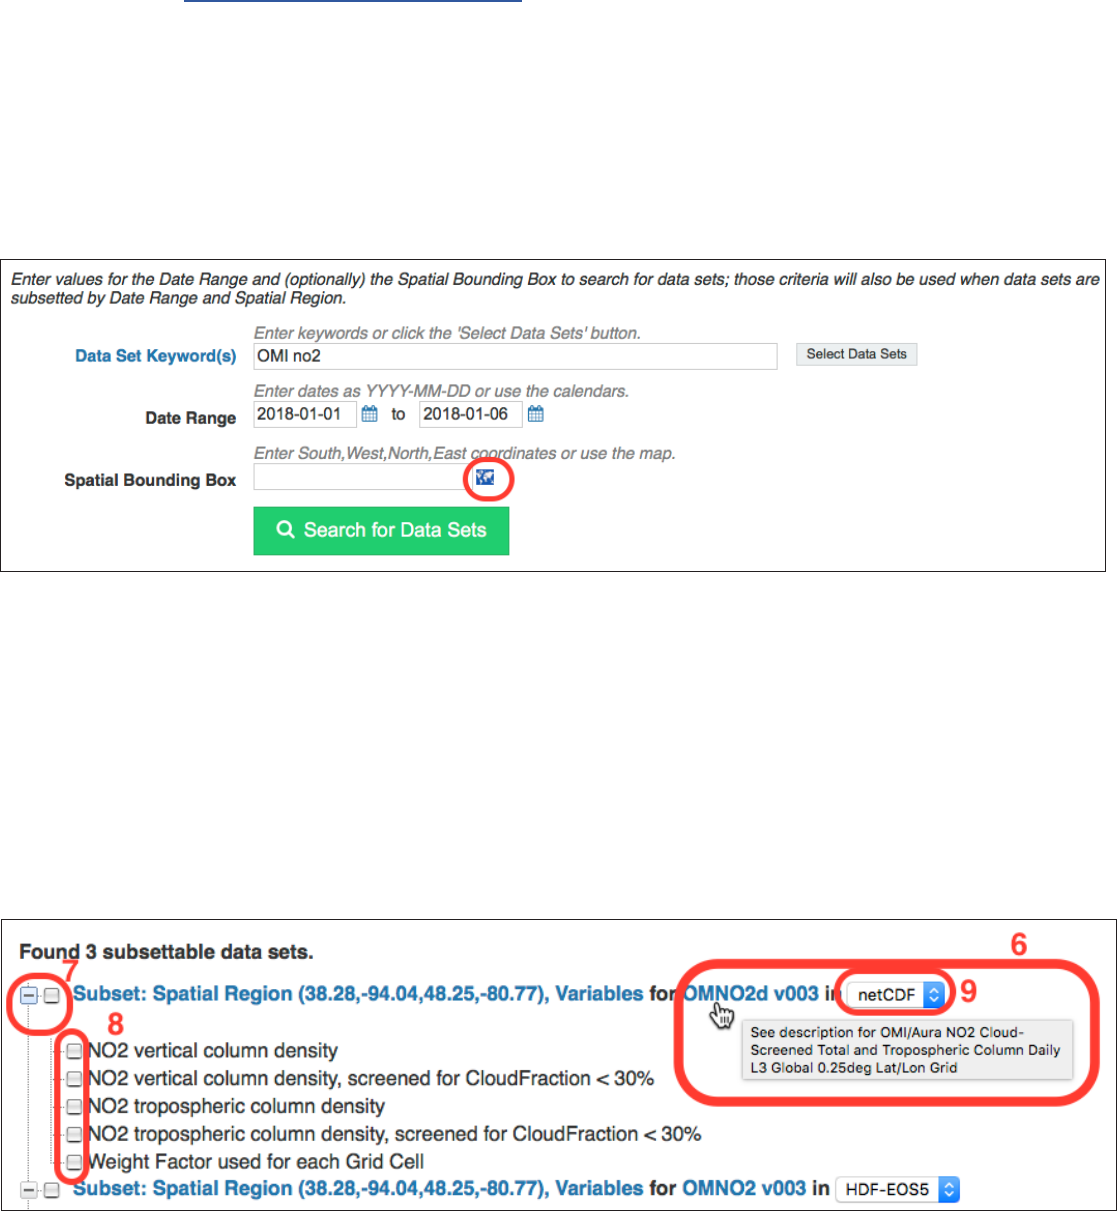
1. Go to: https://disc.gsfc.nasa.gov/SSW/.
2. You can search by keyword (eg.: OMI) or data set (searching by data set assumes that you
know exactly which set you want). Search for OMI NO2.
3. Enter a date range.
4. Click the map icon to select the area for which you want data.
5. Click Search for Data Sets.
6. Hover over each data product for a brief description, or click the product to read the details
of the set.
7. Expand each subset to see individual data products.
8. Select the specic product you want.
9. Choose your preferred le format.