LWR Sites for Experience Cloud
Version 61.0, Summer ’24
Last updated: July 22, 2024
©
Copyright 2000–2024 Salesforce, Inc. All rights reserved. Salesforce is a registered trademark of Salesforce, Inc., as are other
names and marks. Other marks appearing herein may be trademarks of their respective owners.

CONTENTS
Chapter 1: LWR Sites for Experience Cloud . . . . . . . . . . . . . . . . . . . . . . . . . . . . . . . . . . 1
What Are LWR Sites? . . . . . . . . . . . . . . . . . . . . . . . . . . . . . . . . . . . . . . . . . . . . . . . . . . . . 2
Before You Begin . . . . . . . . . . . . . . . . . . . . . . . . . . . . . . . . . . . . . . . . . . . . . . . . . . . . . . 3
Key Resources . . . . . . . . . . . . . . . . . . . . . . . . . . . . . . . . . . . . . . . . . . . . . . . . . . . . . . . . 3
Release Notes . . . . . . . . . . . . . . . . . . . . . . . . . . . . . . . . . . . . . . . . . . . . . . . . . . . . . . . . 5
Chapter 2: Get to Know the LWR Templates . . . . . . . . . . . . . . . . . . . . . . . . . . . . . . . . 6
Pages and Components . . . . . . . . . . . . . . . . . . . . . . . . . . . . . . . . . . . . . . . . . . . . . . . . . 7
Differences in Behavior . . . . . . . . . . . . . . . . . . . . . . . . . . . . . . . . . . . . . . . . . . . . . . . . . . 8
New Publishing Model . . . . . . . . . . . . . . . . . . . . . . . . . . . . . . . . . . . . . . . . . . . . . . 8
Custom URL Paths . . . . . . . . . . . . . . . . . . . . . . . . . . . . . . . . . . . . . . . . . . . . . . . . . 9
Lightning Web Security . . . . . . . . . . . . . . . . . . . . . . . . . . . . . . . . . . . . . . . . . . . . . . . 9
Caching Policy . . . . . . . . . . . . . . . . . . . . . . . . . . . . . . . . . . . . . . . . . . . . . . . . . . . 10
Head Markup . . . . . . . . . . . . . . . . . . . . . . . . . . . . . . . . . . . . . . . . . . . . . . . . . . . . 11
Accessibility . . . . . . . . . . . . . . . . . . . . . . . . . . . . . . . . . . . . . . . . . . . . . . . . . . . . . 12
LWR Template Limitations . . . . . . . . . . . . . . . . . . . . . . . . . . . . . . . . . . . . . . . . . . . . . . . . 12
Chapter 3: Start Building Your LWR Site . . . . . . . . . . . . . . . . . . . . . . . . . . . . . . . . . . . 15
Create an LWR Site . . . . . . . . . . . . . . . . . . . . . . . . . . . . . . . . . . . . . . . . . . . . . . . . . . . . 16
Create Custom Pages . . . . . . . . . . . . . . . . . . . . . . . . . . . . . . . . . . . . . . . . . . . . . . . . . . 17
Create Components for LWR Sites . . . . . . . . . . . . . . . . . . . . . . . . . . . . . . . . . . . . . . . . . . 18
Component Properties . . . . . . . . . . . . . . . . . . . . . . . . . . . . . . . . . . . . . . . . . . . . . . 19
Base Lightning Component Limitations . . . . . . . . . . . . . . . . . . . . . . . . . . . . . . . . . . . 20
User Interface API . . . . . . . . . . . . . . . . . . . . . . . . . . . . . . . . . . . . . . . . . . . . . . . . . 21
@salesforce Modules . . . . . . . . . . . . . . . . . . . . . . . . . . . . . . . . . . . . . . . . . . . . . . . 21
Lightning Navigation . . . . . . . . . . . . . . . . . . . . . . . . . . . . . . . . . . . . . . . . . . . . . . . 23
Make a Custom Lightning Web Component Screen-Size Responsive . . . . . . . . . . . . . . . 24
Create Custom Layout Components . . . . . . . . . . . . . . . . . . . . . . . . . . . . . . . . . . . . . . . . 26
Set Up a Navigation Menu Using Apex . . . . . . . . . . . . . . . . . . . . . . . . . . . . . . . . . . . . . . 27
Publish Your LWR Site . . . . . . . . . . . . . . . . . . . . . . . . . . . . . . . . . . . . . . . . . . . . . . . . . . 29
Chapter 4: Brand Your LWR Site . . . . . . . . . . . . . . . . . . . . . . . . . . . . . . . . . . . . . . . . 30
How Branding Works in LWR Sites . . . . . . . . . . . . . . . . . . . . . . . . . . . . . . . . . . . . . . . . . . 31
Enable --dxp Styling Hooks . . . . . . . . . . . . . . . . . . . . . . . . . . . . . . . . . . . . . . . . . . . . . . 33
--dxp Styling Hooks in LWR Sites . . . . . . . . . . . . . . . . . . . . . . . . . . . . . . . . . . . . . . . . . . . 33
Color --dxp Styling Hooks . . . . . . . . . . . . . . . . . . . . . . . . . . . . . . . . . . . . . . . . . . . . 35
Text --dxp Styling Hooks . . . . . . . . . . . . . . . . . . . . . . . . . . . . . . . . . . . . . . . . . . . . . 38
Site Spacing --dxp Styling Hooks . . . . . . . . . . . . . . . . . . . . . . . . . . . . . . . . . . . . . . . 40
How --dxp Styling Hooks Map to Theme Panel Properties . . . . . . . . . . . . . . . . . . . . . . . . . . 41
Use --dxp Styling Hooks in Custom Components . . . . . . . . . . . . . . . . . . . . . . . . . . . . . . . . 48
Override Component Branding in LWR Sites with Custom CSS . . . . . . . . . . . . . . . . . . . . . . . 49
Create a Section Color Palette . . . . . . . . . . . . . . . . . . . . . . . . . . . . . . . . . . . . . . . . . . . . 50
Create a Configurable Site Logo Component . . . . . . . . . . . . . . . . . . . . . . . . . . . . . . . . . . . 51
Add Custom Fonts . . . . . . . . . . . . . . . . . . . . . . . . . . . . . . . . . . . . . . . . . . . . . . . . . . . . 53
Remove SLDS . . . . . . . . . . . . . . . . . . . . . . . . . . . . . . . . . . . . . . . . . . . . . . . . . . . . . . . 54
Chapter 5: Create a Multilingual LWR Site . . . . . . . . . . . . . . . . . . . . . . . . . . . . . . . . . 55
Add a Language to Your LWR Site . . . . . . . . . . . . . . . . . . . . . . . . . . . . . . . . . . . . . . . . . . 58
Delete a Language from Your LWR Site . . . . . . . . . . . . . . . . . . . . . . . . . . . . . . . . . . . . . . 59
Set the Default Language on Your LWR Site . . . . . . . . . . . . . . . . . . . . . . . . . . . . . . . . . . . . 60
Automatic Language Detection for Multilingual LWR Sites . . . . . . . . . . . . . . . . . . . . . . . . . . 61
Export Content from Your LWR Site for Translation . . . . . . . . . . . . . . . . . . . . . . . . . . . . . . . . 61
Import Translated Content to Your LWR Site . . . . . . . . . . . . . . . . . . . . . . . . . . . . . . . . . . . . 63
Chapter 6: Add More Customizations . . . . . . . . . . . . . . . . . . . . . . . . . . . . . . . . . . . . 65
Create Custom Record Components . . . . . . . . . . . . . . . . . . . . . . . . . . . . . . . . . . . . . . . . 66
Use Apex and SOQL for Search . . . . . . . . . . . . . . . . . . . . . . . . . . . . . . . . . . . . . . . . . . . 67
Use Expressions to Add Dynamic Data to LWR Sites . . . . . . . . . . . . . . . . . . . . . . . . . . . . . . 68
Create a Logout Link Component . . . . . . . . . . . . . . . . . . . . . . . . . . . . . . . . . . . . . . . . . . . 71
Integrate Third-Party Libraries Using the Privileged Script Tag . . . . . . . . . . . . . . . . . . . . . . . 72
Examples: Use Google Analytics in LWR Sites . . . . . . . . . . . . . . . . . . . . . . . . . . . . . . . 73
Examples: Use Google Tag Manager in LWR Sites . . . . . . . . . . . . . . . . . . . . . . . . . . . 75
Chapter 7: Manage Data in LWR Sites . . . . . . . . . . . . . . . . . . . . . . . . . . . . . . . . . . . . 78
Capture and Integrate Engagement Data . . . . . . . . . . . . . . . . . . . . . . . . . . . . . . . . . . . . . 81
Configure the Consent Opt-In Default . . . . . . . . . . . . . . . . . . . . . . . . . . . . . . . . . . . . 82
Track User Interactions to Send to Data Cloud . . . . . . . . . . . . . . . . . . . . . . . . . . . . . . 84
Set Up Data Cloud . . . . . . . . . . . . . . . . . . . . . . . . . . . . . . . . . . . . . . . . . . . . . . . . . . . . 85
Confirm Data Kit Connection . . . . . . . . . . . . . . . . . . . . . . . . . . . . . . . . . . . . . . . . . . 85
Deploy the Experience Cloud Engagement Data Kit to a Data Space . . . . . . . . . . . . . . . 85
Tag Manager Event Reference . . . . . . . . . . . . . . . . . . . . . . . . . . . . . . . . . . . . . . . . . . . . 85
Cart Interactions . . . . . . . . . . . . . . . . . . . . . . . . . . . . . . . . . . . . . . . . . . . . . . . . . . 86
Catalog Interactions . . . . . . . . . . . . . . . . . . . . . . . . . . . . . . . . . . . . . . . . . . . . . . . 88
Consent Interactions . . . . . . . . . . . . . . . . . . . . . . . . . . . . . . . . . . . . . . . . . . . . . . . 91
Email Interactions . . . . . . . . . . . . . . . . . . . . . . . . . . . . . . . . . . . . . . . . . . . . . . . . . 92
Engagement Interactions . . . . . . . . . . . . . . . . . . . . . . . . . . . . . . . . . . . . . . . . . . . . 93
Error Report Interactions . . . . . . . . . . . . . . . . . . . . . . . . . . . . . . . . . . . . . . . . . . . . . 94
Line Item Data . . . . . . . . . . . . . . . . . . . . . . . . . . . . . . . . . . . . . . . . . . . . . . . . . . . 95
Search Interactions . . . . . . . . . . . . . . . . . . . . . . . . . . . . . . . . . . . . . . . . . . . . . . . . 97
Wish-List Interactions . . . . . . . . . . . . . . . . . . . . . . . . . . . . . . . . . . . . . . . . . . . . . . . 98
Contents

CHAPTER 1 LWR Sites for Experience Cloud
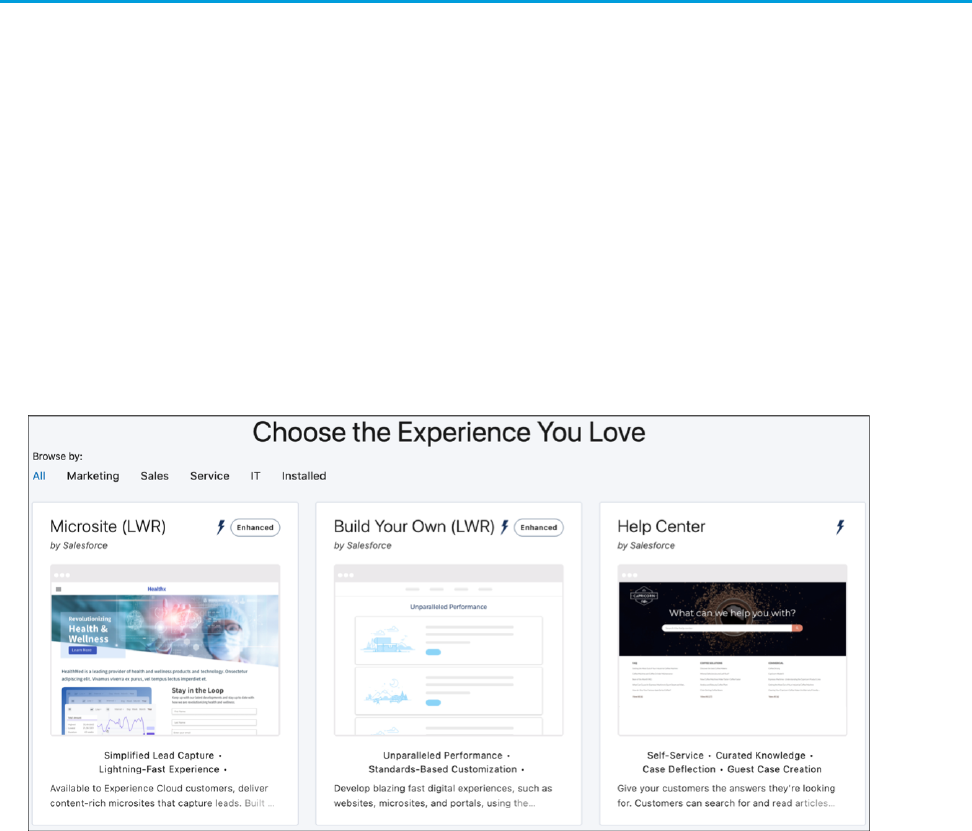
Develop sites that load quickly and scale well using the Build Your Own (LWR) and Microsite (LWR) templates
for Experience Cloud. Based on the Lightning Web Runtime (LWR) and the Lightning Web Components
(LWC) programming model, these lightweight templates support fully custom solutions and deliver
exceptional site performance.
In this chapter ...
• What Are LWR Sites
for Experience
Cloud?
This guide outlines the steps required to successfully develop and deploy LWR-based experiences, and
explains how to create Lightning web components for the templates, build page and theme layouts,
and enable various custom solutions.
• Before You Begin
Building an LWR Site
• Key Resources for
Developing LWR Sites
• Release Notes for
LWR Sites
1

What Are LWR Sites for Experience Cloud?
Powered by the Lightning Web Runtime (LWR), LWR sites deliver unparalleled site performance and improve developer productivity.
The Build Your Own (LWR) and the Microsite (LWR) templates for Experience Cloud let you develop blazing fast digital experiences, such
as websites, portals, and microsites, using the Lightning Web Components programming model.
Lightning Web Components uses core Web Components standards and provides only what’s necessary to perform well in browsers
supported by Salesforce. Because it’s built on code that runs natively in browsers, Lightning Web Components is lightweight, efficient,
and easy to learn.
Lightning Web Components also includes Apex and User Interface API support, so you can access Salesforce records, SOSL, and more
to provide data-rich experiences for your customers. And performance features of LWR templates, such as publish-time freezing and
HTTP caching, help you build richer experiences to target B2B and B2C markets.
At a high level, LWR templates:
•
Provide custom URL paths, meaning no more /s cluttering up your site’s URL—for example,
https://mycustomdomain.com/mypage.
•
Enhance developer productivity. Use Salesforce DX and your preferred editor or development tools to create custom components
and themes. Build what you want, your way.
•
Support the development of reusable Lightning web components and themes that follow modern web standards. Most of the code
you write is standard JavaScript and HTML, making the model easy to learn.
Example: Let’s say you specialize in building highly customized solutions with your own design system and component library.
With the Build Your Own (LWR) template, you can now remove Salesforce Lightning Design System (SLDS) and include your own
components and design system to achieve the pixel-perfect site you require.
Alternatively, let’s say your company is hosting an event, and you need a place to keep all your event information that doesn’t
necessarily live with your other content. Enter microsites. Publish your page with all the event information, pull in logos and other
content that you created in CMS, and archive the page when the event is over.
Enhanced LWR Sites
The enhanced sites and content platform is a flexible new system that brings together Salesforce CMS and LWR sites. From Winter ’23,
this platform is automatically enabled, so all new LWR sites that you create are hosted on the platform. Similarly, any enhanced CMS
workspaces that you create also run on the redesigned system.
Tip: To clarify which features apply where, we use the terms enhanced LWR sites and enhanced CMS workspaces to refer to LWR
sites and CMS workspaces on the new platform.
The new platform offers a range of additional features that are available only to enhanced LWR sites and enhanced CMS workspaces.
For example, enhanced LWR sites can employ partial deployment so you can choose which site elements are ready to go live.
Expression-based visibility controls when and to whom components in your enhanced LWR sites appear. With site content search, your
users can find content contained in Rich Content Editor and HTML Editor components. And because everything runs together on our
consolidated platform, site search results can include content that you share from an enhanced CMS workspace.
See What Is the Enhanced Sites and Content Platform in Salesforce Help.
2
What Are LWR Sites for Experience Cloud?LWR Sites for Experience Cloud
Before You Begin Building an LWR Site
Build Your Own (LWR) is a minimal template in Experience Cloud that provides only the most essential pages and components, so to
build a functioning site, you need to add your own custom pages and components. Therefore, this template is best suited for developers
who are comfortable developing Lightning web components and working with Salesforce DX, User Interface API, and Apex. The Microsite
(LWR) template includes a responsive layout, preconfigured pages, and content components that you can use to quickly spin up a
landing page, event site, or other web experience. Depending on your use case, the template doesn’t necessarily require much additional
customization.
You can create LWR sites for Experience Cloud in Enterprise, Performance, Unlimited, and Developer Editions.
To use this guide successfully, you need an org with Digital Experiences (formerly Communities) enabled. You also need experience:
•
Using Experience Builder to build sites
•
Developing Lightning web components
•
Working with Salesforce DX, User Interface API, and ApexResources
Important: Before you begin developing with an LWR template, we also recommend reviewing the LWR Template Limitations
section to ensure that the template can support your needs.
Key Resources for Developing LWR Sites
Check out these resources to learn more about the main elements you use when developing an LWR site in Experience Cloud.
Code Sample Files
To help you build your custom LWR site, we provide several code samples in a .zip file. Download the file and extract the samples.
Then, in each section of this guide, we specify which examples to examine.
codeSamples.zip
LWR Sites
Check out these additional resources to help you get started with your LWR site.
How to Build LWR Sites with Experience Cloud (Series)
Did You Know (Series)
Experience Cloud LWR Apps
AZ Insurance – Sample App
Lightning Web Runtime
Lightning Web Components
Lightning Web Components is a programming model for building efficient Lightning web components and experiences. It uses modern
ES6+ JavaScript and transpilation, which allows you to write modern JavaScript that works in any current browser.
3
Before You Begin Building an LWR SiteLWR Sites for Experience Cloud

Note: You can build Lightning components using two programming models—Lightning Web Components and the original
model, Aura Components.
When we refer to the programming models, we use Lightning Web Components or LWC, and Aura Components, capitalized.
When we refer to the components, we use lowercase—Lightning web components and Aura components.
Lightning Web Components Developer Guide
Build Lightning Web Components
Lightning Web Components Reference
Introducing Lightning Web Components
Lightning Web Components in Lightning Communities
Ebikes - Communities LWC Demo
Salesforce DX
Salesforce Developer Experience (DX) provides a set of tools to manage and develop apps across their entire development lifecycle. It
enables source-driven development and team collaboration, and it makes the release cycle more efficient and agile.
Salesforce DX Setup Guide
Salesforce DX Developer Guide
Get Started with SFDX
Salesforce Extensions for Visual Studio Code
Build Apps Together with Package Development
User Interface API
The Salesforce User Interface API provides endpoints to build UI components with Salesforce record data. Use it to build UIs that let users
work with records, list views, actions, favorites, and more.
User Interface API Developer Guide
User Interface API
Introduction to the Salesforce UI API
Apex
Apex is a strongly typed, object-oriented programming language that enables you to execute business-logic transactions on Salesforce
servers.
Apex Developer Guide
4
Key Resources for Developing LWR SitesLWR Sites for Experience Cloud

Release Notes for LWR Sites
Use the Salesforce Release Notes to learn about the most recent updates and changes to LWR sites for Experience Cloud.
For new and changed features, see Developer Productivity and Aura and LWR Sites in the Experience Cloud section of the Salesforce
Release Notes. You can also look for Experience Cloud in New and Changed Items for Developers in the Salesforce Release Notes.
5
Release Notes for LWR SitesLWR Sites for Experience Cloud

CHAPTER 2 Get to Know the LWR Templates for Experience Cloud
Experience Cloud has an existing Aura-based Build Your Own template, which supports Aura components
and Lightning web components. But the Build Your Own (LWR) and the Microsite (LWR) templates are
based exclusively on the Lightning Web Components programming model and Lightning web
components. Powered by the Lightning Web Runtime (LWR), these lightweight templates are designed
to scale well and load quickly, and support fully customized solutions.
In this chapter ...
• Pages and
Components in LWR
Templates
• Differences in
Behavior in LWR Sites
In addition to being based solely on Lightning web components, the Build Your Own (LWR) and Microsite
(LWR) templates include several other features that make them distinct. Let’s take a closer look.
• LWR Template
Limitations
6

Pages and Components in LWR Templates
The Build Your Own (LWR) and the Microsite (LWR) templates in Experience Cloud provide only the most essential out-of-the-box pages
and components.
Site Pages
LWR templates typically include the following template pages, so to create a working site, you often need to create additional custom
pages.
•
Home
•
Error
•
Check Password
•
Forgot Password
•
Login
•
Register
•
News Detail (available in enhanced LWR sites)
Page Components
We provide several components with LWR templates, but to accomplish your goals, you often must create custom Lightning web
components.
For more information on the components readily available in LWR templates, see Standard Components for LWR Templates in Salesforce
Help.
Tip: With LWR templates, the startURL query parameter is propagated for all login and page redirects. Also, autofill is enabled
for login input fields and password manager.
Warning: When you customize a login page or any page that includes fields with sensitive or confidential information with
Experience Builder, we recommend that you use only standard components built by Salesforce or components that you built,
customized, or vetted. Use of third-party components and code libraries on a page that includes fields with sensitive or confidential
information can increase your risk for security vulnerabilities.
Light DOM in LWR Templates and Standard Components
Before Spring ’22, standard Lightning web components in the LWR templates rendered by default in shadow DOM (Document Object
Model), making it difficult to integrate third-party analytics services. Now these templates and several of their components are enabled
with light DOM. In Lightning web components enabled with light DOM, you can query DOM elements from the document root, which
facilitates DOM traversal. You can listen for events within these components and send the events to multiple third-party analytics services,
such as Google Analytics.
To take advantage of light DOM on an existing LWR site, republish the site.
SEE ALSO:
Lightning Web Components Developer Guide: Light DOM
Salesforce Help: Standard Components for Use in the Build Your Own (LWR) Template
7
Pages and Components in LWR TemplatesGet to Know the LWR Templates for Experience Cloud

Differences in Behavior in LWR Sites
With LWR templates in Experience Cloud, some things work a little differently than with our Aura templates.
New Publishing Model for LWR Sites
LWR sites in Experience Cloud take advantage of a new publishing paradigm, where components are frozen when the site is published
and served statically at runtime.
Custom URL Paths in LWR Sites
Unlike Aura sites, LWR sites in Experience Cloud support custom URL paths, meaning no more /s cluttering up your site’s URL—for
example, https://mycustomdomain.com/mypage.
Lightning Web Security in LWR Sites
Instead of Lightning Locker, LWR sites in Experience Cloud use Lightning Web Security (LWS), the new security architecture for
Lightning web components. LWS supports cross-namespace communication for Lightning web components, in addition to the
usual security features that Lightning Locker provides. Cross-namespace communication lets you import components from other
namespaces and use them via composition or extension.
Caching Policy in LWR Sites
LWR sites in Experience Cloud make heavy use of caching to improve performance and scalability on the live site. Except for the
initial document request and data API calls, all requests required to load a page are HTTP cacheable.
Head Markup in LWR Sites
With LWR sites in Experience Cloud, you have complete control over the head markup included on the page. Now, when you open
the Head Markup window, you can access this default markup.
Accessibility in LWR Sites
LWR sites in Experience Cloud include several important accessibility features and best practices, such as screen reader support and
F6 navigation.
New Publishing Model for LWR Sites
LWR sites in Experience Cloud take advantage of a new publishing paradigm, where components are frozen when the site is published
and served statically at runtime.
This new paradigm allows LWR sites to deliver components and data as efficiently as possible, but it also introduces some caveats and
limitations when managing your site and writing components.
In Aura sites, Lightning components (both Lightning web components and Aura components) are delivered dynamically. So when you
update a custom component that’s currently used in an Aura site, your component changes go live immediately without publishing
the site. However, in LWR sites, you must publish your site before any changes, such as bug fixes or new features, can propagate to
standard, custom, or managed components.
Note: When you preview your site in Experience Builder, Lightning web components are served dynamically, which means the
preview always shows the most up-to-date versions of your components and data.
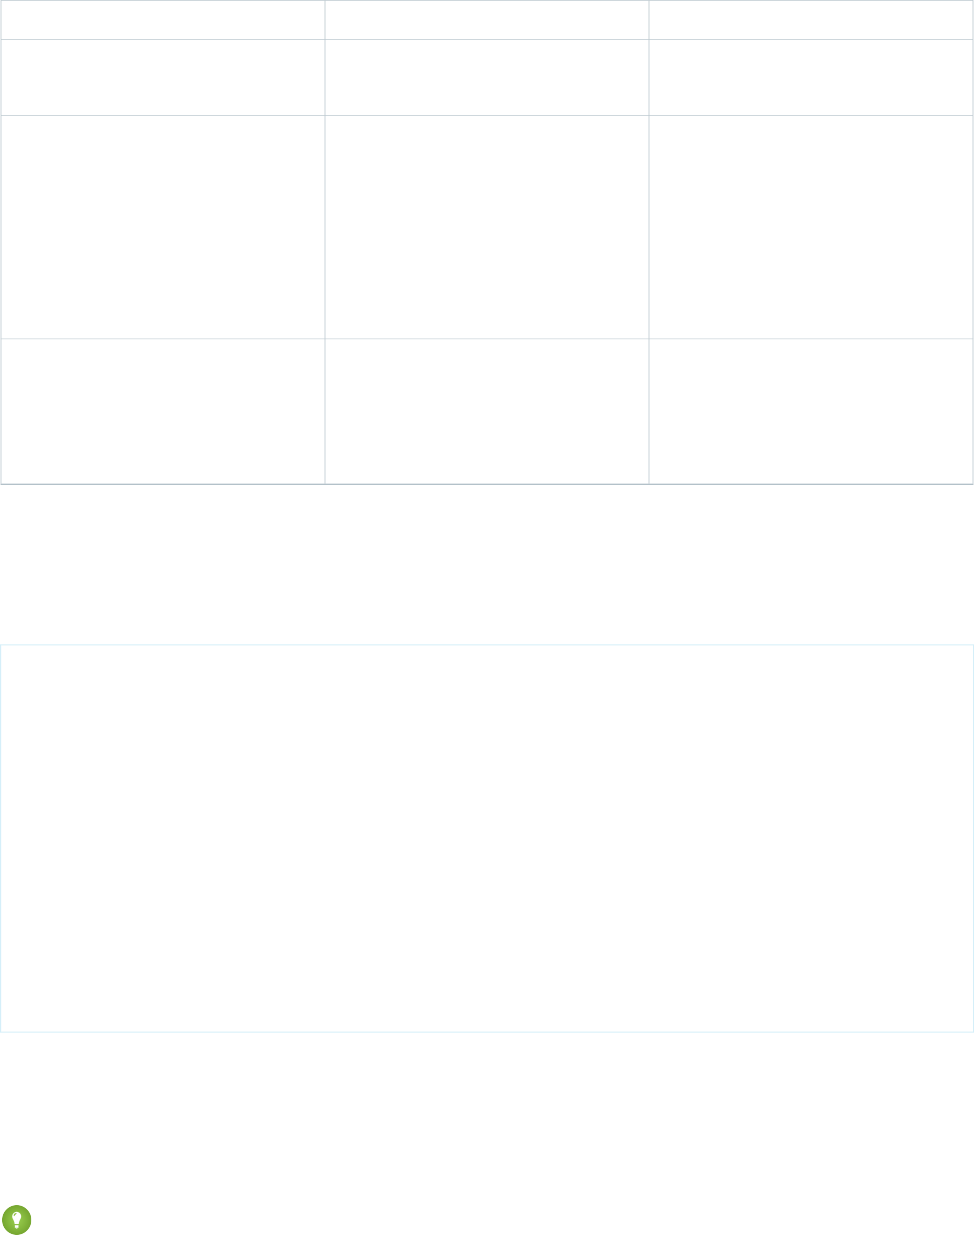
Which Features Are Affected?
This table explains which features are affected by the new publishing model.
8
Differences in Behavior in LWR SitesGet to Know the LWR Templates for Experience Cloud
You must republish your LWR site...Feature
When:Lightning web components
•
You update a Lightning web component that’s being used in an LWR site.
•
Salesforce updates out-of-the-box components.
Until you republish the site, it uses the version of the previously published component’s
source code, which can cause issues at runtime.
When you upgrade components from a managed package that are already in your site.
Until you republish the site, it uses the version of the previously published component’s
source code, which can cause issues at runtime.
Managed package components
When you update a custom label or want updated labels from Salesforce.Labels
Custom URL Paths in LWR Sites
Unlike Aura sites, LWR sites in Experience Cloud support custom URL paths, meaning no more /s cluttering up your site’s URL—for
example, https://mycustomdomain.com/mypage.
Before Winter ’23, you could create an authenticated or an unauthenticated LWR site. Unauthenticated sites supported custom URL
paths, but authenticated sites included /s at the end of the base URL—for example,
https://mycustomdomain.com/s/mypage.
LWR sites created in Winter ’23 or later no longer include /s in their URLs and are authenticated sites by default. Authenticated sites
allow users to log in and access user-specific data, but you can also include public pages or make the entire site publicly accessible.
Sites that don’t use /s can still access Visualforce pages by instead appending vforcesite to the base URL—for example,
https://mycustomdomain.com/vforcesite/mypage. You can also find the vforcesite URL in Setup > Custom
URLs.
Note: Unauthenticated LWR sites created before Winter ’23 are open to anyone on the web and don’t support login or
authentication. Therefore, the Members, Contributors, Login & Registration, and Emails areas in the Administration workspace are
unavailable because their settings don’t apply to unauthenticated sites.
SEE ALSO:
Experience Cloud Developer Guide: Considerations for Deploying Authenticated LWR Sites
Salesforce Help: Control Public Access to Your Experience Builder Sites
Lightning Web Security in LWR Sites
Instead of Lightning Locker, LWR sites in Experience Cloud use Lightning Web Security (LWS), the new security architecture for Lightning
web components. LWS supports cross-namespace communication for Lightning web components, in addition to the usual security
features that Lightning Locker provides. Cross-namespace communication lets you import components from other namespaces and
use them via composition or extension.
Lightning Web Security makes it easier to take advantage of third-party libraries, such as analytics and charting that work within your
Lightning web components.
9
Custom URL Paths in LWR SitesGet to Know the LWR Templates for Experience Cloud
Also, interactions with global objects are no longer restricted. Because each namespace is given its own sandbox, we can expose
document, window, and element globals directly without secure object wrappers. In turn, more standard DOM APIs can work successfully,
and exposed APIs within your namespace behave the same as any web context without secure wrappers.
See Lightning Web Security in the Lightning Web Components Developer Guide.
Note: LWR sites use their own instance of LWS. The Use Lightning Web Security for Lightning web components (GA) and
Aura components (Beta) setting in Session Settings in Setup, described in Enable Lightning Web Security in an Org, has no effect
on LWR sites. Instead, the site-level setting in Experience Builder controls whether the site uses LWS, regardless of the org-level
setting.
SEE ALSO:
LWR Template Limitations
Caching Policy in LWR Sites
LWR sites in Experience Cloud make heavy use of caching to improve performance and scalability on the live site. Except for the initial
document request and data API calls, all requests required to load a page are HTTP cacheable.
When the site is published, the JavaScript resources are generated and persisted, and then served at runtime as static, immutable, and
cacheable resources.
Any resource is publicly cacheable, provided it’s accessible through a public page in the site. If the Salesforce content delivery network
(CDN) is enabled, publicly cacheable resources are cached in the CDN to further improve performance.
See Serve Your Experience Cloud Site with the Salesforce Content Delivery Network (CDN) in Salesforce Help.
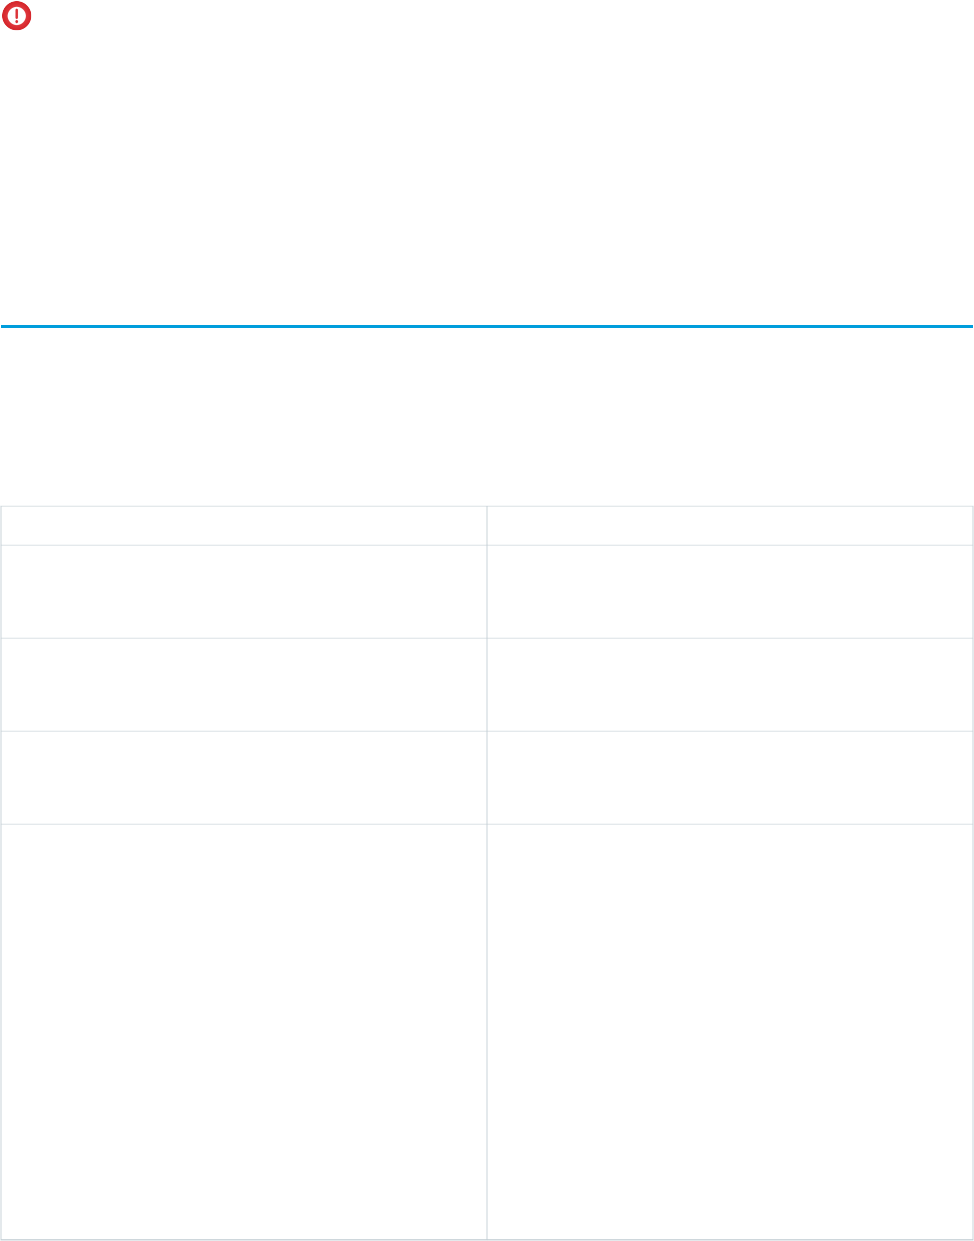
This table provides more detailed information about caching time to live (TTL) values.
DescriptionHTTP Caching PolicyResource
The site’s framework scripts, views, and
components are generated and persisted
150 daysGenerated framework scripts, views, and
components
when the site is published. If its contents
change, the resource URL changes, which
wipes the cache when the site is
republished.
HTML document caching is enabled only
for orgs configured with Salesforce's
1 minuteHTML document
first-party Akamai CDN. See Enable CDN to
Load Applications Faster.
Salesforce first-party CDNs cache HTML
document responses for 60 seconds. To
prevent downstream impact, the response
from the CDN has the cache headers set to
private, must-revalidate, and max-age of 0.
However, HTML document caching is
disabled while a site is being published. We
recommend publishing your site during
off-peak hours to avoid serving a stale HTML
document during the window of time after
10
Caching Policy in LWR SitesGet to Know the LWR Templates for Experience Cloud
DescriptionHTTP Caching PolicyResource
the site is published but before the max-age
TTL expires.
Permissions scoped modules
(@salesforce/userPermission/
5 minutesPermissions
and
@salesforce/customPermission/)
aren’t included in the HTML. Instead, they’re
fetched as separate resources. These
resources are cacheable for 5 minutes on a
per-user basis.
Requests to Salesforce static resources
(@salesforce/staticResource/)
1 dayOrg assets
and content assets
(@salesforce/contentAsset/)
have max-age cache headers set to 1 day.
Head Markup in LWR Sites
With LWR sites in Experience Cloud, you have complete control over the head markup included on the page. Now, when you open the
Head Markup window, you can access this default markup.
<meta charset="UTF-8" />
<meta name="viewport" content="width=device-width, initial-scale=1" />
<title>Welcome to LWC Communities!</title>
<link rel="stylesheet" href="{ basePath }/assets/styles/styles.css?{ versionKey }" />
<!-- webruntime-branding-shared stylesheets -->
<link rel="stylesheet" href="{ basePath
}/assets/styles/salesforce-lightning-design-system.min.css?{ versionKey }" />
<link rel="stylesheet" href="{ basePath
}/assets/styles/dxp-site-spacing-styling-hooks.min.css?{ versionKey }" />
<link rel="stylesheet" href="{ basePath }/assets/styles/dxp-styling-hooks.min.css?{
versionKey }" />
<link rel="stylesheet" href="{ basePath }/assets/styles/dxp-slds-extensions.min.css?{
versionKey }" />
<!-- webruntime-branding-shared stylesheets -->
In Aura sites, this markup isn’t exposed in the Head Markup window, but with LWR sites, you can edit:
•
The meta charset tag, which specifies the character set to use. This specification is a best practice.
•
The title tag, which controls the default title of your site that appears in the browser tab.
•
Links to the default style sheets that control the site’s appearance. One link is for Salesforce Lightning Design System (SLDS) and the
others are internal style sheets used by the base template. Although you can’t edit the style sheets directly, you can remove them.
Tip: You can also use this section to include global JavaScript from third-party libraries using the <x-oasis-script> privileged
script tag.
11
Head Markup in LWR SitesGet to Know the LWR Templates for Experience Cloud

You can use the { basePath } and { versionKey } variable references in your head markup as you want. For example, if
your site URL is https://site.acme.com/service, then { basePath } returns service, which allows you to reference
relative URLs.
{ versionKey } is a unique id that’s used to refer to a current published state, which you can use for caching and performance
purposes. Every time the site is republished, the versionKey changes.
SEE ALSO:
Integrate Third-Party Libraries Using the Privileged Script Tag
Salesforce Help: Add Markup to the Page <head> to Customize Your Site
Accessibility in LWR Sites
LWR sites in Experience Cloud include several important accessibility features and best practices, such as screen reader support and F6
navigation.
F6 Navigation
F6 navigation makes it easier to navigate a webpage with a keyboard or a screen reader. Unlike using the Tab key, which can take several
keystrokes to reach a specific element, pressing F6 lets users first navigate between different regions. Then users can use the Tab key to
home in on components within that region.
The major sections of the out-of-the-box Header and Footer theme layout component are enabled for F6 navigation. To enable F6
navigation for regions in your custom theme layouts, see Create Custom Layout Components.
Screen Reader Support
LWR sites run in a single page application (SPA), which is a web app that loads a single HTML page. Page updates are handled by
JavaScript that modifies the Document Object Model (DOM) to simulate navigation, which can cause issues for screen readers.
So we provide screen readers with the information to properly recognize SPA navigation. Upon navigation, the title of the page is
announced via an ARIA-Live region. If the theme layout stays the same, the user’s focus is returned to the content area. If the theme
layout changes, the user’s focus is returned to the top of the page.
LWR Template Limitations
LWR templates in Experience Cloud don’t include the same features as Aura templates. Check out the current differences and limitations
before you begin creating your site.
Unsupported Features and Settings
The following items are unavailable.
•
Several of the default components and pages that you get with Aura templates, such as Chatter feeds
•
Some preconfigured standard pages, such as Account Management, are used when creating custom pages
•
The default Navigation Menu component, although you can build your own
•
Progressive rendering
•
Default themes and theme management
12
Accessibility in LWR SitesGet to Know the LWR Templates for Experience Cloud
•
Right-to-left languages in standard components
•
Template, page, and theme export and Lightning Bolt Solutions
•
Template-level accessibility features, such as a skip link
•
App-level events that you get with Aura templates, although you can use CustomEvent
•
Some base components and features from the Lightning Component Library
•
Some properties in the @salesforce/i18n module
•
Mobile and value providers such as $Browser
•
The pageAccess property in the ExperienceBundle metadata type.
•
Session timeout alerts
•
Salesforce Community Page Optimizer
•
Surveys
Experience Workspaces Limitations
Only the Administration, Builder, Dashboards, and Guided Setup workspaces are available.
Experience Builder Limitations
•
In the toolbar, the Undo and Redo buttons and some Help options are unavailable.
•
In the Theme panel, branding sets, theme settings, and the CSS editor are unavailable. For alternative solutions, such as creating
section palettes or adding style sheets to the head markup, see Brand Your LWR Site.
•
When working with components, some hover actions and some of the action menu options in the property editor are unavailable.
•
When you modify records while previewing your site in Experience Builder, you can sometimes see stale record data if you navigate
to a previous page. To fix this issue, refresh your browser.
•
Experience admins can't access record pages in Experience Builder for objects that they don't have access to.
LWR Site Limitations
An LWR site supports up to 500 routes, or unique URLs. For best performance, keep the number of routes below 250. Dynamic content
can help keep your number of routes lower. For example, don’t create an individual page with a unique route for each content item.
Instead, use record details to represent your content, and then create a single page that shows record details and requires only one
route.
Enhanced LWR Site Limitations
For enhanced LWR sites, referential integrity for object API names in object routes is unsupported. If you rename an object that a page
component references, the connection to the object breaks.
Dynamic Component Import Limitations
You can import and instantiate a Lightning web component dynamically in LWR sites. However, LWR sites only support statically
analyzable dynamic imports. For this use case, import(“c/analyzable”) works, but import(“c/” + “analyzable”)
doesn’t work because it isn’t statically analyzable. Similarly, import(“c/” + componentName); or import(“c/” +
componentNameVariable) also don’t work.
13
LWR Template LimitationsGet to Know the LWR Templates for Experience Cloud
Lightning Web Security Limitations
Instead of Lightning Locker, LWR sites use Lightning Web Security (LWS), the new security architecture for Lightning web components.
These properties are currently unsupported for LWS in LWR sites.
•
document.domain
•
document.location
•
window.location
•
window.top
Asset Files in Sandbox Limitations
Full and Partial Copy sandboxes can support asset files along with other content entities. Asset files are unsupported in Developer and
Developer Pro sandboxes. When defining the sandbox template for Full and Partial Copy sandboxes, make sure to select Content Body
in the template also.
For unsupported sandboxes, if your site contains a Lightning web component with a @salesforce/contentAsset reference,
the reference breaks in the site on the sandbox org. In LWR sites, the component can’t render, and you can’t publish the site unless you
delete the component from the page or remove the asset reference from the component. In Aura sites, the imported reference resolves
to an invalid URL.
14
LWR Template LimitationsGet to Know the LWR Templates for Experience Cloud

CHAPTER 3 Start Building Your LWR Site
Learn about the initial steps to get a basic LWR in Experience Cloud site up and running, such as creating
custom Lightning web components and setting up navigation.
In this chapter ...
• Create an LWR Site in
Experience Cloud
For details on more advanced customization, such as custom record components, see Add More
Customizations.
• Create Custom
Pages in an LWR Site
• Create Components
for LWR Sites
• Create Custom
Layout Components
• Set Up a Navigation
Menu Using Apex
• Publish Your LWR Site
15
Create an LWR Site in Experience Cloud
Select the Build Your Own (LWR) or the Microsite (LWR) template to create an LWR site in Experience Cloud.
From Winter ’23, the way you create an LWR site has changed in two key ways.
•
Before Winter ’23, when you created an LWR site, you could create an authenticated or an unauthenticated site, which affected the
site’s URL. LWR sites created in Winter ’23 or later are authenticated sites by default and no longer include /s at the end of their
URLs. See Custom URL Paths in LWR Sites.
•
From Winter ’23, new LWR sites and CMS workspaces that you create are hosted together on the enhanced sites and content platform,
which offers partial deployment, site content search, and easy content management. As a result, any new LWR sites that you create
using the Microsite (LWR) or the Build Your Own (LWR) templates are now enhanced LWR sites. See What Is the Enhanced Sites and
Content Platform in Salesforce Help.
To create an LWR site:
1. From Setup, in the Quick Find box, enter Digital Experiences, then select All Sites, and click New.
2. In the site creation wizard, select Build Your Own (LWR) or Microsite (LWR), and click Get Started.
3. Enter a name and base URL value.
The base URL value is appended to the domain that you created when you enabled Digital Experiences. For example, if your domain
name is UniversalTelco.my.site.com and you’re creating a partner site, you can enter partners to create a unique
URL UniversalTelco.my.site.com/partners.
4. Click Create.
After you create your site, the Experience Workspaces area appears.
You can also create the site programmatically through Connect API or using Salesforce CLI commands.
SEE ALSO:
Custom URL Paths in LWR Sites
16
Create an LWR Site in Experience CloudStart Building Your LWR Site
Create Custom Pages in an LWR Site
LWR templates in Experience Cloud provide only a few key default pages, so you can create additional custom pages for your particular
use case.
To create a custom page, open the Pages menu on the top toolbar in Experience Builder. Click New Page at the bottom of the Pages
menu. See Create Custom Pages with Experience Builder in Salesforce Help.
Standard Pages
When creating custom pages, the Search standard page is available for the template and supports certain routes and URL parameters.
Note: Some preconfigured standard pages, such as Account Management, are unsupported.
Object Pages
Because the recommended solutions for record page components use the User Interface API to retrieve data, create object pages only
for Supported Objects in the User Interface API Developer Guide.
Note: Unlike in Aura templates, there are no generic record pages. If you need record pages, you must create them for a specific
object.
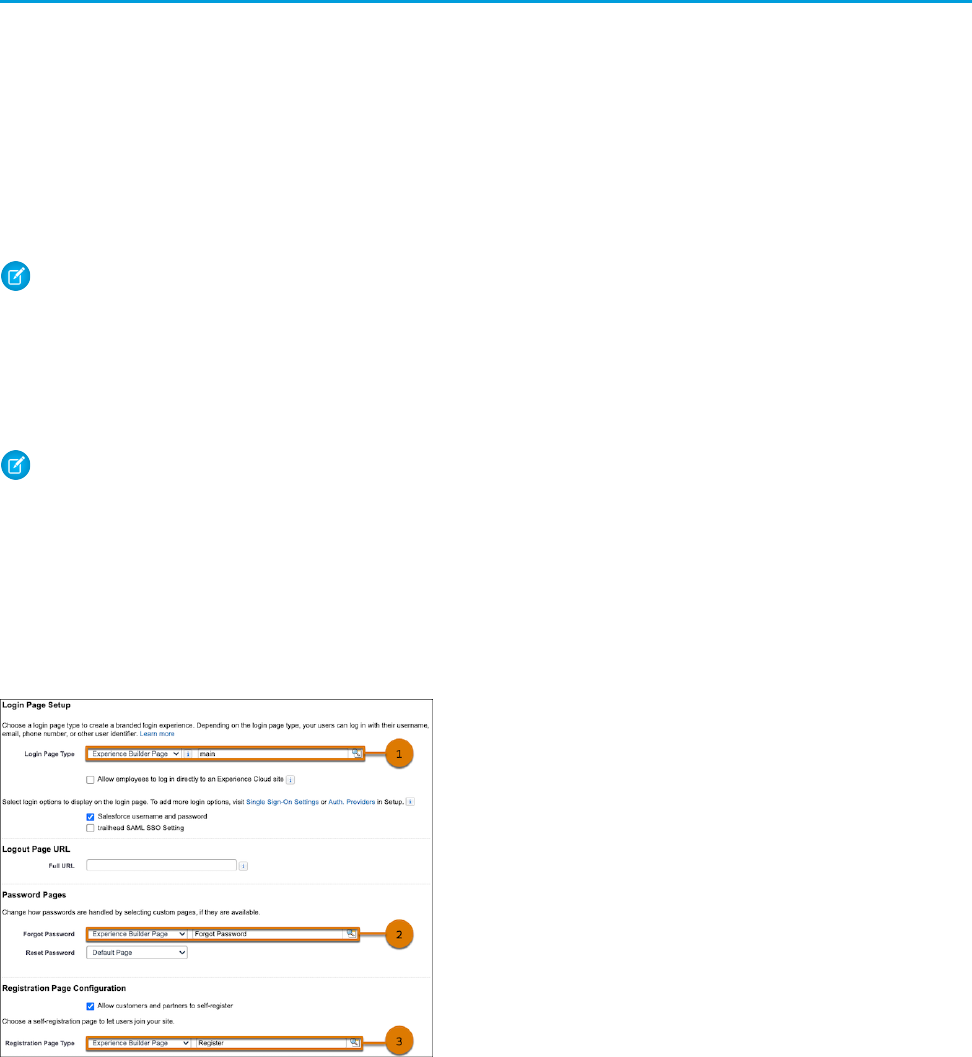
Login Pages
To use the Login, Forgot Password, and Registration pages that come with the LWR templates, ensure that your site is published. In the
Login & Registration tab of the Administration workspace, select Experience Builder Page for each page. Enter main for the Login
page (1), Forgot Password for the Forgot Password page (2), and Register for the Registration page (3).
Page Access & Authentication
As is the case with Aura sites, we send page metadata to the client for all routes in the site, including for guest user sessions.
17
Create Custom Pages in an LWR SiteStart Building Your LWR Site
Important: For LWR sites, URL parameter validation during navigation differs from Aura sites. For example, we don’t prevent a
user from accessing a record route when they don’t have permission to access that object or that particular record. We also don’t
validate that URL parameters correspond to valid existing data in the org.
It’s the responsibility of the components on the page and the APIs used to enforce correct user sharing rules when retrieving data.
Therefore, don’t put sensitive information on a page unless the data comes from an API that implements user access rules.
SEE ALSO:
Pages and Components in LWR Templates
Create Components for LWR Sites
Each Lightning web component folder must include a configuration file named <component>.js-meta.xml. The configuration
file defines the metadata values for the component, including the design configuration values for Experience Builder.
If you previously created Lightning web components for Experience Builder sites, you’re familiar with the
lightningCommunity__Page and lightningCommunity__Default targets. For the LWR template, we added two
new target types—lightningCommunity__Page_Layout and lightningCommunity__Theme_Layout.
DescriptionTarget Value
Enables a drag-and-drop component to be used on an LWR or
Aura site page in Experience Builder. Components appear in the
Components panel.
lightningCommunity__Page
Enables a component to be used as a page layout in an LWR site
in Experience Builder. Components appear in the Page Layout
window.
lightningCommunity__Page_Layout
Enables a component to be used as a theme layout in an LWR site
in Experience Builder. Components appear in Settings in the Theme
area.
lightningCommunity__Theme_Layout
Used together with lightningCommunity__Page or
lightningCommunity__Theme_Layout. Enables a
lightningCommunity__Default
component to expose properties that are editable when the
component is selected in Experience Builder.
For Experience Builder sites, only
lightningCommunity__Default supports configurable
component properties. We support these property attribute data
types:
•
Integer
•
String
•
Boolean
•
Picklist
•
Color
18
Create Components for LWR SitesStart Building Your LWR Site
To use a component in Experience Builder, edit the <component>.js-meta.xml file to define the component’s design configuration
values as follows.
•
To make your component usable in Experience Builder, set isExposed to true, and define lightningCommunity__Page,
lightningCommunity__Page_Layout, or lightningCommunity__Theme_Layout in targets.
•
To include properties that are editable when the component is selected in Experience Builder, define
lightningCommunity__Default in targets and define the properties in targetConfigs.
See Configure a Component for Experience Builder in the Lightning Web Components Developer Guide.
Note: All configuration file tags listed in Configuration File Tags in the Lightning Web Components Developer Guide are supported.
Component Properties
Let’s look at some sample code for a Lightning web component that includes four editable properties.
lightningCommunity__Page tells Experience Builder that this component is a drag-and-drop component. And the
lightningCommunity__Default target is used to configure any design-time component properties for Experience Builder
in its targetConfig.
Base Lightning Component Limitations in LWR Sites
In LWR sites for Experience Cloud, you can use most of the components in the Lightning Component Library, but there are some
limitations.
User Interface API
User Interface API allows you to get Salesforce record data into your Lightning web component. LWR sites don’t require anything
special when developing your Lightning web components with User Interface API.
@salesforce Modules in LWR Sites
LWR sites in Experience Cloud support @salesforce modules, which add functionality to Lightning web components at runtime.
Lightning Navigation
Use the lightning/navigation API to navigate to different pages within your site, generate URLs to different routes, and
get the current pageReference object.
Make a Custom Lightning Web Component Screen-Size Responsive
For enhanced LWR sites, you can assign separate values for the desktop, mobile, and tablet versions of certain properties in custom
Lightning web components. With screen-responsive properties, the component uses the correct property value based on the end
user’s screen size.
Component Properties
Let’s look at some sample code for a Lightning web component that includes four editable properties.
lightningCommunity__Page tells Experience Builder that this component is a drag-and-drop component. And the
lightningCommunity__Default target is used to configure any design-time component properties for Experience Builder in
its targetConfig.
Important: Where possible, we changed noninclusive terms to align with our company value of Equality. We maintained certain
terms to avoid any effect on customer implementations.
<?xml version="1.0" encoding="UTF-8"?>
<LightningComponentBundle xmlns="http://soap.sforce.com/2006/04/metadata" fqn="myComponent">
<apiVersion>51.0</apiVersion>
<isExposed>true</isExposed>
19
Component PropertiesStart Building Your LWR Site
<masterLabel>Component Name</masterLabel>
<description>Description of your component.</description>
<targets>
<target>lightningCommunity__Page</target>
<target>lightningCommunity__Default</target>
</targets>
<targetConfigs>
<targetConfig targets="lightningCommunity__Default">
<property type="String" name="stringProp" default="hello world"/>
<property type="Integer" name="integerProp" default="314"/>
<property type="Boolean" name="booleanProp" default="true"/>
<property type="Color" name="colorProp" default="#333333"/>
<property type="Picklist" name="picklistProp" datasource="item1,item2"/>
</targetConfig>
</targetConfigs>
</LightningComponentBundle>
Note: Always name your component properties using camel case, both in the .js file and the js-meta.xml file. Don’t
capitalize the first letter because it can cause the component to break.
The default value of the property in the js-meta.xml file determines the out-of-the-box value of a component property.
If no default is provided, then we use the value of the corresponding @api variable in the .js file. This value can then be further
edited via the component’s property panel in Experience Builder.
When the component is loaded, we attempt to coerce the current value of a component property to its specified JavaScript type in the
js-meta.xml file. If there’s no corresponding property at all in the js-meta.xml file and the attribute only exists in the .js
file, then the value isn’t coerced.
Component @api properties with values containing expression language syntax (for example, {!Route.recordId}) are only
interpolated if there’s a corresponding design property config in the js-meta.xml file. See Make a Component Aware of Its Context
in the Lightning Web Components Developer Guide.
For multilingual sites, to make a String property translatable, define it as translatable=“true” in the js-meta.xml file.
If you add a datasource attribute to the property—for example, to create a picklist—you can’t define that property as
translatable=”true”.
Base Lightning Component Limitations in LWR Sites
In LWR sites for Experience Cloud, you can use most of the components in the Lightning Component Library, but there are some
limitations.
The lightning-input-field component (including when it’s used within another component):
•
Doesn’t support lookup search in LWR sites viewed on desktop computer
•
Is unsupported in LWR sites viewed on mobile devices
These components and events are unsupported:
•
lightning-emp-api
•
lightning-file-upload
•
lightningsnapin components
•
platform-show-toast-event, but you can use toast-container
These features are unsupported:
•
Opening files, as described in Open Files in the Lightning Web Components Developer Guide
20
Base Lightning Component Limitations in LWR SitesStart Building Your LWR Site
•
Using panels or modals
Tip: See an example of lightning-messageService in codeSamples/messageService in the code sample files.
User Interface API
User Interface API allows you to get Salesforce record data into your Lightning web component. LWR sites don’t require anything special
when developing your Lightning web components with User Interface API.
To learn more, check out the following topics in the Lightning Web Components Developer Guide.
•
Use the Wire Service to Get Data
•
lightning/ui*Api Wire Adapters and Functions
Tip: If your site is public or includes public pages, make sure that you also enable the following settings in the Administration
workspace under Preference.
•
Allow guest users to access public APIs
Lets guest users access any Lightning web components that use the User Interface API, in addition to the API access that it
already provides. Enable this setting to give guest users access to Salesforce CMS and record detail pages, such as Knowledge
detail pages.
•
Let guest users view asset files and CMS content available to the site
Lets guest users access Lightning web components that use @salesforce/contentAssetUrl.
@salesforce Modules in LWR Sites
LWR sites in Experience Cloud support @salesforce modules, which add functionality to Lightning web components at runtime.
Most of the supported modules also support referential integrity, meaning that when a Lightning web component includes a reference
to an object or resource, that dependency is respected. For example:
•
If a Lightning web component in your LWR site contains a reference to a supported module, you can’t delete the referenced object
without first removing the Lightning web component.
•
If you modify the name of the referenced object or other relevant data in your org, the system automatically updates the reference
in your Lightning web component.
Note: For published LWR sites, the system immediately updates the references. However, unpublished sites rely on the source
code of the custom component definition, which can take up to 2 hours to update. During this brief window, sometimes it’s not
possible to publish your LWR site because the component’s references are temporarily invalid.
See @salesforce Modules in the Lightning Web Components Developer Guide.
Description and LimitationsModule
Import Apex methods. Calls to Apex behave the same across LWR and Aura sites.
If an Apex method signature changes, you must republish your site. Otherwise,
the changes can break existing components.
@salesforce/apex
Import Apex methods that can make a long-running request to an external web
service. Calls to Apex behave the same across LWR and Aura sites. If an Apex
@salesforce/apexContinuation
21
User Interface APIStart Building Your LWR Site
Description and LimitationsModule
method signature changes, you must republish your site. Otherwise, the changes
can break existing components.
Get the form factor of the hardware (desktop, tablet, or mobile) that the browser
is running on.
@salesforce/client
Get information about the site, such as the network ID or the base path. If the
base path changes, you’re not required to republish the site.
@salesforce/community
Import content asset files. Content assets behave the same across LWR and Aura
sites. The live site always fetches the latest version of the content asset. And if the
@salesforce/contentAssetUrl
name of the content asset changes, the live site doesn’t require you to republish
the site.
Note: The URL for the content asset isn’t exactly the same as in Aura sites
or in Lightning Experience.
Import a custom permission and check whether it’s assigned to the current user.
If the assignment of the referenced permission changes, you’re not required to
republish the site.
@salesforce/customPermission
Import internationalization properties. For LWR sites, the language and locale are
mapped to the language configured for the site, and the timezone is determined
by the browser’s timezone rather than the user’s personal settings.
Additionally, currency, number.currencySymbol, and
number.currencyFormat are unsupported.
@salesforce/i18n
If the site or org language configurations are updated, you must republish the
site.
Reference a label in the org. If the label is updated, you must republish the site.@salesforce/label
Note: Referential integrity isn’t enforced for labels in a published site, as
they’re frozen when the site is published. However, when you preview the
LWR site in Experience Builder before publishing it, we always fetch the
latest label.
Expose the Lightning Message Service API. The Lightning Message Service lets
you publish and subscribe to messages across the DOM between different
@salesforce/messageChannel
Lightning web components on a page. If updates are made, you must republish
the site.
Import static resources in your org. Resource URLs behave the same for LWR and
Aura sites. The live site always fetches the latest version of the resource. And if
you rename the resource, the live site doesn’t require you to republish the site.
@salesforce/resourceUrl
Note: The URL for the static resource isn’t exactly the same as in Aura
sites or in Lightning Experience.
Reference the name of objects, fields, and relationships in your org. If any of these
names change, you’re not required to republish the site.
@salesforce/schema
22
@salesforce Modules in LWR SitesStart Building Your LWR Site
Description and LimitationsModule
Get information about the site, such as the site ID or the active languages. If the
site language configuration changes, you must republish the site.
@salesforce/site
Get the current user’s ID using the user module’s Id property, or determine
whether the current user is a guest using the user module’s isGuest property.
If the user is a guest user, the ID is a null value.
@salesforce/user
Import a Salesforce permission and check whether it’s assigned to the current
user. If the assignment of the referenced permission changes, you’re not required
to republish the site.
@salesforce/userPermission
Lightning Navigation
Use the lightning/navigation API to navigate to different pages within your site, generate URLs to different routes, and get
the current pageReference object.
See PageReference Types in the Lightning Web Components Developer Guide.
Aura templates support comm__namedPage schemas that use the name attribute (added in Spring ’20) and the pageName
attribute (deprecated in Spring ’20). In LWR templates, only the name attribute is supported. The name of a page is its API name, which
is configurable during page creation and visible on the page properties.
URLs for record detail pages behave a little differently in LWR sites than in Aura sites.
•
For pages of type standard__recordPage, the URLs that are generated using the lightning/navigation API include
detail as the recordName in the URL path. The proper record name is used when the user actually visits the page through a
canonical URL redirect.
•
If the current user visits a record detail page but doesn’t have access to the current record, there’s no canonical URL redirect and the
record name can’t be resolved.
•
There’s no support for pageReference type standard__namedPage. Use comm__namedPage instead.
•
When URL slugs are enabled for LWR Commerce stores, in pages of type standard__recordPage, urlPath is supported
for Category object pages, and urlName is supported for Product object pages. Include the urlName attribute for Product and
urlPath attribute for Category in the standard__recordPage pageReference attributes along with the recordId.
Tip: When you develop custom Lightning web components that contain links, use the lightning/navigation API to
generate URLs for the href values as an SEO best practice. See Basic Navigation in the Lightning Web Components Developer
Guide.
Limitations
•
The comm__loginPage pageReference type isn’t supported. Instead, navigate to the login page as a regular
comm__namedPage.
•
The objectApiName attribute is required when navigating to pages of type standard__recordPage or
standard__recordRelationshipPage.
•
The actionName attribute isn’t enforced as required when navigating to pages of type standard__recordPage or
standard__recordRelationshipPage. However, including actionName remains a recommended best practice.
23
Lightning NavigationStart Building Your LWR Site

Make a Custom Lightning Web Component Screen-Size Responsive
For enhanced LWR sites, you can assign separate values for the desktop, mobile, and tablet versions of certain properties in custom
Lightning web components. With screen-responsive properties, the component uses the correct property value based on the end user’s
screen size.
To make your custom Lightning web component screen responsive, follow these general steps.
1. Declare a Property as Screen-Size Responsive
In the component’s configuration file, componentName.js-meta.xml, declare an integer, string, or both properties as screen-size
responsive by using the screenResponsive attribute with a value of true, and the exposedTo attribute with a value of css.
For example, here’s the code for the maximum height of a custom button component.
<targetConfig targets="lightningCommunity_Default">
<property name="test" type="String" default="Button"/>
<property name="url" type="String"/>
<property name="maxHeight" type="Integer" min="0" max="20" default="0"
screenResponsive="true" exposedTo="css"/></targetConfig>
Here’s the code for the alignment of a child component of a custom banner component.
<targetConfig targets="lightningCommunity_Default">
<property type="Color" name="borderColor" default="" />
<property name="url" type="String"/>
<property type="String" name="bannerAlignment" default="center" screenResponsive="true"
exposedTo="css"/>
</targetConfig>
2. Use CSS Variables to Define Media Queries
In the component’s .css file, use the CSS variable --dxp-c-screensize-property to define a media query, where
screensize can be l (for desktop), m (for tablet), or s (for mobile).
property is the property name in kebab case.
For example, here’s the code for the maximum height (property maxHeight) of a custom button component.
/* Desktop */
div {
max-height: calc(var(--dxp-c-l-max-height)*1px);
}
/* Tablet */
@media only screen and (max-width: 64em) {
div {
max-height: calc(var(--dxp-c-m-max-height)*1px);
}
}
/* Mobile */
@media only screen and (max-width: 47.9375em) {
div {
max-height: calc(var(--dxp-c-s-max-height)*1px);
24
Make a Custom Lightning Web Component Screen-Size
Responsive
Start Building Your LWR Site
}
}
Important: The screen-responsive property applies only to style properties, not expressions. Expressions (such as JavaScript or
data-binding expressions) set at CSS values aren’t resolved at runtime.
Here’s the code for the alignment (property bannerAlignment) of a custom banner component.
/* Desktop */
div {
justify-content: var(--dxp-c-l-banner-alignment, center);
}
/* Tablet */
@media only screen and (max-width: 64em){
div {
justify-content: var(--dxp-c-m-banner-alignment);
}
}
/* Mobile */
@media only screen and (max-width: 47.9375em) {
div {
justify-content: var(--dxp-c-s-banner-alignment);
}
}
Note: Enhanced LWR sites use the same breakpoints as shown in this example to distinguish between each view mode. To give
your users the best experience, use these breakpoints when you define media queries.
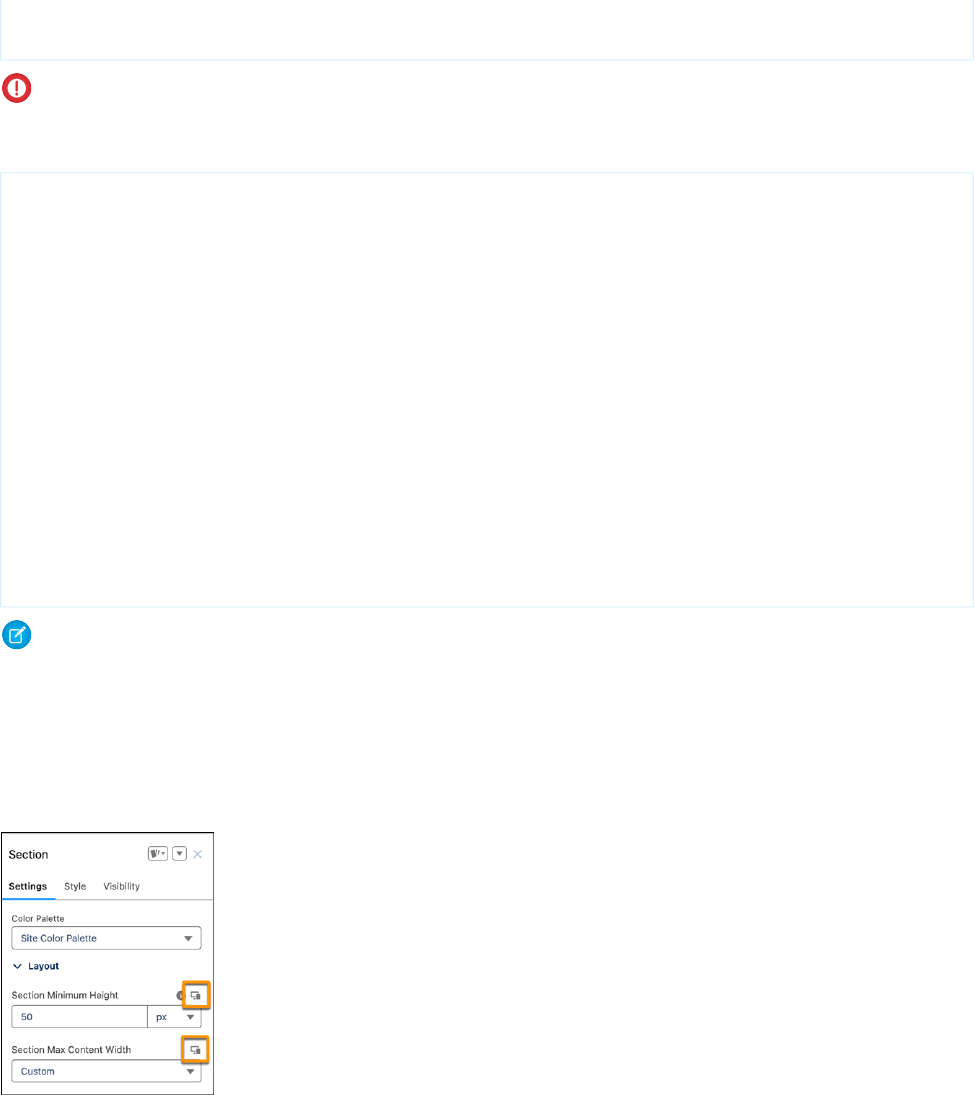
3. Specify the Property Values for Each Screen Size
After you declare a component property as screen responsive, specify the values for each screen size in Experience Builder. In the
component’s property panel, an icon indicates screen-responsive properties.
By default, smaller screen sizes inherit the property values that you specify for larger screen sizes. To set a property value for a particular
screen size, use the dropdown menu in the navigation bar to switch between view modes.
25
Make a Custom Lightning Web Component Screen-Size
Responsive
Start Building Your LWR Site
4. Publish the Site
After you specify a property’s values for different screen sizes, publish the site. When you publish, the CSS custom variables are added
in the host class of the generated component.
For example, here’s the code for the maximum height of a custom button component.
<dxp_base-button data-component-id="button-0b67" slot="column"
style="--dxp-c-l-max-height:100; --dxp-c-m-max-height:80;
--dxp-c-s-max-height:60;">
...
In this example, the component maximum height property is assigned a value of 100 pixels for desktop, 80 pixels for tablet, and 60 pixels
for mobile.
SEE ALSO:
Experience Cloud Help: Assign Different Values for Desktop, Tablet, and Mobile Properties in Custom LWR Components
Create Custom Layout Components
Layouts are supported in the Build Your Own (LWR) template using Lightning web components instead of Aura components. You can
also create your own custom layouts in the same way as for Aura sites, but with some minor changes in syntax.
Tip: If your custom theme layout component exposes design properties for Experience Builder, remember to declare those
properties in the targetConfig of the lightningCommunity__Default target in the js-meta.xml file.
Regions
Slots are the new way to define parts of a web component's template that can be configured declaratively. The presence of slots on
your component tells Experience Builder that it’s a region.
Named slots (<slot name="header">) are analogous to component attributes in Aura layouts. If the slot doesn’t have a name,
it’s considered to be the default slot, which is analogous to {!v.body} in Aura.
To learn more about how LWC uses slots, see Pass Markup into Slots in the Lightning Web Components Dev Guide.
Page Layout
Page layout components use the lightningCommunity__Page_Layout target in js-meta.xml.
Tip: See an example of a two-row page layout with an exposed hero banner region in
customLayoutsAndBranding/force-app/main/default/lwc/customPageLayout in the code sample
files.
Important: The JSDoc annotation containing @slot followed by the name of the region is required for the platform to know
which slots (or regions in Experience Builder) are exposed for your page layout component. For example:
/**
* @slot contentHeaderRegion
* @slot contentRegion
* @slot contentFooterRegion
*/
26
Create Custom Layout ComponentsStart Building Your LWR Site
Theme Layout
Theme layout components use the lightningCommunity__Theme_Layout target in js-meta.xml.
In Aura theme layout components, you include {!v.body} to denote where your content is rendered. Similarly, for an LWC theme
layout component, you must include a default slot—essentially, a slot with no name: <slot></slot>—to indicate the region for
your main content.
Tip: See an example of a three-column theme layout in
customLayoutsAndBranding/force-app/main/default/lwc/customThemeLayout in the code sample
files.
The sample navigation menu implementation is naive. For a functional example of how to build a proper navigation component, see
Set Up a Navigation Menu Using Apex.
Important: The JSDoc annotation containing @slot followed by the name of the region is required for the platform to know
which slots (or regions in Experience Builder) are exposed for your theme layout component. For example:
/**
* @slot themeHeaderRegion
* @slot themeFooterRegion
*/
F6 Navigation
F6 navigation is available for theme layout components only. The framework treats any DOM elements with the data-f6-region
attribute as an F6-navigable region.
To enable F6 navigation for regions in your theme layout, add the data-f6-region attribute to the major regions.
<template>
<header data-f6-region style={headerStyle}>
<slot name="header"></slot>
</header>
<section data-f6-region style={sectionStyle}>
<slot></slot>
</section>
<footer data-f6-region style={footerStyle}>
<slot name="footer"></slot>
</footer>
</template>
SEE ALSO:
Video: How to Implement Custom Layouts for LWR Sites
Set Up a Navigation Menu Using Apex
The Build Your Own (LWR) template doesn’t include a default Navigation Menu component. To set up a navigation menu, we recommend
that you create a custom Lightning web component with an Apex controller to get the navigation items.
27
Set Up a Navigation Menu Using ApexStart Building Your LWR Site
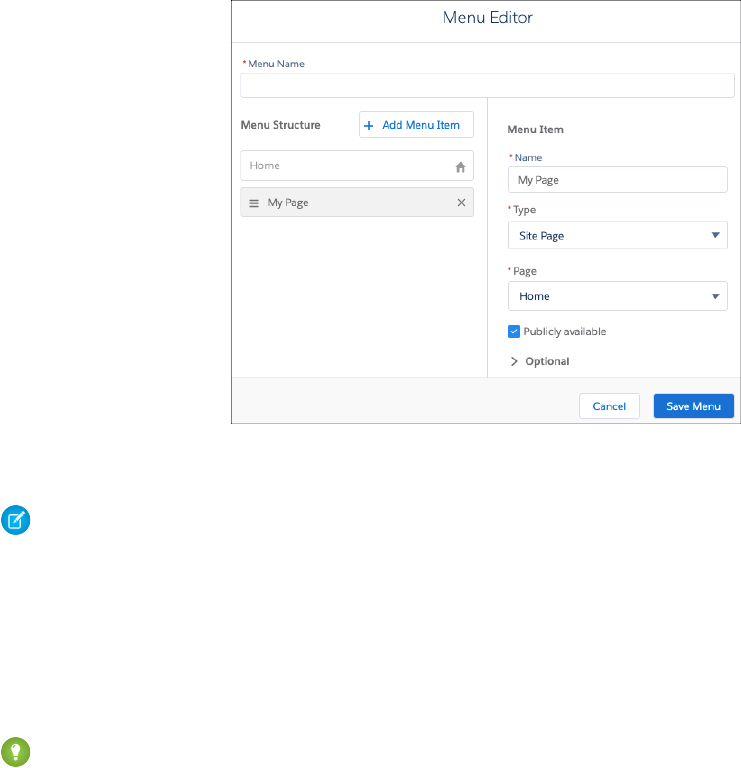
Step 1: Configure a Navigation Menu
To create a navigation menu in Experience Builder, go to Settings > Navigation, and click Add Navigation Menu. In the Menu Editor,
you can add navigation items targeting specific sites pages.
Adding navigation items creates the NavigationLinkSet object and its corresponding NavigationMenuItems.
Note: LWR templates (Build Your Own and Microsites) don’t include generic record pages. So if you create an object or global
action type menu item that links to a Salesforce object, make sure that you also create the corresponding object pages. If you don't
create the associated object pages, end users don’t see anything if they click the menu item.
Step 2: Implement the Apex Controller
To fetch the navigation menu for your component, you can implement an Apex controller that uses the Connect API to get the
NavigationMenuItems for the NavigationLinkSet you created in the Menu Editor.
Tip: See an example of this Apex controller in lightningNavigation/force-app/main/default/classes in
the code sample files.
In the example, we pass in:
•
navigationLinkSetMasterLabel, or the menu name, to look up the NavigationLinkSet.DeveloperName for the nav menu
of the current site
•
publishStatus to get the correct NavigationMenuItems for a published site or for a site in draft mode
•
addHomeMenuItem to determine whether the Home menu item must be included in the data
•
includeImageUrl to determine whether the data must include image URLs
Step 3: Implement the Navigation Menu Component
To implement your own Navigation Menu component, use the code samples provided.
28
Set Up a Navigation Menu Using ApexStart Building Your LWR Site

Tip: See an example of a Navigation Menu component in
lightningNavigation/force-app/main/default/lwc/navigationMenu in the code sample files.
Here are some pointers on how the sample component is set up.
•
JavaScript: To get data into the Lightning web component, we must import the Apex controller using the wire annotation.
•
JavaScript: To get the publishedState for the Apex controller, we can import the CurrentPageReference from
lightning/navigation and check whether the menu is published.
•
XML: We can expose the Navigation Menu Name through the property in the targetConfig of the js-meta.xml file.
•
JavaScript: To navigate between pages, make sure to reference lightning/navigation and the various page types that are supported.
SEE ALSO:
Lightning Web Component Reference: Navigation
Video: Use lightning-navigation in LWR Sites
Video: Build Custom Navigation and Footers for LWR Sites
Publish Your LWR Site
Unlike with Aura sites, you can publish your LWR site at any time, even when the site is unchanged. When changing your organization’s
schema or updating a component used in an LWR site, you must publish your site to make the changes live. Otherwise, your site can
break at runtime.
For more details on what changes require you to publish an LWR site, see New Publishing Model.
29
Publish Your LWR SiteStart Building Your LWR Site

CHAPTER 4 Brand Your LWR Site
Build LWR sites that consistently match your brand with the new Lightning Web Runtime (LWR) design
system. The system includes base components that follow design best practices, and uses --dxp
styling hooks to make it easier to get the look you want.
In this chapter ...
• How Branding Works
in LWR Sites
• Enable --dxp Styling
Hooks
• --dxp Styling Hooks
in LWR Sites
• How --dxp Styling
Hooks Map to
Theme Panel
Properties
• Use --dxp Styling
Hooks in Custom
Components
• Override Component
Branding in LWR Sites
with Custom CSS
• Create a Section
Color Palette
• Create a
Configurable Site
Logo Component
• Add Custom Fonts
• Remove SLDS
30
How Branding Works in LWR Sites
With the Lightning Web Runtime (LWR) design system, you can modify base and custom Lightning web components to achieve a
consistent look and feel across your LWR site. The system uses --dxp styling hooks, which map to properties in the Theme panel, to
help you more easily apply branding to your entire site.
What Are --dxp Styling Hooks?
Styling hooks use CSS custom properties, which are variables within your CSS that cascade to all descendents within the scope of a
selector. --dxp styling hooks are a reduced set of custom properties that map to the lower-level component styling hooks, so you can
set a single hook that affects many individual components at once.
These hooks are used in the base components that come with LWR templates, and can also be used in your custom Lightning web
components, which means that you can brand your entire site much more quickly.
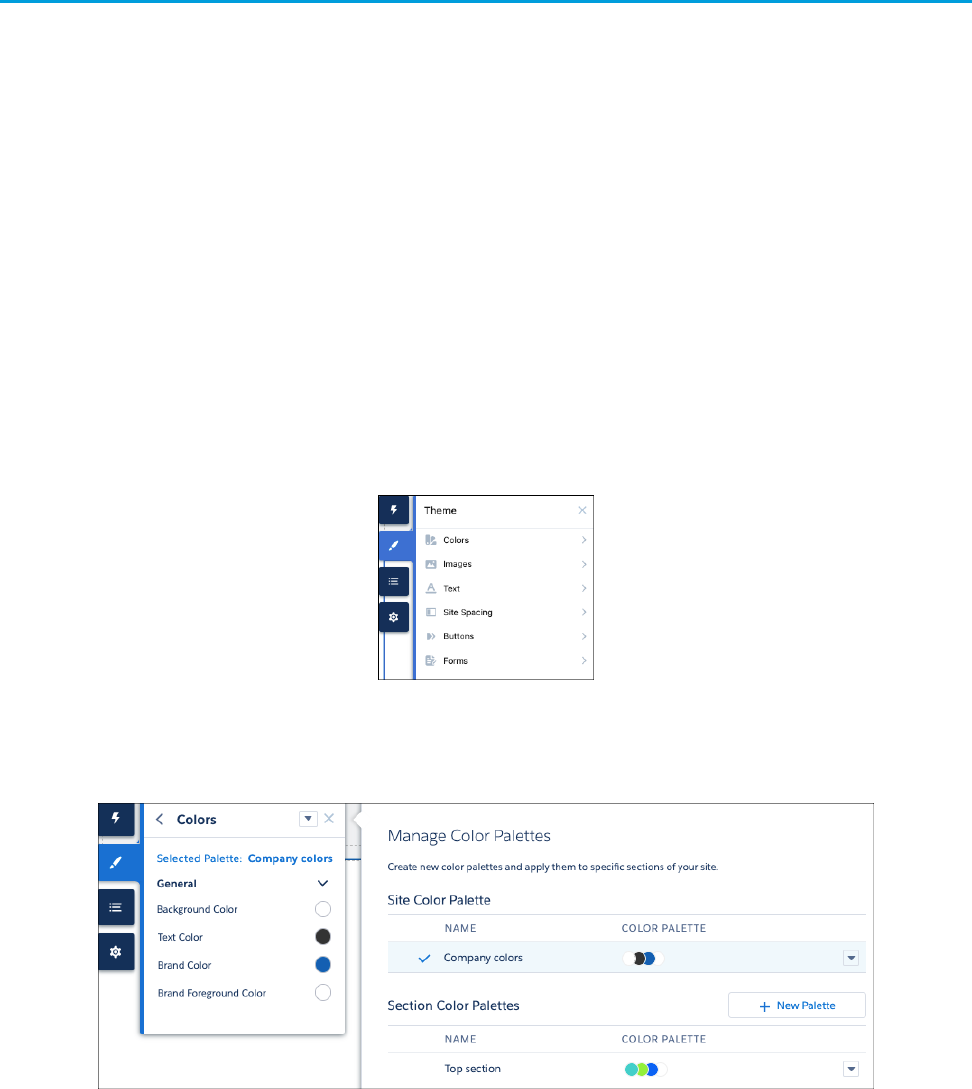
What Are the Theme Panel Properties?
The Theme panel in Experience Builder provides several branding properties that let you declaratively control the color, image, text, and
site spacing of your site.
In the Colors tab, you can create color palettes that differ from the main site colors, and apply them to specific sections of the page. And
in the Images tab, you can select images from a Salesforce CMS workspace to create a logo or a browser icon (favicon).
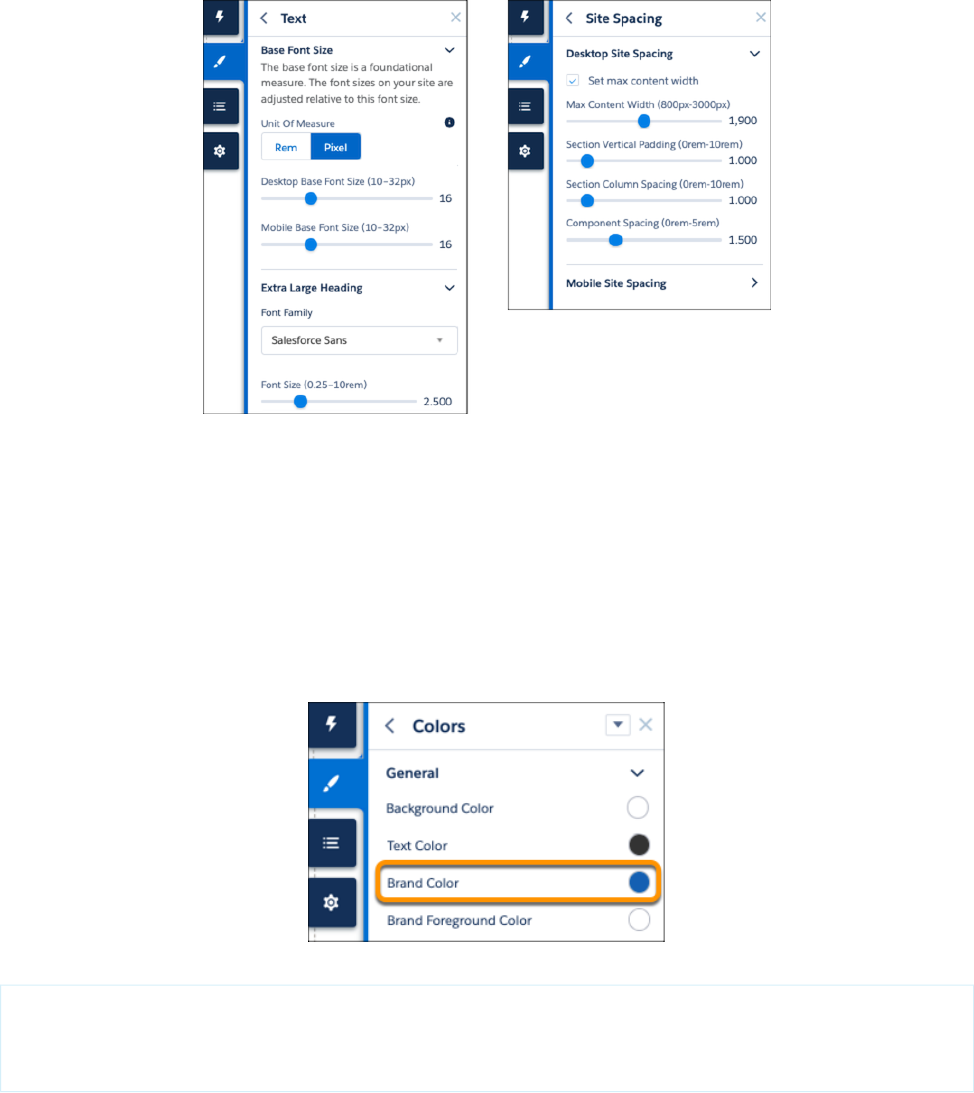
From the Text tab, you can set different base font size values for mobile and desktop sites. You can also select from dynamic font styles,
headings, and decorations for all types of text, including links and buttons. And in the Site Spacing tab, you can adjust your site’s maximum
content width, section padding, and section column and component spacing for desktop and mobile views.
31
How Branding Works in LWR SitesBrand Your LWR Site
How Do --dxp Styling Hooks and Theme Panel Properties Work Together?
Each property in the Theme panel in Experience Builder maps to one or more --dxp styling hooks. So if you update a property in the
Theme panel, the system automatically updates any Lightning web components that use the hooks associated with that property.
For example, let’s say you want to develop a custom button component that uses branding properties from the Theme panel. In this
case, to use the site’s Brand Color as the background color of the button, the component references the --dxp-g-brand global
styling hook.
.my-custom-button-component {
background-color: var(--dxp-g-brand);
color: var(--dxp-g-brand-contrast);
}
32
How Branding Works in LWR SitesBrand Your LWR Site
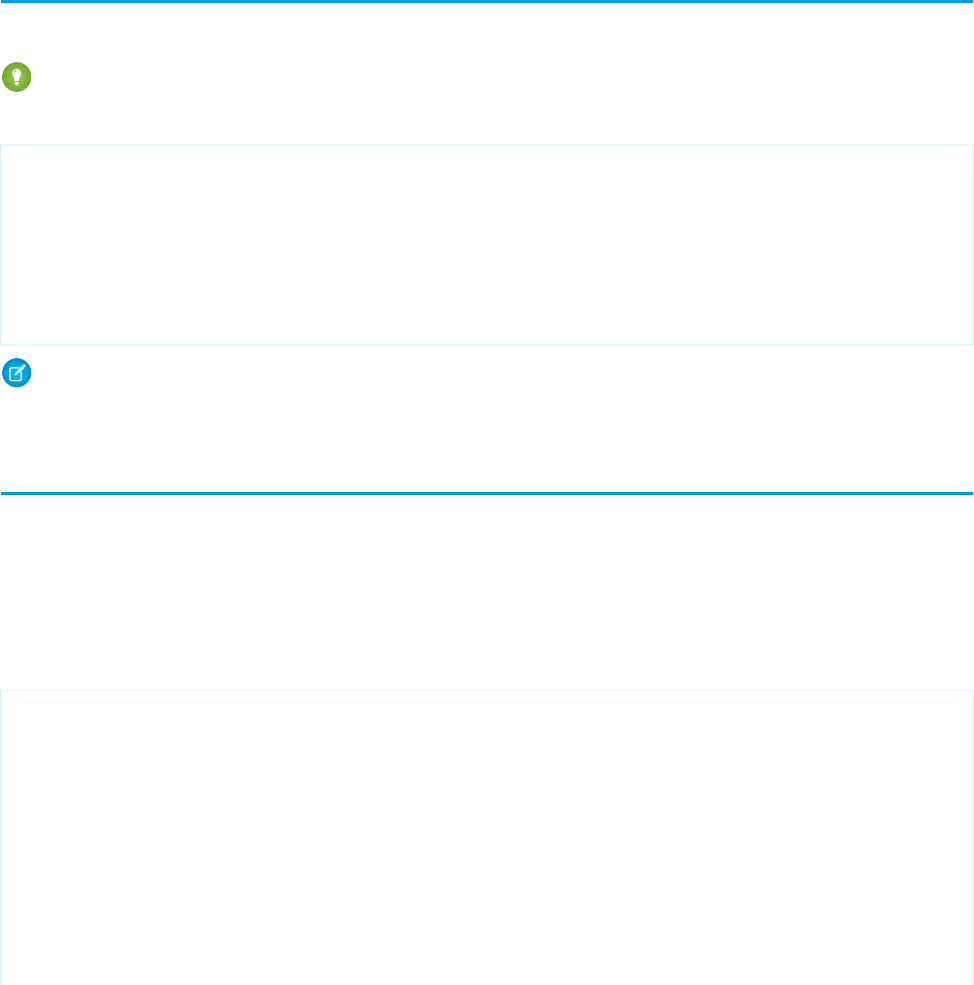
Now, whenever a user updates the Brand Color property in the Theme panel, the system instantly updates the background color of the
button component.
SEE ALSO:
Video: Style LWR Sites with Custom Variables
--dxp Styling Hooks in LWR Sites
How --dxp Styling Hooks Map to Theme Panel Properties
Enable --dxp Styling Hooks
If you created your LWR site before Summer ’21, enable --dxp styling hooks by adding the DXP branding style sheets to your site.
Tip: New LWR sites created in Summer ’21 and later automatically include these style sheets.
Click Settings > Advanced > Edit Head Markup, and include the following code in the Head Markup editor.
<link rel=“stylesheet” href=“{ basePath
}/assets/styles/salesforce-lightning-design-system.min.css?{ versionKey }” />
<link rel=“stylesheet” href=“{ basePath
}/assets/styles/dxp-site-spacing-styling-hooks.min.css?{ versionKey }” />
<link rel=“stylesheet” href=“{ basePath }/assets/styles/dxp-styling-hooks.min.css?{
versionKey }” />
<link rel=“stylesheet” href=“{ basePath }/assets/styles/dxp-slds-extensions.min.css?{
versionKey }” />
Note: Make sure that the dxp-styling-hooks.min.css and dxp-slds-extension.min.css files are loaded
after salesforce-lightning-design-system.min.css.
--dxp Styling Hooks in LWR Sites
With --dxp styling hooks, you can set a single hook that affects both base and custom Lightning web components throughout your
LWR site in Experience Cloud.
The Salesforce Lightning Design System (SLDS) provides many styling hooks that give granular control over how each base component
looks. Styling hooks use CSS custom properties, which are variables within your CSS that cascade to all descendents within the scope
of a selector. For example, the lightning-button component uses the styling hook --slds-c-button-color-background
to change its background color. You can define the hook in any selector.
<style>
/**
* Scoped to the root of the document and all its descendant elements.
*/
:root {
--slds-c-button-color-background: peachpuff;
}
/**
* Scoped to any element with the class applied and all its descendant elements
*/
.container {
33
Enable --dxp Styling HooksBrand Your LWR Site
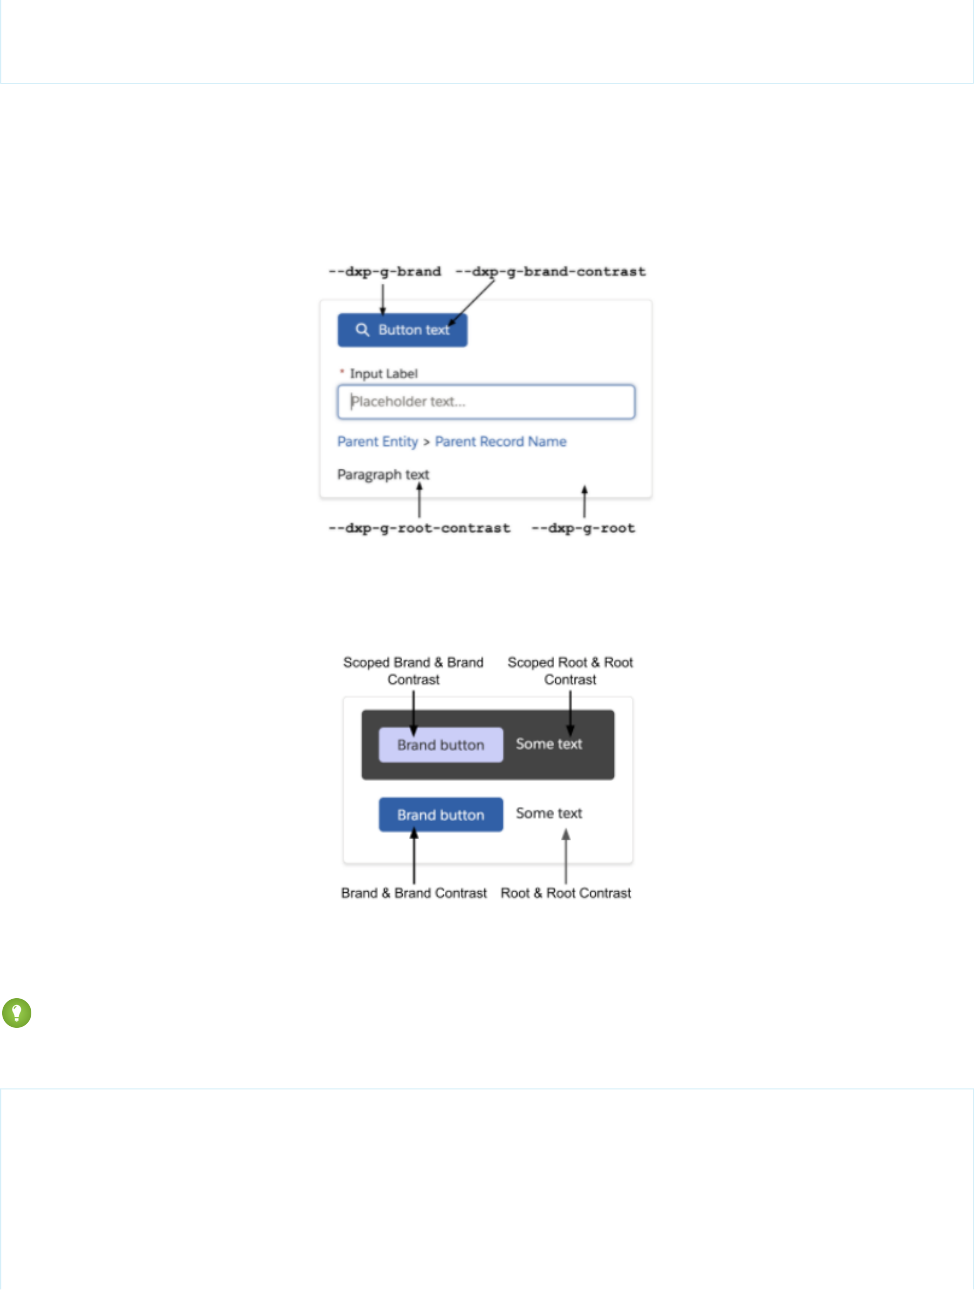
--slds-c-button-color-background: peachpuff;
}
</style>
But with this system, accurately reflecting your brand across every component in your site, including associated variations and states,
often requires updating hundreds of styling hook definitions.
In contrast, --dxp styling hooks are a reduced set of custom properties that map to the lower-level component styling hooks, so you
can set a single hook that changes many individual components at once. For example, setting the --dxp-g-brand hook affects
the background color of the button, the link color, and the input border color on focus.
Root is the background color of the container, with root-contrast as the foreground color. Each color pairing must maintain an acceptable
contrast ratio for accessibility.
Any container can inherit styles (default) or define new styles. If a scoped container sets its own root (background color), remember to
reevaluate all other --dxp hooks to make sure that they’re accessible against the new root.
Tip: We recommend using --dxp styling hooks to make general changes across the components in your site. But if the --dxp
branding defaults don’t provide exactly what you need, you can use --slds-c and --slds-g-color styling hooks to
fine-tune the appearance of individual components where necessary.
<link rel=“stylesheet” href=“{ basePath
}/assets/styles/salesforce-lightning-design-system.min.css?{ versionKey }” />
<link rel=“stylesheet” href=“{ basePath
}/assets/styles/dxp-site-spacing-styling-hooks.min.css?{ versionKey }” />
<link rel=“stylesheet” href=“{ basePath }/assets/styles/dxp-styling-hooks.min.css?{
versionKey }” />
<link rel=“stylesheet” href=“{ basePath }/assets/styles/dxp-slds-extensions.min.css?{
versionKey }” />
34
--dxp Styling Hooks in LWR SitesBrand Your LWR Site
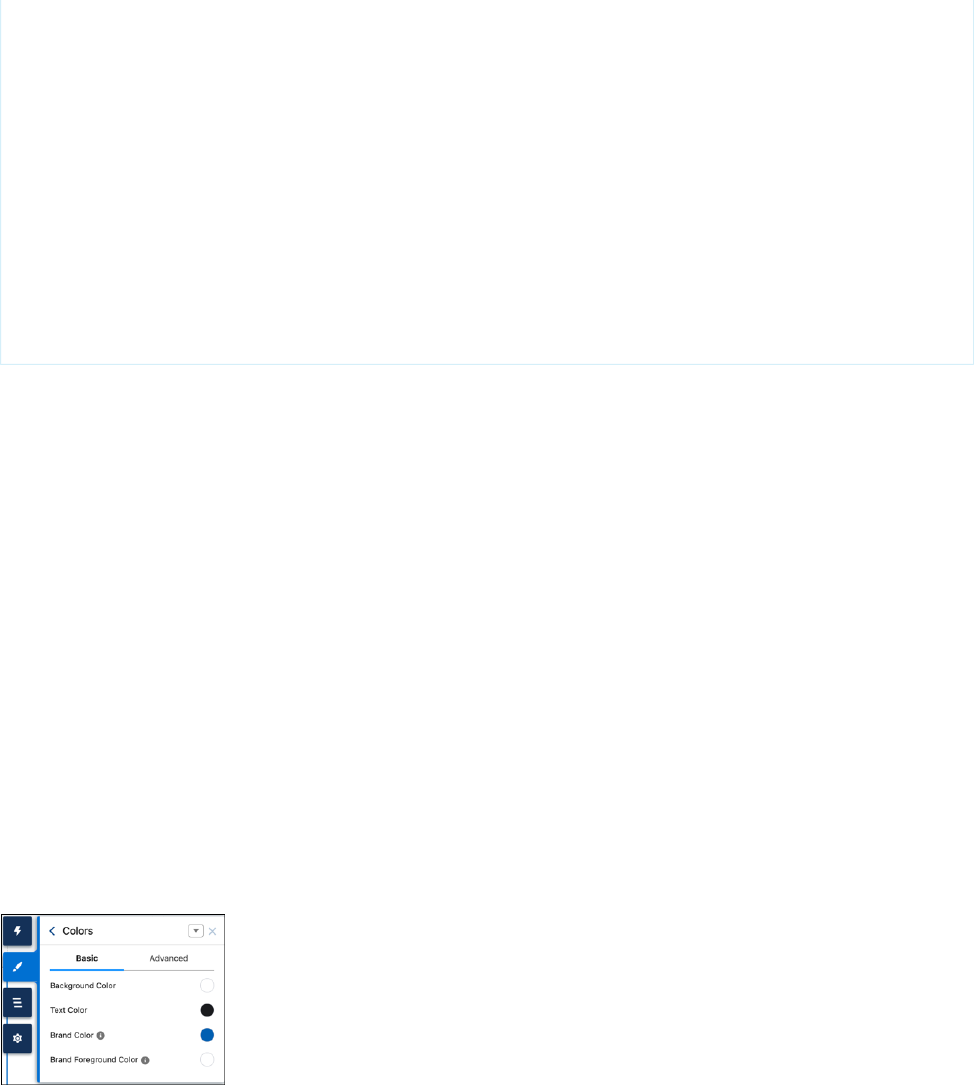
<style>
.mycontainer {
/** Use --dxp-g to make broad changes **/
--dxp-g-root: #1a1b1e;
--dxp-g-root-contrast: #fff;
--dxp-g-brand: #5eb4ff;
--dxp-g-brand-contrast: #fff;
--dxp-g-neutral: #76716b;
--dxp-g-neutral-contrast: #fff;
/** Use --slds-c to fine-tune where necessary **/
--slds-c-button-color-background: peachpuff;
}
</style>
Color --dxp Styling Hooks
In Experience Builder, the Colors tab is divided into families of colors that each have a specific use case along with a scale of possible
values. With these properties, you can adjust the color values for the entire page or for any section within the page. When one of
these color values is defined, other colors are subsequently derived and mapped to the individual base components.
Text --dxp Styling Hooks
Extensive text branding properties make it easy to control the styling of the headings, body, button, link, and forms text used
throughout your site.
Site Spacing --dxp Styling Hooks
Site spacing allows you to customize the global spacing settings for your site. These styling hooks combine to provide a consistent
spacing experience across each page.
Color --dxp Styling Hooks
In Experience Builder, the Colors tab is divided into families of colors that each have a specific use case along with a scale of possible
values. With these properties, you can adjust the color values for the entire page or for any section within the page. When one of these
color values is defined, other colors are subsequently derived and mapped to the individual base components.
For example, if you change the brand color from the default blue, the system updates the associated brand colors in all base components.
Experience Builder has a default derivation of these values that’s increasingly contrasted against the root.
•
If the root background color is dark, derivation becomes increasingly lighter to contrast against the background.
•
If the root background color is light, derivation becomes increasingly darker to contrast against the background.
These derivation colors are often used for interaction states. For example, the color of a button can change from --dxp-g-brand
to --dxp-g-brand-1 on hover.
35
Color --dxp Styling HooksBrand Your LWR Site
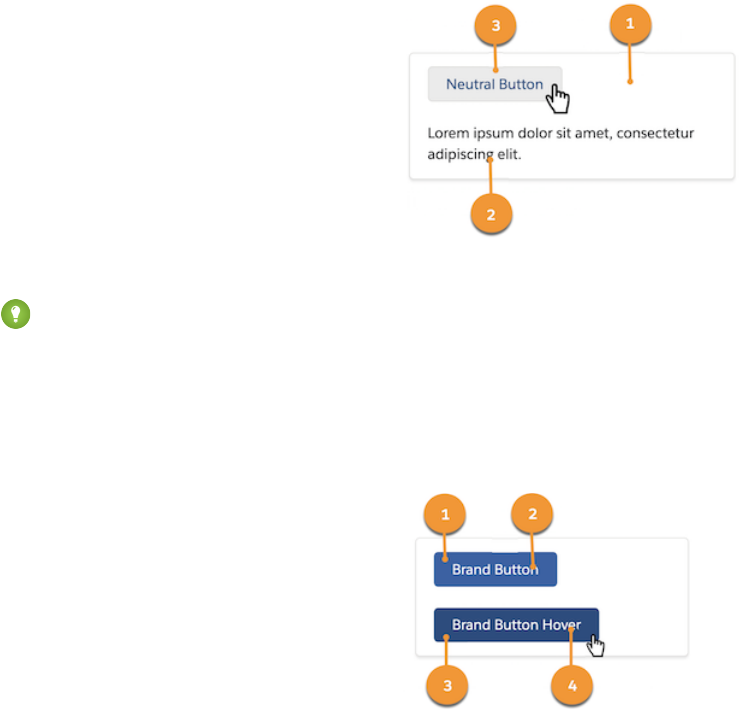
Additionally, many colors come in pairs, with a background color and an associated foreground color. Ensure that each color pairing
maintains an acceptable contrast ratio for accessibility purposes.
Usage Considerations
•
Use the correct family of hooks for your use case. For example, if the main color of your brand is red, don’t use
--dxp-g-destructive because it also happens to be red. Use --dxp-g-destructive only for error and invalid states.
Instead, to define your brand color, use --dxp-g-brand.
•
You can’t configure --dxp-g-neutral, --dxp-g-warning, --dxp-g-info, --dxp-g-success, or
--dxp-g-destructive declaratively in the Theme panel. To modify these styling hooks, you must manually update them in
the head markup.
•
Because alpha values affect transparency, modifying the value can have an unintended impact on page elements. If you’re overriding
a color, we recommend keeping the alpha transparency at the same level as that color.
•
Changes to ExperienceBundle or DigitalExperienceBundle don’t trigger automatic color derivations.
Root
The background color of the page or a section within the page. Root-1 is often used for components that retain the root background
color, but have an interaction state—for example, the background hover state of neutral buttons.
•
--dxp-g-root (1)
•
--dxp-g-root-contrast (2)
•
--dxp-g-root-1 (3)
•
--dxp-g-root-contrast-1
Tip: If you redefine --dxp-g-root on a section within a page, reevaluate all other --dxp styling hooks to make sure that they’re
accessible against the new root. If they’re not, redefine the hooks.
Brand
The primary brand color of your site. For Salesforce, the color is blue. Commonly used on buttons, links, focus states, and so on.
•
--dxp-g-brand (1)
•
--dxp-g-brand-contrast (2)
•
--dxp-g-brand-1 (3)
•
--dxp-g-brand-contrast-1 (4)
36
Color --dxp Styling HooksBrand Your LWR Site
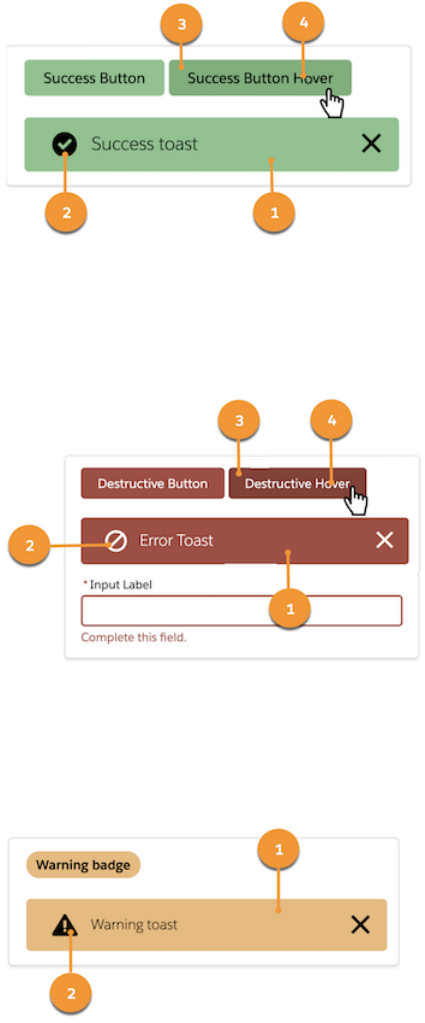
Success
Communicates success. Commonly used on badges, alerts, toasts, and success variant buttons.
•
--dxp-g-success (1)
•
--dxp-g-success-contrast (2)
•
--dxp-g-success-1 (3)
•
--dxp-g-success-contrast-1 (4)
Destructive
Communicates an error or an invalid state. Used on alerts, badges, toasts, form fields in an error state, and destructive variant buttons.
•
--dxp-g-destructive (1)
•
--dxp-g-destructive-contrast (2)
•
--dxp-g-destructive-1 (3)
•
--dxp-g-destructive-contrast-1 (4)
Warning
Communicates a warning to the user. Used on badges, alerts, and toasts.
•
--dxp-g-warning (1)
•
--dxp-g-warning-contrast (2)
Info
Communicates non-urgent information. Used on tooltips and popovers.
37
Color --dxp Styling HooksBrand Your LWR Site
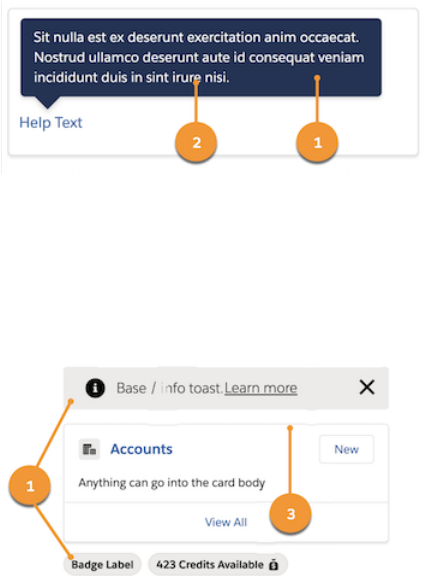
•
--dxp-g-info (1)
•
--dxp-g-info-contrast (2)
•
--dxp-g-info-1
•
--dxp-g-info-contrast-1
Neutral
Used to break the flow between elements with borders and shadows. Neutral colors are also used for non-urgent informational elements,
such as toasts and badges, and elements that don’t have interaction, such as icons and disabled inputs.
•
--dxp-g-neutral (1)
•
--dxp-g-neutral-contrast
•
--dxp-g-neutral-1 (3)
•
--dxp-g-neutral-contrast-1
•
--dxp-g-neutral-2
•
--dxp-g-neutral-contrast-2
•
--dxp-g-neutral-3
•
--dxp-g-neutral-contrast-3
SEE ALSO:
How --dxp Styling Hooks Map to Theme Panel Properties
Create a Section Color Palette
Text --dxp Styling Hooks
Extensive text branding properties make it easy to control the styling of the headings, body, button, link, and forms text used throughout
your site.
The Base Font Size property defines the font size for the <html> element of your site. So when its value is changed, it also affects every
other font size property.
38
Text --dxp Styling HooksBrand Your LWR Site
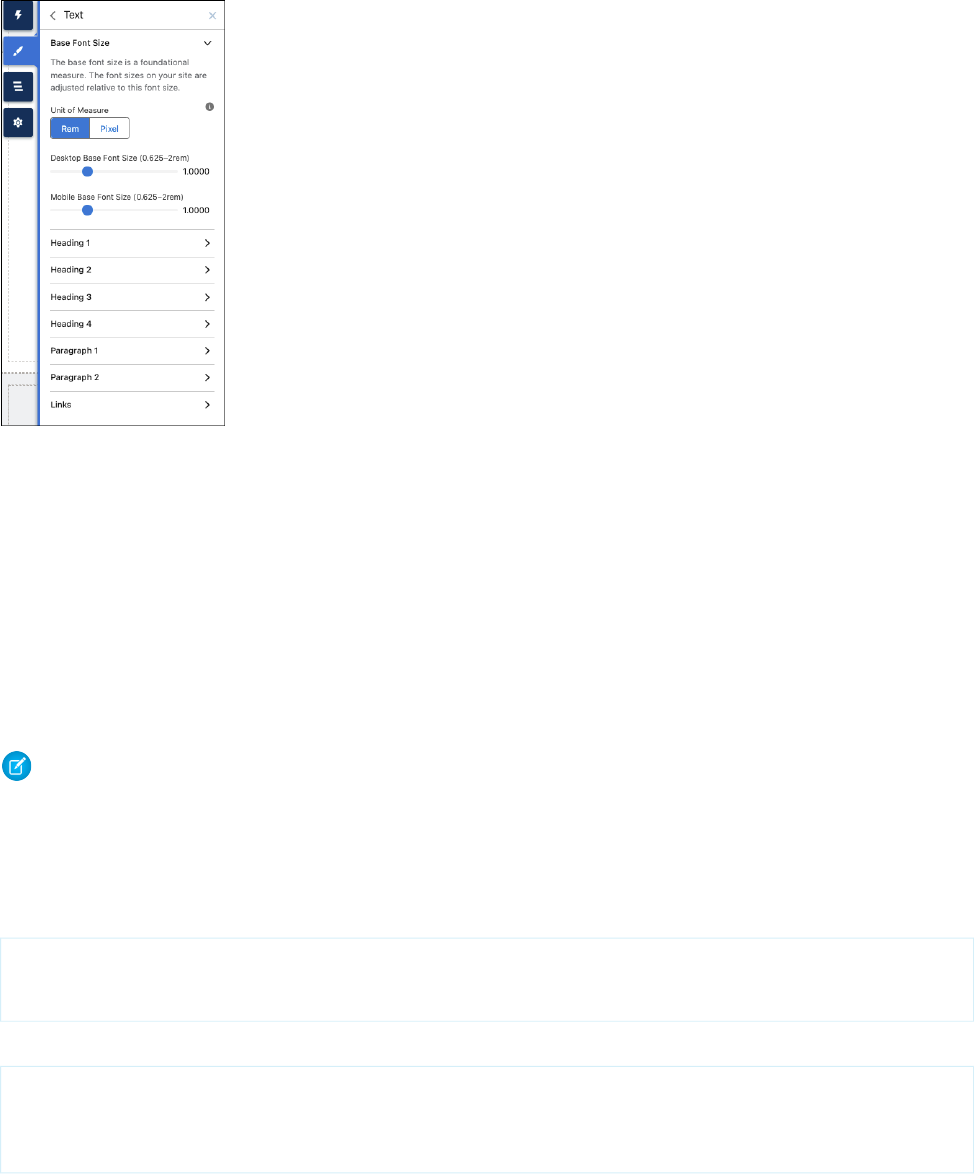
In addition to text for buttons, links, and forms, you can modify the style for several levels of heading and body text, including:
•
Heading 1
•
Heading 2
•
Heading 3
•
Heading 4
•
Paragraph 1
•
Paragraph 2
You can configure each of these text styles declaratively in the Theme panel or programmatically via --dxp styling hooks. When you
change the values for these properties, it also affects the SLDS and DXP CSS classes that consume them.
Note: Override heading tags associated with each style at the component level. For example, if your text component has a
Heading 1 style (associated with an h1 tag), change the tag to h2 if needed.
To use these text properties in your components, use either SLDS or DXP CSS classes, or use the --dxp styling hook directly in the
component’s CSS.
For example, the following code sample styles a component’s h1 using the DXP CSS class to use the branding property values defined
in the Extra Large Heading.
<template>
<h1 class="dxp-text-heading-xlarge">Heading 1</h1>
</template>
Alternatively, you can use the --dxp styling hooks directly in the component’s CSS:
h1 {
font-size: var(--dxp-s-text-heading-extra-large-font-size);
font-family: var(--dxp-s-text-heading-extra-large-font-family);
}
39
Text --dxp Styling HooksBrand Your LWR Site
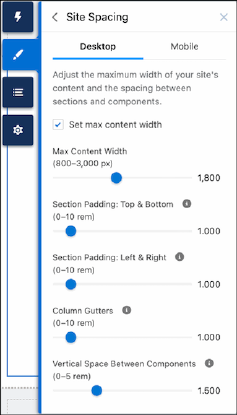
To alter the Base Font Size for small form factors, such as Tablet Portrait or Mobile, you can set the value of
--dxp-s-html-font-size-mobile programmatically.
SEE ALSO:
How --dxp Styling Hooks Map to Theme Panel Properties
Site Spacing --dxp Styling Hooks
Site spacing allows you to customize the global spacing settings for your site. These styling hooks combine to provide a consistent
spacing experience across each page.
The Site Spacing tab of the Theme panel lets you set the following properties for desktop and mobile devices.
Max Content Width
The maximum width of the inner content for theme regions and page regions.
Section Padding: Top & Bottom
The space between the top and bottom of a section’s inner content and the top and bottom of the section container, respectively.
Section Padding: Left & Right
The space between the left and right edges of a section’s inner content and the left and right edges of the section container,
respectively.
Column Gutters
The space between columns for section components with multiple columns. In mobile form factor, this setting controls the vertical
space between stacked columns.
Vertical Space Between Components
The amount of vertical spacing between components in the same region.
Site spacing properties aren’t limited to what’s exposed through the Theme panel. Along with the declarative properties displayed there,
there are dozens of additional component-level site spacing hooks, which you can use to fine-tune spacing in different parts of your
page.
40
Site Spacing --dxp Styling HooksBrand Your LWR Site
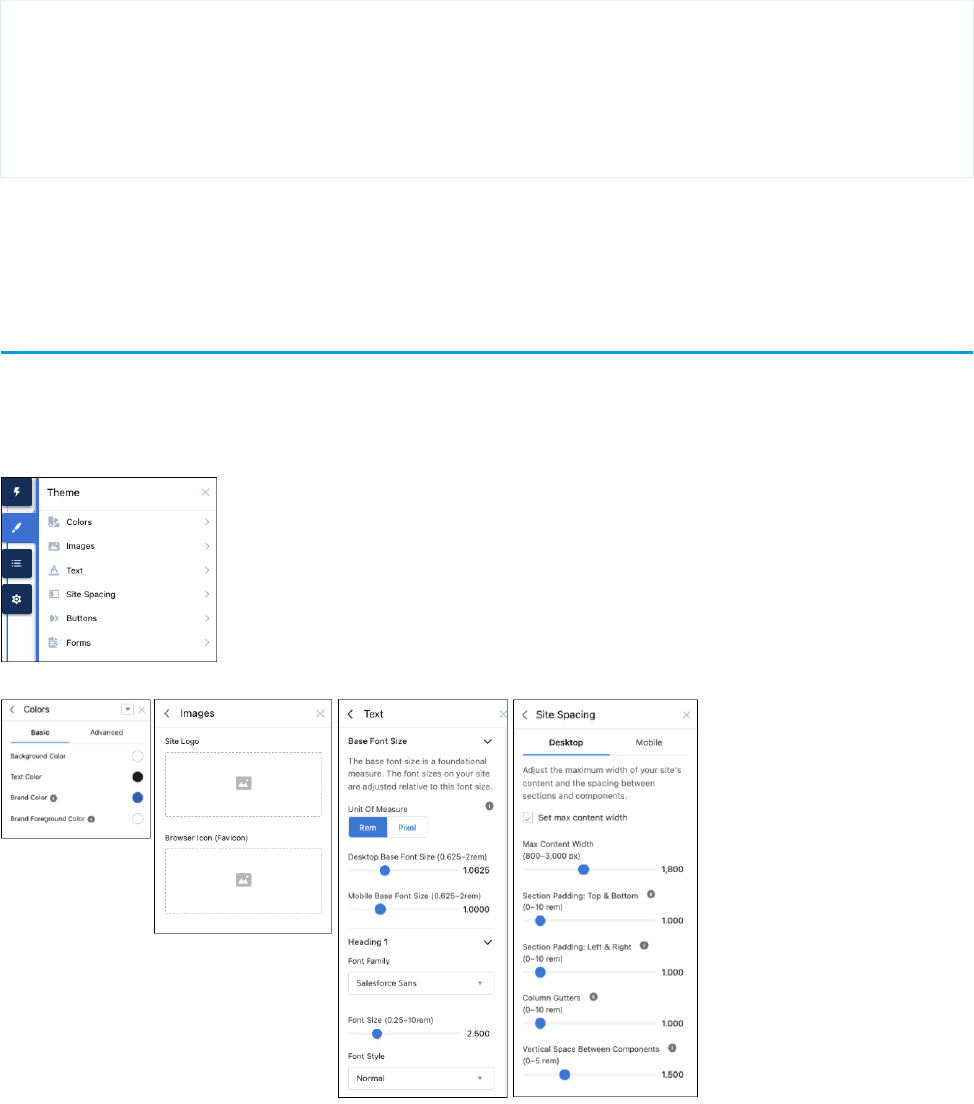
For example, let’s say you want your header region to span edge-to-edge instead of being confined to the max-content width set in
the Theme panel. To achieve this outcome, you would override the max-width and padding directly for the section in question. Using
the --dxp branding hooks enables you to edit the look and feel of any component without violating that component’s style
encapsulation.
header {
--dxp-c-section-content-spacing-block-start: 0;
--dxp-c-section-content-spacing-inline-end: 0;
--dxp-c-section-content-spacing-block-end: 0;
--dxp-c-section-content-spacing-inline-start: 0;
--dxp-c-section-columns-max-width: none;
}
SEE ALSO:
How --dxp Styling Hooks Map to Theme Panel Properties
How --dxp Styling Hooks Map to Theme Panel Properties
Each declarative property in the Theme panel maps to one or more programmatic --dxp styling hooks. When a user updates a property
in the Theme panel, the system automatically updates any Lightning web component that uses the hooks associated with that branding
property.
41
How --dxp Styling Hooks Map to Theme Panel PropertiesBrand Your LWR Site

Colors
...map to these --dxp styling hooksThese Theme panel properties...
Basic
--dxp-g-root
Background Color
--dxp-g-root-1
--dxp-g-root-2
--dxp-g-root-3
--dxp-g-root-contrast
Text Color
--dxp-g-root-contrast-1
--dxp-g-root-contrast-2
--dxp-g-root-contrast-3
--dxp-g-brand
Brand Color
--dxp-g-brand-1
--dxp-g-brand-2
--dxp-g-brand-3
--dxp-g-brand-contrast
Brand Foreground Color
--dxp-g-brand-contrast-1
--dxp-g-brand-contrast-2
--dxp-g-brand-contrast-3
Text
--dxp-s-text-heading-extra-large-colorHeading 1
--dxp-s-text-heading-large-colorHeading 2
--dxp-s-text-heading-medium-colorHeading 3
--dxp-s-text-heading-small-colorHeading 4
--dxp-s-body-text-colorParagraph 1
--dxp-s-body-small-text-colorParagraph 2
Links
--dxp-s-link-text-colorLink Color
--dxp-s-link-text-color-hoverLink Hover Color
Buttons
42
How --dxp Styling Hooks Map to Theme Panel PropertiesBrand Your LWR Site
...map to these --dxp styling hooksThese Theme panel properties...
--dxp-s-button-colorButton Color
--dxp-s-button-color-hoverButton Hover
--dxp-s-button-color-focusButton Focus
--dxp-s-button-color-activeButton Active
Forms
--dxp-s-form-element-label-colorField Label
--dxp-s-form-element-placeholder-text-colorPlaceholder Text
--dxp-s-form-element-text-colorInput Text
--dxp-s-form-element-text-color-focusInput Text Focus
--dxp-s-form-element-color-backgroundField Background Fill
--dxp-s-form-element-color-background-activeField Background Focus
--dxp-s-form-element-color-borderField Border
--dxp-s-form-element-color-border-focusField Border Focus
--dxp-s-form-checkbox-color-backgroundCheckbox Background
--dxp-s-form-checkbox-color-background-checkedSelected Checkbox Background
--dxp-s-form-checkbox-color-borderCheckbox Border
--dxp-s-form-checkbox-color-border-checkedSelected Checkbox Border
Dropdowns
--dxp-s-dropdown-text-colorDropdown Text Color
--dxp-s-dropdown-color-backgroundDropdown Background Color
--dxp-s-dropdown-text-color-hoverDropdown Text Hover Color
--dxp-s-dropdown-color-background-hoverDropdown Background Hover Color
--dxp-s-dropdown-color-borderDropdown Border Color
Tip: See Color --dxp Styling Hooks for information about other available styling hooks that don’t appear in the Theme panel.
Images
...map to these --dxp styling hooksThese Theme panel properties...
--dxp-s-site-logo-path
--dxp-s-site-logo-url
Site Logo
43
How --dxp Styling Hooks Map to Theme Panel PropertiesBrand Your LWR Site

...map to these --dxp styling hooksThese Theme panel properties...
No styling hook.
To add a favicon in Experience Builder, click Theme > Images and
upload the file. After upload, the favicon is added automatically to
your site’s browser tab.
Browser Icon (Favicon)
See Create a Configurable Site Logo Component.
Text
With the base font size properties, which you set on the <html> element, you can set the default desktop and mobile font sizes for
your site. When you change the base font size, you proportionally adjust any site elements, such as font sizes or spacing values, whose
size is specified with relative units (rem or em).
The design system also provides different levels of text styling for your site. Each level includes several style properties that map to
--dxp styling hooks using this format.
--dxp-s-level-style
In the Headings and Body portion of this table, replace level with these values, as appropriate. For text in buttons, see the Buttons
section. For text in forms, see the Forms section.
•
text-heading-extra-large for Heading 1
•
text-heading-large for Heading 2
•
text-heading-medium for Heading 3
•
text-heading-small for Heading 4
•
body for Paragraph 1
•
body-small for Paragraph 2
For example, the --dxp styling hook for the Heading 1’s font family is
--dxp-s-text-heading-extra-large-font-family
...map to these --dxp styling hooksThese Theme panel properties...
Base Font Size
--dxp-s-html-font-size
Desktop Base Font Size
--dxp-s-html-font-size-mobileMobile Base Font Size
Headings and Body
--dxp-s-level-font-familyFont Family
--dxp-s-level-font-sizeFont Size
--dxp-s-level-font-styleFont Style
--dxp-s-level-font-weightFont Weight
--dxp-s-level-text-decorationText Decoration
44
How --dxp Styling Hooks Map to Theme Panel PropertiesBrand Your LWR Site

...map to these --dxp styling hooksThese Theme panel properties...
--dxp-s-level-text-transformText Case
--dxp-s-level-line-heightLine Height
--dxp-s-level-letter-spacingCharacter Spacing
Link Text
--dxp-s-link-text-decorationText Decoration
--dxp-s-link-text-decoration-focusFocus Text Decoration
--dxp-s-link-text-decoration-hoverHover Text Decoration
Site Spacing
...map to these --dxp styling hooksThese Theme panel properties...
Desktop Site Spacing
--dxp-s-section-columns-max-width
Max Content Width
--dxp-s-header-content-max-width
--dxp-s-footer-content-max-width
--dxp-s-section-content-spacing-block-start
Section Padding: Top & Bottom
--dxp-s-section-content-spacing-block-end
--dxp-s-section-content-spacing-inline-start
Section Padding: Left & Right
--dxp-s-section-content-spacing-inline-end
--dxp-s-column-spacer-sizeColumn Gutters
--dxp-s-component-wrapper-spacer-sizeVertical Space Between Components
Mobile Site Spacing
--dxp-s-section-columns-max-width-mobile
Max Content Width
--dxp-s-header-content-max-width-mobile
--dxp-s-footer-content-max-width-mobile
--dxp-s-section-content-spacing-block-start-mobile
Section Padding: Top & Bottom
--dxp-s-section-content-spacing-block-end-mobile
--dxp-s-section-content-spacing-inline-start-mobile
Section Padding: Left & Right
--dxp-s-section-content-spacing-inline-end-mobile
45
How --dxp Styling Hooks Map to Theme Panel PropertiesBrand Your LWR Site

...map to these --dxp styling hooksThese Theme panel properties...
--dxp-s-column-spacer-size-mobileColumn Gutters
--dxp-s-component-wrapper-spacer-size-mobileVertical Space Between Components
Buttons
When you set the base font size for the text on your site (see the Text section), that setting affects the default font size of the text in the
buttons on your site. For button colors, see the Colors section.
...map to these --dxp styling hooksThese Theme panel properties...
Text Values for All Buttons
--dxp-s-button-font-family
Font Family
--dxp-s-button-font-styleFont Style
--dxp-s-button-font-weightFont Weight
--dxp-s-button-text-transformText Case
--dxp-s-button-line-heightLine Height
--dxp-s-button-letter-spacingCharacter Spacing
Standard Button Values
--dxp-s-button-padding-block-start
--dxp-s-button-padding-block-end
Vertical Padding
--dxp-s-button-padding-inline-start
--dxp-s-button-padding-inline-end
Horizontal Padding
--dxp-s-button-font-sizeFont Size
--dxp-s-button-radius-borderBorder Radius
Small Button Values
--dxp-s-button-small-padding-block-start
--dxp-s-button-small-padding-block-end
Vertical Padding
--dxp-s-button-small-padding-inline-start
--dxp-s-button-small-padding-inline-end
Horizontal Padding
--dxp-s-button-small-font-sizeFont Size
--dxp-s-button-small-radius-borderBorder Radius
Large Button Values
46
How --dxp Styling Hooks Map to Theme Panel PropertiesBrand Your LWR Site

...map to these --dxp styling hooksThese Theme panel properties...
--dxp-s-button-large-padding-block-start
--dxp-s-button-large-padding-block-end
Vertical Padding
--dxp-s-button-large-padding-inline-start
--dxp-s-button-large-padding-inline-end
Horizontal Padding
--dxp-s-button-large-font-sizeFont Size
--dxp-s-button-large-radius-borderBorder Radius
Forms
Similar to the different levels of text styling available for headings and body text on your site, the design system provides text styles for
different parts of a form. In the Field Labels, Input Text, and Caption Text section of this table, replace level with these values, as
appropriate.
•
label for Field Label
•
text for Input Text
•
caption-text for Caption
For example, the --dxp styling hook for the Field Label’s font family is
--dxp-s-form-element-label-font-family
...map to these --dxp styling hooksThese Theme panel properties...
Spacing
--dxp-s-form-element-spacing-block-start
Field Padding: Top
--dxp-s-form-element-spacing-horizontal-endField Padding: Right
--dxp-s-form-element-spacing-block-endField Padding: Bottom
--dxp-s-form-element-spacing-horizontal-startField Padding: Left
Borders
--dxp-s-form-element-radius-borderField Border Radius
--dxp-s-form-element-width-borderField Border Weight
--dxp-s-form-checkbox-radius-borderCheckbox Border Radius
--dxp-s-form-checkbox-width-borderCheckbox Border Weight
Field Labels, Input Text, and Caption Text
--dxp-s-form-element-level-font-familyFont Family
--dxp-s-form-element-level-font-sizeFont Size
--dxp-s-form-element-level-font-styleFont Style
47
How --dxp Styling Hooks Map to Theme Panel PropertiesBrand Your LWR Site
...map to these --dxp styling hooksThese Theme panel properties...
--dxp-s-form-element-level-font-weightFont Weight
--dxp-s-form-element-level-text-transformText Case
--dxp-s-form-element-level-line-heightLine Height
--dxp-s-form-element-level-letter-spacingCharacter Spacing
SEE ALSO:
Text --dxp Styling Hooks
Color --dxp Styling Hooks
Site Spacing --dxp Styling Hooks
Use --dxp Styling Hooks in Custom Components
To build a custom Lightning web component for your site that uses the design system, use the appropriate --dxp styling hooks.
Tip: We recommend using --dxp styling hooks to make general changes across the components in your site. But if the --dxp
branding defaults don’t provide exactly what you need, you can use --slds-c and --slds-g-color styling hooks to
fine-tune the appearance of individual components where necessary.
This sample shows the code for a custom combobox component.
<template>
<input type="text">
<ul>
<li>Option 1</li>
<li>Option 2</li>
</ul>
</template>
To ensure that the input looks similar to other base Lightning components that also respond to branding changes, the CSS must reference
the --dxp styling hooks as follows.
input {
border-color: var(--dxp-g-neutral);
}
input:focus {
border-color: var(--dxp-g-brand);
}
48
Use --dxp Styling Hooks in Custom ComponentsBrand Your LWR Site
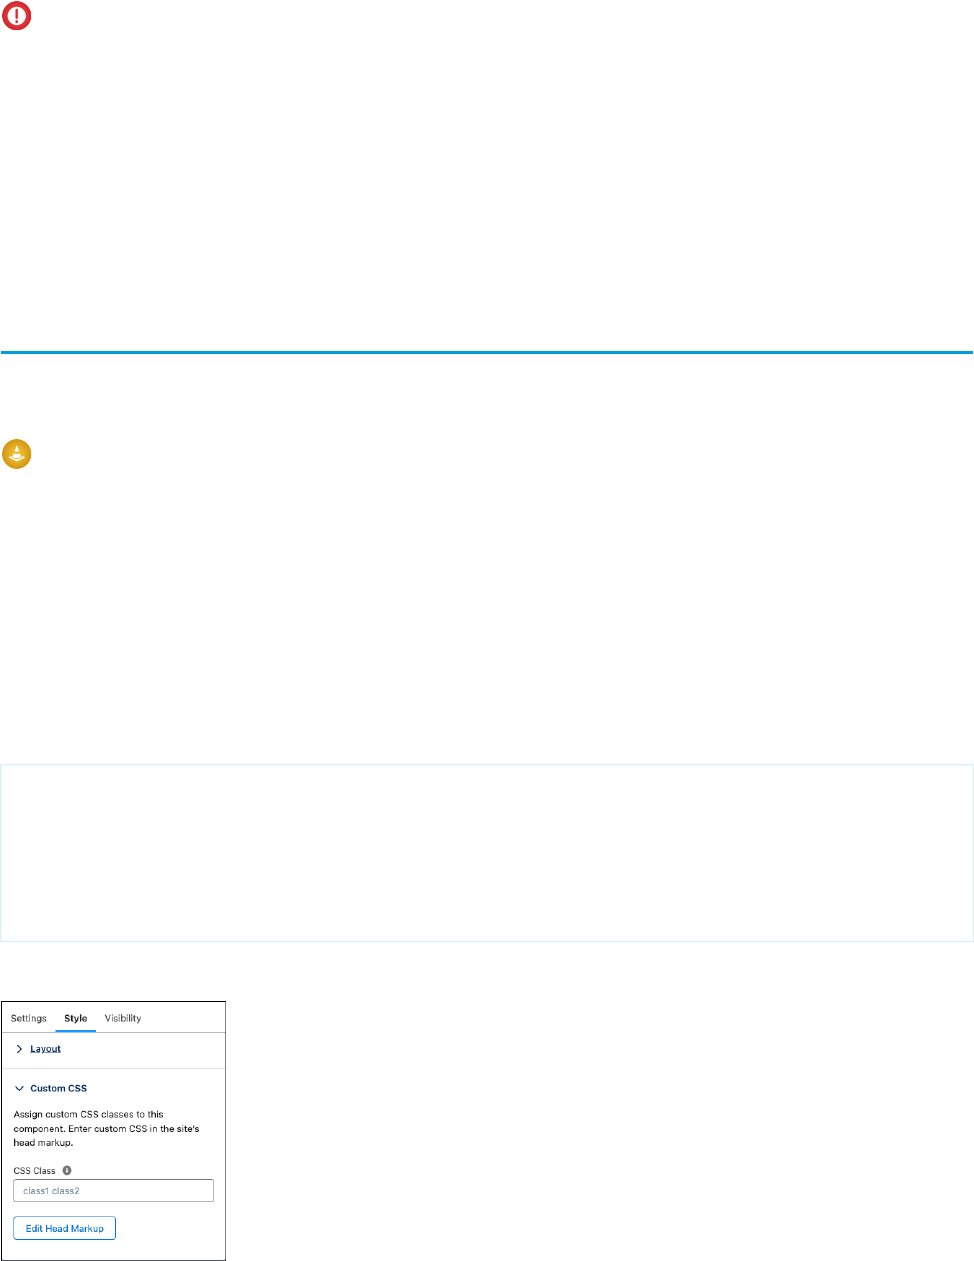
Important: Values of CSS custom properties are resolved at the time of evaluation. For example, let’s say you have a CSS custom
property that references another CSS custom property. If you update the value of the latter CSS custom property in a lower scope,
the value of the former CSS custom property doesn’t reflect the new value.
SEE ALSO:
Text --dxp Styling Hooks
Color --dxp Styling Hooks
Site Spacing --dxp Styling Hooks
How --dxp Styling Hooks Map to Theme Panel Properties
Override Component Branding in LWR Sites with Custom CSS
Occasionally, styling hooks are insufficient to style a component exactly the way you want. In this situation, you can use CSS selectors
to target and style preapproved “parts” within a component.
Warning: Use custom CSS sparingly and avoid targeting DOM elements without a part attribute. Doing so is brittle because
changes to the component’s internal DOM structure is likely to break hard-coded CSS selectors. Additionally, Salesforce Customer
Support can’t help resolve any issues with custom CSS.
Target Component Instances
Every component has a data-component-id attribute with a unique value per component instance. Using this value, you can
easily target the component instance and override styling hooks or add new CSS altogether.
To determine the exact attribute value of a component, inspect the DOM of your app—for example, with Chrome DevTools.
Let’s say a section on the page has the HTML markup <community_layout-section
data-component-id="section-adfb">. This code sample uses the value to override the component’s default styling.
<style>
[data-component-id="section-adfb"] {
--dxp-g-warning: #ff9966;
--dxp-g-warning-contrast: #fff;
border: 2px dashed #000;
}
</style>
You can also specify a custom CSS class on a component’s property panel to target that component.
49
Override Component Branding in LWR Sites with Custom CSSBrand Your LWR Site
Target Parts Within a Component
Most components are made up of many DOM elements, which means that you can style a specific element or part within a component.
Component parts are exposed by DXP with the following format:
<div part="dxp-[component]-[part]">Some element</div>
You can expose parts from your custom components using the same format. For example, a custom hero component could look like
this:
<template>
<div class="hero-background">
<h1>My hero text</h1>
<button part="some-partner-hero-primary-button">Main button</button>
<button part="some-partner-secondary-button">Secondary button</button>
</div>
</template>
And you can target either button with a CSS attribute selector, as follows:
<style>
[part="some-partner-hero-primary-button"] {
--dxp-g-brand: red;
--dxp-g-brand-contrast: white;
transition: background-color 2s ease-in;
}
</style>
Note: In the previous code sample, you would avoid targeting the h1 or hero-background class because they don’t have
a defined part.
If you want to target a part within a specific component instance, you can combine the part selector with a data-component-id
selector, as follows:
<style>
[data-component-id="custom-hero-cd0b"] [part="some-partner-hero-primary-button"] {
--dxp-g-brand: red;
--dxp-g-brand-contrast: white;
transition: background-color 2s ease-in;
}
</style>
Create a Section Color Palette
On many websites, it’s common to have sections of a page, such as the header, footer, or banners, that use different colors from the
overall site. For example, perhaps you want to create a header with a dark background and a light foreground, whereas the rest of your
site does the opposite. To achieve this, you can create separate color palettes and apply them to your page sections. Each section on a
page can have its own color palette.
We’ve made it easy to adjust these colors on any section. Just select a section, and pick an existing or define an entirely new color palette.
1. In Experience Builder, open the Colors tab of the Theme panel.
2.
Click > Manage Color Palettes.
3. Click New Palette and give the palette a name.
50
Create a Section Color PaletteBrand Your LWR Site
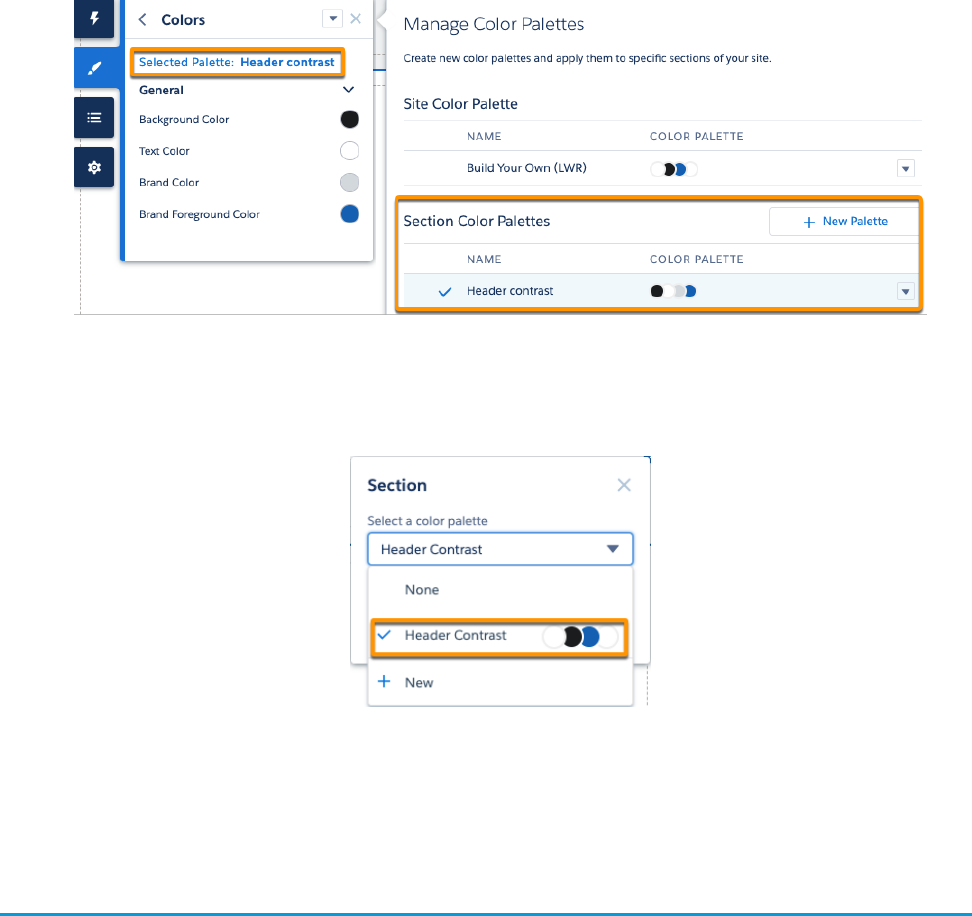
The new palette is created and selected in the Colors tab.
4. Update the palette’s color properties in the Colors tab as needed.
5. To use the palette, select a section on the page and then choose the palette from the section’s properties.
SEE ALSO:
Color --dxp Styling Hooks
Create a Configurable Site Logo Component
Use the --dxp-s-site-logo-path and --dxp-s-site-logo-url global styling hooks to create an easily configurable
site logo component that you can add to your site pages. When you update the Site Logo property in the Images tab of the Theme
panel, the system automatically updates any component that references the hooks.
Site Logo Styling Hooks
Let’s take a closer look at the site logo --dxp styling hooks.
•
--dxp-s-site-logo-path stores the path to the image, which can be consumed in JavaScript and HTML.
•
--dxp-s-site-logo-url stores the site logo path surrounded by url(.), which can be consumed in CSS properties.
51
Create a Configurable Site Logo ComponentBrand Your LWR Site
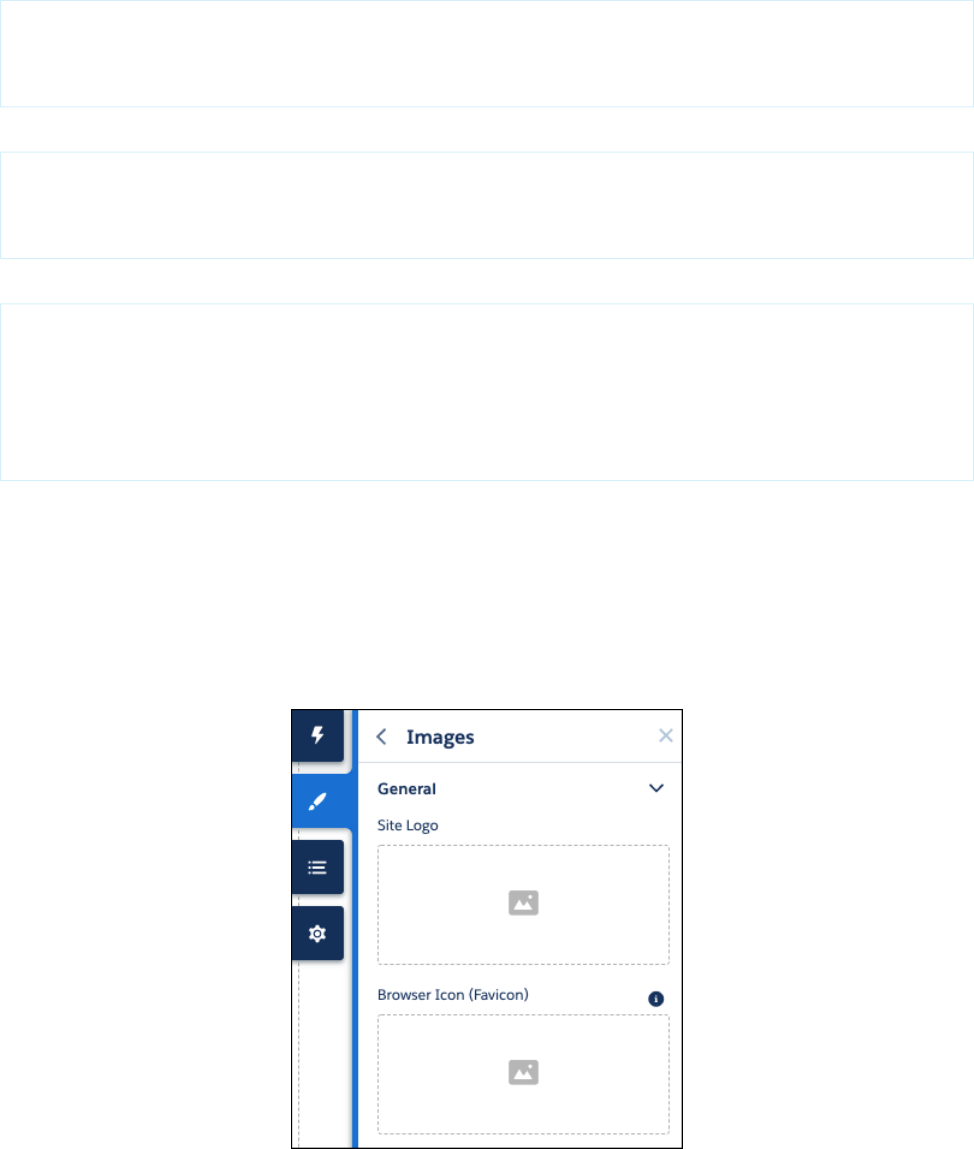
For example:
:root {
--dxp-s-site-logo-path: "/cms/delivery/media/MCKW5KMZTF2BBFDLWWZG2MOVLLXA"
--dxp-s-site-logo-url: url("/cms/delivery/media/MCKW5KMZTF2BBFDLWWZG2MOVLLXA")
}
This JavaScript code sample uses --dxp-s-site-logo-path to set the image src.
const root = document.querySelector('html');
const logoPath = getComputedStyle(root).getPropertyValue('--dxp-s-site-logo-path');
const imgEl = document.createElement('img');
imgEl.src = logoPath;
This CSS code sample uses --dxp-s-site-logo-url to set the site logo as a background image.
.logo-container {
background-image: var(--dxp-s-site-logo-url);
background-position: center;
background-repeat: no-repeat;
background-size: contain;
max-width: 100%;
}
The Site Logo Property in Experience Builder
The Site Logo property in Experience Builder uses Salesforce CMS images, so you must first add your LWR site as a channel in a CMS
workspace in the Digital Experiences app.
Then to add an image in the Images tab of the Theme panel, you must also be a contributor in that CMS workspace. For more information,
see Salesforce CMS.
Finally, if the site logo is used on public pages, enable Let guest users view asset files and CMS content available to the site in the
Administration workspace under Preferences.
52
Create a Configurable Site Logo ComponentBrand Your LWR Site
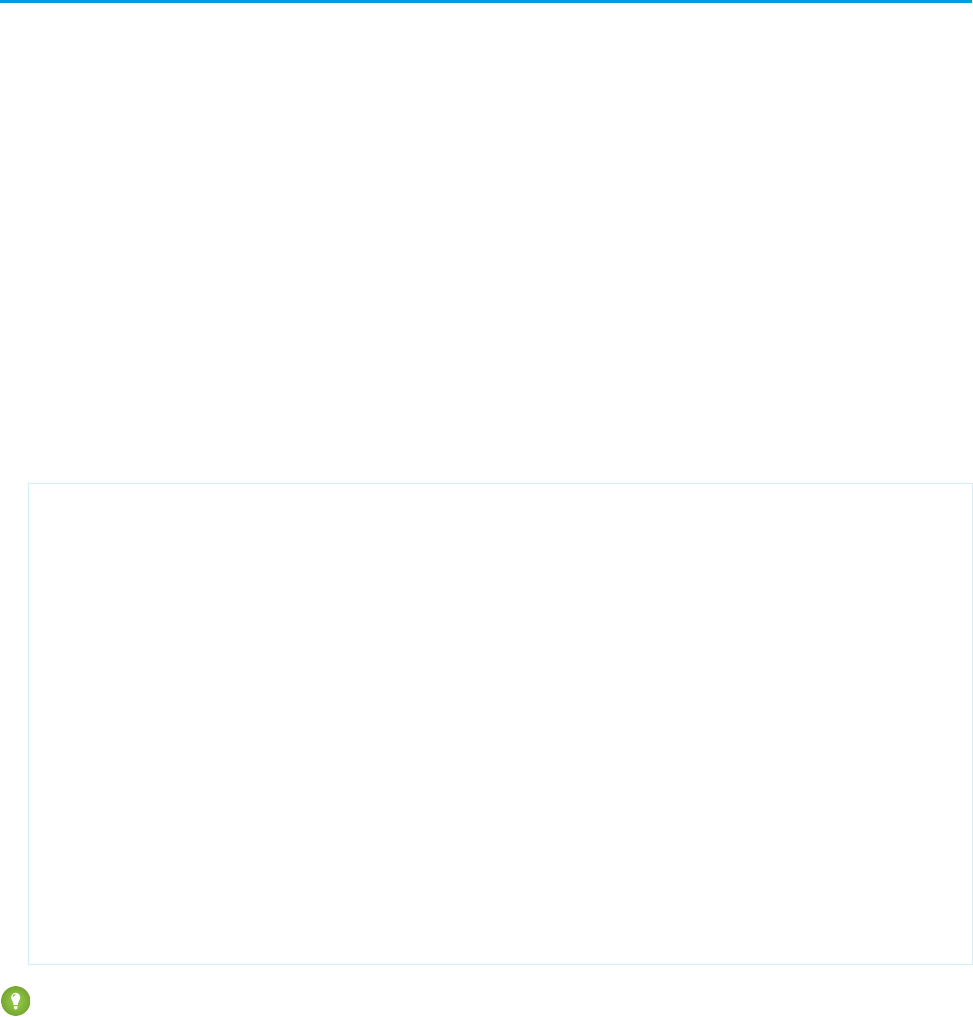
Add Custom Fonts
You can add custom fonts by uploading the font file as a static resource. Alternatively, you can reference a file that’s hosted externally.
Upload Fonts as a Static Resource
To upload your custom font as a static resource and reference it within the head markup:
1. In Setup, in the Quick Find box, enter Static Resources, and then select Static Resources.
2. Click New, upload the file, and give the static resource a name. Keep a note of the resource name. If your site has public pages, select
Public in the Cache Control setting. If you don’t make the font resource publicly available, the page uses the browser’s default font
instead.
3. To add a reference to the font in your site’s head markup, return to Experience Builder, and click Settings > Advanced > Edit Head
Markup.
4. Insert the @font-face declaration and define the appropriate --dxp styling hooks in your desired scope (either :root{}
to the whole page or within a specific selector or component).
•
--dxp-g-root-font-family defines all text other than headers.
•
--dxp-g-heading-font-family defines headline text.
<link rel="stylesheet" href="{ basePath }/assets/styles/dxp-styling-hooks.min.css?{
versionKey}" />
<link rel="stylesheet" href="{ basePath }/assets/styles/dxp-slds-extensions.min.css?{
versionKey}" />
<style>
@font-face {
font-family: 'myFirstFont';
/* Replace myFont with your resource name */
src: url('{ basePath }/sfsites/c/resource/myFont') format('woff');
}
:root {
/** set the font for all root/body text **/
--dxp-g-root-font-family: 'myFirstFont', Helvetica, sans-serif;
/** set the font for headings **/
--dxp-g-heading-font-family: 'myFirstFont', Times, serif;
}
</style>
Tip: Make sure that the font file format, for example, woff, matches your markup. Also make sure that your fallback values, such
as Helvetica, sans-serif, and so on, are properly defined for your brand. To learn more, see @font-face.
Use Externally Hosted Fonts
You can use fonts that are hosted outside Salesforce, such as Google Fonts. However, to access externally hosted files, you must also
update the Content Security Policy (CSP) for your org by adding the hosts to your list of Trusted URLs. Otherwise, an error appears
indicating that the resources can’t be accessed.
For example, for Google Fonts, you would add:
53
Add Custom FontsBrand Your LWR Site
•
https://fonts.googleapis.com to access the Google Fonts style sheet
•
https://fonts.gstatic.com to access fonts from Google Font
For details on how to add a Trusted URL with the required CSP directives, see Manage Trusted URLs.
Remove SLDS
If necessary, you can remove Salesforce Lightning Design System (SLDS) from your site.
Important: Don’t remove SLDS if you plan to use flexible layouts or any of the base Lightning components, as they rely heavily
on the design system.
In Experience Builder, click Settings > Advanced > Edit Head Markup, and delete the following line.
<link
rel="stylesheet"
href="{ basePath }/assets/styles/salesforce-lightning-design-system.min.css?{ versionKey
}"
/>
To use SLDS again later, add the code back to your head markup.
54
Remove SLDSBrand Your LWR Site

CHAPTER 5 Create a Multilingual LWR Site
Deliver content to your site visitors in the languages that they prefer, and reach new audiences in new
languages. You can translate your LWR site into languages that Salesforce supports and offer your site
in up to 40 languages.
In this chapter ...
• Add a Language to
Your LWR Site
On standard components that come with an LWR template, you can translate text values in component
properties such as text, URLs, and alt text fields. You can also translate text contained in components
• Delete a Language
from Your LWR Site
such as Rich Content Editor, HTML Editor, and Text Block. And you can translate SEO page properties,
including title, description, and head tags.
• Set the Default
Language on Your
LWR Site
For custom Lightning web components that you include in your site, you can make a String property
translatable by defining it as translatable="true" in the component’s js-meta.xml file.
For example:
<?xml version="1.0" encoding="UTF-8" ?>
<LightningComponentBundle
• Automatic Language
Detection for
Multilingual LWR Sites
• Export Content from
Your LWR Site for
Translation
xmlns="http://soap.sforce.com/2006/04/metadata">
<isExposed>true</isExposed>
<targets>
• Import Translated
Content to Your LWR
Site
<target>lightningCommunity__Page</target>
<target>lightningCommunity__Default</target>
</targets>
<targetConfigs>
<targetConfig targets="lightningCommunity__Default">
<property type="String" name="recordId"
default="{!Route.recordId}"/>
<property type="String" name="pageTitle"
translatable="true"/>
<property type="String" name="description"
translatable="true"/>
<property type="String" name="customHeadTags"
translatable="true"/>
</targetConfig>
</targetConfigs>
</LightningComponentBundle>
You can translate the content in these text fields directly in the component property editors in Experience
Builder. Or, you can export your site content for translation, and the properties that you marked as
translatable are included in the export file.
Note: If you add a datasource attribute to a property—for example, to create a picklist—you
can’t define that property as translatable="true".
Add the standard Language Selector component to your site so your visitors can select which language
to view on your site.
55
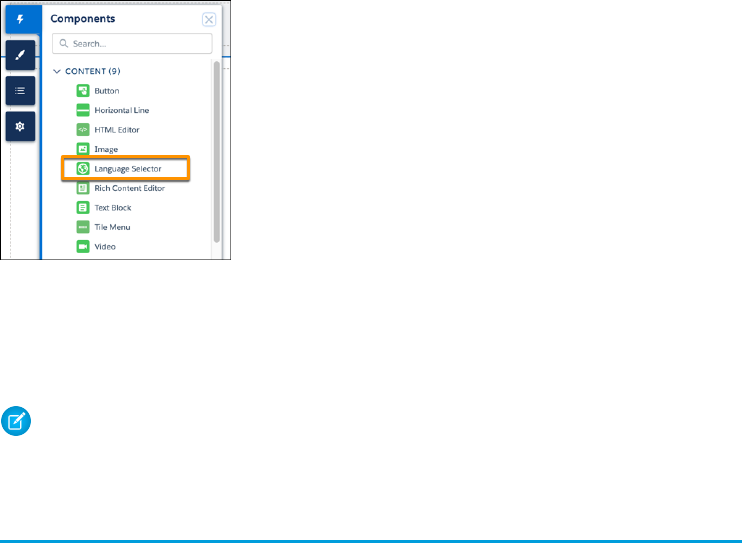
When your site visitors select a language, the URL for your site updates to indicate which language
they’re viewing. For example, if your site URL is
https://www.UniversalTelco.my.site.com and you add a French translation to your
site, the URL for the translated version is https://www.UniversalTelco.my.site.com/fr.
Note: If you prefer to use different logic to identify languages in your site URL, or you want a
different language-selector design, create your own Lightning web component.
Limitations to Multilingual LWR Sites
There are some limitations to keep in mind.
•
Some base Lightning components don’t support localization and aren’t compatible with multilingual
sites.
•
You can’t use the Google Cloud Translation API with LWR sites.
•
LWR sites offer limited support for right-to-left languages in standard components. For the best
customer experience in these languages, use custom Lightning web components.
•
In enhanced LWR sites, the available languages are limited to the languages that are enabled in your
Salesforce org. If a language that’s on your Site Languages list is later disabled in Salesforce, the site
translation in that language is still visible to your users. You can still update that site translation, but
you can’t select a disabled language as your default site language.
•
In rare cases, the URL for a translation of your site inadvertently conflicts with other site URLs. For
example, the URL for a translation can end up identical to the URL for a particular page on your
original site. Or, it can end up identical to the URL for the home page on another one of your sites.
In the first case, the URL that leads to the translated site takes precedence over the URL that leads
to the page on your original site. In the second case, the URL that leads to your other site takes
precedence over the URLs that lead to your translation or to a specific page.
To see how your site visitors can experience this URL conflict, let’s look at some sample URLs.
Say you have a site at https://UniversalTelco.my.site.com, and you have a page
on the site for your franchisees at https://UniversalTelco.my.site.com/fr. The
main URL for your site ends with .com, and the URL that leads to the franchisees page ends with
/fr.
Then you translate your site into French. When you publish the French translation, the main URL for
your site is followed by the part of the URL that identifies the language, /fr. So the URL for the
French translation of your site is also https://www.UniversalTelco.my.site.com/fr.
56
Create a Multilingual LWR Site
When users enter this URL in a browser, they land on the home page of your French translation, not
on the franchisees page.
Now let’s say you set up a new site at https://UniversalTelco.my.site.com/fr
for a sale that you’re running in the city of Framingham. Again, the main URL for your site ends with
.com, and the URL for your sale site ends with /fr. In this case, when users enter
https://UniversalTelco.my.site.com/fr into a browser, they land on the page
for your sale site, not on your French translation or the franchisees page.
To avoid these URL conflicts, change the URL for the franchisees page to end with something different,
such as /franchisees. And change the URL for the sale page to end with something different,
such as /framingham.
SEE ALSO:
Create Components for LWR Sites
Component Properties
Salesforce Help: Supported Languages
Salesforce Help: Right-to-Left (RTL) Language Support
Salesforce Help: Considerations for Page Actions in Experience Builder
57
Create a Multilingual LWR Site
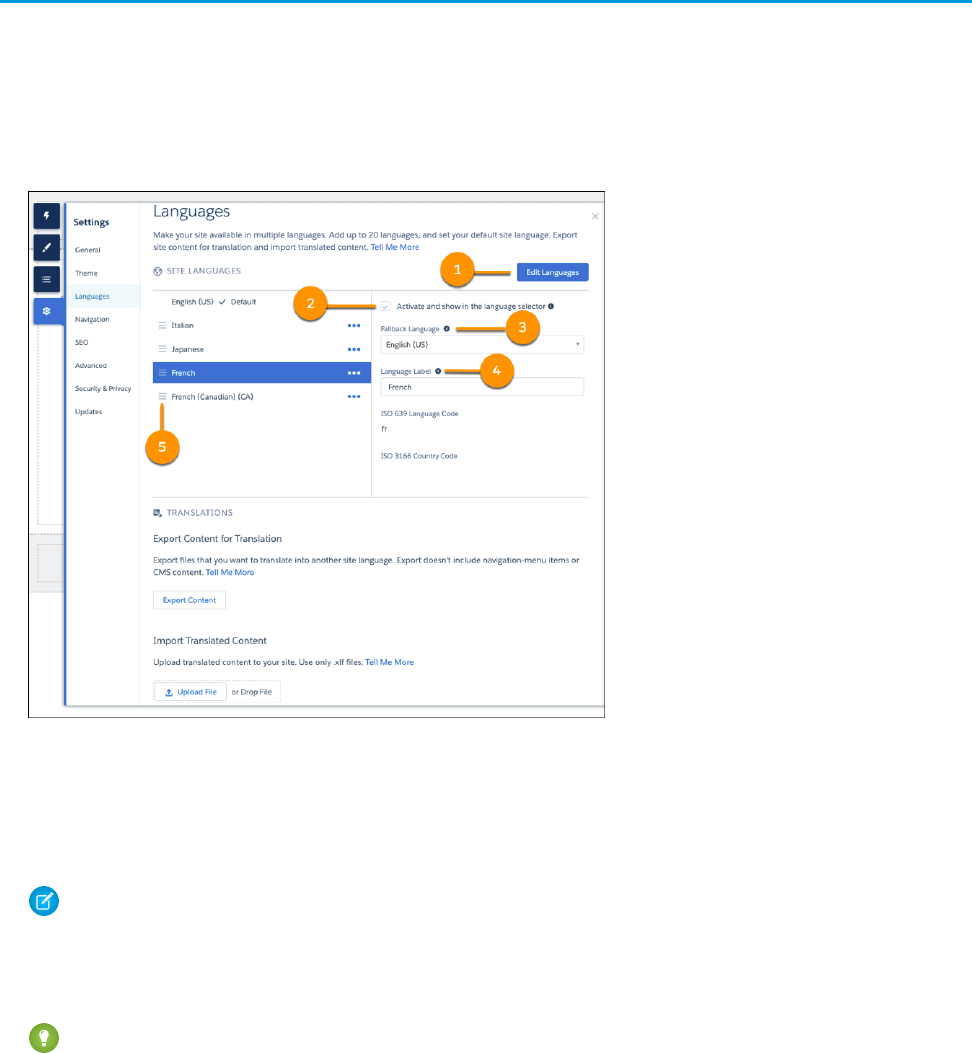
Add a Language to Your LWR Site
To offer your site in multiple languages, first add each language to the site from the Settings panel in Experience Builder. You can offer
your site in up to 40 languages, including your default site language. Each language that you add appears in the language selector in
Experience Builder for easy navigation between different translations of your site. To make the translations available to your site visitors,
add the Language Selector component to your site.
1. In the Settings panel in Experience Builder, select Languages.
2. In the Languages panel, click Edit Languages (1).
3. In the Edit site languages window, select the language from the Available Languages list, move it to the Site Languages list, and
save your changes. You can add more than one language at a time. On enhanced LWR sites, the available languages are limited to
the languages that are enabled in your Salesforce org.
Note: Standard components in LWR sites offer limited support for right-to-left languages. For the best customer experience
in these languages, use custom Lightning web components.
4. To make the language available to your site visitors, select Activate and show in the language selector (2) in the Languages
panel.
Tip: Deselect this option until you’re ready to publish content in that language.
5. Optionally, set the fallback language for each language that you add (3).
On your published multilingual site, if any text isn’t translated into a visitor’s selected site language, the text appears in the fallback
language. For example, if you add translations for French and French (Canadian) to your site, you can designate French as the fallback
language for French (Canadian). If you don’t designate a fallback language, the fallback is your default site language.
58
Add a Language to Your LWR SiteCreate a Multilingual LWR Site

Multilingual sites support only one level of fallback language. For example, if French (Canadian) falls back to French, then your site’s
default language is the only fallback language allowed for French.
Experience Builder prevents you from creating fallback language loops. For example, if French is the fallback language for French
(Canadian), then French (Canadian) isn’t available to select as the fallback language for French. Similarly, if the fallback language for
French (Morocco) is French (Canadian), then French (Morocco) also is unavailable to select as the fallback language for French.
On enhanced LWR sites, any language that has a designated fallback language can’t itself be a fallback language. For example, if
you designate French as the fallback language for French (Canadian), then French (Canadian) can’t be the fallback for any other
language.
6. Optionally, to determine how the language is listed in the language selector on your site, customize the label for the site language
(4).
To rearrange the Site Languages list in the order that you want, use the grabber icon for a language (5). These changes also affect the
order of languages in the language selectors in Experience Builder and on your site.
In Experience Builder, to view your site in another site language, use the language selector.
SEE ALSO:
Export Content from Your LWR Site for Translation
Set the Default Language on Your LWR Site
Delete a Language from Your LWR Site
You can delete a language that you added to your LWR site.
1. In the Settings panel in Experience Builder, select Languages.
2. In the Site Languages list, select Delete site language from the actions menu for the language that you want to delete. You can
also delete a site language in the Edit site languages window.
3. Move the language from the Site Languages list to the Available Languages list, and save your change.
When you delete a site language, you also delete its translated content and listing in the language selectors in Experience Builder and
on your site. To preserve the translated content, export the content before you delete the language.
When you delete a site language that’s designated as the fallback language for another translation on your site, the fallback for that
translation switches to your default site language. You can change the fallback to a different site language.
SEE ALSO:
Add a Language to Your LWR Site
Export Content from Your LWR Site for Translation
59
Delete a Language from Your LWR SiteCreate a Multilingual LWR Site
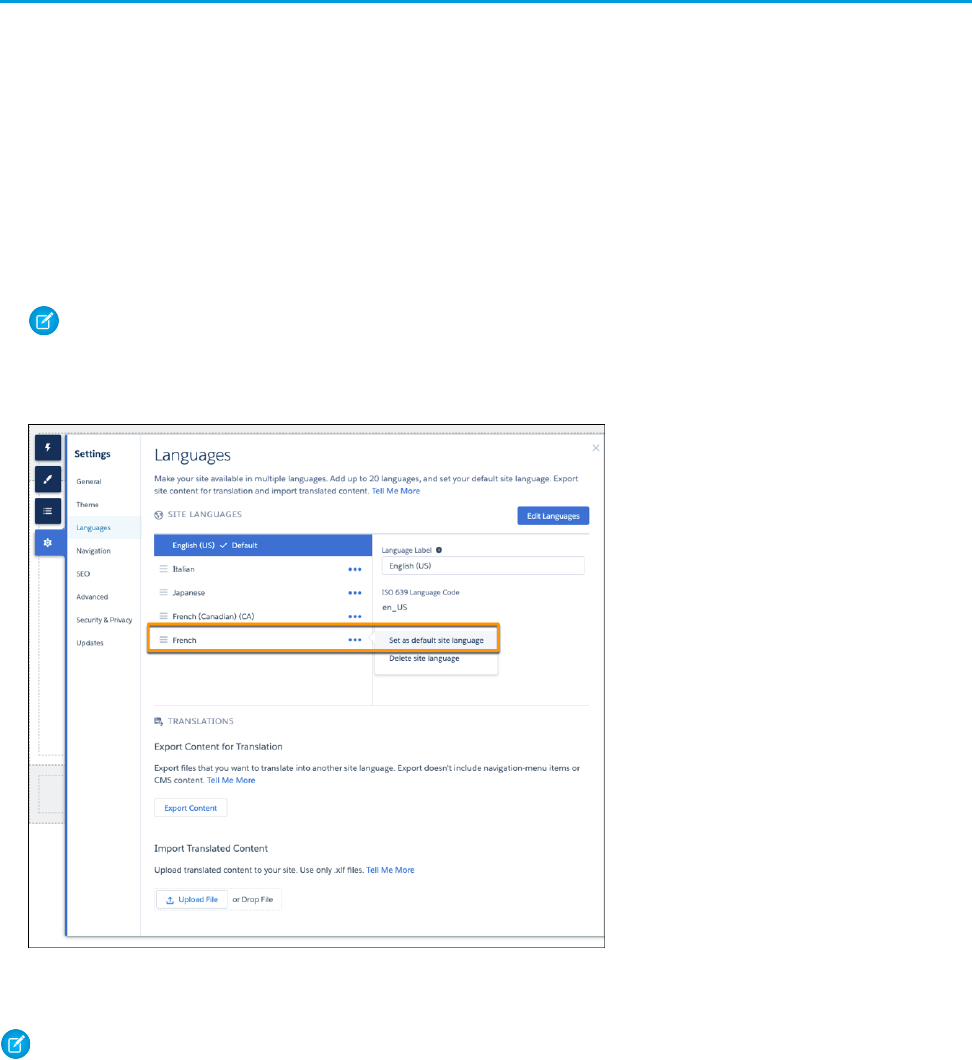
Set the Default Language on Your LWR Site
When you create an LWR site, the default site language is English (US). If you want to change it to a different default language, update
the default language as soon as possible after you create the site to avoid losing content.
When you change the default site language, you remove all content in your original default language. If there’s translated content on
your site in the new default language, you remove that, too. So it’s best to minimize the amount of content that you add to your site in
either language until after you update the default language.
1. In the Settings panel in Experience Builder, select Languages.
2. If you haven’t added your intended new default language to the site, add it now.
3. From the actions menu for your intended new default site language, select Set as default site language. On enhanced LWR sites,
if a site language is disabled in your Salesforce org, you can’t select that language as your default site language.
Note: If you plan to add Salesforce CMS content to your site, it’s important that the site and the CMS workspace have the
same default language so that the content appears properly. If the default languages are different, translate the content in
your CMS workspace into your default site language, then add the translated content to your site.
4. In the confirmation window, click Change.
Note: If you did add content to your site in either language, and you want to preserve that content, export the translation before
you change the default site language. The resulting .xlf file contains the content in both languages. The text in your original default
language appears within the <source> tags in the file. The text in your intended new default language appears within the <target>
tags in the file.
60
Set the Default Language on Your LWR SiteCreate a Multilingual LWR Site
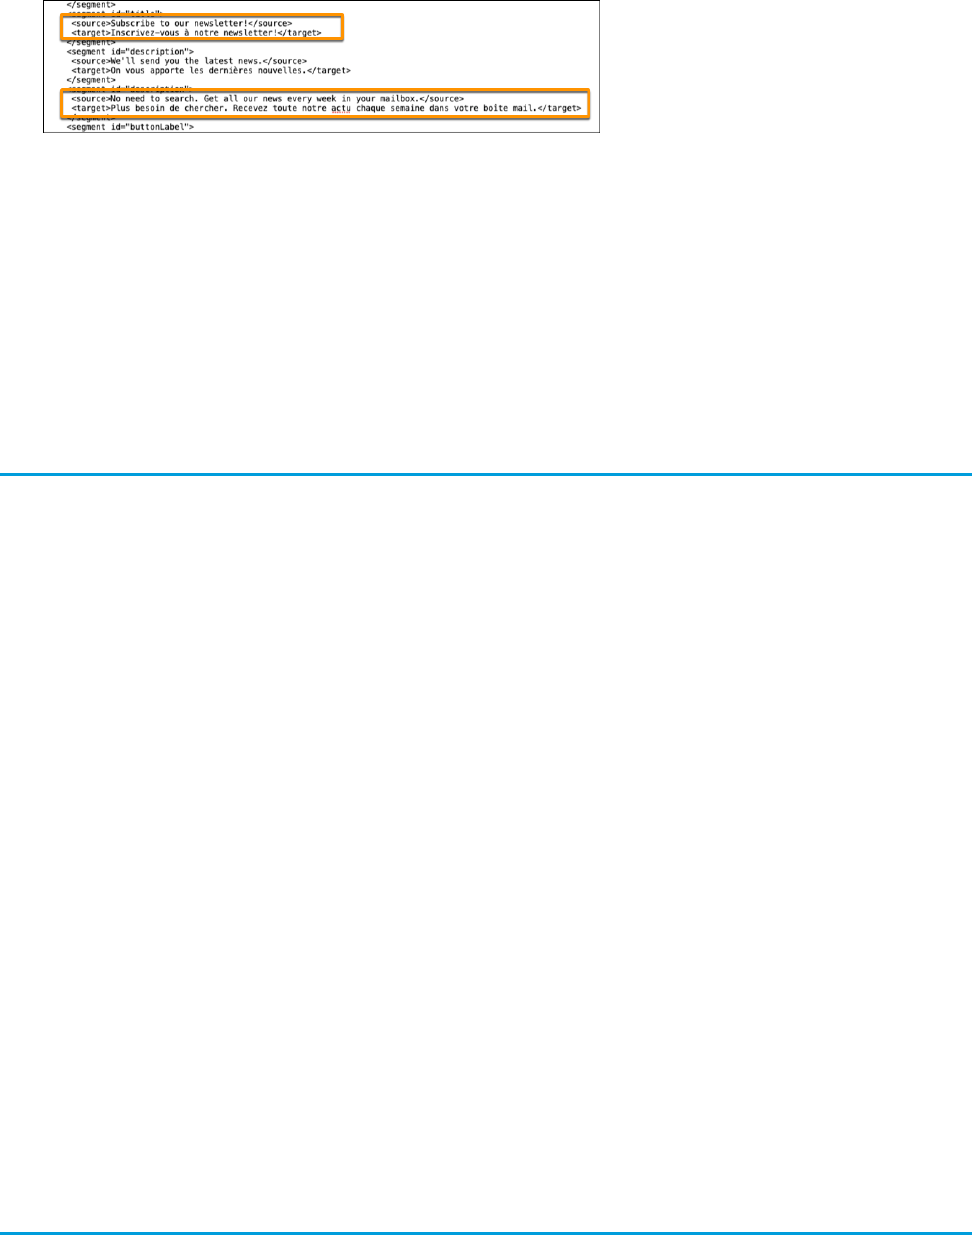
You can’t import this file back to your site, but you can paste the text back into each relevant field in the component property
editor panels in Experience Builder.
SEE ALSO:
Add a Language to Your LWR Site
Export Content from Your LWR Site for Translation
Salesforce Help: Translating Salesforce CMS Content
Automatic Language Detection for Multilingual LWR Sites
When your customers access an LWR site, they see the site in the localized language that’s set in their browser settings. Automatic
language detection works when you republish your LWR site and the site has a localized version.
Let’s say your LWR site has English as the default language, but it also has a French version. When guest users access the site, they see
the site in their browser’s default language. When authenticated users access the site, they see the language that’s set in their user profile.
Keep these considerations in mind when using automatic language detection.
•
Automatic language detection is on by default in your org. To disable it, contact Salesforce Customer Support.
•
If the site doesn’t support the user profile language or the browser’s default language, users see the default site language instead.
•
If guest or authenticated users change their language preference via the Language Selector component, the new preference is used
the next time they access the site.
•
Automatic language detection only happens when a user accesses the site without the locale path prefix. For example, a user
accessing www.salesforce.com/siteprefix/ is automatically redirected,
but www.salesforce.com/siteprefix/fr/ goes to the French language site.
•
When a user logs in to the site, the cookie locale is set immediately. Changing the user locale doesn’t change their language preference,
even if the user never used the Language Selector to change the language.
•
Automatic language detection relies on a functional cookie. If functional cookies are disabled, your site can't detect or save the
language preference of your user.
•
Language preferences are prioritized as follows:
1. Locale path prefix
2. Cookie locale
3. User Profile’s set locale
4. Browser locale
Export Content from Your LWR Site for Translation
After you add a language to your site, you can export the site content to send it to your localization team or vendor for translation.
61
Automatic Language Detection for Multilingual LWR SitesCreate a Multilingual LWR Site
Note: If you exported your site content before Summer ’22, export it again to ensure that you and your translator are working
with the most recent version of the .xlf format. You can’t upload older versions of the .xlf format to your site.
LWR site content exports in an .xlf file, the standard format that’s compatible with third-party translation software. Content in your site’s
original default language is contained within the <source> tags. Translated content goes within the <target> tags. This excerpt from
an .xlf file shows content in English (US), the default site language, along with its French translation.
<segment id="title">
<source>Subscribe to our newsletter!</source>
<target>Inscrivez-vous à notre newsletter!</target>
</segment>
<segment id="headline">
<source>We'll send you our latest news.</source>
<target>On vous apporte nos dernières nouvelles.</target>
</segment>
<segment id="description">
<source>No need to search. Get all our news every week in your mailbox.</source>
<target>Plus besoin de chercher. Recevez toute notre actu chaque semaine dans votre
boîte mail.</target>
</segment>
1. In the Settings panel in Experience Builder, select Languages.
2. In the Languages panel, click Export Content.
The exported file doesn’t include CMS content or the items in your site’s navigation menu. Translate the CMS content in your CMS
Workspace in the Digital Experiences app. Use Translation Workbench to translate the items in the site’s navigation menu.
3. In the Export site content window, select the language that you want to export. Optionally, enter a name for the .zip file, such as the
name of the language that you’re exporting.
You can export more than one language at a time. All languages export in one .zip file, but within the .zip file each language is in its
own .xlf file.
4. Click Export.
Note: After you export your site content for translation, avoid updating the text in your default language because the translation
is based on the earlier (pre-updated) version of the content.
The .xlf file includes the translatable component property values—the properties that are defined as translatable=“true” in
the component’s js-meta.xml file. However, the file excludes empty String values, even if they’re marked as translatable, because
those properties contain no text to translate.
If you use the HTML Editor component or add SEO head tags to your site, the .xlf file also includes their text, which is in HTML. The
exported file includes the HTML tags because these tags sometimes include attributes that need translation, such as placeholder text.
For example, an email field where site visitors can enter their email address can look like this in the .xlf file:
&lt;input type=”email” value=”” placeholder=”Enter your email address”
name=”contact[email]” id=”Email-footer” class=”newsletter-form-group__input”&gt;
62
Export Content from Your LWR Site for TranslationCreate a Multilingual LWR Site
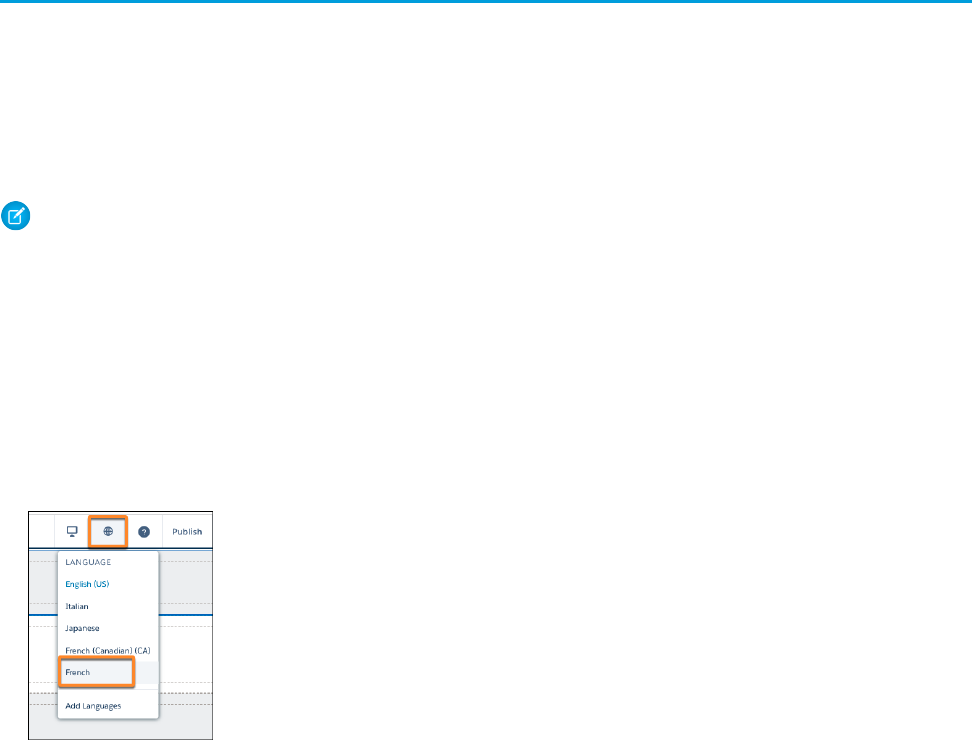
Translators must be familiar enough with HTML tags to know what to translate and what to leave alone. In this case, the only part to
translate is Enter your email address.
SEE ALSO:
Add a Language to Your LWR Site
Import Translated Content to Your LWR Site
Salesforce Help: Work with Translated Content in the Salesforce CMS
Salesforce Help: Translation Workbench
Import Translated Content to Your LWR Site
After you add a language to your site, you can enter translations for that language directly into the component property editor panels
in Experience Builder. Alternatively, to upload an entire site translation at once, export the site content for translation, then import the
translated content in an .xlf file.
In Experience Builder, you can import translated content to your LWR site only in an .xlf file. Each file can contain only one translation,
and you can import only one .xlf file at a time. File uploads of greater than 1 MB can take a few minutes. In that case, we send you an
email when the import is complete.
Note: If you exported your site content before Summer ’22, export it again to ensure that you and your translator are working
with the most recent version of the .xlf format. You can’t upload older versions of the .xlf format to your site.
Importing a site translation overwrites your existing content in that language, but it doesn’t overwrite your default language content or
content in other languages.
Avoid updating your site, including adding or removing components, while the site is being translated because the translation is based
on the earlier (pre-updated) version of the site.
1. In the Settings panel in Experience Builder, select Languages.
2. In the Languages panel, click Upload File and navigate to the translation file, or drag the file to the Drop File field.
3. To view the translated content in Experience Builder, select that language from the language selector.
The file that you exported for translation didn’t include any CMS content that’s on your site or any items in your site’s navigation menu.
Translate the CMS content in your CMS Workspace in the Digital Experiences app. Use Translation Workbench to translate the items in
the site’s navigation menu.
63
Import Translated Content to Your LWR SiteCreate a Multilingual LWR Site

Note: You can also import a translation programmatically using ExperienceBundle. See ExperienceBundle in the Metadata API
Developer Guide.
SEE ALSO:
Add a Language to Your LWR Site
Export Content from Your LWR Site for Translation
Salesforce Help: Work with Translated Content in the Salesforce CMS
Salesforce Help: Translation Workbench
64
Import Translated Content to Your LWR SiteCreate a Multilingual LWR Site

CHAPTER 6 Add More Customizations
This section describes several advanced customizations, such as creating custom record components
and using Apex and SOQL for search.
In this chapter ...
• Create Custom
Record Components
• Use Apex and SOQL
for Search
• Use Expressions to
Add Dynamic Data to
LWR Sites
• Create a Logout Link
Component
• Integrate Third-Party
Libraries Using the
Privileged Script Tag
65
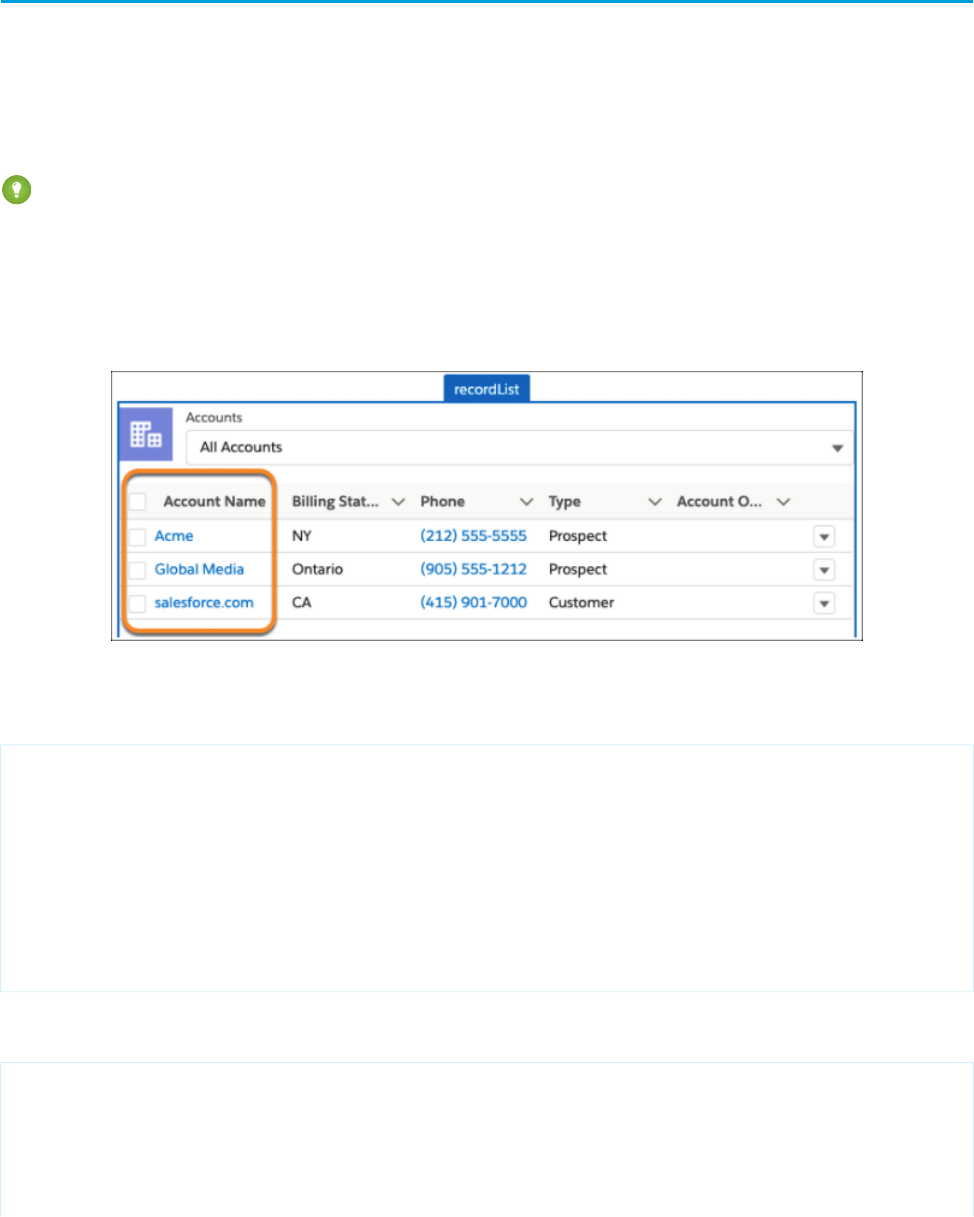
Create Custom Record Components
The Build Your Own (LWR) template doesn’t include record components, but you can use the User Interface API to construct your own
custom components.
Although many Aura template components aren’t available as Lightning web components, you can extend existing Lightning web
components, as detailed in the Lightning Web Components Reference. However, User Interface APIs aren’t yet available for related
record lists, so you can’t fully construct these types of components.
Tip: See examples of custom record home and record detail components in
customRecord/force-app/main/default/lwc in the code samples files.
Create a Custom Cell for Record Lists
Let’s say you want to add a custom column to the data table in your record list component—in this case, the Account Name column.
To add a custom cell to your record list, you can extend LightningDatatable to define a custom data type. In this example, the
name of the record is displayed in the table with a hyperlink to its record page.
import { LightningDatatable } from ‘lightning/datatable;
export default class RecordTable extends LightningDatatable {
// define a new custom type… the custom cell will have a markup
// represented by the template attribute
static customTypes = {
‘name’: {
template: ‘./name.html’
};
}
We then define the markup for the custom type inside our template. To display a hyperlink to a record page, we create a separate record
link component and provide the values supplied by the record table component.
// inside name.html
<template>
<c-record-link
object-api-name={value.objectApiName}
record-id={value.id}
label={value.name}>
66
Create Custom Record ComponentsAdd More Customizations
</c-record-link>
</template>
Navigate to a Record Page or Custom Action
Note: User Interface APIs aren’t yet available for actions. For basic record creation and editing, consider using a separate page
and a lightning-record-form or a custom Apex controller.
Record components can extend NavigationMixin from lightning/navigation, which allows your web component to
generate a URL for navigating record and object pages.
import { LightningElement } from 'lwc';
import { NavigationMixin } from 'lightning/navigation';
export default class RecordList extends NavigationMixin(LightningElement) {
...
}
Using NavigationMixin.Navigate, you provide the desired page type and route parameters. This function generates a new
URL and navigates to it, which is useful for performing actions on another page. Record actionNames other than view require a
custom page.
Here’s an example for navigating to a custom page to edit a record.
handleEdit() {
// assumes you have created a custom page with API Name “record”
this[NavigationMixin.Navigate]({
type: 'comm__namedPage',
attributes: {
name: 'record__c'
},
state: {
objectApiName: this.objectApiName,
recordId,
actionName: 'edit'
}
});
}
The result generates a URL that can be used for a new record page.
Important: Custom solutions for object pages using preconfigured route parameters have only limited support. Use at your own
risk. Use Salesforce-provided page templates when possible.
Use Apex and SOQL for Search
Create a theme layout search component that sends the user to a search results page.
Tip: See examples for custom search in codeSamples/customSearch/force-app/main/default/ in the code
sample files.
1. Create a standard page for Search in the site, which functions as the search results landing page.
67
Use Apex and SOQL for SearchAdd More Customizations
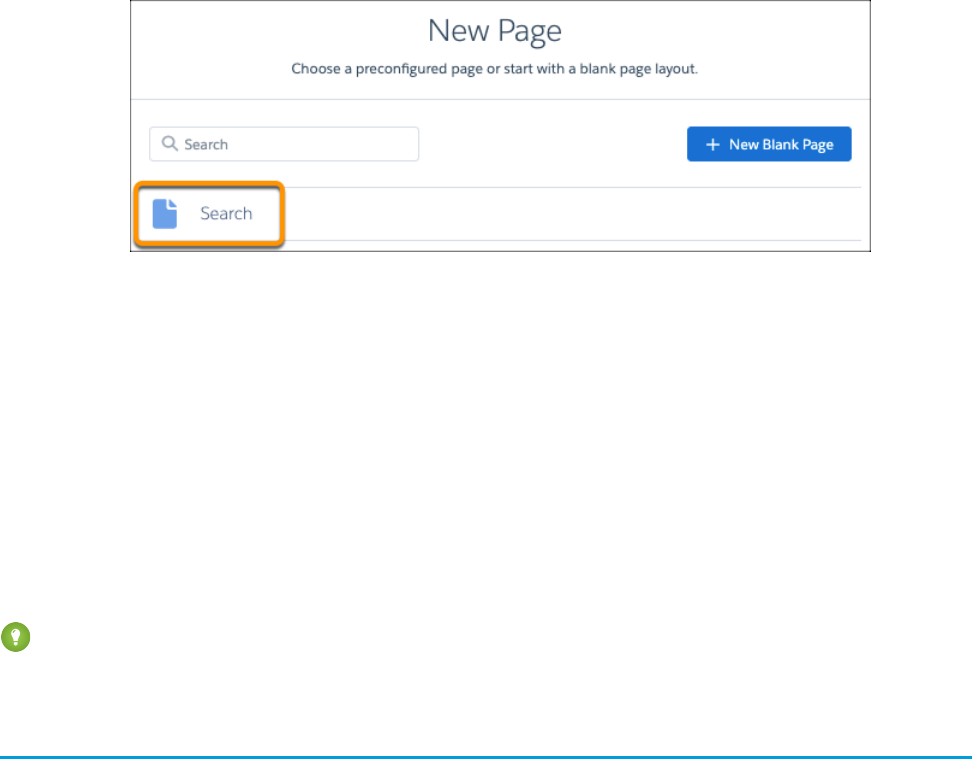
2. Drag the Simple Theme Header component onto the theme header region. The Simple Theme Header component serves as the
header for the page and contains some utilities, such as the Search Bar component.
When a user types a term and clicks Enter, the Search Bar component uses the lightning-navigation API to navigate to
the Search page in the site. See lightning-navigation in the Lightning Web Components Reference.
3. Drag the Search Results component into the content region of the Search page. The Search Results component grabs the search
URL parameter by using the {!Route.term} expression language reference.
The Search Results component then sends the search term and object API name as parameters in an Apex method request for the
search results data, which it uses to populate the UI.
4. The GlobalSearchController.cls is the Apex controller that takes the search term and performs a SOQL search for
records with a Name containing the search string.
Tip: Make sure that you configure the Apex class with permissions for any user you want to be able to use the search results. See
How Does Apex Class Security Work in Salesforce Help.
Use Expressions to Add Dynamic Data to LWR Sites
With expressions, you can make calculations and access property values and other data to pass into the component’s attributes. Use
expressions for dynamic output or for passing values into components by assigning them to attributes.
An expression is any set of literal values, variables, subexpressions, or operators that can be resolved to a single value. Method calls aren’t
allowed in expressions.
The expression syntax is: {!expression} where expression is a placeholder.
Data Binding Expressions
Use these expressions to bind data from Salesforce to your LWR site and dynamically populate content.
You can use an HTML Editor component to a CMS or record detail page. In this case, we want to show an image in the banner.
68
Use Expressions to Add Dynamic Data to LWR SitesAdd More Customizations
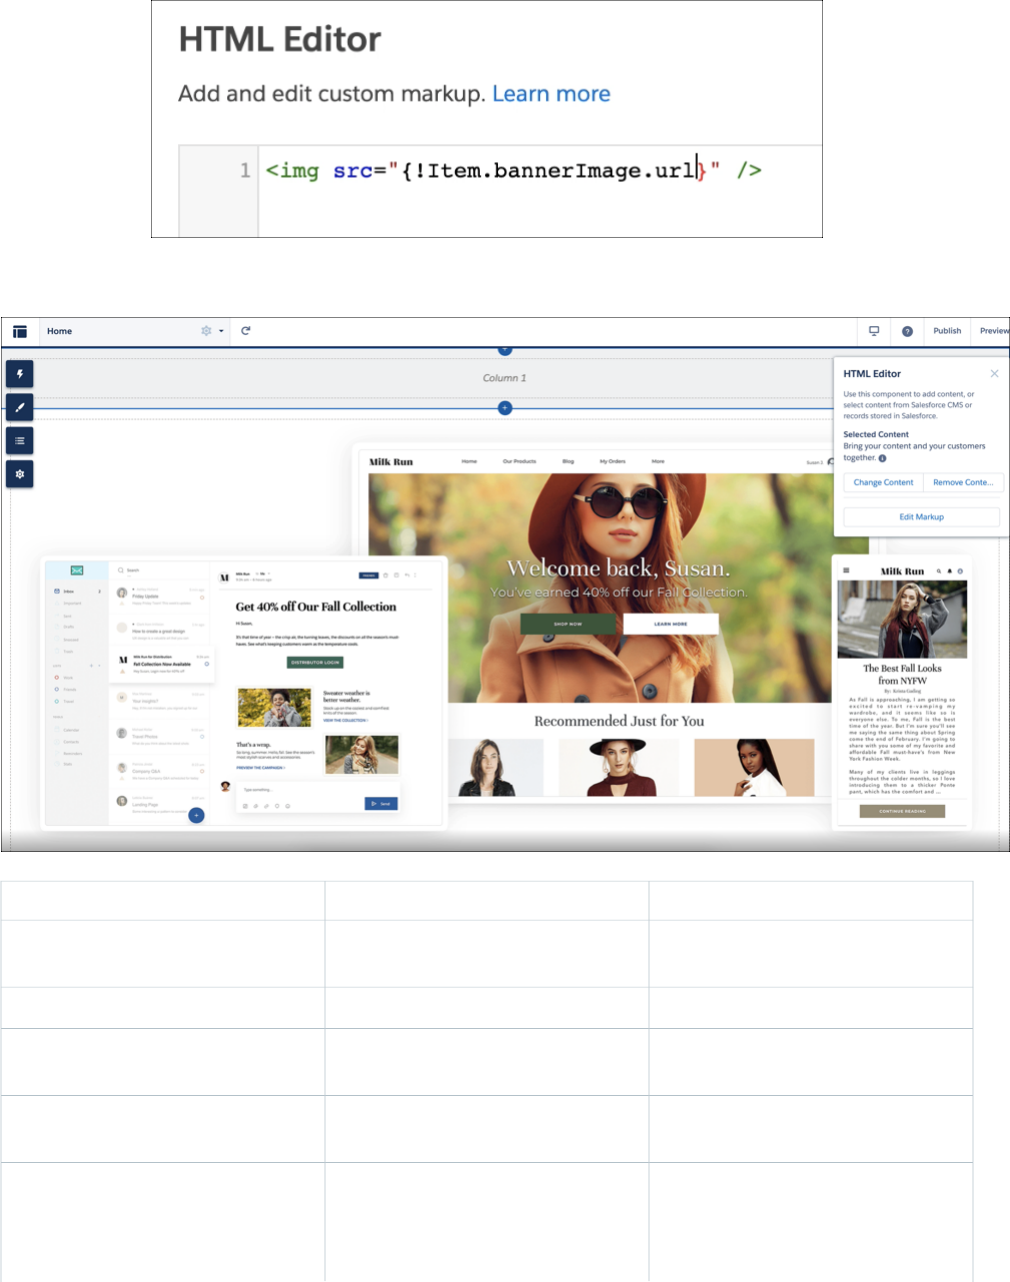
When the page loads on the live site, the relevant value replaces the expression.
Supported Pages and ComponentsDescriptionExpression
Anything that’s bound to data. Can include
Salesforce CMS or record data.
Gets the data for the field on the current
bound data.
{!Item.field}
Anything that’s bound to CRM data.Gets the raw value for the data field.{!Item.field._rawValue}
Anything that’s bound to CRM data.Gets the formatted and localized value for
the data field.
{!Item.field._displayValue}
Anything that’s bound to a CMS item,
including CMS detail pages.
Gets the URL of a Salesforce CMS data item.{!Item._detailURL}
First, create a translated custom label in
Salesforce Setup. For more information, see
Defines the label’s localized value when you
specify labels in Experience Builder.
{!Label.namespace.name}
Translate Custom Labels. Then, use the label
expression in any Experience Builder
69
Use Expressions to Add Dynamic Data to LWR SitesAdd More Customizations

Supported Pages and ComponentsDescriptionExpression
component that has a text field to see the
localized label.
Other Expressions
Use other expressions to query parameters, resolve the correct basePath for a site, or to leverage user fields in expressions.
Supported Pages and ComponentsDescriptionExpression
Gets a query parameter from the URL.{!Route.param}
•
All pages
•
Out-of-the-box and custom
components with string properties
•
HTML Editor
•
Rich Content Editor
Gets a parameter value from a URL where
: precedes the parameter. For example,
{!param}
•
All pages with a dynamic parameter in
their URL
gets {!term} from the
/global-search/:term URL.
•
Out-of-the-box and custom
components with string properties
•
HTML Editor
•
Rich Content Editor
Resolves to the basePath of the LWR site.{!Site.basePath}
•
All pages
•
Out-of-the-box and custom
components with string properties
•
HTML Editor
•
Rich Content Editor
Resolves to the Salesforce ID of the user.{!User.userId}
•
All pages
•
Out-of-the-box and custom
components with string properties
•
HTML Editor
•
Rich Content Editor
Returns TRUE or FALSE based on whether
the user is a guest user.
{!User.isGuest}
•
All pages
•
Out-of-the-box and custom
components with string properties
•
HTML Editor
•
Rich Content Editor
Resolves to the value of a Salesforce User
Object’s field.
{!User.Record.<User sObject
Field>}
•
All pages
70
Use Expressions to Add Dynamic Data to LWR SitesAdd More Customizations
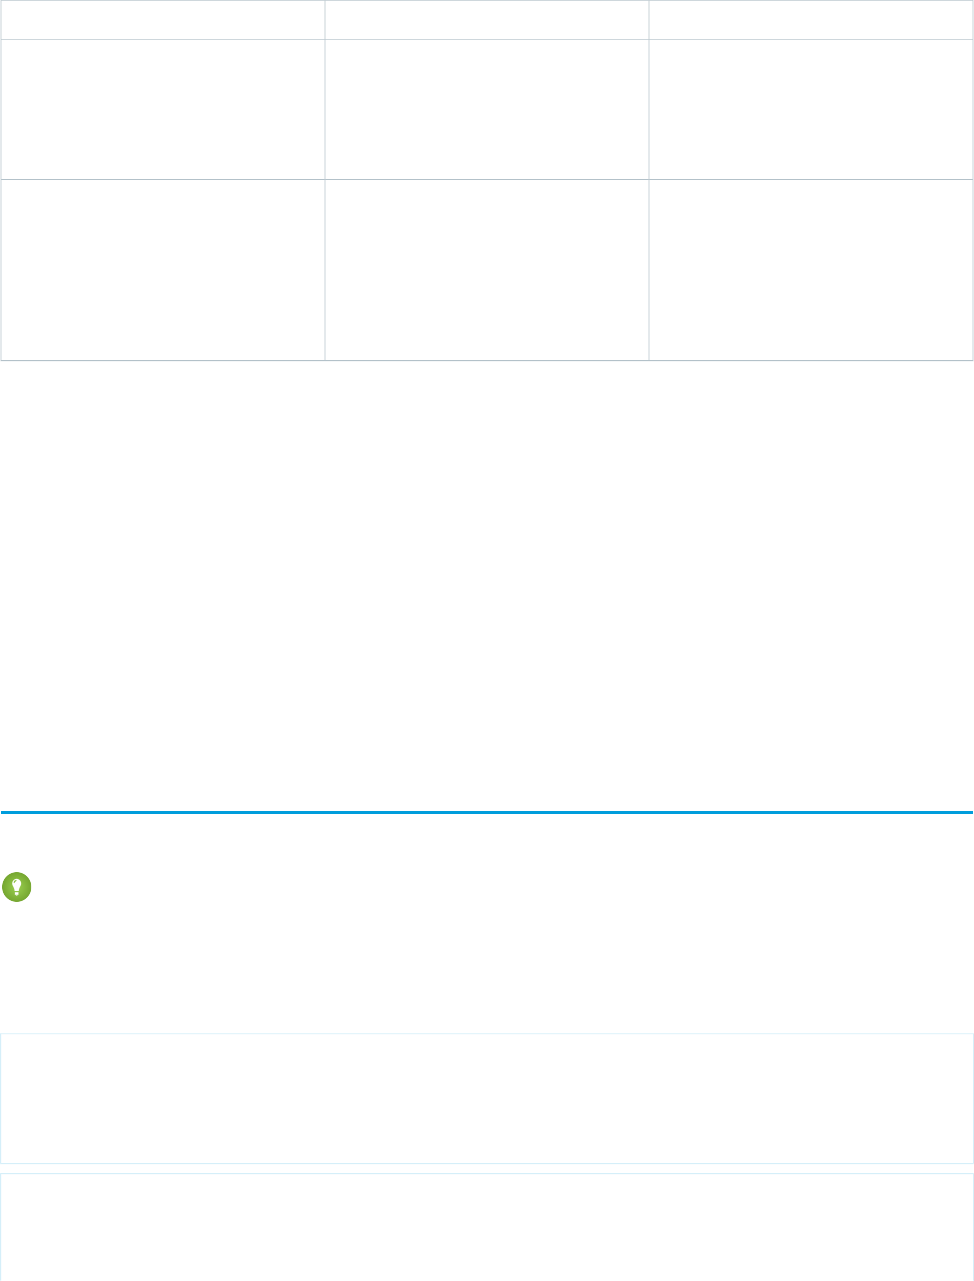
Supported Pages and ComponentsDescriptionExpression
•
Out-of-the-box and custom
components with string properties
•
HTML Editor
•
Rich Content Editor
Returns a list of buyer groups associated
with the user when used in sites that are
built using the Commerce templates.
{!User.Commerce.BuyerGroups}
•
All pages
•
Out-of-the-box and custom
components with string properties
•
HTML Editor
•
Rich Content Editor
•
When you use the {!param} or {!Route.param} expression in the HTML Editor or Rich Content Editor components, some
HTML special characters are escaped, or replaced with different values, for security purposes. These characters include <, >, and &.
•
LWR sites don’t support expressions that display authenticated user information and start with {!CurrentUser.
•
Expressions with user data are resolved for Rich Content Editor only on Preview and Published sites.
•
When binding User data, you can access all the User sObject fields by using the {!User.Record.<User sObject Field>}
expression. You can also use the {!User.Commerce.<Commerce Field>} expression to access user data related to
Commerce in sites built using the Commerce templates. In the Summer ’23 release, only BuyerGroups is supported as a
Commerce field.
SEE ALSO:
Experience Cloud Developer Guide : Use Expressions in Aura Sites
Create a Logout Link Component
To log out your users, you can create a custom logout link component.
Tip: See examples for a logout link and profile menu in
codeSamples/salesforceScopedModules/force-app/main/default/ in the code sample files.
To log out your users, redirect them to the [/sitePrefix]vforcesite/secur/logout.jsp path where [/sitePrefix]
is your site’s base path (without the /s). If your site doesn’t use a prefix, use an empty string.
Here’s an example of a component that only displays the logout link when a user is authenticated.
<template>
<template if:false={isGuest}>
<a href={logoutLink}>Logout</a>
</template>
</template>
import { LightningElement, api } from "lwc";
import isGuest from "@salesforce/user/isGuest";
import basePath from "@salesforce/community/basePath";
71
Create a Logout Link ComponentAdd More Customizations

export default class Logout extends LightningElement {
get isGuest() {
return isGuest;
}
get logoutLink() {
const sitePrefix = basePath.replace("/", "");
return '/${sitePrefix}vforcesite/secur/logout.jsp';
}
}
Alternatively, you can make calls to the provided system Apex classes to get the login and logout links.
import getLogoutUrl from
'@salesforce/apex/applauncher.IdentityHeaderController.getLogoutUrl';
import getLoginUrl from '@salesforce/apex/system.Network.getLoginUrl';
By default, users are redirected to the login page after logging out. You can configure the logout page URL in Experience Workspaces
under Administration > Login & Registration > Logout Page URL.
Integrate Third-Party Libraries Using the Privileged Script Tag
Some components within an LWR site encapsulate their elements in shadow DOM, which prevents global interaction with those
components. As a result, third-party JavaScript libraries such as Google Analytics and Google Tag Manager can have trouble querying
the DOM globally on an LWR site. When programmatic access to an element within the DOM is needed, you can write scripts within an
<x-oasis-script> privileged script tag. Loading third-party libraries using this privileged script tag lets those libraries bypass any
shadow DOM boundaries.
Use the custom <x-oasis-script> tag in place of the standard <script> in the head markup or inline. Scripts loaded within
this custom tag run inside a special iframe that’s exempt from shadow DOM and are always executed asynchronously.
<x-oasis-script> uses the same syntax as the <script> tag.
<x-oasis-script src="third_party_library.js"></x-oasis-script>
You can also use the tag to add event listeners and to import and export global variables with the imported-global-names
and exported-global-names attributes. If you have custom code within the <x-oasis-script> tag, add the attribute hidden="true"
to the tag. This attribute ensures that the custom code within the tag remains hidden from site visitors while the page is loading.
For example, this code sample defines a global variable—testVar—on the outer window, which is then imported for use in the
x-oasis-script window. The global variable must be imported to define it in the privileged scope.
<script>
window.testVar = "myTestVar";
</script>
<x-oasis-script hidden="true" imported-global-names="testVar">
// Custom code to access testVar
console.log(window.testVar)
</x-oasis-script>
72
Integrate Third-Party Libraries Using the Privileged Script TagAdd More Customizations
In turn, this example exports the testVar global variable from x-oasis-script.
<x-oasis-script hidden="true" exported-global-names="testVar">
window.testVar = "myTestVar";
</x-oasis-script>
<script>
// setTimeout is needed in case this script tag is run before oasis script
setTimeout(function(){
// Custom code to access testVar
console.log(window.testVar)
}, 5000);
</script>
Tip: If you include a third-party library inline or in the head markup, remember to switch to Relaxed CSP and to allowlist the
remote host.
Examples: Use Google Analytics in LWR Sites
Discover how visitors engage with your LWR site by using Google Analytics to track their interactions. These real-world examples
use the <x-oasis-script> privileged script tag. This tag allows Google Analytics to interact with elements within the shadow
DOM and attach event handlers such as click events or form submissions.
Examples: Use Google Tag Manager in LWR Sites
Use Google Tag Manager to track customer interactions with your LWR site, which is a single-page application. In these examples,
the <x-oasis-script> privileged script tag lets Google Tag Manager interact with elements within the shadow DOM.
SEE ALSO:
Video: Use Privileged Scripts for Third-Party Libraries in LWR Sites
Salesforce Help: Add Markup to the Page <head> to Customize Your Site
Salesforce Help: Select a Security Level in Experience Builder Sites
Salesforce Help: Where to Allowlist Third-Party Hosts
Examples: Use Google Analytics in LWR Sites
Discover how visitors engage with your LWR site by using Google Analytics to track their interactions. These real-world examples use
the <x-oasis-script> privileged script tag. This tag allows Google Analytics to interact with elements within the shadow DOM
and attach event handlers such as click events or form submissions.
In each example, you add the provided code sample to the head markup. To access the head markup in your LWR site, in Experience
Builder click Settings > Advanced > Edit Head Markup.
73
Examples: Use Google Analytics in LWR SitesAdd More Customizations
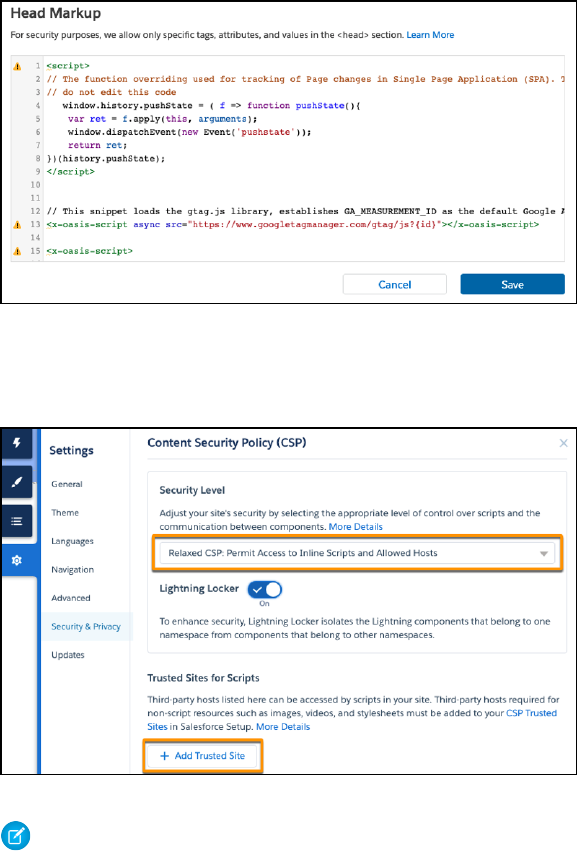
Because you’re adding Google Analytics as a third-party library, switch to Relaxed CSP in Experience Builder in Settings > Security &
Privacy. Also add the URL for your Google Analytics script to the Trusted Sites for Scripts list on this page.
Note: Each sample includes the same <script> tag that adds an entry to the browser stack to facilitate event tracking on
pages in an LWR site, which is a single-page application.
Each sample also loads the Google Analytics JavaScript library using this code, where {id} represents the Google Analytics ID:
<x-oasis-script async
src=“https://www.googletagmanager.com/gtag/js?{id}”></x-oasis-script>.
Example 1: Track Page Views
This example tracks when a user views a page in an LWR site. In the sample code, the pushstate event is fired when a visitor lands
on a site page. The event listener on the window passes the event to Google Analytics along with the page URL.
View the Sample Code
Example 2: Track Click Events
In this scenario, a page in the LWR site contains a button called Submit and a link called Download. Google Analytics can track when a
customer clicks the button or the link.
74
Examples: Use Google Analytics in LWR SitesAdd More Customizations
In the sample code, the buttonAndLinkClick function uses the .button_class class to listen for a click event on the Submit
button. The function also uses .download_link to listen for a click event on the Download link. When either event is fired, the
event listeners on the button and link pass the event details to Google Analytics under the link_button_click event category.
View the Sample Code
Example 3: Track Form Input and Submissions
In this scenario, a page in the LWR site contains a form called Subscribe, and within the form, a button called Submit. Google Analytics
can track when a user enters information in the form or clicks Submit.
In the sample code, the formClick function uses the .subscription_form_class class to listen for a change event on
the form input fields and a click event on the Submit button. When either event is fired, the event listener on the form passes the event
details to Google Analytics under the input_change event category or the form_submit_success event category.
View the Sample Code
Example 4: Track Outbound Link Clicks
In this scenario, a page in the LWR site contains links that redirect users to external websites. Google Analytics can track when a user
clicks any of these outbound links.
In the sample code, the trackOutboundLinks function uses the .outbound class to listen for a click event on an external link.
When a click event is fired, the event listener on the link passes the event details—including the external redirect link—to Google
Analytics under the outbound event category.
View the Sample Code
Example 5: Track Visit Duration
In this scenario, Google Analytics tracks how long a user stays on a page on the LWR site.
In the sample code, the beforeunload event listens for a page refresh or page unload. The window.performance attribute
from the global window object measures the time since the user landed on the page. When the beforeunload event is fired, the
event listener on the window passes the event details to Google Analytics, including the duration of the user’s stay on the page.
View the Sample Code
SEE ALSO:
Google Help: Analytics Help
Examples: Use Google Tag Manager in LWR Sites
Use Google Tag Manager to track customer interactions with your LWR site, which is a single-page application. In these examples, the
<x-oasis-script> privileged script tag lets Google Tag Manager interact with elements within the shadow DOM.
First, because you’re adding Google Tag Manager as a third-party library, switch to Relaxed CSP in Experience Builder in Settings >
Security & Privacy. Also add the URL for your Google Tag Manager script to the Trusted Sites for Scripts list on this page.
75
Examples: Use Google Tag Manager in LWR SitesAdd More Customizations
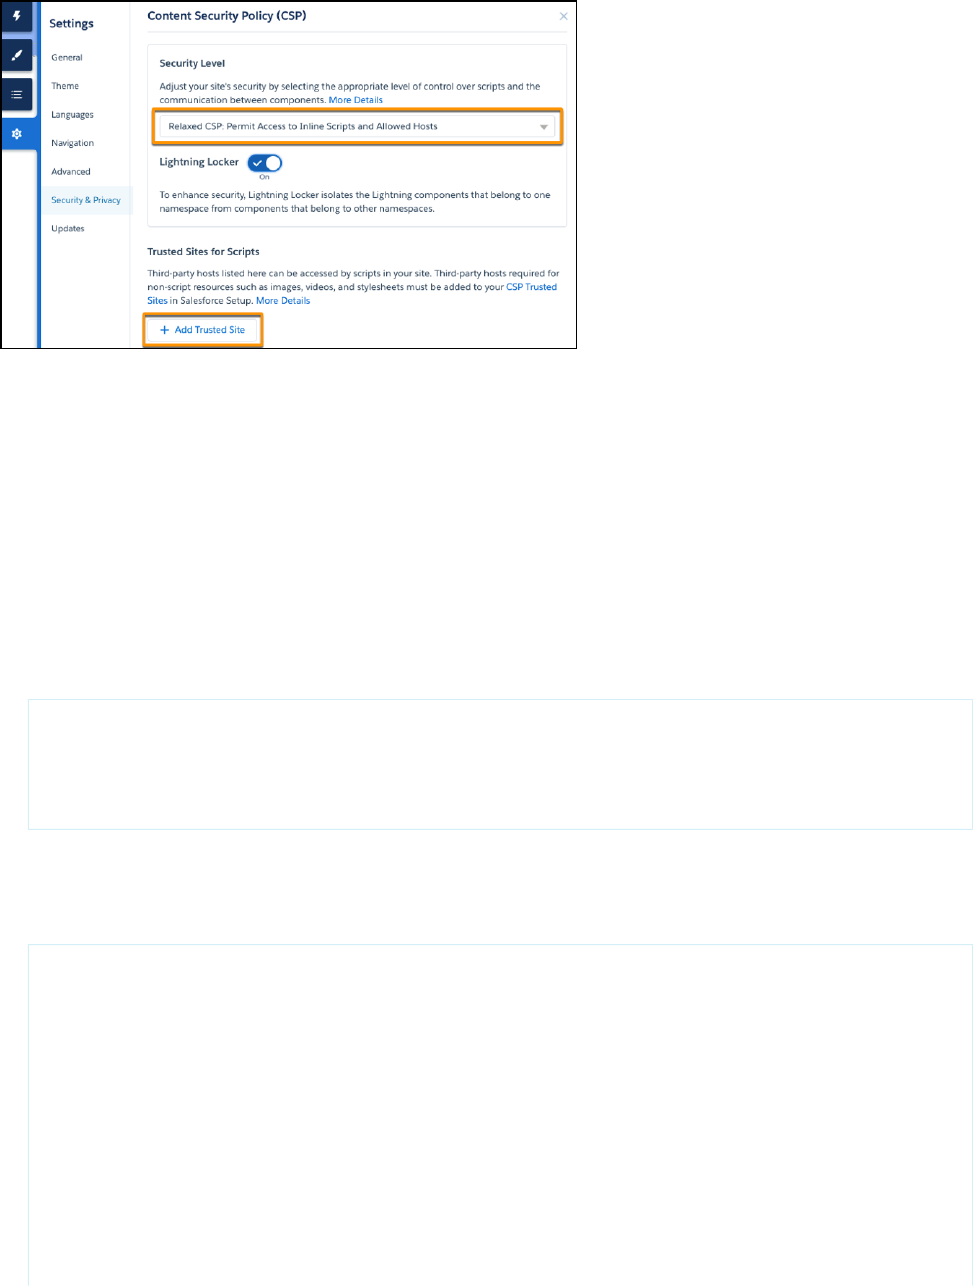
In these examples, the code listens for events and sends the captured details to the data layer. The data layer is an object that contains
all the information that you want to pass to Google Tag Manager, such as events or variables. You can set up triggers in Google Tag
Manager based on the variables in the data layer. Keep in mind that triggers and events loaded into Google Tag Manager using the
<x-oasis-script> aren't visible in Google Tag Manager Preview mode. To view your expected changes, switch to live mode.
Example 1: Track Form Inputs and Submissions
In this example, a page in the LWR site contains a form called Subscribe. Google Tag Manager tracks when the form is submitted and
what a customer entered in the form.
1. In Experience Builder, click Settings > Advanced > Edit Head Markup, and embed this Google Tag Manager script in an oasis
script tag. Replace XXXX with your Google Tag Manager ID.
<x-oasis-script hidden="true">(function(w,d,s,l,i){w[l]=w[l]||[];w[l].push({'gtm.start':
new Date().getTime(),event:'gtm.js'});var f=d.getElementsByTagName(s)[0],
j=d.createElement(s),dl=l!='dataLayer'?'&l='+l:'';j.async=true;j.src=
'https://www.googletagmanager.com/gtm.js?id='+i+dl;f.parentNode.insertBefore(j,f);
})(window,document,'script','dataLayer','GTM-XXXX');</x-oasis-script>
2. In Google Tag Manager, create a custom HTML tag, and add this script to the tag.
This code uses the .subscribe class to listen for the forms present on the page and calls the lwr_form_function to send
the captured inputs to the data layer.
<script>
var lwr_forms = window.frames[0].window.document.querySelectorAll('.subscribe');
lwr_forms.forEach(lwr_form_function);
function lwr_form_function(item) {
item.addEventListener('submit', function (event) {
window.dataLayer.push({
'event': 'formSubmit',
'FormTarget': event.target["target"],
'FormId': event.target.id,
'FormClass': event.target.className,
'FormUrl': event.target.src,
'FormElement': event.target,
'FormText': event.target.innerText
});
76
Examples: Use Google Tag Manager in LWR SitesAdd More Customizations

});
}
</script>
3. Create a Window Loaded page view trigger in Google Tag Manager, and set it on all pages by omitting any filters that enable the
trigger on specific pages.
4. On the configuration page for the custom HTML tag that you created in step 2, assign the Window Loaded page view trigger to the
tag.
5. Publish the trigger.
Example 2: Track Button and Link Clicks
In this scenario, Google Tag Manager tracks each click of a link or button on a page.
1. In Experience Builder, click Settings > Advanced > Edit Head Markup, and embed this Google Tag Manager script in an oasis
script tag. Replace XXXX with your Google Tag Manager ID.
<x-oasis-script hidden="true">(function(w,d,s,l,i){w[l]=w[l]||[];w[l].push({'gtm.start':
new Date().getTime(),event:'gtm.js'});var f=d.getElementsByTagName(s)[0],
j=d.createElement(s),dl=l!='dataLayer'?'&l='+l:'';j.async=true;j.src=
'https://www.googletagmanager.com/gtm.js?id='+i+dl;f.parentNode.insertBefore(j,f);
})(window,document,'script','dataLayer','GTM-XXXX');</x-oasis-script>
2. In Google Tag Manager, create a custom HTML tag, and add this script to the tag.
This code listens for events on the click class and sends the captured details from the event to the data layer.
<script>
window.frames[0].window.document.addEventListener('click',function(e){
var targetElement=e.target;
window.dataLayer.push({
event: 'custom_click_Text_Trigger',
custom_event: {
element: targetElement,
elementId: targetElement.id || '',
elementClasses: targetElement.className || '',
elementUrl: targetElement.href || targetElement.action || '',
elementTarget: targetElement.target || '',
elementText: targetElement.innerText
}
});
});
</script>
3. Create a trigger for Window Loaded in Google Tag Manager, and set it on all pages by omitting any filters that enable the trigger
on specific pages.
4. On the configuration page for the custom HTML tag that you created in step 2, assign the Window Loaded page view trigger to the
tag.
5. Publish the trigger.
SEE ALSO:
Google Help: Tag Manager Help
77
Examples: Use Google Tag Manager in LWR SitesAdd More Customizations
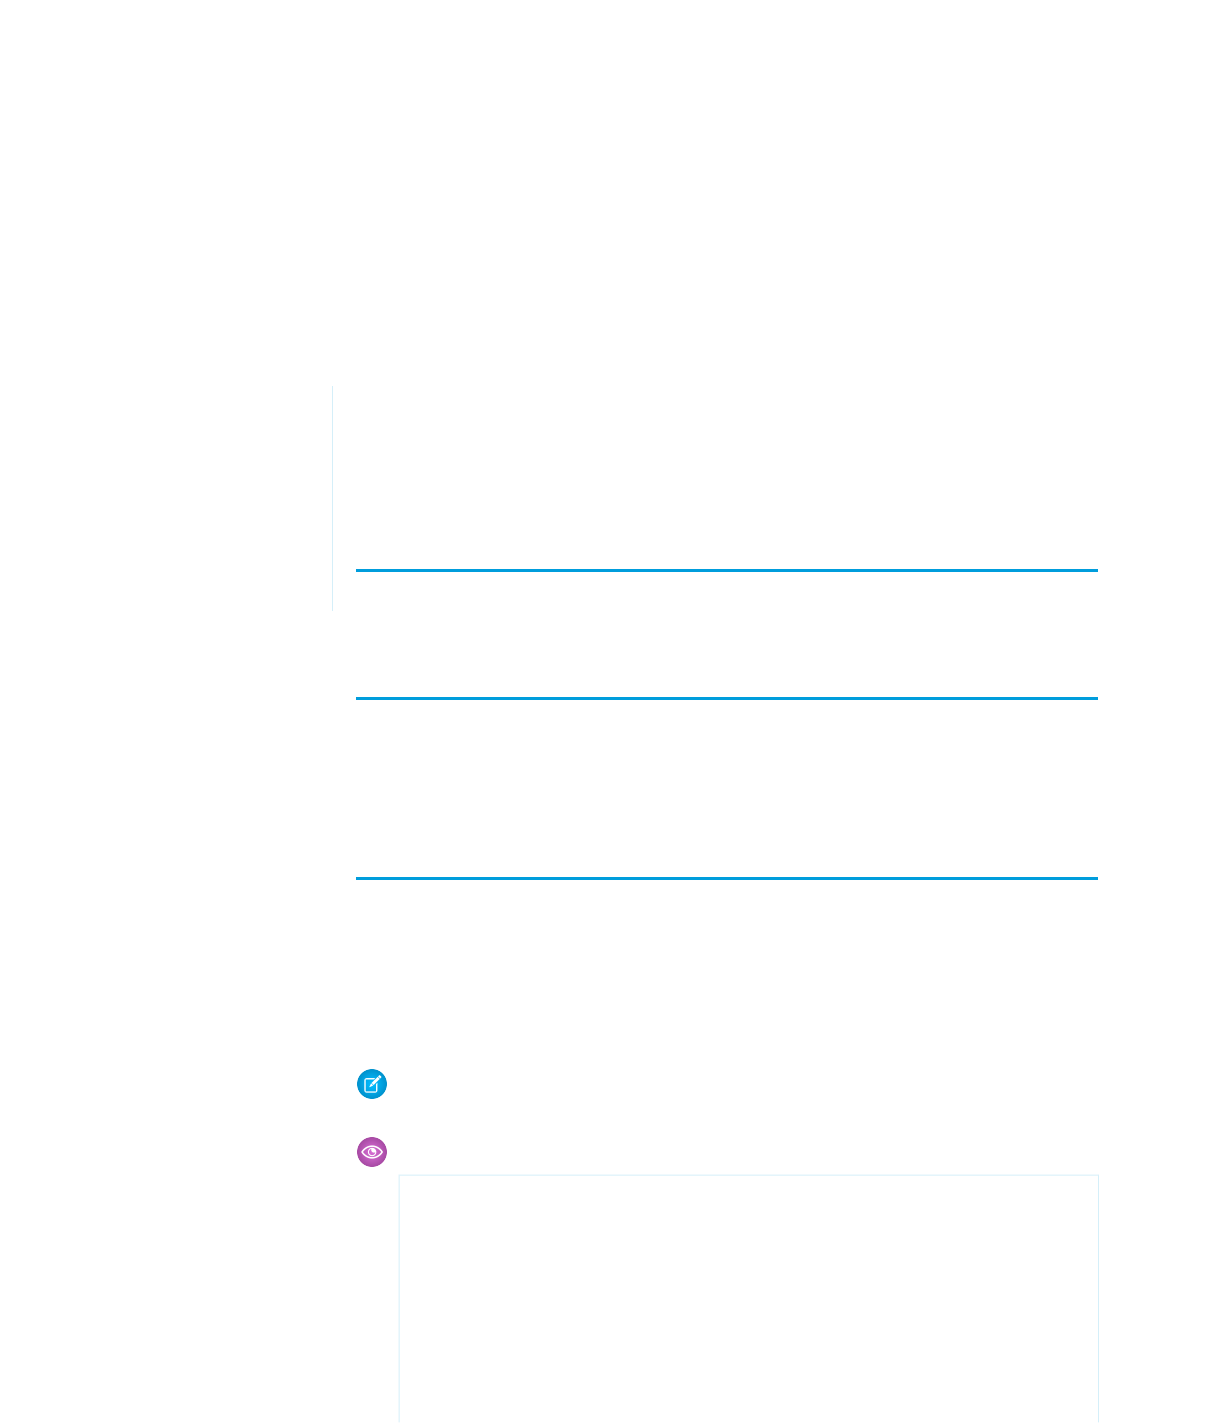
CHAPTER 7 Manage Data in LWR Sites
Use this guide to understand how visitor engagement from your LWR sites can be sent to Data Cloud
and how you can best tailor our tools to your specific needs. Data is a powerful tool in the world of site
management and analytics. Understanding how your users interact with your sites helps you build
detailed user profiles, create enhanced analytics, and personalize your site for the best user experience.
In this chapter ...
• Capture and
Integrate
Engagement Data
Familiarize Yourself with Data Cloud
If you’re unfamiliar with Data Cloud, take some time to explore Data Cloud Help.
• Set Up Data Cloud
• Tag Manager Event
Reference
Turn On Data Cloud for Your Site
The Experience Cloud integration with Data Cloud automatically performs most of the setup needed
for you to get started. Before you get started, perform the tasks described in Connect Data Cloud to Your
LWR Sites in Salesforce Help.
Learn About the Experience Data Layer
A data layer contains all the information captured when a user interacts with your website. The data
layer is embedded as JSON in the HTML of your website. It provides a central location for user data so it
can be sent to other applications and processed. The Experience Data Layer contains information about
the page, the user, and behavioral data from your Experience Cloud sites. All of that data provides valuable
information about how your customers interact with your site and can be sent along to other apps like
Data Cloud and Google Analytics, or power products like Marketing Cloud.
Note: Use the Experience Data Layer Object Lightning web component to populate the data
layer.
Example: Experience Data Layer Code with Embedded JSON
<html>
<head>
</head>
<body>
<web-runtime-app>
<experience-data-layer-object>
<script type="application/json"
data-provider-type="site">
{
78

"siteId": "site-12345"
}
</script>
</experience-data-layer-object>
<experience-data-layer-object>
<script type="application/json"
data-provider-type="page">
{
"url":
"https://www.datacloud.salesforce.com",
"urlReferrer":
"https://www.root.salesforce.com"
}
</script>
</experience-data-layer-object>
<experience-data-layer-object>
<script type="application/json"
data-provider-type="user">
{
"guestUuid": "guest-uuid-12345",
"crmId": "user-id-12345"
}
</script>
</experience-data-layer-object>
<commerce-product-list-component>
<commerce-product-list-data-provider>
<experience-data-layer-object>
<script type="application/json"
data-provider-type="catalog">
[
{
"id": "product-id-12345",
"type": "Product",
"attributes": {
"color": "blue"
}
},
{
"id": "product-id-54321",
"type": "Product",
"attributes": {
"color": "orange"
}
}
]
</script>
</experience-data-layer-object>
</commerce-product-list-data-provider>
<div>
<p>Product-1</p>
</div>
<commerce-individual-product-component>
</commerce-individual-product-component>
<div>
79
Manage Data in LWR Sites

<p>Product-2</p>
</div>
<commerce-individual-product-component>
</commerce-individual-product-component>
</commerce-product-list-component>
</web-runtime-app>
</body>
</html>
80
Manage Data in LWR Sites

Capture and Integrate Engagement Data
Experience Tag Manager is a JavaScript library that captures user-interaction events from the Experience Cloud data layer and combines
them with site data to generate web events. These events are sent to other applications, such as Data Cloud or Google Analytics. Tag
Manager is installed automatically when you connect your enhanced LWR sites to Data Cloud with the built-in Data Cloud integration.
You can then use information you gather with Tag Manager to build behavior profiles for web visitors, audience segmentation, site
personalization, or Salesforce integrations.
Experience interaction events are triggered when a user performs an action on a site page. Examples include scrolling, clicking, and
viewing. Events can take place on Lightning web components or the page itself. When they occur, they’re sent to the event queue,
which notifies the Experience Tag Manager to process the events.
Important: In the Summer '24 release, when Data Cloud and Google Analytics integrations are enabled in an LWR site, the transfer
of site metadata to a different org via the DigitalExperienceBundle Metadata API encounters component failures. For more
information, see DigitalExperienceBundle has component failures with Data Cloud and Google Analtyics integrations.
Configure the Consent Opt-In Default
To start capturing events to send to Data Cloud, configure your user consent options. By default, Tag Manager doesn’t send data to
its destination until the user explicitly opts in. Choose how to present consent options to the site visitor and whether to update the
default behavior.
Track User Interactions to Send to Data Cloud
Your Data Cloud integration comes with a set of interaction events that are turned on and mapped to the Website Engagement
DMO by default. Interactions are either all mapped, or not mapped at all, but you can update event names to customize your
integration. An interaction event has a named identifier, required values, and tracked values that you define.
81
Capture and Integrate Engagement DataManage Data in LWR Sites
Configure the Consent Opt-In Default
USER PERMISSIONS
To create an Experience
Cloud site:
• Create and Set Up
Experiences AND View
Setup and Configuration
To customize an Experience
Cloud site:
• Be a member of the site
AND Create and Set Up
Experiences
OR
• Be a member of the site
AND View Setup and
Configuration AND an
experience admin,
publisher, or builder in
that site
To publish an Experience
Cloud site:
• Be a member of the site
AND Create and Set Up
Experiences
OR
• Be a member of the site
AND an experience
admin or publisher in
that site
To start capturing events to send to Data Cloud, configure your user consent options. By default,
Tag Manager doesn’t send data to its destination until the user explicitly opts in. Choose how to
present consent options to the site visitor and whether to update the default behavior.
Not all website visitors and customers consent to cookie tracking. With Experience Tag Manager,
you can configure whether customers opt in or opt out of tracking. After a user provides consent,
and the consent info is passed to your site, Experience Cloud respects the consent preference by
sending or not sending data. Any engagement event triggered before a user provides consent is
ignored. We recommend using a consent management provider (CMP) application to help manage
your consent options.
Tag Manager listens for a specific interaction event called set-consent to capture user consent.
Consent is stored as long as the session is active and the page isn’t reloaded. Every time the page
is refreshed the consent value must be sent through the set-consent event.
1. From Setup, in the Quick Find box, enter Digital Experiences, click Digital
Experiences, and then click Settings.
2. Select Security & Privacy.
3. Under Security Level, select Relaxed CSP: Permit Access to Inline Scripts and Allowed
Hosts.
4. When you’re prompted, allow the change.
5. Navigate back to Settings and select Advanced.
6. Click Edit Head Markup and add this script to the existing code.
<script>
document.dispatchEvent(
new CustomEvent('experience_interaction', {
bubbles: true,
composed: true,
detail: {
name: 'set-consent',
value: true,
},
})
);
</script>
7. Save your changes and publish your site.
82
Configure the Consent Opt-In DefaultManage Data in LWR Sites

If you’re using a CMP, follow the steps above with the following script and include your CMP’s API as the value attribute.
<script>
document.dispatchEvent(
new CustomEvent('experience_interaction', {
bubbles: true,
composed: true,
detail: {
name: 'set-consent'
value: CMP.getConsent()
},
})
);
</script>
You can remove user consent by triggering an interaction event with no value specified.
<script>
document.dispatchEvent(
new CustomEvent('experience_interaction', {
bubbles: true,
composed: true,
detail: {
name: 'set-consent'
},
})
);
</script>
SEE ALSO:
Consent Interactions
Salesforce Help: Activity Tracking for Marketing Cloud Growth Landing Pages
83
Configure the Consent Opt-In DefaultManage Data in LWR Sites
Track User Interactions to Send to Data Cloud
USER PERMISSIONS
To create an Experience
Cloud site:
• Create and Set Up
Experiences AND View
Setup and Configuration
To customize an Experience
Cloud site:
• Be a member of the site
AND Create and Set Up
Experiences
OR
• Be a member of the site
AND View Setup and
Configuration AND an
experience admin,
publisher, or builder in
that site
To publish an Experience
Cloud site:
• Be a member of the site
AND Create and Set Up
Experiences
OR
• Be a member of the site
AND an experience
admin or publisher in
that site
Your Data Cloud integration comes with a set of interaction events that are turned on and mapped
to the Website Engagement DMO by default. Interactions are either all mapped, or not mapped at
all, but you can update event names to customize your integration. An interaction event has a
named identifier, required values, and tracked values that you define.
The events that you capture can’t be changed, but you can update the named identifier to
personalize your integration. For example, if you want to capture when your user clicks on a menu,
you can change the interaction name to menu-click, instead of the more general
button-click event.
If you want to change an existing name, create an event based on our Tag Manager Event Reference.
1. From Setup, in the Quick Find box, enter Digital Experiences, click Digital
Experiences, and then click Settings.
2. Select Advanced.
3. Click Edit Head Markup and add the script for the event you want to edit.
4. Save your changes and publish your site.
Note: All anchor and button element clicks are captured as events, unless they’re located
inside a Shadow DOM element. For example, if an element is on certain custom lightning
components, clicks aren’t tracked. Events within Shadow DOM elements require custom
tracking by the custom element. Anchor and button element clicks aren’t supported in . For
more information, see Activity Tracking for Marketing Cloud Growth Landing Pages.
SEE ALSO:
Tag Manager Event Reference
84
Track User Interactions to Send to Data CloudManage Data in LWR Sites
Set Up Data Cloud
EDITIONS
Available in: Salesforce
Classic (not available in all
orgs) and Lightning
Experience
Available in: Enterprise,
Performance, Unlimited,
and Developer Editions
Applies to: LWR sites
USER PERMISSIONS
To create or edit a data
stream:
• Customer Data Cloud
Admin OR Customer
Data Cloud for
Marketing Data Aware
Specialist
After you finish setting up your site, head over to Data Cloud to make sure that your data streams
are flowing. Confirm that streams from your Experience Cloud data kit connector are active. If you
want to use a data space other than the default, deploy the data kit manually.
Confirm Data Kit Connection
Your Data Cloud instance includes a default data space where captured data is collected. When
you connect your Experience Cloud site to Data Cloud, the Experience_Cloud_Event_DataKit is
automatically installed in the default data space.
1. From Data Cloud Setup, under Configuration, select Websites and Mobile Apps.
2. Confirm that Experience_Cloud_Event_DataKit is listed.
3. Navigate to the Data Streams tab and verify that your streams from the
Experience_Cloud_Event_DataKit are active.
If you planned to use the default data space, you’re done! If you want to create a data space to map
your Experience Cloud integration, refer to the next task.
Deploy the Experience Cloud Engagement Data Kit to
a Data Space
If you want to deploy your data kit to a data space other than the default, you must do so manually.
1. In Data Cloud, click Data Streams.
2. Click New.
3. Select Installed Data Kits and Packages and then click Next.
4. Add a data space name and select Experience_Cloud_Event_DataKit.
5. Select all the available bundle items and then click Next.
6. For Connector Type, select Website.
7. For Connector Name, select Experience_Cloud_Event_Connectorand then click Next.
8. Review and optionally edit your data fields, and then click Next.
By default, when you deploy a data kit, all fields are deployed. However, to prevent deployment errors, you can deselect fields that
aren’t in the org or instance using the data kit. A data kit requires the deployment of fields with mappings, formula fields, and their
source fields.
9. Click Deploy.
Tag Manager Event Reference
This guide includes the event specifications for Experience Tag Manager. Use the examples and reference to understand the structure
of Experience Cloud interaction events that are mapped to the Website Engagement DMO in Data Cloud.
85
Set Up Data CloudManage Data in LWR Sites
Cart Interactions
A cart interaction occurs when a customer adds or removes items from their cart.
Catalog Interactions
A catalog interaction occurs when a customer interacts with various tracking items. For example, catalog items could include a
product or a blog post.
Consent Interactions
Consent interactions capture whether a user opts into or out of tracking cookies.
Email Interactions
An email interaction occurs when a user updates or adds an email in your site.
Engagement Interactions
An engagement interaction occurs when a customer engages with your site through buttons, links, or other page elements.
Error Report Interactions
Error interactions capture when an error occurs on your site.
Line Item Data
Line items are intended to describe purchasable items. They’re used in cart, catalog, and wish-list interactions.
Search Interactions
A search interaction occurs when a user performs a search on your site.
Wish-List Interactions
A wish-list interaction occurs when a customer adds or removes items from their wish list.
Cart Interactions
A cart interaction occurs when a customer adds or removes items from their cart.
DescriptionInteraction Name
Captures an event for the addition of an item to a cart.cart-add
Captures an event for the removal of an item from a cart.cart-remove
Captures an event for the replacement of all items in a cart at the
same time.
cart-replace
Captures events for updates to a cart.cart-update
Fields
DetailsField
Type
object
attributes
Description
A dictionary of values that you supply.
86
Cart InteractionsManage Data in LWR Sites
DetailsField
Type
string
id
Description
Required. A unique ID representing the Cart object.
Type
Line Item Data on page 95
lineItems
Description
Required. A single Line Item Data value.
Type
string
name
Description
Required. The event name.
Example: Add to Cart Interaction Event
event.target.dispatchEvent(
new CustomEvent('experience_interaction', {
bubbles: true,
composed: true,
detail: {
name: 'cart-add',
cart: {
id: 'cart-12345',
lineItems: {
id: 'line-item-12345',
catalogObject: {
id: 'catalog-id-12345678',
type: 'Product'
},
attributes: {
quantity: 12,
price: 2.5,
imageUrl: 'https://commerce.salesforce.com/blueshirt.jpg',
name: 'blue-shirt'
},
},
attributes: {
currency: '$',
name: 'my-personal-cart',
},
},
},
})
);
87
Cart InteractionsManage Data in LWR Sites
Example: Remove from Cart Interaction Event
event.target.dispatchEvent(
new CustomEvent('experience_interaction', {
bubbles: true,
composed: true,
detail: {
name: 'cart-remove',
cart: {
id: 'cart-12345',
lineItems: {
id: 'line-item-23112',
},
attributes: {
name: 'my-personal-cart'
},
},
},
})
);
Example: Update Cart Interaction Event
event.target.dispatchEvent(
new CustomEvent('experience_interaction', {
bubbles: true,
composed: true,
detail: {
name: 'cart-update',
cart: {
id: 'cart-61221',
lineItems: {
id: 'line-item-11111',
attributes: {
quantity: 2,
},
},
attributes: {
name: 'my-updated-cart'
},
},
},
})
);
Catalog Interactions
A catalog interaction occurs when a customer interacts with various tracking items. For example, catalog items could include a product
or a blog post.
88
Catalog InteractionsManage Data in LWR Sites
DescriptionInteraction Name
Captures the event of a user clicking a catalog object.catalog-object-click
Captures the start point of a user viewing a catalog object.catalog-object-view-start
Captures the stop point of a user viewing a catalog object.catalog-object-view-stop
Captures the event of a user submitting a form.form-submit
Fields
DetailsField
Type
object
attributes
Description
A dictionary of values that you supply.
Type
string
id
Description
Required. A unique ID representing the Catalog object.
Type
Line Item Data on page 95
lineItems
Description
Required. A single-Line Item Data value.
Type
string
name
Description
Required. The event name.
Type
string
type
Description
Required. A type name representing the catalog object. If type is set to product, the
interaction is sent to the Product Browse Engagement DMO. If type is set to anything else,
the interaction is sent to the Website Engagement DMO.
Example: View Catalog Object Start Interaction Event
event.target.dispatchEvent(
89
Catalog InteractionsManage Data in LWR Sites
new CustomEvent('experience_interaction', {
bubbles: true,
composed: true,
detail: {
name: 'catalog-object-view-start',
catalogObject: {
id: 'product-12345678',
lineItems: {
id: 'line-item-12345',
catalogObject: {
. id: 'catalog-id-12345678',
type: 'Product'
},
attributes: {
quantity: 12,
price: 2.5,
name: 'blue-shirt'
},
},
},
},
})
);
Example: View Catalog Object Stop Interaction Event
event.target.dispatchEvent(
new CustomEvent('experience_interaction', {
bubbles: true,
composed: true,
detail: {
name: 'catalog-object-view-stop,
catalogObject: {
id: 'product-12345678',
lineItems: {
id: 'line-item-12345',
catalogObject: {
. id: 'catalog-id-12345678',
type: 'Product'
},
attributes: {
quantity: 12,
price: 2.5,
name: 'blue-shirt'
},
},
},
},
})
);
90
Catalog InteractionsManage Data in LWR Sites
Example: Click Catalog Interaction Event
event.target.dispatchEvent(
new CustomEvent('experience_interaction', {
bubbles: true,
composed: true,
detail: {
name: 'catalog-object-click',
catalogObject: {
id: 'product-12345678',
lineItems: {
id: 'line-item-12345',
catalogObject: {
. id: 'catalog-id-12345678',
type: 'Product'
},
attributes: {
quantity: 12,
price: 2.5,
name: 'blue-shirt'
},
},
},
},
})
);
Consent Interactions
Consent interactions capture whether a user opts into or out of tracking cookies.
DescriptionInteraction Name
Captures the user-consent value.set-consent
Fields
DetailsField
Type
string
name
Description
Required. The event name.
Type
string
value
Description
Indicates whether the user opts in to cookie tracking (true) or opts out (false).
91
Consent InteractionsManage Data in LWR Sites
Example: Opt-in Event
event.target.dispatchEvent(
new CustomEvent('experience_interaction', {
bubbles: true,
composed: true,
detail: {
name: 'set-consent',
value: true,
},
})
);
Example: Opt-out Event
event.target.dispatchEvent(
new CustomEvent('experience_interaction', {
bubbles: true,
composed: true,
detail: {
name: 'set-consent',
value: false,
},
})
);
Email Interactions
An email interaction occurs when a user updates or adds an email in your site.
DescriptionInteraction Name
Captures the email of the site visitor.email-update
Fields
DetailsField
Type
string
email
Description
The email of the site visitor.
Type
string
name
Description
Required. The event name.
92
Email InteractionsManage Data in LWR Sites
Example: Email Event
event.target.dispatchEvent(
new CustomEvent('experience_interaction', {
bubbles: true,
composed: true,
detail: {
name: 'email-update',
email: '[email protected]'
},
})
);
Engagement Interactions
An engagement interaction occurs when a customer engages with your site through buttons, links, or other page elements.
DescriptionInteraction Name
Captures any anchor click.anchor-click
Captures any button click.button-click
Captures when a user scrolls to the bottom of the page.page-scroll-to-bottom
Captures the event when a user views a page.page-view
Fields
DetailsField
Type
object
attributes
Description
A dictionary of values that you supply.
Type
string
linkhref
Description
The web address of the link to capture.
Type
string
name
Description
Required. The event name.
93
Engagement InteractionsManage Data in LWR Sites
Example: Anchor Click Interaction Event
event.target.dispatchEvent(
new CustomEvent('experience_interaction', {
bubbles: true,
composed: true,
detail: {
name: 'anchor-click',
linkHref: 'https://expectedUrl'
attributes: {
buttonLabel: 'Click here'
},
},
})
);
Example: Button Click Interaction Event
event.target.dispatchEvent(
new CustomEvent('experience_interaction', {
bubbles: true,
composed: true,
detail: {
name: 'button-click',
attributes: {
buttonLabel: 'Click here'
}
},
})
);
Error Report Interactions
Error interactions capture when an error occurs on your site.
DescriptionInteraction Name
Captures errors that occur on your site.error
Fields
DetailsField
Type
object
attributes
Description
A dictionary of values that you supply.
94
Error Report InteractionsManage Data in LWR Sites
DetailsField
Type
string
id
Description
Required. A unique ID representing the error type.
Type
string
name
Description
Required. The event name.
Example: Error Report Event
event.target.dispatchEvent(
new CustomEvent('experience_interaction', {
bubbles: true,
composed: true,
detail: {
name: 'error',
id: 'error-id-1',
attributes: {
type: "api-error",
message: "503: service not available"
},
},
})
);
Line Item Data
Line items are intended to describe purchasable items. They’re used in cart, catalog, and wish-list interactions.
Fields
DescriptionField Name
Type
object
attributes
Description
A dictionary of values that you supply.
Type
string
catalogObjectId
95
Line Item DataManage Data in LWR Sites
DescriptionField Name
Description
Required. A unique identifier
representing the catalog object
referenced in the line item.
Type
string
catalogObjectType
Description
Required. A name representing the
catalog object referenced in the line
item.
Type
string
currency
Description
The currency of the price field.
Type
number
price
Description
The price of the catalog object
referenced in the line item.
Type
number
quantity
Description
Required. The number of catalog
objects in this line item.
Example: Here’s a basic structure of a line item used within an interaction.
{
lineItems: {
id: 'line-item-12345',
catalogObject: {
id: 'catalog-id-12345678',
type: 'Product'
},
attributes: {
quantity: 12,
price: 2.5,
imageUrl: 'https://commerce.salesforce.com/blueshirt.jpg',
name: 'blue-shirt'
},
}
96
Line Item DataManage Data in LWR Sites
Search Interactions
A search interaction occurs when a user performs a search on your site.
DescriptionInteraction Name
Captures a search event on your site.search
Fields
DetailsField
Type
object
attributes
Description
A dictionary of values that you supply.
Type
string
categoryId
Description
The ID of a category from a commerce site that the site visitor selects. Must be classified as
a category-based search.
Type
string
name
Description
Required. The event name.
Type
string
searchQuery
Description
A value that the site visitor supplies representing a search query.
Example: Search Event
event.target.dispatchEvent(
new CustomEvent('experience_interaction', {
bubbles: true,
composed: true,
detail: {
name: 'search',
searchQuery: input7.value,
attributes: {
searchFacetList: ['color', 'size'],
searchType: ['product'],
97
Search InteractionsManage Data in LWR Sites
numberOfResultsRequested: 12,
resultPageOffset: 10,
sortType: 'asc',
correlationId: 'X-239-22-0',
},
},
})
);
Wish-List Interactions
A wish-list interaction occurs when a customer adds or removes items from their wish list.
DescriptionInteraction Name
Captures an event for the addition of an item to a wish list.wish-list-add
Captures an event for the removal of an item from a wish list.wish-list-remove
Captures an event for the replacement of all items in a wish list at
the same time.
wish-list-replace
Captures events for updates to a wish list.wish-list-update
Fields
DetailsField
Type
object
attributes
Description
A dictionary of values that you supply.
Type
string
id
Description
Required. A unique ID representing the Wishlist object.
Type
Line Item Data on page 95
lineItems
Description
Required. A single Line Item Data value.
Type
string
name
Description
Required. The event name.
98
Wish-List InteractionsManage Data in LWR Sites
Example: Add to Wish List Interaction Event
event.target.dispatchEvent(
new CustomEvent('experience_interaction', {
bubbles: true,
composed: true,
detail: {
name: 'wish-list-add',
wishList: {
id: 'wish-list-12345',
lineItems: {
catalogObject: {
id: 'catalog-id-12345678',
type: 'Product'
},
attributes: {
quantity: 12,
price: 2.5,
name: 'gray-jeans'
},
},
attributes: {
currency: '$',
name: 'my-personal-wish-list,
},
},
},
})
);
99
Wish-List InteractionsManage Data in LWR Sites
