CLEARWATER SPAS
OWNER’S MANUAL
2 | Clearwater Spas Owner Manual
QUICK REFERENCE
To assist you with the installation and maintenance service of your new spa,
please ll out the following information and keep it on hand for future reference.
My spa model is:
Serial number is:
Dealer purchased from:
Dealer phone #:
Date of purchase:
Dealer address:
Date delivered/installed:
Other notes:
Clearwater Spas Owner Manual | 3
TABLE OF CONTENTS
5 INTRODUCTION
5 ICON Key
6 IMPORTANT SAFETY INSTRUCTIONS
6 Read and Follow All Instructions
10 STEPS FOR A SUCCESSFUL INSTALLATION
10 Preparing For Your Spa Delivery
11 Site Selection and Preparation
12 Installation – Placing Your Spa
14 Electrical Hook-Up Requirements
17 Filling Your Spa
18 TOPSIDE CONTROL - TURNING ON YOUR SPA
18 Topside Control Button Reference Display, TP600
20 Topside Control Button Reference Display, K1000,
SpaTouch2, and TP950
22 WATER PURITY & FILTRATION
22 Keeping The Water Clean
22 Spa Chemistry 101
26 How To Use the Chemicals
26 UsageDenitions
27 Starting A Chemical Maintenance Program
29 Filtration
30 Ozone Generator
31 JETS
31 Types Of Jets
32 Jet, Air and Waterfall Controls
32 Cleaning The Rotating Jets
33 Jet Removal
4 | Clearwater Spas Owner Manual
33 MAINTENANCE
33 Pillows
33 Spa Cabinet
34 The Shell
34 Spa Cover
34 Winterizing
36 Draining The Spa
37 EnergyEfcientGreenTechnology
38 APPENDIX A
38 Troubleshooting
38 System Trouble
38 Controls
39 Pumps
39 Jets
40 Water
41 FAQ’s - Frequently Asked Questions
42 Warranty
“We reserve the right to improve our product without notice”
Copyright©ClearwaterSpas,2019.Allrightsreserved.Specicationsmaychangewithout
notice.Internationalproductsmaybecongureddifferentlytomeetlocalelectrical
requirements. [Copyright © trademark 1976 Clearwater Spas™]

Clearwater Spas Owner Manual | 5
INTRODUCTION
Congratulations on your purchase of a new Clearwater spa! Your spa
wasmanufacturedwiththenestcomponentsavailableandisdesigned
with comfort, low maintenance, and durability in mind.
With proper care and maintenance, you can expect your Clearwater spa
to last for years. This manual will give you information on the best way
to take care of your spa based on how often it will be used, and the
type of environment you live in. It is important for you to read the entire
manual before using your spa. Contained in this manual are important
maintenance and start-up procedures as well as safety precautions that
must be followed to ensure the life of your spa, and the safety of the
people using it. Failure to follow start-up procedures may damage your
spa and void your warranty.
Please feel free to call your local Clearwater Spas dealer if you have any
further questions after reading this manual. We hope you enjoy many
years of enjoyment and relaxation in your new Clearwater spa.
ICON Key
TheICONKeytotherightdenesthetypeofinformationboxesthat
will appear throughout this manual. These icons highlight helpful
information that contains important tips or warnings that apply to the
use and care of your spa.
Safety Tip Key Point Warning!

6 | Clearwater Spas Owner Manual
SAFETY FIRST!
IMPORTANT SAFETY
INSTRUCTIONS!
READ AND FOLLOW ALL
INSTRUCTIONS.
When installing and using electrical equipment it is recommended
that a licensed and bonded electrician perform the work. Basic safety
precautions should always be followed, including the following:
• A “pressure wire connector” is provided and is located on the
outside of the control box. This connector will allow the connection
of a no. 8 AWG solid copper bonding wire (no. 6 AWG Canada)
between the spa and any metal equipment, metal electrical
enclosures, metal water pipe or conduit within 5 feet of the spa as
needed to comply with local requirements.
• A green colored terminal wire (or a wire connector marked “G”,
“GR”, “Ground”, or “Grounding”) is also provided. To reduce
the risk of electric shock, connect this terminal to the grounding
terminal of your electric service or supply panel with a continuous
green insulated copper wire equivalent to the circuit conductor
supplying this equipment.
• The electrical supply must include a suitably rated Ground Fault
Circuit Interrupter to open all underground supply conductors
to comply with section 422-20 of the National Electrical Code.
ANSI/NFPA 70-1987. The power supply cut off must be readily
accessible to the spa occupant, but installed at least 5 feet from
spa water.
• Test the performance of the GFCI according to manufacturers
recommendations. If the GFCI does not perform correctly, there
may be a ground current present which can increase the risk of
electric shock. Disconnect the power until the fault has been
identiedandcorrected.

Clearwater Spas Owner Manual | 7
• DANGER – RISK OF ELECTRIC SHOCK. Install at least 5 feet
from all metal surfaces.
• DANGER – RISK OF ELECTRIC SHOCK. Do not permit any
electric appliance such as lights, telephones, radios or televisions
within 5 feet of your spa.
PREVENT DROWNING
1. SUPERVISE CHILDREN AT ALL TIMES.
2. ATTACH SPA COVER AFTER EACH USE.
3. SPA HEAT CAN CAUSE HYPERTHERMIA AND
UNCONSCIOUSNESS.
4. SPA HEAT IN CONJUNCTION WITH ALCOHOL,
DRUGS, OR MEDICATION CAN CAUSE
UNCONSCIOUSNESS.
PREVENT ELECTROCUTION
1. NEVER PLACE ANY ELECTRIC APPLIANCE
WITHIN 5 FEET OF SPA.
WARNING
• DANGER – RISK OF CHILD DROWNING. Extreme caution must
be exercised to prevent unauthorized access by children. To avoid
accidents, ensure that children cannot use a spa or hot tub unless
they are supervised at all times.
• DANGER – Riskofinjury,donotremovesuctionttings.The
suctionttingsinthisspaaresizedtomatchthespecicwaterow
created by the pump. Should the need arise to replace the suction
ttingsorthepump,besurethattheowratesarecompatible.
Neveroperatespaifthesuctionttingsarebrokenormissing.
Neverreplaceasuctionttingwithoneratedlessthantheow
rate,markedontheoriginalsuctiontting.
• Installation should include proper drainage of the electrical
equipment area to prevent electrical shortage. Store all chemicals
in a cool dry area and keep out of children’s reach.

8 | Clearwater Spas Owner Manual
• WARNING - To reduce the risk of injury:
A. Spa heat can cause hyperthermia and unconsciousness!
Hyperthermia occurs when the internal temperature of the
body reaches a level several degrees above the normal body
temperature of 98.6°F (37C). The symptoms of hyperthermia
include an increase in the internal temperature of the body,
dizziness, lethargy, drowsiness, and fainting. The effects
of hyperthermia include failure to perceive heat; failure to
recognize the need to exit spa or hot tub; unawareness of
impending hazard; fetal damage in pregnant women; physical
inability to exit the spa or hot tub; and unconsciousness
resulting in the danger of drowning.
B. WARNING - The use of alcohol, drugs, or medication can
greatly increase the risk of fatal hyperthermia. The water in
a spa or hot tub should never exceed 104° F (40° C). Water
temperatures between 100° F (38° C) and 104° F (40° C) are
PREVENT DROWNING
1. SUPERVISE CHILDREN AT ALL TIMES.
2. ATTACH SPA COVER AFTER EACH USE.
3. SPA HEAT CAN CAUSE HYPERTHERMIA AND
UNCONSCIOUSNESS.
4. SPA HEAT IN CONJUNCTION WITH ALCOHOL,
DRUGS, OR MEDICATION CAN CAUSE
UNCONSCIOUSNESS.
PREVENT ELECTROCUTION
1. NEVER PLACE ANY ELECTRIC APPLIANCE
WITHIN 5 FEET OF SPA.
WARNING
considered safe for a healthy adult. Lower water temperatures
are recommended for extended use (exceeding 10-15
minutes) and for young children.
C. Since excessive water temperatures have a high potential for
causing fetal damage during the early months of pregnancy.
Pregnant or possibly pregnant women should limit water
temperatures to 100° F (38° C).
Clearwater Spas Owner Manual | 9
AUDIO SYSTEM:
CAUTION - Risk of Electric Shock. Do not leave compartment door
open.
CAUTION - Risk of Electric Shock. Replace components only with
identical components.
CAUTION - Do not operate the audio/video controls while inside
in the spa.
WARNING - Prevent Electrocution. Do not connect any auxiliary
components (for example cable, additional speakers, headphones,
additional audio/video components, etc.) to the system.
These units are not provided with an outdoor antennae; when
provided, it should be installed in accordance with Article 810 of the
National Electrical Code, ANSI/NFPA 70.
Do not service this product yourself as opening or removing covers
may expose you to dangerous voltage or other risk of injury. Refer
allservicingtoqualiedservicepersonnel.
When the power supply connections or power supply cord(s) are
damaged; if water is entering the audio/video compartment or any
electrical equipment compartment area; if the protective shields or
barriers are showing signs of deterioration; or if there are signs of
other potential damage to the unit, turn off the unit and refer
servicingtoaqualiedservicepersonnel.
This unit should be subjected to periodic routine maintenance (for
example, once every 3 months) to make sure that the unit is
operating properly.
SAVE THESE
INSTRUCTIONS!

10 | Clearwater Spas Owner Manual
STEPS FOR A SUCCESSFUL
INSTALLATION:
1. Preparing for your spa
Prior to receiving your new spa, you will want to prepare an area for
installation. You will need to arrange to have your spa placed in the
desired location and prepare the location for the connection of the
electrical circuits. In most cities, permits are required for the installation
of electrical circuits.
Make certain to review the path that your spa will take through your
property along with the size of the spa to ensure you have enough
space. If there are stairs or other obstacles that the spa will have to
travel over to get to the site, additional clearance may be required.
Here are some key things to consider while installing your spa that
will help eliminate some of the unforeseeable situations that could
hinder your spa installation.
• Avoid installing too close to any structures.
• Leave enough room around all sides to allow accessto the service
panels.
• Install on a level, load-bearing surface.
• Install at least 5 feet from ground conductors.
• Use non-conductive conduit for all wiring.
• If installing below the surface of a deck, leave enough room to
access and remove service panels.
We recommend a level 4” thick concrete pad if you are installing on
land (rather than on a deck or platform). The dimensions of the pad
should at least match the outside dimensions of your spa. You should
also accommodate for any steps or obstructions around the spa. Please
allow a few days for curing the cement when scheduling your delivery
date.
Balconies and decks are not recommended for spa installations; but if
youchooseoneasyourlocation,keepinmindthatalargelledspa
with six adults can weigh as much as three tons. Balconies and decks
Clearwater Spas Owner Manual | 11
must be constructed to current state and local building codes and must
support at least 100 pounds per square foot. If you are building a deck
around your spa, be sure that it does not cover up any of the service
panels. If you are building stairs for the spa, it is recommended that
they be installed in such a way that they can be moved out of the way if
access to the service panels is required.
The most important thing to remember is to plan your installation so
that it will be easy to move the spa from the delivery truck to the
installation site. Spas are typically transported on a mover’s dolly lying
on their side. Check for adequate gate clearance and remove any fence
panels if necessary to allow access to the installation site.
2. Site selection and preparation
The location of your spa is entirely up to you. Read these instructions
for ideas of the various locations that your new spa may be
installed.
By the time you have purchased your spa, you have likely already
picked your location. Prior to the spa delivery, please verify the
following:
• Always place the spa on a compacted, level surface. The best
surface is a level concrete pad. A spa, full of water, can weigh a
great deal. Please ensure that the spot can support the weight.
• Makesurethatyourspaislevelbeforeitislled.
• Locate the equipment panel. The system pack, drain valve, and
ozone generator are usually located in the same area. Be sure
thattheconnectionsaretightenedduringlling.Waterinsidethe
system pack will cause the pack to fail, and the breaker to trip.
• The panels, located on all four sides, are removable. Be sure that
you have access to all four panels.
• Be sure to have easy access to the circuit breaker in the sub panel
(240 volt models).
• Never let water into the sub panel (240 volt models), or into the
electrical outlet that your spa is plugged in to. If you have 240 volt
model, the spa’s sub panel is rain tight when installed correctly with
the door closed.
12 | Clearwater Spas Owner Manual
3. Installation - Placing your spa
OUTDOOR AND PATIO INSTALLATION
Positioning your spa correctly in your chosen location is very important
because of the spa’s warranty. The warranty on your spa is voided if the
site is not 100% supportive. If you install your spa outdoors, a concrete
pad is the best method for a stable and level surface. The concrete pad
should be at least four inches thick and properly leveled. Your spa may
beinstalledonadeck,providedtheloadratingcanhandlealledspa
with people in it.
DECK INSTALLATION
When placing the spa on a deck, please ensure the maximum load
capacityofthedeck.Consultaqualieddeckbuilderorstructural
engineer before you place the spa on an elevated deck or indoors. To
determinetheweightofyourspa,pleaserefertothespecicationson
the website. This weight must not exceed the structural load capacity of
the deck.
Clearwater Spas Owner Manual | 13
INDOOR INSTALLATION
When installing a spa indoors, there are extra things to consider.
Moisturewillaccumulateontheoorsurroundingthespa,sothe
ooringmaterialneedstoprovidegripwhenwetforsafety.The
location will also require proper drainage to prevent water build-up.
Whenbuildingaroomforyourspa,itisbesttohaveaoordrain
installed. The humidity of a room with a spa can cause dry-rot, mildew
and mold problems if it is not properly ventilated.
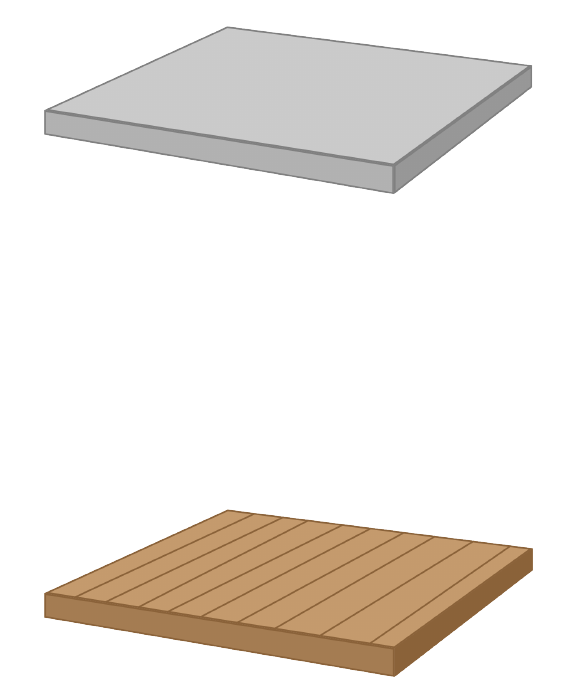
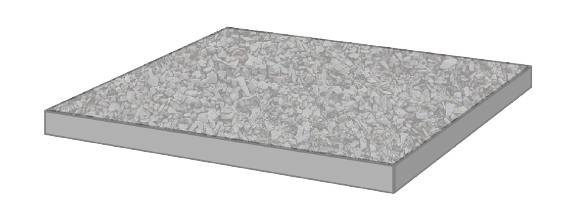
GROUND PREPARATION
Your spa has been designed to be installed on a variety of surfaces.
Theinsulatedspaoorbasegivesyoutheabilitytondtheperfect
location. Though a concrete slab is the best for long term, there are
other options available as long as the surface is level prior to delivery.
The alternatives include 5/8 Minus Crushed Packed Rock, or a deck that
is rated for the load.
When placing a spa on crushed rock, the easiest way to maintain its
formistobuildaframeandllitwiththecrushedrock.Remember,if
the spa is placed on grass or dirt, debris will get inside the spa as users
enter and exit.
It is incredibly important for proper operation and draining of the spa
that the spa is level once it is installed. Failure to have the spa level
prior to adding water can affect the warranty.
Remember; the warranty on your spa is voided if the site is not 100%
supportive.Electrical hook-up requirements - 240V
14 | Clearwater Spas Owner Manual
4. Electrical hook-up requirements
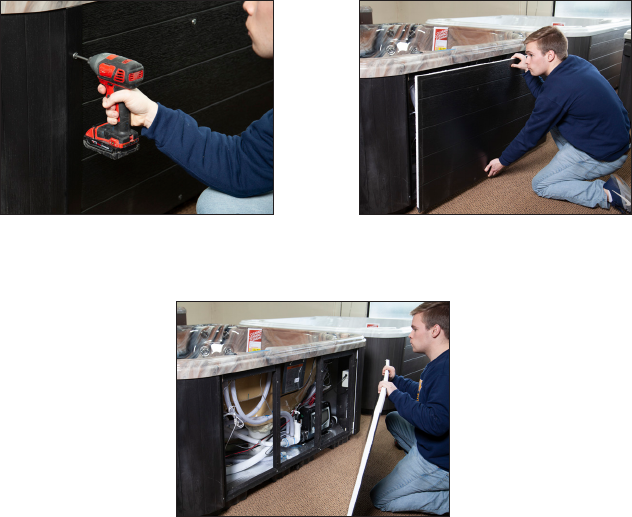
REMOVING SPA PANELS
Electrical Systems wired by Licensed Professionals
To ensure you will have an opportunity to use your spa soon after
delivery, it is very important that the required electrical service has been
installed properly by a professional, licensed electrician before arrival of
your spa.
IMPORTANT: Electrical connections must be made by a qualied,
licensed professional. Please contact a licensed residential electrician
for these services.
Unscrew and remove the two
vertical trim pieces on the front of
your spa below spa control panel.
Unscrew and remove the front
cabinet panel
Remove the spa panel for access
to spa components. Reverse
these steps to reattach the spa
access panel.

Clearwater Spas Owner Manual | 15
NOTE: A separate sub-panel must be used to supply power and
protect the spa. All models require a 50 amp single phase 240 volt
circuit breaker in the main electrical service panel, except for the
Orlando, which requires a 60 amp single phase. Clearwater 240 volt
spas must be wired in accordance with applicable electrical codes.
Electrical work should always be performed by a licensed electrician.
A licensed electrician needs to install a four-wire electrical service (two
line voltages, one neutral, one ground) from the main electrical panel
to the sub-panel, and from the sub-panel to the spa per the wiring
diagramonthenextpage(gure1-1).Theelectricianshouldmountthe
sub-panel in the vicinity of the spa but not closer than 5 feet from the
spa’s water edge (NEC 680-38 to 41-A-3).
WARNING: Removing or bypassing the GFCI breakers in the sub panel
at any time will result in an unsafe spa and will void the warranty.
WIRE SPECIFICATION NOTE: Long electrical runs may require a larger
gauge feed wire than stated. We recommend that a maximum voltage
drop of 3% be used when calculating the larger wire size.
RefertotheWiringDiagrams(gure1-1)fortheelectricalrequirements
of the 240 volt models.
Do not turn on power to the spa when the tub is not lled.
The closer you locate the spa to the main service panel, the
less money you will have to spend on wire. Wire can become
expensive if you run long lengths.
Always shut off power at the source when working with any
electrical power!! Failure to do this could result in serious
injury or even death!
16 | Clearwater Spas Owner Manual
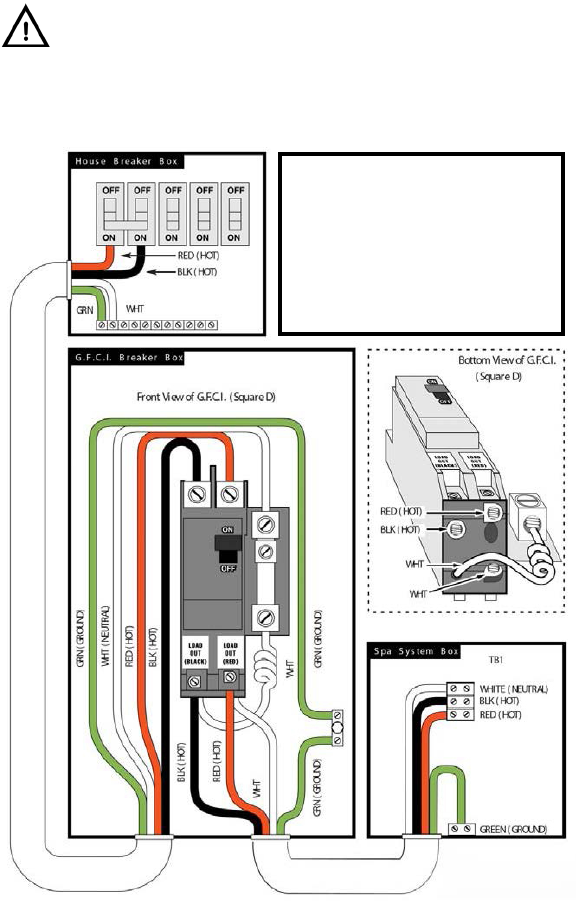
Electrical Requirements
IMPORTANT: Electrical connections must be made by a qualied,
licensed professional. Please contact a licensed residential electrician
for these services.
Minimum 6 gauge wire required
on all 240 volt applications
(except for grounding which is
determined by NEC code and/or
local requirements).
Figure 1-1
240voltwiringcongurationfrom
the house to the spa
Note: Spa System Box wiring may
vary between models. Please refer to
the wiring diagram found in the Spa
System Box.
Clearwater Spas Owner Manual | 17
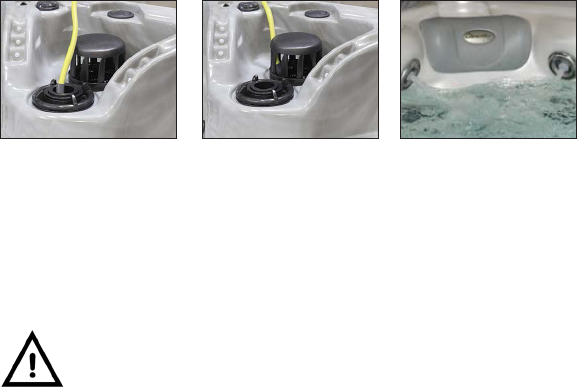
1. Place your garden
hoseintothelter
housing. This will
ensure that air
bubbles are removed
from the lines while
youllthespa.
2. Fill your spa so that
most of the water
enters through the
lterchamber.
3. Fill the water to the
proper level – half way
upthelterhousing,
just below the head
pillow or just under
the neck jets as shown
in picture above.
FILLING YOUR SPA THROUGH THE FILTER CHAMBER
Beforeyoullyourspa,itisadvisabletohaveyourwatertestedfor
hardness (calcium and mineral content). Water from wells usually
contain harder water than urban water supplies. Mineral and metal
imbalances in your water can shorten the life of your spa. Please
contact your local dealer for a proper water analysis or to purchase a
testing kit.
We strongly recommend a high quality “Water Test Kit” for checking
pH and sanitizer levels. Test the water daily until your “user load” is
determined.
Make sure there is no dirt or sediment at the bottom of the tub and
thatthereisnothinginsidetheltercompartmentbeforellingwith
water. Filling the spa through the lter housing will help to prevent
air locks (trapped air) in pumps on start up.
Fill the spa to the correct water level. Be sure to open all valves and jets
intheplumbingsystembeforellingtoallowasmuchairaspossibleto
escapefromtheplumbingandthecontrolsystemduringlling.After
turning the power on at the main power panel, the top-side panel will
display a “splash”, or “startup” screen.
IMPORTANT! Improperly balanced water may damage your
spaandvoidyourwarranty!Donotllourtubwithwaterfrom
your hot water heater!
18 | Clearwater Spas Owner Manual
Start Up
When the GFCI for the spa is switched on to supply power, a startup
sequence of numbers will appear on the display. The spa will then enter
Priming Mode. The display will read ‘RUN PUMPS PURG AIR’. Press
the Pump Button(s) to turn the pumps on and off to verify that all the
air is purged from the plumbing, particularly the plumbing associated
with the heater. The Light Button turns the circulation pump on an
off during Priming Mode. Priming Mode will end automatically after
4 minutes. Pressing a Temperature Button (Cool or Warm) will exit
Priming Mode manually. When Priming Mode ends, the circulation
pump will start. However, the temperature will not show for a few
minutes. Once the water temperature is recognized by the system, and
if it is below the Set Temperature, the heater will start heating your spa
water until the Set Temperature is reached.
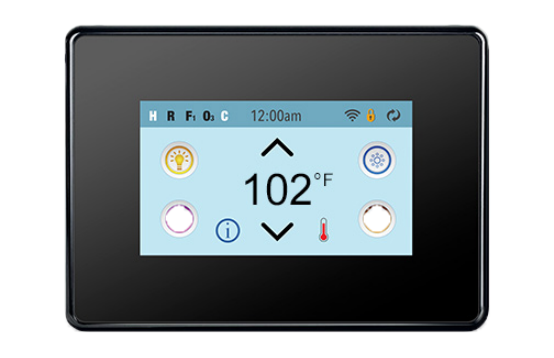
Basic Operation
The Up (Warm) and Down (Cool) buttons are often referred to as
Temperature Button(s). Some panels only have a single Temperature
Button. Press a Temperature Button once and the current Set
TemperaturewillashontheLCD.TheSetTemperatureandtheactual
watertemperatureareoftendifferent.Whilethenumbersareashing,
press a Temperature Button again to change the Set Temperature.
Press and hold for faster adjustment. After the new Set Temperature
stopsashing,theactualtemperatureisdisplayedagainandthenew
Set Temperature is programmed. The spa will now heat to the new Set
Temperature as needed. The Light Button turns the Spa Light on and
off and is also used in conjunctions with the Temperature Button(s) to
navigate the system menus.
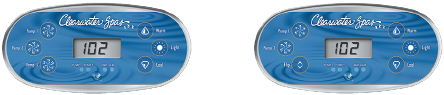
TOPSIDE CONTROLS: TP600:
TURNING ON YOUR SPA
Figure 1: TP600 control panel,
6-button (3 pumps)
Figure 2: TP600 control panel,
6-button (2 pumps)

Clearwater Spas Owner Manual | 19
Programming
Refer to the www.clearwaterspas.com/product-resources/ for
detailed operation, programming and message instructions or to
download the entire guide..
Navigating the spa operation menu is done using only 2 or 3
buttons on the control panel. Pressing the Light Button while the
SetTemperatureisashingwillenterthemenus.PressingtheLight
Button after that will proceed through the menu choices. Pressing a
Temperature Button while any menu item is showing will either edit
it directly, or begin an editing sequence. Depending on the screen
displayed, waiting between 10 and 30 seconds will allow the panel to
return to normal operation and a display of spa status.
Filtration
Yourspaisfactoryprogrammedtocirculateandlterwater24hoursa
day.
Dual Temperature Ranges
This system incorporates two temperature range settings with
independent temperatures. The High Range ▲ is indicated in the
display and might be set between 80°F and 104°F. The Low Range ▼
is indicated in the display and might be set between 50°F and 99°F.
Using the Low Range may be more economical during periods of non-
use.
Ready and Rest Modes
READY Mode will allow your spa to heat as needed and to maintain
the set temperature. Your Clearwater Spa has a dedicated circulation
pump that acts as your spa’s heater pump. In Ready Mode, your spa
water will automatically attempt to maintain it’s set temperature.
However, using the spa with the cover open during extreme cold
temperatures, the set temperature may be unattainable.
REST Modewillonlyallowheatingduringprogrammedltercycles.
Since polling does not occur, the temperature display may not show
acurrenttemperatureuntiltheltrationpumphasbeenrunningfora
minute or two. READY/REST Mode may appear when Pump 1 is active.
20 | Clearwater Spas Owner Manual
TOPSIDE CONTROLS:
TURNING ON YOUR SPA THE MAIN SCREEN
Spatouch2:
Figure 1: SpaTouch2 touchscreen control panel
Look for the operating instructions for the SpaTouch2 with your spa
manual or visit the “CW Club/Resources” page at www.clearwaterspas.
com under the section “Downloads for Controls”.

Clearwater Spas Owner Manual | 21
UTILITIES – GFCI TEST FEATURE
The Ground Fault Circuit Interrupter
(GFCI) or Residual Current Detector
(RCD) is an important Safety device
and is required equipment on a spa
installation.
Used for verifying a proper installation
Your spa may be equipped with a GFCI protection feature. GFCI trips
will indicate a ground fault or other unsafe condition and the spa must
be shut off until a service person can correct the problem.
Forcing a GFCI Trip Test (North America Only)
The installer can cause a GFCI Trip Test to occur by initiating it using
the above menu. The GFCI should trip within several seconds and the
spa should shut down. If it does not, shut down the power manually
and verify that a GFCI breaker is installed and that the circuit and spa
are wired correctly. Verify the function of the GFCI with its own test
button. Restore power to the spa and repeat the GFCI Trip Test. After a
successful test the display will show “Passed” on the GFCI Status
screen as shown above.
Warning:
You should familiarize yourself with where the GFCI is and how to
properly reset the it. If freezing conditions exist, the GFCI or RCD
should be reset immediately or spa damage could result.
22 | Clearwater Spas Owner Manual
WATER PURITY & FILTRATION
Keeping the water clean – chemical sanitizers
One of the main reasons that people require service on their spa is
because they haven’t followed a proper water sterilization regiment.
Water can accumulate impurities that can worsen the performance,
ordamagetheltrationsystemifchemicalsarenotproperlyapplied
at appropriate intervals. The water can even become unhealthy if
chemicals are not used to sanitize the water. Improper pH levels or
calcium levels can cause either corrosion of parts or scale build-up.
We recommend that you begin a routine of sterilization that you are
comfortable with, and that you can follow through with. If you get into
a scheduled regiment, it will be easier to remember when to apply the
chemicals or run your alternative system (like Salt, Ozone or UV).
Your spa comes with an ozonator that will do a very good job at killing
bacteria and oxygenating the water, but chlorine or bromine are often
used to compliment the work of the ozonator.
The best way to keep the water clean over long periods of time is to
change the water four times a year. Connect a hose to the drain valve
and open it all the way to allow the spa to drain all the way. Use a shop-
vac to remove any standing water and debris at the bottom of the spa.
Refer to the maintenance section for instructions on cleaning the spa
beforerellingit.
Spa Chemistry 101
Atrst,learningtounderstandspawaterchemistrycanseemlikea
daunting task to say the least. We intend on helping you understand
spa chemicals so that you can maintain the health of your spa at the
best level possible.
There are three basic principals to spa water chemistry.
1. Sanitize/Disinfect (kill viruses, germs, etc.)
2. Oxidize (break down organic compounds like oils and sweat)
3. Maintain slightly base (alkaline) water (pH of 7.4 - 7.6). This controls
the corrosiveness of the water, prevents excessive scaling (mineral

Clearwater Spas Owner Manual | 23
formation on surfaces exposed to water, and insures that the water
is comfortable to the skin.
Once you have a good understanding of the chemicals that are used
in your spa, you will be able to maintain proper water balance. Water
balance is reached when all elements (pH, total alkalinity, calcium
hardness and total dissolved solids) are within their proper ranges.
IMPORTANT! Always read directions on chemical container
thoroughly before using spa chemicals.
The pH scale goes from 0 to 14, with zero being extremely
acidic and 14 being extremely base (alkaline). Seven is
considered neutral pH.
Thefollowingdenitionsforchemicalswillhelpyouunderstandwhat
the chemical is and what it is used for:
Sanitizers
CHLORINE - Chlorine is widely used as a sanitizer in pool and spa
water to kill bacteria, viruses and algae, it also oxidizes ammonia and
nitrogen compounds such as swimmer waste. Its formal name is Sodium
Dichlor and is referred to as a chlorinated concentrate. Sodium Dichlor
is a fast-dissolving, granular, stabilized organic chlorine compound
providing either 56% or 63% available chlorine. Cyanuric acid and/or
stabilizers are added to prevent U.V. light destruction of the chlorine
by the sun. Use of improper Chlorine additives can cause excessive
Cyanuric acid which can corrode and destroy spa components.
BROMINE – Bromine is the other commonly used sanitizer or
disinfectant in pool and spa water to kill bacteria and algae, and
oxidizes ammonia and nitrogen compounds such as swimmer waste.
This chemical does not eliminate swimmer waste unless it is combined
with an appropriate oxidizer such as a non-chlorine shock. It is
susceptibletodirectsunlight,andisthereforenotefcientinoutdoor
pools. Bromine is sometimes used as an alternative for people whom
are allergic or sensitive to chlorine products. Bromine products are
available as sodium bromide and bromine tablets. The bromide
ion has no effective disinfectant or sanitizing capabilities without the
use of non-chlorine shock (potassium monopersulfate). Potassium
monopersulfate is added to oxidize, or activate, the bromide ion into
24 | Clearwater Spas Owner Manual
bromine, which rapidly forms the active sanitizer hypobromous acid in
the spa water. Upon reaction with bacteria and other spa contaminants,
hypobromous acid is reduced back to bromide ion, ready to be
activated again by the next dose of potassium monopersulfate.
Potassium monopersulfate begins to produce bromine immediately
and continues to do so for several hours, providing time for oxidation
of bather waste and other organic contaminants such as ammonia and
nitrogen.
NON-CHLORINE SHOCK (Potassium Monopersulfate) – Also
known as “Oxy- Shock”, is an important chemical used in the process
of disinfecting and sanitizing the spa water. Non-chlorine shock is
used to oxidize and eliminate organic contaminants, dead algae and
debris, and will also convert the chlorine by-products (chlorides and
chloramines) back into free available chlorine.
When used with bromine products, non-chlorine shock is used
with sodium bromide in a two-part disinfection system. Potassium
monopersulfate (non-chlorine shock) is added to oxidize, or activate,
bromide ion into bromine which rapidly forms the active sanitizer -
hypobromous acid - in spa water. Upon reaction with bacteria and
other spa contaminants, hypobromous acid is reduced back to bromide
ion, ready to be activated again by the next dose of potassium
monopersulfate. Most non-chlorine shock products have buffers that
reduce pH instability, and corrosion inhibitors that help protect the
heater and other metal surfaces.
OZONE – Ozone is a powerful gas that is used as a sanitizer and an
oxidant to keep spa water clean and disinfected. Although ozone is
about 3000 times more powerful than chlorine, it has a tendency to
dissipate quickly and does not create any sanitizer residual. By using
an ozonator for your spa, you can cut maintenance time and chemical
costs by as much as 75%. Ozone is manufactured by an ozonator
(ozonegenerator)andisdispensedduringtheltrationmode.
pH Controllers
SODIUM BICARBONATE - Commonly used to increase pH and total
alkalinity of spa water. Sodium bicarbonate is also known as natural
baking soda. SODIUM CARBONATE – Also known as soda ash, is a
substance used to raise pH and total alkalinity.
Clearwater Spas Owner Manual | 25
SODIUM BISULFATE – Also known as dry acid, the chemical used to
lower pH and total alkalinity of spa water.
Water Conditioners
FLOCCULENT –Acompoundwhichclariesspawaterbygathering
oils, dirt, scum, metal deposits and small contaminant particles into
largerglobules,whichthencanbelteredmoreeffectively.
CLARIFIER – A compound used to remove dissolved solids, metals,
dirt, oils, or other contaminants from spa water.
SCUM BALL™ – A softball sized ball that is kept in the water. The ball
is chemically treated so that it attracts contaminants that would
normallybetrappedinthelter.
SEQUESTERING AGENT – Stain and scale preventing compounds that
sequesters dissolved metals to prevent water discoloration.
CALCIUM CHLORIDE – A soluble white compound used to raise
the calcium hardness of spa & pool water, to protect equipment from
corrosion.
ALGAECIDE – A chemical used to kill algae and prevent it from
growing back.
DEFOAMER – A compound used to reduce or eliminate foaming in
spa water.
CHITIN – A naturally occurring polymer (pronounced KY-tin) found in
crabandlobstershells.Asaspaclarier,itisthebestocculatingagent
available. Removes oils, dirt, scum, and metal deposits, allowing the
lteringsystemtoworkmoreeffectively.
26 | Clearwater Spas Owner Manual
How To Use The Chemicals
Now that you have some knowledge about spa chemicals, you will
learn how to use those chemicals to maintain balanced water in your
spa. This section will explain how to apply chemicals, how much to use,
and when to use them.
Usage Denitions
Before getting into how much and when, it is important to understand
some of the terminology that is used to describe how the chemicals are
applied:
P.P.M. – Parts Per Million. Expressed as a ratio of number out of 1
million.
SHOCK – Addition of an oxidizer (“Oxy-Shock”) or superchlorinator to
the water to break-down the organic contaminates on which bacteria
feed and to destroy ammonia and nitrogen compounds (oxidize only).
SUPERCHLORINATION – Means the addition of enough chlorine
in the water to kill all living things (sanitize) and destroy any organic
wastes present in the water (oxidize). Usually this means about double
your normal dose of chlorine. Superchlorination can be done once
a day for heavy bather loads or as infrequent as once a week for a
moderately used spa.
CHLORINATION – To add chlorine to your spa on a regular basis to
disinfect and oxidize your spa water.
BREAK POINT CHLORINATION – The process of shocking the water
withsignicantquantitiesofchlorinetooxidizeallcontaminantsand
organic wastes and leave all remaining chlorine as free chlorine.
CALCIUM HARDNESS – A measure of the amount of calcium
dissolved in water. Water with low hardness can lead to corrosion of
metal parts. Water with high level of hardness can cause scale (calcium
crust)builduponspasurfaceswhichcancloglters,heatersand
pumps.
WATER BALANCE – Water balance is reached when all elements (pH,
total alkalinity, calcium hardness and total dissolved solids) are within
Clearwater Spas Owner Manual | 27
their proper ranges.
ENZYMES – Biodegradableproteinswhichbreakdownoils,lmsand
digest scum in spa water.
FREE CHLORINE – The amount of chlorine available to kill bacteria or
algae. Also known as “Available Chlorine”.
COMBINED CHLORINE – The portion of the total chlorine in water in
chemical combination with ammonia, organics, and nitrogen, most of
which are chloramines.
TOTAL ALKALINITY (TA) – The measure in PPM of all the dissolved
base/alkaline material in the water. The acid-neutralizing capacity of
waterwhichin-dicatesitsbufferingability,orresistancetouctuations
in pH.
TOTAL DISSOLVED SOLIDS (TDS) – The total amount of dissolved
materials in spa water. The ideal range is 1,500 ppm above the start-up
TDS in spas.
Starting A Chemical Maintenance Program
A chemical maintenance program’s goal is to maintain water balance.
If you apply chemicals and test your water on a regular basis, water
balance is easy to maintain and your spa water will stay clear and
healthy. Test strips are fairly accurate, test kits are also available that are
very accurate and will test everything that you will need to monitor your
water chemistry.
Three main parameters should be tracked closely:
1. pH
2. Free chlorine
3. Alkalinity
T.D.S. (Total Dissolved Solids) and calcium hardness should be checked
aftertherstthreeareinthecorrectrange.Teststripsandtestkits
come with instructions on how to determine whether the chemicals are
in the right range. Table 2-1 shows how to dispense chemicals and how
often to do it.

28 | Clearwater Spas Owner Manual
Water Balance is reached when all elements (free chlorine,
pH, total alkalinity, calcium hardness and total dissolved solids)
are within their proper ranges.
TEST PARAMETER HOW OFTEN TREATMENT
pH
< 7.2 pH 2x weekly or more
for heavy use
Add Spa Up™
pH
< 7.8 pH 2x weekly or more
for heavy use
Add Spa Down™
Chlorine/
Bromine
3 – 5 ppm 2x weekly or more
for heavy use
Add Chlorine or
Bromine
Alkalinity
80 – 120 ppm 2x weekly or more
for heavy use
Add Alkalinity
Increaser
TDS
< 3000 ppm Check monthly Drainandrellif
> 3000 ppm
Oxy-Shock
Add 2x weekly or
more for heavy use
Add Oxy-Shock
Hardness
150 – 400 Check monthly or with
new water
Add calcium
increaser if < 200
ppm. Drain and
rellif>400ppm
Ozone
Ozonatorrunsonlter
cycles
Figure 2-1: Spa water care
In the beginning, it is a good idea to test your water daily to learn how
the water changes with the addition of chemicals. By keeping a log,
you will be able to keep better track of your water condition.
Whenaddingwatertoyourspaforthersttimeorchangingthewater,
you should superchlorinate the water by doubling (1 tbsp. Per 100
gallons) the regular dose of chlorine. It is a good idea to wait for 8
hours before enter-ing your spa after superchlorinating the water.
Remember that keeping your spa water healthy keeps you, your family,
and your guests healthy too. Most service calls for spa repairs are
related to problems caused by improperly balanced spa water.
Clearwater Spas Owner Manual | 29
Filtration
Forthesystemtoworkproperly,theltersmustbehosedoffatleast
once a week and thoroughly cleaned once a month with a degreaser.
Werecommendthatyoubuyanextraltercartridgefromyour
ClearwaterSpasDealertoalternatewiththeltersincludedwithyour
spa.Adirtylterwillrestrictwaterowandwillprohibittheltering
systemfromkeepingyourspaclean.Iftheltersarenotcleanedfor
extended periods, it could possibly damage the pumps.
Ifyouhaveaproblemwithoatingcontaminants,youmaywantto
purchase a skimmer net to easily remove bugs, leaves, etc…
Detailsoncleaningtheltersareincludedinthemaintenancesection,
butasareminder,itisimportanttorstturnoffthepowertothespa.
Leavingthepoweronwhilechangingthelterscouldallowobjects
to be drawn into the heater and/or pump and may damage your
equipment.
CAUTION! Turn off the power to the spa before removing the
lter!
Forthebestperformancepossible,cleanthelterweekly.
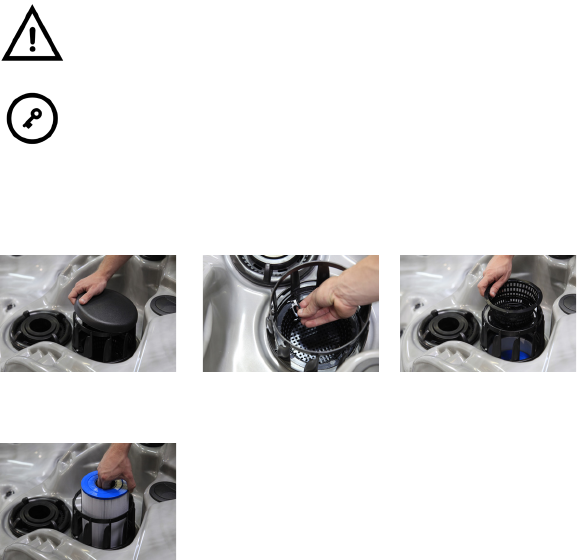
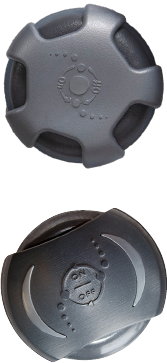
FILTER REMOVAL:
A)Toremovelterswithturbinevaneltercover:
1. Remove lid from the
ltercover.
2. Removelterbasket
clips.
3. Removelterbasket.
4. Remove and clean or
replacelter.
30 | Clearwater Spas Owner Manual
B)Toremovelterwithtelescopingweir:
1. Turnlterhousing
ring counter-
clockwise.
Remove housing.
2. Removelterbasket.
3. Removelterand
clean or eplace.
Ozone Generator
ClearwaterSpasoffersanOzonatormadetoourspecications.
Ozonators supply the spa water with ozone, which is an extremely
effective oxidant that will kill bacteria and microorganisms. The
Ozonator will distribute ozone into your spa automatically during the
ltercyclesandwillkeepyourspaandwatersparklingclean.Even
though ozone is effective at keeping your water clean, it cannot replace
the use of chlorine or bromine. Refer to the chemical section for more
information.
No maintenance is necessary on the ozonator. The ozonator works
duringtheltercyclessetbythecontrolleronly.Ifyourspadidnot
include an optional ozonator and you would like to have one installed,
contact your local Clearwater Spas dealer.
Clearwater Spas Owner Manual | 31
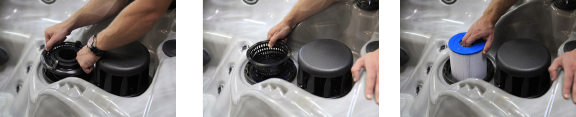
Resort &
Beachcraft
Series
Northwest
& Evergreen
Series
Description
2” ClearFlow™ Directional Micro Jet
Focuses therapy on the legs, arms, wrist and hands.
3” ClearFlow™ Directional Flow Jet
Focuses therapy on the neck, shoulders and hips.
5” ClearFlow™ Directional Flow Jet
Targets larger muscle areas on the back and feet.
3” & 5” ClearFlow™ Spinner Jet
Spinning action targets the back area and creates a
“kneading effect” massage.
3” & 5” ClearFlow™ Spinner Jet
Spinning action targets the back area and creates a
“kneading effect” massage.
5” ClearFlow™ Tri-Swirl & Master Jet
The tri-swirl (lt.) and master jet (rt.) focus on the back.
5” & 7” ClearFlow™ Foot Jet
Thepowerow(top)andmastermassage(below)target
the feet.
JETS
Types of Jets
Your Clearwater spa comes with different types of jets and jet
congurations.Eachtypeofjethasaspecicpurposeandoperates
differentlythantheothers.Alljetswiththeexceptionofthexedjets
in the foot well by the light are adjustable and can be turned on or off.
They all combine to create a soothing, and invigorating hydrotherapy
environment that can’t be beat.
Most of the jets are removable for easy cleaning. It is not uncommon
for particulates to get caught in the jets causing them to stop rotating,
especially in environments where there are trees overhead or nearby.
Refer to the next section for jet cleaning instructions. Most of the jets
are easiest to adjust or remove when the pumps are off.
32 | Clearwater Spas Owner Manual
NOTE: Jet styles may change from time to time such as the cosmetic
outerringorinsidenozzle.Allofthesejetstylesoffersimilarwaterow
movement, directional adjustments and/or spinning motions.
Jet, air and waterfall controls
DIVERTER VALVES
Some spas come with diverter valves. These valves are used to
divertthewaterowfromoneseattoanotherortothefootjetarea
depending on the spa model. The valve has a 180° range from one side
totheother.Ifturnedallthewaytoonesideallthepowerandow
from the pump will go to that seat or area. If turned partially to one
sideortheother,thepowerandowwillbesharedbetweentheseats
orareas.Tooperatethedivertervalveproperly,turnoffthepumprst
then rotate the valve. This will make turning the valve much easier, and
ensure the longevity of the valve.
WATERFALL CONTROL
Soothing waterfalls, water fans or waterfall
arches are featured on selected models. Handy
controlsallowforcompletelyadjustableowto
match your every mood.
AIR CONTROLS
These valves, which are located on the topside,
areusedtocontroltheairthatowsthrough
the jets. By introducing air into the jets, they
effectively double their power. Because of the
variety of models offered by Clearwater, it would
be impractical to describe which air controls
correspond with which jets. Experiment by
opening all the jets and turn on one motor at a
time. Turn the air controls one at a time and take
note which jets are affected. Air controls will
only affect the jets that are operating.
Cleaning The Rotating Jets
Occasionally debris will get caught in the housing of the rotating jets
causing the jet to either slow its rotation or stop rotating altogether.
Thiscaneasilybexedbyremovingandcleaningthejet.Alwaysturn
the pumps off before removing any jets. After removing the jet, they
Clearwater Spas Owner Manual | 33
can easily be cleaned by vigorously shaking the jet while submersed
in water. If the jet nozzle does not spin freely after doing this, move
the nozzle to the outside rotating position and turn the nozzle in the
rotating pattern until it starts to bind. Move the nozzle back and forth
over the binding spot until it starts to free up. Shake the jet while
submersed in the water again and check for free rotation.
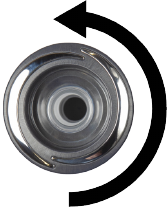
Jet Removal
To remove jets simply turn the outside ring of
the jet counterclockwise approximately one
quarter turn and pull jet out (Figure 3-1). To
replace the jet, simply place the jet in the shell
and turn the jet until the slots line up, then turn
jet one quarter turn clockwise until secured. The
jet will easily push into place and “snap” when it
is locked.
MAINTENANCE
Pillows
Your spa is equipped with high quality polyurethane foam pillows.
Thesepillowscanberemovedbysimplypullinguponthemrmly.To
replace them, line the receptacle holes up with the buttons on the spa.
Cedar Wood Spa Cabinetry – Natural Lasting Beauty
The spa manufacturing company uses select clear cedar for
manufacturing the exterior cabinet. High quality wood is used for
beauty and functionality. A generous coat of water base sealer has
been applied at the factory. To maintain the beautiful appearance and
extend the life of the cabinet, apply a coat of water base clear sealer
once a year.
Synthetic RIM & DuraTech™ Spa Cabinetry
Low maintenance durability. These cabinet systems offer the beautiful
look of tongue and groove wood cabinetry with low maintenance
durability. They are designed to withstand heat, cold and rain while
retaining the long lasting look of elegance. If access to the plumbing,
motors or the controller is required, remove the screws on the service

34 | Clearwater Spas Owner Manual
panels using a screwdriver. Panels can then be easily removed by
pulling the panel away from the spa.
WARNING!Donotsandspanish
The Shell
Your spa is constructed with a high quality, impact resistant,t
thermoplastic shell that requires very little maintenance. Make sure that
when you drain and clean your spa you use a mild, nonabrasive cleaner
and cleaning pads. We recommend that you use a cleaner made
specicallyforcleaningspas.Theytendtobenon-abrasiveandeasyto
rinse off completely. Contact your spa dealer for information on waxes
and sealers.
Spa Cover
If you purchased a cover with your spa, you will want to be sure to
keep it clean and protected. Spa covers exposed to the outdoors take
a beating from the elements. Use a vinyl protectant to discourage
deterioration caused by the UV rays from the sun. This will also
minimize rain penetration. See your local spa dealer for a vinyl
protectant.
Once a month, take the cover off the spa and use a sponge and dish
soap to scrub the cover clean. Keeping the cover free of dirt and debris
is the most important maintenance task for the cover. Be sure to clean
the seams extra well.
Cover Locks
Your cover comes with screws that are used to fasten the receiving end
of the strap locks. Simply align the cover on the spa and stretch out the
straps until they are tight. Mark the location of the strap receptacles,
then fasten them to the spa skirt with the screws supplied.
Winterizing
Since ‘freeze damage’ is not covered under the Limited Warranty, we
recommend contacting and having a spa professional prepare your
spa for winterizing protection. If you live in a climate where winter
temperatures are below freezing and power to the spa will be
Clearwater Spas Owner Manual | 35
disconnected, follow these procedures for draining:
Winterizing guidelines:
1. Add an algaecide to the water and run pumps for half an hour to
evenly disperse algaecide.
2. Turn off power to the unit at the circuit breaker.
3. Drain the spa by attaching a garden hose to the drain and opening
the valve. After the spa is empty, remove the hose and leave the
drain valve open.
4. For freeze protection – Access motor area by removing the
outer front panels to the right and left of the controller panel
and unscrew the plumbing collars from the pumps. Leave union
couplings disconnected. Vacuum out lines with a wet/dry shop
vacuum.
5. Soak up any excess water that drains from motors and associated
plumbing with a towel. Keep water and debris out by covering with
a rigid spa cover.
6. Before using the spa again, reattach pump couplings, close drain
valve,andreviewlling/startupinstructions.
If the spa is to be used during the winter, save energy by turning the
temperature down and keeping the spa covered. If the spa reaches
freezing temperatures, the main pumps will automatically turn on to
circulate the water.
Note: Clearwater Spas utilizes manufacturing methods that make
winterization less than ideal for handling cold weather as it creates a
risk of freeze damage. It is recommended by Clearwater that the spa
be run in Rest Mode as opposed to being winterized. Rest Mode and
the Low Range heat setting are the best methods to ensure your spa
remains functional and undamaged through the winter months.
36 | Clearwater Spas Owner Manual
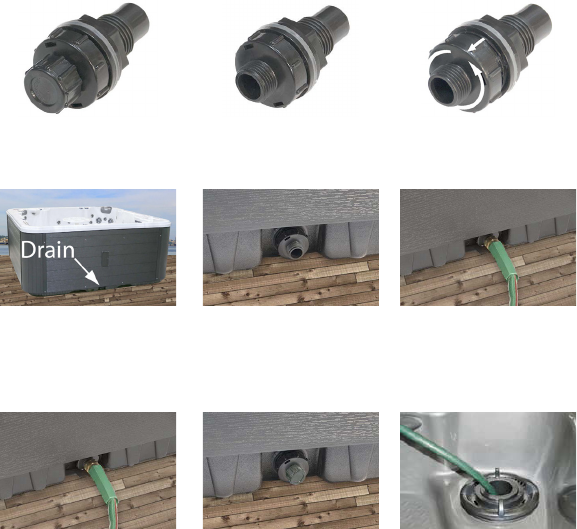
Draining The Spa
The drain is located on the base at the front of the spa below the
control panel. Cabinet styles may vary.
Capped Position Closed Position Open Position
Drain Location: The drain is
located on the base. These
steps are the same for all
cabinet styles.
Step 1: Remove the drain
cap.
Step 2: Attach hose and
place other end of hose in
the area you want the water
to drain to.
Step 3: Twist drain counter-
clockwise and pull out to
open.
Step 4: When you are
nisheddrainingyourspa,
reverse these steps to close
the drain, and screw on
the cap.
Step 5:Rellspaas
recommended in manual.

Clearwater Spas Owner Manual | 37
ENERGY EFFICIENCY GREEN TECHNOLOGY
Providing a greener spa. Clearwater Spas is strongly committed to
protecting the health of our environment and manufacturing energy
efcienthottubsthathelptoconserveournaturalresources.Westrive
to provide clean air, and clean water solutions – both in how we build
our product and in our product itself.
E-Smart Technology - Your spa is made with ‘e-smart
technology’ built into every hot tub to provide a complete
energyefcientsystem.Fromtheinitialengineeringdesign
stage through our manufacturing, and product usage, we have set a
high standard to keep our hot tubs environmentally sound. This symbol
signiesthehighestenergyefciency,thesmartestengineeringdetail
standards, and global environmentally green components.
Energy Efcient - ClearwaterSpasRTB(reectivethermal
barrier)insulationis12%moreenergyefcientthansprayfoam
insulation.Ourinsulationpanelsreectandrecycleheatfrom
within the cabinet keeping it warm and dry.
California Energy Commission (CEC) Certied - All of
ClearwaterSpasarecertiedtoCalifornia’sEnergyCommission
(CEC) – the most stringent energy standards in the United
States. We not only meet these standards – we exceed them.
Healthy Factory Process - We are focused on providing healthy
and safe solutions in our factory for our employees and our
environment. This includes processes for good air quality, and
energyefcientcomponents.
Clean Air Factory - Our Eco-Spray™ process for strengthening
every spa shell has 0% styrene, no odor and emits no VOC’s
(volatile organic compounds) for a clean air environment.
Clean Water Solutions - We provide cutting edge clean water
solutions to help provide natural alternatives and help reduce
the need for chemicals. Salt water, UV-C light, ozone and re-
usableltersprovidenaturalcleanwatersolutions.

38 | Clearwater Spas Owner Manual
APPENDIX A
Troubleshooting
For error message on your topside control, see control reference from
the Initial Start-up.
System Trouble
PROBLEM PROBABLE CAUSE REMEDY
GFCI trips (on startup) Improper or defective
wiring.
Improper or defective wiring.
GFCI trips A) Ozone generator
defective.
Unplug from controller and
reset breaker to verify
problem.
B) Unknown cause. Unplug components one at a
time until breaker holds.
System inoperative A) System lockup. Reset power source or GFCI.
B) Loss of power. Reset breakers. Check fuses.
Call for service.
PROBLEM PROBABLE CAUSE REMEDY
System overheating,
shutdown
A)Restrictedlter. Cleanlterovernightwith
lterdegreaser.
B) Water too low. Raise water level above
lterinlet.
C) Filtration time too long.
(only applies on non-circ.
pump set ups)
Reduceltrationtime.
System not
maintaining temp.
A) Spa is in REST mode. Switch mode back to READY.
B) Spa is set to Low Range
for temperature
Reset to High Range.
C)Restrictedlter. Cleanlterovernightwith
lterdegreaser.
D) Water level is too low. Raise water level above
lterinlet.
Controls

Clearwater Spas Owner Manual | 39
PROBLEM PROBABLE CAUSE REMEDY
Rotating jets won’t
rotate
Debris in jet housing. See ‘Cleaning the rotating
jets’ section of the JETS
chapter.
Spinner worn out. Replace jet insert.
PROBLEM PROBABLE CAUSE REMEDY
Noisy pump or motor A)Cloggedlterorpump
inlets.
Cleanlter,lterbasket
and pump inlets
B) Low water level. Raisewaterlevelabovelters.
C) Slice valves not open. Remove service panels and
open slice valves.
D) Debris in pump(s). Call for service.
E) Damaged or worn
motor bearings.
Call for service.
Pump not working A) Fuse on circuit board
blown.
Replace fuse.
B) Motor overloaded. Let motor cool for one hour,
open all jets. Motor will reset
automatically.
C) Defective Pump button. Call for service.
D) Blockage in line. Call for service.
E) Broken pump or failed
motor.
Call for service.
F) Slice valves not open. Remove service panels and
open slice valves.
Pumps
Jets

40 | Clearwater Spas Owner Manual
PROBLEM PROBABLE CAUSE REMEDY
Water leak A)Compressiontting
(unions) have loosened.
Tightentting.
B) Pump seals leaking. Call for service.
C) Heater gaskets leaking. Replace gaskets or call for
service.
Cloudy water A)Cloggedordirtylter. Rinse off debris and clean
lterwithdegreaser.
B)Insufcientsanitizer
or calcium hardness.
Add sanitizer and calcium
hardness.
C)Insufcientltration
time (does NOT apply to
24hr. circ. pump set ups).
Increaseltrationtoa
minimum4hoursperlter
cycle (8 hours per day).
D)Particlestoosmallforlter. Addclarier.
E) High pH and / or
alkalinity.
Adjust pH with pH Down.
F) Trace metals in water. Use metal remover
G)Toomuchclarieruse. Waittobelteredout.
Green water A) Algae. Add algaecide, super
chlorinate and add Shock.
Check ozone generator.
B) Metal corrosion in
equipment.
PH too low, adjust to 7.2 to
7.6 with pH Up.
Brown water Iron present in water. Super-chlorinate and add
Shock. Add metal remover.
Bleached hair/bathing
suits. Eye irritation.
Too much chlorine. Allow to dissipate. Add Oxy
Shock.
Bad smell, eye & skin
irritation, complaints
of too much chlorine.
Too many chloramines, not
enough free chlorine in water.
Super-chlorinate and maintain
3 - 5 PPM. Add Shock.
Scale formation on
walls and equipment.
A) High pH. Reduce pH to 7.2 to 7.6.
B) Calcium too high. Drain 20% to 40% of tub and
rellwith“soft”water.
Maintain at 150 to 400 PPM.
pHuctuatesradically Total alkalinity out of balance. Balance alkalinity.
Water
Clearwater Spas Owner Manual | 41
FAQ’S - FREQUENTLY ASKED QUESTIONS
Q: Why is my spa not heating?
A. Check which mode you are in: Ready or Rest. See ‘Topside
Control’. Rest can allow the temperature to drop between cycles
B. Check the temperature Range. The lower range only goes up to 99
degrees.
Q: Why won’t my spa heat above 99 degrees?
A. Any spa built from 2014-Current would have Dual Temperature
Ranges. Please reference Dual Temperature Ranges in your Manual
(page 15) and your spas corresponding Topside Control Reference
(which can all be located on our Product Resources, Guides &
Manuals page of our Website.
Q: The system is receiving proper voltage, why doesn’t anything
function?
A. Check for blown fuses, burn marks or signs of tampering in the
box.
A. Power down the spa, and reset the GFCI. If problem persists,
contact customer service for tech support.
Q: What does the ozone generator do?
A. Anozonatorpuriesnaturally.Itproducesanactiveoxygen
that attacks bacteria at microscopic levels reducing the number
of chemicals needed for perfect water. Ozone is also useful in
coagulation of metals and other contaminants found in some areas.
Q: How do I know if my ozonator is working?
A. Duringaltercycle,agreenLEDlightontheozonatorwilllight
and bubbles will move through the clear water line that connects
to the ozonator.
Q: How do I ll the spa with water?
A. Placeyourgardenhoseintothelterhousing.Thiswillensurethat
airbubblesareremovedfromthelineswhileyoullthespa.
B. Turn the water on so that most of the water enters through the
lterchamber.
C. Fillthewatertotheproperlevel–halfwayupthelterhousingor
to the bottom of the pillows.
42 | Clearwater Spas Owner Manual
LIMITED WARRANTY
Thermal Hydra Plastics, LLC, dba Clearwater Spas (“Clearwater”),
warrants solely to the original consumer purchaser (“owner”) at the
original installation site the following about your new Clearwater Spa
manufactured after March 1, 2017 and purchased from an authorized
dealer/service provider (“dealer”) for residential use in the United
States or Canada.
20 YEARS*
Shell Structure & Surface
Clearwater warrants the acrylic shell not to leak due to defects in
material or workmanship for 20 years from the original spa purchase
date. Clearwater also warrants to repair the spa shell interior surface
if it blisters, cracks and delaminates for 20 years from the original spa
purchase date.
20 YEARS
RIM Cabinetry (select models)
Clearwater warrants the RIM cabinetry against defects in material and
workmanship and shall not crack, splinter, rot or suffer water damage or
structural damage from termites or fungal decay for twenty years from
the original spa purchase date. This warranty does not include fading of
thecabinetsurfacecolorornish.
5 YEARS*
Equipment
Clearwater warrants the operating equipment against defects in
materialandworkmanshipforveyearsfromtheoriginalspapurchase
date.Thisspecicallycoverscontrolsystem,pump(s),andheater.
Other equipment, but not limited to, such as pump seals & shafts,
audio components, LED Lighting, Ozonator, Salt System, UV System,
TPS System, and Wi-Fi modules are not included in the Five-Year
Equipment Warranty.
Clearwater Spas Owner Manual | 43
Plumbing
Clearwaterwarrantstheplumbingandttingsnottoleakforve
years from the original spa purchase date. Gaskets and seals are
not included in this warranty.
1 YEAR
Duratech Cabinetry (select models)
Clearwater warrants the Duratech cabinetry against defects in material
and workmanship and shall not crack, splinter, rot or suffer water
damage or structural damage from termites or fungal decay for one
year from the original spa purchase date.
Cedar Cabinetry
Clearwater warrants the cedar cabinetry against defects in material
and workmanship for one year from the original spa purchase date.
Applying a sealant to the cedar on an annual basis is recommended
for optimum appearance and longevity.
1 YEAR
Other Equipment and Parts
Clearwater warrants the following against defects in material and
workmanship for one year from the original spa purchase date.
• Pump Seal & Shaft
• LED Lighting Controller, power supply, and lights
• Stereo & Bluetooth Components including controls, power supply,
and speakers
• Ozonator
• UV System (UV bulb is excluded from this warranty and is
warranted for 90 days)
• Salt System & Controls
• TPS System & Controls
• Control valves including air, water features, and diverter valves
• Wi-Module(ConnectivitySupportisexcludedandprovidedby
the manufacturer of the module. See dealer for details)
• Jet Inserts*
*Laborisexcludedasthesearedenedasanddeemedan“Easily
44 | Clearwater Spas Owner Manual
Removed Component (ERC)” and will be repaired or replaced at
an authorized Clearwater Spa/Service Dealer.
Other Warranty
Clearwater warrants the following against defects in material and
workmanship through time of delivery. No labor claim can be made
against these items and is excluded from our warranty.
• Headrests, Cartridge Filters, Fuses, Jet Facings, and motor/ pump
power cords.
• Filter Covers and Bistro Tables (select models). Replacement of
these parts are not guaranteed to have a matching color to the
original.
• Filter Baskets & Skimmers
• Gaskets or O-Rings within pump(s), heater unions, and valves.
• The insulated spa cover and other spa accessories attached to the
spa AFTER date of manufacture are not covered by this limited
warranty. Please refer to your dealer for details regarding those
product’s separate warranty coverage.
PERFORMANCE OF WARRANTY
Please register your spa within 7 days of delivery. You can register
your new spa at www.clearwaterspas.com/register. Your spa must
be registered before any authorized warranty service work can be
performed. In the event of a covered defect under this Limited
Warranty, Clearwater or its’ agent will make repair in accordance with
conditions contained in this Limited Warranty. In doing so, Clearwater
reserves the right, at its’ option, to either repair or replace the defective
spa or component.
The homeowner is required to provide full access to the spa cabinet’s
entire service side panels, without obstruction, to service all internal
components. There will be no charge for parts or labor to repair the
spa, however, you may incur a core-charge and shipping on the parts
as well as a reasonable repair-person travel and mileage charge by the
servicing company. Clearwater reserves the right to use either new or
reconditioned replacement parts and they will carry the balance of the
original part’s warranty. If the covered defect cannot be repaired in the
Clearwater Spas Owner Manual | 45
eld,asdeterminedbyClearwater,wereservetherighttohavethespa
shipped to the factory for repair or provide a replacement/exchange
spa of equal value. In such an event, the spa owner will be solely
responsible for the cost associated with the removal and shipping costs
to the factory of the defective spa, shipping costs from the factory of
the repaired/replacement spa, and the installation of the replacement
spa. The replacement spa will carry the balance of the original spa’s
warranty. The liability of Clearwater under this Limited Warranty, if any,
shall not exceed the original amount paid for the defective product.
It is the responsibility of the spa owner to notify the factory, in writing,
immediately upon discovery of a warranty claim. Neglecting this
noticationmayvoidyourclaim.
EXCLUSIONS
The Clearwater Spa limited warranty is void if any of the following
occur:
• The spa has been altered, neglected, abused, or misused.
• Damage is caused by the shipping, mis-handling, or moving of the
spa.
• Any repair is attempted by an unauthorized Clearwater service
agent.
• The spa has been used in a commercial setting.
• Damage is caused by an Act of God or another cause outside
Clearwater’s control.
• Damage is caused by improper installation, operation, or
maintenance (including water chemistry) according to the owner’s
manual or any other printed instructions fromClearwater.
• Damage is caused by the addition of any non-approved chemical
substance.
• Damageiscausedbysubjectinganuncovered,unlledspato
direct sunlight.
• Damage is caused by the spa’s water being outside the
temperature range of 32°F-120°F (0°C-49°C).
• Scratches or micro-crazing in the spa shell reported after the day
of installation are notcovered under the warranty. Micro- crazing
isdenedasanareaoftinyshinylinesvisibleinareaonthe
46 | Clearwater Spas Owner Manual
surface of some thermoplastic sheets. Additionally, although rare,
minorimperfections, mold lines, orange peel on surface are known
to occur in many types ofplastic vacuum sheet materials. The
surfaces of thermoformed acrylic hot tubs are notimmune to this
possibility and are not covered under the warranty.
LIMITATIONS
All warranties, implied or otherwise, including implied warranties for
merchantabilityandtnessforaparticularpurpose,arelimitedtothe
terms set forth in this warranty. No representative of Clearwater, not its
agents, distributors or dealers, has any authority to alter in any manner
the terms of this Limited Warranty and Clearwater is not responsible for
any undertaking, representation of warranty made by any other person
beyond those expressly set forth in this warranty. This Limited Warranty
only covers those items manufactured by Clearwater.
DISCLAIMERS
The manufacturer and its’ representatives will not be responsible for
incidental or consequential damages and shall not be liable for any
injury, loss, cost or other damage, whether incidental or consequential,
arising out of any defect covered by this limited warranty, including
without limitation, loss of use of the spa, cost for removal of defective
product and removal of deck or custom surrounding, and water or
chemical replacement cost. The liability of the Manufacturer under
this limited warranty, if any, shall not exceed the original amount paid
for the defective product. Coverage under this limited warranty shall
commence as of the original date of purchase and the duration of
such coverage shall not extend for any reason whatsoever beyond
the stated time periods. These disclaimers shall be equally applicable
to any service provided by the Manufacturer and its designated
representatives.
LEGAL REMEDIES
ThisLimitedWarrantygivesyouspeciclegalrights.Thereareno
warranties applicable to Clearwater products except as expressly stated
herein or as implied by applicable state and federal laws. You may also
have other rights that vary from state to state. Some states do not allow
limitations on how long an implied warranty lasts, disclaimer of certain
warranties, or the exclusion or limitation of incidental or consequential

Clearwater Spas Owner Manual | 47
damages so some of the above limitations may not apply to you.
*Celebration and Spirit hot tubs have a 10 year structural and 5 year
equipment warranty.
*Lite Series hot tubs have a 10 year structural and a 2 year equipment
warranty.
NOTES

P.O. Box 2140 | Woodinville, WA 98072 | www.clearwaterspas.com
Spa Manual Clearwater Spas, N. America 2020
