Splayed Joinery using a software tool.
saw blade
All of the dimensions of a stave are interrelated. As the number of staves, the thickness of the material being used, the
slope of the unit, and other parameters change so do the stave dimensions. I decided to use Microsoft Excel for
developing my software tool. It is flexible in that one can combine a way to input dimensions, do needed calculations,
display the final dimensions in table and graphic form, and supply any needed explanations. I also wanted to
incorporate a means to cut the staves on my table saw using a jig. The tool would need to calculate measurements for
setting up the jig. In addition I wanted an easy method to assemble the staves into the final form.
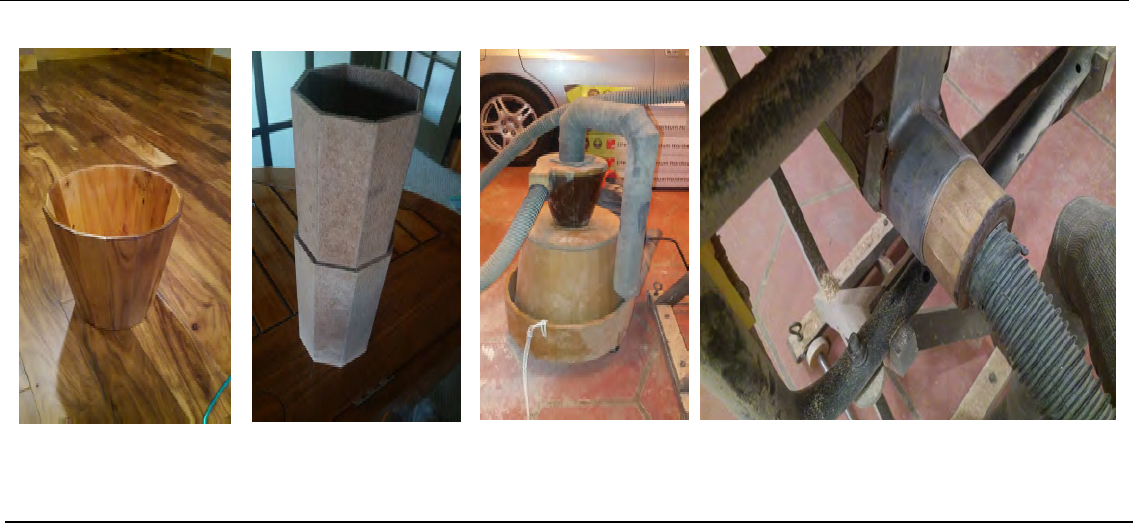
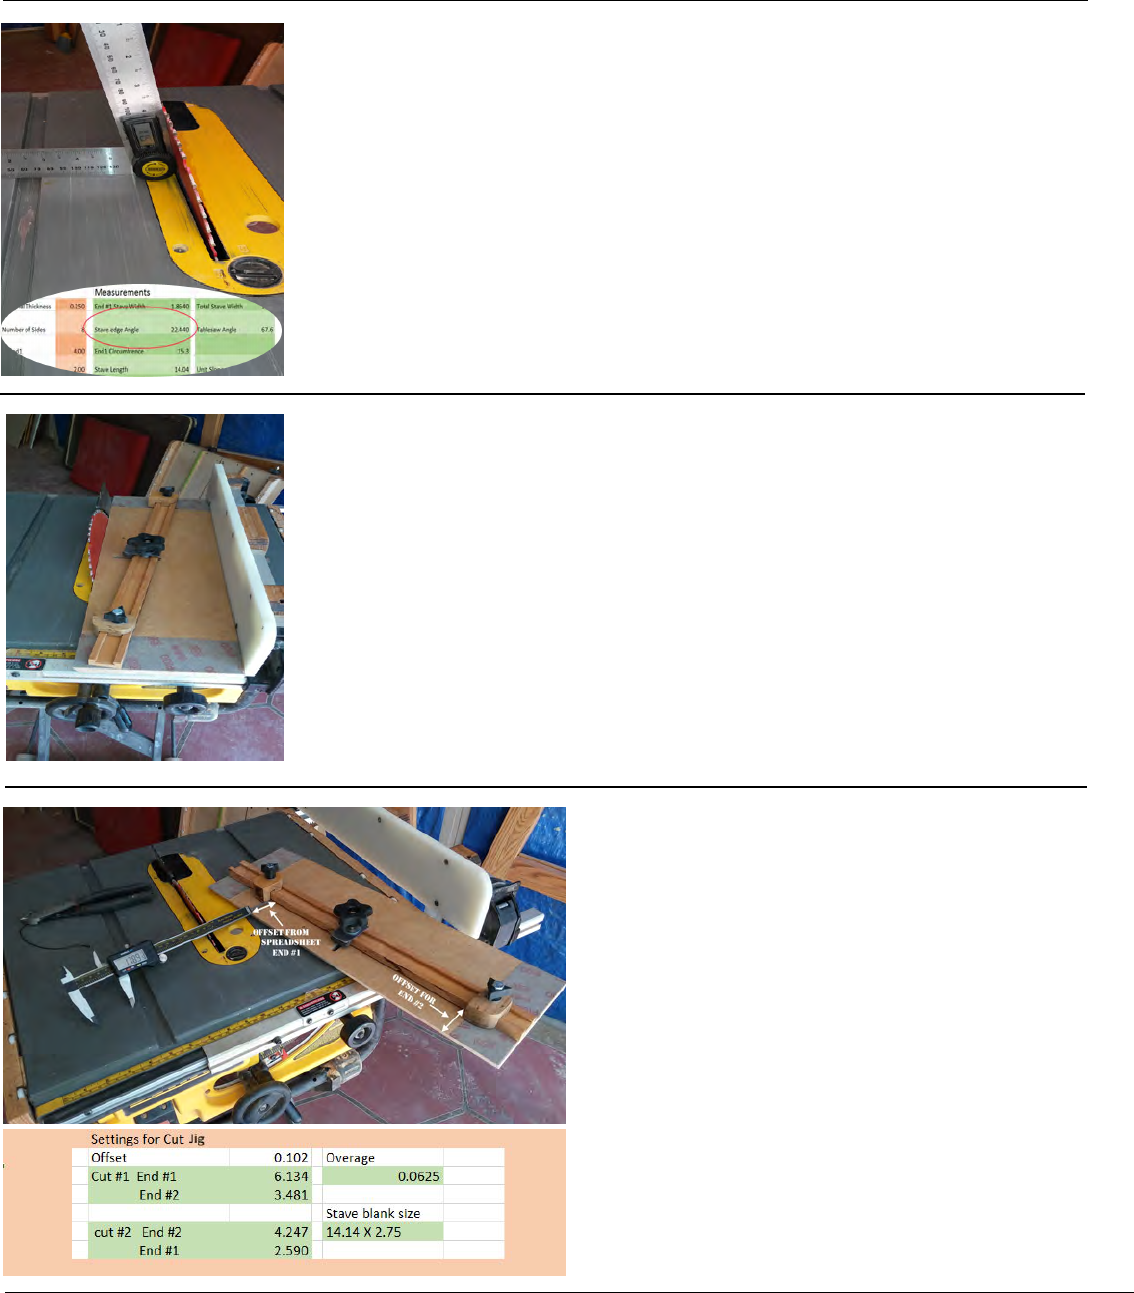
The software tool is used by entering parameters for
the material thickness, number of sides, and the inside
diameter of the unit ends. A graph of the unit gives
a visual representation.
When making a cone the unit height is entered to
calculate the stave length and fine tune other
dimensions..
Two additional parameters are available as needed. glue
thickness (rarely needed) and saw blade kerf, used to
estimate amount of material needed for the unit.
I began this project as a solution for connecting my dust collector to my shop tools.
Each had slightly different sized connection port. I started by using seat of the pants
dimensions. I had some success, and liked the structural integrity of the connectors I
managed to make, I quickly found that more precision was needed. Using Google I
found
several methods that were helpful in understanding the math, but most
approached the subject from a different perspective than I needed.
The tool contains a definition tab which contains definitions
and explanations for all the parameters and measurements.
Calculations can be seen by selecting the calculations tab.
The math is accomplished by using the built in VBA capability of
Excel.
A table provides measurements for setting up the jig used for
cutting the staves. It also gives the dimensions of the blanks
which the staves are cut from.
Imagine a tube made from multiple flat pieces of wood. Each piece has beveled
edges so when placed together form the tube. Then imagine a tube of the same
construction except that the opening on one end is larger. This article is about
making the pieces (staves) that when put together will make these shapes. These
shapes are called a conical frustum and a cylinder. Splayed Joinery is all about
making compound cuts to creating the many identical pieces that will assemble into
these shapes.
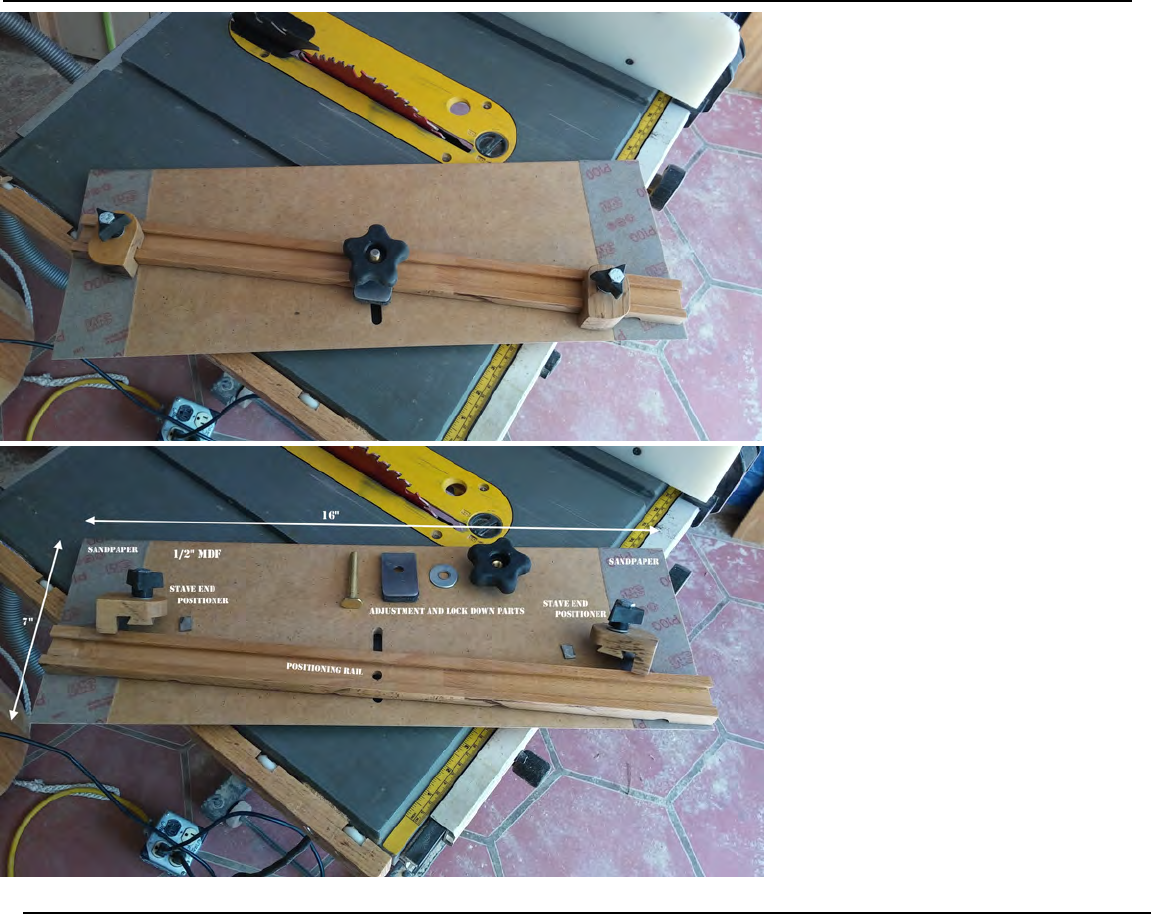
Objects made from staves
Waste Basket
Telescopic Tubes Dust Collector
Hose Adaptor
Here are some of the items I have made using splayed joinery.
The waste basket was made from left over flooring. I cut a grove, for the bottom, on the inside of the blanks.
The telescopic tubes were to see how accurate the overall process can be.
The dust collector, including the cart it sits in and the tubing to the vacuum, was made using stave tubes and cones.
My first project, making adapters to hook up the vacuum hose to my tools.
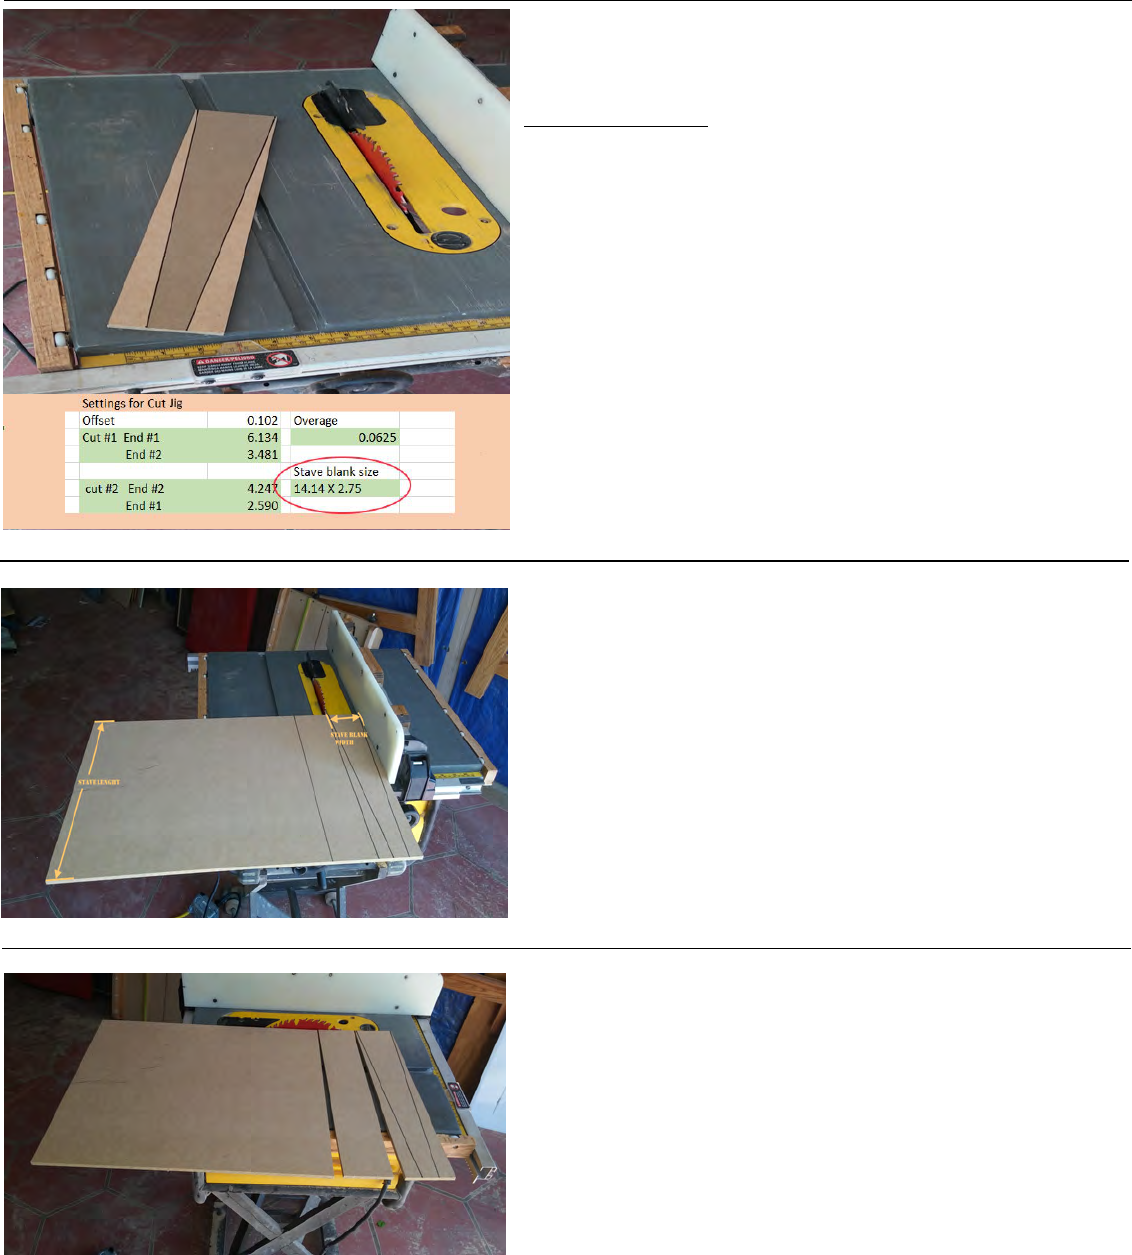
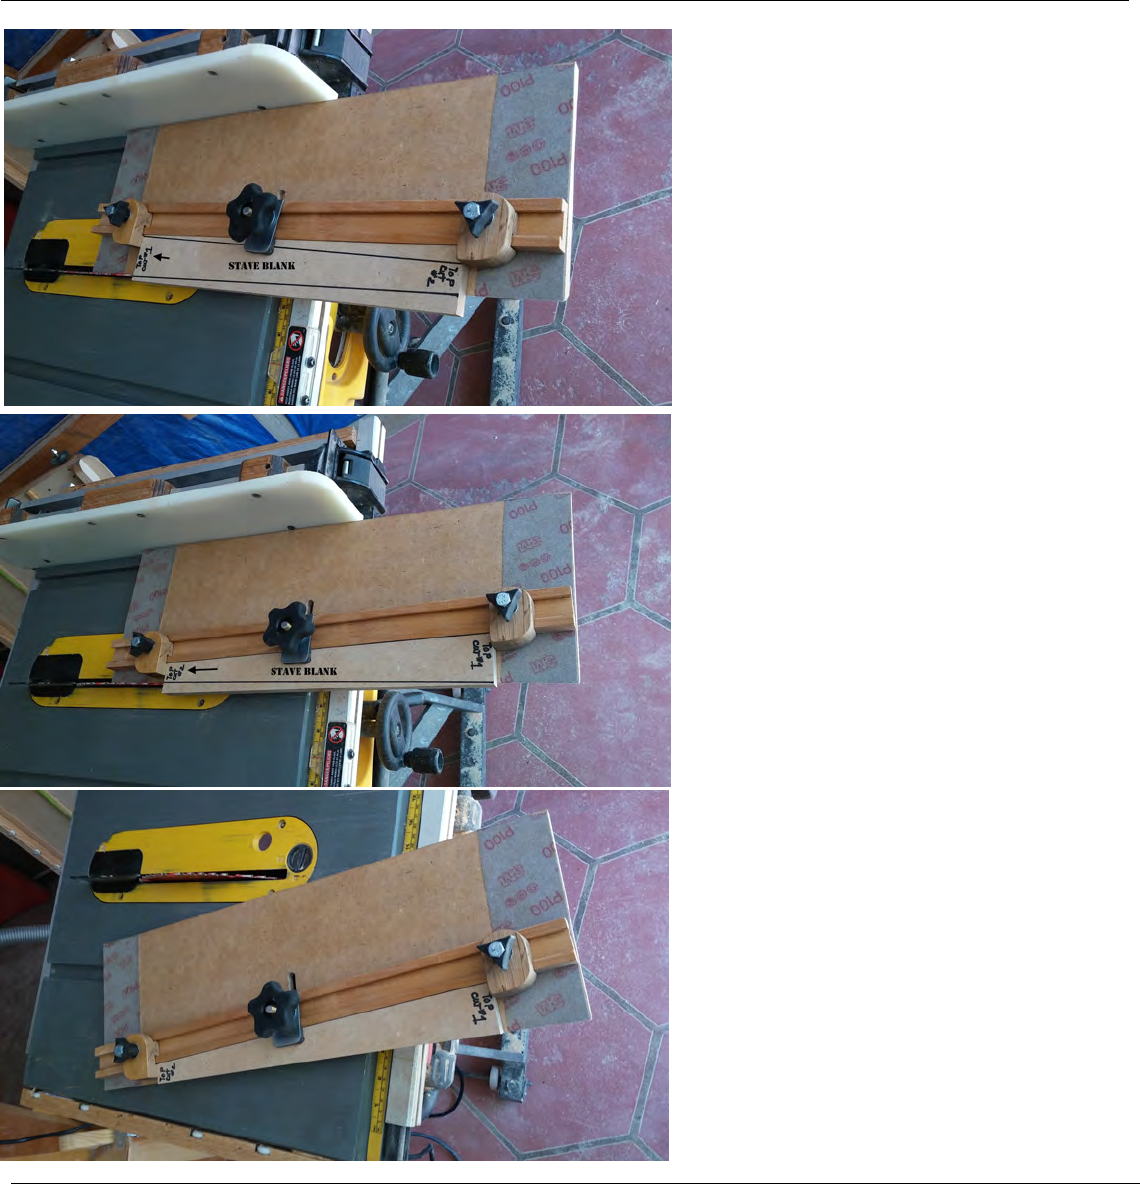
The jig is simple to make. It consists
of a MDF base, an adjustable stave
blank holder with two adjustable stops;
A position and blank locking bolt in
the center of the holder and sandpaper
glued to the ends to prevent movement
when locked down. The exact
measurements and means of attaching
the stave end positioner to the
positioning rail can be modified. One
of the stave positioners could be fixed.
The stave rail needs to be thicker than
the stave material because on the
second cut the inner stave edge is
beveled. The saw blade edge of the
base is undercut to 30 degrees so it can
touch the blade when the blade is tilted
to cut the stave edge angle. The stave
is secured in place when cutting using
the two end positioners and a piece of
metal with thick rubber glued on one
side. When the lock knob is tightened
the metal piece wedges the metal
across the positioning rail and the
blank securing both. A slot in the
center of the base lets the
positioning bar adjust in two
dimensions so the ends of the blank
can be correctly positioned.
The jig used to cut staves
Cutting Staves using the jig
Various material can be used to make stave blanks. If
using sheet material I like to cut a large piece to the length
of a stave. I can then rip the blanks to width from that
piece. I find it easier to handle and get better consistency
in blank size.
Two stave blanks ripped from a stave length piece.
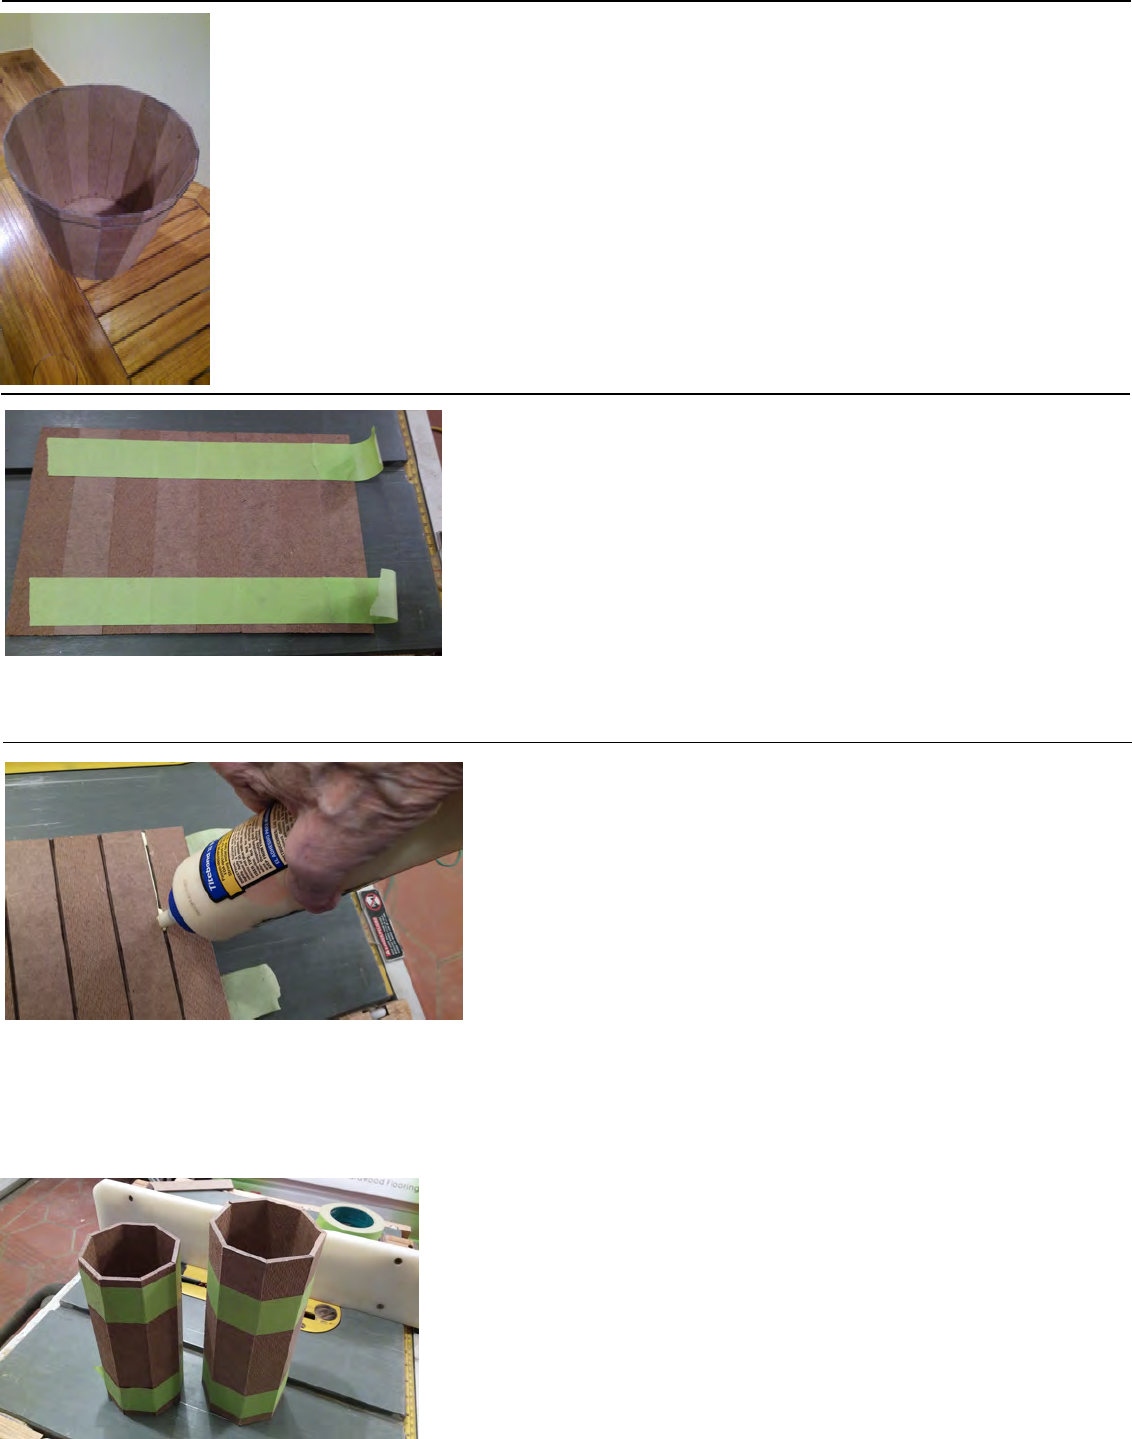
Once the dimensions of the staves to be cut have been
generated by the software tool the first step is to cut stave
blanks. The tool provides the dimensions of the blank in the
jig Settings Table. The sizing of the blank is somewhat
critical. It can be a little wider but not narrower than the tool
values, and must be the given length. In the picture I have
drawn the outline of the stave on the blank to show its final
shape.
The jig settings give the size of the blank, measurements for
setting the positioning bar for each pass, and overage which is
cut away and creates edges which are beveled for the entire
length of the stave.
The jig needs to be registered to the saw blade and is guided by the table saw
fence. This can be tedious, to close and the edge of the jig gets clipped to far way
and the stave ends up wide. For most work this is not critical. Being off by a
fraction in a stand alone unit is usually acceptable. It only becomes critical when
two or more units are to be mated. So my rule of thumb is move the fence till the
jig touches the blade then back it off 1/32 of an inch.
The table saw blade needs to be set to the stave edge angle. I use an inexpensive
digital angle gauge with a readout in tenths of a degree. For material over 1/4
inch thick accuracy becomes important. If the angle is not correct when the unit
is assembled the multiple joints will be tight or loose. I find that over cut angles
(looser) work better. Tight joints (under cut) distort the overall final shape.
Cutting Staves using the jig
To set up the jig a stave blank is placed in the jig
and the end positioners are registered to the ends of
the blank. Then a caliper is used to set the
positioning rail to (cut#1, end#1 / end#2)
distances from the edge of the jig. The stave and
the holder are then locked into position by
tightening the lock knob. After cutting the first
edge the jig is set for cutting the second edge
(cut#2, end#1 / end#2). The half cut staves are put
back in the jig rotated end to end before the second
cut.
Cutting a stave from a blank is a two pass process.
Each pass cuts one edge of all the stave blanks for
the unit.
Cutting Staves using the jig
Here is a picture of a stave blank in the jig
ready for cutting the first pass. I have
marked the outline of the stave on the blank
for clarity.
Here is a picture of a stave blank in the jig
ready for cutting the second pass. I have
marked the outline of the stave on the blank
for clarity. Notice the blank has been rotated
end for end.
Here is a picture of the completed stave
after the second cut.
Remember one edge of all the blanks are
cut using the first setting. The jig is set for
the second cut and all the blanks are rotated
end for end and ran through the saw again.
Assembling staves to make a shape
If you have tried to built a project using staves, or thought about one, a single thought
can make you change your mind. "How am I going to assemble all these pieces at
once?" The ends have to be aligned, glue has to be applied to all the edges, the shape
needs to be maintained! WOW!
I am not the first to try this daunting task. Luckily I found a way that works well. I
said found because I used Google and was amazed at the many possible ways. For
most of the projects I have done I found one that is simple and produced acceptable
results.
By laying the staves on flat surface outside up, the edges and
ends can be aligned. The picture shows the layout of a tube. (A
cone shape would create a fan shaped layout).
It takes some practice to place the pieces. By using one hand to
hold the previous piece the next piece can be adjusted so the ends
line up and the edges are tight. Small pieces of tape can also be
used to hold the individual stave edges together.
Once all the staves are laid down strips of tape are applied to the surface from side to side. For smaller staves two
strips of tape works well. I use original, sticky, masking tape and it holds the pieces secure.
Flip the taped staves over so the inside is up. Once again this
takes some practice. I find that working both hands under the edge
closest to me and then lifting it up and letting it fall over using
gravity as my helper works well and the staves stay together.
With the inside edges exposed glue can be applied between the
staves and to one outside edge. A thin bead of glue can be applied
to all the edges fairly quickly. Using standard wood glue I find I
have plenty of time before the glue begins to set up.
If you take a look at the picture you can see that the strips of tape start in the middle of a stave and extend past the
edge of the last stave. This helps when forming the unit. Once the glue is applied the staves can be set upright and
the shape formed. The over hanging tape can be used to secure the assembled unit together. I am always amazed at
how, well cut staves, almost snap into shape! When forming a cone I find placing the larger end down on the flat
surface works best.
Excess glue will be forced from the joints. If the inside surface is
important, it will need to be wiped smooth (messy).
