
Black Horse Pike Regional School District
580 Erial Road, Blackwood, NJ 08012
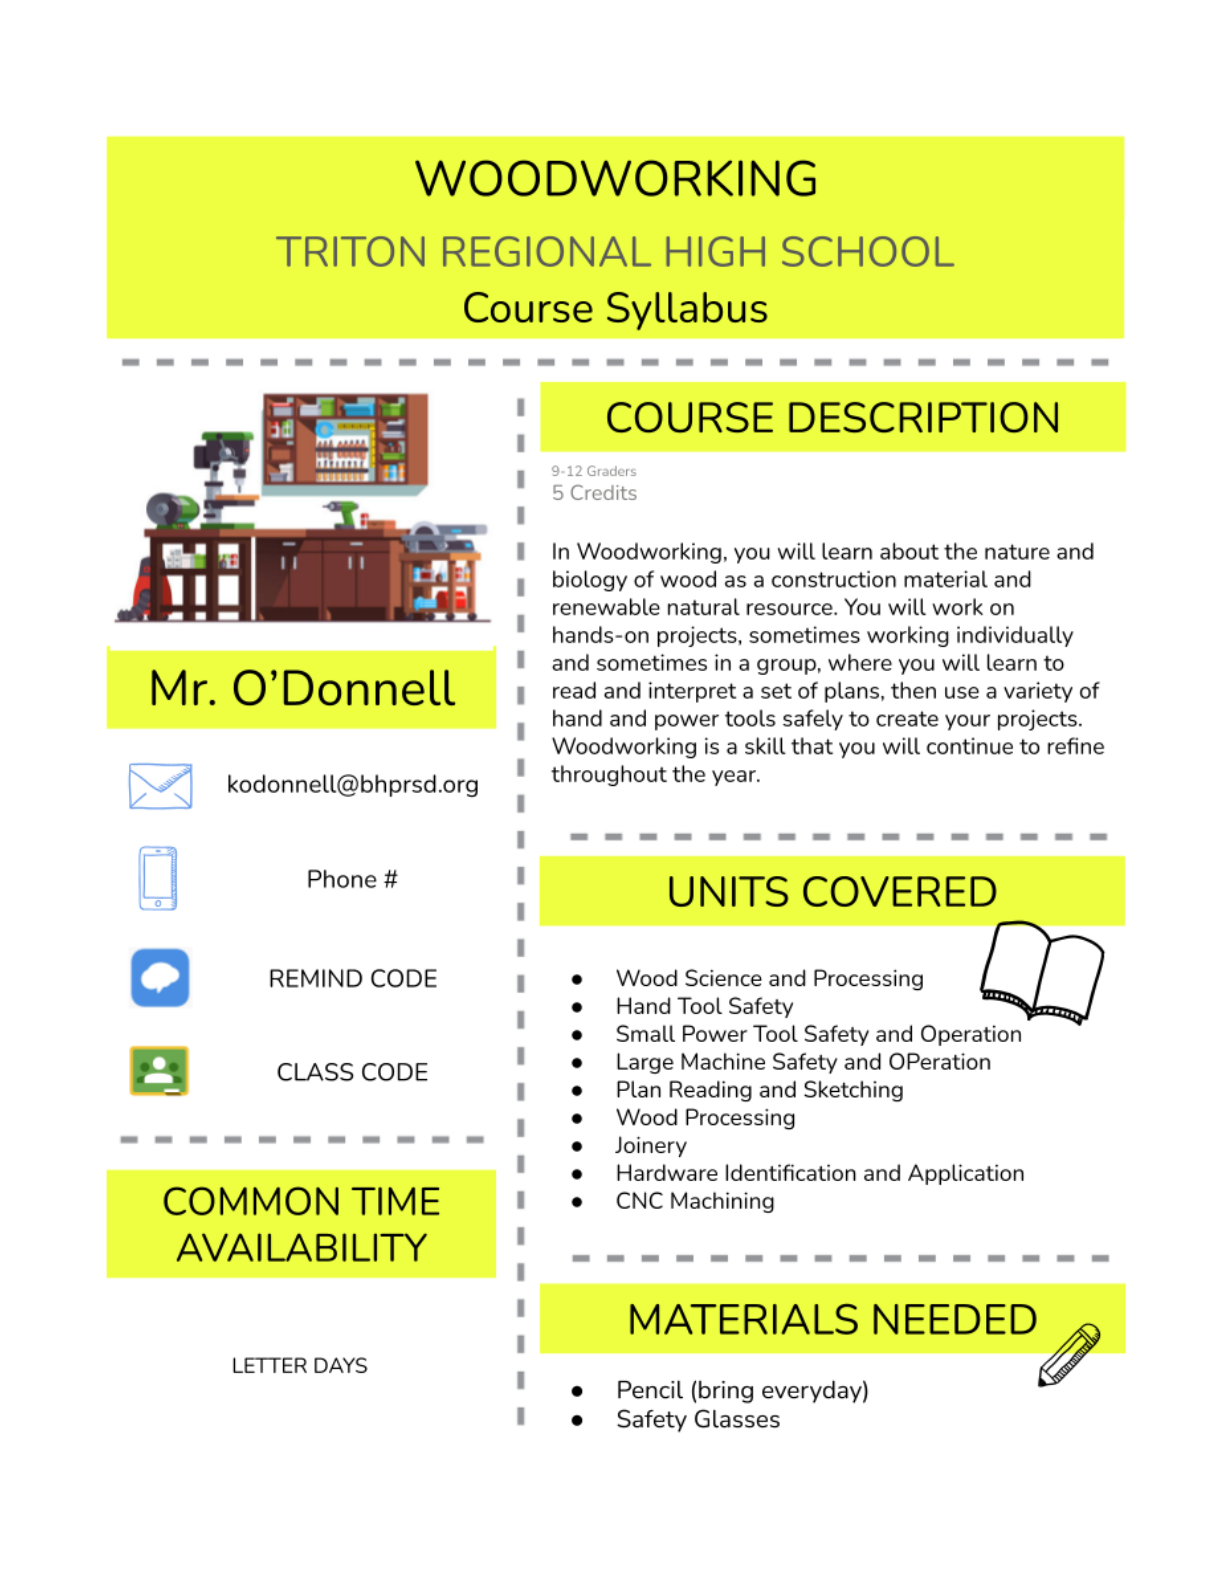
Woodworking
COURSE OF STUDY
Technology Education Department
Written By:
Dustin Keyser
Kyle O'Donnell
Date:
Fall 2023
Supervisor:
Steve Arena
Approved by:
Marcie Geyer, Director of Curriculum & Instruction
Woodworking
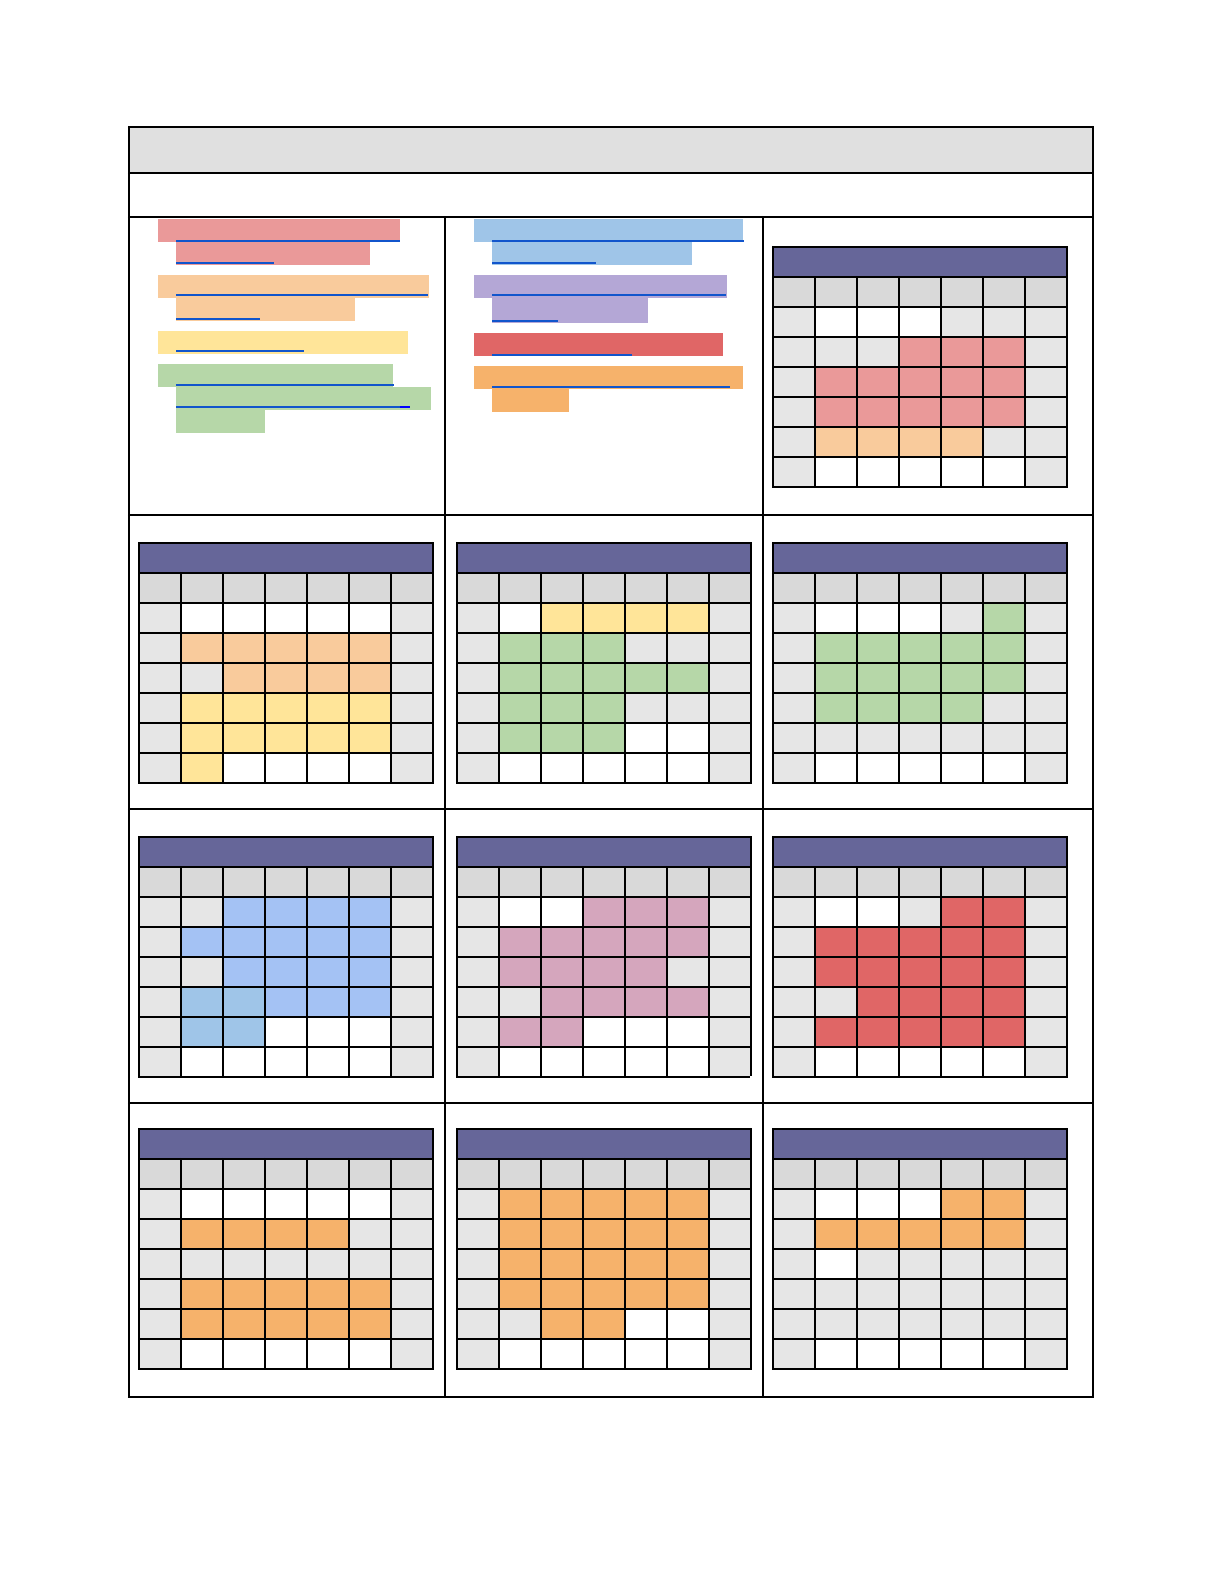
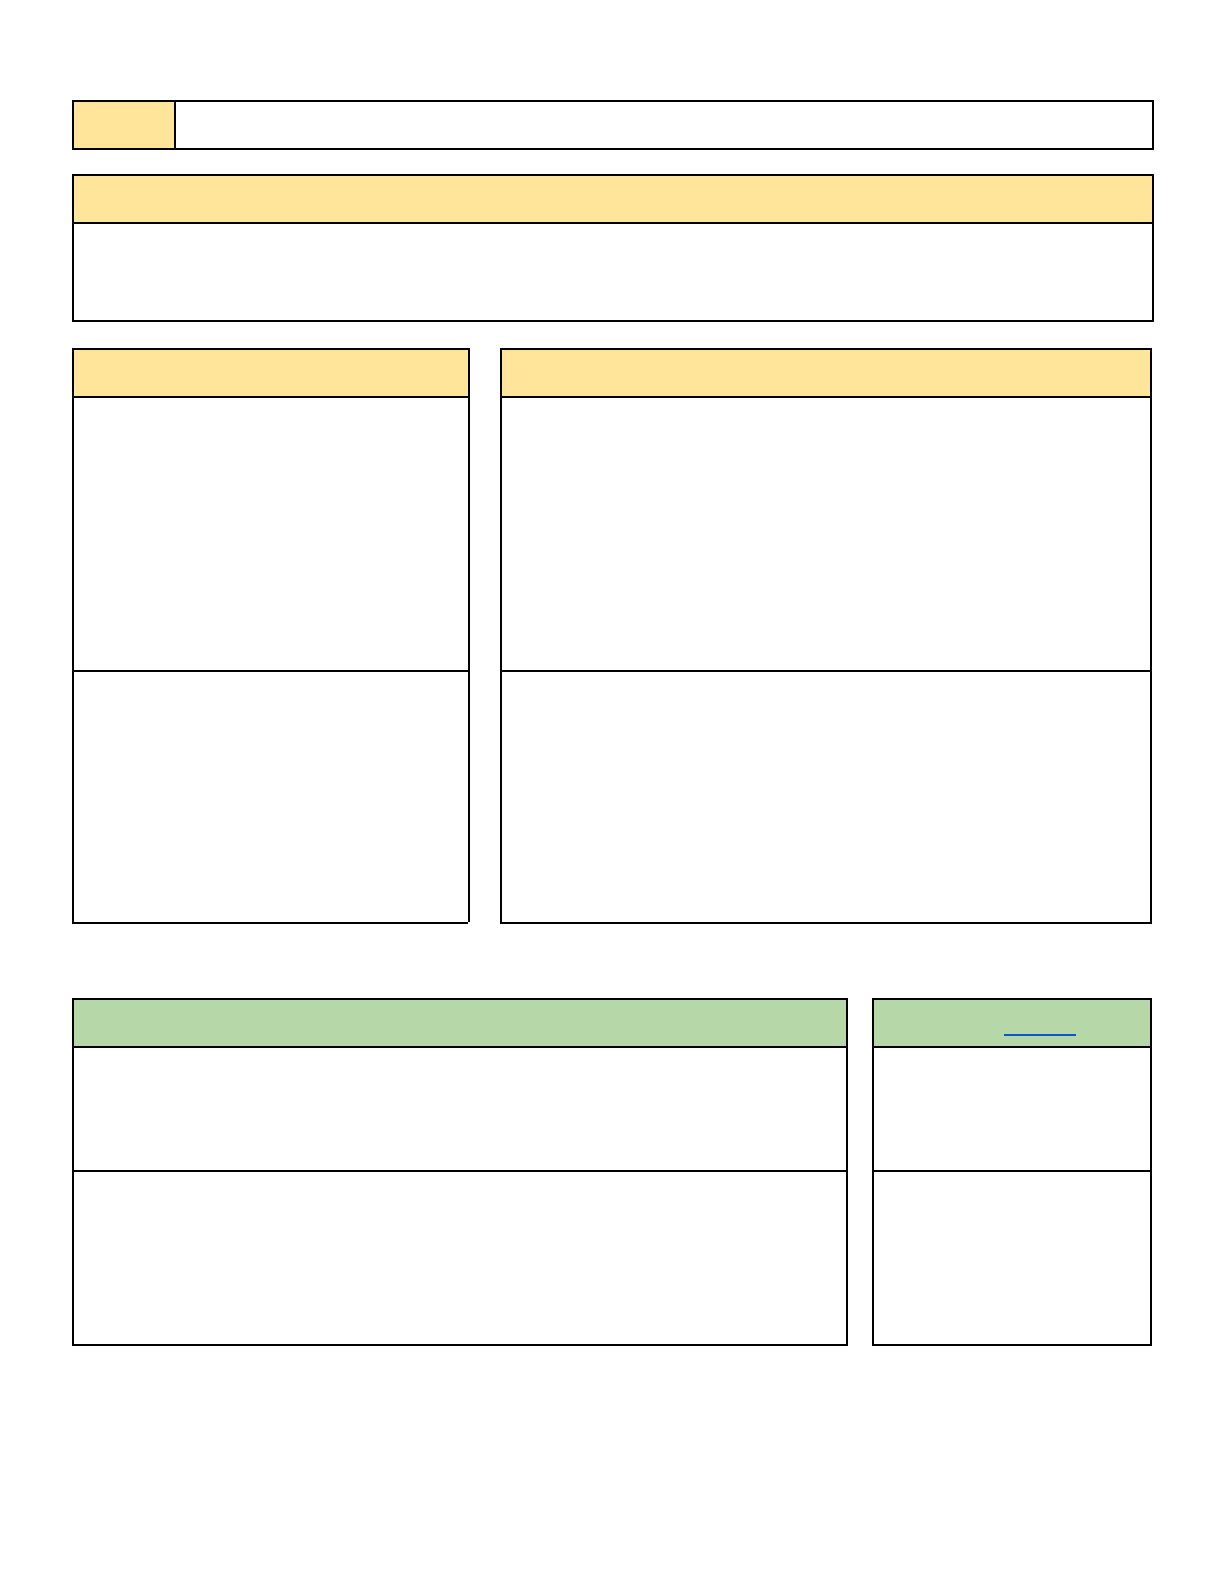
School Calendar
1.Wood Science and Wood
Processing - 3 Weeks
2.Hand and Power Tool Safety
and Uses - 3 Weeks
3.Machine Safety - 3 Weeks
4.Reading and Fabricating
Wood to Woodworking Plans
- 4 Weeks
5.Basic Joinery with a Multiple
Part Project - 7 Weeks
6.Hardwoods and Advanced
Joinery- 4 Weeks
7.CNC Machining - 3 weeks
8.The Woodworking Process -
5 Weeks
September ‘22
Su
M
Tu
W
Th
F
S
1
2
3
4
5
6
7
8
9
10
11
12
13
14
15
16
17
18
19
20
21
22
23
24
25
26
27
28
29
30
October ‘22
Su
M
Tu
W
Th
F
S
1
2
3
4
5
6
7
8
9
10
11
12
13
14
15
16
17
18
19
20
21
22
23
24
25
26
27
28
29
30
31
November ‘22
Su
M
Tu
W
Th
F
S
1
2
3
4
5
6
7
8
9
10
11
12
13
14
15
16
17
18
19
20
21
22
23
24
25
26
27
28
29
30
December ‘22
Su
M
Tu
W
Th
F
S
1
2
3
4
5
6
7
8
9
10
11
12
13
14
15
16
17
18
19
20
21
22
23
24
25
26
27
28
29
30
31
January ‘23
Su
M
Tu
W
Th
F
S
1
2
3
4
5
6
7
8
9
10
11
12
13
14
15
16
17
18
19
20
21
22
23
24
25
26
27
28
29
30
31
February ‘23
Su
M
Tu
W
Th
F
S
1
2
3
4
5
6
7
8
9
10
11
12
13
14
15
16
17
18
19
20
21
22
23
24
25
26
27
28
March ‘23
Su
M
Tu
W
Th
F
S
1
2
3
4
5
6
7
8
9
10
11
12
13
14
15
16
17
18
19
20
21
22
23
24
25
26
27
28
29
30
31
April ‘23
Su
M
Tu
W
Th
F
S
1
2
3
4
5
6
7
8
9
10
11
12
13
14
15
16
17
18
19
20
21
22
23
24
25
26
27
28
29
30
May ‘23
Su
M
Tu
W
Th
F
S
1
2
3
4
5
6
7
8
9
10
11
12
13
14
15
16
17
18
19
20
21
22
23
24
25
26
27
28
29
30
31
June ‘23
Su
M
Tu
W
Th
F
S
1
2
3
4
5
6
7
8
9
10
11
12
13
14
15
16
17
18
19
20
21
22
23
24
25
26
27
28
29
30

Unit Summaries
Woodworking
Course Content
1. Wood Science and Wood Processing - Students will start the year learning about the origin, types, characteristics,
and internal structure of wood. Students will be introduced to concepts of conservation, dendrochronology, and
the skills and opportunities related to the forestry field. Students will learn to identify multiple types of wood and
manufactured wood products. Students will learn the steps of material processing from tree to finished project
with hand tools. (Activity: Wooden Cookie Lanyard Project)
2. Hand Tool Safety and Uses - Students will learn to safely identify, handle, sharpen and use basic hand
woodworking tools to process a board. Students will practice with the tools to master the handsaws, planes,
rasps/files, chisels, mallets, and try squares while they make multiple types of wood shavings. Students will learn
the steps to properly square up a board and attempt to square up a board using their hand tool skills. (Activity:
Square Up a Board with Hand Tools)
3. Machine Safety - Students will learn the universal machine safety rules. Students will learn the specific safety rules
and operating procedures of the bandsaws and power sanders. Students will be introduced to the drill press,
planer, jointer, table saw, belt/disc sanders, and other machines, but the focus will primarily be on the bandsaw.
Students will be responsible for setting up the bandsaw for a safe cut bandsaw and making multiple practice cuts
on the saw. Students will then make two shapes on the bandsaw and sanders and may utilize the hand tools when
applicable. (Activity : Bandsaw Bat, Bandsaw Shape)
4. Reading and Fabricating Wood to Woodworking Plans - Students will learn to read and interpret measurements
from a set of detailed woodworking plans. Students will use these plans, along with layout tools, to accurately
layout their parts on a piece of wood, which they will mill, square up, map and cut out themselves on the
machines. Students will continue learning about machine safety and focus on milling machines in this unit,
including the jointer, planer, table saw, and power miter saw. (Activity: Skills Block)
5. Basic Joinery with a Multiple Part Project - Students will learn to build a project with multiple parts. Students will
be introduced to the full woodworking process, from rough wood to finished product. Students will begin by
reading the set of plans, make a Bill of Materials and Order of Operations, then map out their parts on paper before
milling and processing their pieces. Students will fabricate, assemble with hardware, sand and finish their project,
taking it from rough stock to a fine, finished product. (Activity: Toolbox Project, Rabbet Joint Pencil Box)
6. Hardwoods and Advanced Joinery - Students will continue to expand their knowledge, operation and safety of the
various machines, ultimately taking a project from an idea to a final, finished project. Students will be introduced to
hardwoods, even more complex joinery techniques, and will refine their skills with all of the milling and joinery
machines, including some new ones, like the handheld power router. (Hardwood Joiners Mallet or Handmade
Woodworking Tool)
7. CNC Machining - Students will be introduced to the CNC machines and by the end of this unit, students will create
a VCarve file, safely set up their stock on the CNC Machine, successfully process their design, and clean up and shut
down the machine for future use. (Wooden Spoon, Laser Plaque)
8. The Woodworking Process - Students will work in groups to choose a woodworking project where they will have to
work together to plan, mill, fabricate, assemble, finish multiple projects. This unit caps off the entire year and it is a
chance for students to show their knowledge of project planning, time management, hand tool and machine safety
and operation, and a way for them to showcase their skills with processing and finishing. (Yard/Table top Game
Project)

Programs: Autodesk AutoCAD, Onshape, V-Carve, Shaper
Course Expectations and Skills
1. Come to class each day willing to participate, prepared to learn, and ready to succeed.
2. Phones and other electronic devices should be kept away the entire time.
3. Use your resources when you are stuck (class notes or handouts, posts on Google Classroom, ask a classmate,
search for the solution online, etc.)
4. When prompted to get to work, do not wait. Get to work right away!
5. Engineering is a process. Project will often take weeks or months to complete. Understand that you might not
have the answers today, but if you keep at it and persist through, you will succeed.
6. Strive for accuracy and focus on craftsmanship.
7. See each project through to the end. Incomplete work will not be accepted.
8. Share ideas, help build, and equally contribute to group-based projects.
9. Practice proper attitude and safe discipline at all times.
10. Ask questions and have fun!
Resources:
Wagner, W. H., & Kicklighter, C. E. (2006). “Modern Woodworking (11th Ed.). Goodheart-Willcox Co.

Unit 1:
Wood Science and Hand Tool Woodworking
Unit Summary
Students will start the year learning about the origin, types, characteristics, and internal structure of wood.
Students will be introduced to concepts of conservation, dendrochronology, and the skills and opportunities
related to the forestry field. Students will learn to identify multiple types of wood and manufactured wood
products. Students will apply grain orientation in wood. Students will learn the steps of material processing
from tree to finished project with hand tools.
Essential Questions
Enduring Understandings
● Where does wood come from
and how is it harvested and
processed?
● Wood comes from coniferous and deciduous trees that
are in forests that are logged, harvested, dried,and milled
into boards for use.
● How does the tree’s growth
structure affect its
woodworking properties?
● Woods grain direction flows up and down the tree. Wood
reacts very differently when cut along verses across this
grain pattern.
● What wood working operations
are you currently performing to
the tree/wood?
● We process the wood using tools in a particular order of
operations to make a desired product.
Behavioral Objectives/Learning Outcomes
Standards (NJSLS)
● Identify and compare softwoods and hardwoods and their
sources in nature.
● Identify defects in wood
○ Warps, knots, checks, metal
● Recognize the interconnectivity and relationship between oneself
to nature.
● Identify and explore career paths in forestry related fields.
9.3.12.AG‐NR.2
9.3.12.AG‐PL.2
● Explain and Demonstrate grain orientation comprehension
9.3.MN.6
● Use tools to safely process a tree into a finished project
○ Japanese saw to crosscut
○ Sand through the grits 80-320
○ Layout, center punch, bore holes for cordage
○ Layout and wood burn name into cookie
○ Measure, cut, and assemble cordage
9.3.12.AC‐CST.9
Interdisciplinary Connections
Science - Dendrochronology, environmental studies and sustainability, physics in cutting edge geometry
English - Identify, compare and contrast, explain

21st Century Skills
Communication skills, problem solving, perseverance, collaboration, information literacy, global awareness,
self-direction, social skills, literacy skills, social responsibility, thinking skills
Writing Assignments
Order of Operations
“Tree to Shop” Worksheet
Wooden Cookie Reflection Slide
Activities, Instructional Strategies, and Assignments
Batoning Boards and Branches Activity
Wooden Cookie Project
Accommodations and Modifications (BHPRSD Accommodations and Modifications)
● Provide a variety of concrete examples from familiar contexts
● Build background knowledge of content and vocabulary from familiar contexts prior to readings
● Provide oral & written instructions
● Incorporate multimedia/audio visual representation (YouTube, Discovery Education, TV Show
parodies, etc.) to build understanding
● Use graphic organizers to guide notes, brainstorming, pre-writing, project planning, and test
preparation
● Model through processes during assignments and elicit student-generated thoughts to determine
gaps in understanding
● Highlight, bold, or underline main ideas in readings and in directions for writing assignments in the
curricular areas
● Provide guiding questions to complete during the activity
● Provide chunking of instructional notes and activities to allow for formative assessment (checks for
understanding) before moving on to the next stage
● Choose cooperative learning groups to ensure effective work, maximize productivity and support
socialization
● Use multiple intelligences or the student's learning style to facilitate effective learning when a student
is having difficulty grasping concepts
● Provide demonstrations, utilize pictures, or graphic to assist visual learners to support written text
information
● Include oral discussions, oral presentations, group collaboration, or other oral delivery methods to
support auditory learners
● Utilize hands-on activities, movement or rhythmic experiences to engage tactile/kinesthetic learners
● Provide chunking of assignments into manageable steps, including checklists that clarify directions
for assignments
● Provide a clear, concise version of a scoring rubric prior to the assignment or assessment
● Highlight distinctive features/key concepts
● Provide choice of projects depending on the student’s interests or strengths
● Provide peer assistance/study groups
● Review, repeat, and clarify directions
● Chunk sections of assessment
● Allow for partial credit, when appropriate
● Allow use of familiar contexts to demonstrate understanding of key concepts when use of text
evidence is not necessary
● Provide general assistance with organizational skills
● Utilize homework assignment notebook/planner/agenda
● Provide written intermediate timelines for long assignments
● Have student monitor grade average
● Keep rules simple and clear
● Implement a behavior management system
Formative Assessments
● Checkpoints on student Order of Operations
● “Tree to Shop” Worksheet
Summative Assessments
● Wooden Cookie Name Tag Project
Performance Assessments
● Preparing for Class
● Batoning wood safely
● Cross cutting Wood safely
RETURN TO CALENDAR
RETURN TO UNIT SUMMARIES

Unit 2:
Hand Tool Safety and Uses
Unit Summary
Students will learn to safely identify, handle, sharpen and use basic hand woodworking tools to process a
board. Students will practice with the tools to master the handsaws, planes, rasps/files, chisels, mallets, and
try squares while they make multiple types of wood shavings. Students will learn the steps to properly square
up a board and attempt to square up a board using their hand tool skills.
Essential Questions
Enduring Understandings
● What are the 4 Primary
woodworking tools and what
are they used for?
● The saw, plane, file and chisel can be used together to
process wood into simple and complex shapes
● What order of operations must
be followed to attain a square
board?
● A board should be planed, jointed, ripped, then crosscut
on its ends to attain a square board.
● How can safety be maintained
while using sharp tools?
● One must consider many variables to maintain safe work
operation including the person, wood, tool, workshop
setting and careful, mindful focus always be maintained.
Behavioral Objectives/Learning Outcomes
Standards (NJSLS)
● Students will learn skills to utilize hand tools to process a board
square, tools include:
○ Japanese ryoba saw, western crosscut saw,
○ block plane and bench plane
○ Rasp and file
○ Chisel and sharpening stone
○ try square.
9.3.12.AC‐CST.9
9.3.MN‐HSE.2
● Students will learn the order of operations to square a board
○ Try square use, face planing, edge planing, rip cutting, edge
planing to a line, cross cutting, cross filing and draw filing.
9.3.12.AC‐CST.9
● Students will demonstrate safe working practices while working in the
shop and using tools.
9.3.MN‐HSE.2
9.3.MN‐MIR.2
Interdisciplinary Connections
Science - Physics
Math - Geometry
21st Century Skills
Critical thinking, communication skills, creativity, problem solving, perseverance, collaboration, information
literacy, technology skills and digital literacy, media literacy, global awareness, self-direction, social skills,
literacy skills, civic literacy, social responsibility, innovations skills, thinking skills
Writing Assignments
Hand Tools and Uses
Hand Tool Reflection Slide
Activities, Instructional Strategies, and Assignments
Chisels - Safe two handed paring and chopping
Japanese saws - Crosscut and Ripcuts
Coping saw - Cutting simple curves
Planes - Edge planing, face planing, chamfering
Files and Rasps-Shaping and End Grain filing
Use a Try Square with hand tools to “Square a Board”
Accommodations and Modifications (BHPRSD Accommodations and Modifications)
● Provide a variety of concrete examples from familiar contexts
● Provide study guides and support outside of class time to review before assessments (common time
or after school)
● Build background knowledge of content and vocabulary from familiar contexts prior to readings
● Use mental models to building understanding through familiar contexts
● Provide oral & written instructions
● Incorporate multimedia/audio visual representation (YouTube, Discovery Education, TV Show
parodies, etc.) to build understanding
● Use graphic organizers to guide notes, brainstorming, pre-writing, project planning, and test
preparation
● Model through processes during assignments and elicit student-generated thoughts to determine
gaps in understanding
● Highlight, bold, or underline main ideas in readings and in directions for writing assignments in the
curricular areas
● Provide guiding questions to complete during the activity
● Provide chunking of instructional notes and activities to allow for formative assessment (checks for
understanding) before moving on to the next stage
● Choose cooperative learning groups to ensure effective work, maximize productivity and support
socialization
● Use multiple intelligences or the student's learning style to facilitate effective learning when a student
is having difficulty grasping concepts
● Provide demonstrations, utilize pictures, or graphic to assist visual learners to support written text
information
● Include oral discussions, oral presentations, group collaboration, or other oral delivery methods to
support auditory learners
● Utilize hands-on activities, movement or rhythmic experiences to engage tactile/kinesthetic learners
● Provide chunking of assignments into manageable steps, including checklists that clarify directions
for assignments
● Provide a clear, concise version of a scoring rubric prior to the assignment or assessment
● Highlight distinctive features/key concepts
● Provide choice of projects depending on the student’s interests or strengths
● Provide peer assistance/study groups
● Review, repeat, and clarify directions
● Chunk sections of assessment
● Allow for partial credit, when appropriate
● Allow use of familiar contexts to demonstrate understanding of key concepts when use of text
evidence is not necessary
● Provide general assistance with organizational skills
● Utilize homework assignment notebook/planner/agenda
● Provide written intermediate timelines for long assignments
● Have student monitor grade average
● Keep rules simple and clear
● Implement a behavior management system
Formative Assessments
● Notes on Hand Tools
● Hand Tool Reflection Slide
Summative Assessments
● Wood Shavings with Hand Tools
Performance Assessments
● Safety Checkpoints with each tool
RETURN TO CALENDAR
RETURN TO UNIT SUMMARIES
Unit 3:
Machine Safety
Unit Summary
Students will learn the universal machine safety rules. Students will learn the specific safety rules and
operating procedures of the bandsaws and power sanders. Students will be introduced to the drill press,
planer, jointer, table saw, belt/disc sanders, and other machines, but the focus will primarily be on the
bandsaw. Students will be responsible for setting up the bandsaw for a safe cut bandsaw and making
multiple practice cuts on the saw. Students will then make two shapes on the bandsaw and sanders and may
utilize the hand tools when applicable.
Essential Questions
Enduring Understandings
● What are the General Shop
Safety Rules you must always
follow?
● Why do you need to always
wear safety glasses?
● Why is it important to keep the
classroom and the machines
clean?
● What if a machine is not
cutting/drilling or it is making a
strange noise?
● Shop maturity, attitude, and focus.are the foundation of
safety in a shop. A few important rules are to have
proper clothing, proper PPE, instructor is present, only
using tools you have been cleared to use for specific
operations.
● A well organized and clean shop produces a safer
environment.
● Report all incidents and safety relevant information to the
instructor immediately before proceeding to work.
● How do you safely operate the
band saw?
● How do you adjust the guards
on the bandsaw?
● How do you safely operate the
power sander?
● The bandsaw must be set up with guards ¼ inch above
the stock while it is not running.
● Curved and straight cuts are made slowly, keeping
fingers clear of the blade and its path, not forcing the turn
or speed of the saw. Push sticks may be used to keep
fingers clear on small cuts.
● When would you use a band
saw vs. a power sander?
● Bands saw is used first to cut on the waste of the line by
about an ⅛ of an inch, then the power sander can be
used to sand up to the line and smooth out the saw
marks.
● When planning cuts, how do
you accurately measure and
mark for a cut?
● Measure Twice, then mark one clean line with a square.
Place an X on the waste side to ensure the blade cut is
on the waste side.
Behavioral Objectives/Learning Outcomes
Standards (NJSLS)
● Identify Parts of the saw and
● Safely adjust the height of the guard
9.3.MN‐HSE.1
● Layout and cut on the waste side of both a crosscut, rip cut and a
curve adhering the machine safety procedures
9.3.MN.6
● Trace the bat onto ¼ inch Ply
9.3.MN‐HSE.1
● Layout and number the planned cuts
● Cut out the bat profile on the bandsaw and sanders adhering to the
machine safety procedures
● File and sand the bat smooth
● Paint the bat to a finished product
● Trace and plan cuts of another object/shape on the pine/ poplar
● Cut out shape on the bandsaw and sanders
● Sand the object smooth
● Apply a clear coat finish or paint the object.
9.3.MN.6
9.3.MN‐QA.1
Interdisciplinary Connections
STEAM, English, Geometry
21st Century Skills
Critical thinking, communication skills, creativity, problem solving, perseverance, collaboration, information
literacy, technology skills and digital literacy, self-direction, social skills, literacy skills, innovations skills,
thinking skills
Writing Assignments
Students are encouraged to take written notes when taught safety on each machine. Safety Study Guides
will be provided for each machine, but students should be filling out any missing information. Students will be
taking written Safety Quizzes and must pass with a certain grade. Students who do not pass must review the
content with the teacher and retake the safety quizzes before continuing work in the woodworking
classroom.
Activities, Instructional Strategies, and Assignments
This unit is one of the most important because the content students learn here will carry through the rest of
this course and through Advanced Woodworking too. This is where students will learn how to safely operate
some of the machines in the woodworking classroom. In this unit, students will take a deep dive into the
band saw and the power sanders.
1. The teacher will demonstrate how to safely use each machine.
a. Students are required to identify and describe the most important parts of each machine.
b. Students must know how to turn the machine on and off, adjust guards before making a cut,
successfully make a cut, lower guards, and clean the machine for the next student.
2. After each demonstration, students will be given study guides that will have various parts labeled and
a written checklist for how to safely operate each machine. Safety videos of the teacher’s
demonstration and additional support materials will be posted to Google Classroom.
3. Students will take Safety Quizzes on each machine and must pass with a certain grade. Students
who do not pass must review the content with the teacher and retake the safety quizzes before
continuing work in the woodworking classroom.
4. Once students pass the written safety quiz for a machine, they are cleared to use that machine.
Students will be assessed on their ability to safely use these machines.
After learning the safety on these machines, students will make a Plywood Halloween Bat and a Custom
Shape Pine Project. These projects are designed to ease students into Woodworking, get them using the

tools and machines, getting familiar with how they work, feel, and sound. The goal is to build student
confidence and make sure that students are using these machines safely and that they are comfortable. An
emphasis is placed on accuracy of cuts, but as the year progresses, projects get more complex, and
students use these machines more and more, the quality of their work should improve drastically.
Accommodations and Modifications (BHPRSD Accommodations and Modifications)
● Provide study guides and support outside of class time to review before assessments (common time
or after school)
● Build background knowledge of content and vocabulary from familiar contexts prior to readings
● Provide oral & written instructions
● Incorporate multimedia/audio visual representation (YouTube, Discovery Education, TV Show
parodies, etc.) to build understanding
● Use graphic organizers to guide notes, brainstorming, pre-writing, project planning, and test
preparation
● Model through processes during assignments and elicit student-generated thoughts to determine
gaps in understanding
● Highlight, bold, or underline main ideas in readings and in directions for writing assignments in the
curricular areas
● Provide guiding questions to complete during the activity
● Provide chunking of instructional notes and activities to allow for formative assessment (checks for
understanding) before moving on to the next stage
● Choose cooperative learning groups to ensure effective work, maximize productivity and support
socialization
● Provide demonstrations, utilize pictures, or graphic to assist visual learners to support written text
information
● Include oral discussions, oral presentations, group collaboration, or other oral delivery methods to
support auditory learners
● Utilize hands-on activities, movement or rhythmic experiences to engage tactile/kinesthetic learners
● Provide chunking of assignments into manageable steps, including checklists that clarify directions
for assignments
● Provide a clear, concise version of a scoring rubric prior to the assignment or assessment
● Highlight distinctive features/key concepts
● Provide choice of projects depending on the student’s interests or strengths
● Provide peer assistance/study groups
● Review, repeat, and clarify directions
● Chunk sections of assessment
● Provide general assistance with organizational skills
● Provide written intermediate timelines for long assignments
● Have student monitor grade average
● Keep rules simple and clear
Formative Assessments
● Band Saw Written Safety Quiz and Hands-on Quiz
● Power Sander Written Safety Quiz and Hands-on Quiz

Unit 4:
Reading and Fabricating Wood to Woodworking Plans
Unit Summary
Students will learn to read and interpret measurements from a set of detailed woodworking plans. Students
will use these plans, along with layout tools, to accurately layout their parts on a piece of wood, which they
will mill, square up, map and cut out themselves on the machines. Students will continue learning about
machine safety and focus on milling machines in this unit, including the jointer, planer, table saw, and power
miter saw.
Essential Questions
Enduring Understandings
● Why do we measure to 1/16”?
● How do you move back and
forth between fractions and
decimals?
● Measuring to a 16th of an inch is common practice in
woodworking. Tape measures usually are marked in
1/16th of an inch increments.
● What is an orthographic view?
● Why is it important to have the
top, front and side views of
parts?
● What is an isometric view?
● How can detailed views help
with understanding a part?
● How are woodworking
drawings different and how are
they similar to other drawings?
● An orthographic three view drawing which shows front,
top and right side views is usually necessary to show all
of the dimensions and features of a project.
● Isometric drawings give a lifelike three dimensional view
of the object.
● Detail views and sectional views can be used to gain
new vantage points to show details, and also to enlarge
small details.
● What are the steps you take
when squaring up a board?
● How do you use a square?
● There is a specific process used to attain a square
board. We must machine all the surfaces in a specific
order which utilizes reference surfaces. We must plane,
joint, rip and then crosscut the board.
● The try square is used to check surfaces for flatness and
angles for squares.
● How do you safely operate the
jointer?
● How do most injuries occur on
the jointer?
● Jointer takes small shavings with the grain from the
bottom edge of the board that must be 10” in length.
One slides the piece of wood on edge from the infeed to
the outfeed table while keeping fingers 4” clear of the
blade.
● Main Safety Considerations - Clothing, finger placement,
length and grain orientation, take multiple thin passes,
correct feed direction and speed.
● How do you safely operate the
planer?
● When using the planer, how
much material should you take
off with each pass?
● Wood is fed flat, with the grain, into the rollers and
cutterhead on the infeed table. Wood is kept stable while
clothing and hands are kept clear of the planer. Do not
stand in the kickback zone.
● Only take passes up to 1/16 of an inch in depth. Do not
plane smaller than ¼ inch,thick and 1 foot long stock.
● How do you safely operate the
table saw?
● Stock is rip cut, crosscut and joints milled with a table
saw and accessory. Hands kept 4 inches from the blade.
● What is kickback?
● What is the difference between
the fence and the miter
gauge?
● While ripping the wood must stay tight to the fence to
prevent wood kickback,
● Use a fence to rip cut or a miter gauge to crosscut
● How do you safely operate the
power miter saw?
● How do you prevent your
piece of wood from kicking?
● A conventional cut is made front to back of the saw.
Saws are brought to full speed and a slow steady
crosscut is made.The wood must be 12 inches long and
properly fit in the saw being used. Fingers are kept 4-8
inches away from the blade.
● To prevent kickbacks: No rip cuts, and no small pieces.
Securely hold the wood flat and joint edge tight to the
fence with adequate pressure. A clamp may be
occasionally needed to keep a board stable.
Behavioral Objectives/Learning Outcomes
Standards (NJSLS)
● Students will measure accurately to within 1/16 of an inch
9.3.ST.1
● Students will interpret the orthographic drawings.
● Students will use measurements to transfer the drawings information
into a clean accurate layout on the wood.
9.3.12.AC‐DES.6
● Students will recall the safety rules of the milling machinery including
table saw, power miter saw, jointer, and planer.
● Students will properly operate the machinery following all safe
operating procedures.
● Students will fabricate a “skills block” to a specific set of plans to
enhance mastery of the machine procedures.
9.3.12.AC‐CST.5
9.3.MN‐QA.5
Interdisciplinary Connections
STEAM, English, Geometry
21st Century Skills
Critical thinking, communication skills, creativity, problem solving, perseverance, collaboration, information
literacy, technology skills, self-direction, social skills, literacy skills, innovations skills, thinking skills

Writing Assignments
Students will be given notes and worksheets that teach measurement tools and techniques.
Students will be given notes and worksheets that teach students how to read and interpret woodworking
drawings.
Students are encouraged to take written notes when taught safety on each machine. Safety Study Guides
will be provided for each machine, but students should be filling out any missing information. Students will be
taking written Safety Quizzes and must pass with a certain grade. Students who do not pass must review the
content with the teacher and retake the safety quizzes before continuing work in the woodworking
classroom.
Activities, Instructional Strategies, and Assignments
Students will take a deep dive into measurement and woodworking drawings. Students are expected to
follow along with notes and handouts provided. This will serve as the basis for all the projects that are to
follow in Woodworking and Advanced Woodworking.
This unit is one of the most important because the content students learn here will carry through the rest of
this course and through Advanced Woodworking too. This is where students will learn how to safely operate
some of the machines in the woodworking classroom. In this unit, students will take a deep dive into the
jointer, planer, power miter saw, and the table saw.
1. The teacher will demonstrate how to safely use each machine.
a. Students are required to identify and describe the most important parts of each machine.
b. Students must know how to turn the machine on and off, adjust guards before making a cut,
successfully make a cut, lower guards, and clean the machine for the next student.
2. After each demonstration, students will be given study guides that will have various parts labeled and
a written checklist for how to safely operate each machine. Safety videos of the teacher’s
demonstration and additional support materials will be posted to Google Classroom.
3. Students will take Safety Quizzes on each machine and must pass with a certain grade. Students
who do not pass must review the content with the teacher and retake the safety quizzes before
continuing work in the woodworking classroom.
4. Once students pass the written safety quiz for a machine, they are cleared to use that machine.
Students will be assessed on their ability to safely use these machines.
After learning the safety on these machines, students will process rough lumber to a final, milled and
squared block. This project is designed to give students experience on the machines covered in this unit, but
also to show them how to turn rough lumber into a usable piece. The goal is to build student confidence and
make sure that students are using these machines safely and that they are comfortable.
Accommodations and Modifications (BHPRSD Accommodations and Modifications)
● Provide study guides and support outside of class time to review before assessments (common time
or after school)
● Build background knowledge of content and vocabulary from familiar contexts prior to readings
● Provide oral & written instructions
● Incorporate multimedia/audio visual representation (YouTube, Discovery Education, TV Show
parodies, etc.) to build understanding
● Use graphic organizers to guide notes, brainstorming, pre-writing, project planning, and test
preparation

● Model through processes during assignments and elicit student-generated thoughts to determine
gaps in understanding
● Highlight, bold, or underline main ideas in readings and in directions for writing assignments in the
curricular areas
● Provide guiding questions to complete during the activity
● Provide chunking of instructional notes and activities to allow for formative assessment (checks for
understanding) before moving on to the next stage
● Choose cooperative learning groups to ensure effective work, maximize productivity and support
socialization
● Provide demonstrations, utilize pictures, or graphic to assist visual learners to support written text
information
● Include oral discussions, oral presentations, group collaboration, or other oral delivery methods to
support auditory learners
● Utilize hands-on activities, movement or rhythmic experiences to engage tactile/kinesthetic learners
● Provide chunking of assignments into manageable steps, including checklists that clarify directions
for assignments
● Provide a clear, concise version of a scoring rubric prior to the assignment or assessment
● Highlight distinctive features/key concepts
● Provide choice of projects depending on the student’s interests or strengths
● Provide peer assistance/study groups
● Review, repeat, and clarify directions
● Chunk sections of assessment
● Provide general assistance with organizational skills
● Provide written intermediate timelines for long assignments
● Have student monitor grade average
● Keep rules simple and clear
Formative Assessments
● Jointer Written Safety Quiz and Hands-on Quiz
● Planer Written Safety Quiz and Hands-on Quiz
● Table Written Safety Quiz and Hands-on Quiz
● Practice Piece: Square and Mill a piece of wood
Summative Assessments
● Hands-on Safety:
○ Skills Block Project
Performance Assessments
● Safely utilize all tools and machines
RETURN TO CALENDAR
RETURN TO UNIT SUMMARIES
Unit 5:
Basic Joinery and Building a Multiple Part Project
Unit Summary
Students will learn to build a project with multiple parts. Students will be introduced to the full woodworking
process, from rough wood to finished product. Students will begin by reading the set of plans, make a Bill of
Materials and Order of Operations, then map out their parts on paper before milling and processing their
pieces. Students will fabricate, assemble with hardware, sand and finish their project, taking it from rough
stock to a fine, finished product.
Essential Questions
Enduring Understandings
● How does one organize the
steps and plan of the
woodworking process?
● The wood working process consists of:
○ Research and development, reading and making
plans,, milling, fabrication, assembly, finishing.
● What 3 documents make up a
set of plans?
● A sufficient set of mechanical drawings
● A Bill of Materials
● Order of Operations
● Why is a bill of materials
important?
● What is an order of
operations?
● What are the considerations in
creating the order of
operations?
● A bill of materials is the cut list of the final dimensions of
the rectangular stock in the project. This is referred to
while milling the stock square to dimension. It can be
used to calculate wood volume and material cost.
● An order of operations is a detailed list of operations and
cuts to perform.
● We prioritize Safety, then Accuracy, then Efficiency.when
creating an order of operations.
● How can we safely, accurately,
and efficiently mill the wood
into the dimensioned parts?
● How can we accurately create
the layout on the wood?
● What special operations must
be performed to accurately
fabricate the piece?
● With total focus and organization we can efficiently take
turns milling boards to size.
● Precise measurements and layout lines are diligently and
carefully drawn using layout tools.
● Machine the joinery, curves and more complicated cuts
within the parts of the project.
● How will we connect the
wooden parts together?
● How do we prepare for
assembly?
● What methods can be used to
assemble furniture and wood?
● The Assembly process is used to connect together
wooden parts into a project.
● We prepare for assembly by doing dry assembly, and
gathering and organizing clamps and gluing materials.
● The three methods of assembling wood include joinery,
glue, and fasteners.
● How do we prepare the wood
for finishing?
● What are pros and cons of
common finishes?
● What are the safety concerns
with different finishes?
● What is a common finishing
process?
● We sand with the grain. Sanding the piece 3 times:rough
100, medium150 and smooth 220 grit. We dampen and
raise the grain between sanding grits.
● There are many finishes and the best finish must be
chosen based on intended use, desired look, and
specific application.
● Different finishes have specific safety protocols. Clean
up, fumes, fire, hazardous waste, solvents, skin irritants,
carcinogenic materials that may need to be considered.
● We commonly apply a thinned sealer coat of finish. Then
brush a few heavier coats. Once dry the finish is lightly
sanded smooth with 320 and steel wool. Thinned down
final coats are wiped on. It is smoothed with fine steel
wool and then waxed with furniture wax.
● How can we reflect and learn
from our experience?
● What does the overall
woodworking process involve?
● We must learn from our experiences
● In woodworking we always follow the woodworking
process: Plan, mill, fabricate, assemble, finish.
Behavioral Objectives/Learning Outcomes
Standards (NJSLS)
● Students will interpret the plans and draw a right view of the box.
● Students will interpret the plans and create a “Bill of Materials”
● Students will interpret the plans and create a “Order of Operations”
9.3.ST‐ET.4
● Students will mill the rough lumber into final dimensioned stock
● Students will draw layout of the joinery and shapes
● Students will fabricate the dimensioned parts into final shape with
special operations.
● Students will assemble the parts into the project.
● Students will finish the box following finishing procedures.
9.3.12.AC‐DES.6
9.3.12.AC‐CST.5
Interdisciplinary Connections
Math, Engineering, science. vocational

21st Century Skills
Critical thinking, communication skills, creativity, problem solving, perseverance, collaboration, information
literacy, technology skills and digital literacy, media literacy, global awareness, self-direction, social skills,
literacy skills, civic literacy, social responsibility, innovations skills, thinking skills
Writing Assignments
Reflection Slide
Activities, Instructional Strategies, and Assignments
Orthographic Drawing of Right View
Bill of Materials
Order of Operations
Building a Tool Box Project
Toolbox Reflection Slide
Making Plans for Rabbet Joint Box
Building a Rabbet Joint Box
Rabbet Joint Box Reflection Slide
Accommodations and Modifications (BHPRSD Accommodations and Modifications)
● Provide a variety of concrete examples from familiar contexts
● Provide study guides and support outside of class time to review before assessments (common time
or after school)
● Build background knowledge of content and vocabulary from familiar contexts prior to readings
● Use mental models to building understanding through familiar contexts
● Provide oral & written instructions
● Incorporate multimedia/audio visual representation (YouTube, Discovery Education, TV Show
parodies, etc.) to build understanding
● Use graphic organizers to guide notes, brainstorming, pre-writing, project planning, and test
preparation
● Model through processes during assignments and elicit student-generated thoughts to determine
gaps in understanding
● Highlight, bold, or underline main ideas in readings and in directions for writing assignments in the
curricular areas
● Provide guiding questions to complete during the activity
● Provide chunking of instructional notes and activities to allow for formative assessment (checks for
understanding) before moving on to the next stage
● Choose cooperative learning groups to ensure effective work, maximize productivity and support
socialization
● Use multiple intelligences or the student's learning style to facilitate effective learning when a student
is having difficulty grasping concepts
● Provide demonstrations, utilize pictures, or graphic to assist visual learners to support written text
information
● Include oral discussions, oral presentations, group collaboration, or other oral delivery methods to
support auditory learners
● Utilize hands-on activities, movement or rhythmic experiences to engage tactile/kinesthetic learners
● Provide chunking of assignments into manageable steps, including checklists that clarify directions

for assignments
● Provide a clear, concise version of a scoring rubric prior to the assignment or assessment
● Highlight distinctive features/key concepts
● Provide choice of projects depending on the student’s interests or strengths
● Provide peer assistance/study groups
● Review, repeat, and clarify directions
● Chunk sections of assessment
● Allow for partial credit, when appropriate
● Allow use of familiar contexts to demonstrate understanding of key concepts when use of text
evidence is not necessary
● Provide general assistance with organizational skills
● Utilize homework assignment notebook/planner/agenda
● Provide written intermediate timelines for long assignments
● Have student monitor grade average
● Keep rules simple and clear
● Implement a behavior management system
Formative Assessments
● Bill of Materials,
● Order of Operations
● Milling Checkpoint
● Layout Checkpoint
● Fabrication Checkpoint
● Assembly Checkpoint
● Finish Checkpoint
Summative Assessments
● Tool Box Project
● Rabbet Joint Box Project
Performance Assessments
● Safely utilize all tools and machines
RETURN TO CALENDAR
RETURN TO UNIT SUMMARIES
Unit 6:
Hardwoods and Advanced Joinery
Unit Summary
Students will continue to expand their knowledge, operation and safety of the various machines, ultimately
taking a project from an idea to a final, finished project. Students will be introduced to hardwoods, even more
complex joinery techniques, and will refine their skills with all of the milling and joinery machines, including
some new ones, like the handheld power router.
Essential Questions
Enduring Understandings
● What are the steps in the
woodworking process?
● How do we add joinery into the
planning process?
● Planning, milling, fabricating, assembly and finishing are
the general steps of the wood working process.
● We study auxiliary drawings of joints and then write the
cuts into the “order of operations” during the fabrication
stage of the project. .
● During the fabrication process,
What machines and tools are
commonly utilized to cut
joinery?
● Routers, tables saws, dado blades, power miter saws,
drill presses, fine backsaws, planes, and chisels are
commonly utilized in cutting joinery.
● How do we accommodate the
woodworking process for
hardwood stock?
● We must slow down the feed rate of hardwood stock into
machines. We must take thinner passes with routers,
planers and jointers.
Behavioral Objectives/Learning Outcomes
Standards (NJSLS)
● Draw an orthographic drawing of the Mallet or advanced joinery
project
9.3.ST‐ET.2
● Create a Bill of Materials from the orthographic drawing,
9.3.ST‐ET.2
● Create an Order of Operations
9.3.ST‐ET.2
● Utilize milling machines to safely the wood into dimensioned stock
9.3.12.AC‐CST.5
● Accurately layout and cut joinery utilizing joinery techniques and
procedures.
9.3.ST.6
● Assemble the wooden mallet or advanced joinery project
9.3.ST.6
● Apply the wood finishing process to the mallet or project
9.3.ST.6
● Reflect upon the experience and woodworking process.
9.3.ST‐SM.3
Interdisciplinary Connections
Math, Science, Manufacturing, Vocational
21st Century Skills
Critical thinking, communication skills, creativity, problem solving, perseverance, collaboration, information
literacy, technology skills and digital literacy, media literacy, global awareness, self-direction, social skills,
literacy skills, civic literacy, social responsibility, innovations skills, thinking skills
Writing Assignments
Project Reflection
Activities, Instructional Strategies, and Assignments
Orthographic Drawing
Bill Of Materials
Order of Operations
Mill dimensioned lumber checkpoint
Layout Checkpoint
Fabrication Checkpoint
Router manipulative and Written Quiz
Assembly Checkpoint
Finishing Checkpoint
Reflection Activity and Slide
Accommodations and Modifications (BHPRSD Accommodations and Modifications)
● Provide a variety of concrete examples from familiar contexts
● Provide study guides and support outside of class time to review before assessments (common time
or after school)
● Build background knowledge of content and vocabulary from familiar contexts prior to readings
● Use mental models to building understanding through familiar contexts
● Provide oral & written instructions
● Incorporate multimedia/audio visual representation (YouTube, Discovery Education, TV Show
parodies, etc.) to build understanding
● Use graphic organizers to guide notes, brainstorming, pre-writing, project planning, and test
preparation
● Model through processes during assignments and elicit student-generated thoughts to determine
gaps in understanding
● Highlight, bold, or underline main ideas in readings and in directions for writing assignments in the
curricular areas
● Provide guiding questions to complete during the activity
● Provide chunking of instructional notes and activities to allow for formative assessment (checks for
understanding) before moving on to the next stage
● Choose cooperative learning groups to ensure effective work, maximize productivity and support
socialization
● Use multiple intelligences or the student's learning style to facilitate effective learning when a student
is having difficulty grasping concepts
● Provide demonstrations, utilize pictures, or graphic to assist visual learners to support written text
information
● Include oral discussions, oral presentations, group collaboration, or other oral delivery methods to
support auditory learners
● Utilize hands-on activities, movement or rhythmic experiences to engage tactile/kinesthetic learners
● Provide chunking of assignments into manageable steps, including checklists that clarify directions
for assignments
● Provide a clear, concise version of a scoring rubric prior to the assignment or assessment
● Highlight distinctive features/key concepts
● Provide choice of projects depending on the student’s interests or strengths
● Provide peer assistance/study groups
● Review, repeat, and clarify directions
● Chunk sections of assessment
● Allow for partial credit, when appropriate
● Allow use of familiar contexts to demonstrate understanding of key concepts when use of text
evidence is not necessary
● Provide general assistance with organizational skills
● Utilize homework assignment notebook/planner/agenda
● Provide written intermediate timelines for long assignments
● Have student monitor grade average
● Keep rules simple and clear
● Implement a behavior management system
Formative Assessments
● Written Router Quiz
● Orthographic drawing
● Bill of Materials
● Order of Operations
Summative Assessments
● Rabbet Joint Sliding Box Project
● Hardwood Mallet
Performance Assessments
● Safe operation of milling and fabrication machines.
● Efficient operating procedures of assembly process
● Diligent perform Finishing process
RETURN TO CALENDAR
RETURN TO UNIT SUMMARIES
Unit 7:
CNC Machining
Unit Summary
Students will be introduced to the CNC machines and by the end of this unit, students will create a VCarve
file, safely set up their stock on the CNC Machine, successfully process their design, and clean up and shut
down the machine for future use. Students will use the CNC machine for project fabrication.
Essential Questions
Enduring Understandings
● How has the CNC Machine
changed the manufacturing
process?
● Compare and contrast how a
CNC Machine impacts the
design process vs. using hand
tools.
● CNC stands for computer numerical control and these
machines play an important role in the manufacturing
industry. These complex machines are controlled by a
computer and provide a level of efficiency, accuracy and
consistency that would be impossible to achieve through
a manual process.
● As a result, manufacturers can produce parts in less
time, reduce waste and eliminate the risk of human error.
● Only highly skilled and educated people can operate
CNC Machines because of their complexity.
● How do you set up, run, break
down, and maintain the CNC
Machine?
● What is the difference between
an upcut and downcut bit?
● What are some safety rules
and considerations you must
follow when using the CNC
Machine?
● As with other machines in the Woodworking Classroom,
the CNC Machine requires knowledge, skill, and some
common sense to operate. The tools must be set up the
correct way to ensure they run safely and that no
damage or injury comes to the machine or the operator.
● The CNC Machine operator has to be smarter than the
tool. They have to keep an eye out for things that could
potentially go awry, especially when plunging down into a
material to cut.
Behavioral Objectives/Learning Outcomes
Standards (NJSLS)
● Consider how the CNC Machine has changed the manufacturing
process.
● Describe career opportunities and means to achieve those
opportunities related to CNC Machining.
9.3.MN.1
9.3.MN.4
● Identify the parts of the CNC Machine
● Correctly prepare the VCarve file
● Set up the tooling, clamps, and work piece
● Successfully run the VCarve file and produce a final piece
● Clean up the machine, run routine maintenance and follow all safety
rules while using the CNC Machine
9.3.12.AC‐CST.9
9.3.MN‐HSE.1
9.3.MN‐HSE.3
Interdisciplinary Connections
English - Research a CNC Machining-related career and prepare a presentation on that career
21st Century Skills
Critical thinking, communication skills, creativity, problem solving, perseverance, collaboration, information
literacy, technology skills and digital literacy, media literacy, global awareness, self-direction, social skills,
literacy skills, civic literacy, social responsibility, innovations skills, thinking skills
Writing Assignments
CNC Machinist - Career Investigation Activity
Activities, Instructional Strategies, and Assignments
Students will ensure that their VCarve file is set up correctly, with the appropriate tooling settings. The CNC
Machine requires student’s full attention and students will be setting up the CNC Machine, including
clamping down their work piece, running the machine and cleaning-up. Since there is only one machine,
students who are waiting to use the CNC Machine will be researching the history of the CNC Machine, its
impacts on the manufacturing process, and potential careers related to CNC Machining.
Accommodations and Modifications (BHPRSD Accommodations and Modifications)
● Provide a variety of concrete examples from familiar contexts
● Provide study guides and support outside of class time to review before assessments (common time
or after school)
● Build background knowledge of content and vocabulary from familiar contexts prior to readings
● Use mental models to building understanding through familiar contexts
● Provide oral & written instructions
● Incorporate multimedia/audio visual representation (YouTube, Discovery Education, TV Show
parodies, etc.) to build understanding
● Use graphic organizers to guide notes, brainstorming, pre-writing, project planning, and test
preparation
● Model through processes during assignments and elicit student-generated thoughts to determine
gaps in understanding
● Highlight, bold, or underline main ideas in readings and in directions for writing assignments in the
curricular areas
● Provide guiding questions to complete during the activity
● Provide chunking of instructional notes and activities to allow for formative assessment (checks for
understanding) before moving on to the next stage
● Choose cooperative learning groups to ensure effective work, maximize productivity and support
socialization
● Use multiple intelligences or the student's learning style to facilitate effective learning when a student
is having difficulty grasping concepts
● Provide demonstrations, utilize pictures, or graphic to assist visual learners to support written text
information
● Include oral discussions, oral presentations, group collaboration, or other oral delivery methods to
support auditory learners
● Utilize hands-on activities, movement or rhythmic experiences to engage tactile/kinesthetic learners
● Provide chunking of assignments into manageable steps, including checklists that clarify directions
for assignments
● Provide a clear, concise version of a scoring rubric prior to the assignment or assessment
● Highlight distinctive features/key concepts
● Provide choice of projects depending on the student’s interests or strengths
● Provide peer assistance/study groups
● Review, repeat, and clarify directions
● Chunk sections of assessment
● Allow for partial credit, when appropriate
● Allow use of familiar contexts to demonstrate understanding of key concepts when use of text
evidence is not necessary
● Provide general assistance with organizational skills
● Utilize homework assignment notebook/planner/agenda
● Provide written intermediate timelines for long assignments
● Have student monitor grade average
● Keep rules simple and clear
● Implement a behavior management system
Formative Assessments
● Creating the VCarve file with correct settings
● Clamping and Tool Preparation Checklist
Summative Assessments
● CNC Wooden Spoon, Laser Engraved Plaque
Performance Assessments
● Safety checkpoints on the CNC Machine
● Safe operation of the CNC Machine, including set up, running, break down and clean up
RETURN TO CALENDAR
RETURN TO UNIT SUMMARIES
Unit 8:
The Woodworking Process
Unit Summary
Students will work in groups to choose a woodworking project where they will have to work together to plan,
mill, fabricate, assemble, finish multiple projects. This unit caps off the entire year and it is a chance for
students to show their knowledge of project planning, time management, hand tool and machine safety and
operation, and a way for them to showcase their skills with processing and finishing.
Essential Questions
Enduring Understandings
● What type of information can
we reveal about a potential
project through research?
● Many features and options of a project can be revealed
through research. We must research the overall project
idea, materials needed, the joinery possibilities, size and
dimension options, strength requirements, finish
requirements.
● How can we integrate this
research into our planning
process?
● We will utilize the information we have collected to make
the 3 project planning documents, Drawing, BOM, and
Order of Operations.
● What project specific
considerations must be
recognized while making your
plans?
● Each project has a unique and specific set of
considerations including intended use, material, safety,
size, and how many are being produced.
● What is the order of machine
operations in squaring and
dimensioning the stock?
● What special fabrication
operations must be used to
fabricate the complex shapes
and joinery?
● How will project features affect
the assembly and finishing
process?
● Rough crosscut, joint edge, rip cut, cross cut the end to
properly square a board..
● ;Layout and jig and fixture machine set ups are critical to
fabricating complex joinery and shapes.
● Size, shape, type of material, intended use, time
constraints all determine the assembly and finishing
details chosen.
Behavioral Objectives/Learning Outcomes
Standards (NJSLS)
● Utilize the research and design process to select a project
● Research various important elements and options of the project
● Create a overall rough plan for the project
● Create a mechanical drawings
● Create a Bill of Materials
● Create an “Order of Operations”
9.3.ST‐ET.2
● Safely operate machinery to mill square dimensioned parts
● Layout and fabricate the joinery and shapes of the project
● Assemble and Finish the Project
9.3.12.AC‐CST.5
Interdisciplinary Connections
Math, Science, Engineering, Vocational
21st Century Skills
Critical thinking, communication skills, creativity, problem solving, perseverance, collaboration, information
literacy, technology skills and digital literacy, media literacy, global awareness, self-direction, social skills,
literacy skills, civic literacy, social responsibility, innovations skills, thinking skills
Writing Assignments
“Project idea” presentation outline
Order of Operations
Project Reflection
Activities, Instructional Strategies, and Assignments
Research presentation
Rough Plan
Mechanical Drawings
Bill of Materials
Order of Operations
Project Reflection
Accommodations and Modifications (BHPRSD Accommodations and Modifications)
● Provide a variety of concrete examples from familiar contexts
● Provide study guides and support outside of class time to review before assessments (common time
or after school)
● Build background knowledge of content and vocabulary from familiar contexts prior to readings
● Use mental models to building understanding through familiar contexts
● Provide oral & written instructions
● Incorporate multimedia/audio visual representation (YouTube, Discovery Education, TV Show
parodies, etc.) to build understanding
● Use graphic organizers to guide notes, brainstorming, pre-writing, project planning, and test
preparation
● Model through processes during assignments and elicit student-generated thoughts to determine
gaps in understanding
● Highlight, bold, or underline main ideas in readings and in directions for writing assignments in the
curricular areas
● Provide guiding questions to complete during the activity
● Provide chunking of instructional notes and activities to allow for formative assessment (checks for
understanding) before moving on to the next stage
● Choose cooperative learning groups to ensure effective work, maximize productivity and support
socialization
● Use multiple intelligences or the student's learning style to facilitate effective learning when a student
is having difficulty grasping concepts

● Provide demonstrations, utilize pictures, or graphic to assist visual learners to support written text
information
● Include oral discussions, oral presentations, group collaboration, or other oral delivery methods to
support auditory learners
● Utilize hands-on activities, movement or rhythmic experiences to engage tactile/kinesthetic learners
● Provide chunking of assignments into manageable steps, including checklists that clarify directions
for assignments
● Provide a clear, concise version of a scoring rubric prior to the assignment or assessment
● Highlight distinctive features/key concepts
● Provide choice of projects depending on the student’s interests or strengths
● Provide peer assistance/study groups
● Review, repeat, and clarify directions
● Chunk sections of assessment
● Allow for partial credit, when appropriate
● Allow use of familiar contexts to demonstrate understanding of key concepts when use of text
evidence is not necessary
● Provide general assistance with organizational skills
● Utilize homework assignment notebook/planner/agenda
● Provide written intermediate timelines for long assignments
● Have student monitor grade average
● Keep rules simple and clear
Formative Assessments
● Research Project
● Rough Plan
● Mechanical Drawing
● Bill of materials
● Order Of Operations
Summative Assessments
● Choice Project (Yard Games or Tabletop Games)
● Project Reflection Slide
Performance Assessments
● Safe Machining Fabrication Checkpoint
● Assembly Checkpoint
● Finishing Checkpoint
RETURN TO CALENDAR
RETURN TO UNIT SUMMARIES
