
Red Hat Satellite 6.15
Managing hosts
Register hosts to Satellite, configure host groups and collections, set up remote
execution, manage packages on hosts, monitor hosts, and more
Last Updated: 2024-08-19


Red Hat Satellite 6.15 Managing hosts
Register hosts to Satellite, configure host groups and collections, set up remote execution, manage
packages on hosts, monitor hosts, and more
Red Hat Satellite Documentation Team
satellite-doc-list@redhat.com

Legal Notice
Copyright © 2024 Red Hat, Inc.
The text of and illustrations in this document are licensed by Red Hat under a Creative Commons
Attribution–Share Alike 3.0 Unported license ("CC-BY-SA"). An explanation of CC-BY-SA is
available at
http://creativecommons.org/licenses/by-sa/3.0/
. In accordance with CC-BY-SA, if you distribute this document or an adaptation of it, you must
provide the URL for the original version.
Red Hat, as the licensor of this document, waives the right to enforce, and agrees not to assert,
Section 4d of CC-BY-SA to the fullest extent permitted by applicable law.
Red Hat, Red Hat Enterprise Linux, the Shadowman logo, the Red Hat logo, JBoss, OpenShift,
Fedora, the Infinity logo, and RHCE are trademarks of Red Hat, Inc., registered in the United States
and other countries.
Linux ® is the registered trademark of Linus Torvalds in the United States and other countries.
Java ® is a registered trademark of Oracle and/or its affiliates.
XFS ® is a trademark of Silicon Graphics International Corp. or its subsidiaries in the United States
and/or other countries.
MySQL ® is a registered trademark of MySQL AB in the United States, the European Union and
other countries.
Node.js ® is an official trademark of Joyent. Red Hat is not formally related to or endorsed by the
official Joyent Node.js open source or commercial project.
The OpenStack ® Word Mark and OpenStack logo are either registered trademarks/service marks
or trademarks/service marks of the OpenStack Foundation, in the United States and other
countries and are used with the OpenStack Foundation's permission. We are not affiliated with,
endorsed or sponsored by the OpenStack Foundation, or the OpenStack community.
All other trademarks are the property of their respective owners.
Abstract
This guide describes how to configure and work with hosts in a Red Hat Satellite environment.
Before continuing with this workflow you must have successfully installed a Red Hat Satellite 6
Server and any required Capsule Servers.

. . . . . . . . . . . . . . . . . . . . . . . . . . . . . . . . . . . . . . . . . . . . . . . . . . . . . . . . . . . . . . . . . . . . . . . . . . . . . . . . . . . . . . . . . . . . . . . . . . . . . . . . . . . . . . . . . . . . . . . . . . . . . . . . . . . . . . . . . . . . . . . . . . . . . . . . . . . . . . . . . . . . . . . . . . . . . . . . . . . . . . . . . . . . . . . . . . . . . . . . . . . . . . . . . . . . . . . . . . . . . . . . . . . . . . . . . . . . . . . . . . . . . . . . . . . . . . . . . . . . . . . . . . . . . . . . . . . . . . . .
. . . . . . . . . . . . . . . . . . . . . . . . . . . . . . . . . . . . . . . . . . . . . . . . . . . . . . . . . . . . . . . . . . . . . . . . . . . . . . . . . . . . . . . . . . . . . . . . . . . . . . . . . . . . . . . . . . . . . . . . . . . . . . . . . . . . . . . . . . . . . . . . . . . . . . . . . . . . . . . . . . . . . . . . . . . . . . . . . . . . . . . . . . . . . . . . . . . . . . . . . . . . . . . . . . . . . . . . . . . . . . . . . . . . . . . . . . . . . . . . . . . . . . . . . . . . . . . . . . . . . . . . . . . . . . . . . . . . . . . .
. . . . . . . . . . . . . . . . . . . . . . . . . . . . . . . . . . . . . . . . . . . . . . . . . . . . . . . . . . . . . . . . . . . . . . . . . . . . . . . . . . . . . . . . . . . . . . . . . . . . . . . . . . . . . . . . . . . . . . . . . . . . . . . . . . . . . . . . . . . . . . . . . . . . . . . . . . . . . . . . . . . . . . . . . . . . . . . . . . . . . . . . . . . . . . . . . . . . . . . . . . . . . . . . . . . . . . . . . . . . . . . . . . . . . . . . . . . . . . . . . . . . . . . . . . . . . . . . . . . . . . . . . . . . . . . . . . . . . . . .
. . . . . . . . . . . . . . . . . . . . . . . . . . . . . . . . . . . . . . . . . . . . . . . . . . . . . . . . . . . . . . . . . . . . . . . . . . . . . . . . . . . . . . . . . . . . . . . . . . . . . . . . . . . . . . . . . . . . . . . . . . . . . . . . . . . . . . . . . . . . . . . . . . . . . . . . . . . . . . . . . . . . . . . . . . . . . . . . . . . . . . . . . . . . . . . . . . . . . . . . . . . . . . . . . . . . . . . . . . . . . . . . . . . . . . . . . . . . . . . . . . . . . . . . . . . . . . . . . . . . . . . . . . . . . . . . . . . . . . . .
. . . . . . . . . . . . . . . . . . . . . . . . . . . . . . . . . . . . . . . . . . . . . . . . . . . . . . . . . . . . . . . . . . . . . . . . . . . . . . . . . . . . . . . . . . . . . . . . . . . . . . . . . . . . . . . . . . . . . . . . . . . . . . . . . . . . . . . . . . . . . . . . . . . . . . . . . . . . . . . . . . . . . . . . . . . . . . . . . . . . . . . . . . . . . . . . . . . . . . . . . . . . . . . . . . . . . . . . . . . . . . . . . . . . . . . . . . . . . . . . . . . . . . . . . . . . . . . . . . . . . . . . . . . . . . . . . . . . . . . .
Table of Contents
PROVIDING FEEDBACK ON RED HAT DOCUMENTATION
CHAPTER 1. OVERVIEW OF HOSTS IN SATELLITE
1.1. BROWSING HOSTS IN SATELLITE WEB UI
CHAPTER 2. ADMINISTERING HOSTS
2.1. CREATING A HOST IN RED HAT SATELLITE
2.2. CLONING HOSTS
2.3. ASSOCIATING A VIRTUAL MACHINE WITH SATELLITE FROM A HYPERVISOR
2.4. EDITING THE SYSTEM PURPOSE OF A HOST
2.5. EDITING THE SYSTEM PURPOSE OF MULTIPLE HOSTS
2.6. CHANGING A MODULE STREAM FOR A HOST
2.7. ENABLING CUSTOM REPOSITORIES ON CONTENT HOSTS
2.8. USING THE DETAILS TAB
2.9. CHANGING THE CONTENT SOURCE OF A HOST
2.10. CHANGING THE ENVIRONMENT OF A HOST
2.11. CHANGING THE MANAGED STATUS OF A HOST
2.12. ENABLING TRACER ON A HOST
2.13. RESTARTING APPLICATIONS ON A HOST
2.14. ASSIGNING A HOST TO A SPECIFIC ORGANIZATION
2.15. ASSIGNING A HOST TO A SPECIFIC LOCATION
2.16. SWITCHING BETWEEN HOSTS
2.17. VIEWING HOST DETAILS FROM A CONTENT HOST
2.18. SELECTING HOST COLUMNS
2.19. REMOVING A HOST FROM SATELLITE
2.19.1. Disassociating a virtual machine from Satellite without removing it from a hypervisor
2.20. LIFECYCLE STATUS OF RHEL HOSTS
2.20.1. Displaying RHEL lifecycle status
2.20.2. Host search by RHEL lifecycle status
CHAPTER 3. WORKING WITH HOST GROUPS
3.1. HOST GROUP SETTINGS AND NESTED HOST GROUPS
3.2. CREATING A HOST GROUP
3.3. CREATING A HOST GROUP FOR EACH LIFECYCLE ENVIRONMENT
3.4. ADDING A HOST TO A HOST GROUP
3.5. CHANGING THE HOST GROUP OF A HOST
CHAPTER 4. REGISTERING HOSTS AND SETTING UP HOST INTEGRATION
4.1. SUPPORTED CLIENTS IN REGISTRATION
4.2. REGISTRATION METHODS
4.3. REGISTERING HOSTS BY USING GLOBAL REGISTRATION
4.3.1. Global parameters for registration
4.3.2. Registering a host
4.3.3. Customizing the registration templates
4.4. REGISTERING HOSTS BY USING THE BOOTSTRAP SCRIPT
4.4.1. Setting permissions for the bootstrap script
4.4.2. Advanced bootstrap script configuration
4.4.2.1. Migrating a host from one Satellite to another Satellite
4.4.2.2. Migrating a host from Red Hat Network (RHN) or Satellite 5 to Satellite
4.4.2.3. Registering a host to Satellite without Puppet
4.4.2.4. Registering a host to Satellite for content management only
4.4.2.5. Changing the method the bootstrap script uses to download the consumer RPM
6
7
7
8
8
10
10
10
11
12
12
12
13
14
14
15
15
15
16
17
17
17
18
18
19
19
19
21
21
23
24
25
25
26
26
26
27
27
27
30
31
33
35
35
35
36
37
37
Table of Contents
1

. . . . . . . . . . . . . . . . . . . . . . . . . . . . . . . . . . . . . . . . . . . . . . . . . . . . . . . . . . . . . . . . . . . . . . . . . . . . . . . . . . . . . . . . . . . . . . . . . . . . . . . . . . . . . . . . . . . . . . . . . . . . . . . . . . . . . . . . . . . . . . . . . . . . . . . . . . . . . . . . . . . . . . . . . . . . . . . . . . . . . . . . . . . . . . . . . . . . . . . . . . . . . . . . . . . . . . . . . . . . . . . . . . . . . . . . . . . . . . . . . . . . . . . . . . . . . . . . . . . . . . . . . . . . . . . . . . . . . . . .
. . . . . . . . . . . . . . . . . . . . . . . . . . . . . . . . . . . . . . . . . . . . . . . . . . . . . . . . . . . . . . . . . . . . . . . . . . . . . . . . . . . . . . . . . . . . . . . . . . . . . . . . . . . . . . . . . . . . . . . . . . . . . . . . . . . . . . . . . . . . . . . . . . . . . . . . . . . . . . . . . . . . . . . . . . . . . . . . . . . . . . . . . . . . . . . . . . . . . . . . . . . . . . . . . . . . . . . . . . . . . . . . . . . . . . . . . . . . . . . . . . . . . . . . . . . . . . . . . . . . . . . . . . . . . . . . . . . . . . . .
. . . . . . . . . . . . . . . . . . . . . . . . . . . . . . . . . . . . . . . . . . . . . . . . . . . . . . . . . . . . . . . . . . . . . . . . . . . . . . . . . . . . . . . . . . . . . . . . . . . . . . . . . . . . . . . . . . . . . . . . . . . . . . . . . . . . . . . . . . . . . . . . . . . . . . . . . . . . . . . . . . . . . . . . . . . . . . . . . . . . . . . . . . . . . . . . . . . . . . . . . . . . . . . . . . . . . . . . . . . . . . . . . . . . . . . . . . . . . . . . . . . . . . . . . . . . . . . . . . . . . . . . . . . . . . . . . . . . . . . .
. . . . . . . . . . . . . . . . . . . . . . . . . . . . . . . . . . . . . . . . . . . . . . . . . . . . . . . . . . . . . . . . . . . . . . . . . . . . . . . . . . . . . . . . . . . . . . . . . . . . . . . . . . . . . . . . . . . . . . . . . . . . . . . . . . . . . . . . . . . . . . . . . . . . . . . . . . . . . . . . . . . . . . . . . . . . . . . . . . . . . . . . . . . . . . . . . . . . . . . . . . . . . . . . . . . . . . . . . . . . . . . . . . . . . . . . . . . . . . . . . . . . . . . . . . . . . . . . . . . . . . . . . . . . . . . . . . . . . . . .
. . . . . . . . . . . . . . . . . . . . . . . . . . . . . . . . . . . . . . . . . . . . . . . . . . . . . . . . . . . . . . . . . . . . . . . . . . . . . . . . . . . . . . . . . . . . . . . . . . . . . . . . . . . . . . . . . . . . . . . . . . . . . . . . . . . . . . . . . . . . . . . . . . . . . . . . . . . . . . . . . . . . . . . . . . . . . . . . . . . . . . . . . . . . . . . . . . . . . . . . . . . . . . . . . . . . . . . . . . . . . . . . . . . . . . . . . . . . . . . . . . . . . . . . . . . . . . . . . . . . . . . . . . . . . . . . . . . . . . . .
. . . . . . . . . . . . . . . . . . . . . . . . . . . . . . . . . . . . . . . . . . . . . . . . . . . . . . . . . . . . . . . . . . . . . . . . . . . . . . . . . . . . . . . . . . . . . . . . . . . . . . . . . . . . . . . . . . . . . . . . . . . . . . . . . . . . . . . . . . . . . . . . . . . . . . . . . . . . . . . . . . . . . . . . . . . . . . . . . . . . . . . . . . . . . . . . . . . . . . . . . . . . . . . . . . . . . . . . . . . . . . . . . . . . . . . . . . . . . . . . . . . . . . . . . . . . . . . . . . . . . . . . . . . . . . . . . . . . . . . .
. . . . . . . . . . . . . . . . . . . . . . . . . . . . . . . . . . . . . . . . . . . . . . . . . . . . . . . . . . . . . . . . . . . . . . . . . . . . . . . . . . . . . . . . . . . . . . . . . . . . . . . . . . . . . . . . . . . . . . . . . . . . . . . . . . . . . . . . . . . . . . . . . . . . . . . . . . . . . . . . . . . . . . . . . . . . . . . . . . . . . . . . . . . . . . . . . . . . . . . . . . . . . . . . . . . . . . . . . . . . . . . . . . . . . . . . . . . . . . . . . . . . . . . . . . . . . . . . . . . . . . . . . . . . . . . . . . . . . . . .
4.4.2.6. Providing the host’s IP address to Satellite
4.4.2.7. Enabling remote execution on the host
4.4.2.8. Creating a domain for a host during registration
4.4.2.9. Providing an alternative FQDN for the host
4.5. INSTALLING TRACER
4.6. INSTALLING AND CONFIGURING PUPPET AGENT DURING HOST REGISTRATION
4.7. INSTALLING AND CONFIGURING PUPPET AGENT MANUALLY
CHAPTER 5. ADDING NETWORK INTERFACES
5.1. ADDING A PHYSICAL INTERFACE
5.2. ADDING A VIRTUAL INTERFACE
5.3. ADDING A BONDED INTERFACE
5.4. BONDING MODES AVAILABLE IN SATELLITE
5.5. ADDING A BASEBOARD MANAGEMENT CONTROLLER (BMC) INTERFACE
CHAPTER 6. UPGRADING HOSTS TO NEXT MAJOR RED HAT ENTERPRISE LINUX RELEASE
CHAPTER 7. CONVERTING A HOST TO RED HAT ENTERPRISE LINUX
7.1. ANSIBLE VARIABLES FOR CONVERSION
CHAPTER 8. HOST MANAGEMENT AND MONITORING USING THE RHEL WEB CONSOLE
8.1. ENABLING THE RHEL WEB CONSOLE ON SATELLITE
8.2. MANAGING AND MONITORING HOSTS USING THE RHEL WEB CONSOLE
8.3. DISABLING THE RHEL WEB CONSOLE ON SATELLITE
CHAPTER 9. MONITORING HOSTS USING RED HAT INSIGHTS
9.1. ACCESS TO INFORMATION FROM INSIGHTS IN SATELLITE
9.2. EXCLUDING HOSTS FROM RH-CLOUD AND INSIGHTS-CLIENT REPORTS
9.3. DEPLOYING RED HAT INSIGHTS USING THE ANSIBLE ROLE
9.4. CONFIGURING SYNCHRONIZATION OF INSIGHTS RECOMMENDATIONS FOR HOSTS
9.5. CONFIGURING AUTOMATIC REMOVAL OF HOSTS FROM THE INSIGHTS INVENTORY
9.6. CREATING AN INSIGHTS REMEDIATION PLAN FOR HOSTS
CHAPTER 10. USING REPORT TEMPLATES TO MONITOR HOSTS
10.1. GENERATING HOST MONITORING REPORTS
10.2. CREATING A REPORT TEMPLATE
10.3. EXPORTING REPORT TEMPLATES
10.4. EXPORTING REPORT TEMPLATES USING THE SATELLITE API
10.5. IMPORTING REPORT TEMPLATES
10.6. IMPORTING REPORT TEMPLATES USING THE SATELLITE API
10.7. GENERATING A LIST OF INSTALLED PACKAGES
10.8. CREATING A REPORT TEMPLATE TO MONITOR ENTITLEMENTS
10.9. REPORT TEMPLATE SAFE MODE
CHAPTER 11. CONFIGURING HOST COLLECTIONS
11.1. CREATING A HOST COLLECTION
11.2. CLONING A HOST COLLECTION
11.3. REMOVING A HOST COLLECTION
11.4. ADDING A HOST TO A HOST COLLECTION
11.5. ADDING HOSTS TO A HOST COLLECTION IN BULK
11.6. REMOVING A HOST FROM A HOST COLLECTION
11.7. ADDING CONTENT TO A HOST COLLECTION
11.7.1. Adding packages to a host collection
11.7.2. Viewing installed packages
11.7.3. Upgrading a package
38
38
39
39
40
41
42
44
44
45
46
47
48
50
52
54
56
56
56
57
58
58
58
59
59
60
60
62
62
63
64
65
66
67
68
68
70
71
71
71
71
72
72
73
73
73
74
74
Red Hat Satellite 6.15 Managing hosts
2

. . . . . . . . . . . . . . . . . . . . . . . . . . . . . . . . . . . . . . . . . . . . . . . . . . . . . . . . . . . . . . . . . . . . . . . . . . . . . . . . . . . . . . . . . . . . . . . . . . . . . . . . . . . . . . . . . . . . . . . . . . . . . . . . . . . . . . . . . . . . . . . . . . . . . . . . . . . . . . . . . . . . . . . . . . . . . . . . . . . . . . . . . . . . . . . . . . . . . . . . . . . . . . . . . . . . . . . . . . . . . . . . . . . . . . . . . . . . . . . . . . . . . . . . . . . . . . . . . . . . . . . . . . . . . . . . . . . . . . . .
. . . . . . . . . . . . . . . . . . . . . . . . . . . . . . . . . . . . . . . . . . . . . . . . . . . . . . . . . . . . . . . . . . . . . . . . . . . . . . . . . . . . . . . . . . . . . . . . . . . . . . . . . . . . . . . . . . . . . . . . . . . . . . . . . . . . . . . . . . . . . . . . . . . . . . . . . . . . . . . . . . . . . . . . . . . . . . . . . . . . . . . . . . . . . . . . . . . . . . . . . . . . . . . . . . . . . . . . . . . . . . . . . . . . . . . . . . . . . . . . . . . . . . . . . . . . . . . . . . . . . . . . . . . . . . . . . . . . . . . .
. . . . . . . . . . . . . . . . . . . . . . . . . . . . . . . . . . . . . . . . . . . . . . . . . . . . . . . . . . . . . . . . . . . . . . . . . . . . . . . . . . . . . . . . . . . . . . . . . . . . . . . . . . . . . . . . . . . . . . . . . . . . . . . . . . . . . . . . . . . . . . . . . . . . . . . . . . . . . . . . . . . . . . . . . . . . . . . . . . . . . . . . . . . . . . . . . . . . . . . . . . . . . . . . . . . . . . . . . . . . . . . . . . . . . . . . . . . . . . . . . . . . . . . . . . . . . . . . . . . . . . . . . . . . . . . . . . . . . . . .
11.7.4. Removing a package from a host
11.7.5. Adding errata to a host collection
11.7.6. Adding errata to a single host
11.7.7. Applying installable errata
11.7.8. Filter errata by type and severity
11.7.9. Viewing errata by applicable and installable
11.7.10. Generating a report for installable and applicable errata
11.7.11. Removing content from a host collection
11.7.12. Changing the lifecycle environment or content view of a host collection
CHAPTER 12. CONFIGURING AND SETTING UP REMOTE JOBS
12.1. REMOTE EXECUTION IN RED HAT SATELLITE
12.2. REMOTE EXECUTION WORKFLOW
12.3. PERMISSIONS FOR REMOTE EXECUTION
12.4. TRANSPORT MODES FOR REMOTE EXECUTION
12.5. CONFIGURING A HOST TO USE THE PULL CLIENT
12.6. CREATING A JOB TEMPLATE
12.7. IMPORTING AN ANSIBLE PLAYBOOK BY NAME
12.8. IMPORTING ALL AVAILABLE ANSIBLE PLAYBOOKS
12.9. CONFIGURING THE FALLBACK TO ANY CAPSULE REMOTE EXECUTION SETTING IN SATELLITE
12.10. CONFIGURING THE GLOBAL CAPSULE REMOTE EXECUTION SETTING IN SATELLITE
12.11. SETTING AN ALTERNATIVE DIRECTORY FOR REMOTE EXECUTION JOBS IN PUSH MODE
12.12. SETTING AN ALTERNATIVE DIRECTORY FOR REMOTE EXECUTION JOBS IN PULL MODE
12.13. ALTERING THE PRIVILEGE ELEVATION METHOD
12.14. DISTRIBUTING SSH KEYS FOR REMOTE EXECUTION
12.15. DISTRIBUTING SSH KEYS FOR REMOTE EXECUTION MANUALLY
12.16. ADDING A PASSPHRASE TO SSH KEY USED FOR REMOTE EXECUTION
12.17. USING THE SATELLITE API TO OBTAIN SSH KEYS FOR REMOTE EXECUTION
12.18. CONFIGURING A KICKSTART TEMPLATE TO DISTRIBUTE SSH KEYS DURING PROVISIONING
12.19. CONFIGURING A KEYTAB FOR KERBEROS TICKET GRANTING TICKETS
12.20. CONFIGURING KERBEROS AUTHENTICATION FOR REMOTE EXECUTION
12.21. SETTING UP JOB TEMPLATES
12.22. EXECUTING A REMOTE JOB
12.23. ADVANCED SETTINGS IN THE JOB WIZARD
12.24. USING EXTENDED CRON LINES
12.25. SCHEDULING A RECURRING ANSIBLE JOB FOR A HOST
12.26. SCHEDULING A RECURRING ANSIBLE JOB FOR A HOST GROUP
12.27. MONITORING JOBS
12.28. USING ANSIBLE PROVIDER FOR PACKAGE AND ERRATA ACTIONS
12.29. SETTING THE JOB RATE LIMIT ON CAPSULE
CHAPTER 13. HOST STATUS IN SATELLITE
13.1. HOST GLOBAL STATUS OVERVIEW
13.2. HOST SUB-STATUS OVERVIEW
CHAPTER 14. SYNCHRONIZING TEMPLATE REPOSITORIES
14.1. ENABLING THE TEMPLATESYNC PLUGIN
14.2. CONFIGURING THE TEMPLATESYNC PLUGIN
14.3. USING REPOSITORY SOURCES
14.3.1. Synchronizing templates with an existing repository
14.3.2. Synchronizing templates with a local directory
14.4. IMPORTING AND EXPORTING TEMPLATES
14.4.1. Importing templates
14.4.2. Exporting templates
75
75
75
76
76
76
77
78
78
79
79
79
80
81
82
83
84
85
85
86
86
87
87
88
88
89
89
90
90
91
91
92
94
94
95
95
96
97
97
98
98
98
106
106
106
108
108
108
109
109
111
Table of Contents
3

. . . . . . . . . . . . . . . . . . . . . . . . . . . . . . . . . . . . . . . . . . . . . . . . . . . . . . . . . . . . . . . . . . . . . . . . . . . . . . . . . . . . . . . . . . . . . . . . . . . . . . . . . . . . . . . . . . . . . . . . . . . . . . . . . . . . . . . . . . . . . . . . . . . . . . . . . . . . . . . . . . . . . . . . . . . . . . . . . . . . . . . . . . . . . . . . . . . . . . . . . . . . . . . . . . . . . . . . . . . . . . . . . . . . . . . . . . . . . . . . . . . . . . . . . . . . . . . . . . . . . . . . . . . . . . . . . . . . . . . .
. . . . . . . . . . . . . . . . . . . . . . . . . . . . . . . . . . . . . . . . . . . . . . . . . . . . . . . . . . . . . . . . . . . . . . . . . . . . . . . . . . . . . . . . . . . . . . . . . . . . . . . . . . . . . . . . . . . . . . . . . . . . . . . . . . . . . . . . . . . . . . . . . . . . . . . . . . . . . . . . . . . . . . . . . . . . . . . . . . . . . . . . . . . . . . . . . . . . . . . . . . . . . . . . . . . . . . . . . . . . . . . . . . . . . . . . . . . . . . . . . . . . . . . . . . . . . . . . . . . . . . . . . . . . . . . . . . . . . . . .
. . . . . . . . . . . . . . . . . . . . . . . . . . . . . . . . . . . . . . . . . . . . . . . . . . . . . . . . . . . . . . . . . . . . . . . . . . . . . . . . . . . . . . . . . . . . . . . . . . . . . . . . . . . . . . . . . . . . . . . . . . . . . . . . . . . . . . . . . . . . . . . . . . . . . . . . . . . . . . . . . . . . . . . . . . . . . . . . . . . . . . . . . . . . . . . . . . . . . . . . . . . . . . . . . . . . . . . . . . . . . . . . . . . . . . . . . . . . . . . . . . . . . . . . . . . . . . . . . . . . . . . . . . . . . . . . . . . . . . . .
. . . . . . . . . . . . . . . . . . . . . . . . . . . . . . . . . . . . . . . . . . . . . . . . . . . . . . . . . . . . . . . . . . . . . . . . . . . . . . . . . . . . . . . . . . . . . . . . . . . . . . . . . . . . . . . . . . . . . . . . . . . . . . . . . . . . . . . . . . . . . . . . . . . . . . . . . . . . . . . . . . . . . . . . . . . . . . . . . . . . . . . . . . . . . . . . . . . . . . . . . . . . . . . . . . . . . . . . . . . . . . . . . . . . . . . . . . . . . . . . . . . . . . . . . . . . . . . . . . . . . . . . . . . . . . . . . . . . . . . .
CHAPTER 15. MANAGING PACKAGES
15.1. ENABLING AND DISABLING REPOSITORIES ON HOSTS
15.2. INSTALLING PACKAGES ON A HOST
15.3. UPGRADING PACKAGES ON A HOST
15.4. REMOVING PACKAGES FROM A HOST
APPENDIX A. TEMPLATE WRITING REFERENCE
A.1. ACCESSING THE TEMPLATE WRITING REFERENCE IN THE SATELLITE WEB UI
A.2. USING AUTOCOMPLETION IN TEMPLATES
A.3. WRITING ERB TEMPLATES
A.4. TROUBLESHOOTING ERB TEMPLATES
A.5. GENERIC SATELLITE-SPECIFIC MACROS
A.6. TEMPLATE MACROS
A.7. HOST-SPECIFIC VARIABLES
A.8. KICKSTART-SPECIFIC VARIABLES
A.9. CONDITIONAL STATEMENTS
A.10. PARSING ARRAYS
A.11. EXAMPLE TEMPLATE SNIPPETS
APPENDIX B. JOB TEMPLATE EXAMPLES AND EXTENSIONS
B.1. CUSTOMIZING JOB TEMPLATES
B.2. DEFAULT JOB TEMPLATE CATEGORIES
B.3. EXAMPLE RESTORECON TEMPLATE
B.4. RENDERING A RESTORECON TEMPLATE
B.5. EXECUTING A RESTORECON TEMPLATE ON MULTIPLE HOSTS
B.6. INCLUDING POWER ACTIONS IN TEMPLATES
APPENDIX C. OVERVIEW OF THE HOST COLUMNS
113
113
113
115
117
119
119
119
120
122
122
123
125
129
129
130
131
134
134
134
134
135
135
136
137
Red Hat Satellite 6.15 Managing hosts
4

Table of Contents
5

PROVIDING FEEDBACK ON RED HAT DOCUMENTATION
We appreciate your feedback on our documentation. Let us know how we can improve it.
Use the Create Issue form in Red Hat Jira to provide your feedback. The Jira issue is created in the Red
Hat Satellite Jira project, where you can track its progress.
Prerequisites
Ensure you have registered a Red Hat account .
Procedure
1. Click the following link: Create Issue. If Jira displays a login error, log in and proceed after you
are redirected to the form.
2. Complete the Summary and Description fields. In the Description field, include the
documentation URL, chapter or section number, and a detailed description of the issue. Do not
modify any other fields in the form.
3. Click Create.
Red Hat Satellite 6.15 Managing hosts
6

CHAPTER 1. OVERVIEW OF HOSTS IN SATELLITE
A host is any Linux client that Red Hat Satellite manages. Hosts can be physical or virtual.
You can deploy virtual hosts on any platform supported by Red Hat Satellite, such as Amazon EC2,
Google Compute Engine, KVM, libvirt, Microsoft Azure, OpenStack, Red Hat Virtualization, Rackspace
Cloud Services, or VMware vSphere.
With Satellite, you can manage hosts at scale, including monitoring, provisioning, remote execution,
configuration management, software management, and subscription management.
1.1. BROWSING HOSTS IN SATELLITE WEB UI
In the Satellite web UI, you can browse all hosts recognized by Satellite, grouped by type:
All Hosts – a list of all hosts recognized by Satellite.
Discovered Hosts – a list of bare-metal hosts detected on the provisioning network by the
Discovery plugin.
Content Hosts – a list of hosts that manage tasks related to content and subscriptions.
Host Collections – a list of user-defined collections of hosts used for bulk actions such as
errata installation.
To search for a host, type in the Search field, and use an asterisk (*) to perform a partial string search.
For example, if searching for a content host named server.example.com, click the Content Hosts page
and type server* in the Search field. Alternatively, *ver* will also find the content host
server.example.com.
WARNING
Satellite Server is listed as a host itself even if it is not self-registered. Do not delete
Satellite Server from the list of hosts.
CHAPTER 1. OVERVIEW OF HOSTS IN SATELLITE
7

CHAPTER 2. ADMINISTERING HOSTS
This chapter describes creating, registering, administering, and removing hosts.
2.1. CREATING A HOST IN RED HAT SATELLITE
Use this procedure to create a host in Red Hat Satellite. To use the CLI instead of the Satellite web UI,
see the CLI procedure.
Procedure
1. In the Satellite web UI, navigate to Hosts > Create Host.
2. On the Host tab, enter the required details.
3. Click the Ansible Roles tab, and from the Ansible Roles list, select one or more roles that you
want to add to the host. Use the arrow icon to manage the roles that you add or remove.
4. On the Puppet Classes tab, select the Puppet classes you want to include.
5. On the Interfaces tab:
a. For each interface, click Edit in the Actions column and configure the following settings as
required:
Type — For a Bond or BMC interface, use the Type list and select the interface type.
MAC address — Enter the MAC address.
DNS name — Enter the DNS name that is known to the DNS server. This is used for the
host part of the FQDN.
Domain — Select the domain name of the provisioning network. This automatically
updates the Subnet list with a selection of suitable subnets.
IPv4 Subnet — Select an IPv4 subnet for the host from the list.
IPv6 Subnet — Select an IPv6 subnet for the host from the list.
IPv4 address — If IP address management (IPAM) is enabled for the subnet, the IP
address is automatically suggested. Alternatively, you can enter an address. The address
can be omitted if provisioning tokens are enabled, if the domain does not manage DNS,
if the subnet does not manage reverse DNS, or if the subnet does not manage DHCP
reservations.
IPv6 address — If IP address management (IPAM) is enabled for the subnet, the IP
address is automatically suggested. Alternatively, you can enter an address.
Managed — Select this checkbox to configure the interface during provisioning to use
the Capsule provided DHCP and DNS services.
Primary — Select this checkbox to use the DNS name from this interface as the host
portion of the FQDN.
Provision — Select this checkbox to use this interface for provisioning. This means TFTP
boot will take place using this interface, or in case of image based provisioning, the
Red Hat Satellite 6.15 Managing hosts
8

script to complete the provisioning will be executed through this interface. Note that
many provisioning tasks, such as downloading packages by anaconda or Puppet setup
in a %post script, will use the primary interface.
Virtual NIC — Select this checkbox if this interface is not a physical device. This setting
has two options:
Tag — Optionally set a VLAN tag. If unset, the tag will be the VLAN ID of the subnet.
Attached to — Enter the device name of the interface this virtual interface is
attached to.
b. Click OK to save the interface configuration.
c. Optionally, click Add Interface to include an additional network interface. For more
information, see Chapter 5, Adding network interfaces.
d. Click Submit to apply the changes and exit.
6. On the Operating System tab, enter the required details. For Red Hat operating systems,
select Synced Content for Media Selection. If you want to use non Red Hat operating systems,
select All Media, then select the installation media from the Media Selection list. You can
select a partition table from the list or enter a custom partition table in the Custom partition
table field. You cannot specify both.
7. On the Parameters tab, click Add Parameter to add any parameter variables that you want to
pass to job templates at run time. This includes all Puppet Class, Ansible playbook parameters
and host parameters that you want to associate with the host. To use a parameter variable with
an Ansible job template, you must add a Host Parameter.
When you create a Red Hat Enterprise Linux 8 host, you can set system purpose attributes.
System purpose attributes define what subscriptions to attach automatically on host creation. In
the Host Parameters area, enter the following parameter names with the corresponding
values. For the list of values, see Introduction to System Purpose in Performing a standard RHEL
8 installation.
syspurpose_role
syspurpose_sla
syspurpose_usage
syspurpose_addons
If you want to create a host with pull mode for remote job execution, add the enable-remote-
execution-pull parameter with type boolean set to true. For more information, see
Section 12.4, “Transport modes for remote execution”.
8. On the Additional Information tab, enter additional information about the host.
9. Click Submit to complete your provisioning request.
CLI procedure
To create a host associated to a host group, enter the following command:
# hammer host create \
--ask-root-password yes \
CHAPTER 2. ADMINISTERING HOSTS
9

--hostgroup "My_Host_Group" \
--interface="primary=true, \
provision=true, \
mac=My_MAC_Address, \
ip=My_IP_Address" \
--location "My_Location" \
--name "My_Host_Name" \
--organization "My_Organization"
This command prompts you to specify the root password. It is required to specify the host’s IP
and MAC address. Other properties of the primary network interface can be inherited from the
host group or set using the --subnet, and --domain parameters. You can set additional
interfaces using the --interface option, which accepts a list of key-value pairs. For the list of
available interface settings, enter the hammer host create --help command.
2.2. CLONING HOSTS
You can clone existing hosts.
Procedure
1. In the Satellite web UI, navigate to Hosts > All Hosts.
2. In the Actions menu, click Clone.
3. On the Host tab, ensure to provide a Name different from the original host.
4. On the Interfaces tab, ensure to provide a different IP address.
5. Click Submit to clone the host.
For more information, see Section 2.1, “Creating a host in Red Hat Satellite” .
2.3. ASSOCIATING A VIRTUAL MACHINE WITH SATELLITE FROM A
HYPERVISOR
Procedure
1. In the Satellite web UI, navigate to Infrastructure > Compute Resources.
2. Select a compute resource.
3. On the Virtual Machines tab, click Associate VM from the Actions menu.
2.4. EDITING THE SYSTEM PURPOSE OF A HOST
You can edit the system purpose attributes for a Red Hat Enterprise Linux host. System purpose allows
you to set the intended use of a system on your network and improves reporting accuracy in the
Subscriptions service of the Red Hat Hybrid Cloud Console. For more information about system
purpose, see Introduction to System Purpose in Performing a standard RHEL 8 installation .
Prerequisites
The host that you want to edit must be registered with the subscription-manager.
Red Hat Satellite 6.15 Managing hosts
10

Procedure
1. In the Satellite web UI, navigate to Hosts > All Hosts.
2. Click the name of the host you want to modify.
3. On the Overview tab, click Edit on the System purpose card.
4. Select the system purpose attributes for your host.
5. Click Save.
CLI procedure
1. Log in to the host and edit the required system purpose attributes. For example, set the usage
type to Production, the role to Red Hat Enterprise Linux Server, and add the addon add on.
For the list of values, see Introduction to System Purpose in Performing a standard RHEL 8
installation.
# subscription-manager syspurpose set usage 'Production'
# subscription-manager syspurpose set role 'Red Hat Enterprise Linux Server'
# subscription-manager syspurpose add addons 'your_addon'
2. Verify the system purpose attributes for this host:
# subscription-manager syspurpose
3. Automatically attach subscriptions to this host:
# subscription-manager attach --auto
4. Verify the system purpose status for this host:
# subscription-manager status
2.5. EDITING THE SYSTEM PURPOSE OF MULTIPLE HOSTS
You can edit the system purpose attributes of Red Hat Enterprise Linux hosts. System purpose
attributes define which subscriptions to attach automatically to hosts. For more information about
system purpose, see Introduction to System Purpose in Performing a standard RHEL 8 installation .
Prerequisites
The hosts that you want to edit must be registered with the subscription-manager.
Procedure
1. In the Satellite web UI, navigate to Hosts > Content Hosts and select Red Hat Enterprise Linux
8 hosts that you want to edit.
2. Click the Select Action list and select Manage System Purpose.
3. Select the system purpose attributes that you want to assign to the selected hosts. You can
select one of the following values:
A specific attribute to set an all selected hosts.
CHAPTER 2. ADMINISTERING HOSTS
11

A specific attribute to set an all selected hosts.
No Change to keep the attribute set on the selected hosts.
None (Clear) to clear the attribute on the selected hosts.
4. Click Assign.
5. In the Satellite web UI, navigate to Hosts > Content Hosts and select the same Red Hat
Enterprise Linux 8 hosts to automatically attach subscriptions based on the system purpose.
6. Click the Select Action list and select Manage Subscriptions.
7. Click Auto-Attach to attach subscriptions to all selected hosts automatically based on their
system role.
2.6. CHANGING A MODULE STREAM FOR A HOST
If you have a host running Red Hat Enterprise Linux 8, you can modify the module stream for the
repositories you install.
You can enable, disable, install, update, and remove module streams from your host in the Satellite web
UI.
Procedure
1. In the Satellite web UI, navigate to Hosts > All Hosts.
2. Click the name of the host you want to modify.
3. Click the Content tab, then click the Module streams tab.
4. Click the vertical ellipsis next to the module and select the action you want to perform. You get a
REX job notification once the remote execution job is complete.
2.7. ENABLING CUSTOM REPOSITORIES ON CONTENT HOSTS
As a Simple Content Access (SCA) user, you can enable all custom repositories on content hosts using
the Satellite web UI.
Procedure
1. In the Satellite web UI, navigate to Hosts > All Hosts and select a host.
2. Select the Content tab, then select Repository sets.
3. From the dropdown, you can filter the Repository type column to Custom.
4. Select the desired number of repositories or click the Select All checkbox to select all
repositories, then click the vertical ellipsis, and select Override to Enabled.
2.8. USING THE DETAILS TAB
In Satellite, you can view details of a host name in the Details tab. You can expand and collapse
individual cards and all links. Your browser remembers the card expansion and collapse state.
Red Hat Satellite 6.15 Managing hosts
12

Procedure
1. In the Satellite web UI, navigate to Hosts > All Hosts.
2. Click the name of the host you want to view.
3. Select the Details tab.
The cards in the Details tab show details for the System properties, BIOS, Networking interfaces,
Operating system, Provisioning templates, and Provisioning. Registered content hosts show
additional cards for Registration details, Installed products, and HW properties providing information
about Model, Number of CPU(s), Sockets, Cores per socket and RAM.
In the Operating system card, you can see details for the Architecture, OS, Boot time, and Kernel
release.
There are interactive features for the following Details cards:
Networking interfaces
1. Click to collapse and expand each network interface.
2. Click the link to edit all network interfaces.
System properties
1. Click to copy values to clipboard including Name, Subscription UUID, and Domain.
2. For hosts with virtual guests, click the chip to see the list of guests.
3. For hosts that are virtual guests, click the Virtual host link to view its host.
Provisioning templates
1. Click to view a template in a pop-up modal without leaving the page.
2. Click the pencil icon to edit a template.
3. Click the pop-out button in modal to view the template in a new tab.
4. Click the link in modal to edit the template.
5. Click the Copy to clipboard button in modal to get the template into clipboard.
2.9. CHANGING THE CONTENT SOURCE OF A HOST
A content source is a Capsule that a host consumes content from. Use this procedure to change the
content source for a host.
Procedure
1. In the Satellite web UI, navigate to Hosts > All Hosts.
2. Click the name of the host you want to modify.
3. Click the vertical ellipsis icon next to the Edit button and select Change content source.
CHAPTER 2. ADMINISTERING HOSTS
13

4. Select Content Source, Lifecycle Content View, and Content Source from the lists.
5. Click Change content source.
NOTE
Some lifecycle environments can be unavailable for selection if they are not
synced on the selected content source. For more information, see Adding
lifecycle environments to Capsule Servers in Managing content.
You can either complete the content source change using remote execution or manually. To update
configuration on host using remote execution, click Run job invocation. For more information about
running remote execution jobs, see Configuring and Setting up Remote Jobs. To update the content
source manually, execute the autogenerated commands from Change content source on the host.
2.10. CHANGING THE ENVIRONMENT OF A HOST
Use this procedure to change the environment of a host.
Procedure
1. In the Satellite web UI, navigate to Hosts > All Hosts.
2. Click the name of the host you want to modify.
3. Click the vertical ellipsis in the Content view details card and select Edit content view
assignment.
4. Select the environment.
5. Select the content view.
6. Click Save.
2.11. CHANGING THE MANAGED STATUS OF A HOST
Hosts provisioned by Satellite are Managed by default. When a host is set to Managed, you can
configure additional host parameters from Satellite Server. These additional parameters are listed on
the Operating System tab. If you change any settings on the Operating System tab, they will not take
effect until you set the host to build and reboot it.
If you need to obtain reports about configuration management on systems using an operating system
not supported by Satellite, set the host to Unmanaged.
Procedure
1. In the Satellite web UI, navigate to Hosts > All Hosts.
2. Click the name of the host you want to modify.
3. Click Edit.
4. Click Manage host or Unmanage host to change the host’s status.
5. Click Submit.
Red Hat Satellite 6.15 Managing hosts
14

2.12. ENABLING TRACER ON A HOST
Use this procedure to enable Tracer on Satellite and access Traces. Tracer displays a list of services and
applications that need to be restarted. Traces is the output generated by Tracer in the Satellite web UI.
Prerequisites
Red Hat Satellite Client 6 repository for the operating system version of the host is
synchronized on Satellite Server, available in the content view and the lifecycle environment of
the host, and enabled for the host. For more information, see Changing the repository sets
status for a host in Satellite in Managing content.
Remote execution is enabled.
Procedure
1. In the Satellite web UI, navigate to Hosts > All Hosts.
2. Click the name of the host you want to modify.
3. On the Traces tab, click Enable Traces.
4. Select the provider to install katello-host-tools-tracer from the list.
5. Click Enable Tracer. You get a REX job notification after the remote execution job is complete.
2.13. RESTARTING APPLICATIONS ON A HOST
Use this procedure to restart applications from the Satellite web UI.
Procedure
1. In the Satellite web UI, navigate to Hosts > All Hosts.
2. Click the name of the hosts you want to modify.
3. Select the Traces tab.
4. Select applications that you want to restart.
5. Select Restart via remote execution from the Restart app list. You will get a REX job
notification once the remote execution job is complete.
2.14. ASSIGNING A HOST TO A SPECIFIC ORGANIZATION
Use this procedure to assign a host to a specific organization. For general information about
organizations and how to configure them, see Managing Organizations in Administering Red Hat
Satellite.
NOTE
CHAPTER 2. ADMINISTERING HOSTS
15

NOTE
If your host is already registered with a different organization, you must first unregister
the host before assigning it to a new organization. To unregister the host, run
subscription-manager unregister on the host. After you assign the host to a new
organization, you can re-register the host.
Procedure
1. In the Satellite web UI, navigate to Hosts > All Hosts.
2. Select the checkbox of the host you want to change.
3. From the Select Action list, select Assign Organization. A new option window opens.
4. From the Select Organization list, select the organization that you want to assign your host to.
Select the checkbox Fix Organization on Mismatch.
NOTE
A mismatch happens if there is a resource associated with a host, such as a
domain or subnet, and at the same time not associated with the organization you
want to assign the host to. The option Fix Organization on Mismatch will add
such a resource to the organization, and is therefore the recommended choice.
The option Fail on Mismatch will always result in an error message. For example,
reassigning a host from one organization to another will fail, even if there is no
actual mismatch in settings.
5. Click Submit.
2.15. ASSIGNING A HOST TO A SPECIFIC LOCATION
Use this procedure to assign a host to a specific location. For general information about locations and
how to configure them, see Creating a Location in Managing content.
Procedure
1. In the Satellite web UI, navigate to Hosts > All Hosts.
2. Select the checkbox of the host you want to change.
3. From the Select Action list, select Assign Location. A new option window opens.
4. Navigate to the Select Location list and choose the location that you want for your host. Select
the checkbox Fix Location on Mismatch.
NOTE
A mismatch happens if there is a resource associated with a host, such as a
domain or subnet, and at the same time not associated with the location you
want to assign the host to. The option Fix Location on Mismatch will add such a
resource to the location, and is therefore the recommended choice. The option
Fail on Mismatch will always result in an error message. For example, reassigning
a host from one location to another will fail, even if there is no actual mismatch in
settings.
Red Hat Satellite 6.15 Managing hosts
16

5. Click Submit.
2.16. SWITCHING BETWEEN HOSTS
When you are on a particular host in the Satellite web UI, you can navigate between hosts without
leaving the page by using the host switcher. Click ⇄ next to the hostname. This displays a list of hosts in
alphabetical order with a pagination arrow and a search bar to find the host you are looking for.
2.17. VIEWING HOST DETAILS FROM A CONTENT HOST
Use this procedure to view the host details page from a content host.
Procedure
1. In the Satellite web UI, navigate to Hosts > Content Hosts
2. Click the content host you want to view.
3. Select the Details tab to see the host details page.
The cards in the Details tab show details for the System properties, BIOS, Networking interfaces,
Operating system, Provisioning templates, and Provisioning. Registered content hosts show
additional cards for Registration details, Installed products, and HW properties providing information
about Model, Number of CPU(s), Sockets, Cores per socket, and RAM.
2.18. SELECTING HOST COLUMNS
You can select what columns you want to see in the host table on the Hosts > All Hosts page. For a
complete list of host columns, see Appendix C, Overview of the host columns.
NOTE
It is not possible to deselect the Name column. The Name column serves as a primary
identification method of the host.
Procedure
1. In the Satellite web UI, navigate to Hosts > All Hosts.
2. Click Manage columns.
3. Select columns that you want to display. You can select individual columns or column categories.
Selecting or deselecting a category selects or deselects all columns in that category.
NOTE
Some columns are included in more than one category, but you can display a
column of a specific type only once. By selecting or deselecting a specific column,
you select or deselect all instances of that column.
Verification
You can now see the selected columns in the host table.
CHAPTER 2. ADMINISTERING HOSTS
17

2.19. REMOVING A HOST FROM SATELLITE
Use this procedure to remove a host from Satellite. To use the CLI instead of the Satellite web UI, see
the CLI procedure.
Procedure
1. In the Satellite web UI, navigate to Hosts > All Hosts or Hosts > Content Hosts. Note that
there is no difference from what page you remove a host, from All Hosts or Content Hosts. In
both cases, Satellite removes a host completely.
2. Select the hosts that you want to remove.
3. From the Select Action list, select Delete Hosts.
4. Click Submit to remove the host from Satellite permanently.
WARNING
By default, the Destroy associated VM on host delete setting is set to no. If a host
record that is associated with a virtual machine is deleted, the virtual machine will
remain on the compute resource.
To delete a virtual machine on the compute resource, navigate to Administer >
Settings and select the Provisioning tab. Setting Destroy associated VM on host
delete to yes deletes the virtual machine if the host record that is associated with
the virtual machine is deleted. To avoid deleting the virtual machine in this situation,
disassociate the virtual machine from Satellite without removing it from the
compute resource or change the setting.
CLI procedure
Delete your host from Satellite:
$ hammer host delete \
--id My_Host_ID \
--location-id My_Location_ID \
--organization-id My_Organization_ID
Alternatively, you can use --name My_Host_Name instead of --id My_Host_ID.
2.19.1. Disassociating a virtual machine from Satellite without removing it from a
hypervisor
Procedure
1. In the Satellite web UI, navigate to Hosts > All Hosts.
2. Select the checkbox to the left of the hosts that you want to disassociate.
Red Hat Satellite 6.15 Managing hosts
18

3. From the Select Action list, click Disassociate Hosts.
4. Optional: Select the checkbox to keep the hosts for future action.
5. Click Submit.
2.20. LIFECYCLE STATUS OF RHEL HOSTS
Satellite provides multiple mechanisms to display information about upcoming End of Support (EOS)
events for your Red Hat Enterprise Linux hosts:
Notification banner
A column on the Hosts index page
Alert on the Hosts index page for each host that runs Red Hat Enterprise Linux with an
upcoming EOS event in a year as well as when support has ended
Ability to Search for hosts by EOS on the Hosts index page
Host status card on the host details page
For any hosts that are not running Red Hat Enterprise Linux, Satellite displays Unknown in the RHEL
Lifecycle status and Last report columns.
EOS notification banner
When either the end of maintenance support or the end of extended lifecycle support approaches in a
year, you will see a notification banner in the Satellite web UI if you have hosts with that Red Hat
Enterprise Linux version. The notification provides information about the Red Hat Enterprise Linux
version, the number of hosts running that version in your environment, the lifecycle support, and the
expiration date. Along with other information, the Red Hat Enterprise Linux lifecycle column is visible in
the notification.
2.20.1. Displaying RHEL lifecycle status
You can display the status of the end of support (EOS) for your Red Hat Enterprise Linux hosts in the
table on the Hosts index page.
Procedure
1. In the Satellite web UI, navigate to Hosts > All Hosts.
2. Click Manage columns.
3. Select the Content column to expand it.
4. Select RHEL Lifecycle status.
5. Click Save to generate a new column that displays the Red Hat Enterprise Linux lifecycle status.
2.20.2. Host search by RHEL lifecycle status
You can use the Search field to search hosts by rhel_lifecycle_status. It can have one of the following
values:
CHAPTER 2. ADMINISTERING HOSTS
19

full_support
maintenance_support
approaching_end_of_maintenance
extended_support
approaching_end_of_support
support_ended
Red Hat Satellite 6.15 Managing hosts
20

CHAPTER 3. WORKING WITH HOST GROUPS
A host group acts as a template for common host settings. Instead of defining the settings individually
for each host, use host groups to define common settings once and apply them to multiple hosts.
3.1. HOST GROUP SETTINGS AND NESTED HOST GROUPS
A host group can define many settings for hosts, such as lifecycle environment, content view, or Ansible
roles that are available to the hosts.
IMPORTANT
When you change the settings of an existing host group, the new settings do not
propagate to the hosts assigned to the host group. Only Puppet class settings get
updated on hosts after you change them in the host group.
You can create a hierarchy of host groups. Aim to have one base level host group that represents all
hosts in your organization and provides general settings, and then nested groups that provide specific
settings.
Satellite applies host settings in the following order when nesting host groups:
Host settings take priority over host group settings.
Nested host group settings take priority over parent host group settings.
Example 3.1. Nested host group hierarchy
You create a top-level host group named Base and two nested host groups named Webserver and
Storage. The nested host groups are associated with multiple hosts. You also create host
custom.example.com that is not associated with any host group.
You define the operating system on the top-level host group (Base) and Ansible roles on the nested
host groups (Webservers and Storage).
Top-level host
group
Nested host
group
Hosts Settings inherited from host groups
Base
This host group
applies the
Red Hat
Enterprise
Linux 8.8
operating system
setting.
Webservers
This host group
applies the linux-
system-
roles.selinux
Ansible role.
webserver1.exam
ple.com
Hosts use the following settings:
Red Hat Enterprise
Linux 8.8 defined by host
group Base
linux-system-roles.selinux
defined by host group
Webservers
webserver2.exa
mple.com
CHAPTER 3. WORKING WITH HOST GROUPS
21
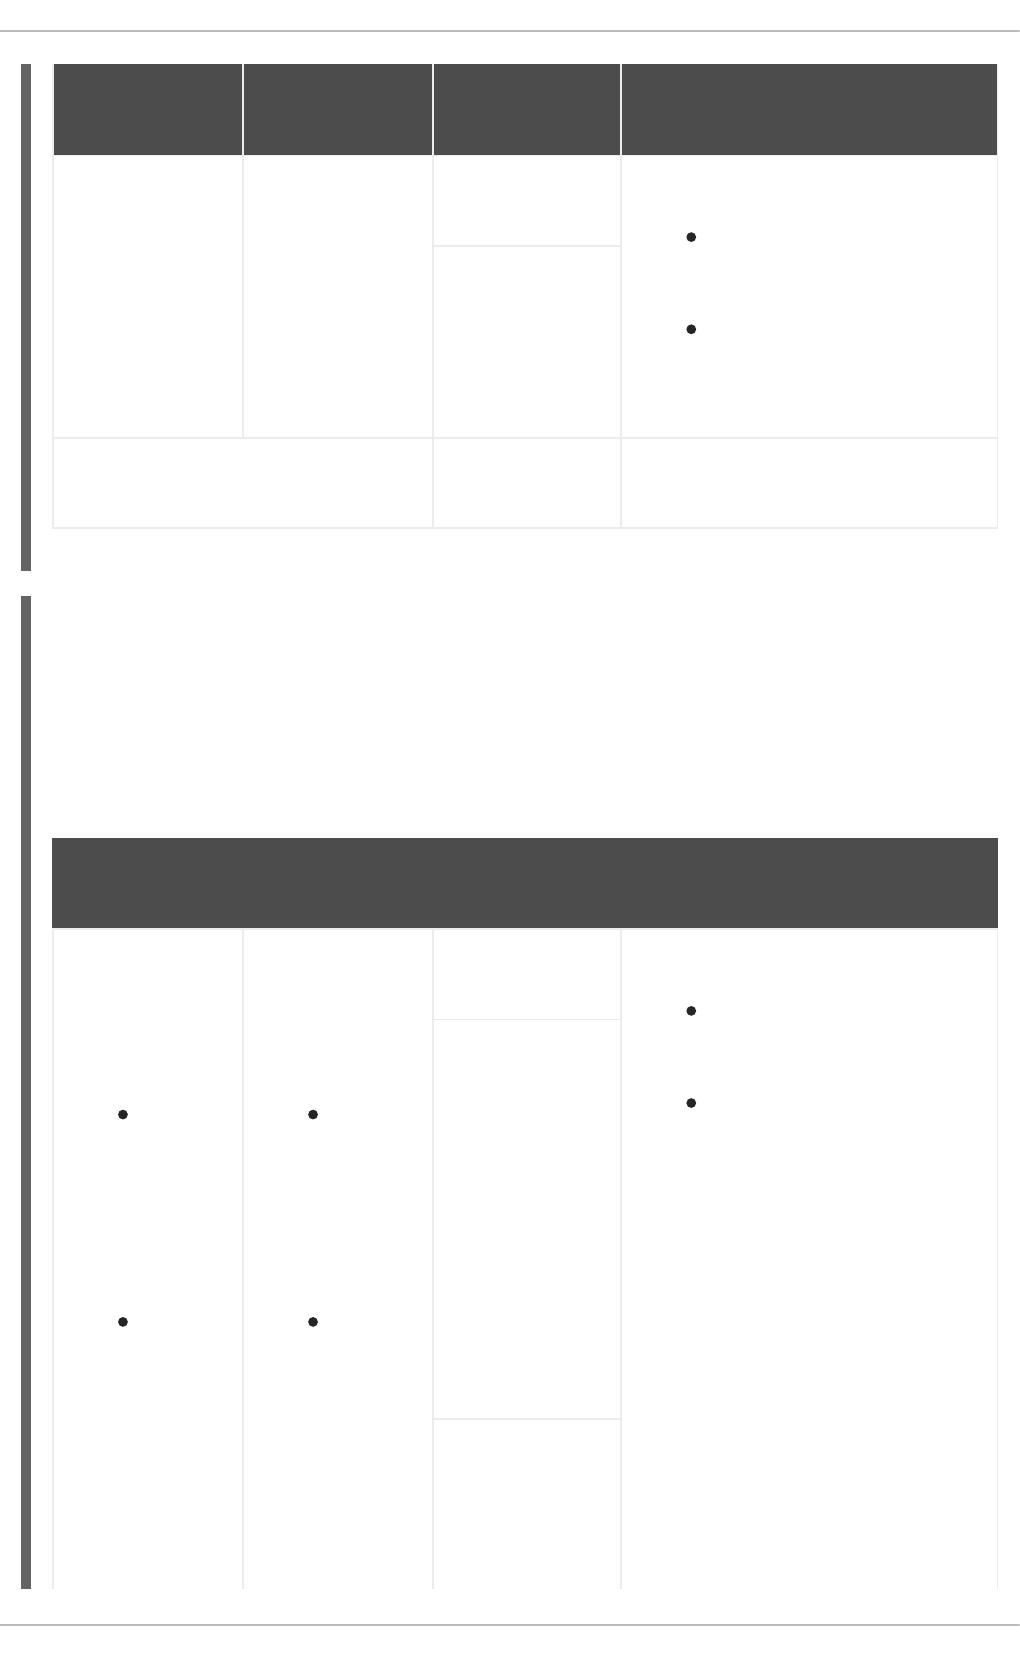
Storage
This host group
applies the linux-
system-
roles.postfix
Ansible role.
storage1.exampl
e.com
Hosts use the following settings:
Red Hat Enterprise
Linux 8.8 defined by host
group Base
linux-system-roles.postfix
defined by host group Storage
storage2.exampl
e.com
[No host group] custom.example.
com
No settings inherited from host groups.
Top-level host
group
Nested host
group
Hosts Settings inherited from host groups
Example 3.2. Nested host group settings
You create a top-level host group named Base and two nested host groups named Webserver and
Storage. You also create host custom.example.com that is associated with the top-level host
group Base, but no nested host group.
You define different values for the operating system and Ansible role settings on the top-level host
group (Base) and nested host groups ( Webserver and Storage).
Top-level host
group
Nested host
group
Host Settings inherited from host groups
Base
This host group
applies these
settings:
The
Red Hat
Enterpri
se
Linux 8.
8
operatin
g system
The
linux-
system-
roles.se
linux
Ansible
role
Webservers
This host group
applies these
settings:
The
Red Hat
Enterpri
se
Linux 8.
9
operatin
g system
No
Ansible
role
webserver1.exam
ple.com
Hosts use the following settings:
The Red Hat Enterprise
Linux 8.9 operating system
from host group Webservers
The linux-system-
roles.selinux Ansible role
from host group Base
webserver2.exa
mple.com
Red Hat Satellite 6.15 Managing hosts
22
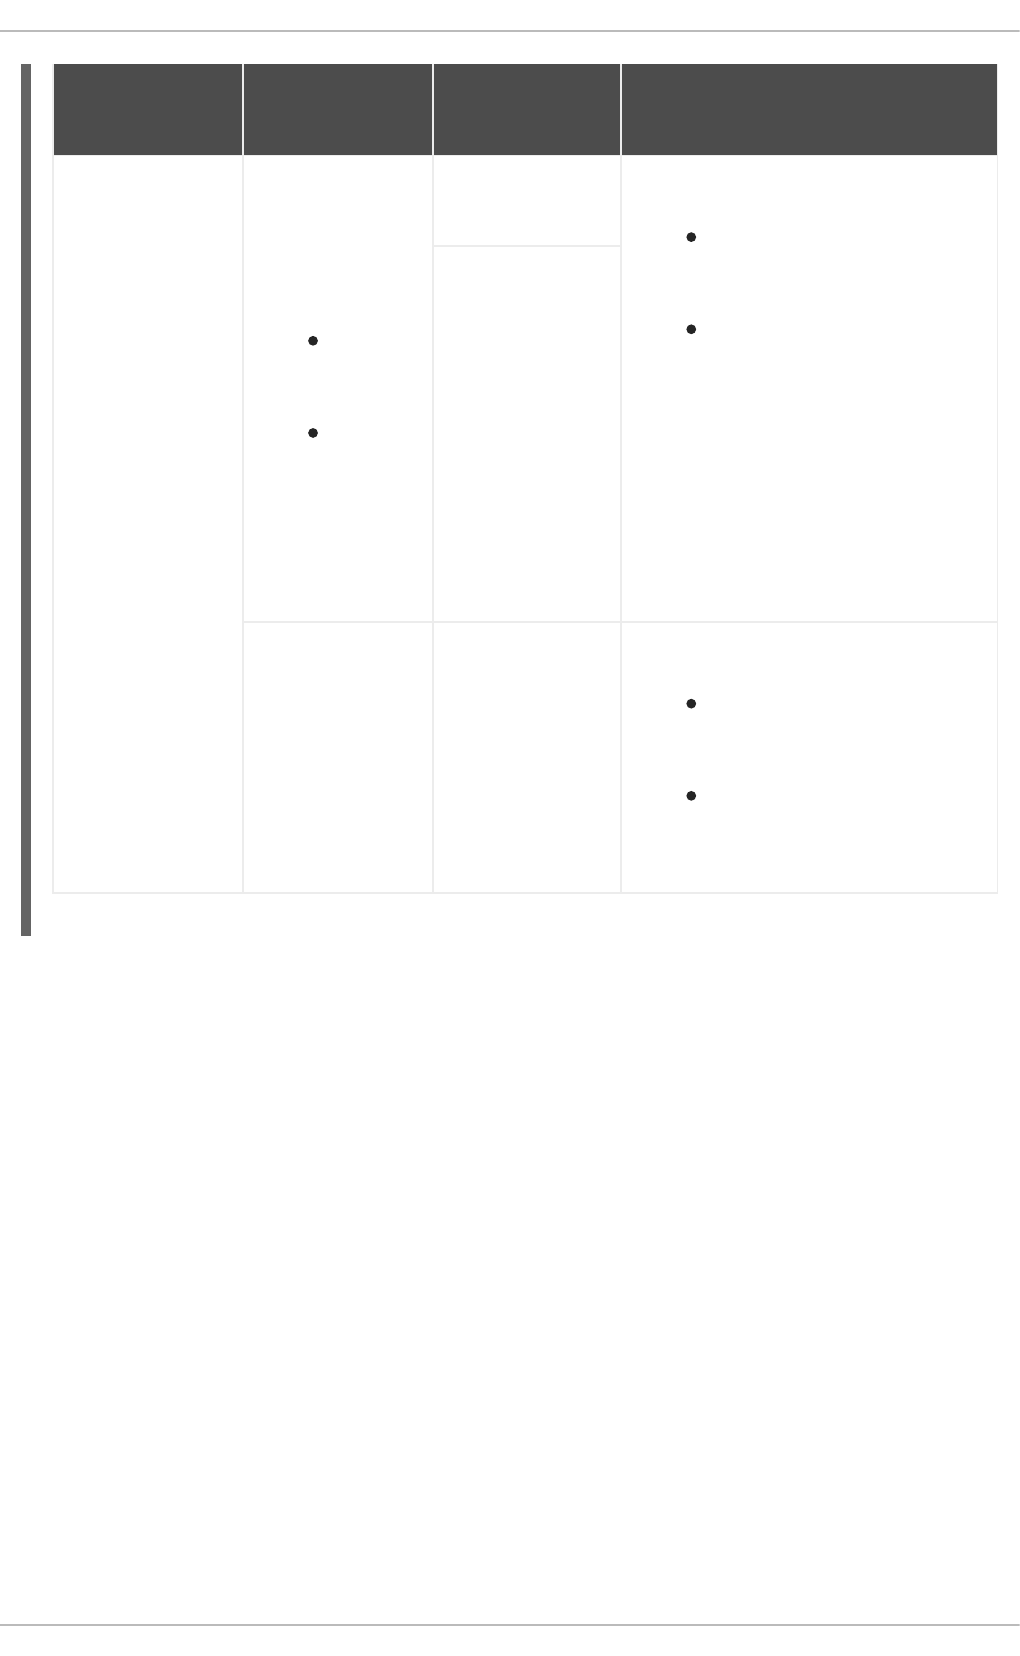
Storage
This host group
applies these
settings:
No
operatin
g system
The
linux-
system-
roles.p
ostfix
Ansible
role
storage1.exampl
e.com
Hosts use the following settings:
The Red Hat Enterprise
Linux 8.8 operating system
from host group Base
The linux-system-
roles.postfix Ansible role
from host group Storage
storage2.exampl
e.com
[No nested host
group]
custom.example.
com
Host uses the following settings:
The Red Hat Enterprise
Linux 8.8 operating system
from host group Base
The linux-system-
roles.selinux Ansible role
from host group Base
Top-level host
group
Nested host
group
Host Settings inherited from host groups
3.2. CREATING A HOST GROUP
Create a host group to be able to apply host settings to multiple hosts.
To use the CLI instead of the Satellite web UI, see the CLI procedure.
Procedure
1. In the Satellite web UI, navigate to Configure > Host Groups and click Create Host Group.
2. If you have an existing host group that you want to inherit attributes from, you can select a host
group from the Parent list. If you do not, leave this field blank.
3. Enter a Name for the new host group.
4. Enter any further information that you want future hosts to inherit.
5. Click the Ansible Roles tab, and from the Ansible Roles list, select one or more roles that you
want to add to the host. Use the arrow icon to manage the roles that you add or remove.
6. Click the additional tabs and add any details that you want to attribute to the host group.
NOTE
CHAPTER 3. WORKING WITH HOST GROUPS
23

NOTE
Puppet fails to retrieve the Puppet CA certificate while registering a host with a
host group associated with a Puppet environment created inside a Production
environment.
To create a suitable Puppet environment to be associated with a host group,
manually create a directory:
# mkdir /etc/puppetlabs/code/environments/example_environment
7. Click Submit to save the host group.
CLI procedure
Create the host group with the hammer hostgroup create command. For example:
# hammer hostgroup create --name "Base" \
--architecture "My_Architecture" \
--content-source-id _My_Content_Source_ID_ \
--content-view "_My_Content_View_" \
--domain "_My_Domain_" \
--lifecycle-environment "_My_Lifecycle_Environment_" \
--locations "_My_Location_" \
--medium-id _My_Installation_Medium_ID_ \
--operatingsystem "_My_Operating_System_" \
--organizations "_My_Organization_" \
--partition-table "_My_Partition_Table_" \
--puppet-ca-proxy-id _My_Puppet_CA_Proxy_ID_ \
--puppet-environment "_My_Puppet_Environment_" \
--puppet-proxy-id _My_Puppet_Proxy_ID_ \
--root-pass "My_Password" \
--subnet "_My_Subnet_"
3.3. CREATING A HOST GROUP FOR EACH LIFECYCLE
ENVIRONMENT
Use this procedure to create a host group for the Library lifecycle environment and add nested host
groups for other lifecycle environments.
Procedure
To create a host group for each lifecycle environment, run the following Bash script:
MAJOR="My_Major_OS_Version"
ARCH="My_Architecture"
ORG="My_Organization"
LOCATIONS="My_Location"
PTABLE_NAME="My_Partition_Table"
DOMAIN="My_Domain"
hammer --output csv --no-headers lifecycle-environment list --organization "${ORG}" | cut -d ',' -f 2 |
while read LC_ENV; do
[[ ${LC_ENV} == "Library" ]] && continue
Red Hat Satellite 6.15 Managing hosts
24

3.4. ADDING A HOST TO A HOST GROUP
You can add a host to a host group in the Satellite web UI.
Procedure
1. In the Satellite web UI, navigate to Hosts > All Hosts.
2. Click the name of the host you want to modify.
3. Click Edit.
4. Select the host group from the Host Group list.
5. Click Submit.
Verification
The Details card under the Overview tab now shows the host group your host belongs to.
3.5. CHANGING THE HOST GROUP OF A HOST
Use this procedure to change the Host Group of a host.
If you reprovision a host after changing the host group, the fresh values that the host inherits from the
host group will be applied.
Procedure
1. In the Satellite web UI, navigate to Hosts > All Hosts.
2. Click the name of the host you want to modify.
3. Click Edit.
4. Select the new host group from the Host Group list.
5. Click Submit.
Verification
The Details card under the Overview tab now shows the host group your host belongs to.
hammer hostgroup create --name "rhel-${MAJOR}server-${ARCH}-${LC_ENV}" \
--architecture "${ARCH}" \
--partition-table "${PTABLE_NAME}" \
--domain "${DOMAIN}" \
--organizations "${ORG}" \
--query-organization "${ORG}" \
--locations "${LOCATIONS}" \
--lifecycle-environment "${LC_ENV}"
done
CHAPTER 3. WORKING WITH HOST GROUPS
25

CHAPTER 4. REGISTERING HOSTS AND SETTING UP HOST
INTEGRATION
You must register hosts that have not been provisioned through Satellite to be able to manage them
with Satellite. You can register hosts through Satellite Server or Capsule Server.
Note that the entitlement-based subscription model is deprecated and will be removed in a future
release. Red Hat recommends that you use the access-based subscription model of Simple Content
Access instead.
You must also install and configure tools on your hosts, depending on which integration features you
want to use. Use the following procedures to install and configure host tools:
Section 4.5, “Installing Tracer”
Section 4.6, “Installing and configuring Puppet agent during host registration”
Section 4.7, “Installing and configuring Puppet agent manually”
4.1. SUPPORTED CLIENTS IN REGISTRATION
Satellite supports the following operating systems and architectures for registration.
Supported Host Operating Systems
The hosts can use the following operating systems:
Red Hat Enterprise Linux 9, 8, 7
Red Hat Enterprise Linux 6 with the ELS Add-On
You can register the following hosts for converting to RHEL:
CentOS Linux 7
Oracle Linux 7 and 8
Supported Host Architectures
The hosts can use the following architectures:
i386
x86_64
s390x
ppc_64
4.2. REGISTRATION METHODS
You can use the following methods to register hosts to Satellite:
Global registration
You generate a curl command from Satellite and run this command from an unlimited number of
Red Hat Satellite 6.15 Managing hosts
26

You generate a curl command from Satellite and run this command from an unlimited number of
hosts to register them using provisioning templates over the Satellite API. For more information, see
Section 4.3, “Registering hosts by using global registration” .
By using this method, you can also deploy Satellite SSH keys to hosts during registration to Satellite
to enable hosts for remote execution jobs. For more information, see Chapter 12, Configuring and
setting up remote jobs.
By using this method, you can also configure hosts with Red Hat Insights during registration to
Satellite. For more information, see Chapter 9, Monitoring hosts using Red Hat Insights .
(Deprecated) Katello CA Consumer
You download and install the consumer RPM from satellite.example.com/pub/katello-ca-
consumer-latest.noarch.rpm on the host and then run subscription-manager.
(Deprecated) Bootstrap script
You download the bootstrap script from satellite.example.com/pub/bootstrap.py on the host and
then run the script. For more information, see Section 4.4, “Registering hosts by using the bootstrap
script”.
4.3. REGISTERING HOSTS BY USING GLOBAL REGISTRATION
You can register a host to Satellite by generating a curl command on Satellite and running this
command on hosts. This method uses two provisioning templates: Global Registration template and
Linux host_init_config default template. That gives you complete control over the host registration
process.
You can also customize the default templates if you need greater flexibility. For more information, see
Section 4.3.3, “Customizing the registration templates” .
4.3.1. Global parameters for registration
You can configure the following global parameters by navigating to Configure > Global Parameters:
The host_registration_insights parameter is used in the insights snippet. If the parameter is
set to true, the registration installs and enables the Red Hat Insights client on the host. If the
parameter is set to false, it prevents Satellite and the Red Hat Insights client from uploading
Inventory reports to your Red Hat Hybrid Cloud Console. The default value is true. When
overriding the parameter value, set the parameter type to boolean.
The host_packages parameter is for installing packages on the host.
The host_registration_remote_execution parameter is used in the
remote_execution_ssh_keys snippet. If it is set to true, the registration enables remote
execution on the host. The default value is true.
The remote_execution_ssh_keys, remote_execution_ssh_user,
remote_execution_create_user, and remote_execution_effective_user_method parameters
are used in the remote_execution_ssh_keys snippet. For more details, see the snippet.
You can navigate to snippets in the Satellite web UI through Hosts > Templates > Provisioning
Templates.
4.3.2. Registering a host
You can register a host by using registration templates and set up various integration features and host
CHAPTER 4. REGISTERING HOSTS AND SETTING UP HOST INTEGRATION
27

You can register a host by using registration templates and set up various integration features and host
tools during the registration process.
Prerequisites
Your user account has a role assigned that has the create_hosts permission.
You must have root privileges on the host that you want to register.
Satellite Server, any Capsule Servers, and all hosts must be synchronized with the same NTP
server, and have a time synchronization tool enabled and running.
An activation key must be available for the host. For more information, see Managing Activation
Keys in Managing content.
Optional: If you want to register hosts to Red Hat Insights, you must synchronize the rhel-8-for-
x86_64-baseos-rpms and rhel-8-for-x86_64-appstream-rpms repositories and make them
available in the activation key that you use. This is required to install the insights-client
package on hosts.
Red Hat Satellite Client 6 repository for the operating system version of the host is
synchronized on Satellite Server and enabled in the activation key you use. For more
information, see Importing Content in Managing content. This repository is required for the
remote execution pull client, Puppet agent, Tracer, and other tools.
If you want to use Capsule Servers instead of your Satellite Server, ensure that you have
configured your Capsule Servers accordingly. For more information, see Configuring Capsule
for Host Registration and Provisioning in Installing Capsule Server .
If your Satellite Server or Capsule Server is behind an HTTP proxy, configure the Subscription
Manager on your host to use the HTTP proxy for connection. For more information, see How to
access Red Hat Subscription Manager (RHSM) through a firewall or proxy in the Red Hat
Knowledgebase.
Procedure
1. In the Satellite web UI, navigate to Hosts > Register Host.
2. Optional: Select a different Organization.
3. Optional: Select a different Location.
4. Optional: From the Host Group list, select the host group to associate the hosts with. Fields
that inherit value from Host group: Operating system, Activation Keys and Lifecycle
environment.
5. Optional: From the Operating system list, select the operating system of hosts that you want
to register.
6. Optional: From the Capsule list, select the Capsule to register hosts through.
NOTE
A Capsule behind a load balancer takes precedence over a Capsule selected in
the Satellite web UI as the host’s content source.
Red Hat Satellite 6.15 Managing hosts
28

7. In the Activation Keys field, enter one or more activation keys to assign to hosts.
8. Optional: Select the Insecure option, if you want to make the first call insecure. During this first
call, hosts download the CA file from Satellite. Hosts will use this CA file to connect to Satellite
with all future calls making them secure.
Red Hat recommends that you avoid insecure calls.
If an attacker, located in the network between Satellite and a host, fetches the CA file from the
first insecure call, the attacker will be able to access the content of the API calls to and from the
registered host and the JSON Web Tokens (JWT). Therefore, if you have chosen to deploy SSH
keys during registration, the attacker will be able to access the host using the SSH key.
Instead, you can manually copy and install the CA file on each host before registering the host.
To do this, find where Satellite stores the CA file by navigating to Administer > Settings >
Authentication and locating the value of the SSL CA file setting.
Copy the CA file to the /etc/pki/ca-trust/source/anchors/ directory on hosts and enter the
following commands:
# update-ca-trust enable
# update-ca-trust
Then register the hosts with a secure curl command, such as:
# curl -sS https://satellite.example.com/register ...
The following is an example of the curl command with the --insecure option:
# curl -sS --insecure https://satellite.example.com/register ...
9. Select the Advanced tab.
10. Optional: From the Setup REX list, select whether you want to deploy Satellite SSH keys to
hosts or not.
If set to Yes, public SSH keys will be installed on the registered host. The inherited value is
based on the host_registration_remote_execution parameter. It can be inherited, for example
from a host group, an operating system, or an organization. When overridden, the selected value
will be stored on host parameter level.
11. Optional: From the Setup Insights list, select whether you want to install insights-client and
register the hosts to Insights.
The Insights tool is available for Red Hat Enterprise Linux only. It has no effect on other
operating systems.
You must enable the following repositories on a registered machine:
Red Hat Enterprise Linux 6: rhel-6-server-rpms
Red Hat Enterprise Linux 7: rhel-7-server-rpms
Red Hat Enterprise Linux 8: rhel-8-for-x86_64-appstream-rpms
The insights-client package is installed by default on Red Hat Enterprise Linux 8 except in
environments whereby Red Hat Enterprise Linux 8 was deployed with "Minimal Install"
option.
12. Optional: In the Install packages field, list the packages (separated with spaces) that you want
CHAPTER 4. REGISTERING HOSTS AND SETTING UP HOST INTEGRATION
29

12. Optional: In the Install packages field, list the packages (separated with spaces) that you want
to install on the host upon registration. This can be set by the host_packages parameter.
13. Optional: Select the Update packages option to update all packages on the host upon
registration. This can be set by the host_update_packages parameter.
14. Optional: In the Repository field, enter a repository to be added before the registration is
performed. For example, it can be useful to make the subscription-manager package available
for the purpose of the registration. For Red Hat family distributions, enter the URL of the
repository, for example http://rpm.example.com/.
15. Optional: In the Repository GPG key URL field, specify the public key to verify the signatures
of GPG-signed packages. It needs to be specified in the ASCII form with the GPG public key
header.
16. Optional: In the Token lifetime (hours) field, change the validity duration of the JSON Web
Token (JWT) that Satellite uses for authentication. The duration of this token defines how long
the generated curl command works. You can set the duration to 0 – 999 999 hours or unlimited.
Note that Satellite applies the permissions of the user who generates the curl command to
authorization of hosts. If the user loses or gains additional permissions, the permissions of the
JWT change too. Therefore, do not delete, block, or change permissions of the user during the
token duration.
The scope of the JWTs is limited to the registration endpoints only and cannot be used
anywhere else.
17. Optional: In the Remote Execution Interface field, enter the identifier of a network interface
that hosts must use for the SSH connection. If you keep this field blank, Satellite uses the
default network interface.
18. Optional: From the REX pull mode list, select whether you want to deploy Satellite remote
execution pull client.
If set to Yes, the remote execution pull client is installed on the registered host. The inherited
value is based on the host_registration_remote_execution_pull parameter. It can be
inherited, for example from a host group, an operating system, or an organization. When
overridden, the selected value is stored on the host parameter level.
The registered host must have access to the Red Hat Satellite Client 6 repository.
For more information about the pull mode, see Section 12.4, “Transport modes for remote
execution”.
19. Optional: Select the Ignore errors option if you want to ignore subscription manager errors.
20. Optional: Select the Force option if you want to remove any katello-ca-consumer packages
before registration and run subscription-manager with the --force argument.
21. Click Generate.
22. Copy the generated curl command.
23. On the host that you want to register, run the curl command as root.
4.3.3. Customizing the registration templates
You can customize the registration process by editing the provisioning templates. Note that all default
Red Hat Satellite 6.15 Managing hosts
30

You can customize the registration process by editing the provisioning templates. Note that all default
templates in Satellite are locked. If you want to customize the registration templates, you must clone the
default templates and edit the clones.
NOTE
Red Hat only provides support for the original unedited templates. Customized templates
do not receive updates released by Red Hat.
The registration process uses the following provisioning templates:
The Global Registration template contains steps for registering hosts to Satellite. This
template renders when hosts access the /register Satellite API endpoint.
The Linux host_init_config default template contains steps for initial configuration of hosts
after they are registered.
Procedure
1. Navigate to Hosts > Templates > Provisioning Templates.
2. Search for the template you want to edit.
3. In the row of the required template, click Clone.
4. Edit the template as needed. For more information, see Appendix A, Template writing reference.
5. Click Submit.
6. Navigate to Administer > Settings > Provisioning.
7. Change the following settings as needed:
Point the Default Global registration template setting to your custom global registration
template,
Point the Default 'Host initial configuration' template setting to your custom initial
configuration template.
4.4. REGISTERING HOSTS BY USING THE BOOTSTRAP SCRIPT
Deprecated Use Section 4.3, “Registering hosts by using global registration” instead.
Use the bootstrap script to automate content registration and Puppet configuration. You can use the
bootstrap script to register new hosts, or to migrate existing hosts from RHN, SAM, RHSM, or another
Red Hat Satellite instance.
The katello-client-bootstrap package is installed by default on Satellite Server’s base operating system.
The bootstrap.py script is installed in the /var/www/html/pub/ directory to make it available to hosts at
satellite.example.com/pub/bootstrap.py. The script includes documentation in the
/usr/share/doc/katello-client-bootstrap-version/README.md file.
To use the bootstrap script, you must install it on the host. As the script is only required once, and only
for the root user, you can place it in /root or /usr/local/sbin and remove it after use. This procedure uses
/root.
CHAPTER 4. REGISTERING HOSTS AND SETTING UP HOST INTEGRATION
31

Prerequisites
You have a Satellite user with the permissions required to run the bootstrap script. The
examples in this procedure specify the admin user. If this is not acceptable to your security
policy, create a new role with the minimum permissions required and add it to the user that will
run the script. For more information, see Section 4.4.1, “Setting permissions for the bootstrap
script”.
You have an activation key for your hosts with the Red Hat Satellite Client 6 repository enabled.
For information on configuring activation keys, see Managing Activation Keys in Managing
content.
You have created a host group. For more information about creating host groups, see
Section 3.2, “Creating a host group” .
Puppet considerations
If a host group is associated with a Puppet environment created inside a Production environment,
Puppet fails to retrieve the Puppet CA certificate while registering a host from that host group.
To create a suitable Puppet environment to be associated with a host group, follow these steps:
1. Manually create a directory:
# mkdir /etc/puppetlabs/code/environments/example_environment
2. In the Satellite web UI, navigate to Configure > Puppet ENC > Environments.
3. Click Import environment from. The button name includes the FQDN of the internal or external
Capsule.
4. Choose the created directory and click Update.
Procedure
1. Log in to the host as the root user.
2. Download the script:
# curl -O http://satellite.example.com/pub/bootstrap.py
3. Make the script executable:
# chmod +x bootstrap.py
4. Confirm that the script is executable by viewing the help text:
On Red Hat Enterprise Linux 8:
# /usr/libexec/platform-python bootstrap.py -h
On other Red Hat Enterprise Linux versions:
# ./bootstrap.py -h
Red Hat Satellite 6.15 Managing hosts
32

5. Enter the bootstrap command with values suitable for your environment.
For the --server option, specify the FQDN of Satellite Server or a Capsule Server. For the --
location, --organization, and --hostgroup options, use quoted names, not labels, as arguments
to the options. For advanced use cases, see Section 4.4.2, “Advanced bootstrap script
configuration”.
On Red Hat Enterprise Linux 8, enter the following command:
# /usr/libexec/platform-python bootstrap.py \
--login=admin \
--server satellite.example.com \
--location="My_Location" \
--organization="My_Organization" \
--hostgroup="My_Host_Group" \
--activationkey="My_Activation_Key"
On Red Hat Enterprise Linux 6 or 7, enter the following command:
# ./bootstrap.py --login=admin \
--server satellite.example.com \
--location="My_Location" \
--organization="My_Organization" \
--hostgroup="My_Host_Group" \
--activationkey="My_Activation_Key"
6. Enter the password of the Satellite user you specified with the --login option.
The script sends notices of progress to stdout.
7. When prompted by the script, approve the host’s Puppet certificate. In the Satellite web UI,
navigate to Infrastructure > Capsules and find the Satellite or Capsule Server you specified
with the --server option.
8. From the list in the Actions column, select Certificates.
9. In the Actions column, click Sign to approve the host’s Puppet certificate.
10. Return to the host to see the remainder of the bootstrap process completing.
11. In the Satellite web UI, navigate to Hosts > All Hosts and ensure that the host is connected to
the correct host group.
12. Optional: After the host registration is complete, remove the script:
# rm bootstrap.py
4.4.1. Setting permissions for the bootstrap script
Use this procedure to configure a Satellite user with the permissions required to run the bootstrap
script. To use the CLI instead of the Satellite web UI, see the CLI procedure.
Procedure
1. In the Satellite web UI, navigate to Administer > Users.
2. Select an existing user by clicking the required Username. A new pane opens with tabs to
CHAPTER 4. REGISTERING HOSTS AND SETTING UP HOST INTEGRATION
33

2. Select an existing user by clicking the required Username. A new pane opens with tabs to
modify information about the selected user. Alternatively, create a new user specifically for the
purpose of running this script.
3. Click the Roles tab.
4. Select Edit hosts and Viewer from the Roles list.
IMPORTANT
The Edit hosts role allows the user to edit and delete hosts as well as being able
to add hosts. If this is not acceptable to your security policy, create a new role
with the following permissions and assign it to the user:
view_organizations
view_locations
view_domains
view_hostgroups
view_hosts
view_architectures
view_ptables
view_operatingsystems
create_hosts
5. Click Submit.
CLI procedure
1. Create a role with the minimum permissions required by the bootstrap script. This example
creates a role with the name Bootstrap:
# ROLE='Bootstrap'
hammer role create --name "$ROLE"
hammer filter create --role "$ROLE" --permissions view_organizations
hammer filter create --role "$ROLE" --permissions view_locations
hammer filter create --role "$ROLE" --permissions view_domains
hammer filter create --role "$ROLE" --permissions view_hostgroups
hammer filter create --role "$ROLE" --permissions view_hosts
hammer filter create --role "$ROLE" --permissions view_architectures
hammer filter create --role "$ROLE" --permissions view_ptables
hammer filter create --role "$ROLE" --permissions view_operatingsystems
hammer filter create --role "$ROLE" --permissions create_hosts
2. Assign the new role to an existing user:
# hammer user add-role --id user_id --role Bootstrap
Alternatively, you can create a new user and assign this new role to them. For more information
Red Hat Satellite 6.15 Managing hosts
34

Alternatively, you can create a new user and assign this new role to them. For more information
on creating users with Hammer, see Managing Users and Roles in Administering Red Hat
Satellite.
4.4.2. Advanced bootstrap script configuration
This section has more examples for using the bootstrap script to register or migrate a host.
WARNING
These examples specify the admin Satellite user. If this is not acceptable to your
security policy, create a new role with the minimum permissions required by the
bootstrap script. For more information, see Section 4.4.1, “Setting permissions for
the bootstrap script”.
4.4.2.1. Migrating a host from one Satellite to another Satellite
Use the script with --force to remove the katello-ca-consumer-* packages from the old Satellite and
install the katello-ca-consumer-* packages on the new Satellite.
Procedure
On Red Hat Enterprise Linux 8, enter the following command:
# /usr/libexec/platform-python bootstrap.py \
--login=admin \
--server satellite.example.com \
--location="My_Location" \
--organization="My_Organization" \
--hostgroup="My_Host_Group" \
--activationkey="My_Activation_Key" \
--force
On Red Hat Enterprise Linux 6 or 7, enter the following command:
# bootstrap.py --login=admin \
--server satellite.example.com \
--location="My_Location" \
--organization="My_Organization" \
--hostgroup="My_Host_Group" \
--activationkey="My_Activation_Key" \
--force
4.4.2.2. Migrating a host from Red Hat Network (RHN) or Satellite 5 to Satellite
The bootstrap script detects the presence of /etc/syconfig/rhn/systemid and a valid connection to
RHN as an indicator that the system is registered to a legacy platform. The script then calls rhn-classic-
migrate-to-rhsm to migrate the system from RHN. By default, the script does not delete the system’s
CHAPTER 4. REGISTERING HOSTS AND SETTING UP HOST INTEGRATION
35

legacy profile due to auditing reasons. To remove the legacy profile, use --legacy-purge, and use --
legacy-login to supply a user account that has appropriate permissions to remove a profile. Enter the
user account password when prompted.
Procedure
On Red Hat Enterprise Linux 8, enter the following command:
# /usr/libexec/platform-python bootstrap.py \
--login=admin \
--server satellite.example.com \
--location="My_Location" \
--organization="My_Organization" \
--hostgroup="My_Host_Group" \
--activationkey="My_Activation_Key" \
--legacy-purge \
--legacy-login rhn-user
On Red Hat Enterprise Linux 6 or 7, enter the following command:
# bootstrap.py --login=admin \
--server satellite.example.com \
--location="My_Location" \
--organization="My_Organization" \
--hostgroup="My_Host_Group" \
--activationkey="My_Activation_Key" \
--legacy-purge \
--legacy-login rhn-user
4.4.2.3. Registering a host to Satellite without Puppet
By default, the bootstrap script configures the host for content management and configuration
management. If you have an existing configuration management system and do not want to install
Puppet on the host, use --skip-puppet.
Procedure
On Red Hat Enterprise Linux 8, enter the following command:
# /usr/libexec/platform-python bootstrap.py \
--login=admin \
--server satellite.example.com \
--location="My_Location" \
--organization="My_Organization" \
--hostgroup="My_Host_Group" \
--activationkey="My_Activation_Key" \
--skip-puppet
On Red Hat Enterprise Linux 6 or 7, enter the following command:
# bootstrap.py --login=admin \
--server satellite.example.com \
--location="My_Location" \
--organization="My_Organization" \
Red Hat Satellite 6.15 Managing hosts
36

--hostgroup="My_Host_Group" \
--activationkey="My_Activation_Key" \
--skip-puppet
4.4.2.4. Registering a host to Satellite for content management only
To register a system as a content host, and omit the provisioning and configuration management
functions, use --skip-foreman.
Procedure
On Red Hat Enterprise Linux 8, enter the following command:
# /usr/libexec/platform-python bootstrap.py \
--server satellite.example.com \
--organization="My_Organization" \
--activationkey="My_Activation_Key" \
--skip-foreman
On Red Hat Enterprise Linux 6 or 7, enter the following command:
# bootstrap.py --server satellite.example.com \
--organization="My_Organization" \
--activationkey="My_Activation_Key" \
--skip-foreman
4.4.2.5. Changing the method the bootstrap script uses to download the consumer RPM
By default, the bootstrap script uses HTTP to download the consumer RPM from
http://satellite.example.com/pub/katello-ca-consumer-latest.noarch.rpm. In some environments, you
might want to allow HTTPS only between the host and Satellite. Use --download-method to change the
download method from HTTP to HTTPS.
Procedure
On Red Hat Enterprise Linux 8, enter the following command:
# /usr/libexec/platform-python bootstrap.py \
--login=admin \
--server satellite.example.com \
--location="My_Location" \
--organization="My_Organization" \
--hostgroup="My_Host_Group" \
--activationkey="My_Activation_Key" \
--download-method https
On Red Hat Enterprise Linux 6 or 7, enter the following command:
# bootstrap.py --login=admin \
--server satellite.example.com \
--location="My_Location" \
--organization="My_Organization" \
CHAPTER 4. REGISTERING HOSTS AND SETTING UP HOST INTEGRATION
37

--hostgroup="My_Host_Group" \
--activationkey="My_Activation_Key" \
--download-method https
4.4.2.6. Providing the host’s IP address to Satellite
On hosts with multiple interfaces or multiple IP addresses on one interface, you might need to override
the auto-detection of the IP address and provide a specific IP address to Satellite. Use --ip.
Procedure
On Red Hat Enterprise Linux 8, enter the following command:
# /usr/libexec/platform-python bootstrap.py \
--login=admin \
--server satellite.example.com \
--location="My_Location" \
--organization="My_Organization" \
--hostgroup="My_Host_Group" \
--activationkey="My_Activation_Key" \
--ip 192.x.x.x
On Red Hat Enterprise Linux 6 or 7, enter the following command:
# bootstrap.py --login=admin \
--server satellite.example.com \
--location="My_Location" \
--organization="My_Organization" \
--hostgroup="My_Host_Group" \
--activationkey="My_Activation_Key" \
--ip 192.x.x.x
4.4.2.7. Enabling remote execution on the host
Use --rex and --rex-user to enable remote execution and add the required SSH keys for the specified
user.
Procedure
On Red Hat Enterprise Linux 8, enter the following command:
# /usr/libexec/platform-python bootstrap.py \
--login=admin \
--server satellite.example.com \
--location="My_Location" \
--organization="My_Organization" \
--hostgroup="My_Host_Group" \
--activationkey="My_Activation_Key" \
--rex \
--rex-user root
On Red Hat Enterprise Linux 6 or 7, enter the following command:
Red Hat Satellite 6.15 Managing hosts
38

# bootstrap.py --login=admin \
--server satellite.example.com \
--location="My_Location" \
--organization="My_Organization" \
--hostgroup="My_Host_Group" \
--activationkey="My_Activation_Key" \
--rex \
--rex-user root
4.4.2.8. Creating a domain for a host during registration
To create a host record, the DNS domain of a host needs to exist in Satellite prior to running the script. If
the domain does not exist, add it using --add-domain.
Procedure
On Red Hat Enterprise Linux 8, enter the following command:
# /usr/libexec/platform-python bootstrap.py \
--login=admin \
--server satellite.example.com \
--location="My_Location" \
--organization="My_Organization" \
--hostgroup="My_Host_Group" \
--activationkey="My_Activation_Key" \
--add-domain
On Red Hat Enterprise Linux 6 or 7, enter the following command:
# bootstrap.py --login=admin \
--server satellite.example.com \
--location="My_Location" \
--organization="My_Organization" \
--hostgroup="My_Host_Group" \
--activationkey="My_Activation_Key" \
--add-domain
4.4.2.9. Providing an alternative FQDN for the host
If the host’s host name is not an FQDN, or is not RFC-compliant (containing a character such as an
underscore), the script will fail at the host name validation stage. If you cannot update the host to use an
FQDN that is accepted by Satellite, you can use the bootstrap script to specify an alternative FQDN.
Procedure
1. Set create_new_host_when_facts_are_uploaded and
create_new_host_when_report_is_uploaded to false using Hammer:
# hammer settings set \
--name create_new_host_when_facts_are_uploaded \
--value false
CHAPTER 4. REGISTERING HOSTS AND SETTING UP HOST INTEGRATION
39

# hammer settings set \
--name create_new_host_when_report_is_uploaded \
--value false
2. Use --fqdn to specify the FQDN that will be reported to Satellite:
On Red Hat Enterprise Linux 8, enter the following command:
# /usr/libexec/platform-python bootstrap.py --login=admin \
--server satellite.example.com \
--location="My_Location" \
--organization="My_Organization" \
--hostgroup="My_Host_Group" \
--activationkey="My_Activation_Key" \
--fqdn node100.example.com
On Red Hat Enterprise Linux 6 or 7, enter the following command:
# bootstrap.py --login=admin \
--server satellite.example.com \
--location="My_Location" \
--organization="My_Organization" \
--hostgroup="My_Host_Group" \
--activationkey="My_Activation_Key" \
--fqdn node100.example.com
4.5. INSTALLING TRACER
Use this procedure to install Tracer on Red Hat Satellite and access Traces. Tracer displays a list of
services and applications that are outdated and need to be restarted. Traces is the output generated by
Tracer in the Satellite web UI.
Prerequisites
The host is registered to Red Hat Satellite.
Red Hat Satellite Client 6 repository for the operating system version of the host is
synchronized on Satellite Server, available in the content view and the lifecycle environment of
the host, and enabled for the host. For more information, see Changing the repository sets
status for a host in Satellite in Managing content.
Procedure
1. On the content host, install the katello-host-tools-tracer RPM package:
# yum install katello-host-tools-tracer
2. Enter the following command:
# katello-tracer-upload
3. In the Satellite web UI, navigate to Hosts > All Hosts, then click the required host name.
4. Click the Traces tab to view Traces. If it is not installed, an Enable Traces button initiates a
Red Hat Satellite 6.15 Managing hosts
40

4. Click the Traces tab to view Traces. If it is not installed, an Enable Traces button initiates a
remote execution job that installs the package.
4.6. INSTALLING AND CONFIGURING PUPPET AGENT DURING HOST
REGISTRATION
You can install and configure the Puppet agent on the host during registration. A configured Puppet
agent is required on the host for Puppet integration with your Satellite. For more information about
Puppet, see Managing configurations using Puppet integration .
Prerequisites
Puppet must be enabled in your Satellite. For more information, see Enabling Puppet
Integration with Satellite in Managing configurations using Puppet integration .
Red Hat Satellite Client 6 repository for the operating system version of the host is
synchronized on Satellite Server and enabled in the activation key you use. For more
information, see Importing Content in Managing content.
You have an activation key. For more information, see Managing Activation Keys in Managing
content.
Procedure
1. In the Satellite web UI, navigate to Configure > Global Parameters to add host parameters
globally. Alternatively, you can navigate to Configure > Host Groups and edit or create a host
group to add host parameters only to a host group.
2. Enable the Puppet agent using a host parameter in global parameters or a host group. Add a
host parameter named enable-puppet7, select the boolean type, and set the value to true.
3. Specify configuration for the Puppet agent using the following host parameters in global
parameters or a host group:
Add a host parameter named puppet_server, select the string type, and set the value to
the hostname of your Puppet server, such as puppet.example.com.
Optional: Add a host parameter named puppet_ca_server, select the string type, and set
the value to the hostname of your Puppet CA server, such as puppet-ca.example.com. If
puppet_ca_server is not set, the Puppet agent will use the same server as puppet_server.
Optional: Add a host parameter named puppet_environment, select the string type, and
set the value to the Puppet environment you want the host to use.
Until the BZ2177730 is resolved, you must use host parameters to specify the Puppet agent
configuration even in integrated setups where the Puppet server is a Capsule Server.
4. Navigate to Hosts > Register Host and register your host using an appropriate activation key.
For more information, see Registering Hosts in Managing hosts.
5. Navigate to Infrastructure > Capsules.
6. From the list in the Actions column for the required Capsule Server, select Certificates.
7. Click Sign to the right of the required host to sign the SSL certificate for the Puppet agent.
CHAPTER 4. REGISTERING HOSTS AND SETTING UP HOST INTEGRATION
41

4.7. INSTALLING AND CONFIGURING PUPPET AGENT MANUALLY
You can install and configure the Puppet agent on a host manually. A configured Puppet agent is
required on the host for Puppet integration with your Satellite. For more information about Puppet, see
Managing configurations using Puppet integration .
Prerequisites
Puppet must be enabled in your Satellite. For more information, see Enabling Puppet
Integration with Satellite in Managing configurations using Puppet integration .
The host must have a Puppet environment assigned to it.
Red Hat Satellite Client 6 repository for the operating system version of the host is
synchronized on Satellite Server, available in the content view and the lifecycle environment of
the host, and enabled for the host. For more information, see Changing the repository sets
status for a host in Satellite in Managing content.
Procedure
1. Log in to the host as the root user.
2. Install the Puppet agent package.
On hosts running Red Hat Enterprise Linux 8 and above:
# dnf install puppet-agent
On hosts running Red Hat Enterprise Linux 7 and below:
# yum install puppet-agent
3. Add the Puppet agent to PATH in your current shell using the following script:
. /etc/profile.d/puppet-agent.sh
4. Configure the Puppet agent. Set the environment parameter to the name of the Puppet
environment to which the host belongs:
# puppet config set server satellite.example.com --section agent
# puppet config set environment My_Puppet_Environment --section agent
5. Start the Puppet agent service:
# puppet resource service puppet ensure=running enable=true
6. Create a certificate for the host:
# puppet ssl bootstrap
7. In the Satellite web UI, navigate to Infrastructure > Capsules.
8. From the list in the Actions column for the required Capsule Server, select Certificates.
Red Hat Satellite 6.15 Managing hosts
42

9. Click Sign to the right of the required host to sign the SSL certificate for the Puppet agent.
10. On the host, run the Puppet agent again:
# puppet ssl bootstrap
CHAPTER 4. REGISTERING HOSTS AND SETTING UP HOST INTEGRATION
43

CHAPTER 5. ADDING NETWORK INTERFACES
Satellite supports specifying multiple network interfaces for a single host. You can configure these
interfaces when creating a new host as described in Section 2.1, “Creating a host in Red Hat Satellite” or
when editing an existing host.
There are several types of network interfaces that you can attach to a host. When adding a new
interface, select one of:
Interface: Allows you to specify an additional physical or virtual interface. There are two types
of virtual interfaces you can create. Use VLAN when the host needs to communicate with
several (virtual) networks using a single interface, while these networks are not accessible to
each other. Use alias to add an additional IP address to an existing interface.
For more information about adding a physical interface, see Section 5.1, “Adding a physical
interface”.
For more information about adding a virtual interface, see Section 5.2, “Adding a virtual
interface”.
Bond: Creates a bonded interface. NIC bonding is a way to bind multiple network interfaces
together into a single interface that appears as a single device and has a single MAC address.
This enables two or more network interfaces to act as one, increasing the bandwidth and
providing redundancy. For more information, see Section 5.3, “Adding a bonded interface” .
BMC: Baseboard Management Controller (BMC) allows you to remotely monitor and manage
the physical state of machines. For more information about BMC, see Enabling Power
Management on Hosts in Installing Satellite Server in a connected network environment . For
more information about configuring BMC interfaces, see Section 5.5, “Adding a baseboard
management controller (BMC) interface”.
NOTE
Additional interfaces have the Managed flag enabled by default, which means the new
interface is configured automatically during provisioning by the DNS and DHCP
Capsule Servers associated with the selected subnet. This requires a subnet with
correctly configured DNS and DHCP Capsule Servers. If you use a Kickstart method for
host provisioning, configuration files are automatically created for managed interfaces in
the post-installation phase at /etc/sysconfig/network-scripts/ifcfg-interface_id.
NOTE
Virtual and bonded interfaces currently require a MAC address of a physical device.
Therefore, the configuration of these interfaces works only on bare-metal hosts.
5.1. ADDING A PHYSICAL INTERFACE
Use this procedure to add an additional physical interface to a host.
Procedure
1. In the Satellite web UI, navigate to Hosts > All Hosts.
2. Click Edit next to the host you want to edit.
3. On the Interfaces tab, click Add Interface.
Red Hat Satellite 6.15 Managing hosts
44

4. Keep the Interface option selected in the Type list.
5. Specify a MAC address. This setting is required.
6. Specify the Device Identifier, for example eth0. The identifier is used to specify this physical
interface when creating bonded interfaces, VLANs, and aliases.
7. Specify the DNS name associated with the host’s IP address. Satellite saves this name in
Capsule Server associated with the selected domain (the "DNS A" field) and Capsule Server
associated with the selected subnet (the "DNS PTR" field). A single host can therefore have
several DNS entries.
8. Select a domain from the Domain list. To create and manage domains, navigate to
Infrastructure > Domains.
9. Select a subnet from the Subnet list. To create and manage subnets, navigate to Infrastructure
> Subnets.
10. Specify the IP address. Managed interfaces with an assigned DHCP Capsule Server require this
setting for creating a DHCP lease. DHCP-enabled managed interfaces are automatically
provided with a suggested IP address.
11. Select whether the interface is Managed. If the interface is managed, configuration is pulled
from the associated Capsule Server during provisioning, and DNS and DHCP entries are
created. If using kickstart provisioning, a configuration file is automatically created for the
interface.
12. Select whether this is the Primary interface for the host. The DNS name from the primary
interface is used as the host portion of the FQDN.
13. Select whether this is the Provision interface for the host. TFTP boot takes place using the
provisioning interface. For image-based provisioning, the script to complete the provisioning is
executed through the provisioning interface.
14. Select whether to use the interface for Remote execution.
15. Leave the Virtual NIC checkbox clear.
16. Click OK to save the interface configuration.
17. Click Submit to apply the changes to the host.
5.2. ADDING A VIRTUAL INTERFACE
Use this procedure to configure a virtual interface for a host. This can be either a VLAN or an alias
interface.
An alias interface is an additional IP address attached to an existing interface. An alias interface
automatically inherits a MAC address from the interface it is attached to; therefore, you can create an
alias without specifying a MAC address. The interface must be specified in a subnet with boot mode set
to static.
Procedure
1. In the Satellite web UI, navigate to Hosts > All Hosts.
CHAPTER 5. ADDING NETWORK INTERFACES
45

2. Click Edit next to the host you want to edit.
3. On the Interfaces tab, click Add Interface.
4. Keep the Interface option selected in the Type list.
5. Specify the general interface settings. The applicable configuration options are the same as for
the physical interfaces described in Section 5.1, “Adding a physical interface” .
Specify a MAC address for managed virtual interfaces so that the configuration files for
provisioning are generated correctly. However, a MAC address is not required for virtual
interfaces that are not managed.
If creating a VLAN, specify ID in the form of eth1.10 in the Device Identifier field. If creating an
alias, use ID in the form of eth1:10.
6. Select the Virtual NIC checkbox. Additional configuration options specific to virtual interfaces
are appended to the form:
Tag: Optionally set a VLAN tag to trunk a network segment from the physical network
through to the virtual interface. If you do not specify a tag, managed interfaces inherit the
VLAN tag of the associated subnet. User-specified entries from this field are not applied to
alias interfaces.
Attached to: Specify the identifier of the physical interface to which the virtual interface
belongs, for example eth1. This setting is required.
7. Click OK to save the interface configuration.
8. Click Submit to apply the changes to the host.
5.3. ADDING A BONDED INTERFACE
Use this procedure to configure a bonded interface for a host. To use the CLI instead of the Satellite
web UI, see the CLI procedure.
Procedure
1. In the Satellite web UI, navigate to Hosts > All Hosts.
2. Click Edit next to the host you want to edit.
3. On the Interfaces tab, click Add Interface.
4. Select Bond from the Type list. Additional type-specific configuration options are appended to
the form.
5. Specify the general interface settings. The applicable configuration options are the same as for
the physical interfaces described in Section 5.1, “Adding a physical interface” .
Bonded interfaces use IDs in the form of bond0 in the Device Identifier field.
A single MAC address is sufficient.
If you are adding a secondary interface, select Managed. Otherwise, Satellite does not apply the
configuration.
6. Specify the configuration options specific to bonded interfaces:
Red Hat Satellite 6.15 Managing hosts
46

Mode: Select the bonding mode that defines a policy for fault tolerance and load balancing.
See Section 5.4, “Bonding modes available in Satellite” for a brief description of each
bonding mode.
Attached devices: Specify a comma-separated list of identifiers of attached devices.
These can be physical interfaces or VLANs.
Bond options: Specify a space-separated list of configuration options, for example
miimon=100. For more information on configuration options for bonded interfaces, see
Configuring network bonding in the Red Hat Enterprise Linux Configuring and Managing
Networking guide.
7. Click OK to save the interface configuration.
8. Click Submit to apply the changes to the host.
CLI procedure
To create a host with a bonded interface, enter the following command:
# hammer host create \
--ask-root-password yes \
--hostgroup My_Host_Group \
--ip=My_IP_Address \
--mac=My_MAC_Address \
--managed true \
--interface="identifier=My_NIC_1, mac=_My_MAC_Address_1, managed=true,
type=Nic::Managed, domain_id=My_Domain_ID, subnet_id=My_Subnet_ID" \
--interface="identifier=My_NIC_2, mac=My_MAC_Address_2, managed=true,
type=Nic::Managed, domain_id=My_Domain_ID, subnet_id=My_Subnet_ID" \
--interface="identifier=bond0, ip=My_IP_Address_2, type=Nic::Bond, mode=active-backup,
attached_devices=[My_NIC_1,My_NIC_2], managed=true, domain_id=My_Domain_ID,
subnet_id=My_Subnet_ID" \
--location "My_Location" \
--name "My_Host_Name" \
--organization "My_Organization" \
--subnet-id=My_Subnet_ID
5.4. BONDING MODES AVAILABLE IN SATELLITE
Bonding Mode Description
balance-rr Transmissions are received and sent sequentially on
each bonded interface.
active-backup Transmissions are received and sent through the first
available bonded interface. Another bonded
interface is only used if the active bonded interface
fails.
balance-xor Transmissions are based on the selected hash policy.
In this mode, traffic destined for specific peers is
always sent over the same interface.
CHAPTER 5. ADDING NETWORK INTERFACES
47

broadcast All transmissions are sent on all bonded interfaces.
802.a3 Creates aggregation groups that share the same
settings. Transmits and receives on all interfaces in
the active group.
balance-tlb The outgoing traffic is distributed according to the
current load on each bonded interface.
balance-alb Receive load balancing is achieved through Address
Resolution Protocol (ARP) negotiation.
Bonding Mode Description
5.5. ADDING A BASEBOARD MANAGEMENT CONTROLLER (BMC)
INTERFACE
You can control the power status of bare-metal hosts from Satellite. Use this procedure to configure a
baseboard management controller (BMC) interface for a host that supports this feature.
Prerequisites
You know the MAC address, IP address, and other details of the BMC interface on the host, and
authentication credentials for that interface.
NOTE
You only need the MAC address for the BMC interface if the BMC interface is
managed, so that it can create a DHCP reservation.
Procedure
1. Install ipmitool on your Capsule:
# satellite-maintain packages install ipmitool
2. Enable BMC power management on your Capsule:
# satellite-installer \
--foreman-proxy-bmc-default-provider=ipmitool \
--foreman-proxy-bmc=true
3. In the Satellite web UI, navigate to Infrastructure > Subnets.
4. Select the subnet of your host.
5. On the Capsules tab, select your Capsule as BMC Capsule.
6. Click Submit.
7. Navigate to Hosts > All Hosts.
Red Hat Satellite 6.15 Managing hosts
48

8. Click Edit next to the host you want to edit.
9. On the Interfaces tab, click Add Interface.
10. Select BMC from the Type list. Type-specific configuration options are appended to the form.
11. Specify the general interface settings. The applicable configuration options are the same as for
the physical interfaces described in Section 5.1, “Adding a physical interface” .
12. Specify the configuration options specific to BMC interfaces:
Username and Password: Specify any authentication credentials required by BMC.
Provider: Specify the BMC provider.
13. Click OK to save the interface configuration.
14. Click Submit to apply the changes to the host.
CHAPTER 5. ADDING NETWORK INTERFACES
49

CHAPTER 6. UPGRADING HOSTS TO NEXT MAJOR RED HAT
ENTERPRISE LINUX RELEASE
You can use a job template to upgrade your Red Hat Enterprise Linux hosts to the next major release.
Below upgrade paths are possible:
Red Hat Enterprise Linux 7 to Red Hat Enterprise Linux 8
Red Hat Enterprise Linux 8 to Red Hat Enterprise Linux 9
Prerequisites
Ensure that your Red Hat Enterprise Linux hosts meet the requirements for the upgrade.
For Red Hat Enterprise Linux 7 to Red Hat Enterprise Linux 8 upgrade, see Planning an
upgrade in Upgrading from RHEL 7 to RHEL 8 .
For Red Hat Enterprise Linux 8 to Red Hat Enterprise Linux 9 upgrade, see Planning an
upgrade to RHEL 9 in Upgrading from RHEL 8 to RHEL 9 .
Prepare your Red Hat Enterprise Linux hosts for the upgrade.
For Red Hat Enterprise Linux 7 to Red Hat Enterprise Linux 8 upgrade, see Preparing a
RHEL 7 system for the upgrade in Upgrading from RHEL 7 to RHEL 8 .
For Red Hat Enterprise Linux 8 to Red Hat Enterprise Linux 9 upgrade, see Preparing a
RHEL 8 system for the upgrade in Upgrading from RHEL 8 to RHEL 9 .
Distribute Satellite SSH keys to the hosts that you want to upgrade. For more information, see
Section 12.14, “Distributing SSH keys for remote execution” .
Procedure
1. On Satellite, enable the Leapp plugin:
# satellite-installer --enable-foreman-plugin-leapp
2. If you are using a custom job template for the Leapp pre-upgrade check, configure the
leapp_preupgrade remote execution feature to point to your template:
a. In the Satellite web UI, navigate to Administer > Remote Execution Features.
b. Click leapp_preupgrade.
c. In the Job Template dropdown menu, select your template.
d. Click Submit.
3. In the Satellite web UI, navigate to Hosts > All Hosts.
4. Select the hosts that you want to upgrade to the next major Red Hat Enterprise Linux version.
5. From the Schedule Remote Job list, select Preupgrade check with Leapp.
6. When the check is finished, click the Leapp preupgrade report tab to see if Leapp has found
any issues on your hosts. Issues that have the Inhibitor flag are considered crucial and are likely
Red Hat Satellite 6.15 Managing hosts
50

to break the upgrade procedure. Issues that have the Has Remediation flag contain
remediation that can help you fix the issue.
a. Click an issue that is flagged as Has Remediation to expand it.
If the issue contains a remediation Command, you can fix it directly from Satellite using
remote execution. Select the issue.
If the issue contains only a remediation Hint, use the hint to fix the issue on the host
manually.
Repeat this step for other issues.
b. After you selected any issues with remediation commands, click Fix Selected and submit
the job.
c. After the issues are fixed, click Rerun, and then click Submit to run the pre-upgrade check
again to verify that the hosts you are upgrading do not have any issues and are ready to be
upgraded.
7. If the pre-upgrade check verifies that the hosts do not have any issues, click Run Upgrade and
click Submit to start the upgrade. Alternatively, you can upgrade your host by selecting
Upgrade with Leapp in the Schedule Remote Job drop down menu.
CHAPTER 6. UPGRADING HOSTS TO NEXT MAJOR RED HAT ENTERPRISE LINUX RELEASE
51

CHAPTER 7. CONVERTING A HOST TO RED HAT ENTERPRISE
LINUX
You can convert Red Hat Enterprise Linux derivative distributions into a supportable Red Hat Enterprise
Linux on a host while retaining installed applications and configurations. Satellite provides
Convert2RHEL utilities to simplify the conversion process.
The Convert2RHEL utilities in Satellite contain an Ansible role and Ansible playbook. You use the
Ansible role to generate conversion data on Satellite Server, which includes enabling required
repositories and creating products, activation keys, and host groups. Then you perform the actual
conversion on the host using the Ansible playbook, which installs the Convert2RHEL CLI tool on the host
and runs it.
You can use the Ansible role to generate conversion data for the following conversions:
CentOS Linux 7 to Red Hat Enterprise Linux 7
Oracle Linux 7 to Red Hat Enterprise Linux 7
Oracle Linux 8 to Red Hat Enterprise Linux 8
These conversions are supported by Red Hat.
The conversion process is similar to a minor release upgrade of Red Hat Enterprise Linux in which every
RPM package on the system is replaced. Third-party packages and non-Red Hat packages that are not
available in Red Hat Enterprise Linux are retained.
The Convert2RHEL utility removes unnecessary packages such as logos or packages known to cause
issues during the conversion. The utility replaces the CentOS-release or Oracle-release package with
the rhel-release package, and all packages signed by CentOS or Oracle with their Red Hat equivalents.
The utility also subscribes the host to Red Hat Subscription Management.
The duration of the conversion process depends on the number of packages that have to be replaced,
network speed, storage speed, and similar factors.
Prerequisites
Review Supported conversion paths in Red Hat Enterprise Linux 8 Converting from a Linux
distribution to RHEL using the Convert2RHEL utility.
You must have completed the steps 1. – 5. of the procedure Preparing for a RHEL conversion in
Red Hat Enterprise Linux 8 Converting from a Linux distribution to RHEL using the
Convert2RHEL utility.
Ensure you have a subscription manifest uploaded to your Satellite and that there are sufficient
Red Hat Enterprise Linux entitlements allocated for the conversions you intend. Alternatively,
you can use Ansible variables to tell the role to import the manifest from disk. The manifest must
be imported to the organization to which you will register hosts for conversion.
You can update your allocations and download the updated manifest from the Red Hat
Customer Portal. For more information, see Exporting and downloading a manifest in Creating
and managing manifests for a connected Satellite Server.
Ensure that you have enabled and synchronized Red Hat repositories in Satellite for the minor
Red Hat Enterprise Linux version to which you convert your hosts. For more information, see
Enabling Red Hat Repositories and Synchronizing Repositories in Managing content.
Red Hat Satellite 6.15 Managing hosts
52

High-level conversion steps
1. Import the redhat.satellite.convert2rhel Ansible role and variables. For more information, see
Importing Ansible Roles and Variables in Managing configurations using Ansible integration.
2. Configure Ansible variables for generation of conversion data. For more information, see
Section 7.1, “Ansible variables for conversion”.
3. Assign the redhat.satellite.convert2rhel role to the host that represents Satellite Server. For
more information, see Assigning Ansible Roles to an Existing Host in Managing configurations
using Ansible integration.
4. Run the Ansible role on Satellite Server. For more information, see Running Ansible Roles on a
Host in Managing configurations using Ansible integration .
The Ansible role generates data required for host conversion, that is, repositories, certificates,
activation keys, and host groups. The role enables the rhel-7-server-rpms repository with the
7Server release and x86_64 architecture, or rhel-8-for-x86_64-baseos-rpms and rhel-8-for-
x86_64-appstream-rpms, or both, depending on which variables you have set in the previous
steps.
5. Register a host for conversion using a generated host group.
Use the global registration template to register and subscribe your host before the conversion.
Select the host group that was generated for the conversion you intend, such as CentOS 7
converting if you convert the host from CentOS 7. For more information, see Section 4.3,
“Registering hosts by using global registration”.
6. Run the pre-conversion analysis on the host group to verify if your hosts are ready for the
conversion. Execute a remote job with the following settings:
Job category: Convert 2 RHEL
Job template: Convert2RHEL analyze
For more information, see Section 12.22, “Executing a remote job”.
Review pre-conversion analysis reports and resolve all issues that are blocking the conversion.
Repeat this step until you resolve all blocking issues. For more information, see Reviewing the
pre-conversion analysis report in Red Hat Enterprise Linux 8 Converting from a Linux distribution
to RHEL using the Convert2RHEL utility.
7. Run the Convert2RHEL playbook on the host group. Execute a remote job with the following
settings:
Job category: Convert 2 RHEL
Job template: Convert to RHEL
Activation key:
convert2rhel_rhel7 if you convert to Red Hat Enterprise Linux 7
convert2rhel_rhel8 if you convert to Red Hat Enterprise Linux 8
For more information, see Section 12.22, “Executing a remote job”.
Additional resources
How to perform an unsupported conversion from a RHEL-derived Linux distribution to RHEL in
CHAPTER 7. CONVERTING A HOST TO RED HAT ENTERPRISE LINUX
53

How to perform an unsupported conversion from a RHEL-derived Linux distribution to RHEL in
the Red Hat Knowledgebase
7.1. ANSIBLE VARIABLES FOR CONVERSION
Before you run the Ansible role to generate conversion data, configure values of the following required
Ansible variables.
Satellite imports most of the required Ansible variables from the redhat.satellite.convert2rhel role.
However, some variables are not imported. These variables are marked with an asterisk * in the tables
below. You must create those additional variables manually and assign them to the
redhat.satellite.convert2rhel role.
Table 7.1. Required variables for conversion
Name Type Intent and value
satellite_server_url * string URL of your Satellite Server, such as
https://satellite.example.com
satellite_username * string Your user name
satellite_password * string Your password
satellite_organization * string Name of your organization
satellite_content_rhel_wait_for_syncs * boolean Set to false if you do not want Satellite Server
to wait until repository sync finishes before
continuing with data generation. (default:
true)
satellite_validate_certs * boolean Set to true if you want to enable certificate
checks in Ansible. (default: true)
satellite_convert2rhel_manage_subscri
ption
boolean Set to false if you already have a manifest on
your Satellite Server. If you upload a new
manifest from disk, the current manifest will be
overwritten. (default: true)
satellite_content_rhel_enable_rhel7 * boolean Enables Red Hat Enterprise Linux 7
repositories. Set to false if you do not intend
to convert hosts to Red Hat Enterprise Linux
7. (default: true)
satellite_convert2rhel_enable_oracle7 boolean Set to true if you want to prepare conversion
data for Oracle Linux 7. Otherwise, you must
set the value to false.
Red Hat Satellite 6.15 Managing hosts
54

satellite_content_rhel_enable_rhel8 * boolean Enables Red Hat Enterprise Linux 8
repositories. Set to false if you do not intend
to convert hosts to Red Hat Enterprise Linux
8. (default: true)
satellite_convert2rhel_enable_oracle8 boolean Set to true if you want to prepare conversion
data for Oracle Linux 8. Otherwise, you must
set the value to false.
Name Type Intent and value
Table 7.2. Optional variables for conversion
Name Type Intent and value
satellite_manifest_path * string Path to a manifest to upload from disk, such as
~/manifest.zip. You must set this path if you
upload a new manifest from disk using
satellite_convert2rhel_manage_subscri
ption.
satellite_content_rhel_rhel8_releasever
*
string Minor release version, such as 8.5. Set this
variable if the minor release version of your
system differs from the latest Red Hat
Enterprise Linux release to prevent conversion
issues. (default: latest)
CHAPTER 7. CONVERTING A HOST TO RED HAT ENTERPRISE LINUX
55

CHAPTER 8. HOST MANAGEMENT AND MONITORING USING
THE RHEL WEB CONSOLE
You can use the RHEL web console interactive web interface to perform actions and monitor Red Hat
Enterprise Linux hosts. You can enable a remote-execution feature to integrate Satellite with the RHEL
web console. When you install the RHEL web console on a host that you manage with Satellite, you can
view the RHEL web console dashboards of that host from within the Satellite web UI. You can also use
the features that are integrated with the RHEL web console, for example, Red Hat Image Builder.
8.1. ENABLING THE RHEL WEB CONSOLE ON SATELLITE
By default, RHEL web console integration is disabled in Satellite. If you want to access RHEL web
console features for your hosts from within Satellite, you must first enable the RHEL web console on
Satellite Server.
Procedure
Enable the RHEL web console on your Satellite Server:
# satellite-installer --enable-foreman-plugin-remote-execution-cockpit --reset-foreman-plugin-
remote-execution-cockpit-ensure
8.2. MANAGING AND MONITORING HOSTS USING THE RHEL WEB
CONSOLE
You can access the RHEL web console UI through the Satellite web UI and use the functionality to
manage and monitor hosts in Satellite.
Prerequisites
You have enabled the RHEL web console in Satellite.
You have installed the RHEL web console on the host that you want to view:
For Red Hat Enterprise Linux 8, see Installing the web console in the Managing systems
using the RHEL 8 web console guide.
For Red Hat Enterprise Linux 7, see Installing the web console in the Managing systems
using the RHEL 7 web console guide.
Satellite or Capsule can authenticate to the host with SSH keys. For more information, see
Section 12.14, “Distributing SSH keys for remote execution” .
Procedure
1. In the Satellite web UI, navigate to Hosts > All Hosts and select the host that you want to
manage and monitor with the RHEL web console.
2. In the upper right of the host window, click the vertical ellipsis and select Web Console.
You can now access the full range of features available for host monitoring and management, for
example, Red Hat Image Builder, through the RHEL web console.
For more information about getting started with Red Hat web console, see the Managing systems using
Red Hat Satellite 6.15 Managing hosts
56

For more information about getting started with Red Hat web console, see the Managing systems using
the RHEL 8 web console guide or the Managing systems using the RHEL 7 web console guide.
For more information about using Red Hat Image Builder through the RHEL web console, see Accessing
Image Builder GUI in the RHEL 8 web console or Accessing Image Builder GUI in the RHEL 7 web
console.
8.3. DISABLING THE RHEL WEB CONSOLE ON SATELLITE
Perform the following procedure if you want to disable the RHEL web console on Satellite.
Procedure
Disable the RHEL web console on your Satellite Server:
# satellite-installer --foreman-plugin-remote-execution-cockpit-ensure absent
IMPORTANT
You can enable or disable RHEL web console integration independently on
Capsule Servers. To prevent enabling RHEL web console integration on a Capsule Server,
enter the following command after completing the procedure:
# satellite-installer --foreman-proxy-plugin-remote-execution-script-cockpit-integration
false
CHAPTER 8. HOST MANAGEMENT AND MONITORING USING THE RHEL WEB CONSOLE
57

CHAPTER 9. MONITORING HOSTS USING RED HAT INSIGHTS
You can use Insights to diagnose systems and downtime related to security exploits, performance
degradation, and stability failures. You can use the Insights dashboard to quickly identify key risks to
stability, security, and performance. You can sort by category, view details of the impact and resolution,
and then determine what systems are affected.
To use Insights to monitor hosts that you manage with Satellite, you must first install Insights on your
hosts and register your hosts with Insights.
For new Satellite hosts, you can install and configure Insights during host registration to Satellite. For
more information, see Section 4.3, “Registering hosts by using global registration” .
For hosts already registered to Satellite, you can install and configure Insights on your hosts by using an
Ansible role. For more information, see Section 9.3, “Deploying Red Hat Insights using the Ansible role” .
Additional information
To view the logs for all plugins, go to /var/log/foreman/production.log.
If you have problems connecting to Insights, ensure that your certificates are up-to-date.
Refresh your subscription manifest to update your certificates.
You can change the default schedule for running insights-client by configuring insights-
client.timer on a host. For more information, see Changing the insights-client schedule in the
Client Configuration Guide for Red Hat Insights .
9.1. ACCESS TO INFORMATION FROM INSIGHTS IN SATELLITE
You can access the additional information available for hosts from Red Hat Insights in the following
places in the Satellite web UI:
Navigate to Configure > Insights where the vertical ellipsis next to the Remediate button
provides a View in Red Hat Insights link to the general recommendations page. On each
recommendation line, the vertical ellipsis provides a View in Red Hat Insights link to the
recommendation rule, and, if one is available for that recommendation, a Knowledgebase
article link.
For additional information, navigate to Hosts > All Hosts. If the host has recommendations
listed, click on the number of recommendations. On the Insights tab, the vertical ellipsis next to
the Remediate button provides a Go To Satellite Insights page link to information for the
system, and a View in Red Hat Insights link to host details on the console.
9.2. EXCLUDING HOSTS FROM RH-CLOUD AND INSIGHTS-CLIENT
REPORTS
You can set the host_registration_insights parameter to False to omit rh-cloud and insights-client
reports. Satellite will exclude the hosts from rh-cloud reports and block insights-client from uploading a
report to the cloud.
Use the following procedure to change the value of host_registration_insights parameter:
Procedure
Red Hat Satellite 6.15 Managing hosts
58

1. In the Satellite web UI, navigate to Host > All Hosts.
2. Select any host for which you want to change the value.
3. On the Parameters tab, click on the edit button of host_registration_insights.
4. Set the value to False.
This parameter can also be set at the organization, hostgroup, subnet, and domain level. Also, it
automatically prevents new reports from being uploaded as long as they are associated with the entity.
If you set the parameter to false on a host that is already reported on the Red Hat Hybrid Cloud
Console, it will be still removed automatically from the inventory. However, this process can take some
time to complete.
9.3. DEPLOYING RED HAT INSIGHTS USING THE ANSIBLE ROLE
The RedHatInsights.insights-client Ansible role is used to automate the installation and registration of
hosts with Insights. For more information about adding this role to your Satellite, see Getting Started
with Ansible in Satellite in Managing configurations using Ansible integration.
Procedure
1. Add the RedHatInsights.insights-client role to the hosts.
For new hosts, see Section 2.1, “Creating a host in Red Hat Satellite” .
For existing hosts, see Using Ansible Roles to Automate Repetitive Tasks on Clients in Managing
configurations using Ansible integration.
2. To run the RedHatInsights.insights-client role on your host, navigate to Hosts > All Hosts and
click the name of the host that you want to use.
3. On the host details page, expand the Schedule a job dropdown menu.
4. Click Run Ansible roles.
9.4. CONFIGURING SYNCHRONIZATION OF INSIGHTS
RECOMMENDATIONS FOR HOSTS
You can enable automatic synchronization of the recommendations from Red Hat Hybrid Cloud Console
that occurs daily by default. If you leave the setting disabled, you can synchronize the recommendations
manually.
Procedures
To get the recommendations automatically:
1. In the Satellite web UI, navigate to Configure > Insights.
2. Enable Sync Automatically.
To get the recommendations manually:
1. In the Satellite web UI, navigate to Configure > Insights.
CHAPTER 9. MONITORING HOSTS USING RED HAT INSIGHTS
59

2. On the vertical ellipsis, click Sync Recommendations.
9.5. CONFIGURING AUTOMATIC REMOVAL OF HOSTS FROM THE
INSIGHTS INVENTORY
When hosts are removed from Satellite, they can also be removed from the inventory of Red Hat
Insights, either automatically or manually. You can configure automatic removal of hosts from the
Insights Inventory during Red Hat Hybrid Cloud Console synchronization with Satellite that occurs daily
by default. If you leave the setting disabled, you can still remove the bulk of hosts from the Inventory
manually.
Prerequisites
Your user account must have the permission of view_foreman_rh_cloud to view the Inventory
Upload page in Satellite web UI.
Procedure
1. In the Satellite web UI, navigate to Configure > Inventory Upload.
2. Enable the Automatic Mismatch Deletion setting.
9.6. CREATING AN INSIGHTS REMEDIATION PLAN FOR HOSTS
With Satellite, you can create a Red Hat Insights remediation plan and run the plan on Satellite hosts.
Procedure
1. In the Satellite web UI, navigate to Configure > Insights.
2. On the Red Hat Insights page, select the number of recommendations that you want to include
in an Insights plan.
You can only select the recommendations that have an associated playbook.
3. Click Remediate.
4. In the Remediation Summary window, you can select the Resolutions to apply. Use the Filter
field to search for specific keywords.
5. Click Remediate.
6. In the Job Invocation page, do not change the contents of precompleted fields.
7. Optional. For more advanced configuration of the Remote Execution Job, click Show
Advanced Fields.
8. Select the Type of query you require.
9. Select the Schedule you require.
10. Click Submit.
Alternatively:
1. In the Satellite web UI, navigate to Hosts > All Hosts.
Red Hat Satellite 6.15 Managing hosts
60

2. Select a host.
3. On the Host details page, click Recommendations.
4. On the Red Hat Insights page, select the number of recommendations you want to include in an
Insights plan and proceed as before.
In the Jobs window, you can view the progress of your plan.
CHAPTER 9. MONITORING HOSTS USING RED HAT INSIGHTS
61

CHAPTER 10. USING REPORT TEMPLATES TO MONITOR
HOSTS
You can use report templates to query Satellite data to obtain information about, for example, host
status, registered hosts, applicable errata, applied errata, subscription details, and user activity. You can
use the report templates that ship with Satellite or write your own custom report templates to suit your
requirements. The reporting engine uses the embedded Ruby (ERB) syntax. For more information
about writing templates and ERB syntax, see Appendix A, Template writing reference.
You can create a template, or clone a template and edit the clone. For help with the template syntax,
click a template and click the Help tab.
10.1. GENERATING HOST MONITORING REPORTS
To view the report templates in the Satellite web UI, navigate to Monitor > Reports > Report
Templates. To schedule reports, configure a cron job or use the Satellite web UI.
Procedure
1. In the Satellite web UI, navigate to Monitor > Reports > Report Templates. For example, the
following templates are available:
Host – Installed Products
Use this template for hosts in Simple Content Access (SCA) organizations. It generates a
report with installed product information along with other metrics included in Subscription –
Entitlement Report except information about subscriptions.
Subscription – Entitlement Report
Use this template for hosts that are not in SCA organizations. It generates a report with
information about subscription entitlements including when they expire. It only outputs
information for hosts in organizations that do not use SCA.
2. To the right of the report template that you want to use, click Generate.
3. Optional: To schedule a report, to the right of the Generate at field, click the icon to select the
date and time you want to generate the report at.
4. Optional: To send a report to an e-mail address, select the Send report via e-mail checkbox,
and in the Deliver to e-mail addresses field, enter the required e-mail address.
5. Optional: Apply search query filters. To view all available results, do not populate the filter field
with any values.
6. Click Submit. A CSV file that contains the report is downloaded. If you have selected the Send
report via e-mail checkbox, the host monitoring report is sent to your e-mail address.
CLI procedure
1. List all available report templates:
# hammer report-template list
2. Generate a report:
Red Hat Satellite 6.15 Managing hosts
62

# hammer report-template generate --id My_Template_ID
This command waits until the report fully generates before completing. If you want to generate
the report as a background task, you can use the hammer report-template schedule command.
NOTE
If you want to generate a subscription entitlement report, you have to use the
Days from Now option to specify the latest expiration time of entitlement
subscriptions. You can use the no limit value to show all entitlements.
Show all entitlements
# hammer report-template generate \
--inputs "Days from Now=no limit" \
--name "Subscription - Entitlement Report"
Show all entitlements that are going to expire within 60 days
# hammer report-template generate \
--inputs "Days from Now=60" \
--name "Subscription - Entitlement Report"
10.2. CREATING A REPORT TEMPLATE
In Satellite, you can create a report template and customize the template to suit your requirements. You
can import existing report templates and further customize them with snippets and template macros.
Report templates use Embedded Ruby (ERB) syntax. To view information about working with ERB
syntax and macros, in the Satellite web UI, navigate to Monitor > Reports > Report Templates, and
click Create Template, and then click the Help tab.
When you create a report template in Satellite, safe mode is enabled by default.
Procedure
1. In the Satellite web UI, navigate to Monitor > Reports > Report Templates.
2. Click Create Template.
3. In the Name field, enter a unique name for your report template.
4. If you want the template to be available to all locations and organizations, select Default.
5. Create the template directly in the template editor or import a template from a text file by
clicking Import. For more information about importing templates, see Section 10.5, “Importing
report templates”.
6. Optional: In the Audit Comment field, you can add any useful information about this template.
7. Click the Input tab, and in the Name field, enter a name for the input that you can reference in
the template in the following format: input('name'). Note that you must save the template
before you can reference this input value in the template body.
CHAPTER 10. USING REPORT TEMPLATES TO MONITOR HOSTS
63

8. Select whether the input value is mandatory. If the input value is mandatory, select the
Required checkbox.
9. From the Value Type list, select the type of input value that the user must input.
10. Optional: If you want to use facts for template input, select the Advanced checkbox.
11. Optional: In the Options field, define the options that the user can select from. If this field
remains undefined, the users receive a free-text field in which they can enter the value they
want.
12. Optional: In the Default field, enter a value, for example, a host name, that you want to set as
the default template input.
13. Optional: In the Description field, you can enter information that you want to display as inline
help about the input when you generate the report.
14. Optional: Click the Type tab, and select whether this template is a snippet to be included in
other templates.
15. Click the Location tab and add the locations where you want to use the template.
16. Click the Organizations tab and add the organizations where you want to use the template.
17. Click Submit to save your changes.
Additional resources
For more information about safe mode, see Section 10.9, “Report template safe mode”.
For more information about writing templates, see Appendix A, Template writing reference.
For more information about macros you can use in report templates, see Section A.6, “Template
macros”.
To view a step by step example of populating a template, see Section 10.8, “Creating a report
template to monitor entitlements”.
10.3. EXPORTING REPORT TEMPLATES
You can export report templates that you create in Satellite.
Procedure
1. In the Satellite web UI, navigate to Monitor > Reports > Report Templates.
2. Locate the template that you want to export, and from the list in the Actions column, select
Export.
3. Repeat this action for every report template that you want to download.
An .erb file that contains the template downloads.
CLI procedure
1. To view the report templates available for export, enter the following command:
Red Hat Satellite 6.15 Managing hosts
64

# hammer report-template list
Note the template ID of the template that you want to export in the output of this command.
2. To export a report template, enter the following command:
# hammer report-template dump --id My_Template_ID > example_export.erb
10.4. EXPORTING REPORT TEMPLATES USING THE SATELLITE API
You can use the Satellite report_templates API to export report templates from Satellite. For more
information about using the Satellite API, see API guide.
Procedure
1. Use the following request to retrieve a list of available report templates:
Example request:
$ curl --insecure --user admin:redhat \
--request GET \
--config https://satellite.example.com/api/report_templates \
| json_reformat
In this example, the json_reformat tool is used to format the JSON output.
Example response:
{
"total": 6,
"subtotal": 6,
"page": 1,
"per_page": 20,
"search": null,
"sort": {
"by": null,
"order": null
},
"results": [
{
"created_at": "2019-11-20 17:49:52 UTC",
"updated_at": "2019-11-20 17:49:52 UTC",
"name": "Applicable errata",
"id": 112
},
{
"created_at": "2019-11-20 17:49:52 UTC",
"updated_at": "2019-11-20 17:49:52 UTC",
"name": "Applied Errata",
"id": 113
},
{
"created_at": "2019-11-30 16:15:24 UTC",
"updated_at": "2019-11-30 16:15:24 UTC",
CHAPTER 10. USING REPORT TEMPLATES TO MONITOR HOSTS
65

"name": "Hosts - complete list",
"id": 158
},
{
"created_at": "2019-11-20 17:49:52 UTC",
"updated_at": "2019-11-20 17:49:52 UTC",
"name": "Host statuses",
"id": 114
},
{
"created_at": "2019-11-20 17:49:52 UTC",
"updated_at": "2019-11-20 17:49:52 UTC",
"name": "Registered hosts",
"id": 115
},
{
"created_at": "2019-11-20 17:49:52 UTC",
"updated_at": "2019-11-20 17:49:52 UTC",
"name": "Subscriptions",
"id": 116
}
]
}
2. Note the id of the template that you want to export, and use the following request to export the
template:
Example request:
$ curl --insecure --output /tmp/_Example_Export_Template.erb_ \
--user admin:password --request GET --config \
https://satellite.example.com/api/report_templates/My_Template_ID/export
Note that 158 is an example ID of the template to export.
In this example, the exported template is redirected to host_complete_list.erb.
10.5. IMPORTING REPORT TEMPLATES
You can import a report template into the body of a new template that you want to create. Note that
using the Satellite web UI, you can only import templates individually. For bulk actions, use the Satellite
API. For more information, see Section 10.6, “Importing report templates using the Satellite API” .
Prerequisites
You must have exported templates from Satellite to import them to use in new templates. For
more information see Section 10.3, “Exporting report templates” .
Procedure
1. In the Satellite web UI, navigate to Monitor > Reports > Report Templates.
2. In the upper right of the Report Templates window, click Create Template.
3. On the upper right of the Editor tab, click the folder icon, and select the .erb file that you want
Red Hat Satellite 6.15 Managing hosts
66

3. On the upper right of the Editor tab, click the folder icon, and select the .erb file that you want
to import.
4. Edit the template to suit your requirements.
5. Click Submit.
For more information about customizing your new template, see Appendix A, Template writing reference.
10.6. IMPORTING REPORT TEMPLATES USING THE SATELLITE API
You can use the Satellite API to import report templates into Satellite. Importing report templates using
the Satellite API automatically parses the report template metadata and assigns organizations and
locations. For more information about using the Satellite API, see the API guide.
Prerequisites
Create a template using .erb syntax or export a template from another Satellite.
For more information about writing templates, see Appendix A, Template writing reference.
For more information about exporting templates from Satellite, see Section 10.4, “Exporting
report templates using the Satellite API”.
Procedure
1. Use the following example to format the template that you want to import to a .json file:
# cat Example_Template.json
{
"name": "Example Template Name",
"template": "
Enter ERB Code Here
"
}
Example JSON file with ERB template:
{
"name": "Hosts - complete list",
"template": "
<%#
name: Hosts - complete list
snippet: false
template_inputs:
- name: host
required: false
input_type: user
advanced: false
value_type: plain
resource_type: Katello::ActivationKey
model: ReportTemplate
-%>
<% load_hosts(search: input('host')).each_record do |host| -%>
<%
report_row(
CHAPTER 10. USING REPORT TEMPLATES TO MONITOR HOSTS
67

'Server FQDN': host.name
)
-%>
<% end -%>
<%= report_render %>
"
}
2. Use the following request to import the template:
$ curl --insecure --user admin:redhat \
--data @Example_Template.json --header "Content-Type:application/json" \
--request POST --config https://satellite.example.com/api/report_templates/import
3. Use the following request to retrieve a list of report templates and validate that you can view
the template in Satellite:
$ curl --insecure --user admin:redhat \
--request GET --config https://satellite.example.com/api/report_templates | json_reformat
10.7. GENERATING A LIST OF INSTALLED PACKAGES
Use this procedure to generate a list of installed packages in Report Templates.
Procedure
1. In the Satellite web UI, navigate to Monitor > Reports > Report Templates.
2. To the right of Host - All Installed Packages, click Generate.
3. Optional: Use the Hosts filter search field to search for and apply specific host filters.
4. Click Generate.
5. If the download does not start automatically, click Download.
Verification
You have the spreadsheet listing the installed packages for the selected hosts downloaded on
your machine.
10.8. CREATING A REPORT TEMPLATE TO MONITOR ENTITLEMENTS
You can use a report template to return a list of hosts with a certain subscription and to display the
number of cores for those hosts. For more information about writing templates, see Appendix A,
Template writing reference.
Procedure
1. In the Satellite web UI, navigate to Monitor > Reports > Report Templates.
2. Click Create Template.
3. Optional: In the Editor field, use the <%# > tags to add a comment with information that might
Red Hat Satellite 6.15 Managing hosts
68

3. Optional: In the Editor field, use the <%# > tags to add a comment with information that might
be useful for later reference. For example:
<%#
name: Entitlements
snippet: false
model: ReportTemplate
require:
- plugin: katello
version: 3.14.0
-%>
4. Add a line with the load_hosts() macro and populate the macro with the following method and
variables:
<%- load_hosts(includes: [:lifecycle_environment, :operatingsystem, :architecture,
:content_view, :organization, :reported_data, :subscription_facet, :pools =>
[:subscription]]).each_record do |host| -%>
To view a list of variables you can use, click the Help tab and in the Safe mode methods and
variables table, find the Host::Managed row.
5. Add a line with the host.pools variable with the each method, for example:
<%- host.pools.each do |pool| -%>
6. Add a line with the report_row() method to create a report and add the variables that you want
to target as part of the report:
<%- report_row(
'Name': host.name,
'Organization': host.organization,
'Lifecycle Environment': host.lifecycle_environment,
'Content View': host.content_view,
'Host Collections': host.host_collections,
'Virtual': host.virtual,
'Guest of Host': host.hypervisor_host,
'OS': host.operatingsystem,
'Arch': host.architecture,
'Sockets': host.sockets,
'RAM': host.ram,
'Cores': host.cores,
'SLA': host_sla(host),
'Products': host_products(host),
'Subscription Name': sub_name(pool),
'Subscription Type': pool.type,
'Subscription Quantity': pool.quantity,
'Subscription SKU': sub_sku(pool),
'Subscription Contract': pool.contract_number,
'Subscription Account': pool.account_number,
'Subscription Start': pool.start_date,
'Subscription End': pool.end_date,
'Subscription Guest': registered_through(host)
) -%>
CHAPTER 10. USING REPORT TEMPLATES TO MONITOR HOSTS
69

7. Add end statements to the template:
<%- end -%>
<%- end -%>
8. To generate a report, you must add the <%= report_render -%> macro:
<%= report_render -%>
9. Click Submit to save the template.
10.9. REPORT TEMPLATE SAFE MODE
When you create report templates in Satellite, safe mode is enabled by default. Safe mode limits the
macros and variables that you can use in the report template. Safe mode prevents rendering problems
and enforces best practices in report templates. The list of supported macros and variables is available in
the Satellite web UI.
To view the macros and variables that are available, in the Satellite web UI, navigate to Monitor >
Reports > Report Templates and click Create Template. In the Create Template window, click the
Help tab and expand Safe mode methods.
While safe mode is enabled, if you try to use a macro or variable that is not listed in Safe mode
methods, the template editor displays an error message.
To view the status of safe mode in Satellite, in the Satellite web UI, navigate to Administer > Settings
and click the Provisioning tab. Locate the Safemode rendering row to check the value.
Red Hat Satellite 6.15 Managing hosts
70

CHAPTER 11. CONFIGURING HOST COLLECTIONS
A host collection is a group of content hosts. This feature enables you to perform the same action on
multiple hosts at once. These actions can include the installation, removal, and update of packages and
errata, change of assigned lifecycle environment, and change of content view. You can create host
collections to suit your requirements, and those of your company. For example, group hosts in host
collections by function, department, or business unit.
11.1. CREATING A HOST COLLECTION
The following procedure shows how to create host collections.
Procedure
1. In the Satellite web UI, navigate to Hosts > Host Collections.
2. Click New Host Collection.
3. Add the Name of the host collection.
4. Clear Unlimited Content Hosts, and enter the desired maximum number of hosts in the Limit
field.
5. Add the Description of the host collection.
6. Click Save.
CLI procedure
To create a host collection, enter the following command:
# hammer host-collection create \
--name "My_Host_Collection" \
--organization "My_Organization"
11.2. CLONING A HOST COLLECTION
The following procedure shows how to clone a host collection.
Procedure
1. In the Satellite web UI, navigate to Hosts > Host Collections.
2. On the left hand panel, click the host collection you want to clone.
3. Click Copy Collection.
4. Specify a name for the cloned collection.
5. Click Create.
11.3. REMOVING A HOST COLLECTION
Use the following procedure to remove a host collection from Satellite.
CHAPTER 11. CONFIGURING HOST COLLECTIONS
71

Procedure
1. In the Satellite web UI, navigate to Hosts > Host Collections.
2. Select the host collection that you want to remove.
3. Under Select Action, click Remove.
4. Click Delete to remove the host collection.
11.4. ADDING A HOST TO A HOST COLLECTION
You can add a host to a host collection in the Satellite web UI.
Prerequisites
A host must be registered to Red Hat Satellite to add it to a Host Collection. For more information about
registering hosts, see Section 4.3, “Registering hosts by using global registration” .
Note that if you add a host to a host collection, the Satellite auditing system does not log the change.
Procedure
1. In the Satellite web UI, navigate to Hosts > All Hosts.
2. Click the name of the host you want to modify.
3. In the Host collections card, click the vertical ellipsis and select Add host to collections.
4. Select the host collection.
5. Click Add.
CLI procedure
To add a host to a host collection, enter the following command:
# hammer host-collection add-host \
--host-ids My_Host_ID_1 \
--id My_Host_Collection_ID
11.5. ADDING HOSTS TO A HOST COLLECTION IN BULK
You can add multiple hosts to a host collection.
Prerequisites
A host must be registered to Red Hat Satellite to add it to a host collection. For more information about
registering hosts, see Section 4.3, “Registering hosts by using global registration” .
Note that if you add a host to a host collection, the Satellite auditing system does not log the change.
Procedure
1. In the Satellite web UI, navigate to Hosts > Host Collections.
Red Hat Satellite 6.15 Managing hosts
72

2. Select the host collection where the host should be added.
3. On the Hosts tab, select the Add subtab.
4. Select the hosts to be added from the table and click Add Selected.
CLI procedure
To add multiple hosts to a host collection, enter the following command:
# hammer host-collection add-host \
--host-ids My_Host_ID_1,My_Host_ID_2 \
--id My_Host_Collection_ID
11.6. REMOVING A HOST FROM A HOST COLLECTION
The following procedure shows how to remove hosts from host collections.
Note that if you remove a host from a host collection, the host collection record in the database is not
modified so the Satellite auditing system does not log the change.
Procedure
1. In the Satellite web UI, navigate to Hosts > Host Collections.
2. Choose the desired host collection.
3. On the Hosts tab, select the List/Remove subtab.
4. Select the hosts you want to remove from the host collection and click Remove Selected.
11.7. ADDING CONTENT TO A HOST COLLECTION
These steps show how to add content to host collections in Red Hat Satellite.
11.7.1. Adding packages to a host collection
The following procedure shows how to add packages to host collections.
Prerequisites
The content to be added should be available in one of the existing repositories or added prior to
this procedure.
Content should be promoted to the environment where the hosts are assigned.
Procedure
1. In the Satellite web UI, navigate to Hosts > Host Collections.
2. Select the host collection where the package should be added.
3. On the Collection Actions tab, click Package Installation, Removal, and Update.
CHAPTER 11. CONFIGURING HOST COLLECTIONS
73

4. To update all packages, click Update All Packages to use the default method. Alternatively,
select the drop-down icon to the right of the button to select a method to use. Selecting the via
remote execution – customize first menu entry will take you to the Job invocation page where
you can customize the action.
5. Select the Package or Package Group radio button as required.
6. In the field provided, specify the package or package group name. Then click:
Install – to install a new package using the default method. Alternatively, select the drop-
down icon to the right of the button and select a method to use. Selecting the via remote
execution – customize first menu entry will take you to the Job invocation page where you
can customize the action.
Update – to update an existing package in the host collection using the default method.
Alternatively, select the drop-down icon to the right of the button and select a method to
use. Selecting the via remote execution – customize first menu entry will take you to the
Job invocation page where you can customize the action.
11.7.2. Viewing installed packages
Use the following procedure to view the installed packages of a host.
Procedure
1. In the Satellite web UI, navigate to Hosts > All Hosts and select the name of the host.
2. On the Content tab, Packages displays a list of installed packages.
3. To see details of a package, select that package.
The Details tab displays details of the selected package.
The Files tab lists the files contained in the package.
The Dependencies tab lists the dependencies of the package.
The Repositories tab lists the repositories that contain the selected package.
4. You can filter these by Library or Default organization.
11.7.3. Upgrading a package
Use the following procedure to view the installed packages of a host.
Procedure
1. In the Satellite web UI, navigate to Hosts > All Hosts and select the name of the host that
contains the package you want to upgrade.
2. On the Content tab, select Packages.
The Status column displays whether the package is upgradable or Up-to date. You cannot
update an up-to-date package.
3. From the list of packages, choose the package you want to upgrade and click the vertical ellipsis
icon at the end of the line.
Red Hat Satellite 6.15 Managing hosts
74

4. Choose the Apply via Remote Execution to use Remote Execution, or Apply via customized
remote execution if you want to customize the remote execution, for example, to set a time
when it should be applied.
5. Click Submit to upgrade the package.
11.7.4. Removing a package from a host
Use the following procedure to remove an installed package from a host.
Procedure
1. In the Satellite web UI, navigate to Hosts > All Hosts and select the host containing the
package you want to remove.
2. On the Content tab, select Packages.
3. Click the vertical ellipsis icon at the end of the line for the package you want to remove, and
choose the Remove option.
4. Click Submit.
11.7.5. Adding errata to a host collection
The following procedure shows how to add errata to host collections.
Prerequisites
The errata to be added should be available in one of the existing repositories or added prior to
this procedure.
Errata should be promoted to the environment where the hosts are assigned.
Procedure
1. In the Satellite web UI, navigate to Hosts > Host Collections.
2. Select the host collection where the errata should be added.
3. On the Collection Actions tab, click Errata Installation.
4. Select the errata you want to add to the host collection and click Install Selected to use the
default method. Alternatively, select the drop-down icon to the right of the button to select a
method to use. Selecting the via remote execution – customize first menu entry takes you to
the Job invocation page where you can customize the action.
11.7.6. Adding errata to a single host
Use the following procedure to add errata to a host.
Procedure
1. In the Satellite web UI, navigate to Hosts > All Hosts.
2. Select the host you want to add errata to.
CHAPTER 11. CONFIGURING HOST COLLECTIONS
75

3. Click Content and select the Errata tab.
4. Select the errata you want to add to the host, or select the checkbox at the top of the list to add
all installable errata. Click the checkbox next to any errata you wish to remove from a full list.
5. Using the vertical ellipsis icon next to the errata you want to add to the host, select Apply via
Remote Execution to use Remote Execution, or select Apply via customized remote
execution if you want to customize the remote execution.
6. Click Submit.
11.7.7. Applying installable errata
Use the following procedure to view a list of installable errata and select errata to install.
Procedure
1. In the Satellite web UI, navigate to Hosts > All Hosts and select the host you require.
2. If there are errata associated with the host, they are displayed in an Installable Errata card on the
new Host page.
3. On the Content tab, Errata displays installable errata for the chosen host.
4. Click the checkbox for any errata you wish to install.
5. Using the vertical ellipsis icon next to the errata you want to add to the host, select Apply via
Remote Execution to use Remote Execution. Select Apply via customized remote execution
if you want to customize the remote execution.
6. Click Submit.
11.7.8. Filter errata by type and severity
Use the following procedure to filter errata by type or severity.
Procedure
1. In the Satellite web UI, navigate to Hosts > All Hosts and click the name of the host.
2. On the Contents tab, Errata lists the errata associated with the selected host.
3. Click Type to filter errata by type.
4. You can filter to display errata of type Security, Bugfix, or Enhancement
5. Click Severity to filter by severity.
6. You can filter to display errata of severity N/A, Low, Moderate, Important, or Critical.
7. To deselect your choice, return to the list of options and click the selected option again.
You can also use the Errata card on the host page to pre-filter errata for type before display.
11.7.9. Viewing errata by applicable and installable
Red Hat Satellite 6.15 Managing hosts
76

Use the following procedure to view errata by applicable or installable.
Procedure
1. In the Satellite web UI, navigate to Hosts > All Hosts.
2. Select the host name.
3. Click the Overview tab. Under the Errata card, there are two types of Errata.
4. Click Applicable to view errata that apply to a package installed on your host.
5. Click Installable to view applicable errata that are available in the host content view and
lifecycle environment.
6. Click the link with number of errata under each type to see the list of all available errata of that
type.
7. Click security advisories, bug fixes, or enhancements under each type to view only the
respective type of errata.
11.7.10. Generating a report for installable and applicable errata
Use the following procedure to generate a report of installable or applicable errata on hosts.
Procedure
1. In the Satellite web UI, navigate to Monitor > Reports > Report Templates.
2. Click Generate for the Host – Applicable Errata template.
3. Optional: To schedule a report, click the calendar icon to the right of the Generate at field and
choose the date and time you want for the generated report.
4. Optional: To send a report to an e-mail address, select the Send report via e-mail checkbox,
and in the Deliver to e-mail addresses field, enter the required e-mail address.
5. Optional: Select another Output format for the report file. The default is CSV.
6. Optional: To limit the report only to hosts found by the search query, click on Hosts filter and
search from the available list of hosts. For a report on all available hosts, leave Hosts filter
empty.
7. Optional: To limit the report only to errata found by the search query, click on Errata filter and
search from the available list of errata. For a report on all available errata, leave Errata filter
empty.
8. From the Installability list, select one of these options:
Applicable to show all applicable errata.
Installable to limit the report exclusively to errata that are accessible in the content view
environments of your host that may be installed.
9. Click Generate. Your browser automatically downloads the report file after Satellite creates it. If
you have selected the Send report via e-mail option, the report is sent to your e-mail address.
CHAPTER 11. CONFIGURING HOST COLLECTIONS
77

11.7.11. Removing content from a host collection
The following procedure shows how to remove packages from host collections.
Procedure
1. Click Hosts > Host Collections.
2. Click the host collection where the package should be removed.
3. On the Collection Actions tab, click Package Installation, Removal, and Update.
4. Select the Package or Package Group radio button as required.
5. In the field provided, specify the package or package group name.
6. Click Remove to remove the package or package group using the default method. Alternatively,
select the drop-down icon to the right of the button and select a method to use. Selecting the
via remote execution - customize first menu entry will take you to the Job invocation page
where you can customize the action.
11.7.12. Changing the lifecycle environment or content view of a host collection
The following procedure shows how to change the assigned lifecycle environment or content view of
host collections.
Procedure
1. In the Satellite web UI, navigate to Hosts > Host Collection.
2. Selection the host collection where the lifecycle environment or content view should be
changed.
3. On the Collection Actions tab, click Change assigned Lifecycle Environment or Content
View.
4. Select the lifecycle environment to be assigned to the host collection.
5. Select the required content view from the list.
6. Click Assign.
NOTE
The changes take effect in approximately 4 hours. To make the changes take
effect immediately, on the host, enter the following command:
# subscription-manager refresh
You can use remote execution to run this command on multiple hosts at the
same time.
Red Hat Satellite 6.15 Managing hosts
78

CHAPTER 12. CONFIGURING AND SETTING UP REMOTE JOBS
Red Hat Satellite supports remote execution of commands on hosts. Using remote execution, you can
perform various tasks on multiple hosts simultaneously.
12.1. REMOTE EXECUTION IN RED HAT SATELLITE
With remote execution, you can run jobs on hosts remotely from Capsules using shell scripts or Ansible
tasks and playbooks.
Use remote execution for the following benefits in Satellite:
Run jobs on multiple hosts at once.
Use variables in your commands for more granular control over the jobs you run.
Use host facts and parameters to populate the variable values.
Specify custom values for templates when you run the command.
Communication for remote execution occurs through Capsule Server, which means that Satellite Server
does not require direct access to the target host, and can scale to manage many hosts.
To use remote execution, you must define a job template. A job template is a command that you want to
apply to remote hosts. You can execute a job template multiple times.
Satellite uses ERB syntax job templates. For more information, see Appendix A, Template writing
reference.
By default, Satellite includes several job templates for shell scripts and Ansible. For more information,
see Setting up Job Templates in Managing hosts.
Additional resources
See Executing a Remote Job in Managing hosts.
12.2. REMOTE EXECUTION WORKFLOW
For custom Ansible roles that you create, or roles that you download, you must install the package
containing the roles on your Capsule Server. Before you can use Ansible roles, you must import the roles
into Satellite from the Capsule where they are installed.
When you run a remote job on hosts, for every host, Satellite performs the following actions to find a
remote execution Capsule to use.
Satellite searches only for Capsules that have the remote execution feature enabled.
1. Satellite finds the host’s interfaces that have the Remote execution checkbox selected.
2. Satellite finds the subnets of these interfaces.
3. Satellite finds remote execution Capsules assigned to these subnets.
4. From this set of Capsules, Satellite selects the Capsule that has the least number of running
CHAPTER 12. CONFIGURING AND SETTING UP REMOTE JOBS
79

4. From this set of Capsules, Satellite selects the Capsule that has the least number of running
jobs. By doing this, Satellite ensures that the jobs load is balanced between remote execution
Capsules.
If you have enabled Prefer registered through Capsule for remote execution, Satellite runs the REX
job using the Capsule the host is registered to.
By default, Prefer registered through Capsule for remote execution is set to No. To enable it, in the
Satellite web UI, navigate to Administer > Settings, and on the Content tab, set Prefer registered
through Capsule for remote execution to Yes. This ensures that Satellite performs REX jobs on hosts
by the Capsule to which they are registered to.
If Satellite does not find a remote execution Capsule at this stage, and if the Fallback to Any Capsule
setting is enabled, Satellite adds another set of Capsules to select the remote execution Capsule from.
Satellite selects the most lightly loaded Capsule from the following types of Capsules that are assigned
to the host:
DHCP, DNS and TFTP Capsules assigned to the host’s subnets
DNS Capsule assigned to the host’s domain
Realm Capsule assigned to the host’s realm
Puppet server Capsule
Puppet CA Capsule
OpenSCAP Capsule
If Satellite does not find a remote execution Capsule at this stage, and if the Enable Global Capsule
setting is enabled, Satellite selects the most lightly loaded remote execution Capsule from the set of all
Capsules in the host’s organization and location to execute a remote job.
12.3. PERMISSIONS FOR REMOTE EXECUTION
You can control which roles can run which jobs within your infrastructure, including which hosts they can
target. The remote execution feature provides two built-in roles:
Remote Execution Manager: Can access all remote execution features and functionality.
Remote Execution User: Can only run jobs.
You can clone the Remote Execution User role and customize its filter for increased granularity. If you
adjust the filter with the view_job_templates permission on a customized role, you can only see and
trigger jobs based on matching job templates. You can use the view_hosts and view_smart_proxies
permissions to limit which hosts or Capsules are visible to the role.
The execute_template_invocation permission is a special permission that is checked immediately
before execution of a job begins. This permission defines which job template you can run on a particular
host. This allows for even more granularity when specifying permissions.
You can run remote execution jobs against Red Hat Satellite and Capsule registered as hosts to
Red Hat Satellite with the execute_jobs_on_infrastructure_hosts permission. Standard Manager and
Site Manager roles have this permission by default. If you use either the Manager or Site Manager role,
or if you use a custom role with the execute_jobs_on_infrastructure_hosts permission, you can
execute remote jobs against registered Red Hat Satellite and Capsule hosts.
Red Hat Satellite 6.15 Managing hosts
80

For more information on working with roles and permissions, see Creating and Managing Roles in
Administering Red Hat Satellite .
The following example shows filters for the execute_template_invocation permission:
name = Reboot and host.name = staging.example.com
name = Reboot and host.name ~ *.staging.example.com
name = "Restart service" and host_group.name = webservers
Use the first line in this example to apply the Reboot template to one selected host. Use the second line
to define a pool of hosts with names ending with .staging.example.com. Use the third line to bind the
template with a host group.
NOTE
Permissions assigned to users with these roles can change over time. If you have already
scheduled some jobs to run in the future, and the permissions change, this can result in
execution failure because permissions are checked immediately before job execution.
12.4. TRANSPORT MODES FOR REMOTE EXECUTION
You can configure your Satellite to use two different modes of transport for remote job execution. You
can configure single Capsule to use either one mode or the other but not both.
Push-based transport
On Capsules in ssh mode, remote execution uses the SSH service to transport job details. This is the
default transport mode. The SSH service must be enabled and active on the target hosts. The
remote execution Capsule must have access to the SSH port on the target hosts. Unless you have a
different setting, the standard SSH port is 22.
This transport mode supports both Script and Ansible providers.
Pull-based transport
On Capsules in pull-mqtt mode, remote execution uses Message Queueing Telemetry Transport
(MQTT) to initiate the job execution it receives from Satellite Server. The host subscribes to the
MQTT broker on Capsule for job notifications using the yggdrasil pull client. After the host receives
a notification from the MQTT broker, it pulls job details from Capsule over HTTPS, runs the job, and
reports results back to Capsule.
This transport mode supports the Script provider only.
To use the pull-mqtt mode, you must enable it on Capsule Server and configure the pull client on
hosts.
NOTE
If your Capsule already uses the pull-mqtt mode and you want to switch back to the ssh
mode, run this satellite-installer command:
# satellite-installer --foreman-proxy-plugin-remote-execution-script-mode=ssh
Additional resources
To enable pull mode on Capsule Server, see Configuring pull-based transport for remote
CHAPTER 12. CONFIGURING AND SETTING UP REMOTE JOBS
81

To enable pull mode on Capsule Server, see Configuring pull-based transport for remote
execution in Installing Capsule Server .
To enable pull mode on a registered host, continue with Section 12.5, “Configuring a host to use
the pull client”.
To enable pull mode on a new host, continue with the following:
Section 2.1, “Creating a host in Red Hat Satellite”
Section 4.3, “Registering hosts by using global registration”
12.5. CONFIGURING A HOST TO USE THE PULL CLIENT
For Capsules configured to use pull-mqtt mode, hosts can subscribe to remote jobs using the remote
execution pull client. Hosts do not require an SSH connection from their Capsule Server.
Prerequisites
You have registered the host to Satellite.
The Capsule through which the host is registered is configured to use pull-mqtt mode. For more
information, see Configuring pull-based transport for remote execution in Installing Capsule
Server.
Red Hat Satellite Client 6 repository for the operating system version of the host is
synchronized on Satellite Server, available in the content view and the lifecycle environment of
the host, and enabled for the host. For more information, see Changing the repository sets
status for a host in Satellite in Managing content.
The host can communicate with its Capsule over MQTT using port 1883.
The host can communicate with its Capsule over HTTPS.
Procedure
Install the katello-pull-transport-migrate package on your host:
On Red Hat Enterprise Linux 9 and Red Hat Enterprise Linux 8 hosts:
# dnf install katello-pull-transport-migrate
On Red Hat Enterprise Linux 7 hosts:
# yum install katello-pull-transport-migrate
The package installs foreman_ygg_worker and yggdrasil as dependencies, configures the
yggdrasil client, and starts the pull client worker on the host.
Verification
Check the status of the yggdrasild service:
# systemctl status yggdrasild
Red Hat Satellite 6.15 Managing hosts
82

12.6. CREATING A JOB TEMPLATE
Use this procedure to create a job template. To use the CLI instead of the Satellite web UI, see the CLI
procedure.
Procedure
1. In the Satellite web UI, navigate to Hosts > Templates > Job templates.
2. Click New Job Template.
3. Click the Template tab, and in the Name field, enter a unique name for your job template.
4. Select Default to make the template available for all organizations and locations.
5. Create the template directly in the template editor or upload it from a text file by clicking
Import.
6. Optional: In the Audit Comment field, add information about the change.
7. Click the Job tab, and in the Job category field, enter your own category or select from the
default categories listed in Default Job Template Categories in Managing hosts.
8. Optional: In the Description Format field, enter a description template. For example, Install
package %{package_name}. You can also use %{template_name} and %{job_category} in
your template.
9. From the Provider Type list, select SSH for shell scripts and Ansible for Ansible tasks or
playbooks.
10. Optional: In the Timeout to kill field, enter a timeout value to terminate the job if it does not
complete.
11. Optional: Click Add Input to define an input parameter. Parameters are requested when
executing the job and do not have to be defined in the template. For examples, see the Help
tab.
12. Optional: Click Foreign input set to include other templates in this job.
13. Optional: In the Effective user area, configure a user if the command cannot use the default
remote_execution_effective_user setting.
14. Optional: If this template is a snippet to be included in other templates, click the Type tab and
select Snippet.
15. Optional: If you use the Ansible provider, click the Ansible tab. Select Enable Ansible Callback
to allow hosts to send facts, which are used to create configuration reports, back to Satellite
after a job finishes.
16. Click the Location tab and add the locations where you want to use the template.
17. Click the Organizations tab and add the organizations where you want to use the template.
18. Click Submit to save your changes.
You can extend and customize job templates by including other templates in the template syntax. For
CHAPTER 12. CONFIGURING AND SETTING UP REMOTE JOBS
83

You can extend and customize job templates by including other templates in the template syntax. For
more information, see Template Writing Reference and Job Template Examples and Extensions in
Managing hosts.
CLI procedure
To create a job template using a template-definition file, enter the following command:
# hammer job-template create \
--file "Path_to_My_Template_File" \
--job-category "My_Category_Name" \
--name "My_Template_Name" \
--provider-type SSH
12.7. IMPORTING AN ANSIBLE PLAYBOOK BY NAME
You can import Ansible playbooks by name to Satellite from collections installed on Capsule. Satellite
creates a job template from the imported playbook and places the template in the Ansible Playbook -
Imported job category.
If you have a custom collection, place it in
/etc/ansible/collections/ansible_collections/My_Namespace/My_Collection.
Prerequisites
Ansible plugin is enabled.
Your Satellite account has a role that grants the import_ansible_playbooks permission.
Procedure
1. Fetch the available Ansible playbooks by using the following API request:
# curl -X GET -H 'Content-Type: application/json'
https://satellite.example.com/ansible/api/v2/ansible_playbooks/fetch?
proxy_id=My_capsule_ID
2. Select the Ansible playbook you want to import and note its name.
3. Import the Ansible playbook by its name:
# curl -X PUT -H 'Content-Type: application/json' -d '{ "playbook_names":
["My_Playbook_Name"] }'
https://satellite.example.com/ansible/api/v2/ansible_playbooks/sync?
proxy_id=My_capsule_ID
You get a notification in the Satellite web UI after the import completes.
Next steps
You can run the playbook by executing a remote job from the created job template. For more
information, see Section 12.22, “Executing a remote job”.
Red Hat Satellite 6.15 Managing hosts
84

12.8. IMPORTING ALL AVAILABLE ANSIBLE PLAYBOOKS
You can import all the available Ansible playbooks to Satellite from collections installed on Capsule.
Satellite creates job templates from the imported playbooks and places the templates in the Ansible
Playbook - Imported job category.
If you have a custom collection, place it in
/etc/ansible/collections/ansible_collections/My_Namespace/My_Collection.
Prerequisites
Ansible plugin is enabled.
Your Satellite account has a role that grants the import_ansible_playbooks permission.
Procedure
Import the Ansible playbooks by using the following API request:
# curl -X PUT -H 'Content-Type: application/json'
https://satellite.example.com/ansible/api/v2/ansible_playbooks/sync?
proxy_id=My_capsule_ID
You get a notification in the Satellite web UI after the import completes.
Next steps
You can run the playbooks by executing a remote job from the created job templates. For more
information, see Section 12.22, “Executing a remote job”.
12.9. CONFIGURING THE FALLBACK TO ANY CAPSULE REMOTE
EXECUTION SETTING IN SATELLITE
You can enable the Fallback to Any Capsule setting to configure Satellite to search for remote
execution Capsules from the list of Capsules that are assigned to hosts. This can be useful if you need to
run remote jobs on hosts that have no subnets configured or if the hosts' subnets are assigned to
Capsules that do not have the remote execution feature enabled.
If the Fallback to Any Capsule setting is enabled, Satellite adds another set of Capsules to select the
remote execution Capsule from. Satellite also selects the most lightly loaded Capsule from the set of all
Capsules assigned to the host, such as the following:
DHCP, DNS and TFTP Capsules assigned to the host’s subnets
DNS Capsule assigned to the host’s domain
Realm Capsule assigned to the host’s realm
Puppet server Capsule
Puppet CA Capsule
OpenSCAP Capsule
CHAPTER 12. CONFIGURING AND SETTING UP REMOTE JOBS
85

Procedure
1. In the Satellite web UI, navigate to Administer > Settings.
2. Click Remote Execution.
3. Configure the Fallback to Any Capsule setting.
CLI procedure
Enter the hammer settings set command on Satellite to configure the Fallback to Any
Capsule setting. To set the value to true, enter the following command:
# hammer settings set \
--name=remote_execution_fallback_proxy \
--value=true
12.10. CONFIGURING THE GLOBAL CAPSULE REMOTE EXECUTION
SETTING IN SATELLITE
By default, Satellite searches for remote execution Capsules in hosts' organizations and locations
regardless of whether Capsules are assigned to hosts' subnets or not. You can disable the Enable
Global Capsule setting if you want to limit the search to the Capsules that are assigned to hosts'
subnets.
If the Enable Global Capsule setting is enabled, Satellite adds another set of Capsules to select the
remote execution Capsule from. Satellite also selects the most lightly loaded remote execution Capsule
from the set of all Capsules in the host’s organization and location to execute a remote job.
Procedure
1. In the Satellite web UI, navigate to Administer > Settings.
2. Click Remote Execution.
3. Configure the Enable Global Capsule setting.
CLI procedure
Enter the hammer settings set command on Satellite to configure the Enable Global Capsule
setting. To set the value to true, enter the following command:
# hammer settings set \
--name=remote_execution_global_proxy \
--value=true
12.11. SETTING AN ALTERNATIVE DIRECTORY FOR REMOTE
EXECUTION JOBS IN PUSH MODE
By default, Satellite uses the /var/tmp directory on hosts for remote execution jobs in push mode. If the
/var/tmp directory on your host is mounted with the noexec flag, Satellite cannot execute remote
execution job scripts in this directory. You can use satellite-installer to set an alternative directory for
executing remote execution jobs in push mode.
Red Hat Satellite 6.15 Managing hosts
86

Procedure
1. On your host, create a new directory:
# mkdir /My_Remote_Working_Directory
2. Copy the SELinux context from the default /var/tmp directory:
# chcon --reference=/var/tmp /My_Remote_Working_Directory
3. Configure your Satellite Server or Capsule Server to use the new directory:
# satellite-installer \
--foreman-proxy-plugin-remote-execution-script-remote-working-dir
/My_Remote_Working_Directory
12.12. SETTING AN ALTERNATIVE DIRECTORY FOR REMOTE
EXECUTION JOBS IN PULL MODE
By default, Satellite uses the /run directory on hosts for remote execution jobs in pull mode. If the /run
directory on your host is mounted with the noexec flag, Satellite cannot execute remote execution job
scripts in this directory. You can use the yggdrasild service to set an alternative directory for executing
remote execution jobs in pull mode.
Procedure
On your host, perform these steps:
1. Create a new directory:
# mkdir /My_Remote_Working_Directory
2. Access the yggdrasild service configuration:
# systemctl edit yggdrasild
3. Specify the alternative directory by adding the following line to the configuration:
Environment=FOREMAN_YGG_WORKER_WORKDIR=/My_Remote_Working_Directory
4. Restart the yggdrasild service:
# systemctl restart yggdrasild
12.13. ALTERING THE PRIVILEGE ELEVATION METHOD
By default, push-based remote execution uses sudo to switch from the SSH user to the effective user
that executes the script on your host. In some situations, you might require to use another method, such
as su or dzdo. You can globally configure an alternative method in your Satellite settings.
Prerequisites
Your user account has a role assigned that grants the view_settings and edit_settings
CHAPTER 12. CONFIGURING AND SETTING UP REMOTE JOBS
87

Your user account has a role assigned that grants the view_settings and edit_settings
permissions.
If you want to use dzdo for Ansible jobs, ensure the community.general Ansible collection,
which contains the required dzdo become plugin, is installed. For more information, see
Installing collections in Ansible documentation.
Procedure
1. Navigate to Administer > Settings.
2. Select the Remote Execution tab.
3. Click the value of the Effective User Method setting.
4. Select the new value.
5. Click Submit.
12.14. DISTRIBUTING SSH KEYS FOR REMOTE EXECUTION
For Capsules in ssh mode, remote execution connections are authenticated using SSH. The public SSH
key from Capsule must be distributed to its attached hosts that you want to manage.
Ensure that the SSH service is enabled and running on the hosts. Configure any network or host-based
firewalls to enable access to port 22.
Use one of the following methods to distribute the public SSH key from Capsule to target hosts:
1. Section 12.15, “Distributing SSH keys for remote execution manually” .
2. Section 12.17, “Using the Satellite API to obtain SSH keys for remote execution” .
3. Section 12.18, “Configuring a Kickstart template to distribute SSH keys during provisioning” .
4. For new Satellite hosts, you can deploy SSH keys to Satellite hosts during registration using the
global registration template. For more information, see Registering a Host to Red Hat Satellite
Using the Global Registration Template in Managing hosts.
Satellite distributes SSH keys for the remote execution feature to the hosts provisioned from Satellite
by default.
If the hosts are running on Amazon Web Services, enable password authentication. For more
information, see New User Accounts.
12.15. DISTRIBUTING SSH KEYS FOR REMOTE EXECUTION MANUALLY
To distribute SSH keys manually, complete the following steps:
Procedure
Copy the SSH pub key from your Capsule to your target host:
# ssh-copy-id -i ~foreman-proxy/.ssh/id_rsa_foreman_proxy.pub root@client.example.com
Red Hat Satellite 6.15 Managing hosts
88

Repeat this step for each target host you want to manage.
Verification
To confirm that the key was successfully copied to the target host, enter the following
command on Capsule:
# ssh -i ~foreman-proxy/.ssh/id_rsa_foreman_proxy [email protected]ample.com
12.16. ADDING A PASSPHRASE TO SSH KEY USED FOR REMOTE
EXECUTION
By default, Capsule uses a non-passphrase protected SSH key to execute remote jobs on hosts. You
can protect the SSH key with a passphrase by following this procedure.
Procedure
On your Satellite Server or Capsule Server, use ssh-keygen to add a passphrase to your SSH
key:
# ssh-keygen -p -f ~foreman-proxy/.ssh/id_rsa_foreman_proxy
Next steps
Users now must use a passphrase when running remote execution jobs on hosts.
12.17. USING THE SATELLITE API TO OBTAIN SSH KEYS FOR REMOTE
EXECUTION
To use the Satellite API to download the public key from Capsule, complete this procedure on each
target host.
Procedure
1. On the target host, create the ~/.ssh directory to store the SSH key:
# mkdir ~/.ssh
2. Download the SSH key from Capsule:
# curl https://capsule.example.com:9090/ssh/pubkey >> ~/.ssh/authorized_keys
3. Configure permissions for the ~/.ssh directory:
# chmod 700 ~/.ssh
4. Configure permissions for the authorized_keys file:
# chmod 600 ~/.ssh/authorized_keys
CHAPTER 12. CONFIGURING AND SETTING UP REMOTE JOBS
89

12.18. CONFIGURING A KICKSTART TEMPLATE TO DISTRIBUTE SSH
KEYS DURING PROVISIONING
You can add a remote_execution_ssh_keys snippet to your custom Kickstart template to deploy SSH
keys to hosts during provisioning. Kickstart templates that Satellite ships include this snippet by default.
Satellite copies the SSH key for remote execution to the systems during provisioning.
Procedure
To include the public key in newly-provisioned hosts, add the following snippet to the Kickstart
template that you use:
<%= snippet 'remote_execution_ssh_keys' %>
12.19. CONFIGURING A KEYTAB FOR KERBEROS TICKET GRANTING
TICKETS
Use this procedure to configure Satellite to use a keytab to obtain Kerberos ticket granting tickets. If
you do not set up a keytab, you must manually retrieve tickets.
Procedure
1. Find the ID of the foreman-proxy user:
# id -u foreman-proxy
2. Modify the umask value so that new files have the permissions 600:
# umask 077
3. Create the directory for the keytab:
# mkdir -p "/var/kerberos/krb5/user/My_User_ID"
4. Create a keytab or copy an existing keytab to the directory:
# cp My_Client.keytab /var/kerberos/krb5/user/My_User_ID/client.keytab
5. Change the directory owner to the foreman-proxy user:
# chown -R foreman-proxy:foreman-proxy "/var/kerberos/krb5/user/My_User_ID"
6. Ensure that the keytab file is read-only:
# chmod -wx "/var/kerberos/krb5/user/My_User_ID/client.keytab"
7. Restore the SELinux context:
# restorecon -RvF /var/kerberos/krb5
Red Hat Satellite 6.15 Managing hosts
90

12.20. CONFIGURING KERBEROS AUTHENTICATION FOR REMOTE
EXECUTION
You can use Kerberos authentication to establish an SSH connection for remote execution on Satellite
hosts.
Prerequisites
Enroll Satellite Server on the Kerberos server
Enroll the Satellite target host on the Kerberos server
Configure and initialize a Kerberos user account for remote execution
Ensure that the foreman-proxy user on Satellite has a valid Kerberos ticket granting ticket
Procedure
1. To install and enable Kerberos authentication for remote execution, enter the following
command:
# satellite-installer --foreman-proxy-plugin-remote-execution-script-ssh-kerberos-auth true
2. To edit the default user for remote execution, in the Satellite web UI, navigate to Administer >
Settings and click the Remote Execution tab. In the SSH User row, edit the second column and
add the user name for the Kerberos account.
3. Navigate to remote_execution_effective_user and edit the second column to add the user
name for the Kerberos account.
Verification
To confirm that Kerberos authentication is ready to use, run a remote job on the host. For more
information, see Executing a Remote Job in Managing hosts.
12.21. SETTING UP JOB TEMPLATES
Satellite provides default job templates that you can use for executing jobs. To view the list of job
templates, navigate to Hosts > Templates > Job templates. If you want to use a template without
making changes, proceed to Executing a Remote Job in Managing hosts.
You can use default templates as a base for developing your own. Default job templates are locked for
editing. Clone the template and edit the clone.
Procedure
1. To clone a template, in the Actions column, select Clone.
2. Enter a unique name for the clone and click Submit to save the changes.
Job templates use the Embedded Ruby (ERB) syntax. For more information about writing templates,
see the Template Writing Reference in Managing hosts.
Ansible considerations
CHAPTER 12. CONFIGURING AND SETTING UP REMOTE JOBS
91

To create an Ansible job template, use the following procedure and instead of ERB syntax, use YAML
syntax. Begin the template with ---. You can embed an Ansible playbook YAML file into the job template
body. You can also add ERB syntax to customize your YAML Ansible template. You can also import
Ansible playbooks in Satellite. For more information, see Synchronizing Repository Templates in
Managing hosts.
Parameter variables
At run time, job templates can accept parameter variables that you define for a host. Note that only the
parameters visible on the Parameters tab at the host’s edit page can be used as input parameters for
job templates.
12.22. EXECUTING A REMOTE JOB
You can execute a job that is based on a job template against one or more hosts.
To use the CLI instead of the Satellite web UI, see the CLI procedure.
Procedure
1. In the Satellite web UI, navigate to Monitor > Jobs and click Run job.
2. Select the Job category and the Job template you want to use, then click Next.
3. Select hosts on which you want to run the job. If you do not select any hosts, the job will run on
all hosts you can see in the current context.
NOTE
If you want to select a host group and all of its subgroups, it is not sufficient to
select the host group as the job would only run on hosts directly in that group
and not on hosts in subgroups. Instead, you must either select the host group and
all of its subgroups or use this search query:
hostgroup_fullname ~ "My_Host_Group*"
Replace My_Host_Group with the name of the top-level host group.
4. If required, provide inputs for the job template. Different templates have different inputs and
some templates do not have any inputs. After entering all the required inputs, click Next.
5. Optional: To configure advanced settings for the job, fill in the Advanced fields. To learn more
about advanced settings, see Section 12.23, “Advanced settings in the job wizard” .
6. Click Next.
7. Schedule time for the job.
To execute the job immediately, keep the pre-selected Immediate execution.
To execute the job in future time, select Future execution.
To execute the job on regular basis, select Recurring execution.
8. Optional: If you selected future or recurring execution, select the Query type, otherwise click
Red Hat Satellite 6.15 Managing hosts
92

8. Optional: If you selected future or recurring execution, select the Query type, otherwise click
Next.
Static query means that job executes on the exact list of hosts that you provided.
Dynamic query means that the list of hosts is evaluated just before the job is executed. If
you entered the list of hosts based on some filter, the results can be different from when
you first used that filter.
Click Next after you have selected the query type.
9. Optional: If you selected future or recurring execution, provide additional details:
For Future execution, enter the Starts at date and time. You also have the option to select
the Starts before date and time. If the job cannot start before that time, it will be canceled.
For Recurring execution, select the start date and time, frequency, and the condition for
ending the recurring job. You can choose the recurrence to never end, end at a certain time,
or end after a given number of repetitions. You can also add Purpose - a special label for
tracking the job. There can only be one active job with a given purpose at a time.
Click Next after you have entered the required information.
10. Review job details. You have the option to return to any part of the job wizard and edit the
information.
11. Click Submit to schedule the job for execution.
CLI procedure
1. Enter the following command on Satellite:
# hammer settings set \
--name=remote_execution_global_proxy \
--value=false
2. Find the ID of the job template you want to use:
# hammer job-template list
3. Show the template details to see parameters required by your template:
# hammer job-template info --id My_Template_ID
4. Execute a remote job with custom parameters:
# hammer job-invocation create \
--inputs My_Key_1="My_Value_1",My_Key_2="My_Value_2",... \
--job-template "My_Template_Name" \
--search-query "My_Search_Query"
Replace My_Search_Query with the filter expression that defines hosts, for example "name ~
My_Pattern". For more information about executing remote commands with hammer, enter
hammer job-template --help and hammer job-invocation --help.
CHAPTER 12. CONFIGURING AND SETTING UP REMOTE JOBS
93

12.23. ADVANCED SETTINGS IN THE JOB WIZARD
Some job templates require you to enter advanced settings. Some of the advanced settings are only
visible to certain job templates. Below is the list of general advanced settings.
SSH user
A user to be used for connecting to the host through SSH.
Effective user
A user to be used for executing the job. By default it is the SSH user. If it differs from the SSH user,
su or sudo, depending on your settings, is used to switch the accounts.
If you set an effective user in the advanced settings, Ansible sets ansible_become_user to
your input value and ansible_become to true. This means that if you use the parameters
become: true and become_user: My_User within a playbook, these will be overwritten by
Satellite.
If your SSH user and effective user are identical, Satellite does not overwrite the
become_user. Therefore, you can set a custom become_user in your Ansible playbook.
Description
A description template for the job.
Timeout to kill
Time in seconds from the start of the job after which the job should be killed if it is not finished
already.
Time to pickup
Time in seconds after which the job is canceled if it is not picked up by a client. This setting only
applies to hosts using pull-mqtt transport.
Password
Is used if SSH authentication method is a password instead of the SSH key.
Private key passphrase
Is used if SSH keys are protected by a passphrase.
Effective user password
Is used if effective user is different from the ssh user.
Concurrency level
Defines the maximum number of jobs executed at once. This can prevent overload of system
resources in a case of executing the job on a large number of hosts.
Execution ordering
Determines the order in which the job is executed on hosts. It can be alphabetical or randomized.
12.24. USING EXTENDED CRON LINES
When scheduling a cron job with remote execution, you can use an extended cron line to specify the
cadence of the job. The standard cron line contains five fields that specify minute, hour, day of the
month, month, and day of the week. For example, 0 5 * * * stands for every day at 5 AM.
The extended cron line provides the following features:
You can use # to specify a concrete week day in a month
For example:
Red Hat Satellite 6.15 Managing hosts
94

0 0 * * mon#1 specifies first Monday of the month
0 0 * * fri#3,fri#4 specifies 3rd and 4th Fridays of the month
0 7 * * fri#-1 specifies the last Friday of the month at 07:00
0 7 * * fri#L also specifies the last Friday of the month at 07:00
0 23 * * mon#2,tue specifies the 2nd Monday of the month and every Tuesday, at 23:00
You can use % to specify every n-th day of the month
For example:
9 0 * * sun%2 specifies every other Sunday at 00:09
0 0 * * sun%2+1 specifies every odd Sunday
9 0 * * sun%2,tue%3 specifies every other Sunday and every third Tuesday
You can use & to specify that the day of the month has to match the day of the week
For example:
0 0 30 * 1& specifies 30th day of the month, but only if it is Monday
12.25. SCHEDULING A RECURRING ANSIBLE JOB FOR A HOST
You can schedule a recurring job to run Ansible roles on hosts.
Prerequisites
Ensure you have the view_foreman_tasks, view_job_invocations, and
view_recurring_logics permissions.
Procedure
1. In the Satellite web UI, navigate to Hosts > All Hosts and select the target host on which you
want to execute a remote job.
2. On the Ansible tab, select Jobs.
3. Click Schedule recurring job.
4. Define the repetition frequency, start time, and date of the first run in the Create New
Recurring Ansible Run window.
5. Click Submit.
6. Optional: View the scheduled Ansible job in host overview or by navigating to Ansible > Jobs.
12.26. SCHEDULING A RECURRING ANSIBLE JOB FOR A HOST GROUP
You can schedule a recurring job to run Ansible roles on host groups.
CHAPTER 12. CONFIGURING AND SETTING UP REMOTE JOBS
95

Procedure
1. In the Satellite web UI, navigate to Configure > Host groups.
2. In the Actions column, select Configure Ansible Job for the host group you want to schedule
an Ansible roles run for.
3. Click Schedule recurring job.
4. Define the repetition frequency, start time, and date of the first run in the Create New
Recurring Ansible Run window.
5. Click Submit.
12.27. MONITORING JOBS
You can monitor the progress of a job while it is running. This can help in any troubleshooting that may
be required.
Ansible jobs run on batches of 100 hosts, so you cannot cancel a job running on a specific host. A job
completes only after the Ansible playbook runs on all hosts in the batch.
Procedure
1. In the Satellite web UI, navigate to Monitor > Jobs. This page is automatically displayed if you
triggered the job with the Execute now setting. To monitor scheduled jobs, navigate to
Monitor > Jobs and select the job run you wish to inspect.
2. On the Job page, click the Hosts tab. This displays the list of hosts on which the job is running.
3. In the Host column, click the name of the host that you want to inspect. This displays the Detail
of Commands page where you can monitor the job execution in real time.
4. Click Back to Job at any time to return to the Job Details page.
CLI procedure
1. Find the ID of a job:
# hammer job-invocation list
2. Monitor the job output:
# hammer job-invocation output \
--host My_Host_Name \
--id My_Job_ID
3. Optional: To cancel a job, enter the following command:
# hammer job-invocation cancel \
--id My_Job_ID
12.28. USING ANSIBLE PROVIDER FOR PACKAGE AND ERRATA
Red Hat Satellite 6.15 Managing hosts
96

12.28. USING ANSIBLE PROVIDER FOR PACKAGE AND ERRATA
ACTIONS
By default, Satellite is configured to use the Script provider templates for remote execution jobs. If you
prefer using Ansible job templates for your remote jobs, you can configure Satellite to use them by
default for remote execution features associated with them.
NOTE
Remember that Ansible job templates only work when remote execution is configured for
ssh mode.
Procedure
1. In the Satellite web UI, navigate to Administer > Remote Execution Features.
2. Find each feature whose name contains by_search.
3. Change the job template for these features from Katello Script Default to Katello Ansible
Default.
4. Click Submit.
Satellite now uses Ansible provider templates for remote execution jobs by which you can perform
package and errata actions. This applies to job invocations from the Satellite web UI as well as by using
hammer job-invocation create with the same remote execution features that you have changed.
12.29. SETTING THE JOB RATE LIMIT ON CAPSULE
You can limit the maximum number of active jobs on a Capsule at a time to prevent performance spikes.
The job is active from the time Capsule first tries to notify the host about the job until the job is finished
on the host.
The job rate limit only applies to mqtt based jobs.
NOTE
The optimal maximum number of active jobs depends on the computing resources of
your Capsule Server. By default, the maximum number of active jobs is unlimited.
Procedure
Set the maximum number of active jobs using satellite-installer:
# satellite-installer \
--foreman-proxy-plugin-remote-execution-script-mqtt-rate-limit MAX_JOBS_NUMBER
For example:
# satellite-installer \
--foreman-proxy-plugin-remote-execution-script-mqtt-rate-limit 200
CHAPTER 12. CONFIGURING AND SETTING UP REMOTE JOBS
97

CHAPTER 13. HOST STATUS IN SATELLITE
In Satellite, each host has a global status that indicates which hosts need attention. Each host also has
sub-statuses that represent status of a particular feature. With any change of a sub-status, the global
status is recalculated and the result is determined by statuses of all sub-statuses.
13.1. HOST GLOBAL STATUS OVERVIEW
The global status represents the overall status of a particular host. The status can have one of three
possible values: OK, Warning, or Error. You can find global status on the Hosts Overview page. The
status displays a small icon next to host name and has a color that corresponds with the status. Hovering
over the icon renders a tooltip with sub-status information to quickly find out more details. To view the
global status for a host, in the Satellite web UI, navigate to Hosts > All Hosts.
OK
No errors were reported by any sub-status. This status is highlighted with the color green.
Warning
While no error was detected, some sub-status raised a warning. For example, there are no
configuration management reports for the host even though the host is configured to send reports.
It is a good practice to investigate any warnings to ensure that your deployment remains healthy.
This status is highlighted with the color yellow.
Error
Some sub-status reports a failure. For example, a run contains some failed resources. This status is
highlighted with the color red.
Search syntax
If you want to search for hosts according to their status, use the syntax for searching in Satellite that is
outlined in the Searching and Bookmarking in Administering Red Hat Satellite , and then build your
searches out using the following status-related examples:
To search for hosts that have an OK status:
global_status = ok
To search for all hosts that deserve attention:
global_status = error or global_status = warning
13.2. HOST SUB-STATUS OVERVIEW
A sub-status monitors only a part of a host’s capabilities.
To view the sub-statuses of a host, in the Satellite web UI, navigate to Hosts > All Hosts and click on the
host whose full status you want to inspect. You can view the global host status next to the name of the
host and the host sub-statuses on the Host status card.
Each sub-status has its own set of possible values that are mapped to the three global status values.
Below are listed sub-statuses that Satellite contains.
Configuration
This sub-status is only relevant if Satellite uses a configuration management system like Ansible,
Red Hat Satellite 6.15 Managing hosts
98
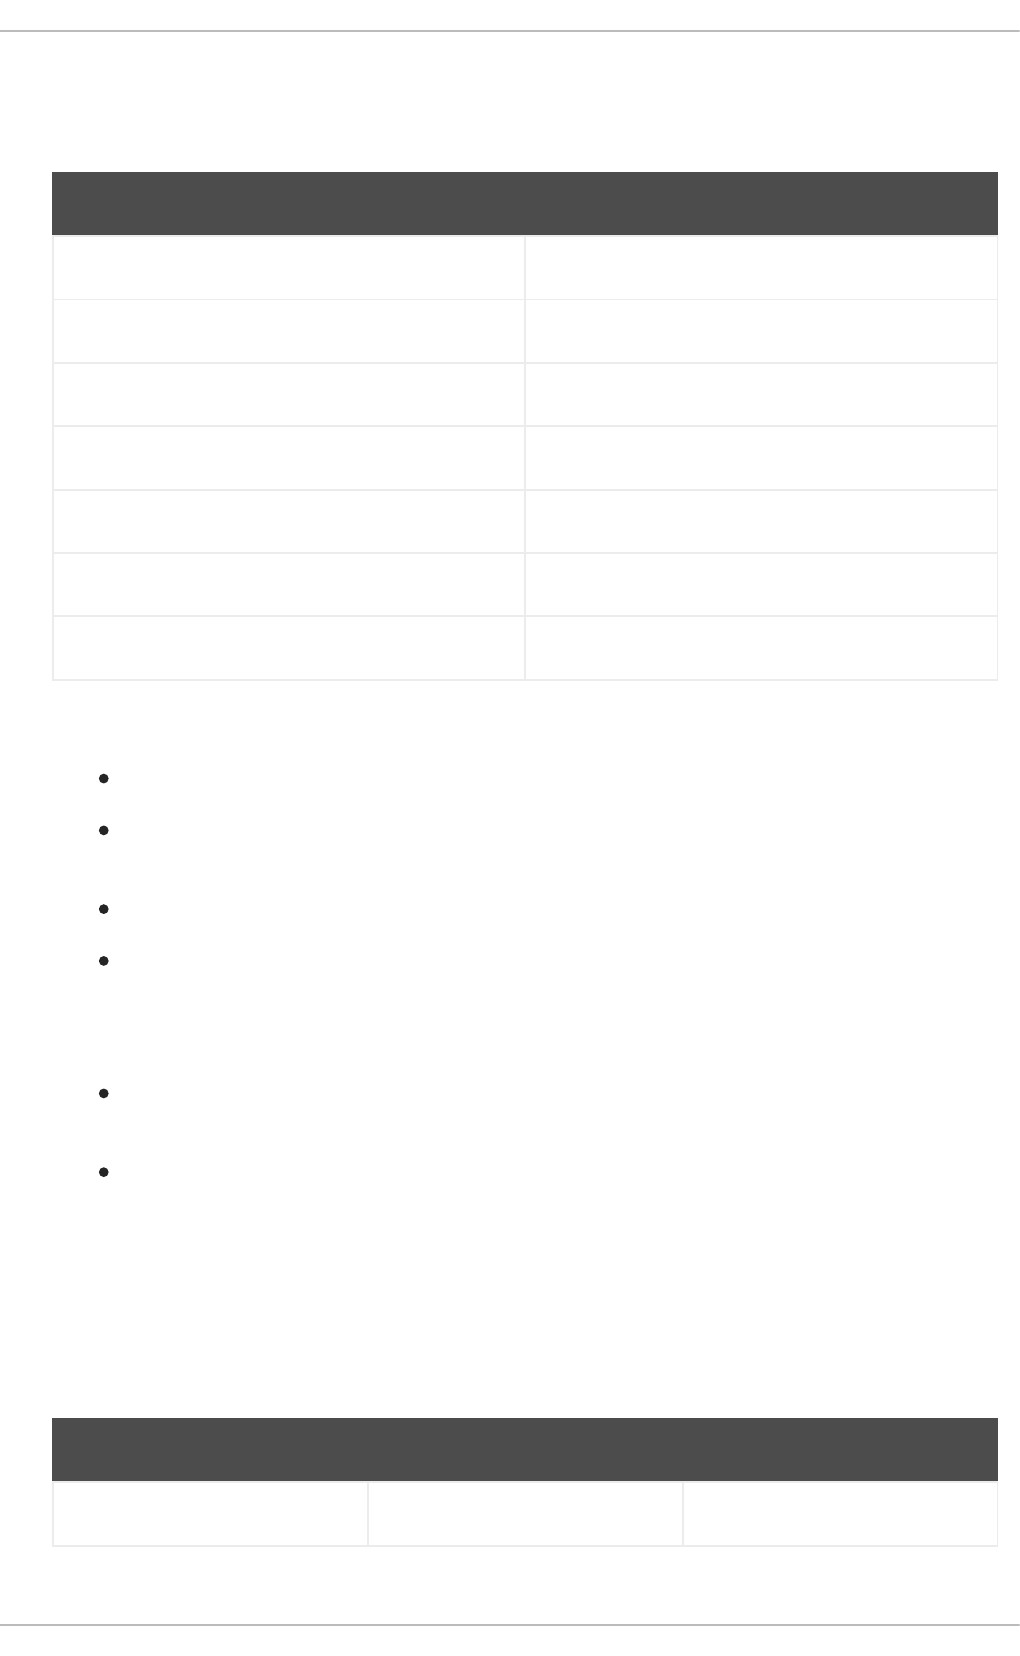
This sub-status is only relevant if Satellite uses a configuration management system like Ansible,
Puppet, or Salt.
Possible values:
Label Global host status
Alerts disabled OK
Active OK
Pending OK
No changes OK
No reports OK / Warning
Out of sync Warning
Error Error
Additional information about the values of this sub-status:
Active: During the last configuration, some resources were applied.
Pending: During the last configuration, some resources would be applied but your
configuration management integration was configured to run in noop mode.
No changes: During the last configuration, nothing changed.
No reports: This can be both a Warning or OK status. When there are no reports but the
host uses an associated Capsule for configuration management or the
always_show_configuration_status setting is set to true, it maps to Warning. Otherwise it
maps to OK.
Error: This indicates an error during configuration. For example, a configuration run failed to
install a package.
Out of sync: A configuration report was not received within the expected interval, based on
the outofsync_interval setting. Reports are identified by an origin and can have different
intervals based upon it.
Build
This sub-status is only relevant for hosts provisioned from Satellite or hosts registered through
global registration.
Possible values:
Label Global host status Number value
Installed OK 0
CHAPTER 13. HOST STATUS IN SATELLITE
99

Pending installation OK 1
Token expired Error 2
Installation error Error 3
Label Global host status Number value
Compliance
Indicates if the host is compliant with OpenSCAP policies.
Possible values:
Label Global host status Number value
Compliant OK 0
Inconclusive Warning 1
At least one incompliant Error 2
OVAL scan
Indicates if there are any vulnerabilities found on the host
Possible values:
Label Global host status Number value
No vulnerabilities found OK 0
Vulnerabilities found Warning 1
Vulnerabilities with available
patch found
Error 2
Execution
Status of the last completed remote execution job.
Possible values:
Label Global host status Number value
Last execution succeeded / No
execution finished yet
OK 0
Last execution failed Error 1
Red Hat Satellite 6.15 Managing hosts
100

Unknown execution status OK 2 or 3
Last execution cancelled OK 4
Label Global host status Number value
Inventory
Indicates if the host is synchronized to Red Hat Hybrid Cloud Console. Satellite Server performs the
synchronization itself but only uploads basic information to Red Hat Hybrid Cloud Console.
Possible values:
Label Global host status Number value
Host was not uploaded to your
RH cloud inventory
Warning 0
Successfully uploaded to your
RH cloud inventory
OK 1
Insights
Indicates if the host is synchronized to Red Hat Hybrid Cloud Console. This synchronization is
performed by the host. The host uploads more information than the Satellite Server.
Possible values:
Label Global host status Number value
Reporting OK 0
Not reporting Error 1
Errata
Indicates if Errata is available on the host.
Possible values:
Label Global host status Number value
Up to date OK 0
Unknown Warning 1
Needed errata Error 2
Needed security errata Error 3
CHAPTER 13. HOST STATUS IN SATELLITE
101

Subscription
Indicates if the host has a valid RHEL subscription.
Possible values:
Label Global host status Number value
Fully entitled OK 0
Partially entitled Warning 1
Unentitled Error 2
Unknown Warning 3
Unsubscribed hypervisor Warning 4
SCA enabled OK 5
Service level
Indicates if a subscription matching your specified Service level syspurpose value can be attached.
Possible values:
Label Global host status Number value
Unknown OK 0
Mismatched Warning 1
Matched OK 2
Not specified OK 3
Role
Indicates if a subscription matching your specified Role syspurpose value can be attached.
Possible values:
Label Global host status Number value
Unknown OK 0
Mismatched Warning 1
Matched OK 2
Not specified OK 3
Red Hat Satellite 6.15 Managing hosts
102

Usage
Indicates if a subscription matching your specified Usage syspurpose value can be attached.
Possible values:
Label Global host status Number value
Unknown OK 0
Mismatched Warning 1
Matched OK 2
Not specified OK 3
Addons
Indicates if a subscription matching your specified Addons syspurpose value can be attached.
Possible values:
Label Global host status Number value
Unknown OK 0
Mismatched Warning 1
Matched OK 2
Not specified OK 3
System purpose
Indicates if a subscription matching your specified syspurpose values can be attached.
Possible values:
Label Global host status Number value
Unknown OK 0
Mismatched Warning 1
Matched OK 2
Not specified OK 3
RHEL Lifecycle
Indicates the current state of the Red Hat Enterprise Linux operating system installed on the host.
CHAPTER 13. HOST STATUS IN SATELLITE
103

Possible values:
Label Global host status Number value
Unknown OK 0
Full support OK 1
Maintenance support OK 2
Approaching end of
maintenance support
Warning 3
Extended support OK 4
Approaching end of support Warning 5
Support ended Error 6
Traces
Indicates if the host needs a reboot or a process restart.
Possible values:
Label Global host status Number value
Unknown Warning -1
Up to date OK 0
Required process restart Error 1
Required reboot Error 2
Search syntax
If you want to search for hosts according to their sub-status, use the syntax for searching in Satellite
that is outlined in the Searching and Bookmarking chapter of the Administering Satellite guide, and then
build your searches out using the following status-related examples:
You search for hosts' configuration sub-statuses based on their last reported state.
For example, to find hosts that have at least one pending resource:
status.pending > 0
To find hosts that restarted some service during last run:
Red Hat Satellite 6.15 Managing hosts
104

status.restarted > 0
To find hosts that have an interesting last run that might indicate something has happened:
status.interesting = true
CHAPTER 13. HOST STATUS IN SATELLITE
105

CHAPTER 14. SYNCHRONIZING TEMPLATE REPOSITORIES
In Satellite, you can synchronize repositories of job templates, provisioning templates, report templates,
and partition table templates between Satellite Server and a version control system or local directory. In
this chapter, a Git repository is used for demonstration purposes.
This section details the workflow for installing and configuring the TemplateSync plugin and performing
exporting and importing tasks.
14.1. ENABLING THE TEMPLATESYNC PLUGIN
Procedure
1. To enable the plugin on your Satellite Server, enter the following command:
# satellite-installer --enable-foreman-plugin-templates
2. To verify that the plugin is installed correctly, ensure Administer > Settings includes the
TemplateSync menu.
14.2. CONFIGURING THE TEMPLATESYNC PLUGIN
In the Satellite web UI, navigate to Administer > Settings > TemplateSync to configure the plugin. The
following table explains the parameters.
NOTE
Some parameters are used only for importing or exporting.
Table 14.1. TemplateSync plugin parameters
Parameter API parameter name Meaning on importing Meaning on exporting
Associate associate
Accepted values:
always, new, never
Associates templates
with an operating
system, organization,
and location based on
metadata.
N/A
Branch branch Specifies the default
branch in Git repository
to read from.
Specifies the default
branch in Git repository
to write to.
Dirname dirname Specifies the
subdirectory under the
repository to read from.
Specifies the
subdirectory under the
repository to write to.
Filter filter Imports only templates
with names that match
this regular expression.
Exports only templates
with names that match
this regular expression.
Red Hat Satellite 6.15 Managing hosts
106
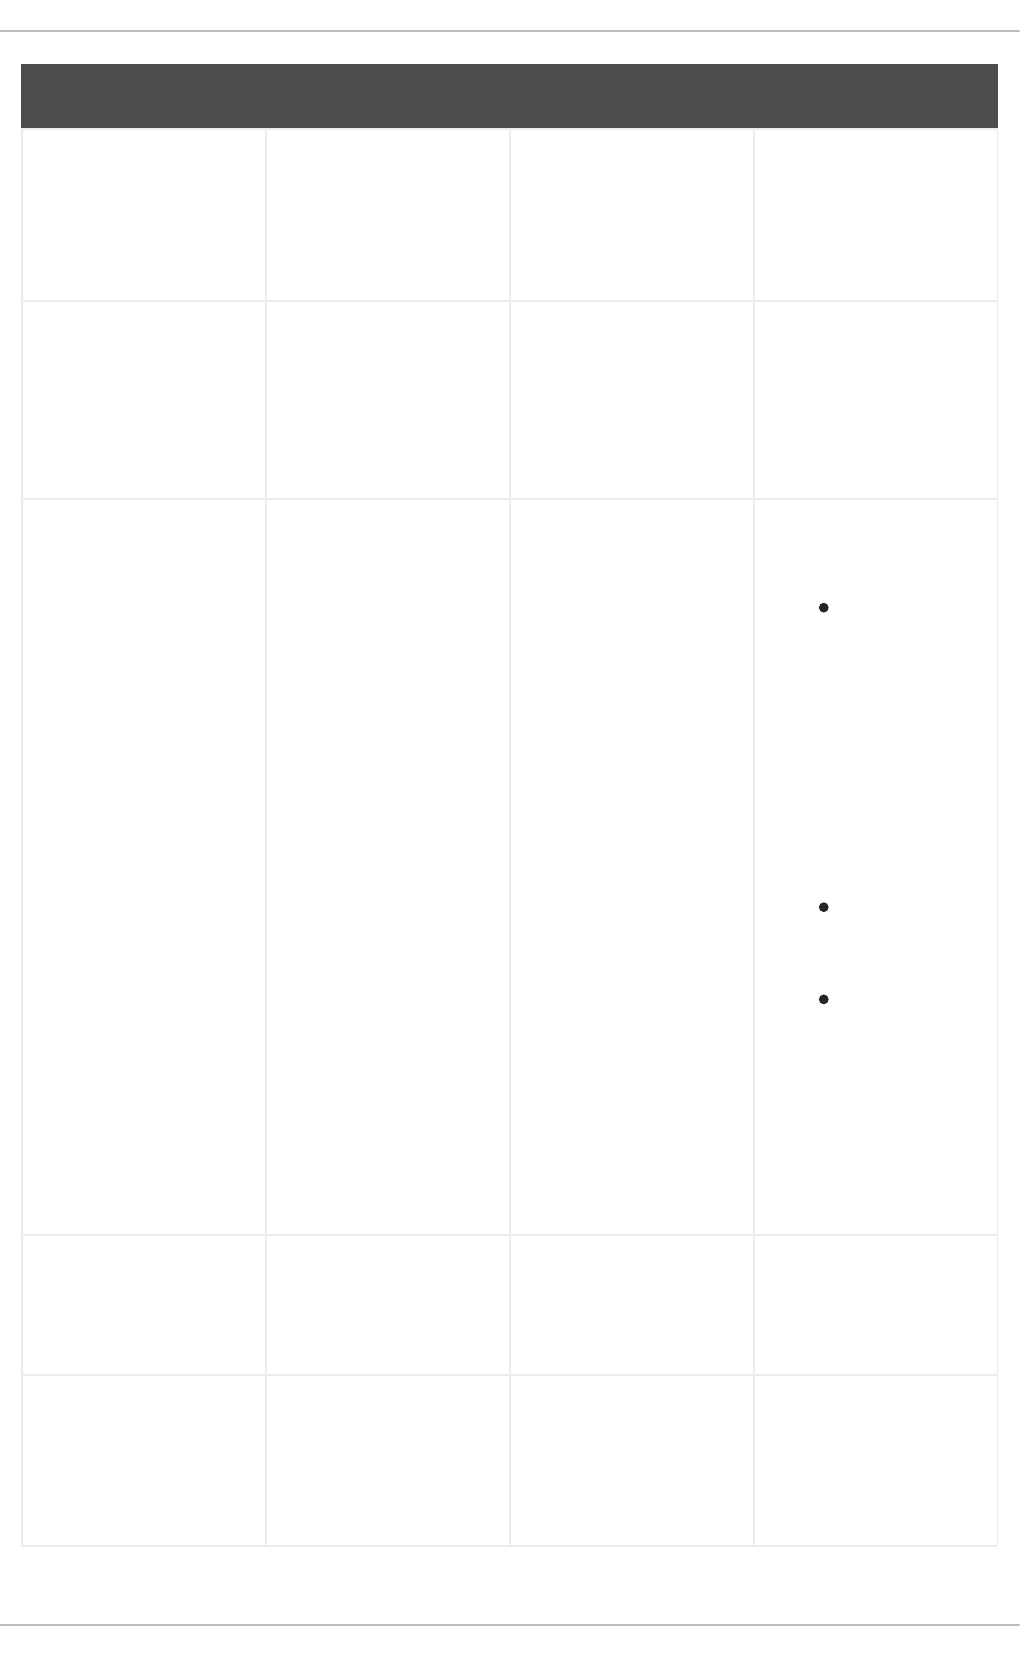
Force import force Imported templates
overwrite locked
templates with the same
name.
N/A
Lock templates lock Do not overwrite
existing templates when
you import a new
template with the same
name, unless Force
import is enabled.
N/A
Metadata export mode metadata_export_m
ode
Accepted values:
refresh, keep, remove
N/A Defines how metadata is
handled when exporting:
Refresh —
remove
existing
metadata from
the template
content and
generate new
metadata
based on
current
assignments
and attributes.
Keep — retain
the existing
metadata.
Remove —
export
template
without
metadata.
Useful if you
want to add
metadata
manually.
Negate negate
Accepted values: true,
false
Imports templates
ignoring the filter
attribute.
Exports templates
ignoring the filter
attribute.
Prefix prefix Adds specified string to
the beginning of the
template if the template
name does not start with
the prefix already.
N/A
Parameter API parameter name Meaning on importing Meaning on exporting
CHAPTER 14. SYNCHRONIZING TEMPLATE REPOSITORIES
107

Repo repo Defines the path to the
repository to
synchronize from.
Defines the path to a
repository to export to.
Verbosity verbose
Accepted values: true,
false
Enables writing verbose
messages to the logs for
this action.
N/A
Parameter API parameter name Meaning on importing Meaning on exporting
14.3. USING REPOSITORY SOURCES
You can use existing repositories or local directories to synchronize templates with your Satellite Server.
14.3.1. Synchronizing templates with an existing repository
Use this procedure to synchronize templates between your Satellite Server and an existing repository.
Procedure
1. If you want to use HTTPS to connect to the repository and you use a self-signed certificate
authentication on your Git server, validate the certificate:
# sudo -u foreman git config --global http.sslCAPath Path_To_My_Certificate
2. If you want to use SSH to connect to the repository, perform the following steps:
a. Create an SSH key pair if you do not already have it. Do not specify a passphrase.
# sudo -u foreman ssh-keygen
b. Configure your version control server with the public key from your Satellite, which resides in
/usr/share/foreman/.ssh/id_rsa.pub.
c. Accept the Git SSH host key as the foreman user:
# sudo -u foreman ssh git.example.com
3. Configure the TemplateSync plugin settings on a TemplateSync tab.
a. Change the Branch setting to match the target branch on a Git server.
b. Change the Repo setting to match the Git repository. For example, for the repository
located in git@git.example.com/templates.git set the setting into
git@git.example.com/templates.git.
14.3.2. Synchronizing templates with a local directory
Synchronizing templates with a local directory is useful if you have configured a version control
Red Hat Satellite 6.15 Managing hosts
108

Synchronizing templates with a local directory is useful if you have configured a version control
repository in the local directory. That way, you can edit templates and track the history of edits in the
directory. You can also synchronize changes to Satellite Server after editing the templates.
Prerequisites
Each template must contain the location and organization that the template belongs to. This
applies to all template types. Before you import a template, ensure that you add the following
section to the template:
<%#
kind: provision
name: My_Provisioning_Template
oses:
- My_first_OS
- My_second_OS
locations:
- My_first_Location
- My_second_Location
organizations:
- My_first_Organization
- My_second_Organization
%>
Procedure
1. In /var/lib/foreman, create a directory for storing templates:
# mkdir /var/lib/foreman/My_Templates_Dir
NOTE
You can place your templates to a custom directory outside /var/lib/foreman, but
you have to ensure that the Foreman service can read its contents. The directory
must have the correct file permissions and the foreman_lib_t SELinux label.
2. Change the owner of the new templates directory to the foreman user:
# chown foreman /var/lib/foreman/My_Templates_Dir
3. Change the Repo setting on the TemplateSync tab to match the
/var/lib/foreman/My_Templates_Dir/ directory.
14.4. IMPORTING AND EXPORTING TEMPLATES
You can import and export templates using the Satellite web UI, Hammer CLI, or Satellite API. Satellite
API calls use the role-based access control system, which enables the tasks to be executed as any user.
You can synchronize templates with a version control system, such as Git, or a local directory.
14.4.1. Importing templates
You can import templates from a repository of your choice. You can use different protocols to point to
CHAPTER 14. SYNCHRONIZING TEMPLATE REPOSITORIES
109

You can import templates from a repository of your choice. You can use different protocols to point to
your repository, for example /tmp/dir, git://example.com, https://example.com, and
ssh://example.com.
NOTE
The templates provided by Satellite are locked and you cannot import them by default.
To overwrite this behavior, change the Force import setting in the TemplateSync menu
to yes or add the force parameter -d '{ "force": "true" }' to the import command.
Prerequisites
Each template must contain the location and organization that the template belongs to. This
applies to all template types. Before you import a template, ensure that you add the following
section to the template:
<%#
kind: provision
name: My_Provisioning_Template
oses:
- My_first_OS
- My_second_OS
locations:
- My_first_Location
- My_second_Location
organizations:
- My_first_Organization
- My_second_Organization
%>
To use the CLI instead of the Satellite web UI, see the ]. To use the API, see the
xref:api_Importing_Templates_managing-hosts[.
Procedure
1. In the Satellite web UI, navigate to Hosts > Templates > Sync Templates.
2. Click Import.
3. Each field is populated with values configured in Administer > Settings > TemplateSync.
Change the values as required for the templates you want to import. For more information
about each field, see Section 14.2, “Configuring the TemplateSync plugin”.
4. Click Submit.
The Satellite web UI displays the status of the import. The status is not persistent; if you leave the status
page, you cannot return to it.
CLI procedure
To import a template from a repository, enter the following command:
$ hammer import-templates \
--branch "My_Branch" \
--filter '.*Template Name$' \
Red Hat Satellite 6.15 Managing hosts
110

--organization "My_Organization" \
--prefix "[Custom Index] " \
--repo "https://git.example.com/path/to/repository"
For better indexing and management of your templates, use --prefix to set a category for your
templates. To select certain templates from a large repository, use --filter to define the title of
the templates that you want to import. For example --filter '.*Ansible Default$' imports various
Ansible Default templates.
API procedure
1. Send a POST request to api/v2/templates/import:
# curl -H "Accept:application/json" \
-H "Content-Type:application/json" \
-u login:password \
-k https://satellite.example.com/api/v2/templates/import \
-X POST
If the import is successful, you receive {"message":"Success"}.
14.4.2. Exporting templates
Use this procedure to export templates to a git repository.
To use the CLI instead of the Satellite web UI, see the ]. To use the API, see the
xref:api_Exporting_Templates_managing-hosts[.
Procedure
1. In the Satellite web UI, navigate to Hosts > Templates > Sync Templates.
2. Click Export.
3. Each field is populated with values configured in Administer > Settings > TemplateSync.
Change the values as required for the templates you want to export. For more information about
each field, see Section 14.2, “Configuring the TemplateSync plugin”.
4. Click Submit.
The Satellite web UI displays the status of the export. The status is not persistent; if you leave the status
page, you cannot return to it.
CLI procedure
1. To export the templates to a repository, enter the following command:
# hammer export-templates \
--organization "My_Organization" \
--repo "https://git.example.com/path/to/repository"
NOTE
CHAPTER 14. SYNCHRONIZING TEMPLATE REPOSITORIES
111

NOTE
This command clones the repository, makes changes in a commit, and pushes
back to the repository. You can use the --branch "My_Branch" option to export
the templates to a specific branch.
API procedure
1. Send a POST request to api/v2/templates/export:
# curl -H "Accept:application/json" \
-H "Content-Type:application/json" \
-u login:password \
-k https://satellite.example.com/api/v2/templates/export \
-X POST
If the export is successful, you receive {"message":"Success"}.
NOTE
You can override default API settings by specifying them in the request with the -d
parameter. The following example exports templates to the git.example.com/templates
repository:
# curl -H "Accept:application/json" \
-H "Content-Type:application/json" \
-u login:password \
-k https://satellite.example.com/api/v2/templates/export \
-X POST \
-d "{\"repo\":\"git.example.com/templates\"}"
Red Hat Satellite 6.15 Managing hosts
112

CHAPTER 15. MANAGING PACKAGES
You can use Satellite to install, upgrade, and remove packages on hosts, as well as to enable or disable
repositories on hosts.
15.1. ENABLING AND DISABLING REPOSITORIES ON HOSTS
Use this procedure to enable and disable repositories on hosts for Satellite.
Procedure
1. In the Satellite web UI, navigate to Hosts > All Hosts,
2. Select the host name.
3. Click the Content tab.
4. Click the Repository Sets tab.
5. Click the vertical ellipsis to choose Override to disabled or Override to enabled to disable or
enable repositories on hosts.
15.2. INSTALLING PACKAGES ON A HOST
Use this procedure to review and install packages on a host using the Satellite web UI. The list of
packages available for installation depends on the content view and lifecycle environment assigned to
the host.
Procedure
1. In the Satellite web UI, navigate to Hosts > All Hosts and select the host you want to install
packages on.
2. On the Content tab, select the Packages tab.
3. On the vertical ellipsis icon next to the upgrade button, click Install Packages.
4. In the Install packages window, select the package or packages that you want to install on the
host.
5. Click Install.
By default, the packages are installed using remote execution. For more information about running
remote execution jobs, see Configuring and Setting up Remote Jobs in Managing hosts.
Create a body of the API request in the JSON format by following the instructions below.
API procedure
1. Create the "job_invocation" object and place rest of the body inside this object.
2. Create the "inputs" object with the "package" field of the string type specifying the packages
you want to install. If you are specifying multiple packages, separate them with a whitespace.
3. Create a "feature" field of the string type with value "katello_package_install".
CHAPTER 15. MANAGING PACKAGES
113

4. Create a "search_query" field of the string type and input a search query matching the hosts
on which you want to install the packages.
5. Optional: If you want to install packages as a specific user, create an ssh object with the
following fields of the string type:
"effective_user" with the name of the ssh user
"effective_user_password" with the password of the ssh user if this password is required
6. Optional: If you want to install packages at a later time, create the "scheduling" object. The
object can contain one or both of the following fields of the string type with date, time, and a
timezone in the ISO 8601 format:
"start_at"- sets the time to install the packages
"start_before" - sets the latest time to install the packages. If it is not possible to install the
packages by this time, then this action is cancelled.
If you omit time, it defaults to 00:00:00. If you omit timezone, it defaults to UTC.
7. Optional: If you want to limit the number of hosts on which the job is run concurrently, create the
"concurrency_control" object with the "concurrency_level" field of the integer type. Assign
the number of hosts as the field value.
8. Optional: If you want to install packages at a later time and you want the host search query to be
evaluated at a time of running the job, create a "targeting_type" field of the string type with
the "dynamic_query" value. This is useful if you expect the result of the search query to be
different at the time of running the job due to changed status of the hosts. If you omit this field,
it defaults to "static_query".
9. Send a POST request with the created body to the /api/job_invocations endpoint of your
Satellite Server and use a tool like Python to see a formatted response.
Example API request:
curl https://satellite.example.com/api/job_invocations \
-H "content-type: application/json" \
-X POST \
-d @Path_To_My_API_Request_Body \
-u My_Username:My_Password | python3 -m json.tool
Verification
In the Satellite web UI, navigate to Monitor > Jobs and see the report of the scheduled or
completed remote execution job to install the packages on the selected hosts.
Example API request body
{
"job_invocation" : {
"concurrency_control" : {
"concurrency_level" : 100
},
"feature" : "katello_package_install",
"inputs" : {
"package" : "nano vim"
Red Hat Satellite 6.15 Managing hosts
114

},
"scheduling" : {
"start_at" : "2023-09-21T19:00:00+00:00",
"start_before" : "2023-09-23T00:00:00+00:00"
},
"search_query" : "*",
"ssh" : {
"effective_user" : "My_Username",
"effective_user_password" : "My_Password"
},
"targeting_type" : "dynamic_query"
}
}
15.3. UPGRADING PACKAGES ON A HOST
You can upgrade packages on a host in bulk in the Satellite web UI.
Procedure
1. In the Satellite web UI, navigate to Hosts > All Hosts.
2. Click the name of the host you want to modify.
3. Click the Content tab, then click the Packages tab.
4. Select Upgradable from the Status list.
5. Select upgrade version from the dropdown menu in Upgradable to column where applicable.
6. Select the packages you want to upgrade.
7. Click Upgrade. You get a REX job notification once the remote execution job is complete.
Create a body of the API request in the JSON format by following the instructions below.
API procedure
1. Create the "job_invocation" object and place rest of the body inside this object.
2. Create the "inputs" object with the "package" field of the string type specifying the packages
you want to update. If you are specifying multiple packages, separate them with a whitespace.
3. Create a "feature" field of the string type with value "katello_package_update".
4. Create a "search_query" field of the string type and input a search query matching the hosts
on which you want to update the packages.
5. Optional: If you want to update packages as a specific user, create an ssh object with the
following fields of the string type:
"effective_user" with the name of the ssh user
"effective_user_password" with the password of the ssh user if this password is required
6. Optional: If you want to update packages at a later time, create the "scheduling" object. The
CHAPTER 15. MANAGING PACKAGES
115

6. Optional: If you want to update packages at a later time, create the "scheduling" object. The
object can contain one or both of the following fields of the string type with date, time, and a
timezone in the ISO 8601 format:
"start_at"- sets the time to update the packages
"start_before" - sets the latest time to update the packages. If it is not possible to update
the packages by this time, then this action is cancelled.
If you omit time, it defaults to 00:00:00. If you omit timezone, it defaults to UTC.
7. Optional: If you want to limit the number of hosts on which the job is run concurrently, create the
"concurrency_control" object with the "concurrency_level" field of the integer type. Assign
the number of hosts as the field value.
8. Optional: If you want to update packages at a later time and you want the host search query to
be evaluated at a time of running the job, create a "targeting_type" field of the string type with
the "dynamic_query" value. This is useful if you expect the result of the search query to be
different at the time of running the job due to changed status of the hosts. If you omit this field,
it defaults to "static_query".
9. Send a POST request with the created body to the /api/job_invocations endpoint of your
Satellite Server and use a tool like Python to see a formatted response.
Example API request:
curl https://satellite.example.com/api/job_invocations \
-H "content-type: application/json" \
-X POST \
-d @Path_To_My_API_Request_Body \
-u My_Username:My_Password | python3 -m json.tool
Verification
In the Satellite web UI, navigate to Monitor > Jobs and see the report of the scheduled or
completed remote execution job to update the packages on the selected hosts.
Example API request body
{
"job_invocation" : {
"concurrency_control" : {
"concurrency_level" : 100
},
"feature" : "katello_package_update",
"inputs" : {
"package" : "nano vim"
},
"scheduling" : {
"start_at" : "2023-09-21T19:00:00+00:00",
"start_before" : "2023-09-23T00:00:00+00:00"
},
"search_query" : "*",
"ssh" : {
"effective_user" : "My_Username",
"effective_user_password" : "My_Password"
},
Red Hat Satellite 6.15 Managing hosts
116

"targeting_type" : "dynamic_query"
}
}
15.4. REMOVING PACKAGES FROM A HOST
You can remove packages from a host in the Satellite web UI.
Procedure
1. In the Satellite web UI, navigate to Hosts > All Hosts.
2. Click the name of the host you want to modify.
3. Click the Content tab, then click the Packages tab.
4. Click the vertical ellipsis for the package you want to remove and select Remove. You get a REX
job notification once the remote execution job is complete.
Create a body of the API request in the JSON format by following the instructions below.
API procedure
1. Create the "job_invocation" object and place rest of the body inside this object.
2. Create the "inputs" object with the "package" field of the string type specifying the packages
you want to remove. If you are specifying multiple packages, separate them with a whitespace.
3. Create a "feature" field of the string type with value "katello_package_remove".
4. Create a "search_query" field of the string type and input a search query matching the hosts
on which you want to remove the packages.
5. Optional: If you want to remove packages as a specific user, create an ssh object with the
following fields of the string type:
"effective_user" with the name of the ssh user
"effective_user_password" with the password of the ssh user if this password is required
6. Optional: If you want to remove packages at a later time, create the "scheduling" object. The
object can contain one or both of the following fields of the string type with date, time, and a
timezone in the ISO 8601 format:
"start_at"- sets the time to remove the packages
"start_before" - sets the latest time to remove the packages. If it is not possible to remove
the packages by this time, then this action is cancelled.
If you omit time, it defaults to 00:00:00. If you omit timezone, it defaults to UTC.
7. Optional: If you want to limit the number of hosts on which the job is run concurrently, create the
"concurrency_control" object with the "concurrency_level" field of the integer type. Assign
the number of hosts as the field value.
8. Optional: If you want to remove packages at a later time and you want the host search query to
CHAPTER 15. MANAGING PACKAGES
117

be evaluated at a time of running the job, create a "targeting_type" field of the string type with
the "dynamic_query" value. This is useful if you expect the result of the search query to be
different at the time of running the job due to changed status of the hosts. If you omit this field,
it defaults to "static_query".
9. Send a POST request with the created body to the /api/job_invocations endpoint of your
Satellite Server and use a tool like Python to see a formatted response.
Example API request:
curl https://satellite.example.com/api/job_invocations \
-H "content-type: application/json" \
-X POST \
-d @Path_To_My_API_Request_Body \
-u My_Username:My_Password | python3 -m json.tool
Verification
In the Satellite web UI, navigate to Monitor > Jobs and see the report of the scheduled or
completed remote execution job to remove the packages on the selected hosts.
Example API request body
{
"job_invocation" : {
"concurrency_control" : {
"concurrency_level" : 100
},
"feature" : "katello_package_remove",
"inputs" : {
"package" : "nano vim"
},
"scheduling" : {
"start_at" : "2023-09-21T19:00:00+00:00",
"start_before" : "2023-09-23T00:00:00+00:00"
},
"search_query" : "*",
"ssh" : {
"effective_user" : "My_Username",
"effective_user_password" : "My_Password"
},
"targeting_type" : "dynamic_query"
}
}
Red Hat Satellite 6.15 Managing hosts
118

APPENDIX A. TEMPLATE WRITING REFERENCE
Embedded Ruby (ERB) is a tool for generating text files based on templates that combine plain text
with Ruby code. Red Hat Satellite uses ERB syntax in the following cases:
Provisioning templates
For more information, see Creating Provisioning Templates in Provisioning hosts.
Remote execution job templates
For more information, see Chapter 12, Configuring and setting up remote jobs .
Report templates
For more information, see Chapter 10, Using report templates to monitor hosts .
Templates for partition tables
For more information, see Creating Partition Tables in Provisioning hosts.
Smart Class Parameters
For more information, see Configuring Puppet Smart Class Parameters in Managing configurations
using Puppet integration.
This section provides an overview of Satellite-specific macros and variables that can be used in ERB
templates along with some usage examples. Note that the default templates provided by Red Hat
Satellite (Hosts > Templates > Provisioning Templates, Hosts > Templates > Job templates, Monitor
> Reports > Report Templates ) also provide a good source of ERB syntax examples.
When provisioning a host or running a remote job, the code in the ERB is executed and the variables are
replaced with the host specific values. This process is referred to as rendering. Satellite Server has the
safemode rendering option enabled by default, which prevents any harmful code being executed from
templates.
A.1. ACCESSING THE TEMPLATE WRITING REFERENCE IN THE
SATELLITE WEB UI
You can access the template writing reference document in the Satellite web UI.
Procedure
1. Log in to the Satellite web UI.
2. In the Satellite web UI, navigate to Administer > About.
3. Click the Templates DSL link in the Support section.
A.2. USING AUTOCOMPLETION IN TEMPLATES
You can access a list of available macros and usage information in the template editor with the
autocompletion option. This works for all templates within Satellite.
Procedure
1. In the Satellite web UI, navigate to either Hosts > Templates > Partition tables, Hosts >
Templates > Provisioning Templates, or Hosts > Templates > Job templates.
2. Click the settings icon at the top right corner of the template editor and select
APPENDIX A. TEMPLATE WRITING REFERENCE
119

2. Click the settings icon at the top right corner of the template editor and select
Autocompletion.
3. Press Ctrl + Space in the template editor to access a list of all available macros. You can narrow
down the list of macros by typing in more information about what you are looking for. For
example, if you are looking for a method to list the ID of the content source for a host, you can
type host and check the list of available macros for content source.
4. A window next to the dropdown provides a description of the macro, its usage, and the value it
will return.
5. When you find the method you are looking for, hit Enter to input the method.
You can also enable Live Autocompletion in the settings menu to view a list of macros that match the
pattern whenever you type something. However, this might input macros in unintended places, like
package names in a provisioning template.
A.3. WRITING ERB TEMPLATES
The following tags are the most important and commonly used in ERB templates:
<% %>
All Ruby code is enclosed within <% %> in an ERB template. The code is executed when the template is
rendered. It can contain Ruby control flow structures as well as Satellite-specific macros and variables.
For example:
<% if @host.operatingsystem.family == "Redhat" && @host.operatingsystem.major.to_i > 6 -%>
systemctl <%= input("action") %> <%= input("service") %>
<% else -%>
service <%= input("service") %> <%= input("action") %>
<% end -%>
Note that this template silently performs an action with a service and returns nothing at the output.
<%= %>
This provides the same functionality as <% %> but when the template is executed, the code output is
inserted into the template. This is useful for variable substitution, for example:
Example input:
echo <%= @host.name %>
Example rendering:
host.example.com
Example input:
<% server_name = @host.fqdn %>
<%= server_name %>
Example rendering:
Red Hat Satellite 6.15 Managing hosts
120

host.example.com
Note that if you enter an incorrect variable, no output is returned. However, if you try to call a method on
an incorrect variable, the following error message returns:
Example input:
<%= @example_incorrect_variable.fqdn -%>
Example rendering:
undefined method `fqdn' for nil:NilClass
<% -%>, <%= -%>
By default, a newline character is inserted after a Ruby block if it is closed at the end of a line:
Example input:
<%= "line1" %>
<%= "line2" %>
Example rendering:
line1
line2
To change the default behavior, modify the enclosing mark with -%>:
Example input:
<%= "line1" -%>
<%= "line2" %>
Example rendering:
line1line2
This is used to reduce the number of lines, where Ruby syntax permits, in rendered templates. White
spaces in ERB tags are ignored.
An example of how this would be used in a report template to remove unnecessary newlines between a
FQDN and IP address:
Example input:
<%= @host.fqdn -%>
<%= @host.ip -%>
Example rendering:
host.example.com10.10.181.216
APPENDIX A. TEMPLATE WRITING REFERENCE
121

<%# %>
Encloses a comment that is ignored during template rendering:
Example input:
<%# A comment %>
This generates no output.
Indentation in ERB templates
Because of the varying lengths of the ERB tags, indenting the ERB syntax might seem messy. ERB
syntax ignore white space. One method of handling the indentation is to declare the ERB tag at the
beginning of each new line and then use white space within the ERB tag to outline the relationships
within the syntax, for example:
<%- load_hosts.each do |host| -%>
<%- if host.build? %>
<%= host.name %> build is in progress
<%- end %>
<%- end %>
A.4. TROUBLESHOOTING ERB TEMPLATES
The Satellite web UI provides two ways to verify the template rendering for a specific host:
Directly in the template editor – when editing a template (under Hosts > Templates >
Partition tables, Hosts > Templates > Provisioning Templates, or Hosts > Templates > Job
templates), on the Template tab click Preview and select a host from the list. The template
then renders in the text field using the selected host’s parameters. Preview failures can help to
identify issues in your template.
At the host’s details page – select a host at Hosts > All Hosts and click the Templates tab to
list templates associated with the host. Select Review from the list next to the selected
template to view it’s rendered version.
A.5. GENERIC SATELLITE-SPECIFIC MACROS
This section lists Satellite-specific macros for ERB templates. You can use the macros listed in the
following table across all kinds of templates.
Table A.1. Generic macros
Name Description
indent(n) Indents the block of code by n spaces, useful when
using a snippet template that is not indented.
foreman_url(kind) Returns the full URL to host-rendered templates of
the given kind. For example, templates of the
"provision" type usually reside at
http://HOST/unattended/provision.
Red Hat Satellite 6.15 Managing hosts
122

snippet(name) Renders the specified snippet template. Useful for
nesting provisioning templates.
snippets(file) Renders the specified snippet found in the Foreman
database, attempts to load it from the
unattended/snippets/ directory if it is not found in
the database.
snippet_if_exists(name) Renders the specified snippet, skips if no snippet
with the specified name is found.
Name Description
A.6. TEMPLATE MACROS
If you want to write custom templates, you can use some of the following macros. Depending on the
template type, some of the following macros have different requirements.
For more information about the available macros for report templates, in the Satellite web UI, navigate
to Monitor > Reports > Report Templates, and click Create Template. In the Create Template window,
click the Help tab.
For more information about the available macros for job templates, in the Satellite web UI, navigate to
Hosts > Templates > Job templates, and click the New Job Template. In the New Job Template
window, click the Help tab.
input
Using the input macro, you can customize the input data that the template can work with. You can
define the input name, type, and the options that are available for users. For report templates, you
can only use user inputs. When you define a new input and save the template, you can then reference
the input in the ERB syntax of the template body.
<%= input('cpus') %>
This loads the value from user input cpus.
load_hosts
Using the load_hosts macro, you can generate a complete list of hosts.
<%- load_hosts().each_record do |host| -%>
<%= host.name %>
Use the load_hosts macro with the each_record macro to load records in batches of 1000 to
reduce memory consumption.
If you want to filter the list of hosts for the report, you can add the option search:
input(‘Example_Host’):
<% load_hosts(search: input('Example_Host')).each_record do |host| -%>
<%= host.name %>
<% end -%>
APPENDIX A. TEMPLATE WRITING REFERENCE
123

In this example, you first create an input that you then use to refine the search criteria that the
load_hosts macro retrieves.
report_row
Using the report_row macro, you can create a formatted report for ease of analysis. The report_row
macro requires the report_render macro to generate the output.
Example input:
<%- load_hosts(search: input('Example_Host')).each_record do |host| -%>
<%- report_row(
'Server FQDN': host.name
) -%>
<%- end -%>
<%= report_render -%>
Example rendering:
Server FQDN
host1.example.com
host2.example.com
host3.example.com
host4.example.com
host5.example.com
host6.example.com
You can add extra columns to the report by adding another header. The following example adds IP
addresses to the report:
Example input:
<%- load_hosts(search: input('host')).each_record do |host| -%>
<%- report_row(
'Server FQDN': host.name,
'IP': host.ip
) -%>
<%- end -%>
<%= report_render -%>
Example rendering:
Server FQDN,IP
host1.example.com,10.8.30.228
host2.example.com,10.8.30.227
host3.example.com,10.8.30.226
host4.example.com,10.8.30.225
host5.example.com,10.8.30.224
host6.example.com,10.8.30.223
report_render
This macro is available only for report templates.
Using the report_render macro, you create the output for the report. During the template rendering
Red Hat Satellite 6.15 Managing hosts
124

Using the report_render macro, you create the output for the report. During the template rendering
process, you can select the format that you want for the report. YAML, JSON, HTML, and CSV
formats are supported.
<%= report_render -%>
render_template()
This macro is available only for job templates.
Using this macro, you can render a specific template. You can also enable and define arguments that
you want to pass to the template.
truthy
Using the truthy macro, you can declare if the value passed is true or false, regardless of whether the
value is an integer or boolean or string.
This macro helps to avoid confusion when your template contains multiple value types. For example,
the boolean value true is not the same as the string value "true". With this macro, you can declare
how you want the template to interpret the value and avoid confusion.
You can use truthy to declare values as follows:
truthy?("true") => true
truthy?(1) => true
truthy?("false") => false
truthy?(0) => false
falsy
The falsy macro serves the same purpose as the truthy macro.
Using the falsy macro, you can declare if the value passed in is true or false, regardless of whether
the value is an integer or boolean or string.
You can use falsy to declare values as follows:
falsy?("true") => false
falsy?(1) => false
falsy?("false") => true
falsy?(0) => true
A.7. HOST-SPECIFIC VARIABLES
The following variables enable using host data within templates. Note that job templates accept only
@host variables.
Table A.2. Host-specific variables and macros
Name Description
@host.architecture The architecture of the host.
@host.bond_interfaces Returns an array of all bonded interfaces. See
Section A.10, “Parsing arrays”.
APPENDIX A. TEMPLATE WRITING REFERENCE
125

@host.capabilities The method of system provisioning, can be either
build (for example kickstart) or image.
@host.certname The SSL certificate name of the host.
@host.diskLayout The disk layout of the host. Can be inherited from the
operating system.
@host.domain The domain of the host.
@host.environment Deprecated Use the
host_puppet_environment variable instead.
The Puppet environment of the host.
@host.facts Returns a Ruby hash of facts from Facter. For
example to access the 'ipaddress' fact from the
output, specify @host.facts['ipaddress'].
@host.grub_pass Returns the host’s bootloader password.
@host.hostgroup The host group of the host.
host_enc['parameters'] Returns a Ruby hash containing information on host
parameters. For example, use host_enc['parameters']
['lifecycle_environment'] to get the lifecycle
environment of a host.
@host.image_build? Returns true if the host is provisioned using an
image.
@host.interfaces Contains an array of all available host interfaces
including the primary interface. See Section A.10,
“Parsing arrays”.
@host.interfaces_with_identifier('IDs') Returns array of interfaces with given identifier. You
can pass an array of multiple identifiers as an input,
for example @host.interfaces_with_identifier(['eth0',
'eth1']). See Section A.10, “Parsing arrays”.
@host.ip The IP address of the host.
@host.location The location of the host.
@host.mac The MAC address of the host.
@host.managed_interfaces Returns an array of managed interfaces (excluding
BMC and bonded interfaces). See Section A.10,
“Parsing arrays”.
Name Description
Red Hat Satellite 6.15 Managing hosts
126

@host.medium The assigned operating system installation medium.
@host.name The full name of the host.
@host.operatingsystem.family The operating system family.
@host.operatingsystem.major The major version number of the assigned operating
system.
@host.operatingsystem.minor The minor version number of the assigned operating
system.
@host.operatingsystem.name The assigned operating system name.
@host.operatingsystem.boot_files_uri(medium_provi
der)
Full path to the kernel and initrd, returns an array.
@host.os.medium_uri(@host) The URI used for provisioning (path configured in
installation media).
host_param('parameter_name') Returns the value of the specified host parameter.
host_param_false?('parameter_name') Returns false if the specified host parameter
evaluates to false.
host_param_true?('parameter_name') Returns true if the specified host parameter
evaluates to true.
@host.primary_interface Returns the primary interface of the host.
@host.provider The compute resource provider.
@host.provision_interface Returns the provisioning interface of the host.
Returns an interface object.
@host.ptable The partition table name.
@host.puppet_ca_server Deprecated Use the
host_puppet_ca_server variable instead.
The Puppet CA server the host must use.
@host.puppetmaster Deprecated Use the
host_puppet_server variable instead.
The Puppet server the host must use.
@host.pxe_build? Returns true if the host is provisioned using the
network or PXE.
Name Description
APPENDIX A. TEMPLATE WRITING REFERENCE
127

@host.shortname The short name of the host.
@host.sp_ip The IP address of the BMC interface.
@host.sp_mac The MAC address of the BMC interface.
@host.sp_name The name of the BMC interface.
@host.sp_subnet The subnet of the BMC network.
@host.subnet.dhcp Returns true if a DHCP proxy is configured for this
host.
@host.subnet.dns_primary The primary DNS server of the host.
@host.subnet.dns_secondary The secondary DNS server of the host.
@host.subnet.gateway The gateway of the host.
@host.subnet.mask The subnet mask of the host.
@host.url_for_boot(:initrd) Full path to the initrd image associated with this host.
Not recommended, as it does not interpolate
variables.
@host.url_for_boot(:kernel) Full path to the kernel associated with this host. Not
recommended, as it does not interpolate variables,
prefer boot_files_uri.
@provisioning_type Equals to 'host' or 'hostgroup' depending on type of
provisioning.
@static Returns true if the network configuration is static.
@template_name Name of the template being rendered.
grub_pass Returns a bootloader argument to set the encrypted
bootloader password, such as --md5pass=#
{@host.grub_pass}.
ks_console Returns a string assembled using the port and the
baud rate of the host which can be added to a kernel
line. For example console=ttyS1,9600.
root_pass Returns the root password configured for the system.
Name Description
Red Hat Satellite 6.15 Managing hosts
128

The majority of common Ruby methods can be applied on host-specific variables. For example, to
extract the last segment of the host’s IP address, you can use:
<% @host.ip.split('.').last %>
A.8. KICKSTART-SPECIFIC VARIABLES
The following variables are designed to be used within kickstart provisioning templates.
Table A.3. Kickstart-specific variables
Name Description
@arch The host architecture name, same as
@host.architecture.name.
@dynamic Returns true if the partition table being used is a
%pre script (has the #Dynamic option as the first line
of the table).
@epel A command which will automatically install the
correct version of the epel-release rpm. Use in a
%post script.
@mediapath The full kickstart line to provide the URL command.
@osver The operating system major version number, same as
@host.operatingsystem.major.
A.9. CONDITIONAL STATEMENTS
In your templates, you might perform different actions depending on which value exists. To achieve this,
you can use conditional statements in your ERB syntax.
In the following example, the ERB syntax searches for a specific host name and returns an output
depending on the value it finds:
Example input
<% load_hosts().each_record do |host| -%>
<% if @host.name == "host1.example.com" -%>
<% result="positive" -%>
<% else -%>
<% result="negative" -%>
<% end -%>
<%= result -%>
Example rendering
host1.example.com
positive
APPENDIX A. TEMPLATE WRITING REFERENCE
129

A.10. PARSING ARRAYS
While writing or modifying templates, you might encounter variables that return arrays. For example,
host variables related to network interfaces, such as @host.interfaces or @host.bond_interfaces,
return interface data grouped in an array. To extract a parameter value of a specific interface, use Ruby
methods to parse the array.
Finding the correct method to parse an array
The following procedure is an example that you can use to find the relevant methods to parse arrays in
your template. In this example, a report template is used, but the steps are applicable to other templates.
1. To retrieve the NIC of a content host, in this example, using the @host.interfaces variable
returns class values that you can then use to find methods to parse the array.
Example input:
<%= @host.interfaces -%>
Example rendering:
<Nic::Base::ActiveRecord_Associations_CollectionProxy:0x00007f734036fbe0>
2. In the Create Template window, click the Help tab and search for the
ActiveRecord_Associations_CollectionProxy and Nic::Base classes.
3. For ActiveRecord_Associations_CollectionProxy, in the Allowed methods or members
column, you can view the following methods to parse the array:
[] each find_in_batches first map size to_a
4. For Nic::Base, in the Allowed methods or members column, you can view the following
method to parse the array:
alias? attached_devices attached_devices_identifiers attached_to bond_options
children_mac_addresses domain fqdn identifier inheriting_mac ip ip6 link mac managed?
mode mtu nic_delay physical? primary provision shortname subnet subnet6 tag virtual?
vlanid
5. To iterate through an interface array, add the relevant methods to the ERB syntax:
Example input:
<% load_hosts().each_record do |host| -%>
<% host.interfaces.each do |iface| -%>
iface.alias?: <%= iface.alias? %>
iface.attached_to: <%= iface.attached_to %>
iface.bond_options: <%= iface.bond_options %>
iface.children_mac_addresses: <%= iface.children_mac_addresses %>
iface.domain: <%= iface.domain %>
iface.fqdn: <%= iface.fqdn %>
iface.identifier: <%= iface.identifier %>
iface.inheriting_mac: <%= iface.inheriting_mac %>
iface.ip: <%= iface.ip %>
Red Hat Satellite 6.15 Managing hosts
130

iface.ip6: <%= iface.ip6 %>
iface.link: <%= iface.link %>
iface.mac: <%= iface.mac %>
iface.managed?: <%= iface.managed? %>
iface.mode: <%= iface.mode %>
iface.mtu: <%= iface.mtu %>
iface.physical?: <%= iface.physical? %>
iface.primary: <%= iface.primary %>
iface.provision: <%= iface.provision %>
iface.shortname: <%= iface.shortname %>
iface.subnet: <%= iface.subnet %>
iface.subnet6: <%= iface.subnet6 %>
iface.tag: <%= iface.tag %>
iface.virtual?: <%= iface.virtual? %>
iface.vlanid: <%= iface.vlanid %>
<%- end -%>
Example rendering:
host1.example.com
iface.alias?: false
iface.attached_to:
iface.bond_options:
iface.children_mac_addresses: []
iface.domain:
iface.fqdn: host1.example.com
iface.identifier: ens192
iface.inheriting_mac: 00:50:56:8d:4c:cf
iface.ip: 10.10.181.13
iface.ip6:
iface.link: true
iface.mac: 00:50:56:8d:4c:cf
iface.managed?: true
iface.mode: balance-rr
iface.mtu:
iface.physical?: true
iface.primary: true
iface.provision: true
iface.shortname: host1.example.com
iface.subnet:
iface.subnet6:
iface.tag:
iface.virtual?: false
iface.vlanid:
A.11. EXAMPLE TEMPLATE SNIPPETS
Checking if a host has Puppet and Puppetlabs enabled
The following example checks if the host has the Puppet and Puppetlabs repositories enabled:
<%
pm_set = @host.puppetmaster.empty? ? false : true
puppet_enabled = pm_set || host_param_true?('force-puppet')
APPENDIX A. TEMPLATE WRITING REFERENCE
131

puppetlabs_enabled = host_param_true?('enable-puppetlabs-repo')
%>
Capturing major and minor versions of a host’s operating system
The following example shows how to capture the minor and major version of the host’s operating
system, which can be used for package related decisions:
<%
os_major = @host.operatingsystem.major.to_i
os_minor = @host.operatingsystem.minor.to_i
%>
<% if ((os_minor < 2) && (os_major < 14)) -%>
...
<% end -%>
Importing snippets to a template
The following example imports the subscription_manager_registration snippet to the template and
indents it by four spaces:
<%= indent 4 do
snippet 'subscription_manager_registration'
end %>
Conditionally importing a Kickstart snippet
The following example imports the kickstart_networking_setup snippet if the host’s subnet has the
DHCP boot mode enabled:
<% subnet = @host.subnet %>
<% if subnet.respond_to?(:dhcp_boot_mode?) -%>
<%= snippet 'kickstart_networking_setup' %>
<% end -%>
Parsing values from host custom facts
You can use the host.facts variable to parse values from a host’s facts and custom facts. In this example
luks_stat is a custom fact that you can parse in the same manner as dmi::system::serial_number,
which is a host fact:
'Serial': host.facts['dmi::system::serial_number'],
'Encrypted': host.facts['luks_stat'],
In this example, you can customize the Applicable Errata report template to parse for custom
information about the kernel version of each host:
<%- report_row(
'Host': host.name,
'Operating System': host.operatingsystem,
'Kernel': host.facts['uname::release'],
'Environment': host.single_lifecycle_environment ? host.single_lifecycle_environment.name :
nil,
'Erratum': erratum.errata_id,
Red Hat Satellite 6.15 Managing hosts
132

'Type': erratum.errata_type,
'Published': erratum.issued,
'Applicable since': erratum.created_at,
'Severity': erratum.severity,
'Packages': erratum.package_names,
'CVEs': erratum.cves,
'Reboot suggested': erratum.reboot_suggested,
) -%>
APPENDIX A. TEMPLATE WRITING REFERENCE
133

APPENDIX B. JOB TEMPLATE EXAMPLES AND EXTENSIONS
Use this section as a reference to help modify, customize, and extend your job templates to suit your
requirements.
B.1. CUSTOMIZING JOB TEMPLATES
When creating a job template, you can include an existing template in the template editor field. This way
you can combine templates, or create more specific templates from the general ones.
The following template combines default templates to install and start the nginx service on clients:
The above template specifies parameter values for the rendered template directly. It is also possible to
use the input() method to allow users to define input for the rendered template on job execution. For
example, you can use the following syntax:
With the above template, you have to import the parameter definition from the rendered template. To
do so, navigate to the Jobs tab, click Add Foreign Input Set, and select the rendered template from the
Target template list. You can import all parameters or specify a comma separated list.
B.2. DEFAULT JOB TEMPLATE CATEGORIES
Job template category Description
Packages Templates for performing package related actions. Install, update, and
remove actions are included by default.
Puppet Templates for executing Puppet runs on target hosts.
Power Templates for performing power related actions. Restart and shutdown
actions are included by default.
Commands Templates for executing custom commands on remote hosts.
Services Templates for performing service related actions. Start, stop, restart, and
status actions are included by default.
Katello Templates for performing content related actions. These templates are
used mainly from different parts of the Satellite web UI (for example bulk
actions UI for content hosts), but can be used separately to perform
operations such as errata installation.
B.3. EXAMPLE RESTORECON TEMPLATE
<%= render_template 'Package Action - SSH Default', :action => 'install', :package => 'nginx' %>
<%= render_template 'Service Action - SSH Default', :action => 'start', :service_name => 'nginx' %>
<%= render_template 'Package Action - SSH Default', :action => 'install', :package =>
input("package") %>
Red Hat Satellite 6.15 Managing hosts
134

This example shows how to create a template called Run Command - restorecon that restores the
default SELinux context for all files in the selected directory on target hosts.
Procedure
1. In the Satellite web UI, navigate to Hosts > Templates > Job templates.
2. Click New Job Template.
3. Enter Run Command - restorecon in the Name field. Select Default to make the template
available to all organizations. Add the following text to the template editor:
The <%= input("directory") %> string is replaced by a user-defined directory during job
invocation.
4. On the Job tab, set Job category to Commands.
5. Click Add Input to allow job customization. Enter directory to the Name field. The input name
must match the value specified in the template editor.
6. Click Required so that the command cannot be executed without the user specified parameter.
7. Select User input from the Input type list. Enter a description to be shown during job
invocation, for example Target directory for restorecon.
8. Click Submit. For more information, see Executing a restorecon Template on Multiple Hosts in
Managing hosts.
B.4. RENDERING A RESTORECON TEMPLATE
This example shows how to create a template derived from the Run command - restorecon template
created in Example restorecon Template. This template does not require user input on job execution, it
will restore the SELinux context in all files under the /home/ directory on target hosts.
Create a new template as described in Setting up Job Templates, and specify the following string in the
template editor:
B.5. EXECUTING A RESTORECON TEMPLATE ON MULTIPLE HOSTS
This example shows how to run a job based on the template created in Example restorecon Template on
multiple hosts. The job restores the SELinux context in all files under the /home/ directory.
Procedure
1. In the Satellite web UI, navigate to Monitor > Jobs and click Run job.
2. Select Commands as Job category and Run Command – restorecon as Job template and
click Next.
3. Select the hosts on which you want to run the job. If you do not select any hosts, the job will run
restorecon -RvF <%= input("directory") %>
<%= render_template("Run Command - restorecon", :directory => "/home") %>
APPENDIX B. JOB TEMPLATE EXAMPLES AND EXTENSIONS
135

3. Select the hosts on which you want to run the job. If you do not select any hosts, the job will run
on all hosts you can see in the current context.
4. In the directory field, provide a directory, for example /home, and click Next.
5. Optional: To configure advanced settings for the job, fill in the Advanced fields. To learn more
about advanced settings, see Section 12.23, “Advanced settings in the job wizard” . When you are
done entering the advanced settings or if it is not required, click Next.
6. Schedule time for the job.
To execute the job immediately, keep the pre-selected Immediate execution.
To execute the job in future time, select Future execution.
To execute the job on regular basis, select Recurring execution.
7. Optional: If you selected future or recurring execution, select the Query type, otherwise click
Next.
Static query means that the job executes on the exact list of hosts that you provided.
Dynamic query means that the list of hosts is evaluated just before the job is executed. If
you entered the list of hosts based on some filter, the results can be different from when
you first used that filter.
Click Next after you have selected the query type.
8. Optional: If you selected future or recurring execution, provide additional details:
For Future execution, enter the Starts at date and time. You also have the option to select
the Starts before date and time. If the job cannot start before that time, it will be canceled.
For Recurring execution, select the start date and time, frequency, and condition for
ending the recurring job. You can choose the recurrence to never end, end at a certain time,
or end after a given number of repetitions. You can also add Purpose - a special label for
tracking the job. There can only be one active job with a given purpose at a time.
Click Next after you have entered the required information.
9. Review job details. You have the option to return to any part of the job wizard and edit the
information.
10. Click Submit to schedule the job for execution.
B.6. INCLUDING POWER ACTIONS IN TEMPLATES
This example shows how to set up a job template for performing power actions, such as reboot. This
procedure prevents Satellite from interpreting the disconnect exception upon reboot as an error, and
consequently, remote execution of the job works correctly.
Create a new template as described in Setting up Job Templates, and specify the following string in the
template editor:
<%= render_template("Power Action - SSH Default", :action => "restart") %>
Red Hat Satellite 6.15 Managing hosts
136

APPENDIX C. OVERVIEW OF THE HOST COLUMNS
Below is the complete overview of columns that can be displayed in the host table divided into content
categories. Some columns fall under more than one category. For more information on how to
customize columns in the host table, see Section 2.18, “Selecting host columns”.
General
Power – Whether the host is turned on or off, if available
Name – name of the host
Operating system – operating system of the host
Model – host hardware model (or compute resource in case of virtual hosts)
Owner – user or group owning the host
Host group – host group of the host
Last report – time of the last host report
Comment – comment given to host
Content
Name – name of the host
Operating system – operating system of the host
Subscription status – does the host have a valid subscription attached
Installable updates – numbers of installable updates divided into four categories: security,
bugfix, enhancement, total
Lifecycle environment – lifecycle environment of the host
Content view – content view of the host
Registered – time when the host was registered to Satellite
Last checkin – last time of the communication between the host and the Satellite Server
Network
IPv4 – IPv4 address of the host
IPv6 – IPv6 address of the host
MAC – MAC address of the host
Reported data
Sockets – number of host sockets
Cores – number of host processor cores
APPENDIX C. OVERVIEW OF THE HOST COLUMNS
137

RAM – amount of memory
Boot time – last boot time of the host
Virtual – whether or not the host is recognized as a virtual machine
Disks total space – total host storage space
Kernel Version – Kernel version of the host operating system
BIOS vendor – vendor of the host BIOS
BIOS release date – release date of the host BIOS
BIOS version – version of the host BIOS
Puppet (only if the Puppet plugin is installed)
Environment name – name of the Puppet environment of the host
RH Cloud
Recommendations – number of available recommendations for the host
Red Hat Satellite 6.15 Managing hosts
138
