Information Returns
Intake System (IRIS)
Taxpayer Portal User Guide
Publication 5717 (Rev. 2-2024) Catalog Number 93551Q Department of the Treasury Internal Revenue Service publish.no.irs.gov
Changes to October TY2023/PY2024 Revision
Location Changes
Throughout Publication Update Processing Year
Throughout Publication Update Tax Years
Introduction Added new sections First Time Filers Quick Reference Guide
Getting Started Added new section Registration
Things you need to know
before completing the IRIS
Application for Transmitter
Control Code
Added new sections Access the IRIS Application for TCC,
Application Approval/Completed, Revise Current TCC Information,
and Deleted TCC
Taxpayer Portal Added new sections Header, Dashboard Tiles, and Issuer
Management
Issuer Management Added new sections Saved Issuers Page, Issuer Information Page,
View Issuer Information Page, and Edit Issuer Page
Upload CSV and Form
Data
Added new sections Download File Template, Access Template
Formatting Guidelines, Enter Form Data, Upload Your Completed
CSV File, Troubleshoot Upload Error Messages, and Review and
Submit Form Data
Make A Correction Updated section to include steps for making a correction
Additional Functions Added new section Submit A Replacement
New Section Added new section Download Recipient Copies
Request Automatic
Extension
Updated section to include steps for ling an automatic extension
Other Helpful Information Added new section Retention Requirements
Combined Federal/State
Filing (CF/SF) Program
Added District of Columbia and Pennsylvania to table

3
Information Returns Intake System (IRIS) Taxpayer Portal User Guide
Table of Contents
Introduction ......................................................................................................................................... 4
First Time Filers Quick Reference Guide ................................................................................................................... 4
Who Can Participate? ................................................................................................................................................. 5
Forms Available to le via Taxpayer Portal for Tax Year 2022 ................................................................................... 5
Getting Started ................................................................................................................................... 6
Registration ................................................................................................................................................................ 6
Things you need to know before completing the IRIS Application for TCC ................................................................ 6
Access the IRIS Application for TCC.................................................................................................................... 7
Application Approved/Completed ......................................................................................................................... 7
Revise Current TCC Information .......................................................................................................................... 7
Deleted TCC ........................................................................................................................................................ 8
Taxpayer Portal ................................................................................................................................... 9
Helpful Hints for Navigating the Portal ........................................................................................................................ 9
Access the Taxpayer Portal ........................................................................................................................................ 9
The Header .......................................................................................................................................................... 9
Dashboard Tiles .................................................................................................................................................. 10
Issuer Management .................................................................................................................................................... 11
Saved Issuers Page ............................................................................................................................................. 11
Add Issuer Information Page ............................................................................................................................... 12
View Issuer Information Page .............................................................................................................................. 13
Edit Issuer Page ................................................................................................................................................... 14
Start New Form ........................................................................................................................................................... 15
Upload CSV and Form Data ....................................................................................................................................... 19
Steps to Download File Template ......................................................................................................................... 19
Steps to veiw Formatting Guidelines ................................................................................................................... 20
Steps to Upload Your Completed CSV File ......................................................................................................... 21
View Unsubmitted Forms section ......................................................................................................................... 26
Additional Functions ................................................................................................................................................... 26
View Unsubmitted Forms ..................................................................................................................................... 26
Status Denitions for Unsubmitted Forms ............................................................................................................ 27
View Submitted Forms ........................................................................................................................................ 27
Status Denitions for Submitted Forms ................................................................................................................ 28
Make A Correction ................................................................................................................................................ 29
Submit A Replacement ......................................................................................................................................... 31
Request Automatic Extension ............................................................................................................. 33
Download Recipient Copies ............................................................................................................... 36
Other Helpful Information ................................................................................................................... 38
Retention Requirements ............................................................................................................................................ 38
Due Dates ................................................................................................................................................................... 38
Filing a Waiver ............................................................................................................................................................ 38
Combined Federal/State Filing (CF/SF) Program ....................................................................................................... 38
Help with the Taxpayer Portal ..................................................................................................................................... 39
Additional Resources .................................................................................................................................................. 39

4
Information Returns Intake System (IRIS) Taxpayer Portal User Guide
Introduction
First Time Filers Quick Reference Guide
The Taxpayer First Act (TFA) was signed into law in July 2019. TFA Provision 2102, Internet Platform for
1099 Filings, required the IRS to develop an Internet portal by January 1, 2023, to allow taxpayers the
ability to electronically le Forms 1099. The Information Returns Intake System (IRIS) was developed as a
result of this legislation.
The Information Returns Intake System (IRIS) Taxpayer Portal is a system that provides a no cost online
method for taxpayers to electronically le information returns. The Taxpayer Portal allows you to enter data
to create forms by either keying in the information or uploading a .csv le. This portal allows taxpayers to:
Electronically prepare (create, edit, and view) and le information returns without software or
service provider
Download and print the recipient copy of information returns for distribution to payees
Maintain a record of completed, led and distributed information forms
Perform basic validation of data before submission
File up to 100 forms per submission
Participate in the Combined Federal/State Filing Program (CF/SF), refer to the CF/SF Program
section for more information
Request automatic extensions; and
File certain corrected information returns
The IRS also offers the IRIS Application to Application (A2A) ling method which requires special software
or a third-party provider to use. A2A uses Extensible Markup Language (XML) format. Allowing users to
bulk le large volumes of information returns. For more information about IRIS A2A, refer to Publication
5718 Information Returns Intake System (IRIS) Electronic Filing Application to Application (A2A)
Specication.
On February 21, 2023, the Department of the Treasury and the Internal Revenue Service published nal
regulations reducing the threshold for ling returns and other documents electronically. These regulations
require lers of 10 or more information returns in a calendar year beginning in 2024, tax year 2023, to le
those information returns electronically. Corrected information returns MUST be led electronically if the
original return was required to be submitted electronically. Corrected information returns are not counted
when calculating the aggregate number of information returns to determine if you are required to le
electronically. For more information about the regulations and the reduced threshold to electronically le,
refer to the IRS and Treasury’s nal regulations on e-le and the IRIS webpages.
If you currently use the FIRE system or a third-party provider to prepare and transmit your information
returns to the IRS, you can continue to use those systems and/or providers. You are not required to
transition to IRIS. Please keep in mind, the FIRE system will be available for ling. Any TCC(s) obtained to
use the FIRE system cannot be used for IRIS. IRIS and the FIRE System are separate systems, and each
require their own TCC. Do not le copies of the forms submitted in the FIRE system in IRIS. This will result
in duplicate ling. To learn more information about other electronic ling methods, please visit www.irs.
gov/inforeturn.

5
Information Returns Intake System (IRIS) Taxpayer Portal User Guide
Who Can Participate?
Any entity with an Employer Identication Number (EIN) can le electronically via IRIS for calendar year
2022 and beyond.
Forms Available to le via Taxpayer Portal
Form 1099-A, Acquisition or Abandonment of Secured Property
Form 1099-B, Proceeds From Broker and Barter Exchange Transactions
Form 1099-C, Cancellation of Debt
Form 1099-CAP, Changes in Corporate Control and Capital Structure
Form 1099-DIV, Dividends and Distributions
Form 1099-G, Certain Government Payments
Form 1099-H, Health Coverage Tax Credit (HCTC) Advance Payments*
Form 1099-INT, Interest Income
Form 1099-K, Payment Card and Third-Party Network Transactions
Form 1099-LS, Reportable Life Insurance Sale
Form 1099-LTC, Long-Term Care and Accelerated Death Benets
Form 1099-MISC, Miscellaneous Income
Form 1099-NEC, Nonemployee Compensation
Form 1099-OID, Original Issue Discount
Form 1099-PATR, Taxable Distributions Received From Cooperatives
Form 1099-Q, Payments from Qualied Education Programs (Under Sections 529 & 530)
Form 1099-QA, Payments from Distributions From ABLE Accounts
Form 1099-R, Distributions From Pensions, Annuities, Retirement or Prot-Sharing Plans, IRAs,
Insurance Contracts, etc.
Form 1099-S, Proceeds From Real Estate Transactions
Form 1099-SA, Distributions From an HSA, Archer MSA, or Medicare Advantage MSA
Form1099-SB, Seller’s Investment in Life Insurance Contract
*This form is only led by the Internal Revenue Service (IRS)
You don’t need to le a Form 1096 when using IRIS. To le other information returns, please visit
www.irs.gov/inforeturn. This forms listing is subject to change in future tax years.

6
Information Returns Intake System (IRIS) Taxpayer Portal User Guide
Getting Started
Registration
All transmitters who le information returns electronically are required to request authorization to le. To
transmit les through the Taxpayer Portal, you will need an IRIS TCC for your rm and/or business. Each
user is required to create an account or sign-in using their existing credentials to validate their identities
using the latest authentication process.
For more information, please visit How to register for IRS online self-help tools Internal Revenue
Service. Important: Please advise all authorized users to set up an account BEFORE you add them to
the application.
Things you need to know before completing the IRIS Application for TCC
The IRS encourages transmitters who le for multiple issuers to submit one application and use the
assigned TCC for all issuers. The purpose of the TCC is to identify the business acting as the transmitter
of the le. As a transmitter, you may transmit les for as many companies as you need to under one TCC.
A responsible ofcial (RO) initiates and submits the IRIS Application for TCC electronically. Each RO must
sign the terms of agreement using the ve-digit PIN they created when they initially accessed the system.
An application will receive a tracking number after saving it. Completing the application in a single session
isn’t a requirement.
The following information is necessary to complete each application:
Firm’s business structure
Firm’s (EIN) (the system doesn’t allow rms to use a Social Security Number (SSN) or Individual
Taxpayer Identication Number (ITIN)
Firm’s legal business name and business type
Firm’s doing business as name when it’s different from the legal business name
Business phone (phone country code and phone number)
Business address (this must be a physical location, not a post ofce box)
Mailing address when different than business address
RO, contact and authorized delegate if applicable information must include:
● SSN or ITIN
● Date of birth
● Contact information, including email address, position/title and phone number
Role: The RO must select one role (Issuer or Transmitter)
Issuer: is a person ling only for their business
Transmitter: is a person ling for their own business and other businesses or multiple businesses
The Software Developer role is not used with the Taxpayer Portal
Forms: At this time, the only option to select is Form 1099 Series
Transmission Method: For the Taxpayer Portal, select the check box next to Portal.
After your application is approved and processed, a ve-character alphanumeric TCC is assigned to your
After the approval of your application, a ve-character alphanumeric TCC that begins with the letter ‘D’ will
be assigned. The IRS will send a letter with this information to the mailing address on your application. You
can always sign into the IRIS Application for TCC to monitor the status of your application and view your
TCCs on the Application Summary page.

7
Information Returns Intake System (IRIS) Taxpayer Portal User Guide
Access the IRIS Application for TCC
If you would like to use the Taxpayer Portal, you must complete the following steps:
1. Go to IRIS TCC
2. Click on the Access Application for TCC button
3. Sign in or create an account to begin the application process (you don’t need to create an account if
you already have one)
4. Select Individual on the Select Your Organization page
Until the application is in Completed status, you must select Individual on the Select Your
Organization page to access your saved application.
5. Click on New Application and select IRIS Application for TCC
6. Complete and submit an IRIS Application for Transmitter Control Code (TCC)
● Each RO must sign the Application Submission page using their 5-digit PIN. The application will
be processed after all ROs have entered their PIN and accepted the Terms of Agreement.
● If you forgot your PIN, select the Modify PIN tab located at the top of the screen to create a
new PIN.
7. Once the application is in Completed status and TCCs have been issued, access the Taxpayer
Portal to submit information returns
Allow up to 45 calendar days for application processing. You may check the status of your
application and TCC(s) on your Application Summary page. If you are unable to complete your
application during your session, follow steps 1-4 above to access your saved application.
If you want to participate in the IRS CF/SF Program, you must select the option and give consent for the
IRS to disclose data to the participating states during the IRIS TCC Application process. Refer to the
CF/SF Program section for more information.
Application Approved/Completed
Electronically led returns may not be transmitted through the Taxpayer Portal until a TCC has been
approved and assigned.
When your IRIS Application for TCC is approved and completed, a ve-character alphanumeric TCC that
begins with the letter ‘D’ will be assigned to your business. An approval letter will be sent via United States
Postal Service (USPS) to the address listed on the application, informing you of your TCC. You can also
sign into your application view your TCCs on the Application Summary page.
If your application is in Submitted Pending Review status for more than 45 days, contact the Help Desk.
You must use an IRIS Taxpayer Portal TCC when transmitting information returns in the Taxpayer Portal.
Any TCCs obtained for the systems below cannot be used in the Taxpayer Portal:
AIR
FIRE
IRIS A2A
PBBA

8
Information Returns Intake System (IRIS) Taxpayer Portal User Guide
Revise Current TCC Information
As changes occur, you must update and maintain your IRIS TCC Application. Some changes will require
all ROs or Authorized Delegates (ADs) on the application to re-sign the Application Submission page.
Below are examples of when the application would need to be re-signed (this list is not all inclusive):
Firm’s DBA Name
Role changes or additions
Add, delete or change RO and/or AD
Changes submitted on an IRIS TCC Application do not change the address of IRS tax records just
as a change of address to IRS tax records does not automatically update information on an IRIS
TCC Application.
Changes that require a rm to acquire a new Employer Identication Number (EIN) require a new IRIS
TCC Application. Firms that change their business structure, such as from a sole proprietorship to a
corporation, generally require the rm to acquire a new EIN.
Deleted TCC
Your TCC will remain valid if you transmit information returns or request an extension of time to le through
the Taxpayer Portal. If you don’t use your TCC for three consecutive years, your TCC will be deleted. Once
your TCC is deleted, it cannot be reactivated. You’ll need to submit a new IRIS Application for TCC.
9
Information Returns Intake System (IRIS) Taxpayer Portal User Guide
Taxpayer Portal
Helpful Hints for Navigating the Portal
Here are some helpful hints for navigating within the portal.
Use your mouse or pointing device to select icons, buttons, check boxes, drop-down, menu items
and to select elds to enter information and navigate the screens.
Use the scroll bar to view more of the form you have selected.
Enter all required elds marked with an asterisk *
Use the ‘Next’ or ‘Back’ button in the portal, never use your browser’s back button.
Use the Frequently Asked Questions (FAQ) boxes available throughout the Taxpayer Portal to assist you.
Access the Taxpayer Portal
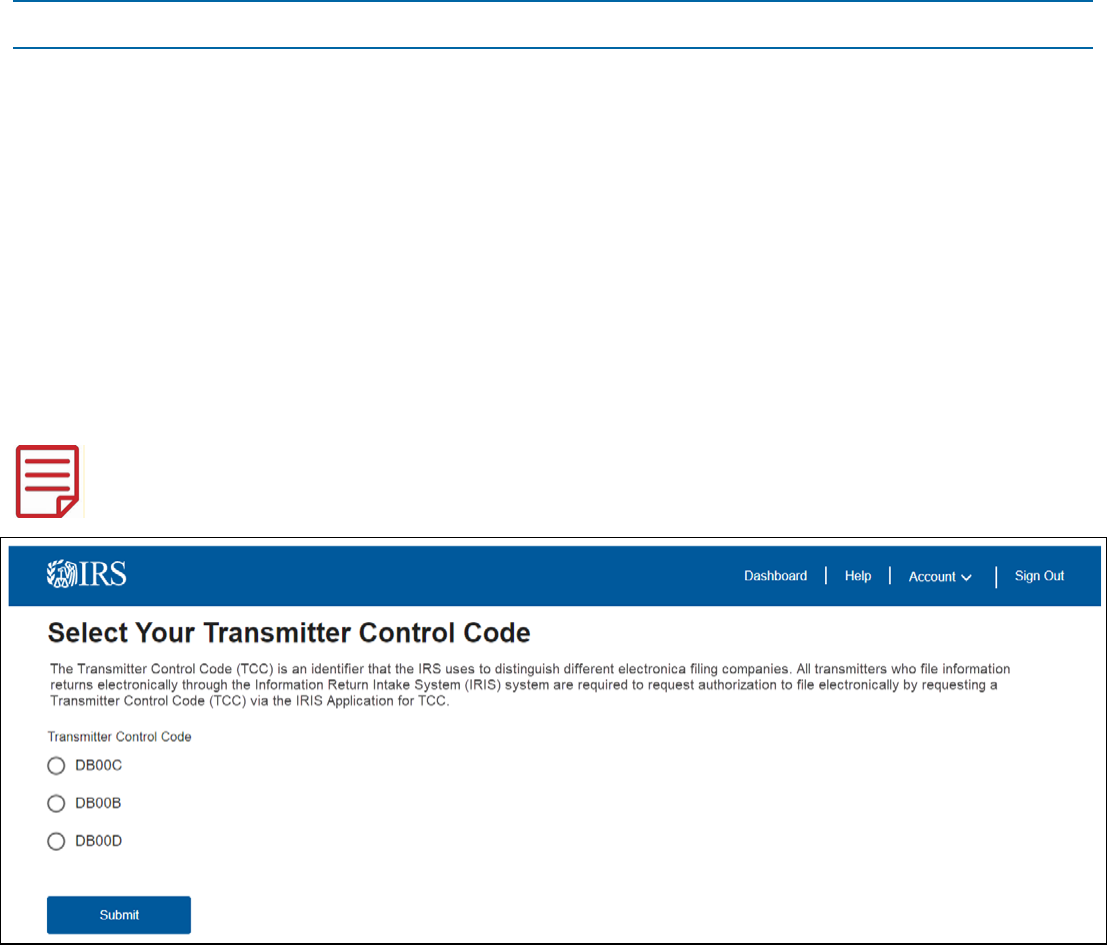
Go to the IRIS webpage and select the Sign in to IRIS button.
You must use an IRIS Taxpayer Portal TCC. If you have multiple TCCs, you will see the screen
below. Select the TCC that has been designated for the Taxpayer Portal.
You will then be directed to the Taxpayer Portal Dashboard which allows you to navigate the main functions.
The Header
The header allows you to quickly return to the Dashboard from any page and access the Help page. It will
also allow you to switch to a different TCC by using the Account drop-down menu, if needed, and exit the
Taxpayer Portal.
10
Information Returns Intake System (IRIS) Taxpayer Portal User Guide
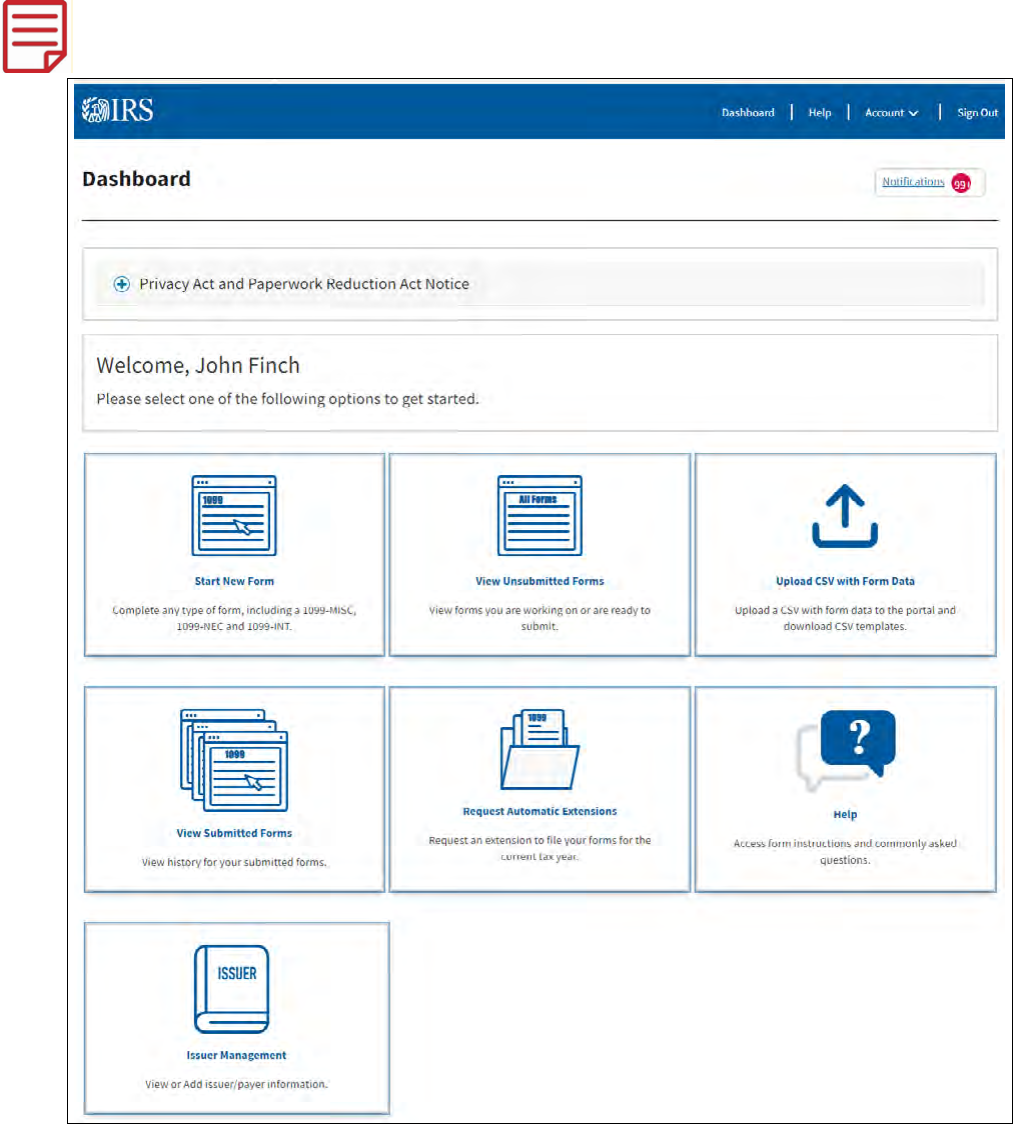
Dashboard Tiles:
The dashboard allows you to navigate the main functions of the application.
If using a mobile device, the Upload CSV tile and Recent Unsubmitted Forms tile will not appear.
Notications (upper left corner): Allows you to view the notications sent to you by the IRS and
retrieve the recipient copies of the forms you’ve downloaded.
Start New Form: Allows you to begin preparing a new form.
View Unsubmitted Forms: Directs you to the Unsubmitted Forms page where you can search for,
view, edit, download, and submit forms.
Upload CSV with Form Data: Allows you to upload les containing form information in a simple le
format.
11
Information Returns Intake System (IRIS) Taxpayer Portal User Guide
View Submitted Forms: Allows you to search for and view transmissions that are associated with
the logged-in user and download recipient copies.
Request Automatic Extension: Allows you to make an automatic extension request.
Help: Allows you to access the Help page.
Issuer Management: Directs you to the Saved Issuer page. Frequently used issuer information can
be entered and saved to use when preparing a form.
Issuer Management
If you plan on keying in your form data, visit the Issuer Management tile to securely save issuer information
that can be easily accessed as you create each form. The information stored here will be available from
year to year. You can save information for up to 25 frequently used Issuers.
After selecting the Issuer Management button on the Dashboard page, you can create and manage your
frequently used issuers.
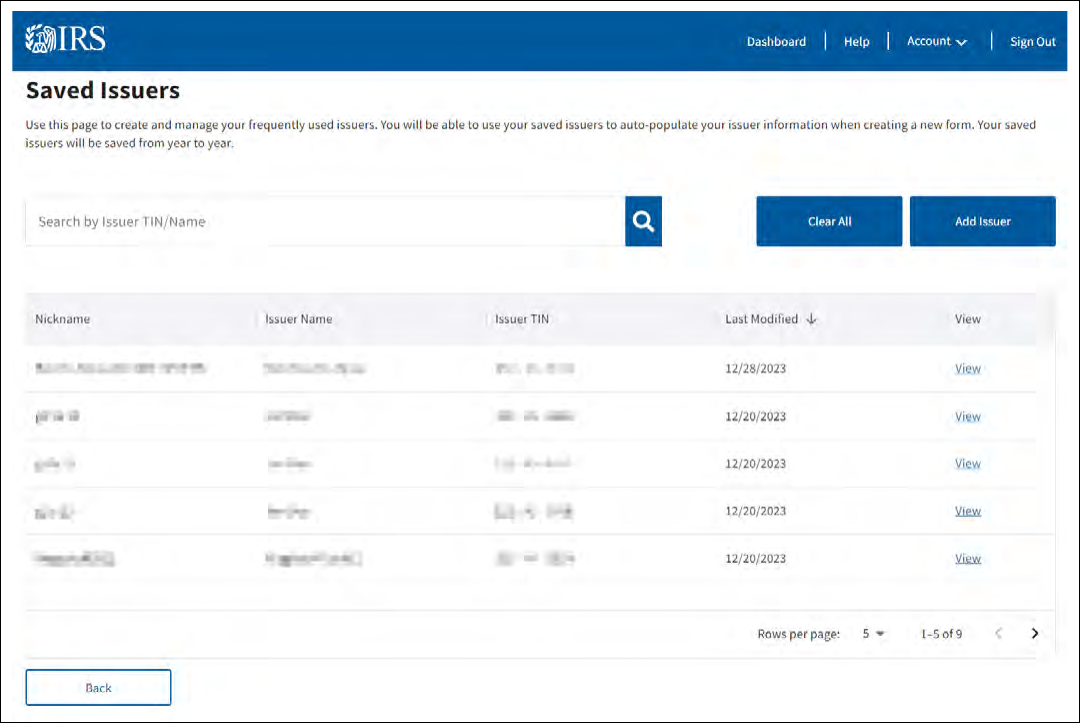
Saved Issuers Page
This is the rst page you will see after selecting the Issuer Management button. This page will allow you
to view a table of saved Issuers. The table can be ltered to narrow results. On this page, you can add an
issuer, edit an issuer, and view an issuer’s information.
12
Information Returns Intake System (IRIS) Taxpayer Portal User Guide
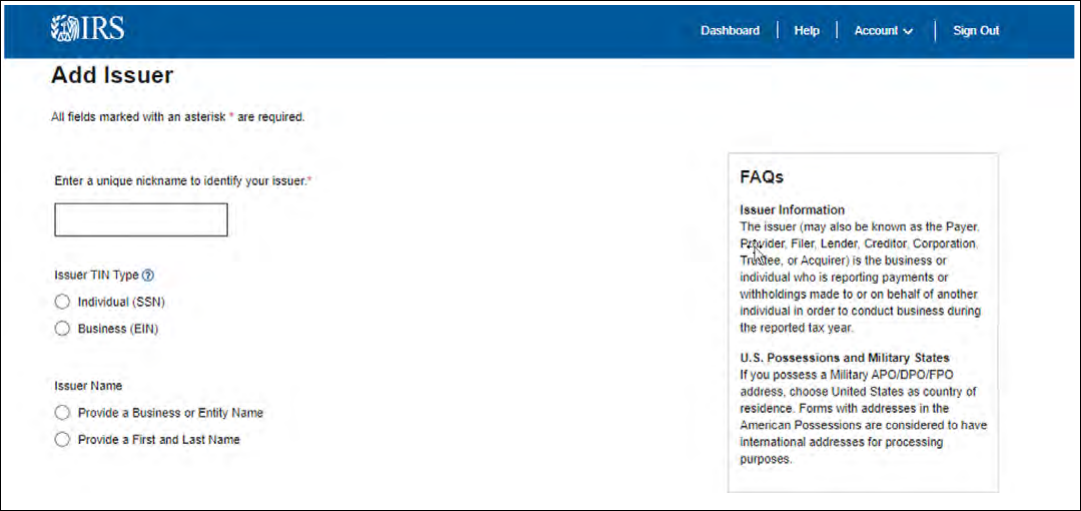
Add Issuer Page
This is the page you will see after selecting the Add Issuer button on the Saved Issuers page. This page
will allow you to add information for up to 25 Issuers one at a time and save the information to the Saved
Issuers table. Note that a nickname is required.
13
Information Returns Intake System (IRIS) Taxpayer Portal User Guide
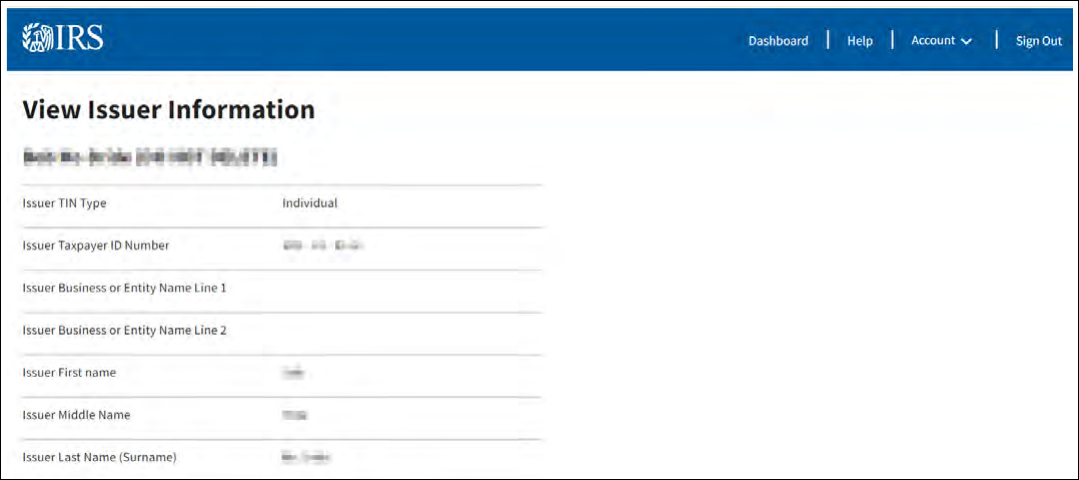
View Issuer Information Page
This is the page you will see after selecting the View link on the Saved Issuers page. This page will allow
you to view the saved issuer information. You will also be able to edit and delete the issuer information.
14
Information Returns Intake System (IRIS) Taxpayer Portal User Guide
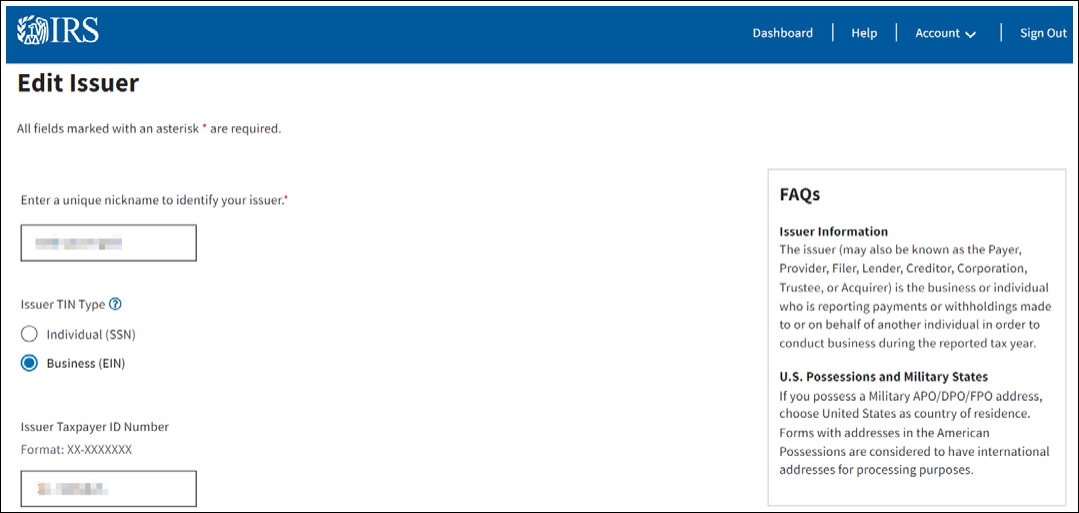
Edit Issuer Page
This is the page you will see after selecting the Edit button on the View Issuer Information page. This page
will allow you to view and make any edits to the saved issuer information.
15
Information Returns Intake System (IRIS) Taxpayer Portal User Guide
Start New Form
After saving information about your frequently used Issuers, you can start preparing forms. As you
complete each form, you will see tips, hints and other tools to help you navigate through the Taxpayer
Portal.
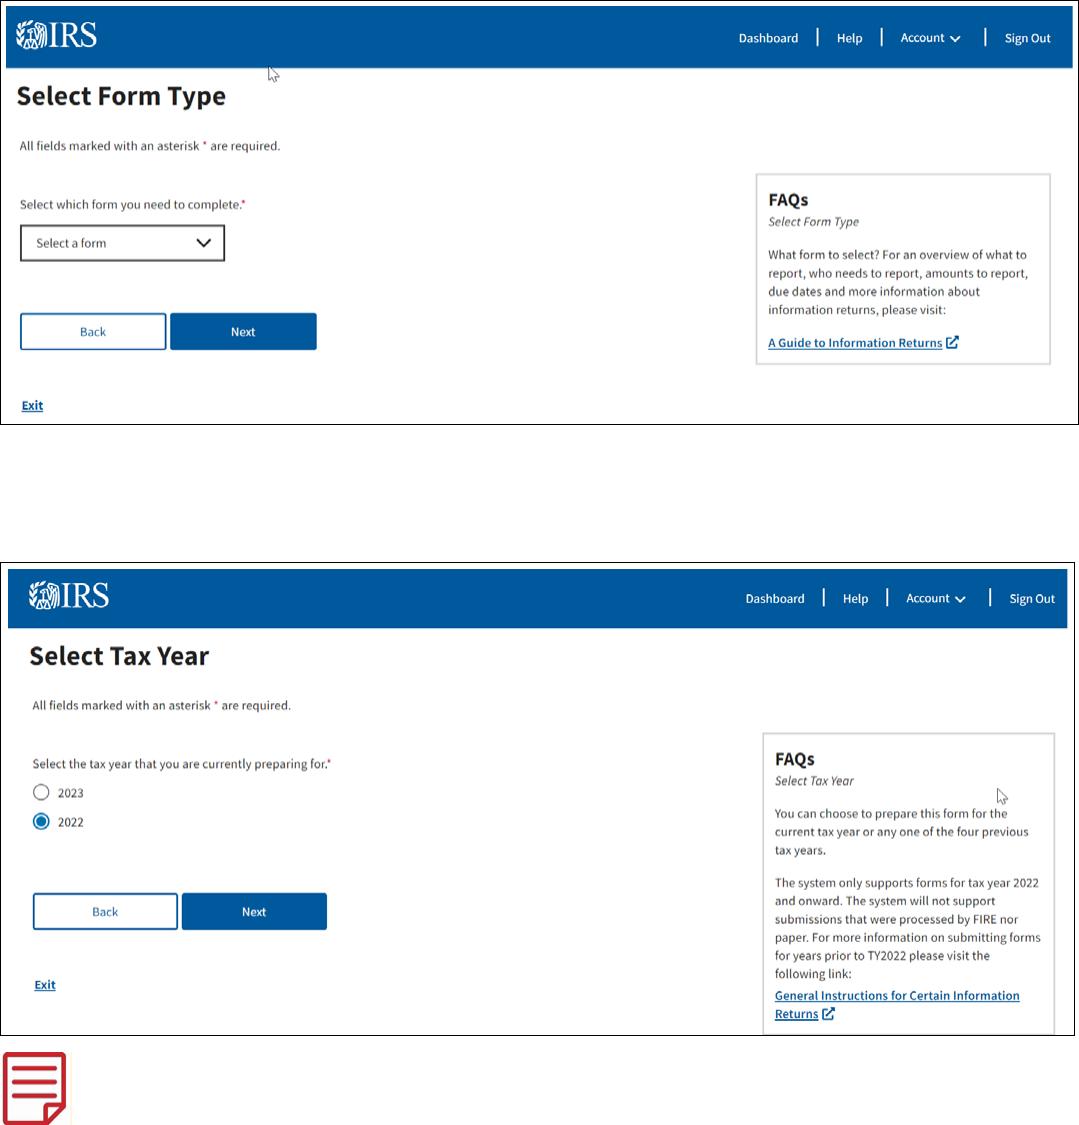
1. Select Start New Form from the Taxpayer Portal Dashboard.
2. You will be directed to the Select Form Type page. Use the drop-down menu to select the form you
need to complete, then select Next.
3. On the Select Tax Year page, select the tax year for which you’re currently preparing returns. You’ll
be able to choose the current tax year or one of the four previous tax years listed. Once you’ve
selected your year, click Next for the Issuer Information page.
● The earliest year IRIS will intake forms is for tax year 2022.
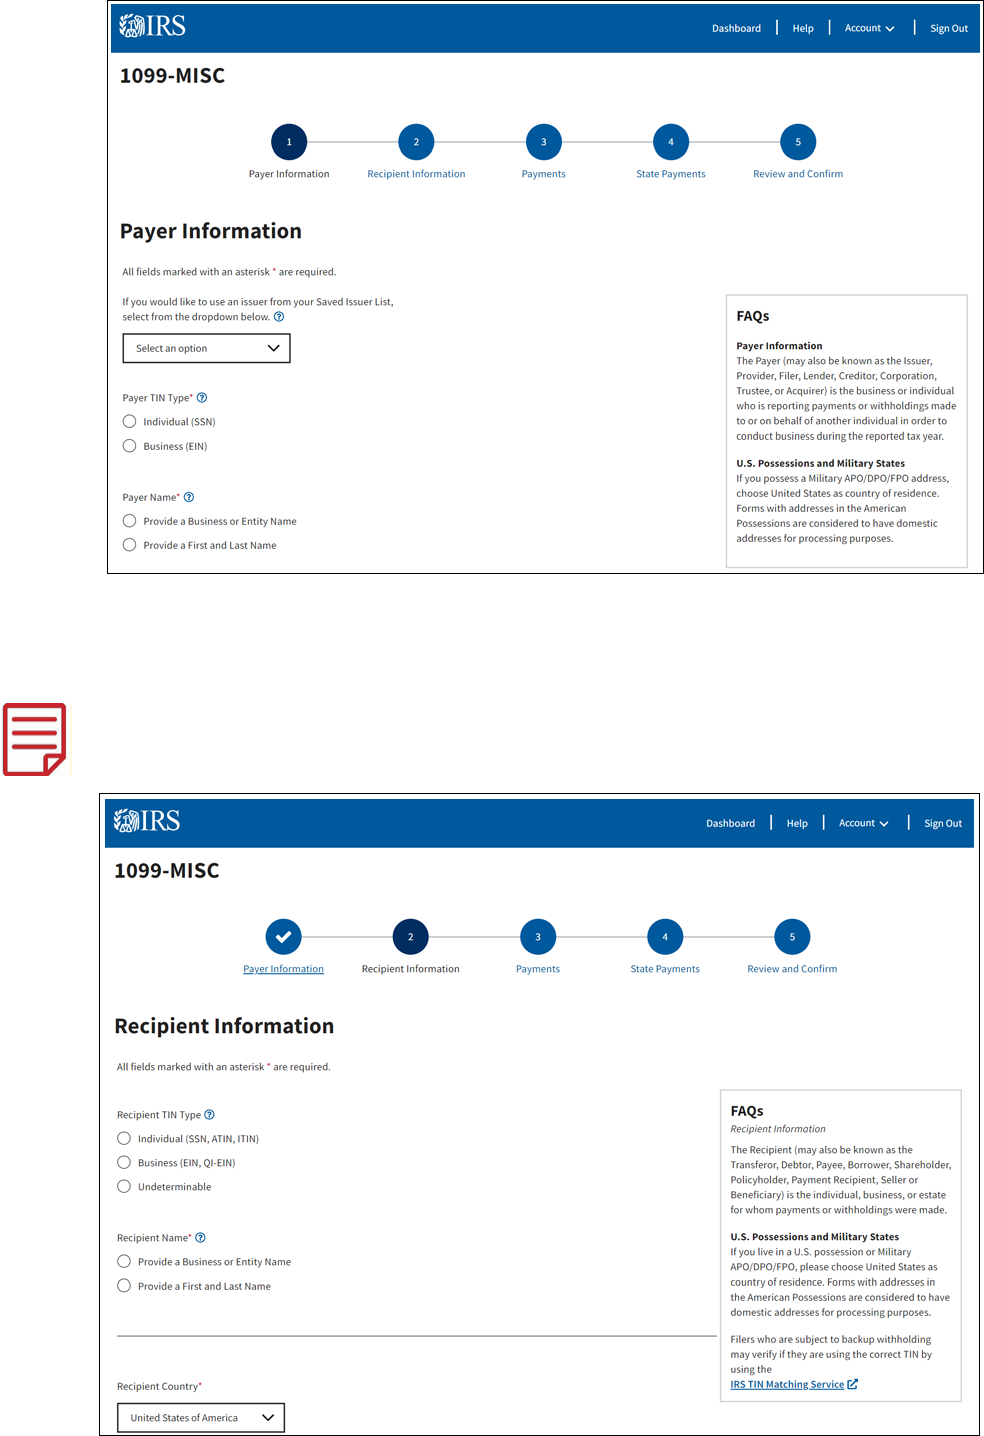
The term issuer is synonymous with payer, provider, ler, lender, creditor, corporation, trustee and
acquirer, depending on the form you’re preparing.
4. Enter the issuer information for the information return or select an issuer from your Saved Issuer List
using the drop-down menu.
16
Information Returns Intake System (IRIS) Taxpayer Portal User Guide
5. Once completed, select Next to go to the ‘Recipient Information’ page or select the Save and Exit
link to continue the form at a later time.
Complete the required elds on the Recipient Information page.
The term recipient is synonymous with transferor, debtor, payee, borrower, shareholder,
policy holder, payment Recipient, seller and beneciary, depending on the type of form
you’re preparing.
17
Information Returns Intake System (IRIS) Taxpayer Portal User Guide
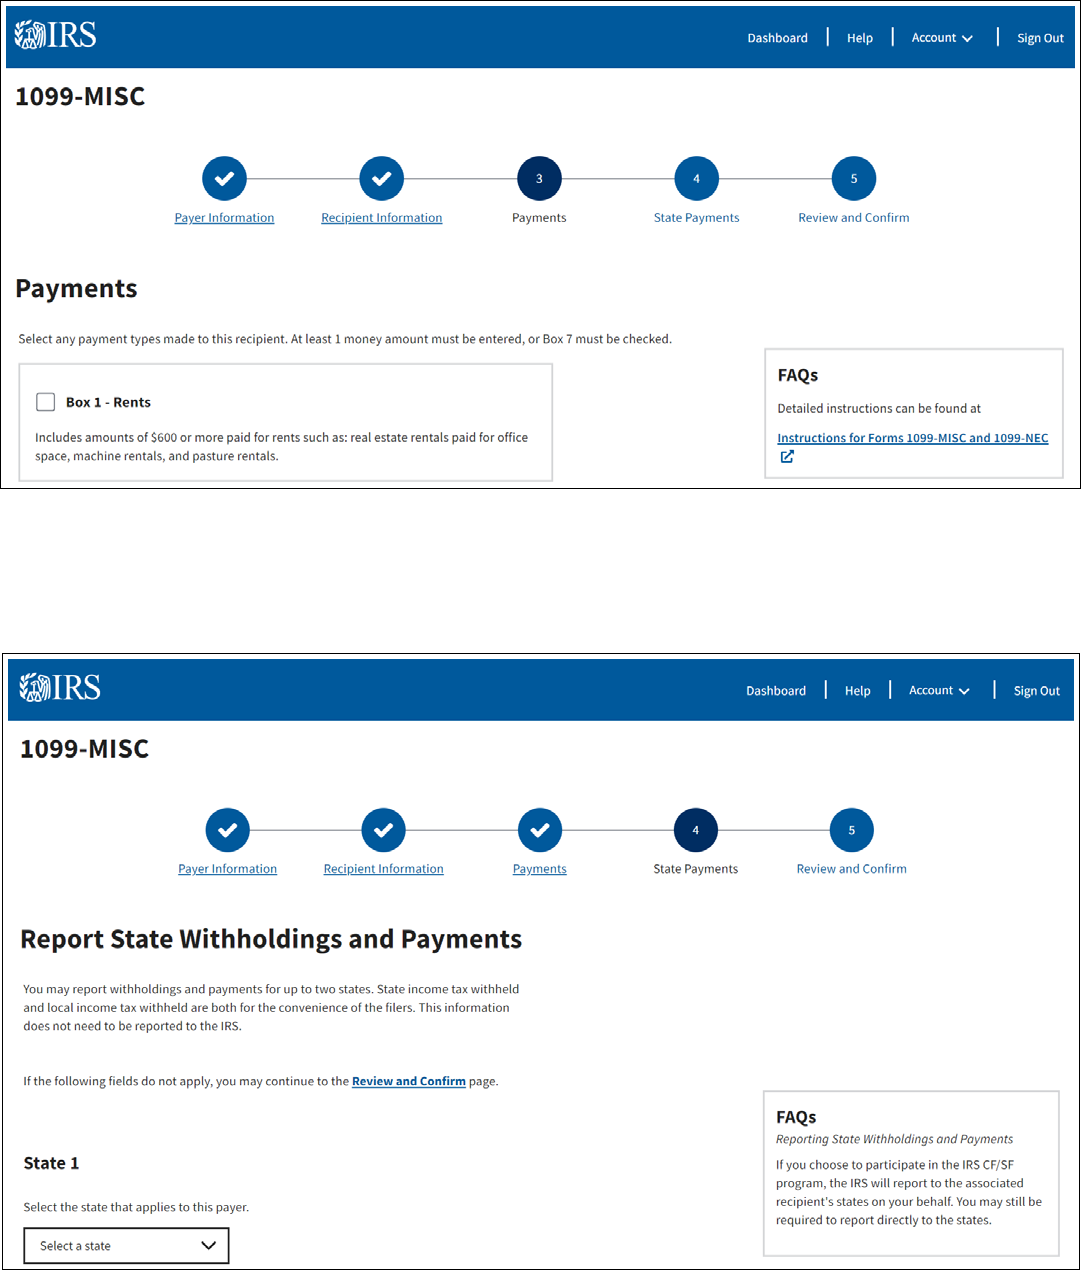
6. Complete the Payments page by selecting and entering the payment information in the
applicable eld. This page contains a FAQ box with a link to the form instructions to help you
correctly complete the Payments page for specic forms.
7. Completing the Report State Withholdings and Payments page is optional. Refer to the Combined
Federal/State Filing (CF/SF) Program section for additional information. Once completed, select Next
to review and conrm your information return.
If you do not have state payments to report, select the ‘Review and Conrm’ link to continue.
18
Information Returns Intake System (IRIS) Taxpayer Portal User Guide
8. On the Review and Conrm page, you can view and edit the information entered in the portal. This
page will also identify any errors and allow you to update. Your progress will automatically save, and
the form will be ready for submission.
9. At this point, you can select the following options:
● Payer Information Edit Link – This selection allows you to return to the Payer Information page
to edit the information entered.
● Recipient Information Edit Link – This selection allows you to return to the Recipient
Information page to edit the information entered.
● Payments Edit Link – This selection allows you to return to the Payments page to edit the
information entered.
● State Withholdings and Payments Edit Link – This selection allows you to return to the State
Payments page to edit the information entered.
● Unsubmitted Forms Page Link – This selection allows you to visit the Unsubmitted Forms Page
to view forms that are in progress or ready for submission.
● Back Button – This selection allows you to return to the State Payments page.
● Submit – Use to submit the completed form to the IRS.
● Unsubmitted Forms – This selection will save the form data that you entered and redirect you to
the Unsubmitted Forms page to review forms that are In Progress or Ready to Submit status.
● Start New Form – This selection will save the form data that you entered and redirect you the
Select Form Type page to create a new form.
● Exit – Returns you to the Taxpayer Portal Dashboard.
19
Information Returns Intake System (IRIS) Taxpayer Portal User Guide
Upload CSV and Form Data
The Upload CSV with Form Data option allows you to download templates for a specic form type and
upload your information return data. You will only be able to upload one form type at a time and the le can
only contain a maximum of 100 records.
This feature is available in desktop view only.
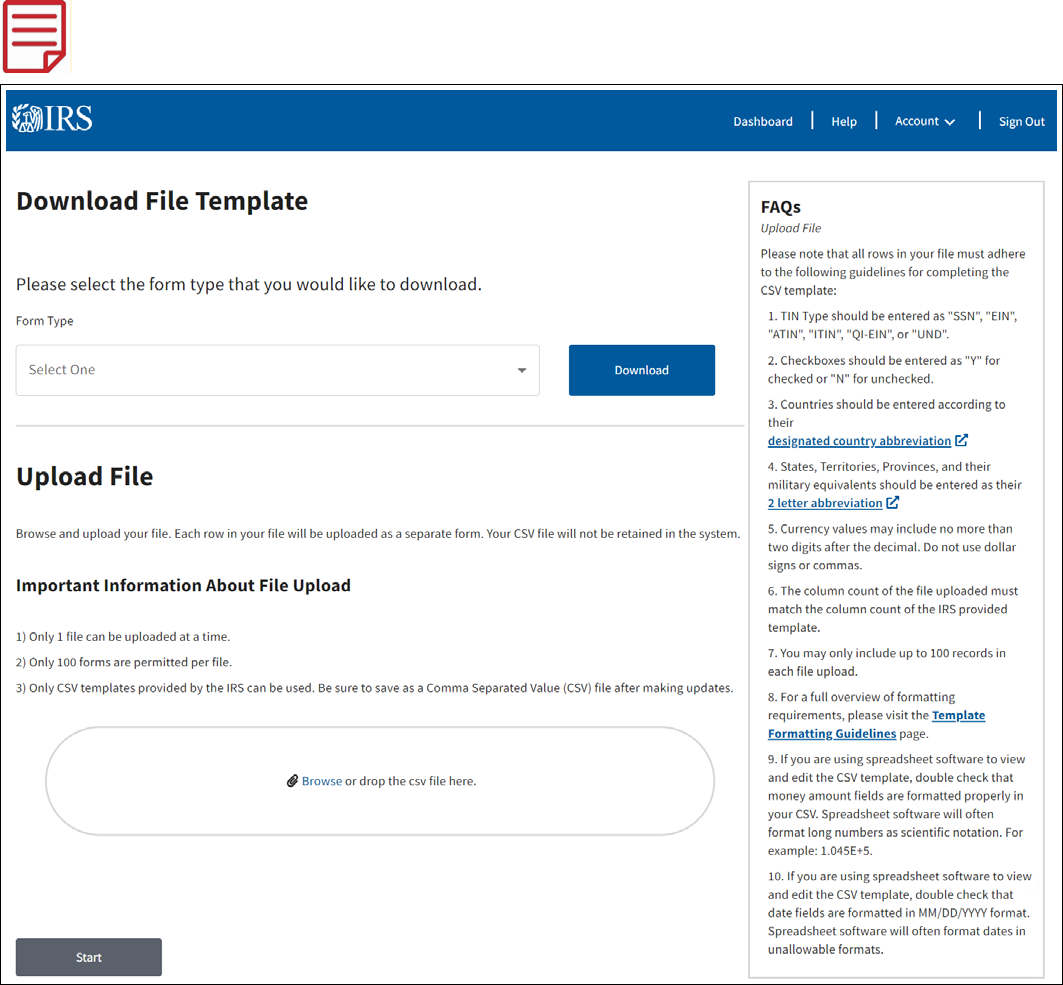
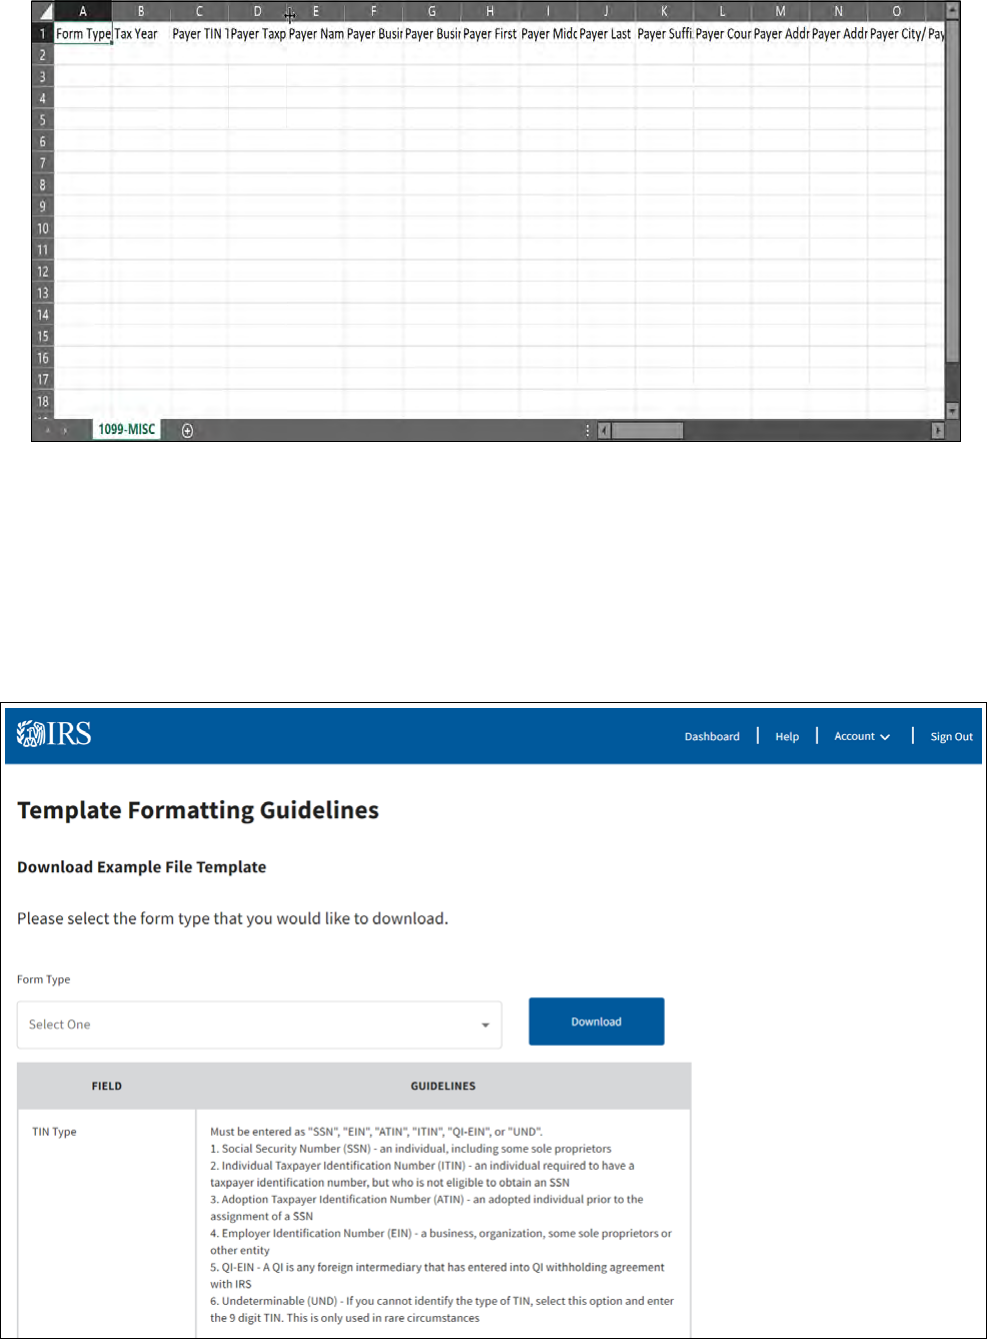
Steps to Download File Template:
1. From the Dashboard, select the Upload CSV with Form Data button
2. Download the le template by selecting the form from the Form Type drop-down and click the
Download button. This will allow you to save the template to your computer.
3. Create your CSV le using the template provided by the IRS. The CSV le can include up to 100
forms per le.
20
Information Returns Intake System (IRIS) Taxpayer Portal User Guide
Before you enter your data onto the CSV le, view the Template Formatting Guidelines page for guidance
on properly formatting your CSV le.
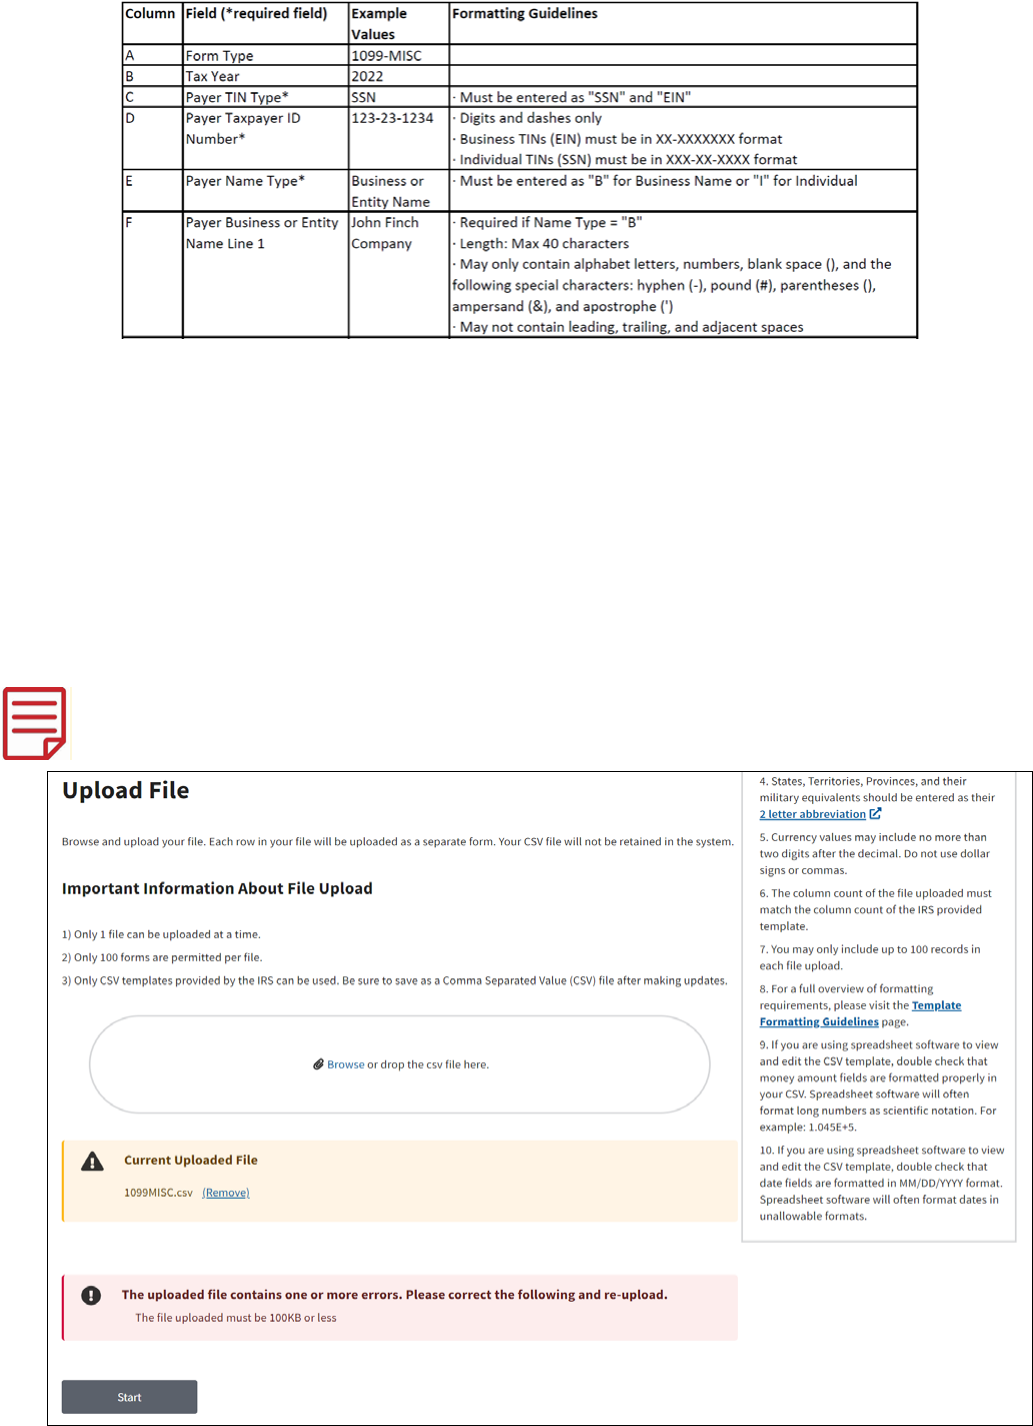
View Formatting Guidelines:
1. Return to the Upload CSV with Form page on the dashboard.
2. In the FAQs box on the right side of the screen, click on Template Formatting Guidelines link. The
Template Formatting Guidelines page will be displayed. The gray table that appears on the initial
page has general formatting guidance for all forms.
3. From the Form Type drop down select the formatting guidelines for your specic form type.
4. After your selection is made, click the Download button.
21
Information Returns Intake System (IRIS) Taxpayer Portal User Guide
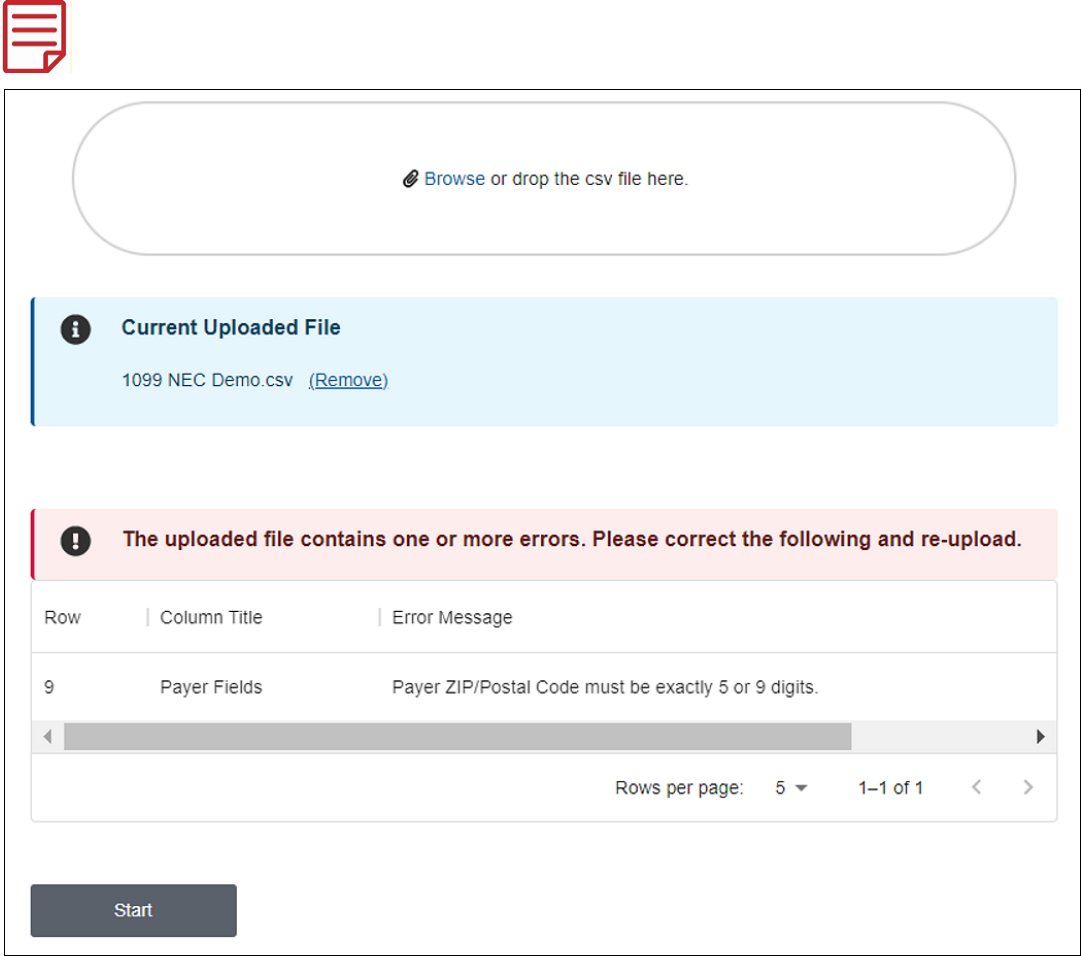
5. Return to your downloaded CSV le template and use the formatting guidance to complete your
entries in each eld.
Upload Your Completed CVS File
1. Once your le is complete, save it, and then upload it to the Taxpayer Portal by selecting Browse
or Drag and Drop CSV File Here on the Upload CSV with Form page.
2. If you see an error message after you upload your le, return to your saved CSV le and correct
your entries.
File Level Error Messages: Occur when there is an error with the le. Examples can include
“You may only include up to 100 forms in each le upload.”, “File type must be text/csv,
application/csv, application/excel, application/vnd.ms-excel, text/comma-separated-values”.
Only 1 File Level Error message will appear at a time.
22
Information Returns Intake System (IRIS) Taxpayer Portal User Guide
Field Level Error Messages: Occur when the information in the eld(s) is incorrect.
For example, “Box 1 – Payments may only include digits”, “Box 2- Code Must be 6 characters”.
All Field Level error messages that occur will appear at the same time on the table.
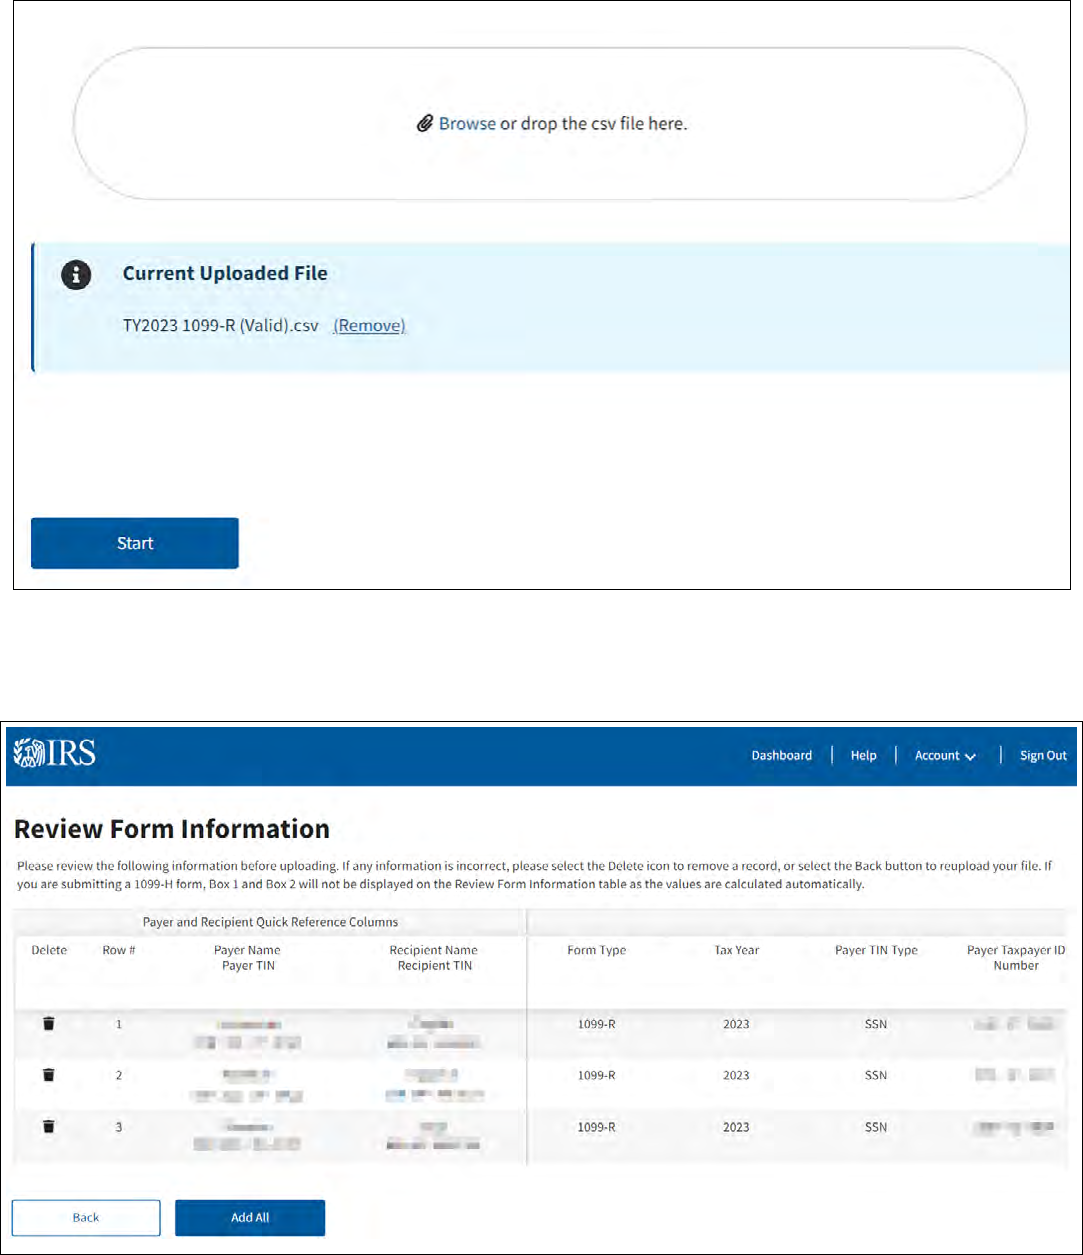
3. Save your corrected le, remove the le that has errors from the dashboard, and upload your
corrected le.
23
Information Returns Intake System (IRIS) Taxpayer Portal User Guide
4. Select the Start button, which will direct you to the Review Form Information page. On this page,
you’ll have the option to review your information return data before continuing. You will also be able
to delete specic rows that you do not want included in the upload.
24
Information Returns Intake System (IRIS) Taxpayer Portal User Guide
5. Select Add All to upload your information to the Taxpayer Portal.
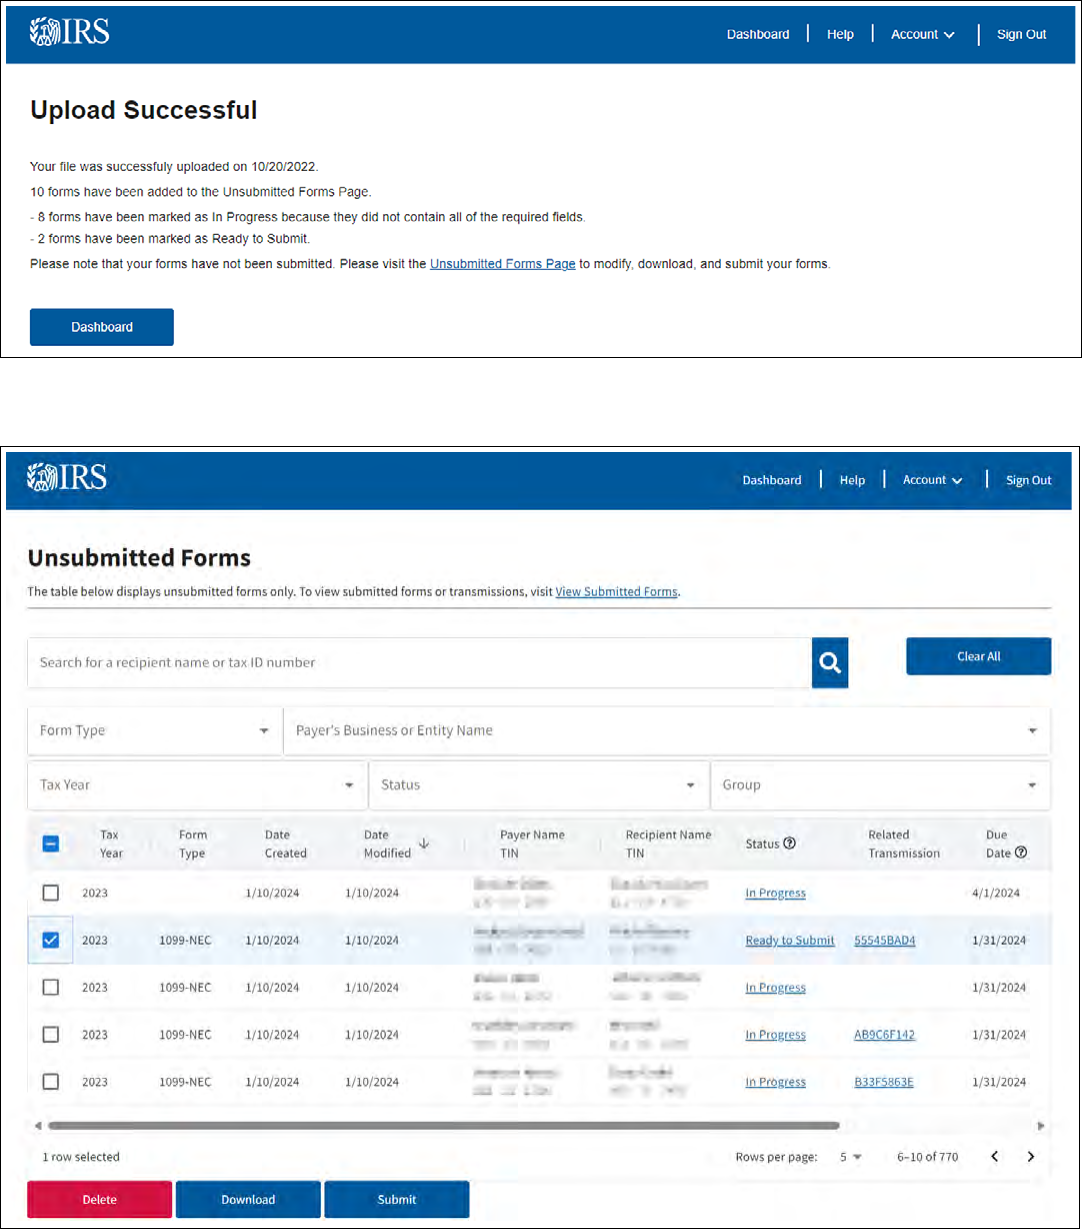
6. The Upload Successful Page will display the number of forms added to the Unsubmitted Forms page
that are ready to submit and the number of forms that need additional information.
7. Visit the Unsubmitted Forms page to modify, download and submit your forms to the IRS. Forms
submitted by simple le upload will automatically be grouped together.
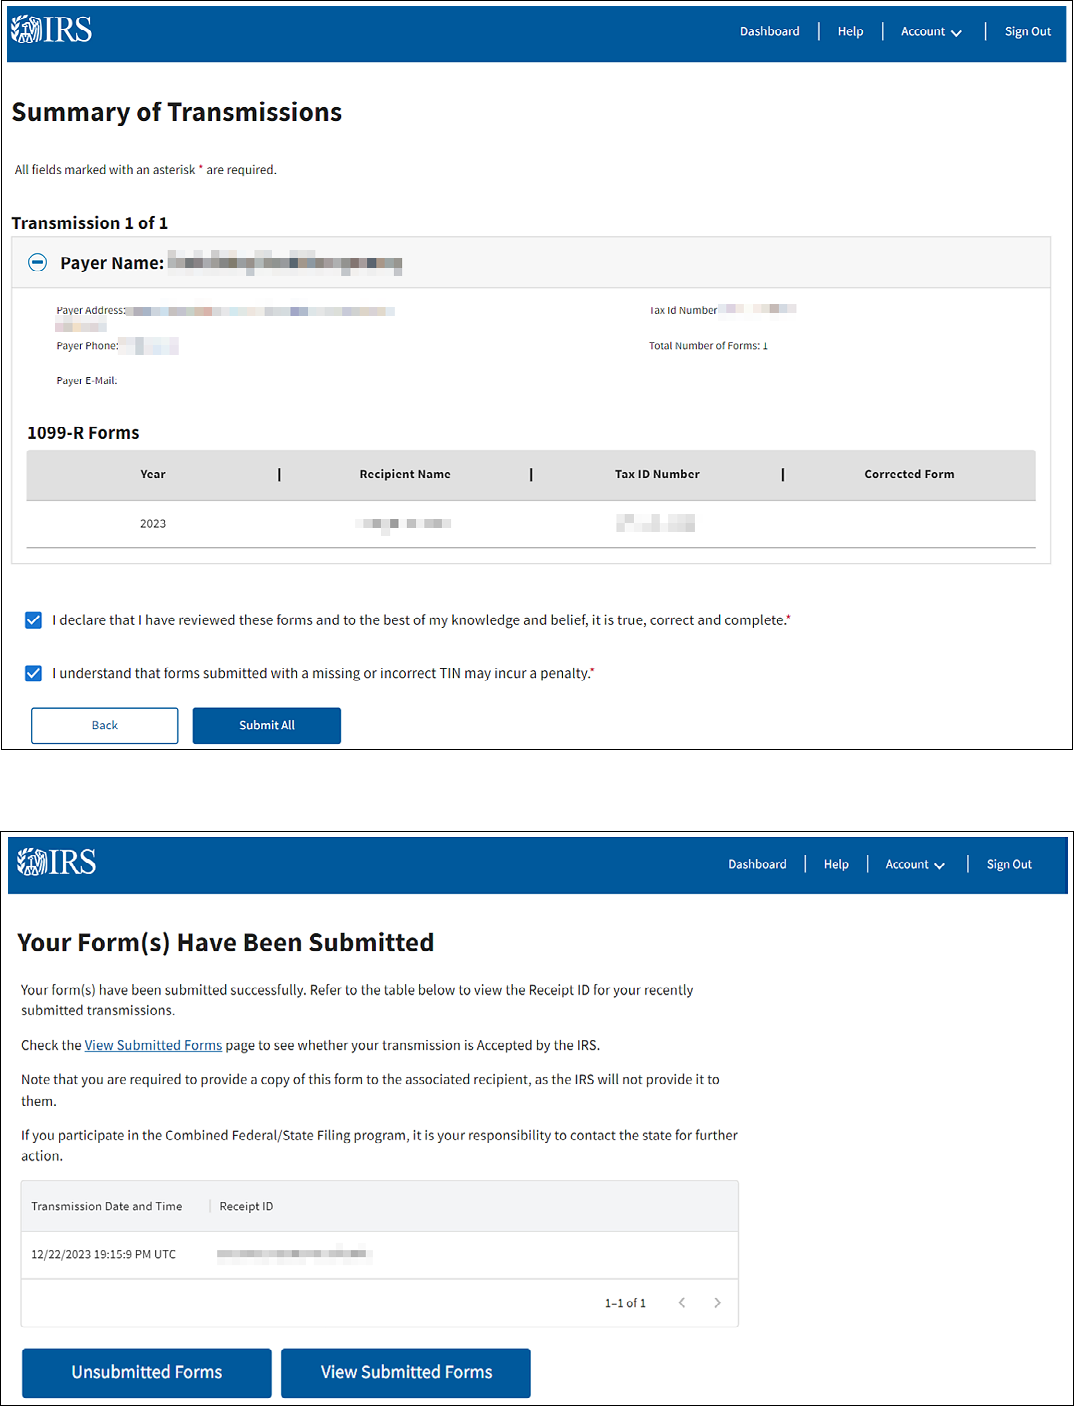
8. Once the submit button is selected, transmission(s) will be organized on the Summary of
Transmissions Page. You can view a list of the forms that have been selected for submission.
Once your review is complete, click Submit All.
25
Information Returns Intake System (IRIS) Taxpayer Portal User Guide
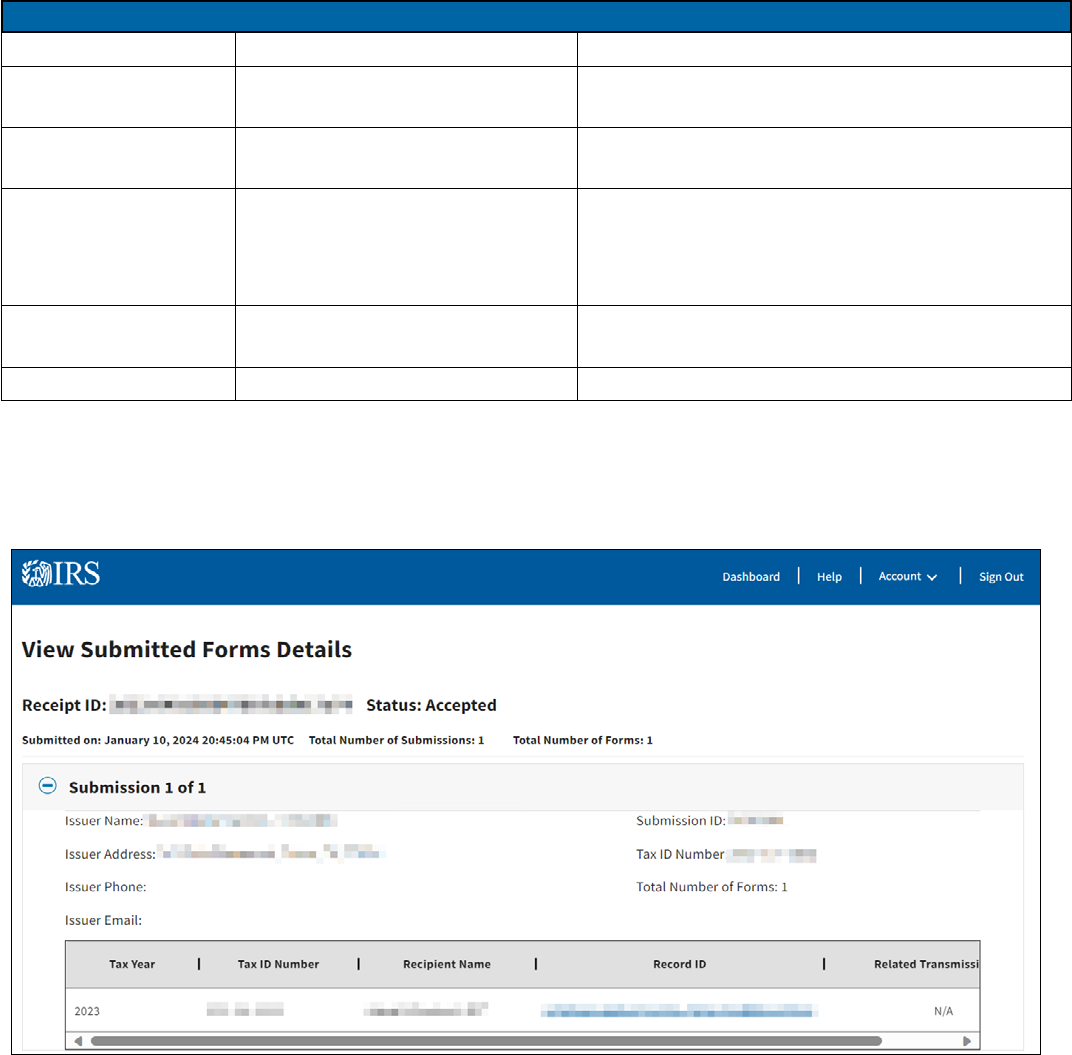
9. After submitting your forms, you will be redirected to the Your Form(s) Have Been Submitted page.
This page will serve as a conrmation of the transmission and provide you with a receipt ID.

26
Information Returns Intake System (IRIS) Taxpayer Portal User Guide
Additional Functions
View Unsubmitted Forms
The Unsubmitted Forms page allows you to search, view, edit, download and submit already created
information returns to the IRS. Use the check box to the left of the user’s information to select returns for
download, submission or deletion.
View Submitted Forms Link: This selection allows you to visit the View Submitted Forms page to
view a table of your submitted transmissions.
In Progress Status Link: This selection allows you to return to the Payer Information page for the
form selected to continue editing your form.
Ready to Submit Status Link: This selection allows you to return to the Review and Conrm Page
for the form selected to review your input and edit, if needed.
Group Column Dropdown List: This selection allows you view the associated group for your
unsubmitted forms. Forms submitted by simple le upload will automatically be associated with the
same group.
Download Button: This selection allows you to download one or more forms. When you request
to download multiple records, a ZIP le will be created with a separate PDF for each record
downloaded. There is a maximum number of 100 forms per download. If you download one or more
forms, you will receive a pop-up message directing you to the Notications page, where you can
download the PDF and Recipient Checklist CSV onto your computer.

27
Information Returns Intake System (IRIS) Taxpayer Portal User Guide
Submit Button: This selection allows you to submit one or more forms. There is a maximum number
of 100 forms per submission. Once the submit button is selected, transmission(s) will be organized
on the Summary of Transmissions Page. If a form is part of a correction or replacement submission,
all forms that belong to that submission will be copied and be part of that submission. Any remaining
forms on the Make a Correction Page will be disabled.
Enabling Delete Button: To enable the delete button you must select a record from the unsubmitted
forms table.
Delete Button: This selection allows you to delete one or more forms from the unsubmitted forms
table.
Status Denitions for Unsubmitted Forms
Status Denitions for Unsubmitted Forms
Status Denition Select the status link to:
In Progress
All required elds have not been completed
Edit or complete the form
Ready to Submit All required elds have been completed.
Forms have not been submitted to IRS
Review data; edit, if needed; and submit
to IRS
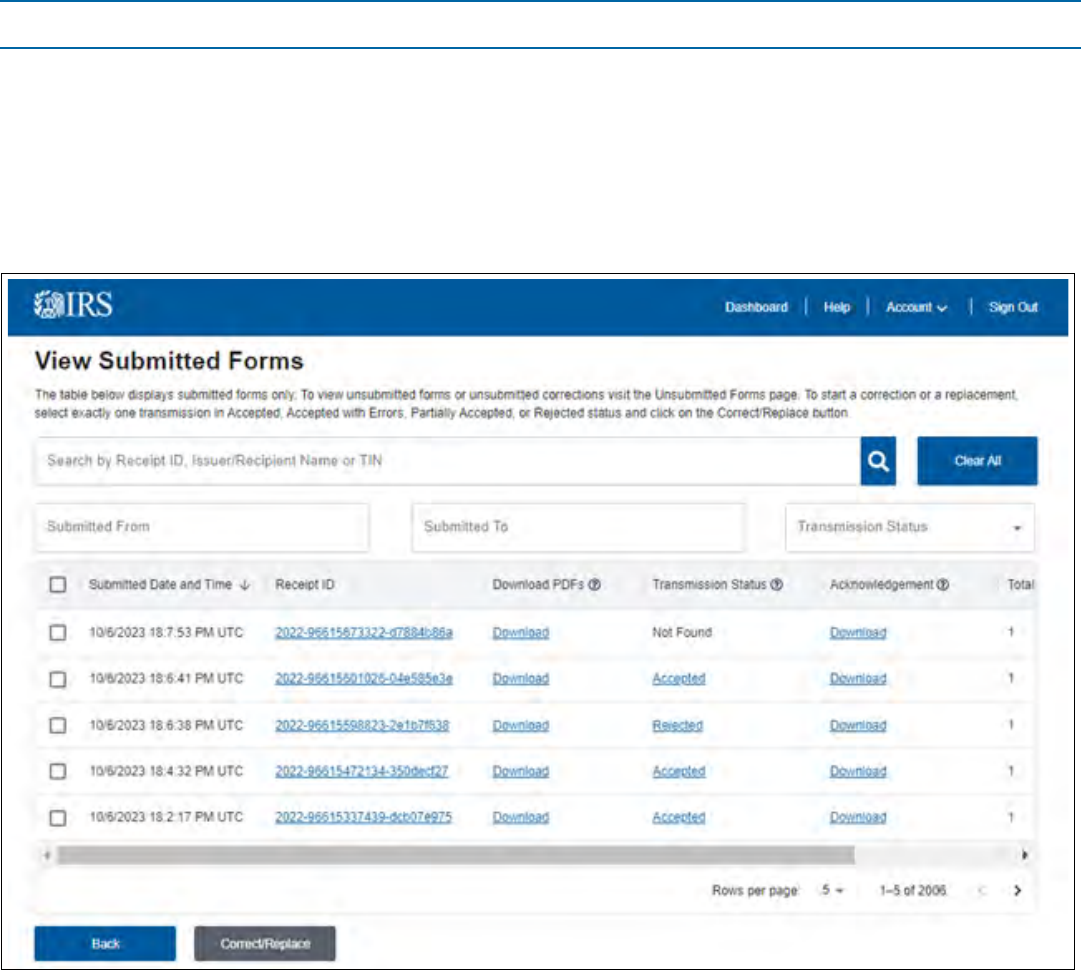
View Submitted Forms
The Submitted Forms page allows you to view a table of transmissions you submitted. Filter the table to
narrow the results. On this page, you can:
View Submitted Forms Details by selecting Receipt ID to display a list of all submissions included
in your transmission. View specic form details by clicking on the Record ID which is a record-level
view of the transmission
View the Transmission Status of submitted forms – Accepted, Accepted with Errors, Partially
Accepted, Received by IRS and Rejected
Download acknowledgements
Use the Correct/Replace button to begin a correction or replacement
28
Information Returns Intake System (IRIS) Taxpayer Portal User Guide
Receipt ID Link: This selection allows you to visit the Submitted Forms Details page to view the
details of your submissions.
Download PDFs link: This selection allows you to download forms. If you download a form, you will
receive a pop-up message directing you to the Notications page, where you can download the PDF
and Recipient Checklist CSV onto your computer.
Transmission Status: This selection allows you to visit the View Acknowledgment page, which will
display the transmission statuses: Accepted, Accepted with Errors, Partially Accepted and Rejected.
Acknowledgement: By clicking on the Download link, your transmission acknowledgment will
download to your browser. The downloaded le displays the raw submission data in JavaScript
Object Notation (JSON) format.
Back Button: This selection allows you to return to the Dashboard page.
Correct/Replace Button: This selection allows you to start correcting/replacing the selected form.
Status Denitions for Submitted Forms
Status Denitions for Submitted Forms
Status Denition Action Needed
Received by IRS IRS has not completed
processing the transmission
Allow 7 days for processing
Accepted IRS has completed processing
and found no errors
No action required
Accepted with Errors IRS has completed processing
and found error(s)
Records accepted with errors are considered
accepted by the IRS. However, every effort
should be made to provide a correct information
return by ling corrections for these errors.
Partially Accepted
IRS has completed processing
and rejected at least 1 submission
Any submission that was rejected must be
replaced.
Rejected All submissions were rejected Resolve issues and replace entire submission
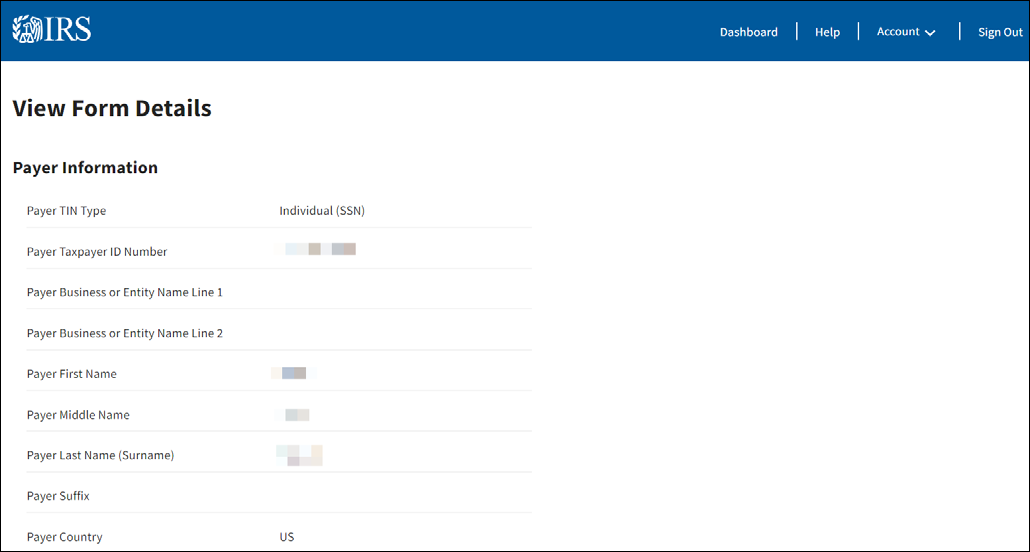
View Submitted Forms Details Page
This is the page you will see after selecting the Receipt ID link on the View Submitted Forms page. This
page will allow you to view a list of all the submissions included in your transmission and view specic
form details. You will also be able to view all the forms completed within those submissions.
29
Information Returns Intake System (IRIS) Taxpayer Portal User Guide
Plus/Minus Button: This selection allows you to maximize and minimize accordion folds to multiple
form submissions.
Record ID Link: This selection allows you to visit the View Forms Details page to view the details of
your form.
Back Button: This selection allows you to return to the View Submitted Forms page to view the
details of another transmission.
You may then click on the Record ID Link, which allows a record level view of your transmissions on View
Forms Detail. On this page, you can view the information you entered. To return to the View the Submitted
Forms Details use the Back button.
View Forms Details Page
This is the page you will see after selecting the Record ID link on the View Submitted Forms Details page.
This page will allow you to view information entered in each section for that form.
Back Button: This selection allows you to return to the View Submitted Forms Details page to view
the details of another transmission.
30
Information Returns Intake System (IRIS) Taxpayer Portal User Guide
Make A Correction
You can make a correction for the following issues (this list is not all-inclusive):
Issue Action Needed
Incorrect money amounts Correct money amounts
Incorrect payment types Correct payment types
Incorrect distribution code Correct distribution code
No recipient TIN Add recipient TIN
Incorrect recipient TIN Correct recipient TIN
Missing recipient account number Add recipient account number
Filed a return when one should not have been led Zero out all money amounts
Incorrect check box Select or deselect the appropriate check box
Filed using wrong form type Zero out all money amounts in your correction
and then submit an original submission using the
appropriate form type
Reminder:
You must submit corrections through the portal for information returns submitted through the
Taxpayer Portal
Make corrections as soon as possible
Send statements to recipients showing the corrections
Error in Reporting the Issuer
You cannot submit a correction to resolve errors in Issuer information. If an error is discovered in reporting
the issuer’s (not recipient) name and/or TIN, the issuer should write a letter to the IRS containing the
following information:
Name and address of issuer
Type of error (include the incorrect issuer name/TIN that was reported)
Tax year
Correct issuer TIN
TCC
Type of return
Number of payees
Filing method, paper or electronic
If federal income tax was withheld
Mail correspondence to:
Internal Revenue Service
230 Murall Drive, Mail Stop 4360
Kearneysville, WV 25430
If you need to make a correction to a form sent to the IRS and the transmission has a status of Accepted
or Accepted with Errors, use the Make a Correction page to address the errors you identied.
To start the correction process, select the View Submitted Forms button on the Dashboard page to view
all submitted forms.
Next, mark the check box next to the transmission you’d like to correct. After making your selection, click
the Correct/Replace button.
31
Information Returns Intake System (IRIS) Taxpayer Portal User Guide
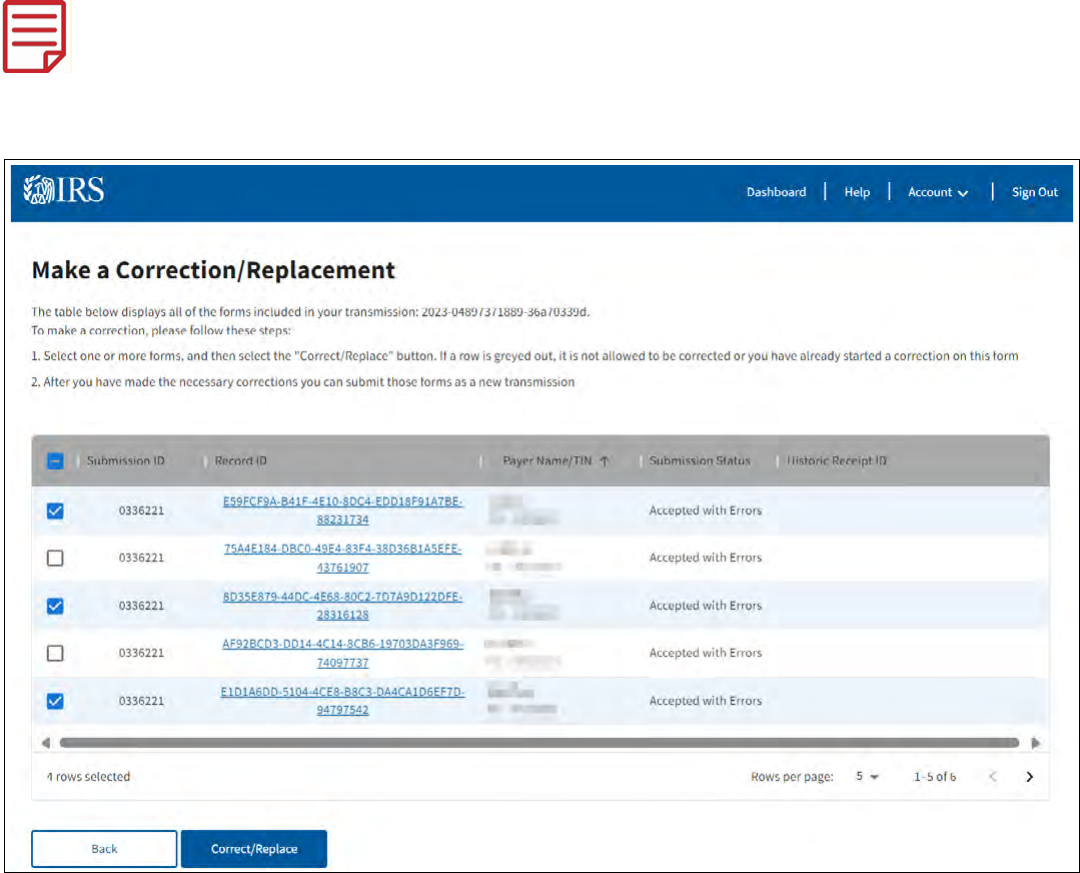
There are two reasons a box next to a record you want to correct may be grayed out:
1. The record has already been successfully corrected. On the Submitted Forms page,
the status of the corrected return would be Accepted or Accepted with Errors.
2. The correction process was already started. The corrected return status would be In Progress
on the Unsubmitted Forms page.
After selecting the Correct/Replace button, you’ll advance to the Make a Correction page to begin the
correction process on one or more forms. Follow the steps provided on the page to make your corrections.
Once you make the corrections, you can choose to submit the form on the Review and Conrm page
or complete multiple corrections and submit multiple corrected forms from the View Unsubmitted Forms
page. Do this by selecting multiple forms in Ready to Submit status and selecting the Submit button.
You can only complete the correction process for each form once. If a form is corrected, you’ll no longer be
able to correct that original form. If another correction is needed, it must be completed on the most current
correction transmission. The form you’ve selected for correction will maintain a historical receipt ID with
the original parent transmission. If you’ve incorrectly selected a form for correction, you’ll be able to delete
the form from the View Unsubmitted Forms page.
Record ID Link: Once the IRS accepts a form with correction, the historic receipt ID will populate
and link the form to its original transmission.
Historic Receipt ID Link: A historic receipt ID will populate with the receipt ID of the parent
transmission for corrected records. Clicking it will send you to the View Submitted Forms Details
page for the parent transmission.
32
Information Returns Intake System (IRIS) Taxpayer Portal User Guide
If you’ve started a correction and need to complete it, navigate to the Unsubmitted Forms page and select
In Progress for the selected form. You’ll advance to the Payer Information page, displaying the information
you previously sent to the IRS.
Once you begin an initial Correction, the Make a Correction table will be disabled unless your Correction
gets rejected, then the records are enabled again.
If your correction gets rejected you will not be able to le a replacement for that rejected correction.
You must return to the original submission and le a correction.
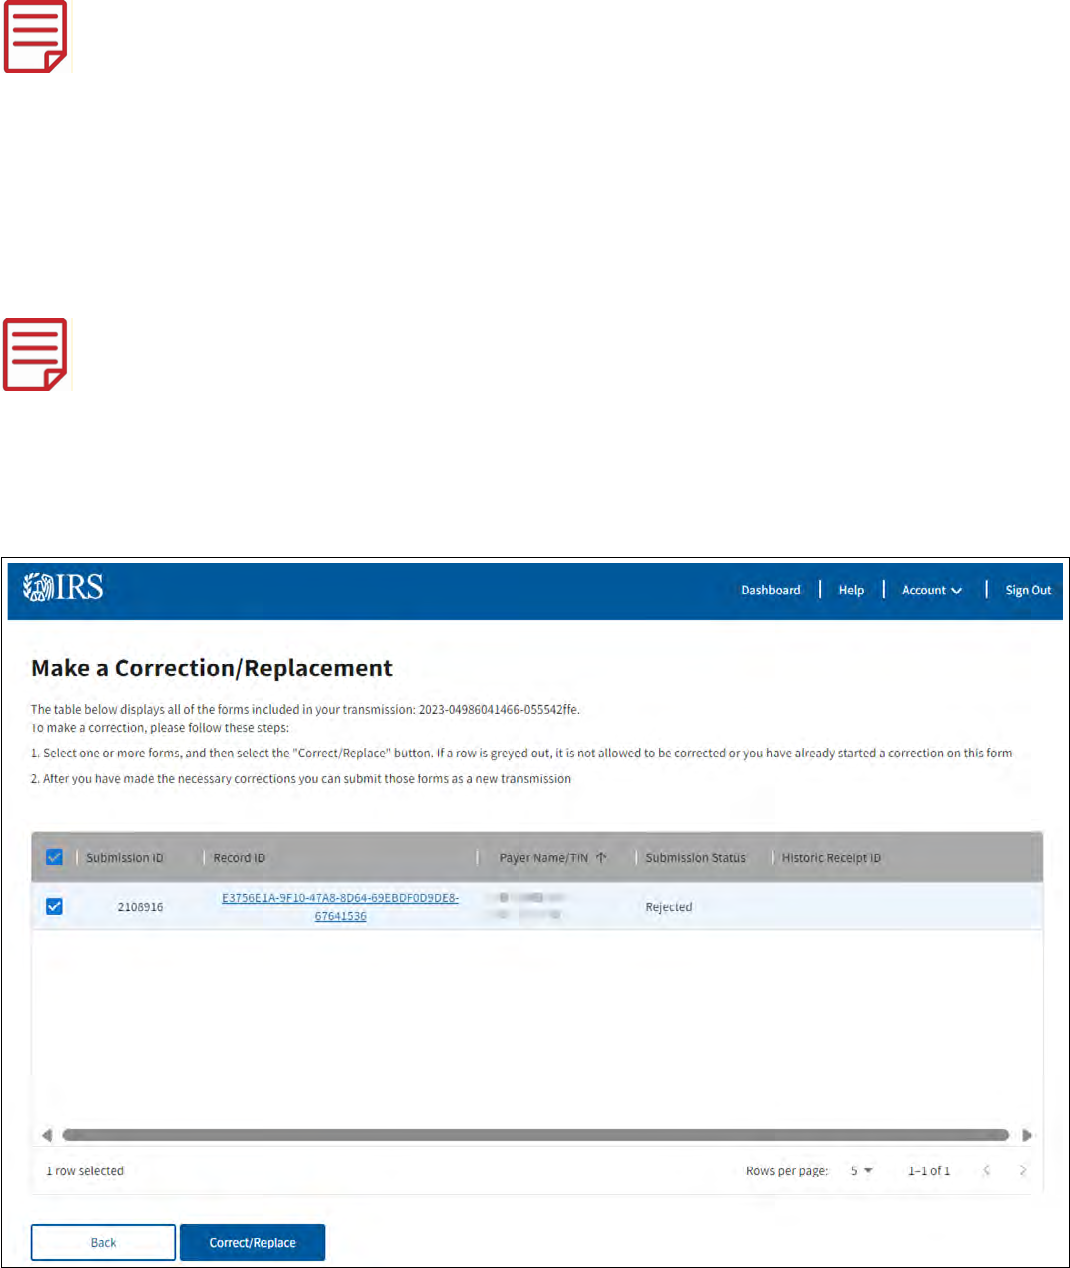
Submit A Replacement
If your submission was rejected you will need to replace the submission no later than 60 days after the
transmission was rejected. If an acceptable replacement transmission is received after the 60 days and
the return due date has passed, the transmitted returns may be subject to any applicable late-ling penalty.
You can follow the same steps for making a correction. Replacements will resend the entire submission
with all records included to replace the rejected one. Corrections will only submit the accepted or accepted
with error individual records that were chosen for correction.
Please wait until a transmission is processed and the Acknowledgment status is either Rejected or
Partially Accepted before submitting a replacement.
To see what was received in the transmission, click on the Receipt ID Link the system will take you to the
View the Submitted Forms Details page. You may then click on the Record ID Link which allows a record
level view of your transmissions. On the View Form Details page, you can view the information you entered.
To return to the View the Submitted Forms Details use the Back button.
33
Information Returns Intake System (IRIS) Taxpayer Portal User Guide
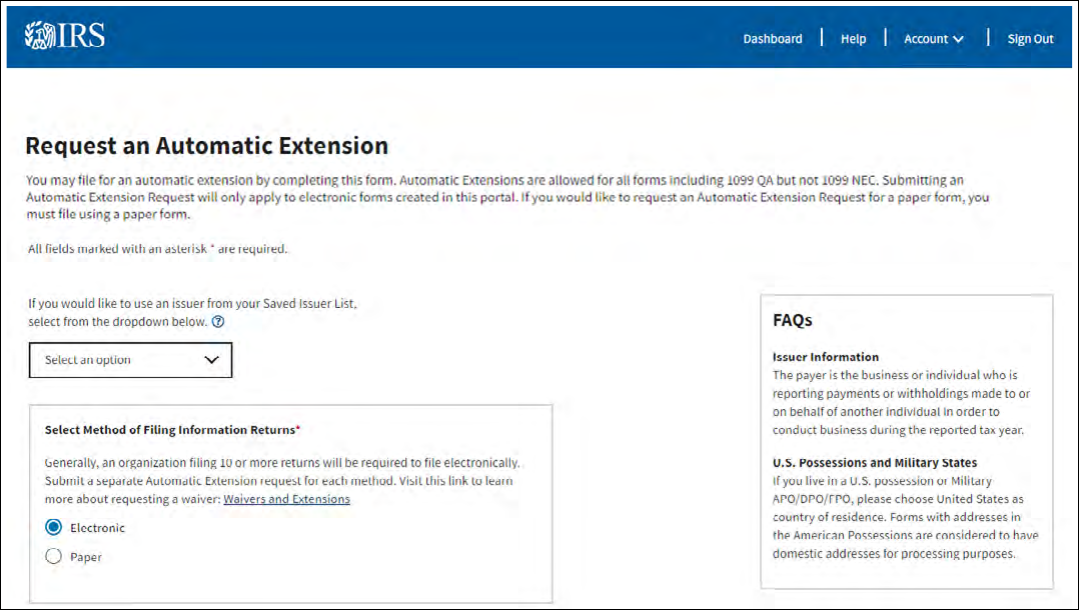
Request Automatic Extension
The Request Automatic Extension section allows you to request an automatic 30-day extension of time to
le. The automatic 30-day extension of time to le information returns must be submitted by the due date
of the returns. File an extension request as soon as you know an extension of time to le is necessary, but
not before January 1 of the year in which the return is due. Submit a separate extension request for each
issuer tax identication number (TIN).
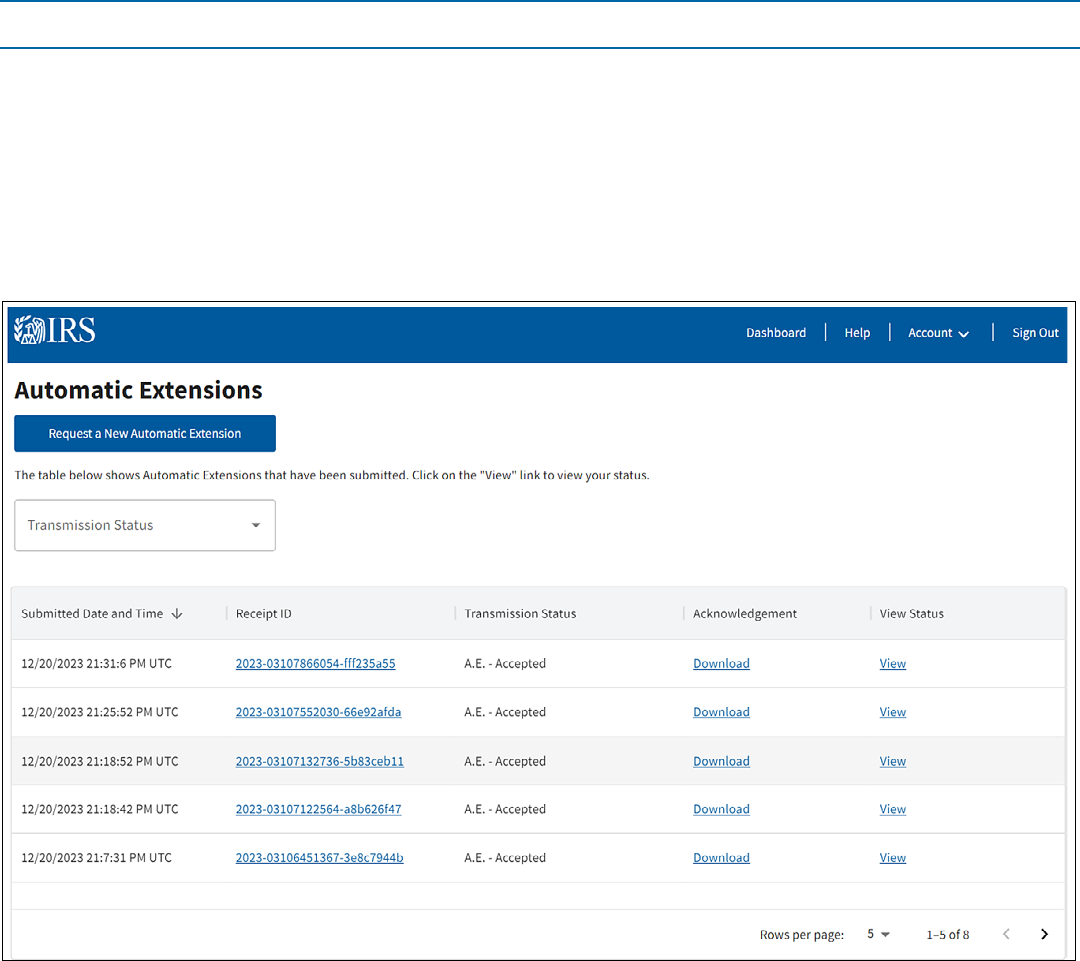
After selecting the Request Automatic Extension button on the Dashboard page, you will be able to
request a 30-day extension to le your forms.
Request a New Automatic Extension Button: This selection will allow you to visit the Request an
Automatic Extension page.
Submitted Date and Time: This selection will show the date and time the AE was submitted in
ascending date and time.
Transmission Status Dropdown: This dropdown will allow you to lter the table by Transmission
Status. The following statuses will be displayed;A.E. - Accepted, A.E. Rejected, A.E. Processing, A.E.
In Transit.
Receipt ID Link: This selection allows you to visit the View Submitted Forms Details page to view
the details of your submissions.
Transmission Status: This selection allows you to view the status of your automatic extension. The
following statuses may be displayed; A.E. - Accepted, A.E. Rejected, A.E Processing, A.E. In Transit.
Acknowledgement: This selection will allow you to download your transmissions acknowledgment.
View Status: This selection allows you to visit the Automatic Extension Details page.
You will only be able to select the Request Automatic Extension button if the date is between January 1st
and March 31st. Otherwise, the button will be disabled.
34
Information Returns Intake System (IRIS) Taxpayer Portal User Guide
Saved issuer dropdown: You can select a saved issuer from the Saved Issuer dropdown, if saved
to the Saved Issuer List, to quickly populate information on this page.
Select Method of Filing Information Return: This selection allows you to select if you are ling
your information return electronically or by paper.
Select Form(s): This selection allows you to select the forms you would like to request an Automatic
Extension for. If a checkbox is disabled, the due date to request an extension for that form has
passed.
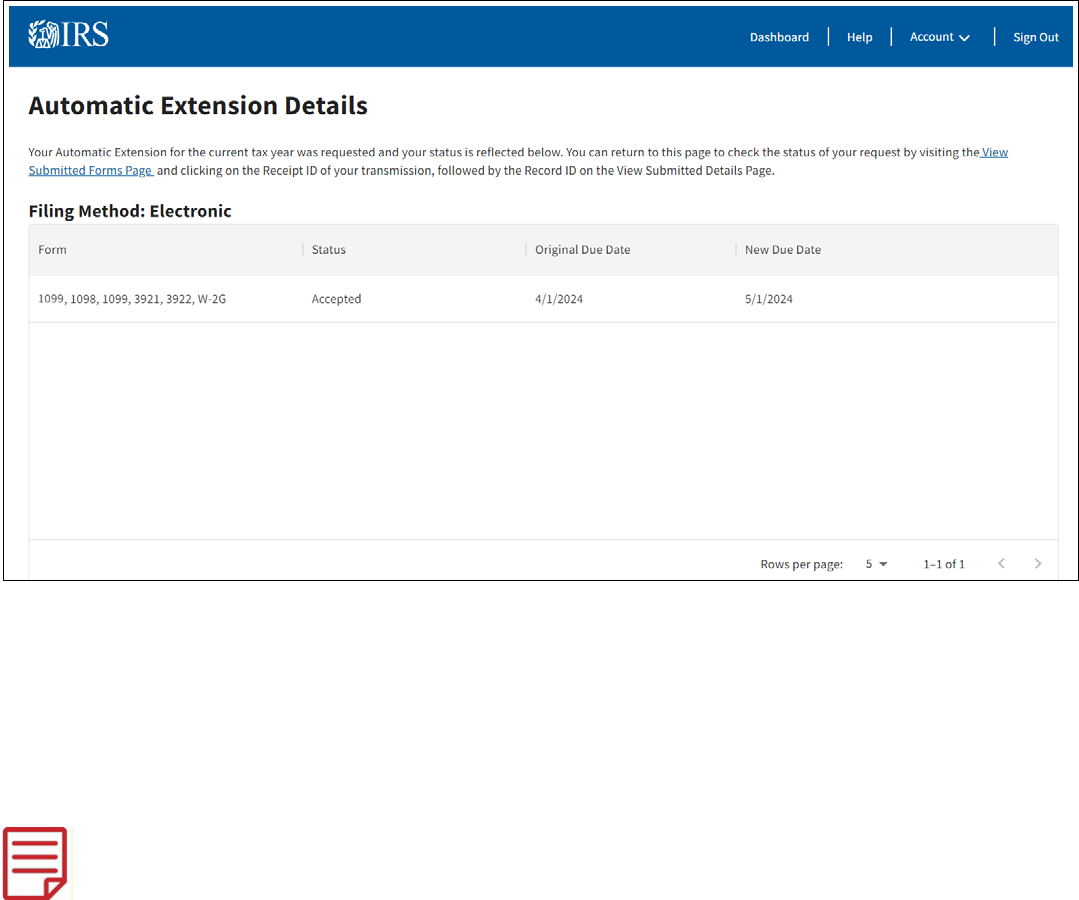
Submit Button: This selection allows you to visit the Automatic Extension Details page to view
automatic extension approval information.
After the submission, you’ll receive an instant approval acknowledgment that will appear on screen if the
request is complete, accurate and timely.
35
Information Returns Intake System (IRIS) Taxpayer Portal User Guide
View Submitted Forms Link: This selection allows you to visit the View Submitted Forms page to
view submitted forms and the status of their Automatic Extension Request.
Reciept ID Link: This selection allows you to visit the View Submitted Forms Details page to view
the details of your form.
Unsubmitted Forms Button: This selection allows you to visit the Unsubmitted Forms page to view
unsubmitted forms and their new due dates.
Print Button: This selection allows you to print your automatic extension approval information.
Exception: Form 1099-NEC, Nonemployee Compensation, is only allowed one nonautomatic 30-
day extension of time, and ling must occur on a paper Form 8809, Application for Extension of
Time to File Information Returns. Refer to Form 8809 for more information.
36
Information Returns Intake System (IRIS) Taxpayer Portal User Guide
Download Recipient Copies
You can meet your requirement to furnish recipient statements and instructions by printing them from the
IRIS Taxpayer Portal.
1. Click on View Submitted Forms on the Dashboard.
2. Select Download next to the Receipt ID of the forms that you would like to download. You will receive
a pop-up message stating that the IRS will not keep track of downloaded forms or whether or not
forms have been distributed to recipients. To proceed, check the box and click on Download.
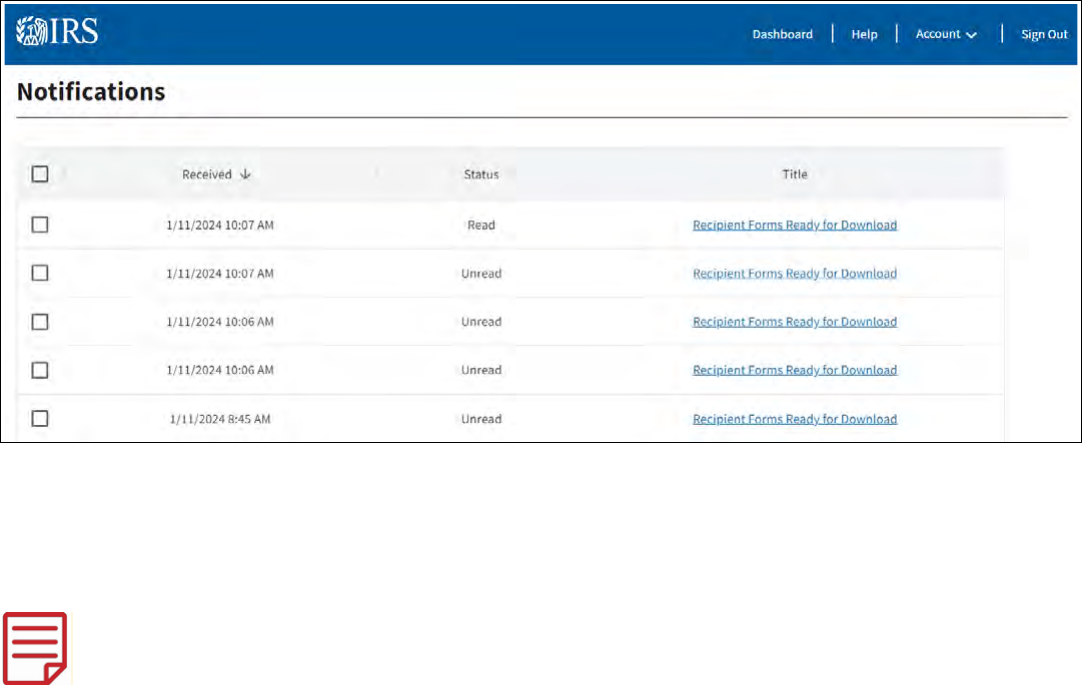
3. You will receive a pop-up message directing you to the Notications page. Return to the Dashboard and
click on the Notications link.
37
Information Returns Intake System (IRIS) Taxpayer Portal User Guide
4. Click on Recipient Forms Ready for Download.
5. Click on the link to download your forms.
6. A Zip le will be created with a separate PDF and Recipient Checklist CSV for each record downloaded.
Each download is limited to 100 forms or less.
If your Zip les are not opening, you can try using one of the available programs online that are specically
designed for zipping and unzipping les.
38
Information Returns Intake System (IRIS) Taxpayer Portal User Guide
Other Helpful Information
Retention Requirements
Issuers should keep a copy of information returns or be able to reconstruct the data for at least three years
from the reporting due date with the following exceptions:
Returns reporting federal withholding need to be retained for four years.
Keep a copy of Form 1099-C, Cancellation of Debt, for at least four years from the due date of
the return.
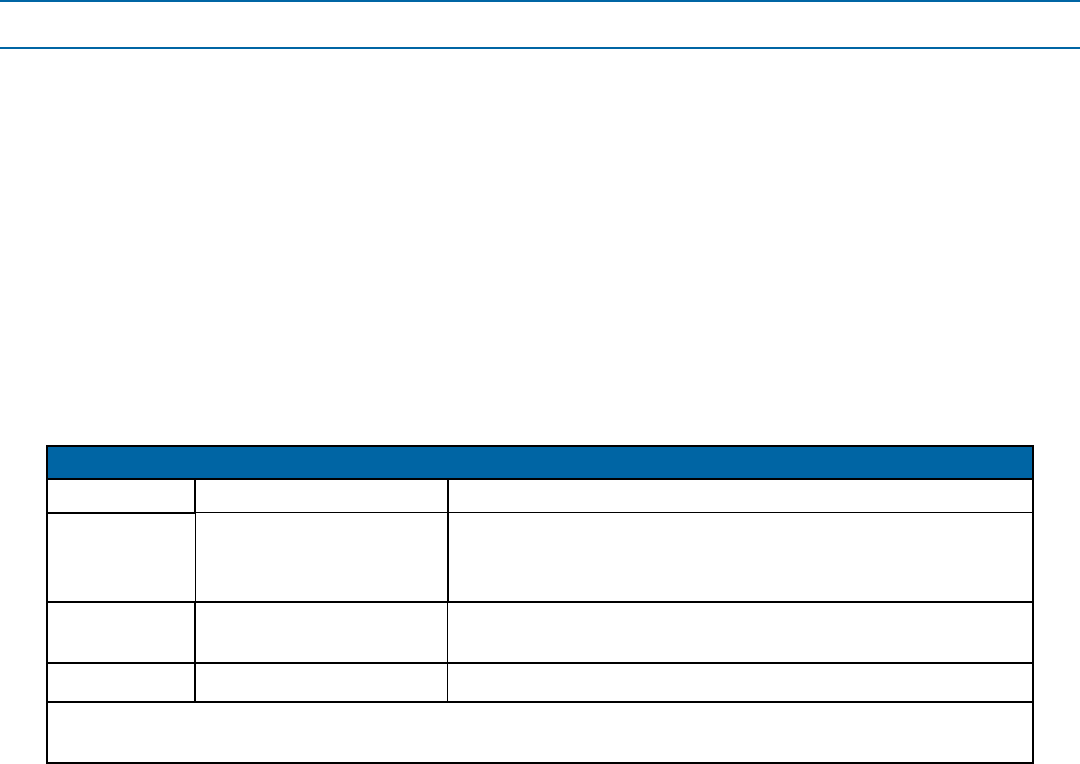
Due Dates
Form 1099 series are led on a calendar year basis. For ling due dates for other information returns,
please refer to the General Instructions for Certain Information Returns (Forms 1096,1097, 1098, 1099,
3921, 3922, 5498, and W-2G).
Due Dates
Form IRS Electronic Filing Furnish Copy to Recipient
1099 March 31 January 31, February 15 for Forms 1099-B and 1099-S.
This also applies to statements furnished as part of a
consolidated reporting statement.
1099-MISC March 31 January 31, February 15 for amounts reported in boxes
8 or 10.
1099-NEC January 31 January 31
NOTE: If any due date falls on a Saturday, Sunday, or legal holiday, the return or statement is
considered timely if led or furnished on the next business day.
Filing a Waiver From Electronic Filing of Information Returns
If you think you won’t be able to meet your electronic ling requirement, you may request a waiver. A
waiver isn’t automatic and, if accepted, is only good for the current ling year. The submission must be a
paper Form 8508, Application for a Waiver from Electronic Filing of Information Returns, and follow
the instructions on the form. See the form for more information.
Combined Federal/State Filing (CF/SF) Program
If you participate in the IRS Combined Federal/State Filing (CF/SF) Program, you may report withholdings
and payments for up to two states on this page. If you made a payment to a recipient that is reportable to
more than one state, you must prorate the amounts for each state.
The following information returns may be led under the CF/SF Program:
Form 1099-B, Proceeds from Broker and Barter Exchange Transactions
Form 1099-DIV, Dividends and Distributions
Form 1099-G, Certain Government Payments
Form 1099-INT, Interest Income
Form 1099-K, Payment Card and Third-Party Network Transactions
Form 1099-MISC, Miscellaneous Information
Form 1099-NEC, Nonemployee Compensation
Form 1099-OID, Original Issue Discount
39
Information Returns Intake System (IRIS) Taxpayer Portal User Guide
Form 1099-PATR, Taxable Distributions Received From Cooperatives
Form 1099-R, Distributions From Pensions, Annuities, Retirement or Prot-Sharing Plans, IRAs,
Insurance Contracts, etc.
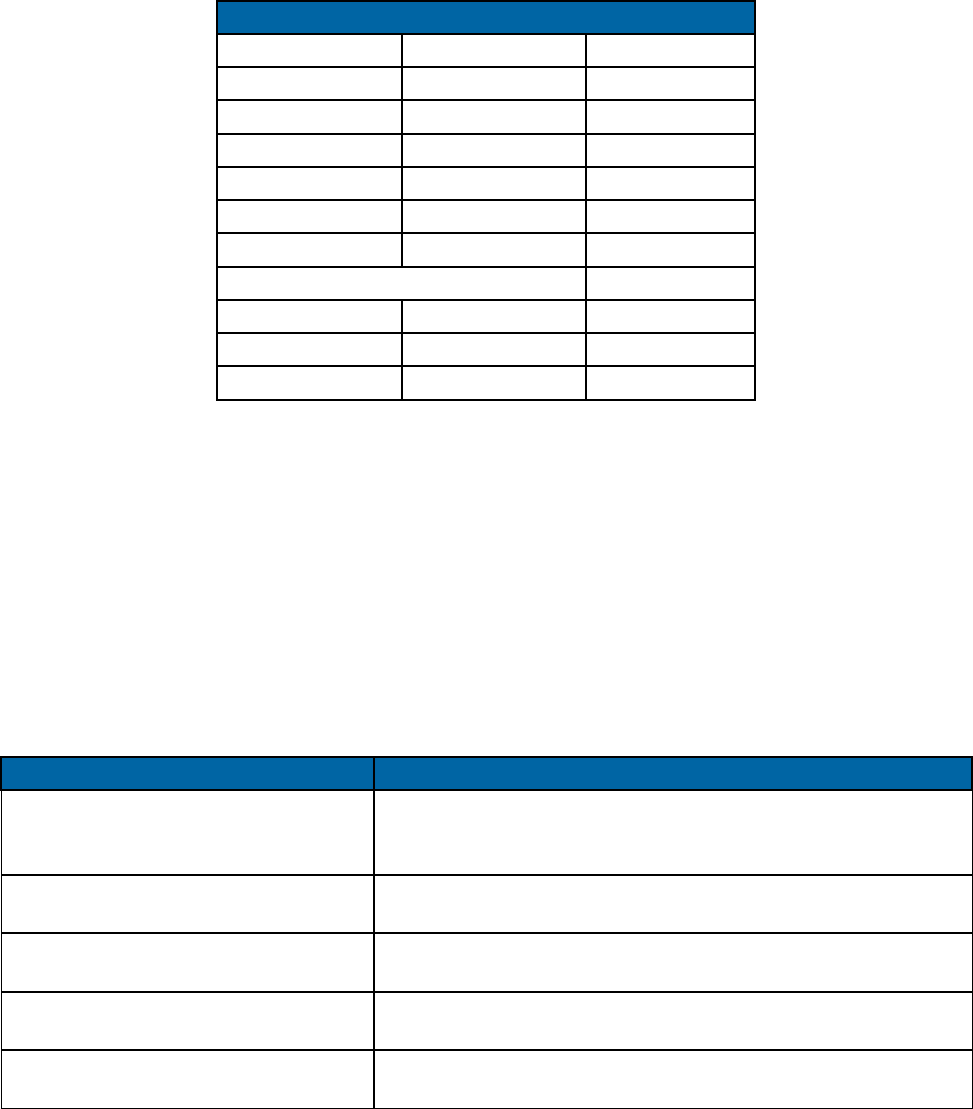
The following table provides the participating states in the CF/SF Program. Each state’s ling requirements
are subject to change by the state. It is the ler’s responsibility to contact the participating state(s) to verify
their criteria and special data entry requirements.
State
Alabama Indiana Montana
Arizona Kansas Nebraska
Arkansas Louisiana New Jersey
California Maine New Mexico
Colorado Maryland North Carolina
Connecticut Massachusetts North Dakota
Delaware Michigan Ohio
District of Columbia Oklahoma
Georgia Minnesota Pennsylvania
Hawaii Mississippi South Carolina
Idaho Missouri Wisconsin
Help with the Taxpayer Portal
Contact the Help Desk Monday through Friday 7:30 a.m. – 7:00 p.m. ET. Listen to all options before
making your selection.
866-937-4130 (toll-free)
470-769-5100 (International) (Not toll-free)
TTY\TDD: The IRS welcomes calls via your choice of relay. Deaf or hard of hearing taxpayer using a
relay service may call any of our toll-free numbers.
Additional Resources
Webpage References Description
www.irs.gov/inforeturn
Learn about the differences between IRIS and other
ling systems such as the Filing Information Returns
Electronically (FIRE) system
www.irs.gov/iris
Access the Taxpayer Portal, subscribe to quick alerts and
locate Help Desk contacts
www.irs.gov/irisats
Find ATS scenarios, known issues and solutions
*For the IRIS A2A ling method”
www.irs.gov/irisschema
Find information about IRIS schemas and business rules
*For the IRIS A2A ling method”
www.irs.gov/iristcc
Access the tutorial for the IRIS TCC Application and apply
for a TCC. to e-le with IRIS
