Directions for converting pictures (.jpg files) to
a PDF document.
Introduction
This document will assist you in understanding different photo types and how to convert
those files into the portable document format (PDF).
What is .jpg?
JPEG (pronounced "jay-peg") is a standardized image compression mechanism.
JPEG stands for Joint Photographic Experts Group, the original name of the committee that
wrote the standard.
JPEG is designed for compressing either full-color or gray-scale images of natural, real-
world scenes. It works well on photographs, naturalistic artwork, and similar material; not
so well on lettering, simple cartoons, or line drawings. JPEG handles only still images, but
there is a related standard called MPEG for motion pictures.
JPEG is "lossy," meaning that the decompressed image isn't quite the same as the one you
started with. (There are lossless image compression algorithms, but JPEG achieves much
greater compression than is possible with lossless methods.) JPEG is designed to exploit
known limitations of the human eye, notably the fact that small color changes are perceived
less accurately than small changes in brightness. Thus, JPEG is intended for compressing
images that will be looked at by humans. If you plan to machine-analyze your images, the
small errors introduced by JPEG may be a problem for you, even if they are invisible to the
eye.
A useful property of JPEG is that the degree of lossiness can be varied by adjusting com-
pression parameters. This means that the image maker can trade off file size against output
image quality. You can make *extremely* small files if you don't mind poor quality; this is
useful for applications such as indexing image archives. Conversely, if you aren't happy
with the output quality at the default compression setting, you can jack up the quality until
you are satisfied, and accept lesser compression.
Another important aspect of JPEG is that decoders can trade off decoding speed against im-
age quality, by using fast but inaccurate approximations to the required calculations. Some
viewers obtain remarkable speedups in this way. (Encoders can also trade accuracy for
speed, but there's usually less reason to make such a sacrifice when writing a file.)
1
How well does JPEG compress images?
Very well indeed, when working with its intended type of image (photographs and suchlike).
For full-color images, the uncompressed data is normally 24 bits/pixel. The best known
lossless compression methods can compress such data about 2:1 on average. JPEG can typi-
cally achieve 10:1 to 20:1 compression without visible loss, bringing the effective storage
requirement down to 1 to 2 bits/pixel. 30:1 to 50:1 compression is possible with small to
moderate defects, while for very-low-quality purposes such as previews or archive indexes,
100:1 compression is quite feasible. An image compressed 100:1 with JPEG takes up the
same space as a full-color one-tenth-scale thumbnail image, yet it retains much more detail
than such a thumbnail.
For comparison, a GIF version of the same image would start out by sacrificing most of the
color information to reduce the image to 256 colors (8 bits/pixel). This provides 3:1 com-
pression. GIF has additional "LZW" compression built in, but LZW doesn't work very well
on typical photographic data; at most you may get 5:1 compression overall, and it's not at all
uncommon for LZW to be a net loss (i.e., less than 3:1 overall compression). LZW *does*
work well on simpler images such as line drawings, which is why GIF handles that sort of
image so well. When a JPEG file is made from full-color photographic data, using a quality
setting just high enough to prevent visible loss, the JPEG will typically be a factor of four or
five smaller than a GIF file made from the same data.
Gray-scale images do not compress by such large factors. Because the human eye is much
more sensitive to brightness variations than to hue variations, JPEG can compress hue data
more heavily than brightness (gray-scale) data. A gray-scale JPEG file is generally only
about 10%-25% smaller than a full-color JPEG file of similar visual quality. But the uncom-
pressed gray-scale data is only 8 bits/pixel, or one-third the size of the color data, so the cal-
culated compression ratio is much lower. The threshold of visible loss is often around 5:1
compression for gray-scale images.
The exact threshold at which errors become visible depends on your viewing conditions.
The smaller an individual pixel, the harder it is to see an error; so errors are more visible on a
computer screen (at 70 or so dots/inch) than on a high-quality color printout (300 or more
dots/inch). Thus a higher-resolution image can tolerate more compression ... which is
fortunate considering it's much bigger to start with. The compression ratios quoted above
are typical for screen viewing. Also note that the threshold of visible error varies
considerably across images.
2
What we will be converting
In our example we will be using Adobe Acrobat 6.0 to convert two .jpg files to the PDF for-
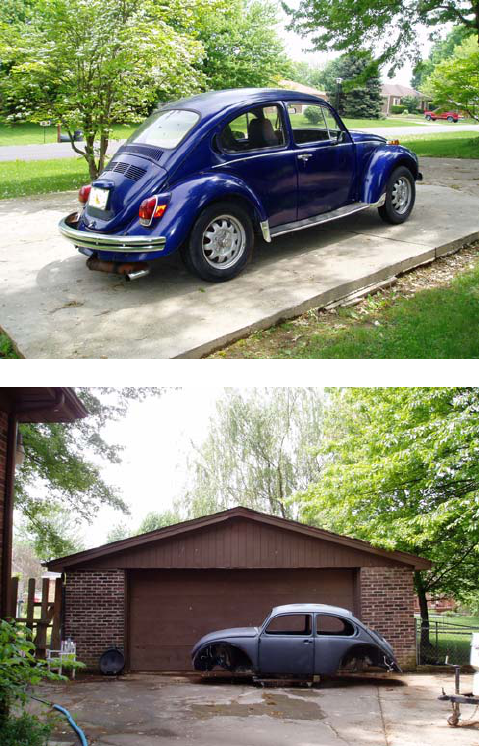
mat for docketing. Our pretend case involves Jane Doe, her beautiful 1972 VW Beetle was
stolen out of her garage and later found stripped down. The photos we wish to docket as evi-
dence are two high resolution, high color photos. Each file was taken with a digital camera
with a resolution setting of 2048 x 1536 at 24 bit of color. The files are named pic_001.jpg
& pic_002.jpg, combined they total 1.36 MB in size.
Below are scaled down examples of the photo:
BEFORE (pic_0001.jpg)
AFTER (pic_002.jpg)
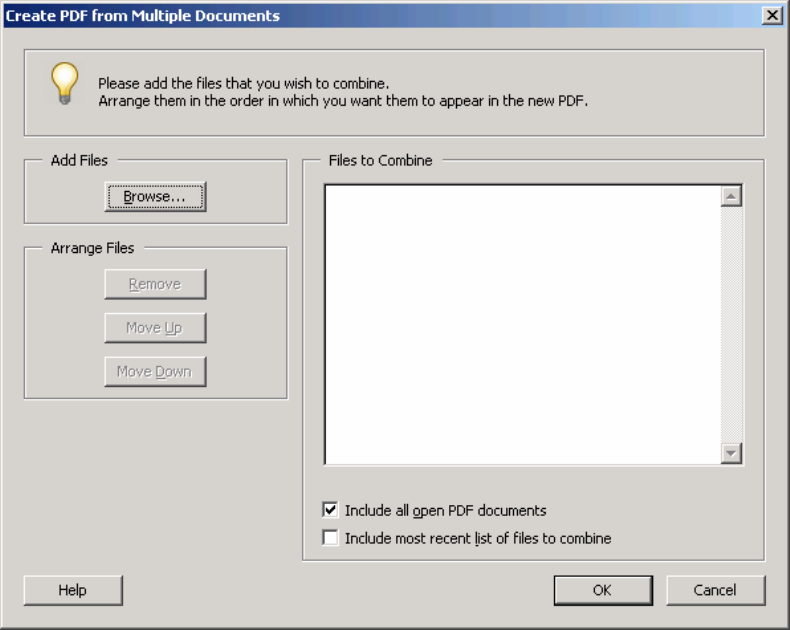
Using Adobe to combine and convert pictures to one single PDF
With Adobe open click on:
FILE > CREATE NEW PDF > FROM MULTIPLE FILES
You should see the dialog box below:
3
At this point you will need to use the browse button to go out to your folder where the pic-
tures are stored. This could be your computers hard drive, a floppy drive or even a CD
ROM drive. Once you have found your directory you will need to click on and choose the
pictures you wish to use, in this case pic_001 and pic_002. You can use your CTRL key to
highlight multiple files at once.
4
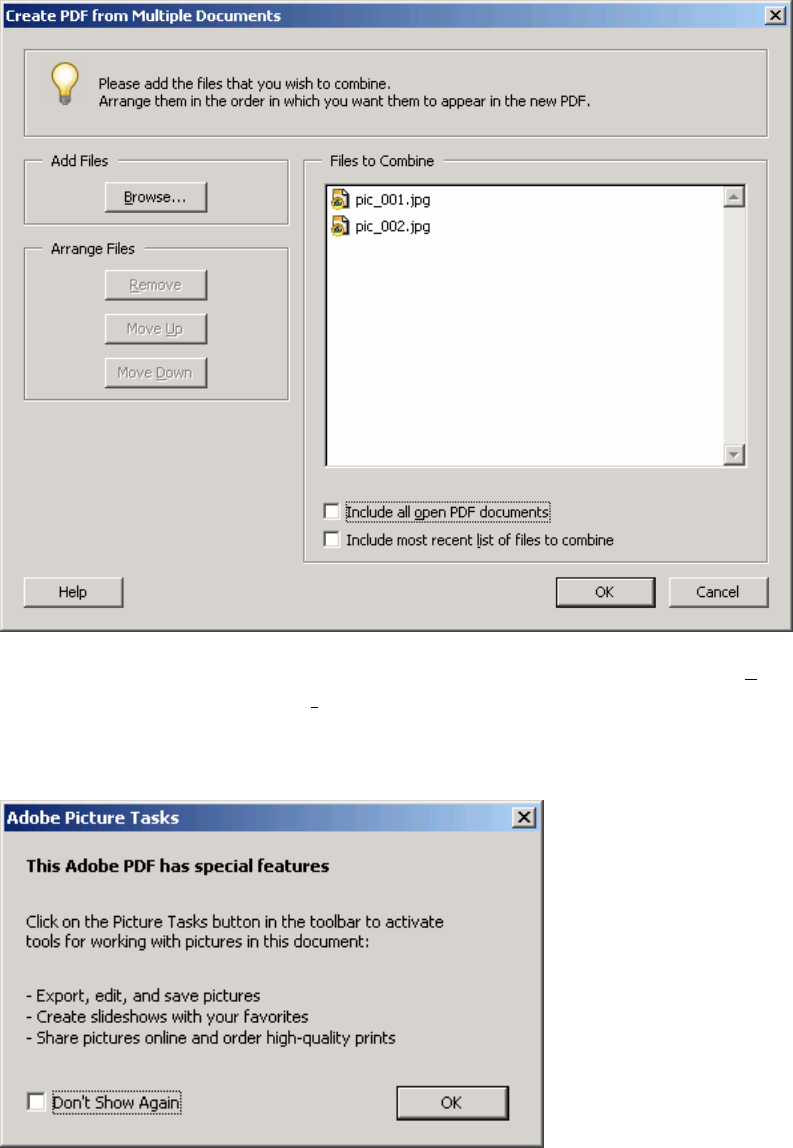
Once you have chosen your files make sure to uncheck both options of Include all open PDF
documents AND Include most recent list of files to combine, click on the OK button.
When you press the OK button Adobe will begin to assemble your document, once complete
you may be presented with this prompt:
If you do receive this message check the box that says Don’t Show Again and press the OK
button. At this point you should have a document called Binder1.pdf that you will need to
5
save and name the file into your PDF directory . In this example we will call this document
Exhibit A Large.pdf. If you were to right click on the file and go to properties you will see
the file at this point is 1.33 MB in size. Next we will discuss compressing the PDF.
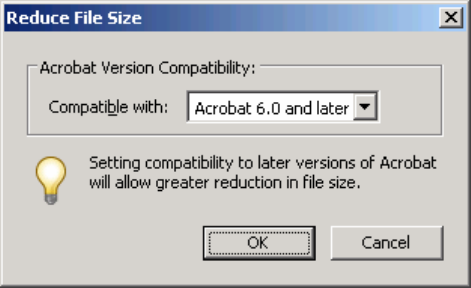
How to compress a PDF file
Compressing a PDF file does two things:
1. It makes the document smaller and easier to upload to ECF, and
2. It allows you to fit more images into a single file and stay under the courts 2MB
file size limit.
Open your new file with Adobe. When the file is loaded click on:
FILE > REDUCE FILE SIZE …
You will be prompted with a screen similar to this:
You will want to choose the option Acrobat 6.0 and later for maximum compression and us-
ability. Click on OK. Adobe will begin to compress the file and will prompt you to name
the new compressed file. The new file is 1.13 MB in size.
6
