
Version 20.0
Inmagic DB/Text for SQL
Installation and Upgrade Instructions
[3/30/2023]

Copyright 2003-2023 Lucidea Technologies Corp., Richmond BC Canada. All rights reserved.
Inmagic
®
, the Inmagic logo, DB/Text
®
, DB/TextWorks
®
, BiblioTech
®
, and BiblioTech PRO
®
are registered
trademarks; and Inmagic.net
™
, BibSpeed
™
, IntelliMagic
™
, and PowerPack
™
are trademarks of Inmagic.
Other brand and product names are trademarks or registered trademarks of their respective holders. Use
of any other product name does not imply endorsement of that product by Inmagic.
The information in this document is subject to change without notice and should not be construed as a
commitment by Inmagic, which assumes no responsibility for any errors that may appear in this
document.
WARRANTY
INMAGIC MAKES NO WARRANTY, EXPRESS OR IMPLIED, INCLUDING BUT NOT LIMITED
TO THE WARRANTIES OF MERCHANTABILITY AND FITNESS. INMAGIC SHALL NOT BE
LIABLE FOR ANY LOST PROFITS OR ANY OTHER INCIDENTAL OR CONSEQUENTIAL
DAMAGES. IN PARTICULAR,
INMAGIC SHALL HAVE NO LIABILITY FOR ANY DATA OR
PROGRAMS STORED OR USED WITH THIS PRODUCT, INCLUDING THE COSTS OF
RECOVERING SUCH PROGRAMS OR DATA.
U.S. GOVERNMENT: If Licensee is acquiring the software on behalf of any unit or agency of the U.S.
Government, the following shall apply:
(a) For units of the Department of Defense: RESTRICTED RIGHTS LEGEND: Use, duplication or disclosure by the
Government is subject to restrictions as set forth in subparagraph (c)(1)(ii) of the Rights in Technical Data Clause
at DFARS 252.227-7013. (b) For any other unit or agency: NOTICE - Notwithstanding any other lease or license
agreement that may pertain to, or accompanying the delivery of, the computer software and accompanying
documentation, the rights of the Government regarding its use, reproduction and disclosure are as set forth in
Clause 52.227-19(c)(2) of the FAR.
Contractor/Manufacturer is Inmagic, 600 Unicorn Park Drive, Second Floor, Woburn, MA 01801, U.S.A.
Questions regarding any Inmagic product should be addressed to Inmagic or your local authorized
Inmagic dealer.
Inmagic
600 Unicorn Park Drive
Second Floor
Woburn, MA 01801 U.S.A.
Telephone: 781-938-4444 or 800-229-8398
Fax: 781-938-4446
https://lucidea.com/inmagic-dbtextworks/
[email protected] - technical support questions
[email protected] - general company, product, and services questions
[email protected] - sales, product pricing, and custom solution questions
wishlist@inmagic.com - feature requests
*

Inmagic DB/Text for SQL Installation and Upgrade Instructions 1
Contents
Chapter 1: Before You Begin ............................................................................................................... 2
Purpose and Audience .............................................................................................................................. 2
How to Proceed ......................................................................................................................................... 2
New Installations .................................................................................................................................... 2
Upgrading an Existing Version .............................................................................................................. 2
Migrating from the Non-SQL Platform ................................................................................................... 2
Components .............................................................................................................................................. 3
DB/TextWorks for SQL .......................................................................................................................... 3
DB/Text for SQL Importer ...................................................................................................................... 3
WebPublisher PRO for SQL .................................................................................................................. 3
Microsoft SQL Server............................................................................................................................. 3
Documentation Resources ........................................................................................................................ 4
Chapter 2: Prerequisites ...................................................................................................................... 5
Supported Configurations .......................................................................................................................... 5
Sample Configurations........................................................................................................................... 5
Microsoft SQL Server Prerequisites .......................................................................................................... 6
DB/TextWorks for SQL Prerequisites ........................................................................................................ 7
WebPublisher PRO for SQL Prerequisites ................................................................................................ 9
Chapter 3: Installing or Upgrading DB/TextWorks for SQL ........................................................... 10
To Install or Upgrade DB/TextWorks for SQL ......................................................................................... 10
Upgrading Textbases from Version 14.5 or below .................................................................................. 21
Configuring Clients (Setup Workstation) ................................................................................................. 22
Installing the Sample Textbases (Sample1 and Sample2) ..................................................................... 24
Changing Configuration Settings Later ................................................................................................... 26
Chapter 4: Installing or Upgrading WebPublisher PRO for SQL ................................................... 27
To Install or Upgrade WebPublisher PRO for SQL ................................................................................. 27
Setting Windows Permissions ................................................................................................................. 37
Installing the Sample Textbase (Cars) .................................................................................................... 38
Testing WebPublisher PRO for SQL ....................................................................................................... 39
Chapter 5: Using the Software .......................................................................................................... 41
Administration and Maintenance ............................................................................................................. 41
Securing the Administration Programs (TW-SQL, WP-SQL) .............................................................. 41
Management and Maintenance ........................................................................................................... 41
Performance Adjustments for Index Browsing .................................................................................... 41

2 Inmagic DB/Text for SQL Installation and Upgrade Instructions
Chapter 1: Before You Begin
Inmagic
®
DB/Text for SQL is an enterprise-wide scalable content management system that combines a
robust and flexible database management environment with high speed search and categorization. Its
Web publishing capabilities provide the ability to publish, access, and maintain information on corporate
intranets and the Internet.
Purpose and Audience
This document explains how to install or upgrade Inmagic
®
DB/TextWorks for SQL (including the DB/Text
for SQL Importer) and WebPublisher PRO for SQL.
This document is intended for administrators, Inmagic Professional Services, or Partners who are
responsible for performing installations or upgrades. Some knowledge of Microsoft SQL Server
administration is assumed, in order to be able to configure a new or existing SQL Server instance for use
with Inmagic applications. Familiarity with Microsoft Internet Information Services (IIS) is also helpful.
How to Proceed
New Installations
Follow the instructions in this document to install DB/Text for SQL for the first time.
Upgrading an Existing Version
Follow the instructions in this document to upgrade an existing version of DB/Text for SQL.
Information that pertains specifically to upgrades appears in a blue box.
Note that prior to v12, DB/TextWorks for SQL was known as Content Server or CS/TextWorks, and
WebPublisher PRO for SQL was known as CS/WebPublisher PRO.
Migrating from the Non-SQL Platform
If you are moving from the non-SQL platform to the SQL platform:
1. Install DB/TextWorks for SQL. Follow the instructions in this document as if you were doing a new
installation (not an upgrade). We recommend that you install the SQL-based application in a separate
location from your existing non-SQL version.
2. Install WebPublisher PRO for SQL. Follow the instructions in this document as if you were doing a
new installation (not an upgrade). We recommend that you install the SQL-based application in a
separate location from your existing non-SQL version.
3. Follow the instructions in the document Converting to the Inmagic DB/Text for SQL Platform, a PDF
that was installed with your DB/TextWorks for SQL software and is also available from the Product
Documentation link on the Customer Extranet page. It explains how to convert your existing non-SQL
textbases and menu screens and, if you have WebPublisher PRO, your non-SQL Web files. This is a
required step.

Inmagic DB/Text for SQL Installation and Upgrade Instructions 3
Components
The Inmagic
®
DB/Text for SQL suite includes the following components:
DB/TextWorks for SQL (previously known as Content Server or CS/TextWorks). The DB/Text
Importer, a Windows Service for loading records, is installed with DB/TextWorks for SQL.
Web Publisher PRO for SQL (previously known as CS/WebPublisher PRO), the optional Web
component, which allows users to search published textbases and edit records (if allowed).
Both components rely on Microsoft SQL Server as the data store.
DB/TextWorks for SQL
DB/TextWorks for SQL (the “desktop component”) is a database and text retrieval system designed to
manage diverse types of information including documents, images, and multimedia. DB/Text for SQL
uses Microsoft SQL Server as its data store. The textbase files themselves are stored outside of SQL
Server. Each textbase consists of files with the same name but different extensions. For example, a
textbase called Sales consists of SALES.CBA, SALES.CBS, SALES.CAC, etc. For information about
textbase files, see the DB/TextWorks online help.
DB/Text for SQL Importer
This component is a Windows service that runs in the background to load files into textbases. The
Importer can load fielded text files (to add, modify, or delete records), XML files, and binary files, such as
Microsoft Word documents or PDFs.
WebPublisher PRO for SQL
This optional component (the “Web component”) enables you to publish textbases on the Web, so clients
can search for records and optionally add, edit, and delete records over the Web. WebPublisher PRO for
SQL uses Microsoft Internet Information Services (IIS) as the Web server for hosting published textbases.
IIS is a built-in component of the Windows operating system.
Microsoft SQL Server
Microsoft
®
SQL Server™ must be installed prior to installing DB/TextWorks for SQL and WebPublisher
PRO for SQL. DB/TextWorks stores records, indexes, and textbase lists (validation lists, record classes,
etc.) in SQL Server. WebPublisher PRO relies on SQL Server when users search and/or edit published
textbases.
Important! For supported versions of SQL Server, please see the Support Matrix, available via the
Product Documentation link on the Customer Extranet page. For prerequisites, including configuration
requirements, see Chapter 2: Prerequisites.

4 Inmagic DB/Text for SQL Installation and Upgrade Instructions
Documentation Resources
In addition to this document and the online help, the following resources are available:
README. Lists known and resolved issues, new features, and other information. This file is installed in
the Documentation subfolder of the main installation folder.
Support Matrix: Lists requirements, including prerequisite software and supported versions. The
Support Matrix is available via the Product Documentation page (http://support.inmagic.com/web/)
Inmagic DB/Text for SQL Administrator’s Guide. Explains how to use the Administration program,
which is essential to the SQL platform; explains how to back up DB/Text for SQL files; and provides
important information about managing security and databases and performing other management
tasks. The PDF file is installed with the software and is also available via the Product Documentation
page (http://support.inmagic.com/web/).
Converting to the Inmagic DB/Text for SQL Platform. This document is only needed if you are
currently using the non-SQL version of DB/TextWorks. The PDF is installed with the DB/TextWorks for
SQL software and is also available via the Product Documentation page
(http://support.inmagic.com/web/).

Inmagic DB/Text for SQL Installation and Upgrade Instructions 5
Chapter 2: Prerequisites
This chapter describes supported configurations and lists the prerequisites for installing or upgrading
DB/TextWorks for SQL and WebPublisher PRO for SQL.
You must be an Administrator on the machine to install the application. How you install the application
depends on whether User Access Control (UAC) is on or off.
If UAC is on and you have Administrator rights on the machine, right-click the executable or menu
item, select Run as Administrator, and click Continue when prompted for permission to continue. If
you do not have Administrator rights, you will be prompted to supply an Administrator password in
order to continue.
If UAC is off, you must be logged in as an Administrator of the machine. You can double-click
executables and launch menu items the same way as in earlier Windows operating systems.
Supported Configurations
Microsoft SQL, Inmagic DB/TextWorks for SQL, and Inmagic WebPublisher PRO for SQL can reside on a
single server or multiple servers, as long as the requirements stated in the separate Support Matrix and
the Prerequisites stated in this chapter are met.
When deciding how to set up your configuration, please take the following into account:
The DB/TextWorks application requires access to Microsoft SQL Server, where record data is
stored.
DB/TextWorks networked clients must have access to the textbase files (CBS, CBA, CAC, CBM,
image files, etc.) created by DB/TextWorks, which are stored outside of SQL.
The WebPublisher PRO application requires access to the SQL database where DB/TextWorks
data is stored. Also requires access to the textbase files listed in the previous bullet.
Textbases published by WebPublisher PRO for end-user searching or editing must reside on a
Web server that users can access via a Web browser.
Sample Configurations
The required components, including SQL Server, can be installed in any reasonable configuration, as
long as each component has the necessary access to the components it needs. You can install all
components on a single machine, or you can set up a dual-server or multiple-server configuration. Client
access also needs to be taken into account.
Your license agreement permits you to install each purchased copy of DB/Text for SQL in one location,
such as your local hard drive, a network workstation, or a network server. The desktop and Web
components may be on different machines, as long as each component resides in only a single location.
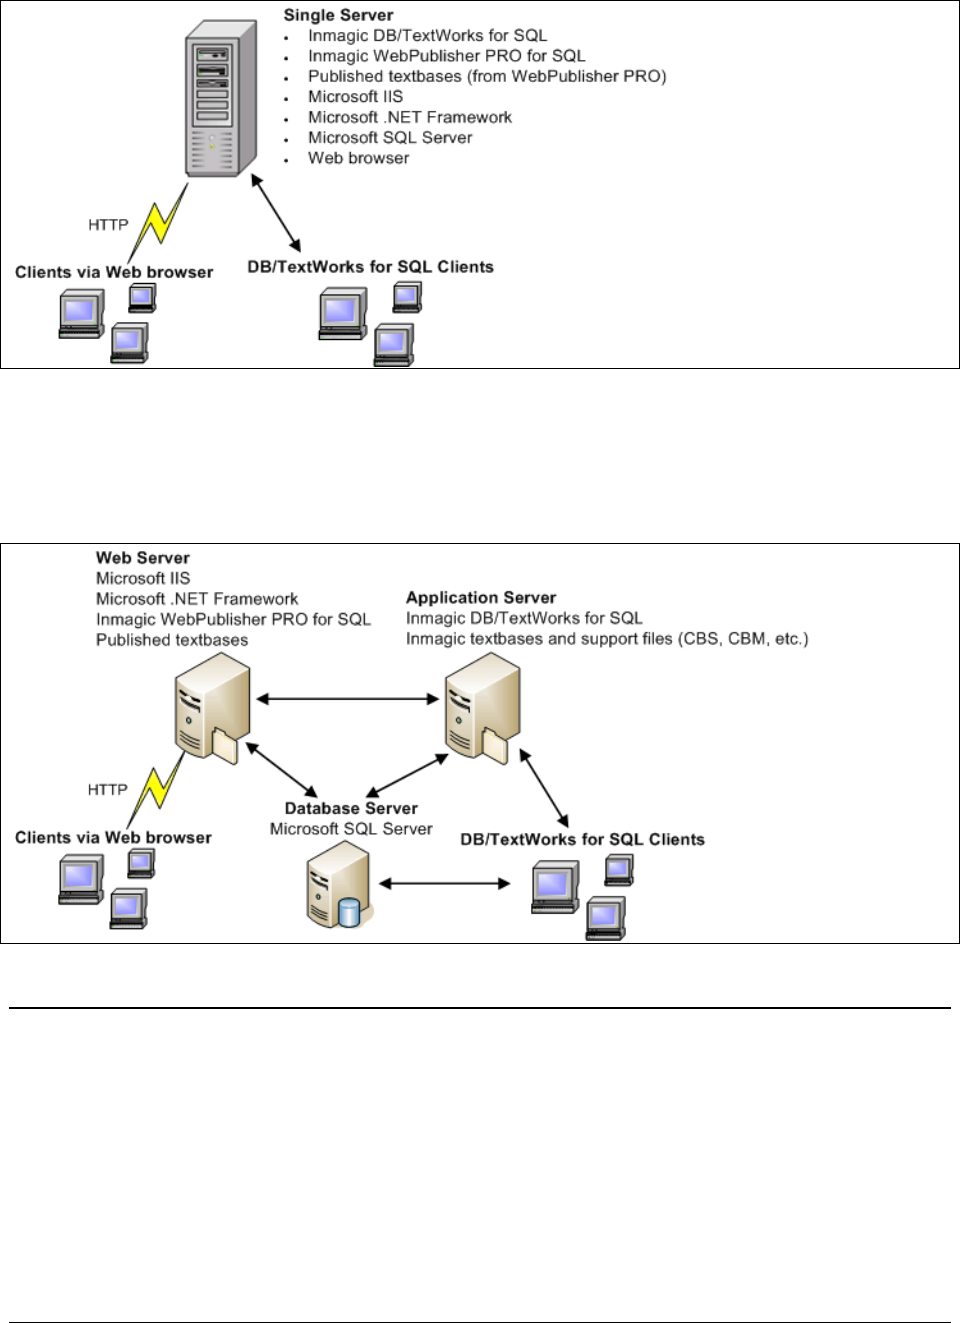
6 Inmagic DB/Text for SQL Installation and Upgrade Instructions
A single-server configuration is shown below, in which all of the applications run on one machine.
An example of a multiple-server configuration is shown below. This configuration could be used on a
corporate intranet, for example, where separate servers provide internal and external access. The use of
separate database and application servers typically provides the highest performance, as it follows
Microsoft’s recommendation to run IIS and SQL on separate machines. A high quality network connection
between machines is required for optimal performance. This is only an example; your configuration may
vary.
Microsoft SQL Server Prerequisites
Before installing DB/Text for SQL, you must ensure that Microsoft SQL Server is configured properly.
□ Important! Confirm that you are using a supported version of SQL Server, as stated in the
DB/Text for SQL Support Matrix, which is available via the Product Documentation link on the
Customer Extranet page.
□ Ensure that the operating system and SQL Server engine have the latest releases and upgrades
from Microsoft Corporation. You can use the automatic update tool provided by Microsoft.

Inmagic DB/Text for SQL Installation and Upgrade Instructions 7
□ Upgrades: Know the SQL Server database instance currently being used by DB/Text for SQL,
since you will have to select it during the installation.
□ New installations: Create a SQL Server database instance that will be used by DB/TextWorks for
SQL. Note the instance name, since you will have to select it during the installation.
□ New installations: You can assign SQL Server a named instance or use the default instance. To
use the default instance of SQL Server on any machine, reference it by the machine name (the
network name). Do not use “local”.
□ New installations: If DB/Text for SQL will use SQL Server Authentication, and/or if
WebPublisher PRO for SQL will be installed on a Web server outside your firewall, SQL Server
must be configured to use SQL Server and Windows Authentication mode before installing
DB/Text for SQL. For information on how to change the authentication mode, see
http://msdn.microsoft.com/en-us/library/ms188670.aspx. For instructions on installing
WebPublisher PRO for SQL outside your firewall, see Inmagic Knowledgebase article 2848.
□ New installations: If DB/Text for SQL will use Windows Authentication to connect to SQL, and
your WebPublisher PRO for SQL web site on IIS will allow Anonymous Access, you must add
your default Internet user account as a database user on SQL Server. (Later, when you install
DB/Text for SQL, you will assign this default account the appropriate DB/Text for SQL role
membership.)
□ Upgrades: You must use the same authentication method currently being used by DB/Text for
SQL.
□ The account running the SQL Server service needs Full Control access to the following:
Temporary file path for SQL Server Bulk Insert (Express Import, Load New Textbase, and
Recover Textbase) AND Paths specified for backup file sets (Back Up Textbase and Restore
Textbase).
□ New installations: Create a shared TEMP folder on the server machine and give SQL Server Full
Control access (the ability to read, write, modify, and delete). Inform your DB/TextWorks for SQL
users of this location, as it will be needed when a staff member uses Express Import or Load New
Textbase in DB/TextWorks. (The software asks where to put temporary files for the SQL Server
BULK INSERT operation.)
DB/TextWorks for SQL Prerequisites
□ Important! Confirm that your system meets the Requirements stated in the DB/Text for SQL
Support Matrix, available via the Product Documentation link on the Customer Extranet page.
□ SQL Server must be installed. Know the SQL Server database instance that you will use, since
you will have to select it during the installation.
□ Know your DB/Text for SQL serial number. You will be asked for it during installation.
□ If DB/Text for SQL will use Windows Authentication to connect to SQL, complete the following
tasks to ensure that users can be authenticated when logging in to DB/TextWorks for SQL:
1. Ensure that all users and/or groups exist in the Windows domain where SQL Server is a
member. For more information, see your Windows documentation.

8 Inmagic DB/Text for SQL Installation and Upgrade Instructions
2. On SQL Server, use the SQL Server Management Studio to create SQL Server logins for
each user or group that will be allowed to access DB/Text for SQL.
Note: We recommend that at least one user be made a member of the SQL Server fixed
server role of dbcreator. (Later, when you install DB/Text for SQL, you should assign this
user a role membership of DB/Text Administrator.)
For information about creating SQL Server logins, see your Microsoft SQL Server
documentation. Also see the DB/Text for SQL Administrator’s Guide.
□ Authentication mode for Internet Information Server (IIS). WebPublisher PRO for SQL
supports Anonymous, Basic, or Integrated Windows Authentication on your Web server. If you
use Anonymous access, and you are using Windows Authentication with DB/Text for SQL, you
must add your default Internet user account as a database user on SQL Server. You must also
assign this default account the appropriate DB/Text for SQL role memberships.

Inmagic DB/Text for SQL Installation and Upgrade Instructions 9
WebPublisher PRO for SQL Prerequisites
□ Microsoft IIS and the .NET framework must be installed on the server where WebPublisher PRO
for SQL will be installed. Important! For supported versions, see the DB/Text for SQL Support
Matrix, which is available via the Product Documentation link on the Customer Extranet page.
□ DB/Text for SQL must be installed and accessible to WebPublisher PRO for SQL.
□ New installations: If WebPublisher PRO for SQL will be installed on a Web server outside your
firewall, please see Inmagic Knowledgebase article 2848.
□ If you are using IIS 6:
o Use IIS Manager to enable the following Web Service Extensions: ASP.NET, ISAPI
Extensions and/or CGI. (If you enable only CGI, WebPublisher PRO for SQL will not
support editing.)
o If you plan to use Basic Authentication in WebPublisher PRO, it must be enabled in IIS (it
is not enabled by default).
o For IIS 6 on Windows Server 2003 R2 (64-bit), 32-bit Application Pools must be enabled
in IIS. For help on getting the .NET framework to work, see
http://support.microsoft.com/kb/911720.
□ If you are using IIS 7/8.5:
o IIS 6 compatibility (subcomponent of IIS 7/8.5) is required.
o Use IIS Manager to install and enable the following Application Development Role
Services: ASP.NET, ISAPI Extensions and/or CGI. (If you enable only CGI,
WebPublisher PRO for SQL will not support editing.)
o If you plan to use Basic Authentication or Integrated Windows Authentication in
WebPublisher PRO for SQL, those components must be installed and enabled in IIS
(Role Services, Security). The default authentication configuration for IIS 7/8.5 enables
Anonymous authentication only. See http://technet.microsoft.com/en-
us/library/cc733010(WS.10).aspx.

10 Inmagic DB/Text for SQL Installation and Upgrade Instructions
Chapter 3: Installing or Upgrading DB/TextWorks for SQL
The main installation and upgrade tasks are listed below.
1. Confirm that you have met the Prerequisites listed in Chapter 2.
2. Follow the instructions below to install or upgrade DB/TextWorks for SQL.
3. Run Setup Workstation on each client that will use DB/TextWorks for SQL.
4. Optionally install the two Sample textbases.
Upgrades can skip step 4, if they have already installed the Sample textbases.
All of these tasks are covered in this chapter.
To Install or Upgrade DB/TextWorks for SQL
These instructions are intended for new installations as well as upgrades.
1. If you are upgrading, confirm that all users have exited the software. We strongly recommend that
you make a backup copy of your current installation folder.
2. Log in as Local Administrator or a domain user with local administrator privileges. If you are not
logged in as an administrator, Setup detects it and a dialog box opens so you can switch accounts (to
an administrator account).
3. Exit all Windows applications.
4. Double-click the Setup.exe program for DB/Text for SQL. If you are installing on a 64-bit OS, right-
click the Setup.exe and select “Run as administrator”.
Note: If anti-virus software is active and you receive an error message about a malicious script, you
can safely choose to continue.
5. Read the Welcome information and click Next.
Inmagic DB/Text for SQL Installation and Upgrade Instructions 11
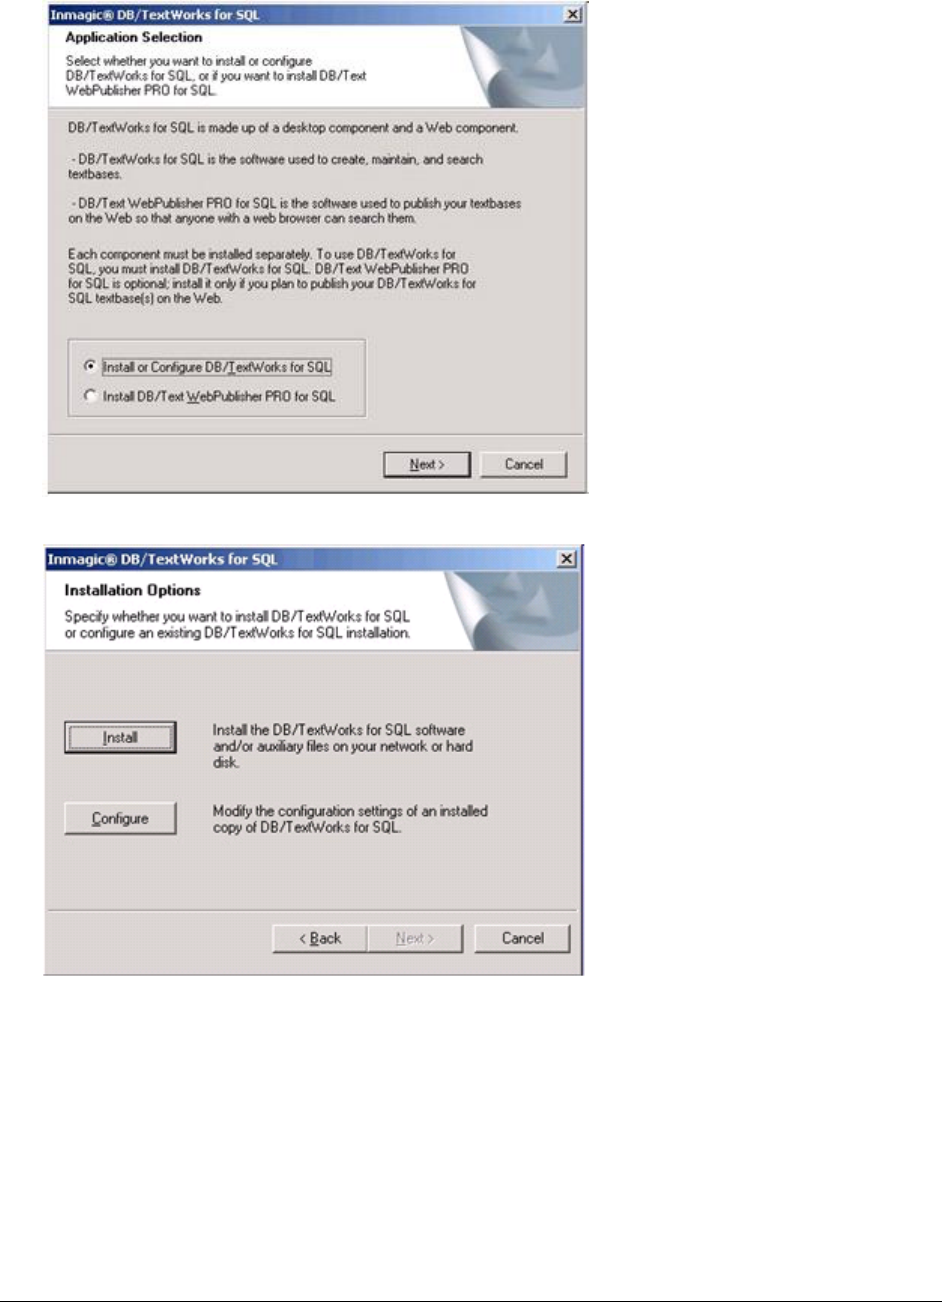
6. In the Application Selection dialog box, select Install or Configure DB/TextWorks for SQL and
click Next.
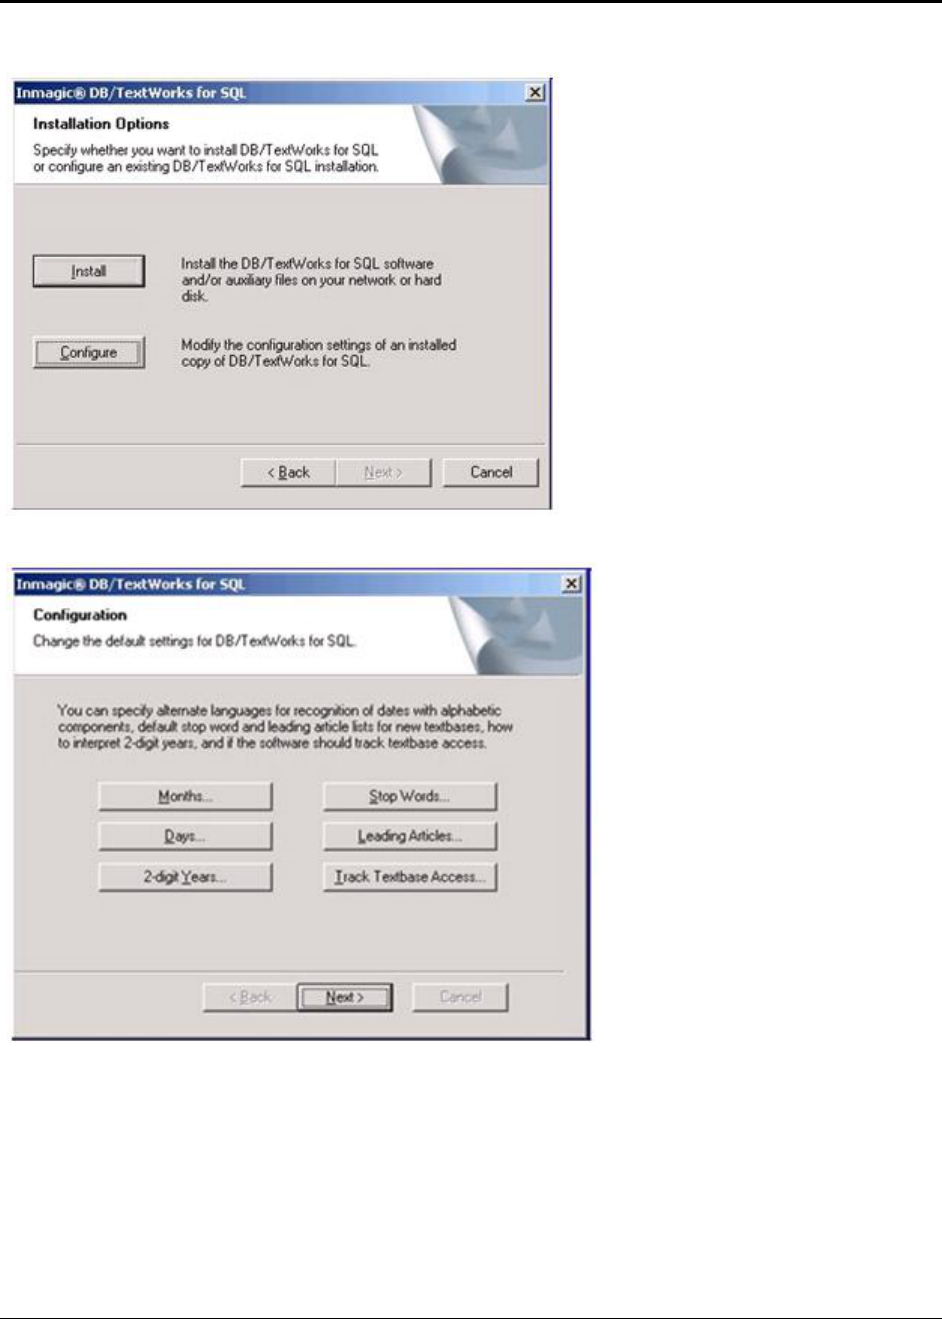
7. In the Installation Options dialog box, click the Install button.
12 Inmagic DB/Text for SQL Installation and Upgrade Instructions
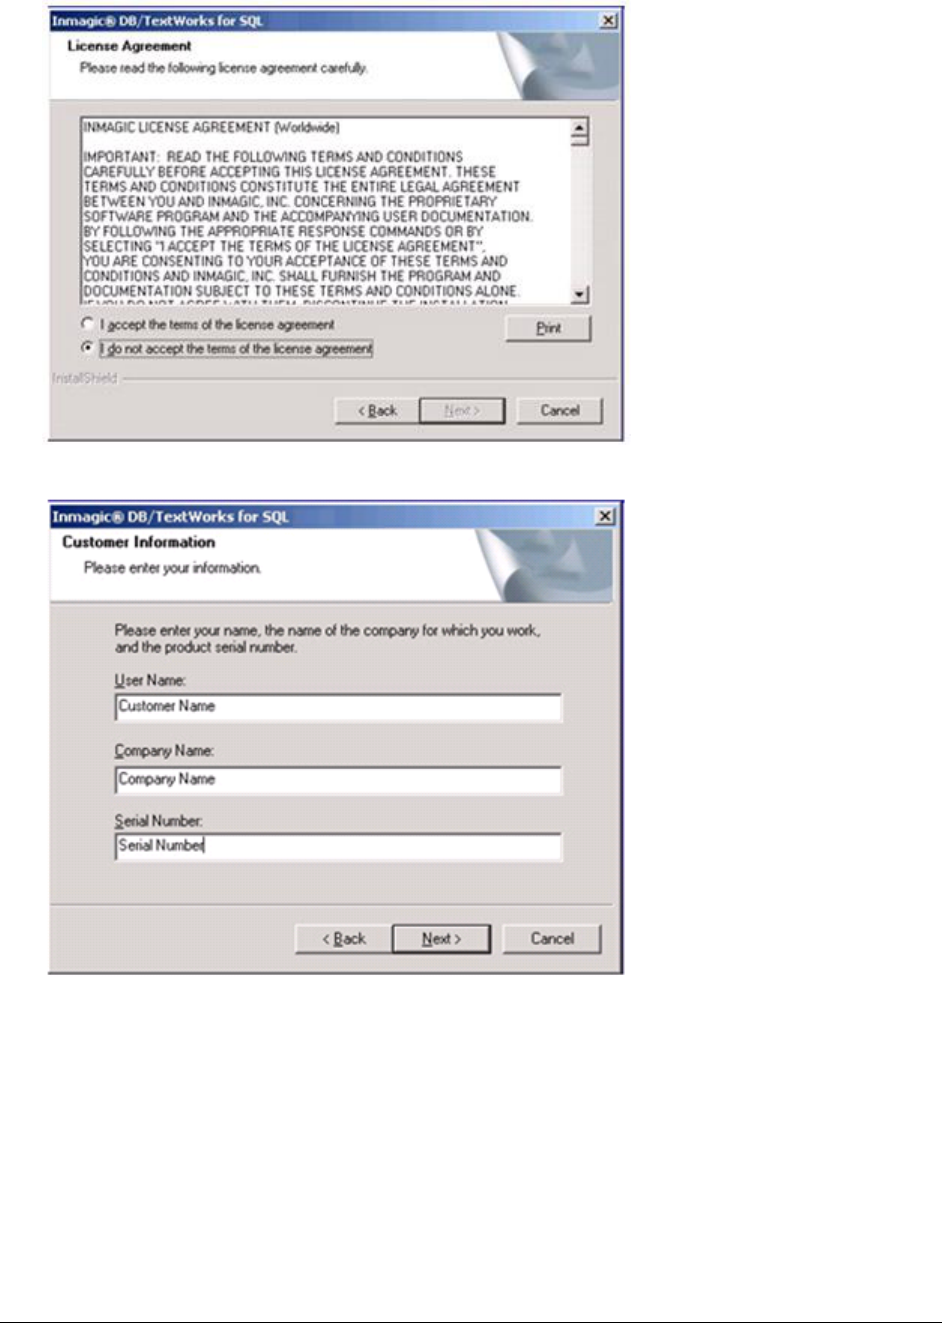
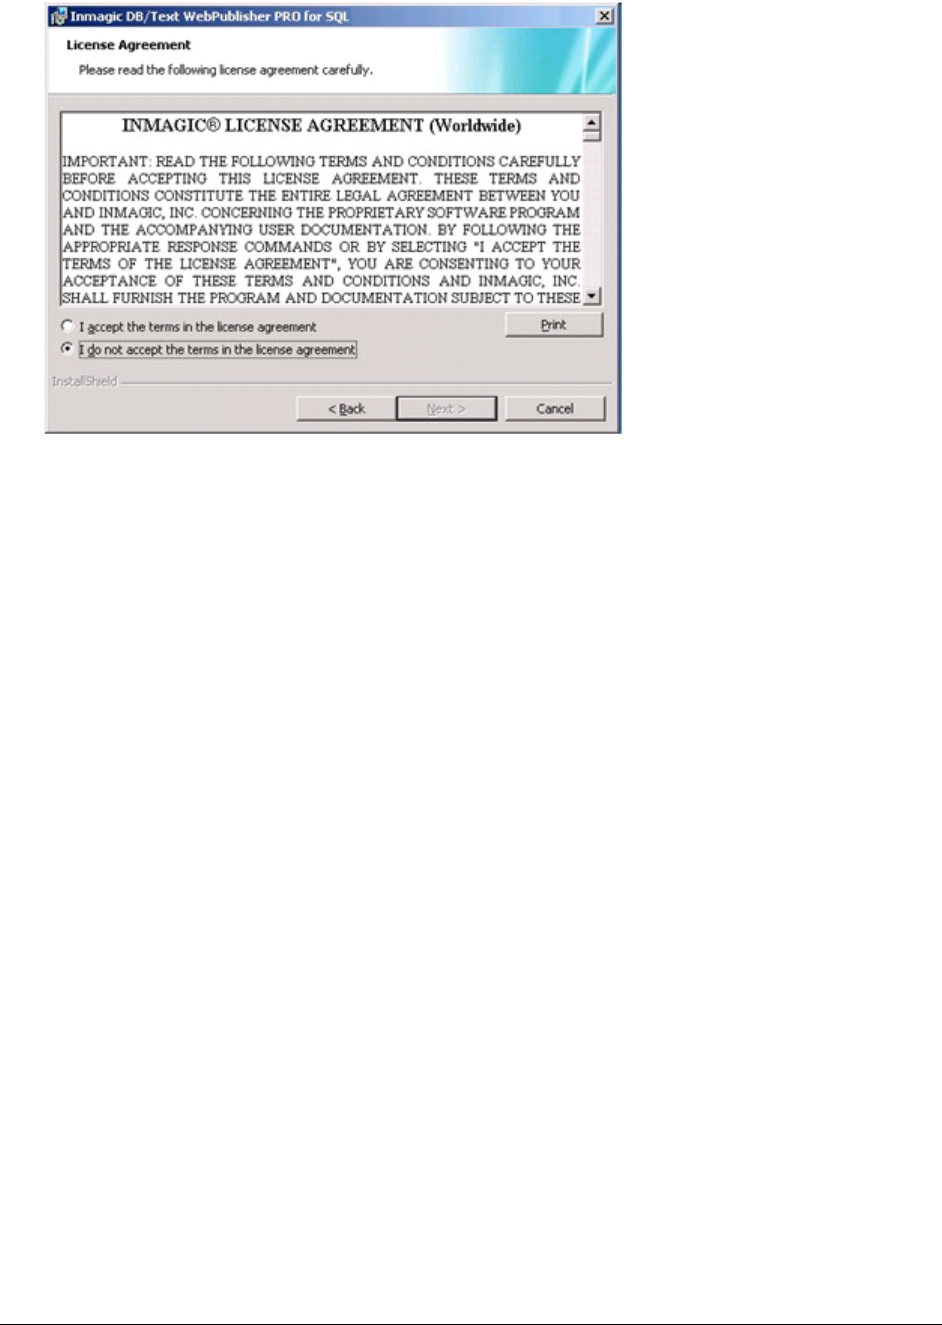
8. Read the license agreement and respond appropriately.
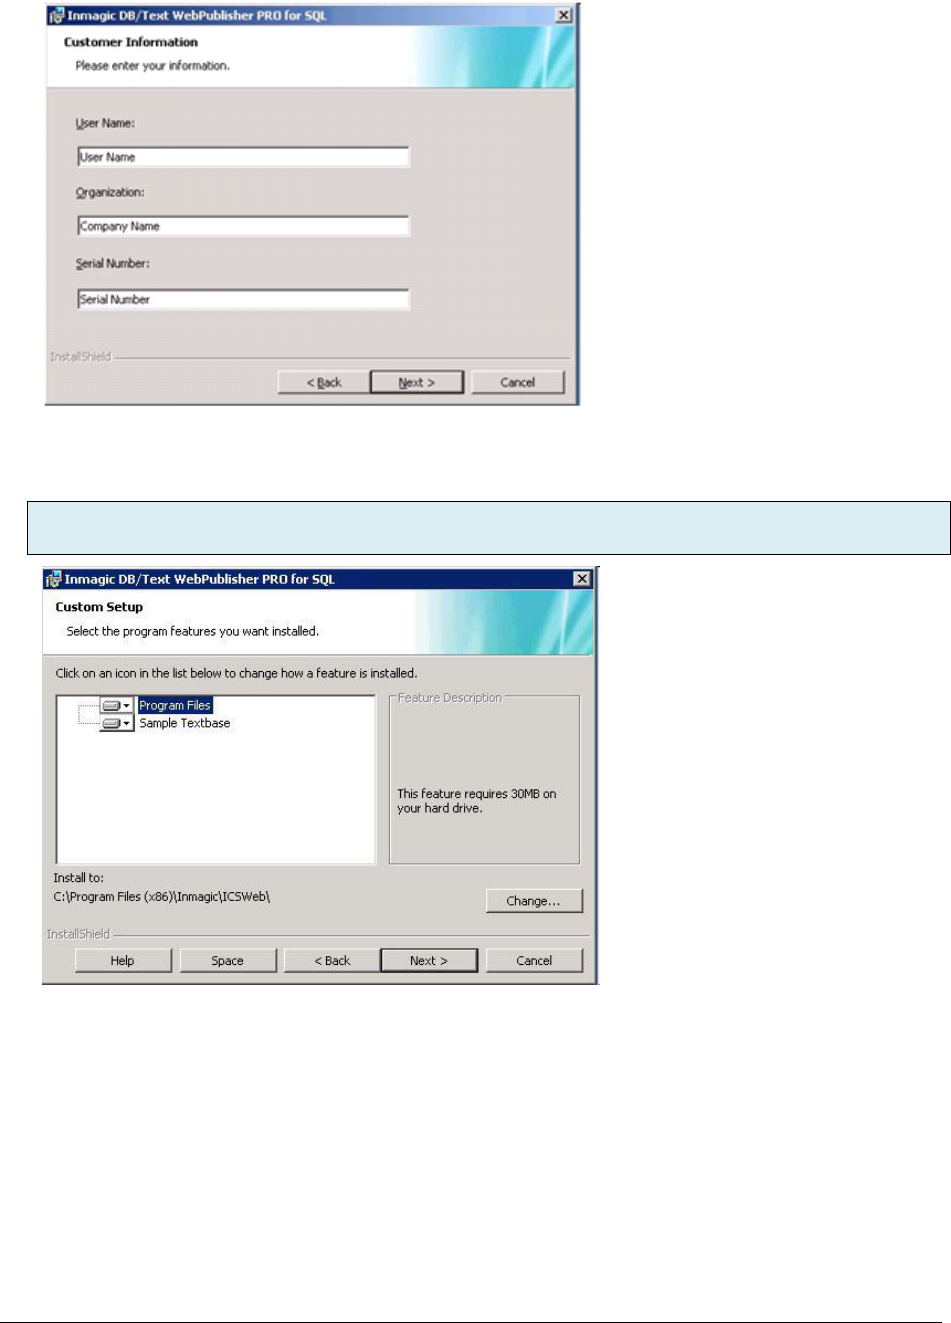
9. Enter your user name, company name, and serial number, then click Next.
Inmagic DB/Text for SQL Installation and Upgrade Instructions 13
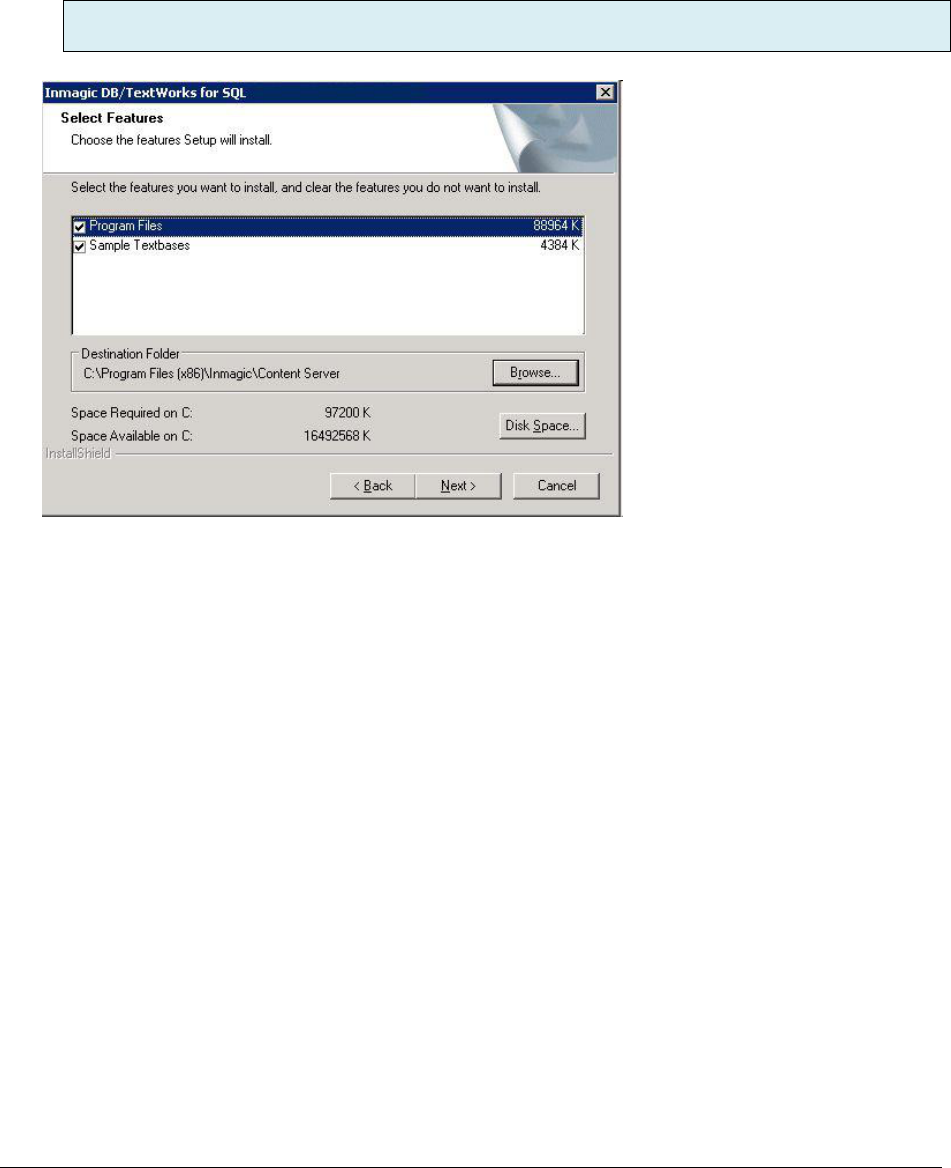
10. Select the features that you want to install, then click Next:
o Program Files: DB/TextWorks for SQL and DB/Text for SQL Importer.
o Sample Textbases: Files for the sample textbases (Sample1, Sample2).
For the Destination Folder:
o If this is a new installation, accept the default or click Browse to select a different location. A
different location may be preferable on Windows 2008 or Windows 2012 R2.
o If this is an upgrade, install the software in the same folder as before. When a message asks
if you want to overwrite the existing files, click Yes.
14 Inmagic DB/Text for SQL Installation and Upgrade Instructions
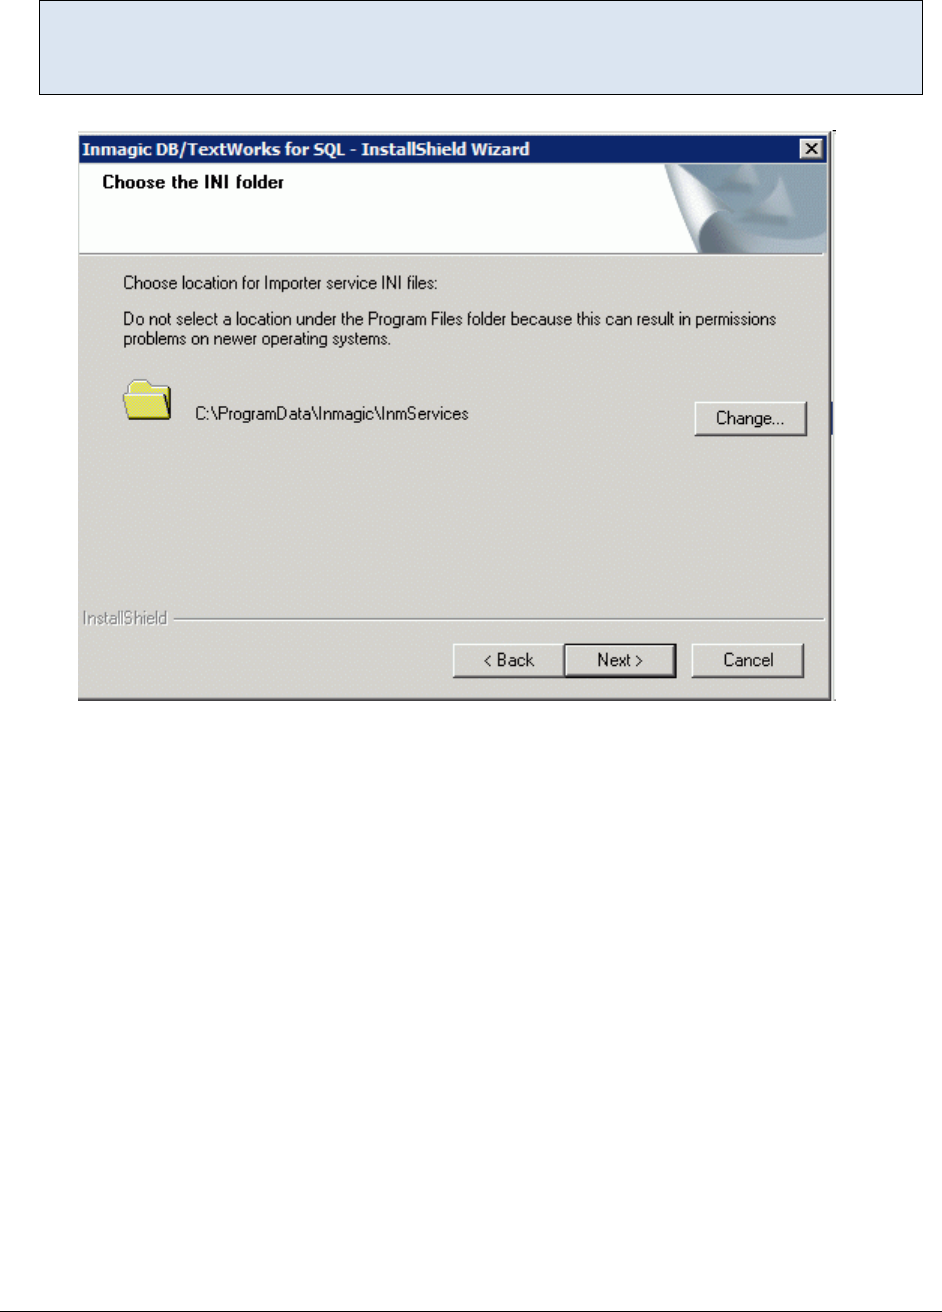
11. Choose a location for the Importer INI files.
Important! If you are upgrading from version 13 or newer, choose the same location that was
previously in use. If you are not sure of the location, you can verify it by opening the
InmServices.ini found in the Content Server folder.
12. The Setup Status notification appears. Wait while Setup installs the files.
Inmagic DB/Text for SQL Installation and Upgrade Instructions 15
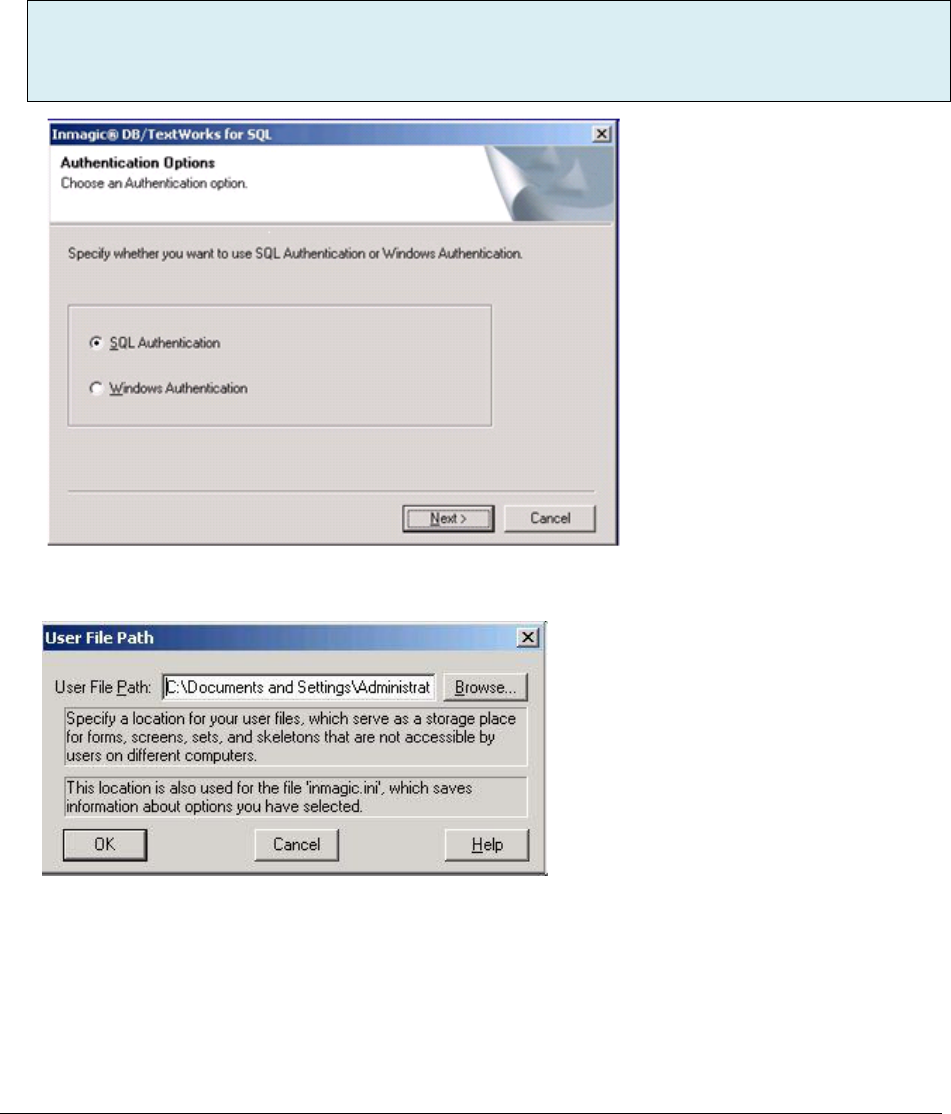
13. In the Authentication Options dialog box, indicate how DB/Text for SQL will access SQL Server,
then click Next.
SQL Authentication: An account called _Inmagic_Content_Server will be created with a default
password. You will be required to change the password later in the installation. This account will
be used to control access to all textbases. Note: If you are going to install WebPublisher PRO for
SQL on a Web server that is outside of your firewall, you must select SQL Authentication.
Windows Authentication: Users will be authenticated based on their Windows user account.
You will be required to assign DB/TextWorks for SQL role memberships to users/groups later in
the installation, to determine user rights to DB/TextWorks for SQL.
Important! Upgrades must be sure to select the same authentication method in use for the currently
installed version. This should be selected by default. If you want to double-check, open INMCSRV.INI
and look for WindowsAuthentication=1 (Windows Authentication) or WindowsAuthentication=0 (SQL
Authentication).
14. If this is a new installation, the User File Path dialog box opens, so you can specify where you want
to save private textbase elements. You need full rights to the folder you specify. Click OK.
Note: The following steps assume that the SQL Server database instance that will be used by
DB/TextWorks for SQL has already been created.
15. Choose Start>Programs>Inmagic Applications>DB/Text for SQL>Administration (TW-SQL).
This launches the Administration program so you can configure SQL Server for use with
DB/TextWorks for SQL. (Be sure to select the TW version of the Administration program.)

16 Inmagic DB/Text for SQL Installation and Upgrade Instructions
16. Open the Configure SQL Server menu and choose Setup Wizard.
17. When the Select SQL Instance dialog box appears, select an existing SQL instance to use. If a SQL
Instance is not displayed, use the Browse button to locate and select an instance. (Note: On a
server running Windows 2008 or 2012 R2, enter the name of the SQL Instance manually.)
If you prefer to enter the instance name manually, use one of the following formats:
Server name followed by a backslash and the instance name.
Example: MACHINENAME\SQL_INSTANCE
Tip! You can press the period ( . ) key to enter your server name.
IP address followed by a comma and the port number on the SQL Server.
Example: 192.168.0.199,1783
18. Click Next.
DB/TextWorks will connect to the specified SQL Server instance.
If a connection cannot be made, an error message appears (“Unable to connect to SQL Server”).
Please see the Inmagic Knowledgebase (http://support.inmagic.com/supbase3.htm) for
troubleshooting assistance.
Inmagic DB/Text for SQL Installation and Upgrade Instructions 17
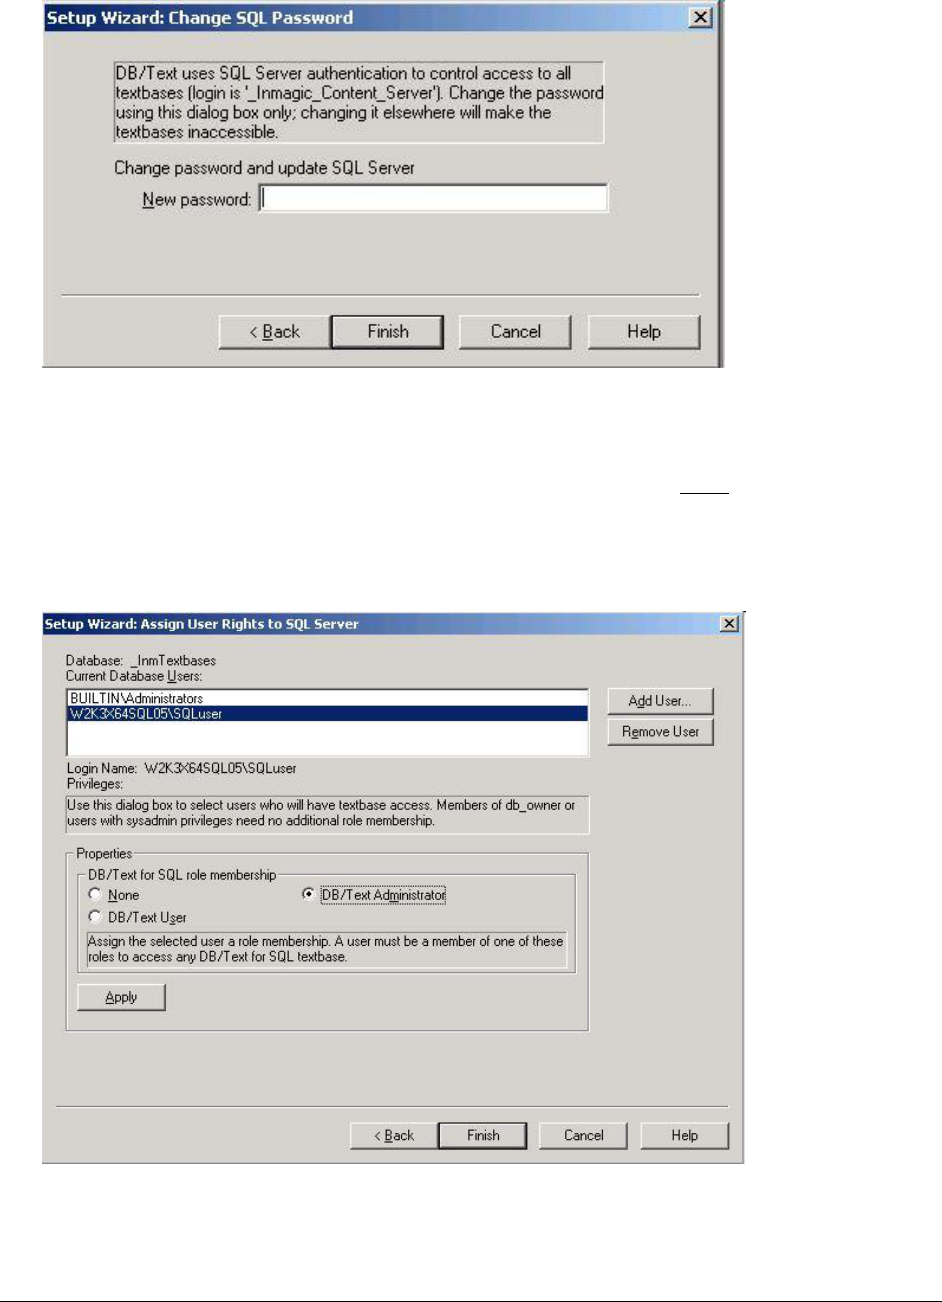
19. If you selected SQL Authentication in the Authentication Options dialog box, the Change SQL
Password dialog box appears.
Use the New password box to assign a password to the _Inmagic_Content_Server account. This is
the account that DB/Text for SQL will use to connect to SQL Server.
Click Finish, then confirm the password and click OK.
Important! Be sure to record the password. You will need to specify the same password during the
installation of WebPublisher PRO for SQL. Both products must use the same password.
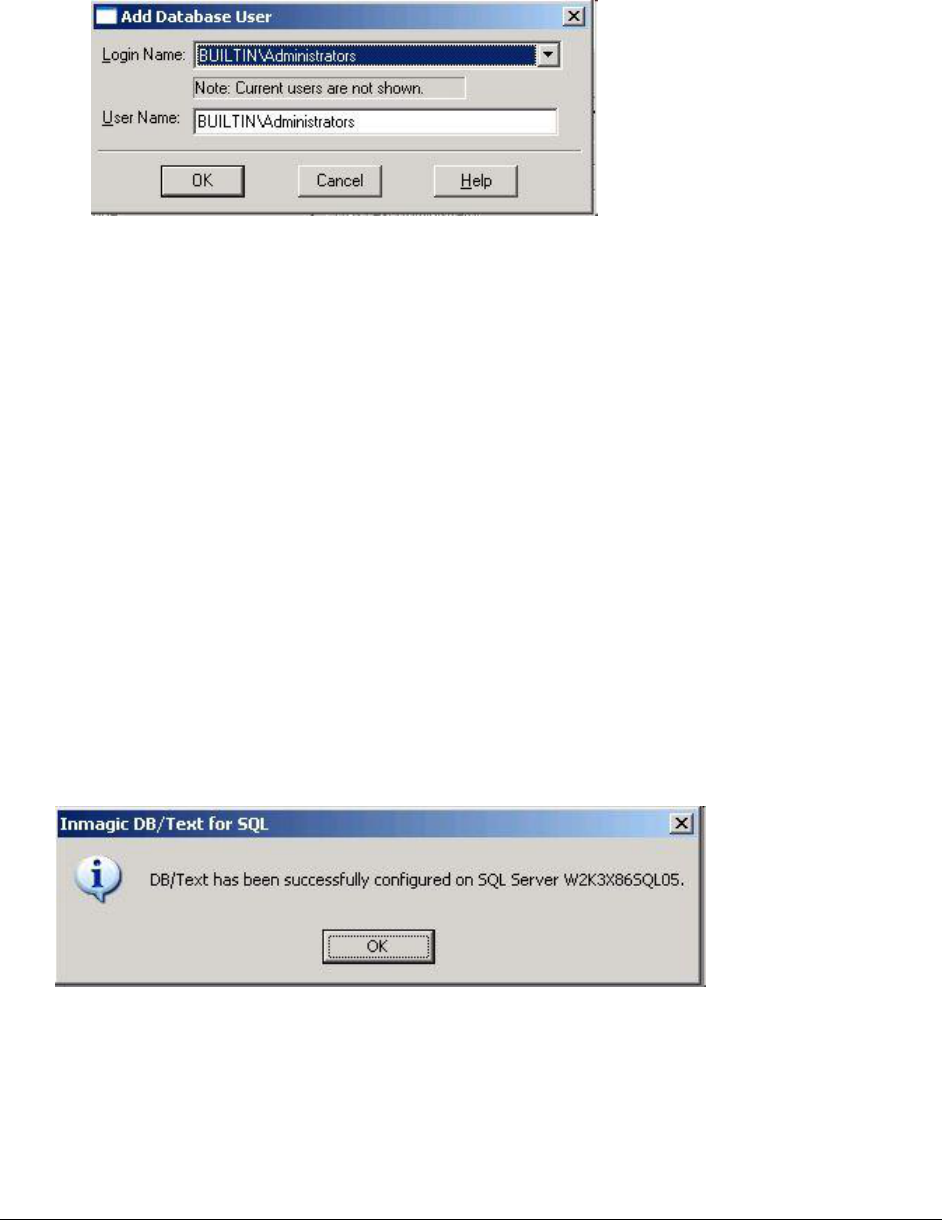
20. If you selected Windows Authentication in the Authentication Options dialog box, the Assign User
Rights to SQL Server dialog box appears. Follow the instructions below to specify the users or groups
that can use DB/TextWorks for SQL and indicate whether they can modify the control database on SQL.
18 Inmagic DB/Text for SQL Installation and Upgrade Instructions
a. Click Add User.
b. In the Add Database User dialog box, select a user from the Login Name list. (By default, the
User Name matches the Login Name and does not need to be adjusted.) When you click OK,
the name will be added to the Current Database Users list shown in the previous screen
capture.
c. Use Add User to select additional Login Names, if you wish.
d. Select a user in the Current Database Users list and assign a DB/Text for SQL role membership
and click Apply:
None. The user name does not have membership in any DB/Text for SQL role and cannot
access SQL Server or the control database. This means the user name will not be able to
use the DB/Text for SQL software.
DB/Text User. The user name has Read and Execute permission. This is required for any
user you plan to let open any DB/Text for SQL textbase.
DB/Text Administrator. An administrator can perform all textbase management functions
(for example, renaming and deleting a textbase). The administrator user can also modify
tables in the SQL control database. We recommend that this user also be a member of the
SQL Server fixed server role of dbcreator, which enables textbase creation.
Repeat for each database user in the list. When you are done, click Finish to continue.
Note: For users/groups that require broader access than the DB/Text roles allow, grant them
membership in additional SQL Server fixed server roles and SQL Server fixed database roles,
as appropriate. These additional roles may be needed for non-admin users/groups that will be
doing management activities, such as backing up DB/Text for SQL textbases and using Express
Import. Note, however, that any user/group with sysadmin privileges does not need any role
memberships to be able to have full access to the software. For more information, see “Using
SQL Server fixed roles” in the DB/Text for SQL Administrator’s Guide.
21. The Setup Wizard confirms that DB/Text has been successfully configured on SQL Server. Click OK.
22. Exit the Administration program.
23. Important: Make sure a copy of the INMCSRV.INI file from the Content Server install folder is
present in the location for Importer INI files you specified previously in step 11. The Importer will not
function properly if the INMCSRV.INI is missing.
Inmagic DB/Text for SQL Installation and Upgrade Instructions 19
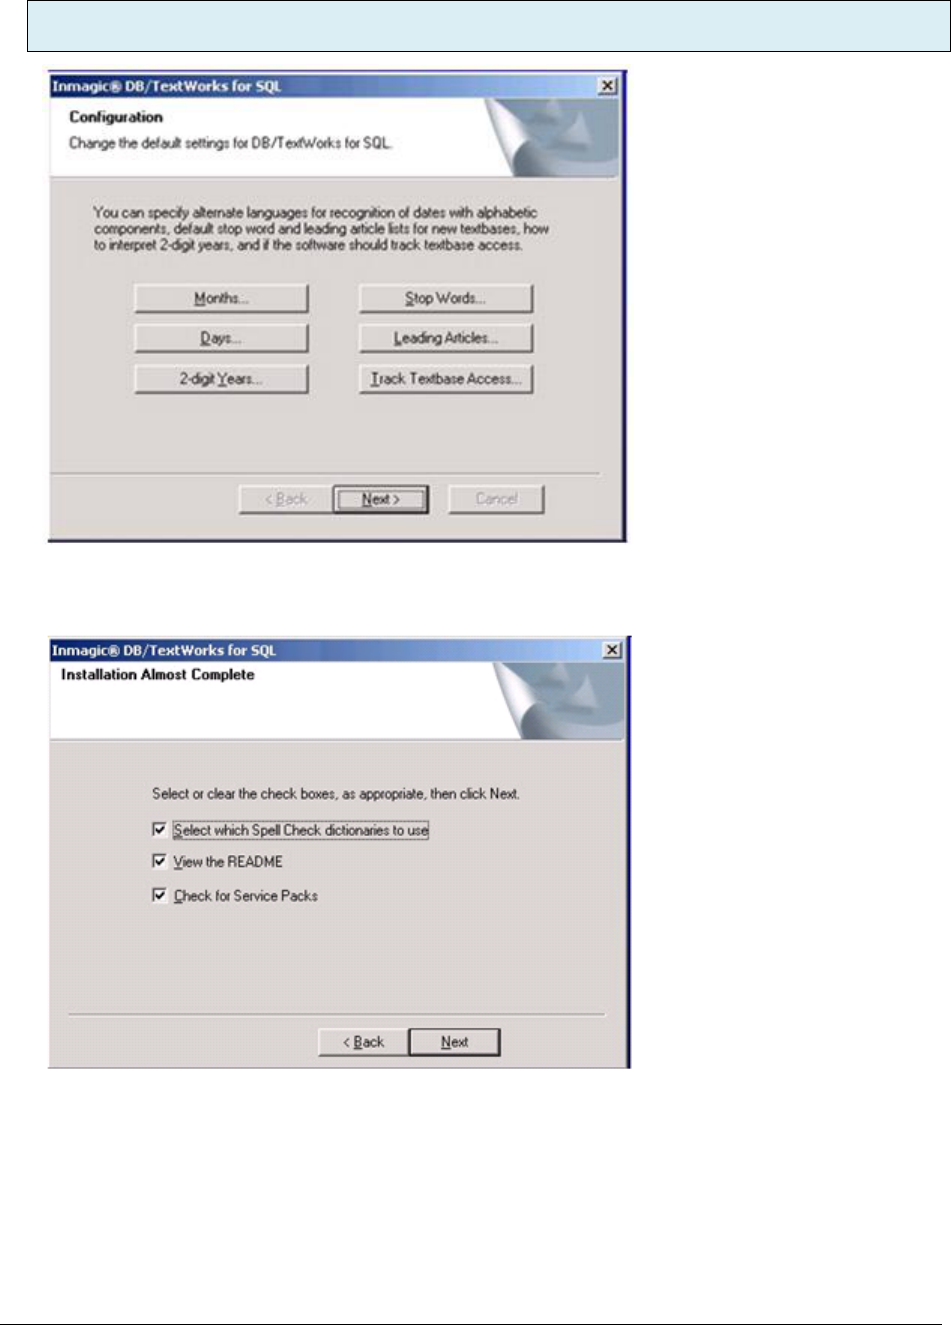
24. Optionally, use the Configuration dialog box to change the configuration settings.
For upgrades, your existing settings (from INMCSRV.INI) have been preserved, so you do not need
to make any configuration changes.
25. Click Next.
26. In the Installation Almost Complete dialog box, check or clear any options, then click Next.
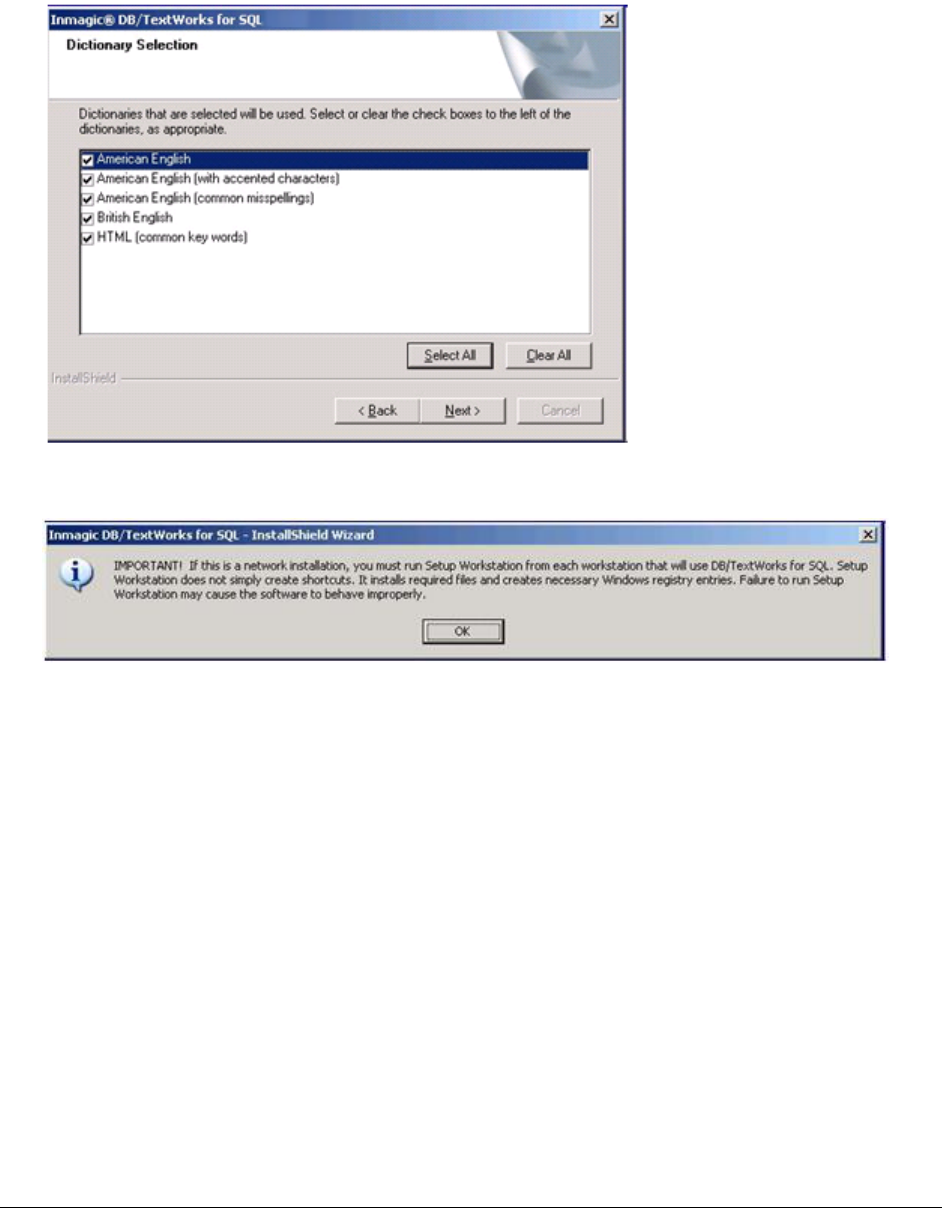
20 Inmagic DB/Text for SQL Installation and Upgrade Instructions
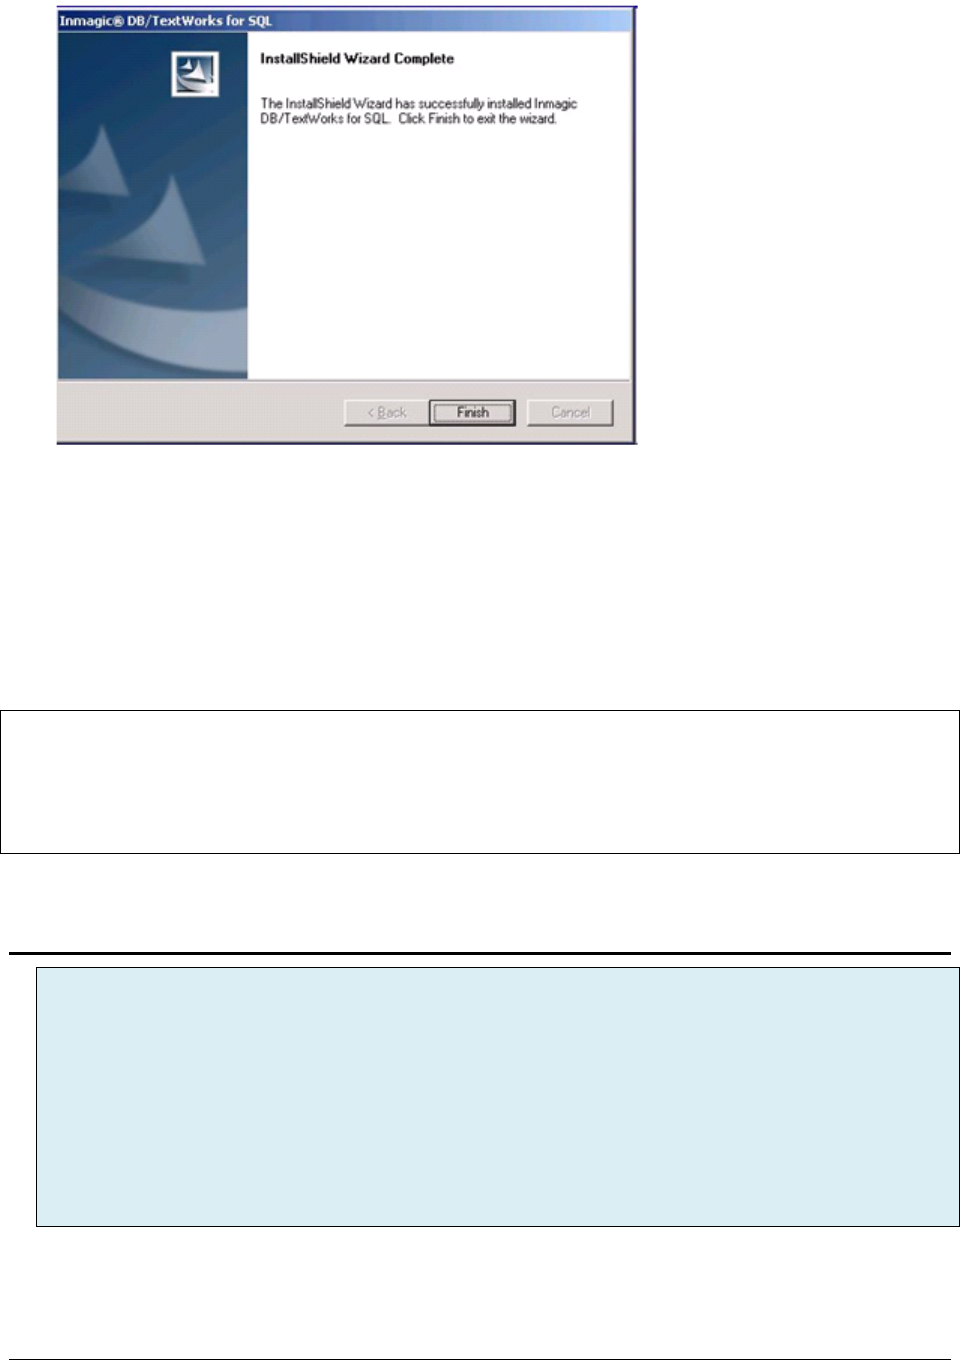
27. If you checked Select which Spell Check dictionaries to use, the Dictionary Selection dialog
opens with a list of available dictionaries, so you can specify which ones to use. For example, users
in the United States may want to leave the British English check box unchecked, so the Spell
Checker will catch words such as “colour” and “centre.” If you do not plan on editing text with
embedded HTML tags, you may want to leave the HTML (common key words) box unchecked.
Click Next to continue.
28. A message reminds you that if this is a network installation, you must run Setup Workstation from
each machine that will run the software, after the installation is complete. Click OK.
29. If you selected View the README, the Readme file will open in your Web browser. Read or print the
file, then close it to continue with the installation.
30. If you selected Check for Service Packs, your browser will open and connect to the Inmagic Service
Packs page.
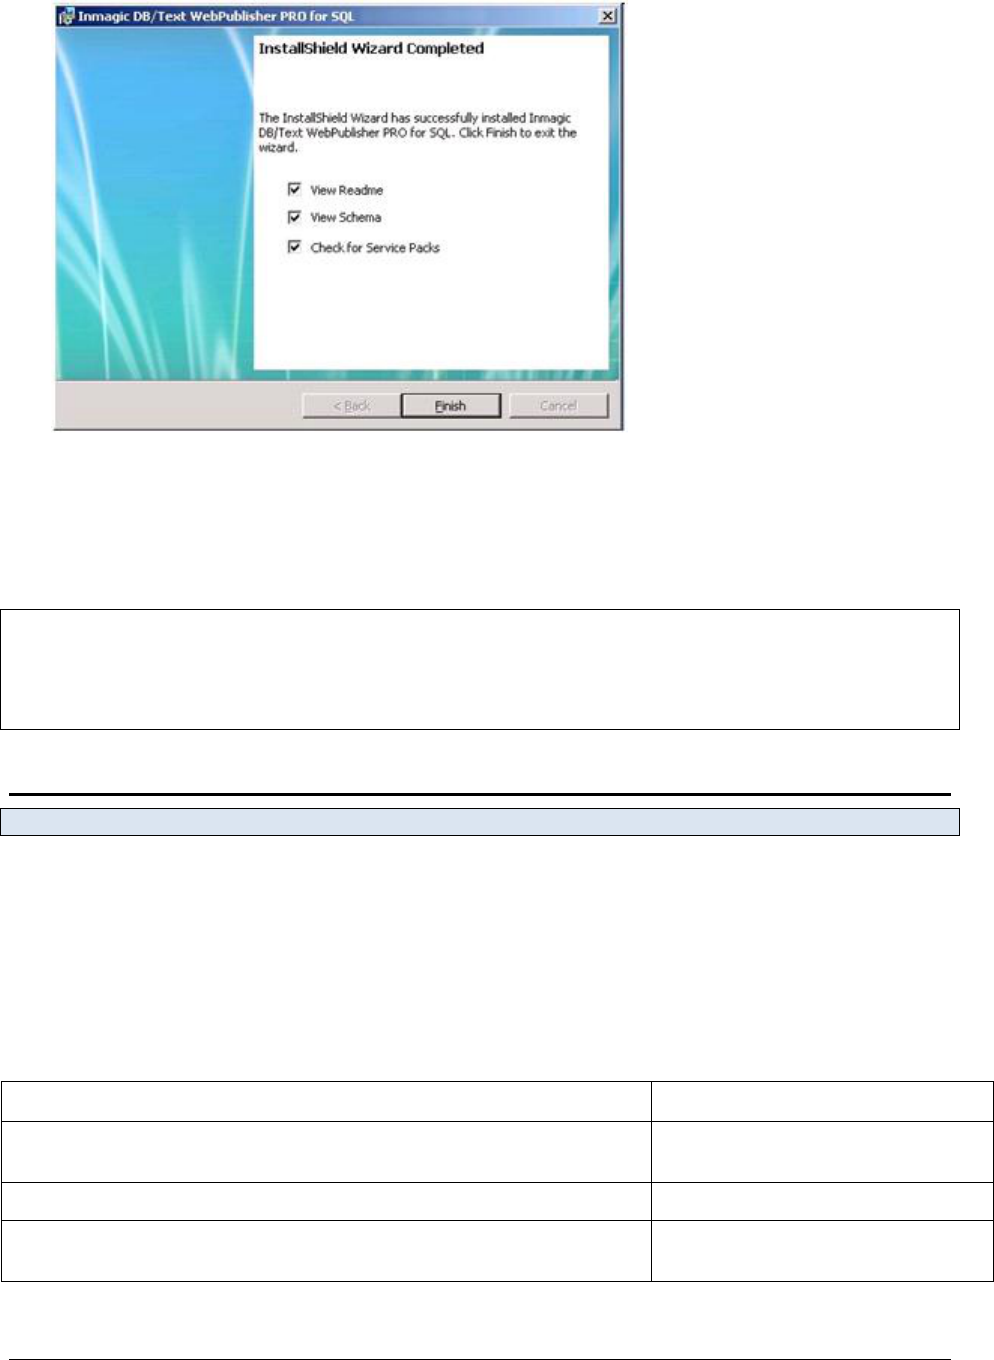
31. When the InstallShield Wizard Complete dialog box appears, click Finish.
Inmagic DB/Text for SQL Installation and Upgrade Instructions 21
32. If Setup determines that you have to reboot your computer, there will be an option to restart your
computer when you click the Finish button.
You have now completed the installation or upgrade process for DB/TextWorks for SQL. The following
required items have been created or upgraded on SQL Server:
The control database on the server, called _InmTextbases. This is the database that tracks each
textbase created in DB/TextWorks for SQL.
A database table to store IDs for each textbase.
A SQL login name (_Inmagic_Content_Server) for the server, if you are using SQL Authentication.
Important! If you converted from the non-SQL version of DB/TextWorks to DB/Text for SQL, you must
use the Administration program to convert your existing textbases, menu screens, and Web files before
you can use them with DB/Text for SQL. After you have completed the instructions in these installation
notes, please follow the instructions in the document Converting to the Inmagic DB/Text for SQL Platform,
a PDF that was installed with your DB/TextWorks for SQL software and is also available from the Product
Documentation link on the Customer Extranet page.
Upgrading Textbases from Version 14.5 or below
For upgrades, textbases created with DB/TextWorks for SQL v14.5 or earlier are not compatible with
v15 or later and must be upgraded. This is done by opening the textbase in DB/TextWorks for SQL
v15 or later. The first time a textbase is opened after upgrading to version 15 or later, you’ll be
prompted to upgrade the textbase. You must proceed with the textbase upgrade to use the software.
It is recommended that a user with full access to all textbases should upgrade each textbase as these
elevated permissions will be required.
If using Windows Authentication, to perform the textbase upgrade, the user must have at least
dbcreator and bulkadmin privileges. Ideally a user with the SQL sysadmin role should be used.
Note: The upgrade process will discard the list of records in any saved sets (in the same sense
Recover Textbase does), so you’ll need to use Refresh Sets (and any omissions will be lost).

22 Inmagic DB/Text for SQL Installation and Upgrade Instructions
Configuring Clients (Setup Workstation)
If you installed DB/Text for SQL on a network server, you must run Setup Workstation on each client
that will use DB/Text for SQL. This configures the client so it can successfully use DB/Text for SQL.
Note: Upgrades are also required to run Setup Workstation on each client.
To Use SMS to Set Up Workstations
Important! Microsoft Visual C++ 2008 Redistributable Package must be present on the target machine.
Typically this is installed on machines that are current with Windows updates.
1. Share the Inmagic folder that contains the DB/TextWorks for SQL installation folder on the host
machine.
2. From the SMS subfolder of the DB/TextWorks for SQL installation folder, edit the CSWorkstation
.MSI file with an MSI editing tool such as Wise, InstallShield, or Orca.
3. Go to the Property table and edit the property CONTENTSERVERDIR to point to your DB/TextWorks
for SQL installation folder (for example, \\ServerName\Vol1\Inmagic\Content Server\). Note that the
path you enter for this value must end in a trailing slash.
4. Use your SMS program to do Setup Workstation on your client machines.
To Manually Set Up Workstations
Perform these steps for each workstation that will access DB/TextWorks for SQL.
1. Share the DB/TextWorks for SQL installation folder on the machine hosting DB/TextWorks for SQL.
2. Log in with Administrator privileges on the workstation that will access DB/TextWorks for SQL. You
must be logged in as Administrator to run Setup Workstation.
3. From the Windows Start menu, choose Run, then run the Setup program from where DB/TextWorks
for SQL is installed (for example, \\Servername\DBT4SQL\Setup.EXE, where DBT4SQL is the name
of the DB/TextWorks for SQL share), and click OK.
4. On the Welcome dialog box, click Next.
5. On the Installation Options dialog box, click the Workstation button.
6. Wait while Setup installs the files.
7. On the Installation Almost Complete dialog box, check or clear the following options, then click Next:
Select which Spell Check dictionaries to use: If you select this option, you will be asked
to specify which dictionaries to use.
View the README: If you select this option, the README file will open in your Web
browser, so you can read or print the file.
8. When the InstallShield Wizard Complete dialog box opens, click Finish.
9. During the Setup Workstation process, DB/Text for SQL checks the Windows System folder and
installs any necessary files. If files were installed, you may need to reboot your computer using the
Reboot Computer dialog box. If files were not installed, you will not need to reboot and will not see
the Reboot Computer dialog box. Click Finish when you have chosen your reboot option.
10. Repeat this process for each workstation that will access DB/TextWorks for SQL.

Inmagic DB/Text for SQL Installation and Upgrade Instructions 23
Note: When DB/TextWorks for SQL is first accessed by a particular client, that client will be asked to
specify a user file path. Tell all clients that they should specify a location on the local machine, not on a
network drive.

24 Inmagic DB/Text for SQL Installation and Upgrade Instructions
Installing the Sample Textbases (Sample1 and Sample2)
You can install the sample textbases provided with DB/TextWorks for SQL, then use them for practice
purposes. The sample textbases are called Sample1 and Sample2.
Perform the following steps for each of the sample textbases.
1. Using an account that has Administrator privileges, log in to the machine where DB/TextWorks for
SQL is installed.
2. If your SQL Server database instance is on a different machine than DB/TextWorks for SQL, you
must share the Sample Textbase Backup File Sets subfolder, which is located in the DB/TextWorks
for SQL installation folder. The account running the SQL Server service needs Full Control access to
the subfolder.
3. Choose Start>Programs>Inmagic Applications>DB/Text for SQL>Administration (TW-SQL) to
open the Administration program. Note: On 64 bit operating systems navigate to the
InmCSAdmin.exe file in the DB/TextWorks install folder, right-click on the file and choose “Run as
administrator”.
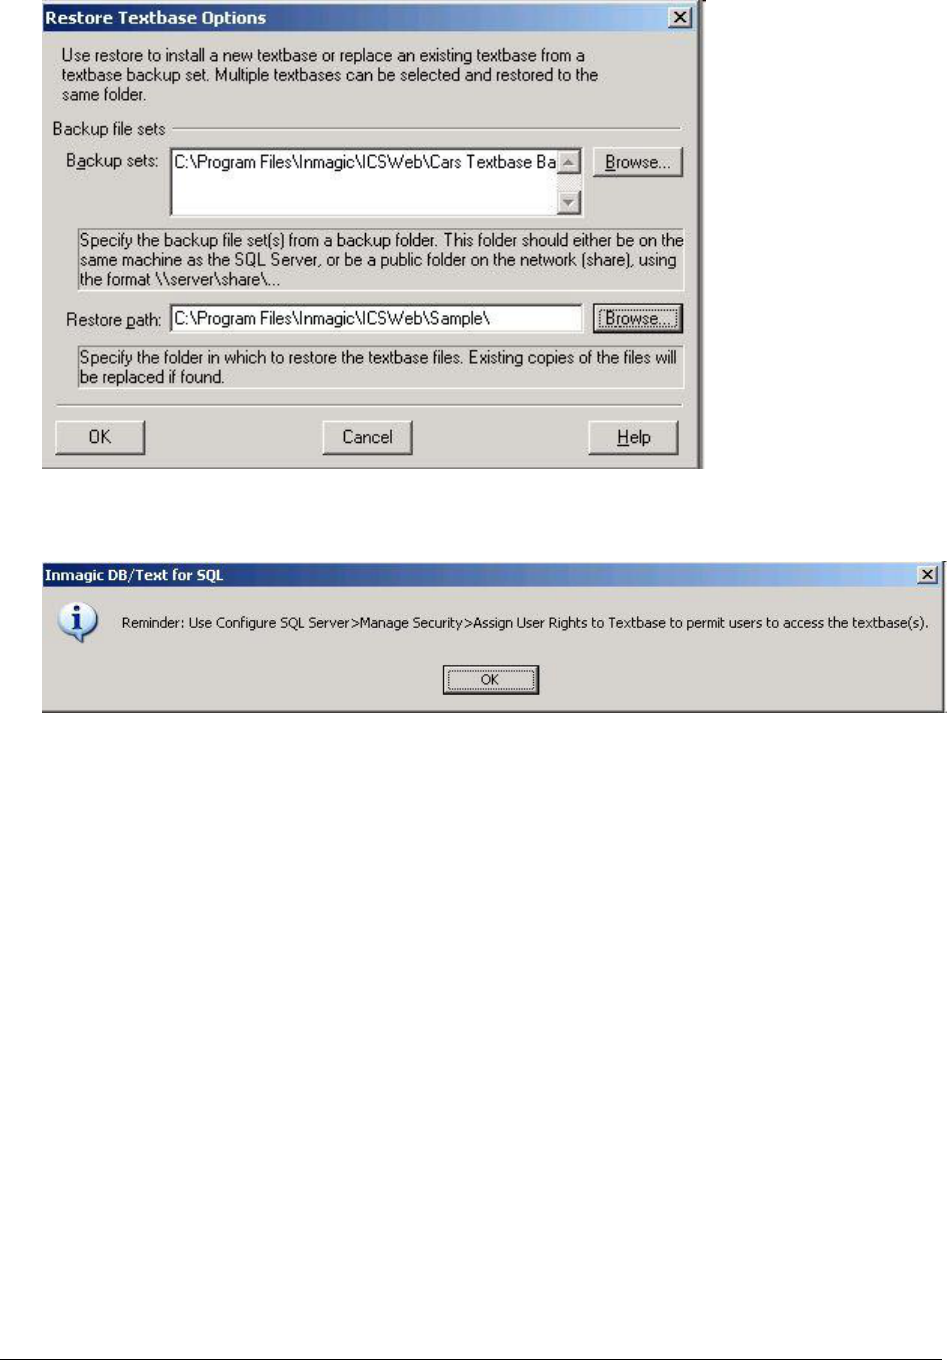
4. Choose Back Up & Restore>Restore Textbases to open the Restore Textbase Options dialog box.
5. In the Backup sets box, use Browse to select Sample1.CBA and Sample2.CBA, located in the
Backup File Set subfolder under the DB/TextWorks for SQL installation folder (for example,
C:\Program Files\Inmagic\Content Server\Textbases\Sample Textbase Backup File
Sets\Sample1.CBA).
Important! If your SQL Server database instance is on a different machine than the one you are
using, specify the sample textbases using the Universal Naming Convention (UNC), not a drive letter.
Additionally, you must use specific log on parameters for the SQL Server service. To do this, right-
click the My Computer icon on the server where SQL Server is running and select Manage. Expand
the Services and Applications tree, and then double-click Services. Right-click your instance of SQL
Server for the DB/TextWorks for SQL application and select Properties. Select the Log On tab and
then specify a domain account that has access to SQL Server and full access to all the textbase files
or folders that reside on other machines.
6. In the Restore path box, enter the path to the Sample subfolder of the DB/TextWorks for SQL
installation folder. You can click the Browse button and navigate to this location (for example,
C:\Program Files\Inmagic\Content Server\Sample).
Tip! For the Sample Textbases shortcut menu item to work correctly, the Sample1 and Sample2
textbases must be installed in the Sample subfolder of the DB/TextWorks for SQL installation folder.
7. Click OK on the Restore Textbase Options dialog box to install the textbase(s) that you specified.
Inmagic DB/Text for SQL Installation and Upgrade Instructions 25
8. If you are using Windows Authentication, a message reminds you that you must use Configure SQL
Server>Manage Security>Assign User Rights to Textbase to permit users to access the Sample
textbase(s). Click OK to dismiss the message box.
9. Review the information on the Restore Textbases: Operation Status dialog box and click Close when
you are done.
10. If you are installing textbases from another backup file set folder, repeat steps 1–9.
11. If you are using Windows Authentication, use Configure SQL Server>Manage Security>Assign
User Rights to Textbase to permit users to access the Sample textbase(s). See the DB/Text for
SQL Administrator’s Guide for details.
12. Exit the Administration program.
26 Inmagic DB/Text for SQL Installation and Upgrade Instructions
Changing Configuration Settings Later
To modify the configuration settings of an installed copy of DB/TextWorks for SQL, you can run the Setup
program again from the installation folder and click the Configure button.
This provides access to the Configuration dialog, where you can make any desired changes.
When you are done, click Next then follow the prompts to save your changes and exit the Setup program.

Inmagic DB/Text for SQL Installation and Upgrade Instructions 27
Chapter 4: Installing or Upgrading WebPublisher PRO for SQL
WebPublisher PRO for SQL (previously called CS/WebPublisher PRO) is the optional Web component of
DB/Text for SQL. It allows textbases to be searched and optionally edited from a Web browser over a
corporate intranet, extranet, or the Internet. Your license agreement permits installation on one Web
server.
To Install or Upgrade WebPublisher PRO for SQL
Important! If WebPublisher PRO for SQL is on a Web server outside of your firewall, see Inmagic
Knowledgebase article 2848 for information on how to set up this configuration.
To install or upgrade WebPublisher PRO for SQL
1. Confirm that you have met the Prerequisites stated in Chapter 2.
2. Log in to the Web server with Administrator privileges.
3. Exit all Windows applications.
4. Upgrade only: Back up your current WebPublisher PRO for SQL (or CS/WebPublisher PRO)
installation folder. You may need some of the content in step 7. It's especially important to back up
ICSWEB.INI, which includes textbase locations.
5. Upgrade only: If you are upgrading from a version prior to v12.0, uninstall the previous version before
proceeding. IMPORTANT: Before uninstalling, make a note of the IIS authentication setting for the
ics-wpd virtual directory (anonymous authentication, integrated windows authentication or basic
authentication). You will need this information when you install v20.0.
6. Double-click the Setup.exe program for DB/Text for SQL. Note: On 64 bit operating systems, right-
click on Setup.exe and select “Run as administrator”. Select Install WebPublisher PRO for SQL and
click Next.
Note: If anti-virus software is active and you receive an error message about a malicious script, you
can safely choose to continue.
If the prerequisite software is not detected, the Setup program will not proceed. See the Support
Matrix for details.
7. Upgrade only: If you are upgrading from a version prior to v12.0, compare your newly installed .INI
files with the ones backed up in step 5. Restore the backup copy if necessary.
8. Upgrade only: If you are upgrading from a version prior to v15, the Inmagic Browse web.config
(default: C:\Program Files\Inmagic\ICSWeb\InmagicBrowse\web.config) must be updated to have
their requestEncoding and responseEncoding be UTF-8. <globalization requestEncoding="UTF-8"
responseEncoding="UTF-8" />
9. Upgrade only: If you are upgrading from a version prior to v15 and you have exported HTML edit
screens (for creating new records) you will need to re-export them so they will use the new HTML edit
page (wpp_edit.aspx) instead of the old .ASP page (icsw-edit.asp).
10. Upgrade only: If you are upgrading from a version prior to v15 and your search results or expanded
display look significantly different than they did in prior versions, you may have Raw HTML or Inline
Images in the forms. Open the form in the Form Designer, choose Tools>Form Properties from the
menu, select the HTML tab, uncheck Use Cascading Style Sheets to preserve formatting, OK
your changes, and save the form. Check the WebPublisher output again. Perform these steps for
each affected form.

28 Inmagic DB/Text for SQL Installation and Upgrade Instructions
11. In the Application Selection dialog box, select Install DB/Text WebPublisher PRO for SQL and click
Next.
12. On the Welcome dialog box, click Next.
Inmagic DB/Text for SQL Installation and Upgrade Instructions 29
13. Read the license agreement and respond appropriately.
30 Inmagic DB/Text for SQL Installation and Upgrade Instructions
14. Enter your user name, company name, and the DB/Text for SQL serial number, and click Next.
15. In the Custom Setup dialog box, click Next to accept the default locations for the WebPublisher PRO
for SQL Program Files and the Cars Sample Textbase, or use the Change button to change the
locations.
If this is an upgrade, install the software in the same folder as your current version. When a
message asks if you want to overwrite the existing files, click Yes.
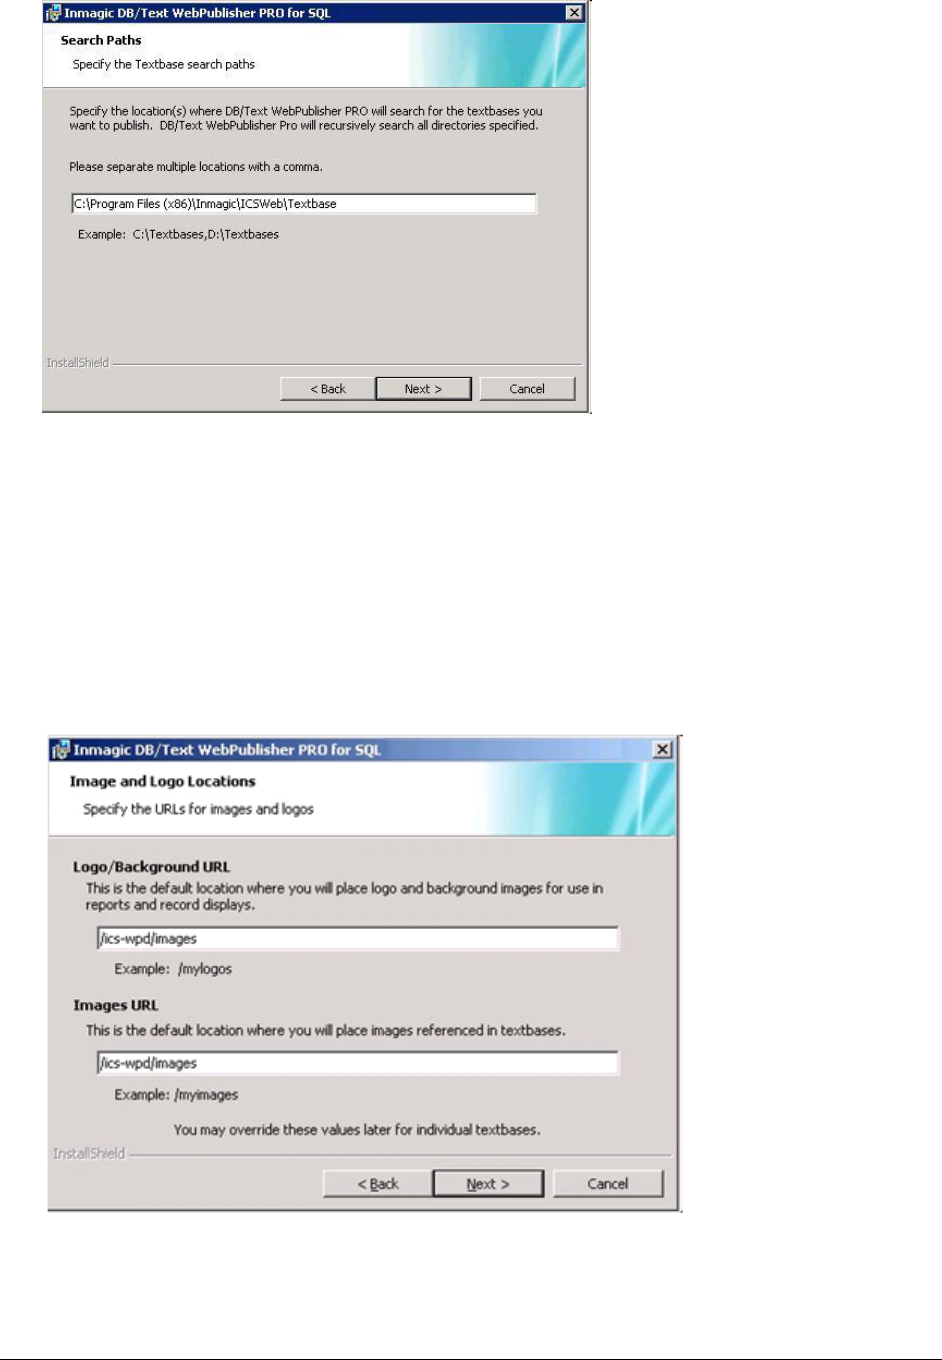
16. Use the Search Paths dialog box to specify one or more locations where WebPublisher PRO for SQL
will look for published textbases. The software will recursively search all subfolders under the
specified location(s).
Note: The Search Paths are the folders that will contain the textbase files that reside outside of SQL
Server (CBS, CBA, CAC, CBM, etc.). To specify multiple locations, use a comma between path
names. To specify a machine other than the HTTP server, use the Universal Naming Convention
(UNC) instead of a drive letter. The following example specifies three locations, with the last one
using a UNC: C:\ICSWEB\TEXTBASE\,D:\DATA,\\SERVER2\TBS
Inmagic DB/Text for SQL Installation and Upgrade Instructions 31
Note: The search paths are written to an initialization file called ICSWeb.INI, located in the installation
folder. You can edit that file if you ever want to add or change locations.
17. Click Next.
18. In the Image and Logo Locations dialog box, specify a default Web directory for Logo/Background
URL and Images URL.
We recommend that you accept the default location (the virtual directory /ics-wpd/images) and
store your images in the Images subfolder of the WebPublisher PRO installation folder. If you want to
specify a different location, use a leading slash to make the URL relative to the current server root.
Specify the full path (for example, http://hostname/mylogos/) only if the Web server where the images
reside is different from the installation server. The URL will be written to the ICSWeb.INI file, in the
installation folder. Later, you can edit that file to change the location, if desired.
19. Click Next.
32 Inmagic DB/Text for SQL Installation and Upgrade Instructions
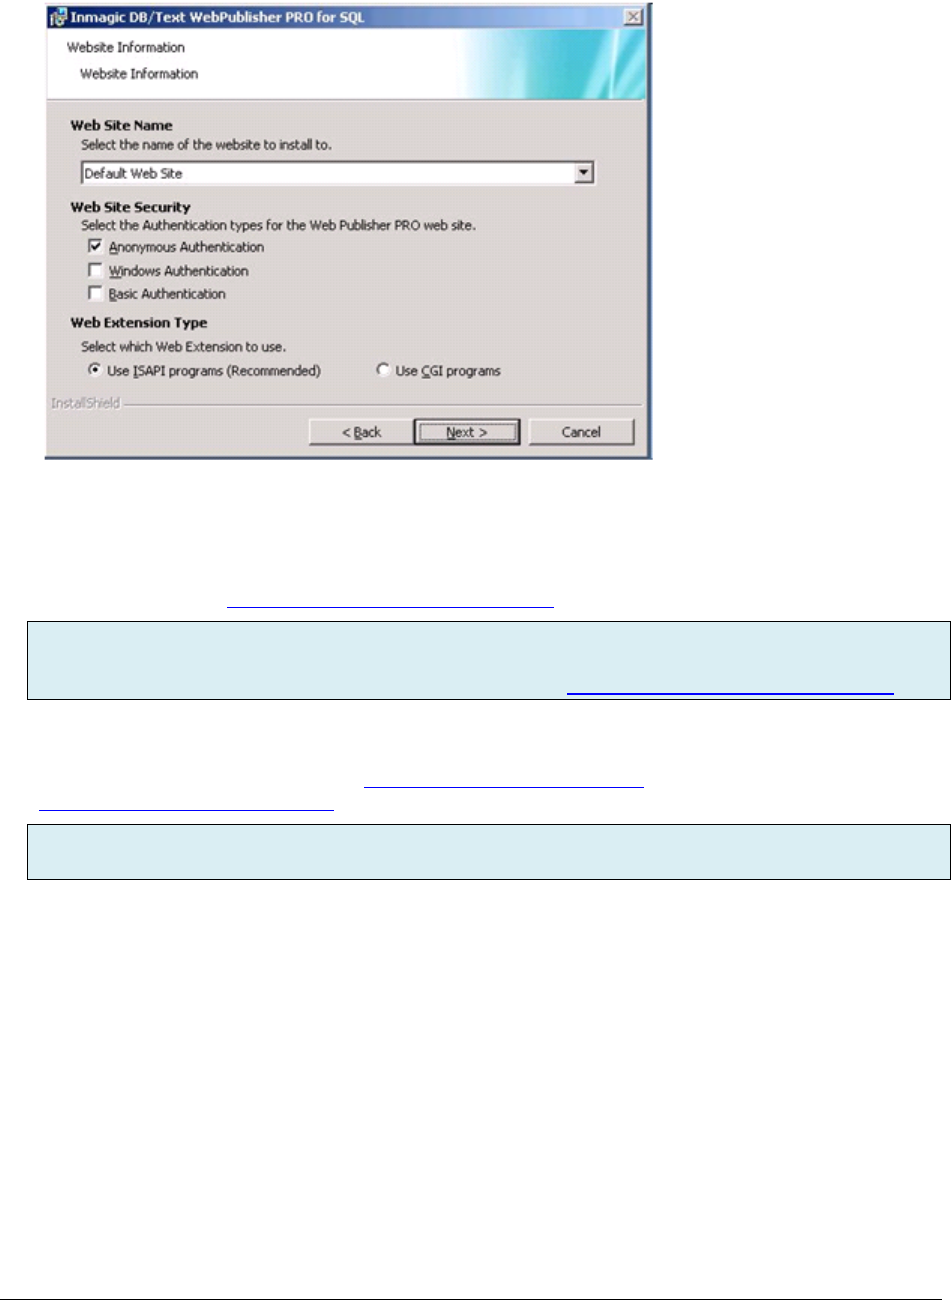
20. Follow the instructions below to use the Website Information dialog box to specify the IIS web site
settings for WebPublisher PRO.
Web Site Name
Select the IIS web site to use for DB/Text Web Publisher PRO.
New installations: We recommend that you use the Default Web Site. Two required virtual directories
(ics-wpd and InmagicBrowse) will be created under the IIS web site that you specify. To use a non-
default web site, see Inmagic Knowledgebase article 2846.
Upgrades: Select the same web site that is currently being used (Default Web Site by default). The
ics-wpd and InmagicBrowse virtual directories should already exist on that web site; they will not be
created. If you want to change these virtual directories, see Inmagic Knowledgebase article 2846.]
Web Site Security
Select an option to specify how to authenticate clients who will access textbases published on the IIS
web site. For more information, see: http://technet.microsoft.com/en-
us/library/cc733010(WS.10).aspx.
Upgrades: It is very important that you select the authentication method that is currently in use. The
correct option is selected by default.
Anonymous Authentication is the default for new installations. This method does not prompt for a
user name or password. Instead, IIS provides stored credentials to Windows using the
IUSR_machinename account (or IUSR for Windows Server 2008 or 2012 R2). Note: If the published
textbases are on a different machine than the Web server, Anonymous Authentication cannot be
used. You must use a valid domain account with the proper security permissions.
Windows Authentication is best suited to an intranet environment, where client computers and Web
servers are in the same domain. This method is available only if Windows Authentication is enabled
in IIS.
Basic Authentication prompts for a user name and password. Each user who will access the
published textbases must have a Windows account. Users must have "log on locally" permissions on
the Web server. This method is available only if Basic Authentication is enabled in IIS.
Inmagic DB/Text for SQL Installation and Upgrade Instructions 33
Web Extension Type
ISAPI is recommended for better performance, or you can use CGI. (If you choose CGI, editing is
supported in WebPublisher PRO for SQL only if both CGI and ISAPI are enabled in IIS.)
Note: If you need to switch later, run ISAPI.BAT in the JScript subfolder to use ISAPI, or run CGI.BAT
to use CGI.
21. Click Next.
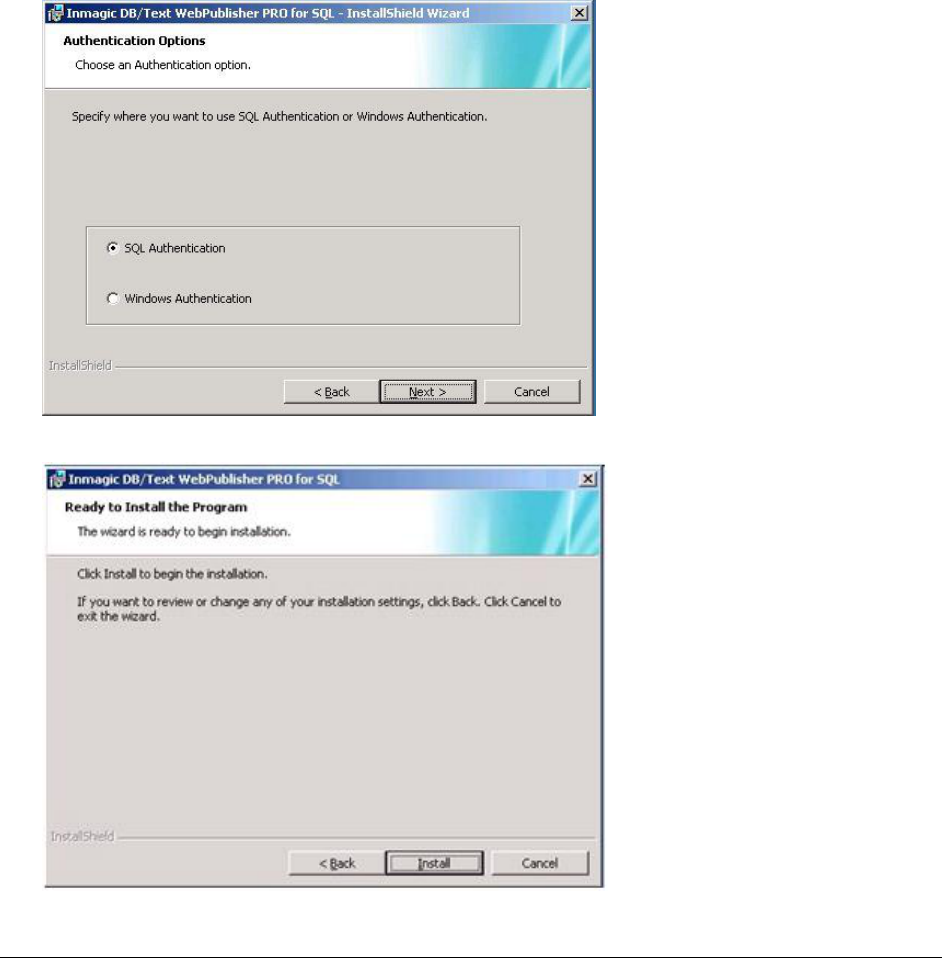
22. In the Authentication Options dialog box, select the same option that you used for DB/TextWorks
for SQL (either SQL Authentication or Windows Authentication), then click Next.
Important! It is essential that you choose the same authentication method that you chose for
DB/TextWorks for SQL. This should be selected by default. If you want to double-check, open
INMCSERV.INI and look for WindowsAuthentication=1 (Windows Authentication) or
WindowsAuthentication=0 (SQL Authentication).
Note: To install WebPublisher PRO for SQL on a Web server that is outside of your firewall, you must
use SQL Authentication.
23. In the Ready to Install the Program dialog box, click Install.
34 Inmagic DB/Text for SQL Installation and Upgrade Instructions
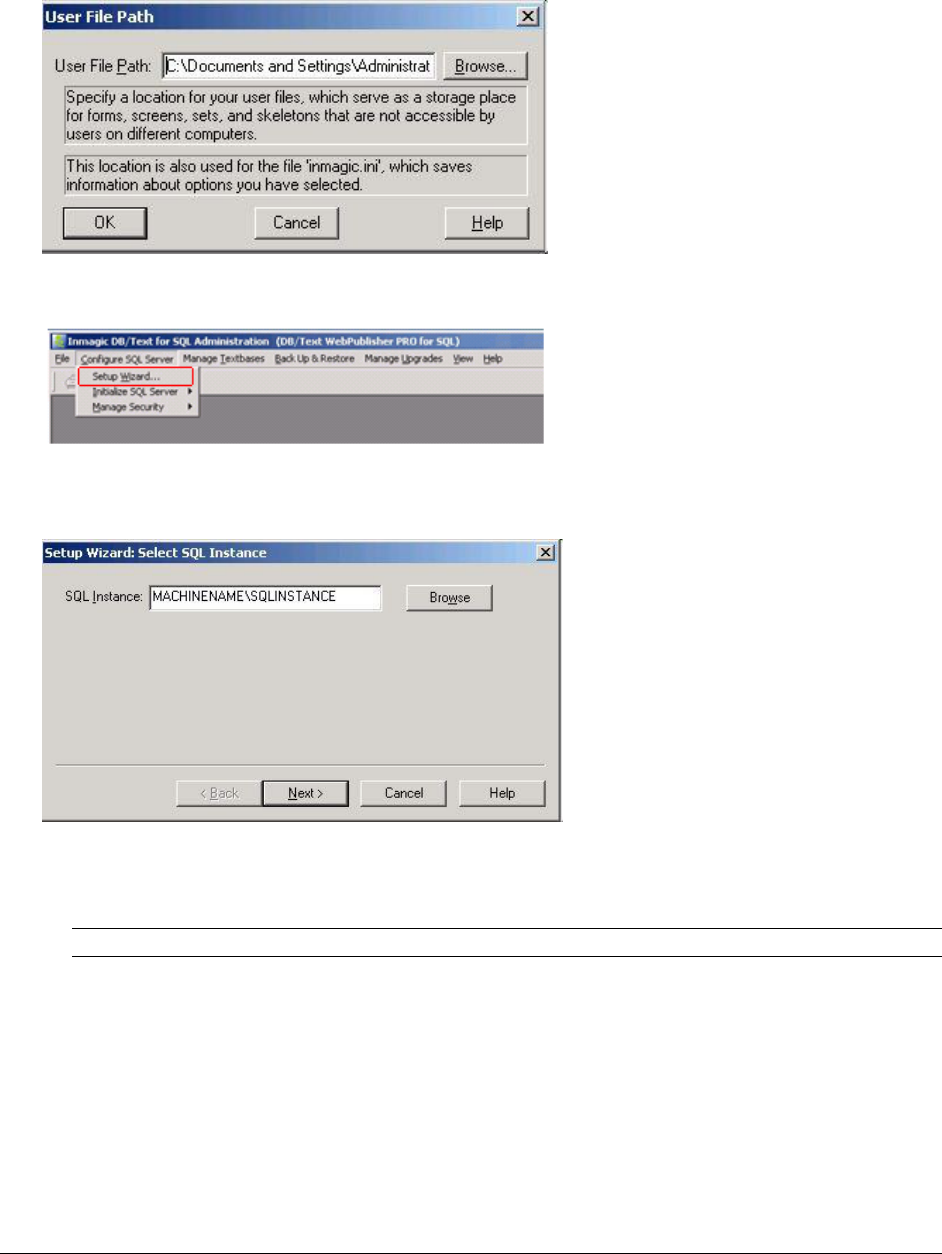
24. Setup launches the Administration program so you can configure SQL Server for use with
WebPublisher PRO for SQL. If this is a new installation, the User File Path dialog box opens, so you
can specify where you want to save private textbase elements and the INMAGIC.INI file. Note that
you need full rights to the folder you specify. Click OK.
25. Open the Configure SQL Server menu and choose Setup Wizard. Important! You must do this for
upgrades as well as new installations.
26. The Select SQL Instance dialog box appears. If a SQL Instance is not displayed, use the Browse
button to select the instance of SQL that you will use. (Note: On a server running Windows 2008 or
2012 R2, enter the name of the SQL Instance manually.)
If you prefer to enter the instance name manually, use one of the following formats:
Server name followed by a backslash and the instance name.
Example: MACHINENAME\SQL_INSTANCE
Tip! You can press the period ( . ) key to enter your server name.
IP address followed by a comma and the port number on the SQL Server.
Example: 192.168.0.199,1783
Record your information here for future reference:
SQL Server Instance selected: _______________________________________
27. Click Next.
Inmagic DB/Text for SQL Installation and Upgrade Instructions 35
28. If DB/TextWorks for SQL cannot connect to the SQL instance, an error message appears. For
troubleshooting assistance, see the Inmagic Knowledgebase
(http://support.inmagic.com/supbase3.htm).
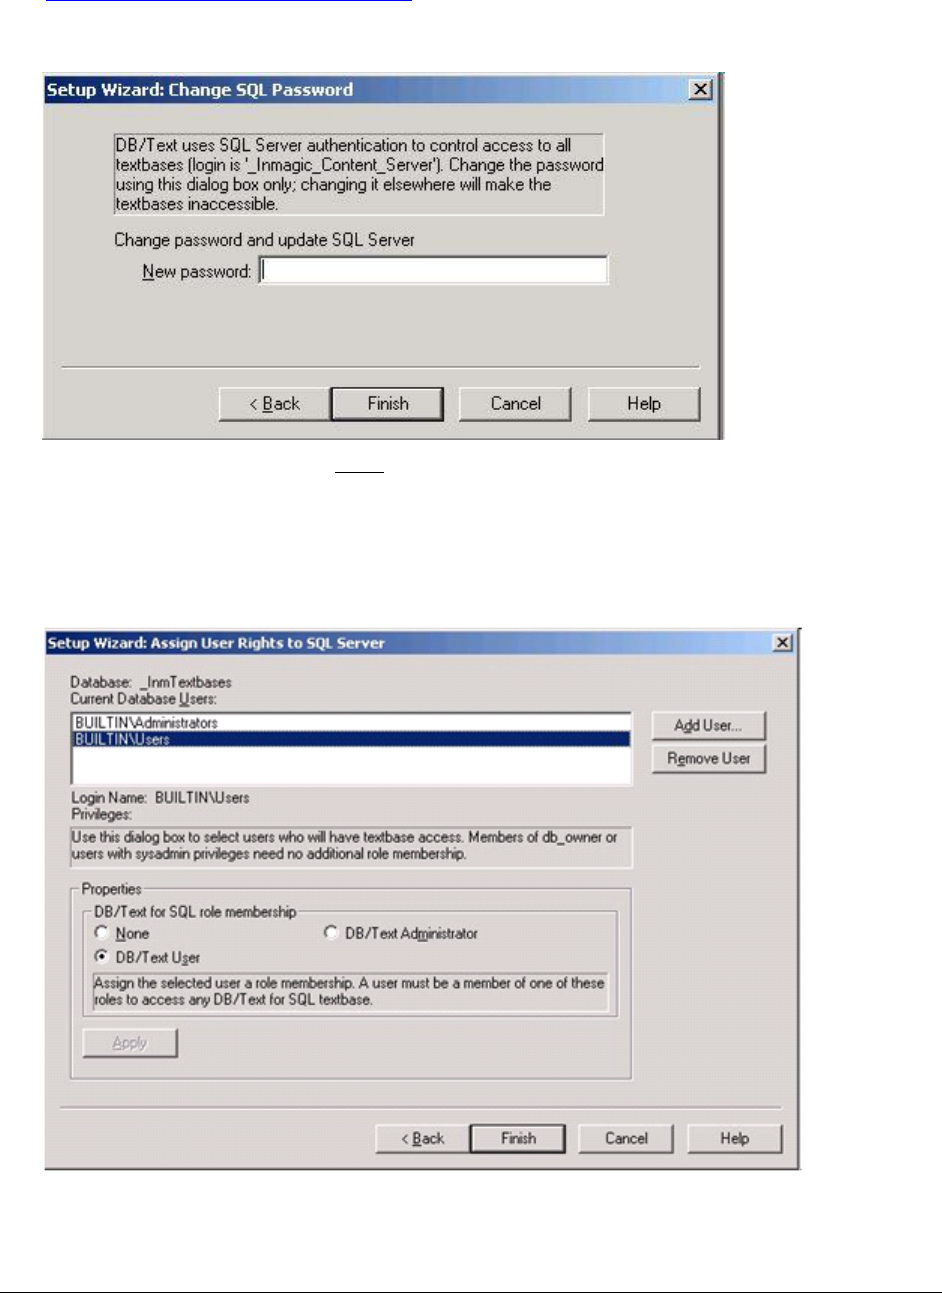
29. If you selected SQL Authentication in the Authentication Options dialog box, the Change SQL
Password dialog box appears.
Important! You must specify the same password that you used when you installed DB/TextWorks for
SQL. Both DB/TextWorks for SQL and WebPublisher PRO for SQL must use the same password to
connect to SQL as the “_Inmagic_Content_Server” account. Click Finish. Confirm the password and
click OK.
30. If you selected Windows Authentication in the Authentication Options dialog box, the Assign User
Rights to SQL Server dialog box appears.

36 Inmagic DB/Text for SQL Installation and Upgrade Instructions
a. Click Add User.
b. In the Add Database User dialog box, select a user from the Login Name list. (By default, the
User Name matches the Login Name and does not need to be adjusted. The User Name is the
name that will appear in the Current Database Users list shown in the previous screen capture.)
When you click OK, the name will be added to the Current Database Users list.
c. Use Add User to select additional Login Names, if you wish.
d. Select a user in the Current Database Users list, assign a DB/Text for SQL role membership,
and click Apply.
None. The user name does not have membership in any DB/Text for SQL role and cannot
access SQL Server or the control database. This means the user name will not be able to
access published textbases.
DB/Text User. The user name has Read and Execute permission. This is required for any
user you plan to let open published textbases.
DB/Text Administrator. The user can perform all textbase management functions (for
example, renaming and deleting a textbase). The user can also modify tables in the SQL
control database. We recommend that this user also be a member of the SQL Server fixed
server role of dbcreator, which enables textbase creation.
Repeat for each database user in the list. When you are done, click Finish to continue.
Note: For users/groups that require broader access than the DB/Text roles allow, grant them
membership in additional SQL Server fixed server roles and SQL Server fixed database roles,
as appropriate. These additional roles may be needed for non-admin users/groups that will be
doing management activities, such as backing up DB/Text for SQL textbases and using Express
Import. Note, however, that any user/group with sysadmin privileges does not need any role
memberships to be able to have full access to the software. For more information, see “Using
SQL Server fixed roles” in the DB/Text for SQL Administrator’s Guide.
31. In the InstallShield Wizard Completed dialog box, check or clear any options, then click Finish. We
recommend that you view the readme and check for the latest service packs.
View Readme
View Schema (http://support.inmagic.com/Web/DBTWandWPPv13/InputSchemaWPP13.html)
Check for Service Packs (http://support.inmagic.com/downloads/extranet-
files/service_packs.html)
Show the Windows Installer log (This option only appears for certain operating systems.)
Inmagic DB/Text for SQL Installation and Upgrade Instructions 37
Read or print the information that appears (readme, schema, installer log).
In some cases, you may be prompted to restart your computer, or you can choose to restart later.
You have now finished installing or upgrading WebPublisher PRO for SQL.
If you selected Windows Authentication or Basic Authentication, you must set Windows permissions
for each user account that will access WebPublisher PRO for SQL (see below).
Important! If you converted from the non-SQL version of WebPublisher PRO for SQL, you must use the
Administration program to convert your existing Web screens and forms for use with the new software.
After you have completed the instructions in this document, please follow the instructions in the document
Converting to the Inmagic DB/Text for SQL Platform, a PDF that was installed with your DB/TextWorks for
SQL software and is also available from the Product Documentation link on the Customer Extranet page.
Setting Windows Permissions
Upgrades: If permissions were set and working before the upgrade, you can skip this step.
If you selected Anonymous Access for the Web Site Security, you can skip this step.
If you selected Windows Authentication or Basic Authentication, you must set Windows permissions
for each user account that will access WebPublisher PRO for SQL.
a. In Windows Explorer, right-click the folder or file (see table below) and choose Properties.
b. Select an account on the Security tab. If necessary, use the Add button to add an account.
c. Specify the permissions indicated in the table below, then click OK to close the dialog box.
d. Repeat for each file or folder listed below.
Folder or File
Permission
WebPublisher PRO for SQL installation folder
(default: C:\Program Files\Inmagic\ICSWeb)
Read
QSets subfolder (example: C:\Program Files\Inmagic\ICSWeb\QSets)
Full Control
Sample subfolder (if you plan the use the Cars textbase on the Web)
Read: Search only. Full Control:
Search, edit, add, delete records.

38 Inmagic DB/Text for SQL Installation and Upgrade Instructions
Textbase folders that will be searched
Read
Textbase folders that will be searched, updated and/or deleted
Full Control
ICSWeb.INI file (in the WebPublisher PRO for SQL installation folder)
Full Control
Installing the Sample Textbase (Cars)
Upgrades will need to upgrade the Cars textbase prior to use in WebPublisher PRO for SQL.
WebPublisher PRO for SQL provides a sample textbase called Cars, which you can install and use for
practice purposes.
Perform the following steps.
1. Using an account that has Administrator privileges, log in to the machine where WebPublisher PRO
for SQL is installed.
If the SQL Server database instance is located on a machine other than the one you are using:
Use an account that has access to SQL Server and full access to all the files or folders that
reside on other machines.
If you are using Windows Authentication, the account must be a domain user on the
domain server, but does not need to be a member of any domain Admin group. This account
should be a part of the local Admin group on the machine. (To do this, right-click the My
Computer icon on your desktop and select Manage. Expand the Services and Applications
tree, then double-click Services. Right-click your instance of SQL Server for the
DB/TextWorks for SQL application, and select Properties. Select the Log On tab and then
specify the account.)
You must share the CARS Textbase Backup File Set subfolder, which is located under the
WebPublisher PRO installation folder. The account running the SQL Server service needs
Full Control access to the subfolder.
Throughout these instructions, use the Universal Naming Convention (UNC) file path instead
of a drive letter, when specifying paths.
2. Choose Start>Programs>Inmagic Applications>DB/Text for SQL>Administration (WP-SQL).
(Be sure to select the WP version of the Administration program.) Note: On 64 bit operating systems,
navigate to the InmCSAdmin.exe tool in the Exec subfolder of the WebPublisher PRO install
directory; right-click on the file and choose “Run as administrator”.
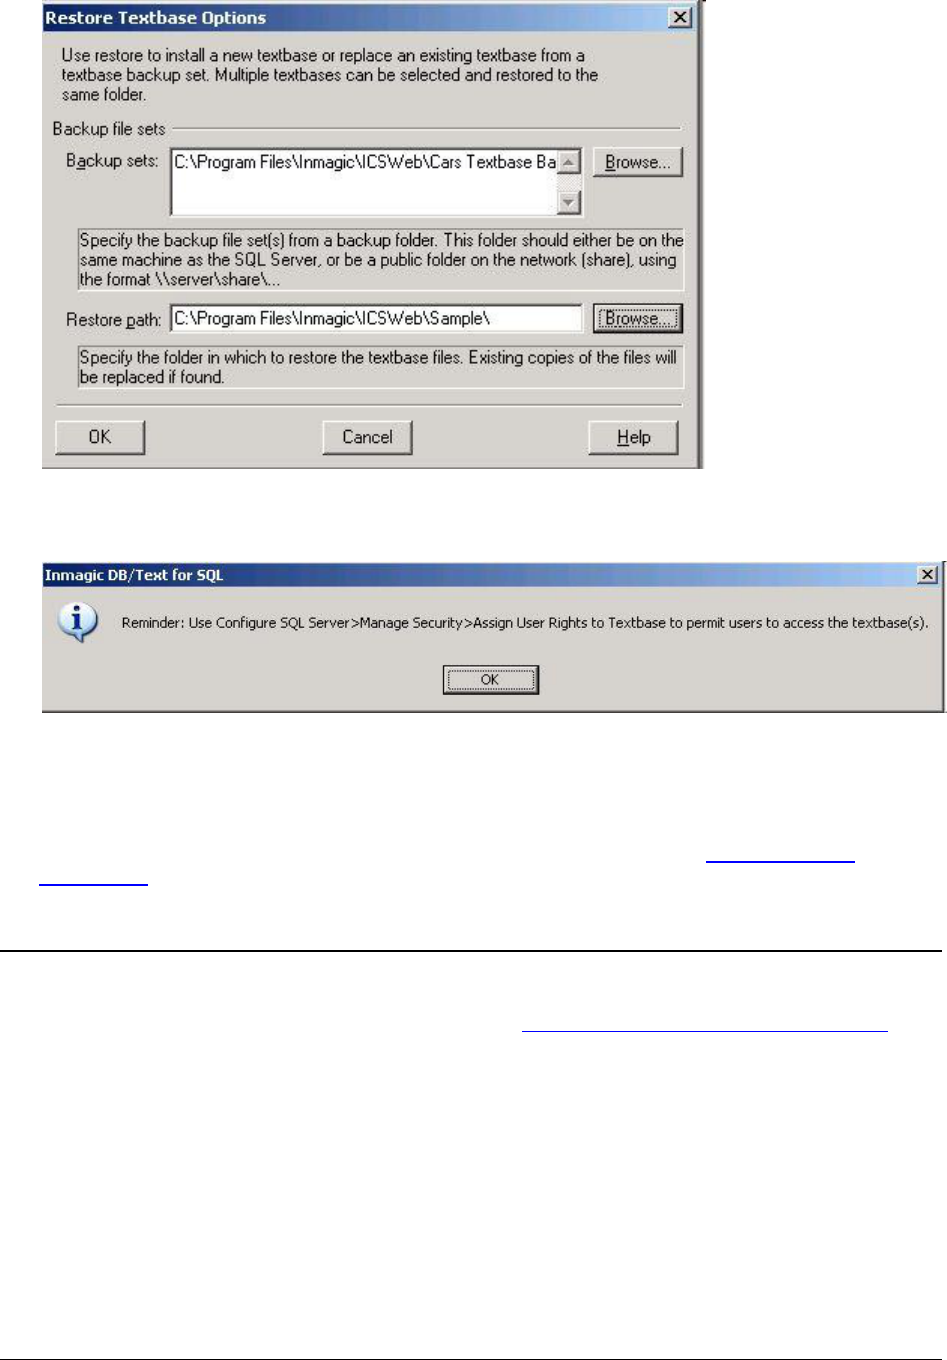
3. Choose Back Up & Restore>Restore Textbases to open the Restore Textbase Options dialog box.
4. In the Backup sets box, select the path to the textbase you want to install: Click the Browse button
and navigate to the Cars Backup File Set subfolder, under the WebPublisher PRO for SQL
installation folder (for example, \\Server\Program Files\Inmagic\ICSWeb\Cars Textbase Backup File
Set). Select Cars.CBA and click Open.
5. In the Restore path box, enter the path to the Sample subfolder of the WebPublisher PRO for SQL
installation folder, or use Browse to navigate to this location.
6. Click OK on the Restore Textbase Options dialog box to install the textbase.
Inmagic DB/Text for SQL Installation and Upgrade Instructions 39
7. If you are using Basic or Integrated Windows Authentication, a message reminds you that you must
use Configure SQL Server>Manage Security>Assign User Rights to Textbase to permit users to
access the textbase(s). Click OK to dismiss the message box.
8. Review the information on the Restore Textbases: Operation Status dialog box and click Close when
you are done.
9. Exit the Administration program.
10. If you are using Basic or Integrated Windows Authentication for IIS, you must provide the proper
Windows permissions to the folder in which the Cars textbase resides. See Setting Windows
Permissions.
Testing WebPublisher PRO for SQL
After you have completed the installation or upgrade of WebPublisher PRO for SQL, perform the following
test to make sure it is accessible. If a step fails, then there may be a problem with the installation. If an
error message appears, see the Inmagic Knowledgebase (http://support.inmagic.com/supbase3.htm) for
troubleshooting assistance. For further assistance, call Inmagic Technical Support.
To test access to WebPublisher PRO for SQL
1. Point your Web browser to http://<WebServerName>/ics-wpd/sample/carsqs.htm, using the name
of the Web server where WebPublisher PRO for SQL resides. Note that the ics-wpd virtual directory
was created during the installation process.
2. On the Search Cars page, type an asterisk (*) in the Model Type: Assembled or Kit? box, then click
the Submit Query button.
3. On the Search Results page, select Prices (edit links) from the drop-down list.
40 Inmagic DB/Text for SQL Installation and Upgrade Instructions
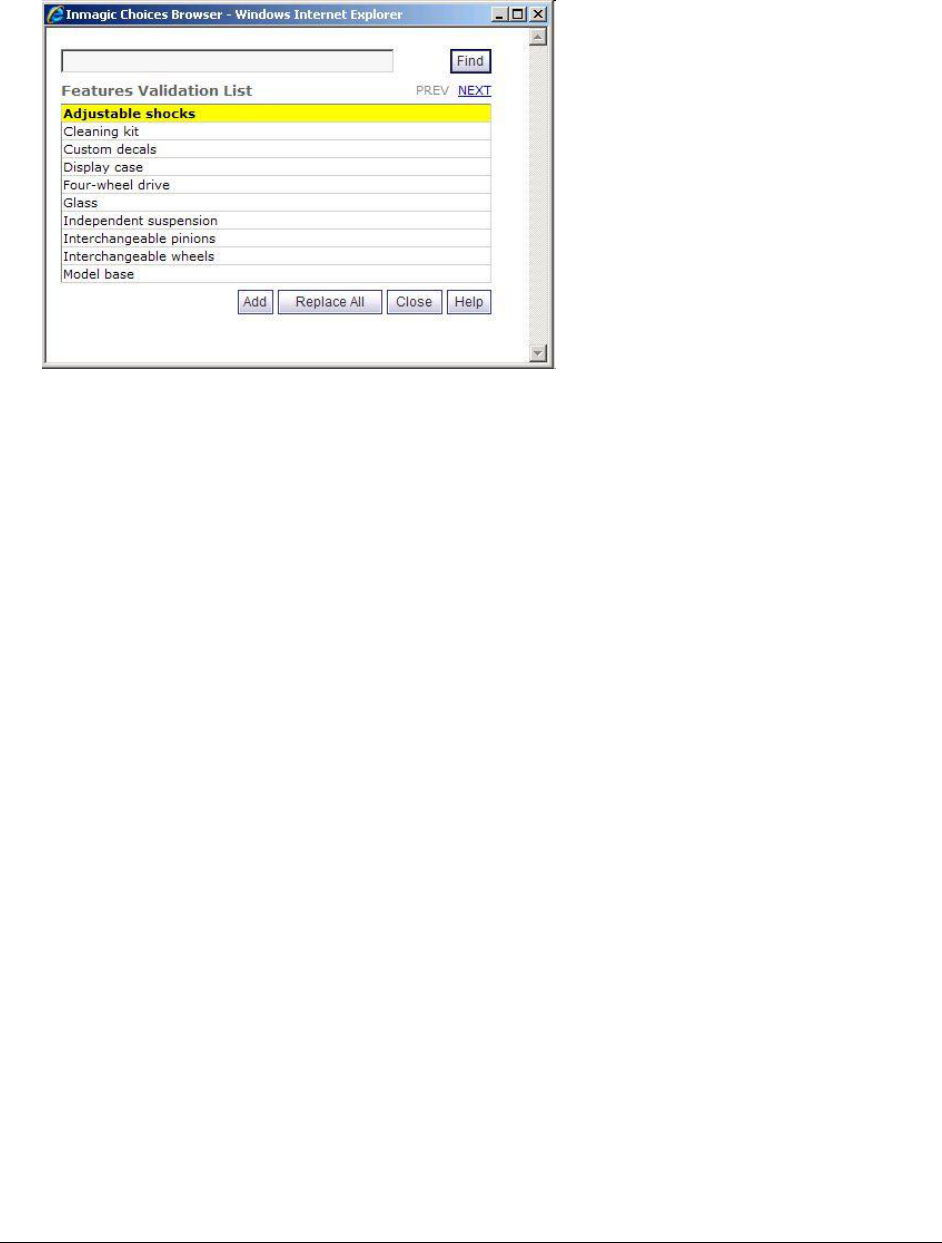
4. Click the first Edit Record link (in the 1935 Ford row).
5. Click the Features link. The Inmagic Choices Browser should look like the following example.
(Depending on the version of InmagicBrowse you are using, the Find button may not appear. If that is
the case, the list will automatically scroll to the nearest matching term.)
6. Close the Inmagic Choices Browser.
7. On the Edit Cars Record page—do not make any changes to the record—click the Submit Record
button. Verify that your record was saved.

Inmagic DB/Text for SQL Installation and Upgrade Instructions 41
Chapter 5: Using the Software
To access installed programs, go to the Windows Start menu and choose Programs>Inmagic
Applications>DB/Text for SQL. Depending on the options selected during Setup, you may see some or
all of the following options:
Administration (TW-SQL). Run the Administration program for DB/TextWorks for SQL.
Administration (WP-SQL). Run the Administration program for WebPublisher PRO for SQL.
Importer. Open the Inmagic Importer Settings dialog so you can configure the Importer service. For
instructions, see the Inmagic DB/Text for SQL Textbase Importer Service User’s Guide available via
the Product Documentation link on the Customer Extranet page.
DB/TextWorks for SQL. Start DB/TextWorks for SQL.
Online Help. Open the online help.
README. Open the README file.
Sample Textbases. Access the Sample1 and Sample2 textbases supplied with DB/TextWorks for
SQL. Use these textbases to practice searching and other operations.
Setup Workstation. Configure clients so they can use DB/TextWorks for SQL. Setup Workstation
must be run on each client that will access DB/TextWorks for SQL, (This option does not install
software; it configures client machines.)
Administration and Maintenance
Securing the Administration Programs (TW-SQL, WP-SQL)
The Administration programs (TW-SQL and WP-SQL) are available to anyone who can access them,
either from the Start menu or the command line. These programs are intended only for administrator use,
and should be restricted from regular users.
Therefore, it is recommended that you secure access to both instances of the executable file
(InmCSAdmin.EXE). It is installed in the same location as the DB/TextWorks EXE file and also in the
same location as the WebPublisher DLL. You can use standard Windows methods to restrict permissions
(right-click the file, choose Properties, Security).
Management and Maintenance
For consistent, optimal performance, it is important that you regularly monitor SQL Server in relationship
to DB/Text for SQL, and that you maintain DB/TextWorks for SQL and its databases on SQL Server. For
information about textbase management and database maintenance, please see the Inmagic DB/Text for
SQL Administrator’s Guide. This PDF file is installed with the DB/TextWorks for SQL software and is also
available via the Product Documentation link on the Customer Extranet page.
Performance Adjustments for Index Browsing
To enhance performance of the Query Choices Browser, we recommend that you set the computation
method for the scroll bars to be faster, by adding the LargeListOption=4 textbase-specific parameter
to all <textbase>.INI files, as shown below.
A value of 4 specifies faster scroll bars for all field types. A value of 3 affects only Term and Word-indexed
on Text and Code fields. (Values of 0, 1, and 2 are ignored.)
To improve performance for the Query Choices Browser and Inmagic Choices Browser, optionally add
LargeHitsOption=4 to all <textbase>.INI files. A value of 4 suppresses hit counts (hides the record

42 Inmagic DB/Text for SQL Installation and Upgrade Instructions
count column in the browsers) for all field types. A value of 3 affects only Term and Word-indexed on Text
and Code fields. Values of 0, 1, and 2 are ignored.
[LargeQueryLists]
LargeListOption=4
LargeHitsOption=4
This is the final page of the document.
