
Infor F9 User Guide
For Cyma
Welcome to F9!
This document outlines how to get started and learn some of the core functionality of
F9 Report Writer, Version 6. For more in-depth information on additional features, you
may also want to refer to product help.
Table of contents
1 F9 Overview ................................................................................................. 1
2 Getting Started ............................................................................................ 2
3 Navigation .................................................................................................... 5
3.1 Ribbon ........................................................................................................... 5
3.2 Task Panes .................................................................................................... 6
4 Reports ....................................................................................................... 10
4.1 Quick Trial Balance ......................................................................................10
4.2 Dynamic Trial Balance .................................................................................14
4.3 Sales Table Report .......................................................................................19
4.4 Pivot Analysis ..............................................................................................22
4.5 Wizard Report ...............................................................................................29
5 Functions ................................................................................................... 40
5.1 Fundamental GL ...........................................................................................40
5.2 Insert GL .......................................................................................................42
5.3 Absolute and Relative Cell Referencing .....................................................48
5.4 Insert GLTRAN .............................................................................................49
5.5 DESC .............................................................................................................56
5.6 SDESC ..........................................................................................................58
5.7 BSPEC ..........................................................................................................60
6 Dropdowns ................................................................................................. 62
6.1 Insert .............................................................................................................62
7 Scheduling ................................................................................................. 71
8 Tools ........................................................................................................... 72
8.1 Publish to Viewer .........................................................................................72
9 Resources .................................................................................................. 73
9.1 Updates .........................................................................................................73
9.2 Help ...............................................................................................................73
9.3 License .........................................................................................................74
10 Appendix ................................................................................................ 75
10.1 Account Ranges ...........................................................................................75
10.2 Period Specifiers ..........................................................................................77
10.3 Migrating from F9 Version 5 ........................................................................79
Infor F9
User Guide
Page 1 of 80
© Copyright 2019. Infor. All rights reserved
1 F9 Overview
Infor F9 (F9) Report Writer is an easy-to-use reporting solution that links financial
data to Microsoft Excel. Everything you know about your spreadsheet can be
applied to the reports you create using F9. If you know Excel, you know F9!
F9 Report Writer offers a powerful feature package including:
• Reports and analysis
• Flexible cell-based formulas
• Consolidations
• Drill down
• Budgeting
• Multi-Currency
• Pivot and Table reports
• Drag and drop parameters
• Slicers and filtering
• And More…
Every financial report starts as a spreadsheet and uses the features of Microsoft
Excel. F9 Version 6 is designed to leverage the latest features of Excel versions
2013-2016.
This User Guide is designed for new users to learn the core features of F9 in a
short period of time as well as act as a quick reference to functionality when it’s
needed. Exercises are based on connecting to a sample GL company database.
Infor F9
User Guide
Page 2 of 80
© Copyright 2019. Infor. All rights reserved
2 Getting Started
To begin, we need to check F9 Report Writer is correctly attached in your Excel
and that the data connection is working.
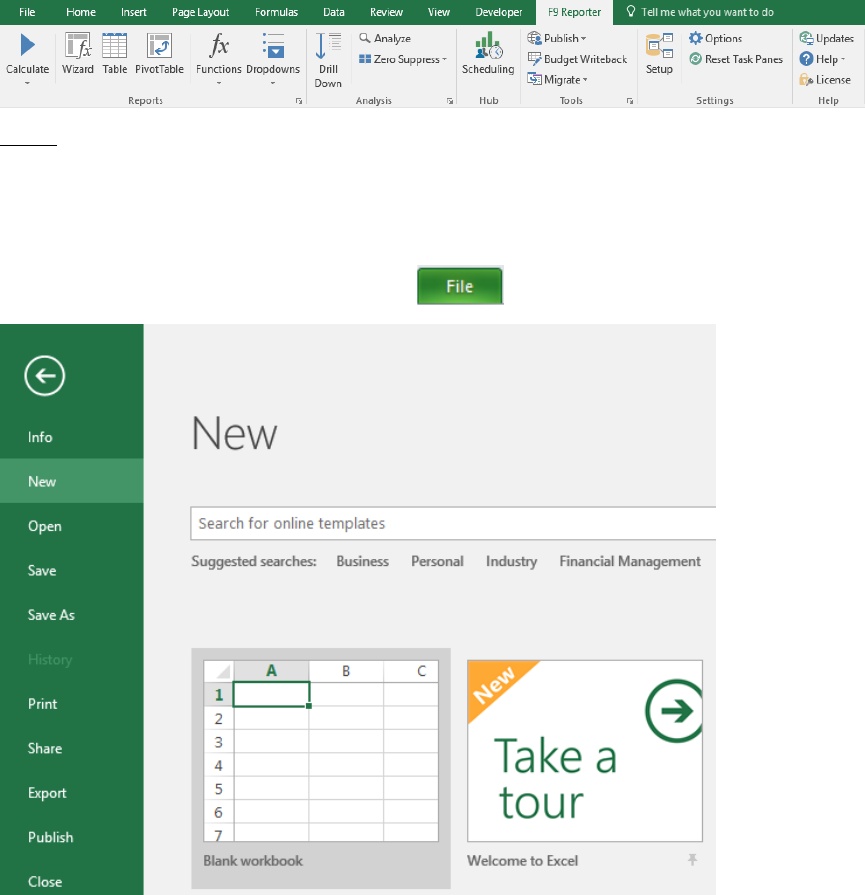
1. Open Excel
2. Check for F9 in the Ribbon:
Note:
➢ If you do not see F9, refer to the installed file: F9 Readme (for your
product).PDF.
➢ Check that your version of Excel is 2013 or 2016
3. To open a blank workbook, choose Tab + New + Blank workbook.
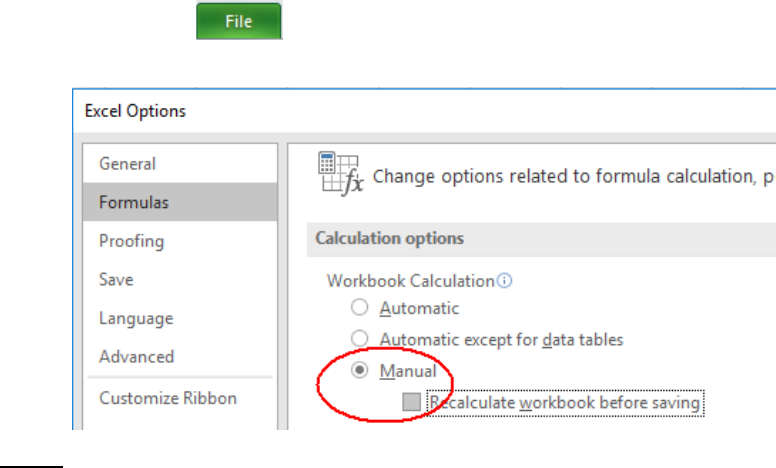
4. Ensure Calculation is set to Manual.
Infor F9
User Guide
Page 3 of 80
© Copyright 2019. Infor. All rights reserved
This allows the most control in Excel as minor changes to your
spreadsheets will not cause a full recalculation.
• Select Tab + Options + Formulas and click Manual as
shown:
Notes:
➢ F9 key - calculates the workbook (or all open workbooks).
➢ Shift+F9 - calculates the active visible worksheet.
➢ F2+Enter - calculates just the active cell.
➢ To save you time, all F9 reports should be saved with Manual
Calculation so that the entire workbook does not recalculate every
time you edit a cell.
5. The last step is for data connection to access the GL database for this
User Guide.
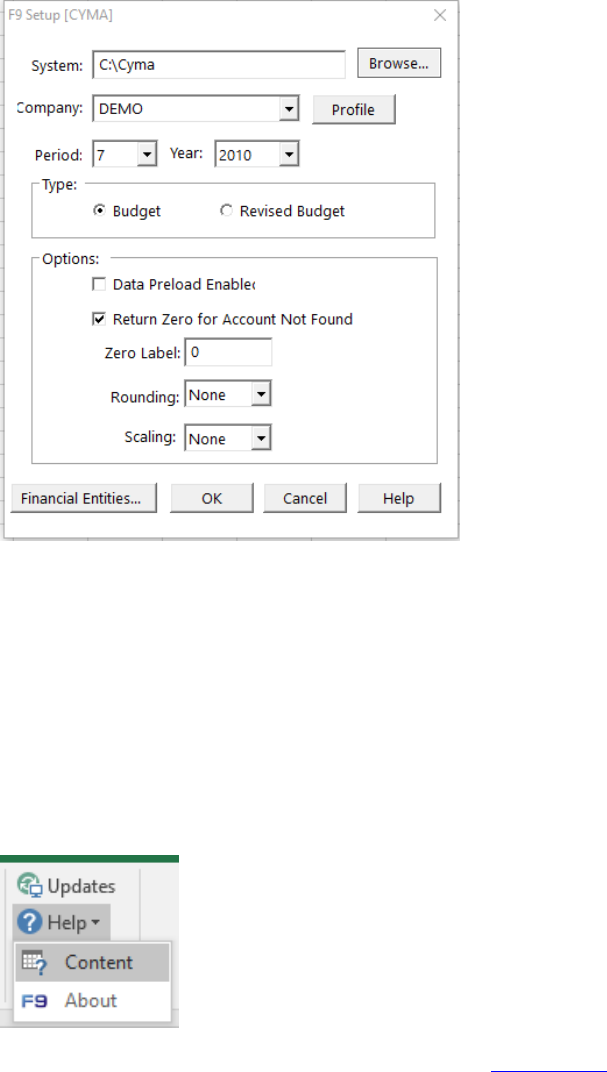
• From the F9 Ribbon, select Setup
• If you are on the 30-day trial of F9, click Ok in the trial screen. The
F9 Setup will window will next display:
Infor F9
User Guide
Page 4 of 80
© Copyright 2019. Infor. All rights reserved
• Before you can access Cyma, you will have to browse to the System
folder which contains file: “SM_CMPY*.DAT”
• If you see one or more companies set in the dropdown, F9 has
successfully connected. If you do not see company DEMO, select
your company’s database.
• This guide can be followed with different data by simply changing
any parameters and steps that are highlighted in blue text.
• For more details on steps to connect to your system, refer to the F9
Help and topic: Windows/Preferences/Setup/Company Setup
• If you are not able to setup access, please contact F9 Technical
Support for help.
Infor F9
User Guide
Page 5 of 80
© Copyright 2019. Infor. All rights reserved
3 Navigation
This section includes tips on how to navigate through F9’s product screens and
menu items. Given that F9 runs within Excel as an Add-in, if you are familiar with
Excel you will find using F9 to be similar in many ways.
3.1 Ribbon
Each time you start Excel, the F9 Ribbon will be included in Excel’s Ribbon.
When you click on the tab name, F9’s Ribbon becomes the current focus in
Excel.
Notice that items are divided into functional groups for:
Reports
Analysis
Hub
Tools
Settings
Help
Items that have a menu display with a down arrow include:
Calculate
Functions
Dropdowns
Zero Suppress
Publish
Migrate
Help
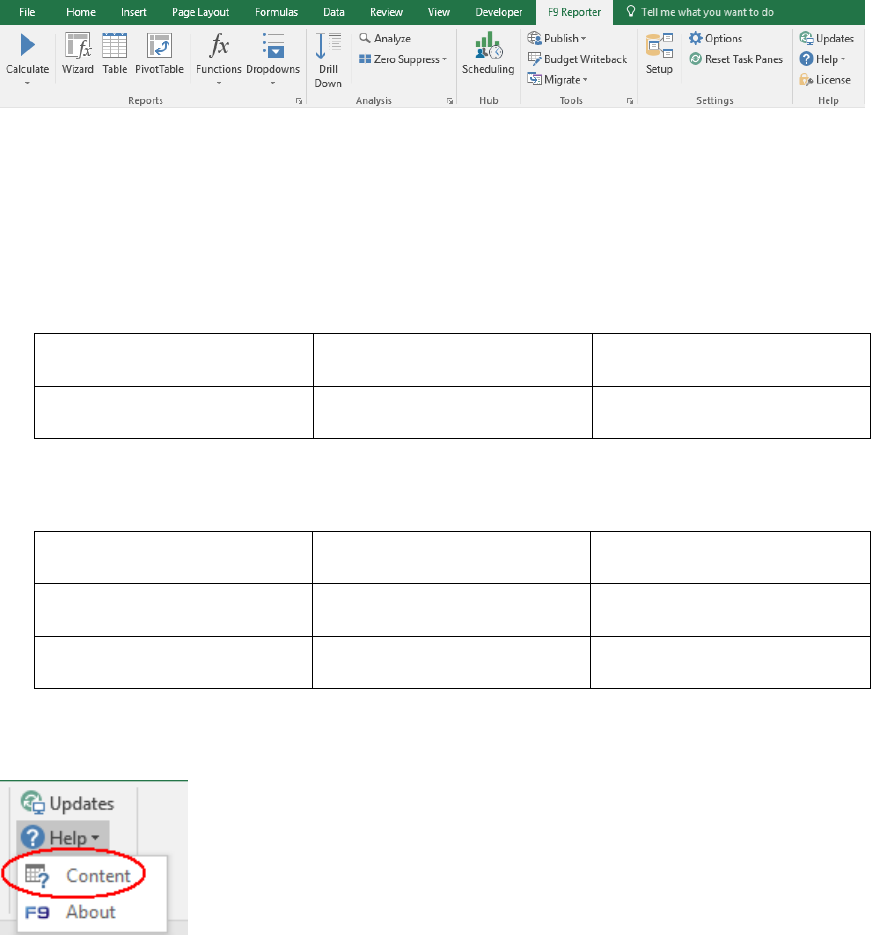
For detailed information on any of the Ribbon items, click on Help + Content:
Infor F9
User Guide
Page 6 of 80
© Copyright 2019. Infor. All rights reserved
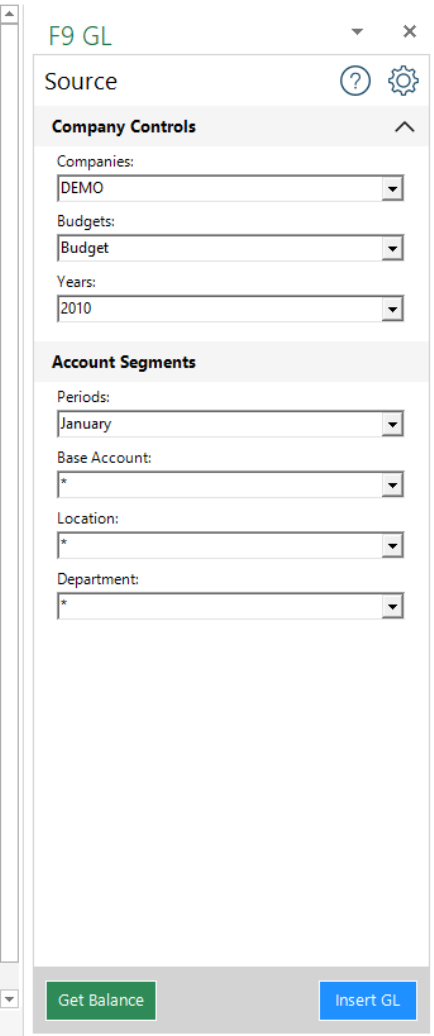
3.2 Task Panes
From the F9 Ribbon, there are seven different Task Panes that display as an
anchored window in order to build out new reports.
Infor F9
User Guide
Page 7 of 80
© Copyright 2019. Infor. All rights reserved
We will demonstrate navigation by going through this Task Pane in more
detail.
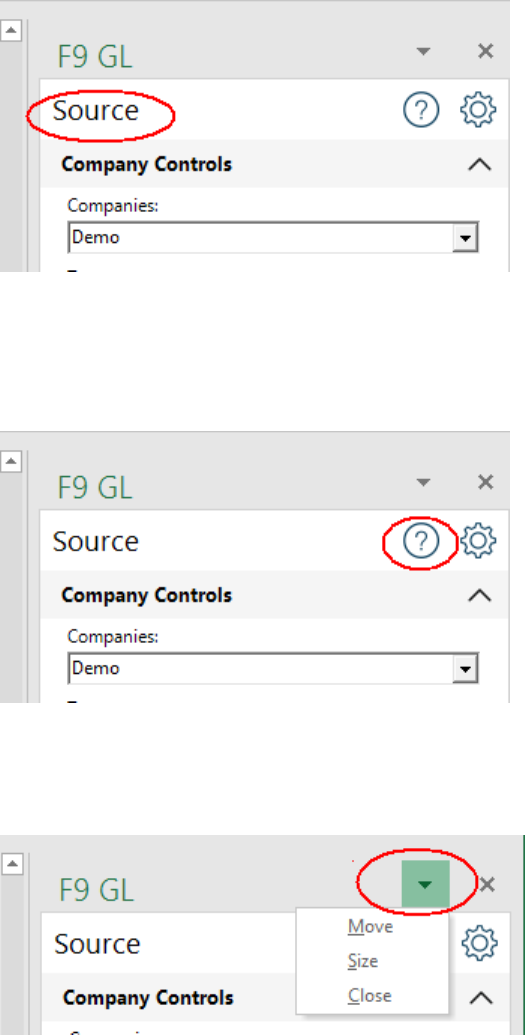
Source:
• Displays what data parameters to use in this function such as your
Company and different accounts.
Help:
• Open’s the F9 help topic for this Task Pane.
Move:
• All Excel Task Panes can be moved, floating, or re-anchored to a different
location.
Infor F9
User Guide
Page 8 of 80
© Copyright 2019. Infor. All rights reserved
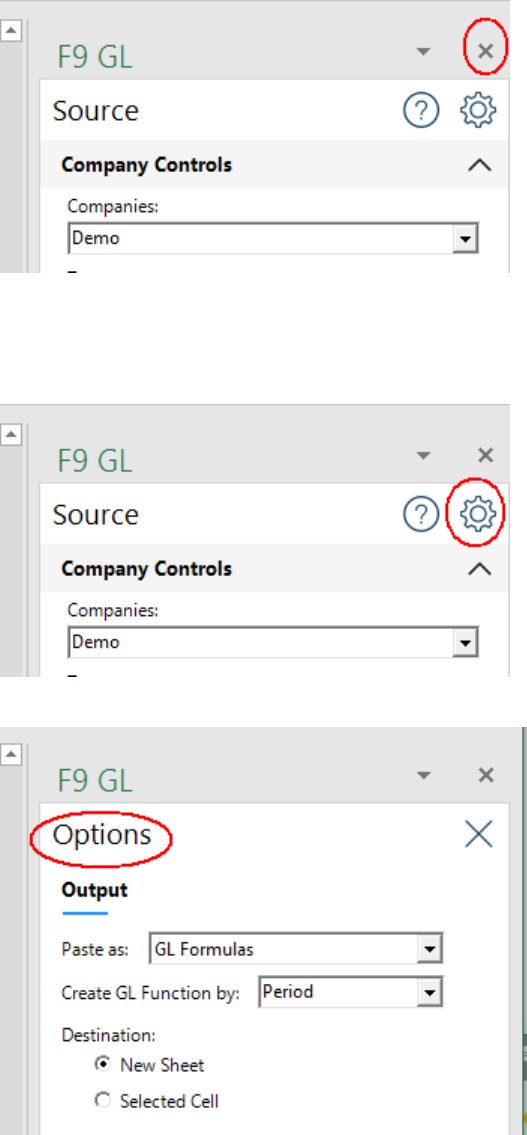
Close:
• Closes the current F9 Task Pane
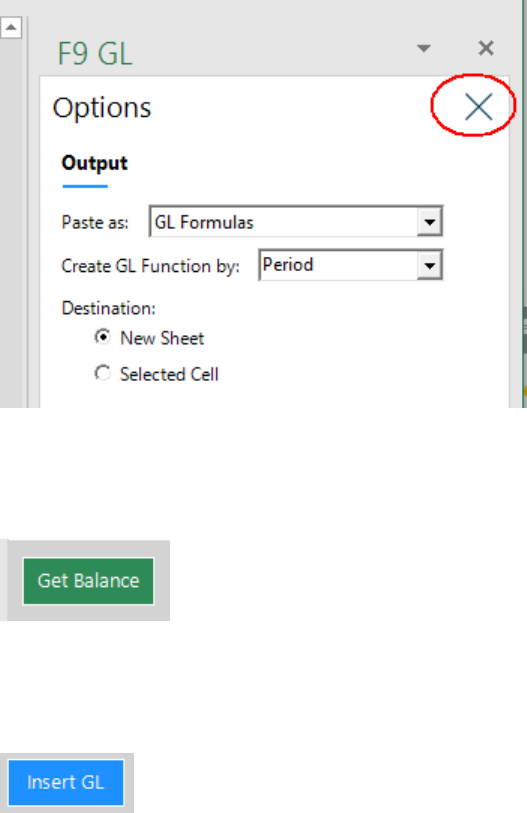
Options:
displays:
• Includes additional options for this F9 Task Pane.
Infor F9
User Guide
Page 9 of 80
© Copyright 2019. Infor. All rights reserved
Close Options:
• Returns back to the Source display in the Task Pane.
Get Balance:
• This button outputs an account balance into the Task Pane.
Insert GL:
• This button results in an F9 function and all its parameters to be output to
your Excel worksheet.
Infor F9
User Guide
Page 10 of 80
© Copyright 2019. Infor. All rights reserved
4 Reports
4.1 Quick Trial Balance
Let’s begin by outputting your Chart of Accounts with period amounts to Excel.
Table Report + Static Values
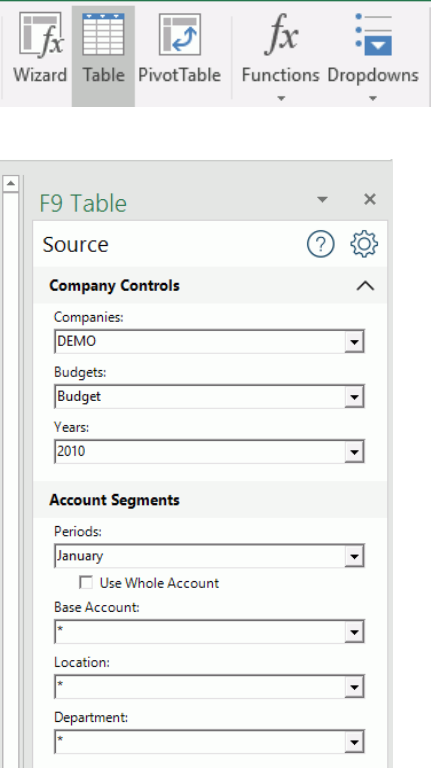
F9 provides a task pane to select criteria and build interactive Excel Tables
which can have static values or dynamic F9 formulas for calculation and refresh.
1. Select an empty worksheet.
2. From the F9 Ribbon, click the Table button
The F9 task pane displays to the right of your active worksheet:
3. Ensure the same defaults are set for your F9 as shown.
Infor F9
User Guide
Page 11 of 80
© Copyright 2019. Infor. All rights reserved
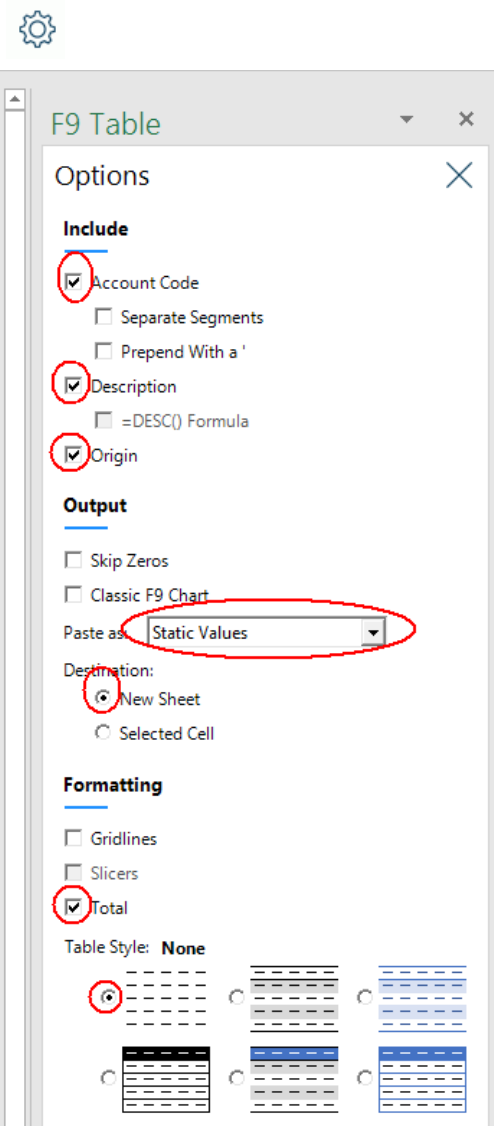
4. Click the Options button
5. Set options to the above.
6. Click Create Table in the lower task pane:

Infor F9
User Guide
Page 12 of 80
© Copyright 2019. Infor. All rights reserved
7. With the trial balance created, we can check the total to see that it sums to
zero.
• Click on any balance in column G
• Click the keyboard End key + down arrow key
• Excel should set the active cell to the last one in the table
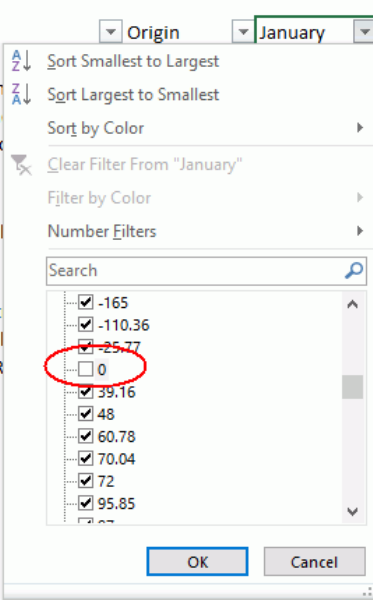
8. The current table contains some accounts with a zero period balance.
These can be filtered out using Excel.
• Click keys: CTRL+Home to return to the top of the worksheet
• Click on the cell with dropdown: January (cell G8)
• Unselect the amount for zero to filter the table
Infor F9
User Guide
Page 13 of 80
© Copyright 2019. Infor. All rights reserved
Notice that Excel has simply hidden the rows in the table.
9. Rename this worksheet tab to: TrialBal_1
10. Save a copy of your report.

Infor F9
User Guide
Page 14 of 80
© Copyright 2019. Infor. All rights reserved
4.2 Dynamic Trial Balance
Table Report + GL Formulas
In the first exercise, the F9 Table output with fixed values with one Excel subtotal
formula. Next, we will generate a more report with dropdown parameters, F9
formulas, and additional filtering.
1. First, we will ensure F9 is setup to create dropdowns. From the F9 Ribbon,
select Options:
2. Click Create Report Dropdowns (if necessary) and OK
3. Select a new worksheet
4. If the F9 Table task pane is closed, click on Table from the F9 Ribbon.
We will use the same Source settings as in the previous exercise:
➢ All accounts; 2010, January
Infor F9
User Guide
Page 15 of 80
© Copyright 2019. Infor. All rights reserved
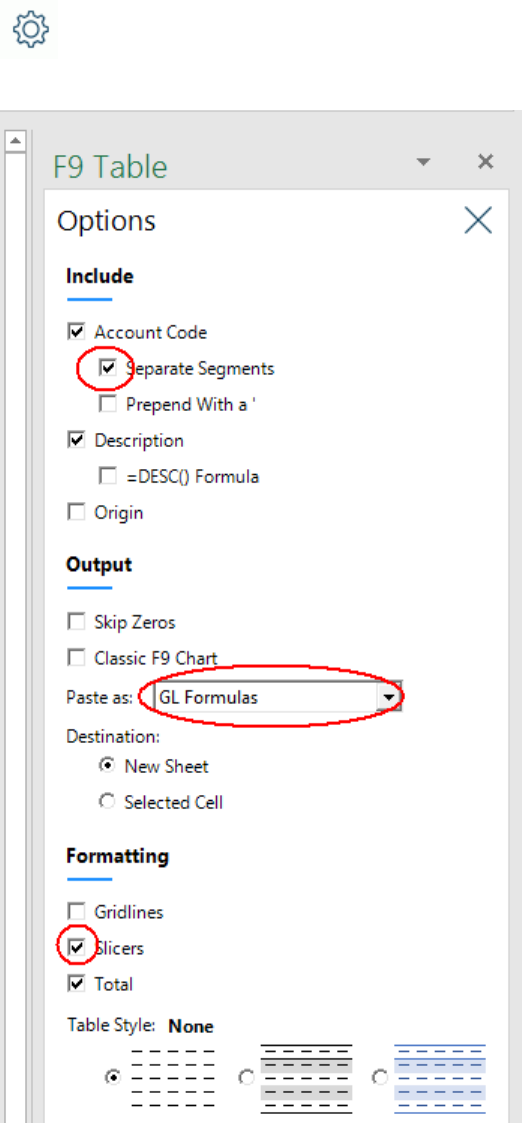
5. Click Options
6. Change settings to the following:
First, by splitting the account segments into separate table columns, we can
add Slicer filtering to the report. The other main difference is that instead of
static balances, there will be F9 formulas for recalculation.
Infor F9
User Guide
Page 16 of 80
© Copyright 2019. Infor. All rights reserved
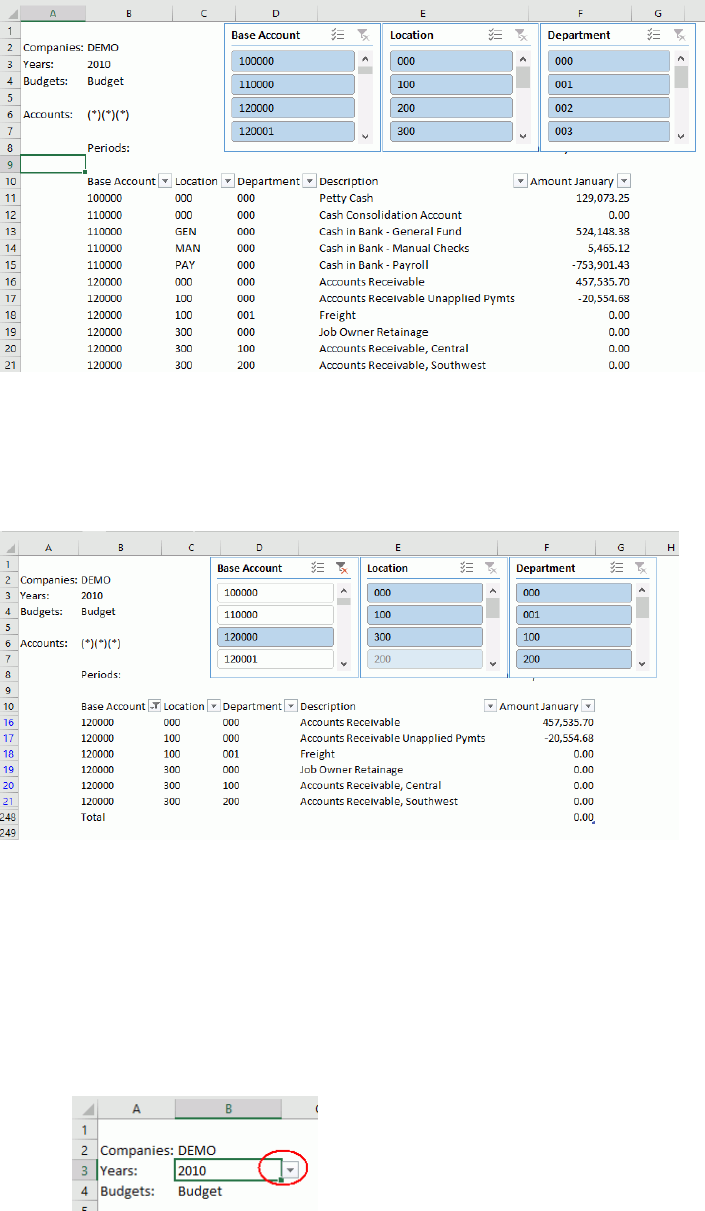
7. Click Create Table to see the new report.
Straight away, you will see the new Table slicers created by the account
segments.
8. Click on the Slicer values: “12000” for Base Account
The table rows automatically filter by the Slicer selection. You can select more
than one row in a given Slicer by holding the Ctrl or Shift key down at the same
time.
9. One difference with this report is that F9 dropdowns have been created
which allows you to change parameters and recalculate.
• Select Cell B3 which has 2010
• Notice when selected, a dropdown control displays:
Infor F9
User Guide
Page 17 of 80
© Copyright 2019. Infor. All rights reserved
• Select year 2009
• From the F9 Ribbon, click Calculate + Worksheet to see new
balances refresh
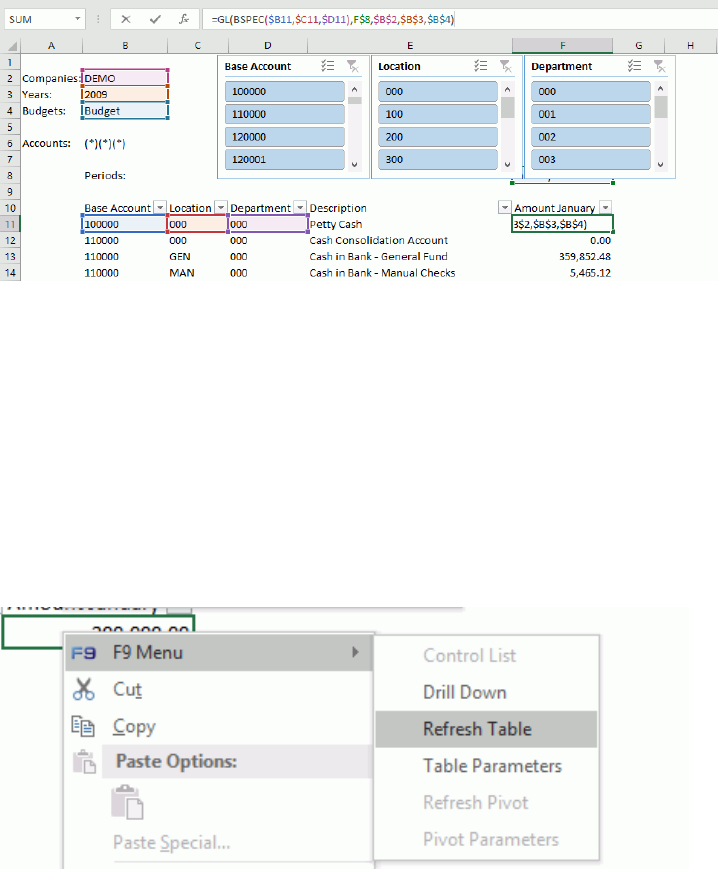
10. The second major difference in this report is that F9 formulas were added
instead of static values and from the calculate just done, new balances were
returned.
• Select cell F11 which contains a balance
• Excel’s formula bar shows the F9 formula for the cell
• If you click on the formula bar, Excel displays the cell references in a
color coded format:
The F9 formulas and dropdowns are what really make this report
dynamic. As new period balances are updated to the F9 reporting
database, the latest results are simply recalculated in Excel.
11. Over time, accounts will be added or deleted from the chart of accounts. In
this scenario, F9 table rows need to be refreshed and this is easy to do.
• Click on any cell within an F9 table report
• Right+Click the mouse
• From the popup menu that displays, select F9 Menu + Refresh
Table
• The rows for the tab will next be refreshed.
Infor F9
User Guide
Page 18 of 80
© Copyright 2019. Infor. All rights reserved
Note:
➢ Table Refresh is only available from F9 table reports created with
F9 Version 6 and higher. If you have a table from F9 Version 5, you
will need to recreate the table.
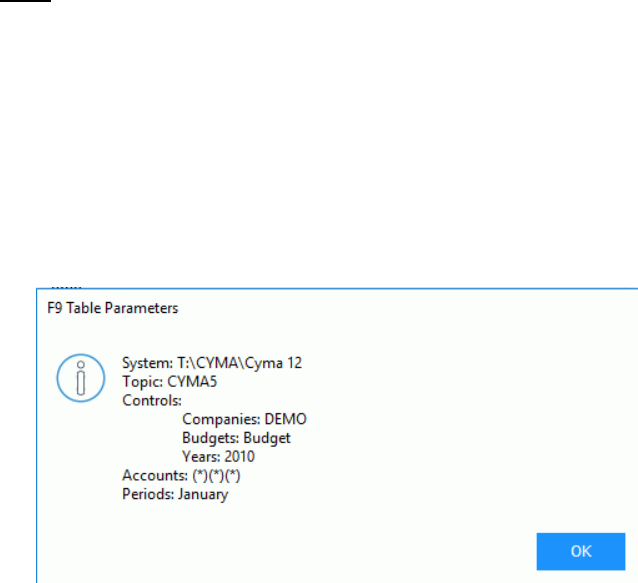
➢ If for any reason an F9 V6 table is not able to refresh, you can lookup
how it was originally created by selecting F9 Menu + Table
Parameters. For example, this might occur if portions of the
worksheet were deleted or changed or you are connected to a
different database. This information may help for trouble-shooting or
if you want to recreate a similar table report.
➢ With F9 table reports, you can change the formatting at any time.
Add or remove slicers, subtotals, and formatting just like you would
with any table by using all the functionality available from Excel.
12. Rename this worksheet tab to: TrialBal_2
13. Save your report.
Infor F9
User Guide
Page 19 of 80
© Copyright 2019. Infor. All rights reserved
4.3 Sales Table Report
F9 Table report can consist of a subset of accounts as well as multiple period
balance columns. The steps that follow will demonstrate this in just a few clicks.
1. Select a new worksheet
2. If the F9 Table task pane is closed, click on Table from the F9 Ribbon.
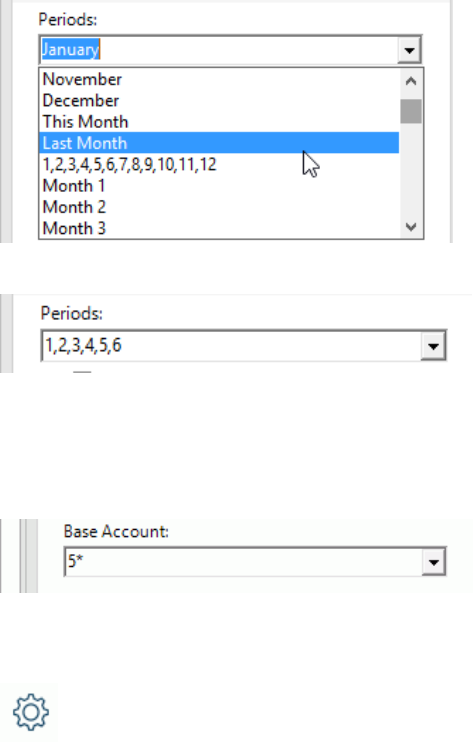
3. You can output multiple balance columns by listing them within Periods.
Click on the dropdown to some of the many values available:
4. Enter the following for Periods:
5. For the table rows, this will represent just the sales accounts. In the demo
database this falls within a range in the Account segment. When you click
on the Base Account dropdown, F9 displays all the available segments.
6. Within Base Account, enter the following:
Also set Year to 2010 for this example.
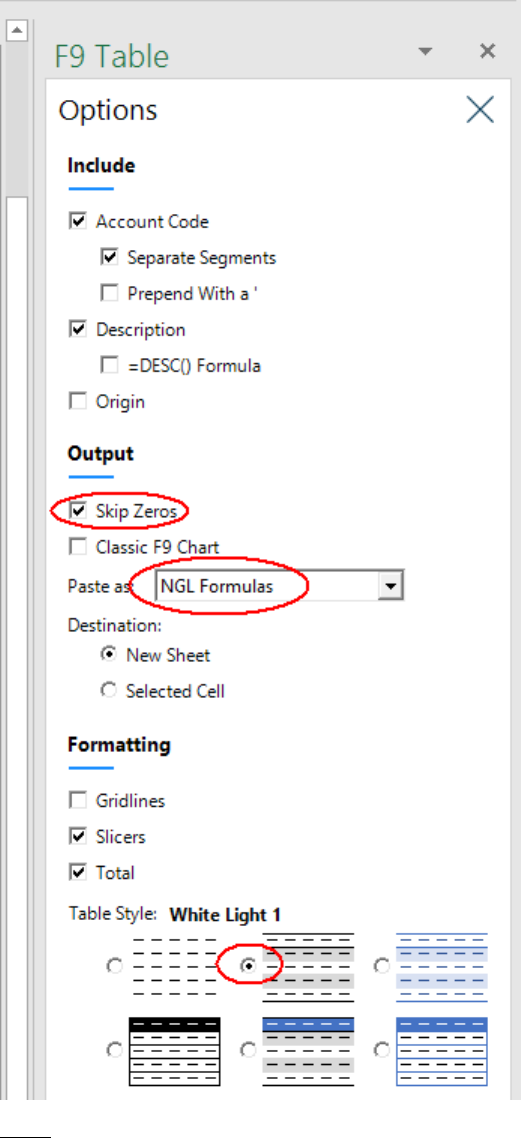
7. Click Options
8. Change settings to the following:
Infor F9
User Guide
Page 20 of 80
© Copyright 2019. Infor. All rights reserved
Note:
➢ NGL Formulas are identical to the F9 GL formula but returns the sign
negated.
Infor F9
User Guide
Page 21 of 80
© Copyright 2019. Infor. All rights reserved
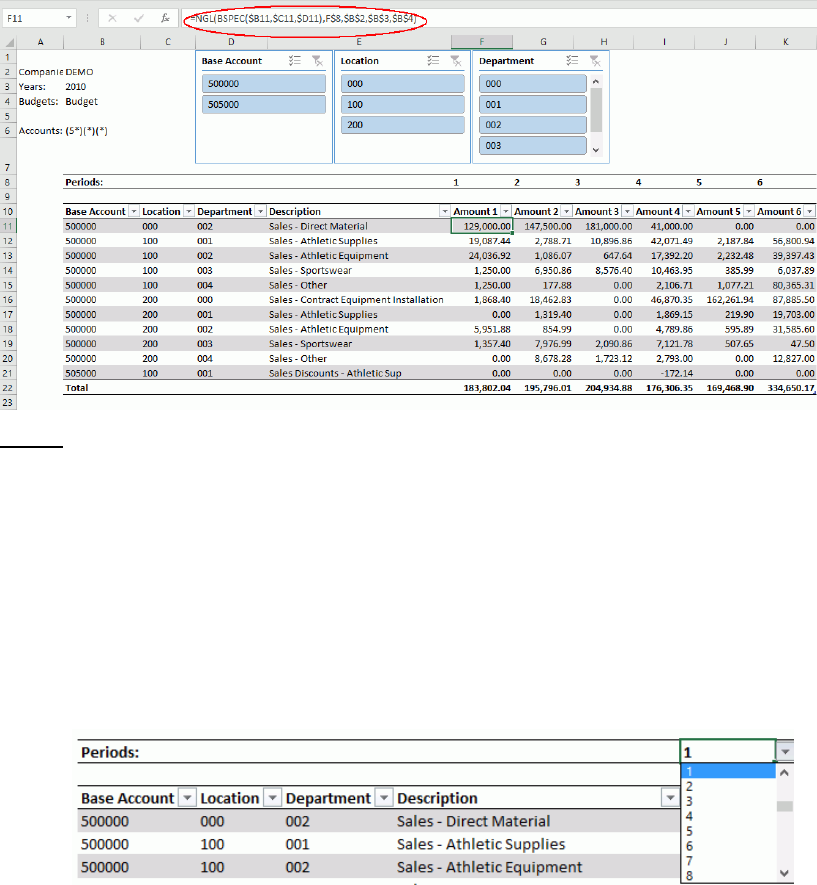
9. Click Create Table to output the new table:
Notes:
➢ This table is dynamic with the use of NGL formulas, slicers, and
report dropdowns for recalculation.
➢ We chose to have F9 skip zero balance rows instead of filtering in
Excel as there are multiple period balances output.
➢ Account segments can be filtered in the Table to display a subset of
rows; a specific department, for example
➢ The period balance columns can also be changed by clicking on their
dropdowns in row 8:
10. Rename the worksheet as SalesTable
11. Save your report.
Infor F9
User Guide
Page 22 of 80
© Copyright 2019. Infor. All rights reserved
4.4 Pivot Analysis
There will be scenarios where you may want to analyze results using the more
dynamic Excel Pivot table. Parameters can be dragged and dropped into rows,
columns, and filters or set as slicers; pivot drilldown outputs the aggregated
balances at any time.
F9’s Pivot creates financial pivot reports easily and provides all your relevant
parameters.
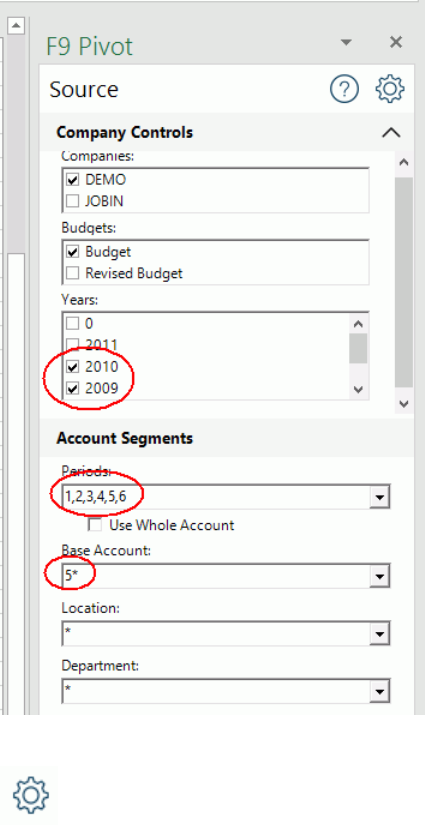
1. Click PivotTable from the F9 Ribbon
The Source settings display next.
2. Select multiple years: 2010 and 2009
3. Edit the Base Account field and enter the value: 5*
4. Change periods to be: 1,2,3,4,5,6
Infor F9
User Guide
Page 23 of 80
© Copyright 2019. Infor. All rights reserved
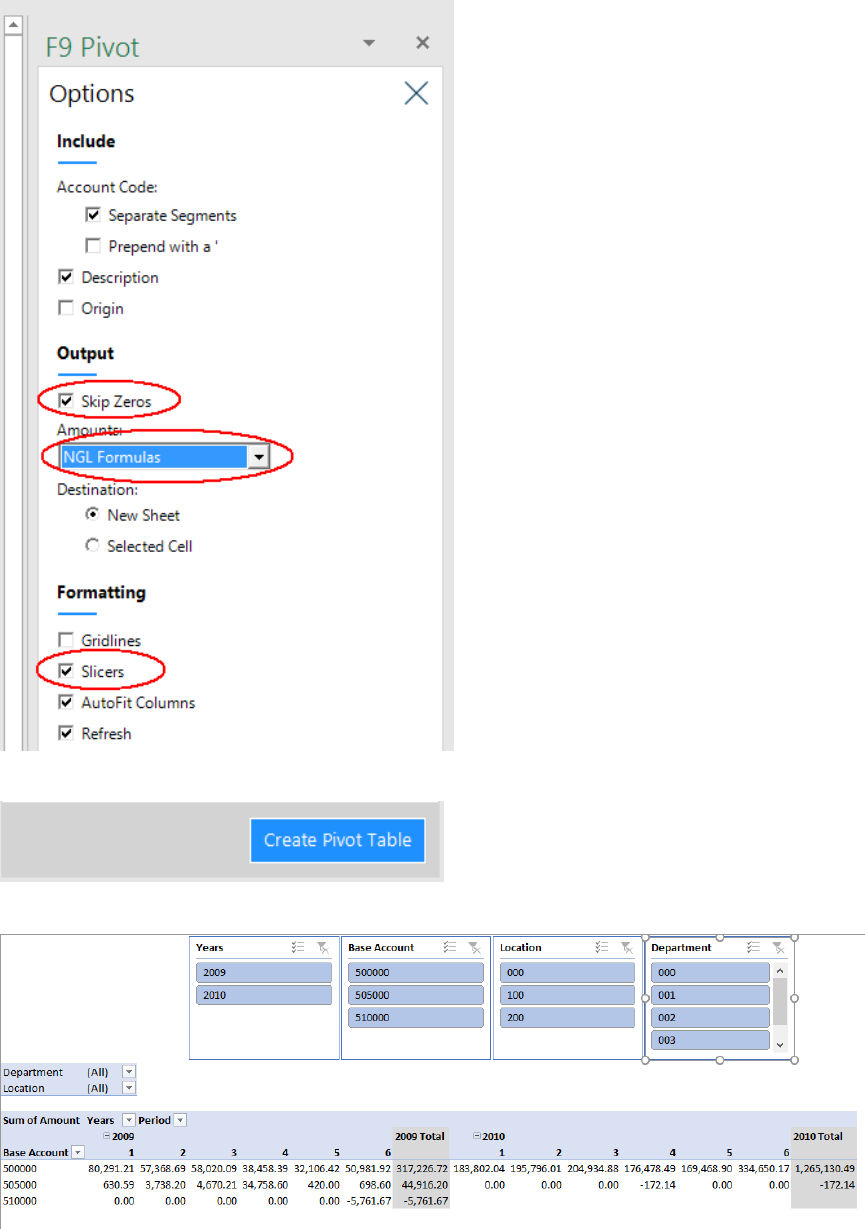
5. Click Options
For this report, we want the sales amounts to be driven by F9 NGL formulas
as opposed to static values.
6. For Output, click Skip Zeros and select NGL formulas for Amounts
7. Under Formatting, click Slicers. Your Options should now be the same as
the following:
Infor F9
User Guide
Page 24 of 80
© Copyright 2019. Infor. All rights reserved
8. Click Create PivotTable in the lower task pane
The new report is created to a new worksheet.
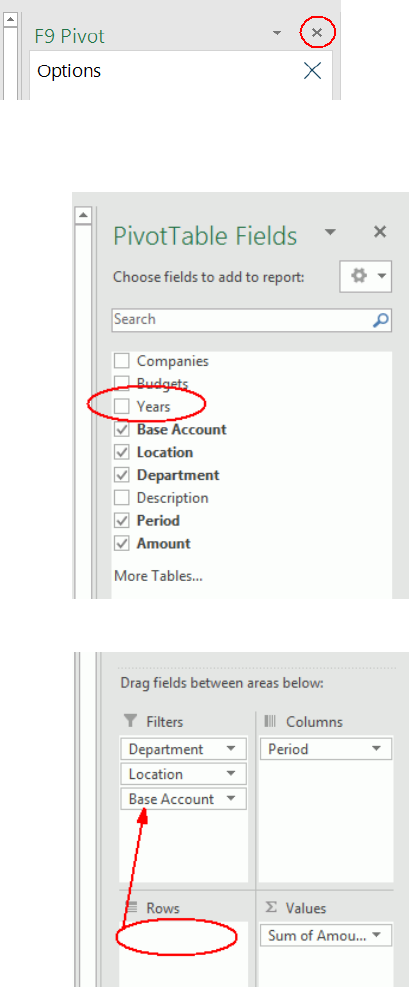
9. Close the F9 Pivot task pane as it is no longer needed
Infor F9
User Guide
Page 25 of 80
© Copyright 2019. Infor. All rights reserved
10. Within Excel’s PivotTable Fields task pane:
• Uncheck Years in the upper field list
• Drag Base Account from Rows up to Filters
Infor F9
User Guide
Page 26 of 80
© Copyright 2019. Infor. All rights reserved
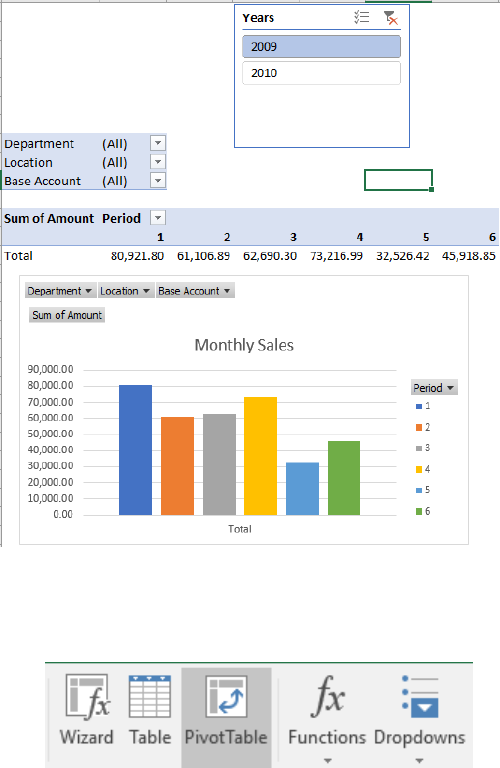
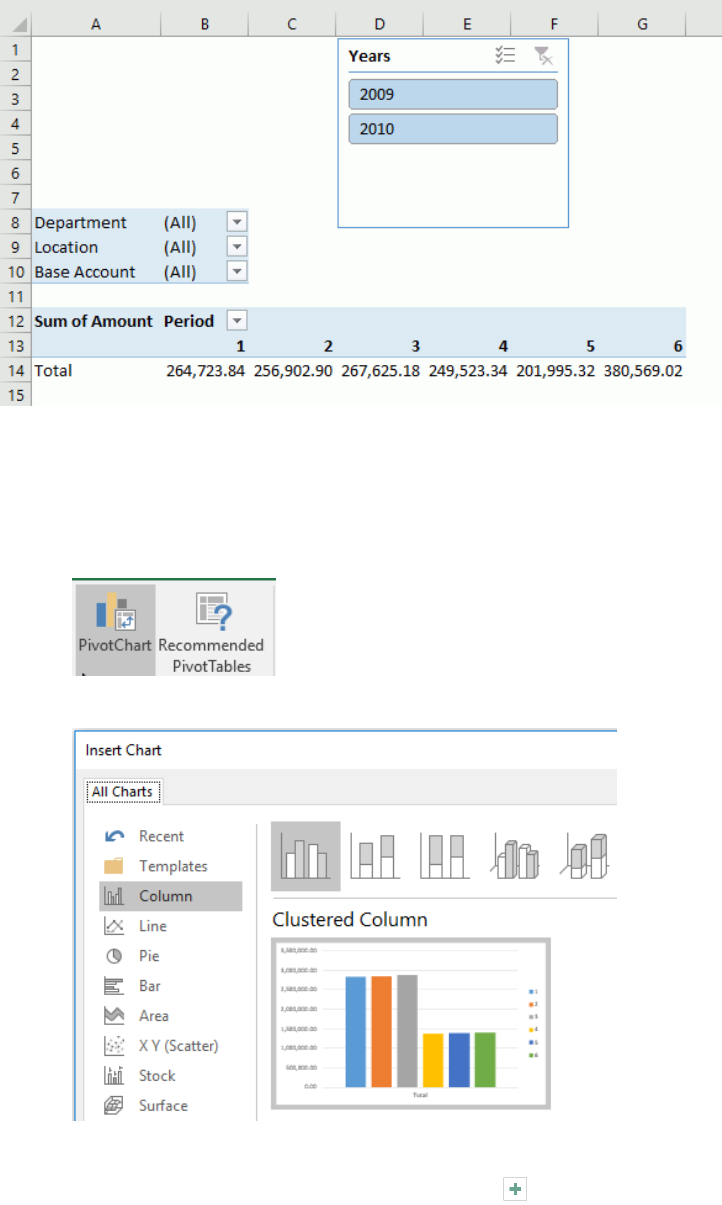
The PivotTable has been created – so far so good!
11. Add a PivotChart
• Select any cell within the PivotTable that has a balance, such as B14
• Excel Ribbon Analyze: select PivotChart
• Set to the following if not already the default:
• Click OK and drag/resize the new chart below the PivotTable
• Optional: Select the PivotChart and to add a chart title
Infor F9
User Guide
Page 27 of 80
© Copyright 2019. Infor. All rights reserved
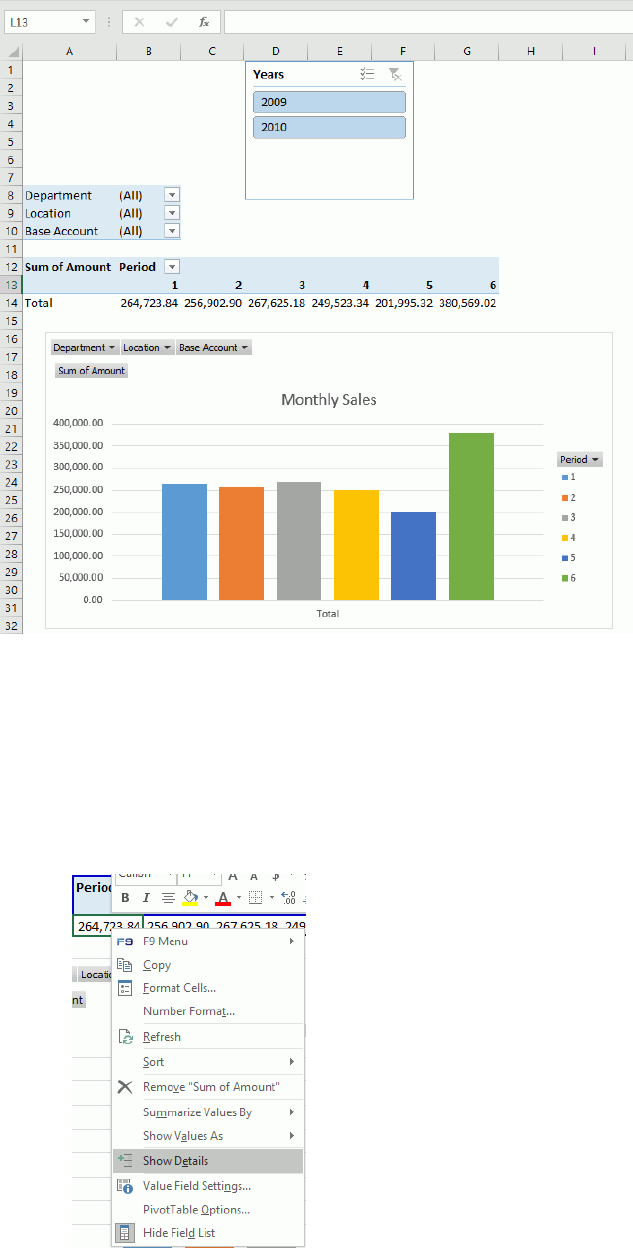
The Pivot report should look similar to the above.
12. Click on the Years Slicer to see how the results change for a single year
versus all.
13. Drilldown steps
• Click anywhere in the PivotTable
• Right-Click + Show Details
Infor F9
User Guide
Page 28 of 80
© Copyright 2019. Infor. All rights reserved
• Alternatively, double-click on the Pivot cell having the balance
Excel places the drill results into a new worksheet tab.
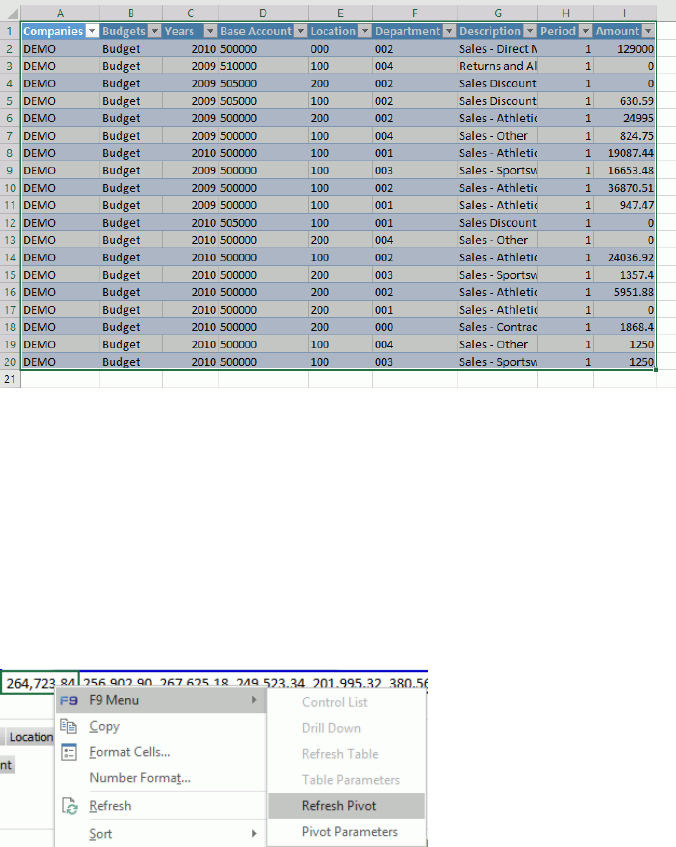
14. Refresh Pivot
Updating the balances in a F9 Pivot report is a bit different given there are
no F9 formulas in the PivotTable.
• Click anywhere in the PivotTable
• Right-Click + F9 Menu
• Select Refresh Pivot
• The Excel status bar will display with details on the refresh until
completed.
Note:
➢ F9 NGL formulas that are linked to the PivotTable totals
➢ The formulas can be found in a separate worksheet created by F9
➢ We recommend hiding this data worksheet to ensure PivotTable
refresh results stay in tact
Infor F9
User Guide
Page 29 of 80
© Copyright 2019. Infor. All rights reserved
4.5 Wizard Report
F9 Wizard is available to step you through defining different report dimensions
by rows and columns and then outputting the results. F9 formulas can reside
anywhere in the workbook and Wizard will help you visualize setting up new
reports by multiple fiscal years or departments for example. Like the other F9
toolsets, a control area is created with dropdown parameters. Select and
change any dropdown to calculate new results easily.
Any new report created by Wizard can be easily expanded and typically this is
by adding new rows, subtotals, and formatting. All the F9 formulas are output
with the correct absolute and relative cell referencing also.
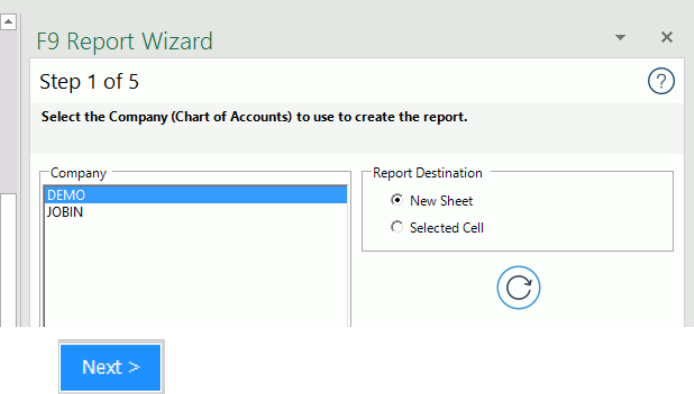
1. Step 1 - Company
The very first thing to decide is what company (database) to access for
building a new report. This also drives the display of parameter values such
as years and account segments in steps that follow.
• From the F9 Ribbon, select Wizard
• You may want to resize the Task Pane display by dragging its border
to the left
• Select a company to start
• For Destination: New Sheet
• Click
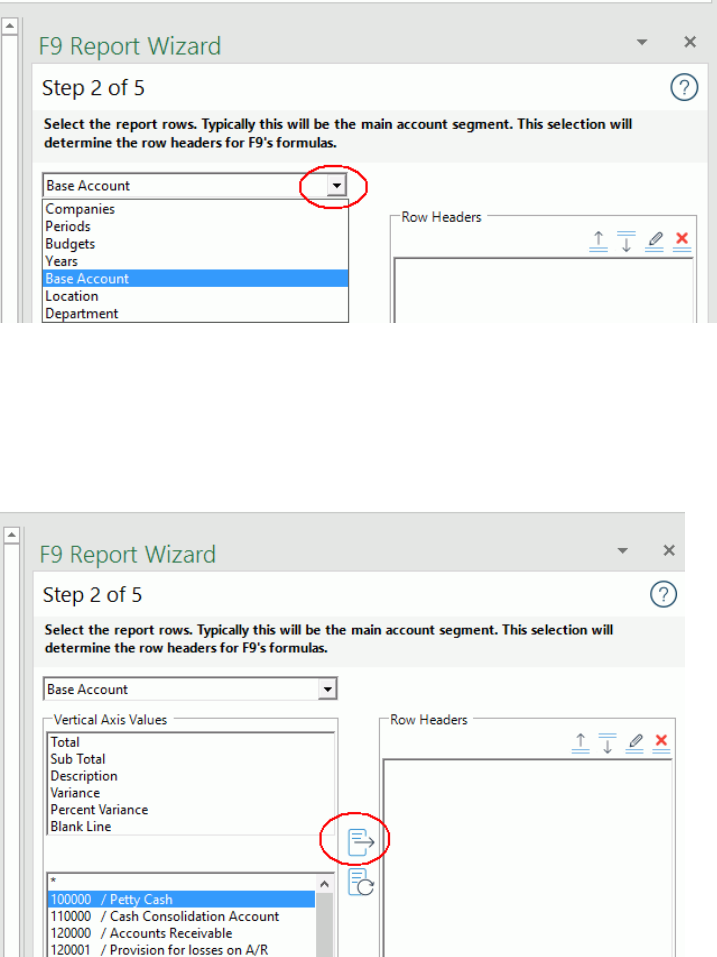
2. Step 2 – Rows
GL reports often have rows defined by accounts and descriptions. In F9’s
Wizard, this will be your main account segment typically. This does not
Infor F9
User Guide
Page 30 of 80
© Copyright 2019. Infor. All rights reserved
mean you cannot have other types of rows; this can be by a different
parameter such as by Location, Year, or Budget. In Step 2, you pick which
parameter and values represent rows.
• In the upper left dropdown, click on the dropdown.
Notice the different items that can represent rows. Try clicking on
different ones to see the values displayed.
• Select Base Account which is the main account segment for this
database.
• Click: 10000 and Add to move across to the Row Headers.
• Next, select account 110000 and Add
• Add a Subtotal and Blank line
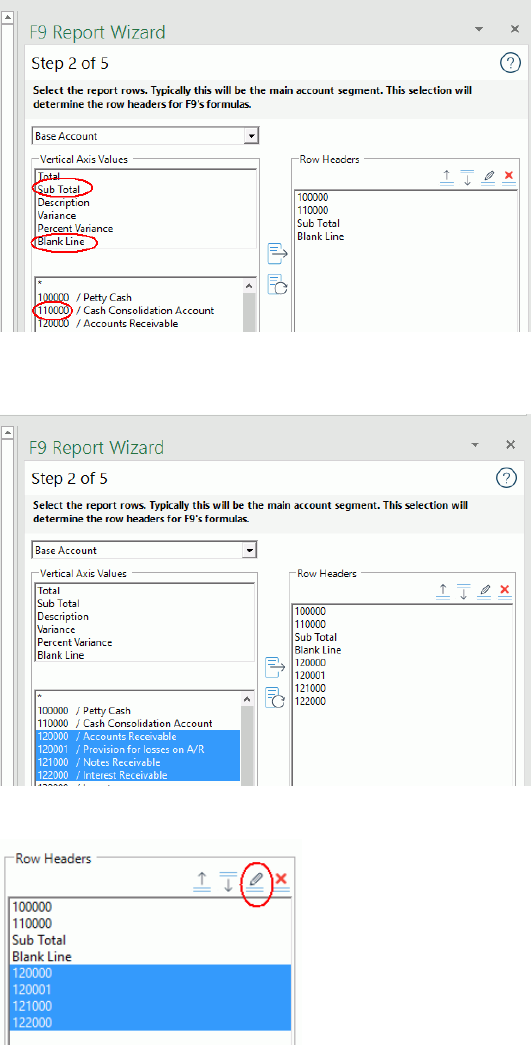
Infor F9
User Guide
Page 31 of 80
© Copyright 2019. Infor. All rights reserved
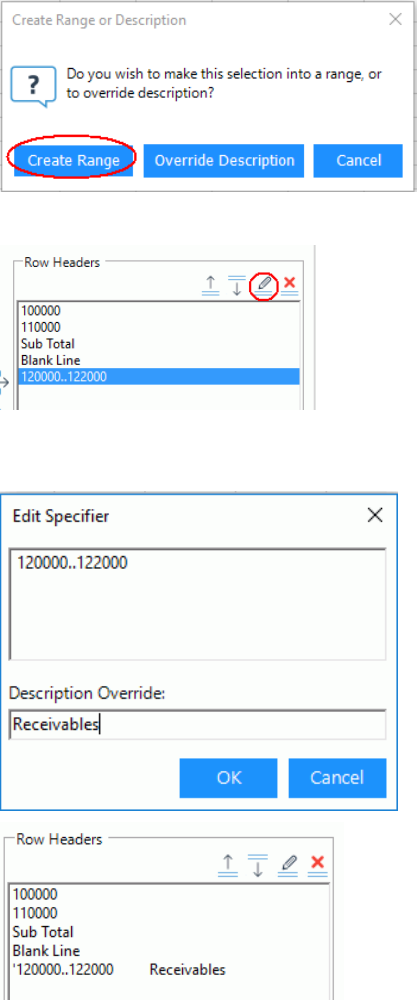
• The next step will demonstrate setting up a range. Select accounts
120000 to 122000 and Add
• In Row Headers, select 120000 to 122000 and then Edit
• Click Create Range
Infor F9
User Guide
Page 32 of 80
© Copyright 2019. Infor. All rights reserved
• Select the new range and then Edit
• Let’s add a description for this group of accounts. Click Override
Description and type: Receivables
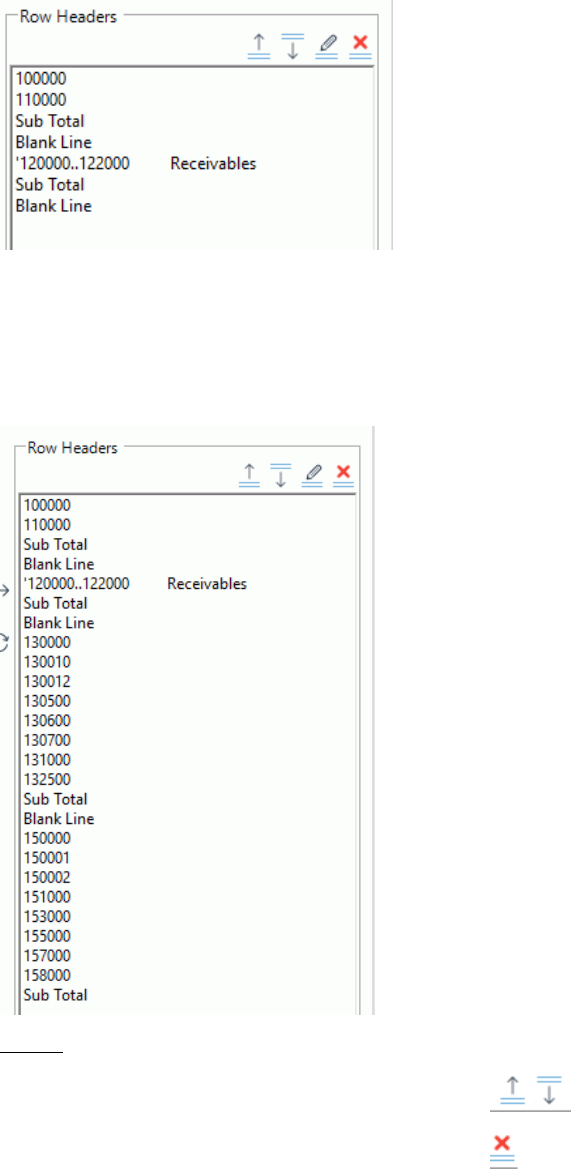
• Select Sub Total + Add + Blank Line
Infor F9
User Guide
Page 33 of 80
© Copyright 2019. Infor. All rights reserved
• From the account list, highlight 130000 to 132500 + Add
• Select Sub Total + Add + Blank Line
• Highlight accounts 150000 to 158000 + Add
• Select Sub Total
Notes:
➢ You can move row headers using buttons:
➢ To delete a header row, select it and then:
Infor F9
User Guide
Page 34 of 80
© Copyright 2019. Infor. All rights reserved
• Click:
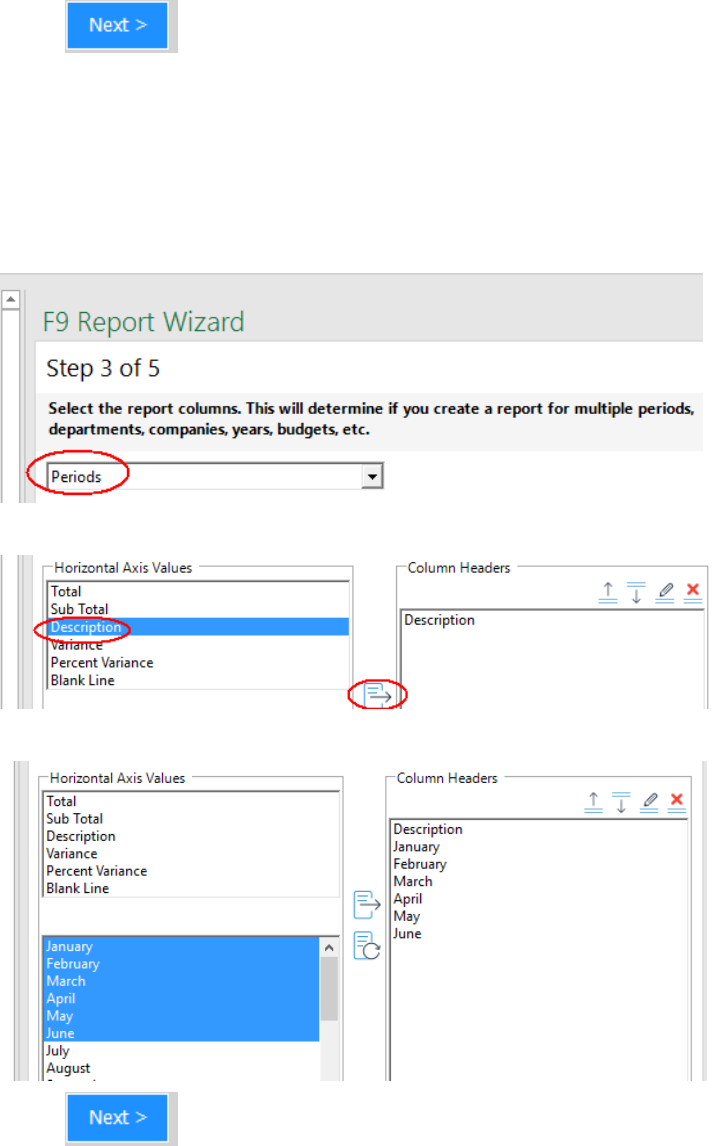
3. Step 3 - Columns
We could continue to add more rows and sub totals within Step 2 but for the
purposes of this guide, we will go to the next step. For this report, the
columns will be defined by Periods. Note that just like in Step 2, you can
build columns by a different parameter such as Department or Year.
• In the upper left dropdown, click on Periods
• To include descriptions for the accounts, select: Description + Add
• Select Periods: January to June + Add
• Click:
Infor F9
User Guide
Page 35 of 80
© Copyright 2019. Infor. All rights reserved
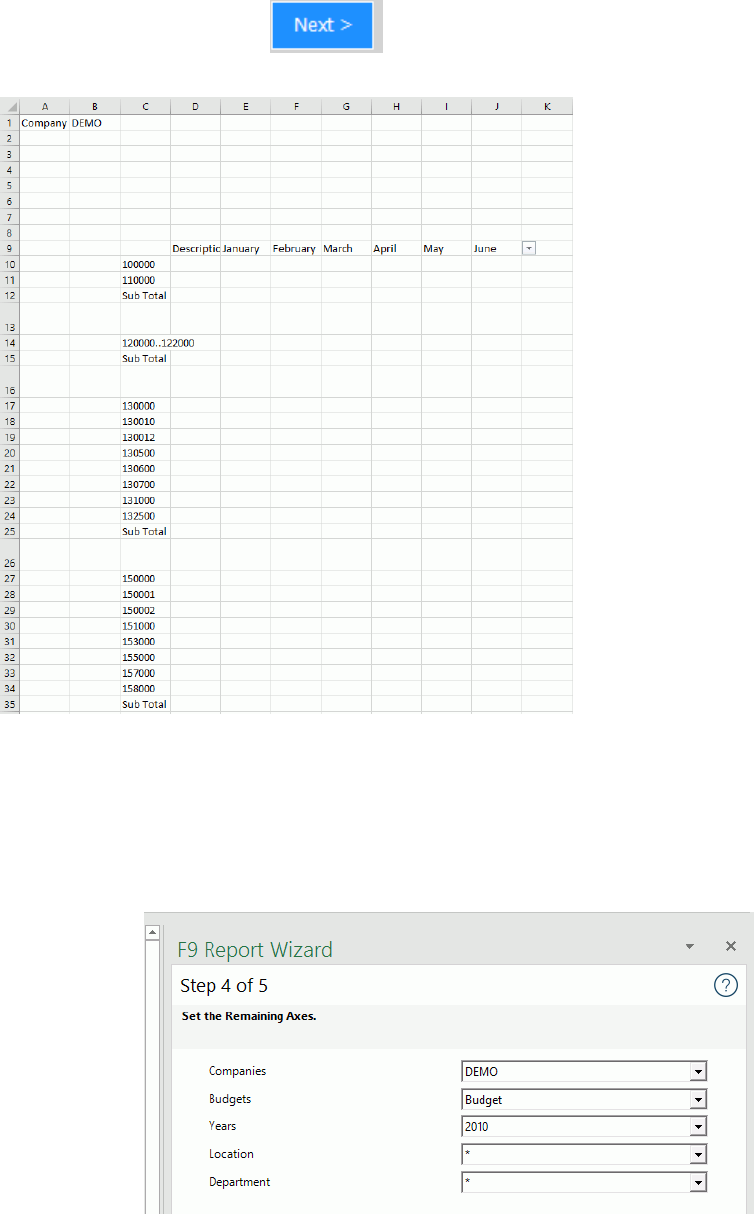
You will notice each time is clicked, the Wizard outputs the criteria into
Excel:
4. Step 4 – Control Area
The control area represents all reaming parameters for F9’s formulas which
are Dropdown controls to be used for later recalculation.
• No changes are required for defaults here
Infor F9
User Guide
Page 36 of 80
© Copyright 2019. Infor. All rights reserved
• Click:
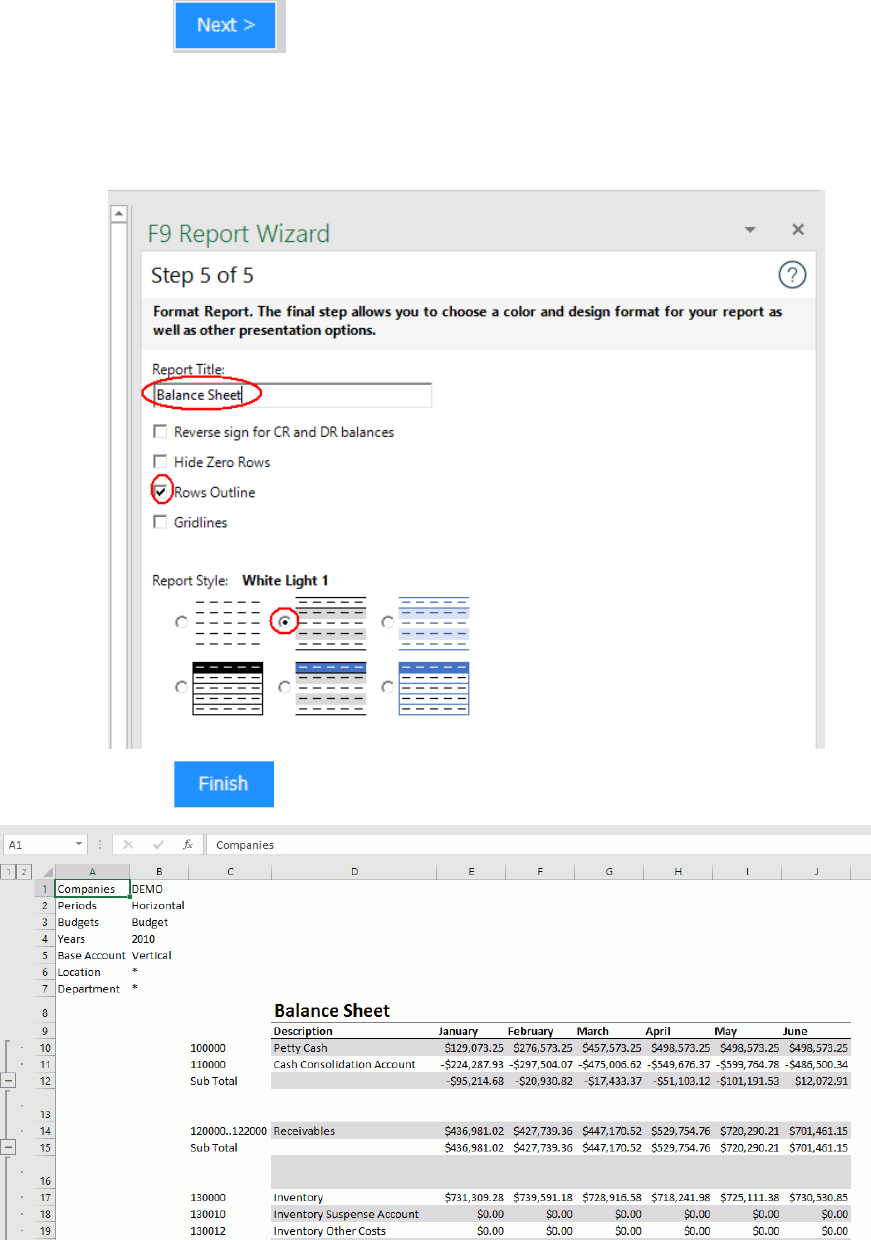
5. Step 5 - Formatting
• Change the settings to be the following:
• Click:
Infor F9
User Guide
Page 37 of 80
© Copyright 2019. Infor. All rights reserved
The resulting report created by Wizard contains formulas for balances as well
as account descriptions.
Note:
➢ Now that the focus is back in Excel, you can change any of the
formatting, add additional rows and subtotals to build out the report as
needed.
➢ From Excel’s Home tab, try working with different fonts, borders, color
fill to enhance the style. For example:
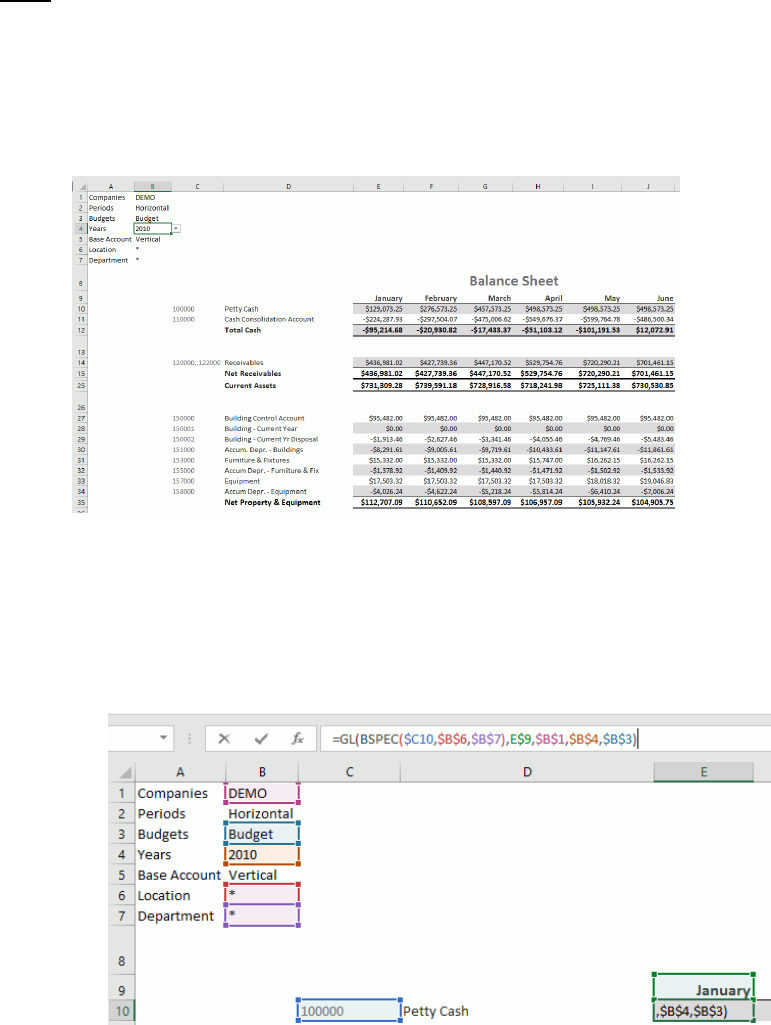
6. Recalculate
As a final exercise to the report creation with Wizard, we will step through
some easy ways to refresh the results.
• Select the first balance in the report
• Click on the formula bar in Excel to see its references color coded
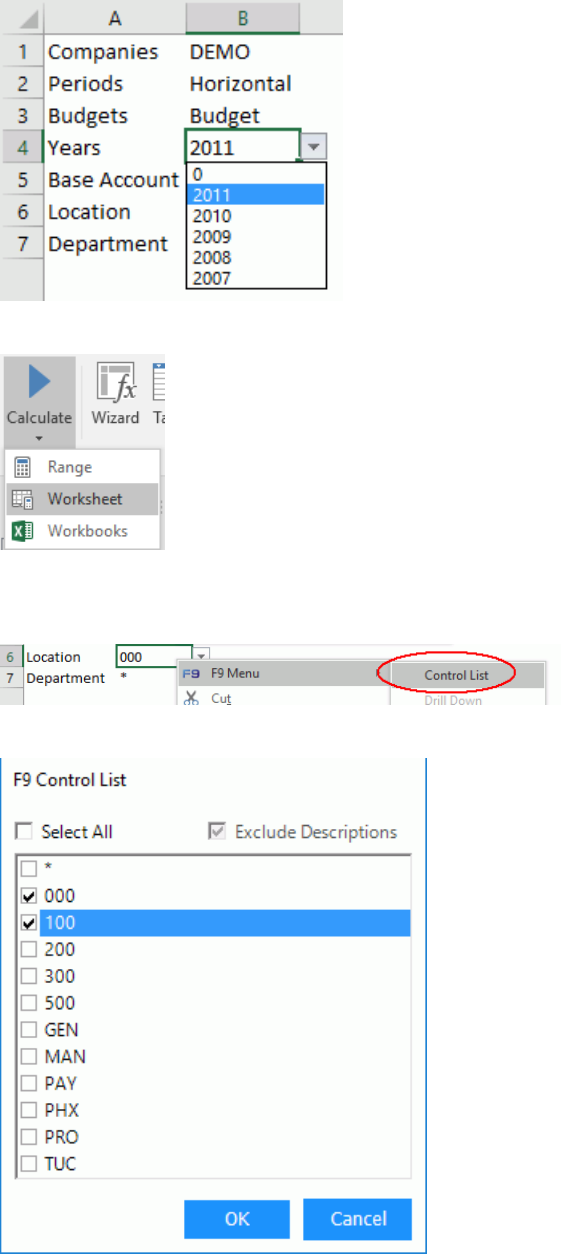
• Select cell B4 and change the Year to 2011
Infor F9
User Guide
Page 38 of 80
© Copyright 2019. Infor. All rights reserved
• F9 Ribbon + Calculate + Worksheet
• Select Location, cell B6
• Right-Click + F9 Menu + Control List
• Select 000 and 100 to output a list + OK
Infor F9
User Guide
Page 39 of 80
© Copyright 2019. Infor. All rights reserved
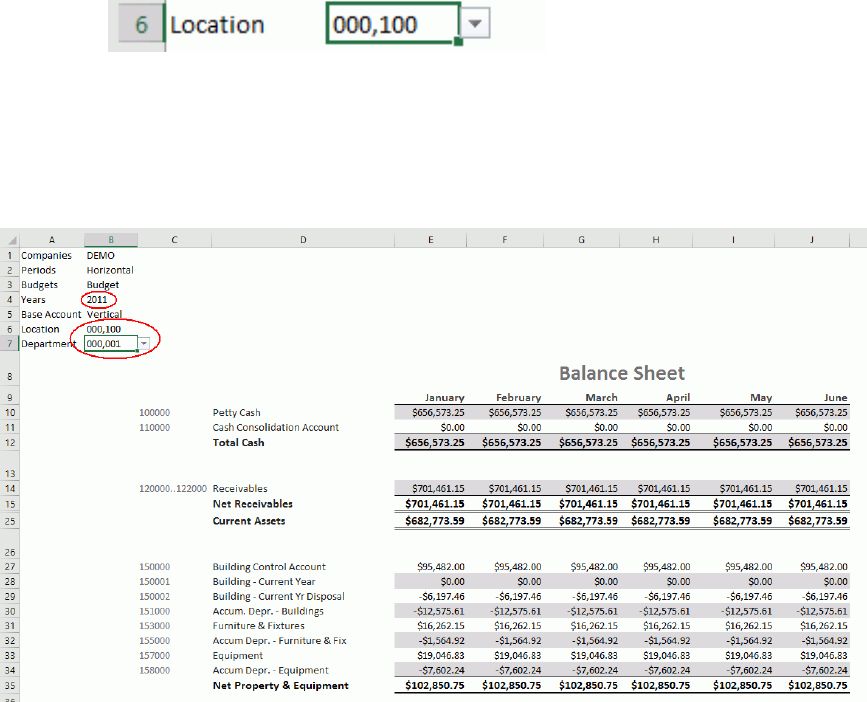
• F9 Ribbon + Calculate + Worksheet
• Select Department Center, cell B7
• Change to 00 and 01 and recalculate
• Rename this tab to: Wizard
As you can see a report created by Wizard is very flexible to calculate across
a variety of parameters. You can also click on the period headings (January to
June) and change to other values.

Infor F9
User Guide
Page 40 of 80
© Copyright 2019. Infor. All rights reserved
5 Functions
5.1 Fundamental GL
We have seen how F9 formulas return dynamic results when recalculated and
this leads into learning more about how this works.
The GL function is the fundamental F9 formula as it links any cell in your
spreadsheet to any balance in your GL. This happens with the use of
parameters that tell F9 what GL total should be returned.
Syntax:
=GL(Account, Period, Company, Year, Type, Currency)
Parameter
Description
Examples
Account
GL account(s)
100*-000-*
1*-000..110-9000
Period
Reporting period(s)
Month 1
March
Year to Date 5
Company
Company database
DEMO
Year
Fiscal year
2010
Type
Balance type
Budget
Revised Budget
Currency
Currency code
Not used in Cyma
By the end of this User Guide, we hope you will be very familiar with this
formula and how best to utilize its functionality.
If you already know how to write other Excel formulas, the same rules apply
to F9’s.
F9 provides a number of tools to help build GL formulas with the proper
absolute and relative cell referencing to then copy and autofill additional
rows and columns as needed.

Infor F9
User Guide
Page 41 of 80
© Copyright 2019. Infor. All rights reserved
F9 toolsets for creating GL formulas:
• Table
• Wizard
• Pivot
• Insert Function - GL
In the previous sections: Dynamic Trial Balance and Sales Report, F9 created both
GL and NGL (sign negated) formulas within the table reports.
Of course you can always start typing any new formula manually in Excel but let’s
start learning more about the GL function by following the exercise in the next
section.
Infor F9
User Guide
Page 42 of 80
© Copyright 2019. Infor. All rights reserved
5.2 Insert GL
So far in this guide, we have used F9’s reporting tools to generate formatted
results. It is possible to create F9 formulas anywhere in the worksheet and you
can also place the dropdown controls anywhere you like.
1. F9 Ribbon
• Select a new blank worksheet
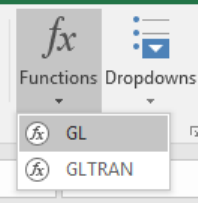
• From the F9 Ribbon, click Functions
• Select GL
A task pane will next open in Excel.
2. Insert GL
• From the F9 task pane, select the following:

Infor F9
User Guide
Page 43 of 80
© Copyright 2019. Infor. All rights reserved
Note:
➢ All of the dropdowns represent the parameters that will be
included in the GL formula.
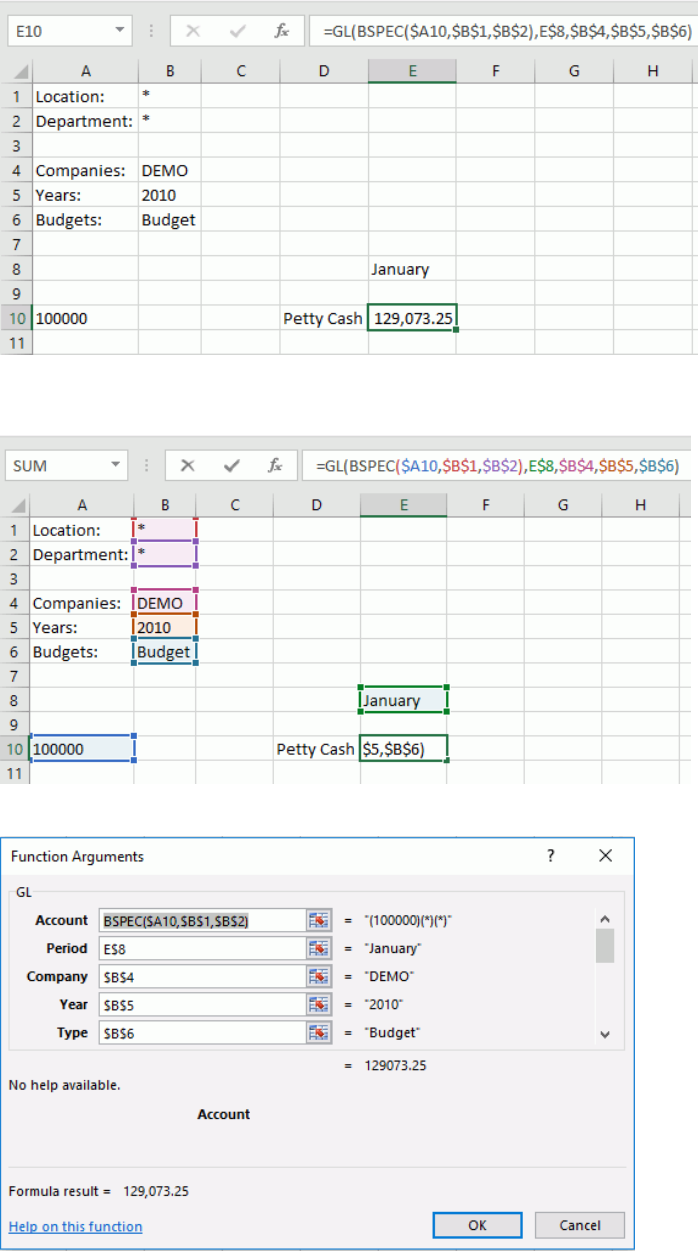
• Click
The account balance for January, 2010 displays beside the button.
• Next, click to have F9 create a new GL formula template
on the worksheet.
Infor F9
User Guide
Page 44 of 80
© Copyright 2019. Infor. All rights reserved
• Select the cell with the GL formula and then click on the Excel formula
bar; parameters display as color-coded:
• From the Excel Ribbon, select Formulas + Insert Function
Infor F9
User Guide
Page 45 of 80
© Copyright 2019. Infor. All rights reserved
Notes:
➢ Excel provides its own window to help build formulas. Because F9 is
an Excel Add-In, our functions are registered so that they can be
calculated.
➢ The Account parameter includes a second F9 formula called BSPEC
which stands for Build SPECifier. This will be explained later in the
User Guide but for now, understand that it is used to build out
combinations of account parameters.
3. Expand Report
The next steps will show how to extend results across columns and rows
using just Excel.
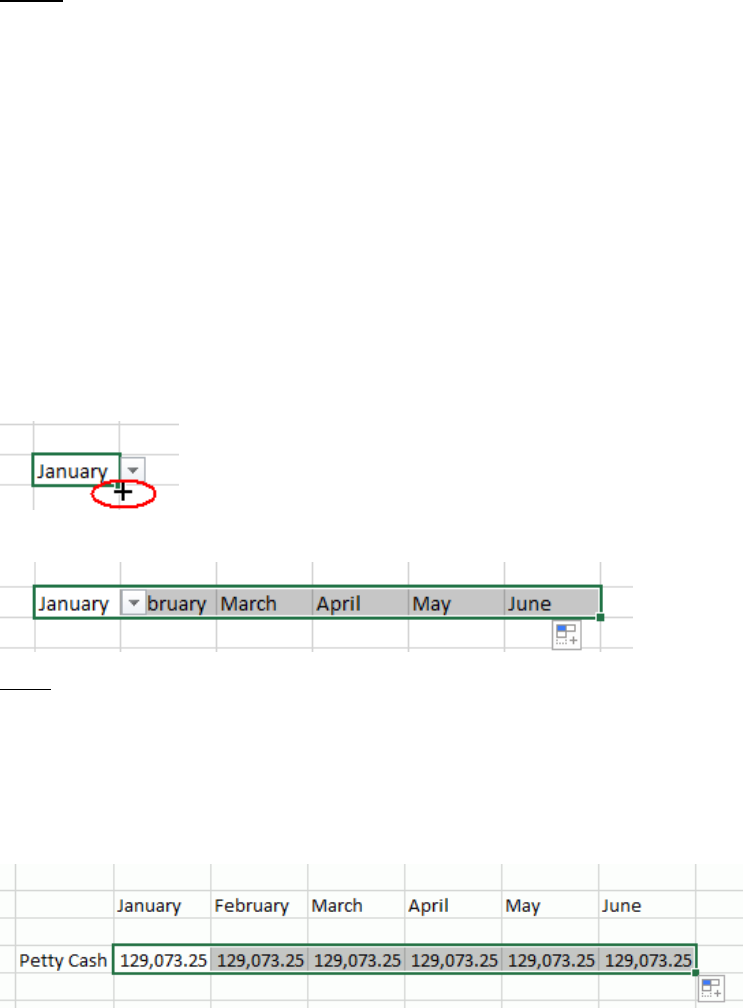
• Click on cell E9 which has the dropdown: January
• Hover the mouse until the icon changes to:
• Drag the cell across to output months January to June
Note:
➢ The above step is using Excel’s feature called Auto Fill
➢ Notice how F9 period dropdown controls are copied to each cell
• Next select cell E10 which has the GL balance: $129,073.25
• Drag the cell across columns E through J
• Click Shift-F9 to recalculate the balances for the new formulas

Infor F9
User Guide
Page 46 of 80
© Copyright 2019. Infor. All rights reserved
Note:
➢ Shift-F9 calculates the active worksheet tab where-as F9
calculates all open workbook(s)
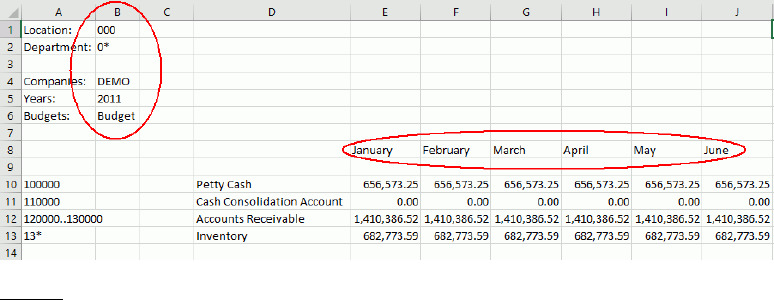
• Click on cell A11 (which is empty)
• Enter the account: ‘110000
• Click on cell A12 (which is empty)
• Enter the range: ‘120000..130000
• In cell A13, enter the wild card account: ‘13*
• Next, select cells D10 to J10
• Drag the cells down rows using Excel’s auto fill
• Click Shift-F9 to recalculate
Notes:
➢ The F9 GL formula uses cell referencing for parameters and this
allows you to auto fill (or copy) to other rows and columns.
➢ F9 formulas can reside anywhere in the worksheet which offers
a high level of flexibility.
➢ F9 account segments can be single values, ranges,
wildcards, as well as lists.
Infor F9
User Guide
Page 47 of 80
© Copyright 2019. Infor. All rights reserved
➢ A single quote was entered in front of Account segments for
Excel to treat as text. This is useful so that Excel does not format
as a numeric result; for example: 100-10 (= 90)
➢ Notice in column D there are account descriptions with another
F9 formula called: =DESC( ). This is described in more detail later
in the guide.
4. F9 Calculate
With just one Insert GL function, you can see that the beginnings of a
new report were created easily as all the cell referencing within the GL
formula was setup correctly. In addition to the F9 formulas, there are
also report dropdowns created for you.
• Select cell B5 which has year 2010.
• Change the year to 2011
• F9 Ribbon + Calculate + Worksheet
• Select cell B1 for Location
• Change to ‘000 and then F9 Ribbon + Calculate + Worksheet
• Select cell B2 for Department
• Change to 0* and then F9 Ribbon + Calculate + Worksheet
Notes:
➢ The above highlights all the cells where F9 created
Dropdown parameters from the first Insert GL Function step.
➢ When a dropdown is not selected, it displays as regular text
which is helpful when printing and publishing reports.
➢ F9 Dropdowns can also be moved to different cells because
of correct syntax for cell referencing. For example, you can
cut and paste the Year dropdown to be closer to Periods.
Infor F9
User Guide
Page 48 of 80
© Copyright 2019. Infor. All rights reserved
5.3 Absolute and Relative Cell Referencing
By default, a formula you create in Excel uses Relative cell references. This
means that if you copy a formula, Excel will automatically adjust the cell
references in the copied formula to refer to different cells, relative to the position
of the original formula. An example would be: =A5*.50 (both column and row
are relative and can change).
If you want to maintain the original cell reference when copying formulas to
different rows or columns, you make the cell address absolute by preceding
both the column and row with a dollar sign ($). For example: $A$2 (the address
will not change).
Perhaps less often, there are situations where you will want to copy formulas
relative to different column headings such as budget types or periods. In this
case, only part of the cell reference is fixed and the other should change relative
to where it is copied or auto filled by Excel. An example: G$10 (row 10 is fixed
and the column can change).
The following table summarizes how cell references change when copied:
Original Reference:
Changes To:
$A$1
$A$1 (absolute reference)
A$1
C$1 (column is relative; row is fixed)
$A1
$A3 (column is fixed; row is relative)
A1
C3 (column and row are both relative)
When entering a cell reference, press F4 to see how Excel toggles through
different types of references for you.
Infor F9
User Guide
Page 49 of 80
© Copyright 2019. Infor. All rights reserved
5.4 Insert GLTRAN
This section steps through how to build a report that sums up transactions.
There may be instances where you need to calculate by week, for example,
and GLTRAN is used for this scenario.
The GLTRAN formula is very similar to GL and NGL but uses a start/end date
range instead of a period parameter.
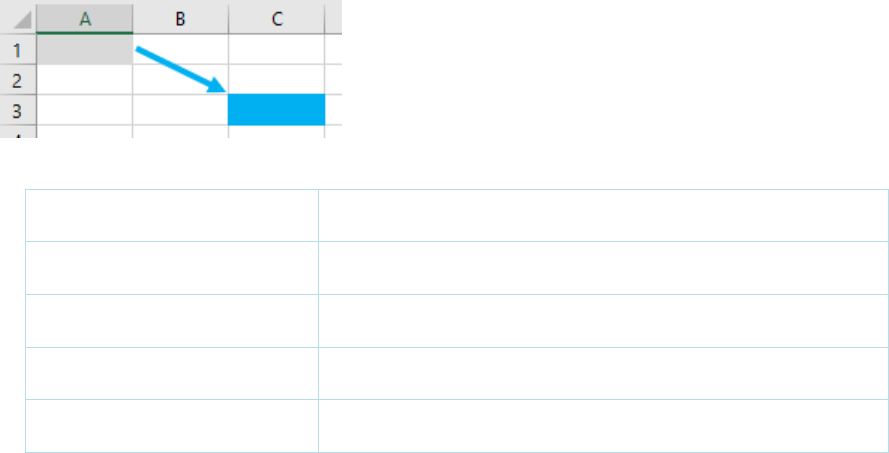
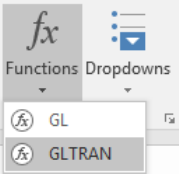
1. F9 Ribbon
• Select a new blank worksheet
• From the F9 Ribbon, click Functions
• Select GLTRAN
A task pane will next open in Excel.
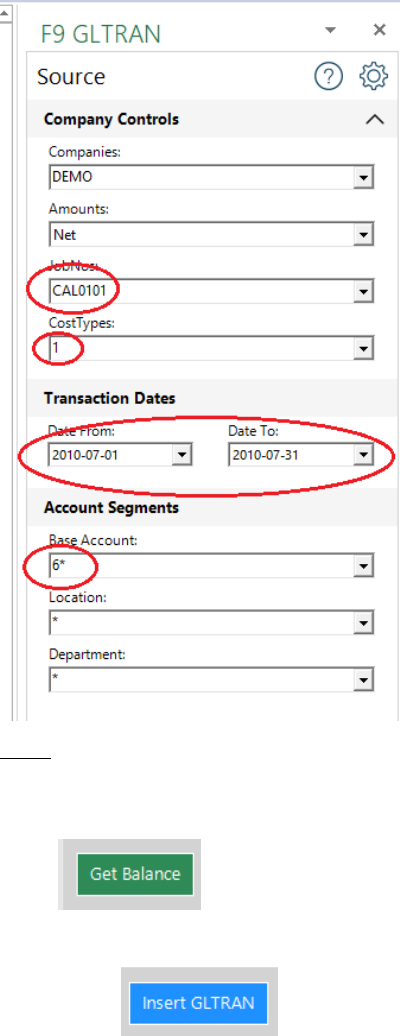
2. Insert GLTRAN
• From the F9 task pane, select the following:
Infor F9
User Guide
Page 50 of 80
© Copyright 2019. Infor. All rights reserved
Note:
➢ All of the dropdowns represent parameters that will be included
in the GLTRAN formula.
• Click
The sum displays beside the button.
• Next, click to have F9 create a new GLTRAN formula
template on the worksheet.
Infor F9
User Guide
Page 51 of 80
© Copyright 2019. Infor. All rights reserved
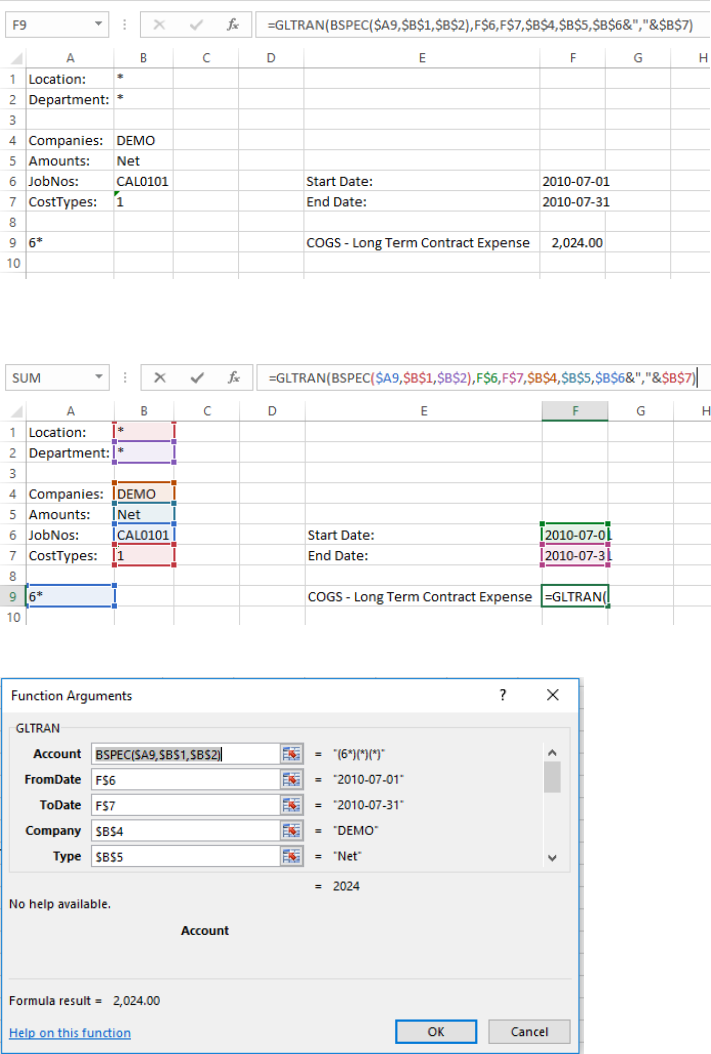
• Select the cell with the GLTRAN formula and then click on the Excel
formula bar; parameters display as color-coded:
• From the Excel Ribbon, select Formulas + Insert Function
3. Expand Report
The next steps will show how to extend results by rows using F9.
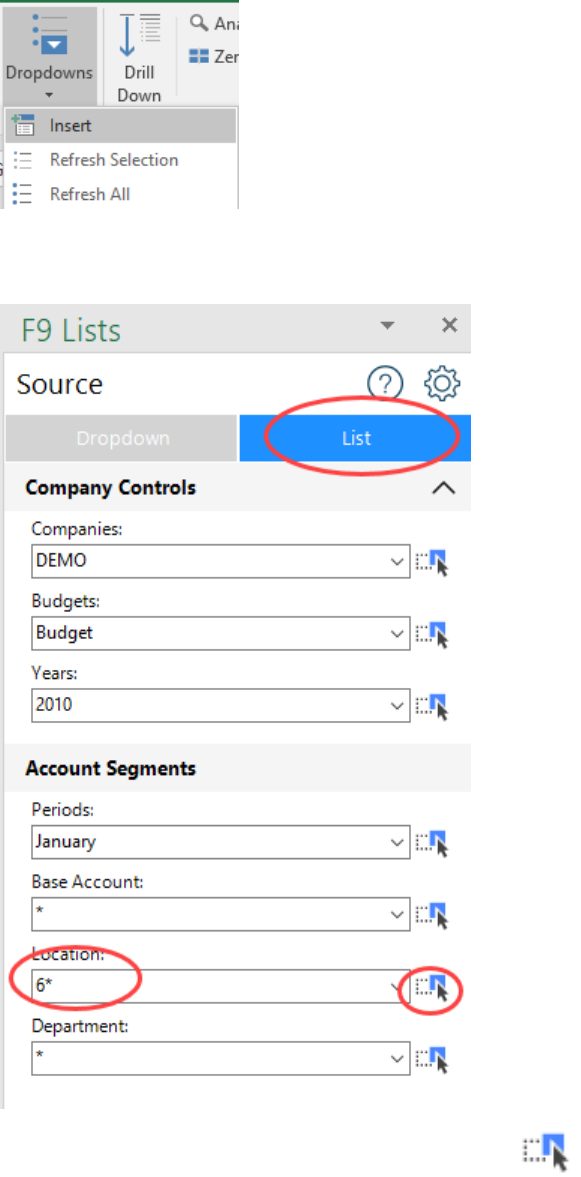
• From the F9 Ribbon select Dropdowns + Insert
Infor F9
User Guide
Page 52 of 80
© Copyright 2019. Infor. All rights reserved
• Highlight List
• Enter 6* for Account
• Drag the Account filter by selecting its button: and drop to cell
A10 in the worksheet.

Infor F9
User Guide
Page 53 of 80
© Copyright 2019. Infor. All rights reserved
Note:
➢ The above step copies all Account segments for 600000 to
600500
➢ List was chosen to return a partial list of accounts as text
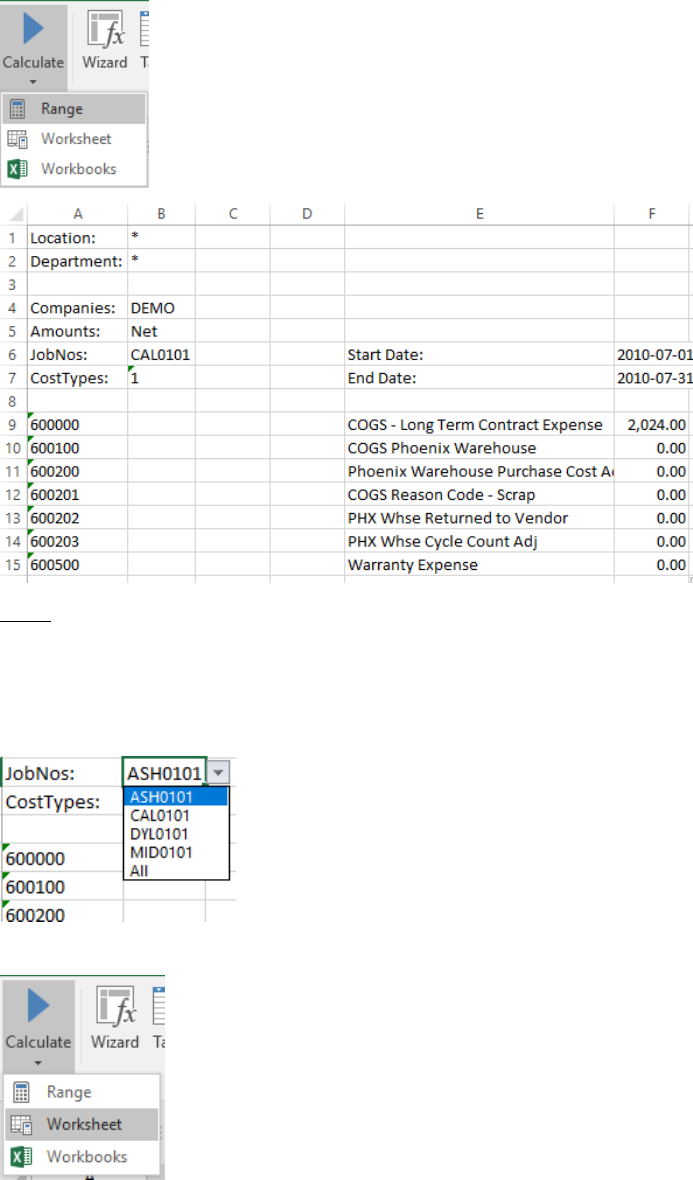
• Next select cells E9 to F9 (the first description and amount row)
• Drag to row 16
• F9 Ribbon: Calculate + Range (to update selection only)
Infor F9
User Guide
Page 54 of 80
© Copyright 2019. Infor. All rights reserved
Note:
➢ F9 creates dropdown filters relevant to the GLTRAN formula
• Click on cell B6
• Select dropdown value ASH0101:
• F9 Ribbon: Calculate + Worksheet

Infor F9
User Guide
Page 55 of 80
© Copyright 2019. Infor. All rights reserved
Notes:
➢ The F9 GLTRAN formula uses cell referencing for parameters
and this allows you to auto fill (or copy) to other rows.
➢ F9 formulas can reside anywhere in the worksheet which offers
a high level of flexibility.
➢ Because Insert GLTRAN started with row 9 (Account 3*), we can
delete this row as it’s unique accounts are in the rows below.
• Rename the tab to: GLTRAN
• Save the report file

Infor F9
User Guide
Page 56 of 80
© Copyright 2019. Infor. All rights reserved
5.5 DESC
We have seen how F9 formulas return dynamic results when recalculated and
this includes account descriptions. The DESC function returns descriptions for
full account codes. If the formula is used on a range or list of accounts, the first
account description found will be returned. In short, DESC should be used to
return the Natural Account description.
Syntax:
=DESC(Account, Company, Year, Type, Currency)
Parameter
Description
Examples
Account
GL account(s)
100-000-00
1150-*-*
5000-01-*
Company
Company database
DEMO
Year
Fiscal year
2010
Type
Balance Type
Not required in Cyma
Currency
Currency
Not required in Cyma
F9 provides a number of tools to help build DESC formulas with the proper
absolute and relative cell referencing:
• Table
• Insert Function - GL
An example of a DESC formula built using Insert GL is shown next.
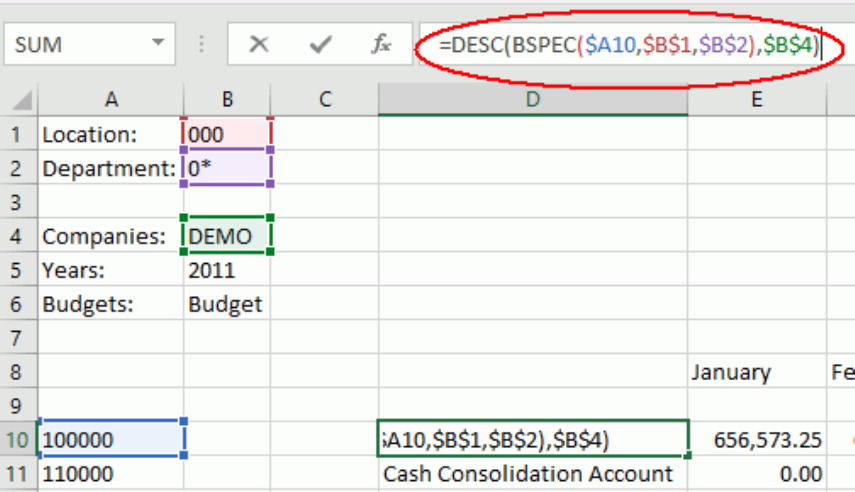
Infor F9
User Guide
Page 57 of 80
© Copyright 2019. Infor. All rights reserved

Infor F9
User Guide
Page 58 of 80
© Copyright 2019. Infor. All rights reserved
5.6 SDESC
The SDESC function is similar to DESC but returns descriptions for the
individual account segment. If the formula is used on a range or list of
segments, the first description found will be returned. When your reports split
segment parameters into separate cells, we recommend using SDESC.
Syntax:
=SDESC(Segment, Segment Number, Company)
Parameter
Description
Examples
Segment
GL account(s)
1000
1150
500*
Segment Number
Segment position in the
full account code (1..N)
1
2
3
Company
Company database
DEMO
F9 tools and resources to help build SDESC formulas include:
• Wizard
• Sample Reports
Example of SDESC formula built by Wizard is shown next.
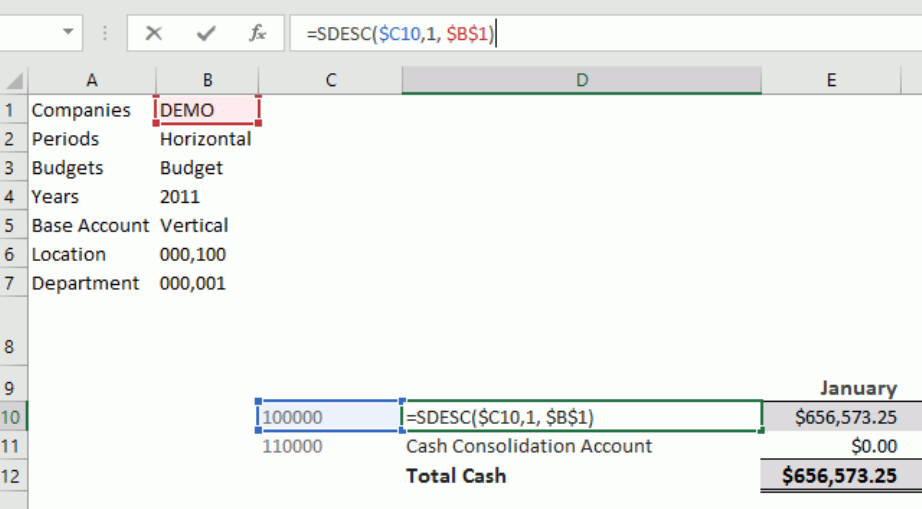
Infor F9
User Guide
Page 59 of 80
© Copyright 2019. Infor. All rights reserved

Infor F9
User Guide
Page 60 of 80
© Copyright 2019. Infor. All rights reserved
5.7 BSPEC
The BSPEC function expands the functionality of the Account code by Building
Account SPECifier combinations. It is used for the full account parameter in
F9 formulas where the segments are split in different cells.
Syntax:
=BSPEC(Segment 1, Segment 2, … Segment N)
You start to see the power of BSPEC when using different types of segments:
Segment:
Example:
Single
10050
Wild
5*
Range
101..112
List
10,14,18,22
Mixed
000,1*,505..525
The BSPEC formula is typically found within F9 formulas such as NGL, GL,
and GLTRAN but can also reside in a cell by itself. The major benefit for using
BSPEC is for account combinations and the next example illustrates this in
detail.
For a product sales total, you need to include account codes ranging from
1000..1200 and 1500..1700. Additionally, certain divisions are excluded from
the report which is the second segment of the account code. The divisions do
not fit in a range but are listed as: 01,03, and 2*
One way in Excel is to list all the unique account combinations in one cell as:
Cell A1:
1000..1200-01, 1000..1200-03,1000..1200-2*,1500..1700-01,
1500..1700-03, 1500..1700-2*
And the GL formula is:
Infor F9
User Guide
Page 61 of 80
© Copyright 2019. Infor. All rights reserved
=GL(A1,”this month”,…)
If you have more segments and more groupings, the number of combinations
will quickly become complex and difficult to maintain!
Instead, with F9’s BSPEC formula, the combinations are built for you. Simply
provide the segment groups:
Cell A1: 1000..1200,1500..1700
Cell A2: 01,03,2*
And the GL formula becomes:
=GL(BSPEC(A1,A2),”this month”,…)
Infor F9
User Guide
Page 62 of 80
© Copyright 2019. Infor. All rights reserved
6 Dropdowns
Formulas are based on your GL parameters and F9 creates Excel dropdowns so
that you do not need to memorize available values such as account segments,
departments, and budgets that will change over time.
Creation of F9 dropdowns is automatic from reporting toolsets: Wizard, Table,
PivotTable, Insert GL, and Insert GLTRAN.
When designing new reports, keep in mind that the dropdowns can reside
anywhere in your Excel file and this section includes information on how to insert
and work with individual dropdowns.
6.1 Insert
1. Source
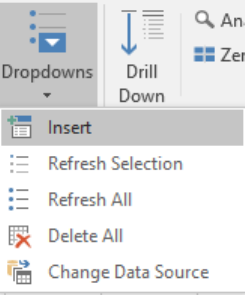
• Select a new blank worksheet
• From the F9 Ribbon, click Dropdowns
• Select Insert
A task pane will display on the left.
Infor F9
User Guide
Page 63 of 80
© Copyright 2019. Infor. All rights reserved
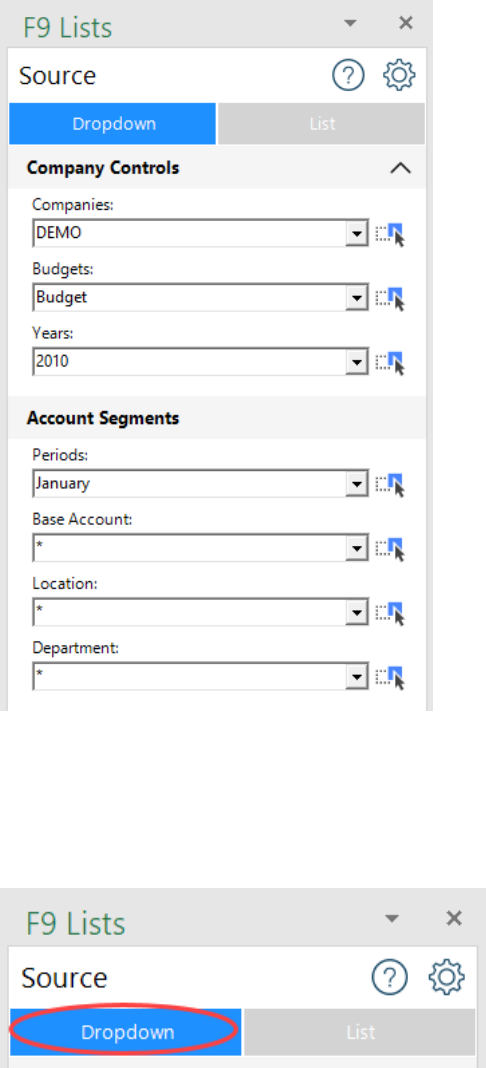
There are three types of output that can be dragged into Excel:
Dropdown and List. Simply select and it will be highlighted in blue.
For example, to output F9 dropdowns:
F9 parameters are dragged and dropped into Excel. With the mouse, you
select and drag the icon to the right of its corresponding parameter.
Infor F9
User Guide
Page 64 of 80
© Copyright 2019. Infor. All rights reserved
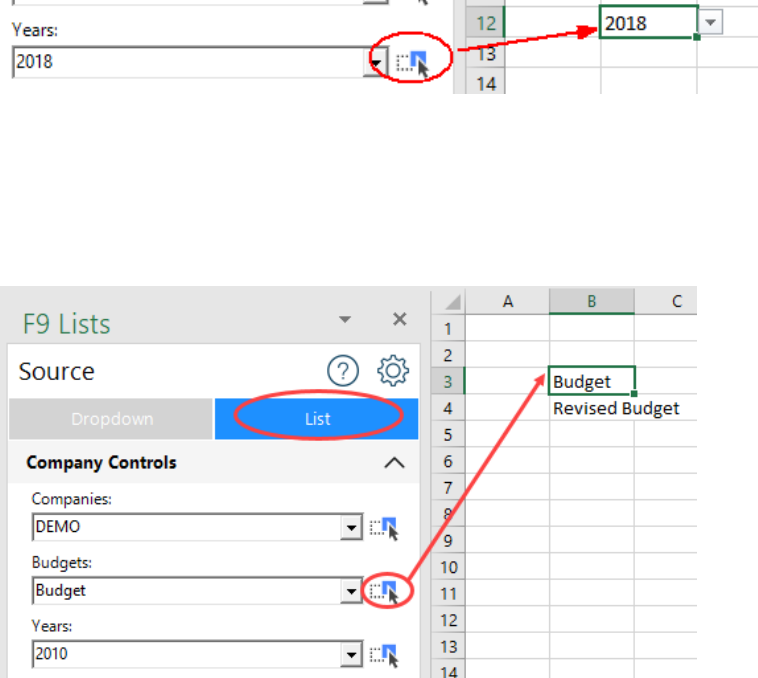
Dropdown
An F9 dropdown is dynamic and contains all values for a given parameter.
From time to time, this information can be refreshed; for example, when a
new fiscal year is opened or when new account segments are added.
An example for Years:
List
Copies a static list of parameter values into a range of cells.
For example, Budgets is dragged to cell B3:
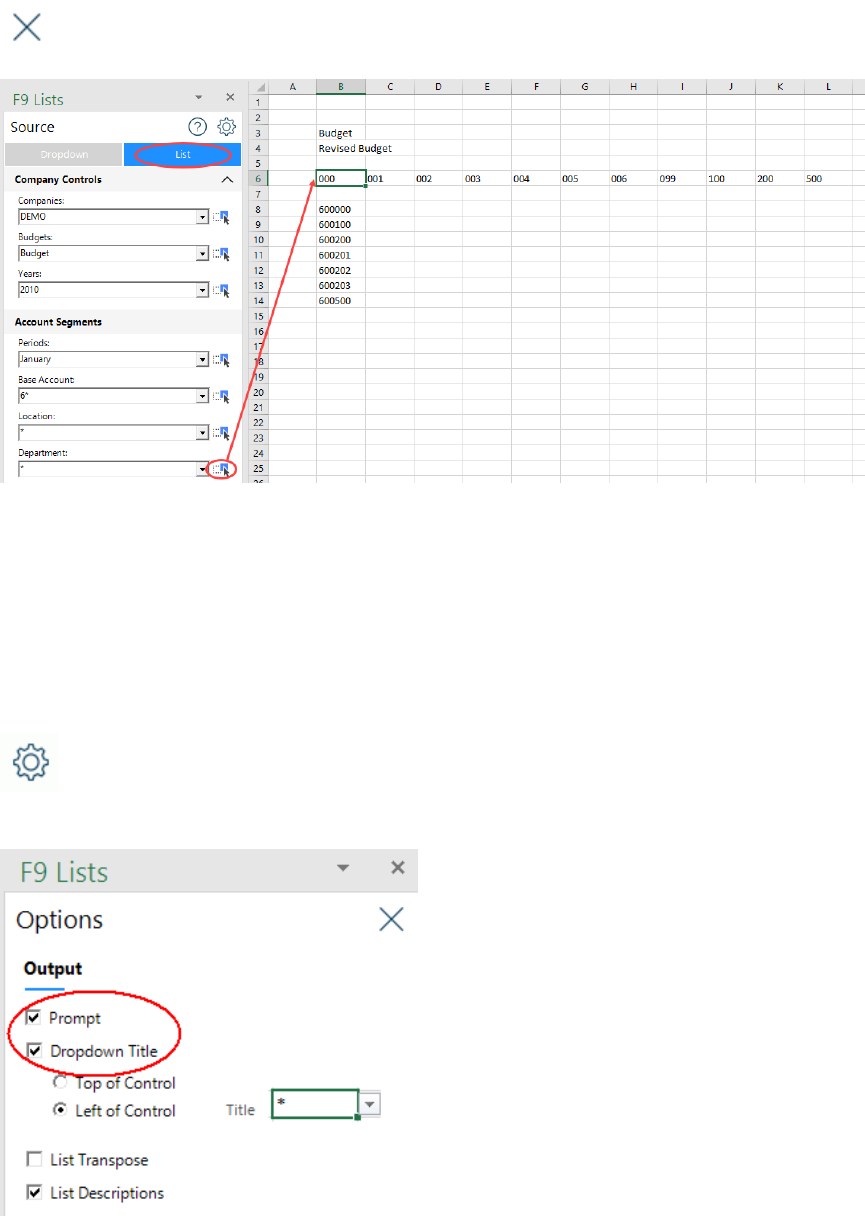
Filter
Copies a partial static list of values into a range of cells.
For example, to output a Base Account wildcard: 6*
Infor F9
User Guide
Page 65 of 80
© Copyright 2019. Infor. All rights reserved
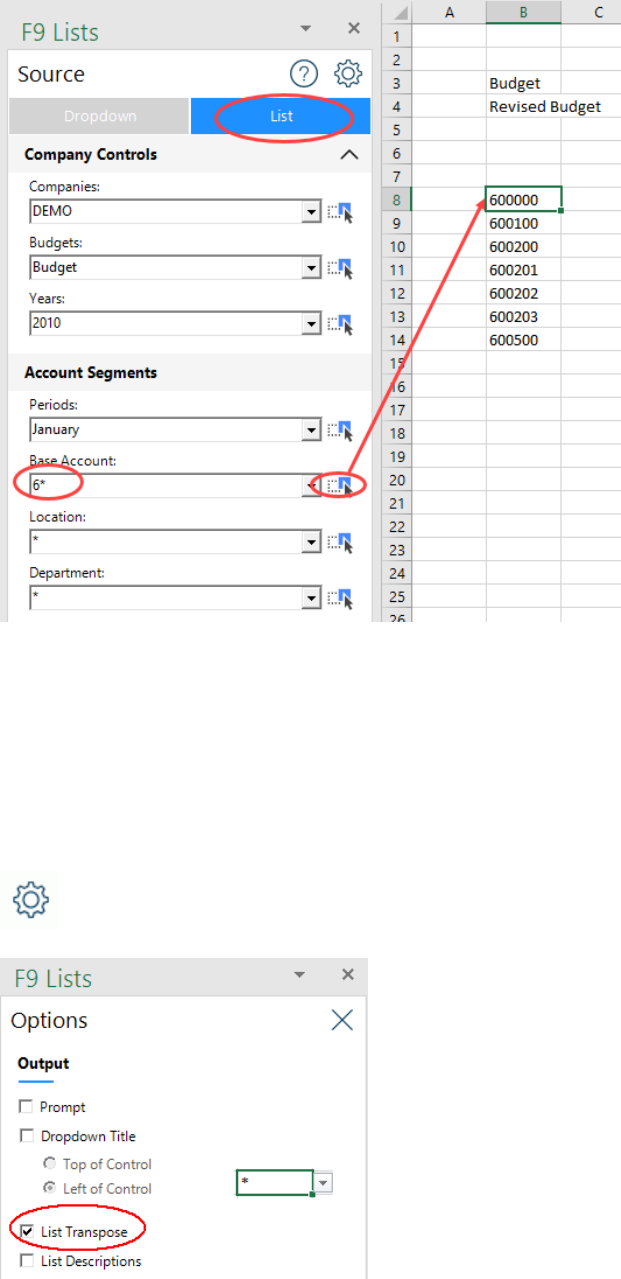
2. Options
There are additional settings which can be changed depending on how you
want dropdowns or lists formatted. For example, if a new report needs to be
created by department, we can drag the departments across columns.
• Click the Options button
• Select List Transpose
Infor F9
User Guide
Page 66 of 80
© Copyright 2019. Infor. All rights reserved
• Click the Close button
• Drag a new List for Departments to cell B6
3. New Report Template
To learn more on how to leverage F9’s Drag and Drop features, the following
steps demonstrate creating a new report template from scratch.
• Add a new blank Worksheet
• Click Options
• Change to use a Prompt and Dropdown Title
• Ensure List Transpose is not checked
Infor F9
User Guide
Page 67 of 80
© Copyright 2019. Infor. All rights reserved
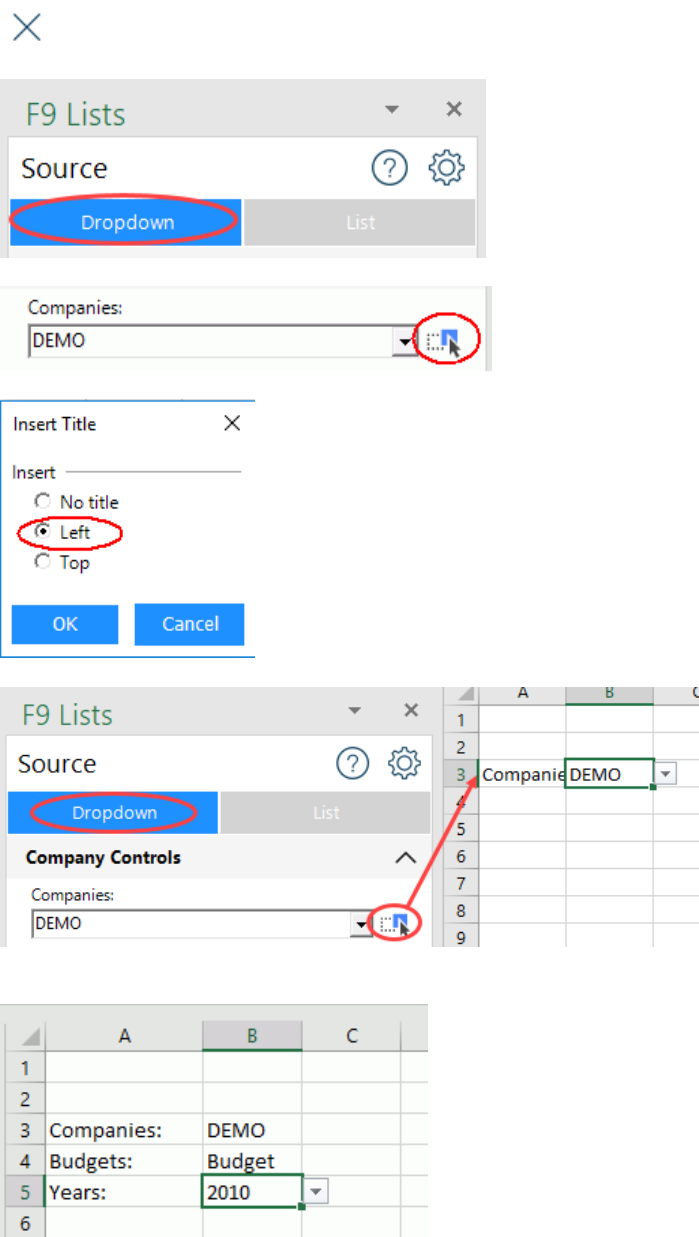
• Click Close
• Set Dropdowns as the type of parameter
• Start dragging the Company parameter
• Click Left when prompted
• Drag and drop to cell A3
• Repeat the same steps and drag Budgets and Years into subsequent
rows:
Infor F9
User Guide
Page 68 of 80
© Copyright 2019. Infor. All rights reserved
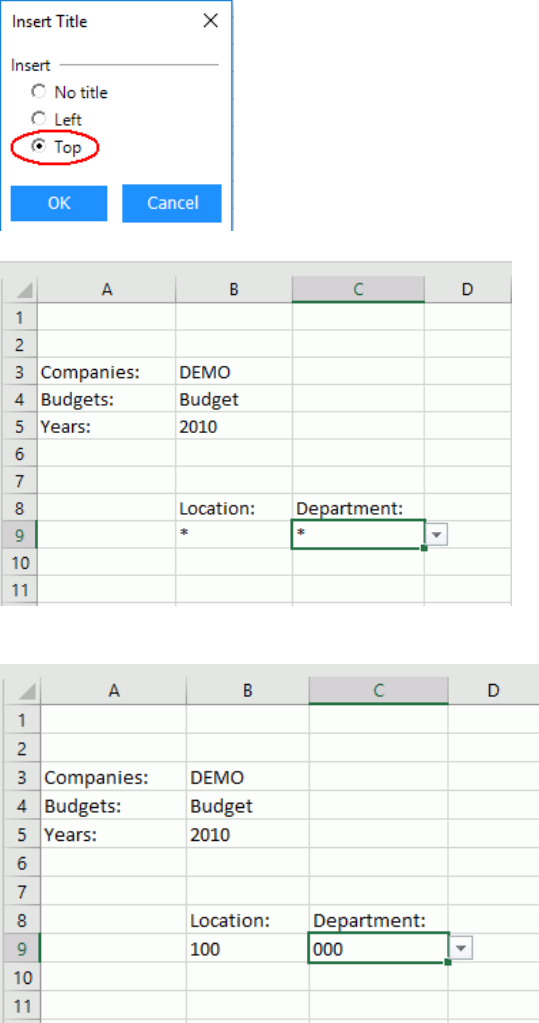
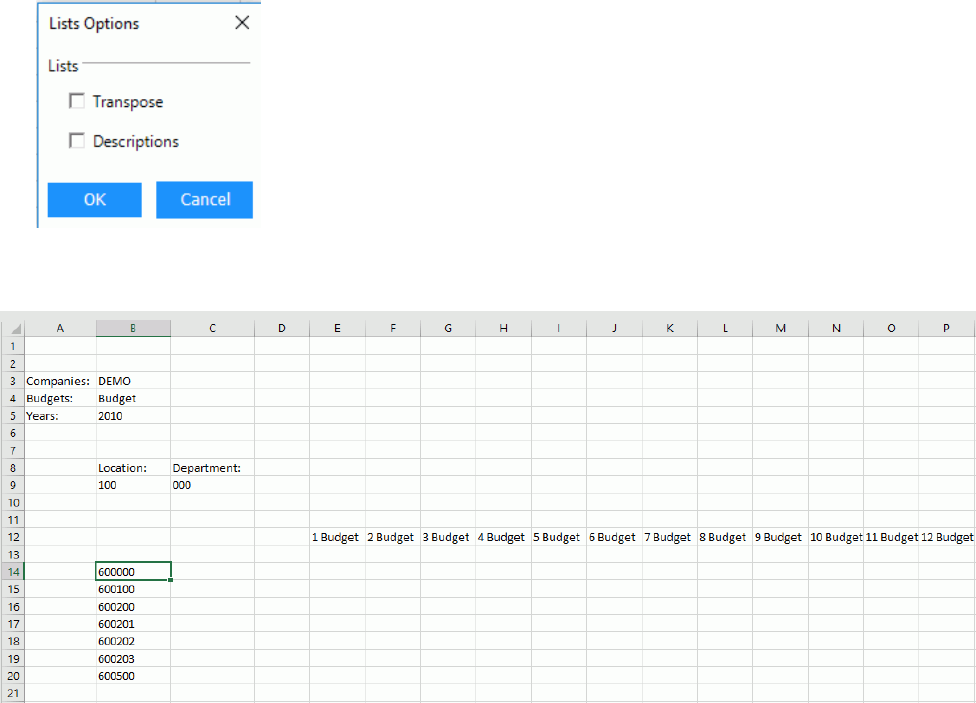
Next, we will output two parameters where the title displays above.
• Start dragging Locations to cell B8
• Click Top for the Title prompt
• Drag Departments to cell C8 with Title at Top
• From the dropdowns, select Location: 100 and Department: 000
• Resize the Excel columns if needed
This can be considered the control area for the new report template.
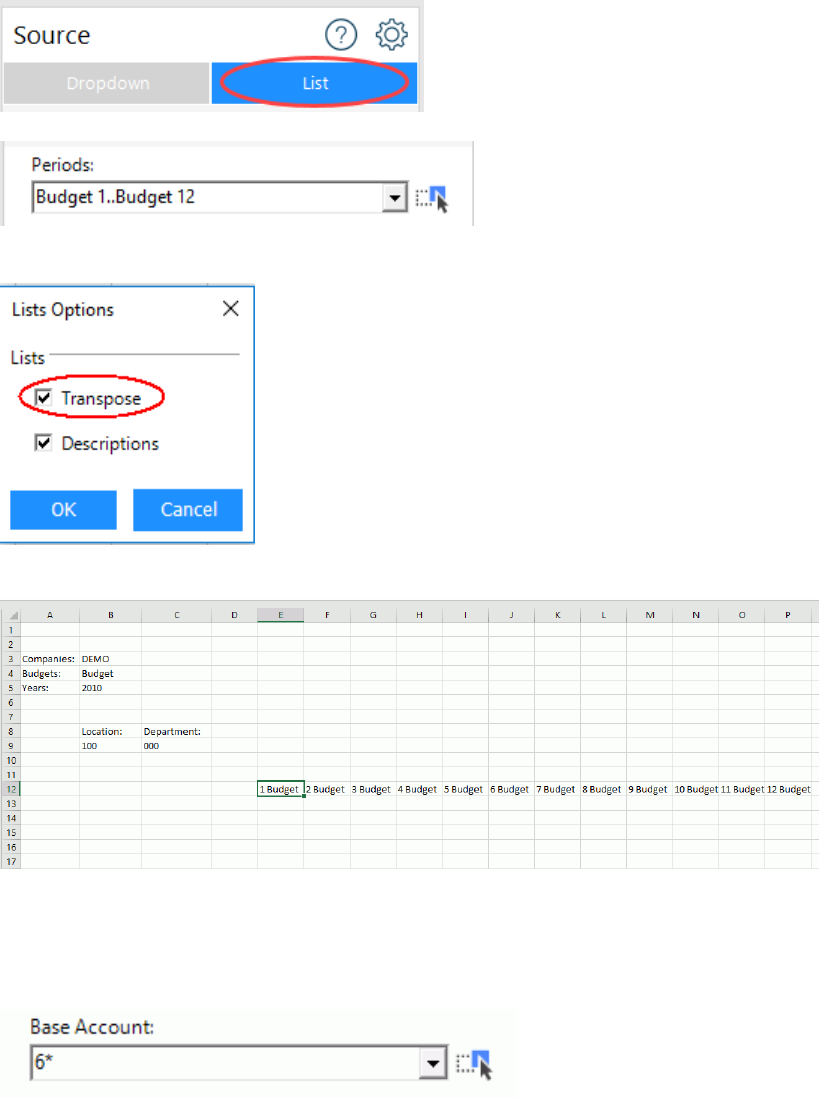
Next, for the report we should build in columns to represent budget balances for
the entire fiscal year.
Infor F9
User Guide
Page 69 of 80
© Copyright 2019. Infor. All rights reserved
• Select List as the source type
• For Periods, enter the following range:
• Start dragging Periods to cell E12
• Check Transpose + OK
The result is F9 creates budget periods across 12 columns:
The next step for this template’s parameters is to build in rows by main Account.
• Within Base Accounts, enter the following: 4100..4120
• Start dragging Accounts to cell B14 as a List
• Uncheck Transpose and Descriptions + OK
Infor F9
User Guide
Page 70 of 80
© Copyright 2019. Infor. All rights reserved
The result is that F9 adds in rows for the individual accounts.
As a summary, eight report parameters were dragged and dropped into a new
Worksheet. The control area contains F9 Dropdowns. Columns are based on
budget periods and rows are setup by main segment.
With this report template, you can start building a single =GL formula that
includes cell referencing to the parameters and then copy across rows and
columns. Adding subsequent groups of accounts and subtotals should be a snap.

Infor F9
User Guide
Page 71 of 80
© Copyright 2019. Infor. All rights reserved
7 Scheduling
F9’s Scheduling Hub is a robust, feature-rich application for running and
distributing reports and a convenient point of access for managing them.
Some common scenarios:
➢ Run one or a group of reports
➢ Schedule overnight or hourly runs
➢ Email reports (or portions) to users
➢ Save to shared folders and sites
➢ Output to different formats such as PDF
With F9 Hub, you can easily automate the steps and this helps increase
productivity.
F9 Hub also provides more advanced features such as: conditional email alerts,
report filters, tree report generation, password protection, and Publish to Viewer.
F9 Hub runs as a separate application outside of Excel and replaces the older
Scheduler from F9 Version 5. It can be launched from the F9 Ribbon or using
Windows Start/Run.
For more information, visit the product page or refer to the installed Scheduling
Hub User Guide to setup and begin using the F9 Hub!
Infor F9
User Guide
Page 72 of 80
© Copyright 2019. Infor. All rights reserved
8 Tools
With this guide, we will touch on two of F9’s toolsets to cover tasks related to
other products.
8.1 Publish to Viewer
There will be customers who install both F9 Report Writer licenses as well as
F9 Viewers licenses.
F9 Report Writer users design, create, and maintain F9 reports and are also
responsible for sharing to other non-F9 users.
F9 Viewer is for decision-makers who want to do more than look at static
reports. Viewer provides an interface to easily drill, filter, and recalculate
financial results.
Both F9 Report Writer and F9 Viewer run inside Excel but have different
formulas. F9 formulas can be edited and copied anywhere whereas Viewer
formulas can only be recalculated.
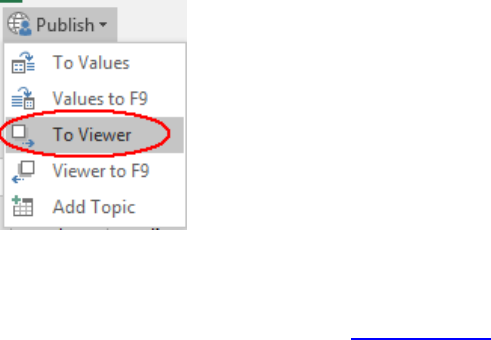
Within F9, you can easily publish your report for use by F9 Viewer.
1. Open Excel and set calculation to Manual
2. File Open the F9 report
3. F9 Ribbon: Publish + To Viewer
4. Follow steps to save the file to a new name/folder.
For more details on F9 Viewer, visit the product page or refer to the installed F9
Viewer documentation and help.
Infor F9
User Guide
Page 73 of 80
© Copyright 2019. Infor. All rights reserved
9 Resources
The information in this guide does not cover all aspects of F9’s functionality
but should provide a solid foundation.
We recommend referring to the installed product help topics for specific/more
technical details as needed. The installed F9 sample reports showcase a
variety of financial report scenarios and formulas which can be leveraged to
build new reports. F9’s website provides the entire picture for all products
available including updates from the Downloads site.
From the F9 Ribbon, you can navigate to a number of resources.
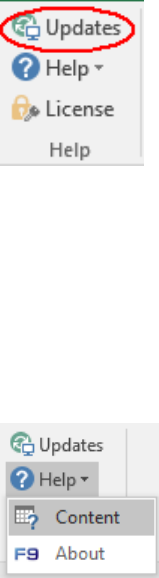
9.1 Updates
➢ Select Updates to have F9 check online to see if there any new
updates for your product.
9.2 Help
➢ Select Content to open F9’s detailed product Help
➢ Click About to see your installed program versions of F9; this is often
required by F9 Technical Support
Infor F9
User Guide
Page 74 of 80
© Copyright 2019. Infor. All rights reserved
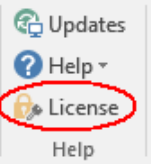
9.3 License
When F9 is first installed, it initially runs as a trial.
A purchased license of F9 needs to be activated on either the workstation
running F9 or a Server depending on what is required.
F9 can be easily activated by selecting its command from the F9 Ribbon.
For more details, please refer to the product Help content.

Infor F9
User Guide
Page 75 of 80
© Copyright 2019. Infor. All rights reserved
10 Appendix
10.1 Account Ranges
The majority of sample reports and formulas in this guide split the account
segments into separate cells. Another option available is to use full account
codes where segments are separated by dashes.
Syntax:
Segment1-Segment2-...-SegmentN
where N = total number of segments
A given segment can have wildcard characters and you can list multiple
accounts in one cell. Examples:
Account Specifier:
Description:
*-*-*
All accounts
4000-*-*
All departments for account 4000
4*-010-00
All accounts starting with 4 for department 010 and
subaccount 00
5?00-*-*
All accounts starting with 5 and last 2 characters 00
for all departments and subaccounts.
4000..5000-010-*
Range of accounts from 4000 to 5000 for
department 010 and all subaccounts
4000-000-*,5100-010-*
Sum of 2 accounts: 4000-000-* and 5100-010-*
4000-010-00..5100-010-
00
Invalid – ranges only supported within each
segment
4000,4100,5000-010-00
Invalid – use BSPEC to list segments
4*..5*-010-00
Invalid – a segment cannot mix ranges with
wildcards
Infor F9
User Guide
Page 76 of 80
© Copyright 2019. Infor. All rights reserved
Although these Account specifiers may seem to be able to accommodate
every aspect of your reporting needs, imagine if you wanted to create a
departmentalized report for each department. Using the above Account ranges
will accomplish this, but you will have to recreate the report for each
department, reentering the appropriate account ranges, each time specifying
a different department.
A very important feature of F9 is allowing you to cell reference each segment
of your account code individually, so that you can make your report turn on
any segment of your account code. This is accomplished with the BSPEC
Function.

Infor F9
User Guide
Page 77 of 80
© Copyright 2019. Infor. All rights reserved
10.2 Period Specifiers
In F9, period parameters use basic English words that related to accounting
periods as well as calendar time lines. A variety of examples are listed in the
reporting task panes (Pivot, Wizard, and Table) as well as F9 Dropdowns.
A given F9 parameter can consist of more than one period however, for best
performance you should always use “year” or “ytd”. For example:
➢ 1,2,3,4,5,6 (slow calculation) versus YTD 6 (fast calculation)
Period Specifier:
Description:
Month 2
Balance for fiscal period 2
This Month
Current (usually open) period
This Month Last Year
Current period in previous fiscal year
Last Month
Period before current fiscal period
Year, YTD, Year to Date
Total balance for periods up to current period
Change Month 5
Net period activity for period 5
September
Balance for colander month September
QTR 1, Quarter 1
Total for first fiscal quarter
Half Year 2
Last 6 periods of fiscal year
Running Year 10
Adds prior year periods (11,12) plus YTD 10
Another feature of F9’s periods is that the balance returned follows general
accounting principles and is based on the type of account (Balance Sheet or
P&L). By default, F9 returns a year to date balance for Balance Sheet accounts
and a net period amount for P&Ls. With the correct wording, F9 can return any
type of balance.

Infor F9
User Guide
Page 78 of 80
© Copyright 2019. Infor. All rights reserved
Results vary depending on the account type as shown in the next table:
Period Specifier:
Results:
Month 5
BS: Open + 1 + 2 + 3 + 4 + 5
PL: 5
YTD 5
BS: Open + 1 + 2 + 3 + 4 + 5
PL: 1 + 2 + 3 + 4 + 5
Change 5
BS: 5
PL: 5
Year Change 5
BS: 1 + 2 + 3 + 4 + 5
PL: 1 + 2 + 3 + 4 + 5
Open 1
BS: Open 1 (open balance for year)
PL: 0
Open 5
BS: 4 (ending YTD balance)
PL: 0
Infor F9
User Guide
Page 79 of 80
© Copyright 2019. Infor. All rights reserved
10.3 Migrating from F9 Version 5
Reports from F9 Version 5:
o All your F9 V5 reports will continue to run in F9 Version 6 without
requiring any changes.
New Functionality in F9 Version 6:
o Table Refresh
o F9 Version 6 Tables can have the underlying data rebuilt. For
example, if new accounts are added, these will appear in the
refreshed F9 Table
o For any F9 Version 5 Tables, you will need to recreate them with
F9 V6 to have this new Refresh rows capability
o PivotTable Refresh
o F9 Version 6 PivotTables can also have the underlying data
rebuilt. For example, for new accounts.
o For any F9 Version 5 PivotTables, you will need to recreate them
with F9 V6 to have this new Refresh rows capability
Infor F9
User Guide
Page 80 of 80
© Copyright 2019. Infor. All rights reserved
Copyright © 2019 Infor. All rights reserved.
Important Notices
The material contained in this publication (including any supplementary information) constitutes and contains
confidential and proprietary information of Infor.
By gaining access to the attached, you acknowledge and agree that the material (including any modification,
translation or adaptation of the material) and all copyright, trade secrets and all other right, title and interest
therein, are the sole property of Infor and that you shall not gain right, title or interest in the material (including
any modification, translation or adaptation of the material) by virtue of your review thereof other than the non-
exclusive right to use the material solely in connection with and the furtherance of your license and use of software
made available to your company from Infor pursuant to a separate agreement, the terms of which separate
agreement shall govern your use of this material and all supplemental related materials ("Purpose").
In addition, by accessing the enclosed material, you acknowledge and agree that you are required to maintain such
material in strict confidence and that your use of such material is limited to the Purpose described above. Although
Infor has taken due care to ensure that the material included in this publication is accurate and complete, Infor
cannot warrant that the information contained in this publication is complete, does not contain typographical or
other errors, or will meet your specific requirements. As such, Infor does not assume and hereby disclaims all
liability, consequential or otherwise, for any loss or damage to any person or entity which is caused by or relates
to errors or omissions in this publication (including any supplementary information), whether such errors or
omissions result from negligence, accident or any other cause.
Without limitation, U.S. export control laws and other applicable export and import laws govern your use of this
material and you will neither export or re-export, directly or indirectly, this material nor any related materials or
supplemental information in violation of such laws, or use such materials for any purpose prohibited by such laws.
Trademark Acknowledgements
The word and design marks set forth herein are trademarks and/or registered trademarks of Infor and/or related
affiliates and subsidiaries. All rights reserved. All other company, product, trade or service names referenced may
be registered trademarks or trademarks of their respective owners.
