
WebAdMIT User Manual
© 2017 Liaison International. All Right Reserved.

Section 1: Introduction > What is WebAdMIT?
2
Table of Contents
Section 1: Introduction .................................................................................................................... 6
What is WebAdMIT? .......................................................................................................................6
About Liaison International .................................................................................................................. 6
About This Help Manual ....................................................................................................................... 6
System Requirements .....................................................................................................................6
Browser Requirements ......................................................................................................................... 6
Mobile Accessibility .............................................................................................................................. 7
Screen Resolution ................................................................................................................................. 7
PDF Viewer ............................................................................................................................................ 7
Troubleshooting .................................................................................................................................... 7
Security Information .......................................................................................................................7
Support Resources ..........................................................................................................................8
WebAdMIT Support .............................................................................................................................. 8
Admissions Questions ........................................................................................................................... 8
Section 2: Key Terms and Definitions ............................................................................................... 9
Section 3: Accessing WebAdMIT .................................................................................................... 12
Username and Password ............................................................................................................... 12
Forgotten Username or Password ................................................................................................. 12
Dashboard .................................................................................................................................... 12
Section 4: Searching for Applicants ................................................................................................ 14
Sorting Results .............................................................................................................................. 14
Applying Search Actions to Selected Applicants ............................................................................. 15
Section 5: Viewing Applicant Information ...................................................................................... 16
Applicant Details Panels ................................................................................................................ 16
Applicant Header ................................................................................................................................ 17
Contact Information ........................................................................................................................... 18
Designations ....................................................................................................................................... 18
Scoring ................................................................................................................................................ 18
Assignments ........................................................................................................................................ 19
Interviews ........................................................................................................................................... 19
Documents .......................................................................................................................................... 20
Evaluations .......................................................................................................................................... 20
Personal Information .......................................................................................................................... 21
Infractions ........................................................................................................................................... 23
Custom Fields ...................................................................................................................................... 23
GPA Overview ..................................................................................................................................... 23
Standardized Tests .............................................................................................................................. 24
Education ............................................................................................................................................ 24
Requirements ..................................................................................................................................... 24

Section 1: Introduction > What is WebAdMIT?
3
Prerequisite GPAs ............................................................................................................................... 25
Electronic Transcript ........................................................................................................................... 26
Essays .................................................................................................................................................. 28
Experiences ......................................................................................................................................... 29
Licenses and Certifications ................................................................................................................. 29
Socioeconomic Indicators ................................................................................................................... 29
Emails .................................................................................................................................................. 30
Notes ................................................................................................................................................... 30
History ................................................................................................................................................. 31
Section 6: Using the Clipboard ....................................................................................................... 33
Accessing the Clipboard ................................................................................................................ 33
Adding Applicants to the Clipboard ............................................................................................... 33
Removing Applicants from the Clipboard ....................................................................................... 33
Applying Clipboard Actions ........................................................................................................... 34
Section 7: Working with Lists ......................................................................................................... 35
Creating a Field List ....................................................................................................................... 35
Using List Operators ............................................................................................................................ 38
Excluding Null Values .......................................................................................................................... 38
Fields with Multiple Values ........................................................................................................... 39
Creating a Composite List .............................................................................................................. 39
Managing Lists .............................................................................................................................. 40
Reordering Lists .................................................................................................................................. 40
Editing Lists ......................................................................................................................................... 40
Copying Existing Lists .......................................................................................................................... 41
Deleting Lists ....................................................................................................................................... 41
Exporting Lists ..................................................................................................................................... 41
Emailing Applicants in a List ................................................................................................................ 42
Performing Batch Local Status Updates ......................................................................................... 42
Section 8: Working with Reports and Exports ................................................................................ 44
Creating Exports ........................................................................................................................... 44
Managing Exports ......................................................................................................................... 49
Running Exports .................................................................................................................................. 49
Reordering Exports ............................................................................................................................. 49
Editing Exports .................................................................................................................................... 49
Copying Existing Exports ..................................................................................................................... 49
Deleting Exports .................................................................................................................................. 50
Creating Reports ........................................................................................................................... 50
Applicant Reports ............................................................................................................................... 50
Comparative Reports .......................................................................................................................... 51
Decision Reports ................................................................................................................................. 52
User Reports ....................................................................................................................................... 53

Section 1: Introduction > What is WebAdMIT?
4
Managing Reports ......................................................................................................................... 54
Editing Reports .................................................................................................................................... 54
Deleting Reports ................................................................................................................................. 54
Finding Recent Files ...................................................................................................................... 54
Working with the PDF Manager ..................................................................................................... 55
Managing Access to the PDF Manager ............................................................................................... 55
Creating a PDF Template .................................................................................................................... 55
Generating and Downloading PDF Zip Files ........................................................................................ 56
Document Naming .............................................................................................................................. 56
Section 9: Working with Assignments ............................................................................................ 58
Searching for Assignments ............................................................................................................ 58
Sorting Results .............................................................................................................................. 58
Applying Search Actions to Selected Applicants ............................................................................. 59
Batch Assign Applicants ...................................................................................................................... 59
Allocating Assignments ................................................................................................................. 60
Submitting Assignment Results ..................................................................................................... 62
Section 10: Working with Interviews .............................................................................................. 63
Searching for Interviews ................................................................................................................ 63
Sorting Results .............................................................................................................................. 63
Applying Search Actions to Selected Applicants ............................................................................. 64
Batch Assign Interviews ...................................................................................................................... 64
Assigning Interviews ..................................................................................................................... 66
Submitting Interview Results ......................................................................................................... 67
Section 11: Working with Email Correspondence .......................................................................... 69
Searching for Correspondence ....................................................................................................... 69
Sorting Results .............................................................................................................................. 70
Sending Emails .............................................................................................................................. 70
Sending Emails from the Applicant Details Page ................................................................................ 70
Email Statuses ..................................................................................................................................... 72
Viewing Email Statuses from the Search Correspondence Page ........................................................ 73
Section 12: Configuring WebAdMIT ............................................................................................... 74
Creating Work Groups ................................................................................................................... 74
Adding Users to Work Groups ............................................................................................................ 77
Creating Users .............................................................................................................................. 77
Check Boxes on New User Accounts ................................................................................................... 78
Editing Existing Users .................................................................................................................... 78
Creating Custom Fields .................................................................................................................. 79
Creating Local Statuses ................................................................................................................. 81
Creating GPAs ............................................................................................................................... 83
Creating Local GPAs ............................................................................................................................ 84

Section 1: Introduction > What is WebAdMIT?
5
Creating Prerequisite GPAs ................................................................................................................. 87
Creating Requirements ................................................................................................................. 89
Creating Scoring Models ................................................................................................................ 91
Creating Point Tables .......................................................................................................................... 92
Creating Assignments .................................................................................................................... 95
Updating Completed Assignments ..................................................................................................... 97
Creating Interviews ....................................................................................................................... 98
Creating Interview Types .................................................................................................................... 98
Adding Interviewer Availability ........................................................................................................... 99
Updating Completed Interviews ....................................................................................................... 100
Creating Email Templates ............................................................................................................ 101
Creating Email Addresses ............................................................................................................ 104
Managing Applicant Headers ....................................................................................................... 105
Transferring Settings to a New Cycle ............................................................................................ 106

Section 1: Introduction > What is WebAdMIT?
6
Section 1: Introduction
What is WebAdMIT?
WebAdMIT is a cloud-based admissions management platform that provides users with tools to
streamline their admissions processes. Using WebAdMIT, admissions staff can:
• Manage each applicant as they progress through the admissions cycle.
• Manage collective groups of applicants.
• Obtain holistic views of applicant pools.
• Take full advantage of applicant data to make the best admissions decisions.
About Liaison International
For more than 20 years, Liaison has partnered with associations and agencies to deliver solutions to
thousands of institutions and programs. Our integrated software, services and data offerings streamline
processes, free our customers from administrative burden and provide them with tools and data to
improve their decision-making. Our team includes technology, services, support and data experts, with
direct experience in admissions and accreditation.
Mission: The mission of Liaison International is to provide state-of-the-art information technology
products and services to educational associations, accrediting agencies, and institutions of higher
education; to create an environment for sharing common technologies and best practices; and to
contribute to the advancement of health professions education through comprehensive, innovative and
collaborative technology-based projects.
About This Help Manual
This manual is to be used as a guide when working in the WebAdMIT software. Please note that each
Centralized Application Service (CAS) may have minor variances from what is set out here, so some
features described may be slightly different in your live environment. For any questions, feel free to use
the contact information listed under Support Resources to get in touch with us.
System Requirements
Browser Requirements
You can access WebAdMIT using the latest versions of the following browsers:

Section 1: Introduction > Security Information
7
• Chrome and Firefox (Preferred): For the optimum experience, we recommend using the most
current version of Mozilla Firefox or Google Chrome, which work on both Macs and PCs. You
can download these browsers for free here: Google Chrome and Mozilla Firefox.
• Safari: Safari is the default internet browser for Apple products and is compatible with
WebAdMIT. If you encounter any difficulty while using the most up-to-date version of Safari,
try switching to Chrome or Firefox.
• Edge: Edge is Microsoft’s most recent browser and is compatible with WebAdMIT. If you
encounter any difficulty while using the most up-to-date version of Edge, try switching to
Chrome or Firefox.
• Internet Explorer 11: IE11 is compatible with WebAdMIT; however, any previous versions of
Internet Explorer are no longer supported by Microsoft, and are therefore incompatible. If you
encounter any difficulty while using Internet Explorer 11, try switching to Chrome or Firefox.
Mobile Accessibility
WebAdMIT generally works on a tablet for faculty reviewers. It is not, however, supported for any
mobile device and some features may not function. Part of our product roadmap includes upgrading
WebAdMIT to be responsive and mobile supported.
Screen Resolution
For the best viewing experience, we recommend using WebAdMIT with a display resolution of at least
1024 x 768.
PDF Viewer
A PDF viewer is required to view documents contained in WebAdMIT. Download a free PDF viewer from
Adobe Systems at www.adobe.com.
Troubleshooting
If you are having difficulty loading pages:
• Ensure you are using the most current version of a compatible browser.
• Confirm that Cookies, JavaScript, and Pop-ups are enabled within your browser.
To determine your browser's version, and to confirm that Cookies, JavaScript, and Pop-up windows are
enabled, visit http://whatismybrowser.com.
Security Information
Your institution's IT department may have questions regarding the security measures taken to safeguard
applicant data. The following security measures include:

Section 1: Introduction > Support Resources
8
• Physical Security: The WebAdMIT servers are located at an AT&T Data Center in the Boston, MA
area. The data center is in alignment with compliance standards SOC 1/SSAE 16 and PCI DDS
compliance. This is one of largest Data Centers in the region with redundant power, Internet
access, and dynamic Bandwidth expansion.
• Configuration Portal: The WebAdMIT Configuration Portal uses a secured TLS version approved
by the PCI compliance. Credit card processing vendor services is done through PayPal. The Portal
sits behind secure and redundant routers, firewalls, and an intrusion prevention system at the
IDC.
• WebAdMIT (Admissions Portal): WebAdMIT uses a secured TLS version approved by the PCI
compliance.
• File(s) Download: Admissions Officers can access or download electronic data through the "web
interface" of the secure WebAdMIT portal. Institutions download the generated export files in a
Secure encrypted environment. No FTP access involved.
Support Resources
WebAdMIT Support
The WebAdMIT Support Team is available Monday-Friday from 9:00am to 8:00pm (ET).
• WebAdMIT Support Email: webadmitsupport@liaisonedu.com
• WebAdMIT Support Phone: 716-636-7777 option 7
Note that upgrades to WebAdMIT occur on Saturday evenings to minimize downtime for users.
Admissions Questions
WebAdMIT’s Support Resources page contains contact information specific to your CAS. This includes
applicant customer service offerings.

Section 2: Key Terms and Definitions > Support Resources
9
Section 2: Key Terms and Definitions
Administrator
A user responsible for the management, configuration, and operation of WebAdMIT.
Admissions User
Any member of an institution with a WebAdMIT account.
Applicant
A person who has applied to – and wishes to be considered for – a program via the centralized
application service (CAS).
Applicant Channels
Applicant Channels provide a snapshot of recent and upcoming activities.
Applicant Details Page
A page containing data for a single applicant, organized by panels.
Applicant Gateway
A portal that allows applicants to complete admissions-related activities, such as completing
supplemental applications, scheduling interviews, submitting payments, uploading additional
documentation, and accepting offers.
Assignment
A WebAdMIT feature that allows a user to assign an application to a member of the admissions
committee for review.
Association Users
Any member of the Association of American Medical Colleges with a WebAdMIT account
(Association Users have different permissions than Admission Users).
Batch Local Status Update
A function used to simultaneously change the local status of a group of applicants (on a per
designation basis).
Clipboard
An ad hoc list of applicants available for quick access by a WebAdMIT user.
CAS Configuration Portal
A portal used to configure your program settings, requirements, and branding.
Dashboard
WebAdMIT’s home page that provides an overview of application and admissions activity.
Decision Code

Section 2: Key Terms and Definitions > Support Resources
10
Decision Codes are used to record the decisions that you make for each applicant during the
application cycle. These vary based on what CAS you’re working in.
Designation
A program or track at an organization to which an applicant has applied.
Documents
PDFs associated with an application.
Evaluator
An individual who provides a letter of reference/recommendation for an applicant.
Export
A function that allows you to extract applicant information for use outside of WebAdMIT.
Interview
A WebAdMIT feature that allows a user to schedule, track and record an interview between an
applicant and a member of admissions committee.
List Manager
An advanced search tool that allows you to search/query the applicant pool using selected criteria.
Search results are referred to as lists, which can be saved and used to complete admissions tasks in
bulk, thereby helping improve efficiency.
Local Status
Descriptive categories created/customized by individual institutions that are used to track applicants
in each stage of the admissions process.
Menu Bar
The interface area that contains the tools you use to search, manage, and analyze your applicant
pool.
Panels
Collapsible panes of related information found in the Menu Bar and on the Applicant Details page.
Permissions
Access levels that define the activities users can perform.
Program
See Designation.
Requirement
Supplemental or prerequisite obligations for admission.
Score

Section 2: Key Terms and Definitions > Support Resources
11
A general term indicated by a value-based rating across a variety of areas. Scores can be configured
to factor in GPAs, test results, Assignment/Interview ratings, and other overall ratings of an
applicant’s aptitude.
Status Channels
Status Channels provide a numeric count of applicants at each stage in your admissions process.
User
Any member of an organization with an account that allows them to access and use WebAdMIT.
Work Groups
Collections of users who share common permissions and access within WebAdMIT.
Section 3: Accessing WebAdMIT > Username and Password
12
Section 3: Accessing WebAdMIT
To access WebAdMIT, use a supported web browser to navigate to https://current.webadmit.org.
Username and Password
New users created by their institution’s WebAdMIT administrator will receive an email from WebAdMIT
with a link to create a password.
Forgotten Username or Password
If you forgot your username or password, click the Forgot username or password? link to receive an
email with further instructions. Typically, your institution email address is your username.
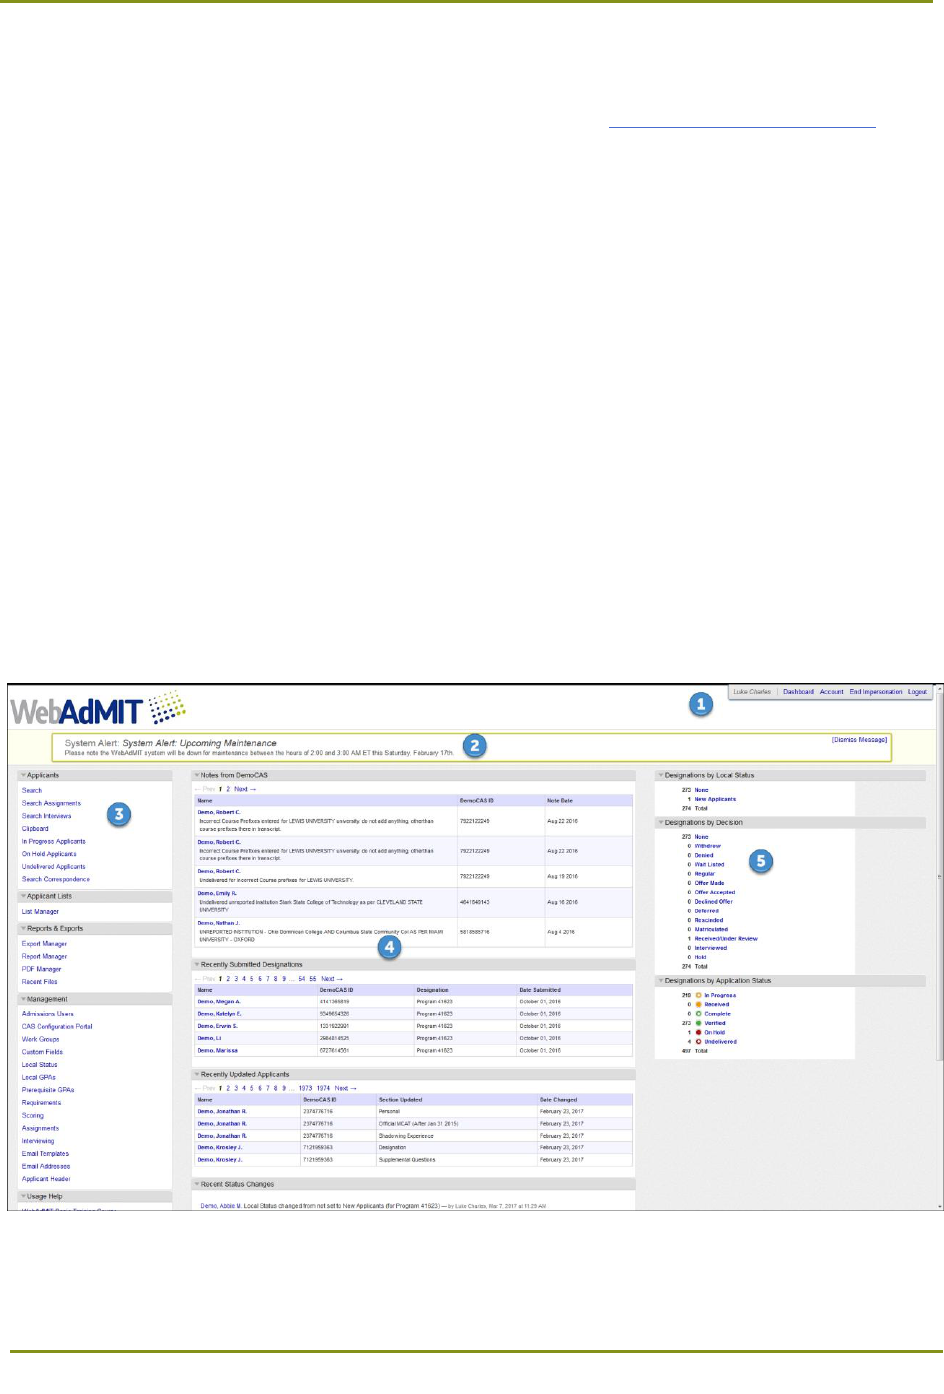
Dashboard
After logging in to WebAdMIT, you arrive on the Dashboard, which provides an overview of essential
information.
There are five main areas of the dashboard:
1. Page Header: Displays your name and institution, as well as:
• CAS Logo: Click the link to return to the dashboard.

Section 3: Accessing WebAdMIT > Dashboard
13
• Dashboard Link: Provides quick access to the dashboard.
• Account Link: Provides access to your account information; here, you can manage your
contact information and password.
• Logout Link: Logs you out of your current session.
• Cycle Switcher: Where applicable, a dropdown menu will appear, allowing users to adjust
their view to a different CAS or cycle.
2. Splash Message: Displays messages from Liaison and will not appear unless there is at least one
posted message.
3. Menu Bar: Contains the tools you use to search, manage, and analyze your applicant pool, and
provides access to support and training resources. Management and configuration functions are
available for select users based on their permissions.
4. Applicant Channels: Provides a snapshot of recent and upcoming activities, including:
• Review Assignments: Displays any Assignments assigned to you, and only appears if you
have incomplete Assignments.
• Interviews: Displays any Interviews assigned to you, and only appears if you have
incomplete Interview Assignments.
• Recently Submitted Designations: Displays applicants who have recently designated a
program at your institution and submitted their application.
• Recently Updated Applicants: Displays the most recent changes occurring in WebAdMIT,
including changes to contact information, new letters of evaluation, new test scores, etc.
• Recent Status Changes: Displays the most recent local status changes made by your
admissions staff.
5. Status Channels: Provides a numeric count of applications at each stage in your admissions
process, including:
• Designations by Local Status: Displays the number of applicants you’ve assigned to each
Local Status.
• Designations by Decision: Displays the number of applicants assigned to Decision Code.
Note that Status Channels count designations; this means that, where applicable, if applicants
apply to more than one program (designation) at your institution, then the displayed number
factors into each application submitted.
Section 4: Searching for Applicants > Sorting Results
14
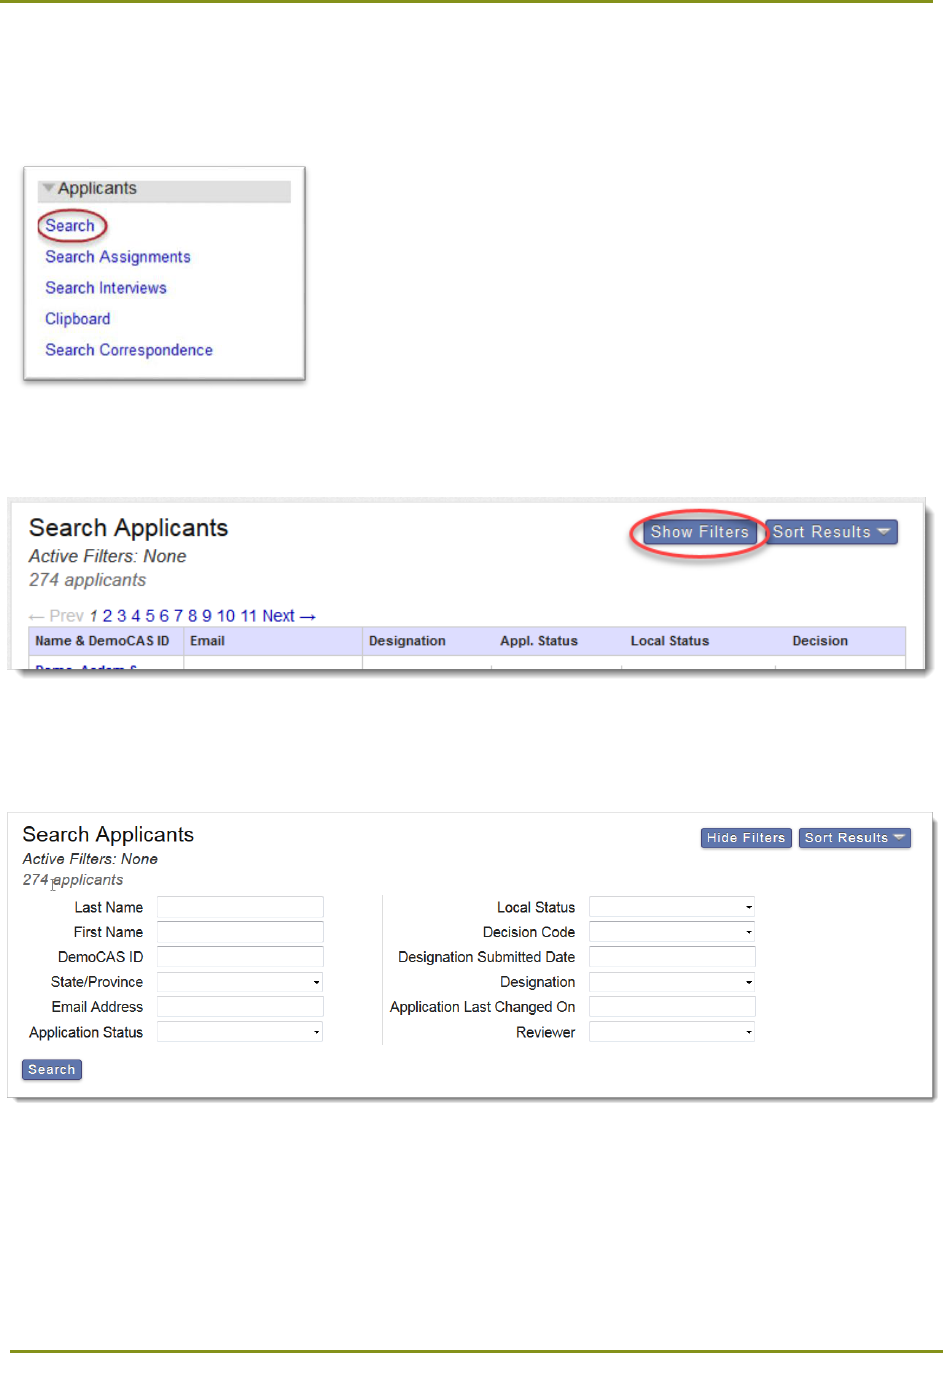
Section 4: Searching for Applicants
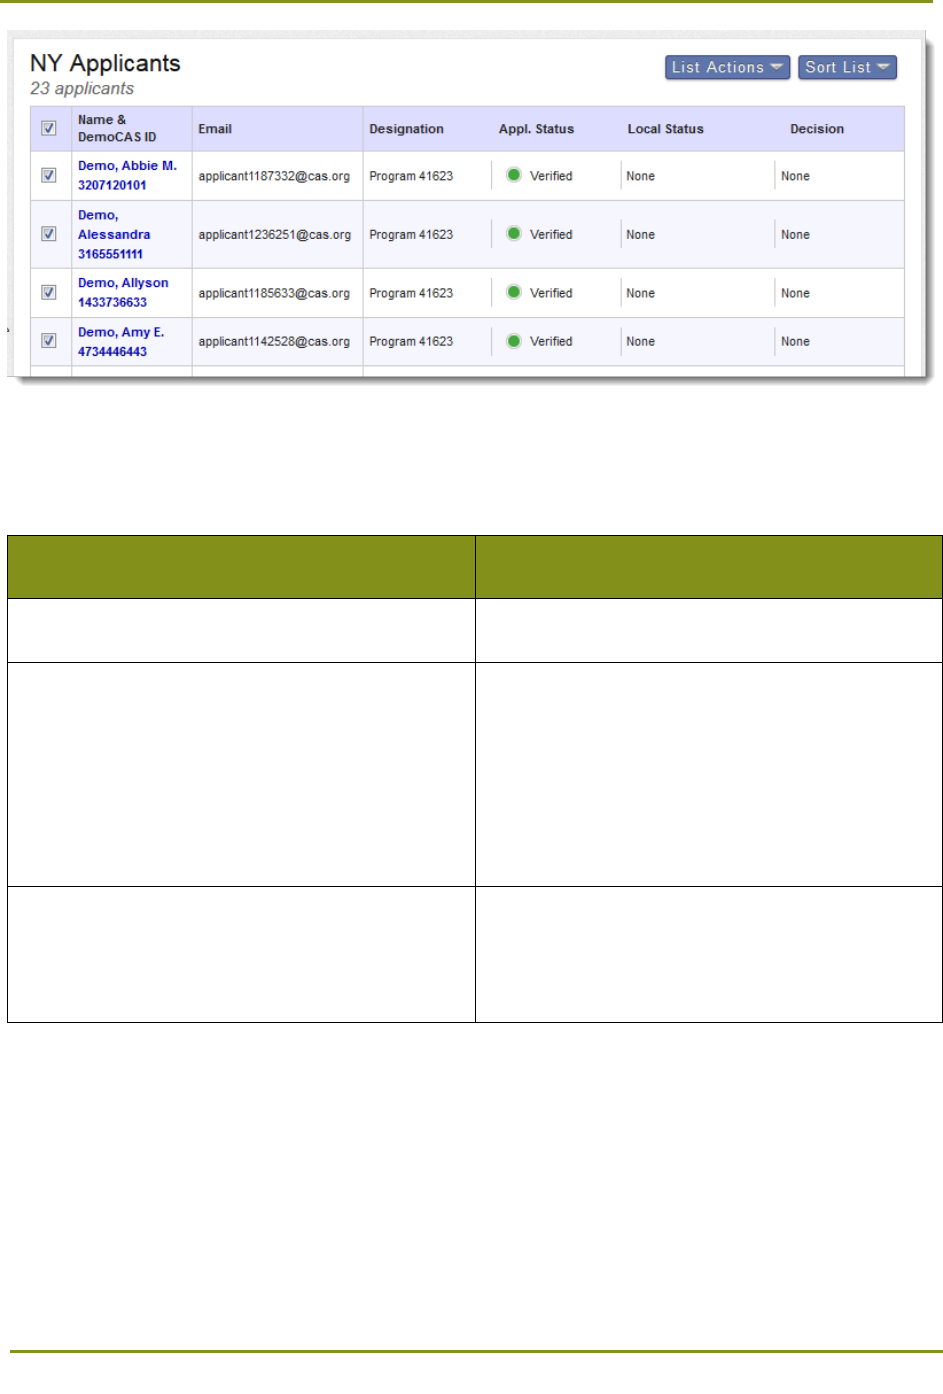
1. Using the Menu Bar, open the Applicants panel, then click Search.
2. You can apply one or more filters to refine the list of search results. Only applicants you have
permission to view will appear in your results. To apply filters, click the Show Filters button.
3. Enter your criteria, then click Search. Note that the Last Name, First Name, and CAS ID fields match
information in the Applicant Header; State and Email Address match the Preferred Address; and
Designation Submitted Date matches the date that appears in the Designation panel.
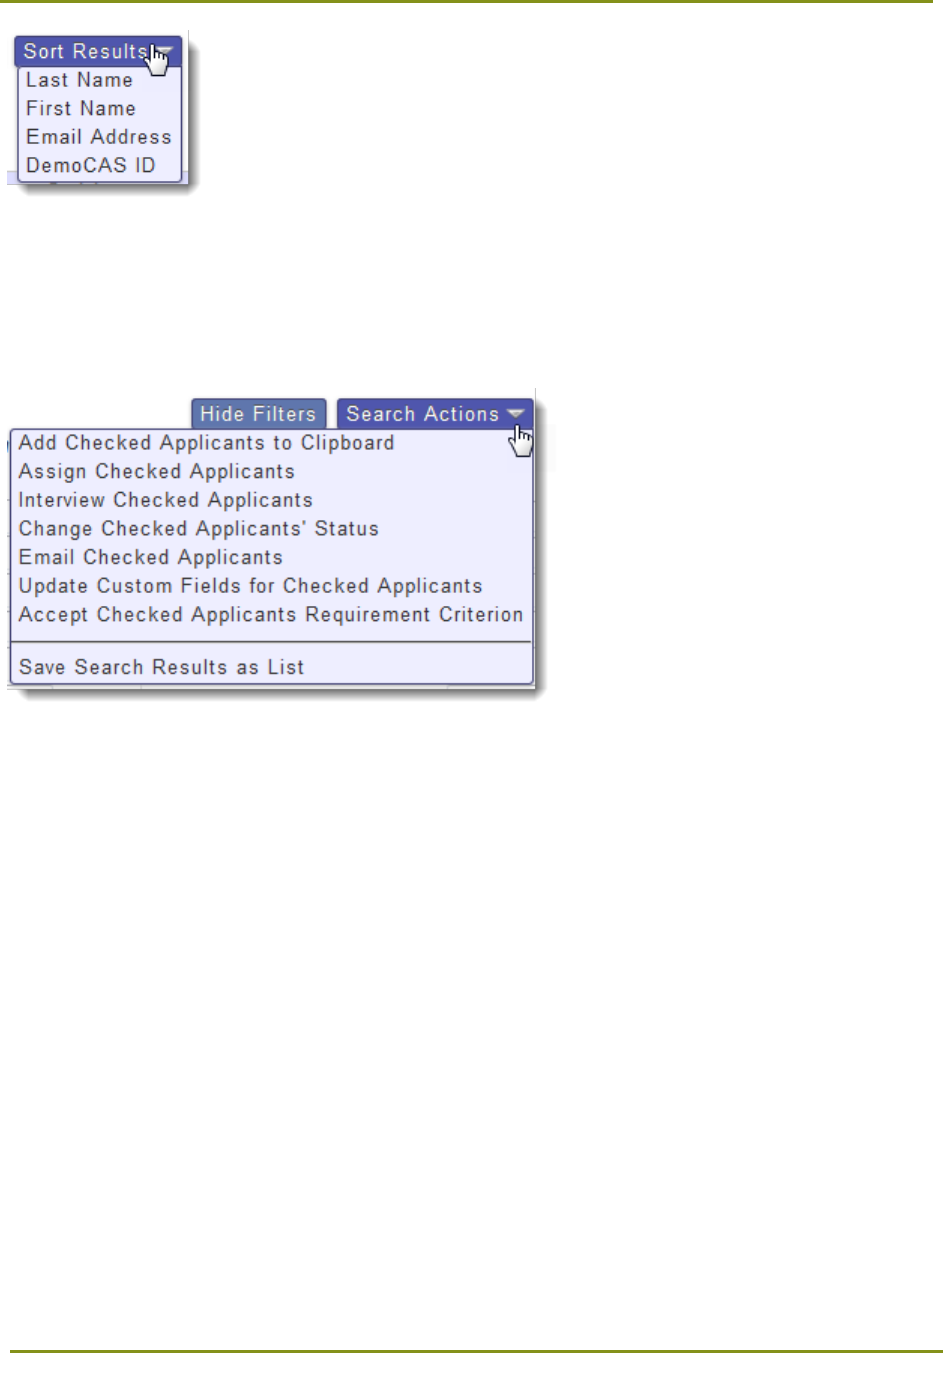
Sorting Results
Click the Sort Results button to sort your results by name, email address, or ID number.
Section 4: Searching for Applicants > Applying Search Actions to Selected Applicants
15
Applying Search Actions to Selected Applicants
Using the checkboxes in the first column of your search results, you can select multiple applicants and
apply an action. These actions are described in more detail in subsequent sections of this manual.
• Add Checked Applicants to Clipboard: Add the selected applicants to the clipboard.
• Assign Checked Applicants: Assign the selected applicants to a specific admission user (you
must have at least one Assignment Type set up).
• Interview Checked Applicants: Create an Interview for the selected applicants (you must have
at least one Interview Type set up).
• Change Checked Applicants' Status: Change the Local Status for the selected applicants.
• Email Checked Applicants: Send an email to the selected applicants.
• Update Custom Fields for Checked Applicants: Update the custom fields that have been defined
for selected applicants.
• Accept Checked Applicants Requirement Criterion: Select a requirement and update the
response to that requirement for the selected applicants (this function only appears if
requirements are configured).
• Save Search Results as List: Save the filters you selected as a list (accessible via the List
Manager).
Warning: Dispensing Assignments and/or Interviews is an advanced function that can’t be undone in
batch. Confirm that your search results and selections are accurate before performing the change.

Section 5: Viewing Applicant Information > Applicant Details Panels
16
Section 5: Viewing Applicant Information
1. From any search or list, click the applicant’s name to view the Applicant Details page.
2. Information appears in categorized, collapsible panels.
Applicant Details Panels
The panels that display are determined by users’ Work Groups; only applicant header information will
display if panels are not permissioned to a Work Group.
Section 5: Viewing Applicant Information > Applicant Details Panels
17
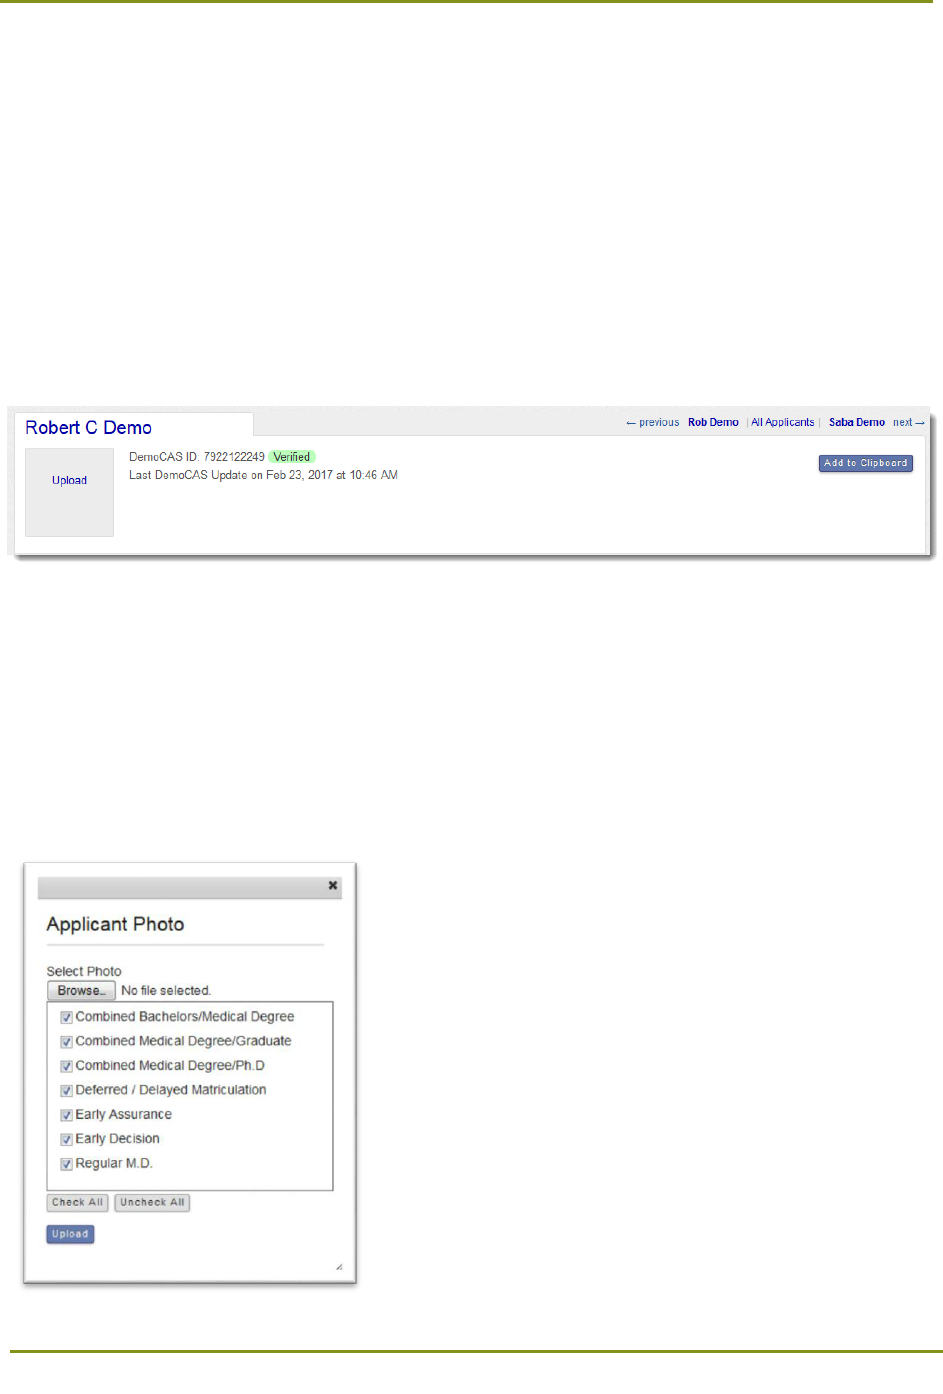
Applicant Header
The Applicant Header displays key demographic information, including:
• Applicant Name
• Applicant Photo
• Applicant ID
• Application Status, which appears as a flag (highlighted in green).
• The most recent date and time that information was transmitted from the CAS to WebAdMIT
(i.e., last Applicant Update)
Additionally, the top right corner of the Applicant Header provides navigation options to move between
applicants.
Uploading an Applicant Photo
From the Applicant Details page, you can upload a photo in .jpg, .gif, .bmp, and .png formats. We
recommend a size of 640x480. Note that photos are optional and are not provided by the CAS.
1. Click Upload in the Applicant Header section.
2. Click Browse to find and select the photo on your computer. Note that a list of programs appears in
the Applicant Photo dialog box. WebAdMIT automatically selects the programs that the applicant
applied to. If necessary, uncheck any programs, then click Upload.
Section 5: Viewing Applicant Information > Applicant Details Panels
18
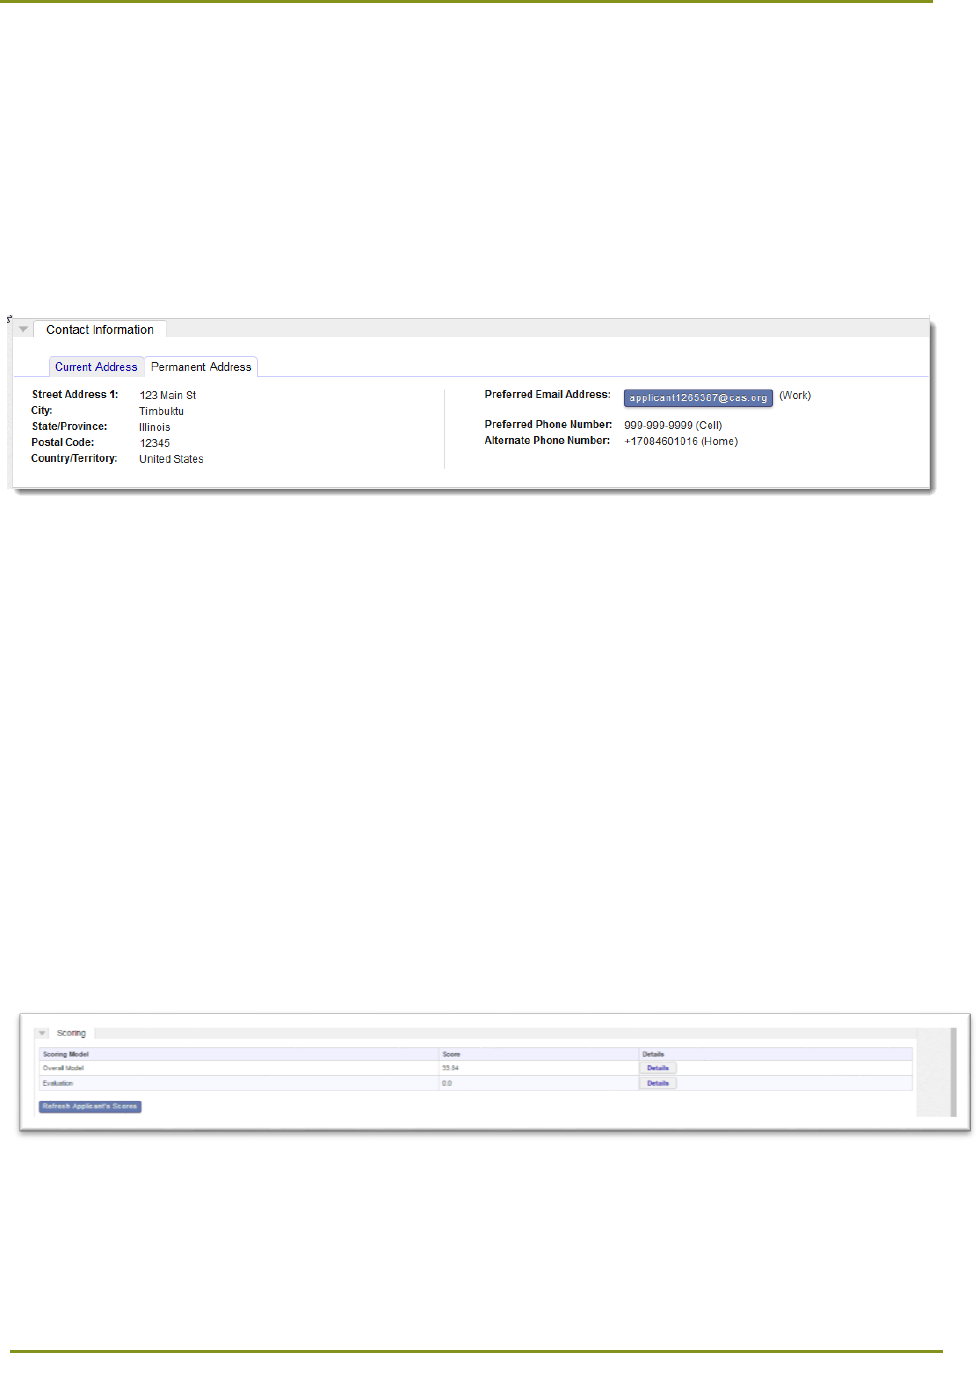
Contact Information
This panel displays the applicant’s contact information, which may include
• Current Address
• Permanent Address
• Preferred Address
• Alternate Contact
Designations
This panel displays the program at your institution to which the applicant applied, as well as:
• Local Status
• Decision Code
• Application Status
• Relevant Dates (the date the application was completed, submitted, verified)
• Details (additional information about the designation, such as year(s) of previous application
and graduate program interest tracks, if applicable)
Scoring
This panel displays the scoring model used for the applicant, as well as the actual score and a detailed
view of score calculations.
To view the score calculations, click Details. Details displayed include:
• Scorable Field name
• Input score (original score)
• Point Table applied to score that component
Section 5: Viewing Applicant Information > Applicant Details Panels
19
• Multiplier used
• Component Score (final score)
Scores are automatically updated when changes are made to an applicant’s scored items or a Scoring
Model. When making changes directly on an applicant’s page, you may need to click Refresh Applicant's
Scores to view the updated component scores.
Applicant scores can be exported via the Export Manager and are searchable in the List Manager; a
Scoring Details report can be generated using the Report Manager tool.
Assignments
This panel displays the user(s) who completed or are assigned to complete Assignments for the
Applicant.
Interviews
This panel displays the user(s) who completed or are assigned to complete Interviews for the Applicant.
Section 5: Viewing Applicant Information > Applicant Details Panels
20
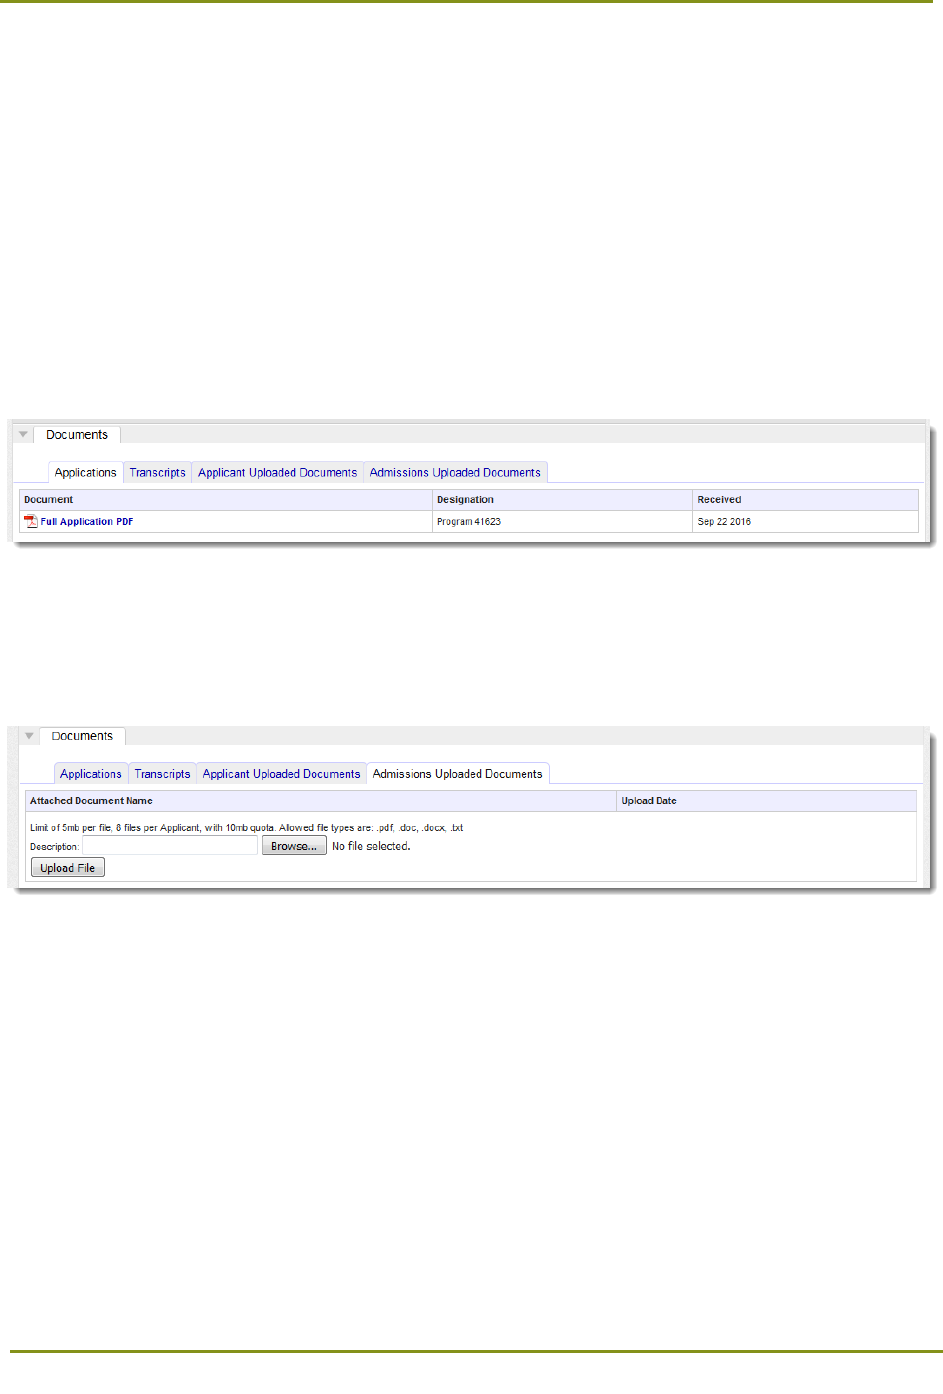
Documents
This panel displays the applicant’s documents transmitted from the CAS. Documents uploaded by local
program staff also appear here. Documents sources can include:
• Applications: This section contains a full PDF of the application.
• Transcripts: These documents appear when they are received and processed for a submitted
applicant. Note that the received date is the date the document was received into WebAdMIT
from the CAS.
• Applicant Uploaded Documents: Documents submitted by the candidates from the applicant
portal.
• Admissions Uploaded Documents: Documents uploaded internally by your admissions team.
These are not visible to applicants.
To download a document, click on its name. Depending on your browser, you may be prompted to open
or save the file.
To attach a document, enter a description (name), click Browse to find and select the document on your
computer, then click Upload.
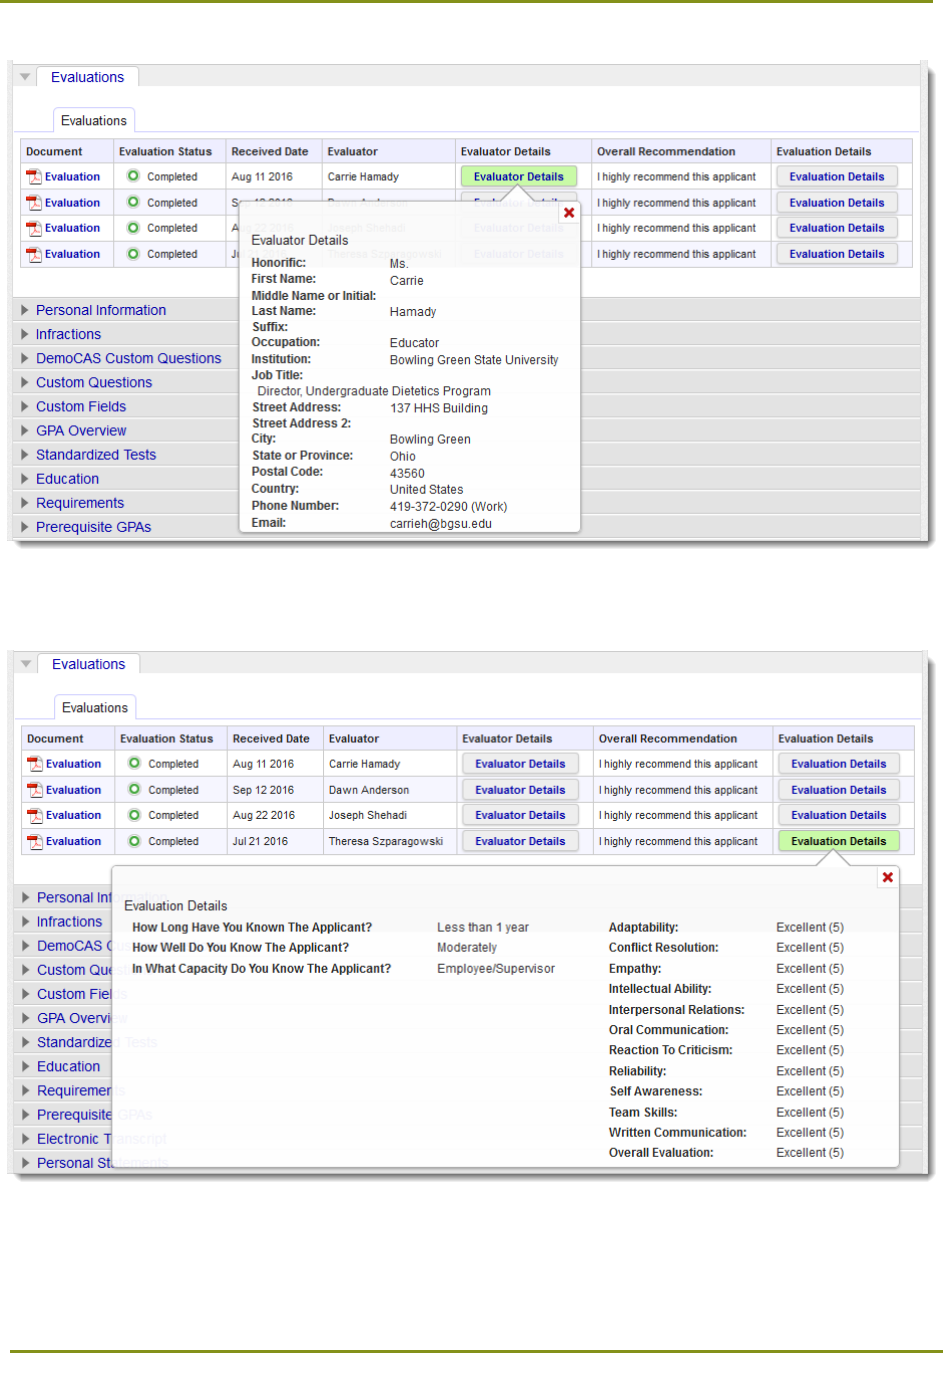
Evaluations
This panel displays the letters of evaluation that were completed by the applicant’s evaluators.
To view evaluator information, click Evaluator Details.
Section 5: Viewing Applicant Information > Applicant Details Panels
21
To view additional evaluator information, if applicable, click Additional Evaluators.
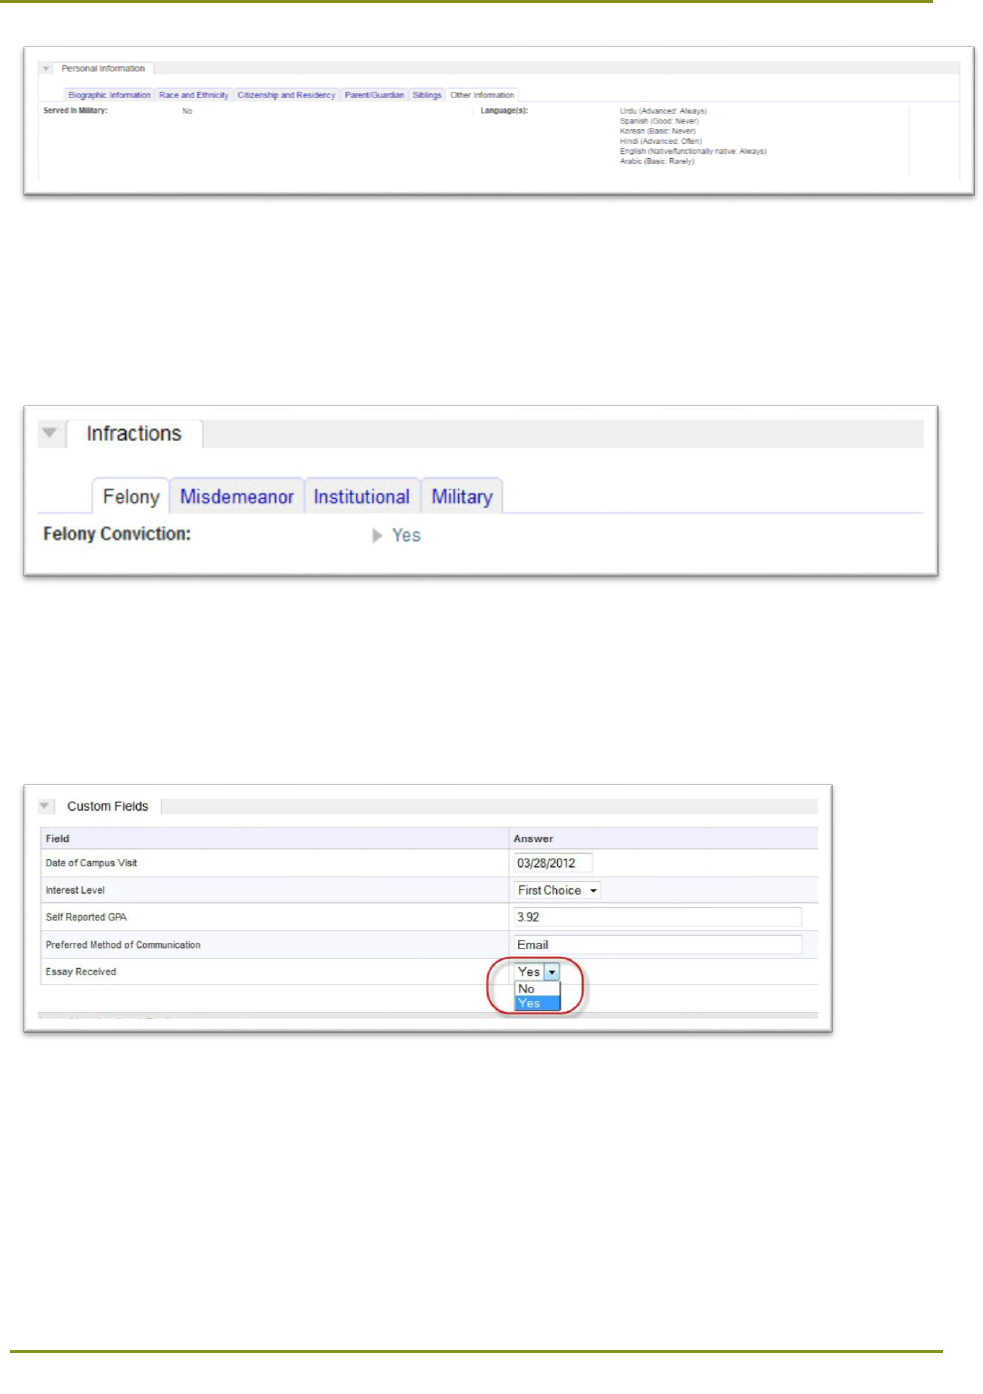
Personal Information
This panel displays the applicant’s personal information, including:

Section 5: Viewing Applicant Information > Applicant Details Panels
22
• Biographic Information
• Race & Ethnicity
• Citizenship and Residency Information
• Parent/Guardian (note: expand the education section to view any schools attended by the
parent/guardian, then expand the Residency section for more information)
• Siblings
• Other information, such as military status or languages spoken
Section 5: Viewing Applicant Information > Applicant Details Panels
23
Infractions
This panel displays felony, misdemeanor, institutional, or military infractions reported by the applicant.
If the applicant reported Yes to an infraction, expand that section for more information.
Custom Fields
This panel displays supplemental application information. The fields that display here are configured by
your WebAdMIT administrator.
GPA Overview
This panel displays a series of post-secondary GPAs calculated for the applicant. Some of the GPAs are
calculated by the CAS, while other are customized by you and calculated by WebAdMIT. Some of the
GPAs may include:
• GPAs by Year
• GPAs by Subject

Section 5: Viewing Applicant Information > Applicant Details Panels
24
• Local GPAs
• Prerequisite GPAs
• Foreign Evaluations
Standardized Tests
This panel displays the applicant’s applicable test scores for exams. The available tests that may appear
here will vary based on your CAS. Tests may include ACT, DAT, GRE, GMAT, HESI, IELTS, MCAT, NBDE,
OAT, PCAT, TEAS, and/or TOEFL exams.
Note: Some tests may have a dedicated panel outside of the Standardized Tests panel.
Education
This panel displays the previous institutions attended. This may include the undergraduate institution(s),
graduate institution(s), and/or high school(s) attended by the applicant.
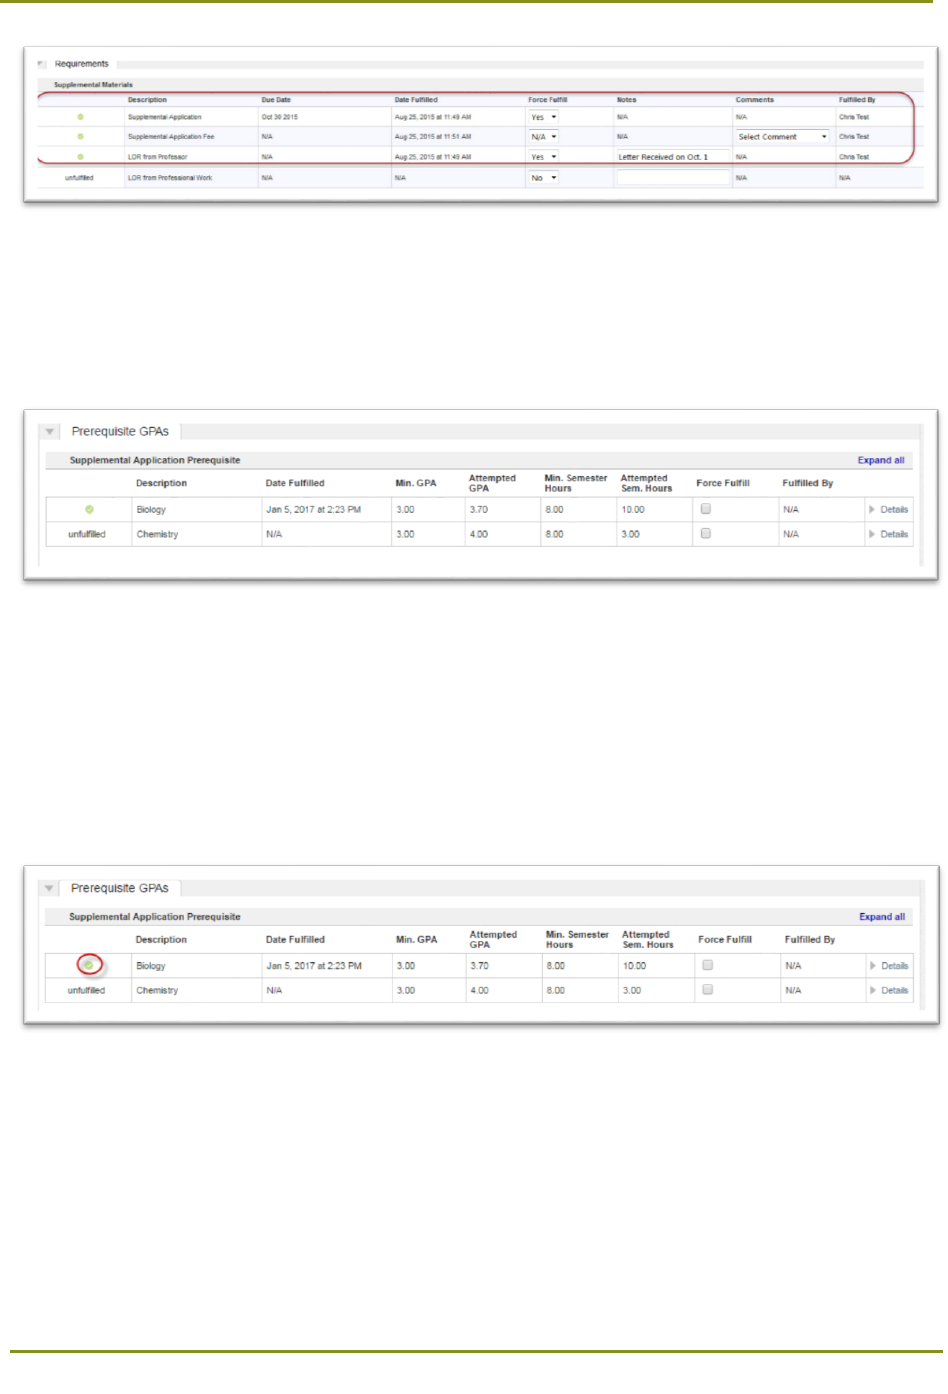
Requirements
This panel displays the status of supplemental application materials and information, such as fees or
deadlines. The fields that display here are configured by your WebAdMIT Administrator.
Section 5: Viewing Applicant Information > Applicant Details Panels
25
Prerequisite GPAs
This panel displays a summary of your prerequisites, if the applicant has completed them, and (if so) the
applicant's total credits and average GPA used to fulfill the criterion.
Fulfilling Criteria
Prerequisites that are built in WebAdMIT will be matched by admissions users and are not visible to
applicants. Prerequisite criteria can be fulfilled in two ways:
1. Associate the prerequisite with a course from the Electronic Transcript. When the matched
course(s) meets the GPA and Credit thresholds that you have determined (labeled as "Min. GPA"
and "Min. Credits" on the Prerequisite GPA panel), the criterion is marked as fulfilled.
To view the course(s) that is fulfilling a criterion, click the Details link. To view all courses matched to
a criterion, click Expand all.
Section 5: Viewing Applicant Information > Applicant Details Panels
26
2. Manually fulfill the criterion. To manually fulfill a criterion, click the Force Fulfill checkbox.
Electronic Transcript
This panel displays a normalized view of the applicant’s post-secondary academic coursework, including
the CAS standardized classification and grade.
To view additional information about a course, click the Details link.
Section 5: Viewing Applicant Information > Applicant Details Panels
27
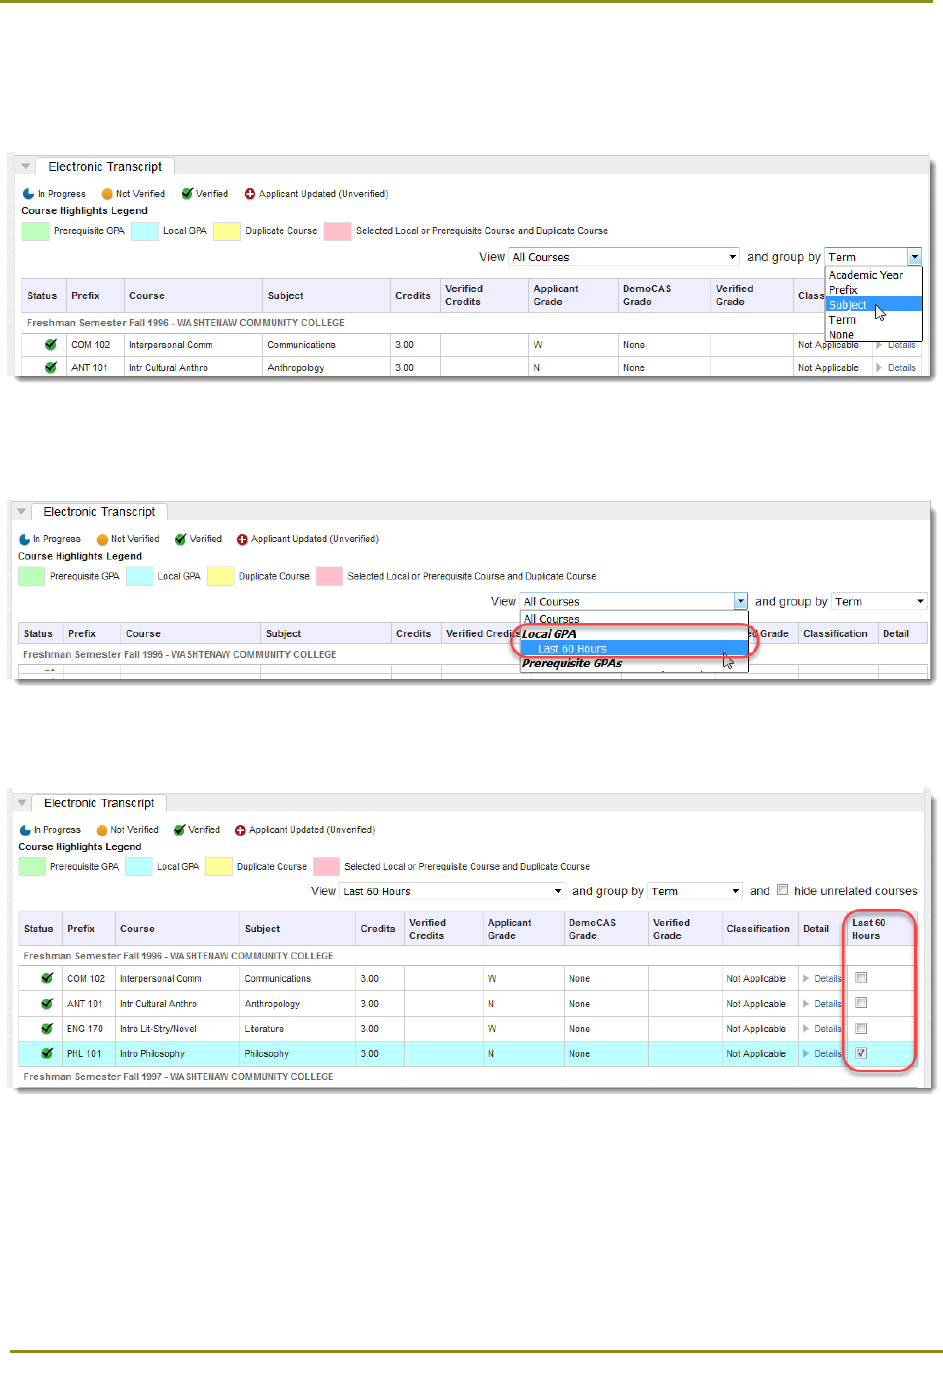
Grouping Courses
To group courses by academic status, course number, classification, or term, select an option from the
and group by drop-down list.
Viewing Local GPAs
To review courses that comprise a Local GPA, select a Local GPA template from the View drop-down list.
The resulting view displays a column of checkboxes; checked courses are included in the Local GPA you
are viewing. To remove a course from the Local GPA, uncheck the box.
Note: Unchecking courses to remove them from a Local GPA is a temporary action. Adjustments to the
Local GPA setup or updates to an applicant’s coursework will cause Local GPAs to recalculate, and
manual course selections to be overwritten.
To restrict the view to only the courses included in the selected Local GPA, click the Hide Unrelated
Courses checkbox.

Section 5: Viewing Applicant Information > Applicant Details Panels
28
Viewing Prerequisite GPAs
To review and add courses to specific Prerequisite GPAs, select a Prerequisite GPA template from the
View drop-down list.
The resulting view displays a requirements column. To add a course to a prerequisite, click the
Prerequisite GPAs button.
Essays
This panel displays the applicant’s Personal Statement / Essay.
Section 5: Viewing Applicant Information > Applicant Details Panels
29
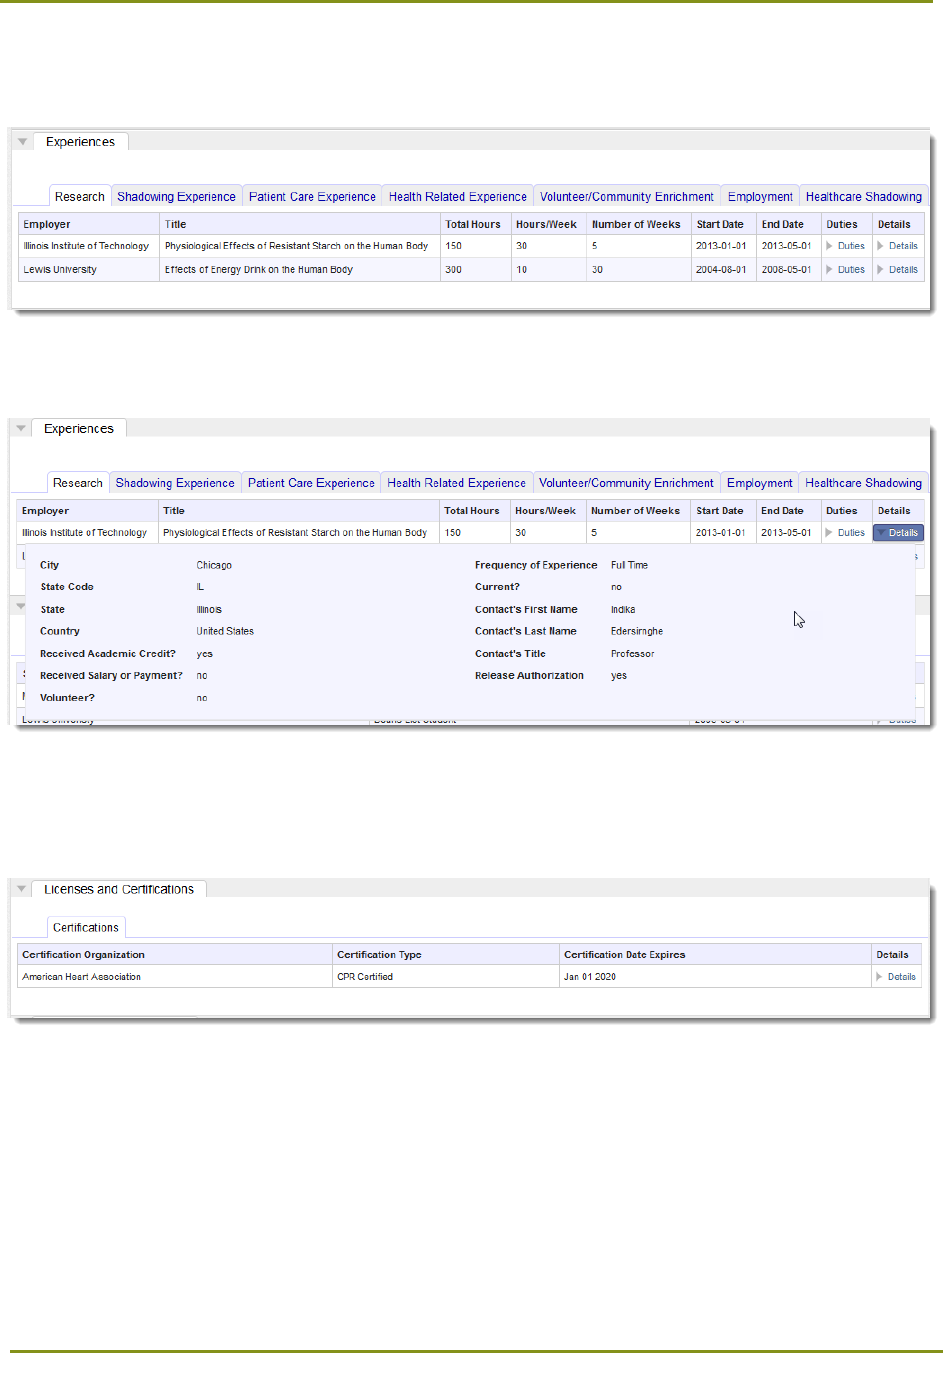
Experiences
This panel displays the applicant’s reported work, activities, and experiences.
To view additional information about the experience (i.e. organization, contact information, etc.), click
Details.
Licenses and Certifications
This panel displays relevant licenses and certifications reported by the applicant.
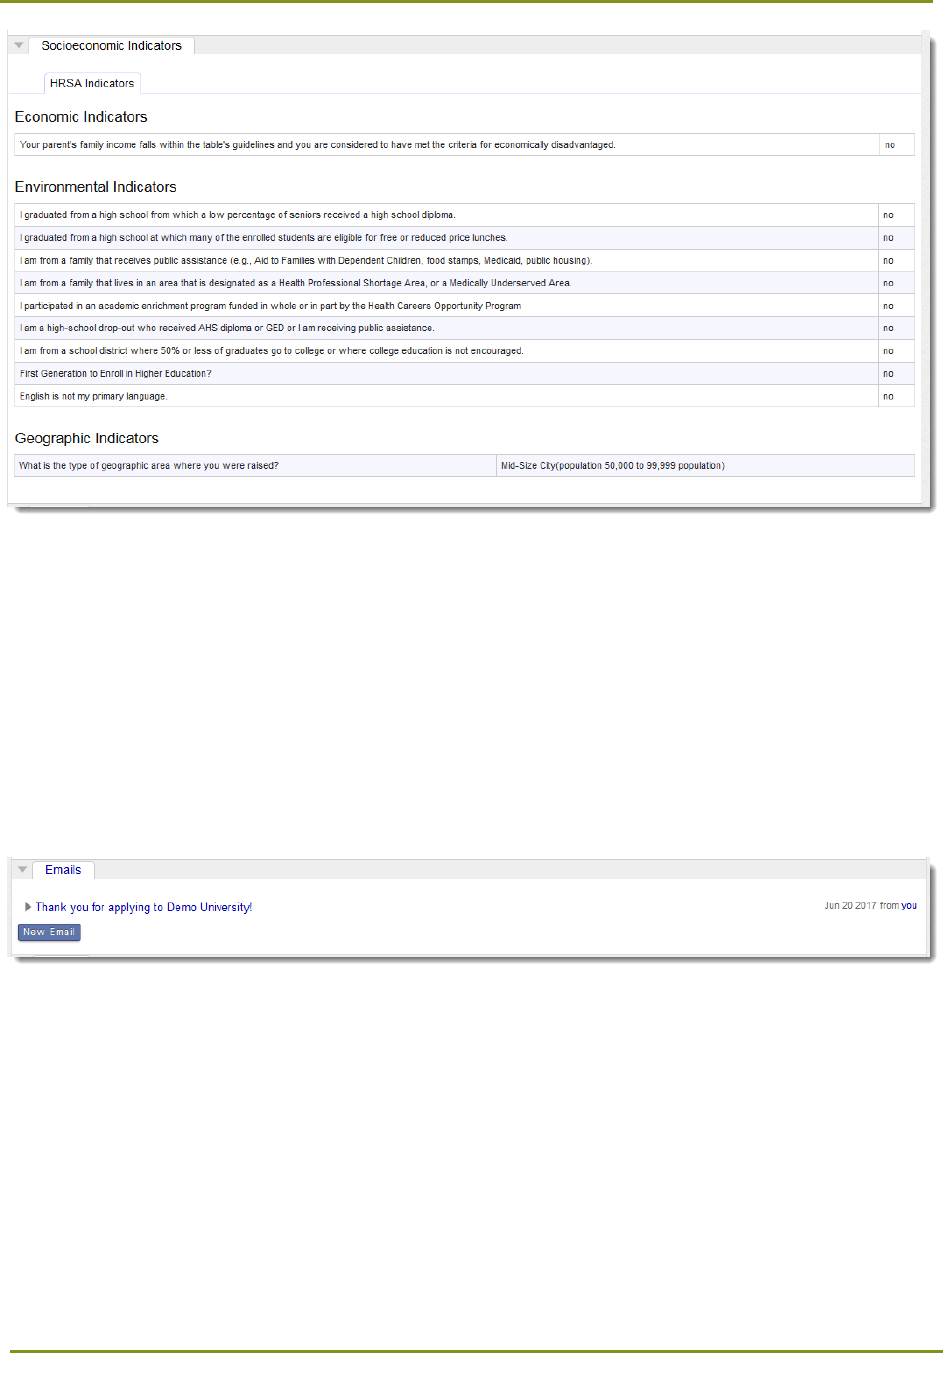
Socioeconomic Indicators
This panel displays three sets of indicators for the applicant, which may include Economic Indicators,
Environmental Indicators, and Geographic Indicators.
Section 5: Viewing Applicant Information > Applicant Details Panels
30
1. Geographic Indicators indicate if the counties listed in the applicant’s Preferred Address, Permanent
Address, Alternate Contact Address, Childhood Address, Birth Address, Residency Address, or High
School Attended are considered rural or medically underserved.
2. Childhood Indicators provide additional reported information about the applicant’s economic
childhood situation.
Emails
This panel displays email correspondence with the applicant. To view an email, click the email name.
Note: If merge fields are incorporated into an email, the merge fields display instead of the applicant’s
information. To see an email with all applicant information filled in for the merge fields and any logos,
send a preview to yourself.
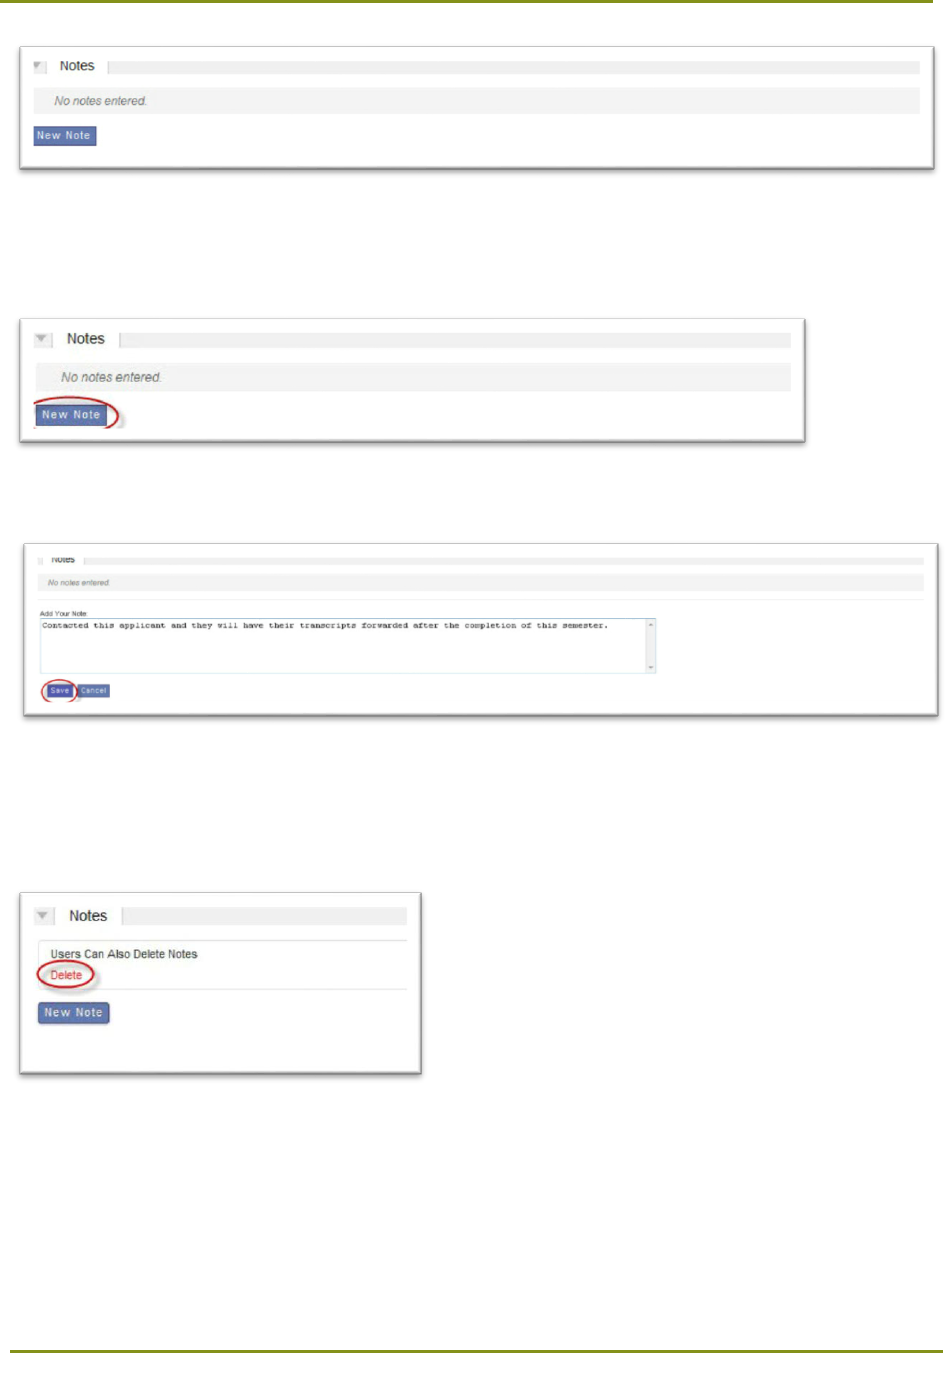
Notes
This panel displays recorded notes and comments about the applicant. Notes entered here can be
viewed by all users with access to this panel.
Section 5: Viewing Applicant Information > Applicant Details Panels
31
Creating a Note
1. To create a note, click New Note.
2. Enter your note in the Add Your Note text box, then click Save.
Deleting a Note
To delete a note, place your cursor under the note’s text, then click Delete. Note that only a note author
can delete their note.
History
This panel displays a change log that includes the following:
• CAS Updates (Note that the change date reflects the last date this information was transmitted
from the CAS to WebAdMIT, not the date it was changed by the applicant.)

Section 5: Viewing Applicant Information > Applicant Details Panels
32
• Local Status Changes.
Section 6: Using the Clipboard > Accessing the Clipboard
33
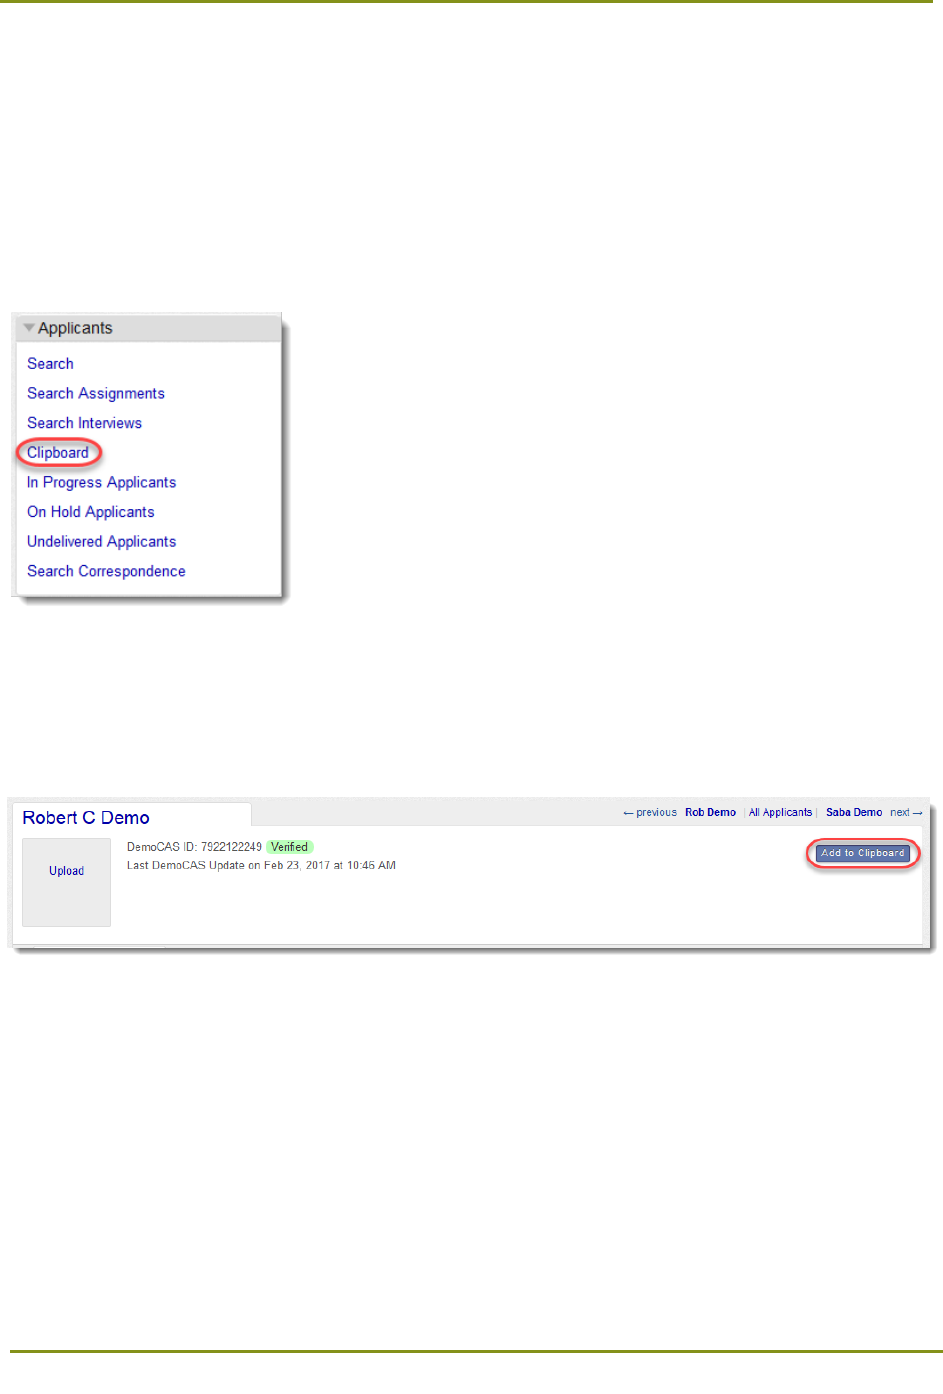
Section 6: Using the Clipboard
The Clipboard allows you to store an ad hoc list of applicants for quick access. Clipboards are user-
specific, and you can add as many applicants as necessary.
Accessing the Clipboard
Using the Menu Bar, open the Applicants panel, then click Clipboard.
Adding Applicants to the Clipboard
From the Applicant Details page, click the Add to Clipboard button to add the applicant to your
clipboard.
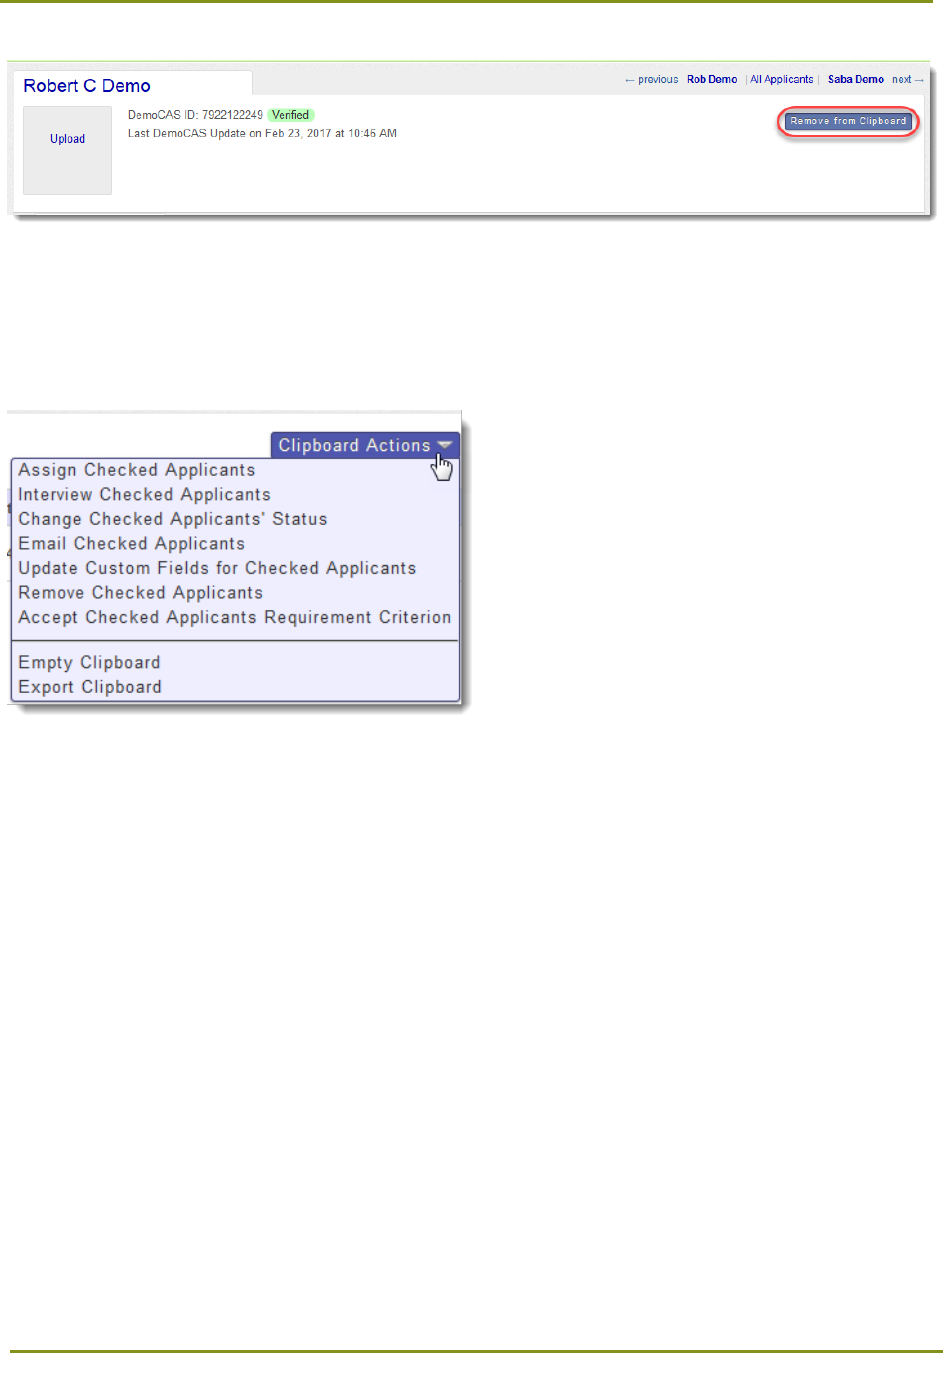
Removing Applicants from the Clipboard
From your Clipboard, navigate to the Applicant Details page of the applicant you want to remove, then
click Remove from Clipboard.
Section 6: Using the Clipboard > Applying Clipboard Actions
34
Applying Clipboard Actions
Use the checkboxes in the first column of your search results to select multiple applicants and apply an
action. These actions are described in more detail in subsequent sections of this manual.
• Assign Checked Applicants: Assign the selected applicants to a specific admission user (you
must have at least one Assignment Type set up).
• Interview Checked Applicants: Create an Interview for the selected applicants (you must have
at least one Interview Type set up).
• Change Checked Applicants' Status: Change the Local Status for the selected applicants.
• Email Checked Applicants: Send an email to the selected applicants.
• Update Custom Fields for Checked Applicants: Update the custom fields that were defined for
selected applicants (this function only appears if custom fields have been created).
• Remove Checked Applicants: Removes the checked applicants from the Clipboard.
• Accept Checked Applicants Requirement Criterion: Select a requirement and update the
response to that requirement for the selected applicants (this function only appears if
requirements were configured).
• Empty Clipboard: Remove all applicants from the Clipboard.
• Export Clipboard: Export the Clipboard to .csv, .xls, or .txt formats.
Warning: Dispensing Assignments and/or Interviews is an advanced function that can’t be undone in
batch. Confirm that your search results and selections are accurate before performing the change.
Section 7: Working with Lists > Creating a Field List
35
Section 7: Working with Lists
WebAdMIT allows you to group and manage applicants by common criteria. Once you create a list, you
can access it as needed and perform various actions. Lists are dynamic and update as your applicant
pool changes.
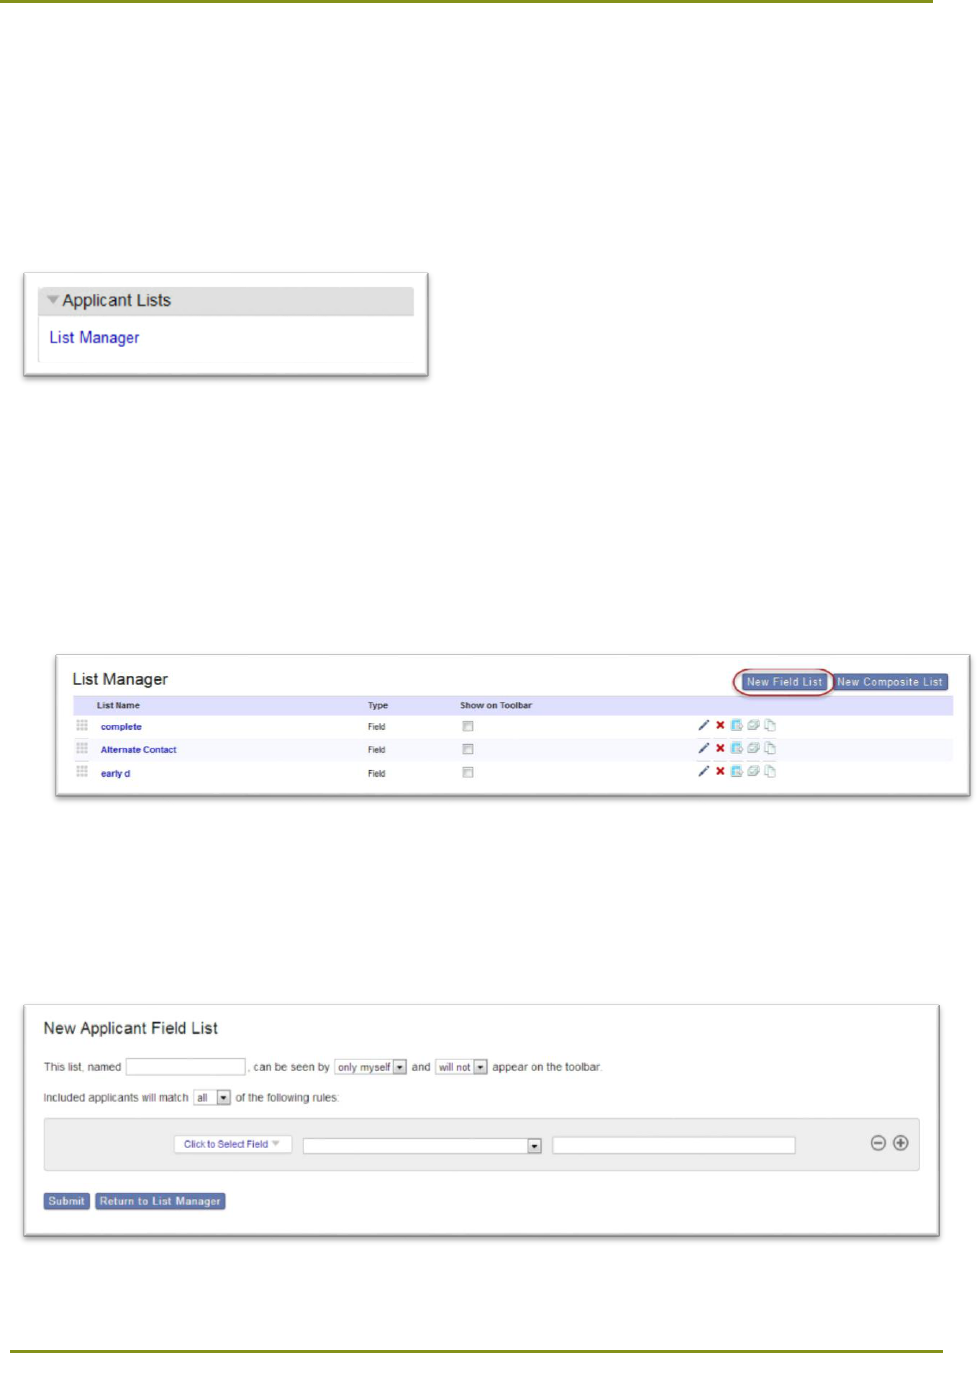
Using the Menu Bar, open the Applicant Lists panel, then click List Manager.
Creating a Field List
Use field lists to search for applicants using and/or criterion. For example, you can create a list that
contains female applicants who are in-state (i.e. female and in-state), or a list that contains applicants
who reside in a regional area (i.e. MA or CT or VT or RI).
1. From the List Manager page, click the New Field List button.
2. Name the list, select who can view it (just you or everyone at your institution), and indicate if it
should appear in the Menu Bar under the Applicant Lists panel (this option provides you with quick
access to run the list). Then, determine if you want your query to match all or any of the rules you
will subsequently establish. You can think of this as AND/OR logic, except in WebAdMIT and = all
and any = or.
Section 7: Working with Lists > Creating a Field List
36
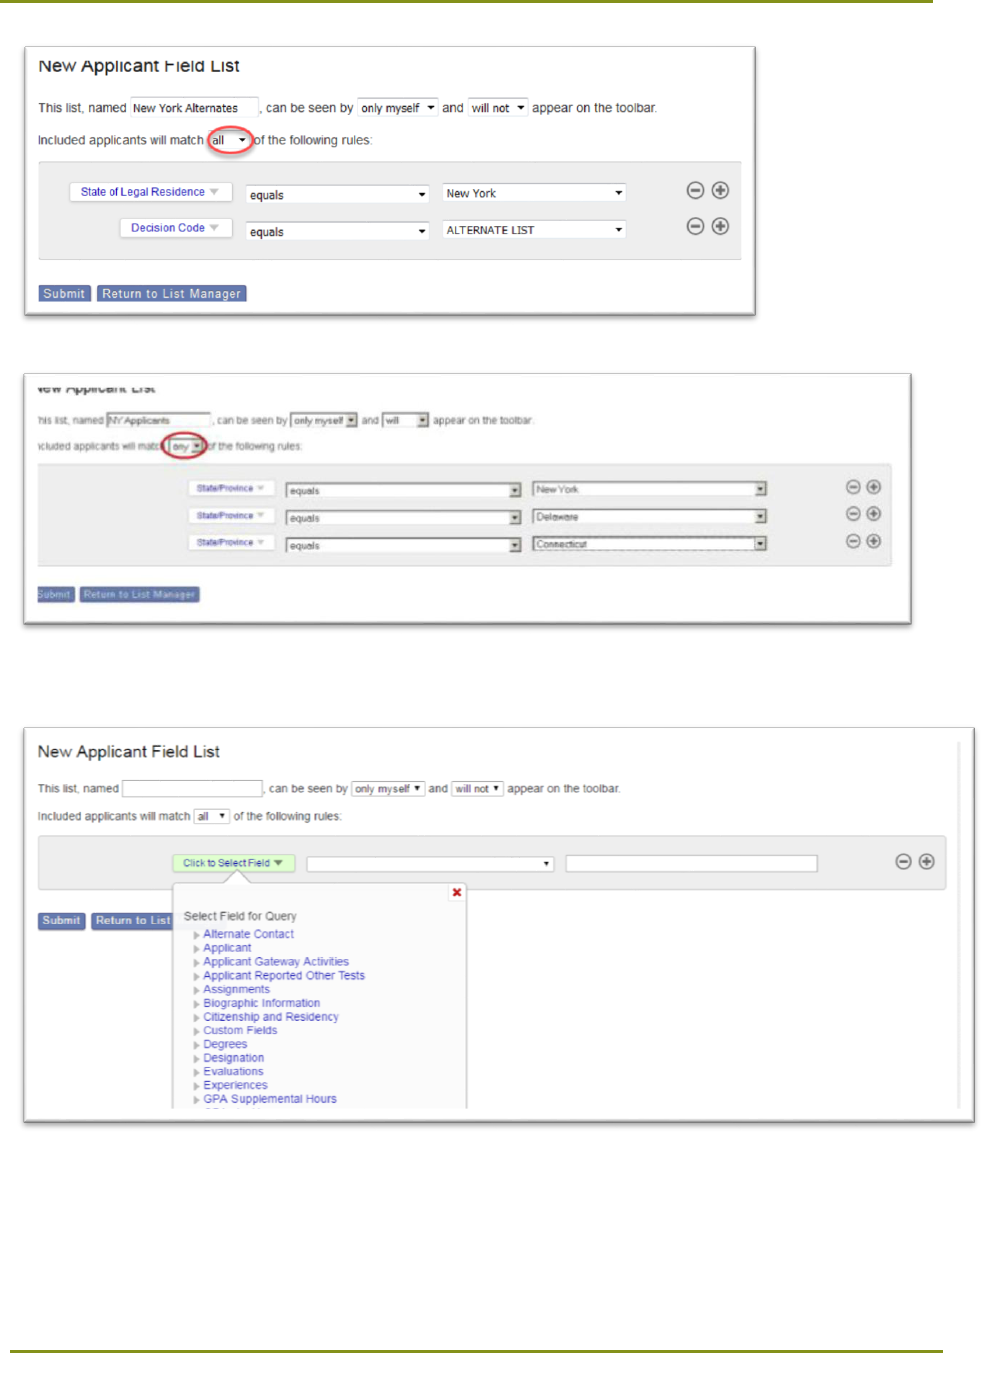
3. Next, create a query by selecting a field, an operator, and criteria.
Section 7: Working with Lists > Creating a Field List
37
4. If applicable, click the plus and minus signs to add or remove criteria.
5. When you are finished adding criteria, click Submit.
Section 7: Working with Lists > Creating a Field List
38
Using List Operators
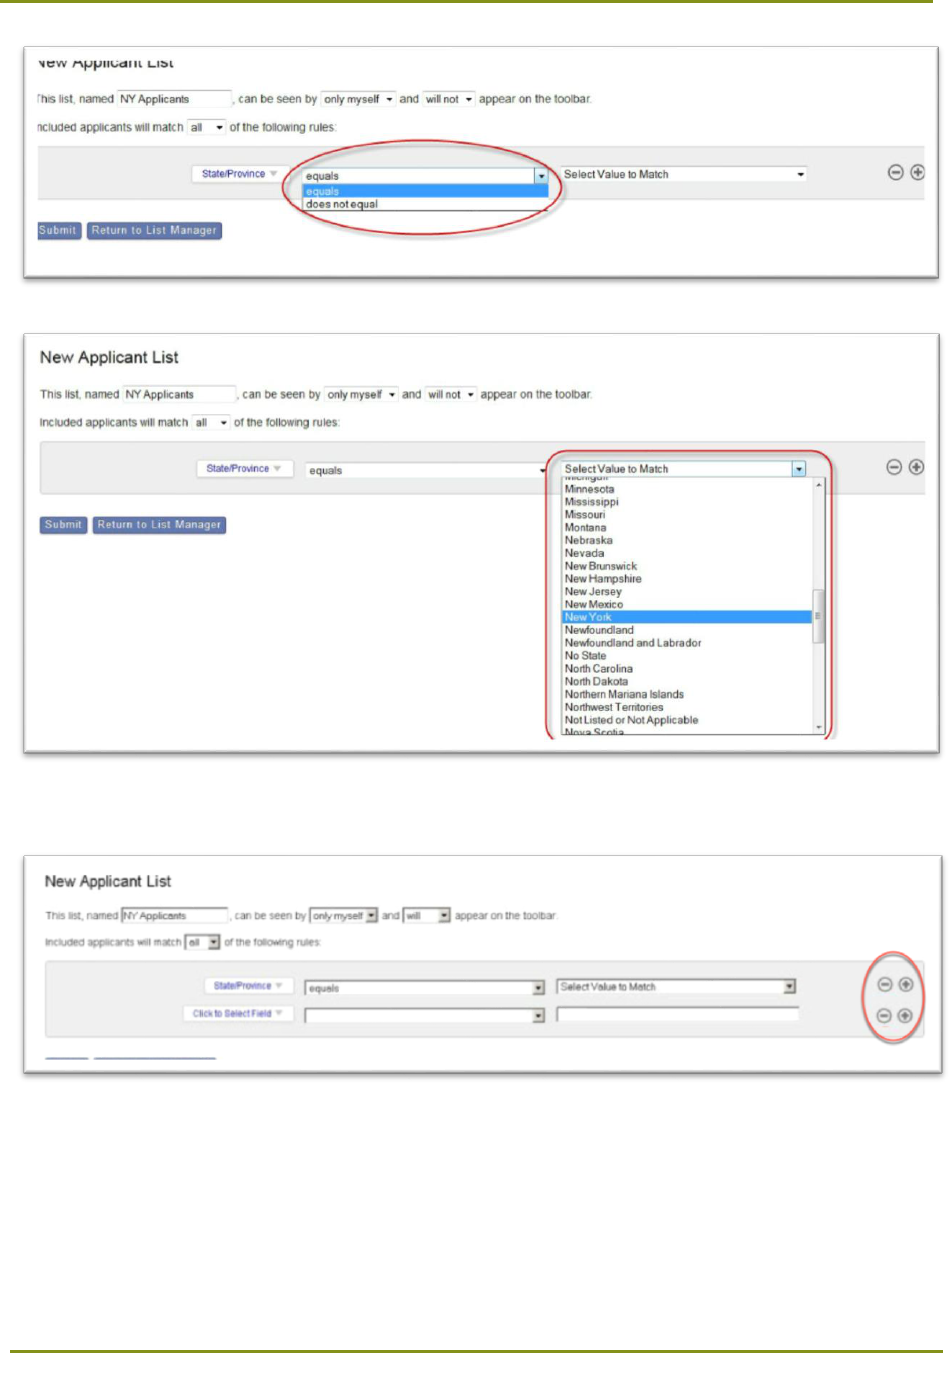
The fields you select are associated with several operators, as follows:
Field Type
Available Operators
All Field Types
• Equals
Lookup, String, and Numeric
• Does Not Equal
• Is Null
• Is Not Null
• Contains
• Does Not Contain
• Begins With
• Does Not Begin With
Numeric Only
• Less than
• Less than or equal to
• Greater than
• Greater than or equal to
Excluding Null Values
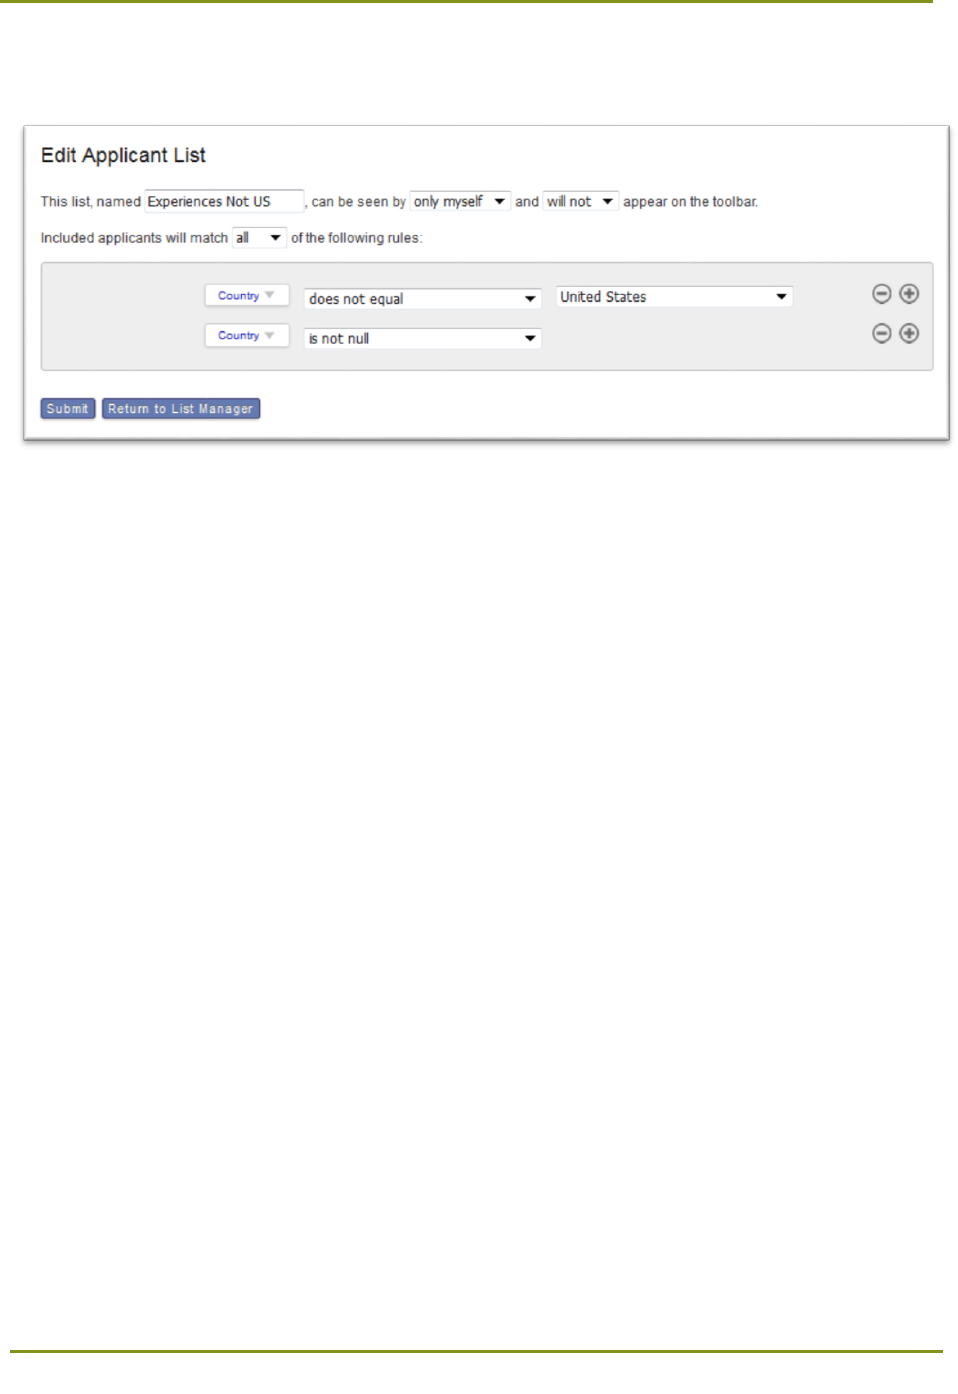
When searching your applicant pool, consider including a second operator of Is Not Null if you wish to
ignore empty fields. This ensures your resulting list includes only those applicants with data in a given
field.
For example, if you want a list of applicants who reported Experiences outside of the United States, but
you don’t want to include the applicants who did not report any Experience at all:
Section 7: Working with Lists > Fields with Multiple Values
39
• Include applicants who match all your rules, and
• Use the operators does not equal and is not null.
Fields with Multiple Values
Some applicant questions may result in multiple answers. For example, an applicant could report
speaking multiple languages, having multiple ethnicities, or having multiple parents.
When you create a list on a field with multiple values, the resulting list includes any applicant that has at
least one value meeting the defined conditions. For example, if you would like to see all applicants who
have a parent from a country other than the United States, create a list on the field Country of Legal
Residence in the field group Parents/Guardians and include the operators:
• Country does not equal United States
• Country is not null
The resulting list includes all applicants who have at least one parent that meets these conditions, but
this does not mean that all parents are from a non-US country.
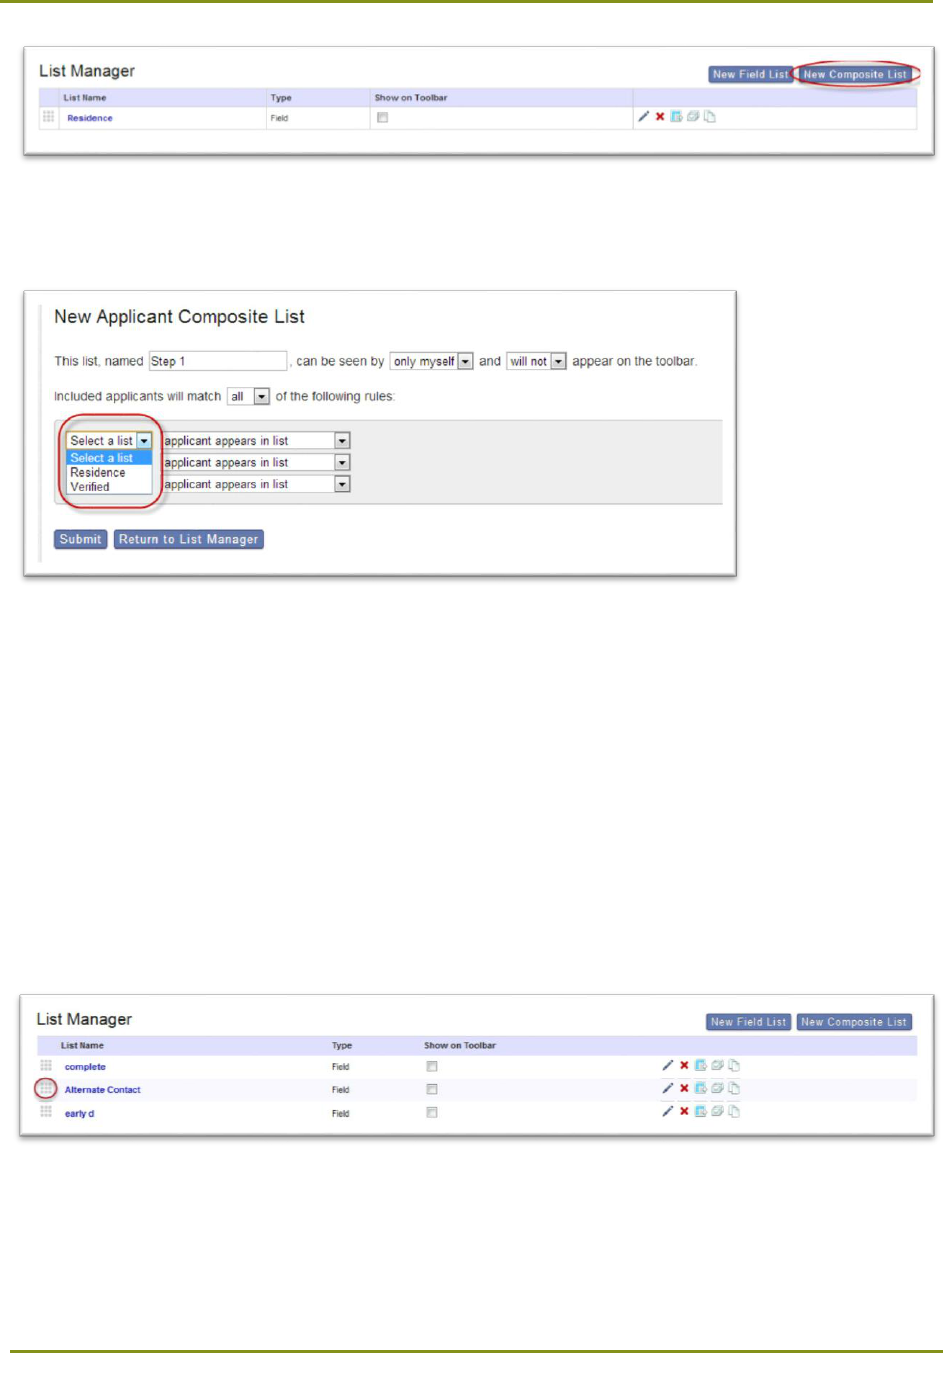
Creating a Composite List
Use composite lists if you need to create a more advanced search that uses multiple sets of query
criteria. Specifically, composite lists allow you to combine ‘any’ and ‘all’ functions in one list. For
example, you can create a list that contains:
• All applicants residing in NY and in the Wait Listed Decision Code, and
• All applicants residing outside of NY and in the Deferred Decision Code.
1. Before creating a composite list, follow the steps above to create the necessary Field Lists.
2. From the List Manager page, click the New Composite List button and begin customizing your new
list. This list can combine or cross-reference existing Field Lists.
Section 7: Working with Lists > Managing Lists
40
3. Select the appropriate query options, including whether you want the applicant to appear in the list.
You can select up to three lists.
4. When you are finished adding your criteria, click Submit.
Note: Search queries are not case-sensitive. Additionally, when searching on numeric fields such as GPA
or hours, you can only use numbers and decimals. For example, search 1000 instead of 1,000, or
3000.00 instead of 3,000.00.
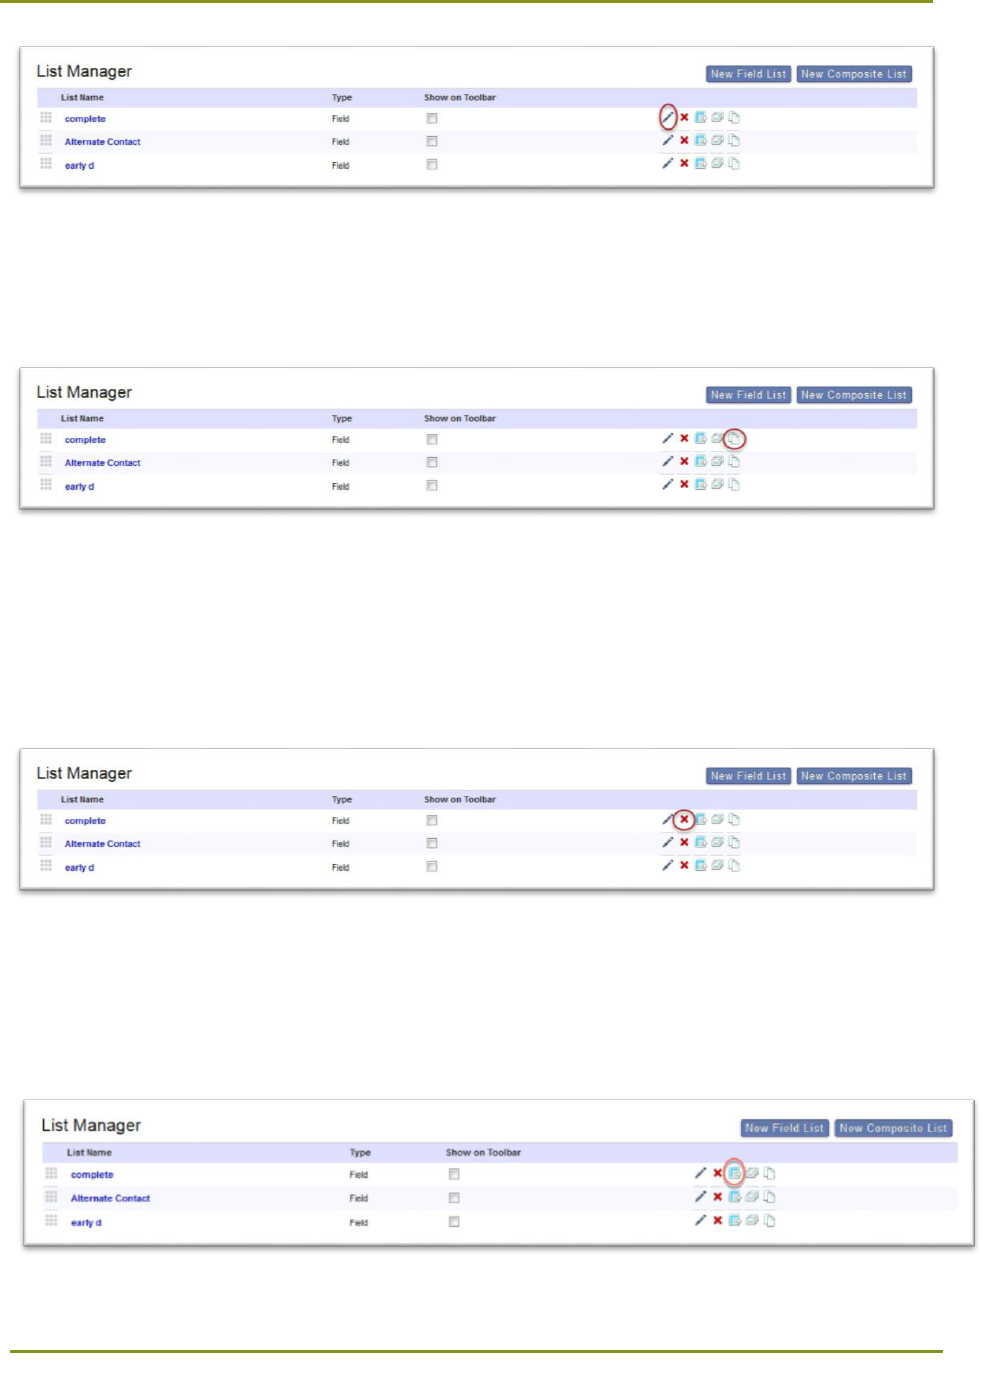
Managing Lists
Reordering Lists
To reorder a list, use the grip icon to drag and drop the list into the preferred order.
Editing Lists
To modify a list, click the pencil icon. Note that only list owners can perform edits.
Section 7: Working with Lists > Managing Lists
41
Copying Existing Lists
To copy an existing list, click the duplicate icon.
Deleting Lists
To delete a list, click the remove icon. Note that only list owners can delete lists. Additionally, any
associated exports using the list will also be deleted (you will be prompted to confirm that you want to
proceed).
Exporting Lists
To export a list, click the export icon. Selecting this option will take you to the Export Manager with the
desired list pre-selected.
Section 7: Working with Lists > Performing Batch Local Status Updates
42
Emailing Applicants in a List
To email the applicants in a list, click the envelope icon. This will take you to the email editor with the
desired list pre-selected.
Performing Batch Local Status Updates
Warning: This function can’t be undone. Proceed with caution.
1. From a list, click List Actions, then select Change Checked Applicants’ Status from the drop-down.
2. Select the new status using the Set status to drop-down, select the associated Designations, then
click Submit.

Section 7: Working with Lists > Performing Batch Local Status Updates
43
3. If the new Local Status is associated with an email template, a dialog box prompts you to select an
action. Click Send to send the email to all applicants, excluding those who already received it.
Section 8: Working with Reports and Exports > Creating Exports
44
Section 8: Working with Reports and Exports
Creating Exports
WebAdMIT allows you to create a rich data file containing selected applicant and data elements. Exports
are especially useful for committee review meetings and for integration with ERP Systems.
1. Using the Menu Bar, open the Reports & Exports panel, then click Export Manager.
2. Click New Export.
3. Select a list to export.
4. Select an export type (.csv, .xls, .txt, or .zip).

Section 8: Working with Reports and Exports > Creating Exports
45
5. Enter a name for your export.
6. Select whether to include column headings (column headings are names of the fields you select for
the export).
7. Select how you want to export fields with more than one result (this includes fields like College
Names, Test Scores, and Evaluations).
Section 8: Working with Reports and Exports > Creating Exports
46
• Select as many columns as needed to expand the field to display as many results as needed,
based on the applicant pool you have chosen (i.e. if an applicant attended 10 colleges, the
college field and all fields in that grouping will expand to 10 columns for all applicants).
• Select exactly to set a fixed number of columns allotted for all one-to-many fields (i.e. you can
set it to 2 columns, and colleges attended, test scores, and experiences will expand to 2 columns
each). Warning: when selecting this option for an applicant who has more answers than the
number of columns you selected, you can’t control which data points appear in the export.
Entering a higher number of fixed columns may help ensure that you export all necessary data.
• Select by field category to specify the number of fixed columns for a category. Selecting this
option does not allow you to intermingle fields from different categories. Only sections with
one-to-many fields offer the “Many” fields allowed: option.
8. Select who can view the export (just you or everyone at your institution) and indicate if it should
appear in the Menu Bar under the Reports & Exports panel (this option provides you with quick
access to run the export).

Section 8: Working with Reports and Exports > Creating Exports
47
9. Under the Export these fields… column, click the categories to view and select fields.
10. The fields you select appear in the …in this order. column. If you previously selected .txt for the
export type, you can set a fixed width for each item. Depending on the field, you can also select a
data transformation option. These options are useful to IT staff when importing data into an ERP
system.
11. After selecting your fields, use the grip icon to drag and drop them into the preferred order; the top
field will export first, and the bottom last. Additionally, you can group by field or numerically.
• Group by Field exports the data by field category (e.g. College Name 1, College Name 2, College
Name 3, College State 1, College State 2, College State 3).
• Group by Numeric exports the data by value ( e.g. College Name 1, College State 1, College
Name 2, College State 2, College Name 3, College State 3).

Section 8: Working with Reports and Exports > Creating Exports
48
12. When you’re done adding criteria, click Create File to save and run the export, Save Export Settings
to save the customized export for future use, or Return to Export Manager to cancel the export.
Note: An Office 2007 security feature may prevent you from opening an export or report in .xls format.
Adjust your export type to .csv to avoid this issue.
Additionally, MS Excel 2003 (and earlier versions) limits data to 255 columns, including data points that
may generate more than one column (such as Colleges Attended). For larger exports, please use the
.CSV format. These files can be opened in MS Excel 2007 and later, even if they exceed 255 columns.
Exceeding the Export Fields limit will result in an "Internal Server Error" message. To export all fields, try
dividing the fields into two separate exports.
Section 8: Working with Reports and Exports > Managing Exports
49
Managing Exports
Running Exports
To run an export, click the export name.
Reordering Exports
To reorder a list, use the grip icon to drag and drop the list into the preferred order.
Editing Exports
To modify an export, click the pencil icon. Note that only export owners can perform edits.
Copying Existing Exports
To copy an existing export, click the duplicate icon.

Section 8: Working with Reports and Exports > Creating Reports
50
Deleting Exports
To delete an export, click the remove icon. Note that only export owners can delete exports.
Creating Reports
WebAdMIT provides you with a suite of predefined reports that you can run against any existing
applicant list. Reports may include:
Applicant Reports
• Applicants by Application Status: Includes applicant CAS ID, name, number of designations they
have submitted their CAS application to, the organization and program(s) they have applied to
at your institution, their application status, and the decision code you have placed them in.
• Colleges Attended with Degrees: You have the option to choose “All Colleges Attended with
Degrees” or “Primary Colleges Attended with Degrees.” The “Primary” indicator is selected by
the applicant in their application. This report includes applicant CAS ID, name, college name,
attended dates, degree, degree status, and degree earned date.
• Coursework: Includes applicant CAS ID, name, course prefix, course name, applicant-reported
grade and credits, CAS grade, converted numeric grade, verified grade and credits, college code,
college name, year, term, term type, status, level, subject, and classification.
• Designations by Application Status: Includes organization name, program name(s), and the
number of applicants who are in the in-progress, received, complete, verified, on hold, and
undelivered application statuses, and the total number of applicants for each program and each
status.
• Designations by Decision Code: Similar to “Designations by Application Status,” this report
includes organization name, program name(s), and the number and percentage of applicants
who are in each decision code (as specified by your program). It also includes the total number
of applicants for each program and each decision code.
• Folder Labels – Avery 5160: Includes applicant CAS ID and name, with last name listed before
first name.
• GRE General Official: Includes applicant CAS ID, name, GRE received date, GRE date,
quantitative, verbal, and written converted and percentile scores.
• Local Status Summary: Includes your program’s Local Statuses along with number and
percentage of applicants for your applicant pool.

Section 8: Working with Reports and Exports > Creating Reports
51
• Local and Prerequisite GPAs: Lists the Local and Prerequisite GPA template names, type,
applicant count, and average GPA, credits, and quality points for those applicants
• Mailing Labels – Avery 5160: Includes applicant name, street address, city, state, zip code, and
country.
• Scoring Details: Includes applicant CAS ID, name, country, scorable fields, scores for each field,
converted values for each field, overall score, and ranking.
Comparative Reports
These reports compare your applicant pool to the entire CAS pool. You can choose to run these reports
based on applicants or applications, and can limit the results to applicants who are in a certain decision
code(s).
• Ages: Includes age groups, number and percentage of applicants for CAS and your program, and
median age, age range, and average age for CAS and your applicant pool.
• Ages by Gender or Sex: This report splits the applicants by gender/sex, and runs the same data
from the “Ages” report for each grouping.
• Applicant Distribution by Month: Charts each month, starting with the previous month you pull
the report, to a year before. Includes number/percentage of applicants based on received,
complete, and verified application statuses.
• Citizenship Status: Lists number and percentage of applicants based on citizenship statuses.
• Colleges Attended: Can be split between “All Colleges Attended” or “Primary Colleges
Attended.” Lists all applicants’ colleges attended school names, school states, applicants for CAS
and your applicant pool.
• Countries of Birth: Includes countries of birth abbreviations, and number/percentage of
applicants for CAS and your programs.
• Country of Citizenship: Includes countries of citizenship, and number/percentage of applicants
for CAS and your programs.
• Degree Awarded: Lists types of degrees, and number/percentage of applicants for CAS and
your programs.
• Degree Expected: Similar to “Degree Awarded” report, though for those applicants with a
degree expected rather than earned.
• Ethnicities and Races: Lists major ethnicity and race groups as determined by the CAS, and
number/percentage of applicants for CAS and your programs.
• Ethnicities and Races by Gender or Sex: This report splits the applicants by gender/sex, and
runs the same data from the “Ethnicities and Races” report for each grouping.
• Ethnicities and Races by Residency: This report splits the applicants by US Citizens/Non-Citizens,
and runs the same data from the “Ethnicities and Races” report for each grouping.
• Ethnicities and Races by Residency and Gender or Sex: This report splits the applicants by US
Citizens/Non-Citizens and gender/sex, and runs the same data from the “Ethnicities and Races”
report for each grouping.

Section 8: Working with Reports and Exports > Creating Reports
52
• Ethnicity and Race (Ignoring Two or More): Lists major ethnicity and race groups as determined
by the CAS, and number/percentage of applicants for CAS and your programs. For applicants
who have chosen more than one ethnicity/race, they will be included within each ethnicity/race
category, rather than a “multiple” category.
• GPA by Subject by Gender or Sex: This report splits the applicants by gender/sex, and runs the
same data from the “GPAs by Subject” report for each grouping.
• GPAs by Subject: Lists the subject groupings and mean GPAs of applicants for CAS and your
programs.
• GPAs by Year: Lists the year breakdowns, and if applicable, the science, non-science, math, and
overall mean GPAs of applicants for CAS and your programs.
• GPAs by Year by Gender or Sex: This report splits the applicants by gender/sex, and runs the
same data from the “GPAs by Year” report for each grouping.
• Gender or Sex: Lists gender/sex breakdowns and number/percentage of applicants for CAS and
your programs.
• Majors: Lists majors and number of applicants for CAS and your programs. List is arranged in
most popular to least popular, based on your applicant numbers.
• States/Provinces of Residence: Lists states/provinces of residence and number/percentage of
applicants for CAS and your programs.
• States/Provinces of Residence by Gender or Sex: This report splits the applicants by
gender/sex, and runs the same data from the “States/Provinces of Residence” report for each
grouping.
• Summary: Lists select reports (total applicants, citizenships by race/ethnicity, average age and
GPAs of applicants, decision codes, and highest degree earned), split by gender for applicants in
your applicant pool.
• Zip Code: Lists zip codes and number/percentage of applicants for CAS and your programs.
Decision Reports
These reports are based on the decision codes that you have assigned to your applicants, as well as the
decision codes other programs have assigned to their applicant pools.
• Offers Received: Lists the number of applications per applicant, the total applicants for each
breakdown, and the number of offers an applicant receives based on the number of applications
the applicant submitted.
• Shared Applicants: Lists all the institutions and programs participating in the CAS and the
number of applicants you share with that program.
• Shared Offers: Where applicable, this lists all the institutions and programs participating in the
CAS and these breakdowns
▪ Total Number of Applicants Your Program Shares with the Competing Program
▪ Applicants Receiving an Offer from Your Program(s) that have Applied to the Competing
Program
▪ Applicants Accepting an Offer from Your Program(s) that have Applied to the Competing
Program
Section 8: Working with Reports and Exports > Creating Reports
53
▪ Applicants Receiving an Offer from the Competing Program that have Applied to Your
Program(s)
▪ Applicants Accepting an Offer from the Competing Program that have Applied to Your
Program(s)
User Reports
• Admissions Users: Lists institutions, user names, email addresses, phone numbers, primary user
indicator, active/deactivated account, programs they have access to, user roles/work groups,
date the account was created, last update and login, and login count
• Interviewer Ability: Lists user names, interview template name, interview date and time, and
availability.
• Programs List: Includes institution name, programs, program identifiers, and program labels for
the entire institution
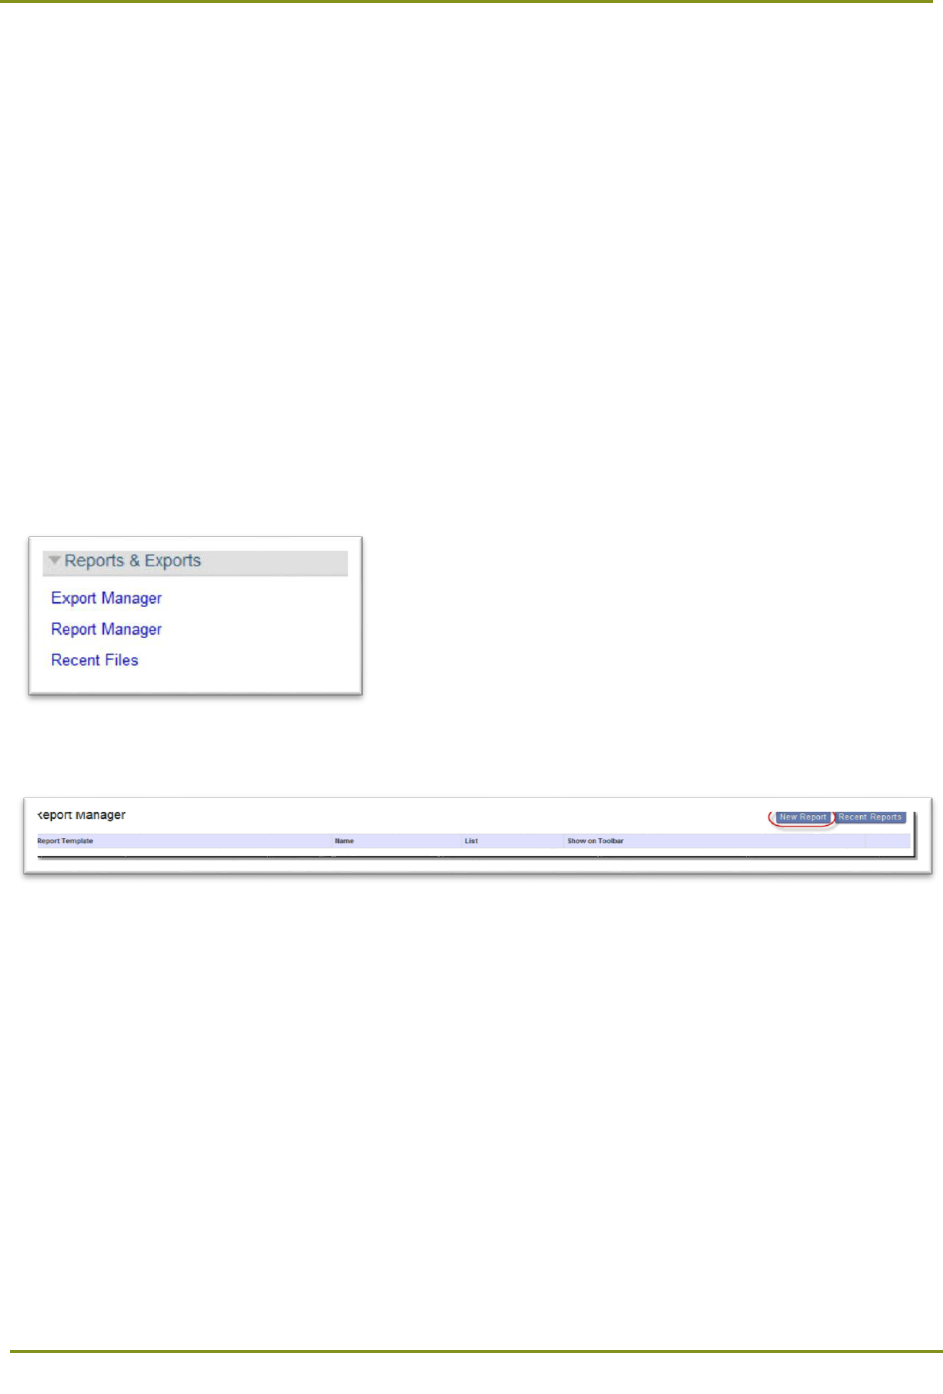
1. Using the Menu Bar, open the Reports & Exports panel, then click Report Manager.
2. Click the New Report button.
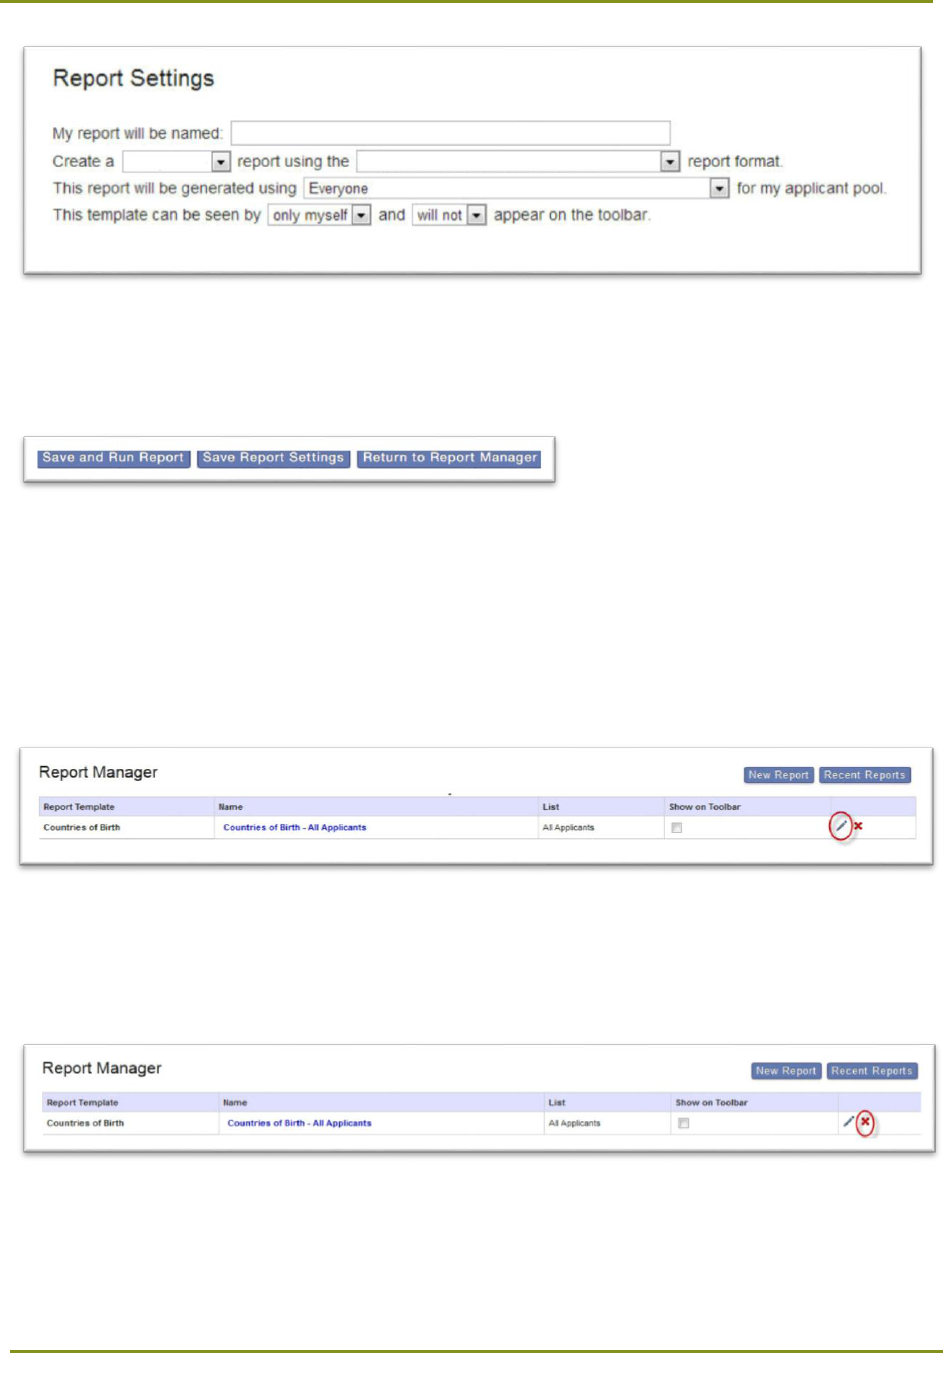
3. Enter a name for your report, then:
• Select the report type. Applicant Reports focus on data about your applicant pool. User Reports
focus on your program’s Admissions Users.
• Select an existing list to run the report against, if applicable.
• Select who can view the report (just you or everyone at your institution) and indicate if it should
appear in the Menu Bar under the Reports & Exports panel (this option provides you with quick
access to run the report).
Section 8: Working with Reports and Exports >
54
4. When you’re done adding criteria, click Save and Run Report to run and save the report, Save
Report Settings to save the customized report for future use, or Return to Report Manager to
cancel the report.
Managing Reports
Editing Reports
To modify a report, click the pencil icon. Note that only report owners can perform edits.
Deleting Reports
To delete a report, click the remove icon. Note that only report owners can delete reports.
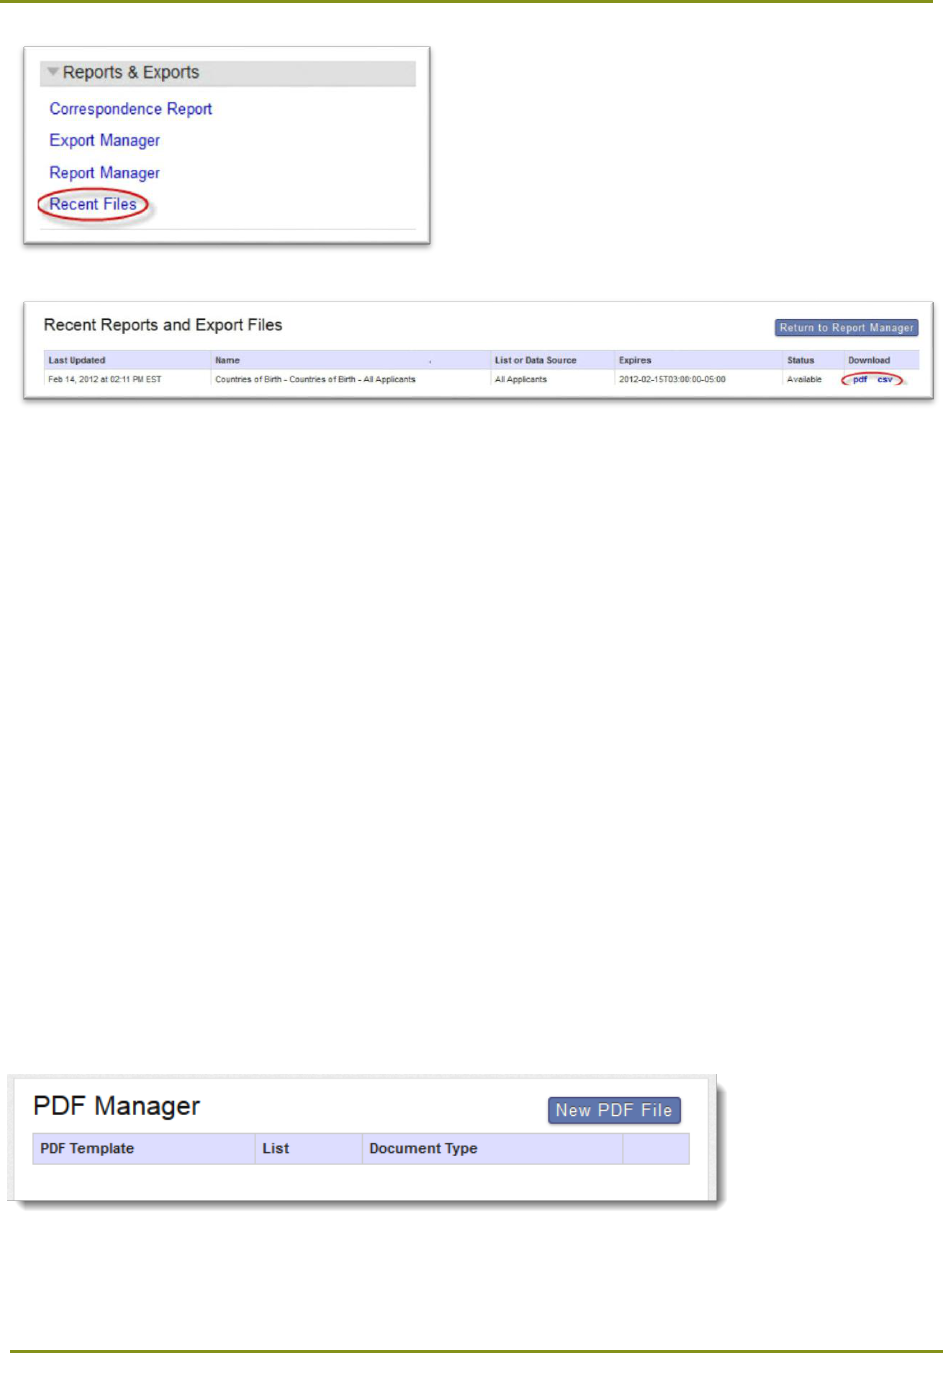
Finding Recent Files
To download and view recent exports and reports, click Recent Files.
Section 8: Working with Reports and Exports > Working with the PDF Manager
55
Working with the PDF Manager
The PDF Manager tool allows users to download full applications, scanned transcripts, foreign
evaluations, letters of reference, and applicant uploaded documents in bulk, making it simpler for
participating programs to work with them outside of WebAdMIT. You can download documents for up
to 1,000 applicants at a time in zip file format.
Managing Access to the PDF Manager
Access to the PDF Manager is controlled through Work Groups. Users must have access to the Manage
Lists, Reports, and Exports permission to use the PDF Manager.
When a user accesses a PDF in WebAdMIT (within the applicant’s profile or through the PDF Manager),
the data is limited in the same way that WebAdMIT limits access to panels on the Applicant Details
page. As a result, administrators can use the Work Groups in WebAdMIT to redact information from the
PDF for faculty reviewers and other users.
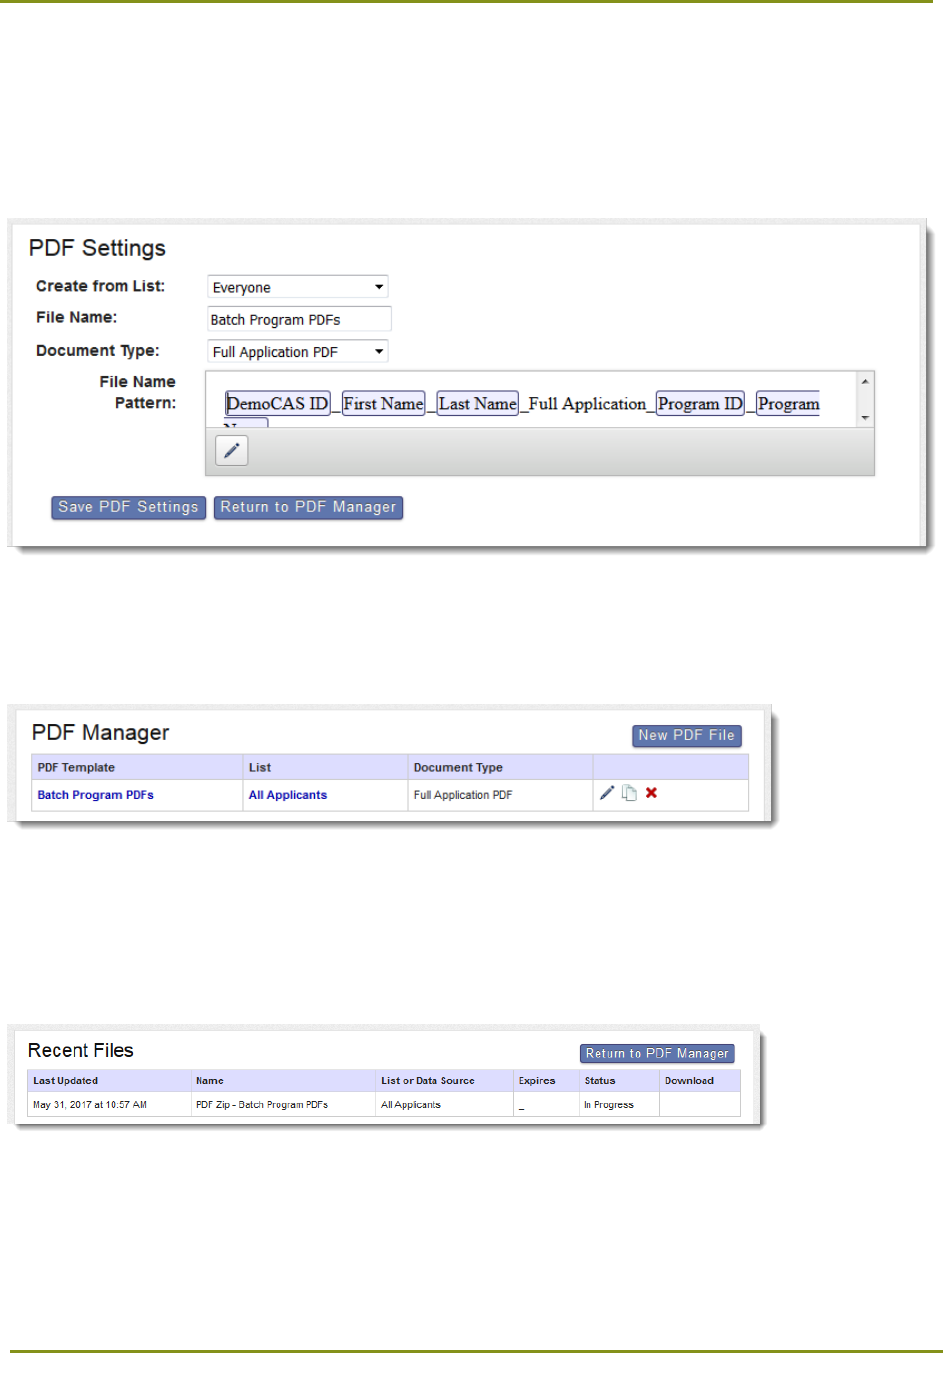
Creating a PDF Template
You must create a PDF template before you can generate and download a zip file of PDF documents.
Select PDF Manager in the tool bar. Then, click New PDF File.
Section 8: Working with Reports and Exports > Working with the PDF Manager
56
On the PDF Settings screen, select the list you want to use from the Create from List drop‐down. Then,
name the file and select the Document Type. Only one document type can be downloaded in each zip
file.
The attributes used in each PDF file name display in the File Name Pattern field and are customizable.
Once complete, click Save PDF Settings.
Generating and Downloading PDF Zip Files
Available PDFs templates appear in the PDF Manager. To generate the zip file of PDF documents, click
the template name in the PDF Template column.
Depending on document size, number of applicants, and other factors, it may take anywhere from a few
minutes to a few hours for WebAdMIT to create the zip file. You can monitor its progress and any errors
in the Status column. Once generated, the zip file is stored for 7 days.
Then, you can download the zip file from Recent Files page by clicking the zip file name in the Download
column.
Document Naming
Each document in the downloaded zip file has a default file name. The variables used for each name are
listed below. The name can be customized as needed.

Section 8: Working with Reports and Exports > Working with the PDF Manager
57
College Transcripts
Default format: <CAS ID>_<FirstName>_<LastName>_Transcript_<Liaison college code>_<College
Name>.pdf
Example: 123456789_Jane_Smith_Transcript_2345_Watertown University.pdf
Foreign Evaluations
Default format: <CAS ID>_<FirstName>_<LastName>_Foreign Evaluation_<Evaluation Agency>.pdf
Example: 123456789_Jane Smith_Foreign Evaluation_Education Credential Evaluators.pdf
Full Application
Default format: <CAS ID>_<FirstName>_<LastName>_Full Application_<CAS Side Program
ID>_<Program Name>.pdf
Example: 123456789_Jane Smith_Full Application_3579_Epidemiology.pdf
Electronically Submitted Evaluation
Default format: <CAS ID>_<FirstName>_<LastName>_Letter of Reference_<Evaluator Name>.pdf
Example: 123456789_Jane Smith_Letter of Reference_Douglas Howser.pdf
Applicant Uploaded Documents
Default format: <CAS ID>_<FirstName>_<LastName>_Applicant Uploaded Document_<Source>.pdf
Example: 123456789_Jane Smith_Applicant Uploaded Document_Personal Statement.pdf
Section 9: Working with Assignments > Searching for Assignments
58
Section 9: Working with Assignments
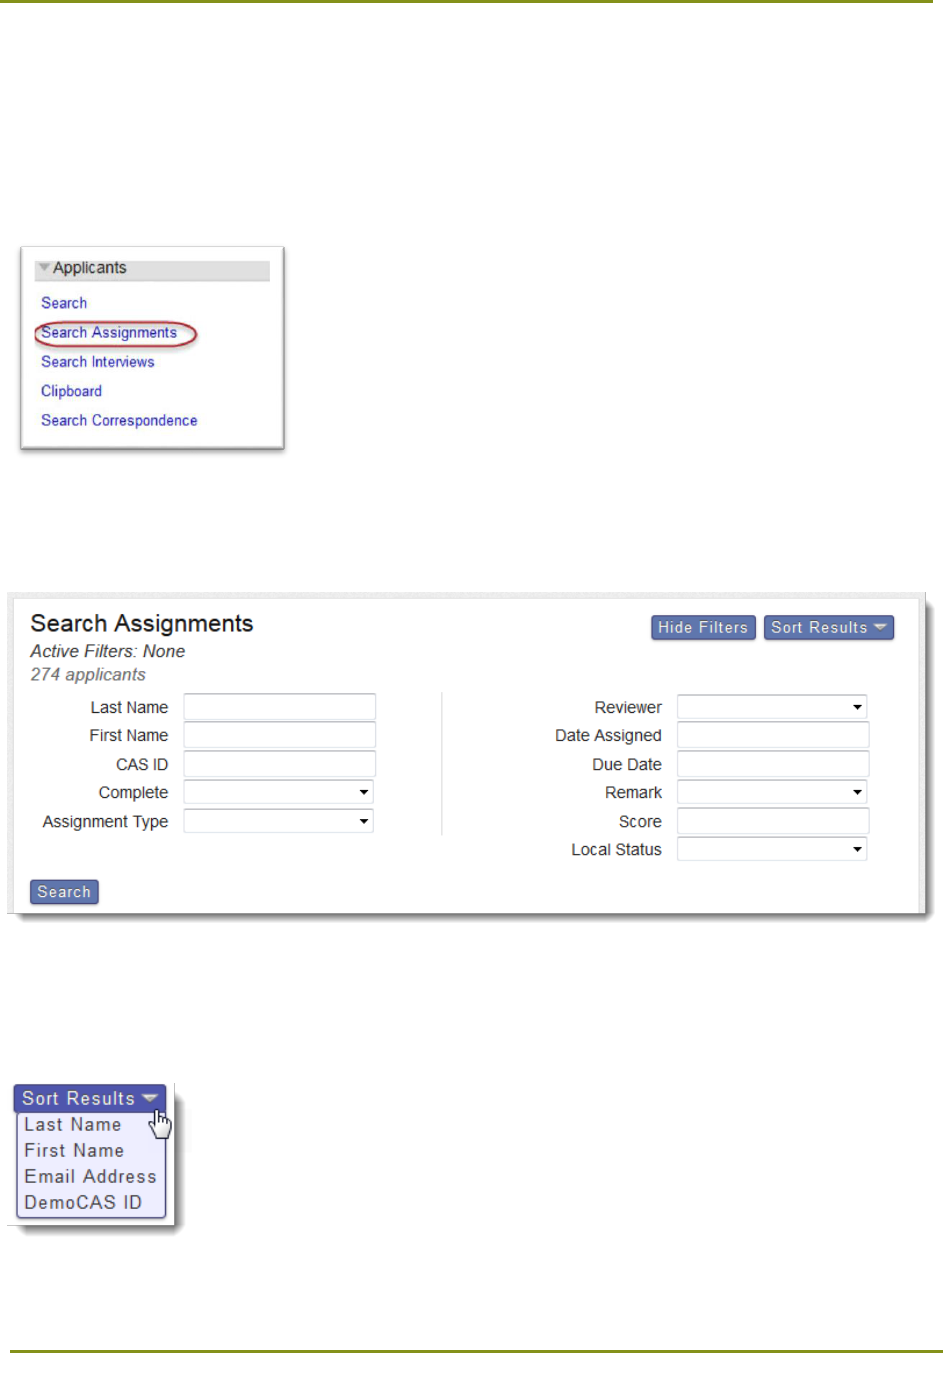
Searching for Assignments
Using the Menu Bar, open the Applicants panel, then click Search Assignments.
You can apply one or more filters to refine the list of search results. Only applicants you have permission
to view will appear in your results. To apply filters, click the Show Filters button.
Sorting Results
Click the Sort Results button to sort your results by name, email address, or ID number.
Section 9: Working with Assignments > Applying Search Actions to Selected Applicants
59
Applying Search Actions to Selected Applicants
Use the checkboxes in the first column of your search results to select multiple applicants and apply an
action.
• Add Checked Applicants to Clipboard: Add the selected applicants to the clipboard.
• Assign Checked Applicants: Assign the selected applicants to a specific admission user (you
must have at least one Assignment Type set up).
• Interview Checked Applicants: Create an Interview for the selected applicants (you must have
at least one Interview Type set up).
• Change Checked Applicants' Status: Change the Local Status for the selected applicants.
• Email Checked Applicants: Send an email to the selected applicants.
• Update Custom Fields for Checked Applicants: Update the custom fields that were defined for
selected applicants.
• Accept Checked Applicants Requirement Criterion: Select a requirement and update the
response to that requirement for the selected applicants (this function appears only if
requirements were configured).
Warning: Assigning or Interviewing Checked Applicants are features that can’t be undone in batch.
Confirm that your search results and selections are accurate before performing the change.
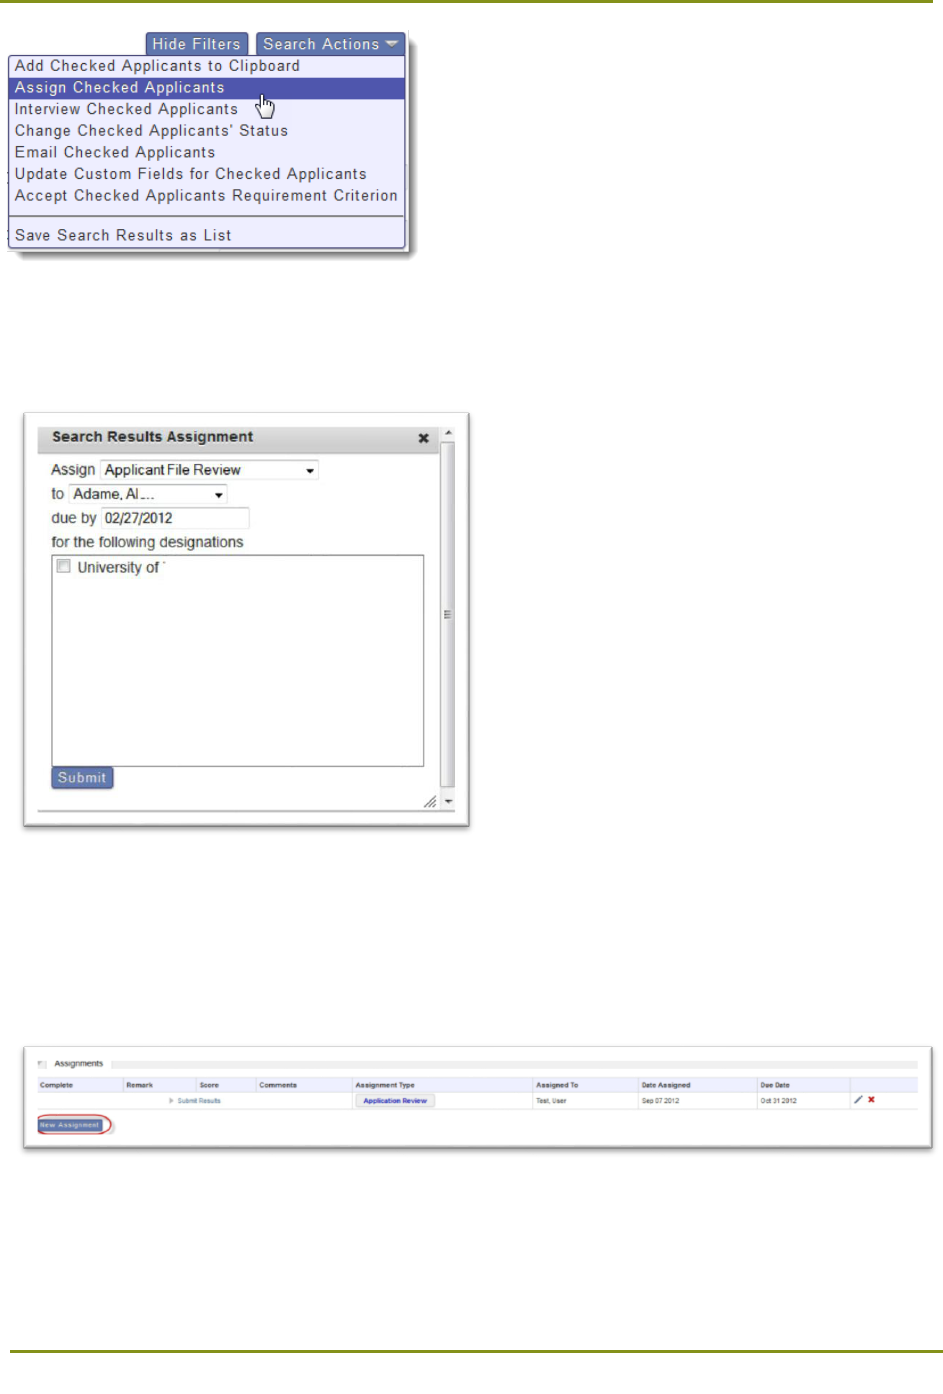
Batch Assign Applicants
The Assign Applicants function allows you to simultaneously assign multiple applicants to an
Assignment.
After searching for and selecting applicants, click the Search Action button, then select Assign Checked
Applicants.
Section 9: Working with Assignments > Allocating Assignments
60
1. Select an Assignment Type, Reviewer, Due Date, and Designation. Then, click Submit. To select
multiple reviewers, press and hold down the control key (Command on Mac) while selecting the
applicable reviewers.
Allocating Assignments
1. To allocate an Assignment to a user for an applicant, click New Assignment. Note that this button
only appears when at least one Assignment Type exists for an applicable program.
2. Select an Assignment.
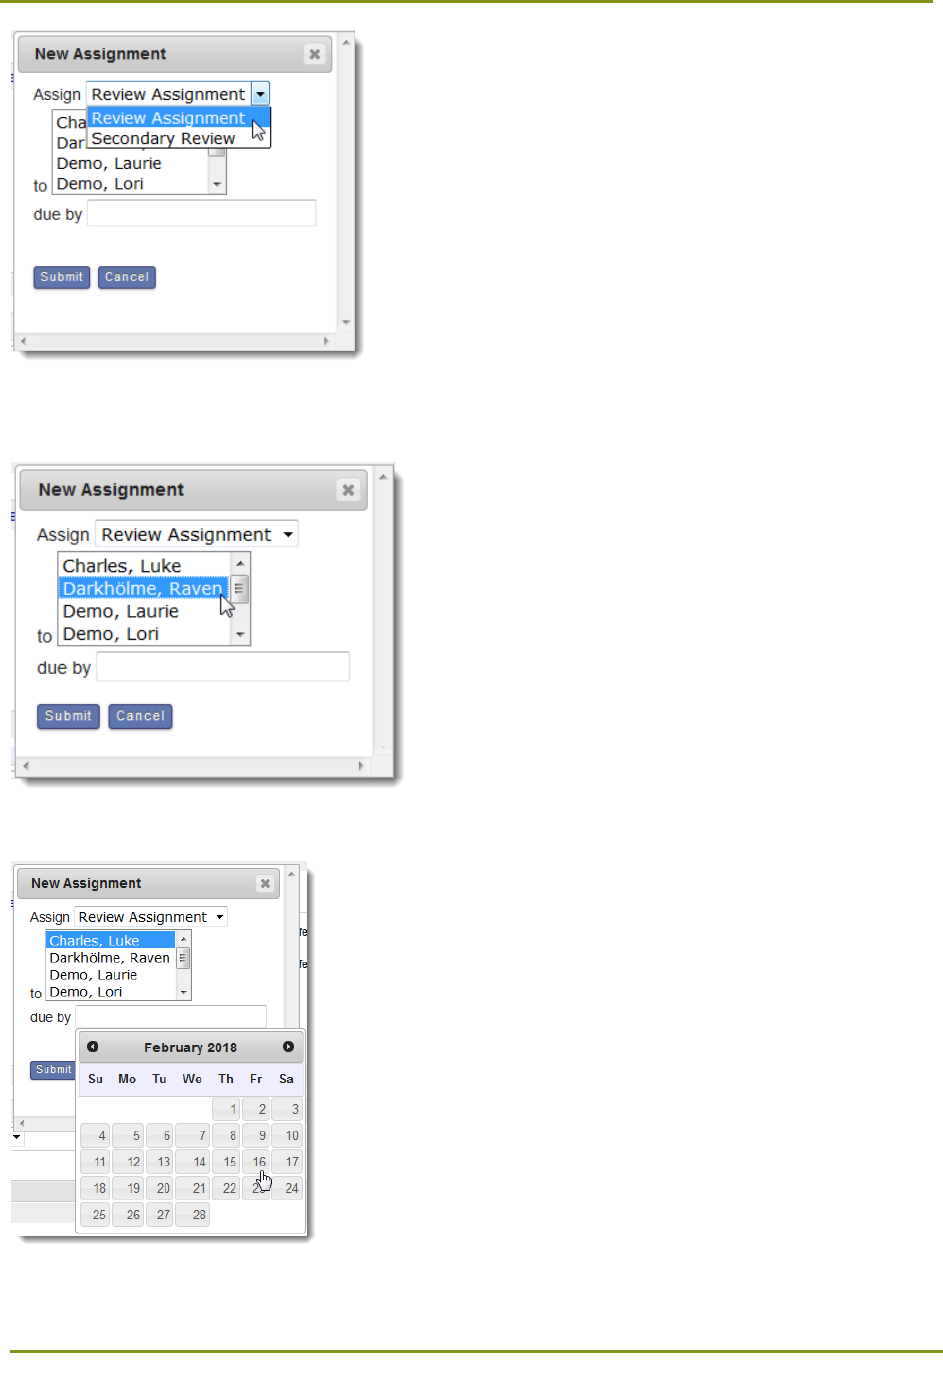
Section 9: Working with Assignments > Allocating Assignments
61
3. Select the user who is to complete the Assignment. To select multiple users, press and hold down
the control key (Command on Mac) while selecting the applicable users.
4. To choose the due date for the Assignment, click the Due By field, and select a date.
5. Click Submit.
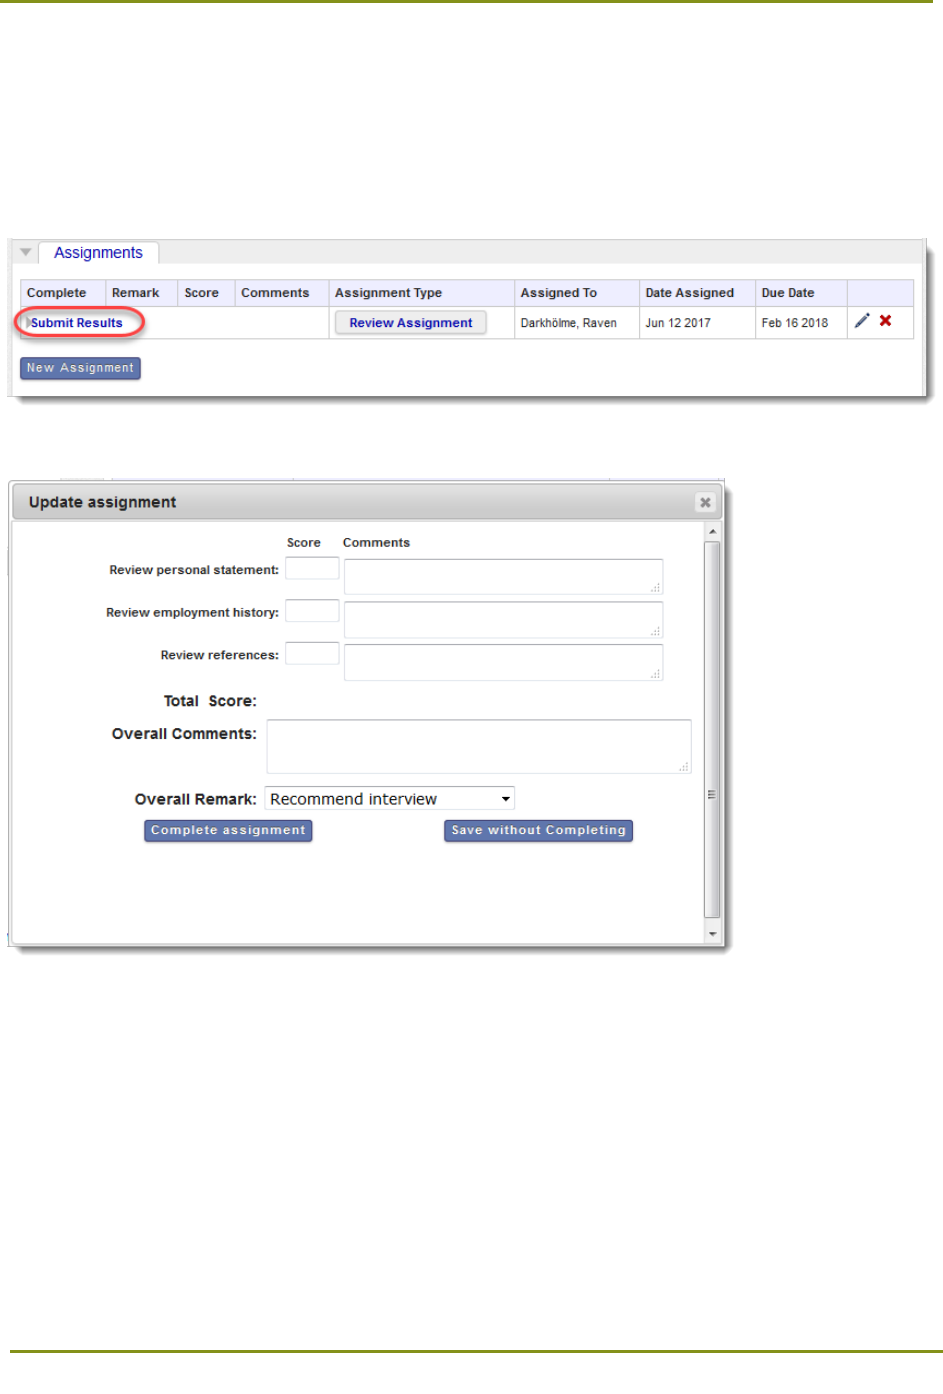
Section 9: Working with Assignments > Submitting Assignment Results
62
Submitting Assignment Results
1. To complete an Assignment, click Submit Results.
2. Enter scores and comments.
Note that when using questions, the individual score field is required (if enabled). Also, the overall
score is calculated by summing or averaging the individual question scores, or it can be entered
independently by the reviewer (depending on question configuration).
3. Enter overall comments and overall remarks, then click Complete Assignment to submit your
responses or Save without Completing to save your input for future edits.
Note: Remarks, scores, comments, and questions are selected and configured by Administrators.
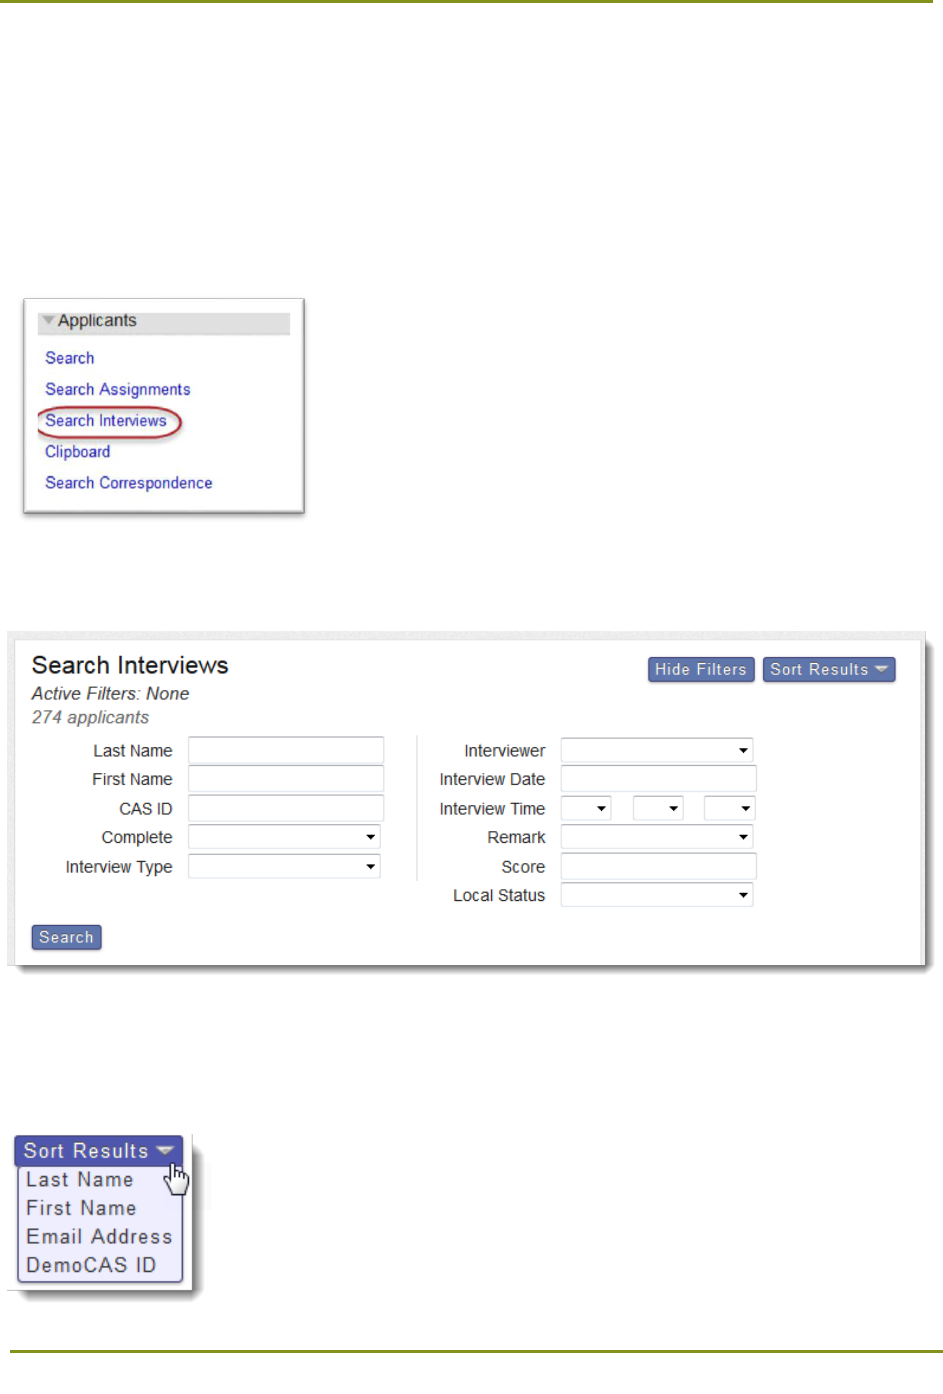
Section 10: Working with Interviews > Searching for Interviews
63
Section 10: Working with Interviews
Searching for Interviews
The Search Interviews function allows you to view all Interviews assigned to you.
1. Using the Menu Bar, open the Applicants panel, then click Search Interviews.
2. You can apply one or more filters to refine the list of search results. Only applicants you have
permission to view will appear in your results.
Sorting Results
Click the Sort Results button to sort your results by name, email address, or ID number.

Section 10: Working with Interviews > Applying Search Actions to Selected Applicants
64
Applying Search Actions to Selected Applicants
Use the checkboxes in the first column of your search results to select multiple applicants and apply an
action.
• Add Checked Applicants to Clipboard: Add the selected applicants to the clipboard.
• Assign Checked Applicants: Assign the selected applicants to a specific admission user (you
must have at least one Assignment Type set up).
• Interview Checked Applicants: Create an Interview for the selected applicants (you must have
at least one Interview Type set up).
• Change Checked Applicants' Status: Change the Local Status for the selected applicants.
• Email Checked Applicants: Send an email to the selected applicants.
• Update Custom Fields for Checked Applicants: Update the custom fields that were defined for
selected applicants.
• Accept Checked Applicants Requirement Criterion: Select a requirement and update the
response to that requirement for the selected applicants (this function appears only if
requirements were configured).
Batch Assign Interviews
The Interview Checked Applicants function allows you to simultaneously assign multiple applicants to an
Interview.
1. After searching for and selecting applicants, click the Search Action button, then select Interview
Checked Applicants.
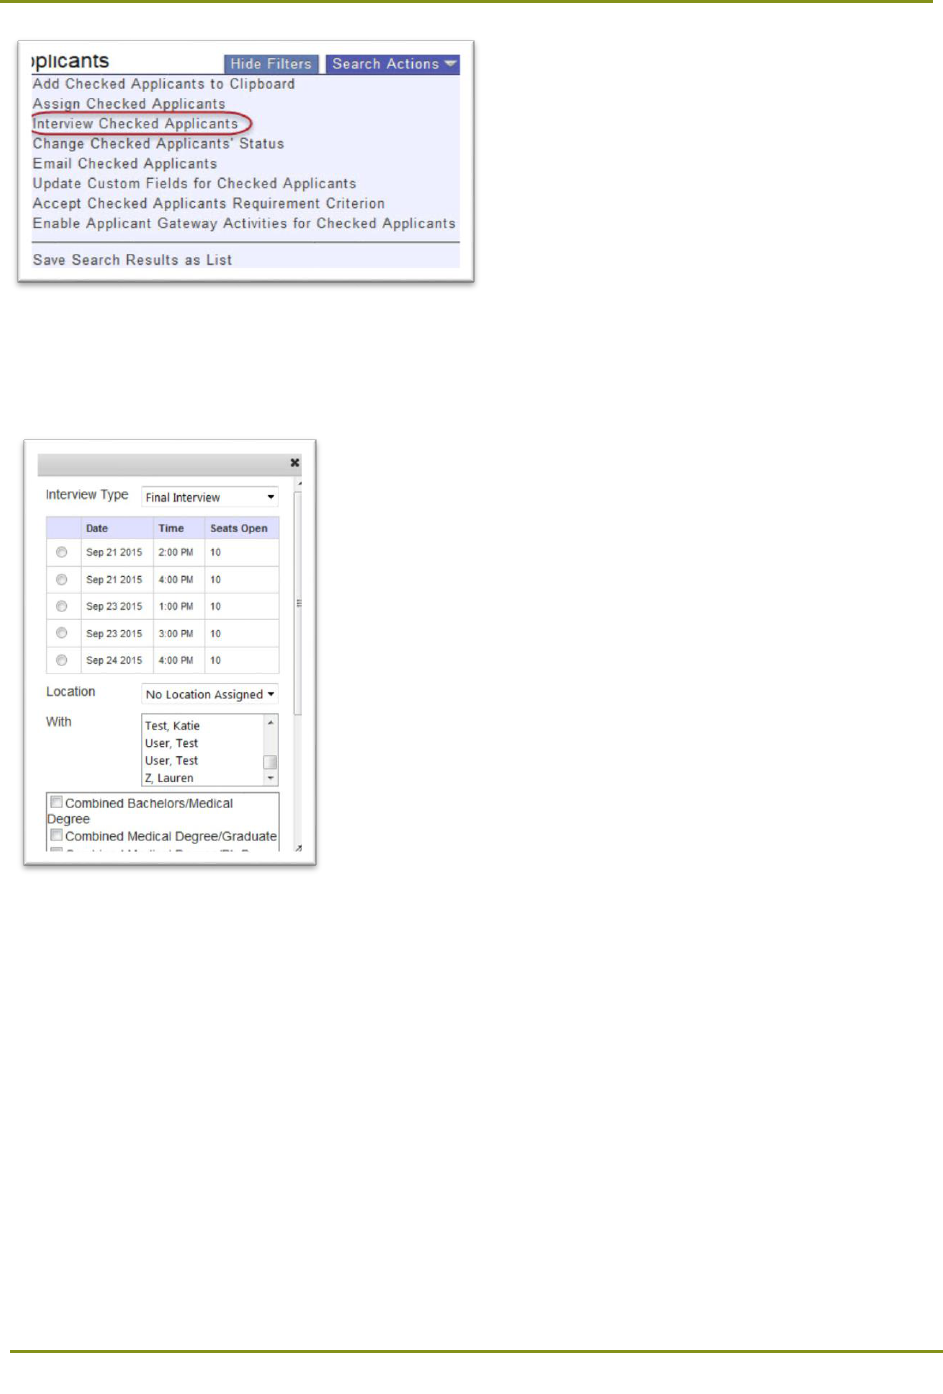
Section 10: Working with Interviews > Applying Search Actions to Selected Applicants
65
2. Select an Interview Type, Date/Time, Location, Interviewer(s), and Designation(s). Then, click
Submit. To select multiple interviewers, press and hold down the control key (Command on Mac)
while selecting the applicable interviewers.
Note: When batch assigning applicants to an interview, be sure there are enough interview slots to
accommodate all applicants. If the batch of applicants outnumbers the available slots, only the available
slots will be filled; the remaining applicants will not be assigned.
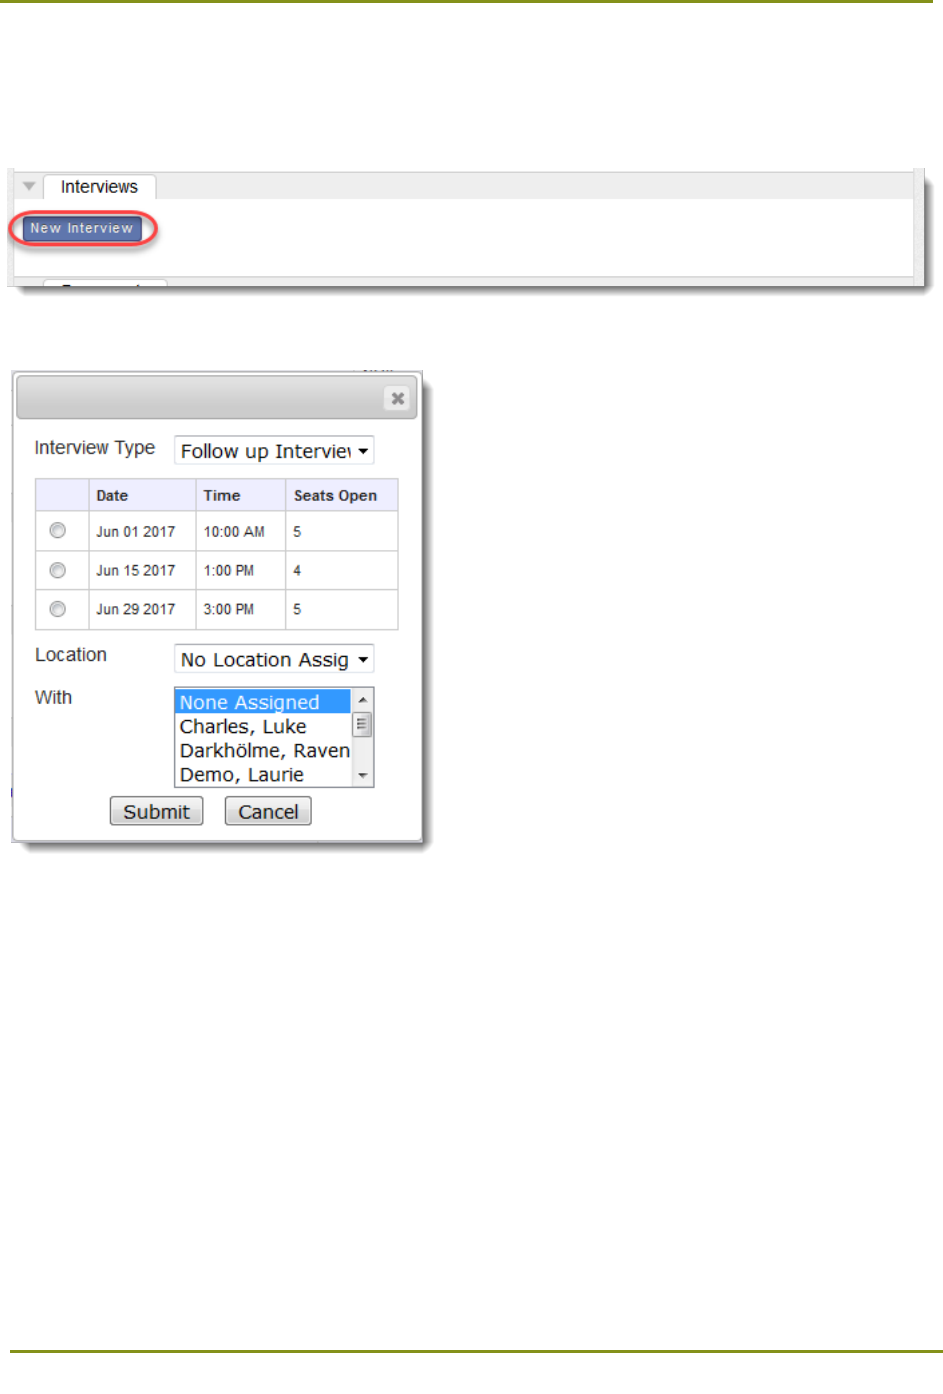
Section 10: Working with Interviews > Assigning Interviews
66
Assigning Interviews
1. To assign an interview to an applicant, click New Interview.
2. Select the Interview type and date/time.
3. Assign an Interviewer and location and click Submit. To select multiple interviewers, press and hold
down the control key (Command on Mac) while selecting the applicable Interviewers. Only the
Interviewers available on this date/time are visible in the drop-down.
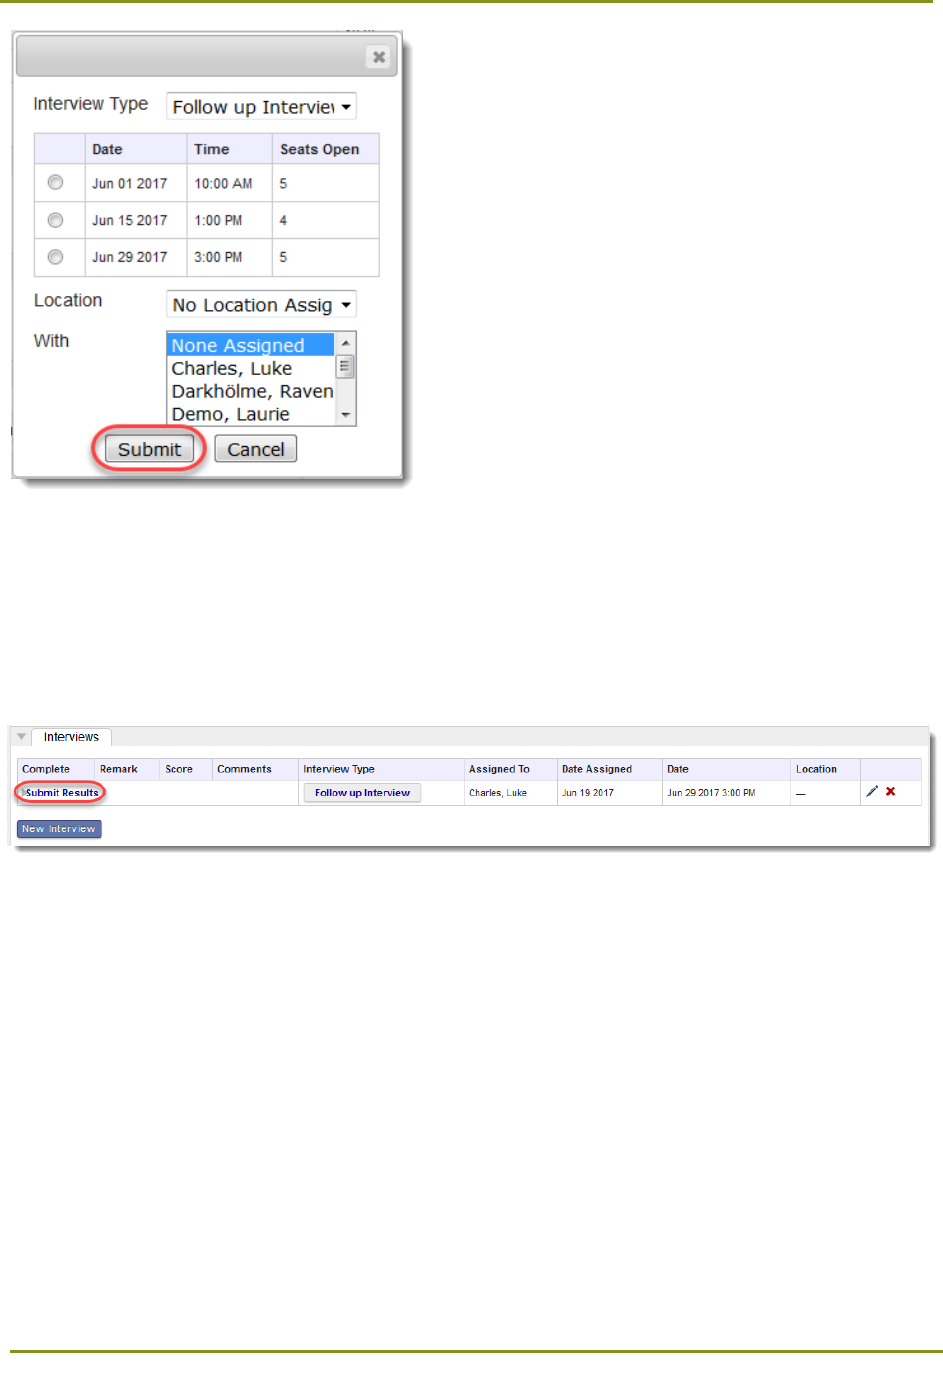
Section 10: Working with Interviews > Submitting Interview Results
67
Submitting Interview Results
After completing an Interview, you can provide feedback such as scores and comments.
1. Click Submit Results.
Enter overall comments and overall remarks, then click Complete Interview to submit your
responses. Note that if using questions, the individual score field is required (if configured). Also,
the overall score is calculated by summing or averaging the individual question scores, or it can be
entered independently by the interviewer (depending on question configuration).

Section 10: Working with Interviews > Submitting Interview Results
68

Section 11: Working with Email Correspondence > Searching for Correspondence
69
Section 11: Working with Email Correspondence
Searching for Correspondence
The Search Correspondence function allows you to view correspondence that was sent or is waiting to
be sent to applicants.
Using the Menu Bar, open the Applicants panel, then click Search Correspondence.
You can apply one or more filters to refine the list of search results. Only applicants you have permission
to view will appear in your results.
Note: When using the Date Created filter, WebAdMIT searches for correspondence sent on or before
the selected date.
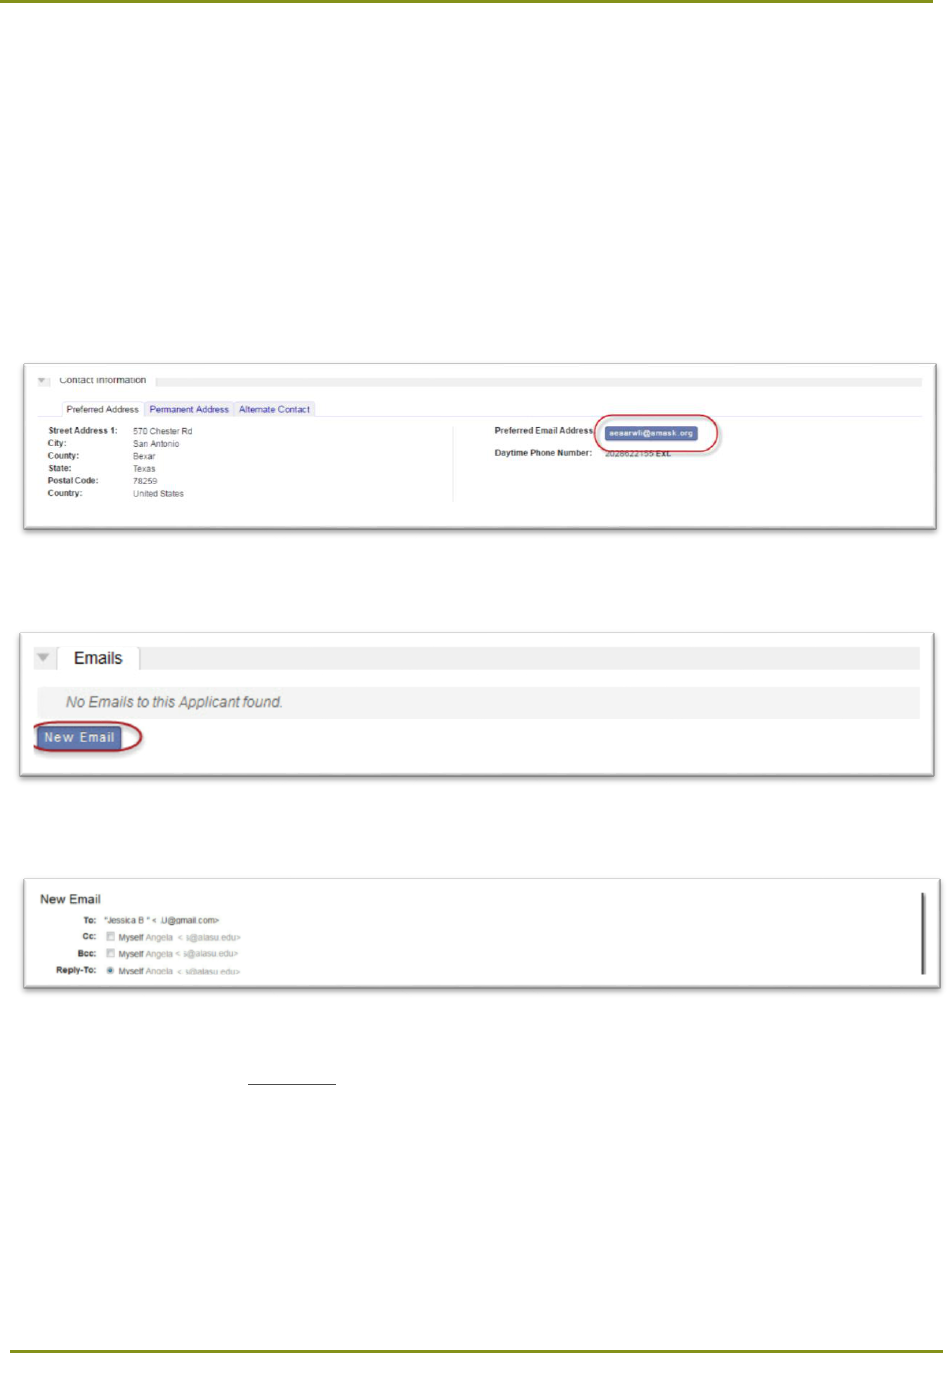
Section 11: Working with Email Correspondence > Sorting Results
70
Sorting Results
Click Sort Results to sort your results by name, email address, or ID number.
Sending Emails
Sending Emails from the Applicant Details Page
1. From the Contact Information panel of the Applicant Details page, click the email button.
2. Click New Email.
3. Select the recipients and a reply-to address.
4. Select a template, if applicable, and format your email. The email editor allows you to:
• Bold, Italicize, and Underline text
• Change font type
• Change font size
• Use merge fields
• Change font color and background color
• Create a link or insert an image
• Create numbered list, bullet points, and increase or decrease the indentation
• Left, Center, or Right justify text
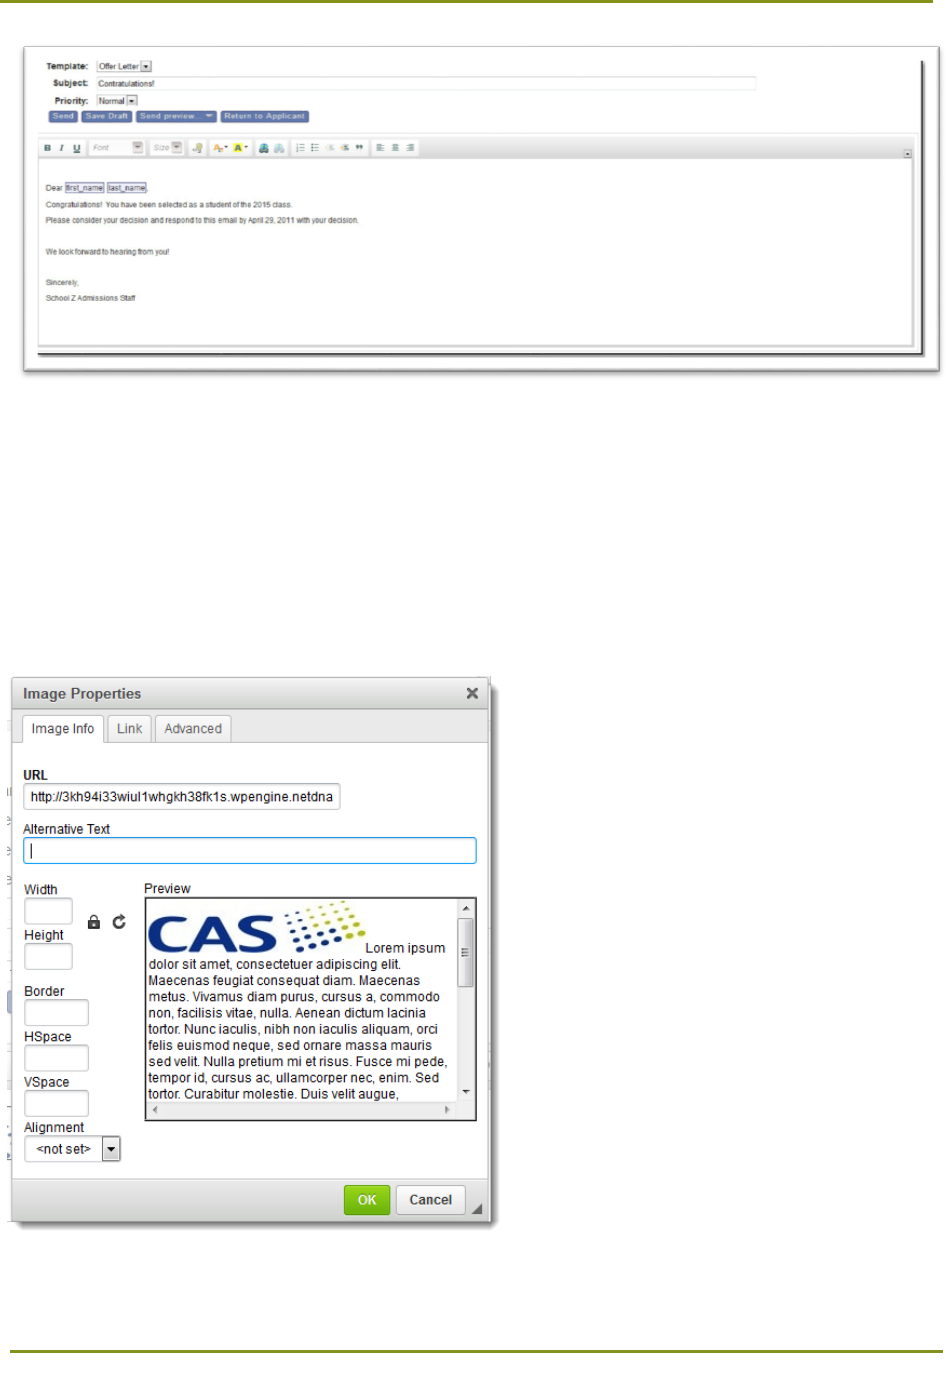
Section 11: Working with Email Correspondence > Sending Emails
71
To add an image or logo:
• Obtain a URL link for the image. You can do this by either searching online for your image or
working with your IT or Marketing staff.
• Next, drag and drop it into the email template (if dragging and dropping from a website, be sure
you are using the same browser), or click the image icon, then enter the image's link. Note that
an error message displays when an incorrect image link or data URL is used.
Right-click on the image to edit its properties, including size.
To personalize the message using mail merge fields, click the lightbulb icon, then select the information
you want to merge into the message.
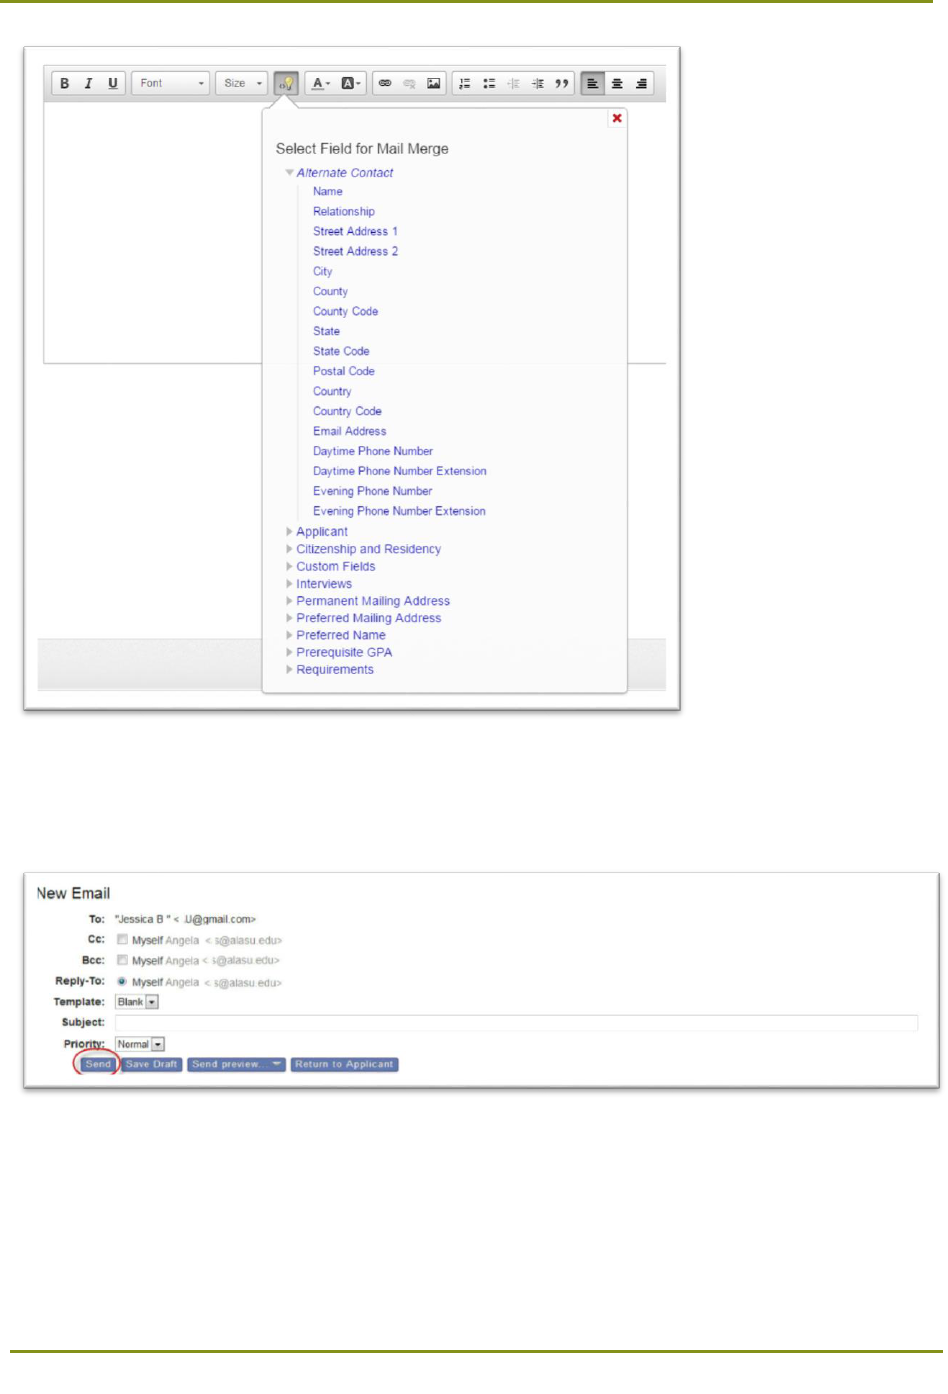
Section 11: Working with Email Correspondence > Sending Emails
72
5. When you are finished composing your email, click Send to send the email, Save Draft to save but
not send the email, Send preview… to view a preview of the email, or Return to Applicant to cancel
the email.
Note: If the applicant replies to the email, their response is routed to your selected reply-to address.
Email Statuses
Email statuses include:

Section 11: Working with Email Correspondence > Sending Emails
73
• Bounced: The message was rejected by the recipient’s email server; you should verify the recipient’s
email address. If incorrect, the applicant should update this information by returning to their CAS
application. If correct, contact the WebAdMIT Support Team.
• Clicked: The recipient received the message, opened it, and clicked a link or image.
• Deferred: The message was not sent and is in queue for redelivery.
• Delivered: The recipient’s email server received the message; however, this does not indicate that
the applicant opened or viewed the message. The recipient may have recently changed their email
address, or they may have rules or junk mail settings enabled that prevent the email from reaching
the inbox. Applicants are encouraged (in the Applicant Help Center) to maintain updated contact
information and disable junk mail filters.
• Dropped: The email provider is preventing delivery of the message. Messages are typically dropped
when they contain an invalid (or non-existent) email address, or when the recipient marks a
previous WebAdMIT message as spam. Contact the WebAdMIT Support Team. Additionally, you may
want to confirm with the recipient that you have the correct address, and that they added
donotreply@webadmit.org to their "safe senders" list.
• Failed: The message was not sent. Try manually sending the email.
• Opened: The recipient received the message and opened it.
• Sent: The message is being processed for delivery to the recipient.
• Spam Report: The recipient reported the email as spam.
• Unknown: The status of the email can’t be determined. This status typically appears for recently
sent emails and is replaced by another status within 24 hours.
Note: Some emails will remain indefinitely in a status of Sent or Delivered if the recipient’s email server
fails to process read receipts.
Viewing Email Statuses from the Search Correspondence Page
From the Search Correspondence results, you can view the status of emails. Additionally, you can:
• Click the pencil icon to edit a draft email.
• Click the remove icon to delete a draft email.
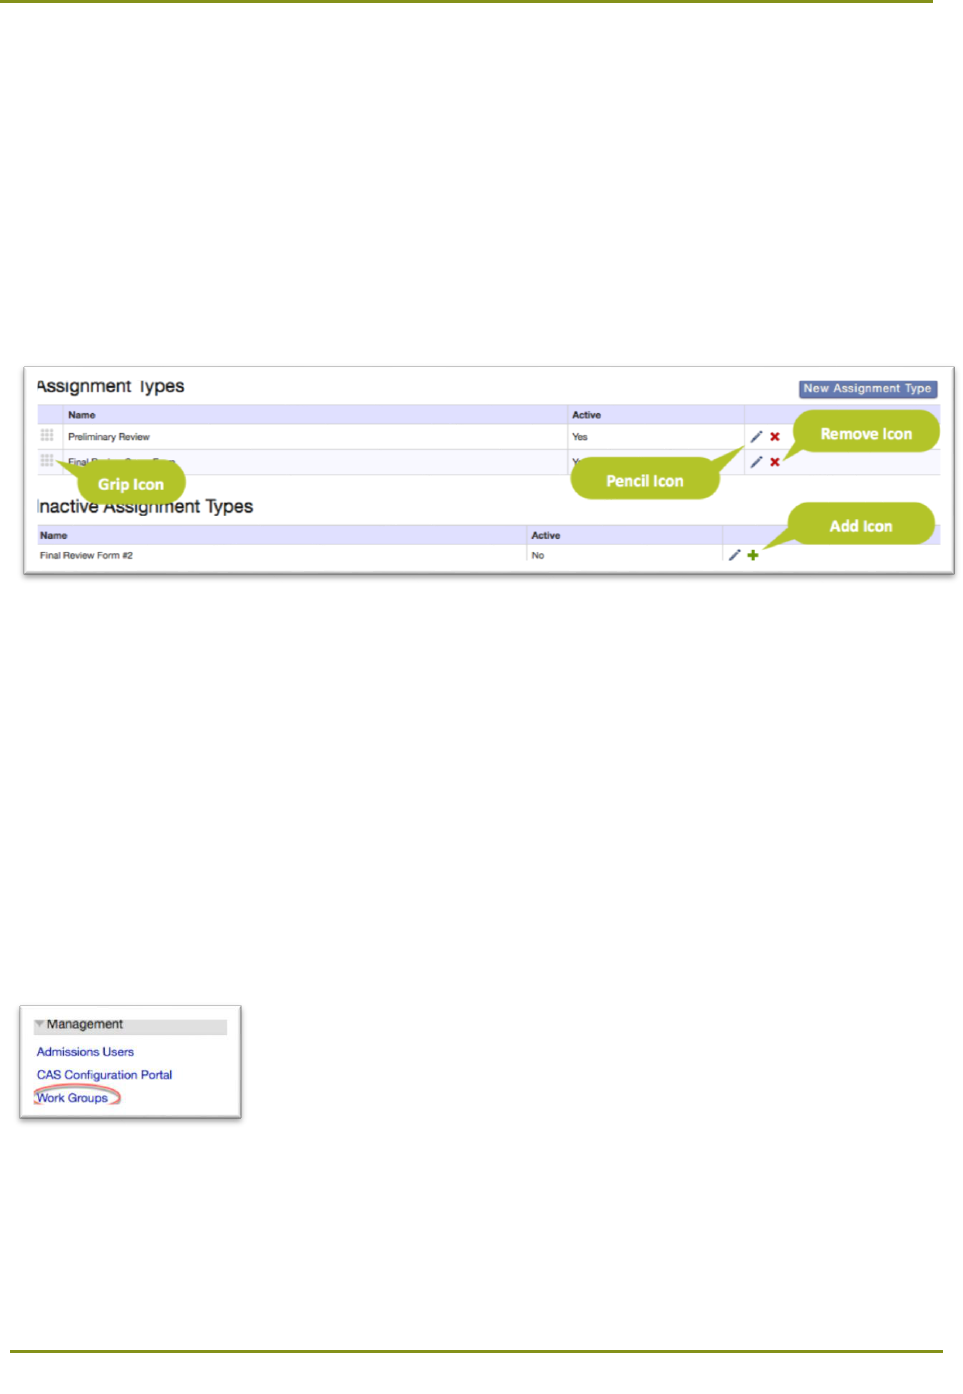
Section 12: Configuring WebAdMIT > Creating Work Groups
74
Section 12: Configuring WebAdMIT
WebAdMIT allows you to configure settings to create efficient workflows. As you’re configuring settings,
you can:
• Use the grip icon to reorder elements.
• Use the pencil icon to modify configurations.
• Use the remove icon to remove or deactivate elements. In some features, like List Manager,
Export Manager, and Report Manager, this icon permanently deletes the element. In other
features, this icon deactivates the element. To reactivate an element, use the add icon.
To perform the following action, you need Configure Software permissions. Note that primary users set
up by Liaison are granted full administrator access to configure WebAdMIT, and these users have the
ability to grant this permission to others.
Creating Work Groups
Work Groups allow you to manage permissions for a group of users, as opposed to managing
permissions for each individual user. Users can only reside in one Work Group at a time. Note that a
WebAdMIT Administrators Work Group is available by default and provides users with full
administrative access.
1. Using the Menu Bar, open the Management panel, then click Work Groups.
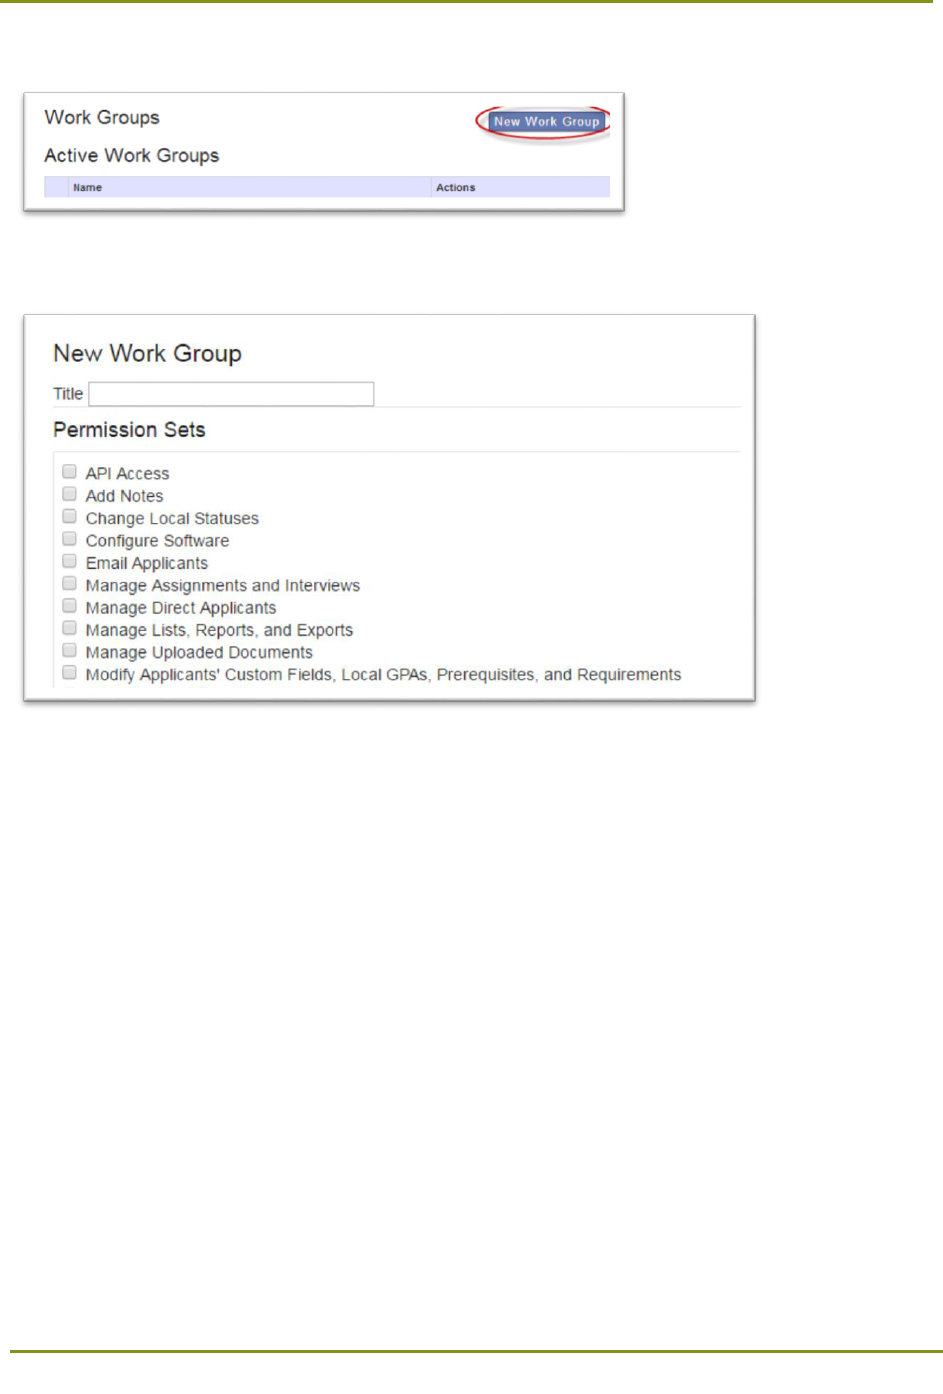
Section 12: Configuring WebAdMIT > Creating Work Groups
75
2. Click the New Work Group button.
3. Enter a name for the Work Group and select the group’s permission sets.
Permission sets may include:
• API Access: Allows users to query WebAdMIT using the API.
• Add Notes: Allows users to enter notes on the Applicant Details page. Users without this
permission can read, but not create notes.
• Change Local Statuses: Allows users to change the Local Status of an applicant's
designation, either individually on the Applicant Details page, or in batches via list or search
actions.
• Configure Software: Allows users to access all management functions.
• Email Applicants: Allows users to email applicants.
• Manage Assignments and Interviews: Allows users to assign and delete Assignments and
Interviews on applicant pages. Users with this permission can also edit submitted
Assignment and Interview results.
• Manage Direct Applicants: Where applicable, this allows users to manually add applicants
into WebAdMIT. Note that this feature is only available for select application services.
• Manage Lists, Reports, and Exports: Allows users to create lists, reports, and exports and
define their visibility.
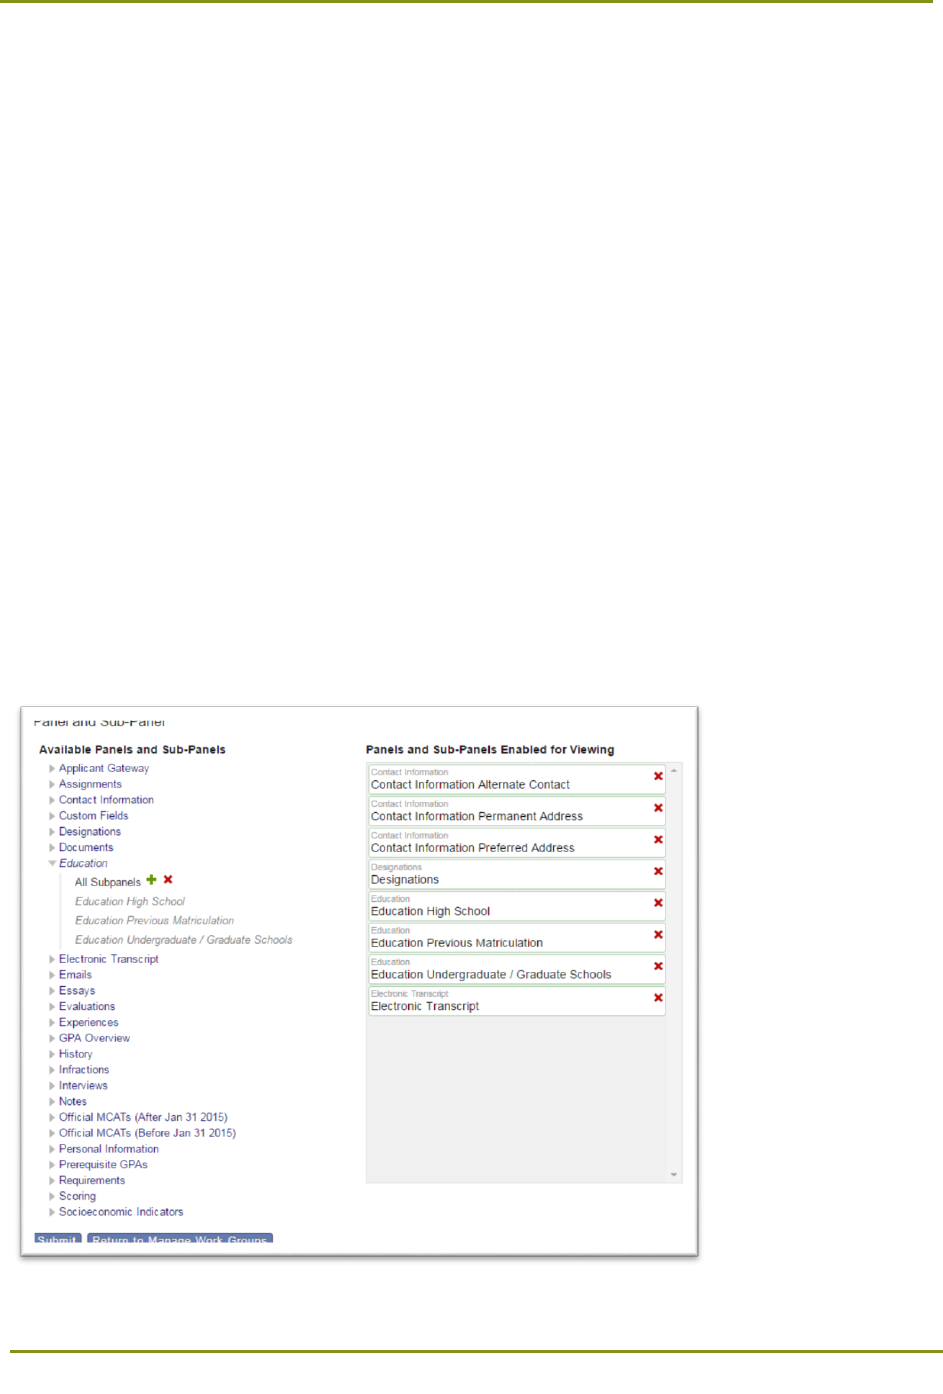
Section 12: Configuring WebAdMIT > Creating Work Groups
76
• Manage Uploaded Documents: Allows users to upload and delete documents on an
applicant's record for an organization.
• Modify Applicants' Custom Fields, Local GPAs, Prerequisites, and Requirements: Allows
users to update an applicant's Custom Fields and Requirements, either from the Applicant
Details page or in batches. This permission set also allows users to update courses included
in an applicant's Prerequisite or Local GPA via the Electronic Transcript.
• Request Background Check: Where applicable, this allows users to submit a request for a
background check for an applicant. Note that this feature is only available select application
services.
• View All Applicants: Allows users to view information for all applicants. Users without this
permission can only view their assigned applicants.
• View Background Check: Where applicable, this allows users to view an applicant’s
background check information. Note that this feature is only available for select application
services.
• View Other User's Assignment/Interview Results: Allows users to view any applicant’s
Assignments and Interviews, both on the Applicant Details page and on the Search
Assignments and Search Interviews screens. Users without this permission can only view
their assigned Assignments and Interviews.
4. Select the panels and subpanels that the group can view on the Applicant Details page, then click
Submit.
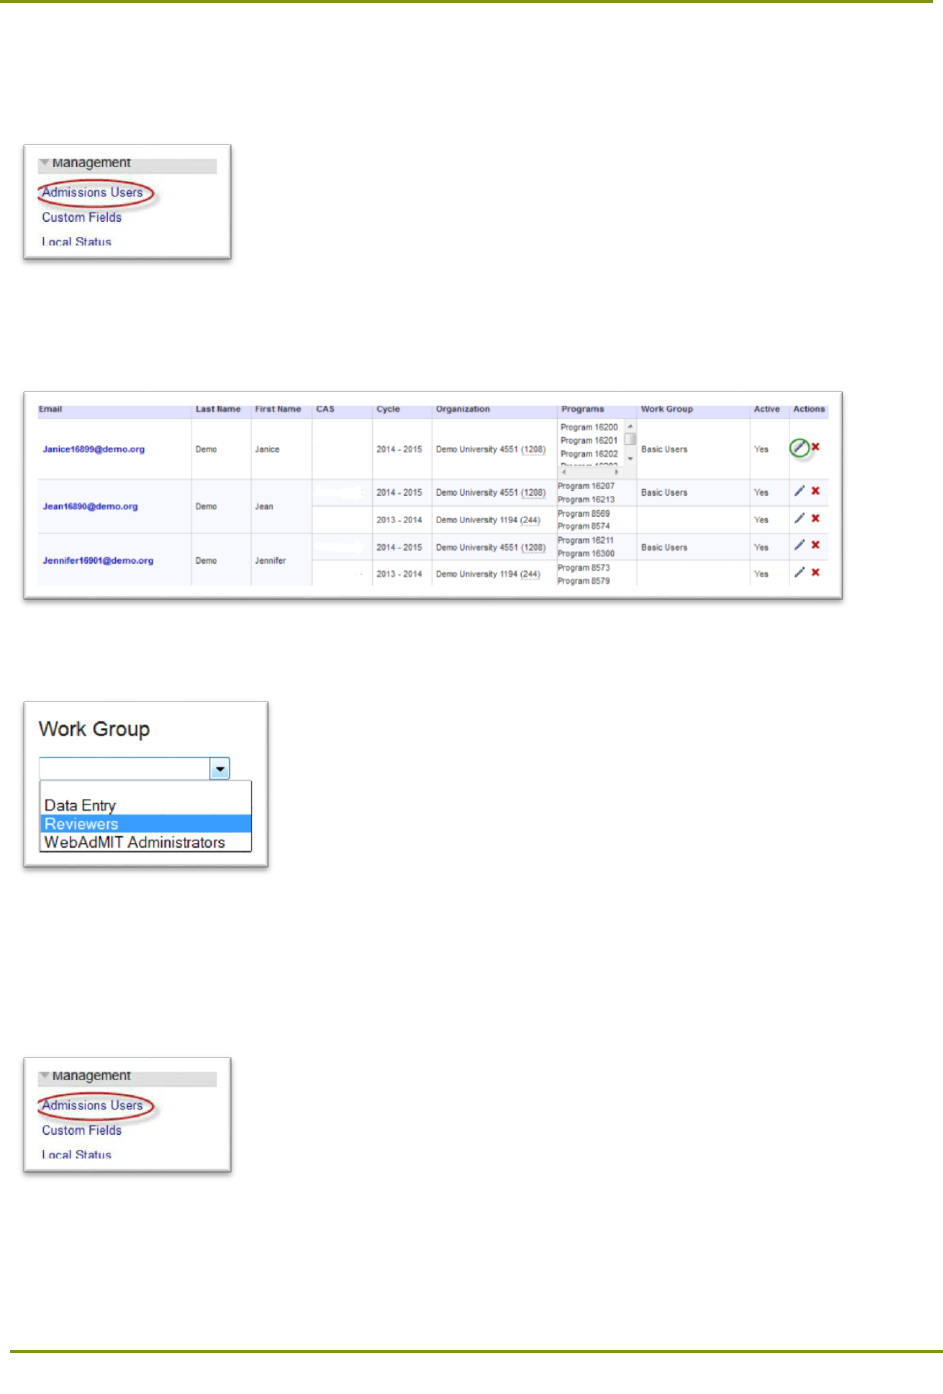
Section 12: Configuring WebAdMIT > Creating Users
77
Adding Users to Work Groups
1. Using the Menu Bar, open the Management panel, then click Admissions Users.
2. Click the pencil icon for the applicable user. Note that you can only add existing users to Work
Groups; to create a new user, see the Creating Users topic below.
3. Select the applicable Work Group and click Submit.
Creating Users
1. Using the Menu Bar, open the Management panel, then click Admissions Users.
2. Click the New User button.
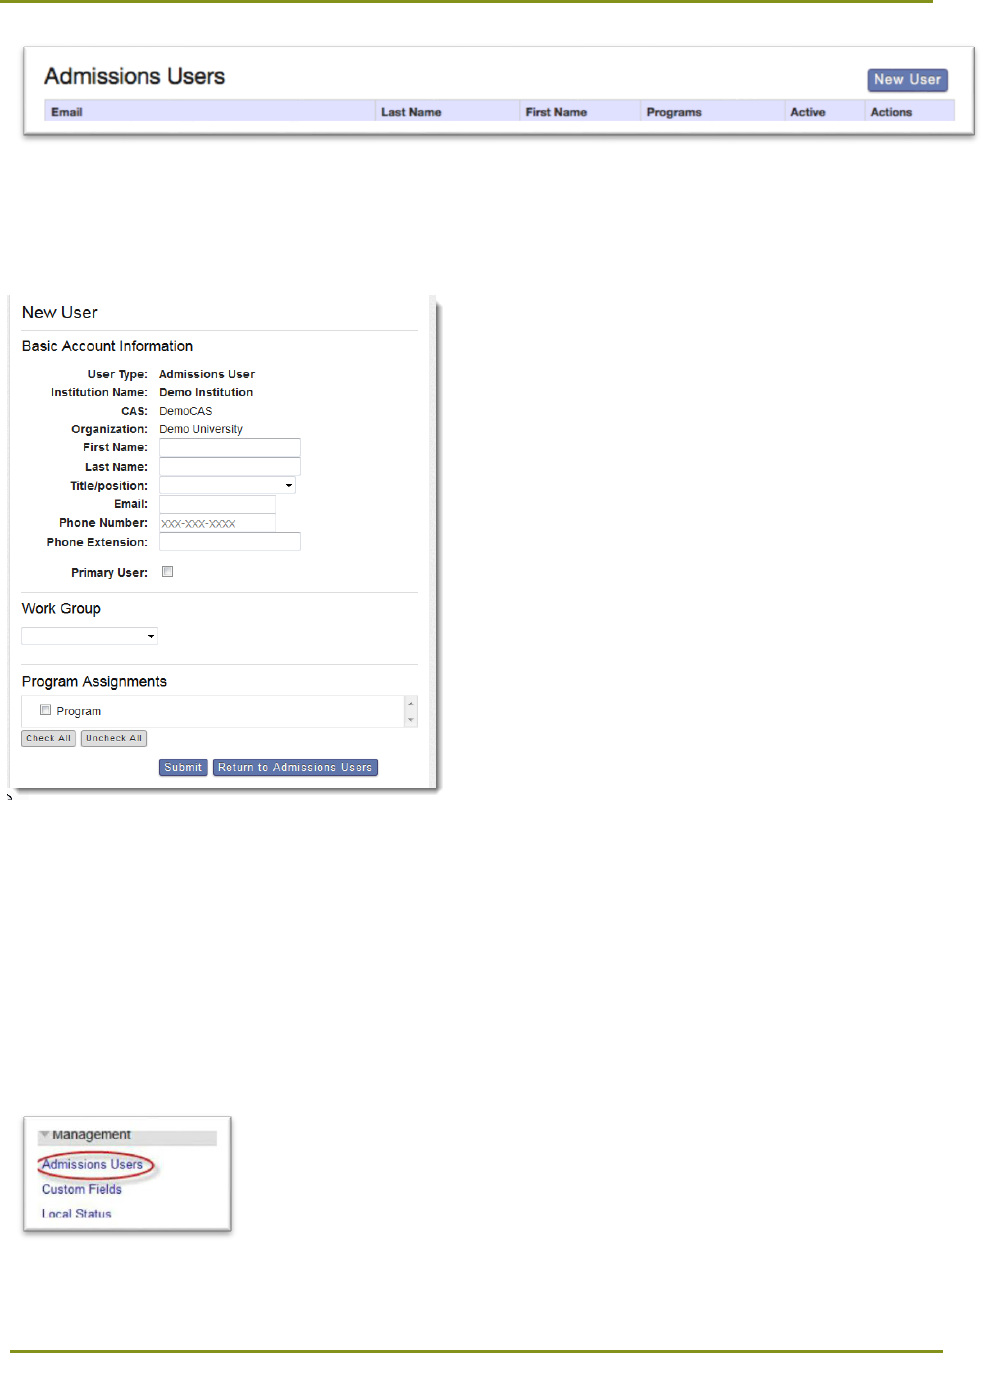
Section 12: Configuring WebAdMIT > Editing Existing Users
78
3. Enter the new user’s information, including the Work Group and Program Assignment(s).
4. Click Submit. The user will receive a system-generated email prompting them to create a password.
Check Boxes on New User Accounts
• Primary User check box has no current functionality.
• Institution Manager allows the user to add a new cycle to existing users.
Editing Existing Users
1. Using the Menu Bar, open the Management panel, then click Admissions Users.
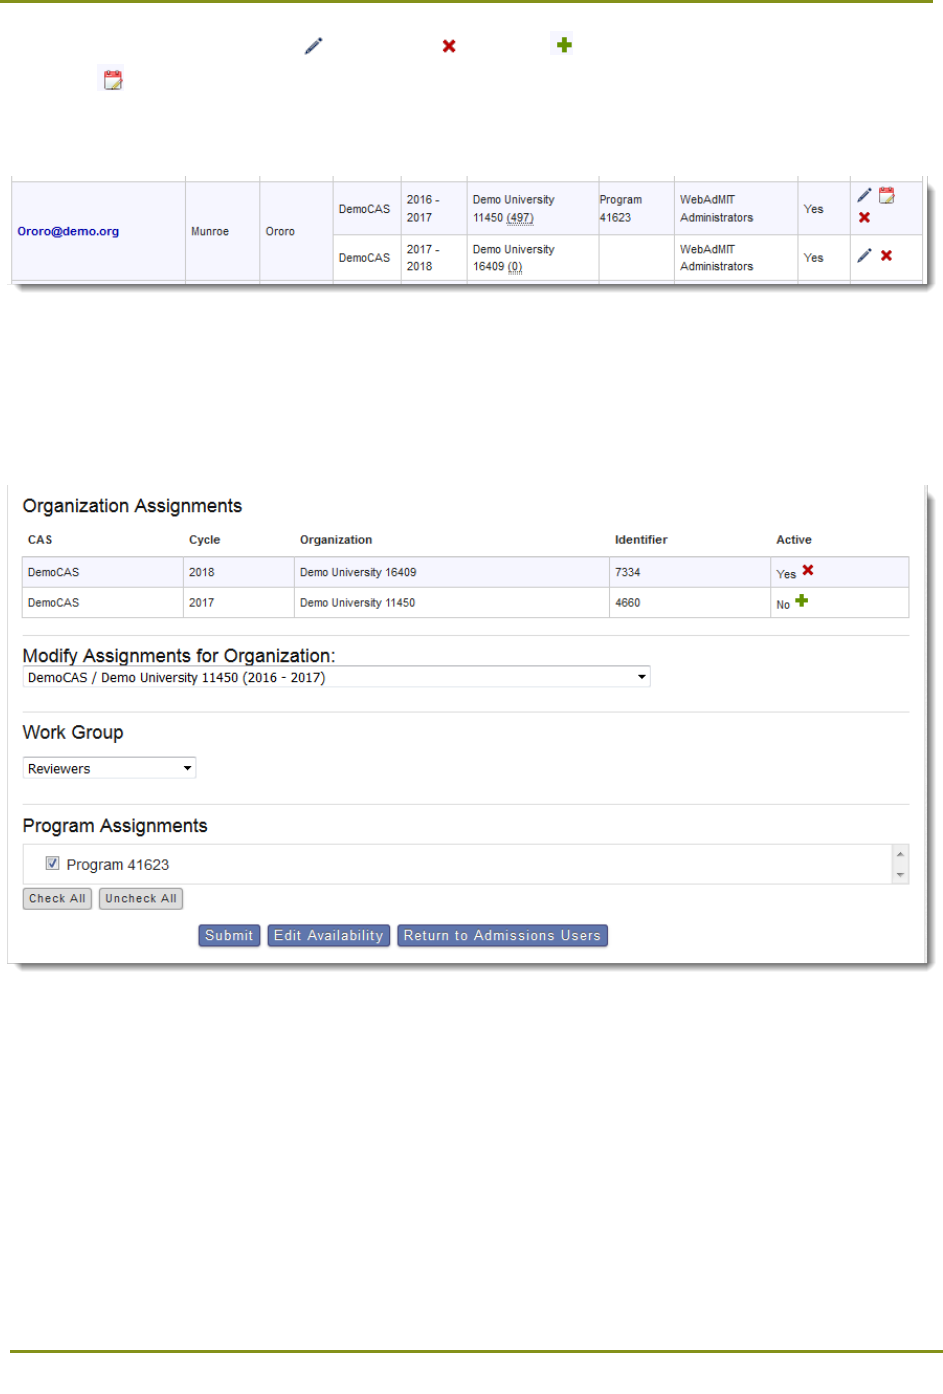
Section 12: Configuring WebAdMIT > Creating Custom Fields
79
2. Using the icons you can edit , deactivate , activate , or edit interview availability dates and
times . Note that editing interview availability only appears as an option once Interviews have
been created.
3. Click the pencil icon to edit the user.
4. Add an Organization to this user’s permissions by clicking the green plus sign.
5. Select the Organization and cycle from the drop down for which you want to modify the Work
Group and Program Assignments.
6. Click Edit Availability to change this user’s available dates and times to conduct interviews.
7. Click Submit.
Note: it is possible to have different work group and program assignments for a user by cycle.
Creating Custom Fields
Custom Fields allow you to store information that your program needs, but is not collected from the
applicant in the CAS application.
1. Using the Menu Bar, open the Management panel, then click Custom Fields.
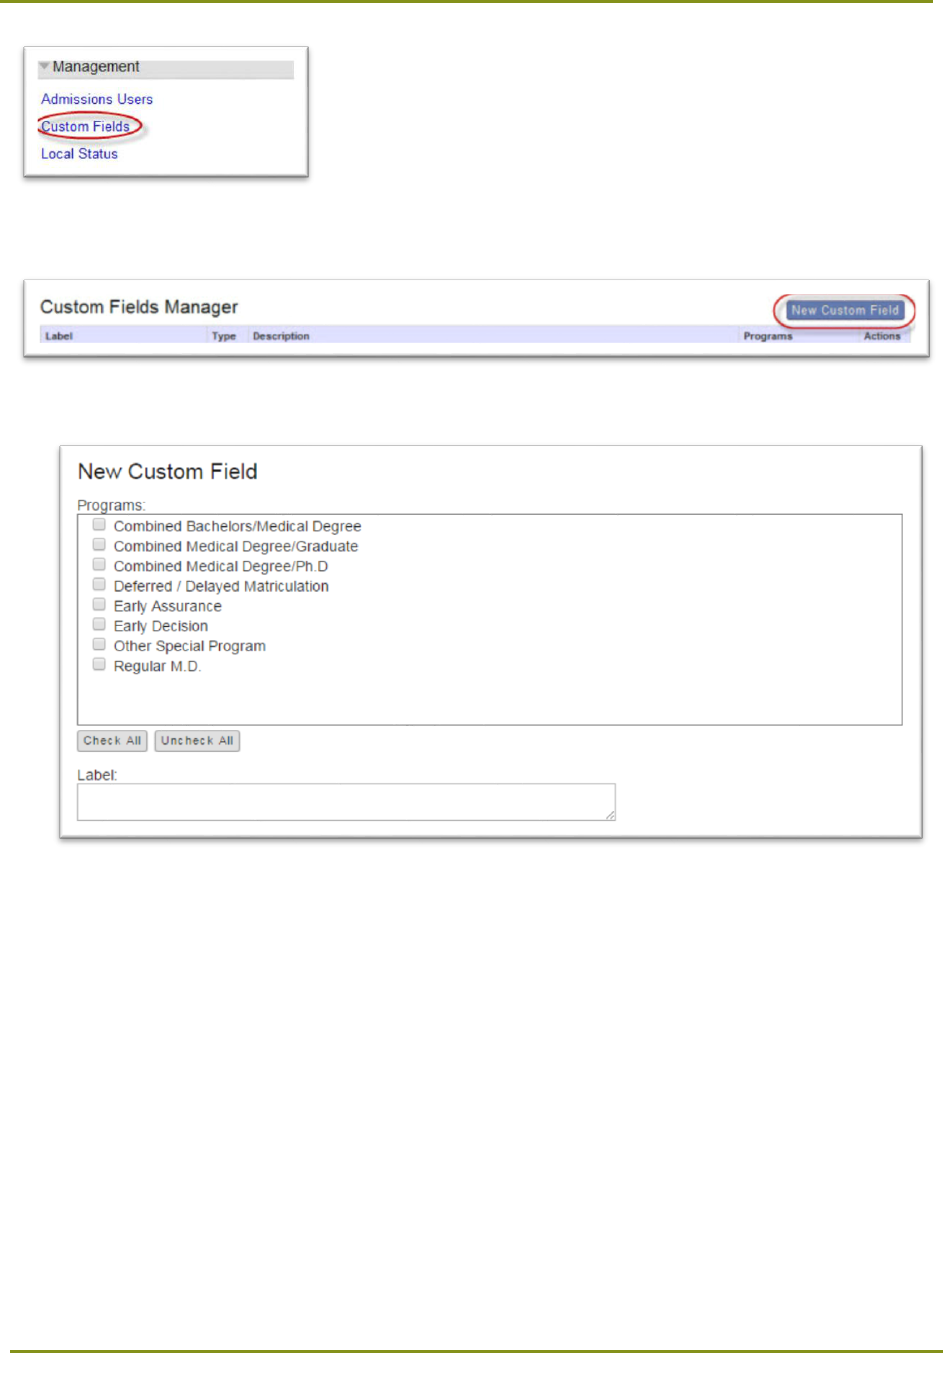
Section 12: Configuring WebAdMIT > Creating Custom Fields
80
2. Click New Custom Field.
3. Select the Programs associated with the Custom Field, then enter a Label (name).
4. Select a custom field type and enter a description that provides an overview of the type of data to
be collected in this field, then click Submit. Note that you can’t change this selection, but you can
deactivate it and create a new one, if necessary.
Custom field types include:
• Text Value: Users can enter text, such as notes/comments, phone numbers, or identification
numbers.
• Select From List: Users can select an option from a customized drop-down list containing
multiple options.
• Date: Users can select a date from a pop-up calendar.
• Yes/No Value: Users can select Yes or No from a drop-down list.
• Numeric: Users can enter numeric values that can be carried out two decimal places.
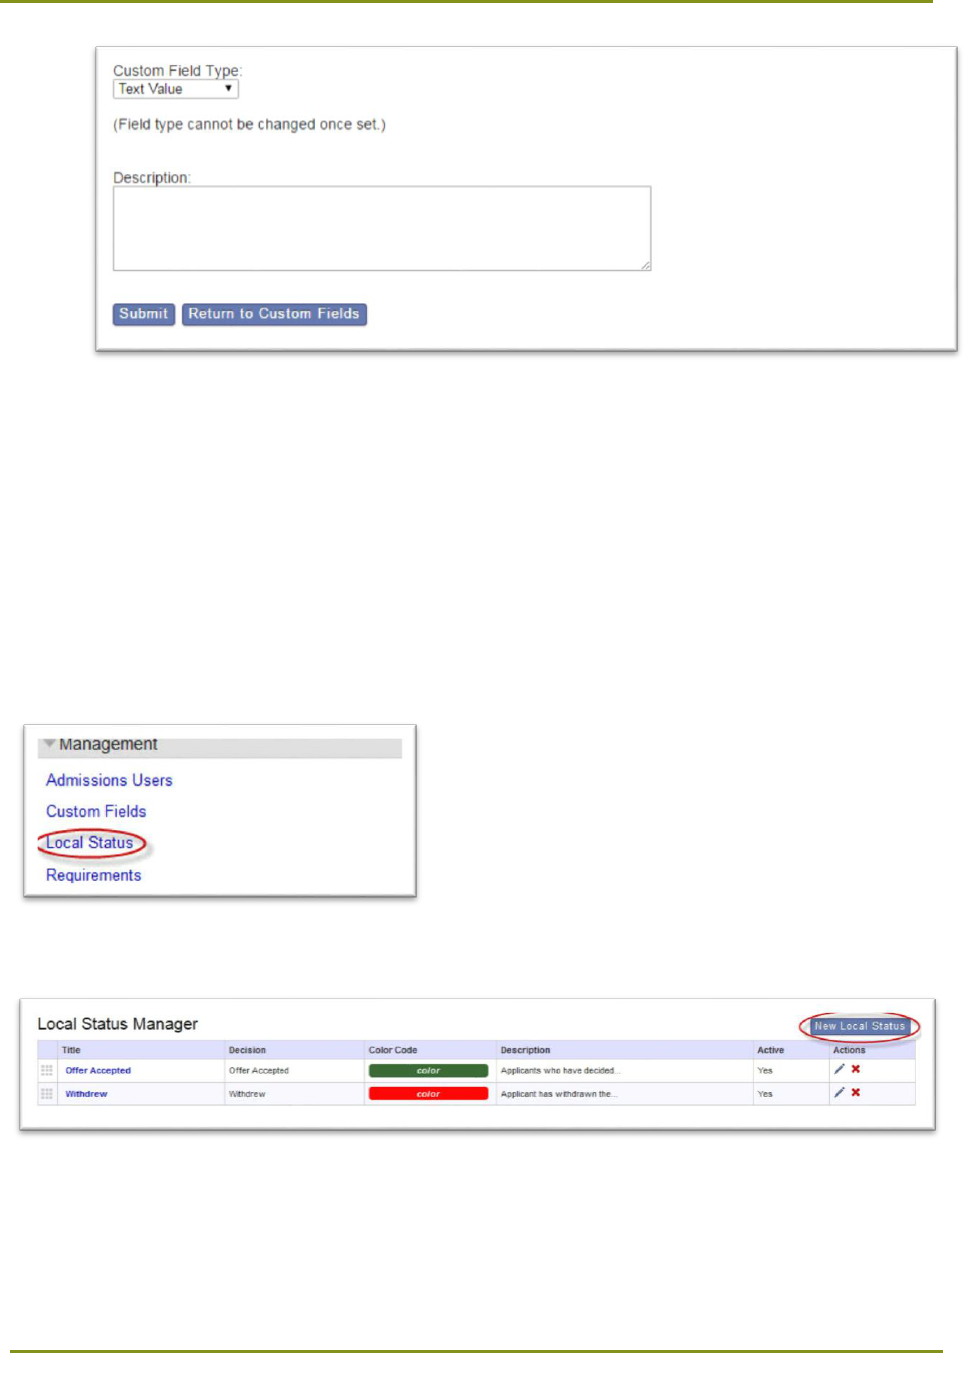
Section 12: Configuring WebAdMIT > Creating Local Statuses
81
Once Custom Fields have been created, they appear on each applicant’s page in the Custom Fields
panel.
Creating Local Statuses
Local Statuses allow you to track applicants by Designation during each stage of your admissions
process. Optionally, Local Statuses can be matched to Decision Codes so that when you change an
applicant’s Local Status, WebAdMIT automatically updates the Decision Code.
1. Using the Menu Bar, open the Management panel, then click Local Status.
2. Click New Local Status.
3. Enter a name and select whether the status is active.
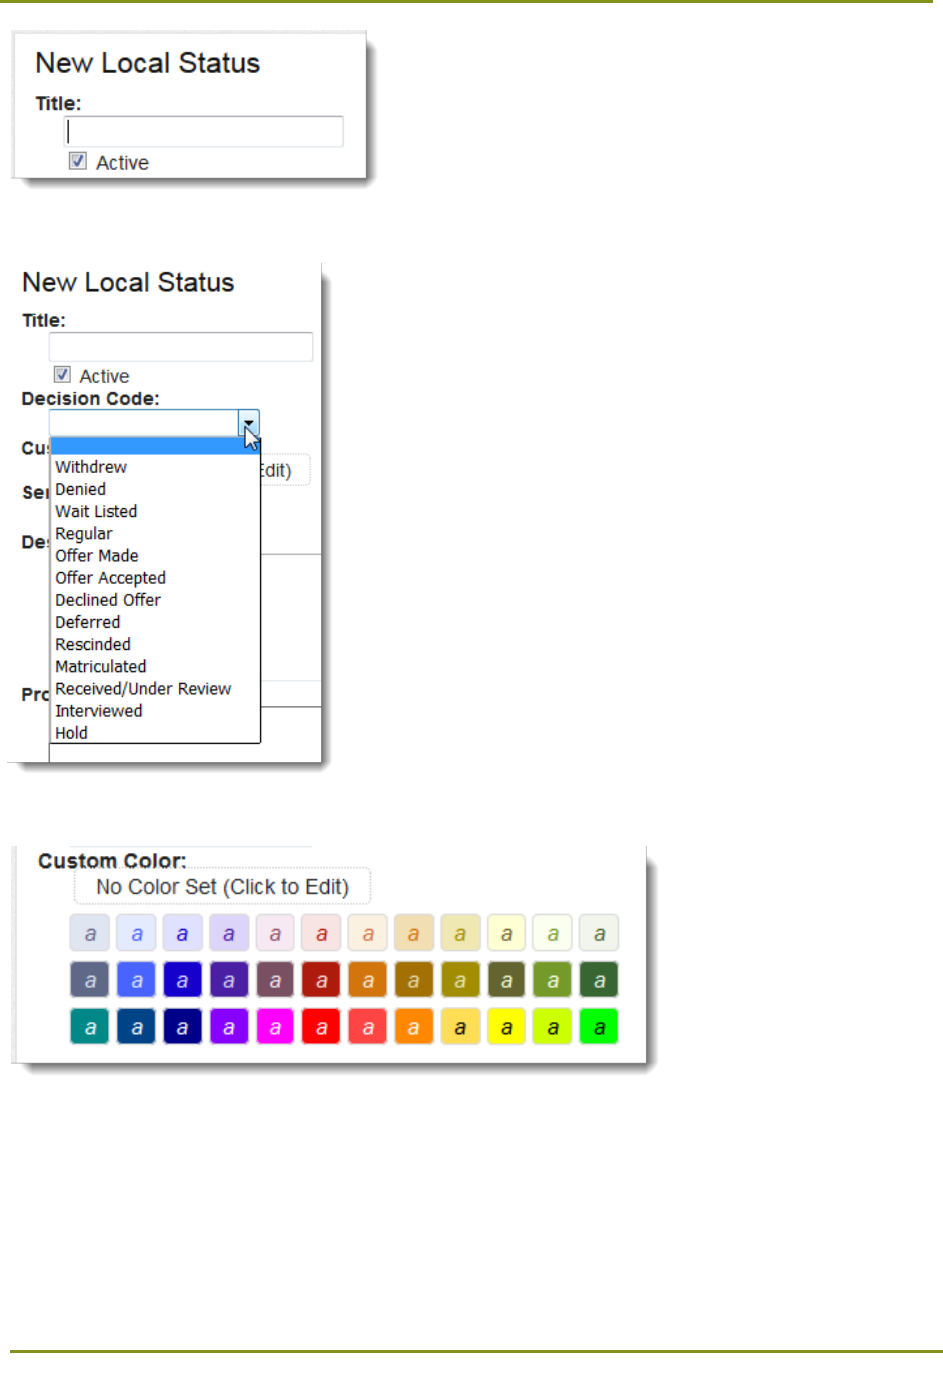
Section 12: Configuring WebAdMIT > Creating Local Statuses
82
4. Select the related Decision Code.
5. Choose a color to visually represent your status.
6. Select an Email Template to link to this Local Status. When an applicant is moved into this Local
Status, a dialog box prompts you to send, edit, save as a draft, or do not send the linked email
template. Note that this option only appears when email templates exist.
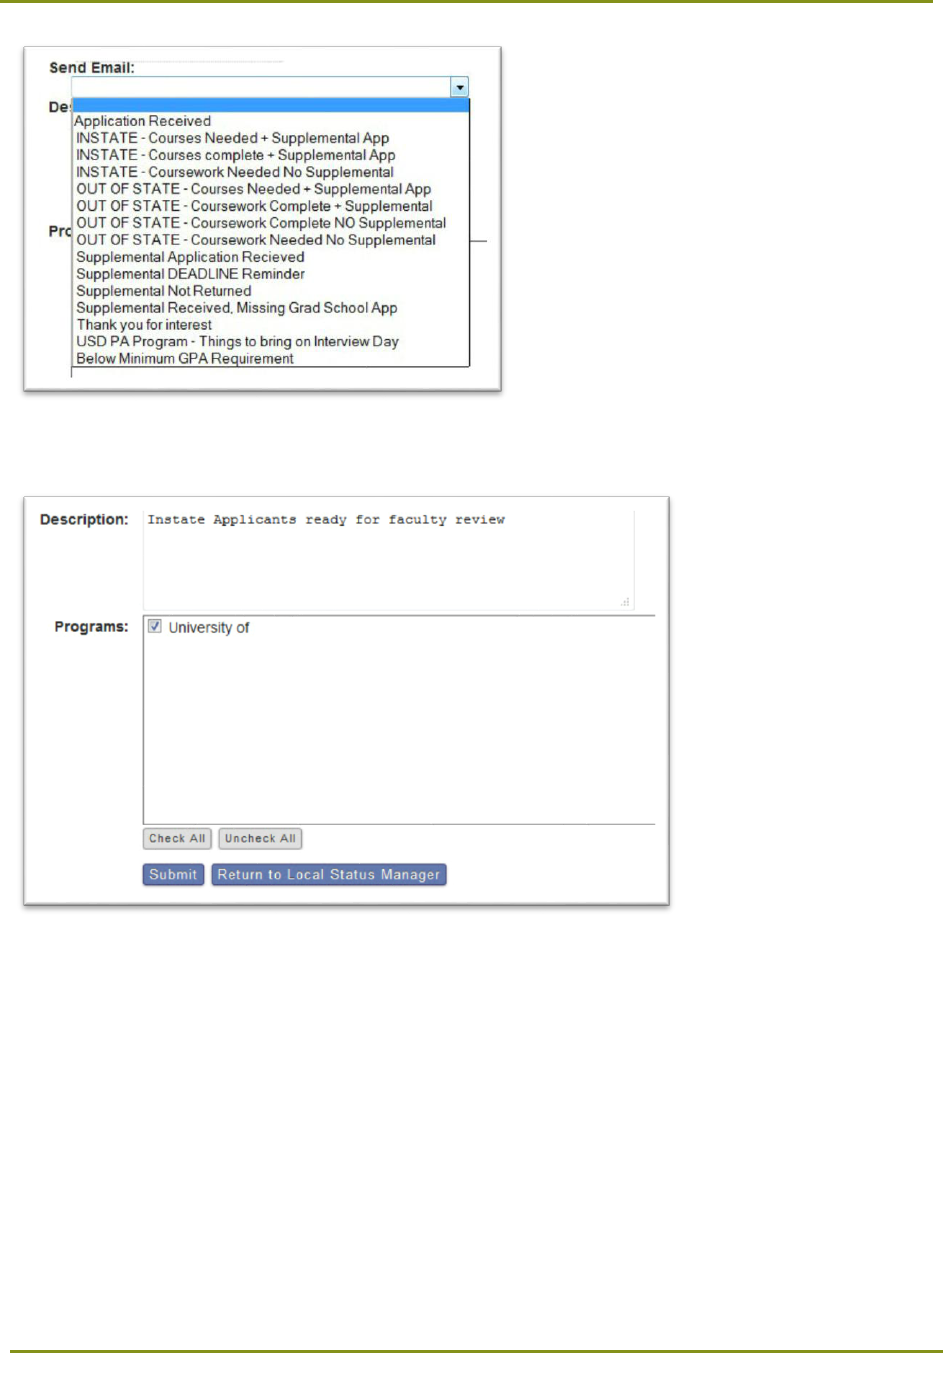
Section 12: Configuring WebAdMIT > Creating GPAs
83
7. Enter a description, select the programs associated with this status, then click Submit.
Once Local Statuses have been created, they can be assigned to applicants individually from the
Designations panel on the Applicant Details page, or in batch via Lists, Searches, or the Clipboard.
Creating GPAs
WebAdMIT allows you to analyze applicants using two types of GPAs:
• Local GPAs: Create a customized GPA from classes in one or more subject areas. On an
individual basis, you can also review an applicant’s Electronic Transcript and remove classes that
factor into that GPA.
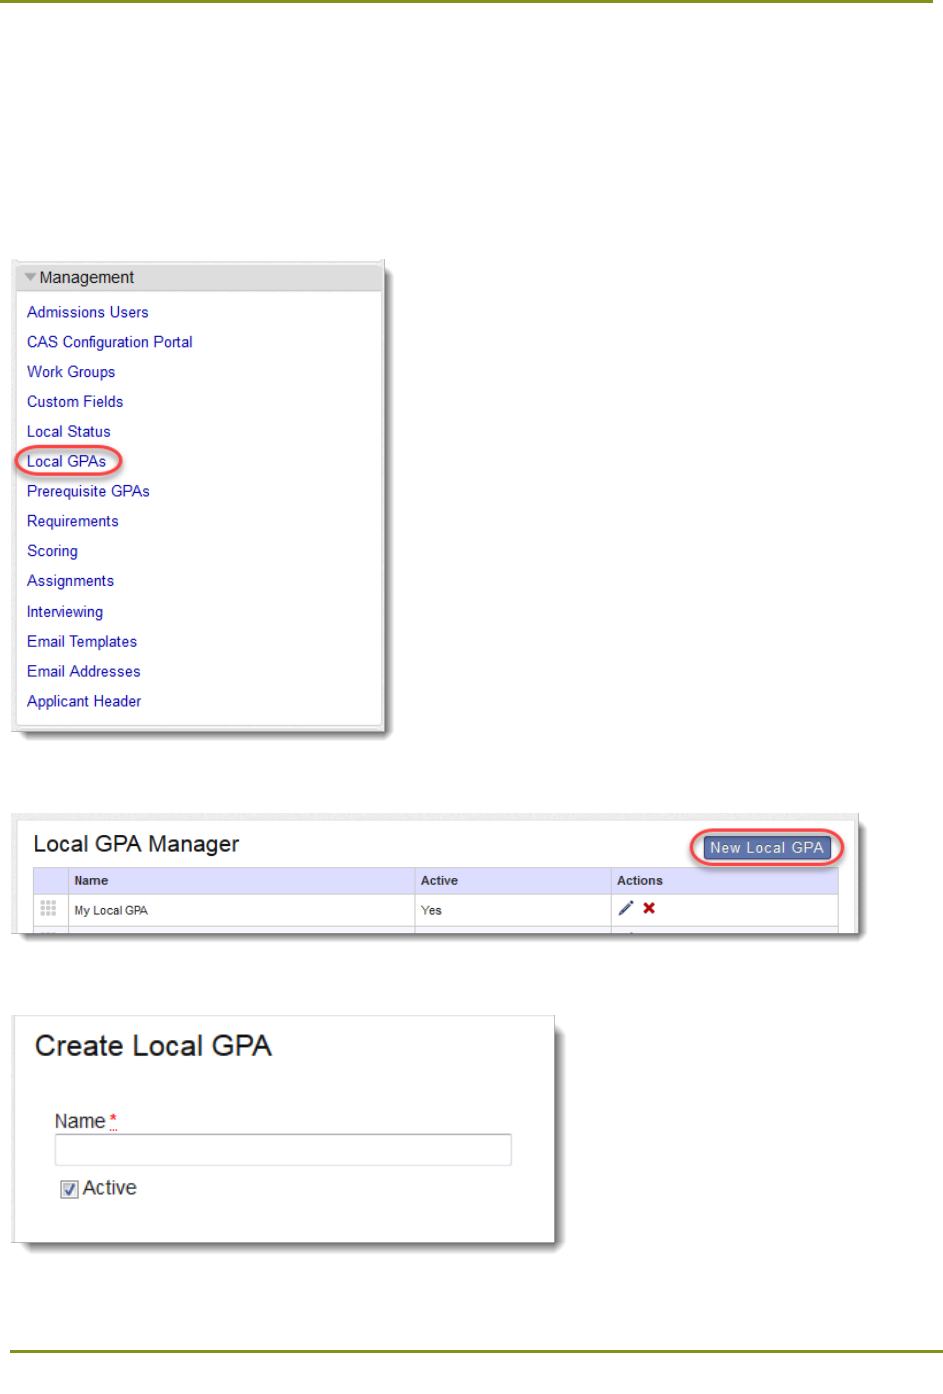
Section 12: Configuring WebAdMIT > Creating GPAs
84
• Prerequisite GPAs: Create, describe, and track prerequisite coursework required for admission.
On an individual basis, you can also review an applicant’s Electronic Transcript and mark courses
as fulfilling a prerequisite GPA.
Creating Local GPAs
1. Using the Menu Bar, open the Management panel, then click Local GPAs.
2. Click the New Local GPA button.
3. Enter a name and select whether the status is active.

Section 12: Configuring WebAdMIT > Creating GPAs
85
4. Select the subjects included in the calculation. By default, every applicant’s Local GPA will be
calculated using these subjects (from both verified and unverified coursework).
5. Select the classifications included in the calculation. Note that most completed courses fall into the
“Not Applicable” category. This is the default category used when a course does not fall into one of
the other categories (i.e. Advanced Placement, Honors, etc.). If building a Local GPA, consider
selecting “Not Applicable” in this section.
6. Select the academic year(s) included in the calculation.
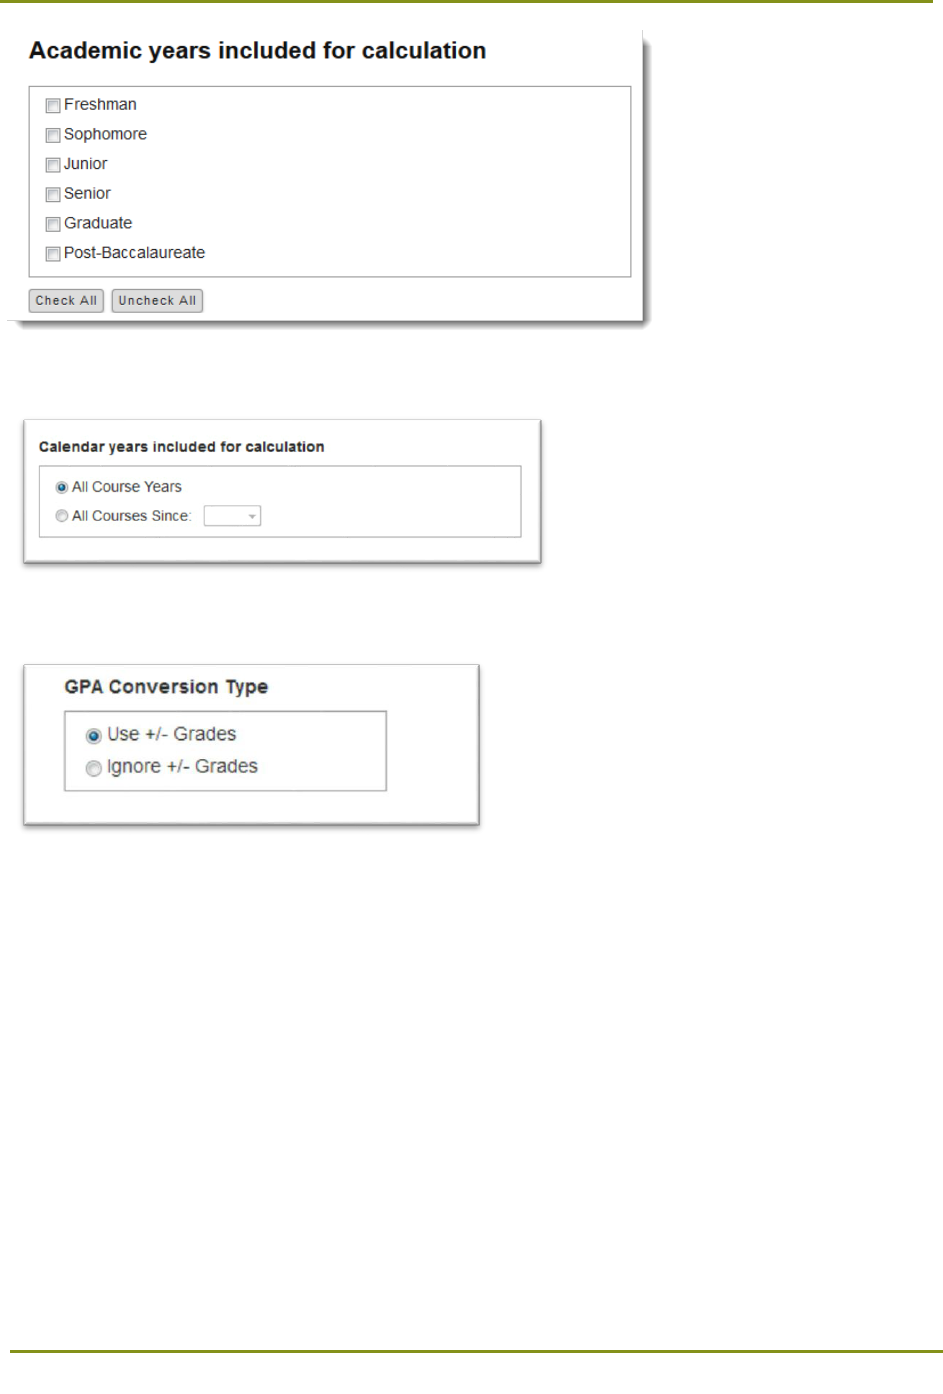
Section 12: Configuring WebAdMIT > Creating GPAs
86
7. Select the calendar year(s) included in the calculation.
8. Select whether you are including or ignoring +/- grades.
9. Select the course inclusion type included in the calculation. For example, you can create a “last 45
credits” GPA calculation, where WebAdMIT starts with the last course an applicant has received a
grade and credit for and works backward until it meets the entered numeric value (in this example
45 credits). When doing this, you'll need to select if you'd like to include courses to the closest
credit, or include the entire term that contains those credit hours. Selecting “closest credit” will
include all credits up to the last course that meets the number of credit hours that you’ve entered.
Selecting "closest credit's term" here will cause that entire term to be counted toward the GPA.
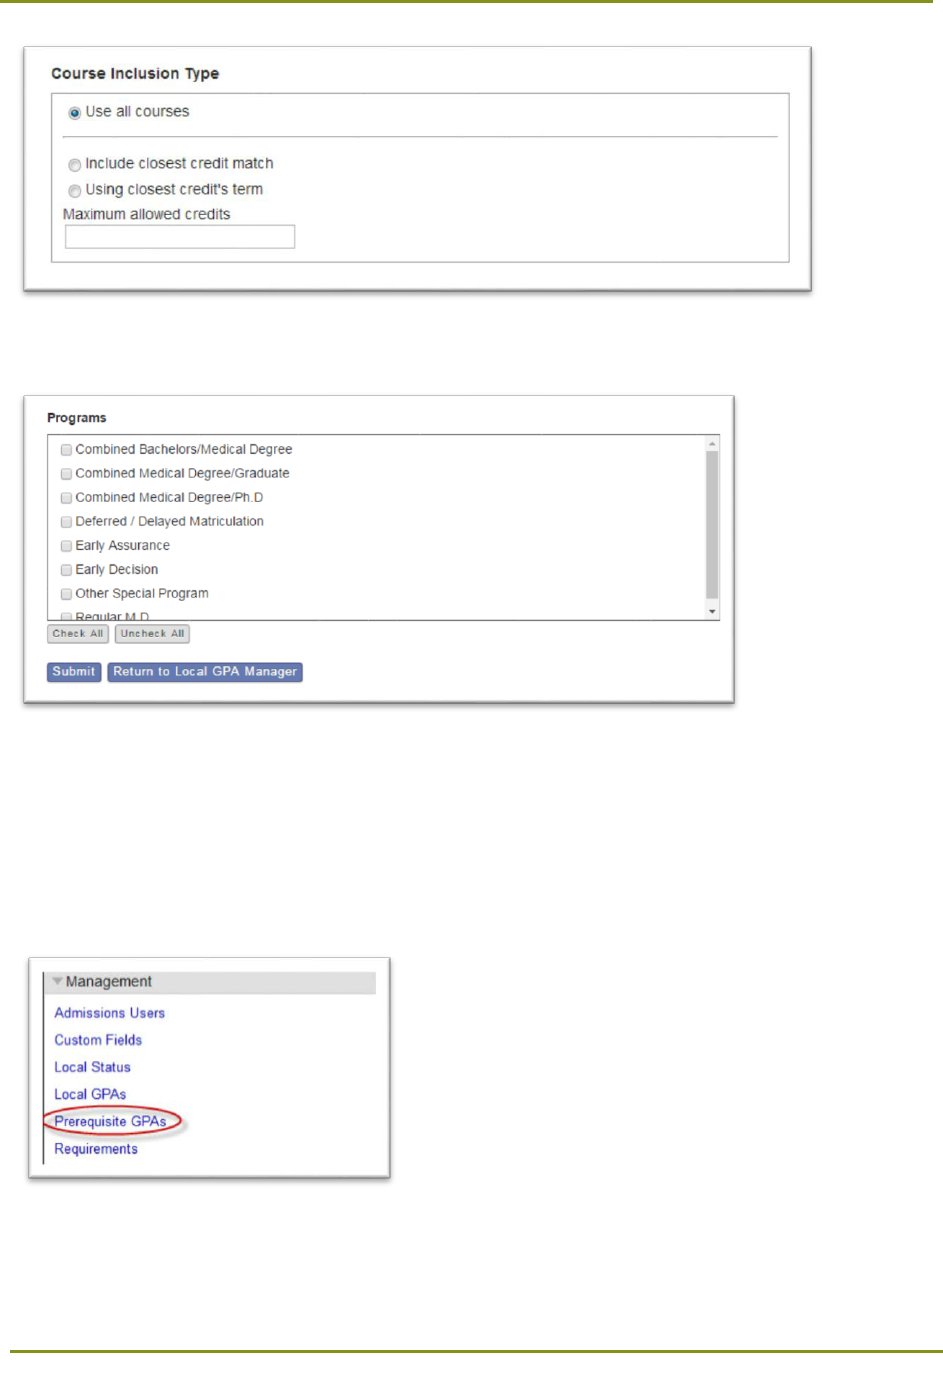
Section 12: Configuring WebAdMIT > Creating GPAs
87
10. Select the programs associated with this Local GPA, then click Submit.
Once Local GPAs have been configured, each applicable applicant will have a GPA calculated. This is
visible from the GPA Overview panel on the Applicant Details pages.
Creating Prerequisite GPAs
1. Using the Menu Bar, open the Management panel, then click Prerequisite GPAs.
2. Click New Prerequisite GPA.
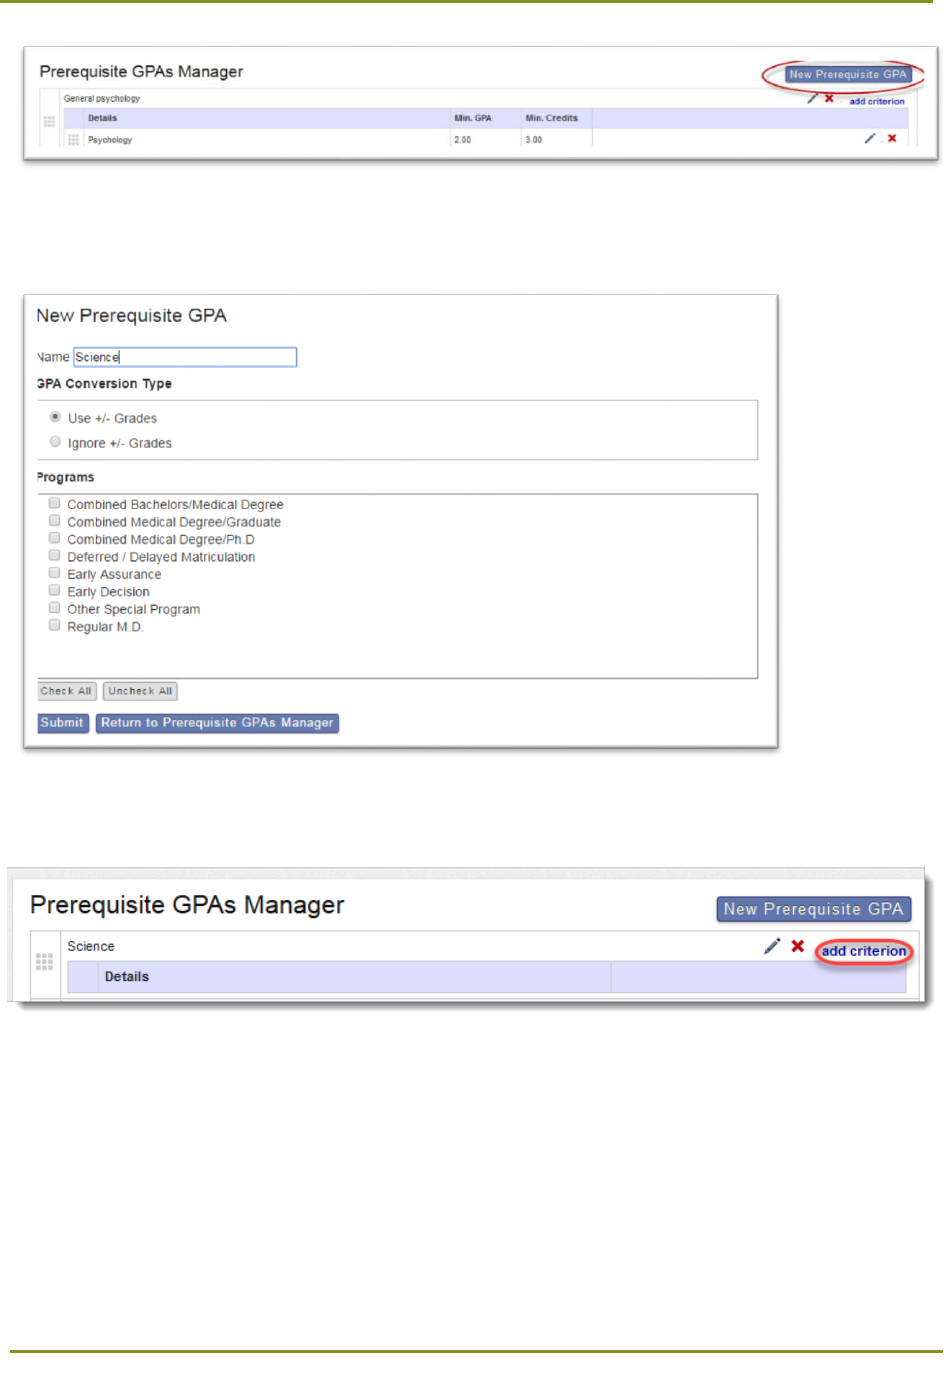
Section 12: Configuring WebAdMIT > Creating GPAs
88
3. Begin by creating a Prerequisite GPA category. Enter a name, select whether you are including or
ignoring +/- grades, select the programs associated with this Prerequisite GPA, and click Submit.
4. Click the add criterion link to add criterion to the GPA.
5. Enter a description for the new criterion, then click Submit. If applicable, enter values for Minimum
GPA and Minimum Credits.
Section 12: Configuring WebAdMIT > Creating Requirements
89
Once Prerequisite GPAs have been configured, navigate to the Electronic Transcript on any applicable
applicant to begin selecting courses to match each prerequisite.
Creating Requirements
WebAdMIT allows you to create a checklist of supplemental requirements for each applicant.
Requirements can be tracked on a simple fulfilled/not fulfilled basis.
1. Using the Menu Bar, open the Management panel, then click Requirements.
2. Click New Requirement.
3. Begin by creating a new Requirement category. Enter a name, select the programs associated with
this Requirement, then click Submit.
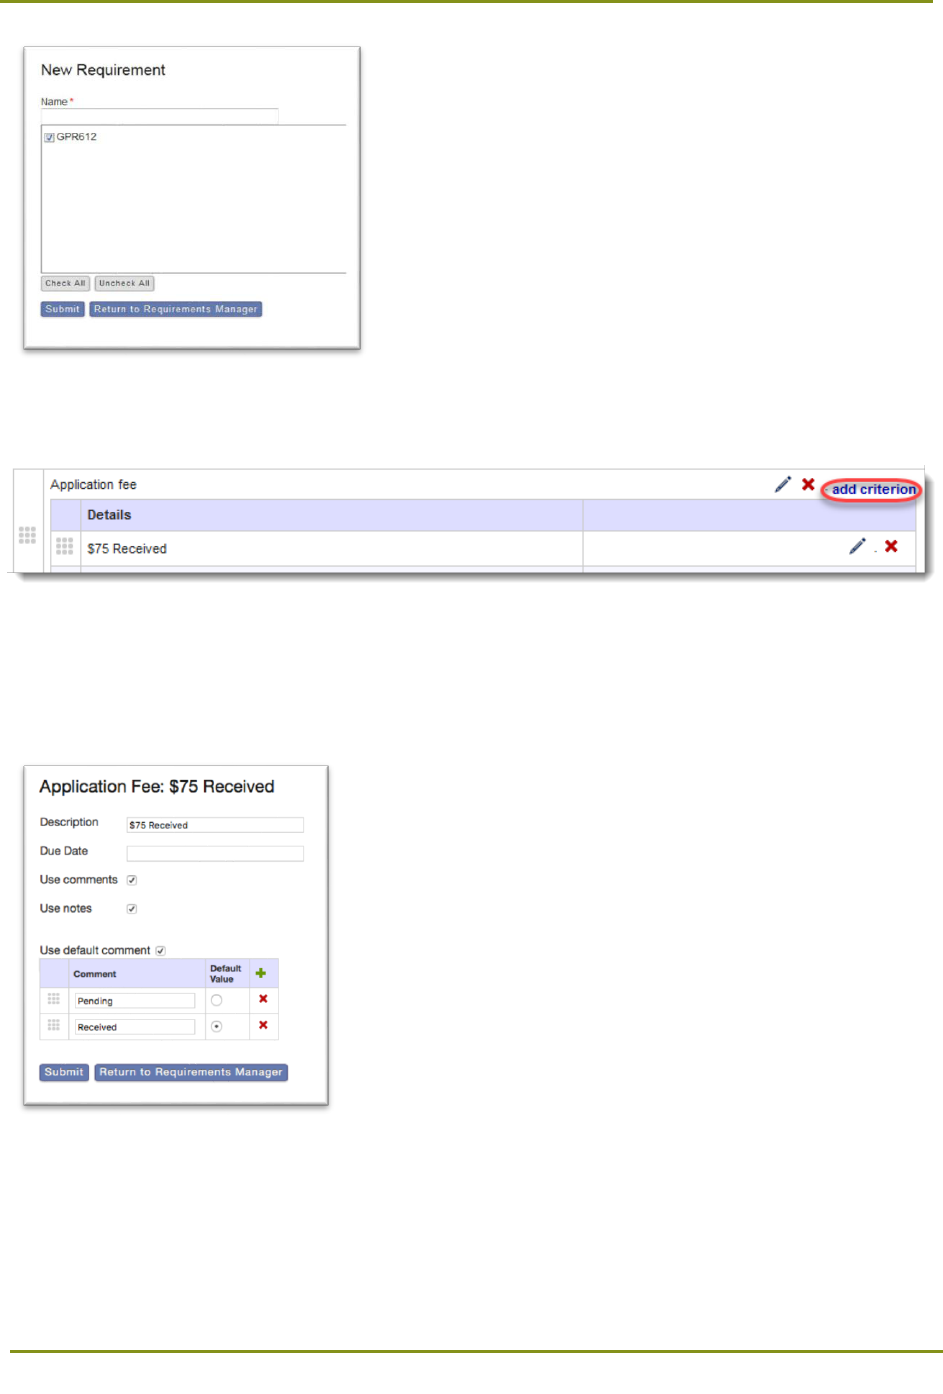
Section 12: Configuring WebAdMIT > Creating Requirements
90
4. Click the add criterion link to add criterion to the Requirement.
5. Enter a description for the new criterion, then click Submit. If applicable, enter a due date and
indicate if you want to use comments and/or notes. If you choose to use comments, you can create
a list of preset comments that the user can select from, and you can select a default value. Note that
if you later change the default value, it will only affect new applicants.
Once Requirements have been configured, they can be worked with for each applicant in the
Requirements panel on the Applicant Details page. They can also be manipulated in batch via Lists,
Searches, or the Clipboard.
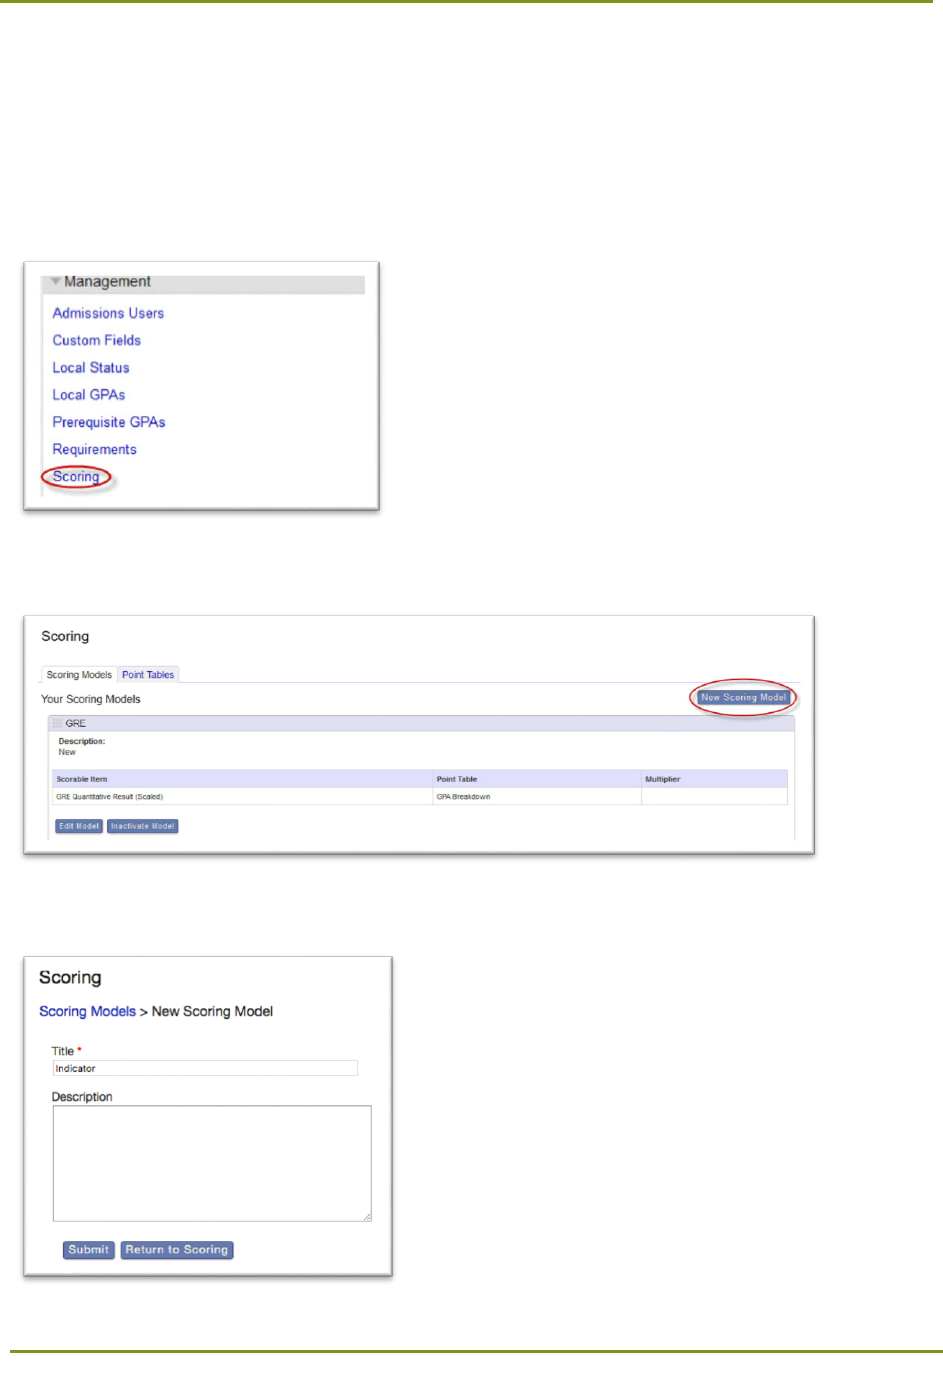
Section 12: Configuring WebAdMIT > Creating Scoring Models
91
Creating Scoring Models
Scoring Models provide a framework for how applicants are scored based on institutional rating policies.
Some Scoring Models also use Point Tables that allow you to assign points based on customized point
scales. This helps you normalize and assign scores in a standard manner.
1. Using the Menu Bar, open the Management panel, then click Scoring.
2. Click New Scoring Model.
3. Enter a name and description and click Submit.
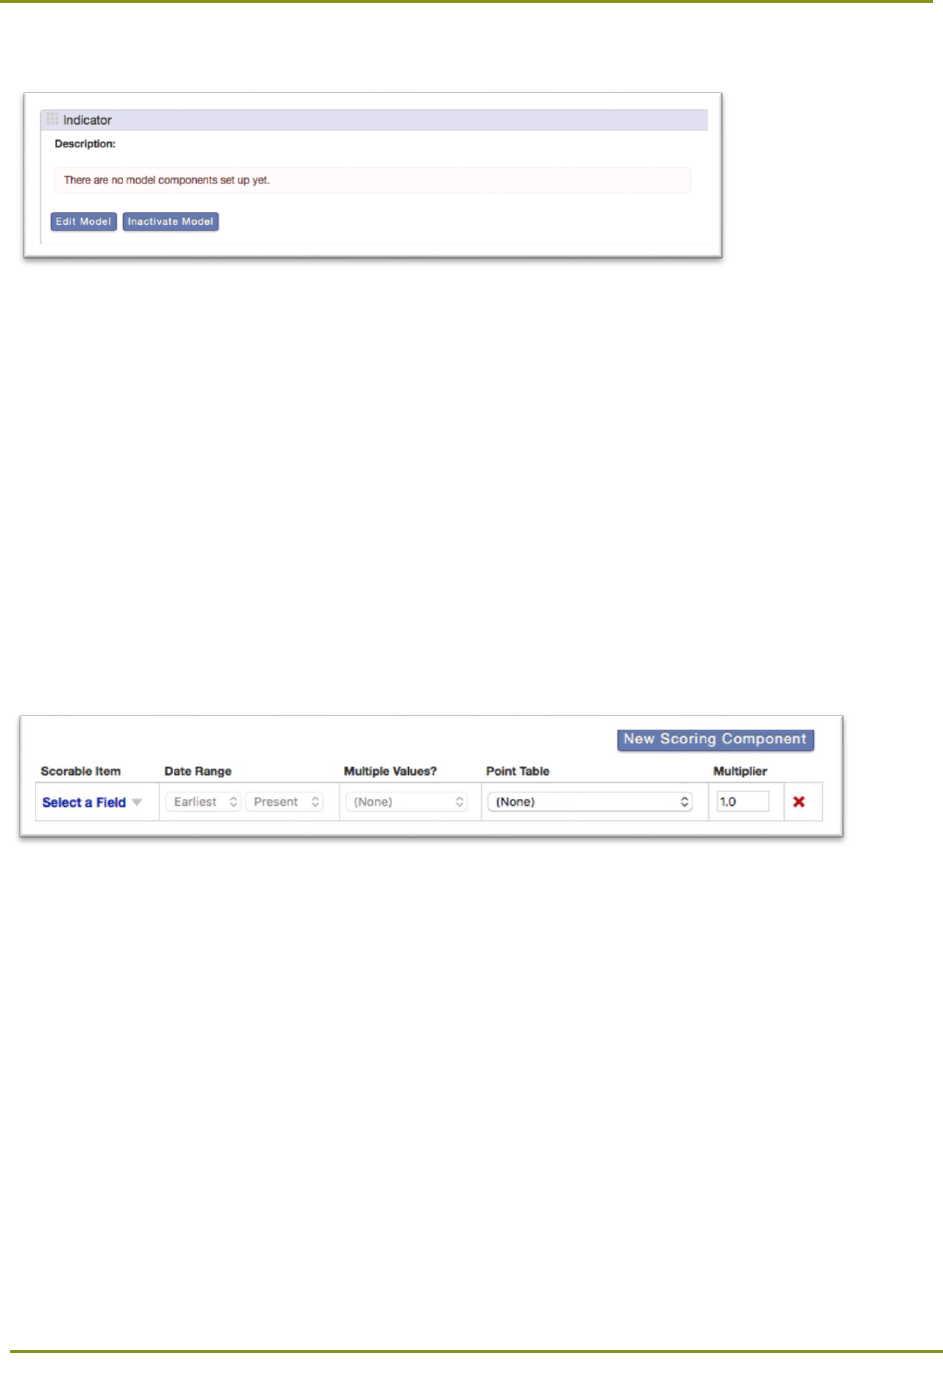
Section 12: Configuring WebAdMIT > Creating Scoring Models
92
4. To add components to your Scoring Model, click Edit Model.
5. Click New Scoring Component to add scorable items. If applicable, determine how multiple values
are scored:
• Average: The average score of the selected component.
• Highest Overall: The component taken from the test with the highest overall score
(regardless of whether they scored higher on that selected component in another test).
• Maximum: The highest score obtained for the selected testing component.
• Most Recent: The most recent score for the selected testing component.
• Sum: The sum of all selected testing components.
Note: In some situations when using standardized tests, the highest score in different sections may not
have been obtained in the same test. Select Maximum for each section to obtain a “super score” that
presents the best scores for each section, regardless of whether they were obtained during the same
session. Select Highest Overall to select the score that came from the test with the best overall result.
6. Select the programs associated with this Scoring Model, then click Submit.
Once Scoring Models have been configured, each applicant will have a score calculated. This is visible in
the Scoring panel on each Applicant Details page.
Creating Point Tables
1. From the Scoring page, click the Point Tables tab, then click the New Point Table button. Note that
WebAdMIT provides a suite of Point Table templates that you can copy and customize, as needed. If
copying a template, skip to step 3.

Section 12: Configuring WebAdMIT > Creating Scoring Models
93
Enter a title, select a point table type (note that you can’t change this after submission), enter a
description, then click Submit.
You can select from three point table types:
• Numeric: convert a number into another numeric value (e.g. 0.5 value is awarded 1 point, 1.5
value is awarded 2 points, etc.). This is useful when number conversions do not follow a
standard multiplier value.
• Range: convert a range of numbers into a single numeric value (e.g. GPA values between 3.0
and 3.2 are awarded 5 points). This is useful for GPAs and test scores.
• String: convert text into a numeric value (e.g. Military Status “Active Duty” value is awarded 2
points). This is useful when scoring text in Custom Fields.
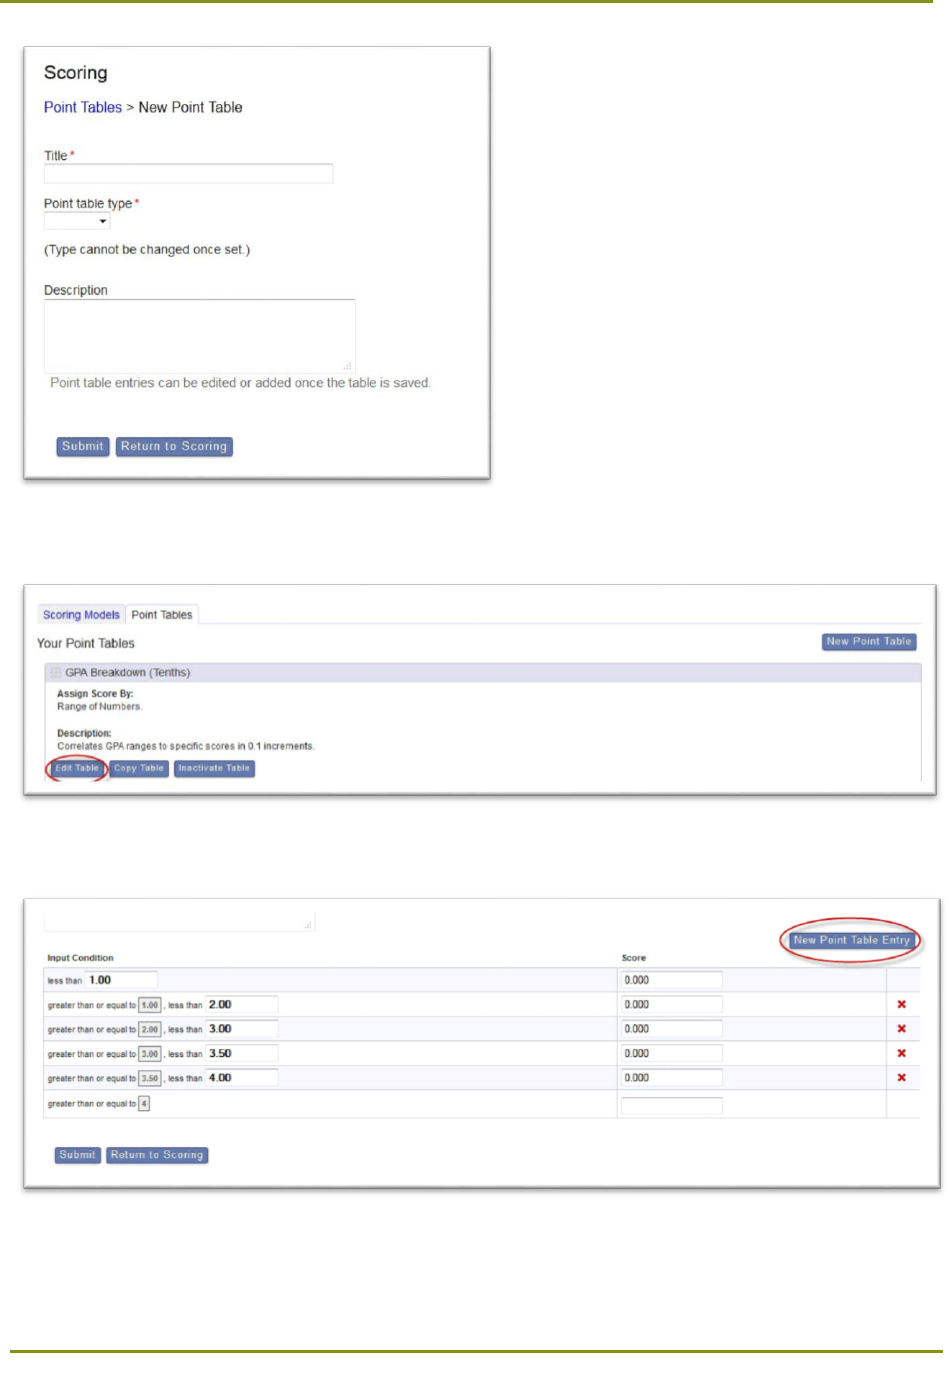
Section 12: Configuring WebAdMIT > Creating Scoring Models
94
2. To add parameters to your Point Table, click Edit Table.
3. Click New Point Table Entry to add conditions, then click Submit.
Once Point Tables have been created, they can be applied to applicable scoring components by editing
the Scoring Model(s) and making a selection in the Point Table column.

Section 12: Configuring WebAdMIT > Creating Assignments
95
Creating Assignments
WebAdMIT allows you to create tasks for reviewers. Assignments appear on a user's dashboard until
completed.
1. Using the Menu Bar, open the Management panel, then click Assignments.
2. Click New Assignment Type.
3. Enter a name, select the associated programs, and indicate if you want to use questions, overall
scores, overall comments, and overall remarks.
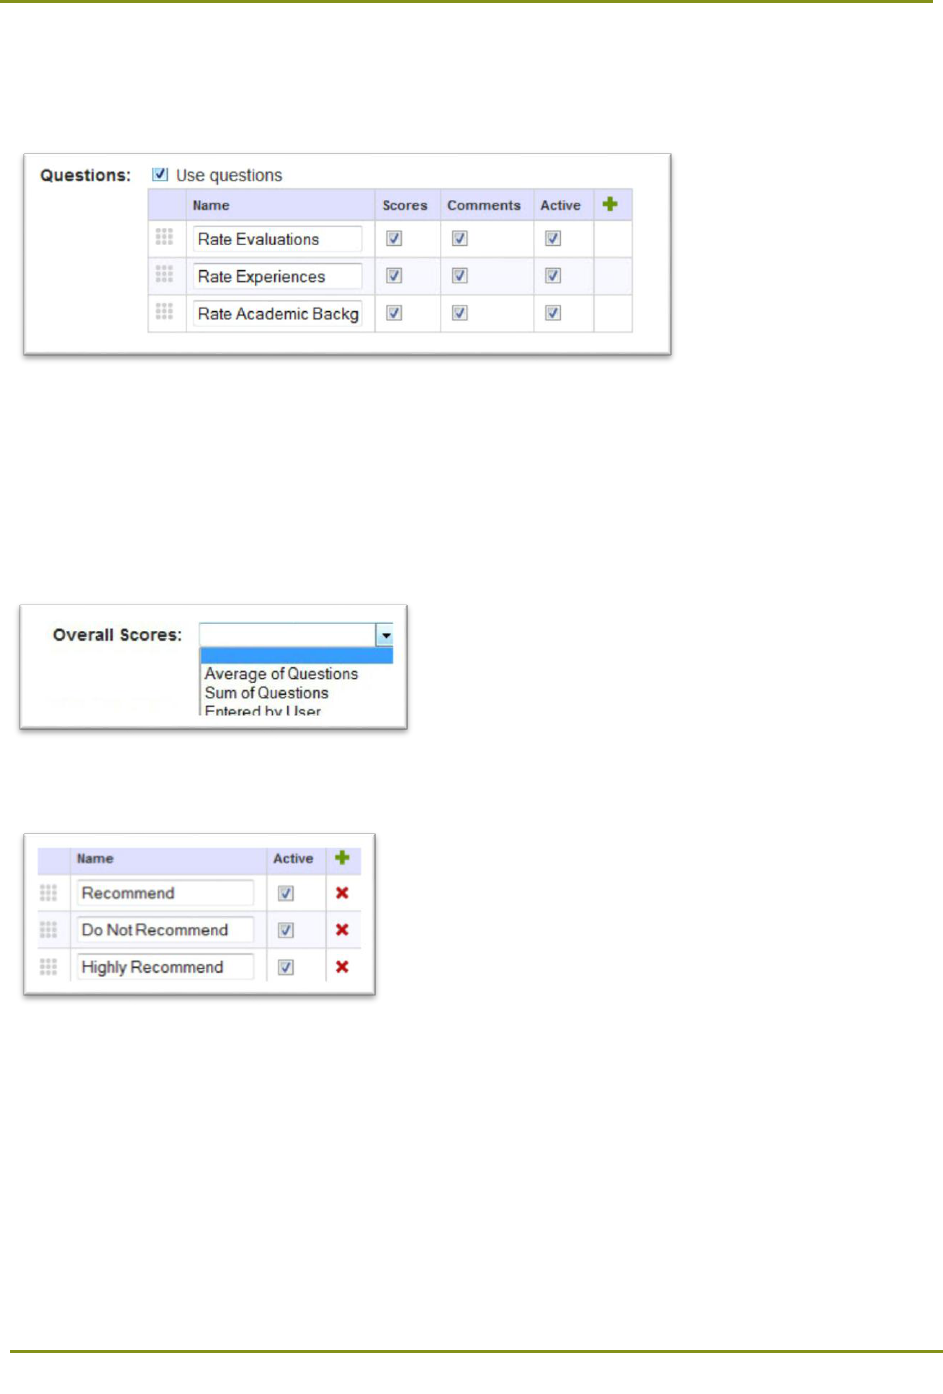
Section 12: Configuring WebAdMIT > Creating Assignments
96
If adding questions for the reviewer, enter a question name. This can be used to indicate what items
should be reviewed. Then indicate if you want to use scores and/or comments with the questions.
Additionally, select whether the question is active.
If adding overall scores when using questions:
• Select Average of Questions to provide an average score for each question.
• Select Sum of Questions to provide a sum of all question scores.
• Select Enter by User to allow the user to enter a score; use this option if you are not using
questions or if the overall score is not a direct calculation of the questions.
If adding overall remarks, enter the items that you want to appear in a drop-down list for users.
4. Enter instructions if desired, then click Submit.
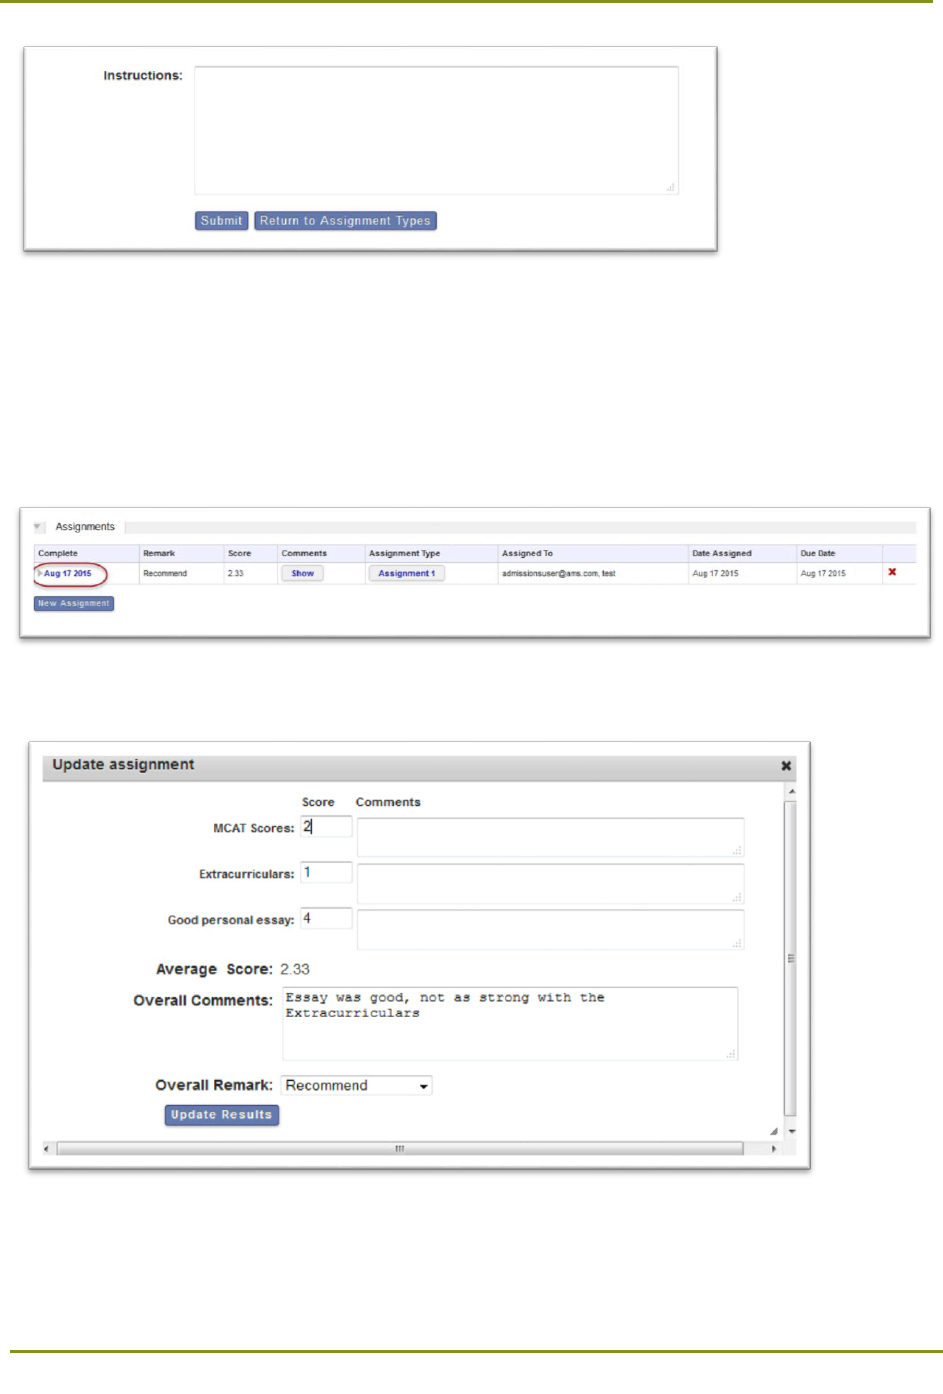
Section 12: Configuring WebAdMIT > Creating Assignments
97
Once Assignments have been configured, they can be disseminated individually from the Assignments
panel on an applicant’s page, or in batch via Lists, Searches, or the Clipboard.
Updating Completed Assignments
1. To update a completed Assignment, navigate to the Assignment and click the Date link.
2. Edit the Assignment, then click Update Results.
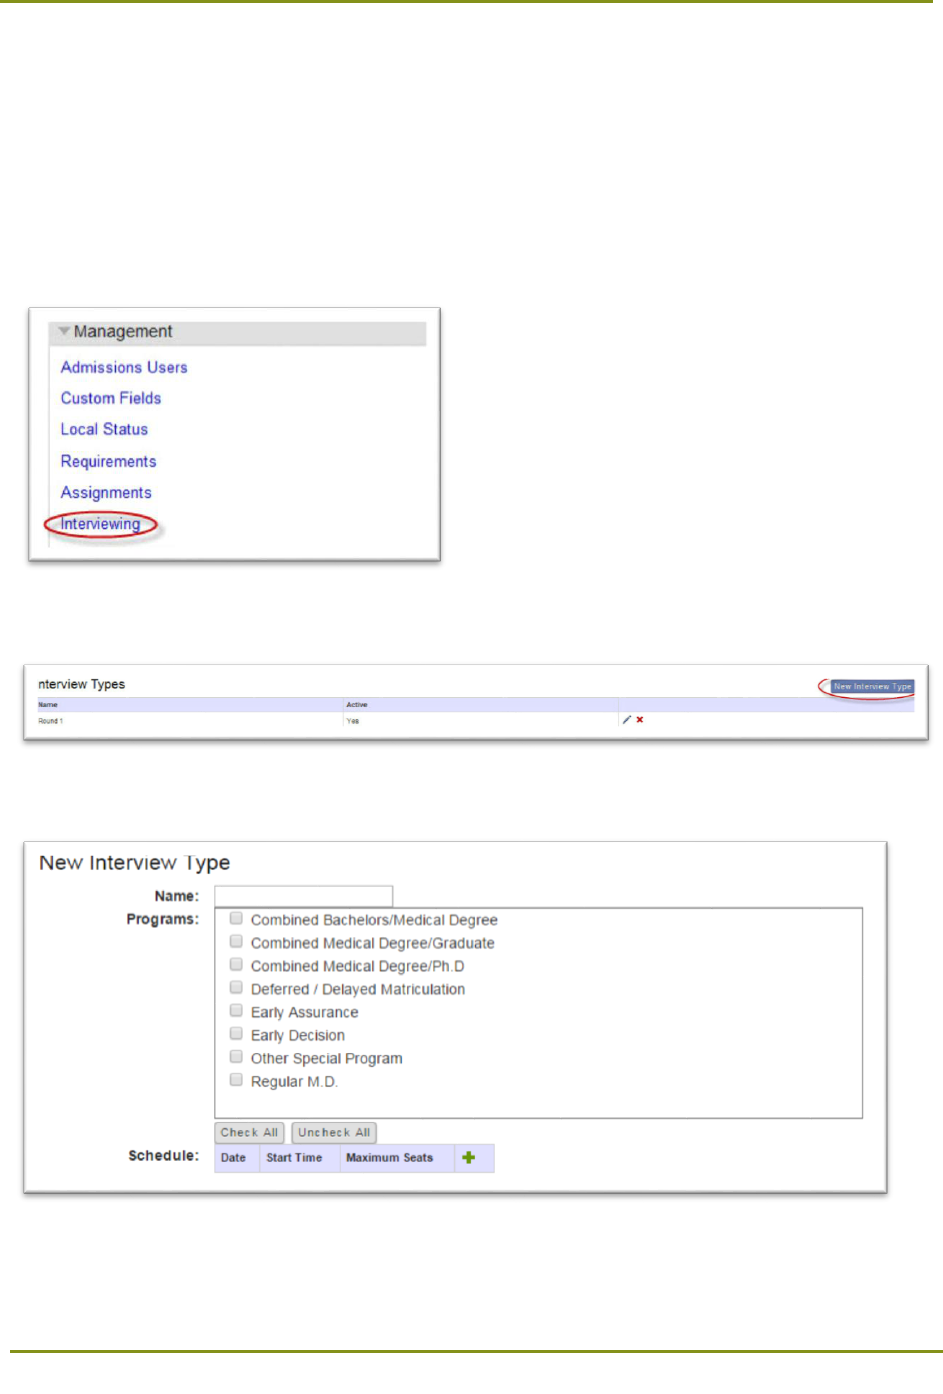
Section 12: Configuring WebAdMIT > Creating Interviews
98
Creating Interviews
WebAdMIT allows you to create and assign Interviews for reviewers. Interviews appear on a user's
dashboard until completed.
Creating Interview Types
1. Using the Menu Bar, open the Management panel, then click Interviewing.
2. Click New Interview Type.
3. Enter a name, select the associated programs, and add schedule information.
When adding schedule information, use the add icon to add dates and times. Additionally, if applicable,
select a Maximum Seat number. This prevents you from over-assigning this date/time.
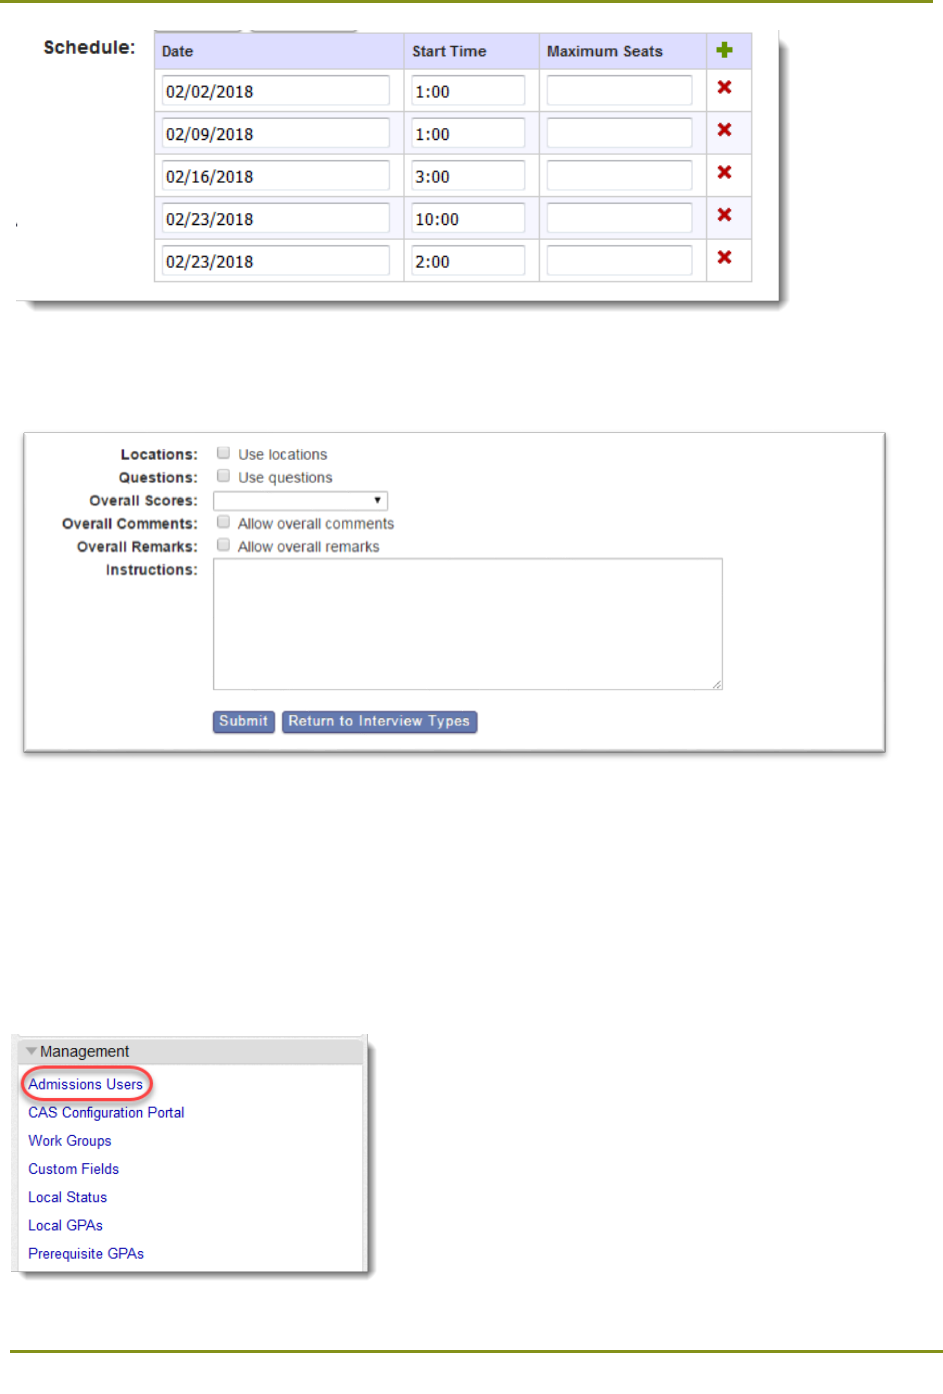
Section 12: Configuring WebAdMIT > Creating Interviews
99
Similar to creating Assignments, indicate if you want to use locations, questions, overall scores, overall
comments, and overall remarks. Then, enter instructions and click Submit.
Once Interviews have been configured, they can be disseminated individually from the Interviews panel
on an applicant’s page, or in batch via Lists, Searches, or the Clipboard.
Adding Interviewer Availability
WebAdMIT allows you to configure which time slots are available for each user to conduct interviews.
1. Using the Menu Bar, open the Management panel, then click Admissions Users.
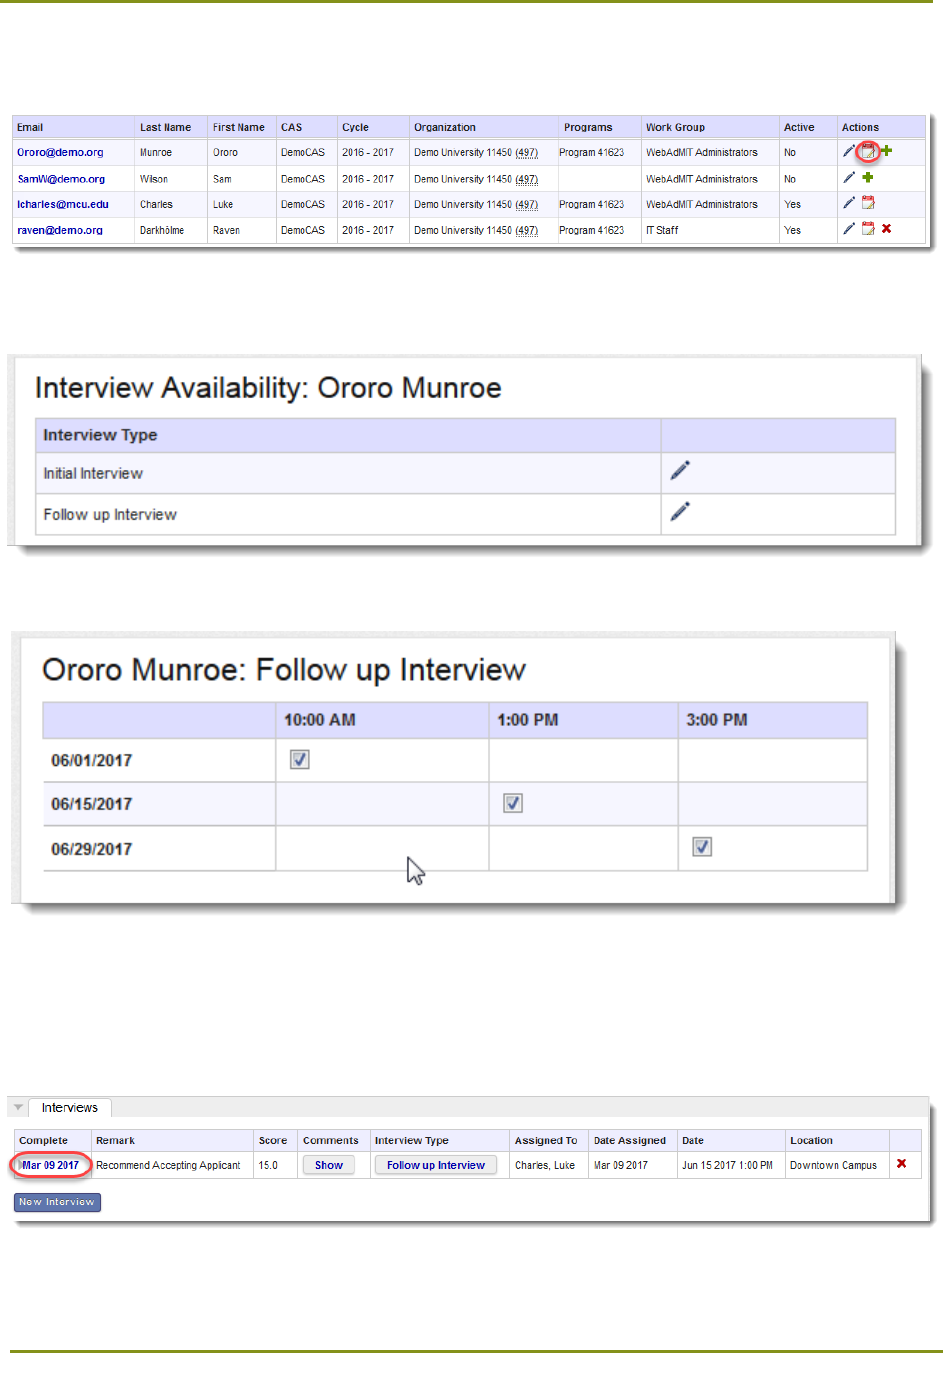
Section 12: Configuring WebAdMIT > Creating Interviews
100
2. Click the calendar icon for the applicable user. Note that this icon only appears if Interviews were
created/enabled.
3. Click the pencil icon for the applicable Interview type.
4. Select the days and times the user is available to conduct Interviews, then click Submit.
Updating Completed Interviews
1. To update a completed Interview, navigate to the Interview and click the Date link.
2. Edit the Interview, then click Update Results.

Section 12: Configuring WebAdMIT > Creating Email Templates
101
Creating Email Templates
WebAdMIT allows you to create and save email templates for quick correspondence with applicants.
1. Using the Menu Bar, open the Management panel, then click Email Templates.
2. Click the New Email Template button.
3. Enter a name, select the associated programs, and select who can view the email template.
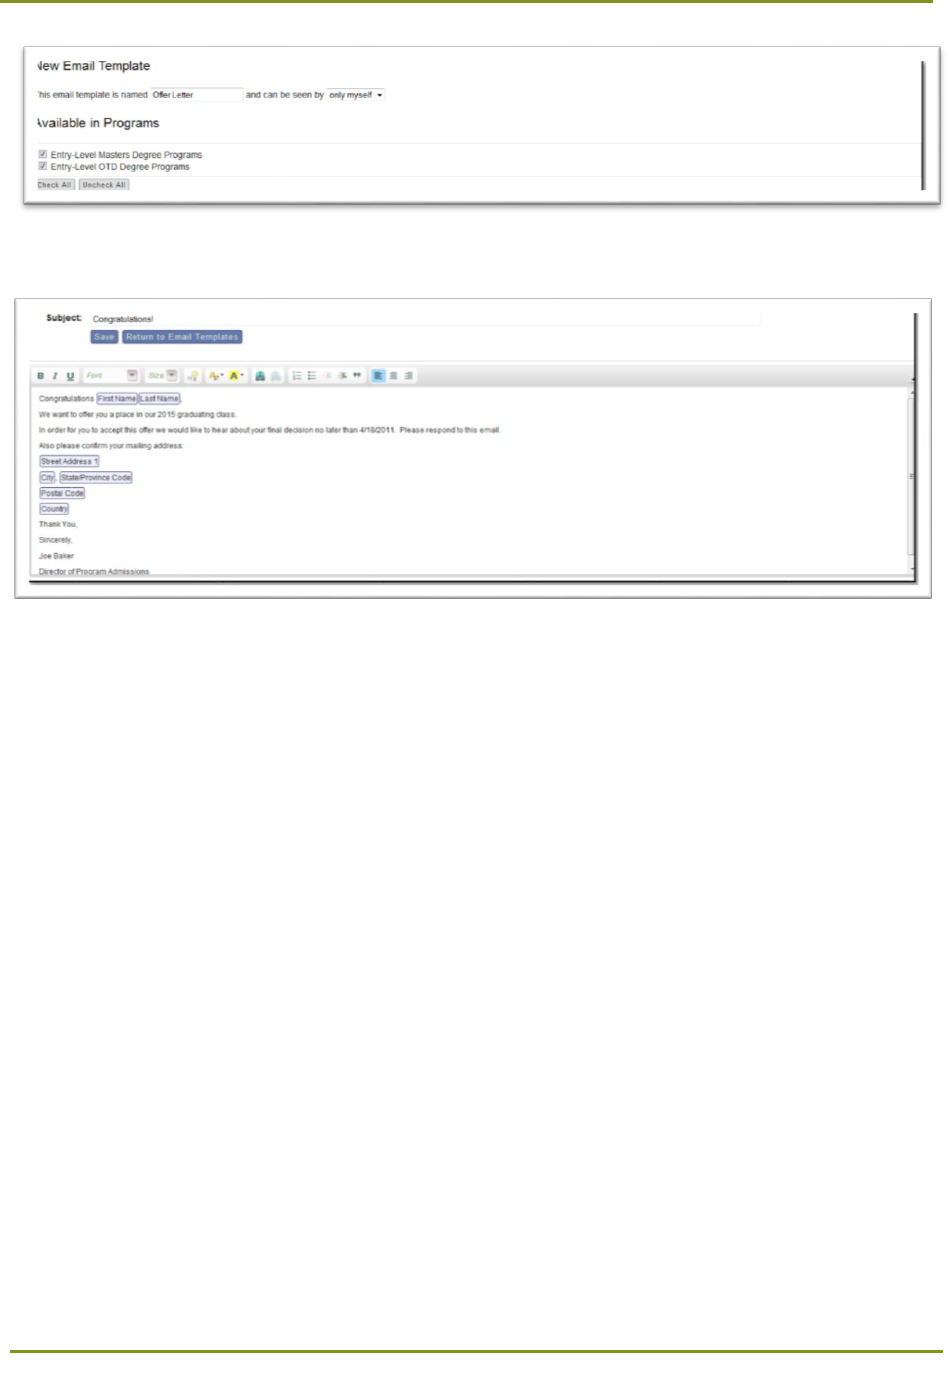
Section 12: Configuring WebAdMIT > Creating Email Templates
102
4. Enter a subject, then format the email.
To add an image or logo:
• Obtain a URL link for the image. You can do this by either searching online for your image or
working with your IT or Marketing staff.
• Next, drag and drop it into the email template (if dragging and dropping from a website, be sure
you are using the same browser), or click the image icon, then enter the image's link. Note that
an error message displays when an incorrect image link or data URL is used.
Right-click on the image to edit its properties, including size.
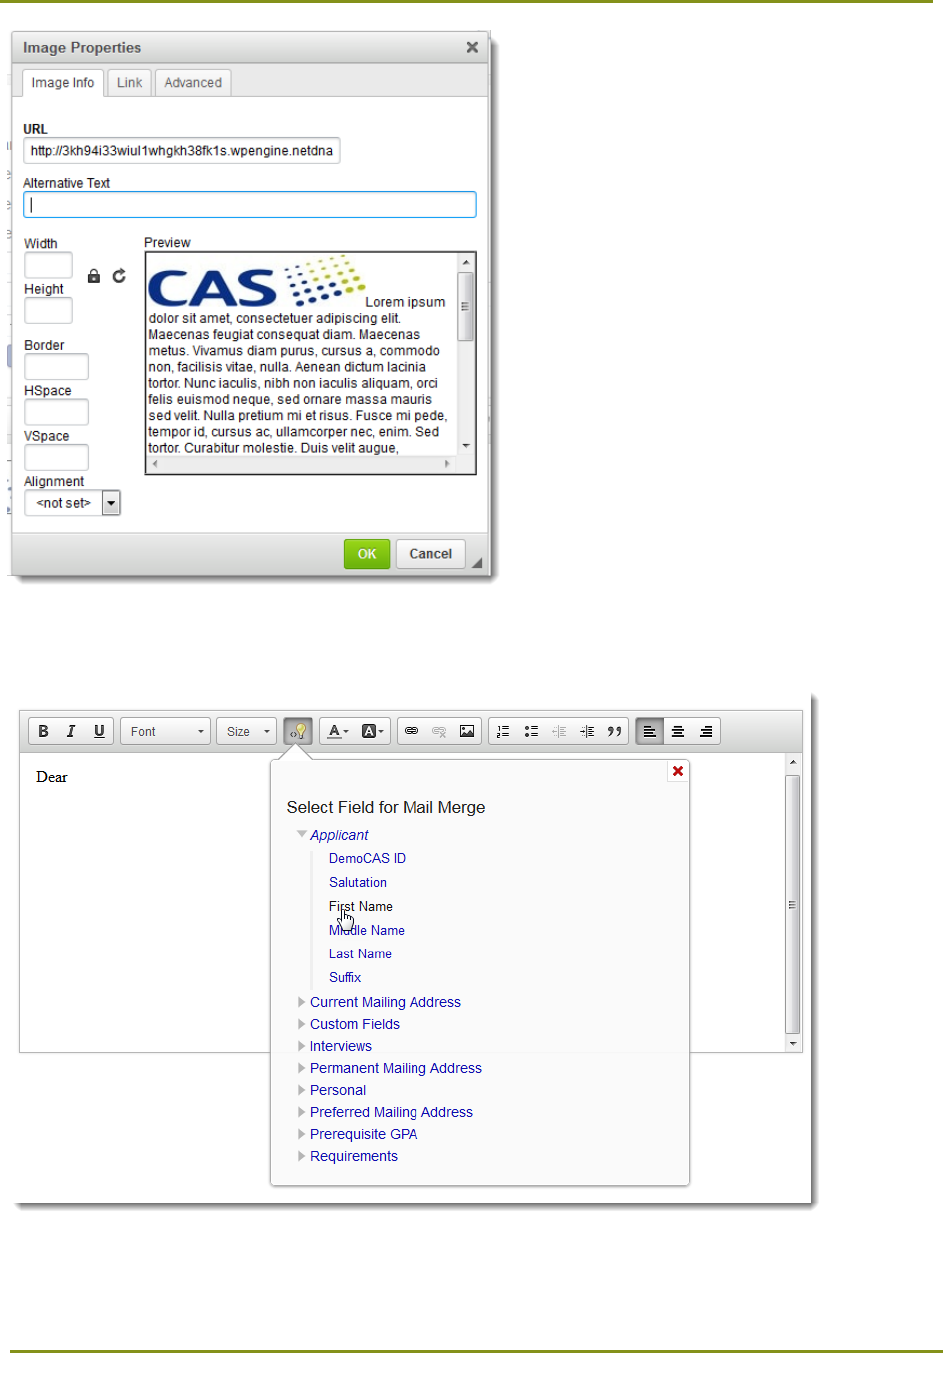
Section 12: Configuring WebAdMIT > Creating Email Templates
103
To personalize the message using mail merge fields, click the lightbulb icon, then select the information
you want to merge into the message.
5. Click Save.
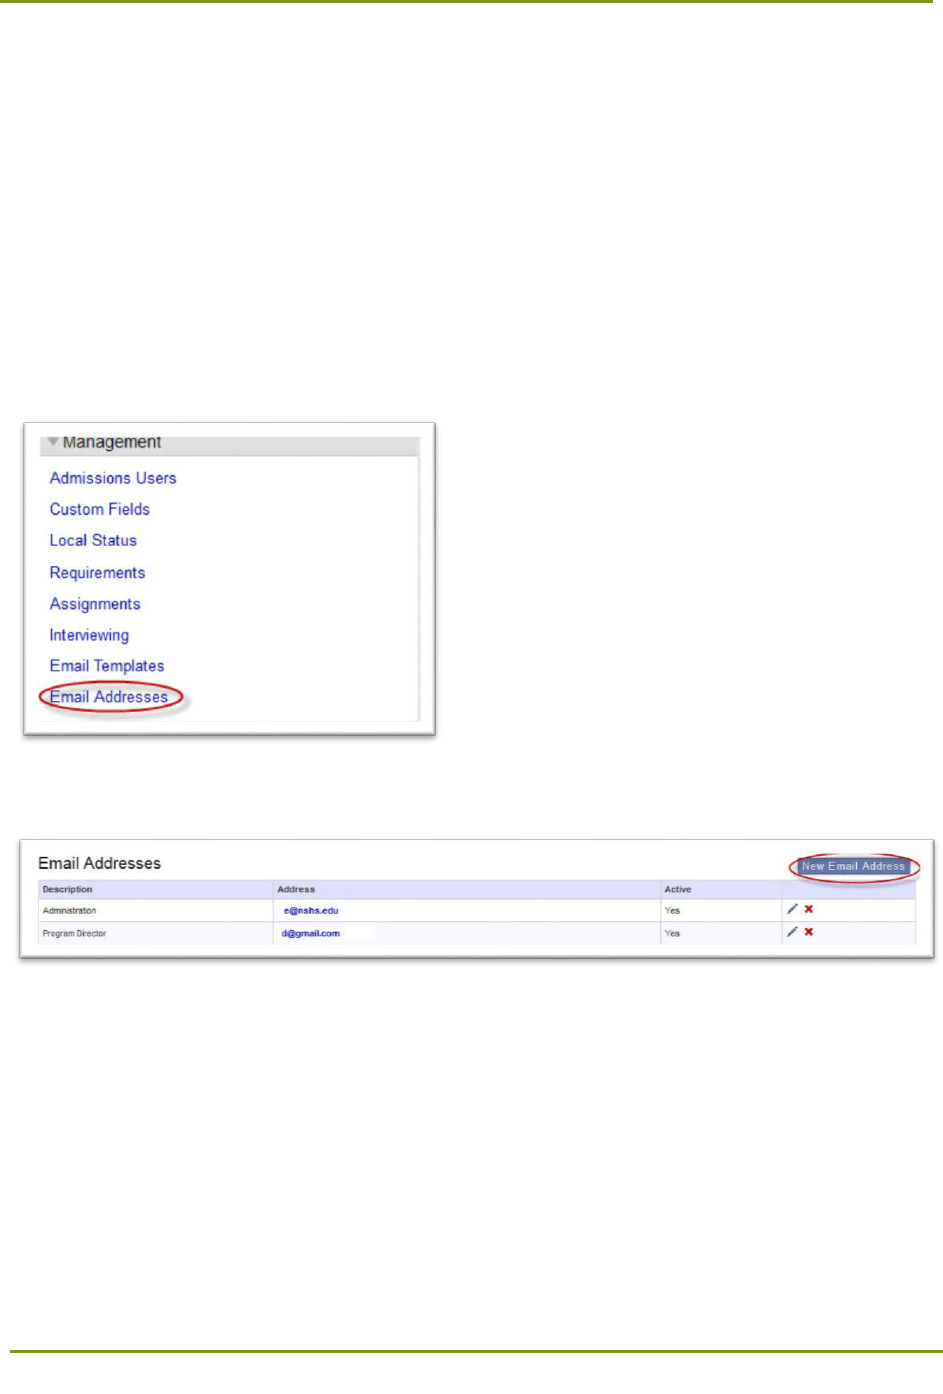
Section 12: Configuring WebAdMIT > Creating Email Addresses
104
Note: When using interview locations in a mail merge, the Interview Type is included with the Interview
Location. For example, if your interview type is First Interview and your location is Conference Room
243, the resulting email will display the information as First Interview: Conference Room 243 when
selecting the Interview Location merge field.
Creating Email Addresses
WebAdMIT allows you to manage email addresses to use as carbon copy (CC) and blind carbon copy
(BCC) options. Additionally, you can configure email addresses for reply-to email communications, or
send a preview of an email to the email addresses you configure.
1. Using the Menu Bar, open the Management panel, then click Email Addresses.
2. Click New Email Address.
3. Enter a description (for internal purposes), a name (that the recipient sees), and the email address.
Additionally, select CC, BCC, and Reply To options, select the associated programs, then click
Submit.
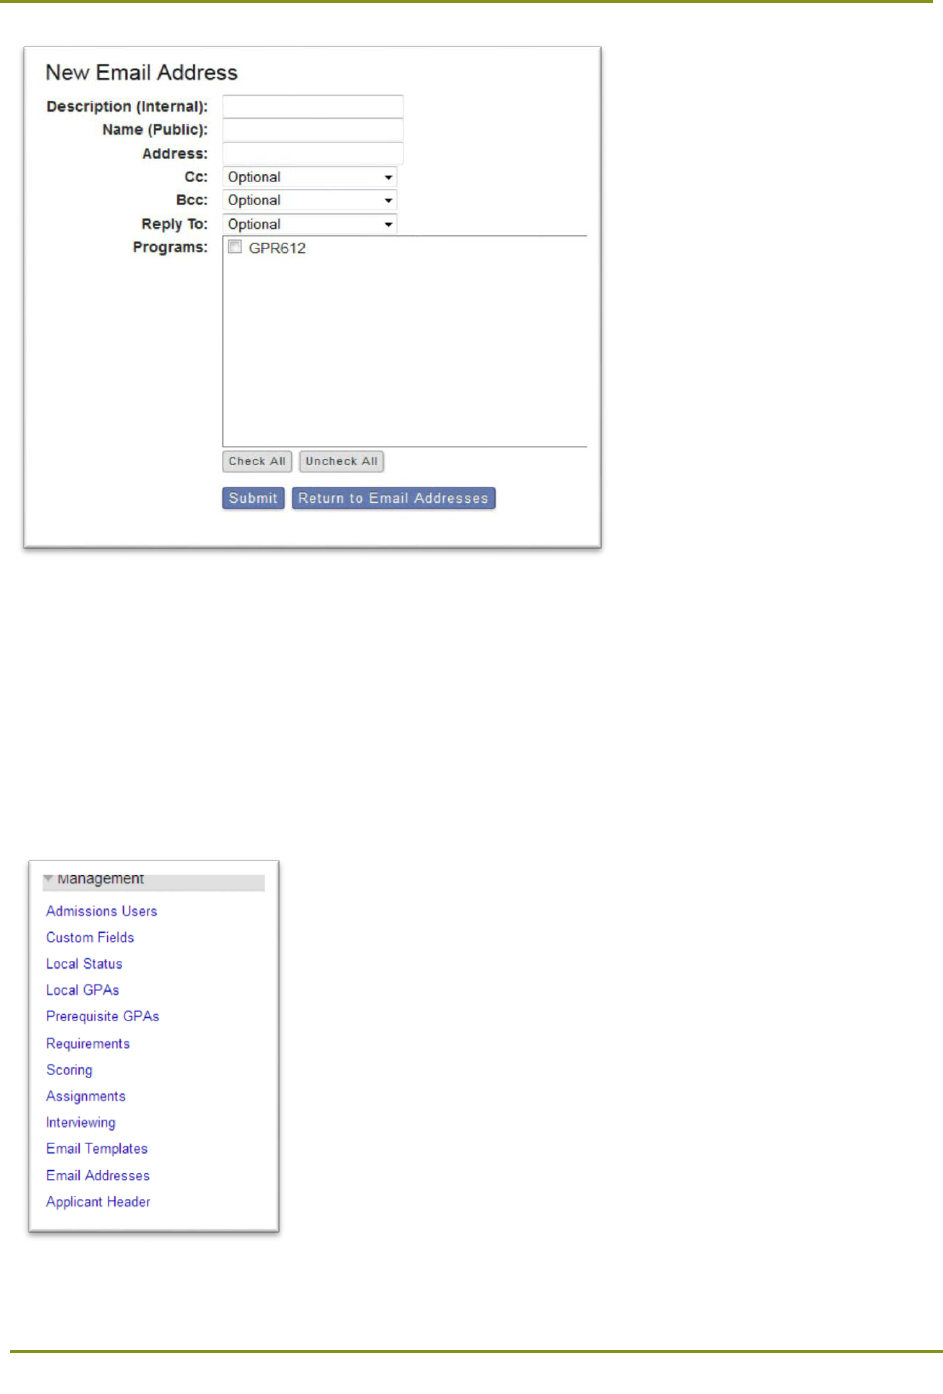
Section 12: Configuring WebAdMIT > Managing Applicant Headers
105
Once these options are configured the new email address is available when composing an email.
Managing Applicant Headers
WebAdMIT allows you to select up to 5 fields that display in the Applicant Details page header. This
allows for quick access to information.
1. Using the Menu Bar, open the Management panel, then click Applicant Header.
2. Click Add Field to Header.
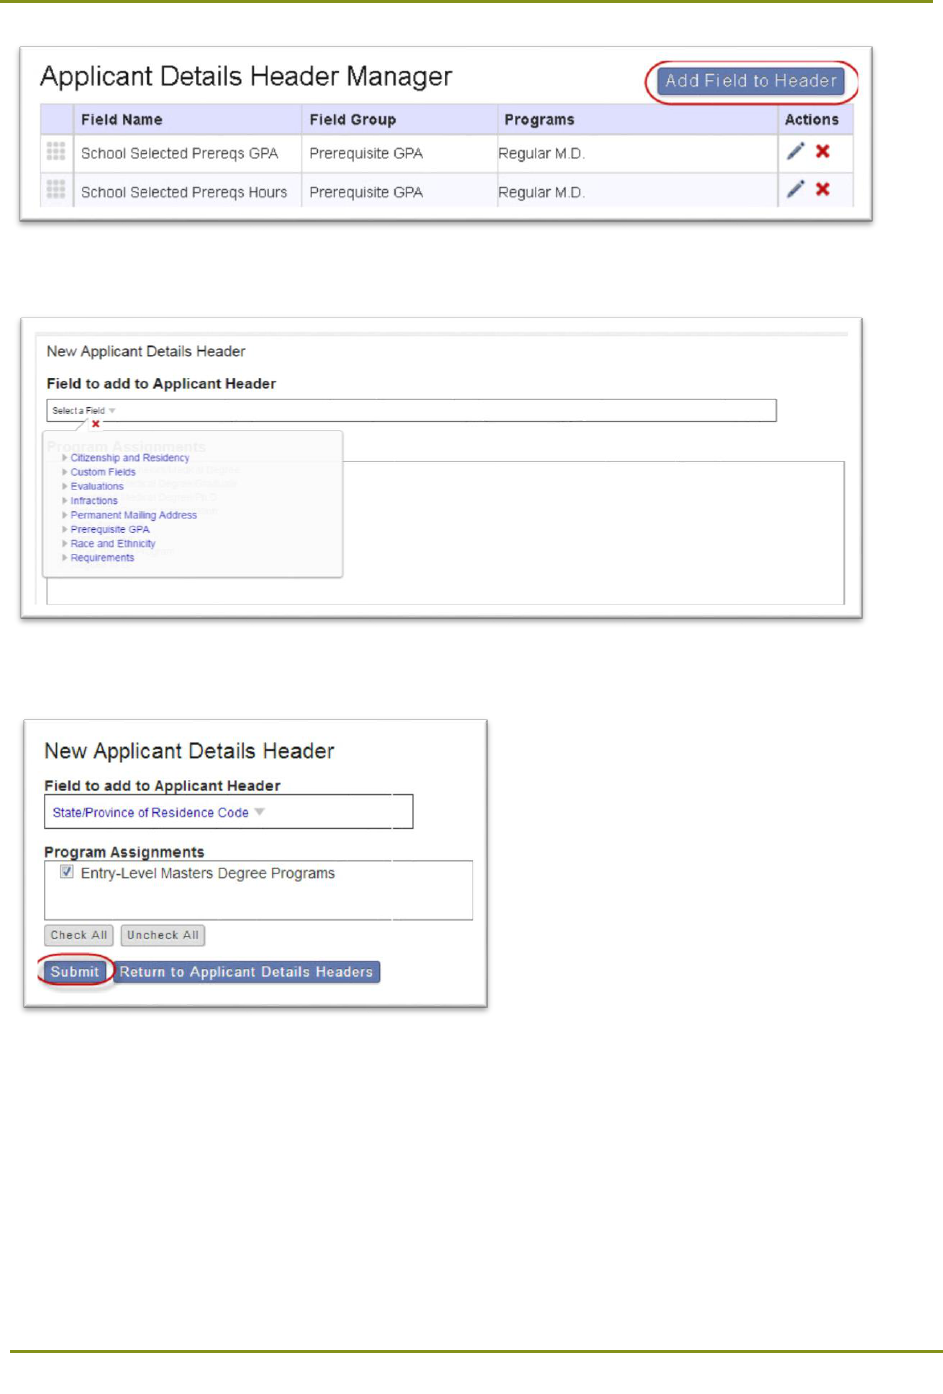
Section 12: Configuring WebAdMIT > Transferring Settings to a New Cycle
106
3. From the Select a Field drop-down list, select a category and field.
4. Select the associated programs, then click Submit.
Note that only select fields are available to add to the Applicant Header.
Transferring Settings to a New Cycle
The Settings Transfer feature in WebAdMIT allows you to transfer templates from the previous cycle to
the current cycle. Active templates from the List Manager, Export Manager, Custom Fields, Local
Statuses, Local GPAs, Prerequisite GPAs, Requirements, Scoring, Assignments, Interviewing, Email
Templates, and Email Addresses will be transferred when the Transfer Settings option is initiated.
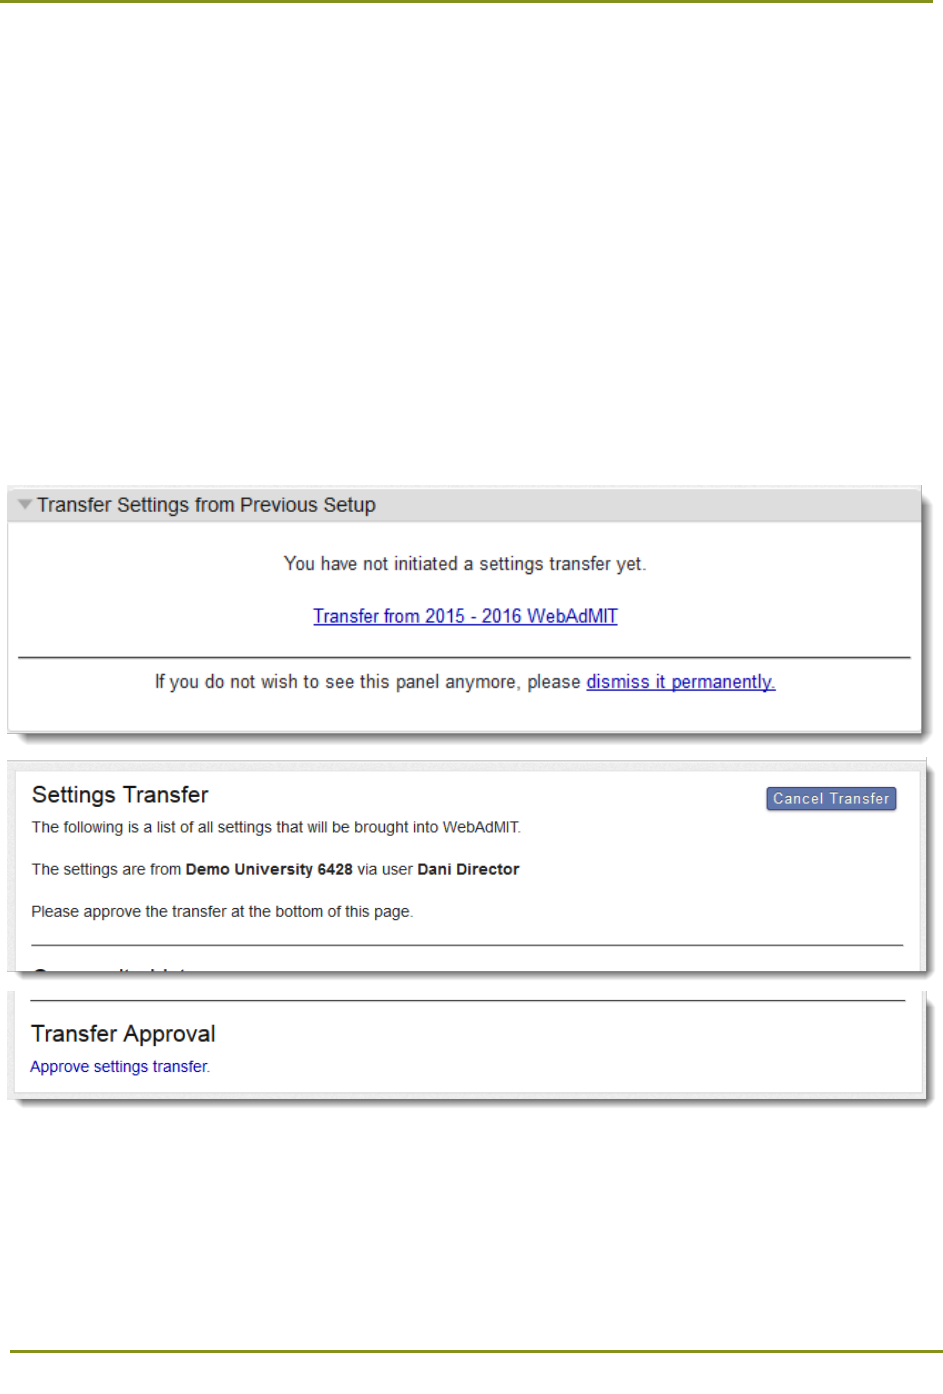
Section 12: Configuring WebAdMIT > Transferring Settings to a New Cycle
107
Work Group, Applicant Header, and Report Manager templates don’t transfer and need to be rebuilt in
the new cycle. Additionally, Admissions Users don’t transfer; instead, an institution manager must add
the new cycle to their account.
The Transfer Settings feature can only be initiated once per cycle. After transferring your templates,
review them to ensure they transferred correctly.
The user who initiates the Transfer Settings becomes the owner of the templates, which allows them to
edit and delete, as necessary. Other users can create and edit their own copies of the templates. Note,
however, that templates that were configured to be viewed by a single user (and not everyone) are not
included in the Transfer Settings.
1. To initiate the Transfer Settings, locate the Transfer Settings from Previous Setup panel in the
center section of the dashboard.
2. Click Transfer from 201X - 201X WebAdMIT, then review the templates that will be carried over.
3. When you are finished, click Approve settings transfer.
Note that if a user selects dismiss it permanently, it will remove the Transfer Settings panel for all users
within their cycle and organization.
