
The Command Line:
Reinvented for
Modern Developers
WHITEPAPER
© 2017 Progress. All Rights Reserved.
Here’s what’s in store / 5
BECOME A CLI ARTISAN ON WINDOWS 6
Chocolatey / 7
Posh-Git / 8
ConEmu / 8
Copy/Paste / 9
Split Screen and Tabs / 10
Presenter Mode / 11
Create a Custom Console / 11
Visual Studio Code / 13
Tips/Tricks / 14
From CLI to Code / 14
From CLI to File Explorer / 14
From File Explorer to CLI / 15
From Code to CLI / 16
Internal VS Code Prompt / 16
.
NET CLI DECODED 17
DotNet Commands / 20
DotNet New / 20
Initializes a .NET Core application project / 20
DotNet Restore / 22
DotNet Build / 23
DotNet Run / 23
DotNet Test / 24
DotNet Pack / 25
DotNet Publish / 25
Extending the .NET CLI / 25
NuGet Extensibility / 26
Path Extensibility / 26
A GIT CLI REFERENCE FOR BEGINNERS 28
Command Prompt Basics / 29
Git Commands / 30
Pro Tips / 32
Progress Open Source on GitHub / 32
Conclusion / 32
Table of Contents
© 2017 Progress. All Rights Reserved.
MODERN ASP.NET TECH STACK 33
Why JavaScript? / 34
ASP.NET Yeoman Generator / 34
RAPID CROSSPLATFORM
DEVELOPMENT WITH THE ANGULAR 2 CLI 36
Getting Started: The Prerequisites / 36
Creating your First Project / 37
Project Structure / 38
Source Structure / 38
Testing / 39
Production / 39
Easy Deployment / 40
Services / 40
Pipes / 41
Components / 42
Routes / 42
Third-Party Support / 43
Conclusion / 44
IT’S A WRAP 45
© 2017 Progress. All Rights Reserved.
4
Contents
© 2017 Progress. All Rights Reserved.
Modern developers are often polyglots—they
dabble in different operating systems, programming
language, frameworks and tools as they build the
next generation of amazing applications. On top
of that, modern applications run on a variety of
platforms and devices, all leading to very mixed
developer skillsets and tools of the trade. No longer
are developers stuck on a platform or tooling silo—
developers should be able to use any development
platforms or tools of their choice to build
applications. This is the new mindset, and modern
application frameworks are catering to the flexibility
developers need.
A developer may be using Windows, MacOS/OSX
or Linux as the development machine operating
system and the development tools should be
consistent across the platform of choice. What’s
the one thing common across all these desktop
operating systems? They all have a command line!
And accordingly, command line interface (CLI) tools
have quickly become the de facto lowest common
denominator. It is not by chance that CLI tools have
become popular of late—makers of developer tools
quickly realized the ubiquity of command line in this
polyglot world and are now catering to developers
by offering them basic CLI tooling first. If one goes
back to the basics, CLI tools work consistently cross-
platform and provide a foundation for Graphical User
Interface (GUI) tools to be built on top as need be.
It is fair to say that command line has made a big
comeback, thanks to its cross-platform flexibility.
Developers love CLI tools that give them the
freedom to work from any operating system and
pick the tools of their trade. This trend is solidified
by the fact that most development platforms these
days are offering tools beginning with CLI first.
This whitepaper celebrates the resurgence of
CLI tools and provides insight into how modern
development platforms cater to application
development through CLI—for web, desktop and
mobile channels.
5
Contents
© 2017 Progress. All Rights Reserved.
Here’s what’s in store:
1
Become a CLI Artisan on Windows:
Let’s stop complaining that the
Windows command line experience
isn’t the best. Modern tooling and
code editors give you the top notch
experience, making you a pro using
CLI tools on Windows.
2
NET CLI Decoded: We explore the
new .NET CLI for building console/
web applications on top of the
new .NET Core. While the .NET CLI
works consistently everywhere, we
specifically focus on non-Windows
development workflows, just to
showcase the flexibility.
2
A Git CLI Reference for Beginners:
Every developer needs source control
and GitHub is one of the most popular
distributed source control systems. We
explore the basics of some CLI tools
that make source control workflows a
breeze, all powered by Git.
3
Modern ASP.NET Tech Stack and
CLI Tooling: Does your ASP.NET stack
now include AngularJS and NodeJS? If
so, you’re in good company. We’ll take
a brief look at some modern ASP.NET
tooling. Surprise, it’s CLI here as well.
4
Rapid Cross-Platform Development
with the Angular 2 CLI: Build your
next web application powered by
one of the most popular JavaScript
application frameworks—Angular.
Did you know you get a great CLI
experience with Angular as well? Enlist
command line to scaffold, build and
deploy Angular 2 applications.

6
Contents
© 2017 Progress. All Rights Reserved.
Become a CLI Artisan on
Windows
Not long ago, developers were trying to come to
terms with the graphic user interface (GUI). The tool
of the trade was the command line Interface, because
it was the only way. Visual Studio slowly transformed
Windows developers by abstracting away command
line tools until they were no longer a “necessity.” Only
a rare sighting
of the CLI might have been seen in the
dimly lit rooms of system admins and dev ops.
Today, there is a resurgence of the CLI among
developers. There are many invaluable CLI tools like
Git that make developers’ lives easier. Developers
today are looking for more cross-platform
opportunities, where Visual Studio isn’t front and
center, and if you’re working with modern JavaScript,
CLI tools are an absolute necessity.
On Windows, the CLI has suffered from its years of
obscurity as Microsoft moved to “Visual” everything.
While it can still perform the necessary functions,
the default shell provides just the basics. Even the
simplest luxuries, like copy/paste, font size and tabs,
are either nonexistent or a chore to use.
Let’s look at a few simple tools that can transform your
CLI developer experience from dismal to dazzling. It’s
time to reclaim your CLI and become a CLI artisan on
Windows.
7
Contents
© 2017 Progress. All Rights Reserved.
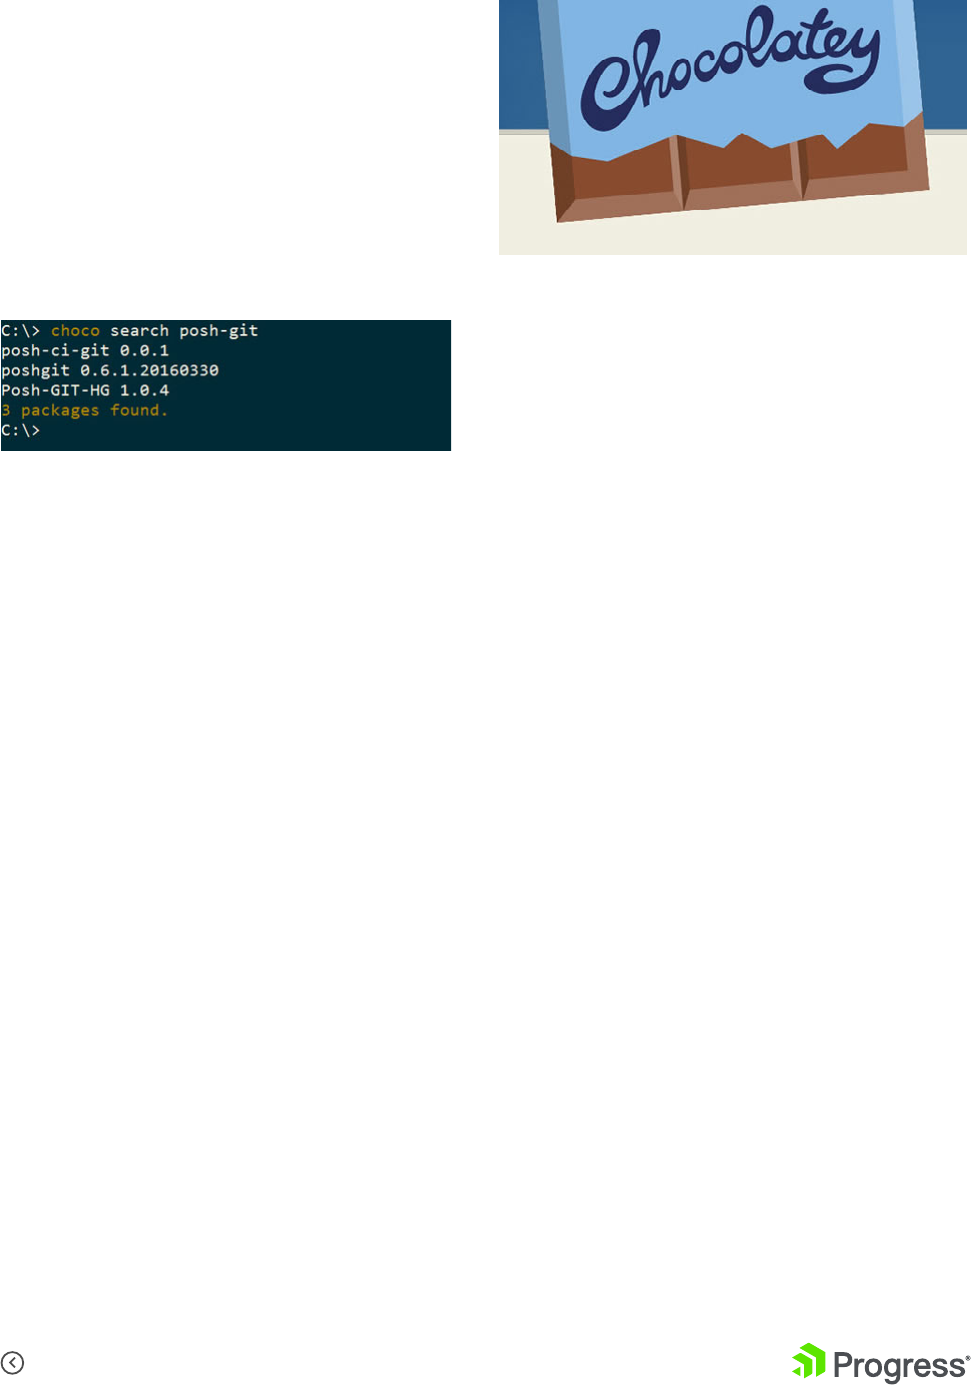
Chocolatey
The first step in retooling your CLI is to ensure
you’re using Chocolatey. Think of Chocolatey as the
NuGet package manager for Windows software. You
can quickly search for apps like Chrome, Notepad++
and 7-Zip, and manage the installation, configuration
and uninstallation of software with just a few
keystrokes. In addition, Chocolatey integrates with
several infrastructure automation tools.
In just a few simple steps (which are nicely laid out
for you in the install documentation), you can get
Chocolatey up and running.
We’ll be using Chocolatey to install more CLI tooling,
so if you’ve heard of Chocolatey and just haven’t
tried it yet, there’s no better time than now. If
Chocolatey is already installed and you just haven’t
touched it in a while, no problem—just run choco
update chocolatey to update it to the latest version.
8
Contents
© 2017 Progress. All Rights Reserved.
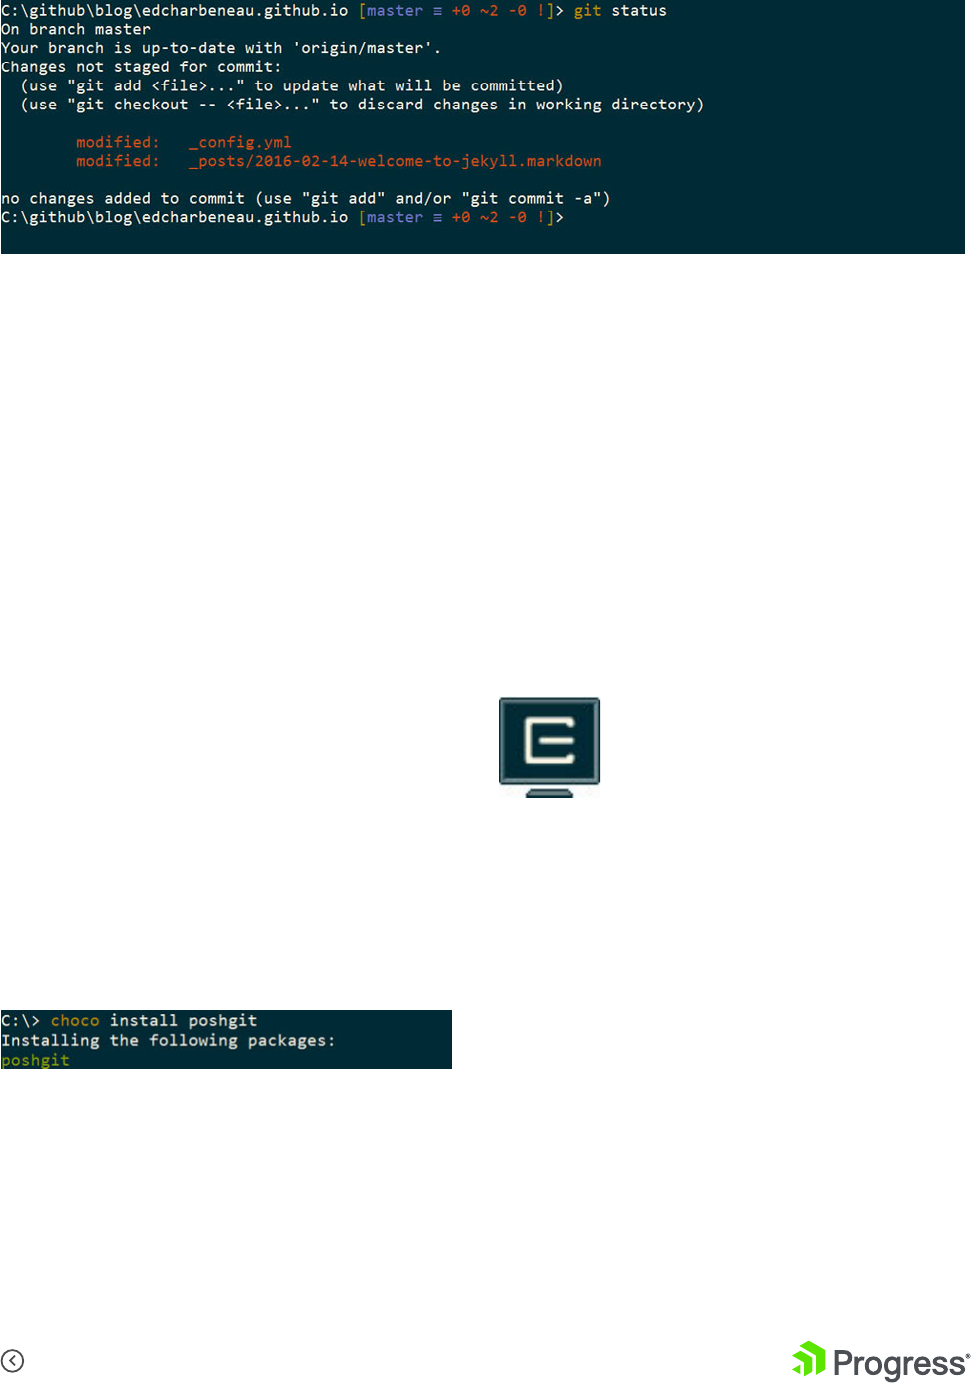
Posh-Git
If you spend any time with Git or GitHub, or maybe
it’s on your developer bucket list, then Posh-Git is
the next CLI tool for you. Posh-Git is a PowerShell
module that incorporates a Git repository status
right in the prompt. When Posh-Git detects a Git
repository at your current location, the prompt
shows the current branch and the state of files
(additions, modifications and deletions) within. The
status is also color coded so you can see the state of
the repository at a glance.
Adding Posh-Git to your CLI is as simple as getting
the package through Chocolatey and following the
prompts.
choco install poshgit
Once Posh-Git is installed, just navigate to a folder
where you have
an active Git project and see for
yourself how useful Posh-Git can be.
ConEmu
Now that we have our Posh-Git-enabled PowerShell
command tool, let’s ditch that classic command shell
and upgrade to something more versatile. We’ll be
trading out the standard Windows command prompt
in favor of a shell that can handle different command
shell configurations for specific tasks. This will also
let us use the Posh-Git/PowerShell combo as a
default.
9
Contents
© 2017 Progress. All Rights Reserved.
Copy/Paste
Copy/paste is an indispensable feature for modern
development. With the variety of CLI tooling
available, there’s also a lot of commands to
remember. With ConEmu, there’s no more struggling
to copy word-for-word a command from a tutorial,
guide or help resource. Simply press ctrl+v as you
would in any app and the command is pasted
right in. Sure, this is finally a feature on the default
Windows 10 command line tool, but too little, too
late.
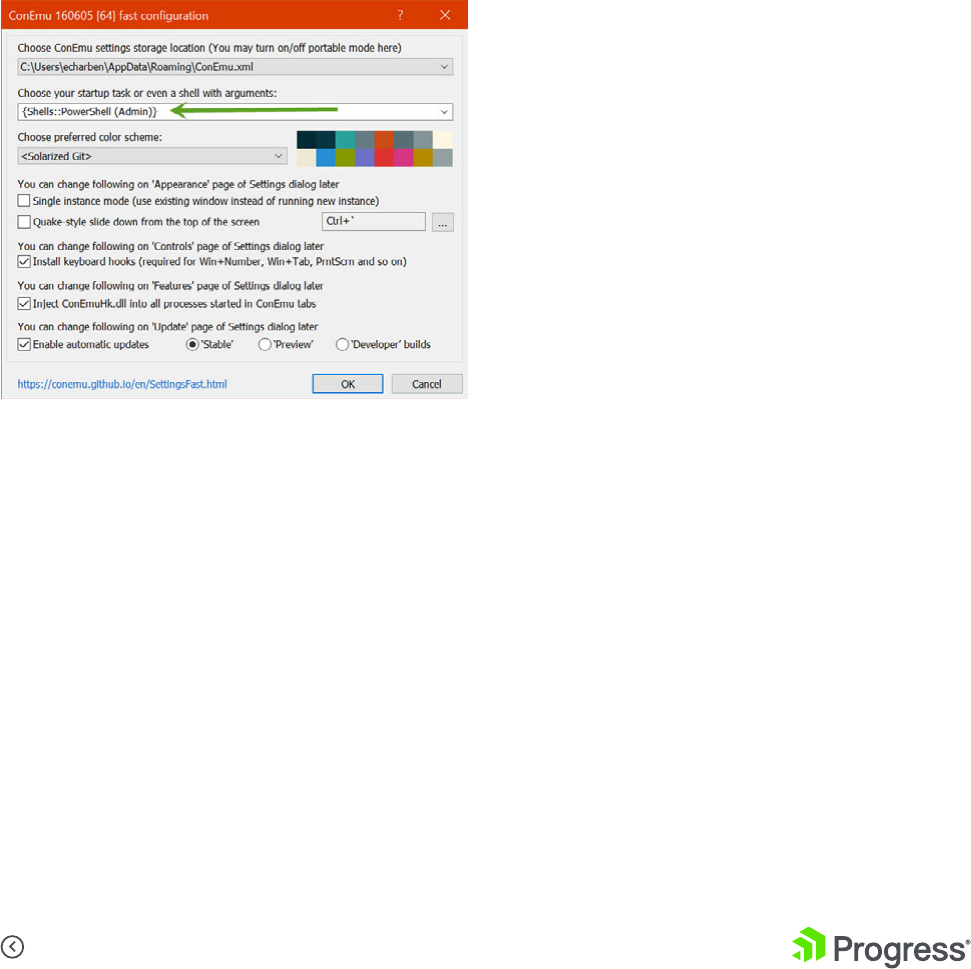
We’ll be installing a modern Windows console called
ConEmu. ConEmu is a Windows console emulator
with tabs, which presents multiple consoles and
simple GUI applications as one customizable GUI
window. ConEmu comes packed with features that
simplify the developer experience such as: tabs,
presets, copy/paste, themes and much more.
choco install conemu
After installing, set the default console to PowerShell
(Admin) so you’ll always start with a developer-
friendly Posh-Git-enabled console.
10
Contents
© 2017 Progress. All Rights Reserved.
Split Screen and Tabs
Having organized tabs for your console is another
great feature that you may not think you need
until you make use of it. Many JavaScript tools
use a “watch” mechanism or kick off a web host.
These tools often take control of your console until
the process is terminated. With tabs, this isn’t a
problem—simply kick off your watch task then open
a new tab and continue working. Checking back
in on your watch task or seeing if a web host has
reported errors is just a tab click away.
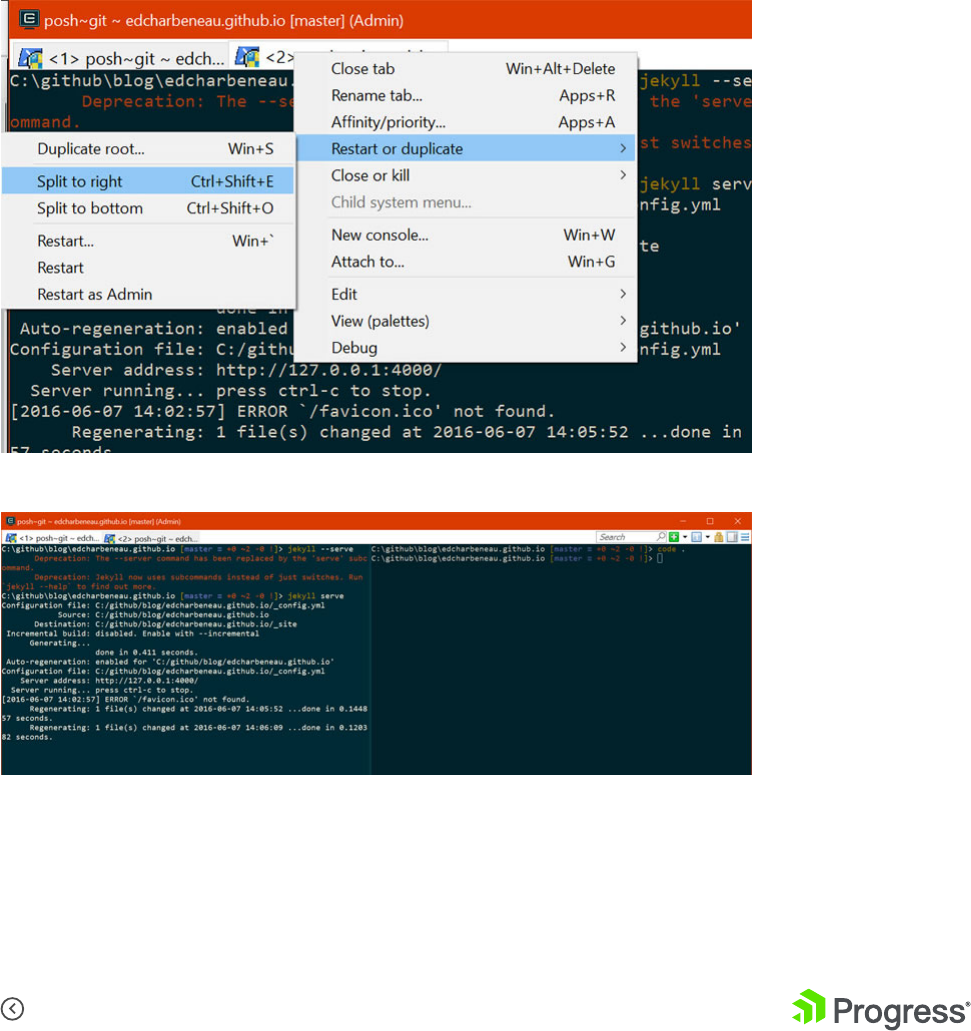
You can choose to organize consoles with a split
screen as well. Just right click on any tab and choose
Restart or Duplicate > Split to right. Now you can
place processes side by side, or maintain a working
console while monitoring a process.
11
Contents
© 2017 Progress. All Rights Reserved.
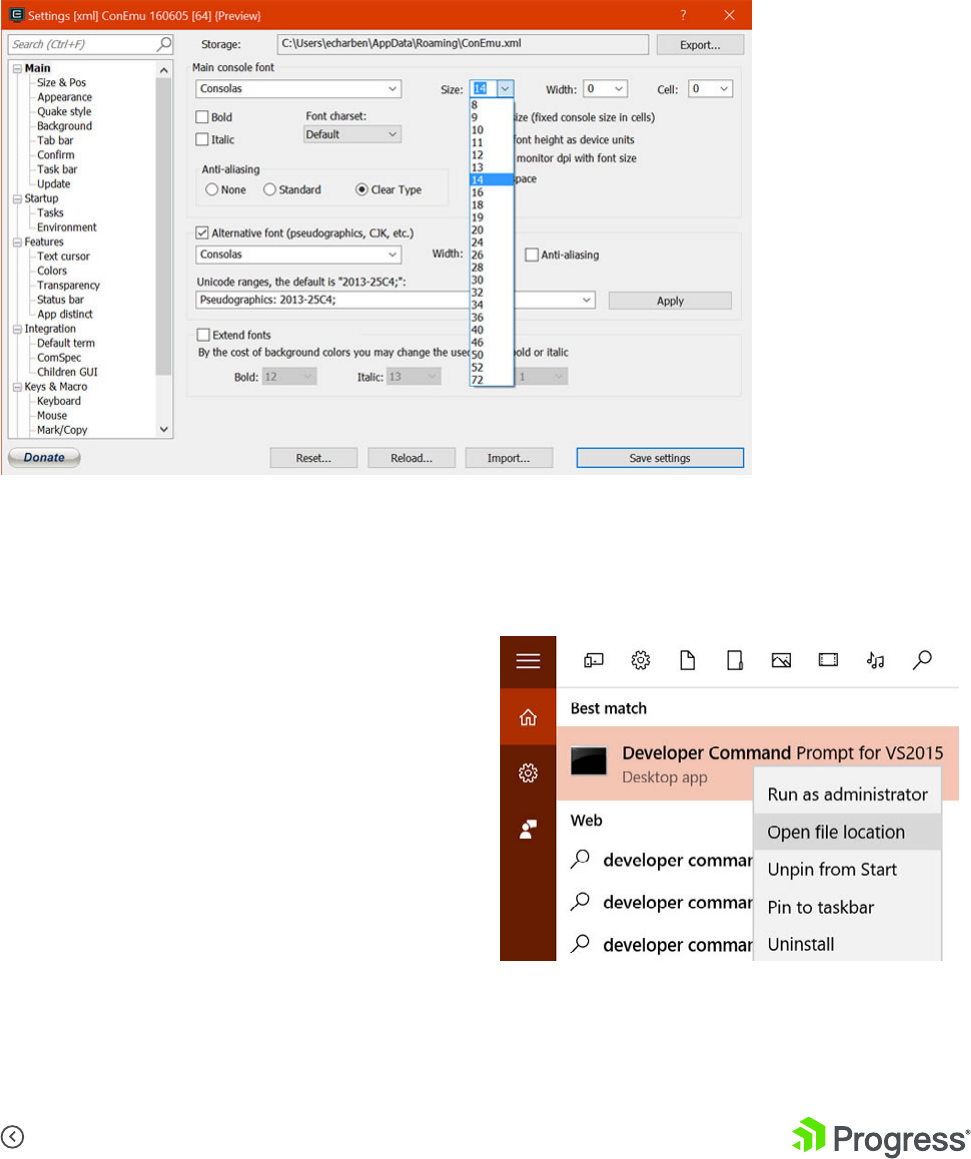
Presenter Mode
Don’t forget to look into the settings for full control
over fonts. If you’ve ever had to present at a
stand-up, user group or simply demo code, you’ll
understand how important it is to change the font
size for your audience.
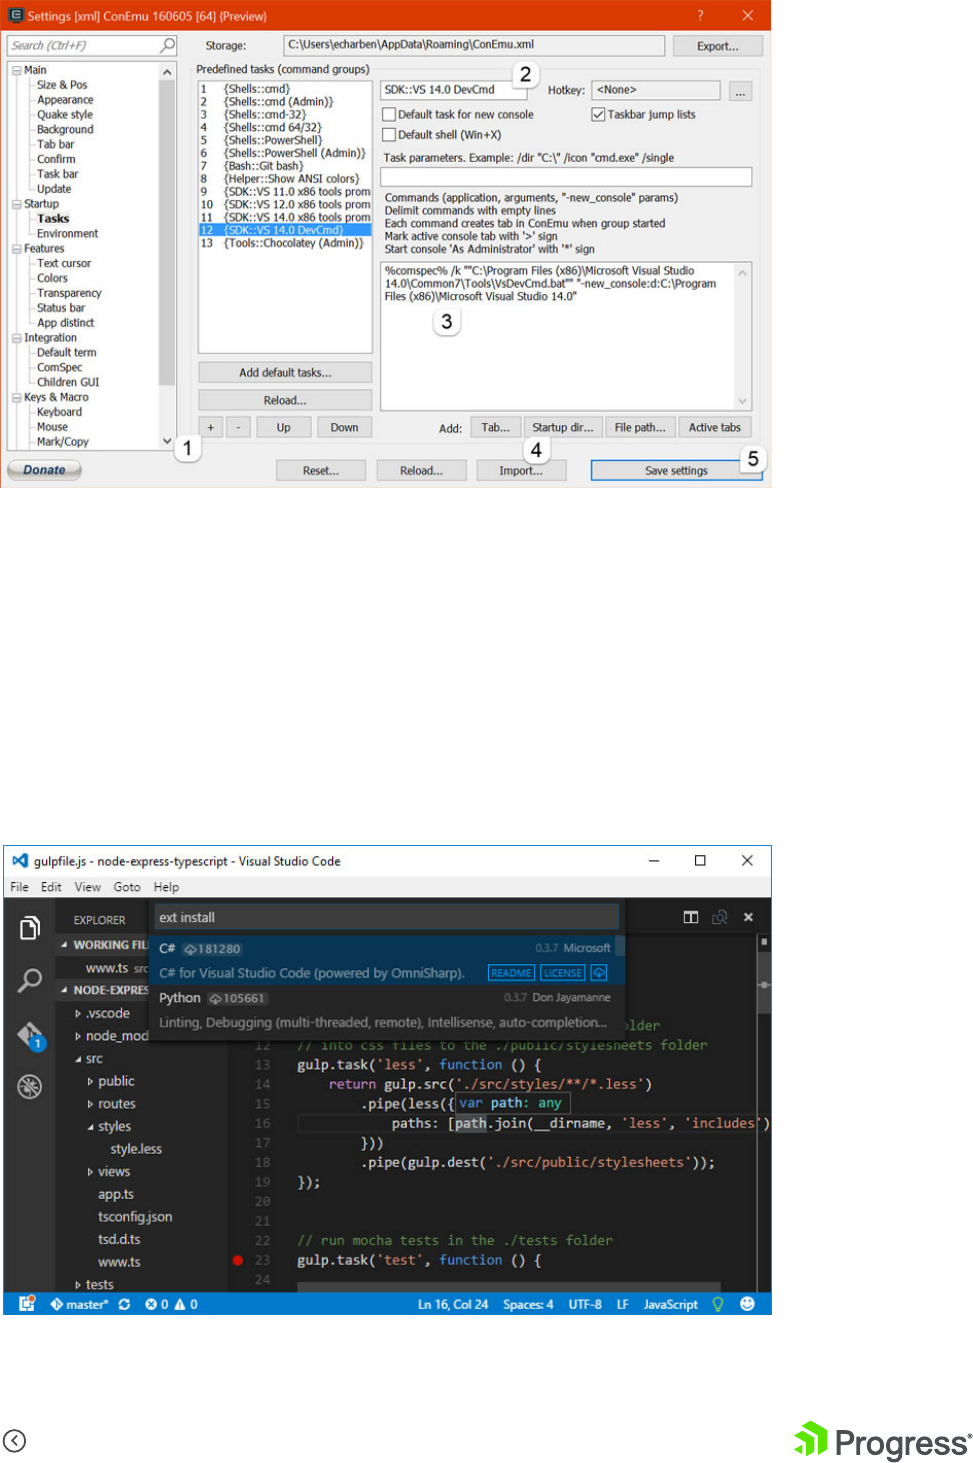
Create a Custom Console
ConEmu supplies some useful prompts or “tasks”
out-of-the-box. You can easily add your own
through the settings panel. For example, we can
easily add the Developer Command Prompt for
VS2015, so that it’s accessible from ConEmu.
First, you’ll need to look at the properties of the
Developer Command Prompt for VS2015. This was
created for you when VS2015 was installed. Simply
search for “Developer Command,” then right click
and choose “Open file location.”
12
Contents
© 2017 Progress. All Rights Reserved.
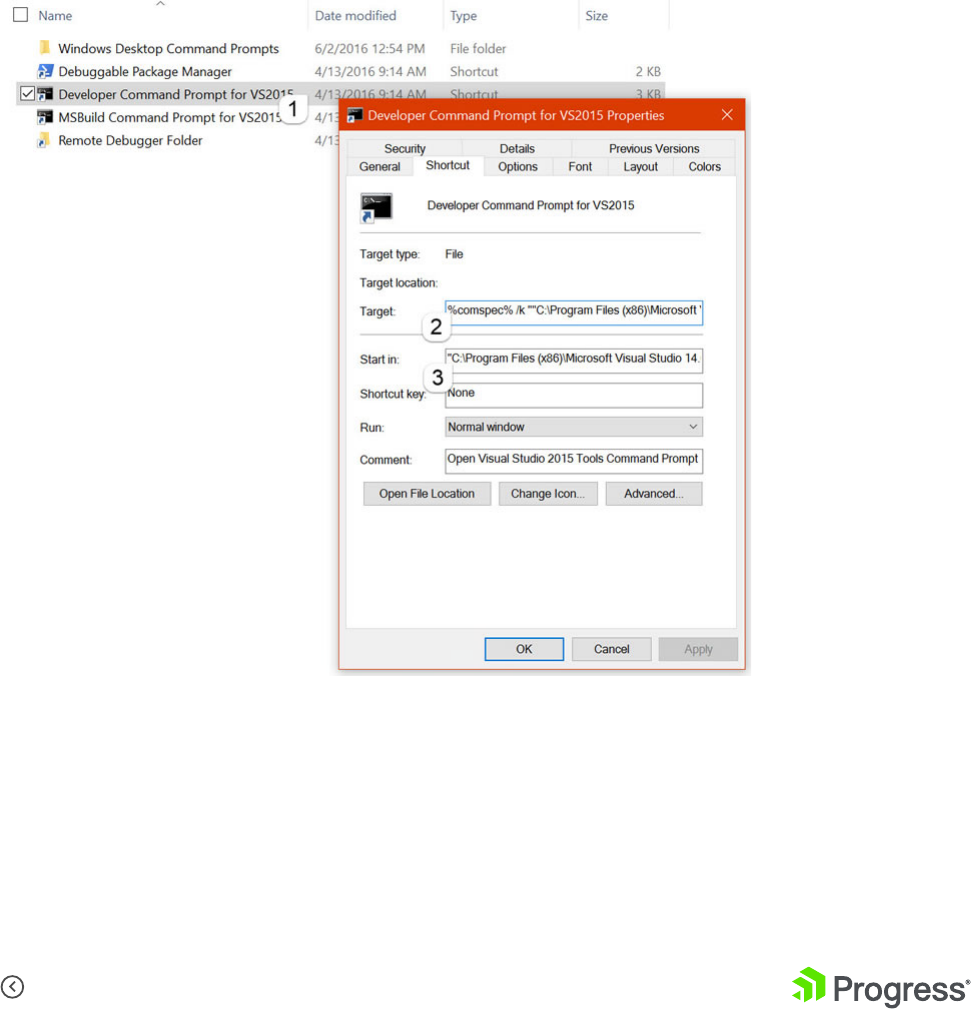
Next, open the properties for the shortcut and leave
it open. You’ll need the Target and Start in fields for
the settings in ConEmu.
In ComEmu, click Settings and then navigate to
Startup > Tasks. Next:
1. Click [+]
2. Name the task SDK::VS 14.0 DevCmd
3. Copy the Target to the commands text box
4. Click Startup Dir, and copy the Start in value
14
Contents
© 2017 Progress. All Rights Reserved.
Visual Studio is a great IDE—it handles everything
for software development from file-new-project to
deployment. However, there are times where you
just need a quick editor to work on that one off
Markdown or JavaScript file. Or perhaps you would
like to work on a project that doesn’t need a slick IDE
and is designed with CLI tooling in mind. For those
situations, the Visual Studio Code editor is a fantastic
option. To install VS Code, we’ll simply rely on
Chocolatey again, just execute the command below
and you’re ready to go.
choco install visualstudiocode
With VS Code installed, we now have a complete tool
set for CLI craftsmanship. Next, we’ll focus on some
simple tips and tricks that will help with efficiency.
Tips/Tricks
These next few tips are designed to help you
navigate from CLI, to file Explorer, to VS Code and
back. You can think of this as having a fancy, well-
organized tool belt where every tool is always within
reach.
From CLI to Code
Anytime you’re in the console and need to fire
up Visual Studio Code, simply type code ..The .
parameter will initialize VS Code at the current path.
You can also start VS Code for just a file using code
<filename>. If VS Code is already running, reuse the
instance by adding the -r parameter, for example
code . -r
From CLI to File Explorer
If you would like to view your current path in file
explorer, the same trick applies. In the console just
enter explorer . to jump into the GUI.
15
Contents
© 2017 Progress. All Rights Reserved.
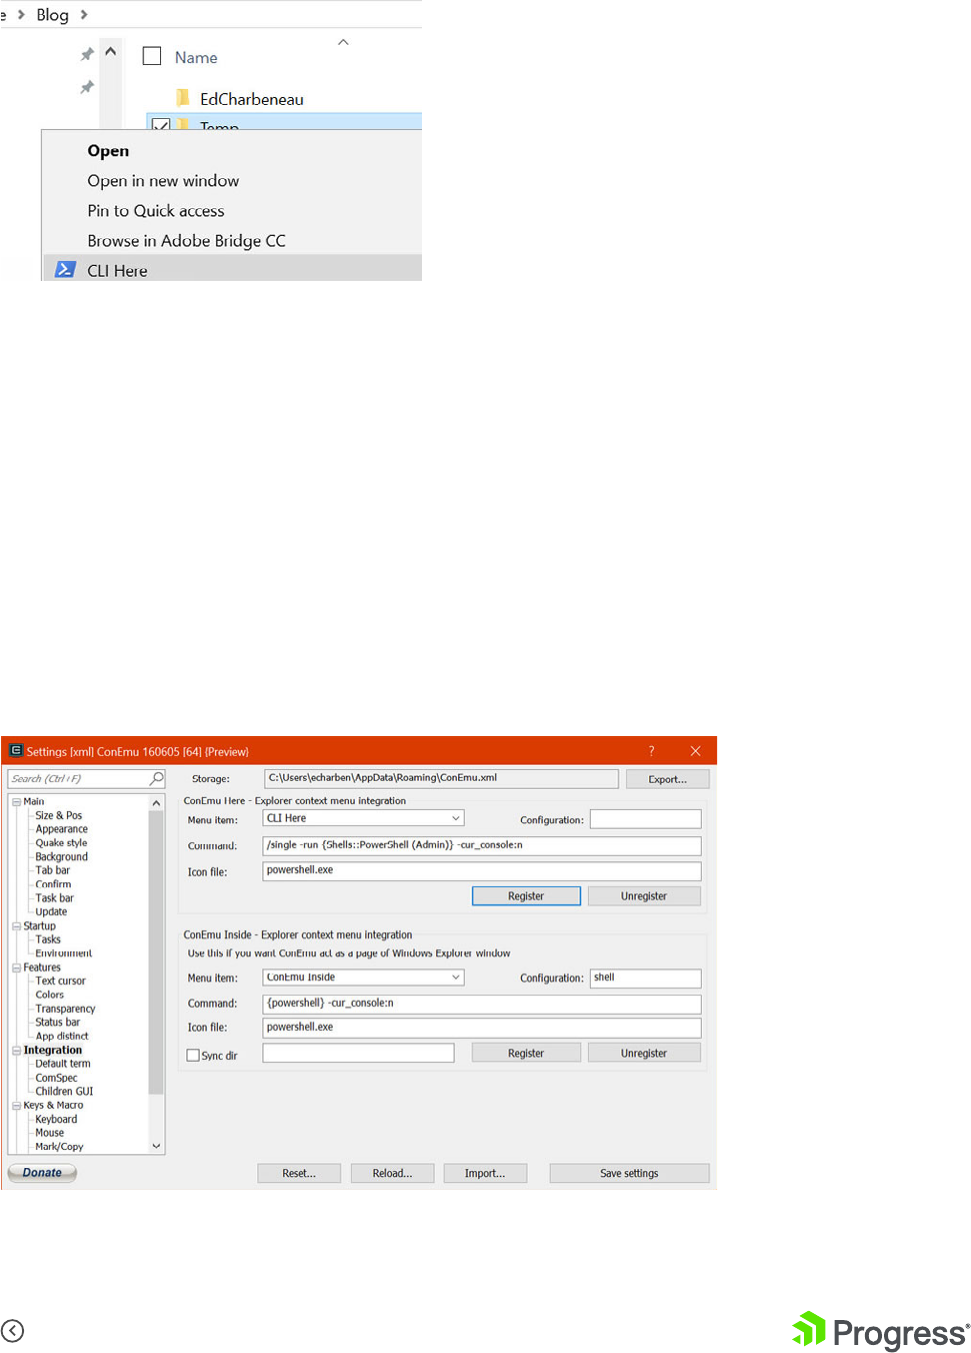
From File Explorer to CLI
There are many times where the GUI File Explorer is
just easier to navigate. While browsing, you can jump
straight to the CLI on the current folder by enabling
the integration feature on ConEmu.
Open the ConEmu settings Win + alt + p and
navigate to Integration and add the following
settings under ConEmu—Explorer context menu
integration:
• Menu Item: CLI Here
• Command: /single -run {Shells::PowerShell
(Admin)} -cur_console:n
• Icon file: PowerShell.exe
Make sure you click Register and Save settings to
complete the setup.
Now you can enter the CLI from a right click on any
folder, no more typing long file paths.
16
Contents
© 2017 Progress. All Rights Reserved.
From Code to CLI
Visual Studio Code already has a menu shortcut
for the CLI, however it only launches the default
Windows console. Let’s get VS Code to use ConEmu
instead, this will let us jump straight into our
PowerShell prompt.
Open the ConEmu settings Win + alt + p and
navigate to Integration and then to Default term.
Look for the setting, List of hooked executables or
windows … and append | code.exe to the setting.
Also, enable the setting Use existing ConEmu
window if available to make the experience seamless.
Be sure to click Apply and Save settings to complete
the setup.
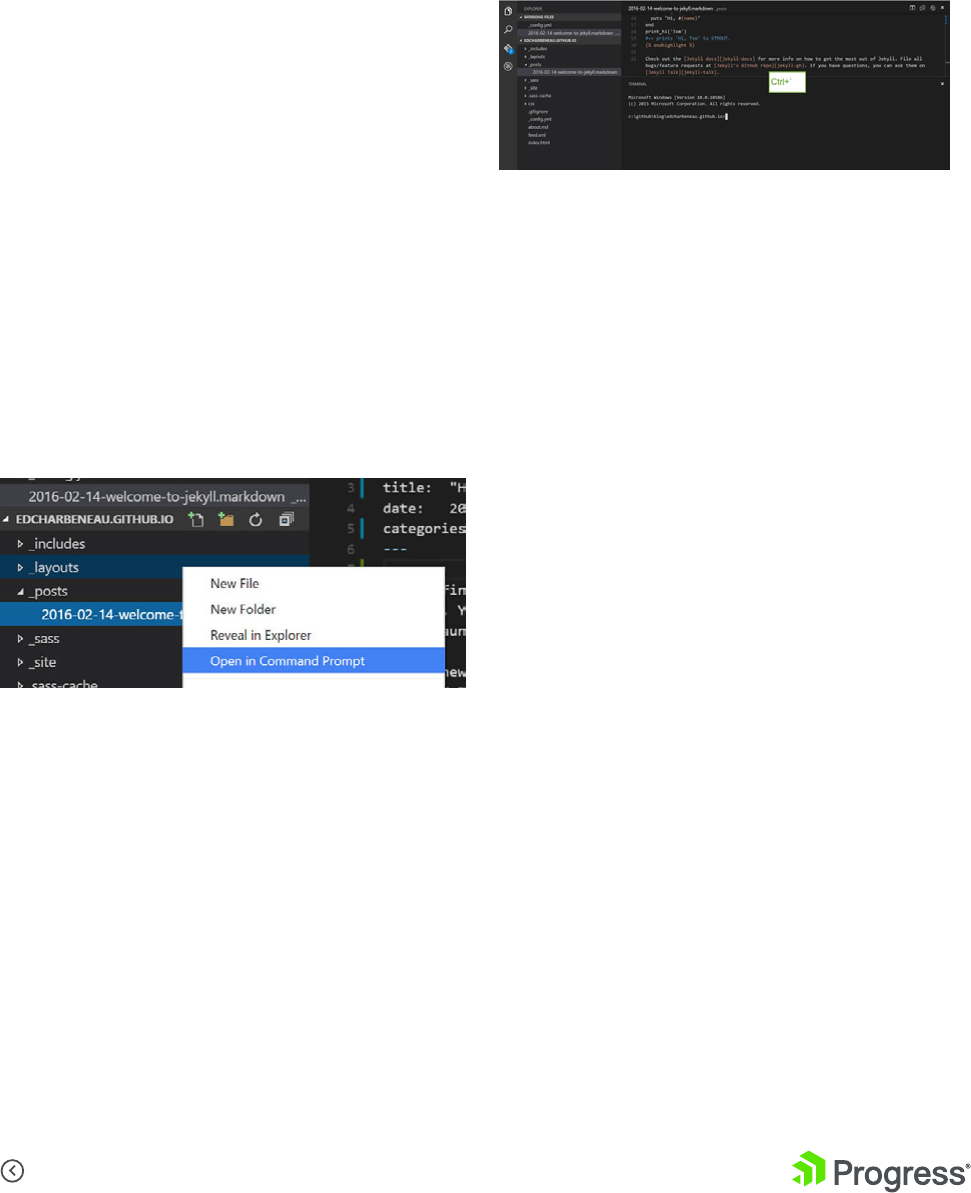
Now clicking “Open in Command Prompt” in VS
Code will use ConEmu instead. Note that a restart of
VS Code may be required.
Internal VS Code Prompt
In the May release of Visual Studio Code, an internal
command prompt was added. If you would like to
access the terminal directly from within the editor
simply press Ctrl + `. Now that’s easy access!
17
Contents
© 2017 Progress. All Rights Reserved.
.NET CLI Decoded
What was cool once has become cool again.
Thanks to the infectious enthusiasm of developers,
command line tooling is back again—even for .NET
development. Guess what else is back? ASCII art!
You could contemplate adding some ASCII artwork
on top of your C# code files.
Jokes aside—the command line is a powerful user
interface and CLI tooling provides developers with
lots of flexibility to aid in development and DevOps
workflows. With the new .NET Core framework, the
focus is squarely on CLI tooling to lower the barrier to
entry and make .NET development accessible to all.
Whether you use Windows, OSX or Linux, the
command line works the same way everywhere. Let
us explore some of the new cross-platform .NET CLI
tooling.
18
Contents
© 2017 Progress. All Rights Reserved.
The New .NET CLI
Let us see what the new .NET development
experience is like on a fresh OSX machine. First, you
need to get some things set up. You can get started
at the .NET website:
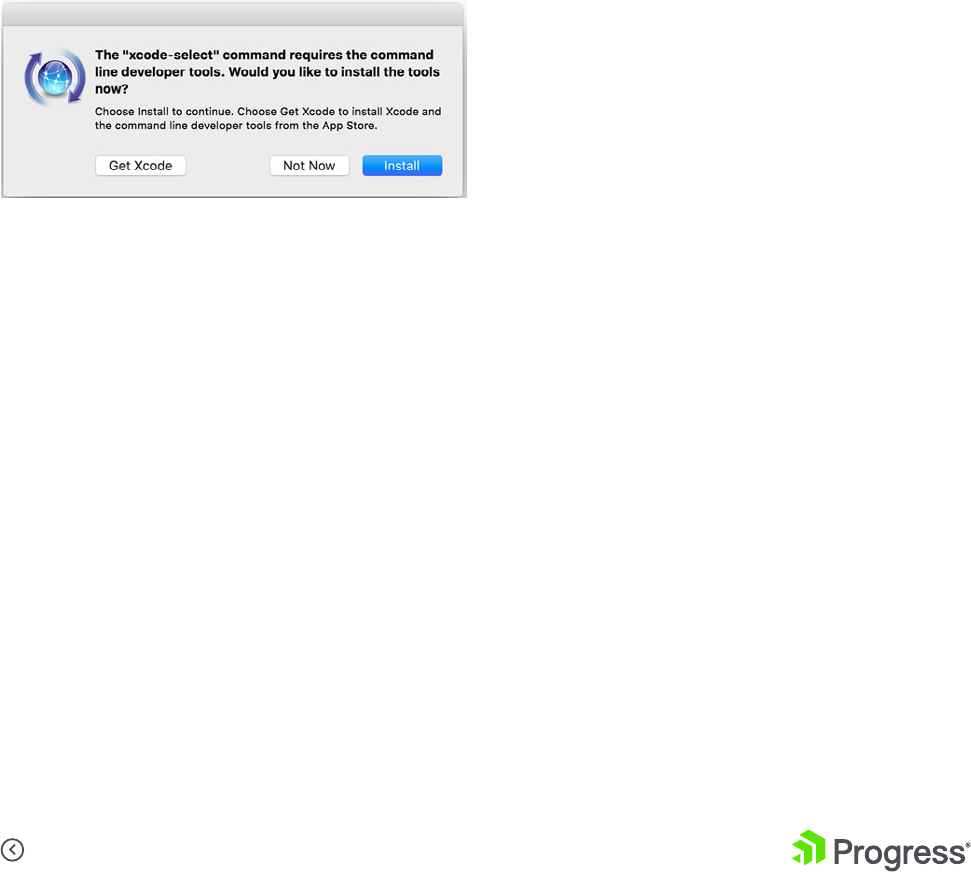
1
Install XCode Command Line tooling,
if you don’t have it. While you’re not
doing iOS development, some things
are included in the XCode CLI that are
needed. You can install just the CLI
without getting the gigantic XCode
IDE—simply enter xcode-select --install
in terminal and accept the install.
2
Get HomeBrew, if you haven’t
already—the popular package
manager for OSX/Linux machines.
/usr/bin/ruby -e “$(curl -fsSL https://raw.
githubusercontent.com/Homebrew/install/
master/install)”
3
You need an updated OpenSSL
through Homebrew. These commands
will do it:
brew update
brew install openssl
brew link --force openssl
19
Contents
© 2017 Progress. All Rights Reserved.
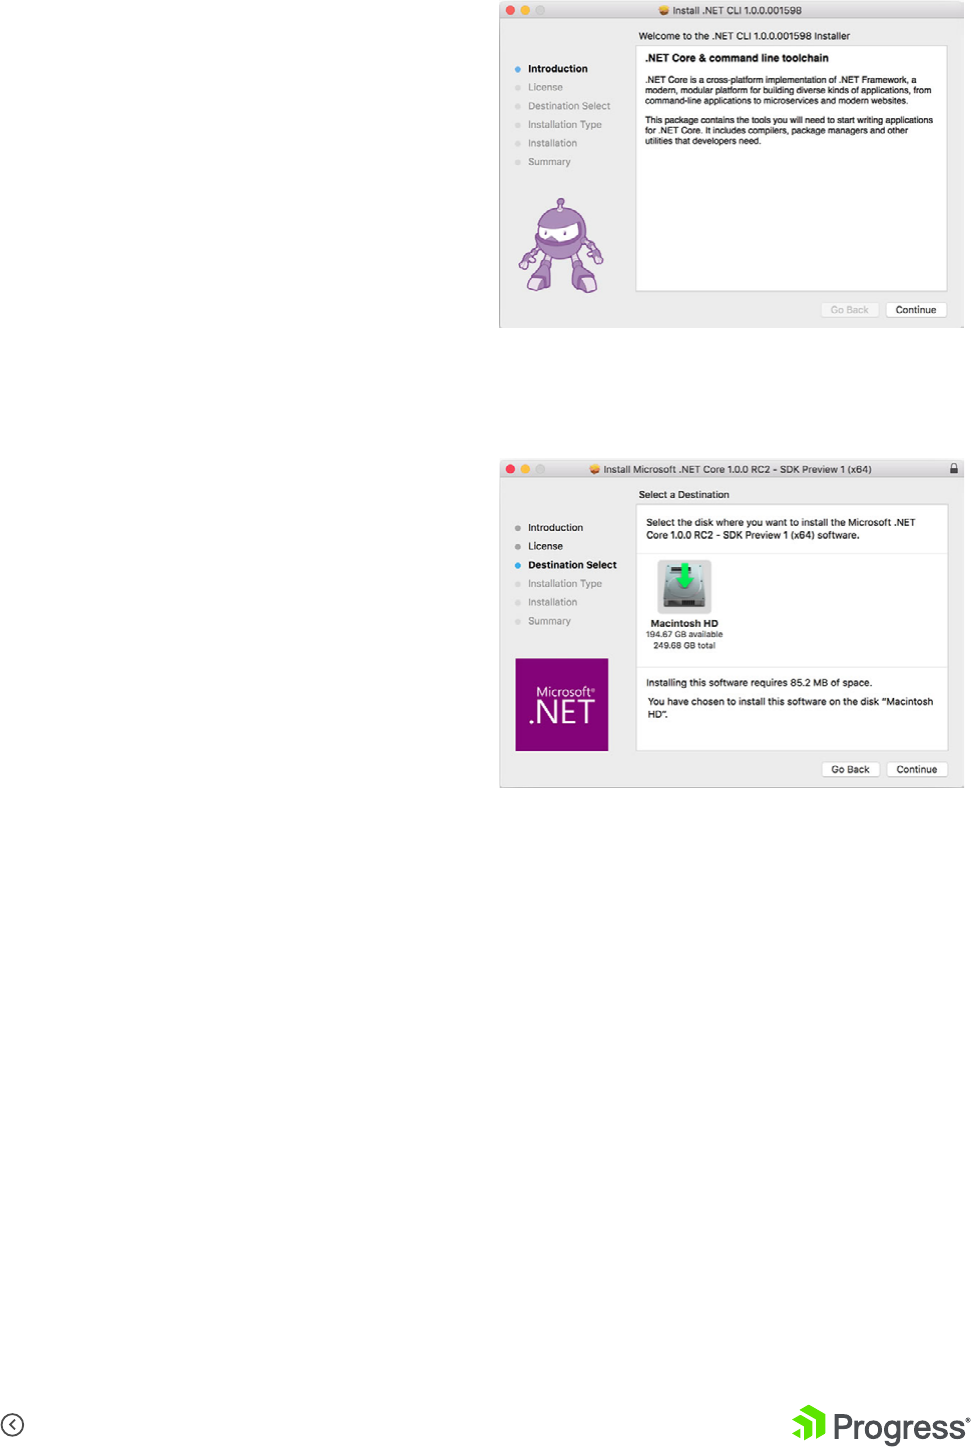
4
Install the official .NET Core for OSX
Package. This should be a simple
install wizard that sets everything
up for you--including getting you
the .NET CLI tools. .NET Core hit the
RTM milestone recently, so based on
whether you did the install before or
after, you’ll see the changed logo.
Once the install finishes, you should have all of the
pieces in place to start building apps with the new
.NET Core framework. The new CLI is a foundational
cross-platform toolchain for developing .NET Core
applications—one over which other complex tooling
can be built on.
Now compare that to:
20
Contents
© 2017 Progress. All Rights Reserved.
Meet dotnet—the generic driver for running the
command line tools. Invoked on its own, it will give
out brief usage instructions or fire up specific IL
code if pointed to a DLL path. The primary usage,
however, is using the convention dotnet <command>,
where you execute verbs/commands through the
dotnet driver. Any time you need help, fire up the
help command, like so: dotnet -h/--help.
DotNet Commands
The new .NET CLI comes pre-packed with some
existing commands—essentially ‘verbs’ that the
dotnet driver can execute. Each command has a
set of optional parameters and can take arguments.
Let’s explore all the available built-in commands,
along with the popular options that you may find
useful.
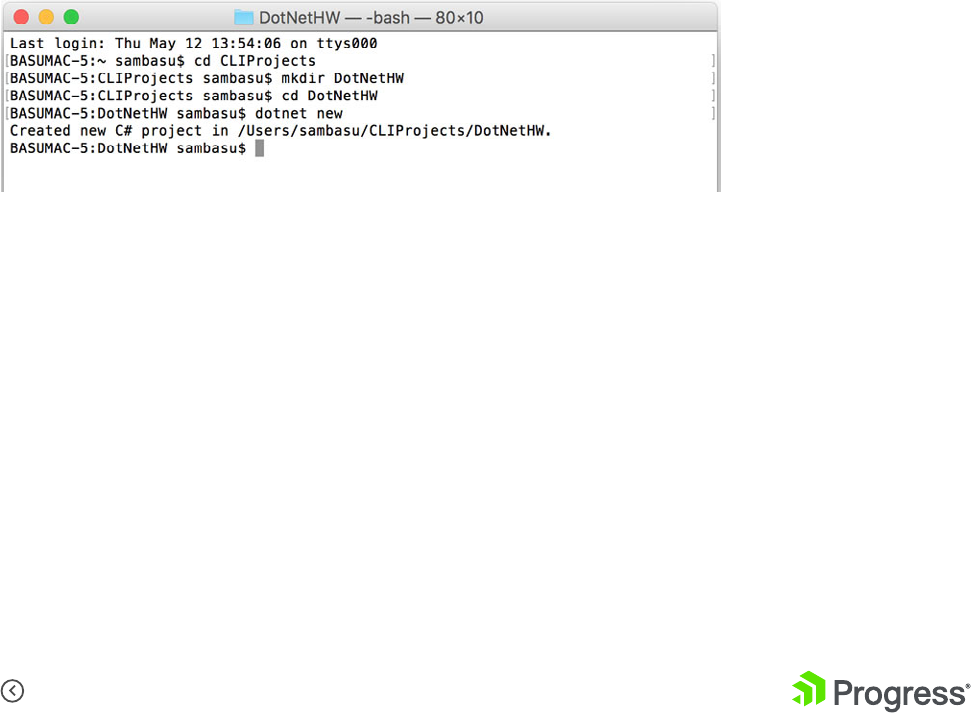
DotNet New
Initializes a .NET Core application project
• Bootstraps project with bare essential files
Options:
• -l/–lang | Choose preferred language | Valid
choices – ‘C##/F##’
• -t/–type | Choose preferred app type | Valid
choice now – ‘console’ | May be expanded in
future
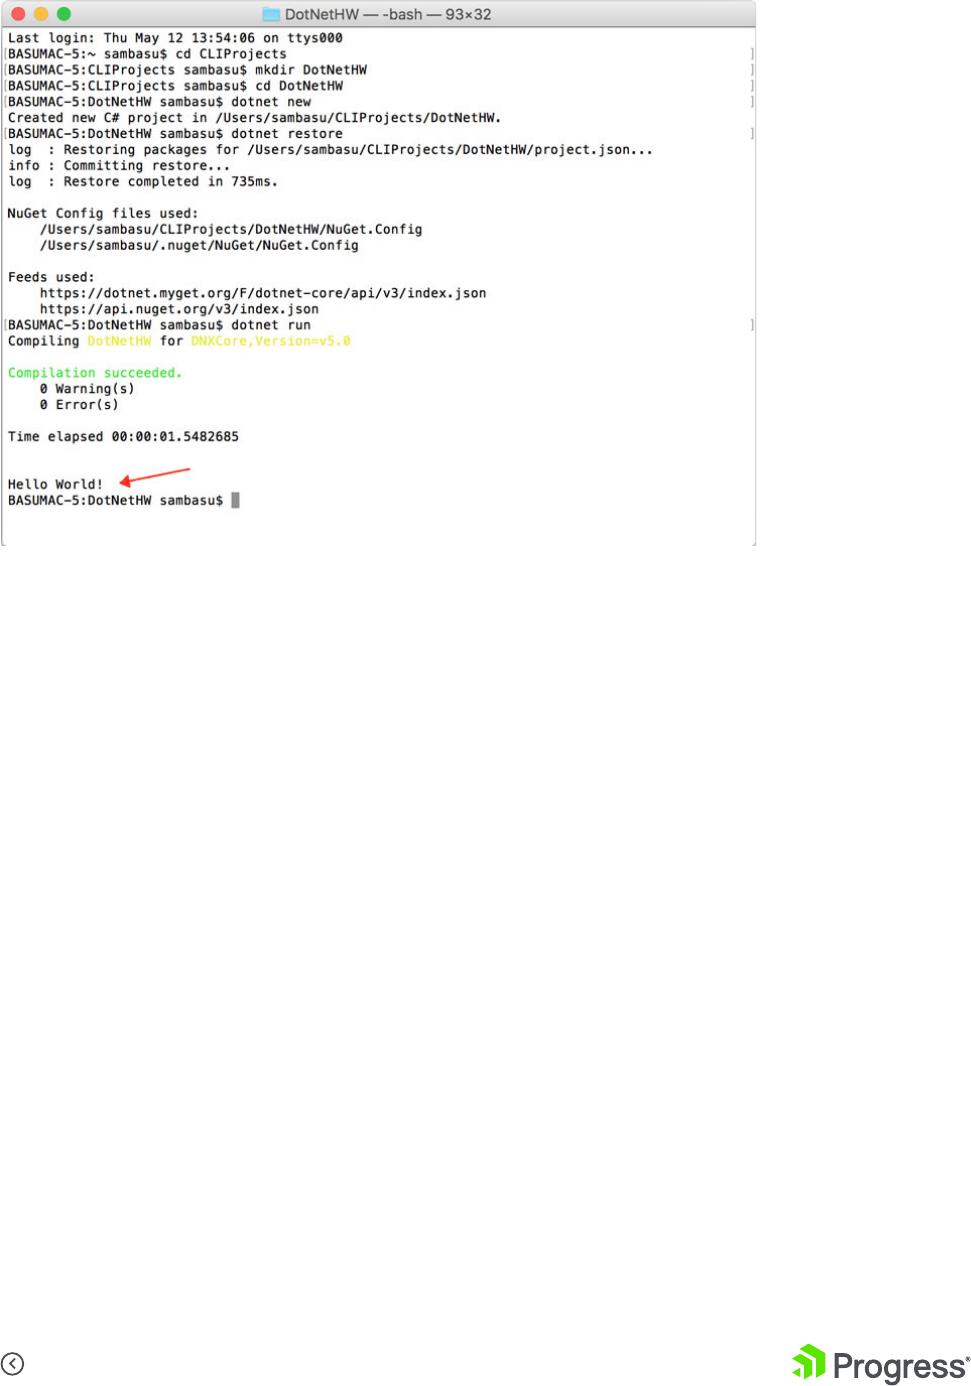
You can see a sample usage in which a new
directory is created and then the dotnet new
command is invoked--things work “in place.”

21
Contents
© 2017 Progress. All Rights Reserved.
The result is pretty basic—a boilerplate console
application with just enough to run itself.
The ingredients are a project.json file with all
dependencies, a program.cs file with executable
code and a NuGet.Config that points to the NuGet
source to resolve dependencies.
Here’s the boilerplate project.json—notice the dependencies and frameworks nodes.
And here’s program.cs—the glorious code that spits out ‘Hello World’ on console.
22
Contents
© 2017 Progress. All Rights Reserved.
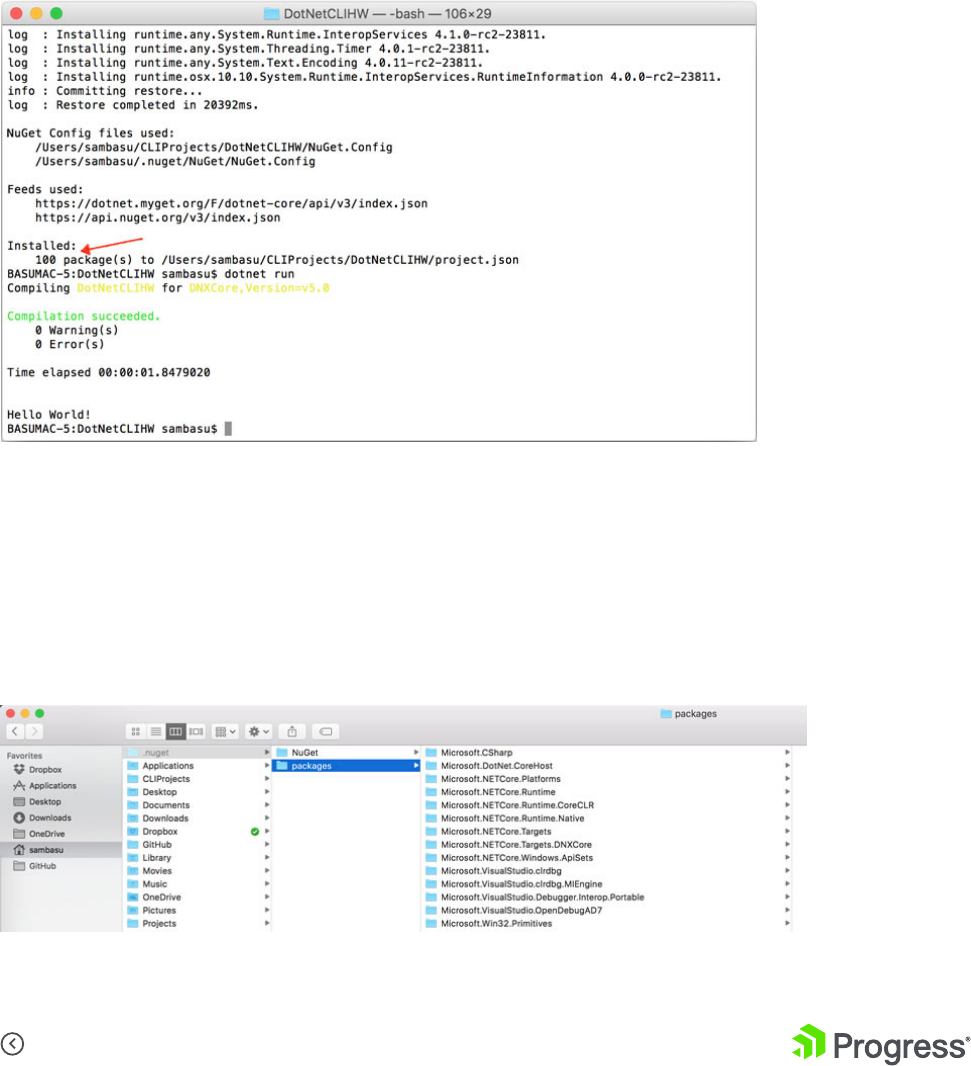
DotNet Restore
• Restores the dependencies for a given project
from NuGet using Project.JSon file
• The NuGet feed source is configured in the
NuGet.config file
• By default, looks first for packages in the NuGet
package cache
Options:
• -s/–source | Override NuGet.config source of
NuGet packages
• –packages [Dir] | Specifies the target directory
for restored packages
The first time you run dotnet restore on a fresh
machine, all .NET Core basic dependencies will
be pulled down from NuGet servers—about 100
packages.
NuGet packages that are pulled down are cached for subsequent usage in a global NuGet cache, which, by
default, is .nuget/packages in the user’s home directory, as seen below. Subsequent restoration of the same
dependencies is very quick.
23
Contents
© 2017 Progress. All Rights Reserved.
DotNet Build
• Builds a .NET Core application
• Compiles all dependencies to produce a binary
executable
• dotnet restore must have been run prior
• Outputs binaries in child Bin folder
Options:
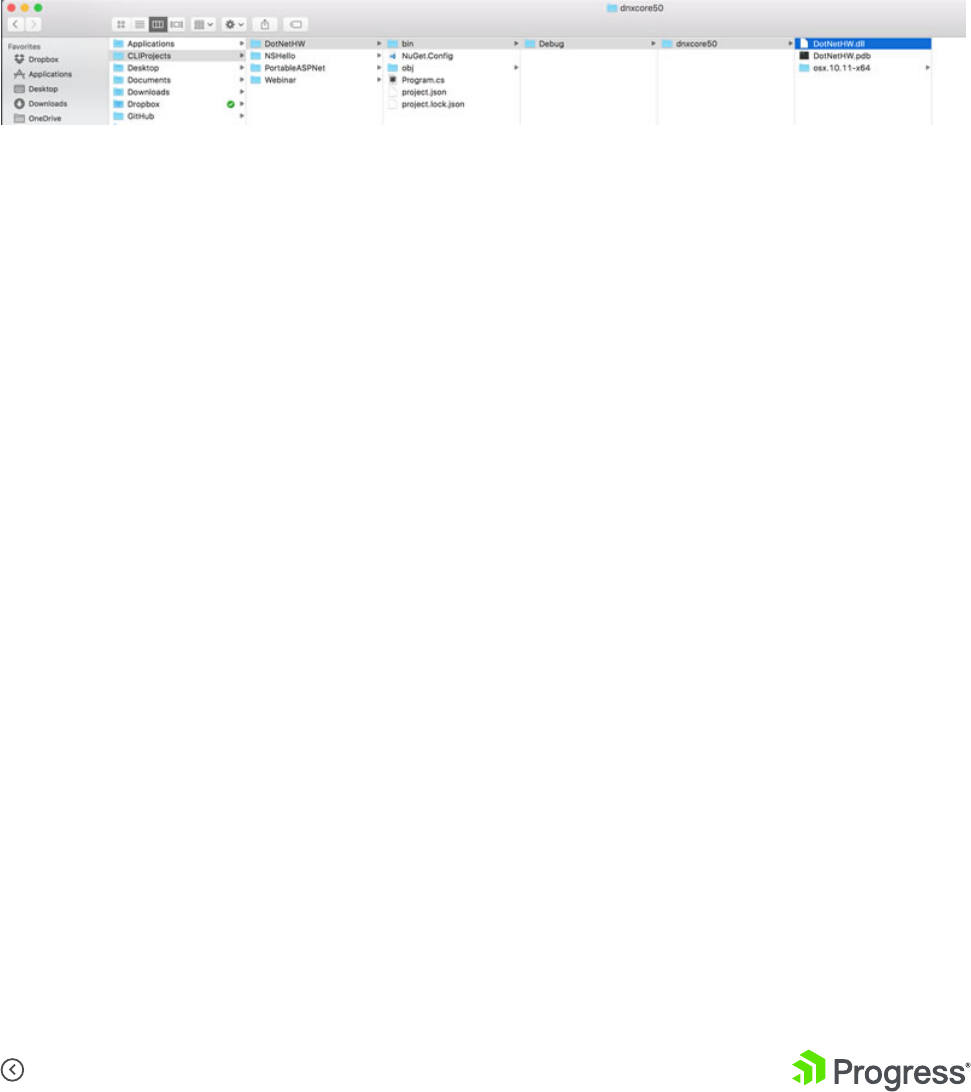
DotNet Run
• Runs application from source code ‘in place’
• Combines compile, build binaries and launch into
one step
• Depends on dotnet build
Options:
• -f/–framework [Framework] | Runs the app
for a given framework identifier
• -p/–project [Path] | Specifies which project to
run | Path points to project.json in the project
directory
• -o/–output [Dir] | Target directory to put
compiled binaries
• -f/–framework [Framework] | Compile for a
specific framework defined in project.json file
In our case, take a look at the binaries created for the
corresponding frameworks—nice and simple.
24
Contents
© 2017 Progress. All Rights Reserved.
Here’s our ‘Hello World’ console app—running unceremoniously.
DotNet Test
• Executes unit tests for given project and gives
you guilt if you don’t unit test
• Uses configured test runner in project.json
• Resolves dependencies on NUnit/XUnit and
bootstraps tests as class libraries
• Defaults to running tests in Console mode
Options:
• [Path] | Specifies the path to test project |
Defaults to the current directory if omitted
• -o/–output [Dir] | Directory in which to find
binaries to run

25
Contents
© 2017 Progress. All Rights Reserved.
DotNet Pack
• Creates a NuGet package of your code
• Build nupkg packages with source and
debug symbols
• NuGet dependencies of the project being
packed are added to the nuspec file for
resolution
• Builds the project as first step before
packaging
Options:
• [Path] | Specifies path to project to be
packed | Defaults to the current directory
if omitted
• -o/–output [Dir] | Directory in which
built packages are placed
DotNet Publish
• Publishes a .NET application in a bundled
container
• Packs application and all dependencies
into single folder for publishing
• Packaging includes application’s
Intermediate Language (IL) code and
dependencies for portable applications
• For self-contained applications, packaging
includes IL, dependencies and runtime of
the targeted platform
Options:
• [Path] | Specifies path to project.json of
project to be published
• -o/–output [Dir] | Directory in which the
built packages are placed
• -f/–framework [Framework] | Publish
the application for a given framework as
defined in project.json
• -r/–runtime [Runtime] | Publish the
application for a given runtime
Extending the .NET CLI
So hopefully you are on board with the new
.NET CLI, but perhaps you realize that your
development or DevOps workflows need a
few more commands. You can easily extend
the .NET CLI through custom commands.
.NET CLI tools can be extended in two main
ways:
1. NuGet Packages on per-project basis
2. System Path on per-machine basis
The two extensibility options aren’t mutually
exclusive—you could easily mix and match.

26
Contents
© 2017 Progress. All Rights Reserved.
NuGet Extensibility
To extend the .NET CLI with custom tools to use
in specific projects, all you have to do is create a
portable console application that runs on top of
.NET Core. Your application can then be packaged
up (using dotnet pack) and distributed through
NuGet. To consume, you simply need to make a
reference to the tooling in project.json. The custom
tooling is only available in the context of the project
that references/restores the NuGet package.
Your project needs to follow the .NET CLI driver-
command nomenclature of dotnet-<command>. To
consume, you simply need to add a Tools section in
projects’ project.json, like so:
“tools”: {
“dotnet-domything”: {
“version”: “1.0.0”,
“imports”: [“dnxcore50”]
}
}
Once dotnet restore is run on the project, the NuGet
tool and all of its dependencies are resolved. You can
then happily use the command dotnet-domything,
but only in context of your project.
Since custom tools are simply portable applications,
the user consuming the tool has to have the same
version of the .NET Core libraries that the tool was
built against in order to run the tool. Any other
dependency that the tool uses and that is not
contained within the .NET Core libraries is restored
and placed in the NuGet cache. The entire tool is,
therefore, run using the assemblies from the .NET
Core libraries as well as assemblies from the NuGet
cache.
Path Extensibility
Path-based extensibility allows you to build custom
.NET CLI tooling that can be used across multiple
projects, but only on the given machine. The one
drawback is portability to another machine requires
deploying the tool elsewhere. Nevertheless, Path-
based extensibility wins with simplicity and ease of
use—just follow the CLI extensibility conventions.
The dotnet driver can invoke any command that
follows the dotnet-<command> convention. The
default resolution logic will first probe several
locations in the context of the project and finally fall
back to the system PATH. If the requested command
exists in the system PATH and is a binary that can
be invoked, the dotnet driver can invoke it.
The custom binary tool can be pretty much anything
that the operating system can execute. On Unix or
OSX systems, this means any command script saved
as dotnet-domything that has the execute bit set
via chmod +x. On Windows, it means anything that
Windows knows how to run. That’s it—simple.

27
Contents
© 2017 Progress. All Rights Reserved.
Conclusion
Yes, command line tooling is very cool and powerful.
Embracing it with an open mind will reward you with
flexibility—if you know what you’re doing. The new
.NET framework is lean, modular and open source. It
is cross-platform and takes your .NET apps to places
never possible before. And .NET CLI provides the
consistent foundational toolchain to build new .NET
Core applications everywhere.
While the new tooling definitely helps, your
apps will continue to be complicated to serve
specific business needs of your customers. Unless
you’re building console apps, you probably need
professionally built UI controls—for web, desktop
or mobile. Have we mentioned that with Progress®
Telerik ® by Progress, you can create awesome UI for
your apps with an all-encompassing .NET Toolbox?
It’s free to try, so go ahead and give it a shot.
Step boldly, ye .NET Developer—it’s a brave new
world. The command line is your friend!
28
Contents
© 2017 Progress. All Rights Reserved.
A Git CLI Reference for Beginners
Hopefully, no one needs to sell you on GitHub—the
world’s largest open-source community. GitHub is
home for most developers—a fast, flexible social
environment to build personal projects, support
enterprises and collaborate on open-source
technologies.
The underpinnings of GitHub is Git—a free, open-
source, cross-platform and highly productive
distributed version control system. GitHub
conveniently wraps all of Git’s features into polished
UI tools for your chosen development platform,
namely:
• GitHub for Windows: https://windows.github.com
• GitHub for Mac: https://mac.github.com
But you are a developer and nothing appeals more
to your than pure text on a bland terminal window.
Everything you do through the GitHub UI tools first
began life as command line tools via the the Git CLI.
And it is incredibly powerful.
This is your cheat sheet of common Git CLI
commands. The best news is that all of the
commands work the exact same way on Linux, Mac
OS/OSX and Windows.

29
Contents
© 2017 Progress. All Rights Reserved.
Command Prompt Basics
First, let’s get a basic command line refresher under our belt—most commands work consistently across
the Bash and DOS command prompts.
ls List Directory contents: Provides a list of all files/folders in
given working directory.
cd <DirectoryName> Change Directory: Navigates to the given folder as working
directory. cd / navigates to root folder and cd .. traverses one
level up to the parent directory of the current working directory.
mkdir <DirectoryName> Make Directory: Creates a new folder in place.
open -a “TextEdit” .bash_profile Opens the bash_profile file in TextEdit on a Mac. If you’re on
Linux/OSX systems, the bash_profile is the user’s personal
initialization file, executed by login shells as the terminal
command prompt starts up.
PS1=”\u @ \t: “ Also on Linux/OSX, the Bash shell command prompt can
be customized using PS1-4 Prompt Statements—essentially
environment variables. You could add PS variables in your bash_
profile to customize the command prompt. Above is mine with
an Emoji in my command prompt—because why not!
clear Clears terminal window of past commands and outputs—
provides fresh command prompt.

30
Contents
© 2017 Progress. All Rights Reserved.
Git Commands
Now let’s dig into the Git CLI. This is not an exhaustive list, but focuses on the most frequently used
commands.
git config --global user.name “<UserName>” Sets the name you want attached to your
commit transactions.
git config --global user.email “<UserEmail>” Sets the email you want attached to your commit
transactions.
git init <ProjectName> Initializes a new Git repository. Transforms a
regular folder into a directory that can accept Git
commands.
git clone <RemoteGitHubURL> Copies down a remote GitHub repository along
with all the version history to a local working
directory. Maps the directory for further
commands.
git status Checks the status of a given repository. Lists the
working branch and any new/changed files that
need to be committed.
git diff Shows the file differences not yet staged.
git add <FileName> Brings new files in your repository to Git’s
attention for tracking. Includes the file in the
repository snapshot for versioning.
git add . Adds a batch of files to Git’s tracking in a local
working directory. Adds everything in one
swoop. This command could also add files with a
specific extension or other filters.
git reset <FileName> Unstages the named file from the repository
snapshot, but preserves its contents.
git branch Shows all the local branches in the current
repository.

31
Contents
© 2017 Progress. All Rights Reserved.
git branch <BranchName> Creates a new branch in the current repository.
git checkout master/<BranchName> A navigational command that switches the
working directory to master/named branch. The
files are representative of the state of master/
branch.
git com mit -m “<CommitMessage>” Commit changes that you have made in your
working directory with a descriptive message.
git merge <BranchName> Merge changes made in a given branch to the
master branch. Makes updates visible to all
repository collaborators.
git branch -d <BranchName> Deletes a branch after changes have been
merged with master branch.
git remote add origin <RemoteURL> Introduces local Git to remote repository
(typically GitHub). Adds hooks for pull/push for
syncing with remote source.
git push --set-upstream origin master Pushes local repository changes to a remote
master branch in a linked repository (again,
probably GitHub). Syncs remote with local.
git pull origin master Pulls down a master/named branch from a linked
remote repository to a local working directory.
Syncs local with remote.
git help Forgot something? Pull up the Git CLI Help to
look up commands with the option to dig further
into each command.

32
Contents
© 2017 Progress. All Rights Reserved.
Pro Tips
1
Delete branches after the
corresponding pull request has been
merged onto master. Orphaned
branches only cause confusion.
2
Fork a project, branch off and make
a pull request sooner rather than
later. This announces your intent to
work on something to the rest of the
collaborators. A pull request does
not have to wait until all the work has
been finalized before merging it onto
master.
3
Don’t keep working for too long on
your own local branch. Things can get
out of sync quickly if you do so.
4
GitHub does not magically solve
merge conflicts between branches.
Diff tools are your friend.
5
Projects on GitHub do not
automatically become open source.
GitHub repositories need to pick a
valid license before they are truly
considered open-source software—
make your pick as you’re setting up
your repository.
6
Please play nice with others and
have meaningful ReadMe files and
descriptive commit messages. Emojis
are more than welcome.
As you collaborate more and more on GitHub projects, you may find these tips to be helpful:
Progress Open Source on GitHub
We at Progress love open source and love GitHub. You’ll find some very popular GitHub repositories
maintained by Progress—and we are happy to share. So jump in, clone it, use it, fork it and contribute back.
• Kendo UI Core
• NativeScript®
• VS Code Extension for NativeScript
• JustCode™ Extensions
• JustDecompile™ Engine
Conclusion
This cheat sheet should help you get off the ground quickly with your projects.
So keep that terminal window open, refer to this list and get productive on
your GitHub projects. Happy coding!
33
Contents
© 2017 Progress. All Rights Reserved.
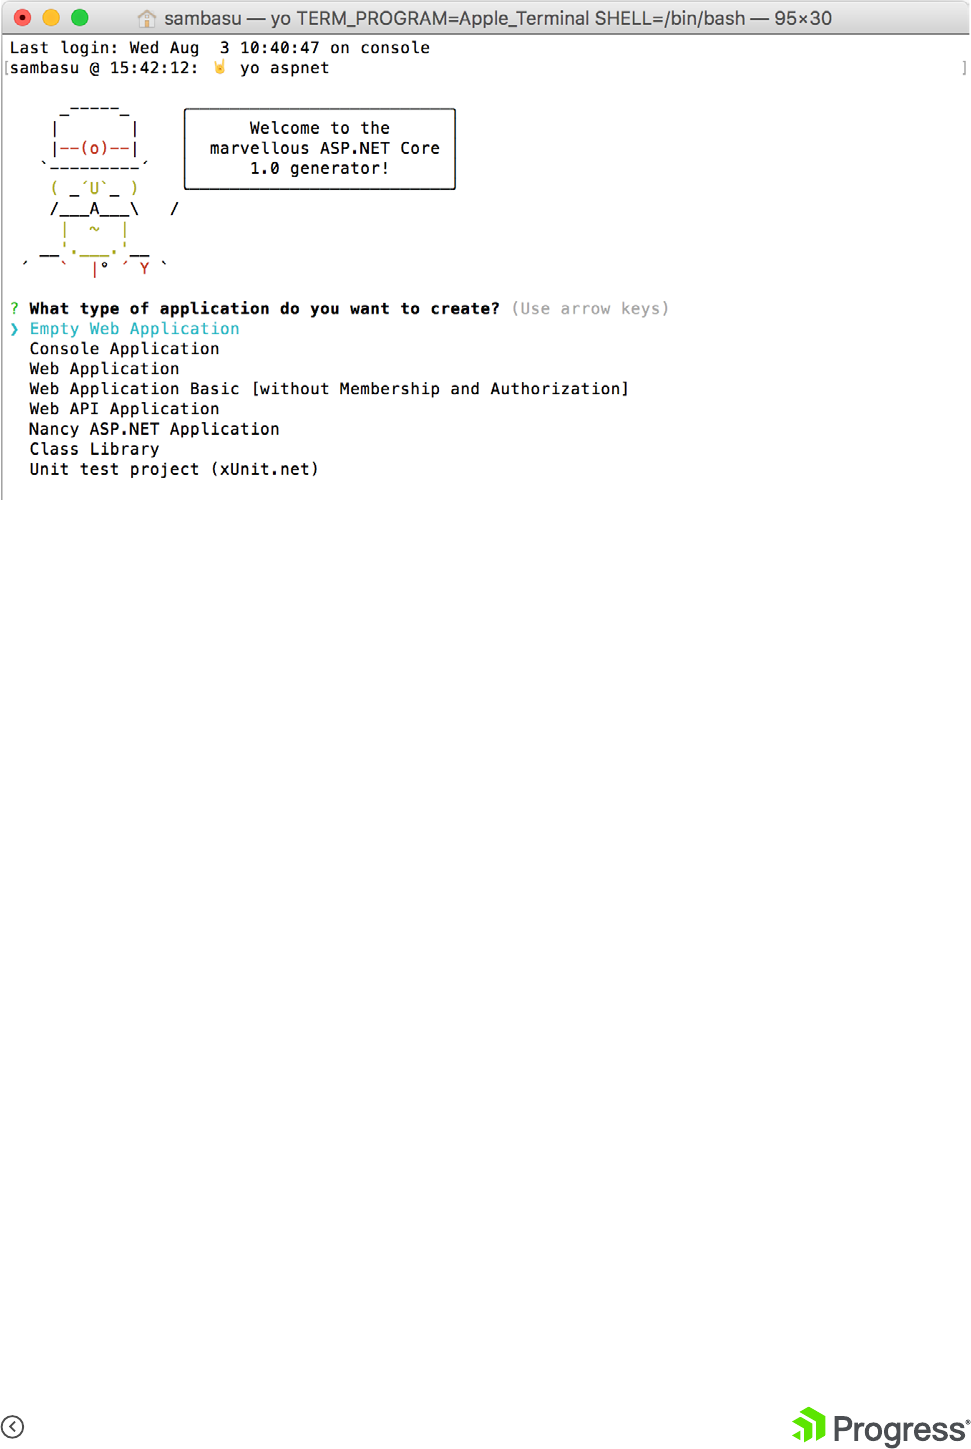
Modern ASP.NET Tech Stack
[Image Courtesy – Microsoft]
Let’s talk about ASP.NET—every .NET developer’s
favorite web application stack. With ASP.NET Core,
the landscape for ASP.NET developers, is changing
big time. On one hand, you can still have the
comforts of Visual Studio on Windows for ASP.NET
development; but on the other, ASP.NET is going
places it has never gone before—thanks in part to
the new .NET Core.
The modern ASP.NET Core is lean, modular, open
source and truly, completely cross-platform. Not
only does it run everywhere, but developers can
build ASP.NET applications on any platform. Below
is a quick view of the moving pieces in ASP.NET
land. Want to learn more? Check out this webinar
recording for a detailed walkthrough on how to pick
the right tech stack for modern ASP.NET.

34
Contents
© 2017 Progress. All Rights Reserved.
Why JavaScript?
As the popular saying goes, JavaScript is the
assembly language of the web and its success is
clearly influencing the ASP.NET stack. Why should
you consider a Core JS Framework in ASP.NET
stack? Quite simply—reusability of established
frameworks and flexibility of client-side code.
Popular Core JS frameworks give you a lot out of
the box—easy data binding, separation of concerns
and well-oiled rendering engines. And all of this JS
tooling works right inside of Visual Studio for the
best of both worlds. A few major JS frameworks
to consider are Angular, React, Aurelia, Backbone,
Knockout, Durandal, etc.
Interestingly, NodeJS is also making its presence
felt in the ASP.NET stack. NodeJS is the V8-
based JavaScript runtime that is event driven and
performance optimized for non-blocking IO. This
makes NodeJS a great lightweight web host, and
ASP.NET developers may want to keep their hosting
options open, now that there’s Docker support in
ASP.NET. Visual Studio is a great IDE for NodeJS
development and even if not hosting, NodeJS plays
home to much of the tooling that makes your life
easier as an ASP.NET developer.
Don’t want to write JavaScript? No problem–you can
now leverage TypeScript in ASP.NET. Too much in
love with object-oriented concepts? Now you can
do all of that through TypeScript, a typed superset
of JS—everything simply gets compiled down to
plain JavaScript. With the Angular 2.0 endorsement,
TypeScript’s popularity is on the upswing and
it could be the perfect companion to your ASP.
NET client-side code. In fact, the bigger and more
complicated your business logic, the brighter
TypeScript shines.
ASP.NET Yeoman Generator
Want to get started with the new ASP.NET Core?
Irrespective of what development platform you are
one, one consistent CLI tool works everywhere—
Yeoman. This NodeJS-based tool gives you the
perfect scaffolding option for starting your ASP.NET
application from Command Line. How? Simply use
the popular ASP.NET Yeoman Generator.
Here are some steps in your beloved command
line:
• Make sure you have NodeJS installed. You
could do brew install node on MacOSX or choco
install nodejs on Windows.
• Get Yeoman - npm install –g yo
• Get Bower – npm install –g bower. Bower will
be used as a package manager by the Yeoman
generator to pull down some dependencies for
the scaffolded ASP.NET project.
• Get the ASP.NET Yeoman generator – npm
install –g generator-aspnet
• Once all requirements are in place, you could
simply type in – yo aspnet. This powers up the
Yeoman ASP.NET generator and provides you
scaffolding options, as below:
35
Contents
© 2017 Progress. All Rights Reserved.
Once you pick a Web Application template, the ASP.
NET Yeoman Generator will scaffold an ASP.NET
project in your chosen directory and Bower will pull
down dependencies. The structure and contents of
the project are almost identical to the same File-New
Project experience one gets in Visual Studio.
Once your project has been scaffolded, you can
jump into the project directory and fire up the dotnet
restore command to resolve NuGet references. And
finally, dotnet run would bootstrap and run your ASP.
NET project, just as hitting F5 does in Visual Studio.
The big advantage of going the CLI and Yeoman
route to start your ASP.NET project—it works the
exact same way in Windows, Linux and MacOSX.

36
Contents
© 2017 Progress. All Rights Reserved.
The origin of the quote “with great power comes
great responsibility,” may be subject to debate, but
the truth behind it is universally accepted. As the
power of the web grows, so does its complexity and
the opportunity for error.
Angular 2 represents a major step in the evolution
of modern web front-end frameworks, but it comes
with a price. From TypeScript compilation to running
test scripts, bundling JavaScript, and following the
Angular 2 Style Guide, “ng2 developers” are faced
with myriad problems to solve and challenges to
overcome.
Fortunately, there exists a way to simplify the
process of building Angular 2 applications. Whether
your goal is to stand up a rapid prototype or build
an enterprise-ready line of business applications that
are continuously deployed to the cloud, the Angular
CLI is a tool that you don’t want to code without.
Getting Started: The
Prerequisites
Angular 2 supports cross-platform development with
open-source tools. Regardless of your development
environment, a few simple steps will get you up and
running.
1. Install the Long Term Support (LTS) version
of Node.js
2. Install your favorite open source IDE. A
popular one is Visual Studio Code
3. Finally, go to a Node.js command line prompt
and install the Angular-CLI:
npm install -g angular-cli
Now you’re ready to start your first project!
Rapid Cross-Platform Development
With the Angular 2 CLI
37
Contents
© 2017 Progress. All Rights Reserved.
Creating Your First Project
To start a new project, navigate to the parent folder
and execute the following command:
ng new my-first-app
Replace “my-first-app” with your project name. This
single command executes several tasks, including:
• Creates a local folder structure
• Generates an initial set of HTML pages,
TypeScript source files, CSS styles and tests
• Writes a package.json that has all the basic
Angular 2 dependencies
• Installs all Node (npm) dependencies for you
• Sets up Karma for running unit tests with
Jasmine
• Configures Protractor for running end-to-end
(E2E) tests
• Initializes a Git repository and commits the initial
project
• Creates various files to help with building and
generating your production app.
You now have everything you need to build and run
the project! Make sure you are in the root project
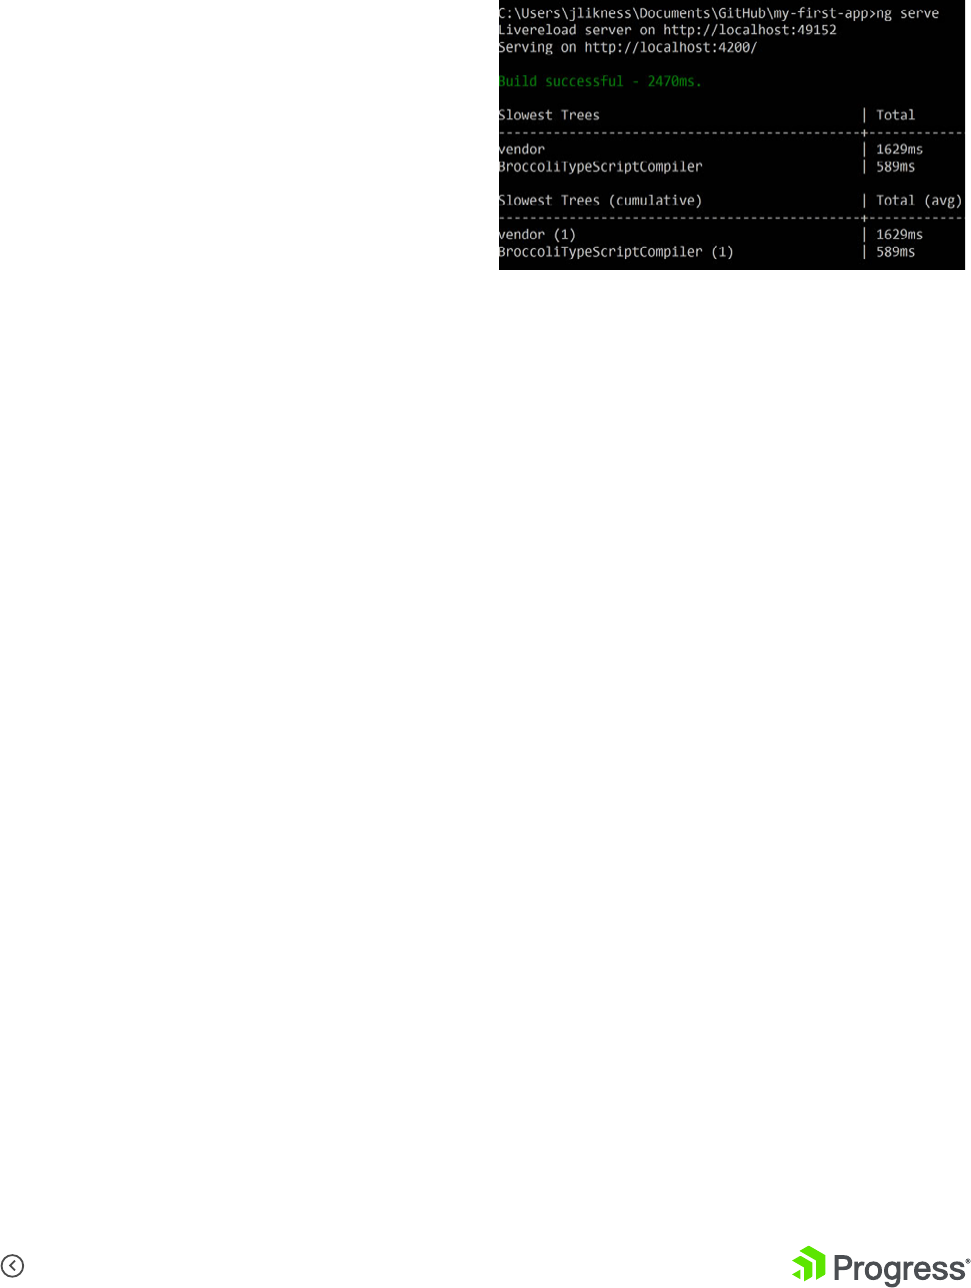
directory and issue the following command:
ng serve
You will see something like the following image:
If your browser doesn’t open automatically, launch it
and navigate to the address on the “serving” line (i.e.
port 4200). You should see the app. You can keep
the command running and as you make changes,
the site will automatically reload to reflect the
changes.
38
Contents
© 2017 Progress. All Rights Reserved.
Project Structure
There are a number of folders generated automatically. These include:
Config: This folder contains configuration information for the deployment and testing
Dist: This folder is not included in source control by default and is the distribution
or generated build for your app
e2e: This folder contains the scripts for end-to-end tests
node_modules: This folder is not included in source control and is the standard folder for
npm packages
public: This is a generic folder with an .npmignore file
src:
This folder contains all source assets, including code, stylesheets, images and
HTML markup, for your app
tmp: Temporary folder
typings: This folder contains TypeScript description files that provide live
documentation and auto-completion for libraries you use
There are several JavaScript and JSON files in the project’s root that you do not have to edit directly and
update via CLI commands.
Source Structure
The root of the src folder contains some important
files:
• index.html is the main page loaded that
bootstraps the entire application.
• main.ts is the bootstrap code. You should only
have to edit this if you need to add modules
when the app is bootstrapped.
• system-config.ts configures dependencies for
the app. Later, you will learn how to use this with
add third-party libraries.
• tsconfig.json contains the configuration for the
TypeScript compiler.
• typings.d.ts is used for ambient type
declarations that your application will use.

39
Contents
© 2017 Progress. All Rights Reserved.
Underneath the app folder you will find the
templates, styles, code and test specifications for
the project. Based on the Angular 2 style guide, you
will find that components and services are grouped
together with a common name for the template
(HTML), style (CSS), source code (TypeScript) and
specification (TypeScript). When you generate a
new component, the CLI will create a folder for that
component.
A module id is used for the component’s definition
that makes it easier to move the component to a
new location if you need to at a later time. Routes
will also generate subfolders.
You may notice an index.ts file exists in the root and
is also generated when you create new components.
This file exports the types that you declare for
that component to make it easier to reference. For
example, because the root index.ts under the app
folder has this line:
export * from ‘./my-first-app.component’;
You can reference the component using the /
app path without specifying the file name. This is
demonstrated in the root main.ts file:
import { MyFirstAppAppComponent, environment
} from ‘./app/’;
Components have a similar convention, allowing you
to import them from the component path instead of
the filename.
Testing
The CLI automatically configures the Karma test
runner to use Jasmine, includes dependencies and
generates basic tests for you to build upon. To see
the tests in action, simply type:
ng test
Ensure you are at the root of the project in a Node.
js command line. This will build the app, spin up
a browser to host the tests and execute them for
you. The test harness runs continuously so you
can update code and tests and have them rerun
automatically.
Note: On some Windows systems, the test
command may fail due to filesystem compatibility
issues. If that’s the case, don’t despair! There is a
simple workaround. First, build the project:
ng build
Next, execute the test script with a special option to
suppress the test build:
ng test --build:false
This should get you up and running with tests. With
this approach, you will have to rebuild manually to
trigger a refresh of the tests. You can use ng serve in
another window to automatically rebuild and refresh.
Production
You may notice that the dist folder essentially
copies all the compiled JavaScript files from your
application and includes the .map.js files to link
the generated JavaScript to its TypeScript source.
Although this is perfect for testing and debugging, it
is common to bundle files for production to reduce
overall load time.
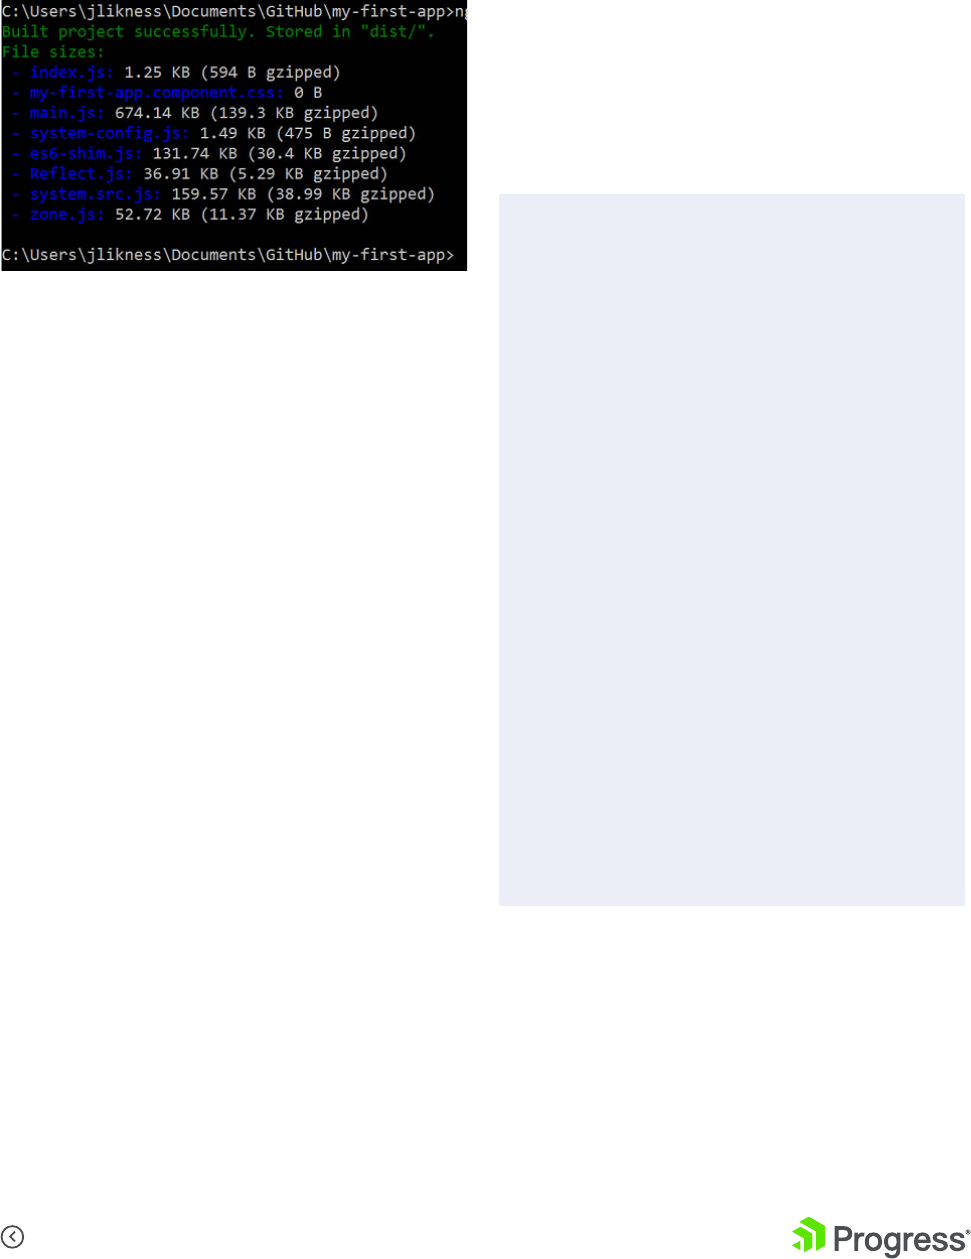
You can create a production build using this
command:
ng build –prod
40
Contents
© 2017 Progress. All Rights Reserved.
This will generate a production-ready build with
bundled files. The command will output the relative
file sizes and how small they will be on servers that
support dynamic compression:
Easy Deployment
If you are using GitHub, you can optionally deploy
code to GitHub pages for quick, easy hosting of
lightweight projects. Angular 2 supports publishing
to the gh-pages branch automatically. To learn how,
read the excellent Quick Angular 2 Hosting with the
Angular CLI and GitHub Pages article by TJ VanToll.
Services
Services are typically reusable pieces of logic that
don’t leverage templates or UI. Services may perform
calculations, manage state for the application or
fetch data from web service end points. To scaffold a
new service, type:
ng g service GenerateNumbers
Where GenerateNumbers is the name of the
service that you wish to generate. The CLI will
automatically parse the camel case and translate it
to generate-numbers.service.ts. The corresponding
test includes spec in the filename. Per the style
guide, the service is generated with the name
GenerateNumbersService so don’t add the Service
suffix to your own names as it will be provided for
you.
The following code will generate a Fibonacci
sequence of numbers.
import { Injectable } from ‘@angular/core’;
@Injectable()
export class GenerateNumbersService {
private _x: number;
private _next: number;
constructor() {
this._x = 1;
this._next = 1;
}
public fetch(): number {
let current = this._x;
let next = this._x + this._next;
this._x = this._next;
this._next = next;
return current;
}
}

41
Contents
© 2017 Progress. All Rights Reserved.
A corresponding test looks like this:
describe(‘GenerateNumbers Service’, () => {
beforeEachProviders(() => [GenerateNumbersService]);
it(‘should generate a Fibonacci sequence’,
inject([GenerateNumbersService], (service: GenerateNumbersService) => {
expect(service).toBeTruthy();
let expected = [1, 1, 2, 3, 5, 8];
let actual = [];
while (actual.length < expected.length) {
actual.push(service.fetch());
}
for (let idx = 0; idx < expected.length; idx += 1) {
expect(actual[idx]).toBe(expected[idx]);
}
}));
});
Pipes
Pipes are reusable formatters for data. They take in
raw data and transform it to an
output as part of data-binding. To generate a pipe,
use:
ng g pipe NumberToStyle
The template will generate the source and a test.
The implementation takes in a source value with
optional arguments and returns the transformed
value. This example will translate a number to the
style properties to set the width and height of an
element in pixels:
transform(value: any, args?: any): any {
let numeric = Number(value);
return ‘height: ‘ + numeric + ‘px; width: ‘ + numeric + ‘px;’;
}

42
Contents
© 2017 Progress. All Rights Reserved.
Components
Components are reusable, self-contained units that
include templates, styles and related code. You
generate a component like this:
ng g component Tile
This will create a folder based upon the
component’s name and export the component
types via a generated index.ts file. Per the
suggested naming convention, this component will
be called TileComponent.
It’s important to note that the CSS for the
component is self-contained. You can specify a
generic div style in the CSS and it will only apply
to div tags that are present in the component’s
template. Angular supports this by either using
Shadow DOM or, for browsers that don’t support
mshadow DOM, by generating unique CSS classes
for the component automatically.
Routes
To generate a route, use:
ng g route AboutUs
This will generate a folder and corresponding
component from the route, and add the necessary
decorators to configure the route. You will notice in
your top-level MyFirstAppAppComponent there is
now a @Routes definition:
Note: Although the generator will add the
appropriate import statement for routes, you may
need to manually configure support to embed links.
Simply add ROUTER_DIRECTIVES to the list of
directives and ROUTER_PROVIDERS to the list of
providers, and then you can configure a link to the
route like this:
@Ro utes([
{path: ‘/AboutUs’, component: AboutUsComponent}
])
<div><a [routerLink]=”[‘AboutUs’]”>About Us</a></div>
You can include this in the top-level component or
may wish to build a specific navigation component
to generate the menu.
You may have noticed the route folder is prefixed to
look like this: +AboutUs. This indicates the route is
“lazy-loaded,” which means the assets are not pulled
into the DOM until the user actually requests the
route. This can help with performance and reduce
application overhead. You can specify a permanent
route that is pre-loaded when the application
bootstraps by adding the --lazy false option.

43
Contents
© 2017 Progress. All Rights Reserved.
Third-Party Support
There are a few steps to integrate third-party
libraries. First, install the third-party package.
For example, to install the showdown library
that converts markdown to HTML, execute this
command:
npm i showdown –save
This will install the package and save it in the project
configuration.
Next, configure the build to include the package.
This step will vary depending on how the package
installs. For this example, add the following item to
the vendorNpmFiles array in angular-cli-build.js:
‘showdown/dist/showdown.js’
You can execute an ng build to verify the correct
files get copied to a folder called vendor under dist.
Next, edit system-config.ts to inform the TypeScript
compiler and system.js module loader how to
reference the library. Again, this will vary from library
to library so check the vendor’s documentation for
the appropriate configuration. For this example, we
add a map and a packages entry like this:
const map: any = {
‘showdown’:’vendor/showdown/dist’
};
const packages: any = {
‘showdown’: {
main: ‘showdown.js’,
format: ‘global’
}
};

44
Contents
© 2017 Progress. All Rights Reserved.
Optionally you can install the type information for the library or specify an ambient declaration in the root
typings.d.ts like this:
Conclusion
This section only scratched the surface of what the
Angular CLI is capable of. Here are a few tips to
wrap-up with:
• If you want to serve the app and run continuous
tests at the same time, there is no need for both
commands to build the app. Launch ng serve
and then launch ng test --build false separately.
• Scaffolding new files can throw the automated
builds off. I recommend that you stop any
current processes first, scaffold your new items,
then restart the processes and modify them as
needed.
• The Angular team updates the CLI often, so you
should periodically issue the npm i angular-cli -g
command to keep it up to date.
• Anytime you change the configuration for the
CLI itself, including angular-cli-build.js, you
should stop any running processes and restart
them to pick up the changes. Only changes
underneath the src folder will be auto-detected.
declare var showdown: any;
To use it in a component, import it:
import ‘showdown’;
Then use the library:
public text: string;
constructor() {
let converter = new showdown.Converter();
this.text=converter.makeHtml(‘#About Us\r\n## This works!’);
}
That’s it!

45
Contents
© 2017 Progress. All Rights Reserved.
Have fun rapidly building and deploying your Angular 2 apps!
> npm install —g angular—cli
> ng new my—dream—app
> cd my—dream—app
> ng serve
It’s a Wrap
CLI Tools have seen a huge resurgence among
developers and hopefully this whitepaper did
enough to pique your interest. We talked about
polishing up your Windows Command Line
experience, the new .NET CLI, the ubiquitous Git CLI
and the fancy Angular 2 CLI.
With .NET and Angular 2 CLI tools, you should
be well covered building desktop and web
applications. When you decide to go build mobile
apps, your mobile strategy should guide the choice
of technology stack—for Native, Hybrid, Cross-
Compiled or JS Native mobile apps. Whatever your
choice, Progress Telerik gives you the sharpest UI
components for your apps—web, desktop or mobile.
Starting a project with MVC? UI for ASP.NET MVC
enables you to build awesome apps for any browser
and device in half the time.
In all, modern developers are embracing CLI tools
for platform-agnostic flexibility and freedom of
choice with developer tools. Don’t get left behind,
as development platforms are catering to this new
mindset. Embrace command line, build expertise in
your chosen CLI tool and watch your productivity
skyrocket. Happy coding!
46
Contents
© 2017 Progress. All Rights Reserved.
Brought to You by Progress Telerik
UI for ASP.NET MVC
Progress® Telerik® UI for ASP.NET MVC includes 70+ UI components and thousands of features we’ve
developed over the years, so you don’t have to build any UI from the ground up. Enjoy a wide variety of
controls ranging from must-have HTML helpers for every app like Grids, Dropdowns and Menus to advanced
line-of-business UIs such as Charts, Gantt, Diagram, Scheduler, PivotGrid and Maps.
Try UI for ASP.NET MVC
About Progress
Progress (NASDAQ: PRGS) offers the leading platform for
developing and deploying mission-critical business applications.
Progress empowers enterprises and ISVs to build and deliver
cognitive-first applications, that harness big data to derive
business insights and competitive advantage. Progress offers
leading technologies for easily building powerful user interfaces
across any type of device, a reliable, scalable and secure backend
platform to deploy modern applications, leading data connectivity
to all sources, and award-winning predictive analytics that brings
the power of machine learning to any organization. Over 1700
independent software vendors, 80,000 enterprise customers, and
2 million developers rely on Progress to power their applications.
Learn about Progress at www.progress.com +1-800-477-6473.
Worldwide Headquarters
Progress, 14 Oak Park, Bedford, MA 01730 USA
Tel: +1 781 280-4000 Fax: +1 781 280-4095
On the Web at: www.progress.com
Find us on facebook.com/progresssw
twitter.com/progresssw
youtube.com/progresssw
For regional international office locations and contact
information, please go to
www.progress.com/worldwide
Progress is trademark or registered trademark of Progress Software Corporation and/or one of its subsidiaries or ailiates in the U.S. and/or other countries. Any
other trademarks contained herein are the property of their respective owners.
© 2016 Progress Software Corporation and/or its subsidiaries or ailiates.
All rights reserved. Rev 2016/08 | 160802-0049
© 2017 Progress. All Rights Reserved.
