The Quick and Dirty
DSF Web Print
Reference guide
Everything you need to know in only a few easy to read pages
Revised: 8-17-17 Version 7.1 for DSF 9.5
How to reach Reprographics
Reprographics can be reached at 310-434-4828 / [email protected]
Richard Yancey x 4147
Cecil Godbold x 4146
Miguel Ozaeta x 4820
Rigo Contreras x 8206
Warren Cancilla x 4827
Table of Contents:
Page Subject
1. Creating a File to Send to DSF – General Info
2. Opening & Bookmarking the Digital Storefront
3. First Time Users (One-Time Only)
4. Getting the Xerox PDF Converter
5. Converting to PDF and Sending to DSF -- The SurePDF Way
6. Reprographics Home Page (filling your cart)
7. Completing your Cart – Checking Out
8. Trouble Shooting
1 Carved Stone outside a Buddhist Temple – Osaka, Japan
1
Creating a File to Send to DSF – General Info
Digital Storefront (DSF) will accept only PDF files – And, we recommend you use Xerox’s
SurePDF converter (See page 4). Don’t send us Word/photoshop/ Test Bank/Pages/etc.
o You can always send jobs that were previously converted to PDF, but for new files,
SurePDF will ensure that there are no font or image issues. Also note that not all PDFs
are the same. We will work with you if you have an older computer/software, etc. Feel
free to do an initial test run to see how images, symbols, and non-standard text looks.
o To have the SurePDF driver installed on your office computer, E-mail a request to
Telecom. To install at home, follow the instructions on page 4.
o Adobe Acrobat will convert any software’s file into a PDF (Photoshop, the Microsoft
suites, Pagemaker, Illustrator, publisher’s Test Banks, Pages, etc.) and read any PDF
that you open. It is already on your SMC office computer, but if you need to load
Acrobat at home, it’s easy. Just go to http://get.adobe.com/reader/
o At the moment that you are converting to PDF, there will be no need to type in
quantities, staple settings (portait/landscape), simplex/duplex commands, or any other
parameters.
o Digital Storefront does not accept odd sized jobs. Any JPG’s, Gif’s, png’s, etc. can
be inserted into an MS Word file before being converted to PDF, so that they are
placed on a standard 8.5” x 11” page rather than sent as (for instance) a 1” x 3”
Document, which we do not have the capability of printing.
o SurePDF does not save a PDF onto your computer. It converts with superior images,
takes you directly to your DSF webpage so you can complete your submission, and
leaves your computer free of unnecessary PDFs.
2 Osaka - Bicycle Parking Lot

2
Opening & Bookmarking Digital Storefront’s Home Page
Start at the Santa Monica College Home Page .
1) On the SMC Banner at the top of the page, click Faculty & Staff.
2) In the third column (“More Resources”), choose the
fourth item from the bottom, “Technology Resources.”
3) On the Technology Resources page, choose the Seventh item from the
top, “DSF Web Print”.
4) Now you are at the Reprographics Digital
Storefront Web Print Page. Bookmark this page,
then Sign-in with your SMC e-mail Name
(“lastname_firstname”) and your SMC e-mail
password.
Bookmark this page:
https://webprint.smc.ed
u/

3
First Time Users (One-Time only)
The first time you log-in to DSF, you will see this
screen. No need to Panic. Choose “Create New Account,”
if it is not already checked. After that, Re-enter your
password, then click “Continue.”
You will never see this screen again.
On This first visit into Digital Storefront, explore the following areas to make submitting documents easier.
This is your home page. At the top right-hand corner, you will
see four buttons
1. “Home” Takes you to this page
2. “My Profile” Your Information
3. “Help” Info about whichever page you are on.
4. “Logout” One click and you’re gone.
My Account
A. Contact Info
The “My Profile” screen will allow you to update your contact information to help us reach you by phone or e-mail if
your job has issues. It is easy to use and should take only a few minutes to adjust.
B. E-mail options
Even though you do not want the system to send you a slew of E-mails every time you submit a job, you can adjust
when it does. We have defaulted only one e-mail, for “Order Shipped” (when we’re done). You can choose from a
variety of notification options.
C. Printing Defaults
At the bottom of the profile screen, you will find your default print settings: Double-sided, portrait stapling.
The “Cart” section of this tutorial includes information for changing settings for specific jobs. As you go over
that information, you might decide to re-set a default (i.e., you might want 3-hole punch as a default). If so,
come back to this screen and make the change here because changes in the “Cart” will affect only that job.
4
Getting the Xerox PDF Converter
This is the best (and easiest) way to send your jobs to Digital Storefront.
1. It saves you the trouble of converting your file to a PDF.
2. It takes you directly into your DSF Shopping Cart.
3. It keeps your computer from being inundated with dozens of PDF files that you don’t need to keep.
To have SurePDF installed on your office computer,
Send a request to Telecom@smc.edu
Make sure you include your computer name, it will
be marked on your computer’s CPU (“Compname”)
near the on/off button.
To install at home:
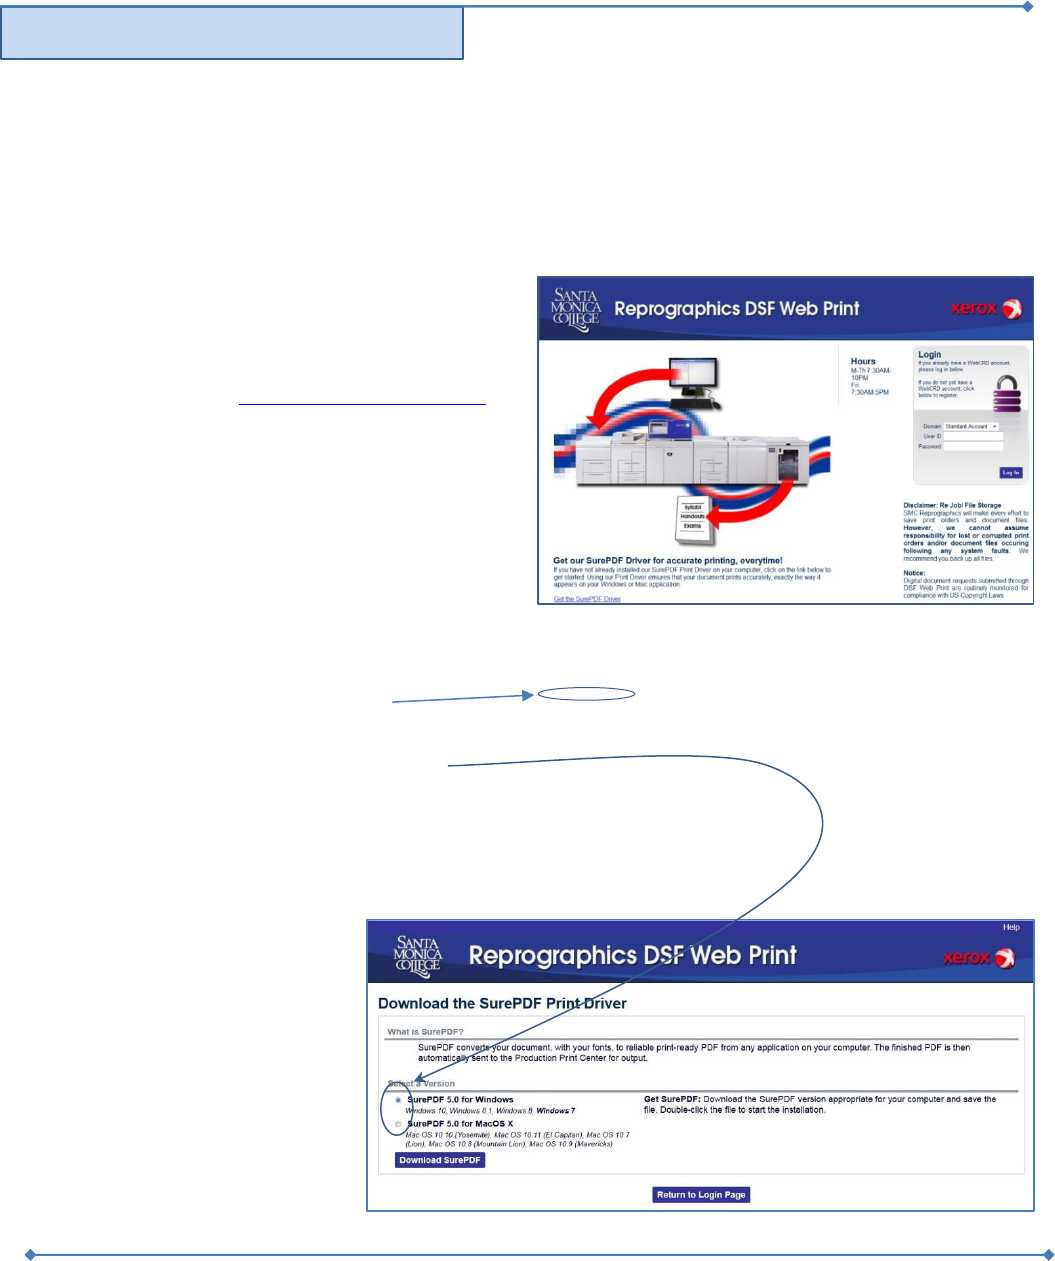
Go to the DSF log-in page. In the Bottom, left-hand corner, click on “Get the SurePDF Driver.”
1) On the next screen, select Windows or Mac for the
correct driver. Click on it and follow the instructions to
download the SurePDF Driver.
2) If your computer says that it cannot download because the publisher is unknown,
give the security protocol permission to download it. The software is made by a
third party company trusted by Xerox.
3) Please give us a call at 310-434-4828 for further
troubleshooting techniques.
5
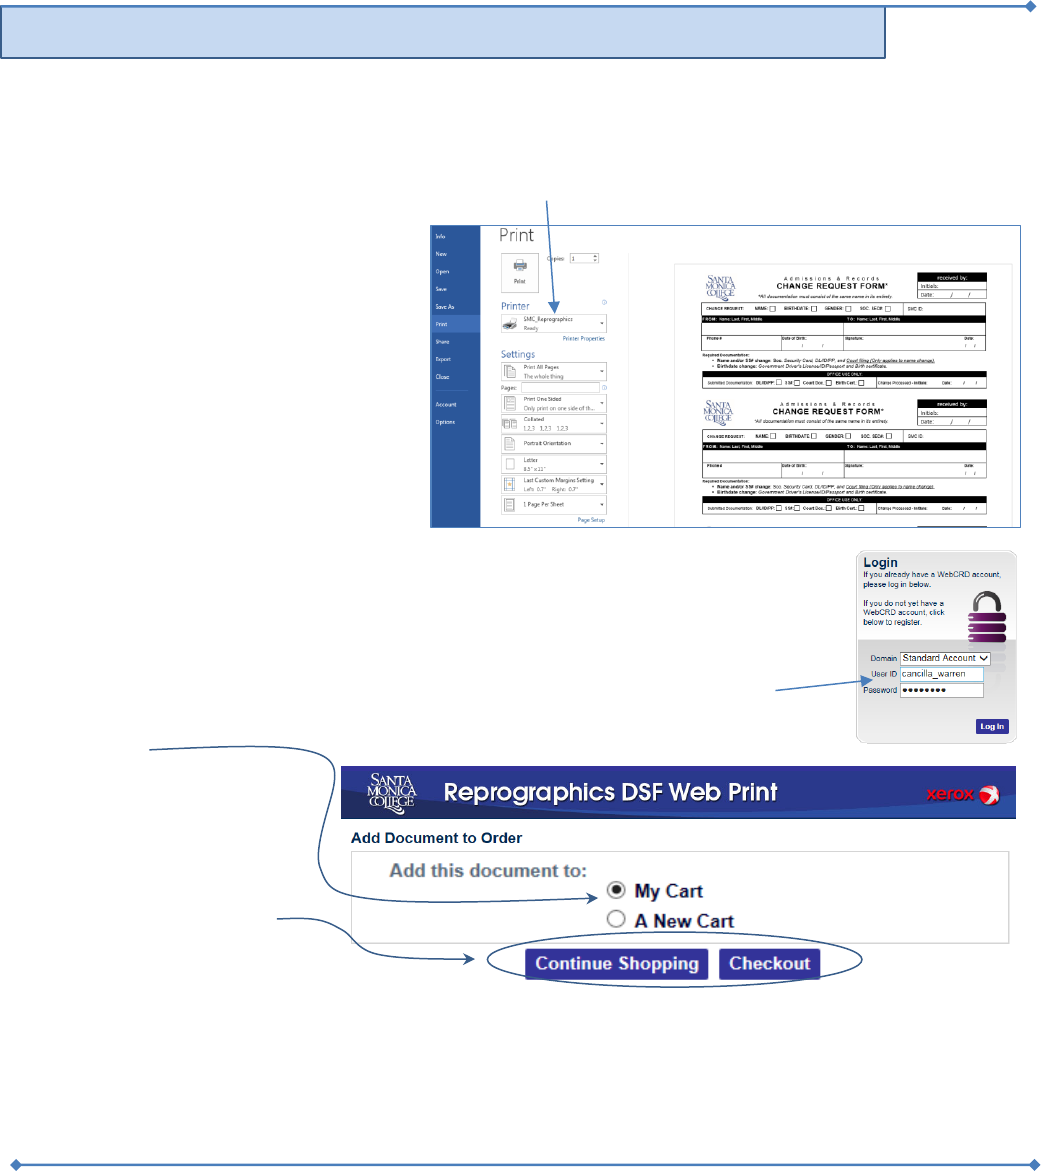
Converting to PDF and Sending to DSF -- The SurePDF Way
The Sure PDF Driver will work from any software, but for demonstration sake, we will use Microsoft Word.
1. In your word document, bring up your print function ([Control +P] or click on “File” and choose ”Print”)
2. After loading the SurePDF driver, you will find an extra printer in your printer selections.
3. Choose the new printer, which is called SMC_Reprographics on PCs and SMCReprographics on Apple
products.
At this point you are only creating a PDF,
there is no need to type in
a quantity
staple placement (Portrait or Landscape)
simplex/duplex command (single or
double sided).
or any other parameters.
Also, The PDF will not be stored on your
computer. This way, you send only from the
latest active file from your originating
software (Word/Excel/Photoshop/a
browser/etc.).
This saves you from having a folder full of outdated PDFs (and 2 or 3 versions of each title).
4. When you click the print-send button, the SurePDF creator will open a webpage with
the DSF Login Screen.
5. Sign-in with your SMC email login: Lastname_firstname (do not type @smc.edu)
6. The next window will ask where you want to add the document. Always choose
“My Cart.”
7. If you have more jobs to send,
Choose “Continue Shopping”
and send another job through
SurePDF.
8. When you have added all of
the documents you intend to
send, choose “Checkout.”
Once you are in your cart, you will be able to preview your job to make sure that it converted properly.
If your file is already a PDF, there is another way of sending a job:
6
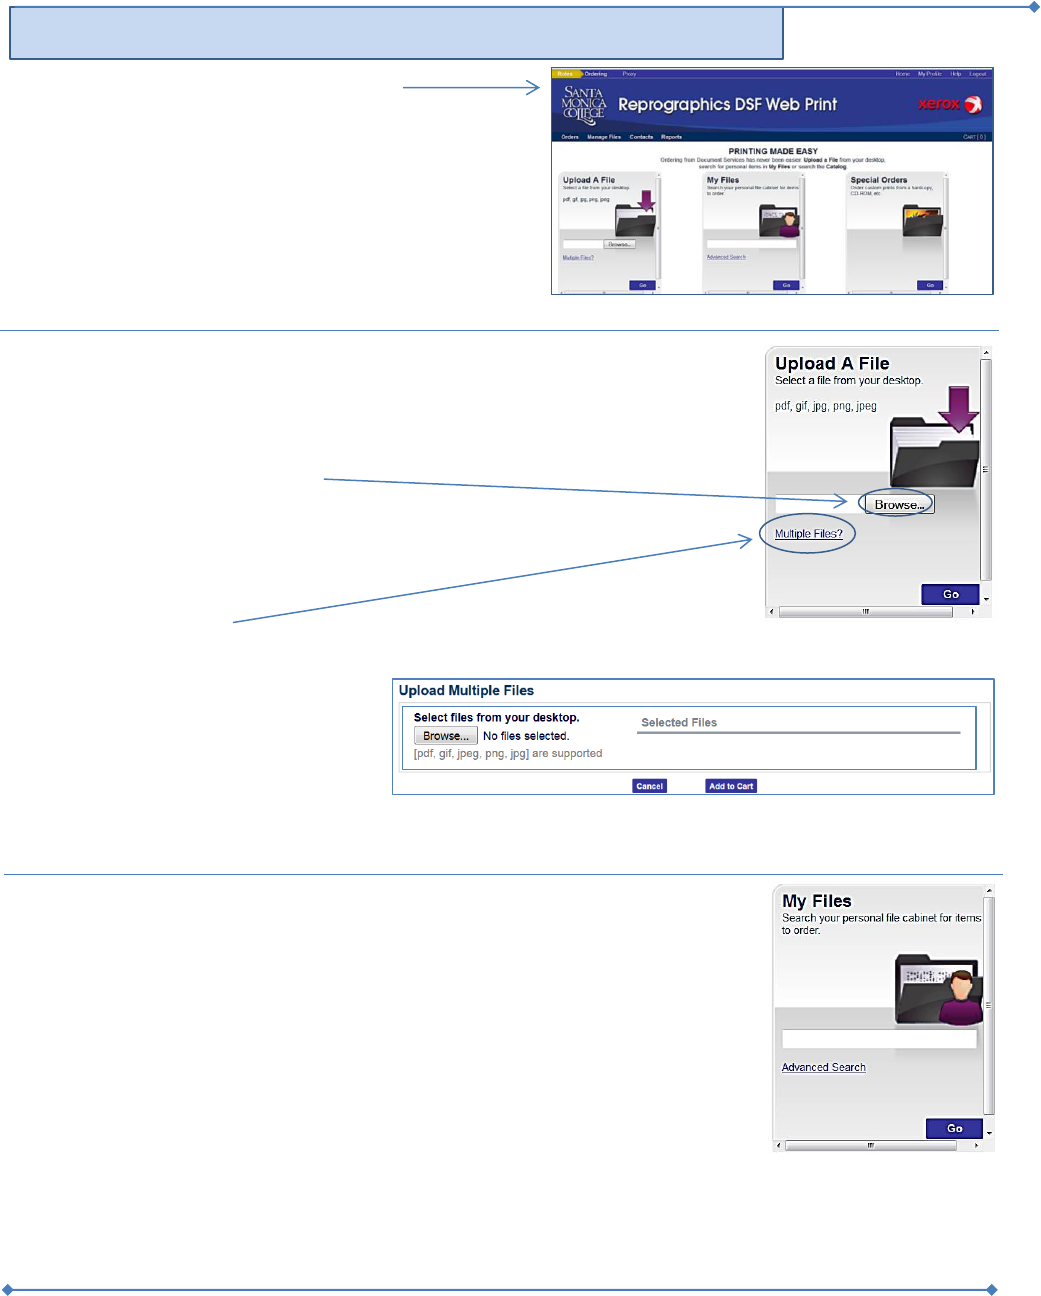
Reprographics Home Page (the other way to fill your cart)
This is the home page and it is used to
Upload files.
Organize your files and folders
Resend previously sent files
First-Time Users: If you receive an “Account not
found” screen instead of this one, see the top of Page
3 (First-Time Users”).
The “Upload a File” box gives you a choice:
a) submit only one file
b) save time and energy by sending multiple files
Submitting only one Document
Click on the “browse” button to find The PDF file to submit. Save it on your desktop
to locate it easily, then delete it after submission.
Sending multiple files
Click on the “Multiple Files” button to submit more than one file.
Click “Browse” to begin Uploading
files. You can use Click+Shift or Click+
Control to load more than one file at
time. So, choose whichever files you
need and they will list under the Selected
Files bar.
When ready, click “Upload” to send the files to your cart.
The “My Files” box will
1. Allow you to resend files that were previously uploaded.
2. Allow you to organize your files into folders.
Play around with this; it is quite useful. Later versions of this instructional will
have more details.
7
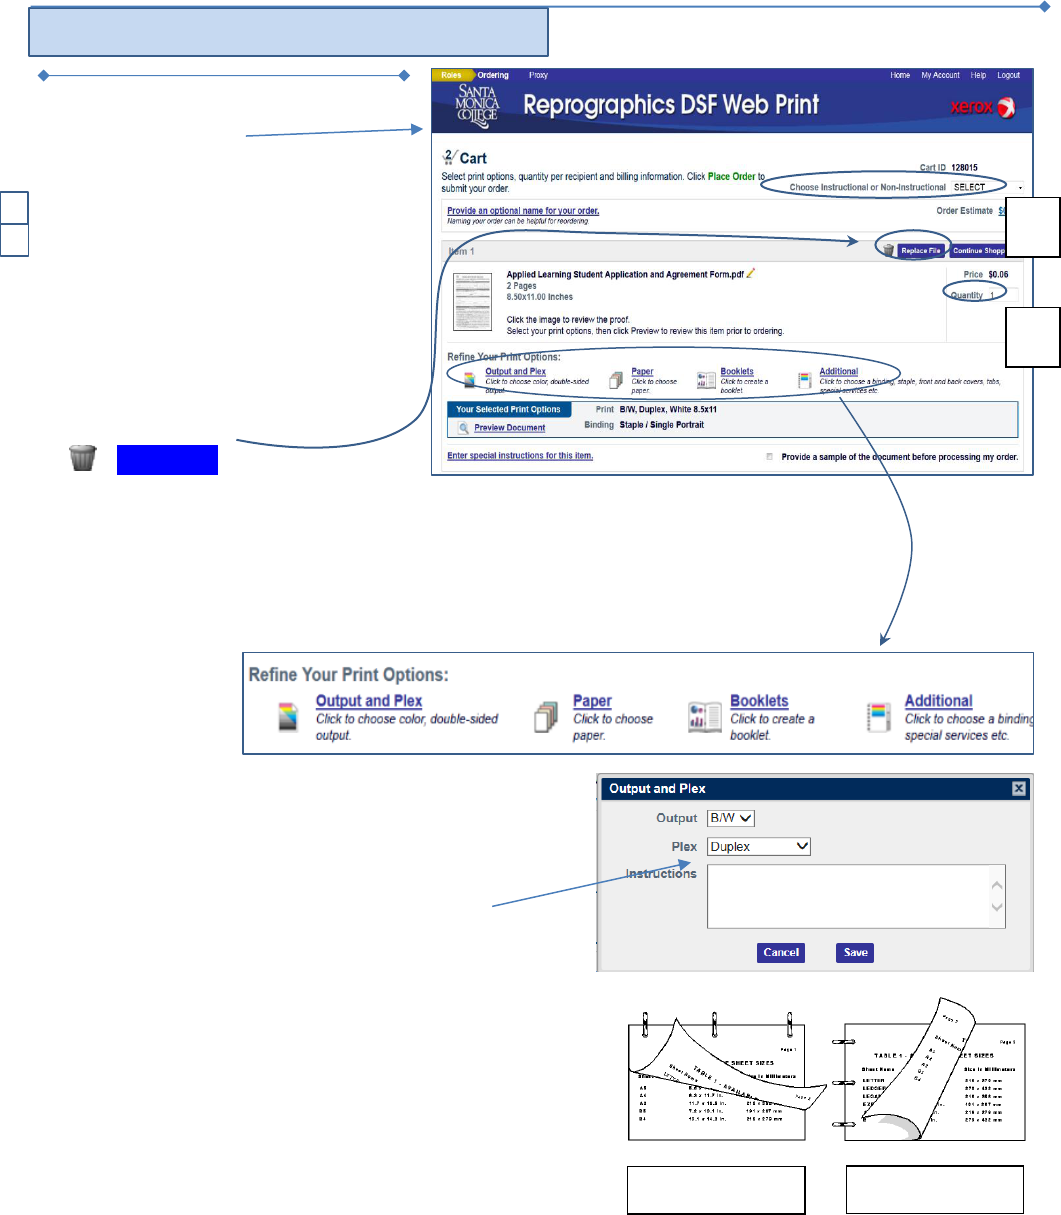
Completing your Cart – Checking Out
This is how your cart will look when you
first arrive to checkout.
There are four sections to be aware of.
A. Choose Instructional or Non-instructional.
B. Once you have set your defaults in My
Profile (Portrait Staple, 3-hole punch,
etc.), your jobs specs will almost always
be the way you want them. If you want to
send a job with different specifications,
your cart is where you may change the
parameters for that one job. i.e., you can
change to landscape stitching or choose a
color cover sheet.
1. Replace file -
Trashcans show up only when there is
more than one job in your cart. If there’s a trashcan, you can delete a job. But, you can also…
Replace file If you submitted the wrong file, click on this and browse for the right file.
2. Quantity -
(Under Replace File) You know what to do here.
3. Output and Plex -
Your jobs default to Duplex, and our policy is to run
most materials back-to-back, in order to save resources.
All multiple-choice tests are run as duplex. We will run
essay and math style tests single-sided to allow room for
writing out answers.
If you need to, you can change to simplex here.
Click on “Save” when you are finished.
Unfortunately, landscape jobs (jobs that are wider than they are
tall) are set to print out like a calendar where the pages open
upward, instead of opening left to right. To fix that, change
from “Duplex” to “Duplex Tumble.”
B
C
A
Duplex - Tumble
Duplex
8
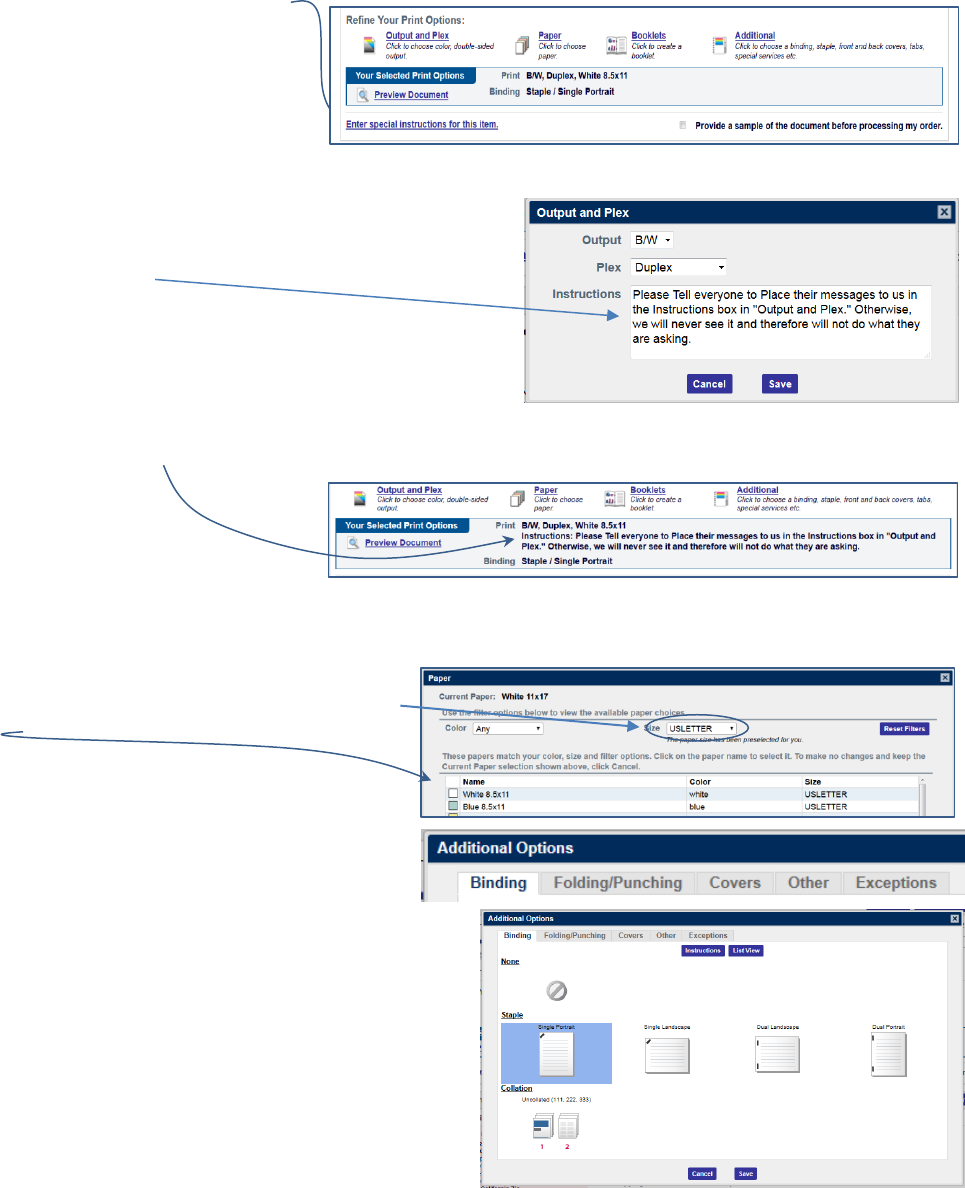
The Special Instructions Box –
This function doesn’t work, so
don’t use it. But, when you do need
to send us a message about a job in
your cart, click on Output and Plex.
There is a working “Instructions”
box in that pop-up window and your
notes will be printed out on your
receipt, so that we can read and address it.
Just Type them here:
Your instructions will show here and on the receipt.
4. Paper -
Here, you can choose different sizes of paper.
Color is for use only as the front page of tests.
5. Booklets –
If you feel you need this, call us.
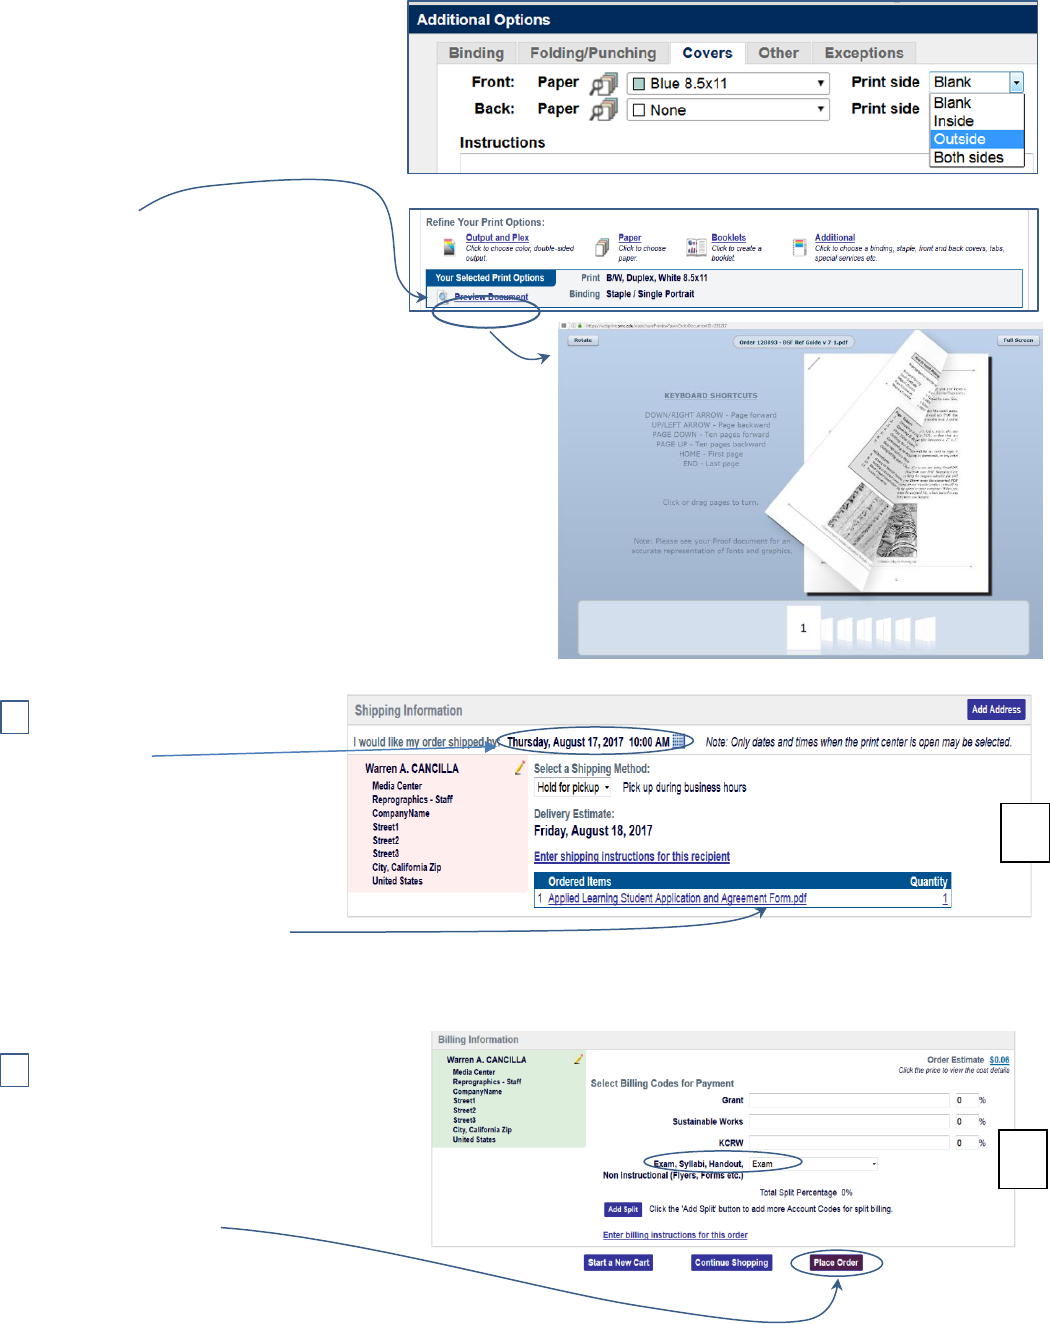
6. Additional Options
Binding, Folding/Punching, Covers
Binding – All jobs are defaulted to Portrait
stapling (for jobs that are taller than they are
wide, like a portrait painting). Adjust the stapling
in your cart for the occasional landscape job.
When you do so, the Preview Window will also
adjust to read as landscape (See next page).
Options will appear only when they are applicable: a 2-
page document will not offer stapling or coil-binding.
Also, there is an “uncollated” feature, so you can send 5
originals, choosing “Simplex” in Output and
“uncollated” here to get 1 separate stack of each
original. Click on “Save” when you’re done.
Folding/Punching – for your 3-hole punching needs.
9
Covers - To get a colored cover,
choose the color you want and then
on the “Print Side” drop-down
menu, choose either “Outside” for a
single-sided cover, or “Both Sides”
when the 2
nd
page can be printed on
the inside of the cover.
Preview Document – Allows you
to make sure page breaks are where
they should be, images don’t over-
lap in the wrong way, and that you
chose the right staple options.
Always do a quick review here.
Despite the fact that the image is low resolution, it’s
still pretty darned cool.
Click and drag from the outside-bottom corner of
any page to turn them. You can also click on the
numbered pages below your image for faster
movement. Or you can use the arrow keys.
C. Shipping Date – When do you
need the job printed out? DSF
picks a date for you. If you want
to change it, click on the little
calendar to the right of the date
and choose an appropriate date.
Weekends will not be clickable
because we aren’t open then.
Your jobs and their requested
quantities will be listed here.
If you sent a large number of jobs and realize that you need to change the quantity, you don’t need to go all the way
back up to do so. Click on the number here and change it.
D. In section D, identify what kind of jobs you
are sending, Exam, Syllabi, Handout, or
Non-Instructional. Just pick one
designation for the whole batch. When the
“Place Order” button returns to dark
purple, click on it and then approve the
price (we aren’t charging you, but now
you know the cost).
C
D
10
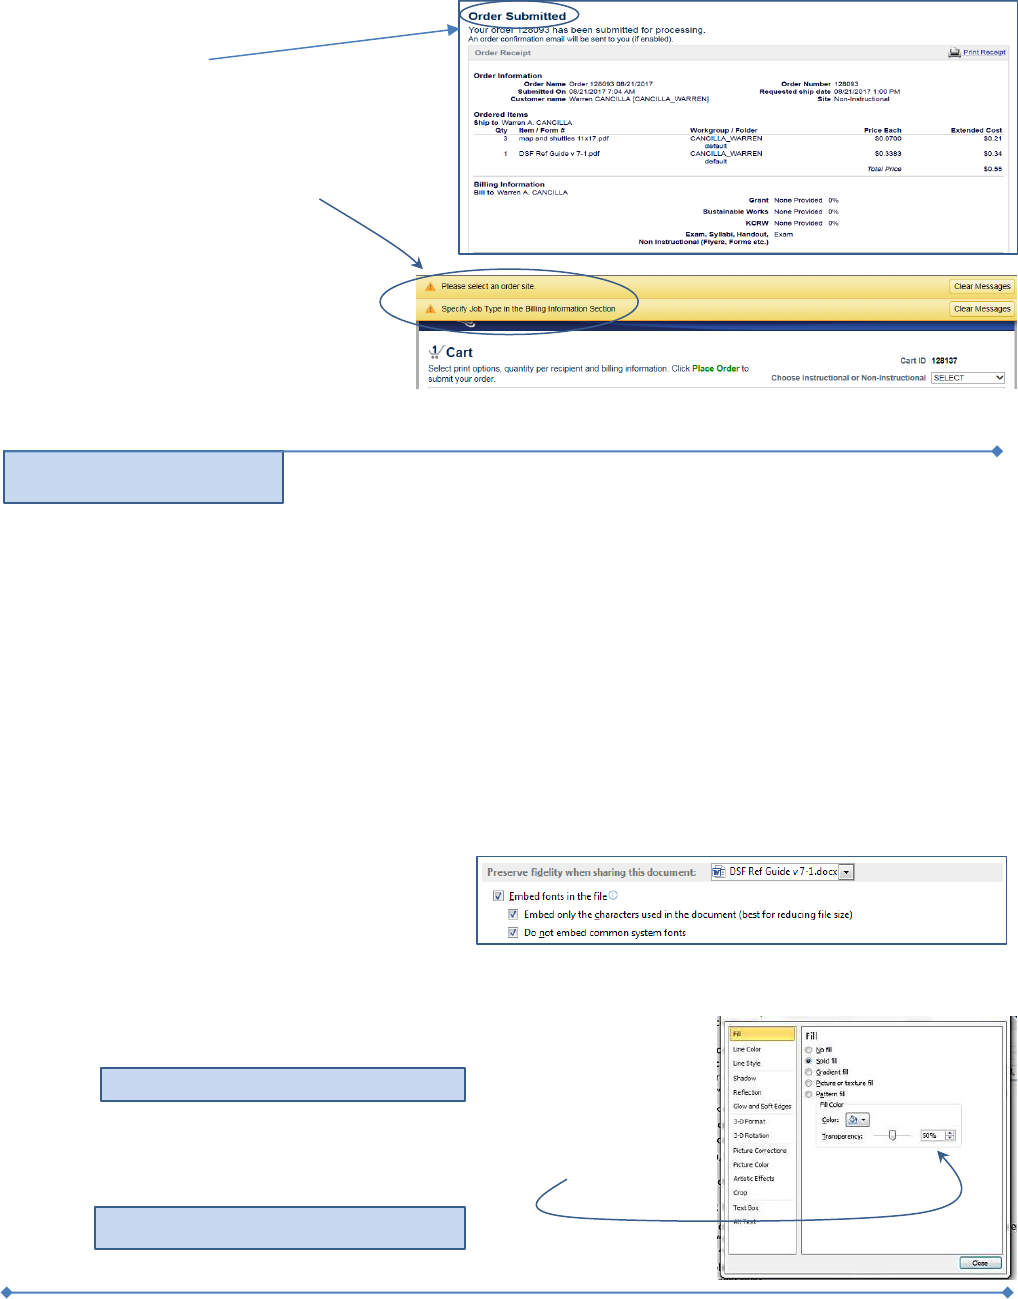
Make sure the follow-up window says
“Order Submitted.”
If it does not say “Order Submitted,” check
the top of your screen for a green or gold
prompt that will tell you what still needs to
be done to complete your send.
These are the two most common issues:
1) Please Select An Order Site –
In the top right-hand corner,
choose “Instructional” or “Non-
Instructonal”
2) Specify Job Type in Billing
Section – At the bottom, choose Exam, Handout, etc.
Trouble Shooting
#1: Fonts Do not Print Properly
Problem: When the job is sent to print at Reprographics, we get a message saying that there is a font type missing.
You will not see the message, but if it happens enough, we might mention it.
Example: N/A
Solution: To keep your file sizes small use this solution ONLY when specialized fonts are faulting.
You can ensure that all fonts used will travel with the job by accessing your “Word Options” menu.
Microsoft likes to move it around with every version of MS Word. In the present version, just do the
following:
1. On the Menu Bar, click on the “File” button and “Options” Is at the bottom of the list. In the word options
window, choose the 4th item down: “Save”.
2. The Embed Fonts option is at the bottom of the save window:
3. Choose all three options:
Embed Fonts in the File
Embed only the characters used in the
document (Best to reduce file size).
Do Not embed common System Fonts
4. Hit “Okay” in the bottom right corner when done.
#2: Words disappear in boxes
Problem: Boxes with Colored backgrounds cover most of the words inside it.
Example: ox.
Solution: When you Create a box with a solid Background, pick a slightly darker
background than you want, then make the color 50% transparent
and it will look like this:
These words were covered by the box.
(A) Portrait set-up: Taller than Wide
