INSTRUCTION MANUAL
9 - 36kg (Approx. 9 months - 12 years)
Model: EST-02
Group: 1/2/3
Please read this manual carefully before use

CONTENTS
1. WARNING.....................................................................................................................................................................01
2. USE IN THE VEHICLE .....................................................................................................................................02
3. PREPARATORY WORK.................................................................................................................................03 - 04
3.1 Prepare ISOFIX
3.2 Adjusting the headrest in the 5-Point Harness installation
3.3 Adjusting the headrest in vehicle belt installation
4. INSTALLATION......................................................................................................................................................05 - 11
4.1 Group 1 (9-18kg) with ISOFIX + Top Tether
+ 5-Point Harness
4..1.1 Securing your child with 5-Point Harness
4.2 Group 1 (9-18kg) vehicle belt + 5-Point Harness
4.3 Group 2 (15-25kg) vehicle belt + Top Tether + 5-Point Harness
4.4 Group 2 (15-25kg) & Group 3 (22-36kg) vehicle belt
5. REMOVAL OF THE CHILD SEAT.........................................................................................................11
6. REMOVING THE 5-POINT HARNESS................................................................................................12 - 13
7. REFITTING THE 5-POINT HARNESS..................................................................................................14 - 15
8. CARE AND MAINTENANCE.........................................................................................................................16 - 17
8.1 Care for the harness buckle
8.2 Cleaning

01
1. WARNING
Please read carefully before installing the child seat in the vehicle.
1. This child safety seat is suitable for use as Group 1/2/3 from approx.
9 months - 12 years age / 9 - 36kg.
2. Please read these instructions carefully, as incorrect installation could result in
serious injury, If any injuries should occur as a result of incorrect installation, the
manufacturer will accept no responsibility.
3. This child seat is in accordance with the ECE R44/04 regulations and may be
installed in the majority of vehicles equipped with approved points, such as
ISOFIX points, in accordance with ECE regulation 16, however, prior to purchase,
the child seat should always be tested in your vehicle with the child seated, in
order to ensure that the model meets your needs.
4. Never use the child safety seat without its cover.
5. Protect the child safety seat from direct sunlight, as the seat can get very hot
and harm the child.
6. Child seats or accessories that are damaged or have been used incorrectly must
be replaced.
7. Do not leave heavy objects inside the car, as these may injure the child in the
event of an accident.
8. Ensure that no part of the child seat is caught in the door of the vehicle or in a
reclining seat. In addition, ensure that the safety seat is correctly installed and
secured.
9. Do not disassemble, modify, or add any piece to the child seat or harness.
as this would seriously affect its basic functioning and the safety
that the child seat provides.
10. The safety seat must remain installed in the vehicle. Even if the child
is not seated in the car seat. The child must never be left unattended while
seated in the safety seat, not even outside the vehicle.
11. Keep the safety seat away from corrosive products.
12. The manufacture guarantees the quality of its products, but not the quality of
the send-hand products or products belonging to other companies.
13. Instruction illustrations are for informational purposes only. The child
restraint system may contain small differences compared to the
photographs or images in the instruction manual.
02
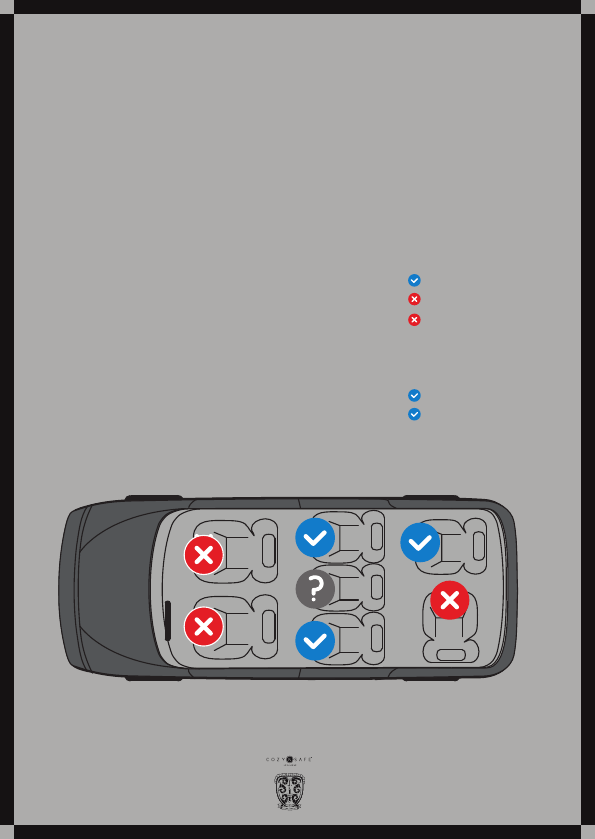
2. USE IN THE VEHICLE
Please observe the instructions on the use of the child restraint systems
described in your vehicle owner’s manual.
The seat may be used in vehicles equipped with ISOFIX, Top Tether anchoring
systems or 3-point belt.
You can use your child car seat as follows:
- In the direction of travel
- Against the direction of travel
- With 2-point (vehicle) belt
On seats featuring:
- ISOFIX attachments and Top Tether anchoring
- 3- point (vehicle) belt
03
3 4 5
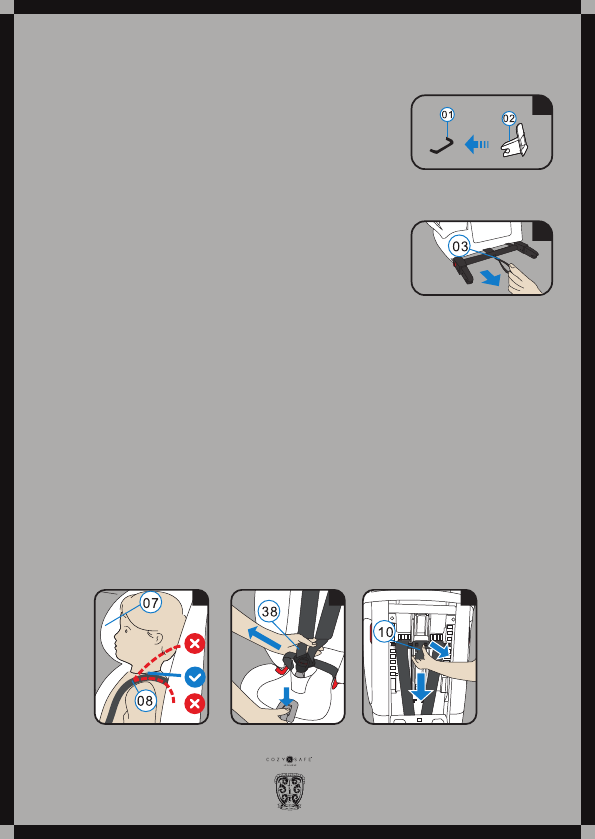
3. PREPARATORY WORKS
3.1 Prepare ISOFIX
1. If your vehicle is not equipped with the ISOFIX insert
guides as standard, clip the two insert guides
(02 - Included with seat) with the cut our facing upwards
onto the two ISOFIX attachment points(01) of your vehicle.
Tip: The ISOFIX attachment points are located between the surface and
the backrest of the vehicle seat(fig 1).
2. Pull the fabric loop(03) to pull out both locking arms to
the longest position(fig.2).
3.2 Adjusting the headrest in 5-Point Harness installation
A correctly adjusted headrest(07) must be adjusted so that the shoulder
belts(08) are at the same level as your child’s shoulders(fig.3).
CAUTION! The shoulder belts(08) must not run behind the back of the child or at
ear height or above the ears.
The shoulder belts are adjusted as follows:
1. Press the adjusting button(26) and at the same time pull both shoulder
belts(08) forwards. Do not pull on the shoulder pads(19), loosen the 5-Point
Harness of the child seat as much as possible(fig.4).
Back side of the child seat;
2: Press the button of the shoulder belt height adjuster(10) at the rear of the seat
shell and tilt the shoulder belt height adjuster (10) towards you.
3. Slide the shoulder belt height adjuster(10) to select the correct height of the
shoulder belts(08) and engage it in the position that fits for your child by
releasing the button(fig.5).
1
2
04
6
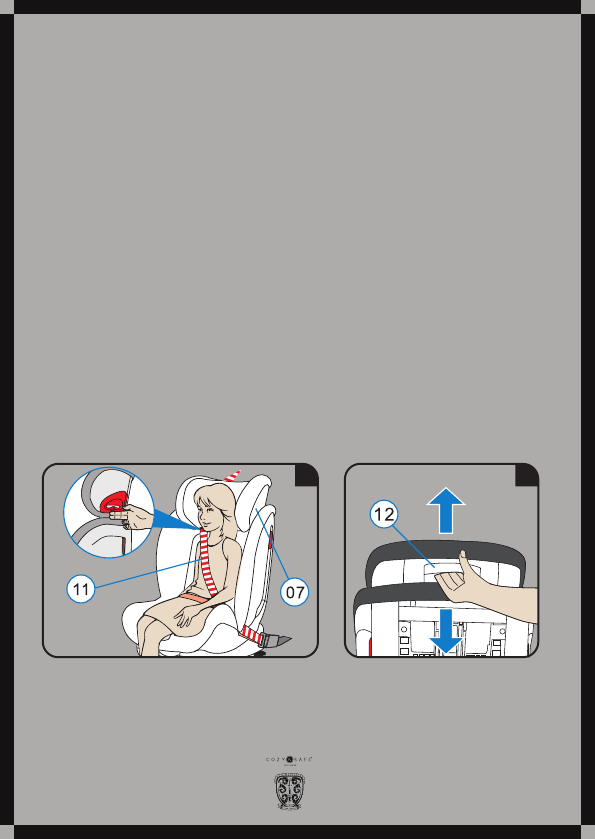
3.3. Adjusting the headrest in vehicle belt installation
A correctly adjusted headrest(07) ensures that the diagonal seat belt(11)
is optimally positioned, and gives your child the optimal protection.
The headrest(07) must be adjusted so that there is a space two fingers
wide between the headrest(07) and your child’s shoulders(fig.6).
To adjust the height of the headrest to fit your child:
1. Squeeze the adjustment handle(12) on the back of the headrest(07).
this unlocks the headrest(fig.7).
2. You can now move the unlocked headrest(07) to the desired height.
As soon as you release the adjustment handle(12) the headrest(07) will
lock into place.
3. If the position of the headrest(07) is still not fix child, additional adjustment
can be made through the shoulder belt height adjuster(10), as explained in
Section 3.2.
7

05
9 10
C L I C K
8
4. NEW INSTALLATION
4.1 Group 1 (9- 18kg)
With ISOFIX + Top Tether + 5 Point Harness
1. Make sure that the child seat’s 5-Point Harness is installed correctly
(see section 7).
2. Follow the steps in section 3.1 (to prepare the ISOFIX).
3. Follow the steps in section 3.2 (to adjust the headrest.)
4. Take the Top Tether and lay it over the child seat.
5. Place the child seat facing in the direction of travel on the vehicle seat.
6. Grasp the child seat with both hands and slide the two locking arms(15) firmly
into the insert guides(02) until the locking arms engage with a clicking noise on
both sides, the ISOFIX indicator(04) turn
green on both sides(fig.8, 9).
CAUTION! The locking arms are only
correctly engaged if both of the safety
buttons(04) are completely green.
7. Push the child seat towards the
backrest applying firm, even pressure
on both sides(fig.10).
8. Shake the child safety seat to make
sure it is safely attached and re-check
the green safety buttons(04) to make sure that both of them are
completely green.
06
11 12
13
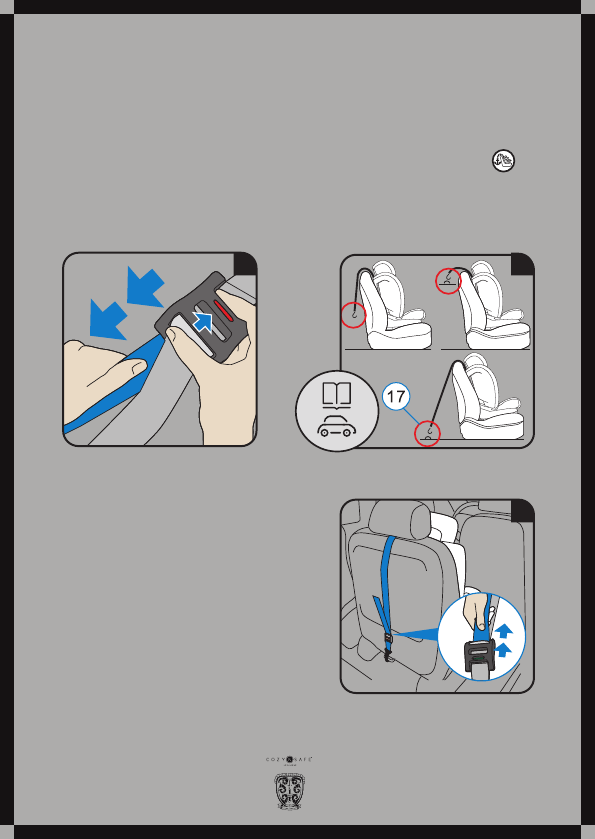
8. Take the Top Tether and if required, lengthen the belt by pressing the Top
Tether brake button to release the trap, pulling to adjust as necessary(fig.11).
9. Hook the snap hook(17) into the Top Tether anchoring point recommended in
your vehicle owner’s guide. look for this symbol in your vehicle(fig.12).
10. To tension the Top Tether, remove any slack by pulling on the free end of
strap until it is suitably tightened. The Top Tether will be properly tightened when
the tension indicator turns completely green(fig1.3).
11. Follow the steps in section securing your child with 5-point harness.
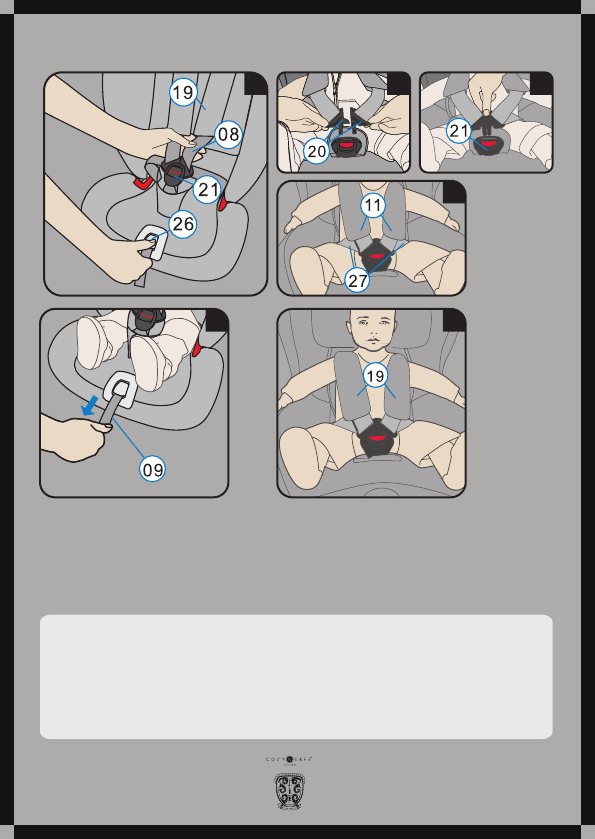
4.1.1 Securing Your Child With 5-Point Harness
The more snugly the harness fits over
your child’s body, the better your child
will be protected. Therefore avoid putting
thick clothes on your child under the belt.
1. Open the harness buckle(21) by pressing red
button.
2. Press the adjusting button(26) and at the
same time pull both shoulder belts(08)
forwards. Do not pull on the shoulder
pads(19) (fig.14).
3. Have your child sit down in the child seat.
07
14
15
16
17
18
19
4. Make sure that your child’s back lies flat against the backrest of the child seat.
5. Guide the two buckle latches(20) together and engage them before putting
them into the harness buckle(21) - this should make a click noise(fig.15, 16, 17).
6. Pull on the adjuster strap(09) until the harness lies flat and is close against your
child’s body.
For the safety of your child, before every journey in the car check that...
- The child safety seat is engaged on both sides with the ISOFIX locking arms(15) in the ISOFIX attachment points(01) and that
both green safety buttons(04) are completely green;
- The child seat is firmly installed in the vehicle;
- The Top Tether(13) is tightly tensioned over the backrest of the car seat and the tension indicator(18) is green;
- The straps of the child safety seat are close to the body without constricting the child;
- The shoulder belts(08) are correctly adjusted and the straps are not twisted;
- The shoulder pads(19) are the same level as your child’s shoulders;
- The buckle latches(20) are engaged in the harness buckle.

08
20 21
22
4.2 Group 1 (9-18kg) Vehicle belt + 5-Point Harness
1. Make sure that the child seat’s 5-Point Harness is installed correctly(see section 7).
2. Follow the steps in section 3.2(to adjust headrest).
3. Place the child seat facing in the direction of travel on the vehicle seat.
4. Pull the vehicle belt(22) out and guide it through the belt guides of the child seat.
Make sure that the belt is not twisted(fig.20).
5. Engage the buckle tongue in the vehicle seat buckle(29) this should make a click
noise(fig.21).
6. On the side opposite the car seat belt buckle, swivel clamping lever(24) and insert
diagonal belt in belt lock-off(25) (fig.22).
7. Apply your body weight to the child seat (kneel into the seat). At the same time
pull the diagonal belt strongly to tighten.
8. Follow the steps in section securing your child with 5-Point Harness.
For the safety of your child, before every journey in the car
check that...
- The child seat is firmly installed in the vehicle;
- The belt is not twisted;
- The diagonal belt is only clamped by the lock-off which is
located on the opposite side from the car seat belt buckle;
- The straps of the child safety seat are close to the body
without constricting the child;
- The shoulder belts(08) are correctly adjusted and straps are not
twisted;
- The shoulder pads(19) are at the same level as your child’s
shoulders;
- The buckle latches(20) are engaged in the harness buckle(21).
09
23 24
25
4.3 Group 2 (15-25kg)
Vehicle belt + Top Tether + 5-Point Harness
1. Follow the steps in the section 4.2 (to fix child seat by three point belt).
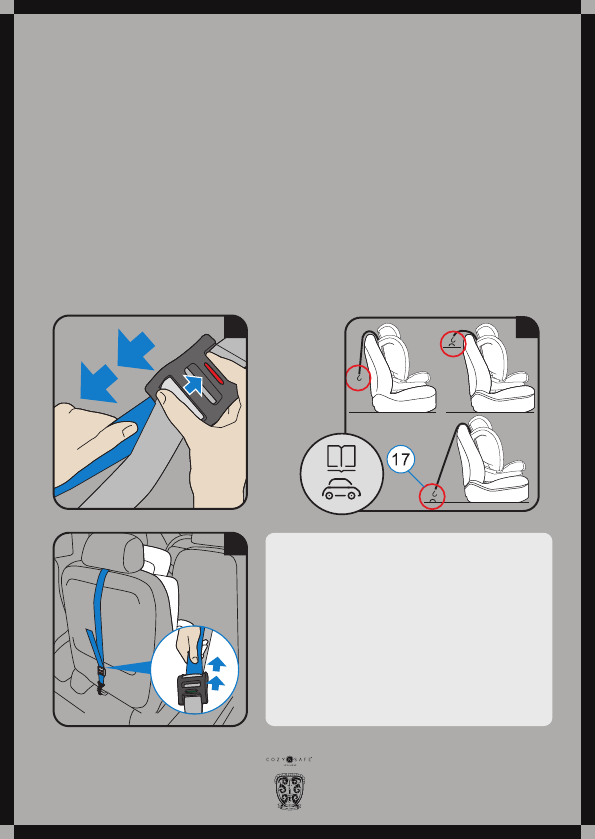
2. Take the Top Tether and if required, lengthen the belt by pressing the top tether
brake button to release the strap, pulling to adjust as necessary(fig.23).
3. Hook the snap hook(17) into the Top Tether anchoring point recommended in
your vehicle owner’s guide. Look for this symbol in the your vehicle(fig.24).
4. To tension the top tether, remove any slack by pulling on the free end of strap
until it is suitably tightened. The Top Tether will be properly tightened when the
tension indicator turns completely green(fig.25).
5. Follow the steps in section securing your child with 5-point harness.
For the safety of your child, before every journey in the car
check that...
- The child seat is firmly installed in the vehicle;
- The belt is not twisted;
- The top tether(13) is tightly tensioned over the backrest of the car
seat and the tension indicator(18) is green;
- The diagonal belt is only clamped by the lock- off which is located
on the opposite side from the car seat buckle;
- The straps of the child’s safety seat are close to the body without
constricting the child;
- The shoulder belts(08) are correctly adjusted and the straps are not
twisted;
- The shoulder pads(19) are at the same level as your child’s shoulders;
- The buckle latches(20) are engaged in the harness buckle(21);
10
25
26
4.4 Group 2 (15-25kg) & Group 3 (22-36kg) Vehicle belt.
1. Make sure that the child seats 5-Point Harness is removed correctly
(see section 9)
2. Follow steps in section 3.3 (to adjust headrest).
3. Follow steps in section 4.1, install child seat with ISOFIX and Top Tether(option).
Tip! For Group 2 and 3 the ISOFIX connectors and Top Tether have been designed
to improve stability.
In case of problem during use in your vehicle, it is possible to use without this option.
4. Have your child sit down in the child seat.
5. Pull out the vehicle seat belt and guide it in front of your child to the vehicle
seat buckle(29). Engage the buckle tongue in the vehicle seat buckle(29)
CLICK! (fig.25).
CAUTION! Do not twist the belt.
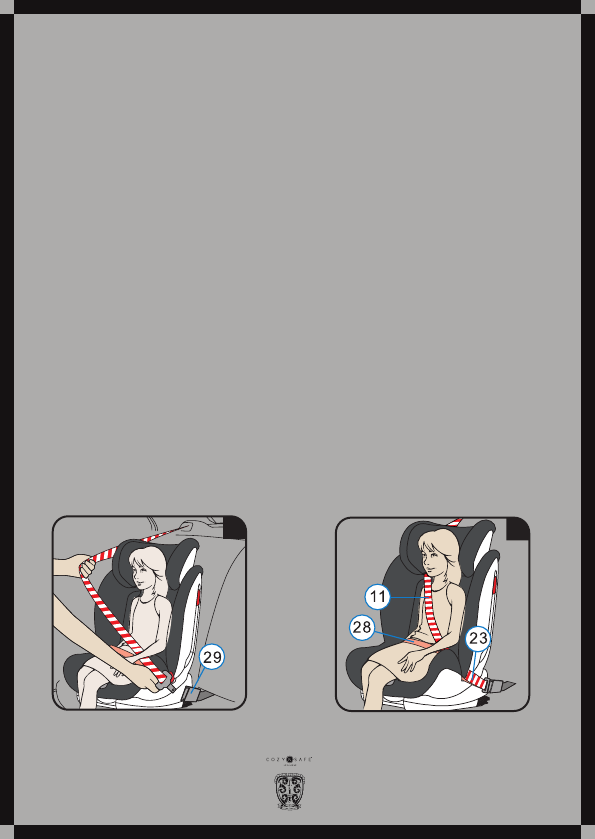
6. Place the diagonal seat belt(11) and lap belt(28) on the side of the vehicle seat
belt buckle(29) under the armrest and into the red belt guide(23) of the child
seat(fig.26).
7. Place the lap belt(28) on the other side of the child seat in the red belt
guide(23) (fig.27).
11
27 28
4. INSTALLATION / 5. REMOVAL OF THE CHILD SEAT
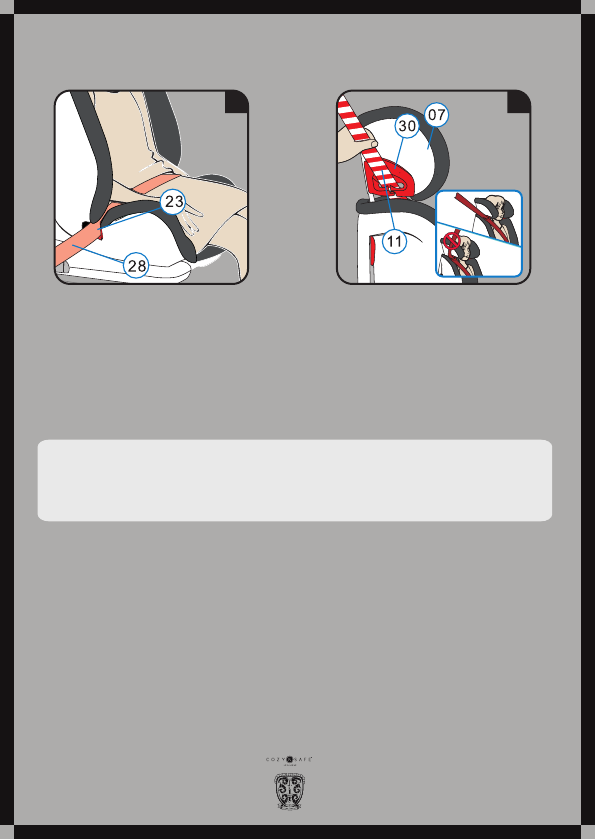
8. Guide the diagonal seat belt section(11) into the red belt holder(30) of the
headrest(07) until it lies completely in the belt holder(30) and is not twisted(fig.28).
9. Make sure that the diagonal seat belt(11) runs over your child’s shoulder bone,
and not in front of his/her neck.
Tip! You can still adjust the height of the headrest(07) again here in the vehicle.
5. Removal Of The Child Seat
1. To release the ISOFIX fastening, squeeze the safety button, first on one on side,
then on the other.
2. Open the buckle of the vehicle seat belt and pull out the diagonal from lock-off.
3. To release the Top-Tether anchoring, loosen the belt by pressing the brake
button of the adjuster. Then take the spring hook out of the anchoring point.
4. Slide the ISOFIX locking arms back into the seat shell.
For the safety of your child, before every journey in the car check that...
- The lap belt(28) runs through the light red belt guides(23) on both sides of seat cushion;
- The diagonal seat belt(11) on the side of the vehicle seat belt buckle(29) also runs through the light red belt guide(23) of the
seat cushion;
- The diagonal seat belt section(11) runs through the dark red belt holder(30) of the head rest.

12
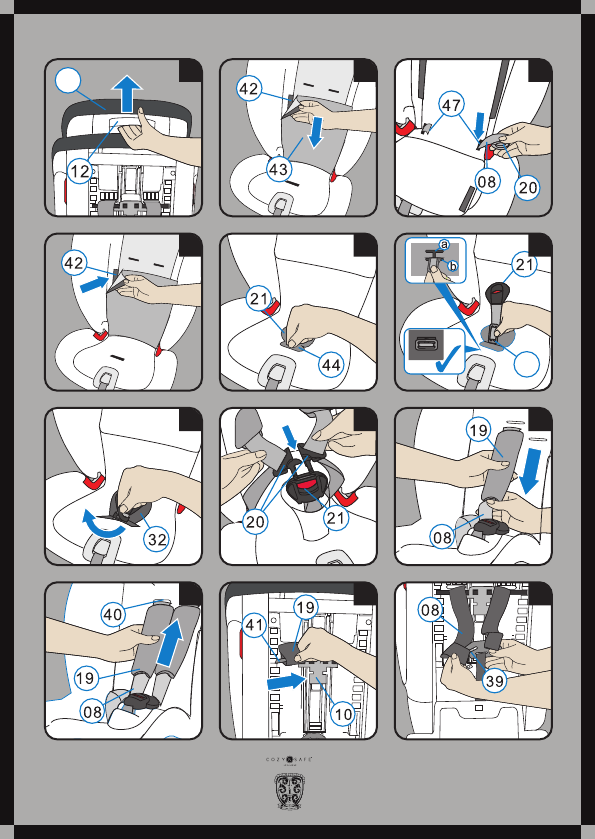
6. REMOVING THE 5-POINT HARNESS
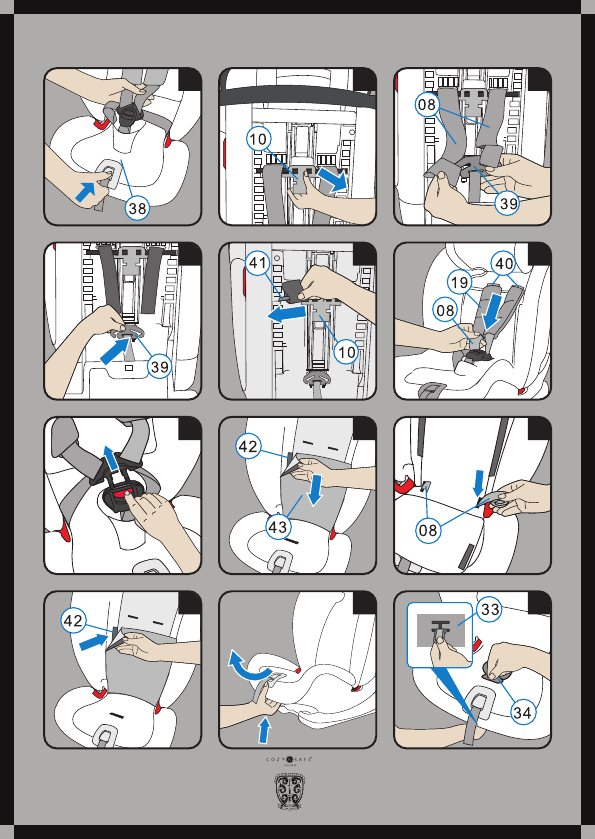
1. Loosen the 5-Point Harness(38) of the child seat as much as possible(fig.29).
Back side of the child seat:
2. Press the button of the shoulder belt height adjuster(10) towards your(fig.30).
3. Move the shoulder belt adjuster(10) into the top position and fix the position by
releasing the button of the shoulder belt height adjuster.
4. Loosen the 5-Point Harness(38) of the child seat as much as possible. Unhook
the shoulder belts(08) on the back side of the child seat from the connecting
piece(39) (fig.31).
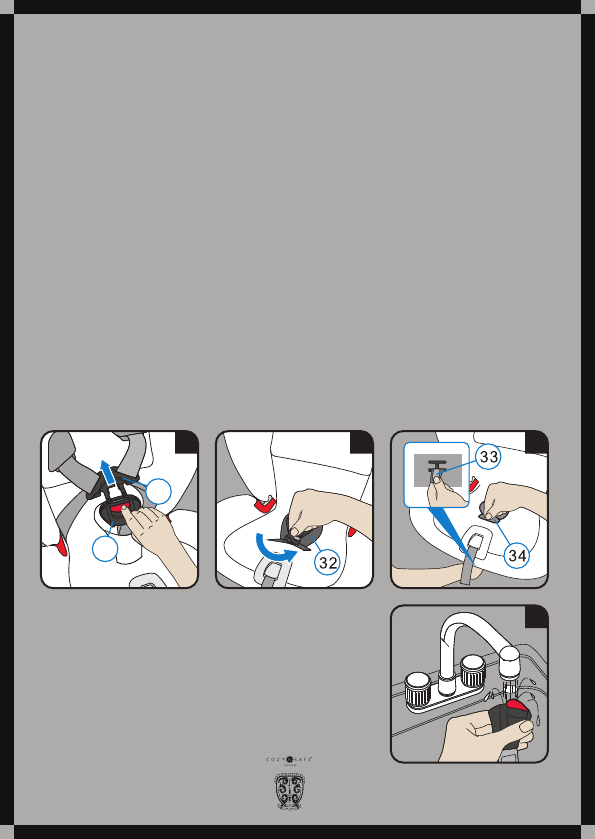
5. Snap the connecting piece(39) in the provided storage(fig.32).
6. Slide the belt loops off of the plastic extensions(41) of the shoulder belt height
adjuster(10) (fig.33).
Front side of the child seat:
7. Pull below both, the shoulder pads(19) and the two shoulder belts(08) to the
front through the slots(40) (front side of the child seat) (fig.34).
8. Open the harness buckle(21) (press the red release button) (fig.35).
9. Open the left and right velcro(42) on the lower part of the cover(43) and lift
the cover piece to the front. Slide the buckle latches(20) down into the storage
compartments(fig.36, 37).
10. Roll the shoulder belts(08) together and also place them into the storage
compartments (fig.37).
11. Reposition the two cover parts to the rear and lock the velcro(42) on the left
and the right side of the cover back side (fig.38).
12. Lift the recline handle and pull at the front to fully recline the child seat (fig.39).
13. Grasp the metal plate(33) from underneath and turn it into a vertical position.
14. Push upwards and slide the metal plate(33) through the slot(34). Remove the
harness buckle (fig.40).
13
29 30 31
32 33 34
35 36 37
38 39 40
14
7. REFITTING THE 5-POINT HARNESS
1. Squeeze the adjustment handle(12) at the rear of the headrest(07)
and push the headrest into the lowest position(fig.41).
2. Open the left and the right buttons on the lower part of the cover(43) and lay
the cover piece on the seating area(fig.42).
3. Take the shoulder belts(08) and the buckle latches(20) from the storage
compartment(47) and unroll the shoulder belts(fig.43).
4. Fold back the two cover pieces and close the left and right poppers(43) on the
lower part of the cover(fig.44).
5. Refitting harness buckle(21) and crotch pad. Group 1 (9-18kg) use the belt slot
closest to the backrest “a”, For Group 2 (15-25kg) use the one furthest away “b”.
6 Take the harness buckle(21) and hold the metal plate(33) vertically. Push it with
the narrow side upwards through the belt slot “a” or “b” into the seat shell from
above(fig.45).
7. Ensure by looking underneath the seat that the metal plate(33) is in a horizontal
position and check the installation by pulling on the harness buckle(21) several
times(fig.46, 47).
8. Guide the two buckle latches(20) together and engage them before putting
them into the harness buckle(21) - this should make a click noise(fig.48).
9. Thread the shoulder pads(19) onto the shoulder belts(08) in the correct
orientation as shown ensuring there are no twists. Align the two loops of the
shoulder belts(08) and strap loops of the shoulder pads(19) (fig.49).
10. Pull the shoulder belts(08) and strap loops of the shoulder pads(19) through the
slots(40) (fig.50).
11. Pull the strap loops of the shoulder pad(19) onto the plastic extensions(41) of the
shoulder belt height adjuster(10) (fig.51).
Tip: The strap loops of the shoulder pads should be the lower loop.
CAUTION! The shoulder belts(08) must not be twisted or swapped.
12. Take the connecting piece(39) from the provided storage on the backside of
the child seat.
13. Hook the shoulder belts(08) back onto the connecting piece(39). The left loop
on the left arm of the connecting piece and the right loop on the right arm(fig.52).
15
33
07
41 42 43
44 45 46
47 48 49
50 51 52
16
20
21
53 54 55
56
8. CARE AND MAINTENANCE
8.1 Care for the harness buckle
It is vital for the safety of your child that the harness buckle works
correctly. Malfunctions of the harness buckle are usually caused by
accumulations of dirt or foreign bodies.
Malfunctions are as follows:
- The buckle latches are ejected only slowly when the red release button is pressed.
- The buckle latches will no longer lock home (i.e. they are ejected again if you try
to push them in).
- the buckle latches engage without an audible “click”.
- The buckle latches are difficult to insert (you feel resistance).
- the buckle only opens if extreme force is applied.
Remedy
Wash out the harness buckle so that it functions properly once again: cleaning the
harness buckle.
1. Follow section 6 to remove the harness buckle(21)
(fig.53, 54, 55)
2. Soak the harness buckle(21) in warm water with
washing up liquid for at least and hour.
Then rinse thoroughly.


e X C a L i B u R
C O Z Y N S A F E
R
