
Unica Campaign V12.0 User Guide
Contents
Chapter 1. Unica Campaign overview...............................................................................1
Unica Campaign concepts....................................................................................................1
Prerequisites for using Unica Campaign.............................................................................4
Getting started with Unica Campaign..................................................................................5
Your username and password......................................................................................6
Your role and permissions............................................................................................ 6
Security levels in Unica Campaign............................................................................... 6
Logging in to Unica........................................................................................................7
Setting your start page..................................................................................................8
Unica Campaign integration with other products.............................................................. 8
Chapter 2. Creating and managing campaigns................................................................ 11
Before you begin creating campaigns...............................................................................11
Accessing campaigns.........................................................................................................12
Creating campaigns............................................................................................................ 13
Editing campaigns...............................................................................................................14
Organizing campaigns in folders....................................................................................... 15
Printing campaigns............................................................................................................. 16
Deleting campaigns.............................................................................................................17
How to use control groups to measure campaign results...............................................18
Association of control cells to target cells................................................................19
Chapter 3. Designing flowcharts..................................................................................... 20
Create flowcharts................................................................................................................ 20
Editing flowcharts................................................................................................................22
Contents | iii
Example: Contact and response flowcharts..................................................................... 23
Flowchart workspace overview..........................................................................................25
Flowchart design considerations.......................................................................................29
Flowchart process overview...............................................................................................30
Types of processes..................................................................................................... 31
List of Unica Campaign processes....................................................................................34
Adding processes to flowcharts........................................................................................ 36
Connecting processes in flowcharts................................................................................. 38
Changing the appearance of connection lines................................................................. 39
Deleting a connection between two processes................................................................40
Aligning process boxes.......................................................................................................41
Adjusting flowchart layout..................................................................................................41
Annotating flowcharts.........................................................................................................42
Determining the status of a process.................................................................................45
Copying processes within a flowchart.............................................................................. 46
Copying processes between flowcharts........................................................................... 46
Moving processes in flowcharts........................................................................................47
Deleting processes from flowcharts................................................................................. 48
Data sources for processes............................................................................................... 49
Skipping duplicate IDs in process output..........................................................................50
Previewing field values from your user data.....................................................................51
Refreshing profile counts............................................................................................53
Restricting input for profiling......................................................................................53
Disallowing profiling.................................................................................................... 54
Changing the maximum number of profile segments.............................................. 55
Contents | iv
Profiling field values by meta type.............................................................................55
Inserting a profile category into a query....................................................................56
Printing profile data.....................................................................................................57
Exporting profile data..................................................................................................57
Creating queries with Formula helper................................................................................58
Creating raw SQL queries...................................................................................................60
Guidelines for using raw SQL queries........................................................................61
Hive query language conformance............................................................................ 63
Specifying pre- or post-processing SQL statements.................................................63
Using the TempTable and OutputTempTable tokens in raw SQL queries................65
Referencing Extract tables in raw SQL queries......................................................... 67
How queries are evaluated in Unica Campaign processes...................................... 67
The Select process..............................................................................................................68
Selecting a list of contacts.........................................................................................69
Targeting Digital Analytics segments in campaigns.................................................74
The Merge process............................................................................................................. 77
Merging and suppressing contacts............................................................................78
The Segment process.........................................................................................................81
Segmenting considerations........................................................................................ 81
Segmenting data by field............................................................................................ 83
Segmenting data with queries....................................................................................85
Segment process: Segment tab................................................................................. 89
Segment process: Extract tab.................................................................................... 92
Segment process: General tab................................................................................... 93
Segment process: New segment and Edit segment controls.................................. 94
Contents | v
The Sample process........................................................................................................... 95
Dividing contacts into sample groups....................................................................... 95
About the sample size calculator...............................................................................99
The Audience process...................................................................................................... 101
Audience levels.......................................................................................................... 102
Householding............................................................................................................. 103
When to switch audience levels...............................................................................104
Example: Audience process......................................................................................105
Example: Filtering records........................................................................................ 105
Switching and filtering audience levels................................................................... 106
The Extract process.......................................................................................................... 117
Example: Extracting transaction data...................................................................... 118
Prerequisites for extracting data from IBM eMessage landing pages...................119
Extracting data from a cell, table, or strategic segment.........................................119
Extracting data from an IBM eMessage landing page............................................125
Extract tab reference.................................................................................................126
The Snapshot process......................................................................................................128
Taking a snapshot of data for export to a table or file...........................................128
The Schedule process...................................................................................................... 131
Difference between the Unica Campaign Schedule process and Unica
Scheduler....................................................................................................................133
Inbound and outbound triggers................................................................................134
Scheduling processes in a running flowchart......................................................... 135
The Cube process............................................................................................................. 138
Creating a multi-dimensional cube of attributes.....................................................138
Contents | vi
The CreateSeg process.................................................................................................... 140
Creating segments for global use in multiple campaigns......................................141
Associating strategic segments with campaigns................................................... 143
The Mail list process........................................................................................................ 143
Configuring Mail list or Call list processes..............................................................144
The Call list process......................................................................................................... 153
The Track process.............................................................................................................153
Tracking contact history........................................................................................... 154
The Response process..................................................................................................... 157
Updating response history........................................................................................158
The History tab (Unica Campaign).................................................................................. 162
Chapter 4. Managing flowcharts................................................................................... 164
Email notification management.......................................................................................164
Validating flowcharts........................................................................................................ 165
Testing and running flowcharts....................................................................................... 166
Doing a test run of a process, branch, or flowchart............................................... 167
Doing a production run of a flowchart.....................................................................168
Doing a production run of a process or branch...................................................... 170
Pausing or stopping a flowchart run....................................................................... 170
Continuing a stopped flowchart run........................................................................ 171
Continuing a paused flowchart run..........................................................................171
Troubleshooting runtime errors................................................................................172
Working with flowchart log files...................................................................................... 172
Flowchart log file structure.......................................................................................173
Searching for flowcharts and flowchart-related objects................................................174
Contents | vii
Copying flowcharts........................................................................................................... 175
Reviewing flowcharts........................................................................................................176
Viewing flowcharts in Read-Only mode...........................................................................177
Viewing two flowcharts side-by-side............................................................................... 178
Viewing history of flowcharts.......................................................................................... 179
Printing flowcharts............................................................................................................179
Deleting flowcharts........................................................................................................... 180
Chapter 5. Offer management....................................................................................... 181
Overview.............................................................................................................................182
Offer attributes.................................................................................................................. 182
Offer versions.................................................................................................................... 183
Offer templates..................................................................................................................184
Treatments.........................................................................................................................185
Creating offers...................................................................................................................186
Editing offers..................................................................................................................... 189
Assigning offers to cells in a flowchart.......................................................................... 189
Associating relevant offers with campaigns...................................................................191
Relevant products for offers............................................................................................ 191
Importing relevant products to an offer by pasting product IDs............................ 192
Using Edit query to create or edit relevant products for an offer...........................194
Duplicating offers..............................................................................................................195
Duplicating an offer from the Offers page.............................................................. 196
Duplicating an offer from the offer's Summary page............................................. 196
Grouping offers..................................................................................................................197
Grouping offers using attributes.............................................................................. 197
Contents | viii
Grouping offers in folders.........................................................................................197
Moving offers or offer lists.............................................................................................. 198
Retiring offers or offer lists..............................................................................................198
Deleting offers or offer lists.............................................................................................199
Searching for offers.......................................................................................................... 200
Searching for offers with Advanced Search............................................................201
Analyzing offers.................................................................................................................202
Offer lists........................................................................................................................... 203
Security and offer lists..............................................................................................203
Creating static offer lists.......................................................................................... 204
Creating smart offer lists..........................................................................................205
Editing offer lists....................................................................................................... 206
How to retire offer lists.............................................................................................207
Offer list assignment to cells................................................................................... 207
Offer management in integrated Unica Plan-Unica Campaign systems....................... 208
Introduction to using Unica Plan assets in Unica Campaign offers..............................208
Using Unica Plan assets in Unica Campaign offers............................................... 210
Overview of IBM eMessage offer integration with Unica Campaign.............................213
Viewing and editing IBM eMessage assets that are linked to a Unica Campaign
offer.................................................................................................................................... 214
Chapter 6. Target cell management...............................................................................216
Generating cells in a flowchart........................................................................................ 216
Limiting the size of output cells...................................................................................... 217
Processes taking input from an output cell............................................................ 218
Limiting the output cell size based on the input cell size.......................................218
Contents | ix
Processes taking input from a table........................................................................220
Applying test run output cell size limitations.......................................................... 221
Changing the random seed for record selection.....................................................222
Cell names and codes...................................................................................................... 223
Examples: cell renaming scenarios..........................................................................224
Changing the cell name............................................................................................ 226
Resetting the cell name............................................................................................ 227
Changing the cell code............................................................................................. 228
About copying and pasting cell names and codes.................................................229
Target cell spreadsheets.................................................................................................. 231
Managing target cell spreadsheets..........................................................................233
Linking flowchart cells to a TCS.............................................................................. 242
Chapter 7. Contact history............................................................................................ 248
Contact history and audience levels overview................................................................248
How the contact history tables are updated...................................................................249
Treatment history (UA_Treatment)...........................................................................251
Base contact history (UA_ContactHistory).............................................................. 252
Detailed contact history (UA_DtlContactHist)......................................................... 254
Offer history............................................................................................................... 255
Updating contact history by doing a production run......................................................255
Run History Options scenario...................................................................................256
Specifying a database table for contact logging............................................................257
Specifying an output file for contact logging................................................................. 258
Disabling writing to contact history.................................................................................259
Clearing contact history and response history............................................................... 260
Contents | x
Chapter 8. Campaign response tracking........................................................................263
How to track responses to a campaign..........................................................................264
Using multiple response tracking flowcharts................................................................. 266
Response tracking using multi-part offer codes............................................................ 269
Date scope for response tracking................................................................................... 269
Response tracking for controls........................................................................................269
Response tracking for personalized offers..................................................................... 270
Response types................................................................................................................. 271
Response categories.........................................................................................................272
Direct responses........................................................................................................272
Inferred responses.....................................................................................................275
Attribution methods.......................................................................................................... 276
Best match................................................................................................................. 277
Fractional match........................................................................................................278
Multiple match........................................................................................................... 278
Chapter 9. Stored objects..............................................................................................279
Derived fields.....................................................................................................................279
Naming restrictions for derived fields..................................................................... 280
Creating derived fields.............................................................................................. 280
Creating a derived field from an existing one......................................................... 281
Creating a derived field based on a macro............................................................. 282
Making derived fields persistent.............................................................................. 282
Storing derived fields................................................................................................ 286
Using and managing stored derived fields..............................................................287
User variables....................................................................................................................287
Contents | xi
Creating user variables............................................................................................. 289
Custom macros.................................................................................................................290
Creating custom macros.......................................................................................... 291
Guidelines for using custom macros.......................................................................293
Organizing and editing custom macros...................................................................297
Templates...........................................................................................................................297
Copying a template to the template library............................................................. 298
Pasting a template from the template library......................................................... 298
Organizing and editing templates............................................................................ 299
Stored table catalogs........................................................................................................300
Accessing stored table catalogs..............................................................................300
Editing table catalogs................................................................................................300
Deleting table catalogs............................................................................................. 301
Chapter 10. Session flowcharts.....................................................................................303
Creating sessions..............................................................................................................304
Adding flowcharts to sessions........................................................................................ 305
Editing session flowcharts............................................................................................... 305
Organizing sessions in folders.........................................................................................306
Moving sessions............................................................................................................... 307
Viewing sessions...............................................................................................................308
Editing sessions................................................................................................................ 308
Deleting sessions.............................................................................................................. 309
The History tab (Session).................................................................................................309
About strategic segments................................................................................................ 310
Prerequisites for creating strategic segments........................................................311
Contents | xii
Improving performance of strategic segments.......................................................312
Creating strategic segments.....................................................................................313
Viewing strategic segments..................................................................................... 314
Editing a strategic segment's Summary details...................................................... 315
Editing a strategic segment's source flowchart......................................................315
Running strategic segments.....................................................................................316
Organizing strategic segments.................................................................................316
About global suppressions and global suppression segments.....................................320
Applying global suppressions...................................................................................321
Disabling global suppressions for a flowchart........................................................322
About dimension hierarchies............................................................................................322
Examples: Dimension hierarchies............................................................................ 323
Creating dimension hierarchies................................................................................324
Updating a dimension hierarchy...............................................................................326
Loading a stored dimension hierarchy.....................................................................326
About cubes.......................................................................................................................327
Chapter 11. Unica Campaign reports overview.............................................................330
Using flowchart cell reports during flowchart development..........................................330
Cell List report: Displaying information about all cells in a flowchart....................332
Cell Variable Profile report: Profiling one characteristic of a cell...........................333
Cell Variable Crosstab report: Profiling two characteristics of a cell
simultaneously........................................................................................................... 334
Cell Content report: Displaying the contents of cells............................................. 335
Cell Waterfall report: Analyzing cell waterfall in downstream processes..............336
Printing or exporting flowchart cell reports............................................................ 338
Contents | xiii
Using reports to analyze campaigns and offers.............................................................339
List of Unica Campaign reports.......................................................................................341
Performance reports for Unica Campaign......................................................................345
® ® report portlets for Unica Campaign.........................................................................351
Unica Campaign list portlets............................................................................................352
Sending reports by email..................................................................................................352
Re-running reports.............................................................................................................353
Chapter 12. Special characters in Unica Campaign object names..................................354
Special characters not supported....................................................................................354
Objects with no naming restrictions................................................................................355
Objects with specific naming restrictions.......................................................................355
Chapter 13. Packaging flowchart files for troubleshooting............................................ 357
Options for packaging flowchart data.............................................................................358
Index..........................................................................................................................

Chapter 1. Unica Campaign overview
Unica Campaign is a web-based solution that enables you to design, run, and analyze direct
marketing campaigns.
Marketing professionals typically use Unica Campaign in the following ways:
• Administrators perform initial and ongoing tasks such as adjusting configuration
settings, mapping database tables, and defining custom attributes and offer templates.
• Users create and run direct marketing campaigns.
To conduct a marketing campaign, you start by defining offers for target audiences. You
then build a flowchart, which provides a visual representation of the Unica Campaign logic.
Part of building a flowchart involves associating offers with target audiences.
To design your campaigns, you can use data from multiple sources, including relational
databases and flat files. For example, you can select contact data from a database, merge it
with customer data from a flat file, then suppress, segment, and sample the data. To access
and manipulate data, Unica Campaign supports the use of raw SQL, macros, and functions.
However, you do not need to know SQL to use Unica Campaign.
After you build a flowchart and assign offers to various segments, you run the flowchart
to generate a list of contacts. To control the timing of your marketing campaigns, you can
schedule different campaigns to run at various times.
During the course of a campaign, contact history and response history are stored. Unica
Campaign uses this history to track and analyze campaign results, so you can refine your
campaigns over time.
Unica Campaign consists of a back-end server and a web application server, plus security,
authentication, and authorization that are supplied by Unica Platform.
Note: Unica Platform provides a common access point and user interface for Unica
Campaign and other applications, plus features related to security and configuration.
Unica Campaign V12.0 User Guide | 1 - Unica Campaign overview | 2
Unica Campaign concepts
There are several basic concepts that can help you understand how to use Unica Campaign
to create and manage marketing campaigns.
Campaigns
Each marketing campaign is defined by a business objective, a corporate-defined initiative
specific to your marketing plan, and a date range during which the campaign is effective.
For example, you could create a retention campaign to deliver an offer to customers who
otherwise might be lost through attrition.
Flowcharts
Every marketing campaign consists of one or more flowcharts. For example, a marketing
campaign might consist of a flowchart that provides offers to selected customers and
another flowchart to track responses to the offers, for reporting and analysis.
Each flowchart makes use of one or more data sources. A data source contains information
about your customers, prospects, or products, for use in marketing campaigns. For
example, a flowchart can pull contact names and addresses from one database and pull
opt-out information from another source.
A flowchart performs a sequence of actions on your marketing data. To define the actions,
you use building blocks called processes, which you connect and configure. These
processes make up the flowchart.
To implement your campaign, you run the flowcharts. You can run each flowchart manually,
by a scheduler, or in response to some defined trigger.
Licensed users of Unica Interact can use Unica Campaign to run real-time interactive
flowcharts that depend on the occurrence of an event. For more information on interactive
flowcharts, see the Unica Interact User’s Guide.
Processes
Each flowchart is made up of processes, or process boxes, that are configured and
connected to perform specific tasks in a campaign or session. For example, a Select
Unica Campaign V12.0 User Guide | 1 - Unica Campaign overview | 3
process can select customers who you want to target, and a Merge process can combine
two distinct audience groups.
You configure and connect processes in each flowchart to achieve specific marketing
goals. For example, a flowchart can consist of processes that select qualified recipients
for a direct mail campaign, assign various offers to recipients, then generate a mailing list.
Another flowchart can track respondents to your campaign, so you can calculate your return
on investment.
Sessions
Sessions provide a way to create persistent, global data artifacts for use in all campaigns.
Each session contains at least one flowchart. Running a session flowchart makes the
outcome of the session (the data artifacts) available globally to all campaigns.
A typical use for a session flowchart is to create strategic segments, which are segments
that can be used in multiple campaigns. For example, you can create strategic segments for
opt-ins or opt-outs, then use those segments in various marketing campaigns.
Offers
An offer represents a single marketing message, which can be delivered in a variety of ways.
Offers are re-usable:
• in different campaigns
• at different points in time
• for different groups of people (cells) in a flowchart
• as different "versions" (by varying the offer's parameterized attributes)
You can assign offers to target cells in flowcharts using one of the contact processes,
such as Mail list or Call list. You can track the campaign results by capturing data about
customers who received the offer and those who responded.
Cells
A cell is a list of identifiers, such as customer or prospect IDs, from your database. You
create cells by configuring and running data manipulation processes in flowcharts. For
Unica Campaign V12.0 User Guide | 1 - Unica Campaign overview | 4
example, a Select process can generate an output cell consisting of males between the
ages of 25 and 34.
An output cell can be used as input for other processes in the same flowchart. For example,
two Select processes can select customers from different data sources. A downstream
Merge process can then combine the results.
A cells that has an offer assigned to it is called a target cell. A target cell is a group of
homogeneous individuals, as defined by the audience level, such as individual customers or
household accounts.
For example, cells can be created for high-value customers, customers who prefer to
shop on the web, accounts with on-time payments, customers who opted to receive email
communications, or loyal repeat buyers. Each cell that you create can be treated differently,
receiving different offers or communications through different channels.
Cells that contain IDs who are qualified to receive an offer but who are excluded from
receiving the offer for analysis purposes are called control cells. In Unica Campaign,
controls are always hold-out controls.
Prerequisites for using Unica Campaign
Before you begin using Unica Campaign, confirm that your environment meets the following
requirements.
• For an improved user experience, use at least a 21" screen.
• For an improved user experience, set your screen resolution to 1600 x 900. Lower
resolutions can result in some information not being properly displayed. If you use a
lower resolution, maximize the browser window to see more content.
• A mouse is best for navigating in the user interface.
• Do not use the browser controls to navigate. For example, avoid using the Back and
Forward buttons. Instead, use the controls that are in the user interface.
• If pop-up blocker (ad blocker) software is installed on the client machine, Unica
Campaign might not function properly. For best results, disable pop-up blocker
software while running Unica Campaign.

Unica Campaign V12.0 User Guide | 1 - Unica Campaign overview | 5
• Ensure that the technical environment meets the minimum system requirements and
the supported platforms.*
• The correct browser and versions must be used.*
• Clear the browser cache after upgrading or applying any fix pack. This only needs to be
done once, after the application is updated.
•
If you use Internet Explorer (IE) with Unica Campaign or any module that uses
Unica Campaign flowcharts (IBM eMessage, Unica Optimize, Unica Interact, Unica
Collaborate): To log in multiple times to view side-by-side information, open IE and log
in to Unica. Then select File > New Session in the IE menu bar. In the new IE browser
window, log in to Unica as the same or a different user.
Important: Do not use any other method to open multiple sessions. For example,
do not open a new tab; do not open another browser session from the Start menu or
desktop icon; and do not use File > New Window in IE. These methods can corrupt
information that is shown in the application.
*For details on the items indicated by an asterisk, see the Unica Recommended Software
Environments and Minimum System Requirements.
Getting started with Unica Campaign
Before meaningful work can be done in Unica Campaign, some initial configuration is
required. Database tables must be mapped, data objects such as segments, dimensions, or
cubes might need to be created, and individual campaigns must be planned and designed.
Typically, these tasks are completed with the help of an consultant. After the initial work is
done, you can design and run additional campaigns yourself and you can refine, expand, and
build on initial campaigns as needed.
For information about initial and ongoing configuration and administration, see the Unica
Campaign Installation Guide and the Unica Campaign Administrator's Guide.
Unica Campaign V12.0 User Guide | 1 - Unica Campaign overview | 6
Your username and password
To access Unica Campaign, you must have a username and password combination that has
been created for you in Unica Platform, and also be authorized to access Unica Campaign.
If you do not have a valid username and password, contact your system administrator.
Your role and permissions
Your user name in Unica Campaign is associated with one or more roles, such as Reviewer,
Designer, and Manager. Your administrators define roles specific to your organization. Your
roles determine the functions that you can perform in Unica Campaign. The object-level
security implemented by your organization determines whether you can perform those
functions on specific objects. If you need to access objects or perform tasks that your
permissions do not allow, contact your system administrator.
Security levels in Unica Campaign
In Unica Campaign, security settings control your ability to access functions and the objects
with which you can work.
Security in Unica Campaign works on two levels.
• Functional - Determines the actions that you can perform on types of objects, based on
the roles that you belong to. Your organization defines these roles at implementation.
Each role has a set of permissions that are associated with it that determine what
actions a user who belongs to that role can perform. For example, if you are a user
assigned a role that is called "Administrator", you might have permissions to map and
delete system tables. If you are a user assigned a role that is called "Reviewer", you
might be denied permissions to map and delete system tables.
• Object - Defines the object types on which you can perform your allowed actions.
In other words, even if you belong to a role that has general permissions to edit
campaigns, object-level security for Unica Campaign can be set up so that you cannot
access campaigns that are in particular folders. For example, if you belong to Division

Unica Campaign V12.0 User Guide | 1 - Unica Campaign overview | 7
A, regardless of your functional roles, you can be disallowed from accessing the
contents of folders that belong to Division B.
Logging in to Unica
Use this procedure to log in to Unica.
You need the following.
• An intranet (network) connection to access your Unica server.
• A supported browser installed on your computer.
• User name and password to sign in to Unica.
• The URL to access Unica on your network.
The URL is:
http://host.domain.com:port/unica
where
host is the machine where Unica Platform is installed.
domain.com is the domain in which the host machine resides.
port is the port number where the Unica Platform application server is listening.
Note: The following procedure assumes that you are logging in with an account that has
Admin access to Unica Platform.
Access the Unica URL using your browser.
• If Unica is configured to integrate with Windows™ Active Directory or with a web access
control platform, and you are logged in to that system, you see the default dashboard
page. Your login is complete.
•
If you see the login screen, log in using the default administrator credentials. In a
single-partition environment, use asm_admin with password as the password. In a multi-
partition environment, use platform_admin with password as the password.
Unica Campaign V12.0 User Guide | 1 - Unica Campaign overview | 8
A prompt asks you to change the password. You can enter the existing password, but
for good security you should choose a new one.
• If Unica is configured to use SSL, you may be prompted to accept a digital security
certificate the first time you sign in. Click Yes to accept the certificate.
If your login is successful, Unica displays the default dashboard page.
With the default permissions assigned to Unica Platform administrator accounts, you can
administer user accounts and security using the options listed under the Settings menu.
To perform the highest level administration tasks for Unica dashboards, you must log in as
platform_admin.
Setting your start page
The start page is the page that displays when you log in to Unica. The default start page is
the default dashboard, but you can easily specify a different start page.
If you do not want a dashboard page to display when you first log in to Unica, you can select
a page from one of the installed HCL products as your start page.
To set a page you are viewing as your start page, select Settings > Set current page as
home. Pages available for selection as a start page are determined by each Unica product
and by your permissions in Unica.
On any page you are viewing, if the Set current page as home option is enabled, you can set
the page as your start page.
Unica Campaign integration with other products
Unica Campaign optionally integrates with a number of other products.
For integration instructions, see the documentation that is included with each application,
plus any documents mentioned below.
Unica Campaign V12.0 User Guide | 1 - Unica Campaign overview | 9
Table 1. Integrate Unica Campaign with other HCL products
Task Documentation
Integrate with IBM Engage Campaign and Engage Integration Guide for IBM
Marketing Cloud
Integrate with IBM Digital Analytics Unica Campaign Administrator's Guide: How to
configure the integration
Unica Campaign User's Guide: Targeting IBM
Digital Analytics segments in campaigns
Integrate with Unica Plan Unica Plan and Unica Campaign Integration Guide
Integrate with Opportunity Detect Unica Campaign Administrator's Guide: How to
configure the integration
Opportunity Detect Administrator's Guide
and Opportunity Detect User's Guide: How to
administer and use the product
Integrate with IBM eMessage Unica Campaign Installation and Upgrade guides:
How to install and prepare eMessage components
in the local environment.
IBM eMessage Startup and Administrator's
Guide: How to connect to the hosted messaging
resources.
Unica Campaign Administrator's Guide: How to
configure offer integration.
Integrate with IBM SPSS Modeler
Advantage Enterprise Marketing
Management Edition
Unica Campaign and IBM SPSS Modeler
Advantage Enterprise Marketing Management
Edition Integration Guide
Integrate with IBM WeatherFX. You can integrate WeatherFX with Campaign
so that you can pull weather events into your
marketing campaigns. Unica Campaign version 9
Unica Campaign V12.0 User Guide | 1 - Unica Campaign overview | 10
Task Documentation
and version 10 users can integrate with WeatherFX
by using the UBX toolkit.
Integrate with Unica Director. Unica Director Installation Guide: You can
integrate Unica Director with Campaign so that
you can get status of all the running/completed/
failed flowcharts, migrate Camapigns from one
Unica Campaign environment to other, download/
delete flowchart logs etc.
Note: Additional integrations may be available that are not listed in this table. See
Product tools and utilities for Unica Campaign.

Chapter 2. Creating and managing campaigns
One of the first things you do in Unica Campaign is to create a marketing campaign to
identify your objective. Each campaign is defined by its business objective, initiative, and
effective date range. A campaign always consists of at least one flowchart, where you
select recipients and assign offers. You can create, view, edit, delete, and perform similar
operations on marketing campaigns.
Note: If Unica Campaign is integrated with Unica Plan, use campaign projects in Unica
Plan to work with campaigns. If your integrated system is configured to access legacy
campaigns, you can open them by choosing Campaign > Campaigns and clicking the
Campaign projects folder. Legacy campaigns are campaigns that were created in Unica
Campaign before the integration was enabled.
Working with campaigns requires the appropriate permissions. For information about
permissions, see the Unica Campaign Administrator's Guide.
Before you begin creating campaigns
Before you begin using Unica Campaign to create marketing campaigns, there are some
important initial tasks. Some of these initial tasks, such as creating offer templates,
typically are done by administrators.
One of the most important initial tasks is to make information about your customers and
products available to Unica Campaign. To access your user data, Unica Campaign needs to
know which tables or files in your data source to use. To make your data available for use
in Unica Campaign, your company's database tables and files must be mapped into Unica
Campaign. An administrator typically performs this step. An administrator also creates
offer templates, strategic segments, and other data objects for use in campaigns. For more
information, see the Unica Campaign Administrator's Guide.
After the initial objects are created and tables are mapped, you can begin creating
marketing campaigns.

Unica Campaign V12.0 User Guide | 2 - Creating and managing campaigns | 12
Often, the first step is to design the campaign on paper or in Unica Plan so you can
determine your workflow. Identify your campaign goals, decide what offers to make, which
customers to include or exclude, and whether to use control groups. After this initial design,
you can use Unica Campaign to create marketing campaigns to accomplish your objectives.
Each marketing campaign is made up of one or more flowcharts. Each flowchart performs
a sequence of actions on your customer data. A flowchart consists of interconnected
process boxes, which you configure to perform the actual data selection, manipulation, and
response tracking that is required for your campaign. Each process box performs a specific
action, such as selecting customers, segmenting them, merging data, or generating a mail
list or a call list. By configuring and connecting process boxes in a flowchart, you determine
the logic of your campaign.
Offers are created outside of a flowchart, and are assigned when you configure a contact
process box, such as a Mail list or Call list, in a flowchart. Offers can also be assigned on
the target cell spreadsheet (TCS), which provides a visual matrix of segments and offers.
You use Unica Campaign to define offers. You then create a flowchart where you select
customers or prospects to be contacted, assign offers to your selections, and generate a
list of contacts. When customers respond, you can use a separate flowchart to track the
campaign results.
For an example of two flowcharts that were designed for a retention campaign using
multiple channels to deliver an offer, see Example: Contact and response flowcharts (on
page 23).
Accessing campaigns
Access campaigns in Unica Campaign to view or edit them, depending on what your
permissions allow.
1. Choose Campaign > Campaigns to open the All campaigns page.
2.
Perform one of the following actions:

Unica Campaign V12.0 User Guide | 2 - Creating and managing campaigns | 13
• For a stand-alone Unica Campaign environment: The All campaigns page lists all
campaigns and campaign folders for which you have at least read access. Click
the name of any campaign to open it.
•
For an integrated Unica Plan-Unica Campaign environment: Click the link for
the Campaign projects folder to access campaign projects that were created in
Unica Plan. Campaigns that were created through Unica Plan are always accessed
through campaign projects, unless they are legacy campaigns.
The available projects depend on the default project view that is set in Unica Plan.
You can configure this view to display all campaign projects if wanted.
Note: The Campaign projects folder cannot be deleted, moved, or copied.
• For an integrated Unica Plan-Unica Campaign environment with access to legacy
campaigns enabled: The All campaigns page displays legacy campaigns, which
were created before the environment was integrated. Click the name of any legacy
campaign to open it. You can also use the Campaign projects folder link to access
campaigns created through Unica Plan.
Note: History Summary, Target Cell, Analysis and Flowcharts tabs are listed in the All
Campaigns.
• For information about campaign projects, see the Unica Plan and Unica Campaign
Integration Guide.
• For information about project views, see the Unica Plan User's Guide.
• For information about configuring Unica Campaign to enable access to legacy
campaigns, see the upgrade documentation.
Creating campaigns
Follow these instructions to create a marketing campaign in Unica Campaign.
Each campaign has a business objective, a corporate-defined initiative specific to your
marketing plan, and a date range during which the campaign is effective.
Unica Campaign V12.0 User Guide | 2 - Creating and managing campaigns | 14
Note: If Unica Campaign is integrated with Unica Plan, you create campaigns from the
Operations > Projects menu. See the Unica Plan documentation for more information.
1.
Select Campaign > Campaigns.
The All campaigns page displays the folders or campaigns in the current partition.
2. Click Add campaign .
3.
Complete the Campaign summary fields on the New campaign page.
Choose Help > Help for this page to see explanations of each field.
Note: Ensure that you do not use the following invalid characters (%?|:,<>&\/"+
$<tab>)* under the Campaign name attribute value. These special characters are not
supported for the Campaign Name field.
4.
Do one of the following actions:
• Click Save and finish to save and close the campaign. Use this approach if you
want to do other initial steps before you create and add flowcharts. For example,
you can create and associate offers and strategic segments with a campaign
before you create and add flowcharts.
• Click Save and add a flowchart to immediately start creating a flowchart for the
campaign.
Typically, your next step is to add a flowchart to the campaign.
Editing campaigns
Users with appropriate permissions can use the Campaign summary page to edit a
campaign's details and access its flowcharts, reports, and target cell spreadsheet.
Additionally, if you have the appropriate permissions, you can perform actions such as
adding flowcharts, segments, or offers to a campaign.
1. Choose Campaign > Campaigns.
Unica Campaign V12.0 User Guide | 2 - Creating and managing campaigns | 15
2. On the All campaigns page, locate the campaign that you plan to edit. It might be listed
on the page or it might be in a folder.
3. When you see the campaign that you want to edit, do one of the following:
• Click the campaign name to open the campaign in View mode. You see tabs
for Summary, Target cells, Analysis, and any flowcharts that were added to the
campaign. Click Edit in the toolbar to make the information editable.
• Click the Edit a tab icon next to a campaign and select an option from the menu
(Edit summary, Edit target cells, Analysis, or a flowchart) to open the tab in edit
mode.
4. The actions that you can perform depend on the tab that you selected (Summary,
Target cells, Analysis, or a flowchart). Use the toolbar options to perform the desired
actions.
5.
Here are some of the operations that you can perform on each tab when you edit a
campaign:
• Summary tab: Click Add/remove segments to associate strategic segments with
the campaign. Add/remove offers to associate offers with the campaign. Click Run
to run a flowchart. Click Add flowchart to create a flowchart for this campaign.
You can also Delete the campaign, Move the campaign to another folder, or Print
the campaign summary.
• Target cells tab: Use this tab to work with the target cell spreadsheet. You can Get
cell status, Export target cells, or Import target cells. See Target cell management
(on page 216).
• Analysis tab: Use this tab to access reports for this campaign. See Unica
Campaign reports overview (on page 330).
• Flowchart tabs: To access a flowchart that is part of this campaign, click a
flowchart tab.
For detailed information, choose Help > Help for this page.
Unica Campaign V12.0 User Guide | 2 - Creating and managing campaigns | 16
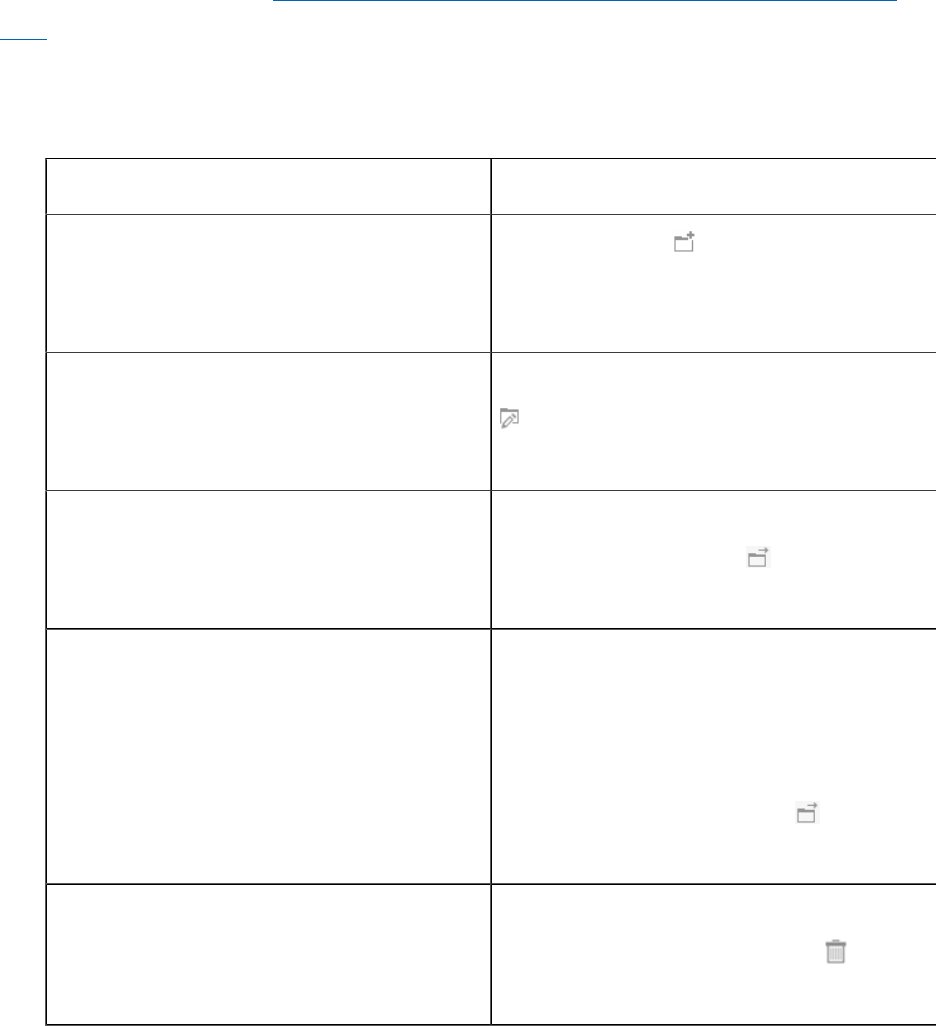
Organizing campaigns in folders
Folders provide a way to keep your campaigns organized. You can create folders and move
campaigns from one folder to another.
Follow the steps below to organize campaigns in folders. Note that folder names have
character restrictions. See Special characters in Unica Campaign object names (on page
354).
1. Choose Unica Campaign > Campaigns.
2.
Use the All campaigns page to do any of the following operations.
Option Description
Add a folder
Click New folder . If you want to create
a subfolder, select a folder, then click New
folder.
Edit a folder name or description Select a folder, then click Rename folder
. You cannot rename the My campaigns
folder.
Move a folder Check the box next to one or more
folders, then click Move and select a
destination folder.
Move a campaign Select one or more campaigns by clicking
on them, so a check mark appears to
the left of each item. You can use Shift
+click or Ctrl+click to select multiple
campaigns. Then click Move and
select a destination folder.
Delete an empty folder Check the box next to any folders that
you want to delete, click Delete , then
confirm the deletion.
Unica Campaign V12.0 User Guide | 2 - Creating and managing campaigns | 17
Printing campaigns
You can print any page in a campaign by using the Print icon.
1. Choose Campaign > Campaigns.
2. Select the campaign that you want to print, or select the tab that you want to print.
3. Click Print .
Deleting campaigns
When you delete a campaign, the campaign and all flowchart files are deleted.
If you want to keep portions of the campaign for reuse, save them as stored objects
(templates) before you delete the campaign. If you delete a campaign with associated
contact or response history records, all of the corresponding contact and response history
records are deleted.
Important: Do not delete the campaign if you want to retain the associated contact and
response history.
1. Choose Campaign > Campaigns and locate the campaign that you want to delete.
2. Select the check box next to the campaign that you want to delete.
3.
Click Delete .
Important: If you attempt to delete a campaign that has contact or response history
records, a warning message indicates that all corresponding contact and response
history records will be deleted. If you want to retain the corresponding contact and
response history, click Cancel.
4. Click OK to permanently delete the campaign.
The selected campaign is deleted.

Unica Campaign V12.0 User Guide | 2 - Creating and managing campaigns | 18
Note: You can also delete a campaign while you view the campaign by clicking Delete.
How to use control groups to measure campaign
results
You can purposely exclude a random sample of prospects or customers from a marketing
campaign to ensure that they do not receive the offer. After the campaign runs, you can
compare the activity of the control group against those who received the offer, to determine
the effectiveness of your campaign.
Controls are applied at the cell level. Cells that contain IDs which you purposely exclude
for analysis purposes are called control cells. When you assign offers to cells, either in
a contact process in a flowchart or in a target cell spreadsheet (TCS), you can optionally
specify one control cell for each target cell.
In Unica Campaign, controls are always hold-out controls. In other words, they are not
contacted with an offer, even though they qualify for the offer. Contacts who belong to
control cells are not assigned any offers and are not included in contact process output
lists. Holdouts ("no-contacts") do not receive communications, but are measured against
the target group for comparison.
Unica Campaign provides the following methods for working with control groups:
• To create control groups, use the Sample process. The Sample process provides
several options for excluding IDs (Random, Every Other X, Sequential Portions).
• To exclude control groups from offers, configure a Mail list or Call list process in a
flowchart. When you configure the process to assign offers to cells, you can optionally
exclude control groups from contact.
• If you work with a target cell spreadsheet (TCS), you can use the Control Cell and
Control Cell Code columns to identify control cells. Cells that are designated as
controls cannot be assigned offers.
• The contact history tables are populated when you run the flowchart in production
mode. The contact history identifies the members of control cells and the offers
Unica Campaign V12.0 User Guide | 2 - Creating and managing campaigns | 19
that were withheld (not sent to controls). This information allows for analysis and
comparison of the target versus control cell for lift and ROI calculations.
• Use the Response process in a flowchart to track control group responses
simultaneously with offer responses.
• The Unica Campaign Performance and Offer Performance reports indicate the lift, or
difference, in response from an active target cell that received an offer.
When you plan an offer, consider whether you want to use holdout control groups for cells
that are assigned the offer. Control groups are a powerful analysis tool for measuring
Campaign effectiveness.
Association of control cells to target cells
A single control cell can be used as the control for multiple target cells. However, each
target cell can have only a single control cell, where the cell is defined by its cellID.
When a single control cell is used in multiple contact processes, you must configure the
control cell relationship for the target cell the same way in each contact process.

Chapter 3. Designing flowcharts
Unica Campaign flowcharts define the campaign logic. Each campaign consists of at least
one flowchart. A flowchart performs a sequence of actions on data that is stored in your
customer databases or flat files.
Note: To work with flowcharts, you must have the appropriate permissions assigned by
an administrator.
Create flowcharts
Follow these instructions to add a flowchart to a marketing campaign. A flowchart
determines the campaign logic.
Each marketing campaign consists of at least one flowchart. A typical campaign has
a flowchart that selects customers or prospects who will receive offers and a separate
flowchart that tracks responses.
For example, a contact flowchart might select a set of customers that will be contacted by
phone or email. Another flowchart in the same campaign tracks responses to those offers.
After the offers are made, you use the response flowchart to record and analyze responses.
You can add multiple flowcharts to a campaign as you analyze and refine your results. More
complex campaigns can include many flowcharts to manage multiple offer streams.
Each flowchart is made up of processes. You configure and then connect processes to
perform data manipulation, create contact lists, and record contact and response tracking
for your campaign. By connecting a series of processes in a flowchart, then running that
flowchart, you define and implement your campaign.
For example, a flowchart might include a Select process, which is connected to a Segment
process, which is connected to a Call List process. The Select process can be configured
to select all customers from your database who live in the northeast. The Segment process
can segment those customers into value tiers, such as Gold, Silver, Bronze. The Call List
Unica Campaign V12.0 User Guide | 3 - Designing flowcharts | 21
process assigns offers, generates a contact list for a telemarketing campaign, and records
the results in the contact history.
The following procedure provides a quick overview of how to create a new flowchart and
add it to a campaign or a session. (Alternatively, you can copy an existing flowchart. You
can also use the template library to copy configured processes from one flowchart to
another.)
Note: If you are creating an interactive flowchart, see the Unica Interact documentation
for information.
1. Open a campaign or session.
2.
Click Add flowchart .
The Flowchart properties page opens.
3.
Enter a flowchart name (required) and description (optional). For Flowchart type,
Standard batch flowchart is the only option unless you are a licensed user of Unica
Interact. If you installed a licensed version of Unica Interact, you can select Interactive
flowchart.
Note: Flowchart names have specific character restrictions. See Special characters
not supported (on page 354).
4.
Click Save and edit flowchart.
The flowchart window opens. You see the process palette on the left, a toolbar at the
top, and a blank flowchart workspace.
5.
Add a process to your flowchart by dragging a process box from the palette to the
workspace.
A flowchart typically begins with one or more Select or Audience processes to define
the customers or other marketable entities with which to work.
6. Double-click a process in the workspace or right-click the process and choose Process
configuration. Then use the configuration dialog to specify how the process operates.
Unica Campaign V12.0 User Guide | 3 - Designing flowcharts | 22
7. Connect the configured processes to determine the workflow of your campaign.
8. Use Save and continue frequently while you work.
9. When you are done, open the Save options menu and choose Save and exit .
Editing flowcharts
Open a flowchart for editing to make changes to it. For example, you can add or remove
processes, reconfigure existing processes, or change the flowchart name and description.
1.
Choose Campaign > Campaigns.
Note: If your flowchart is in a session, adapt these instructions by choosing
Campaign > Sessions to open a flowchart from a session.
2. On the All campaigns page, find the campaign that contains the flowchart you want to
open. The Unica Campaign might be listed on the page or it might be in a folder. If you
can't locate it, use the Search flowcharts link to search for it.
3.
After locating the Unica Campaign that contains your flowchart, click the Edit a tab icon
next to a campaign, and click the name of a flowchart from the menu.
If you try to edit a flowchart that is already being edited by someone else, Unica
Campaign warns you that the flowchart is open by another user.
Important: If you continue opening the flowchart, the other user's changes are
immediately and permanently lost. To prevent the loss of work, do not continue opening
the flowchart without first checking with the other user.
4. Make changes to the flowchart, just as you would when creating a flowchart. For
example, double-click a process to reconfigure it, or drag a new process from the
palette to the workspace.
Unica Campaign V12.0 User Guide | 3 - Designing flowcharts | 23
5. To change the flowchart name, description, or type, click the Properties icon in the
toolbar.
Note: Flowchart names have specific character restrictions. See Special characters
not supported (on page 354).
Note: Avoid renaming a flowchart that is using the Scheduler because scheduled
tasks rely on the flowchart name. For more information, see the Unica Platform
Administrator's Guide.
6. Click Save and continue as you work. When you are done, open the Save options
menu and choose Save and exit .
Example: Contact and response flowcharts
This example shows two flowcharts that were designed for a marketing campaign that uses
multiple channels to deliver an offer to customers who otherwise might be lost through
attrition.
The Unica Campaign includes two flowcharts:
• A contact flowchart generates lists of customers to whom the offer will be sent, using a
different channel for each segment.
• A response flowchart tracks responses to the offer and makes the response data
available for reporting and analysis.
Contact flowchart
This example shows a simple flowchart for contacting customers for a marketing
campaign.

Unica Campaign V12.0 User Guide | 3 - Designing flowcharts | 24
In the first level of the flowchart, Select processes select customers in the Gold and
Platinum segments, as well as customers who opted out of marketing communications.
In the second level, a Merge process combines the Gold and Platinum customers and
excludes customers who opted out. The result is all Eligible customers.
In the third level, a Segment process divides the eligible customers into value tiers based on
their scores.
Finally, each customer is assigned to a list. The high-value customers are output to a call
list, so they can be contacted with an offer by phone. The remaining customers are output
to a mail list; they will receive a direct mail offer.
Response flowchart
A second flowchart in this same campaign tracks responses to the offers. The response
information is compiled outside of the Unica Campaign application. For example, a call
center might record responses in a database or flat file. When the response information is
made available to Unica Campaign, your response flowchart can then query the data.
The following example shows a response tracking flowchart. Select process boxes query
the Mail Responders and Call Responders. The Response process box evaluates which
Unica Campaign V12.0 User Guide | 3 - Designing flowcharts | 25
responses are considered valid and how they are credited back to campaigns or offers.
When you run the flowchart, the output of the Response process is written to several
response history system tables, where the data can be accessed for analysis using Unica
Campaign performance and profitability reports.
Flowchart workspace overview
Use the flowchart workspace to design flowcharts for marketing campaigns.
You can open just one flowchart at a time. If you attempt to open another flowchart while
one is already open, you are prompted to save your changes. To open two flowcharts at the
same time, see Viewing two flowcharts side-by-side (on page 178).
If a flowchart is open for viewing but not editing, the toolbar contains a smaller set of
functions and the process palette does not appear. Click the pencil icon to open a
flowchart for editing. The following figure shows a flowchart open for editing.
Unica Campaign V12.0 User Guide | 3 - Designing flowcharts | 26
The flowchart workspace consists of the following elements.
Table 2. Flowchart window elements
Flowchart window elements
Element Description
Palette
(Edit
mode
only)
The palette at the left side of the window contains processes that you use
to build your flowchart. It is visible only in Edit mode. Drag a process from
the palette to the workspace, then configure and connect processes in the
workspace.
By default, all process types are displayed. Click a category (List generation,
Segmentation, Response tracking, Data preparation) to view a subset of
processes.
To resize the palette, drag the edge of the palette area to widen or narrow it.
To hide or show the palette, click Hide palette (gray arrow) or Show palette.
Main
workspace
area
In View mode, you can view but not modify process boxes and you can
perform a limited set of operations. In Edit mode, you can configure and
connect processes to determine the workflow and behavior of the flowchart.
Right-click any process box to open a menu of options.
Unica Campaign V12.0 User Guide | 3 - Designing flowcharts | 27
Element Description
To configure a process: Double-click it, or right-click it and choose Process
configuration.
To connect processes: Rest the cursor over a process box until four arrows
appear, then drag a connection arrow to another process box.
Panning
area
Use the panning area to highlight the portion of the flowchart that you want
to see. This visual representation of the workspace is useful when not all of
the process boxes fit on the screen at the same time.
Flowchart
toolbar
Use the buttons and menus in the toolbar to perform the actions that are
described in the following table. Rest your cursor over each item to see
what it does. To open a menu, click its down-arrow . The toolbar icons and
available options depend on your permissions and whether the flowchart is in
View or Edit mode.
The flowchart toolbar contains the following icons and menu options.
Table 3. Flowchart toolbar icons
Flowchart toolbar icons
In View mode, click the pencil icon to open a flowchart for editing.
Use the Run menu to perform test and production runs of a flowchart or to validate a
flowchart. You can also pause, continue, or stop a run.
In View mode, use the Schedules menu to view or schedule process runs at defined
intervals. For details, see the Unica Platform Administrator's Guide.
In View mode, click Delete to permanently delete the flowchart, if you are sure that you no
longer need this flowchart. Then confirm or cancel.
In View mode, click Add a flowchart if you want to create a new flowchart in this
campaign.
Unica Campaign V12.0 User Guide | 3 - Designing flowcharts | 28
Flowchart toolbar icons
In View mode, click Copy to duplicate a flowchart. You are asked for a destination
campaign.
In View mode, click Search flowcharts to search all flowcharts in all campaigns for any
object (process box, user database, offer, configuration details, and so on).
Click the Properties icon to change the flowchart name or description.
Use the Options menu to work with custom macros, stored derived fields, stored
triggers, stored templates, stored table catalogs, user variables, user authorization lists,
and to match and link target cells.
Use the Log options menu to view flowchart logs, set logging options, enable or
disable logging, clear a log file, or change the path.
Click the Reports icon to open the Cell specific reports dialog.
Use the Save options menu to either Save and continue or Save and exit the
flowchart designer.
Click Cancel and discard changes to close the flowchart without saving changes.
Click Print this item to print a visual depiction of the flowchart. All process boxes in the
flowchart are included, regardless of whether they are selected.
Administrators can use the Admin menu to perform actions on individual
flowcharts. See the Unica Campaign Administrator's Guide for details.
Use the Select All, Cut, Copy, Paste, and Delete icons to select and then
perform actions on the selected process boxes. Use Ctrl-click to add or remove process
boxes from the selection.
Unica Campaign V12.0 User Guide | 3 - Designing flowcharts | 29
Flowchart toolbar icons
Use the Alignment menu to align the selected process boxes. To select process
boxes for alignment, drag a selection box around the process boxes or use Ctrl-click to
add or remove boxes.
Use the Layout menu to reposition all processes in a flowchart.
Click Fit contents to resize the flowchart to fit in the workspace.
Use the Zoom icons to reset zoom, zoom out, or zoom in.
Use Hide all annotations or Show all annotations to hide or show all annotations
that were added to the flowchart. (To add, delete, show, or hide individual annotations,
right-click a process box in Edit mode.)
Use the Find process by name field to search for a process box by entering any portion of
the name.
Click the Help icon for a list of topics that explain how to work with flowcharts.
Flowchart design considerations
Be aware of the following considerations when you create flowcharts.
• Avoid cyclical dependencies. Be careful not to create cyclical dependencies among
processes. Consider this example of a cyclical dependency: (a) Your flowchart contains
a Select process whose output provides input to a Create Seg process. (b) The Create
Seg process generates a strategic segment as its output. (c) You use that segment as
input to the Select process. This situation results in an error when you try to run the
process.
• Applying global suppressions. If your organization uses the global suppression feature,
it is possible that a particular set of IDs might be automatically excluded from use in
target cells and campaigns. The flowchart log file indicates whether global suppression
is applied.
Unica Campaign V12.0 User Guide | 3 - Designing flowcharts | 30
Flowchart process overview
Process boxes are the building blocks of Unica Campaign flowcharts. All available
processes are in the palette at the left of the workspace when a flowchart is open for
editing.
To create a flowchart, you drag process boxes from the palette to the workspace. You then
configure each process box to perform a specific operation, such as selecting customers
to target for a mailing. By dragging connector lines from one box to another, you connect
processes in the workspace in a logical flow to determine the order of events.
For example, you can configure a Select process to identify high-value prospects, configure
another Select process to identify medium-value prospects, then use a Merge process
to combine the two lists. You can end with a Call List process, which assigns offers and
generates a list of customers to contact by phone.
When you do a test or production run, each process performs an action on your customer
data, with the results flowing from one process to the next. The type of process and the way
you configure it determines what happens when the process runs.
You can move and delete process boxes as you experiment with different flowchart
scenarios. To confirm that your flowchart is progressing successfully, you can test run each
process as you build your flowchart. Save your flowchart frequently as you work.
There are many types of processes, and each one performs a distinct function. Some
processes are intended to be used when you implement your campaign. For example, you
use the Call List process to assign offers and generate a call list. You use other processes
after your campaign is deployed. For example, you use the Track process to update Contact
History after you see who responds to your offers.
Typically, each process takes one or more cells as input, transforms the data, and produces
one or more cells as output. (A cell is a list of IDs that identify marketing message
recipients, such as customers, prospects, or responders.) Here is one simple example of
how you could set up a flowchart:

Unica Campaign V12.0 User Guide | 3 - Designing flowcharts | 31
1. Configure a Select process to select all high-value customers aged 25 - 34 from a
database or flat file. Call the Select process "Gold." The output of a Select process is a
cell (a list of IDs), which will be used as input into a subsequent process.
2. Configure another Select process to select all medium-value customers aged 25 - 34.
Call this process "Silver".
3. Connect both of the Select processes ("Gold" and "Silver" customers) to a Merge
process to combine them into a single list. You can also use the Merge process to
remove opt-outs from the list of IDs.
4. Connect the Merge process to a Mail List process. The output of the Merge process is
a list of IDs for all high and medium value customers aged 25-34 who have not opted
out of marketing communications.
5. When you configure the Mail List process, you assign pre-defined offers and generate a
list of contacts. For example, you can assign a 10% discount to Silver customers and a
20% discount to Gold customers.
6. Test run each process as you configure it to confirm that it produces the expected
results, and save the flowchart frequently.
Types of processes
Unica Campaign processes are divided into three types by function, which are distinguished
by color in the flowchart process palette.
• Data manipulation processes - blue
• Run processes - red
• Optimization processes - green, orange, or purple
Note: Unica Interact, Unica Optimize, IBM eMessage, IBM SPSS Modeler Advantage
Enterprise Marketing Management Edition, and Engage provide additional processes for
use in campaign flowcharts. For information about those processes, see the separate
documentation for those products.
Unica Campaign V12.0 User Guide | 3 - Designing flowcharts | 32
Data manipulation processes
Use data manipulation processes to select contact IDs from your data sources and work
with those IDs to create meaningful groups or target audiences.
Examples of the tasks that you can complete by using data manipulation processes follow.
• You can select potential contacts that meet the criteria that you define, such as repeat
customers within a certain income range.
• You can merge lists to include or exclude contacts.
• You can segment customers into meaningful groups, for example by language or
gender.
• You can set up test or control groups.
• You can change the target audience for your campaign, for example from Household to
Individual.
• You can extract sets of data for additional processing to improve performance.
The following data manipulation processes are available:
• The Select process (on page 68)
• The Merge process (on page 77)
• The Segment process (on page 81)
• The Sample process (on page 95)
• The Audience process (on page 101)
• The Extract process (on page 117)
Run processes
After you build your flowchart to select the audience that you want, you need to use a run
process to output the results in a usable way. Run processes control the running of the
flowchart and initiate actual customer contact.
Run processes control the actual execution of completed campaigns, which includes the
management and output of contact lists, the treatment of target audiences, the tracking of
Unica Campaign V12.0 User Guide | 3 - Designing flowcharts | 33
responses and contacts, the logging of data, and the scheduling of campaign or session
runs.
The run processes are:
• The Snapshot process (on page 128)
• The Schedule process (on page 131)
• The Cube process (on page 138)
• The CreateSeg process (on page 140)
• The Mail list process (on page 143) (also called a contact process)
• The Call list process (on page 153) (also called a contact process)
• Email, SMS, Push (see the Unica Campaign and Engage Integration Guide for IBM
Marketing Cloud)
Optimization processes
Use the optimization processes to help determine a campaign's effectiveness and refine
your marketing campaigns over time.
The Track and Response processes help you to track who is contacted and who responds.
In this way, you can evaluate the response to your campaigns and modify them over time.
The Model process automates the creation of a response model that can be used to predict
responders and non-responders.
The Score process scores contacts against a data model to rate the likelihood of each
customer making a purchase or responding to an offer. Scoring accurately identifies the
best customers or prospects for a campaign. In this way, you can determine the most
effective campaign, offer, and channels.
For more information, see the following topics:
• The Track process (on page 153)
• The Response process (on page 157)
• The SPSS® model and SPSS score processes require IBM SPSS Modeler Advantage
Enterprise Marketing Management Edition. For information, see the Unica Campaign
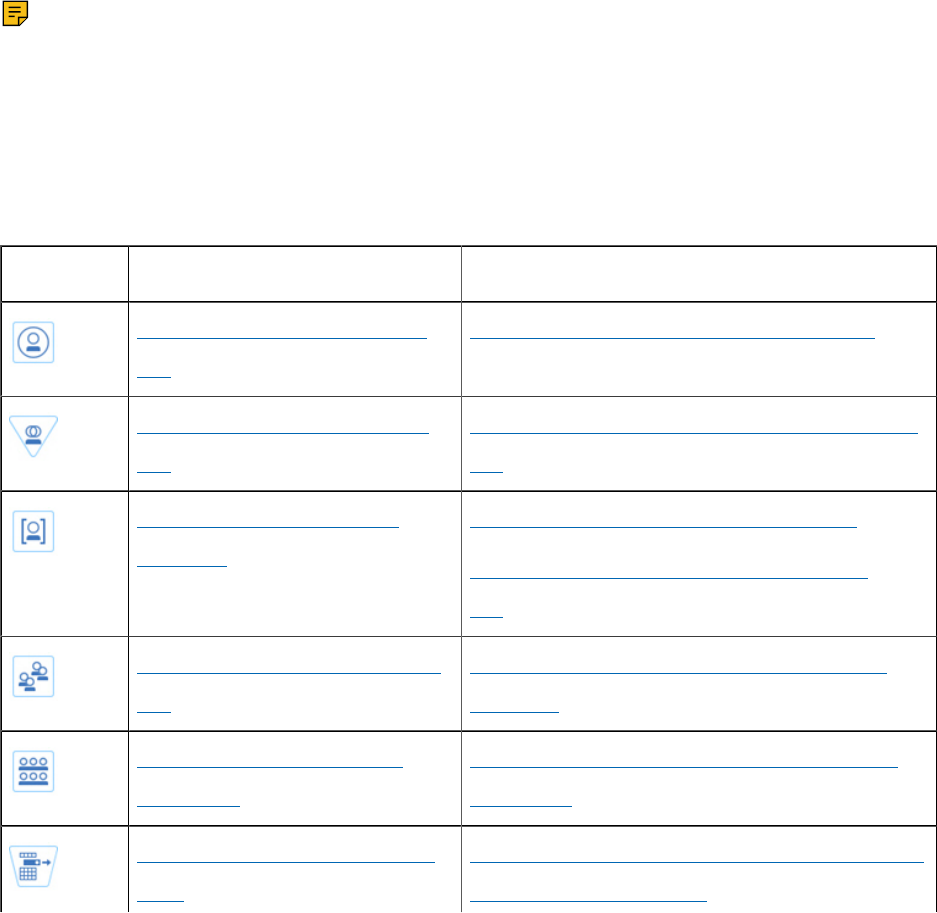
Unica Campaign V12.0 User Guide | 3 - Designing flowcharts | 34
and IBM SPSS Modeler Advantage Enterprise Marketing Management Edition
Integration Guide.
List of Unica Campaign processes
Configure and connect processes in flowcharts to accomplish your campaign goals.
Each process performs a specific operation, such as selecting, merging, or segmenting
customers.
Note: IBM Engage, Unica Interact, Unica Optimize, IBM eMessage, and IBM SPSS
Modeler Advantage Enterprise Marketing Management Edition provide additional processes
for use in flowcharts. For more information, see the documentation for those products.
Table 4. List of Unica Campaign processes in batch flowcharts
List of Unica Campaign processes in batch flowcharts
Process Overview topic: Instructions:
The Select process (on page
68)
Selecting a list of contacts (on page 69)
The Merge process (on page
77)
Merging and suppressing contacts (on page
78)
The Segment process (on
page 81)
Segmenting data by field (on page 83)
Segmenting data with queries (on page
85)
The Sample process (on page
95)
Dividing contacts into sample groups (on
page 95)
The Audience process (on
page 101)
Switching and filtering audience levels (on
page 106)
The Extract process (on page
117)
Extracting data from a cell, table, or strategic
segment (on page 119)
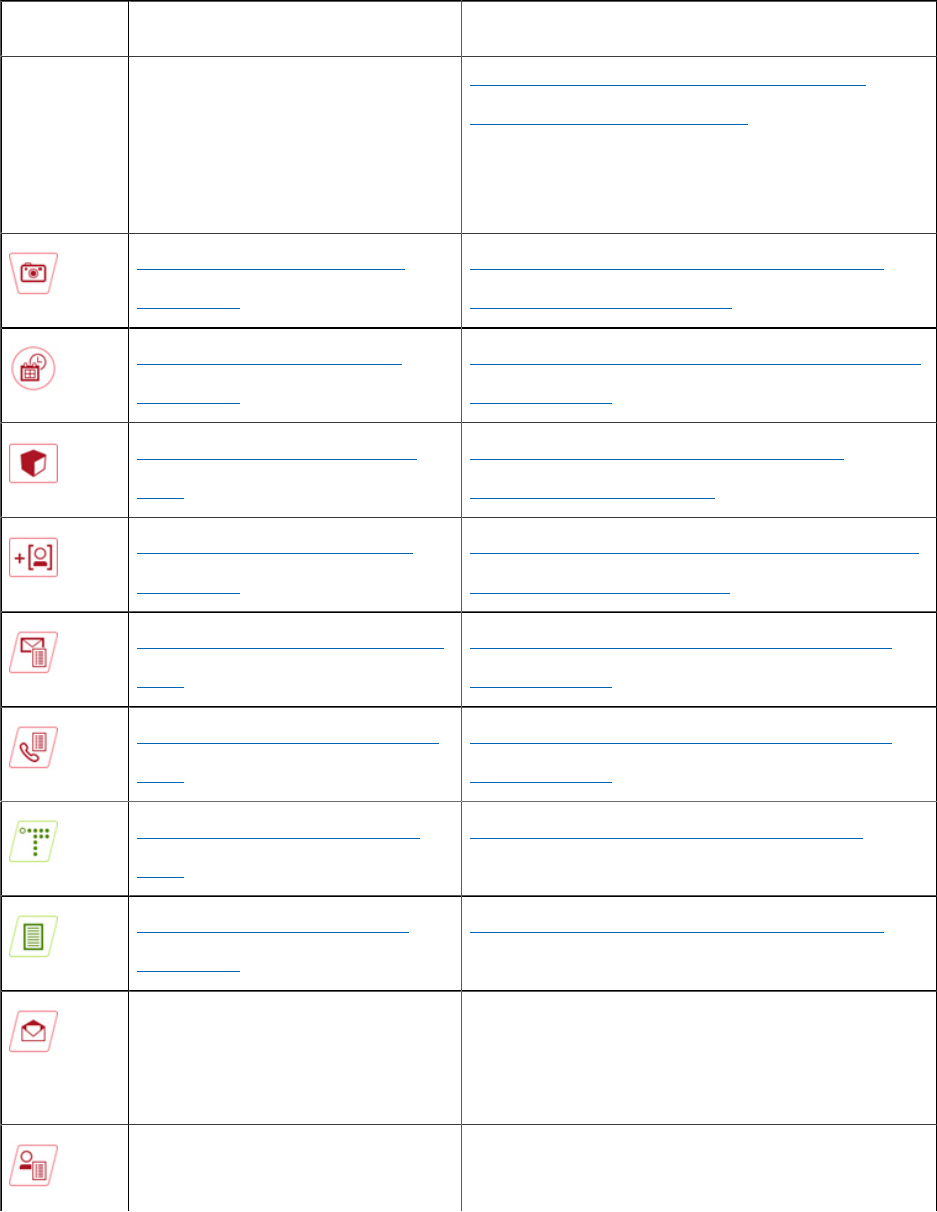
Unica Campaign V12.0 User Guide | 3 - Designing flowcharts | 35
Process Overview topic: Instructions:
Extracting data from an IBM eMessage
landing page (on page 125)
To extract data from an optimized list, see
the Unica Optimize User's Guide.
The Snapshot process (on
page 128)
Taking a snapshot of data for export to a
table or file (on page 128)
The Schedule process (on
page 131)
Scheduling processes in a running flowchart
(on page 135)
The Cube process (on page
138)
Creating a multi-dimensional cube of
attributes (on page 138)
The CreateSeg process (on
page 140)
Creating segments for global use in multiple
campaigns (on page 141)
The Mail list process (on page
143)
Configuring Mail list or Call list processes
(on page 144)
The Call list process (on page
153)
Configuring Mail list or Call list processes
(on page 144)
The Track process (on page
153)
Tracking contact history (on page 154)
The Response process (on
page 157)
Updating response history (on page 158)
The IBM eMessage process
defines the recipient list for an
IBM eMessage mailing.
Requires IBM eMessage. See the IBM
eMessage User's Guide.
The Interact list process
determines which offers the
Requires Unica Interact. See the Unica
Interact User's Guide.
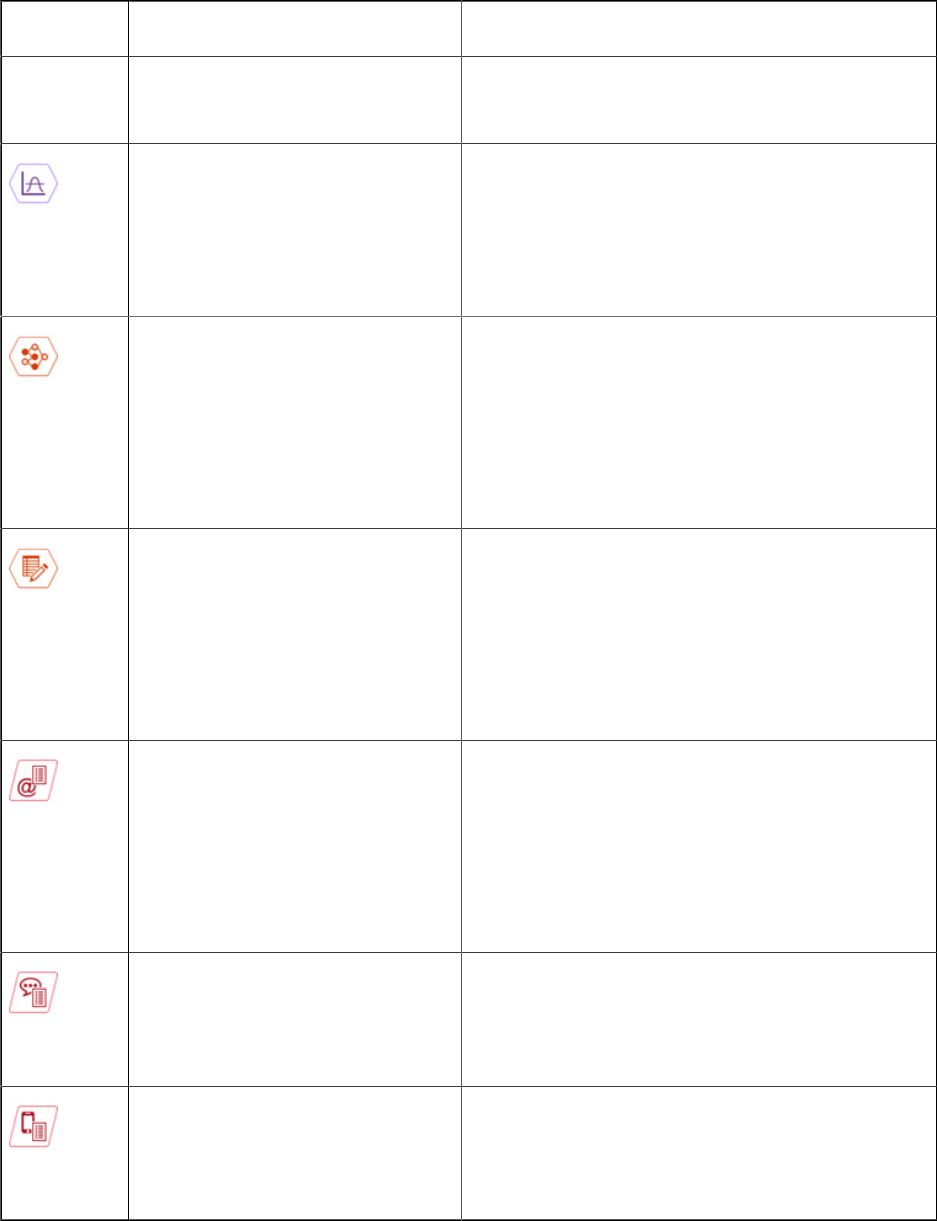
Unica Campaign V12.0 User Guide | 3 - Designing flowcharts | 36
Process Overview topic: Instructions:
Unica Interact runtime server
presents to customers.
The Optimize process
associates a marketing
campaign with a Unica
Optimize session.
Requires Unica Optimize. See the Unica
Optimize User's Guide.
The SPSS model process
generates predictive models
to predict likely responders
based on past behavior.
Requires IBM SPSS Modeler Advantage
Enterprise Marketing Management Edition.
See the Unica Campaign and IBM SPSS
Modeler Advantage Enterprise Marketing
Management Edition Integration Guide.
The SPSS score process rates
the likelihood of customers
responding to offers, to
identify the best prospects for
a campaign.
Requires IBM SPSS Modeler Advantage
Enterprise Marketing Management Edition.
See the Unica Campaign and IBM SPSS
Modeler Advantage Enterprise Marketing
Management Edition Integration Guide.
The Email process sends
personalized email
communications, including
offers, from IBM Marketing
Cloud.
Requires IBM Engage. See the Unica
Campaign and Engage Integration Guide for
Marketing Cloud.
The SMS process sends SMS
text messages from IBM
Marketing Cloud.
Requires IBM Engage. See the Unica
Campaign and Engage Integration Guide for
Marketing Cloud.
The Push process sends
mobile push notifications from
IBM Marketing Cloud.
Requires IBM Engage. See the Unica
Campaign and Engage Integration Guide for
Marketing Cloud.
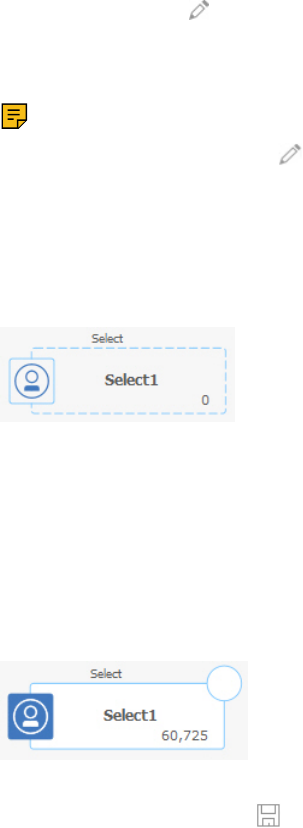
Unica Campaign V12.0 User Guide | 3 - Designing flowcharts | 37
Adding processes to flowcharts
You can add a process to a flowchart by dragging a process box from the palette to the
workspace.
This procedure explains how to add processes by dragging them from the palette into your
flowchart. Other ways to add processes are to copy an existing process (right-click, copy,
then paste), or paste a template from the template library. Templates contain one or more
configured processes and connections.
1.
Open a flowchart for editing: Select Campaign > Campaigns, locate a campaign, click
the Edit a tab icon next to a campaign, then select a flowchart from the list.
The flowchart window opens and the palette appears at the left of the workspace.
Note: If you do not see the process palette, it means the flowchart is not in Edit
mode: Click the pencil icon in the flowchart toolbar.
2.
Drag a process box from the palette to the flowchart.
Newly added process boxes are transparent with a dashed border until they are
configured.
Typically, the next step is to configure the process. To open the configuration dialog,
double-click a process in the workspace or right-click a process and choose Process
configuration.
Configured process boxes have a solid background and border. The round status icon
is blank to indicate that the process has not yet run.
3. Click Save and continue frequently to save your changes.
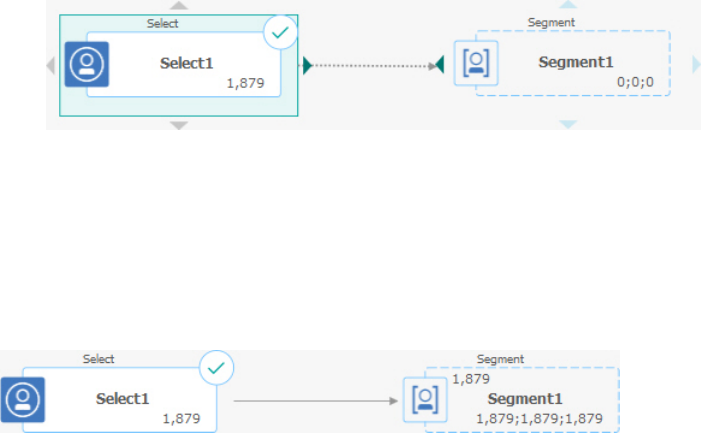
Unica Campaign V12.0 User Guide | 3 - Designing flowcharts | 38
As you develop the flowchart, place each subsequent box in a logical position, such as
left to right or top to bottom, and connect the boxes to indicate the flow of data. Some
processes must be connected before they are configured because they require input from
the source process.
For example, configure a Select process to select households in a specific earning bracket,
then connect it to an Audience or Merge process. Finally, you test run the process or branch.
See the other available topics for information about configuring, connecting, and running
processes.
Connecting processes in flowcharts
Connect processes in a flowchart to specify the direction of data flow and the order
in which the processes run. When you move processes in the workspace, any existing
connections between processes remain. Moving processes in a flowchart does not affect
data flow. You affect data flow only by adding or deleting connections.
1. Open a campaign flowchart for editing.
2. Move your cursor over a process box until four arrows appear around the box.
3.
Drag one of the arrows from the source process to the destination process.
When four arrows appear on the destination process, release the mouse button to
complete the connection.
The processes are now connected. An arrow indicates the direction of data flow between
the connected processes.

Unica Campaign V12.0 User Guide | 3 - Designing flowcharts | 39
The source process will run before the destination process. Data that is output from the
source process is then available as input to the destination process. For example, a Select
process generates output, which can then serve as input to a Segment process.
Whether connection lines are solid or dotted depends on the process box relationships.
When a destination process receives data from a source process, the connection line is
solid. When a destination process depends on a source process but does not receive data
from it, the connection line is dotted. A dotted line indicates that the destination process
cannot run successfully until the source process completes. In this way, you can identify
temporal processes, which are time-dependent on each other.
Related tasks
• Changing the appearance of connection lines (on page 39)
• Deleting a connection between two processes (on page 40)
Changing the appearance of connection lines
There are several options to control the appearance of connector lines between process
boxes in a flowchart.
You can specify whether connection lines are angled (slanted) or straight (right angles only).
You can also control whether connector lines appear in front of or behind process boxes.
Note: Whether connection lines are solid or dotted depends on the process box
relationships. When a destination process receives data from a source process, the
connection line is solid. When a destination process depends on a source process but
does not receive data from it, the connection line is dotted. A dotted line indicates that the
destination process cannot run successfully until the source process completes. In this way,
you can identify temporal processes, which are time-dependent on each other.
Unica Campaign V12.0 User Guide | 3 - Designing flowcharts | 40
1. Open a flowchart for editing.
2. Right-click in the flowchart workspace to open the context menu.
3. To switch between angled (slanted) and straight (right angles only), choose View and
check or clear Angled connections.
4. To make connection lines appear behind process boxes, choose View and clear
Overlap connections.
Related tasks
• Connecting processes in flowcharts (on page 38)
Deleting a connection between two processes
If you no longer want two processes to be connected, or if you want to change the direction
of the data flow between them, you can delete the connection.
1. Open a flowchart for editing.
2.
Do one of the following:
• Right-click a connection and select Delete from the context menu.
• Click the connection that you want to delete, then press Del or Ctrl+X or use the
Cut icon .
3. Confirm the deletion.
Related tasks
• Connecting processes in flowcharts (on page 38)

Unica Campaign V12.0 User Guide | 3 - Designing flowcharts | 41
Aligning process boxes
You can align process boxes to improve the appearance of the flowchart.
1. Open a flowchart for editing.
2. Drag a selection box around at least two processes. To add or remove processes from
the selection, use Ctrl-click.
3.
Open the Alignment menu in the toolbar and use one of the following options:
• To align boxes in a row: Choose Align top, Align bottom, or Align center (in a row).
• To align boxes in a column: Choose Align left, Align right, or Align center (in a
column).
If you choose an incorrect alignment, select an option from the Layout menu to restore
the layout. In many cases, the Hierarchical layout fixes overlapping process boxes. You
can also select an individual process box and drag it to a new location.
4.
To reposition all process boxes to a horizontal or vertical layout, open the Alignment
menu and choose Horizontal/vertical. Or right-click the flowchart workspace and
choose View > Horizontal/vertical. You do not have to select process boxes before
using this option. It affects all process boxes in the flowchart.
If this option causes connection lines to overlap, right-click the workspace and select
View > Angled connections twice to redraw the connection lines.
To make connection lines appear behind process boxes, right-click the workspace,
select View, and clear Overlap connections.
Adjusting flowchart layout
When you edit a flowchart, use the Layout menu to reposition all process boxes in a single
command to improve the appearance of the flowchart. This is a visual change which

Unica Campaign V12.0 User Guide | 3 - Designing flowcharts | 42
does not affect the flow of data. The direction of the connection lines between processes
determines data flow.
1. Open a flowchart for editing.
2.
Open the Layout menu and select an option:
• Tree: Organizes process boxes in a tree format. Useful when each process box has
a single input.
• Org chart: Organizes simple flowcharts and is effective for flowcharts with a single
input from the top.
• Circular: Arranges process boxes in a radial fashion. Useful for single connection-
based flowcharts that lead to one output.
• Hierarchical: Organizes process boxes in horizontal or vertical levels so that most
links flow uniformly in the same direction. This layout often provides the most
simple and visually straightforward choice.
3. To control whether connection lines appear in front of or behind process boxes, right-
click the workspace, open the View menu and check or clear Overlap connections.
Annotating flowcharts
You can annotate process boxes to communicate with other users of the flowchart and
clarify the intention and functionality of each process. Annotations appear as yellow sticky
notes.
Use annotations to ask and answer questions among team members or communicate
implementation details as a flowchart is developed. For example, an analyst can add an
annotation to explain the selection logic for a process and the Marketing Manager can use
the annotation to request changes.
Annotations can supplement the mouse-over information that is provided by the Note field
on the General tab of the process configuration dialog. For example, the Note field might
describe the selection criteria, but an annotation can be added to ask questions.
Unica Campaign V12.0 User Guide | 3 - Designing flowcharts | 43
Each process box in a flowchart can have a maximum of one annotation. A process box
that has an annotation includes a small annotation icon. The icon helps to identify which
processes have annotations if the annotations are hidden.
1. Open a flowchart for editing.
2. Right-click a process box, and choose Annotations > Add annotation.
3.
Type the information that you want to convey.
A small annotation icon is added to the process box so you can tell that the process is
annotated, even if annotations are hidden.
4.
Save the flowchart. If you do not save the flowchart, the annotations are not saved.
The show/hide state for annotations is retained and any blank (empty) annotations are
removed.
The following table explains how to work with annotations.
Action Details
Add an
annotation
In flowchart Edit mode, right-click a process box and choose
Annotations > Add annotation. You can use a maximum of 1024
characters. Each process box can have only one annotation.
Annotations are not saved until you save the flowchart.
Edit an
annotation
In flowchart Edit mode, show the annotation. Click the annotation and
make your changes. An annotation can be edited by anyone who has
permission to edit the flowchart.
Delete an
annotation
Use either method in flowchart Edit mode:
• Right-click a process box and choose Annotations > Delete
annotation.
• When an annotation is showing, click the Delete annotation icon
on the annotation, then confirm the deletion.
Unica Campaign V12.0 User Guide | 3 - Designing flowcharts | 44
Action Details
An annotation can be deleted by anyone who has permission to edit the
flowchart. An annotation is automatically deleted if its process box is
deleted.
Show or
hide all
annotations
In View or Edit mode, click Show all annotations or Hide all
annotations in the flowchart toolbar. If you are in Edit mode, the
state is retained when you save the flowchart.
Show or
hide a
specific
annotation
In flowchart Edit mode, right-click a process box and use the
Annotations menu to Show annotation or Hide annotation. The state is
retained when you save the flowchart.
Move an
annotation
Annotations always appear to the right of the associated process box.
If you move a process box, the annotation is also moved. In View or Edit
mode, you can drag an annotation to a new position but the position is
not saved after you exit the flowchart.
Copy
annotations
Annotations are copied in the following situations: a.) If you cut/copy/
paste a process box that has an annotation. b.) If you save a process
box to a template and paste the template. c. If you copy a flowchart.
For method c, the original display state of the annotations is retained.
Select or
resize an
annotation
Annotations cannot be selected or resized and are unaffected by Zoom.
Save
annotations
You must save the flowchart or annotations will not be retained.
Print
annotations
When you print a flowchart, any visible annotations are also printed.
Show any annotations that you want to print. Only annotations that are
visible in the workspace are printed. Annotations that are outside of the
screen area might not print.
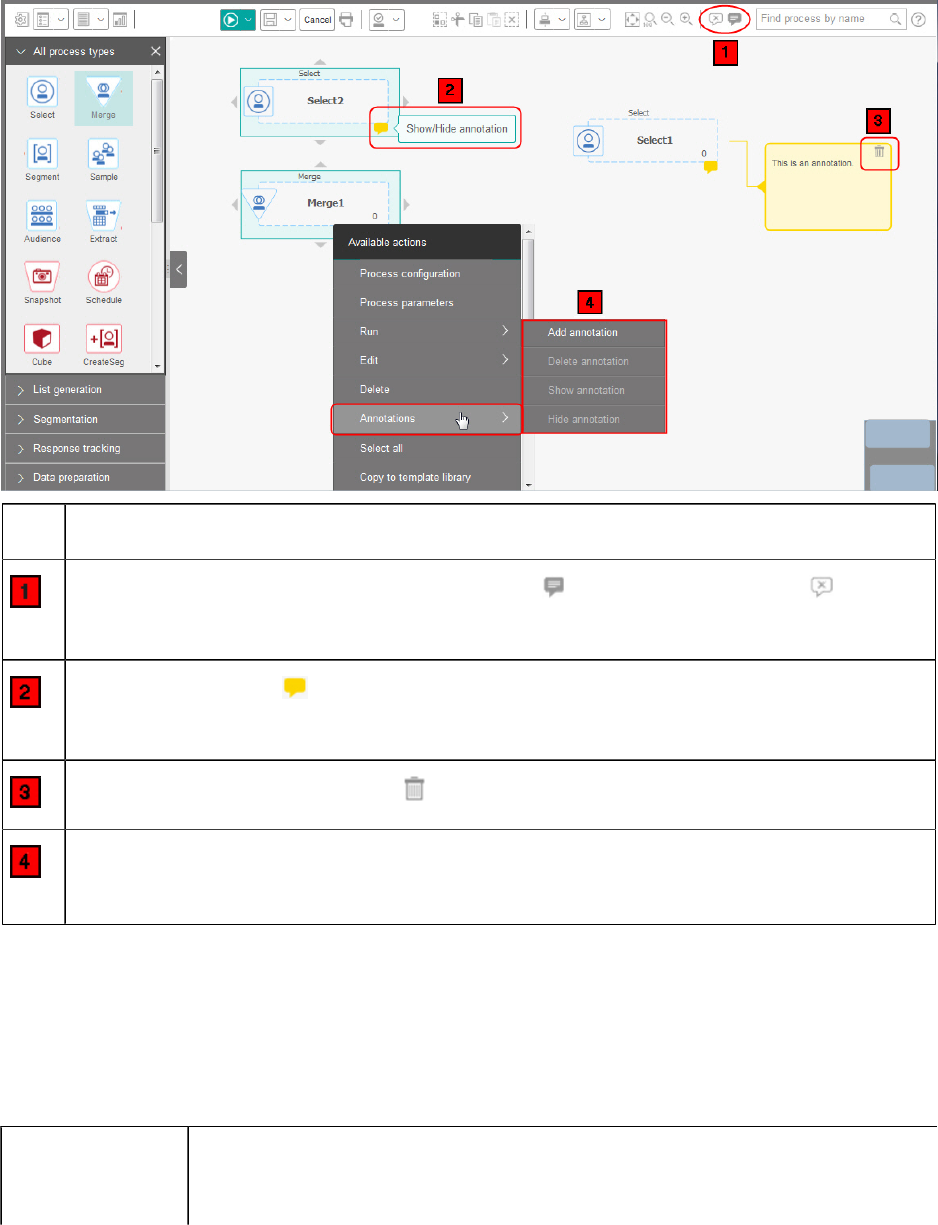
Unica Campaign V12.0 User Guide | 3 - Designing flowcharts | 45
The following image shows the annotation menus and icons.
Item Description
Use the toolbar icons to Show all annotations or Hide all annotations in the
flowchart.
The annotation icon on a process box indicates which processes have
annotations. Click the icon to show or hide an individual annotation.
Click the Delete annotation icon to delete an individual annotation.
Right-click a process box and use the Annotations menu to add, delete, show, or
hide an annotation.
Determining the status of a process
Each process box in a flowchart displays an icon to indicate its status.
Process not started (has not run)
Process running
Unica Campaign V12.0 User Guide | 3 - Designing flowcharts | 46
Process run complete
Warning
Error
Paused
Schedule process is ready to initiate any subsequent processes. (This
icon appears only on a Schedule process, after the flowchart has run.)
A process box with the process run complete icon is shown below.
Copying processes within a flowchart
Copying a configured process can save time when you build campaign flowcharts. You can
paste the process elsewhere in the workspace.
1. Within a campaign, open a flowchart for editing.
2.
In the workspace, click the process that you want to copy.
Note: To select multiple processes, you can Ctrl+Click the processes, drag a
selection box around them, or use Ctrl+A to select all the processes in the flowchart.
3.
Click the Copy icon .
You can also select Copy from the menu or press Ctrl+C.
4.
Click the Paste icon .
You can also select Paste from the menu or press Ctrl+V.
A copy of the process appears in the workspace.
5. Click and drag the copied process to the desired location.
Unica Campaign V12.0 User Guide | 3 - Designing flowcharts | 47
Copying processes between flowcharts
Use the template library to copy configured processes from one flowchart to another. A
template contains one or more configured processes and connections. Copying configured
process boxes can save time when you design complex flowcharts.
Due to certain limitations, you cannot use two separate browser windows to copy
configured processes from one flowchart to another. Instead, use the following procedure.
The best way to copy configured processes from one flowchart to another is to use the
template library:
1. Open a flowchart for editing.
2.
Select processes in the flowchart.
You can use Ctrl+Click or drag a selection box around them, or use Ctrl+A to select all
of the processes in the flowchart.
3. Right-click any selected process box and select Copy to template library.
4. When prompted, enter a Name and Note to help you identify the template later.
5. You can now paste the process boxes into any other flowchart, by choosing Paste from
template library from the right-click menu or by using Options > Stored templates.
6.
As an alternative to using the template library, you can perform the following steps:
a. Select one or more processes.
b. Use the Copy icon or Ctrl+C or the right-click menu to copy the processes.
c. Close the flowchart.
d. Open another flowchart in edit mode.
e. Paste the processes by clicking the Paste icon or using Ctrl+V or the right-click
menu.
Unica Campaign V12.0 User Guide | 3 - Designing flowcharts | 48
Moving processes in flowcharts
You can move any process in a flowchart by dragging the process to a different location in
the workspace. Moving a process does not affect the workflow; it only affects the visual
appearance of the flowchart.
You might want to move processes so that you can see the process boxes and connections
more clearly. In general, it is best to avoid positioning processes on top of each other
because it is harder to see the overall flow. If you have a large flowchart with many
processes, you can move the processes and then use the zoom feature to see them all.
The position of processes in the flowchart workspace does not affect the logical flow of
data. The connections between the processes determine data flow.
Follow the steps below to move process boxes in a flowchart.
1. Open a flowchart for editing.
2.
In the flowchart workspace, drag a process to a new location.
Existing connections to and from the process remain, and are redrawn for the new
location.
3. Click Save.
Deleting processes from flowcharts
As you design and build flowcharts, you can delete processes if you decide that you no
longer need them. If you delete a process that has an annotation, the annotation is also
deleted.
This procedure assumes that you have a flowchart open for editing.
1.
In the flowchart workspace, right-click the process that you want to delete, and select
Delete from the menu.
You can select more than one process at the same time by holding down the Ctrl key.
Unica Campaign V12.0 User Guide | 3 - Designing flowcharts | 49
2. Click OK to confirm the deletion.
The selected processes are removed from the workspace and all connections to and from
the processes are deleted. Any annotations related to the processes are also deleted.
Data sources for processes
When you configure most processes in a flowchart, you must specify the source of the data
that the process will act on. The data source for a process can be one or more incoming
cells, segments, files, or tables. For example, the data source for a Select process might
be a database table where your organization stores customer information such as Name,
Address, Age, and Income.
The available tables depend on which data sources your administrator mapped. (Mapping
tables is the process of making external customer tables accessible in Unica Campaign.
Only tables that an administrator has mapped are available for selection.)
If multiple tables have been mapped, you can select more than one table as input to a
process. For example, a Select process can take input from your company's "A" database
and "B" database. The tables that you select must have the same audience level, such as
Household or Customer.
It is common to use the output of one process as the input to a subsequent process. For
example, you might connect a Select process to a Segment process. When you configure
the Segment process, the ouput of the Select process would serve as the input to the
Segment process.
If you select multiple cells as input, all cells must have the same audience level. For
example, if two Select processes provide input to a Merge process, both Select processes
must have the same audience level. You cannot mix Household and Customer, for example.
To specify the data source for a process, configure the process in a flowchart. In most
cases, you use the Input field on the first tab of the process configuration dialog. The Input
field displays all of the base tables that are currently mapped in the table catalog, along with
their audience levels. The Input field also indicates any connected (upstream) processes.

Unica Campaign V12.0 User Guide | 3 - Designing flowcharts | 50
If there is an incoming cell (for example, if a Select process is connected to a Segment
process), then only tables with the same audience level as the cell are displayed.
For more information about selecting data sources, see the instructions for configuring
each process.
Skipping duplicate IDs in process output
The Extract, Call list, Mail list, and Snapshot processes allow you to specify how to treat
duplicate IDs in the process output. The default is to allow duplicate IDs in the output.
Follow these steps to exclude records with duplicate IDs from the output.
Note: This feature can impact performance because the application must download all
data before it can de-duplicate the data. Best practice is to ensure that the data does not
contain duplicates. You can use an ETL process to remove duplicates or choose columns in
the audience key to make it unique.
1.
From the configuration window of the process, click More.
You see the Advanced Settings window.
a. Select Skip records with duplicate IDs, and specify the criteria to determine which
record to retain if duplicate IDs are returned. For example, select MaxOf and
Household_Income to export only the ID with the highest household income.
Note: This option only removes duplicates in the same input field. Your data
can still contain duplicate IDs if the same ID appears in multiple fields. To remove
all duplicate IDs, you must use a Merge or Segment process upstream of the
Extract process to purge duplicate IDs or create mutually exclusive segments.
2.
Click OK to close the Advanced Settings window.
Your duplicate ID settings are displayed in the configuration window.
Note: In the Mail list or Call list process box, the Skip records with duplicate IDs
option pertains only to the fulfillment table created by the process and not to records
Unica Campaign V12.0 User Guide | 3 - Designing flowcharts | 51
that are written to contact history. The contact history tables only handle unique IDs.
The flowchart designer must ensure that the result set obtains the correct records
before reaching the contact history tables. Use the Extract process to de-dupe the
result set before the Mail list or Call list process box to ensure that the correct records
are written to both the fulfillment table and contact history.
Previewing field values from your user data
When you configure a process in a flowchart, you can use the Profile feature to preview field
values. This feature lets you see actual values from fields in your user data. You can profile
any field in a mapped data source. You can also profile derived fields.
You must have the appropriate permissions to profile fields. Ask your system administrator
if you have questions about your access to this feature. Also note that your administrator
can prevent fields from being profiled. You see a warning if you try to profile a field that is
also an audience because profiling an audience can return many records and potentially
impact performance.
When you profile a field, you can view and select values to use in the current operation, for
example to build a query for a Select process.
In addition to listing the values, the Profile feature indicates each value's frequency of
occurrence in the selected field. You can use this information to ensure that you are
targeting the intended contacts. Only records in the current cell are included in the count,
unless the counts were pre-computed.
1. Open a flowchart for editing and begin to configure a process.
2. In the configuration dialog of a process that includes the Profile button, such as Select,
Extract, or Segment, select the field that you want to profile.
3.
Click Profile.
Unica Campaign profiles the data in the selected field. The Category and frequency
Count fields are updated as profiling progresses.
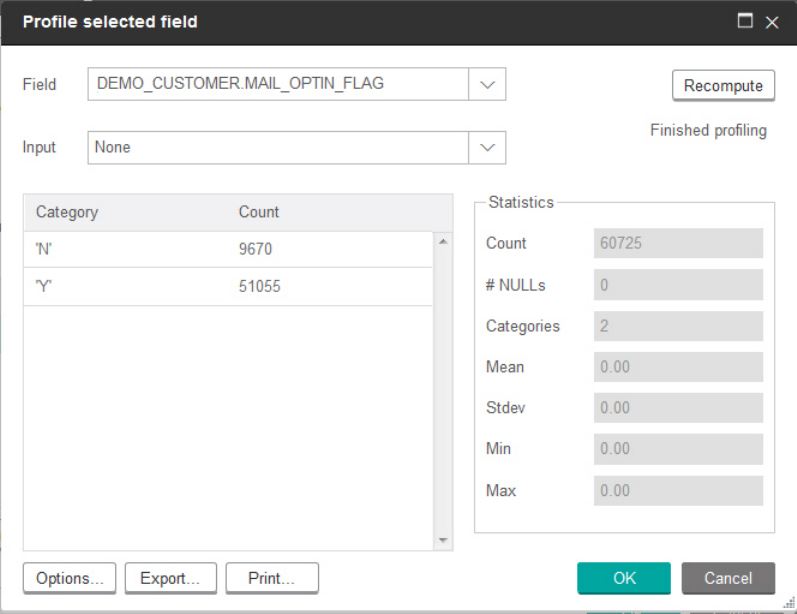
Unica Campaign V12.0 User Guide | 3 - Designing flowcharts | 52
Wait until profiling is complete before using the results, to ensure that all categories are
processed and counts are complete.
When profiling is complete, the Profile selected field dialog shows the following
information:
• The list of values in the selected field, shown in the Category column, and the
corresponding Count of IDs with that value. Unica Campaign organizes values by
category, grouping them to create approximately equal-sized segments. The default
maximum number of categories (distinct bins of values) for display is 25. You can
change the maximum number of categories.
•
The Statistics pane shows the total count of IDs and other details about the data for
that field, including:
◦ The number of NULL values found.
◦ The total number of categories, or values, for that field.

Unica Campaign V12.0 User Guide | 3 - Designing flowcharts | 53
◦ Statistical values for the data including the mean, standard deviation, minimum,
and maximum values.
Note: Mean, Stdev, Min, and Max are not available for ASCII fields. When you
profile text fields, these values appear as all zeros.
Refreshing profile counts
Refresh the profile count when something occurs that might change the results. For
example, you can refresh the count when new values are added to a field or when a
database table is updated.
Follow these steps to refresh the profile results for a field.
1. Open any process configuration dialog in which the Profile option is available.
2. Select a field and click Profile.
3.
In the Profile selected field dialog, click Recompute.
Note: When you first profile a field from a dimension table, Unica Campaign returns
counts that match the field in the dimension table. When you click Recompute to
refresh the profile results, Unica Campaign returns counts from the resulting join with
the base table that is linked to the dimension table. If you want to profile a dimension
table field without joining to a base table, map the dimension table as a base table.
Restricting input for profiling
When Unica Campaign profiles a field, it creates only the segments that are available in the
input to the process where you are performing profiling.
For example, if you restrict input to the Segment process, and you profile a field based
on the restricted input, the profile displays only the segments that were available in the
restricted input.
Consider this example:

Unica Campaign V12.0 User Guide | 3 - Designing flowcharts | 54
1. You configure a Select process that does a query that returns only 354 records.
2. You use that Select process as input to a Segment process.
3. In the Segment process configuration dialog, you use the Profile feature to see which
values are available in various fields.
4. The selection that you make in the Input list of the Profile selected field dialog
determines how many records are profiled. If you choose None, Unica Campaign
profiles all of the records. If you choose the incoming Select box as the Input, Unica
Campaign profiles only the records that were selected by that process. If the Select
process query resulted in only 354 records, Unica Campaign profiles only those
records.
Note:
• For the Extract process, you must select the input cell to which the extract table is
associated to profile the extracted fields because the extracted fields are attached to
the inbound cell. You can choose None only for single input cell. For multiple input cells,
you must select the input cell to which the extract table is associated.
• In the right panel of the Select Process Configuration window, even if you select
multiple condition values in the value field, only one value would be displayed in the
grid. This is because, you may have to perform a double-click to complete the action
and double-click works only on a single value at a time. Hence multiple values will not
be displayed in the grid.
Disallowing profiling
profiling fieldsdisallowingReal-time profiling allows you to view and use characteristics of a selected field. It can
affect performance, however, when working with large databases. For this reason, Unica
Campaign allows this option to be disabled.
When real-time profiling is disabled, and you click Profile, a message at the bottom of the
Profile selected field dialog indicates that real-time profiling is disallowed.
Unica Campaign V12.0 User Guide | 3 - Designing flowcharts | 55
If profiling is disallowed and the field is not configured to be pre-computed, the Profile
selected field dialog indicates that no data is available, no counts or categories are
displayed, and all Statistics counts are zero.
If pre-computed values are available for a field, the pre-computed values are displayed
instead of live values when profiling is performed. The Profile selected field dialog indicates
that the data source is "Imported," and shows the date and time that the values were last
computed.
For more information about disallowing real-time profiling, see the Unica Campaign
Administrator's Guide.
Changing the maximum number of profile segments
When you profile fields in flowchart process boxes, Unica Campaign automatically creates
up to a maximum number of 25 segments. You can change this value for the current
flowchart session.
When you use the Profile option in a process configuration dialog, you can specify the
maximum number of segments to generate when previewing field values. The new value is
used by all process boxes in the current flowchart. However, the value applies only to the
current flowchart and session. When you open another flowchart or close and then reopen
the same flowchart, the value reverts to the default value of 25.
1. Open any process configuration dialog in which the Profile option is available.
2. Select a field for profiling and click Profile.
3. In the Profile selected field dialog, click Options.
4. In the Profiling options dialog, enter a new value in the Number of segments field
to indicate the maximum number of segments into which you want the field values
grouped.
The profile is recomputed with the new value. If the number of distinct values in the field
exceeds the maximum allowed number of segments, the profile groups the values together
into equal sized segments to avoid exceeding the maximum number of segments.
Unica Campaign V12.0 User Guide | 3 - Designing flowcharts | 56
Profiling field values by meta type
Profiling by meta type affects how data is sorted when you profile a field in a process
configuration dialog. You can sort field values for data types such as dates, money, and
other numeric data.
1. Open any process configuration dialog in which the Profile option is available.
2. Select a field for profiling or click Profile.
3.
In the Profile selected field dialog, click Options.
The Profiling options dialog opens and Profile by meta type is enabled by default, so
field values that represent dates, money, telephone numbers, and similar data types are
correctly sorted and binned. For example, dates are sorted as dates, not as numeric
values. If you disable this option, the values are sorted as ASCII text.
The following example shows how this setting affects a date field. Meta type profiling
recognizes that the data type is Date and sorts the dates accordingly.
Profile by meta type enabled
(sorted by date)
Profile by meta type disabled
(sorted numerically)
25-DEC-2014 20-FEB-2015
20-FEB-2015 20-MAR-2015
20-MAR-2015 25-DEC-2014
Inserting a profile category into a query
While you build a query expression in a process configuration dialog, you can insert a field
value into your query expression.
1.
While configuring a process, select a field and click the Profile button.
The Profile selected field dialog opens. Wait for the dialog to be populated.

Unica Campaign V12.0 User Guide | 3 - Designing flowcharts | 57
2. When profiling is finished, double-click a category in the Profile selected field dialog to
insert that value at the current cursor location in the query text box.
Note: If you do not see the value that you want, it is possible that multiple values
are being grouped together into a profile segment. If you set the maximum number of
profile segments to a number greater than the number of categories (reported in the
Profile selected field dialog), each field value will be listed as a separate category. This
makes it possible to access all of the existing categories.
Printing profile data
After you profile a field, you can print the profile data.
1. Click Print from the Profile selected field dialog.
2. Use the resulting dialog to specify the print options.
Exporting profile data
After you profile a field, you can export the profile data to a comma-separated values (CSV)
text file.
1. Profile a field while configuring a process in a flowchart.
2.
In the Profile selected field dialog, click Export.
Note: The Export button is available only when profiling is finished.
The Export report data dialog opens.
3. Enter a file name in the File name field or accept the default value. Do not specify a
path or extension. The extension .csv will be used when the file is created.
4. (Optional) Select Include column labels if you want to include column headers in the
file to identify each field.
Unica Campaign V12.0 User Guide | 3 - Designing flowcharts | 58
5. Click Export. If this button is disabled, you must enter a file name first.
6. Use the resulting dialog box to open or save the .csv file.
7. If you save the file, you are prompted for a location. You can also change the file name
at that time.
You can open the CSV file in any text editor. If you open the file in Microsoft™ Excel, your
Excel settings determine how the data is displayed. For example, Excel might interpret a
range value, such as "1-5", as a date (January 5).
Creating queries with Formula helper
When you create a query to select IDs in a Select, Segment, or Extract process, you can use
the Formula helper to help build the query. The Formula helper is available from the process
configuration dialog. The Formula helper contains a set of buttons for inserting commonly
used operators and a list of macros, operators, and functions.
1. Begin configuring a process that uses queries, such as Segment, Select, or Extract.
2.
Access the query option for the process:
• For a Select process, choose Select <audience> IDs with.
• For a Segment process, choose Segment by query, then either create a segment
or double-click a segment to edit it. In the resulting dialog box, choose Select IDs
with.
• For an Extract process, choose Select records with.
3. Click the Text Builder button to change from the default query method. The button label
changes to Point & click.
4.
Click the Formula helper button.
The Formula helper dialog opens. It contains a set of buttons for inserting commonly
used operators and a list of macros, operators, and functions.
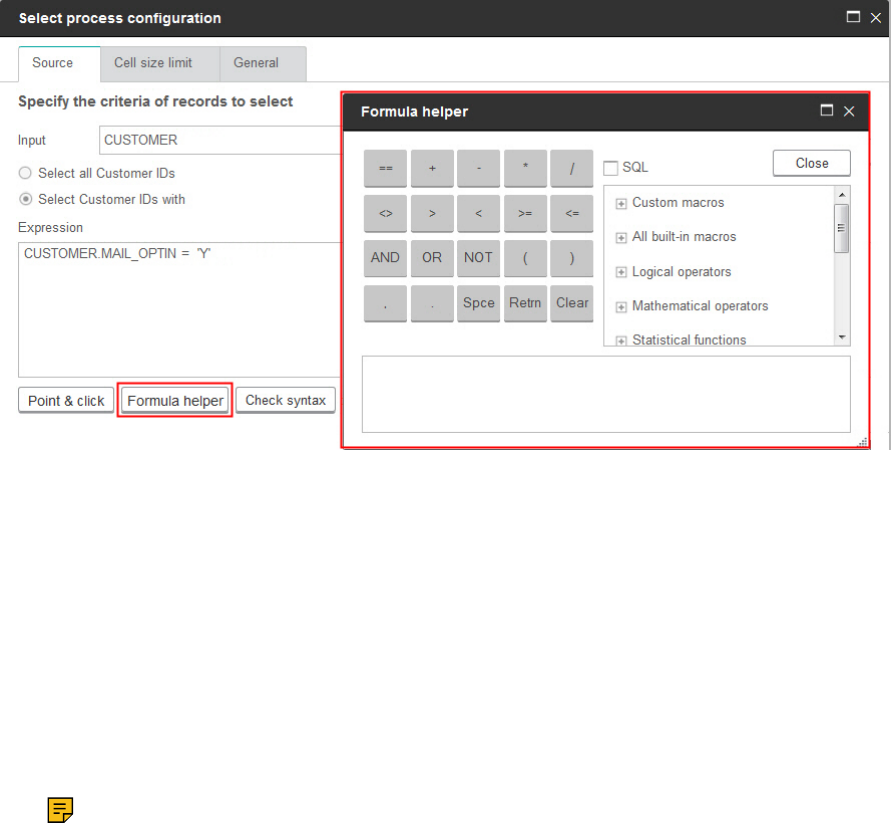
Unica Campaign V12.0 User Guide | 3 - Designing flowcharts | 59
5. (Optional) To restrict the list to only SQL operators and functions, check SQL.
6.
As you build your query by selecting fields from the Available fields list, use the
Formula helper window to help define the query:
a. Expand the list of macros, operators, or functions to locate the item that you want
to use. Select an item to see a description and syntax example. Double-click an
item to add it to the query text box.
Note: For custom macros, the description and syntax were created by the
person who wrote the macro.
b. Use the Formula helper buttons to add operators and punctuation. The Clear
button acts as a backspace (erase) key.
c.
You can also edit the query directly. However, you can avoid syntax errors by
selecting items, such as field and table names, from the lists provided.
d. Click Close.
7. Note that if your query includes a table field that has the same name as a Campaign
generated field, you must qualify the field name. Use the following syntax:
<table_name>.<field_name>.

Unica Campaign V12.0 User Guide | 3 - Designing flowcharts | 60
8. Use Check syntax in the process configuration dialog box to detect any errors.
Checking the syntax does not put any load on the database server.
9. (Optional) Use Test query to see how many IDs the query returns.
A progress bar is displayed while the query is being tested. Close the progress window
if you want to cancel the test. When testing is complete, Unica Campaign indicates the
number of rows the query returned.
Important: Global suppressions and cell size limits are not applied in test query
counts. Test queries might also return non-normalized data. To obtain an accurate
result count, test run the process.
Creating raw SQL queries
When you configure a Select, Segment, or Extract process in a flowchart, you can use
queries to identify contacts from your databases or flat files. The Select, Segment, and
Extract processes provide query builders to help you construct queries. Additionally,
experienced SQL users can write their own SQL queries or copy and paste SQL queries from
other applications. Writing raw SQL is an advanced operation; users are responsible for
correct syntax and query results.
1. Begin configuring a Select, Segment, or Extract process.
2.
For a Select process:
a. Choose Select <audience> IDs with.
b. The button under the Expression box must say Point & click. If it does not, click the
Text Builder button so the label changes to Point & click.
c. Click Advanced.
d. In the Advanced settings dialog, check Use raw SQL for record selection.
This option enables the use of raw SQL in the Text Builder when you specify
your selection criteria. If you do not select this option, you can only use Unica
expressions and custom macros.

Unica Campaign V12.0 User Guide | 3 - Designing flowcharts | 61
e. Use the Database list to select a data source to query. Select a target audience
from the Audience level list.
f. If you want to run SQL commands before or after the Select process, you can
specify raw SQL in the Pre-processing or Post-processing areas. See Specifying
pre- or post-processing SQL statements (on page 63).
g. Click OK to close the Advanced Settings dialog.
h. Enter raw SQL in the Expression area. You can use the Formula helper to help
construct the SQL. Check SQL in the Formula helper to restrict the list of operators
and functions to SQL-specific options.
3.
For a Segment process:
a. On the Segment tab, choose Segment by query.
b. Click New segment to create a segment, or select an existing segment in the list
and click Edit.
c. In the New segment or Edit segment dialog, choose Select <audience> IDs with,
click Text Builder, then click Advanced.
d. In the Advanced settings dialog, check Use raw SQL, select a database, and click
OK.
e. Enter raw SQL in the Expression area. Optionally, use the Formula helper to help
construct the SQL. Check SQL in the Formula helper to restrict the list of operators
and functions to SQL-specific options.
4.
For an Extract process:
a. Choose Select <audience> IDs with.
b. The button under the Expression box must say Point & click. If it does not, click the
Text Builder button so the label changes to Point & click.
c. Enter raw SQL in the Expression area. You can use the Formula helper to help
construct the SQL. Check SQL in the Formula helper to restrict the list of operators
and functions to SQL-specific options.
5. Note that if your query includes a table field that has the same name as a Campaign
generated field, you must qualify the field name. Use the following syntax:
<table_name>.<field_name>.

Unica Campaign V12.0 User Guide | 3 - Designing flowcharts | 62
Guidelines for using raw SQL queries
Writing raw SQL is an advanced operation; users are responsible for correct syntax and
query results.
Note: The Use raw SQL permission for user tables in Unica Campaign determines who
can use raw SQL. It is strongly recommended that administrators restrict the ability to use
raw SQL to a user who has proper ACL privileges within the organization. For important
information, read about administrative permissions in the Unica Campaign Administrator's
Guide.
Follow these guidelines when using raw SQL to construct queries in a process
configuration:
• A SQL query must return a list of only the unique IDs as defined by the key on a base
table.
•
A SQL query must use the following syntax:
SELECT DISTINCT(<key1> [<key2>,...]) FROM <table> WHERE <condition>
ORDERBY <unique_id>
This query instructs the database to perform sorting and data deduplication. If you omit
the DISTINCT or ORDERBY clause, Unica Campaign sorts and deduplicates the data on
the application server, so you still receive the correct results, but performance will be
slower.
• If in-database optimization is enabled and there is an input cell to the Select process,
you must use the <TempTable> token to obtain the correct list of audience IDs.
• To significantly improve performance with large tables, use the <TempTable> token
even when not using in-database optimization.
•
If your database allows multiple commands to be passed, enter as many valid SQL
commands as you need, with the following rules:
◦ Separate commands with the appropriate delimiter
◦ The last command must be a select command.
◦ This select command must select all the relevant fields required in defining your
audience level in the same order the audience level is defined.
◦ No other select statements are used
Unica Campaign V12.0 User Guide | 3 - Designing flowcharts | 63
• Data filters do not apply to raw SQL queries or to custom macros that use raw SQL. To
learn about data filters, see the Unica Platform Administrator's Guide.
Hive query language conformance
The following guidelines apply when Unica Campaign is integrated with Hive-based big data
sources.
Apache Hive has its own query language called HiveQL (or HQL). While based on SQL,
HiveQL does not strictly follow the full SQL-92 standard. HiveQL offers extensions not in
SQL, including multitable inserts and create table as select, but only offers basic support
for indexes. Also, HiveQL lacks support for transactions and materialized views, and only
limited subquery support.
Therefore, the following guidelines apply when using Hive-based big data sources with
Unica Campaign:
• The SQL must conform with HiveQL.
• If you are writing raw SQL queries for use in Unica Campaign, confirm that the queries
work on Hive.
• Using multiple SQL statements for raw SQL queries is not supported.
• You might need to modify existing queries for Hive if you are using raw SQL in
Unica Campaign process boxes, custom macros, or derived fields, for pre- and post-
processing.
Specifying pre- or post-processing SQL statements
If you are using a Select or Extract process, you can optionally include raw SQL statements
to run before or after the process.
You can include SQL procedures as part of the process run, which can be useful for ETL,
routine data mart updates, performance tuning, and security. You can specify pre- or post-
processing SQL:

Unica Campaign V12.0 User Guide | 3 - Designing flowcharts | 64
• Pre-processing: Enter raw SQL to be processed before the query runs.
• Post-processing: Enter raw SQL to be processed after the query runs.
For example, you can use pre- and post-processing SQL statements to:
• Run stored procedures in the database
• Create, drop, and re-create tables and indexes
• Grant or change privileges to other users or groups
• Organize multistep database commands
• Run complex database routines without having to use external scripts to connect to the
database
Note: For important information, see Guidelines for using raw SQL queries (on page
61).
1.
Begin configuring a Select or Extract process.
You can select all records or use a query to select specific IDs. For the Select process,
you can apply pre or post processing regardless of the query type (standard query or
Use raw SQL for record selection).
2.
Click the Advanced button.
The Advanced Settings window appears.
3. Double-click in the Pre-processing area and enter a raw SQL statement to run before
the process.
4. Click in the Database cell, and select the database on which you want to run this
statement.
The Database list shows all available databases (those for which a data source
category was configured on the Configuration page in Unica Platform). If your database
does not appear in the list, contact your Unica Campaign system administrator. You
must enter a SQL statement before you can select a database.
The SQL statements are processed in the order in which they appear.

Unica Campaign V12.0 User Guide | 3 - Designing flowcharts | 65
5. Follow the same procedure to enter any Post-processing SQL statements to run after
the process.
The SQL statements are processed in the order in which they appear.
Note: For information about the Use raw SQL for record selection option in the
Advanced Settings dialog, see Creating raw SQL queries (on page 60).
Using the TempTable and OutputTempTable tokens in raw SQL
queries
Temporary tables provide a workspace for intermediate results when processing or passing
data. When the operation is finished, temp tables are discarded automatically.
• For best performance, use the <TempTable> token in raw SQL queries, especially when
querying large tables.
• If you are using in-database optimization and you specify a raw SQL query in a Select
process with an input cell, you must use the <TempTable> token to ensure correct
behavior. See below for a full explanation.
• If you are using in-database optimization, also use the <OutputTempTable> token to
prevent audience IDs from being unnecessarily copied from the database to the Unica
Campaign server.
When you use a raw SQL query in a Select process with an input cell, the processing
behavior depends on whether you are using in-database optimization. (In-database
optimization is controlled globally with the Use In-DB Optimization configuration setting.
It is controlled for individual flowcharts with the Use In-DB Optimization during Flowchart
Run option on the Admin menu.)
• When in-database optimization is off: The list of IDs from the raw SQL query is
automatically matched against the ID list from the incoming cell. The resulting list of
IDs is a subset of the cell, as expected.
• When in-database optimization is on: Unica Campaign assumes that the ID list
generated from the Select process is the final list. Unica Campaign does not match
Unica Campaign V12.0 User Guide | 3 - Designing flowcharts | 66
this list against the ID list of any incoming cell. Therefore, the raw SQL query written
for an intermediate Select process (a Select process with an input cell) must use the
<TempTable> token to properly join against the incoming cell. Joining against the
input cell ensures correct results and improves performance by preventing extraneous
processing for audience IDs that are not in the input cell.
In-database optimization is explained in the Unica Campaign Administrator's Guide.
Example: Using the TempTable and OutputTempTable tokens
This example shows how to use TempTable and OutputTempTable tokens in a raw SQL
query.
Assume that you have a Select1 process that selects 10,000 customers who are "Gold"
customers (for example, Indiv.AcctType = 'Gold'). You then connect Select1 to a second
Select process ("Select2") using a raw SQL query:
Select p.CustID from Indiv p, <TempTable> where p.CustID = <TempTable>.CustID
group by p.CustID having sum(p.PurchAmt) > 500
This example selects customers the sum of whose purchases exceeds $500 and who are in
the input cell (in other words, customers who have a "Gold" account type).
In contrast, a raw SQL query omitting the <TempTable> token and join:
Select p.CustID from Purchases p group by p.CustID having sum(p.PurchAmt) >
500
first calculates the sum of purchases for all customers in the Purchases table (which could
be millions of customers) and then selects all customers the sum of whose purchases
exceed $500, regardless of whether they are "Gold" customers or not.
Therefore, for best performance, even if in-DB optimization is disabled, write your raw SQL
queries using the <TempTable> token when there is an input cell.
For simplicity, this example does not use the <OutputTempTable> token, but to maintain in-
DB optimization and prevent the audience IDs from being retrieved from the database back
to the Unica Campaign server, you must include the <OutputTempTable> token in your raw
SQL query. For example:

Unica Campaign V12.0 User Guide | 3 - Designing flowcharts | 67
Create table <OutputTempTable> as Select p.CustID from Purchases p,
<TempTable> where p.CustID = <TempTable>.CustID group by p.CustID having
sum(p.PurchAmt) > 500
Referencing Extract tables in raw SQL queries
You can reference an Extract table in downstream processes via raw SQL using the
<Extract> token. Use this token to specify subsets of data for subsequent processing,
which can improve performance when working with large tables.
The following example queries an Extract table to select the customer IDs of all customers
whose account balance exceeds $1,000.
Select p.CUSTOMERID from USER_TABLE p, <Extract> where p.CUSTOMERID =
<Extract>.CUSTOMERID group by p.CUSTOMERID having sum(p.BALANCE) > 1000
For flowcharts containing multiple Extract processes, the <Extract> token always refers to
the latest available Extract table.
Note: After a Merge, the <Extract> token may or may not be valid. Test run the
flowchart to determine if the token works as expected.
How queries are evaluated in Unica Campaign processes
Queries in Unica Campaign processes are evaluated left to right using mathematical rules.
For example, the following statement:
[UserVar.1] < PDF < [UserVar.2]
is evaluated as:
([UserVar.1] < PDF) < [UserVar.2]
That is, the first part of the statement ([UserVar.1] < PDF) is evaluated as true or false (1 or
0), and the result is passed to the second statement:
[1 | 0 ] < [UserVar.2]

Unica Campaign V12.0 User Guide | 3 - Designing flowcharts | 68
For the example to be evaluated as PDF greater than [UserVar.1] and less than [UserVar.2],
you would need to construct the following query:
[UserVar.1] < PDF AND PDF < [UserVar.2]
This statement is equivalent to the following:
([UserVar.1] < PDF) AND (PDF < [UserVar.2])
The Select process
Use the Select process to select IDs from your marketing data, such as customers,
accounts, or households that you intend to contact.
Select is one of the most frequently used processes in Unica Campaign. Many flowcharts
begin with one or more Select processes. The Select process outputs a cell that contains a
list of IDs, such as customer IDs, which can be modified and refined by other processes.
Filtering the mapped user tables
You can filter the mapped user tables that appear in the Available Fields section in the
Select process configuration window. The tables are filtered by table name.
To filter the mapped user tables by table name, complete the following steps:
1. Open a flowchart for editing (click Edit in the flowchart toolbar).
2. Double-click the Select process box in the flowchart to open the Select process
configuration window.
3. Click the Filter icon next to Available Fields.
4.
Enter the text to filter the tables and click Apply.
You cannot use any special characters except underscore in the filter text. The search
is not case sensitive.
The filtered list of tables is displayed. The Filter icon changes to a dark green color.
5. To clear the filter, click the Filter icon , and in the Filter window, click Clear.

Unica Campaign V12.0 User Guide | 3 - Designing flowcharts | 69
The filter is applicable until you click Clear or you close the Select process configuration
window.
Selecting a list of contacts
Configure a Select process to select contacts from your marketing data.
To select contacts, you can specify all IDs in a segment or table, or you can use a query to
find just the contacts that you want. One or more Select processes can then be used as
input into another process. For example, you can select all Gold customers, then create
another selection of Silver customers. You can then use a Merge process to create a single
list of eligible contacts.
1. Open a flowchart for editing (click Edit in the flowchart toolbar).
2. Drag a Select process from the palette to your flowchart.
3.
Double-click the Select process box in the flowchart.
The Select process configuration dialog box opens and the Source tab is open by
default.
4.
On the Source tab, use the Input list to select a Segment or Table as the data source.
To select multiple tables, click the ellipsis button next to the Input field, then check
the tables that you want to use.
Note: If Digital Analytics is integrated with Unica Campaign, you can select Digital
Analytics segments as the input.
5. If you want to include all rows from the segment or table that you selected as the
Input source, choose Select all <audience> IDs (The word <audience> indicates the
audience level, such as Customer, that is specified for the selected input data source.)
6.
If you prefer to use a subset of IDs from the selected data source, choose Select
<audience> IDs with, so you can do a query for the records that you want.
Unica Campaign V12.0 User Guide | 3 - Designing flowcharts | 70
The Expression box shows columns labeled Field name, Oper, Value, and And/Or.
When the button says Text Builder, you can build expressions by populating the
columns labeled Field name, Oper, Value, And/Or.
When the button says Point & click, you can view or edit raw SQL and you can use the
Formula helper to pick macros, operators, and string functions from a list.
With either method (Text Builder / Point & click), you can select fields from the
Available fields list, including Unica Campaign Generated Fields and Derived fields.
7. Construct a query to determine which records are selected:
a.
To specify which field to query, click in the Field name cell. The Available fields list
should appear. If the list does not appear, click in the Field name cell again. In the
Available fields list, expand the fields until you see the one that you want. Select an
available field by double-clicking it or by highlighting it and clicking Use.
Note: When deciding which field to use, you can highlight an available field
and click Profile to see a list of values in that field. Then use the Profile selected
field dialog to examine the field values. For more information, see Previewing field
values from your user data (on page 51).
Note: When the list of Available fields is displayed, you can use the Derived
fields button if you want to create or select a variable for querying. For more
information, see Derived fields (on page 279).
b. Click in the Oper cell, then double-click a comparison operator in the Operators list
(=, <, >, <=, >=, <>, In, Not in, Between).
c.
Click in the Value cell, then double-click a value. If no values appear, double-click
(Profile...) in the Values list to open the Profile selected field dialog so you can
select from a list of values. You can also double-click in the Value cell to edit the
value directly.
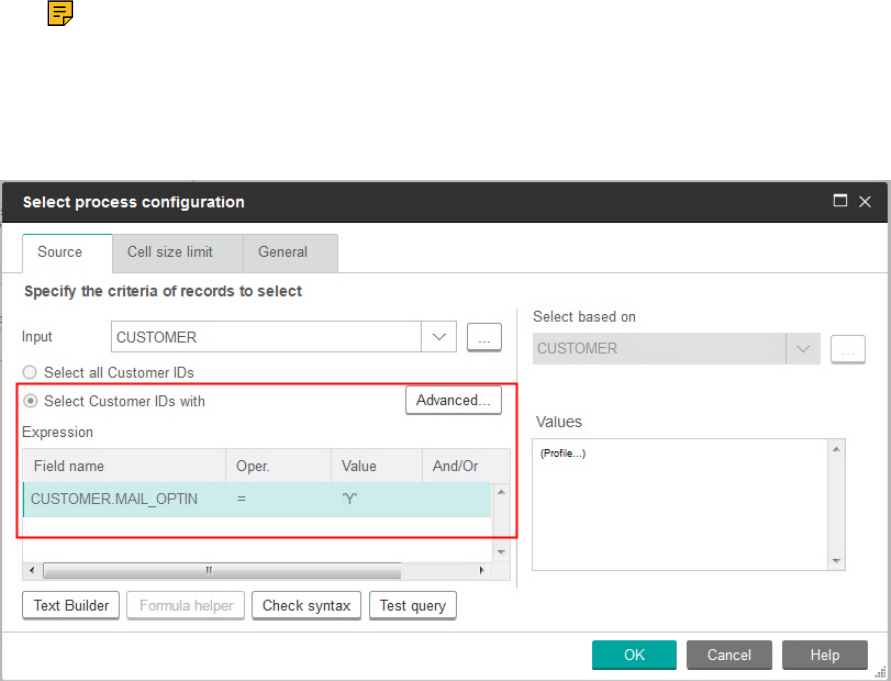
Unica Campaign V12.0 User Guide | 3 - Designing flowcharts | 71
Note: If you do not see the expected list (Available fields, Operators, Values,
For selected expresssion), try either single clicking or double clicking on a cell in
the Expression area.
You now have an expression that consists of a field name, operator, and value.
8. Click Check syntax to confirm whether the query syntax is valid. Checking the syntax
does not put any load on the database server.
9.
To add and combine multiple expressions, follow the guidelines below:
a. To add another expression, click the And/Or cell, then double-click AND or OR in
the Values list to indicate how to combine the expressions.
b. Build your next expression, consisting of a field name, operator, and value.
c. To add parentheses to control evaluation order, double-click the Field Name in
any row to display the For selected expression list. In the list of expressions,
double-click Add ( ) to add a set of parentheses, Remove ( ) to remove a single
set of parentheses, or Clear all ( ) to remove all of the parentheses in the selected
expression. Parentheses allow you to group expressions when defining complex
queries. For example, (AcctType = 'Gold' AND Rank = 'A') OR NewCust = 'Yes' is
different from AcctType = 'Gold' AND (Rank = 'A' OR NewCust = 'Yes').
Unica Campaign V12.0 User Guide | 3 - Designing flowcharts | 72
d. To reorder the selected expression, double-click Move up or Move down.
e. To add a blank row below the selected expressions, double-click Insert.
f. To delete the selected expression, double-click Delete.
10.
Optionally, click the Text Builder button so its label changes to Point & click. When the
button says Point & click, you can view or edit raw SQL. You can also use the Formula
helper to pick macros, operators, and string functions from a list.
Note: If your query includes a table field that has the same name as a Campaign
generated field, you must qualify the field name. Use the following syntax:
<table_name>.<field_name>.
For related information, see Creating raw SQL queries (on page 60). Also see
Creating queries with Formula helper (on page 58).
11. Click the Point & click button to change back to the original query mode. The button
label changes back to Text Builder.
12.
(Optional) Use Test query to see how many IDs the query returns.
A progress bar is displayed while the query is being tested. Close the progress window
if you want to cancel the test. When testing is complete, Unica Campaign indicates the
number of rows the query returned.
Important: Global suppressions and cell size limits are not applied in test query
counts. Test queries might also return non-normalized data. To obtain an accurate
result count, test run the process.
13. Continue configuring the process, as described below, or click OK to close the process
configuration dialog and save the query expression.

Unica Campaign V12.0 User Guide | 3 - Designing flowcharts | 73
14. Optionally, use the Cell size limit tab to limit the number of IDs generated by the
process during production or test runs. See Limiting the size of output cells (on page
217).
If you selected Random seed, in most cases you can accept the default seed. The
random seed represents the starting point that Unica Campaign uses to select IDs
randomly.
Note: The same random set of records will be used for each subsequent run
of the Select process (unless the input to the process changes). This is important
if you intend to use the results for modeling purposes, because different modeling
algorithms must be compared across the same set of records to determine each
model's effectiveness. If you do not intend to use the results for modeling, you can
make the Select process select a different random set of records each time it runs. To
do this, use a Random Seed of zero (0). A value of 0 ensures that a different random set
of records will be selected each time the process runs.
15.
Use the General tab to set the following options.
a. Process name: Assign a descriptive name, such as Select_Gold_Customers. The
process name is used as the box label on the flowchart. It is also used in various
dialogs and reports to identify the process.
b. Output cell name: This name matches the Process name by default. It is used
in dialogs and reports to identify the output cell (the set of IDs that the process
retrieves).
c. (Optional) Link to target cell: Perform this step if your organization pre-defines
target cells in a target cell spreadsheet. To associate the pre-defined target cell
with the flowchart process output, click Link to target cell, then select a target
cell from the spreadsheet. The Output cell name and Cell code are inherited from
the target cell spreadsheet, and both of those field values are shown in italics to
indicate that there is a link relationship.
d. Cell code: The cell code has a standard format that is determined by your system
administrator and is unique when generated. Do not change the cell code unless
you understand the implications of doing so. By default, the name of a cell created
in a process matches the process name. When you save changes to an output cell

Unica Campaign V12.0 User Guide | 3 - Designing flowcharts | 74
name, if Auto generate is selected, the cell code is regenerated. If you do not want
the cell code to change, uncheck Auto generate. See Cell names and codes (on
page 223).
e. Note: Use the Note field to explain the purpose or result of the process. Common
practice is to reference the selection criteria or other important information. The
contents of this field appears when you rest your cursor over the process box in a
flowchart.
16. Click OK to save and close the configuration.
The Select process is now configured. You can test run the process to verify that it
returns the results you expect.
Targeting Digital Analytics segments in campaigns
Digital Analytics lets users define segments based on visit and view level criteria. When you
configure a Select process in Unica Campaign, you can use these segments as the data
source.
To use segments exported from Digital Analytics in Unica Campaign, the two products
must be integrated. Configuring the integration is explained in the Unica Campaign
Administrator's Guide.
If you used Digital Analytics to make segments available to Unica Campaign, you can target
those segments in a campaign flowchart.
Unica Campaign users who are using both IBM eMessage and the post-click analytics tools
can also make use of Digital Analytics segments. The optional post-click analysis tools
track customer behavior from the click-through of an email or hosted landing page and
subsequent navigation through the web site (within the same visit or session) to browse or
buy. Unica Campaign designers can use the analytics to determine how to create follow-up
campaigns.
Note: IBM eMessage requires separate integration steps. See the documentation
provided with IBM eMessage.

Unica Campaign V12.0 User Guide | 3 - Designing flowcharts | 75
1. Double-click a Select process in a Unica Campaign flowchart to open the Select
process configuration dialog.
If the Select process contains a previously defined Digital Analytics segment, the Input
box on the Source tab shows the existing segment name.
2.
Open the Input list and click Digital Analytics segments.
The Digital Analytics segment selection dialog opens.
3.
Select a Client ID to see a list of the published segments for that Digital Analytics
client.
Note: The Select segment list shows only the segments that were created for the
client ID that is selected. To see other published segments, select a different client ID.
4.
In the Select segment list, choose the segment that you want to use:
• The Select segment list indicates the Application where the segment was created,
its Type, and its Start and End dates, as defined in Digital Analytics.
• The Description should help you determine the purpose of the segment. If you
need more information about a segment, double-click it to see the segment
expression and other information.
• The Start date and End date next to each segment indicate the Digital Analytics-
defined date range for finding visitors who match the segment criteria. For
example, one segment might find everyone who visited a particular site at least 3
times between January 12, 2012 and April 12, 2012, and another segment might
find visitors from a different range of dates. The Digital Analytics-defined date
range cannot be changed here. However, you can use the Segment range date
controls at the bottom of the dialog to define a date range that falls within the
range defined in Digital Analytics.
5.
Use the Segment range date and calendar controls at the bottom of the dialog to
specify the date range from which you want to obtain data for the selected segment.
If you are modifying (as opposed to creating) a Select process, the existing segment
range is displayed.
Unica Campaign V12.0 User Guide | 3 - Designing flowcharts | 76
• The range that you specify must fall within the Start date and End date defined for
the segment in Digital Analytics (shown next to each segment in the list).
• In addition to taking the Start and End dates into account, Unica Campaign also
considers the date constraint (if any). The date constraint is defined in Digital
Analytics but does not appear in the Segment selection dialog. The date constraint
limits the number of days' worth of data to pull for a segment, to ensure that
Digital Analytics is not overloaded with exporting a large data set.
For example, say there is a segment defined in Digital Analytics with a 3-month
span (Start and End date) and a date constraint of 7 days. The date range that you
define in Unica Campaign takes both constraints into account. If you specify a
date range outside of the 3-month span, your segment definition cannot be saved.
Likewise, if you specify a date range that exceeds 7 days, your segment definition
cannot be saved.
• You can specify absolute or relative dates, as long as they fall within the Digital
Analytics-defined range and date constraint.
• If you specify an absolute Start Date, you must also supply an End Date. For
example, if the Digital Analytics-defined segment defines a 3-month span, your
campaign can target visitors whose information was gathered on a single day,
month, or week within that span.
•
Examples of relative dates:
◦ If the Digital Analytics-defined segment is for a 3-month span, you can specify
a relative date, such as Yesterday or Last 7 days, to continually find recent
visitors. The campaign will run successfully until the Digital Analytics-defined
end date occurs.
◦ If you specify THIS MONTH, the full month of data must be available up until
the day before this relative date is used. For example, if today is March 28,
data from March 1 - March 27 must be available for the selected segment.
◦ If you specify LAST MONTH; the full previous month of data must be
available. Example #1: If the Digital Analytics-defined segment has a start
date of March 1 and an end date of March 31, LAST MONTH can be used
starting on April 1, up to and including April 30 (to get data for the month
of March). Example #2: If the Digital Analytics-defined segment has a start
Unica Campaign V12.0 User Guide | 3 - Designing flowcharts | 77
date of March 1 and an end date of March 30, LAST MONTH cannot be used,
because there is not a full month of data. Example #3: If the Digital Analytics-
defined segment has a start date of March 2 and an end date of March 31,
LAST MONTH cannot be used, because there is not a full month of data. In
these cases, a message indicates that LAST MONTH does not fall within the
segment dates. Instead, you must use absolute dates.
6.
Click OK to return to the Select process configuration dialog.
When the Select process runs, it pulls data from Digital Analytics for the segments within
the specified date range and date constraint. The mapping table used for the flowchart tells
Unica Campaign how to convert Digital Analytics IDs to Unica Campaign Audience IDs. The
Audience IDs are then available for use in downstream processes. For technical information
about how this works, see the Unica Campaign Administrator's Guide.
In rare situations, when you run a flowchart, the number of Digital Analytics IDs for a
selected segment might not match the number of Audience IDs found in Unica Campaign.
For example, there might be 100 Digital Analytics keys but only 95 matching IDs in Unica
Campaign. Unica Campaign warns about this situation but continues running the flowchart.
A message is written to the log file for that flowchart, asking you to verify that your mapped
translation table contains updated records. An administrator can resolve this situation by
(re)matching the online and offline keys according to your corporate policy and repopulating
the translation table with up-to-date data. You must re-run the flowchart after the mapped
translation table is updated.
The Merge process
Use the Merge process to specify which input cells are included and combined and which
input cells are excluded (suppressed).
In this way, you can include or exclude cells from subsequent processes in your flowchart.
For example, use the Merge process to suppress "opt-out" customers who requested that
they not receive any marketing materials.

Unica Campaign V12.0 User Guide | 3 - Designing flowcharts | 78
Merging and suppressing contacts
The Merge process accepts input from multiple cells and produces one combined output
cell. When you merge cells, you can choose to include or exclude content.
1. Open a campaign and click a flowchart tab.
2. Click the Edit icon in the flowchart window.
3.
Configure at least two processes whose output you want to merge.
For example, configure two Select processes.
4. Drag the Merge process from the palette to your flowchart.
5.
Drag an arrow from an upstream process (for example, a Select process) to the
Merge process, to connect the boxes. You must connect from the upstream process
to the Merge process. Repeat to connect any other upstream processes into the
Merge process. An arrow indicates the direction of data flow between the connected
processes
Note: All cells that provide input to the Merge process must have the same
audience level. For example, multiple Select processes must use the Household
audience.
6.
Double-click the Merge process in the flowchart.
The process configuration dialog box opens and the Method tab is open by default.
Cells from processes that are connected to the Merge process are listed in the Input
list.
7. If you want to exclude IDs from the merged output, select a cell in the Input list and add
it to the Records to exclude list. For example, use this option to exclude Opt Outs.

Unica Campaign V12.0 User Guide | 3 - Designing flowcharts | 79
8. If you want to include IDs in the merged output, select a cell in the Input list and add
it to the Records to include list. The IDs in the cells that you add to this list will be
combined into one list of unique IDs.
9.
Specify how to merge the lists from the input cells that are in the Records to include
list:
• Merge/Purge on include: This option produces a list of unique IDs that exist in
at least one input cell. Duplicate IDs are included only once. This method uses a
logical "OR" or "ANY." For example: Include customer A if that customer is in either
the Gold.out cell OR the Platinum.out cell.
• Match (AND) on include: Include only those IDs that exist across all input cells.
This method uses a logical "AND" or "ALL." For example: Include customer A only
if that ID exists in both the Gold.out cell AND the LoyaltyProgram.out cell. This
option is useful when you want to include customers that meet multiple criteria. If
an ID does not exist in all of the Merge process input cells, the ID is not included.
10.
Optionally, use the Cell size limit tab to limit the number of IDs generated by the
process during production or test runs. See Limiting the size of output cells (on page
217).
If you selected Random seed, in most cases you can accept the default seed. The
random seed represents the starting point that Unica Campaign uses to select IDs
randomly.
Note: The same random set of records will be used for each subsequent run
of the Merge process (unless the input to the process changes). This is important
if you intend to use the results for modeling purposes, because different modeling
algorithms must be compared across the same set of records to determine each
model's effectiveness. If you do not intend to use the results for modeling, you can
make the Merge process select a different random set of records each time it runs. To
do this, use a Random Seed of zero (0). A value of 0 ensures that a different random set
of records will be selected each time the process runs.
11.
Use the General tab to set the following options.

Unica Campaign V12.0 User Guide | 3 - Designing flowcharts | 80
a. Process name: Assign a descriptive name. The process name is used as the box
label on the flowchart. It is also used in various dialogs and reports to identify the
process.
b. Output cell name: This name matches the Process name by default. It is used
in dialogs and reports to identify the output cell (the set of IDs that the process
retrieves).
c. (Optional) Link to target cell: Perform this step if your organization pre-defines
target cells in a target cell spreadsheet. To associate the pre-defined target cell
with the flowchart process output, click Link to target cell, then select a target
cell from the spreadsheet. The Output cell name and Cell code are inherited from
the target cell spreadsheet, and both of those field values are shown in italics to
indicate that there is a link relationship.
d. Cell code: The cell code has a standard format that is determined by your system
administrator and is unique when generated. Do not change the cell code unless
you understand the implications of doing so. By default, the name of a cell created
in a process matches the process name. When you save changes to an output cell
name, if Auto generate is selected, the cell code is regenerated. If you do not want
the cell code to change, uncheck Auto generate. See Cell names and codes (on
page 223).
e. Note: Use the Note field to explain the purpose or result of the process. For
example, indicate which records you are including or excluding. The contents of
this field appears when you rest your cursor over the process box in a flowchart.
12. Click OK to save and close the configuration.
The process is now configured. You can test run the process to verify that it returns the
results you expect.

Unica Campaign V12.0 User Guide | 3 - Designing flowcharts | 81
The Segment process
Use the Segment process to divide data into distinct groups, or segments. Connect a
Segment process to a contact process, such as a Call list or Mail list, to assign treatments
or offers to the segments.
For example, you can divide your customers into high-value, medium-value, and low-value
segments based on their prior purchase history. Each segment can receive a different
offer when the segment is input to a contact process. There is no limit to the number of
segments that you can create.
You can segment data in two ways: by using the distinct values in a field, or by using a query
to filter the data in a field. In addition to database table fields, you can use derived fields to
segment data. In this way, you can perform custom grouping, to segment your customers
however you want.
Note: Segments that are created by the Segment process are not persistent across
flowcharts or sessions. To create a "permanent" segment (also called a strategic segment),
an administrator can use the Create Seg process.
Segmenting considerations
Consider the following options and guidelines when you configure a Segment process in a
Unica Campaign flowchart.
Choosing a segmenting method
You can segment by field or by query when you configure a Segment process in a Unica
Campaign flowchart.
In some cases, the same results can be achieved when segmenting either by field or by
query. For example, assume that the AcctType field in your database divides your customer
accounts into Standard, Preferred and Premier levels. Segmenting by the AcctType field will
create three segments for these account types.
Unica Campaign V12.0 User Guide | 3 - Designing flowcharts | 82
You could achieve the same results using queries, but creating the segments would require
writing three separate queries. Determine the most efficient method based on the data that
you are segmenting.
Making segments mutually exclusive
You can specify that segments are mutually exclusive, meaning that each qualifying
record is guaranteed to be placed into no more than one segment. When the segments are
assigned to offers, each customer will receive only one offer.
Records are placed in the first segment whose criteria they satisfy, based on a priority order
that you define. For example, if a customer qualifies for segments 1 and 3, and segment 1 is
before segment 3 in the priority order, that customer will appear only in segment 1.
Restricting segment size
When you configure a Segment process, the default size for the number of records per
segment is Unlimited. You may want to restrict the size of the created segment if, for
example, you are performing test runs of a campaign flowchart or process.
You can limit the segment size to any positive integer. When you limit the segment size, the
qualifying records are chosen randomly.
The same random set of records will be used for each subsequent run of the process
(unless the input to the process changes). This is important if you intend to use the
Segment results for modeling purposes, because different modeling algorithms must be
compared across the same set of records to determine each model's effectiveness.
If you do not intend to use the results for modeling, you can make the Segment process
select a different random set of records each time it runs. To do this, use a Random Seed of
zero (0) in the upstream process that provides input to the Segment process. A value of 0
ensures that a different random set of records will be selected each time the process runs.
Selecting source cells
When you configure a Segment process in a Unica Campaign flowchart, all selected cells
must be defined at the same audience level. If more than one source cell is selected, the
same segmentation is performed on each source cell.
Unica Campaign V12.0 User Guide | 3 - Designing flowcharts | 83
Using segments as input to another Segment process
Segments can be used as input cells to another Segment process in a Unica Campaign
flowchart. For example, you can segment by age range, then further segment by preferred
channel.
For this example, assume that you want to segment your customers into age ranges. Your
database contains the field AgeRange, which assigns one of six age ranges (such as 26-30)
to each customer. Segment by the AgeRange field to create six segments.
You could then use these six segments as input to another Segment process that
further divides customers by another field or query. For example, assume that your
database contains a field called PreferredChannel, which specifies each customer's
preferred contact channel: Direct mail, telemarketing, fax, or email. Using the six age range
segments as input, you could then create a second Segment process to segment by the
PreferredChannel field. Each of the six age range segments is further segmented into four
preferred channel segments, to produce a total of 24 output segments.
Segmenting data by field
You can use the Segment process to divide data into segments based on field values. When
you segment data by a field in a database table, each distinct value in the field creates a
separate segment.
Segmenting considerations (on page 81)
Segmenting data by field is most useful when the values in the field correspond to the
segments that you want to create. For example, assume that you want to assign a different
offer to customers in four different regions. Your customer database contains a field that is
called region, which indicates the region to which each customer belongs. Segment by the
region field to create the four regional segments.
1. Open a flowchart for editing.
2. Drag a Segment process from the palette to your flowchart.

Unica Campaign V12.0 User Guide | 3 - Designing flowcharts | 84
3. Connect at least one configured process, such as a Select process, as input into the
Segment process.
4. Double-click the Segment process in the flowchart to open the Segment process
configuration dialog.
Cells from processes that are connected to the Segment process appear in the Input
list.
5. On the Segment tab, open the Input list and select the input to the Segment process. To
select multiple cells, use the ellipsis button (...) next to the Input list.
6.
Select Segment by field, then use the drop-down list to select the field that you want to
use to create the segments. For example, to segment by region, select the region field.
The Profile selected field dialog opens, and Unica Campaign immediately begins
examining the field values. By profiling the field values, Unica Campaign can determine
which segments to create.
For more information about this dialog, see Previewing field values from your user data
(on page 51).
7.
Wait for profiling to finish to ensure that all segments are properly created. Then click
OK to close the Profile selected field dialog.
The # of segments field and the list of Segment names are updated based on the
profiling results of the field that was selected for Segment by field. For example, if you
segment by field "Status" which has two values "A" and "B", two segments are created,
"Status_A" and "Status_B."
8.
Optionally, you can edit the segment names, adjust the maximum size, create mutually
exclusive segments, or create extract tables. For information about options that you
can set, see the following topics:
• Segment process: Segment tab (on page 89)
• Segment process: Extract tab (on page 92)
• Segment process: General tab (on page 93)
9. Click OK to save your selections and close the Segment process configuration dialog.
Unica Campaign V12.0 User Guide | 3 - Designing flowcharts | 85
The process is now configured. You can test the process to verify that it returns the
results you expect.
Segmenting data with queries
You can use the Segment process to segment data based on the results of a query that you
create.
Segmenting considerations (on page 81)
Segmenting by query is most useful when it is necessary to filter the data in a field to
create the required segments. For example, assume that you want to divide your customers
into high-value (more than $500), medium-value ($250-$500), and low-value (under $250)
segments that are based on their purchase history over the last year. The PurchaseHistory
field in your customer database stores the total dollar amount of each customer's
purchases. Use a separate query to create each segment, selecting records with values in
the PurchaseHistory field that meet the criteria of the segment.
Note: You can also use raw SQL to segment data.
1. Open a flowchart for editing.
2. Drag a Segment process from the palette to your flowchart.
3. Connect at least one configured process, such as a Select process, as input into the
Segment process.
4.
Double-click the Segment process in the flowchart to open the Segment process
configuration dialog.
Cells from processes that are connected to the Segment process appear in the Input
list.
5. On the Segment tab, open the Input list and select the input to the Segment process. To
select multiple cells, use the ellipsis button (...) next to the Input list.

Unica Campaign V12.0 User Guide | 3 - Designing flowcharts | 86
6. Select Segment by query.
7. Determine the number of segments that you want to create, and enter that number in
the # of segments field.
8.
Now you will construct a query for each segment: Select the first segment and click
Edit to open the Edit segment dialog.
Note: For reference information about each available control, see Segment process:
New segment and Edit segment controls (on page 94).
9. If you want to include all IDs from the segment or table that you selected as the
Input source, choose Select all <audience> IDs (The word <audience> indicates the
audience level, such as Customer, that is specified for the selected input data source.)
10.
If you prefer to use a subset of IDs from the selected data source, choose Select
<audience> IDs with, so you can do a query for the records that you want.
The Expression box shows columns labeled Field name, Oper, Value, and And/Or.
When the button says Text Builder, you can build expressions by populating the
columns labeled Field name, Oper, Value, And/Or.
When the button says Point & click, you can view or edit raw SQL and you can use the
Formula helper to pick macros, operators, and string functions from a list.
With either method (Text Builder / Point & click), you can select fields from the
Available fields list, including Unica Campaign Generated Fields and Derived fields.
11.
Construct a query to determine which records will be used to create the segment:
a.
To specify which field to query, click in the Field name cell. The Available fields list
should appear. If the list does not appear, click in the Field name cell again. In the
Available fields list, expand the fields until you see the one that you want. Select an
available field by double-clicking it or by highlighting it and clicking Use.
Note: When deciding which field to use, you can highlight an available field
and click Profile to see a list of values in that field. Then use the Profile selected
Unica Campaign V12.0 User Guide | 3 - Designing flowcharts | 87
field dialog to examine the field values. For more information, see Previewing field
values from your user data (on page 51).
Note: When the list of Available fields is displayed, you can use the Derived
fields button if you want to create or use derived fields. For more information, see
Derived fields (on page 279).
b. Click in the Oper cell, then double-click a comparison operator in the Operators list
(=, <, >, <=, >=, <>, In, Not in, Between).
c. Click in the Value cell, then double-click a value. If no values appear, double-click
(Profile...) in the Values list to open the Profile selected field dialog so you can
select from a list of values. You can also double-click in the Value cell to edit the
value directly.
Note: If you do not see the expected list (Available fields, Operators, Values,
For selected expresssion), try either single clicking or double clicking on a cell in
the Expression area.
You now have an expression that consists of a field name, operator, and value.
12. Click Check syntax to confirm whether the query syntax is valid. Checking the syntax
does not put any load on the database server.
13.
To add and combine multiple expressions, follow the guidelines below:
a. To add another expression, click the And/Or cell, then double-click AND or OR in
the Values list to indicate how to combine the expressions.
b. Build your next expression, consisting of a field name, operator, and value.

Unica Campaign V12.0 User Guide | 3 - Designing flowcharts | 88
c. To add parentheses to control evaluation order, double-click the Field Name in
any row to display the For selected expression list. In the list of expressions,
double-click Add ( ) to add a set of parentheses, Remove ( ) to remove a single
set of parentheses, or Clear all ( ) to remove all of the parentheses in the selected
expression. Parentheses allow you to group expressions when defining complex
queries. For example, (AcctType = 'Gold' AND Rank = 'A') OR NewCust = 'Yes' is
different from AcctType = 'Gold' AND (Rank = 'A' OR NewCust = 'Yes').
d. To reorder the selected expression, double-click Move up or Move down.
e. To add a blank row below the selected expressions, double-click Insert.
f. To delete the selected expression, double-click Delete.
14.
Optionally, click the Text Builder button so its label changes to Point & click. When the
button says Point & click, you can view or edit raw SQL. You can also use the Formula
helper to pick macros, operators, and string functions from a list.
Note: If your query includes a table field that has the same name as an Unica
Campaign generated field, you must qualify the field name. Use the following syntax:
<table_name>.<field_name>.
15. Click the Point & click button to change back to the original query mode. The button
label changes back to Text Builder.
16.
(Optional) Use Test query to see how many IDs the query returns.
A progress bar is displayed while the query is being tested. Close the progress window
if you want to cancel the test. When testing is complete, Unica Campaign indicates the
number of rows the query returned.
Important: Global suppressions and cell size limits are not applied in test query
counts. Test queries might also return non-normalized data. To obtain an accurate
result count, test run the process.
17. Click OK to save the query for this segment and close the Edit segment dialog.
18. In the Segment process configuration dialog, edit the remaining segments to define
queries for them.
Unica Campaign V12.0 User Guide | 3 - Designing flowcharts | 89
19. Continue configuring the Segment process by using the controls on the Segment,
Extract, and General tabs. For more information, see the following topics:
• Segment process: Segment tab (on page 89)
• Segment process: Extract tab (on page 92)
• Segment process: General tab (on page 93)
20.
Click OK to save your selections and close the Segment process configuration dialog.
The process is now configured. You can test the process to verify that it returns the
results you expect.
Segment process: Segment tab
Use the Segment tab of the Segment process configuration dialog to indicate how to divide
incoming data into distinct groups, or segments.
The following table describes the controls on the Segment tab of the Segment process
configuration dialog.
Table 5. Segment tab
Control Description
Input Specifies the input to the Segment process. The drop-down
list contains all output cells from any process connected to
the Segment process. Select Multiple cells if you want to
select more than one input.
Segment by field Specifies a field to use for segmenting data. The data is
segmented using the values that exist for the selected
field. Each distinct value in the field creates a separate
segment. For example, a field that contains the values A, B,
C results in three segments.
Profile Opens the Profile selected field dialog, which calculates
the values and distributions of records in the selected field.

Unica Campaign V12.0 User Guide | 3 - Designing flowcharts | 90
Control Description
Active only when segmenting by field. To reprofile the field
at any time after initially selecting it, click Profile.
Derived fields... Active only when segmenting by field. Opens the Create
derived field dialog so you can create a new field.
Segment by query Segments data based on a query that you create.
# of segments Active only when segmenting by query. Indicates the
number of segments to create. By default, three segments
are created, with default names "Segment1," "Segment2,"
and "Segment3." The # of segments field does not allow
you to enter a value greater than 1000 because that is the
maximum number of segments that can be created in a
flowchart.
When segmenting by field: The # of segments field is
updated based on the profiling results of the selected field.
The number of segments depends on the values that are
detected in the field.
Mutually exclusive segments Specifies whether the segment is to be mutually exclusive
(that is, each qualifying record is guaranteed to fall into no
more than one segment).
Create extract tables This control specifies whether segments should create
Extract tables for each output cell. Selecting this option
ensures that Unica Campaign can provide a later process
with the information necessary to keep track of duplicate
target audiences across segments.
Select this check box to enable the options on the Extract
tab.
This check box is disabled if Mutually exclusive segments
is selected.

Unica Campaign V12.0 User Guide | 3 - Designing flowcharts | 91
Control Description
Segment name Lists all segments by name. By default, three segments are
created, with default names "Segment1," "Segment2," and
"Segment3."
When segmenting by field: Segment names are updated
based on the profiling results of the selected field.
For example, if you are segmenting on a field called
"Acct_Status" which has two distinct values "A" and "B",
two segments are created, named "Acct_Status_A" and
"Acct_Status_B."
Max. size Maximum number of records allowed in each segment.
Size Number of records that meet the criteria for the segment.
Before the process is run, this number defaults to the total
number of records in the output cell.
Query The Query column in the list of segments appears only
when segmenting by query. It indicates the query criteria
that is used to create the segment. To change the query
criteria, double-click the segment name or select a
segment and click Edit.
Up 1, Down 1 arrows Move the selected segment up or down in the list.
Segments are processed in the order in which they are
listed.
New segment Active only when segmenting by query. Opens the New
segment dialog so you can create a new segment by
specifying a query.
Edit This button opens the Edit segment window for the
selected segment. When segmenting by field, you can
change the segment name or Max size. When segmenting
Unica Campaign V12.0 User Guide | 3 - Designing flowcharts | 92
Control Description
by query, you can change the name, size, and query
expression.
Remove Removes the selected segment. When a segment is
removed, the # of segments field updates automatically. If
there is only one segment available, the Remove button is
disabled to avoid deleting the only segment.
Do not run subsequent
processes for empty
segments
Prevents downstream processes from running for empty
segments.
Segment process: Extract tab
Use the Extract tab of the Segment process configuration dialog to select fields to extract.
In this way, you allow the output from the Segment process to be accessible as input to Mail
list or Call list processes in a flowchart.
The following table describes the fields, buttons, and controls on the Extract tab. The
controls on the Extract tab are active only if you selected Create extract tables on the
Segment tab.
Table 6. Extract tab
Field Description
Target data source Location to which the output from this process is written.
The Unica Campaign server and any other data sources to
which you are connected are available from the Target data
source drop-down list.
Candidate fields List of fields available to extract, including field name and
data type, based on your input data source.
If your input source is a landing page in IBM eMessage,
each field name is an attribute of the landing page. If
Unica Campaign V12.0 User Guide | 3 - Designing flowcharts | 93
Field Description
the attribute contains special characters or spaces, it is
converted to a valid field name. Data types of all landing
page attributes are listed as text.
Note: Schema object names are limited to 30
characters. Restrict your attribute names to 30 characters
or less to produce valid column names for extracted
output.
Fields to extract Fields that you selected to extract from the Candidate
fields list. The Output name defaults to the field name in
the Field to extract column.
If you change the Output name, you can use any
combination of letters and numbers. Do not use spaces,
hyphens (-), periods (.), slashes (/ or \), or any special
characters.
Profile Opens the Profile selected field dialog, which calculates
the values and distributions of records in the selected field.
Active only when a field name is selected in the Candidate
fields list.
Derived fields... Opens the Create derived field dialog.
More... Opens the Advanced settings dialog, which includes the
option to skip duplicate records and to specify how Unica
Campaign identifies duplicates.
Segment process: General tab
Use the General tab of the Segment process configuration dialog to modify the Process
name, Output cell name , or Cell code. You can also enter a Note to explain the purpose of
the Segment process. The note appears when you rest your cursor over the process box in a
flowchart.
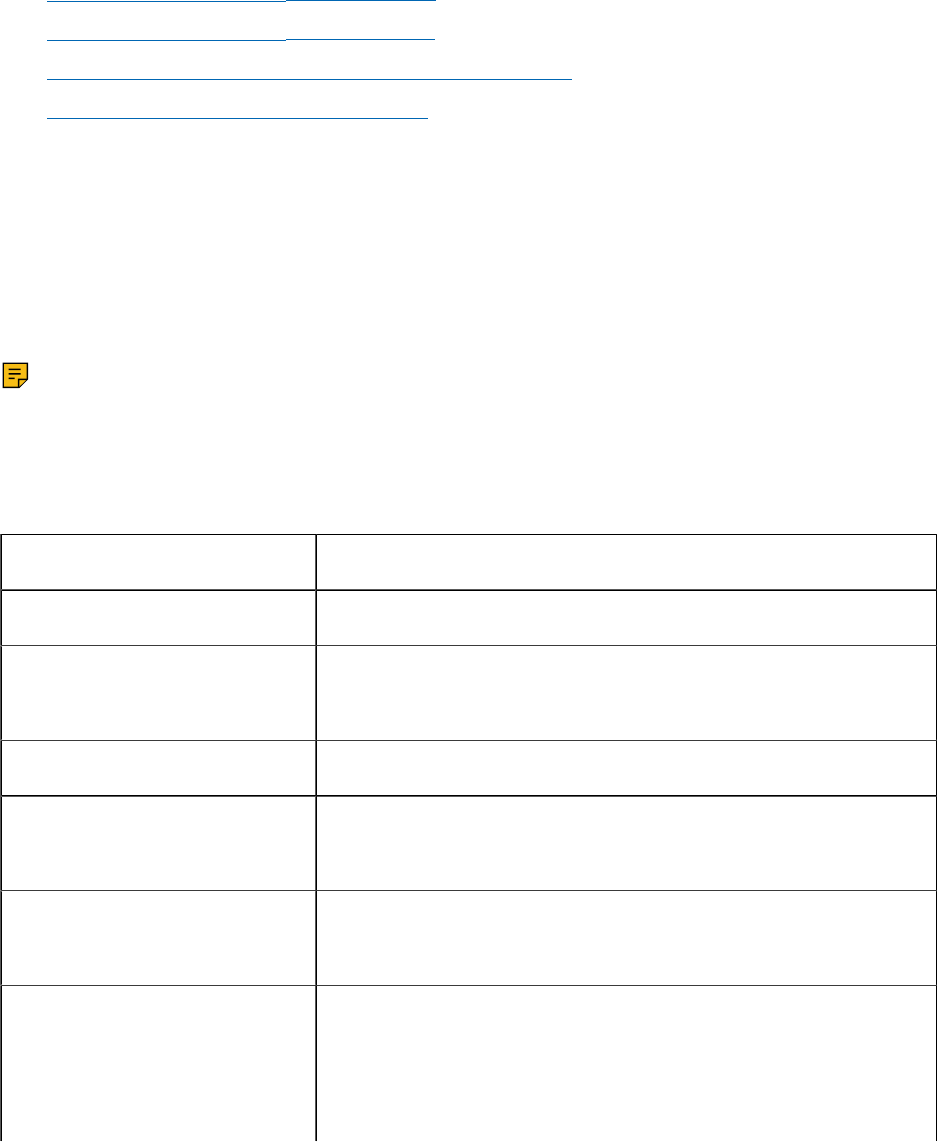
Unica Campaign V12.0 User Guide | 3 - Designing flowcharts | 94
For more information, see these topics:
• Changing the cell name (on page 226)
• Resetting the cell name (on page 227)
• To copy and paste all cells in the grid (on page 229)
• Changing the cell code (on page 228)
Segment process: New segment and Edit segment controls
The following table describes the controls on the New segment and Edit segment dialog
boxes. You can access these dialog boxes when configuring a Segment process.
Note: The New segment dialog box can be accessed only when you are segmenting by
query. When you segment by field, only the Name and Max. size fields are available in the
Edit Segment dialog box.
Table 7. New Segment and Edit Segment dialog box controls
Control Description
Name Name of the segment.
Max. size Maximum number of records that are allowed in the
segment.
Select based on Specifies a data source on which to base your query.
Select all data source type Includes all the IDs from the data source in the Input drop-
down list.
Select data source type with Provides access to the functions for creating a query to
select only certain IDs based on criteria you define.
Advanced... Opens the Advanced settings dialog, which provides the
following options:
• Use raw SQL: Use a raw SQL query to segment data.
Unica Campaign V12.0 User Guide | 3 - Designing flowcharts | 95
Control Description
• Use query scope from input cell: Available only if a
source cell to this Segment process uses a query.
Select the check box to combine the query in the
source cell (using "AND") with the current selection
criteria.
Derived fields... Opens the Create derived field dialog.
Query text box and buttons For information about using the query text box and related
fields and buttons, see "Creating queries in processes" in
the Unica Campaign Administrator's Guide.
The Sample process
Use the Sample process to divide contacts into groups. The classic use of sampling is to
establish target and control groups that you can use to measure the effectiveness of your
marketing campaign.
Dividing contacts into sample groups
To create target and control groups, use the Sample process. There are several sampling
methods: Random creates statistically valid control groups or test sets. Every other X
allocates every other record to a sample group. Sequential portions allocates a number of
records into subsequent samples.
1. Open a flowchart for editing.
2. Drag the Sample process from the palette to your flowchart.
3. Connect at least one configured process (such as a Select process) as input to the
Sample process box.
4. Double-click the Sample process in the flowchart.

Unica Campaign V12.0 User Guide | 3 - Designing flowcharts | 96
5. Use the Input list on the Sample tab to select the cells that you want to sample. The list
includes all output cells from any process connected to the Sample process. If multiple
cells are providing input, you can optionally select the Multiple cells option. If more
than one source cell is selected, the same sampling is performed on each source cell.
Note: All selected cells must be defined at the same audience level, such as
Household or Customer.
6. Use the # of Samples/Output cells field to specify how many samples to create for
each input cell. By default, three samples are created for each input cell, with default
names Sample1, Sample2 and Sample3.
7.
To change the default sample names, double-click a sample in the Output name
column, then type a new name. You can use any combination of letters, numbers, and
spaces. Do not use periods (.) or slashes (/ or \).
Important: If you change the name of a sample, you must update all subsequent
processes that use this sample as an input cell. Changing a sample name might
unconfigure subsequent connected processes. In general, you should edit the names of
samples before connecting subsequent processes.
8.
Use one of the following methods to define the sample size:
• To divide records up by percentages: Select Specify size by %, then double-click
the Size field to indicate the percentage of records to use for each sample. Use the
Max size field if you want to limit the size of the sample. The default is Unlimited.
Repeat for each sample listed in the Output name column, or use the All remaining
check box to assign all remaining records to that sample. You can select All
remaining for only one output cell.
• To specify the number of records for each sample size: Select Specify size by #
records, then double-click the Max size field to specify the maximum number of
records to allocate to the first sample group. Specify the Max size for the next
sample that is listed or use the All remaining check box to assign all remaining
records to that sample. You can select All remaining for only one output cell.

Unica Campaign V12.0 User Guide | 3 - Designing flowcharts | 97
Optional: Click Sample size calculator and use the calculator to determine the
optimal sample size. (See About the sample size calculator (on page 99).) Then
copy the value from the Min. sample size field in the calculator, click Done to close
the calculator, and paste the value into the Max. size field for Specify size by #
records.
9. Ensure that each sample in the Output name list has a Size defined or has All
remaining checked.
10. In the Sampling method section, specify how to build the samples:
• Random sample: Use this option to create statistically valid control groups or test
sets. This option randomly assigns records to sample groups using a random
number generator based on the specified seed. Seeds are explained later in these
steps.
• Every other X: This option puts the first record into the first sample, the second
record into the second sample, up to the number of samples specified. This
process repeats, until all records are allocated to a sample group. To use this
option, you must specify the Ordered by options to determine how records are
sorted into groups. The Ordered by options are explained later in these steps.
• Sequential portions: This option allocates the first N records into the first sample,
the next set of records in the second sample, and so on. This option is useful
for creating groups based on the top decile (or some other size) based on some
sorted field (for example, cumulative purchases or model scores). To use this
option, you must specify the Ordered by options to determine how records are
sorted into groups. The Ordered by options are explained later in these steps.
11.
If you selected Random sample, in most cases you can accept the default seed. The
Seed represents the starting point that Unica Campaign uses to select IDs randomly.
To generate a new seed value, click Pick or enter a value in the Seed field. Examples of
when you might need to use a new seed value are:
• You have exactly the same number of records in the same sequence and if you use
the same seed value, records are created into the same samples each time.

Unica Campaign V12.0 User Guide | 3 - Designing flowcharts | 98
• The random sample produces undesired results (for example, all males are being
allocated to one group and all females to another).
Note: The same random set of records will be used for each subsequent run of
the Sample process (unless the input to the process changes). This is important
if you intend to use the results for modeling purposes, because different modeling
algorithms must be compared across the same set of records to determine each
model's effectiveness. If you do not intend to use the results for modeling, you can
make the Sample process select a different random set of records each time it runs. To
do this, use a Random Seed of zero (0). A value of 0 ensures that a different random set
of records will be selected each time the process runs.
12.
If you selected Every other X or Sequential portions, you must specify a sort order to
determine how records will be allocated to sample groups:
a. Select an Ordered by field from the drop-down list or use a derived field by clicking
Derived fields.
b. Select Ascending to sort numeric fields in increasing order (low to high) and sort
alphabetic fields in alphabetical order. If you choose Descending, the sort order is
reversed.
13. Use the General tab as follows:
a. Process name: Assign a descriptive name. The process name is used as the box
label on the flowchart. It is also used in dialogs and reports to identify the process.
b. Output cell names: By default, output cell names consist of the process name
followed by the sample name and a digit. These names are used in dialogs and
reports. You can double-click an output cell name to change it by typing in the field.
Or, click the Copy button to open a text box that shows all of the existing Output
cell names. Copy them manually, then click OK. Then click the Paste button to
paste them into a text box, where you can edit them. Then click OK to copy the
edited Output cell names into the fields. You can use the Reset cell names button
if you want to revert to the default output cell names.
c. Cell codes: The cell code has a standard format that is determined by your system
administrator and is unique when generated. Do not change the cell code unless
you understand the implications of doing so. By default, the name of a cell created

Unica Campaign V12.0 User Guide | 3 - Designing flowcharts | 99
in a process matches the process name. When you save changes to an output cell
name, if Auto generate cell codes is selected, the cell code is regenerated. If you
do not want the cell code to change, uncheck Auto generate cell codes. See Cell
names and codes (on page 223).
d. Note: Use the Note field to explain the purpose or result of the process. The
contents of this field appears when you rest your cursor over the process box in a
flowchart.
14. Click OK.
The process is configured and enabled in the flowchart. You can test run the process to
verify that it returns the results you expect.
About the sample size calculator
Unica Campaign provides a sample size calculator to help determine the statistical
significance of sample sizes in evaluating campaign results.
There are two ways to specify the level of accuracy that you want. You can enter an error
bound and compute the minimum sample size needed, or you can enter a minimum
sample size and compute the error bound that will result. Results are reported at the 95%
confidence level.
Determining the appropriate sample size
The sample size calculator determines the minimum number of contacts to include in
your sample, based on what you consider to be an acceptable margin of error. Results are
reported at a 95% confidence level.
Determining the appropriate sample size is important when your goal is to make inferences
about a group of people based on a sample. In general, a larger sample size produces a
smaller margin of error. Use the sample size calculator to either compute the sample size
needed for a particular error bound, or to determine the error bound for different sample
sizes.
Unica Campaign V12.0 User Guide | 3 - Designing flowcharts | 100
1. On the Sample tab of the Sample process configuration dialog, click Sample size
calculator.
The Sample size calculator opens.
2.
For Response rate estimate, enter your best guess for the Minimum and Maximum
response rates that you expect from your marketing campaign.
These two values must be percentages between 0% and 100%. The lower the expected
response rate, the larger the sample size must be to achieve the same level of accuracy
for the measured response rate.
3. If you are not using a predictive model, select No model as the Modeling estimate.
4.
If you are using a predictive model, select Model performance, then enter percentages
for the Cumulative gain and File depth.
To obtain these values:
a. Open the Evaluate reports in IBM SPSS Modeler Advantage Enterprise Marketing
Management Edition, and open the Testing partition.
b. Select the Gains tab, and display the information as a Table.
c. Use a value from the first column (Segment) of the table as the File depth, to
indicate the percentage of customers that you intend to contact.
d.
Use the corresponding value from the last column (Cumulative Gain) of the table
as the Cumulative gain.
The calculator uses this information to determine the number of samples that you
need to use, based on the expected response rate and modeling performance.
5.
Use either approach:
• To determine the minimum sample size based on the margin of error that you
are willing to accept: Enter a value of 0% to 100% in the Error bound (+ or -) field
to indicate the percentage margin of error that you are willing to accept for this
sample. Then click Compute sample size. The Min. sample size field indicates the
smallest sample that will meet the specified error bound. A smaller error bound
percentage requires a larger sample size. Conversely, a larger error bound requires
Unica Campaign V12.0 User Guide | 3 - Designing flowcharts | 101
a smaller sample size. For example, a 3% error bound requires a larger sample size
than if you allow for a 10% error bound.
• To determine the margin of error that will result from a specific sample size: Enter
a value in the Min. sample size field to indicate the sample size that you plan to
use, then click Compute error bound. Based on the results, you can decide whether
to increase or decrease the sample size. Larger sample sizes result in smaller error
bounds. If the resulting error bound is too high, use a larger sample size.
6. After you determine the optimal sample size:
a. Copy the value from the Min. sample size field.
b. Click Done to close the calculator.
c. Confirm that Specify size by # records is selected.
d. Paste the value into the Max. size field in the Sample process box.
The Audience process
Audience levels define the target entity that you want to work with, such as account,
customer, household, product, or business division. Use the Audience process in a flowchart
to switch between audience levels or to filter out IDs by audience level.
Audience levels are defined by an administrator during the table mapping process. When
you use the Audience process in a flowchart, you can specify which audience levels you
want to target in your campaign. For example, you can configure the Audience process to:
• Select one customer per household based on some business rule (for example, oldest
male or the person with the highest account balance);
• Select all accounts belonging to a particular set of customers;
• Select all accounts with a negative balance belonging to a particular set of customers;
• Select all households with individuals holding checking accounts;
• Select customers with three or more purchases within a specified time-frame.
The Audience process can select from any defined table(s), so you can use it as a top-level
process in your flowchart to initially select data.
Unica Campaign V12.0 User Guide | 3 - Designing flowcharts | 102
To use the Audience process, you must work with tables for which multiple audience levels
are defined. These levels, defined within a single table, provide a relationship to "translate"
from one level to another.
• One key is defined as the "primary" or "default" key for the table. (This key represents
the audience used most frequently for this data source.) The default level associated
with a table is specified during the table mapping process. For more information about
mapping tables, see the Unica Campaign Administrator's Guide.
• The other keys are "alternate" keys that are available for switching audience levels.
After you switch audience levels, Unica Campaign displays only those tables whose
default key is defined at the same audience level. If you work at different audience levels
on a regular basis, you might need to map the same table more than once within Unica
Campaign, each time with a different primary/default key.
Restricting audience size
When you configure an Audience process, the default size for the number of records per
audience is Unlimited. You may want to restrict the size of the audience if, for example, you
are performing test runs of a campaign flowchart or process.
You can limit the audience size to any positive integer. When you limit the audience size, the
qualifying records are chosen randomly.
The same random set of records will be used for each subsequent run of the Audience
process (unless the input to the process changes). This is important if you intend to use the
results for modeling purposes, because different modeling algorithms must be compared
across the same set of records to determine each model's effectiveness. If you do not
intend to use the results for modeling, you can make the Audience process select a different
random set of records each time it runs. To do this, use a Random Seed of zero (0). A value
of 0 ensures that a different random set of records will be selected each time the process
runs.
Unica Campaign V12.0 User Guide | 3 - Designing flowcharts | 103
Audience levels
Audience levels are defined by Unica Campaign administrators to represent different
potential targets of campaigns, such as account, customer, household, product, or business
division.
Audience levels are often, but not always, organized hierarchically. Here are some examples
of hierarchical audience levels that are commonly found in customer marketing databases:
• Household > Customer > Account
• Company > Division > Customer > Product
Your organization can define and use an unlimited number of audience levels. If you are
using multiple audience levels (for example, customer and household), it is important to
understand how to use the Audience process to best accomplish your business objectives.
Audience levels are created and maintained by an administrator. Moving from one audience
level to another requires that all of the audience levels that you use have keys defined within
the same table. This provides a "look up" mechanism to switch from one level to another.
Audience levels are global, and are attached to each mapped base table. Thus, when a
flowchart is loaded, the audience levels are loaded along with the table mappings within
that flowchart.
If you have permissions to map tables in Unica Campaign, you can map a new table to one
or more existing audience levels, but you cannot create new audience levels. Only users with
the appropriate permissions, usually system administrators, can create audience levels.
In the Audience process, you specify an input audience level and an output audience level.
The input and output audience levels can be the same (for example, Customer) or different
(for example, Customer and Household). Use the Audience process to stay within the same
audience level, or to switch audience levels.
Householding
Householding is a general term that means reducing the number of members in the current
audience level by scoping using another audience level.
Unica Campaign V12.0 User Guide | 3 - Designing flowcharts | 104
One of the most common examples of householding is to identify a single individual to
target within each household. You might select one individual per household according to a
marketing business rule such as:
• The individual with the greatest dollar value across all accounts;
• The individual with the most purchases in a particular product category;
• The individual with the greatest tenure; or
• The youngest male over 18 within the household.
You can use the Audience process to change audience levels and filter IDs according to
user-specified criteria.
When to switch audience levels
Some complex campaigns require processing at different audience levels to arrive at the
list of final target entities. This can involve starting at one audience level, performing some
computations and taking this output, then moving to another audience level, and performing
other computations.
For example, you might want to support complex suppressions at different levels. As a
result, in a data model where there is a one-to-many or many-to-many relationship between
customers and accounts, a marketing analyst might want to build a campaign that does the
following:
• Eliminates all accounts of customers that satisfy certain criteria (for example, eliminate
any account that is in default);
• Eliminates particular accounts that satisfy certain criteria (for example, eliminate all the
low-profitability accounts).
In this example, the campaign might start at the customer level, perform customer-level
suppressions (suppress accounts in default), switch to the account level, apply account-
level suppressions (suppress low-profitability accounts), and then switch back to the
customer level to obtain the final contact information.

Unica Campaign V12.0 User Guide | 3 - Designing flowcharts | 105
Example: Audience process
This example shows how to configure an Audience process in a flowchart.
The following figure shows a configured Audience process.
The process is configured to choose the customer who has the highest credit limit within a
household:
• The selected input audience level is Customer; it is the default audience level of the
DEMO table. The Audience Level is displayed to the right of the Input field.
• The output audience level is the same: Customer as defined in the DEMO table. The DEMO
table has two other audience levels defined: Branch and HouseHold .
• The process is configured to choose One Customer entry per... HouseHold based on
the maximum of the field CREDIT_LIMIT.
Example: Filtering records
This example explains how to use filtering in an Audience process in a flowchart.

Unica Campaign V12.0 User Guide | 3 - Designing flowcharts | 106
When you configure an Audience process to select IDs based on a count, or a statistical
function ( MaxOf, MedianOf, MinOf) or Any One, the Filter button becomes available. When
you click Filter, the Specify selection criteria dialog appears, which allows you to enter a
query expression to specify which records will be used in the Based on calculation.
Note: The filtering criteria is applied before the Based on calculation is performed,
allowing you to remove records from consideration.
For example, you might want to constrain the date range over which an operation is
performed. To use only purchase transactions over the last year, you can enter a filter query
expression such as:
CURRENT_JULIAN() - DATE(PURCH_DATE) <= 365
Then, if you are computing a Based on calculation that chooses the sum of the Amount
field, only the amounts from transactions within the last year are summed together.
Switching and filtering audience levels
Configure an Audience process to switch between audience levels or to filter out IDs by a
specific audience level.
To use the Audience process, you must work with tables for which multiple audience levels
are defined.
The options that are available in the Audience process configuration dialog depend on
various choices that you can make:
• Whether the input and output audience levels are the same or different
• Whether the audience level values are normalized in these tables
• Whether there are multiple audience levels defined for the selected tables
For this reason, not all of the options described below are available for all pairs of input and
output table selections.
1. Open a flowchart for editing.
Unica Campaign V12.0 User Guide | 3 - Designing flowcharts | 107
2. Drag the Audience process from the palette to your flowchart.
The Audience process can select from any defined tables, so you can use it as a top-
level process in your flowchart to initially select data. You can also use a process such
as Select or Merge to provide input to the Audience process.
3.
Double-click the Audience process in the flowchart.
The Audience process configuration dialog box opens and the Source tab is open by
default.
4. On the Source tab, open the Input list and select a data source for the process. You can
select a Segment, a Table, or the output cell from any process that is providing input to
the Audience process.
The audience level for the selected input is displayed next to the Input field. If there is
no input, the audience level is shown as not selected.
Tip: Notice that the Select options indicate the input audience level. For example, if
the audience level is Customer, you can select One entry per Customer. If the audience
level is Household, you can select One entry per Household.
5.
Select an output audience level from the Choose audience list.
Note: If you do not see the expected audience level, you can try remapping a table.
The Select options now reflect both the input and the output audience levels.
For example, if your input is Household and your output is Customer, the Select options
are labeled All Customer entries, Some Customer entries, One Customer entry per
Household.
6.
Use the Select and Filter options to specify how to select records. The available
options depend on whether you are selecting All IDs (in which case filtering is not
allowed), switching levels, or staying at the same level.
For details on how to select and filter based on whether you are switching audience
levels, see:

Unica Campaign V12.0 User Guide | 3 - Designing flowcharts | 108
• Options that are available when using the same input and output audience levels
(on page 109)
• Options that are available when using different input and output audience levels
(on page 114)
7. Optionally, use the Cell size limit tab to limit the number of IDs generated by the
process during production or test runs. See Limiting the size of output cells (on page
217).
8. Use the General tab to set the following options.
a. Process name: Assign a descriptive name to identify the process in the flowchart
and in various dialogs and reports.
b. Output cell name: This name matches the Process name by default. It is used
in dialogs and reports to identify the output cell (the set of IDs that the process
retrieves).
c. (Optional) Link to target cell: Perform this step if your organization pre-defines
target cells in a target cell spreadsheet. To associate the pre-defined target cell
with the flowchart process output, click Link to target cell, then select a target
cell from the spreadsheet. The Output cell name and Cell code are inherited from
the target cell spreadsheet, and both of those field values are shown in italics to
indicate that there is a link relationship.
d. Cell code: The cell code has a standard format that is determined by your system
administrator and is unique when generated. Do not change the cell code unless
you understand the implications of doing so. By default, the name of a cell created
in a process matches the process name. When you save changes to an output cell
name, if Auto generate is selected, the cell code is regenerated. If you do not want
the cell code to change, uncheck Auto generate. See Cell names and codes (on
page 223).
e. Note: Use the Note field to explain the purpose or result of the process, such as
Contact one individual per household. The contents of this field appears when you
rest your cursor over the process box in a flowchart.
9.
Click OK to save and close the configuration.
Unica Campaign V12.0 User Guide | 3 - Designing flowcharts | 109
The process is now configured. You can test run the process to verify that it returns the
results that you expect.
Options that are available when using the same input and output audience levels
When the input and output audience levels are the same in an Audience process of a
flowchart, you can use the following selections to identify the audience.
The Select options vary depending on the relationship of the selected audience levels for
the Input and output (Choose audience). Options that are not meaningful are disabled.
Note: The name of the selected audience level is used in the Select option labels. For
example, if the input audience level is Customer, the One entry per option appears as One
Customer entry per.
The Select options include:
One per One member of the input/output audience level, scoped
by another audience level.
For example: One customer per household.
See Selecting one <Input/Output audience> entry per
<Different audience> (on page 110).
Some per Some members of the input/output audience level,
scoped by another audience level.
For example: All customers in the household with above
average purchases.
See Selecting some <Audience> records per <Different
audience> (on page 111).
For each Select members if the number of members at the
selected audience level satisfies some condition.
For example: Number of accounts > 1, or number of
purchases > 3.

Unica Campaign V12.0 User Guide | 3 - Designing flowcharts | 110
See Selecting entries for each entry at that audience
level (on page 112).
Selecting one <Input/Output audience> entry per <Different audience>
Choose this option if the input and output audience levels are the same, but a different
audience level is used to scope the output.
An example is to select the one customer in each household who has the oldest account.
(Input audience level is customer, output audience level is customer, scoping by Household
level, using MinOf(BaseInfo.AcctStartDt) to select.) Specify a business rule to indicate
how the single entity is selected (for example, the minimum, maximum, or median of some
field), or else choose Any one (in this case, no field choices are available).
1. In the Audience process, select an input source for Input.
2.
Choose the same audience level for the output audience.
The relevant Select options become available.
3. Select the One entry per option.
4.
Select an audience level from the list.
All alternate defined audience levels (other than the input audience) appear in the list.
5.
Choose a value from the Based on list:
• Any One eliminates the need to pick a Based on value
• MaxOf returns the maximum value of the selected field
• MedianOf returns the median value of the selected field
• MinOf returns the minimum value of the selected field
Each of these functions will return exactly one member from the input audience level.
If more than one entry is tied at the maximum, minimum, or median value, the first
encountered entry is returned.
6.
If you selected a Based on criterion other than Any one, select a field on which the
function operates. This list includes all the fields from the table selected in the Choose

Unica Campaign V12.0 User Guide | 3 - Designing flowcharts | 111
audience field and any mapped dimension tables. Expand a table by clicking the " + "
sign. Created derived fields are listed at the bottom.
For example, to select the account holder from each household with the highest
account balance, select MaxOf for the Based on criteria and Acct_Balance from the
list of table fields.
You can also create or select derived fields by clicking Derived fields.
7.
(Optional) If you selected a count to be based on, the Filter button becomes available.
Use the Filter function to reduce the number the IDs that will be available to the
Based on calculation. For example, you might want to select customers based on their
average account balance in the last 6 months, but prior to doing that, you would want to
filter out all customers whose accounts are inactive.
To filter records before performing the Based on computation, click Filter. The Specify
selection criteria dialog appears. You can enter a query expression to specify which
records will be used in the Based on calculation. The filtering criteria is applied before
performing the Based on calculation, thereby allowing you to remove records from
consideration.
Tip: You create a query expression in the Specify selection criteria dialog the same
way that you would for a Select process. For instructions, see the topic Selecting a list
of contacts (on page 69).
8. Click OK to save your query and close the Specify selection criteria dialog.
9. Continue configuring the Audience process by completing the fields on the remaining
tabs.
Selecting some <Audience> records per <Different audience>
This selection indicates that there are multiple entries per audience.
In this situation, the input and output audience levels are the same, but a different audience
level is used to scope the output. For example, select all customers within each household
Unica Campaign V12.0 User Guide | 3 - Designing flowcharts | 112
who have made purchases over $100 (Input audience level is customer, output audience
level is customer, scoping by Household level, using Maximum Purchase Value>$100.)
In addition to creating a query, the Based on criterion also supports keywords allowing the
functional equivalent of a GROUPBY macro function to be performed.
1.
Select an input source for Input and the same audience level for the output audience in
the Audience process.
The relevant Select options become available.
2.
Select the Some entries per... option.
A list appears next to the selected option.
3.
Select an audience level from the list.
All alternate defined audience levels (other than the input audience) appear in the list.
4.
Click in the Based on field to enter a query.
The Specify selection criteria dialog opens.
5.
Enter or build a valid query expression, then click OK to save it and close the Specify
selection criteria dialog.
Tip: You create a query expression in the Specify selection criteria dialog the same
way that you would for a Select process. For instructions, see the topic Selecting a list
of contacts (on page 69).
6. Continue configuring the process by completing the fields on the remaining tabs.
Selecting entries for each entry at that audience level
This selection indicates that there are multiple selections from multiple audience levels.
Select this option if the number of members at the selected audience levels satisfies some
condition (for example, Number of Accounts > 1 or Number of Purchases > 3 ).
Note: This option is available only if the input audience level is not normalized (that is,
the record ID is not unique in the selected Choose Level table), and the input and output

Unica Campaign V12.0 User Guide | 3 - Designing flowcharts | 113
levels are the same. It is the only option available if no alternate keys have been defined for
your output audience table.
1.
Select an input source for Input and the same audience level for the output audience in
the Audience process.
The relevant Select options become available.
2.
Select the For each option.
Note: This option is available only if the input audience level is not normalized (that
is, the record ID is not unique in the selected Choose Level table).
A list appears next to the selected option.
3.
Choose a Based on selection.
If the table that you selected for Choose audience (that is, the output audience) is not
normalized, there might be duplication in your results. To avoid duplication, specify a
Based on method for Unica Campaign to use when selecting records. For example, if
your results might include more than one individual in the same household, you can use
Based on to select only one individual from that household, based on the criterion that
you configure in this feature.
You must select one of the Based on methods:
•
Count: This option lets you select the <Input Audience Level> ID, where the
number of occurrences of the <Input Audience Level> ID satisfies the specified
condition. To toggle between different relationships (<,<=,>,>=,=), click the operator
button repeatedly until the desired relation is displayed.
When you select Count, the Filter button becomes available. Optionally, use the
Filter function to reduce the number the IDs that will be available to the Based on
calculation. For example, you might want to select customer IDs based on their
average account balance in the last six months, but before doing that, you would
want to filter out all customers whose accounts are inactive. When you click Filter,
the Specify selection criteria dialog opens. You can enter a query expression to
specify which records will be used in the Based on calculation. The filtering criteria
Unica Campaign V12.0 User Guide | 3 - Designing flowcharts | 114
is applied before performing the Based on calculation, allowing you to remove
records from consideration.
• Condition: Click in the text box to the right of Condition. The Specify selection
criteria dialog appears. Enter or build a valid query expression, then click OK to
save your expression and close the Specify selection criteria dialog.
Tip: You create a query expression in the Specify selection criteria dialog
the same way that you would for a Select process. For instructions, see the topic
Selecting a list of contacts (on page 69).
4. Continue configuring the process by completing the fields on the remaining tabs.
Options that are available when using different input and output audience levels
When the input and output audience levels are different in an Audience process of a
flowchart, you can use the following selections to identify the audience.
Note: The name of the selected audience level is used in the Select option labels. For
example, if the input audience level is Customer, the One entry per option appears as One
Customer entry per. In the following sections, this dynamically changing portion of the
option text is indicated with <Input/Output Audience> where appropriate.
The Select options include:
All Select all members of the input audience level, scoped
by another audience level. For example: All customers
per household.
See Selecting all <Output Audience Level> entries (on
page 115).
Some Select some members of the output audience level,
keeping only those IDs that satisfy a specified
condition. For example: All customers aged 18 or over
within a household.
Unica Campaign V12.0 User Guide | 3 - Designing flowcharts | 115
See Selecting some <Different Output Audience Level>
entries (on page 115)
One per Select exactly one output audience record for each
input audience record. For example: One customer per
household.
See Selecting one <Output Audience> per <Different
Input Audience> (on page 116).
Selecting all <Output Audience Level> entries
Select this option to switch to the output audience level without performing any filtering.
For example, you can select all customers in a household or all accounts belonging to a
customer.
This option creates an output cell with all output audience level entries associated with the
input IDs. It switches audience levels without applying any selection or filtering criteria.
If you change from a primary audience level to another audience level, you will no longer be
able to use derived fields in downstream processes.
1.
Select an input source for Input and a different output audience for Choose audience.
The Select options become available.
2. Select All <Output Audience Level> entries.
3. Click OK.
Selecting some <Different Output Audience Level> entries
Select this option to switch from the input audience level to a different output audience
level, keeping only those IDs that satisfy a specified condition. For example, you could
select all customers aged 18 or over within a household, or select all accounts of a
customer with positive balances.
1.
Select an input source for Input and a different output audience for Choose audience.

Unica Campaign V12.0 User Guide | 3 - Designing flowcharts | 116
The Select options become available.
2.
Click to select Some <Output Audience Level> entries.
The Based on field becomes available.
3.
Click in the Based on field to enter a query.
The Specify Selection Criteria window appears. The Based on criteria allows you to
enter a query expression to limit the output audience level entries selected.
4. Enter or build a valid query expression, then click OK to save the query and close the
Specify Selection Criteria window.
5. Click OK to close the Audience process configuration dialog, saving your entries.
Selecting one <Output Audience> per <Different Input Audience>
Select this option to choose exactly one output audience record for each input audience
record (for example, to choose one email address per customer).
You must specify a business rule to indicate how the single entity should be selected (min/
max/median of some field) or choose AnyOne (in this case, no field choices are available).
This option is available only if the input audience level is not normalized (that is, the record
ID is not unique in the selected Choose Level table).
In addition to creating a query, the Based on criterion also supports keywords allowing the
functional equivalent of a GROUPBY macro function to be performed.
1.
Select an input source for Input and an output audience for the Audience process.
The Select options become available.
2. Select One <Output Audience Level> per <Input Audience Level>.
3.
Select a value from the Based on drop-down list.
(Field selection, using the drop-down list to the right, becomes inactive when you select
Any One. If this is your selection, skip to step 5.)
Unica Campaign V12.0 User Guide | 3 - Designing flowcharts | 117
4. Select a field in the next drop-down list to which the Based on function relates:
a.
Click in the Based on text box.
The Select Field window appears. All fields from the table selected in the Choose
audience drop-down list appear, including any mapped dimension tables.
You can expand a table by clicking the "+" sign. Created derived fields are listed at
the bottom.
b. Select a field and click OK.
c. (Optional) Create derived fields by clicking Derived fields.
5. (Optional) To filter records before performing the Based On computation, use Filter.
6. Click OK.
The Extract process
Use the Extract process to select fields from one table and write them out to another table
for subsequent processing. The Extract process is designed to pare down a large amount
of data to a manageable size for subsequent operations, resulting in vast performance
improvements.
The Extract process can take input from a cell, single table, strategic segment, optimized list
(Unica Optimize only), or IBM eMessage landing page (IBM eMessage only). If you select a
strategic segment as input, you must join it to a table before you can extract fields.
If you use several Extract processes in a series, only the fields in the final Extract process
are written out.
If you use several Extract processes in parallel (in different branches in the same flowchart),
they behave the same as persistent derived fields:
• The extracted fields attach to the inbound cell
• The extracted fields are calculated before query execution in that process

Unica Campaign V12.0 User Guide | 3 - Designing flowcharts | 118
• Multiple extracted fields are available in subsequent processes
•
When extracted fields are sent to a contact process:
◦ If an extracted field is not defined for a cell, its value = NULL
◦ If a single ID is in more than one cell, one row is output for each cell
• When extracted fields are sent to a Segment or Decision process, the extracted field
must exist in all selected input cells for it to be used in segmenting by query.
Extracted tables
Data is extracted as either a binary file on the Unica Campaign server or as a table with a
UAC_EX prefix.
Extract tables are not deleted at the end of a flowchart run. An extract table persists so that
users can continue to access it to perform operations such as profiling its fields.
An extract table is deleted only when you delete its associated Extract process, flowchart,
campaign, or session.
Note: To conserve space, system administrators can periodically delete tables with a
UAC_EX prefix. However, if these tables are removed, you must rerun the affected Extract
processes before you rerun flowcharts or profile fields in the now-missing tables. Otherwise,
Unica Campaign generates "Table Not Found" errors.
Example: Extracting transaction data
This example explains how to use the Extract process to obtain data about purchase
transactions.
Assume that you designed a campaign to perform selections or calculations based on the
last three months of purchase transactions for all non-delinquent customers (approximately
90% of your customer base), resulting in 4 Gb of data.
Even if Unica Campaign created a temporary table for these customers, joining it back to
the purchase transaction table would entail pulling over approximately 90% of the 4 Gb rows
(and discarding all transactions except for the last three months) to execute a GROUPBY
macro, for example.

Unica Campaign V12.0 User Guide | 3 - Designing flowcharts | 119
Instead, you can configure an Extract process (placed at the purchase transaction level) to
pull out all transactions within the last three months, put them into a table in the database,
and then subsequently run multiple GROUPBY macros and other calculations against it (for
example, min/max and average).
Prerequisites for extracting data from IBM eMessage landing
pages
Several prerequisites must be met before you can configure an Extract process to accept
input from IBM eMessage landing pages.
• IBM eMessage must be installed, running, and enabled.
• IBM eMessage landing pages must be appropriately configured.
• The mailing must be executed and responses from mailing recipients must be received.
For more information about IBM eMessage landing pages, see the IBM eMessage User's
Guide.
Extracting data from a cell, table, or strategic segment
This procedure explains how to use the Extract process to obtain data from an input cell,
such as a Select process, or from a single table or a strategic segment. In this way, you
can pare down a large amount of data to a manageable size for subsequent operations,
resulting in improved performance.
See The Extract process (on page 117).
1. Open a flowchart for editing (click Edit in the flowchart toolbar).
2. Drag the Extract process from the palette to your flowchart.
3. Optionally, connect a configured process, such as a Select process, as input into the
Extract process.

Unica Campaign V12.0 User Guide | 3 - Designing flowcharts | 120
4. Double-click the Extract process in the flowchart.
The Extract process configuration dialog opens and the Source tab is open by default.
5. On the Source tab, use the Input list to select an input cell, a table, or a strategic
segment. The Select based on list indicates your selection. If you selected a strategic
segment, you must join it to a table by selecting a table from the Select based on list.
6. Specify which records to select. If you want to include all records from the input data
source, choose Select all records.
7. If you prefer to use a subset of IDs from the selected data source, choose Select all
records with, so you can do a query for the records that you want to extract.
The Expression box shows columns labeled Field name, Oper, Value, and And/Or.
When the button says Text Builder, you can build expressions by populating the
columns labeled Field name, Oper, Value, And/Or.
When the button says Point & click, you can view or edit raw SQL and you can use the
Formula helper to pick macros, operators, and string functions from a list.
With either method (Text Builder or Point & click), you can select fields from the
Available fields list, including Unica Campaign Generated Fields and Derived fields.
8.
Construct a query to determine which records are selected:
a.
To specify which field to query, click in the Field name cell. The Available fields list
should appear. If the list does not appear, click in the Field name cell again. In the
Available fields list, expand the fields until you see the one that you want. Select an
available field by double-clicking it or by highlighting it and clicking Use.
Note: When deciding which field to use, you can highlight an available field
and click Profile to see a list of values in that field. Then use the Profile selected
field dialog to examine the field values. For more information, see Previewing field
values from your user data (on page 51).
Unica Campaign V12.0 User Guide | 3 - Designing flowcharts | 121
Note: When the list of Available fields is displayed, you can use the Derived
fields button if you want to create or select a variable for querying. For more
information, see Derived fields (on page 279).
b. Click in the Oper cell, then double-click a comparison operator in the Operators list
(=, <, >, <=, >=, <>, In, Not in, Between).
c.
Click in the Value cell, then double-click a value. If no values appear, double-click
(Profile...) in the Values list to open the Profile selected field dialog so you can
select from a list of values. You can also double-click in the Value cell to edit the
value directly.
Note: If you do not see the expected list (Available fields, Operators, Values,
For selected expresssion), try either single clicking or double clicking on a cell in
the Expression area.
You now have an expression that consists of a field name, operator, and value.
9. Click Check syntax to confirm whether the query syntax is valid. Checking the syntax
does not put any load on the database server.
10.
To add and combine multiple expressions, follow the guidelines below:
a. To add another expression, click the And/Or cell, then double-click AND or OR in
the Values list to indicate how to combine the expressions.
b. Build your next expression, consisting of a field name, operator, and value.
c. To add parentheses to control evaluation order, double-click the Field Name in
any row to display the For selected expression list. In the list of expressions,
double-click Add ( ) to add a set of parentheses, Remove ( ) to remove a single
set of parentheses, or Clear all ( ) to remove all of the parentheses in the selected
expression. Parentheses allow you to group expressions when defining complex
queries. For example, (AcctType = 'Gold' AND Rank = 'A') OR NewCust = 'Yes' is
different from AcctType = 'Gold' AND (Rank = 'A' OR NewCust = 'Yes').
d. To reorder the selected expression, double-click Move up or Move down.
e. To add a blank row below the selected expressions, double-click Insert.
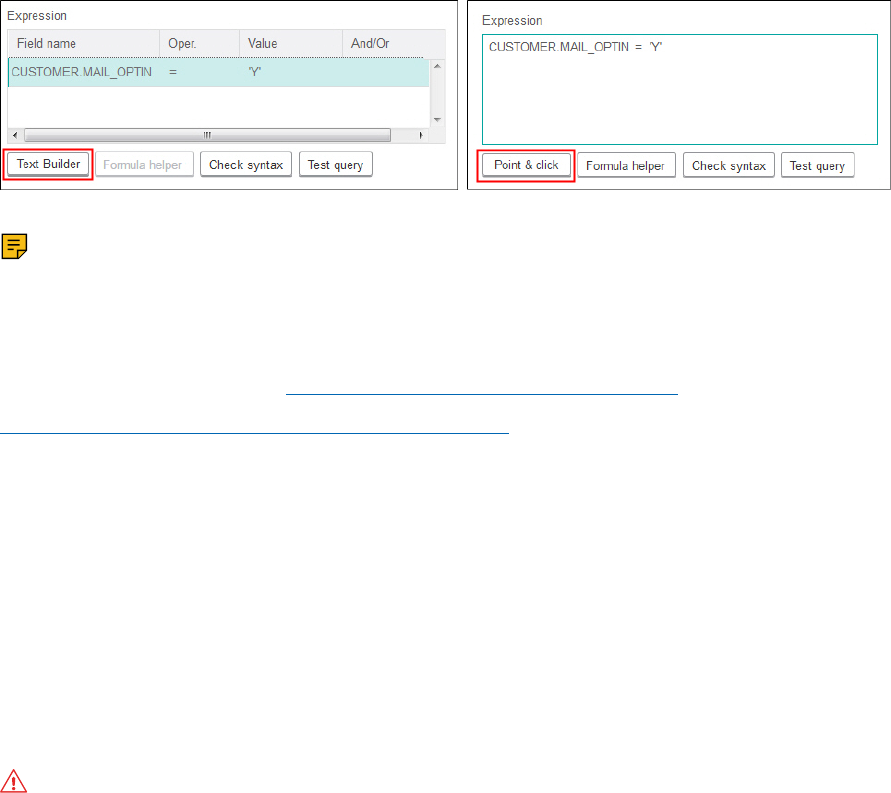
Unica Campaign V12.0 User Guide | 3 - Designing flowcharts | 122
f. To delete the selected expression, double-click Delete.
11.
Optionally, click the Text Builder button so its label changes to Point & click. When the
button says Point & click, you can view or edit raw SQL. You can also use the Formula
helper to pick macros, operators, and string functions from a list.
Note: If your query includes a table field that has the same name as a Campaign
generated field, you must qualify the field name. Use the following syntax:
<table_name>.<field_name>.
For related information, see Creating raw SQL queries (on page 60). Also see
Creating queries with Formula helper (on page 58).
12. Click the Point & click button to change back to the original query mode. The button
label changes back to Text Builder.
13.
(Optional) Use Test query to see how many IDs the query returns.
A progress bar is displayed while the query is being tested. Close the progress window
if you want to cancel the test. When testing is complete, Unica Campaign indicates the
number of rows the query returned.
Important: Global suppressions and cell size limits are not applied in test query
counts. Test queries might also return non-normalized data. To obtain an accurate
result count, test run the process.
14. Continue configuring the process, as described below, or click OK to close the process
configuration dialog and save the query expression.
Unica Campaign V12.0 User Guide | 3 - Designing flowcharts | 123
15. Optionally, use the Cell size limit tab to limit the number of IDs generated by the
process during production or test runs. See Limiting the size of output cells (on page
217).
If you selected Random seed, in most cases you can accept the default seed. The
random seed represents the starting point that Unica Campaign uses to select IDs
randomly.
Note: The same random set of records will be used for each subsequent run
of the Extract process (unless the input to the process changes). This is important
if you intend to use the results for modeling purposes, because different modeling
algorithms must be compared across the same set of records to determine each
model's effectiveness. If you do not intend to use the results for modeling, you can
make the Extract process select a different random set of records each time it runs. To
do this, use a Random Seed of zero (0). A value of 0 ensures that a different random set
of records will be selected each time the process runs.
16.
On the Extract tab, use the Target data source field to select an output location:
• To store the data in binary format, select Unica Campaign Server.
• To store the data in a uniquely named table with a UAC_EX prefix, select an available
database.
Then select fields from the list of Candidate fields and add them to the Fields to
extract list. Use the controls to remove or reorder fields. For information about using
the Extract tab, see Extract tab reference (on page 126).
17.
Optionally, use the Dimension tab to add existing dimension tables to the extract table
and specify the key fields to join on. The extract table becomes a base table for the
selected dimension tables and can be used in downstream processes.
Note: The Dimension tab is not applicable if you are extracting data to the Unica
Campaign Server.
18.
Select the General tab to set the following options.

Unica Campaign V12.0 User Guide | 3 - Designing flowcharts | 124
a. Process name: Assign a descriptive name. The process name is used as the box
label on the flowchart. It is also used in various dialogs and reports to identify the
process.
b. Output cell name: This name matches the Process name by default. It is used
in dialogs and reports to identify the output cell (the set of IDs that the process
retrieves).
c. (Optional) Link to target cell: Perform this step if your organization pre-defines
target cells in a target cell spreadsheet (TCS). To associate the pre-defined target
cell with the flowchart process output, click Link to target cell, then select a target
cell from the spreadsheet. The Output cell name and Cell code are inherited
from the TCS, and both of those field values are shown in italics to indicate that
there is a link relationship. For more information, read about using target cell
spreadsheets.
d.
Cell code: The cell code has a standard format that is determined by your system
administrator and is unique when generated. Do not change the cell code unless
you understand the implications of doing so. By default, the name of a cell created
in a process matches the process name. When you save changes to an output cell
name, if Auto generate is selected, the cell code is regenerated. If you do not want
the cell code to change, uncheck Auto generate.
See Changing the cell code (on page 228).
e. Note: Use the Note field to explain the purpose or result of the process. Common
practice is to reference the selection criteria or other important information. The
contents of this field appears when you rest your cursor over the process box in a
flowchart, in View or Edit mode.
19. Click OK to save and close the configuration.
The process is now configured. You can test run the process to verify that it returns the
results you expect.
Unica Campaign V12.0 User Guide | 3 - Designing flowcharts | 125
Extracting data from an IBM eMessage landing page
You can use the Extract process in a flowchart to extract data from an IBM eMessage
landing page. The Extract process selects fields from one table and writes them out to
another table for subsequent processing.
Ensure that your environment meets the requirements before attempting to extract IBM
eMessage landing page data. For more information, see Prerequisites for extracting data
from IBM eMessage landing pages (on page 119).
1.
In a flowchart in Edit mode, double-click the Extract process in the flowchart
workspace.
The process configuration dialog appears.
2. On the Source tab, select IBM eMessage landing pages.
3.
In the popup window, select an IBM eMessage landing page as input.
Note: You can select only one IBM eMessage landing page as input to an Extract
process. To extract data from more than one landing page, configure multiple Extract
processes.
4. If there is more than one audience level available for the landing page, select the
appropriate audience level from the drop-down list. If there is only one audience level
available, it is automatically selected.
5. Click OK.
6.
On the Extract tab, use the Target data source field to select an output location:
• To store the data in binary format, select Unica Campaign Server.
• To store the data in a uniquely named table with a UAC_EX prefix, select an available
database.
Then select fields from the list of Candidate fields and add them to the Fields to
extract list. Use the controls to remove or reorder fields. For information about using
the Extract tab, see Extract tab reference (on page 126).
Unica Campaign V12.0 User Guide | 3 - Designing flowcharts | 126
7. Perform any of the following optional tasks:
• Add a derived field to the list of candidate fields. See Derived fields (on page
279)
• Specify that duplicate IDs are excluded from the output. See Skipping duplicate IDs
in process output (on page 50).
• Limit the size of the output cell (that is, limit the number of IDs generated by the
process). See Limiting the size of output cells (on page 217).
• Use the General tab to modify the Process name, Output cell names, or Cell codes,
link to a target cell, or enter a Note about the process.
For information about linking to target cells, see Linking flowchart cells to targeted
offers defined in a target cell spreadsheet (on page 242).
Note: Profiling is not available for IBM eMessage landing page attributes.
8. Click OK.
The process is configured. You can test the process to verify that it returns the results you
expect.
Note: During the extraction process, Unica Campaign creates an intermediate view
in the system tables database with a UCC_LPV prefix. This internal view remains in the
database until the process box is deleted. If you remove the view, you must reconfigure its
corresponding Extract process before rerunning the process or flowchart; otherwise, Unica
Campaign generates a missing table error.
Extract tab reference
Use the fields on the Extract tab when you configure an Extract process in a flowchart.
Table 8. Fields on the Extract tab
Field Description
Target data source Location to which the output from this process will be
written. The Unica Campaign Server and any other data

Unica Campaign V12.0 User Guide | 3 - Designing flowcharts | 127
Field Description
sources to which you are connected are available in the
Target data source drop-down list.
Candidate fields List of fields available to extract, including field name and
data type, based on your input data source. To see the list
of fields, you may need to click the arrow next to an item to
expand the item.
If your input source is a landing page in IBM eMessage,
each field name is an attribute of the landing page. If
the attribute contains special characters or spaces, it is
converted to a valid field name. Data types of all landing
page attributes are listed as text.
Note: Schema object names are limited to 30
characters. Restrict your attribute names to 30 characters
or less to produce valid column names for extracted
output.
Fields to extract Fields that you chose to extract from the Candidate fields
list. The Output name defaults to the field name in the
Fields to extract column.
If you change the Output name, you can use any
combination of letters and numbers. Do not use spaces,
hyphens (-), periods (.), slashes (/ or \), or any special
characters.
Profile... Click Profile to preview a list of values in the selected
candidate field. Profiling is not available for IBM eMessage
landing page attributes.
Derived fields... Click Derived fields... to create a variable in the list of
candidate fields. Derived fields are variables that do not
Unica Campaign V12.0 User Guide | 3 - Designing flowcharts | 128
Field Description
exist in a data source and are created from one or more
existing fields, even across different data sources.
More... Click More... to open the Advanced settings dialog. This
dialog includes the option to exclude duplicate IDs from
the output and specify how Unica Campaign identifies
duplicates.
The Snapshot process
Use the Snapshot process to capture data for export to a table or a file.
To make sure that duplicate rows are not exported, set Skip records with duplicate IDs to
Yes in the snapshot configuration. Or you can use an Extract process and then snapshot the
results.
To associate or track offers with the list, use the snapshot as input to a Mail list or Call list
process. When you configure the Mail list or Call list process, export the necessary data to
an alternate location (either a file or a table).
Taking a snapshot of data for export to a table or file
Use the Snapshot process to capture data for export to a table or file. Select the source of
the values that you want to capture, and define the output table or a file for those values.
1. Open a flowchart for editing.
2. Drag the Snapshot process from the palette to your flowchart.
3.
Connect one or more configured processes to provide input to the Snapshot process.
Note: All of the cells that you select as input must have the same audience level.
4.
Double-click the Snapshot process in the flowchart workspace.

Unica Campaign V12.0 User Guide | 3 - Designing flowcharts | 129
The Snapshot process configuration dialog box opens and the Snapshot tab is open by
default.
5. Use the Snapshot tab to specify how to capture data.
a.
Use the Input list to specify which cells to use as the data source for the snapshot.
Note: If the Snapshot process is not connected to a process that provides
output cells, there are no cells to select from in the Input list. Also, the Multiple
cells option is available only if the input process generates multiple cells.
b.
Use the Export to list to select a table or file for the Snapshot output.
Note: You can test the Snapshot process by running the process with output
exported to a temporary file that you can review.
• You can select an existing table from the list
• If the table that you want to use is not in the list, or if you want to output to an
unmapped table, select Database table. Use the Specify database table dialog
box to specify the table and database name. User variables are supported in
the table name that you specify here.
• You can select File to open the Specify output file dialog, so you can define
how to output to a Flat file with data dictionary, Flat file based on existing
data dictionary, or Delimited file.
• If you want to create a new user table, select New mapped table from the
Export to list. For instructions on mapping tables, see the Unica Campaign
Administrator's Guide.
• Choose [Extract table] if you want to export to an extract table, which has a
UAC_EX prefix. An extract table persists so that users can continue to access
it to perform operations such as profiling its fields.
c. Select an option to specify how updates to the output file or table are handled:
• Append to existing data. Add the new information to the end of the table or
file. If you select this option for a delimited file, labels are not exported as the
first row. This is a best practice for database tables.
Unica Campaign V12.0 User Guide | 3 - Designing flowcharts | 130
• Replace all records. Remove any existing data from the table or file, and
replace it with the new information.
• Update records. Available only if you are exporting to a table. All fields that are
specified for the snapshot are updated with the values from the current run of
the process.
• Create new file. Available only if you are exporting to a file. This option is
selected by default if you are exporting to a file. Each time that you run the
process, a new file is created with an underscore and digit appended to the file
name (file_1, file_2, and so on).
6.
To specify which fields to snapshot, use the controls to move selected fields from the
Candidate fields list to the Fields to snapshot list. You can select multiple fields with
Ctrl+Click or select a range of fields with Shift+Click.
Note: To view the values in a field, select a field in the Candidate fields list and click
Profile.
• If you selected a table as the snapshot destination, the fields in that table appear
in the Candidate fields list. You can automatically find matching fields by clicking
the Match button. Fields with exact matches for the table field names are
automatically added to the Fields to snapshot list. If there are multiple matching
fields, the first match is taken. You can manually modify the pairings by using
Remove << or Add >>.
• To include generated fields, expand the list of Unica Campaign generated fields in
the Candidate fields list, select a field, then use the controls to move the field to
the Fields to snapshot list.
• To work with derived fields, click the Derived fields button.
• You can reorder the Fields to snapshot by selecting a field and clicking Up 1 or
Down 1 to move it up or down in the list.
7. To skip records with duplicate IDs or to specify the order in which records are output,
click More to open the Advanced settings dialog.

Unica Campaign V12.0 User Guide | 3 - Designing flowcharts | 131
a. To remove duplicate IDs within the same input cell, select Skip records with
Duplicate IDs. Then choose the criteria to determine which record to retain if
duplicate IDs are found.
For example, select MaxOf and Household_Income to specify that when duplicate
IDs are found, Unica Campaign exports only the ID with the highest household
income.
Note: This option removes duplicates only within the same input cell. Your
snapshot data can still contain duplicate IDs if the same ID displays in multiple
input cells. To remove all duplicate IDs, use a Merge or Segment process upstream
of the Snapshot process to purge duplicate IDs or create mutually exclusive
segments.
b.
To sort the snapshot output, select the Order by check box, then select the field to
sort by and the sort order.
For example, select Last_Name and Ascending to sort IDs by surname in
ascending order.
c. Click OK.
8.
Use the General tab to set the following options:
• Process name: Assign a descriptive name. The process name is used as the box
label on the flowchart. It is also used in various dialogs and reports to identify the
process.
• Note: Use the Note field to explain the purpose or result of the process. The
contents of this field appears when you rest your cursor over the process box in a
flowchart.
9. Click OK to save and close the configuration.
The process is now configured. You can test run the process to verify that it returns the
results you expect.

Unica Campaign V12.0 User Guide | 3 - Designing flowcharts | 132
The Schedule process
Use the Schedule process to initiate a process, a series of processes, or an entire flowchart.
The Schedule process works only if the flowchart is running.
A Schedule process is active for a defined period of time. During that time, specified events
might occur that cause subsequent connected processes to begin running. The most
common use of the Schedule process is to control timing of the entire flowchart.
Note: A flowchart can include multiple Schedule process boxes as long as they are in
independent branches. However, errors can occur if a process has more than one Schedule
ancestor in different ancestral branches leading to the same process.
You can configure a Schedule process to define the total scheduling period by setting up a
time limit in days, hours, and minutes starting from when the process begins running.
• You can schedule a process to run in a variety of ways, including repetitively, by trigger,
and by calendar.
• You can combine multiple scheduling options. For example, you can schedule a
process to run every Monday at 9:00 a.m., and whenever it is triggered by a specific
event, such as a visit to the website.
• You can schedule a batch process, for example, to run late at night when it will not
interfere with daytime jobs.
There are no limits on the number of options that you can use simultaneously in scheduling
a flowchart, as long as the selections do not conflict. (For example, you cannot schedule a
flowchart to run both "Once Only" and "Every Monday.")
In general, a process runs only when all of its inputs have run successfully (that is, when
all processes connected to the current process have run, even if the dependency is only
temporal). However, when multiple schedule inputs exist within a branch, the process will
run whenever any one of its inputs completes (an "OR" rather than an "AND" of its inputs).
A contact process with tracking enabled contains an inherent schedule. Using a Schedule
process in the middle of a flowchart is an advanced feature. Make sure that you are getting
the desired behavior and correct results.

Unica Campaign V12.0 User Guide | 3 - Designing flowcharts | 133
Note: If the Schedule process in your flowchart tells the flowchart to run before a
previous run is complete, Unica Campaign holds the request until the previous run is
finished. Only one run can be held in this manner. In certain cases, this might mean that the
flowchart does not run as many times as you expect.
For example, if your flowchart takes two hours to run, and you have a Schedule process
that tries to trigger three runs that are only 10 minutes apart, Unica Campaign will start the
first run. When the Schedule process attempts to start the second run, Unica Campaign will
queue it. When the Schedule process attempts to start the third run, Unica Campaign will
ignore it. When the first run is finished, Unica Campaign will start the second run. The third
run will never start.
Difference between the Unica Campaign Schedule process and
Unica Scheduler
Starting with the 8.0 release of Unica Platform, the Unica Scheduler is intended to replace
the Unica Campaign Schedule process for scheduling runs of an entire flowchart. The Unica
Scheduler is more efficient, as it does not consume any server system resources when the
flowchart is not actually running.
The Unica Scheduler starts a flowchart even if it is not running, while the Unica Campaign
Schedule process in a flowchart works only if the flowchart is running.
The Unica Campaign Schedule process is preserved for full compatibility with earlier
versions, and for other use cases not handled by the Unica Scheduler. For example, you
might want to use the Unica Campaign Schedule process to send Unica Campaign triggers
or to delay execution of dependent processes.
Do not use the Unica Scheduler to schedule a flowchart that uses the Unica Campaign
Schedule process as the top-level process that starts a flowchart run. Typically, only one
or the other is necessary. However, if the Schedule process appears in a flowchart that is
started by the Unica Scheduler, it functions as configured; conditions required by the Unica
Scheduler and the Schedule process must be met before subsequent processes run.

Unica Campaign V12.0 User Guide | 3 - Designing flowcharts | 134
Unlike the Unica Scheduler, the Unica Campaign Schedule process can send external
triggers to call command-line scripts. The Unica Scheduler can send triggers only to its own
schedules.
Inbound and outbound triggers
You can configure the Schedule process to be triggered by an event and to trigger events
upon completion. Use Options > Stored Triggers to define triggers, then call the triggers by
configuring the Schedule process in a flowchart.
Note: For performance advantages, use the Unica Scheduler to send triggers to Unica
Campaign. To learn more about the Scheduler, see the Unica Platform Administrator's
Guide.
Inbound triggers: Events that activate the Schedule process
An inbound trigger is an external event that sets a flowchart or campaign in motion. A
trigger can be anything that you define. Examples include clicking a website link, receiving
an email message, a telemarketer's response indicator, completion of a database upload, or
any other defined event.
To specify inbound triggers that activate the Schedule process, configure the Schedule
process and select Custom run from the Schedule to run list, then use the Run on trigger(s)
option.
The Run on trigger(s) option uses unica_actrg (included with your Unica Campaign
installation) to run. To understand how Run on trigger works behind the scenes, it is helpful
to look at an example: Example: Run on Trigger (on page 135).
Outbound triggers: Events activated by the Schedule process
An outbound trigger executes a command line, which can be a batch file or a script. Unica
Campaign can run one or more triggers each time the Schedule process activates the
trigger names in the Send trigger(s) after each run field. If you specify multiple trigger
names, they must be separated by commas.

Unica Campaign V12.0 User Guide | 3 - Designing flowcharts | 135
This function allows you to send an outbound trigger to an executable file. The full path and
the name of the file must be defined in the Stored Trigger Definitions dialog. Each time that
the Schedule process is activated, Unica Campaign runs the specified executable file.
Using triggers with other scheduling options
Triggers can be used with any other scheduling options or alone. Used in combination, you
can, for example, set up a flowchart to run every Monday at 9:00 a.m. as well as every time
someone clicks on an internet banner advertisement.
If, for example, you scheduled the flowchart to Run on trigger(s) based on hits on a website,
and you also specify a Delay period before each run, the flowchart will not begin until both
the event (the Web hit) occurs and the delay period expires.
Example: Run on Trigger
An online retailer has a cross-sell campaign that runs on a trigger, so that when a customer
makes a purchase, it triggers cross-sell offers.
Specifically, when the customer makes a purchase:
• The website runs the unica_actrg executable, passing the campaign code and the
trigger name (web_purchase).
•
The Unica Campaign listener checks that the campaign is active and the trigger name
exists, then runs the Schedule process, and the campaign flowchart is triggered.
For more details about triggers, see the Unica Campaign Administrator's Guide.
Scheduling processes in a running flowchart
Configure the Schedule process to initiate processes in a running flowchart. The Schedule
process works only if the flowchart is running.
1. Open a flowchart for editing.
2. Drag the Schedule process from the palette to your flowchart.
Unica Campaign V12.0 User Guide | 3 - Designing flowcharts | 136
3. Double-click the Schedule process box in the flowchart.
The Schedule process configuration dialog box opens and the Schedule tab is open by
default.
4.
On the Schedule tab, specify the scheduling conditions:
a. Specify a value for Total schedule period by entering the appropriate values in the
Days, Hours, and Minutes fields. The total schedule period is the total time over
which the Schedule process will be active. By default, the total schedule period is
30 days.
b.
Select a run frequency from the Schedule to run drop-down list, to specify exactly
when the Schedule process will activate subsequent connected processes.
• If you select Once only, the flowchart will run exactly once, regardless of what
other schedule options have been added. If any other value is selected, then
the scheduling options are connected as OR statements and the Schedule
process kicks off any process to which it is connected when any option is
satisfied.
• The first option that is satisfied will begin the Schedule run. If Schedule to
run is the only option enabled and the setting is Once only, the process runs
immediately (unless a delay or user authorization has been enabled).
• The Hours and Minutes fields enable you to specify the time at which you
want the schedule to run. The time entry form is based on a 24 hour clock
(also referred to as "military time"). In other words, 9 hours 30 minutes is 9:30
a.m., and 22 hours 45 minutes is 10:45 p.m. Because the time base is 24
hours, there is no need to designate a.m. or p.m.
5.
If you select Custom run from the Schedule to run list, you can use one or both of the
following options to specify when the schedule runs:
• Choose Run on time, then specify dates and times for the process to run. Multiple
entries must be separated by commas. Click Calendar to select dates and times
from a calendar.
•
Choose Run on trigger(s) if you want the schedule to be triggered by an event.

Unica Campaign V12.0 User Guide | 3 - Designing flowcharts | 137
The named trigger(s) must be defined using Options > Stored Triggers. Enter the
name of each trigger that can activate this Schedule process. Separate multiple
triggers with commas. The trigger name can contain any characters except
commas. A trigger name does not have to be unique. You can use the same trigger
in multiple campaigns or flowcharts and activate them all at the same time.
For more information, see Inbound and outbound triggers (on page 134).
6.
Use one or both of the following options if you want to specify a delay or require
authorization.
• If you choose Wait for user authorization before each run, a prompt for user
authorization will appear each time any other schedule conditions are satisfied,
and the Schedule process will not activate unless specific authorization is
provided. This option takes precedence over any other schedule indicators; the
process will not start unless authorization is given.
Note: When a flowchart is running with a client attached, user authorization
can only occur through the client. If no client is attached, any user with read/write
privileges for the campaign can authorize it to continue.
• If you choose Delay period before each run, specify the amount of time to wait
after a schedule condition has been satisfied before the process runs, using the
Days, Hours, and Minutes fields. This delay applies to all other specified schedule
options. For example, if a Schedule process is configured to run at 9:00 a.m. on
Monday morning with a delay of one hour, subsequent processes will begin to run
at 10:00 a.m.
7. (Optional) Specify triggers to send after the Schedule run is completed.
If you select Send trigger(s) after each run, Unica Campaign runs one or more triggers
each time the Schedule process is activated. An outbound trigger executes a command
line, which can be a batch file or a script file. Any named triggers must be defined
using Options > Stored triggers. If you specify multiple trigger names, they must be
separated by commas.
8.
(Optional) Click the General tab to assign a name and descriptive note.

Unica Campaign V12.0 User Guide | 3 - Designing flowcharts | 138
The name displays on the process box in the flowchart. The note displays when you
hover the cursor over the process box in the flowchart.
9. Click OK.
The process is configured and appears enabled in the flowchart. You can test the process
to verify that it returns the results you expect.
The Cube process
Administrators use the Cube process to allow users to drill into data from multiple sources.
Data cubes consist of dimensions that are based on strategic segments.
The Cube process is intended for technical users or consultants. A best practice is to
create all global constructs, such as cubes and strategic segments, in the Sessions area of
the application.
Users can select one or more defined segments, create a cube, and then drill into the
data to select a target audience. The audience can then be converted into the appropriate
processes, such as Select, for inclusion in a flowchart.
Creating a multi-dimensional cube of attributes
Configure a Cube process to create a multi-dimensional cube of attributes. Any cubes
created in the Sessions area will be available globally.
Before you can create a cube using a Cube process, you must create a strategic segment or
dimension hierarchy.
1. Open a session flowchart for editing.
2. Drag the Cube process from the palette to your flowchart.
3.
Double-click the Cube process in the flowchart.
Unica Campaign V12.0 User Guide | 3 - Designing flowcharts | 139
The Cube process configuration dialog box opens and the Source tab is open by
default.
4. On the Source tab, use the Input segments list to select one or more segments as input
for the cube.
Important: If you select more than one source segment, ensure that they all have
the same audience level.
5.
Click the Cube definitions tab to define your cube:
• Click Add to add a new cube. Enter a name and description. Select up to three
dimensions from the corresponding lists. The dimensions must be related to the
strategic segments that the cube source is based on. When you click OK, the new
cube definition appears in the list of cubes on the Cube definitions tab.
• Select a cube and click Edit to modify it.
• Select a cube and click Remove to delete it.
6.
Click the Select additional fields to track tab to specify additional fields for tracking.
You can:
• Select and move the fields you want to track from the Available fields list to the
Selected fields list, using the Add>> button
• Click Derived fields to select or create derived fields to track.
• Click Profile to see the contents of the selected field.
7.
(Optional) Click the General tab to assign a name and descriptive note.
The name displays on the process box in the flowchart. The note displays when you
hover the cursor over the process box in the flowchart.
8. Click OK.
The process is configured. You can test the process to verify that it returns the results
you expect.
Related concepts
Unica Campaign V12.0 User Guide | 3 - Designing flowcharts | 140
• About cubes (on page 327)
•
About dimension hierarchies (on page 322)
The CreateSeg process
Use the CreateSeg process to create lists of audience IDs from customer database tables.
Define the CreateSeg process in the Sessions area of Unica Campaign so that the segments
are available globally for use in all campaigns.
The CreateSeg process is intended to be used by Unica Campaign administrators. A
CreateSeg process that is defined in a session flowchart creates a strategic segment, which
can then be used in any flowchart. The segments can then be used as input for processes.
They can also be used to create dimensions and cubes, or as the global suppression
segment for an audience level.
Note: A best practice is to create all global constructs in a session flowchart.
To work with strategic segments, you do the following:
• Create segments in the Sessions area, using CreateSeg.
• Manage segments from the Segments area.
• Use the segments in campaigns from the Campaign section.
Related tasks
• Creating segments for global use in multiple campaigns (on page 141)

Unica Campaign V12.0 User Guide | 3 - Designing flowcharts | 141
Creating segments for global use in multiple campaigns
Administrators use the CreateSeg process in session flowcharts to create segments that
can be used in multiple campaigns. The resulting segments are called strategic segments.
The Save flowchart run results option under Admin > Advanced settings must be enabled
for flowcharts that include CreateSeg processes. Otherwise, the strategic segments will
not persist. To enable this option, the configuration property Campaign|partitions|
partition[n]|server|flowchartRun|saveRunResults must be set to TRUE
Define a CreateSeg process in the Sessions area of the application so the segments are
available globally. Users can then use the segments in any campaign.
1. Open a session flowchart for editing.
2. Drag the CreateSeg process from the palette to your flowchart.
3. Connect one or more data manipulation processes (for example, a Select process) as
input to the CreateSeg process.
4.
Double-click the CreateSeg process.
The CreateSeg process configuration dialog box opens and the Define segments tab is
open by default.
5.
On the Define segments tab:
a. Select one or more source cells from the Input list. These source cells will be
turned into segments. If there is only one input, it is already selected.
b. Select Create mutually exclusive segments if you want to ensure that each
qualifying record belongs to no more than one segment.
c. In the Result segments area, highlight an input cell and click Edit to configure the
segment.
The Edit segment dialog opens.
6.
In the Edit segment dialog:

Unica Campaign V12.0 User Guide | 3 - Designing flowcharts | 142
a. Give the segment a name that describes its purpose. The name that you assign is
the name that will appear when users select this segment from lists.
b. Provide a brief description of the segment contents (for example, what input was
used to create the segment).
c. From the Create under list, select a folder where the segment will be stored.
d.
From the Temp table data source list, select a data source in which to cache the
strategic segment. Use the Ctrl key to select multiple data sources.
If you prefer to store the temporary tables in a binary file on the server, rather than
in a user data source, do not select a data source. To deselect a data source (for
example, to revert to no data source selection), Ctrl+click the item again.
Note: Selecting a data source is required only if doNotCreateServerBinFile
on the Campaign|partitions|partition[n]|Server|Optimization
configuration page is set to TRUE. If this property is set to TRUE, at least one valid
data source must be selected.
e. From the Security policy list, select a security policy, if applicable, to apply to the
new segment.
f. Click OK to return to the Define segments tab.
7. (Optional) Use the General tab to assign a name and descriptive note. The name and
note only appear in the session flowchart. They are not used to identify the generated
segment in lists.
8. Click OK to save and close the configuration.
9. To create or update strategic segments, run the CreateSeg process in production mode
or use the Run menu to save and run the flowchart in production mode. Test runs do
not create or update strategic segments.
After you save and run the flowchart in production mode, the strategic segments are
available for use in other flowcharts. Typically, the next step is to associate the strategic
segment with a campaign
Unica Campaign V12.0 User Guide | 3 - Designing flowcharts | 143
Related concepts
• The CreateSeg process (on page 140)
• About strategic segments (on page 310)
Associating strategic segments with campaigns
A strategic segment is a list of IDs created by an administrator or advanced user in a
session and made available to all campaigns. A strategic segment is no different from
other segments (such as those created by the Segment process) except that it is available
globally, for use in any campaign.
Associating a strategic segment with a campaign makes it easier to select that segment
when you create flowcharts. Associating the relevant strategic segments with a campaign
also provides greater reporting capabilities.
1. Choose Campaign > Campaigns.
2. Locate your campaign and click the campaign name.
3. On the campaign Summary tab, click Add/remove segments at the top of the page.
4. Use Browse or Search to locate the segments that you want to add. You can switch
between Tree view and List view.
5. Select the segments that you want to add, and click >> to move them to the Segments
to include list. Use Shift+Click or Ctrl+Click to select multiple segments.
6. Click Save.
The segments that you added are listed on the Campaign summary page under Relevant
segments. When you use the Select process to select customers in your campaign
flowcharts, the segments that are associated with your campaign appear at the top of the
list, so they are easy to locate.
Unica Campaign V12.0 User Guide | 3 - Designing flowcharts | 144
The Mail list process
Use the Mail list process to assign offers to contacts, generate a contact list for a direct
mail campaign, and log the contact history. The Mail list process is often referred to as a
contact process.
Configuring Mail list or Call list processes
Follow these instructions to configure a Mail list or Call list process in a Unica Campaign
flowchart. Configure a Mail list or Call list process to assign offers to contacts, generate
a contact list for a direct mail or telemarketing campaign, and write the results to contact
history.
1. Open a flowchart for editing.
2. Drag a Mail list or Call list process from the palette to your flowchart.
3.
Connect one or more configured processes as input to the Mail list or Call list.
The input processes must produce output cells, which provide input to the Mail list or
Call list process. For example, a Select process produces a list of IDs, which are used
by the Mail list or Call list process.
Important: All of the cells that you select as input cells must have the same
audience level.
4. Double-click the Mail list or Call list process in the flowchart workspace to open the
configuration dialog.
5.
Use the Fulfillment tab to build the contact list and specify whether the output is sent
to a list or table.
a. From the Input list, specify the cells to use as the data source for the contact list.
If multiple processes are connected to the Mail list or Call list process (or if an
input process generates multiple cells), click the ellipsis button then select
Unica Campaign V12.0 User Guide | 3 - Designing flowcharts | 145
which inputs to use. For example, if Gold, Silver, and Bronze cells are connected to
a Mail list, you can select one, two, or all three of them. When more than one cell is
selected, the Input list says Multiple cells.
b.
To export the list to a table or file, select Enable export to, then use the appropriate
options:
• To write the output to a file, select File from the Enable export to list, then
provide a file name and other details. You can write to a file to test the output
of the Mail list or Call list process. After you run the process, review the file to
confirm that the results are what you expect.
• To write the output to a database table, select a table from the Enable export
to list.
• If the database table that you want to use is not in the list, or if you want to
write the output to an unmapped table, select Database table. Use the Specify
database table dialog to indicate the table name and database. User variables
are supported in the table name that you specify.
• To create a user table, select New mapped table from the Enable export to list.
For instructions, see the Unica Campaign Administrator's Guide.
•
Specify how to handle updates to the output file or table:
◦ Append to existing data. Add the new information to the end of the table
or file. This option is the best practice for database tables. If you select
this option for a delimited file, labels are not exported as the first row.
◦ Replace all records. Remove any existing data from the table or file and
replace it with new information.
◦ Create new file. This option is available if you specify a new file in the
Enable export to field.
c. If you only want to write to contact history, and you do not want to generate output
to a table or file, clear the Enable export to option. (To specify how to log to the
Contact history tables, use the Log tab, explained later in these steps.)
d. (Optional) Summary file: Enter a path and file name in the Summary file field, or
navigate to a location by clicking the ellipsis button. A summary file is a text file
with the extension .sum. This file contains information about the contents of the

Unica Campaign V12.0 User Guide | 3 - Designing flowcharts | 146
list. Typically, you include this file with the list when you send it to the fulfillment
center. A summary file is generated only if you select the Enable export to option.
e. (Optional) To send a trigger when the process finishes running, select Send
trigger(s), and choose the trigger that you want to send. To send multiple triggers,
use Ctrl+Click to select more than one trigger. The selected triggers are listed in
the Send trigger(s) field, and they are separated by commas.
6.
Use the Treatment tab to assign one or more offers or offer lists to each target cell. The
cells that appear depend on the inputs you selected on the Fulfillment tab:
a. Double-click the Offer field next to a Target cell, then select an offer. To assign
multiple offers to a cell, select one or more target cells, then click Assign offers.
You can then choose which offers to assign to which cells.
Note: If the input cells are linked to a top-down cell defined in the target cell
spreadsheet, and offers are already assigned in the target cell spreadsheet, the
offers are displayed here. You can override these assignments. Any changes
that you make here are reflected in the target cell spreadsheet after you save the
flowchart.
b. If you want to use control groups to exclude some IDs from the contact list, check
Use holdout control groups, then change the Control? field to Y for each cell that
you want to use as a control. Those cells appear in the Control cell list and cannot
be assigned offers.
c. For each non-control cell, you can specify a control cell and an offer.
7.
The Parameters tab shows the parameter names and values for each offer that was
assigned on the Treatment tab. For example, an offer might have the parameter
"Channel" with values of 'Email' and 'Phone'. If there are no parameterized offers, you
can skip this tab.
a.
Use the For cell(s) list to select the cells that you want to affect.

Unica Campaign V12.0 User Guide | 3 - Designing flowcharts | 147
To save data entry time, select [All cells] to assign values that apply to most of the
cells, then select individual cells to override the values. When you select [All cells],
you see one row per offer per parameter. Values that you enter in the Assigned
value field apply to every cell that gets that offer.
If you assigned the same offer to multiple cells on the Treatment tab, but you
assign different parameter values for each cell, the [All cells] view displays the text
[Multiple values] in the Assigned value column, and the For cell(s) list shows the
value that is assigned to each cell.
When you select an individual cell in the For cell(s) list, you see only the offers
assigned to the selected cell. Values that you enter in the Assigned value field
apply to that cell only.
b.
Click in the Assigned value field (or select a row in the table and click Assign
value), then select or type a value to assign to the parameter. For example, if the
parameter is Discount, the available values might be 10%, 15%, and 20%. The
available values depend on how the offer was defined.
The configuration setting Unica Campaign | partitions | partition[n]
| server | flowchartConfig | disallowAdditionalValForOfferParam
determines whether you are allowed to specify additional values or whether you
are restricted to values in the list for offer attributes of type Single select drop
down.
Note: If you edit an offer to change a parameter value after assigning the
offer, the original value continues to be used in any assigned offers. This behavior
prevents unintentional changes of attribute values for offers that have already
been assigned. For example, say you assign an offer that has a Cost Per Offer
value of $1.00. Later, someone edits the offer on the Offer Summary page and
changes the value to $1.99. The Assigned value on the Parameters tab of the Mail
list or Call list remains set to its original value of $1.00. To update the value, you
must explicitly remove and then re-add the offer on the Treatment tab: Select the
Target cell, click Assign offers, and remove the offer. Select a different tab, then
Unica Campaign V12.0 User Guide | 3 - Designing flowcharts | 148
select the Treatment tab again and reassign the offer. Now when you select the
Parameters tab, the edited value ($1.99) appears.
Note: Do not use a Unica Campaign generated field (UCGF) in a Mail list
derived field unless the generated field is constant. Unica Campaign assumes
constant values for generated fields and does not re-calculate them for records in
the result set. Therefore, you may see blank or incorrect results from derived fields
that call a generated field that changes value. Instead of using a derived field,
output the necessary generated field directly into your Mail list fulfillment table or
file. Then read that table or file back into Unica Campaign as a Select and use a
Snapshot process to manipulate a new fulfillment table or file using data from the
old one.
8.
Use the Personalization tab to specify which fields to write out to the contact list. For
example, if you are building a mailing list, include contact names and addresses.
• The Export fields list indicates which fields to write to the output list.
• If you selected a table on the Fulfillment tab, the Export fields list includes all of
the fields from that table. You must map each data field to a corresponding table
column. To automatically find matching fields, click Match . Fields with exact
matches for the table field names are automatically added to the list. If there are
multiple matching fields, the first match is taken.
• If you selected a file on the Fulfillment tab, the Export fields list is empty and you
must specify which fields to output.
• When you select Candidate fields, you can click the arrow next to an item to
expand it. For example, you can expand the Unica Campaign generated fields
list, then select Treatment code. By including the Treatment code in your output,
you can use it to track responses. Direct Response tracking requires customers
to provide the same code when they respond to the offer (for example, by using a
coupon). Use Ctrl+Click or Shift+Click to select multiple fields.
• To view the values in a field, select the field and click Profile.
• Use the Add and Remove controls to adjust the contents of the list.
• The order of the fields in the Export fields list determines the order that the data is
written out.

Unica Campaign V12.0 User Guide | 3 - Designing flowcharts | 149
9. To sort the output and specify how to handle duplicate IDs in the list, click More on the
Personalization tab.
You see the Advanced settings dialog.
a.
Decide whether your list will include or omit duplicate IDs. For example, if your
Audience ID is Household, there might be duplicate Audience IDs for each
person in that household. You may or may not want each person included in
the list. To omit duplicate IDs, choose Skip records with duplicate IDs, and
specify which record to retain if duplicate IDs are returned. For example, to keep
only the family member with the highest household income, select MaxOf and
Household_Income.
Note: This option removes duplicates that occur in the same input cell. If
the same ID exists in multiple input cells, your contact list might still contain
duplicates. If your goal is to remove all duplicates from the list, use a Merge or
Segment process upstream of the Mail list or Call list process to purge duplicate
IDs or create mutually exclusive segments.
Note: This option pertains only to the fulfillment table (the list) and not to
contact history. The contact history tables always contain unique IDs only. For
example, say that your output list includes multiple family members (duplicate IDs
for Households). The contact history will contain only one record for Household,
using the first CustomerID found. The flowchart designer must ensure that the
result set obtains the correct records before the records reach the contact history
tables. Use the Extract process to de-dupe the results before the Mail list or
Call list process box to ensure that the correct records are written to both the
fulfillment table and contact history.
b. To sort the output, use the Order by options. For example, to sort by surname in
reverse order, select the Last_Name field and Descending.
c. Click OK to close the Advanced settings dialog.
10. Use the Log tab to control what is written to contact history.
You must have the appropriate permissions to enable or disable the contact history log
options.

Unica Campaign V12.0 User Guide | 3 - Designing flowcharts | 150
a. To log contact history to the system tables, check Log to contact history tables.
This option makes contact information available for tracking and reporting
throughout Unica Campaign.
Note: When you create a mailing list, do not log to contact history if you plan
to send the list to a mailing house for processing (such as validating addresses).
Instead, consider using a Track process to log the information after it is returned
from the mailing house. In this way, you capture only the list of customers who
were mailed an offer. Another approach is to allow the Mail list to update contact
history, then use the Track process to update the contact history records that were
created by the Mail list process.
b. (Optional) To store contact information in another location, in addition to or instead
of the contact history tables, check Log into other destination. This option is
useful if your organization requires further processing of the information in another
format, or if you want to examine the output before you update contact history.
11.
If you selected Log into other destination on the Log tab:
a. Use Select cells to specify which input to use (if there are multiple inputs).
b. Use Log to to select a destination table or file. If you select File, define the output
file name and parameters.
Indicate which field data to include by moving candidate fields to the Fields to
output list. You can automatically find matching fields by clicking Match .
Fields with exact matches for the Table field names are automatically added to the
Field to log list. If there are multiple matching fields, the first match is taken. The
order of fields in the list determines the order of data in the file.
c.
Use the following options to specify how updates to the destination file or table are
handled:
• Append to existing data: Add the new contact information to the end of the
table or file. Appending data is a safe choice for database tables because it

Unica Campaign V12.0 User Guide | 3 - Designing flowcharts | 151
preserves existing data. If you select this option for a delimited file, labels are
not exported as the first row.
• Replace all records: Remove any existing data from the table or file, and
replace it with the new contact information.
An informational field indicates whether Skip records with duplicate IDs is set
to Yes or No. You set this option on the Personalization tab but it also applies to
the table or file that you specified for Log into other destination, where you are
additionally logging contact history.
12.
To customize the information that gets written to contact history, click More options on
the Log tab.
The Log dialog for contact history logging options opens.
a.
To avoid updating contact history when this process runs, select Create
treatments only.
This option generates new treatments in the Treatments table without updating the
contact history, allowing for a delayed update to the history tables. For example,
use this option if you plan to remove invalid and duplicate addresses through post-
processing. By waiting to update contact history with the final list of IDs to which
offers are sent, the resulting contact history will be smaller and more accurate.
If you select this option, the other options in this dialog that no longer apply are
disabled.
By default, this option is not selected, so contact history is updated when the
process runs.
For more information about logging contact history, see Contact history (on page
248).
b.
To generate new treatments with the same package ID as in the most recent
process run, select Use last package ID.
All offers given to an individual in the same contact process are considered to be a
single "package". By default, Use last package ID is not selected. Not selecting this
option ensures that each package is assigned a unique ID for each production run
of the contact process.

Unica Campaign V12.0 User Guide | 3 - Designing flowcharts | 152
If you selected Create treatments only to prevent customer history from being
updated, you can also select Use last package ID to ensure that the package ID
from the prior run is assigned to each set of offers. This action links the offers to
the existing contact history.
c.
Use the Tracking audience level to determine which audience level is written to
contact history.
Note: The Mail list or Call list process removes duplicate records based on the
Audience level of the input process. Changing the Tracking audience level does
not affect how records are de-duped. For example, say the input process for a Mail
list process uses Audience level 1. However, you want to log records to contact
history at Audience level 2. In this case, you must configure an Audience process
to change the audience level. Then connect the Audience process as input to the
contact process. Now you can select a Tracking audience level of 2.
d. Use the Contact date (flowchart run date will be used if empty) field to specify
when to contact the people in the contact list. If you do not specify a date, Unica
Campaign uses the flowchart run date.
e. Use the Contact status code list to specify a status code for tracking.
f. Use the controls to add fields from the Candidate fields list to the Fields to log list.
g. Click Close to return to the Log tab of the process configuration dialog.
13.
(Optional) To permanently delete existing contact history and associated response
history entries before the next run of the contact process, click Clear history on the Log
tab.
Important: Clear history permanently deletes contact and response history records
from the system tables. This data is not recoverable.
14. (Optional) Use the General tab to assign a name and descriptive note to the process.
The Process name is used as the box label on the flowchart. It is also used in various
dialogs and reports to identify the process. The content of the Note field appears when
you rest your cursor over the process box in a flowchart.
15. Click OK.

Unica Campaign V12.0 User Guide | 3 - Designing flowcharts | 153
16. Note: The mail list process box remains unconfigured in case no table is mapped in the
flowchart for the audience level of the segment. To configure it, the select process box
should be executed.
The process is now configured. You can test run the process to verify that it returns the
results you expect. A test run does not output data or update any tables or files, but it does
run any triggers that were selected on the Fulfillment tab.
The Call list process
Use the Call list process to assign offers to contacts, generate a contact list for a
telemarketing campaign, and log the contact history. The Call list process is often referred
to as a contact process.
You configure a Call list process the same way as you configure a Mail list process. See
Configuring Mail list or Call list processes (on page 144).
The Track process
Use the Track process to update the contact statuses or additionally tracked fields for
existing records in contact history. The Track process can update existing contact history
records, create new records, or do a combination of both.
The Track process lets you log contact information to the contact history tables, separate
from the contact process that generated the list of contacts.
For example, if your mail house does post-processing to remove invalid and duplicate
addresses, then you probably would not write your initially-generated list to contact history.
Instead, you would wait for the mail house to send you a confirmation list of IDs to which
they actually sent offers.
In this case, your input to the Track process will be the final mailing list used by the mail
house after they performed post-processing, and your contact history will be more accurate.
Later, if some direct mail pieces are returned as undeliverable, you can use the Track
process to update the contact status for those contacts as "Undeliverable."
Unica Campaign V12.0 User Guide | 3 - Designing flowcharts | 154
Additionally, there are times when the target list is large, and it is not necessary to load all
of this information into contact history. Instead, you can log only those contacts who were
actually contacted. Often, you do not know who was or was not contacted until you receive
feedback from call centers or mail houses. You can use the Track process so that when
feedback is received from different sources you can insert it into the contact history tables.
For details about logging contacts to contact history, see Contact history (on page 248).
Example 1
You create two separate flowcharts to take advantage of the Track process's delayed
writing to contact history.
Create your contact list in Flowchart 1: A Select process selects data and provides input to
a Segment process, where the data is segmented by value tier. The segmented data from
the Segment process is input to a Mail List process. You configure the Mail List process to
output a list of IDs to a file, without logging contact history, because you want the contact
list to undergo post-processing by the mail house.
Create Flowchart 2 to handle the contact list that the mail house returns to you, and to write
the final list of contacts to contact history. Flowchart 2 consists of a Select process whose
input is the list of customers who were actually contacted by the mail house, connected to a
Track process which then writes the information to contact history.
Example 2
In a variation of the previous example, the mail house returns a list of IDs that could not be
contacted. To obtain the list of contacted IDs, select the original output contact list from
Flowchart 1 and use a Merge process to suppress the IDs that could not be contacted.
The output from the Merge process is then your list of contacted IDs, and these IDs can be
passed to a Track process for writing to contact history.
Note: In both examples, the Treatment code is needed to map the updated data back to
the original list.
Tracking contact history
Configure a Track process to update existing rows in contact history or create new rows.
Unica Campaign V12.0 User Guide | 3 - Designing flowcharts | 155
For examples, see The Track process (on page 153).
1. Open a flowchart for editing.
2. Drag the Track process from the palette to your flowchart.
3. Connect one or more configured processes as input into the Track process.
4.
Double-click the Track process in the flowchart.
The Track process configuration dialog box opens and the Source tab is open by
default.
5.
Use the Source tab to select input cells that contain potential responders. Cells from
processes that are connected to the Track process appear in the Input list.
a. Use the Input list to select different or additional source cells.
b. Use the Contact date field to select a date to associate with records that the Track
process will update. By default, a value of "Today" is selected. You can also use
derived fields to populate the Contact date.
c. Select a Contact status code to associate with the records that you are updating in
contact history.
6.
Click the Mapping to treatments tab.
Use the Candidate action fields list to choose the relevant field to match to the
Treatment Code. The Treatment Code uniquely identifies the row in the contact history
to update.
Select a field to use for matching, and click Add to move it to the Matched offer/
treatment fields list, so it is paired with a treatment code.
7.
Click the Log tab to specify how to update contact history.
Note: You must have the appropriate permissions to enable or disable updates to
contact history tables.
Unica Campaign V12.0 User Guide | 3 - Designing flowcharts | 156
a. To update contact history in the system tables, select the Log to contact history
tables check box.
b. Specify how to update the contact history tables:
• Update existing records: If a record exists, update it. If a record does not exist,
do not create it.
• Create new records only: If a record does not exist, create it. Do not update
existing records.
• Update existing and create new: If a record exists, update it. If a record does
not exist, add it.
c. To write additional fields to the contact history, click Additional fields to display
the Contact history logging options dialog. Use the Add, Remove, Match, Up1,
and Down1 buttons to select and move fields from the Candidate fields list to the
Fields to log list. Unmatched fields will not be updated.
d. Click OK.
8.
If you want to log to a destination other than, or in addition to, the contact history in the
system tables, select the Log into other destination check box. This option allows you
to write to an alternate table or file.
a.
Use the Log to list to specify whether the output should be written to a file or a new
or existing table in the database:
If you select File, use the Specify output file dialog to output to a Flat file with data
dictionary, Flat file based on existing data dictionary, or a Delimited file.
If you select New table, use the New table definition: Select the table type dialog
to specify information about the new table to which you want to write the log
output.
b.
To specify which fields to output to the log, select fields from the Candidate fields
list and move them to the Fields to output list.
If you do not see the fields that you want to select, expand the items in the
Candidate fields list. You can also used derived fields for Candidate fields.

Unica Campaign V12.0 User Guide | 3 - Designing flowcharts | 157
c. You can automatically find matching fields by clicking Match . Fields with exact
matches for the Table field names are automatically added to the Field to log list.
If there are multiple matching fields, the first match is taken.
d.
Select an option to specify how to handle updates to the output file or table:
• Append to existing data: Append the new contact information to the end of
the table or file. If you select this option for a delimited file, labels will not be
exported as the first row. This is the best practice for database tables.
• Replace all records: Remove any existing data from the table or file, and
replace it with the new contact information.
9. (Optional) Click the General tab to assign a name and descriptive note to the process.
The Process name is used as the box label on the flowchart. It is also used in various
dialogs and reports to identify the process. Use the Note field to explain the purpose or
result of the process. The content of this field appears when you rest your cursor over
the process box in a flowchart.
10. Click OK.
The process is now configured. You can test run the process to verify that it returns the
results you expect.
The Response process
The Response process tracks the responses of customers who were contacted in a contact
process, such as Mail list or Call list.
Based on rules that you define during process configuration, the Response process
evaluates which responses are considered valid and how they are credited back to
campaigns or offers. The output of the Response process is written to several response
history system tables, where the data can be accessed for analysis using Campaign
performance and profitability reports.

Unica Campaign V12.0 User Guide | 3 - Designing flowcharts | 158
In its simplest form, the Response process can appear in its own flowchart connected to a
Select process (and optionally a Segment process). In such a flowchart, the Select process
selects IDs from a mapped table containing data about responders and their response
actions. These IDs are segmented by the Segment process into meaningful groups, and
finally passed to a Response process, where response tracking rules are applied and output
is written to response history tables.
A Response process is tightly aligned with its corresponding contact process, in which the
responders now being tracked were possibly members of cells targeted with particular
offers.
Related tasks
• Updating response history (on page 158)
Related reference
• Performance reports for Unica Campaign (on page 345)
Updating response history
Use the Response process to update response history. The Response process compares
campaign response information with contact history and writes information to the response
history tables for the appropriate audience level.
A Response process is tightly aligned with its corresponding contact process, in which the
responders now being tracked were possibly members of cells targeted with particular
offers. Therefore, before you can configure a Response process, you must:
• Know the audience level of your contact list.
Unica Campaign V12.0 User Guide | 3 - Designing flowcharts | 159
• Ensure that contact history and response history system tables are mapped for each
audience level that you are contacting and tracking. This is usually done by the Unica
Campaign administrator.
• Set up a separate Response process for each audience level in which you are tracking
responders.
• Know the codes representing the response types that you want to track.
• Know what Unica Campaign-generated codes (campaign, cell, offer, or treatment
codes) were sent to your contact list, so you can map them for tracking.
• Enable the ability to create temp tables in the Unica Campaign system tables database
(set the AllowTempTables configuration property to true).
Follow the steps below to configure a Response process.
1. Navigate to the list of campaigns where you created your contact flowcharts (the
flowcharts that assigned the offers that you plan to analyze).
2. Typically, you create a separate flowchart to handle the response process. You
could also have one response flowchart per channel or one global response tracking
flowchart for all campaigns.
3. Click Edit to open the flowchart for editing.
4. Drag the Response process from the palette to your flowchart.
5.
Connect a Select or Extract process as input to the Response process.
The Select or Extract process typically reads from an action table. An action table
is an optional database table or file containing response data that is collected after
offers are presented to customers. Often, data originates from several tables such as
transactions or sales information.
Note: Administrators must ensure that the action table is locked during response
processing. Administrators must also clear rows after each Response process run
to ensure that responses are not credited multiple times. For example, use Unica

Unica Campaign V12.0 User Guide | 3 - Designing flowcharts | 160
Campaign to run SQL after the Response process to purge the action table. For
important information, see the Unica Campaign Administrator's Guide.
6. Double-click the Response process in the flowchart to open the process configuration
dialog.
7.
Use the Source tab as follows.
a.
If you followed the steps in this procedure, the Input list already displays the
correct input. The input should originate from the mapped action table that holds
your customer response information.
Note: If you are using a delimited flat file as input to the Response process, you
must ensure that all of the data types in the input files are mapped appropriately,
as this is not enforced by the Response process. Using a mismatched data
type (for example, having a treatment code mapped as "numeric" when the
UA_Treatment.TreatmentCode field is a "string" type) causes a database error on
some databases (for example, system tables on DB2®).
b. For Response date, select a date from your action table to associate with the
records that will be output by the Response process. By default, a value of "Today"
is selected.
c. For Response type code, choose a field from your action table. The response type
codes are globally defined and available for all campaigns. Response types are
the specific actions that you are tracking, such as click-through, inquiry, purchase,
activation, and use. Each response type is represented by a unique response code.
8.
Use the Mapping to treatments tab to select the fields to be tracked and match them to
a list of offer and treatment attributes.
a. In the Candidate action fields list, expand the action table that you are using, so
you can see the list of fields.

Unica Campaign V12.0 User Guide | 3 - Designing flowcharts | 161
b. Use the Add button to match Candidate action fields to the corresponding
attributes in the Matched offer/Treatment fields list. The Offer/Treatment
attribute column lists all offer or treatment attributes in the system.
It is best to match at least one Attribute of Interest and one Response Code.
Note: Unmapped fields and fields for which values are not available (or are
NULL) are not used for response attribution. For a treatment instance to receive
response credit, all populated fields must match, except for controls. For controls,
all codes are ignored.
9.
Click the Log tab to specify additional fields to log to response history.
Use the controls to match fields from the Candidate fields list with fields in the Fields
to log list.
You can automatically match fields by clicking Match. Fields with exact matches for
the Table field names are automatically added to the Fields to log list. If there are
multiple matching fields, the first match is taken.
10. Click the General tab to assign a name and descriptive note to the process.
11. Click OK.
The process is now configured. You can test run the process to verify that it returns the
results that you expect.
When you save and run the flowchart, information is written to the response history system
tables. Unica Campaign administrators must be sure to clear rows after each Response
process run to ensure that responses are not credited multiple times.
Related concepts
• How to track responses to a campaign (on page 264)

Unica Campaign V12.0 User Guide | 3 - Designing flowcharts | 162
• The Response process (on page 157)
•
Direct responses (on page 272)
•
Attribution methods (on page 276)
•
Campaign response tracking (on page 263)
The History tab (Unica Campaign)
Overview:
The History tab (Unica Campaign) is a means by which you can find out who worked on the
Unica Campaign flowcharts and how they interacted with the flowchart. For example, when
the flowchart was created, modified, saved, deleted or run.
It is a mechanism which allows you to log the changes they have made to the flowchart in
the campaign. Thus, you can track down changes while figuring out the issues related to the
flowchart.
The “History" tab occurs after the “Analysis" tab in Unica Campaign. On clicking this History
tab, a history log is displayed on the UI.
The History tab includes following details:
1. Flowchart name
2. Event Type i.e. description of the event
3. User name
4. Timestamp of the event
5. Comments (if any)
Each flowchart will have "Save with comments" option if users wants to add some
information about the recent changes done to flowchart.
Unica Campaign V12.0 User Guide | 3 - Designing flowcharts | 163
Audited events:
The following events are audited:
1. Create a flowchart
2. Save and continue a flowchart
3. Save and exit the flowchart
4. Save flowchart with comments
5. Save and run branch
6. Save and run process
7. Test run flowchart (Whole, Branch, Process): Results are not logged
8. Pause, continue or stop a flowchart, branch and process
9. Rename a flowchart
10. Delete a flowchart
11. Duplicate a flowchart
12. Copy a flowchart
13. Run a flowchart

Chapter 4. Managing flowcharts
Unica Campaign flowcharts define the campaign logic. Each flowchart in a campaign
performs a sequence of actions on data that is stored in your customer databases or flat
files.
During and after creating flowcharts, you can perform various management activities on
them. For example, you can test and run flowcharts, edit them, print them, and so on.
Note: To work with flowcharts, you must have the appropriate permissions assigned by
an administrator.
More information
There are restrictions in the use of special characters in flowchart names. For details, see
Appendix A of the Unica Campaign User's Guide.
Email notification management
Unica Campaign can send email notifications to user's "About flowchart" status.
Unica Campaign must send notifications to the configured user's email ID for the following
flowchart statuses.
1. Flowchart Run
2. Flowchart Finish (Ran Successfully)
3. Flowchart Stop
4. Flowchart Pause
5. Flowchart Continue
6. Flowchart Failure
For details on how to configure user email ID in Platform Email Notification, see the "Alert
and notification management" and HCL Unica | General | Communication | Email topics in
Unica Campaign Administrator Guide.

Unica Campaign V12.0 User Guide | 4 - Managing flowcharts | 165
Email format
Subject: Unica Campaign Execution Status <PASS> / <FAILED> / <STOPPED>/
<PAUSED> - <CAMPAIGN_NAME>-- <FLOWCHART_NAME>
Body
Hello <USERNAME> – This is platform user name who triggers the flowchart execution.
See the following Unica Campaign flowchart execution details.
Campaign name: <CAMPAIGN_NAME> – Name of the Campaign
Flowchart name: <FLOWCHART_NAME> – Name of the flowchart under execution
Execution Status: <PASS> / <FAILED> / <STOPPED>/ <PAUSED> – Flowchart
execution statuses
Execution Start time: <START TIME> – Start time of the flowchart execution
Execution complete time: <END TIME> – End time of the flowchart execution,
if its paused then the time when the flowchart is paused.
Execution Type – <PRODUCTION/TEST> – If flowchart is executed in test mode
or in production mode.
Validating flowcharts
When you validate a flowchart, each process is checked for errors. Each error that is found
displays in succession so you can view and correct each one. A best practice is to run
validation on flowcharts before you do a production run. This is especially important if you
are running scheduled flowcharts; using batch mode; or you are not planning to actively
monitor the run.

Unica Campaign V12.0 User Guide | 4 - Managing flowcharts | 166
Use the Validate flowchart feature to check the validity of a flowchart before you do a
production run. Validation performs the following checks for a flowchart:
• Processes in the flowchart are configured.
• Cell codes are unique in the flowchart, if the AllowDuplicateCellCodes configuration
parameter is set to No. If this parameter is set to Yes, duplicate cell codes in flowcharts
are allowed.
• Cell names are unique in the flowchart.
• Offers and offer lists that are referenced by contact processes are valid (have not been
retired or deleted). Offer lists that are referenced but are empty generate warnings, not
errors.
• Cells that were linked to a top-down entry from the target cell spreadsheet are still
connected.
The validation tool reports the first error found in the flowchart. You might need to run the
validation tool several times in succession (after correcting each displayed error) to ensure
that you have fixed all errors.
1.
On a flowchart page in Edit mode, open the Run menu and select Validate
flowchart.
Unica Campaign checks your flowchart.
2. If errors exist, a message displays the first error that was found. As you correct each
error and rerun the validation, any remaining errors display successively.
Testing and running flowcharts
You can do a test or production run on an entire flowchart, a branch, or an individual process
in the flowchart. You can also validate flowcharts. For best results, conduct test runs and
perform validation as you build a flowchart, so that you can troubleshoot errors as they
occur. Be sure to save each flowchart before you do a test or production run and before you
perform validation.
Unica Campaign V12.0 User Guide | 4 - Managing flowcharts | 167
Important: For flowcharts that contain contact processes, each production run of a
flowchart can generate contact history only once. To generate multiple contacts from the
same list of IDs, snapshot out the list of IDs and read from the list for each flowchart run.
Note: Users with Administrative privileges can access the Monitoring page, which
displays all running flowcharts and their status. The Monitoring page also provides controls
to suspend, resume, or stop flowchart runs.
Doing a test run of a process, branch, or flowchart
Conduct test runs as you build a flowchart so that you can troubleshoot errors as they
occur. You can then view a report of any errors in the flowchart.
Always save an edited flowchart before you do a test run. When you do a test run, be aware
of the following:
• Test runs do not update any tables or files. However, triggers run on completion of test
runs and global suppression is applied.
• The option Advanced settings > Test run settings > Enable output determines whether
output is generated during test runs.
• When you test run a data manipulation process (Select, Merge, Extract, Audience), you
can limit the number of records. Use the Limit output cell size option on the Cell Size
Limit tab in the process configuration dialog.
• Results from a previous test run are lost.
• If a process requires data from an upstream process, you might have to run the
upstream process first so that its data is available to the downstream process.
1. Open a flowchart in Edit mode.
2. To test run a process or branch, right-click a process, open the Run menu and
select Test run selected process or Test run selected branch.
3.
To test run the entire flowchart, open the Run menu in the toolbar and select Test
run flowchart.
Unica Campaign V12.0 User Guide | 4 - Managing flowcharts | 168
The process, branch, or flowchart runs in test mode. Each process that runs
successfully displays a green check mark. If there are errors, the process displays a red
"X".
4. If you want to pause or stop the run, right-click a process box and select Pause or Stop
from the Run menu.
5. Use one of the Save options in the toolbar. If you click Save and exit before the
flowchart finishes the test run, the flowchart continues to run and is saved when it
finishes. If anyone reopens the flowchart while it is still running, any changes made to
the flowchart are lost. For this reason, always save a flowchart before you run it.
6. To determine if there were any errors in the run, click the Analysis tab and view the
Campaign flowchart status summary report.
Doing a production run of a flowchart
When you do a production run of a flowchart, the data that it generates is saved in system
tables. After you run and save the flowchart, you can view the results of the run in reports.
Do a production run after you save, validate, and do a test run. A production run writes to the
history tables.
The contact processes, such as Mail list and Call list, write entries into Contact History.
Each production run can generate contact history only once. Contact processes that already
ran for that production run can be rerun only if the contact history from the current run is
first deleted. To generate multiple contacts from the same list of IDs, snapshot the list of
IDs and read from the list for each flowchart run.
Triggers run on completion of a production run.
After initiating a run, users with Administrative privileges can access the Monitoring page,
which displays all running flowcharts and their status.
1. Save the flowchart before you run it.
Unica Campaign V12.0 User Guide | 4 - Managing flowcharts | 169
2. If any approval exists for a flowchart , the approval must be in the completed or
canceled state otherwise the flowchart will not run.
3.
If you are viewing a flowchart, open the Run menu and select Run.
If you are editing a flowchart, open the Run menu and select Save and run
flowchart.
4.
To run a process or branch, right-click a process, open the Run menu and select
Save and run selected process or Save and run selected branch.
Note: Running only a process or a branch of a flowchart does not increment the
Run ID of a flowchart. When you run only a process or a branch, if contact history
records exist, you are prompted to choose run history options before you can proceed.
The Run history options dialog appears only when you run a branch or process that
previously generated contact history for the current Run ID. You can either append
information to contact history or replace existing contact history for the Run ID.
5. To run the entire flowchart, open the Run menu in the toolbar and select Save and
run flowchart.
If the flowchart has already run, you are asked to confirm the run.
The process, branch, or flowchart runs in production mode. Data from the run is saved
to the appropriate system tables. Each process that runs successfully displays a green
check mark. If there are errors, the process displays a red "X".
6. If you want to pause or stop the run, right-click a process box, open the Run menu and
select Pause or Stop.
7.
Use one of the Save options in the toolbar. If you click Save and exit before the
flowchart finishes the run, the flowchart continues to run and is saved when it finishes.
If anyone reopens the flowchart while it is still running, any changes made to the
flowchart are lost.
You must save the flowchart after it runs to view the results of the run in any reports.
After you save the flowchart, results of repeated runs are immediately available.
Unica Campaign V12.0 User Guide | 4 - Managing flowcharts | 170
8. To determine if there were any errors in the run, click the Analysis tab and view the
Unica Campaign flowchart status summary report.
Doing a production run of a process or branch
If you run only a process or a branch, the Run ID of the flowchart is not incremented.
Do a production run after you save, validate, and do a test run. A production run writes to the
history tables.
After initiating a run, users with Administrative privileges can access the Monitoring page,
which displays all running flowcharts and their status.
Important: For contact processes, each production run can generate contact history
only once. To generate multiple contacts from the same list of IDs, snapshot out the list of
IDs and read from the list for each flowchart run.
1. Open a flowchart in Edit mode.
2. Click a process on the branch that you want to run.
3.
Open the Run menu and select Save and run selected branch.
Note: When you run only a process or a branch, if contact history records exist, you
are prompted to choose run history options before you can proceed. For details, see
Updating contact history by doing a production run (on page 255).
Each process displays a check mark after it runs successfully. If there are errors, the
process displays a red "X".
4. Click the Analysis tab and view the Unica Campaign flowchart status summary report
to determine whether there were any errors in the run.
Unica Campaign V12.0 User Guide | 4 - Managing flowcharts | 171
Pausing or stopping a flowchart run
When you pause a running flowchart, branch, or process, the server stops running but saves
all of the data that was already processed. When you stop a flowchart run, the results of any
currently running processes are lost and a red "X" appears on those processes.
You can pause a run to free up computing resources on the server, for example. After you
pause a run, you can continue the run or stop it. After you stop a run, you can continue the
run from the point at which it stopped.
Note: If you have the appropriate permissions, you can also control flowcharts from the
Monitoring page.
1. On a flowchart page, open the Run menu .
2. To pause the run, select Pause. To stop the run, select Stop.
Continuing a stopped flowchart run
If you stopped a flowchart run, you can continue the run by running the flowchart branch
that begins with the process where the run stopped. That process is rerun along with all
downstream processes.
1. On a flowchart page in Edit mode, click the process that has a red "X".
2. Open the Run menu and select Save and run selected branch.
Note: If you have the appropriate permissions, you can also control flowcharts from
the Monitoring page. For details, see the Unica Campaign Administrator's Guide.
Continuing a paused flowchart run
When you continue a paused run, the run resumes at the exact point at which it stopped.
For example, if a Select process was paused after processing 10 records, it resumes by
processing the 11th record.
Unica Campaign V12.0 User Guide | 4 - Managing flowcharts | 172
1. On a flowchart page, open the Run menu .
2. Select Continue.
Note: If you have the appropriate permissions, you can also control flowcharts from
the Monitoring page. For details, see the Unica Campaign Administrator's Guide.
Troubleshooting runtime errors
Correctly configured processes are displayed in color (the specific color reflects the type of
process). A gray process with its name in italics has a configuration error. To find out more
information about the error, hold your mouse over the process to display a descriptive error
message.
If a flowchart stops running due to an error, the processes that were running display a red X.
Hold your mouse over the process to see an error message.
Note: If Unica Campaign is configured so that system tables are stored in a database,
you are not viewing the flowchart, and the run stops due to a database connection failure,
the processes will not display a red X. Instead, the flowchart appears as it did when it was
last saved.
You should also consult the log file for system error information and review the Analysis
and Performance/Profitability reports for the Unica Campaign to see that the results are
what you expected.
Working with flowchart log files
Each flowchart has its own log file, named CampaignName_CampaignCode_
FlowchartName.log. By default, flowchart log files are saved in Campaign_home/
partitions/partition_name/logs.
1. Open a flowchart for editing.

Unica Campaign V12.0 User Guide | 4 - Managing flowcharts | 173
2. Open the Log options menu . The options that are available depend on your
permissions:
• View log: Each flowchart has its own log file, which records events during each
flowchart and process run. You can analyze the log file to determine how a
flowchart is performing and troubleshoot errors.
• Logging options: Open the Logging options dialog. You can select which Severity
levels to include in the log: Information, Warning, Error, Debug. You can also select
which categories of Events get logged. For example: Memory allocation, File
operations (open, read, write, etc.), Process run, Cell level operations, and so on.
You can also specify whether to include the process ID in log entries.
• Enable logging: Check or clear this box to turn logging on or off for the current
flowchart.
• Clear log: Remove all existing entries in the log file. To back up the log file before
clearing it, open it for viewing and copy the contents to another file.
• Change log path: Specify a different location for the current flowchart log.
3. If the log file contains too much information (or not enough), use Logging options
to adjust the severity level and event categories, then do a test run of a process and
reexamine the log file. When you are done, revert to the default logging level to avoid
performance issues.
The selected options apply only to the flowchart that is being edited. The selected options
do not persist beyond the current session. The next time a user edits the flowchart, the
logging options revert to the default settings.
Flowchart log file structure
To analyze flowchart log files, it helps to understand the log file structure.
The following example illustrates the log file structure. To view or set logging options, open
a flowchart for editing and use the Log options menu menu. The Logging options
choice lets you adjust the logging level (Information, Warning, Error, Debug), specify which
event categories to log, and include the Process ID in log entries.

Unica Campaign V12.0 User Guide | 4 - Managing flowcharts | 174
The following example shows a portion of a flowchart log file. When you analyze a log
file, it is helpful to identify where each process run starts and ends and to see the SQL
that generated the database queries. Depending on your flowchart, you can also look for
information about derived fields or other entities that you are interested in analyzing.
Searching for flowcharts and flowchart-related
objects
Use Search flowcharts to find a flowchart or a flowchart-related object by entering one or
more characters as search criteria.
Unica Campaign V12.0 User Guide | 4 - Managing flowcharts | 175
Flowchart-related objects include flowchart and process box names, configuration details,
descriptions, owners, user variables, user database tables, segments, associated offers, and
any other objects that are stored in the Unica Campaign session files (.ses). When you do
a search, all flowcharts in all campaigns in the current partition are searched. Searching is
not case-sensitive. For example, a search for "Customer" can find user databases, process
boxes, and assigned offers that contain the word "customer."
1.
Click Search flowcharts from any available location:
• On the All campaigns or All sessions page
• From any flowchart tab in View mode
2.
When the Search flowcharts dialog opens, enter your search criteria.
If you click the Search button without entering any criteria, the search results include all
flowcharts.
3.
Use the Search results area to examine the results and optionally navigate to a
flowchart. For example, you can click the name of a flowchart to open that flowchart in
View mode.
If you want to see a list of all of the process boxes that contain the search criteria,
expand a cell in the Matching process boxes column or use the Expand all / Collapse
all icons in the Search results toolbar.
4. Search results are retained, even if you close the dialog. Therefore, you can navigate
to various flowcharts while still being able to access the existing search results. The
results remain until you click Clear results in the dialog box or perform another search.
Copying flowcharts
Copying an existing flowchart saves time because you can start with a completed flowchart
and modify it to meet your needs.
1. View the flowchart that you want to copy. For example, click a flowchart tab while you
view its campaign.
Unica Campaign V12.0 User Guide | 4 - Managing flowcharts | 176
2. Click the Copy icon .
3. In the Duplicate flowchart dialog, select the destination campaign into which you want
to copy the flowchart.
4. Click Accept this location.
Note: You can also double-click a folder to select and accept the location in one
step.
The flowchart is copied to the campaign that you selected.
Process configuration settings are copied to the new flowchart. However, any temporary
files or tables that were created as a result of running the original flowchart are not copied
to the new flowchart.
If the copied flowchart includes contact processes (Mail list or Call list) with target cells
that are linked to a target cell spreadsheet, new cell codes are generated for cells in the new
flowchart so that duplicate cell codes do not occur. If the target cells were defined in the
flowchart, and if the Auto-generate cell code option in the contact process is off, new cell
codes are NOT generated for the new flowchart.
Note: If the flowchart logic uses derived fields that reference cell codes from the old
flowchart, the logic does not carry over to the new flowchart.
Reviewing flowcharts
Depending on your permissions, you might be allowed to review, but not edit, flowcharts.
Reviewing a flowchart means you can look at process configurations and make changes,
but you cannot save any changes or perform production runs. The flowchart auto-save
option is disabled and cannot be enabled. To save changes to a flowchart, you must have
Edit permissions.
If you are allowed to review but not edit flowcharts, you can verify a flowchart's contents
without inadvertently changing the flowchart.

Unica Campaign V12.0 User Guide | 4 - Managing flowcharts | 177
You open a flowchart in Review mode the same way as you open a flowchart in Edit mode.
Your permissions ensure that you can only access flowcharts in Review mode if you do not
also have Edit permissions.
Follow these steps to review a flowchart.
1.
Use one of the following methods to open a flowchart:
• On the Campaigns page, Edit a tab next to the campaign, and select a flowchart
from the menu.
• Open a campaign, click the flowchart tab, then click Edit in the flowchart
toolbar.
• Open the campaign's Analysis tab, click the flowchart link, then click Edit .
A message indicates that the flowchart is in review mode and that any changes you
make cannot be saved. The page header says "Reviewing" and only the Cancel option is
visible.
2.
You can perform the following actions in Review mode:
• Save processes as a template.
• Save the flowchart as a template.
• Modify the flowchart (but you cannot save your changes).
• Perform test runs, if you have the appropriate permissions.
Important: Even in Review mode, test runs can write output and execute triggers.
Also, if you have the appropriate permissions, you can edit custom macros and triggers
in the flowchart, and thus might change the flowchart.
Viewing flowcharts in Read-Only mode
If you have View permissions for a flowchart, you can open it in Read-Only mode to see
which processes are used and how they are connected. However, you cannot open process
configuration dialogs or make any changes.
1. Choose Campaign > Campaigns.

Unica Campaign V12.0 User Guide | 4 - Managing flowcharts | 178
2. Use one of the following methods to open a flowchart.
• Click View a tab next to the campaign name, and select a flowchart from the
menu.
• Open the campaign, then click the flowchart tab.
• Open the campaign's Analysis tab, then click the name of the flowchart that you
want to view.
If you want to see more details of the flowchart, such as how the processes are configured,
you must open the flowchart for reviewing or editing: Click the Edit icon in the flowchart
toolbar. Your permissions determine whether the flowchart opens in review or edit mode.
Viewing two flowcharts side-by-side
Some Unica Campaign designers prefer to view two flowcharts side-by-side when
developing new flowcharts. When using Internet Explorer, you must use File > New Session
to open additional browser windows.
Do not use any other method to open multiple browser sessions. For example, do not use
a new tab; do not open another browser session from the Start menu; and do not use File >
New Window. Using these methods can confuse or corrupt information that is displayed in
Unica Campaign.
Note: When using the method below, you cannot copy processes from one flowchart to
another. To copy configured processes across flowcharts, use the template library options
available on the right-click command menu, as explained in Copying processes between
flowcharts (on page 46).
1. Open Internet Explorer.
2. Log in to the Unica Suite and navigate to a Unica Campaign flowchart in view mode
only.

Unica Campaign V12.0 User Guide | 4 - Managing flowcharts | 179
3. In the browser window that you opened in Step 1, select File > New Session in the
Internet Explorer menu bar.
A new Internet Explorer instance opens.
4.
In the new browser window, log in to the Unica suite as the same or a different user, and
navigate to a Unica Campaign flowchart in view mode only.
Remember: You must disable any pop-up blockers in your browser or browser add-
ons, such as toolbars. Pop-up blockers prevent the flowchart window from opening.
Viewing history of flowcharts
You can view the history of the Unica Campaign Flowcharts and the events (activities)
associated with them.
1. Navigate to Campaign > Campaign to view the list of all Campaigns.
2.
On this page, click on a Campaign that you wish to edit.
You can edit the policies and so on, and also edit the flowchart, or create a new one.
Once you make edits, the edited flowcharts and all the associated events (activities)
are saved in the History tab of the respective Campaign. The associated events
(activities) include flowchart saved with comments, creating a flowchart, running a
flowchart, pausing a flowchart, renaming a flowchart, duplicating a flowchart, and so
on.
Printing flowcharts
You can print hardcopies of flowcharts from Unica Campaign.
Note: Do not use the web browser File > Print command. This procedure does not
always print flowcharts correctly.
1. Open a flowchart in View or Edit mode.

Unica Campaign V12.0 User Guide | 4 - Managing flowcharts | 180
2. Click the Print icon .
Deleting flowcharts
You can delete a flowchart if you are sure that you no longer need it.
Deleting a flowchart permanently removes a flowchart and all of its associated files,
including the log file. If you want to retain portions of your flowchart for reuse, save them
as stored objects. Output files (such as files written by a Snapshot, Optimize, or a contact
process) are not deleted, and contact and response history are retained.
1. Open a flowchart in View mode.
2.
Click the Delete button.
Important: If you try to delete a flowchart that is being edited by someone else,
Unica Campaign warns you that the flowchart is open by another user. If you continue,
the other user's changes are lost. To prevent the loss of work, do not continue without
first checking with the other user.
3.
If you are sure that you want to permanently delete the flowchart, click OK to confirm
the deletion.
The flowchart and all of its associated files are deleted.
Chapter 5. Offer management
Offers are specific marketing communications that you send to particular groups of
people, using one or more channels. Each offer is based on an offer template that a Unica
Campaign administrator defines.
A simple offer from an online retailer could consist of free shipping on all online purchases
made in the month of April. A more complex offer could consist of a credit card from a
financial institution, with a personalized combination of artwork, introductory rate, and
expiration date that varies based on the recipient's credit rating and region.
In Unica Campaign, you create offers that can be used in one or more campaigns.
Offers are re-usable:
• in different campaigns;
• at different points in time;
• for different groups of people (cells);
• as different "versions" by varying the offer's parameterized fields.
The general workflow is:
1. (Optional) An administrator defines custom attributes.
2. An administrator creates offer templates (required) and adds custom attributes to them
(optional).
3. A user creates offers based on the templates.
4. A flowchart designer assigns the offers by configuring a contact process in a flowchart
or by relating offers to target cells that were defined in a target cell spreadsheet.
5. The campaign runs, and the offer is made to the customer.
After an offer has been used in a campaign that has run in production mode, the offer
cannot be deleted. However, it can be retired. Retired offers cannot be assigned, and any
assigned offers that have been retired will no longer be sent. Retired offers are grayed out in
the offer hierarchy. They are still available for reporting and response tracking.

Unica Campaign V12.0 User Guide | 5 - Offer management | 182
Note: Working with offers requires the appropriate permissions. For information about
permissions, see the Unica Campaign Administrator's Guide.
Overview
Starting from v12.0, Unica introduces a new product called as Centralized Offer
Management. This product can be used as a central place for Offer Management. If you are
planning to configure Centralize Offer Management, see the Centralized Offer Management
installation guide for more details.
Centralized Offer Management product is an additional component to start managing
offers available in the Campaign Offer management. If you do not have Centralized Offer
Management module installed or enabled, then Campaign Offer management continues to
work as it is.
Once you install and enable Centralized Offer management all offers information including
(templates, attributes, offer folders, offers, offer lists) would become available in the
Centralized Offer management. Centralized Offer management module can be turned ON
and OFF based on configuration. This does not not impact any offers data whether its
created in Campaign Offers or in Centralized Offers Management module.
See the Campaign Administrator Guide to know more details about Campaign and
Centralized Offer Management integration.
Offer attributes
Offer attributes are the information that defines an offer. Offer name, Description, and
Channel are examples of offer attributes.
Some attributes are specific to a type of offer. For example, Interest Rate might be an
attribute of a credit card offer, but not of a free shipping offer.
There are three types of offer attribute:
Unica Campaign V12.0 User Guide | 5 - Offer management | 183
• Basic: The fields that are required to define an offer, such as Offer name, Security
policy, a unique Offer code, Description, and Relevant product(s).
• Standard: Offer attributes that are supplied with Unica Campaign, which can optionally
be included in an offer. Examples are Channel, Effective date, and Expiration date.
• Custom: Attributes that are created for your organization, such as Department, Sponsor,
Interest Rate, and SKU.
When administrators define offer attributes in an offer template, each attribute is defined
as either static or parameterized. The same offer attribute (for example, Channel), could be
static in one offer template, but parameterized in another.
• Static attributes: Offer attributes whose values do not change when you create a
different version of the offer. Examples are offer code, offer name, and description.
• Hidden static attributes: Static attributes are included on an offer template but hidden
from the person who creates the offer. Hidden attributes can be searched for, tracked,
and reported on. For example, if a template includes Offer Cost (the cost to your
organization of administering the offer), you can search for all offers that cost less
than $1.00 to administer. The information can be used in reports for performance ROI
analysis.
• Parameterized attributes: Offer attributes whose values can be supplied when the offer
is assigned. For example, you can type a value, select an option from a pre-defined
drop-down list, or select a database field. When the offer template is defined, your
administrator can set up any standard or custom offer attribute as a parameterized
attribute.
Parameterized attributes in offer templates have default values that you can override when
the offer is created and when it is assigned. For example, the introductory interest rate for
a credit card offer could be parameterized in its offer template with values of 5%, 8%, and
12%. When you use the template to create an offer, you can select one of those values as
the default interest rate. When the offer is subsequently used in a flowchart and assigned to
a cell, the flowchart designer can change the interest rate to a different value.

Unica Campaign V12.0 User Guide | 5 - Offer management | 184
Offer versions
An offer version is created each time you vary the parameterized attributes of an offer to
create a unique combination.
For example, you can vary the following attributes in a credit card offer:
• Artwork (lighthouse, kittens, or racing cars)
• Introductory rates (5.99%, 8.99%, or 12.99%)
• Offer valid dates (January, June, or September)
Thus, a credit card with the lighthouse image, 5.99% introductory rate, and offer valid from
September 1-31 is a different version of the offer than a credit card with a different image,
rate, or valid date.
Note: To uniquely identify specific instances of offer usage, use treatment codes.
Offer templates
When you create an offer, you base it on an offer template. Offer templates are created in
advance by an administrator.
Every offer template includes several required fields, such as Offer name and Security
policy. Additionally, templates may include custom attributes that were defined separately.
For example, a template for creating "Reward Card" offers might include a "Discount" drop-
down list (a custom attribute) that contains the values 10%, 15%, and 20%.
When you create an offer based on that template, you fill out any fields that are defined in
the template. For example, you supply an Offer name, select a Security policy, and choose a
default value from the "Discount" drop-down list. If you are allowed to add values to the list,
you see an Add button next to the attribute when you create the offer. For example, if you
add the value 25%, the list will then contain four values (10%, 15%, 20%, 25%).
When you save the offer, it becomes available for use in Unica Campaign flowcharts. The
flowchart designer can then assign offers by configuring a contact process, such as Mail
list, Call list, or Optimize.
Unica Campaign V12.0 User Guide | 5 - Offer management | 185
The behavior of drop-down lists in contact processes is controlled by the generic
configuration parameter disallowAdditionalValForOfferParam. This parameter
determines whether flowchart designers are restricted to selecting a value from the list
when they configure a contact process. If the parameter is true, designers can only select
values from the drop-down list. If the parameter is false, designers can select values outside
of the list, for example from a database table.
Treatments
Treatments are unique combinations of a cell and an offer version at a particular point in
time. Because they enable you to track responses in a very specific way, using treatment
codes for response tracking is a best practice.
Treatments are automatically created when you run a flowchart with contact processes
(for example, Call list or Mail list) that have been associated with offers. Each treatment
is uniquely identified by a system-generated treatment code whose format is specified in
the offer template(s) from which the offer(s) were produced. Treatment codes cannot be
overridden by users.
Each time a contact process is run (except in test mode), Unica Campaign records the
following details:
• The offer version(s) assigned in the contact process;
• The cell(s) to which the offers are assigned;
• The treatment code for each unique combination of offer version, cell, and date/time;
• The contact process run date.
Running the same contact process twice (in production runs) creates two treatment
instances, each with a unique treatment code. This enables you to track responses in a
very specific way, back to an exact contact instance. For example, you could run the same
promotion on January 15 as you ran on February 15, and if you used the treatment codes
for tracking, people responding to the February 15 mailing would be distinguishable from
people responding to the January 15 mailing by their treatment codes, even if they were
targeted by both promotions.
Unica Campaign V12.0 User Guide | 5 - Offer management | 186
Treatment codes are not available prior to flowchart runs because they are generated only
at run-time, and therefore are not suitable for pre-printed codes requirements. However,
they can be output as Unica Campaign-generated fields for tracking or on-demand print
purposes.
Creating offers
Create offers to represent the marketing messages that you want to communicate to
customers or prospects.
Before you can create an offer, an administrator must create at least one offer template and
you must have permission to use that template. To be able to create offers in a folder, you
must have appropriate permissions in the security policy that governs that folder.
Whether you create a new offer or a new version of an existing offer depends on how
your administrator defined offer templates. You must create a new offer in the following
situations:
• Whenever non-parameterized offer fields change.
• When you need a new offer code for tracking purposes (for example, for pre-printing
response codes on mailers).
To create an offer you can follow this procedure, or you can duplicate an existing offer and
then edit it.
1. Select Campaign > Offers.
2. Click New offer .
3.
If only one offer template exists, the New offer page opens. If there is more than one
offer template, you are prompted to select an offer template on which to base your new
offer.
Note: Template names that are displayed in gray are retired and cannot be used for
creating offers.
Unica Campaign V12.0 User Guide | 5 - Offer management | 187
4. Click Continue.
5.
Use the New offer page to define the offer. The fields that you see depend on the offer
template that is being used. However, the following fields are always included:
Offer name Offer names have specific character restrictions. See Special
characters in Unica Campaign object names (on page 354).
Security policy A policy that is defined by your administrator.
Description Optional.
Offer code Offers are identified with unique system-assigned offer codes
based on a format that is specified by your company. If you
override or regenerate offer codes, Unica Campaign cannot
assure that the new offer code is unique. If you use a non-unique
offer code for response tracking, your results can be inaccurate.
For details about offer codes, see the Unica Campaign
Administrator's Guide.
Relevant products The relevant products functionality relates product IDs to offers.
Optionally, list any products that you want to associate with this
offer for inferred response tracking. These product IDs can then
be used to determine whether an event (for example, a purchase
of a relevant product) is considered to be a response.
There are two ways to define relevant products:
• Use Edit query to build a query that returns a list of
product IDs that you consider relevant.
• Use Import product IDs to type or paste a list of product IDs
from a source file.
Note: When offer management is performed from Unica
Plan, the relevant products functionality is not available.

Unica Campaign V12.0 User Guide | 5 - Offer management | 188
Parameterized
attributes
Optionally, select values and specify defaults. The values that you
can view and change are defined by the offer template that you
are using.
Parameterized attributes are offer attributes whose values can
be supplied when the offer is assigned. The Parameterized
attributes section might contain fields, buttons, or drop-downs
from which you can select predefined values or enter your own
default values. You can modify the Parameterized attributes
section only if the offer template has defined parameterized
attributes.
If a list of values is available and you are allowed to add values to
it, you see an Add button next to the attribute. For example, you
might add the value 25% to a "Discount" offer list.
If you add list items, those additions are saved back to the
custom attribute so they are available to all users. After you save
changes, you cannot remove any items that you added. Only
administrators can remove items from lists, by modifying the
custom attribute.
Offer suppression
for real time
interactions
Optionally, determine whether to stop presenting this offer in real-
time interactions based on criteria you specify. This section is
displayed only if you are defining an offer using a template that
has Allow offers created from this template to be used in real-
time interactions selected.
For example, you might suppress this offer from being presented
to visitors who have explicitly rejected it, or you might want
to suppress the offer after it has been presented to a visitor a
certain number of times.
For detailed information on using the Offer suppression for real
time interactions section, see the Unica Interact User's Guide.

Unica Campaign V12.0 User Guide | 5 - Offer management | 189
6. Click Save changes.
To use the offer, assign it to a cell in a flowchart or a target cell spreadsheet.
Editing offers
You can edit an offer at any time, whether or not it has been used in a contact process,
depending on your roles and permissions.
After an offer is used in production (once it has been assigned to a cell in a flowchart that
has been run in production and logged to contact history), you can edit only the offer name,
description, and default values for parameterized offer attributes. This restriction ensures
that Unica Campaign can track the exact offer details for offers that have already been
made.
1. Select Campaign > Offers.
2. Click the offer name.
3. Click the Edit icon on the offer Summary tab.
4. Edit the offer name, description, or default values for parameterized offer attributes. For
explanations of these fields, see Creating offers (on page 186).
5. Click Save.
Assigning offers to cells in a flowchart
Flowchart designers assign offers to cells by configuring a contact process in a flowchart. A
cell is a list of customers who you want to contact with a specific offer. A target cell is a cell
that has an offer assigned to it. You can optionally exclude control groups from contact, for
analysis purposes.
Before you begin, you must create an offer so it is available for assignment. You can also
choose to associate offers with campaigns by using the campaign Summary tab. Offers
that are associated with a campaign appear at the top of selection lists as "relevant" offers.
Unica Campaign V12.0 User Guide | 5 - Offer management | 190
Note: Organizations who use a "top-down" management approach assign offers to cells
in a target cell spreadsheet. A flowchart designer then selects recipients for those offers.
For more information, see Assigning offers to cells in a target cell spreadsheet (on page
239).
Note: If Unica Campaign is integrated with Unica Plan, use Unica Plan to assign offers
to output cells in the target cell spreadsheet form of a campaign project. You cannot assign
offers in a contact process unless you are working with legacy campaigns.
Follow these steps to assign offers to cells in a flowchart.
1. Open a campaign and click a flowchart tab.
2. Click Edit in the flowchart window.
3. Double-click the contact process, such as Mail list or Call list, which contains the
recipients for your offer.
4. Use the Treatment tab to assign at least one offer to each cell.
5.
Click the Parameters tab to see the names and values of each parameterized offer that
was assigned on the Treatment tab and to adjust the offer parameter values.
Depending on how the offer was defined, you might be able to select values from
a list. For example, if a Mail list process includes a discount offer, you might see
the values 10%, 15%, 20%. If a list of values appears, the configuration setting
Unica Campaign | partitions | partition[n] | server | flowchartConfig |
disallowAdditionalValForOfferParam determines whether you can specify more
values or whether you are restricted to selecting values from the list.
Note: If you edit an offer to change a parameter value after assigning the offer,
the original value continues to be used in any assigned offers. This behavior prevents
unintentional changes of attribute values for offers that have already been assigned.
For example, say you assign an offer that has a Cost Per Offer value of $1.00. Later,
someone edits the offer on the Offer Summary page and changes the value to $1.99.
The Assigned value on the Parameters tab of the Mail list or Call list remains set to its

Unica Campaign V12.0 User Guide | 5 - Offer management | 191
original value of $1.00. To update the value, you must explicitly remove and then re-add
the offer on the Treatment tab: Select the Target cell, click Assign offers, and remove
the offer. Select a different tab, then select the Treatment tab again and reassign the
offer. Now when you select the Parameters tab, the edited value ($1.99) appears.
For more information, see Configuring Mail list or Call list processes (on page 144).
Associating relevant offers with campaigns
You can associate offers with campaigns to make it easier for users to select relevant
offers when they configure contact processes in flowcharts (assign offers to cells).
1. Click Campaign > Campaigns.
2. Locate the campaign and click its name.
3. On the campaign Summary tab, click Add/remove offers.
4.
Browse or search for the offers that you want to add, and move them into the Offers to
include list.
You can use Shift+Click or Ctrl+Click to select multiple offers.
5. Click Save.
The Relevant offers area of the campaign Summary tab shows all of the offers that are
associated with the campaign. The offers are grayed out until someone uses them in a
flowchart in this campaign.
As asterisk next to an offer name indicates that the offer was associated with a campaign
("top-down" association). Offers that were used directly in a flowchart ("bottom up") without
first being associated with a campaign do not have an asterisk.
When users configure a contact process to create contact lists in campaign flowcharts,
relevant offers appear at the top of the list so they are easy to locate and select for
assignment to one or more target cells.

Unica Campaign V12.0 User Guide | 5 - Offer management | 192
Relevant products for offers
Relevant product(s) is a required attribute in offer templates, although it does not have to be
populated in each offer.
You can assign relevant products when you create or edit an offer, by using the Relevant
product(s) section of the create or edit an offer page.
The relevant products functionality relates product IDs to offers. Optionally, list any products
that you want to associate with this offer for inferred response tracking. These product
IDs can then be used to determine whether an event (for example, a purchase of a relevant
product) is considered to be a response.
There are two ways to define relevant products:
• Use Edit query to build a query that returns a list of product IDs that you consider
relevant.
• Use Import product IDs to type or paste a list of product IDs from a source file.
Note: When offer management is performed from Unica Plan, the relevant products
functionality is not available.
Importing relevant products to an offer by pasting product IDs
You can assign a list of relevant product IDs to an offer. Relevant products are products that
are not explicitly part of the offer but which you intend to count as responses.
1. Choose Unica Campaign > Offers.
2. Create an offer or open an offer for editing.
3.
Click Import product IDs in the Relevant products section of the New offer page.
The Select products dialog opens.
4.
Copy product IDs from your source file.

Unica Campaign V12.0 User Guide | 5 - Offer management | 193
Note: The source content can include one or more of the following delimiters: tab,
comma, linefeed, newline. Multiple consecutive delimiters are ignored. If product IDs
are text strings, spaces are not stripped and case is preserved.
5. Paste the IDs into the Import product IDs list. You can also manually add, edit, or delete
entries from the list. There is no limit to the number of entries that you can add to the
list.
6.
Click Import.
The IDs from the Import product IDs area are imported and listed in the Select
products where section, with "PRODUCTID =" prepended to each product ID. If any
errors are detected during import (for example, alphabetic characters when the Product
ID field is numeric, or exceeding the maximum string length for a text product ID), you
see a pop-up for each error. Note each error and click OK to view the next error.
Note: The Import feature only imports a product ID once. Duplicate occurrences of
the same value are ignored.
7.
Click Save and test query to confirm that the query gets results.
When the results are displayed in the View selected products dialog, you can either
click Edit query to return to the Select products dialog or click Finish to save and exit.
Note: You can continue to paste and import product IDs until you click Save in the
Select products dialog or Finish in the View selected products dialog. After you close
the View selected products or the Select products dialog, you cannot import additional
IDs. If you click Import product IDs again, your existing IDs will be cleared unless you
click Cancel.
The product IDs from the Select products where list are saved as a query for the offer,
and the IDs are added to the Relevant products list on the offer page.
8. Save the offer.

Unica Campaign V12.0 User Guide | 5 - Offer management | 194
If you want to remove items from the list of Relevant products, select an item (or use Ctrl
+click or Shift+click to select multiple items), then click Remove selected. If you want
to test the query again, use Test query. If you want to edit the query, click Edit query. For
instructions, see Using Edit query to create or edit relevant products for an offer (on page
194).
Using Edit query to create or edit relevant products for an offer
When you create or edit an offer, you can use Edit query in the Relevant products section of
the page to specify a query that finds products to relate to the offer.
You can use Edit query to create or edit a query that relates products to an offer. If you used
Import product IDs to assign a list of relevant products to an offer, the list is saved as a
query. You can use Edit query to edit the query, including adding additional conditions.
1. Choose Unica Campaign > Offers.
2. Create or edit an offer.
3.
Locate the Relevant products portion of the page and click Edit query.
The Select products dialog opens.
The Add a condition list on the left of the dialog shows fields from the UA_Product
system database table, such as ProductID and any additional fields that were added
by a system administrator. The Select products where list shows the currently defined
list of relevant products..
4.
Edit the query by adding or removing conditions:
• To build an AND query: When multiple values (fields) are added in a single step,
they are combined as an AND. Specify at least two values in the Add a condition
area, then click >> to move them into the Select products where list. For example:
Color = 'Red' AND Brand = 'XYZ'.
• To build an OR query: When values are added one at a time, they are implicitly OR'd.
Type a value in one field in the Add a condition list, then click >> to move it into the
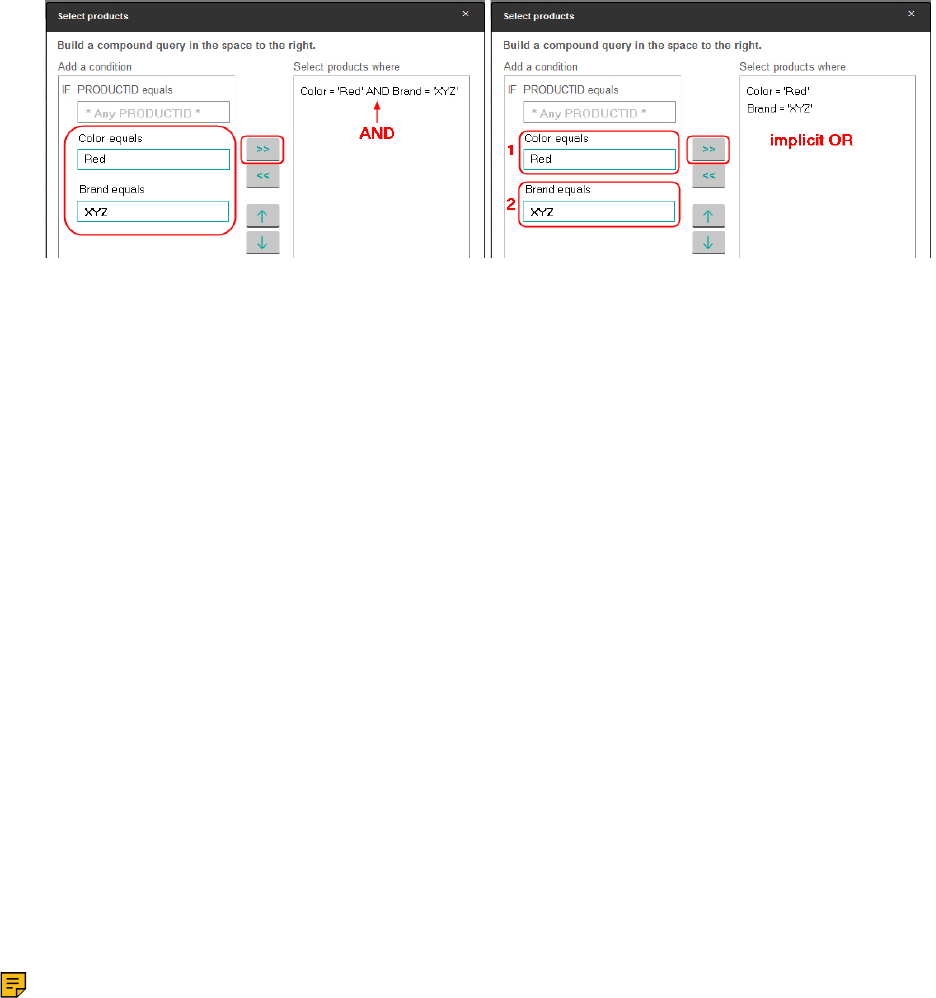
Unica Campaign V12.0 User Guide | 5 - Offer management | 195
Select products where list. Then specify another condition and again use >>. Each
condition that appears in the list is OR'd.
5. Click Save and test query to keep the dialog open so you can edit the query if
necessary after testing it. Or click Save to save the query and close the dialog.
6. On the offer Edit page, click Save to save the offer.
If you want to remove items from the list of Relevant products, select an item (or use Ctrl
+click or Shift+click to select multiple items), then click Remove selected. If you want to
test the query again, use Test query. If you want to edit the query, click Edit query.
Duplicating offers
You can create new offers by duplicating existing offers, to save data entry time. You can
duplicate retired offers or active offers.
Offers that are created by duplication are automatically assigned unique offer codes. They
are named "Copy of <original offer name>" and have the same description, security policy,
and offer attribute values as the original offer.
Note: Duplicated offers are created in the same folder as their originals, but can be
moved to a different location later. You must have the appropriate permissions to be able to
duplicate and move offers.

Unica Campaign V12.0 User Guide | 5 - Offer management | 196
Duplicating an offer from the Offers page
To save time, you can duplicate an offer from a list of offers. You can then change the new
offer so that it meets your needs.
1.
Select Campaign > Offers.
The Offers page opens.
2. Navigate to the folder that contains the offer or offers that you want to duplicate.
3. Select the check box next to each offer that you want to duplicate.
4. Click Duplicate .
5.
Click OK to confirm.
The selected offers are duplicated and display in the list of offers.
Duplicating an offer from the offer's Summary page
To save time, you can duplicate an offer while you are viewing or editing its summary
information. You can then change the new offer so that it meets your needs.
1.
On the Summary tab of the offer thatyou want to copy, click Duplicate .
A confirmation window indicates that you are about to duplicate the offer and new offer
codes will be generated.
2.
Click OK to confirm.
You see the New offer page in Edit mode, with fields populated with values from the
original offer but with a new offer code.
3.
Edit the values that you want to change, including the offer name and description.
Note: Offer names have specific character restrictions. For details, see Special
characters in Unica Campaign object names (on page 354)

Unica Campaign V12.0 User Guide | 5 - Offer management | 197
4. Click Save to create the new offer.
Grouping offers
You can group offers for reporting or analysis purposes.
For example, you might want to see the response rates to a "Free Shipping" offer that was
sent through various channels and offered at different times of year.
Note: For any report to use an offer attribute for grouping or roll-up purposes, the report
must be customized by your report administrator.
You can group offers in two ways:
• Using attributes
• In folders
Grouping offers using attributes
You can create any number of custom attributes in your offers to use as "offer grouping
fields." For example, if you have various college-affiliation credit card promotions, you could
create a custom attribute called "region" that you can then use in reports. This would allow
you to group together offers targeted to alumni of New England colleges versus those on
the West coast.
When you create offers that use custom attributes, you must enter the values manually. You
can also duplicate a similar offer to reduce data entry effort, as the values of parameterized
attributes will also be copied.
Offer attributes can also be used within smart offer lists to identify and group offers.
Grouping offers in folders
It can be useful to group offers in folders for reporting purposes. If you maintain all related
offers in the same folder, and specify the folder as the target when prompted for offers

Unica Campaign V12.0 User Guide | 5 - Offer management | 198
to report on, all the offers in that folder (and in any of its subfolders) are automatically
selected for reporting.
Note: Including folder and subfolder contents for reporting in this way does not achieve
"roll up" reporting for the offers. They are simply selected based on inclusion in a folder
structure.
Moving offers or offer lists
You can move one or more offers among folders. The procedure for moving offers is
the same as for moving offer lists, and you can move offers and offer lists in the same
operation.
Access to different locations is governed by different security policies. You can only move
offers into a folder with a security policy in which you have permissions to do so.
1. Choose Campaign > Offers.
2.
Select the offers or offer lists that you want to move, and click Move.
Another way to move an offer (but not a list) is to click its name link to view its
Summary tab, and click Move.
3. When prompted, select a destination folder and click Accept this location.
Retiring offers or offer lists
If you have the appropriate permissions, you can retire offers and offer lists to prevent their
further use. Retired offers can no longer be assigned and cannot be given out as part of an
offer list.
Retired offers remain visible in the offer hierarchy but are grayed out. They can be found
using the search feature, can be duplicated to create new offers, and are available for
reporting.

Unica Campaign V12.0 User Guide | 5 - Offer management | 199
Note: A retired offer cannot be re-enabled. If you need an offer with the same details,
you can create a new one by duplicating the retired offer.
Retiring an offer does not affect campaigns or flowcharts in which the offer has already
been used, and maintains the data integrity with any system table data that has been
generated based on the offer, such as contact and response history.
You can clean up static offer lists by deleting retired offers from them. Smart offer lists
do not require cleanup as they will resolve only to non-retired offers matching their query
criteria.
The procedure for retiring offers is the same as that for retiring offer lists, and you can retire
offers and offer lists in the same operation.
1. Choose Campaign > Offers.
2.
Select any offers or offer lists that you want to retire, and click Retire.
Another way to retire an offer (but not a list) is to click its name link to view its
Summary tab, and click Retire.
3. When prompted, click OK.
The selected offers and offer lists are retired and display in gray.
Deleting offers or offer lists
You use the same procedure to delete an offer or an offer list.
You must have the appropriate permissions to delete an offer or offer list. To preserve
system integrity, Unica Campaign does not allow you to delete offers or offer lists that are
referenced in system tables. You cannot delete offers or offer lists that:
• are associated with a campaign
• are assigned to a cell in a contact process in a flowchart for which contact history has
been populated
Unica Campaign V12.0 User Guide | 5 - Offer management | 200
• are assigned to a cell in an Optimize process in a flowchart
Important: If you attempt to delete an offer or offer list in these situations, a
confirmation message indicates that the offer or offer list will be retired instead of deleted.
You can back out if you want. To prevent further use of offers or lists that are referenced in
system tables, you should retire rather than delete them.
If the offers that you want to delete belong to any static offer lists, you will be asked to
confirm the deletion. If you choose to continue, the deleted offer(s) are automatically
removed from any static offer lists.
Contact processes containing cells that were assigned offers that have subsequently been
deleted will remain configured, but the offer will be indicated as "Unknown Offer" in the
process configuration dialog, and a warning will be produced when the flowchart is run.
The procedure for deleting offers is the same as that for deleting offer lists, and you can
delete offers and offer lists in the same operation.
1. Choose Campaign > Offers.
2.
Select the offers or offer lists that you want to delete, and click Delete.
Another way to delete an offer (but not an offer list) is to click its name link to view its
Summary tab, and click Delete.
3. When prompted, click OK.
Searching for offers
You can search for offers but not for offer lists.
You can perform a basic search for offers using any of the following criteria:
• Name or partial name
• Description or partial description
• Offer code or partial offer code

Unica Campaign V12.0 User Guide | 5 - Offer management | 201
• Owner name
In addition, you can use the Advanced Search feature to find offers or offer lists using
queries based on offer attributes and specified values.
Searching for offers with Advanced Search
With the Advanced Search option, you define a query to find the offers that match your
specifications.
1. Choose Campaign > Offers.
2. Click Filter .
The Advanced search dialog opens.
3. Use the first drop-down list to select an offer attribute.
4.
Based on the type of attribute you selected, you can specify further conditions for
searching.
For example:
• On the attribute "Cost Per Offer", search for values less than or equal to $10.00
• On the attribute "Expiration Date", search for the exact date 11/30/2015
• On the attribute "Description", search for specified values that do not contain the
string "abc"
5.
If you want to specify another condition, click Add another condition then select either
And or Or to combine the conditions. To remove a condition, click X. To reorder a
condition, use the up or down arrow.
Note: Depending on the operator(s) that you use in your query ( =, >, contains,
begins with, and so on), you might be able to select multiple values or only a single
value. In some cases when you choose multiple values with an operator, you create
"OR" conditions. For example, if you create a query where "Color =" and select blue, red,
and white as the colors, the query you create is "Color = blue OR color = red OR color =
white."
Unica Campaign V12.0 User Guide | 5 - Offer management | 202
6. When you finish building your query, click Apply.
The Search results page lists any offers that match your search criteria.
Analyzing offers
Use Unica Campaign reports to analyze an individual offer or do a system-wide analysis
across multiple offers.
1.
To analyze an individual offer: (This applies to Unica Centralized Offer Management)
a. Select Offers.
b. Click the name of an offer.
c. Click the Analysis tab.
d.
Select a report from the Report type list at the top of the page.
The report displays in the same window.
2.
To analyze results across multiple offers: (This applies to Unica Campaign)
a. Select Analytics > Campaign analytics.
b. Click one of the report folders.
c.
Click a report link.
If the report allows filtering, the Report parameter window opens.
d. Select one or more objects on which to filter the report. Use Ctrl+click to select
multiple objects. Your permissions determine which objects appear.
e. Click Generate the report.
The report displays in the same window. The report generation date and time are
displayed at the bottom of the page. If the report spans more than one page, use
the provided controls to move to the top or bottom of the report or to page up and
down.
Unica Campaign V12.0 User Guide | 5 - Offer management | 203
Offer lists
Offer lists are configurable groups of offers that you can use to manage offers. The same
offer can exist in more than one offer list. You can add offers to offer lists and assign offer
lists to cells. You can also edit, move, delete, or retire offer lists.
After an offer list has been used, it cannot be deleted but it can be retired. Retired offer lists
can no longer be assigned. Assigned offer lists that have been retired will no longer be given
out.
You can create two types of offer lists:
• Creating static offer lists (on page 204): Pre-defined lists whose contents do not
change unless you edit the list.
• Creating smart offer lists (on page 205): A dynamic list of offers that is specified by a
query, so its contents can change each time it is used.
Offer lists appear in the same hierarchy as offers, but are identified by different icons:
Offers
Static offer lists
Smart offer lists
Note: Working with offer lists requires the appropriate permissions. For information
about permissions, see the Unica Campaign Administrator's Guide.
Security and offer lists
Object-level security applies to offer lists, based on the folders where your offer lists and the
offers included in your lists reside.
When you create a static offer list, you can only add offers to which you have access.
However, anyone with permission to access an offer list is automatically granted

Unica Campaign V12.0 User Guide | 5 - Offer management | 204
permissions to access the offers included in that list. Therefore, anyone who can access
your list can also use that offer list and all the offers within it, even if they would not
normally have access to those offers based on their security permissions.
Similarly, users who can access a folder containing a smart offer list can use that smart
offer list. They will get the same result as anyone else running that offer list, even if they
would not normally have access to particular offers (for example in another division's
folders).
Creating static offer lists
Static offer lists are pre-defined lists of offers whose contents do not change unless you
explicitly edit the list.
To create a static offer list, select individual offers to include in the list.
Generally you use static offer lists to repeatedly reuse a specific, fixed set of offers. For
example, if you have 5 each of RFM (Recency, Frequency, Monetary) segments, giving you
125 cells, and you want to assign the same offers to each cell, you can create a single set
of offers in a static offer list, and assign that offer list to all 125 cells. The same type of
reusability applies across flowcharts and campaigns.
A limitation of static offer lists is that default values are used for any parameterized offer
attributes.
1. Select Campaign > Offers.
2. Click New offer list.
3.
Enter a Name, Security policy, and Description.
Note: Offer list names have specific character restrictions. See Special characters
in Unica Campaign object names (on page 354).
4. You are creating a static offer list, so do not check This is a smart offer list.
5. In the Included offers section, click Add offer.

Unica Campaign V12.0 User Guide | 5 - Offer management | 205
6. Use the Relevant offers dialog to locate the offers that you want to add to the list. You
can use the search box to locate offers.
7. Select each offer that you want to add to the list.
8. Click Add selected offers.
9. Click Save changes.
Creating smart offer lists
A smart offer list is a dynamic list of offers that can resolve to different results each time
the list is used. A smart offer list is specified by a query which can be based on offer
attributes, offer locations (folders or subfolders), offer owner, and so on.
Generally you use smart offer lists for periodically recurring campaigns. You can set up
a cell to receive a smart offer list and then change the contents of the smart offer list
without having to modify the flowchart. For example, if you set up a smart offer list to be the
contents of a particular folder, then you can simply add or remove offers to and from that
folder to modify the offers given out each time the Unica Campaign is run.
A further example for using smart offer lists involves setting up the smart offer list to
automatically return the offers that you want to give out. If you want to give your "high-value
customer" cell the "best credit card offer" available, you can set up a smart offer list that
includes all credit card offers, sorted by the lowest interest rate and with maximum size
set to 1. The lowest interest rate credit card offer available at the time that the flowchart
contact process is run is automatically found and given to the high-value cell.
Note: Newly created offers can become part of smart offer lists with no action on your
part if they meet the smart offer list query criteria.
To create a smart offer list, you use a query to specify characteristics for the offers to
include in the list.
1. Select Campaign > Offers.

Unica Campaign V12.0 User Guide | 5 - Offer management | 206
2. Click New offer list.
3. Enter a Name, Security policy, and Description.
4. For List type, select This is a smart offer list.
5. In the Smart offer list criteria section, click Add criteria.
6. In the Smart offer list dialog, use the drop-down lists to build a query to include
offers in the list. Select an offer attribute, a condition, and a value. To specify multiple
expressions, use Create condition to add another set of drop-down lists, then combine
the expressions using And or Or.
7.
Use the Restrict search access tab to limit the search to the selected folders. To
include subfolders in search results, select Restrict access to all subfolders of
selected folders.
Note: Any offers that are chosen as a result of this search are available to any user
with access permissions to this offer list, even if they do not normally have permissions
to see or access the offers.
8. Use the controls under Order matching offers by to specify sorting options. Select the
offer attribute by which you want matching orders to be sorted, select Ascending or
Descending order, and indicate whether to limit the search results to the first "X" offers
that match. By default, there is no limit.
9. Click Save changes.
Editing offer lists
When you change an offer list, the campaigns that use the list use the updated offer list
definition the next time they are run.
1. Select Campaign > Offers.
2.
Click the hyperlinked name of the offer list that you want to edit.
Unica Campaign V12.0 User Guide | 5 - Offer management | 207
The Summary tab for the offer list appears.
3. Click Edit .
4.
Make your changes.
Offer list names have specific character restrictions. For details, see Special characters
in Unica Campaign object names (on page 354).
5. Click Save Changes.
How to retire offer lists
You can retire an offer list at any time to prevent its further use. Retiring an offer list does
not affect the offers contained in that list.
Retired offer lists remain visible in the offer hierarchy, but are grayed out. They are available
for reporting; however, they can no longer be assigned.
Note: After you retire an offer list, you cannot re-enable it. If you need an offer list with
the same details as a retired one, you must manually recreate it.
You retire offer lists by performing the same steps as you do to retire offers, and you can
retire offers and offer lists in the same operation.
Offer list assignment to cells
You can assign offer lists to cells in contact processes in the same way that you assign
individual offers. You can assign any combination of offers and offer lists to the same cell.
However, any parameterized attributes in the offers that are in the offer list use their default
values. You cannot assign parameter values for offers that are in the offer list. In order to
change parameterized values, you can do one of the following:
• Change the default values associated with the existing offer, create a copy of the offer
with the new defaults, and ensure that it is used in the offer list.
• Assign the offer individually, outside of an offer list.
Unica Campaign V12.0 User Guide | 5 - Offer management | 208
Offer lists in systems that are integrated with Unica Plan
If your Unica Campaign environment is integrated with Unica Plan, you must use Unica
Plan to assign offers or offer lists to output cells in the target cell spreadsheet form of a
campaign project.
Offer lists and legacy campaigns
If your Unica Campaign or Unica Centralized Offer Management environment is configured
to access legacy campaigns, use the instructions in this guide to assign offers or offer
lists to output cells in legacy campaigns. For legacy campaigns, there are two ways to
assign offers to cells: from the campaign's target cell spreadsheet, or within a process
configuration dialog.
Offer management in integrated Unica Plan-Unica
Campaign systems
If your Unica Campaign environment is integrated with Unica Plan, you work with offers in
one of two ways.
• If your system is configured so that offers are managed by Unica Plan, then you use the
Offers option from the Operations menu. For information about creating offers in this
way, see the Unica Plan and Unica Campaign Integration Guide.
• If your system is configured so that offers are managed through Unica Campaign, then
you use the Offers option from the Campaign menu.
Ask your system administrator which offer management option is configured on your
system.
Introduction to using Unica Plan assets in Unica
Campaign offers
If both Unica Plan and Unica Campaign are installed, and you licensed the Marketing Asset
Management add-on for Unica Plan, your campaigns can include digital assets from your
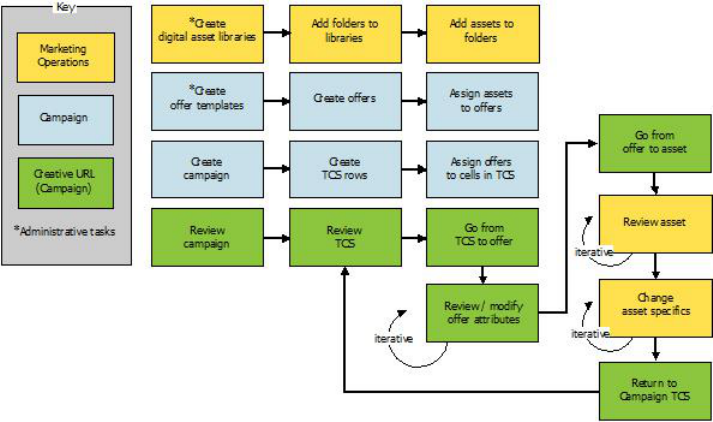
Unica Campaign V12.0 User Guide | 5 - Offer management | 209
Unica Plan asset libraries. Unica Campaign does not need to be integrated with Unica Plan,
although it may be.
An example of this functionality is to create an offer that includes a product logo stored in a
Unica Plan asset library.
To include a Unica Plan asset in an offer, a user creates an offer based on a template that
includes the CreativeURL attribute. A "Creative URL" is a pointer that indicates the location
of an asset in Unica Plan. The asset that the CreativeURL attribute points to is included in
the offer.
The CreativeURL attribute allows users to move seamlessly from Unica Campaign to Unica
Plan when configuring offers, offer templates, or campaigns.
For example, when creating or editing a campaign, you can go from a target cell
spreadsheet (TCS) cell to the offer related to that cell. From the offer, you can go to the
related asset in Unica Plan, where you can view or modify it. You can also upload a new
asset to the library for immediate use in the campaign.
The following example shows one possible workflow for a system. This example is for a
system that is not integrated. Your workflow might differ.
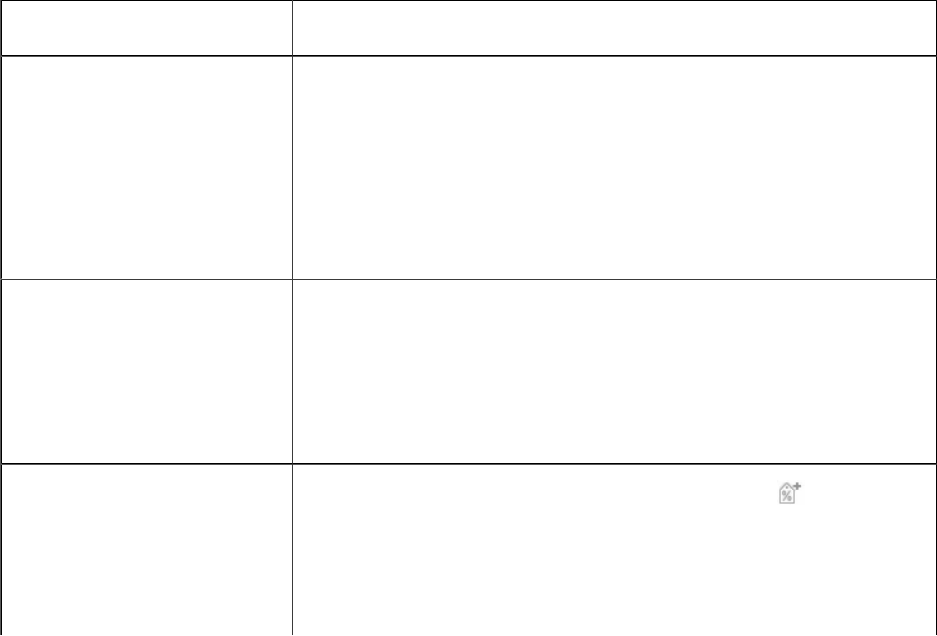
Unica Campaign V12.0 User Guide | 5 - Offer management | 210
Using Unica Plan assets in Unica Campaign offers
This topic explains how to relate a digital asset from Unica Plan to a Unica Campaign offer,
for systems that are not integrated. If Unica Plan is integrated with Unica Campaign, and
offer integration is enabled, you follow a slightly different procedure. See the Unica Plan and
Unica Campaign Integration Guide.
An asset is an electronic file that is designed for use in a marketing program. Examples
include logos, brand images, marketing research documents, reference materials, corporate
collateral, or document templates. If you use both Unica Plan and Unica Campaign, you can
include a file from a Unica Plan asset library as part of a Unica Campaign offer. To include
an asset in an offer, use the CreativeURL attribute. A "Creative URL" is a pointer to a file in a
Unica Plan asset library.
Table 9. Using Unica Plan assets in Unica Campaign offers
Using Unica Plan assets in Unica Campaign offers
Task Details
Prerequisite: Create and
populate an asset library in
Unica Plan.
Unica Plan administrators create asset libraries, which serve
as repositories for files. Unica Plan users can upload digital
assets and organize them in folders within the asset libraries.
For a list of prerequisites and guidelines, see the Unica
Campaign Administrator's Guide.
Prerequisite: Add the
CreativeURL attribute to
an offer template.
Unica Campaign administrators add the CreativeURL
attribute to an offer template when they define the template.
For more information, see the Unica Campaign
Administrator's Guide.
Create an offer that is
based on a template that
includes the CreativeURL
1. Select Campaign > Offers, click New offer , and select
a template that includes the CreativeURL attribute.
2. Use the New offer page to define the offer (name,
security policy, and other information), then click Browse

Unica Campaign V12.0 User Guide | 5 - Offer management | 211
Task Details
attribute, and relate one
asset to the offer.
library in the Creative URL. (Steps 2 - 5 can also be done
from the Target Cell Spreadsheet view mode.)
3. In the dialog, click a library to open it. The library window
opens.
4. In the library window, go to a folder in the asset library,
and select the asset that you want to use in this offer.
5. To add an asset, click Add asset, then define the asset
name, owner, and other information. In the File field, click
Upload, then browse to the asset. You can upload a File,
Preview File, or Thumbnail.
6. Follow the prompts to select and upload assets to the
library, save changes, and accept the asset.
7. Click Save to save the offer.
A link to the specified asset is now included in the Creative
URL field.
Assign offers to cells in
the campaign target cell
spreadsheet.
1. Go to the All Campaigns page, click a campaign, select
the Target cells tab, and edit the target cell spreadsheet.
2. Click in the Assigned offers column and click Select one
or more offers.
3. Use the Select Offers window to select the offer you
created.
4. Save and exit the target cell spreadsheet.
Your campaign now includes a digital asset from Unica
Plan. Typically, a campaign now goes through a review and
adjustment process, which is explained in the following
steps.
Optionally, modify the
offer.
1. Go to the All campaigns page, click a campaign, select
the Target cells tab, and edit the target cell spreadsheet.

Unica Campaign V12.0 User Guide | 5 - Offer management | 212
Task Details
2. Click in the Assigned offers column and click View
offers . The View/Edit offer window opens.
3. Select the offer and click Preview. (If you decide to
remove an offer, select it and click Remove.)
4. To open the offer for editing, click the Edit icon at the top
of the window.
5.
With the offer open for editing, you can edit the values
of parameterized attributes. You can also access Unica
Plan assets:
a. Click the Browse library link in the Creative URL
field.
b. In the window that opens, click a library.
c. In the resulting window, go to a folder in the asset
library, and select an asset to use in this offer.
d. If you want to add an asset, click Add Asset, then
provide the required information. In the File field,
click Upload, then browse to the asset. You can
upload a File, a Preview File, or a Thumbnail. Follow
the prompts to complete the action.
e. Click Save to save the offer.
A link to the selected asset is now included in the Creative
URL field.
Save and exit. Close the windows in Unica Plan and return to the Unica
Campaign target cell spreadsheet. Save and exit the target
cell spreadsheet.
Unica Campaign V12.0 User Guide | 5 - Offer management | 213
Overview of IBM eMessage offer integration with
Unica Campaign
If your Unica Campaign administrator enabled IBM eMessage offer integration, Unica
Campaign offers can be associated with IBM eMessage assets.
When offer integration is configured:
• Cross-channel marketers can create and use the same marketing offers on multiple
channels to measure the effectiveness of offers across channels. For example,
compare email to direct mail.
• The Unica Campaign performance reports show the sum of all contacts or responders
over all channels that were used. You can customize the reports to break out the
information by channel.
• The Unica Campaign Detailed Offer Response Breakout report analyzes IBM eMessage
link clicks that are associated with offers. This report lists all offers associated with a
campaign and the number of responses for each channel.
When offer integration is configured, the basic workflow for IBM eMessage users is:
1.
Use Unica Campaign to create offer attributes, offer templates, and offers, as you
normally would, with the following exceptions:
• Offer lists are not supported because only one offer can be associated with a
digital asset.
• You cannot use Derived Fields in IBM eMessage offer attributes because you
cannot populate Derived Fields in IBM eMessage. However, you can use Derived
Fields on an offer if you also target that offer over another channel.
• You can populate parameterized offer attributes with a constant value. However,
you cannot use Derived Fields for the email channel and you cannot change values
per recipient.
2. Use IBM eMessage as you normally would, with one addition: You must associate a
Unica Campaign offer with a digital asset in the IBM eMessage Content Library.
3. Add the asset and its associated offer to an email communication.
Unica Campaign V12.0 User Guide | 5 - Offer management | 214
4. If you want to modify the offer, open the offer Summary page in Unica Campaign. Click
Link to IBM eMessage Digital Asset at the top of the offer Summary page to see a list
of IBM eMessage assets that are related to the offer. Double-click an asset to open it in
the IBM eMessage Content Library.
5.
Send the mailing.
Recipients open the email and click the offer links.
IBM eMessage receives the responses and processes them using a configurable ETL
process so that they end up in the Unica Campaign database.
Unica Campaign checks for updated offer and contact data at intervals that are
scheduled by your Unica Campaign administrator. The offer and contact information is
then processed by Unica Campaign and moved to the appropriate report tables.
6. Use the IBM eMessage reports as you normally would. Additionally, use the Unica
Campaign Detailed Offer Response Breakout report to analyze responses to your
offers.
The IBM eMessage offer integration depends on an ETL process to coordinate offer and
response information between IBM eMessage and Unica Campaign:
• To configure Unica Campaign for IBM eMessage offer integration, see the Unica
Campaign Administrator's Guide.
• To use IBM eMessage, see the IBM eMessage User's Guide.
Related tasks
•
Viewing and editing IBM eMessage assets that are linked to a Unica
Campaign offer (on page 214)
Unica Campaign V12.0 User Guide | 5 - Offer management | 215
Viewing and editing IBM eMessage assets that are
linked to a Unica Campaign offer
You can view all of the related IBM eMessage digital assets for an offer from the offer
Summary page and optionally edit the assets in the Content Library.
Before you can view IBM eMessage assets in an offer, you must use the IBM eMessage
Document Composer to associate the offer with at least one asset in the Content Library.
Each asset can be associated with only one offer at time, but an offer can be associated
with more than one asset. For more information, see your IBM eMessage documentation.
After establishing the relationship between an offer in Unica Campaign and assets in IBM
eMessage, you can view those assets from the Unica Campaign offer Summary page.
1. Click Unica Campaign > Offers.
2. Locate an offer that has IBM eMessage assets.
3.
Click the offer name.
The offer Summary page appears.
4.
Click Link to IBM eMessage Digital Asset at the top of the Summary page.
The IBM eMessage Content Library opens and displays a list of all of the IBM
eMessage assets that are related to the offer.
5. You can double-click an asset to open it.
Related concepts
•
Overview of IBM eMessage offer integration with Unica Campaign (on
page 213)
Chapter 6. Target cell management
A cell is a group of people that you want to target, such as high value customers. A target
cell is a cell that has an offer assigned to it.
Cells are created when you configure and then run a data manipulation process (Select,
Merge, Segment, Sample, Audience, or Extract) in a flowchart. For example, a Select process
can generate an output cell that consists of Gold customers. An output cell can be used as
input for other processes in the same flowchart.
You create a target cell by assigning an offer to a cell. You can assign offers by configuring
a contact process (such as a Mail list or Call list) in a flowchart or by editing the Target Cell
Spreadsheet (TCS®). Most organizations use only one of the two approaches:
• Bottom-up: A Unica Campaign designer creates offers, then assigns offers by
configuring a Mail List or Call List process in a flowchart.
• Top-down: A marketing manager creates offers, then assigns the offers in a Target
Cell Spreadsheet (TCS). A Unica Campaign designer then creates a flowchart to select
recipients for the offers, and links the flowchart cells to cells in the TCS.
Every cell has:
• A system-generated cell name, unique within the current flowchart.
•
A system-generated cell code. The cell code has a standard format that is
determined by your system administrator and is unique when generated. Cell codes
are not checked for uniqueness unless the flowchart configuration parameter
AllowDuplicateCellCodes is set to "No." In this case, cell codes are enforced to be
unique only within the current flowchart.
Cell codes and cell code generators are explained in the Unica Campaign
Administrator's Guide. Configuration parameters are explained in the Unica Platform
Administrator's Guide.
Unica Campaign V12.0 User Guide | 6 - Target cell management | 217
Generating cells in a flowchart
When you run a data manipulation process in a flowchart, the process generates one or
more cells as output. A cell is a list of IDs. The generated output can be used as input into
downstream processes.
Data manipulation processes include Select, Merge, Segment, Sample, Audience, and
Extract. When you run a configured process, one or more cells are created as the output.
The number of cells that is generated depends on the type of process and its configuration
details. For example, you can configure and then run a Select process to generate an output
cell of high-income households. You can use that cell as input into a Segment process
to divide the contacts by age. The resulting output from the Segment process would be
multiple cells, segmented into age groups.
If your organization uses top-down management to define campaigns, you can link
output cells in a flowchart to placeholder target cells that were defined in the Target Cell
Spreadsheet (TCS). In this way, the Unica Campaign designer generates output that meets
the goals that are defined in the TCS.
Limiting the size of output cells
To limit the number of IDs generated by data manipulation processes such as Audience,
Extract, Merge, or Select, use the Cell size limit tab of the process configuration dialog.
The options for limiting output cell size depend on whether the process accepts input from
a cell or a table. In processes that can accept either type of input, the Cell Size Limit window
changes dynamically to present options appropriate to the input type.
• Processes taking input from an output cell
• Processes taking input from a table
For either type of input, you can also change the random seed. The random seed represents
the starting point that Unica Campaign uses to select IDs randomly.

Unica Campaign V12.0 User Guide | 6 - Target cell management | 218
Processes taking input from an output cell
If a process takes input from an output cell, the Cell size limit tab includes the options
described below. Use these options to limit the number of IDs that the process will output.
Use the following controls to affect the output cell size:
• Unlimited cell size returns all IDs that satisfy the query or selection criteria. This option
is the default.
•
Limit output cell size to Random (slowest) returns no more than the specified number
of unique IDs, selected randomly from all IDs that meet the query criteria. In the text
box, enter the maximum number of IDs that you want returned. Unica Campaign
matches the deduplicated records that are returned from the database to those of the
input cells, then does a random selection to arrive at the final cell size. The ID list in
cells that are passed from process to process is always unique.
Note: Use the Random option only when it is important for exactly N records to be
returned. This option uses a large amount of temporary space and takes the most time
because all IDs must be retrieved to the Unica Campaign server.
• Limit output cell size based on sizes of input cells: For information about this option,
see Limiting the output cell size based on the input cell size (on page 218).
Limiting the output cell size based on the input cell size
In processes that take input from cells, you can use the sizes of cells from connected
incoming processes as attributes for limiting the output cell size, even if you are not using
the actual cell data or IDs.
For example, if you connect 3 processes that each have one output cell, to a Select process,
you might use only one of the three incoming cells as the actual data input for the Select
process, but you can use the attributes of the other incoming cells to specify the output cell
size for the Select process. A solid line connects the process whose output cell is actually
Unica Campaign V12.0 User Guide | 6 - Target cell management | 219
used by the Select process; dotted lines connect the processes whose output cells are not
used as data input but only have a temporal relationship with the Select process.
Use the Limit output cell size based on sizes of input cells checkbox to specify the input
cells whose size attributes you want to use for limiting your current process's output cell
size. Some of these options act in conjunction with the Limit output size to value that you
specify.
1. Click the Cell size limit tab in the process configuration dialog.
2.
Choose the method by which the limits will be calculated:
• Largest checked cell: Specifies that the output cell size should not exceed the size
of the largest selected input cell. For example, if cells A and B are checked, with
sizes of 100 and 200, the size of the output cell for this process would be limited to
200.
• Maximum size (Above) minus sum of all checked cells: Use this option in
conjunction with the Limit output cell size to value specified above. This option
specifies that the output cell size should not exceed N, where N is the difference
between the number specified in the Limit output cell size to field above, and
the sum of all selected input cells. For example, if you entered 1000 as the Limit
output cell size to value, and checked input cells A and B with sizes 100 and 200
respectively, the size of the output cell for this process would be limited to 1000 –
(100+200) = 700.
• Size of any checked cells: Specifies that the output cell size should not exceed the
size of any of the selected input cells. For example, if cells A, B, and C are checked,
with sizes of 100, 200, and 500 respectively, the size of the output cell for this
process would be limited to 100.
• Sum of all checked cells: Specifies that the output cell size should not exceed
the total (sum) of all the selected input cells. For example, if cells A, B, and C are
checked, with sizes of 100, 200, and 500, the size of the output cell for this process
would be limited to 800, the sum of all three of the input cell sizes.
3. In the list of input cells, select the check boxes for the input cells on whose size(s) you
want the output cell size criteria to be based.
Unica Campaign V12.0 User Guide | 6 - Target cell management | 220
Processes taking input from a table
If a process takes input from a table or strategic segment, the Cell size limit tab includes
the options described below. Use these options to limit the number of IDs that are output by
the process in production or test runs.
Use the Specify output cell size limitation options to control production runs of the
process. The key difference between the two Limit options is their impact on resources and
the final number of records when your data source is non-normalized.
• Unlimited cell size: Returns all IDs that meet the query or selection criteria. This option
is the default.
• Limit output cell size to: Returns no more than the specified number of unique IDs,
selected randomly from all IDs that meet the query criteria. In the text box, enter the
maximum number of IDs that you want returned. Unica Campaign deduplicates the
complete set of IDs before random selection, then retains only the specified number
of records, so that a list of unique IDs is returned even when duplicates exist on the ID
fields. This option uses a large amount of temporary space and takes the most time
because all IDs must be retrieved to the Unica Campaign server. Use this option only
when the data is not normalized on the ID field and if it is important that exactly N
records are returned.
•
Limit selection based on: Use this option to limit records that meet your query criteria.
This option reduces the time and memory that are required to select the final set of
records. However, it can result in fewer than the specified number of unique IDs.
◦ First N (fastest): Unica Campaign retrieves from the database only the first N
records that meet your query criteria. Unica Campaign then deduplicates these IDs.
If the data is not normalized, then the final result contains fewer than the requested
number of unique records. This method is the fastest because it takes less time to
retrieve data and uses less temporary space.
◦ Random: Unica Campaign retrieves from the database all records that meet your
query criteria, then randomly selects the number of records requested. Unica
Campaign then deduplicates those IDs. If the data is not normalized, the final
result contains fewer than the requested number of unique records. This option

Unica Campaign V12.0 User Guide | 6 - Target cell management | 221
uses less temporary space because only the randomly selected records are
retrieved and stored by Unica Campaign.
Use the Test run output cell size limitations options to control test runs.
In some processes, including Audience and Select, you can limit cell size specifically for test
runs. Use these options to control the amount of data returned and processed during test
runs. For information, see Applying test run output cell size limitations (on page 221).
Applying test run output cell size limitations
In some processes, including Audience and Select, you can limit cell size specifically for test
runs.
Use the options in this section to control the amount of data returned and subsequently
processed during a test run.
• Unlimited cell size: This is the default option. The number of IDs returned from the
query or selection criteria on the Source tab of this process is not changed. With this
option, the test run operates on all the data that it would during a production run, but
offer and contact histories are not populated.
• Limit output cell size to: Returns an exact specified number of IDs, selected randomly
from all IDs that meet your query criteria. In the text box, enter the number of IDs that
you want returned. With this method, Unica Campaign deduplicates the complete set of
IDs prior to random selection, then retains only the specified number of records, so that
a list of unique IDs is returned even when duplicates exist on the ID fields.
Note: Selecting records with this option uses a large amount of temporary space and
takes the most time, because all IDs must be retrieved to the Unica Campaign server. Use
this option only when the data is not normalized on the ID field, and if it is important for
exactly N records to be returned.
Unica Campaign V12.0 User Guide | 6 - Target cell management | 222
Changing the random seed for record selection
The random seed represents the starting point that Unica Campaign uses to select records
randomly.
Some processes provide the ability to select a random set of records. If you decide to select
random records, there are times when you might want to change the random seed. For
example:
• Your random sample is producing highly skewed results (for example, if all males in
your data fall into one group and all females into another).
• You have the same number of records in the same sequence, and using the same seed
value each time that you run this process results in records being created into the same
samples.
Follow the steps below to generate a different starting point for random record selection.
1. Click the Cell size limit tab of the Audience, Extract, Merge, Select, or Sample
configuration dialog.
2.
Perform one of the following operations:
•
Click the Pick button next to the Random seed field to randomly select a new seed
value.
The same random set of records will be used for each subsequent run of the
process (unless the input to the process changes). This is important if you intend
to use the process results for modeling purposes, because different modeling
algorithms must be compared across the same set of records to determine each
model's effectiveness.
• If you do not intend to use the results for modeling, you can make the process
select a different random set of records each time it runs. To do this, enter a
zero (0) as the Random seed. A value of 0 ensures that a different random set of
records will be selected each time the process runs.

Unica Campaign V12.0 User Guide | 6 - Target cell management | 223
Tip: The Segment process does not include a Random seed control. To make the
Segment process select a different random set of records each time it runs, set the
Random seed to 0 in the upstream process that provides input to the Segment process.
Cell names and codes
Cell names and codes are important because they establish the links between processes
that output cells or use cells as input.
Cell codes
Cell codes have a standard format determined by your system administrator, and are unique
when generated. Cell codes can be edited. Therefore, they are not checked for uniqueness
unless the flowchart configuration property AllowDuplicateCellCodes is False, in which
case cell codes are enforced to be unique only within the current flowchart. There is no
checking for uniqueness in the target cell spreadsheet (TCS). For details about cell codes
and cell code generators, see the Unica Campaign Administrator's Guide.
Cell names
Note: Cell names have specific character restrictions. For details, see Special
characters in Unica Campaign object names (on page 354).
By default, cell names are based on the process from which they are generated. For
example, if a cell is generated by a process named "Select1", then the default cell name
is "Select1". You can change the cell name. If you change a process name, the names of
cells generated by that process are automatically changed as well, both in that process and
in any connected downstream processes within the same flowchart. If you change a cell
name, you might also affect the links between that cell and any downstream processes
using that cell as input.
For example, if a Segment process generates two output cells named Segment1 and
Segment2, and these cells are used as input into two Mail List processes (Mail List 1 and
Mail List 2), if you change the names of the Segment cells after you have already connected
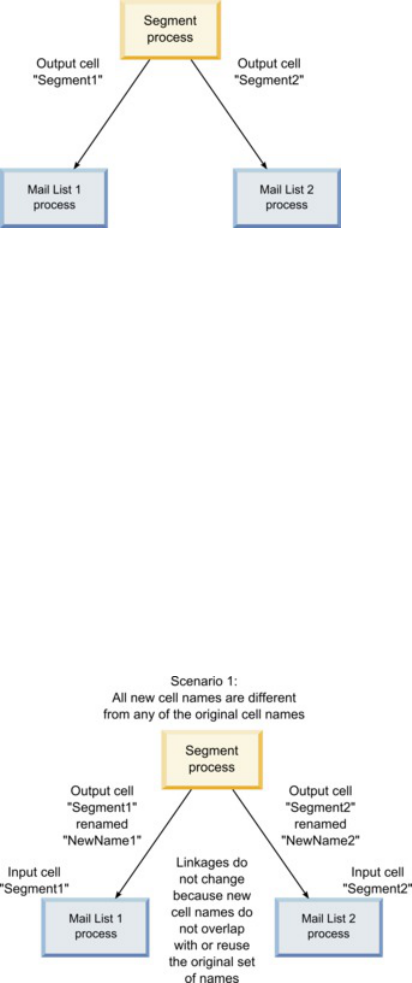
Unica Campaign V12.0 User Guide | 6 - Target cell management | 224
the Mail List processes, you need to understand how Unica Campaign handles the new cell
names.
The following diagram illustrates a basic example of a Segment process that outputs two
cells, each cell then becoming the input for downstream Mail List processes.
Examples: cell renaming scenarios
Scenario 1: All new cell names are different from any of the original names
If no new cell names overlap with the original default names (that is, in the example, if you
do not use "Segment1" or "Segment2" as the name for either of the Segment output cells),
then Unica Campaign can maintain the original linkages based on the original "order" of
the cells. In this situation, because there is no overlap or re-use of either of the original
cell names, the linkage between the output cells from the Segment process and the two
respective Mail List processes remains unchanged, as shown in the following diagram.
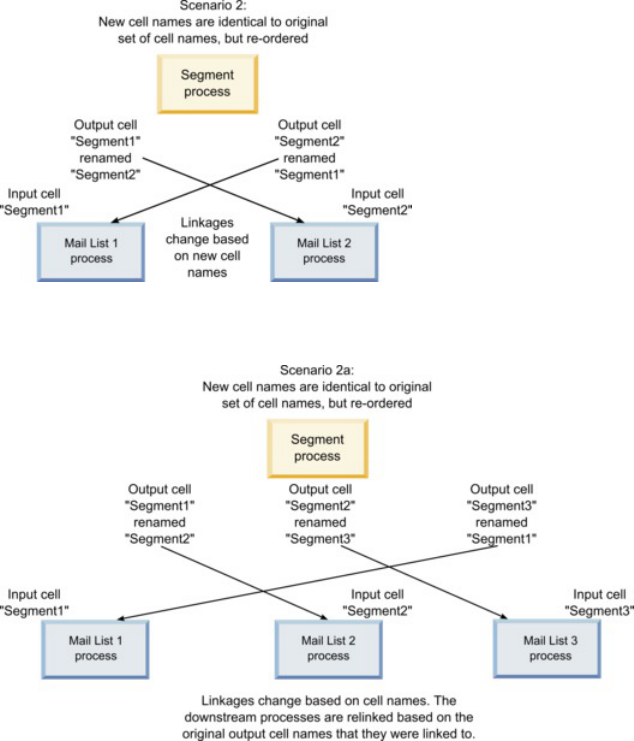
Unica Campaign V12.0 User Guide | 6 - Target cell management | 225
Scenario 2: The set of new cell names is identical to the original set of cell
names, but re-ordered
If the new names you choose for your cells are exactly the same as the names in the
original set and simply re-ordered, the downstream processes will look for available output
cells by name (that is, the new cell names), and the linkages will be switched as necessary.
In the example, the newly renamed Segment2 output cell is now the input cell to Mail List
2, and the newly named Segment1 cell is now the input cell to Mail List 1, as shown in the
following diagram.
The following diagram illustrates the same situation with three output and input cells.
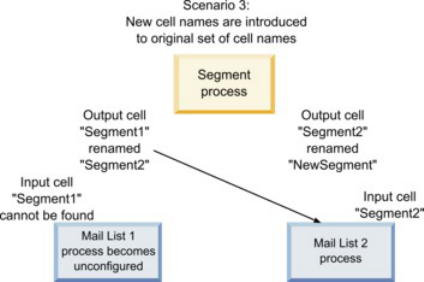
Unica Campaign V12.0 User Guide | 6 - Target cell management | 226
Scenario 3: The set of new cell names overlaps with some of the original cell
names, and new cell names are introduced
If the new names overlap with some of the original names, and new cell names are added,
any links using names in the original set of cell names can be recognized, otherwise they
are broken. For example, if you rename cell "Segment1" to "Segment2" and rename cell
"Segment2" to "NewSegment", the new "Segment2" will be hooked up to Mail List2 and Mail
List1 will become unconfigured, because it cannot find an input cell name with the name
"Segment1."
Changing the cell name
By default, the name of a cell created in a process matches the process name. For
processes that create more than one cell, the output cell names are a concatenation of the
process name and the segment name. For example, a Segment process named "Segment1"
creating 3 segments will have output cells whose default names are "Segment1.Segment1",
"Segment1.Segment2", and "Segment1.Segment3."
Cell names are designed to be linked to the name of the process from which they were
created. If you edit a process name, the cell names will automatically change as well.
However, if you edit the cell names, you remove their link to the process name. This
means that if you subsequently change the process name, the cell name(s) will no longer
automatically change.

Unica Campaign V12.0 User Guide | 6 - Target cell management | 227
To change the name of a cell in a flowchart process
Note: When you save changes to the output cell name, if Auto generate is selected
for the cell code, the cell code is regenerated. If you do not want the cell code to change,
uncheck Auto generate prior to editing the cell name.
1. In a flowchart in Edit mode, double-click the process whose output cell name you want
to change. You see the process configuration dialog for the process.
2. Click the General tab. You see the general information for the process, including the
process name and the output cell name.
3. Place your cursor in the Output cell name field so that the text is selected, and edit the
cell name.
4.
Click OK. Your changes are saved. If you have edited the cell name so that it no longer
matches the process name, these names are no longer linked.
Note: Saving a flowchart does not trigger any type of validation. To check that
your flowchart has configured correctly with no errors, you can manually perform a
flowchart validation.
Resetting the cell name
By default, the name of a cell created in a process matches the process name. For
processes that create more than one cell, the output cell names are a concatenation of the
process name and the segment name. For example, a Segment process named "Segment1"
creating 3 segments will have output cells whose default names are "Segment1.Segment1",
"Segment1.Segment2", and "Segment1.Segment3."
If you rename the process, the cell name(s) will automatically change as well, so that the
cell name and process name remain linked.
Unica Campaign V12.0 User Guide | 6 - Target cell management | 228
However, if you have change the cell name manually so that it is different from the process
name, the cell and process names are no longer linked. You can restore the link by renaming
the cell name to the same as the process name.
To reset the cell name
1. In a flowchart in Edit mode, double-click the process whose output cell name you want
to reset. You see the process configuration dialog for the process.
2. Click the General tab. You see the general information for the process.
3.
The next step varies depending on whether you are editing a process that outputs a
single cell or multiple cells:
• In processes that output a single cell, edit the text in the Output cell name field so
that it is identical to the process name displayed in the Process Name field.
• In processes that output multiple cells, click Reset cell names. The cell names
revert to the default format, which is a concatenation of the current process name
and the segment name.
The process and cell names are now relinked. If you now change the process name, the
output cell name will automatically change as well.
4. Click OK. Your changes are saved and the process configuration dialog closes.
Changing the cell code
By default, a cell's code is automatically generated by the system, based on the format
defined for all cell codes by your system administrators. Cell code uniqueness is enforced
across flowcharts and campaigns, but cell codes can be duplicated within flowcharts if you
have the flowchart configuration parameter AllowDuplicateCellCodes set to "Yes."
For more details about configuration parameters in the central configuration parameter
provided by Unica, see the Unica Platform Administrator's Guide.

Unica Campaign V12.0 User Guide | 6 - Target cell management | 229
Note: Although you can override the default system-generated cell code, any cell code
you enter manually must still conform to the cell code format. This format is displayed
below the Cell Code field in the process configuration dialog. Code formats are represented
by constants and variables as follows: uppercase letters represent alphabetical constants,
a lowercase "n" represents a numeric character. For example, a cell code format of "Annn"
indicates that the cell code must be 4 characters long, with the first character being
uppercase "A", followed by 3 numbers. A sample cell code of this format would be "A454."
To change the code for a cell in a flowchart process
1. In a flowchart in Edit mode, double-click the process whose output cell name you want
to change. You see the process configuration dialog for the process.
2. Click the General tab. You see the general information for the process.
3. Clear the Auto generate checkbox if it is selected. The Cell code field becomes
editable.
4. In the Cell code field, edit the cell code. Remember that the modified code must
conform to the cell code format displayed below the Cell code field.
5. When you have finished editing the cell code, click OK. The process configuration
dialog closes and your changes are saved.
About copying and pasting cell names and codes
In processes that output more than one cell, you can use the copy and paste feature to edit
multiple output cell names and codes in the Output Cells grid.
To copy and paste all cells in the grid
In processes that output more than one cell, you can use the copy and paste feature to edit
multiple output cell names and codes in the Output Cells grid.
1. In a flowchart in Edit mode, double-click the process for which you want to copy and
paste cell names and codes. You see the process configuration dialog for the process.

Unica Campaign V12.0 User Guide | 6 - Target cell management | 230
2. Click the General tab. You see the general information for the process, including the
Output Cells grid.
3. In the Output Cells grid, click anywhere to select all cells. All cells are always selected
for pasting regardless of the cursor position.
Note: The Cell code column is not selectable or editable unless you clear the Auto
Generate Cell Codes checkbox.
4. Click Copy. All cells are copied to the clipboard.
5. Click inside the cell that will be at the top left position of where you want to paste the
cells.
6. Click Paste. The contents of your copied cells replaces the original content of a block
of cells the same size as that which was copied.
To paste cell names and codes from an external spreadsheet
1. Select and copy cells or text from an external spreadsheet or other application using
that application's copy feature.
2. In Unica Campaign, in a flowchart in Edit mode, double-click the process for which
you want to copy and paste cell names and codes. You see the process configuration
dialog for the process.
3.
Click the General tab. You see the general information for the process, including the
Output Cells grid.
Note: The Cell code column is not selectable or editable unless you clear the Auto
Generate Cell Codes checkbox. If you want to paste content into the Cell code column,
make sure you clear this checkbox.
4. Click inside the cell where you want to paste what you have copied. If you are copying
and pasting a rectangular group of cells, click inside the cell that will be the top left cell
of the rectangle.
Unica Campaign V12.0 User Guide | 6 - Target cell management | 231
5. Click Paste. The contents of your copied cell(s) replaces the original contents of a
block of cells the same size.
Target cell spreadsheets
Each marketing campaign has a target cell spreadsheet (TCS), which provides a visual
matrix of segments and offers. The TCS provides the ability to build and examine
relationships between target cells and their associated offers or controls. (Controls are not
contacted with an offer., even though they qualify for the offer.)
Note: To use the target cell spreadsheet, you must have Global Policy permission to
Manage Unica Campaign target cells.
The TCS includes one row for each target cell and, if you use control groups, one row for
each corresponding control cell. A target cell is a cell that has an offer assigned to it. A
control cell is qualified for the offer but is excluded from receiving the offer for analysis
purposes. Controls do not receive communications, but are measured against the target
group for comparison.
When you work with the TCS, you can use a top-down or bottom-up management approach.
Most organizations use only one of the following management methods.
Table 10. Top-down and bottom-up TCS management
Top-down and bottom-up TCS management
Top-down This approach typically is used by larger organizations, where one person
creates the TCS and another person designs the flowchart.
The first person creates a TCS that contains target and control cells. For
example, the TCS for a direct mail campaign might include 4 rows: One row
for a cell that gets a 10% offer, one row for a cell that gets a 20% offer, one
row for 10% holdouts, and one row for 20% holdouts.
Then, the flowchart designer creates processes to select IDs that meet
the 10% and 20% offer and hold-out criteria. To link the data manipulation

Unica Campaign V12.0 User Guide | 6 - Target cell management | 232
process output to a pre-defined cell in the TCS, the flowchart designer
selects Link to Target Cell in each process configuration dialog box.
Bottom-up Create a flowchart that includes a Mail List or Call List process.
When you save the flowchart, a TCS is generated. The TCS includes one
row for each target cell that provides input to the Mail List or Call List
process.
Bottom-up cells cannot be linked or unlinked. The concept of linking
applies only to top-down management.
When you work with a target cell spreadsheet, keep in mind the following guidelines:
• Linking is based on cell codes, so avoid changing cell codes after you link cells.
• You can unlink or relink a cell at any time, provided the cell did not write to Contact
History.
• If you unlink a cell that has Contact History, it is "retired". Retired cells cannot be linked
again. They do not appear in the target cell spreadsheet and they cannot be selected
in a process configuration dialog box. (If Unica Campaign is integrated with Unica
Plan, retired cells continue to be displayed in the target cell spreadsheet but cannot be
reused.)
Important: Incorrect data might be saved if edits are made to the flowchart and the TCS
by different users at the same time. To avoid conflicts, define business rules that minimize
the possibility of a TCS being edited when its flowchart is being edited or run. For example,
do not edit a flowchart contact process while another user is changing offer assignments in
the TCS.
Note: If Unica Campaign is integrated with Unica Plan, you must use Unica Plan to work
with target cell spreadsheets.
Related tasks
Unica Campaign V12.0 User Guide | 6 - Target cell management | 233
•
Linking flowchart cells to targeted offers defined in a target cell
spreadsheet (on page 242)
•
Unlinking flowchart cells from targeted offers defined in a target cell
spreadsheet (on page 245)
• Using Match & Link to remove an association (on page 246)
•
Using Match & Link to associate flowchart cells with a target cell
spreadsheet (on page 244)
Managing target cell spreadsheets
The target cell spreadsheet (TCS) for a marketing campaign provides a visual matrix of
segments and offers. The TCS provides the ability to build and examine relationships
between target cells and their associated offers and hold-outs.
Editing a target cell spreadsheet
You edit a target cell spreadsheet so that it contains target and control cells for the offers
you intend to make.
For example, the target cell spreadsheet for a direct mail campaign might include four rows:
One for a 10% offer, one for 10% holdouts, one for a 20% offer, and one for 20% holdouts.
Important: Never edit the attributes of cells in the target cell spreadsheetat the same
time that any flowcharts in the associated campaign are being edited or run. Put business
practices in place to ensure that users do not edit or run a flowchart at the same time as the
target cell spreadsheet is being edited.
1. Open a campaign and click the Target cells tab.
2.
Click Edit .
Unica Campaign V12.0 User Guide | 6 - Target cell management | 234
The spreadsheet opens in Edit mode. Existing cells that are used in flowcharts are
highlighted in color.
3. Click the cell fields that you want to edit, and make your changes. Descriptions of the
most common edits follow.
To Do this
Add one row to the
bottom of the spreadsheet
Click Add a cell.
Add several rows to the
bottom of the spreadsheet
a. Click Add many cells.
b. Select N empty rows, enter the
number of rows to add, and click
Create target cells.
Duplicate one or more rows a. Select at least one row.
b. Click Add many cells, select N
duplicate rows, enter the number of
rows to add, and click Create target
cells.
The new rows are added below the
selected row, with the cell code and cell
name already populated. All other column
values except Used in flowchart are
copied from the selected row.
Search the target cell spreadsheet a. Click Search.
b. Use the Search to enter one or more
characters. You can enter a partial
string to find matches in any column
of the spreadsheet. For example,
"924" finds a row that contains cell
code "A0000000924" and also finds a
row with "Offer9242013" assigned.
Unica Campaign V12.0 User Guide | 6 - Target cell management | 235
To Do this
c. Click Find next to highlight the row
that contains the first match.
d. Click Find next to continue searching.
Paste data from an external source a. Copy content from another
application.
b. Click a cell in the target cell
spreadsheet to make it editable.
c. Use the right-click menu to Paste.
Import target cell data from a .csv file a. Obtain a comma-separated values
file in the required format. See Import
and export format for TCS data (on
page 236).
b. Open a target cell spreadsheet for
viewing (not editing).
c. Click Import target cells.
d. In the Import TCS dialog, click
Browse to locate the .CSV file that
you want to import, select the file,
and click Open.
e. Click Import.
The contents of the .CSV file is appended
below any existing cells in the target cell
spreadsheet.
Move rows up or down, or delete rows Select a row, then use the options in the
toolbar: Move up, Move down, or Delete.
4. Click Save or Save and exit.
The flowchart designer can now create processes to select IDs that meet the 10% and
20% offer and hold-out criteria. To link the data manipulation process output to a cell in the

Unica Campaign V12.0 User Guide | 6 - Target cell management | 236
target cell spreadsheet, the flowchart designer selects Link to target cell in the process
configuration dialog box.
Specifying control cells in a target cell spreadsheet
Cells that contain IDs that you purposely exclude for analysis purposes are called control
cells. When you assign offers to cells, you can optionally specify one control cell for each
target cell.
1. Open a campaign and click the Target cells tab.
2. Click Edit .
3.
To designate a cell as a control cell: Click in the Control cell column to make the field
editable, then select Yes.
Cells that are designated as controls cannot be assigned offers.
4.
To assign a control cell to a target cell: Click in the Control cell code column to make
the field editable. Then, select a control cell (any cell whose Control cell column is Yes)
for the current target cell.
Important: If you assign a control cell (for example, Cell A) for one or more target
cells, then later change the control cell (Cell A) to a target cell, Cell A is removed as a
control from any target cells that previously used it as a control.
5. Click Save or Save and exit.
Import and export format for TCS® data
To import data into a target cell spreadsheet (TCS), the comma-separated values (.CSV) file
that you prepare must match the required format. When you export the contents of a TCS,
this is also the format in which data is exported.
• The file must contain a header row with column names that match the predefined and
custom cell attributes.

Unica Campaign V12.0 User Guide | 6 - Target cell management | 237
• Each row must have the same number of columns as specified in the header row.
• If there is no data for a given column, leave it blank.
• Values of custom attributes will be converted to the appropriate data type. For dates,
the date string must be in the user's locale format.
Column Name Description Required? Valid Values
CellName Name of the target cell. Yes
CellCode Cell code assigned to this
target cell. If empty, Unica
Campaign generates a
cell code, otherwise the
specified value is used.
Yes Cell code must match the
defined cell code format.
IsControl Indicates whether the cell
in this row is a control
cell or a regular target
cell.
No Yes | No
ControlCellCode The CellCode of a cell
where IsControl = Yes.
Only if
IsControl =
Yes
A valid cell code that exists
for a cell marked IsControl =
Yes.
AssignedOffers A semicolon-delimited
set of offers, offer lists, or
a combination of both.
No Offers can be specified
using offer codes. Offer
lists can be specified using
offerlist names.The format is:
OfferName1[OfferCode1];
OfferName2[OfferCode2];
OfferListName1[];
OfferListName2[], where the
offer name is optional, but the
offer code is required, and the

Unica Campaign V12.0 User Guide | 6 - Target cell management | 238
Column Name Description Required? Valid Values
offer list name is required with
empty square brackets.
FlowchartName Name of the associated
flowchart.
No*
CellCount The counts for this cell. No*
LastRunType The type of the last
flowchart run.
No*
LastRunTime The time of the last
flowchart run.
No*
Custom Attr1 Add a column for each
custom cell attribute that
you defined for which you
are importing data.
No Valid values as required by the
custom attribute's data type
and user locale/format.
*This column is populated by Unica Campaign. If specified, it is ignored. It is populated for
export.
Generating unique cell codes for use in a target cell spreadsheet
Unica Campaign can generate a unique cell code for use in the target cell spreadsheet. Cell
codes have a standard format that is determined by your system administrators, and are
unique when generated.
1. Open a campaign and click the Target cells tab.
2. Click Edit.
3.
Click Generate cell code.
A window with the generated cell code opens.
4. Select and copy the generated cell code, then click OK.

Unica Campaign V12.0 User Guide | 6 - Target cell management | 239
5. Paste the cell code into a field in the target cell spreadsheet.
6. Click Save.
Exporting data from a target cell spreadsheet
You can export the contents of a target cell spreadsheet in comma-separated values (.csv)
format to a local or network drive. The entire contents of the target cell spreadsheet is
exported; you cannot select a subset of the contents.
1. Open a campaign and click the Target cells tab to open the target cell spreadsheet for
the campaign.
2. Click Export target cells.
3.
Use the resulting dialog to open or save the file.
For information about the export format, see Import and export format for TCS data (on
page 236).
Assigning offers to cells in a target cell spreadsheet
Some organizations create target cells and assign offers in a target cell spreadsheet. Then,
another person creates a flowchart to select customers to receive the offers. Follow these
instructions if you are using a target cell spreadsheet to assign offers.
1. Open a campaign and click the Target cells tab to open the target cell spreadsheet for
the campaign.
2.
Click Edit in the toolbar.
The target cell spreadsheet opens in edit mode and any existing cells that are used in
flowcharts are highlighted in color.
3. In the Assigned offer(s) cell for the target cell where you want to assign an offer, click
the Assign offers icon in the cell where you want to assign offers.

Unica Campaign V12.0 User Guide | 6 - Target cell management | 240
4. In the Select offer(s) window, locate and select one or more offers or offer lists or click
the Search tab to find an offer by name, description, owner, or code.
5. After you select the offers that you want to assign to the current cell, click Accept and
close.
The Select offer(s) window closes, and the Assigned offer(s) column is populated with
your selected offers.
6. Click Save or Save and exit.
Managing assigned offers or offer lists in a target cell spreadsheet
You can view (and optionally edit) or unassign offers or offer lists in a target cell
spreadsheet.
1. Open a campaign and click the Target cells tab to open the target cell spreadsheet for a
campaign.
2.
Click Edit.
The target cell spreadsheet opens in edit mode. Any existing cells that are used in
flowcharts are highlighted in color.
3.
In the Assigned offer(s) cell, click the Manage offer assignments icon .
The View/edit offer details dialog opens. Any assigned offers or offer lists appear in
the Assigned offers section.
4.
To view or edit an item in the View/edit offer details dialog: Select an offer or offer list
and click Preview.
A window opens, showing the offer details. Optionally, click Edit to make changes to the
offer. If an offer has been used in production (assigned to a cell in a flowchart that has
been run in production and logged to contact history), you are limited in what changes
are allowed.

Unica Campaign V12.0 User Guide | 6 - Target cell management | 241
5. To unassign an offer or offer list in the View/edit offer details dialog: Select the offers
or offer lists that you want to remove from a cell, and click the >> button to move the
selected items to the Removed offers section. Then click Accept changes.
The View/edit offer details window closes. The removed items no longer appear in the
Assigned offer(s) column for the cell.
6. Click Save or Save and exit. Or, if you want to discard your changes, click Cancel.
Cell status information in the target cell spreadsheet
The target cell spreadsheet in Unica Campaign displays the current status of each cell,
including the cell count, last run type (production or test run of a flowchart, branch, or
process), and last run time.
The cell count is the number of unique audience IDs for each cell that is linked to an
output cell in a flowchart that has been run. This cell status is the result of the latest saved
production or test run of the corresponding process.
Cell status information displays in the target cell spreadsheet in either Unica Campaign
(stand-alone) or Unica Plan (when integrated).
Updating the cell counts
If you make changes to a process configuration, any previous run results are lost and
the Cell count, Last run type and Last run time columns appear blank in the target cell
spreadsheet. You must run the flowchart, branch, or process in production or test mode and
subsequently save the flowchart to update the cell count.
Note the effect on the cell counts in the target cell spreadsheet for the following types of
process configuration changes.
• Linking a flowchart output cell to a target cell. The cell count remains blank until the
next saved production or test run.
• Unlinking a flowchart output cell from a target cell. Any previous run results are
removed and the cell count is blank.

Unica Campaign V12.0 User Guide | 6 - Target cell management | 242
Refreshing cell counts manually
The cell counts in the target cell spreadsheet are updated automatically when you run the
flowchart, branch, or process in production, or when you save a test run. If the target cell
spreadsheet is open when the run completes, you must refresh the cell counts manually.
1. Choose Campaign > Campaigns.
2. Click a campaign link.
3. Select the Target cells tab.
4. Click the Get cell status
Linking flowchart cells to a TCS
Larger organizations often use one person to create a target cell spreadsheet (TCS) for a
campaign, and another person to design flowcharts. The TCS associates offers with targets
and controls. The flowchart designer then configures flowchart processes that select
recipients for the offers. By linking output cells in a flowchart with the cells and offers that
were pre-defined in the TCS, the flowchart designer completes the association between the
flowchart cells and a TCS.
Linking flowchart cells to targeted offers defined in a target cell spreadsheet
If your organization pre-defines targeted offers in a target cell spreadsheet, a flowchart
designer must then configure processes to select recipients for the offers. The designer
must link the flowchart cells with the predefined cells in the target cell spreadsheet.
This completes the association between the cells in the target cell spreadsheet and the
recipients defined in the flowchart.
Before you begin, someone in your organization must define target cells in a target cell
spreadsheet. Then the flowchart designer can follow the steps below to associate output
cells in a flowchart with the cells that were defined in the TCS.
Note: An alternative method is to use Options > Match & link target cells.

Unica Campaign V12.0 User Guide | 6 - Target cell management | 243
To associate flowchart cells with pre-defined cells in a target cell spreadsheet:
1. In a flowchart in Edit mode, double-click the process whose output cell you want to link
to a cell in thetarget cell spreadsheet.
2. Click the General tab in the process configuration dialog.
3.
To open the Select target cell dialog:
• In processes that output a single cell, such as Select, click Link to target cell....
• In processes that output multiple cells, such as Segment, click the Output cell
name or Cell code row for each cell that you want to link. Click the ellipsis button.
You see the Select target cCell dialog, which displays the cells that were predefined in
the target cell spreadsheet for the current campaign.
4. In the Select target cell dialog, select the row for the cell to which you want to link the
current output cell.
5.
Click OK.
The Select target cell dialog closes. The Output cell name and Cell code in the
process configuration dialog are replaced with the name and code from the target
cell spreadsheet. These fields are italicized to indicate that they are obtained from the
spreadsheet.
6. Click OK to save your changes.
7. Save the flowchart. Target cell linkages are not saved in the database until you save the
flowchart. If you cancel changes in the flowchart, cell linkages are not saved.
Related concepts
• Target cell spreadsheets (on page 231)
Unica Campaign V12.0 User Guide | 6 - Target cell management | 244
Using Match & Link to associate flowchart cells with a target cell spreadsheet
Use the Match & link target cells dialog to associate target cells in a flowchart with
predefined cells in a target cell spreadsheet. This option is an alternative to using a
flowchart process configuration dialog to establish the link.
Before you begin, someone in your organization must define target cells in a target cell
spreadsheet. Then the flowchart designer can follow the steps below to associate output
cells in a flowchart with the cells that were defined in the target cell spreadsheet.
Note: To use automatching, ensure that the flowchart output cell names match the
target cell spreadsheet cell names or start with at least the same three characters.
1.
In a flowchart in Edit mode, select Options > Match & link target cells.
The Match and link target cells dialog shows Available target cells in the left pane and
flowchart output cells in the right pane.
2.
Use one of the following methods to match target cells from the target cell spreadsheet
with flowchart cells.
To automatically match cells based on
name
Click Automatch.
Successfully automatched cells have a
status of Exact or Best match, and target
cells that are matched display in red.
To match cells manually Select one or more pairs of target cells
and flowchart output cells, and click
Match.
The selected target cells are matched, in
order, with the selected flowchart output
cells. Successfully matched output cells
have a status of Manual. Target cells that
are matched display in red.

Unica Campaign V12.0 User Guide | 6 - Target cell management | 245
3. Click OK.
You see a warning that the flowchart run results will be lost.
4. Click OK to continue.
5. Save the flowchart. Target cell linkages are not saved until you save the flowchart. If
you cancel the flowchart changes, cell linkages are not saved.
The next time that you view the Match & link target cells dialog for this flowchart, the status
of the matched and linked cells is Linked.
Related concepts
• Target cell spreadsheets (on page 231)
Unlinking flowchart cells from targeted offers defined in a target cell spreadsheet
The flowchart designer can remove the association between IDs that were selected in
a flowchart and targeted offers that were predefined in a target cell spreadsheet. This
procedure pertains only to organizations that define targeted offers using a target cell
spreadsheet.
If a cell does not have Contact History, you can unlink (and subsequently relink) it at any
time.
Note: If you unlink a cell that has Contact History, it is "retired". Retired cells cannot be
linked again. They do not appear in the target cell spreadsheet and they cannot be selected
in a process configuration dialog box. (If Unica Campaign is integrated with Unica Plan,
retired cells continue to be displayed in the target cell spreadsheet but cannot be reused.)
1. In a flowchart in Edit mode, double-click the process whose output cell you want to
unlink from the target cell spreadsheet.
Unica Campaign V12.0 User Guide | 6 - Target cell management | 246
2. Click the General tab in the process configuration dialog.
3.
Open the Select target cell window:
• In processes that produce a single cell as output, such as Select, click Link to
target cell.
• In processes that produce multiple cells, such as Segment, click the Output cell
name or Cell code row for the cell that you want to unlink. Click the ellipsis button.
The Select target cell window shows the cells that are defined in the target cell
spreadsheet for the current campaign. The currently linked cell is highlighted.
4.
Select [Not linked].
The cell name and code are no longer highlighted.
5.
Click OK.
The Output cell name and Cell code in the process configuration dialog are no longer
italicized, indicating that they are not linked to the target cell spreadsheet.
Related concepts
• Target cell spreadsheets (on page 231)
Using Match & Link to remove an association
You can use the Match and link dialog to remove the association between target cells in a
flowchart and cells in the target cell spreadsheet.
If a cell does not have Contact History, you can unlink (and subsequently relink) it at any
time.
Important: If you unlink a cell that has Contact History, it is retired. Retired cells cannot
be linked again. They do not appear in the target cell spreadsheet and cannot be selected

Unica Campaign V12.0 User Guide | 6 - Target cell management | 247
in a process configuration dialog. (If Unica Campaign is integrated with Unica Plan, retired
cells continue to be displayed in the target cell spreadsheet but cannot be reused.)
1.
In a flowchart in Edit mode, select Options > Match & link target cells.
Any matched or linked cells are displayed in the right pane, and their status is indicated
in the Status column.
2.
To unmatch all matched cell pairs, click Unmatch all.
The unmatched target cells are refreshed in the Available target cells pane, and the
output cell Status and Target cell name columns are cleared. Linked pairs of cells are
not changed.
3.
To unlink all linked cell pairs, click Unlink all.
Previously linked pairs are unlinked, but they remain matched. The target cells now
appear in the Available target cells list in red, as matched target cells.
4. Save the flowchart. Target cell linkages are not saved until you save the flowchart. If
you cancel flowchart changes, cell linkages are not saved.
Related concepts
• Target cell spreadsheets (on page 231)
Chapter 7. Contact history
Unica Campaign maintains contact history to record information about offers that are sent
to contacts. History is also recorded about control cells, to identify customers who are
purposely not sent the offer.
The term "contact history" refers to information that Unica Campaign maintains about:
• what offers were sent
• to which customers (or accounts, or households, depending on audience level)
• by which channel
• on what date.
For example, a list of target customers can be generated as the output of a Call list or
Mail list process in a campaign flowchart. Each target customer belongs to a cell that is
assigned one or more offers. When the Call List or Mail List process is run in production
mode with logging to contact history enabled, details are written to several tables in the
Unica Campaign system database.
Together, those tables comprise the contact history. The contact history records the specific
offer version (including the values of parameterized offer attributes) given to each ID in
each cell at flowchart run time. Contact history also records the members of control cells,
who are purposely withheld from receiving any communications. Control cells indicate hold-
out or no-contact controls, therefore customers belonging to control cells are not assigned
any offers and are not included in contact process output lists.
Contact history and audience levels overview
Unica Campaign maintains contact history for each audience level, such as Customer and
Household. Contact history provides a historical record of your direct marketing efforts,
including who was contacted, what offers were made, by which channels.
Unica Campaign maintains contact history in the system database tables:
Unica Campaign V12.0 User Guide | 7 - Contact history | 249
• Base contact history (UA_ContactHistory) is recorded when all members of a cell are
treated the same (when they are all given the same version of an offer).
• Detailed contact history (UA_DtlContactHist) is recorded only when individuals in the
same cell receive different offer versions (offers with different values for personalized
offer attributes) or a different number of offers.
Detailed contact history can quickly grow very large, but it provides complete data to
support detailed response tracking and to analyze targets and controls.
• For every production run, data is recorded in the Treatment tables (UA_Treatment).
Control information for hold-outs is also recorded here. Hold-outs do not receive
communications, but are measured against the target group for comparison. Treatment
history is used together with contact history to form a complete historical record of
offers that were sent.
Contact history and the corresponding response history are maintained for each audience
level.
For example, suppose you have two audience levels, Customer and Household. The table
implementation depends on how your database is configured:
• Each audience level usually has its own set of contact and response history tables in
the Unica Campaign system database. In other words, the Customer audience level
has a set of tables (contact history, detailed contact history, response history), and the
Household audience level has its own set of tables.
• If your database is configured so that multiple audience levels write to the same
underlying physical tables, then each audience level does not require its own set of
tables. However, the underlying physical tables (contact history, detailed contact
history, response history), must include a key for each audience level.

Unica Campaign V12.0 User Guide | 7 - Contact history | 250
How the contact history tables are updated
Entries are written to the Unica Campaign contact history tables when a flowchart contact
process (such as Call list or Mail list) or the Track process runs in production mode with the
history logging options enabled. Test runs do not populate the contact history tables.
When contact history logging is enabled, the following details are written to contact history
during a production run:
• The date and time of the contact (by default, this is when the contact process was run);
• The offer versions assigned in the contact process, including parameterized offer
attribute values;
• Exactly which offer versions were given to each ID;
• For target and control cells, the treatment codes for tracking each unique combination
of offer version, cell, and date and time.
The following system tables are involved:
• Base contact history (UA_ContactHistory), if all members of a cell are given the same
version of an offer
• Detailed contact history (UA_DtlContactHist), if individuals in the same cell receive
different offer versions
• Treatment history (UA_Treatment)
• Offer history (multiple system tables which collectively store information about offers
that were used in production)
Treatment history and offer history are used together with contact history to form a
complete historical record of offers that were sent. Controls, who were not assigned offers,
are identified in the Treatment table.
History is updated only if the Log to contact history tables option is checked in the Mail list,
Call list, or Track process configuration dialog box.
Note: This does not affect how IBM eMessage and Unica Interact load data into the
Unica Campaign history tables. Those products use their own ETL processes to extract,
transform, and load data into the Unica Campaign contact and response history tables.
Unica Campaign V12.0 User Guide | 7 - Contact history | 251
Treatment history (UA_Treatment)
Rows are added to the treatment history table (UA_Treatment) each time a flowchart runs in
production mode.
If a flowchart is scheduled to run periodically, each new run generates a new set of
treatments, one for each offer per cell, for both contact and control cells, at flowchart run
time. Unica Campaign thus provides the most granular tracking possible, by recording as a
separate instance each time a treatment is generated.
Treatment history works together with base contact history to provide a highly compressed
and efficient way to store complete contact history information:
• The base contact history table (UA_ContactHistory) records only the cell membership
information for the appropriate audience.
• The treatment(s) given to each cell are recorded in the treatment history table
(UA_Treatment).
Each treatment instance is identified with a globally unique treatment code. The treatment
code can be used in response tracking to attribute each response to a specific treatment
instance.
How controls are handled in treatment history
A control cell is qualified for an offer but is excluded from receiving the offer for analysis
purposes. If controls are used, treatment history also records control cell data:
• Rows pertaining to offers that are given to a target cell are called target treatments.
• Rows pertaining to offers that are assigned to a control cell are called control
treatments.
Target treatments have an associated control treatment if a control cell was assigned to the
target cell in the contact process. Each control treatment is assigned a unique treatment
code, although the codes are not distributed to control members. Control treatment codes
are generated to facilitate custom response tracking where custom flowchart logic is used
Unica Campaign V12.0 User Guide | 7 - Contact history | 252
to identify a control: control treatment codes can be looked up and associated with the
event so that the response can be attributed to an exact control treatment instance.
Base contact history (UA_ContactHistory)
One row is written to the base contact history table for each combination of contact ID, cell,
and flowchart run date/time, for target cells as well as control cells.
Mutually exclusive cell membership
If your cells are mutually exclusive, and each ID can belong to only one cell, then each ID
has one row in the contact history table when it is treated within a single contact process,
regardless of the number of offers assigned. For example, this is the case if you define cells
that correspond to "Low," "Medium," and "High" value segments, and customers can belong
only to one of these segments at any given time. Even if the "High value" segment is given
3 offers in the same contact process, only one row is written to base contact history, since
base contact history records cell membership.
Non-exclusive cell membership
If individuals can belong to more than one target cell (for example, if each of your target
cells receives offers based on different eligibility rules, and customers might qualify for
none, one, or more than one of the offers), then each individual has the number of rows in
the contact history table corresponding to the number of cells in which that individual is a
member.
For example, if you define two cells: "Customers who have made purchases within the last
3 months," and "Customers who have spent at least $500 in the last quarter," an individual
could be a member of one or both of these cells. If the individual is a member of both cells,
two entries are written to the base contact history for that individual when the contact
process is run.
Even if multiple rows are written to the contact history table for an individual because he or
she belongs to more than one target cell, all offers given in the same contact process are
considered to be a single "package" or interruption. A unique "package ID" in the contact
history table groups together the rows written by a particular run instance of a specific

Unica Campaign V12.0 User Guide | 7 - Contact history | 253
contact process for an individual. Multiple "interruptions" to a person or household would
occur only if the individual or household belonged to multiple cells in separate contact
processes.
Writing additionally tracked fields to contact history
You can create additionally tracked fields and populate them in the base contact history
table. For example, you might want to write out the treatment code from the treatment table,
or an offer attribute, as an additionally tracked field in contact history.
However, since it is cell membership that is being captured in base contact history, and
each target or control cell writes one row per audience ID, note that if you are populating
additionally tracked fields in base contact history with offer or treatment data, only the first
treatment for each target or control cell is written out.
Example
Cell
Associated
control cell
Offer given to cell
TargetCell1 ControlCell1 OfferA, OfferB
TargetCell2 ControlCell1 OfferC
ControlCell1 - -
When the flowchart containing the contact process that assigns the listed offers to
TargetCell1 and TargetCell2 is run in production (with writing to contact history enabled), a
treatment is created for each combination of cell, offer given, and the run date/time. In other
words, six treatments are created in this example:
Treatments Treatment Code
TargetCell1 receiving OfferA Tr001
TargetCell1 receiving OfferB Tr002
ControlCell1 receiving OfferA Tr003
Unica Campaign V12.0 User Guide | 7 - Contact history | 254
Treatments Treatment Code
ControlCell1 receiving OfferB Tr004
TargetCell2 receiving OfferC Tr005
ControlCell1 receiving OfferC Tr006
If you added Treatment Code as an additionally tracked field in base contact history, only
the first target or control treatment for each cell is written out. In this example, therefore,
only three rows are written to base contact history, for the first treatment for each cell:
Cell Treatment Code
Target Cell1 Tr001
ControlCell1 Tr003
TargetCell2 Tr005
For this reason, capturing offer-level attributes in the base contact history table may not be
a good practice, since it will only provide complete contact information if:
• only one offer is assigned to any target cell; and
• each control cell is assigned to only one target cell.
In any other instance, only data associated with the first treatment (or control treatment) is
output. An alternative is to use a database view to flatten and provide access to offer-level
information by joining the UA_ContactHistory and UA_Treatment system tables. You can
also output this information to alternate contact history.
Note: If you output offer attribute information as additionally tracked fields, complete
treatment information can be displayed because detailed contact history and alternate
contact history write a row for each treatment (rather than a row for each cell).

Unica Campaign V12.0 User Guide | 7 - Contact history | 255
Detailed contact history (UA_DtlContactHist)
The detailed contact history table is written to only if you are using a scenario where
individuals within the same cell receive different versions of an offer.
For example, members of the same cell might receive the same mortgage offer, but the
offer can be personalized so that Person A receives a 5% rate offer, while Person B receives
a 4% rate offer. Detailed contact history contains one row for each offer version that an
individual receives and one row for each control cell based on the offer versions they would
have received.
Offer history
Offer history is comprised of multiple system tables which collectively store information
about an offer version that has been used in production.
New rows are added to the offer history table only if the combination of parameterized offer
attribute values are unique. Otherwise, existing rows are referenced.
Updating contact history by doing a production run
When you do a production run, you can update contact history for the current Run ID. Use
the Run history options window to choose how the new contact history will be written to the
contact history table.
1. On a flowchart page in Edit mode, click the process that you want to run.
2. Open the Run menu and select Save and run selected branch.
3.
If contact history records exist, you are prompted to choose run history options.
The Run history options dialog appears only when you run a branch or process that
previously generated contact history for the current Run ID. You can either append
information to contact history or replace existing contact history for the Run ID.
Unica Campaign V12.0 User Guide | 7 - Contact history | 256
Option Description
Create a new run instance Rerun a specific branch or process of the
flowchart using a new Run ID. Append the
results, associated with the new Run ID, to
the contact history table. Existing contact
history remains intact.
Replace the contact history of the
previous run
Reuse the previous Run ID and replace
the contact history previously generated
for that Run ID (only for the process or
branch that is being run). Contact history
records that were previously generated
for other branches or processes of the
flowchart remain intact.
Cancel Cancel the branch or process run and do
nothing to existing contact history. The
flowchart remains open in Edit mode.
Run History Options scenario
In this example, you have a flowchart with two branches and two contact processes, A and
B, both configured to log to contact history.
You run the entire flowchart (from the top, by using the Run Flowchart command) once.
This creates a new Run ID (for example, Run ID = 1) and generates contact history for this
Run ID.
After this first successful run of the entire flowchart, you edit contact process A to give a
follow-up offer to the same individuals who received the first offer. Therefore, you want to
rerun contact process A. The current Run ID is "1" and contact history exists for process A
and Run ID = 1. You want to retain the original contact history.

Unica Campaign V12.0 User Guide | 7 - Contact history | 257
When you select contact process A and click Run Process, the Run History Options window
opens. If you choose to leave the Run ID unchanged (Run ID = 1), you will replace the
existing contact history, which is not what you want to do. Instead, you choose Create a new
run instance. This option increments the Run ID to 2, retains the contact history associated
with Run ID = 1, and appends new contact history to Run ID = 2. In this way, you will not lose
the contact history that is associated with the first offer.
If you now edit and run contact process B, the Run History Options window does not open,
because you are using a new Run ID (Run ID =2), which does not have any contact history
associated with it. When you run only contact process B, you generate more contact history
records for Run ID = 2.
Specifying a database table for contact logging
You can log contact information to a database when you configure a contact process.
1. In the process configuration dialog box, select New mapped table or Database table
from the Enable export to or Log to list.
This option usually appears at the bottom of the list, after the list of mapped tables.
The Specify database table dialog box opens.
2.
Specify the table name.
Note: You can use user variables in the table name. For example, if you specify
MyTable<UserVar.a> as the table name, and the value of UserVar.a is "ABC" at the
time that the process is run, the output is written to a table named MyTableABC. You
must set the Initial value and the Current value of the user variable before you run the
flowchart.
3. Select a database name from the list.
4.
Click OK.
The Specify database table window closes. The Export/log to field in the process
configuration dialog displays the name of the database table that you entered.
Unica Campaign V12.0 User Guide | 7 - Contact history | 258
5. If a table of the name you specified exists, choose an option for writing the output data:
• Append to existing data: If you choose this option, the existing table must have
a schema compatible with the output data. In other words, field names and field
types must match, and field sizes must allow for the output data to be written.
• Replace all records: If you choose this option, existing rows in the table are
replaced with the new output rows.
Specifying an output file for contact logging
You can optionally output contact history to a flat file with a data dictionary or a delimited
file.
1. Open a flowchart in Edit mode.
2.
In the process configuration dialog box for a contact process, select File from the
Enable export to or Log to list.
The File option usually displays at the bottom of the list, after the list of mapped tables.
The Specify output file dialog box opens.
3.
Select an output file type:
• Flat file with data dictionary: Create a fixed-width file and a new data dictionary
file.
• Flat file based on existing data dictionary: Create a fixed-width file and select an
existing data dictionary file.
• Delimited file: Create a file in which field values are delimited by a tab, comma, or
other character. If you select Other, enter the character to use as a delimiter. Check
Include labels in top row if you want the first row of the file to contain a column
header for each column of data.
4.
Enter the complete path and file name in the File name field or use Browse to select an
existing file.

Unica Campaign V12.0 User Guide | 7 - Contact history | 259
Note: You can include user variables in the output file name (Options > User
variables). For example, if you specify MyFile<UserVar.a>.txt as the file name,
and the value of UserVar.a is "ABC" at the time that the process is run, the output is
written to MyFileABC.txt. You must set the Initial value and the Current value of the
user variable before running the flowchart.
5.
Unica Campaign completes the Data dictionary field with a .dct file with the same
name and location as the file that you entered.
If you want to use a different data dictionary, or to rename the data dictionary, enter the
complete path and name of the data dictionary file in the Data dictionary field.
6. Click OK.
Disabling writing to contact history
If you do not want production runs to update the contact history tables, you can configure
the Call list or Mail list process to prevent logging. However, the best practice is not to
disable contact history logging.
Test runs do not populate the contact history tables, so if you want to run a contact process
without writing to contact history, you can do a test run.
Contact history is updated when a flowchart contact process runs in production mode with
the contact logging options enabled. If you want to prevent a contact process from writing
to contact history, you can configure the process to disable logging during production runs.
Important: The best practice is not to disable contact history logging. If you run a
campaign in production mode without logging to contact history, you will not be able to
accurately re-generate the contact history at a later date if any of the underlying data
changes.
1. Double-click the contact process (Call list or Mail list) for which you want to disable
contact history logging.

Unica Campaign V12.0 User Guide | 7 - Contact history | 260
2. Click the Log tab.
3.
In the window for configuring logging of contact transactions, clear the Log to contact
history tables and the Log into other destinations checkboxes.
Note: To change the Log to contact history tables option, the
OverrideLogToHistory configuration setting must be set to true and you must have the
appropriate permissions.
4. Optionally, click More Options to access the Contact history logging options and select
Create treatments only. This option generates new treatments in the Treatments table
but does not update the contact history.
5. Click OK.
When you run the contact process, no entries will be written to the contact history tables or
to alternate logging destinations.
Note: This does not affect how IBM eMessage and Unica Interact load data into the
Unica Campaign history tables. Those products use their own ETL processes to extract,
transform, and load data into the Unica Campaign contact and response history tables.
Clearing contact history and response history
Clearing contact and response history permanently deletes history records from the system
tables. This data is not recoverable.
The following procedure permanently deletes contact and response history. If later recovery
might be required, back up the system table database prior to clearing any history.
Note: History is also permanently deleted when you delete a campaign. In this case,
you are prompted to continue. If you continue, the entire campaign and all of its contents,
including all contact and response history, is deleted.
You might want to delete contact or response history records in the following situations:
Unica Campaign V12.0 User Guide | 7 - Contact history | 261
• If a production run was executed by mistake.
• If you decide to cancel a campaign after a production run.
You can choose to delete all associated contact and response history records, or delete
only the response history records. Usually, it is best not to delete contact history for which
responses have been recorded. However, you have the option of doing so.
Referential integrity across Unica Campaign system tables is always preserved. All
contact history tables are written to simultaneously, and any clean up of contact history
is done simultaneously across all contact history tables. For example, treatment table
entries cannot be deleted if there are entries in the base or detailed contact history tables
referencing them.
To permanently delete contact and/or response history for a contact process, follow the
steps below.
1. In a flowchart in Edit mode, double-click the contact process whose history you want to
permanently delete.
2. In the process configuration dialog, click the Log tab. You see the window for
configuring logging of contact transactions.
3.
Click Clear history.
If no contact history entries exist, a message indicates that there are no entries to clear.
4.
If contact history exists, specify which entries to delete:
• All entries
• All entries within a selected date range
• Specific flowchart runs identified by the run date and time
5.
Click OK.
If no response history records exist for the entries that you selected, you see a
confirmation message.
6.
If response history records exist for any of the entries that you selected, use the Clear
History Options dialog to select an option:
Unica Campaign V12.0 User Guide | 7 - Contact history | 262
• Clear all associated contact and response history records: Both contact history
and response history are cleared for the entries you specified.
• Clear associated response history records only: Only response history is cleared
for the entries you specified. Contact history records are retained.
• Cancel: No contact history or response history records are cleared.
Chapter 8. Campaign response tracking
Use the Response process in a flowchart to track the actions that occur after a campaign.
When you run the Response process, data is recorded in the response history tables and is
available for the Unica Campaign performance reports.
Response tracking helps you to evaluate the effectiveness of your campaigns. You can
determine whether actions taken by individuals are in response to offers that were given.
You can evaluate responders and non-responders who were sent offers. You can also
evaluate controls (individuals who were not sent offers) to see whether they performed the
desired action despite not being contacted.
Unica Campaign saves the response history and uses it in the Unica Campaign performance
reports, so you can easily determine:
• Who responded: The list of audience entities (such as individual customers or
households) whose behavior matched the response types being tracked.
• What they did, and when: Unica Campaign records the actions that were performed
and the date and time of the actions. Examples are a click-through on a website or the
purchase of a specific item. This information depends on the Response Types that are
set up and/or additional data that is captured during response processing.
• Which offer treatment they responded to: Any Unica Campaign-generated codes
(campaign, offer, cell, or treatment code) and any offer attributes with non-null values
returned by the respondent are matched for response tracking.
• How the response is attributed: Criteria include matching Unica Campaign-generated
codes or non-null values for offer attributes, whether responders were in the original
targeted group or a control group, and whether the response was received before the
expiration date.
•
Additional information: The response history tables also record the following
information:
◦ Whether the response was direct (one or more Unica Campaign-generated codes
were returned) or inferred (no response codes were returned).
◦ Whether the respondent was in a target cell or control cell
◦ Whether the response was unique or a duplicate

Unica Campaign V12.0 User Guide | 8 - Campaign response tracking | 264
◦ Best, fractional, and multiple attribution scores
◦ The response type (action) attributed to the response
◦ Whether the response was received before or after the expiration date of the
specific offer version. (This information depends on the following property:
Settings > Configuration > Campaign > partitions > partition[n] > server >
flowchartConfig > AllowResponseNDaysAfterExpiration. The default value is 90
days.)
Related tasks
• Updating response history (on page 158)
How to track responses to a campaign
To perform response tracking, create a flowchart that includes the Response process. The
Response process takes input from a Select or an Extract process and typically uses an
action table as the source data.
Using an action table as input to the Response process
An action table is an optional database table or file containing response data that is
collected after offers are presented to customers. There is usually one action table per
audience level.
An action table usually serves as the source data of the input cell for the Response process.
An action table is not required for response processing, but is considered a best practice.
An action table includes data such as customer identification, response codes, and
attributes of interest. Depending on how responses are tracked in your organization, the
responses could be directly related to transactional data, such as purchases or contracts
and subscriptions.

Unica Campaign V12.0 User Guide | 8 - Campaign response tracking | 265
When you use an action table as input to a Response process, the actions or events in the
table are evaluated to see whether they should be attributed as responses to contact or
control treatments. Unica Campaign reads from the action table, and if a match is found
between the relevant attributes and/or response codes, Unica Campaign populates the
response history tables for response tracking.
The Unica Campaign system tables include a sample action table for the Customer
audience level, called UA_ActionCustomer. Administrators can customize the table as
needed.
Important: Administrators must ensure that any action table that is used for response
tracking is locked during response processing. Administrators must also clear rows after
each Response process run to ensure that responses are not credited multiple times. For
example, Unica Campaign can be configured to run SQL after the Response process to
purge the action table.
For important information about action tables, see the Unica Campaign Administrator's
Guide.
How the Response process works
You configure the Response process in a flowchart to evaluate and output the IDs that
you consider to be responses to your offer. The evaluation is done by matching some
combination of response codes or other standard or custom offer attributes from the action
table.
The response processing logic uses response codes of interest and response attributes of
interest to determine direct and inferred responses:
• Response codes of interest: Any Unica Campaign-generated codes (campaign, offer,
cell or treatment code) that are mapped in the Response process are considered to be
"response codes of interest."
• Response attributes of interest: Any other offer attributes, whether standard or custom,
that are mapped in the Response process are considered to be "response attributes of
interest." For example, you can use the "Relevant Products" field as an offer attribute to
track inferred responses.
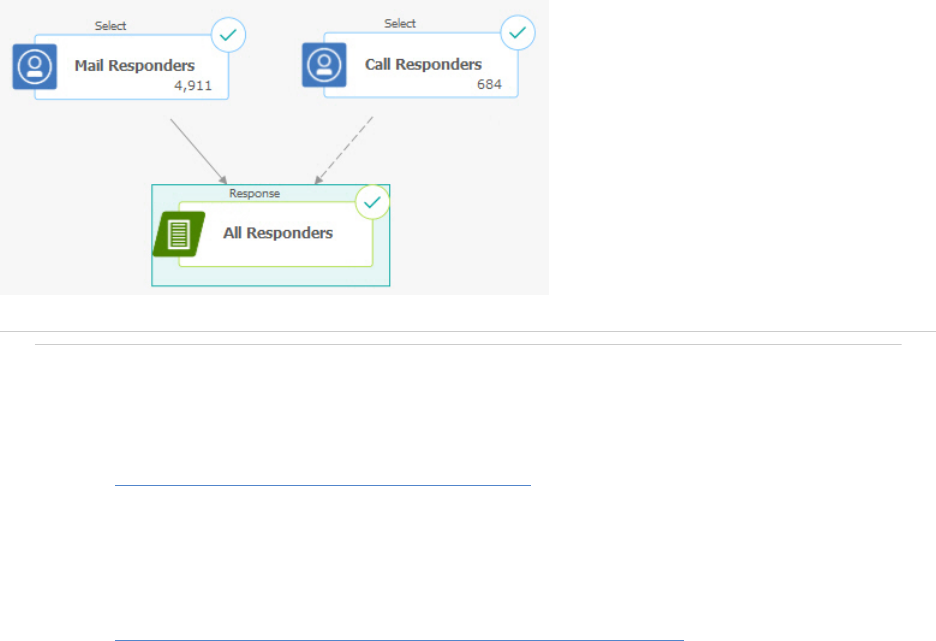
Unica Campaign V12.0 User Guide | 8 - Campaign response tracking | 266
Those responses are written to the response history system table (UA_ResponseHistory,
or its equivalent for each audience level) when you run the Response process. There is one
response history system table for each audience level that you are tracking.
The response history data is then available for use and analysis by the Unica Campaign
performance reports.
The following example shows a simple flowchart that tracks responses to direct mail and
telephone offers.
Related tasks
• Updating response history (on page 158)
Related reference
• Performance reports for Unica Campaign (on page 345)
Using multiple response tracking flowcharts
Many organizations choose to use multiple response tracking flowcharts, for various
reasons.
Unica Campaign V12.0 User Guide | 8 - Campaign response tracking | 267
It is possible to have a single response tracking flowchart for all of the campaigns in your
corporation. If a single action table is used, your system administrator will typically set up
session flowcharts to write data to the action table for processing.
However, your implementation of Unica Campaign might use one or more action tables for
convenience, each related to a separate response tracking flowchart.
The following sections describe why you might use multiple response tracking flowcharts.
You are tracking responses for different audience levels
(Required) You need one response tracking flowchart for each audience level for which you
receive and track responses. The Response process operates at the audience level of the
incoming cell, and automatically writes to the appropriate reponse history table for that
audience level. To track responses for two different audience levels, for example, customer
and household, you need two different Response processes, most likely in two separate
response tracking flowcharts.
You have real-time vs. batch processing requirements
(Required) Most of your response tracking sessions will be batch flowcharts, periodically
processing events populated into an action table (for example, nightly processing of
customer purchases). The frequency of response tracking runs will depend on the
availability of the transaction data used to populate the action table.
For example, if you process responses from different channels (such as web vs. direct
mail), you might need separate response processing sessions because the frequency of
availability of incoming transaction data will be different for each channel.
You want to avoid duplicating large volumes of data
(Optional) If you have large transaction volumes (such as millions of sales transactions per
day) that must be evaluated, you might want to build a response tracking flowchart to map
directly against the source data, rather than ETL (extract, transform, load) it into an action
table.
For example, you can build a response tracking flowchart in which an Extract process pulls
transactions directly from an e-commerce system's purchase transaction history table
Unica Campaign V12.0 User Guide | 8 - Campaign response tracking | 268
(based on a particular date range), and a Response process that maps directly to columns
in this table from this extract.
You want to hard-code specific data for different situations
(Optional) You might want to hard-code specific data (such as response types) for different
situations, such as different channels. For example, if you are interested specifically in
tracking a specific response type (such as "inquiry") that is specific to a channel (such
as "call center"), you can create a derived field to filter these responses, and use it in a
response processing flowchart to pull all inquiries from the call center database. It might
be more convenient to create the data necessary for response tracking using derived fields,
and pull the data directly from the source, than to write the data to a single action table.
You need custom response processing logic
(Optional). If you need to write your own rules for attributing responses, you can create a
separate response tracking flowchart to implement custom response-tracking logic. For
example, if you need to identify responders to a "Buy 3 Get 1 Free" offer, you need to look
at multiple transactions to determine whether an individual qualifies as a responder. Upon
finding qualifying individuals, you can then input them into a Response process to record
the responses using the treatment code and appropriate response type.
You want a response flowchart for each product or product group that was
promoted
(Optional) You can create a separate response flowchart for each product or product group
that was promoted through the offers. In this way, you can easily analyze response per
product.
You want one response flowchart per campaign
(Optional) In this scenario, you have one or more flowcharts that generate output but
only one flowchart per campaign that tracks responders. If the data is available on a per
campaign basis, this is a convenient way to set up response processing.
Unica Campaign V12.0 User Guide | 8 - Campaign response tracking | 269
Response tracking using multi-part offer codes
You can track responses using a derived field that consists of a multi-part offer code (that
is, an offer code that consists of two or more codes). All parts of the offer code must be
concatenated using the partition-wide offerCodeDelimiter configuration property. The
following example creates a derived field called MultipleOfferCode consisting of two parts
concatenated using the default delimiter "-":
MultipleOfferCode = string_concat(OfferCode1, string_concat("-", OfferCode2))
When configuring the Response process to use the derived field as a Candidate Action Field,
you must match the derived field to the offer/treatment attribute of each offer code in the
multi-part code.
Date scope for response tracking
In addition to recording whether responses were made within the valid offer time period
(that is, after the effective date and on or before the expiration date), response tracking also
records whether the response was outside a valid date range for all offers. Unica Campaign
tracks late responses for all offers based on a configurable time period after an offer's
expiration date to provide data on how often your offers are redeemed after their official end
dates.
The date scope for response tracking in Unica Campaign is set globally, and is applied to
all campaign offers. Your system administrator sets the number of days past the offer
expiration date that responses will be tracked.
This date setting automatically limits the possible treatment instances that can match
an event. The smaller the date scope, the more performance is improved because fewer
instances from the treatment table are returned for possible matches.
For details about setting the date scope, see "Setting the number of days after a campaign
ends to record responses" in the Unica Campaign Adminstrator's Guide.
Unica Campaign V12.0 User Guide | 8 - Campaign response tracking | 270
Response tracking for controls
Control group responses are tracked simultaneously with offer responses, using the
Response process.
Control cell responses are handled in the same way as inferred responses, except that any
response codes are first discarded. For any responses from control cell members, any
response tracking codes are ignored and any attributes of interest (for example, relevant
products) are checked for matches against control treatment instances. Unica Campaign
uses an internal, globally-unique treatment code that is generated for all control treatments;
however, control treatment codes are not given out, as control treatments are always no-
contact, hold-out controls.
It is possible for the same event to credit both target treatment instances and control
treatment instances. For example, if a particular customer is targeted with an offer for 10%
of any purchase in the women's department, and that customer is also a member of a hold-
out control group monitoring for any purchase from the store, if that customer makes a
purchase using the coupon, that event would be associated with both the target treatment
instance (using the coupon's treatment code) and the control treatment instance. Control
treatment instances are also marked within the valid date range or after the expiration
date, in the the same manner as target treatment instances - this provides a valid control
comparison for late activity in the target cell.
Best or fractional attribution is not used for control cell responses - multiple attribution is
always used. In other words, if a respondent is in a control cell for an offer and her action
qualifies as an inferred response for multiple control treatments, all of these matching
control treatments are credited for the response.
Response tracking for personalized offers
If you have used data-driven, personalized, or derived or parameterized offer fields to
generate different offer versions, for responses to these personalized offers to be correctly
attributed, your action table must contain fields representing the parameterized offer
attribute fields. When these fields are mapped in a Response process as attributes of
interest and populated, they can be used to match responses back to the offer version or
Unica Campaign V12.0 User Guide | 8 - Campaign response tracking | 271
treatment instance. Responses with values for these "attributes of interest" must exactly
match the values recorded for that individual in offer version history, for attribution to that
treatment.
For example, if you had flight offers which were personalized with an origin airport and
a destination airport, then your action table should contain fields for "Origin Airport" and
"Destination Airport." Each flight purchase transaction would contain these values, and
response tracking would be able to match the specific flight purchased by an individual to
the offer version(s) that were promoted to him or her. These fields also would be used to
track inferred responses for members of the control group, to see if they purchased any
flights that would have been promoted to them.
Response types
Response types are the specific actions that you are tracking, such as click-through,
inquiry, purchase, activation, use, and so on. Each response type is represented by a unique
response code. Response types and codes are defined globally in the Unica Campaign
Response Type system table, and are available for all offers, although not all response
types are relevant for all offers. For example, you would not expect to see a click-through
response type for a direct mail offer.
When events are written to the action table, each event row can have only one response
type. If the response type field is empty (null) for an action, it will be tracked as the default
response type ("unknown").
If a single event needs to be associated with multiple response types, multiple rows must
be written to the action table, one for each response type. For example, if a financial
institution is tracking the purchase usage level of a new credit card during the first month
after activation with response types of "Purch100," "Purch500," and "Purch1000," a purchase
of $500 might need to generate an event with response types of both "Purch100" and
"Purch500," because the purchase meets both of these conditions.
If you need to detect complex sequences of separate transactions that will together
constitute a response event, you will need a separate monitoring session that looks for
the qualifying transactions and, when these are found, then submits an event to the action
Unica Campaign V12.0 User Guide | 8 - Campaign response tracking | 272
table. For example, if a retailer's promotion rewards customers who purchase any three
DVDs during the month of December, you can build a flowchart to compute the number
of DVD purchases for each customer, select the customers who have made three or more
purchases, and write these customers to the action table with a special response type (such
as "Purch3DVDs").
For more details about response types, see the Unica Campaign Administrator's Guide.
Response categories
Responses in Unica Campaign fall into two categories:
• Direct response - one or more Unica Campaign-generated tracking codes sent out with
the offer were returned, and any returned attributes of interest must match.
• Inferred response - no tracking codes were returned, but at least one offer attribute
used for response tracking was returned and matched. Responses from hold-out
control groups are always inferred responses.
Direct responses
A response is considered to be a direct response if:
• The respondent returned at least one Unica Campaign-generated code (campaign,
cell, offer, or treatment code) that exactly matches one or more of the possible target
treatment instances generated by Unica Campaign.
AND
• Any "attributes of interest" (that is, any offer attribute, standard or custom, that was
mapped in the Response process for tracking) returned must have a value exactly
matching the value of attribute in the treatment.
For example, if treatment code is a response code of interest and "Response Channel" is an
attribute of interest, an incoming response with the values of "XXX123" for treatment code
Unica Campaign V12.0 User Guide | 8 - Campaign response tracking | 273
and "retail store" for Response Channel will not be considered a direct match for a treatment
with the respective values of "XXX123" and "Web."
A response with a null value for an attribute of interest cannot match a treatment that
has that offer attribute. For example, a response that is missing a value for "interest rate"
cannot match any offer created from an offer template that contains interest rate as an
offer attribute.
However, a response with a value for an attribute of interest that does not exist in a
treatment does not prevent a match. For example, if a Free Shipping offer was created from
an offer template without an "interest rate" offer attribute, and "interest rate" is an attribute
of interest, the value of the "interest rate" attribute for an incoming response does not
matter when Unica Campaign considers possible matches against treatments associated
with the Free Shipping offer.
Response tracking considers whether the response was made within the valid offer time
period (that is, after the effective date and on or before the expiration date), or whether the
response was outside the valid date range. Unica Campaign tracks late responses for a
configurable time period after an offer's expiration date.
Response tracking also identifies whether a direct response was from a respondent that
was in the originally contacted group, that is, the target cell.
Note: If a direct response was not from the originally targeted group, then the response
is considered a "viral" response or a "pass-along," meaning that the responder somehow
obtained a valid response code although they did not originally receive the offer.
It can be valuable to understand how many of your responses came from your target group,
especially if you are trying to cultivate high-value customers. These values can be broken
out in performance reports to see how many direct responses came from the original target
group and how many were viral responses.
Direct responses can be exact or inexact matches.
Related tasks
Unica Campaign V12.0 User Guide | 8 - Campaign response tracking | 274
• Updating response history (on page 158)
Related reference
• Performance reports for Unica Campaign (on page 345)
Direct exact matches
A response is considered to be a direct exact match if Unica Campaign can uniquely identify
a single target treatment instance to credit.
Note: It is a best practice to use Unica Campaign-generated treatment codes for
tracking, because Unica Campaign can always uniquely identify a treatment instance to
credit if the treatment code is returned.
For example, if you used the treatment codes generated from a contact flowchart as
coupon codes in an offer, and a treatment code is returned by a respondent in one of the
offer's target cells, then the response is a direct exact match to that offer.
If multiple tracking codes or attributes of interest are received, all codes and attribute
values must match exactly for the treatment instance to be counted. In other words, if a
respondent provides an offer code, a treatment code, and an offer attribute with a non-null
value, all must exactly match the codes and offer attribute values in the treatment.
Direct inexact matches
A response is considered to be a direct inexact match if Unica Campaign cannot uniquely
identify a treatment instance to credit, but the returned tracking code(s) match multiple
possible target treatment instances.
To narrow down target treatment instances that will receive credit for this response, if any
target treatment instance contacted the responder, Unica Campaign then discards any
treatment instances that did not contact the responder. If no target treatment instances
contacted the responder, all are kept, and all will receive credit for a viral response.
Unica Campaign V12.0 User Guide | 8 - Campaign response tracking | 275
For example, if a customer in the high-value segment received an offer from a campaign
which was given to both high and low-value customers and returned the offer code, this
would initially match two target treatment instances (one for the high-value cell and one for
the low-value cell). Applying this response tracking rule, since the treatment instance for the
high-value cell actually targeted this responder but the treatment instance for the low-value
cell did not, the latter is discarded. Only the treatment instance associated with the high-
value customer group is credited for this response.
In addition, if the response date was within any of the remaining treatment instances' valid
date range, any treatment instances not within their effective and expiration dates are
discarded.
For example, if a customer was contacted in both the January and February instances of
the same campaign, and the offer code was returned, it would match two target treatment
instances (one from January and one from February). If each offer version expired at the
end of the month in which it was issued, a response in February would cause the January
treatment instance to be discarded because it had expired. Only the February treatment
instance would be credited for this response.
After response tracking rules are applied and all invalid target treatment instances are
discarded, Unica Campaign uses different attribution methods to calculate the credit to give
to any remaining treatment instances.
Inferred responses
A response is considered to be inferred when the following conditions are met:
• no Unica Campaign-generated tracking codes (campaign, cell, offer, or treatment code)
are returned
• the responder belongs to either a target cell or a control cell
• at least one offer attribute used for response tracking was returned
• all returned offer attributes match.
A response with a null value for an attribute of interest cannot match a treatment that
has that offer attribute. For example, a response that is missing a value for "interest rate"
Unica Campaign V12.0 User Guide | 8 - Campaign response tracking | 276
cannot match any offer created from an offer template that contains interest rate as an
offer attribute.
However, a response with a value for an attribute of interest that does not exist in a
treatment does not preclude a match. For example, if a Free Shipping offer was created
from an offer template without an "interest rate" offer attribute, and "interest rate" is an
attribute of interest, the value of the "interest rate" attribute for an incoming response
does not matter when Unica Campaign considers possible matches against treatments
associated with the Free Shipping offer.
In addition, the respondent must have been contacted (that is, they must have been in the
target cell, or in a group that was contacted), for their response to be counted as inferred.
For example, if a customer was sent a coupon for $1 off laundry detergent and that
customer purchased laundry detergent (even if they did not redeem the coupon), Unica
Campaign infers a positive response to that target treatment instance.
Inferred responses from control groups
All responses from members of control groups (which are always hold-out controls in Unica
Campaign ) are inferred responses. Matching inferred responses is the only mechanism for
crediting responses from holdout control group members.
Since members of a control group did not receive any communication, they cannot have any
tracking codes to return.
Response tracking monitors members of control groups to see if they take a desired
action without having received any offer. For example, a campaign might target a group of
customers who do not have checking accounts with a checking account offer. Members of
the control group are tracked to see if they open a checking account within the same time
period as the checking account offer.
All incoming events are evaluated to see if they are possible inferred responses for control
treatment instances. Any response codes are discarded and remaining attributes of interest
are evaluated against control treatment instances for possible response credit.

Unica Campaign V12.0 User Guide | 8 - Campaign response tracking | 277
Attribution methods
Unica Campaign supports three methods by which responses are credited to offers:
• Best match
• Fractional match
• Multiple match
All three of these response attribution methods are used simultaneously and recorded as
part of response history. You can choose to use one, a combination, or all of these in the
various performance reports to evaluate your campaign and offer performance.
Response attribution is performed on target treatment instances that remain after invalid
responses are discarded (either because the treatment instance did not contact the
responder, or because the target instance is expired).
For example, a respondent in a target cell that was given three offers returns a cell code;
an exact treatment instance cannot be identified. Best match attribution would choose one
of the three offers to receive full credit; fractional match attribution would give each of the
three offers 1/3 credit each, and multiple match attribution would give all three offers full
credit for the response.
Related tasks
• Updating response history (on page 158)
Related reference
• Performance reports for Unica Campaign (on page 345)

Unica Campaign V12.0 User Guide | 8 - Campaign response tracking | 278
Best match
With best match attribution, only a single target treatment instance receives full credit for
a response; and any other matching treatment instances receive zero credit. When multiple
treatment instances match for a response, Unica Campaign chooses the treatment instance
with the most recent contact date as the best match. If there are multiple treatment
instances with the same contact date and time, Unica Campaign credits one of them
arbitrarily.
Note: In the case of multiple treatment instances with the same contact date and time,
the same instance will be credited each time, but you should not expect Unica Campaign to
select a specific treatment instance.
Fractional match
With fractional match attribution, all n matching treatment instances get 1/n credit for the
response, so that the sum of all attributed scores sum is 1.
Multiple match
With multiple match attribution, all n matching treatment instances receive full credit for the
response. This can lead to over-crediting of treatments and should be used with caution.
Control groups are always tracked using multiple attribution: every response from a member
of a control group receives full credit.
Chapter 9. Stored objects
If there are campaign components that you use frequently, you can save them as stored
objects. Reusing stored objects across flowcharts and campaigns saves time and ensures
consistency.
The types of stored objects in Unica Campaign are:
• Derived fields (on page 279)
• User variables (on page 287)
• Custom macros (on page 290)
• Templates (on page 297)
• Stored table catalogs (on page 300)
Note: For related information, read about sessions and strategic segments, which can
be reused across campaigns.
Derived fields
Derived fields are variables that do not exist in a data source and are created from one or
more existing fields, even across different data sources.
In many processes, the configuration window includes a Derived fields button that you can
use to create a new variable for querying, segmenting, sorting, calculating, or providing
output to a table.
You can make derived fields that you create explicitly available to a subsequent process by
enabling the Make persistent option when you create it.
Derived fields that are available to a process are listed in the Derived fields folder. Derived
fields are available only for the process in which they were created. If you have not created
any derived fields in a process, no Derived fields folder appears in the list.
To use a derived field in another non-subsequent process, store the derived field expression
in the Stored derived fields list so it is available for all processes and all flowcharts.
Unica Campaign V12.0 User Guide | 9 - Stored objects | 280
Note: Do not use a Unica Campaign Generated Field (UCGF) in a Mail List derived
field unless the generated field is constant. Unica Campaign assumes constant values for
generated fields and does not re-calculate them for records in the result set. Therefore,
you may see blank or incorrect results from derived fields that call a generated field that
changes value. Instead of using a derived field, output the necessary generated field
directly into your Mail List fulfillment table or file. Then read that table or file back into Unica
Campaign as a Select and use a Snapshot process to manipulate a new fulfillment table or
file using data from the old one.
Naming restrictions for derived fields
Derived field names have the following restrictions:
• They cannot be the same as either of the following types of names:
◦ A database keyword (such as INSERT, UPDATE, DELETE, or WHERE)
◦ A field in a mapped database table
• They cannot use the words Yes or No.
If you do not follow these naming restrictions, database errors and disconnects may result
when these derived fields are called.
Note: Derived field names also have specific character restrictions. For details, see
Special characters in Unica Campaign object names (on page 354)
Creating derived fields
You can create fields from one or more existing fields, even across different data sources.
1. From the configuration window of a process that supports derived fields, click Derived
fields.
The Create derived field dialog opens.
2. All derived fields that were previously created in this process appear in the Field name
list. To create a new derived field, enter a different name.
Unica Campaign V12.0 User Guide | 9 - Stored objects | 281
3. Select the Make persistent check box if you want to store and pass on the calculated
values for this field.
This option makes the derived field available to a subsequent process.
4.
Define the derived field directly in the Expressions area or use the Formula Helper. You
can double-click an available field to add it to the Expressions area.
Only fields from tables that are selected in the process configuration dialog can be
used in a derived field expression. If a desired table does not appear, make sure it is
selected as a source table.
A derived field can be a null value. Use NULL to return a null value for a snapshot. Use
NULL_STRING to return a null value with a string data type if you want the derived field
to be used with a Unica Campaign macro.
You can enter a string in a derived field as a constant. If you use a string, it must be
surrounded by double quotation marks. For example, "my string". Quotation marks are
not required for numeric strings.
5.
(Optional) Click Stored derived fields if you want to be able to use the derived field in
another process or flowchart.
You can also use this option to load an existing derived field or to organize the list of
stored derived fields.
6. Click Check syntax to detect any errors.
7. Click OK to save the derived field.
Creating a derived field from an existing one
You can create a new derived field by basing it on an existing derived field, then changing
the expression.
Only fields from tables that are selected in the process configuration dialog can be used in
a derived field expression. If a desired table does not appear, make sure it is selected as a
source table.

Unica Campaign V12.0 User Guide | 9 - Stored objects | 282
1. From the configuration window of a process that supports derived fields, click Derived
fields.
The Create Derived Field dialog opens.
2.
From the Field name list, select an existing derived field.
The expression for the selected field appears in the Expression area.
3.
Change the name of the existing derived field to the name that you want to use for the
new derived field.
Important: You cannot use the words "Yes" or "No" as names for derived fields.
Doing so results in database disconnects when these derived fields are called.
4. Edit the derived field expression.
5. Click OK.
Creating a derived field based on a macro
You can create a derived field by basing it on a macro.
1. From the configuration dialog of a process that supports derived fields, click Derived
Fields.
2. In the Create Derived Field dialog, click Formula Helper.
3.
Select a macro from the list by double-clicking it.
The macro's declaration and description display, and the macro is inserted in the
Formula Helper.
4. Select the appropriate fields from the Fields available for expression list to complete
your expression.
5. Click OK.
Unica Campaign V12.0 User Guide | 9 - Stored objects | 283
Making derived fields persistent
When you make a derived field persistent, you instruct Unica Campaign to store its
calculated values and make them available to subsequent processes. This saves time and
resources because Unica Campaign does not have to recalculate these values downstream
in the flowchart.
1.
From the configuration window of a process that supports derived fields, click Derived
fields.
The Create Derived Field window appears.
2. Select the Make persistent checkbox to store and pass on the calculated values for this
field.
Example: Persistent derived field
You might have a Select process configured to choose IDs based on a constraint on a
derived field, connected to a Snapshot process to output the selected records that include
that derived field. If you mark the derived field to be persistent, the calculated value is
passed from the Select process to the Snapshot process.
Another use of persistent derived fields is with any aggregate-type derived field (for
example, AVG or GROUPBY). These aggregated fields are calculated based on the multiple
rows of data within the current cell, so the value of these aggregated fields changes as
the contents of the cell change. With persistent derived fields, you can choose to keep the
original calculated value, then carry that to other processes. If you choose to recalculate
the derived field instead, you get a calculated value based on the remaining records in the
current cell.
When a process takes multiple inputs, such as a Snapshot process working with the input
from two Select processes, all persistent derived fields are available to the downstream
process.
If a persistent derived field is not available across all incoming Select processes, and it is
included in the output for a Snapshot process, then the Snapshot process displays a NULL
Unica Campaign V12.0 User Guide | 9 - Stored objects | 284
value for that persistent derived field in all the output rows from the Select processes that
did not have that persistent derived field.
If a persistent derived field is not available across all incoming Select processes, and you
use it to define a Segment process, then the Segment process has empty segments for the
Select processes that did not have that persistent derived field.
The Segment process remains unconfigured if you try to define a segment with an
expression using more than one persistent derived field not available across all the Select
processes.
The following guidelines apply to persistent derived fields (PDFs):
• PDFs attach to an inbound cell (vector)
• PDFs are calculated before query execution
•
Multiple PDFs are available in the following processes:
◦ Snapshot: If a PDF is not defined for a cell, its value = NULL. If a single ID is greater
than one cell, one row is output for each cell.
◦ Segment: PDFs are not available for segmentation by field when multiple input
cells are selected. PDFs must exist in all selected input cells for use in a segment
by query.
•
PDFs keep only a single value (selected at random) per ID value, regardless of the
number of times an ID value occurs in the data. Thus, when the output includes no table
fields (and includes an ID), there will be only one record per ID value.
However, when you use a derived field based on a table field, the output includes a
table field indirectly. Thus, there will be a record for each instance of an ID value. (In
other words, if the ID value occurs seven times in the data, there will be seven records
output.)
Persistent derived fields only store a single value for each audience ID, which is randomly
selected from the available values. This means that when working with unnormalized data,
you must use a GROUPBY macro function to achieve the desired behavior.
For example, say you want to find from the purchase transaction table, the highest dollar
amount in a single transaction a customer has made and save this as a persistent derived
Unica Campaign V12.0 User Guide | 9 - Stored objects | 285
field for downstream processing. You could write a derived field (and then persist it as a
persistent derived field) as follows:
Highest_purchase_amount = groupby(CID, maxof, Purch_Amt)
Against unnormalized purchase transaction data such as the following, this would compute
as follows:
CID DATE PURCH_AMT HIGHEST_PURCHASE_AMOUNT
A 1/1/2007 $200 $300
A 3/15/2007 $100 $300
A 4/30/2007 $300 $300
When the derived field is persisted, it choose (randomly) any value (which are all $300) and
persists the value $300 for customer A.
A second less obvious example might be to select a predictive model score from a scoring
table for a specific model X. Here the derived field might look like this:
ModelX_score = groupby(CID, maxof, if(Model = 'X', 1, 0), Score)
And the data might look like:
CID MODEL SCORE MODELX_SCORE
A A 57 80
A B 72 80
A X 80 80
Persisting the derived field, ModelX_Score, gives the desired result of the score value of 80.
It is incorrect to create a derived field:
Bad_ModelX_score = if(Model = 'X', Score, NULL)
This would result in the following:

Unica Campaign V12.0 User Guide | 9 - Stored objects | 286
CID MODEL SCORE BAD_MODELX_SCORE
A A 57 NULL
A B 72 NULL
A X 80 80
Then when you persist the derived field Bad_ModelX_score, the persisted value could be
NULL or 80. If you are working with unnormalized data and the derived field values are not
all the same, persisting that derived field could result in any of the values being returned.
For example, defining Derived_field_Score = SCORE and persisting it could result in the value
57, 72, or 80 for customer A. To ensure desired behavior, you must use the GROUPBY macro
over the customer ID and guarantee the derived field value is the same for all data for that
customer.
Storing derived fields
Store a derived field if you want to be able to use it in another process in the same or a
different flowchart.
Derived fields are variables that do not exist in a data source; they are created from one or
more existing fields, even across different data sources. A derived field is available only
within the process where it was created. It is not available in any other process (except an
immediately following process if Make persistent is enabled).
If you want to store a derived field definition so that you can use it in other processes and
flowcharts, follow the procedure below.
1.
From the configuration window of a process that supports derived fields, click Derived
fields and create the derived field that you want to store.
For example, define an expression such as (Balance / Credit_limit) * 100.
2. In the Create derived field dialog, open the Stored derived fields list and select Save
current expression to stored list.

Unica Campaign V12.0 User Guide | 9 - Stored objects | 287
3. Use the Save derived field expression dialog to specify whether to save the expression
in a folder. You can assign a security policy and optionally change the expression and
assign it a different name. The expression that you save will be stored in a list that you
can access when you configure other processes and flowcharts.
4. Click Save.
Using and managing stored derived fields
A derived field that was stored can be used in another flowchart. A derived field consists of
an expression, such as AccountType='gold'. Derived fields are variables that do not exist in
a data source and are created from one or more existing fields, even across different data
sources.
1.
To use a saved expression in a flowchart process:
a. Open the configuration dialog of a process that supports derived fields, and click
Derived fields.
b. Open the Stored derived fields menu and select Retrieve expression from stored
list.
c. Select an expression from the list and click Use expression.
2.
To create, edit, move, or delete stored expressions:
a. Open the Options menu and select Stored derived fields.
b. Use the Stored derived field expressions dialog to create or edit expressions,
delete expressions, or move an expression to a different folder.
User variables
Unica Campaign supports user variables, which can be used during process configuration
when creating queries and expressions.
Guidelines for using user variables
The following guidelines apply to user variables:

Unica Campaign V12.0 User Guide | 9 - Stored objects | 288
• User variables are local to the flowchart in which they are defined and used, but they
have global scope within a flowchart run.
• User variables use the following syntax: UserVar.UserVarName
•
User variables have Initial Values, which is the value assigned when a user variable is
initially defined in the User variables variables dialog. The Initial value is only used to
set the Current value before executing a flowchart run. It is the Current value that Unica
Campaign uses during a flowchart run.
Note: If the Current® value for a user variable is not set and you execute a process
run or a branch run, Unica Campaign will not be able to resolve the user variable. Unica
Campaign only sets the Current value of a user variable to the Initial value before a
flowchart run.
• You can change the Current value of a user variable in the Derived Field window of a
Select process.
•
User variables can be set to constants or to expressions, such as UserVar.myVar =
Avg(UserTable.Age).
Note: If you use an expression that returns multiple values (such as UserTable.Age
+3, which will return one value for each record in the table), the user variable is set to
the first value returned.
• The length of the User Variables of type TEXT(UserVar) supports up to 512 characters..
• When using user variables within SQL statements, do not enclose user variables in
quotation marks, either single or double.
• If you pass object names to your database (for example, if you use a user variable
that contains a flowchart name), you must ensure that the object name contains
only characters supported by your particular database. Otherwise, you will receive a
database error.
• The values of user variables can be passed in on process execution.
• User variables are supported in outbound triggers.
• User variables are supported for use in custom macros.
•
You cannot rename a user variable in the following cases:
◦ You created a derived field using the user variable in a flowchart process and
saved or ran the flowchart or process.
Unica Campaign V12.0 User Guide | 9 - Stored objects | 289
◦ You created the user variable in a flowchart process and published the flowchart to
Distributed Marketing.
User variable behavior with Flowchart Templates:
Copy Template:
If a flowchart template is copied and pasted then the User Variables are also copied along
with template.
If specific process boxes from the template are selected, then only the User Variables used
in those process boxes will get copied from the flowchart template.
If all process boxes from the template are selected, then all the User Variables used in those
process boxes will get copied from the flowchart template.
If a flowchart contains user variable with the same name as a copied variable, it
(UserVariable) will be overwritten by template paste operation. In this case, if the data
type of the UserVariable copied from the template and existing user variable are different,
then any process boxes using this user variable reference from the existing flowchart, get
unconfigured.
Paste Template:
Only the user variables from copied process boxes are pasted into their respective process
boxes and into the global variables section. All existing user variables remain unchanged.
If a flowchart contains user variable with the same name as a copied variable, it
(UserVariable) will be overwritten by template paste operation. In this case, if the data
type of the UserVariable copied from the template and existing user variable are different,
then any process boxes using this user variable reference from the existing flowchart, get
unconfigured.
Creating user variables
You can define variables for use in the processes that you add to a flowchart.
1. Open a flowchart in Edit mode.

Unica Campaign V12.0 User Guide | 9 - Stored objects | 290
2. Click Options and select User variables.
The User variables dialog opens.
3. In the Variable name column, enter a name for the new user variable: Click the <Click
here to add new item> hotspot.
4. In the Data type column, select a data type from the list. If you do not select a data type,
the application selects None when you click OK.
The None data type can produce unpredictable results, so it is best to specify the
correct data type.
5. In the Initial value column, enter a starting value. You can also profile fields for
available values by clicking the ellipsis button (...) that becomes available when you
click inside the column.
6. In the Current value column, enter a current value for the user variable. You can also
profile fields for available values by clicking the ellipsis button (...) that becomes
available when you click inside the column.
7. Repeat these steps for each user variable that you want to create.
8.
Click OK.
The application stores the new user variables. You can access them later when you
configure processes.
After a flowchart runs, the Current value of each user variable displays in the Current value
section for each user variable. If the current value is different from the initial value, you can
restore the initial value by clicking Restore defaults.
Note: If the Current value of a user variable is redefined in a Select process, resetting
the Current value to the Initial value manually has no effect on the value of the user variable
during a flowchart, branch, or process run.
Unica Campaign V12.0 User Guide | 9 - Stored objects | 291
Custom macros
A custom macro is a query that you create using an macro expression, raw SQL, or raw SQL
that includes a value. Custom macros support the use of variables.
Creating custom macros
Macros that you create are available when configuring processes in a flowchart and
defining derived fields.
Unica Campaign supports the following types of custom macros, which in turn support an
unlimited number of variables:
• Custom macros that use an expression
• Custom macros that use raw SQL
• Custom macros that use raw SQL and include a specified value
Support for raw SQL improves performance, allowing complex transactions to be carried out
in the database rather than having the raw data filtered and manipulated in the application
server.
Important: Non-technical users are able to use custom macros; therefore, when you
create a custom macro you should describe how it works very carefully, place similar kinds
of macros in special folders, and so on. This approach can help reduce the possibility
that someone might use a custom macro incorrectly and retrieve data that they were not
expecting.
1. Open a flowchart in Edit mode.
2. Open the Options menu and select Custom macros.
3. In the Custom macros dialog, click New item.
4. In the Save under list, select the folder where you want to save the macro. If no folders
exist, use the default, None.

Unica Campaign V12.0 User Guide | 9 - Stored objects | 292
5. In the Name field, enter a name and declaration for the macro so that it can be
referenced.
Use the following syntax: MacroName(var1,var2,...)
For example: GenGroupBy(id,val1,table,val2)
The MacroName must be unique and alphanumeric. It can include underscores (_) but
not spaces.
Note: If a custom macro has the same name as a built-in macro, the custom macro
takes precedence. To avoid confusion, do not name custom macros with operator
names or names that are the same as the built-in macros. The exception would be if
you specifically want the new custom macro to always be used instead of the built-in
macro.
Important: The variable names must match the variable names in the custom
macro definition in the Expression window, and they must be expressed as a comma-
separated list in parentheses.
6. From the Security policy list, select a security policy for the new custom macro.
7. Use the Note field to explain what the custom macro is designed to do and what each
variable represents. Be sure to describe the macro carefully, so users understand how it
works when they encounter it in lists.
8.
From the Expression type list, select the type of custom macro that you are creating:
• HCL macro expression: For more information, see the HCL Macros User's Guide.
• Raw SQL selecting ID list: If you select this option, you must select a Database.
• Raw SQL selecting ID + value: If you select this option, you must select a Database
and a Value type. Be sure to select the correct value type. Otherwise, when
you later attempt to profile this query, a "Mismatched Type" error results. If you
select Text as the value type, fill in the Width (# bytes) field. You can obtain this
information from the database. If you do not have access to the database or are
unable to obtain the information, enter 256, the maximum width.
9. Click in the Expression field to open the Specify selection criteria dialog.
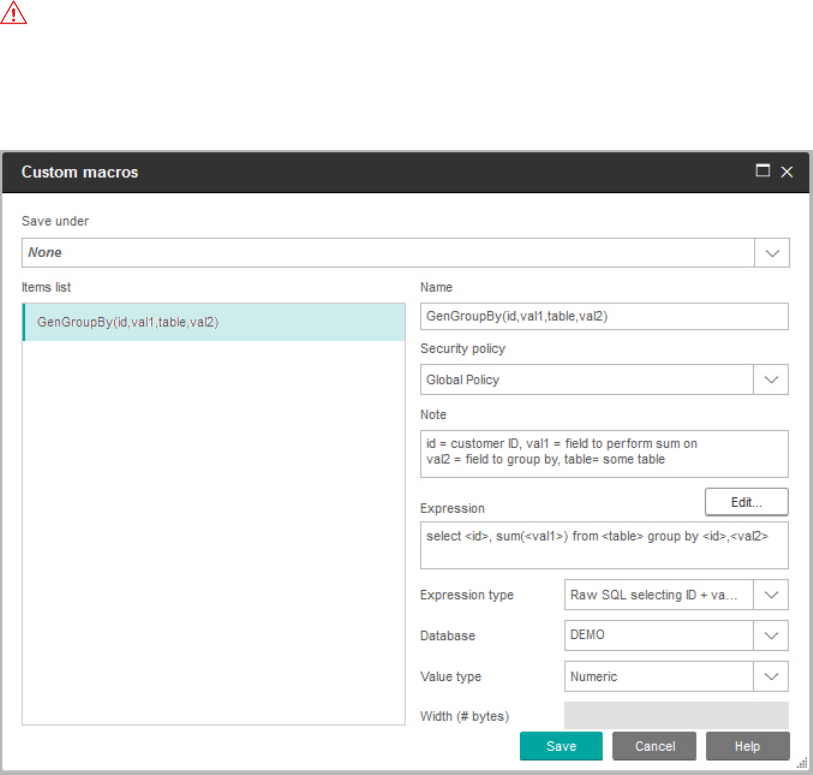
Unica Campaign V12.0 User Guide | 9 - Stored objects | 293
10. Create your query expression. You can use as many variables as you like. Variable
syntax is alphanumeric, and the variable must be enclosed in angle brackets (< >).
Operands (values and strings) and operators might be variables.
Important: Do not use flowchart user variables in custom macro definitions
because custom macros are global but flowchart user variables are not global.
The following example shows a custom macro definition.
11. Click Save.
The custom macro is saved in the Items list.
12. Close the Custom macros dialog.
The macro can now be accessed by name for use in flowchart processes and in definitions
for derived fields. If you need to edit the macro, select Custom macros from the Options
menu.
Unica Campaign V12.0 User Guide | 9 - Stored objects | 294
Guidelines for using custom macros
Keep the following guidelines in mind when creating or using a custom macro:
• The name of a custom macro must be alphanumeric. You cannot use spaces in the
name string, but you can use underscores (_).
• If a data source has been configured with the property ENABLE_SELECT_SORT_BY =
TRUE, then you must write raw SQL custom macros with an ORDER BY clause in order
to sort the returned records by the audience key fields of the audience level under
which you are working. Otherwise, if the sort order is not as expected, an error will be
generated when the custom macro is used in a derived field in a Snapshot process.
• If you do not compare a returned value from a custom macro, if the value is numeric,
non-zero values are treated as TRUE (and therefore IDs associated with them are
selected) and zero values are treated as FALSE. String values are always treated as
FALSE.
•
When creating a custom macro that uses raw SQL, using a temp table can greatly
speed up the performance of the raw SQL by scoping the amount of data it needs to
work with.
When a custom macro uses temp tables in its underlying logic, a temp table will be
forced up to the database so that the logic does not fail.
However, if a custom macro is used in a top level SELECT, then there is no history for
Unica Campaign to use to force a temp table up to the database, and the logic fails.
Thus, when creating a custom macro that uses raw SQL, you might need to create two
versions of the same custom macro - one that uses temp table tokens and one that
does not.
The custom macro without temp table tokens can be used at the top of a tree (for
example, in the first SELECT). The one with temp table tokens can be used anywhere
else in the tree when there might be a temp table to take advantage of.
•
Self-joins might occur when combining values returned from custom macros when
querying against unnormalized data, which is not likely to be the desired behavior.
For example, if you a use a custom macro based on raw SQL that returns a value and
(in a Snapshot process, for example) you output the custom macro and another field
Unica Campaign V12.0 User Guide | 9 - Stored objects | 295
from the table that the custom macro is based on, Unica Campaign performs a self join
on that table. If the table is non-normalized, you will end up with a Cartesian product
(that is, the number of records displayed is more than you would expect).
•
Custom macros are now automatically by reference, because the definition of the
custom macro is not copied into the current process.
At execution time, a custom macro is resolved by looking up its definition in the
UA_CustomMacros system table (where definitions are stored) and then used/
executed.
•
Unlike stored queries, custom macro names must be unique, independent of the folder
path. In releases prior to 5.0, you could have a stored query named A, for example, in
both folder F1 and F2.
Unica Campaign supports stored queries from earlier releases. However, references to
non-unique stored queries must use the old syntax:
storedquery(<query name>)
• When resolving user variables in custom macros, Unica Campaign uses the current
value of the user variable when checking syntax. If the current value is left blank, Unica
Campaign generates an error.
• The temp table token is provided as a performance optimization advanced feature
that scopes the amount of data pulled down from the database by the set of audience
IDs in the temp table available for use by the current process. This temp table list of
IDs might be a superset of the IDs in the current cell. Therefore, aggregate functions
performed over the temp table (for example, average or sum) are not supported and
might generate incorrect results.
• If you intend to use the custom macro across several different databases, you might
want to use a expression rather than raw SQL, since raw SQL can be specific to a
particular database.
• If a custom macro contains raw SQL and another custom macro, the custom macro is
resolved, executed and its value returned before the raw SQL is executed.
•
Unica Campaign treats a comma as a parameter separator. If you are using commas as
literal characters in a parameter, enclose the text in open and close brackets ({}), as in
the following example:
Unica Campaign V12.0 User Guide | 9 - Stored objects | 296
TestCM( {STRING_CONCAT(UserVar.Test1, UserVar.Test2) } )
•
Unica Campaign supports simple substitution for parameters in custom macros
using raw SQL code. For example, if you set up a Select process box on a flowchart
containing this query:
exec dbms_stats.gather_table_stats(tabname=> <temptable>,ownname=>
'autodcc')
Unica Campaign would successfully substitute the actual temp table in place of the
<temptable> token. Note that the single quotes around the table name are required.
The following tables show how Unica Campaign treats custom macros in queries and
derived fields.
Custom macros in queries and derived fields (Select, Segment, and Audience Processes)
Type of custom macro How it is used
Raw SQL: IDs Runs as a separate query. The ID list is merged with other
results.
If a custom macro contains other custom macros plus raw
SQL, the custom macros are resolved and executed and
then the raw SQL is executed.
Raw SQL: IDs + Value Expects that the returned value will be used in an
expression or as a comparison.
If the value is not used this way, Unica Campaign treats a
non-zero value as TRUE for ID selection and a zero value
and string as FALSE.
Expression The expression is resolved and a syntax check is
performed. One query per table is supported, and the IDs
are match/merged.
In a Raw SQL Query (Select, Segment, and Audience Processes)
Unica Campaign V12.0 User Guide | 9 - Stored objects | 297
Type of custom macro How it is used
Raw SQL: IDs Custom macro is resolved and then the query is executed.
Raw SQL: IDs + Value Not supported.
Expression The expression is resolved, but no syntax check is
performed. If the expression is incorrect, it is detected by
the database server when executed.
Organizing and editing custom macros
You can create a folder structure to organize your custom macros. You can move custom
macros from one folder to another. You can change the macro name, description, and
expression.
1. Open a flowchart in Edit mode.
2.
Click Options and select Custom macros.
The Custom macros dialog opens.
3.
Select a macro in the Items list.
The Info area shows detailed information for the selected macro.
4.
Click Edit/move to edit or move the selected macro.
The Edit/move custom macros dialog opens.
5. You can change the name of the macro, edit the note, change the folder/location where
the macro is stored, or click Edit to edit the expression.
6. Click Save to save your changes.
7. Click Close.
Unica Campaign V12.0 User Guide | 9 - Stored objects | 298
Templates
A template is a group of selected and saved processes from flowcharts.
Templates allow you to design and configure one or more processes only once, and save
them in the Template Library. Templates save process configurations and table mappings,
and are available for any session or campaign.
Copying a template to the template library
You can add templates to the template library by copying them.
1. Open a flowchart in Edit mode.
2. Select the processes that you want to save as a template. Use Ctrl+click to select
multiple processes. Use Ctrl+A to select all processes in the flowchart.
3.
Right-click any selected process and select Copy to template library.
The Save Template window appears.
4.
Enter a name for the template in the Name field.
You cannot use spaces in the name. Stored templates are identified by names, which
must be unique in the folder in which it is stored.
5. (Optional) Enter a description in the Note field.
6. (Optional) Use the Save under list to select a folder for the template, or use New folder
to create a new folder. You can create any number of folders (including nesting folders
in a hierarchy) to organize and store your templates.
7. Click Save.
Pasting a template from the template library
You can paste a template from the template library into a flowchart you are building.

Unica Campaign V12.0 User Guide | 9 - Stored objects | 299
1. Open a flowchart in Edit mode.
2. Click Options and select Stored templates.
The Stored templates dialog opens.
3. Select a template from the Items list.
4. Click Paste template.
The selected template is pasted onto the flowchart workspace.
Note: The inserted processes can appear on top of other process already in the
flowchart. All inserted processes are initially selected to make them easy to move as a
group.
Templates can be accessed by any other session or campaign through the template library.
If a template is pasted into a flowchart that has different table mappings, the subsequent
mapping is augmented but not replaced by the new mapping, unless the table name(s) are
the same.
Organizing and editing templates
You can create new folders, edit, move, and remove stored templates.
1. Open a flowchart in Edit mode.
2. Click Options and select Stored templates.
3. From the Items list, select the template that you want to edit or move.
4.
Click Edit/move.
The Edit/move stored templates dialog opens.
5. In the Save under field, specify a new location for the template.

Unica Campaign V12.0 User Guide | 9 - Stored objects | 300
6. You can also change the name of the stored template, or edit the note that is
associated with it.
7. Click Save.
8. Click Close.
Stored table catalogs
A table catalog is a collection of mapped user tables.
Table catalogs store metadata information about user table mappings for re-use across
flowcharts. By default, table catalogs are stored in a binary format with the extension .cat.
For information on creating and working with table catalogs, see the Unica Campaign
Administrator's Guide
Accessing stored table catalogs
You access stored table catalogs from within a flowchart. A table catalog is a collection of
mapped user tables.
Note: If you have administrator permissions, you can also access stored catalogs from
the Campaign settings page. For more information, see the Unica Campaign Administrator's
Guide.
1. Open a flowchart in Edit mode.
2.
Click Options and select Stored table catalogs.
The Stored table catalogs window opens.
Editing table catalogs
Within a flowchart, you can edit the name or description of a table catalog, or move the
table catalog to a different location.
Unica Campaign V12.0 User Guide | 9 - Stored objects | 301
1. Open a flowchart in Edit mode.
2. Click Options and select Stored table catalogs.
The Stored table catalogs dialog opens.
3.
Select a table catalog in the Items list.
The Info area shows the detailed information for the selected table catalog, including
the table catalog name and file path.
4. Click Edit/move.
5. You can change the name of the stored table catalog, edit the table catalog description,
or change the folder/location where the table catalog is stored.
6. Click Save.
7. Click Close.
Deleting table catalogs
You can permanently remove a table catalog so that it is no longer available to any
flowcharts in any campaigns.
Removing a table catalog deletes the .cat file, which points to database tables and possibly
flat files. Removing a table catalog does not affect the underlying tables in the database.
However, it does permanently remove the catalog file.
Important: Only use the Unica Campaign interface to remove table catalogs or perform
table operations. If you remove tables or change table catalogs directly in the file system,
Unica Campaign cannot guarantee data integrity.
1. Open a flowchart in Edit mode.
2.
Open the Options menu and select Stored table catalogs.
Unica Campaign V12.0 User Guide | 9 - Stored objects | 302
The Stored table catalogs dialog opens.
3.
Select a table catalog in the Items list.
The Info area shows the detailed information for the selected table catalog, including
the table catalog name and file path.
4.
Click Remove.
You see a confirmation message asking you to confirm removal of the selected table
catalog.
5. Click OK.
6. Click Close.
The catalog is removed from the Items list and is no longer available to any flowcharts in
any campaigns.
Chapter 10. Session flowcharts
Sessions provide a way to create persistent, global "data artifacts" for use in all campaigns.
Each session contains one or more flowcharts. Running a session flowchart makes the
outcome of the session (the data artifacts) available globally to all campaigns.
Session flowcharts are not intended to be used in marketing campaigns. They do not have
associated offers or start and end dates.
To work with sessions, use the Sessions menu. Advanced users can create session
flowcharts to perform computations outside of a campaign and to perform ETL tasks that
are not associated with any specific marketing initiative or program.
Often, a session flowchart starts with a Schedule process, to ensure that the data is
refreshed on a regular basis.
When you run a session flowchart, the data artifacts that are created are then available for
use in any number of campaign flowcharts.
Some typical examples follow:
•
Use the Create Seg process in a session flowchart to create strategic segments, which
are segments that can be used in multiple campaigns.
For example, start with a Schedule process, then a Select process, then a CreateSeg
process to generate strategic segments for opt-ins, opt-outs, or global suppressions.
The Schedule process periodically updates the segment, which is written out as a
static member list. The resulting segment is then available for selection in campaign
flowcharts.
• Perform data preparation of large complex tables. A session flowchart can snapshot
the data into smaller data chunks for reuse in Unica Campaign.
• Set up periodic modeling tasks to score data or create derived fields for ETL/rollups.
For example, if a session flowchart creates and writes out model scores that are then
mapped in a table catalog/mapping, those model scores can be used in campaign
flowcharts for selection and targeting.
Unica Campaign V12.0 User Guide | 10 - Session flowcharts | 304
Note: When you design flowcharts, be careful not to create cyclical dependencies
among processes. For example, if a Select process provides input to a CreateSeg process,
do not use a segment created by that CreateSeg process as input to the Select process.
This situation will result in an error when you try to run the process.
Creating sessions
Create a session if you need to create persistent, global "data artifacts" that can be used
in all campaigns. Then add a flowchart to the session and run it, to create the persistent
objects.
Each session contains one or more flowcharts. Run a session flowchart to make the
outcome of the session (the data artifacts) available globally to all campaigns. You can
create, view, edit, move, and delete sessions, and you can organize sessions in folders. To
work with sessions, you must have the appropriate permissions. You do not copy sessions,
but rather the flowcharts within sessions. You do not run a session; you run each of its
flowcharts individually.
1.
Select Campaign > Sessions.
The All sessions page displays the folder structure that is used to organize your
company's sessions.
2.
Locate the folder where you want to add a session, and click Add session .
The New session page appears.
3.
Enter a Name, Security policy, and Description.
Note: Session names have character restrictions. For details, see Special
characters in Unica Campaign object names (on page 354).
4.
Click Save changes.
Note: You can also click Save and add a flowchart to immediately start creating a
session flowchart.

Unica Campaign V12.0 User Guide | 10 - Session flowcharts | 305
Adding flowcharts to sessions
A session can contain one or more flowcharts. You create a session flowchart the same
way that you create a campaign flowchart, except that you start by opening a session.
1. Select Campaign > Sessions.
2. Click the name of a session.
3. Click Add a Flowchart .
4. Create the flowchart as you normally would.
Editing session flowcharts
To edit a session flowchart, use the Sessions menu.
1. Select Campaign > Sessions.
The All Sessions page opens.
2. Click Edit a tab next to the name of the session whose flowcharts you want to edit.
3. From the menu, click the name of the flowchart that you want to edit.
4.
Make your changes to the flowchart:
• Use the palette and workspace to add and change process configurations.
• To change the flowchart name or description, click the Properties icon in the
flowchart window toolbar.
5.
Click Save and continue or click Save and exit to close the flowchart window.
Note: The History, Summary and Flowcharts tabs are listed in the All Sessions page.
You can add your comments and save and exit, save and run or save and test run
flowcharts. The History Tab contains the Flowchart Name, Event Type, User Name,
Date /Time stamp and Comments columns.
Unica Campaign V12.0 User Guide | 10 - Session flowcharts | 306
The History tab is a means by which you can find out who worked on the Session
flowcharts and how they interacted with the flowchart. For example, whether the
flowchart was created, modified, saved, deleted or run. It is a mechanism which allows
you to log the changes they have made to the flowchart in the session. Thus, you can
track down changes while figuring out the issues related to the flowchart.
Organizing sessions in folders
Choose Unica Campaign > Sessions, then use the All sessions page to create folders for
sessions and move sessions from one folder to another.
You can complete the following operations after you select Campaign > Sessions.
Table 11. Organizing sessions in folders
Task Description
Add a folder Click New folder to add a folder at the top level. To add a subfolder,
select an existing folder then click New folder.
Enter a Name, Security policy, and Description.
Note: Folder names have character restrictions. For details,
see Special characters in Unica Campaign object names (on page
354).
Edit a folder name
or description
Click a folder name, click Edit , then change the name.
Move a folder and
all of its contents
Important: If someone is editing a flowchart in the session you
plan to move, flowchart results or the entire flowchart might be lost
when you move the session. Be sure that none of the flowcharts in
the session are open for editing when you move the session.
1. Select the check box next to the folder or folders that you want
to move.
Unica Campaign V12.0 User Guide | 10 - Session flowcharts | 307
Task Description
2. Click Move.
3. Select a destination folder and click Accept this location.
Delete a folder You can delete an empty session folder and all of its empty
subfolders. (If you have permission to delete a folder, you can also
delete any one of its subfolders.)
1. If necessary, move or delete the contents of the session folder.
2. Open the folder that contains the subfolder that you want to
delete.
3. Check the box next to the folder or folders that you want to
delete.
4. Click Delete, then confirm the deletion.
Moving sessions
You can move sessions from folder to folder for organizational purposes.
Note: If someone is editing a flowchart in the session that you plan to move, the
flowchart might be lost when you move the session. You must make sure that none of the
flowcharts in the session are open for editing when you move the session.
1.
Select Campaign > Sessions.
The All sessions page opens.
2. Open the folder that contains the session you want to move.
3. Select the check box next to the session that you want to move. You can select multiple
sessions.
4.
Click Move.
The Move items to dialog opens.
Unica Campaign V12.0 User Guide | 10 - Session flowcharts | 308
5. Select a destination folder and click Accept this location.
Viewing sessions
Open a session in Read-Only mode to access its associated flowcharts.
1. Select Campaign > Sessions.
2.
When All Sessions page appears, use one of the following methods:
• Click a session name to display its Summary tab and also any flowchart tabs.
• Click View a tab next to the name of the session that you want to view, then
select Summary or a flowchart from the menu.
Editing sessions
You can change the name, security policy, or description of a session.
1. Select Campaign > Sessions.
2. Click the name of a session.
3. On the session Summary tab, click Edit .
4.
Change the session name, security policy, or description.
Note: Session names have specific character restrictions. For details, see Special
characters in Unica Campaign object names (on page 354).
5. Click Save.

Unica Campaign V12.0 User Guide | 10 - Session flowcharts | 309
Deleting sessions
When you delete a session, the session and all of its flowchart files are deleted. If there
are portions of your session that you want to retain for reuse, save them as stored objects
before you delete the session.
1. Select Campaign > Sessions.
2.
Open the folder that contains the session that you want to delete.
3. Select the checkbox next to one or more sessions that you want to delete.
4. Click Delete.
5. Click OK to confirm.
The History tab (Session)
Overview:
The History tab (Session) is a means by which you can find out who worked on the Session
flowcharts and how they interacted with the flowchart. For example, when the flowchart
was created, modified, saved, deleted or run.
It is a mechanism which allows you to log the changes they have made to the flowchart in
the session. Thus, you can track down changes while figuring out the issues related to the
flowchart.
The “History" tab occurs after the “Analysis" tab in Session. On clicking this History tab, a
history log is displayed on the UI.
The History tab includes following details:
1. Flowchart name
2. Event Type i.e. description of the event
Unica Campaign V12.0 User Guide | 10 - Session flowcharts | 310
3. User name
4. Timestamp of the event
5. Comments (if any)
Each flowchart will have "Save with comments" option if users wants to add some
information about the recent changes done to flowchart.
Audited events:
The following events are audited:
1. Create a flowchart
2. Save and continue a flowchart
3. Save and exit the flowchart
4. Save flowchart with comments
5. Save and run branch
6. Save and run process
7. Test run flowchart (Whole, Branch, Process): Results are not logged
8. Pause, continue or stop a flowchart, branch and process
9. Rename a flowchart
10. Delete a flowchart
11. Duplicate a flowchart
12. Copy a flowchart
13. Run a flowchart
About strategic segments
A strategic segment is a globally persistent list of IDs, which is available for use in multiple
campaigns. A strategic segment is a static list of IDs until the flowchart that created it
originally is re-run.
Strategic segments are created using the Create Seg process in a session flowchart.
A strategic segment is no different from segments created by a Segment process in a
Unica Campaign V12.0 User Guide | 10 - Session flowcharts | 311
flowchart except that a strategic segment is available globally. Availability depends on the
security policy that is applied to the folder in which the strategic segment is stored.
Unica Campaign supports multiple strategic segments. The ID list that is created for each
strategic segment and audience level is stored in the Unica Campaign system tables. You
can associate any number of strategic segments with a campaign.
Strategic segments can be used for global suppression. A global suppression segment
defines the list of IDs that are automatically excluded from cells in flowcharts for a
particular audience level.
Strategic segments are also used in cubes. A cube can be created from any list of IDs, but
cubes that are based on strategic segments are global and can be analyzed by the various
segment reports.
Strategic segments can optionally specify one or more data sources in which that strategic
segment will be cached (stored in the database so that uploading the strategic segment
IDs is not required for each flowchart that uses the segment). This can provide significant
performance improvements. Cached strategic segments are stored in temporary tables,
which are assigned the SegmentTempTablePrefix configuration parameter.
Note: Working with strategic segments requires the appropriate permissions. For
information on permissions, see the Unica Campaign Administrator's Guide.
Related tasks
• Creating segments for global use in multiple campaigns (on page 141)
Prerequisites for creating strategic segments
Before you create a strategic segment, you must meet the following prerequisites.
• The saveRunResults configuration property (Campaign|partitions|
partition[n]|server|flowchartRun) must be set to TRUE.

Unica Campaign V12.0 User Guide | 10 - Session flowcharts | 312
• You must have the appropriate permissions to work with strategic segments.
• Determine how your strategic segments will be organized, the folder hierarchy and
naming conventions you will use.
• Determine exactly what strategic segments are important to you.
• Determine the logic behind your strategic segments.
• Identify the relationship between different strategic segments.
• Identify the audience levels appropriate to your strategic segments.
• Determine how often the strategic segments should be refreshed.
• Determine what level of detail is defined in each strategic segment. For example,
should a segment include all suppressions?
• Determine if you want to keep historical strategic segments in an archive folder.
• Consider the size of the strategic segments you want to create and their potential
impact on performance. See Improving performance of strategic segments (on page
312).
Improving performance of strategic segments
By default, the Create Seg process creates a binary file on the application server, which can
take a long time for a large strategic segment. When Unica Campaign updates the binary
file, it drops and then inserts the rows again into a cached table; the entire file is rewritten
for sorting. For extremely large strategic segments (for example, 400 million IDs), it takes a
long time to rewrite the entire file, even when most of the IDs have not changed.
To improve performance, set the doNotCreateServerBinFile property on the Configuration
page to TRUE. A value of TRUE specifies that strategic segments create a temp table in the
data source instead of creating a binary file on the application server. When this property is
set to TRUE, at least one valid data source must be specified on the Define Segments tab of
the CreateSeg process configuration.
Other performance optimizations, such as creating indexes and generating statistics,
which cannot be applied to cached segment tables, can be used with segment temp
tables. The PostSegmentTableCreateRunScript, SegmentTablePostExecutionSQL, and
SuffixOnSegmentTableCreation properties on the Configuration page support these
performance optimizations.

Unica Campaign V12.0 User Guide | 10 - Session flowcharts | 313
For details about properties on the Configuration page, see the Unica Campaign
Administrator's Guide.
Creating strategic segments
A strategic segment is one that is available for use in multiple campaigns. Create strategic
segments in a session flowchart, run the flowchart in production mode, and save the
flowchart. The resulting segments can then be used in marketing campaigns.
You must meet the prerequisites described in Prerequisites for creating strategic segments
(on page 311). For example, you must have the appropriate permissions and Campaign|
partitions|partition[n]|server|flowchartRun | saveRunResults must be
set to TRUE.
1. Create a session or open an existing session for editing.
2.
Create a flowchart whose final output process is the CreateSeg process.
For instructions, see Creating segments for global use in multiple campaigns (on page
141).
3.
Run the flowchart in production mode and click Save and exit.
Running the process in test mode does not create a strategic segment or update an
existing one. You must run the process in production mode in a session flowchart.
The strategic segments are listed on the All segments page and are available for use in all
campaigns.
Example: Session flowchart creating strategic segments
In a flowchart in the Sessions area of Unica Campaign, add two Select processes, one to
select all records from a particular field in a mapped table in your datamart, and the other
to select all records from the same datamart that have been classified as opt-outs and thus
need to be removed from the total list of IDs.
Unica Campaign V12.0 User Guide | 10 - Session flowcharts | 314
Next, use a Merge process whose input consists of the output cells of the two Select
processes to eliminate the OptOut IDs and produce an output cell of eligible IDs.
Then, add a Segment process to which the eligible IDs from the Merge process are passed,
where they are divided into three discrete groups of IDs.
Finally, add a Create Seg process to output the three segments as a globally persistent list
of audience IDs.
Run the flowchart in production mode to create the strategic segment and make it available
for use in multiple campaigns.
Viewing strategic segments
You can view information about strategic segments that were created with the Create Seg
process in a session flowchart. The session flowchart must run in production mode in order
to generate the segments, which are then globally available.
Use one of the following methods:
• Go to the Summary page of any campaign that uses strategic segments, then click the
segment name in the Relevant Segments list.
• Select Campaign > Segments, then click the name of the segment that you want to
view.
The Summary page provides information about the segment.
Element Description
Description The description of the segment provided in
the Create Seg process.
Source flowchart The name of the session flowchart where
the segment was defined.
Audience level The audience level for the segment.
Current count The number of IDs in this segment and the
date that the segment last ran.
Unica Campaign V12.0 User Guide | 10 - Session flowcharts | 315
Element Description
Used in the following campaign(s) A list of the campaigns that use the
segment, with links to those campaigns.
Editing a strategic segment's Summary details
You can change the name or description of a strategic segment.
1. Select Campaign > Segments.
2.
Click the name of the segment whose summary you want to edit.
The segment opens to its Summary tab.
3.
Change the name or description of the segment.
Note: Segment names have specific character restrictions. For details, see Special
characters in Unica Campaign object names (on page 354).
4. Click Save Changes.
Editing a strategic segment's source flowchart
You can make changes to the session flowchart where a strategic segment is defined.
1. Select Campaign > Segments.
The All segments page appears.
2.
Click the name of the segment whose flowchart you want to edit.
The segment's Summary page appears.
3.
Under Source flowchart, click the link to the flowchart.
The flowchart page opens in Read only mode.
4. Click Edit to open the flowchart in Edit mode.

Unica Campaign V12.0 User Guide | 10 - Session flowcharts | 316
5. Make the desired changes to the flowchart.
6. Click Save or Save and exit.
The strategic segment is not updated until you re-run the session flowchart in production
mode. If you want to update the segment, run the session flowchart in production mode,
then save it. The segment will be saved only if the configuration property Campaign|
partitions|partition[n]|server|flowchartRun| saveRunResults is set to TRUE.
Note: When a CreateSeg process is re-run in production mode, the existing strategic
segment created by that process is deleted. Any users of the existing strategic segment
(including global suppressions) might see an "invalid segment" error if the new CreateSeg
process run fails to complete successfully, or while it is still running.
Running strategic segments
You should re-generate strategic segments if the contents of your datamart have changed.
To re-generate a strategic segment, you run the flowchart in which that segment was
created, in production mode. The Enable Output setting in Test Run mode has no effect;
strategic segments are output only in production mode.
Note: When a Create Seg process is re-run in production mode, the existing strategic
segment created by that process is deleted. This means that any users of the existing
strategic segment (including global suppressions) might see an "invalid segment" error if
the new Create Seg process run fails to complete successfully, or while it is still running.
Organizing strategic segments
You can organize your strategic segments by creating a folder or series of folders. You can
then move strategic segments from one folder to another within the folder structure you
have created.
Note: The folder in which a strategic segment resides specifies the security policy
applying to the strategic segment, determining who can access, edit, or delete it.

Unica Campaign V12.0 User Guide | 10 - Session flowcharts | 317
Adding a segment folder
You can add, move, and delete folders to organize strategic segments. You can also edit the
folder name and description.
1.
Select Campaign > Segments.
The All segments page opens.
2. Click the folder where you want to add a subfolder.
3. Click New folder.
4.
Enter a name, security policy, and description for the folder.
Note: Folder names have specific character restrictions. For details, see Special
characters in Unica Campaign object names (on page 354).
5. Click Save.
Editing a segment folder name and description
You can change the name or description of a folder.
1. Select Campaign > Segments.
The All segments page appears.
2. Click the folder that you want to rename.
3. Click Rename folder.
4.
Edit the name or description of the folder.
Note: Folder names have specific character restrictions. For details, see Special
characters in Unica Campaign object names (on page 354).
5. Click Save.

Unica Campaign V12.0 User Guide | 10 - Session flowcharts | 318
Moving a segment folder
You can organize strategic segments by creating folders for them, and then moving the
folders into a hierarchical structure.
Important: If someone is editing the source flowchart for any segment you plan to
move, that entire flowchart might be lost when you move the segment. Make sure that none
of the source flowcharts are open for editing when you move the subfolder.
1.
Select Campaign > Segments.
The All segments page opens.
2. Locate the folder that you want to move, and select the check box next to the folder.
You can select multiple folders to move to the same location at one time.
3. Click Move.
4.
Use the Move items to dialog to select a destination folder, and click Accept this
location.
The subfolder and all of its segments are moved into the destination folder.
Deleting a segment folder
You must move or delete the contents of a folder before you can delete it. If you have the
permissions that are required to delete a folder, you can also delete any of the subfolders in
that folder.
1. Select Campaign > Segments.
2. Locate the folder that you want to delete and select the check box next to the folder.
You can select multiple folders to delete at one time.
3. Click Delete.
4.
Click OK to confirm.

Unica Campaign V12.0 User Guide | 10 - Session flowcharts | 319
The folder and all of its empty subfolders are deleted.
Moving a segment
You can move strategic segments from folder to folder for organizational purposes.
Important: If a source flowchart for the segment you plan to move is open for editing,
the entire flowchart may be lost when you move the segment. Make sure that none of the
source flowcharts are open for editing before you move the subfolder.
1. Select Campaign > Segments.
2. Open the folder that contains the segment that you want to move.
3. Select the check box for the segment that you want to move. You can select multiple
segments to move to the same location at one time.
4.
Click Move.
window opens.
5.
Use the The Move items to dialog to select a destination folder, and click Accept this
location.
The segment is moved into the destination folder.
Deleting strategic segments
Use the following procedure to delete a strategic segment.
Strategic segments can be deleted in the following ways:
• By deleting the strategic segment itself from its folder location on the All Segments
page. Strategic segments that you delete by this method are re-created if the Create
Seg processes that generated them originally are re-run in production mode.

Unica Campaign V12.0 User Guide | 10 - Session flowcharts | 320
• By deleting the Create Seg process that created the strategic segment. The strategic
segment is deleted only when the flowchart is saved. Strategic segments deleted in this
way cannot be recovered. For details, read about deleting processes in flowcharts.
• By deleting the flowchart containing the Create Seg process that created the strategic
segment. Strategic segments deleted in this way cannot be recovered. For details, read
about deleting flowcharts.
Use the following procedure to delete a strategic segment directly from the All Segments
page.
1. Select Campaign > Segments.
2. Open the folder that contains the segment that you want to delete.
3. Select the check box next to the segment that you want to delete. You can select
multiple segments to delete at one time.
4. Click Delete.
5.
Click OK to confirm.
The segment is deleted.
Note: If there are still active flowcharts that contain the segment, the segment can
be re-created when those flowcharts are run. If a flowchart that contains the segment
was open for editing when you deleted the segment, it also is re-created.
About global suppressions and global suppression
segments
Use global suppression to exclude a list of IDs in a single audience level from all cells in all
Unica Campaign flowcharts.
global suppression segmentsoverview

Unica Campaign V12.0 User Guide | 10 - Session flowcharts | 321
To define global suppression, an administrator creates a list of unique IDs as a strategic
segment in a session flowchart and runs the session flowchart. Then campaign designers
can specify that segment as a global suppression segment for a specific audience level in
a campaign flowchart. Only one global suppression segment can be configured for each
audience level.
If a global suppression segment is configured for an audience level, all top-level Select,
Extract, or Audience processes associated with that audience level automatically exclude
the IDs from their output results, unless global suppression is disabled for a specific
flowchart. By default, all flowcharts (except session flowcharts) have global suppression
enabled.
Note: Specifying and managing global suppression segments requires the "Manage
Global Suppressions" permission and is usually performed by a Unica Campaign
administrator. For details, see the Unica Campaign Administrator's Guide.
Applying global suppressions
If a global suppression segment has been defined for an audience level, all top-level
Select, Extract, or Audience processes associated with that audience level automatically
exclude the IDs in the global suppression segment from their output cells (unless the global
suppression is explicitly disabled for a specific flowchart). By default, flowcharts have
global suppression enabled so that no action needs to be taken for any configured global
suppression to be applied.
An exception to the default of global suppression being enabled is the flowchart containing
the CreateSeg process that created the global strategic segment itself. In this case, the
global suppression is always disabled (only for the audience level for which the global
suppression segment is being created).
Note: Also note that performing Test Query in Select, Extract or Audience processes
does not take into account any global suppressions.

Unica Campaign V12.0 User Guide | 10 - Session flowcharts | 322
Switching audiences with global suppressions
If you are switching from Audience 1 to Audience 2 in a flowchart, and have one global
suppression defined for each of these audience levels, the global suppression segment for
Audience 1 is applied to the input table, and the global suppression segment for Audience 2
is applied to the output table.
Disabling global suppressions for a flowchart
Global suppression is an administrator-applied feature that excludes a list of IDs in a single
audience level from all cells in all Campaign flowcharts. By default, flowcharts have global
suppression enabled. If your permissions allow, you can disable this feature for individual
flowcharts.
You can disable global suppressions for individual flowcharts if you have the appropriate
permissions. If you do not have the appropriate permissions, you cannot change the
setting and you must run the flowchart with the existing setting. An administrator might
grant global suppression override permissions to specific users so that they can design
and execute special campaigns that are allowed to contact normally suppressed IDs, for
example, IDs in a universal holdout group.
1. Open a flowchart for editing.
2. Open the Admin menu and select Advanced settings.
3. In the Advanced settings dialog, select Disable global suppressions for this flowchart.
4. Click OK.
About dimension hierarchies
A dimension hierarchy is a set of SQL selection queries that can be applied to any list of IDs.
Like strategic segments, dimension hierarchies can be made available globally in a Select
process or used as the basis for constructing cubes.

Unica Campaign V12.0 User Guide | 10 - Session flowcharts | 323
Among the most commonly specified dimensions are time, geography, product, department,
and distribution channel. However, you can create any kind of dimension that best relates to
your business or campaign.
As the building blocks of cubes, dimensions become the basis for a variety of reports
(total sales across all products at increasing aggregation levels, cross-tabular analysis of
expenses versus sales by geography, and so on). Dimensions are not limited to a single
cube; they can be used in many cubes.
A dimension hierarchy is made up of various levels, which in turn are comprised of
dimension elements, or elements for short.
You can have dimensions that are comprised of an infinite number of levels and elements,
as well as:
• Data points built as input to customer analytic reporting and visual selection
• Roll ups into unlimited number of categories to support drill-down capability.
(Dimensions must roll up cleanly across boundaries, so elements must be mutually
exclusive and not overlap.)
Related tasks
• Creating a multi-dimensional cube of attributes (on page 138)
Examples: Dimension hierarchies
The following two examples illustrate a basic dimension hierarchy that would be created in
your datamart and then mapped into Unica Campaign.
Example: Age Dimension Hierarchy
Lowest level: (21-25), (26-30), (31-35), (36-45), (45-59), (60+)
Rollups: Young (18-35), Middle (35-59), Older (60+)

Unica Campaign V12.0 User Guide | 10 - Session flowcharts | 324
Example: Income Dimension Hierarchy
Lowest level: >$100,000, $80,000-$100,000, $60,000-$80,000, $40,000-$60,000
Rollups: High (> $100,000), Middle ($60,000-$100,000), Low (< $60,000) (> $100,000),
($60,000-$100,000), (< $60,000)
Creating dimension hierarchies
To use dimensions in Unica Campaign, you must do the following:
• Define and create a hierarchical dimension in a table or delimited flat file in your data
mart
• Map this hierarchical dimension table or flat file to a dimension in Unica Campaign
Note: A hierarchical dimension is created in the data mart either by the Unica Campaign
system administrator or by members of your consulting team, and is an operation external
to Unica Campaign. Also note that the lowest level of the hierarchical dimension must use
either raw SQL or a pure Expression (no custom macros, strategic segments, or derived
fields) to define the individual elements.
When this hierarchical dimension is then mapped into Unica Campaign, Unica Campaign
executes this code to perform the various roll-ups.
Mapping a hierarchical dimension to a Unica Campaign dimension
To map dimensions, you create a dimension in Unica Campaign and then specify the file
or table that contains the hierarchical dimension. The hierarchical dimension must exist in
your data mart before you can complete this task.
Note: Since in almost all cases dimensions are used to create cubes, you may want to
create dimensions from a flowchart in the Sessions area of the application.
1.
Open the Dimension hierarchies dialog in one of these ways:
Unica Campaign V12.0 User Guide | 10 - Session flowcharts | 325
• In a flowchart in Edit mode, open the Admin menu and select Dimension
hierarchies.
• On the Administrative settings page, select Manage dimension hierarchies.
2.
In the Dimension hierarchies dialog, click New dimension.
The Edit dimension dialog opens.
3.
Enter the following information about the dimension that you are creating:
• Dimension name.
• Description.
• Number of levels in the dimension. (In most cases, this number corresponds to the
levels in the hierarchical dimension in the data mart to which you are mapping this
dimension.)
• If you are using this dimension as the basis for a cube, ensure that the Elements
are mutually exclusive check box is selected (it is selected by default). Otherwise,
when you use this dimension to create a cube an error results, since the values in
elements cannot overlap in a cube.
4.
Click Map table.
The Edit table definition dialog opens.
5.
Select one of the following options:
• Map to existing file
• Map to existing table in selected database
Proceed with the steps for mapping a table. For details, see the Unica Campaign
Administrator's Guide.
Note: When mapping tables for dimension hierarchies, the field names
"Level1_Name," "Level2_Name," etc. must exist in the table for mapping to succeed.
When you finish mapping the table for the dimension, the Edit dimension window
opens with the dimension information for the new dimension.
6.
Click OK.
Unica Campaign V12.0 User Guide | 10 - Session flowcharts | 326
The Dimensions hierarchies window opens with the newly mapped dimension visible.
7. To store a dimension hierarchy so that it is available for future use and does not need
to be re-created, click Save in the Dimension hierarchies dialog.
Updating a dimension hierarchy
Unica Campaign does not support automatic updates of dimension hierarchies. If the
underlying data changes, you must update the dimension hierarchies manually.
Note: Cubes consist of dimensions that are based on strategic segments. Therefore,
you must update dimensions whenever strategic segments are updated.
1.
Open the Dimension hierarchies window in one of these ways:
• In a flowchart in Edit mode, open the Admin menu and select Dimension
hierarchies.
• On the Administrative settings page, select Manage dimension hierarchies.
2.
In the Dimension hierarchies dialog, click Update all.
Alternatively, to update an individual dimension, select the dimension and then click
Update.
You must load the dimension hierarchy in order to use it.
Loading a stored dimension hierarchy
After you define a dimension hierarchy, you make it accessible in Unica Campaign by
loading it.
1.
Open the Dimension hierarchies dialog in one of these ways:
• In a flowchart in Edit mode, open the Admin menu and select Dimension
hierarchies.
• On the Administrative settings page, select Manage dimension hierarchies.
Unica Campaign V12.0 User Guide | 10 - Session flowcharts | 327
The Dimension hierarchies dialog opens.
2. Highlight the dimension hierarchies that you want to load and click Load.
About cubes
A cube is the simultaneous segmentation of a list of IDs (most often a strategic segment)
by the queries provided by a number of dimension hierarchies. After the cube is created, you
can view segment cross-tab reports that drill into two dimensions of the cube at any given
time.
Before you can create a cube, you must perform the following preliminary tasks:
• Create a strategic segment
• Create dimensions that are based on the strategic segment
• The following guidelines apply to cubes:
•
Cube metrics can be defined as any Unica Campaign expression with the following
restrictions:
◦ You can specify an unlimited number of additional NUMERIC metrics and Unica
Campaign will calculate min, max, sum, average for them. Selected metrics can be
derived fields or persistent derived fields.
◦ The aggregation function on cell count (min, max, avg, % of total no, and so on) is
calculated automatically.
◦ The aggregation function on an attribute value (for example, avg(age) )
automatically calculates min, max, sum, and average.
◦ Expressions that contain multiple attribute values (for example, (attribute1 +
attribute2) ) are supported in derived fields.
◦ The Cube process supports derived fields and persistent derived fields.
◦ Groupby expressions (for example, (groupby_where (ID, balance, avg, balance,
(trxn_date > reference_date))) ) are supported in derived fields.
◦ Expressions involving user variables (defined in same flowchart as cube process
AND exposed to Distributed Marketing) are supported in derived and persistent

Unica Campaign V12.0 User Guide | 10 - Session flowcharts | 328
derived fields. (For more information about Distributed Marketing, see the
Distributed Marketing User's Guide.)
◦ Expressions that use raw SQL are supported in a derived field that uses a raw SQL
custom macro
◦ Expressions that use a custom macro are supported in a derived field.
• Although cubes are composed of up to three dimensions, metrics can be displayed
for only two dimensions at a time. The undisplayed third dimension is still computed
and stored on the server, but is not used in visual selection/reporting for that particular
report.
• Cubes can be built on cells as well as segments (which, for example, can be created at
the transaction level). However, if a cube is built on a cell, the cube is available only in
that flowchart. For that reason, you may want to base cubes on strategic segments.
• Unless your tables are normalized, defining dimensions with a many-to-many
relationship with the audience level could produce unexpected results. The cube
algorithm relies on normalized tables. Before you select and build a cube, normalize
data by rolling it up (to the customer level through a data prep session for example).
Note: If you build a cube on non-normalized dimensions, the sum counts will
be wrong in the crosstab reports, owing to the way that Campaign processes the
dimension IDs. If you must use non-normalized dimensions, build cubes with only
two dimensions and use transactions as the lowest level metric of the nonnormalized
dimensions, rather than customer IDs, since the transaction sum will be correct.
• When creating a cube dimension, you must give the dimension a name, audience
level, and a table to correspond to the dimension. Later, when working in a session or
a campaign flowchart, you map this dimension the same as if you were mapping a
database table.
• Cubes should be built when users are not accessing them, typically after business
hours and on weekends.
Related tasks


Chapter 11. Unica Campaign reports
overview
Unica Campaign provides reports to aid in campaign and offer management.
Some reports are intended to be used during the flowchart design phase. Other reports
help you to analyze contact responses and campaign effectiveness after a campaign is
deployed.
Unica Campaign reports provide several different types of information:
• Object-specific reports analyze a specific campaign, offer, cell, or segment. To access
these reports, click the Analysis tab for a campaign or offer.
• System-wide reports provide analysis across multiple campaigns, offers, cells, or
segments. To access these reports, choose Analytics > Campaign analytics.
• Cell reports provide information about customers or prospects who are being targeted
or used as controls. Cell reports are useful when creating campaign flowcharts. To
access these reports, click the Reports icon while editing a flowchart.
The reports that are available depend on several factors:
• Your permissions, which are set by your Unica Campaign administrator.
• Some reports are available only if you installed the Unica Campaign Reports Pack
and integrated Unica Campaign with Cognos®. For information, see the Unica
Reports Installation and Configuration Guide. Also see the Unica Campaign Report
Specifications, which are provided as a compressed file with the reports pack.
• Cognos report packs for IBM eMessage, Unica Interact, and Unica Collaborate are also
available, if you have licenses for those additional products. You can access the reports
from the Analytics page for each product or from the campaign or offer Analysis tab.
For more information, see the documentation for those products.
Unica Campaign V12.0 User Guide | 11 - Unica Campaign reports overview | 331
Using flowchart cell reports during flowchart
development
As you create a Unica Campaign flowchart, you can use flowchart cell reports to analyze the
accuracy of each process. Flowchart cell reports provide information about which IDs are
selected and how each downstream process affects the list of selections.
To access cell reports, you must have permission to edit or review flowcharts and view or
export cell reports. See the Unica Campaign Administrator's Guide for information about cell
report permissions for the system-defined Administrative Role.
Unica Campaign provides flowchart cell reports for use during flowchart development.
Some reports examine each cell, or list of identifiers, that a data manipulation process
(Select, Merge, Segment, Sample, Audience, or Extract) generates as output. Other reports
show the flow of data throughout the flowchart, from one process to the next. By analyzing
cell data, you can refine your selections and identify possible errors. You can also confirm
that each process is producing the output that you expect. For example, the Cell Content
report shows the field values, such as names, phone numbers, and email addresses, for
each ID in the cell.
1. Open a flowchart in Edit mode.
2. Click Reports in the flowchart toolbar.
3.
Select a report from the list:
• Cell List report: Displaying information about all cells in a flowchart (on page
332)
• Cell Variable Profile report: Profiling one characteristic of a cell (on page 333)
• Cell Variable Crosstab report: Profiling two characteristics of a cell simultaneously
(on page 334)
• Cell Content report: Displaying the contents of cells (on page 335)
• Cell Waterfall report: Analyzing cell waterfall in downstream processes (on page
336)
Unica Campaign V12.0 User Guide | 11 - Unica Campaign reports overview | 332
Cell List report: Displaying information about all cells in a
flowchart
Use the Cell List report to obtain information about all of the cells that are in the current
flowchart. The report provides information about any processes that were run.
1. Open a flowchart in Edit mode.
2.
Click Reports in the toolbar.
The Cell specific reports window opens. Each cell in the flowchart corresponds to a
row in the report.
The Cell List report is selected by default in the Report to view list. This report shows
data from the last run of the flowchart. The Status column indicates the type of
flowchart run, such as a test or production run.
3. To sort the display, click a column header in the report.
4.
To change the display, click Options in the dialog toolbar and select one of the
following options:
•
Tree view: View the flowchart cells in a folder hierarchy. The levels represent the
levels and relationships in the flowchart. Expand or collapse each level to show or
hide the items below it.
If the flowchart contains Merge processes, they are color coded throughout the
report. For example, Merge1 is red and Merge2 is blue. The child and parent cells
of each Merge process are also color coded, so you can easily identify them no
matter how the list is sorted. For example, if Merge1 is red, the Cell ID field is red
for all of the Merge1 child processes and parent processes.
• Table view: View the flowchart cells in a table format (default).

Unica Campaign V12.0 User Guide | 11 - Unica Campaign reports overview | 333
Cell Variable Profile report: Profiling one characteristic of a cell
Use the Cell Variable Profile report to display data that is associated with one variable of a
specified cell. For example, you can select the Gold.out cell and specify Age as the variable
to see the age range of all clients with gold credit cards.
The Cell Variable Profile report displays demographic information that can help you to
identify potential targets for your campaign.
1. Open a flowchart in Edit mode.
2. Click Reports .
3. Select Cell Variable Profile from the Report to view list.
4. Select the cell that you want to profile from the Cell to profile list.
5. Select a field from the Field list.
6.
(Optional) To modify the display, click Options , then change the following options:
• Number of bins: Unica Campaign groups field values to create equal-sized
segments, or bins. The field values along the horizontal axis are organized into
bins. For example, if you specify four bins for Age, values might be grouped into
bins of 20-29 and 30-39, 40-49, and 50-59. If the number that you specify is less
than the number of different field values, some fields are joined in one bin. The
default maximum number of bins is 25.
• Profile by meta type: This option ensures that field values that represent dates,
money, telephone numbers, and other numeric data are correctly sorted and
binned, rather than sorting on ASCII text. For example, when you profile by meta
type, dates are sorted as dates, not as numeric values.
• View table: View the report in a table format. Each bin is represented as a row, with
the count for each bin as a column.
• View plot: View the report as a graph. This option is the default. Right-click the
report to access more display options.
Unica Campaign V12.0 User Guide | 11 - Unica Campaign reports overview | 334
• Show 2nd cell: If more than one cell is available for profiling, select this option
to view a second cell in the report. The two cells are displayed side by side in
graphical format.
Cell Variable Crosstab report: Profiling two characteristics of a
cell simultaneously
Use the Cell Variable Crosstab report to profile data from two fields simultaneously for the
specified cell. For example, you can select Age and Amount for the Gold.out cell to see the
relative amount of purchases by age for clients with gold credit cards.
Each field that you select represents one axis of the grid. For example, you could select Age
for the X axis and Amount for the Y axis. The report divides the field values into a number of
bins along each axis. The size of the box at each intersection represents the relative number
of customer IDs that have both attributes. For example, using Age and Amount, you can
visually identify which age groups spent the most money.
1. Open a flowchart in Edit mode.
2. Configure and run the process to generate the cell that you want to profile.
3. Click Reports in the toolbar.
4. Select Cell Variable Crosstab from the Report to view list.
5. Select a cell from the Cell list.
6.
Select fields (variables) to profile from the Field 1 and Field 2 lists.
7.
(Optional) To modify the display, click Options , then change the following options:
• Number of bins: Unica Campaign groups field values along each axis to create
equal-sized segments, or bins. For example, if you specify four bins for Age, values
might be grouped into bins of 20-29 and 30-39, 40-49, and 50-59. If the number
that you specify is less than the number of different field values, some fields are
joined in one bin. The default number of bins is 10.

Unica Campaign V12.0 User Guide | 11 - Unica Campaign reports overview | 335
• Profile by meta type: This option is enabled by default. This option ensures
that field values that represent dates, money, telephone numbers, and other
numeric data are correctly sorted and binned, rather than sorting on ASCII text. For
example, when you profile by meta type, dates are sorted as dates, not as numeric
values.
• View table: View the report in a table format.
• View 2-D plot: View the report as a 2-D plot graph (the default). Right click the
report to access more display options.
• View 3-D plot: View the report as a 3-D plot graph. Right click the report to access
more display options.
• Cell 1 display: Specify how the cell information is displayed on the X-axis. For
certain numeric fields, you can select fields to operate on from the Value field list.
• Value field (For both Cell 1 display and Cell 2 display): Add a variable to the
existing variable that is being profiled. This second variable will appear as a box
within the box that represents the first variable.
Cell Content report: Displaying the contents of cells
Use the Cell Content report to display details of the records in a cell. Using the report
options, you can display actual field values, such as the email addresses, phone numbers,
and other demographic data for each customer in the cell.
This report can display values from any table sources defined at the current audience level.
This report is useful for verifying the results of runs and to confirm that you are selecting
the intended set of contacts.
1. Open a flowchart in Edit mode.
2. Click Reports in the toolbar.
3. Select Cell Content from the Report to view list.
4. Select a cell from the Cell to view menu.
Unica Campaign V12.0 User Guide | 11 - Unica Campaign reports overview | 336
5. (Optional) To modify the display, click Options , then specify the following options:
• Max. number of rows to view: Change the maximum number of rows that the
report displays. The default is 100.
• Fields to view: Select fields in the Available Fields area and add them to the Fields
to View area.
• Skip records with duplicate IDs: Choose to skip records with duplicate fields. This
is useful if you are using non-normalized tables. This option is disabled by default.
Note: The number of records field is limited to 10000.
Cell Waterfall report: Analyzing cell waterfall in downstream
processes
Use the Cell Waterfall report to see how many individuals are removed with each
downstream process in your flowchart. The report provides information about the output of
each data manipulation process, so you can see how each subsequent process affects your
selections. You can then refine target counts based on viewing the falloff that is incurred by
each successive criteria.
By analyzing the falloff of audience members as cells are processed, you can refine your
selections and identify possible errors. You can also confirm that each process is producing
the output that you expect. For example, you can see how many IDs are initially selected,
then see what happens when you use a Merge process on those results. In this way, you can
see the falloff that is incurred by each successive criteria. If your flowchart is complex and
contains multiple processing paths, you can select which path you want to analyze.
1. Open a flowchart in Edit mode.
2. Click Reports in the flowchart window toolbar.
3. Select Cell Waterfall from the Report to view list.
4. Select the cell that you want to analyze from the Cell list.
5. If the cell is connected to multiple downstream processes, use the Path list to indicate
which path in the flowchart that you want to analyze.
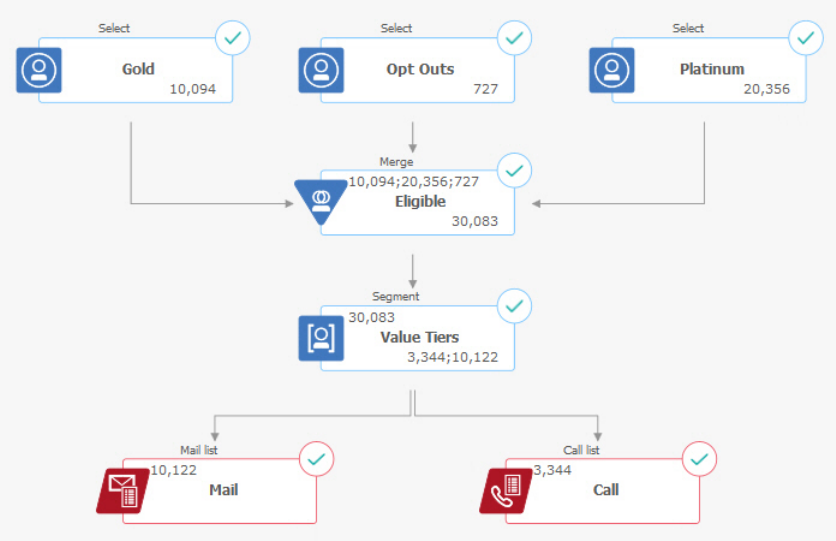
Unica Campaign V12.0 User Guide | 11 - Unica Campaign reports overview | 337
Cell Waterfall report example
This example shows how you can use a Cell Waterfall report to identify processes that
affect output volume. The report provides details about the output by percentage and
quantity.
This example analyzes the output from a Select process named "Gold" in the campaign
flowchart shown below.
The Cell Waterfall report for this flowchart is shown in the following figure. The Gold cell
is selected in the Cell list at the top of the report. Therefore, the report analyzes the output
from the "Gold" Select process. The Path list is not relevant in this example because the
Gold cell has only one path in this flowchart (from Gold to Eligible). If the Gold process box
provided output to other processes in the flowchart, you could use the Path list to look at
other sequences.
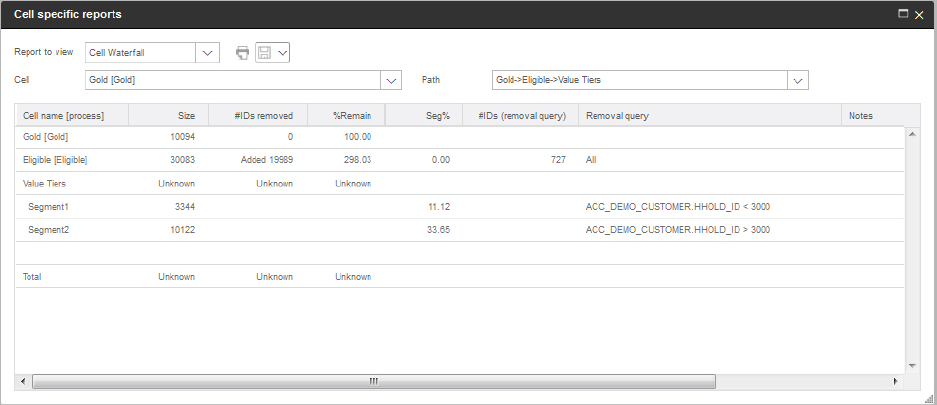
Unica Campaign V12.0 User Guide | 11 - Unica Campaign reports overview | 338
Each cell is identified by its output cell name, plus a [process name] shown in square
brackets. These names were assigned on the General tab of the process configuration
dialog.
This example report shows the following progression:
1. The IDs in the Gold cell are passed to a Merge process named Eligible.
2. You can see that some IDs were added and some were removed.
3. By looking at the flowchart, you can see that the Platinum (Select) process added some
IDs and the Opt Outs (Select) process removed some IDs.
4. The Eligible IDs (Gold and Platinum, minus Opt-Outs) are passed to a Segment process
named Value Tiers.
5. The Segment process divides the Eligible IDs into multiple contact channels.
The Total row shows how many IDs the Gold process originally selected. This row also
shows the number and percentage of Gold IDs that remain.
Printing or exporting flowchart cell reports
You can print any flowchart cell report or export it to another format.
1. Open a flowchart.
Unica Campaign V12.0 User Guide | 11 - Unica Campaign reports overview | 339
2. Click Reports .
3. Select a report from the list and set any report-specific controls.
4. Click Print to print the report.
5.
Click Export to save the report as a comma-separated values (CSV) file. Assign a file
name but do not include a path or extension. If you want to include column headers in
the CSV file, check Include column labels. Then click Export.
You are prompted to either open or save the file.
Using reports to analyze campaigns and offers
Unica Campaign provides reports to help you analyze information about your campaigns
and offers. Some reports can be run during campaign development as part of your planning
process. Other reports show campaign results, so you can analyze and fine-tune your offers
and campaign strategy.
Before you run a campaign, use the Unica Campaign flowchart cell reports to analyze your
selections. To use the cell reports, open a flowchart in Edit mode and click the Reports
link at the top of the page. For more information, see Using flowchart cell reports during
flowchart development (on page 330).
Unica Campaign reports provide detailed information about offers, segments, and
campaigns. By viewing reports, you can analyze campaign offers, response rates, revenue,
profit per responder, and other data to calculate your total and incremental revenue, profit,
and ROI.
1.
To analyze an individual campaign, offer, or segment, use the Analysis tab:
a. Open the Campaign menu and choose Campaigns, Offers, or Segments.
b. Click the name of a campaign, offer, or segment.

Unica Campaign V12.0 User Guide | 11 - Unica Campaign reports overview | 340
c. Click the Analysis tab.
d.
Select a report from the Report type list at the top of the page.
The report displays in the same window.
2.
To analyze results across multiple campaigns, offers, cells, or segments, use the
Campaign analytics page:
a. Select Analytics > Campaign analytics.
b. Click one of the report folders.
c.
Click a report link.
If the report allows filtering, the Report parameter window opens.
d. Select one or more objects on which to filter the report. Use Ctrl+click to select
multiple objects. Your permissions determine which objects appear.
e.
Click Generate the report.
The report displays in the same window. The report generation date and time are
displayed at the bottom of the page. If the report spans more than one page, use
the provided controls to move to the top or bottom of the report or to page up and
down.
The Reports toolbar is displayed for reports generated by Cognos. It is not available for the
calendar or segment reports or for flowchart cell reports. You can the Reports toolbar to
perform the following tasks:
• Keep this version: Send the report by email
• Drill down/Drill up: Used for reports that support dimensional drilling.
• Related links: Used for reports that support dimensional drilling.
•
View format: The default viewing format for reports is HTML. You can choose other
viewing formats from the list. The icon changes to indicate the selected view option.
Note: Not all reports can be viewed in all formats. For example, reports that use
multiple queries cannot be viewed in CSV or XML.
Unica Campaign V12.0 User Guide | 11 - Unica Campaign reports overview | 341
List of Unica Campaign reports
Unica Campaign reports are intended to help you design effective marketing campaigns and
analyze campaign results.
Standard reports
Unica Campaign administrators and designers use the following reports to plan and analyze
campaigns.
Table 12. Standard reports for campaign development
Report Description How to Access
Segment
Crosstab
Analysis
Unica Campaign administrators use this report to
drill into cells and create a Select process for use
in a campaign or session flowchart.
This report calculates detailed information about
any two dimensions in a cube and displays the
results in tabular format. Only strategic segments
or cells that are part of a cube can be analyzed in
this report.
Use the campaign
Analysis tab.
Segment
Profile
Analysis
Unica Campaign administrators use this report to
build strategic segments and construct cubes for
use in multiple campaigns.
This report calculates and displays the count
for a strategic segment's dimensions. The
information is displayed in both tabular and
graphical views. Only strategic segments that are
part of a cube can be analyzed in this report.
Use the campaign
Analysis tab.
Campaign
Flowchart
Unica Campaign designers use this report after
doing a test or production run to determine if
there were any errors in the flowchart run.
Use the campaign
Analysis tab.
Unica Campaign V12.0 User Guide | 11 - Unica Campaign reports overview | 342
Report Description How to Access
Status
Summary
Calendar of
Campaigns
Unica Campaign designers use the calendar
reports when planning and running Unica
Campaigns.
These reports display campaigns and offers on
a calendar based on the Effective and Expiration
Dates defined in the campaign. Double arrows
indicate the start (>>) and end (<<) dates of a
campaign.
Choose Analytics
> Unica Campaign
analytics.
Flowchart cell reports
Use the flowchart cell reports when designing campaign flowcharts, to help identify
the intended targets of a marketing campaign. A cell is a list of identifiers that a data
manipulation process (Select, Merge, Segment, Sample, Audience, or Extract) generates as
output. To access the cell reports, click the Reports icon when editing a flowchart.
Table 13. Campaign flowchart cell reports
Report Description
Cell List Display information about all of the cells that are in the current
flowchart. Each cell represents a potential target group.
For more information: See Cell List report: Displaying information
about all cells in a flowchart (on page 332).
Cell Variable
Profile
Display demographic information to identify potential targets for
your campaign. You can display data for one variable of a cell. For
example, you can display the age range of clients with gold credit
cards.
For more information: See Cell Variable Profile report: Profiling one
characteristic of a cell (on page 333).
Unica Campaign V12.0 User Guide | 11 - Unica Campaign reports overview | 343
Report Description
Cell Variable
Crosstab
Display demographic information to identify potential targets for
your campaign. You can display data for two variables of a cell. For
example, using Age and Amount for the "Gold" credit cards cell, you
can visually identify which age groups spent the most money.
For more information: See Cell Variable Crosstab report: Profiling two
characteristics of a cell simultaneously (on page 334).
Cell Content Display details about the records in a cell. For example, you can see
email addresses, phone numbers, and other demographic data for
each customer in a cell. Use this report to verify the results of runs
and confirm that you are selecting the intended set of contacts.
For more information: See Cell Content report: Displaying the
contents of cells (on page 335).
Cell Waterfall Analyze the falloff of audience members as cells are processed,
so you can refine your selections and identify possible errors. For
example, you can see how many IDs are initially selected, then see
what happens when you use a Merge process to exclude opt-outs.
For more information: See Cell Waterfall report: Analyzing cell
waterfall in downstream processes (on page 336).
Cognos reports
The Cognos reports are supplied with the Unica Campaign Reports Pack. Use the Cognos
reports to plan, adjust, and analyze campaigns. These reports are examples that you can
customize for your own use. To access these reports, you must integrate Unica Campaign
with Cognos. For instructions, see the Unica Reports Installation and Configuration Guide.

Unica Campaign V12.0 User Guide | 11 - Unica Campaign reports overview | 344
Table 14. Cognos reports
Report Description How to access
Campaign
Summary
Unica Campaign designers use this report when
creating and running campaigns.
This report displays information about all
campaigns that have been created. It lists the
campaign code, creation date, start and end
dates, last run date, initiative and objective of
each campaign.
For more information: See the Unica Campaign
Report Specifications provided with the reports
pack.
Choose Analytics
> Unica Campaign
analytics.
Offer
Campaign
Listings
Campaign designers use this report when
planning offers or creating and running
campaigns.
This report shows which offers were provided
with various campaigns; it lists campaigns
grouped by offers. It lists the campaign code,
initiative, start and end dates and last run date.
For more information: See the Unica Campaign
Report Specifications provided with the reports
pack.
Choose Analytics
> Unica Campaign
analytics.
Performance
reports
Unica Campaign designers and marketing
managers use the "What If" Offer Financial
Summary report when planning offers and
campaigns.
They use the other performance reports after
deploying a campaign and obtaining response
data. These reports analyze campaign results
Choose Analytics
> Unica Campaign
analytics >
Performance Reports
to analyze results
across one or more
campaigns, offers,
cells, or segments.
Unica Campaign V12.0 User Guide | 11 - Unica Campaign reports overview | 345
Report Description How to access
by looking at contact and response data across
campaigns, offers, cells, or segments.
For more information: See Performance reports
for Unica Campaign (on page 345).
To analyze results for
a specific campaign,
open the Analysis tab
of the campaign or
offer.
Performance reports for Unica Campaign
Performance reports are provided with the Unica Campaign Reports Pack. The performance
reports are example reports that you can modify to analyze contact and response data
across one or more campaigns, offers, cells, or segments.
To use these reports, you must integrate Unica Campaign with Cognos. For more
information, see:
• Unica Reports Installation and Configuration Guide.
• Unica Campaign Report Specifications, which is a compressed file with the reports
pack. The specification provides examples of output from the performance reports.
The performance reports are available in the following ways:
• From the Analysis tab of a campaign or offer.
• By choosing Analytics > Unica Campaign Analytics > Performance Reports to analyze
results across one or more campaigns, offers, cells, or segments.
Use the "What If" Offer Financial Summary report when planning offers and campaigns. Use
the other performance reports after deploying a campaign and obtaining response data.

Unica Campaign V12.0 User Guide | 11 - Unica Campaign reports overview | 346
Table 15. Performance reports
Report Description
"What If" Offer
Financial
Summary
This report calculates the hypothetical financial performance of an
offer based on your input. You specify parameters for evaluating
different response rate scenarios. The report calculates financial
performance for six scenarios, incrementing upward based on
your specified response rate and the response rate increment. For
example, if you specify a response rate of 2% and an increment of
0.25%, the report will return performance data for six scenarios with
response rates ranging from 2% to 3.25%.
You can optionally change parameters in this report, such as cost per
contact, offer fulfillment fixed cost and revenue per response.
Campaign
Detailed Offer
Response
Breakout
The Campaign Detailed Offer Response Breakout report provides
campaign performance data for offer response types. It lists all offers
that are associated with a campaign and indicates the number of
responses for each response type across all channels.
If IBM eMessage offer integration is configured, this report includes
information about the IBM eMessage Link Click response type.
Landing Page and SMS Reply Message are not currently supported.
Columns that exist for those response types are not populated by the
ETL process at this time.
If your administrator configured IBM eMessage offer integration,
this report also includes information about IBM eMessage response
types, such as: Link Click, Landing Page, SMS Reply Message (if the
SMS feature is licensed), and any additional response types that
your administrator added. Only Link Click information is included by
default when IBM eMessage offer integration is configured.
Campaign
Financial
The Campaign Financial Summary by Offer (Actual) report provides
financial data for offers in campaigns. It includes data such as
contact costs, gross revenue, net profit, and ROI.
Unica Campaign V12.0 User Guide | 11 - Unica Campaign reports overview | 347
Report Description
Summary by Offer
(Actual)
Campaign Offer
Performance by
Month
The Campaign Offer Performance by Month report shows campaign
performance for a specified month with performance data for each
offer within the campaign. It lists the number of offers given, number
of response transactions, and response rate for the specified month.
Campaign
Performance
Comparison
The Campaign Performance Comparison report compares the
financial performance of campaigns. It includes data such as
response transactions and response rate, number of unique
responders and responder rate. It also includes lift over control group
information, which shows the increase in response compared to the
control group.
Campaign
Performance
Comparison (with
Revenue)
The Campaign Performance Comparison (with Revenue) report
compares the financial performance of selected campaigns. It
includes data such as response transactions, response rate, number
of unique responders, responder rate and actual revenue. It also
includes optional lift over control group information, which shows the
increase in response compared to the control group.
Campaign
Performance
Comparison by
Initiative
The Campaign Performance Comparison by Initiative report
compares the financial performance of selected campaigns grouped
by their initiatives. It includes data such as response transactions
and response rate, number of unique responders and responder rate.
It also includes optional lift over control group information, which
shows the increase in response compared to the control group.
Campaign
Performance
Summary by Cell
The Campaign Performance Summary by Cell report provides
performance data for campaigns with cells grouped by the
corresponding campaigns. It includes data such as the number of
offers given, number of response transactions, response rate, number
of unique responders and responder rate. It also includes lift over
Unica Campaign V12.0 User Guide | 11 - Unica Campaign reports overview | 348
Report Description
control group information, which shows the increase in response
compared to the control group.
Campaign
Performance
Summary by Cell
(with Revenue)
The Campaign Performance Summary by Cell (with Revenue) report
provides performance data for selected campaigns with cells
grouped by the corresponding campaigns. It includes data such as
number of offers given, number of response transactions, response
rate, number of unique responders, responder rate and actual
revenue. It also includes optional lift over control group information,
which shows the increase in response compared to the control group.
Note: This report requires the additionally tracked field Revenue in
the response history table.
Campaign
Performance
Summary by Cell
and Initiative
The Campaign Performance Summary by Cell and Initiative
report provides performance data for selected campaigns with
cells grouped by the corresponding campaigns and initiatives. It
includes data such as number of offers given, number of response
transactions, response rate, number of unique responders and
responder rate. It also includes optional lift over control group
information, which shows the increase in response compared to the
control group.
Campaign
Performance
Summary by Cell
and Offer
The Campaign Performance Summary by Cell and Offer report
provides a way to see campaign performance by both offer and
cell in the same report. Each campaign is listed, along with each
cell and the associated offer names. For each combination of cell
and offer, the report shows the number of offers given, number of
response transactions, response rate, number of unique recipients
and responders and responder rate. It also includes lift over control
group information, which shows the increase in response compared
to the control group.
Unica Campaign V12.0 User Guide | 11 - Unica Campaign reports overview | 349
Report Description
Campaign
Performance
Summary by Cell
and Offer (with
Revenue)
The Campaign Performance Summary by Cell and Offer (with
Revenue) report provides a way to see campaign performance by
both offer and cell in the same report, along with revenue information.
Each campaign is listed, along with each cell and the associated offer
names. For each combination of cell and offer, the report shows the
number of offers given, number of response transactions, response
rate, number of unique recipients and responders and responder
rate, plus revenue. It also includes lift over control group information,
which shows the increase in response compared to the control group.
Note: This report requires the additionally tracked field Revenue in
the response history table.
Campaign
Performance
Summary by Offer
The Campaign Performance Summary by Offer report provides a
summary of campaign and offer performance with selected offers
grouped by the corresponding campaigns. It includes data such as
number of offers given, number of response transactions, response
rate, number of unique responders, and responder rate. It also
includes lift over control group information, which shows the increase
in response compared to the control group.
Campaign
Performance
Summary by Offer
(with Revenue)
The Campaign Performance Summary by Offer (with Revenue) report
provides a summary of offer performance for selected campaigns.
It includes data such as number of offers given, number of response
transactions, response rate, number of unique responders, responder
rate and actual revenue. It also includes optional lift over control
group information, which shows the increase in response compared
to the control group.
Offer Performance
by Day
The Offer Performance by Day report shows offer performance for
a specified date or date range. It lists the number of offers given,
number of response transactions, and the response rate during the
specified date or date range.
Unica Campaign V12.0 User Guide | 11 - Unica Campaign reports overview | 350
Report Description
Offer Performance
Comparison
The Offer Performance Comparison report compares the
performance of selected offers. It includes data such as the number
of offers given, number of response transactions, response rate,
number of unique responders, and responder rate. It also includes lift
over control group information, which shows the increase in response
compared to the control group.
Offer Performance
Metrics
The Offer Performance Metrics report compares the performance of
selected offers based on various response attributions, such as Best
Match, Fractional Match and Multiple Match. It also includes optional
lift over control group information and percentage differences
between various attribution rates.
Offer Performance
Summary by
Campaign
The Offer Performance Summary by Campaign report provides a
summary of the performance of selected offers by campaign. It
includes data such as number of offers given, number of response
transactions, response rate, number of unique responders, and
responder rate. It also includes lift over control group information,
which shows the increase in response compared to the control group.
Related concepts
• How to track responses to a campaign (on page 264)
• The Response process (on page 157)
•
Direct responses (on page 272)
•
Attribution methods (on page 276)
Unica Campaign V12.0 User Guide | 11 - Unica Campaign reports overview | 351
IBM® Cognos® report portlets for Unica Campaign
The IBM® Cognos report portlets are provided with the Unica Campaign reports package.
Use the report portlets to analyze response rates and campaign effectiveness.
You can enable and then add pre-defined dashboard portlets to any dashboard that you
create. To manage your dashboards and add portlets to them, click Dashboard > Create
Dashboard.
Table 16. IBM Cognos report portlets for Unica Campaign
Report Description
Unica Campaign
Return on
Investment
Comparison
An IBM Cognos report that compares, at a high level, the ROI of
campaigns created or updated by the user viewing the report.
Unica Campaign
Response Rate
Comparison
An IBM Cognos report that compares the response rates of one or
more campaigns created or updated by the user viewing the report.
Unica Campaign
Revenue
Comparison by Offer
An IBM Cognos report that compares the revenue received to date
per campaign containing offers created or updated by the user
viewing the report.
Offer Responses for
Last 7 Days
An IBM Cognos report that compares the number of responses that
were received over the last 7 days based on each offer created or
updated by the user viewing the report.
Offer Response Rate
Comparison
An IBM Cognos report that compares the response rate by offer
created or updated by the user viewing the report.
Offer Response
Breakout
An IBM Cognos report that shows the active offers created or
updated by the user viewing the report, broken out by status.
Unica Campaign V12.0 User Guide | 11 - Unica Campaign reports overview | 352
Unica Campaign list portlets
The standard Unica Campaign list portlets are available for use on dashboards even if the
reports package for Unica Campaign is not installed.
Table 17. Unica Campaign list portlets
Report Description
My Custom
Bookmarks
A list of links to websites or files created by the user viewing the
report.
My Recent
Campaigns
A list of the most recent campaigns created by the user viewing the
report.
My Recent Sessions A list of the most recent sessions created by the user viewing the
report.
Unica Campaign
Monitor Portlet
A list of the campaigns that have run or are currently running that
were created by the user viewing the report.
Sending reports by email
If your SMTP server is configured to work with Cognos, you can email a report directly from
Unica Campaign.
If you acquired your Cognos license with your products, the option to include a link to the
report is not supported. To use this feature, you must purchase a full license for Cognos.
1.
After the report has finished running, click Keep this version in the Reports toolbar and
select Email Report from the list.
You see the Set the email options page, where you specify the recipients and optional
message text.
2. To send the report as an attachment in the email message, select the Attach the report
checkbox and clear the Include a link to the report checkbox.
Unica Campaign V12.0 User Guide | 11 - Unica Campaign reports overview | 353
3. Click OK.
The request is sent to your email server.
Re-running reports
reportsre-runningrunningreportsReports are generated against the data source so that they reflect the latest data. If you
believe that the data has changed since the report you want to view was last run and want
to view an up-to-date version, you can re-run the report.
Chapter 12. Special characters in Unica
Campaign object names
Some special characters are not supported in any Unica Campaign object names. In
addition, some objects have specific naming restrictions.
Note: If you pass object names to your database (for example, if you use a user variable
that contains a flowchart name), you must ensure that the object name contains only
characters supported by your particular database. Otherwise, you will receive a database
error.
Special characters not supported
The following special characters are not supported in the names of campaigns, flowcharts,
folders, offers, offer lists, schedules, segments, or sessions. These characters are also
not supported in the Audience Level Name and the corresponding field names, which are
defined in Campaign Settings.
Table 18. Special characters not supported
Character Description
% Percent
* Asterisk
? Question mark
| Pipe (vertical bar)
: Colon
, Comma
< Less than symbol
> Greater than symbol
Unica Campaign V12.0 User Guide | 12 - Special characters in Unica Campaign object names | 355
Character Description
& Ampersand
\ Backward slash
/ Forward slash
" Double quotation mark
+ Plus
$ Dollar
Tab Tab
Objects with no naming restrictions
The following objects in Unica Campaign have no restrictions for characters used in their
names.
• custom attribute display names (the internal names do have naming restrictions)
• offer templates
Objects with specific naming restrictions
The following objects in Unica Campaign have specific restrictions on their names.
• Custom attribute internal names
• Audience Level Names and the corresponding field names, which are defined in
Campaign Settings
• Cells
• Derived fields
• User table and field names

Unica Campaign V12.0 User Guide | 12 - Special characters in Unica Campaign object names | 356
For these objects, names must:
• Contain only alphabetic or numeric characters, or the underscore (_) character
• Start with an alphabetic character
For non-Latin-based languages, Unica Campaign supports all of the characters that are
supported by the configured string encoding configured.
Note: Derived field names have additional restrictions.

Chapter 13. Packaging flowchart files for
troubleshooting
If you need help from HCL to troubleshoot a flowchart, you can automatically collect
relevant data to send to the Technical Support.
Only a user with permissions to edit or run a flowchart can perform this procedure. If you do
not have "View logs" permission, you cannot select the log-related entries in the selection
window.
Perform this task to package flowchart data files so you can send them to the Technical
Support. You can specify which items to include and indicate date ranges to limit data. The
data is written to the folder you choose, and the contents can be compressed and sent to
the Technical Support.
1. Open a flowchart in Edit mode.
2. Select Admin > Collect flowchart data.
3.
In the Create Data Package for Troubleshooting window, type a name for the package
or leave the default name.
The package name will be used to create a subfolder in which the selected data items
will be written.
4. Click Browse and select the folder where the data package will be saved.
5.
Select the items that you want to include in the package or check Select default items
to select all data that is commonly required. Some items, when selected, may allow
additional information to be entered.
For more information, see Options for packaging flowchart data (on page 358).
6. Click OK to create the package.
7. Send the data package to Technical Support by email or use the method
recommended by your support representative. Technical Support accepts

Unica Campaign V12.0 User Guide | 13 - Packaging flowchart files for troubleshooting | 358
uncompressed data (the entire package subdirectory), but you may optionally
compress, encrypt, and package the files into a single file before sending them.
In addition to the data items you select, Unica Campaign creates a summary file that
identifies:
• Current date and time
• Version and build numbers of the software
• Your user name
• The selections that you included in the package
• Campaign name and ID
• Flowchart name and ID
Options for packaging flowchart data
Select Admin > Collect flowchart data to package flowchart files to send to Technical
Support. When prompted, specify the options described in this topic.
Table 19. Options for packaging flowchart data
Item Description of what is included
Additional specifications
you may set
Select default
items check box
All data commonly required
for troubleshooting flowcharts,
including all of the listed items
except log files and the contents
of the user table and contact
history table.
Flowchart The flowchart .ses file. Include run results? Optionally
include or exclude the runtime
data files, also called the
"underscore" files.

Unica Campaign V12.0 User Guide | 13 - Packaging flowchart files for troubleshooting | 359
Item Description of what is included
Additional specifications
you may set
Flowchart log The flowchart .log file. Optionally set start and end time
stamps. If you do not set them, the
default is the entire log file.
Listener log The unica_aclsnr.log file. Optionally set start and end time
stamps. If you do not set them, the
default is the entire log file.
Startup log The AC_sess.log file. Optionally set start and end time
stamps. If you do not set them, the
default is the entire log file.
Web message
log
The AC_web.log file. Optionally set start and end time
stamps. If you do not set them, the
default is the entire log file.
Unica Campaign
configuration
The .config file, which lists
configuration properties and
settings from your Unica
Campaign environment to help
troubleshooting the flowchart.
Unica Campaign
custom
attributes
The
customcampaignattributes.dat
file, which lists attribute name and
value pairs for Unica Campaign
custom attributes. Only entries
that are related to the current
campaign are included.
Cell custom
attributes
The customcellattributes.dat
file, which lists attribute name and
value pairs for Unica Campaign

Unica Campaign V12.0 User Guide | 13 - Packaging flowchart files for troubleshooting | 360
Item Description of what is included
Additional specifications
you may set
cell custom attributes. Only entries
that are related to the current
campaign are included.
Offer definitions All rows are included for each of
the following offer-related system
tables:UA_AttributeDef.dat,
UA_Folder.dat, UA_Offer.dat,
UA_OfferAttribute.dat,
UA_OfferList.dat,
UA_OfferListMember.dat,
UA_OfferTemplate.dat,
UA_OfferTemplAttr.dat,
UA_OfferToProduct.dat,
UA_Product.dat,
UA_ProductIndex.dat
Target cell
spreadsheet
data
The targetcellspreadsheet.dat
file, which includes data from
UA_TargetCells for the entire
target cell spreadsheet. Includes
data for the current campaign, in
column/row-delimited text format.
Custom macro
definitions
The custommacros.dat file,
which includes the following
fields from UA_CustomMacros,
in column/row format: Name,
FolderID, Description,
Expression, ExpressionType,
DataScrName, DataVarType,
DataVarNBytes, CreateDate,

Unica Campaign V12.0 User Guide | 13 - Packaging flowchart files for troubleshooting | 361
Item Description of what is included
Additional specifications
you may set
CreatedBy, UpdateDate, UPdateBy,
PolicyIS, ACLID
System table
mapping
The systablemapping.xml
file. Includes all system table
mappings, including the data
source.
+ Include
system table
contents
When you select this option, it
expands to list all system tables.
Select each system table to
include. The entire table will
be included (all rows and all
columns).
If you do not select any sub-
options, the package will not
include any system tables.
+ Include
contact history
tables
When you select this option, it
expands to show the contact
history and detailed contact
history tables for each audience
level.
For each set you select, the
package will include the contact
history and detailed contact
history records for that audience
level.
You can optionally set start and
end time stamps. If you do not set
them, the default is all records.
If you do not select a suboption,
the package will not contain any
contact history table information.
+ Include
response history
tables
When you select this option, it
expands to show response history
tables for all audience levels.
For each table you select, the
package will include the response

Unica Campaign V12.0 User Guide | 13 - Packaging flowchart files for troubleshooting | 362
Item Description of what is included
Additional specifications
you may set
history records for that audience
level.
For each table you select, you can
optionally set start and end time
stamps. If you do not set them, the
default is all records.
If you do not select a table, the
package will not contain any
response history table information.
+ Include user
table contents
When you select this option, it
expands to show the user table
contents that you can select for
the package.
Select the user tables from the
flowchart to include.
If you do not select any, the
package will not include any user
table contents.
For each user table that you select,
you can optionally set maximum
number of rows to include. If you
do not set a maximum number of
rows, the package will include the
entire table.
+ Include
strategic
segments
When you select this option, it
expands to show all the strategic
segments that you can select for
the package.
Select the segment data for
each strategic segment from the
flowchart that you want to include.
+ Include stack
trace files
Option available for UNIX versions
only.
Select the stack trace files
that you want to include in the
package. If you do not select any

Unica Campaign V12.0 User Guide | 13 - Packaging flowchart files for troubleshooting | 363
Item Description of what is included
Additional specifications
you may set
When you select this option, it
expands to show the list of stack
trace files (*.stack) in the same
directory as unica_aclsnr.log.
sub options, the package will not
include any stack trace files.
