
IBM SPSS Collaboration and Deployment
Services Repository
8.4
Installation and Conguration Guide
IBM

Note
Before using this information and the product it supports, read the information in “Notices” on page
77.
Product Information
This edition applies to version 8, release 4, modication 0 of IBM
®
SPSS
®
Collaboration and Deployment Services and to
all subsequent releases and modications until otherwise indicated in new editions.
©
Copyright International Business Machines Corporation 2000, 2022.
US Government Users Restricted Rights – Use, duplication or disclosure restricted by GSA ADP Schedule Contract with
IBM Corp.

Contents
Chapter1.Overview.............................................................................................. 1
IBM SPSS Collaboration and Deployment Services ................................................................................... 1
Collaboration.......................................................................................................................................... 1
Deployment............................................................................................................................................ 2
System architecture.....................................................................................................................................2
IBM SPSS Collaboration and Deployment Services Repository ...........................................................3
IBM SPSS Deployment Manager ........................................................................................................... 3
IBM SPSS Collaboration and Deployment Services Deployment Portal ..............................................4
Execution servers................................................................................................................................... 4
Scoring server......................................................................................................................................... 5
License tracking........................................................................................................................................... 5
Chapter2.Installation...........................................................................................7
Pre-installation.............................................................................................................................................7
Planning your installation.......................................................................................................................7
Host system requirements..................................................................................................................... 8
Application server...................................................................................................................................9
Database...............................................................................................................................................12
Installation and conguration................................................................................................................... 18
Installation and conguration..............................................................................................................18
Cluster conguration............................................................................................................................ 23
Post-installation.........................................................................................................................................25
Starting the repository server.............................................................................................................. 25
Verifying connectivity........................................................................................................................... 27
Managing the database password....................................................................................................... 27
JDBC drivers......................................................................................................................................... 28
IBM SPSS products compatibility........................................................................................................ 29
Dockerized installation.............................................................................................................................. 29
Uninstalling................................................................................................................................................ 33
Chapter3.Migration............................................................................................ 35
Installing with a copy of the repository database.....................................................................................35
Installing with an existing repository database........................................................................................ 36
Migrating to a different database.............................................................................................................. 36
Additional migration considerations......................................................................................................... 37
Migrating passwords............................................................................................................................ 37
JMS store migration on WebSphere.................................................................................................... 38
Migrating notication templates..........................................................................................................38
Migrating JRE keystore les.................................................................................................................38
Chapter4.Package management......................................................................... 41
Installing packages....................................................................................................................................41
Chapter5.Single sign-on..................................................................................... 43
Directory conguration for single sign-on.................................................................................................44
OpenLDAP.............................................................................................................................................44
Active Directory.................................................................................................................................... 45
Kerberos server conguration................................................................................................................... 46
Application server conguration for single sign-on.................................................................................. 46
WebSphere........................................................................................................................................... 46
iii
JBoss.................................................................................................................................................... 47
Updating Windows registry for single sign-on.......................................................................................... 48
Conguring one-way trust relationships...................................................................................................48
Server Process Credential conguration...................................................................................................49
Conguring browsers for single sign-on....................................................................................................51
Forwardable tickets and IBM SPSS Deployment Manager.......................................................................52
Chapter6.Application context roots.................................................................... 53
Conguring application context roots....................................................................................................... 54
Adding a context root to the URL Prex...............................................................................................54
Updating context roots for WebSphere............................................................................................... 55
Updating context roots for JBoss.........................................................................................................55
Chapter7.FIPS 140–2 compliance...................................................................... 57
Repository conguration........................................................................................................................... 57
Desktop client conguration......................................................................................................................58
Browser conguration............................................................................................................................... 58
Chapter8.Using SSL to secure data transfer........................................................ 59
How SSL works...........................................................................................................................................59
Securing client/server and server-server communications with SSL.......................................................59
Installing unlimited strength encryption............................................................................................. 60
Adding the certicate to client keystore (for connections to the repository).....................................60
Importing the certicate le for browser-based client connections..................................................61
Instructing users to enable SSL........................................................................................................... 61
Conguring the URL prex ........................................................................................................................ 61
Securing LDAP with SSL ............................................................................................................................61
Conguring SSL for application servers.................................................................................................... 62
Chapter9.Logging...............................................................................................65
Chapter10.Example: WebSphere cluster installation and conguration............... 67
Notices................................................................................................................77
Privacy policy considerations ................................................................................................................... 78
Trademarks................................................................................................................................................ 78
Index.................................................................................................................. 81
iv

Chapter 1. Overview
IBM SPSS Collaboration and Deployment Services
IBM SPSS Collaboration and Deployment Services is an enterprise-level application that enables
widespread use and deployment of predictive analytics.
IBM SPSS Collaboration and Deployment Services provides centralized, secure, and auditable storage of
analytical assets and advanced capabilities for management and control of predictive analytic processes,
as well as sophisticated mechanisms for delivering the results of analytical processing to users. The
benets of IBM SPSS Collaboration and Deployment Services include:
• Safeguarding the value of analytical assets
• Ensuring compliance with regulatory requirements
• Improving the productivity of analysts
• Minimizing the IT costs of managing analytics
IBM SPSS Collaboration and Deployment Services allows you to securely manage diverse analytical
assets and fosters greater collaboration among those developing and using them. Furthermore, the
deployment facilities ensure that people get the information they need to take timely, appropriate action.
Collaboration
Collaboration refers to the ability to share and reuse analytic assets efciently, and is the key to
developing and implementing analytics across an enterprise.
Analysts need a location in which to place les that should be made available to other analysts or
business users. That location needs a version control implementation for the les to manage the evolution
of the analysis. Security is required to control access to and modication of the les. Finally, a backup and
restore mechanism is needed to protect the business from losing these crucial assets.
To address these needs, IBM SPSS Collaboration and Deployment Services provides a repository for
storing assets using a folder hierarchy similar to most le systems. Files stored in the IBM SPSS
Collaboration and Deployment Services Repository are available to users throughout the enterprise,
provided those users have the appropriate permissions for access. To assist users in nding assets, the
repository offers a search facility.
Analysts can work with les in the repository from client applications that leverage the service interface
of IBM SPSS Collaboration and Deployment Services. Products such as IBM SPSS Statistics and IBM
SPSS Modeler allow direct interaction with les in the repository. An analyst can store a version of a le
in development, retrieve that version at a later time, and continue to modify it until it is nalized and
ready to be moved into a production process. These les can include custom interfaces that run analytical
processes allowing business users to take advantage of an analyst's work.
The use of the repository protects the business by providing a central location for analytical assets that
can be easily backed-up and restored. In addition, permissions at the user, le, and version label levels
control access to individual assets. Version control and object version labels ensure the correct versions
of assets are being used in production processes. Finally, logging features provide the ability to track le
and system modications.
©
Copyright IBM Corp. 2000, 2022 1
Deployment
To realize the full benet of predictive analytics, the analytic assets need to provide input for business
decisions. Deployment bridges the gap between analytics and action by delivering results to people and
processes on a schedule or in real time.
In IBM SPSS Collaboration and Deployment Services, individual les stored in the repository can be
included in processing jobs. Jobs dene an execution sequence for analytical artifacts and can be created
with IBM SPSS Deployment Manager. The execution results can be stored in the repository, on a le
system, or delivered to specied recipients. Results stored in the repository can be accessed by any
user with sufcient permissions using the IBM SPSS Collaboration and Deployment Services Deployment
Portal interface. The jobs themselves can be triggered according to a dened schedule or in response to
system events.
In addition, the scoring service of IBM SPSS Collaboration and Deployment Services allows analytical
results from deployed models to be delivered in real time when interacting with a customer. An analytical
model congured for scoring can combine data collected from a current customer interaction with
historical data to produce a score that determines the course of the interaction. The service itself can
be leveraged by any client application, allowing the creation of custom interfaces for dening the process.
The deployment facilities of IBM SPSS Collaboration and Deployment Services are designed to easily
integrate with your enterprise infrastructure. Single sign-on reduces the need to manually provide
credentials at various stages of the process. Moreover, the system can be congured to be compliant
with Federal Information Processing Standard Publication 140-2.
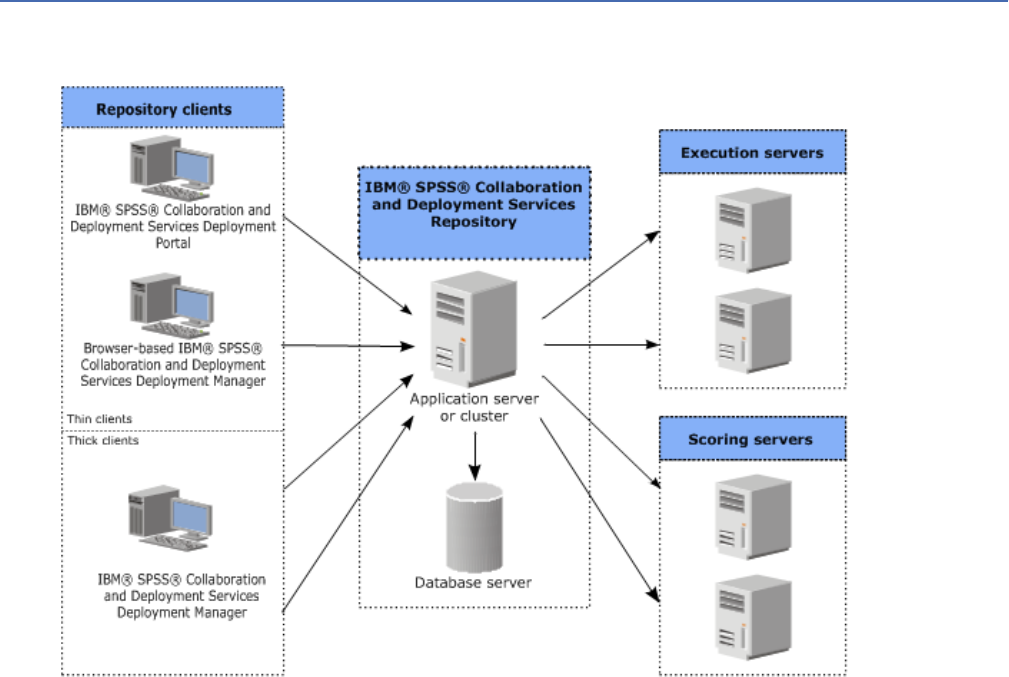
System architecture
In general, IBM SPSS Collaboration and Deployment Services consists of a single, centralized IBM SPSS
Collaboration and Deployment Services Repository that serves a variety of clients, using execution servers
to process analytical assets.
Figure 1. IBM SPSS Collaboration and Deployment Services Architecture
IBM SPSS Collaboration and Deployment Services consists of the following components:
2
IBM SPSS Collaboration and Deployment Services Repository: Installation and Conguration Guide
• IBM SPSS Collaboration and Deployment Services Repository for analytical artifacts
• IBM SPSS Deployment Manager
• IBM SPSS Collaboration and Deployment Services Deployment Portal
• Browser-based IBM SPSS Deployment Manager
IBM SPSS Collaboration and Deployment Services Repository
The repository provides a centralized location for storing analytical assets, such as models and data. The
repository requires an installation of a relational database, such as IBM Db2, Microsoft SQL Server, or
Oracle.
The repository includes facilities for:
• Security
• Version control
• Searching
• Auditing
Conguration options for the repository are dened using the IBM SPSS Deployment Manager or the
browser-based IBM SPSS Deployment Manager. The contents of the repository are managed with
the Deployment Manager and accessed with the IBM SPSS Collaboration and Deployment Services
Deployment Portal.
IBM SPSS Deployment Manager
IBM SPSS Deployment Manager is a client application for IBM SPSS Collaboration and Deployment
Services Repository that enables users to schedule, automate, and execute analytical tasks, such as
updating models or generating scores.
The client application allows a user to perform the following tasks:
• View any existing les within the system, including reports, SAS syntax les, and data les
• Import les into the repository
• Schedule jobs to be executed repeatedly using a specied recurrence pattern, such as quarterly or
hourly
• Modify existing job properties
• Determine the status of a job
• Specify email notication of job status
In addition, the client application allows users to perform administrative tasks for IBM SPSS Collaboration
and Deployment Services, including:
• Manage users
• Congure security providers
• Assign roles and actions
Browser-based IBM SPSS Deployment Manager
The browser-based IBM SPSS Deployment Manager is a thin-client interface for performing setup and
system management tasks, including:
• Setting system conguration options
• Conguring security providers
• Managing MIME types
Non-administrative users can perform any of these tasks provided they have the appropriate actions
associated with their login credentials. The actions are assigned by an administrator.
Chapter 1. Overview
3

You typically access the browser-based IBM SPSS Deployment Manager at the following URL:
http://<host IP address>:<port>/security/login
Note: An IPv6 address must be enclosed in square brackets, such as [3ffe:2a00:100:7031::1].
If your environment is congured to use a custom context path for server connections, include that path
in the URL.
http://<host IP address>:<port>/<context path>/security/login
IBM SPSS Collaboration and Deployment Services Deployment Portal
IBM SPSS Collaboration and Deployment Services Deployment Portal is a thin-client interface for
accessing the repository. Unlike the browser-based IBM SPSS Deployment Manager, which is intended
for administrators, IBM SPSS Collaboration and Deployment Services Deployment Portal is a web portal
serving a variety of users.
The web portal includes the following functionality:
• Browsing the repository content by folder
• Opening published content
• Running jobs and reports
• Generating scores using models stored in the repository
• Searching repository content
• Viewing content properties
• Accessing individual user preferences, such as email address and password, general options,
subscriptions, and options for output le formats
You typically access the home page at the following URL:
http://<host IP address>:<port>/peb
Note: An IPv6 address must be enclosed in square brackets, such as [3ffe:2a00:100:7031::1].
If your environment is congured to use a custom context path for server connections, include that path
in the URL.
http://<host IP address>:<port>/<context path>/peb
Execution servers
Execution servers provide the ability to execute resources stored within the repository. When a resource
is included in a job for execution, the job step denition includes the specication of the execution server
used for processing the step. The execution server type depends on the resource.
Execution servers currently supported by IBM SPSS Collaboration and Deployment Services include:
• Remote Process. A remote process execution server allows processes to be initiated and monitored
on remote servers. When the process completes, it returns a success or failure message. Any machine
acting as a remote process server must have the necessary infrastructure installed for communicating
with the repository.
Note: The IBM SPSS Collaboration and Deployment Services Remote Process Server has a default
thread pool core size of 16, which allows a maximum of 16 concurrent jobs to be executed on a single
remote process server. Any concurrent jobs in excess of 16 must wait in the queue until the available
thread pool has free resources. To manually congure the IBM SPSS Collaboration and Deployment
Services Remote Process Server thread pool core size, add the following JVM option (with a user
dened value) to the remote process server's startup script: prms.thread.pool.coresize=<user
defined value>
4
IBM SPSS Collaboration and Deployment Services Repository: Installation and Conguration Guide

For more information regarding the start-up script, see the "Starting and stopping the remote process
server" section in the IBM SPSS Collaboration and Deployment Services Remote Process Server guide.
Execution servers that process other specic types of resources can be added to the system by installing
the appropriate adapters. For information, consult the documentation for those resource types.
During job creation, assign an execution server to each step included in the job. When the job executes,
the repository uses the specied execution servers to perform the corresponding analyses.
Scoring server
IBM SPSS Collaboration and Deployment Services Scoring Service is also available as a separately
deployable application, the Scoring Server.
The Scoring Server improves deployment flexibility in several key areas:
• Scoring performance can be scaled independently from other services
• Scoring Server(s) can be independently congured to dedicate computing resources to one or any
number IBM SPSS Collaboration and Deployment Services scoring congurations
• Scoring Server operating system and processor architecture does not need match the IBM SPSS
Collaboration and Deployment Services Repository or other Scoring Servers
• Scoring Server application server does not need match the application server used for IBM SPSS
Collaboration and Deployment Services Repository or other Scoring Servers
License tracking
When you use IBM SPSS Collaboration and Deployment Services, license usage is tracked and logged at
regular intervals. The license metrics that are logged are AUTHORIZED_USER and CONCURRENT_USER,
and the type of metric that is logged depends on the type of license that you have for IBM SPSS
Collaboration and Deployment Services.
The log les that are produced can be processed by the IBM License Metric Tool, from which you can
generate license usage reports.
The license log les are created in the same directory where IBM SPSS
Collaboration and Deployment Services log les are recorded (by default,
<UserProfile>\AppData\Roaming\SPSSInc\Deployment Manager).
Chapter 1. Overview
5
6IBM SPSS Collaboration and Deployment Services Repository: Installation and Conguration Guide

Chapter 2. Installation
This chapter provides the information about installing IBM SPSS Collaboration and Deployment Services
Repository. The process consists of a number of pre-installation, installation and conguration, and
post-installation steps.
• Pre-installation steps for setting up the application environment include determining the system
requirements based on the installation type and projected system use, provisioning the machine(s)
to run the application server or server cluster, making sure the server(s) meet all hardware and software
requirements, conguring the application server or cluster, and conguring the database. It may also
be necessary to migrate the content from the previous installation to the new database using database
copy tools.
• Installation and conguration steps include installing the application les on the host system using
IBM Installation Manager and subsequent IBM SPSS Collaboration and Deployment Services Repository
conguration to run with the designated application server or server cluster and the repository
database.
• Post-installation steps include starting IBM SPSS Collaboration and Deployment Services Repository,
verifying connectivity, conguring autostart, installing additional database drivers, optional components,
and content adapters for other IBM SPSS products.
Note that in some environments IBM SPSS Collaboration and Deployment Services Repository
deployment may also require a number of optional enterprise conguration steps related to the
application security, access control, and notication capabilities.
• Email and RSS notications. For more information, see the corresponding chapter of the administrator's
guide.
• Secure repository connection. See the topic Chapter 8, “Using SSL to secure data transfer,” on page 59
for more information.
• FIPS 140-2 security and secure repository database connection. See the topic Chapter 7, “FIPS 140–2
compliance,” on page 57 for more information.
• Single sign-on. See the topic Chapter 5, “Single sign-on,” on page 43 for more information.
Pre-installation
Before you install IBM SPSS Collaboration and Deployment Services, you must set up the resources in
your environment so that the components can operate. For example, you must create a database for the
content repository, and congure an application server.
Use the following checklist to guide you through the pre-installation process:
• Determine the installation type based on projected system use and the corresponding system
requirements.
• Provision the machine(s) to run the application server or server cluster. Make sure the server(s) meet all
hardware and software requirements.
• Verify installing user authority and host le system permissions.
• Congure the application server or cluster.
• Congure the database. If necessary, migrate the content from the previous installation to the new
database using database copy tools. See the topic Chapter 3, “Migration,” on page 35 for more
information.
Planning your installation
Before installing IBM SPSS Collaboration and Deployment Services Repository, you must determine the
installation type in order to be able to set up the application environment. IBM SPSS Collaboration and
©
Copyright IBM Corp. 2000, 2022 7

Deployment Services Repository is an enterprise-level system that requires integration with multiple
IBM Corp. and third-party components and technologies. In its most basic conguration, it requires a
preexisting installation of an application server to run the Web services that enable the application's
functionality, and a relational database, such as IBM Db2 UDB, Oracle, or Microsoft SQL Server to store
analytical artifacts and application settings.
Use the following guidelines when planning your installation:
• In operational environments, the repository must be installed on a server-grade system. See the topic
“Host system requirements” on page 8 for more information. Running the repository database on a
separate dedicated server may improve overall system performance.
• In enterprise environments with large processing loads (for example, producing real-time scores) and
a greater number of users, scaling up with an application server cluster rather than a stand-alone
application server is recommended.
• While the repository can be installed and run on a desktop workstation or a notebook for educational
and demonstration purposes, it cannot be run on such systems in a production environment.
When planning your IBM SPSS Collaboration and Deployment Services Repository deployment, you must
also consider the additional requirements of a production environment. For example, to enable the
processing of analytical artifacts and scoring, it may be necessary to set up execution servers, such as
IBM SPSS Statistics and IBM SPSS Modeler servers, which may also require dedicated hardware and
network resources. To enable the email notications functionality, an SMTP server must be available. It
may also be necessary to congure repository authentication through an external directory system and
single sign-on with a Kerberos server.
Host system requirements
Before installing IBM SPSS Collaboration and Deployment Services Repository, verify that the following
hardware and software requirements have been met. If you are installing with an application server
cluster, the requirements must be met on all nodes.
For current system requirements information, refer to the software product compatibility reports
on the IBM Technical Support site at: http://publib.boulder.ibm.com/infocenter/prodguid/v1r0/clarity/
softwareReqsForProduct.html
Important: The specied amount of RAM is the minimum required to successfully install and start
the repository. Depending on the types of analytical processing performed by IBM SPSS Collaboration
and Deployment Services, runtime memory requirements may be signicantly higher and use a large
portion of RAM typically installed on a server-grade system. Note that installing repository adapters for
other IBM SPSS products, such as IBM SPSS Modeler adapter, requires additional dedicated memory.
It is recommended to consult the application server documentation when estimating for memory
requirements for your selected application server.
If installing into WebSphere, the WebSphere prole used with IBM SPSS Collaboration and Deployment
Services must be congured to run with Java 7 SDK or above. See “WebSphere” on page 10.
Additional requirements
IBM Installation Manager (for all operating systems)
IBM Installation Manager 1.9.1 or higher must be installed and congured to use a repository that
contains IBM SPSS Collaboration and Deployment Services installation les.
If IBM Installation Manager it is not already present on the system, it will be automatically installed when
you launch the IBM SPSS Collaboration and Deployment Services installation. If you have an older version
of IBM Installation Manager, you will be required to update it as part of the installation.
If IBM Installation Manager is not automatically installed and it is not present on the system, download
and install IBM Installation Manager from the IBM Corp. support site (http://www.ibm.com/support
).
For download location and user information, see the IBM Installation Manager documentation: http://
www-01.ibm.com/support/knowledgecenter/SSDV2W/welcome.
8
IBM SPSS Collaboration and Deployment Services Repository: Installation and Conguration Guide

UNIX and Linux
• X Window System Terminal software is required for IBM SPSS Collaboration and Deployment Services
Repository GUI-based installation. Alternatively, it may be possible to run the server in headless mode
(Java command line option -Djava.awt.headless=true) or use PJA (Pure Java AWT) Toolkit.
User and le system permissions
As a general rule, you should install and congure the repository with the same user permissions that
were used to install and congure the application server. See seeing your application server vendor
documentation for information about supporting installations as a non-root/non-administrator user.
The user installing the repository must have the following permissions on the host system:
• Write permissions to the installation directory and subdirectories.
• Write permissions to the deployment and conguration directories and read and execute permissions to
other application server directories.
• When the repository is installed with an application server cluster, the repository installation directory
on the machine hosting the management prole (WebSphere traditional prole or Liberty prole) must
be shared to be available to all nodes of the cluster.
Note: When installing IBM SPSS content adapters, you must use the same user that was used for IBM
SPSS Collaboration and Deployment Services Repository installation.
Important: If you install IBM SPSS Collaboration and Deployment Services Repository on Windows by
using an administrator account, you will need to use the administrator privilege to run all accompanying
utilities and scripts, such as the conguration utility.
Virtualization
IBM SPSS Collaboration and Deployment Services Repository or client components can be deployed into
virtualized environments provided by third-party software. For example, in order to simplify deployment
of a development or testing environment, a system administrator can congure a virtual server on which
to install IBM SPSS Collaboration and Deployment Services. The virtual machines hosting IBM SPSS
Collaboration and Deployment Services components must meet minimum system requirements. See the
topic “Host system requirements” on page 8
for more information.
Assuming that the congured virtualized environment meets the minimum system requirements, no
performance degradation of IBM SPSS Collaboration and Deployment Services Repository or client
installations is expected. It is important to note, however, that virtualized systems might share available
physical resources, and resource contention on systems with a heavy processing load can cause
performance degradation of the hosted IBM SPSS Collaboration and Deployment Services installations.
Note that additional restrictions on deployment into virtualized environments may exist if the application
server used to run the repository cannot be deployed into these environments.
Application server
Before you install IBM SPSS Collaboration and Deployment Services Repository, a supported application
server or a server cluster must be installed and accessible.
You can use either the single-server, base IBM WebSphere Application Server included with IBM
SPSS Collaboration and Deployment Services or any other supported application server. The included
application server is licensed only for use with IBM SPSS Collaboration and Deployment Services
Repository and can't be used in a cluster environment. For more information about IBM WebSphere,
see the product documentation.
If the repository is reinstalled, re-create the application server, for example, by deploying a new
WebSphere prole. Make sure that the latest versions of vendor patches are applied to application server
installations. When you install the IBM SPSS Collaboration and Deployment Services Repository with an
application server cluster, all cluster nodes must have the same version of the application server and run
on the same operating system.
Chapter 2. Installation
9
The application server must be set up with an appropriate JRE. Verify that you are running Java in 64-bit
mode and that your application server is working properly in 64-bit mode before you attempt to install
IBM SPSS Collaboration and Deployment Services Repository. For example, if you are using JBoss and
have both a 32-bit and a 64-bit JDK installed, congure the JVM to run in 64-bit mode by specifying the
-d64 option for the Java command. For deployment to WebSphere Liberty prole, the IBM JRE is bundled
with IBM SPSS Collaboration and Deployment Services. For more information, see the application server
vendor documentation.
Important: To support connections from web browsers that have disabled cookies, you must enable
URL rewriting for your application server. In WebSphere, for example, this setting is available in the
administration console at Application servers > server1 > Web container > Session management >
Enable URL rewriting. For more information, see your application server documentation.
Restriction: URL rewriting is not supported by features that were deprecated in past releases. Those
features might require that cookies be enabled.
WebSphere
IBM SPSS Collaboration and Deployment Services Repository can be run with a stand-alone WebSphere
server, a managed server, or a cluster.
Before installing with a stand-alone WebSphere server
• Create a new prole for every installation using the default application prole template.
Before installing with a managed WebSphere server
• Create the deployment management prole.
• Start management prole.
• Create the managed prole.
• Add a managed node to the management prole.
• Using WebSphere console, create the managed server based on the managed node.
Before installing with a WebSphere cluster
• Create the cluster and make sure it is accessible through the load balancer.
Before installing with a WebSphere Application Server Network Deployment
topology
Increase the default memory conguration for the WebSphere Deployment Manager (dmgr) process and
the WebSphere Nodeagent processes. The actual memory requirements depend on your system. For
example, a minimum memory conguration would be to increase the memory as follows:
• For the WebSphere Deployment Manager process, increase the minimum heap size to 512 and the
maximum heap size to 1024
• For the WebSphere Nodeagent processes, increase the minimum heap size to 256 and the maximum
heap size to 512
Note: IBM SPSS Collaboration and Deployment Services must be congured to run with Java 7 SDK or
later. The latest WebSphere 8.5.5 and WebSphere 9 x packs already bundle the Java 8 SDK, and the Java
8 SDK is the only supported version of WebSphere 9. So no extra conguration is needed for Java SDK
when these versions of WebSphere are used.
Conguring your prole to run with Java
Note: Since the latest x packs of WebSphere 8.5.5 already bundle the Java SDK 8, this section only
applies to WebSphere 8.5.5.8 or prior x levels.
10
IBM SPSS Collaboration and Deployment Services Repository: Installation and Conguration Guide

Before installing IBM SPSS Collaboration and Deployment Services into WebSphere, the WebSphere
prole used with IBM SPSS Collaboration and Deployment Services must be congured to run with Java 7
SDK or later as follows.
1. Download and install IBM WebSphere SDK Java Technology Edition Version 7.0 into the
WebSphere 8.5.x installation. See http://www-01.ibm.com/support/knowledgecenter/SSEQTP_8.5.5/
com.ibm.websphere.installation.base.doc/ae/tins_installation_jdk7.html.
2. Once installed, congure the WebSphere prole for IBM SPSS Collaboration and Deployment Services
to use the Java 7 SDK. See http://www-01.ibm.com/support/knowledgecenter/SSAW57_8.5.5/
com.ibm.websphere.nd.multiplatform.doc/ae/rxml_managesdk.html.
3. WebSphere allows the SDK to be congured globally (all proles) or per-prole. To set Java 7 SDK for a
specic WebSphere prole:
From the <app_server_root>/bin directory:
a. Step 1: (optional) View a list of available SDK names for the product installation (conrm Java 7
SDK is present). For example:
C:\IBM\WebSphere\AppServer\bin> managesdk -listAvailable
CWSDK1003I: Available SDKs :
CWSDK1005I: SDK name: 1.6_64
CWSDK1005I: SDK name: 1.7_64
CWSDK1001I: Successfully performed the requested managesdk task.
b. Step 2: Set the prole used for IBM SPSS Collaboration and Deployment Services to the Version 7.0
SDK. For example:
C:\IBM\WebSphere\AppServer\bin>managesdk -enableProfile -profileName CADS -sdkname 1.7_64
-enableServers
CWSDK1017I: Profile CADS now enabled to use SDK 1.7_64.
CWSDK1001I: Successfully performed the requested managesdk task.
Or to set Java 7 SDK for all WebSphere proles (and any subsequent proles created):
The following example demonstrates the sequence of commands to use for listing available SDKs,
changing the default SDK to a Version 7.0 SDK and, if proles exist already, enabling the proles to use
the Version 7.0 SDK.
a. Step 1: (optional) View a list of available SDK names for the product installation (conrm Java 7
SDK is present):
C:\IBM\WebSphere\AppServer\bin> managesdk -listAvailable
CWSDK1003I: Available SDKs :
CWSDK1005I: SDK name: 1.6_64
CWSDK1005I: SDK name: 1.7_64
CWSDK1001I: Successfully performed the requested managesdk task.
b. Step 2: Set the command default to the Version 7.0 SDK:
C:\IBM\WebSphere\AppServer\bin>managesdk -setCommandDefault -sdkname 1.7_64
CWSDK1021I: The command default SDK name is now set to 1.7_64.
CWSDK1001I: Successfully performed the requested managesdk task.
c. Step 3: Set the new prole default to the Version 7.0 SDK:
C:\IBM\WebSphere\AppServer\bin>managesdk -setNewProfileDefault -sdkname 1.7_64
CWSDK1022I: New profile creation will now use SDK name 1.7_64.
CWSDK1001I: Successfully performed the requested managesdk task.
d. Step 4: If proles already exist, enable the proles to use the Version 7.0 SDK:
C:\IBM\WebSphere\AppServer\bin>managesdk -enableProfileAll -sdkname 1.7_64 -enableServers
CWSDK1017I: Profile DEPLOYMENT now enabled to use SDK 1.7_64.
CWSDK1001I: Successfully performed the requested managesdk task.
Chapter 2. Installation
11

To change federated proles in a Network Deployment installation, the deployment manager must be
running. The managesdk command updates the master conguration repository. After the command
runs, a synchronization operation must occur before the new SDK can be used for the federated proles.
JBoss
IBM SPSS Collaboration and Deployment Services Repository can be run only with a stand-alone JBoss
server.
Before installing with JBoss
• Create a new server for every repository installation.
Note:
• It is recommended that only one instance of the server be run. If multiple instances of the repository
must be set up on a single machine using JBoss, consult the JBoss documentation.
• To avoid errors at repository startup, it is recommended that JBoss application server installation path
not contain any spaces, for example, as in c:\jboss-eap-7.1.
• If you are running JBoss in an IPv6 environment, some additional application server conguration is
needed. For more information, see the Red Hat JBoss documentation.
Liberty
IBM SPSS Collaboration and Deployment Services Repository can be run only with a IBM WebSphere
Liberty stand-alone server or a cluster.
Before installing with a Liberty cluster
1. Create a WebSphere Liberty cluster and make sure it's accessible through the load balancer.
2. Congure the le transfer so it writes white list entries by adding the following entries to server.xml
for each Collective Member in the cluster:
<remoteFileAccess>
<writeDir>${wlp.usr.dir}</writeDir>
<writeDir>${server.config.dir}</writeDir>
</remoteFileAccess>
3. For WebSphere Liberty cluster on Windows, set up RXA for Liberty collective operations. For more
information about how to do this, see the WebSphere Liberty documentation.
Database
Before installing IBM SPSS Collaboration and Deployment Services Repository, a database must be
running and accessible. A connection to the database is required in order to establish the necessary
control tables and infrastructure.
The database and the IBM SPSS Collaboration and Deployment Services Repository do not need to be
installed on the same server, but some conguration information is necessary to ensure connectivity.
During the installation, you will be prompted for the database server name, port number, user name and
password, and the name of the database to use for information storage and retrieval.
Important: You must manually create the database before installation. Any valid database name can be
used, but if a previously created database does not exist, the installation will not continue.
Database permissions
The following table identies the general database permissions that are required for a user to install,
apply xes to, update, and run IBM SPSS Collaboration and Deployment Services Repository:
12
IBM SPSS Collaboration and Deployment Services Repository: Installation and Conguration Guide

Table 1. User permissions for repository maintenance tasks
Permission
Installation, Fix Pack
Application, Migration Run Time
Alter any schema Required Optional
Create function Required Optional
Create procedure Required Optional
Create table Required Optional
Create view Required Optional
Create XML schema
collection
Required Optional
Connect Required Required
Delete Required Required
Execute Required Required
Insert Required Required
References Required Required
Select Required Required
Update Required Required
For example, when you install the repository, you need all of the permissions in the table. After
installation, many of the permissions can be removed before you start and run the repository. To apply a
x pack, those permissions need to be reinstated.
The exact names of these permissions vary depending on the database, and other permissions might be
needed. The following examples illustrate the permissions for specic database systems.
Example: Db2 11.1 for Linux, Windows, and UNIX
• BINDADD
• CONNECT
• CREATETAB
• CREATE_EXTERNAL_ROUTINE
• CREATE_NOT_FENCED_ROUTINE
• DATAACCESS
• EXPLAIN
• IMPLICIT_SCHEMA
• DBADM
Note: DBADM provides explicit create schema privilege that is needed for conguring IBM SPSS
Collaboration and Deployment Services Repository.
Example: Microsoft SQL Server 2016
• ALTER ANY SCHEMA
• CONNECT
• CREATE FUNCTION
• CREATE PROCEDURE
Chapter 2. Installation
13

• CREATE TABLE
• CREATE VIEW
• CREATE XML SCHEMA COLLECTION
• DELETE
• EXECUTE
• INSERT
• REFERENCES
• SELECT
• UPDATE
Example: Oracle 12cR1
The following permissions are required for conguring IBM SPSS Collaboration and Deployment Services
Repository with Oracle 12cR1 database:
• CREATE SESSION
• ALTER SESSION
• CREATE TYPE
• CREATE TABLE
• CREATE PROCEDURE
• CREATE VIEW
• CREATE TRIGGER
The following permissions are required for starting IBM SPSS Collaboration and Deployment Services
Repository with Oracle 12c database:
• CREATE SESSION
• ALTER SESSION
• SESSIONS_PER USER - must be set to value equal to, or greater than, 100.
Db2
Db2 for Linux, UNIX, and Windows
When using Db2 for Linux, UNIX, and Windows database, the default database creation parameters are
not sufcient. The following additional parameters must be specied:
• UTF-8 code set
• 8 KB page sized buffer pool (in the sample script CDS8K) for the tables that are wider than 4 KB
• 8 KB table space using the 8 KB buffer pool
• 32 KB buffer pool (CDSTEMP in the sample script)
• 32 KB temporary table space for any wide result sets using the 32 KB buffer pool
An example script for creating a database named SPSSCDS follows. If you copy and paste the script, make
sure it matches exactly the SQL as shown. Note that the script references a UNIX-style database le path
which must be modied if the script is to be run on Windows. In the software downloads, the script is
included as part of the documentation package.
CREATE DATABASE SPSSCDS ON /home/cdsuser USING CODESET UTF-8 TERRITORY US COLLATE USING SYSTEM;
CONNECT TO SPSSCDS;
CREATE Bufferpool CDS8K IMMEDIATE SIZE 250 AUTOMATIC PAGESIZE 8 K;
CREATE REGULAR TABLESPACE CDS8K PAGESIZE 8 K MANAGED BY AUTOMATIC STORAGE EXTENTSIZE 8
OVERHEAD 10.5 PREFETCHSIZE 8 TRANSFERRATE 0.14 BUFFERPOOL CDS8K DROPPED TABLE RECOVERY ON;
COMMENT ON TABLESPACE CDS8K IS '';
CREATE Bufferpool CDSTEMP IMMEDIATE SIZE 250 PAGESIZE 32 K;
CREATE SYSTEM TEMPORARY TABLESPACE CDSTEMP PAGESIZE 32 K MANAGED BY AUTOMATIC STORAGE
EXTENTSIZE 16 OVERHEAD 10.5 PREFETCHSIZE 16 TRANSFERRATE 0.14 BUFFERPOOL "CDSTEMP";
14
IBM SPSS Collaboration and Deployment Services Repository: Installation and Conguration Guide

COMMENT ON TABLESPACE CDSTEMP IS '';
CONNECT RESET;
Db2 on z/OS
• When using Db2 z/OS database, you must ensure that Db2 zOS subsystem is enabled for Java, Stored
Procedure, Function and XML.
• To enable XQuery support, PTF UK73139 or later must be applied.
JMS message store table conguration
When IBM SPSS Collaboration and Deployment Services Repository is installed with a WebSphere
Application Server, the default WebSphere JMS provider, Service Integration Bus (SIB), is congured
to use the repository database as the JMS message store. When the repository is started, it will
automatically create the required JMS tables in the database if they do not already exist.
When using WebSphere on z/OS with Db2, you must manually create the JMS message store tables.
To create WebSphere JMS message store tables on z/OS with Db2, use WebSphere sibDDLGenerator
command to generate the DDL and then apply the DDL to the database to create the tables. For more
information about sibDDLGenerator, see WebSphere documentation.
Additional considerations
When running Db2 on dedicated hardware, it is recommended that Db2 Conguration Advisor be used
for database Performance Management. Increasing the values of the following parameters may improve
performance:
• IBMDEFAULTBP. The buffer pool size should be set according to the available memory and with regard
to other applications running on the system.
• NUM_IOCLEANERS. The number of asynchronous page cleaners must at least equal the number of
processors on the system.
• NUM_IOSERVERS. Increasing the number of I/O servers optimizes prefetching.
• LOCKLIST. Increasing the amount of storage for the lock list helps avoid timeouts and deadlocks during
write operations.
• MAXLOCKS. The percentage of the LOCKLIST that must be lled before the database manager performs
an escalation.
If Db2 is run on a shared system, changing these values must be done with consideration of available
system resources, and Db2 self-tuning functionality should be considered as an alternative for managing
the database performance.
Microsoft SQL Server
When using Microsoft SQL Server database:
• The DBO schema must be used.
• A SQL Server user is required for conguring database access. Windows-based authentication is not
supported.
• IP addresses must be enabled for the Internet Protocol network protocol.
• Appropriate options must be used for processing non-Latin character sets. For example, it is
recommended to use the Kana-sensitive (_KS) option to distinguish between Hiragana and Katakana
Japanese characters. For more information about database collation, refer to Microsoft SQL Server
documentation.
• The selected database collation must be case-insensitive (_CI).
• Snapshot isolation must be enabled for Microsoft SQL Server database. The following is a example of
statements to activate snapshot isolation:
Chapter 2. Installation
15

USE MASTER
GO
ALTER DATABASE <database_name> SET ALLOW_SNAPSHOT_ISOLATION ON
GO
ALTER DATABASE <database_name> SET READ_COMMITTED_SNAPSHOT ON
GO
Oracle
Initialization parameters
When you use an Oracle database with IBM SPSS Collaboration and Deployment Services, the following
parameters and congurations must be followed. Changes are made to the init.ora and spfile.ora
parameter les.
Table 2. Oracle database Parameters
Parameter Setting
OPEN_CURSORS 300
NLS_CHARACTERSET AL32UTF8
NLS_NCHAR_CHARACTERSET AL16UTF16
SESSIONS_PER USER Equal to, or greater than, 100
Note: Set both NLS_CHARACTERSET and NLS_NCHAR_CHARACTERSET when you create the Oracle
instance.
Tip: To address case sensitivity of user login values, use parameters such as NLS_LANG, NLS_COMP, or
NLS_SORT for your Oracle instance. See the Oracle documentation to determine which parameter best
addresses your needs.
Oracle XDB
For an Oracle database, Oracle XDB (XML database feature) must be installed. You can verify that
by querying for schema (user account) XDB (SELECT * FROM ALL_USERS), or by verifying that
RESOURCE_VIEW exists (DESCRIBE RESOURCE_VIEW). The Oracle principal that is used with IBM SPSS
Collaboration and Deployment Services Repository must be granted the XDBADMIN role.
Errors when migrating data from 12c to 19c
When upgrading from 12c to 19c, note that the following nine user role names in 12c no longer exist in
19c:
• XS_RESOURCE
• JAVA_DEPLOY
• SPATIAL_WFS_ADMIN
• WFS_USR_ROLE
• SPATIAL_CSW_ADMIN
• CSW_USR_ROLE
• APEX_ADMINISTRATOR_ROLE
• APEX_GRANTS_FOR_NEW_USERS_ROLE
• DELETE_CATALOG_ROLE
If you used these roles in 12c, you'll see the following errors when importing data to 19c:
ORA-39083: Object type ROLE_GRANT failed to create with error:
ORA-01919: role 'XXX' does not exist
16
IBM SPSS Collaboration and Deployment Services Repository: Installation and Conguration Guide

Failing sql is:
GRANT "XXX" TO "%schemaName%" WITH ADMIN OPTION
Since some role names have changed in 19c, your database administrator should ensure that
corresponding new role permissions are granted manually before performing the import. Doing this will
prevent these errors from impacting your installation and use of IBM SPSS Collaboration and Deployment
Services.
Repository database maintenance
It is strongly recommended that IBM SPSS Collaboration and Deployment Services Repository database
maintenance tasks be performed at regular intervals.
Table 3. Repository database maintenance schedule
Task Recommended schedule
Backup Daily
Update statistics Daily
Consistency check Weekly
Reorganize Weekly
Rebuild Monthly
Enabling custom JDBC URL settings
1. Create a new properties le on your local machine and add your user-dened JDBC URL to it. For
example, create the le C:\temp\db.properties and add the following URL setting to it:
db2_url=spss:jdbc:spssoem:db2://${host}:${port};DatabaseName=$
{name};LobStreamingProtocol=materialize;DynamicSections=400;CreateDefaultPackage=TRUE;Authent
icationMethod=encryptedUIDPassword;ReplacePackage=TRUE%{;EncryptionMethod=SSL}
Notes:
• One line is allowed in the properties le (since you only have one database as your installation
target).
• For the property name, you must use one of the following: sqlserver_url, oracle_sid_url,
oracle_service_url, db2_url, or db2zos_url.
• For the property value, you must use a JDBC connection URL based on the IBM SPSS Collaboration
and Deployment Services default setting (refer to the following bullet), and must include one of
the following items: url.contains("%{;EncryptionMethod=SSL}") && url.contains("$
{host}") && url.contains("${port}") && url.contains("${name}").
• The default JDBC URL for IBM SPSS Collaboration and Deployment Services is:
sqlserver_url=spss:jdbc:spssoem:sqlserver://${host}:${port};DatabaseName=$
{name};SelectMethod=cursor;MaxPooledStatements=250;allowPortWithNamedInstance=true%
{;EncryptionMethod=SSL}
db2_url=spss:jdbc:spssoem:db2://${host}:${port};DatabaseName=$
{name};LobStreamingProtocol=materialize;DynamicSections=400;BatchPerformanceWorkaround=TRUE
%{;EncryptionMethod=SSL}
oracle_sid_url=spss:jdbc:spssoem:oracle://${host}:${port};SID=${name}%
{;EncryptionMethod=SSL}
oracle_service_url=spss:jdbc:spssoem:oracle://${host}:${port};ServiceName=${name}%
{;EncryptionMethod=SSL}
db2zos_url=spss:jdbc:spssoem:db2://${host}:${port};LocationName=$
{name};LobStreamingProtocol=materialize;QueryBlockSize=1;ConcurrentAccessResolution=useCurr
entlyCommitted;AddToCreateTable=CCSID UNICODE;BatchPerformanceWorkaround=TRUE%
{;EncryptionMethod=SSL}
• When making TLSv1.2 connections, add the property CryptoProtocolVersion=TLSv1.2.
Chapter 2. Installation
17

2. Before launching Installation Manager, edit the IBMIM.ini le in the directory [Install Manager
Install Dir]/eclipse. Add a new line that points to the properties le you created in step 1:
-Dcads.jdbc.config.file=D:\temp\db.properties
3. Now when you launch Installation Manager and start the IBM SPSS Collaboration and Deployment
Services installation, the installation process will leverage your user-dened JDBC URL settings.
Installation and conguration
Use the following checklist to guide you through installation with a stand-alone application server:
• Install the application les on the host system using IBM Installation Manager.
• Also in Installation Manager, enter the precongured application server and database information, then
congure IBM SPSS Collaboration and Deployment Services Repository to be used with the application
server and the database.
While the steps described for stand-alone server are also applicable to clustered installation, installing on
a cluster topology requires additional steps. See the topic “Cluster conguration” on page 23 for more
information.
Installation and conguration
IBM SPSS Collaboration and Deployment Services Repository application les are installed on the
host system with IBM Installation Manager. Installation les can be downloaded from IBM Passport
Advantage.
The IBM SPSS Collaboration and Deployment Services Repository conguration utility performs the
following tasks:
• Creates database objects for the content repository
• Creates application server resources, for example, JMS queues, and deploys Java programs into the
application server
• Congures encryption and security
While conguration with a stand-alone application server is the last required installation step, additional
steps will be required in a clustered environment. See the topic “Cluster conguration” on page 23 for
more information.
Before installation and conguration
1. Verify that the application server is installed and working. If you are performing an automatic
conguration (conguration that creates the artifacts and deploys them to the application server)
the application server must be in the following state:
• WebSphere stand-alone: Server must be stopped.
• WebSphere managed: Managed server must be stopped, Deployment Manager server must be
running.
• WebSphere cluster: Cluster members must be stopped, Deployment Manager server must be
running.
• JBoss: Server must be stopped.
• Liberty stand-alone: No action is needed.
• Liberty cluster: Both collective controller and cluster members must be stopped. The features
required by the Repository server must be installed on both the controller server and the member
server.
appSecurity-2.0
blueprint-1.0
concurrent-1.0
ejb-3.2
18
IBM SPSS Collaboration and Deployment Services Repository: Installation and Conguration Guide

ejbLite-3.2
jaxrs-2.0
jaxws-2.2
jca-1.7
jdbc-4.2
jms-2.0
jndi-1.0
json-1.0
jsp-2.3
mdb-3.2
servlet-3.1
ssl-1.0
wab-1.0
websocket-1.1
wasJmsClient-2.0
wasJmsSecurity-1.0
wasJmsServer-1.0
transportSecurity-1.0
javaMail-1.5
localConnector-1.0
ejbPersistentTimer-3.2
jaxb-2.2
restConnector-2.0
2. Verify that the database is accessible.
3. If reusing an existing repository database with WebSphere, delete the SIB (JMS message store tables).
Installation and conguration steps
1. Log on to the operating system as a user with appropriate level of permissions. See the topic “User
and le system permissions” on page 9 for more information.
2. Launch IBM Installation Manager:
GUI mode:
<IBM Installation Manager installation directory>/eclipse/IBMIM
Command line mode:
<IBM Installation Manager installation directory>/eclipse/tools/imcl -c
3. If the installation repository is not congured, specify the repository path, for example, as a location
on the host le system, the network, or an HTTP address.
Note: To successfully access an installation repository, the repository location path must not contain
an ampersand (&).
4. Select IBM SPSS Collaboration and Deployment Services as the package to be installed.
Note: You can also select adapters or components to be installed with the IBM SPSS Collaboration
and Deployment Services server, such as the IBM SPSS Collaboration and Deployment Services
Scoring Adapter for PMML, provided those adapters or components are available in the installation
repositories.
5. Read the license agreement and accept its terms.
6. Specify the package group and the installation directory.
• A new package group is required for IBM SPSS Collaboration and Deployment Services Repository
install.
• Specify the installation directory for shared resources. You can specify the shared resources
directory only the rst time that you install a package.
7. Select the Deployment Target by selecting one of the following application server types:
• WebSphere Traditional Prole
• WebSphere Liberty Prole
• JBoss EAP
8. Specify the application server settings:
Chapter 2. Installation
19

• WebSphere
– WebSphere Prole Root. The directory location of the WebSphere server prole. Note that for a
managed server or cluster, it is the path of the Deployment Manager prole.
– WebSphere Install Root. The directory location where WebSphere server is installed.
– Server topology. WebSphere prole topology: Stand-alone, managed, or cluster. You must select
a topology if the deployment manager prole contains both managed servers and clusters.
– URL Prex. For clustered installation, the URL of the load balancer or proxy server for routing
server-initiated requests.
– WebSphere Server or Cluster. WebSphere server or cluster name.
– WebSphere Node. For a managed WebSphere server, the name of the node where the target
server is located. For a WebSphere cluster, this is the node name of the dmgr node.
– JVM. Directory location of the WebSphere JVM used by the target prole.
– WebSphere user name and password. Only if administrative security is enabled.
• JBoss
– Server Directory Path. The directory location where JBoss is installed.
– JBoss Server. JBoss server name. Specify a value of standalone.
– JVM. Directory location of the JBoss JVM.
– URL Prex. The URL for routing server-initiated requests. The default URL prex for JBoss
is http://127.0.0.1:8080, unless server properties, such as bind address or port, have been
modied. Note that localhost is not allowed as part of the URL prex. The prex value must
be externally resolvable if external clients will connect to the IBM SPSS Collaboration and
Deployment Services Repository.
• Liberty
– Standalone. The WebSphere Liberty prole is bundled with the IBM SPSS Collaboration and
Deployment Services Repository Server. Select this option if you want to install a new Liberty
prole with the Repository Server.
– Cluster. Select this option if you want to install the IBM SPSS Collaboration and Deployment
Services Repository Server into an existing Liberty cluster.
The following conguration options are only available when Cluster is selected:
- Collective Controller Host (Hostname or IP). The host name or IP address where the collective
controller is set up.
- Collective Controller Port. The secure HTTPS port of the collective controller that's dened in
server.xml.
- Collective Controller Administrative Username. The user name for the collective controller
administrative account.
- Collective Controller Administrative Password. The password for the collective controller
administrative account.
- Collective Controller Trust Store File. The le location of the collective controller trust store
le, named collectiveTrust.p12. This le can be located on the local le system, or
copied from another le system. Note that the default keystore type has been changed
from JKS to PKCS12 in Liberty 19.0.0.3. If a Liberty server has an existing conguration
that uses a JKS keystore le, you must convert it to PKCS12 format. For information
about converting the keystore le, see https://www.ibm.com/support/knowledgecenter/
SS7K4U_liberty/com.ibm.websphere.wlp.zseries.doc/ae/rwlp_liberty_keystore_default.html.
- Collective Controller Trust Store Password. The password for the collective controller trust
store le.
- URL Prex. This is the URL for routing server-initiated requests. In most cases, it's the port of
the load balancer for cluster setup.
20
IBM SPSS Collaboration and Deployment Services Repository: Installation and Conguration Guide

- Detect Cluster. After you've entered all the Liberty collective controller information, click
Detect Cluster. All available clusters that are precongured in the collective controller server
will be listed. You can then select the cluster where you plan to install IBM SPSS Collaboration
and Deployment Services Repository Server.
9. Specify database connection information:
• Database type. IBM Db2, SQL Server, or Oracle.
• Host. The host name or address of the database server.
• Port. The access port for the database server.
• Database name. The name of the database to be used for content repository.
• SID/Service Name. For Oracle, SID or service name
• Run as service. For Oracle, indicates that the connection is to a database service rather than by
SID.
• User name. Database user name.
• Password. Database user password.
10. If reusing a database from a prior installation, specify whether existing data should be preserved or
discarded.
11. Specify the options for the encryption keystore. The keystore is an encrypted le that contains
the key for decrypting the passwords used by the repository, such as the repository administration
password, the database access password, etc.
• To reuse a keystore from an existing repository installation, specify the path and password to the
keystore. The key from the old keystore will be extracted and used in the new keystore. Note that
the JRE used to run the application server must be compatible with the JRE that was used to create
the encryption keys.
• If you are not reusing an existing keystore, specify and conrm the password to the new keystore.
The keystore will be created in <repository installation directory>/keystore.
Important: If the keystore le is lost, the application will not be able to decrypt any passwords and
will become unusable. It will subsequently have to be reinstalled. Therefore, it is recommended that
backup copies of the keystore le be maintained.
12. Specify the password value to be used for the built-in repository administrator user account (admin).
The password will be used when logging in to the repository for the rst time.
13. Select deployment mode (automatic or manual):
• Automatic deployment will create application server resources and deploy the application les.
• Manual deployment will generate the application le and installation scripts in the toDeploy/
<timestamp> output directory. These artifacts can later be used to manually deploy the repository.
Manual conguration is intended for advanced users when more control of the application server
environment is required.
14. Review summary information and proceed with the installation. On the main menu, select Install.
The application les will be installed in the specied directory.
• If conguration reports success, you can proceed with post-installation steps, such as starting
the repository and verifying connectivity. See the topic “Post-installation” on page 25
for more
information.
• If you have chosen the manual deployment mode, you can proceed to the manual steps.
• If you are installing the repository with an application server cluster, you can proceed to conguring the
other cluster nodes. See the topic “Cluster conguration” on page 23 for more information.
Notes:
• The conguration operation can take 15-30 minutes or longer to complete, depending on your
hardware, network speed, the complexity of your application server topology, etc. If it appears that
Chapter 2. Installation
21

the conguration process is not responding or if a failure is reported, examine the log les in <IBM SPSS
Collaboration and Deployment Services Repository installation directory>/log.
• The installation and conguration can be completed in a single run. If you're planning to complete some
extra settings during the conguration (such as a customized JDBC connection URL, for example), you
can add a deploy later option before the installation. To do so, before launching Installation Manager,
complete the following steps:
1. Open the le <Installation Manager installation directory>/eclipse/IBMIM.ini in
a text editor.
2. Add the line -Dcads.deploy.later=true, then save and close the le.
3. When you're ready to run the conguration later, launch the conguration utility manually:
a. Log on to the operating system as the same user that installed IBM SPSS Collaboration and
Deployment Services Repository.
b. Launch the conguration utility:
GUI mode - Windows
<repository installation directory>\bin\configTool.bat
GUI mode - UNIX and Linux
<repository installation directory>/bin/configTool.sh
Command line mode - Windows
<repository installation directory>\bin\cliConfigTool.bat
Command line mode - UNIX and Linux
<repository installation directory>/bin/cliConfigTool.sh
Silent conguration
IBM SPSS Collaboration and Deployment Services Repository conguration can be automated by running
IBM Installation Manager in silent mode with input from an IBM Installation Manager response le. The
template for the response le is similar to the following. Note that this template is an example of an
installation for a WebSphere Liberty prole and DB2 repository database.
<?xml version='1.0' encoding='UTF-8'?>
<agent-input>
<variables>
<variable name='sharedLocation' value='/opt/IBM/IMShared'/>
</variables>
<server>
<repository location=xxxx'/>
<repository location='xxxx'/>
</server>
<profile id='IBM SPSS Collaboration and Deployment Services 8.5.0' installLocation='/opt/IBM/
SPSS/Deployment/8.5.0/Server'>
<data key='cic.selector.arch' value='x86_64'/>
<data key='user.LibertyTopologyUserData,com.ibm.spss.cds.server.v8.4.0.offering'
value='single'/>
<data key='user.KeyPassUserData,com.ibm.spss.cds.server.v8.4.0.offering' value='xxxx'/>
<data key='user.ReuseKeyUserData,com.ibm.spss.cds.server.v8.4.0.offering' value='false'/>
<data key='user.KeyPwdUserData,com.ibm.spss.cds.server.v8.4.0.offering' value='xxxx'/>
<data key='user.AdminPassUserData,com.ibm.spss.cds.server.v8.4.0.offering' value='xxxx'/>
<data key='user.AdminPwdUserData,com.ibm.spss.cds.server.v8.4.0.offering' value='xxxx'/>
<data key='user.DBPort,com.ibm.spss.cds.server.v8.4.0.offering' value='50000'/>
<data key='user.DBName,com.ibm.spss.cds.server.v8.4.0.offering' value='cadsdb'/>
<data key='user.DBHost,com.ibm.spss.cds.server.v8.4.0.offering' value='x.x.x.x'/>
<data key='user.DBTypeUserData,com.ibm.spss.cds.server.v8.4.0.offering' value='db2'/>
<data key='user.DataEraseUserData,com.ibm.spss.cds.server.v8.4.0.offering' value='false'/>
<data key='user.DBPassword,com.ibm.spss.cds.server.v8.4.0.offering' value='xxxx'/>
<data key='user.SSLServiceUserData,com.ibm.spss.cds.server.v8.4.0.offering' value='false'/>
<data key='user.OracleServiceUserData,com.ibm.spss.cds.server.v8.4.0.offering'
value='false'/>
<data key='user.DBUsername,com.ibm.spss.cds.server.v8.4.0.offering' value='xxxx'/>
22
IBM SPSS Collaboration and Deployment Services Repository: Installation and Conguration Guide
<data key='user.DeployOptionUserData,com.ibm.spss.cds.server.v8.4.0.offering'
value='automatic deployment'/>
</profile>
<install>
<!-- IBM SPSS Collaboration and Deployment Services - Repository Server 8.5.0.0 -->
<offering profile='IBM SPSS Collaboration and Deployment Services 8.5.0'
id='com.ibm.spss.cds.server.v8.4.0.offering' features='deploy.liberty'/>
<!-- IBM SPSS Modeler Adapters for Collaboration and Deployment Services 18.4.0.0 -->
<offering profile='IBM SPSS Collaboration and Deployment Services 8.5.0'
id='com.ibm.spss.modeler.adapter.18.4.0' features='main.feature,text.analytics'/>
<!-- IBM SPSS PMML Scoring Adapter 8.5.0.0 -->
<offering profile='IBM SPSS Collaboration and Deployment Services 8.5.0'
id='com.ibm.spss.pmml.scoring.adapter.v8.4.0' features='main.feature'/>
</install>
<preference name='com.ibm.cic.common.core.preferences.eclipseCache' value='$
{sharedLocation}'/>
<preference name='com.ibm.cic.common.core.preferences.searchForUpdates' value='true'/>
</agent-input>
To run the installation in silent mode:
<IBM Installation Manager installation directory>/eclipse/tools/imcl input
responseFile -acceptLicense -showProgress
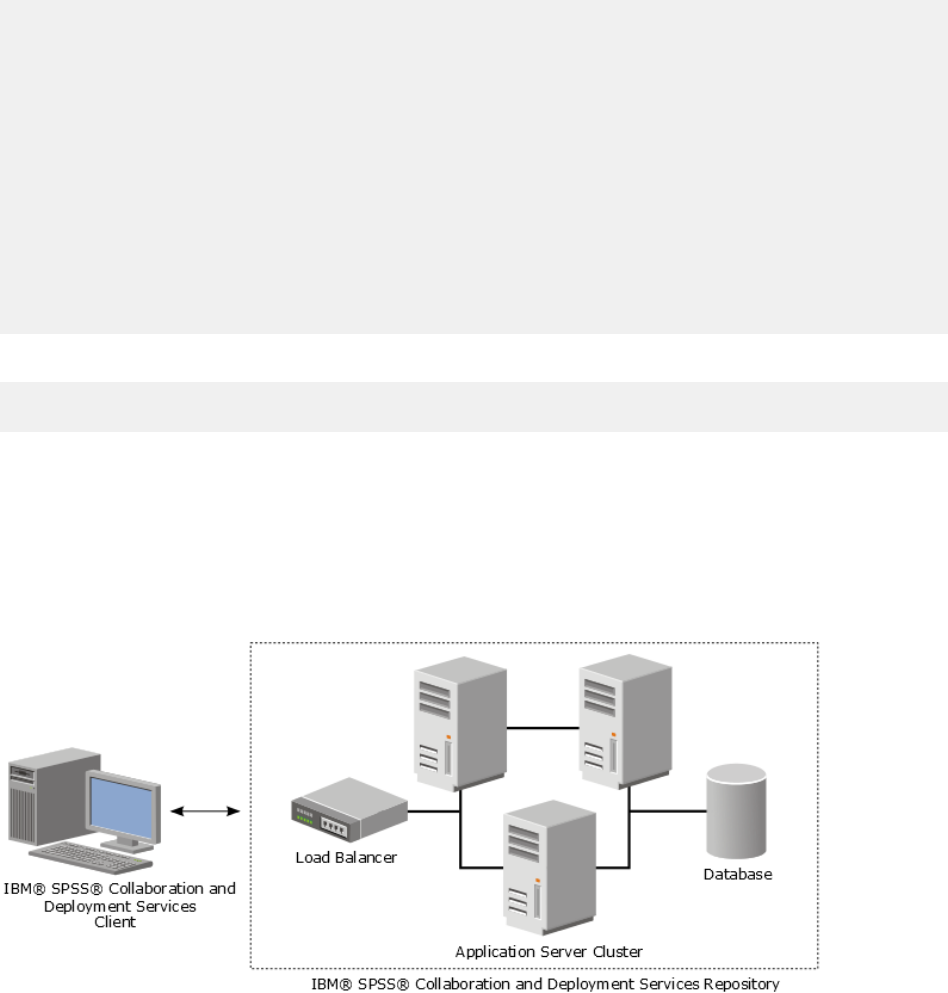
Cluster conguration
IBM SPSS Collaboration and Deployment Services Repository can be deployed into an environment
of clustered application servers. Each application server in the cluster should have the identical
conguration for the hosted application components and the repository is accessed through a hardware
or software-based load balancer. This architecture allows processing to be distributed among multiple
application servers and it also provides redundancy in case of a single server failure.
Figure 2. Clustered deployment architecture
The process of installing the repository into a cluster includes the following steps:
• Initial installation and conguration of application components on the management node of the cluster.
• Subsequent conguration of cluster nodes.
IBM SPSS Collaboration and Deployment Services Repository currently supports clustering WebSphere
traditional application servers and WebSphere Liberty proles. Follow the application server-specic
instructions to complete the deployment.
Installation prerequisites
• Host system requirements must be met on all nodes of the cluster.
• All members of IBM SPSS Collaboration and Deployment Services Repository cluster must run on the
same operating system as the main (management) node.
Chapter 2. Installation
23

• The repository database must already exist and be accessible
• The application server topology must already exist before installing IBM SPSS Collaboration and
Deployment Services Repository. It is recommended that you verify that the cluster is accessible and
running properly at the load balancer address.
• The IBM SPSS Collaboration and Deployment Services Repository installation directory must be shared
across all nodes in the cluster.
WebSphere cluster
1. Make sure all prerequisites have been met.
2. Perform the installation and conguration. You can choose to deploy the application either
automatically or manually. See the topic “Installation and conguration” on page 18 for more
information.
3. Congure the installation directory to be shared so that it is accessible to all members of the cluster.
4. Set the value of the CDS_HOME variable for each node.
• Open the administrative console
• Open the Environment > WebSphere variables section.
• For each node in the cluster, there will be a CDS_HOME variable dened. Verify that the value
contains the appropriate path to the shared installation directory.
5. Set the value of the log4j.configurationFile Java system property for each cluster member.
This property identies the location at which the logging system can access the logging conguration
le. Typically, this property has a value of: file://${CDS_HOME}/platform/log4j2.xml.
• Open the administrative console
• For each server in the cluster, review the log4j.configurationFile value. This value is available
at Application servers > server-name > Process denition > Java Virtual Machine > Custom
properties, where server-name corresponds to the particular server.
• On the Windows operating system, if the CDS_HOME variable from step “4” on page 24 contains a
drive letter, add a forward slash ("/") escape character to the log4j2.xml value. For example, the
new value would be file:///${CDS_HOME}/platform/log4j2.xml.
6. Save and synchronize your changes.
7. Make sure the IBM SPSS Collaboration and Deployment Services Repository URL Prex conguration
property value is set correctly to the URL of the load balancer. See the topic “Load balancer
conguration” on page 24 for more information.
8. Start the WebSphere cluster.
Load balancer conguration
A software or hardware-based load balancer must be congured for accessing the repository in a
clustered environment.
WebSphere application servers provide built-in software-based load-balancer utilities(for example, IBM
HTTP Server).
Important: Session afnity must be enabled for any load balancer used with IBM SPSS Collaboration and
Deployment Services cluster. For more information, see load balancer vendor documentation.
Setting the URL prex property
In a cluster environment, URL_Prex repository conguration property value, used for routing server-
initiated HTTP requests, must be set to the URL of the load balancer. Note that this property can be
initially set when the IBM SPSS Collaboration and Deployment Services Repository conguration utility is
run. See “Installation and conguration” on page 18
for more information.
To set/update the value of URL prex property after repository conguration:
24
IBM SPSS Collaboration and Deployment Services Repository: Installation and Conguration Guide

• Start a single cluster member.
• Open the browser-based IBM SPSS Deployment Manager by navigating to http://<repository host>:<port
number>/security/login.
• Update the URL_Prex conguration property with the URL of the load balancer for the cluster and save
your changes.
• Stop the running cluster member.
• Start the cluster.
Expanding the cluster
In enterprise environments with large processing loads, it may be necessary to expand the cluster running
IBM SPSS Collaboration and Deployment Services Repository by adding nodes after the initial installation.
WebSphere
1. Create additional WebSphere managed proles and federate them to the cell. Create servers and add
them to the cluster using the WebSphere console.
2. Execute the CrtCDSresources.py script in the /toDeploy/ directory to update the new node(s) that have
been dened for the cell.
/bin/wsadmin -lang jython -f CrtCDSresources.py -update
3. Set the value of the CDS_HOME variable for each node. See the topic “WebSphere cluster” on page 24
for more information.
4. Restart the cluster.
Post-installation
Use the following checklist to guide you through post-installation steps:
• Start the server and verify the connectivity. If necessary, congure server autostart.
• Install any content adapter for using IBM SPSS Collaboration and Deployment Services Repository with
other IBM SPSS products such as IBM SPSS Statistics and IBM SPSS Modeler.
• If necessary, install IBM SPSS Collaboration and Deployment Services Remote Process Server and IBM
SPSS Collaboration and Deployment Services - Essentials for Python. For more information, see IBM
SPSS Collaboration and Deployment Services Remote Process Server 8.5.0 Installation Instructions and
IBM SPSS Collaboration and Deployment Services - Essentials for Python 8.5.0 Installation Instructions.
• If necessary, change the master database password.
• If necessary, install additional JDBC drivers.
• Install IBM SPSS Collaboration and Deployment Services clients and IBM SPSS Deployment Manager.
For more information, see client application installation instructions.
• Using Deployment Manager, create repository users and group and assign application permissions
through roles. For more information, see IBM SPSS Collaboration and Deployment Services 8.5.0
Administrator's Guide.
If problems occur during post-installation steps, see IBM SPSS Collaboration and Deployment Services
8.5.0 Troubleshooting Guide.
Starting the repository server
The repository server can run either on a console or in the background.
Running on a console allows viewing of processing messages and can be useful for diagnosing
unexpected behavior. However, the repository server typically runs in the background, handling requests
from clients such as IBM SPSS Modeler or the IBM SPSS Deployment Manager.
Note: Running other applications simultaneously may reduce system performance and startup speed.
Chapter 2. Installation
25

On the Windows platform, running on a console corresponds to running in a command window. Running
in the background corresponds to running as a Windows service. In contrast, on a UNIX platform, running
on a console corresponds to running in a shell, and running in the background corresponds to running as a
daemon.
Important: To avoid permissions conflicts, the repository server must always be started under the same
credentials, preferably a user with sudo (UNIX) or administrator-level (Windows) privileges.
The repository server is started by starting the application server. This can be accomplished with the
scripts provided with the repository server installation or native application server administration tools.
For more information, see the application server vendor documentation.
WebSphere
Use WebSphere administration tools. For more information, see WebSphere documentation.
WebSphere Liberty stand-alone
By default, the bundled Liberty prole uses 9080 for the HTTP endpoint and 9443 for the HTTPS
endpoint. If you want to change these port numbers, update the server.xml le in the following
directory:
<repository installation directory>/wlp/usr/servers/cdsServer
If you use the default port numbers, make sure the port number isn't already being used by other
applications before you start the server. Use the following scripts with the repository installation:
<repository installation directory>/bin/startserver.bat
<repository installation directory>/bin/startserver.sh
During the WebSphere Liberty start up process, the Liberty prole will start rst and then the
application will be deployed. To check repository server status, see the cds.log le in <repository
installation directory>/wlp/usr/servers/cdsServer/.
WebSphere Liberty cluster
Before starting the repository server that was deployed to your WebSphere Liberty cluster, deploy
related conguration les. These les are required by Liberty for collective members in the cluster,
and they include the conguration les in server.xml in each collective member. Before deploying the
conguration les:
1. Congure the installation directory to be shared and make sure it's accessible to all members of the
cluster.
2. Ensure {wlp.usr.dir} and {server.config.dir} are added to the write white list for each
collective member in the cluster. You need to do this in server.xml for the collective controller. See
your WebSphere Liberty documentation for details.
3. For WebSphere Liberty on Windows, make sure RXA is set up correctly.
4. Start the collective controller and all collective members in the cluster.
Use the following scripts with the repository server installation:
<repository installation directory>/bin/deployUtility.bat -cads_home ${CDS_HOME}
<repository installation directory>/bin/deployUtility.sh -cads_home ${CDS_HOME}
where ${CDS_HOME} is the shared location of IBM SPSS Collaboration and Deployment Services system
les. This location must be accessible to all the collective members by using le sharing on Windows or
NFS on Linux/UNIX.
Then restart all collective members in the cluster to load the newly deployed conguration les.
26
IBM SPSS Collaboration and Deployment Services Repository: Installation and Conguration Guide

JBoss
Use the following scripts with the repository server installation:
<repository installation directory>/bin/startserver.bat
<repository installation directory>/bin/startserver.sh
Alternatively, you can also use JBoss administration tools to start the server. For more information, see
JBoss documentation.
Verifying connectivity
You can verify that IBM SPSS Collaboration and Deployment Services Repository is running by accessing
browser-based IBM SPSS Deployment Manager using one of the following supported Web browsers:
• Internet Explorer 10 or above
• Firefox 48 ESR or above
• Safari 5 or above
To access browser-based IBM SPSS Deployment Manager
1. Navigate to the login page at http://<repository host>:<port number>/security/login.
2. Specify the administrator login credentials. The credentials are established during repository
conguration.
Managing the database password
The database password provided during IBM SPSS Collaboration and Deployment Services Repository
conguration is stored as part of the data source denition in the application server settings. Additional
steps may be required to ensure the database password security.
Testing the database connection
The IBM SPSS Collaboration and Deployment Services Repository database connection can be tested
using the data source management facilities in the application server administrative console.
Application server
Data source object name
WebSphere Traditional CDS_DataSource
WebSphere Liberty CDS_DataSource
JBoss jdbc/spss/PlatformDS
JAAS object security
The credentials for IBM SPSS Collaboration and Deployment Services data source created in the
application server are persisted as a JAAS object.
Important: When the repository is congured on WebSphere application server using either automatic
deployment (with IBM Installation Manager) or with scripts generated by the conguration utility, the
password is passed to the application server as clear text and then persisted according to the application
server settings. Although the default WebSphere settings provide for storing passwords in encrypted
form, it may be necessary to verify that the password is not stored as clear text. See application server
documentation for additional information about password security.
Chapter 2. Installation
27

Changing the database password
For security reasons, it may be necessary to change the database password following IBM SPSS
Collaboration and Deployment Services Repository installation. In such cases, the stored database
password can be changed by using IBM SPSS Collaboration and Deployment Services Password Utility.
To run the password utility:
1. Shut down the application server that hosts IBM SPSS Collaboration and Deployment Services.
2. Execute
Windows:
<repository installation directory>/bin/cliUpdateDBPassword.bat
UNIX:
<repository installation directory>/bin/cliUpdateDBPassword.sh
3. Start the application server that hosts IBM SPSS Collaboration and Deployment Services.
4. Specify and conrm the new password using the command prompt.
The password can also be changed by modifying the application server settings. Note that the password is
stored in encrypted form, therefore the new password can be converted to an encrypted string by running
cliEncrypt.bat/cliEncrypt.sh with the password as command line argument.
JDBC drivers
Adding driver support to IBM SPSS Collaboration and Deployment Services
Repository
IBM SPSS Collaboration and Deployment Services includes a set of IBM Corp. JDBC drivers for all major
database systems: IBM Db2, Microsoft SQL Server, and Oracle. These JDBC drivers are installed by
default with the repository.
If IBM SPSS Collaboration and Deployment Services does not include a driver for a needed database, you
can update your environment to include a third-party driver for the database. Third party drivers can be
used by augmenting your repository installation with the driver les.
Depending on the application server, the directory location of the JDBC drivers is as follows:
• WebSphere: <WebSphere installation directory>/lib/ext
For JBoss, you need to install the JDBC driver as a JBoss core module and register the module as global.
For details, see the JBoss documentation.
Note that for Netezza, the version 5.0 driver should be used to access both version 4.5 and 5.0 databases.
Adding driver support to client applications
To add a JDBC driver to the IBM SPSS Deployment Manager:
1. Close the client application if it is running.
2. Create a folder named JDBC at the root level of the client installation directory.
3. Place the driver les in the JDBC folder
After adding the driver les to your environment, the driver can be used in a data source denition. In the
JDBC Name and URL dialog box, type the name and URL for the driver. Consult the vendor documentation
for the driver to obtain the correct class name and URL format.
28
IBM SPSS Collaboration and Deployment Services Repository: Installation and Conguration Guide

IBM SPSS products compatibility
IBM SPSS Collaboration and Deployment Services Repository functionality can be extended to support
other IBM SPSS applications by installing additional content adapter packages.
For current compatibility information, refer to the software product compatibility reports on
the IBM Technical Support site at: http://publib.boulder.ibm.com/infocenter/prodguid/v1r0/clarity/
softwareReqsForProduct.html
Note:
• For some products, patches may need to be applied. Check with IBM Corp. support to determine that
correct patch level.
• You must verify that the installation and runtime requirements for IBM SPSS applications (for example,
application servers and databases) are compatible with the requirements for IBM SPSS Collaboration
and Deployment Services Repository. For detailed information, consult Software product compatibility
reports and the documentation for individual IBM SPSS products.
IBM SPSS Statistics client and IBM SPSS Modeler client are not required for use of IBM SPSS
Collaboration and Deployment Services. However, these applications offer interfaces for using the IBM
SPSS Collaboration and Deployment Services Repository to store and retrieve objects. The server versions
of these products are required for jobs containing IBM SPSS Statistics or IBM SPSS Modeler objects to be
executed.
By default, the repository is installed without adapters for other IBM SPSS products and users must install
the adapter packages corresponding to their versions of products. The packages are included on the
products' distribution media.
Note that you should avoid storing IBM SPSS product objects in the repository until you rst install the
required adapter packages. If you do so, the object will not be a recognized type even after installing
the adapter packages and you will need to delete the objects and add them to the repository again. For
example, if an IBM SPSS Modeler stream is stored in the repository before the IBM SPSS Modeler adapter
is installed, the MIME type will not be known and will instead be set to a generic type, resulting in an
unusable stream le.
Dockerized installation
A dockerized Repository Server installation is available for easier deployment. You can load the
predened IBM SPSS Collaboration and Deployment Services image. In a future release, a fully functioned
docker based cluster support will be added, which will give you high availability, load balancing, etc.
The dockerized IBM SPSS Collaboration and Deployment Servicesdelivery package can run in various
docker environments, and provides the full Repository Server functional via a container method.
Prerequisites
If you want to run the dockerized Repository Server, ensure you meet the following prerequisites.
• The docker engine must be properly installed and congured on the target operating system. Refer to
the docker vendor documentation. Supported operating systems are Windows x64, RedHat x64, and
Ubuntu x64.
• The docker daemon must be in a running state.
• For the docker engine hosted on Windows x64, the docker daemon must be running in Linux container
mode.
• Make sure there is at least 20GB free disk space to load the docker image for the Repository Server.
• Make sure you have a prepared IBM SPSS Collaboration and Deployment Services Database, either
initialized from a new database or migrated from a previous release, or from another instance of a
working IBM SPSS Collaboration and Deployment Services Database. For information about Repository
database initialization and migration, see Dockerized preparation later in this section.
Chapter 2. Installation
29

Typical use case
1. Run the IBM SPSS Collaboration and Deployment Services Dockerize Preparation Toolkit to initialize a
fresh new database or perform a migration from a 8.1.1 Repository database. See the following section
Dockerize preparation for details.
2. Download the IBM SPSS Collaboration and Deployment Services docker package (.zip le) from
Passport Advantage and extract it to the local le system.
3. Make a copy of the keystore folder, which is generated or reused in step 1, in the unzipped folder
from step 2.
4. Edit the le cads_db.env with your Repository database information. The contents of this le is as
follows:
#CaDS Repository Database configuration file. Enter your database information.
#Examples:
#DB_TYPE=db2
#DB_HOST=8.8.8.8
#DB_PORT=50000
#DB_NAME=cadsdb
#DB_USERNAME=dbuser
#Additional Notes:
#DB_TYPE can be db2, sqlserver, oracle_sid, db2zos, or oracle_service
DB_TYPE=
DB_HOST=
DB_PORT=
DB_NAME=
DB_USERNAME=
5. Depending on your OS, run cdsServer.sh or cdsServer.bat to conduct operations such as
checking the environment and loading the image and startup container. Detailed usage is as follows:
./cdsServer.sh
This script intends to provide full management functionalities to Dockerized IBM SPSS
Collaboration and Deployment Services Repository Server (aka. CaDS)
Usage: cdsServer check | load | start --port --db_pass | list | stop --container_id | remove
| help
check
check the availability of docker engine
load
load CaDS docker image tarball to local
start --port --db_pass
start CaDS container and specify the port which container is exposed to, need to input
the repository database password to connect
list
list all the containers of CaDS
stop --container_id | --all
stop all CaDS containers or specified by the container id
remove
remove all the stopped CaDS containers
help
print all the command usage
Dockerized preparation
The IBM SPSS Collaboration and Deployment Services Dockerize Preparation Toolkit helps you initialize or
migrate a prepared Repository database for use with the dockerized Repository Server.
1. Run the toolkit in GUI mode:
<IBM Installation Manager installation directory>/eclipse/IBMIM
Or run the toolkit in Console mode:
30
IBM SPSS Collaboration and Deployment Services Repository: Installation and Conguration Guide

<IBM Installation Manager installation directory>/eclipse/tools/imcl -c
2. If the installation repository is not congured, specify the repository path (for example, as a location
on the host le system, the network, or an HTTP address).
3. Select IBM SPSS Collaboration and Deployment Services as the package to be installed. You can also
select adapters or components to be installed with the server, such as the IBM SPSS Collaboration
and Deployment Services Scoring Adapter for PMML, provided those adapters or components are
available in the installation repositories.
4. Read the license agreement and accept its terms.
5. Specify the package group and the installation directory. A new package group is required for this
installation.
6. Specify the installation directory for shared resources. You can specify the shared resources directory
only the rst time that you install a package.
7. Select Dockerize Preparation as the Deployment Target.
8. Specify database connection information:
• Database type. IBM DB2, SQL Server, or Oracle.
• Host. The host name or address of the database server.
• Port. The access port for the database server.
• Database name. The name of the database to use for the Repository.
• SID/Service Name. For Oracle, the SID or service name.
• User name. Database user name.
• Password. Database user password.
• If reusing a database from a prior installation, specify whether existing data should be preserved or
discarded.
9. Specify options for the encryption keystore. The keystore is an encrypted le that contains the key for
decrypting the passwords used by the Repository, such as the Repository administration password
and the database access password.
• To reuse a keystore from an existing Repository installation, specify the path and password to the
keystore. The key from the old keystore will be extracted and used in the new keystore. Note that
the JRE used to run the application server must be compatible with the JRE that was used to create
the encryption keys.
• If you are not reusing an existing keystore, specify and conrm the password to the new keystore.
The keystore will be created in <repository installation directory>/keystore.
10. Specify the password to use for the built-in Repository administrator user account (admin). This
password is used when logging on to the Repository for the rst time.
11. Click Install.
Running the toolkit in silent mode
You can automate the toolkit by running IBM Installation Manager in silent mode with input from an IBM
Installation Manager response le. The template for the response le is similar to the following:
<?xml version='1.0' encoding='UTF-8'?>
<agent-input>
<variables>
<variable name='sharedLocation' value='/opt/IBM/IMShared'/>
</variables>
<server>
<repository location=xxxx'/>
<repository location='xxxx'/>
</server>
<profile id='IBM SPSS Collaboration and Deployment Services 8.5.0' installLocation='/opt/IBM/
SPSS/Deployment/8.5.0/Server'>
<data key='cic.selector.arch' value='x86_64'/>
<data key='user.KeyPassUserData,com.ibm.spss.cds.server.v8.4.0.offering' value='xxxx'/>
Chapter 2. Installation
31

<data key='user.ReuseKeyUserData,com.ibm.spss.cds.server.v8.4.0.offering' value='false'/>
<data key='user.KeyPwdUserData,com.ibm.spss.cds.server.v8.4.0.offering' value='xxxx'/>
<data key='user.AdminPassUserData,com.ibm.spss.cds.server.v8.4.0.offering' value='xxxx'/>
<data key='user.AdminPwdUserData,com.ibm.spss.cds.server.v8.4.0.offering' value='xxxx'/>
<data key='user.DBPort,com.ibm.spss.cds.server.v8.4.0.offering' value='50000'/>
<data key='user.DBName,com.ibm.spss.cds.server.v8.4.0.offering' value='cadsdb'/>
<data key='user.DBHost,com.ibm.spss.cds.server.v8.4.0.offering' value='x.x.x.x'/>
<data key='user.DBTypeUserData,com.ibm.spss.cds.server.v8.4.0.offering' value='db2'/>
<data key='user.DataEraseUserData,com.ibm.spss.cds.server.v8.4.0.offering' value='false'/>
<data key='user.DBPassword,com.ibm.spss.cds.server.v8.4.0.offering' value='xxxx'/>
<data key='user.SSLServiceUserData,com.ibm.spss.cds.server.v8.4.0.offering' value='false'/>
<data key='user.OracleServiceUserData,com.ibm.spss.cds.server.v8.4.0.offering'
value='false'/>
<data key='user.DBUsername,com.ibm.spss.cds.server.v8.4.0.offering' value='xxxx'/>
</profile>
<install>
<!-- IBM SPSS Collaboration and Deployment Services - Repository Server 8.5.0.0 -->
<offering profile='IBM SPSS Collaboration and Deployment Services 8.5.0'
id='com.ibm.spss.cds.server.v8.4.0.offering' features='deploy.docker'/>
<!-- IBM SPSS Modeler Adapters for Collaboration and Deployment Services 18.4.0.0 -->
<offering profile='IBM SPSS Collaboration and Deployment Services 8.5.0'
id='com.ibm.spss.modeler.adapter.18.4.0' features='main.feature,text.analytics'/>
<!-- IBM SPSS PMML Scoring Adapter 8.5.0.0 -->
<offering profile='IBM SPSS Collaboration and Deployment Services 8.5.0'
id='com.ibm.spss.pmml.scoring.adapter.v8.4.0' features='main.feature'/>
</install>
<preference name='com.ibm.cic.common.core.preferences.eclipseCache' value='$
{sharedLocation}'/>
<preference name='com.ibm.cic.common.core.preferences.searchForUpdates' value='true'/>
</agent-input>
To run the installation in silent mode:
<IBM Installation Manager installation directory>/eclipse/tools/imcl input responseFile
-acceptLicense -showProgress
Important: Back up the keystore le. If you lose the keystore le, the Repository Server will not be able to
decrypt any passwords and will be come unusable. This requires reinstallation.
Additional migration considerations
IBM SPSS Collaboration and Deployment Services Repository migration preserves the contents and
conguration settings of an existing Repository.
For the dockerized Repository, the following migration scenario is supported.
• Migration from an earlier version of the Repository database. For IBM SPSS Collaboration and
Deployment Services 8.5.0, migration from version 8.3 or 8.2.2 is supported.
• Migration from a different host, application server, or database server. Dockerized IBM SPSS
Collaboration and Deployment Services Repository Server can connect to an existing 8.5.0 Repository
database.
Important: Due to the usage of a keystore, the JRE before and after the migration must be the same IBM
JRE.
Notes
• The url_prefix setting is the URL for routing server-initiated requests. The prex value must be
externally resolvable if external clients will connect to the Repository. Due to the complex conguration
scenario of docker networking, sometimes this setting needs to be manually congured.
– For a single container instance of the Repository, set url_prefix to the host name where the
docker daemon is hosted and the port that the container exposes.
– For clustering container instances (Swam, Kubernetes, etc.), set url_prefix to the reverse proxy
server address (Ngnix, for example).
• The dockerized 8.5.0 Repository Server already has the 18.4.0 Modeler Adapter installed and
congured. No extra conguration is needed for the adapter.
32
IBM SPSS Collaboration and Deployment Services Repository: Installation and Conguration Guide

• The timezone for each container may differ from the docker daemon. This is a limitation of docker itself.
You can update the timezone settings by manually changing docker run in the le cdsServer.bat/
cdsServer.sh. For example: docker run -e TZ=Europe/Amsterdam
• Known issues:
– For clustering mode, the scoring conguration may not be synchronized among containers properly.
If you encounter this issue, restart the container. Then synchronization should be invoked during
startup.
– SSL is not enabled by default. To use SSL, you may need to import and congure the SSL certicate to
the container manually
Uninstalling
In the event that an installation is no longer required, the current version can be uninstalled.
To uninstall the repository:
1. Stop the repository.
2. If the Manual option was used when conguring the repository, undeploy the repository resources
from the application server:
• WebSphere stand-alone server
<WAS profile root>/bin/wsadmin -lang jython -connType none -f
<repository installation directory>/toDeploy/<time stamp>/delCDS.py
• WebSphere managed server or cluster
<WAS profile root>/bin/wsadmin -lang jython -f
<repository installation directory>/toDeploy/<time stamp>/delCDS.py
• JBoss
<repository installation directory>/setup/ant/bin/ant -lib "<repository installation directory>/setup/lib"
-Dinstall.dir="<repository installation directory>" -Doutput.dir="."
-f <repository installation directory>/setup/resources/scripts/JBoss/delete-resources.xml
3. To delete all data in the repository database, open <repository installation directory>/uninstall/
uninstall.properties conguration le and set the cds.uninstall.remove.user.data property
to true. Note that some data may still remain in the database after IBM Installation Manager uninstall
is run, and it must be deleted manually.
Important: Do not perform this step if you plan on using the repository again for new installs, or need
to preserve the audit or logging data. You should also consider using the database vendor tools to
create a database backup before using this option.
4. Run IBM Installation Manager (GUI or command line), select the option to uninstall IBM SPSS
Collaboration and Deployment Services, and follow the prompts. IBM Installation Manager can also
be run in the silent mode. For more information, see the IBM Installation Manager documentation:
http://www-01.ibm.com/support/knowledgecenter/SSDV2W/welcome
.
5. Manually delete the root installation directory for the repository.
Important: If you intend to reuse repository data, it is recommended to save the keystore le, which
can be found in <repository installation directory>/keystore.
Chapter 2. Installation
33
34IBM SPSS Collaboration and Deployment Services Repository: Installation and Conguration Guide

Chapter 3. Migration
For IBM SPSS Collaboration and Deployment Services 8.5, migration from version 8.3 is supported.
IBM SPSS Collaboration and Deployment Services Repository migration preserves the contents
conguration settings of an existing repository including the following:
• Repository les and folder structure
• Scheduling and notication components
• Notication templates
• Local users
• Locally dened overrides of remote directory user lists and groups
• Role denitions and membership
• User preferences
• Icons
The following migration scenarios are supported:
• Migration from an earlier version of the repository.
• Migration to a different host, application server, or database server.
The following paths can be used for migration:
• Installation with a copy of the repository database. This is the recommended way to migrate.
• Installation of the repository with an existing repository database.
Before selecting a migration path, review this entire chapter, including the information on additional
migration considerations.
Regardless of the selected migration path, you must follow these guidelines:
• IBM SPSS Collaboration and Deployment Services Repository application les must be installed in a
different location from the original installation. Do not overwrite the les in the original location.
• A new application server instance must be created. Do not reuse the prole (WebSphere) or server
(JBoss) already used to run the old instance of the repository.
• Migration process does not preserve repository package conguration, so any additional packages
for IBM SPSS products such as IBM SPSS Modeler and IBM SPSS Statistics must be reinstalled. the
packages in the target instance must be at the same level or higher than the packages in the source
repository; and they should reference the DB table for that. The packages must be at a level that is
compatible with the given target version of IBM SPSS Collaboration and Deployment Services. See the
topic “ IBM SPSS products compatibility” on page 29
for more information.
Note: The packages in the target instance must be at the same version level or higher than the packages
in the source instance. The information about installed packages and their versions can be found in the
SPSSSETUP_PLUGINS table of the source instance database.
Installing with a copy of the repository database
Using a copy of an existing repository database allows the existing instance to remain online until the new
installation is ready to go live.
This procedure is for migration with a copy of the repository database where the source and target
databases are the same, for example, Db2 to Db2. For information about switching database systems, see
“Migrating to a different database” on page 36
• Make a copy of the existing repository database. The database copy can be performed using the
database vendor or third-party tools.
©
Copyright IBM Corp. 2000, 2022 35

• Run IBM SPSS Collaboration and Deployment Services conguration utility and point it to the new copy
of the repository database. Make sure that the Preserve Existing Data option is selected to retain all
existing data.
• Reinstall additional packages.
Installing with an existing repository database
You can also upgrade to IBM SPSS Collaboration and Deployment Services Repository by installing the
system with an existing repository database.
• Stop the repository.
• Backup the existing repository database.
• Install IBM SPSS Collaboration and Deployment Services and run the conguration utility. Make sure
that the Preserve Existing Data option is selected to retain all existing data.
• Reinstall additional packages.
Migrating to a different database
Migrating to a different database can include moving to a different database vendor (for example, SQL
Server to IBM Db2 or Oracle to Db2), or migrating to a database on a different operating system (for
example from Db2 for i to Db2 for Linux, UNIX, and Windows).
Transferring repository objects to a different vendor's database can be accomplished by creating a copy of
the old database in the new database.
• Create the target database following the instructions provided with the release of IBM SPSS
Collaboration and Deployment Services you are migrating from.
• Use the database vendor tools to move the data from the source repository database to the target
repository database. The database should already be congured, so it is only necessary to move
the data in the IBM SPSS Collaboration and Deployment Services tables. See the database vendor
documentation for more information.
• Make a copy of the keystore le that is used by the source repository database.
• Install IBM SPSS Collaboration and Deployment Services and run the conguration utility.
– Specify the target database as the repository database
– Make sure the Preserve Existing Data option is selected to retain all existing data
– When prompted for the keystore, select the copy of the keystore le to be used for the new instance.
• Reinstall any additional packages.
Note that because of differences between database environments and vendor copy tools, such as Db2
backup, MS-SQL Server backup, or Oracle RMAN, you must verify during migration that the following
database features are supported by the tool you have selected:
• XML tables (SPSSDMRESPONSE_LOG and SPSSSCORE_LOG)
• Binary data/BLOB, CLOB
• Special date formats
For example, Oracle 12cR1 Data Pump does not support XML tables. Therefore, it can be used for
restoring all repository tables except the two XML tables. The XML tables can be migrated using Oracle
Export. Review all database vendor requirements, like XML schema registration in MS SQL Server and
Oracle. We recommend consulting your database administrator before migrating your database.
Errors when migrating data from 12c to 19c
When upgrading from 12c to 19c, note that the following nine user role names in 12c no longer exist in
19c:
36
IBM SPSS Collaboration and Deployment Services Repository: Installation and Conguration Guide

• XS_RESOURCE
• JAVA_DEPLOY
• SPATIAL_WFS_ADMIN
• WFS_USR_ROLE
• SPATIAL_CSW_ADMIN
• CSW_USR_ROLE
• APEX_ADMINISTRATOR_ROLE
• APEX_GRANTS_FOR_NEW_USERS_ROLE
• DELETE_CATALOG_ROLE
If you used these roles in 12c, you'll see the following errors when importing data to 19c:
ORA-39083: Object type ROLE_GRANT failed to create with error:
ORA-01919: role 'XXX' does not exist
Failing sql is:
GRANT "XXX" TO "%schemaName%" WITH ADMIN OPTION
Since some role names have changed in 19c, your database administrator should ensure that
corresponding new role permissions are granted manually before performing the import. Doing this will
prevent these errors from impacting your installation and use of IBM SPSS Collaboration and Deployment
Services.
Additional migration considerations
Depending on your setup, additional tasks may be required for a successful migration of the following:
• Passwords
• JMS data store
• Notication templates
• JRE keystore les
When planning the migration, note that some of these tasks may need to be performed before the
conguration utility is run with an existing database or a database copy.
Migrating passwords
When migrating to a new IBM SPSS Collaboration and Deployment Services instance, it is best to use
a Java environment from the same vendor and with the same bit size (32-bit or 64-bit) as the original
installation. This is because the passwords that are stored in the repository are encrypted based on a
keystore key that is provided by the Java runtime. A different Java bit size or vendor implementation will
have a different keystore key which will not be able to decrypt the passwords correctly. In some cases, it
is necessary to change Java vendors or bit size (for example, when moving from JBoss to WebSphere).
If Java encryption used while installing the repository over an existing database is different from the
encryption used by the original instance (for example, IBM Java encryption versus Sun Java encryption),
credentials passwords will not be migrated and the conguration utility will report failure. However, the
repository can be still started, and you can use IBM SPSS Deployment Manager to manually change
credentials passwords. The export/import utility will migrate passwords, but when reusing an existing
database, the export must be performed from the source installation before importing the credential
resources to the target installation.
If you need to use a different Java environment, you can replace the passwords in credential resource
denitions and IBM SPSS Modeler job steps after IBM SPSS Collaboration and Deployment Services
Repository conguration:
• Export the jobs and credential resource denitions from the source repository instance and import them
into the target repository using IBM SPSS Deployment Manager.
or
Chapter 3. Migration
37
• Manually update each password in job steps and each credential in the target repository using IBM
SPSS Deployment Manager.
JMS store migration on WebSphere
When IBM SPSS Collaboration and Deployment Services Repository is installed with a WebSphere
Application Server, the default WebSphere JMS provider, Service Integration Bus (SIB), is congured
to use the repository database as the JMS message store. When the repository is started, it will
automatically create the required JMS tables in the database if they do not already exist. Note that when
using WebSphere on z/OS with Db2, you must manually create the JMS message store tables.
When using database copy to migrate the content of a repository to a new instance running on
WebSphere, you must delete the JMS message store tables (the tables with the names starting with
SIB*) from the database before you start IBM SPSS Collaboration and Deployment Services. The tables
will then be automatically created, with the exception of WebSphere on z/OS.
To manually create WebSphere JMS message store tables on z/OS with DB2, use the WebSphere
sibDDLGenerator command to generate the DDL and then apply the DDL to the database to create the
tables. For more information about sibDDLGenerator, see WebSphere documentation.
Migrating notication templates
To preserve the customizations made to notications templates in an existing repository, you must
copy the templates from <repository installation directory>/components/notication/templates to the
same directory of the new installation, after the new installation has been initially congured. For
more information about notications templates, see IBM SPSS Collaboration and Deployment Services
Repository 8.5.0 Administrator's Guide.
Migrating JRE keystore les
The IBM SPSS Collaboration and Deployment Services keystore le (platformKeystore) is designed
to store one AES key, which encrypts the end-user password. The keystore le and the key inside it are
generated by the native JRE implementation, so varies among different JREs. If the source and target
JREs are different before and after migration, a keystore migration tool is available to help you transform
keystore le formats between different JREs.
Example:
keystoreUtils.bat/keystoreUtils.sh
Requirements:
• Source and target JREs must be installed.
• You must manually copy the keystore le (platformKeystore) from <repository
installation directory>\keystore to the working directory.
Location:
<repository installation directory>\applications\keystore-utils
For advanced users
Advanced users can use the following procedure to migrate JRE keystore les.
1. Modify jvm_settings.properties:
a. Set the variable "jvm_source" value to the source JRE path that has the same vendor as source IBM
SPSS Collaboration and Deployment Services Repository Server uses
b. Set the variable "jvm_target" value to a valid JRE le path, the vendor of this JRE must be same as
the JRE used by the target IBM SPSS Collaboration and Deployment Services Repository Server
If JRE in Windows OS, must use double slashes as the le path separator, e.g. C:\\Program Files\
\IBM\\Java80, otherwise an error message will be obtained when run this tool: ***Error***: jvm
path doesn't point to a valid JVM
38
IBM SPSS Collaboration and Deployment Services Repository: Installation and Conguration Guide
2. Run the keystore migration tool. Example: keystoreUtils.bat / keystoreUtils.sh. Choose
the appropriate script for your operating system.
3. Enter the correct keystore password when running keystoreUtils.
4. After the tool runs successfully, you'll see a new folder called new_keystore in the working directory
that contains the newly generated keystore le platformKeystore. Use this new le when installing
the target IBM SPSS Collaboration and Deployment Services Repository Server.
Chapter 3. Migration39
40IBM SPSS Collaboration and Deployment Services Repository: Installation and Conguration Guide

Chapter 4. Package management
Updates, optional components, and content adaptors for IBM SPSS products are installed into the
IBM SPSS Collaboration and Deployment Services Repository server as packages with IBM Installation
Manager.
For details, see the installation instructions for individual components.
You can also use IBM SPSS Collaboration and Deployment Services Package Manager utility for
troubleshooting IBM SPSS Collaboration and Deployment Services package conguration and installing
additional components, for example, custom content adapters and security providers.
Installing packages
IBM SPSS Collaboration and Deployment Services Package Manager is a command line application. It can
also be called in batch mode by other applications to install their package les into the repository.
If IBM SPSS Collaboration and Deployment Services Repository was initially deployed automatically,
during package installation the application server must be in the following state:
• JBoss: Stopped
• Liberty: Stopped
The user must have administrator-level privileges to be able to install packages.
To prevent the newer version of a package from being overwritten by an older version, package manager
performs a version check. Package manager also checks for prerequisite components to ensure that they
are installed and their versions are equal to or newer than the required version. It is possible to override
the checks, for example, to install an older version of the package.
Note: Dependency checks cannot be overridden if package manager is called in batch mode.
To install a package
1. Navigate to <repository installation directory>/bin/.
2. Depending on the operating system, execute cliPackageManager.bat on Windows or
cliPackageManager.sh on UNIX.
3. When prompted, enter the user name and password.
4. Type the install command and press Enter. The command must include the install option and the
path of the package in quotes, as in the following example:
install 'C:\dir one\package1.package'
To install multiple packages at the same time, enter multiple package names separated by a space, for
example:
install 'C:\dir one\package1.package' 'C:\dir one\package2.package'
An alternative way to install multiple packages is to use the -dir or -d parameter with the path of a
directory containing the packages to install
install -dir 'C:\cds_packages'
In the case of failed dependencies or version checks, you will be brought back to the main package
manager prompt. To install ignoring non-fatal failures, rerun the install command using the -ignore
or -i parameter.
5. When the installation is completed, use exit command to exit package manager.
To display more command line install options, type help and press Enter key. The options include:
©
Copyright IBM Corp. 2000, 2022 41

• info "<package path>": Display information for a specied package le.
• install "<package path>": Install the specied package les into the repository.
• tree: Display installed package tree information.
Silent mode
To automate package installation, IBM SPSS Collaboration and Deployment Services Package Manager
can be run in silent mode:
<repository installation directory>/bin/cliPackageManager[.sh]
-user <administrator> -pass <administrator password>
install <package path> [<additional_package_path>]
Logging
IBM SPSS Collaboration and Deployment Services Package Manager logs (main and Ant log) can be found
in <repository installation directory>/log.
42IBM SPSS Collaboration and Deployment Services Repository: Installation and Conguration Guide
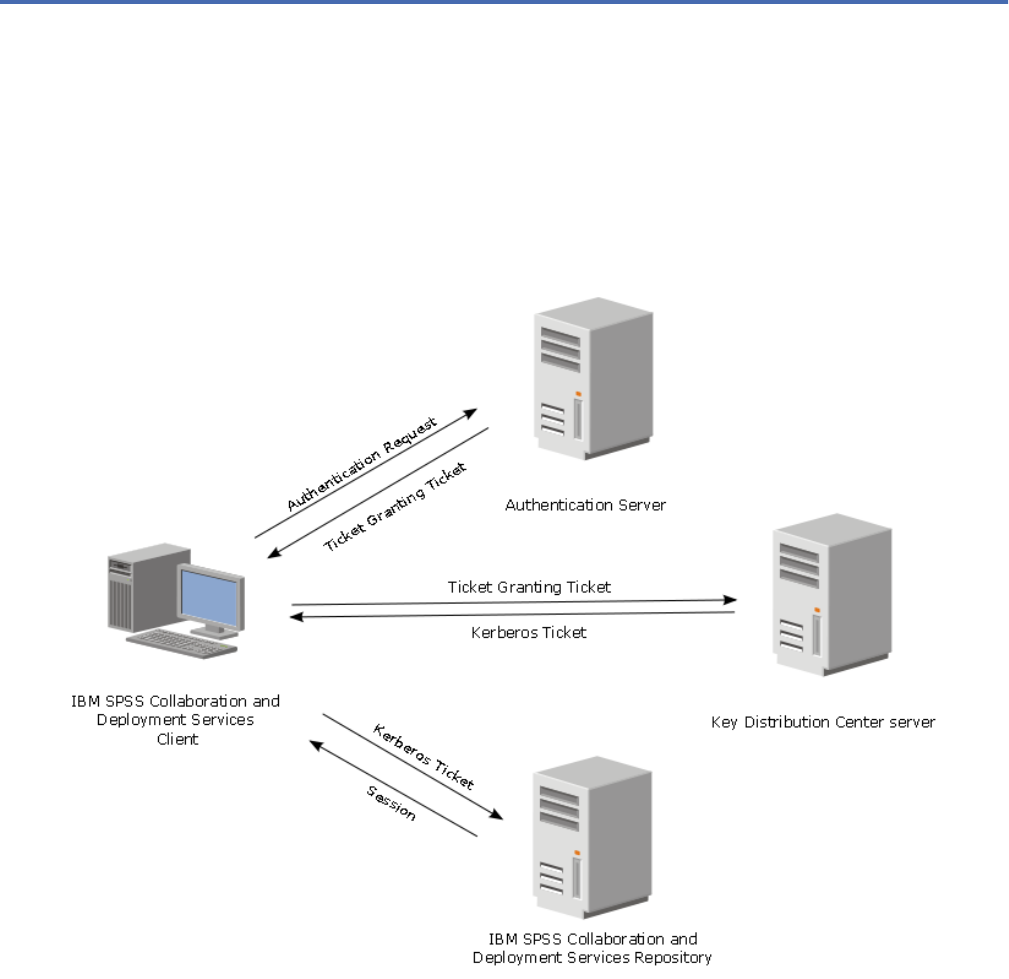
Chapter 5. Single sign-on
IBM SPSS Collaboration and Deployment Services provides single sign-on capability by initially
authenticating users through an external directory service based on the Kerberos security protocol, and
subsequently using the credentials in all IBM SPSS Collaboration and Deployment Services applications
(for example, IBM SPSS Deployment Manager, IBM SPSS Collaboration and Deployment Services
Deployment Portal, or a portal server) without additional authentication.
Note: Single sign-on is not allowed for browser-based IBM SPSS Deployment Manager.
Figure 3. IBM SPSS Collaboration and Deployment Services SSO architecture
For example, when IBM SPSS Collaboration and Deployment Services is used in conjunction with
Windows Active directory, you must congure the Kerberos Key Distribution Center (KDC) service to
enable single sign-on. The service will supply session tickets and temporary session keys to users and
computers within an Active Directory domain. The KDC must run on each domain controller as part of
Active Directory Domain Services (AD DS). When single sign-on is enabled, IBM SPSS Collaboration and
Deployment Services applications log into a Kerberos domain and use Kerberos tokens for web services
authentication. If single sign-on is enabled, it is strongly recommended that SSL communication be
congured for the repository.
Desktop client applications, such as Deployment Manager, create a Java subject and then establishes
a GSS session with the repository using the subject context. The repository returns a Kerberos service
ticket to the client when the GSS context is established. Thin client applications, such as Deployment
Portal, also obtains a Kerberos service ticket from the repository. However, thin clients rst perform
HTTP-based cross-platform authentication via the Negotiate Protocol. Both desktop and thin client
©
Copyright IBM Corp. 2000, 2022 43

applications require that you rst log on to a Kerberos domain, for example, to your Microsoft Active
Direcory/Windows domain.
Single sign-on conguration in IBM SPSS Collaboration and Deployment Services includes the following
steps:
• Directory system setup.
• Conguring the directory system as an IBM SPSS Collaboration and Deployment Services security
provider using the Server Administration tab of IBM SPSS Deployment Manager. For more information,
see IBM SPSS Collaboration and Deployment Services administrator documentation.
• Kerberos Key Distribution Center server conguration. Credential delegation must be enabled for the
Kerberos Service Principal on the Kerberos Key Distribution Center server. The procedure for enabling
credential delegation will be different depending on your directory server and Kerberos environment.
• Conguring Kerberos Key Distribution Center server as an IBM SPSS Collaboration and Deployment
Services single sign-on provider using the Server Administration tab of IBM SPSS Deployment
Manager. For more information, see IBM SPSS Collaboration and Deployment Services administrator
documentation.
• Conguring the application server for single sign-on.
• For Windows client systems, the registry must be updated for Kerberos LSA access.
• Depending on the application server used with the repository, it may be necessary to update the
application server conguration.
• Windows client systems must have
HKEY_LOCAL_MACHINE\System\CurrentControlSet\Control\Lsa\Kerberos\ registry value
updated. See the topic “Updating Windows registry for single sign-on” on page 48
for more
information.
• For thin-client access to the repository (for example, with IBM SPSS Collaboration and Deployment
Services Deployment Portal), the Web browser must have Simple and Protected GSS-API Negotiation
(SPNEGO) enabled.
Additional conguration step are also required to enable the repository Server Process Credential. See the
topic “Server Process Credential conguration” on page 49 for more information.
Directory conguration for single sign-on
IBM SPSS Collaboration and Deployment Services single sign-on requires an external directory to be set
up. Directory authentication for IBM SPSS Collaboration and Deployment Services single sign-on can be
based on the following directory systems:
• OpenLDAP directory
• Microsoft Active Directory
OpenLDAP
The overall conguration includes the following steps:
• Conguring OpenLDAP security provider. For more information, see IBM SPSS Collaboration and
Deployment Services 8.5.0 Administrator's Guide.
• Kerberos server-specic changes to OpenLDAP conguration depending on the Kerberos server being
used.
OpenLDAP with Windows Kerberos Server
If OpenLDAP directory is used with Windows Kerberos server, where OpenLDAP is the IBM SPSS
Collaboration and Deployment Services security provider and Windows Kerberos server is the single sign-
on provider, you must make sure that your OpenLDAP schema matches your Active Directory schema. If
the schema does not match, you must change the user mapping on the OpenLDAP server.
44
IBM SPSS Collaboration and Deployment Services Repository: Installation and Conguration Guide

MIT Kerberos Server
If MIT Kerberos Server is used with OpenLDAP, it may be necessary to set up SSL on the OpenLDAP server
and client to ensure secure communication when the KDC service and LDAP server are on different host.
Consult release-specic MIT Kerberos Server documentation for updated information.
Active Directory
The following instructions are for Windows Server 2003 domain controller. The steps will be similar for
Windows Server 2012 systems.
1. Create a user prole that will be used as Kerberos service principal
2. Map this user prole to the IBM SPSS Collaboration and Deployment Services host system
3. Congure the encryption type and Kerberos credential delegation
4. Create a Kerberos keytab le and place it on IBM SPSS Collaboration and Deployment Services host
system
After these steps have been completed, you can use Deployment Manager to congure Active Directory as
a security provider, and then congure a Kerberos single sign-on provider.
To create a user prole for Kerberos principal
1. Using the Active Directory users and computers management console, create a domain user for the
selected domain (for example, user krb5.principal in domain spss). This user corresponds to the
Kerberos service principal.
2. Specify a surname parameter for this user. It is required by some application servers.
3. Select the option for password to never expire.
To map the user prole to the IBM SPSS Collaboration and Deployment Services
host system
Associate the user prole with a Service Principal Name (SPN) by using the setspn tool. An SPN is a
name that is used by a Kerberos client to identify a service on a Kerberos server. The client references the
SPN instead of a specic domain user.
The setspn tool accesses, updates, and removes the SPN property for a user. To add an SPN, use the
following command syntax:
setspn -A <spn> <user>
The -A option adds an arbitrary SPN to the domain account. The other arguments have the following
denitions:
<spn>
The SPN that is added to the user, having a format of <service_class>/<host>. The
<service_class> value denotes the class of the service. The <host> value corresponds to the host
name, either fully qualied or simplied.
<user>
The user prole to associate with the SPN.
To map the user prole, perform the following steps. Add both the fully qualied host name and the
simplied, shortened host name as a client may reference either name.
1. If you do not have the setspn tool, download and install an appropriate version of Windows Support
Tools.
2. Run setspn with the IBM SPSS Collaboration and Deployment Services server fully qualied host
name as the argument, as in the following example:
setspn -A HTTP/cdsserver.spss.com krb5.principal
Chapter 5. Single sign-on
45

3. Run setspn with the IBM SPSS Collaboration and Deployment Services server host name as the
argument, as in the following example:
setspn -A HTTP/cdsserver krb5.principal
For more information on the setspn tool, see http://technet.microsoft.com/en-us/library/
cc731241.aspx.
To congure encryption type and credential delegation
1. On the Account tab of the user properties dialog, select the option to use AES encryption.
2. On the Delegation tab of the user properties dialog, select the option to trust the user with for
delegation to any service.
To create a Kerberos keytab le
A keytab le contains Kerberos principals with their corresponding encrypted keys and is used for
principal authentication. To create a keytab le, use the ktpass tool. For information on the ktpass
tool, see http://technet.microsoft.com/en-us/library/cc753771.aspx
.
1. Run the ktpass tool as in the following example:
ktpass -out c:\temp\krb5.prin.keytab -princ HTTP/[email protected]
-mapUser [email protected] -mapOp set -pass Pass1234 -crypto AES256-SHA1 -ptype KRB5_NT_PRINCIPAL
• The value for the princ option must have the following format:
<service_provider_name>@<domain>.
• The value for the mapUser option must have the following format:
<Kerberos_service_principal>@<domain>.
• Any form of strong encryption, as dened by the crypto option, requires the JCE extension for
strong encryption from Oracle.
2. Place the generated keytab le (in the example, c:\temp\krb5.prin.keytab) on the le system of your
IBM SPSS Collaboration and Deployment Services host.
If the service password changes, the keytab le must also be updated.
Kerberos server conguration
In Microsoft Windows environment, using the Active Directory Server with Windows (integrated) Kerberos
Server is recommended. You must update all client machines' registry for Kerberos LSA access. You
must also make specic changes to the browsers to use Kerberos. For non-Microsoft-Windows Kerberos
servers, you may need to install additional software both on your repository host machine as well as on
each client machines. In all cases, Kerberos service principal must be set to delegate credential. You must
also make specic changes to each client machines for credential delegation.
Application server conguration for single sign-on
Depending on the application server used with the repository, it may be necessary to update the
application server settings.
WebSphere
IBM SPSS Collaboration and Deployment Services conguration for single sign-on in WebSphere 7 and 8
includes the following steps:
• Dening Kerberos keytab.
• Dening JAAS-JGSS policy.
46
IBM SPSS Collaboration and Deployment Services Repository: Installation and Conguration Guide

Dening Kerberos keytab
1. In the administrative console, choose:
Servers > Application Servers > <Server Name> > Server Infrastructure > Process Denition >
Java Virtual Machine > Custom Properties
2. Add custom property KRB5_KTNAME with the value of the keytab le path.
Dening JAAS-JGSS policy
1. In the administrative console, choose:
Security > Secure Administration, application and infrastructure > Java Authentication and
Authorization Service > Applications logins
2. Dene a property JGSSServer.
3. In Additional Properties for JGSSServer, dene the module class
com.ibm.security.auth.module.Krb5LoginModule with authentication strategy REQUIRED.
4. Dene the following custom properties for com.ibm.security.auth.module.Krb5LoginModule.
Property name Value
credsType both
principal <principal name>, for example, HTTP/
cdsserver.spss.com@SPSS.COM
useDefaultKeytab true
JBoss
For JBoss application server, at least one JAAS (Java Authentication and Authorization Service)
conguration for JGSSServer and CaDSMiddleTier must be provided. The template for single sign-on
application policy can be found in the JGSSServer element of <JBoss installation directory>/
standalone/configuration/cds_server.xml. It may be necessary to change the Kerberos login
module name to correspond to the application server JRE.
At a minimum, at least one JAAS conguration for JGSSServer must be provided with the following
parameters:
• JGSSServer is required
• CaDSMiddleTier is required
• KerberosLocalUser is optional
• JDBC_DRIVER_01 is optional
1. For Sun JRE, the following default JGSSServer conguration is created:
JGSSServer {
com.sun.security.auth.module.Krb5LoginModule required
storeKey="true"
doNotPrompt="true"
realm=<realm name>
useKeyTab="true"
principal=<name>
keyTab=<path>
debug=false;
};
2. Optional KerberosLocalUser conguration is used to allow NTLM bypass. This conguration allows
users to create a Kerberos credential when the client browser sends an NTLM token (instead of a
Kerberos token) during the negotiation challenge. Note that on Windows systems, with browser on
the same machine, where IBM SPSS Collaboration and Deployment Services server is installed, it will
always send an NTLM token. All NTLM requests to IBM SPSS Collaboration and Deployment Services
may be disabled by omitting this conguration from their JAAS conguration le.
For IBM JRE:
Chapter 5. Single sign-on
47

KerberosLocalUser {
com.ibm.security.auth.module.Krb5LoginModule required
useDefaultCcache=true
debug=false;
};
For Sun JRE:
KerberosLocalUser {
com.sun.security.auth.module.Krb5LoginModule required
useTicketCache="true"
debug=false;
};
3. Optional JDBC_DRIVER_01 conguration is used for Kerberos authentication to database servers.
For IBM JRE:
JDBC_DRIVER_01 {
com.ibm.security.auth.module.Krb5LoginModule required
useDefaultCcache=true
debug=false;
};
For Sun JRE:
JDBC_DRIVER_01 {
com.sun.security.auth.module.Krb5LoginModule required
useTicketCache="true"
debug=false;
};
4. For Sun JRE, the following default CaDSMiddleTier conguration is created:
CaDSMiddleTier {
com.sun.security.auth.module.Krb5LoginModule required
useTicketCache="true"
renewTGT="true"
debug="false";
realm=<realm name>
kdc=<kdc name>
};
5. It's also possible to specify appropriate login module class name, requirement type, and other options
that the login module requires for each JAAS conguration. The login module class must be in class
path. For more information, see JRE and application server vendor documentation.
Updating Windows registry for single sign-on
For SSO to function properly, the Kerberos Ticket-Granting Ticket (TGT) must include the session
key. To enable this inclusion, the Windows registry must be updated. For more information, see http://
support.microsoft.com/kb/308339.
IBM SPSS Collaboration and Deployment Services installation media include registry update les for
conguring Windows XP SP2, Windows Vista, and Windows 2003 systems for Kerberos-based single sign-
on. The les can be found in the /Documentation/Utility_Files/Windows/registry directory of
the documentation package (downloaded from IBM Passport Advantage). The les are as follows:
• /Server/Kerberos/Win2003_Kerberos.reg
• /Server/Kerberos/WinXPSP2_Kerberos.reg
For Windows Vista and later systems, use the Win2003_Kerberos.reg le.
The registry les allow the system administrator to push registry changes to all systems on the network
that must have single sign-on access to the repository.
Conguring one-way trust relationships
You can congure your environment for cross-realm authentication to control user access.
For example, suppose you have two domains, AppDomain and UserDomain. The two domains have a
one-way trust relationship, with AppDomain congured for outgoing trust and UserDomain congured
for incoming trust. You install the IBM SPSS Collaboration and Deployment Services server in the
AppDomain domain and install IBM SPSS Deployment Manager in the UserDomain domain.
48
IBM SPSS Collaboration and Deployment Services Repository: Installation and Conguration Guide

To congure IBM SPSS Collaboration and Deployment Services for one-way trust, you need to modify both
the IBM SPSS Collaboration and Deployment Services server and IBM SPSS Deployment Manager.
Conguring the IBM SPSS Collaboration and Deployment Services server
1. Stop the IBM SPSS Collaboration and Deployment Services server.
2. Create a valid krb5.conf Kerberos conguration le on the server le system. The le should have
content similar to the following lines, with the domains replaced with values corresponding to your
system:
[libdefaults]
default_realm = APPDOMAIN.COM
[realms]
APPDOMAIN.COM = {
kdc = kdc.appdomain.com:88
default_domain = appdomain.com
}
[domain_realm]
.appdomain.com = APPDOMAIN.COM
3. Set the Java system property java.security.krb5.conf to the location of the krb5.conf le. For
example:
-Djava.security.krb5.conf="c:/windows/krb5.conf"
See your application server documentation for instructions on setting Java system properties.
4. Start the IBM SPSS Collaboration and Deployment Services server.
Conguring IBM SPSS Deployment Manager
1. Close IBM SPSS Deployment Manager.
2. Create a valid krb5.ini Kerberos conguration le in the windows installation folder, such as
c:\windows\krb5.ini. The le should have content valid for cross-realm authentication similar
to the following lines, with the domains replaced with values corresponding to your system:
[libdefaults]
default_realm = USERDOMAIN.COM
[realms]
USERDOMAIN.COM = {
kdc = kdc.userdomain.com:88
default_domain = userdomain.com
}
APPDOMAIN.COM = {
kdc = kdc.appdomain.com:88
default_domain = appdomain.com
}
[domain_realm]
.userdomain.com = USERDOMAIN.COM
.appdomain.com = APPDOMAIN.COM
3. Start IBM SPSS Deployment Manager.
Server Process Credential conguration
Server Process Credential is the built-in credentials denition of the user prole under which the
repository server is run. In Active Directory or OpenLDAP-based single sign-on environment, Server
Process Credential can be used instead of regular repository user credentials to:
• Run reporting job steps and schedule time-based jobs
• Query a security provider for a list of user and group proles
For more information on using the Server Process Credential, see IBM SPSS Deployment Manager
documentation.
Chapter 5. Single sign-on
49

After the repository has been congured for single sign-on, the following additional steps are required for
enabling the Server Process Credential:
• Congure the middle tier user login conguration for the application server.
• Create the Kerberos ticket cache on the repository host.
To use the server process credential with reporting job steps:
• Add the data source database server to the domain/realm.
• Congure the data source database server to accept single sign-on connections from the domain/realm.
• Congure the data source database to provide the appropriate permissions to the Server Process
Credential.
To congure the middle tier user login on WebSphere
1. Using administrative console, open
Security > Global security > JAAS - Application logins
2. Dene login conguration CaDSMiddleTier.
3. For CaDSMiddleTier, dene a JAAS module with class name
com.ibm.security.auth.module.Krb5LoginModule.
4. For com.ibm.security.auth.module.Krb5LoginModule, dene the following custom properties:
• useDefaultCache true
• renewTGT true
• debug false
To congure the middle tier user login on JBoss
Add the following application policy to <JBoss installation directory>/server/<Server Name>/conf/login-
cong.xml:
<application-policy name="CaDSMiddleTier">
<authentication>
<login-module code="com.sun.security.auth.module.Krb5LoginModule" flag="required">
<module-option name="useTicketCache">true</module-option>
<module-option name="realm">###DOMAIN#NAME###</module-option>
<module-option name="kdc">###KDC#SERVER#HOST###</module-option>
<module-option name="renewTGT">true</module-option>
</login-module>
</authentication>
</application-policy>
To create the Kerberos ticket cache
The Kerberos ticket cache will be used to store the Kerberos ticket used to authenticate the Server
Process Credential. To create the ticket cache perform the following steps:
1. Update the Kerberos conguration le on the repository host server, for example c:\windows\krb5.ini.
This le identies the default realm/domain, default encoding types, renewable ticket, and KDC
address, and will be used by the kinit application to generate our ticket cache. The following is
an example of the Kerberos conguration le:
[libdefaults]
default_realm = ACSSO.COM
default_tkt_enctypes = rc4-hmac
default_tgs_enctypes = rc4-hmac
renewable = true
[realms]
ACSSO.COM = {
kdc = acKDC.ACSSO.COM:88
default_domain = ACSSO.COM
}
2. Login to the repository host using the domain credentials that will used for the Server Process
Credential. Make sure that this credentials have appropriate permissions on the host.
50
IBM SPSS Collaboration and Deployment Services Repository: Installation and Conguration Guide

3. Run kinit from directory of the JRE used by the repository application server with the options to
create a renewable ticket and a ticket cache.
Note: On the Windows operating system, kinit may not create a renewable ticket. To overcome this
problem, add the following registry setting:
\HKEY_LOCAL_MACHINE\SYSTEM\CurrentControlSet\Control\Lsa\Kerberos\Parameters\allowtgtsessionk
ey=0x01
(DWORD)
For more information, see the Kerberos documentation for your operating system.
4. Enter the password for the user for the Server Process Credential.
Conguring browsers for single sign-on
To enable single sign-on for IBM SPSS Collaboration and Deployment Services Deployment Portal and
other thin clients of IBM SPSS Collaboration and Deployment Services, you must congure your web
browser to support Simple and Protected GSS-API Negotiation (SPNEGO) protocol.
Microsoft Internet Explorer
For information on conguring Microsoft Internet Explorer to support SPNEGO, see http://
msdn.microsoft.com/en-us/library/ms995329.aspx.
Mozilla Firefox
SPNEGO support for Firefox is turned off by default. To enable it:
1. Go to the about:cong URL (Firefox conguration le editor).
2. Change the following preference values:
• network.negotiate-auth.allow-non-fqdn = false
• network.negotiate-auth.allow-proxies = true
• network.negotiate-auth.delegation-uris = Include the local intranet domain name, such
as .your-domain.com, where the leading period represents a wildcard character
• network.negotiate-auth.trusted-uris = Include the local intranet domain name, such
as .your-domain.com, where the leading period represents a wildcard character
• network.negotiate-auth.using-native-gsslib = true
Google Chrome
SPNEGO support for Chrome is disabled by default. To enable it, you need to include theIBM SPSS
Collaboration and Deployment Services server name in an allowlist:
• For Windows, dene the AuthNegotiateDelegateWhitelist group policy. For more information,
see the Chrome Policy List
, Issue 472145, and Issue 469171.
As a member of the allowlist, the IBM SPSS Collaboration and Deployment Services server is treated as a
trusted destination for Kerberos ticket forwarding.
Safari
Single sign-on is not supported for Safari.
Chapter 5. Single sign-on
51

Forwardable tickets and IBM SPSS Deployment Manager
Although not necessary, you could use the kinit.exe tool of your JDK to obtain and cache Kerberos
ticket-granting tickets. For example, from the jre\bin directory of your IBM SPSS Deployment Manager
installation, you could issue the following command:
kinit.exe -f
The -f option creates a forwardable ticket. This command creates a cache le in the Windows user
directory where the JVM automatically searches for a cache.
If you have issued this command by using an IBM JDK 7 older than 170_SR8, you may need to modify
your krb5.ini le to access this cache successfully.
1. Open the krb5.ini le in a text editor. This le is often located in the C:\Windows directory.
2. In the [libdefaults]: section, add the following setting:
forwardable = true
3. Save the updated le.
This change is only needed for the client. No corresponding change is needed for the IBM SPSS
Collaboration and Deployment Services Repository server.
52IBM SPSS Collaboration and Deployment Services Repository: Installation and Conguration Guide

Chapter 6. Application context roots
The context root for an application denes the location at which the module can be accessed. The context
root is part of the URL you use to connect to the application.
A URL reference to an IBM SPSS Collaboration and Deployment Services application includes the
following elements:
URL prex
Consists of the protocol, the server name or IP address, and the port number
Context root
Determines the location at which the application is accessed. By default, the context root is the server
root itself, denoted as a single forward slash.
Application root
Species the root of the application itself
For example, the IBM SPSS Collaboration and Deployment Services Deployment Portal has the following
URL when the repository server is running locally on port 8080:
http://localhost:8080/peb
The URL prex is http://localhost:8080 and the context root is the application server root. The
application root is peb.
There is nothing in the URL that identies the web module as being part of IBM SPSS Collaboration and
Deployment Services. If you add other applications to your server, managing the many modules available
at the server root becomes increasingly difcult.
If you congure the repository server to use a context root, you can isolate the IBM SPSS Collaboration
and Deployment Services components from other applications. For example, you can dene a context
root of ibm/spss for the IBM SPSS Collaboration and Deployment Services modules. In this case, the
URL for the IBM SPSS Collaboration and Deployment Services Deployment Portal interface is:
http://localhost:8080/ibm/spss/peb
Important: If you use a context root for your repository server, all client applications must include the
same context root when they connect to the server. The URL for any application running within the IBM
SPSS Collaboration and Deployment Services environment must be updated accordingly.
Related tasks
Adding a context root to the URL Prex
If your system uses a custom URL prex for accessing the IBM SPSS Collaboration and Deployment
Services Repository, add the context root to the URL prex specication.
Updating context roots for WebSphere
Modify the location at which applications deployed on WebSphere are accessed by using the
administrative console.
Updating context roots for JBoss
©
Copyright IBM Corp. 2000, 2022 53

Modify the location at which applications deployed on JBoss are accessed by updating the ear le that
contains the location denitions.
Conguring application context roots
You must update the system URL prex and modify the individual context root specications to congure
context roots.
Procedure
1. If the use of a URL prex is enabled, add the context root to the URL prex.
2. Update the context root for each application.
The steps depend on the application server.
• “Updating context roots for WebSphere” on page 55
• “Updating context roots for JBoss” on page 55
Results
You can access the browser-based IBM SPSS Deployment Manager and the IBM SPSS Collaboration and
Deployment Services Deployment Portal by using URL values that include your context root.
What to do next
Update any references to the repository server, such as those dened using IBM SPSS Deployment
Manager, to include the context root in the server URL.
Adding a context root to the URL Prex
If your system uses a custom URL prex for accessing the IBM SPSS Collaboration and Deployment
Services Repository, add the context root to the URL prex specication.
Before you begin
• Your login credentials must be associated with the Conguration action.
• Use of the URL Prex setting must be enabled by using the browser-based IBM SPSS Deployment
Manager.
Procedure
1. Log in to the browser-based IBM SPSS Deployment Manager.
2. On the Conguration panel, click the URL Prex option in the Setup group.
3. Add the context root to the URL Prex denition.
For example, if your URL prex is http://myserver:8080 and you want to use a context root of
ibm/spss, the new value is http://myserver:8080/ibm/spss.
Restriction: Do not end the URL specication with a slash. For example, specify a value of http://
myserver:8080/myroot instead of http://myserver:8080/myroot/.
4. Restart the application server.
What to do next
Update the context root for each application. The steps depend on the application server.
Related concepts
Application context roots
54
IBM SPSS Collaboration and Deployment Services Repository: Installation and Conguration Guide

The context root for an application denes the location at which the module can be accessed. The context
root is part of the URL you use to connect to the application.
Related tasks
Updating context roots for WebSphere
Modify the location at which applications deployed on WebSphere are accessed by using the
administrative console.
Updating context roots for JBoss
Modify the location at which applications deployed on JBoss are accessed by updating the ear le that
contains the location denitions.
Updating context roots for WebSphere
Modify the location at which applications deployed on WebSphere are accessed by using the
administrative console.
Before you begin
“Adding a context root to the URL Prex” on page 54
Procedure
1. Log in to the WebSphere console.
2. Access the IBM SPSS Collaboration and Deployment Services application.
3. Update the Context Root For Web Modules settings to include your root value.
If the URL prex is enabled for your system, the root value for each module must be the same as the
value you added to the URL Prex. The application root must be unchanged.
For example: /IBM/SPSS/CDS/admin
4. Restart the WebSphere nodes where IBM SPSS Collaboration and Deployment Services is deployed
Related concepts
Application context roots
The context root for an application denes the location at which the module can be accessed. The context
root is part of the URL you use to connect to the application.
Related tasks
Adding a context root to the URL Prex
If your system uses a custom URL prex for accessing the IBM SPSS Collaboration and Deployment
Services Repository, add the context root to the URL prex specication.
Updating context roots for JBoss
Modify the location at which applications deployed on JBoss are accessed by updating the ear le that
contains the location denitions.
Updating context roots for JBoss
Modify the location at which applications deployed on JBoss are accessed by updating the ear le that
contains the location denitions.
Before you begin
“Adding a context root to the URL Prex” on page 54
Procedure
1. Make a backup copy of the cds83.ear le in the toDeploy/timestamp directory of your JBoss
installation.
2. Use an archive utility to modify the META-INF/application.xml le in the original ear le.
Chapter 6. Application context roots
55

Prex the application root value for each context-root element with the new context root. You must
add the same value to each context-root element.
3. Copy the ear le that contains the updated application.xml le to the deploy directory of the
application server.
4. Restart the application server.
Example
Suppose the application.xml le contains the following specications:
<module>
<web>
<web-uri>admin.war</web-uri>
<context-root>admin</context-root>
</web>
</module>
<module>
<web>
<web-uri>peb.war</web-uri>
<context-root>peb</context-root>
</web>
</module>
To add a context root of ibm/spss, update the context-root denitions with the following values:
<module>
<web>
<web-uri>admin.war</web-uri>
<context-root>ibm/spss/admin</context-root>
</web>
</module>
<module>
<web>
<web-uri>peb.war</web-uri>
<context-root>ibm/spss/peb</context-root>
</web>
</module>
Related concepts
Application context roots
The context root for an application denes the location at which the module can be accessed. The context
root is part of the URL you use to connect to the application.
Related tasks
Adding a context root to the URL Prex
If your system uses a custom URL prex for accessing the IBM SPSS Collaboration and Deployment
Services Repository, add the context root to the URL prex specication.
Updating context roots for WebSphere
Modify the location at which applications deployed on WebSphere are accessed by using the
administrative console.
56
IBM SPSS Collaboration and Deployment Services Repository: Installation and Conguration Guide
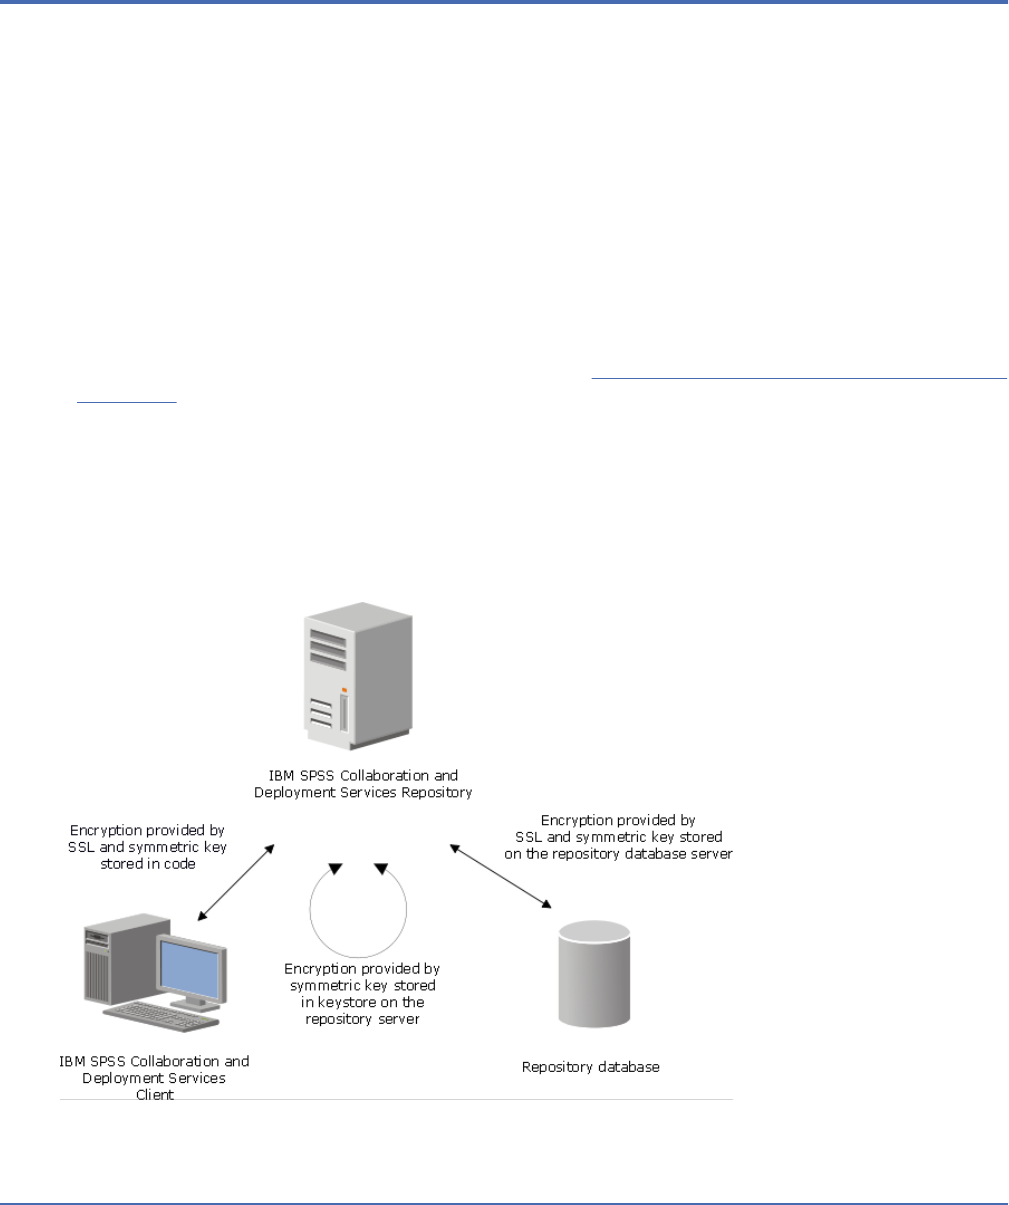
Chapter 7. FIPS 140–2 compliance
The Federal Information Processing Standard (FIPS) Publication 140-2, FIPS PUB 140-2, is a US
government computer security standard used to accredit cryptographic modules. The document species
the requirements for cryptography modules which include both hardware and software components,
corresponding to four different levels of security that are mandated for organization that do business
with the US government. IBM SPSS Collaboration and Deployment Services can be congured to provide
Security Level 1 as specied by FIPS 140-2.
Security conguration for FIPS 140-2-compliance must follow these guidelines:
• Communications between the repository and client applications must use SSL for transport layer
security of general data transfers. Additional AES encryption is provided for credential passwords using
a shared key stored in the application code. See the topic Chapter 8, “Using SSL to secure data transfer,”
on page 59 for more information.
• The repository server uses AES algorithm with the key stored in a keystore on the server le system
to encrypt passwords in the conguration les, application server conguration les, security provider
conguration les, etc.
• Communications between the repository server and the database server can optionally use SSL for
transport layer security for general data transfer. AES encryption is provided for credential passwords,
conguration passwords, user preference passwords, etc. using a shared key stored in a keystore on the
database server le system.
Figure 4. IBM SPSS Collaboration and Deployment Services FIPS 140-2-compliant security setup
Repository conguration
The repository conguration for FIPS 140-2-compliance must follow these guidelines:
• The database must be set up to accept SSL communications; the JCE encryption module must also be
congured.
• If the repository is installed on UNIX, the default JRE must be set up with a JCE module.
• The application server JRE must also be set up with a JCE module.
©
Copyright IBM Corp. 2000, 2022 57

• The application server must be congured to accept SSL communications; a JCE module must also be
congured.
• If the repository is installed on Windows, you must exit the installation at setup screen, congure a
JCE module, then restart the setup and select to run in FIPS 140-2-compliant mode on the appropriate
screen.
• If the repository is deployed into a clustered environment, keystore must be replicated to all nodes in
the cluster.
• The JREs that are being used by IBM Corp. server applications interacting with IBM SPSS Collaboration
and Deployment Services, such as IBM SPSS Statistics Server and IBM SPSS Modeler Server, must have
SSL certicates installed.
Desktop client conguration
For IBM SPSS Collaboration and Deployment Services desktop client applications, such as IBM SPSS
Deployment Manager, JCE encryption module must be enabled for the JRE used to run the applications.
The JRE must have SSL certicates installed.
Browser conguration
• Mozilla Firefox can be congured to run in FIPS 140-2 compliant mode by modifying
the application options. For more information, see http://support.mozilla.com/en-US/kb/
Conguring+Firefox+for+FIPS+140-2.
• Internet Explorer conguration requires enabling Windows cryptography and modifying the browser
settings. For more information, see http://support.microsoft.com/kb/811833.
• Apple Safari cannot be used in FIPS 140-2 compliant mode.
58
IBM SPSS Collaboration and Deployment Services Repository: Installation and Conguration Guide

Chapter 8. Using SSL to secure data transfer
Secure Sockets Layer (SSL) is a protocol for encrypting data transferred between two computers. SSL
ensures that communication between the computers is secure. SSL can encrypt the authentication of a
username/password and the contents of an exchange between a server and client.
Follow these general steps to use SSL with a supported application server:
1. Import the SSL certicate into the JRE of IBM Installation Manager.
2. During installation, select the SSL Enabled option to enable the SSL connection to the database.
3. After installation, before server startup, import the certicate into the JRE that's bundled into IBM
SPSS Collaboration and Deployment Services.
For further instructions specic to your application server, see “Conguring SSL for application servers”
on page 62.
How SSL works
SSL relies on the server's public and private keys, in addition to a public key certicate that binds the
server's identity to its public key.
1. When a client connects to a server, the client authenticates the server with the public key certicate.
2. The client then generates a random number, encrypts the number with the server's public key, and
sends the encrypted message back to the server.
3. The server decrypts the random number with its private key.
4. From the random number, both the server and client create the session keys used for encrypting and
decrypting subsequent information.
The public key certicate is typically signed by a certicate authority. Certicate authorities, such
as VeriSign and Thawte, are organizations that issue, authenticate, and manage security credentials
contained in the public key certicates. Essentially, the certicate authority conrms the identity of
the server. The certicate authority usually charges a monetary fee for a certicate, but self-signed
certicates can also be generated.
Securing client/server and server-server communications with SSL
The main steps in securing client/server and server-server communications with SSL are:
1. Obtain and install the SSL certicate and keys.
2. If using encryption certicates with a strength greater than 2048 bits, install unlimited strength
encryption on the Deployment Manager client computers. For more information, see “Installing
unlimited strength encryption” on page 60
3. Add the certicate to the client keystore.
4. Instruct users to enable SSL when connecting to the server.
Notes:
• Occasionally a server product acts as a client. An example is IBM SPSS Statistics Server connecting
to the IBM SPSS Collaboration and Deployment Services Repository. In this case, IBM SPSS Statistics
Server is the client.
©
Copyright IBM Corp. 2000, 2022 59

Installing unlimited strength encryption
The Java Runtime Environment shipped with the product has US export-strength encryption enabled. For
enhanced security of your data, upgrading to unlimited-strength encryption is recommended.
IBM J9
1. Download the Java Cryptography Extension (JCE) Unlimited Strength Jurisdiction Policy Files for your
version of the SDK from the IBM.com website.
2. Extract the unlimited jurisdiction policy les that are packaged in the compressed le. The compressed
le contains a US_export_policy.jar le and a local_policy.jar le. In your WebSphere
Application Server installation, go to the $JAVA_HOME/jre/lib/security directory and back up
your US_export_policy.jar and local_policy.jar les.
3. Replace the existing copies of US_export_policy.jar and local_policy.jar les with the two les that you
downloaded and extracted.
Note: You need to also install the *.jar les to your
<DeploymentManager_Client_Install>/jre/lib/security folder.
4. Enable security in the WebSphere Application Server administration console. Make sure that all node
agents within the cell are active beforehand. For more information, see WebSphere documentation.
Note that you must select an available realm denition from the list in Security > Secure
administration, applications, and infrastructure, and then click Set as current so that security is
enabled upon a server restart.
5. Log off the administrative console.
6. Stop the server.
7. Restart the server.
Sun Java
1. Download the Java Cryptography Extension (JCE) Unlimited Strength Jurisdiction Policy Files for your
version of the SDK from Sun Java website.
2. Extract the downloaded le.
3. Copy the two .jar les local_policy.jar and US_export_policy.jar into <installation folder>/jre/lib/
security, where <installation folder> is the folder in which you installed the product.
Adding the certicate to client keystore (for connections to the repository)
Note: Skip this step if you are using a certicate that is signed by a certicate authority.
If you are using SSL to connect to an IBM SPSS Collaboration and Deployment Services repository and
you are using self-signed certicates, you need to add the certicate to the client's Java keystore. The
following steps are completed on the client computer.
1. Open a command prompt and change directories to the following location, where <product install dir>
is the directory in which you installed the product:
<product install dir>/jre/bin
2. Enter the following command:
keytool -import -alias <alias name> -file <path to cert> -keystore <path
to keystore>
where <alias name> is an arbitrary alias for the certicate, <path to cert> is the full path to the
certicate, and <path to keystore> is the full path to the Java keystore, which may be <product install
dir>/lib/security/jssecacerts or <product install dir>/lib/security/cacerts.
3. When prompted, enter the keystore password, which is changeit by default.
60
IBM SPSS Collaboration and Deployment Services Repository: Installation and Conguration Guide

4. When prompted about trusting the certicate, enter yes.
Importing the certicate le for browser-based client connections
When you connect to IBM SPSS Collaboration and Deployment Services Repository through SSL with a
browser-based client, for example, IBM SPSS Collaboration and Deployment Services Deployment Portal,
the browser either prompts you to accept the unsigned, untrusted certicate, or displays a message that
the site is unsafe and provides a link to import the certicate into the browser truststore. This process is
different for different browsers, and it might be different depending on the browser conguration. You can
also manually install the certicate into the browser truststore.
Instructing users to enable SSL
When users connect to the server through a client product, they need to enable SSL in the dialog box for
connecting to the server. Be sure to tell your users to select the appropriate check box.
Conguring the URL prex
If IBM SPSS Collaboration and Deployment Services Repository is set up for SSL access, the value of the
URL Prex conguration setting must be modied as follows:
1. Log in to the repository using browser-based console.
2. Open URL Prex conguration option.
Conguration > Setup > URL Prex
3. Set the value of the prex to https instead of http and set the port value to the SSL port number. For
example:
[default]
http://<hostname>:<port>
[SSL-enabled]
https://<hostname>:<SSLport>
Securing LDAP with SSL
Lightweight Directory Access Protocol (LDAP) is an Internet Engineering Task Force (IETF) standard for
exchanging information between network directories and databases containing any level of information.
For systems requiring additional security, LDAP providers, such as Microsoft's Active Directory, can
operate over Secure Socket Layer (SSL), provided that the Web or application server supports LDAP over
SSL. Using SSL in conjunction with LDAP can ensure that login passwords, application information, and
other sensitive data are not hijacked, compromised, or stolen.
The following example illustrates how to enable LDAPS using Microsoft's Active Directory as a security
provider. For more specic information on any of the steps or to nd details that address a particular
release of the security provider, see the original vendor documentation.
1. Verify that Active Directory and the Enterprise Certicate Authority are installed and functioning.
2. Use the certicate authority to generate a certicate, and import the certicate into the certicate
store of the IBM SPSS Deployment Manager installation. This allows the LDAPS connection to be
established between the IBM SPSS Collaboration and Deployment Services Repository and an Active
Directory server.
To congure IBM SPSS Deployment Manager for secure Active Directory connections, verify that a
connection exists to the repository.
3. Launch the IBM SPSS Deployment Manager.
4. From the Tools menu, choose Server Administration.
5. Log in to a previously dened administered server.
6. Double-click the Conguration icon for the server to expand the hierarchy.
7. Double-click the Security Providers icon to expand the hierarchy.
Chapter 8. Using SSL to secure data transfer
61

8. Double-click the Active Directory security provider.
9. Enter conguration values for the instance of Active Directory with security certicates installed.
10. Select the Use SSL check box.
11. Note the name in the Domain User eld. Subsequent logins using Active Directory are authenticated
using SSL.
For additional information about installing, conguring, and implementing LDAPS on a particular
application server, see the original vendor's documentation.
Conguring SSL for application servers
You can install IBM SPSS Collaboration and Deployment Services Repository Server against an SSL-
enabled database. Follow the steps below for your application server:
JBoss
Refer to your JBoss EAP 7.x documentation for instructions on enabling SSL/TLS. SSL is enabled by
default in JBoss EAP 7.x. Make customizations as follows:
1. Create a key le with Java keystore format. For example:
keytool -genkey -alias cads822 -keyalg RSA -ext san=ip:*.**.**.** -keystore myserver.jks
-validity 10950
Make sure the common name (CN) is the fully qualied domain name (FQDN) of the system where IBM
SPSS Collaboration and Deployment Services Repository is installed. The ip is the IP address of the
IBM SPSS Collaboration and Deployment Services Repository Server.
If your key le is in a format other than keystore, transform it into Java keystore format rst.
2. Update the following SSL settings in the le cds_server.xml, located at
JBOSS_HOME\standalone\configuration:
<security-realm name="CaDSRealm">
<server-identities>
<ssl>
<keystore path="JBOSS_HOME\standalone\configuration\myserver.jks" keystore-password="xxxx"
alias="cads822"/>
</ssl>
...
</security-realm>
Where the value for alias is the same name you used for creating the key le.
<http-connector name="http-remoting-connector" connector-ref="default" security-
realm="CaDSRealm"/>
<https-listener name="https" socket-binding="https" security-realm="CaDSRealm" enable-
http2="true"/>
3. Optional: You can make changes to port conguration. For example, change the default JBoss HTTPS
port from 8443 to 443 under <socket-binding-group> in the le cds_server.xml:
<socket-binding-group name="standard-sockets" default-interface="public" ...>
<socket-binding name="http" port="80" />
<socket-binding name="https" port="443" />
...
</socket-binding-group>
Liberty
Refer to your JBoss EAP 7.x documentation for instructions on enabling SSL/TLS. SSL is enabled by
default in JBoss EAP 7.x. Make customizations as follows:
62
IBM SPSS Collaboration and Deployment Services Repository: Installation and Conguration Guide

1. Create a key le with Java keystore format. For example:
keytool -genkey -alias test.jks -keyalg RSA san=ip:*.**.**.** -validity 20000 -keystore
test.jks
Make sure the common name (CN) is the fully qualied domain name (FQDN) of the system where IBM
SPSS Collaboration and Deployment Services Repository is installed. The ip is the IP address of the
IBM SPSS Collaboration and Deployment Services Repository Server.
If your key le is in a format other than keystore, transform it into Java keystore format rst.
2. Update the le server.xml located at CADS_HOME\wlp\usr\servers\cdsServer with the new
keystore le information:
<keyStore id="defaultKeyStore" location=".\test.jks" type="JKS" password="xxxx"/>
WebSphere
Refer to your WebSphere documentation for instructions on enabling SSL/TLS.
Chapter 8. Using SSL to secure data transfer63
64IBM SPSS Collaboration and Deployment Services Repository: Installation and Conguration Guide

Chapter 9. Logging
Logging is essential when troubleshooting application problems as well as when planning preventive
maintenance activities. As system and application events are generated, administrative personnel can
be alerted when warning thresholds are reached or critical system events occur. Additionally, verbose
information output can be stored in a text le for analysis at a later time.
The IBM SPSS Collaboration and Deployment Services Repository uses the log4j 2 package for handling
runtime log information. Log4j 2 is Apache Software Foundation's logging solution for Java applications.
The log4j 2 approach permits logging control using a conguration le; the application binary does not
have to be modied. For a comprehensive discussion of log4j 2, see the log4j website .
Logging conguration le
The location of the IBM SPSS Collaboration and Deployment Services Repository logging conguration le
varies depending on the host application server:
• WebSphere: <repository installation directory>/platform/log4j2.xml
• Liberty: <repository installation directory>/platform/log4j2.xml
• JBoss: <JBoss server directory>/standalone/configuration/log4j2.xml
This le controls both the destination and the amount of log output. Conguration of log4j 2 is handled by
modifying this le to dene appenders for log destinations and to route logger output to those appenders.
The following default loggers are dened:
Table 4. Loggers
Logger Description
log4j.rootCategory Root logger
log4j.logger.com.spss All IBM SPSS Collaboration and
Deployment Services events
log4j.com.spss.cmor,
log4j.com.spss.cmor.internal.MetaObjectImportEngine
Repository events
log4j.com.spss.security Security events
log4j.com.spss.process Job scheduling events
log4j.com.spss.reporting , log4j.com.spss.reportservice Reporting events
log4j.com.spss.notication Notication events
log4j.logger.org.springframework.jdbc.core.JdbcTemplate Spring framework JDBC events
log4j.logger.com.spss.repository.internal.transfer Export-import events
The following appenders are dened:
• Console
• Main log (cds.log)
• Export-import transactions log (cds_transfer.log)
The default location of the log les varies depending on the host application server:
• WebSphere: <WebSphere profile directory>/logs/
• JBoss: <JBoss server directory>/standalone/log
©
Copyright IBM Corp. 2000, 2022 65
• Liberty: <repository installation directory>/wlp/usr/servers/cdsServer/logs
66IBM SPSS Collaboration and Deployment Services Repository: Installation and Conguration Guide
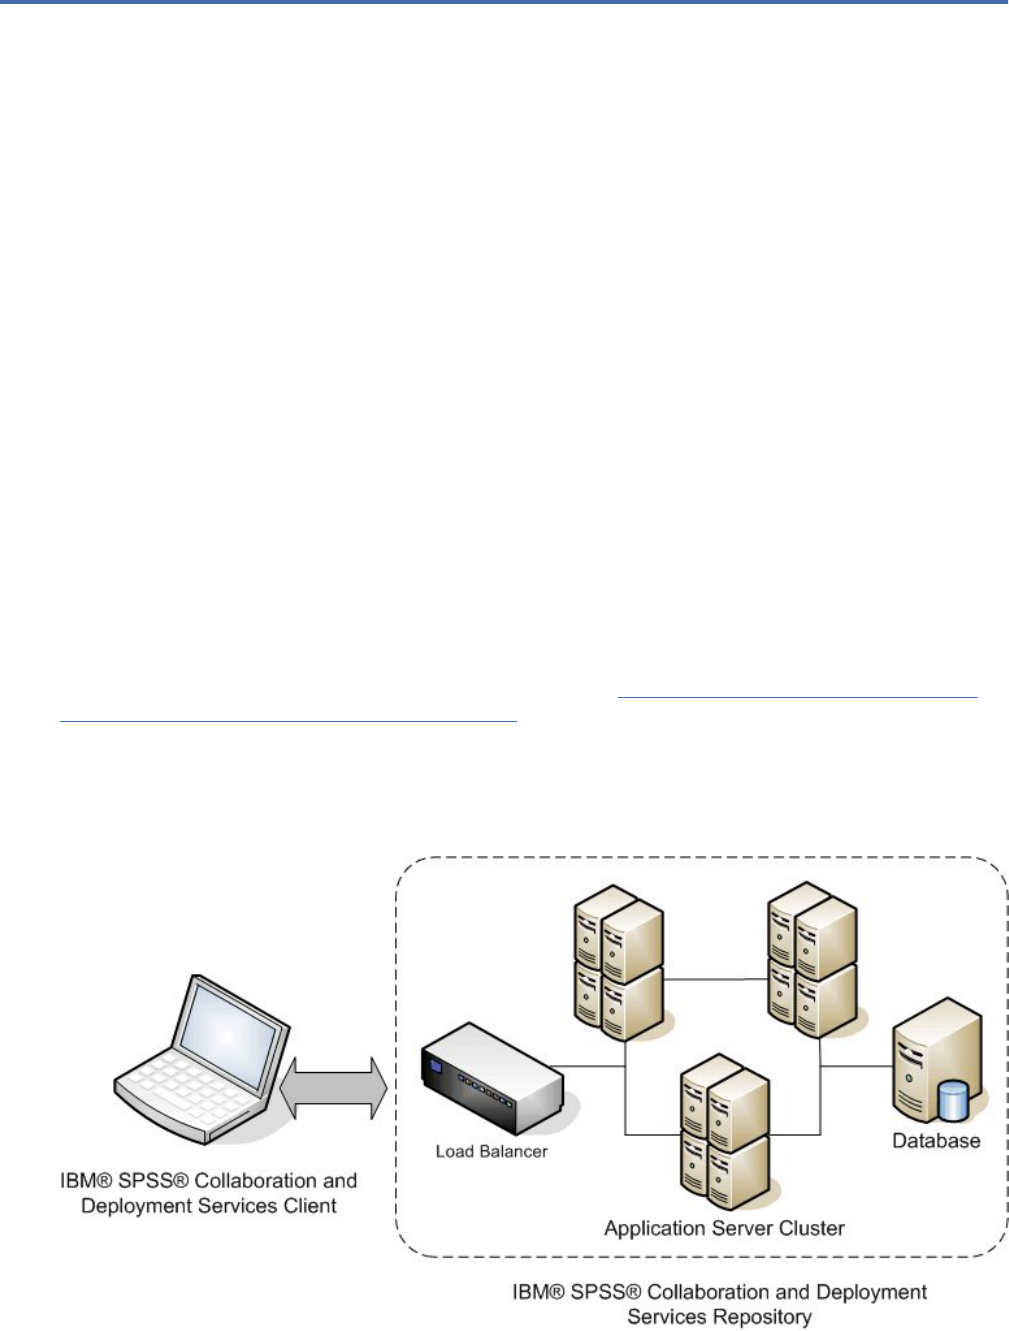
Chapter 10. Example: WebSphere cluster installation
and conguration
This section provides and end-to-end example of installing and conguring IBM SPSS Collaboration and
Deployment Services Repository with an IBM WebSphere clustered server.
This example walks through the following information:
• Pre-installation steps for determining system requirements based on your installation type and system
use, provisioning the machines to run the application server cluster, and making sure the servers meet
all hardware and software requirements.
• WebSphere clustered server steps for installing WebSphere using IBM Installation Manager and
setting up a WebSphere clustered server.
• Database steps for initializing your database.
• Installation and conguration steps for installing the application les on the host system using IBM
Installation Manager and conguring the IBM SPSS Collaboration and Deployment Services Repository
to run with the designated application server cluster and repository database.
• Post-installation steps for starting the IBM SPSS Collaboration and Deployment Services Repository
and verifying connectivity.
Pre-installation
Before installing IBM SPSS Collaboration and Deployment Services with a WebSphere clustered server,
verify that your environment meets all hardware and software requirements on all nodes of the
cluster. See the IBM software product compatibility reports at:https://www.ibm.com/software/reports/
compatibility/clarity/softwareReqsForProduct.html
When deploying the IBM SPSS Collaboration and Deployment Services Repository Server into a clustered
application server environment, each application server in the cluster should be congured identically
for the hosted application components and the repository should be accessed through a hardware
or software-based load balancer. This architecture allows processing to be distributed across multiple
application servers and also provides redundancy in case of a single server failure.
Figure 5. Cluster architecture
©
Copyright IBM Corp. 2000, 2022 67

The process of installing the Repository server into a cluster includes the following steps:
• Initial installation and conguration of application components on the management node of the cluster
• Subsequent conguration of cluster nodes
Installation prerequisites
• Host system requirements must be met on all nodes of the cluster.
• All members of the cluster must run on the same operating system as the main (management) node.
• The IBM SPSS Collaboration and Deployment Services Repository database must already exist and be
accessible before installing the Repository.
• The application server topology must already exist before installing the Repository. We recommend you
verify that the cluster is accessible and running properly at the load balancer address.
• The Repository installation directory must be shared across all nodes in the cluster.
WebSphere clustered server installation
Before installing IBM WebSphere, IBM Installation Manager 1.9.1 or higher must be installed. For more
information about IBM Installation Manager installation, see https://jazz.net/wiki/bin/view/Deployment/
InstallingUpdatingScriptingWithInstallationManager.
Depending on your operating system, WebSphere can be installed using the Installation Manager
interface, command line, a response le, or console mode. See https://www.ibm.com/support/
knowledgecenter/SSEQTP_9.0.0/com.ibm.websphere.installation.base.doc/ae/tins_install.html for more
information.
Installing WebSphere with IBM Installation Manager
1. Start Installation Manager
• GUI mode: <IBM Installation Manager installation directory>/eclipse/IBMIM
• Command line mode: <IBM Installation Manager installation directory>/eclipse/
tools/imcl -c
2. Congure Installation Manager to use a repository that contains IBM WebSphere application server
installation les.
3. Click Install.
4. Select the following product offerings to be installed and click Next.
• IBM WebSphere Application Server Network Deployment
• IBM SDK, Java Technology Edition, Version 8
5. Accept the terms in the license agreements and click Next.
6. Select a shared resources directory, which contains resources that can be shared by multiple
installation packages, and click Next.
7. Select any languages to install translated content and click Next.
8. Select the features you want to install and click Next.
9. Review the summary information and click Install.
Important: WebSphere Application Server should be installed on all the nodes in the designed
WebSphere cluster topology. Repeat the previous steps on all the nodes in the cluster.
68
IBM SPSS Collaboration and Deployment Services Repository: Installation and Conguration Guide

Clustered server setup
Before setting up a clustered server, conrm that the WebSphere prole used with IBM SPSS
Collaboration and Deployment Services is congured to run with Java 7 SDK or later. The following
example demonstrates the sequence of commands for listing available SDKs and setting default SDKs.
<WebSphere Installation Directory> \bin>managesdk.bat –listAvailable
CWSDK1003I: Available SDKs :
CWSDK1005I: SDK name: 8.0_64
CWSDK1001I: Successfully performed the requested managesdk task.
<WebSphere Installation Directory>\bin>managesdk.bat -setNewProfileDefault -sdkName 8.0_64
CWSDK1022I: New profile creation will now use SDK name 8.0_64.
CWSDK1001I: Successfully performed the requested managesdk task
Important: Ensure the version of Java SDK on all the nodes in the cluster is 7 or later.
Generally, a clustered topology contains one management node and a few managed nodes. WebSphere
provides a prole management utility that can be used for creating proles. For example:
1. Create the deployment management prole on the management machine:
• Log on to the management node and run the prole management utility. For example:
– Windows:
<WebSphere Installation Directory>\bin> manageprofiles.bat –create –templatePath
<WebSphere
Installation Path>\profileTemplates\management –profileName XXXX -enableAdminSecurity
true
-adminUserName XXXX -adminPassword XXXX
– Linux/UNIX:
<WebSphere Installation Directory>\bin> manageprofiles.sh –create –templatePath
<WebSphere
Installation Path>\profileTemplates\management –profileName XXXX -enableAdminSecurity
true
-adminUserName XXXX -adminPassword XXXX
2. Create the deployment manage prole on the managed machine:
• Log on to the managed node and run the prole management utility. For example:
– Windows:
<WebSphere Installation Directory>\bin>manageprofiles.bat -create -templatePath
<WebSphere
Installation Directory>\profileTemplates\managed -profileName XXXX
– Linux/UNIX:
<WebSphere Installation Directory>\bin>manageprofiles.sh -create -templatePath
<WebSphere
Installation Directory>\profileTemplates\managed -profileName XXXX
Important: If there are two or more managed nodes in your cluster topology, run this command
multiple times to create managed proles on every managed machine.
Once all the proles are ready, you need to build the relationship between management prole and
managed proles. If a managed prole is on a different machine than a management prole, ensure
proper network connectivity between the management machine and the managed machine.
1. Start the management prole on the management node:
• Log on to the management machine and run the following command:
– Windows:
<WebSphere Installation Directory>\profiles\<PROFILE_NAME>\bin>startManager.bat
– Linux/UNIX:
Chapter 10. Example: WebSphere cluster installation and
conguration69

<WebSphere Installation Directory>\profiles\<PROFILE_NAME>\bin>startManager.sh
2. Add managed nodes to the management prole:
• Log on to the managed machine and run the following command:
– Windows:
<WebSphere Installation Directory>\profiles\<PROFILE_NAME>\bin>addNode.bat
<Management_Host>
– Linux/UNIX:
<WebSphere Installation Directory>\profiles\<PROFILE_NAME>\bin>addNode.sh
<Management_Host> Port
Where <Management_Host> is the host name of the management machine. Port is the
Management SOAP connector port of the management prole, which can be found in the le
AboutThisProfile.txt. If there are two or more managed nodes in your cluster topology, run
this command multiple times against each managed prole.
3. Log on to the WebSphere Admin Console and create a cluster denition based on the managed nodes:
• Log on to the WebSphere Admin Console of the management prole (https://
hostname:port/ibm/console/logon.jsp, where hostname is the host name of the
management machine and port is the Admin Console port number.
• Go to Servers > Clusters > WebSphere application server clusters and click New to create a
cluster denition.
• Specify a cluster name and click Next.
• Specify a member name for the rst cluster member and select one of the available nodes. Click
Next.
• Create additional cluster members by adding other available nodes.
Database
The database and the IBM SPSS Collaboration and Deployment Services Repository do not need to be
installed on the same server, but some conguration is necessary to ensure connectivity. During the
installation, you will be prompted for the database server name, port number, user name and password,
and the name of the database to use for information storage and retrieval.
Important: You must manually create the database before installation. Any valid database name can be
used, but if a previously created database does not exist, the installation will not continue.
Here's an example SQL script for creating a DB2 database named SPSSCDS:
CREATE DATABASE SPSSCDS ON c:\ USING CODESET UTF-8 TERRITORY US COLLATE USING SYSTEM;
CONNECT TO SPSSCDS;
CREATE Bufferpool SPSS8K IMMEDIATE SIZE 250 AUTOMATIC PAGESIZE 8 K ;
CREATE REGULAR TABLESPACE SPSS8K PAGESIZE 8 K MANAGED BY AUTOMATIC STORAGE EXTENTSIZE 8 OVERHEAD 10.5 PREFETCHSIZE 8 TRANSFERRATE 0.14 BUFFERPOOL SPSS8K
DROPPED TABLE RECOVERY ON;
COMMENT ON TABLESPACE SPSS8K IS '';
CREATE Bufferpool SPSSTEMP IMMEDIATE SIZE 250 PAGESIZE 32 K ;
CREATE SYSTEM TEMPORARY TABLESPACE SPSSTEMP PAGESIZE 32 K MANAGED BY AUTOMATIC STORAGE EXTENTSIZE 16 OVERHEAD 10.5 PREFETCHSIZE 16 TRANSFERRATE 0.14
BUFFERPOOL "SPSSTEMP";
COMMENT ON TABLESPACE SPSSTEMP IS '';
CONNECT RESET;
CONNECT TO SPSSCDS;
GRANT DBADM,CREATETAB,BINDADD,CONNECT,CREATE_NOT_FENCED_ROUTINE,IMPLICIT_SCHEMA,LOAD,CREATE_EXTERNAL_ROUTINE,QUIESCE_CONNECT,SECADM ON DATABASE TO USER
CADSDBUSER;
CONNECT RESET;
UPDATE DB CFG FOR SPSSCDS USING LOGSECOND 200;
RESTART DATABASE SPSSCDS;
Installation
When you deploy the IBM SPSS Collaboration and Deployment Services Repository Server into a
WebSphere clustered server, you must be sure the Repository Server is installed on the same machine as
the WebSphere management prole.
1. Log on to the operating system as a user with the appropriate level of permissions.
70
IBM SPSS Collaboration and Deployment Services Repository: Installation and Conguration Guide
2. Open IBM Installation Manager using one of the following methods:
• GUI mode: <IBM Installation Manager installation directory>/eclipse/IBMIM
• Command line mode: <IBM Installation Manager installation directory>/eclipse/
tools/imcl -c
3. If the installation repository is not congured, specify the repository path (for example, as a location
on the host le system, the network, or an HTTP address).
Note: To successfully access an installation repository, the repository location path must not contain
an ampersand (&).
4. On the main menu, select Install.
5. Select IBM SPSS Collaboration and Deployment Services as the package to install. For example:
• IBM SPSS Collaboration and Deployment Services - Repository Services
• IBM SPSS Collaboration and Deployment Services Scoring Adapter for PMML
• IBM SPSS Modeler Adapter for Collaboration and Deployment Services
6. Read the license agreement and accept its terms.
7. Specify the package group and the installation directory:
• A new package group is required for the IBM SPSS Collaboration and Deployment Services
Repository installation.
• Specify the installation directory for shared resources. You can specify the shared resources
directory only the rst time you install a package.
8. Review summary information and proceed with the installation. The application les will be installed in
the specied directory after you click Install.
9. Congure the installation directory to be shared so that it is accessible by all members of the cluster
(for example, use le sharing on Windows or NFS on Linux/UNIX).
If problems occur during installation, you can use the IBM Installation Manager logs for
troubleshooting. Access the log les from the main menu in IBM Installation Manager.
Conguration
After following the previous installation steps, you should now have:
• All members in the WebSphere cluster running on the same operating system as the main
(management) node
• The repository database ready and accessible
• The IBM SPSS Collaboration and Deployment Services Repository installation directory shared to all the
nodes in your WebSphere cluster
Deploy the Repository Server into your cluster
1. Launch the conguration utility using one of the following methods:
• GUI mode:
– Windows: <repository installation directory>\bin\configTool.bat
– Linux/UNIX: <repository installation directory>/bin/configTool.sh
• Command line mode:
– Windows: <repository installation directory>\bin\cliConfigTool.bat
– Linux/UNIX: <repository installation directory>/bin/cliConfigTool.sh
2. Specify the application server type. For a WebSphere cluster, you select IBM WebSphere.
3. Specify application server settings as follows:
• WebSphere prole directory. The directory location of the WebSphere server prole. For a
WebSphere cluster, this is the path of the management prole. Other WebSphere settings, such
Chapter 10. Example: WebSphere cluster installation and
conguration71
as WebSphere installation root, prole topology, and node, will be automatically populated based
on prole information. If any values cannot be populated automatically, you must specify them
manually.
• URL Prex. The URL used for accessing repository server (for example, http://
<machine>:<port>). In a cluster environment, the port is commonly the port number of the load
balancer.
4. Specify database connection information as follows:
• Database type. IBM DB2, SQL Server, or Oracle.
• Host. The host name or IP address of the database server.
• Port. The access port for the database server.
• Database name. The name of the database to use for the Repository.
• SID/Service name. For Oracle, SID or service name.
• Run as a service. For Oracle, indicates that the connection is to a database service rather than by
SID.
• User name. Database user name.
• Password. Database user password.
5. If reusing a database from a prior installation, specify whether existing data should be preserved or
discarded.
6. Specify options for the encryption keystore. The keystore is an encrypted le that contains the key for
decrypting the passwords used by the Repository, such as the Repository administration password, the
database access password, etc.
• To reuse a keystore from an existing Repository installation, specify the path and password to the
keystore. The key from the old keystore will be extracted and used in the new keystore. Note that the
JRE used to run the application server must be compatible with the JRE that was used to create the
encryption keys.
• If you are not reusing an existing keystore, specify and conrm the password for the new keystore.
The keystore will be created in <repository installation directory>/keystore.
Important: If you lose the keystore le, the application will not be able to decrypt any passwords and
will become unusable. It will have to be reinstalled. We recommend you save back up copies of the
keystore le.
7. Specify the password value to use for the built-in Repository administrator user account (admin). This
password is used when logging on to the Repository for the rst time.
8. Select the deployment mode (automatic or manual). In this example, we'll select automatic.
9. Review summary information and proceed with conguration.
Congure the cluster
When the IBM SPSS Collaboration and Deployment Services Repository Server is deployed into your
WebSphere cluster successfully, there are some external conguration steps required so you can be sure
the server is accessible to each node in the cluster or over the load balancer.
1. Set CDS_HOME for each node:
• Log on to the WebSphere Admin Console.
• Go to Environment > WebSphere Variables
• Verify the CDS_HOME variable value for each node. If a WebSphere node is on a different
server than the Repository server, update the value of CDS_HOME to point to the shared
installation directory (for example, \\<Management_Host>\SPSS\Deployment\8.2\Server,
where <Management_Host> is the host name of the machine where the Repository server is
installed.
2. Set Log4j Properties for each node:
• Log on to the WebSphere Admin Console.
72
IBM SPSS Collaboration and Deployment Services Repository: Installation and Conguration Guide

• Find the log4j.cnfigurationFile property under Servers > WebSphere application servers >
[server name] > Java and Process Management > Process denition > Java Virtual Machine >
Custom Properties. This property identies the location where the logging system can access the
logging conguration le. Typically, this property has a value of file://${CDS_HOME}/platform/
log4j2.xml. On Windows, if the CDS_HOME variable contains a drive letter, add a forward
slash (/) escape character to the log4j.configurationFile value (for example, file:///$
{CDS_HOME}/platform/log4j2.xml).
• Save and synchronize your changes.
Load balancer
A software or hardware-based load balancer must be congured to access the repository in a clustered
environment. WebSphere application servers provide built-in software-based load-balancer utilities (for
example, IBM HTTP Server). The following steps outline the installation and conguration of an IBM HTTP
Server.
Install IBM HTTP Server
1. Start IBM Installation Manager
2. Congure Installation Manager to use a repository that contains IBM HTTP Server installation les.
3. Click Install.
4. Select the following product offerings to install and click Next.
• IBM HTTP Server for WebSphere Application Server
• Web Server Plug-ins for IBM WebSphere Application Server
5. Accept the terms in the license agreements and click Next.
6. Specify the installation directory and click Next.
7. Select the features to install and click Next.
8. Congure the details for IBM HTTP Server.
9. Review the summary information and click Install.
Create a web server denition in your WebSphere cluster
1. Log on to the WebSphere Admin Console for the management prole at https://
hostname:port/ibm/console/logon.jsp, where hostname is the host name of the management
machine and port is the Admin Console port.
2. Go to Server Types > Web Servers and click New to create a new web server denition.
3. Specify the server name and select the node that corresponds to the web server you want to add.
Typically, the node should be on the same server where the HTTP server is installed. For Type, Select
IBM HTTP Server and click Next.
4. Select the template that corresponds to the server you want to create and click Next. In this example
we'll use the default.
5. Specify properties for the new web server.
6. Review the summary of the new web server denition and click Finish.
7. Save your changes.
Congure the web server
1. Log on to the WebSphere Admin Console for the management prole.
2. Find the conf.httpd le under Servers > Server Types > Web servers > [server name]. Add the
following script to the le:
LoadModule was_ap22_module "<Plug-ins directory>\bin\32bits\mod_was_ap22_http.dll"
WebSpherePluginConfig "<Plug-ins directory>\config\<web server name>\plugin-cfg.xml"
Chapter 10. Example: WebSphere cluster installation and
conguration73
Where <Plug-in directory> is the Web Server Plug-ins installation directory and <Web server
name> is the name of your web server.
3. Go to Servers > Server Types > Web servers, select your web server, and click Generate Plug-in.
4. Click Propagate Plug-in to broadcast the plug-in.
5. Go to Servers > Server Types > Web servers > [server name] and view plugin-cfg.xml to conrm
that all the URIs for IBM SPSS Collaboration and Deployment Services have been generated (for
example, <Uri AffinityCookie="JSESSIONID" AffinityURLIdentifier="jsessionid"
Name="/admin/*"/>.
Set the URL prex property
In a cluster environment, the URL_Prex repository conguration property is used for routing server-
initiated HTTP requests. The property must be set to the URL of the load balancer. Note that you can
set this property when you initially run the IBM SPSS Collaboration and Deployment Services Repository
conguration utility.
To set or update the value of the URL prex property after repository conguration:
1. Start a single cluster member.
2. Open the browser-based IBM SPSS Deployment Manager by navigating to http://<repository
host>:<port number>/security/login and logging on with the admin account that was created
during Repository conguration.
3. Update the URL_Prex conguration property with the URL of the load balancer for the cluster. Save
your changes.
4. Stop the running cluster member. Start the cluster.
Post-installation
The following checklist guide you through the post-installation steps:
1. Start the server and verify connectivity (instructions provided after this section).
2. Install any content adapters you need for using IBM SPSS Collaboration and Deployment Services
Repository with other SPSS products such as IBM SPSS Modeler or IBM SPSS Statistics.
3. If necessary, install IBM SPSS Collaboration and Deployment Services Remote Process Server and IBM
SPSS Collaboration and Deployment Services - Essentials for Python. For more information, see the
installation instructions for those components.
4. Install IBM SPSS Collaboration and Deployment Services clients, including IBM SPSS Deployment
Manager. For more information, see client application installation instructions.
5. Using IBM SPSS Deployment Manager, create repository users and groups and assign them application
permissions via roles. For more information, see the IBM SPSS Collaboration and Deployment
ServicesAdministrator's Guide.
If you encounter problems during these post-installation steps, see the IBM SPSS Collaboration and
Deployment ServicesTroubleshooting Guide.
Start the Repository server
For WebSphere clustered servers, the repository server starts automatically when you start the
application server. Start the application server by using the scripts provided with the WebSphere
administration tools.
1. Log on to the management machine and start the management node:
• Windows: <WebSphere Installation
Directory>\profiles\<PROFILE_NAME>\bin>startManager.bat
• Linux/UNIX: <WebSphere Installation
Directory>\profiles\<PROFILE_NAME>\bin>startManager.sh
2. Log on to each machine and start each managed node agent:
74
IBM SPSS Collaboration and Deployment Services Repository: Installation and Conguration Guide

• Windows: <WebSphere Installation
Directory>\profiles\<PROFILE_NAME>\bin>startNode.bat
• Linux/UNIX: <WebSphere Installation
Directory>\profiles\<PROFILE_NAME>\bin>startNode.sh
3. Log on to the WebSphere Admin Console for the management node (http://hostname:port/ibm/
console). Go to Servers > Server Types > WebSphere application servers, select each node, and
click Start.
4. Go to Servers > Server Types > Web servers and click Start.
Important: To avoid permissions conflicts, the Repository server must always be started under the same
credentials, preferably a user with sudo (UNIX) or administrator-level (Windows) privileges.
Verify connectivity
You can verify that the IBM SPSS Collaboration and Deployment Services Repository Server is running
by accessing the browser-based IBM SPSS Deployment Manager in a supported web browser at http://
<repository host>:<port number>/security/login. If the tool doesn't launch, the server likely
isn't running. See the IBM software product compatibility reports at https://www.ibm.com/software/
reports/compatibility/clarity/softwareReqsForProduct.html for more information about supported web
browsers.
Chapter 10. Example: WebSphere cluster installation and conguration75
76IBM SPSS Collaboration and Deployment Services Repository: Installation and Conguration Guide

Notices
This information was developed for products and services offered in the US. This material might be
available from IBM in other languages. However, you may be required to own a copy of the product or
product version in that language in order to access it.
IBM may not offer the products, services, or features discussed in this document in other countries.
Consult your local IBM representative for information on the products and services currently available in
your area. Any reference to an IBM product, program, or service is not intended to state or imply that
only that IBM product, program, or service may be used. Any functionally equivalent product, program, or
service that does not infringe any IBM intellectual property right may be used instead. However, it is the
user's responsibility to evaluate and verify the operation of any non-IBM product, program, or service.
IBM may have patents or pending patent applications covering subject matter described in this
document. The furnishing of this document does not grant you any license to these patents. You can
send license inquiries, in writing, to:
IBM Director of Licensing
IBM Corporation
North Castle Drive, MD-NC119
Armonk, NY 10504-1785
US
For license inquiries regarding double-byte (DBCS) information, contact the IBM Intellectual Property
Department in your country or send inquiries, in writing, to:
Intellectual Property Licensing
Legal and Intellectual Property Law
IBM Japan Ltd.
19-21, Nihonbashi-Hakozakicho, Chuo-ku
Tokyo 103-8510, Japan
INTERNATIONAL BUSINESS MACHINES CORPORATION PROVIDES THIS PUBLICATION "AS IS"
WITHOUT WARRANTY OF ANY KIND, EITHER EXPRESS OR IMPLIED, INCLUDING, BUT NOT LIMITED
TO, THE IMPLIED WARRANTIES OF NON-INFRINGEMENT, MERCHANTABILITY OR FITNESS FOR A
PARTICULAR PURPOSE. Some jurisdictions do not allow disclaimer of express or implied warranties in
certain transactions, therefore, this statement may not apply to you.
This information could include technical inaccuracies or typographical errors. Changes are periodically
made to the information herein; these changes will be incorporated in new editions of the publication.
IBM may make improvements and/or changes in the product(s) and/or the program(s) described in this
publication at any time without notice.
Any references in this information to non-IBM websites are provided for convenience only and do not in
any manner serve as an endorsement of those websites. The materials at those websites are not part of
the materials for this IBM product and use of those websites is at your own risk.
IBM may use or distribute any of the information you provide in any way it believes appropriate without
incurring any obligation to you.
Licensees of this program who wish to have information about it for the purpose of enabling: (i) the
exchange of information between independently created programs and other programs (including this
one) and (ii) the mutual use of the information which has been exchanged, should contact:
IBM Director of Licensing
IBM Corporation
North Castle Drive, MD-NC119
Armonk, NY 10504-1785
US
©
Copyright IBM Corp. 2000, 2022 77

Such information may be available, subject to appropriate terms and conditions, including in some cases,
payment of a fee.
The licensed program described in this document and all licensed material available for it are provided by
IBM under terms of the IBM Customer Agreement, IBM International Program License Agreement or any
equivalent agreement between us.
The performance data and client examples cited are presented for illustrative purposes only. Actual
performance results may vary depending on specic congurations and operating conditions.
Information concerning non-IBM products was obtained from the suppliers of those products, their
published announcements or other publicly available sources. IBM has not tested those products
and cannot conrm the accuracy of performance, compatibility or any other claims related to non-
IBMproducts. Questions on the capabilities of non-IBM products should be addressed to the suppliers of
those products.
Statements regarding IBM's future direction or intent are subject to change or withdrawal without notice,
and represent goals and objectives only.
This information contains examples of data and reports used in daily business operations. To illustrate
them as completely as possible, the examples include the names of individuals, companies, brands, and
products. All of these names are ctitious and any similarity to actual people or business enterprises is
entirely coincidental.
COPYRIGHT LICENSE:
This information contains sample application programs in source language, which illustrate programming
techniques on various operating platforms. You may copy, modify, and distribute these sample programs
in any form without payment to IBM, for the purposes of developing, using, marketing or distributing
application programs conforming to the application programming interface for the operating platform
for which the sample programs are written. These examples have not been thoroughly tested under
all conditions. IBM, therefore, cannot guarantee or imply reliability, serviceability, or function of these
programs. The sample programs are provided "AS IS", without warranty of any kind. IBM shall not be
liable for any damages arising out of your use of the sample programs.
Privacy policy considerations
IBM Software products, including software as a service solutions, (“Software Offerings”) may use cookies
or other technologies to collect product usage information, to help improve the end user experience,
to tailor interactions with the end user or for other purposes. In many cases no personally identiable
information is collected by the Software Offerings. Some of our Software Offerings can help enable you
to collect personally identiable information. If this Software Offering uses cookies to collect personally
identiable information, specic information about this offering’s use of cookies is set forth below.
This Software Offering does not use cookies or other technologies to collect personally identiable
information.
If the congurations deployed for this Software Offering provide you as customer the ability to collect
personally identiable information from end users via cookies and other technologies, you should seek
your own legal advice about any laws applicable to such data collection, including any requirements for
notice and consent.
For more information about the use of various technologies, including cookies, for these purposes,
See IBM’s Privacy Policy at http://www.ibm.com/privacy and IBM’s Online Privacy Statement at http://
www.ibm.com/privacy/details the section entitled “Cookies, Web Beacons and Other Technologies”
and the “IBM Software Products and Software-as-a-Service Privacy Statement” at http://www.ibm.com/
software/info/product-privacy.
Trademarks
IBM, the IBM logo, and ibm.com are trademarks or registered trademarks of International Business
Machines Corp., registered in many jurisdictions worldwide. Other product and service names might be
78
Notices

trademarks of IBM or other companies. A current list of IBM trademarks is available on the web at
"Copyright and trademark information" at www.ibm.com/legal/copytrade.shtml.
Adobe, the Adobe logo, PostScript, and the PostScript logo are either registered trademarks or
trademarks of Adobe Systems Incorporated in the United States, and/or other countries.
Intel, Intel logo, Intel Inside, Intel Inside logo, Intel Centrino, Intel Centrino logo, Celeron, Intel Xeon,
Intel SpeedStep, Itanium, and Pentium are trademarks or registered trademarks of Intel Corporation or
its subsidiaries in the United States and other countries.
Linux is a registered trademark of Linus Torvalds in the United States, other countries, or both.
Microsoft, Windows, Windows NT, and the Windows logo are trademarks of Microsoft Corporation in the
United States, other countries, or both.
UNIX is a registered trademark of The Open Group in the United States and other countries.
Java and all Java-based trademarks and logos are trademarks or registered trademarks of Oracle and/or
its afliates.
Other product and service names might be trademarks of IBM or other companies.
Notices79
80IBM SPSS Collaboration and Deployment Services Repository: Installation and Conguration Guide

Index
Numerics
64-bit JRE 9
A
Active Directory 43
, 45
adding nodes to the cluster 25
AES 57
application server clustering 23, 24
application servers
requirements 9
applications
supported versions 29
authentication 43
B
browser 61
browser trust store 61
browsers
single sign-on 51
C
case insensitive collation 15
certicate
importing 61
certicates 57
Chrome
single sign-on 51
Citrix Presentation Server 9
client updates 41
clipackagemanager.bat 41
clipackagemanager.sh 41
cluster
expanding 25
WebLogic 25
WebSphere 25
clustering 23, 24
collaboration 1
command line 41
conguring
Db2 14
MS SQL Server 15
Oracle databases 16
context roots
in JBoss 55
in WebSphere 55
URL prex 54
credentials 36, 37
custom JDBC URL settings 17
D
database connectivity 27
database maintenance 17
database permissions 12
databases
requirements 12
Db2
conguration 14
Db2 for Linux, UNIX, and Windows 12
Db2 UDB 12
dependency check 41
deployment 2
docker 29
dockerized installation 29
E
enabling custom JDBC URL settings during installation 17
encrypt.bat 27
encrypt.sh 27
encryption
SSL 59
example installation scenario 67
execution servers
remote process 2, 4
SAS 2, 4
expanding the cluster 25
export-import events
logging 65
F
failover 23, 24
FIPS 140-2 57
G
Google Chrome
single sign-on 51
I
IBM HTTP Server 24
IBM Installation Manager 18, 33
IBM SPSS Collaboration and Deployment Services
Deployment Manager 2, 3
IBM SPSS Collaboration and Deployment Services
Deployment Portal 2, 4
IBM SPSS Collaboration and Deployment Services Package
Manager 41
IBM SPSS Collaboration and Deployment Services Password
Utility 27
IBM SPSS Collaboration and Deployment Services
Repository 2
, 3
IBM SPSS Modeler version 29
IBM SPSS Statistics version 29
importing
certicate 61
Index81

installation 8
installing
packages 41
J
Java 9
JBoss
single sign-on 47
JCE 24
JCE module 57, 58
JMS 38
JMS message store 14
job events
logging 65
JRE keystore le migration 38
Jython 24
K
Kerberos
domain 43
Key Distribution Center 43
Service Ticket 43
Kerberos server 46
Kerberos ticket cache 49
keystore le migration 38
L
LDAP
securing 61
load balancer
hardware based 23, 24
software-based 23, 24
log4j
conguration 65
logging in 51
logging tools 65
logs 65
M
manual 9
Microsoft Internet Explorer
single sign-on 51
Microsoft SQL Server
conguration 15
middle tier user login 49
migration
JRE keystore les 38
notication templates 38
passwords 37
to a different database 36
to a different server 35
to a newer version of the repository 35
with a copy of repository database 35
with existing repository database 36
MIT Kerberos 44
Mozilla Firefox
single sign-on 51
N
Netezza 28
notication events
logging 65
notication templates migration 38
O
one-way trust
conguration 48
OpenLDAP 44
optional components 41
Oracle 10g 12
Oracle Database 12
Oracle databases
conguration 16
Oracle WebLogic 9
P
packages
installing
in command line mode 41
silent 41
password
changing 27
encrypting 27
password migration 36, 37
password utility 27
performance degradation 9
permissions 9, 12
R
redundancy 23, 24
registry update les 48
remote process
execution servers 2, 4
remotely-deployed scoring servers 5
reporting events
logging 65
repository database maintenance 17
repository events
logging 65
repository updates 41
requirements
application 29
application servers 9
databases 12
S
Safari 51
SAS
execution server 2, 4
scoring servers 5
Secure Sockets Layer 59
securing
LDAP 61
security
SSL 59
security events
82IBM SPSS Collaboration and Deployment Services Repository: Installation and Conguration Guide

security events (continued)
logging 65
server clustering 23, 24
server updates 41
session afnity 24
SIB 38
silent
IBM Installation Manager 18, 33
installation 18
package installation 41
unistalling 33
single sign-on
Active Directory 45
application server conguration 46
Google Chrome 51
JBoss 47
Microsoft Internet Explorer 51
MIT Kerberos 44
Mozilla Firefox 51
one-way trust 48
OpenLDAP 44
registry update les 48
WebSphere 46
Windows Kerberos Server 44
SPNEGO 51
SSL
certicates 57
overview 59
securing communications 59
SSL for JBoss 62
SSL for Liberty 62
SSL for WebSphere 62
SSO 43
supported applications 29
symmetric encryption 57
System Integration Bus 14
U
UNC 24
unistalling 33
URL prex 24, 54, 61
user preferences 4
user privileges 9
V
version check 41
versions
IBM SPSS Modeler 29
IBM SPSS Statistics 29
virtualization 9
VMWare 9
W
WebLogic 23
WebLogic Apache Plugin 23, 24
WebSphere
automatic deployment 24
cluster 24
manual deployment 24
single sign-on 46
WebSphere cluster installation example 67
Windows share 24
Windows Terminal Services 9
Index83
84IBM SPSS Collaboration and Deployment Services Repository: Installation and Conguration Guide
IBM®
