
PUBLIC
SAP Data Services
Document Version: 4.3 (14.3.00.00)–2024-03-25
Administrator Guide
© 2024 SAP SE or an SAP aliate company. All rights reserved.
THE BEST RUN
Content
1 Naming conventions and variables...............................................7
2 Architecture overview........................................................12
2.1 Data Services and the SAP BI portfolio............................................. 13
2.2 Standard components.........................................................14
Designer................................................................15
Repository...............................................................16
Job Server...............................................................16
Access Server ............................................................17
Management Console.......................................................17
Adapter SDK.............................................................18
2.3 Management tools........................................................... 19
Manage license keys........................................................19
Repository Manager........................................................20
Server Manager...........................................................20
2.4 Operating systems........................................................... 21
2.5 Distributed architecture........................................................21
Host names and port numbers................................................23
2.6 SAP applications integration....................................................23
3 Security..................................................................25
3.1 Data protection and privacy.....................................................26
3.2 Firewall for secure administrative functions..........................................27
3.3 External DTD in XML documents.................................................28
3.4 Message client library.........................................................29
3.5 Temporary cache les.........................................................29
Encrypting temporary cache les...............................................31
3.6 SSL or TLS for Data Services components...........................................31
Protected communication paths...............................................32
Default certicates........................................................ 34
Copying certicates in a distributed environment...................................35
Enable or disable SSL on select communication paths............................... 36
Using custom certicates....................................................39
Generating keys and signing certicates......................................... 40
3.7 Congure SSL for the CMS connection.............................................41
3.8 SSL for Metadata Browsing and View Data Services....................................42
Conguring SSL for Metadata Browsing and View Data Services........................ 43
2
PUBLIC
Administrator Guide
Content
Creating keystore le and certicates for default ...................................44
3.9 Password encryption......................................................... 45
Encryption key storage locations...............................................46
Encrypt passwords manually................................................. 47
3.10 Repository password required...................................................47
Accessing Data Services applications without repository credentials .....................48
3.11 Blocking localhost IP addresses..................................................50
3.12 Block invalid domains and IP addresses to CMS server system from Data Services management
console web application....................................................... 50
4 User and rights management..................................................53
4.1 User management...........................................................53
4.2 Group management..........................................................54
Detailed application rights................................................... 55
Viewing application rights assigned to a group.....................................58
Managing application rights for a group..........................................58
5 Repository management..................................................... 60
5.1 Conguring a Data Services repository.............................................61
5.2 Registering a repository in the CMC...............................................63
5.3 Accessing repository user security in the CMC .......................................65
Viewing rights for a user or group on a repository...................................66
Assigning users and groups to an access control list for a repository......................66
Detailed repository rights....................................................67
5.4 IBM DB2 SSL/TLS protocol for repositories......................................... 68
Conguring SSL/TLS for IBM DB2 repository......................................69
Registering IBM DB2 repository with SSL/TLS in the CMC.............................71
5.5 Microsoft SQL Server SSL/TLS protocol for repositories.................................73
Importing SSL certicate from Microsoft SQL Server.................................74
Conguring SSL/TLS for Microsoft SQL Server repository.............................75
Registering Microsoft SQL Server repository with SSL/TLS in the CMC....................76
5.6 MySQL SSL/TLS protocol for repositories...........................................79
Conguring SSL/TLS for MySQL repository.......................................80
Registering MySQL repository with SSL/TLS in the CMC..............................83
5.7 Oracle TCPS protocol for repositories..............................................86
Prerequisites for using TCPS for an Oracle repository................................87
Oracle TCPS conguration options with SSL/TLS...................................90
Registering Oracle repository with TCPS in the CMC.................................92
5.8 SAP HANA SSL/TLS protocol for repositories........................................94
Conguring SSL/TLS for SAP HANA repository....................................95
Registering SSL/TLS in the CMC for SAP HANA....................................96
5.9 Editing the java.security le .....................................................98
Administrator Guide
Content
PUBLIC 3
6 Server Management........................................................100
6.1 DSN-less and TNS-less connections..............................................101
6.2 Setting UNIX environment variables..............................................102
6.3 Start services automatically for Windows and Unix....................................104
6.4 History retention and Job Server log retention.......................................105
USPS-required log les and reports............................................106
Setting the History Retention Period............................................107
Job Server Log Retention...................................................108
Setting the Job Server Log Retention Period......................................109
6.5 Congure database connectivity for UNIX and Linux...................................110
Database connectivity for UNIX and Linux........................................111
Using the Connection Manager............................................... 112
Congure drivers with server name (DSN-less) connections...........................113
Congure drivers with data source name (DSN) connections.......................... 119
Conguring DataDirect ODBC................................................128
6.6 Using the ODBC Drivers Selector for Windows.......................................137
6.7 Using the License Manager.................................................... 138
6.8 Use the Server Manager on Windows............................................. 138
Conguring Job Servers....................................................139
Conguring runtime resources for Job Server operations.............................143
Conguring Access Servers..................................................144
Conguring SSL paths..................................................... 145
Verifying that Job and Access servers are running..................................146
6.9 Using the Server Manager on UNIX systems........................................ 146
Conguring Job Servers on UNIX..............................................148
Conguring runtime resources for UNIX server manager............................. 151
Conguring Access Servers..................................................153
Conguring SSL paths.....................................................154
Starting or stopping the service...............................................155
Congure SMTP email..................................................... 156
6.10 Conguring Metadata Browsing Service and View Data Service ...........................156
Metadata Browsing Service conguration parameters...............................157
View Data Services conguration parameters.....................................159
6.11 Data Services CMC application settings........................................... 160
7 Monitoring jobs............................................................163
7.1 Viewing overall status of executed jobs............................................163
7.2 Statistics.................................................................165
Viewing job statistics......................................................166
Data ow statistics........................................................167
7.3 Ignoring error status.........................................................168
7.4 Deleting batch job history data..................................................168
4
PUBLIC
Administrator Guide
Content
7.5 Stopping a running job........................................................169
7.6 Deleting trace, monitor, and error logs for a batch job..................................169
8 Lifecycle migration......................................................... 171
8.1 Development phases.........................................................171
The design phase.........................................................173
The test phase...........................................................173
The production phase......................................................174
8.2 Migration tools............................................................. 175
Naming conventions for migration.............................................176
Datastore and system congurations...........................................179
8.3 Migration mechanisms....................................................... 183
Export and import migration.................................................184
Multi-user development migration.............................................185
The best mechanism...................................................... 186
8.4 Migrate with export and import..................................................187
The export editor.........................................................188
Exporting objects to another repository.........................................189
Exporting objects to a le...................................................190
Exporting a repository to a le................................................192
Importing objects or a repository from a le......................................193
8.5 Back up repositories.........................................................195
8.6 Mismatched locales and job performance..........................................196
9 The Enhanced Change and Transport System (CTS+)...............................198
10 Object promotion management...............................................200
10.1 Requirements for object promotion..............................................200
Shared directory user rights.................................................202
Sequential import of multiple objects.......................................... 202
10.2 User rights for promotion management ...........................................203
10.3 Export and import conguration requirements...................................... 204
Creating an export conguration..............................................206
Creating an import conguration..............................................207
Edit or delete congurations.................................................208
10.4 Before you export and import objects.............................................209
10.5 Object promotion options.....................................................209
10.6 Exporting objects...........................................................210
10.7 Importing objects...........................................................212
10.8 Export and import trace and error log.............................................214
11 Integration with SAP and SAP Solution Manager.................................. 216
11.1 SAP System Landscape Directory (SLD)...........................................216
Administrator Guide
Content
PUBLIC 5
11.2 Solution Manager Diagnostics (SMD) Agent.........................................217
11.3 SLD integration requirements...................................................217
12 Data Services registration in the SLD...........................................219
13 Performance and availability monitoring........................................220
13.1 Solution Manager Diagnostics (SMD) overview......................................220
13.2 SMD Agent guidelines........................................................222
13.3 Congure your system for SMD.................................................222
13.4 The Native Component Supportability (NCS) library.................................. 223
Enabling NCS library on Windows.............................................224
Enabling NCS library on Unix or Linux.......................................... 225
13.5 Heartbeat monitoring........................................................226
13.6 Alert monitoring............................................................226
14 Command line administration................................................ 228
14.1 Command line reference: License Manager.........................................229
Starting License Manager in Unix............................................. 230
14.2 Command line: Data Services Connection Manager (Unix).............................. 231
14.3 Command line: Repository Manager (Windows)......................................232
14.4 Command line: Repository Manager (Unix).........................................236
14.5 Command line: Server Manager (Unix)............................................239
Command line: Adding an Access Server (Unix or Linux).............................241
Command line: Adding a Job Server (Unix or Linux)................................ 242
Command line: Adding runtime resources (Unix or Linux)............................246
14.6 Command line: Server Manager (Windows).........................................247
Command line: Adding an Access Server (Windows)................................248
Command line: Adding a Job Server (Windows)...................................248
Command line: Adding runtime resources (Windows)...............................252
14.7 Command line: Password encryption.............................................253
14.8 al_engine.................................................................255
al_engine Export and Import options...........................................257
6
PUBLIC
Administrator Guide
Content

1 Naming conventions and variables
This documentation uses specic terminology, location variables, and environment variables that describe
various features, processes, and locations in SAP Data Services.
Terminology
SAP Data Services documentation uses the following terminology:
• The terms Data Services system and SAP Data Services mean the same thing.
• The term BI platform refers to SAP BusinessObjects Business Intelligence platform.
• The term IPS refers to SAP BusinessObjects Information platform services.
Note
Data Services requires BI platform components. However, when you don't use other SAP applications,
IPS, a scaled back version of BI, also provides these components for Data Services.
• CMC refers to the Central Management Console provided by the BI or IPS platform.
• CMS refers to the Central Management Server provided by the BI or IPS platform.
Variables
The following table describes the location variables and environment variables that are necessary when you
install and congure Data Services and required components.
Administrator Guide
Naming conventions and variables
PUBLIC 7
Variables Description
INSTALL_DIR
The installation directory for SAP applications such as Data
Services.
Default location:
• For Windows: C:\Program Files (x86)\SAP
BusinessObjects
• For UNIX: $HOME/sap businessobjects
Note
INSTALL_DIR isn't an environment variable. The in-
stallation location of SAP software can be dierent than
what we list for INSTALL_DIR based on the location
that your administrator sets during installation.
BIP_INSTALL_DIR
The directory for the BI or IPS platform.
Default location:
• For Windows: <INSTALL_DIR>\SAP
BusinessObjects Enterprise XI 4.0
Example
C:\Program Files
(x86)\SAP BusinessObjects\SAP
BusinessObjects Enterprise XI 4.0
• For UNIX: <INSTALL_DIR>/enterprise_xi40
Note
These paths are the same for both BI and IPS.
Note
BIP_INSTALL_DIR isn't an environment variable.
The installation location of SAP software can be dierent
than what we list for BIP_INSTALL_DIR based on the
location that your administrator sets during installation.
8
PUBLIC
Administrator Guide
Naming conventions and variables

Variables Description
<LINK_DIR>
An environment variable for the root directory of the Data
Services system.
Default location:
• All platforms
<INSTALL_DIR>\Data Services
Example
C:\Program Files (x86)\SAP
BusinessObjects\Data Services
Administrator Guide
Naming conventions and variables
PUBLIC 9

Variables Description
<DS_COMMON_DIR>
An environment variable for the common conguration di-
rectory for the Data Services system.
Default location:
• If your system is on Windows (Vista and newer):
<AllUsersProfile>\SAP
BusinessObjects\Data Services
Note
The default value of <AllUsersProfile> environ-
ment variable for Windows Vista and newer is
C:\ProgramData.
Example
C:\ProgramData\SAP
BusinessObjects\Data Services
• If your system is on Windows (Older versions such as
XP)
<AllUsersProfile>\Application
Data\SAP BusinessObjects\Data
Services
Note
The default value of <AllUsersProfile> en-
vironment variable for Windows older versions
is C:\Documents and Settings\All
Users.
Example
C:\Documents and Settings\All
Users\Application Data\SAP
BusinessObjects\Data Services
• UNIX systems (for compatibility)
<LINK_DIR>
The installer automatically creates this system environment
variable during installation.
Note
Starting with Data Services 4.2 SP6, users
can designate a dierent default location for
10
PUBLIC
Administrator Guide
Naming conventions and variables
Variables Description
<DS_COMMON_DIR> during installation. If you can't nd
the <DS_COMMON_DIR> in the listed default location, ask
your System Administrator to nd out where your de-
fault location is for <DS_COMMON_DIR>.
<DS_USER_DIR>
The environment variable for the user-specic conguration
directory for the Data Services system.
Default location:
• If you're on Windows (Vista and newer):
<UserProfile>\AppData\Local\SAP
BusinessObjects\Data Services
Note
The default value of <UserProfile> environment
variable for Windows Vista and newer versions is
C:\Users\{username}.
• If you're on Windows (Older versions such as XP):
<UserProfile>\Local
Settings\Application Data\SAP
BusinessObjects\Data Services
Note
The default value of <UserProfile> en-
vironment variable for Windows older ver-
sions is C:\Documents and Settings\
{username}.
Note
The system uses <DS_USER_DIR> only for Data
Services client applications on Windows. UNIX plat-
forms don't use <DS_USER_DIR>.
The installer automatically creates this system environment
variable during installation.
Administrator Guide
Naming conventions and variables
PUBLIC 11

2 Architecture overview
Use information about SAP Data Services architecture, system components, and service components to
understand system essentials and to form a plan for system deployment, management, and maintenance.
Data Services and its architecture enables high performance across a broad spectrum of user and deployment
scenarios.
Example
Integrate Data Services into other technology systems in your organization by using the following tools:
• Web services
• Java
• .NET APIs
Use specialized tools and application to access, create, edit, and interact with Data Services projects and
reports. Use the following applications for data and system management tools:
• Data Services Management Console
• SAP BusinessObjects Central Management Console (CMC)
• Data Services Server Manager
• Data Services Repository Manager
To provide exibility, reliability, and scalability, install Data Services components on one or across many
machines using vertical or horizontal scaling:
• Vertical scaling: One computer runs several, or all, server-side processes. Use vertical scaling to reduce
cost or to improve performance by distributing server processes between two or more networked
machines.
• Horizontal scaling: Run multiple, redundant versions of the same server process on more than one
machine, so that processing continues if the primary process encounters a problem.
Data Services and the SAP BI portfolio [page 13]
The SAP BusinessObjects Business Intelligence (BI) Suite delivers insight through specialized end-user
tools on a single, trusted, SAP BusinessObjects BI platform.
Standard components [page 14]
SAP Data Services works with standard components in the SAP BusinessObjects Business Intelligence
(BI) suite.
Management tools [page 19]
SAP Data Services provides utilities to help you manage your repositories and servers.
Operating systems [page 21]
SAP Data Services supports many types of operating systems and versions.
Distributed architecture [page 21]
SAP Data Services oers exibility to design your system using a distributed architecture.
SAP applications integration [page 23]
12
PUBLIC
Administrator Guide
Architecture overview
SAP Data Services integrates with SAP applications and infrastructures with specic tools, such as the
SAP System Landscape Directory (SLD) for lifecycle management of your SAP systems.
2.1 Data Services and the SAP BI portfolio
The SAP BusinessObjects Business Intelligence (BI) Suite delivers insight through specialized end-user tools
on a single, trusted, SAP BusinessObjects BI platform.
SAP Data Services supports the entire SAP BusinessObjects BI platform. On top of Data Services, the SAP
BusinessObjects BI Suite layers the most reliable, scalable, exible, and manageable platform. The platform
supports integrated end-user interfaces for the following features:
• Reports
• Queries
• Analyses
• Performance management dashboards
• Performance management scorecards
• Performance management applications
SAP has created a data integration product that uses relational datastores and built-in intelligence for real time
and batch data access. Data is from ERP systems and other sources. With these capabilities, leverage your ERP
and enterprise application infrastructure for multiple uses.
With batch and real-time data integration, you can take advantage of analytic and supply-chain management
applications. With data integration solutions, you can maintain a real-time, on-line dialogue with customers,
suppliers, employees, and partners. Your company can provide customers, suppliers, employees, and partners
with information for transactions and business analysis.
Parent topic: Architecture overview [page 12]
Related Information
Standard components [page 14]
Management tools [page 19]
Operating systems [page 21]
Distributed architecture [page 21]
SAP applications integration [page 23]
Administrator Guide
Architecture overview
PUBLIC 13
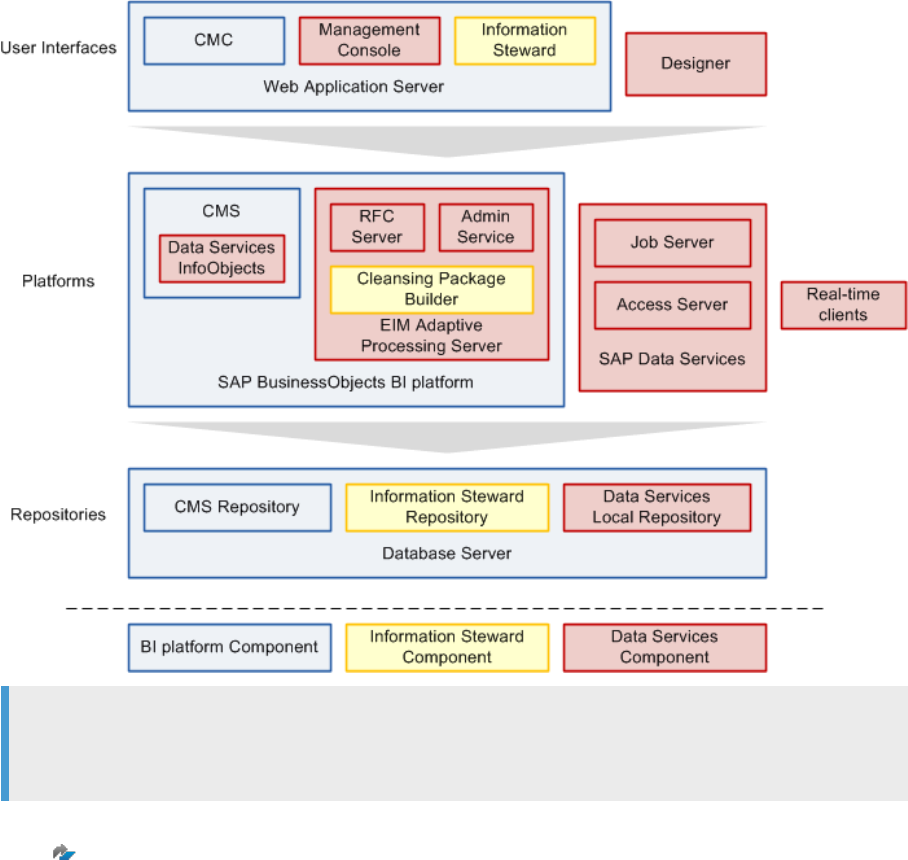
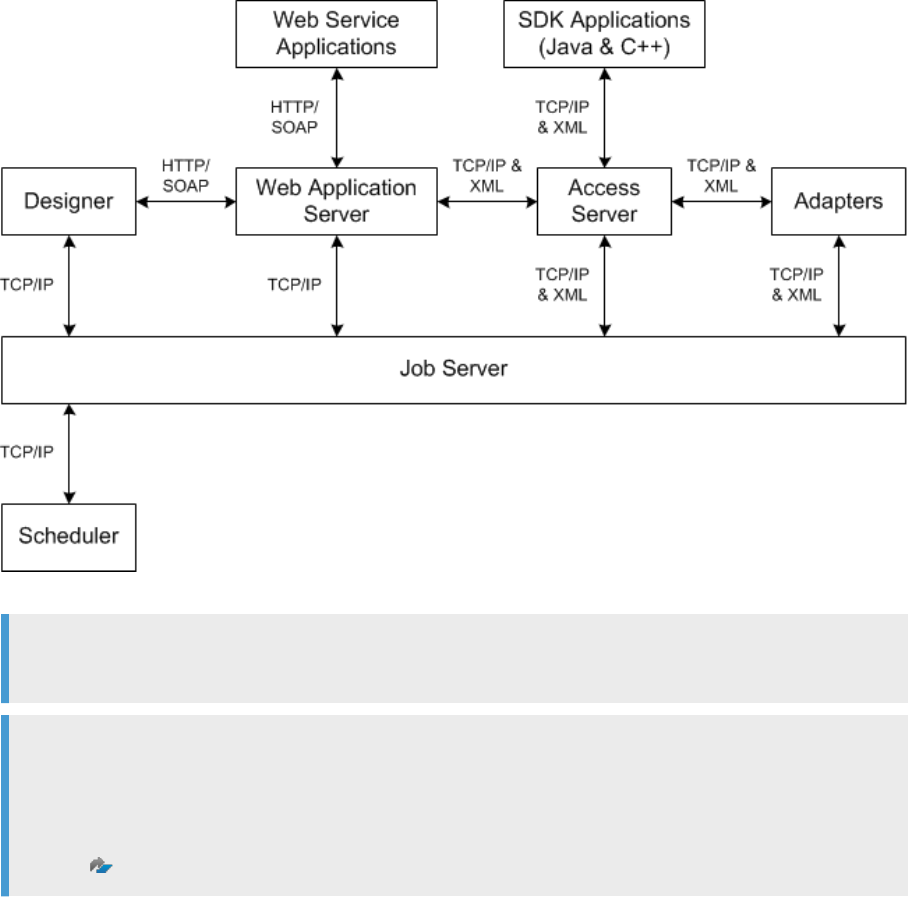
2.2 Standard components
SAP Data Services works with standard components in the SAP BusinessObjects Business Intelligence (BI)
suite.
The following diagram shows how Data Services works with other user interfaces, platforms, repositories, and
components in the BI suite.
Note
The basic components required by Data Services are also provided by SAP Information platform services
as a scaled back version of the BI platform.
For a detailed list of supported environments and hardware requirements, see the Product Availability Matrix
(PAM) on the SAP Support Portal.
Designer [page 15]
Designer is the graphical user interface for SAP Data Services that enables you to dene data
management applications that consist of data mappings, transformations, and control logic.
Repository [page 16]
An SAP Data Services repository contains data, such as user-created and predened system objects,
source and target metadata, and transformation rules.
Job Server [page 16]
14
PUBLIC
Administrator Guide
Architecture overview

The SAP Data Services Job Server starts the data movement engine that integrates data from multiple
heterogeneous sources.
Access Server [page 17]
The Access Server collects message requests, routes them to a real-time service, and delivers message
replies within a user-specied time frame.
Management Console [page 17]
The Management Console contains a collection of Web-based applications for administering multiple
SAP Data Services features and objects.
Adapter SDK [page 18]
The SAP Data Services Adapter SDK provides a Java platform for rapid development of adapters to
other applications and middleware products such as EAI (Enterprise Application Integration) systems.
Parent topic: Architecture overview [page 12]
Related Information
Data Services and the SAP BI portfolio [page 13]
Management tools [page 19]
Operating systems [page 21]
Distributed architecture [page 21]
SAP applications integration [page 23]
2.2.1Designer
Designer is the graphical user interface for SAP Data Services that enables you to dene data management
applications that consist of data mappings, transformations, and control logic.
Use the Designer to create applications such as the following:
• Work ows: Job execution denitions.
• Data ows: Data transformation denitions.
To create jobs in designer, drag and drop objects into work ows and data ows. Congure the objects using
various icons in ow diagrams, table layouts, and nested workspace pages. The objects represent metadata,
which is stored in either a local or central repository.
Note
In our SAP Data Services documentation, when we refer to “Data Services” without specically including
the word “Designer”, we're referring to SAP Data Services Designer unless otherwise stated.
Administrator Guide
Architecture overview
PUBLIC 15
2.2.2Repository
An SAP Data Services repository contains data, such as user-created and predened system objects, source
and target metadata, and transformation rules.
Set up repositories on an open client—server platform to facilitate sharing data with other enterprise tools.
Create each repository on an approved RDBMS and register each repository in the Central Management
Console (CMC).
Associate your repository with one or more Job Servers, which run the jobs that you create. The following are
the repository types in Data Services:
• Local repository: Required. Used by an application designer to store denitions of objects, like projects,
jobs, work ows, and data ows. Also stores source and target metadata.
• Central repository: Optional. Used in a multiuser environment for version control. Stores a copy of all
objects in a project, and preserves all versions so reversion is possible.
Multiuser development includes other advanced features such as labeling and ltering to provide you with
more exibility and control in managing application objects.
For more information about local and central repositories, see the Designer Guide.
• Proler repository: Optional. Stores information generated by the Data Proler, which helps you
determine the quality of your data.
2.2.3Job Server
The SAP Data Services Job Server starts the data movement engine that integrates data from multiple
heterogeneous sources.
The Job Server performs complex data transformations, and manages extractions and transactions from ERP
systems and other sources in batch and real-time modes. The Job Server delivers high data throughput and
scalability through the following techniques:
• Distributed query optimization
• Multi threaded processes
• In memory caching
• In memory data transformations
• Parallel processes
When you initiate a job in Designer, the Job Server runs the job as follows:
• Retrieves the job information from the repository.
• Starts the applicable engine to process the job.
In your production environment, the Job Server runs jobs triggered by a scheduler or by a real-time service
managed by the Access Server.
In production environments, balance job loads by creating a Job Server group. Job Server groups consist of
multiple Job Servers that run jobs according to overall system load.
16
PUBLIC
Administrator Guide
Architecture overview
Engine processes
When you run Data Services jobs, the Job Server starts engine processes to perform data extraction,
transformation, and movement. The engine uses parallel processing and in-memory data transformations to
deliver high data throughput and scalability.
Service
The Data Services service starts Job Servers and Access Servers when you restart your system. The installer
installs the service when it installs the Job and Access Servers. The service name on Windows is SAP Data
Services. The UNIX equivalent is a daemon named AL_JobService.
2.2.4Access Server
The Access Server collects message requests, routes them to a real-time service, and delivers message replies
within a user-specied time frame.
The Access Server queues messages and sends them to the next available real-time service across any number
of computing resources. This approach provides automatic scalability because the Access Server initiates
additional real-time services on additional computing resources when trac for a given real-time service is
high. You can congure multiple Access Servers.
For more information about the Access Server, see the Post Installation section of the Installation Guide and
see the Administrator section of the Management Console Guide.
2.2.5Management Console
The Management Console contains a collection of Web-based applications for administering multiple SAP Data
Services features and objects.
The Management Console administers the following Data Services processes:
• Executes jobs and services
• Analyzes object relationships
• Evaluates job execution performance
• Conrms data validity
• Generates data quality reports
Management Console includes several applications as described in the following table.
Administrator Guide
Architecture overview
PUBLIC 17
Application Description
Administrator Manage your production environment, which includes, for
example:
• Batch job execution
• Real-time services
• Web services
• Adapter instances
• Server groups
• Central repositories
• Proler repositories
Impact and Lineage Analysis
Analyze the end-to-end impact and lineage for source and
target objects used within the Data Services local repository.
Operational Dashboard View dashboards that provide statistics for job execution, job
status, and job performance for one or more repositories
over a given time period.
Data Validation Dashboard Evaluate the reliability of your target data based on the vali-
dation rules that you created in your batch jobs. Quickly re-
view, assess, and identify potential inconsistencies or errors
in source data.
Auto Documentation
View, analyze, and print graphical representations of all ob-
jects as depicted in the Designer including their relation-
ships, properties, and more.
Data Quality Reports View and export reports for batch and real-time jobs, such as
job summaries and data quality transform reports.
For details about the applications, and for more information about how to use the Management Console, see
the Management Console Guide.
2.2.6Adapter SDK
The SAP Data Services Adapter SDK provides a Java platform for rapid development of adapters to other
applications and middleware products such as EAI (Enterprise Application Integration) systems.
Adapters use industry-standard XML and Java technology to ease the learning curve. Adapters provide all
necessary styles of interaction including the following:
• Reading, writing, and request-reply from SAP Data Services to other systems.
• Request-reply from other systems to SAP Data Services.
For detailed information about the Adapter SDK, see the Adapter SDK User Guide.
18
PUBLIC
Administrator Guide
Architecture overview
2.3 Management tools
SAP Data Services provides utilities to help you manage your repositories and servers.
Manage license keys [page 19]
Use the License Manager in command line mode to manage your product activation keycodes.
Repository Manager [page 20]
Use the Repository Manager to create repositories, upgrade repositories, and check the versions of
repositories.
Server Manager [page 20]
Use the Server Manager to add, delete, and edit the properties of Job Servers and Access Servers and
to dene links between Job Servers and repositories.
Parent topic: Architecture overview [page 12]
Related Information
Data Services and the SAP BI portfolio [page 13]
Standard components [page 14]
Operating systems [page 21]
Distributed architecture [page 21]
SAP applications integration [page 23]
2.3.1Manage license keys
Use the License Manager in command line mode to manage your product activation keycodes.
Activation keycodes are alphanumeric codes that the system refers to each time you run certain applications,
such as SAP Data Services Designer. You can't open or run Data Services without current license keys. For
more information about the License Manager, see Command line reference: License Manager [page 229]
Parent topic: Management tools [page 19]
Related Information
Repository Manager [page 20]
Server Manager [page 20]
Command line reference: License Manager [page 229]
Administrator Guide
Architecture overview
PUBLIC 19
2.3.2Repository Manager
Use the Repository Manager to create repositories, upgrade repositories, and check the versions of
repositories.
The Repository Manager is a utility for creating and managing repositories. When you create a local repository
during installation, you don't have to use the Repository Manager. However, to create additional repositories,
edit existing repositories, or update existing repositories, you use the Repository Manager.
Parent topic: Management tools [page 19]
Related Information
Manage license keys [page 19]
Server Manager [page 20]
Conguring a Data Services repository [page 61]
2.3.3Server Manager
Use the Server Manager to add, delete, and edit the properties of Job Servers and Access Servers and to dene
links between Job Servers and repositories.
Use the server manager to perform the following tasks:
• Link multiple Job Servers on dierent machines to a single repository for load balancing.
• Link one Job Server to multiple repositories to support individual repositories, for example, to separate a
test repository from a production repository.
• Specify SMTP server settings for the smtp_to email function.
• Add or edit System Landscape Directory (SLD) registration information for Data Services.
Parent topic: Management tools [page 19]
Related Information
Manage license keys [page 19]
Repository Manager [page 20]
Use the Server Manager on Windows [page 138]
Using the Server Manager on UNIX systems [page 146]
20
PUBLIC
Administrator Guide
Architecture overview

2.4 Operating systems
SAP Data Services supports many types of operating systems and versions.
Ensure that the operating system on which you install SAP Data Services is tested and approved by SAP. For a
complete list of operating systems approved by SAP for SAP Data Services, see the Product Availability Matrix
(PAM) on the SAP Support Portal.
Parent topic: Architecture overview [page 12]
Related Information
Data Services and the SAP BI portfolio [page 13]
Standard components [page 14]
Management tools [page 19]
Distributed architecture [page 21]
SAP applications integration [page 23]
2.5 Distributed architecture
SAP Data Services oers exibility to design your system using a distributed architecture.
The architecture includes an Access Server, which can serve multiple Job Servers and repositories. The
multi-user licensed extension allows multiple Designers to work from a central repository.
Distribute components across a number of computers to best support the trac and connectivity
requirements of your network. Design a system that is distributed minimally for developing and testing. Or,
design a system distributed so that it scales with the demands of a production environment.
Adhere to the following rules when you distribute software components across multiple computers:
• Engine processes must run on the same computer as the Job Server that spawns them.
• Adapters require a local Job Server.
The following diagram shows an example of Data Services Designer in a distributed architecture.
Administrator Guide
Architecture overview
PUBLIC 21

Host names and port numbers [page 23]
Communication between your SAP Data Services systems occurs through TCP/IP connections that
you specify by IP addresses (host names) and port numbers.
Parent topic: Architecture overview [page 12]
Related Information
Data Services and the SAP BI portfolio [page 13]
Standard components [page 14]
Management tools [page 19]
Operating systems [page 21]
SAP applications integration [page 23]
22
PUBLIC
Administrator Guide
Architecture overview

2.5.1Host names and port numbers
Communication between your SAP Data Services systems occurs through TCP/IP connections that you
specify by IP addresses (host names) and port numbers.
Communication in the Data Services system occurs between Web applications, the Access Server, the Job
Server, and real-time services. If your network doesn't use static IP addresses, use the name of the computer
as the host name. If your network uses static IP addresses, use the static IP number as the host name for
Access Server and Job Server congurations.
To create a system that is scalable, ensure that each component maintains its own list of connections. Dene
the connections through the following components:
• Data Services Server Manager
• Management Console Administrator
• Data Services Repository Manager
• Message Client library calls from the Web client
For a list of the default port numbers used by Data Services, see the Installation Guide.
Parent topic: Distributed architecture [page 21]
2.6 SAP applications integration
SAP Data Services integrates with SAP applications and infrastructures with specic tools, such as the SAP
System Landscape Directory (SLD) for lifecycle management of your SAP systems.
The following table provides brief descriptions for each integration tool for your SAP environment.
Data Services integration tools
SAP tool
Description
SAP System Landscape Directory (SLD) Central source for system landscape information for lifecycle
management. Provides a directory with information about all
installable software available from SAP.
Automatically updates data about installed systems in your
landscape. Provides a foundation for tool support to plan
software lifecycle tasks in your system landscape.
SAP Solution Manager Organizes SAP and non SAP solutions by implementing, sup-
porting, operating, and monitoring the following:
• Integrated content
• Tools
• Methodologies
Administrator Guide
Architecture overview
PUBLIC 23

SAP tool Description
Change and Transport System (CTS+) Transports ABAP and non-ABAP objects, including Data
Services objects, from source systems to target systems for
lifecycle management.
Monitoring with CA Wily Introscope Web application management product that enables moni-
toring and diagnosing performance problems that occur in
Java-based SAP modules in production.
Provides visibility into custom Java applications and connec-
tions to back-end systems.
Isolates performance bottlenecks in Netweaver modules,
such as the following:
• Individual Servlets
• JSPs
• EJBs
• JCOs
• Classes
• Methods
Parent topic: Architecture overview [page 12]
Related Information
Data Services and the SAP BI portfolio [page 13]
Standard components [page 14]
Management tools [page 19]
Operating systems [page 21]
Distributed architecture [page 21]
The Enhanced Change and Transport System (CTS+) [page 198]
SAP System Landscape Directory (SLD) [page 216]
Solution Manager Diagnostics (SMD) Agent [page 217]
24
PUBLIC
Administrator Guide
Architecture overview
3 Security
SAP Data Services addresses enterprise security concerns and provides administrators and system architects
with answers to security questions.
Data Services relies on the Central Management Server (CMS) for authentication and security features.
For complete information about the security features provided by the CMS, see the SAP BusinessObjects BI
Platform Administrator Guide or the SAP BusinessObjects Information Platform Services Administrator Guide.
Data protection and privacy [page 26]
SAP provides specic features and functions to support compliance with relevant legal requirements,
including data protection and privacy.
Firewall for secure administrative functions [page 27]
Use a rewall to prevent unintended remote access to SAP Data Services and administrative functions.
External DTD in XML documents [page 28]
An external DTD (Data Type Denition) in an XML document that you send to the SDK can increase
security vulnerabilities.
Message client library [page 29]
Some message client libraries with real-time services lack an authorization requirement.
Temporary cache les [page 29]
Temporary cache les are not encrypted and cause a security risk when they contain condential or
other sensitive data.
SSL or TLS for Data Services components [page 31]
Secure Sockets Layer (SSL), and its newer version, Transport Layer Security (TLS), are cryptographic
protocols that provide security and data integrity for network communications.
Congure SSL for the CMS connection [page 41]
Use the Secure Sockets Layer (SSL) protocol for all network communications between SAP Data
Services clients and the SAP Central Management Server (CMS)
SSL for Metadata Browsing and View Data Services [page 42]
Use Secure Sockets Layer (SSL) protocol for all network communications between SAP Data Services,
back-end engines, and EIM Adaptive Processing Server services.
Password encryption [page 45]
In the SAP Data Services system, all passwords are encrypted using the AES algorithm with 128-bit
keys.
Repository password required [page 47]
By default, the SAP Data Services system requires that you enter the repository user name and
password when you log into applications that use the repository.
Blocking localhost IP addresses [page 50]
Blocking localhost IP addresses is not eective for limiting the use of localhost in a web application.
This prevention should be done at the rewall or system level by only allowing trusted IP addresses and
DNS names.
Administrator Guide
Security
PUBLIC 25

Block invalid domains and IP addresses to CMS server system from Data Services management console
web application [page 50]
To ensure a secure login and prevent server-side request forgery, you can provide a list of allowed CMS
names or IP addresses, along with the port numbers, by utilizing SAP BusinessObjects Enterprise's
(BOE) CMC global.properties le.
3.1 Data protection and privacy
SAP provides specic features and functions to support compliance with relevant legal requirements, including
data protection and privacy.
Data protection is associated with numerous legal requirements and privacy concerns. In addition to
compliance with applicable data privacy regulations, SAP considers compliance with industry-specic
legislation in dierent countries. SAP doesn't give advice on whether the provided features and functions
are the best method to support company, industry, regional, or country-specic requirements. Also, SAP-
provided information doesn't give advice or make recommendations for additional features that are required in
particular IT environments. Make your protection and privacy decisions on a case-by-case basis. Consider your
system landscape and the legal requirements of your company, industry, region, or country.
Note
In the majority of cases, compliance with applicable data protection and privacy laws is not covered by an
SAP product feature. SAP software supports data protection compliance by providing security features and
specic data protection-relevant functions, such as simplied blocking and deletion of personal data. SAP
doesn't provide legal advice in any form. SAP uses denitions and other terms in this document that aren’t
from any given legal source.
SAP software places the data that you provide into trace logs, sample reports, repositories, and so on, as side-
eect data. In other words, your data nds its way into places other than output les. It's your responsibility to
delete this data.
In addition, Data Services doesn't run any virus scan applications on persisted data. To protect persisted data,
we strongly recommend running your own virus scan software on any system that runs Data Services.
The following list contains a few examples of where Data Services uses customer data:
• Log les: When you enable the Trace all option, Data Services prints data in some log les.
• Bulkload directory: If a job using bulk-load functionality fails, Data Services saves data les that contain
customer data in the bulkload directory so you can review and analyze the data. The default bulkload
directory location is %DS_COMMON_DIR%/log/BulkLoader.
• Data Services repository: The smtp_to and mailer functions use mail ID numbers as input parameters,
which Data Services saves in the repository.
• Data Services repository: Data Services places a sampling of customer data in the Data Services
repository when the “full” option is enabled during side-eect data generation for Global Address Cleanse
and Universal Data Cleanse.
• Sample Report: The Global Address Cleanse transform places a sample of user address data into the
sample report.
26
PUBLIC
Administrator Guide
Security
Parent topic: Security [page 25]
Related Information
Firewall for secure administrative functions [page 27]
External DTD in XML documents [page 28]
Message client library [page 29]
Temporary cache les [page 29]
SSL or TLS for Data Services components [page 31]
Congure SSL for the CMS connection [page 41]
SSL for Metadata Browsing and View Data Services [page 42]
Password encryption [page 45]
Repository password required [page 47]
Blocking localhost IP addresses [page 50]
Block invalid domains and IP addresses to CMS server system from Data Services management console web
application [page 50]
3.2 Firewall for secure administrative functions
Use a rewall to prevent unintended remote access to SAP Data Services and administrative functions.
In a distributed installation, congure your rewall so that the Data Services components are able to
communicate with each other as needed.
For information about conguring ports on your rewall, see your operating system rewall documentation. For
information about port assignments, see the Installation Guide.
Parent topic: Security [page 25]
Related Information
Data protection and privacy [page 26]
External DTD in XML documents [page 28]
Message client library [page 29]
Temporary cache les [page 29]
SSL or TLS for Data Services components [page 31]
Congure SSL for the CMS connection [page 41]
SSL for Metadata Browsing and View Data Services [page 42]
Password encryption [page 45]
Repository password required [page 47]
Administrator Guide
Security
PUBLIC 27

Blocking localhost IP addresses [page 50]
Block invalid domains and IP addresses to CMS server system from Data Services management console web
application [page 50]
Host names and port numbers [page 23]
3.3 External DTD in XML documents
An external DTD (Data Type Denition) in an XML document that you send to the SDK can increase security
vulnerabilities.
A DTD contains information that denes a document type, such as an XML document. When it's dened
separately (external) from an XML document, it can cause a security risk. Therefore, don't use external DTDs
(data type denitions) in XML documents that you send to the SDK.
Example
The following code example shows an XML document with a reference to an external DTD. The DTD le
note.dtd is dened in a le in the system that is external to the XML document.
<?xml version="1.0" encoding="UTF-8" standalone="no" ?>
<!DOCTYPE note SYSTEM "note.dtd">
<note>
<to>Mr.X</to>
<from>Mr.Y</from>
<message>Stack Overflow is awesome</message>
</note>
Parent topic: Security [page 25]
Related Information
Data protection and privacy [page 26]
Firewall for secure administrative functions [page 27]
Message client library [page 29]
Temporary cache les [page 29]
SSL or TLS for Data Services components [page 31]
Congure SSL for the CMS connection [page 41]
SSL for Metadata Browsing and View Data Services [page 42]
Password encryption [page 45]
Repository password required [page 47]
Blocking localhost IP addresses [page 50]
Block invalid domains and IP addresses to CMS server system from Data Services management console web
application [page 50]
28
PUBLIC
Administrator Guide
Security
3.4 Message client library
Some message client libraries with real-time services lack an authorization requirement.
The message client libraries, such as Java and C++ for real-time services don't require authorization to
connect. Keep this security risk in mind when you use these libraries.
For more information about using the Message Client library, see the SAP Data Services Integrator Guide.
Parent topic: Security [page 25]
Related Information
Data protection and privacy [page 26]
Firewall for secure administrative functions [page 27]
External DTD in XML documents [page 28]
Temporary cache les [page 29]
SSL or TLS for Data Services components [page 31]
Congure SSL for the CMS connection [page 41]
SSL for Metadata Browsing and View Data Services [page 42]
Password encryption [page 45]
Repository password required [page 47]
Blocking localhost IP addresses [page 50]
Block invalid domains and IP addresses to CMS server system from Data Services management console web
application [page 50]
3.5 Temporary cache les
Temporary cache les are not encrypted and cause a security risk when they contain condential or other
sensitive data.
SAP Data Services generates temporary cache les for functions and operations, such as proling, joins, and
table comparisons. When you process condential or other sensitive data, that data can end up in temporary
cache les. Both pageable and persistent caches create data les that aren't encrypted.
Temporary le location
Secure your temporary les using the appropriate permissions at the operating system level.
Data Services stores temporary les, including cache les, in
<DS_COMMON_DIR>\log\pCache\<ServerName_RepositoryName>.
Administrator Guide
Security
PUBLIC 29
Pageable cache
The pageable cache option in a data ow enables the system to remove the les automatically after a data ow
nishes running.
Persistent cache
When you use metadata from a persistent cache type of datastore, the data isn't encrypted. It is your
responsibility to secure the data using operating system le and directory permissions.
long data
When you process long data types, such as BLOB or CLOB, in databases that are large, Data Services stores
the data in temporary cache les. When long data is cached, such as for a join, sort, or table comparison
process, Data Services deletes the cache when it nishes executing the job.
Data Services also deletes a long data cache le when the data is out of scope. For example, the data is out of
scope under the following circumstances:
• The data ow loads the data to a target.
• A query transform lters the data out.
• Data Services converts a long datatype to a varchar.
Encrypting temporary cache les [page 31]
Set SAP Data Services to encrypt specic temporary cache les to protect personal information.
Parent topic: Security [page 25]
Related Information
Data protection and privacy [page 26]
Firewall for secure administrative functions [page 27]
External DTD in XML documents [page 28]
Message client library [page 29]
SSL or TLS for Data Services components [page 31]
Congure SSL for the CMS connection [page 41]
SSL for Metadata Browsing and View Data Services [page 42]
Password encryption [page 45]
Repository password required [page 47]
Blocking localhost IP addresses [page 50]
Block invalid domains and IP addresses to CMS server system from Data Services management console web
application [page 50]
30
PUBLIC
Administrator Guide
Security

3.5.1Encrypting temporary cache les
Set SAP Data Services to encrypt specic temporary cache les to protect personal information.
Data Services can encrypt the following temporary cache les:
• Persistent cache datastore les
• Pageable cache data ow les
• Cache les from functions such as lookup, search_replace, distinct, and group_by.
• Cache les from transforms such as Data Quality transforms and Table Comparison
Data Services deletes the les immediately after the data ow nishes executing.
Note
Encrypting temporary cache les can slow job performance signicantly.
Encrypting the cache les is optional.
To encrypt the specic temporary cache les, perform the following steps:
1. Open the DSConfig.txt le, located in <DS_COMMON_DIR>\conf.
2. Add the following parameter to the String section: pageable_cache_encrypt_data =.
3. Enter the value yes.
pageable_cache_encrypt_data = yes
4. Save and close the dsconfig.txt le.
Task overview: Temporary cache les [page 29]
3.6 SSL or TLS for Data Services components
Secure Sockets Layer (SSL), and its newer version, Transport Layer Security (TLS), are cryptographic
protocols that provide security and data integrity for network communications.
Transport Layer Security (TLS) is the standard specication published by the IETF that is based on earlier SSL
specications. Use TLS for Windows version 10 and higher.
Note
When you see the term “SSL” or “SSL/TLS” in this document, understand that you can use TLS when it is
supported by your database system, and when you use Widows 10 and higher versions.
The SSL/TLS protocol allows client/server applications to communicate across a network in a way designed
to prevent eavesdropping, tampering, and message forgery. SSL/TLS provides endpoint authentication and
communications condentially over the network using cryptography.
Administrator Guide
Security
PUBLIC 31
Protected communication paths [page 32]
Within the SAP Data Services platform, SSL/TLS is supported for all communication paths between
components that communicate over a network.
Default certicates [page 34]
By default, the SAP Data Services installer creates a set of SSL certicates for secure communication
between Data Services components.
Copying certicates in a distributed environment [page 35]
Manually copy trusted certicates to all machines in a distributed environment.
Enable or disable SSL on select communication paths [page 36]
SAP Data Services uses multiple communication paths, therefore, there are many methods to enable
or disable SSL for any given path.
Using custom certicates [page 39]
SAP Data Services includes a set of SSL certicates by default, however, you can use your own
certicates.
Generating keys and signing certicates [page 40]
To use custom certicates for SSL security in SAP Data Services, generate the certicates and have
them signed by a trusted certicate authority (CA), such as VeriSign.
Parent topic: Security [page 25]
Related Information
Data protection and privacy [page 26]
Firewall for secure administrative functions [page 27]
External DTD in XML documents [page 28]
Message client library [page 29]
Temporary cache les [page 29]
Congure SSL for the CMS connection [page 41]
SSL for Metadata Browsing and View Data Services [page 42]
Password encryption [page 45]
Repository password required [page 47]
Blocking localhost IP addresses [page 50]
Block invalid domains and IP addresses to CMS server system from Data Services management console web
application [page 50]
3.6.1Protected communication paths
Within the SAP Data Services platform, SSL/TLS is supported for all communication paths between
components that communicate over a network.
The following diagram illustrates the communication channels within the Data Services architecture that
support SSL/TLS.
32
PUBLIC
Administrator Guide
Security
Note
All TCP/IP communication paths support SSL/TLS.
Note
Depending on the communication for your web application server, you can switch your clients that use
HTTP to the HTTPS protocol.
For information about conguring HTTPS with Data Services Management Console, see SAP Note
1423991
.
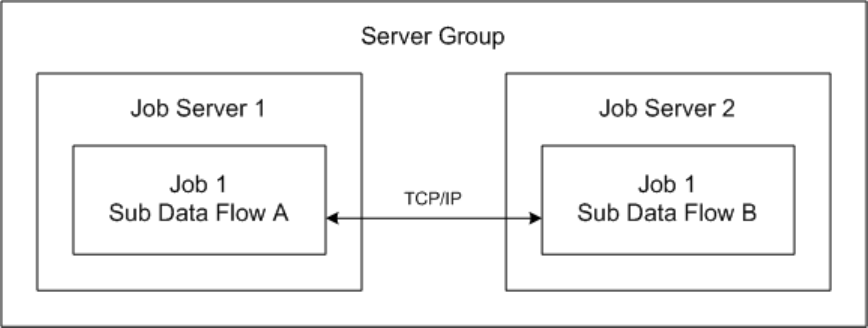
When you use a server group with a distribution level of “Sub data ow”, SSL/TLS also protects the TCP/IP
communication path between sub data ows that are on dierent job servers within the server group. The
following diagram illustrates the communication path.
Administrator Guide
Security
PUBLIC 33
Parent topic: SSL or TLS for Data Services components [page 31]
Related Information
Default certicates [page 34]
Copying certicates in a distributed environment [page 35]
Enable or disable SSL on select communication paths [page 36]
Using custom certicates [page 39]
Generating keys and signing certicates [page 40]
3.6.2Default certicates
By default, the SAP Data Services installer creates a set of SSL certicates for secure communication between
Data Services components.
The default certicates use 2048-bit RSA keys and are valid for 30 years.
To use your own custom certicates, congure the certicates after installation.
Parent topic: SSL or TLS for Data Services components [page 31]
Related Information
Protected communication paths [page 32]
Copying certicates in a distributed environment [page 35]
Enable or disable SSL on select communication paths [page 36]
Using custom certicates [page 39]
34
PUBLIC
Administrator Guide
Security

Generating keys and signing certicates [page 40]
3.6.3Copying certicates in a distributed environment
Manually copy trusted certicates to all machines in a distributed environment.
When you install SAP Data Services components on multiple machines, and each installation has its own root
and intermediate certicate authority (CA) conguration, you must manually copy the trusted certicate les
from one machine to all other machines.
Note
Trusted certicate les are root and intermediate CA certicate les. Trusted certicate les have a .crt
extension, and are located in the <LINK_DIR>\ssl\trusted_certs folder.
Remember
When you copy trusted certicates from one host machine to another, always copy the les to and from the
<LINK_DIR>\ssl\trusted_certs folder on each respective machine.
Each step represents a dierent scenario. Find the step that represents your situation and perform the
substeps.
1. If the Job Server and Access Server are installed on dierent machines, congure the hosts with the new
certicates by performing the following substeps.
a. Copy the trusted certicates from the Access Server to the Job Server host.
b. Run the following batch le on the Job Server host machine to refresh the
<LINK_DIR>\ssl\trusted_certs\jssecacerts keystore le:
• On Windows: <LINK_DIR>\bin\SetupJavaKeystore.bat
• On UNIX: $LINK_DIR/bin/SetupJavaKeystore.sh
After you run the batch les, adapters that communicate with the Access Server use the new
certicates.
c. Copy the trusted certicates from the Job Server to the Access Server host.
d. Restart the job service on both the Job Server and Access Server host machines.
2. If the Access Server and Management Console are installed on dierent machines, congure the
Management Console host with the new certicates by performing the following substeps:
a. Copy the trusted certicates from the Access Server to the Management Console host.
b. Run the following batch le on the Management Console host machine to refresh the
<LINK_DIR>\ssl\trusted_certs\jssecacerts keystore le:
• On Windows: <LINK_DIR>\bin\SetupJavaKeystore.bat
• On UNIX: $LINK_DIR/bin/SetupJavaKeystore.sh
c. Restart the web application server that hosts the Management Console.
3. If the Access Server and message client are installed on dierent machines, congure the message client
host with the new certicates by performing the following substeps:
a. Copy the trusted certicates from the Access Server to the message client host.
b. If the message client host uses Java, import the trusted certicates into the keystore used by the
message client application.
Administrator Guide
Security
PUBLIC 35

For information about creating keystores, see the JDK help for the keytool command.
4. If the Job Server and job launcher or external scheduler are installed on dierent machines, copy the
trusted certicates from the Job Server to the job launcher or external scheduler host.
Note
If the scheduled job connects to multiple Job Servers through a server group, copy the trusted
certicates from all Job Servers within the group.
Task overview: SSL or TLS for Data Services components [page 31]
Related Information
Protected communication paths [page 32]
Default certicates [page 34]
Enable or disable SSL on select communication paths [page 36]
Using custom certicates [page 39]
Generating keys and signing certicates [page 40]
3.6.4Enable or disable SSL on select communication paths
SAP Data Services uses multiple communication paths, therefore, there are many methods to enable or disable
SSL for any given path.
Choose to enable or disable SSL on select communication paths based on your security and performance
requirements. The following table describes the types of communication paths.
Communication path Considerations
Adapter management Enable SSL on your Job Servers to protect the communica-
tion path between your Job Servers and adapters and mes-
sage broker clients.
To congure SSL on a Job Server, use the Data Services
Server Manager.
36 PUBLIC
Administrator Guide
Security
Communication path Considerations
Real-time messaging Enable SSL on your Access Servers to protect the communi-
cation path between your Access Servers and their real-time
clients.
Note
By default, SSL is enabled for real-time messaging. If
you disable it on an Access Server, be sure to disable it
on any message clients or adapters that communicate
with that Access Server.
Note
You can enable or disable SSL on a per-server basis. You
don't have to congure SSL the same way for all Access
Servers.
To congure SSL on an Access Server, use the Data Services
Server Manager.
Peer-to-peer communication Enable SSL by conguring SSL for run-time resources to
protect the communication path between sub data ows
running on dierent Job Servers.
Note
If you run multiple Job Servers within a server group,
congure SSL the same way on each Job Server.
To congure SSL for run-time resources, use the Data
Services Server Manager.
Administrator Guide
Security
PUBLIC 37
Communication path Considerations
Other communication paths SSL is required for other communication paths in the Data
Services architecture, and is already enabled.
For example, SSL is always enabled on the communication
paths between a Job Server and the following clients:
• The Administrator application in the Management
Console
• SAP Data Services Designer
• The job launcher
• Access Servers
• The job execution engine
• Other Job Servers within a server group
• The job service used for monitoring
Ensure that each client has the correct certicates for these
other communication paths. however, there are no addi-
tional conguration steps to perform.
Note
You must copy the certicates from the Job Server to
the Access Server, Management Console, and external
job launcher hosts. In all other cases, the certicates are
exchanged automatically.
Parent topic: SSL or TLS for Data Services components [page 31]
Related Information
Protected communication paths [page 32]
Default certicates [page 34]
Copying certicates in a distributed environment [page 35]
Using custom certicates [page 39]
Generating keys and signing certicates [page 40]
Use the Server Manager on Windows [page 138]
Using the Server Manager on UNIX systems [page 146]
38
PUBLIC
Administrator Guide
Security

3.6.5Using custom certicates
SAP Data Services includes a set of SSL certicates by default, however, you can use your own certicates.
Before you perform the following task, generate custom certicates and have them signed by a trusted
certicate authority (CA). For instructions, see Generating keys and signing certicates [page 40].
To use custom certicates instead of the certicates provided by Data Services, perform the following steps:
Note
The following steps are based on dierent Data Services deployments. Perform the steps that apply to your
specic deployment.
1. Copy all required custom certicates to the Data Services client machine or machines.
Note
When the system validates the certicates for the Data Services server, it requires that each Data
Services client has the certicates for all CAs in the certicate chain. The certicates within a
certicate chain are called “trusted certicates”. Trusted certicates must be present on the local
machine. In most cases, the certicate chain is the same for all clients, and therefore the same
certicates must be present on all client machines.
2. If you use Java-based clients, generate a keystore that contains the trusted certicates using the JDK
keytool utility.
3. Congure server certicate and keyle paths with the SAP Data Services Server Manager.
4. Congure certicates for SAP Data Services Designer.
a. Choose
Tools Options in Designer.
b. Expand the Designer node and select the SSL node.
c. Specify the locations for the following options:
• Server certicate le
• Server private key le
• Trusted certicates folder
If you change any SSL options other than Use SSL protocol for proler, you must restart both the Designer
and any Data Services servers.
Task overview: SSL or TLS for Data Services components [page 31]
Related Information
Protected communication paths [page 32]
Default certicates [page 34]
Copying certicates in a distributed environment [page 35]
Enable or disable SSL on select communication paths [page 36]
Generating keys and signing certicates [page 40]
Administrator Guide
Security
PUBLIC 39

Conguring SSL paths [page 145]
3.6.6Generating keys and signing certicates
To use custom certicates for SSL security in SAP Data Services, generate the certicates and have them
signed by a trusted certicate authority (CA), such as VeriSign.
To generate custom SSL certicates and have them signed, perform the following steps:
1. Open a command prompt and use the Open SSL toolkit with a command like the following:
openssl req -config <DS_COMMON_DIR>\ssl\conf\openssl.conf -new -newkey
rsa:2048 -nodes -keyout <mykey.pem> -out <myreq.pem>
Where:
• <mykey.pem> is the name of the key le to generate.
• <myreq.pem> is the name of the certicate le to generate.
Note
By default, OpenSSL is installed to <DS_COMMON_DIR>\bin. For more information about available
options and commands, see the OpenSSL documentation at https://www.openssl.org/docs/
.
2. Send the RSA private key and certicate les to your external CA.
3. After you receive the signed certicate from your CA, use the SAP Data Services Server Manager to specify
the path to the new certicate and private key le.
Note
Trusted certicates from an external CA must be in PEM format.
4. Copy the signed certicates to the <DS_COMMON_DIR>\ssl\trusted_certs directory.
Task overview: SSL or TLS for Data Services components [page 31]
Related Information
Protected communication paths [page 32]
Default certicates [page 34]
Copying certicates in a distributed environment [page 35]
Enable or disable SSL on select communication paths [page 36]
Using custom certicates [page 39]
Conguring SSL paths [page 154]
40
PUBLIC
Administrator Guide
Security

3.7 Congure SSL for the CMS connection
Use the Secure Sockets Layer (SSL) protocol for all network communications between SAP Data Services
clients and the SAP Central Management Server (CMS)
To set up SSL for all CMS communication, you need to perform the following tasks:
• Deploy the SAP BusinessObjects BI platform or Information Platform Services with SSL enabled.
• Create key and certicate les for each machine in your deployment.
• Congure the location of the key and certicate les in the Central Conguration Manager (CCM) and your
web application server.
For Data Services, use the sslconfig utility to congure all components that log into the CMS for SSL,
including the following components:
• SAP Data Services Designer
• Job Servers
• External schedulers and the job launcher
• SAP Data Services Management Console (if deployed to a dierent web application server than the SAP
BusinessObjects BI platform or Information platform services web tier)
Note
For J2EE web application servers, congure SSL by modifying the startup script.
By default, the sslconfig utility is installed in the following location:
• For Windows:
<INSTALL_DIR>\SAP BusinessObjects Enterprise XI 4.0\win32_x86\sslconfig.exe
• For UNIX:
$INSTALL_DIR/sap_bobj/enterprise_xi40/<platform>/boe_sslconfig
Where <platform> matches your UNIX platform.
For more information about sslconfig.exe and conguring the SSL protocol for CMS and its clients, see
the SAP BusinessObjects BI Platform Administrator Guide or the SAP BusinessObjects Information Platform
Services Administrator Guide.
Parent topic: Security [page 25]
Related Information
Data protection and privacy [page 26]
Firewall for secure administrative functions [page 27]
External DTD in XML documents [page 28]
Message client library [page 29]
Temporary cache les [page 29]
SSL or TLS for Data Services components [page 31]
Administrator Guide
Security
PUBLIC 41

SSL for Metadata Browsing and View Data Services [page 42]
Password encryption [page 45]
Repository password required [page 47]
Blocking localhost IP addresses [page 50]
Block invalid domains and IP addresses to CMS server system from Data Services management console web
application [page 50]
3.8 SSL for Metadata Browsing and View Data Services
Use Secure Sockets Layer (SSL) protocol for all network communications between SAP Data Services, back-
end engines, and EIM Adaptive Processing Server services.
The following EIM Adaptive Processing Server services use SSL:
• Metadata Browsing Service
• View Data Service
Data Services provides the EIM Adaptive Processing Server services, but they're used by other SAP software
products, such as the Data Insight module of SAP Information Steward.
Data Services provides the keystore le and the trusted certicates le by default. The following table describes
each le.
File
Description
Java Server keystore
Contains a single key and all the certicates that are part of
the certicate chain involved in signing the key on the server
side. Password les for the Java Server keystore le and the
key are also required.
Data Services places the default keystore le and password
les in <LINK_DIR>\ssl\mds.
Trusted certicate
Certicates in a certicate chain, used for signing the key
that is stored in the Java keystore on the server side. The
client side, the Data Services back-end engine, uses the
trusted certicates to communicate with the server.
Data Services places the trusted certicates in
<LINK_DIR>\ssl\mds\trusted_certs .
Conguring SSL for Metadata Browsing and View Data Services [page 43]
The Metadata Browsing Service and View Data Service are EIM Adaptive Processing Server services
that use SSL.
Creating keystore le and certicates for default [page 44]
Use custom keystore le and SSL certicate instead of using the default les provided for the Metadata
Browsing Service and View Data Service services.
42
PUBLIC
Administrator Guide
Security
Parent topic: Security [page 25]
Related Information
Data protection and privacy [page 26]
Firewall for secure administrative functions [page 27]
External DTD in XML documents [page 28]
Message client library [page 29]
Temporary cache les [page 29]
SSL or TLS for Data Services components [page 31]
Congure SSL for the CMS connection [page 41]
Password encryption [page 45]
Repository password required [page 47]
Blocking localhost IP addresses [page 50]
Block invalid domains and IP addresses to CMS server system from Data Services management console web
application [page 50]
3.8.1Conguring SSL for Metadata Browsing and View Data
Services
The Metadata Browsing Service and View Data Service are EIM Adaptive Processing Server services that use
SSL.
To enable and congure SSL communications for Metadata Browsing and View Data Services, perform the
following steps:
1. Log into the Central Management Console (CMC) as a user with administrative rights to SAP Data
Services.
2. Open the Applications management page of the CMC.
3. Right-click Data Services Application and choose Settings.
4. Choose Yes from the Enable SSL communication for Metadata Browsing and View Data Services list.
5. To use the default keystore and certicates that Data Services provides, perform the following substeps:
a. Choose Yes from the Use Default SSL Settings list.
b. Select Save.
6. To use custom certicates, perform the following substeps:
Your keystore must be a Java keystore le that contains a single key with all the certicates that are part
of the certicate chain involved in signing the key. Provide a password for the key and a password for the
keystore le.
Your keystore le must be in the <LINK_DIR>\ssl\mds directory. The corresponding certicate les must
be in the <LINK_DIR>\ssl\mds\trusted_certs directory.
Administrator Guide
Security
PUBLIC 43

a. For multiple instances of Metadata Browsing Service or View Data Service associated with the same
CMS server, copy the keystore and certicate les to all the machines where these instances are
installed.
b. Choose No from the Use Default SSL Settings list.
c. Enter the name of the KeyStore le in KeyStore File.
d. Enter the applicable password in KeyStore Password.
e. Enter the applicable password in Key Password.
f. Select Save.
7. Restart the EIM Adaptive Processing Server by performing the following substeps:
a. Open the Servers management area.
b. Expand the Service Categories node and select the Enterprise Information Management Services node.
c. Select the EIMAdaptiveProcessingServer from the Server Name column in the right pane.
d. Select Action Restart Server .
The State column lists “Stopping”, then “Starting”, and nally “Running”.
Selecting the Refresh icon helps to update the status in the State column.
Task overview: SSL for Metadata Browsing and View Data Services [page 42]
Related Information
Creating keystore le and certicates for default [page 44]
3.8.2Creating keystore le and certicates for default
Use custom keystore le and SSL certicate instead of using the default les provided for the Metadata
Browsing Service and View Data Service services.
Before performing the following steps, congure SSL for the Metadata Browsing Service and View Data Service
services following the instructions in Conguring SSL for Metadata Browsing and View Data Services [page
43]. Ensure that you select Yes for Use Default SSL Settings when you congure SSL for the services.
To create a keystore le and SSL certicates for the default SSL settings, perform the following steps:
1. Run the MDSSetupJavaKeyStore.bat tool.
The MDSSetupJavaKeyStore.bat le is in <LINK_DIR>\bin by default.
The MDSSetupJavaKeyStore batch le creates the les described in the following table:
44
PUBLIC
Administrator Guide
Security

File name Location Description
DSJavaKeyStore.keystore <LINK_DIR>\ssl\mds Keystore le that contains a single key
and all the certicates that are part
of the certicate chain for signing the
key.
sslks.key <LINK_DIR>\ssl\mds Key password.
sslstore.key <LINK_DIR>\ssl\mds Keystore password.
2. Restart the EIMAdaptiveProcessingServer in the Central Management Console.
The restart picks up the new keystore and certicate les as the default les.
Task overview: SSL for Metadata Browsing and View Data Services [page 42]
Related Information
Conguring SSL for Metadata Browsing and View Data Services [page 43]
3.9 Password encryption
In the SAP Data Services system, all passwords are encrypted using the AES algorithm with 128-bit keys.
Encryption key storage locations [page 46]
The SAP Data Services system stores passwords for les and applications, and it stores individual keys
associated with each password in specic locations.
Encrypt passwords manually [page 47]
Manually encrypt passwords when encryption isn't handled automatically by the SAP Data Services
applications and utilities.
Parent topic: Security [page 25]
Related Information
Data protection and privacy [page 26]
Firewall for secure administrative functions [page 27]
External DTD in XML documents [page 28]
Message client library [page 29]
Temporary cache les [page 29]
SSL or TLS for Data Services components [page 31]
Administrator Guide
Security
PUBLIC 45
Congure SSL for the CMS connection [page 41]
SSL for Metadata Browsing and View Data Services [page 42]
Repository password required [page 47]
Blocking localhost IP addresses [page 50]
Block invalid domains and IP addresses to CMS server system from Data Services management console web
application [page 50]
3.9.1Encryption key storage locations
The SAP Data Services system stores passwords for les and applications, and it stores individual keys
associated with each password in specic locations.
The following table lists each le or application that has a password, and the associated password key location.
Password for
Associated key location
Local repository
REPOKEY column in the AL_VERSION table
Central repository
REPOKEY column in the AL_VERSION table
Management Console
admin.key located in the same directory as admin.xml
Access Server
AS.key located in the same directory as AS.xml
Adapter SDK
<DS_COMMON_DIR>/adapters/adapter.key
DSConfig.txt <DS_COMMON_DIR>/conf/DSConfig.key
Data Services-managed schedules If the schedule uses a password le, the password is stored
in the password le.
If the schedule doesn't use a password le, the password is
located in the job command line.
External scheduler command lines
If the schedule uses a password le, the password is stored
in the password le.
If the schedule doesn't use a password le, the password is
located in the job command line.
Caution
For encryption keys that are stored in les, Data Services protects the security of the key le with strong
OS permissions. For example, the software sets owner-only read and write access to the le (chmod 600
on UNIX systems). You should also protect the key le by restricting user access to the server host machine
when possible.
Parent topic: Password encryption [page 45]
46
PUBLIC
Administrator Guide
Security

Related Information
Encrypt passwords manually [page 47]
3.9.2Encrypt passwords manually
Manually encrypt passwords when encryption isn't handled automatically by the SAP Data Services
applications and utilities.
When password encryption for some tasks isn't handled automatically by the Data Services application or
utility, manually encrypt the password.
Example
You quickly generate a data ow to use with the object creation XML toolkit. The data ow contains a
datastore that requires a password. Therefore, the password must be encrypted before you can import and
run the data ow successfully.
To manually encrypt a password, use the al_encrypt command-line utility installed with the software. For
more information about using al_encrypt for password encryption, see Command line: Password encryption
[page 253]
Parent topic: Password encryption [page 45]
Related Information
Encryption key storage locations [page 46]
3.10 Repository password required
By default, the SAP Data Services system requires that you enter the repository user name and password when
you log into applications that use the repository.
For example, your repository user name and password are required when you log into SAP Data Services
Designer or when you open a Data Quality report in SAP Data Services Management Console.
You, as an administrator, can disable the requirement of the repository user name and password through
permissions in the Central Management Console. After you disable the default behavior, the system sends the
repository credentials from the Central Management Server to the client, such as Data Services, without you
entering the repository user name and password.
Administrator Guide
Security
PUBLIC 47

Caution
Although this password is encrypted, and you can secure the communication channel through SSL,
sending passwords can pose a risk, such as malicious users obtaining access to the password.
You can selectively grant the permissions for repositories. For example, you can grant the right for
development repositories but not for production repositories.
Accessing Data Services applications without repository credentials [page 48]
Grant permission for certain users, or certain repositories, to open SAP Data Services applications that
use the repository without entering user name and password credentials.
Parent topic: Security [page 25]
Related Information
Data protection and privacy [page 26]
Firewall for secure administrative functions [page 27]
External DTD in XML documents [page 28]
Message client library [page 29]
Temporary cache les [page 29]
SSL or TLS for Data Services components [page 31]
Congure SSL for the CMS connection [page 41]
SSL for Metadata Browsing and View Data Services [page 42]
Password encryption [page 45]
Blocking localhost IP addresses [page 50]
Block invalid domains and IP addresses to CMS server system from Data Services management console web
application [page 50]
3.10.1Accessing Data Services applications without
repository credentials
Grant permission for certain users, or certain repositories, to open SAP Data Services applications that use the
repository without entering user name and password credentials.
Before peforming the following steps, understand the application rights by viewing the table in Detailed
application rights [page 55].
Caution
Although the repository password is encrypted, and you can secure the communication channel through
SSL, sending passwords can pose a risk, such as malicious users obtaining access to the password.
You can selectively grant the permissions for repositories. For example, you can grant the right for
development repositories but not for production repositories.
48
PUBLIC
Administrator Guide
Security

To set repository permissions in the Central Management Console (CMC), perform the following steps:
1. Open the Data Services page from CMC Home.
2. Select the Repositories node at left.
To assign rights to a user group for all repositories, skip the next step where you select a specic
repository.
3. Select the applicable repository at right.
Select the repository to restrict access rights to a specic repository. For example, remove the requirement
for repository credentials for the test repository only. To assign rights to a user group for all repositories,
don't select a specic repository.
4. Choose Manage Security User Security .
The User Security page opens. Check that you selected the correct repository by looking at the repository
name in the page banner.
5. Select the applicable user group under Name.
Before you select the user group, consider the application from which you want to remove the repository
credential requirement.
Example
• To remove the credential requirement from Data Services Designer, select Data Services Designer
Users.
• To remove the credential requirement from Data Quality reports in the Management Console,
select Data Services Monitor Users.
6. Select Assign Security.
The Assign Security page opens. Check that you have the correct user group by looking at the Principal
value in the upper right corner of the page.
7. Open the Advanced tab.
8. Select Add/Remove Rights.
The Add/Remove Rights page opens.
9. Expand the Application node at left and select the applicable repository name.
10. Under Specic Rights for Data Services Repository, select Granted for either or both of the following
options:
• Allow user to retrieve repository password
• Allow user to retrieve repository password that user owns
11. Select OK.
All users in the selected user group now have rights for accessing an application that uses the selected
repository without entering the repository credentials.
Task overview: Repository password required [page 47]
Administrator Guide
Security
PUBLIC 49
3.11 Blocking localhost IP addresses
Blocking localhost IP addresses is not eective for limiting the use of localhost in a web application. This
prevention should be done at the rewall or system level by only allowing trusted IP addresses and DNS names.
Blocking a static list of IP addresses is not an eective way to limit the use of localhost. Because the host name
is used throughout the whole web application, blocking localhost related IP addresses cannot be accomplished
with a simple blocking option within the application.
This type of prevention needs to be at the rewall or system level. You need to only allow trusted IP addresses
and DNS names for your web application. It is your responsibility to prevent non-trusted localhost IP addresses
from being used in your network.
Parent topic: Security [page 25]
Related Information
Data protection and privacy [page 26]
Firewall for secure administrative functions [page 27]
External DTD in XML documents [page 28]
Message client library [page 29]
Temporary cache les [page 29]
SSL or TLS for Data Services components [page 31]
Congure SSL for the CMS connection [page 41]
SSL for Metadata Browsing and View Data Services [page 42]
Password encryption [page 45]
Repository password required [page 47]
Block invalid domains and IP addresses to CMS server system from Data Services management console web
application [page 50]
3.12 Block invalid domains and IP addresses to CMS server
system from Data Services management console web
application
To ensure a secure login and prevent server-side request forgery, you can provide a list of allowed CMS names
or IP addresses, along with the port numbers, by utilizing SAP BusinessObjects Enterprise's (BOE) CMC
global.properties le.
The global.properties le contains a property named allowed.cms where you include the
allowed CMS names or IP addresses, with port numbers. For more information, see SAP
BusinessObjects Business Intelligence Platform on SAP Help Portal at https://help.sap.com/docs/
50
PUBLIC
Administrator Guide
Security
SAP_BUSINESSOBJECTS_BUSINESS_INTELLIGENCE_PLATFORM and search for CMC properties in the
Business Intelligence Administrator Guide.
In the SAP Data Services deployment, the global.properties and DSCmc.properties are located in the
following locations:
• <BOE WARFILES folder>\webapps\BOE\WEB-INF\config\default
• <Tomcat folder>\tomcat\webapps\BOE\WEB-INF\config\default
You need to add the CMS entry information into these les.
Example
The following is an example using Tomcat as the web application server, but other web application servers
require similar steps.
1. Go to <Tomcat folder>\tomcat\webapps\BOE\WEB-INF\config\custom
2. Edit the global.properties le in notepad.
If this le is not present, make a copy of global.properties
from <Tomcat folder>\tomcat\webapps\BOE\WEB-INF\config\default to <Tomcat
folder>\tomcat\webapps\BOE\WEB-INF\config\custom.
3. Congure the mandatory parameter allowed.cms=<server:port> for a single CMS environment.
Where there are multiple CMS, you can use a comma separated list in the parameter like
allowed.cms=<server1:port1,server2:port2,@clustername>.
Note that @clustername can also be congured in the allowed.cms parameter in addition to the server
and port but CMS host names and their ports are required for reliable operation.
Your addition to the global.properties le might look as follows:
allowed.cms=server1:6400,server2:6400,localhost:6400.
4. Edit the DSCmc.properties le in both locations with the following parameters:
• Set cms.default=<CMSHost:CMSPort>
• Set cms.visible=false
5. Save the le and restart Tomcat.
Parent topic: Security [page 25]
Related Information
Data protection and privacy [page 26]
Firewall for secure administrative functions [page 27]
External DTD in XML documents [page 28]
Message client library [page 29]
Temporary cache les [page 29]
SSL or TLS for Data Services components [page 31]
Congure SSL for the CMS connection [page 41]
SSL for Metadata Browsing and View Data Services [page 42]
Administrator Guide
Security
PUBLIC 51
4 User and rights management
SAP Data Services uses the Central Management Server (CMS) for user accounts and rights management.
To set user accounts and rights management for administrating procedures for applications other than
Data Services, see the SAP BusinessObjects BI Platform Administrator Guide or the SAP BusinessObjects
Information Platform Services Administrator Guide.
User management [page 53]
When you create users and groups in the Central Management Console (CMC), you also grant the user
or group access rights to the repository with which they work.
Group management [page 54]
Groups are collections of users who share the same account privileges, such as users in the same
department, role, or location.
4.1 User management
When you create users and groups in the Central Management Console (CMC), you also grant the user or
group access rights to the repository with which they work.
By default, the SAP Data Services installation program doesn't create any user accounts. Use the CMC to
create new user accounts, or assign existing user accounts to the default group accounts.
For information about creating user accounts for applications other than Data Services, see the SAP
BusinessObjects BI Platform Administrator Guide or the SAP BusinessObjects Information Platform Services
Administrator Guide.
Parent topic: User and rights management [page 53]
Related Information
Group management [page 54]
Accessing repository user security in the CMC [page 65]
Administrator Guide
User and rights management
PUBLIC 53

4.2 Group management
Groups are collections of users who share the same account privileges, such as users in the same department,
role, or location.
Manage groups in the Users and Groups area of the Central Management Console.
Groups enable administrators to change the rights and permissions for multiple users in one place instead of
modifying the rights and permissions for each user account individually. Also, administrators can assign object
rights to a group or groups.
In addition to the basic SAP BusinessObjects BI platform or Information Platform Services group accounts,
Data Services includes several default group accounts as described in the following table.
Account name
Description
Data Services Administrator Members have access to all Data Services administrative
functionalities.
Data Services Designer Users Members have access to Designer.
Note
Application rights and repository security rights are two
separate sets of rights. For more information about
repository rights, see Detailed repository rights [page
67].
Data Services Monitor Users
Members have access limited to options available from the
Status tabs.
Example
• A Monitor User can cancel batch jobs but can't run
or schedule them.
• A Monitor User can restart, cancel, or shut down an
Access Server, service, adapter instance, or client
interface but can't add or remove them.
Data Services MU (Multi-user) Administrator
Members are limited to managing secure central reposito-
ries. This role is a subset of the Data Services Administrator
role. Multi-user administrators have the rights to perform
the following tasks:
• Add and remove secure central repositories.
• Manage users and groups.
• View secure central repository reports.
Data Services Operator Users
Members have all Administrator privileges except they can't
modify repository, access, or CMS servers nor update data-
store settings.
54 PUBLIC
Administrator Guide
User and rights management
Account name Description
Data Services Proler Administrator Users Members are limited to managing proler repositories. This
role is a subset of the Administrator role. Proler administra-
tors can do the following:
• Manage proler tasks in any proler repository.
• Manage the Proler conguration.
Data Services Proler Users
Members of this group are limited to managing proler tasks
in the proler repository that is congured for the user.
Detailed application rights [page 55]
Each SAP Data Services user group has default rights to the application.
Viewing application rights assigned to a group [page 58]
Administrators can view application rights assigned to each SAP Data Services group in the Central
Management Console (CMC).
Managing application rights for a group [page 58]
Administrators can manage application rights assigned to each SAP Data Services group in the Central
Management Console (CMC).
Parent topic: User and rights management [page 53]
Related Information
User management [page 53]
4.2.1Detailed application rights
Each SAP Data Services user group has default rights to the application.
The following table lists all default application rights granted to each type of user group. In the Central
Management Console (CMC), each Data Services group name is prefaced with “Data Services”. For example,
Data Services Designer Users. However, because of limited space, we don't include “Data Services” in the table
for Data Services user groups.
Note
The Data Services Administrator group has access to all of the available Data Services application rights.
Therefore, the Administrator group isn't included in the table.
Administrator Guide
User and rights management
PUBLIC 55

Application rights
Data Services user groups
Designer
Users
Monitor
Users
Multi-user
(MU) Adminis-
trator
Operator
Users
Proler Ad-
ministrator
Users
Proler
Users
Management Console Administra-
tor
X X X X X X
Management Console Auto Docu-
mentation
X X X X X X
Management Console Data Quality
Reports
X X X X X X
Data Services Designer X
Management Console Impact and
Lineage
X X X X X X
Management Console Operational
Dashboard
X X X X X X
Management Console Validation
Dashboard
X X X X X X
Management Console Administra-
tor overview
X X X X X X
Execute batch job X X
Manage access server congura-
tions
Manage adapter congurations X
Manage batch job history X X
Manage central repository groups X
Manage certication log congura-
tions
Manage datastore and substitution
param congurations
Manage Object Promotion Congu-
rations
Manage Object Promotion Import
Manage proler congurations X
Manage real-time client interface
status
X
Manage real-time logs X
Manage real-time service status X
Manage real-time status X
Manage RFC client and server con-
gurations
X
Manage server group congura-
tions
X X
56 PUBLIC
Administrator Guide
User and rights management
Application rights
Data Services user groups
Designer
Users
Monitor
Users
Multi-user
(MU) Adminis-
trator
Operator
Users
Proler Ad-
ministrator
Users
Proler
Users
Manage status interval congura-
tion
Manage webservices congurations X
View adapter status X X
View batch job history X X X
View Data Quality sample data X X X X X X
View proler status X X
View internal information in log X X
View real-time client interface sta-
tus
X X
View real-time logs X X
View real-time service status X X
View real-time status X X
View RFC client status X X
View server group information X X X
View Validation sample data X X X X X X
View webservices status X X
Note
Application rights and repository security rights have separate rights. When a repository is registered, the
owner is granted full access to the repository. By default, other Designer users have no access to the
repository.
Parent topic: Group management [page 54]
Related Information
Viewing application rights assigned to a group [page 58]
Managing application rights for a group [page 58]
Detailed repository rights [page 67]
Administrator Guide
User and rights management
PUBLIC 57
4.2.2Viewing application rights assigned to a group
Administrators can view application rights assigned to each SAP Data Services group in the Central
Management Console (CMC).
To perform the following steps, you must have Administrator rights or be a member of the Data Services
Administrator Users group.
To view the assigned application rights for a group, perform the following steps in the CMC:
1. In CMC Home, select Applications in the Manage column.
2. Double-click Data Services Application in the Application Name column.
3. Select User Security.
The user groups display at right.
4. Select the applicable user group to view and select View Security.
The Permissions Explorer opens and displays all of the current application rights that are assigned to your
selected user group.
Task overview: Group management [page 54]
Related Information
Detailed application rights [page 55]
Managing application rights for a group [page 58]
4.2.3Managing application rights for a group
Administrators can manage application rights assigned to each SAP Data Services group in the Central
Management Console (CMC).
To perform the following steps, you must have Administrator rights or be a member of the Data Services
Administrator Users group.
For complete information about the windows and options mentioned in this topic, see the Business Intelligence
Platform Administrator Guide.
To manage the assigned application rights for a group, perform the following steps in the CMC:
1. In CMC Home, select Applications in the Manage column.
2. Double-click Data Services Application in the Application Name column.
3. Select User Security.
The user groups display at right.
4. Select the applicable user group and select Assign Security.
The Assign Security window opens.
58
PUBLIC
Administrator Guide
User and rights management
5. Select the Advanced tab.
6. Select Add/Remove rights located below the tab labels.
The Add/Remove Rights window opens. Each right is in a row with options to grant or deny the right.
7. Find the row for the applicable right under Specic Rights for Data Services Application.
8. Select the applicable option:
• Select the radio dial under the Granted icon in the row for the applicable right to grant the right.
• Select the radio dial under the Deny icon in the row for the applicable right to deny access to the right.
9. Select Apply to save your changes and then select OK.
Task overview: Group management [page 54]
Related Information
Detailed application rights [page 55]
Viewing application rights assigned to a group [page 58]
Administrator Guide
User and rights management
PUBLIC 59
5 Repository management
Before you can access an SAP Data Services repository in other components such as the Designer and Data
Services Management Console, congure the repository correctly.
Create and congure a repository by performing the tasks in the following workow:
1. Create the repository database in an approved database management system.
2. Create the repository connection using the Data Services Repository Manager.
3. Associate the repository server with the Job Server in the Data Services Server Manager.
4. Register the repository in the Central Management Console (CMC).
5. Manage user security settings for the repository in the CMC.
For descriptions of the repository types that you can create in Data Services, see Repository [page 16].
Conguring a Data Services repository [page 61]
To create a local, central, or proler repository, enter the repository connection information in the Data
Services Repository Manager.
Registering a repository in the CMC [page 63]
Register a repository in the Data Services Central Management Console (CMC) by entering connection
information including server name, port number, and password.
Accessing repository user security in the CMC [page 65]
User security settings include granting access to the repository for users and groups, and other user
and group privileges to the repository.
IBM DB2 SSL/TLS protocol for repositories [page 68]
Protect your IBM DB2 repository with the SSL/TLS secure authentication and data encryption for
server-based (DSN-less) connections.
Microsoft SQL Server SSL/TLS protocol for repositories [page 73]
Choose the SSL/TLS protocol when you congure your Microsoft SQL Server repository for server-
based (DSN-less) connections.
MySQL SSL/TLS protocol for repositories [page 79]
Connect to your MySQL repository with the SSL/TLS protocol when the repository uses a server-based
(DSN-less) connection.
Oracle TCPS protocol for repositories [page 86]
Choose TCPS (Transmission Control Protocol Secures) for an Oracle repository to perform credential
authentication between server and client, and encrypt/decrypt all data.
SAP HANA SSL/TLS protocol for repositories [page 94]
Choose the SSL/TLS protocol for an SAP HANA repository for either DSN or server-based (DSN-less)
connections.
Editing the java.security le [page 98]
Edit the java.security le based on the TrustStore type that you select when you use either SAP
HANA, Oracle, IBM DB2, or SQL Server for your repository.
60
PUBLIC
Administrator Guide
Repository management
5.1 Conguring a Data Services repository
To create a local, central, or proler repository, enter the repository connection information in the Data
Services Repository Manager.
Before you congure a new repository, you must perform the following tasks:
• Create a database for the repository using an approved database management system.
For approved databases and versions for the Data Services repository, see the Product Availability Matrix.
• For server-based (DSN-less) connections, gather the following information: Server information, database
name, user name, and password.
• For data source name (DSN) connections, create the DSN following instructions in your database
documentation before you congure the repository. Then use one of the following utilities to connect
with the applicable driver and create the DSN:
• Windows: ODBC Data Source Administrator
• Linux and Unix: Data Services Connection Manager
Note
If you're creating additional repositories, don't use the tools in your DBMS to replicate the additional
repositories. Instead, use the Data Services Repository Manager to create and seed multiple repositories to
avoid potential issues related to the conguration of repository objects.
To create a repository in the Data Services Repository Manager, perform the following steps:
1. Open the Repository Manager:
• Windows: Select the Start icon and then select
SAP Data Services <version> Data Services
Repository Manager.
• Unix or Linux: Open a command prompt and open the Repository Manager in <$LINK_DIR>/bin/
repoman.sh.
2. Choose the repository type from the Repository Type list.
For example, choose Local to congure a local repository.
3. Select a database from the Database Type list.
The remaining options appear based on the database type that you select.
4. Select Use data source name (DSN) or Use TNS name (Oracle).
Don't select this option if your connection is based on the server name.
Note
If your database doesn't support connecting with DSN or TNS, the option isn't available.
5. Select a version from the Database version list when applicable.
6. The following table contains a list of all remaining options.
Options appear based on the type of database you selected and whether you selected to create a DSN
connection.
Administrator Guide
Repository management
PUBLIC 61
Repository Manager Option Descriptions
Option Description
Additional connection parameters To enable multi-subnet failover and column encryption,
enter additional parameters
MultiSubnetFailover=Yes;ColumnEncryptio
n=Enabled;. Applicable for Microsoft SQL Server,
Azure Paas, and Azure VM.
Authentication Method
The authentication method you are using to connect to
the Microsoft SQL Server.
• SQL Server Authentication (default)
• Windows Authentication
• Active Directory – Password
Data Source Name
Species the DSN connection name that you created for
this repository. Not applicable for server-based (DSN-less)
connections
Database Name Enter the name of the database that you created for the
repository. Applicable for DSN-less connections.
Database Server Name Enter the server name for the repository database. Appli-
cable for DSN-less connections.
Database Version Select the version for the repository database manage-
ment system. Not applicable for all database types.
Encryption parameters Opens the Encryption parameters dialog box where you
set SSL/TLS options.
Note
Available when you select Use SSL encryption.
Not applicable for all database types. See information
about conguring SSL/TLS for the applicable data-
base type in a separate topic.
Hostname
Enter the hostname of the Oracle database.
Applicable for Oracle TNS-less connections.
Password Enter the password associated with the stated user name.
Applicable for DSN-less connections.
Port Enter the server port number. Applicable for DSN-less
connections.
SID Enter the Oracle system ID that uniquely identies the
database to access.
Applicable for Oracle TNS-less connections.
TNS name Species the connection string created by your database
administrator for the TNS. Not applicable for server-based
(TNS-less) connections.
Applicable for Oracle databases only.
62 PUBLIC
Administrator Guide
Repository management

Option Description
Use SSL encryption Select to enable SSL/TLS encryption to secure your con-
nection.
If you select this option, also select Encryption parameters
to set SSL/TLS options. Options vary based on database
type.
Note
SSL/TLS is available only for certain database types.
User Name
Enter the user name associated with the specied reposi-
tory database. Applicable for DSN-less connections.
7. After you complete all applicable options, select Create.
8. When the repository is created successfully, select Close.
Before you can use the new repository, perform the following tasks:
• Associating a Job Server to a repository [page 141]
• Registering a repository in the CMC [page 63]
Related Information
Using the Connection Manager [page 112]
5.2 Registering a repository in the CMC
Register a repository in the Data Services Central Management Console (CMC) by entering connection
information including server name, port number, and password.
Before you perform the following steps, make sure that you perform the following tasks:
• Create the repository in the Data Services Repository Manager: Conguring a Data Services repository
[page 61].
• Associate the repository to a Job Server: Associating a Job Server to a repository [page 141].
1. Log into the Central Management Console (CMC) as a user with administrative rights to the SAP Data
Services application.
2. Open the Data Services page.
3. Select Manage Congure Repository .
The Add Data Services Repository dialog box opens.
4. Specify a name and optionally a description for the repository.
After you complete the registration, the repository name and description show in the Designer and Data
Services Management Console applications.
Administrator Guide
Repository management
PUBLIC 63
5. Select a type from the Database Type list.
6. Enter the connection information for the repository database. Options vary based on the database type
you select.
The following table contains descriptions for common connection options. For descriptions of options
specic to the database type, see that database type topic for registering a repository in the CMC.
Common CMC Repository Registration options
Option
Description
Database Server Name The service or server name used to connect to the reposi-
tory.
Note
For Microsoft SQL Server or Sybase ASE, don't
use localhost for the server name. If you use
localhost, other machines are unable to connect
to the repository.
Port
Enter the port number of the database server.
Database Name Enter the name of the database for the repository.
Authentication Method The authentication method you are using to connect to a
Microsoft SQL Server.
• SQL Server Authentication (default)
• Windows Authentication
• Active Directory – Password
Additional Connection Parameters
To enable multi-subnet failover and column encryption,
enter additional parameters
MultiSubnetFailover=Yes;ColumnEncryptio
n=Enabled;. Applicable for Microsoft SQL Server,
Azure Paas, and Azure VM.
User Name
Enter the user name for accessing the repository
Password Enter the password for accessing the repository.
Is Proler Repository Select one of the following values:
• Yes: This repository is for the Data Services Proler.
If you select Yes, also complete Proler Server Host
Name and Proler Server Port options.
• No: This repository is for the local or central reposito-
ries.
Proler Server Host Name
Enter the host name of the web application server hosting
the proler.
Applicable when you select Yes for Is Proler Repository.
Proler Server Port
Enter the port number used by the web application server
hosting the proler.
Applicable when you select Yes for Is Proler Repository.
64 PUBLIC
Administrator Guide
Repository management

Option Description
Data Source Name (DSN) Enter the data source name that you created for this repo-
sitory. Leave blank for a server-based (DSN-less) connec-
tion.
Note
DSN-less is the default connection type for DB2,
MySQL, or SAP HANA databases.
Note
If you use DSN connections in a distributed installa-
tion, congure the database connection to the reposi-
tory the same on each machine as in the CMC. For
example, if you congured a repository with the DSN
my_dsn in the CMC, you must also congure the
DSN of my_dsn for the Designer and Job Server ma-
chines.
7. Select Test Connection.
Data Services attempts to verify the connection details without adding the repository to the CMC. If the
connection isn't successful, review the error message and correct the repository connection information.
8. When the connection test is successful, select Save.
The new repository appears in the list of registered repositories in the Data Services application page.
5.3 Accessing repository user security in the CMC
User security settings include granting access to the repository for users and groups, and other user and group
privileges to the repository.
Manage security settings for repositories that are registered in the Data Services Central Management Console
(CMC) using the security options in the Manage menu.
Note
To perform the following steps, you must have administrative rights to SAP Data Services.
To set user and group privileges to a repository, perform the following steps in the CMC:
1. Open the Data Services page.
2. Highlight the Repositories node in the navigation tree at left.
A list of all repositories appears at right.
3. Select Manage Security User Security.
The User Security page for the selected repository opens.
Viewing rights for a user or group on a repository [page 66]
Administrator Guide
Repository management
PUBLIC 65

View user and group rights to a repository when you open the user security page in the Central
Management Console (CMC).
Assigning users and groups to an access control list for a repository [page 66]
Assign a user or group to an access control list, which species the users or groups that are granted or
denied rights to a repository.
Detailed repository rights [page 67]
Each access right comes with specic repository rights for the user or group.
5.3.1Viewing rights for a user or group on a repository
View user and group rights to a repository when you open the user security page in the Central Management
Console (CMC).
To view user and group rights to a repository, perform the following steps:
1. Log into the CMC and open the Data Services page.
2. Select the Repositories node at left.
3. Select the repository for which you want to view security settings from the list at right.
4. Select
Manage Security User Security.
The User Security page for the selected repository opens. The page displays a list of users and groups that
have access to the repository, and their access type.
5. Highlight a user or group from the list, and select View Security.
The Permissions Explorer page opens. The page displays a list of rights for the user or group to the
repository.
6. Select OK to close the Permissions Explorer.
Task overview: Accessing repository user security in the CMC [page 65]
Related Information
Assigning users and groups to an access control list for a repository [page 66]
Detailed repository rights [page 67]
5.3.2Assigning users and groups to an access control list for
a repository
Assign a user or group to an access control list, which species the users or groups that are granted or denied
rights to a repository.
To assign the same access right to select users and groups for a specic repository, perform the following
steps:
66
PUBLIC
Administrator Guide
Repository management

1. Log into the CMC and open the Data Services page.
2. Select the Repositories node at left.
3. Select the applicable repository from the list at right.
4. Select Manage Security User Security .
The User Security page opens. The Access column lists the access type for each listed user or group in the
Name column.
5. Select Add Principals.
The Add Principals page opens.
6. Select the User List node or the Group List node from the Available Users or Groups list at left.
The applicable users or groups appear in the center pane.
7. Select one or more user or group from the center pane list as applicable.
8. Select the right-pointing arrow.
Tip
To select both users and groups, rst select the User List node, select the user or users, and select
the right-pointing arrow. Then select the Group List node, select the group or groups, and select the
right-pointing arrow.
The system adds the selected users or groups to the Selected Users or Groups list at right.
9. Select Add and Assign Security at the bottom of the page.
The Assign Security page opens.
10. Select the access level to grant to the user or group and select the right-pointing arrow to add the users or
groups to the Assigned Access Level list.
11. Select OK.
The Assign Security page closes and the User Security page reopens. Notice that the access type in the
Access list changes to the new access level for the applicable user or group.
Task overview: Accessing repository user security in the CMC [page 65]
Related Information
Viewing rights for a user or group on a repository [page 66]
Detailed repository rights [page 67]
5.3.3Detailed repository rights
Each access right comes with specic repository rights for the user or group.
The following table lists some of the common repository rights that are available to the Full Control and the
View access rights.
Administrator Guide
Repository management
PUBLIC 67
Repository right Full control View
Add objects to the folder X
Copy objects to another folder X
Delete objects X
Edit objects X
Modify the rights users have to objects X
Replicate content X
Securely modify right inheritance settings X
Securely modify right users have to objects X
Translate objects X
Use access level for security assignment X
View objects X X
To view all repository rights related to Full Control and View access rights, select the user or group that has
Full Control in the User Security page and select View Security. The rights are listed in the Permissions Explorer
page.
Note
Application rights and repository security rights are two separate sets of rights. When a repository is
registered, the owner is granted full access to the repository. By default, other Designer users have no
access to the repository.
Parent topic: Accessing repository user security in the CMC [page 65]
Related Information
Viewing rights for a user or group on a repository [page 66]
Assigning users and groups to an access control list for a repository [page 66]
Detailed application rights [page 55]
5.4 IBM DB2 SSL/TLS protocol for repositories
Protect your IBM DB2 repository with the SSL/TLS secure authentication and data encryption for server-based
(DSN-less) connections.
Apply the SSL/TLS protocol for your local, proler, and central repositories on both Windows and Linux.
68
PUBLIC
Administrator Guide
Repository management

Note
SSL/TLS protocol support for your DB2 repository is applicable only for DB2 UDB server version 11.1 and
above.
Prerequisites
Before you congure your IBM DB2 repository with SSL/TLS protocol, ensure that you congure the applicable
ODBC driver. Also ensure that you have the keystore and key stash les in the applicable local locations. For
information about the key stash le, see your IBM DB2 documentation.
Conguring SSL/TLS for IBM DB2 repository [page 69]
During repository conguration in the SAP Data Services Repository Manager, complete SSL/TLS
settings to secure the repository connection to your DB2 database.
Registering IBM DB2 repository with SSL/TLS in the CMC [page 71]
Complete your IBM DB2 repository conguration with SSL/TLS by registering the repository in the
Central Management Console (CMC).
5.4.1Conguring SSL/TLS for IBM DB2 repository
During repository conguration in the SAP Data Services Repository Manager, complete SSL/TLS settings to
secure the repository connection to your DB2 database.
Before you congure SSL/TLS for your DB2 repository, obtain the following information:
• The location and le name of your key store database (.kdb).
• The location and le name of your key stash le (.sth).
Perform the following steps twice; once for when you congure the repository in the Repository Manager, and
again when you associate a Job Server to your IBM repository using the Server Manager.
Perform the basic steps in the Repository Manager and the Server Manager using the instructions in the
following topics:
• Conguring a Data Services repository [page 61]
• Associating a Job Server to a repository [page 141]
As you perform the basic steps in the Repository Manager and the Server Manager, perform the following
additional steps:
1. Select the Use SSL encryption checkbox.
2. Click Encryption parameters.
The Encryption Parameters dialog box opens.
3. Complete the options in the Encryption Parameters dialog box as described in the following table.
Administrator Guide
Repository management
PUBLIC 69

Option Description
Key Store Database Specify the name of the key store database using either
a relative or an absolute path. The key store database
contains the SSL/TLS server certicate.
The key store database has the le extension KDB, for
example, mydbclient.kdb.
Key Store Database is applicable when you select Yes for
Use SSL Encryption.
Key Stash
Specify the name of the key stash le using either a rela-
tive or an absolute path. The key stash le contains an
encrypted password to the key store database.
The IBM Global Security Kit (GSKit) uses the key stash
le to obtain the password to the key store database.
The key stash le has the extension STH, for example,
mydbclient.sth.
Key Stash is applicable when you select Yes for Use SSL
Encryption.
Note
For the Key Store Database and Key Stash settings, the Repository Manager searches for the le in the
le location keyword “DB2_KeyStore”, which is specied in %DS_COMMON_DIR%/conf/DSConfig.txt
le. If you leave the options blank, or the keyword “DB2_KeyStore” isn't specied in the conguration
le, the Repository Manager defaults the setting to %LINK_DIR%/ssl/DB2_KeyStore.
4. Select OK.
The Encryption Parameters dialog box closes.
Continue completing the general steps in the Repository Manager or the Server Manager.
After you've successfully congure the repository, SAP Data Services updates the DSConfig.txt le with the
SSL/TLS options for the specic Job Server section.
Example
[JobServer1]
...
UseSSLEncryption=yes
EncryptionParameters=" KeyStash=<relative or absolute path to .sth>;<relative
or absolute path to .kdb>"
Note
For command line information in the Repository Manager, see Command line: Repository Manager
(Windows) [page 232] or Command line: Repository Manager (Unix) [page 236]
For command line information in the Server Manager, see Command line: Adding a Job Server (Windows)
[page 248] or Command line: Adding a Job Server (Unix or Linux) [page 242].
70
PUBLIC
Administrator Guide
Repository management

Task overview: IBM DB2 SSL/TLS protocol for repositories [page 68]
Related Information
Registering IBM DB2 repository with SSL/TLS in the CMC [page 71]
5.4.2Registering IBM DB2 repository with SSL/TLS in the
CMC
Complete your IBM DB2 repository conguration with SSL/TLS by registering the repository in the Central
Management Console (CMC).
Before you register the repository in the CMC, you must rst congure SSL/TLS settings in both the
Repository Manager and the Server Manager. For instructions, see Conguring SSL/TLS for IBM DB2
repository [page 69].
There's a conict between the required version for TLS for Java and IBM DB2. Java requires a TLS version of
1.2, and DB2 requires a version of 1.1. To ensure that there isn't a mismatch between the server and client TLS
versions, perform the following steps:
1. Open the java.security le that is installed with JRE:
1. The le is located in <BOE_INSTALL_DIR>\SAP BusinessObjects Enterprise XI
4.0\win64_x64\sapjvm\jre\lib\security\java.security.
2. Search for the line that contains the option jdk.tls.disabledAlgorithms=.
3. Type a hash (#) at the beginning of the line to comment out the line.
4. Save and close the java.security le.
5. Restart the Web server, such as Tomcat, and the Server Intelligence Agent (SIA) in the Central
Conguration Manager.
Perform the general steps in Registering a repository in the CMC [page 63]. As you perform the general steps,
complete the following additional steps to enable SSL/TLS for your IBM DB2 repository. Perform the following
steps in the Add Data Services Repository dialog box:
1. Choose Yes from the Enable SSL list.
2. Complete the remaining SSL/TLS options based on the descriptions in the following table.
Option
Description
SSL TrustStore Enter the path and le name for your SSL/TLS TrustStore.
The SSL/TLS TrustStore is the repository for trusted cer-
ticates. Required by the JDBC driver.
Administrator Guide
Repository management
PUBLIC 71
Option Description
SSL TrustStore Type Choose the le format type for your SSL/TLS TrustStore
from the list:
• JKS: Java KeyStore, which is format-specic for Java
only.
• PCKS12: Public-Key Cryptography Standards for Java
and other languages. Standardized and language-
neutral.
Required by the JDBC driver.
SSL TrustStore Password
Enter the password for your SSL/TLS TrustStore.
Required by the JDBC driver.
Key Store Database Specify the name of the key store database using either
a relative or an absolute path. The key store database
contains the SSL/TLS server certicate.
The key store database contains server certicates,
and has the le extension KDB, for example,
mydbclient.kdb.
Note
For the Key Store Database, the Repository Man-
ager searches for the le in the le location
keyword “DB2_KeyStore”, which is specied in
%DS_COMMON_DIR%/conf/DSConfig.txt le.
If you leave the option blank, or the keyword
“DB2_KeyStore” isn't specied in the conguration
le, the Repository Manager defaults the setting to
%LINK_DIR%/ssl/DB2_KeyStore.
Required by the ODBC driver.
72
PUBLIC
Administrator Guide
Repository management

Option Description
Key Stash Specify the name of the key stash le using either a rela-
tive or an absolute path. The key stash le contains an
encrypted password to the key store database.
The IBM Global Security Kit (GSKit) uses the key stash
le to obtain the password to the key store database.
The key stash le has the extension STH, for example,
mydbclient.sth.
Note
For the Key Stash option, the Repository Man-
ager searches for the le in the le location
keyword “DB2_KeyStore”, which is specied in
%DS_COMMON_DIR%/conf/DSConfig.txt le.
If you leave the option blank, or the keyword
“DB2_KeyStore” isn't specied in the conguration
le, the Repository Manager defaults the setting to
%LINK_DIR%/ssl/DB2_KeyStore.
Note
Required by the ODBC driver.
3. Test the connection.
4. After the repository connection test is successful, select Save.
The CMC adds the new repository to the repository node in the Data Services page.
Task overview: IBM DB2 SSL/TLS protocol for repositories [page 68]
Related Information
Conguring SSL/TLS for IBM DB2 repository [page 69]
5.5 Microsoft SQL Server SSL/TLS protocol for
repositories
Choose the SSL/TLS protocol when you congure your Microsoft SQL Server repository for server-based
(DSN-less) connections.
SSL/TLS for SQL Server repository is supported on Windows only.
Administrator Guide
Repository management
PUBLIC 73

Drivers
Before you congure SSL/TLS for your SQL Server repository, ensure that you have the applicable ODBC and
JDBC drivers installed.
• ODBC driver: Download and install the ODBC driver for Windows. Check the Product Availability Matrix
(PAM) on the SAP Support Portal to determine the correct version for SQL Server.
• JDBC driver: Data Services bundles the JDBC driver with your installation. Check the PAM for the correct
version for SQL Server.
Certicates
If you congure SSL/TLS to validate the server certicate, import the trusted certicate les to your certicate
store using the Microsoft Management Console. Importing certicate les is not applicable when you choose to
not validate the server certicate.
Congure repository
Congure your Microsoft SQL Server repository, and set SSL/TLS options, in each of the following
applications:
• Data Services Repository Manager
• Data Services Server Manager
• Central Management Console (CMC)
Importing SSL certicate from Microsoft SQL Server [page 74]
If you congure SQL Server in SAP Data Services to validate the SSL/TLS certicate, you must import
the certicate les to your certicate store using the Microsoft Management Console.
Conguring SSL/TLS for Microsoft SQL Server repository [page 75]
To protect your Microsoft SQL Server repository with the SSL/TLS protocol, congure SSL/TLS in both
the Data Services Repository Manager and the Data Services Server Manager.
Registering Microsoft SQL Server repository with SSL/TLS in the CMC [page 76]
Register your Microsoft SQL Server repository and include SSL/TLS settings in the Central
Management Console (CMC).
5.5.1Importing SSL certicate from Microsoft SQL Server
If you congure SQL Server in SAP Data Services to validate the SSL/TLS certicate, you must import the
certicate les to your certicate store using the Microsoft Management Console.
Before you perform the following steps, consult the following documentation for more information:
• For information about SSL/TLS in Data Services and generating keys, see SSL or TLS for Data Services
components and subtopics in the Administrator Guide.
74
PUBLIC
Administrator Guide
Repository management

• For more information about SSL/TLS in SQL Server, see Enable encrypted connections to the Database
Engine in your Microsoft documentation.
• For information about the Microsoft Management Console (MMC), see Step-by-Step Guide to the
Microsoft Management Console in your Microsoft documentation.
1. Generate a private key le and get a server certicate for Microsoft SQL Server from a trusted authority.
2. Open the MMC and import the SQL Server database certicate le to your local Trusted Root Certication
Authority folder.
The import places the SSL/TLS certicate in your local TrustStore.
Task overview: Microsoft SQL Server SSL/TLS protocol for repositories [page 73]
Related Information
Conguring SSL/TLS for Microsoft SQL Server repository [page 75]
Registering Microsoft SQL Server repository with SSL/TLS in the CMC [page 76]
5.5.2Conguring SSL/TLS for Microsoft SQL Server
repository
To protect your Microsoft SQL Server repository with the SSL/TLS protocol, congure SSL/TLS in both the
Data Services Repository Manager and the Data Services Server Manager.
Prerequisites:
If you plan to have SAP Data Services validate certicates, import the trusted certicate les to your local
certicate store as described in Importing SSL certicate from Microsoft SQL Server [page 74].
Follow the basic instructions for using the Repository Manager and the Server Manager to congure the
repository in the following topics:
• Conguring a Data Services repository [page 61]
• Associating a Job Server to a repository [page 141]
As you perform the basic steps, perform the following additional steps in both the Repository Manager and the
Server Manager:
1. Select Use SSL encryption.
Note
For Microsoft Azure PaaS, Use SSL encryption is enabled.
2. Click the Encryption Parameters button.
The Encryption Parameters dialog box opens.
3. Optional: Select the Validate Certicate option.
Administrator Guide
Repository management
PUBLIC 75

Remember
The Validate Certicate option is selected by default. When you deselect the option, SSL/TLS
encryption is still enabled, but SAP Data Services doesn't validate the certicate.
Restriction
If you select to validate certicates, you must import the certicates as mentioned in Prerequisites.
4. Select OK.
Task overview: Microsoft SQL Server SSL/TLS protocol for repositories [page 73]
Related Information
Importing SSL certicate from Microsoft SQL Server [page 74]
Registering Microsoft SQL Server repository with SSL/TLS in the CMC [page 76]
5.5.3Registering Microsoft SQL Server repository with
SSL/TLS in the CMC
Register your Microsoft SQL Server repository and include SSL/TLS settings in the Central Management
Console (CMC).
Before performing the following task, follow the steps in Conguring SSL/TLS for Microsoft SQL Server
repository [page 75].
Note
You must perform the steps twice: Once in the Repository Manager and once in the Server Manager.
Open the CMC and perform the general steps in Registering a repository in the CMC [page 63]. As you perform
the general steps, complete the following additional steps to enable SSL/TLS for your SQL Server repository:
1. Choose Yes from the Enable SSL list.
Note
For Microsoft Azure PaaS, Enable SSL is set to Yes.
2. Choose Yes or No from the Verify Server Certicate list.
• Yes: SAP Data Services veries the SSL/TLS server certicate based on the information you enter in
the additional SSL/TLS options.
• No: Data Services uses the SSL/TLS protocol, but doesn't verify the SSL/TLS server certicate.
When you select No, the remaining SSL/TLS options are disabled. However, nish the registration by
following the general instructions.
76
PUBLIC
Administrator Guide
Repository management

3. Complete the remaining SSL/TLS options based on the descriptions in the following table.
The following options are disabled if you chose No for Verify Server Certicate.
Option Description
Host Name in Certicate Enter the host name that is listed on your SSL/TLS certif-
icate. Data Services uses this host name to validate the
SQL Server SSL/TLS certicate.
SSL KeyStore Enter the path and le name for the Java SSL/TLS Key-
Store le.
Note
The Java SSL/TLS KeyStore stores the private keys
and the column master key used with Always En-
crypted data.
SSL KeyStore Password
Enter the password for the Java SSL/TLS KeyStore.
SSL KeyStore Type Choose the le format type for the Java SSL/TLS Key-
Store from the list:
• JKS: Java KeyStore, which is format-specic for Java
only.
• PCKS12: Public-Key Cryptography Standards for Java
and other languages. Standardized and language-
neutral.
SSL TrustStore
Enter the path and le name for your SSL/TLS TrustStore.
Note
The SSL/TLS TrustStore is the repository for trusted
certicates.
SSL TrustStore Type
Choose the le format type for your SSL/TLS TrustStore
from the list:
• JKS: Java KeyStore, which is format-specic for Java
only.
• PCKS12: Public-Key Cryptography Standards for Java
and other languages. Standardized and language-
neutral.
SSL TrustStore Password
Enter the password for your SSL/TLS TrustStore.
Administrator Guide
Repository management
PUBLIC 77

Option Description
Unix SSL TrustStore The SSL truststore le to use for establishing a secure
connection from a Unix client to a repository database.
This option works together with
SQLServer_UnixTrustStore in the DSConfig.txt le to
determine the full path of the SSL truststore le on the
Unix machine.
The SQLServer_UnixTrustStore value denes the direc-
tory that contains the SSL truststore le and Unix SSL
Truststore denes the SSL truststore le name.
For example,
if SQLServer_UnixTrustStore=/.../
SQLServer_UnixTrustStore_Dir is dened
in the DSconfig.txt le and Unix SSL
Truststore is set to truststore.p12, then
SAP Data Services uses the SSL truststore
le /.../SQLServer_UnixTrustStore_Dir/
truststore.p12 to connect to the SQL Server reposi-
tory when SSL is enabled for the repository.
If the value of SQLServer_UnixTrustStore is not dened in
DSConfig.txt, then $LINK_DIR/bin is used as the
default directory.
Unix SSL TrustStore Password
Enter the password to access the certicate from the
UNIX truststore le.
4. Test the connection.
5. After the repository connection test is successful, select Save.
The CMC adds the new repository to the repository node in the Data Services page.
Task overview: Microsoft SQL Server SSL/TLS protocol for repositories [page 73]
Related Information
Importing SSL certicate from Microsoft SQL Server [page 74]
Conguring SSL/TLS for Microsoft SQL Server repository [page 75]
78
PUBLIC
Administrator Guide
Repository management

5.6 MySQL SSL/TLS protocol for repositories
Connect to your MySQL repository with the SSL/TLS protocol when the repository uses a server-based
(DSN-less) connection.
Prerequisites
Note
When you use a MySQL repository with a DSN connection, congure SSL/TLS when you congure the
DSN.
Before you congure SSL/TLS for your MySQL repository, ensure that you download and install the applicable
ODBC driver following instructions in the MySQL Connector/ODBC Developer Guide .
Congure the ODBC driver following instructions based on your platform. For instructions to congure the
ODBC driver on Windows, and for information about unixODBC Driver manager, see the following topics in the
Designer Guide:
• “Conguring ODBC driver on Windows”.
• “MySQL dependency on unixODBC Driver Manager”.
Also before you congure SSL/TLS for your MySQL repository, follow specic directions in Using Encrypted
Connections in the MySQL Reference Manual to generate the SSL certicate and key les, and to enable
SSL/TLS on your MySQL server.
Note
Support for SSL/TLS for server-based (DSN-less) connections to your local repository begins with Data
Services version 4.3.00.00 for Windows and Linux. Supported MySQL versions for SSL/TLS are:
• MySQL Server 5.7 and later
• MySQL Connector/ODBC 5.3.x and later
• MySQL Connector/J 8.0.26
See the Product Availability Matrix (PAM)
on the SAP Support Portal for details about supported
versions and platforms. Select the icon under Essential Information.
Conguring SSL/TLS for MySQL repository [page 80]
Congure SSL/TLS protocol for your MySQL repository in the Data Services Repository Manager and
the Data Services Server Manager.
Registering MySQL repository with SSL/TLS in the CMC [page 83]
To complete the conguration of your MySQL repository for SSL/TLS protocol, complete the
applicable settings in the Central Management Console (CMC) when you register the repository.
Administrator Guide
Repository management
PUBLIC 79

5.6.1Conguring SSL/TLS for MySQL repository
Congure SSL/TLS protocol for your MySQL repository in the Data Services Repository Manager and the Data
Services Server Manager.
Before you congure SSL/TLS in the following task, complete the prerequisite tasks in MySQL SSL/TLS
protocol for repositories [page 79], which includes:
• Download and congure the supported ODBC driver.
• Obtain the following SSL/TLS information based on the type of SSL/TLS mode you select:
• SSL Key File name
• SSL Certicate File name
• SSL CA Certicate File name
• SSL Cipher Type
• RSA Public Key File name
The following steps are applicable when the repository uses a server-based (DSN-less) connection. When you
use a MySQL repository with a DSN connection, congure SSL/TLS when you congure the DSN.
Perform the basic steps in the Repository Manager and the Server Manager using the instructions in the
following topics:
• Conguring a Data Services repository [page 61]
• Associating a Job Server to a repository [page 141]
To congure SSL/TLS, perform the following additional steps in both the Repository Manager and the Server
manager as you perform the basic steps:
1. Select the Use SSL encryption checkbox.
2. Select Encryption parameters.
The Encryption Parameters dialog box opens.
3. Complete the options in the Encryption Parameters dialog box as described in the following table.
The options are listed alphabetically.
Option
Description
RSA Public Key Enter the le name for the RSA public key le. Applicable
only when you include RSA for the SSL Cipher option.
Note
The Repository Manager searches for
the le in the le location keyword
MySQL_SecureCertStore, which is specied in
<DS_COMMON_DIR>\conf\DSConfig.txt. If
the le location isn't specied or is left blank in
MySQL_SecureCertStore, the Repository Manager
looks in <LINK_DIR>\ssl\MySQL_Certs by de-
fault.
80 PUBLIC
Administrator Guide
Repository management

Option Description
SSL CA File Enter the le name for the Certicate Authority certicate
le.
Note
The Repository Manager searches for
the le in the le location keyword
MySQL_SecureCertStore, which is specied in
<DS_COMMON_DIR>\conf\DSConfig.txt. If
the le location isn't specied or is left blank in
MySQL_SecureCertStore, the Repository Manager
looks in <LINK_DIR>\ssl\MySQL_Certs by de-
fault.
SSL Certicate
Enter the le name of the public key certicate le.
Note
The Repository Manager searches for
the le in the le location keyword
MySQL_SecureCertStore, which is specied in
<DS_COMMON_DIR>\conf\DSConfig.txt. If
the le location isn't specied or is left blank in
MySQL_SecureCertStore, the Repository Manager
looks in <LINK_DIR>\ssl\MySQL_Certs by de-
fault.
SSL Cipher
Enter the list of permitted ciphers for the connection en-
cryption. You designate the ciphers in the MySQL server
conguration.
If not applicable, leave blank.
SSL Key
Enter the le name of the server private key le.
Note
The Repository Manager searches for
the le in the le location keyword
MySQL_SecureCertStore, which is specied in
<DS_COMMON_DIR>\conf\DSConfig.txt. If
the le location isn't specied or is left blank in
MySQL_SecureCertStore, the Repository Manager
looks in <LINK_DIR>\ssl\MySQL_Certs by de-
fault.
Administrator Guide
Repository management
PUBLIC 81

Option Description
SSL Mode Enter the type of SSL/TLS mode Data Services uses to
connect to the MySQL server.
• Preferred: Permits, but doesn't require, encrypted
connections. If client can't connect using encryption,
it uses an unencrypted connection. Preferred is the
default setting.
• Required: Requires encrypted connections. Connec-
tion fails if client can't connect using an encrypted
connection.
• Verify_CA: Requires an encrypted connection and
also performs verication against the server CA cer-
ticate. Connection fails if client can't connect us-
ing an encrypted connection and-or the verication
against the server CA certicate fails.
• Verify_Identity: Requires an encrypted connection
and also performs verication against the server host
name in the CA certicate. Connection fails if client
can't connect using an encrypted connection and-or
the verication against the server host name in the
CA certicate fails.
4. Select OK.
The Encryption Parameters dialog box closes.
Continue completing the general steps in the Repository Manager and the Server Manager.
After you've successfully congured the repository, SAP Data Services updates the DSConfig.txt le with
the SSL/TLS options for the specic Job Server section.
Example
[JobServer1]
...
UseSSLEncryption=yes
EncryptionParameters="sslmode=VERIFY_CA;sslkey=sanitized-client-
key.pem;sslcert=client-cert.pem;sslca=ca-
cert.pem;sslcipher=;rsakey=rsakey.pem"
Before you can use your MySQL local repository, register the repository in the Central Management Console
(CMC).
Task overview: MySQL SSL/TLS protocol for repositories [page 79]
Related Information
Registering MySQL repository with SSL/TLS in the CMC [page 83]
82
PUBLIC
Administrator Guide
Repository management

5.6.2Registering MySQL repository with SSL/TLS in the
CMC
To complete the conguration of your MySQL repository for SSL/TLS protocol, complete the applicable
settings in the Central Management Console (CMC) when you register the repository.
Before you register the repository in the CMC, perform the following tasks:
1. Complete the prerequisite tasks in MySQL SSL/TLS protocol for repositories [page 79].
2. Perform the steps in Conguring SSL/TLS for MySQL repository [page 80]
Perform the general steps in Registering a repository in the CMC [page 63]. Include the following additional
steps in the Data Services Repository Properties dialog box in the CMC:
1. Choose Yes from the Enable SSL list.
The SSL/TLS options appear.
2. Complete the SSL/TLS options as described in the following table.
The options are listed alphabetically.
Option
Description
RSA Public Key Enter the le name for the RSA public key le. Applicable
only when you include RSA for SSL Cipher.
Note
Location:
The CMC searches for the le in the le location
keyword MySQL_SecureCertStore, which is specied
in <DS_COMMON_DIR>\conf\DSConfig.txt. If
the le location isn't specied or is left blank
in MySQL_SecureCertStore, the CMC looks in
<LINK_DIR>\ssl\MySQL_Certs by default.
SSL CA File
Enter the le name for the Certicate Authority certicate
le.
Note
Location:
The CMC searches for the le in the le location
keyword MySQL_SecureCertStore, which is specied
in <DS_COMMON_DIR>\conf\DSConfig.txt. If
the le location isn't specied or is left blank
in MySQL_SecureCertStore, the CMC looks in
<LINK_DIR>\ssl\MySQL_Certs by default.
Administrator Guide
Repository management
PUBLIC 83

Option Description
SSL Certicate Enter the le name of the public key certicate le.
Note
Location:
The CMC searches for the le in the le location
keyword MySQL_SecureCertStore, which is specied
in <DS_COMMON_DIR>\conf\DSConfig.txt. If
the le location isn't specied or is left blank
in MySQL_SecureCertStore, the CMC looks in
<LINK_DIR>\ssl\MySQL_Certs by default.
SSL Cipher
Enter the list of permitted ciphers for the connection en-
cryption. You designate the ciphers in the MySQL server
conguration.
Enter the suite name. If there are multiple suite names,
separate each name by a comma.
If not applicable, leave blank.
SSL Key
Enter the le name of the server private key le.
Note
Location:
The CMC searches for the le in the le location
keyword MySQL_SecureCertStore, which is specied
in <DS_COMMON_DIR>\conf\DSConfig.txt. If
the le location isn't specied or is left blank
in MySQL_SecureCertStore, the CMC looks in
<LINK_DIR>\ssl\MySQL_Certs by default.
SSL KeyStore
Enter the path and le name for the Java KeyStore.
Note
The KeyStore stores the private keys and the column
master key.
SSL KeyStore Password
Enter the Java SSL KeyStore password.
84 PUBLIC
Administrator Guide
Repository management
Option Description
SSL KeyStore Type Select the le format of the Java KeyStore to use:
• JKS: Java KeyStore, which is format-specic for Java
only.
• PCKS12: Public-key Cryptography Standards for Java
and other languages. Standardized and language-
neutral.
SSL Mode
Select the type of SSL/TLS mode Data Services uses to
connect to the MySQL server.
• Preferred: Permits but doesn't require encrypted con-
nections. If client can't connect using encryption, it
uses an unencrypted connection. Preferred is the de-
fault setting.
• Required: Requires encrypted connections. Connec-
tion fails if client can't connect using an encrypted
connection.
• Verify_CA: Requires an encrypted connection and
also performs verication against the server CA cer-
ticate. Connection fails if client can't connect us-
ing an encrypted connection and-or the verication
against the server CA certicate fails.
• Verify_Identity: Requires an encrypted connection
and also performs verication against the server host
name in the CA certicate. Connection fails if client
can't connect using an encrypted connection and-or
the verication against the server host name in the
CA certicate fails.
SSL TrustStore
Enter the path and le name for the Java SSL TrustStore.
Note
The SSL TrustStore is the repository for trusted certif-
icates.
SSL TrustStore Password
Enter the Java SSL TrustStore password.
SSL TrustStore Type Select the le format of the Java TrustStore to use:
• JKS: Java TrustStore, which is format-specic for
Java only.
• PCKS12: Public-key Cryptography Standards for Java
and other languages. Standardized and language-
neutral.
3. Complete the remaining applicable options.
4. Select Test Connection.
5. After the repository connection test is successful, select Save.
The CMC adds the new repository to the repository node in the CMC Data Services page.
Administrator Guide
Repository management
PUBLIC 85

Task overview: MySQL SSL/TLS protocol for repositories [page 79]
Related Information
Conguring SSL/TLS for MySQL repository [page 80]
5.7 Oracle TCPS protocol for repositories
Choose TCPS (Transmission Control Protocol Secures) for an Oracle repository to perform credential
authentication between server and client, and encrypt/decrypt all data.
TCPS is an optional feature for connecting to an Oracle repository with the SSL/TLS protocol. TCPS oers
various levels of security, including the following:
• Secure with data encryption only.
• Secure with data encryption and server authentication.
• Secure with data encryption, server authentication, and client authentication.
TNS or TNS-less connections
Implement TCPS for your repository when you connect using TNS (Transparent Network Substrate) or TNS-
less (server-based) connections. The method of conguring TCPS varies based on your connection type:
• TNS connection: Copy the TNS connection string that your Oracle database administrator entered into the
tnsnames.ora le.
• TNS-less connection: Enable SSL in SAP Data Services Repository Manager and set encryption options in
the Encryption Parameters dialog box.
Oracle references
For information about Oracle TCPS protocol, and the prerequisite steps, see the following documentation:
• To learn about how to prepare for SSL/TLS conguration in your Oracle database, see Enabling Secure
Sockets Layer
in the Oracle Database Security Guide.
• For additional information about your connection and using wallets for TrustStores, see SSL with Oracle
JDBC Thin Driver, an Oracle white paper. To access the whitepaper, copy and paste the following URL in
your browser:
https:/www.oracle.com/technetwork/topics/wp-oracle-jdbc-thin-ssl-130128.pdf
• For information about the Oracle Security requirements, see your Oracle Database Documentation
.
Select your version from the list, then select Security under Topics.
86
PUBLIC
Administrator Guide
Repository management

Prerequisites for using TCPS for an Oracle repository [page 87]
Before you congure an Oracle database for your repository with TCPS, congure settings in both
Oracle and SAP Data Services.
Oracle TCPS conguration options with SSL/TLS [page 90]
Create and congure an Oracle repository that uses TCPS protocol in the Data Services Repository
Manager and in the Data Services Server Manager.
Registering Oracle repository with TCPS in the CMC [page 92]
Secure your Oracle repository using TCPS protocol and SSL/TLS when you register the repository in
the Central Management Console (CMC).
5.7.1Prerequisites for using TCPS for an Oracle repository
Before you congure an Oracle database for your repository with TCPS, congure settings in both Oracle and
SAP Data Services.
Ensure that you complete the following prerequisite tasks:
• Install the Oracle Advanced Security les.
The Advanced Security les contain the necessary les to congure TCPS for an Oracle repository in SAP
Data Services.
• Install the required JDBC driver le ojdbc<x>.jar.
To determine the correct version (<x>), see the Product Availability Matrix (PAM)
on the SAP Support
Portal. Select Open in New Window in the Essential Information pane.
Note
For instructions to congure JDBC driver les for Oracle, see the Data Services Installation Guide.
• To connect using TNS (Transparent Network Substrate), ensure that your database administrator creates
the TNS.
Obtain the following information after you install the Oracle Advanced Security les:
• For a TNS connection, the TNS connection string from the tnsnames.ora le.
• For a server-based connection, server connection information.
• For the TLS-SSL network protocol, Cipher Suite names to use.
• SSL TrustStore location, type, and password, as applicable.
• KeyStore location, type, and password, as applicable.
Conguring JCE Cipher Suites with stronger encryption [page 88]
JCE Cipher Suites provide stronger cryptography encryption than the Cypher Suites provided with the
Oracle Advanced Security les.
Add information to the Java Security le [page 89]
When you enable the TCPS protocol for your Oracle repository, congure the Cipher Suite information
by editing the Java Security le based on the security selections that you make.
Parent topic: Oracle TCPS protocol for repositories [page 86]
Administrator Guide
Repository management
PUBLIC 87
Related Information
Oracle TCPS conguration options with SSL/TLS [page 90]
Registering Oracle repository with TCPS in the CMC [page 92]
5.7.1.1 Conguring JCE Cipher Suites with stronger
encryption
JCE Cipher Suites provide stronger cryptography encryption than the Cypher Suites provided with the Oracle
Advanced Security les.
Cipher Suites with key lengths of 128 bits are included in the Oracle Advanced Security les along with the
necessary JAR les. Cipher Suites with key lengths of more than 128 bits, such as 256 bits, provide stronger
encryption. To use Cipher Suites with stronger encryption, you must perform extra steps.
Before you perform the following steps, obtain the JAR les for the stronger Cipher Suites from the JCE
(Java Cryptography Encryption) Unlimited Strength Jurisdiction Policy Files. For more information about the
JCE les, and to access the JCE Cipher Suites download page, see “Enabling Cipher Suites for Stronger
Encryption” on the Open Source Elastic Stack Web page at https://www.elastic.co/guide/en/shield/current/
ciphers.html .
To implement the JCE Unlimited Strength Jurisdiction Policy Files Cipher Suites, perform the following steps:
1. Download and unzip the JCE zip le and extract the following 2 les to
<BOE_INSTALL_DIR>\SAP BusinessObjects Enterprise XI 4.0\<win64_x64 or
win32_x32>\sapjvm\jre\lib\security:
• local_policy.jar
• US_export_policy.jar
2. Restart the EIM Adaptive Processing Server in the Central Management Console (CMC).
a. Log into the CMC.
b. Open the Servers page
c. Expand Service Categories and select Enterprise Information Management Services.
d. Highlight the EIM Adaptive Processing server and select Actions Restart Server.
The status in the State column switches to Stopping, Starting, and nally Running.
Note
Select the Refresh icon several times to update the State column.
3. Obtain the ocial Cipher Suite names. SAP Data Services requires the names when you congure the
Oracle repository for TCPS protocol. To obtain the ocial JCE Cipher Suite names, perform the following
steps:
a. Go to the Oracle documentation “Java Cryptography Architecture Standard Algorithm Name
Documentation for JDK 16” at https://docs.oracle.com/en/java/javase/16/docs/specs/security/
standard-names.html .
The link takes you to Java SE 16 documentation. Make sure to look at the list relative to your version of
Java SE.
88
PUBLIC
Administrator Guide
Repository management

b. To open the list, scroll down the list of names in the Standard Names list and click the “JSSE Cipher
Suite names” link.
c. Find the name of the Cipher Suite you downloaded in the Standard Name column.
d. When you congure the repository connection in the CMC in a later process, enter the Cipher Suite
name or names in the SSL Cypher Suite option as they're listed in the JSSE Cipher Suite names list.
Task overview: Prerequisites for using TCPS for an Oracle repository [page 87]
Related Information
Add information to the Java Security le [page 89]
5.7.1.2 Add information to the Java Security le
When you enable the TCPS protocol for your Oracle repository, congure the Cipher Suite information by
editing the Java Security le based on the security selections that you make.
When you congure the Oracle repository using TCPS, you need the following information to congure the
repository:
• The type of Cipher Suites that you use, if applicable.
Note
Use the Cipher Suite that doesn't use the Die-Hellman anonymous authentication.
• TCPS information.
The following special requirements apply based on your TCPS selections:
• If you choose to use PKCS12 wallet for the SSL TrustStore Type option, edit the java.security le for the
Oracle PKI provider. For instructions, see Editing the java.security le [page 98].
• If you choose to use Cipher Suites, modify the java.security le to comment out a specic row. For
instructions, see Editing the java.security le [page 98].
• If you choose to use Cipher Suites that have stronger encryption (key lengths greater than 128 bits), obtain
and add additional JAR les to the security folder. For instructions, see Conguring JCE Cipher Suites with
stronger encryption [page 88].
Parent topic: Prerequisites for using TCPS for an Oracle repository [page 87]
Related Information
Conguring JCE Cipher Suites with stronger encryption [page 88]
Administrator Guide
Repository management
PUBLIC 89
5.7.2Oracle TCPS conguration options with SSL/TLS
Create and congure an Oracle repository that uses TCPS protocol in the Data Services Repository Manager
and in the Data Services Server Manager.
Complete the prerequisite tasks in Prerequisites for using TCPS for an Oracle repository [page 87].
Follow the basic instructions for using the Repository Manager and the Server Manager in the following topics:
• Conguring a Data Services repository [page 61]
• Associating a Job Server to a repository [page 141]
Note
If you created an Oracle repository during installation, congure the repository for TCPS and SSL/TLS after
installation.
The following table contains descriptions for the TCPS and SSL/TLS options in the Repository Manager and
Server manager.
Oracle TCPS and SSL/TLS options
Option
Description
Use TNS name Species whether to connect to your Oracle database using
a TNS (Transparent Network Substrate).
• Yes: Connects using the connection string from
tnsnames.ora le.
Note
Your administrator must congure the TNS in Ora-
cle and enter the applicable connection string in
tnsnames.ora le.
• No: Connects using a server-based connection.
TNS name
Enter the connection string from the tnsnames.ora le.
Note
To enable SSL/TLS, your administrator must have in-
cluded the SSL/TLS information in the connection
string.
Applicable when you select Use TNS name.
Options for server-based (TNS-less) connection:
Hostname Enter the Oracle database host computer name.
SID or Service Name Enter the database identier for the Oracle database that
you use for the repository.
Port Enter the port number for the Oracle listener port for TCPS.
The default port number is 2484.
90 PUBLIC
Administrator Guide
Repository management
Option Description
User name Enter the user name to access the repository database in
Oracle.
Password Enter the password to access the repository database in
Oracle.
Use SSL encryption Select to enable SSL/TLS encryption to secure your connec-
tion with the Oracle database.
When you select Use SSL encryption, the system enables the
Encryption parameters button.
Encryption parameters
Select to open the Encryption Parameters dialog box.
To enable the Encryption parameters button, select Use SSL
encryption.
The following option appears in the Encryption Parameters dialog box:
Distinguished name Enter the distinguished name (DN) or leave blank.
Enter the DN to access the applicable Oracle database. The
DN contains the location of the SSL certicates and identify-
ing information, such as the following:
• Qualied domain name
• Your organization name
• Organization location
Leave Distinguished name blank when the Oracle server cer-
ticate doesn't dene the identifying information or doesn't
force distinguished name match in your Oracle congura-
tion.
Parent topic: Oracle TCPS protocol for repositories [page 86]
Related Information
Prerequisites for using TCPS for an Oracle repository [page 87]
Registering Oracle repository with TCPS in the CMC [page 92]
Command line: Repository Manager (Unix) [page 236]
Conguring Job Servers on UNIX [page 148]
Administrator Guide
Repository management
PUBLIC 91

5.7.3Registering Oracle repository with TCPS in the CMC
Secure your Oracle repository using TCPS protocol and SSL/TLS when you register the repository in the
Central Management Console (CMC).
Ensure that you perform the prerequisites in Prerequisites for using TCPS for an Oracle repository [page 87].
For details about conguring the JDBC driver for Oracle, see the topic “Congurinng JDBC drivers for SAP
HANA, Oracle, and My SQL” in the Installation Guide.
Perform the general steps in the CMC by following the steps in Registering a repository in the CMC [page 63].
To congure your Oracle repository with TCPS protocol, perform the following additional steps:
1. Choose Oracle from the Database Type list.
2. Choose Yes or No for Use Oracle RAC.
Consult your Oracle documentation about using Oracle RAC. These instructions don't include steps for
Oracle RAC.
Note
If you set Use Oracle RAC to Yes, you must complete the option TNS Name as described in the following
TCPS option descriptions table.
3. Choose Yes for Use Oracle TCPS.
4. Enter information for Oracle TCPS based on the option descriptions in the following table.
If an option isn't applicable, leave it blank.
TCPS option descriptions
Option Description
TNS Name Enter the TNS connection string from the
tnsnames.ora le.
Applicable only when you select Yes for Use Oracle RAC.
Database Server Name
Enter the Oracle host computer name for the repository
database.
Port Enter the Oracle listener port number for the repository
database. The default port number is 2484.
SID or Service Name Enter the database identier for the Oracle database that
you use for the repository.
Distinguished Name Enter the server certicate distinguished name (DN) or
leave blank:
• Enter the DN when the server certicate contains
identifying information.
• Leave the option blank when your Oracle server certif-
icate doesn't dene the identifying information.
92 PUBLIC
Administrator Guide
Repository management
Option Description
SSL Cipher Suites Enter the ocial Cipher Suite name or names, or leave
blank when not applicable.
To enable a subset of Cipher Suites based on your server-
client setup, enter the ocial Cipher Suite name or names
in parentheses.
When you enter more than one name, separate each Ci-
pher Suite name by a comma.
Example
Note
Line breaks added for readability.
(SSL_RSA_WITH_RC4_128_CBC_SHA,
SSL_RSA_WITH_3DES_EDE_CBC_SHA,
SSL_RSA_WITH_RC4_128_SHA,
TLS_RSA_WITH_AES_256_CBC_SHA)
SSL TrustStore Enter the path and le name for the SSL TrustStore.
Note
The SSL TrustStore is the repository for trusted cer-
ticates. Use the SSL TrustStore for authenticating
server certicates for two-way SSL.
SSL TrustStore Type Enter the TrustStore type:
• JKS (Java KeyStore): For Java 8 and earlier. Format-
specic for Java.
• PCKS12: Public-Key Cryptography Standards. For
Java 9 and later. Standardized and language-neutral.
Note
If you use Oracle PKCS12, remember to update the
java.security le with the Oracle PKI provider.
SSL TrustStore Password Enter the TrustStore password.
SSL KeyStore Enter the path and le name for the SSL KeyStore.
Note
The keystore contains the client certicate and a set
of private and public key pairs for encryption.
Administrator Guide
Repository management
PUBLIC 93

Option Description
SSL KeyStore Type Specify the type of KeyStore you use:
• JKS (Java KeyStore): For Java 8 and earlier. Format-
specic for Java.
• PKCS12: Public-Key Cryptography Standards. For
Java 9 and later. Standardized and language-neutral.
Note
If you use Oracle PKCS12, remember to update the
java.security le with the Oracle PKI provider.
SSL KeyStore Password
Enter the SSL KeyStore Password.
User Name Enter the user name to access the repository database.
Password Enter the password to access the repository database.
Is Proler Repository Indicates that the repository is for proling purposes.
• Select No if you are conguring a local or central re-
pository.
• Select Yes if you are conguring a proler repository.
5. Select Save.
Task overview: Oracle TCPS protocol for repositories [page 86]
Related Information
Prerequisites for using TCPS for an Oracle repository [page 87]
Oracle TCPS conguration options with SSL/TLS [page 90]
5.8 SAP HANA SSL/TLS protocol for repositories
Choose the SSL/TLS protocol for an SAP HANA repository for either DSN or server-based (DSN-less)
connections.
SSL/TLS protocol is an optional feature that adds additional security for repositories that use the SAP HANA
database.
Note
The following SAP Data Services versions are required for implementing SSL/TLS protocol for an SAP
HANA repository:
• DSN connection: Version 4.2.11 (14.01.11.02) or later versions.
94
PUBLIC
Administrator Guide
Repository management

• DSN-less connection: Version 4.3.00 (14.03.00.00) or later versions.
Prerequisites for DSN and server-based (DSN-less) connections
Edit the Java security le by performing the steps in Editing the java.security le [page 98].
Download and install the SAP Common Crypto Library to a local directory, and create the system variable
named SECUDIR. The Common Crypto Library encrypts communication between the Data Services client and
the SAP HANA server. For complete instructions, see Obtaining the SAP CommonCryptoLib le in Windows
and Unix in Data Services Supplement for Big Data. Then gather the following information:
• Java SSL TrustStore type, location, password
• Java SSL KeyStore type, location, password
Note
The locations of the Java SSL TrustStore and Java SSL KeyStore must be local so the Central Management
Console can access them.
The JDBC driver is bundled with SAP HANA.
Download and install the ODBC driver. Consult the Product Availability Matrix (PAM) on the SAP Support
Portal for the correct version.
Conguring SSL/TLS for SAP HANA repository [page 95]
To add SSL/TLS protocol for your SAP HANA repository, enable SSL/TLS in the Data Services
Repository Manager and the Data Services Server Manager.
Registering SSL/TLS in the CMC for SAP HANA [page 96]
Register your SAP HANA repository and included SSL/TLS settings in the Central Management
Console (CMC).
5.8.1Conguring SSL/TLS for SAP HANA repository
To add SSL/TLS protocol for your SAP HANA repository, enable SSL/TLS in the Data Services Repository
Manager and the Data Services Server Manager.
Before you perform the following steps, complete the prerequisite tasks in SAP HANA SSL/TLS protocol for
repositories [page 94].
Follow the basic instructions for using the Repository Manager and the Server Manager to congure the
repository in the following topics:
• Conguring a Data Services repository [page 61]
• Associating a Job Server to a repository [page 141]
As you perform the basic steps, perform the following additional steps in both the Repository Manager and the
Server Manager:
Administrator Guide
Repository management
PUBLIC 95

1. Select the Use SSL encryption checkbox.
2. Select the Encryption Parameters button.
The Encryption Parameters dialog box opens.
3. Complete the options as described in the following table.
Encryption parameters
Option
Description
Validate Certicate Select to validate the SSL/TLS certicate during connec-
tion.
Note
When this option isn't selected, the remaining options
aren't available to complete.
Key Store
Enter the location and name of the local key store le.
Applicable only when you select Validate Certicate.
Certicate Host Enter the server host name as it appears in the certicate.
Enter an asterisk (*) or leave blank to skip the verication
of the server host name.
Applicable only when you select Validate Certicate.
4. Select OK.
The Encryption Parameters dialog box closes.
5. Continue completing the general steps in the Repository Manager and the Server Manager.
Before you can use your SAP HANA local repository, register the repository in the Central Management
Console (CMC).
Task overview: SAP HANA SSL/TLS protocol for repositories [page 94]
Related Information
Registering SSL/TLS in the CMC for SAP HANA [page 96]
5.8.2Registering SSL/TLS in the CMC for SAP HANA
Register your SAP HANA repository and included SSL/TLS settings in the Central Management Console
(CMC).
Before you perform the following steps, perform the prerequisite tasks in SAP HANA SSL/TLS protocol for
repositories [page 94]
96
PUBLIC
Administrator Guide
Repository management
Perform the general steps to register the repository in the CMC in Registering a repository in the CMC [page
63].
As you perform the general steps, complete the following additional steps to enable SSL/TLS:
1. Choose Yes from the Enable SSL list.
2. Choose Yes or No from the Verify Server Certicate list.
• No: SAP Data Services doesn't validate the server certicate but still uses SSL/TLS protocol.
When you select No, continue by completing the remaining general steps for registering the repository.
• Yes: Data Services validates the SSL server certicate based on your settings in the remaining
SSL/TLS options.
3. Set SSL/TLS options based on the descriptions in the following table.
SSL/TLS option descriptions
Option
Value
Host Name in Certicate Enter the host name that is listed on your SSL/TLS certif-
icate. SAP Data Services uses this host name to validate
the SAP HANA SSL/TLS certicate.
SSL KeyStore Enter the path and le name for your Java KeyStore.
Note
Make sure that the CMC can access the KeyStore:
• Windows: Locate the KeyStore in a local drive.
• Unix/Linux: Location doesn't matter as long as
the CMC can access the folder.
SSL KeyStore Type
Choose the le format type for your Java KeyStore from
the list:
• JKS: Java KeyStore is format-specic for Java only.
• PKCS12: Public-Key Cryptography Standards for Java
and other languages. Standardized and language-
neutral.
SSL KeyStore Password
Enter the password to access the private key from the
specied Java KeyStore le, if applicable.
SSL TrustStore Enter the location of the Java SSL TrustStore.
SSL TrustStore Type Choose the le format type for your Java SSL TrustStore
from the list:
• JKS: Java KeyStore is format-specic for Java only.
• PKCS12: Public-Key Cryptography Standards for Java
and other languages. Standardized and language-
neutral.
Regardless of your selection for this option, you must edit
the java.security le as instructed in Editing the
java.security le [page 98].
Administrator Guide
Repository management
PUBLIC 97

Option Value
SSL TrustStore Password Enter the password to access the private key from the
specied Java SSL TrustStore, if applicable.
Common Crypto SSL KeyStore Enter the name of the PSE le that you congured in
SECUDIR.
4. Test the connection. After the repository connection test is successful, select Save.
The CMC adds the new repository to the repository node in the CMC Data Services page.
Task overview: SAP HANA SSL/TLS protocol for repositories [page 94]
Related Information
Conguring SSL/TLS for SAP HANA repository [page 95]
5.9 Editing the java.security le
Edit the java.security le based on the TrustStore type that you select when you use either SAP HANA,
Oracle, IBM DB2, or SQL Server for your repository.
Edit the java.security le under the following circumstances:
• Oracle: When you select to use an Oracle PKCS12 as your TrustStore type or you choose to use Cipher
Suites with either PKCS12 or JKS.
• SAP HANA: When you select to use PKCS12 or JKS as your TrustStore type.
• SQL Server and IBM DB2: When you select to use JKS as your TrustStore type.
The following steps apply to either Oracle, SAP HANA, or SQL Server databases as your repository.
1. Open the java.security le that is installed with JRE.
The le is located in <BOE_INSTALL_DIR>\SAP BusinessObjects Enterprise XI
4.0\win64_x64\sapjvm\jre\lib\security\java.security.
2. Copy and paste the provider information as instructed for your database type:
a. Oracle: If you select to use Oracle PKCS12 as the SSL TrustStore type, copy the Oracle provider
information from Oracle and paste the information to the specied location in the provider list in the
java.security le.
The provider information and instructions for specic placement are located in the Oracle white paper,
SSL with Oracle JDBC Thin Driver. To access the whitepaper, copy and paste the following URL in your
browser: https:/www.oracle.com/technetwork/topics/wp-oracle-jdbc-thin-ssl-130128.pdf.
b. SAP HANA: If you select to use PKCS12 or JKS as the SSL TrustStore type, copy the SAP HANA
provider information from SAP HANA and paste the information to the specied location in the
provider list in the java.security le.
98
PUBLIC
Administrator Guide
Repository management

Search the Java security le for the following sentence: List of providers and their
perference order. Enter the provider information in the format specied in the Java security le.
3. Oracle only: If you use Cipher Suites for TCPS protocol with either PKCS12 or JKS, perform the following
substeps:
a. In the java.security le, search for the line that contains the option
jdk.tls.disabledAlgorithms=.
b. Type a “#” to comment out the line.
If you don't comment out this line, the connection that you create using the Cipher Suites fails.
4. SQL Server and IBM DB2: If the JKS keystore type loads keystore les only in the JKS format, perform the
following substeps:
a. Open the java.security le.
b. Search for the line that contains the option keystore.type.compat=.
c. Set to false: keystore.type.compat=false.
Note
For SQL Server and IBM DB2, the JKS keystore type supports loading keystore les in either JKS or
PKCS12 format.
5. Save and close the java.security le.
6. Restart the Server Intelligence Agent (SIA).
7. If the change doesn't take eect, delete the EIM Adaptive Processing Server cache by performing the
following substeps:
a. Find the EIMAPS cache at <BOE_INSTALL_DIR>\SAP BusinessObjects Enterprise XI
4.0\java\pjs\container\work\<WIN2K8R2X64>.EIMAdaptiveProcessingServer.
b. Delete the entire folder.
Note
Your system could have a dierent prex than <WIN2K8R2X64>.
c. Restart The SIA again.
Administrator Guide
Repository management
PUBLIC 99
6 Server Management
Manage the Job Server and database servers using server management tools, and congure ODBC drivers,
data source name (DSN), and server name (DSN-less) connections.
DSN-less and TNS-less connections [page 101]
DSN-less and TNS-less (Oracle) connections are also known as server name connections.
Setting UNIX environment variables [page 102]
Set up UNIX or Linux environment variables by running a script with the applicable syntax for your
environment.
Start services automatically for Windows and Unix [page 104]
To run properly, SAP Data Services requires the Job Service and related services, and the packaged
Tomcat service.
History retention and Job Server log retention [page 105]
The job execution history les and the Job Server logs contain data to produce internal statistics,
regulatory reports, or other nonregulatory reports.
Congure database connectivity for UNIX and Linux [page 110]
Each time you add an ODBC database type for SAP Data Services processing, congure a supported
driver in the SAP Data Services (DS) Connection Manager to establish a connection to the database.
Using the ODBC Drivers Selector for Windows [page 137]
To congure an ODBC driver on the Windows platform, use the SAP Data Services ODBC Drivers
Selector utility.
Using the License Manager [page 138]
The License Manager allows you to add and delete licenses that you receive from SAP, such as when
you buy the software or when your current license expires.
Use the Server Manager on Windows [page 138]
Use the Data Services Server Manager for many tasks, such as to create, edit, or delete Job Servers
and Access Servers after installation.
Using the Server Manager on UNIX systems [page 146]
Use the Server Manager to create, edit, or delete Job Servers and Access Servers after installation on
your UNIX platform.
Conguring Metadata Browsing Service and View Data Service [page 156]
SAP Information Steward uses the Metadata Browsing Service and the View Data Service to connect to
and view data in proling sources.
Data Services CMC application settings [page 160]
You can change the following settings for the Data Services Application on the Central Management
Console (CMC).
100
PUBLIC
Administrator Guide
Server Management

6.1 DSN-less and TNS-less connections
DSN-less and TNS-less (Oracle) connections are also known as server name connections.
If you congure a repository during installation, SAP Data Services creates a DSN-less or TNS-less (Oracle)
connection to the repository database by default.
Server name connections eliminate the need to congure the same DSN (Data Source Name) or TNS ( Oracle
Transparent Network Substrate) entries on every machine in a distributed environment.
Restriction
To congure the repository using a DSN or TNS connection, skip the repository creation during installation
and create the repository after installation.
The following table lists all eligible database types for the Data Services repository, and the supported
connection types.
Repository database types and supported connection types
Database DSN DSN-less
DB2 Yes Yes
Microsoft SQL Server No Yes
My SQL Yes Yes
Oracle Yes: TNS Yes: TNS-less
SAP HANA Yes Yes
SQL Anywhere Yes Yes
Sybase ASE No Yes
For databases that you use as sources and targets in Data Services, the database type determines the type of
connection you can create. Some databases support both types of connections while other support one or the
other.
The following table lists all eligible source and target databases and the connection types they support.
Source and target databases and supported connections
Database DSN DSN-less
Amazon Redshift Yes Yes
Attunity Connector No Yes
Data Federator No Yes
DB2 (Linux, UNIX, Windows) Yes Yes
Administrator Guide
Server Management
PUBLIC 101
Database DSN DSN-less
Hive
Yes Yes
HP Vertica Yes No
Informix Yes Yes
Microsoft SQL Server No Yes
My SQL Yes Yes
Netezza Yes Yes
ODBC Yes No
Oracle Yes: TNS Yes: TNS-less
PostgreSQL
Yes Yes
SAP HANA Yes Yes
Snowake Yes Yes
SQL Anywhere Yes Yes
Sybase ASE No Yes
SAP IQ (Sybase IQ) Yes Yes
Teradata Yes Yes
The information in the database tables is subject to change and may not reect the most up-to-date
information. For current lists of supported databases and versions for repository or sources and targets, see
the Product Availability Matrix (PAM) on the SAP Support Portal.
6.2 Setting UNIX environment variables
Set up UNIX or Linux environment variables by running a script with the applicable syntax for your
environment.
When you install SAP Data Services on UNIX or Linux platforms, the SAP Data Services Job Server requires
that you set environment variables. To set these variables, run the script le al_env.sh.
To run the le, use the syntax required by your environment.
Example
$ cd $LINK_DIR/bin/
$ . ./al_env.sh
102
PUBLIC
Administrator Guide
Server Management
You can also add a command to your login script so that the environment variable is always congured. For
example, add the following line to .profile:
. $LINK_DIR/bin/al_env.sh
Troubleshooting
If the script fails to run, the system does not issue an error. Therefore, to check that you properly set the
variable values, check one or more of the environment variables described in the following table:
Variable
Details
$LINK_DIR
Points to the default Data Services installation directory, set
by the installer.
$DS_COMMON_DIR Includes the $LINK_DIR path for compatibility.
$SHLIB_PATH
For 64-bit Oracle clients, make sure that you list
$LINK_DIR/bin before any 64-bit Oracle shared library
path.
$LD_LIBRARY_PATH
For Linux, make sure that the variable includes
$LINK_DIR/bin and the location of the database libra-
ries.
To use a 64-bit Oracle client, make sure that you list
$LINK_DIR/bin before any 64-bit Oracle shared library
path.
$LIBPATH
Make sure that the variable includes $LINK_DIR/bin and
the location of the database libraries.
To use a 64-bit Oracle client, make sure that you list
$LINK_DIR/bin before any 64-bit Oracle shared library
path.
$ORACLE_SID
Required for an Oracle source, target, or repository.
$ORACLE_HOME
Required for an Oracle source, target, or repository.
To use a 64-bit Oracle client, make sure this variable points
to the 64-bit Oracle installation.
$DB2INSTANCE
Required for a DB2 source, target, or repository.
$DB2DIR
Required for a DB2 source, target, or repository.
$SYBASE
Required for an SAP ASE source, target, or repository.
$SYBASE_OCS
Required for an SAP ASE source, target, or repository.
$ODBCINI
Required for ODBC sources or targets. Contains the data
source name (DSN) information for all existing DSNs. For
MySQL, the variable is $ODBCSYSINI.
Administrator Guide
Server Management
PUBLIC 103
Variable Details
$ODBCINST
Required for ODBC sources or targets. Contains the ODBC
driver information for installed drivers.
Note
For the MySQL ODBC driver, set the driver location
in the $ODBCSYSINI environment variable instead of
the $ODBCINST environment variable. Make sure that
the odbcinst.ini le exists. If you do not set the
location in $ODBCSYSINI, Data Services uses /etc/
odbcinst.ini by default for the instance le.
$PATH Make sure that the variable includes $LINK_DIR/bin and
<databasehome>/bin.
Tip
Use the echo command to verify environment variable settings.
If you don't properly congure the variable settings and you start any Data Services utility, the software issues
error messages that indicate there are missing database server les.
If you see errors about missing database server les, verify that al_env.sh contains commands to set the
appropriate database home locations. Run al_env.sh for the account used by the Job Server, or start the Job
Server using an account that has all necessary environment variables dened in its .profile.
Tip
To use the RFC Server Interface in the Management Console on a 64-bit UNIX platform, see the
Management Console Guide for additional environment conguration information.
6.3 Start services automatically for Windows and Unix
To run properly, SAP Data Services requires the Job Service and related services, and the packaged Tomcat
service.
Some congurations for Data Services require that you stop services. The services also stop when you close
Data Services. In some cases, you restart the services manually. Otherwise, Data Services restarts the services
automatically.
On Windows
The Data Services service and packaged Tomcat service start automatically when you start or restart your
computer. The Data Services service starts Job Servers and Access Servers on the restarted computer.
104
PUBLIC
Administrator Guide
Server Management

If applicable, you can change service startup to Manual in the Windows services window.
Note
To manually log in Web applications, refer to “Conguring tracing for web applications” section in the
Information platform services Administration Guide.
On UNIX
To start Job and Access Servers automatically when the server restarts, install the actaservices script with
root privileges. Data Services stores the script le in $LINK_DIR/bin.
Call the script using the syntax supported by your environment.
Example
# cd $LINK_DIR/bin/
# autostrt.sh $LINK_DIR
6.4 History retention and Job Server log retention
The job execution history les and the Job Server logs contain data to produce internal statistics, regulatory
reports, or other nonregulatory reports.
Set a time period for data retention in the history les and Job Server logs. After the set time period, SAP Data
Services deletes retained data automatically and permanently. Therefore, know what these logs contain before
setting the retention period.
Tip
To create reports based on specic jobs, transforms, time periods, and job statistics, back up the job
execution les and the Job Server log les before the retention period expires.
It's important to delete les periodically to maintain ecient system processing. If you don't delete les
periodically, the history les and Job Server logs can get large, which slows job performance. The les get large
because Data Services appends information to les for each job that you run. Therefore, we recommend that
you establish a maintenance management procedure.
Caution
You can select to delete Job Server and history les for a specic batch job in the Data Services
Management Console. Data Services deletes the selected job, history, and log les, and ignores the set
retention periods in the Central Management Console (CMC).
For more information about deleting jobs, history, and log les for the selected job in the Data Services
Management Console, see the Management Console Guide.
Administrator Guide
Server Management
PUBLIC 105

USPS-required log les and reports [page 106]
Set the log retention period so that you don't lose data before the creation and submission of USPS-
required logs and reports.
Setting the History Retention Period [page 107]
Change the default setting of 30 days for history log le retention to increase or decrease the number
of days that SAP Data Services retains the les before deleting them.
Job Server Log Retention [page 108]
Deleting log les regularly alleviates security concerns and reduces the possibility of performance
degradation.
Setting the Job Server Log Retention Period [page 109]
The Job Server Log Retention Period provides a set schedule for automatically deleting Job Server log
les, such as server_event*.logs.
Related Information
Deleting batch job history data [page 168]
Monitoring jobs [page 163]
6.4.1USPS-required log les and reports
Set the log retention period so that you don't lose data before the creation and submission of USPS-required
logs and reports.
Set the number of days in History Retention Period in the Central Management Console (CMC). If you have
postal certication requirements such as CASS certication, the USPS requires that you submit log les to the
postal authorities on a periodic basis.
Example
For CASS certied mailings, the USPS requires that you submit certication log les each month. The
default setting for the History Retention Period option is 30 days. Thirty days don't provide enough time for
you to export and send the log les to the USPS by the monthly due date. And 30 days don't account for
months that include 31 days. Therefore, set the history retention to longer, such as 50 days, to ensure that
you submit complete monthly logs to the USPS.
In addition to sending monthly data to the USPS, you must have report data available for the USPS to examine
for several years after the job is processed. To ensure that you retain all required reports and logs before the
data is deleted from the repository, consider exporting the required reports and logs from the repository to
a local folder on a monthly basis. Exporting reports and logs to a local folder also prevents the repository
contents from becoming so large that the export process times out because of the volume of statistics
retained.
View stored job execution history les in the Administrator application of the SAP Data Services Management
Console.
106
PUBLIC
Administrator Guide
Server Management

Caution
Many history les contain job statistics and other information required for statistics and regulatory reports.
Make sure that you understand what your job history les are used for before you set a number of days
to delete them. Also be aware of current USPS rules for data retention by viewing your USPS licensing
agreement.
For information about regulatory statistics and log les, see the Designer Guide. For information about trace
and error logs, data quality reports, and troubleshooting, see the Management Console Guide.
Parent topic: History retention and Job Server log retention [page 105]
Related Information
Setting the History Retention Period [page 107]
Job Server Log Retention [page 108]
Setting the Job Server Log Retention Period [page 109]
6.4.2Setting the History Retention Period
Change the default setting of 30 days for history log le retention to increase or decrease the number of days
that SAP Data Services retains the les before deleting them.
To change the History Retention Period setting, perform the following steps:
1. Log into the Central Management Console and open the Applications page.
2. Right-click Data Services Application from the Application Name column and select Settings.
The Data Services Application Settings dialog box opens.
3. Type an integer in the History Retention Period text box.
Example
The following table describes results for specic settings.
Value Results
30 Data Services retains job history les for 30 days before
deleting.
0 Data Services doesn't retain any of the job history les.
Negative number Data Services retains job history les indenitely.
4. Select Save.
Administrator Guide
Server Management
PUBLIC 107

If Data Services is performing background processes, it can take up to an hour before the new setting goes
into eect.
Task overview: History retention and Job Server log retention [page 105]
Related Information
USPS-required log les and reports [page 106]
Job Server Log Retention [page 108]
Setting the Job Server Log Retention Period [page 109]
6.4.3Job Server Log Retention
Deleting log les regularly alleviates security concerns and reduces the possibility of performance degradation.
By default, Data Services deletes Job Server log les every 30 days. However, you can change the default
number of days for log le deletion in the Central Management Console. After you set the number of days for
retention, Data Services deletes the log les, including the following:
• In <DS_Common_Dir>\log\:
• server_eventlog_*.txt
• error_*.txt
• Monitor_*.txt
• trace_*.txt
• In <Link_Dir>\logging\:
• AL_Designer_*_trace.glf
• AL_JobLauncher_*_trace.glf
• BIClient (RFC logs)
Before you set the Job Server Log Retention Period, consider any legal requirements for retaining information,
such as for postal regulations. To retain some information for longer periods of time, move the applicable log
le to a secure location before the deletion time.
For information about your data security responsibilities, see Data protection and privacy [page 26].
Note
Data Services doesn't delete bulk loading les with the history and Job Server log les. Instead, Data
Services deletes the bulk loading les based on the setting for Clean up bulk loader directory after load
option in the target editor of the data ow.
View stored log les in the Data Services Management Console. For information about how to view the stored
log les, see the Management Console Guide.
Parent topic: History retention and Job Server log retention [page 105]
108
PUBLIC
Administrator Guide
Server Management

Related Information
USPS-required log les and reports [page 106]
Setting the History Retention Period [page 107]
Setting the Job Server Log Retention Period [page 109]
6.4.4Setting the Job Server Log Retention Period
The Job Server Log Retention Period provides a set schedule for automatically deleting Job Server log les,
such as server_event*.logs.
The default setting for the Job Server Log Retention Period is 30 days. To change the setting, perform the
following steps:
1. Log into the Central Management Console (CMC) and select Applications.
2. Right-click Data Services Application from the Application Name column and select Settings.
The Data Services Application Settings dialog box opens.
3. Type an integer in the Job Server Log Retention Period text box.
The value sets the number of days that SAP Data Services retains the Job Server log les.
Example
The following table describes results for specic settings.
Value Results
30 Default setting. Software retains Job Server logs for 30
days.
0 Software doesn't retain Job Server logs.
Negative number Software retains Job Server logs indenitely.
4. Select Save.
If Data Services is performing background processes, it can take up to an hour before the new setting goes
into eect.
To view stored Job Server log les, open the Administrator application in the Data Services Management
Console.
Task overview: History retention and Job Server log retention [page 105]
Administrator Guide
Server Management
PUBLIC 109
Related Information
USPS-required log les and reports [page 106]
Setting the History Retention Period [page 107]
Job Server Log Retention [page 108]
6.5 Congure database connectivity for UNIX and Linux
Each time you add an ODBC database type for SAP Data Services processing, congure a supported driver in
the SAP Data Services (DS) Connection Manager to establish a connection to the database.
Although the required information is similar, the processes for conguring an ODBC driver on UNIX and Linux
operating systems are dierent than for Windows operating systems. For example, to congure installed ODBC
drivers in UNIX and Linux, you use the SAP Data Services Connection Manager. For Windows, you use either
the Microsoft ODBC Data Source Administrator for data source name (DSN) connections or the ODBC Drivers
Selector for server name (DSN-less) connections.
Congure a DSN connection at the same time you congure the driver. For a DSN connection, you need
information about the data source, including server information, user name, and password. When applicable,
congure SSL/TLS for secure data transfer.
Database connectivity for UNIX and Linux [page 111]
To congure database connectivity on UNIX or Linux platforms, use the SAP Data Services (DS)
Connection Manager.
Using the Connection Manager [page 112]
The SAP Data Services Connection Manager is a command-line utility that adds the ODBC driver
information to SAP Data Services driver library les.
Congure drivers with server name (DSN-less) connections [page 113]
On UNIX and Linux platforms, SAP Data Services requires the ODBC driver information be included in
the ODBC driver library when you congure the driver for a DSN-less connection.
Congure drivers with data source name (DSN) connections [page 119]
On Linux and Unix platforms, SAP Data Services requires the ODBC driver information with a data
source name (DSN) connection be included in the ODBC driver manager library and the ODBC driver
library.
Conguring DataDirect ODBC [page 128]
The DataDirect driver is included with your SAP Data Services installation to use with applicable
databases such as Microsoft SQL Server or DB2 on zSeries or iSeries.
Related Information
SSL or TLS for Data Services components [page 31]
110
PUBLIC
Administrator Guide
Server Management

6.5.1Database connectivity for UNIX and Linux
To congure database connectivity on UNIX or Linux platforms, use the SAP Data Services (DS) Connection
Manager.
Use the DS Connection Manager to congure ODBC drivers and to create DSN connections. The DS
Connection Manager adds the driver information to the odbcinst.ini le, and the DSN information to the
ds_odbc.ini le. The ds_odbc.ini le lists the DSN with the name of the ODBC driver.
Installer sets DSN-less connections
When you install Data Services on UNIX or Linux, you can select to have the SAP Data Services installation
setup program congure the repository. To have the installer congure the repository, you enter the database
type for the repository. By default, the installer automatically performs the following repository database tasks:
• Establishes database connectivity for the specied database type.
• Creates a server name (DSN-less) connection.
If you want to use a DSN or TNS (for Oracle) connection for your repository, skip repository creation during
installation.
Congure repository database connection after install
Use the DS Connection Manager after installation to congure the repository database and establish a DSN or
TNS (Oracle) connection. Additionally, use the DS Connection Manager to add additional databases and DSN
connections to Data Services.
Perform the following tasks in the Connection Manager:
• Add information about the ODBC driver including driver manager location and driver name.
• Add information about a DSN connection, including a name for the data source, server information, and
applicable user names and passwords.
Data Services includes the DS Connection Manager in the installation and places it in the following location by
default: $LINK_DIR//bin/DSConnectionManager.sh.
See the Product Availability Matrix (PAM)
on the SAP Support Portal for a list of supported databases
and versions that you can use for your repository. The PAM also includes the non-repository databases and
versions supported in Data Services plus the applicable ODBC drivers.
Parent topic: Congure database connectivity for UNIX and Linux [page 110]
Related Information
Using the Connection Manager [page 112]
Administrator Guide
Server Management
PUBLIC 111

Congure drivers with server name (DSN-less) connections [page 113]
Congure drivers with data source name (DSN) connections [page 119]
Conguring DataDirect ODBC [page 128]
6.5.2Using the Connection Manager
The SAP Data Services Connection Manager is a command-line utility that adds the ODBC driver information
to SAP Data Services driver library les.
Before you run the Connection Manager to congure the ODBC driver for a database, perform the following
tasks:
• Check the Product Availability Matrix (PAM)
on the SAP Support Portal to determine the ODBC driver
and version for the applicable database type.
• Download and install the supported ODBC driver, and read all information about the driver in the vendor
documentation to make sure you congure the driver correctly.
• Optional. To use a graphical user interface for the Connection Manager, install the GTK+2 library. The
GTK+2 is a free multi-platform toolkit that creates user interfaces. For more information about obtaining
and installing GTK+2, see https://www.gtk.org/
.
Connection Manager sets the ODBC driver and DSN information in the SAP Data Services driver manager les
as follows:
• Connection Manager adds the driver information to the odbcinst.ini le including the name and
location of the vendor client driver le. The vendor location must be readable and writable.
Example
The default location for DataDirect drivers is $LINK_DIR/DataDirect/odbc/. Therefore, set the
following location when the Connection Manager asks for the information:
Specify the Driver:
/$LINK_DIR/DataDirect/odbc/<name_of_driver_file>
• Connection Manager adds the DSN information to the ds_odbc.ini le.
The following instructions assume that you have the user interface for Connection Manager.
1. Open the Connection Manager with the following command, replacing $LINK_DIR with the path to the
Data Services installation directory:
$ cd $LINK_DIR/bin/DSConnectionManager.sh
The Connection Manager opens.
2. For both DSN connections and server name (DSN-less) connections, open the Drivers tab to congure the
ODBC driver for the database.
The options in the Drivers tab may dier based on the driver type.
3. For DSN connections, open the Data Sources tab and congure the data source name connection.
The options in the Data Sources tab dier based on the database type.
4. Click Restart Services to restart the EIM Adaptive Process Service and the Data Services Job Service.
112
PUBLIC
Administrator Guide
Server Management
Task overview: Congure database connectivity for UNIX and Linux [page 110]
Related Information
Database connectivity for UNIX and Linux [page 111]
Congure drivers with server name (DSN-less) connections [page 113]
Congure drivers with data source name (DSN) connections [page 119]
Conguring DataDirect ODBC [page 128]
6.5.3Congure drivers with server name (DSN-less)
connections
On UNIX and Linux platforms, SAP Data Services requires the ODBC driver information be included in the
ODBC driver library when you congure the driver for a DSN-less connection.
The UNIX ODBC driver conguration le contains driver names that reference ODBC driver libraries. The UNIX
ODBC driver conguration is an instance le referenced by the $ODBCINST variable.
When you congure the ODBC driver for natively-supported databases in the SAP Data Services (DS)
Connection Manager, the DS Connection Manager automatically updates the ODBC driver library les in
$ODBCINST.
Conguring native ODBC drivers for UNIX and Linux [page 114]
Congure ODBC drivers for UNIX and Linux that have a server name (DSN-less) connection using the
SAP Data Services (DS) Connection Manager.
Properties for server name connections [page 115]
The SAP Data Services (DS) Connection Manager congures the applicable environment variables for
native ODBC drivers based on the property values that you enter.
Parent topic: Congure database connectivity for UNIX and Linux [page 110]
Related Information
Database connectivity for UNIX and Linux [page 111]
Using the Connection Manager [page 112]
Congure drivers with data source name (DSN) connections [page 119]
Conguring DataDirect ODBC [page 128]
Setting UNIX environment variables [page 102]
Administrator Guide
Server Management
PUBLIC 113

6.5.3.1 Conguring native ODBC drivers for UNIX and Linux
Congure ODBC drivers for UNIX and Linux that have a server name (DSN-less) connection using the SAP Data
Services (DS) Connection Manager.
Ensure that you perform the following prerequisite tasks before you congure the ODBC native driver:
• Congure the ODBC driver library and the associated environment variables for the database client. For
instructions, see Setting UNIX environment variables [page 102].
• Ensure that the database is eligible for server name connection. For a current list of databases and
supported connections, see the Product Availability Matrix (PAM)
on the SAP Support Portal.
• Optional. To work in the GUI for the DS Connection Manager, install the GTK+2 library. For download
instructions, see Using the Connection Manager [page 112].
The following steps are for the GUI version of the DS Connection Manager.
1. Open the Connection Manager using the following command:
$ cd $LINK_DIR/bin/DSConnectionManager
2. Open the Data Sources tab and click Add.
3. Select the database type from the Select Database Type dialog box and click OK.
The Conguration for... dialog box opens with the value lled in for the option ODBC Inst File.
4. Enter information about the driver and the database server.
Provide values for the following server properties:
• Server name
• Port (if relevant)
• Database (if relevant)
• User name
• Password
Note
The Connection Manager does not save the values that you enter for future use.
5. Test the connection by clicking Test Connection.
6. When the connection test is successful, click Restart Services.
Connection Manager restarts the EIM Adaptive Process Service and-or the Data Services Job Service under
the following circumstances:
• If you installed Data Services on the same machine and in the same folder as the Information Platform
Services (IPS) or BI platform, DS Connection Manager restarts both the EIM Adaptive Process Service
and the Data Services Job Service.
Note
Enter the Central Management Server (CMS) password when prompted.
• If you installed Data Services on a dierent computer than IPS or BI platform, Connection Manager
restarts the Data Services Job Service.
114
PUBLIC
Administrator Guide
Server Management

Task overview: Congure drivers with server name (DSN-less) connections [page 113]
Related Information
Properties for server name connections [page 115]
6.5.3.2 Properties for server name connections
The SAP Data Services (DS) Connection Manager congures the applicable environment variables for native
ODBC drivers based on the property values that you enter.
Environment variables for ODBC data sources include $ODBCINST or $ODBCSYSINI.
The following table contains a list of native database types and the information required in the DS Connection
Manager to congure the ODBC driver.
Note
We add support for additional database types on a regular basis. Therefore, the following table may not be
up-to-date.
Database Type
Properties on Drivers tab
DB2 UDB
• DB2 Client Path
• Driver Version
• Server Name
• Port
• Database
• User Name
• Password
Administrator Guide
Server Management
PUBLIC 115

Database Type Properties on Drivers tab
Google BigQuery ODBC
• Driver Name (Must use Simba ODBC driver for Google
BigQuery)
• Driver location
• UNIX ODBC Lib Path
• Google BigQuery Oauth Mechanism and options based
on the type chosen:
• BigQuery Refresh Token
• BigQuery e-mail
• BigQuery Private Key
•
Google BigQuery catalog
• Optional. Proxy server information:
• Host
• Port
• Username
• Password
• Google BigQuery Trusted Certicates
Informix
• ODBC Inst File
• Driver Version
• Driver Name
• Informix Home Path
• Server Name
• Database
• User Name
• Password
MySQL
• ODBC Inst File
• Driver Version
• Unix ODBC Lib Path
• Driver Name
• Driver
• Server Name
• Port
• Database
• User Name
• Password
116 PUBLIC
Administrator Guide
Server Management

Database Type Properties on Drivers tab
Netezza
• ODBC Inst File
• Driver Version
• Driver Name
• Driver
• Server Name
• Port
• Database
• User Name
• Password
Oracle
• Oracle Home Path
• Driver Version
• Server Name
• Port
• SID
• User Name
• Password
SAP HANA
• ODBC Inst File
• Driver Version
• Driver Name
• Driver
• Server Name
• Port
• User Name
• Password
SAP Sybase IQ
• ODBC Inst File
• Driver Version
• Driver Name
• Driver
• Server Name (This is also known as the host name. For
example, a host name may be vanpgc13b9.)
• Port
• Engine Name (This is also known as the server name.
For example, a server name may be vanpgc13b9_iq-
demo.)
• Database
• User Name
• Password
Administrator Guide
Server Management
PUBLIC 117

Database Type Properties on Drivers tab
SingleStoreDB
• ODBC Inst File
• Driver Version
• Driver Name
• Driver
• Server Name
• Port
• Database
• Unix ODBC Lib Path
• User Name
• Authentication Method
• Password
• SSL mode
SQL Anywhere
• Driver Version
• Driver Name
• User Name
• Password (no echo)
• Retype Password (no echo)
• Driver (path and le name)
• Host
• Port
• Database
Teradata
• ODBC Inst File
• Driver Version
• Driver Name
• Driver
• Server Name
• User Name
• Password
Parent topic: Congure drivers with server name (DSN-less) connections [page 113]
Related Information
Conguring native ODBC drivers for UNIX and Linux [page 114]
118
PUBLIC
Administrator Guide
Server Management

6.5.4Congure drivers with data source name (DSN)
connections
On Linux and Unix platforms, SAP Data Services requires the ODBC driver information with a data source name
(DSN) connection be included in the ODBC driver manager library and the ODBC driver library.
Some ODBC driver vendors include ODBC driver manager and ODBC driver capabilities in one library,
while others separate them into two libraries. To accommodate all ODBC vendors, Data Services requires
congurations in two libraries for DSN connections:
• UNIX ODBC driver conguration le, referenced by $ODBCINST environment variable: Contains
DSN instances that reference ODBC driver manager libraries. The default location is $LINK_DIR/bin/
ds_odbc.ini.
Tip
For ODBC databases that Data Services supports natively, do not congure the ds_odbc.ini le
manually. Instead, congure the driver using the SAP Data Services (DS) Connection Manager to
automatically add the information to the Unix ODBC driver manager library.
• Vendor ODBC conguration les, referenced by the $ODBCINI environment variable: Contains data
source name (DSN) instances that reference the ODBC driver libraries and the database server connection
information.
Note
One ODBC conguration le can contain multiple DSN instances. For example, a le referenced by
$ODBCINI may contain DSNs for MySQL, Netezza, and Teradata.
Native ODBC data sources [page 120]
SAP Data Services supports several ODBC data sources natively with DSN connections.
Non-Native ODBC data sources [page 120]
For non-native ODBC data sources, you need to manually congure the driver and data source.
Conguring ODBC data sources [page 121]
To congure ODBC data sources in Linux or UNIX, use the SAP Data Services Connection Manager.
Properties for ODBC data sources using DSN connections [page 122]
The Connection Manager congures the $ODBCINI le based on the property values that you enter on
the Data Sources tab.
Troubleshooting [page 127]
Conguring drivers can be troublesome for a variety of reasons.
Parent topic: Congure database connectivity for UNIX and Linux [page 110]
Related Information
Database connectivity for UNIX and Linux [page 111]
Using the Connection Manager [page 112]
Administrator Guide
Server Management
PUBLIC 119

Congure drivers with server name (DSN-less) connections [page 113]
Conguring DataDirect ODBC [page 128]
6.5.4.1 Native ODBC data sources
SAP Data Services supports several ODBC data sources natively with DSN connections.
For native ODBC data sources, congure the driver and the data source using the SAP Data Services
Connection Manager. Set the Data Services ODBC conguration and associated environment variables. Non
native ODBC data sources require additional manual conguration.
Note
For the most current list of database types that the Connection Manager supports, see the Product
Availability Matrix (PAM) on the SAP Support Portal.
Enter values in the Connection Manager to set the $ODBCINI to a le that contains the DSN connection. Before
you run Connection Manager, ensure that the le is readable and writable by using the following command:
export ODBCINI=<dir-path>/ds_odbc.ini
touch $ODBCINI
Parent topic: Congure drivers with data source name (DSN) connections [page 119]
Related Information
Non-Native ODBC data sources [page 120]
Conguring ODBC data sources [page 121]
Properties for ODBC data sources using DSN connections [page 122]
Troubleshooting [page 127]
6.5.4.2 Non-Native ODBC data sources
For non-native ODBC data sources, you need to manually congure the driver and data source.
To congure a data source name manually on Linux:
1. Set an environment variable ODBCINI in the Bash shell.
export ODBCINI=<path to the odbc.ini file>
2. Open $ODBCINI and add the following lines for your new data source (we use Amazon Athena in this
example):
[Athena_DSN]
Driver=/opt/simba/athenaodbc/lib/64/libathenaodbc_sb64.so
AuthenticationType=IAM Credentials
120
PUBLIC
Administrator Guide
Server Management

UID=<user ID>
PWD=********
AwsRegion=us-east-2
S3OutputLocation=s3://xian-analytics-data-day-2020/athena_results/
For more information about the attributes, see the Magnitude Simba Amazon Athena ODBC Data
Connector Installation and Conguration Guide on the Amazon AWS website.
3. Move to $LINK_DIR/bin/, open ds_odbc.ini, and add the following lines for your data source:
[Athena_DSN]
Driver=<unixODBC so file>
Parent topic: Congure drivers with data source name (DSN) connections [page 119]
Related Information
Native ODBC data sources [page 120]
Conguring ODBC data sources [page 121]
Properties for ODBC data sources using DSN connections [page 122]
Troubleshooting [page 127]
6.5.4.3 Conguring ODBC data sources
To congure ODBC data sources in Linux or UNIX, use the SAP Data Services Connection Manager.
Data Services supports several ODBC data sources natively with DSN connections. Ensure that Data Services
supports your ODBC data source.
Ensure that you have the correct privileges to change the conguration les mentioned in these steps.
Install the GTK+2 library to make a graphical user interface for Connection Manager. The GTK+2 is a free
multi-platform toolkit that creates user interfaces. The installation is at https://www.gtk.org/ .
1. To open the DSConnectionManager, enter the following command:
$ cd $LINK_DIR/bin/
$ ./DSConnectionManager.sh
The DSConnectionManager GUI opens.
2. Click the Data Sources tab, and click Add to display the list of database types.
3. Select the database type in the Select Database Type dialog box, and click OK.
The Conguration for... dialog box opens. The Connection Manager automatically completes the following
information:
• The absolute location of the odbc.ini le in which the DSN is dened
• Driver, if relevant for database type
• Driver Version, if relevant for database type
4. Provide values for additional connection properties, such as Server Name, Instance, or Port, for the specic
database type.
Administrator Guide
Server Management
PUBLIC 121

For a list of relevant properties for each database type, see Properties for ODBC data sources using DSN
connections [page 122].
5. Provide the following properties:
• User name
• Password
Note
The Connection Manager does not save this information for further use.
6. To test the connection, click Test Connection.
7. When the connection test is successful, click Restart Services to restart the following services:
• EIM Adaptive Process Service and Data Services Job Service: When Data Services is installed at the
same location (machine and folder) as Information Platform Services (IPS) or BI platform. A prompt
appears for the Central Management Server (CMS) password.
• Data Services Job Service: When Data Services is installed without IPS or BI platform.
Task overview: Congure drivers with data source name (DSN) connections [page 119]
Related Information
Native ODBC data sources [page 120]
Non-Native ODBC data sources [page 120]
Properties for ODBC data sources using DSN connections [page 122]
Troubleshooting [page 127]
6.5.4.4 Properties for ODBC data sources using DSN
connections
The Connection Manager congures the $ODBCINI le based on the property values that you enter on the Data
Sources tab.
The following table lists the properties that are relevant for each database type.
Note
We add support for additional database types on a regular basis. Therefore, the following table may not be
up-to-date.
122
PUBLIC
Administrator Guide
Server Management

Database Type Properties on Data Sources tab
Amazon Redshift
• DSN Name
• User Name
• Database password
• Unix ODBC Lib Path
• Driver
• Driver Version
• Host Name
• Port
• Database
• Redshift SSL Certicate Mode [require|allow|disa-
ble|prefer|verify-ca|verify-full]
Apache Cassandra
• User Name
• Database password
• Host Name
• Port
• Database
• Unix ODBC Lib Path
• Driver
• Cassandra SSL Certicate Mode[0:disabled|1:one-way|
2:two-way]
Depending on the value you choose for the Certicate Mode,
you may be asked to dene some or all of the following
• Cassandra SSL Server Certicate File
• Cassandra SSL Client Certicate File
• Cassandra SSL Client Key File
• Cassandra SSL Client Key Password
• Cassandra SSL Validate Server Hostname?[0:disa-
bled|1:enabled]
Apache Impala
• ODBC Ini File
• DSN Name
• User Name
• Database password
• Host Name
• Port
• Database
• Unix ODBC Lib Path
• Driver
• Impala Auth Mech[0:noauth|1:kerberos|2:user|3:user-
password]
• Kerberos Host FQDN
• Kerberos Realm
• Impala SSL Mode[0:disabled|1:enabled]
• Impala SSL Server Certicate File
Administrator Guide
Server Management
PUBLIC 123

Database Type Properties on Data Sources tab
Attunity
• Attunity Driver Path
DB2 on iSeries or zSeries
• ODBC ini File
• DSN Name
• Server Name
• Port
• Location
• Collection
• Package Collection
• User Name
• Password
Google BigQuery ODBC
• ODBC ini le
• DSN Name
• Unix ODBC Lib Path
• Specify the Driver (Must use Simba ODBC driver for
Google BigQuery)
• Google BigQuery Oauth Mechanism and options based
on the type chosen:
• BigQuery Refresh Token
• BigQuery e-mail
• BigQuery Private Key
• Google BigQuery catalog
• Optional. Proxy server information:
• Host
• Port
• Username
• Password
• Google BigQuery Trusted Certicates
Hive Server
• Driver
• Host Name
• Port
• Schema
• Service Discovery Mode
• Hive Server Type
• Auth Mech
• Thrift Target
• UID
• PWD
• Kerberos Host FQDN
• Kerberos Realm
• SSL
124 PUBLIC
Administrator Guide
Server Management

Database Type Properties on Data Sources tab
Informix
• ODBC Ini File
• DSN Name
• Driver
• Server Name
• Database
• User Name
• Password
MySQL
• ODBC Ini File
• DSN Name
• Unix ODBC Lib Path
• Driver
• Driver Version
• Server Name
• Port
• Database
• User Name
• Password
Netezza
• ODBC Ini File
• DSN Name
• Driver
• Driver Version
• Server Name
• Port
• Database
• User Name
• Password
PostgreSQL
• Database name
• Server
• Port
• User name
• Password
SAP HANA
• ODBC Ini File
• DSN Name
• Driver
• Server Name
• Instance
• User Name
• Password
Administrator Guide
Server Management
PUBLIC 125

Database Type Properties on Data Sources tab
SAP Vora
• ODBC Ini File
• DSN Name
• User Name
• Password
• Driver
• Host Name
• Port
Snowake
• User
• Password
• Server
• Database
• Schema
• Warehouse
• Role
• Tracing(0-6)
• Authenticator
• Proxy
• NoProxy
For information about these connection options, see the
Snowake User Guide.
SQL Server
• ODBC Ini File
• DSN Name
• Server Name
• Port
• Database
• User Name
• Password
Sybase ASE
• Sybase Home Path
• OCS
• Server Name
• Database
• User Name
• Password
126 PUBLIC
Administrator Guide
Server Management

Database Type Properties on Data Sources tab
Sybase IQ
• ODBC Ini File
• DSN Name
• Driver
• Server Name (This is also known as the host name. For
example, a host name may be vanpgc13b9.)
• Port
• Engine Name (This is also known as the server name.
For example, a server name may be vanpgc13b9_iq-
demo.)
• Database
• User Name
• Password
Teradata
• ODBC Ini File
• DSN Name
• Teradata Install Path
• Teradata Version
• Server Name
• User Name
• Password
Parent topic: Congure drivers with data source name (DSN) connections [page 119]
Related Information
Native ODBC data sources [page 120]
Non-Native ODBC data sources [page 120]
Conguring ODBC data sources [page 121]
Troubleshooting [page 127]
6.5.4.5 Troubleshooting
Conguring drivers can be troublesome for a variety of reasons.
The following are some of the more common issues to troubleshoot when you congure drivers with DSN
connections:
Administrator Guide
Server Management
PUBLIC 127

Trouble with libraries
To determine whether all dependent libraries are set properly in the environment variables, use the ldd
command on the ODBC driver manager library and the ODBC driver library.
Example
ldd tdata.so
If you see that any dependent libraries are missing, ensure that you've added the environment settings to the
session running the job service, or consult your ODBC driver vendor's documentation.
Trouble with Connection Manager
If an error occurs when using the Connection Manager, invoke it from the command line by using the -c option,
and use the -d option to show details in the log.
Example
$LINK_DIR/bin/DSConnectionManager.sh -c -d
The log le path is $LINK_DIR/log/DSConnectionManager.log.
Possible errors include the following:
• The Connection Manager can't connect to database.
• The Data Services Job Server can't connect to database.
Parent topic: Congure drivers with data source name (DSN) connections [page 119]
Related Information
Native ODBC data sources [page 120]
Non-Native ODBC data sources [page 120]
Conguring ODBC data sources [page 121]
Properties for ODBC data sources using DSN connections [page 122]
6.5.5Conguring DataDirect ODBC
The DataDirect driver is included with your SAP Data Services installation to use with applicable databases
such as Microsoft SQL Server or DB2 on zSeries or iSeries.
Before you manually congure the ODBC DataDirect driver for your database, ensure the following:
128
PUBLIC
Administrator Guide
Server Management

• Ensure that you have the proper permission to edit the odbc.ini and the odbcinst.ini les.
• Determine the applicable DataDirect version and database version by looking in the latest Product
Availability Matrix (PAM) on the SAP Support Portal.
• Consider using the SAP Data Services (DS) Connection Manager to automatically add driver and data
source information to the .ini les in $ODBCINI and $ODBCINST.
To manually congure the DataDirect ODBC driver for the applicable database type on a Linux or Unix platform,
perform the following steps:
1. Open the ds_odbc.ini le with a text editor.
The le is located in $LINK_DIR/bin/ds_odbc.ini.
2. Add the data source name in between square brackets.
For Microsoft SQL Server::
[test_Microsoft_SQL_SERVER]
For DB2 on zSeries or iSeries:
[test_DB2]
3. Add the install location for the Driver key.
For Microsoft SQL Server:
[test_Microsoft_SQL_SERVER]
Driver = <install_location>/lib/[DA][DD]sqls<xx>.so
where <install_location> is the location of the DataDirect ODBC driver.
For DB2 on zSeries or iSeries:
[test_DB2]
Driver = <install_location>/lib/[DA][DD]db2<xx>.so
where <install_location> is the location of the DataDirect ODBC driver.
Note
4. Add a value for RebrandedLib =.
A Rebranded Library value is required when you use the SAP rebranded DataDirect driver.
For Microsoft SQL Server:
[test_Microsoft_SQL_SERVER]
Driver = <install_location>/lib/[DA][DD]sqls<xx>.so
RebrandedLib = TRUE
For DB2 on zSeries or iSeries:
[test_DB2]
Driver = <install_location>/lib/[DA][DD]db2<xx>.so
RebrandedLib = TRUE
5. Add the data source to the ODBC vendor conguration le referenced by the Unix variable $ODBCINI.
Administrator Guide
Server Management
PUBLIC 129

Note
The version number and driver lenames are subject to change with each release. Access
$LINK_DIR/DataDirect/odbc/odbc.ini to view the current version information.
Note
EnableQuotedIdentifiers = 1 is required for Microsoft SQL server
For Microsoft SQL Server, the prompts are bolded for illustration:
[test_Microsoft_SQL_SERVER]
Driver=<install_location>/lib/[DA][DD]msss<xx>.so
Description=DataDirect <current version number> SQL Server Wire Protocol
AlternateServers=
AnsiNPW=Yes
ConnectionRetryCount=0
ConnectionRetryDelay=3
Database=<database_name>
EnableQuotedIdentifiers=1
HostName=<SQL_Server_host>
LoadBalancing=0
LogonID=
Password=
PortNumber=<SQL_Server_server_port>
QuotedId=No
ReportCodePageConversionErrors=0
DriverExpirationBehavior=1
<install_location> is the location of the DataDirect ODBC driver.
For DB2 on zSeries or iSeries:
[test_DB2]
Driver=<install_location>/lib/[DD][DA]db2<xx>.so
Description=DataDirect <current version number> DB2 Wire Protocol
AddStringToCreateTable=
AlternateID=
AlternateServers=
ApplicationUsingThreads=1
AuthenticationMethod=0
CatalogSchema=
CharsetFor65535=0
#Collection applies to z/OS and iSeries only
Collection=<collection_name>
ConnectionRetryCount=0
ConnectionRetryDelay=3
#Database applies to DB2 UDB only
Database=<database_name>
DefaultIsolationLevel=1
DynamicSections=200
EncryptionMethod=0
GrantAuthid=PUBLIC
GrantExecute=1
GSSClient=native
HostNameInCertificate=
IpAddress=<DB2_server_host>
LoadBalancing=0
#Location applies to z/OS and iSeries only
Location=<location_name>
LogonID=
Password=
PackageCollection=<package_collection>
PackageOwner=
130
PUBLIC
Administrator Guide
Server Management

ReportCodePageConversionErrors=0
TcpPort=<port number>
TrustStore=
TrustStorePassword=
UseCurrentSchema=1
ValidateServerCertificate=1
WithHold=1
XMLDescribeType=-10
<install_location> is the location of the DataDirect ODBC driver.
6. Run the $LINK_DIR/DataDirect/odbc/odbc.sh script to add the environment settings to the session
running the job service.
Example of a driver manager conguration le for DSN connection [page 131]
Each ODBC driver you use has information in the driver library les, which are editable only by
authorized users.
Task overview: Congure database connectivity for UNIX and Linux [page 110]
Related Information
Database connectivity for UNIX and Linux [page 111]
Using the Connection Manager [page 112]
Congure drivers with server name (DSN-less) connections [page 113]
Congure drivers with data source name (DSN) connections [page 119]
6.5.5.1 Example of a driver manager conguration le for
DSN connection
Each ODBC driver you use has information in the driver library les, which are editable only by authorized
users.
When you add a data source name, enclose the names in square brackets ([]). Enter data source properties on
subsequent lines in the following format: PropertyName = PropertyValue.
Example
[test_source]
Driver = /path/to/driver
OdbcConformanceLevel =
LazyLoading =
ODBC64SqlHandleSize =
ODBC64SqlLenSize =
DriverUnicodeType =
The data source in this example is [test_source], which can be loaded using the specied driver library le.
SAP Data Services uses default values when you leave optional properties blank.
Administrator Guide
Server Management
PUBLIC 131

Follow these guidelines when you edit the Data Services ODBC le named <LINK_DIR>/bin/ds_odbc.ini
le:
• Dene at least one driver property for each data source name. A driver property allows the driver manager
to load the driver when it connects to the database.
• Begin any comment line with a pound sign (#) as the rst character to denote a comment.
• Data Services ignores all leading blanks and trailing blanks in data source names and properties.
The following table contains the data source conguration parameters (Keys) in the ds_odbc.ini, whether is
required, valid value description, and an example.
Data source conguration le key descriptions
Key
Required Valid value Example
Driver
Yes
The full path and library
name for the ODBC driver li-
brary. The directory that con-
tains the dependent libraries
must be in the shared library
path. For example, for Linux,
LD_LIBRARY_PATH
Check the applicable vendor
documentation for the appli-
cable shared library path.
Driver=/home/
mysql/myodbc/lib/
libmyodbc3_r.so
132 PUBLIC
Administrator Guide
Server Management

Key Required Valid value Example
OdbcConformanceLeve
l
No
A decimal value that speci-
es the ODBC conformance
level of the driver.
The default value is 0. With
a setting of 0, the driver de-
tects the conformance level
by loading API functions for
conformance level 2.x, fol-
lowed by loading API func-
tions for conformance level
3.x.
If there is a value equal to or
greater than 4.0, the driver
manager prints a runtime er-
ror.
Note
An ODBC driver can be
compliant to either 2.x or
3.x or both. The UNIX
ODBC driver manager
detects if the driver is 2.x
or 3.x compliant and
loads the respective
compatible ODBC API
functions. If the driver is
both 2.x and 3.x compli-
ant, then the driver man-
ager only loads the 2.x
ODBC API. You can over-
ride this behavior by
specifying, for example,
OdbcConformanceL
evel = 3.0. As a re-
sult, the ODBC driver
manager only loads 3.x
ODBC API functions.
OdbcConformanceLeve
l=0
OdbcConformanceLeve
l=3.0
Administrator Guide
Server Management
PUBLIC 133

Key Required Valid value Example
LazyLoading
No
Species whether the ODBC
driver manager loads the
ODBC driver and instructs
the operating system to load
all of the driver dependent li-
braries.
Specify TRUE for Yes, or
FALSE for No. The default
value is FALSE.
The LazyLoading ag is use-
ful when certain dependent
libraries of the ODBC driver
are not required, and the
ODBC vendor recommends
to load the library in lazy
mode.
LazyLoading=TRUE
134 PUBLIC
Administrator Guide
Server Management

Key Required Valid value Example
ODBC64SqlHandleSize
Yes, for 64-bit platforms only.
Species the size of the
ODBC handle.
Enter 32 or 64.
If you leave this option blank,
or you set it to a value other
than 32 or 64, Data Services
uses the default value of 64.
The standard denition of the
SQLHANDLE data type in 64-
bit ODBC is 64-bit integer.
However, some ODBC driv-
ers do not conform to this
standard. Therefore, use the
ODBC64S1lHandleSize
key to specify the actual size
of SQLHANDLE.
For DataDirect 64-bit ODBC
drivers, ignothe key or set to
64 because Data Direct 64-
bit conforms to the standard.
For other 64-bit ODBC driv-
ers, contact your vendor to
determine the actual size of
SQLHANDLE.
Note
This option is required
only for 64-bit platforms.
ODBC64SqlHandleSize
=64
Administrator Guide
Server Management
PUBLIC 135

Key Required Valid value Example
ODBC64SqlLenSize
Yes, for 64-bit platforms only
Species the SQL length size
of the ODBC driver.
Enter 32 or 64.
If you leave this key blank or
enter a value other than 32 or
64, SAP Data Services uses
the default value of 64.
The standard denition of
the SQLLEN data type in 64-
bit ODBC is 64-bit integer.
However, some ODBC driv-
ers do not conform to this
standard. Therefore, use the
ODBC64SqlLenSize key
to specify the actual size of
SQLLEN.
DataDirect 64-bit ODBC driv-
ers conform to the standard,
so ignore the setting or set
the key to 64 for DataDirect.
For other 64-bit ODBC driv-
ers, contact your vendor to
determine the actual size of
SQLLEN.
Note
This option is required
only for 64-bit platforms.
ODBC64SqlLenSize=64
136 PUBLIC
Administrator Guide
Server Management

Key Required Valid value Example
DriverUnicodeType
Yes, for ODBC drivers that
only support W functions
only.
Species the ODBC driver
Unicode type.
Enter one of the following in-
tegers:
• 1: For UTF16
• 2: For UTF8
If you leave this key blank, or
set a value other than 1 or 2,
or not detectable, Data Serv-
ices uses the default value of
2.
DataDirect SQL Server ODBC
driver only supports W func-
tions; for this driver, specify
2.
Note
This option is required
only for ODBC drivers
that only support W
functions.
DriverUnicodeType=2
Parent topic: Conguring DataDirect ODBC [page 128]
6.6 Using the ODBC Drivers Selector for Windows
To congure an ODBC driver on the Windows platform, use the SAP Data Services ODBC Drivers Selector
utility.
Download and install the applicable ODBC driver.
1. Open the ODBC Driver Selector: <LINK_DIR>\bin\ODBCDriversSelector.exe.
The Drivers Selector dialog box contains three columns:
• Database versions: Contains a row for each database type and version supported in Data Services. Not
editable.
• ODBC Driver: Contains the ODBC driver name or is blank. Has a dropdown arrow that displays all
available ODBC drivers.
• State: Contains “installed”, “not installed”, or blank.
2. Find your database type and version under the Database version column.
3. Click the corresponding cell under the ODBC Drivers column and select the correct driver from the
dropdown list.
Administrator Guide
Server Management
PUBLIC 137

4. If the status doesn't appear in the State column, click in the empty column and the applicable state
appears. The state should be “Installed”.
Note
The list of drivers in the ODBC Driver Selector is the same as the list of drivers in the ODBC Data Source
Administsrator for data sources using DSN connections.
5. Click OK.
Open the DSConf.txt le and verify that the data source and driver are present in the [DBClientDrivers]
section. The format is <DATASOURCE_VERSION>=<ODBC_DRIVER>.
6.7 Using the License Manager
The License Manager allows you to add and delete licenses that you receive from SAP, such as when you buy
the software or when your current license expires.
The License Manager is a command-based utility. For a list of commands and location of the License Manager,
see Command line reference: License Manager [page 229].
6.8 Use the Server Manager on Windows
Use the Data Services Server Manager for many tasks, such as to create, edit, or delete Job Servers and
Access Servers after installation.
The Server Manager user interface consists of several tabs in which to view, add, and edit your environment
related to SAP Data Services. The following table describes the tabs in the Server Manager.
Tab
Description
Job Server Associate an existing repository to a Job Server. Also add,
edit, or delete Job Servers.
Access Server Add, edit, or delete access servers.
SSL Congure SSL paths.
Run-Time Congure runtime resources.
NCS Enable the NCS (Native Component Supportability) library
and set the tracing level threshold, execution interval, and
execution time oset.
SLD Enable SLD (System Landscape Directory) support by reg-
istering the SAPHOSTAGENT, installing the SMD (Solution
Manager Diagnostics) agent, and conguring the CA Intro-
scope Enterprise Manager.
138 PUBLIC
Administrator Guide
Server Management
Tab Description
Miscellaneous Specify the SMTP server settings and Windows cluster set-
tings.
6.8.1Conguring Job Servers
Use the Data Services Server Manager to create and edit all types of Job Servers.
To use the Server Manager for Job Servers, perform the following steps:
1. Open the Windows Start menu, expand SAP Data Services <version>.
2. Right-click Data Services Server Manager and select More Run as administrator.
The Data Services Server Manager opens.
3. In the Job Server tab, select Conguration Editor.
From the Job Server Conguration Editor you can perform the following tasks:
• Add a new job server and associate it with an existing repository.
• Edit an existing Job Server.
• Delete an existing Job Server.
• Resync an existing Job Server with the associated repository.
4. Decide which conguration task to perform:
• To add a new Job Server, click Add.
Continue to the remaining conguration steps.
• To edit an existing Job Server, select the Job Server and click Edit.
Continue to the remaining conguration steps.
• To remove an existing Job Server, select the Job Server and click Delete.
No additional conguration steps are required.
Note
If the Job Server has associated repositories, you must rst delete those and then click OK before
you can delete the Job Server.
5. In the Job Server Properties window, enter conguration information for the Job Server.
6. In the Associated Repositories section, congure any local or proler repositories that you want to
associate with the Job Server. Each Job Server must be associated with at least one local repository.
a. If you want to use a server name connection (for DB2, MySQL, SQL Anywhere, or SAP HANA database
types), clear the Use data source name (DSN) checkbox.
b. If you want to use a server name connection for an Oracle database type, clear the Use TNS name
checkbox.
c. When you have nished conguring associated repositories, including one default, click OK.
7. Click OK to return to the Server Manager window.
8. Click Restart to restart the services with any updated congurations.
Job Server properties [page 140]
When you open a Job Server, the Server Manager displays information about the Job Server.
Administrator Guide
Server Management
PUBLIC 139

Associating a Job Server to a repository [page 141]
A repository must have a Job Server for moving data into and out of SAP Data Services.
Resynchronizing associated repositories [page 142]
There are times when you must resynchronize a Job Server with the local repository, such as after a
reinstallation.
6.8.1.1 Job Server properties
When you open a Job Server, the Server Manager displays information about the Job Server.
The following table describes the Job Server Properties listed in the Server Manager.
Property
Description
Job Server name Species a name that uniquely identies the Job Server.
Job Server port Species the TCP/IP port that the Job Server uses to receive
commands from the Designer and the Access Server. If a
computer hosts multiple Job Servers, each Job Server must
have a unique port number. Additionally, the post number
must not be used by another process on the computer.
If you are unsure of which port number to use, use the de-
fault port number and increment it for each additional Job
Server that you congure.
Support adapter and message broker communication
Enables communication between the Job Server and adapt-
ers. Each computer that hosts adapters must have exactly
one Job Server designated to manage them.
Use SSL protocol for adapter, message broke and communi-
cation
Enables SSL security on the communication paths between
the Job Server and any adapters or message brokers.
Communication port Species the TCP/IP port number that the Job Server uses
for communicating with adapters. The default port is 4001.
Parent topic: Conguring Job Servers [page 139]
Related Information
Associating a Job Server to a repository [page 141]
Resynchronizing associated repositories [page 142]
140
PUBLIC
Administrator Guide
Server Management

6.8.1.2 Associating a Job Server to a repository
A repository must have a Job Server for moving data into and out of SAP Data Services.
For more information about Job Servers, and other standard components, see Architecture overview [page 12].
In addition to a repository association, each Job Server can be associated with other local and proler
repositories.
To associate a repository to a Job Server, perform the following steps:
1. Open the Data Services Server Manager from the Windows Start menu selecting to run as an
administrator.
2. Select Conguration Editor.
The Job Server Conguration Editor opens.
3. Select Add.
The Job Server Properties opens.
4. Select Add.
The Repository Information pane at right becomes enabled.
5. Enter the required connection information for your repository database. The details required vary
depending on the database and connection type. You can enter Additional connection parameters like
MultiSubnetFailover=Yes; Column Encryption=Enabled;
6. Enter the user name and password for the repository database.
7. Check Default repository if this repository is the default repository for the Job Server.
You can specify only 1 default repository per Job Server.
Note
Don't check Default repository if you're adding a proler repository.
8. Select Apply to save your entries and associate the repository with the Job Server.
The associated repository entry updates with the Job Server's computer name and port number.
9. To change the default repository setting, perform the following substeps beginning in the Job Server
Conguration Editor dialog box:
a. Select the Job Server with which the repository is associated and select Edit.
b. Select the repository under Associated Repositories and select Edit.
c. Under Repository Information, enter the password.
d. Check or uncheck Default repository, indicating whether this repository is the default repository for the
Job Server.
e. Select Apply.
Restriction
You can change only whether an associated repository is the default for the Job Server. To change
other congurations, delete the existing associated repository and add a new one with the updated
conguration information.
10. To delete an associated repository, perform the following substeps:
Administrator Guide
Server Management
PUBLIC 141
a. Select the Job Server with which the repository is associated and select Edit.
b. Select the repository under Associated Repositories and select Delete.
c. Under Repository Information, enter the password.
d. Select Apply to remove the associated repository from the Job Server conguration.
Task overview: Conguring Job Servers [page 139]
Related Information
Job Server properties [page 140]
Resynchronizing associated repositories [page 142]
6.8.1.3 Resynchronizing associated repositories
There are times when you must resynchronize a Job Server with the local repository, such as after a
reinstallation.
The following lists situations when you must resynchronize the Job Server and the local repository:
• The Job Server information isn't available or not correct in the local repository.
• You've uninstalled SAP Data Services and reinstalled the same version, without creating a new local
repository.
• You create a new local repository using the Repository Manager after creating a repository and Job Server
when you installed Data Services.
To resynchronize Job Servers, perform the following steps:
1. Open the Data Services Server Manager from the Windows Start menu, and select to run as an
administrator.
2. Select Conguration Editor.
The Job Server Conguration Editor opens.
3. Select the name of your Job Server.
4. Select Resync with Repository.
5. In the Job Server Properties window, select an associated local repository.
6. Select Resync.
7. Select OK when asked whether to update this associated repository with this local machine information.
8. Enter the local repository password under Repository Information.
9. Select Apply.
10. Select OK on the Job Server Properties window.
Task overview: Conguring Job Servers [page 139]
142
PUBLIC
Administrator Guide
Server Management

Related Information
Job Server properties [page 140]
Associating a Job Server to a repository [page 141]
6.8.2Conguring runtime resources for Job Server
operations
Congure runtime resources to control Job Server operations, such as pageable cache or parallel processes.
1. In the Server Manager window, click the Run-time resources tab.
2. For the Specify a directory with enough disk space for pageable cache option, accept the default directory
(<DS_COMMON_DIR>\Log\PCache) or click the ellipses button to browse to a dierent directory.
Note
For memory-intensive operations such as Group By, Order By, and Detailed proling, specify a
pageable cache directory that fullls the following criteria:
• The directory contains enough disk space for your data. To estimate the amount of space required for
pageable cache, consider factors such as:
• Number of concurrently running jobs or data ows.
• Amount of pageable cache required for each concurrent data ow.
• The directory exists on a separate disk or le system from the SAP Data Services system and
operating system (such as the C: drive on Windows, or the root le system on UNIX systems).
• The directory limits the disk space that data ows consume. The pageable cache uses all available disk
space on the le system that contains the pageable cache directory. So, to limit the disk space that
data ows consume, create a le system (or partition on Windows) with a limited size. Use the new le
system (partition on Windows) as the pageable cache directory.
The software uses this directory in the following situations:
• For pageable caching, which is the default cache type for data ows.
• When selecting a le transfer type and Automatic is specied in the Data_Transfer transform.
3. In the Peer-to-peer options area, change the values for Start port and End port to restrict the number
of ports used by the software. The default values for Start port and End port are 1025 and 32767,
respectively.
The software uses these ports for peer-to-peer communications when sending data between data ows or
sub data ows.
Note
If you want to enable SSL security on the communication paths between data ows and sub data ows,
select Use SSL protocol.
4. Click Apply to save any conguration changes.
Administrator Guide
Server Management
PUBLIC 143
Related Information
Performance Optimization Guide: Caching data
Reference Guide: Data_Transfer
Performance Optimization Guide: Using grid computing to distribute data ows execution
6.8.3Conguring Access Servers
When you congure the location for an Access Server installation, SAP Data Services creates space for the
Access Server log les.
1. Open the Server Manager, click the Access Server tab and click Edit.
2. Decide which conguration task to perform:
• To add a new Access Server, click Add.
Continue to the remaining conguration steps.
• To edit an existing Access Server, select the Access Server and click Edit.
Continue to the remaining conguration steps.
• To remove an existing Access Server, select the Access Server and click Delete.
No additional conguration steps are required.
3. In the Access Server Properties window, enter the Access Server conguration information and click OK.
Property Description
Directory Species the location of the log les for this instance of the Access Server. Click
the ellipses button to browse to the Log directory under the directory where
you installed the software.
Do not change this value after the initial conguration.
Communication Port Species the port on this computer that the Access Server uses to listen for
incoming messages from clients.
Make sure that this port number is unused and is unique for each Access
Server.
Parameters Specify any additional Access Server parameters.
Note
Additional Access Server parameters can be viewed by typing
AL_AccessServer at the command line. For more information, see
“Real Time Performance” in the Management Console Guide.
Use SSL protocol Enables SSL security for real-time messaging on this Access Server.
144 PUBLIC
Administrator Guide
Server Management

Property Description
Enable Access Server Controls whether the Access Server is automatically started when the Data
Services service starts.
4. Click OK to return to the Server Manager window.
5. Click Restart to restart the services with the updated conguration.
Related Information
Management Console Guide: Conguring an Access Server
6.8.4Conguring SSL paths
Use the Server Manager to congure the paths to SSL certicates and keyles.
Note
By default, the paths for the SSL certicate and keyles are automatically congured during installation.
You do not need to change them unless you want to use your own certicates.
Note
If you change the SSL certicate conguration, you must resync all repositories associated with the Job
Server before you can run jobs successfully.
1. Open the Server Manager and click the SSL tab.
2. Specify the locations of the server certicate le, the server private key le, and the trusted certicates
folder.
Note
The server certicate must be in PEM format. Valid extensions for certicates in the trusted certicates
folder include .pem, .crt, and .cer. Regardless of the le extension, all certicate le contents must
be in PEM format.
3. If you want to specify a private key password le, select Use server private key password le and specify the
location of the password le.
4. Click Close and Restart to close the Server Manager and restart any Data Services servers on the machine
with the updated certicate information.
Note
The certicate information specied in the Server Manager applies to all Data Services servers running on
that physical machine. For example, any Job Servers, Access Servers, and so on.
Administrator Guide
Server Management
PUBLIC 145
6.8.5Verifying that Job and Access servers are running
To verify that Job Servers are running:
1. Check in the Windows Task Manager Processes tab for:
• al_jobservice.exe (represents the SAP Data Services service)
• al_jobserver.exe (one per Job Server)
• AL_AccessServer.exe (one per Access Server)
2. If you do not see all the processes expected, check for error messages in the Job Server event log in
<LINK_DIR>/log/<JobServer name>/server_eventlog.txt.
Note
Access Server logs are in <AccessServerPathName>/error_mm_dd_yyyy.log
6.9 Using the Server Manager on UNIX systems
Use the Server Manager to create, edit, or delete Job Servers and Access Servers after installation on your
UNIX platform.
The following tables describe the options that the Server Manager displays.
Job Server information
Option
Description
Server name This name uniquely identies the Job Server. The Job Server
name cannot be changed.
TCP/IP port number The port number is a TCP/IP port that the Job Server uses to
receive commands from the Designer and an Access Server.
If a computer hosts multiple Job Servers, each Job Server
must have a unique port number. Choose a port number that
is not used by another process on the computer. It's recom-
mended that you use 3500. If you are unsure of which port
number to use, use the default port number and increment it
for each additional Job Server you congure.
Supports adapter communication on port
If this computer hosts adapters, you must designate one
(and only one) Job Server to support them. Once a Job
Server is set to support adapters (a port is entered and
saved), it is marked on the Job Server Conguration screen
with this label.
146 PUBLIC
Administrator Guide
Server Management
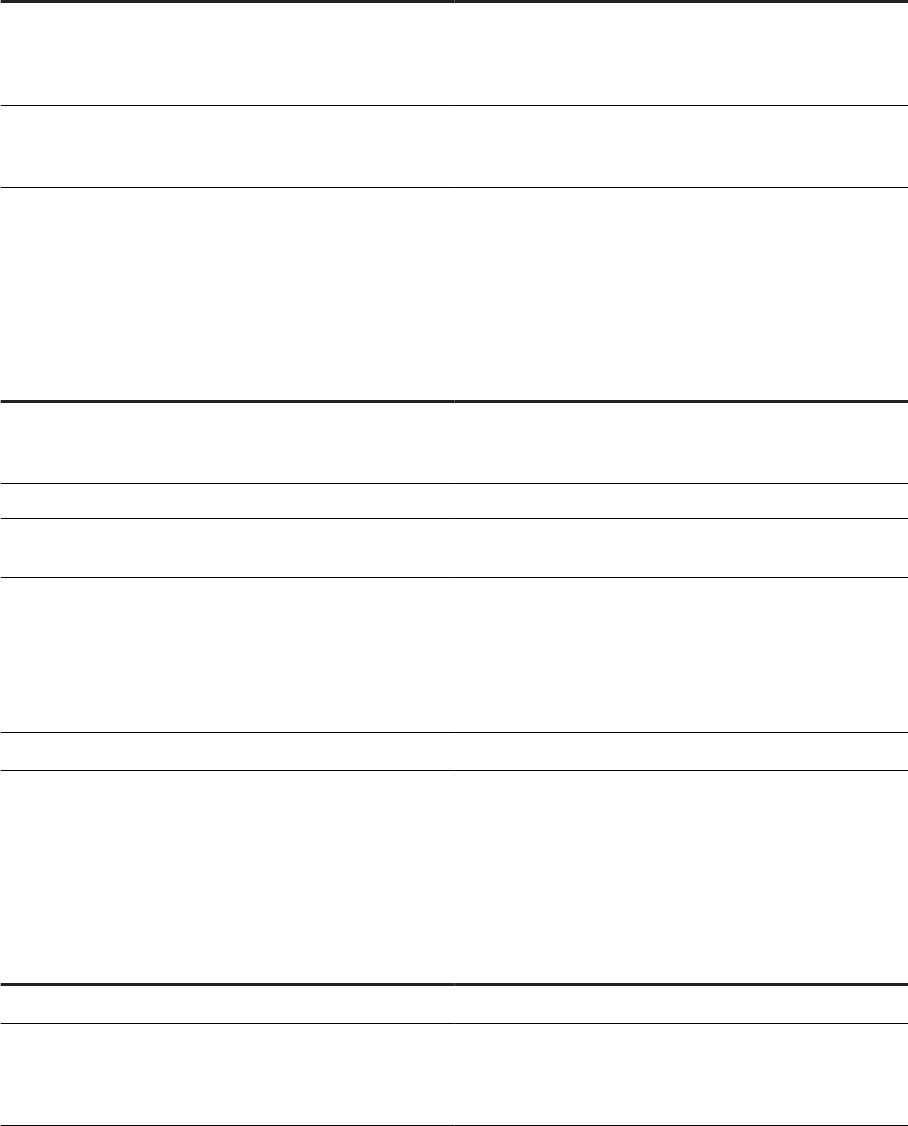
Run-time resource information
Option Description
Pageable cache directory This directory contains the pageable cache that the software
uses for memory-intensive operations and for le transfer
types when Automatic is specied in the Data_Transfer
transform.
Start port
The software uses this starting port number for peer-to-peer
communication between data ows or sub data ows that
are running on dierent Job Servers. The default is 1025.
Access Server information
Option
Description
Server number This sequence number uniquely identies the Access Server
on this machine. The Access Server number cannot be
changed.
Directory The directory containing Access Server information.
Communication port This port number is used to communicate between the Ac-
cess Server and the Administrator. The default is 4000.
Parameters Additional parameters used by the Access server.
View Access Server parameters by typing
AL_AccessServer at the command line. For more in-
formation about parameters, see "Conguring an Access
Server" in the Management Console Guide.
Enable
Enter Y to activate the Access Server.
Job service information
Option
Description
Service executable path
The directory containing AL_JobService information.
Status Status of the Data Services service:
• Running
• Not running
Administrator Guide
Server Management
PUBLIC 147

SMTP Server information
Option Description
Server The name or IP address of the SMTP server (for example,
mail.company.com).
Sender The email address that will appear in the From eld of the
email.
For information about conguring an Access Server, see the Management Console Guide.
Conguring Job Servers on UNIX [page 148]
Use the Server Manager executable to congure the Job Server and to congure a repository Job
Server for your Unix or Linux platform.
Conguring runtime resources for UNIX server manager [page 151]
Conguring Access Servers [page 153]
Conguring SSL paths [page 154]
Starting or stopping the service [page 155]
Congure SMTP email [page 156]
Use the Server Manager to specify SMTP server settings for the smtp_to email function.
6.9.1Conguring Job Servers on UNIX
Use the Server Manager executable to congure the Job Server and to congure a repository Job Server for
your Unix or Linux platform.
Before you perform the following steps, ensure that you set all required environment variables.
The following steps provide an overview of the process, and don't include all of the details specic for each
database type.
1. Start the Server Manager by opening a command prompt and typing the following commands:
$ cd $LINK_DIR/bin/
$ . ./al_env.sh
$ ./svrcfg
The Server Manager main screen opens.
2. Enter the number associated with the Job Server.
The Job Server information screen opens. The repository information for each congured Job Server is
displayed in a specic format.
• The following table contains the formats for a data source name (DSN) connection, or for Oracle, a
Transparent Network Substrate (TNS) connection:
Database Type
Format of Repository String
Oracle <username>@<TNSname_user>
148 PUBLIC
Administrator Guide
Server Management

Database Type Format of Repository String
SAP HANA <username> @<DSNname_user>
DB2
MySQL
SQL Anywhere
• The following table contains the formats for a server name connection (also known as DSN-less or
TNS-less connection):
Database Type
Format of Repository String
Oracle <username>@<server_SID_user>
SAP HANA <username> @<server_port_user>
MySQL <username> @<server_database_user>
DB2
SAP Sybase
Microsoft SQL Server
Microsoft SQL Server - Azure VM
Microsoft SQL Server - Azure PaaS
3. Enter the command for the applicable conguration task as described in the following table.
Command
Conguration task
c
Add a new Job Server.
e
Edit an existing Job Server.
d
Delete an existing Job Server.
a
Add a repository connection to a Job Server.
u
Update a repository connection on a Job Server.
r
Remove a repository connection from a Job Server.
s
Set the default repository connection for a Job Server.
y
Resynchronize a Job Server conguration with a repository.
You must resynchronize your Job Server and repository when:
• You have uninstalled Data Services and are reinstalling the same version without creating a new
repository.
• You have created a new repository using the Repository Manager after installing the software.
If you resynchronize your Job Server conguration with a repository, you must re-add a connection for this
repository to the Administrator. For more information, see the Management Console Guide.
4. To add or edit a Job Server, perform the following steps as applicable:
a. Enter the name for the Job Server.
Administrator Guide
Server Management
PUBLIC 149

b. Specify the TCP/IP port that the Job Server uses to receive commands from the Designer and the
Access Server.
Note
If a computer hosts multiple Job Servers, enter a unique port number for each Job Server.
Additionally, the port number must not be used by another process on the computer.
If you are unsure of which port number to use, use the default port number and increment it for
each additional Job Server that you congure.
c. Enter Y or N for Do you want to manage adapters for the Job Server as applicable.
If you enter
Y
, specify the TCP/IP port number to use.
d. Enter Y or N to enable SSL on the adapter management communication paths used by the Job Server.
5. When you add or edit a repository connection, specify the following database connection information:
a. For a DSN-less connection, enter N when the Server Manager asks you if you want to use an ODBC
data source.
b. For a TNS-less connection for an Oracle database, enter N when the Server Manager asks you if you
want to use a TNS name.
c. To use a DSN or TNS connection, you must specify the following additional database connection
information:
Database
Required information
Oracle The TNSNAME specied in tnsnames.ora
MySQL The DSN entry specied in odbc.ini
SAP HANA The DSN entry specied in odbc.ini
DB2 The DB2 instance name
SQL Anywhere The DSN entry specied in odbc.ini
d. If your database type is SAP Sybase, specify the Sybase server name specied in the Interfaces le.
e. To congure SSL/TLS, enter Y for Do you want to use SSL/TLS 'Y|N'? [Y].
Specify the following additional information based on your database type.
Database
Prompt
Oracle Enter the distinguished name:
SAP HANA Do you want to validate certificate
'Y|N'? [Y]:
Enter the SSL Key file:
Enter the SSL Host Name in
Certificate [*]:
150 PUBLIC
Administrator Guide
Server Management

Database Prompt
Microsoft SQL Server
Microsoft SQL Server – Azure VM
Microsoft SQL Server – Azure PaaS
Enter authentication method (1,2) for
the associated repository.
• 1: SQL Server Authentication. Valid for Microsoft
SQL Server, Microsoft SQL Server - Azure VM, and
Microsoft SQL Server – Azure PaaS databases.
• 2: Azure Active Directory - Password. Use for the
Microsoft SQL Server – Azure PaaS database.
Do you want to validate certificate
'Y|N'? [Y]:
f. Enter the user name and password for the repository.
Note
The Server Manager for UNIX systems does not prompt for the repository password except
when creating a Job Server or adding a repository. To update the repository password in the
<DS_COMMON_DIR>/conf/DSConfig.txt le, enter u. All options use the updated password
from DSConfig.txt le.
The Server Manager displays the entered server information.
6. When you are satised with your conguration settings, enter Y to conrm the information is correct.
7. Enter q to quit and then x to exit the Server Manager.
Task overview: Using the Server Manager on UNIX systems [page 146]
Related Information
Conguring runtime resources for UNIX server manager [page 151]
Conguring Access Servers [page 153]
Conguring SSL paths [page 154]
Starting or stopping the service [page 155]
Congure SMTP email [page 156]
6.9.2Conguring runtime resources for UNIX server
manager
1. Ensure required environment variables are set, and run the Server Manager.
$ cd $LINK_DIR/bin/
$ . ./al_env.sh
$ ./svrcfg
Administrator Guide
Server Management
PUBLIC 151

The Server Manager main screen appears.
2. Enter 4 to congure runtime resources.
The runtime resource information screen appears.
3. Enter e to edit the runtime resource conguration.
4. Accept the default Pageable Cache Directory, or specify a dierent location.
Restriction
The Pageable Cache Directory path cannot exceed 70 characters.
Note
For memory-intensive operations such as Group By, Order By, and Detailed proling, specify a
pageable cache directory that fullls the following criteria:
• The directory contains enough disk space for your data. To estimate the amount of space required,
consider factors such as the number of concurrently running jobs or data ows and the amount of
pageable cache required by each concurrent data ow.
• The directory exists on a separate disk or le system from the Data Services system and operating
system.
• The directory limits the disk space that data ows consume. The pageable cache uses all available
disk space on the le system that contains the pageable cache directory. To limit the disk space
that data ows consume, create a le system with a limited size. Use the new le system as the
pageable cache directory.
The software uses this directory in the following situations:
• For pageable caching, the default cache type for data ows. For more information, see the
Performance Optimization Guide.
• When the software selects a le transfer type and Automatic is specied in the Data_Transfer
transform.
5. Change the values for Start port and End port to restrict the number of ports used by the software for
peer-to-peer communications. The default values are 1025 and 32767, respectively.
The software uses these ports for peer-to-peer communications when sending data between data ows or
sub data ows that are running on dierent Job Servers.
6. Specify whether you want to use the SSL security protocol on the communication paths between data
ows and sub data ows.
7. Enter q and then x to exit the Server Manager.
Task overview: Using the Server Manager on UNIX systems [page 146]
Related Information
Conguring Job Servers on UNIX [page 148]
Conguring Access Servers [page 153]
Conguring SSL paths [page 154]
Starting or stopping the service [page 155]
152
PUBLIC
Administrator Guide
Server Management
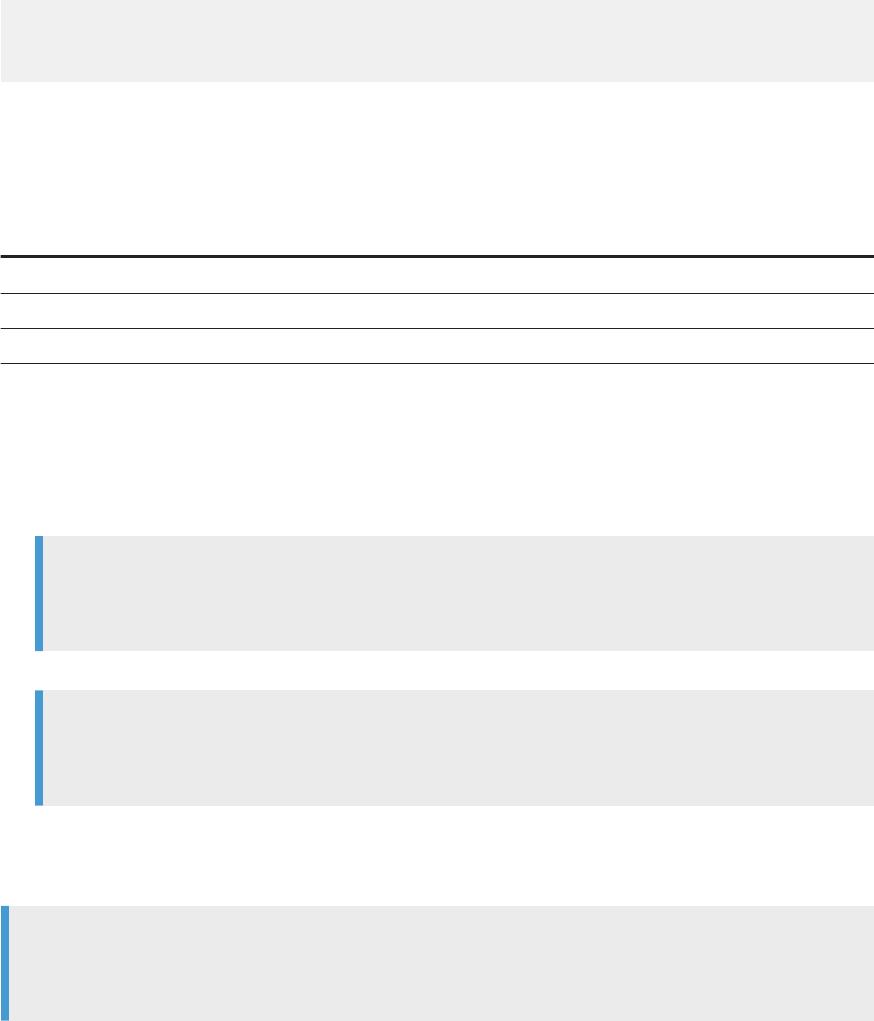
Congure SMTP email [page 156]
Performance Optimization Guide: Using grid computing to distribute data ow execution
6.9.3Conguring Access Servers
When you congure the location for an Access Server installation, SAP Data Services creates space for the
Access Server log les.
1. Ensure required environment variables are set, and run the Server Manager.
$ cd $LINK_DIR/bin/
$ . ./al_env.sh
$ ./svrcfg
The Server Manager main screen appears.
2. Enter 4 to congure an Access Server.
The Access Server information screen appears.
3. Enter the command for the conguration task you want to perform:
Command
Conguration task
c
Create a new Access Server.
e
Edit an existing Access Server.
d
Delete an existing Access Server.
4. When you create or edit an Access Server, specify additional conguration details:
a. If you are editing an existing Access Server, enter the number of the Access Server shown in the
Access Server conguration information screen.
b. Specify the directory for the Access Server.
c. Specify the TCP/IP port that the Access Server should use for communication.
Note
You can congure more than one Access Server on the same computer, but each must have
separate ports. If you enter a port number already in use, an error message appears.
d. Specify any additional parameters for the Access Server.
Note
Additional Access Server parameters can be viewed by typing AL_AccessServer at the command
line. For more information, see “Real Time Performance” in the Management Console Guide.
e. Specify whether you want to use the SSL security for real-time messaging on this Access Server.
f. Specify whether you want to enable the Access Server.
5. When you delete an Access Server, specify the number of the Access Server to delete.
Note
When you delete an Access Server, all Access Servers are stopped. When you exit the Server Manager,
any remaining Access Servers restart.
Administrator Guide
Server Management
PUBLIC 153

6. When you are satised with your conguration changes, enter q and then x to exit the Server Manager.
Task overview: Using the Server Manager on UNIX systems [page 146]
Related Information
Conguring Job Servers on UNIX [page 148]
Conguring runtime resources for UNIX server manager [page 151]
Conguring SSL paths [page 154]
Starting or stopping the service [page 155]
Congure SMTP email [page 156]
Management Console Guide: Conguring an Access Server
6.9.4Conguring SSL paths
Use the Server Manager to congure the paths to SSL certicates and keyles.
Note
By default, the paths for the SSL certicate and keyles are automatically congured during installation.
You do not need to change them unless you want to use your own certicates.
1. Ensure required environment variables are set, and run the Server Manager.
$ cd $LINK_DIR/bin/
$ . ./al_env.sh
$ ./svrcfg
The Server Manager main screen appears.
2. Enter 7 to congure SSL paths.
The SSL conguration information screen appears.
3. Enter e to edit the SSL conguration.
4. Specify the SSL conguration information when prompted:
a. The path to the server certicate le
b. The path to the server private key le
c. Whether you want to use a private key password le and the path to that le
d. The directory where your trusted certicates are stored
Note
The server certicate must be in PEM format. Valid extensions for certicates in the trusted certicates
folder include .pem, .crt, and .cer. Regardless of the le extension, all certicate le contents must
be in PEM format.
5. When you are satised with your conguration changes, enter q and then x to exit the Server Manager.
154
PUBLIC
Administrator Guide
Server Management

The certicate information specied in the Server Manager applies to all Data Services servers running on that
physical machine (for example, any Job Servers, Access Servers, and so on.)
Task overview: Using the Server Manager on UNIX systems [page 146]
Related Information
Conguring Job Servers on UNIX [page 148]
Conguring runtime resources for UNIX server manager [page 151]
Conguring Access Servers [page 153]
Starting or stopping the service [page 155]
Congure SMTP email [page 156]
6.9.5Starting or stopping the service
The SAP Data Services service (AL_JobService) is a daemon associated with $LINK_DIR that starts locally-
congured Job Servers and Access Servers and then monitors them and attempts to restart them if they are
not running.
After you exit the Server Manager, AL_JobService automatically retrieves any changes made to Job Servers
or Access Servers. You do not need to restart AL_JobService.
1. Run the Server Manager.
$ cd $LINK_DIR/bin/
$ . ./al_env.sh
$ ./svrcfg
Note
The second command sets required environment variables before ./svrcfg starts the Server
Manager.
The Server Manager main screen appears.
2. Enter 1 to control the service (Job service).
3. Start or stop the Job service.
• Enter s to start the Job service.
• Enter o to stop the Job service.
4. Enter q and then x to exit the Server Manager.
Task overview: Using the Server Manager on UNIX systems [page 146]
Administrator Guide
Server Management
PUBLIC 155
Related Information
Conguring Job Servers on UNIX [page 148]
Conguring runtime resources for UNIX server manager [page 151]
Conguring Access Servers [page 153]
Conguring SSL paths [page 154]
Congure SMTP email [page 156]
6.9.6Congure SMTP email
Use the Server Manager to specify SMTP server settings for the smtp_to email function.
For more information, see “Dening and enabling the smtp_to function” in the Reference Guide.
Parent topic: Using the Server Manager on UNIX systems [page 146]
Related Information
Conguring Job Servers on UNIX [page 148]
Conguring runtime resources for UNIX server manager [page 151]
Conguring Access Servers [page 153]
Conguring SSL paths [page 154]
Starting or stopping the service [page 155]
6.10 Conguring Metadata Browsing Service and View Data
Service
SAP Information Steward uses the Metadata Browsing Service and the View Data Service to connect to and
view data in proling sources.
When you install SAP Data Services, the installation congures the two services with default settings, and
lists them under the server EIMAdaptiveProcessingServer. You can change the conguration settings to more
eectively integrate Information Steward with your hardware, software, and network congurations.
To change the conguration settings for Metadata Browsing Service and View Data Service, perform the
following steps in the Central Management Console (CMC):
1. Open the Servers management area of the CMC.
2. Expand Service Categories node the tree panel and select Enterprise Information Management Services.
3. Double-click <computername.> EIMAdaptiveProcessingServer in the list in the right pane.
156
PUBLIC
Administrator Guide
Server Management
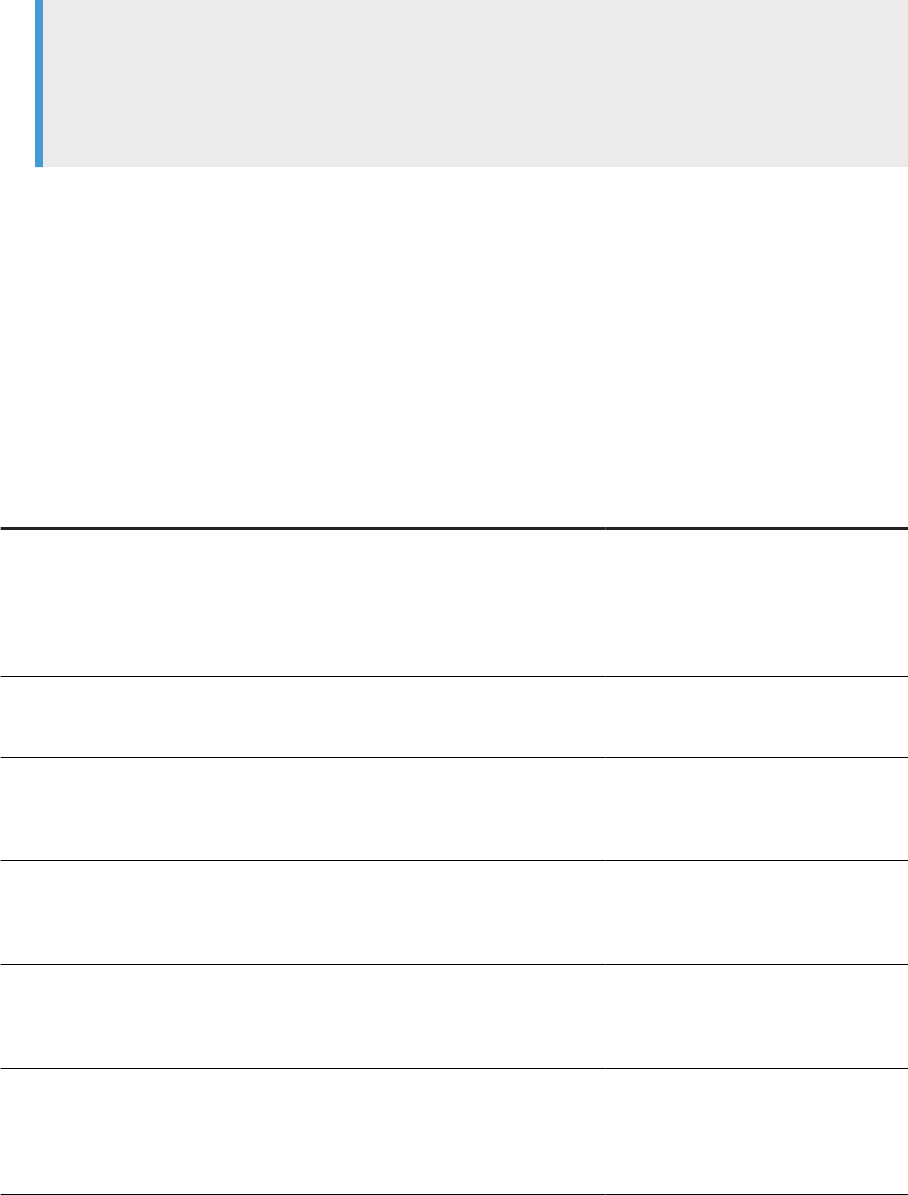
The Properties page opens.
4. Double-click the service to change.
5. Change the conguration as applicable and select Save or Save & Close.
Note
Not all changes occur immediately. If a setting can't change immediately, the Properties page displays
both the current setting (in red text) and the updated setting. When you return to the Servers
management area, the server is labeled as Stale. When you restart the server, it uses the updated
settings from the Properties page and removes the Stale ag from the server.
Metadata Browsing Service conguration parameters [page 157]
You can change the following properties of the Metadata Browsing Service.
View Data Services conguration parameters [page 159]
You can change the following properties of the View Data Service.
6.10.1Metadata Browsing Service conguration parameters
You can change the following properties of the Metadata Browsing Service.
Server
Conguration Parameter Description Possible Values
Service Name Name of the service conguration. Alphanumeric string with a maximum
length of 64. The Service Name cannot
contain any spaces.
Default value: MetadataBrowsingSer-
vice
Maximum Data Source Connections
Maximum number of data source con-
nections that can be opened at any
time under a service instance.
integer.
Default value: 200
Retry attempts to launch Service Pro-
vider
Maximum number of attempts to
launch a new service provider when
there is contention to access a shared
service provider.
Default value: 1
Stateful Connection Timeout (seconds) Maximum duration in which a state-
ful connection is open. Stateful connec-
tions include SAP Applications and SAP
BW Source.
Default value: 1200
Stateless Connection Timeout (sec-
onds)
Maximum duration in which a state-
less connection is open. Stateless con-
nections include all relational database
sources.
Default value: 1200
Recycle Threshold Maximum number of requests that
the service processes before the Data
Services back end engine is recycled
to free memory that was allocated for
metadata browsing.
Default value: 50000
Administrator Guide
Server Management
PUBLIC 157
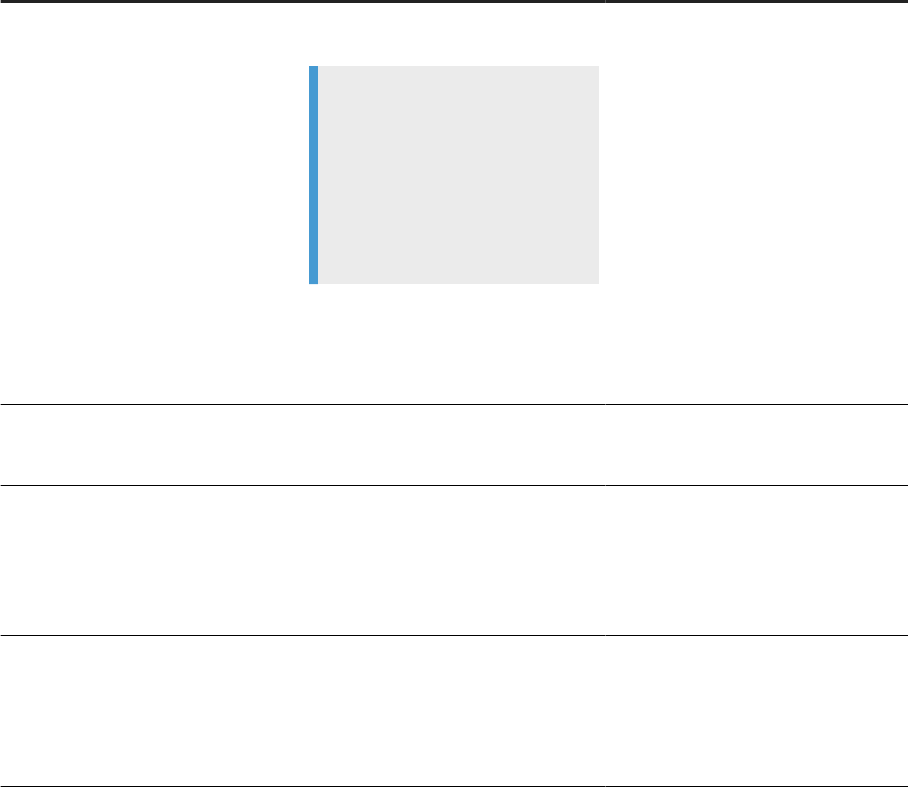
Server Conguration Parameter Description Possible Values
Log Level Level of logging of trace messages to
the log le.
Note
If there is more than one instance
of Metadata Browsing Service con-
gured in the CMS, the same level
of information is collected from all
instances. The log level dened for
the rst running service is the level
used.
Information Steward logs:
• None: Logging disabled.
• Info: Logging disabled. (same as
None)
• Finer: All traces, requests, and re-
sponses.
Data Services logs:
• None: Logging disabled.
• Info: All traces.
• Finer: All traces, requests, and re-
sponses.
Default level is Info.
Collect Connection Statistics
Enable or disable the collection of sta-
tistic information for each open con-
nection.
Default is enabled.
Listener Port Port number used to communicate with
the Data Services back end engine.
If you change the port number, you
must restart the EIMAdaptiveProces-
singServer for the change to take eect.
Four-digit port number that is not cur-
rently in use.
Default value: 4010
JMX Connector Port Port number used for the JMX Connec-
tor.
If you change the port number, you
must restart the EIMAdaptiveProces-
singServer for the change to take eect.
Four-digit port number that is not cur-
rently in use.
Default value: 4011
Parent topic: Conguring Metadata Browsing Service and View Data Service [page 156]
Related Information
View Data Services conguration parameters [page 159]
158
PUBLIC
Administrator Guide
Server Management

6.10.2View Data Services conguration parameters
You can change the following properties of the View Data Service.
Server Conguration Pa-
rameter
Description Possible Values
Service Name Name of the service conguration. Alphanumeric string with a max-
imum length of 64. The Service
Name cannot contain any spaces.
Default value: ViewData
Listener Port
Port number used to communicate with the Data
Services backend engine.
If you change the port number, you must restart the
EIMAdaptiveProcessingServer for the change to take
eect.
Four-digit integer.
Default value: 4012
JMX Connector Port Port number used for the JMX Connector.
If you change the port number, you must restart the
EIMAdaptiveProcessingServer for the change to take
eect.
Four-digit integer.
Default value: 4013
Batch Size (kilobytes) Size of the data to be stored in a view data response.
Minimum value: 1000
Maximum value: 5000
Default value: 1000
Minimum Shared Service
Providers
Minimum number of shared Data Services backend en-
gines that need to be launched at the startup time of
the service.
Default value: 1
Maximum Shared Service
Providers
Maximum number of shared Data Services backend en-
gines that can be launched during the time to service
the view data requests.
Default value: 5
Maximum Dedicated Service
Providers
Maximum number of dedicated Data Services backend
engines that can be launched at any instant of time.
Default value: 10
Recycle Threshold Maximum number of requests that will be processed by
a service before the Data Services backend engine is
recycled to free memory that was allocated for viewing
data.
Any integer.
Default value: 200
Number of attempts to
launch service provider
Number of attempts to be made to try launching the
Data Services backend engine instance.
Default value: 1
Maximum idle time for
shared service provider (mi-
nutes)
Maximum number of minutes that a Data Services
backend engine can remain without processing any re-
quests. After this time is exceeded, the Data Services
backend engine is shut down.
Default value: 120
Administrator Guide
Server Management
PUBLIC 159

Server Conguration Pa-
rameter Description Possible Values
Log Level Level of logging of trace messages to the log le.
Note
If there is more than one instance of View Data
Service congured in the CMS, the same level of
information is collected from all instances. The log
level dened for the rst running service is the level
used.
Information Steward logs:
• None: Logging disabled.
• Info: Logging disabled. (same
as None)
• Finer: All traces, requests,
and responses.
Data Services logs:
• None: Logging disabled.
• Info: All traces.
• Finer: All traces, requests,
and responses.
Default level is Info.
Parent topic: Conguring Metadata Browsing Service and View Data Service [page 156]
Related Information
Metadata Browsing Service conguration parameters [page 157]
6.11 Data Services CMC application settings
You can change the following settings for the Data Services Application on the Central Management Console
(CMC).
Setting
Description
History Retention Period Number of days to retain the job execution history.
Default value: 30
• If you enter 0, then the software does not retain job history.
• If you enter a negative number, then the software retains job history inde-
nitely.
160 PUBLIC
Administrator Guide
Server Management

Setting Description
Job Server Log Retention Period Number of days to retain the Job Server logs.
Default value: 30
• If you enter 0, then the software does not retain Job Server logs.
• If you enter a negative number, then the software retains Job Server logs
indenitely.
Job History Cleanup Period Number of seconds from the job start time that the Data Services
Management Console cleans up the bad or crashed job history.
With this setting, you can nd jobs that are either running longer than the
normal time, or jobs that have crashed abnormally.
A job that crashes for an abnormal reason fails to update the job history
metadata tables or the local repository, and the software doesn't register an
end time. Therefore, even though the job crashed, the Management Console
may show it as still running.
The default setting is 0.
• If you keep the default of 0, or set to a negative number, then the software
does not clean up the bad or crashed job history.
• If you set to 1 or higher, then the software cleans up the bad or crashed job
history in the set number of seconds from the job start time.
When you enter a positive number in this setting, enter a number that provides
enough time for your longest running jobs to complete. After the time elapses,
any jobs that do not have an end timestamp will be marked as failed. For these
jobs, you can check the log les to discover if the job ended abnormally.
For example, if your longest-running job takes 30 minutes, set this option to
3600 seconds, so that, after an hour from the job start time, the status in the
batch status page in the Management Console shows the job is no longer proc-
essing. That way, you can see a list of jobs that potentially crashed abnormally,
without having to wait a long period of time.
Enable SSL communication for Metadata
Browsing and View Data Services
Species whether or not to use SSL communications for Metadata Browsing
Service and View Data Service of the EIM Adaptive Processing Server.
Other SAP software products, such as SAP Information Steward, use the Met-
adata Browsing Service and View Data Service service to browse and import
metadata and to view the data in connections.
Use Default SSL Settings
Species whether or not to use the default SSL keystore and certicates.
Default value: No
If you specify No, then you must enter values in KeyStore File, KeyStore
Password, and Key Password.
KeyStore File File name of the keystore that contains the key and all the certicates that are
part of the certicate chain involved in signing the key.
Default value: DSJavaKeyStore.keystore
Administrator Guide
Server Management
PUBLIC 161

Setting Description
KeyStore Password Password to the keystore le.
Key Password Password to the key inside the keystore le.
Encryption passphrase Passphrase to use for encrypting passwords that are sent as part of requests
to the Metadata Browsing Service and View Data Service.
Other SAP software products, such as SAP HANA, use this Encryption
passphrase to encrypt passwords when sending an open connection request.
The backend engine will use this passphrase to decrypt the password and
process the open connection request.
162 PUBLIC
Administrator Guide
Server Management
7 Monitoring jobs
To view the overall status of a batch job and job statistics, SAP Data Services provides job monitoring tools in
the Management Console Administrator.
Monitor the job execution information of any batch job in a connected repository. Monitor jobs that you run
from the Administrator or from the Designer.
Viewing overall status of executed jobs [page 163]
To view the overall status of each batch job execution and to access more detailed statistics and
log les, use the list in the Batch Job Status tab of the SAP Data Services Management Console
Administrator.
Statistics [page 165]
The SAP Data Services Management Console Administrator contains statistics for each job that you
run.
Ignoring error status [page 168]
When you view the job status logs for jobs with warnings or errors, use the Ignore Error Status button to
change the status indicator to green to indicate that you've reviewed the job logs.
Deleting batch job history data [page 168]
The Batch Job Status page in the SAP Data Services Management Console includes an option to delete
information about how a job ran.
Stopping a running job [page 169]
Stop a running batch job in the SAP Data Services Management Console Administrator while you
monitor job status.
Deleting trace, monitor, and error logs for a batch job [page 169]
View and delete trace, monitor, and error logs for job instances in the SAP Data Services Management
Console.
7.1 Viewing overall status of executed jobs
To view the overall status of each batch job execution and to access more detailed statistics and log les, use
the list in the Batch Job Status tab of the SAP Data Services Management Console Administrator.
Before you perform the following steps, execute the batch job, log in to the Management Console, and open the
Administrator.
To view the overall status of an executed job, perform the following steps:
1. Expand the Batch node on the left of the Administrator window and select the repository name.
The Batch Job Status tab opens at right. The tab shows lter options and a list of each job execution
instance for the selected repository.
2. Optional: Filter the list of batch jobs displayed by performing the following substeps:
Administrator Guide
Monitoring jobs
PUBLIC 163
a. Choose a job name from the Job name list.
b. Select Search.
3. Optional: Further lter the list of batch jobs displayed using one of the following Display options:
• To display the instance of the last execution for the job or jobs: Choose Last execution of job and select
Search.
• To display the instances of the job or jobs executed in the specied number of days: Choose Last,
choose the number of days from the Days list, and select Search.
• To display the instances of the job or jobs executed within the specied date range: Choose All
executions, enter a From and To date, and select Search.
4. Optional: Sort a specic column by selecting a column heading and choosing Ascending or Descending in
the Batch jobs history section.
5. View the status indicator in the Status column.
Status indicators
Indicator
Description
A green icon indicates that the batch job ran without error.
A yellow icon indicates that the batch job has one or more
warnings.
A red icon indicates that the batch job experienced an
error.
6. Optional: View the End Time column to see when the job completed.
Note
If a job is running longer than usual, and there's no end time listed, there's an issue with the job, or
the job completed abnormally. When a job completes abnormally, it doesn't update the job history
metadata or the local repository, so there's no end time. You can set a limit for how long jobs display as
running in the Central Management Console. For more information, see Data Services CMC application
settings [page 160].
7. Optional: To view job processing information, select one of the following links under the Job information
column:
• Trace: View information in the Job Trace Log tab.
• Monitor: View information in the Job Monitor Log tab.
• Error: View information in the Job Error Log tab.
8. Optional: View additional information in the Batch Job Status tab, such as server information.
Note
Congure jobs to execute by a specic Job Server, or by a server group. If you choose to execute a job
using a server group, use the Batch Job Status tab to see which Job Server actually executed the job.
Note
When the job includes a server group icon in the Job Server column, a server group executed the job.
To view the name of the server group, roll your cursor over the Server Group icon. The Job Server
164
PUBLIC
Administrator Guide
Monitoring jobs

listed is the Job Server in the server group that executed the job. If you explicitly select a Job Server to
execute a job, the Server Group icon doesn't appear for the job, even when the Job Server is a part of a
server group.
Task overview: Monitoring jobs [page 163]
Related Information
Statistics [page 165]
Ignoring error status [page 168]
Deleting batch job history data [page 168]
Stopping a running job [page 169]
Deleting trace, monitor, and error logs for a batch job [page 169]
Setting the status interval
7.2 Statistics
The SAP Data Services Management Console Administrator contains statistics for each job that you run.
Statistics quantify the activities of the components of the job. View the following types of statistics in the
Administrator:
• Job statistics, such as time spent in a given component of a job and the number of data rows that
streamed through the component.
• Data ow object statistics, such as the cache size used by a transform within a data ow.
Viewing job statistics [page 166]
Use job statistics to help tune job performance.
Data ow statistics [page 167]
Use statistics from a data ow to help tune job performance.
Parent topic: Monitoring jobs [page 163]
Related Information
Viewing overall status of executed jobs [page 163]
Ignoring error status [page 168]
Deleting batch job history data [page 168]
Stopping a running job [page 169]
Deleting trace, monitor, and error logs for a batch job [page 169]
Administrator Guide
Monitoring jobs
PUBLIC 165
7.2.1Viewing job statistics
Use job statistics to help tune job performance.
Before you perform the following steps, run a job for which you want to improve job performance.
To view job statistics in SAP Data Services Management Console, perform the following steps:
1. Expand the Batch node on the left of the Administrator window and select the repository name.
The Batch Job Status tab opens at right.
2. Find the applicable job instance using the page subtitle.
The page subtitle provides the name of the repository in which SAP Data Services stores the job. Further,
use the column headings described in the following table.
Column name
Description
Status Contains an icon that indicates the overall job status:
• Green icon indicates that the job ran without error.
• Yellow icon indicates that the job ran, but has one or
more warnings.
• Red icon indicates that the job didn't complete be-
cause of one or more errors.
Job Name
Name of the job that you ran in Designer.
System Conguration Name of the set of datastore congurations that the job
used to connect to source and target databases when you
ran the job.
Each value in this column is a link that opens to the set of
datastore congurations in the system conguration.
Job Server
Name of the Job Server on which the job ran.
Start Time The date and time that the job started.
End Time The date and time that the job stopped.
Duration The number of seconds that the job took to complete.
Run # The number of times that the job instance ran before it
completed.
3. Select Monitor under Job Information for a job instance.
The Administrator opens the Job Server Monitor Log Viewer page, which shows statistics about this job
instance, starting with the name of the Monitor log le.
After the Monitor log le name, each line in the log provides the information described in the following
table.
166
PUBLIC
Administrator Guide
Monitoring jobs

Column name Description
Path Name Indicates which object (step in a data ow) is running.
State Indicates the run-time order of the processes in the trans-
form object and the states of each process.
The states in this column aren't error status states. How-
ever, an error is indicated when a process state lists
Proceed, and it never changes to Stop.
Initializing
Indicates that the job is initializing.
Optimizing Indicates that the job is optimizing.
Proceed Indicates that the process is executing.
Stop Indicates that the process ended without error.
Row Count Indicates the number of rows processed through this ob-
ject. This value updates based on the Monitor sample rate
(# of seconds) set as an execution option on the Execute
Batch Job page.
Elapsed Time
Indicates the number of seconds since the object received
its rst row of data.
Absolute Time Indicates the number of seconds since the running of this
entire data ow, including all of the transforms, began.
Task overview: Statistics [page 165]
Related Information
Data ow statistics [page 167]
7.2.2Data ow statistics
Use statistics from a data ow to help tune job performance.
Parent topic: Statistics [page 165]
Related Information
Viewing job statistics [page 166]
Administrator Guide
Monitoring jobs
PUBLIC 167
7.3 Ignoring error status
When you view the job status logs for jobs with warnings or errors, use the Ignore Error Status button to change
the status indicator to green to indicate that you've reviewed the job logs.
When you initially look at the Batch Job Status page in SAP Data Services Management Console, the Status
column shows icons whose color indicates whether the job ran successfully (green), has warnings (yellow), or
has errors (red). After you've reviewed a job that has warnings or errors, use the Ignore Error Status button to
change the icon to green, and move on to review the next job with warnings or errors.
To use the Ignore Error Status feature, perform the following steps in the Batch Job Status page:
1. Choose the job and examine the logs to discover why the job has warnings or wasn't successful.
2. Select the Ignore Error Status button.
The page refreshes, and the row that you've selected now display a green icon in the Status column.
3. Continue in this manner until you've reviewed all jobs that had warnings or errors.
Task overview: Monitoring jobs [page 163]
Related Information
Viewing overall status of executed jobs [page 163]
Statistics [page 165]
Deleting batch job history data [page 168]
Stopping a running job [page 169]
Deleting trace, monitor, and error logs for a batch job [page 169]
7.4 Deleting batch job history data
The Batch Job Status page in the SAP Data Services Management Console includes an option to delete
information about how a job ran.
Delete selected rows from the Batch Job Status page. To delete entire log les on a periodic basis, set the Job
Server Log Retention Period or the History Retention Period options in the Central Management Console. For
more information about the log retention settings in the Central Management Console, see History retention
and Job Server log retention [page 105]. See the Management Console Guide for more information about the
Batch Job Status page.
Parent topic: Monitoring jobs [page 163]
168
PUBLIC
Administrator Guide
Monitoring jobs

Related Information
Viewing overall status of executed jobs [page 163]
Statistics [page 165]
Ignoring error status [page 168]
Stopping a running job [page 169]
Deleting trace, monitor, and error logs for a batch job [page 169]
7.5 Stopping a running job
Stop a running batch job in the SAP Data Services Management Console Administrator while you monitor job
status.
The Batch Job Status page includes an option to stop batch jobs while they are running. If a batch job is running
and you need to stop it, select the check box next to the job name and select Abort.
Parent topic: Monitoring jobs [page 163]
Related Information
Viewing overall status of executed jobs [page 163]
Statistics [page 165]
Ignoring error status [page 168]
Deleting batch job history data [page 168]
Deleting trace, monitor, and error logs for a batch job [page 169]
7.6 Deleting trace, monitor, and error logs for a batch job
View and delete trace, monitor, and error logs for job instances in the SAP Data Services Management Console.
Delete a set of batch log history les from a Job Server computer and its corresponding repository. The
corresponding Job Server must be up and running to view or delete these logs.
Caution
The trace, monitor, and error log les can contain important les that the system needs to create
regulatory or certied reports as well as statistical tables. Therefore, make sure that the log les you
delete aren't required for reporting purposes. If you're not sure, make backup copies of any les that you
need before you delete the batch job history.
Administrator Guide
Monitoring jobs
PUBLIC 169
1. Expand the Batch node on the left of the Administrator window and select the repository name.
The Batch Job Status tab opens at right.
2. Select the job or jobs with the logs to delete.
Alternately, you can select Select All.
3. Select Delete.
The software deletes the batch log history les from the Job Server computer and the corresponding
repository.
Task overview: Monitoring jobs [page 163]
Related Information
Viewing overall status of executed jobs [page 163]
Statistics [page 165]
Ignoring error status [page 168]
Deleting batch job history data [page 168]
Stopping a running job [page 169]
170
PUBLIC
Administrator Guide
Monitoring jobs
8 Lifecycle migration
Lifecycle migration is the process of moving SAP Data Services applications through multiple development
phases to production.
Data Services supports simple and complex migration through all phases into production.
Development phases [page 171]
SAP Data Services supports multiple phases to conform to your development requirements.
Migration tools [page 175]
Migration tools help you create a foundation for your development phases and migration structure.
Migration mechanisms [page 183]
Decide which migration mechanism to use to migrate aplications from one development phase to the
next.
Migrate with export and import [page 187]
Use the exibility of the export and import features in SAP Data Services to migrate projects with single
and multiple developers in dierent development environments.
Back up repositories [page 195]
To avoid data loss by accidentally deleting or overwriting data, adopt the best practice of backing up
your repositories on a regular schedule, and especially before migration.
Mismatched locales and job performance [page 196]
After you migrate to a new environment, performance is aected by factors such as dierent locales
between source and target data sources.
8.1 Development phases
SAP Data Services supports multiple phases to conform to your development requirements.
The ETL application development process typically involves the following distinct phases:
• Design: Requires only limited sample data and low security.
• Test: Requires larger sample data with increased security.
• Development: Requires actual data with the highest security.
The following diagram shows the three development phases.
Administrator Guide
Lifecycle migration
PUBLIC 171
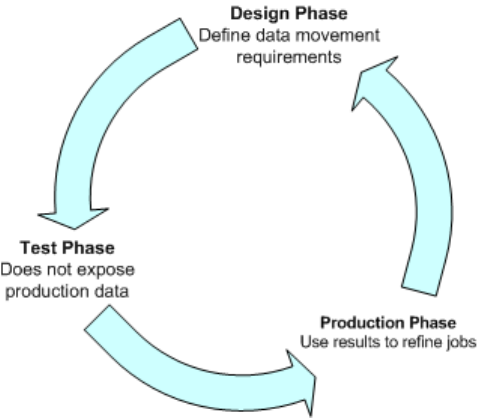
Data Services supports separate repositories for each development phase to control environment dierences.
Your environment can have as many phases as you require. Further, you can create each phase on a dierent
computer in a dierent environment with dierent security settings. Data Services provides migration tools and
mechanisms for moving objects from phase to phase in an ordered manner.
The design phase [page 173]
In the design phase, dene applications that instruct SAP Data Services in your data movement
requirements.
The test phase [page 173]
In the test phase, test applications for errors and trace the ow of data without exposing actual data to
security risks.
The production phase [page 174]
In the production phase, use actual data, set a schedule to run applications, monitor application
performance, and evaluate results.
Parent topic: Lifecycle migration [page 171]
Related Information
Migration tools [page 175]
Migration mechanisms [page 183]
Migrate with export and import [page 187]
Back up repositories [page 195]
Mismatched locales and job performance [page 196]
172
PUBLIC
Administrator Guide
Lifecycle migration
8.1.1The design phase
In the design phase, dene applications that instruct SAP Data Services in your data movement requirements.
The design phase has its own local repository. Data Services stores objects and applications in the local
repository for reuse or modication as your system evolves.
Design your project with migration in mind. Consider the following basic guidelines as you design your
applications:
• Construct steps as independent, testable modules.
• Use meaningful names for each step you construct.
• Make independent modules that you can use repeatedly for common operations.
• Use test data that reects all the variations of your production data.
Parent topic: Development phases [page 171]
Related Information
The test phase [page 173]
The production phase [page 174]
8.1.2The test phase
In the test phase, test applications for errors and trace the ow of data without exposing actual data to security
risks.
If you discover data movement problems or other errors during this phase, return to the design phase to
correct the application. Then move the corrected application to the test phase for further testing.
Testing has two parts:
• The rst part includes designing the data movement through the application using your local repository.
• The second part includes fully emulating your production environment, including increasing the data
volume.
Use SAP Data Services Management Console Administrator to view feedback through trace, error, and monitor
logs during both parts of the test phase. For more information about the Management Console trace and error
monitoring, read about batch jobs in the Management Console Guide.
In the second part of the test phase, emulate the production repository environment as closely as possible. For
example, schedule jobs through the Central Management Console rather than starting jobs manually.
Parent topic: Development phases [page 171]
Administrator Guide
Lifecycle migration
PUBLIC 173

Related Information
The design phase [page 173]
The production phase [page 174]
8.1.3The production phase
In the production phase, use actual data, set a schedule to run applications, monitor application performance,
and evaluate results.
After moving objects from test to production, continue to use the SAP Data Services Management Console
Administrator to monitor performance and results. Most issues are caught during testing. However, if the
performance or results still aren't what you expect, return to the test phase to optimize performance and rene
your target requirements.
Monitor Performance during the production phase:
• View trace and monitoring logs in the Management Console Administrator for information about each job,
and the work ows and data ows contained within the job.
Note
Customize log details in jobs to provide the information that is most helpfulWhen you adjust log
details to provide more information, the job takes longer to complete. Balance job run time against the
information necessary to analyze job performance.
For more information about the Management Console trace and error monitoring, read about batch jobs in
the Management Console Guide.
• Check the accuracy of your data by reviewing output and reports.
If you determine that adjustments are necessary, enhance, or correct your applications.
Example
You notice that an application produces unexpected results. You perform the following tasks:
1. Export the application to the design environment, nd issues, and update the application.
2. Export the adjusted application to the test environment.
3. Test the application.
4. When you are satised with the results, export changed application to the production environment.
Parent topic: Development phases [page 171]
Related Information
The design phase [page 173]
174
PUBLIC
Administrator Guide
Lifecycle migration

The test phase [page 173]
8.2 Migration tools
Migration tools help you create a foundation for your development phases and migration structure.
Prepare for migration using one or both tools based on your development environment. The following table
describes the migration tools.
Tool
Description
Naming conventions
Use when migrating applications in a multi-user environ-
ment.
Implement standardized naming conventions in datastores
for connectivity between computer systems.
Multiple conguration datastore and system congurations
Use if your source data comes from multiple, homogeneous
systems.
Create datastores with multiple congurations. Each con-
guration reects the environment of each development
phase.
Group datastores into system congurations to use when
running jobs.
Naming conventions for migration [page 176]
Use common naming conventions to ensure fast and seamless migration across all systems and
phases of your development environments.
Datastore and system congurations [page 179]
Use multi-conguration datastores and system congurations as tools for reducing the tasks required
to execute the same logic against dierent datastore environments.
Parent topic: Lifecycle migration [page 171]
Related Information
Development phases [page 171]
Migration mechanisms [page 183]
Migrate with export and import [page 187]
Back up repositories [page 195]
Mismatched locales and job performance [page 196]
Administrator Guide
Lifecycle migration
PUBLIC 175

8.2.1Naming conventions for migration
Use common naming conventions to ensure fast and seamless migration across all systems and phases of your
development environments.
Just as we recommend that you standardize object prexes, suxes, and path name identiers to simplify your
projects internally, we also recommend that you use naming conventions externally for migration purposes.
When you consider using naming conventions for migration, look at your data. Even though the actual data that
you extract, transform, and load is dierent based on database type, the essential structure of the data should
be the same.
The goal is to make migration for applications between users and development phases as quick and easy
as possible. Using common naming conventions translates to signicantly reducing or eliminating time spent
reconguring your jobs to work in each specic environment.
Use common naming conventions for the following objects:
• Connections to external databases
• Directory locations
• Schema structures and owners
Connections to external data sources [page 176]
Consider how the migration impacts connection congurations associated with your jobs.
Directory names [page 178]
Use logical directory names, such as x:\, or point to common local drives to standardize directory
locations.
Schema structures and owners [page 178]
Provide the same owner name for all database instances with the same schema structure from which
you read and to which you load data.
Parent topic: Migration tools [page 175]
Related Information
Datastore and system congurations [page 179]
8.2.1.1 Connections to external data sources
Consider how the migration impacts connection congurations associated with your jobs.
When you create multi-conguration datastores for a data source, use generic names for the connections to
reduce the time to reconguring them in other development phases.
Note
If you use this naming structure, use the multi-conguration datastore migration mechanism.
176
PUBLIC
Administrator Guide
Lifecycle migration

Note
When you use this generic, cross-phase naming method, you can't access both design and test from the
same computer because the connection string maps only to one instance. If you require access to both
instances, use the multiple datastore conguration mechanism.
Make connection names meaningful based on the development phase and specic computer system name.
Example
Example
You create a multi-conguration datastore for your data warehouse source. You use the following
connection names for design and test phases, incorporating the phase name and the source type:
Design phase
Test phase
User name: Des_DW User name: Test_DW
Password: Des_DW Password: Test_DW
Host String: Des_DW Host String: Test_DW
When you run a job that uses the data warehouse datastore, select to use the Des_DW for the design phase
and the Test_DW for the test phase.
Alternatively, drop the “Des” and “Test” prexes and name the connection “DW”. Then, regardless of the
phase, the datastore conguration works without having to create multiple congurations.
Design phase
Test phase
Database A Datastore connection Database B Datastore connection
User name: DW User name: DW User name: DW User name: DW
Password: DW Password: DW Password: DW Password: DW
Host string: DW Host string: DW Host string: DW Host string: DW
Parent topic: Naming conventions for migration [page 176]
Related Information
Directory names [page 178]
Schema structures and owners [page 178]
Administrator Guide
Lifecycle migration
PUBLIC 177

8.2.1.2 Directory names
Use logical directory names, such as x:\, or point to common local drives to standardize directory locations.
Example
Since every computer has a C:\ drive, pointing to the directory location, C:\TEMP is a reproducible
standard.
Parent topic: Naming conventions for migration [page 176]
Related Information
Connections to external data sources [page 176]
Schema structures and owners [page 178]
8.2.1.3 Schema structures and owners
Provide the same owner name for all database instances with the same schema structure from which you read
and to which you load data.
Regardless of the name, the owner of each schema structure can vary, and SAP Data Services reconciles them.
178
PUBLIC
Administrator Guide
Lifecycle migration

Parent topic: Naming conventions for migration [page 176]
Related Information
Connections to external data sources [page 176]
Directory names [page 178]
8.2.2Datastore and system congurations
Use multi-conguration datastores and system congurations as tools for reducing the tasks required to
execute the same logic against dierent datastore environments.
With datastore and system congurations, migration between development phases becomes faster and more
simplied.
For more information about multiple conguration datastores and system congurations, see the Designer
Guide.
Administrator Guide
Lifecycle migration
PUBLIC 179

Multiple congurations in multi-user environments [page 180]
An ecient way to streamline migration of datastore congurations in a multi-user environment is to
use multiple congurations in one datastore.
Datastores, system congurations, and migration [page 181]
Use datastores with multiple congurations for faster migration, and then, create system
congurations to facilitate migration in a multi-user environment.
Parent topic: Migration tools [page 175]
Related Information
Naming conventions for migration [page 176]
8.2.2.1 Multiple congurations in multi-user environments
An ecient way to streamline migration of datastore congurations in a multi-user environment is to use
multiple congurations in one datastore.
In a multi-user development environment, a team can work on an application during the design, testing, and
production phases. Further, dierent teams can work on the phases simultaneously.
A team uses a central repository to store, check in, and check out objects that belong to the primary
application. Individual team members work on objects checked out from the central repository in their local
repository, then check in the changed object to the central repository as a version. The central repository
preserves all versions of an application's objects, allowing you to revert to a previous version if needed.
The easiest way to set up your environment to work with multiple users is by establishing the same
environment naming standards for each user. In each developer's environment, the conguration is dierent.
For example, a database connection string points to their local database.
However, if implementing these naming standards isn't possible, you can still save time and streamline your
multi-user environment by using multiple-conguration datastores.
Example
If developers on a team use databases with the same metadata structure but dierent database instances
and owners, dene a datastore conguration for each developer on the team. Map dierent owners to a
common set of aliases used by all. This way, the owners can share and contribute to the same projects
without having to set up their datastore connection information each time they check out a project from
the central repository.
Parent topic: Datastore and system congurations [page 179]
180
PUBLIC
Administrator Guide
Lifecycle migration
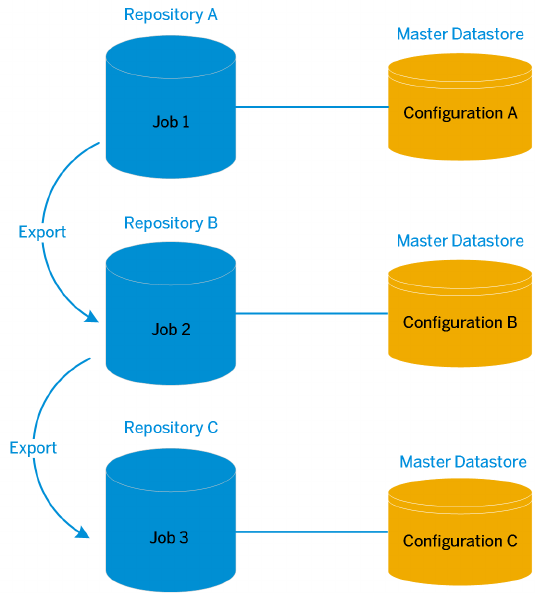
Related Information
Datastores, system congurations, and migration [page 181]
8.2.2.2 Datastores, system congurations, and migration
Use datastores with multiple congurations for faster migration, and then, create system congurations to
facilitate migration in a multi-user environment.
Datastore with multiple congurations
Without multiple conguration datastores, each time you export and import from one repository to another,
you need to recongure the datastore connection to work with the new repository. With multiple congurations
in a datastore, migrating to a new environment involves opening the datastore and selecting the conguration
for the new environment.
The following diagram shows the migration of a job. The multiple conguration datastore has three
congurations. For each new repository, the conguration changes based on the repository.
All objects that you include in a multiple conguration datastore must share the same owner.
Administrator Guide
Lifecycle migration
PUBLIC 181
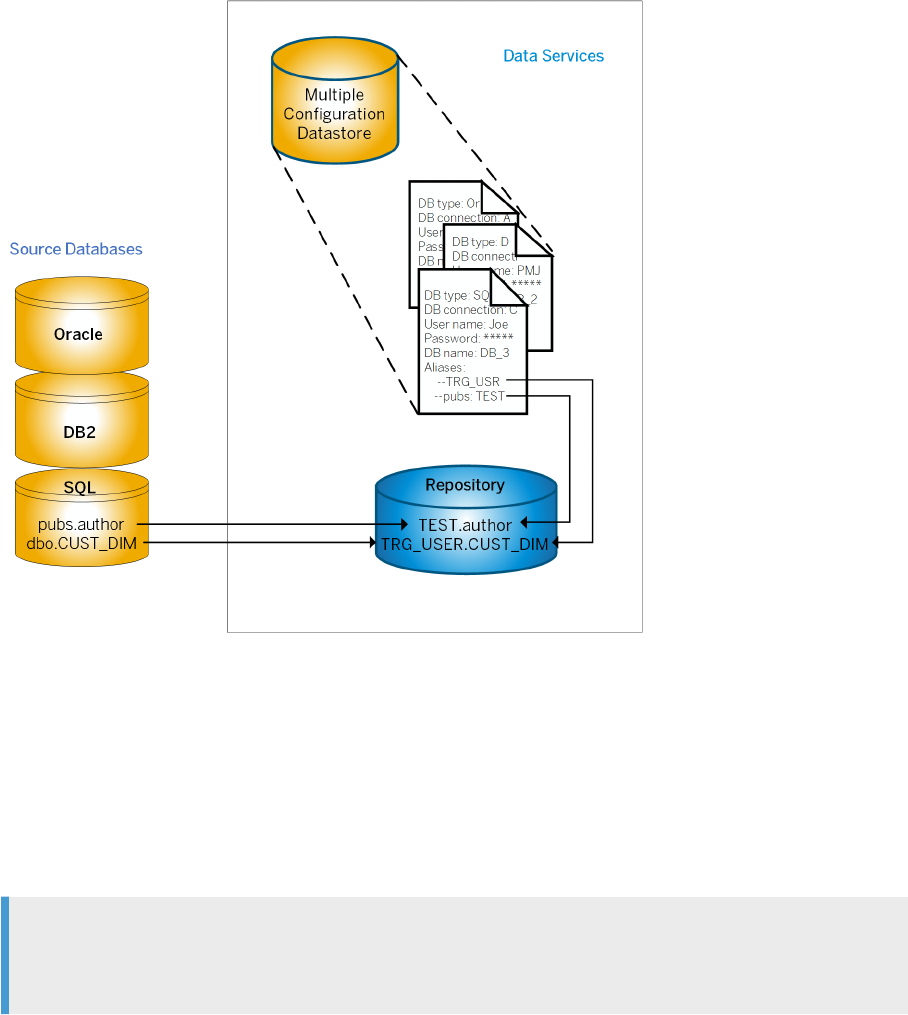
System congurations
A system conguration contains a group of selected datastore congurations. With system congurations,
you can associate substitution parameter congurations with the system conguration. SAP Data Services
maintains system congurations separate from jobs. You can't check in or check out system congurations
from a central repository.
Note
You must create datastore congurations for the datastore in your repository before you can create system
congurations.
The following diagram illustrates multiple datastore congurations in a single system conguration.
182
PUBLIC
Administrator Guide
Lifecycle migration
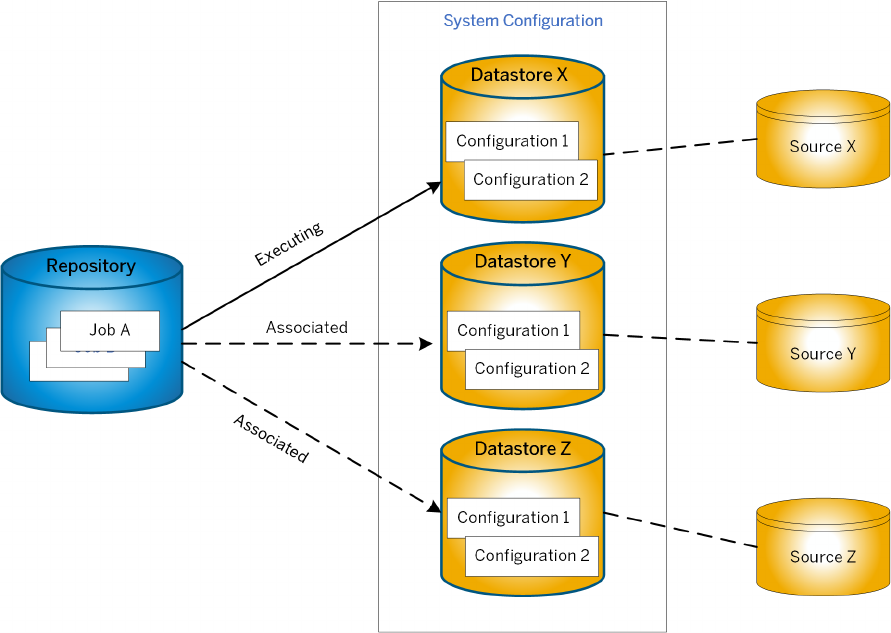
Parent topic: Datastore and system congurations [page 179]
Related Information
Multiple congurations in multi-user environments [page 180]
8.3 Migration mechanisms
Decide which migration mechanism to use to migrate aplications from one development phase to the next.
Choose a migration mechanism based on several criteria, such as project size, team size, and types of objects
to migrate. SAP Data Services provides two migration mechanisms:
• Export and import
• Multi-user
Export and import migration [page 184]
Export and import migration in SAP Data Services involves exporting applications from the local
repository in one phase, to the local repository in another phase.
Administrator Guide
Lifecycle migration
PUBLIC 183
Multi-user development migration [page 185]
Multi-user development migration in SAP Data Services includes advanced features, like labeling and
ltering, to provide exibility and control in managing application objects.
The best mechanism [page 186]
To determine the best mechanism to use, examine factors, such as the size of your development team,
the size of your projects, and the complexity of your projects.
Parent topic: Lifecycle migration [page 171]
Related Information
Development phases [page 171]
Migration tools [page 175]
Migrate with export and import [page 187]
Back up repositories [page 195]
Mismatched locales and job performance [page 196]
8.3.1Export and import migration
Export and import migration in SAP Data Services involves exporting applications from the local repository in
one phase, to the local repository in another phase.
Alternately, instead of importing to another local repository, use an intermediate le and then import the jobs
into another local repository.
Consider using the export and import mechanism for the following environment:
• Projects are small to medium size.
• Team includes a small number of developers.
• Team members use independent Data Services applications through all phases of development.
The following diagram shows the movements between three repositories: Design, Test, and Production. The red
lines show an indirect route using a temporary le between the export and import. The blue lines show a direct
route from one repository to the next repository.
184
PUBLIC
Administrator Guide
Lifecycle migration
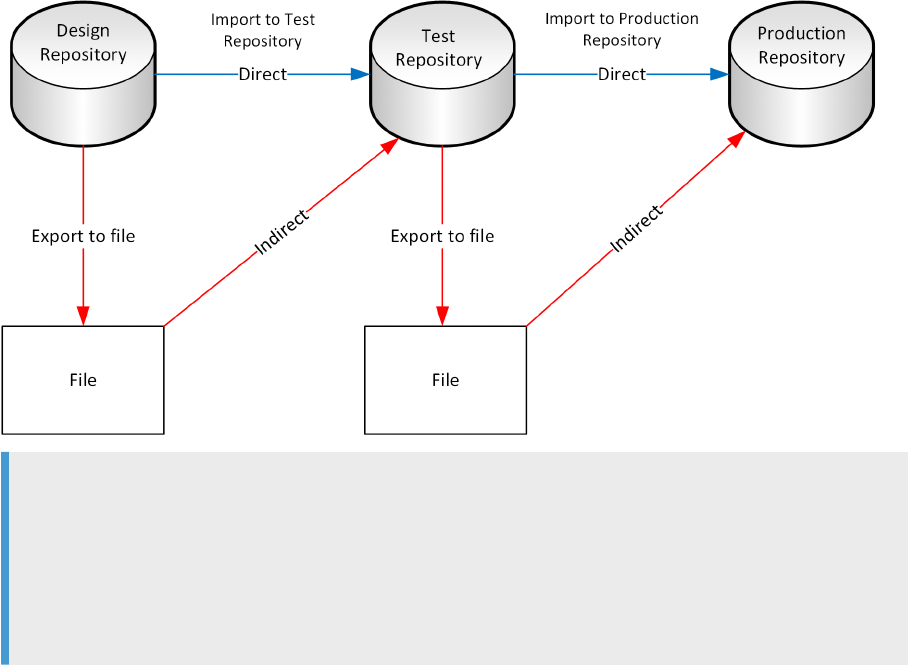
Example
If your test system issues application errors during testing:
1. Open the application in the Design Repository.
2. Correct the application errors.
3. Export from the Design Repository directly or indirectly to the Test Repository.
4. Retest the application.
Parent topic: Migration mechanisms [page 183]
Related Information
Multi-user development migration [page 185]
The best mechanism [page 186]
8.3.2Multi-user development migration
Multi-user development migration in SAP Data Services includes advanced features, like labeling and ltering,
to provide exibility and control in managing application objects.
Instead of exporting and importing applications like you would for simpler environments, multi-user
development provides a more secure check-in, check-out, and get mechanism. Multi-user migration uses a
central repository to store the primary copies of your application elements.
Consider the multi-user migration mechanism for the following environment:
• Projects are large.
Administrator Guide
Lifecycle migration
PUBLIC 185

• Team includes multiple developers or multiple teams of developers.
• Teams work use interdependent parts of Data Services applications through all phases of development.
For more information about migrating multi-user jobs, see the Designer Guide.
Parent topic: Migration mechanisms [page 183]
Related Information
Export and import migration [page 184]
The best mechanism [page 186]
8.3.3The best mechanism
To determine the best mechanism to use, examine factors, such as the size of your development team, the size
of your projects, and the complexity of your projects.
Not all situations comply exactly with our guidelines for determining the mechanisms and tools to use for
migration.
SAP Data Services supports a multi-user environment, however, a multi-user environment isn't required on
all projects. If your project is small to medium and consists only of one or two developers, then a Central
Repository isn't a solution for integrating the work of the developers.
Example
Two consultants worked on an HR data mart application. Instead of using a central repository, the
consultants worked in the following manner:
• Consultant 1 managed the local repository.
• Consultant 2 worked on a new section of development in a copy of the local repository.
Consultant 2 used the export utility to export the completed new section from the copy of the local
repository into the original local repository. Then consultant 2 created a copy of the local repository. The
copy wrote over the previous copy.
Use the following matrix to help determine which mechanism and tools work best in your environment.
Legend:
• X = Optimal solution
• O = Compatible solution
• blank = Not applicable
186
PUBLIC
Administrator Guide
Lifecycle migration

Environments
Migration Mechanism Migration Tool
Export/Import Multiuser Naming Conventions
Datastore & System
Congurations
Project: Small to me-
dium
X O O
Team: Multiple X X O
Data: Multiple, homo-
geneous systems
X X
Databases: Dierent
source and target da-
tabases between the
environments
X
X
Requirement: A “fast
and easy” migration
solution
O X
Parent topic: Migration mechanisms [page 183]
Related Information
Export and import migration [page 184]
Multi-user development migration [page 185]
8.4 Migrate with export and import
Use the exibility of the export and import features in SAP Data Services to migrate projects with single and
multiple developers in dierent development environments.
When you export a job from a test repository to a production repository, change the properties of objects being
exported to match your production environment, for example:
• Datastore denitions
• Application locations
• Database locations
• Login information
Choose to export objects directly to another repository or indirectly to a at le (ATL or XML) and then to
another repository. You must be able to connect to and have write permission for target repositories, and the
current and new repository versions must match.
Restriction
You can't export read-only transform congurations.
Administrator Guide
Lifecycle migration
PUBLIC 187

The export editor [page 188]
The SAP Data Services Designer Export editor enables you to select individual objects, object trees,
and all objects within the tree for exporting.
Exporting objects to another repository [page 189]
When you export objects directly to another repository, you change environment-specic information
dened in datastores and le formats to match the new environment.
Exporting objects to a le [page 190]
When you export objects to an ATL or XML le, the process doesn't provide options to change
environment-specic information.
Exporting a repository to a le [page 192]
When you export an entire repository to a le, SAP Data Services also exports all jobs and their job
execution schedules.
Importing objects or a repository from a le [page 193]
After you export objects to an ATL or XML le, import the objects to a repository in the target
environment.
Parent topic: Lifecycle migration [page 171]
Related Information
Development phases [page 171]
Migration tools [page 175]
Migration mechanisms [page 183]
Back up repositories [page 195]
Mismatched locales and job performance [page 196]
8.4.1The export editor
The SAP Data Services Designer Export editor enables you to select individual objects, object trees, and all
objects within the tree for exporting.
Add the objects to export using drag and drop from the object library into the Export editor. When you select
objects, such as work ows, Data Services adds all associated objects to the Export editor. Select objects in the
Export editor to exclude from the export, if applicable.
Example
Export a work ow and all tables contained in the work ow, but exclude the associated data ow.
After you've specied all objects to export, select the le or repository as the target object for the export.
When you export objects to a le, enter a passphrase so that Data Services encrypts all passwords associated
with the exported objects. Later, you must enter the passphrase when you import the objects to the target
environment.
188
PUBLIC
Administrator Guide
Lifecycle migration
Parent topic: Migrate with export and import [page 187]
Related Information
Exporting objects to another repository [page 189]
Exporting objects to a le [page 190]
Exporting a repository to a le [page 192]
Importing objects or a repository from a le [page 193]
8.4.2Exporting objects to another repository
When you export objects directly to another repository, you change environment-specic information dened
in datastores and le formats to match the new environment.
Before you export objects from one repository to another repository, ensure that the repositories are created
and that they're the same versions.
To export objects from one repository to another repository, perform the following steps, starting in SAP Data
Services Designer:
1. Right-click an object to export from the object library and select Export.
The Export editor opens in the workspace.
2. Drag and drop additional objects to export from the object library to the Objects to export list.
3. Optional: To exclude objects from export:
a. Right-click the applicable object or tree in the Export editor.
b. Select Exclude.
A red “X” appears on the icon that represents the excluded objects. If you change your mind, you can
add back any object with a red “X”.
4. Right-click an empty area of the Export editor and choose Export to repository.
The login dialog box opens for the Central Management Console (CMC)
5. Enter your user credentials for the CMC and select Log on.
After a successful login, the CMC displays a list of repositories available to your user name.
6. Select the applicable repository for the export target and select Next.
The Export Conrmation dialog box opens.
7. Verify the listed export components.
The following table shows the applicable values in the Destination status column. The values reect the
status of the component in the target database and the proposed action.
Administrator Guide
Lifecycle migration
PUBLIC 189

Destination Status Action
Does not exist Create or Exclude
Exists Replace or Exclude
8. To edit an action, perform the following substeps:
a. Select one or more objects.
b. Select either Create, Exclude, or Replace from the Target Status list.
9. Select Next.
The Datastore Export Options dialog box opens.
10. Select the applicable datastore, change the owner of a table, or change the connection properties of the
datastore as necessary and select Advanced.
11. Change the database connection information as required by the target repository database and select
Next.
The File Format Mapping dialog box opens.
12. Select a le and change the Destination Root Path, if necessary.
Change the Destination Root Path for any le format to match the new destination.
13. Select Finish.
Data Services copies objects in the Export editor to the target destination. When copying is complete, the
objects display in the Output window. The Output window shows the number of objects exported as well as a
list of any errors.
Task overview: Migrate with export and import [page 187]
Related Information
The export editor [page 188]
Exporting objects to a le [page 190]
Exporting a repository to a le [page 192]
Importing objects or a repository from a le [page 193]
8.4.3Exporting objects to a le
When you export objects to an ATL or XML le, the process doesn't provide options to change environment-
specic information.
To export objects to a le, perform the following steps in SAP Data Services Designer:
1. Right-click an object in the object library, and select Export.
The Export editor opens in the workspace.
2. Drag and drop additional objects to export from the object library to the Objects to export list.
190
PUBLIC
Administrator Guide
Lifecycle migration
3. Optional: To exclude objects from export:
a. Right-click the applicable object from the specic area of the Export editor.
b. Select Exclude.
A red “X” appears on the icon that represents the excluded object. If you change your mind, you can
add back any object with a red “X”.
4. Right-click an empty area of the Export editor and choose Export to ATL le or Export to XML le, based on
the type of le format for the export.
Tip
Even though ATL is the Data Services' proprietary format, XML is easier to read the repository content.
You can also use XML with the object creation XML toolkit.
By default, Data Services doesn't include non-executable elements in an export to an XML le for improved
readability.
Example
The order of transforms in a data ow isn't included in the export, but Data Services automatically
arranges the transforms when you import the data ow into the next phase of Data Services.
5. To include the non-executable elements, perform the following substeps:
a. Select Tools Options.
b. Expand Designer and select General.
c. Uncheck Exclude non-executable elements from exported XML document.
6. Specify the location for the le.
7. Enter the case-sensitive passphrase to encrypt any passwords that are stored in the objects to be exported
and select OK.
Note
The passphrase is required when you import the le so that the passwords are also imported. If you use
an incorrect passphrase, or don't enter a passphrase on import, Data Services imports the objects but
removes the stored passwords.
If you select the option Export to XML le, your SAP Data Quality Management SDK developer can congure
Data Quality transforms within Data Services Designer, and export the settings to an XML le to use with the
Data Quality Management SDK.
However, if you employ Data Services as a conguration tool for the Data Quality Management SDK, Data
Services doesn't create a change log for changes to the conguration.
You can use the Data Services central repository concept to manage changes to the Data Quality transforms,
but no change log is created.
Task overview: Migrate with export and import [page 187]
Administrator Guide
Lifecycle migration
PUBLIC 191

Related Information
The export editor [page 188]
Exporting objects to another repository [page 189]
Exporting a repository to a le [page 192]
Importing objects or a repository from a le [page 193]
8.4.4Exporting a repository to a le
When you export an entire repository to a le, SAP Data Services also exports all jobs and their job execution
schedules.
Keep the following information in mind about exporting a repository to a le:
• You can't export and import schedules without including the associated job and the job's repository.
• Data Services doesn't provide options to change environment-specic information.
1. In Data Services Designer, right-click in the Local Object Library and choose Repository Export To
File.
2. Browse the directory to change the location, set the le type (XML or ATL), and enter a name for the le.
3. Select Save.
4. Enter a case-sensitive passphrase to encrypt all passwords that are stored in the repository and select
Export.
Note
The passphrase is required when you import the le so that the passwords are also imported. If you use
an incorrect passphrase, or don't enter a passphrase on import, Data Services imports the objects but
removes the stored passwords.
Task overview: Migrate with export and import [page 187]
Related Information
The export editor [page 188]
Exporting objects to another repository [page 189]
Exporting objects to a le [page 190]
Importing objects or a repository from a le [page 193]
192
PUBLIC
Administrator Guide
Lifecycle migration
8.4.5Importing objects or a repository from a le
After you export objects to an ATL or XML le, import the objects to a repository in the target environment.
Before you perform the following steps, export objects from an instance of Data Services to an ATL or XML le.
Ensure that the target repository has the same version as the source repository.
Note
Importing objects or an entire repository from a le overwrites existing objects with the same names in the
destination repository.
To import objects or a repository from an ATL or XML le, perform the following steps in Data Services
Designer:
1. Right-click in the object library and choose Repository Import from File .
The Open Import File dialog box opens.
2. Select the le type of the import le from the list.
Import an individual le or an entire repository by selecting ATL, XML, DMT, or FMT from the list.
3. Select a le to import and select Open.
A Data Services warning appears, if applicable, telling you that the imported le overwrites existing objects.
Select Yes to continue.
For ATL and XML le types, the Import Plan dialog box opens.
4. Select objects to import in one of the following ways:
• Select Import to import all objects listed in the Import Plan dialog box.
• Highlight objects and use the buttons at the bottom of the window to include or exclude the objects
during import and select Import.
• The following table describes the buttons at the bottom of the Import Plan dialog box.
Option
Description
Exclude Select to exclude the selected objects from the list
of objects to be imported. A red “X” appears on the
object to be excluded.
All occurrences of the object are excluded.
When you import, objects called by the excluded ob-
ject aren't removed from the list of objects to be im-
ported, unless you've marked them for exclusion.
Administrator Guide
Lifecycle migration
PUBLIC 193

Option Description
Exclude Tree Select to exclude the selected object tree from the list
of objects to be imported.
Example
Select a project parent object and select Exclude
Tree. The project object and all jobs in the project
appear with a red “X” for exclusion from the im-
port.
When you import the list, the excluded objects aren't
imported.
Include
Select to include an object marked for exclusion with
a red “X”.
Example
If you select a project tree and select Exclude
Tree, but you decide to import one or two of the
jobs in the project, select the job or jobs within
the project and select Include.
Data Services removes the red “X” on the icon to
indicate that all occurrences of the object are now
included in the import.
Include Tree
Select to include the selected parent object and all
child objects in the import. If you've previously ex-
cluded the tree, the red X on all icons disappears.
When you import the tree, the parent and all children
objects are copied to the destination.
Select All
Select to include all objects. The red “X” disappears
from any objects that had a red “X”, and all other
listed objects are included in the import.
After you select Import, the Passphrase dialog box opens.
5. Enter the passphrase to decrypt the passwords and include them in the import.
6. Select Import.
Note
If the passphrase is incorrect, or if you select Import without entering a passphrase, Data Services
continues with the import, but doesn't import the passwords. When Data Services doesn't import the
passwords, you must set the passwords manually.
7. Perform any additional steps based on the le type you import. The following table describes additional
steps based on le type.
194
PUBLIC
Administrator Guide
Lifecycle migration
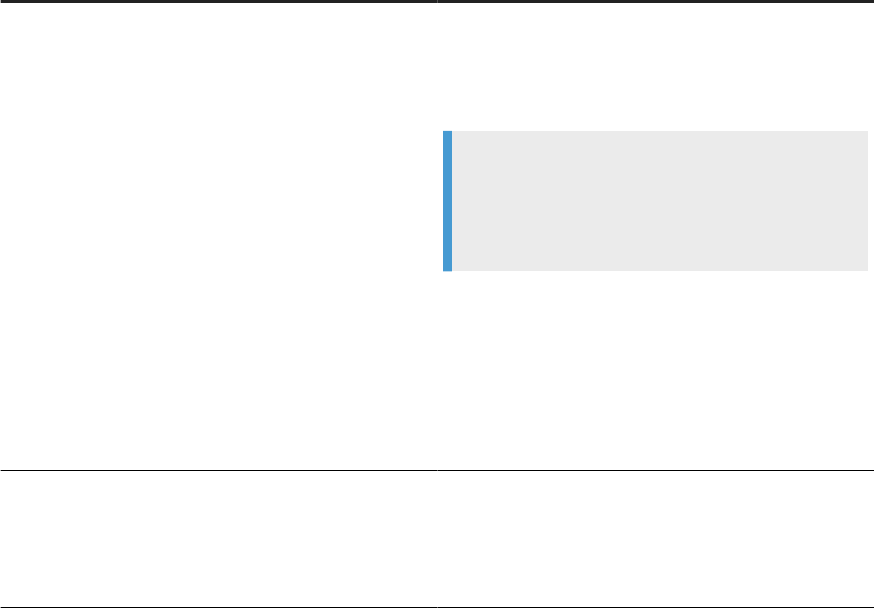
File type Information
ATL le from an earlier version of Data Services Displays a warning that the version of the ATL le is older
than the repository version, and that the ATL le you're
about to import can contain objects that don't make opti-
mal use of your upgraded repository.
Example
New features and options in the current version of
Data Services may not be available in the imported
ATL le.
Workaround: Before you import the ATL le into the newer
version of Data Services, import it into a repository with
the same version as the ATL, then upgrade the repository.
Options:
• Cancel the import by selecting No to the warning.
• Continue the import by selecting Yes to the warning.
ATL le saved from a repository that is newer than your
current version
Displays an error that the version of the ATL le is newer
than the repository version, and that the le can't be im-
ported.
Cancel the import by selecting OK.
Task overview: Migrate with export and import [page 187]
Related Information
The export editor [page 188]
Exporting objects to another repository [page 189]
Exporting objects to a le [page 190]
Exporting a repository to a le [page 192]
8.5 Back up repositories
To avoid data loss by accidentally deleting or overwriting data, adopt the best practice of backing up your
repositories on a regular schedule, and especially before migration.
During the migration process, accidents can happen. Therefore, before you migrate from one development
phase to the next, back up your repositories. If the import process overwrites any data, use the backup copy to
restore your lost objects.
Administrator Guide
Lifecycle migration
PUBLIC 195

To back up repositories, follow instructions from the database management system that supports the
repository.
Parent topic: Lifecycle migration [page 171]
Related Information
Development phases [page 171]
Migration tools [page 175]
Migration mechanisms [page 183]
Migrate with export and import [page 187]
Mismatched locales and job performance [page 196]
8.6 Mismatched locales and job performance
After you migrate to a new environment, performance is aected by factors such as dierent locales between
source and target data sources.
The cause
Data Services allows you to use dierent codepages for your source and target databases without causing
errors. Data Services attempts to treat equivalent settings without any transcoding. However, mismatched
locales can result in performance degradation from the transcoding process during job execution.
Example
Your design environment is on Windows, and has the following congurations:
• Data Services, the local repository, and the Job Server are on the same computer.
• There's one datastore with two congurations: The source database and the target database.
The test environment has the following congurations:
• The local repository is on the same computer as the design environment.
• Data Services and the Job Server are on a dierent computer.
• Data Services has a database client installed for each database required to run jobs in the test
environment.
196
PUBLIC
Administrator Guide
Lifecycle migration
Solution
If you notice a signicant dierence between the speed of design and test environments after migration, check
the locale settings of the data sources in the test environment.
• Ensure that your default locales are the same.
• Check that codepages for the datastores and the targets datastores match client codepages on the Job
Server computer.
For more information about locales, see Locales and multi-byte functionality in the Reference Guide.
Parent topic: Lifecycle migration [page 171]
Related Information
Development phases [page 171]
Migration tools [page 175]
Migration mechanisms [page 183]
Migrate with export and import [page 187]
Back up repositories [page 195]
Administrator Guide
Lifecycle migration
PUBLIC 197

9 The Enhanced Change and Transport
System (CTS+)
CTS+ transports ABAP and non-ABAP objects between systems for lifecycle management.
Use CTS+ to transport ABAP and non-ABAP objects to a new system, such as upgrading to a new service pack.
Note
To migrate from one environment to another environment, such as design to test, use one of the migration
mechanisms described in Migration mechanisms [page 183].
CTS or CTS+
CTS and CTS+ are part of SAP Solution Manager and SAP NetWeaver. CTS+ is a newer version of CTS, which
supported transporting only ABAP objects.
For simplicity, we use the term CTS to mean one of two things:
• The system where the transport landscapes are congured.
• The system that transports ABAP and non-ABAP objects.
If you don't need a transport management system like CTS, use Object Promotion in the SAP Data Services
Management Console Administrator to transport objects over secure FTP. For more information about Object
Promotion, see Object promotion management [page 200].
Required versions and CTS+ plug-in
To use CTS in your environment, ensure that you use the following:
• SAP Data Services 4.2 Support Pack 6 patch 1 and later versions
• SAP Solution Manager or SAP NetWeaver that supports a separate CTS+ plug-in, or a version that has the
CTS+ plug-in included in the installation.
Transport objects with CTS
Transport the following Data Services objects, and their dependents, using CTS:
• Projects
• Jobs
198
PUBLIC
Administrator Guide
The Enhanced Change and Transport System (CTS+)
• Workows
• Dataows
• File formats
• Functions
• Datastores (as top-level object only)
For complete information about CTS+, see the Conguration Guide for CTS+ for version requirements.
Administrator Guide
The Enhanced Change and Transport System (CTS+)
PUBLIC 199
10 Object promotion management
The object promotion tool in SAP Data Services Management Console Administrator enables you to move one
or more objects from one environment to another environment using FTP or shared directories.
To maintain security in both source and target environments, congure the environments so that there is no
direct access between them. Also, actions such as exporting and importing objects, and creating export and
import congurations, require specic user types and application or repository rights.
Requirements for object promotion [page 200]
Understand the special requirements for object promotion, such as user types, application rights, and
shared directory requirements.
User rights for promotion management [page 203]
The tasks for conguring and performing object promotion in SAP Data Services Management Console
require the correct user type, user group, application rights, or repository rights.
Export and import conguration requirements [page 204]
Before you create export and import congurations for object promotion, familiarize yourself with
some rules and tips for a successful conguration.
Before you export and import objects [page 209]
Ensure that you and your systems are ready for export and import.
Object promotion options [page 209]
The Object Promotion page in SAP Data Services Management Console oers export and import
options.
Exporting objects [page 210]
Use object promotion in SAP Data Services Management Console to export objects from a Data
Services environment.
Importing objects [page 212]
Import objects into a new environment that is dierent than the export environment.
Export and import trace and error log [page 214]
The SAP Data Services Management Console generates trace and error information, which you can
access from the Conrmation page after an export or import completes.
10.1 Requirements for object promotion
Understand the special requirements for object promotion, such as user types, application rights, and shared
directory requirements.
The following table is an overview of the special requirements for conguring and using the promotion
management feature.
200
PUBLIC
Administrator Guide
Object promotion management
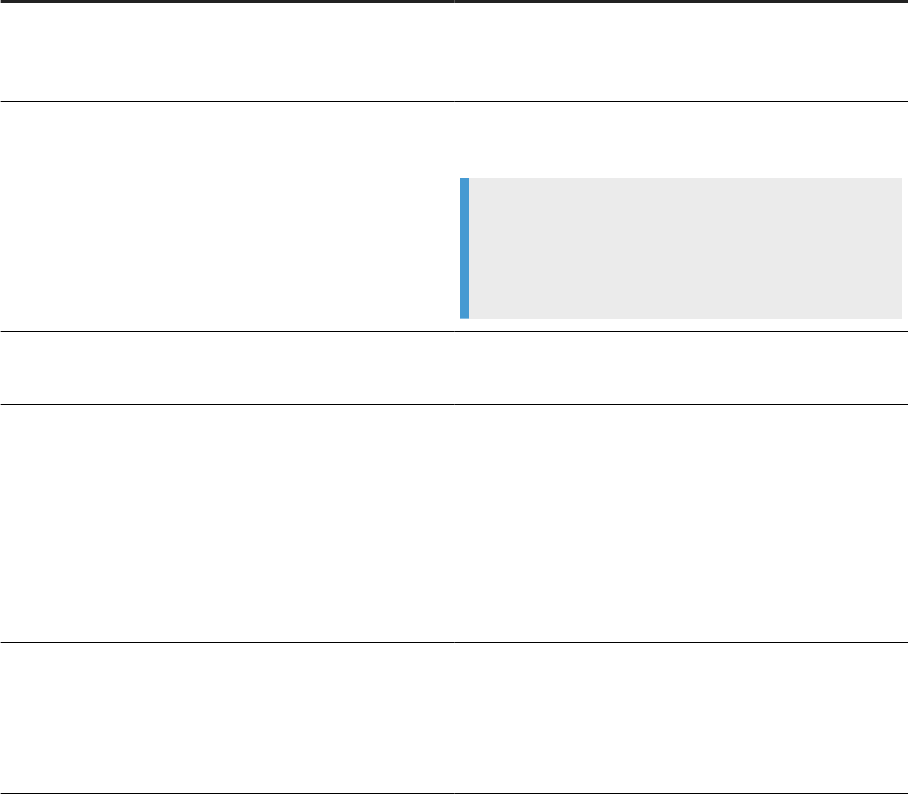
Considerations Description
User rights and permissions To congure promotion management, and to export and im-
port objects, the Management Console requires that users
have specic rights and permissions.
Repositories The repository in the source and target environments must
be running the same Data Services version.
Example
If you have a design, test, and production environment,
repositories in each environment must have the same
Data Services version.
Datastore promotion Promote datastores separately from other promoted ob-
jects.
Datastore reconguration You must recongure datastores after import for the follow-
ing reasons:
• Your design, test, and production data sources are dif-
ferent, therefore, the data source connection informa-
tion in each environment is dierent.
• For security, Management Console doesn't promote
passwords when it promotes datastores. Therefore, en-
ter the data source password when you recongure pro-
moted datastores.
Sequential import Management Console imports each top-level object sequen-
tially. With sequential import, if one object fails to import,
Management Console reverts the object back to its previous
state, then continues importing with the next top-level ob-
ject.
Shared directory user rights [page 202]
The user who starts the Server Intelligence Agent (SIA) server for the shared directories must at least
be a SAP Data Services user with full read and write access to the shared directories.
Sequential import of multiple objects [page 202]
If you export the same objects multiple times, and them import the objects, SAP Data Services
Management Console imports the objects sequentially by export date.
Parent topic: Object promotion management [page 200]
Related Information
User rights for promotion management [page 203]
Export and import conguration requirements [page 204]
Administrator Guide
Object promotion management
PUBLIC 201
Before you export and import objects [page 209]
Object promotion options [page 209]
Exporting objects [page 210]
Importing objects [page 212]
Export and import trace and error log [page 214]
User and rights management [page 53]
Detailed application rights [page 55]
Detailed repository rights [page 67]
10.1.1Shared directory user rights
The user who starts the Server Intelligence Agent (SIA) server for the shared directories must at least be a SAP
Data Services user with full read and write access to the shared directories.
If you use shared directories for object promotion, and the Data Services user who starts the SIA server for the
shared directory doesn't have full read and write access to the directory, the export and import congurations
fail validation.
Reset the congurations
Before you can complete an export or import using the shared directories, you must reset the failed
conguration.
• Data Services user must have the application right: Manage Object Promotion Congurations.
• Open the export and/or import conguration that failed.
• Select Test, or select Save.
After resetting the failed conguration, ensure that a user with full read and write access to the shared
directories restarts the SIA server.
Parent topic: Requirements for object promotion [page 200]
Related Information
Sequential import of multiple objects [page 202]
10.1.2Sequential import of multiple objects
If you export the same objects multiple times, and them import the objects, SAP Data Services Management
Console imports the objects sequentially by export date.
If you import objects that you've already imported, the Management Console doesn't overwrite the objects
in the target system. It displays all imported objects in the Import Conguration page. Objects that you've
202
PUBLIC
Administrator Guide
Object promotion management

imported multiple times appear in a group, with the objects in the group listed sequentially based on export
date.
Parent topic: Requirements for object promotion [page 200]
Related Information
Shared directory user rights [page 202]
10.2 User rights for promotion management
The tasks for conguring and performing object promotion in SAP Data Services Management Console require
the correct user type, user group, application rights, or repository rights.
The following list contains the various user permissions and rights required for tasks in object promotion:
• User types:
• Data Services Administrator
• Data Services user
• User group: Data Services Administrator group
• Application rights:
• Manage Object Promotion Congurations
• Manage Object Promotion Import
• Repository rights:
• View access
• Full control
The following table summarizes the minimum user requirements for the processes in object promotion.
User requirements
Create export and import
congurations
Export objects from source
repository
Import objects to target re-
pository
User type: Data Services Ad-
ministrator
X X X
User group type: Data Serv-
ices Administrator Users
X X X
• User type: Regular Data
Services user
• Application right: Man-
age Object Promotion
Congurations
X
Administrator Guide
Object promotion management
PUBLIC 203

User requirements
Create export and import
congurations
Export objects from source
repository
Import objects to target re-
pository
• User type: Data Serv-
ices user
• Repository right: View
Objects
X
• User type: Regular Data
Services user
• Application right: Man-
age Object Promotion
Import
X
Parent topic: Object promotion management [page 200]
Related Information
Requirements for object promotion [page 200]
Export and import conguration requirements [page 204]
Before you export and import objects [page 209]
Object promotion options [page 209]
Exporting objects [page 210]
Importing objects [page 212]
Export and import trace and error log [page 214]
User and rights management [page 53]
Detailed application rights [page 55]
Detailed repository rights [page 67]
10.3 Export and import conguration requirements
Before you create export and import congurations for object promotion, familiarize yourself with some rules
and tips for a successful conguration.
Requirements for both export and import congurations
• Ensure that you obtain the required user rights to create and edit export and import congurations. For
more information, see User rights for promotion management [page 203].
• For security reasons, only a system administrator can create a shared directory for export and import.
204
PUBLIC
Administrator Guide
Object promotion management

• To clear space on a shared directory, delete the exported ATL and Manifest les after you've imported
them.
Tip
If you create a separate export conguration for each release, it's easier to identify the groups of les
you can safely archive or delete.
Requirements for export congurations
• You can associate the same repository with multiple export congurations.
• If a shared directory hasn't yet been created but you've been granted permission to congure exports and
imports, the only available transport option for your conguration is FTP.
• If you set an export conguration to use FTP to promote objects to a UNIX system, congure the FTP
server to have full read and write access to the shared directory for exported objects.
Requirements for import congurations
• You can associate only one repository with an import conguration.
• An object and all of its dependent objects must have already been exported before you run the import
conguration.
• A target repository must be congured to a shared directory to which you've already exported ATL les.
Creating an export conguration [page 206]
Create an export conguration to export objects and dependencies over secure FTP or to a shared
directory.
Creating an import conguration [page 207]
Create an import conguration to import objects and dependencies from an export shared directory.
Edit or delete congurations [page 208]
Users with the correct permission and access can edit or delete export and import congurations.
Parent topic: Object promotion management [page 200]
Related Information
Requirements for object promotion [page 200]
User rights for promotion management [page 203]
Before you export and import objects [page 209]
Object promotion options [page 209]
Exporting objects [page 210]
Administrator Guide
Object promotion management
PUBLIC 205
Importing objects [page 212]
Export and import trace and error log [page 214]
10.3.1Creating an export conguration
Create an export conguration to export objects and dependencies over secure FTP or to a shared directory.
Before you perform the following steps, ensure that you comply with the requirements listed in Export and
import conguration requirements [page 204] and Requirements for object promotion [page 200].
To create an export conguration, perform the following steps:
1. Log into SAP Data Services Management Console and open the Administrator.
Start Management Console from your Windows Start menu or by selecting the link in the Start Page of
Data Services Designer.
2. Expand the Object Promotion node from the Administrator tree.
3. Select the Export Conguration node.
The Export Conguration page opens to the right of the Administrator tree.
4. Open either the FTP tab or the Shared Directory tab.
• FTP: Select to create an export conguration to transport objects using FTP.
• Shared Directory: Select to create an export conguration to transport objects to an existing shared
directory.
5. To transport objects over FTP, open the FTP tab and perform the following substeps:
a. Select Add.
The FTP Conguration tab opens.
b. Enter applicable information in each of the required elds, which are designated with an asterisk.
c. Optional: Choose Secure FTP.
If you don't select Secure FTP, the system exports information in clear text format instead of encrypted
format.
d. Select one or more repositories listed in the Available Repositories list and select the right-pointing
arrow to add the repositories to the Associated Repositories list.
You can export objects only from the repositories that you include in the Associated Repositories list.
e. Select Test.
Testing ensures that the conguration can access the associated repositories and the directory that
you indicated in the Target Directory option.
f. Select Save.
6. To transport objects directly to an existing shared directory, open the Shared Directory tab and perform the
following steps:
a. Select Add.
The Share Directory Conguration tab opens.
b. Enter a name for the conguration
c. Enter the path of the shared directory in Target Directory.
206
PUBLIC
Administrator Guide
Object promotion management
The target directory is the shared directory for exported objects.
d. Select one or more repositories listed in the Available Repositories list and select the right-pointing
arrow to add the repositories to the Associated Repositories list.
You can export objects only from the repositories that you added to the Associated Repositories list.
e. Select Save.
When you test the FTP conguration, or save the shared directory conguration, the Object Promotion
Management tool validates whether the Server Intelligence Agent (SIA) can read and write content to the
shared directory. If the conguration can access the repositories with which it has been associated and the SIA
validates access to the shared directory, the Management Console saves the conguration with the name that
you specied.
The Management Console displays the export conguration name in the following locations:
• As a choice in the Export Conguration page.
• As a choice in the Object Name list when you choose the following options from the Select an object list in
the Object Promotion page:
• Export Objects
• Export System Conguration
• Export Substitution Parameters
Task overview: Export and import conguration requirements [page 204]
Related Information
Creating an import conguration [page 207]
Edit or delete congurations [page 208]
10.3.2Creating an import conguration
Create an import conguration to import objects and dependencies from an export shared directory.
Before you perform the following steps, ensure that you comply with the requirements listed in Export and
import conguration requirements [page 204] and Requirements for object promotion [page 200].
To create an import conguration, perform the following steps:
1. Log into SAP Data Services Management Console and open the Administrator.
Start Management Console from your Windows Start menu or by selecting the link in the Start Page of
Data Services Designer.
2. Expand the Object Promotion node from the Administrator tree at left.
3. Select Import Conguration.
The Import Conguration page opens.
4. Select Add.
Administrator Guide
Object promotion management
PUBLIC 207
5. Select a repository from the Repository list.
The repository is where the imported objects are placed.
6. Enter the path to the shared directory that contains the exported ATL les in Source Directory.
After you save the conguration, you can't congure the repository with a dierent path because the
repository won't appear in the list.
7. Select Save.
The Management Console checks that it can access the specied shared directory.
If the import conguration can access the shared directory to where the objects are exported, Management
Console saves the conguration. The conguration now appears in the following locations:
• As a choice on the Import Conguration page.
• As a choice in the Object Name list when you choose the Import option from the Select an object list.
Task overview: Export and import conguration requirements [page 204]
Related Information
Creating an export conguration [page 206]
Edit or delete congurations [page 208]
10.3.3Edit or delete congurations
Users with the correct permission and access can edit or delete export and import congurations.
A regular SAP Data Services user who is granted the Manage Object Promotion Congurations rights can edit
or remove congurations.
Parent topic: Export and import conguration requirements [page 204]
Related Information
Creating an export conguration [page 206]
Creating an import conguration [page 207]
208
PUBLIC
Administrator Guide
Object promotion management

10.4 Before you export and import objects
Ensure that you and your systems are ready for export and import.
Check that you comply with the following items before you export and import objects using the object
promotion feature:
• You've read and complied with the information in Requirements for object promotion [page 200].
• You've met the user rights requirements stated in User rights for promotion management [page 203].
• The repository from which you're exporting objects is associated with an export conguration.
• The repository to which you're importing objects is associated with an import conguration.
• The source and target repositories are running the same version of SAP Data Services.
• You import to a local repository.
Note
The export repository can be a local or a central repository.
• Export datastores separately from their parent objects.
• Import datastores separately from their parent objects.
Parent topic: Object promotion management [page 200]
Related Information
Requirements for object promotion [page 200]
User rights for promotion management [page 203]
Export and import conguration requirements [page 204]
Object promotion options [page 209]
Exporting objects [page 210]
Importing objects [page 212]
Export and import trace and error log [page 214]
10.5 Object promotion options
The Object Promotion page in SAP Data Services Management Console oers export and import options.
Access the Object Promotion page by selecting the Object Promotion node in Management Console. Select an
action from the Select an object list in the Object Promotion page. The following table describes each action.
Administrator Guide
Object promotion management
PUBLIC 209

Action Description
Export Objects
Select to export objects from the specied repository.
Export Substitution Parameters Select to export existing substitution parameters in the se-
lected repository.
Export System Congurations Select to export existing system conguration in a selected
repository.
Import Select to import objects into a selected target repository.
Enables you to lter and search for specic objects or object
types.
Parent topic: Object promotion management [page 200]
Related Information
Requirements for object promotion [page 200]
User rights for promotion management [page 203]
Export and import conguration requirements [page 204]
Before you export and import objects [page 209]
Exporting objects [page 210]
Importing objects [page 212]
Export and import trace and error log [page 214]
10.6 Exporting objects
Use object promotion in SAP Data Services Management Console to export objects from a Data Services
environment.
Before you perform the following steps, ensure that you comply with the requirements listed Before you export
and import objects [page 209].
Also create an export conguration.
To export objects using object promotion, perform the following steps:
1. Log into SAP Data Services Management Console and open the Administrator.
Start Management Console from your Windows Start menu or by selecting the link in the Start Page of
Data Services Designer.
2. Select the Object Promotion node from the Administrator tree at left.
The Object Promotion page opens at right.
3. To export objects:
210
PUBLIC
Administrator Guide
Object promotion management

a. Select Export objects from the Objects list and select Next.
b. Select the repository from the Select Repository list.
The repository can be local or central.
c. Choose an object type from the Type list and select Next.
Remember that you must export all datastores separately from any parent object.
The Export page opens with a list of the latest versions for all of the objects that match the selected
object type. Only the objects that are available in your chosen repository appear in the list.
Management Console lists up to 23 entries on each page. Use the page navigation icons to move to
additional pages, if applicable.
d. Optional: Set search criteria to narrow the list of objects and select Search.
Search suggestions:
• Enter specic text in the Object Name search eld.
• Combine search terms with an asterisk as a wildcard to nd objects that partially match or are a
part of a common naming schema.
• If you select a central repository for exporting, use the additional lter options.
Example
If the selected Object Type is Project, select a dierent version in the Get list (the default is
Latest Version).
When you submit the query, it matches the parent object's label with the associated version. If
the label for a child of an object does not match with the specied label, when a parent object
is exported, the latest version of the child object will be exported.
4. To export system congurations or substitution parameters:
a. Select Export system congurations or Export substitution parameters and select Next.
b. Select a repository and select Next.
The Export page opens, with a list of the latest versions for all of the objects that match the selected
object type. Only the objects that are available in your chosen repository appear in the list.
Management Console lists up to 23 entries on each page. Use the page navigation icons to move to
additional pages, if applicable.
c. Choose up to 23 Object Name entries displayed on the current page, or choose Select All on Current
Page to import all 23 objects on the currently displayed page.
d. Optional: Use the Search eld to narrow the list to only objects that you want to export.
The Search eld supports wildcards.
5. Choose the export method from the Export over list.
The method is either shared directory or FTP.
6. Select Export.
Results:
For each object, Management Console writes export data to an ATL le and a manifest le, and sends the les
to the target directory that is specied in the export conguration.
The Conrmation page displays progress for the export. The Management Console refreshes the Status
automatically every ve seconds. When the export is completed, the automatic refresh ends, and the nal
Administrator Guide
Object promotion management
PUBLIC 211
status is Completed. The Conrmation page lists each item exported with an export completed date and time,
and a status of success or failure.
For more information about the trace and error logs, and the conrmation ID, see Export and import trace and
error log [page 214].
Task overview: Object promotion management [page 200]
Related Information
Requirements for object promotion [page 200]
User rights for promotion management [page 203]
Export and import conguration requirements [page 204]
Before you export and import objects [page 209]
Object promotion options [page 209]
Importing objects [page 212]
Export and import trace and error log [page 214]
10.7 Importing objects
Import objects into a new environment that is dierent than the export environment.
Before you import objects, ensure that you've created an import conguration. Also, you must rst export the
objects so that they are available to import. Ensure that you comply with the requirements in Before you export
and import objects [page 209].
To import objects, perform the following steps:
1. Log into SAP Data Services Management Console and open the Administrator.
Start Management Console from your Windows Start menu or by selecting the link in the Start Page of
Data Services Designer.
2. Select the Object Promotion node from the Administrator tree at left.
The Object Promotion page opens at right.
3. Select Import from the Select an object list and select Next.
The Target Repository page opens.
4. Choose a repository from the Select Repository list and select Next.
The Import page opens with a list of exported objects that are available in the source repository. The list
contains the following information about each exported object:
• Object name
• Type
• Label (version)
• Source Repository
212
PUBLIC
Administrator Guide
Object promotion management

• Source Repository version
• Date exported (includes the time)
• Whether the object has been imported
• Exported by
There are 23 entries listed on each page.
5. Optional: To narrow the list of objects to import, perform the following substeps:
a. Select a Filter option:
• All
• Objects exported the last <number> Days
• From <date range>
b. Use the Search by options to build an expression:
• Select All object types, or an object type from the rst list.
• Select not imported, imported, older export, or All from the next list.
• Enter a word or words in the object name in the last text box. Combine with an asterisk wild card, if
applicable.
c. Select Search.
6. Select objects to import per page, or check Select All to select all objects on the page.
Use the page navigation icons to move to the next page and repeat selecting objects on the page.
7. Select Import.
Result:
The Conrmation page opens. The Status column reects the import progress. Management Console updates
the status automatically every ve seconds.
When the import is completed, the automatic refresh ends, the ending status information is success or failure.
For more information about the logs and the unique conformation ID, see Export and import trace and error log
[page 214].
Post-requisites:
• Recongure all datastores that you imported:
• Update the connection information.
• Enter the applicable password.
To recongure datastores in the SAP Data Servics Management Console, expand the following nodes:
Administration Management Datastore.
• Update the paths for any imported substitution parameters.
Required permissions and rights for updating datastores and substitution parameters include one of the
following:
• Data Services Administrator user
• Data Services Administrator Users group
• Regular Data Services user with the application right, Manage datastore and substitution param
congurations.
Administrator Guide
Object promotion management
PUBLIC 213
Task overview: Object promotion management [page 200]
Related Information
Requirements for object promotion [page 200]
User rights for promotion management [page 203]
Export and import conguration requirements [page 204]
Before you export and import objects [page 209]
Object promotion options [page 209]
Exporting objects [page 210]
Export and import trace and error log [page 214]
10.8 Export and import trace and error log
The SAP Data Services Management Console generates trace and error information, which you can access
from the Conrmation page after an export or import completes.
Export or import log
View the log information after export or import completes, but while you still have the Conrmation page open.
Select view log under the Status column for a specic object.
A dialog box opens showing the unique export or import Conrmation ID in the banner. There's a Trace and an
Error tab:
• Trace: Contains details about the export or import.
• Error: If there were export or import errors, lists error messages. Otherwise blank.
Further, the Management Console stores log information under the repository table AL_EXPORT_HISTORY.
Export Conrmation ID
The Management Console assigns a unique Conrmation ID to each export or import attempt and displays it in
the Conrmation page and the Trace and Error dialog box. The Conrmation ID is a unique ID stored under the
AL_EXPORT_HISTORY table. The Management Console uses the Conrmation ID to pass information to the
target environment when you import the objects. The Conrmation ID consists of the following information:
<Timestamp-in-milliseconds>-<six-digit random number>-<number of export attempts>
214
PUBLIC
Administrator Guide
Object promotion management

Example
The breakdown of the Conrmation ID 162447709772-518654-2 is:
• 162447709772 = Timestamp in milliseconds
• 518654 = Six-digit random number
• 2 = Number of export attempts
You can't return to the Conrmation page after you dismiss it. If you want to refer to the trace and error
information later, copy the unique conrmation ID, and any information from the Trace and/or Error tab, and
save it to a text le.
Alternately, the Management Console saves a copy of the log to the repository under the
AL_EXPORT_HISTORY table. Therefore, to nd log information after you close the Conrmation page, query
the AL_EXPORT_HISTORY table.
Parent topic: Object promotion management [page 200]
Related Information
Requirements for object promotion [page 200]
User rights for promotion management [page 203]
Export and import conguration requirements [page 204]
Before you export and import objects [page 209]
Object promotion options [page 209]
Exporting objects [page 210]
Importing objects [page 212]
Administrator Guide
Object promotion management
PUBLIC 215
11 Integration with SAP and SAP Solution
Manager
Integrate SAP Data Services with the SAP System Landscape Directory and the SAP Solution Manager
diagnostics features to manage, monitor, and maintain your SAP Data Services deployment.
SAP System Landscape Directory (SLD) [page 216]
The System Landscape Directory (SLD) is a central repository for your system landscape information,
which helps SAP Solution Manager manage SAP software lifecycles.
Solution Manager Diagnostics (SMD) Agent [page 217]
The SMD component of SAP Solution Manager provides all functionality to centrally analyze and
monitor a complete system landscape.
SLD integration requirements [page 217]
SAP Data Services and SAP Solution Manager require specic components to enable System
Landscape Directory (SLD) support.
11.1 SAP System Landscape Directory (SLD)
The System Landscape Directory (SLD) is a central repository for your system landscape information, which
helps SAP Solution Manager manage SAP software lifecycles.
The SLD contains a description of the systems and software components that are currently installed. The
SLD uses all gathered system information to provide a foundation for tool support so that you can better plan
software lifecycle tasks in your system landscape. The SLD also provides a directory that contains information
about all installable software available from SAP. Additionally, SLD automatically updates existing data about
systems that are already installed in your landscape.
The SAP Data Services installation program registers all associated vendors, product names, and versions
with the SLD. The installation program also registers server and front-end component names, versions, and
location.
Parent topic: Integration with SAP and SAP Solution Manager [page 216]
Related Information
Solution Manager Diagnostics (SMD) Agent [page 217]
SLD integration requirements [page 217]
216
PUBLIC
Administrator Guide
Integration with SAP and SAP Solution Manager

11.2 Solution Manager Diagnostics (SMD) Agent
The SMD component of SAP Solution Manager provides all functionality to centrally analyze and monitor a
complete system landscape.
If an SMD Agent is installed, the SMD server monitors SAP Data Services and Data Services systems. The SMD
Agent reports information to Solution Manager for analysis, which uses the information for root cause analysis.
SAP Data Services supports performance monitoring through CA (Wily) Introscope, which works with Solution
Manager Diagnostics through an integration with the NCS (Native Component Supportability) library. The Data
Services installer installs the NCS library automatically.
Parent topic: Integration with SAP and SAP Solution Manager [page 216]
Related Information
SAP System Landscape Directory (SLD) [page 216]
SLD integration requirements [page 217]
11.3 SLD integration requirements
SAP Data Services and SAP Solution Manager require specic components to enable System Landscape
Directory (SLD) support.
The following table summarizes the components that are required to enable SLD support.
Support for...
Required for Data Services
SLD registration Requires the following application and les:
• SAPHOSTAGENT: Enables registration of Data Services
servers.
Note
If you install SAPHOSTAGENT before Data Services,
the Data Services installer registers servers auto-
matically.
• Create the slddest.cfg.key and slddest.cfg
les for the SLDReg data supplier that reports on the
back-end servers.
Solution Manager Diagnostics (SMD) Agent integration
Download and install SMD Agent (DIAGNOSTICS.AGENT) on
all Data Services server hosts.
Administrator Guide
Integration with SAP and SAP Solution Manager
PUBLIC 217

Support for... Required for Data Services
Performance instrumentation Congure the Introscope Agent to connect to the CA Intro-
scope Enterprise Manager with Data Services Server Man-
ager. For Unix, use the ServerCong utility.
Parent topic: Integration with SAP and SAP Solution Manager [page 216]
Related Information
SAP System Landscape Directory (SLD) [page 216]
Solution Manager Diagnostics (SMD) Agent [page 217]
218
PUBLIC
Administrator Guide
Integration with SAP and SAP Solution Manager

12 Data Services registration in the SLD
The SLDReg (System Landscape Directory data suppliers) registers the landscape systems, including SAP
Data Services, on the SLD server and keeps the information updated.
Management and business applications access the information stored in the SLD to perform tasks in a
collaborative computing environment.
SLDReg is installed when you install the SAPHOSTAGENT. After SLDReg is installed, you must create the
slddest.cfg and slddest.cfg.key les to enable SLDReg to connect to the SLD server.
The Data Services installer supplies the SLDReg for every installation of Data Services. SLDReg reports on the
following components:
• Server components, such as Job Server and Access Server.
• Services deployed on the SAP Business Intelligence Platform, such as the RFC (Remote Function Call)
Server, View Data Service, Metadata Browsing Service, and the Administrator Service.
• Web applications deployed on an application server, such as the Data Services Management Console
Note
SAP NetWeaver has a built-in SLD-DS supplier that registers the NetWeaver application server as well as
hosted web applications and services. This SLD-DS is relevant for Data Services deployments that are
integrated in an SAP NetWeaver environment.
The Data Services installer stores the information required for registering Data Services in a conguration le.
This le contains information used by the SLDReg to connect to the Data Services database.
For information about how to congure the specic data supplier for WebSphere, see the SAP Web Application
Deployment Guide for Unix or SAP Web Application Deployment Guide for Windows.
Administrator Guide
Data Services registration in the SLD
PUBLIC 219

13 Performance and availability monitoring
Monitor your job performance and system availability using tools in the SAP Solution Manager such as Solution
Manager Diagnostics Agent and alert monitoring.
Solution Manager Diagnostics (SMD) overview [page 220]
SMD analyzes and monitors problematic components from incidents in your system landscape to help
you keep your systems running.
SMD Agent guidelines [page 222]
The Solution Manager Diagnostics Agent (DIAGNOSTICS.AGENT) on your local system collects and
sends information to the SMD server.
Congure your system for SMD [page 222]
For the Solution Manager Diagnostics (SMD) to work properly, enable SMD by conguring the
applicable les and setting the correct options.
The Native Component Supportability (NCS) library [page 223]
SAP Data Services supports performance monitoring through CA Introscope, which needs the NCS
library integration with Solution Manager Diagnostics.
Heartbeat monitoring [page 226]
Heartbeat monitoring, also known as availability monitoring, uses the SAP Solution Manager to monitor
whether a component, such as a Job Server or Access Server, is running.
Alert monitoring [page 226]
SAP Solution Manager provides alerts that enable you to view critical errors.
13.1 Solution Manager Diagnostics (SMD) overview
SMD analyzes and monitors problematic components from incidents in your system landscape to help you
keep your systems running.
The SMD Agent sends local information to the SMD, including back-end server congurations and the location
of server log les. The SMD uses this information in its analysis of the complete system.
Note
SMD requires SAP Solution Manager version 7.01 SP 26 or later.
The following table describes the components of SMD.
220
PUBLIC
Administrator Guide
Performance and availability monitoring
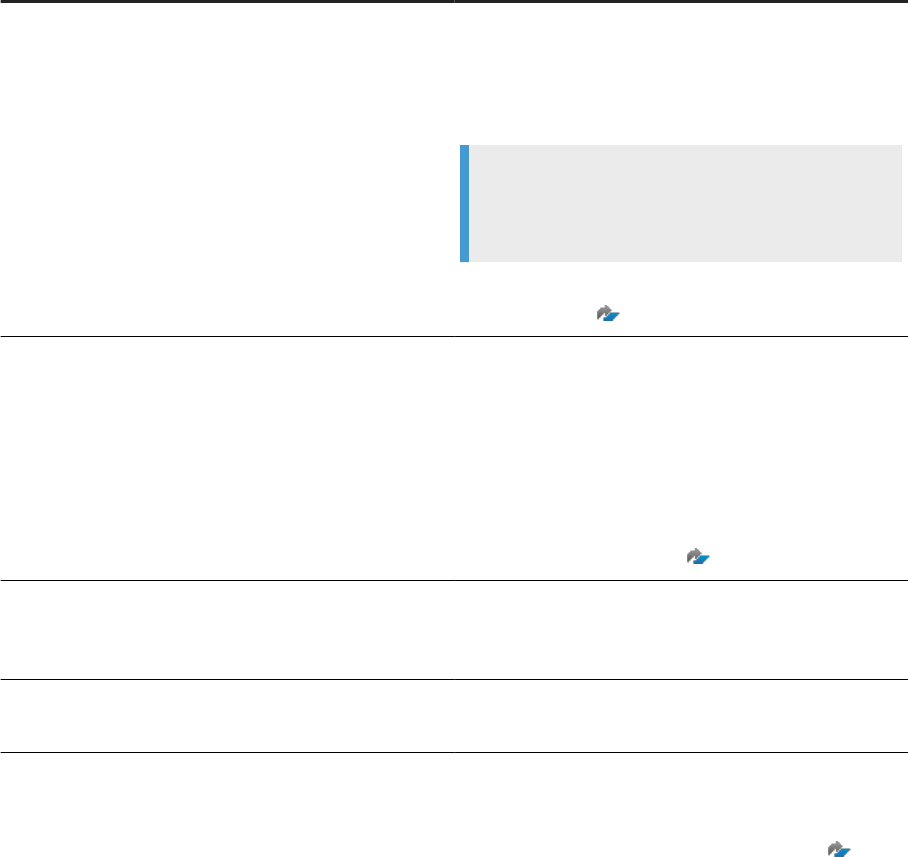
Component Information
SMD Agent
Named DIAGNOSTICS.AGENT, collects and sends local
diagnositcs information to the SMD through the SMD server.
Download and install the SMD Agent on each Job Server
machine.
Note
You must install the SMD Agent on each Job Server
machine manually.
For information about the diagnostics Agent installation, see
SAP Note 1833501
CA Introscope An application performance management framework. Intro-
scope Enterprise Server is part of SAP Solution Manager. CA
Introscope doesn't require a separate installation.
For complete information about the application opera-
tions of CA Introscope and the integration with SAP
Solution Manager, see the following SAP Commun-
ity WIKI page: https://wiki.scn.sap.com/wiki/display/Te-
chOps/RCA_Introscope_Home
.
NCS (Native Component Supportability) library
Integrated in SMD to enable CA Introscope. The Data Serv-
ices installer automatically installs the NCS library on your
system.
SAP Operating System Collector (SAPOSCOL) The SAPOSCOL provides operating system data to SMD and
CA Introscope.
For more information about any of the SMD components, see the SAP Solution Manager documentation page
at https://help.sap.com/viewer/product/SAP_Solution_Manager/latest/en-US?task=discover_task.
Download any of the components from the SAP Service Marketplace at http://support.sap.com/swdc .
Parent topic: Performance and availability monitoring [page 220]
Related Information
SMD Agent guidelines [page 222]
Congure your system for SMD [page 222]
The Native Component Supportability (NCS) library [page 223]
Heartbeat monitoring [page 226]
Alert monitoring [page 226]
Administrator Guide
Performance and availability monitoring
PUBLIC 221

13.2 SMD Agent guidelines
The Solution Manager Diagnostics Agent (DIAGNOSTICS.AGENT) on your local system collects and sends
information to the SMD server.
The following are a few guidelines for using the SMD Agent:
• Install the SMD Agent before or after installing and deploying SAP Data Services. The installation order of
the monitored system and agent isn't critical.
• If the servers are deployed on a distributed system, install an SMD Agent on every machine hosting a
server.
Parent topic: Performance and availability monitoring [page 220]
Related Information
Solution Manager Diagnostics (SMD) overview [page 220]
Congure your system for SMD [page 222]
The Native Component Supportability (NCS) library [page 223]
Heartbeat monitoring [page 226]
Alert monitoring [page 226]
13.3 Congure your system for SMD
For the Solution Manager Diagnostics (SMD) to work properly, enable SMD by conguring the applicable les
and setting the correct options.
The following list contains the basic steps to enable SMD:
1. Enable the feature in the Data Services Server Manager for each Job Server from which you want
performance metrics.
2. If you see unexpected information in the metrics, edit the Native Component Supportability (NCS) Library
(ncs.conf) le, which controls the information sent to the SMD Agent.
Note
The ncs.conf library le is located in <LINK_DIR>\bin. The ncs.conf library le contains
descriptions of the options.
3. Congure the following SMD Agent les to provide information to the SAP Solution Manager server.
• SapAgentConfig.xml
• IntroscopeSapAgent.profile
The SMD Agent les are located in your SMD Agent installation location.
222
PUBLIC
Administrator Guide
Performance and availability monitoring
Parent topic: Performance and availability monitoring [page 220]
Related Information
Solution Manager Diagnostics (SMD) overview [page 220]
SMD Agent guidelines [page 222]
The Native Component Supportability (NCS) library [page 223]
Heartbeat monitoring [page 226]
Alert monitoring [page 226]
13.4 The Native Component Supportability (NCS) library
SAP Data Services supports performance monitoring through CA Introscope, which needs the NCS library
integration with Solution Manager Diagnostics.
The Data Services installer automatically installs the NCS library. However, before Data Services can monitor
Job Server performance, you need to enable NCS in the Job Server.
Enabling NCS library on Windows [page 224]
Enable the NCS (Native Component Supportability) library on the Windows platform.
Enabling NCS library on Unix or Linux [page 225]
Enable the NCS (Native Component Supportability) library on the Unix or Linux platforms.
Parent topic: Performance and availability monitoring [page 220]
Related Information
Solution Manager Diagnostics (SMD) overview [page 220]
SMD Agent guidelines [page 222]
Congure your system for SMD [page 222]
Heartbeat monitoring [page 226]
Alert monitoring [page 226]
Administrator Guide
Performance and availability monitoring
PUBLIC 223
13.4.1Enabling NCS library on Windows
Enable the NCS (Native Component Supportability) library on the Windows platform.
To enable NCS on the Job Server for Windows, perform the following steps:
1. Open the Data Services Server Manager from the Windows Start menu as an Administrator.
2. Open the NCS tab.
3. Select Enable instrumentation in NCS (Native Component Supportability) library.
4. Complete the remaining options.
For most situations, leave the options set to the default settings. The following table describes all of the
options in the NCS tab.
Option Description
Tracing level threshold Indicates the tracing level:
• 0: Uses the value from the ncs.conf conguration
le. 0 is the default setting.
• 1–5: No tracing (NONE).
• 6–10: Tracing major points (MAJOR).
• 11–15: Tracing minor points (MINOR).
• 16–20: Tracing ne details (FINE).
• >20: Max details (FINEST).
Execution interval The time in seconds, between which the system sends the
CPU usage/process memory metrics to the CA Interscope
Enterprise Manager.
The default setting of 0 causes the system to use the NCS
library scheduler.
Execution time oset The execution time oset in seconds related to the set
Execution interval.
Example
If you set the execution settings as follows, the system
sends the CPU usage/process memory metrics to the
SMD agent at 3:30, 4:30, 5:30, and so on:
• Execution interval = 3600 (every 1 hour)
• Execution time oset = 1800 (every half hour)
If you set the Execution interval to less time than the de-
fault NCS library scheduler interval, the system bypasses
your setting in Execution time oset. The default NCS li-
brary scheduler interval is set in the datasending_interval
parameter.
224
PUBLIC
Administrator Guide
Performance and availability monitoring

Option Description
Tracing level Currently not used.
Application passport Currently not used.
5. Select Apply and then select Close.
The system enables the performance monitoring for the jobs run on this computer by the Data Services
Job Server.
Task overview: The Native Component Supportability (NCS) library [page 223]
Related Information
Enabling NCS library on Unix or Linux [page 225]
13.4.2Enabling NCS library on Unix or Linux
Enable the NCS (Native Component Supportability) library on the Unix or Linux platforms.
To enable NCS on the Job Server for Unix or Linux, perform the following steps:
1. Open the DSConfig.txt le.
DSConfig.txt is located in <DS_COMMON_DIR>/conf.
2. Set the Wily_instrumentation parameter to True.
Leave all of the other parameters in the Engine section set to the default values as follows:
• Wily_instrumentation=TRUE
• Wily_instrumentation_Level_Threshold=0
• Wily_instrumentation_Interval=0
• Wily_instrumentation_Offset=
• Wily_instrumentation_TraceLevel=3487
• Wily_instrumentation_App_Passport=
Task overview: The Native Component Supportability (NCS) library [page 223]
Related Information
Enabling NCS library on Windows [page 224]
Administrator Guide
Performance and availability monitoring
PUBLIC 225

13.5 Heartbeat monitoring
Heartbeat monitoring, also known as availability monitoring, uses the SAP Solution Manager to monitor
whether a component, such as a Job Server or Access Server, is running.
With hearbeat monitoring, you can also view information about real-time services for Access Servers.
View each monitored Job Server or Access Server status from CA Introscope under the Status node. The
following are example values for heartbeat monitoring:
• 1 = The server is running.
• 0 = The server isn't running
In addition, view the real-time service status for Access Servers. The following table describes each status
indicator.
0
not running
1 starting
2 started
3 shutting down
4 warning
5 error
9 disabled
Parent topic: Performance and availability monitoring [page 220]
Related Information
Solution Manager Diagnostics (SMD) overview [page 220]
SMD Agent guidelines [page 222]
Congure your system for SMD [page 222]
The Native Component Supportability (NCS) library [page 223]
Alert monitoring [page 226]
13.6 Alert monitoring
SAP Solution Manager provides alerts that enable you to view critical errors.
The SAP Data Services Job Servers send alerts when a job fails.
In CA Introscope Enterprise Manager, view the status for each monitored Job Server under the Status node. A
value of 1 indicates a job that ran in a specic Job Server repository has failed.
226
PUBLIC
Administrator Guide
Performance and availability monitoring
Parent topic: Performance and availability monitoring [page 220]
Related Information
Solution Manager Diagnostics (SMD) overview [page 220]
SMD Agent guidelines [page 222]
Congure your system for SMD [page 222]
The Native Component Supportability (NCS) library [page 223]
Heartbeat monitoring [page 226]
Administrator Guide
Performance and availability monitoring
PUBLIC 227

14 Command line administration
SAP Data Services provides utilities that run from a command line on both Windows and Unix platforms.
Each utility has a special set of command-line options that control the behavior of the specic Data Services
component.
Note
Data Services components also use internal options, however the internal options aren't published because
they can't be modied.
In all command line topics, values shown in square brackets [ ] are optional.
Command line reference: License Manager [page 229]
Use License Manager to view, add, and remove SAP Data Services product activation keycodes for SAP
solution portfolio software that require them.
Command line: Data Services Connection Manager (Unix) [page 231]
Use the Connection Manager after you install SAP Data Services on Unix, to congure ODBC databases
and ODBC drivers for repositories, sources, and targets.
Command line: Repository Manager (Windows) [page 232]
Use the command-line version of the Data Services Repository Manager to create or update
repositories on Windows platforms.
Command line: Repository Manager (Unix) [page 236]
Use the Repository Manager executable le, repoman, to create or update repositories from the
command line on Unix platforms.
Command line: Server Manager (Unix) [page 239]
Use the console-based SAP Data Services Server Manager, svrcfg, on Unix or Linux to create, edit, or
delete Job Servers and Access Servers after installation.
Command line: Server Manager (Windows) [page 247]
Use the SAP Data Services Server Manager executable, AWServerConfig.exe, on Windows to create,
edit, or delete Job Servers and Access Servers after installation
Command line: Password encryption [page 253]
Use AL_Encrypt to encrypt a password with an encryption key or a passphrase, and also to return the
base64 encoding of any text.
al_engine [page 255]
al_engine is a core Data Services process that is responsible for executing jobs, importing repository
objects, exporting repository objects, and so on.
228
PUBLIC
Administrator Guide
Command line administration
14.1 Command line reference: License Manager
Use License Manager to view, add, and remove SAP Data Services product activation keycodes for SAP
solution portfolio software that require them.
Use License Manager only in command-line mode. For more information about managing stored license
keys in the CMC, see the Business Intelligence Platform Administrator Guide at https://help.sap.com/viewer/
2e167338c1b24da9b2a94e68efd79c42/latest/en-US/468a356e6e041014910aba7db0e91070.html.
License Manager enables you to manage your product activation keycodes—the alphanumeric codes that are
referred to each time that you run certain software.
Note
License Manager accesses keycodes on the local system only; you can't access the keycodes from a
remote system. When updating keycodes, change the codes on all SAP Data Services computers by
launching License Manager on each computer, including Designer and Job Server computers.
Note
If you use a Windows operating system, you can't add or remove license keycodes unless you have
Administrator privileges. If you have nonadministrator privileges, only the -v and --view parameters are
available for use.
Syntax
LicenseManager [-v | -a <keycode> | -r <keycode> [-l <location>]]
Note
Values shown in square brackets [ ] are optional.
Parameter
Description
-v or --view
Displays the stored product activation keycodes. For example:
Keycode: 00000-0000000-0000000-0000
Trial Option: Yes
Expired: No
Days Remaining: 54
Administrator Guide
Command line administration
PUBLIC 229

Parameter Description
-a or --add <keycode>
Adds the specied license keycode, and displays the stored keycodes. Returns status
messages for the following conditions:
• An internal error occurred.
• Successfully added the keycode.
• Successfully added the keycode and replaced a trial version.
• Keycode not added because it’s invalid.
• Keycode not added because it’s a duplicate.
-r or --remove
<keycode> [-l
<location>]
Removes the specied product activation keycode, and displays the stored keycodes.
If <location> is specied, the removal is restricted to that node. Returns status mes-
sages for the following conditions:
• An internal error occurred.
• Removed one keycode.
• Removed multiple keycodes.
• Keycode not removed because it’s invalid.
• Keycode not removed because it wasn’t found.
Starting License Manager in Unix [page 230]
Start License Manager from a terminal, and use commands to set your license keys.
Parent topic: Command line administration [page 228]
Related Information
Command line: Data Services Connection Manager (Unix) [page 231]
Command line: Repository Manager (Windows) [page 232]
Command line: Repository Manager (Unix) [page 236]
Command line: Server Manager (Unix) [page 239]
Command line: Server Manager (Windows) [page 247]
Command line: Password encryption [page 253]
al_engine [page 255]
14.1.1Starting License Manager in Unix
Start License Manager from a terminal, and use commands to set your license keys.
Before you use License Manager on UNIX platforms, set the environment variable BOE_REGISTRYHOME.
If you've already congured the SAP Data Services environment by running the al_env.sh script, the
BOE_REGISTRYHOME variable is already set. However, if it isn't set, manually add BOE_REGISTRYHOME to
your .profile, .login, or .cshrc le:
230
PUBLIC
Administrator Guide
Command line administration
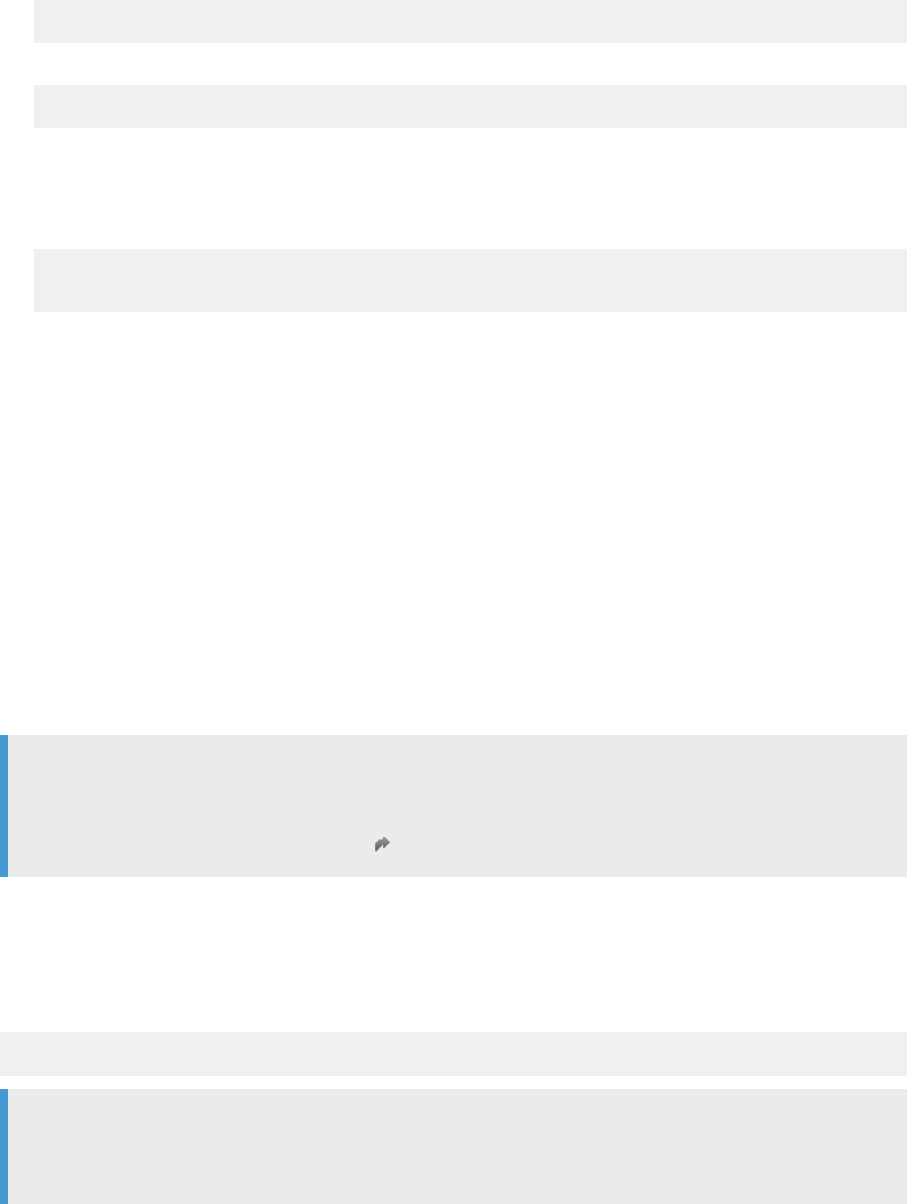
• If you use Bourne shell, add product entries to your .profile or .login le:
BOE_REGISTRYHOME=$LINK_DIR/registry ; export BOE_REGISTRYHOME
• If you use C shell (Berkeley), add product entries to your .cshrc le:
setenv BOE_REGISTRYHOME $LINK_DIR/registry
To start License Manager in Unix, perform the following steps:
1. Open a terminal.
2. Open License Manager by entering a command such as the following:
$ cd $LINK_DIR/bin
$ ./LicenseManager
3. Use the commands and syntax in Command line reference: License Manager [page 229] to set your license
key.
Task overview: Command line reference: License Manager [page 229]
14.2 Command line: Data Services Connection Manager
(Unix)
Use the Connection Manager after you install SAP Data Services on Unix, to congure ODBC databases and
ODBC drivers for repositories, sources, and targets.
The Connection Manager is a command-line utility. However, a graphical user interface (GUI) is available.
Note
To use the graphical user interface for Connection Manager, you must install the GTK+2 library. The GTK+2
is a free multi-platform toolkit that creates user interfaces. For more information about obtaining and
installing GTK+2, see https://www.gtk.org/ .
To use DSConnectionManager.sh from the command line, use the -c parameter which must be the rst
parameter.
If an error occurs when using the Connection Manager, use the -d option to show details in the log
For example:
$LINK_DIR/bin/DSConnectionManager.sh -c -d
Note
For Windows installations, use the ODBC Administrator (Driver Selector) to congure ODBC databases and
drivers for repositories, sources, and targets.
Parent topic: Command line administration [page 228]
Administrator Guide
Command line administration
PUBLIC 231

Related Information
Command line reference: License Manager [page 229]
Command line: Repository Manager (Windows) [page 232]
Command line: Repository Manager (Unix) [page 236]
Command line: Server Manager (Unix) [page 239]
Command line: Server Manager (Windows) [page 247]
Command line: Password encryption [page 253]
al_engine [page 255]
Using the ODBC Drivers Selector for Windows [page 137]
14.3 Command line: Repository Manager (Windows)
Use the command-line version of the Data Services Repository Manager to create or update repositories on
Windows platforms.
The Repository Manager default location is <LINK_DIR>/bin/RepoManBatch.exe.
The following table contains an alphabetical list of descriptions for all of the commands in the Repository
Manager.
Option
Description
-a
Central Repository security.
-c
Operation mode: Creates repository.
-d
Operation mode: Shows details.
-encryption_parameters
Enter additional SSL/TLS variables based on the database
type, listed in key-value pairs.
Separate each key-value pair with semicolons, and surround
the string in quotations.
Required when you include -use_ssl_encryption.
232 PUBLIC
Administrator Guide
Command line administration

Option Description
The following table lists all valid key-value pairs and the applicable database type for -encryption_parameters.
Key Value Database type
CertHostName
Distinguished name or host name in
certicate.
SAP HANA
Oracle
KeyStash Key stash le name (.sth) and rela-
tive or absolute path.
DB2
KeyStore
Path and server root certicate le. SAP HANA
KeyStoreDatabase Key database le name (.kdb) and
relative or absolute path.
DB2
rsakey
Name of PEM le that contains the
RSA public key.
MySQL
sslca
SSL certicate authority name. MySQL
sslcert
SSL certicate le name. MySQL
sslcipher
List of permitted ciphers for SSL. MySQL
sslkey
SSL key name. MySQL
sslmode
SSL mode. MySQL
ValidateCertificate
True
False
SAP HANA
Microsoft SQL Server
-g
Repository uses Windows Authentication (Microsoft SQL
Server only).
-Kaddlconn
Enter additional connection parameters to connect to the
SQL Server.
-N<DatabaseType>
Repository database type.
Replace <DatabaseType> with a valid value. For example:
• DB2
• HANA
• Microsoft_SQL_Server
• MySQL
• Oracle
• SQL_Anywhere
• Sybase
This parameter is required.
Administrator Guide
Command line administration
PUBLIC 233

Option Description
-dbSubType<DatabaseSubType>
Use to distinguish the SQL Server repository connection on-
premise or on Azure. Values include:
• Microsoft_SQL_Server_Azure_PaaS
• Microsoft_SQL_Server_Azure_VM
-o
Overwrites existing repository.
-P<Password>
Repository login password.
Required for all database types.
-p<PortNo>
Repository server port number.
This parameter is required if you specied -s for a server
name connection.
-Q<Database>
Repository database.
This parameter is required only for SAP ASE (Sybase).
-s
Specify to use a server name-based connection (also known
as DSN-less or TNS-less) to the repository.
If you include -s, you must specify the -p and -V parame-
ters.
-S<Server>
Use to indicate the server connection information:
• If you don't include -s, enter the DSN (TNS for Oracle)
name for <Server>.
• If you include -s (to indicate server-based connection),
enter the database server hostname or IP address for
<Server>.
-authMethod<AuthenticationMethod>
Indicates the authentication method for the Microsoft SQL
Server connection. Values include:
• SQLServer (default)
• Windows
• Azure_AD_Password
-t<Type>
Repository type:
• local
• central
• proler
-U<User>
Repository login user.
Required for all database types.
234 PUBLIC
Administrator Guide
Command line administration
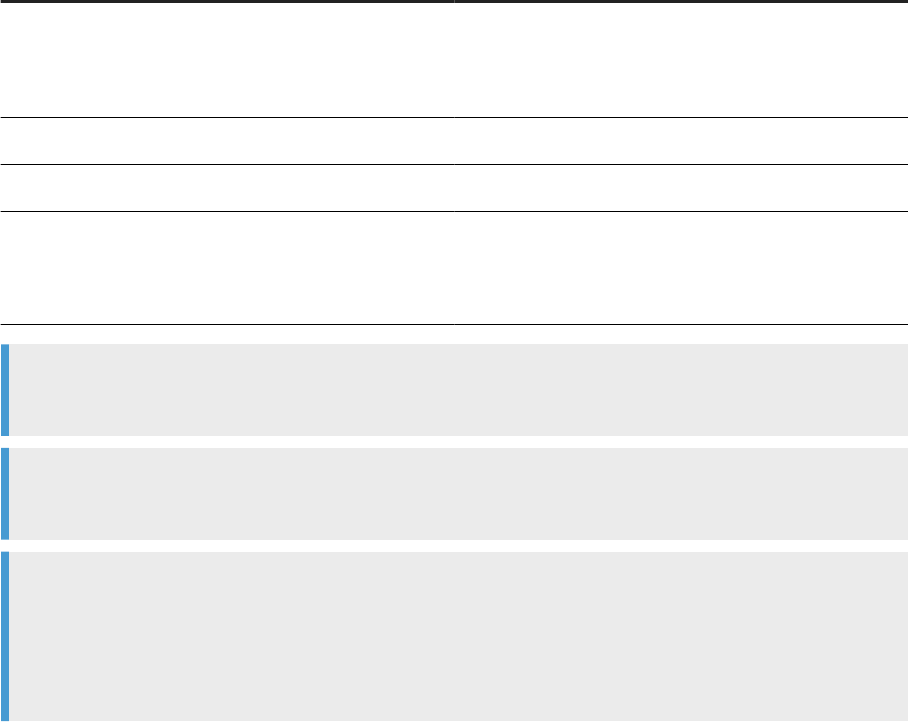
Option Description
-use_ssl_encryption
Enables SSL/TLS encryption.
When you include -use_ssl_encryption, also include
-encryption_parameters.
-u
Operation mode: Upgrades repository.
-v
Operation mode: Gets repository version.
-V<Database_version>
Repository database server version.
This parameter is required if you specied -s for a server
name connection.
Example
RepoManBatch -Usa -Psa -NMicroSoft_SQL_Server -SServer -QJake -c -tcentral -d
Example
RepoManBatch -UJake -PJake -NOracle -Sdbsvr -v
Example
RepoManBatch -Uuser -Ppassword -NMySQL -V"MySQL 8.x" -s -SServer -QDB -c -d
-use_ssl_encryption
-encryption_parameters"sslmode=mode;sslkey=key.pem;sslcert=cert.pem;sslca=ca.pem;
sslcipher=;rsakey="
Parent topic: Command line administration [page 228]
Related Information
Command line reference: License Manager [page 229]
Command line: Data Services Connection Manager (Unix) [page 231]
Command line: Repository Manager (Unix) [page 236]
Command line: Server Manager (Unix) [page 239]
Command line: Server Manager (Windows) [page 247]
Command line: Password encryption [page 253]
al_engine [page 255]
Administrator Guide
Command line administration
PUBLIC 235
14.4 Command line: Repository Manager (Unix)
Use the Repository Manager executable le, repoman, to create or update repositories from the command line
on Unix platforms.
By default, repoman is installed to the <LINK_DIR>/bin directory.
Specify parameters using a command prompt. ./repoman must be the rst command.
The following table contains an alphabetical list of descriptions for each code in the Repository Manager.
Code
Description
-a
Central repository security.
-authMethod<AuthenticationMethod>
Indicates the authentication method for the Microsoft SQL
Server connection. Values include:
• SQLServer: Use SQL Server authentication to con-
nect. This is the default.
• Windows: Use Windows authentication to connect.
• Azure_AD_Password: Use Microsoft Azure Active
Directory with password authentication to connect.
-c
Operation mode: Creates repository.
-d
Operation mode: Shows details.
-dbSubType<DatabaseSubType>
Use to distinguish the SQL Server repository connection on-
premise or on Azure. Values include:
• Microsoft_SQL_Server_Azure_PaaS
• Microsoft_SQL_Server_Azure_VM
-encryption_parameters
Enter additional SSL/TLS variables based on the database
type, listed in key-value pairs.
Separate each key-value pair with semicolons, and surround
the string in quotations.
Required when you include -use_ssl_encryption.
236 PUBLIC
Administrator Guide
Command line administration

Code Description
The following table lists all valid key-value pairs and the applicable database type for -encryption_parameters.
Key Value Database type
CertHostName
Distinguished name or host name in
certicate.
SAP HANA
Oracle
Microsoft SQL Server
KeyStash Key stash le name (.sth) and rela-
tive or absolute path.
DB2
KeyStore
SSL keystore le.
SAP HANA
KeyStoreDatabase Key database le name (.kdb) and
relative or absolute path.
DB2
TrustStore
SSL truststore le. Microsoft SQL Server
StoresCertPasswd
The SSL truststore password. Microsoft SQL Server
rsakey
Name of PEM le that contains the
RSA public key.
MySQL
sslca
SSL certicate authority name. MySQL
sslcert
SSL certicate le name. MySQL
sslcipher
List of permitted ciphers for SSL. MySQL
sslkey
SSL key name. MySQL
sslmode
SSL mode. MySQL
ValidateCertificate
True
False
SAP HANA
Microsoft SQL Server
-Kaddlconn
Enter additional connection parameters to connect to the
SQL Server.
-N
Repository database type:
• DB2
• HANA
• Microsoft_SQL_Server
• MySQL
• Oracle
• SQL_Anywhere
•
Sybase (SAP ASE)
Required for all database types.
-o
Overwrite existing repository.
Administrator Guide
Command line administration
PUBLIC 237

Code Description
-P
Repository login password.
Required for all database types.
-p
Repository database port number.
Required if you specied -s for a server name connection.
-Q
Repository database name.
Required for SAP ASE (Sybase).
-s
Specify to use a server name-based connection (also known
as DSN-less or TNS-less) to the repository.
If you include -s, you must specify the -p and -V parame-
ters.
-S
Use to indicate the server connection information:
• If you don't include -s, enter the DSN (TNS for Oracle)
name for <Server>.
• If you include -s (to indicate server name connection),
enter the database server hostname or IP address for
<Server>.
-t
Repository type:
• local
• central
• profiler
-u
Operation mode: Upgrades repository.
-U
Repository login user.
Required for all database types.
-use_ssl_encryption
Enable SSL/TLS encryption.
When you include -use_ssl_encryption, also include
-encryption_parameters.
-V
Repository database version.
Required if you specied -s for a server name connection.
-v
Operation mode: Gets repository version.
Example
Line breaks added for readability.
./repoman -Usa -Psa
238
PUBLIC
Administrator Guide
Command line administration

-NDB2 -s -Srepo_server
-Qrepo_central -c
-tcentral -d
Where:
Command
Description Value
-U User name sa
-P Password sa
-N Repository database type DB2
-s Indicates server name (DSN-less)
connection
N/A
-S Repository server host name repo_server
-Q Repository database name repo_central
-c Create repository
-t Repository type Central repository
-d Show details
Parent topic: Command line administration [page 228]
Related Information
Command line reference: License Manager [page 229]
Command line: Data Services Connection Manager (Unix) [page 231]
Command line: Repository Manager (Windows) [page 232]
Command line: Server Manager (Unix) [page 239]
Command line: Server Manager (Windows) [page 247]
Command line: Password encryption [page 253]
al_engine [page 255]
14.5 Command line: Server Manager (Unix)
Use the console-based SAP Data Services Server Manager, svrcfg, on Unix or Linux to create, edit, or delete
Job Servers and Access Servers after installation.
svrcfg supports command-line parameters for the following tasks:
• Adding a Job Server
• Adding an Access Server
Administrator Guide
Command line administration
PUBLIC 239
• Adding run-time resources
• Starting Data Services services
• Stopping Data Services services
Find the svrcfg le in $LINK_DIR/bin.
Common parameters
svrcfg supports one common parameter, -T, in combination with task characters for all operations. The
following table lists the characters to use in combination with -T for each task.
Parameter
Task
-TJS
Add a Job Server.
-TAS
Add an Access Server.
-TR
Add a runtime resource.
-TSTART
Start SAP Data Services services.
-TSTOP
Stop SAP Data Services services.
Note
-TSTART and -TSTOP don't require additional parameters.
Example
To start Data Services services: svrcfg -TSTART
To stop Data Services services: svrcfg -TSTOP
Output
When you use svrcfg to perform tasks from the command line, the Server Manager directs output to the
stdout console. The last line of the output indicates whether the task execution succeeded or failed. Possible
statuses include the following:
• Success
• Failure
Command line: Adding an Access Server (Unix or Linux) [page 241]
Add an Access Server in Unix or Linux using the -TAS parameter, along with other special parameters,
in svrcfg.
Command line: Adding a Job Server (Unix or Linux) [page 242]
Add a Job Server in Unix or Linux using the -TJS parameter, along with other special parameters, in
svrcfg.
Command line: Adding runtime resources (Unix or Linux) [page 246]
240
PUBLIC
Administrator Guide
Command line administration
Add runtime resources in Unix or Linux using the -TR parameter along with other special parameters,
in svrcfg.
Parent topic: Command line administration [page 228]
Related Information
Command line reference: License Manager [page 229]
Command line: Data Services Connection Manager (Unix) [page 231]
Command line: Repository Manager (Windows) [page 232]
Command line: Repository Manager (Unix) [page 236]
Command line: Server Manager (Windows) [page 247]
Command line: Password encryption [page 253]
al_engine [page 255]
14.5.1Command line: Adding an Access Server (Unix or
Linux)
Add an Access Server in Unix or Linux using the -TAS parameter, along with other special parameters, in
svrcfg.
The following table describes the additional Access Server-specic parameters to use with -TAS.
Note
Ensure that -TAS is the rst argument in the string.
Parameter
Description
-A<path>
Species the path for the access server.
Replace <path> with the desired path.
-O<port>
Species the port assigned to the Access Server.
Replace <port> with the desired port number. Use a value
from 1024 through 49151 for the port number. The number
must be unique and not already in use.
-R<param>
Species a parameter for the Access Server.
Replace <param> with the desired parameter.
-E
Indicates that the Access Server is created and enabled.
If -E isn't specied, the Access Server is created but not
enabled.
Administrator Guide
Command line administration
PUBLIC 241
Example
The following string creates and enables an Access Server on port 4000: svrcfg -TAS -A/home/bods/
AStest -O4000 -E
Parent topic: Command line: Server Manager (Unix) [page 239]
Related Information
Command line: Adding a Job Server (Unix or Linux) [page 242]
Command line: Adding runtime resources (Unix or Linux) [page 246]
14.5.2Command line: Adding a Job Server (Unix or Linux)
Add a Job Server in Unix or Linux using the -TJS parameter, along with other special parameters, in svrcfg.
The following table contains an alphabetical list of additional Job Server-specic parameters to use with -TJS.
Note
Ensure that -TJS is the rst argument in the string.
Parameter
Description
-a
Indicates that the Job Server will manage an adapter. If not
specied, the new Job Server won't manage adapters.
-authMethod<AuthenticationMethod>
Indicates the authentication method for the Microsoft SQL
Server connection. Values include:
• SQLServer: Use SQL Server authentication to con-
nect. This is the default.
• Windows: Use Windows authentication to connect.
• Azure_AD_Password: Use Microsoft Azure Active
Directory with password authentication to connect.
-b<broker_port>
Species the adapter manager port.
Replace <broker_port> with the desired port number. The
port number can have a value between 1024 and 49151, and
must be unique and not in use.
242 PUBLIC
Administrator Guide
Command line administration
Parameter Description
-C<connect_string>
Species the connection string to use to connect to the re-
pository.
Replace <connect_string> with appropriate information
for the database type:
• For DB2, the database instance name.
• For MySQL, the data source name as specied in ven-
dor conguration le referenced by $ODBCINI.
• For Oracle, the service name as specied in
tnsnames.ora.
• For SAP HANA, the data source name as specied in
vendor conguration le referenced by $ODBCINI
• For SAP SQL Anywhere, the database server name.
• For SAP IQ, the database server name.
-d<database>
Species the database name for the repository.
Replace <database> with the name of the repository data-
base.
Note
This parameter is required only for repositories on Syb-
ase.
-D<db_type>
Species the type of database used for the repository.
Replace <db_type> with a valid value. For example:
• DB2
• HANA
• Microsoft_SQL_Server
• MySQL
• Oracle
•
SQL_Anywhere
• SYBASE
-dbSubType<DatabaseSubType>
Use to distinguish the SQL Server repository connection on-
premise or on Azure. Values include:
• Microsoft_SQL_Server_Azure_PaaS
• Microsoft_SQL_Server_Azure_VM
-e
Indicates that SNMP is enabled for the Job Server. If not
specied, SNMP is disabled.
Administrator Guide
Command line administration
PUBLIC 243

Parameter Description
-encryption_parameters
Enter additional SSL/TLS variables based on the database
type, listed in key-value pairs.
Separate each key-value pair with semicolons, and surround
the string in quotations.
Required when you include -use_ssl_encryption.
The following table lists all valid key-value pairs and the applicable database type for -encryption_parameters.
Key Value Database type
CertHostName
Distinguished name or host name in
certicate.
SAP HANA
Oracle
KeyStash Key stash le name (.sth) and rela-
tive or absolute path.
DB2
KeyStore
Path and server root certicate le. SAP HANA
KeyStoreDatabase Key database le name (.kdb) and
relative or absolue path.
DB2
rsakey
Name of PEM le that contains the
RSA public key.
MySQL
sslca
SSL certicate authority name.
MySQL
sslcert
SSL certicate le name. MySQL
sslcipher
List of permitted ciphers for SSL. MySQL
sslkey
SSL key name. MySQL
sslmode
SSL mode.
MySQL
ValidateCertificate
True
False
SAP HANA
Microsoft SQL Server
-J<server_name>
Species the name of the Job Server.
Replace <server_name> with the desired name for the Job
Server. The specied name must not contain @@ and must
be unique.
-Kaddlconn
Enter additional connection parameters to connect to the
SQL Server.
-P<password>
Species the password used to connect to the repository.
Replace <password> with the repository password.
244 PUBLIC
Administrator Guide
Command line administration

Parameter Description
-p<port_number>
Species the listening port for the Job Server.
Replace <port_number> with the desired port number. The
port number can have a value between 1024 and 49151, and
must be unique and not in use.
-use_ssl_encryption
Enable SSL/TLS encryption.
When you include -use_ssl_encryption, also include
-encryption_parameters.
-UseX509Authentication
Enables X.509 authentication. Applicable only for SAP
HANA.
-U<username>
Species the username used to connect to the repository.
Replace <username> with the repository username.
-X509KeyStore
Species the path and le name for the x509.pse key store
le, which contains the X.509 certicate and the SSL certi-
cate.
Applicable when you include
-Usex509Authentication.
Example
The following string adds a Job Server with an Oracle repository:
svrcfg -TJS -JJobServer_1 -p3500 -DOracle -CORCL -Uuser -Ppassword
Parent topic: Command line: Server Manager (Unix) [page 239]
Related Information
Command line: Adding an Access Server (Unix or Linux) [page 241]
Command line: Adding runtime resources (Unix or Linux) [page 246]
Administrator Guide
Command line administration
PUBLIC 245

14.5.3Command line: Adding runtime resources (Unix or
Linux)
Add runtime resources in Unix or Linux using the -TR parameter along with other special parameters, in
svrcfg.
The following table describes the additional runtime resource-specic parameters to use with the -TR
parameter.
Note
Ensure that -TR is the rst argument in the string.
Parameter
Description
-i<cache_dir>
Species the directory for the pageable cache.
Replace <cache_dir> with the desired directory.
-n<port>
Species the ending port number.
Replace <port> with the desired port number. The port
number may have a value between 1026 and 32767, and
must be unique and not in use. The ending port value must
be greater than the starting port value.
-t<port>
Species the starting port number.
Replace <port> with the desired port number. The port
number may have a value between 1025 and 32766, and
must be unique and not in use.
Example
The following string adds a pageable cache resource on ports 2000-3000
svrcfg -TR -i$LINK_DIR\Log\Cache2 -t2000 -n3000
Parent topic: Command line: Server Manager (Unix) [page 239]
Related Information
Command line: Adding an Access Server (Unix or Linux) [page 241]
Command line: Adding a Job Server (Unix or Linux) [page 242]
246
PUBLIC
Administrator Guide
Command line administration

14.6 Command line: Server Manager (Windows)
Use the SAP Data Services Server Manager executable, AWServerConfig.exe, on Windows to create, edit, or
delete Job Servers and Access Servers after installation
In addition, AWServerConfig.exe also supports command-line parameters for the following tasks:
• Adding a Job Server
• Adding an Access Server
• Adding run-time resources
• Conguring SSL
• Enabling and setting NCS (Native Component Supportability) library
• Adding and editing SLD registration information for Data Services
Find the AWServerConfig.exe le in <LINK_DIR>\bin.
Note
Data Services installs AWServerConfig.exe as a Windows service. Therefore, you can't start or stop the
Data Services services using AWServerConfig.exe. Instead, use the standard net command to start and
stop the Data Services services.
Example
To start the Data Services services: net start "SAP Data Services"
To stop the Data Services services: net stop "SAP Data Services"
Command line: Adding an Access Server (Windows) [page 248]
Add an Access Server in Windows using the -n parameter and other special parameters.
Command line: Adding a Job Server (Windows) [page 248]
Add a Job Server in Windows using the -n parameter along with other special parameters.
Command line: Adding runtime resources (Windows) [page 252]
Add runtime resources in Windows using the -n parameter along with other special parameters.
Parent topic: Command line administration [page 228]
Related Information
Command line reference: License Manager [page 229]
Command line: Data Services Connection Manager (Unix) [page 231]
Command line: Repository Manager (Windows) [page 232]
Command line: Repository Manager (Unix) [page 236]
Command line: Server Manager (Unix) [page 239]
Command line: Password encryption [page 253]
al_engine [page 255]
Administrator Guide
Command line administration
PUBLIC 247
The Native Component Supportability (NCS) library [page 223]
14.6.1Command line: Adding an Access Server (Windows)
Add an Access Server in Windows using the -n parameter and other special parameters.
The following table describes the special Access Server-specic parameters to use with -n.
Note
Ensure that -n is the rst argument in the string.
Parameter
Description
-R<access_server_dir>
Species the directory path for the Access Server.
Replace <access_server_dir> with the Access Server directory path.
-A<port>
Species the port assigned to the Access Server.
Replace <port> with the desired port number. The port number may have a
value between 1024 and 49151, and must be unique and not in use.
-E
Indicates that the Access Server should be enabled. If not specied, the Access
Server is created but not enabled.
-T<param>
Species a parameter for the Access Server.
Replace <param> with the desired parameter.
Example
The following string creates and enables an Access Server on port : AWServerConfig.exe -n
-RC:\DataServices\AccessServer -A4000 -E
Parent topic: Command line: Server Manager (Windows) [page 247]
Related Information
Command line: Adding a Job Server (Windows) [page 248]
Command line: Adding runtime resources (Windows) [page 252]
14.6.2Command line: Adding a Job Server (Windows)
Add a Job Server in Windows using the -n parameter along with other special parameters.
The following table describes the other Job Server-specic parameters to use with -n.
248
PUBLIC
Administrator Guide
Command line administration
Note
Ensure that -n is the rst argument in the string.
Parameter Description
-a
Indicates that the Job Server manages an adapter. If not
specied, the new Job Server won't manage adapters.
-authMethod<AuthenticationMethod>
Indicates the authentication method for the Microsoft SQL
Server connection. Values include:
• SQLServer: Use SQL Server authentication to con-
nect. This is the default.
• Windows: Use Windows authentication to connect.
• Azure_AD_Password: Use Microsoft Azure Active
Directory with password authentication to connect.
-B<broker_port>
Species the adapter manager port.
Replace <broker_port> with the desired port number. The
port number can have a value between 1024 and 49151, and
must be unique and not in use.
-d
Indicates that this repository is the default for the Job
Server.
-encryption_parameters
Enter additional SSL/TLS variables based on the database
type, listed in key-value pairs.
Separate each key-value pair with semicolons, and surround
the string in quotations.
Required when you include -use_ssl_encryption.
Administrator Guide
Command line administration
PUBLIC 249

Parameter Description
The following table lists all valid key-value pairs and the applicable database type for -encryption_parameters.
Key Value Database type
CertHostName
Distinguished name or host name in
certicate.
SAP HANA
Oracle
KeyStash Key stash le name (.sth) and rela-
tive or absolute path.
DB2
KeyStore
Path and server root certicate le. SAP HANA
KeyStoreDatabase Key database le name (.kdb) and
relative or absolue path.
DB2
rsakey
Name of PEM le that contains the
RSA public key.
MySQL
sslca
SSL certicate authority name.
MySQL
sslcert
SSL certicate le name. MySQL
sslcipher
List of permitted ciphers for SSL. MySQL
sslkey
SSL key name. MySQL
sslmode
SSL mode.
MySQL
ValidateCertificate
True
False
SAP HANA
Microsoft SQL Server
-g
Indicates that Windows authentication will be used for the
connection to the repository.
Note
This parameter is applicable only for repositories on Mi-
crosoft SQL Server.
-J<server_name>
Species the name of the Job Server.
Replace <server_name> with the desired name for the Job
Server. The specied name may not contain @@ and must be
unique.
-Kaddlconn
Enter additional connection parameters to connect to the
SQL Server.
250 PUBLIC
Administrator Guide
Command line administration
Parameter Description
-N<db_type>
Species the type of database used for the repository.
Replace <db_type> with a valid value. For example:
• DB2
• Microsoft_SQL_Server
Use -dbSubType<DatabaseSubType> to specify
an Azure database. Values include:
• Microsoft_SQL_Server_Azure_PaaS
• Microsoft_SQL_Server_Azure_VM
• MySQL
• Oracle
• SQL_Anywhere
• Sybase
-P<port_number>
Species the listening port for the Job Server.
Replace <port_number> with the desired port number. The
port number can have a value between 1024 and 49151, and
must be unique and not in use.
-Q<database_name>
Species the database name for the repository.
Replace <database_name> with the name of the repository
database.
Note
This parameter is required only for repositories on Syb-
ase and Microsoft SQL Server.
-s
Indicates that SNMP is enabled for the Job Server. If not
specied, SNMP is disabled.
-S<server_name>
Species the database service name or server name used to
connect to the repository.
Replace <server_name> with the appropriate information
for the database type:
• For Oracle, the database service name as specied in
tnsnames.ora.
• For DB2, the database instance name.
• For Microsoft SQL Server, the database server name.
• For Sybase (SAP ASE), the database server name.
• For MySQL, the database source name as specied in
the system DSN.
• For SAP Sybase SQL Anywhere, the database server
name.
Administrator Guide
Command line administration
PUBLIC 251

Parameter Description
-use_ssl_encryption
Enables SSL/TLS encryption.
When you include -use_ssl_encryption, also include
-encryption_parameters.
-U<username>
Species the username used to connect to the repository.
Replace <username> with the repository username.
-W<password>
Species the password used to connect to the repository.
Replace <> with the repository password.
Example
The following string adds a Job Server with an Oracle repository: AWServerConfig.exe -n
-JNewJobServer -P3500 -Uuser -Wpass -NOracle -SORCLPROD
Parent topic: Command line: Server Manager (Windows) [page 247]
Related Information
Command line: Adding an Access Server (Windows) [page 248]
Command line: Adding runtime resources (Windows) [page 252]
14.6.3Command line: Adding runtime resources (Windows)
Add runtime resources in Windows using the -n parameter along with other special parameters.
The following table describes the other runtime resource-specic parameters to use with -n.
Note
Ensure that -n is the rst argument in the string.
Parameter
Description
-C<cache_dir>
Species the directory for the pageable cache.
Replace <cache_dir> with the desired directory.
-PF<from_port>
Species the starting port number.
Replace <from_port> with the desired port number. The port number may have
a value between 1025 and 32766, and must be unique and not in use.
252 PUBLIC
Administrator Guide
Command line administration

Parameter Description
-PT<to_port>
Species the ending port number.
Replace <to_port> with the desired port number. The port number may have a
value between 1026 and 32767, and must be unique and not in use. The ending
port value must be greater than the starting port value.
Example
The following string adds a pageable cache resource on ports 2000-2550: AWServerConfig.exe -n
-C"%LINK_DIR%\log\Pcache" -PF2000 -PT2550
Parent topic: Command line: Server Manager (Windows) [page 247]
Related Information
Command line: Adding an Access Server (Windows) [page 248]
Command line: Adding a Job Server (Windows) [page 248]
14.7 Command line: Password encryption
Use AL_Encrypt to encrypt a password with an encryption key or a passphrase, and also to return the base64
encoding of any text.
Returning the base64 encoding can be useful to modify a command line that contains global variable or
substitution variable data, which must be encoded in base64 form.
By default, the installer locates AL_Encrypt in the <LINK_DIR>/bin directory.
Syntax
AL_Encrypt -e <plain_password> [-k <key string> | -p <passphrase>]
AL_Encrypt "<text to encode>"
Note
Values shown in square brackets [ ] are optional.
Administrator Guide
Command line administration
PUBLIC 253

Where
Parameter Description
-e <password>
Species the plain-text password to encrypt.
-k <key string>
Species the encryption key for encrypting the password.
-p <passphrase>
Species the passphrase for encrypting the password.
<text to encode>
Returns the base64 encoding of any following text when you
run AL_Encrypt with no parameters. The text can be in
quotation marks or not.
Example: Encrypt a password using a passphrase
AL_Encrypt -e mypassword -p thepassphrase >
+0100000000120303000803E83F55088B0C987CD715006C02938825530E8691DFD9DDB4198AFFC5C194
CD8CE6D338FDE470E2
Example: Encode text using base64 encoding
AL_Encrypt "encode this as base64" > ZW5jb2RlIHRoaXMgYXMgYmFzZTY0
Parent topic: Command line administration [page 228]
Related Information
Command line reference: License Manager [page 229]
Command line: Data Services Connection Manager (Unix) [page 231]
Command line: Repository Manager (Windows) [page 232]
Command line: Repository Manager (Unix) [page 236]
Command line: Server Manager (Unix) [page 239]
Command line: Server Manager (Windows) [page 247]
al_engine [page 255]
254
PUBLIC
Administrator Guide
Command line administration
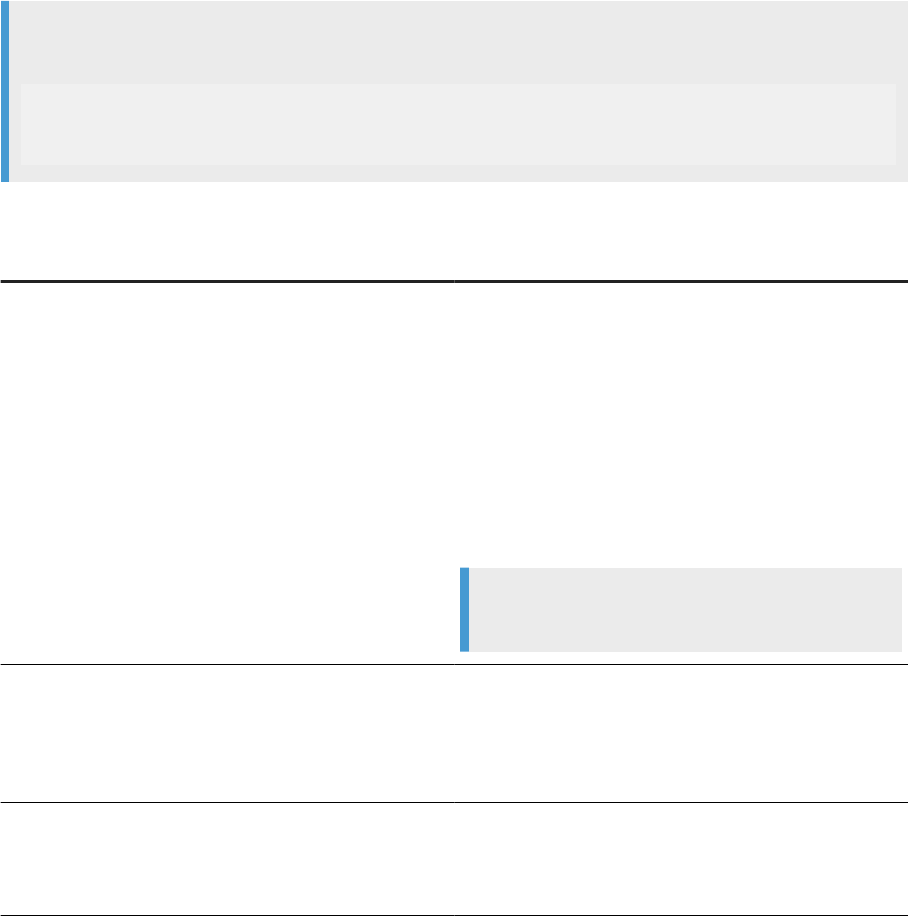
14.8 al_engine
al_engine is a core Data Services process that is responsible for executing jobs, importing repository objects,
exporting repository objects, and so on.
Common options
al_engine supports options that are common to many dierent operations.
Example
The following example shows an Oracle repository with a server-based connection and SSL/TLS protocol:
-U<repo user name> -P<repo password> -NOracle -S<database server
name> -Q<database> -Kserver -Kport<port number> -use_ssl_encryption
-encryption_parameters“CertHostName=CN=ccus1vmwin062”
The following table contains an alphabetical list of descriptions of all codes for the al_engine.
Parameter
Description
-authMethod<AuthenticationMethod>
Species the authentication method you are using to con-
nect to the Microsoft SQL Server.
Acceptable values include:
• Windows: Use Windows authentication to connect to
the repository.
• SQLServer: Use SQL Server authentication to con-
nect to the repository. This is the default.
• Azure_AD_Password: Use Microsoft Azure Active
Directory with password authentication to connect to
the repository.
Example
-authMethodAzure_AD_Password
-dbSubType<DatabaseSubType>
Use to distinguish the SQL Server repository connection on-
premise or on Azure. Values include:
• Microsoft_SQL_Server_Azure_PaaS
• Microsoft_SQL_Server_Azure_VM
-encryption_parameters
Species additional SSL/TLS variables based on the data-
base type, listed in key-value pairs.
Valid only when you include -use_ssl_encryption.
Administrator Guide
Command line administration
PUBLIC 255
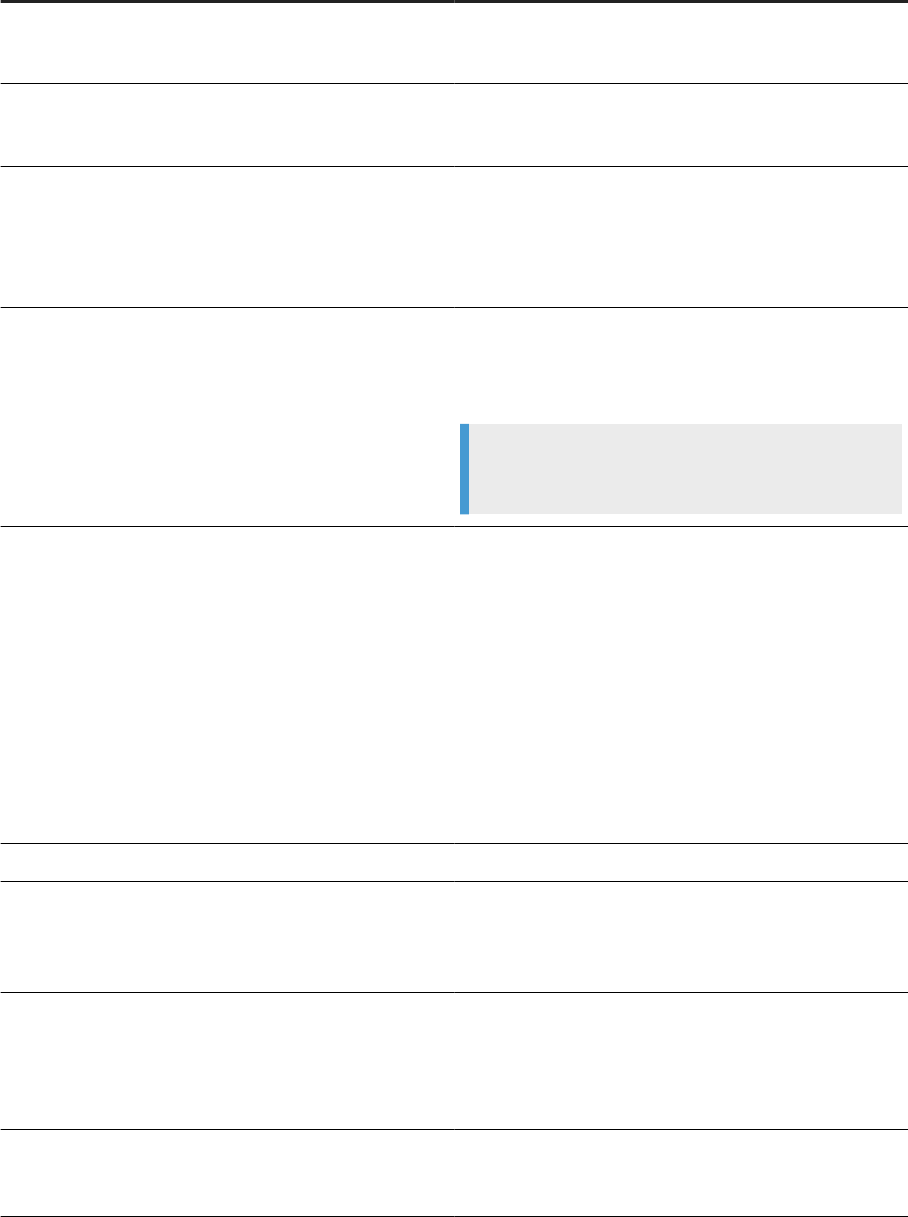
Parameter Description
-g
Species Windows Authentication as the repository connec-
tion type. This parameter is valid only for repositories on
Microsoft SQL Server.
-Kport<PortNumber>
Repository port number for server name connection. This
parameter is required if you specied -Kserver for a
server name connection.
-Kserver
Species to use a server name (also known as DSN-less or
TNS-less) connection to the repository.
If you specify this parameter, you must specify the -Kport
and -Kversion parameters.
-Kversion<VersionNumber>
Species the server version for the repository database.
Applicable for server-based connections. Required if you
specied -Kserver for a server name connection.
Example
-Kversion"MySQL 5.1"
-N<DatabaseType>
Species the repository database type.
Acceptable values include:
• Oracle
• Microsoft_SQL_Server
• DB2
• MySQL
• Sybase
•
HANA
• SQL_Anywhere
-P<Password>
Species the password used to log into the repository.
-Q<DatabaseName_or_SID>
Species the repository database name or SID (for Oracle).
Specify the database name for a DSN-less connection to a
DB2, SAP Sybase, or SAP Sybase SQL Anywhere repository.
-S<ServerName>
Species the repository server name.
Use ODBC connection name for a DSN connection to a DB2,
SAP HANA, SAP Sybase, or SAP Sybase SQL Anywhere re-
pository.
-use_ssl_encryption
Enables SSL/TLS encryption.
Also include -encryption_parameters.
256 PUBLIC
Administrator Guide
Command line administration
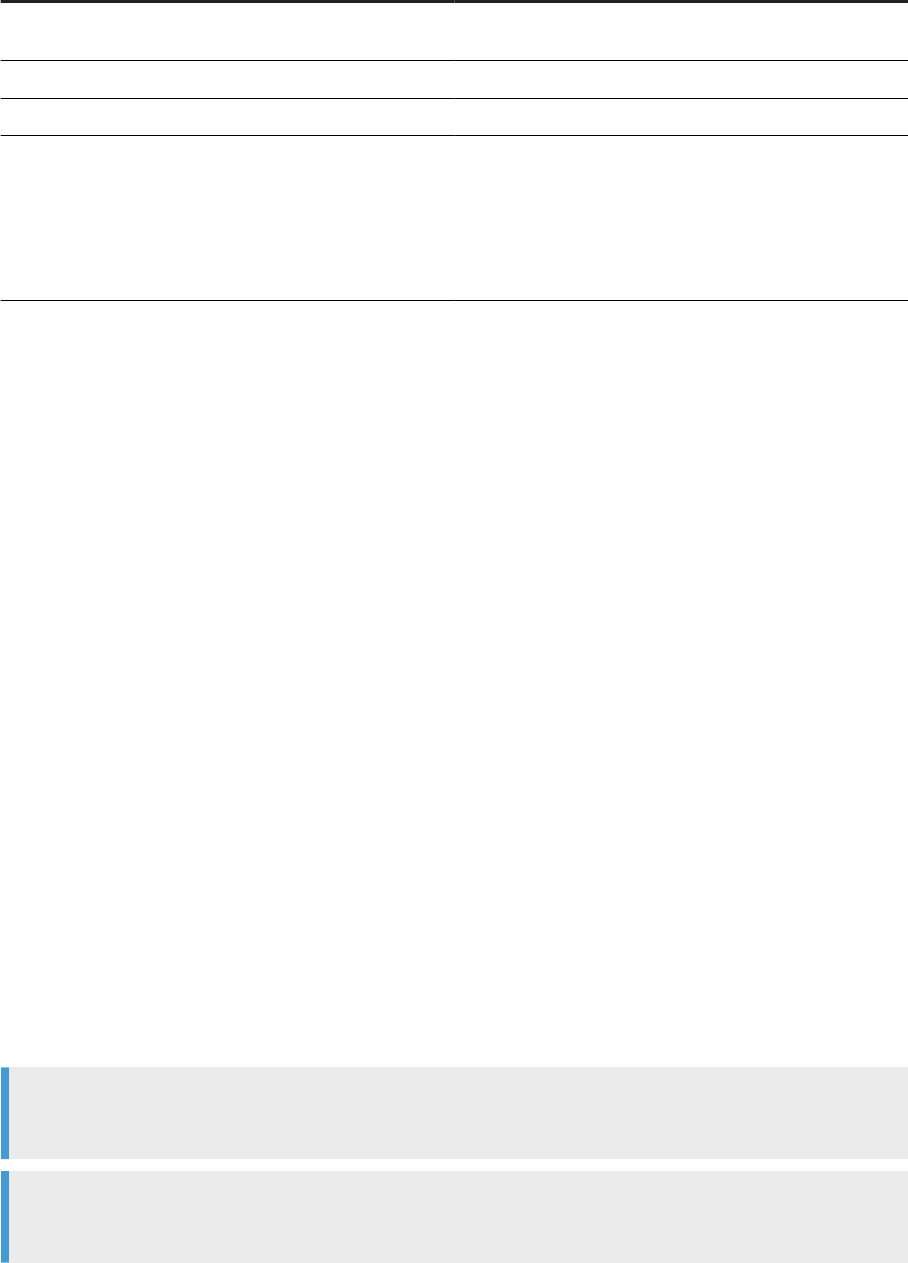
Parameter Description
-UseX509Authentication
Enables X.509 authentication. Applicable only for SAP
HANA.
-U<Username>
Species the username used to log into the repository.
-v
Returns the version number of the Data Services engine.
-X509KeyStore
Species the path and le name for the x509.pse key store
le, which contains the X.509 certicate and the SSL certi-
cate.
Applicable when you include
-Usex509Authentication.
al_engine Export and Import options [page 257]
al_engine imports and exports repository information in the internal scripting languages of SAP Data
Services: XML and ATL.
Parent topic: Command line administration [page 228]
Related Information
Command line reference: License Manager [page 229]
Command line: Data Services Connection Manager (Unix) [page 231]
Command line: Repository Manager (Windows) [page 232]
Command line: Repository Manager (Unix) [page 236]
Command line: Server Manager (Unix) [page 239]
Command line: Server Manager (Windows) [page 247]
Command line: Password encryption [page 253]
14.8.1al_engine Export and Import options
al_engine imports and exports repository information in the internal scripting languages of SAP Data
Services: XML and ATL.
The following table describes the export and import options that al_engine supports.
Remember
The options are only for export and import operations.
Note
Values shown in square brackets [ ] are optional.
Administrator Guide
Command line administration
PUBLIC 257
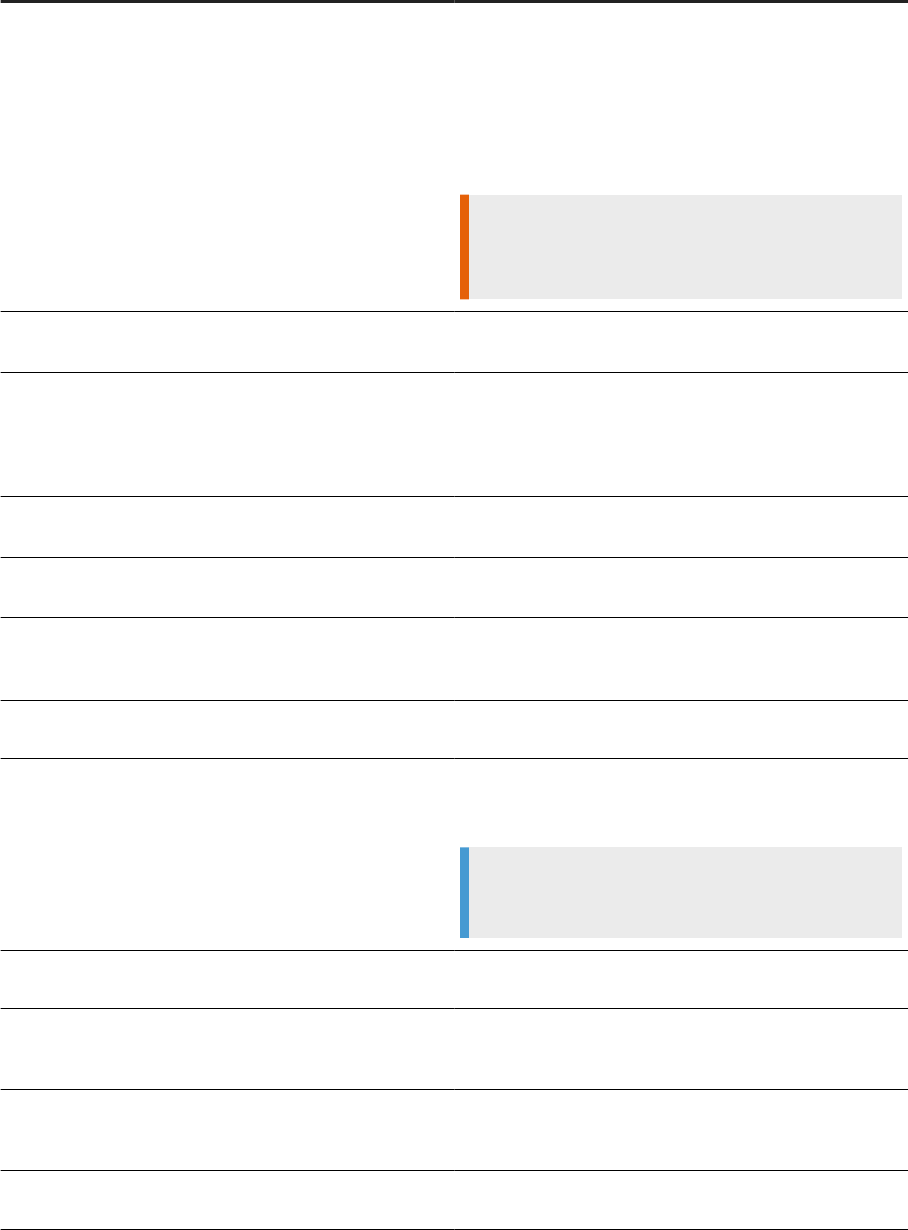
Parameter Description
-epassphrase<passphrase>
Species a base64-encoded passphrase to use for the fol-
lowing purposes:
• Encrypt any passwords when exporting objects.
• Decrypt any passwords when importing objects.
You can use -epassphrase<passphrase> for a pass-
phrase that contains special characters.
Restriction
You must transcode the passphrase to the UTF8 charac-
ter set before encoding it into base64.
-f<filename.atl>
Imports information from the ATL le specied in
<filename.atl> to the repository.
-passphrase<passphrase>
Species a plain-text passphrase to use for the following
purposes:
• Encrypt any passwords when exporting objects.
• Decrypt any passwords when importing objects.
-X
Exports the entire repository in ATL format to
repo_export.atl.
-XI<filename.xml>
Imports information from the XML le specied in
<filename.xml> to the repository.
-XKport<PortNumber>
Exports repository port number for server name connection.
You must use this parameter with the -XKserver parame-
ter.
-XKserver
Exports repository server name connection. Applicable for
MySQL, SAP HANA, ORACLE, and DB2 database types.
-XKversion<VersionNumber>
Exports repository database server version for server
name connection. You must use this parameter with the
-XKserver parameter.
Example
-XKversion“MySQL 5.1”
-Xp@<ObjectType>@<FileName>
Exports all repository objects of the specied type to the
specied le in ATL format.
-Xp@<ObjectType>@<FileName>@<ObjectName>
@D
Exports the specied repository object and its dependents
to the specied le in ATL format, excluding datastore infor-
mation.
-Xp@<ObjectType>@<FileName>@<ObjectName>
@DE
Exports the specied repository object and its dependents
to the specied le in ATL format, including datastore infor-
mation.
-Xp@<ObjectType>@<FileName>@<ObjectName>
Exports the specied repository object to the specied le in
ATL format.
258 PUBLIC
Administrator Guide
Command line administration
Parameter Description
-XX[L]
Exports the entire repository in XML format to
export.xml.
-XX[L]@<ObjectType>@<FileName>
Exports all repository objects of the specied type to the
specied le in XML format.
-XX[L]@<ObjectType>@<FileName>@<ObjectNa
me>@D
Exports the specied repository object and its dependents
to the specied le in XML format, excluding datastore infor-
mation.
-XX[L]@<ObjectType>@<FileName>@<ObjectNa
me>@DE
Exports the specied repository object and its dependents
to the specied le in XML format, including datastore infor-
mation.
-XX[L]@<ObjectType>@<FileName>@<ObjectNa
me>
Exports the specied repository object to the specied le in
XML format.
Note
When you export objects, you must specify a passphrase with either the -passphrase parameter or
the -epassphrase parameter. When you import objects, the passphrase is optional. However, if you
don’t specify a passphrase, or the specied passphrase is incorrect, the software removes any encrypted
passwords in the imported objects.
Lean XML format [L]
Specify the lean XML format using [L] when you use any of the -XX parameters.
The lean XML format excludes all non-executable elements from the exported XML to improve readability.
Example
The exact arrangement of transforms in a data ow in the Designer workspace area isn't maintained on
export when you use [L] with an -XX parameter. However, when imported back into the software, Data
Services arranges the data ows automatically.
Example
To export all data ows in lean XML format, use the following string:
al_engine -Uuser -Ppassword -Slocalhost -NMySQL -QTheRepository
-XXL@D@exported_dataflows.xml -passphraseMypassphrase
Available object type codes
The following table lists the possible values for the object type (<ObjectType>) codes and the related object
types.
Administrator Guide
Command line administration
PUBLIC 259

Code Object type
B
COBOL Copybooks
C
Custom functions
D
data ows
E
Excel workbooks
F
User-dened le formats
J
Jobs
K
SDK-type transform congurations
P
Projects
p
System proles
S
Datastores
T
Idocs
v
Substitution parameter congurations
W
work ows
X
XML and DTD message formats
Parent topic: al_engine [page 255]
260
PUBLIC
Administrator Guide
Command line administration

Important Disclaimers and Legal Information
Hyperlinks
Some links are classied by an icon and/or a mouseover text. These links provide additional information.
About the icons:
• Links with the icon
: You are entering a Web site that is not hosted by SAP. By using such links, you agree (unless expressly stated otherwise in your
agreements with SAP) to this:
• The content of the linked-to site is not SAP documentation. You may not infer any product claims against SAP based on this information.
• SAP does not agree or disagree with the content on the linked-to site, nor does SAP warrant the availability and correctness. SAP shall not be liable for any
damages caused by the use of such content unless damages have been caused by SAP's gross negligence or willful misconduct.
• Links with the icon : You are leaving the documentation for that particular SAP product or service and are entering an SAP-hosted Web site. By using
such links, you agree that (unless expressly stated otherwise in your agreements with SAP) you may not infer any product claims against SAP based on this
information.
Videos Hosted on External Platforms
Some videos may point to third-party video hosting platforms. SAP cannot guarantee the future availability of videos stored on these platforms. Furthermore, any
advertisements or other content hosted on these platforms (for example, suggested videos or by navigating to other videos hosted on the same site), are not within
the control or responsibility of SAP.
Beta and Other Experimental Features
Experimental features are not part of the ocially delivered scope that SAP guarantees for future releases. This means that experimental features may be changed by
SAP at any time for any reason without notice. Experimental features are not for productive use. You may not demonstrate, test, examine, evaluate or otherwise use
the experimental features in a live operating environment or with data that has not been suciently backed up.
The purpose of experimental features is to get feedback early on, allowing customers and partners to inuence the future product accordingly. By providing your
feedback (e.g. in the SAP Community), you accept that intellectual property rights of the contributions or derivative works shall remain the exclusive property of SAP.
Example Code
Any software coding and/or code snippets are examples. They are not for productive use. The example code is only intended to better explain and visualize the syntax
and phrasing rules. SAP does not warrant the correctness and completeness of the example code. SAP shall not be liable for errors or damages caused by the use of
example code unless damages have been caused by SAP's gross negligence or willful misconduct.
Bias-Free Language
SAP supports a culture of diversity and inclusion. Whenever possible, we use unbiased language in our documentation to refer to people of all cultures, ethnicities,
genders, and abilities.
Administrator Guide
Important Disclaimers and Legal Information
PUBLIC 261

www.sap.com/contactsap
© 2024 SAP SE or an SAP aliate company. All rights reserved.
No part of this publication may be reproduced or transmitted in any form
or for any purpose without the express permission of SAP SE or an SAP
aliate company. The information contained herein may be changed
without prior notice.
Some software products marketed by SAP SE and its distributors
contain proprietary software components of other software vendors.
National product specications may vary.
These materials are provided by SAP SE or an SAP aliate company for
informational purposes only, without representation or warranty of any
kind, and SAP or its aliated companies shall not be liable for errors or
omissions with respect to the materials. The only warranties for SAP or
SAP aliate company products and services are those that are set forth
in the express warranty statements accompanying such products and
services, if any. Nothing herein should be construed as constituting an
additional warranty.
SAP and other SAP products and services mentioned herein as well as
their respective logos are trademarks or registered trademarks of SAP
SE (or an SAP aliate company) in Germany and other countries. All
other product and service names mentioned are the trademarks of their
respective companies.
Please see https://www.sap.com/about/legal/trademark.html for
additional trademark information and notices.
THE BEST RUN
