Warranty
This KOOLATRON product is warranted to the retail consumer for 90 days from date of retail purchase, against
defects in material and workmanship.
WHAT IS COVERED
- Replacement parts and labor.
- Transportation charges to customer for the repaired product.
WHAT IS NOT COVERED
- Commercial or industrial use of this product.
- Damage caused by abuse, accident, misuse, or neglect.
- Transportation of the unit or component from the customer to Koolatron.
IMPLIED WARRANTIES
Any implied warranties, including the implied warranty of merchantability are also limited to duration of 90 days
from the date of retail purchase.
WARRANTY REGISTRATION
Register on-line at www.koolatron.com AND keep the original, dated, sales receipt with this manual.
WARRANTY AND SERVICE PROCEDURE
If you have a problem with your unit, or you require replacement parts, please telephone the following number
for assistance: 1-800-265-8456
A Koolatron Master Service Centre must perform all warranty work. Service after warranty may be obtained at a
Master Service Centre or at an authorized service dealer. Purchase Receipt is required to establish warranty
eligibility.
Koolatron has Master Service Centres at these locations:
U.S.A.
4330 Commerce Dr.
Batavia, NY 14020-4102
Canada
139 Copernicus Blvd.
Brantford, ON N3P 1N4
www.koolatron.com
©2016 Koolatron, Inc. All rights reserved.
All specification are subject to change without notice.
Made in China
06/2016-v2H1S192
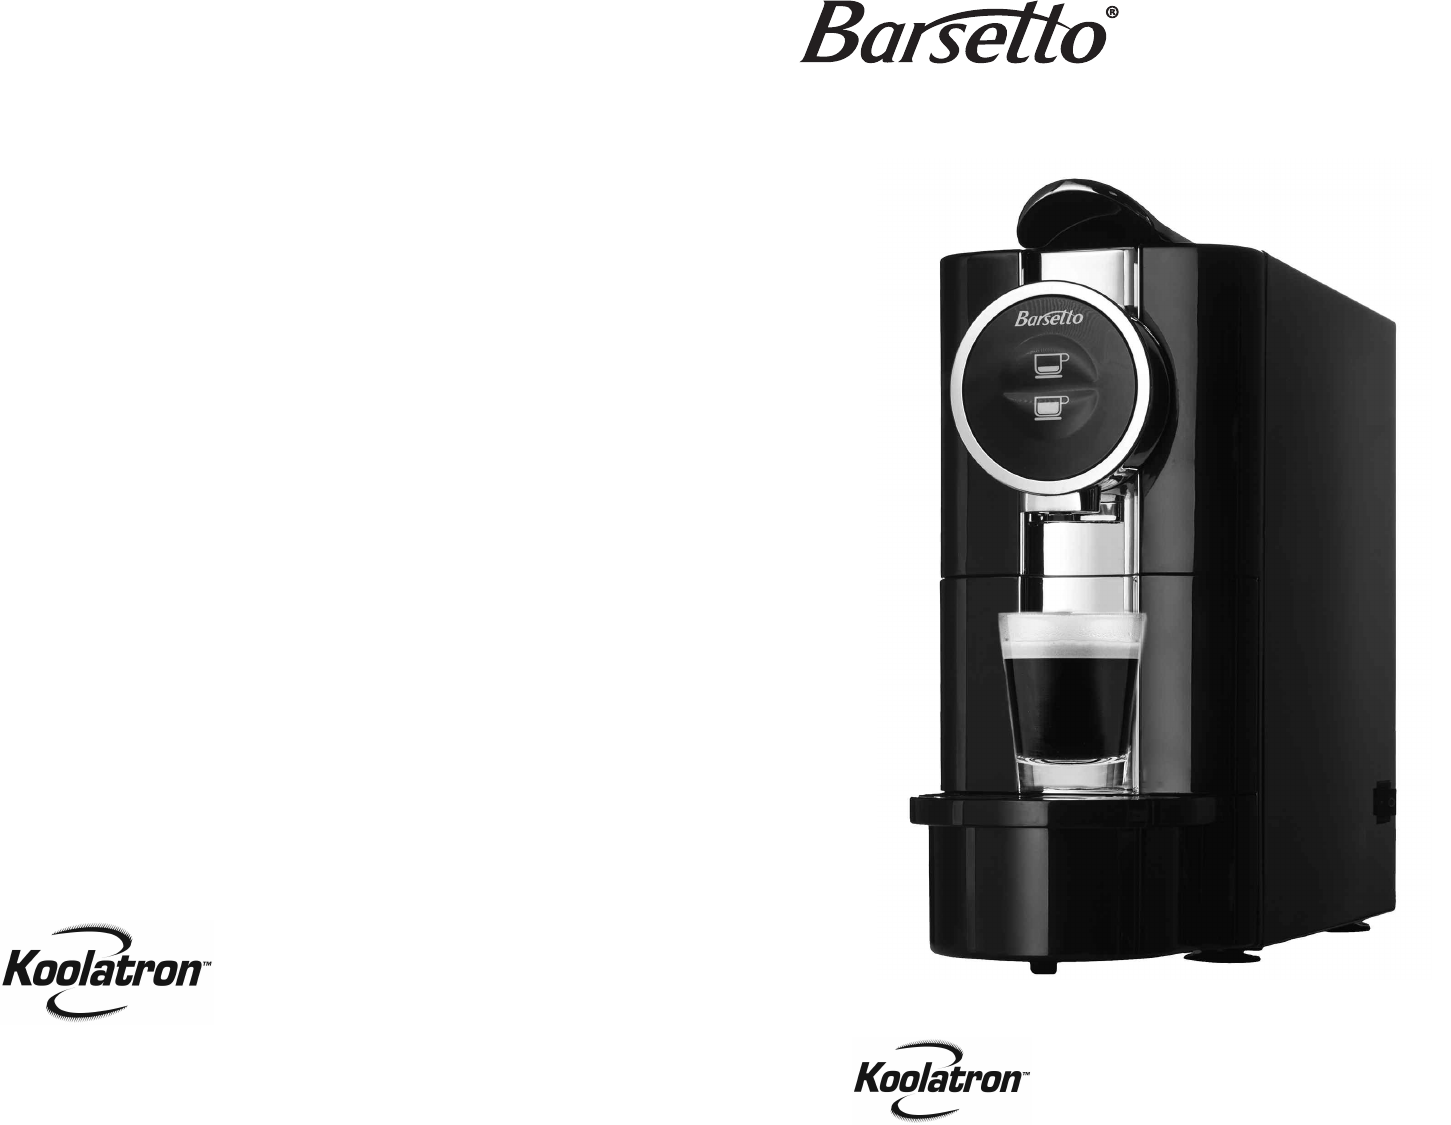
BARSM1
User Manual
by
Single Serve
Espresso Coffee Machine
FEATURES
• 40-second preheating
• Capsule auto-drop system
• 0.7L (23.7 fl. oz) removable water tank
• Long & short coffee control
• 19 Bar High Pressure Pump
Compatible for use with Nespresso® Capsules*
*Koolatron™ is a registered trademark of Koolatron Corporation and Koolatron Inc., respectively. Nespresso® is registered trademark of the
Nestlé Nespresso S.A., an operating unit of the Nestlé Group. Nestlé Nespresso S.A., the Nestlé Group have not sponsored, endorsed, certi-
fied or approved, and is not affilated in any manner whatsoever with Koolatron Corporation, its affiliates or any of their respective products.
SPECIFICATIONS
Power Requirements: AC 120V ~ 60Hz 1050W
Capacity: 0.7L (23.7 fl. oz.) water tank
IMPORTANT SAFEGUARDS
When using electrical appliances, basic precautions should always be followed!
1. READ ALL INSTRUCTIONS
2. Make sure that your outlet voltage corresponds to the voltage stated on the rating label of the
coffee maker.
3. To protect against fire, electric shock and injury to persons do not immerse cord, plug or unit in
water or other liquid.
4. Close supervision is necessary when any appliance is used by or near children.
5. Unplug from outlet when not in use and before cleaning. Allow cooling before putting on or
taking off parts, and before cleaning the appliance.
6. Do not operate any appliance with a damaged cord or plug or after the appliance malfunctions,
or has been damaged in any manner. Return appliance to an authorized service facility for
examination, repair or adjustment.
7. The use of non-Barsetto® accessories is not recommended by the appliance manufacturer and
may result in fire, electric shock or injury to persons.
8. Do not let cord hang over edge of table or counter, or touch hot surface.
9. Do not place on or near a hot gas or electric burner, or in a heated oven.
10. Only fill the tank with clean and cold water. Never fill the tank with mineral water, milk or other
liquids.
11. Do not let the coffee maker operate without water.
12. There is extremely hot water in the capsule holder during the brew process. To avoid risk of
injury, do not lift the brew handle during brewing process.
13. Never insert finger into the capsule holder to avoid nipping finger.
14. To disconnect, turn all controls to “off”, remove plug from wall outlet. Always hold the plug, never
pull the cord.
15. Some parts of appliance are hot when operated, so do not touch with hand. Use handles or
knobs only.
16. Do not leave the appliance on unattended.
17. The environment temperature of operating or storing must be more than 0°C
18. Do not leave the appliance exposed to atmospheric agents (sun, rain, etc.)
19. Do not use appliance for other than intended use.
20. Do not use outdoors.
21. Scalding may occur if the lid is removed during the brewing cycles.
22. SAVE THESE INSTRUCTIONS
Notes on the power cord
A short power supply cord is provided to reduce the risk of becoming entangled in or tripping over a
longer cord. Extension cords are available and may be used if care is exercised in their use. If one
is used:
1) The marked electrical rating of the detachable power-supply cord or extension cord should be at
least as great as the electrical rating of the appliance;
2) If the appliance is of the grounded type ,the extension cord should be a grounding-type 3-wire
cord ;
3) The longer cord should be arranged so that it will not drape over the counter top or table top
where it can be pulled on by children or tripped over.
2 3
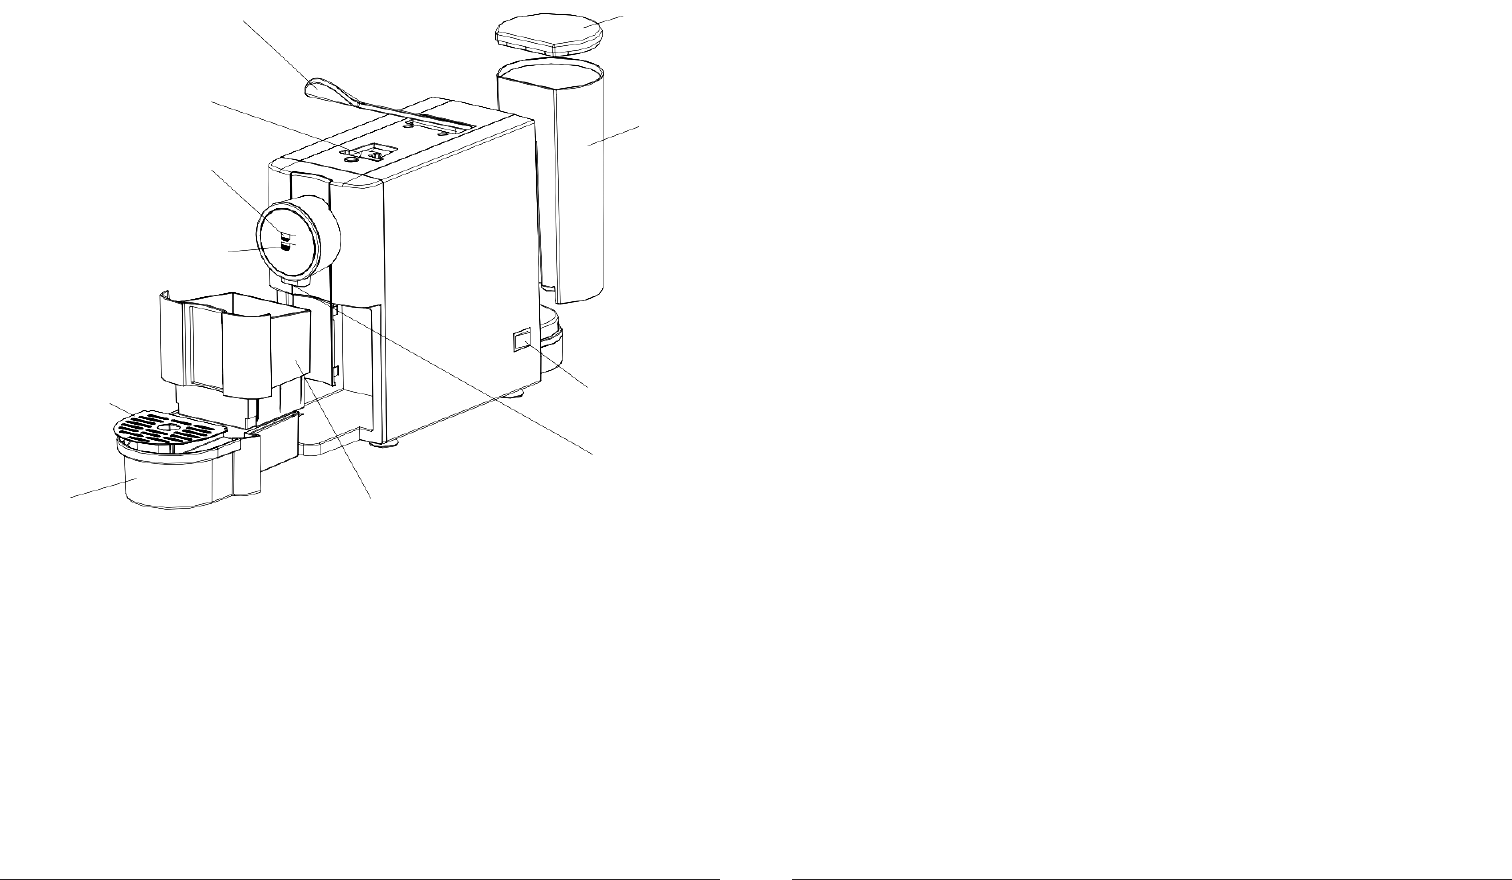
WATER
TANK LID
REMOVABLE
WATER TANK
POWER SWITCH
COFFEE OUTLET
CAPSULE
COLLECTION TRAY
DRIP TRAY
CUP HOLDER
GRID
SMALL CUP
BUTTON
WITH INDICATOR
LARGE CUP
BUTTON
WITH INDICATOR
CAPSULE
HOLDER
HANDLE

OPERATING INSTRUCTIONS (cont.)
6. The coffee dispensing amount of small cup and big cup can be adjusted:
a) Hold and press the small cup button for about 3 seconds, and then its corresponding indicator will
start to flash while the indicator of the large cup button turns off.
b) At that time, release the small cup button. Then press the small cup button again, the coffee
maker will start to brew coffee, after a while the coffee will flow out.
c) When you get your desired amount of coffee, press the small cup button again The coffee maker
will stop working and save the selected coffee dispensing amount of small cup.
d) When you press the small cup button again, the coffee maker will dispense the selected coffee
amount.
e) You can follow the above operations to adjust the coffee dispensing amount of the big cup.
NOTES
- The coffee dispensing amount of small cup & big cup can be only adjusted after preheat-
ing is finished.
- Coffee dispensing amount of small cup is ranged between 25ml and 45ml while the coffee
dispensing amount of big cup is ranged between 55ml and 85ml.
- The appliance will enter into the standby mode and both the indicators will be extinguished
if there is no any operation within 4 minutes.
- During brewing process, you can cancel the coffee brewing process by pressing your
selected coffee button once. To restart the brewing process, press the button again.
7. Press the big cup or small cup coffee button according to your demand, and then its
corresponding indicator starts to flash in blue. After a while, coffee will flow out from the coffee
outlet. Once the desired quantity has been reached, the coffee will stop flowing out
automatically and the corresponding indicator of your selected coffee button will light steadily.
8. During brewing process, both the indicators of big cup & small cup coffee buttons will flash quick-
ly if there is lack of water in the water tank. At that time, you must refill the water tank. Before refill-
ing, please firstly press the Power switch to “O” position and then remove the water tank to refill.
After refilling it, replace the water tank and make sure that it is placed in position. And then press
down the Power Switch to “I” position and you can continue to brew coffee.
9. Once you have finished brewing coffee, always expel the capsule. Capsules are automatically
expelled into the capsule collection tray by opening the handle.
CAUTION: Never open the handle during brewing cycles.
NOTE: The appliance will enter into the standby mode and both the indicators will be extin-
guished if there is no any operation within 4 minutes after the appliance finishes brewing
coffee. If you want to brew coffee again, firstly, make sure that the plug is connected well
with the power source and the Power Switch is at “I” position, and then press any button.
The appliance will then continue to brew coffee.
10. If you want to make another cup, insert a new capsule and repeat the previous steps.
11. Empty the capsule collection tray and rinse the unit and tank frequently.
12. Always turn the coffee maker off and disconnect the power supply when not use.
5
IMPORTANT SAFEGUARDS (cont.)
OPERATING INSTRUCTIONS
FIRST USE
Check that all accessories are complete and the unit is not damaged. Add water into water tank,
make sure the handle is closed in place. Place a container on the cup holder grid, insert the plug,
press the power switch to “I” position and the indicators of big cup and small cup coffee buttons start
to flash. Wait until the indicator lights stop-flashing, then press the big cup or small cup coffee
button. The water will start to flow out from the coffee outlet. Once the desired quantity has
been reached, the water will stop flowing out. Discard the water and clean all detachable parts
thoroughly with warm water.
NOTE: While pressing down the big cup or small cup coffee button, the machine may pro-
duce a pumping sound, this is normal. The sound tells you that water is pumped for brew-
ing coffee.
USING YOUR COFFEE MAKER
1. Fill the detachable water tank with drinking water. The water level should not exceed MAX level
marked on the tank.
2. Open the handle by lifting it and insert a coffee capsule. Close the handle by pushing it down
directly.
CAUTION: Use Nespresso®* original line and Barsetto® capsules only for the appliance.
3. Plug the power cord into the outlet. Press the power switch to “I” position and then both the
indicators of big cup and small cup coffee buttons will start to flash, this signals the water is being
heated.
CAUTION: Never open the handle during brewing cycle, the coffee capsule will be expelled
into the capsule collection tray.
4. Position a container on the cup holder grid. Make sure the drip tray is assembled in place.
5. Once the indicators of big cup & small cup coffee buttons light steadily, the coffee maker has
finished preheating. You can start to brew coffee under the default setting. The default coffee
dispensing amount is 35ml (1.23 fl. oz.) for small cup and 70ml (2.47 fl. oz) for large cup.
Notes on the cord plug
This appliance has a polarized plug. To reduce the risk of electric shock, this plug is intended to fit
into a polarized outlet only one way. If the plug does not fit fully into the outlet, reverse the plug. If it
still does not fit, contact a qualified electrician. Do not attempt to modify the plug in any way.
Use of extension cords
Because of potential safety hazards under certain conditions, we strongly recommend against the use
of an extension cord. However, if you must use an extension cord, it is absolutely necessary that it is
a UL-listed (in the United States) or a CSA-listed (in Canada), 3-wire grounding type appliance exten-
sion cord having a grounding type plug and outlet, and that the electrical rating of the cord is 15
amperes (minimum) and 120 volts.
4

You can solve many common appliance problems easily, saving you the cost of a possible service
call. Try the suggestions below to see if you can solve the problem before calling the servicer.
PROBLEM POSSIBLE CAUSE
Indicator not lit. Check that the plug has been inserted correctly into the
socket, that the power button has been pressed and that
the corresponding red light is on.
The machine makes a strange noise. Check that there is water in the tank.
The lights are on but no coffee The capsule inserted may be faulty. Wait for a
comes out. few seconds, then try again with a new capsule.
There are signs of water at the Make sure that the tank has been fitted correctly
bottom of machine. into position.
The capsule can’t be put into Check if the capsule collection tray is full, needs cleaning
brewing cavity.
The capsule can’t fall down normally. Check if the capsule collection tray is full, or needs
cleaning.
The handle may need to be opened again.
A slight hiss can be heard after This is not a fault, but normal settling of the pressure
the coffee has been released. control valve.
CLEANING AND MAINTENANCE
67
TROUBLESHOOTING GUIDE
CLEANING
Be sure to unplug this appliance and cool down before cleaning. To protect against electrical shock,
do not immerse cord, plug or unit in water or liquid. After each use, always make sure plug is first
removed from wall outlet. We recommend that the following is performed on a periodical basis:
1. Use a dry cloth to clean the removable water tank.
2. Empty the capsule collection tray and clean it.
3. Clean the capsule holder with a dry cloth.
4. Use a damp cloth to gently wipe the cup holder grid.
5. Clean the machine using a damp cloth, never submerge the machine.
6. Replace all parts and unit is ready for next use.
REMOVING MINERAL DEPOSITS
To keep your coffee maker operating efficiently, you should clean away the mineral deposits left by
the water regularly according to the water quality in your area and the frequency of use:
1. Fill the water tank with water and descaler to the MAX level. The scale of water and descaler is
4:1. Please use “household descaler”, you can use the citric acid instead of the descaler (one
hundred parts of water and three parts of citric acid).
2. Press the Power switch to “I” position and the indicators of big cup and small cup coffee
buttons start to flash, wait until the indicators light steadily.
3. Make sure the handle is closed in place.
4. Position a container on the cup holder grid.
5. Press the big cup or small cup coffee button and allow the liquid to flow. Once the desired
quantity has been reached, the water will stop flowing out.
6. Wait for 20 minutes with the machine turned on.
7. Press the big cup or small cup coffee button until all of the water is used up.
8. Rinse the tank well and fill with clean water. Press the big cup or small cup coffee button until all
of water is used up.

RECIPES RECIPES
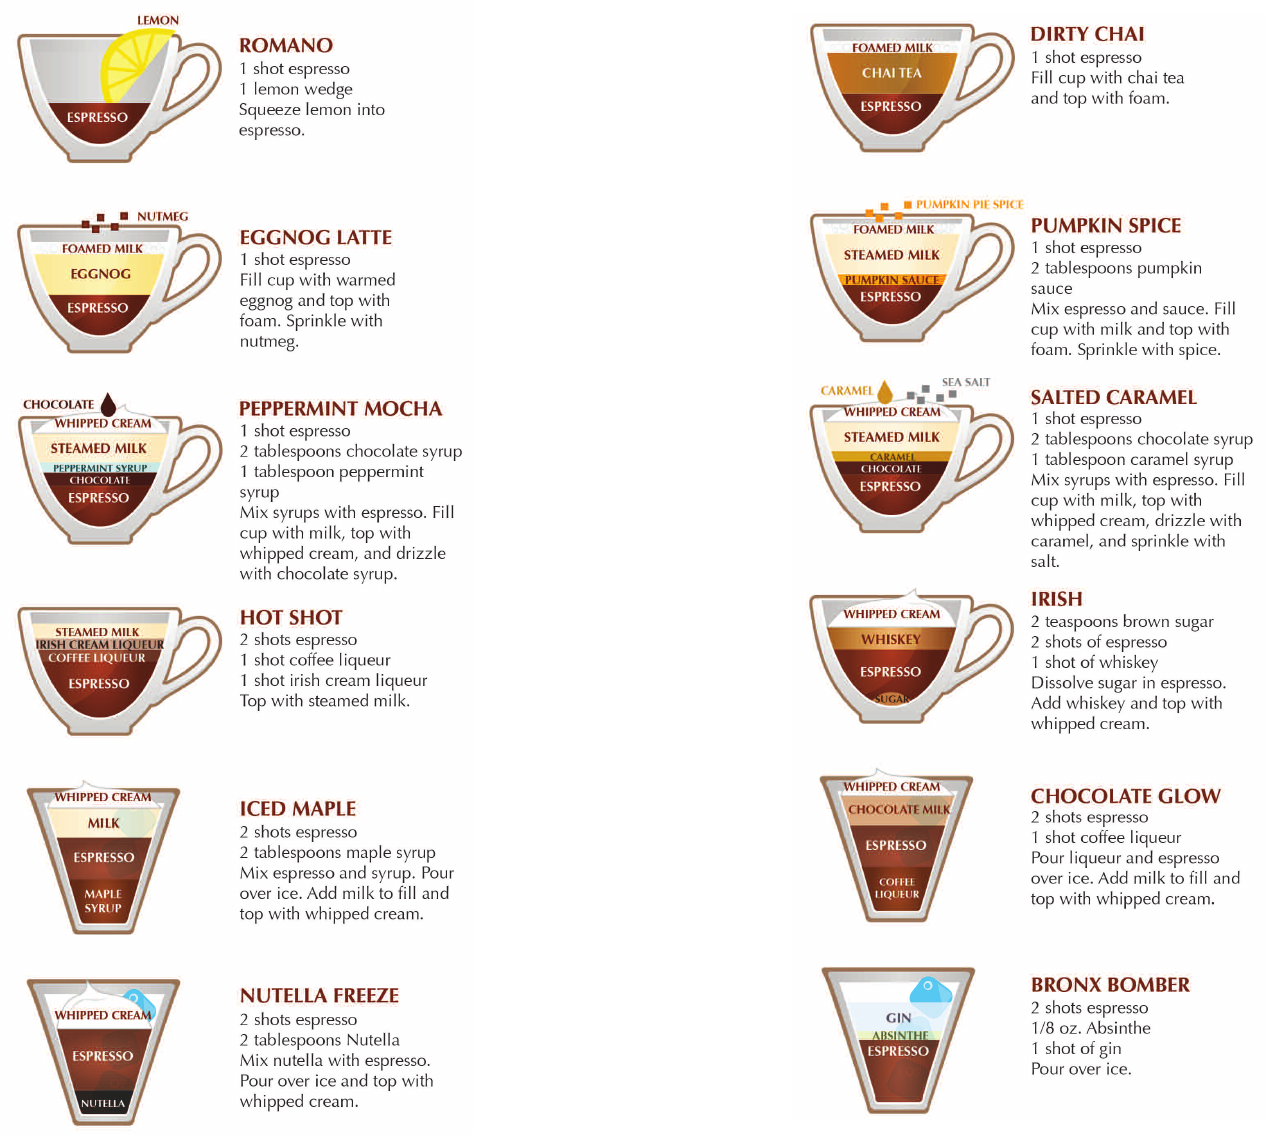
RECIPES RECIPES
