
Every Door Direct Mail
®
User Guide // Simplied Mailing Process
7
V.

Every Door Direct Mail
®
// User Guide // Simplied Mailing Process
Copyright © 2017 U.S. Postal Service
®
2
Overview
What is Every Door Direct Mail
®
Service?
What Are My Mailing Options?
Registration
New EDDM Retail Registration
New EDDM BMEU Registration
Enter Starting Location
Choose Routes
RETAIL // Table View
BMEU // Table View
Select Drop-o Date & Payment Options
RETAIL // Select Drop-o Date & Payment Options
BMEU // Select Drop-o Date & Payment Options
Order Conrmation & Print Forms
RETAIL // Order Conrmation & Print Forms
BMEU // Order Conrmation & Print Forms
Saved Orders
RETAIL // Saved Orders
BMEU // Saved Orders
Order History
3
3
4
6
6
7
9
11
11
16
21
21
23
26
26
28
29
29
30
31
Table of Contents

Every Door Direct Mail
®
// User Guide // Simplied Mailing Process
Copyright © 2017 U.S. Postal Service
®
3
With Every Door Direct Mail
®
(EDDM
®
) service from the U.S. Postal Service
®
, you can get help reaching potential
customers in nearby neighborhoods—and you don’t even need to know names or street addresses. Simply identify
the delivery routes you want to reach, prepare your mailpieces, drop o your mailpieces with us, and we’ll deliver the
printed pieces to the active addresses in your designated area.
Overview
What Is Every Door Direct Mail
®
Service?
You can use Every Door Direct Mail
®
Service to:
• Help reach a location without an address list.
• Send out local mailings or national campaigns.
• Help build more trac.
• Seek new customers.
• Potentially increase revenue.
• Help reduce mail preparation costs.

Every Door Direct Mail
®
// User Guide // Simplied Mailing Process
Copyright © 2017 U.S. Postal Service
®
4
Every Door Direct Mail® service can help you get your marketing messages into the hands of your consumers. Most
local businesses choose Retail service for sending up to 5,000 mailpieces per day, while Business Mail Entry Unit
(BMEU) mailings of more than 5,000 mailpieces per day work best for large businesses.
What Are My Mailing Options?
1. With Every Door Direct Mail—Retail
®
, you can drop o your mailings at the local
Post Oce™ for processing if you’ve satised all of the following criteria:
You must log in to access the EDDM tool and complete or save your order. New EDDM Retail® accounts
can be created at https://reg.usps.com/register
• Appropriate documentation will be provided online to take with your mailing to the Post Oce™.
• You can choose to pay for your mailing online with a valid credit card or debit card, or choose to
pay for your mailing at the Post Oce™ where you drop the mailing o by cash, check, debit card,
or credit card.
• Mailpieces are limited to USPS Marketing Mail™ ats only.
• Each mailpiece must be at least 0.007” thick (approx. 3 sheets of copy paper) and cannot exceed
3.3 ounces. We’ve also added a Mailpiece Size Checker to the EDDM tool. At any point while
creating a mailing, you will be able to check your mailpiece size against the requirements. For more
information on mailpiece size restrictions please reference the EDDM Quick Reference Guide:
https://www.usps.com/business/pdf/quick-reference-guide.pdf [pdf]
• Each mailpiece must display the Every Door Direct Mail—Retail indicia.
• For more information, please visit USPS
®
Every Door Direct Mail:
https://www.usps.com/business/every-door-direct-mail.htm
• Business Rules for EDDM – Retail
®
orders:
• Retail Users may mail up to 5000 mailpieces per day per ZIP Code™
• Customers who select to Pay at Post Oce™ and do not induct the order can cancel
orders through their Order History to prevent that order from counting against their
daily limit for that ZIP Code™
• Retail Users can create orders of up to 5000 mailpieces per order, unless a single route
contains over 5000 delivery points
• Retail Users order must contain at least 200 mailpieces in a ZIP Code™ unless the routes in
the ZIP Code™ do not total over 200 mailpieces
• Retail Users can pay for up to 5000 mailpieces per transaction day using a credit card
• Retail Users cannot add part of a route to an order; when a route is added, it is the entire
route
• Refund requests for Pay at Post Oce™ orders must be made at the Post Oce™ and
cannot be made online
• Refund requests for Paid Online EDDM orders must be initiated through a customer’s Order
History (Request Refund button located on the order’s detail page)
• Retail Users can only create EDDM orders within the United States and its territories

Every Door Direct Mail
®
// User Guide // Simplied Mailing Process
Copyright © 2017 U.S. Postal Service
®
5
2. With Every Door Direct Mail — BMEU
®
(Business Mail Entry Unit), you can drop o your
mailings at a Business Mail Entry Unit where the permit is held for processing if you’ve
satised the following criteria:
• You must have or must obtain an active USPS Marketing Mail
™
permit number to process
an order.
• BMEU orders must be paid by permit.
• You may register or log in via https://reg.usps.com/register to access the online tool, or obtain
updated delivery statistics via one of the appropriate NCSC (National Customer Support
Center) products.
• You must bring appropriate documentation with your mailing to the BMEU where the permit
used for the mailing is held.
• Mailpieces may weigh less than 16 ounces and postage prices may vary based on piece
weight and entry point. For more information on mailpiece size restrictions, please reference
the EDDM Quick Reference Guide:
https://www.usps.com/business/pdf/quick-reference-guide.pdf [pdf]
• For more information, please visit USPS Every Door Direct Mail
https://www.usps.com/business/every-door-direct-mail.htm
• Business Rules for EDDM – BMEU
®
orders:
• A user is considered a BMEU user if a valid USPS Marketing Mail permit is attached to
the user’s account
• BMEU orders must contain at least 200 mailpieces
• BMEU refund requests must be made through the BMEU associated with the permit used
to pay for the order.
• BMEU Users cannot add part of a route to an order; when a route is added, it is the entire
route
• BMEU Users can only create EDDM orders within the United States and its territories
Every Door Direct Mail
®
// User Guide // Simplied Mailing Process
Copyright © 2017 U.S. Postal Service
®
6
Registration
New EDDM Retail Registration
Go to https://eddm.usps.com/eddm/customer/routeSearch.action
Select Register/Sign In within the global header.
You will be taken to the registration page.
Note: Existing customers, enter your username and password.
Enter the required information.
Select [Create Account].
And you’re registered. It’s that simple.
1
2
3
4
After your new USPS.com
®
account has been created,
you will automatically be redirected to the online mapping tool so you can begin to create your order.
5
Every Door Direct Mail
®
// User Guide // Simplied Mailing Process
Copyright © 2017 U.S. Postal Service
®
7
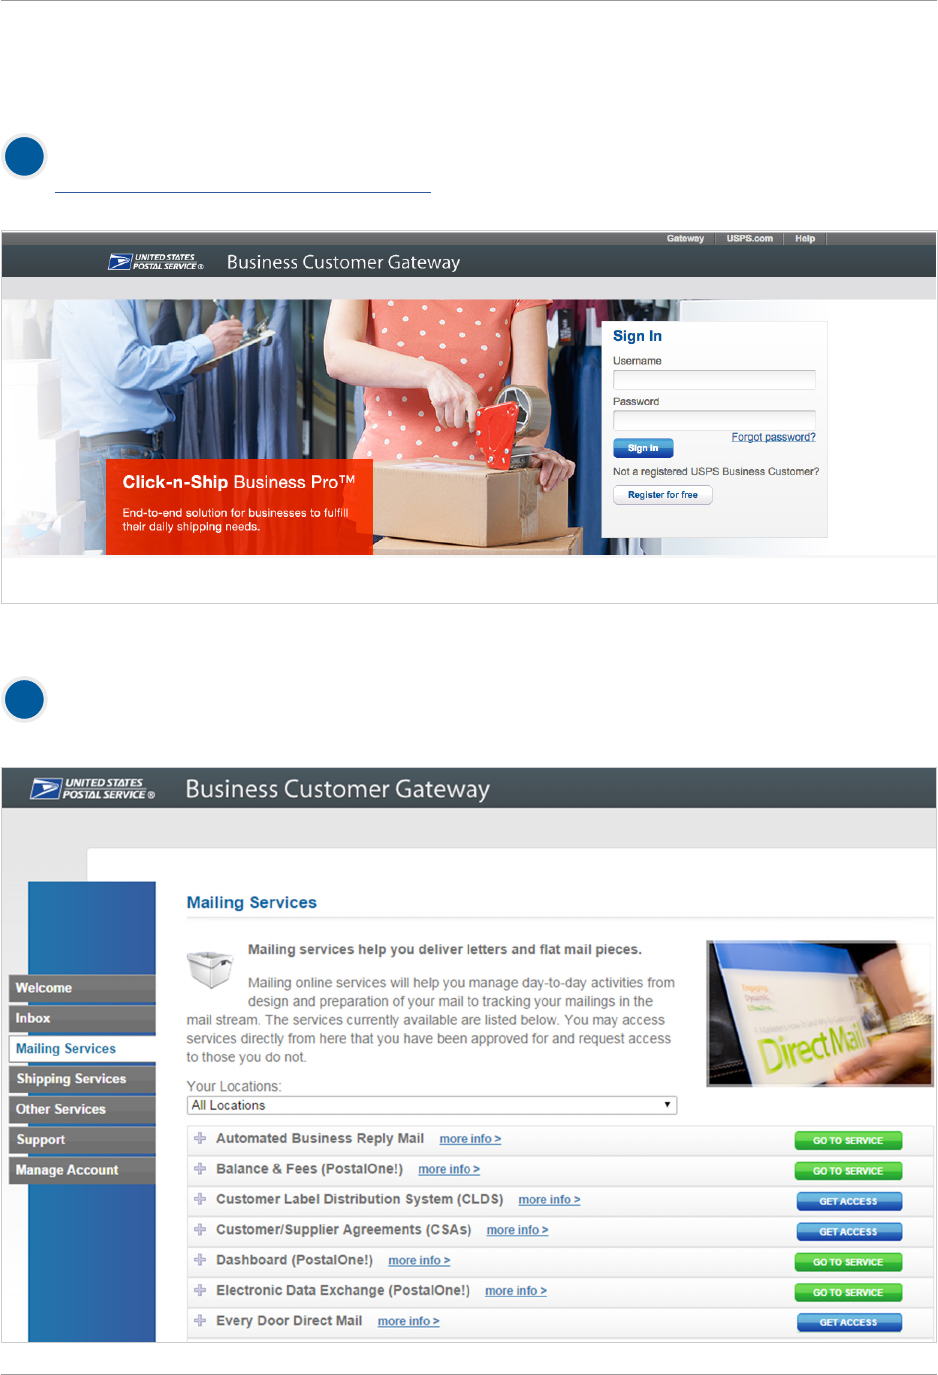
New EDDM BMEU Registration
For existing BMEU customers, return to Business Customer Gateway.
https://gateway.usps.com/eAdmin/view/signin
Select [Get Access] next to the EDDM
®
listing
under the mailing services section.
1
2
Every Door Direct Mail
®
// User Guide // Simplied Mailing Process
Copyright © 2017 U.S. Postal Service
®
8
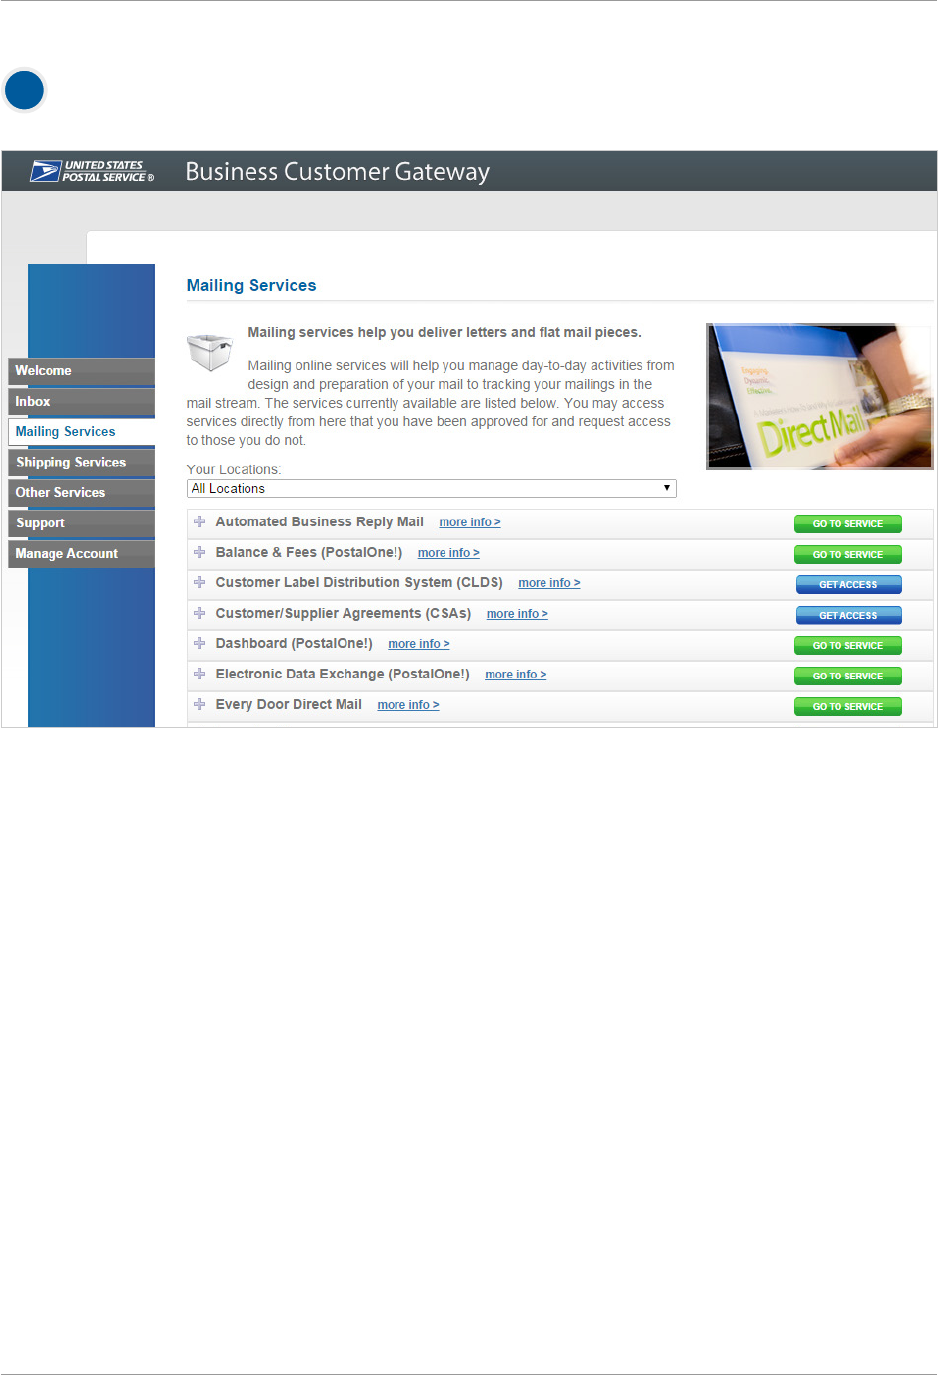
Select [Go To Service] to go to EDDM
®
Tool.
3
Every Door Direct Mail
®
// User Guide // Simplied Mailing Process
Copyright © 2017 U.S. Postal Service
®
9
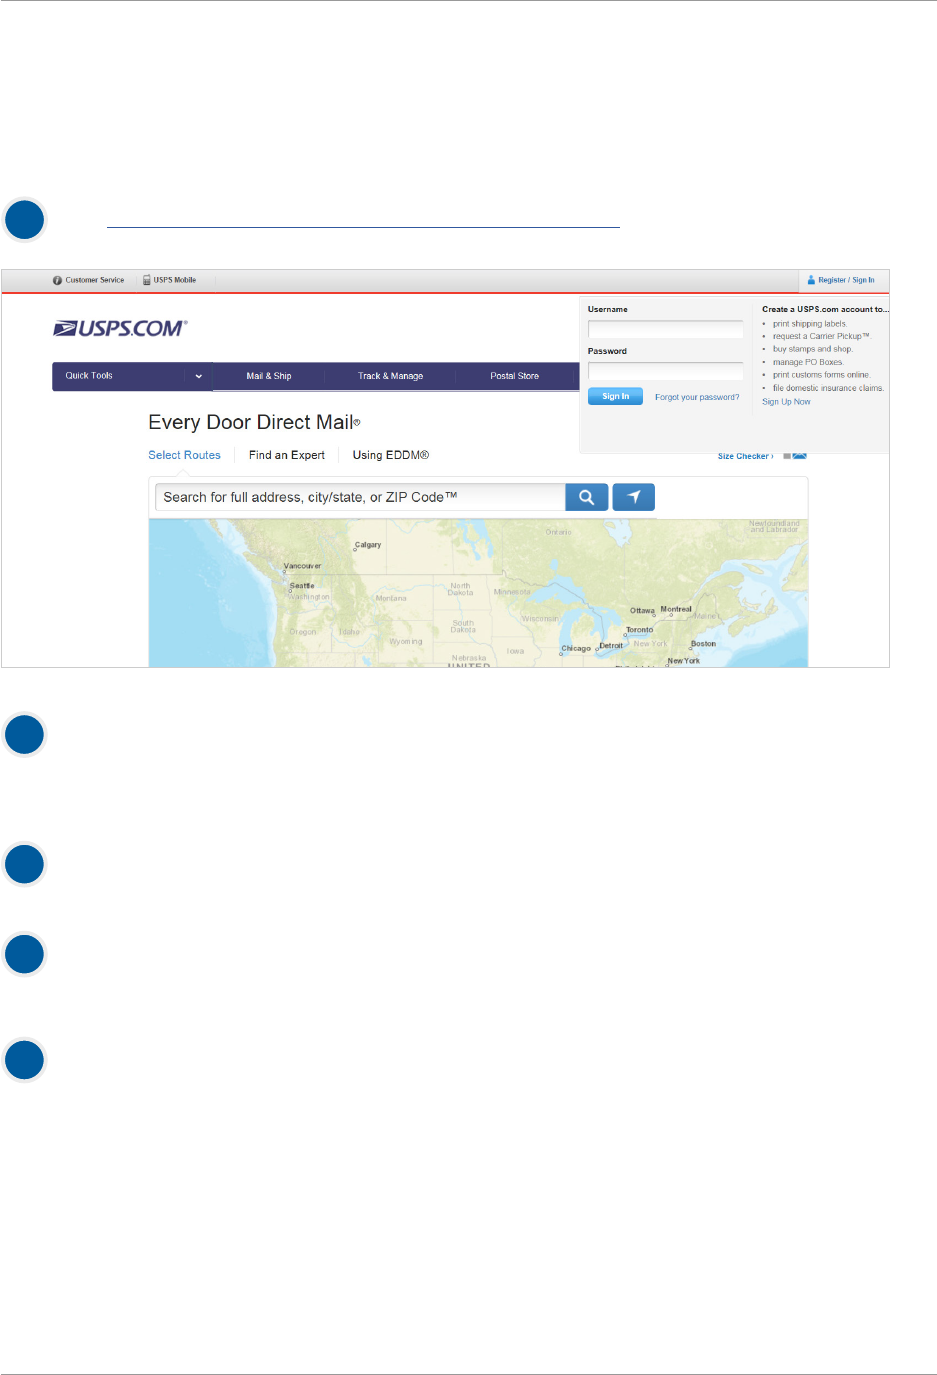
Enter Starting Location
To sign in to the EDDM
®
Tool,
select the Register/Sign In link in the global navigation. A yout window will prompt you to sign in to your
USPS.com
®
account. If you do not have an account, you can create a new one by selecting the [Sign
Up Now] button on the right side of the yout.
1
Every Door Direct Mail
®
// User Guide // Simplied Mailing Process
Copyright © 2017 U.S. Postal Service
®
10
Results are displayed on the route table and map.
Selecting routes is covered on the next section.
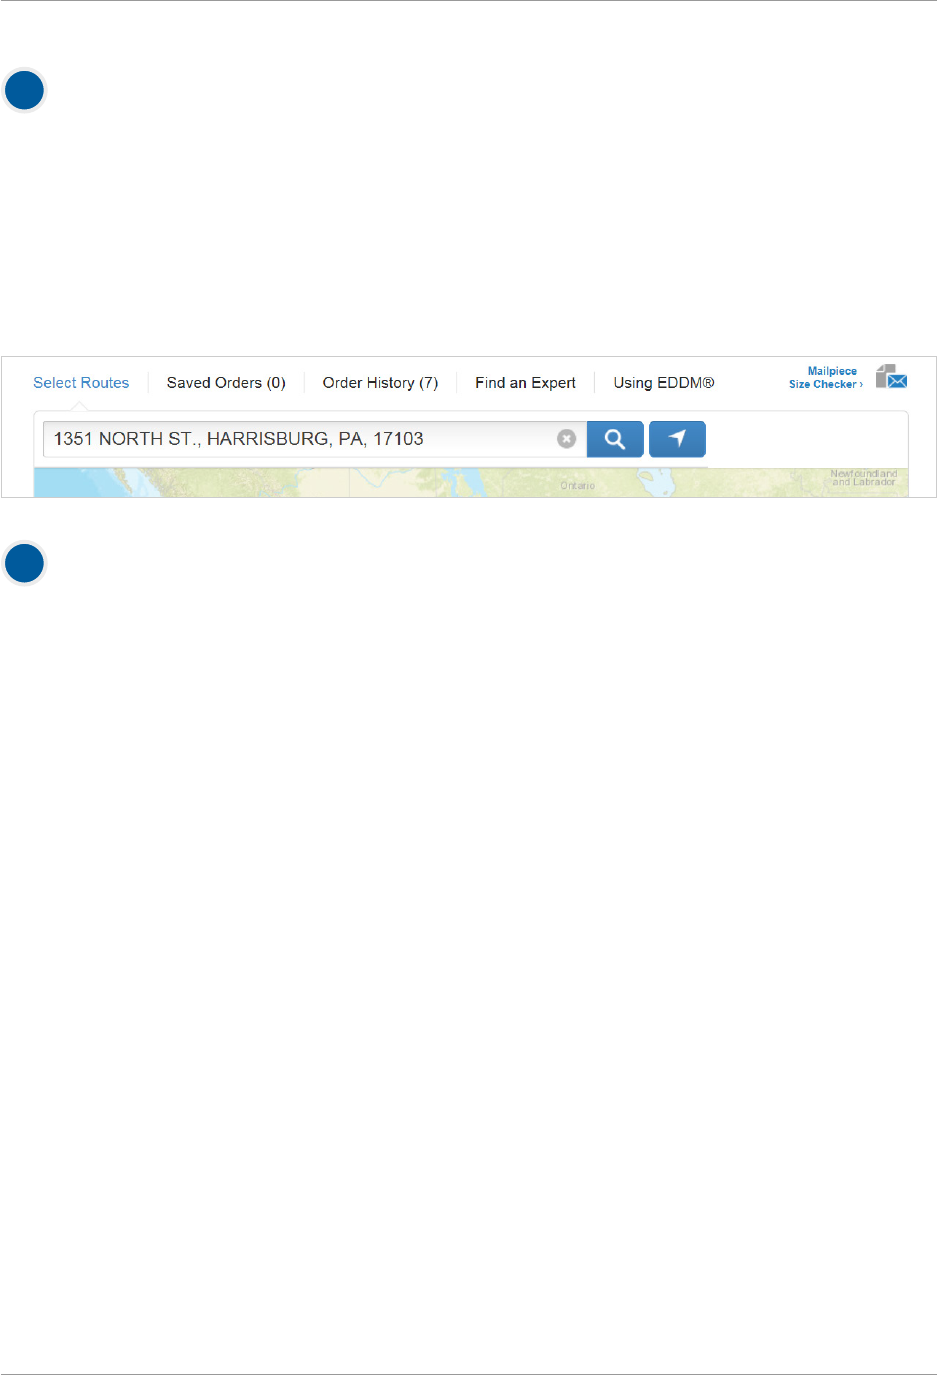
Begin your search to determine your mailing audience.
You can search by street address, city and state, or ZIP Code™ by entering in your search criteria into the
text eld within the search location box and selecting the magnifying glass button or hitting [Enter] on
your keyboard.
Note: If searching by city and state, you may be presented with the option to select up to ve ZIP Code™
locations to target for delivery. This is accomplished by selecting the checkboxes that appear to the left of
each ZIP Code™. It is also possible your search will result in more than one address result. If this is the case,
you will need to select the appropriate address.
3
2
Every Door Direct Mail
®
// User Guide // Simplied Mailing Process
Copyright © 2017 U.S. Postal Service
®
11
Choose Routes
RETAIL // Table View
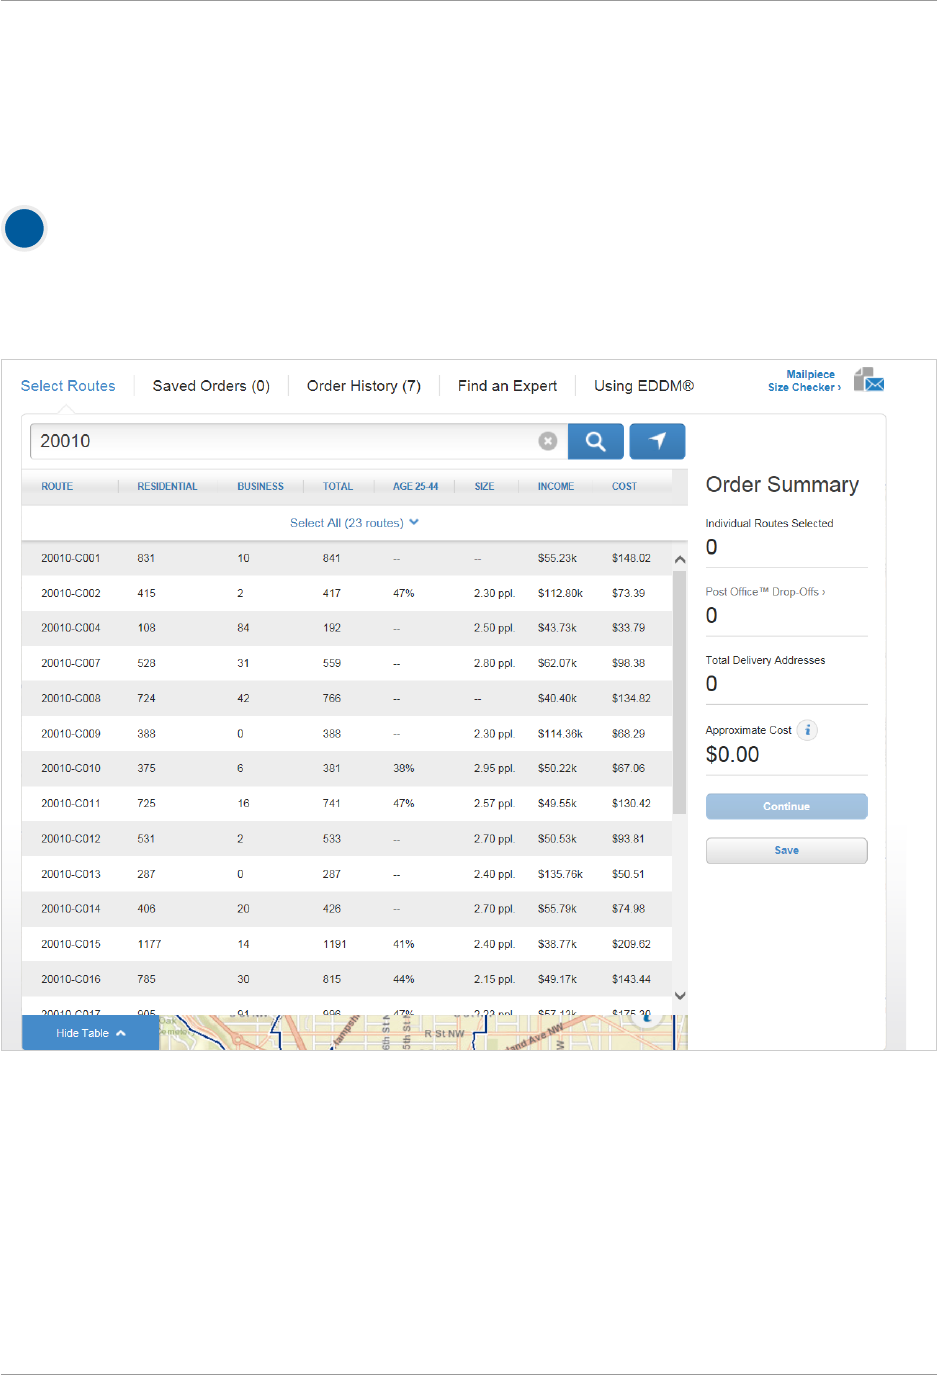
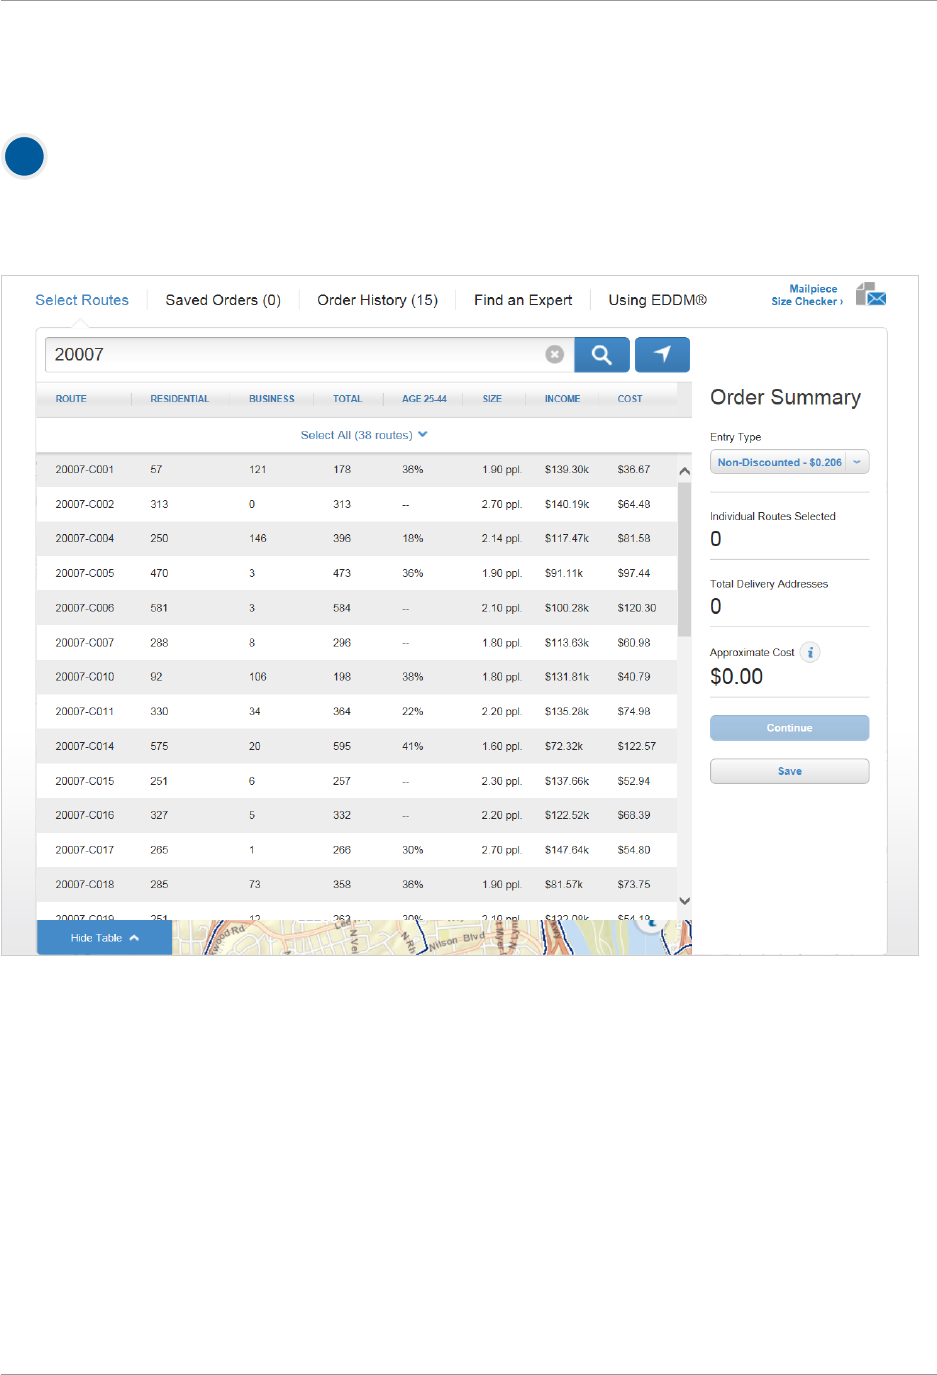
Selection results are available in a table for all search options.
Results of the starting location search are displayed in the route table by indicating the total routes and the
total possible deliveries. Selecting the [Show Table] tab will reveal the table overlaid on the map.
1

Every Door Direct Mail
®
// User Guide // Simplied Mailing Process
Copyright © 2017 U.S. Postal Service
®
12
The Table view displays selection results and an approximate mailing cost
for ats only to be dropped at a local Post Oce™ retail unit. The table view columns include the following
data*.
ROUTE / Identies the particular route by ZIP Code™ and carrier route ID.
Note that it is not possible to select a partial route.
RESIDENTIAL / Indicates the number of residential delivery points in a given route.
BUSINESS / Indicates the number of business delivery points in a given route.
TOTAL / Indicates the total number of delivery points in a given route.
AGE / Indicates the percentage of each route that matches a given age range criteria.
SIZE / Indicates the average household size of a given route.
INCOME / Indicates the average household income of a given route.
COST / Indicates total estimated cost for mailings included within that route.
*Demographic data is based on U.S. Census Reports.
2
3
Additional lters are available within the rst 3 columns,
which can help narrow your search results. These lters include:
Select route types:
• City / Results will include delivery points where mail is delivered by a USPS
®
employee.
• Rural/Highway / Results will include delivery points where mail is delivered by a USPS or contract
employee.
• PO Box™ / Results will include delivery points where mail is delivered to USPS Post Oce™ Boxes.
Includes personal and business boxes.
A
Select delivery types:
• Business & Residential / Results will include business and residential delivery points.
• Residential only / Results will only include residential delivery points.
B
When searching by a full address, it will also be possible to revise search results based on location
radius. To accomplish this, you can use the location slider to revise search location by .25 mile
increments. Remember that routes outside the selected radius will not appear. Expand your radius
to include those routes. Selecting the[Apply] button will update the table view results with
your selections.
4
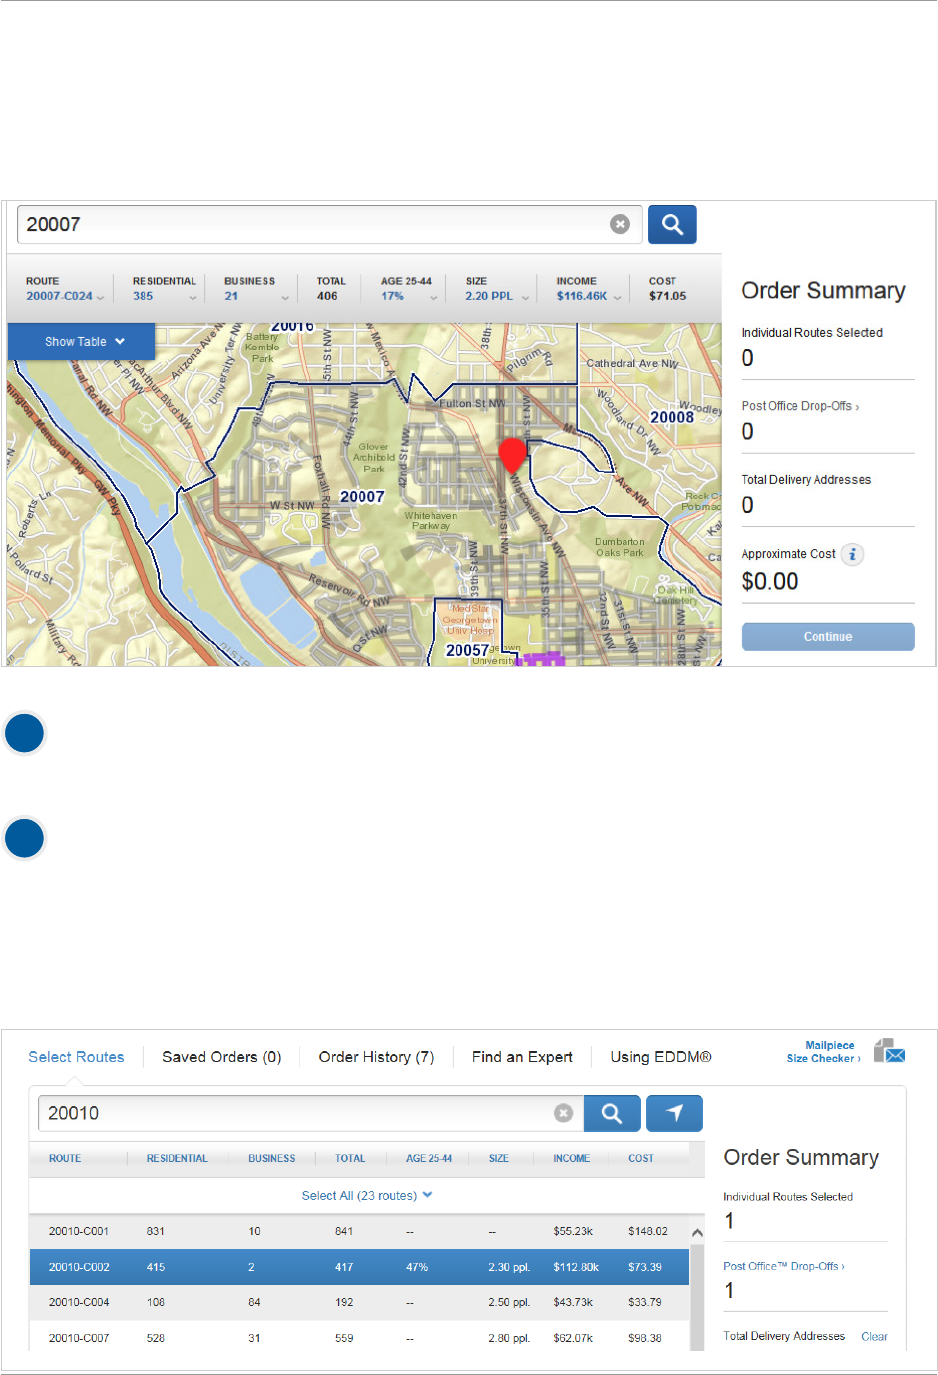
Route demographics are shown on the route table.
Available demographics include age, household income, and household size*. You can narrow your search
results by selecting the column header for each demographic and selecting either [Show] or [Hide].
Selecting age shows the percentage of routes for the default age range of 25 to 44 years old. To edit this
criteria, select the [Age] column header and move the indicators to the beginning and end of your desired
age range. Once satised with the range, select [x] to close.
*Demographic data is based on U.S. Census Reports.
5
Within the map view,
hovering over a route will show the route details, including selected demographic data, in the route summary
pane. Selecting this route will add it to your selected list of routes in the table view.
Every Door Direct Mail
®
// User Guide // Simplied Mailing Process
Copyright © 2017 U.S. Postal Service
®
13
Map Interaction for Tablet Users:
To View Route Information / First tap on a route
To Select a Route / Second tap on a route in hover state
To De-Select a Route / Third tap on a selected route
6
All columns in the route table are sortable in ascending and descending order.
This can be accomplished by selecting the column header and selecting [Highest] or [Lowest] in each
column yout.
7
Within the route table view,
you have the ability to select routes by selecting anywhere within a row containing route information.
Note: The possibility exists that your route selections will require you to drop-o mail pieces at more than one
drop-o location. If this is the case, you will be prompted by an alert message that your selections require
additional drop o locations. It is possible to continue forward with your order or remove that route from your
selections.
Every Door Direct Mail
®
// User Guide // Simplied Mailing Process
Copyright © 2017 U.S. Postal Service
®
14
8
When using the route table view,
the EDDM
®
map will change to indicate your selections. To view the changes within the map, select [Hide
Table]. Your route selections on the map will be updated visually in the following ways:
• Your searched location will be indicated by a circular icon on the map.
• Hovering over a route within the table will apply a purple color to the route within the map.
• Selecting a business only route within the table will apply a green color to the route within the map.
• Selecting a residential & business route within the table will apply a blue color to the route within the map.
• Selecting a PO Box™ route within the table will add an orange icon to the map.
9
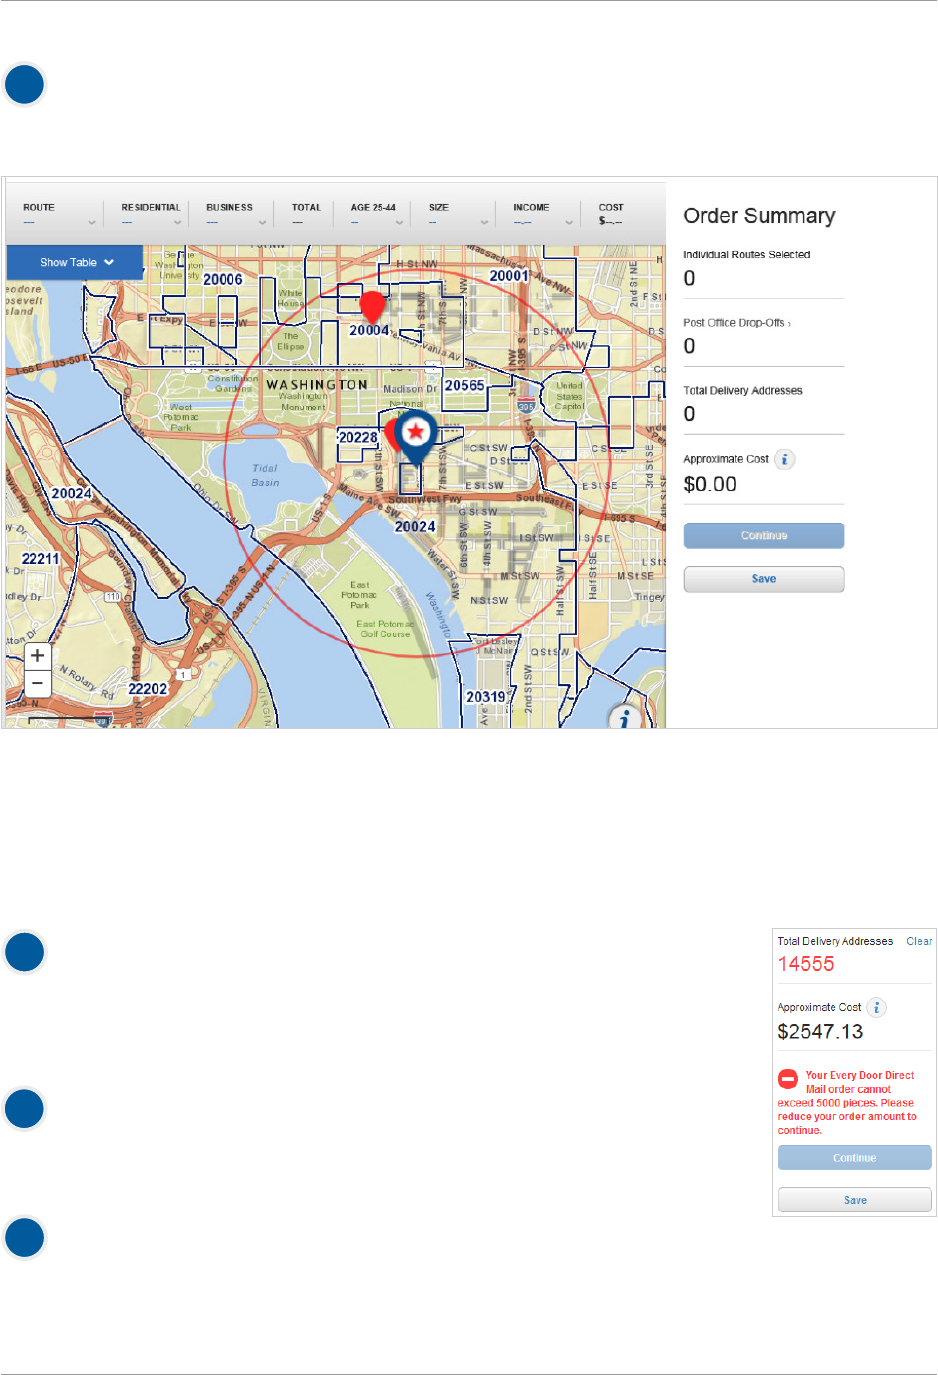
When selections do not meet Retail qualications
(more than 200 but 5,000 or fewer deliveries per ZIP Code™ per day), a message
appears indicating such. If your selections total more than 5,000 delivery points, you
will be prompted to reduce that number.
10
A summary of your selected routes are shown in the Order Summary.
Included in the summary is the total number of routes selected, Post Oce™ drop-
os, delivery addresses, and approximate cost.
11
Selecting the Post Oce™ drop-os text will display the drop-o details of your
order. This includes the Post Oce™ locations that you will need to drop o your order
at, and which deliveries apply to which locations. You also have the option to deselect
routes from your order as they apply to certain Post Oce™(s).

Every Door Direct Mail
®
// User Guide // Simplied Mailing Process
Copyright © 2017 U.S. Postal Service
®
15
12
At this stage, you also have the ability to save the progress of your order with the ability to continue
later.
This can be accomplished by selecting the [Save] button, below the [Continue] button.
Note: User must be signed-in to Save Order.
13
Selecting the Save link will bring up a window
that will also allow you to add a nickname to your order. This step is optional.
14
Once your order has been saved,
you may review your saved order by selecting the Saved Orders text located above the EDDM
®
search bar on
the top of page.
Every Door Direct Mail
®
// User Guide // Simplied Mailing Process
Copyright © 2017 U.S. Postal Service
®
16
BMEU // Table View
Selection results are available in a table for all search options.
Results of the starting location search are displayed in the route table by indicating the total routes and the
total possible deliveries, in addition to approximate cost to mail. Selecting the [Show Table] tab will
reveal the table overlaid on the map.
1

Every Door Direct Mail
®
// User Guide // Simplied Mailing Process
Copyright © 2017 U.S. Postal Service
®
17
The Table view displays selection results and an approximate mailing cost
for ats only to be dropped at a local Post Oce™ retail unit. The table view columns include the following
data*.
ROUTE / Identies the particular route by ZIP Code™ and carrier route ID.
Note that it is not possible to select a partial route.
RESIDENTIAL / Indicates the number of residential delivery points in a given route.
BUSINESS / Indicates the number of business delivery points in a given route.
TOTAL / Indicates the total number of delivery points in a given route.
AGE / Indicates the percentage of each route that matches a given age range criteria.
SIZE / Indicates the average household size of a given route.
INCOME / Indicates the average household income of a given route.
COST / Indicates total cost for mailings included within that route.
*Demographic data is based on U.S. Census Reports.
2
3
Additional lters are available within the rst 3 columns,
which can help target your search results. These lters include:
Select route types:
• City / Results will include delivery points where mail is delivered by a USPS
®
employee.
• Rural/Highway / Results will include delivery points where mail is delivered by a USPS or contract
employee.
• PO Box™ / Results will include delivery points where mail is delivered to USPS Post Oce™ Boxes.
Includes personal and business boxes.
A
Select delivery types:
• Business & Residential / Results will include business and residential delivery points.
• Residential only / Results will only include residential delivery points.
B
When searching by a full address, it will also be possible to revise search results based on location
radius. To accomplish this, you can use the location slider to revise search location by .25 mile
increments. Remember that routes outside the selected radius will not appear. Expand your radius
to include those routes. Selecting the [Apply] button will update the table view results with
your selections.
4
5
All columns in the route table are sortable in ascending and descending order.
This can be accomplished by selecting the column header and selecting [Highest] or [Lowest] in each
column yout.
Route demographics are shown on the route table.
Available demographics include age, household income, and household size*. You can narrow your search
results by selecting the column header for each demographic and selecting either [Show] or [Hide].
Selecting age shows the percentage of routes for the default age range of 25 to 44 years old. To edit this
criteria, select the [Age] column header and move the indicators to the beginning and end of your desired
age range. Once satised with the range, select [x] to close.
*Demographic data is based on U.S. Census Reports.
Every Door Direct Mail
®
// User Guide // Simplied Mailing Process
Copyright © 2017 U.S. Postal Service
®
18
6
Within the map view,
hovering over a route will show the route details, including selected demographic data, in the route summary
pane. Selecting this route will add it to your selected list of routes in the table view.
For tablet users:
To View Route Information / First tap on a route
To Select a Route / Second tap on a route in hover state
To De-Select a Route / Third tap on a selected route
7
Within the Order Summary, the drop-o location
can be selected, which aects the price per piece. The dierent locations include:
Non-Discounted
Regional Plant / Destination Network Distribution Center (DNDC)
Local Plant / Destination Sectional Center Facility (DSCS)
Local PO / Destination Delivery Unit (DDU)
8
Within the route table view,
you have the ability to select routes by selecting anywhere within a row containing route information.
Note: If you have selected DDU as the drop-o location you may be required to drop o mail pieces at more
than one location. If this is the case, you will be prompted by an alert message that your selections require
additional drop o locations. It is possible to continue forward with your order or remove that route from your
selections.

Every Door Direct Mail
®
// User Guide // Simplied Mailing Process
Copyright © 2017 U.S. Postal Service
®
19
When using the route table view,
the EDDM
®
map will change to indicate your selections. To view the changes within the map, select [Hide
Table]. Your route selections on the map will be updated visually in the following ways:
9
• Your searched location will be indicated by a circular icon on the map.
• Hovering over a route within the table will apply a purple color to the route within the map.
• Selecting a business only route within the table will apply a green color to the route within the map
• Selecting a residential & business route within the table will apply a blue color to the route within the map.
• Selecting a PO Box™ route within the table will add an orange icon to the map.
Note: There is also a key within the lower right corner of the map explaining each visual indicator.
A summary of your selected routes is shown in the Order Summary.
Included in the summary is the total number of routes selected, Post Oce™ drop-os, delivery addresses,
and approximate cost. Hovering over the [i] tooltip icon located next to Approximate Cost will reveal an
approximate cost per mail piece. When logged in, selecting the [Continue] button will bring you to Select
Drop-O Date.
10
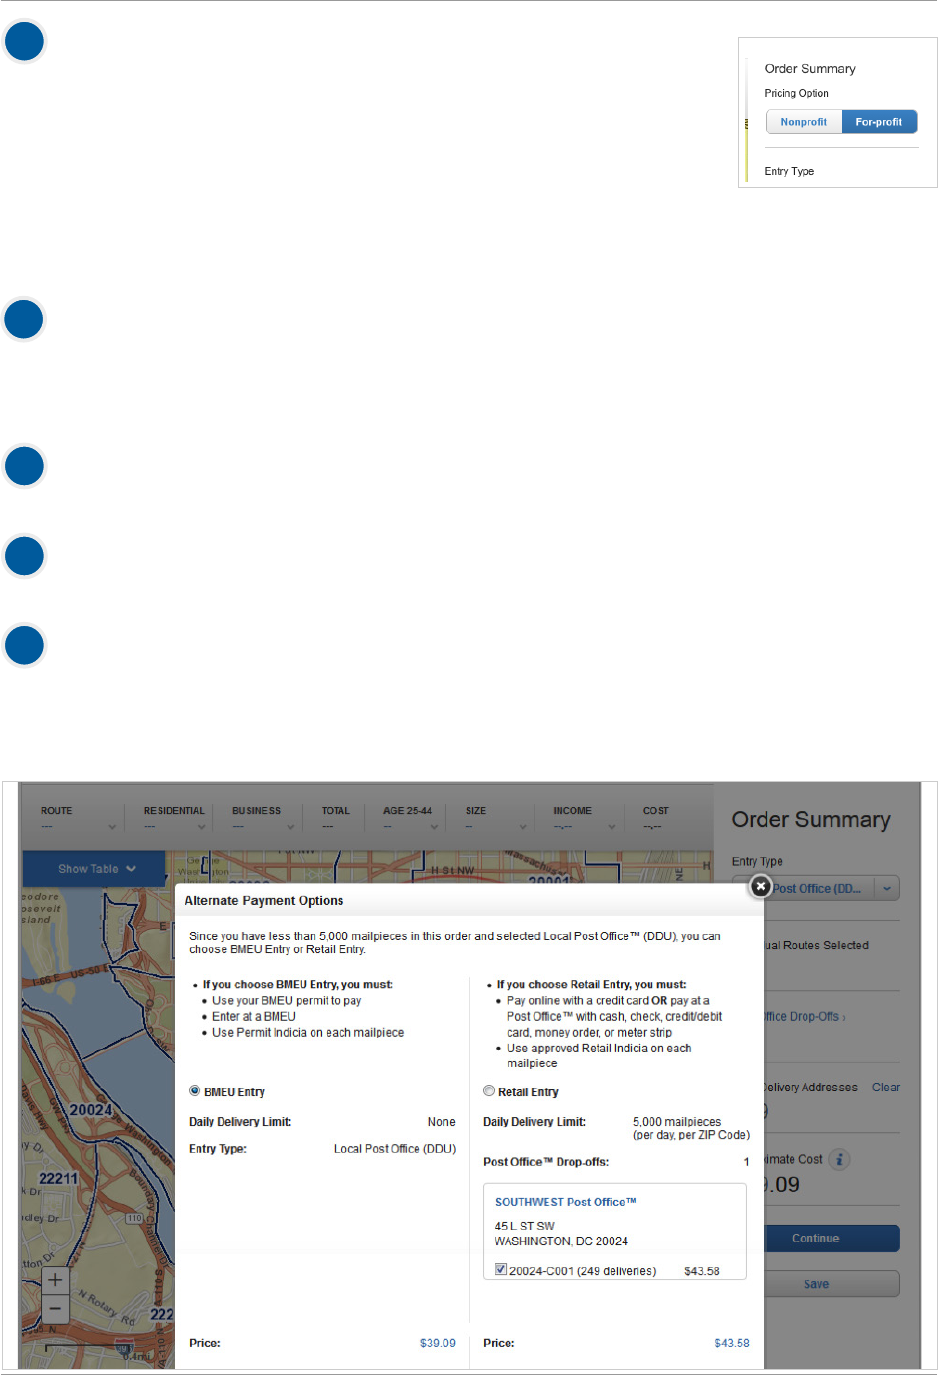
If DDU has been selected as the drop-o location, selecting the [Post Ofce™ Drop-Offs]
text will display the drop-o details of your order. This includes which Post Oce™ locations that you will
need to drop o your order at, and which deliveries apply to which locations. You also have the option to
deselect routes from your order as they apply to certain Post Oce™(s).
11
Every Door Direct Mail
®
// User Guide // Simplied Mailing Process
Copyright © 2017 U.S. Postal Service
®
20
If you are a Nonprot organization with an authorization number tied to your
Customer Registration Identier (CRID), you may be eligible for Nonprot
pricing for your Every Door Direct Mail – BMEU order.
If your CRID is associated only with a Nonprot authorization number, when using
the EDDM Online Tool, you will only be shown Nonprot pricing options. If your
CRID is associated with both a for-prot permit and a Nonprot authorization
number, you will be given the option to view Nonprot and for-prot prices for your
order. Your mailing must satisfy certain requirements to be eligible for Nonprot
USPS Marketing Mail™ prices. For details, please see Domestic Mail Manual 703.
12
Selecting the Save link will bring up a window
that will also allow you to add a nickname to your order. This step is optional.
14
Once your order has been saved, you may review your saved order
by selecting the Saved Orders text located above the EDDM
®
search bar on the top of page.
15
If your selected routes total 5,000 or fewer delivery points,
then a window will open to oer you the option to checkout using the EDDM Retail
®
checkout. Your mailing
must comply with the requirements specic to EDDM Retail procedures, including dropping the mailpieces o
at the local Post Oce™. Selecting [Retail Entry] and pressing [Continue] will continue your order
with retail options and pricing.
16
At this stage, you also have the ability to save the progress of your order with the ability to continue
later.
This can be accomplished by selecting the [Save] button, below the [Continue] button.
Note: User must be signed-in to Save Order.
13
Every Door Direct Mail
®
// User Guide // Simplied Mailing Process
Copyright © 2017 U.S. Postal Service
®
21
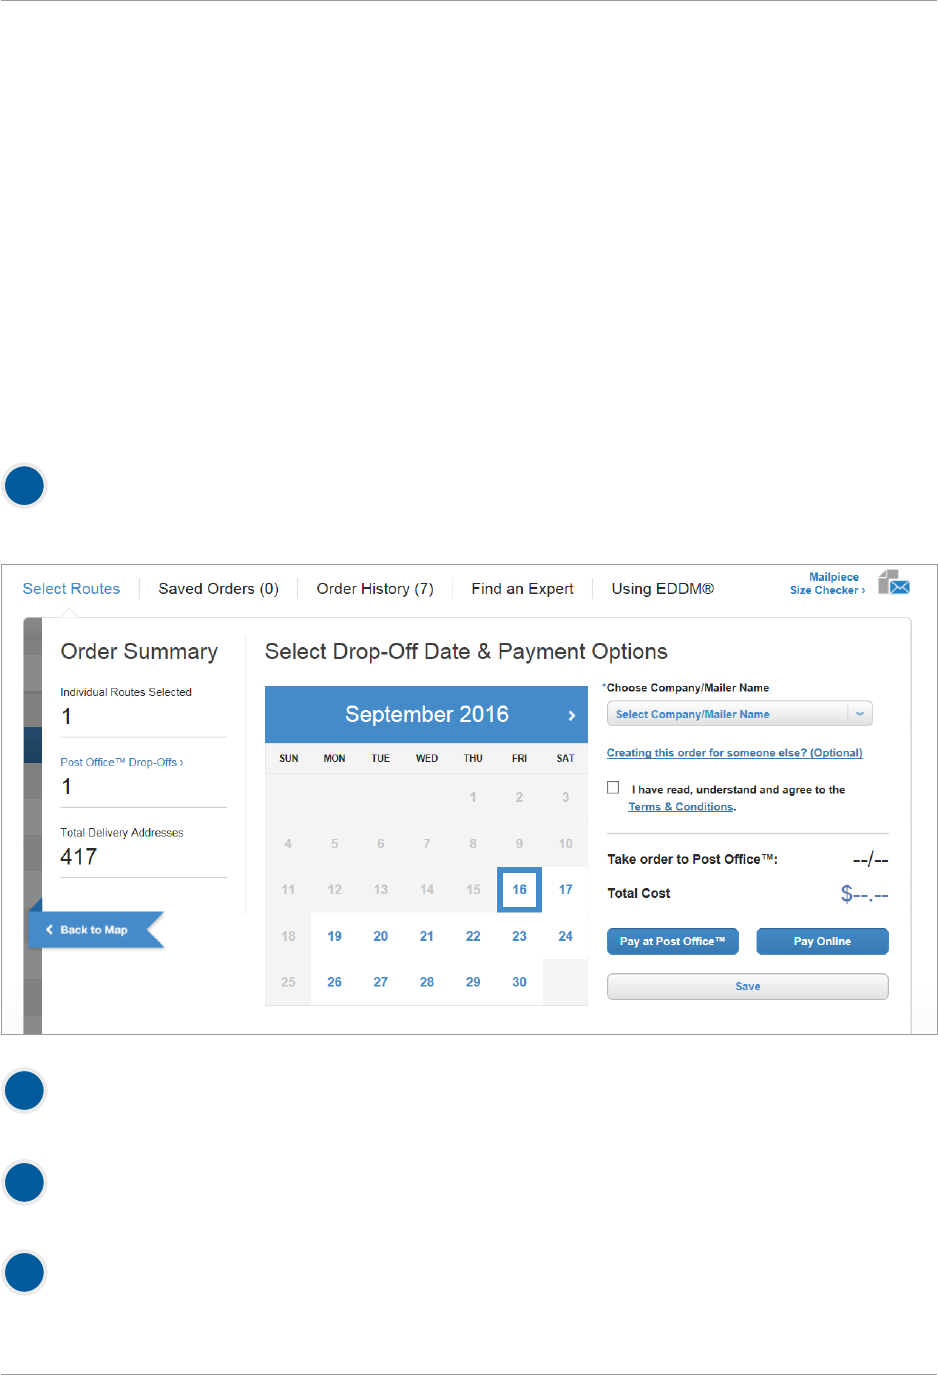
Select Drop-O Date & Payment
Options
First you must select a drop-o date for your EDDM
®
mailings using the calendar.
Note: Dates may be selected up to 30 days in advance.
1
This ow will allow you to select a Drop-O Date for your mailings and will include a summary of all information
pertaining to your EDDM® order including:
• Total Deliveries
• Drop-o location, hours, address, and contact information
• Scheduled drop-o date
• Total order cost
• By-For ow (Optional)
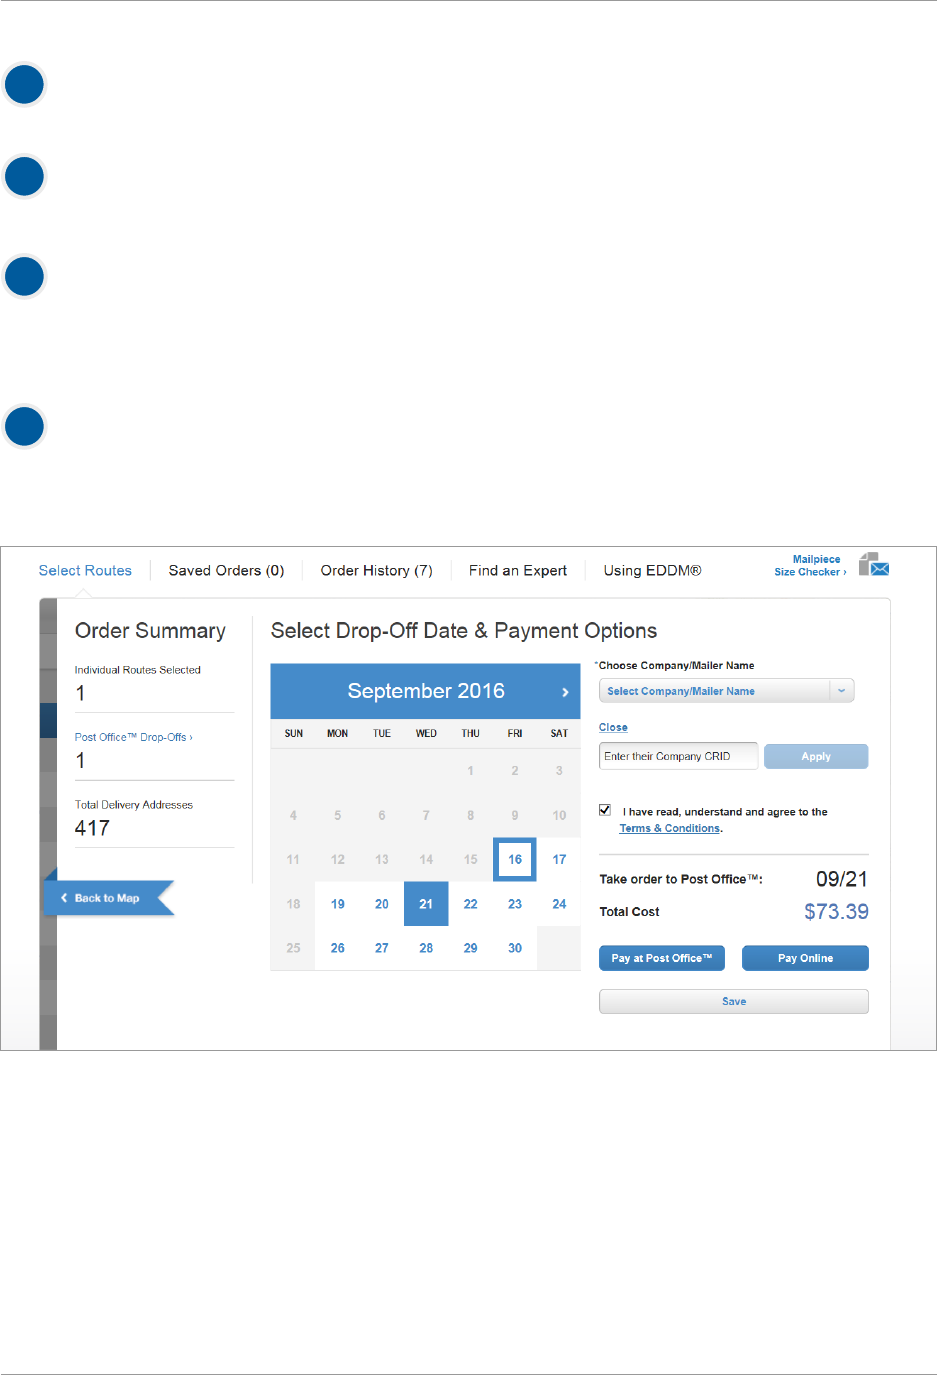
RETAIL // Select Drop-o Date & Payment Options
Select a Company/Mailer name from the drop-down.
2
Select Mailer ID from drop-down.
3
Once you have agreed to the Terms & Conditions,
you will be presented with the option to pay at your local Post Oce™, pay online, or save for later.
4
Every Door Direct Mail
®
// User Guide // Simplied Mailing Process
Copyright © 2017 U.S. Postal Service
®
22
Selecting the [Pay at Post Ofce] button will take you to Order Conrmation/Print Forms.
5
Selecting the [Pay Online] button will take you into the online payment portal,
where you can complete your order.
6
7
8
Selecting the [Save] button will bring up a window that will also allow you to add a nickname to your
order.
This step is optional. Once your order has been saved, you may review your saved order using the navigation
links located in the top right corner of the page.
Creating this order for someone else?
will bring up a By-For ow to create a mailing on another person’s behalf. You will need a valid Company
CRID. If a coupon is available, you will be able to enter and apply a coupon code to the total cost of the
mailing. Going through this ow is optional.
Every Door Direct Mail
®
// User Guide // Simplied Mailing Process
Copyright © 2017 U.S. Postal Service
®
23
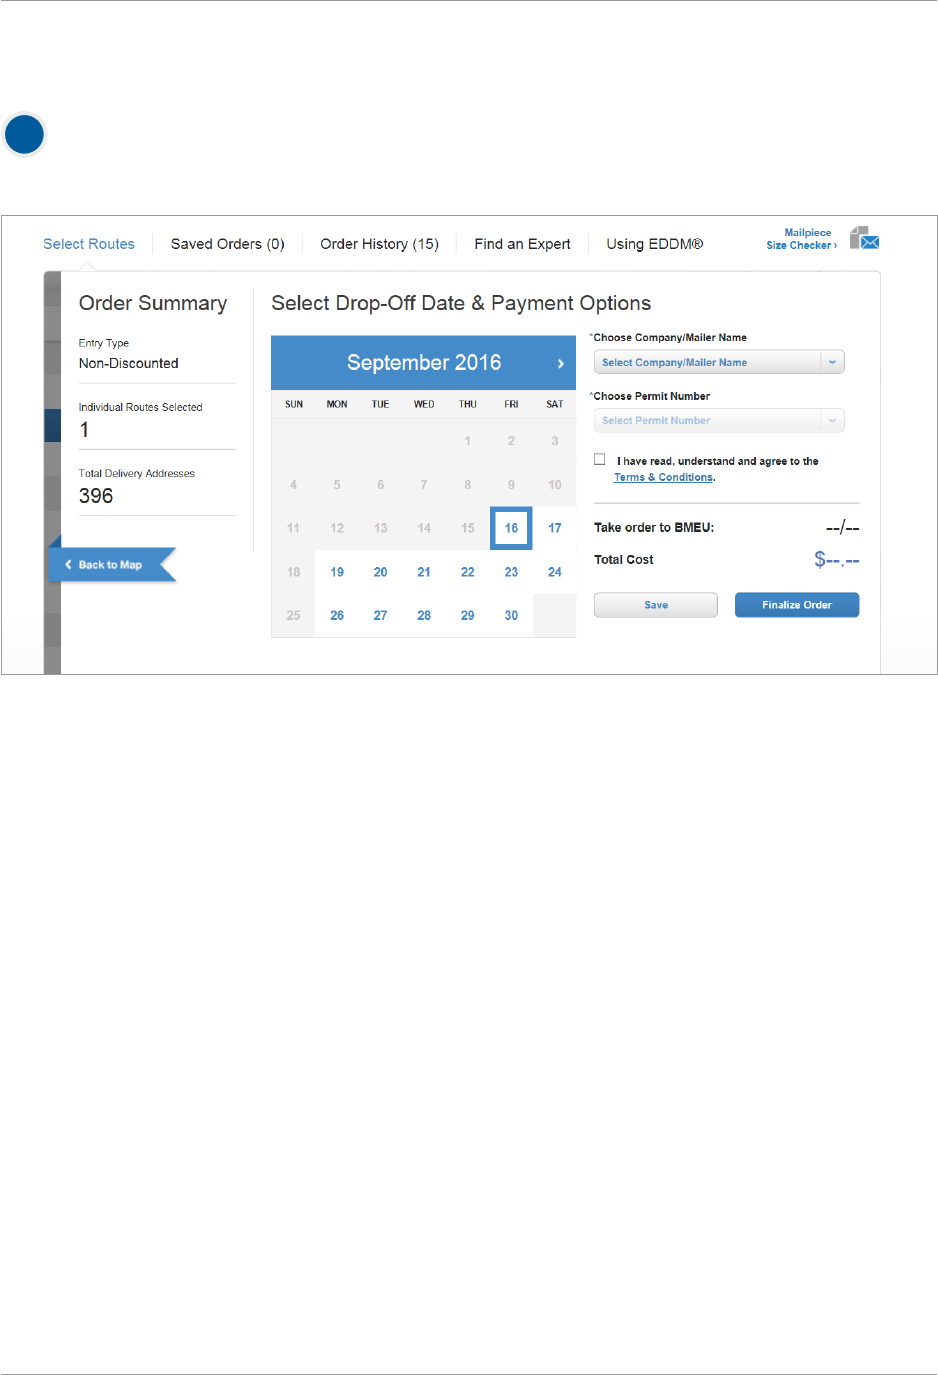
First you must select a drop-o date for your EDDM
®
mailings using the calendar.
Note: Dates may be selected up to 30 days in advance.
1
BMEU // Select Drop-o Date & Payment Options
Every Door Direct Mail
®
// User Guide // Simplied Mailing Process
Copyright © 2017 U.S. Postal Service
®
24
Within the conrmation step,
you will be required to select your company/mailer name using the drop down menu to the right of the Drop-
O Date Calendar. To associate a dierent company/mailer name with your account, you will need to update
your account in the Business Portal Gateway.
2
You will also be required to select a permit
associated with your account using the drop down menu to the right of the Drop-O Date Calendar. To
associate a dierent permit with your account, you will need to update your account in the Business Portal
Gateway.
3
Every Door Direct Mail
®
// User Guide // Simplied Mailing Process
Copyright © 2017 U.S. Postal Service
®
25
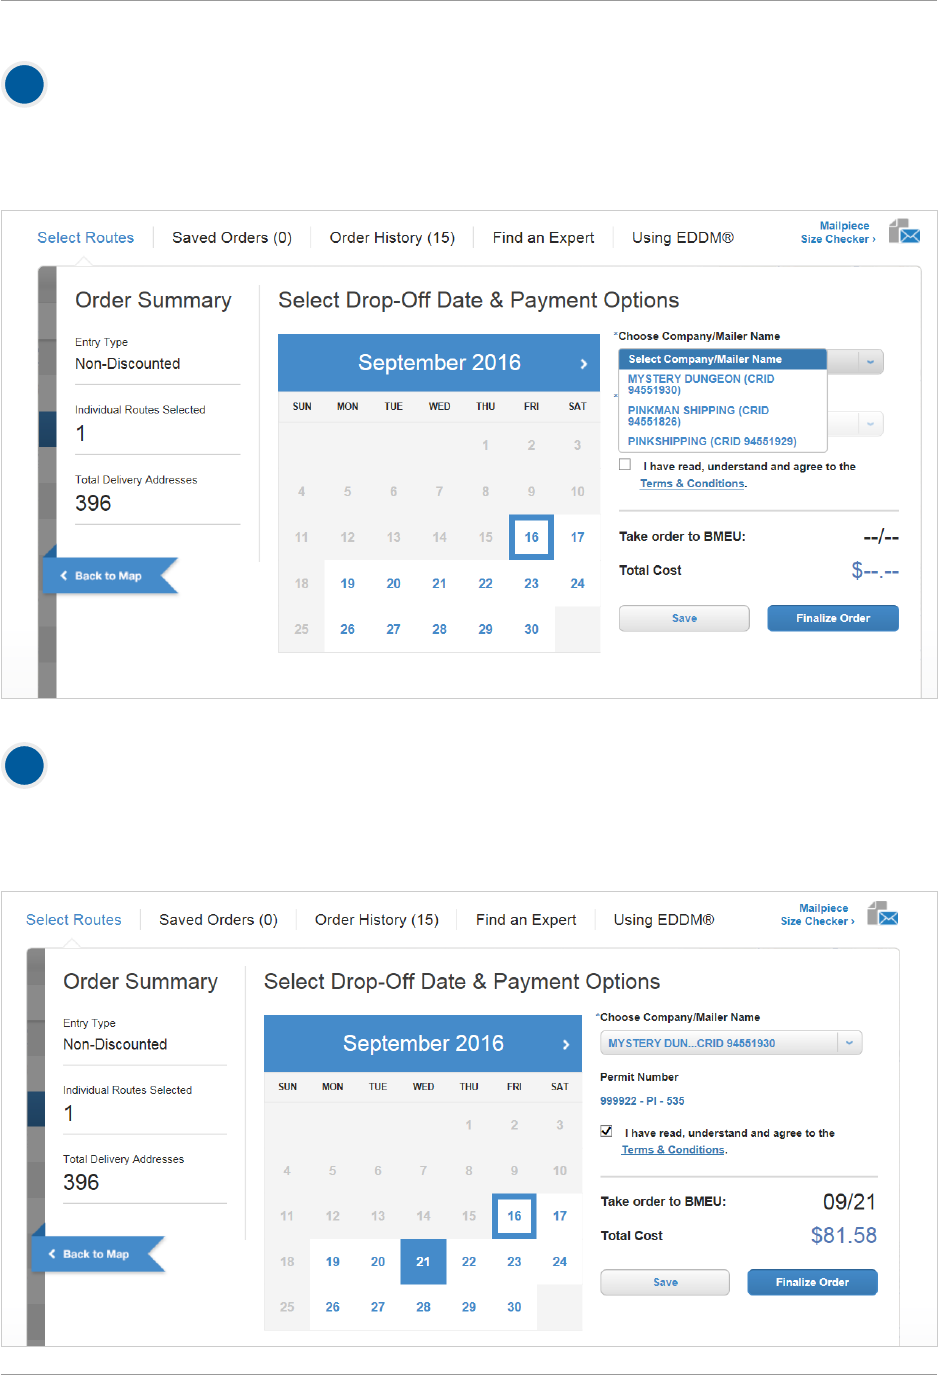
You will also be required to agree to the Terms & Conditions for EDDM
®
service.
This can be accomplished by reading the Terms & Conditions box and selecting the checkmark to indicate
agreement.
4
Once you have agreed to the Terms & Conditions,
you will be presented with the option to nalize your order.
5
Selecting the [Save] button will bring up a window
that will also allow you to add a nickname to your order. This step is optional. Once your order has been
saved, you may review your saved order using the navigation links located in the top right corner of the page.
6
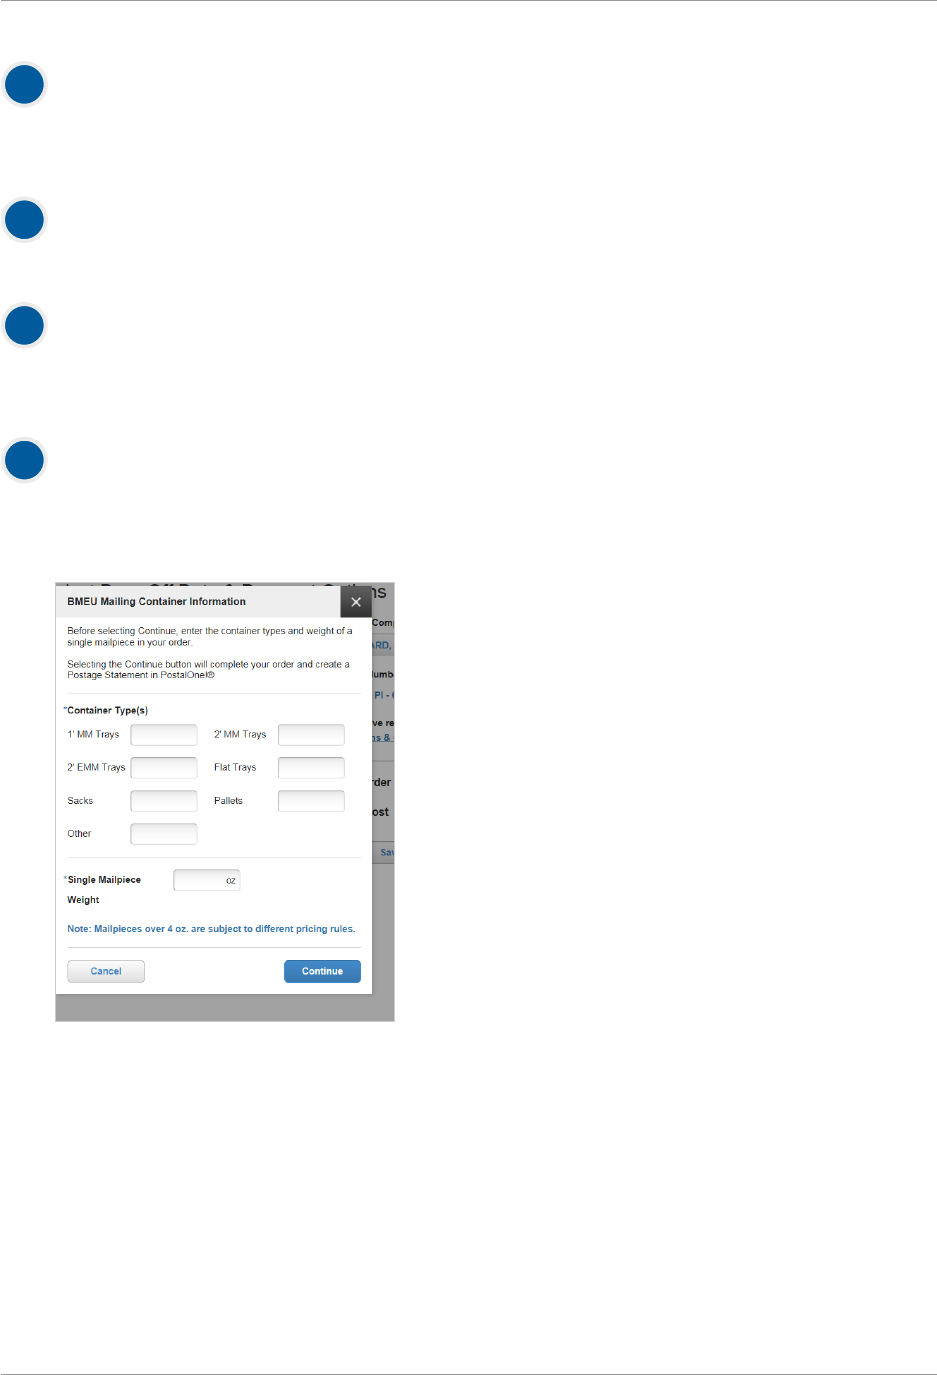
Before completing your order,
you are required to enter mailpiece weight and container information
related to your order.
7
Every Door Direct Mail
®
// User Guide // Simplied Mailing Process
Copyright © 2017 U.S. Postal Service
®
26
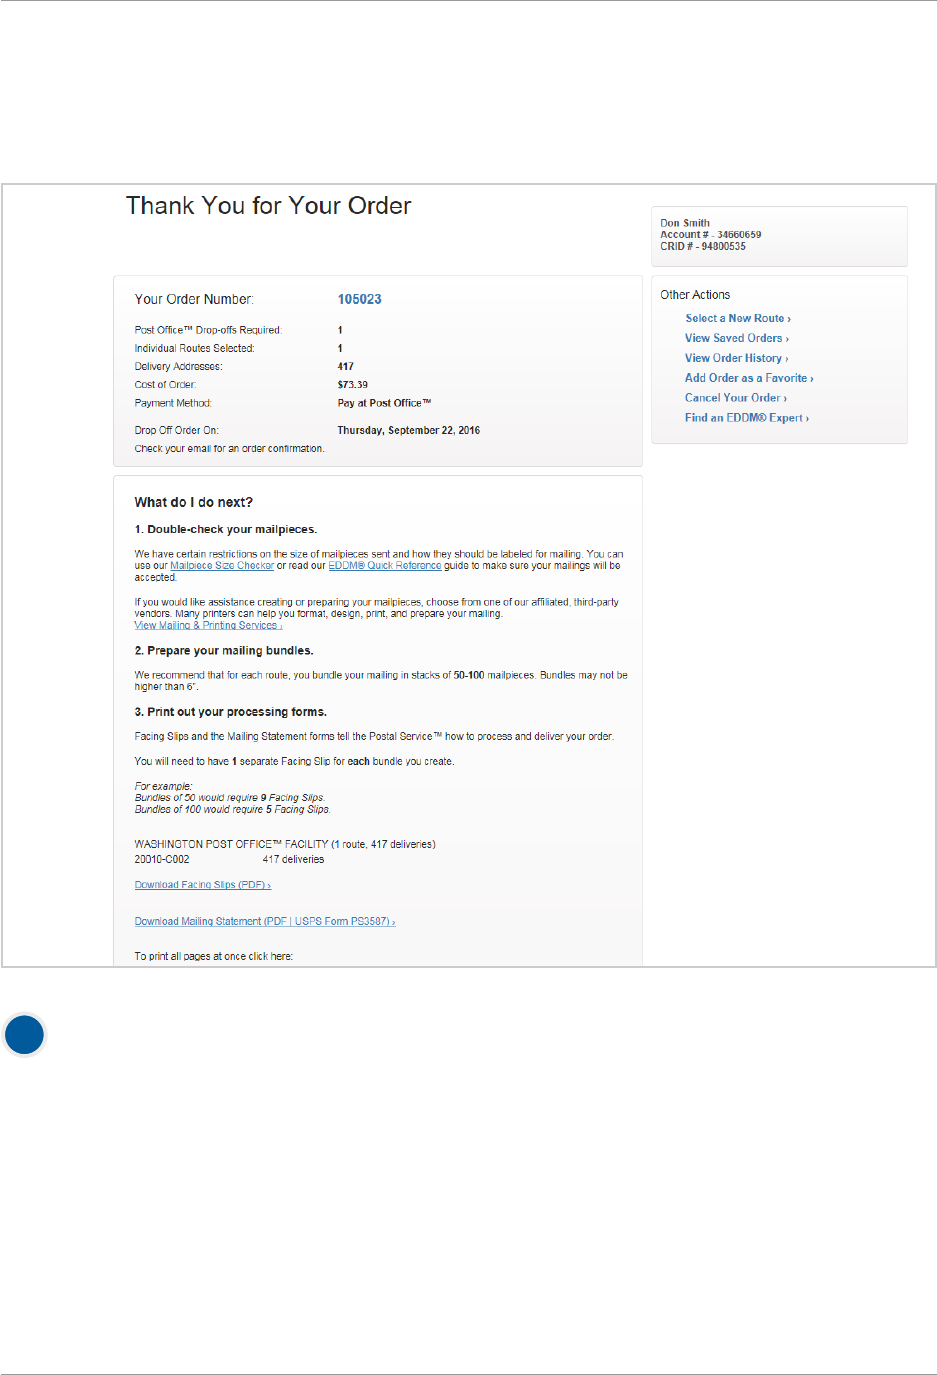
RETAIL // Order Conrmation & Print Forms
Order Conrmation & Print Forms
The order conrmation page will include a summary of the information
pertaining to your EDDM
®
order. This includes:
• Total deliveries
• Total order cost
• Scheduled drop-o date
• Post Oce™ drop-os
• Payment method
1

Every Door Direct Mail
®
// User Guide // Simplied Mailing Process
Copyright © 2017 U.S. Postal Service
®
27
Within the conrmation page, there are several forms relating to your order
that you will need to print prior to dropping o your order at the drop-o location, which are prepopulated
with your order information. The forms include:
Retail Post Oce™ Listing Form / Identies the Post Oce™ retail units that service the ZIP Code™
locations and routes included in your mailing. The form is pre-populated with:
• Retail Post Oce™ address
• Phone number
• Fax number
• Hours of operations
• The total number of mailpieces to submit to each unit
• Approximate cost at each unit
3
A
Facing Slips / Includes information for the Post Oce™ on how to process your EDDM order. One
facing slip should be printed for each route selected.
C
Mailing Statement (USPS Form PS 3587) / Includes information specic to your EDDM
®
mailing
order, including:
• 5-digit ZIP Code™
• Route number
• Number of mailpieces per route
B
Printing can be accomplished by selecting each of the individual forms
and printing manually or by selecting the blue [Print Forms Now] button.
Once you have printed your forms, you are ready to bring your EDDM order to your scheduled drop-o
location.
Note: You must bring your printed forms to your scheduled drop-o location in order to complete your order.
4
Other Actions may be performed after receiving conrmation
Other Actions include:
• Select a New Route
• View Order History
• View Saved Orders
• Find an EDDM Expert
• Add Order as a Favorite
• Request a Refund
5
Once your order is conrmed, you can choose whether you want
help creating your mailpieces. If you would like assistance with mailpiece format, design, print, or preparation,
select the View Mailing & Printing Services link. This step is optional.
2
Every Door Direct Mail
®
// User Guide // Simplied Mailing Process
Copyright © 2017 U.S. Postal Service
®
28
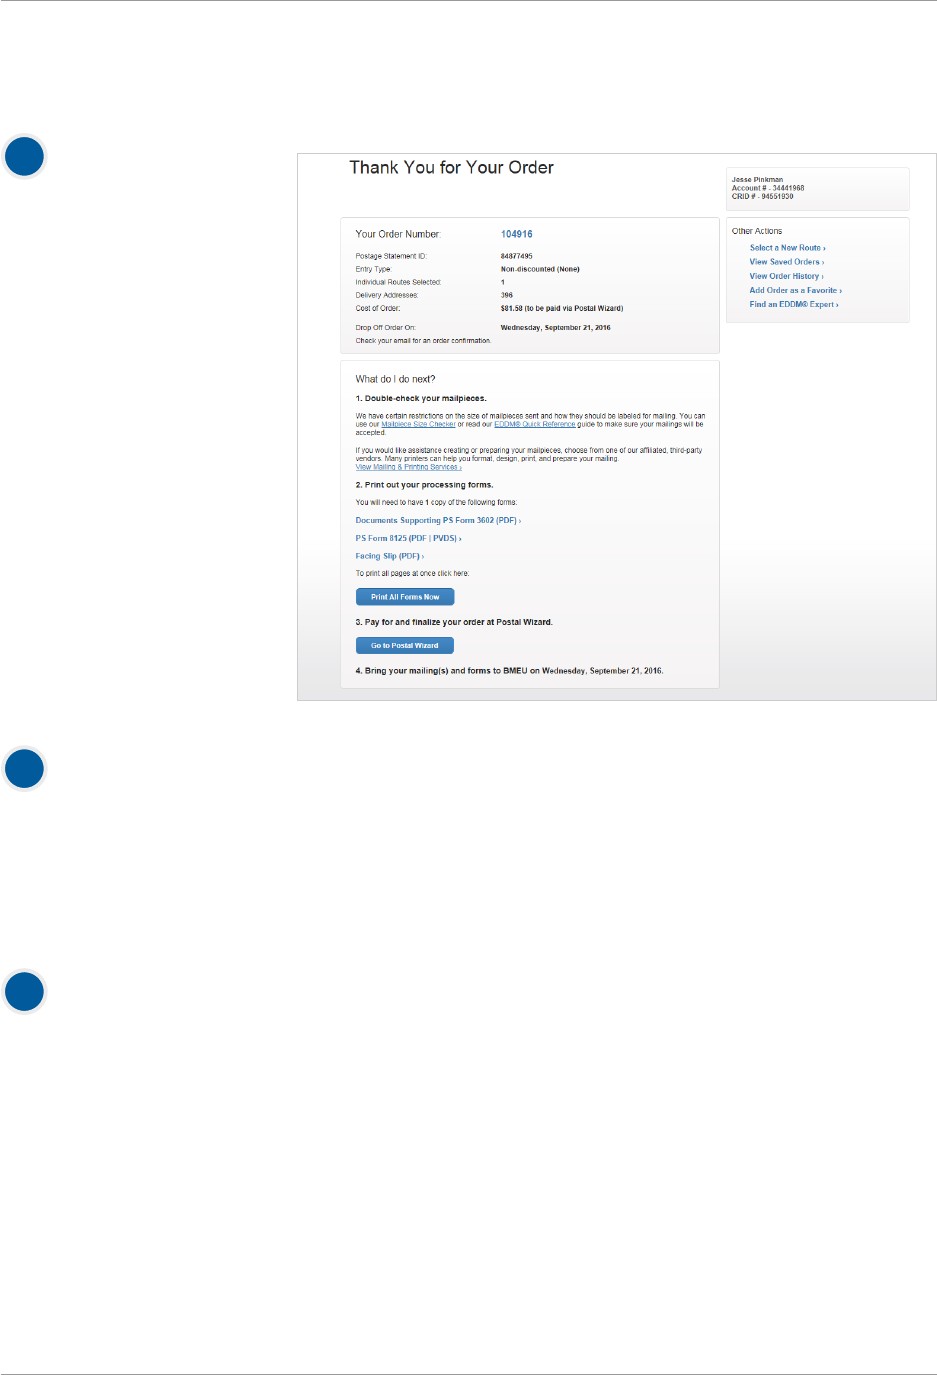
BMEU // Order Conrmation & Print Forms
The order conrmation
page
will include a summary of all
of the information pertaining
to your EDDM
®
order. This
includes:
• Total deliveries
• Total order cost
• Scheduled drop-o
date
• Post Oce™ drop-os
• Payment method.
1
Once you have printed your forms, you will need to proceed to the Postal Wizard to complete
your order.
Note: You must bring your printed forms to your scheduled drop-o location to complete your order.
3
Within the conrmation page, there are several forms that you will need to print
prior to dropping o your order at the drop-o location, which are prepopulated with your order information.
The forms include:
• PS Form 3602 (Mailing Statement).
• PS Form 8125 (Plant Veried Drop Shipment).
• Facing Slip.
2
Every Door Direct Mail
®
// User Guide // Simplied Mailing Process
Copyright © 2017 U.S. Postal Service
®
29
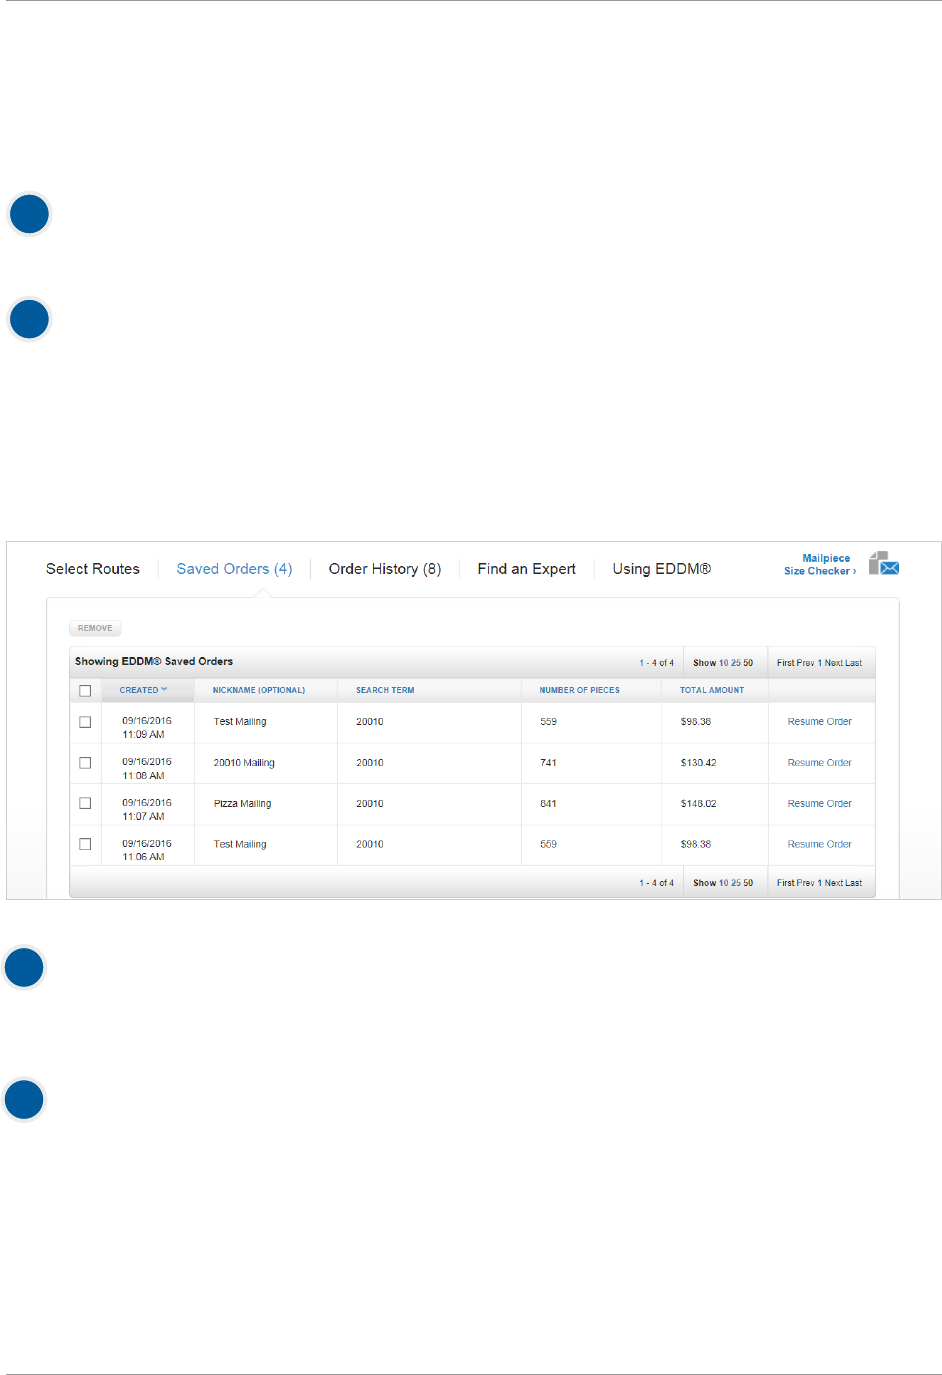
Saved Orders
To review your saved orders, select the saved orders link
located just above the EDDM
®
map on the EDDM tool page.
1
Within the saved orders page, several columns of information are provided:
• Date order was created
• Nickname (if given one, not required)
• Search term for saved order
• Number of pieces in order
• Total amount
• Payment method (Paid with Permit, Pay at Post Oce™, Paid Online)
2
To resume a saved order,
select the resume order link in the far right column of the saved orders page. This will return you to the
EDDM
®
tool with all previous entries and selections completed.
3
To remove a saved order from view,
select the box in the far left column of the order. Then select the [Remove] button located in the lower left
corner. You will be prompted to conrm removal of the order, at which point the order will be
removed from your saved order history.
4
RETAIL // Saved Orders
Every Door Direct Mail
®
// User Guide // Simplied Mailing Process
Copyright © 2017 U.S. Postal Service
®
30
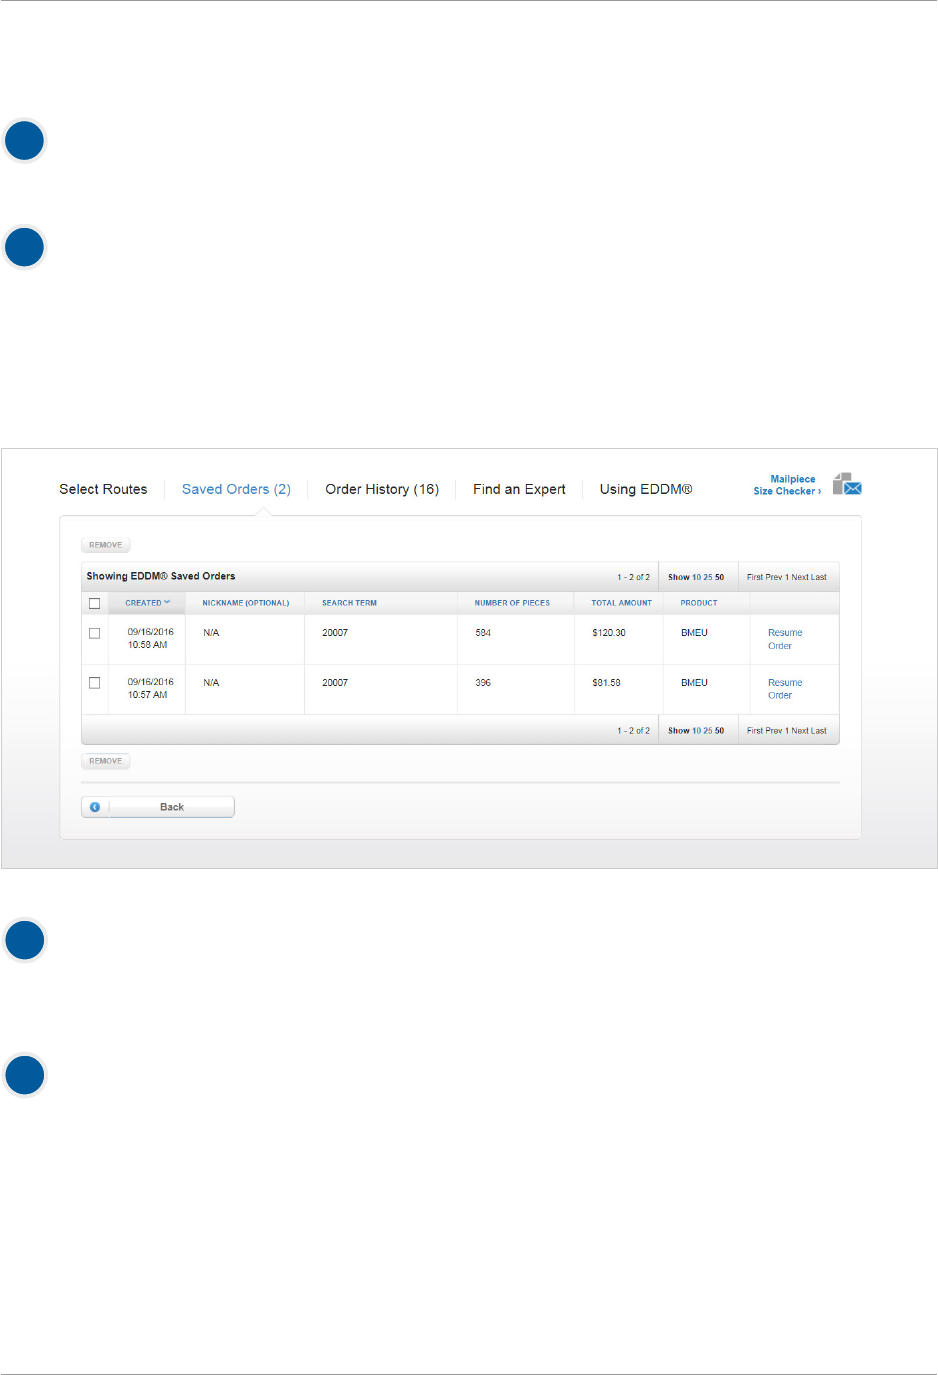
To review your saved orders, select the saved orders link
located on the top right of the page just above the EDDM
®
map on the EDDM tool page.
1
Within the saved orders page, several columns of information are provided:
• Date order was created
• Nickname (if given one, not required)
• Search term for saved order
• Number of pieces in order
• Total amount
• Payment method (Paid with Permit, Pay at Post Oce™, Paid Online)
2
To resume a saved order,
select the resume order link in the far right column of the saved orders page. This will return you to the
EDDM
®
tool with all previous entries and selections completed.
3
To remove a saved order from view,
select the box in the far left column of the order. Then select the [Remove] button located in the lower left
corner. You will be prompted to conrm removal of the order, at which point the order will be
removed from your saved order history.
4
BMEU // Saved Orders
Every Door Direct Mail
®
// User Guide // Simplied Mailing Process
Copyright © 2017 U.S. Postal Service
®
31
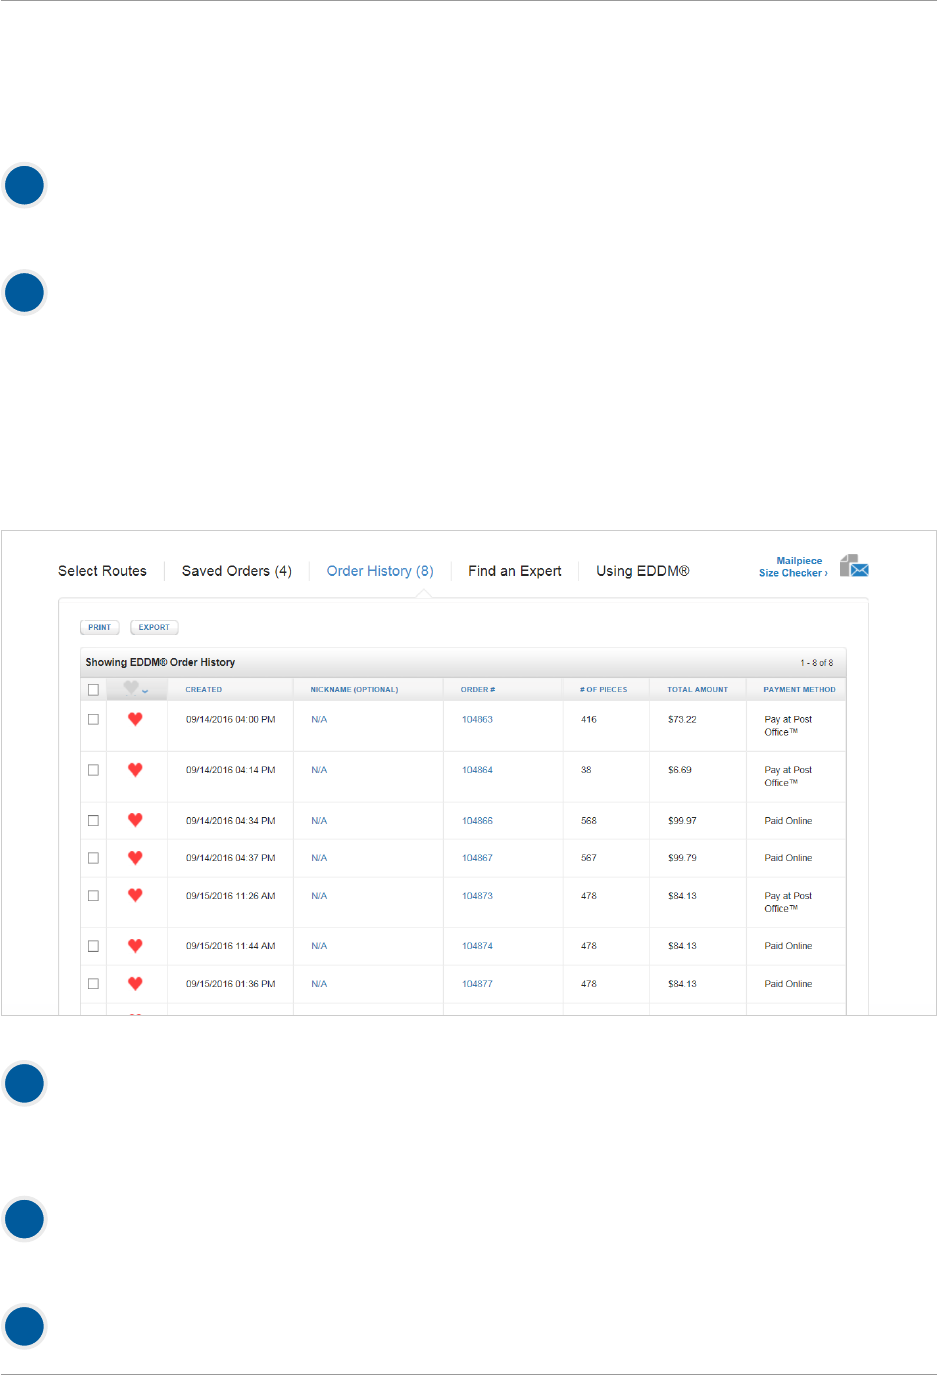
Order History
To review your order history,
select the Order History link located just above the EDDM
®
map on the EDDM tool page.
1
Within the order history page, there are several columns of information about your orders:
• If order is a Favorite Order
• Date order was created
• Nickname (if given one, not required)
• Search term for saved order
• Number of pieces in order
• Total amount
• Payment Method
2
To print or export orders,
select the box in the far left column of the order(s), then select the [Print] or [Export] buttons at the
bottom left of page.
3
To view the details of a specic order,
select the Nickname link or Order # link.
4
To mark an order as a Favorite,
select the heart icon which will turn red when order is marked as Favorite.
5
Every Door Direct Mail
®
// User Guide // Simplied Mailing Process
Copyright © 2017 U.S. Postal Service
®
32
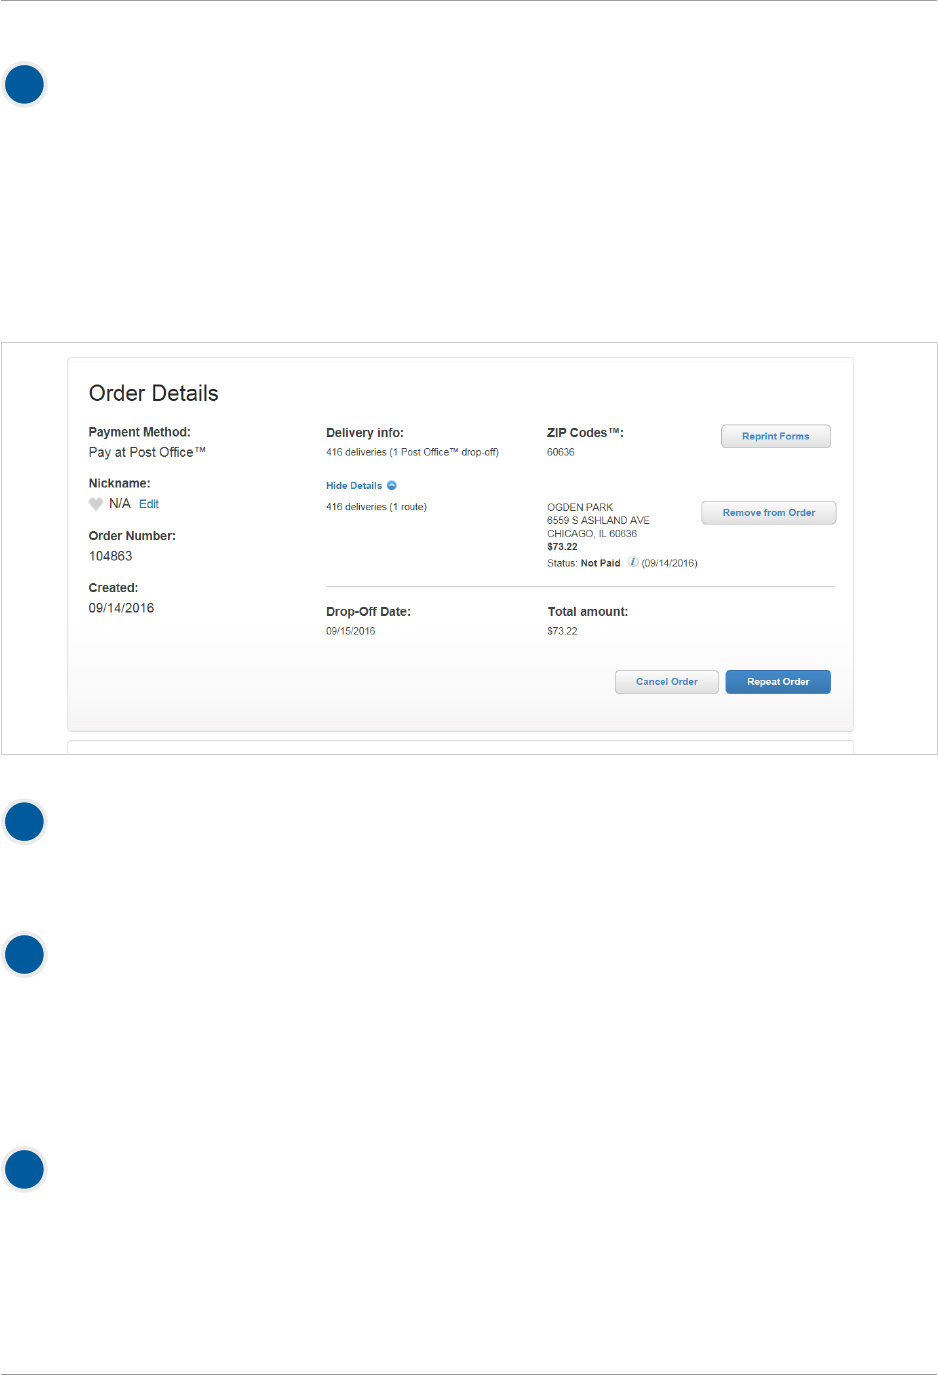
Within the order details page you will nd:
• Payment Method
• Favorite Order / Nickname of Order (if given one, not required)
• Order number
• Date order was created
• Delivery information: Shows the number of deliveries and local Post Oce drop-os of each order
• Drop-o date
• Total amount
• ZIP Code(s)
• Option to reprint forms
6
7
To request a refund,
select the [Request Refund] button in the bottom right corner of the page. Once selected, you will be
prompted to select what individual Post Oce™(s) from your order you would like a refund from. Each
selection provides cost and amount of deliveries associated with each Post Oce™. Once selection(s) are
made, select the [Submit Request] button. This process can only be made for orders that were EDDM –
Retail
®
Orders that were paid for online.
9
To repeat an order,
select the [Repeat Order] button in the bottom right corner of the page. This will take you to the EDDM
®
Tool page with your order’s routes already pre-selected.
8
To cancel an order,
select the [Cancel Order] button in the bottom right side of the Order Details page. Canceling an order
automatically updates your daily allowable volume. This process can only be made for orders that were paid
for at a local Post Oce.
Every Door Direct Mail
®
// User Guide // Simplied Mailing Process
Copyright © 2017 U.S. Postal Service
®
33
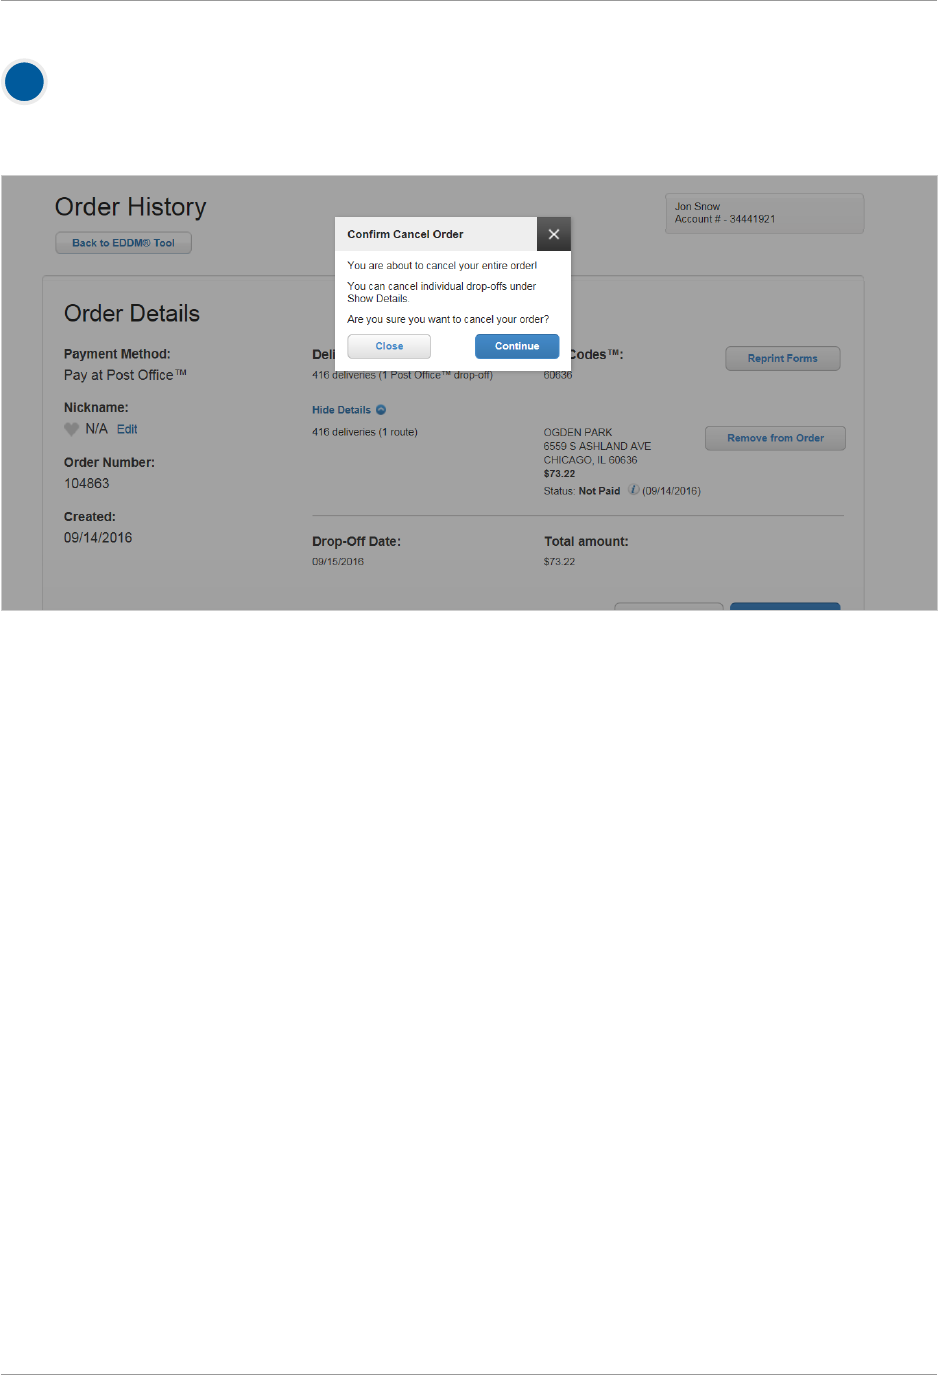
To cancel an undelivered delivery segment,
select the [Show Details] button below the deliveries info area. Select the [Remove from Order]
button next to the delivery segment that you would like to cancel and conrm its removal.
10
