TM-RANGER SERIES
TECHNICAL MANUAL FOR
OPERATION AND MAINTENANCE
OF SILENCER MODEL
RANGER SERIES
Printed in the U.S.A. 105116 REV-10.22
5021 Bradford Drive, Suite A
Huntsville, AL 35805
OPERATIONAL MANUAL FOR SILENCER MODEL RANGER SERIES
Distributed by
ADVANCED ARMAMENT CO.
Phone: (800) 581-1610
www.advanced-armament.com
CONTENTS:
The Ten Commandments of Firearm Safety.................................. P.3
General description........................................................................ P.3
Configuring a RANGER for Fast-Attach use.................................. P.4
Configuring a RANGER for Direct-Thread use.............................. P.6
Installing RANGER Fast-Attach onto a host firearm...................... P.7
Removing RANGER Fast-Attach from a host firearm.................... P.9
Installing RANGER Direct-Thread onto a host firearm................... P.10
Removing RANGER Direct-Thread from a host firearm................ P.12
Cleaning the RANGER ................................................................ P.12
ADVANCED ARMAMENT CO.
Limited Lifetime Warranty for Silencers
ADVANCED ARMAMENT CO. (“AAC”) warrants to the original purchaser (“Purchaser”) of a new
Silencer from AAC that such Silencer shall be free from defects in material and workmanship for
the duration of time that the Purchaser originally owns that Silencer. AAC, in its sole discretion,
shall repair or replace the Silencer if the Purchaser submits a valid warranty claim in accordance
with these instructions. If AAC opts to replace the Silencer, AAC will keep the Silencer that it re-
places. The Purchaser’s remedies under this warranty are limited to repair or replacement of the
Silencer; AAC will not provide cash, credit, or refund. AAC does not warrant against any type of
defect to the Silencer that AAC did not cause, including but not limited to defects or failures arising
out of:
1. Failure to provide proper care and maintenance,
2. Accidents, abuse, or misuse,
3. Silencer obstruction,
4. Hand loaded, reloaded, or improper ammunition,
5. Unauthorized adjustments, repairs, or modifications, or
6. Normal wear and tear.
Additionally, AAC EXCLUDES AND WILL NOT PAY INCIDENTAL OR CONSEQUENTIAL DAM-
AGES UNDER THIS WARRANTY. THIS WARRANTY ALSO EXCLUDES ANY OTHER WAR-
RANTIES, TO INCLUDE IMPLIED WARRANTIES. Furthermore, no individual or entity other than
AAC possesses the authority to alter the obligations, limitations, disclaimers, or exclusions under
this warranty. AAC’s obligations under this warranty shall not apply to the extent that any law, reg-
ulation, or other governmental requirements prohibits the repair, replacement and, or, return of a
Silencer to the person who shipped the Silencer to AAC.
The Purchaser, in order to achieve eligibility under this warranty, must be able to produce, on re-
quest, Purchaser’s original sales receipt for the Silencer that clearly indicates that Purchaser is
the original purchaser at retail. The Purchaser, upon discovering a defect in material or workman-
ship in the silencer, shall contact AAC at 800-581-1610 or [email protected]
Upon receiving the Purchaser’s correspondence or phone call, AAC shall provide instructions to
the Purchaser governing the manner in which to return the Silencer for repair or replacement.
Repair Policy
Should the silencer require repair or modification, the owner should contact AAC Customer Service
to secure a Return Merchandise Authorization (RMA). Once the customer has the RMA, they may
then ship the silencer insured to AAC for evaluation and repair, along with a photocopy of the ap-
proved form proving ownership and a brief letter detailing the customer’s concerns and contact in-
formation.
Manufacturer’s Disclaimer
ADVANCED ARMAMENT CO. shall not be responsible in any manner whatsoever for physical in-
jury or property damage stemming from criminal or negligent misuse, improper or careless han-
dling, unauthorized modifications, defective, improper hand-loaded or reloaded ammunition,
neglect, or other influences beyond our direct and immediate control. If you do not understand the
instructions and recommendations in this manual, contact ADVANCED ARMAMENT CO. at 800-
581-1610 for clarification.
© 2022 JJE Brands, LLC. The stylized AAC logo and Ti-RANT are registered trademarks of
JJE Brands, L.L.C.
This manual contains operating, care, and maintenance instructions. To assure
safe operation, any user of this silencer must read and understand this manual
before using the silencer. Failure to follow the instructions and heed the warn-
ings in this manual can cause property damage, personal injury, and/or death.
This manual should always accompany this silencer, and be transferred with it
upon change of ownership.
WARNING Keep this silencer out of the reach of children, unauthorized and/or
prohibited individuals, and others unfamiliar with the safe handling of firearms
and silencers.
Alert Symbols and Definitions:
Indicates a hazardous situation which, if not avoided,
could result in property damage, personal injury, or death.
Indicates a hazardous situation which, if not avoided,
could result in minor to moderate personal injury.
Addresses practices not relating to personal injury.
WARNING!
CAUTION!
NOTE:
© 2022 ADVANCED ARMAMENT CO.

THE TEN COMMANDMENTS OF FIREARM SAFETY
1. Always keep the muzzle pointed in a safe direction.
2. Firearms should be unloaded when not actually in use.
3. Do not rely on your firearm's safety.
4. Be sure of your target and what is beyond it.
5. Only use ammunition that exactly matches the markings on your
firearm.
6. If your firearm fails to fire when the trigger is pulled, handle with
care.
7. Always wear eye and hearing protection when shooting.
8. Be sure the barrel is clear of obstructions before shooting.
9. Do not alter or modify your firearm and have it serviced regularly.
10.Learn the mechanics and handling characteristics of your firearm.
Read your firearm's instruction manual.
WARNING! Failure to follow the instructions and recommendations
set forth in this manual can create a potentially dangerous situation
for the user and surrounding personnel, possibly leading to property
damage, personal injury and/or death.
WARNING! DO NOT shoot through a RANGER SERIES silencer that
is mounted on a BLACKOUT
®
Silencer-Mounting muzzle device that
has not been installed onto the host rifle using the included Rocksett
sealant and recommended torque fastening. Mounting and shooting
through a RANGER SERIES silencer that is mounted to an unsecured
BLACKOUT Silencer-Mounting muzzle device could lead to property
damage, personal injury and/or death.
WARNING! DO NOT use an auxiliary thread adapter between your
host weapon barrel and a BLACKOUT Silencer-Mounting muzzle de-
vice. Using an auxiliary thread adapter between your host weapon
barrel and a BLACKOUT Silencer-Mounting muzzle device could lead
to misalignment between the host weapon bore and the RANGER SE-
RIES silencer, which could lead to property damage, personal injury
and/or death.
WARNING! We recommend having your BLACKOUT Silencer-Mount-
ing muzzle device installed by a competent gunsmith or armorer. Nei-
ther Advanced Armament Co. nor its affiliates are liable for damage(s)
to the host weapon, silencer , and user attributed to improper instal-
lation. An improperly installed or misaligned BLACKOUT Silencer-
Mounting muzzle device can create a potentially dangerous situation
for the user and surrounding personnel, and may lead to property
damage, personal injury and/or death.
WARNING! Always wear protective gear, such as eye protection and
solvent-resistant gloves when working with any solvent. Only use sol-
vents in a well-ventilated area away from open flames. Unsafe use of
solvents may lead to property damage, personal injury and/or death.
WARNING! DO NOT use a crush washer or compression washer
when installing a BLACKOUT Silencer-Mounting muzzle device. In-
stalling a BLACKOUT Silencer-Mounting muzzle device with a crush
washer or compression washer can lead to misalignment of a BLACK-
OUT Silencer-Mounting muzzle device and the host weapon bore.
Misalignment of a BLACKOUT Silencer-Mounting muzzle device and
the host weapon bore can create a dangerous situation that may lead
to property damage, personal injury and/or death.
WARNING! Never install or remove a silencer on or from a host
firearm that you have not verified to be completely empty and ren-
dered safe. Installing or removing a silencer on or from a loaded
firearm may lead to property damage, personal injury and/or death.
WARNING! The RANGER SERIES is designed for use on modern ri-
fles and carbines in serviceable condition. It is the user's responsi-
bility to ensure the intended host firearm is in serviceable condition.
Using a RANGER SERIES on firearms that are not in serviceable con-
dition can lead to property damage, personal injury and/or death.
WARNING! The barrel threads must be properly machined to allow
proper attachment of a BLACKOUT Silencer-Mounting muzzle device.
The use of an improperly threaded barrel with a BLACKOUT Silencer-
Mounting muzzle device may lead to property damage, personal in-
jury and/or death. For further clarification on muzzle threads, contact
Advanced Armament Co. at 770-925-9988.
WARNING! The bore through your RANGER SERIES must align con-
centrically with the bore of the barrel to which it is mounted. A mis-
alignment of the silencer and barrel bore may lead to property
damage, personal injury and/or death.
WARNING! Discharging silenced firearms can make airborne and/or
SILENCER MODEL RANGER SERIES P.1 SILENCER MODEL RANGER SERIES P.2
deposit lead and other substances around, on and in the silencer.
Using, handling and/or cleaning a silencer may result in exposure to
lead and other substances known to cause birth defects, reproductive
harm, cancer and other serious physical injury. Have adequate ven-
tilation at all times and wash hands thoroughly after exposure.
CAUTION! Silencers can become extremely hot while the host firearm
is being discharged. After shooting, allow the silencer to reach ambi-
ent temperature before attempting to remove the silencer from the
firearm. If removal is necessary prior to the silencer cooling to ambi-
ent and/or the tightness of the silencer on the host firearm barrel
must be verified, the use of heat-resistant gloves is mandatory. Han-
dling a hot silencer without heat resistant gloves may lead to skin
burns and/or personal injury.
CAUTION! Always wear eye and hearing protection when discharging
a firearm. Discharging a firearm without wearing eye and hearing pro-
tection may lead to personal injury.
GENERAL DESCRIPTION
Congratulations! You are now the proud owner of AAC’s newest user-con-
figurable sound and flash suppressor for 5.56mm and 7.62mm rifles and
carbines. The RANGER SERIES can be configured as either a direct-
thread or fast- attach suppressor in seconds using the industry-standard
1-3/8-24 threaded socket. In addition to the ease of configuring the mount-
ing apparatus, the RANGER SERIES feature removable front end cap in-
serts that can be easily removed and replaced in the event of damage.
The RANGER SERIES are constructed of fully laser welded 17-4 stainless
steel and Inconel 718 for light-weight and durability. The revolutionary de-
sign and construction of the RANGER SERIES baffle core significantly re-
duces felt recoil, environmental disturbance, and aids in the preservation
of the hearing of shooters and observers. In numerous circumstances, the
RANGER SERIES may deliver an overall sound signature below the pain
threshold and risk limit for hearing loss*. The RANGER SERIES is finished
with a combination of Cerakote and matte black nitride.
* The cumulative effects of sound on hearing are influenced by multiple
factors, including but not limited to the sound level, the total amount of time
(or number of times) one is exposed, barrel length, type of firearm operat-
ing system, ammunition selection, and the surrounding environment. Also,
unforeseen events, such as case ruptures, can expose the user and by-
standers to sound levels well beyond the level of suppressed fire. For these
reasons, AAC recommends the use of hearing protection, even when
shooting with a suppressor.
CONFIGURING A RANGER FOR FAST-ATTACH USE
The industry-standard 1-3/8-24 threaded socket used with the RANGER
SERIES makes it possible to employ fast-attach adapters from other man-
ufacturers with the RANGER SERIES. Prior to using other manufacturers
fast-attach adapters with the RANGER SERIES, it is the responsibility of
the user to ensure the adapters are fully compatible with the RANGER SE-
RIES. Refer to the other manufacturers fast-attach adapter installation and
removal instructions. The following instructions cover installation and use
of AAC designed fast-attach adapters.
WARNING! Only perform configuration changes on silencers that are
not mounted to a firearm. Attempting configuration changes on a
mounted silencer could lead to property damage, personal injury
and/or death.
1. If the RANGER SERIES is mounted to a host firearm, dismount it fol-
lowing the procedure outlined in “Removing the RANGER SERIES
from a host firearm” in this manual.
2. If the RANGER SERIES is configured for direct-thread use, remove
the direct-thread adapter follow-
ing the procedure outlined in
“Configuring the RANGER SE-
RIES for direct-thread use” in
this manual.
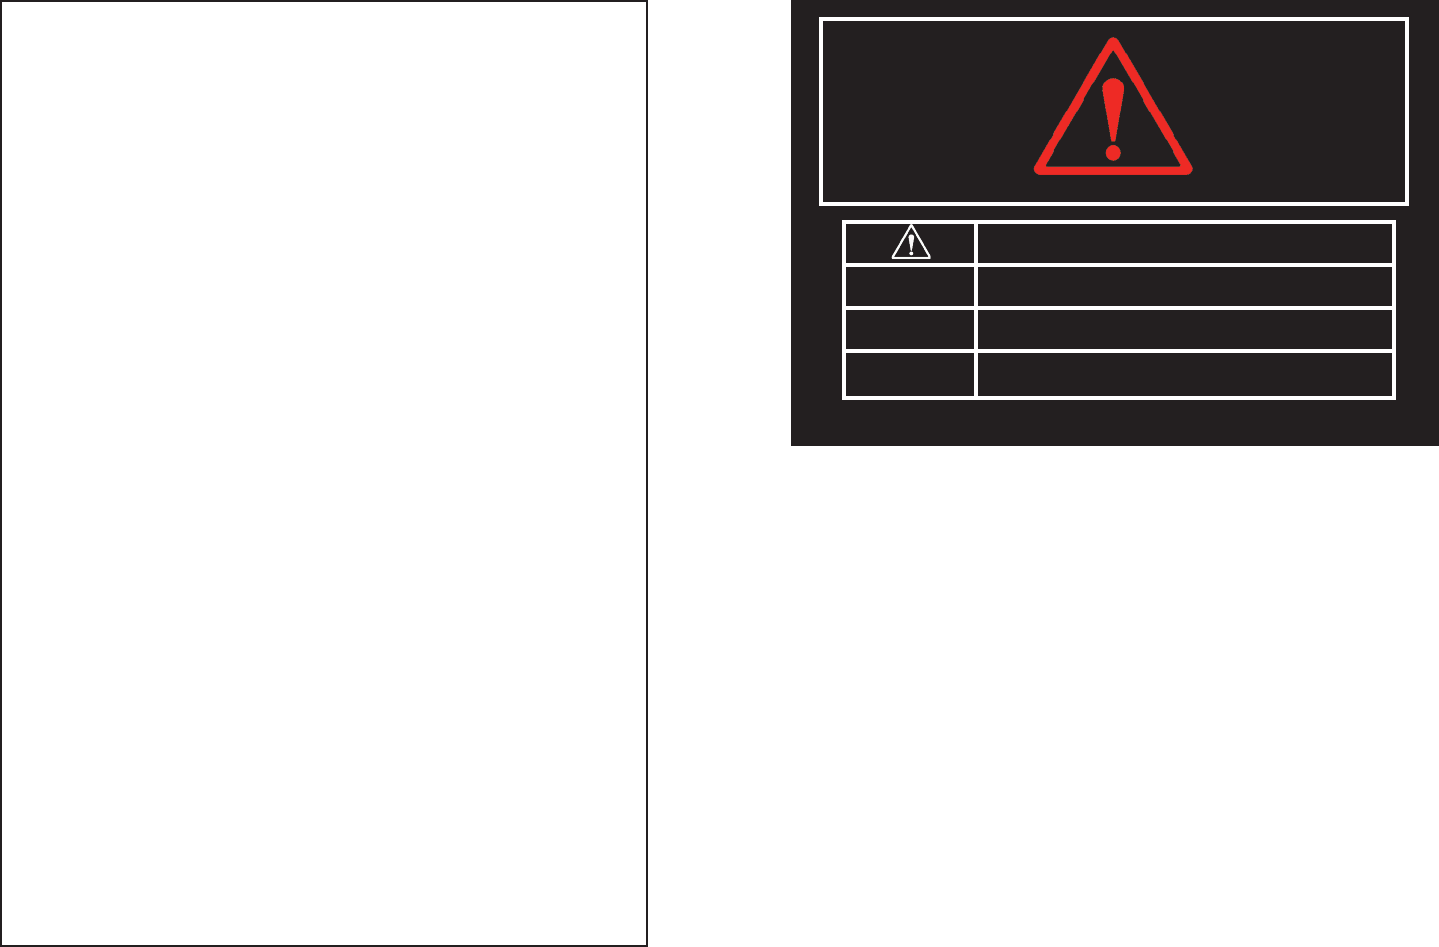
3. Inspect the threaded socket and
tapered sealing surface in the
rear of the suppressor to ensure
they are clean and free of dam-
age. See Figure 1.
WARNING! Never attempt to install an adapter in a RANGER SERIES
silencer with threads or tapered sealing surfaces that are dirty or
damaged, as this may lead to property damage, personal injury
and/or death.
SILENCER MODEL RANGER SERIES P.3 SILENCER MODEL RANGER SERIES P.4
Figure 1
Tapered
Sealing
Surface
Threads

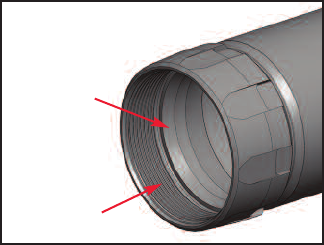
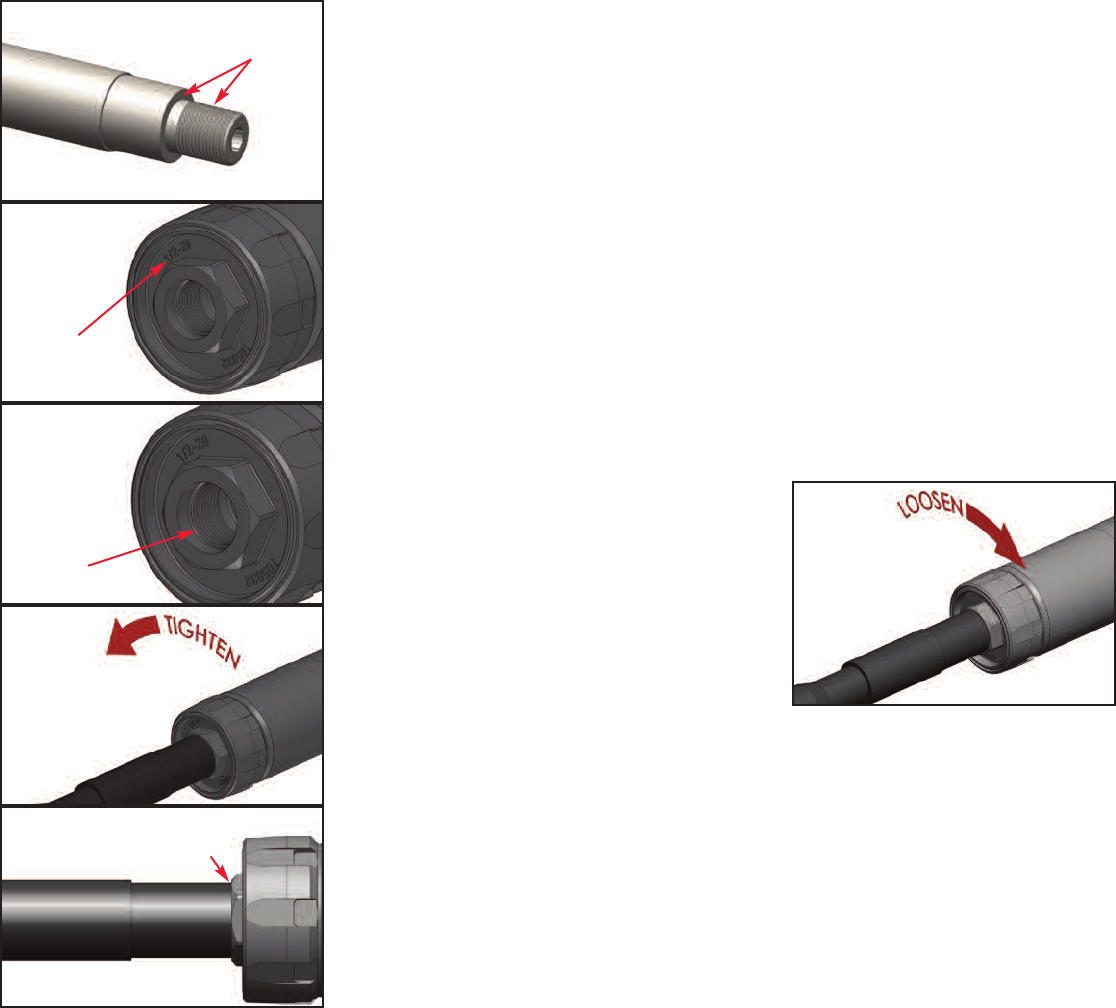
4. Inspect the threads and tapered
sealing surface on the outside of
the fast-attach adapter to ensure
they are clean and free of dam-
age.See Figure 2.
5. Apply a light coat of high-tem-
perature grease or anti-seize to
the threads and tapered sealing
surface on the outside of the
fast-attach mount.See Figure 3.
6. Thread the fast-attach mount
into the silencer until the tapered
sealing surface on the outside of
the fast-attach mount seats
against the mating tapered seal-
ing surface inside the silencer.
See Figure 4.
7. Use a spanner to tighten the
fast-attach mount into the si-
lencer.See Figure 5.
8. To remove a fast-attach adapter
from a dismounted RANGER
SERIES silencer, use a spanner
to break loose the fast-attach
adapter and unthread it and re-
move it by hand.
9. Inspect the threads and tapered
sealing surface on the outside of
the fast-attach adapter to ensure
they are clean and free of dam-
age.
10. Inspect the threaded socket and tapered sealing surface in the rear of
the suppressor to ensure they are clean and free of damage.
WARNING! It is the responsibility of the user to ensure the silencer
stays securely threaded into the RANGER SERIES silencer. Failure
to do so may lead to property damage, personal injury and/or death.
CONFIGURING A RANGER FOR DIRECT-THREAD USE
The industry-standard 1-3/8-24 threaded socket used with the RANGER
SERIES makes it possible to employ direct-thread adapters from other
manufacturers with the RANGER SERIES. Prior to using other manufac-
turers direct-thread adapters with the RANGER SERIES, it is the respon-
sibility of the user to ensure the adapters are fully compatible with the
RANGER SERIES. Refer to the other manufacturers direct-thread adapter
installation and removal instructions. The following instructions cover in-
stallation and use of AAC designed direct-thread adapters.
WARNING! Only perform configuration changes on silencers that are
not mounted to a firearm. Attempting configuration changes on a
mounted silencer could lead to property damage, personal injury
and/or death.
1.If the RANGER SERIES is mounted to a host firearm, dismount it fol-
lowing the procedure outlined in “Removing the RANGER SERIES
from a host firearm” in this manual.
2. If the RANGER SERIES is configured for fast-attach use, remove the
fast-attach adapter following the
procedure outlined in “Configur-
ing the RANGER SERIES for
fast-attach use” in this manual.
3. Inspect the threaded socket and
tapered sealing surface in the
rear of the suppressor to ensure
they are clean and free of dam-
age.See Figure 6.
4. Inspect the threads and tapered
sealing surface on the outside of
the direct-thread adapter to en-
sure they are clean and free of
damage. See Figure 7.
5. Apply a light coat of high-temper-
ature grease or anti-seize to the
SILENCER MODEL RANGER SERIES P.5 SILENCER MODEL RANGER SERIES P.6
Figure 2
Tapered
Sealing
Surface
Figure 4
Figure 5
Figure 3
Apply Hi-
Temp
Grease or
Anti-Seize
here
Threads
Figure 7
Tapered Sealing
Surfaces
Partial
Section
Figure 6
Tapered
Sealing
Surface
Threads
Tapered
Sealing
Surface
Threads
threads and tapered sealing sur-
face on the outside of the direct-
thread mount. See Figure 8.
6. Thread the direct-thread mount
into the silencer until the tapered
sealing surface on the outside of
the direct-thread mount seats
against the mating tapered seal-
ing surface inside the silencer.
See Figure 9.
7. Use a ¾” socket to tighten the di-
rect-thread mount into the si-
lencer. See Figure 10.
8. To remove a direct-thread
adapter from a dismounted
RANGER SERIES silencer, use
a ¾” socket to break loose the
fast-attach adapter and unthread
it and remove it by hand.
9. Inspect the threads and tapered
sealing surface on the outside of
the ¾” socket adapter to ensure
they are clean and free of dam-
age.
10.Inspect the threaded socket and tapered sealing surface in the rear of
the suppressor to ensure they are clean and free of damage.
INSTALLING A RANGER SERIES SILENCER CONFIGURED FOR
FAST-ATTACH USE ONTO A HOST FIREARM
WARNING! Never attempt to attach a RANGER SERIES to a BLACK-
OUT Silencer-Mounting muzzle device with threads that are dirty or
damaged, as this may lead to property damage, personal injury
and/or death.
WARNING! Never attempt to attach a RANGER SERIES with dirty or
damaged threads to a BLACKOUT Silencer-Mounting muzzle device,
as this may lead to property damage, personal injury and/or death.
WARNING! Never use a silencer with an obstructed bore, as this may
lead to property damage, personal injury and/or death.
1. Always keep the firearm pointed in a safe direction.
2. Render the firearm safe by removing the magazine, completely unload-
ing the firearm and engaging the safety mechanism to the "SAFE" po-
sition. See the firearm's owner's manual for detailed instructions.
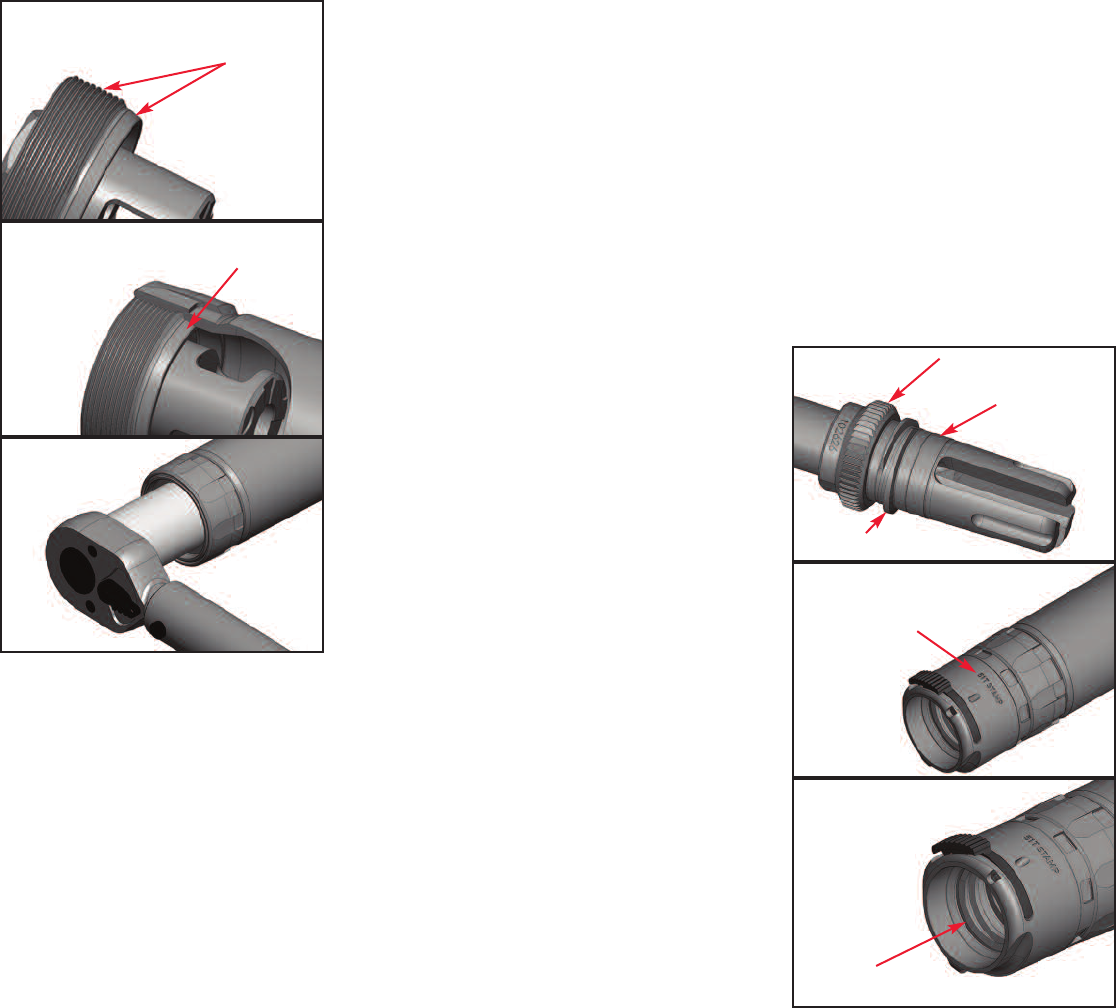
3. Inspect the threads on the exterior of the BLACKOUT Silencer-Mount-
ing muzzle device, the toothed
gear behind the threads, and the
silencer alignment surfaces to
verify they are clean and un-
damaged. See Figure 11.
4. Verify the fast-attach mount is
compatible with the BLACKOUT
Silencer-Mounting muzzle de-
vice mounted to the host
firearm. The fast-attach mount
designation is marked on the
mount. See Figure 12.
5. Inspect the threads in the rear of
the Fast-Attach Mount to verify
they are clean and undamaged.
See Figure 13.
6. Look through the silencer from
the rear to ensure the bullet path
through the silencer is unob-
structed.
7. Examine the silencer for any
signs of damage.
8. Grasp the silencer by the in-
SILENCER MODEL RANGER SERIES P.7 SILENCER MODEL RANGER SERIES P.8
Figure 11
Figure 12
Figure 13
Thread
Figure 9
Figure 10
Figure 8
Apply Hi-
Temp
Grease or
Anti-Seize
here
Tapered Sealing
Surfaces
Toothed Gear
Alignment
Surface
Thread
Mount
Designation
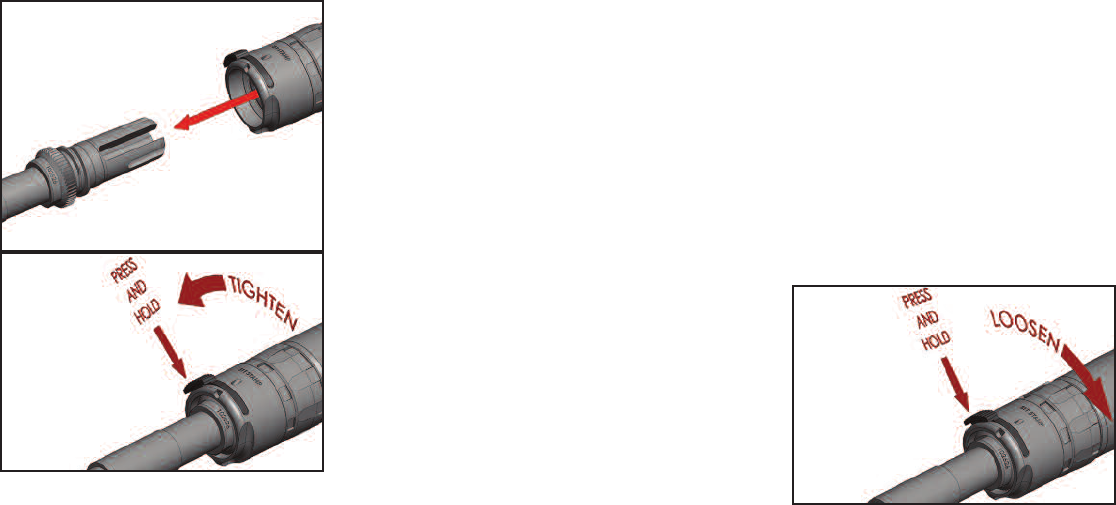
stalled mount and slide the
RANGER SERIES over the
BLACKOUT Silencer-Mounting
muzzle device. See Figure 14.
9. Hold the RANGER SERIES by
the mount and while keeping the
textured thumb pad of the latch
depressed, carefully screw the
silencer onto the 90T Ratchet
Taper BLACKOUT Silencer-
Mounting muzzle device threads
in the direction indicated in Fig-
ure 15.
10. Tighten the silencer fully onto
the BLACKOUT Silencer-
Mounting muzzle device hand-
tight. With a 90T Ratchet Taper
mount, tighten just until the ta-
pered alignment surface adja-
cent to the toothed gear on the 90T Ratchet Taper BLACKOUT
Silencer-Mounting muzzle device engages the mating tapered align-
ment surface in the rear of the RANGER SERIES silencer. With a
S.T.A.M.P. Mount, after 1-1/2 to 2 turns, tension from the S.T.A.M.P
Mount™ can be felt. When either mount is fully engaged with the
BLACKOUT Silencer-Mounting muzzle device, release tension on the
textured thumb pad. There should be no perceptible movement be-
tween the BLACKOUT Silencer-Mounting muzzle device/host rifle and
the RANGER SERIES silencer.
WARNING! User must ensure the silencer stays securely threaded to
the BLACKOUT Silencer-Mounting muzzle device during use. Failure
to ensure the silencer stays securely threaded to the BLACKOUT Si-
lencer-Mounting muzzle device may lead to property damage, per-
sonal injury and/or death.
NOTE. Do not over-tighten the silencer onto the BLACKOUT Silencer-
Mounting muzzle device/host firearm, as it may be difficult to remove.
REMOVING A RANGER SERIES SILENCER CONFIGURED FOR
FAST-ATTACH USE FROM A HOST FIREARM
1. Keep the host firearm pointed in a safe direction.
2. Render the firearm safe by removing the magazine, completely unload-
ing the firearm and engaging the safety mechanism to the "SAFE" po-
sition. See the firearm's owner's manual for detailed instructions.
3. Verify the silencer is at ambient temperature. If the silencer is hot, allow
it to cool.
CAUTION! Never handle a hot silencer without heat-resistant gloves,
as this may lead to skin burns and/or personal injury.
4. While firmly grasping the mount,
depress and hold the textured
thumb-pad on the ratchet latch
and unscrew the silencer from
the BLACKOUT Silencer-Mount-
ing muzzle device in the direction
indicated in Figure 16.
INSTALLING A RANGER SERIES SILENCER CONFIGURED FOR
DIRECT-THREAD USE ONTO A HOST FIREARM
WARNING! Never attempt to attach a RANGER SERIES to muzzle
threads that are dirty or damaged, as this may lead to property dam-
age, personal injury and/or death.
WARNING! Never attempt to attach a RANGER SERIES with dirty or
damaged threads to a threaded muzzle, as this may lead to property
damage, personal injury and/or death.
WARNING! Never use a silencer with an obstructed bore, as this may
lead to property damage, personal injury and/or death.
1. Always keep the firearm pointed in a safe direction.
2. Render the firearm safe by removing the magazine, completely unload-
ing the firearm and engaging the safety mechanism to the "SAFE" po-
sition. See the firearm's owner's manual for detailed instructions.
SILENCER MODEL RANGER SERIES P.9 SILENCER MODEL RANGER SERIES P.10
Figure 14
Figure 15
Figure 16
3. Remove the existing flash hider
and any washers or shims from
the host firearm muzzle.
4. Clean the threads and shoulder
on the host-firearm muzzle and
verify they are undamaged. See
Figure 17.
5. Verify the thread specification on
the Direct-Thread mount
matches the threads on the host
firearm muzzle. The mount
thread specification is marked
on the mount. See Figure 18.
6. Inspect the threads in the rear of
the Direct-Thread Mount to ver-
ify they are clean and undam-
aged. See Figure 19.
7. Look through the silencer from
the rear to ensure the bullet path
through the silencer is unob-
structed.
8. Examine the silencer for any
signs of damage.
9. Hold the silencer by the direct-
thread mount and carefully
screw it onto the muzzle threads
in the direction indicated in Fig-
ure 20. Thread the silencer on
completely so that the rear of
the direct-thread mount sits
flush and square against the
shoulder behind the threads.
See Figure 21.
WARNING! User must ensure the
silencer stays securely threaded
to the host-firearm muzzle threads during use. Failure to ensure the
silencer stays securely threaded to the host-firearm muzzled threads
may lead to property damage, personal injury and/or death.
REMOVING A RANGER SERIES SILENCER CONFIGURED FOR
DIRECT-THREAD USE FROM A HOST FIREARM
1. Always keep the host firearm pointed in a safe direction.
2. Render the firearm safe by removing the magazine, completely unload-
ing the firearm and engaging the safety mechanism to the "SAFE" po-
sition. See the firearm's owner's manual for detailed instructions.
3. Verify the silencer is at ambient temperature. If the silencer is hot, allow
it to cool.
CAUTION! Never handle a hot silencer without heat-resistant gloves,
as this may lead to skin burns and/or personal injury.
4. While firmly grasping the direct-
thread mount, unscrew the si-
lencer from the muzzle threads in
the direction indicated in Figure
22.
CLEANING THE RANGER SERIES
WARNING! Only perform cleaning and maintenance procedures on
silencers that are not mounted to a firearm and are at ambient tem-
perature. Attempting to clean or perform maintenance on a mounted
silencer or hot silencers could lead to property damage, personal in-
jury and/or death.
WARNING! Always wear protective gear, such as eye protection and
solvent-resistant gloves when working with any solvent. Only use sol-
vents in a well-ventilated area away from open flames. Unsafe use of
SILENCER MODEL RANGER SERIES P.11 SILENCER MODEL RANGER SERIES P.12
Figure 22
Figure 17
Figure 18
Figure 19
Figure 20
Figure 21
Squarely
Shouldered
Clean
Thread
Designation
Inspect
Threads
solvents may lead to property
damage, personal injury and/or
death.
1. If there is a fast-attach or direct
thread mount installed, remove
the mount following the instruc-
tions in this manual.
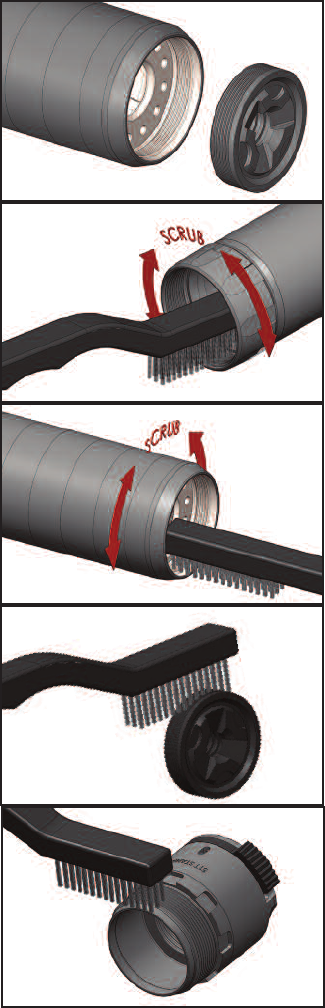
2. Remove the front-end cap from
the silencer. See Figure 23.
3. Using a gun cleaning brush and
solvent, thoroughly scrub the
threaded socket and taper in the
rear of the silencer. See Figure
24.
4. Using a gun cleaning brush and
solvent, thoroughly scrub the
threaded socket and taper in the
front of the silencer. See Figure
25.
5. Clean the threads on the outside
of the front-end cap. See Figure
26.
6. Clean the threads and taper on
the outside of the fast-attach or
direct thread mount. See Figure
27.
7. Apply a small amount of high
temperature grease or anti-seize
to the threads on the front-end
cap and reinstall the front end
cap in the front of the silencer.
8. Apply a small amount of high
temperature grease or anti-seize
to the threads and taper on the
fast-attach or direct thread mount
SILENCER MODEL RANGER SERIES P.13 SILENCER MODEL RANGER SERIES P.14
and reinstall the mount in the rear of the silencer.
9. Wipe off the exterior of the silencer with a clean cloth.
Figure 23
Figure 24
Figure 25
Figure 26
Figure 27
