
17667v1.3
LAMP Words for Life
®
User’s Guide

LAMP Words for Life User’s Guide 2
Copyright/Trademark Information
© 2016-2018 Prentke Romich Company. All rights reserved. Under copyright laws this document may not be copied, in whole or in part,
without the written consent of the Prentke Romich Company.
LAMP Words for Life and Realize Language are trademarks of Prentke Romich Company.
iSharePRC is a service mark of Prentke Romich Company.
AirDrop, Guided Access, iPad, iTunes, and Safari are registered trademarks of Apple Inc.
Dropbox is a registered trademark of Dropbox, Inc.
Facebook is a registered trademark of Facebook, Inc.
Twitter is a trademark of Twitter, Inc.
VocaliD is a trademark of VocaliD, Inc.
17667v1.3 ∙ 08/07/2018
Prentke Romich Company (PRC)
1022 Heyl Rd
Wooster, OH 44691
Telephone: (330) 262-1984 • (800) 262-1984
Fax: (330) 263-4829
E-mail Address: info@prentrom.com
Web Site Address: www.prentrom.com

LAMP Words for Life User’s Guide 3
Contents
Using LAMP Words for Life .................................................................................................................................... 5
Setting Up for AAC ..................................................................................................................................................... 5
Finding the LAMP Words for Life Version ................................................................................................................. 5
Closing versus Minimizing the Application ................................................................................................................ 5
Working with LAMP Words for Life Menus ............................................................................................................... 6
Preventing Access to Menus ..................................................................................................................................... 6
Working with Vocabulary Files .............................................................................................................................. 7
English Vocabulary Files ............................................................................................................................................ 7
Loading a Vocabulary File .......................................................................................................................................... 7
Copying a Vocabulary File ......................................................................................................................................... 8
Creating a New Blank Vocabulary File ....................................................................................................................... 8
Deleting a Vocabulary File ......................................................................................................................................... 9
Turning Edit Mode On .......................................................................................................................................... 10
Working with Buttons .......................................................................................................................................... 10
Adding a Word to a Page ......................................................................................................................................... 10
Modifying Text ........................................................................................................................................................ 10
Inserting Special Characters .................................................................................................................................... 11
Adding a Symbol from the Icon Library ................................................................................................................... 11
Adding a Picture from the Image Library ................................................................................................................ 11
Using the Camera to Take a Picture for Your Button .............................................................................................. 12
Changing a Button Style .......................................................................................................................................... 12
Changing a Button Action ........................................................................................................................................ 12
Removing or Changing the Order of an Action ....................................................................................................... 12
Creating a Button to Link to a Page ......................................................................................................................... 13
Storing Text on a Button ......................................................................................................................................... 14
Rearranging Buttons using Drag and Drop .............................................................................................................. 14
Creating a Volume Control Button .......................................................................................................................... 14
Creating a Battery Status Button ............................................................................................................................. 15
Copying and Pasting a Button Style ......................................................................................................................... 15
Copying and Pasting an Entire Button ..................................................................................................................... 16
Hiding a Button ........................................................................................................................................................ 16
Changing Button Functions to Accommodate Motor Control Difficulties .............................................................. 17
Working with Pages ............................................................................................................................................. 18
Renaming a Page ..................................................................................................................................................... 18
Duplicating a Page ................................................................................................................................................... 18
Loading Another Page ............................................................................................................................................. 18
Creating a New Page ............................................................................................................................................... 18
Copying a Page from a Different Vocabulary File .................................................................................................... 19
Editing an Abbreviation Expansion ...................................................................................................................... 20
Editing Pronunciations ......................................................................................................................................... 20

LAMP Words for Life User’s Guide 4
Using Vocabulary Builder ..................................................................................................................................... 21
Creating a List of Words to Teach ........................................................................................................................... 21
Saving a List ............................................................................................................................................................. 21
Loading a List ........................................................................................................................................................... 21
Using Word Finder ............................................................................................................................................... 22
Using Word Prediction ......................................................................................................................................... 22
Adding a Calculator Function ............................................................................................................................... 22
Making a Backup of your Vocabulary File ............................................................................................................ 23
Backing up your Vocabulary File using iTunes Software ......................................................................................... 23
Backing up your Vocabulary File using AirDrop Software ....................................................................................... 23
Backing up your Vocabulary File using Dropbox Software ...................................................................................... 24
Backing up your Vocabulary File using the iSharePRC℠ Subscription Service ........................................................ 24
Setting up Switch Scanning .................................................................................................................................. 25
Configuring Switches ............................................................................................................................................... 26
Setting up Touchscreen Scanning............................................................................................................................ 26
Setting up Auto Scanning ........................................................................................................................................ 26
Selecting the Scan Pattern ...................................................................................................................................... 27
Including the Speech Display Bar (SDB) in Scans ..................................................................................................... 28
Configuring Empty Cell Scans .................................................................................................................................. 28
Setting Scan Timing ................................................................................................................................................. 28
Configuring Rescans ................................................................................................................................................ 28
Turning on Auto Restart .......................................................................................................................................... 28
Enabling Auditory Feedback .................................................................................................................................... 28
Choosing and Adjusting a Prompt Voice ................................................................................................................. 29
Blocking and Restoring Access to the Editing Menus ........................................................................................... 30
Changing LAMP Words for Life Settings ............................................................................................................... 31
Navigation ............................................................................................................................................................... 31
Page Size .................................................................................................................................................................. 31
Editing...................................................................................................................................................................... 31
Speech ..................................................................................................................................................................... 31
Speech Display Bar .................................................................................................................................................. 32
Expanded Speech Area ............................................................................................................................................ 32
Speak ....................................................................................................................................................................... 32
Data Logging ............................................................................................................................................................ 33
Buttons .................................................................................................................................................................... 33
Analyzing Language Development ....................................................................................................................... 34
Using the Realize Language Website ....................................................................................................................... 34
Turning on Data Logging from Your Device ............................................................................................................. 35
Creating a Privacy Password.................................................................................................................................... 35
Manually Uploading Data for Analysis .................................................................................................................... 36
Uploading Data to the Realize Language Website .................................................................................................. 36
Clearing Usage Data ................................................................................................................................................ 36
Changing or Removing Your Privacy Password ....................................................................................................... 37
Using Email, Messaging, Twitter™, and Facebook
®
Services Directly from within the App ................................... 38
Voice Customization or Voice Banking ................................................................................................................. 38

LAMP Words for Life User’s Guide 5
Using LAMP Words for Life
LAMP Words for Life® is intended for individuals who have difficulty using their natural voice. LAMP
Words for Life is designed for individuals with Autism, Down syndrome, ALS, apraxia, stroke, or other
conditions that affect a person's ability to use natural speech.
Setting Up for AAC
When an individual is first learning to communicate via Augmentative and Alternative Communication, it
can be helpful to restrict access to other distracting programs on the iPad
®
device.
1. On the device, select the Settings icon.
2. Select General.
3. Scroll down to Restrictions and select Enable Restrictions.
4. Enter a passcode that the client will not easily be able to obtain.
5. Turn Off any apps that may be a distraction or need to be restricted from use.
6. Select the Home button on the device to return to the desktop.
Another way to restrict access to other apps is by turning on the Guided Access
®
feature.
1. On the device, select the Settings icon.
2. In the General settings, select Accessibility.
3. Scroll down to the Learning settings and select Guided Access. Turn it On. You’ll be prompted to set
a passcode.
When you are in the LAMP Words for Life app, triple click the home button to activate the Guided
Access feature. Triple click again to End Guided Access.
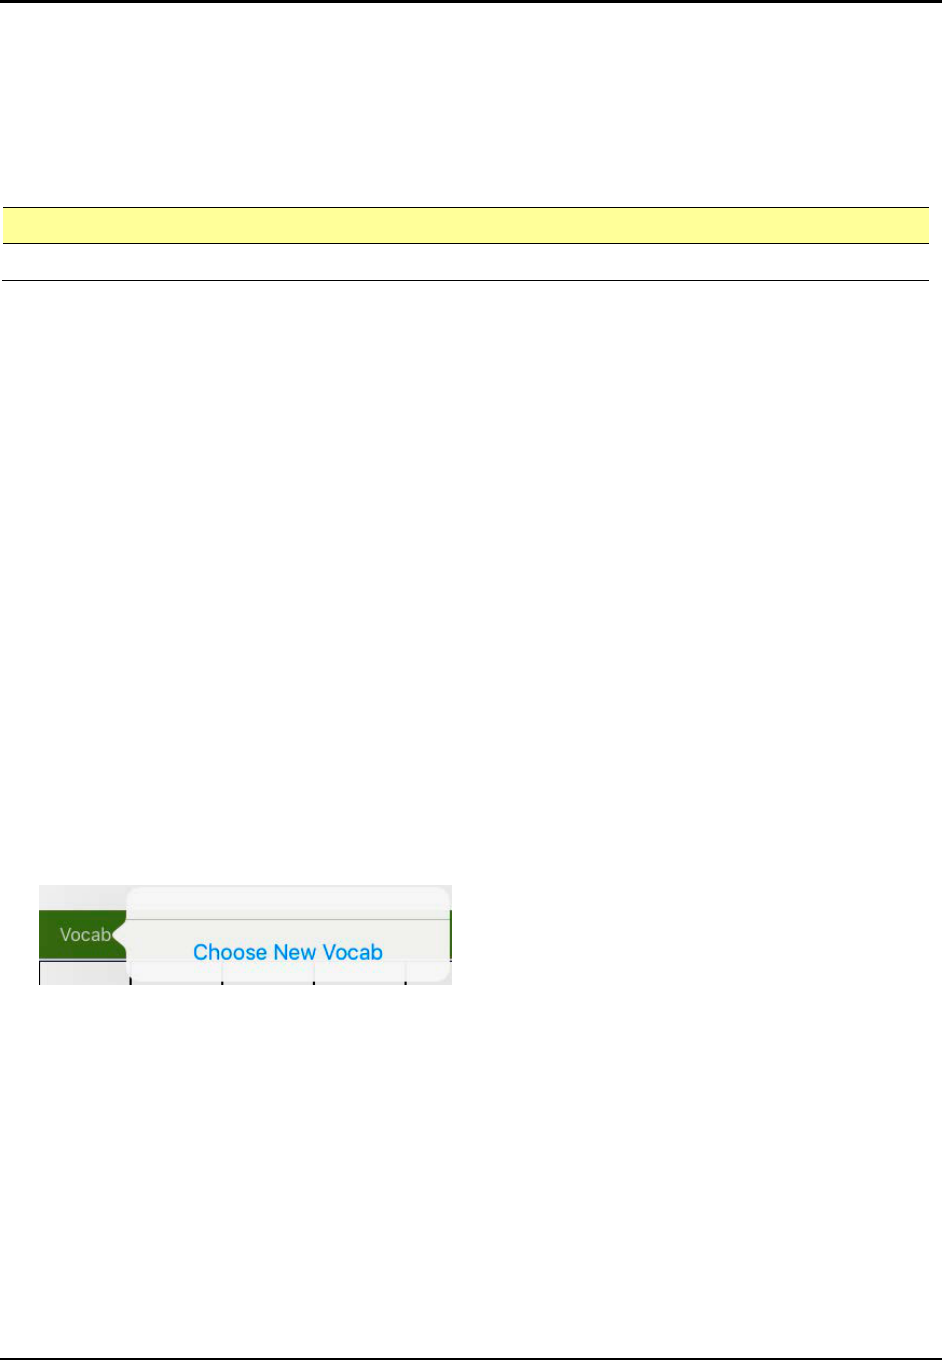
Finding the LAMP Words for Life Version
1. Tap Vocab.
2. Tap Choose New Vocab.
3. In portrait mode, the version will show at the bottom of the screen.
Closing versus Minimizing the Application
Closing applications while not in use helps to preserve battery life and maximizes the working memory
available to the WFL app. Tapping the Home button minimizes the app while continuing to allow it to
run in the background. To close the app:
1. Select the Home button on the bottom of the device to exit the application.
2. Double tap the Home button on the bottom of the device. The open applications should display in
the middle of the screen.
3. Select the application and swipe up off the screen to close. Do this for all open applications.
4. Once the applications are closed, select the Home button to return to the desktop.
LAMP Words for Life User’s Guide 6
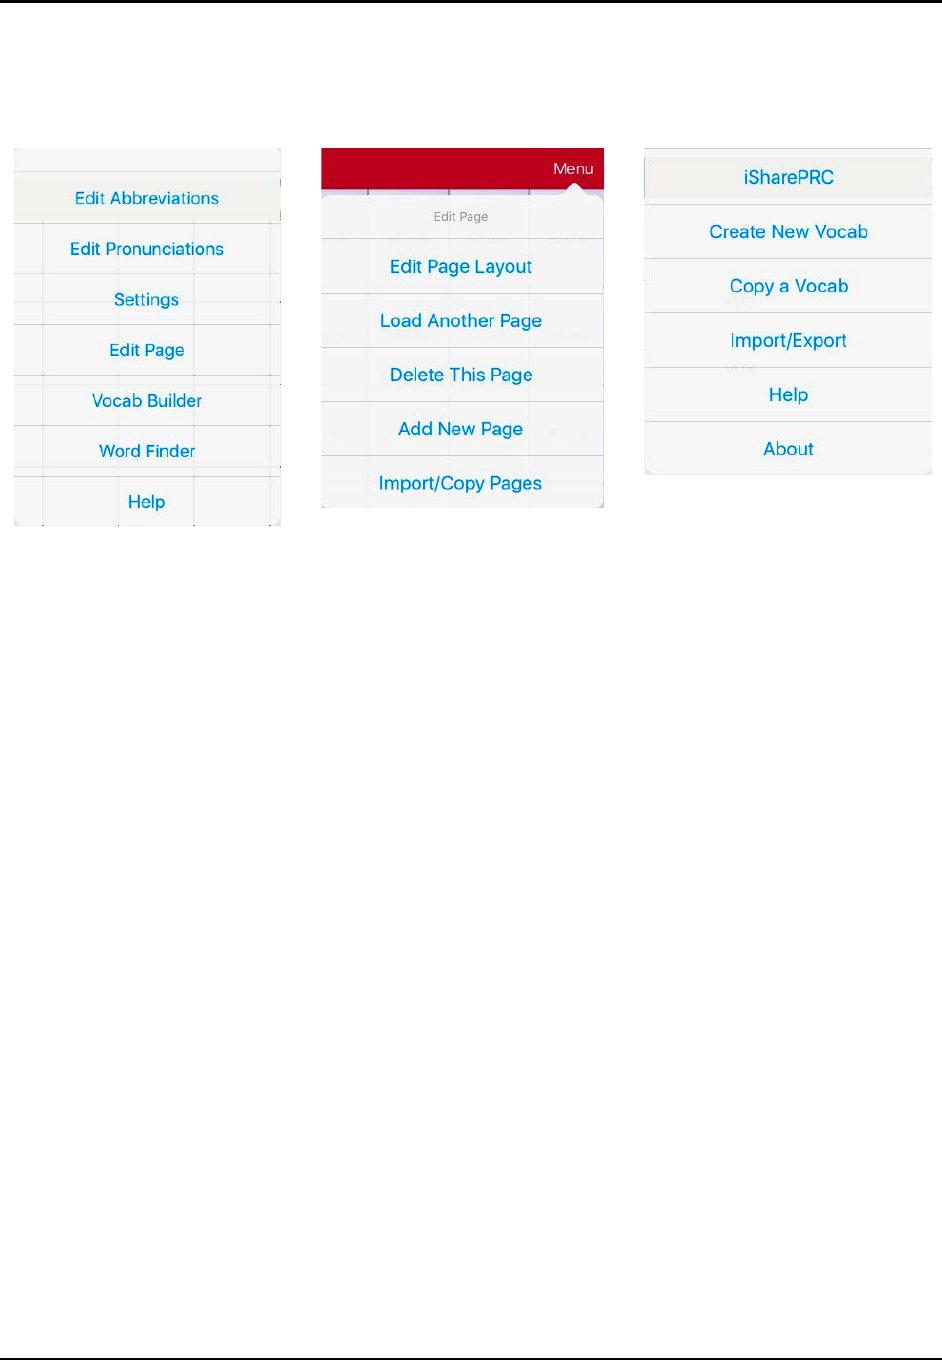
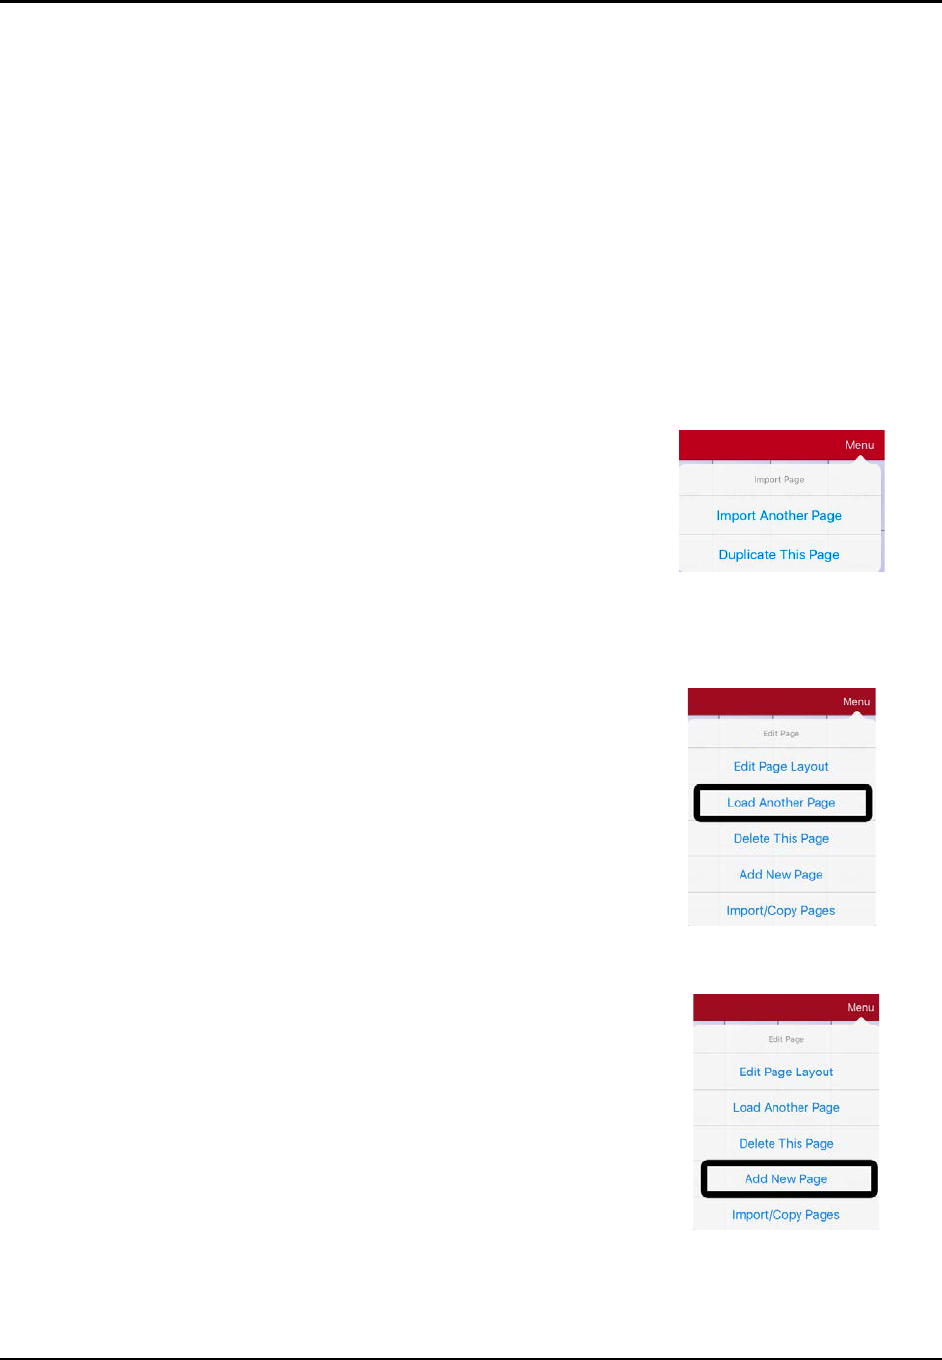
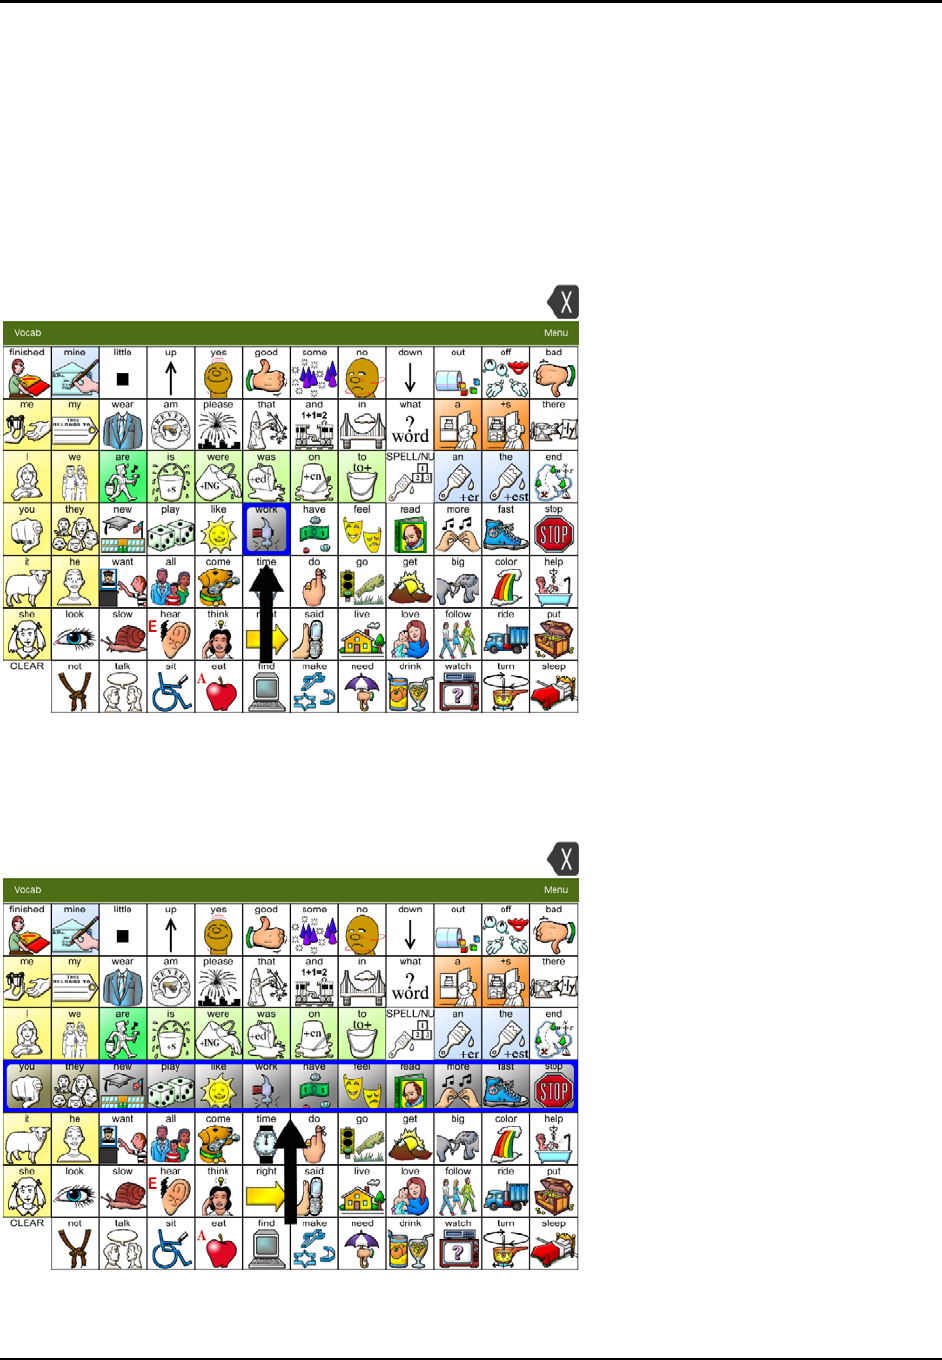
Working with LAMP Words for Life Menus
To access the LAMP Words for Life menus, tap Menu. Menu options depend on where you are in the
application and whether Edit Mode is turned on. For example:
Menu options with Edit Mode
turned off (green menu bar)
Menu options with Edit Mode turned
on (red menu bar)
Menu options after choosing Vocab >
Choose New Vocab > Menu (green
menu bar)
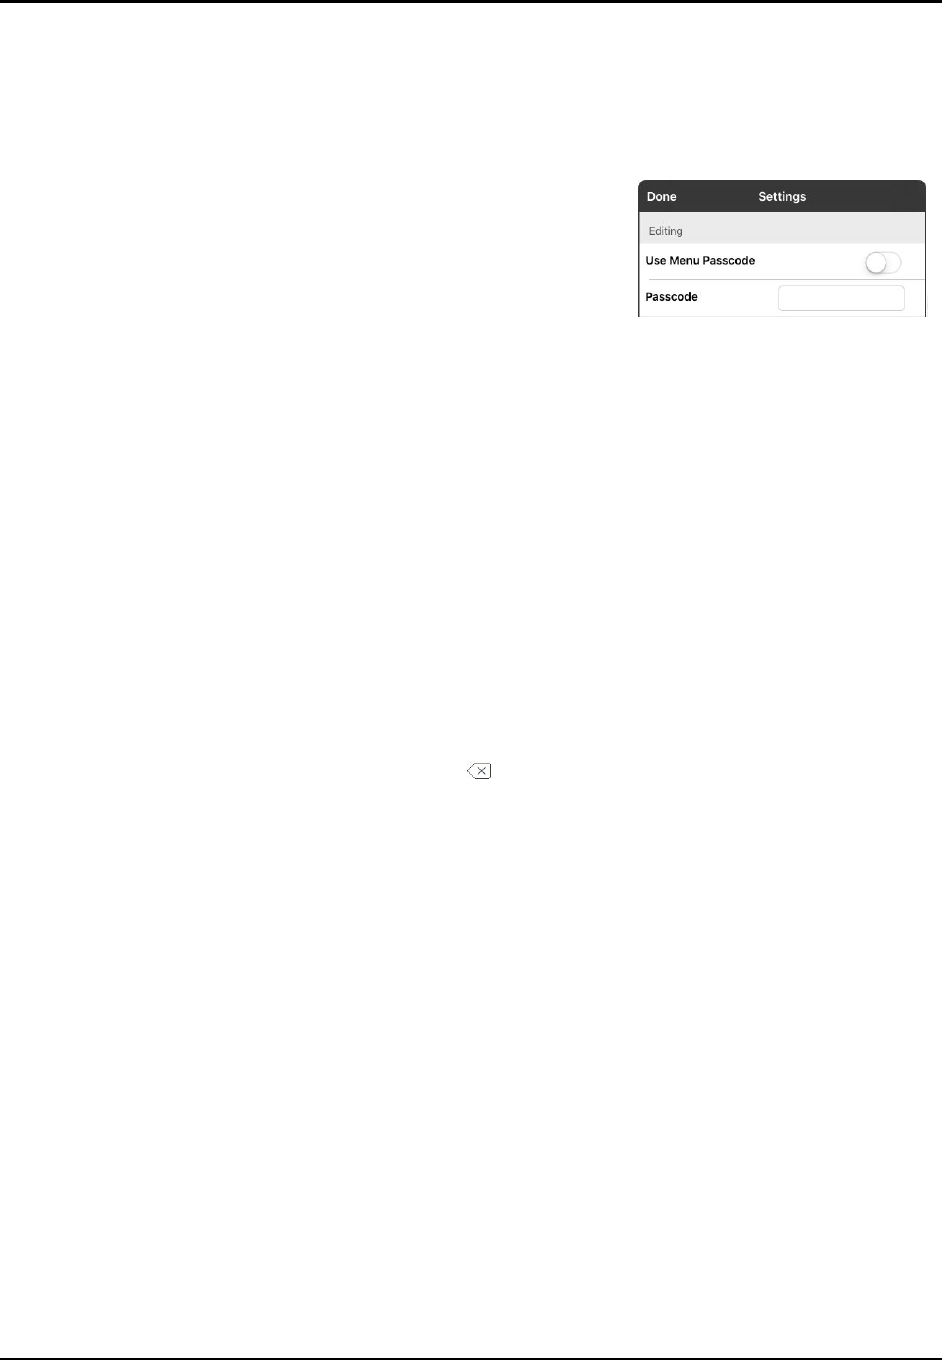
Preventing Access to Menus
The Vocab and Menu buttons in the green menu bar can be locked to prevent unauthorized editing or
changing of the settings.
1. From the app, select Menu.
2. Select Settings.
3. In the Editing section, create a passcode and then slide the button by Use Menu Passcode to ON.
4. Select Done.
The Menu button will now require a passcode to be modified. If the passcode is forgotten, you can turn
this feature off in iPad Settings by scrolling down on the left of the screen to the WFL app and select it.
Turn Use Menu Passcode to Off. The menu buttons may also be hidden using a tool within the Guided
Access feature.
LAMP Words for Life User’s Guide 7
Working with Vocabulary Files
LAMP Words for Life provides a variety of pages that have different button layouts. Each set of pages, or
vocabulary set, is called a vocabulary file. LAMP Words for Life-provided vocabulary files have locks in
front of them indicating they cannot be deleted. LAMP Words for Life provides the following vocabulary
files:
Language Available Vocabulary Files
English One-Hit, Transition, Full
English Vocabulary Files
One-Hit
The One-Hit level is an introductory vocabulary file that features 83 core words that are only one touch
away. Core words are those words that are most frequently used in speech and can be used in a variety
of settings and activities.
Transition
The Transition level is an intermediate vocabulary file that requires a second button to be pressed
before hearing the initial 83 core words paired with additional vocabulary. This level allows for the
learning of extended motor patterns without the visual distractions of the full vocabulary file.
Full
The Full vocabulary file gives the device user access to verb conjugations and word endings such as “+ s”,
“+ er”, and “+ est”. It includes 3,000+ words and allows for the customization of personalized vocabulary
such as names, favorite foods, and favorite places.
Loading a Vocabulary File
1. Tap Vocab. Choose New Vocab will be displayed.
2. Tap Choose New Vocab. A page will display a list of the available vocabulary files. Scroll down to see
them all.
3. Select the vocabulary file you want to load.
4. Once loaded, explore the pages and button organization by choosing the buttons. Buttons with
arrows will navigate to new pages.
Note: After choosing an appropriate vocabulary file, you must make a copy of the file before you can
customize it. See the next topic, “Copying a Vocabulary File”.
LAMP Words for Life User’s Guide 8
Copying a Vocabulary File
To customize an original vocabulary file, you must first make a copy of the original file. Once you make a
copy, you can edit the copy. This keeps the original files in place in case they are needed at a later time.
1. Tap Vocab and tap Choose New Vocab.
2. Tap Menu and tap Copy a Vocab.
3. Tap the vocabulary file to copy.
4. Give the file a new title and description.
5. Tap Save.
6. Tap the new file name to open the file.
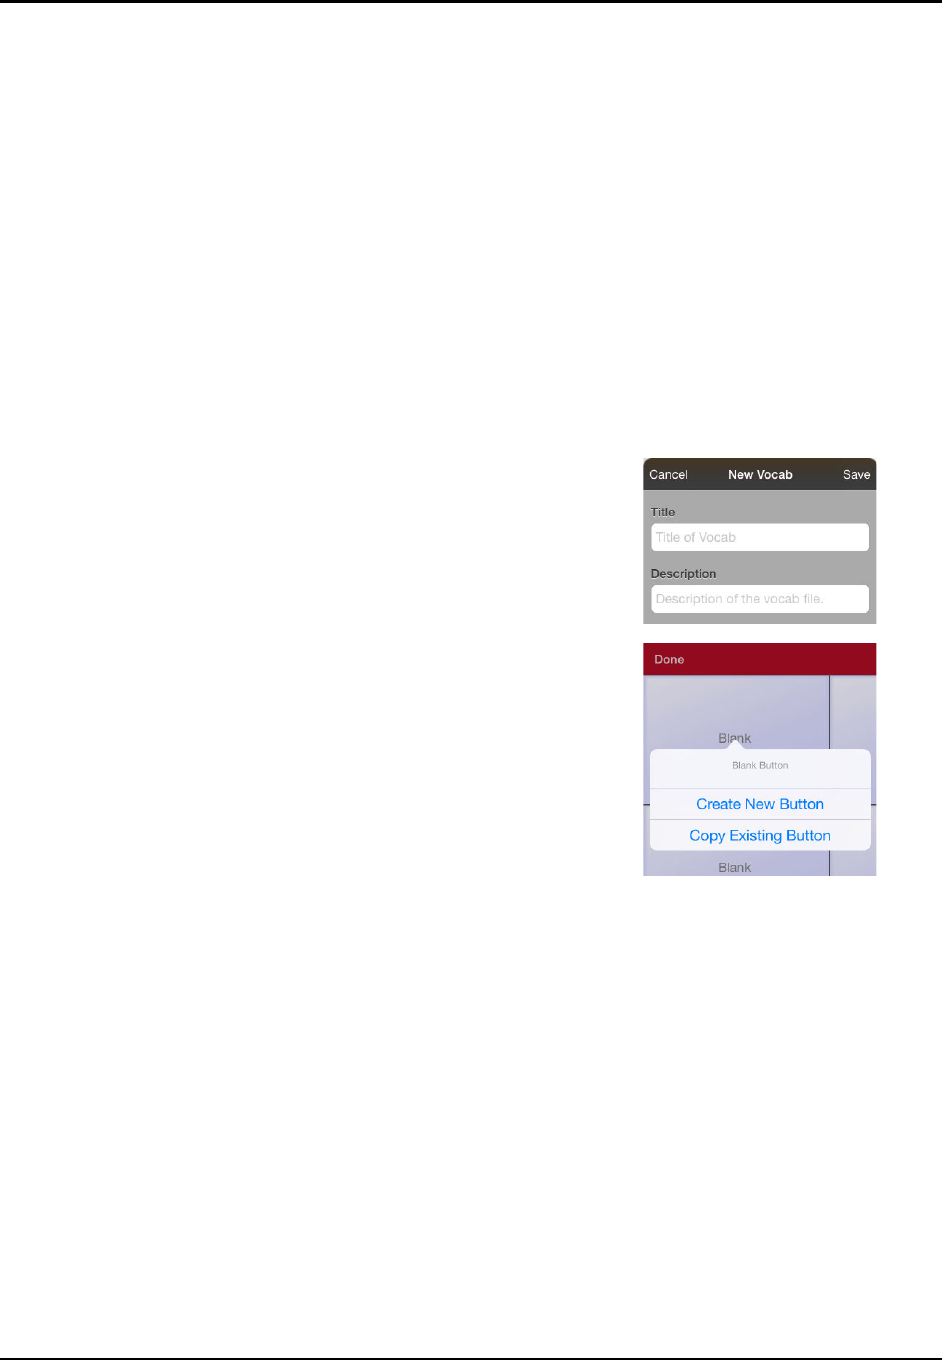
Creating a New Blank Vocabulary File
1. Tap Vocab and tap Choose New Vocab.
2. Tap Menu and tap Create New Vocab.
3. Give the new vocabulary file a title and description.
4. Tap Save.
5. Scroll to the new file you created and tap it to open it.
6. Tap Menu and tap Edit Page. A page of blank buttons opens.
7. For each blank button, select Create New Button or Copy
Existing Button.
8. When you finish, tap Done. You have created the first
page of your new vocabulary.
LAMP Words for Life User’s Guide 9
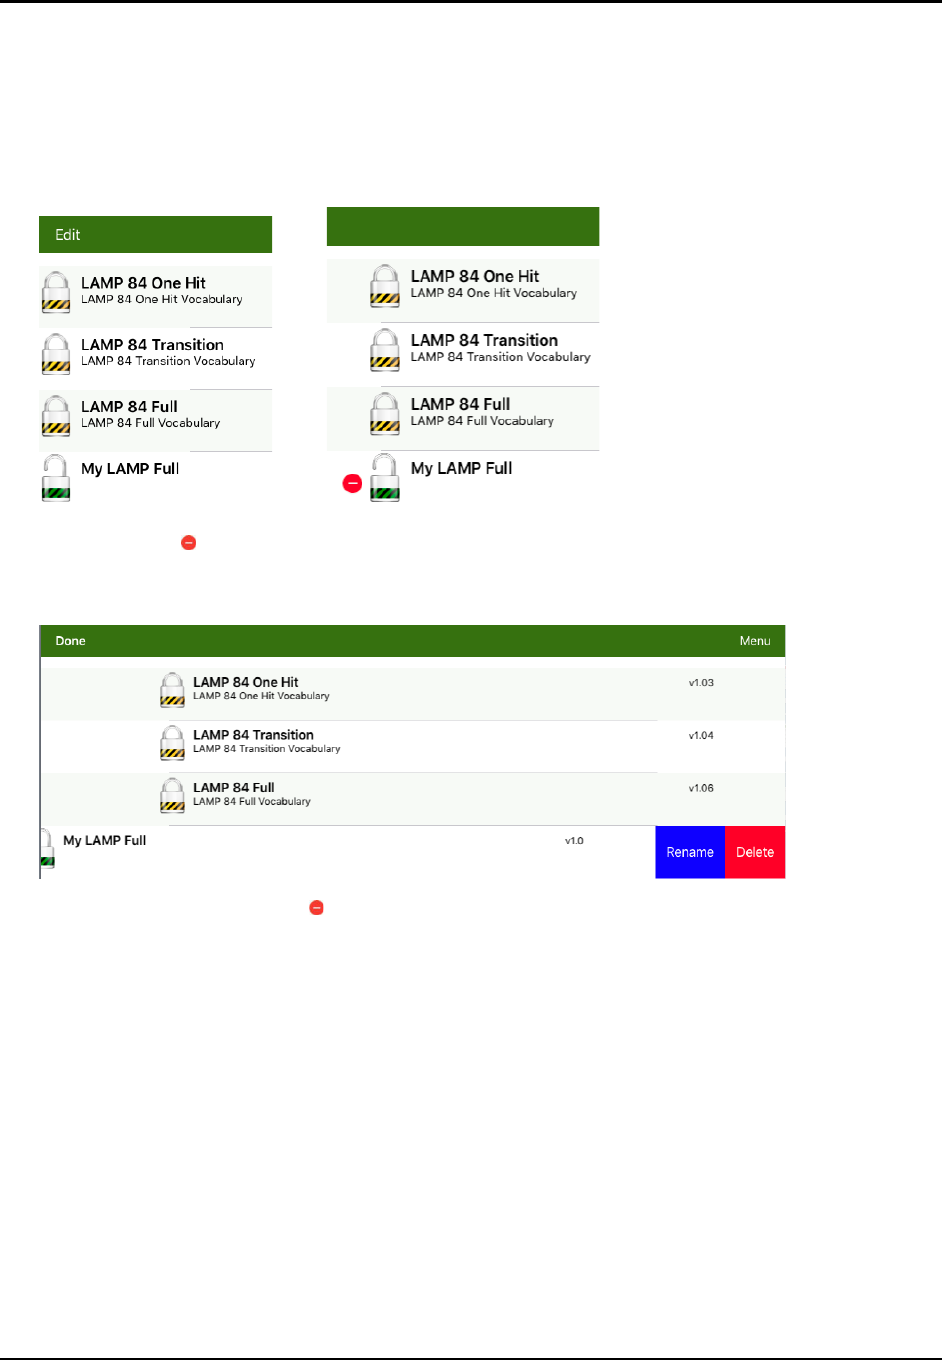
Deleting a Vocabulary File
1. From the home page of the vocabulary file, tap Vocab.
2. Tap Choose New Vocab.
3. Tap Edit.
4. The delete icon will appear to the left of the padlock images. You will only be able to delete
custom vocabulary files. The original vocabulary files are displayed with a locked padlock and cannot
be deleted.
5. When you tap the delete icon , “Rename” and “Delete” will appear on the far right side.
6. Tap Delete and the vocabulary file will be deleted from LAMP Words for Life. Tap Done.

LAMP Words for Life User’s Guide 10
Turning Edit Mode On
You can only edit a copy of a vocabulary file, not the original. To make a copy, see “Copying a Vocabulary
File” on page 8.
1. Go to the page where the button will be created.
2. Tap Menu.
3. Tap Edit Page.
4. The page is now in Edit Mode.
Working with Buttons
What a button speaks, how it appears, what icon is shown, and what action the button will perform can
be changed on any button. All button modifications are performed in Edit Mode.
1. In Edit Mode, tap the button you want to modify.
2. Tap Edit This Button. A window will appear that will allow you to modify the button.
Adding a Word to a Page
Due to the extensive vocabulary in the WFL app, customizations will likely be based on personal needs.
To add a word to a vocabulary, you can edit an existing button or create a new button.
1. Access the page where the new word will be added.
2. Select Menu.
3. Select Edit Page.
4. Select the button for the new word. If it is BLANK, select Create New Button; otherwise select Edit
This Button.
5. Enter button preferences such as label, message, picture, and button actions.
Note: See the topics related to working with buttons for the procedures.
6. When finished, select Save.
7. Select Done in the top left of the page to exit edit mode.
Modifying Text
Within the Edit window:
1. Tap in the Button Label area to change the label that will be displayed on the button.
2. Tap in the Button Message area to change the message that will be spoken.
LAMP Words for Life User’s Guide 11
Inserting Special Characters
Sometimes you may need to insert a special character in a word that you type, such as a letter with an
accent; for example, ó.
On the keyboard, press and hold the applicable character key. A small menu of special characters
available for that character will open above the key. Select the special character you want.
For example, to insert the special character ó, you would hold down the “o” key on the keyboard and
select ó from the small menu.
Adding a Symbol from the Icon Library
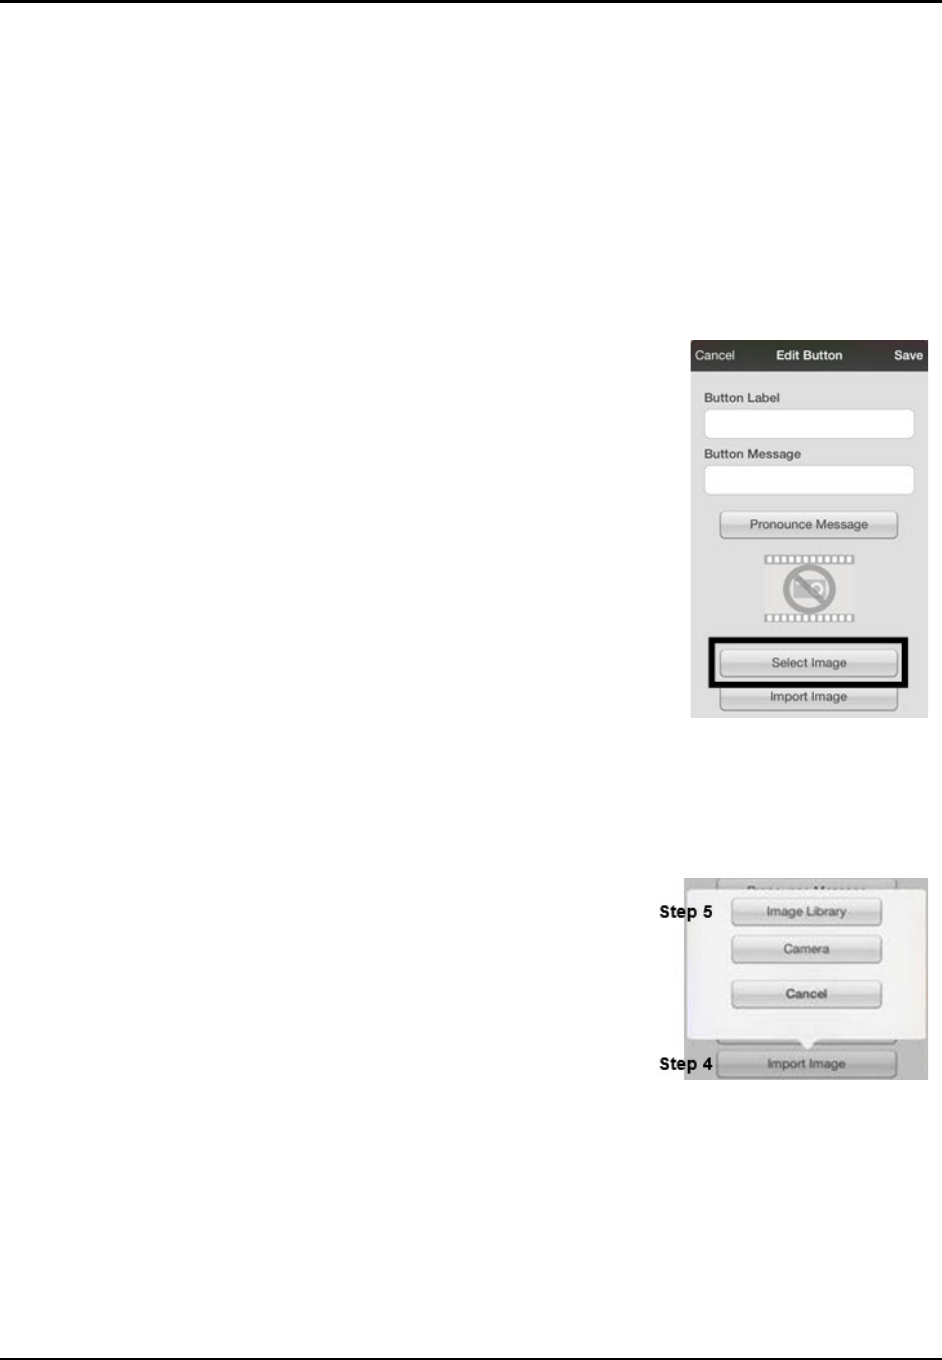
1. While in the Edit Button window, tap Select Image.
2. Tap the magnifying glass icon at the top right.
3. Type the name of the icon.
4. Tap Search on the keyboard.
5. Select the image you want.
Note: While editing a symbol, you can also choose to browse and
find your icon by choosing Select Image, then tap a category.
Adding a Picture from the Image Library
1. Tap Menu and tap Edit Page.
2. Tap the button to which you want to add the picture.
3. Tap Edit This Button.
4. Tap Import Image. A small menu opens above Import Image.
5. Tap Image Library.
6. Tap Camera Roll or another available library.
7. Find the picture you want and tap it.
8. Tap Use and give the button an appropriate label.
9. Tap Save and tap Done.
LAMP Words for Life User’s Guide 12
Using the Camera to Take a Picture for Your Button
1. While in the Edit Button window, tap Import Image.
2. Tap Camera.
3. Take your picture by pressing the camera icon.
4. Tap Use.
5. Tap Save and Done.
Changing a Button Style
1. While still in the Edit Button window, scroll down to the area you want to edit.
2. Choose to edit the font, size, color, and border and make those changes.
3. Tap Save.
Changing a Button Action
1. While still in the Edit Button window, scroll down to the Button Actions section.
2. Tap Add.
3. Tap the appropriate action (scroll to see the full list of actions). You can tap an existing action to
change it to a different action.
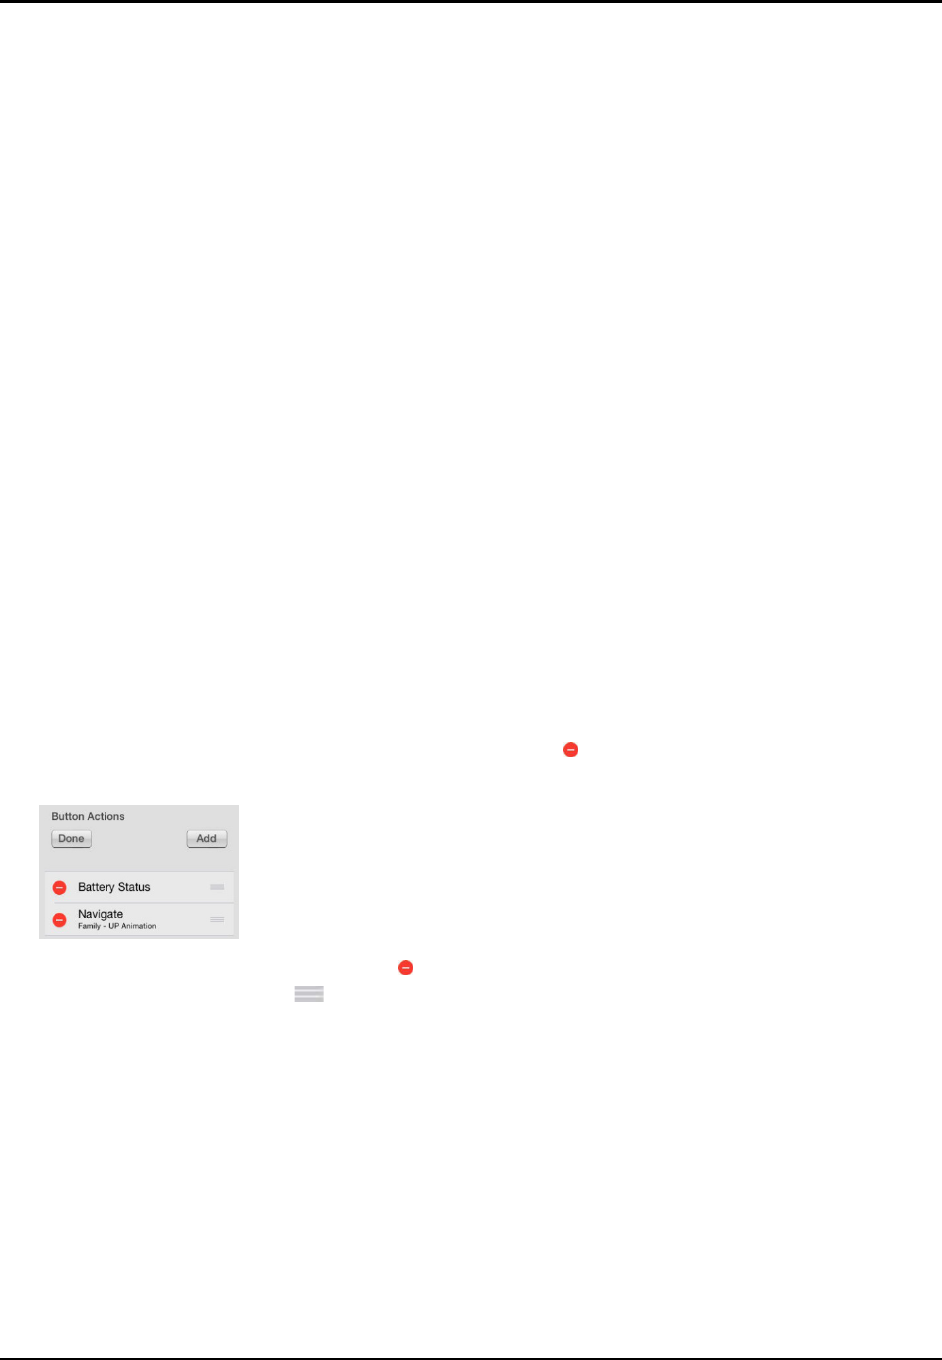
Removing or Changing the Order of an Action
1. While in the Button Actions area, tap Edit. The delete icon will appear in front of each action
linked to the button.
2. To remove an action, tap the delete icon and then tap Delete. To rearrange the order of the actions,
touch and hold the gray bars to the right of an action and drag the action into the correct position.
3. Tap Done.
4. Tap Save and Done.

LAMP Words for Life User’s Guide 13
Creating a Button to Link to a Page
When a button action is set to Navigate or Visit, you can determine what page that button will take you
to. Navigate will take you to a New Page and leave you there requiring an additional button to be
pressed to return to your previous page or to the home page. Visit will take you there for one selection
and immediately return to the previous page.
The following linking button actions are available.
Action Description
Navigate Links to a new page and requires another button press to move away from this page
Visit Links to a page for a single hit and then automatically goes back to the previous page
Navigate Back Returns to the previous page
Navigate to Home Links to the Home page of the vocabulary file
To create a linking button:
1. Navigate to the page where you want to create the link.
2. Select Menu.
3. Select Edit Page.
4. Tap the button to be linked to the new page.
5. If the button is blank, select Create new Button. Otherwise, select Edit This Button.
6. Label the button (in all capital letters). This automatically populates the Button Message field to
clear that text. Select an image and any Body Color (if needed).
7. Scroll down to the Button Actions area and select Add.
8. Select a navigation action for the button from the drop-down list (Navigate, Visit, Navigate Back,
Navigate to Home). Navigate and Visit offer a listing of pages to link to. If you choose Navigate Back
or Navigate to Home, skip to step 8.
9. Choose the page to navigate to or visit from the listing. If the page does not already exist, choose +
and create a new page to link the button to.
10. Remove the Speech Message action by selecting Edit, tap the delete icon , and tap Delete.
11. Select Save.
12. Select Done.
LAMP Words for Life User’s Guide 14
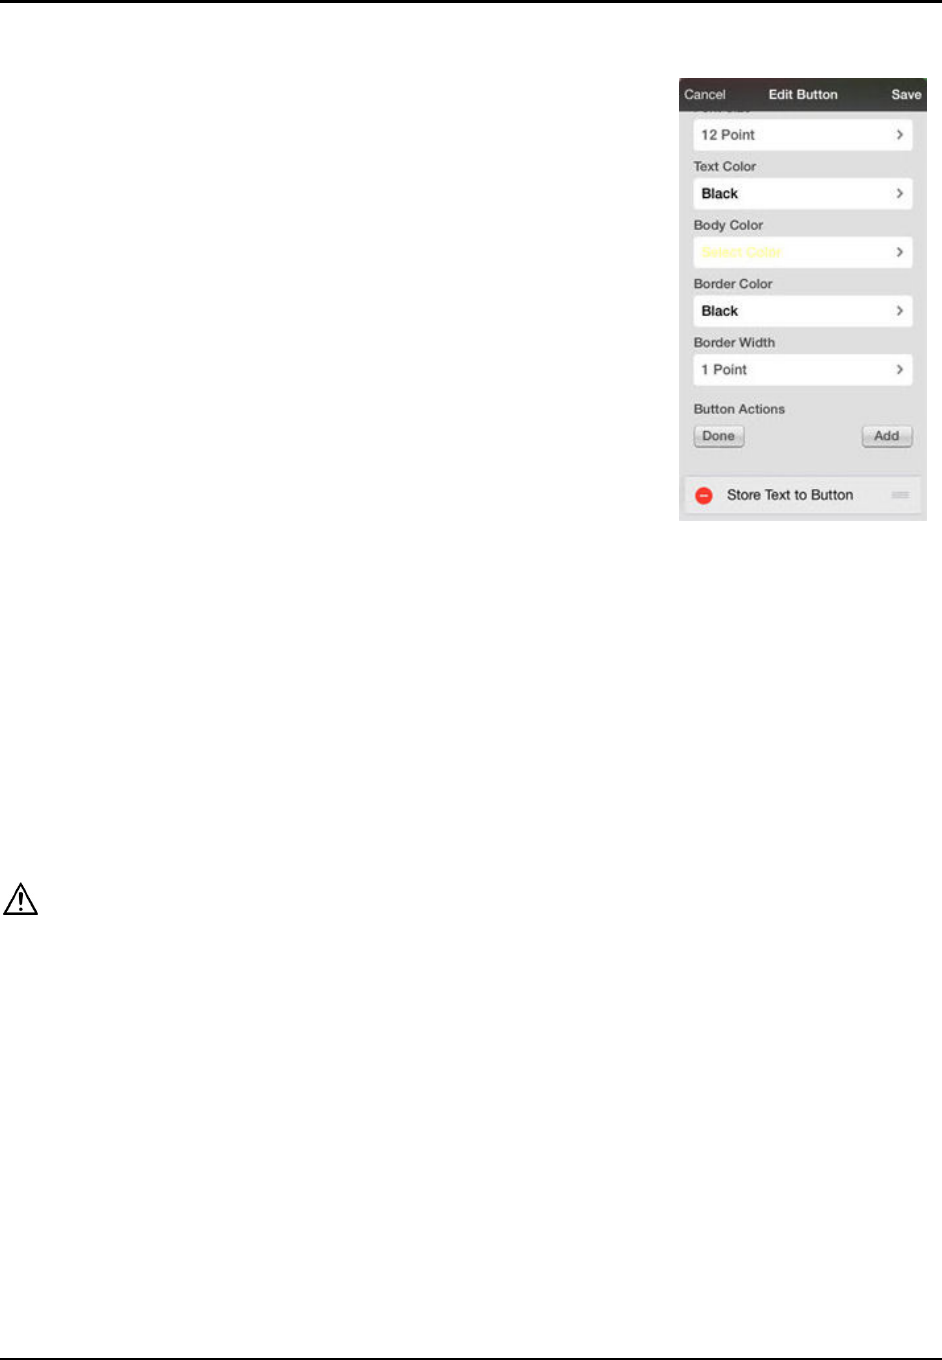
Storing Text on a Button
1. Go to the page that includes the button on which you want
to store text.
2. Tap Menu and then tap Edit Page.
3. Tap the button on which you want to store text.
4. Tap Edit This Button.
5. Name the button, and optionally create a message and modify
the style.
6. Scroll down to Button Actions and tap Add.
7. Scroll down and tap Store Text to Button. The action will be
displayed in the Button Actions section.
8. Tap Save and then tap Done.
Note: Once a sentence or phrase has been constructed, it can be saved on a button by navigating to the
location of the Store Text button that you created. Tap the button, tap Continue, tap the button in
which you want to store the text, and then tap Okay. The text will appear in the button you selected,
and each time you tap that button it will speak that saved text.
Rearranging Buttons using Drag and Drop
1. While editing a page, touch a button and drag it to another location.
2. Upon release, the button will move to the new location. If there is already a button in the new
location, it will move to the old position.
Creating a Volume Control Button
Excessive volume or sound pressure level when using earphones or headphones can cause hearing loss over extended
periods of time.
You can add volume controls to buttons within vocabulary pages.
1. In LAMP Words for Life, tap Menu > Edit Page.
2. Go to the page on which you want to create the button.
3. Press and hold on the button you want to use. A list of button options appears.
4. Choose Edit This Button.
5. Add a button label and icon.
6. Under Button Actions, choose Add. A list of actions appears.
7. Choose either Volume Up or Volume Down.
8. Choose Save.

LAMP Words for Life User’s Guide 15
Creating a Battery Status Button
You can create a button that displays the battery status of both the device and the amplifier in the
Speech Display Bar (SDB).
1. In LAMP Words for Life, tap Menu > Edit Page.
2. Go to the page on which you want to create the button.
3. Press and hold on the button you want to use. A list of button options appears.
4. Choose Edit This Button.
5. Add a button label and icon.
6. Under Button Actions, choose Add. A list of actions appears.
7. Choose Battery Status.
8. Choose Save.
Copying and Pasting a Button Style
“Button Style” refers to the background color, the font size, and other style options that are associated
with a button. There are times when it might be faster to copy and paste a button’s style from an
existing button rather than editing each of these items on a new button.
1. Tap Menu and tap Edit Page.
2. Tap the button whose style you want to copy.
3. Tap Copy Button and Style.
4. Tap the button you wish to paste the style to. You are presented with two options:
• Select Paste Style Only to change only the style of the button.
• Select Paste Button and Style to paste the contents of the button (label, image, etc.) and the
style to the new location.
5. Select Paste Style Only.
6. Tap Done.

LAMP Words for Life User’s Guide 16
Copying and Pasting an Entire Button
1. Tap Menu and tap Edit Page.
2. Tap the button you would like to copy.
3. Tap Copy Button and Style to copy the button.
4. Tap Done.
5. Go to the page where you wish to add the copied button.
6. Tap Menu and tap Edit Page.
7. Tap the location you wish to copy to.
8. Tap Paste Button and Style. The button you copied will appear in that location.
9. Tap Done.
Hiding a Button
There are times that presenting all buttons at once might be intimidating,
or in order to complete a task a button might need to be hidden.
1. Tap Menu and tap Edit Page.
2. Tap the button you want to hide and tap Edit This Button.
3. Turn Visible off.
4. Tap Save and Done.
LAMP Words for Life User’s Guide 17
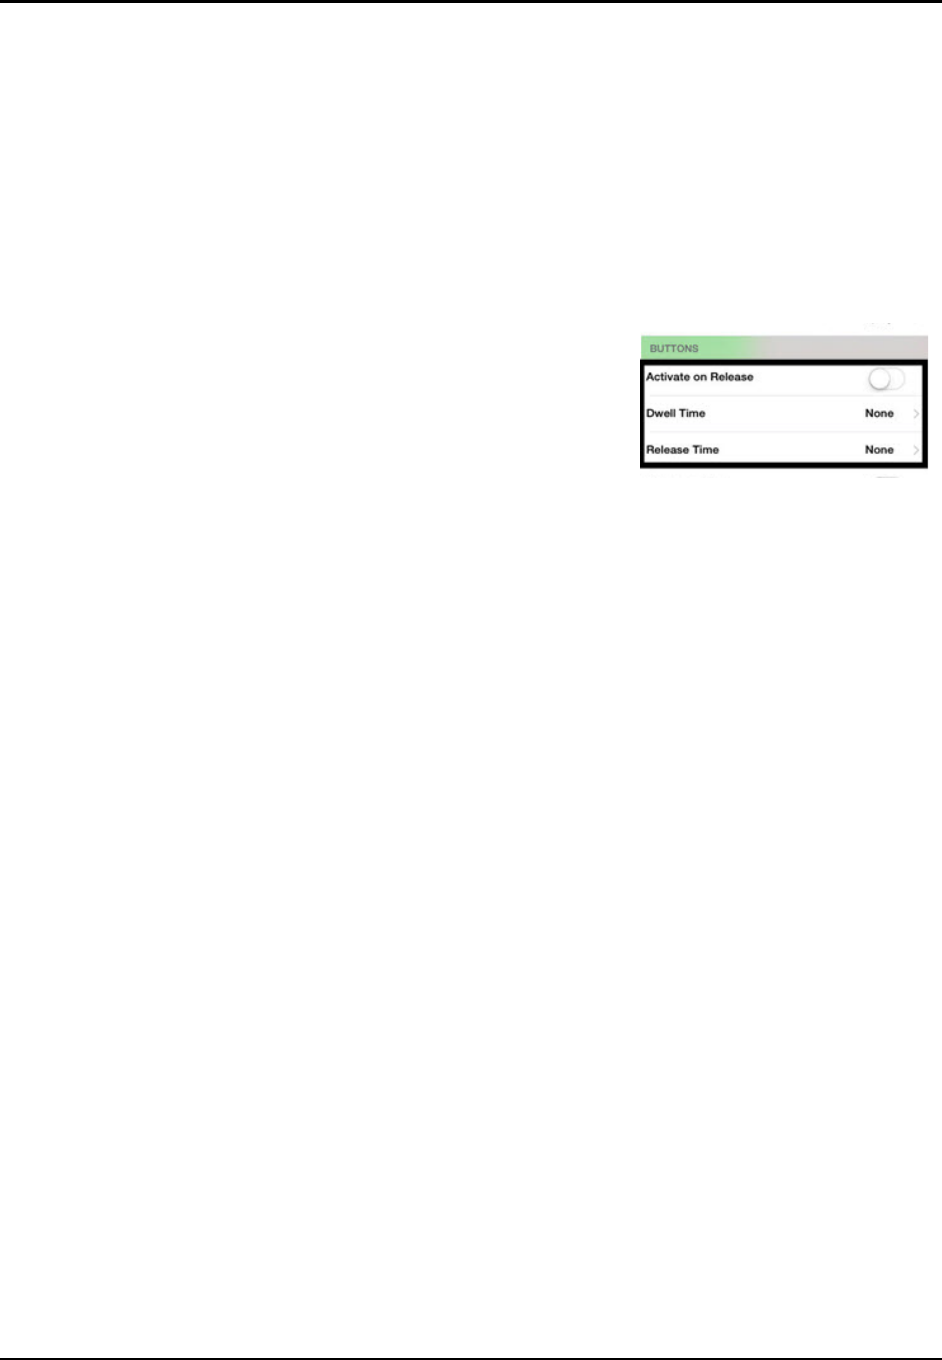
Changing Button Functions to Accommodate Motor Control
Difficulties
To accommodate a user’s motor control difficulties, you can set buttons to activate on touch or release,
set dwell time, and set release time. Tap Menu and tap Settings. Scroll down to the “Buttons” section.
Activate on Release
By default, the buttons will activate immediately when touched.
This allows for immediate feedback. However, if the device user
has difficulty with motor control and accidently activates
unintended buttons, it may be helpful to have the buttons Activate
on Release. This allows the user to put his or her hand on the
screen and drag it to the desired button, and that button will
activate when the hand is removed. Turn the toggle switch to the
On position.
Dwell Time
Dwell time is the amount of time it takes for your device to
accept a location you have selected and to activate the button.
For example, if you set acceptance time for .50 seconds, you must
touch the button for ½ second before the button will be selected.
Release Time
Release time is the amount of time it takes you to release a button
and be able to select another button. For example, if you set this
option for 1 second, you must wait one second after you touch a
button before you can select the same button or a new button.
Release time is intended to help prevent accidental double button
activations.
LAMP Words for Life User’s Guide 18
Working with Pages
LAMP Words for Life allows you to rename, duplicate, load, and create pages, choose a different
keyboard, copy a page from a different vocabulary, and add gestures to pages.
Renaming a Page
1. Tap Menu and tap Edit Page.
2. Tap Menu and tap Edit Page Layout.
3. In the area under Page Name, tap, then backspace to erase the name, and then type the new name.
4. Tap Save.
Duplicating a Page
1. Tap Menu and tap Edit Page.
2. Tap Menu and tap Import/Copy Pages.
3. Tap Duplicate This Page. A duplicate of this page will now
appear in the list of pages within this vocabulary set.
4. Tap Done.
Loading Another Page
1. Tap Menu and tap Edit Page.
2. Tap Menu and tap Load Another Page.
3. Scroll up to find the page you want to load.
4. Tap Done.
Note: This page is now available to copy buttons or make additions
or changes to your vocabulary set.
Creating a New Page
1. Tap Menu and tap Edit Page.
2. Tap Menu and tap Add New Page.
3. Give the page a name that represents its content.
4. Select how many rows and columns you would like.
5. Choose a background color.
6. Select an image (optional).
7. Tap Save. A new page will appear with blank buttons.
8. Start creating buttons on this page.
9. Tap Done when you are finished.
LAMP Words for Life User’s Guide 19
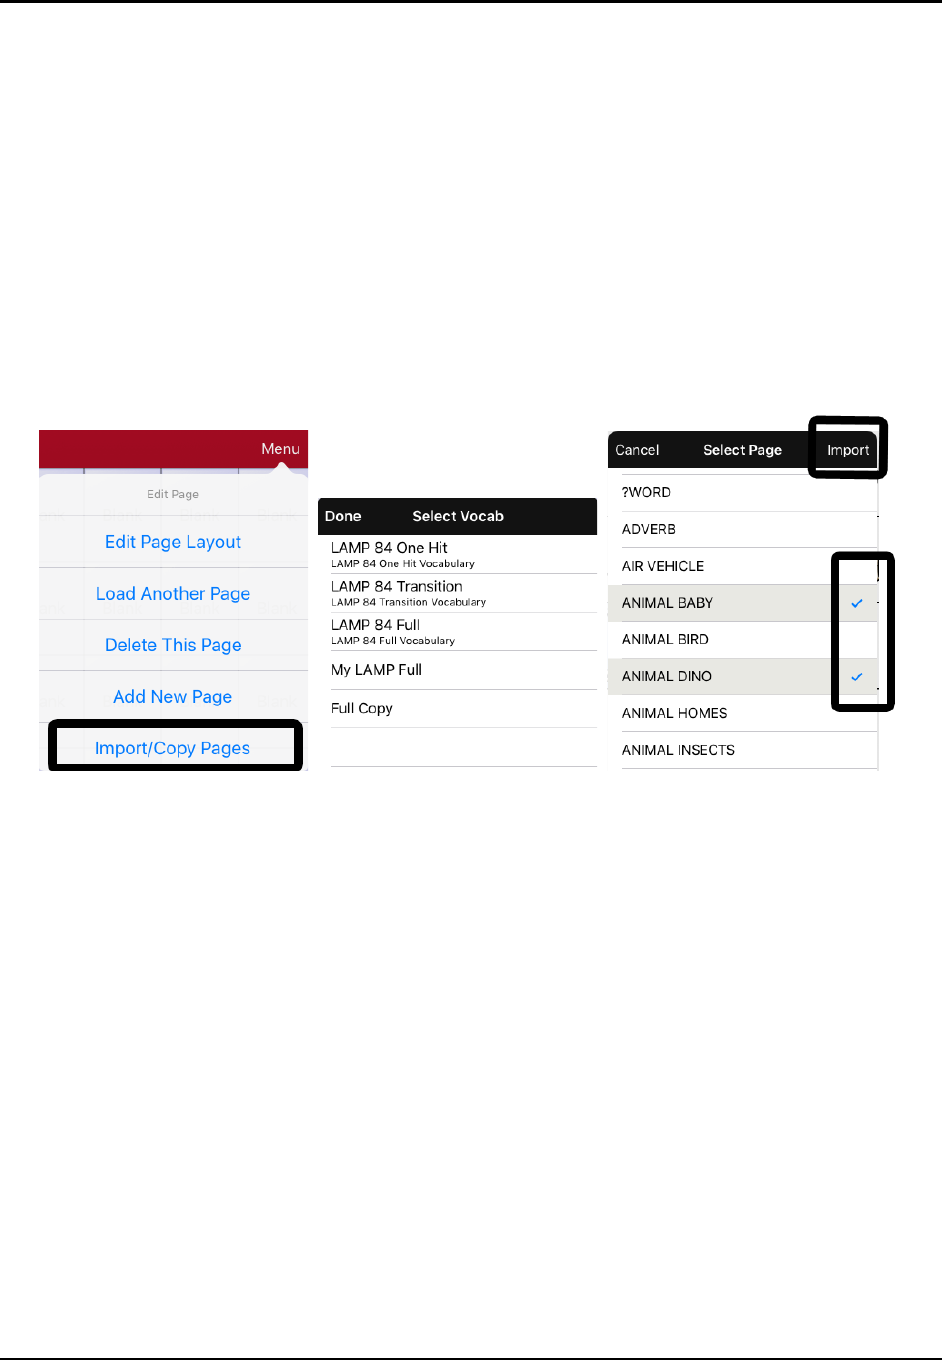
Copying a Page from a Different Vocabulary File
There are times when borrowing previously created pages could be a time saver. LAMP Words for Life
allows you to import multiple pages at one time.
1. Have your vocabulary file open.
2. Tap Menu and tap Edit Page.
3. Tap Menu and tap Import/Copy Pages.
4. Tap Import Another Page.
5. Tap the vocabulary file that contains the page you want and tap the appropriate pages to import. A
checkmark will appear following each page you tap.
6. Tap Import and tap Done.
7. While still in Edit Mode, tap the button that you want to navigate to the imported pages.
8. Tap Edit This Button.
9. Give the button a label and, if needed, an icon and make any style changes you want.
10. Scroll down to Button Actions, tap Add, and then tap Navigate.
11. Tap the page you imported.
12. Tap an animation or No Animation.
13. Tap Save and tap Done.
LAMP Words for Life User’s Guide 20
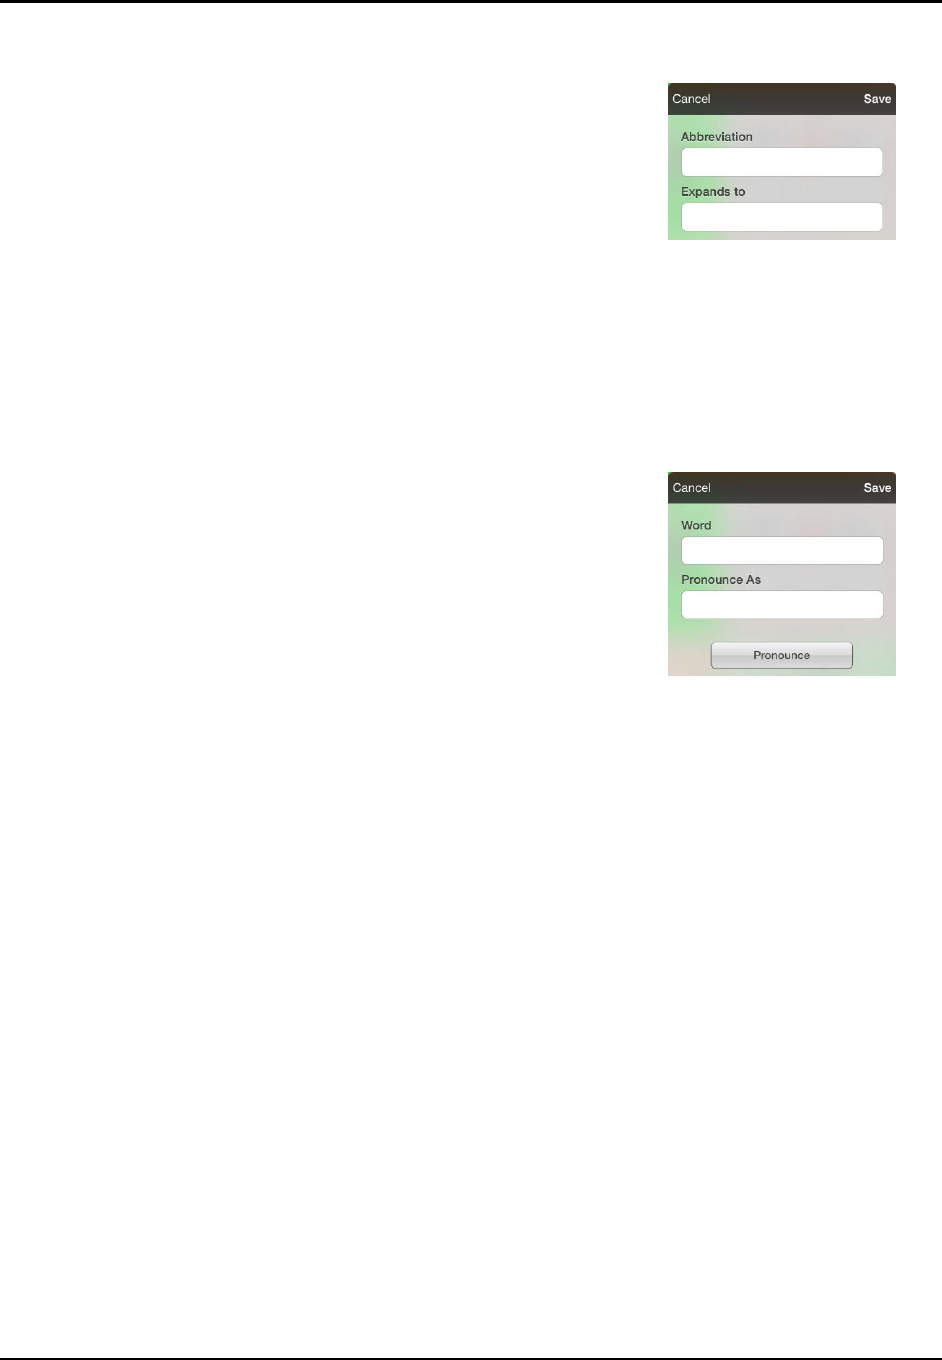
Editing an Abbreviation Expansion
1. Tap Menu and tap Edit Abbreviations.
2. Tap +.
3. In the space under Abbreviation, type the abbreviated form.
4. In the space under Expands to, type the full word, phrase, or
sentence that it will expand to.
5. Tap Save and tap Done.
Note: When typing the abbreviation, type a period after the abbreviation to activate the action.
Editing Pronunciations
1. Tap Menu and tap Edit Pronunciations.
2. Tap +.
3. In the space under Word, type the correct spelling.
4. In the space under Pronounce As, type word phonetically or
the way it should be pronounced. Tap Pronounce Word to
determine if it is pronounced correctly. If not, change the
spelling until the word is pronounced correctly.
5. Tap Save and tap Done.
Note: If the word already exists in the Pronunciation list, scroll up to find the word and then tap
the word to edit to the correct pronunciation.

LAMP Words for Life User’s Guide 21
Using Vocabulary Builder
Vocabulary Builder is a feature that allows you to hide all the words in the app except for the ones you
choose to teach. While it is a powerful teaching tool, it is recommended that the device user have some
time to explore the system with Vocabulary Builder off.
Creating a List of Words to Teach
1. From the app, select Menu.
2. Select Vocab Builder.
3. Slide the On/Off button at the bottom to On.
4. Select Disable All from the bottom right of the window showing the list of words.
5. Either (a) type a word you want to teach in the search window and then check the box next to that
word on the list OR (b) select the Quick Edit button at the bottom left of the window and type each
word, selecting Add Word, after each entry. Select Save.
6. Select Done.
A window will appear that will notify you the app is "Updating Buttons." When that window disappears,
only buttons for the words selected will appear. When you turn the setting OFF, all the hidden words
can be seen again.
Saving a List
At any time active words in Vocabulary Builder can saved as a list.
1. From the app, select Menu and then select Vocab Builder.
2. Select Save List.
3. Give the list a name in the Word List File Name field.
4. Select Save.
5. When the list has been saved, you will be notified that the “File Saved Successfully”. Select Okay.
6. Select Done to exit the Vocabulary Builder menu.
Loading a List
At any time a list may be loaded that was previously saved or imported via iTunes
®
software.
1. From the app, select Menu and then select Vocab Builder.
2. Select Load List.
3. Select the list to be loaded.
4. Slide the Mask Buttons to ON to turn on Vocabulary Builder.
5. Select Done to exit the Vocabulary Builder menu.

LAMP Words for Life User’s Guide 22
Using Word Finder
Searching for a new word is quick and easy with Word Finder. To use this feature:
1. From the app, select Menu and select Word Finder.
2. Type the word you want to find. If the word is not stored, the Find button will remain grayed out
and you will not be able to select it.
3. Select the Find button.
4. The window will show the sequence of buttons to press to activate the word.
5. Touch that sequence to practice the motor pattern or select Cancel to close the Word Finder
feature.
Note: If the word is not stored, the Find button will remain grayed out.
Using Word Prediction
1. Select Menu and Edit Page.
2. Select the button that links to your spelling page.
3. Select Edit This Button.
4. Scroll down to the bottom of the Edit Button menu to the Button Actions section.
5. Select the Navigate action that displays in the window.
6. In the Select Action Menu, select Navigate.
7. Select the 84 SPELL WP page.
8. Select Save and Done. Word Prediction will now be available the next time you access your spell
page.
Adding a Calculator Function
1. When on the keyboard or numbers page, select Menu and Edit Page.
2. Select an empty button and select Edit This Button.
3. Type the Button Label you want; delete the Button Message; and choose the icon you want.
4. Scroll down to Button Actions and select Edit and delete Speech Message as the button action.
5. Select Add; then select Calculator.
6. Select Save.
LAMP Words for Life User’s Guide 23
Making a Backup of your Vocabulary File
You can back up your customized vocabulary file by using iTunes, AirDrop
®
, or Dropbox
®
software.
Backing up your Vocabulary File using iTunes Software
To save a vocabulary file using this method requires two steps: the first involving your iPad device and
the second using your iTunes software.
Step 1:
1. Select the Vocab button.
2. Touch Choose New Vocab.
3. Touch the Menu button and select Import/Export to iTunes.
4. Choose Export a Vocab and from the menu that pops up, select the vocabulary you want to save.
5. Give the file a name and select Save.
Step 2:
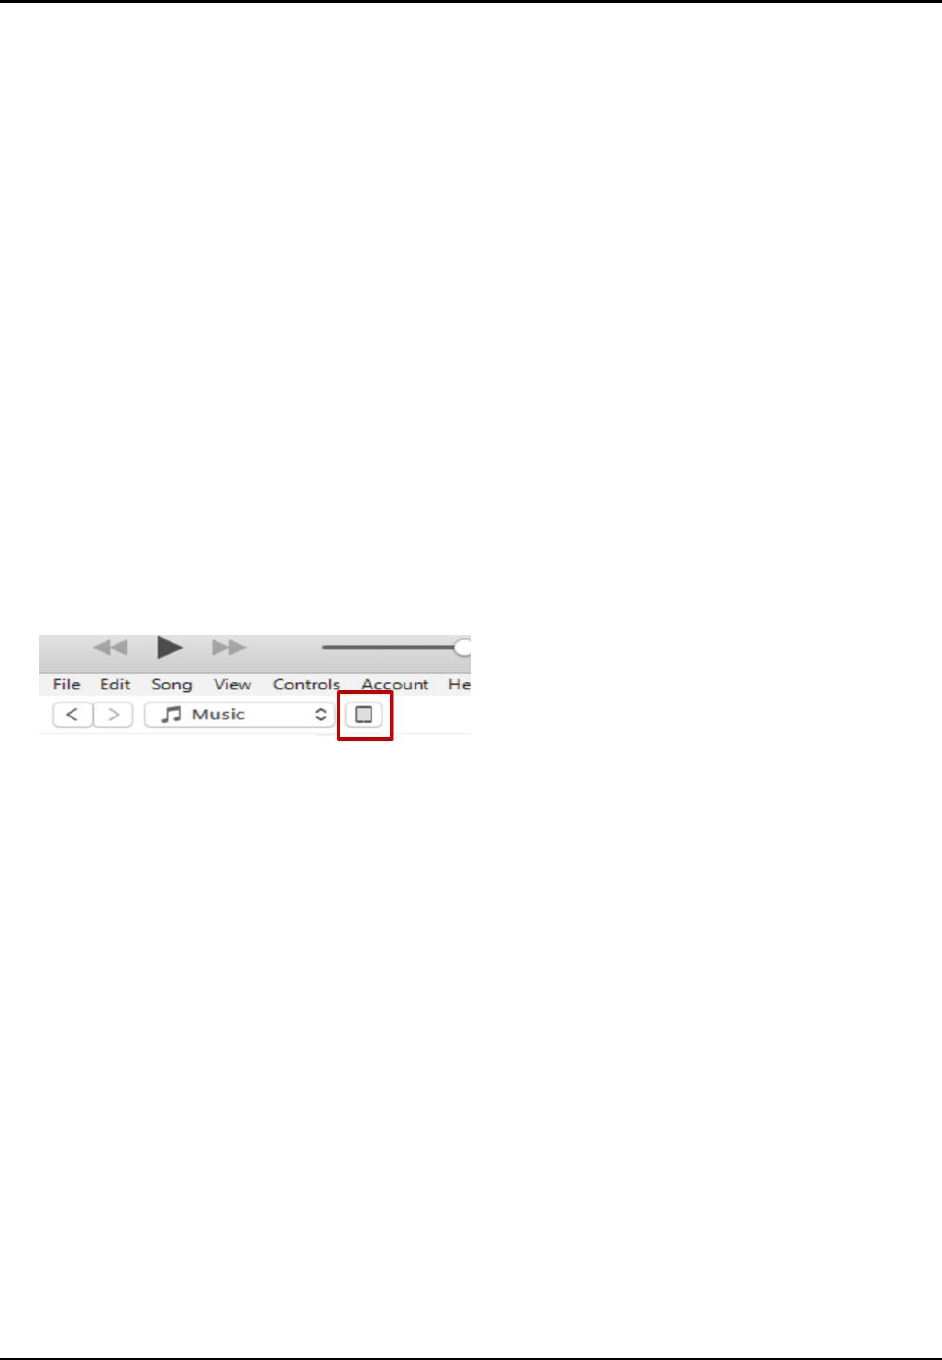
1. Connect your device to a computer and run the iTunes software.
2. In the iTunes library, look for and click on the Device icon in the upper left corner.
3. In the left-hand column, select Apps.
4. Scroll down to the section called File Sharing and in the Apps column, select the Words for Life app.
5. From the column under Words for Life Documents, choose the vocabulary file you want to save.
6. Choose the Save to… button at the bottom right and browse to the folder where you want to save
the file.
7. Select the OK button and the file will be saved.
Backing up your Vocabulary File using AirDrop Software
1. In the WFL app, select the Vocab button and touch Choose New Vocab.
2. Touch the Menu button and select Import/Export.
3. Select Export with Airdrop.
4. Select the vocabulary you would like to share.
5. Select Done.
6. You will see the nearby devices that have AirDrop on and can accept your file. Choose the device
you want.

LAMP Words for Life User’s Guide 24
Backing up your Vocabulary File using Dropbox Software
1. In the WFL app, select the Vocab button and touch Choose New Vocab.
2. Touch the Menu button and select Import/Export.
3. Select Export to Dropbox.
4. Select the vocabulary you would like to share.
5. Select Save. If you have the Dropbox software installed on your iPad device, the file will be saved
directly. If not, you’ll be directed to sign into your Dropbox account via the Safari
®
application.
Backing up your Vocabulary File using the iSharePRC℠ Subscription
Service
You must have an iSharePRC account and a Wi-Fi connection to make backups using this method.
1. Select the Vocab button.
2. Select Choose New Vocab.
3. Select the Menu button.
4. Select iShare PRC from the drop-down menu.
5. Select Login to iShare PRC.
6. Enter your e-mail address and password.
7. Select Login and press Okay.
8. Select a folder to store the vocabulary file.
9. To SAVE a file:
• Select the + button.
• From the list that appears, select the file you want to save.
• Fill in the Name, Description, Keywords, and File Revision, and choose a Collection (if you have
any).
• Select Upload.
10. To DOWNLOAD a previously saved file:
• When you open a folder, choose the file you want to download.
• Select the Download button.

LAMP Words for Life User’s Guide 25
Setting up Switch Scanning
As an alternative to directly selecting each button on the screen, the application offers single switch and
two-switch scanning. To access the options for customizing a scanning technique, choose Menu > Settings
and scroll to the Scanning section.
Important! For the scanning settings to be available, your amplifier must be turned on, charged, and
communicating with the device.
Setting Description
Scanning Enabled Turns scanning on or off. You must turn scanning on to access the other settings.
Auto-Scan When Auto-Scan is turned on, scanning activates automatically. When Auto-
Scan is turned off, a switch activation is required to move the scan through each
button, one at a time.
Auto Restart When Auto Restart is turned on, a scan cycle restarts automatically after an
activation.
Use Screen As Switch When Use Screen As Switch is turned on, the touchscreen acts as a switch.
Instead of pressing a switch, you can tap anywhere on the screen to start a scan.
Auditory Scan When Auditory Scan is turned on, audio feedback is provided during scanning.
Use Headphone For Prompt
When Use Headphone For Prompt is turned on, a headphone or earphone
functions as the audio output device. When this setting is turned off, a speaker
functions as the audio output device.
Prompt Voice Set the voice to use for prompts. Select Prompt Voice to open a list of available
voices. To hear a voice before selecting it, tap the speaker icon located to the
right of each voice. When you decide which voice you want, tap the voice to
select it.
Prompt Voice Rate Set the prompt voice rate. Drag the slider to the right to increase the rate or to
the left to decrease the rate.
Prompt Voice Pitch
Set the prompt voice pitch. Select Prompt Voice Pitch and select a pitch level:
Lowest, Lower, Low, Normal, High, Higher, or Highest.
Scan Speech Display Bar When Scan Speech Display Bar is turned on, the Speech Display Bar is included
in scans.
Skip Empty Cells When Skip Empty Cells is turned on, empty button areas are not included in
scans. When Skip Empty Cells is turned off, empty button areas are included in
scans.
Scanning Type Set the scanning pattern. Select Scanning Type and select either Sequential or
Row/Column.
A Sequential scan steps through the buttons from left to right beginning in the
first row. When the button you want is highlighted, activate your switch.
A Row/Column scan highlights each row of buttons beginning with the top row
and moves down the screen. When the row that contains the button you want
is highlighted, activate your switch. The scan will then step through the buttons
from left to right across the row. When the button you want is highlighted,
activate your switch.

LAMP Words for Life User’s Guide 26
Setting Description
Scan Speed Set the amount of time it takes for your device to move from one button, row,
or column to the next in a scan. Select Scan Speed and select the speed you
want. You may need to test several speeds until you find the one that works
best. Available speeds range from 0.2 seconds to 10 seconds.
Number of Rescans Set the number of times you want a page scan to repeat automatically before
you activate your switch. Once you reach the set number of rescans, the scan
will stop until you activate your switch again.
Choose Number of Rescans and select the number of rescans you want. For
example, if you select 2 as the number of rescans, the device will scan the page
and then the scan will repeat automatically two more times unless you activate
your switch. Note: If you select 0, scans will not repeat automatically.
Number of Switches
Set the number of switches you connected to the device to use for scanning.
Select Number of Switches and select 1 Switch or 2 Switches.
Configuring Switches
To use an external switch, plug the switch into either switch jack A or switch jack B on the side of the
device. If you are using two switches, plug a switch into each.
1. To enable scanning, choose Menu > Settings > Scanning Enabled.
2. To set the number of switches you connected to the device, choose Number of Switches.
3. Select 1 Switch or 2 Switches.
4. Configure additional settings as needed.
Setting up Touchscreen Scanning
There are times when a user is not capable of activating specific areas on the screen. For example,
maybe the user does not have the pointing skills to press one button. Using the touchscreen to scan
allows the user to tap anywhere on the screen to initiate a scan of the buttons. In this scenario, the
device screen acts as a single switch.
1. Choose Menu > Settings > Scanning Enabled.
2. Choose Use Screen As Switch.
3. Configure additional settings as needed.
Setting up Auto Scanning
You can choose to have scanning activate automatically, or you can choose to either hold the switch or
step to each location. When Auto-Scan is turned on, scanning activates automatically. When Auto-Scan
is turned off, a switch activation is required to move the scan through each button, one at a time.
To set scanning to activate without holding a switch, choose Menu > Settings > Auto-Scan.
LAMP Words for Life User’s Guide 27
Selecting the Scan Pattern
To select the scanning mode:
1. Choose Menu > Settings > Scanning Type.
2. Choose Sequential or Row/Column.
Sequential Scan Mode
A sequential scan steps through the buttons from left to right beginning in the first row. When the
button you want is highlighted, activate your switch.
Row/Column Scan Mode
A row/column scan highlights each row of buttons beginning with the top row and moves down the
screen. When the row that contains the button you want is highlighted, activate your switch.
The scan will then step through the buttons from left to right across the row. When the button you want
is highlighted, activate your switch.

LAMP Words for Life User’s Guide 28
Including the Speech Display Bar (SDB) in Scans
Selecting the SDB speaks the current text. To include the Speech Display Bar in scans, choose Menu >
Settings > Scan Speech Display Bar. Turn Scan Speech Display Bar on.
Configuring Empty Cell Scans
Turn scanning of empty button areas on or off by choosing Menu > Settings > Skip Empty Cells. When
Skip Empty Cells is turned on, empty button areas and buttons that have speech message actions but no
text are not included in scans. When Skip Empty Cells is turned off, empty button areas and buttons that
have speech message actions but no text are included in scans.
Setting Scan Timing
Scan speed is the amount of time it takes for your device to move from one button, row, or column to
the next in a scan. For example, if the scan speed is set to 1.0 seconds, it takes one second from the time
one key is highlighted until the next key is highlighted.
To change the scan speed, choose Menu > Settings > Scan Speed and select the speed you want. You
may need to test several speeds until you find the one that works best. Available speeds range from 0.2
seconds to 10 seconds.
Configuring Rescans
You can set the number of times you want a page scan to repeat automatically before you activate your
switch. Once you reach the set number of rescans, the scan will stop until you activate your switch again.
To set the number of re-scans, choose Menu > Settings > Number of Rescans and choose the number of
rescans you want. For example, if you select 2 as the number of rescans, the device will scan the page
and then the scan will repeat automatically two more times unless you activate your switch. Note: If you
select 0, scans will not repeat automatically.
Turning on Auto Restart
You can configure scanning to restart a scan cycle automatically after an activation. To turn on auto
restart, choose Menu > Settings > Auto Restart.
Enabling Auditory Feedback
You can include audio feedback in scans. To enable auditory prompts, choose Menu > Settings >
Auditory Scan. When you are scanning, simply activate your switch. To retrieve a message, activate the
switch again after you hear the prompt.
Audio Output Device
When Use Headphone For Prompt is turned off, you can hear prompts through the device's speaker. You
may prefer to hear prompts through a headphone or earphone. This allows you, but not others, to hear
the prompts.
To hear prompts through a headphone or earphone, plug stereo headphones or earphones into the
headphone jack on the side of the device. Then choose Menu > Settings > Use Headphone For Prompt.

LAMP Words for Life User’s Guide 29
Choosing and Adjusting a Prompt Voice
When choosing a voice to use for auditory prompts, it can be helpful to choose a different voice than
the one the system uses for speaking messages. To change the voice:
1. Choose Menu > Settings > Prompt Voice. A list of available voices opens.
2. To hear a voice before selecting it, tap the speaker icon located to the right of each voice.
3. When you decide which voice you want, tap the voice to select it.
4. Adjust the prompt voice rate and pitch as needed.
To adjust the prompt voice rate:
To adjust the prompt voice rate, choose Menu > Settings > Prompt Voice Rate and drag the slider to the
right to increase the rate or to the left to decrease the rate.
To adjust the prompt voice pitch:
To adjust the prompt voice pitch, choose Menu > Settings > Prompt Voice Pitch and select a pitch level:
Lowest, Lower, Low, Normal, High, Higher, or Highest.
LAMP Words for Life User’s Guide 30
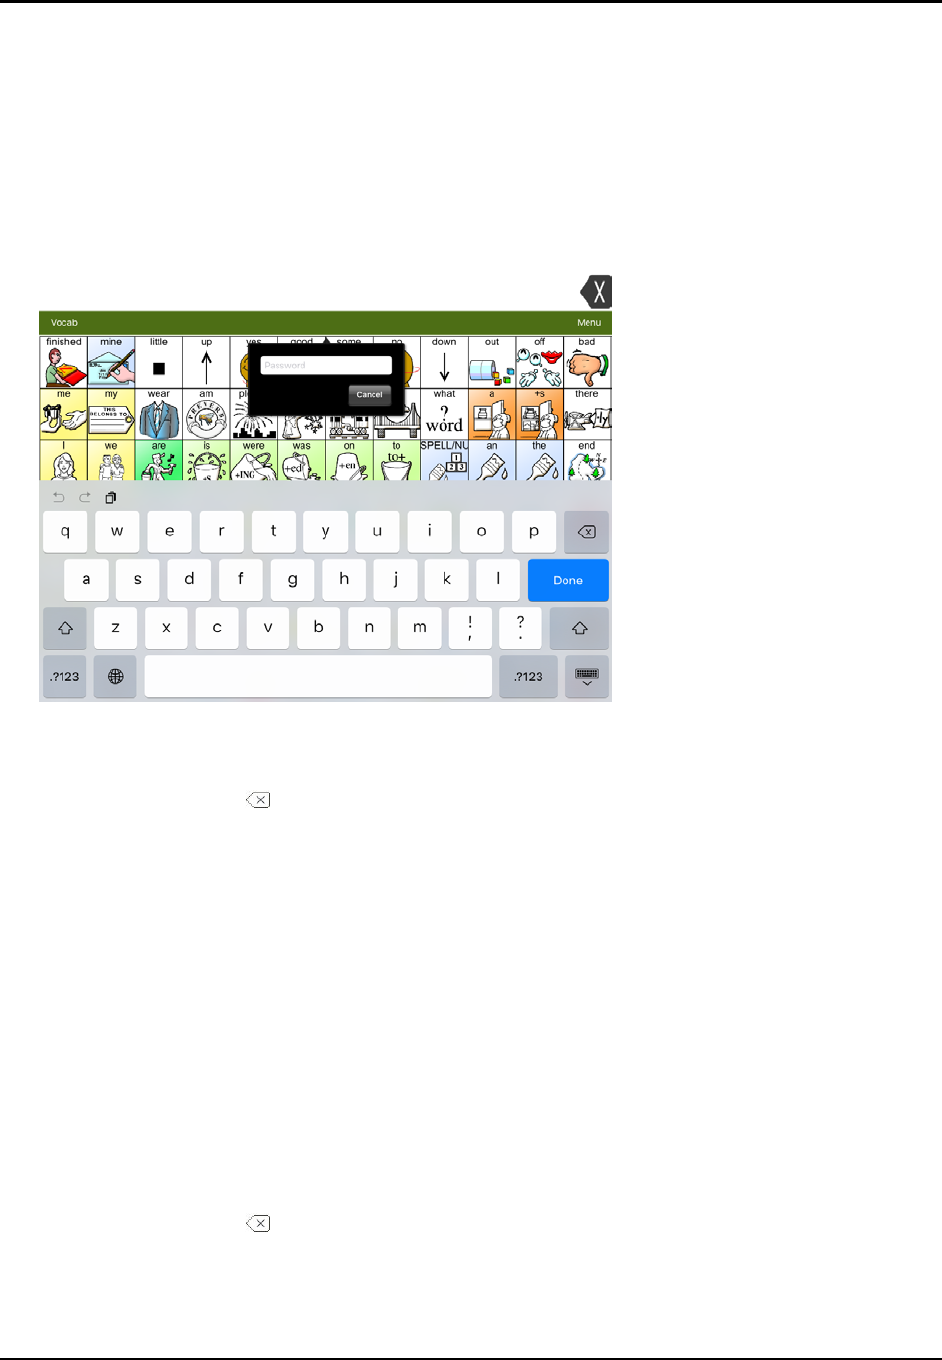
Blocking and Restoring Access to the Editing Menus
There may be times when you need to block access to the Editing menus. To do this, the Use Menu
Passcode setting can be turned on or off. When this setting is turned on, the Menu and Vocab items can
only be accessed by entering a password.
To password-protect the Editing menus:
1. In LAMP Words for Life, tap Menu and tap Settings. The
Settings menu will open.
2. Under “Editing”, turn Use Menu Passcode on.
3. Tap in the Passcode field to open a keyboard.
4. Enter your password and tap Done on the keyboard.
5. Tap Done on the Settings menu.
Now when the user taps either Menu or Vocab, a
password prompt will be displayed.
To remove password protection from the Editing menus:
1. In LAMP Words for Life, tap Menu or Vocab. The Password
prompt will be displayed.
2. Enter your password. The Settings menu will open.
3. Turn Use Menu Passcode off.
4. To remove the password, tap in the Passcode field to open
the keyboard. Use the Keyboard backspace key to
remove the password.
5. Tap Done on the keyboard.
6. Tap Done on the Settings menu.

LAMP Words for Life User’s Guide 31
Changing LAMP Words for Life Settings
LAMP Words for Life settings are located by going—within the LAMP Words for Life app—to Menu >
Settings. From the LAMP Words for Life Settings screen, scroll to see all available settings.
Navigation
Setting Description
Page Animation When turned on, this setting allows you to navigate a page by scrolling up, down,
right, or left.
Allow Gestures When turned on, this setting allows you to add a gesture to a page such as swiping
left or right to engage an action.
Gesture Pop Sound When turned on, this setting provides audible feedback when a gesture is performed.
Button Click Sound When turned on, this setting provides audible feedback when a button is selected.
Page Size
Setting Description
Keyguard Inset When turned on, this setting adjusts the display for a keyguard.
Editing
Setting Description
Use Menu Passcode When turned on, this setting requires a password to access the Editing menus.
Passcode When applicable, enter the password you want to use in this field.
Speech
Setting Description
Voice
Since there are many voice options, voices are downloadable. This will save a lot of
space on the app by only downloading the voices needed.
To download a voice, tap the green down arrow and select Yes.
Rate Use the slide bar to modify the rate of speech.
Voice Pitch You can make a voice sound different by modifying the pitch.
Pause Between Words You can add a speech delay between individual words.

LAMP Words for Life User’s Guide 32
Speech Display Bar
Setting Description
Hide Speech Display When turned on, this setting hides the entire SDB.
Auto Capitalization When turned on, this setting capitalizes the first word of a sentence automatically.
Show Icons Choose this setting if you want to display icons with text in the SDB.
Hide Delete Button When turned on, this setting hides the SDB’s Delete button.
Font Select one of the seven available fonts to use for text in the SDB.
Font Size Determines the size of the font that appears in the SDB.
Font Color Choose one of the 12 available font colors to apply to text in the SDB.
Background Color Choose one of the 12 available background colors to apply to the SDB.
Number of Lines Choose how many lines of text you want to appear in the SDB.
Single Line Cursor Choose this setting if you want a cursor to appear in the SDB.
Tap Action Choose Speak, Speak and Enlarge Text, or No Action when the SDB is tapped.
Expanded Speech Area
Setting Description
Font Select one of the seven available fonts to use for text in the expanded speech area.
Font Size Determines the size of the font that appears in the expanded speech area.
Font Color Choose one of the 12 available font colors to apply to text in the expanded speech
area.
Background Color Choose one of the 12 available background colors to apply to the expanded speech
area.
Speak
Setting Description
Speak Characters When this setting is turned on, each character will be spoken as entered.
Speak Words When this setting is turned on, each word will be spoken as entered.
Speak Sentences When this setting is turned on, each sentence will be spoken as entered.
Auto Clear When this setting is turned on, the SDB clears automatically after speaking.
Prevent Interruption When turned on, this setting will prevent interruptions of speaking a sentence if you
accidentally hit another button while it is speaking.

LAMP Words for Life User’s Guide 33
Data Logging
Setting Description
Enable Logging
Turn on data logging, allowing your device to collect language usage data which you
can upload to the Realize Language™ website for web-based analysis or save to a file
to analyze manually.
Privacy Password Set or change your data logging privacy password.
Clear Log Clear usage data for the current person.
Realize Language Setup Upload data collected for a person to the Realize Language website for analysis.
Buttons
Setting Description
Activate on Release
When this setting is turned on, a button will not activate until released, rather than
on touch
.
Dwell Time
Controls the delay before a button press is recognized in case a user needs to slide
across multiple buttons before pressing the intended button.
Release Time All buttons are disabled for specified period after each button press event to prevent
accidental double button presses.
Force Font Size When this setting is turned off, the button label font size is automatically reduced as
needed to allow the entire label to fit into the button area.
Highlight Touch When this setting is turned on, the button that is touched is highlighted briefly—the
button turns red for a moment when activated.
Hide All Icons When turned on, this setting will hide all of the icons from the buttons and only the
text will appear. Note that hiding the button icons will also force the SDB setting
“Show Icons” off.
Show Hidden Buttons When turned on, buttons that have been hidden will be displayed.
LAMP Words for Life User’s Guide 34
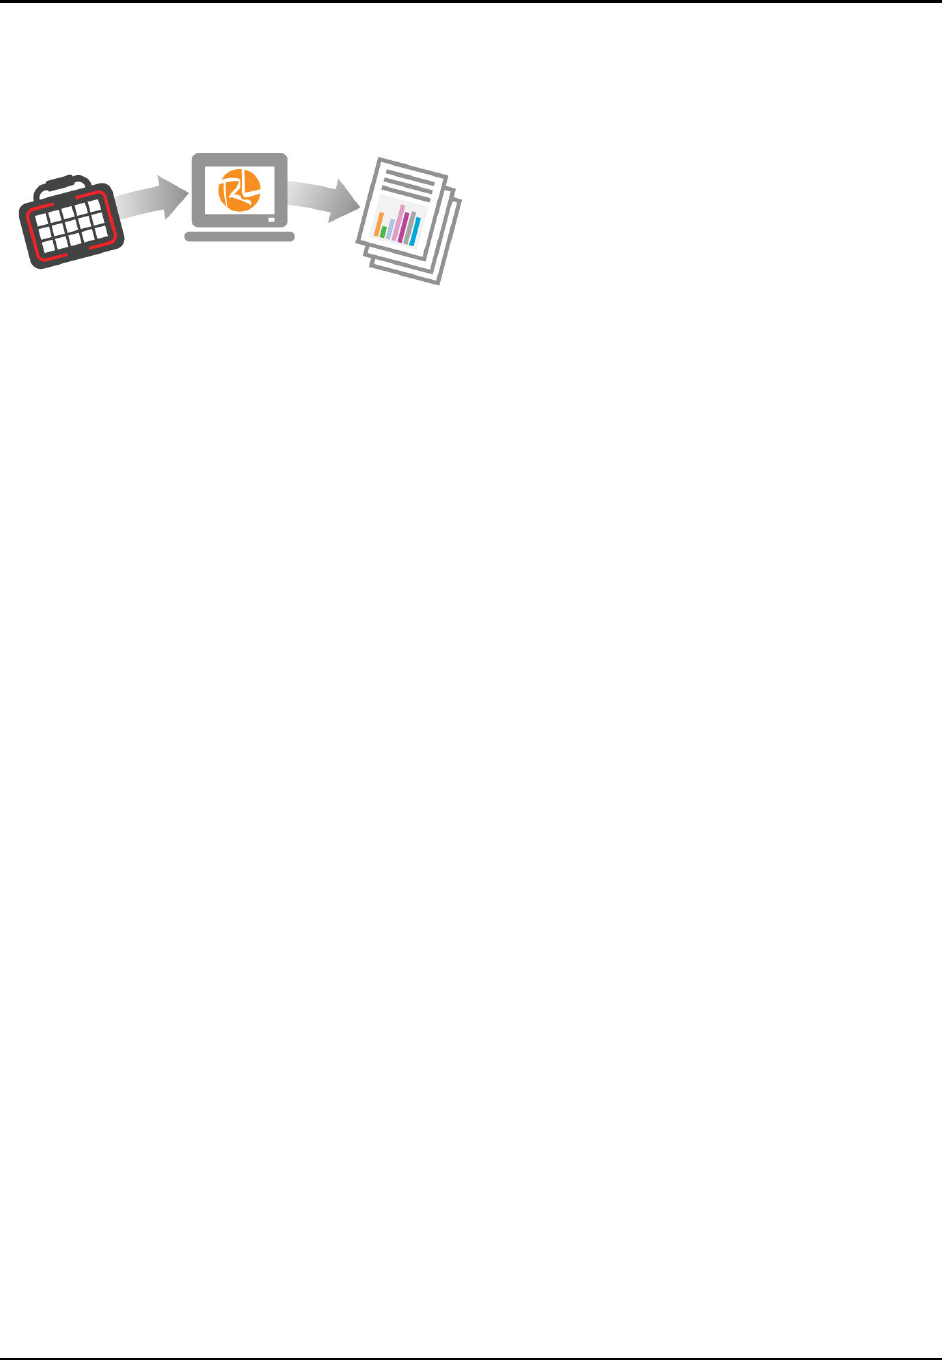
Analyzing Language Development
You can use the data logging capabilities of your device to collect information on a person’s language
development. Then you can upload that information to the Realize Language website.
Collect data on
your device
Upload the data to the
Realize Language website
Create easy-to-
understand reports
This process allows you to monitor, measure and maximize the person's use of the device.
Using the Realize Language Website
Realize Language is a subscription-based online service that organizes and analyzes information and
presents the results in easy-to-understand graphic formats that provides valuable insights into each
person's language development. With this service you can
• Track the person’s progress and communication development over time
• Compare different aspects of communication automatically
• Create a detailed summary of performance
• Share information with others
• Quickly create reports that anyone can understand
To learn more, go to the Realize Language website: https://realizelanguage.com/info/
To view or download the Realize Language Starter’s Guide, go to
https://realizelanguage.com/info/support
For Customer Support:
If you have a problem with the Realize Language website, email support@realizelanguage.com.
If you have a problem with your device, call PRC technical support at 1-800-262-1990 or email
service@prentrom.com.

LAMP Words for Life User’s Guide 35
Turning on Data Logging from Your Device
When data logging is turned on, your device collects language usage data which you can upload to the
Realize Language website for web-based analysis or save to a file to analyze manually.
1. In LAMP Words for Life, tap Menu and tap Settings. The
LAMP Words for Life Settings screen will be displayed.
2. Under Data Logging, turn on Enable Logging.
Important! If you plan to use the Realize Language website to analyze data, set up a person before you
start collecting data.
Creating a Privacy Password
Data logging provides the option to create a privacy password to protect the data you collect against
unauthorized access.
1. Under Data Logging, tap the password box
located to the right of Privacy Password. A
cursor will appear in the password box and
keyboard will be displayed.
2. Type the privacy password you want to use
and tap Done. The Confirm New Privacy
Password prompt will be displayed.
3. Type your password again and tap Enter.
“New Password Set” will be displayed.
4. Tap OK to close the message.
LAMP Words for Life User’s Guide 36
Manually Uploading Data for Analysis
Upload data collected for a person to the Realize Language website for analysis.
1. Connect the device to your computer.
2. Open iTunes on the computer.
3. In iTunes on the computer, tap on the device and go to the Apps section.
4. Scroll down until you see LAMP Words for Life in the File Sharing area.
5. Highlight the logFile.lam file that you are uploading.
6. Click Save To on the bottom right. A Windows save box will open. Select the folder in which you
want the file saved. Right-click the file, select Rename, and type the filename extension .txt in place
of .lam.
7. Log onto the Realize Language website.
8. Select Upload Data File and then Select a File to Upload.
9. Select the file and click Upload.
Uploading Data to the Realize Language Website
1. Create a Realize Language account at www.realizelanguage.com.
2. From the app, sign into your Realize language account.
3. As long as there is a Wi-Fi connection, data will be automatically uploaded.
4. Reports can be viewed online.
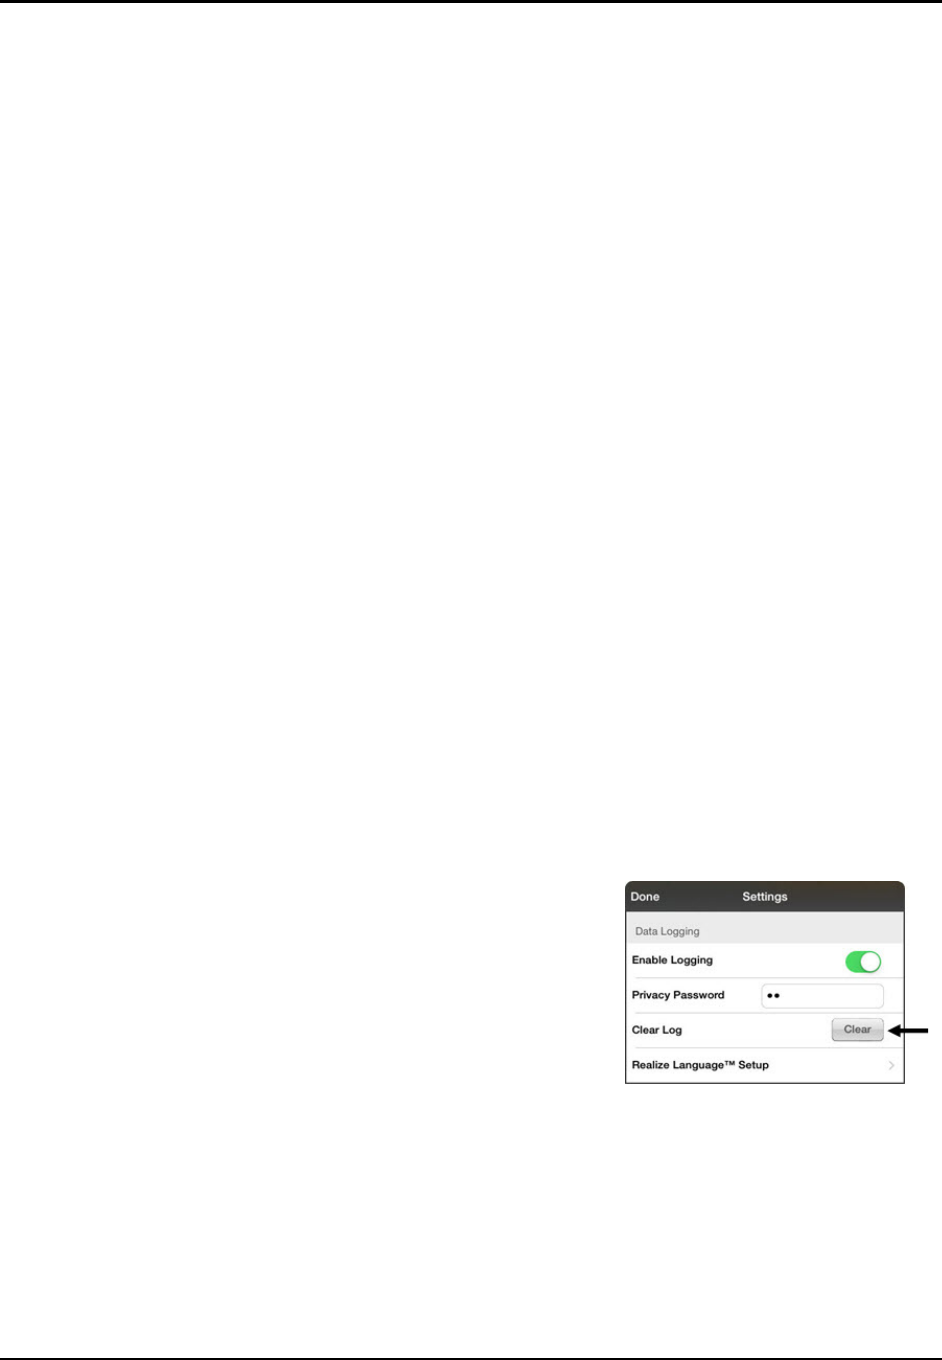
Clearing Usage Data
To clear usage data for the current person:
1. Under Data Logging, tap the Clear button.
2. The Privacy Password prompt and keyboard will be displayed.
Type your privacy password and tap Enter.
3. “Do you really want to Clear Log?” will be displayed. Choose
Yes to clear the data log.
4. “Clear Log Completed” will be displayed. Tap Okay to close
the message.
LAMP Words for Life User’s Guide 37
Changing or Removing Your Privacy Password
By default, each time you save data to a file, you enter a password. Entering a password helps ensure
privacy—only you will be able to view the data. You can change this privacy password as often as you
want, or you can eliminate the need for a privacy password.
To change your privacy password:
1. Under Data Logging, tap the password box located to the right of Privacy Password. A Privacy
Password prompt and keyboard will be displayed.
2. Type your old privacy password and tap Enter. A cursor will appear in the password box.
3. Use the backspace key to clear the Privacy Password field.
4. Type your new password and tap Done.
5. The Confirm New Privacy Password prompt will be displayed. Type your new password again and
tap Enter.
6. “New Password Set” will be displayed. Tap OK to close the message.
To remove your privacy password:
If you prefer not to enter a password each time you save data to a file, use this procedure. Keep in mind,
however, that you will also lose the privacy protection a password provides.
1. Under Data Logging, tap the password box located to the right of Privacy Password. A Privacy
Password prompt and keyboard will be displayed.
2. Type your old privacy password and tap Enter. A cursor will appear in the password box.
3. Use the backspace key to clear the Privacy Password field and tap Done.
4. “Privacy Password Cleared” will be displayed. Tap OK to close the message.

LAMP Words for Life User’s Guide 38
Using Email, Messaging, Twitter™, and Facebook
®
Services
Directly from within the App
Before using any of these services, you must be signed into them in iPad Settings.
Note: The Facebook service works only when signed in under iPad Settings, but the app is not
downloaded to the iPad device.
1. In the WFL app, select Menu.
2. Select Settings.
3. Scroll down to the Social Networking heading and turn Allow Social Networking on.
4. Exit the menu by selecting Done.
5. Once you’ve typed your message, touch and hold the speech display bar.
6. Select Share.
7. Choose the service you want to use. Once that service opens, your text will automatically be placed
within that application. It will copy all spoken text since the CLEAR button was last selected whether
or not it is all visible in the speech display bar.
Voice Customization or Voice Banking
LAMP Words for Life is VocaliD™-compatible.
For more information about VocaliD voices, visit www.vocalid.co.
