Personal Profile User Guide
August 5, 2024
NOTE: This user guide is an identical PDF version of the online help.
Personal Profile User Guide
Contact Us/Disclaimer 2 August 5, 2024
Contact Us
Additional Help Needed?Please contact the eRA Service Desk (https://www.era.ni-
h.gov/need-help).
Toll-free: 1-866-504-9552; Phone:301-402-7469
Hours: Mon-Fri, 7:00 a.m. to 8:00 p.m. Eastern Time
Feedback on the user guide? Please email the eRA Communications Office (era-
Disclaimer STATEMENT
No data shown in illustrations represents any real account, project, or individual. Any
resemblance to actual accounts, projects, or individuals is purely coincidental.
Personal Profile User Guide
Table of Contents 3 August 5, 2024
Table ofContents
Table ofContents 3
Personal Profile Module 7
Accessing Personal Profile 7
Editing and Saving Personal Profile Information 8
Selecting a Profile to Edit 10
Personal Profile Summary 10
Dashboard 13
Personal Profile Summary Sections 16
Personal Profile Errors 17
What's the Difference Between View andEdit? 18
Viewing the Information in Your Profile 19
Editing the Information in Your Profile 19
Name and ID 20
Viewing Name and ID 20
Editing Name and ID 21
Demographics 26
Viewing Demographics 26
Edit Demographics 27

Personal Profile User Guide
Table of Contents 4 August 5, 2024
Employment 29
View Employment 29
Edit Employment 29
Current Jobs 31
Past Jobs 31
Updating Your Current Job(s) 32
Adding a Current Job 32
Editing a Current Job 35
Performing a Quick Update for a Current Job 38
Leaving a Current Job 40
Deleting a Current Job 42
Updating Your Past Job(s) 43
Adding a PastJob 43
Editing a Past Job 46
Deleting a Past Job 48
Reviewer Information 50
Viewing Reviewer Information 50
Editing Reviewer Information 51
Trainee Information 56
View Trainee Permanent Address 56
Personal Profile User Guide
Table of Contents 5 August 5, 2024
Edit Trainee Permanent Address 56
Education 58
Viewing Education 58
Editing Education 59
Updating Your Degrees 61
Adding a Degree 61
Editing a Degree 64
Deleting a Degree 66
Updating Your Post-Graduate Clinical Training 68
Adding Post-Graduate Clinical Training Information 68
Editing Post-Graduate Clinical Training Information 69
Deleting Post-Graduate Clinical Training Information 70
Overview--Early Stage Investigator (ESI) Status 71
How to Access the Link for Requesting an ESIExtension 73
Determining Your ESI Status 75
Complete and Submit the ESI ExtensionRequest Form 77
ESI Status Request Screen 78
Reason for Hiatus Popup 80
Submitting the Extension Request 81
Reference Letters 84


Personal Profile User Guide
eRACommons Personal Profile 7 August 5, 2024
Personal Profile Module
The Personal Profile module in Commons is the central repository of information for all
Commons registered users. It is designed so that individual eRA system users hold and
maintain ownership over the accuracy of their own profile information. This profile
information is then integrated throughout eRA's systems and used for a variety of
agency business such as peer review, application data, and trainee data. You can del-
egate the authority to maintain your profile to other users within your institution.
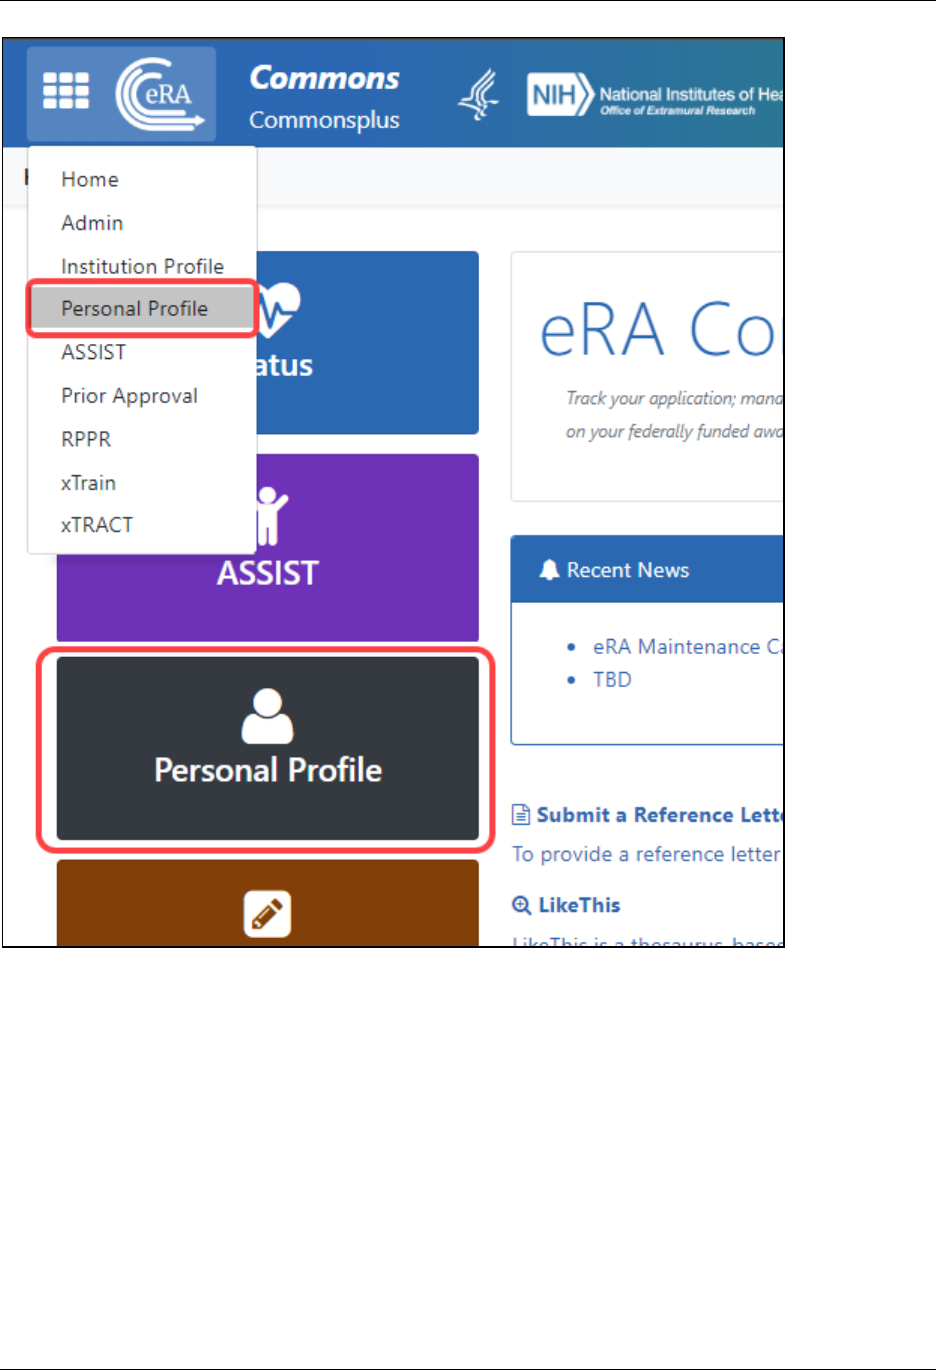
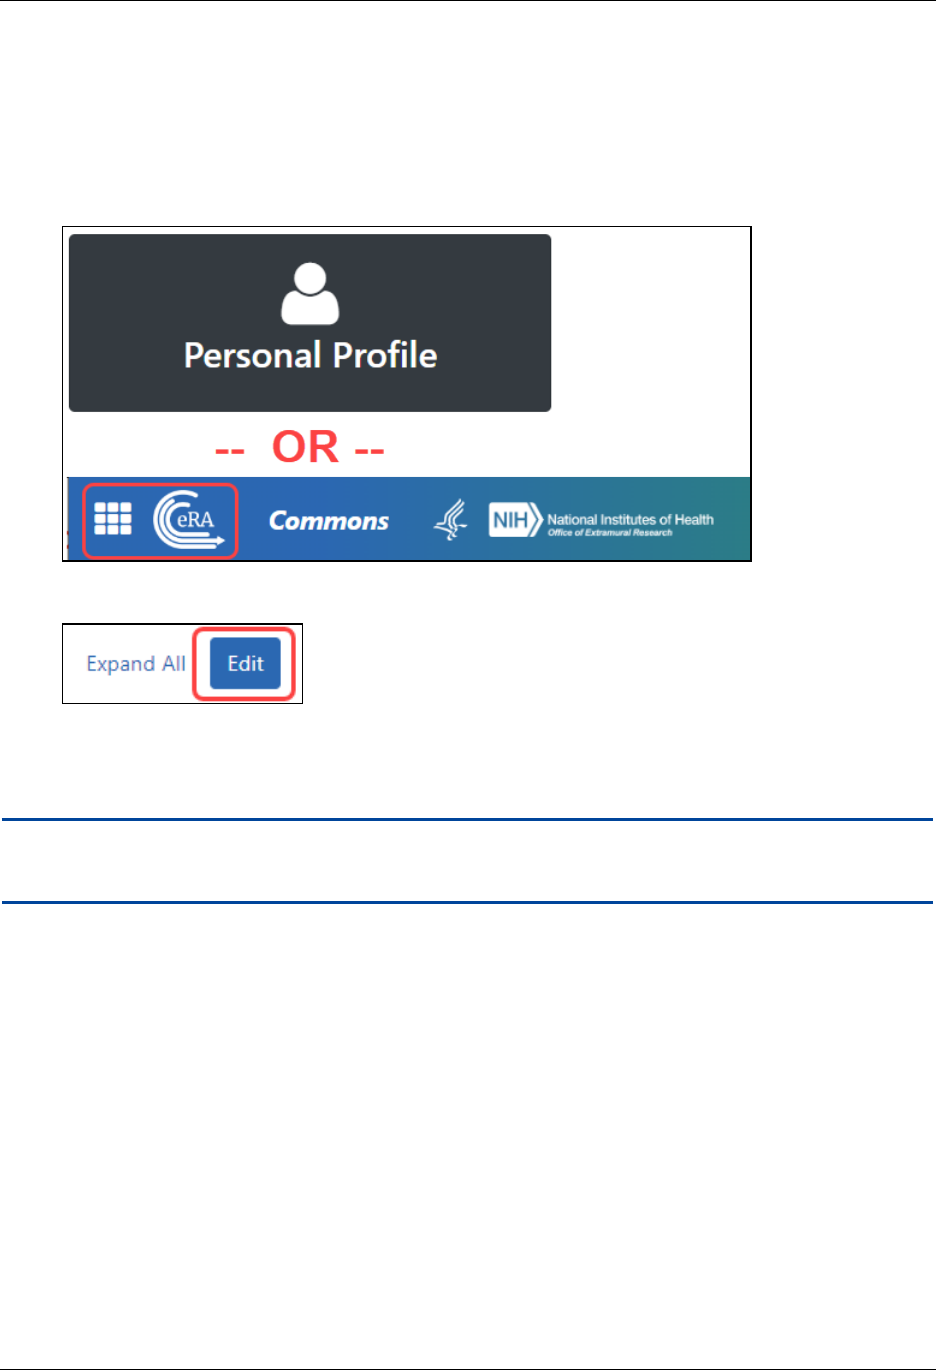
Accessing Personal Profile
Access Personal Profile by clicking the Main menu / eRA menu and selecting Personal
Profile, or by clicking the Personal Profile button on the eRA Home page. See below.
Personal Profile User Guide
eRACommons Personal Profile 8 August 5, 2024
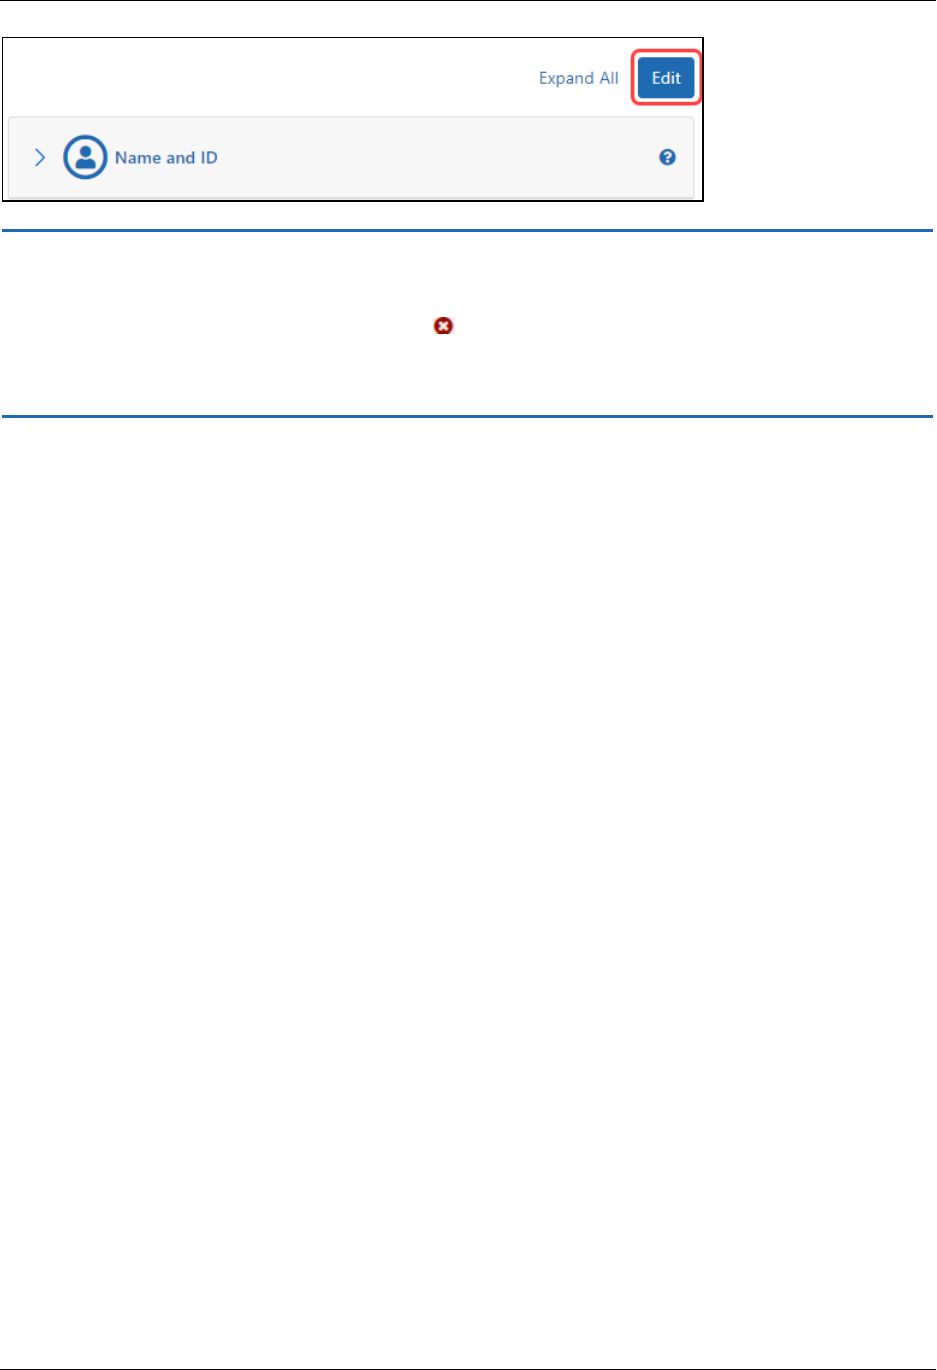
Editing and Saving Personal Profile Information
To edit Personal Profile, click the Edit button above the Name and ID section, make
changes, then click the Save All button. Navigating away from the Personal Profile turns
Edit mode off without saving. Also see What's the Difference Between View andEdit?.
Personal Profile User Guide
eRACommons Personal Profile 9 August 5, 2024
IMPORTANT: To save any profile changes, you must click the Save All button, which is
located at the top right of the screen. You can save profile changes ONLY after fixing ALL
error items in red/pink that show a red x ( ), even those unrelated to your current
change. If you save while errors exist, changes are NOTsaved and you see an error mes-
sage.
The personal profile is divided into sections of information and includes:
l
Name and ID. Personal information such as name, email, date of birth, citizenship
status
l
Demographics. Race, ethnicity, sex. Trainees are additionally asked about dis-
advantaged status and federal debt.
l
Employment. Current and past employment history
l
Reviewer Information. (only peer reviewers see this) Work address for those users
serving as peer reviewers as well as honorarium information
l
Trainee Information. (only trainees see this) Trainee permanent address for those
with Trainee roles using the xTrain module
l
Education. Degrees and post-graduate clinical training information
l
Reference Letters. (principal investigators only) Data about letters of reference
submitted to NIH
l
Publications. (does not appear for all users) Access to MYNCBI, at which pub-
lications can be viewed
l
xTRACT Information. (does not appear for all users) Provides a link to xTRACT
module for trainees, participants, or scholars on a training grant, research edu-
Personal Profile User Guide
eRACommons Personal Profile 10 August 5, 2024
cation award, or institutional career development award, where you can update the
training institution on subsequent educational activities.
NOTE: Depending on your Commons role, you might not have access to all sections of
the PersonalProfile.
Selecting a Profile to Edit
You can grant any active eRACommons user the ability to enter your Personal Profile
information by delegating PPF authority. If you have been designated with this authority,
you must select which profile you wish to access.
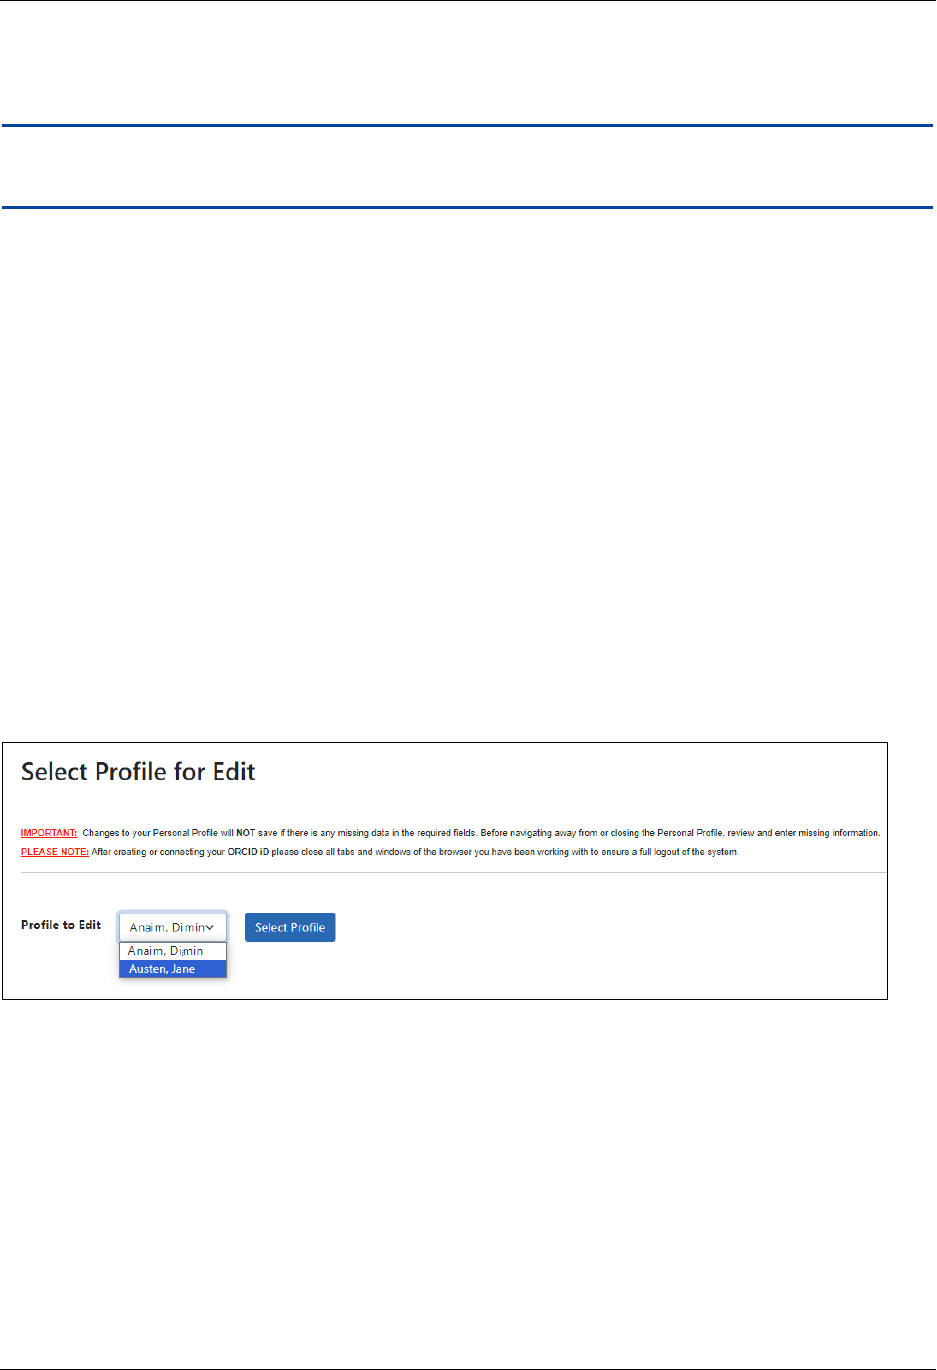
After selecting the Personal Profile tab from the Commons menu, you will be instructed
to choose a profile for editing.
Select a name from the Profile to Edit drop-down list and click the Select Profile but-
ton. The profile of your selected person displays and changes made will be reflected on
that profile.
To switch profiles, select the Personal Profile tab again and choose a different profile
from the list.
Figure 1: Select Profile for Edit
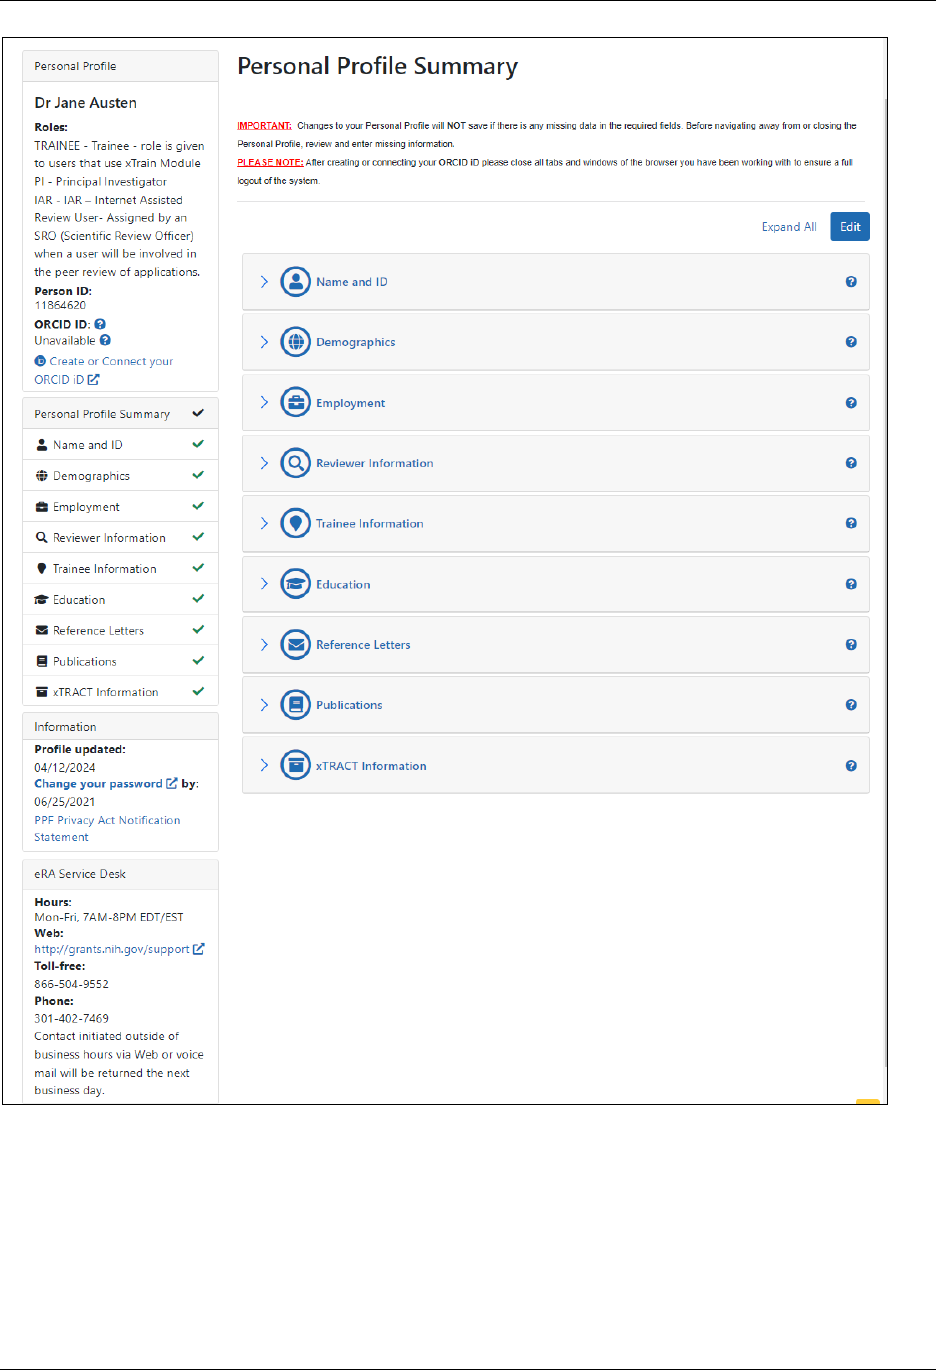
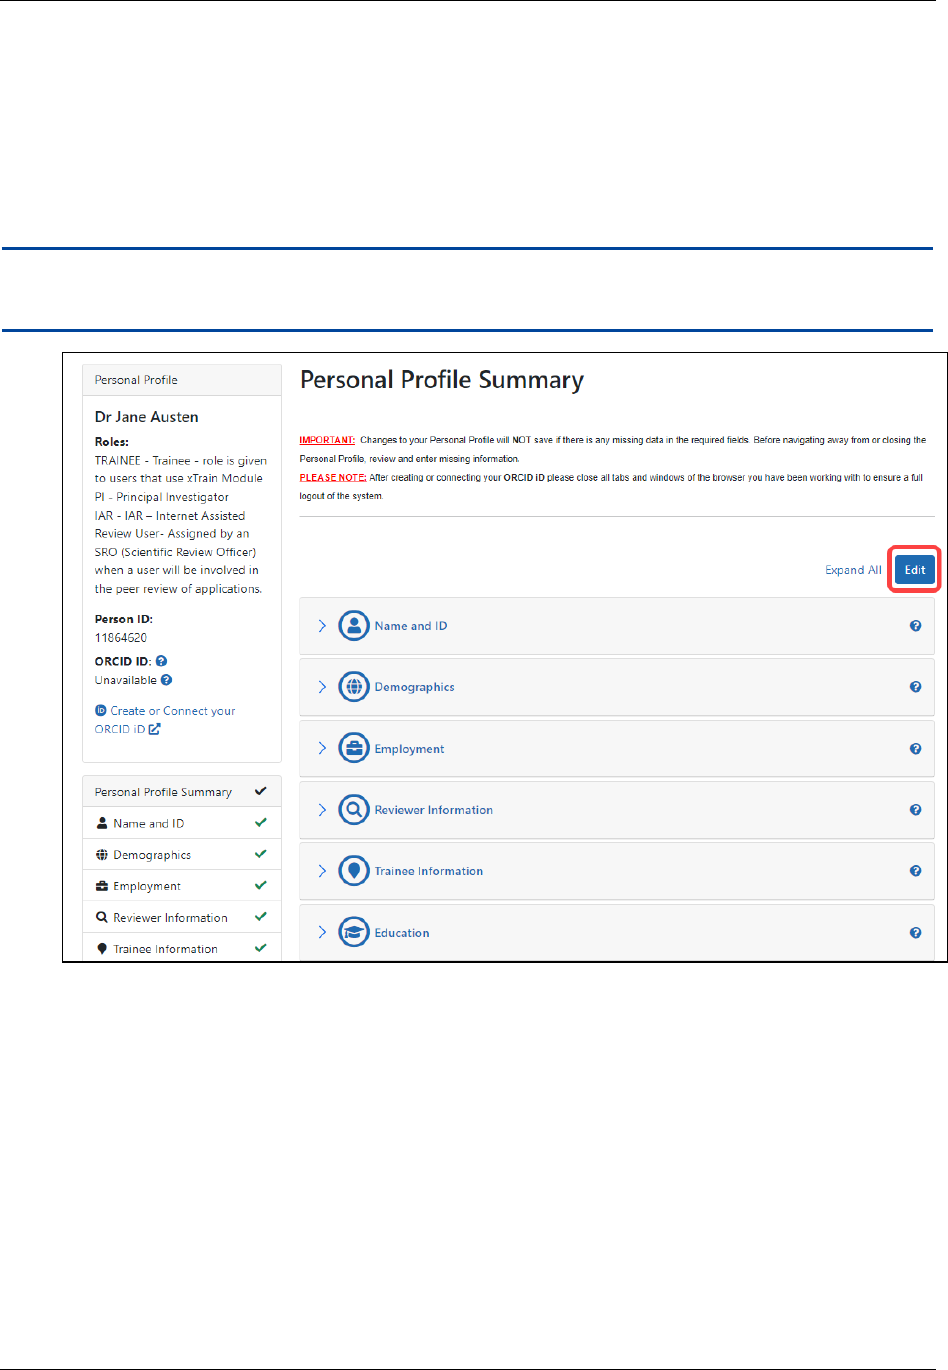
Personal Profile Summary
The Personal Profile Summary page lets you view or edit sections of the PersonalProfile.
Your name appears in the upper left.
Personal Profile User Guide
eRACommons Personal Profile 11 August 5, 2024
IMPORTANT: To save any profile changes, you must click the Save All button, which is
located at the top right of the screen. You can save profile changes ONLY after fixing ALL
error items in red/pink that show a red x ( ), even those unrelated to your current
change. If you save while errors exist, changes are NOTsaved and you see an error mes-
sage.
Personal Profile User Guide
eRACommons Personal Profile 12 August 5, 2024
Figure 2: PersonalProfile Summary Page

Personal Profile User Guide
eRACommons Personal Profile 13 August 5, 2024
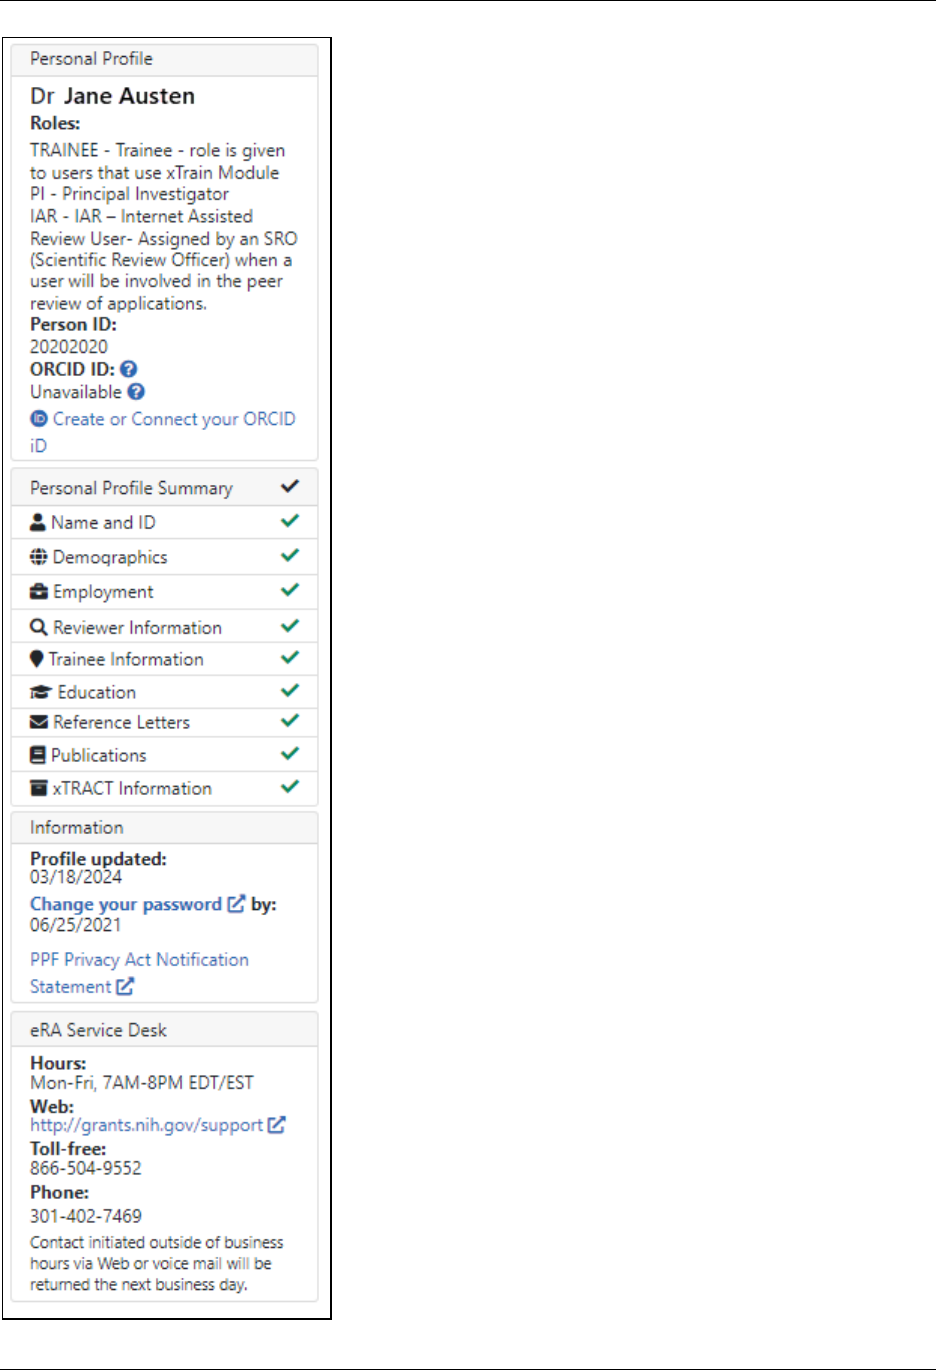
Dashboard
The left side of the summary page contains user name, person ID, a list of user roles, and
ORCID if available. Also shown is eRAService Desk contact information.
Personal Profile User Guide
eRACommons Personal Profile 14 August 5, 2024

Personal Profile User Guide
eRACommons Personal Profile 15 August 5, 2024
Figure 3: PersonalProfile Dashboard
Personal Profile Information:
l
Name of the personal profile
l
List of roles associated with the personal profile
l
Person ID associated with the personal profile
l
ORCID ID (or link to set up an ORCID ID); see The ORCID ID on page 88.
o
Additional Instructions for Fellowship:
For NIH fellowship applications, the personal profile associated with the eRA
Commons username entered in the Credential field for the PD/PI (fellowship
applicant) must include an ORCID ID (e.g., orcid.org/0000-0001-2345-6789)
to pass NIH validation requirements.
o
Additional Instructions for Career Development:
For NIH career development award applications, the personal profile asso-
ciated with the eRA Commons username entered in the Credential field for
the PD/PI (candidate) must include an ORCID ID (e.g., orcid.org/0000-0001-
2345-6789) in order to pass NIH validation requirements.
o
Additional Instructions for Trainees:
For NIH trainees, the Personal Profile associated with the eRA Commons user
ID must be linked to an ORCID ID (e.g., orcid.org/0000-0001-2345-6789) in
order to pass NIH validation requirements.
PersonalProfile Expand/Collapse Links
The left side shows links for each of the sections of the Personal Profile. Clicking these
links expands the corresponding section of Personal Profile. A green checkmark mean
the section's required fields are complete, while a red x means they are not.
Personal Profile User Guide
eRACommons Personal Profile 16 August 5, 2024
NOTE: The Personal Profile sections vary depending on your user role. Not all profile sec-
tions are available for all Commons users. If you are affiliated with multiple institutions
and hold different roles at each, your profile will display the sections applicable for all
roles across affiliations.
Update and Access Information:
l
Profile Updated:system displays date when the user last performed a save onthe
Personal Profile
l
Change your password:Date when password will expire plus a link for accessing
the Change Password feature
eRAService Desk Information
Includes the hours, phone numbers, and web address for contacting and creating a ticket
for system support.
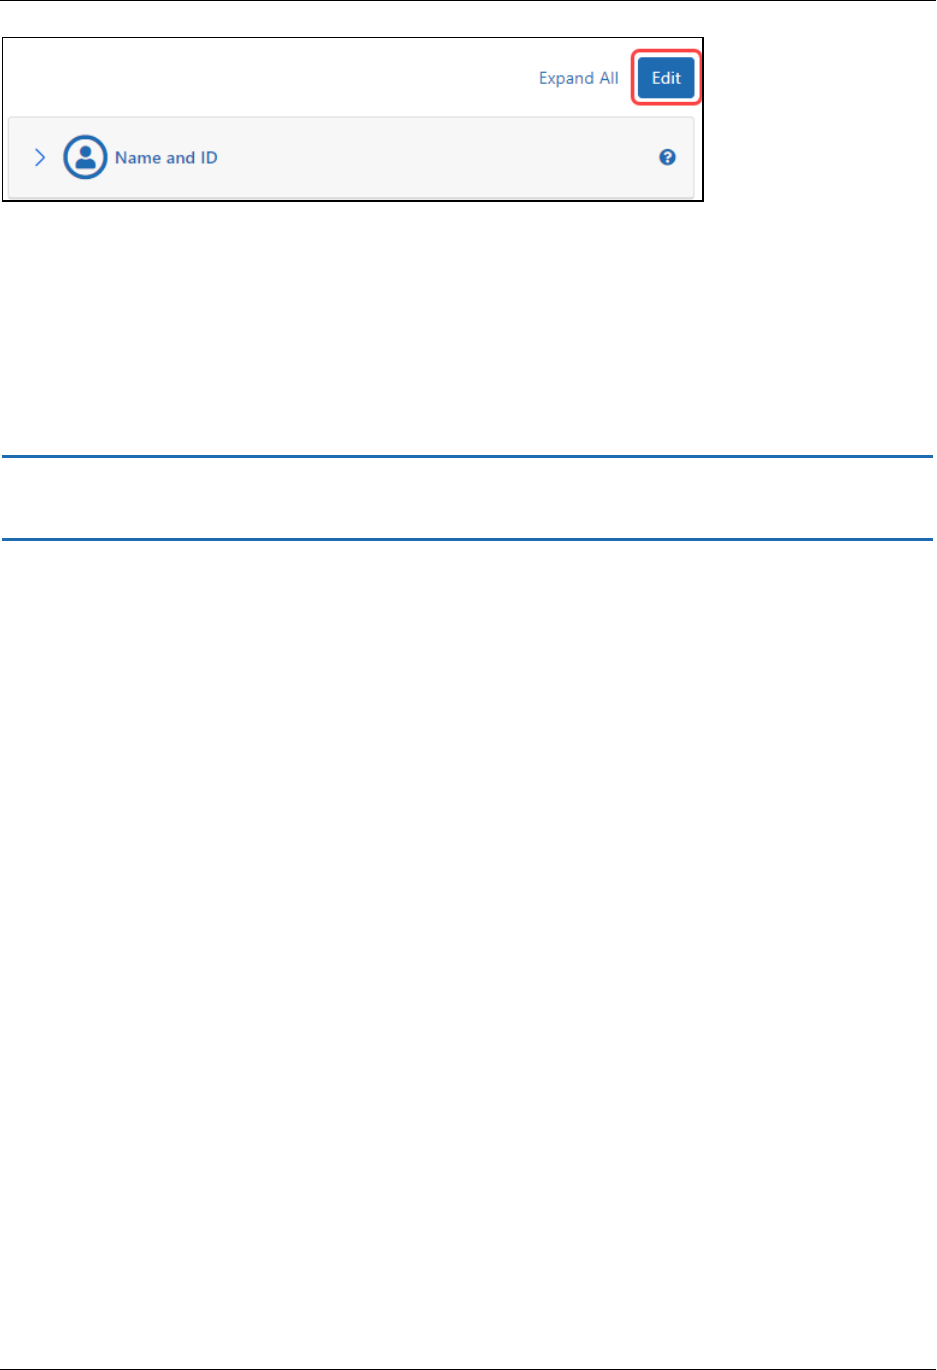
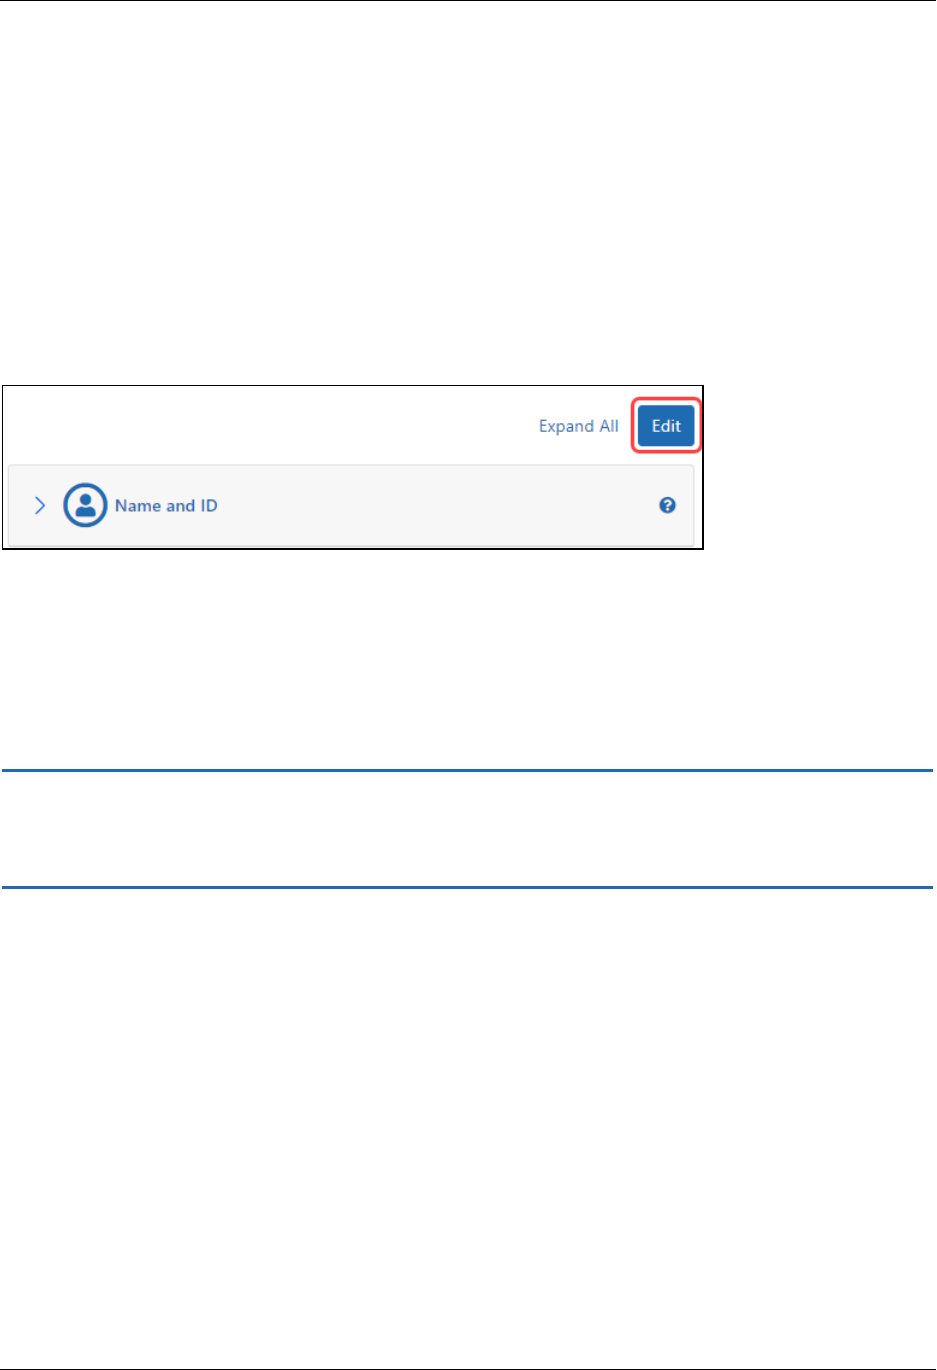
Personal Profile Summary Sections
The Personal Profile Summary page displays profile information for each section, which
you can expand or collapse by clicking the section header.
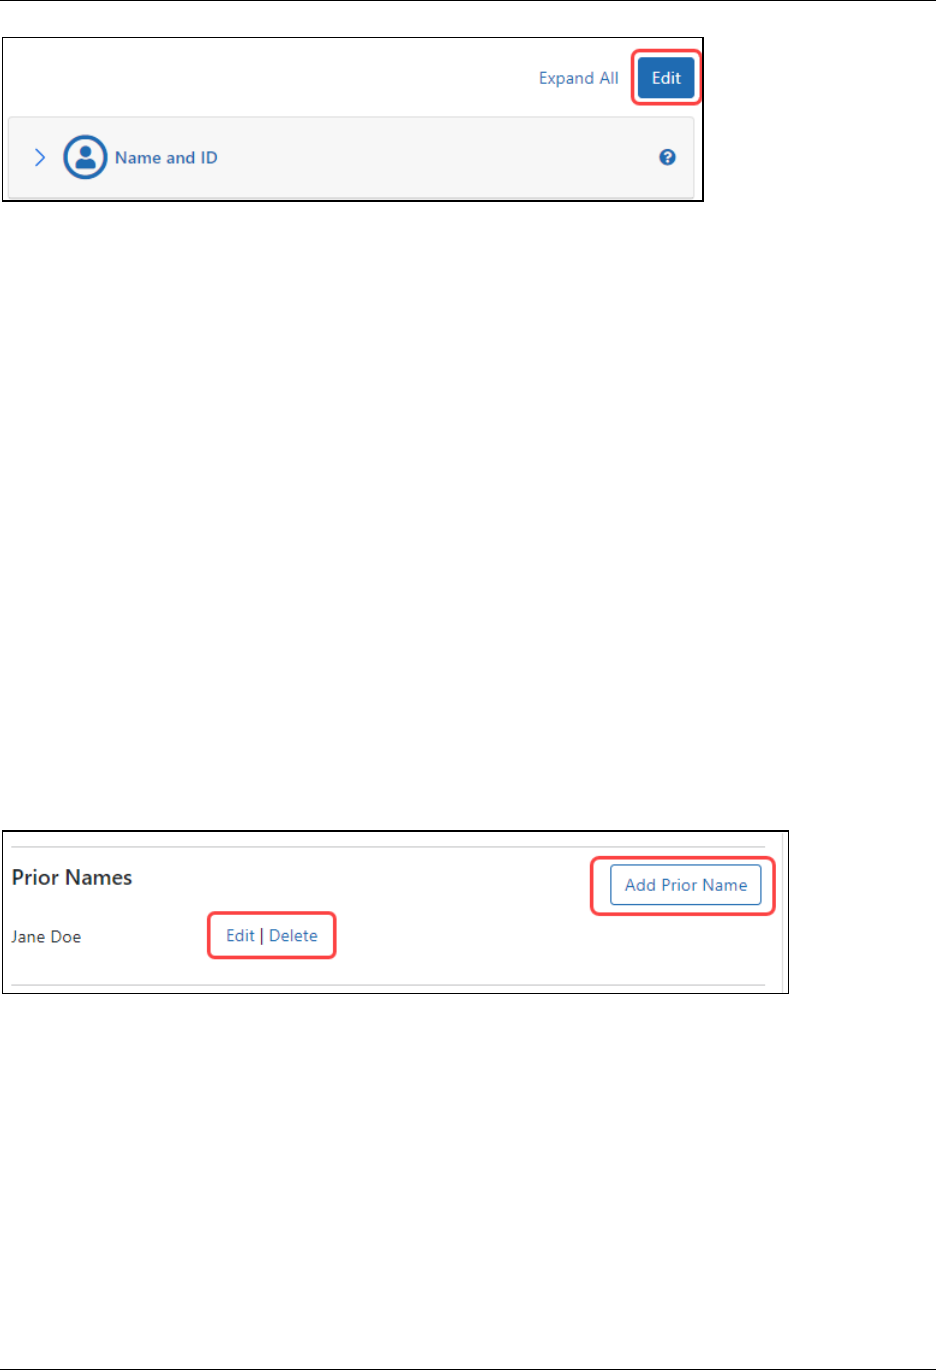
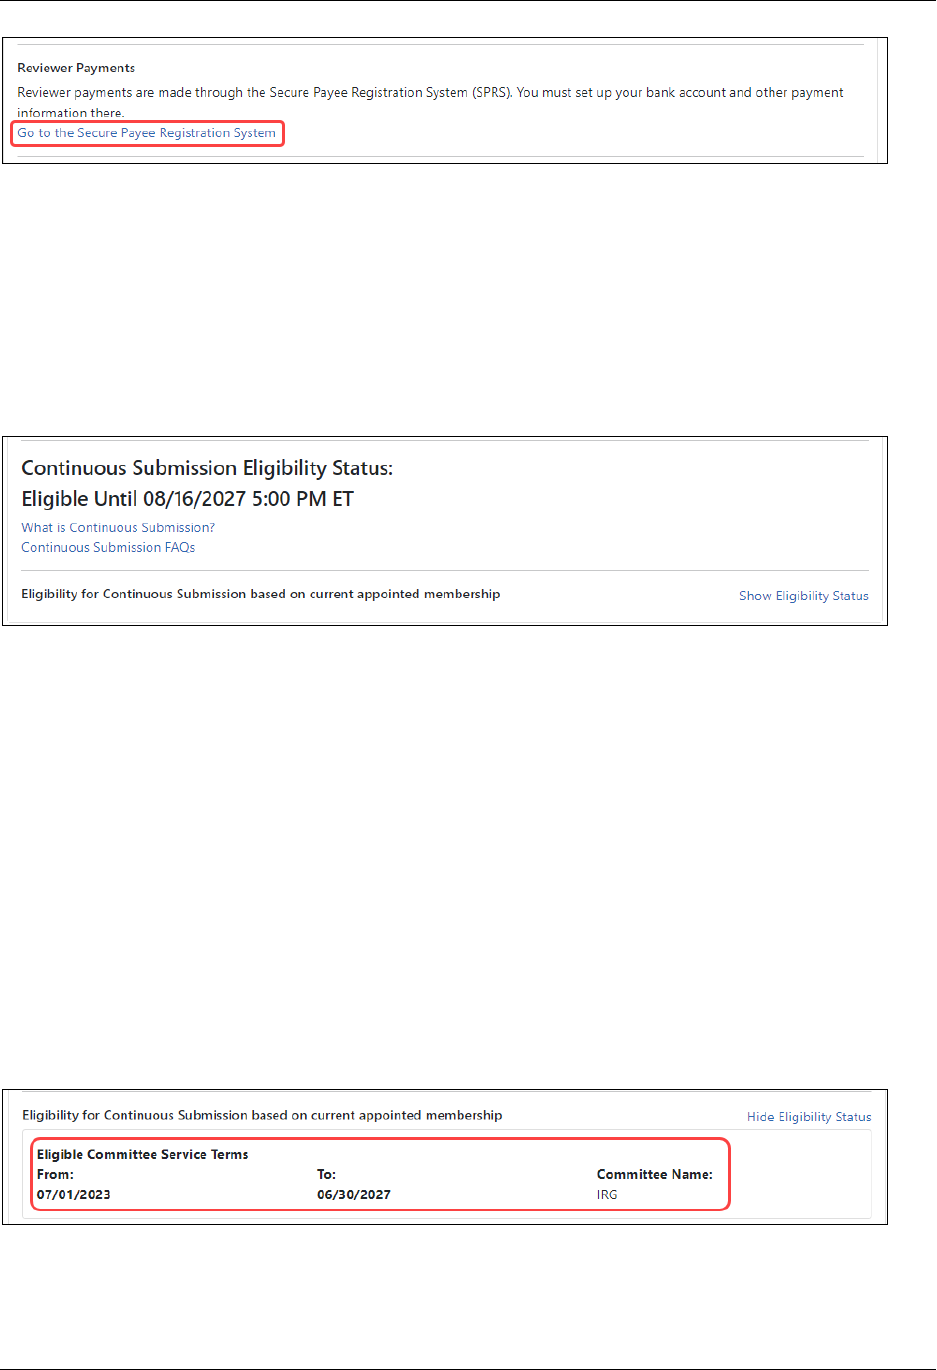
To edit any section, first click the Edit button at the upper right of the section headers:
Personal Profile User Guide
eRACommons Personal Profile 17 August 5, 2024
To expand all sections, click the + Expand All button.
To save entered data, click the Save All button. (Save All is available only after clicking
the Edit button to enter Edit mode.)
To discarded data you just entered/edited, click the Discard Changes button. (Discard
Changes is available only after clicking the Edit button to enter Edit mode.)
IMPORTANT: All required fields in the entire Personal Profile (not just the section you
edited) must be filled in prior to saving; otherwise you cannot save.
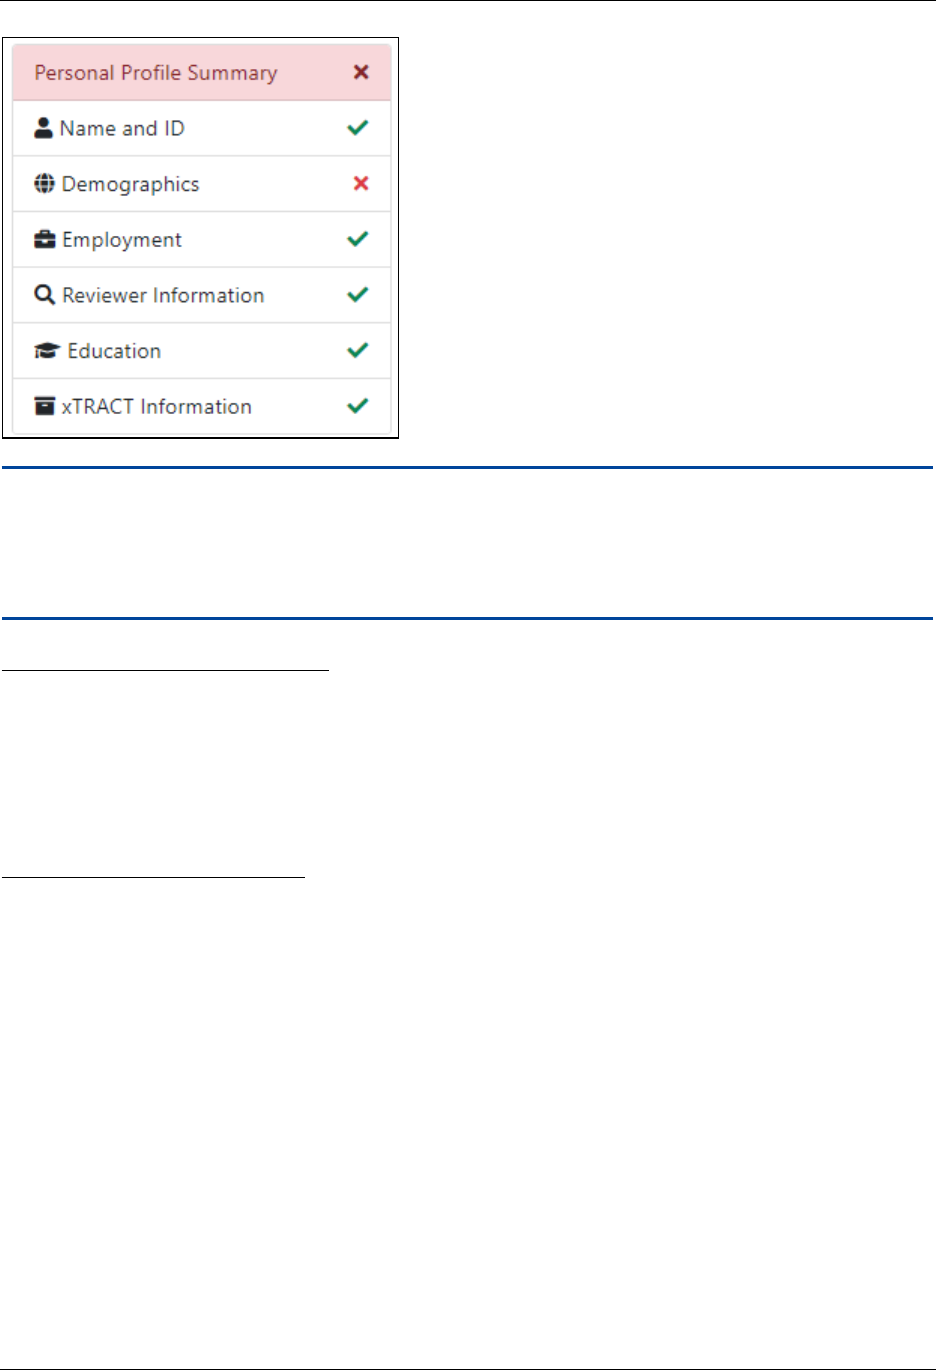
Personal Profile Errors
If any required information is missing from ANY section, a message titled Error(s) dis-
plays across the top of the screen as well as in the header for the incomplete section.
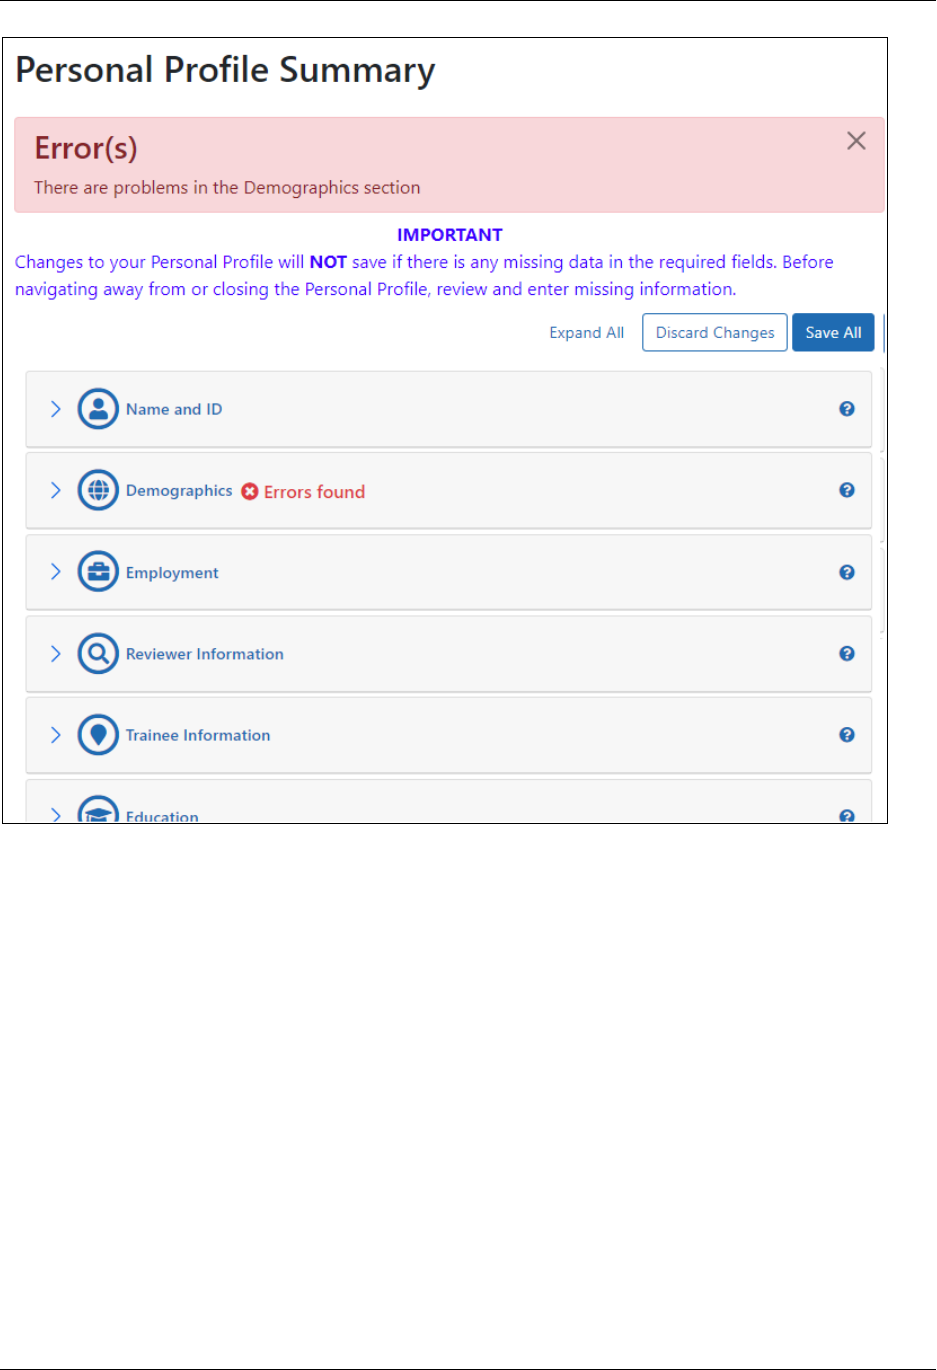
Personal Profile User Guide
eRACommons Personal Profile 18 August 5, 2024
Figure 4: PersonalProfile Summary Indicating errors/missing information
You must correct the error prior to saving. You cannot save unless you first correct the
error.
What's the Difference Between View andEdit?
The PersonalProfile provides you two ways to access your information:view mode and
edit mode.
Personal Profile User Guide
eRACommons Personal Profile 19 August 5, 2024
Viewing the Information in Your Profile
View mode provides a read-only summary of the information within a specific com-
ponent of the profile. In view mode, not all fields are displayed. To view a section, click its
heading. To expand all sections at once, click the Expand All button.
Editing the Information in Your Profile
You can edit any section of your profile by clicking a Edit button at the top right of the
Personal Profile screen. This unlocks the entire profile for editing.
You can then expand sections and update the information as necessary.
Not all components can be edited. View-only components do not have an Edit button.
When you are done editing your profile, click the Save All button. Navigating away from
Personal Profile turns Edit mode off.
TIP: Hiding or closing sections of the profile is not the same thing as saving the inform-
ation. If you navigate away from the personal profile, your changes will be lost. You must
click the Save All button to save your changes!
If you wish to discard your changes, click the Discard Changes button, then click Yes
from the confirmation popup. Keep in mind that any information you've added since the
last time you clicked Save All will be discarded when you click the Discard Changes but-
ton!
Refer to the help topics for each individual profile component to see what fields are avail-
able for editing.
Personal Profile User Guide
Name and ID 20 August 5, 2024
Name and ID
The Name andID section of the PersonalProfile lets you view, add, or update your:
l
Name
l
Prior Names
l
Email address
l
Preferred address information for all communication generated fromCommons
l
Identification information to differentiate you from other Commons users with a
similar name
l
Citizenship status
All Commons users have access to the Name andID section of the Personal Profile.
IMPORTANT: To save any profile changes, you must click the Save All button, which is
located at the top right of the screen. You can save profile changes ONLY after fixing ALL
error items in red/pink that show a red x ( ), even those unrelated to your current
change. If you save while errors exist, changes are NOTsaved and you see an error mes-
sage.
Viewing Name and ID
Click the Name and ID section heading to see the section content.
The information initially displays as read-only.
l
Name
l
Username
l
eRAPerson ID
l
Email for Account-Related Communications
l
Contact Information for Commons Communications
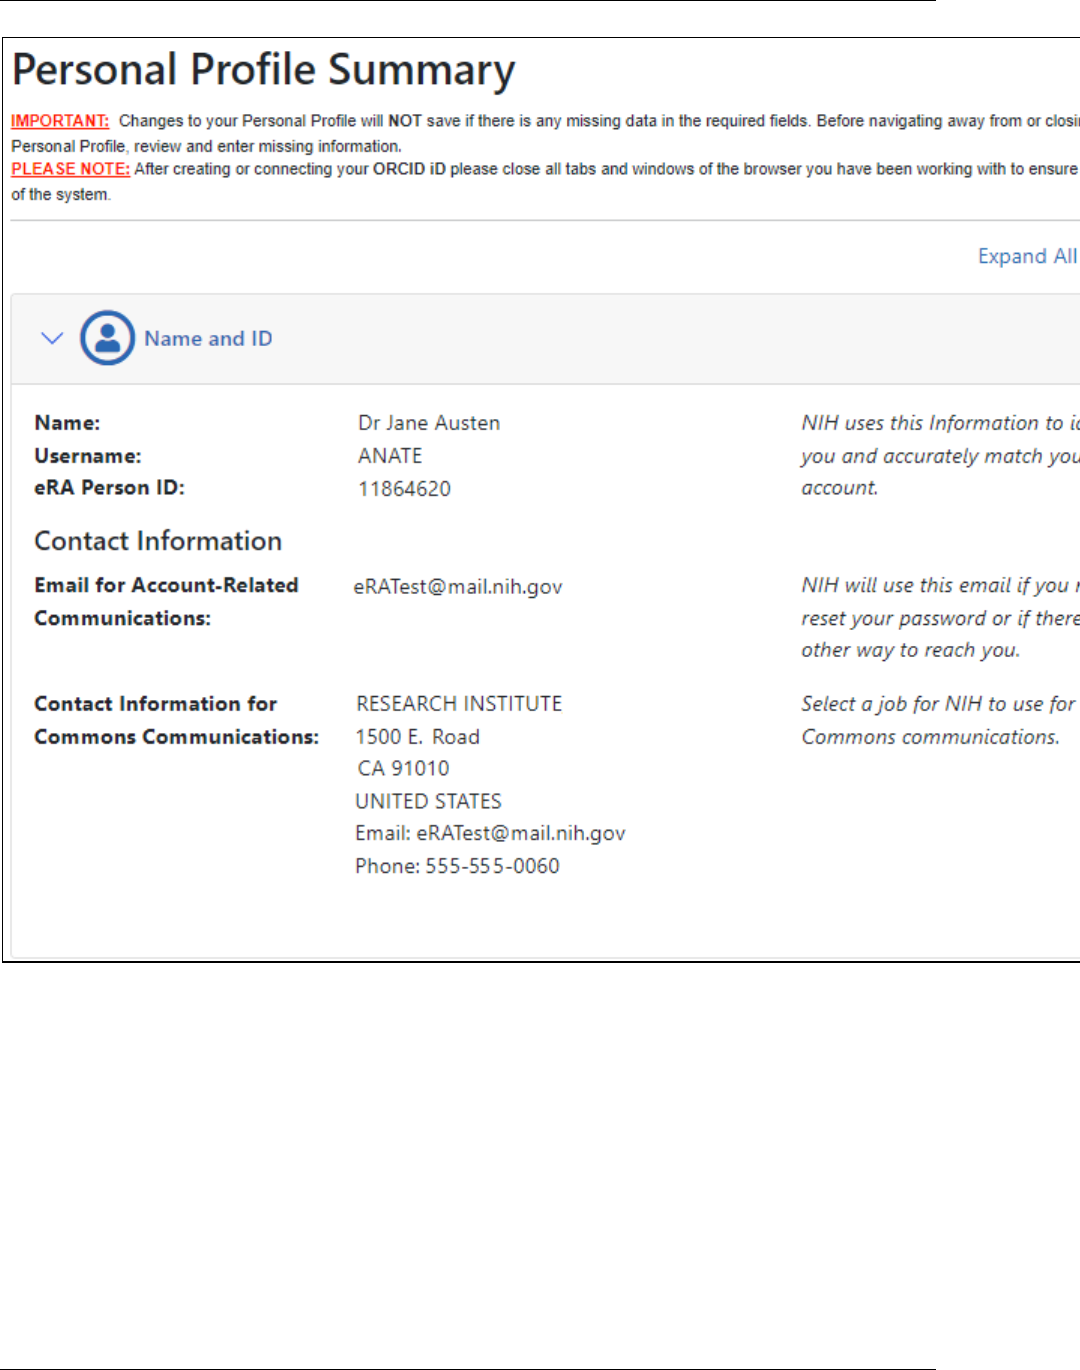
Personal Profile User Guide
Name and ID 21 August 5, 2024
Figure 5: Summary View of Personal Profile Name and ID
Editing Name and ID
To edit any section, first click the Edit button at the upper right of the section headers:
Personal Profile User Guide
Name and ID 22 August 5, 2024
The following fields are available for editing in Name and ID:
Name
l
Prefix:Select a choice from the drop-down list.
l
First Name (required): Enter your first name.
l
Middle Name:If you have a very common name, it is helpful to enter your middle
name.
l
Last Name (required): Enter your last name.
l
Suffix:Select a choice from the drop-down list.
Prior Names
You can enter, view, edit, and delete prior names in the Name and ID section. Use the
Prior Names section to specify other names you have used professionally in the past
(such as maiden, married names, etc.), so that your award data and career progress can
be better maintained and tracked in eRA Commons. The Prior Names section is only
accessible for NIH official use when completing reporting requirements and will not be
shared.
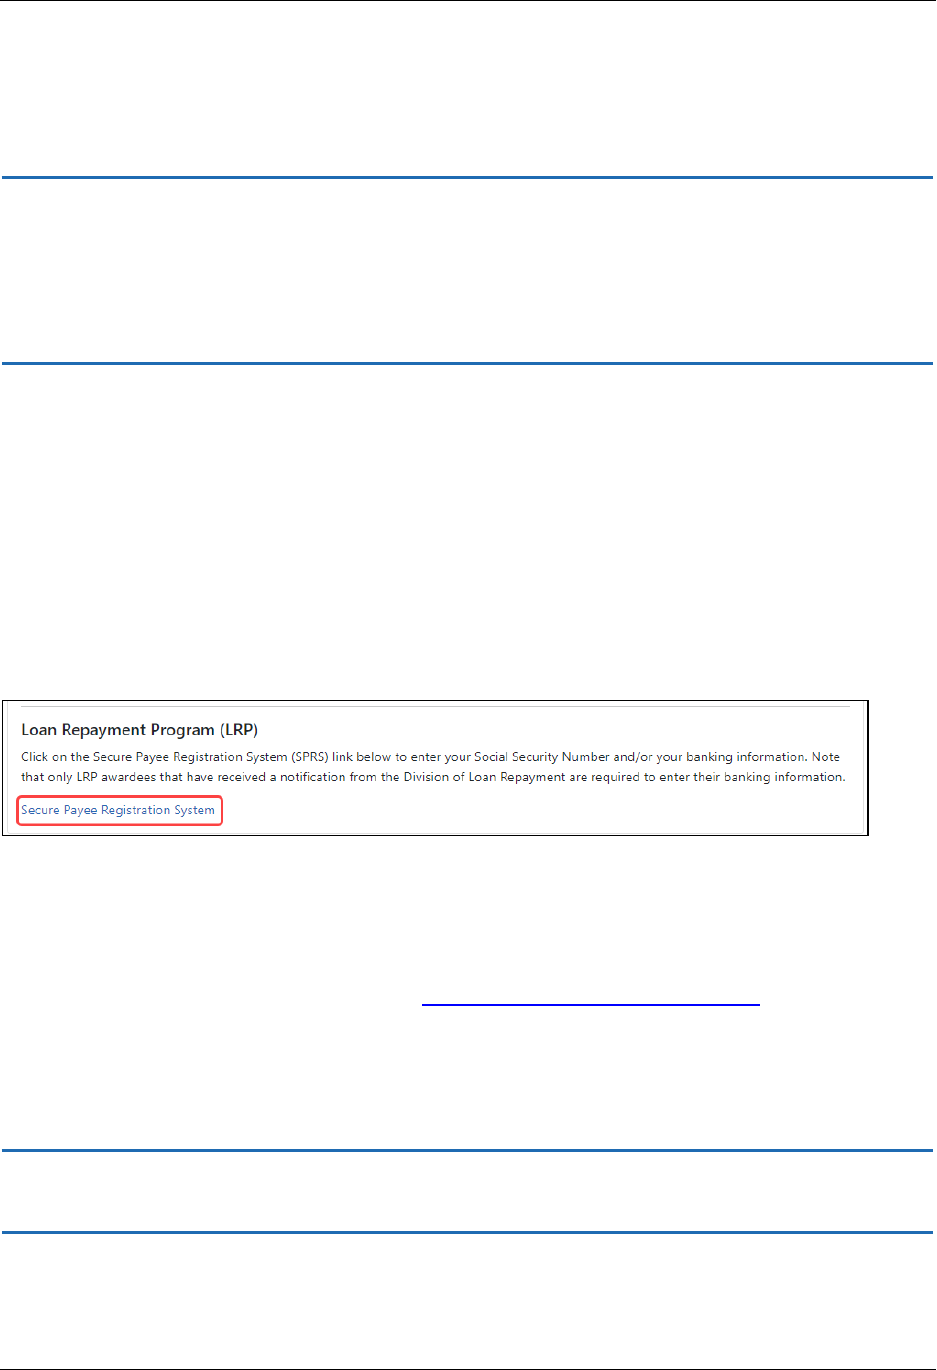
In the Prior Names section, which lists all previously entered names, you can enter new
names and update or delete existing names.
l
To add a new name, click the Add Prior Name button and complete the fields in
the new section that drops down.

Personal Profile User Guide
Name and ID 23 August 5, 2024
l
To change an existing name, click its Edit link and edit the fields in the onscreen
section that drops down.
l
To remove an existing name, click its Delete link, then click the Delete button in
the Delete Prior Name section that drops down.
Email Address
l
For account-related communications
Enter the email address at which you prefer to receive communications from Com-
mons about managing your profile. This will also be the addresses used if no other
means of reaching you is provided. Required field. NIHrecommends that you use
an email that you will have access to even after changing jobs.
l
Replace other email addresses?
Select this checkbox if you would like this account-related communications email
address to replace the email address(es) you provided for Grants Communication
and Reviewer Correspondence in the other sections of the Personal Profile.
Address for Awards-Related Communications
l
Use contact information from current job
Select a job from the drop-down list.
Remember:you can update your jobs on the Employment section of the profile. A
link to Employment is provided next to this field.
Identification
l
Date of Birth (required)
Enter your date of birth in the format MM/DD/YYYY or select a date from the cal-
endar icon.Selecting the Do Not Wish to Provide checkbox also counts as filling
out this required field.
Personal Profile User Guide
Name and ID 24 August 5, 2024
l
SSN (optional)
Enter the last four digits of your Social Security Number (SSN)to help eRAidentify
you more accurately.
IMPORTANT: As a security measure, the Date of Birth and SSN fields are only editable
if blank or filled with all zeroes. Once populated with other data, these fields become
read-only to prevent accidental updates to the wrong personal profile. Should you need
to make changes to either of these fields and cannot, contact the eRAService Desk for
assistance.
Citizenship Status
l
What country are you a citizen of? (required)
Select a country from the drop-down list.
l
Citizenship Status (required)
Select the appropriate radio button.
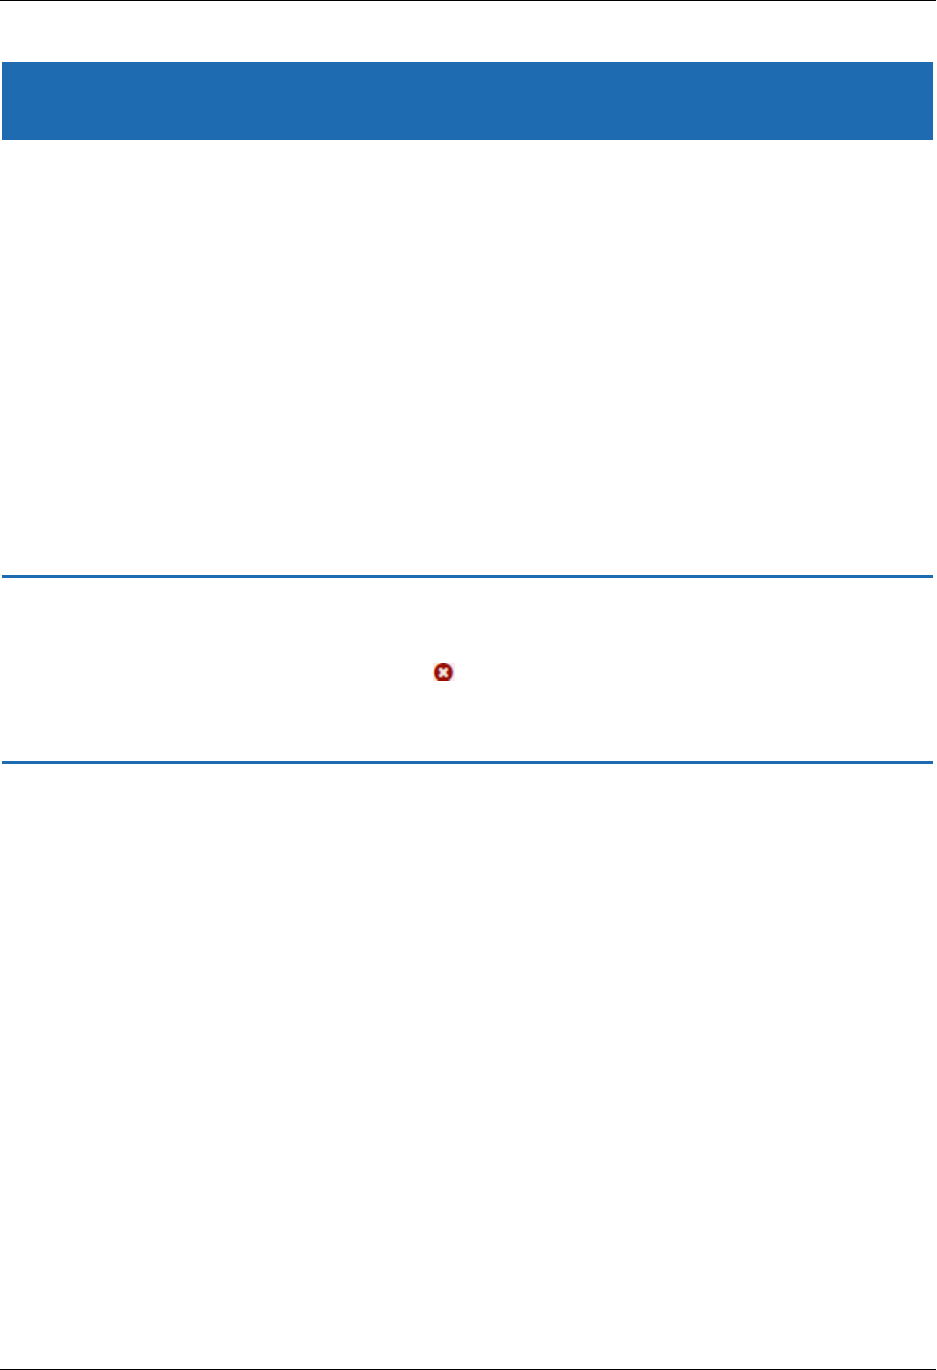
Loan Repayment Program (LRP)
For certain LRP applicants who were selected or awardees who are eligible for reim-
bursement, an additional section titled Loan Repayment Program (LRP) appears at the
end of the Name and ID section of Personal Profile. It contains a link to the Secure Payee
Registration System; see the topic titled Submitting Banking Information in LRP online
help.
When you are done with your edits, click the Save All button at the top of the profile to
save your changes.
IMPORTANT: As a security measure, after if you are updating the value of a previously
entered email address, date of birth, and/or SocialSecurity Number, Commons will send

Personal Profile User Guide
Name and ID 25 August 5, 2024
an email to the former (if changed)email address in a person's Commons profile as an
alert to the change. If you receive this email after making these changes, no further
action is required. If you have not made these changes to your profile and receive this
alert, please contact the eRA Commons Help Desk immediately.
Personal Profile User Guide
Demographics 26 August 5, 2024
Demographics
The Demographics section of the PersonalProfile lets you view, add, or update your:
l
Sex
l
Ethnicity and race
l
Disability
If you are in a training or career development program, you must answer questions con-
cerning:
l
Repayment of federal debt (required if you have a Trainee role)
l
Disadvantaged background (required if you have a Trainee role)
All Commons users have access to the Demographics section of the Personal Profile.
IMPORTANT: To save any profile changes, you must click the Save All button, which is
located at the top right of the screen. You can save profile changes ONLY after fixing ALL
error items in red/pink that show a red x ( ), even those unrelated to your current
change. If you save while errors exist, changes are NOTsaved and you see an error mes-
sage.
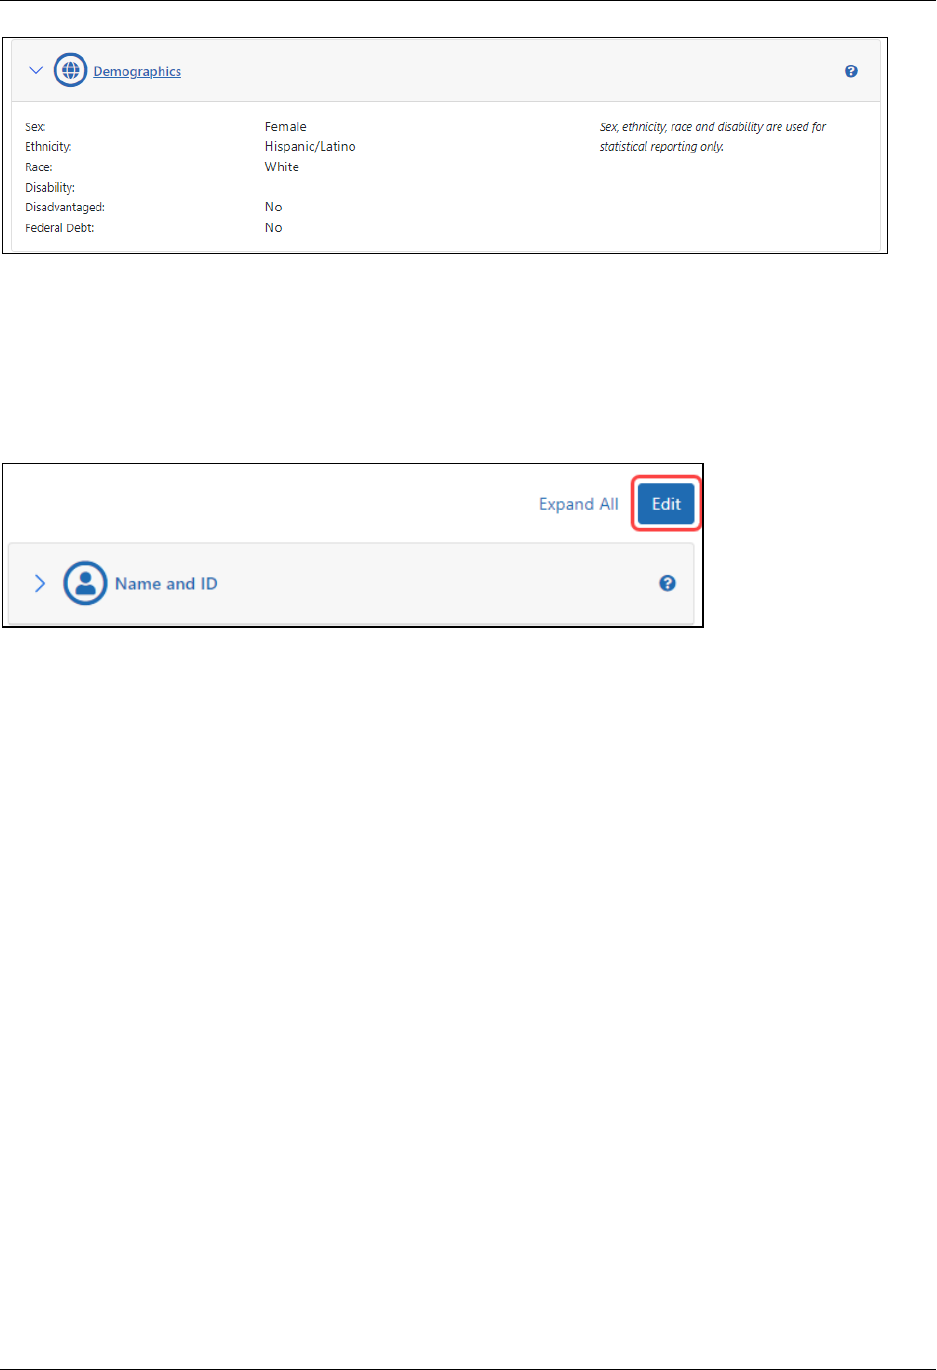
Viewing Demographics
Click the Demographics section heading to see the section content.
The following information displays as read-only:
l
Sex
l
Ethnicity
l
Race
l
Disability
l
FederalDebt (Trainee only)
l
Disadvantaged (Trainee only)
Personal Profile User Guide
Demographics 27 August 5, 2024
Figure 6: Summary View of the Personal Profile Demographics
Edit Demographics
To edit any section, first click the Edit button at the upper right of the section headers:
The following fields are available for editing in Demographics:
Sex
Select the radio button for one of the options (required):
l
Female
l
Male
l
Do not wish to provide
Ethnicity and Race
Select the radio button for the appropriate response to:
l
Ethnicity (required):Select one of the options.
l
Do not wish to provide
l
Hispanic/Latino
l
Non-Hispanic

Personal Profile User Guide
Demographics 28 August 5, 2024
l
Race (required):Select all that apply.
l
American Indian or Alaska Native
l
Asian
l
Black or African American
l
White
l
Native Hawaiian or Other Pacific Islander
l
Other
l
Do not wish to provide
Disability
Select a response to the question Do you have a disability?.If Yes, select the checkbox
for the disability you have. This is a required field.
Questions for Those in Training and Career DevelopmentPrograms
The following questions are required for those persons appointed to and supported by
NRSA or non-NRSA research training, institutional career award, or research education
award.
l
Are you delinquent on the repayment of any U.S. Federal debts?
Select the appropriate radio button. For a response of Yes, use the text box for a
mandatory explanation. Use the link provided next to this field to see examples of
debts requiring a Yes response.
l
Are you from a disadvantaged background?
Select the appropriate radio button. Use the link provided next to this field to see
the full definition of disadvantaged background.
When you are done with your edits, click the Save All button at the top of the profile to
save your changes.
Personal Profile User Guide
Employment 29 August 5, 2024
Employment
The Employment section of the Personal Profile lets you view, add, or update your
research and professional employment history for current and past employment.
The Employment section is considered complete if:
l
PIand IAR roles:Personal Profile contains employment for the past 3 years
l
Trainee roles:Personal Profile contains at least one employment entry
l
Admin roles:Personal Profile contains at least one current employment entry
All Commons users have access to the Employment section of the PersonalProfile.
IMPORTANT: To save any profile changes, you must click the Save All button, which is
located at the top right of the screen. You can save profile changes ONLY after fixing ALL
error items in red/pink that show a red x ( ), even those unrelated to your current
change. If you save while errors exist, changes are NOTsaved and you see an error mes-
sage.
View Employment
Click the Employment section heading to see the section content.
The following information displays as read-only:
l
Current Jobs:Includes any employment entered into the profile with no end date
or an end date in the future
l
Past Jobs:Includes any employment entered into the profile with an end date in
the past
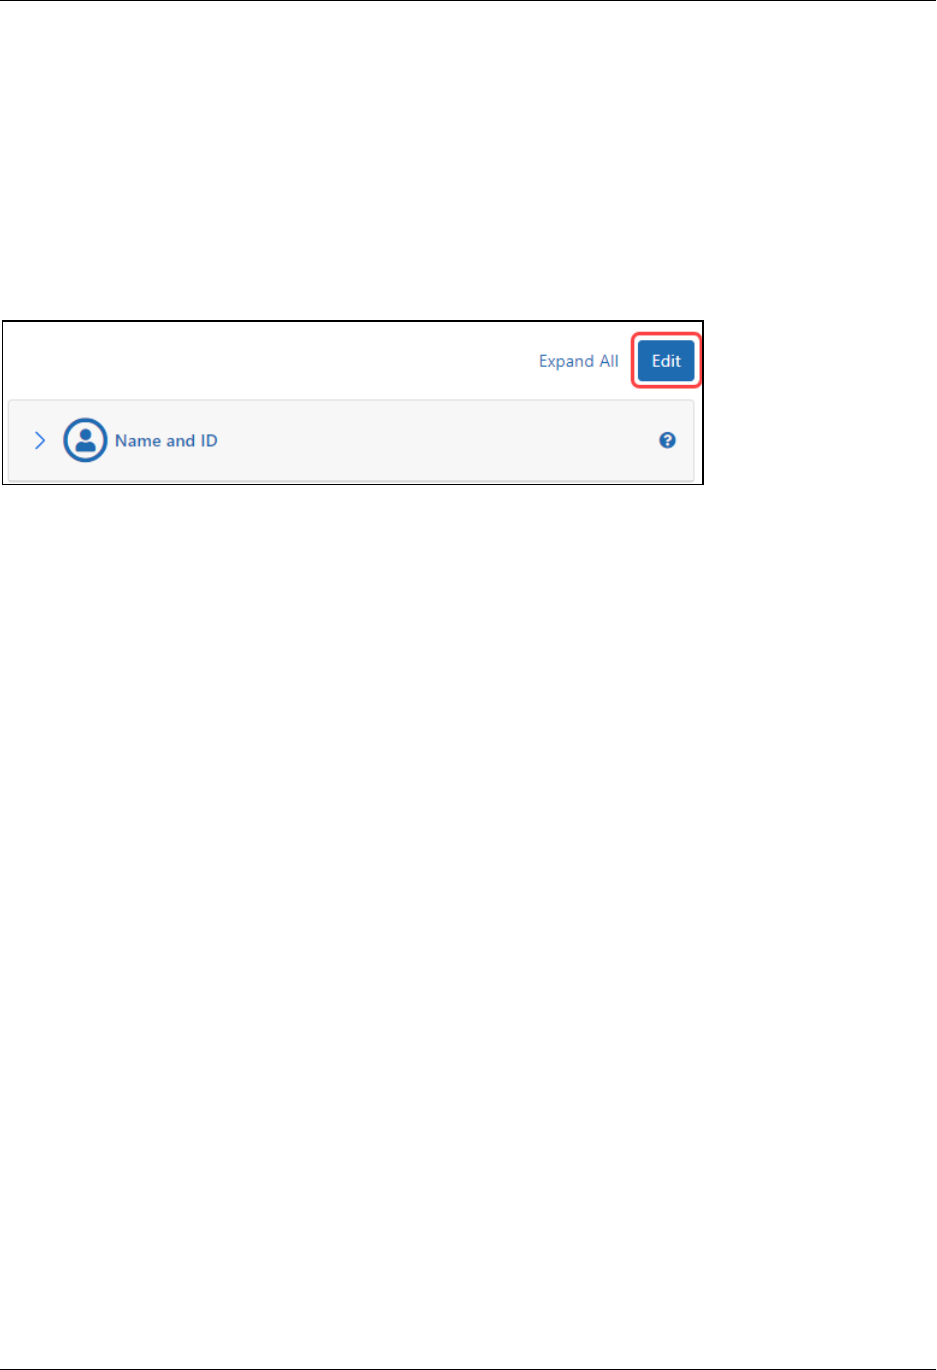
Edit Employment
To edit any section, first click the Edit button at the upper right of the section headers:
Personal Profile User Guide
Employment 30 August 5, 2024
In the edit mode of Employment, you can add, update, or remove current and past jobs.
When you are done with your edits, click the Save All button at the top of the profile to
save your changes.
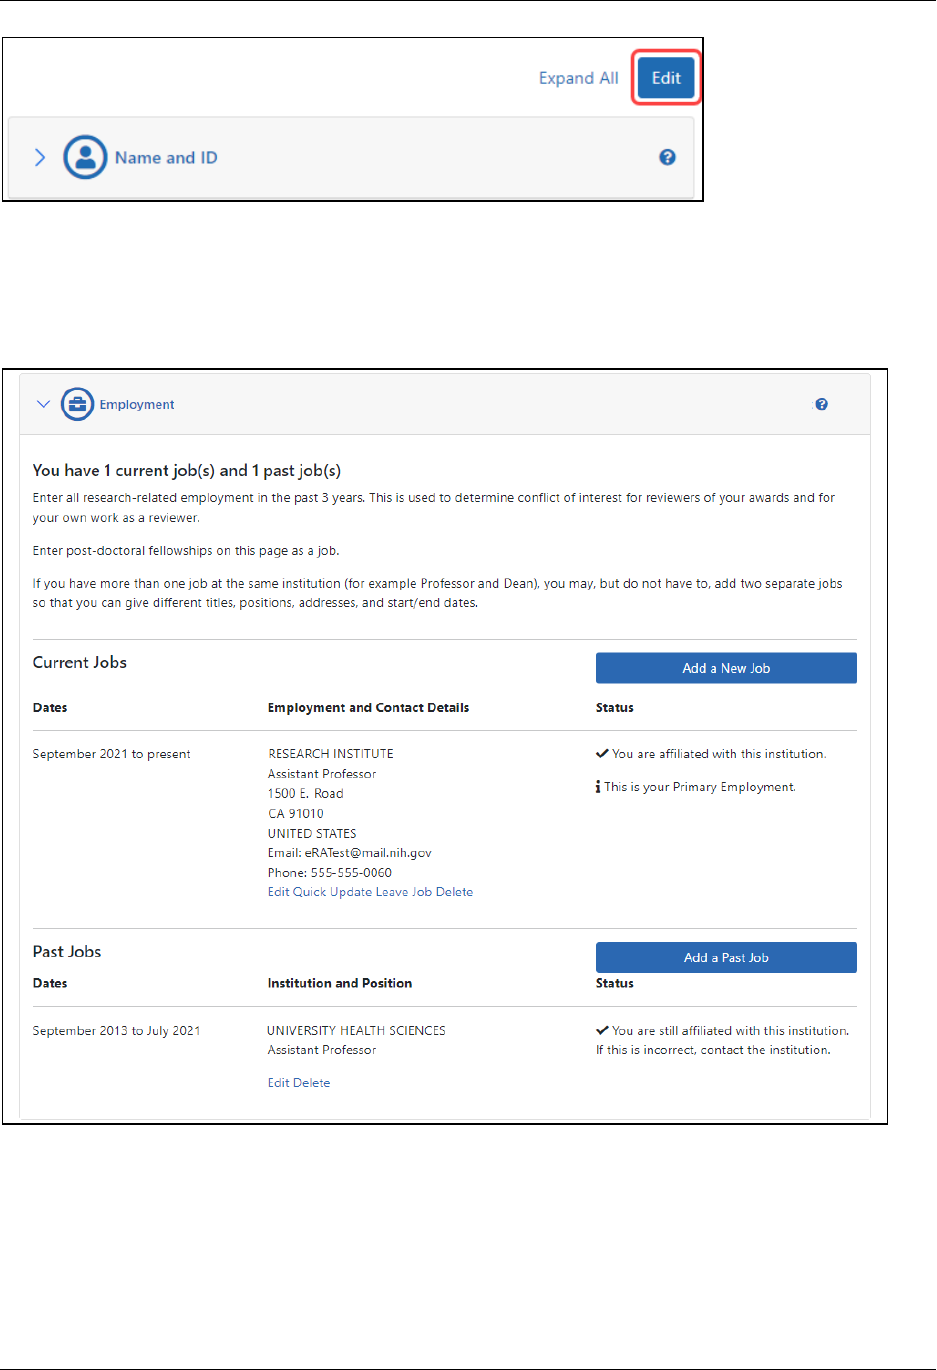
Figure 7: Edit Mode of Personal Profile Employment

Personal Profile User Guide
Employment 31 August 5, 2024
Current Jobs
Displays all current jobs (i.e., jobs with no end date entered) information, including:
l
Dates: Indicates the start date to present
l
Employment and Contact Details: Includes information such as name of the insti-
tution; department; street address; phone; email address
l
Status: Includes information such as current affiliation with institution; whether this
job has been selected as your address for communication; whether this job is your
Primary Employment
From within the Current Job section, you can perform the following tasks:
l
Add a New Job:Provides access for entering details for another current job
l
Edit:Provides access for editing all details of the specific current job
l
Quick Update:Provides access for editing basic information of the specific current
job.
l
Leave Job: Provides access for entering an end date for the specific job
l
Delete: Remove the specific job
Past Jobs
Displays all past jobs (i.e., jobs with an end date entered) information, including:
l
Dates: Indicates the start date to present
l
Institution andPosition: Includes information such as name of the institution and
position held there
l
Status: Includes information such as your current affiliation with institution
From within the Past Jobs section, you can perform the following tasks:
l
Add a Past Job:Provides access for entering details for another past job
l
Edit:Provides access for editing all details of the specific current job
l
Delete: Remove the specific past job
Personal Profile User Guide
Employment 32 August 5, 2024
Updating Your Current Job(s)
Adding a Current Job
If a current job is missing from the list, you can add a new one using the Add a New Job
button in the Employment section of the Personal Profile.
To edit any section, first click the Edit button at the upper right of the section headers:
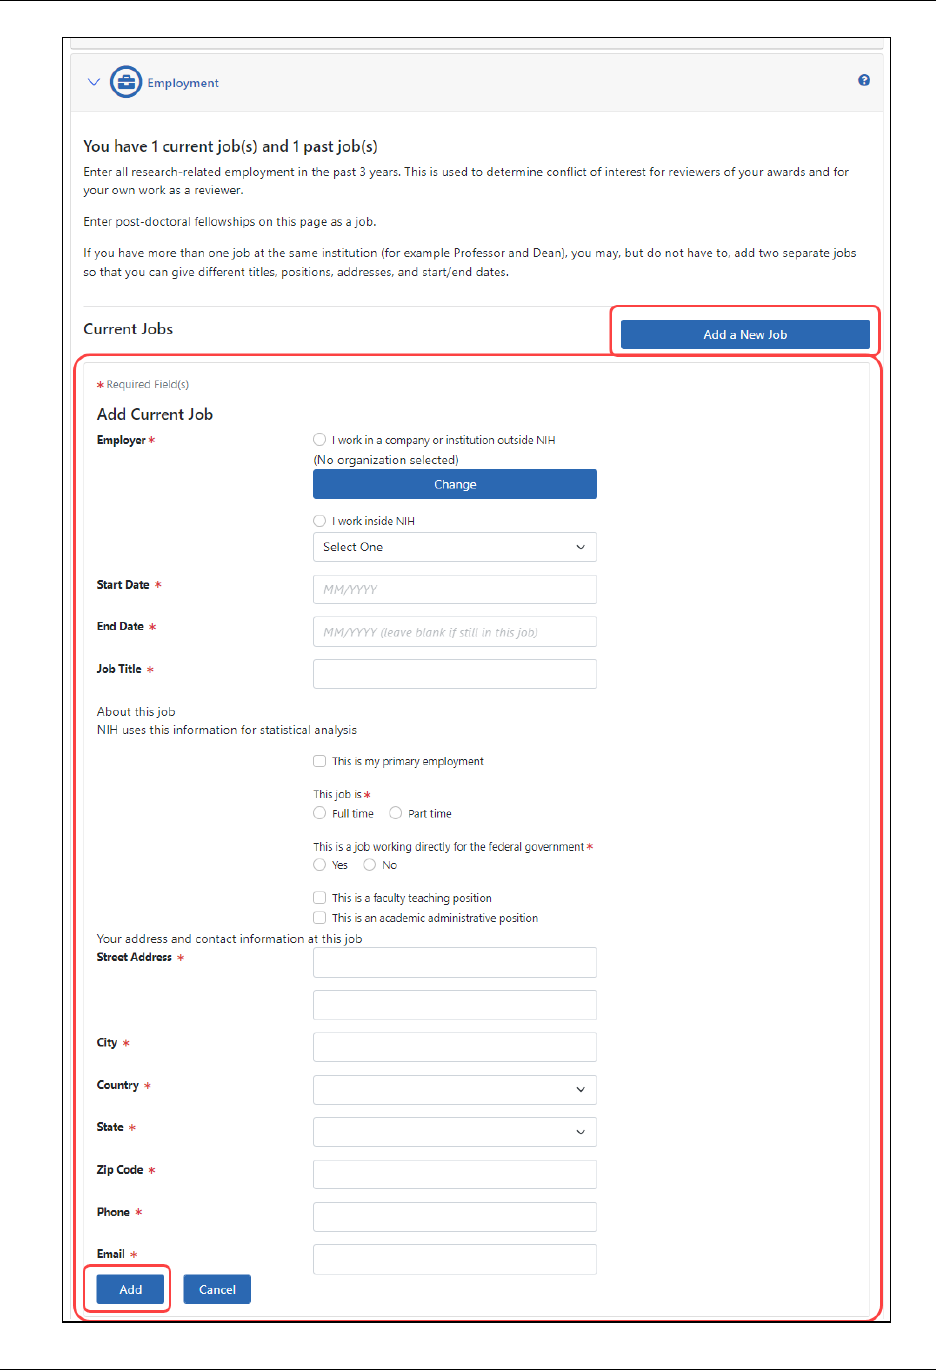
1. Click the Add a New Job button from within Current Jobs.
The Add Current Job data fields display.
Personal Profile User Guide
Employment 33 August 5, 2024

Personal Profile User Guide
Employment 34 August 5, 2024
2. Enter the new job information in the following fields:
Employer (required)
Select the appropriate radio button.
l
I work for a company or institution outside NIH
n
Click the Chose from List button to search for and select a company or
institution.
n
Click the Name of Company Change button to change the name of the
company.
l
I work inside NIH
n
Select the institute from the drop-down list.
Start Date (required)
Enter the start date of the job in a MM/YYYY format.
End Date
Enter the end date only if not currently in the job, otherwise leave this field blank.
Job Title (required)
Enter the position/title held at the job.
About this job
Select all applicable checkboxes:
l
This is my primary employment. . Mark this checkbox ONLY if this job is
where you are CURRENTLY employed.
l
This job is. Choose:Full time or Part time (required)
l
This is a job working directly for the federal government. Choose Yes or
No (required)
l
This is a faculty teaching position. A dropdown appears; select an option
that best matches your academic rank.
l
This is an academic administrative position. A dropdown appears; select
an option that best matches your administrative position.
Your address and contact information at this job
Personal Profile User Guide
Employment 35 August 5, 2024
Enter the address information:
l
Street Address (required)
l
City (required)
l
Country (required)
l
State/Province (required)
l
ZIPCode (required)
l
Phone (required)
l
Email (required)
3. Click the Add button.
4. You can continue editing your profile as necessary, but you must click the Save All
button to save the information.
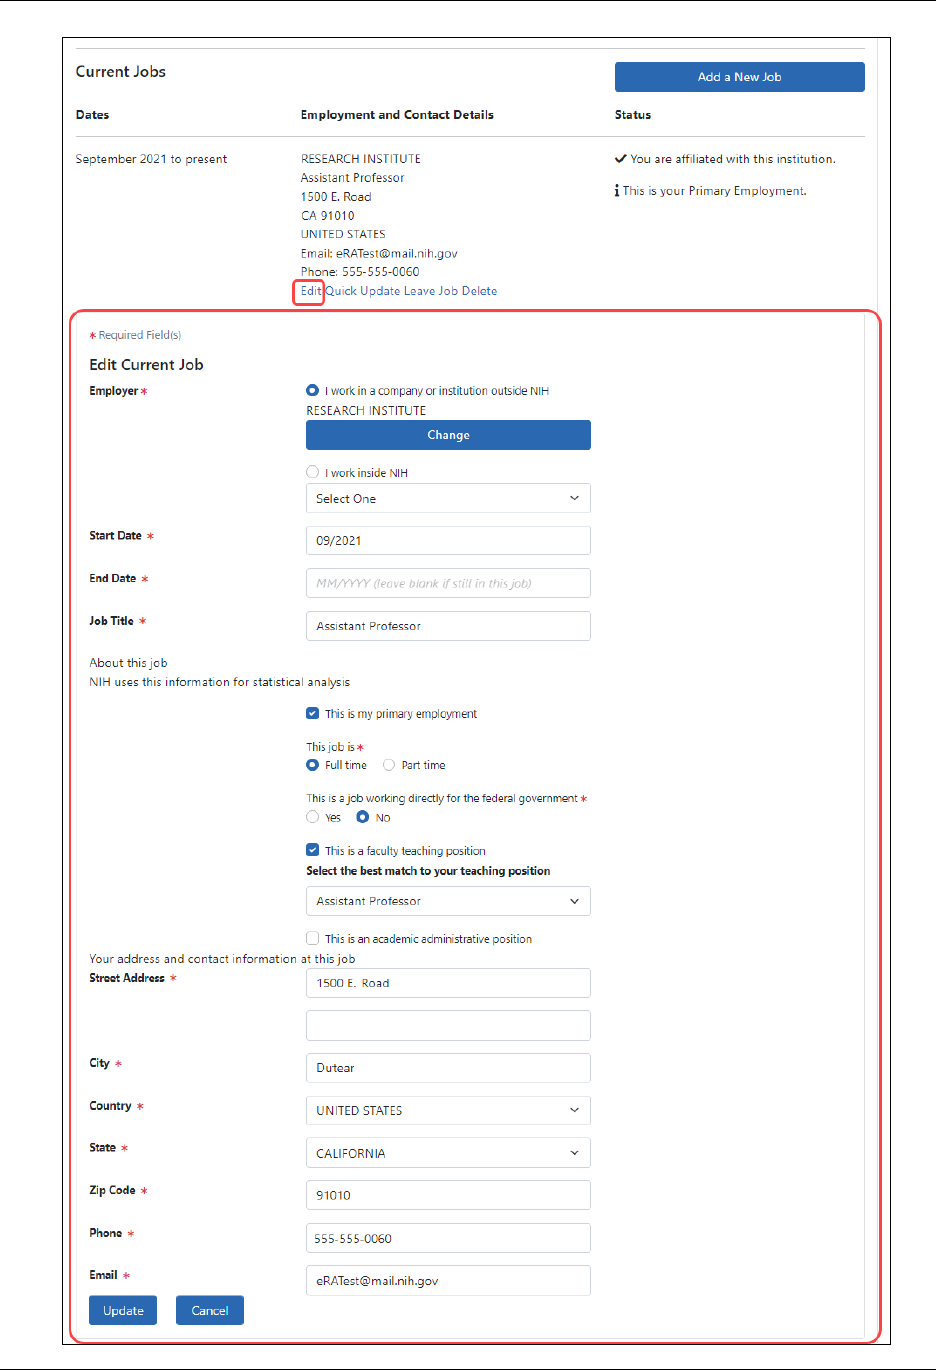
Editing a Current Job
Before editing your profile, remember to first click the Edit button at the top of the Per-
sonal Profile screen to make it editable.
1. Click the Edit button for the current job.
The Edit Current Job data fields display.
Personal Profile User Guide
Employment 36 August 5, 2024

Personal Profile User Guide
Employment 37 August 5, 2024
2. Enter information for the following fields:
Employer (required)
Select the appropriate radio button.
l
I work in a company or institution outside NIH
n
Click the Name of Company Change button to change the name of the
company.
l
I work inside NIH
n
Select the institute from the dropdown.
Start Date (required)
Enter the start date of the job in a MM/YYYY format.
End Date
Enter the end date only if not currently in the job, otherwise leave this field blank.
Job Title(required)
Enter the position/title held at the job.
About this job
Select all applicable checkboxes.
l
This is my primary employment. . Mark this checkbox ONLY if this job is
where you are CURRENTLY employed.
l
This job is. Choose:Full time or Part time (required)
l
This is a job working directly for the federal government. Choose Yes or
No (required)
l
This is a faculty teaching position. A dropdown appears; select an option
that best matches your academic rank.
l
This is an academic administrative position. A dropdown appears; select
an option that best matches your administrative position.
Your address and contact information at this job
Personal Profile User Guide
Employment 38 August 5, 2024
Enter the address information:
l
Street Address (required)
l
City (required)
l
Country (required)
l
State/Province (required if applicable)
l
ZIPCode (required)
l
Phone (required)
l
Email (required)
3. Click the Update button.
4. You can continue editing your profile as necessary, but you must click the Save All
button to save the information.
Performing a Quick Update for a Current Job
Perform a quick update of a current job when you only need to update the more com-
mon items related to a job, such as your phone number, email address, and/or title.
Before editing your profile, remember to first click the Edit button at the top of the Per-
sonal Profile screen to make it editable.
1. Click the Quick Update link for the current job.
The Update Info data fields display.
2. In the Update Info section that drops down, update the following fields.
l
My information has changed at this job:
n
Phone
n
Email
n
Title
3. Click the Update button.
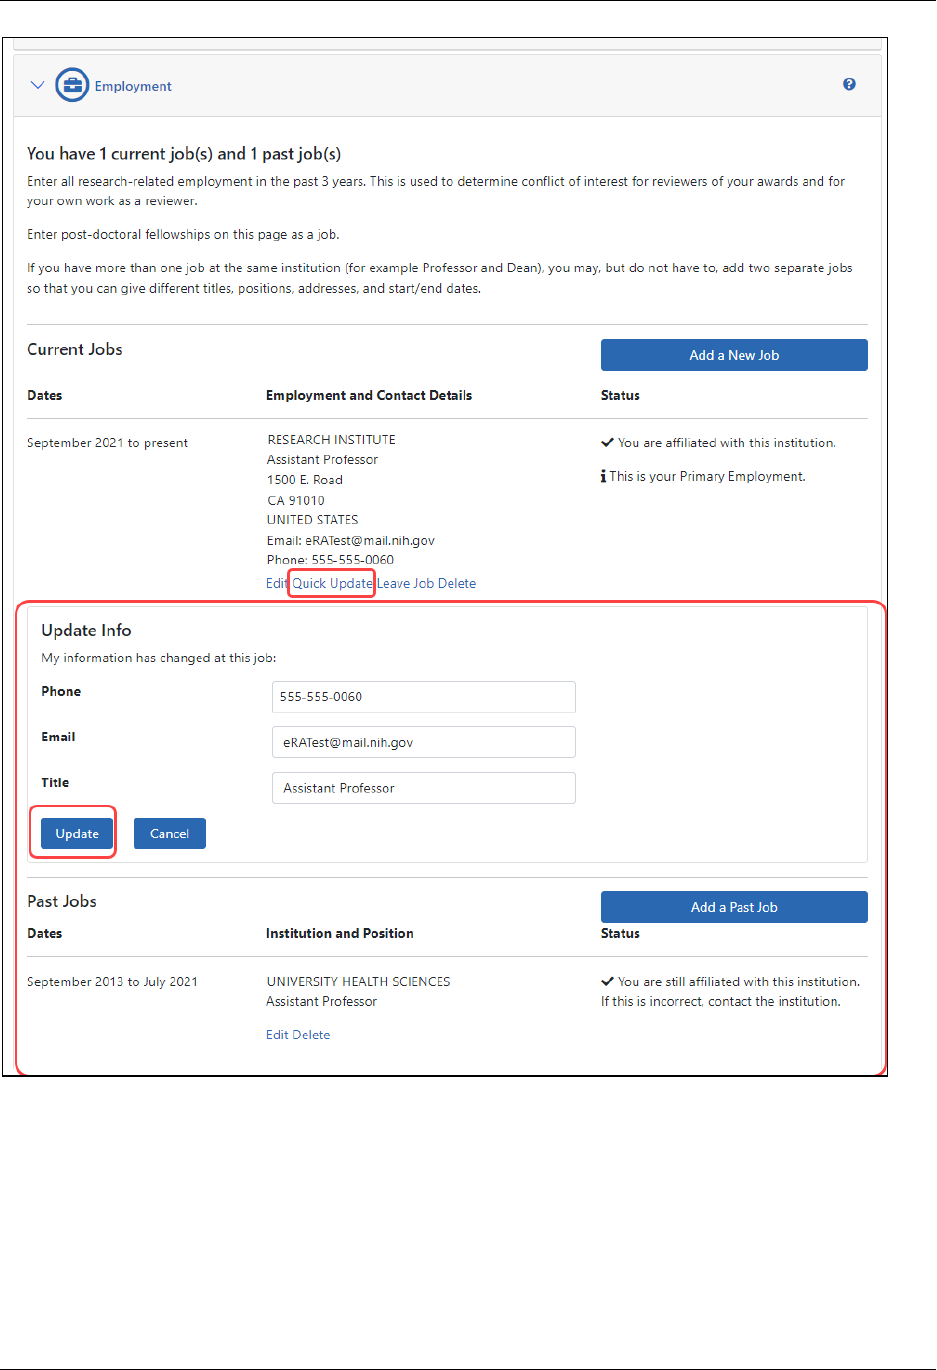
Personal Profile User Guide
Employment 39 August 5, 2024
Figure 8: Personal Profile Employment QuickUpdate
4. You can continue editing your profile as necessary, but you must click the Save All
button to save the information.
Personal Profile User Guide
Employment 40 August 5, 2024
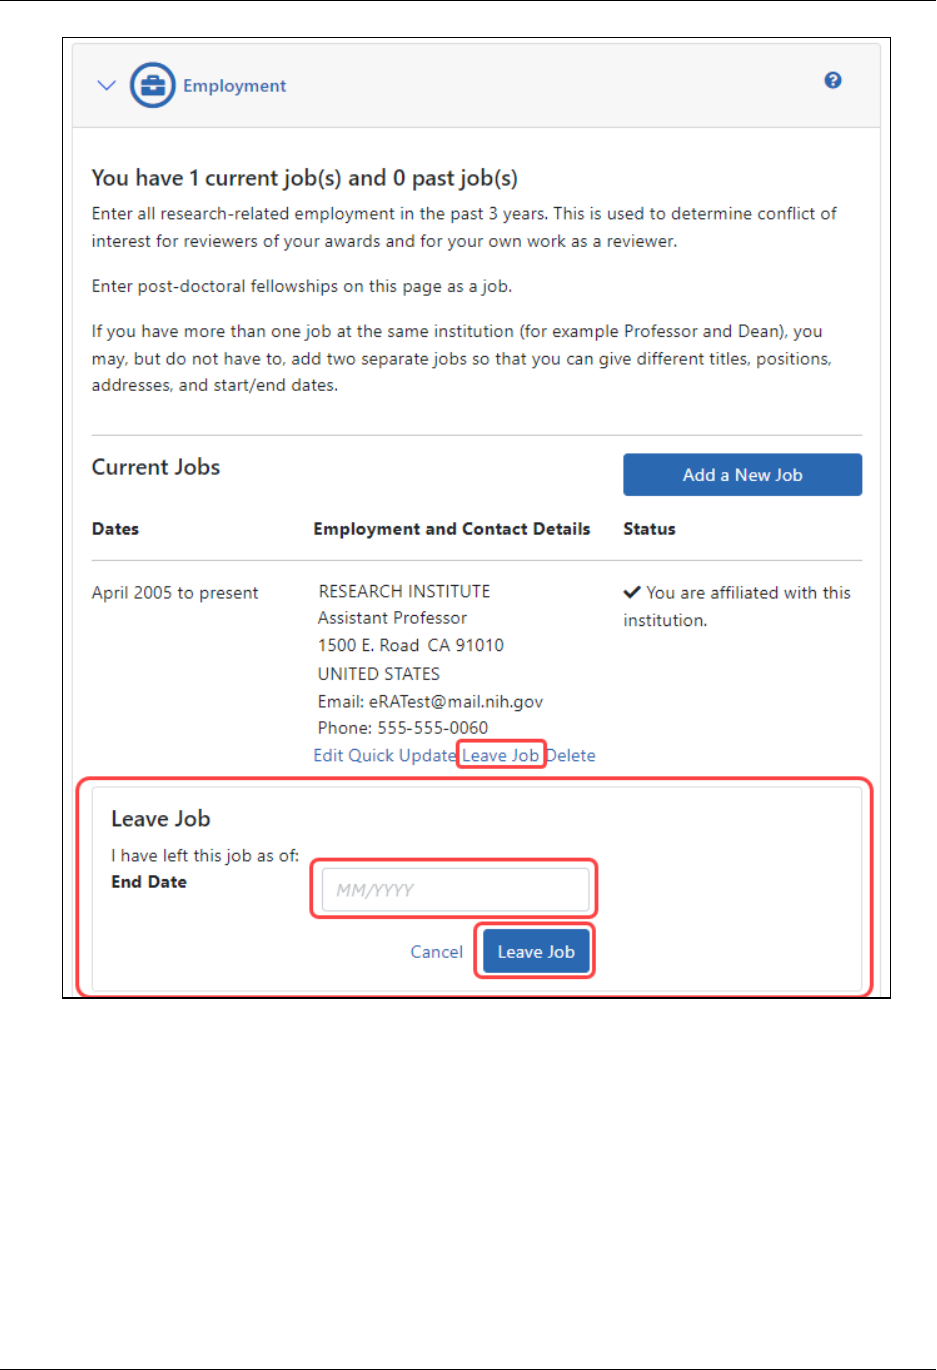
Leaving a Current Job
When you leave a current job, you can use the Leave Job link to update your personal
profile.
Before editing your profile, remember to first click the Edit button at the top of the Per-
sonal Profile screen to make it editable.
1. Click the Leave Job link for the current job.
The Leave Job box displays.
Personal Profile User Guide
Employment 41 August 5, 2024
Figure 9: Leave Job Feature of Personal Profile
2. Update the following field:
l
End Date (enter in MM/YYYY format):
Personal Profile User Guide
Employment 42 August 5, 2024
3. Click the Leave Job button.
4. You can continue editing your profile as necessary, but you must click the Save All
button to save the information.
Deleting a Current Job
You can remove a current job from your personal profile by using the Delete Job feature.
Use this information if you do not want the job listed in your profile; deleting a job per-
manently removes the information. If you accidentally remove this information, you will
need to re-add it.
Before editing your profile, remember to first click the Edit button at the top of the Per-
sonal Profile screen to make it editable.
NOTE: Do not use the Delete Job option to indicate that you are no longer at a job. If
you wish to update your profile to show a past job, use the Leave Job feature. Refer to
Leaving a Current Job on page 40.
To delete a current job from your profile:
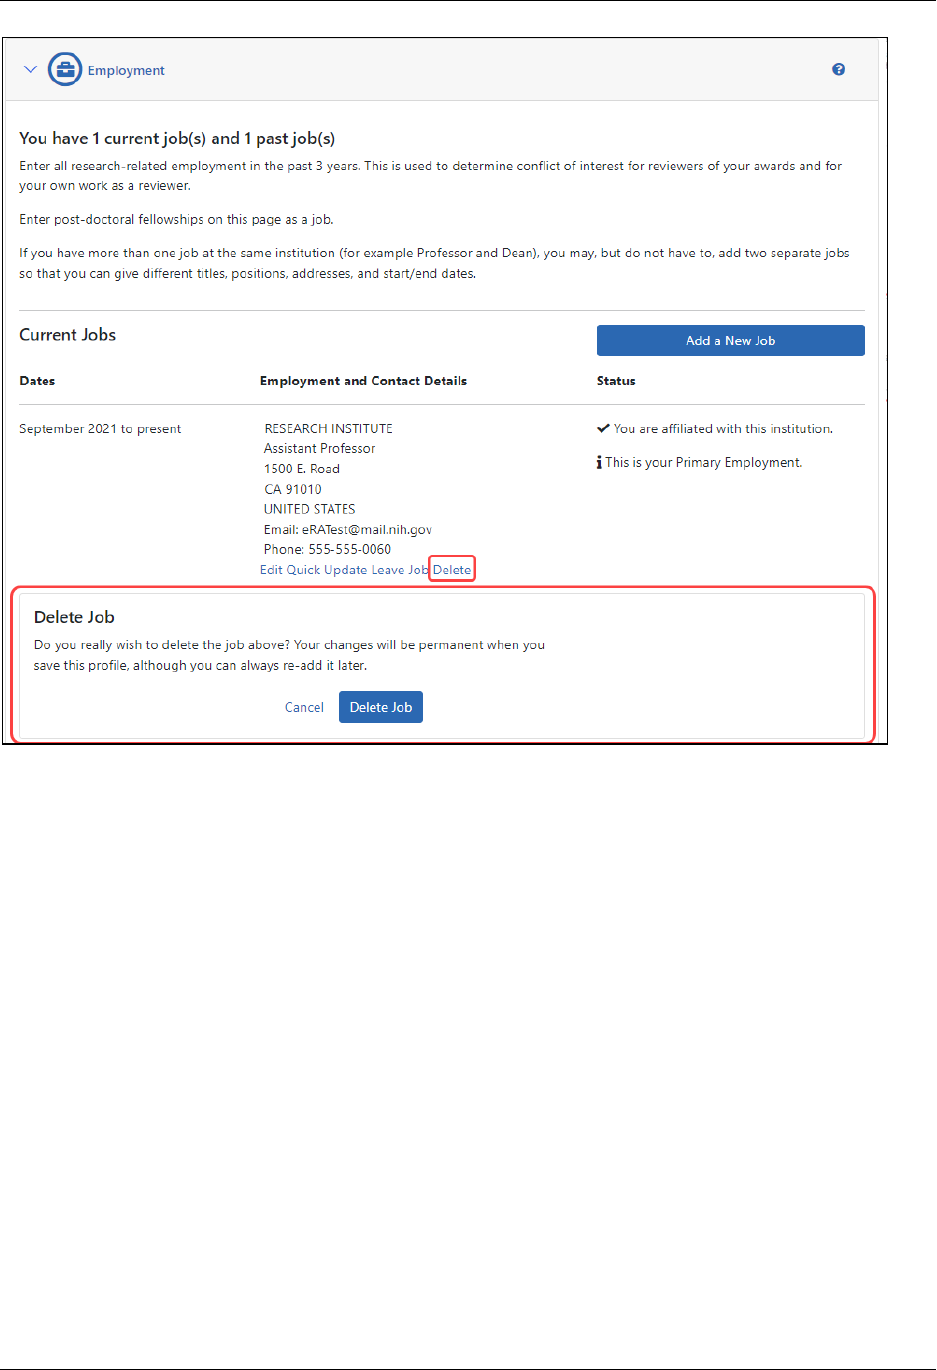
1. Click the Delete link for the current job.
The Delete Job section displays.
Personal Profile User Guide
Employment 43 August 5, 2024
Figure 10: Delete Job section for a Current Job
2. Click the Delete Job button.
3. You can continue editing your profile as necessary, but you must click the Save All
button to save the information.
Updating Your Past Job(s)
Adding a PastJob
If you would like to add a past job, you can do so by using the Add a Past Job button in
the Past Jobs section.
Personal Profile User Guide
Employment 44 August 5, 2024
Before editing your profile, remember to first click the Edit button at the top of the Per-
sonal Profile screen to make it editable.
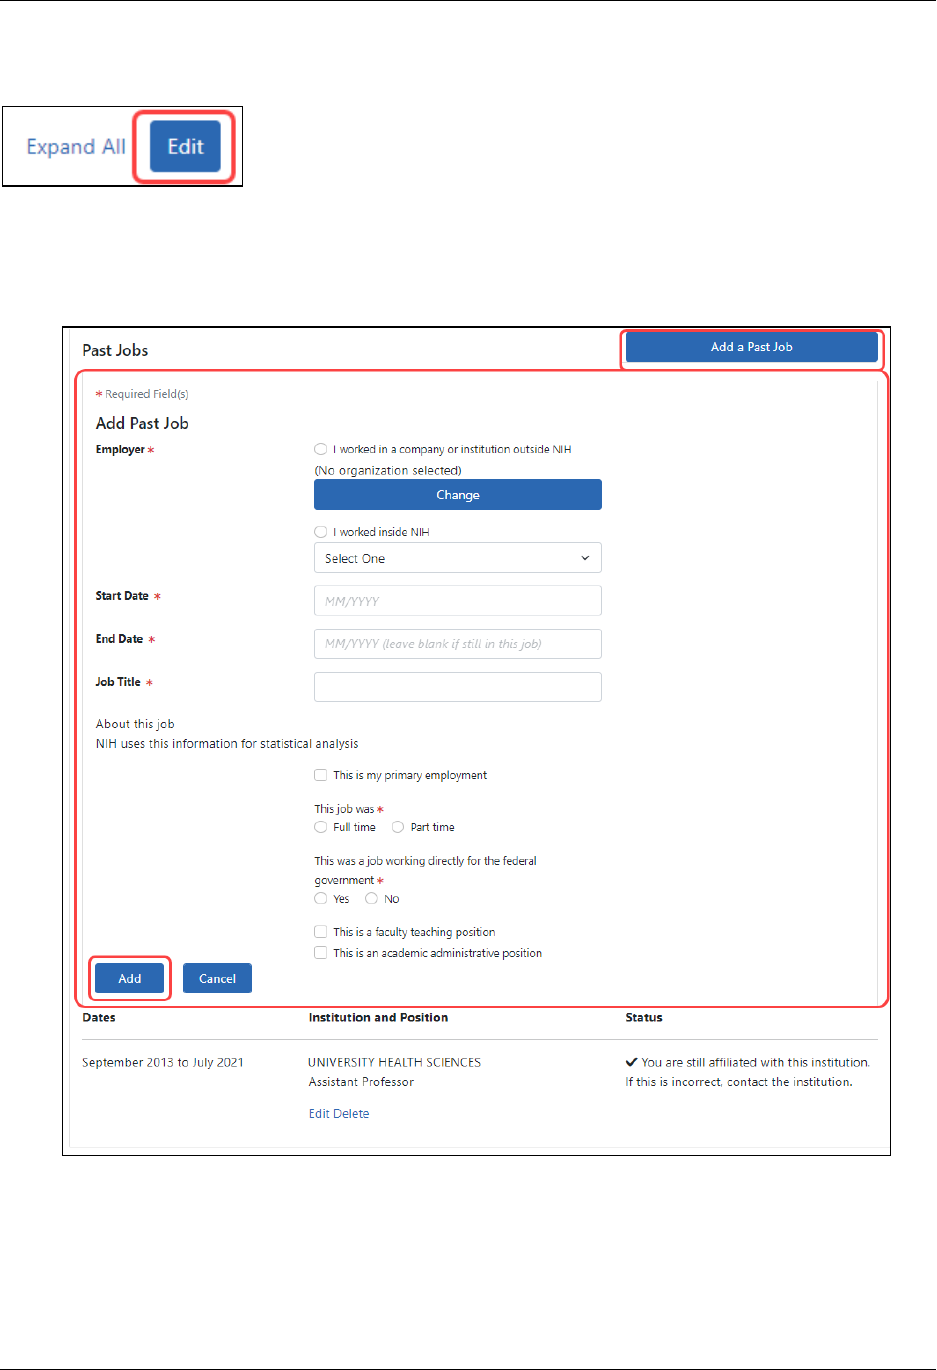
1. Click the Add aPast Job button.
The Add Past Job section appears.
Figure 11: Adding a Past Job
2. Enter the information for the following fields:

Personal Profile User Guide
Employment 45 August 5, 2024
Employer (required)
Select the appropriate radio button.
l
I work for a company or institution outside NIH
n
Click the Change button to search for and select a company or insti-
tution.
l
I worked inside NIH
n
Select the institute/agency/department/organization from the drop-
down list. This includes organizations beyond the scope of NIH.
Start Date (required)
Enter the start date of the past job in a MM/YYYY format.
End Date (required)
Enter the date (MM/YYYY)when you left this job.
Job Title (required)
Enter the position/title held at the job.
About this job
Select all applicable checkboxes.
l
This is my primary employment. . Mark this checkbox ONLY if this job is
where you are CURRENTLY employed.
l
This job was. Choose:Full time or Part time (required)
l
This was a job working directly for the federal government. Choose Yes
or No (required)
l
This is a faculty teaching position. A dropdown appears; select an option
that best matches your academic rank.
l
This is an academic administrative position. A dropdown appears; select
an option that best matches your administrative position.
3. Click the Add button.
4. You can continue editing your profile as necessary, but you must click the Save All
button to save the information.
Personal Profile User Guide
Employment 46 August 5, 2024
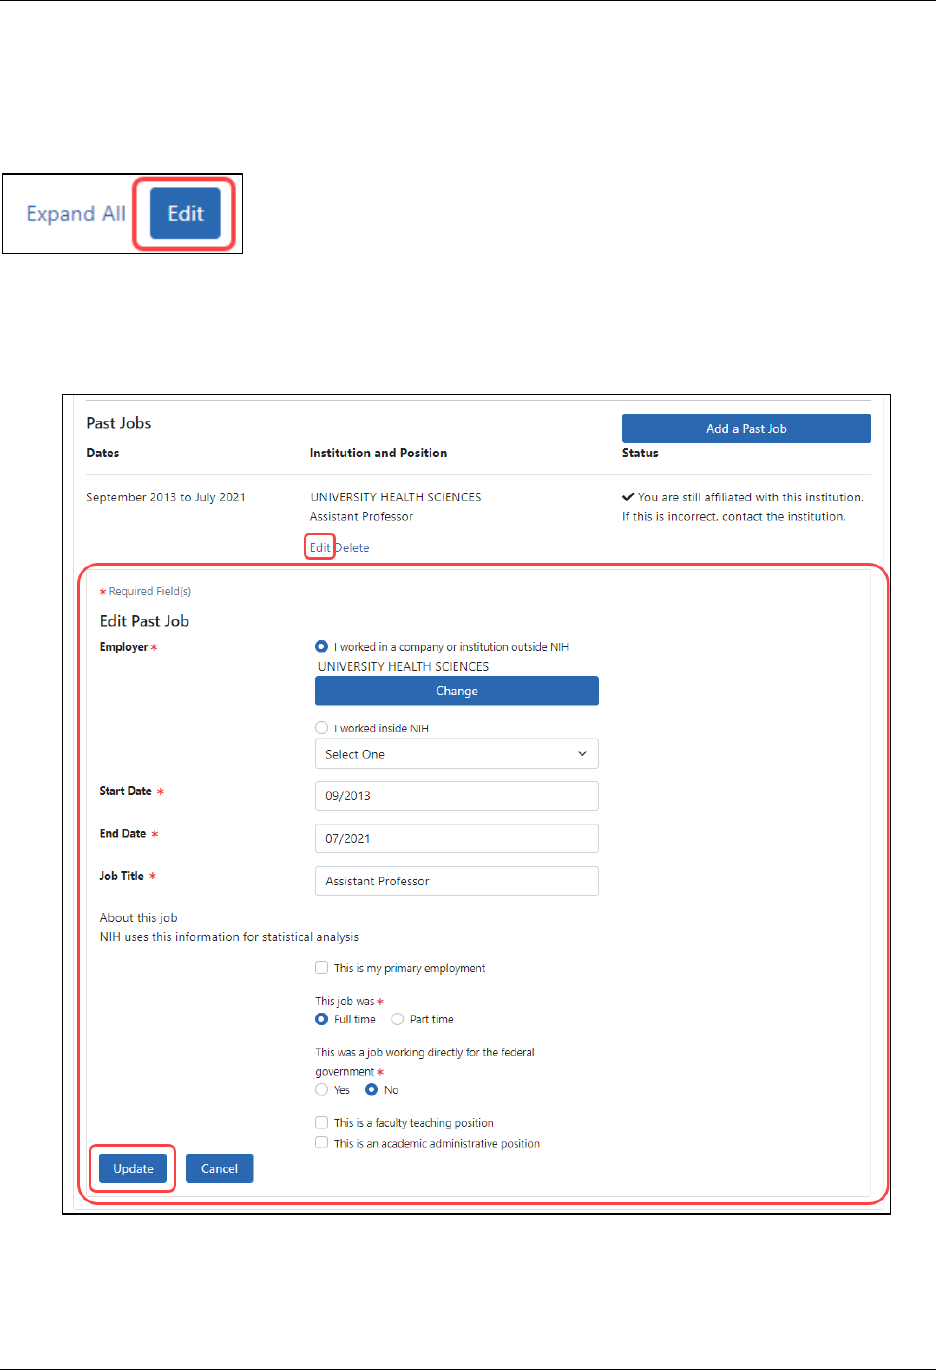
Editing a Past Job
Before editing your profile, remember to first click the Edit button at the top of the Per-
sonal Profile screen to make it editable.
1. Click the Edit link of the past job.
The Edit Past Job section appears.

Personal Profile User Guide
Employment 47 August 5, 2024
Figure 12: Edit Past Job Data Fields
2. Enter information for the following fields:
Employer (required)
Select the appropriate radio button.
l
I work for a company or institution outside NIH
n
Click the Chose from List button to search for and select a company or
institution.
n
Click the Name of Company Change button to change the name of the
company.
l
I work inside NIH
n
Select the institute from the drop-down list.
Start Date (required)
Enter the start date of the past job in a MM/YYYY format.
End Date (required)
Enter the date (MM/YYYY)when you left this job.
Job Title (required)
Enter the position/title held at the job.
About this job
Select all applicable checkboxes.
l
This is my primary employment. . Mark this checkbox ONLY if this job is
where you are CURRENTLY employed.
l
This job was. Choose:Full time or Part time (required)
l
This was a job working directly for the federal government. Choose Yes
or No (required)
l
This is a faculty teaching position. A dropdown appears; select an option
that best matches your academic rank.
l
This is an academic administrative position. A dropdown appears; select
an option that best matches your administrative position.
Personal Profile User Guide
Employment 48 August 5, 2024
3. Click the Update button.
4. You can continue editing your profile as necessary, but you must click the Save All
button to save the information.
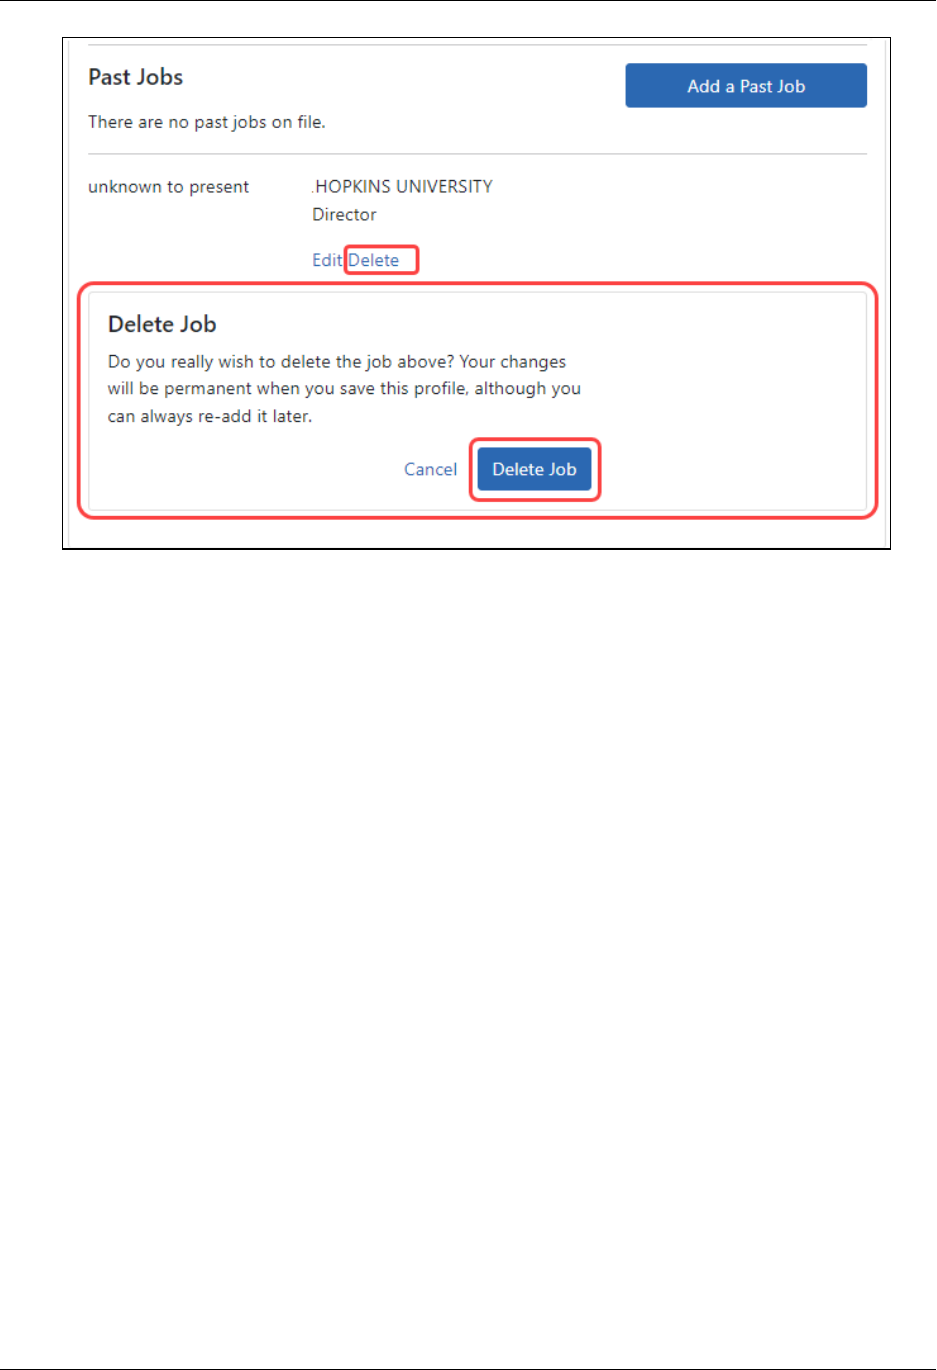
Deleting a Past Job
You can remove a past job from your personal profile by using the Delete Job feature.
Use this information if you do not want the job listed in your profile; deleting a job per-
manently removes the information. If you accidentally remove this information, you will
need to re-add it manually.
Before editing your profile, remember to first click the Edit button at the top of the Per-
sonal Profile screen to make it editable.
To delete a current job from your profile:
1. Click the Delete button for the past job.
The Delete Job box displays.
Personal Profile User Guide
Employment 49 August 5, 2024
Figure 13: Delete Job section for a Past Job
2. Click the Delete Job button.
3. You can continue editing your profile as necessary, but you must click the Save All
button to save the information.
Personal Profile User Guide
Reviewer Information 50 August 5, 2024
Reviewer Information
If you have one of the following Commons user roles, you are required to complete fields
within the Reviewer Information section of the Personal Profile:
l
IAR
l
PI
If you are a Reviewer using Internet Assisted Review (IAR) via the Commons system, keep
in mind that accurate Reviewer information is essential for successfully using IAR for the
review process.
The Reviewer Information section lets you view, add, update, and/or access:
l
Your preferred method of contact for review meetings
l
Your home address information
l
Secure Payment Registration System (SPRS)
l
Your eligibility for continuous submission
Keep your profile updated with employment information from the last 3 years. This
information is vital to NIH and its SROs for determining any conflicts of interest with
applications. Employment information is maintained in the Employment section of your
profile. Refer to Employment on page 29 for steps on completing this information.
IMPORTANT: To save any profile changes, you must click the Save All button, which is
located at the top right of the screen. You can save profile changes ONLY after fixing ALL
error items in red/pink that show a red x ( ), even those unrelated to your current
change. If you save while errors exist, changes are NOTsaved and you see an error mes-
sage.
Viewing Reviewer Information
Click the Reviewer Information section heading to see the section content.
Initially the following fields appear as read-only.
l
Reviewer Correspondence
l
Reviewer Payments

Personal Profile User Guide
Reviewer Information 51 August 5, 2024
l
Continuous Submission Eligibility Status
You can view your Continuous SubmissionEligibility status while in the view mode of the
Reviewers Information by clicking the Show Eligibility Status link. Refer to the section
titled Refer to Continuous Submission Eligibility Status on page 54.
Editing Reviewer Information
To edit any section, first click the Edit button at the upper right of the section headers:
Personal Profile User Guide
Reviewer Information 52 August 5, 2024

Personal Profile User Guide
Reviewer Information 53 August 5, 2024
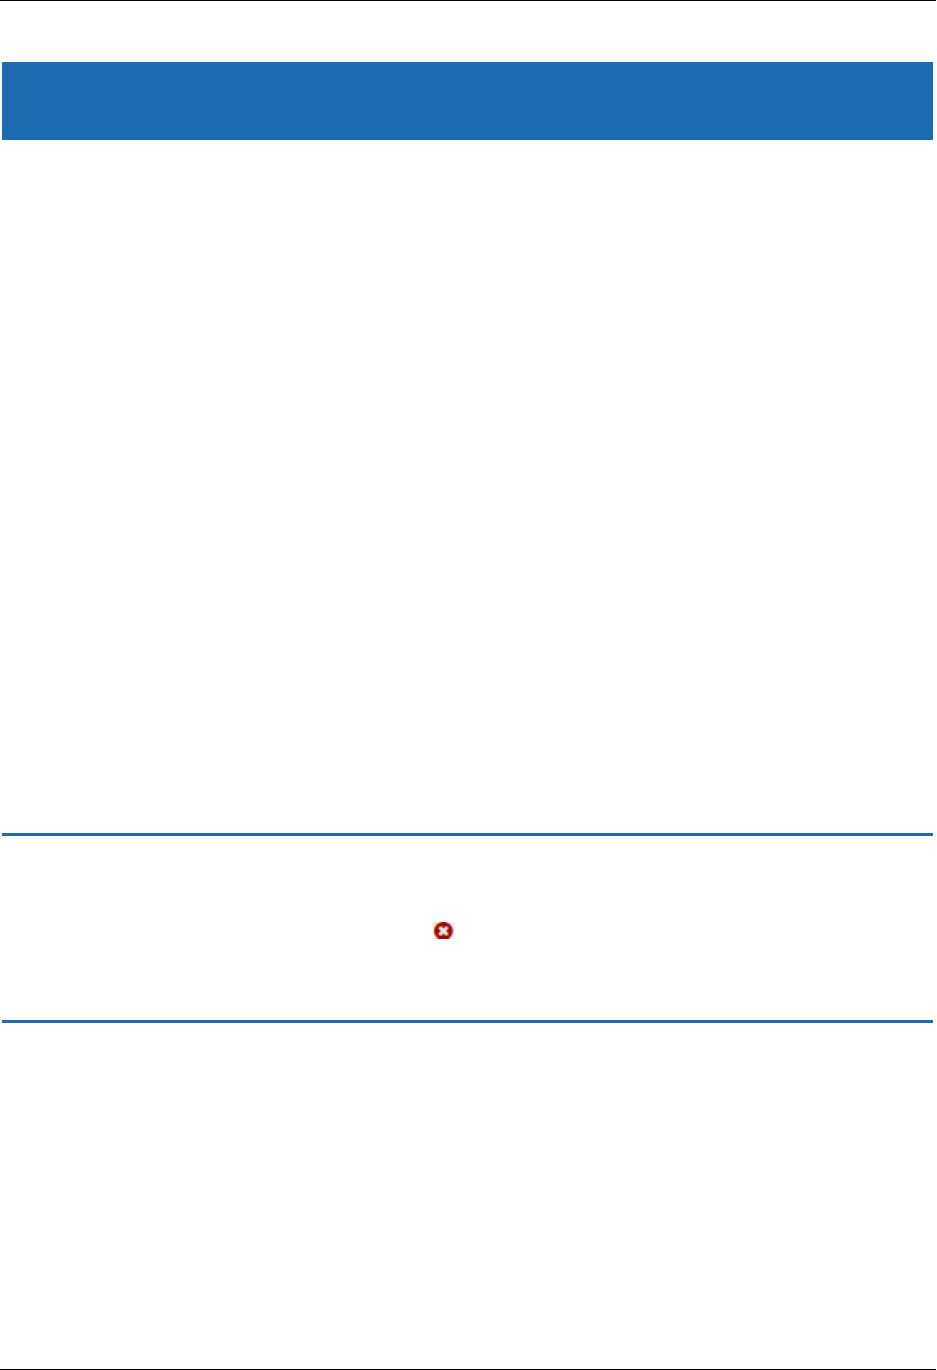
Reviewer Communications
You must provide NIHwith a means of contacting you for review meeting com-
munications, such as your initial invitation by the SRO* to participate in a review meeting.
l
What address should NIHuse to contact you for reviews? Select one of the
radio buttons provided.
l
Use my work address at:
Select this option to use a work address that we have for you in your profile.
You can select the specific one from the drop-down list.
If the work address you want to use is not listed, it means it is not in your pro-
file. In this case, update your Employment section by adding a new job, save
the profile, and then return to this field to select it.
l
Use the home address on this page
Select this option if you want to use the home address listed in this Reviewer
Information section of the PersonalProfile. When you choose this option, you
must also enter your Phone and Email on the required fields that are
provided.
l
Provide a different address
Select this option if you wish to provide another address not already in your
profile. Selecting this option displays editable address fields.
Home Address
You must provide a home address in order to be paid for your services as a Reviewer.
This address should be the same one you use to file your federal income tax. All fields in
this section are required.
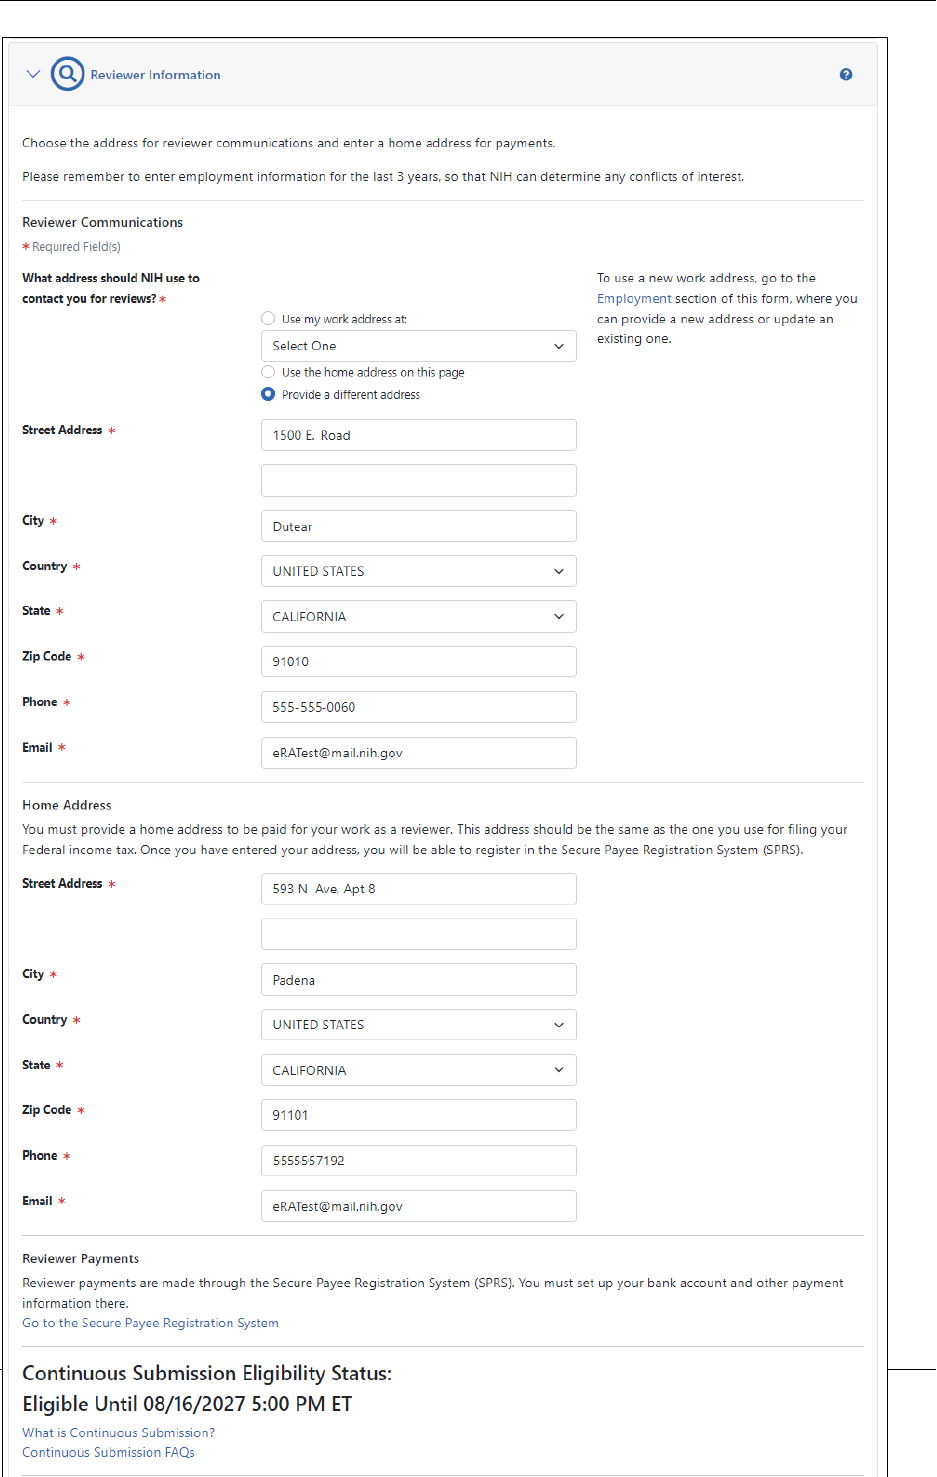
Reviewer Payments
This section, which only appears while you are in Edit mode, includes a link to the Secure
Payee Registration System (SPRS). Reviewer payments are made through this system.
Use the provided link to access SPRS and register your bank account and payment
information there.
Personal Profile User Guide
Reviewer Information 54 August 5, 2024
Figure 14: Reviewer Payments Section of ReviewerInformation
Continuous Submission Eligibility Status
Displays Eligible Until <Date and Time> or Not Eligible as appropriate.
Use the What is Continuous Submission? and Continuous Submission FAQs links in
this section to access information on Continuous Submission Eligibility.
Figure 15: Continuous Submission Eligibility Status Section of Reviewer Information
Click the Show Eligibility Status link to view details of your eligibility based on current
appointed membership. Click Hide Eligibility Status to again hide details.
Eligibility for Continuous Submission based on current appointed membership
Use this section to check if you are eligible for continuous submission based on current
appointed membership to NIH review and advisory groups. Details of the current eligible
committee service team(s) display including the From and To date and Committee
Name.
If ineligible, the following message displays:There are no eligible committee mem-
berships available.

Personal Profile User Guide
Reviewer Information 55 August 5, 2024
Figure 16: Eligibility Based on Current AppointedMembership
When you are done with your edits, click the Save All button at the top of the profile to
save your changes.
TIP: *Other Transaction Authority (OTA) - Some screens and terminology may be dif-
ferent in order to accommodate review of OTA, a type of award that is neither a grant
nor a contract but a different way of funding that is being used across NIH. These
changes will typically not be visible to NIH or agency reviewers.
Personal Profile User Guide
Trainee Information 56 August 5, 2024
Trainee Information
If you hold a Commons Trainee user role and are using the xTrain module, you have
access to the Trainee Information section of the Personal Profile. This section of the pro-
file lets you view, add, or update your permanent address where you can be contacted
after the training program is completed.
IMPORTANT: To save any profile changes, you must click the Save All button, which is
located at the top right of the screen. You can save profile changes ONLY after fixing ALL
error items in red/pink that show a red x ( ), even those unrelated to your current
change. If you save while errors exist, changes are NOTsaved and you see an error mes-
sage.
View Trainee Permanent Address
Click the Trainee Information section heading to see the section content, which con-
sists only of a permanent address and email.
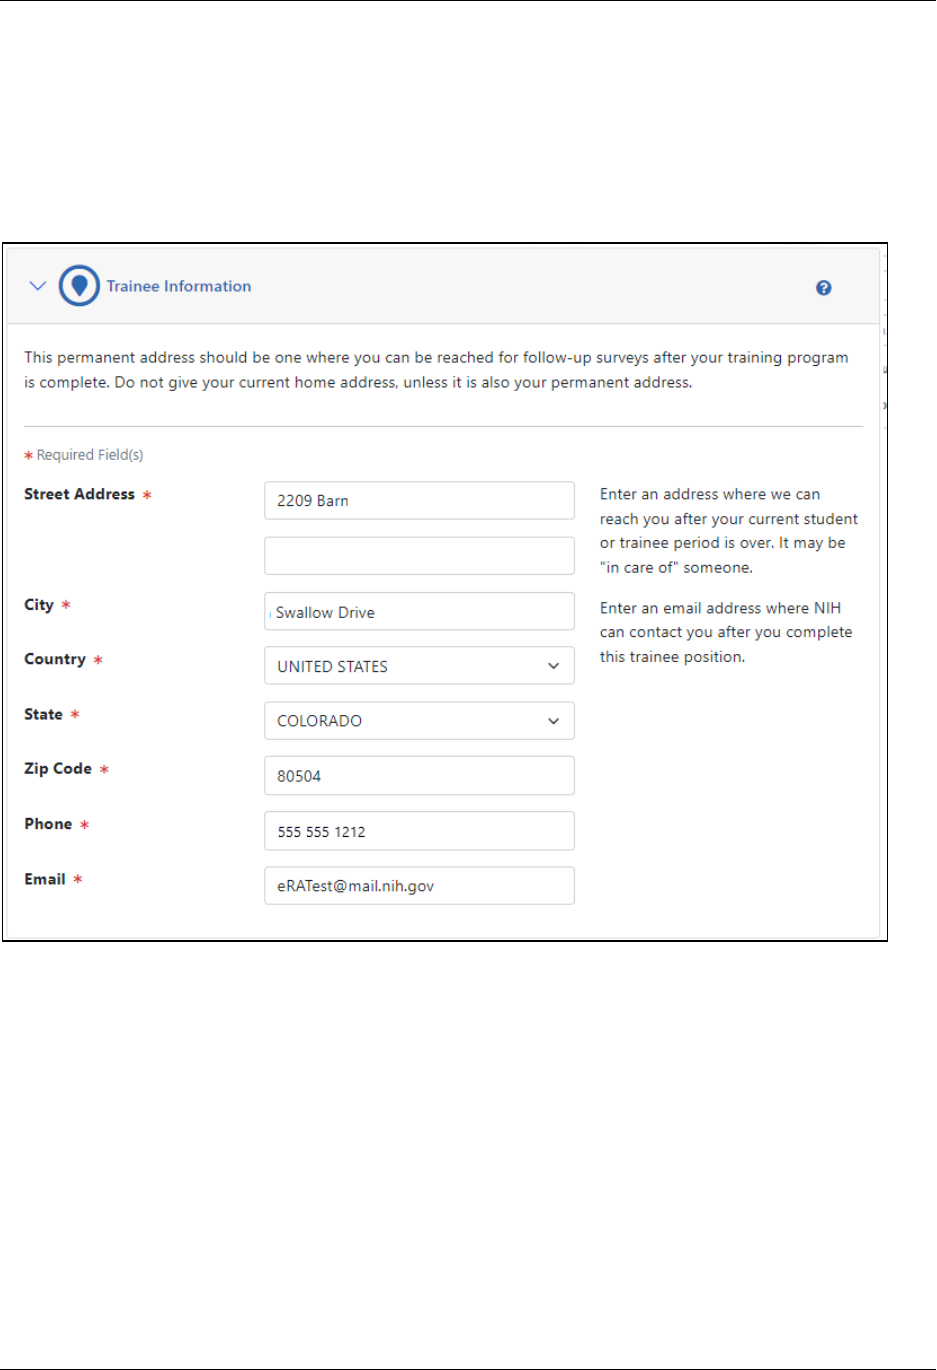
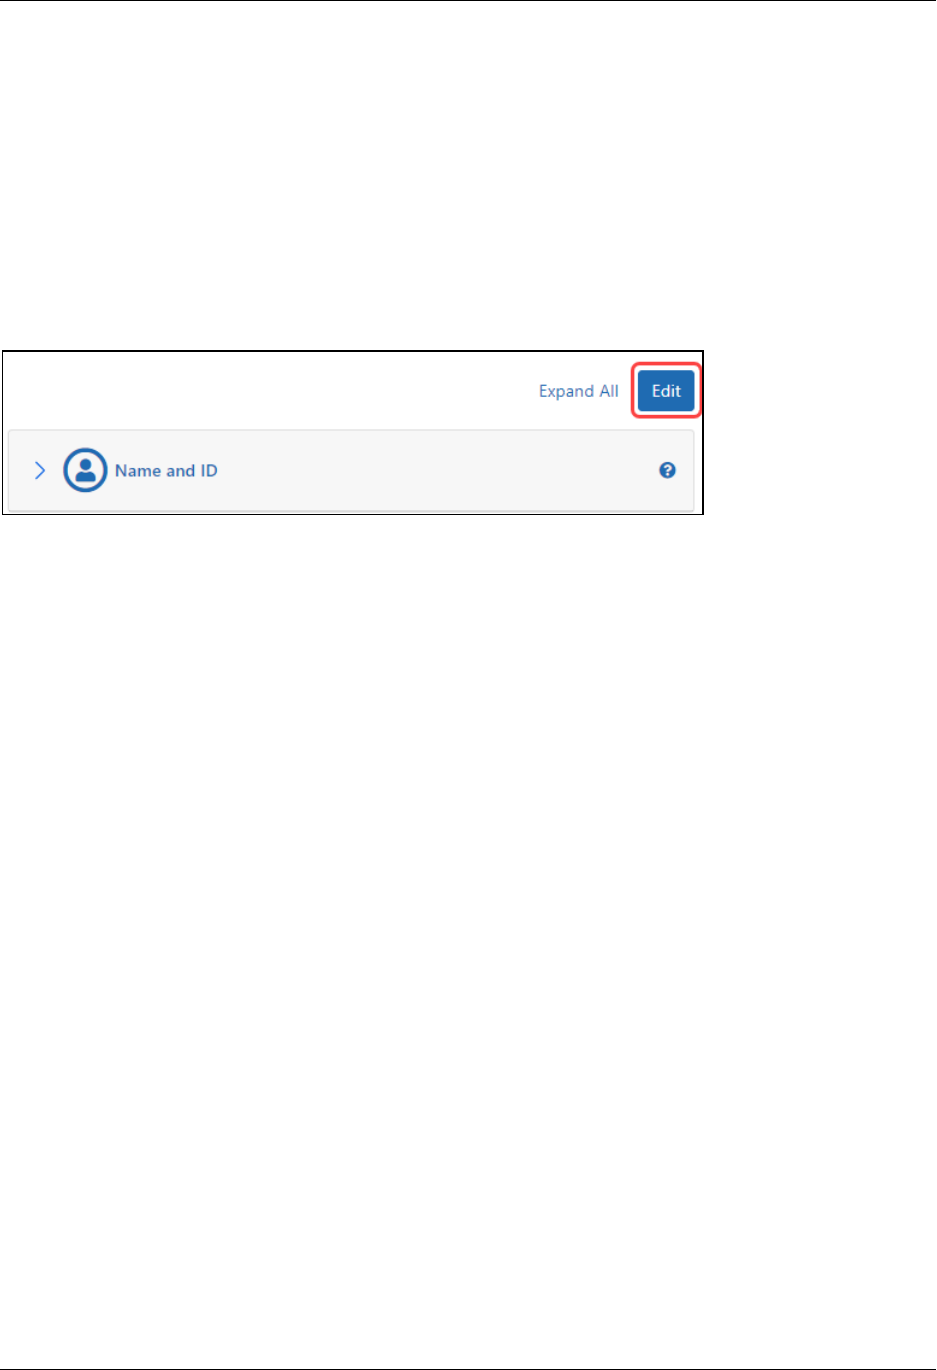
Edit Trainee Permanent Address
To edit any section, first click the Edit button at the upper right of the section headers:
In Trainee Information, make sure the contact information - both the street and email
addresses - are valid to reach you after your current trainee period ends. Do not use
institutional contact information that will be unavailable later. All fields are required.
l
Street Address
l
City
l
Country (select from drop-down)
l
State (select from drop-down)
Personal Profile User Guide
Trainee Information 57 August 5, 2024
l
ZIPcode
l
Phone
l
Email
When you are done with your edits, click the Save All button at the top of the profile to
save your changes.
Figure 17: Edit Mode for Personal Profile Trainee Information

Personal Profile User Guide
Education 58 August 5, 2024
Education
The Education section of the Personal Profile lets you lets you view, add, update, and/or
access your:
l
Awarded and expected degree information
l
Areas of Post-Graduate Clinical Training
l
Eligibility for continuous submission
The Education section is considered complete when the profile contains at least one
degree (complete or in progress).
IMPORTANT: To save any profile changes, you must click the Save All button, which is
located at the top right of the screen. You can save profile changes ONLY after fixing ALL
error items in red/pink that show a red x ( ), even those unrelated to your current
change. If you save while errors exist, changes are NOTsaved and you see an error mes-
sage.
If you have one of the following Commons user roles, you have access to the Education
section of the PersonalProfile:
l
ASST
l
IAR
l
PI
l
Postdoc
l
Scientist
l
Sponsor
l
Trainee
Viewing Education
Click the Education section heading to see the section content.
The information displays as read-only.
l
Your Degrees
Date Completed
Personal Profile User Guide
Education 59 August 5, 2024
Degree andInstitution
l
Your Post-Graduate Clinical Training Information
Date Completed
Area ofPost-Graduate Clinical Training
l
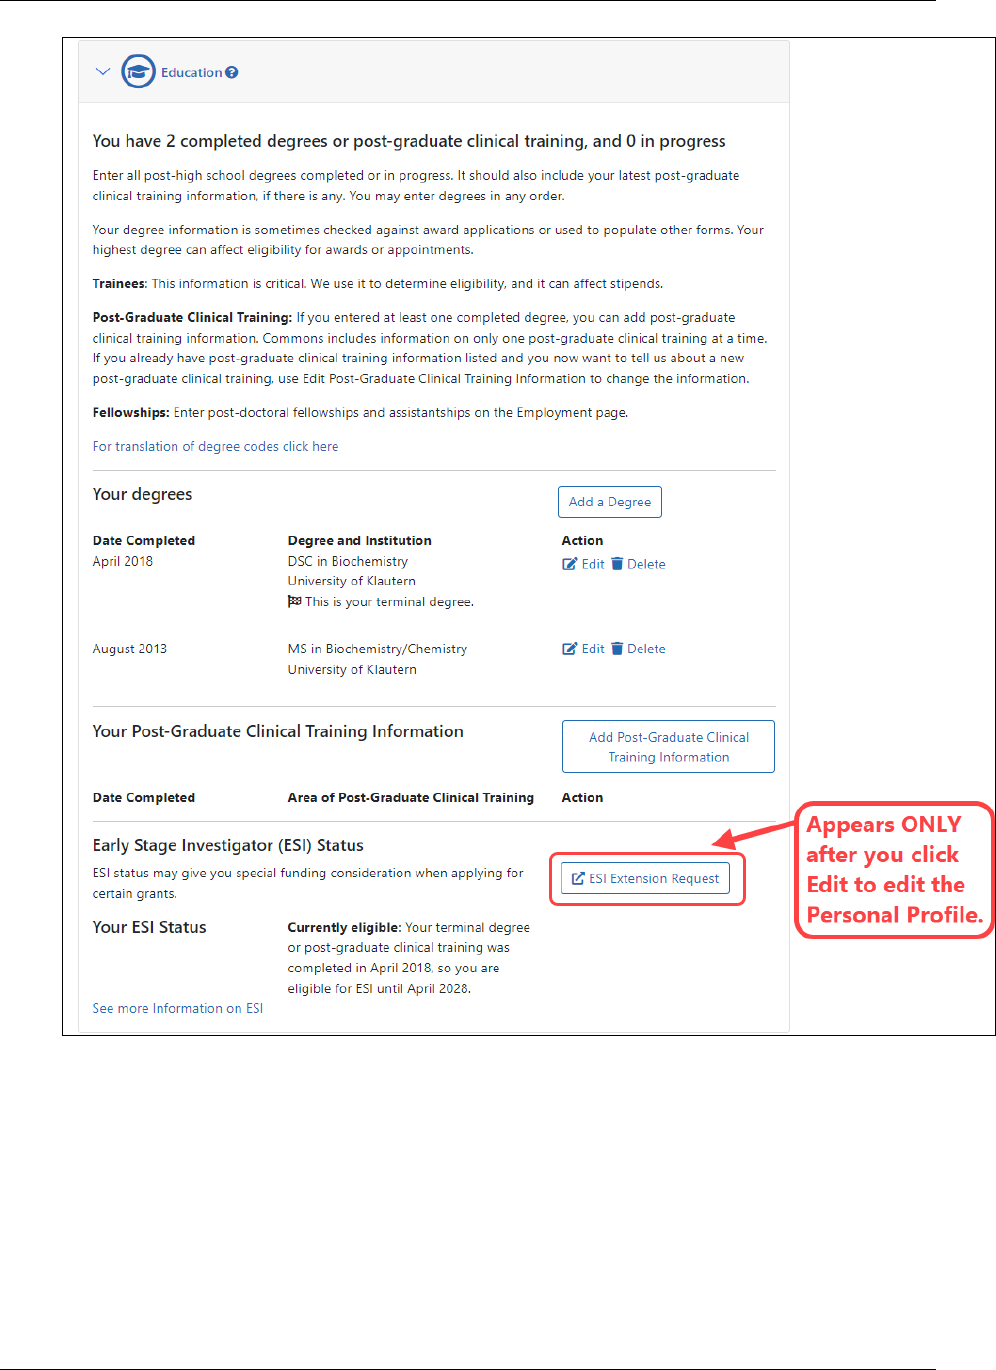
Early Stage Investigator (ESI) Status (appears ONLY in Edit mode)
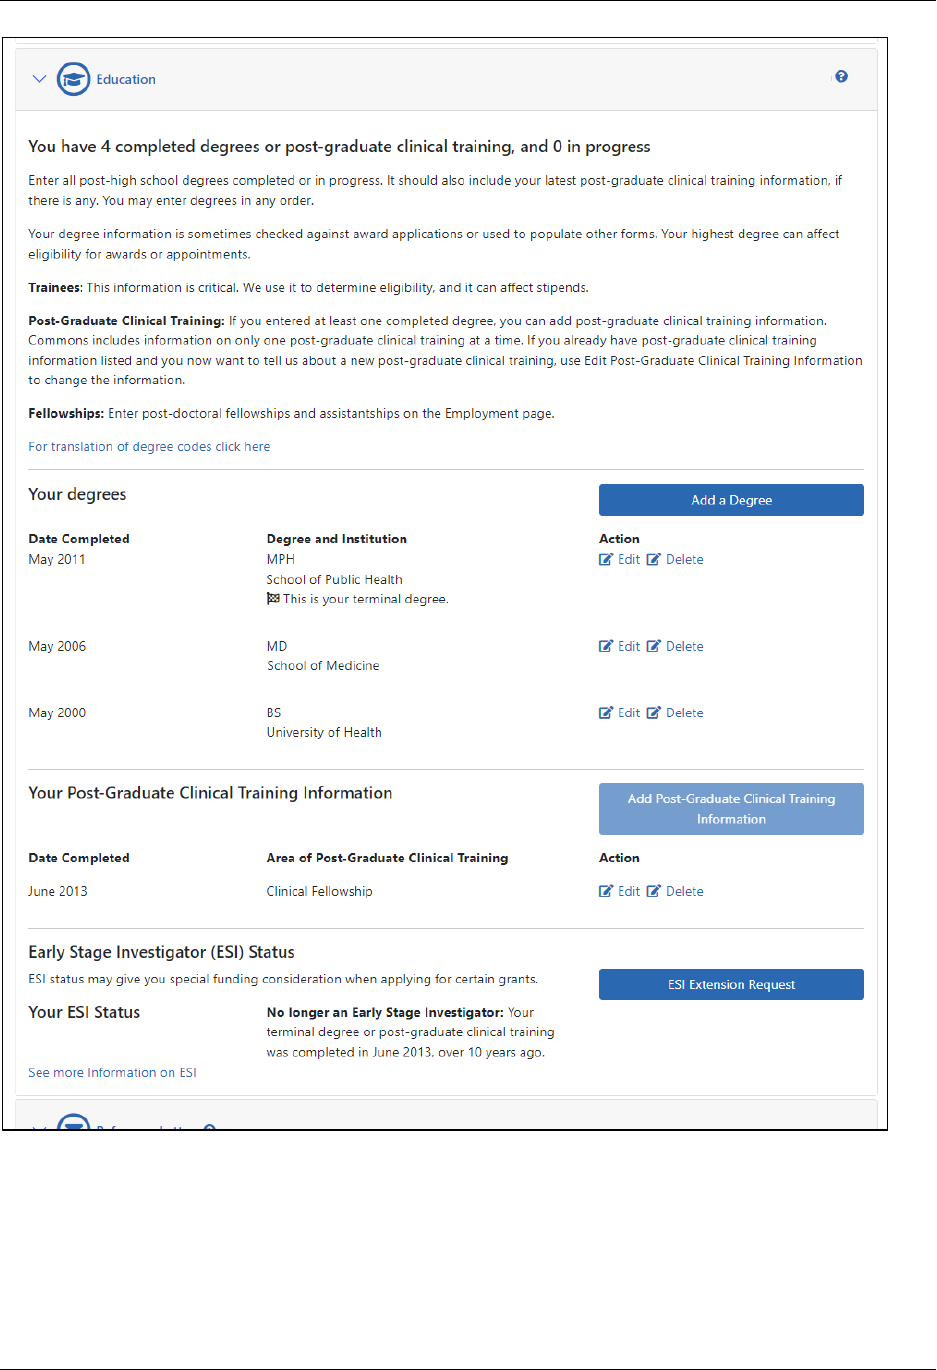
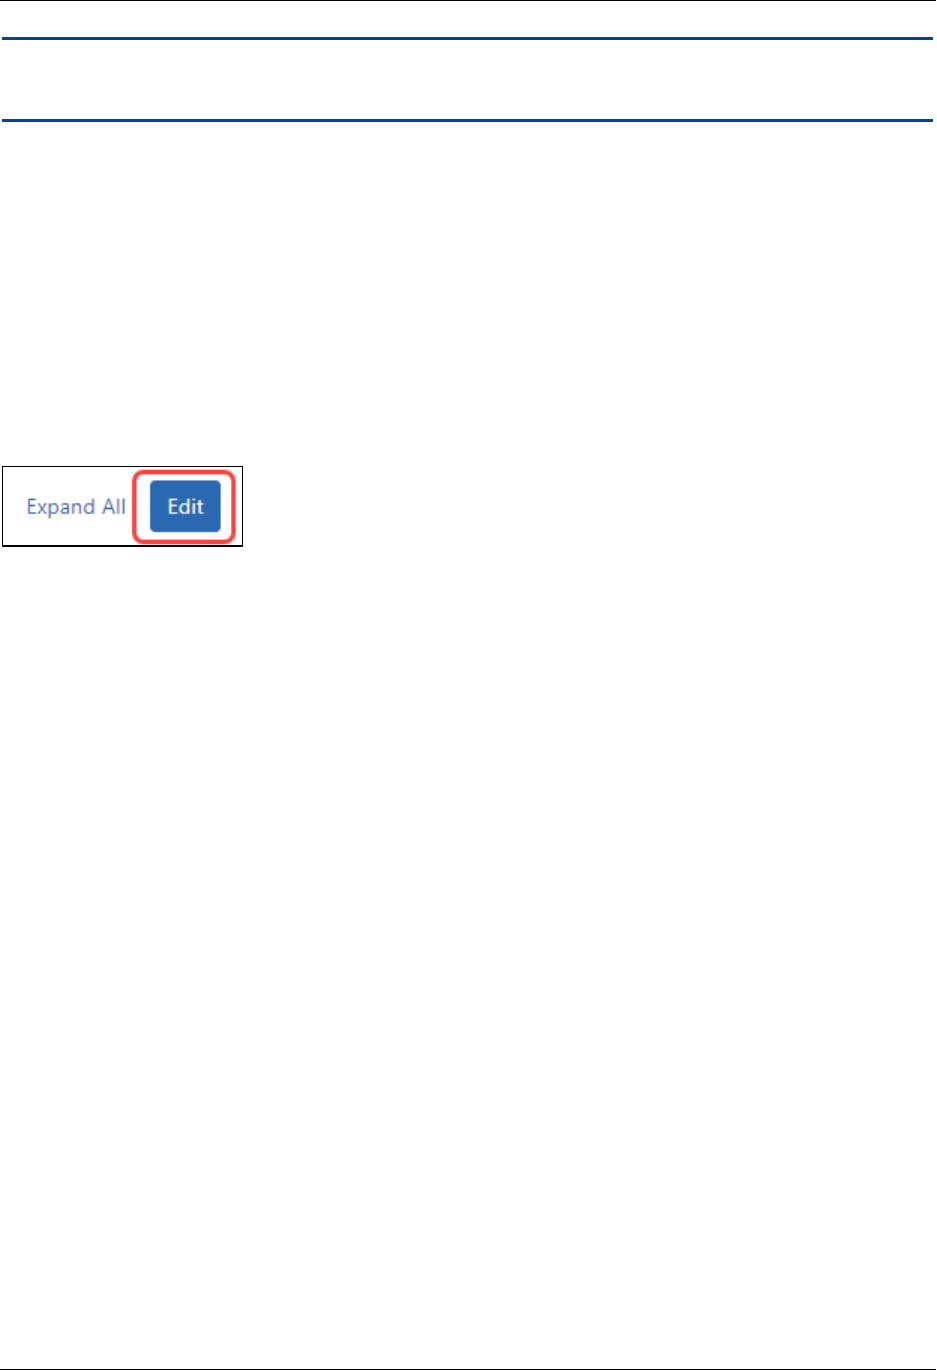
Editing Education
To edit any section, first click the Edit button at the upper right of the section headers:
While in edit mode, you can edit or delete your individual degrees and/or Post-Graduate
Clinical Training Information records or add new information using Add a Degree or
Add Post Graduate Clinical Training Information buttons.
When you are done with your edits, click the Save All button at the top of the profile to
save your changes.
Your EarlyStage Investigator (ESI) Status displays in edit mode ONLY. Look to the bot-
tom of the Education section to view Your ESI Status. See How to Access the Link for
Requesting an ESIExtension on page 73.
Personal Profile User Guide
Education 60 August 5, 2024
Figure 18: Edit Mode for PersonalProfile Education
Personal Profile User Guide
Education 61 August 5, 2024
NOTE: Click the link titled For translation of degree codes click hereto open the
Degree Codebook file. This link is only available while in edit mode.
Updating Your Degrees
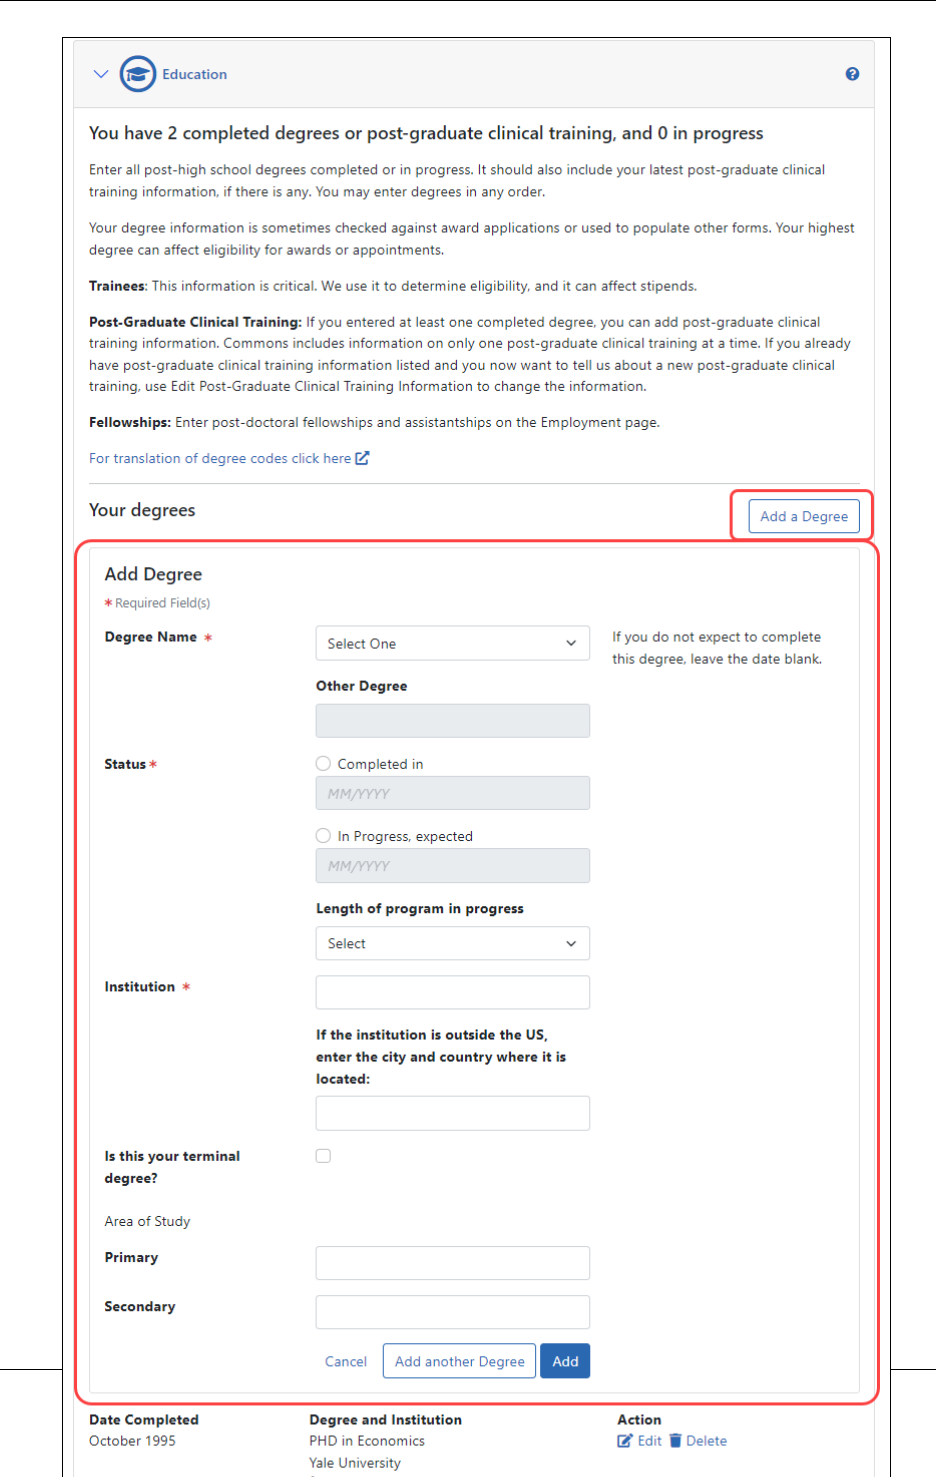
Adding a Degree
You can add another degree to your profile using theAddDegree button in the Edu-
cation component of the Personal Profile.
Before editing your profile, remember to first click the Edit button at the top of the Per-
sonal Profile screen to make it editable.
1. Click the Add Degree button.
The AddDegree box displays.
Personal Profile User Guide
Education 62 August 5, 2024

Personal Profile User Guide
Education 63 August 5, 2024
2. Enter information for the following fields:
Degree Name (required)
Select your type of degree from the drop-down list or choose Other Degree if not
available.
For a translation of degree codes, please refer to the Degree Codebook spread-
sheet located online (http://www.era.nih.gov/files/degree_codebook.xlsx).
Status (required)
Select the appropriate radio button concerning the status of your degree and enter
the month/year in MM/YYYY format:
l
Completed in
l
In Progress, expected
Choose a Length of program in progress from the drop-down box if your
status is in progress.
Institution (required)
Enter the name of the institution. If outside the United States, enter the city and
country in the next box.
Is this your terminal degree
Select the checkbox if this is the highest degree available in the field of study.
Area of Study
l
Enter a Primary area of study
l
Enter a Secondary area of study
3. Click the Add button.
-OR-
Select the Add another Degree button to repeat the steps for another degree.
Personal Profile User Guide
Education 64 August 5, 2024
Editing a Degree
You can edit or delete existing degree information using the Edit and Delete buttons.
Before editing your profile, remember to first click the Edit button at the top of the Per-
sonal Profile screen to make it editable.
To edit a degree:
1. Click the Edit button for your degree.
The Edit Degree box displays.

Personal Profile User Guide
Education 65 August 5, 2024
2. From the Edit Degree box, update the following fields:
Degree Name (required)

Personal Profile User Guide
Education 66 August 5, 2024
Select your type of degree from the drop-down list or choose Other Degree if not
available.
For a translation of degree codes, please refer to the Degree Codebook spread-
sheet located online (http://www.era.nih.gov/files/degree_codebook.xlsx).
Status (required)
Select the appropriate radio button concerning the status of your degree and enter
the month/year:
l
Completed in
l
In Progress, expected
Choose a Length of program in progress in years from the drop-down box
if your status is in progress.
Institution (required)
Enter the name of the institution. If outside the United States, enter the city and
country in the next field.
Is this your terminal degree
Select the checkbox if this is the highest degree available in the field of study.
Area of Study
l
Enter a Primary area of study
l
Enter a Secondary area of study
3. Click the Update button.
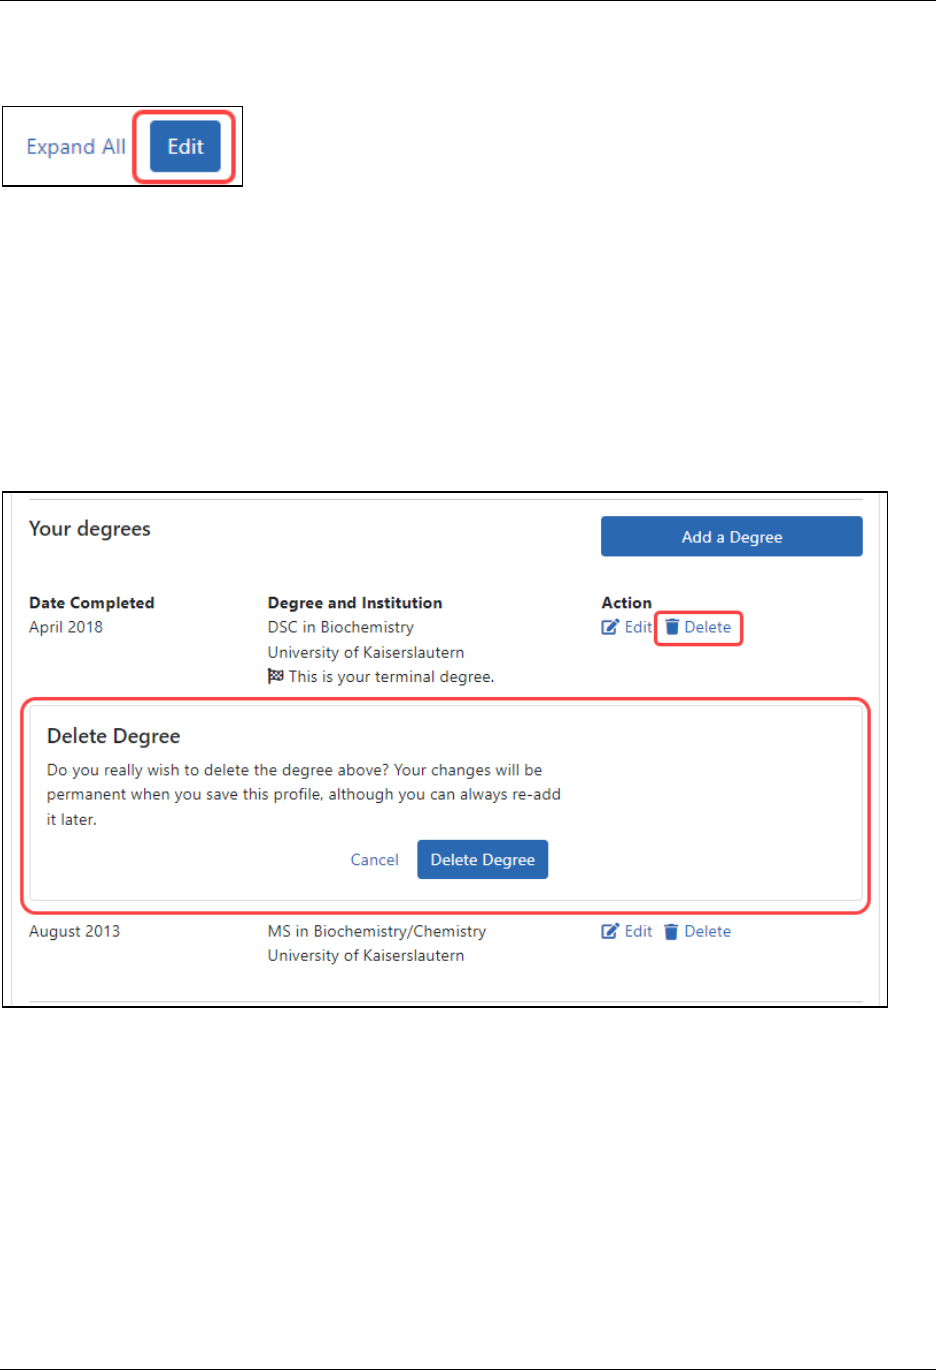
Deleting a Degree
You can remove a degree from your personal profile by using the Delete Degree feature.
Use this information if you do not want the degree information listed in your profile;
deleting a degree permanently removes the information. If you accidentally remove this
information, you will need to re-add it.
Personal Profile User Guide
Education 67 August 5, 2024
Before editing your profile, remember to first click the Edit button at the top of the Per-
sonal Profile screen to make it editable.
To delete a degree:
1. Click the Delete link next to the degree being removed.
The Delete Degree box displays.
2. Click the Delete Degree button.
The degree information is permanently removed from your profile.
Figure 19: Deleting a Degree
Personal Profile User Guide
Education 68 August 5, 2024
Updating Your Post-Graduate Clinical Training
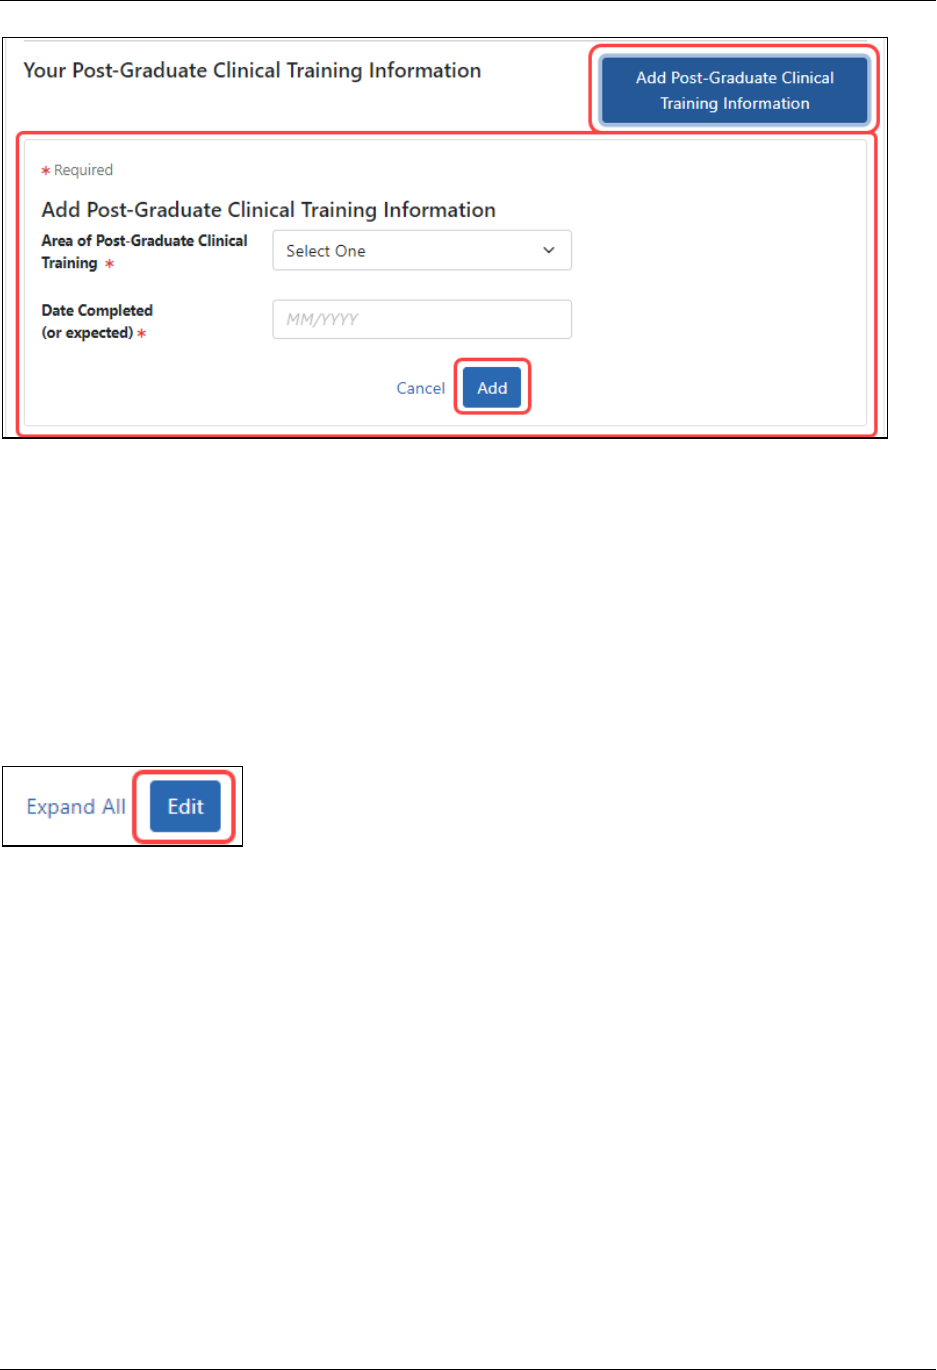
Adding Post-Graduate Clinical Training Information
If Post-Graduate Clinical Training Information is missing from the list, you can add a new
one using the Add Post-Graduate Clinical Training Information button in the Edu-
cation component of the PersonalProfile.
Before editing your profile, remember to first click the Edit button at the top of the Per-
sonal Profile screen to make it editable.
To add Post-Graduate Clinical Training Information:
1. Click the Add Post-Graduate Clinical Training Information button for your Clin-
ical Training.
The Edit Post-Graduate Clinical Training box displays.
2. Update the following fields:
l
Area of Post-Graduate Clinical Training
l
Date Completed (or expected) in MM/YYYY format (required field)
3. Click the Add button.
Personal Profile User Guide
Education 69 August 5, 2024
Figure 20: Adding Clinical Training Information
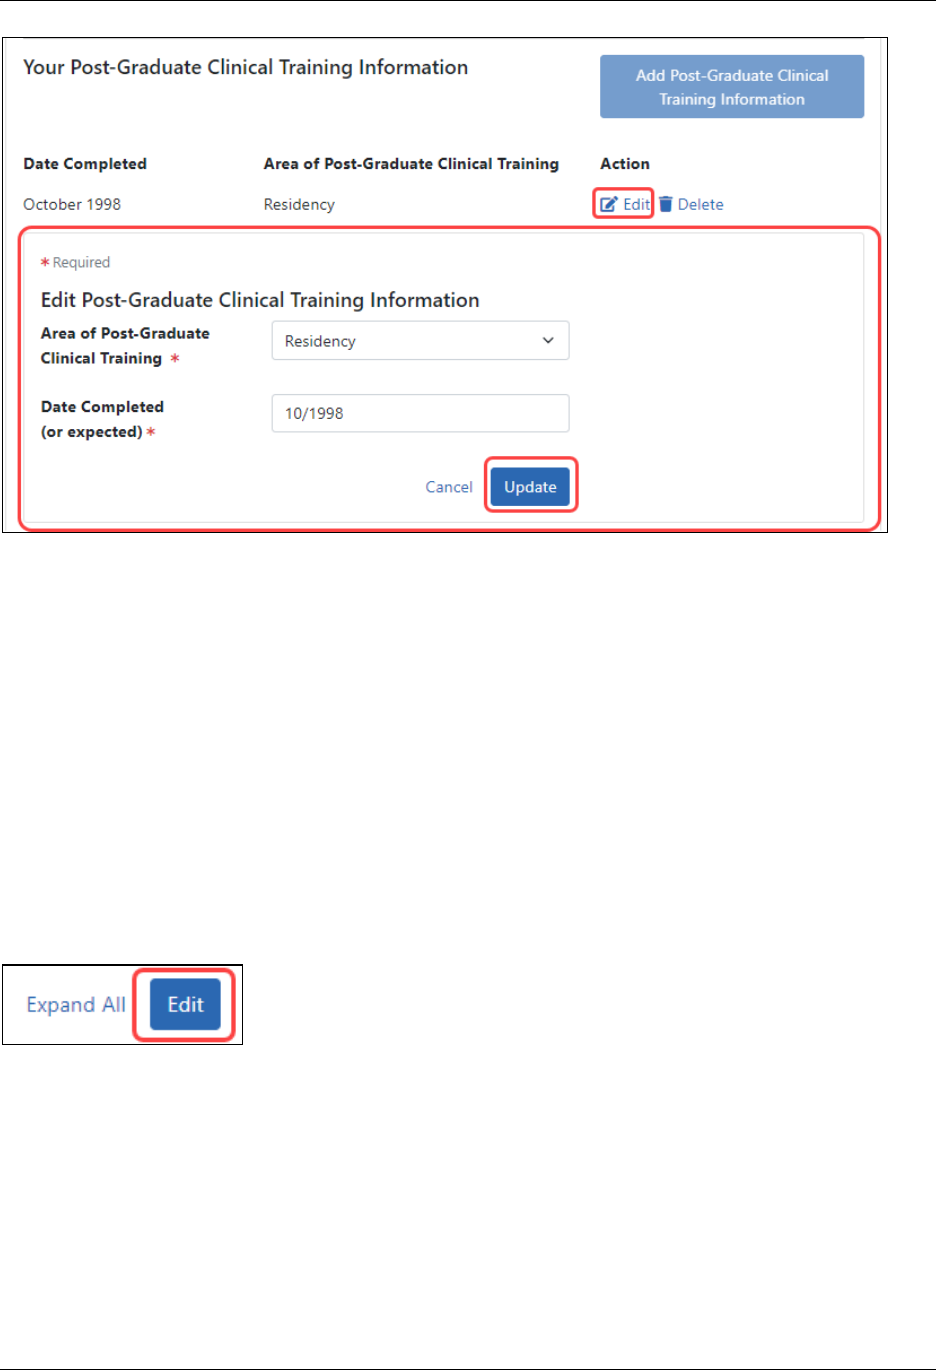
Editing Post-Graduate Clinical Training Information
You can edit or delete existing Post-Graduate Clinical Training Information using the Edit
and Delete buttons.
Before editing your profile, remember to first click the Edit button at the top of the Per-
sonal Profile screen to make it editable.
To edit your Post-Graduate Clinical Training Information:
1. Click the Edit button for your Post-Graduate Clinical Training.
The Edit Post-Graduate Clinical Training Information box displays.
2. Update the following fields:
l
Area of Post-Graduate Clinical Training Information
l
Date Completed (or expected) in MM/YYYY format (required field)
3. Click the Update button.
Personal Profile User Guide
Education 70 August 5, 2024
Figure 21: Editing Post-Graduate Clinical Training Information
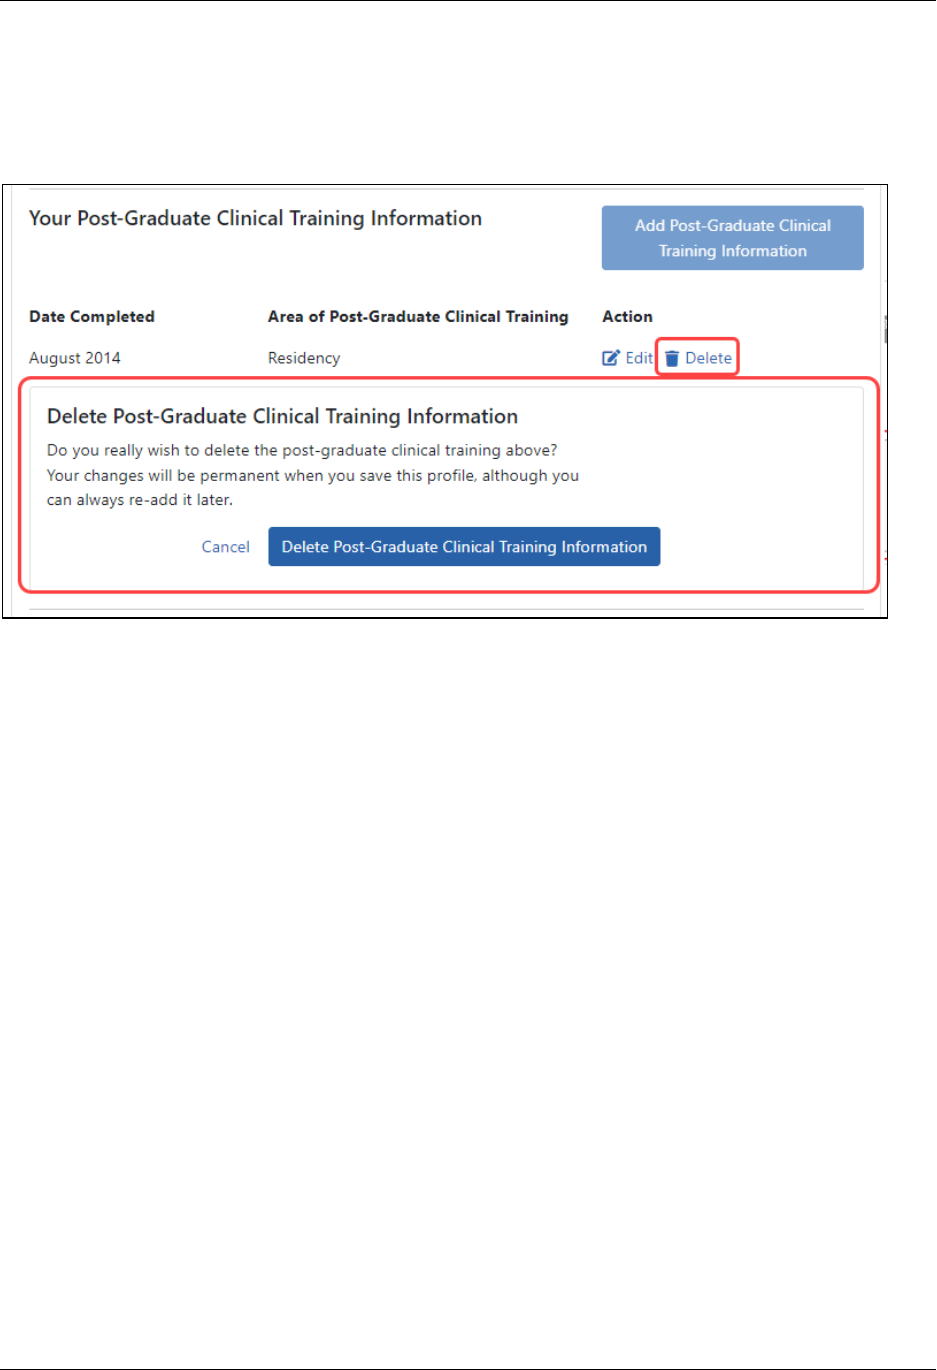
Deleting Post-Graduate Clinical Training Information
You can remove Post-Graduate Clinical Training Information from your personal profile
by using the Delete Post-Graduate Clinical Training Information button. If you do not
want the Post-Graduate Clinical Training Information listed in your profile; delete it using
the instructions below, which permanently removes the information. If you accidentally
remove this information, you will need to re-add it.
Before editing your profile, remember to first click the Edit button at the top of the Per-
sonal Profile screen to make it editable.
To delete Post-Graduate Clinical Training Information:
1. Click the Delete link next to your Post-Graduate Clinical Training Information.
The Delete Post-Graduate Clinical Training Information box displays.
Personal Profile User Guide
Education 71 August 5, 2024
2. Click the Delete Post-Graduate Clinical Training Information button.
The Post-Graduate Clinical Training Information is permanently removed from your pro-
file.
Figure 22: Deleting Clinical Training Information
Overview--Early Stage Investigator (ESI) Status
An Early Stage Investigator (ESI) is a Program Director/Principal Investigator (PD/PI) who
meets the following qualifications:
l
Completed terminal research degree or end of post-graduate clinical training,
whichever date is later, within the past 10 years, and
l
Has not previously successfully competed as PD/PI for a substantial NIH inde-
pendent research award.
ESI applications with meritorious scores will be prioritized for funding by the institute or
center receiving the application.
Some ESIs will experience a lapse in their research or research training or periods of less
than full-time effort during the 10-year ESI period. To accommodate such lapses, NIH
will consider requests to extend the ESI period, on a case by case basis at the sole dis-
cretion of NIH.

Personal Profile User Guide
Education 72 August 5, 2024
PIs should consult Frequently Asked Questions (FAQs)for Early Stage Investigators prior
to submitting a request.
Extensions can be granted for the following reasons as described in NOT-OD-09-034:
l
Childbirth
l
Family Care Responsibilities
l
Required Clinical Training for Degree
l
Clinical Loan Repayment Requirements
l
Disability or Illness
l
Active Duty Military Service
l
Natural or Other Disaster
l
Public Health Emergency
l
Other
Investigators can submit a request via an ESI Extension Request button in the Education
section of the Personal Profile in eRA Commons. The PI must provide a justification for
requesting the extension. NOTE: ESI buttons and information do NOT appear until and
unless you click the Edit link for the Education pane.
NOTE: Only the PD/PI can request the ESI extension. Although filling out the Personal
Profile can be delegated by the PI, the request for ESI extension cannot be delegated.
The information described in the request for ESI extension will be considered con-
fidential and will be maintained under the Privacy Act record system SORN, 09-25-0036,
“Extramural Awards”. The individual submitting a request for ESI extension is responsible
for providing true, accurate, and complete information.
See also:
Determining Your ESI Status on page 75
How to Access the Link for Requesting an ESIExtension on page 73
Complete and Submit the ESI ExtensionRequest Form on page 77
Personal Profile User Guide
Education 73 August 5, 2024
How to Access the Link for Requesting an ESIExtension
1. Log in to eRA Commons and navigate to the Personal Profile module to open your
profile.
2. Click the Edit button at top right of the Personal Profile screen.
NOTE: ESI buttons and information do NOT appear until and unless you click the Edit
button for the Personal Profile.
3.
Expand the Education section in the list of Personal Profile sections.
4.
At the bottom of the expanded Education section, click on the ESI Extension
Request button.
Personal Profile User Guide
Education 74 August 5, 2024
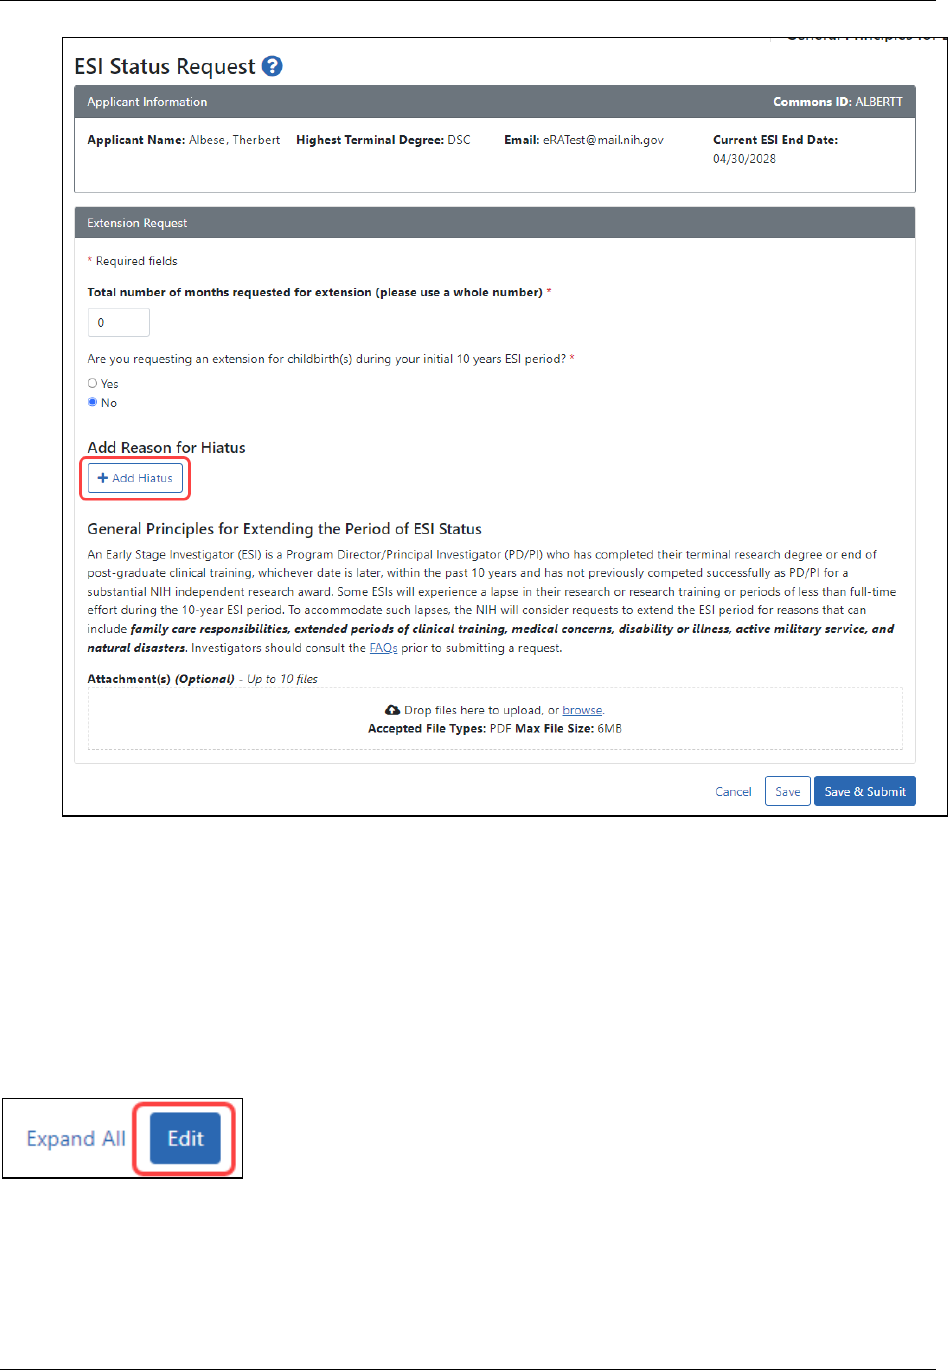
The ESI Status Request screen opens.
Personal Profile User Guide
Education 75 August 5, 2024
See Complete and Submit the ESI ExtensionRequest Form on page 77.
Determining Your ESI Status
You can find your ESI Status in your Personal Profile. To find your ESI Status:
Before editing your profile, remember to first click the Edit button at the top of the Per-
sonal Profile screen to make it editable.
Personal Profile User Guide
Education 76 August 5, 2024
1. Log into an eRA Commons account with a Program Director/Principal Investigator
(PD/PI) role.
2.
Click the Personal Profile button or click the Apps menu and select Personal Profile.
The Personal Profile Summary appears.
3.
Click the Edit button at the top of the Personal Profile screen to make it editable.
4.
Scroll down to the Education section and click its heading. The Education section
expands to show your information.
NOTE: ESI buttons and information do NOT appear until and unless you click the Edit
button at the top right of the Personal Profile screen.
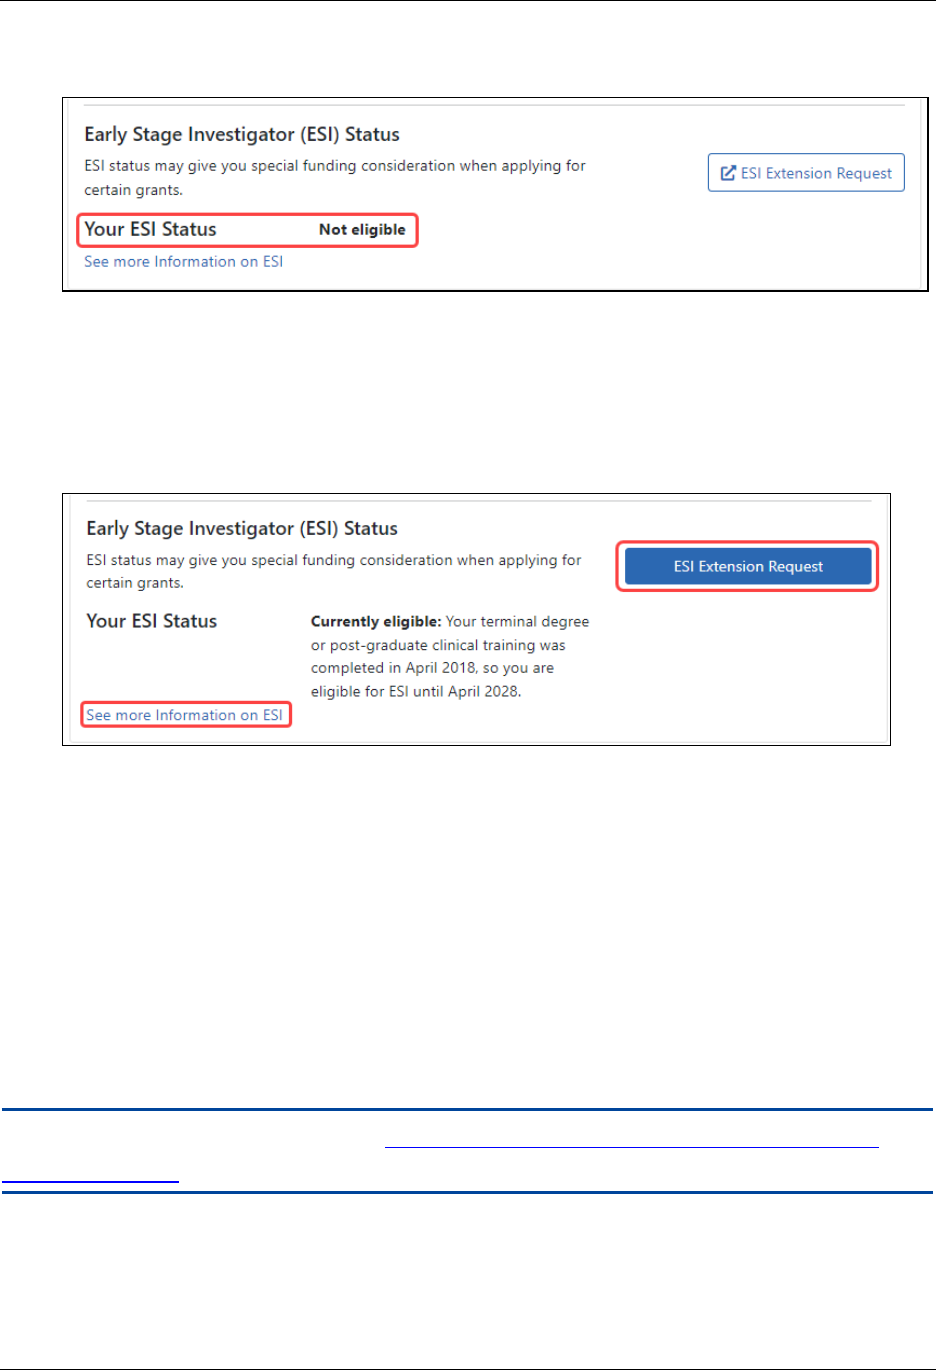
5. Scroll down to the bottom of the Education section, and you see an area labeled
Early Stage Investigator (ESI) Status. If you are no longer an Early Stage Investig-
Personal Profile User Guide
Education 77 August 5, 2024
ator, you see a note informing you of that status:
Figure 23: Early Stage Investigator Status screen, showing text that informs the user that
their ESI status is over
If you are still an Early Stage Investigator, you see the date when your ESIstatus
ends:
To learn more about ESI, click the "See more information..."link.
To apply for an ESI extension, click the ESI Extension Request button. If you are
near your ESI Status end date, and you experienced a qualified event where you
were unable to work, such as a natural disaster, you can apply for an extension of
your ESI Status to cover the time period lost to the qualified event. See Complete
and Submit the ESI ExtensionRequest Form on page 77
Complete and Submit the ESI ExtensionRequest Form
NOTE: For COVID-19 questions, see Can ESI Status Be Extended Due to Disruptions
From COVID-19?
Personal Profile User Guide
Education 78 August 5, 2024
To access the ESI Status Request form, see How to Access the Link for Requesting an
ESIExtension on page 73. Fill out the form as detailed below, paying attention to items
with a red asterisk, which are required.
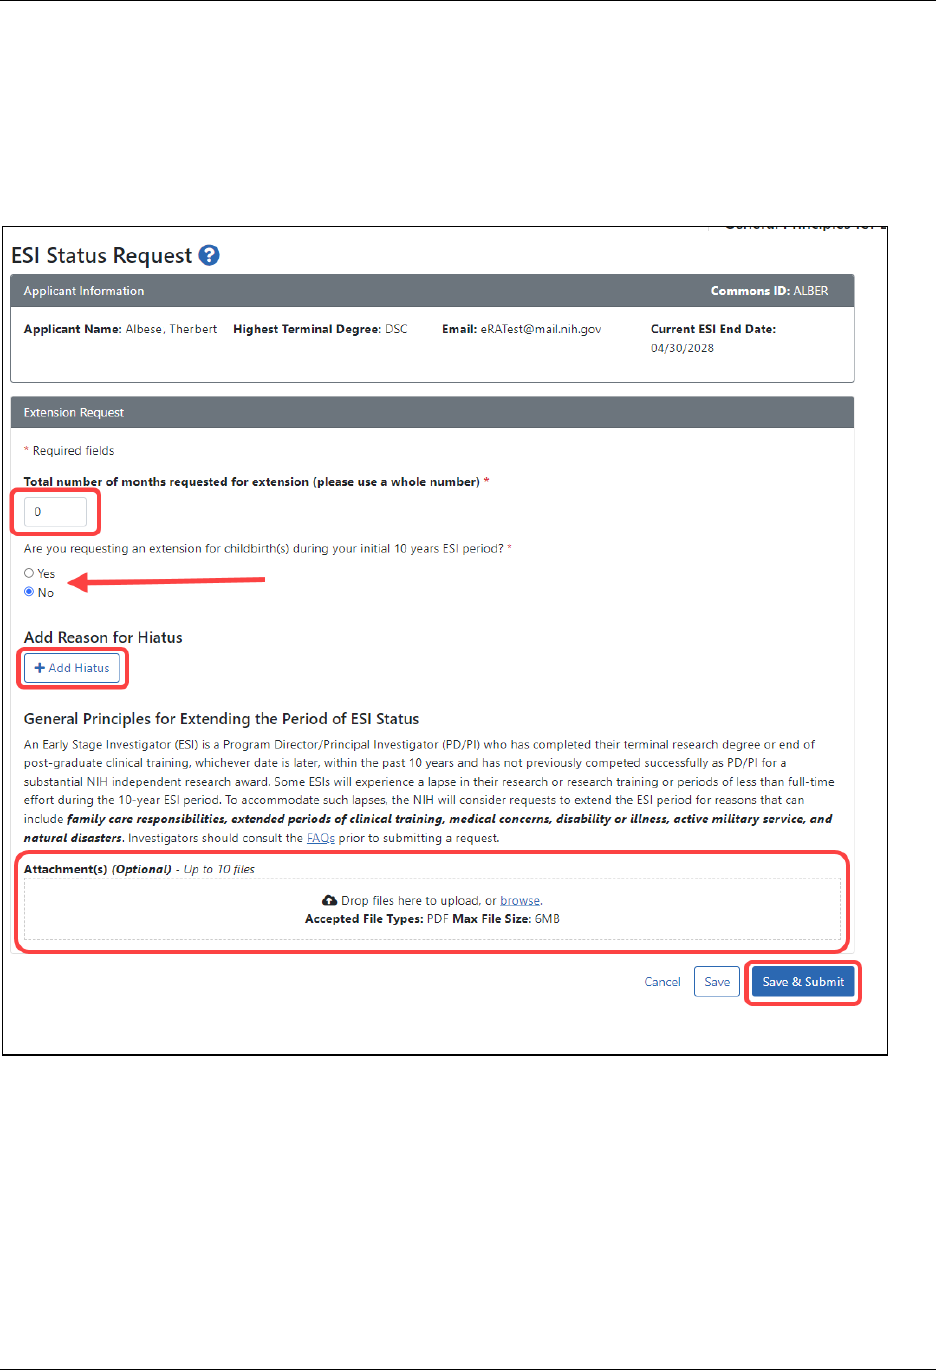
ESI Status Request Screen
Total number of months requested... Enter the total number of months requested in
whole numbers.
Are you requesting an extension for childbirth... Select Yes or No for the childbirth
question. If you click Yes, several other options appear:

Personal Profile User Guide
Education 79 August 5, 2024
Gender (of you, not the child). This is filled out and disabled if your gender is
already specified in your Personal Profile demographic information.
Number of Child(ren). Enter the number of children born during the hiatus.
Date of Birth for child (1). This field appears once for each child you specified in
Number of Child(ren). When entering the childbirth date, the date should fall
within the ESI eligibility window.
Add Reason for Hiatus. Click the Add Hiatus button to open the Reason for Hiatus win-
dow.
Personal Profile User Guide
Education 80 August 5, 2024
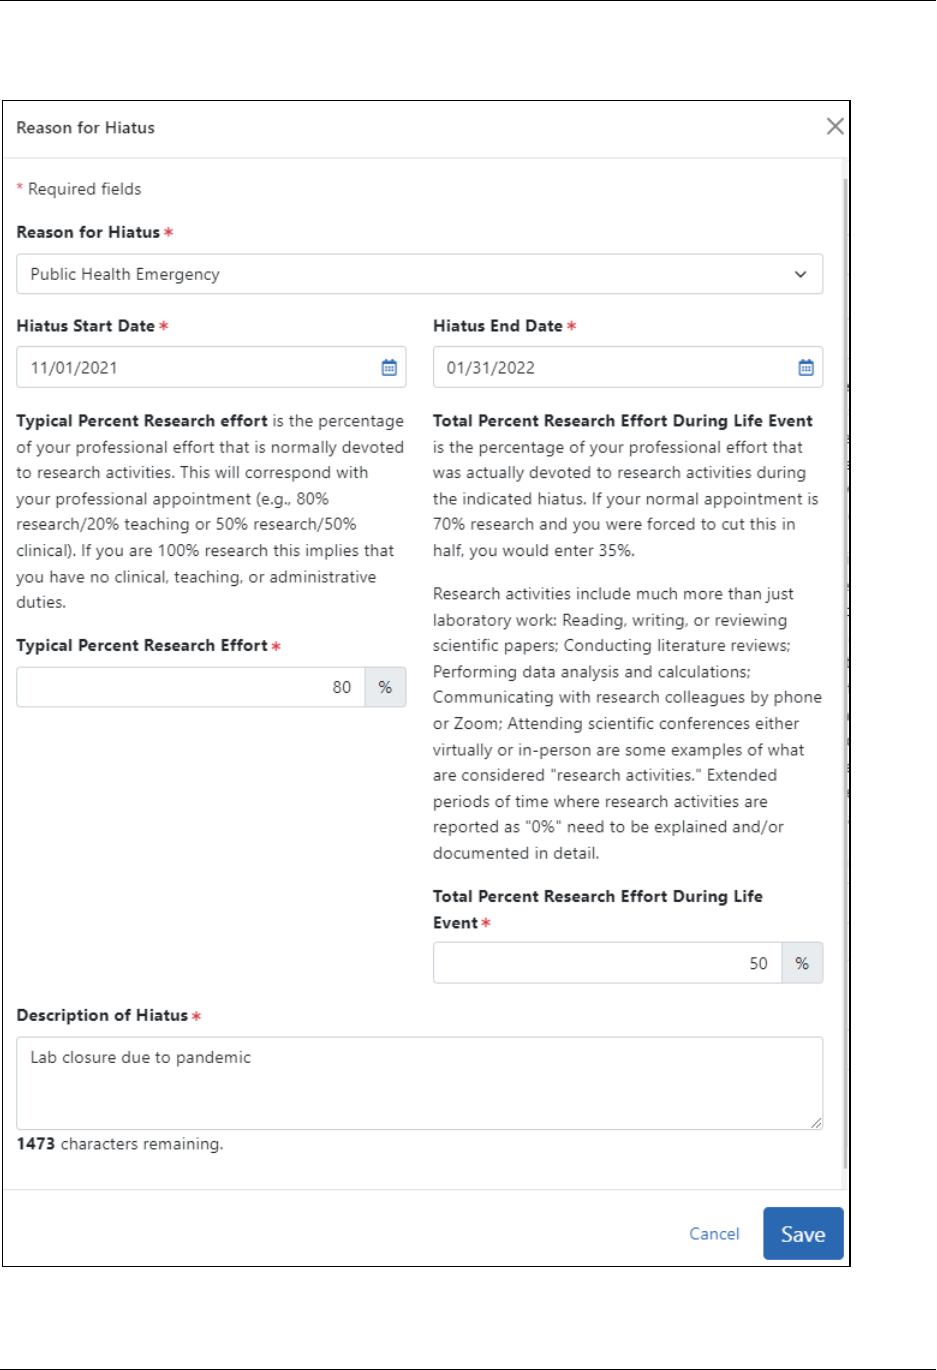
Reason for Hiatus Popup

Personal Profile User Guide
Education 81 August 5, 2024
Reason for Hiatus. Use the drop-down menu in the Reason for Hiatus field to select a
reason:
l
Clinical or Didactic Training
l
Disability or Illness
l
Family Care - Child/Children
l
Family Care - Other than Children
l
Lab Issue (i.e. lose animal colony, cell line, lab relocation, personnel)
l
Military Service
l
Natural Disaster
l
Pay Back Obligation
l
Visa Issues
l
Other/Miscellaneous
l
Public Health Emergency
Hiatus Start Date/Hiatus End Date. Use the calendar icon to select the hiatus start and
end dates. If you are requesting an extension due to childbirth, note that you can leave
these blank if you want to accept the automatic extension of 12 months per child born.
Typical Percent Research Effort. Enter the percent of time that you typically spend on
research.
Total Percent Research Effort During Life Event.. This is the percent of time you actu-
ally spent on research during the hiatus/life event. This percent must be less than or
equal to the Typical Percent Research Effort
Description of Hiatus. Describe the situation that caused you to need to extend your
ESI eligibility period.
Click the Save button in the Reasons for Hiatus popup.
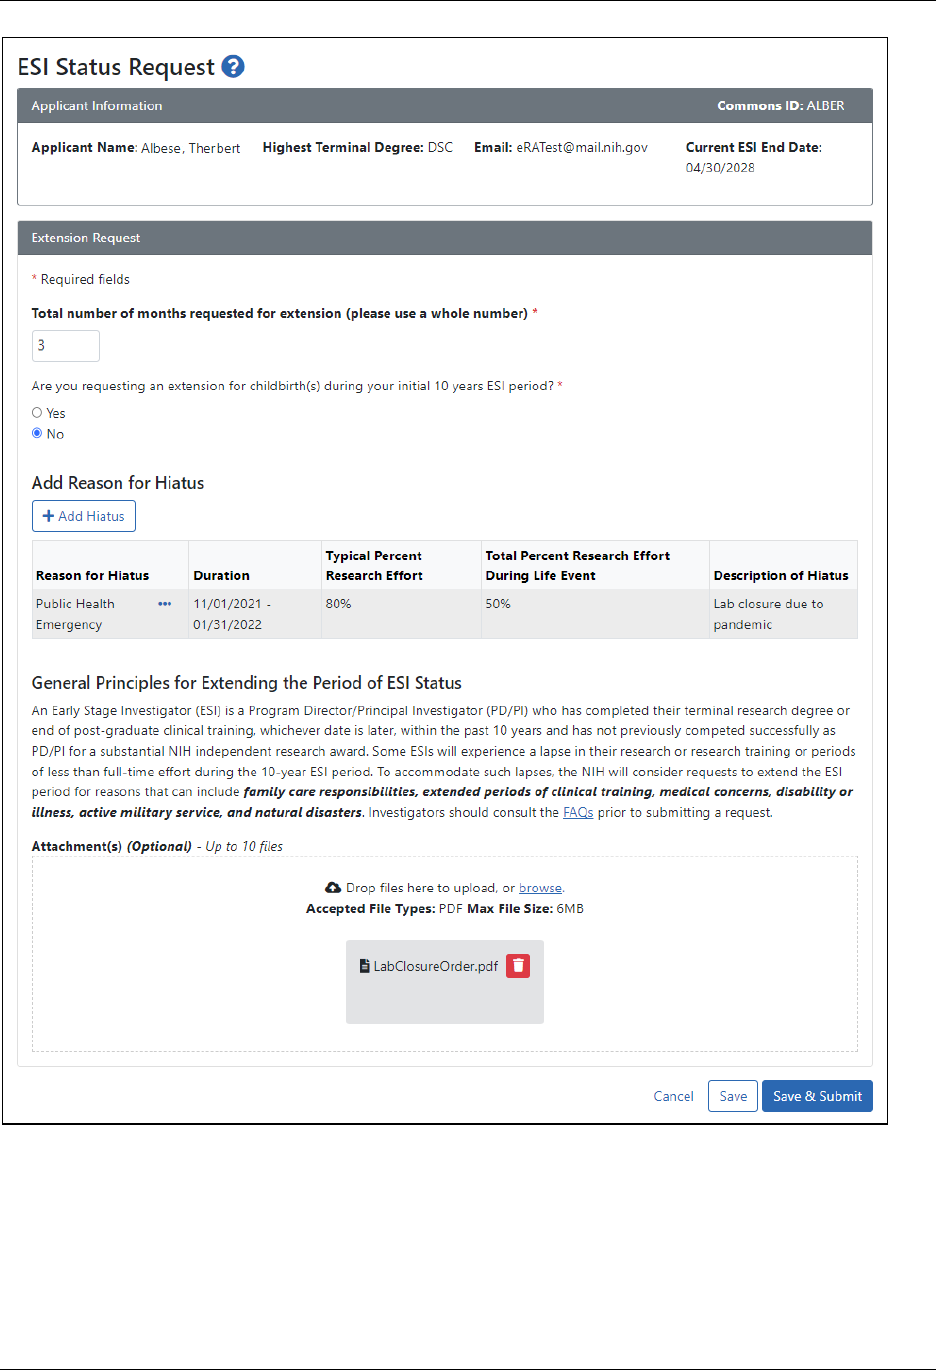
Submitting the Extension Request
After you close the Reason for Hiatus popup, you again see the ESI Status Request screen
with the hiatus information displayed.
Personal Profile User Guide
Education 82 August 5, 2024
Attachments (Optional). If you have supporting documentation that you would like to
add, drop files in the "Drop Files here..." area or use the Browse button to add attach-
ments (PDF only).
Personal Profile User Guide
Education 83 August 5, 2024
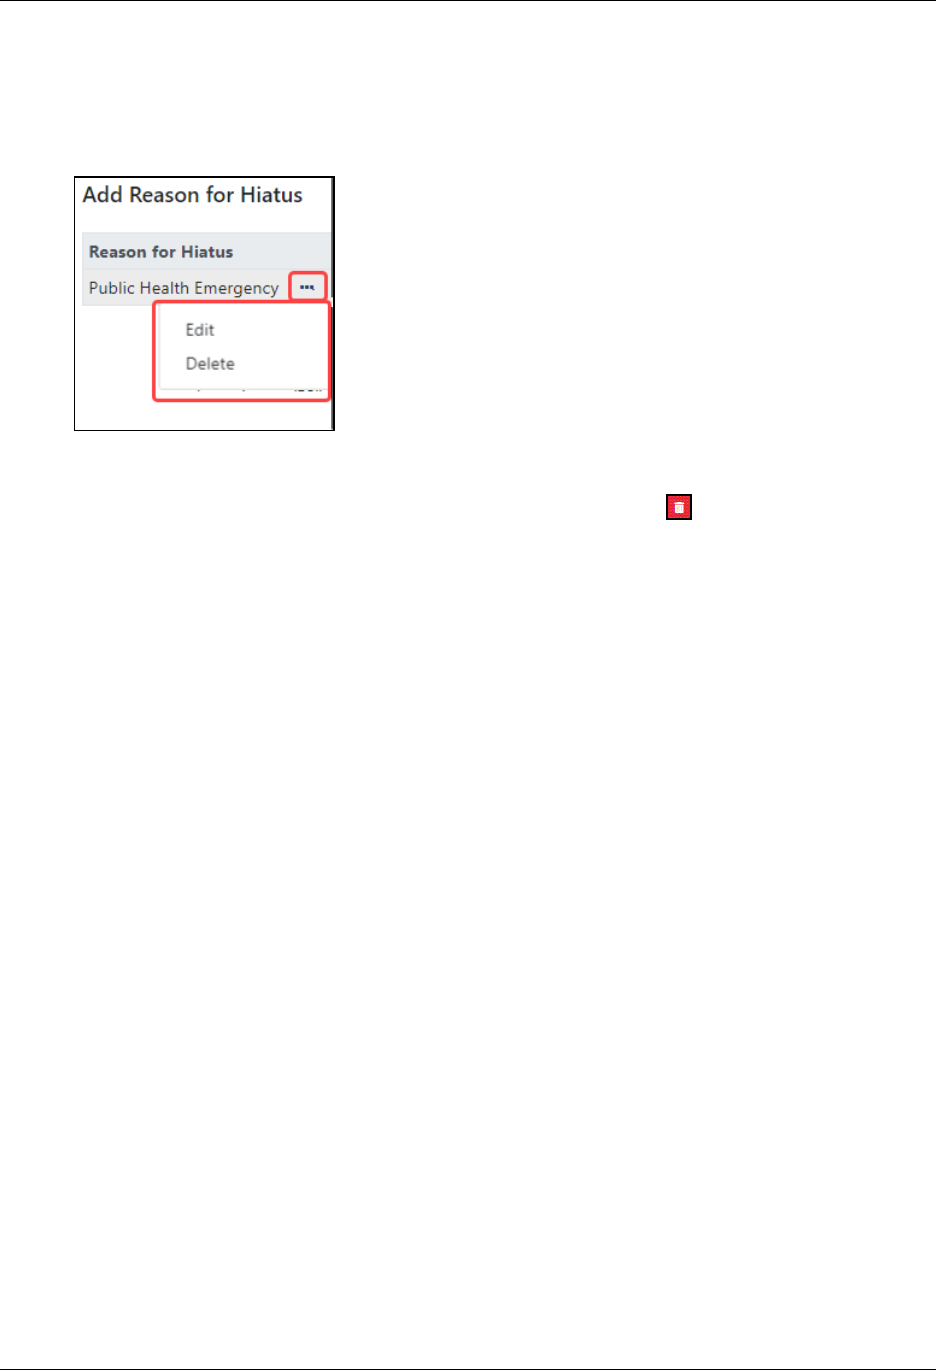
You can edit the information you specified:
l
To change the Reason for Hiatus, click the item's three-dot ellipsis menu and
select Edit or Delete.
l
To view an attached file, click the file's name and it will be downloaded by your
browser. To delete an attached file, click its trash can icon .
Save & Submit.
When finished, click the Save & Submit button.
Save.
Use the Save button if you are not ready to submit the request, which means you can
come back to this form later to edit it and then submit.
When a decision is made regarding your request, you will receive an email at the email
address specified in your eRA Commons account. In addition, the ESI indicator in your
eRA Commons Account will change and the end date of your ESI status period will be
modified to reflect the extension granted. In most cases it is expected that a decision will
be made within a few weeks. If there are large numbers of requests for extensions or if
there are unanswered questions after the first request, the process and the decision may
take longer.
Personal Profile User Guide
Reference Letters 84 August 5, 2024
Reference Letters
If you have the PI role, you have access to the Reference Letters section of the Personal
Profile.
IMPORTANT: To save any profile changes, you must click the Save All button, which is
located at the top right of the screen. You can save profile changes ONLY after fixing ALL
error items in red/pink that show a red x ( ), even those unrelated to your current
change. If you save while errors exist, changes are NOTsaved and you see an error mes-
sage.
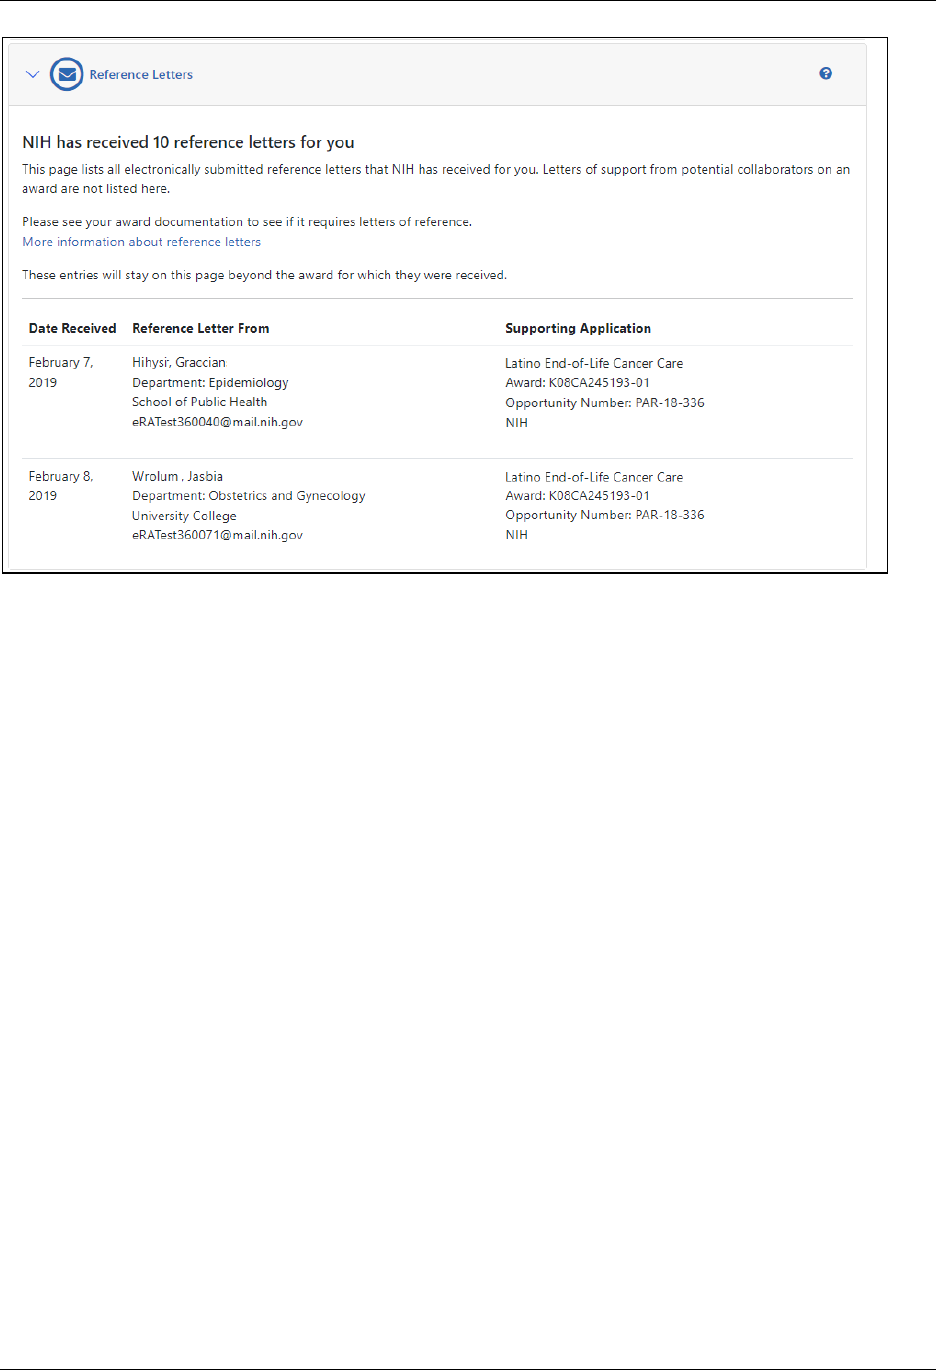
The Reference Letters section contains a list of all reference letters received by NIH on
your behalf . The information is read-only and cannot be changed. You cannot read the
actual contents of the letter, only the date received, referee name, and the application
which the letter supports.
NOTE: The Personal Profile does not provide access to the actual reference letters.
Click the Reference Letters section heading to see the section content.
The following read-only information displays for each letter received:
l
Date Received
l
Reference Letter From
l
Supporting Application
Personal Profile User Guide
Reference Letters 85 August 5, 2024
Figure 24: Reference Letters Section of the Personal Profile
Personal Profile User Guide
Publications 86 August 5, 2024
Publications
eRACommons has partnered with the National Center for Biotechnology Information
(NCBI) to link NCBI's personal online tool, My NCBI, to Commons. My NCBI offers an
online portal - My Bibliography - for users to maintain and manage a list of all their
authored works, such as journal articles, manuscripts accepted for publication, books,
and book chapters.
IMPORTANT: To save any profile changes, you must click the Save All button, which is
located at the top right of the screen. You can save profile changes ONLY after fixing ALL
error items in red/pink that show a red x ( ), even those unrelated to your current
change. If you save while errors exist, changes are NOTsaved and you see an error mes-
sage.
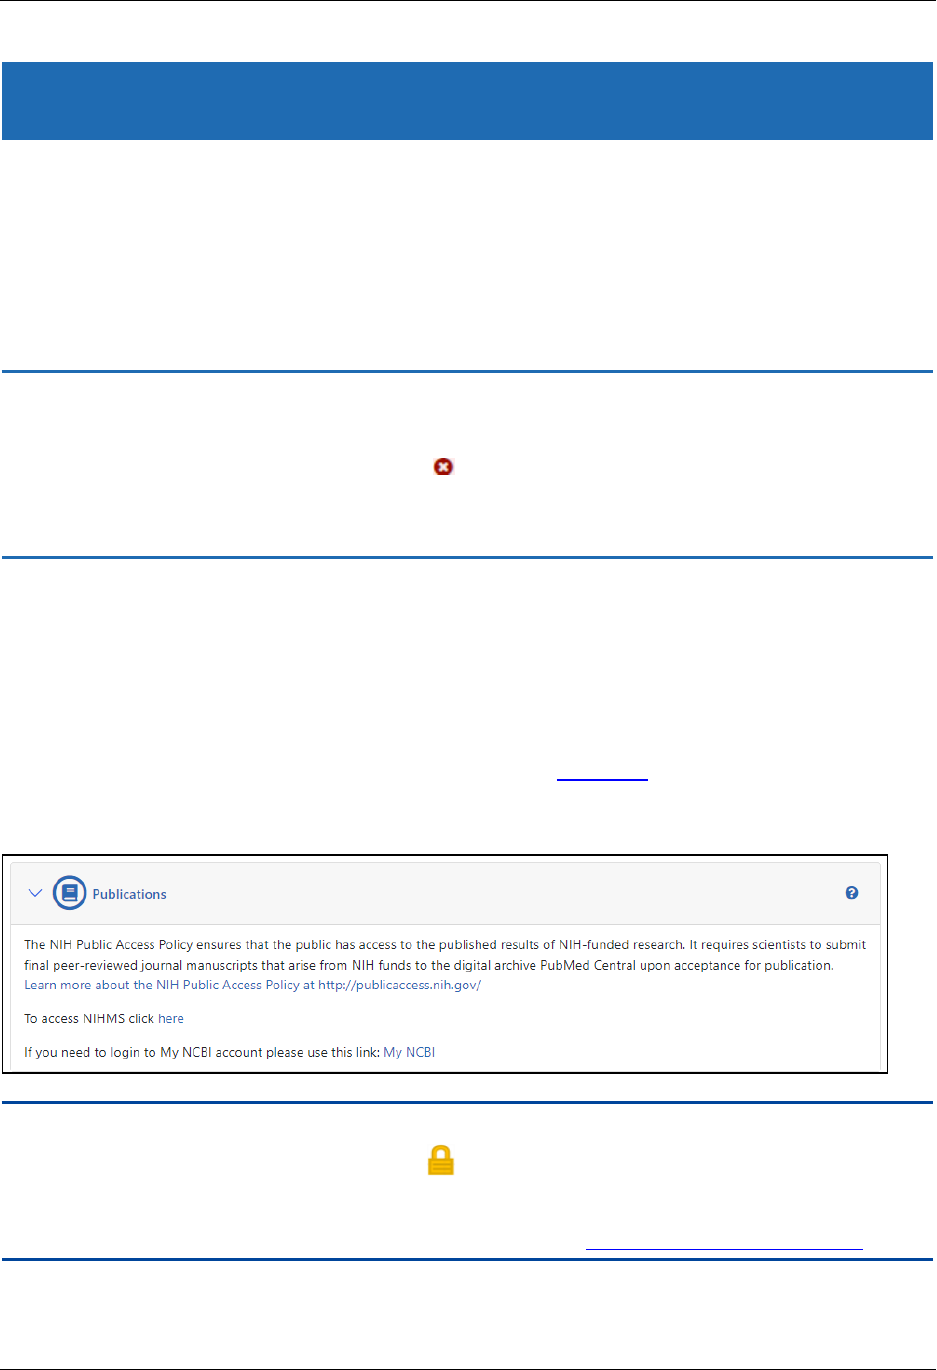
Click the Publications section heading to see the section content.
The Publications section of the personalprofile provides links to the following:
l
NIHPublic Access website
l
NIH Manuscript SubmissionSystem
l
National Center for Biotechnology Information My NCBItool
If you have the PI role, you have access to this section of the personal profile.
NOTE: Publications that have a gold lock on them in your My NCBIbibliography cannot
be removed from the RPPR. A gold lock ( ) indicates that the award was associated with
the publication through NIHMS. To delete a citation with a gold lock, contact the NIHMS
help desk through their web form which is accessible at http://www.nihms.nih.gov/.

Personal Profile User Guide
Publications 88 August 5, 2024
The ORCID ID
The Open Researcher and Contributor ID (ORCID) ID is used within NIH and Grants.gov to
relate publications to grants. You can associate your ORCID ID from the Commons Per-
sonal Profile module.
If no ORCIDID is connected to your profile, use the link in Personal Profile (at left) to
start the process.
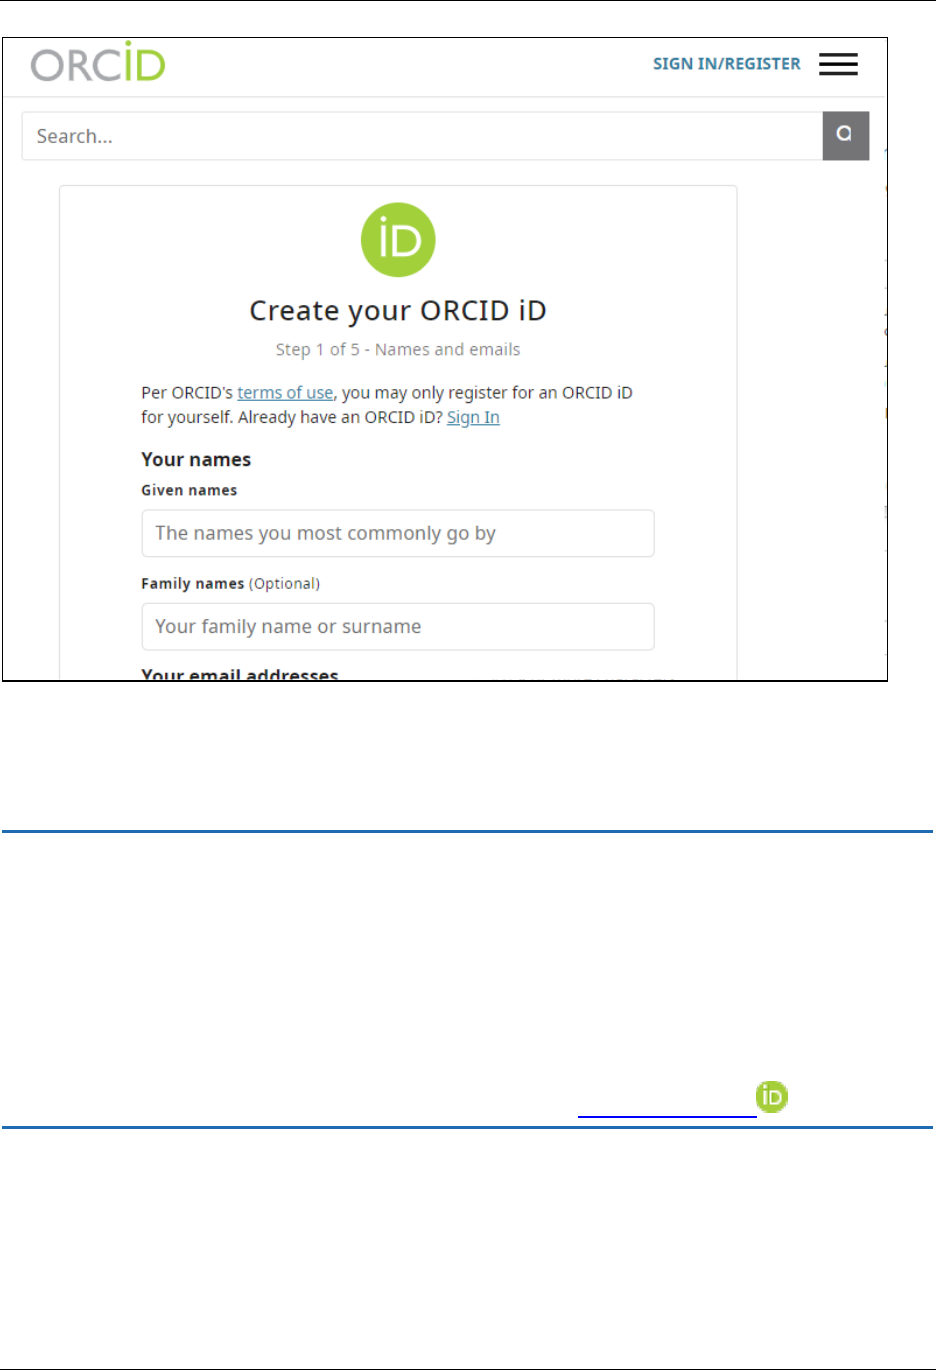
Click the Create or Connect your ORCIDID link and the ORCID site opens, letting you log
in and connect your IDto your Commons profile or to set up an ORCID ID which can
then be connected to your Commons profile.
NOTE: If you get an error from eRACommons when attempting to link your ORCID ID,
contact the eRA Service Desk. One common reason why this might not work is that you
have two eRA Commons accounts, and the other account is already linked to the ORCID
ID. The ORCID ID can be linked to only one Commons account. Also, to remove an
ORCID, you must also contact the eRA Service Desk.
Personal Profile User Guide
Publications 89 August 5, 2024
Once your ORCID ID has been created, click the Create or Connect your ORCID ID link in
your Commons Personal Profile and log into ORCID. You will then be prompted to
authorize NIHto access your personal ORCIDprofile (public information only).
IMPORTANT: The ORCID IDis an important identifier to enable transparent and trust-
worthy connections between individuals engaged in research, scholarship, and innov-
ation activities and is tied to an individual researcher's or contributor's name. ORCID IDs
have been established worldwide to connect individuals to their professional information
(such as publications, awards, affiliations, etc.) for references and citations. You are
encouraged to complete your ORCID profile and connect the resulting IDto your Com-
mons account.
For more information regarding ORCID IDs please visit https://orcid.org .
Once you have successfully linked your ORCID ID to your Commons account, it will be
shown on your Personal Profile .

Personal Profile User Guide
Publications 90 August 5, 2024
Additional Instructions for Fellowship:
For NIH fellowship applications, the personal profile associated with the eRA Commons
username entered in the Credential field for the PD/PI (fellowship applicant) must
include an ORCID ID (e.g., orcid.org/0000-0001-2345-6789) to pass NIH validation
requirements.
Additional Instructions for Career Development:
For NIH Individual career development award applications, the personal profile asso-
ciated with the eRA Commons username entered in the Credential field for the PD/PI
(candidate) must include an ORCID ID (e.g., orcid.org/0000-0001-2345-6789) to pass
NIH validation requirements.
Additional Instructions for Trainees:
For NIH trainees, the Personal Profile associated with the eRA Commons user ID must be
linked to an ORCID ID (e.g., orcid.org/0000-0001-2345-6789) in order to pass NIH val-
idation requirements.
Personal Profile User Guide
Publications 91 August 5, 2024
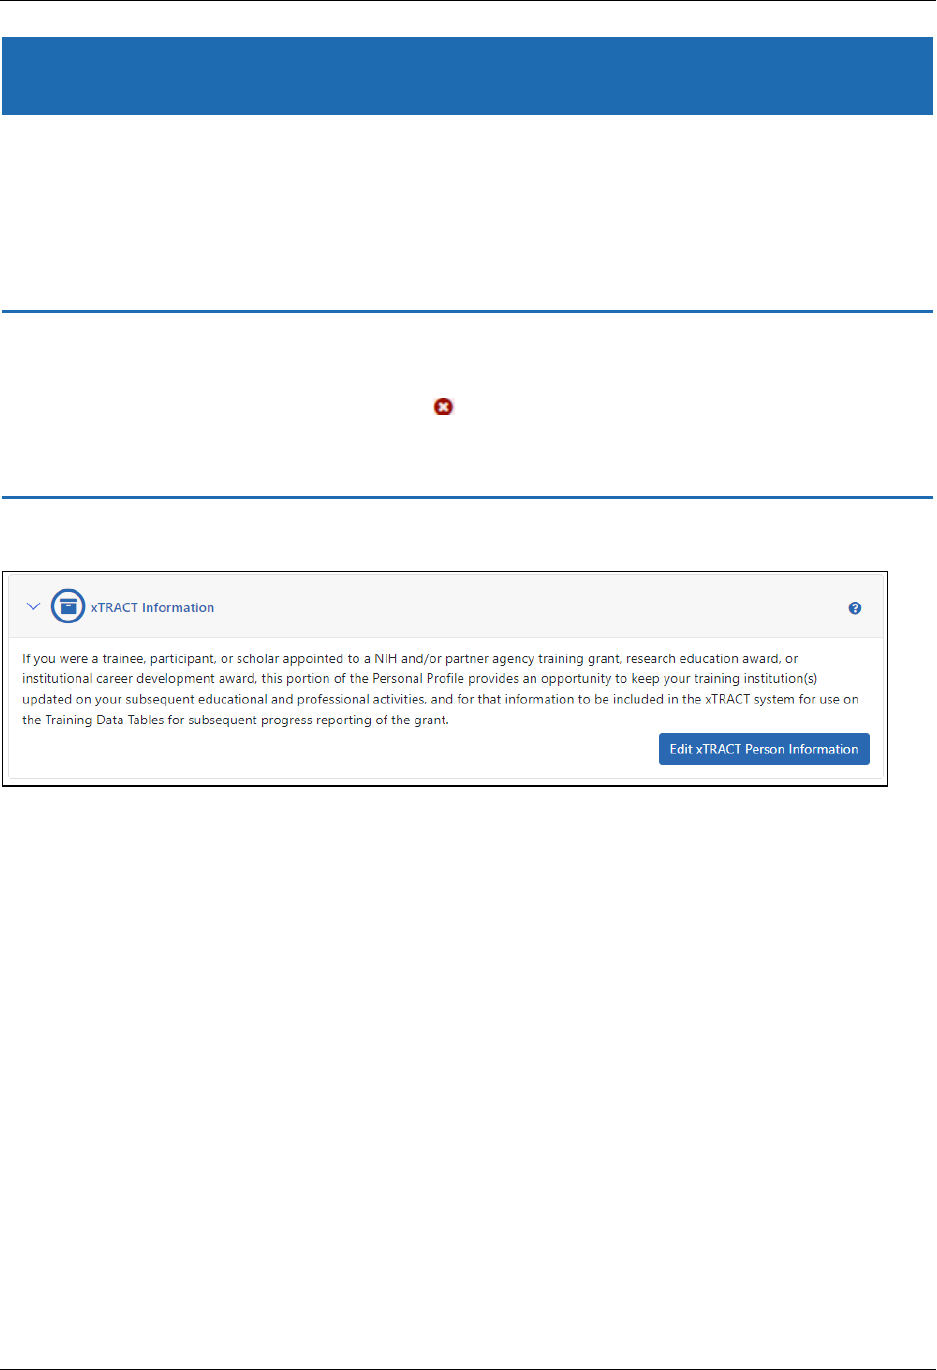
xTRACT
The xTRACT section of Personal Profile provides a handy link to the xTRACT module.
Trainees, participants, or scholars on a training grant, research education award, or insti-
tutional career development award can use xTRACT to update their training institution
on subsequent educational activities.
IMPORTANT: To save any profile changes, you must click the Save All button, which is
located at the top right of the screen. You can save profile changes ONLY after fixing ALL
error items in red/pink that show a red x ( ), even those unrelated to your current
change. If you save while errors exist, changes are NOTsaved and you see an error mes-
sage.
Click the xTRACT Information section heading to see the xTRACTlink.
Figure 26: xTRACT Section of Personal Profile
