Tencent VooV Meeting
©2013-2022 Tencent Cloud. All rights reserved. Page 1 of 110
Tencent VooV Meeting
Operation Guide
Product Documentation
Tencent VooV Meeting
©2013-2022 Tencent Cloud. All rights reserved. Page 2 of 110
Copyright Notice
©2013-2024 Tencent Cloud. All rights reserved.
Copyright in this document is exclusively owned by Tencent Cloud. You must not reproduce, modify, copy or distribute
in any way, in whole or in part, the contents of this document without Tencent Cloud's the prior written consent.
Trademark Notice
All trademarks associated with Tencent Cloud and its services are owned by Tencent Cloud Computing (Beijing)
Company Limited and its affiliated companies. Trademarks of third parties referred to in this document are owned by
their respective proprietors.
Service Statement
This document is intended to provide users with general information about Tencent Cloud's products and services
only and does not form part of Tencent Cloud's terms and conditions. Tencent Cloud's products or services are
subject to change. Specific products and services and the standards applicable to them are exclusively provided for in
Tencent Cloud's applicable terms and conditions.

Tencent VooV Meeting
©2013-2022 Tencent Cloud. All rights reserved. Page 3 of 110
Contents
Operation Guide
Starting a Meeting
Starting a Meeting with Personal Meeting ID
Scheduling a Meeting
Scheduling a Public Meeting
Scheduling a Recurring Meeting
Joining a Meeting
Joining a Meeting on Clients
Joining a Meeting on Phone
Mobile Client
Organizing Meetings
Inviting Attendees
Meeting Controls
PC Client
Organizing Meetings
Inviting Attendees
Meeting Controls
Meeting Control and Management
Host and Co-host Management
Attendee List Management
Meeting Security Control
Controlling Hand Raise
Viewing Past Meetings
Waiting Room
Mute New Attendees for Meetings with 6+ Attendees
Syncing Meetings from System Calendar
Collaboration and Interaction
Chat and Interaction
Chat in Meeting
Unmuting with Shortcut Key
Whiteboard Sharing
Screen Sharing
Partial Screen Sharing
Sharing External Video Source
Share PC Audio During Screen Sharing

Tencent VooV Meeting
©2013-2022 Tencent Cloud. All rights reserved. Page 4 of 110
Annotate During Screen Sharing
Screen Sharing Watermark
Speaker View Mode
Audio and Video Management
Live Streaming Management
Starting a Live Streaming
Video Management
HD Video
Floating Window Display
Multi-Monitor Mode
Gaze Correction
Virtual Background
Video Noise Cancellation
Audio Management
Audio Selection and Testing
Audio Mode
Music Mode
Audio Noise Cancellation
Recording Management
Local Recording
Recording Layout and Content
Recording File Conversion and Retention
Account and Management
Web Account Center
Web Account Center-My Meetings
VooV Meeting Outlook Plugin
Joining a Meeting from Browser

Tencent VooV Meeting
©2013-2022 Tencent Cloud. All rights reserved. Page 5 of 110
Operation Guide
Starting a Meeting
Starting a Meeting with Personal Meeting ID
Last updated 2023-12-19 16:41:09
Feature Overview
A personal meeting ID is your dedicated fixed meeting ID, through which you can start a meeting directly.
Prerequisites
Logged-in user: Free or Enterprise Edition user.
Logged-in device: Windows, macOS, iOS, or Android.
Version: v1.5.0 or later.
Notes
A personal meeting can be created only as a directly started meeting instead of a scheduled meeting.
On the Settings page of Use Personal Meeting ID, you can set the meeting password, enable the waiting room, allow
attendees to join the meeting before the host (enabled by default), and mute attendees when they join the meeting. To
start a meeting using your personal meeting ID, you can click Start and select Use Personal Meeting ID. To start a
meeting with random meeting ID, you can deselect Use Personal Meeting ID.
Currently, meetings started through a personal meeting ID don't support the meeting file feature.
Using Personal Meeting ID to Start a Meeting
On PC client
1. Click the drop-down arrow next to Start and select Use Personal Meeting ID.
2. Click Start.
On mobile client
1. Tap Start and select Use Personal Meeting ID.

Tencent VooV Meeting
©2013-2022 Tencent Cloud. All rights reserved. Page 6 of 110
2. Tap Enter to enter the meeting.

Tencent VooV Meeting
©2013-2022 Tencent Cloud. All rights reserved. Page 7 of 110
Scheduling a Meeting
Scheduling a Public Meeting
Last updated 2023-12-19 16:41:22
Feature Overview
You can schedule a meeting on web and the client.
Prerequisites
Logged-in user: Free or Enterprise Edition user.
Logged-in device: Windows, macOS, iOS, or Android.
Notes
The start time of a scheduled meeting cannot be earlier than the current time, but there is no limit on the number of
days before the schedule meeting starts.
You cannot create a meeting if you haven't logged in.
You can help another user schedule a meeting and transfer the host role after entering the meeting.
If you are an Enterprise Edition user and are scheduling a meeting, you can invite your enterprise contacts to join the
meeting, and the corresponding meeting name will be displayed in the meeting list on the VooV Meeting client of the
invitees.
To batch schedule meetings at different times, select the target times and submit the meeting information.
After a meeting is scheduled successfully, the meeting ID will be retained for 30 days from the scheduled start time,
within which you can return to the meeting at any time.
If you use a Free Edition account to schedule a meeting, you can hold only one meeting at any time. If there is another
meeting in the specified time period, you can select another meeting time or purchase an Enterprise Edition account.
If you use an Enterprise Edition account to schedule a meeting and the number of scheduled meetings in the specified
time period has reached the upper limit of concurrent meetings, your scheduled meeting may not be held normally. In
this case, you can select another meeting time or increase the number of concurrent meetings under your Enterprise
Edition account.
Scheduling a Meeting

Tencent VooV Meeting
©2013-2022 Tencent Cloud. All rights reserved. Page 8 of 110
Scheduling a meeting on web
1. Log in to the official website and find [Account Center] (https://voovmeeting.com/user-center/personal-information).
2. Click Meeting List on the left sidebar and click Schedule a Meeting in the top-right corner.
3. Enter the relevant meeting information and click Schedule a Meeting at the bottom of the page.
Scheduling a meeting on client
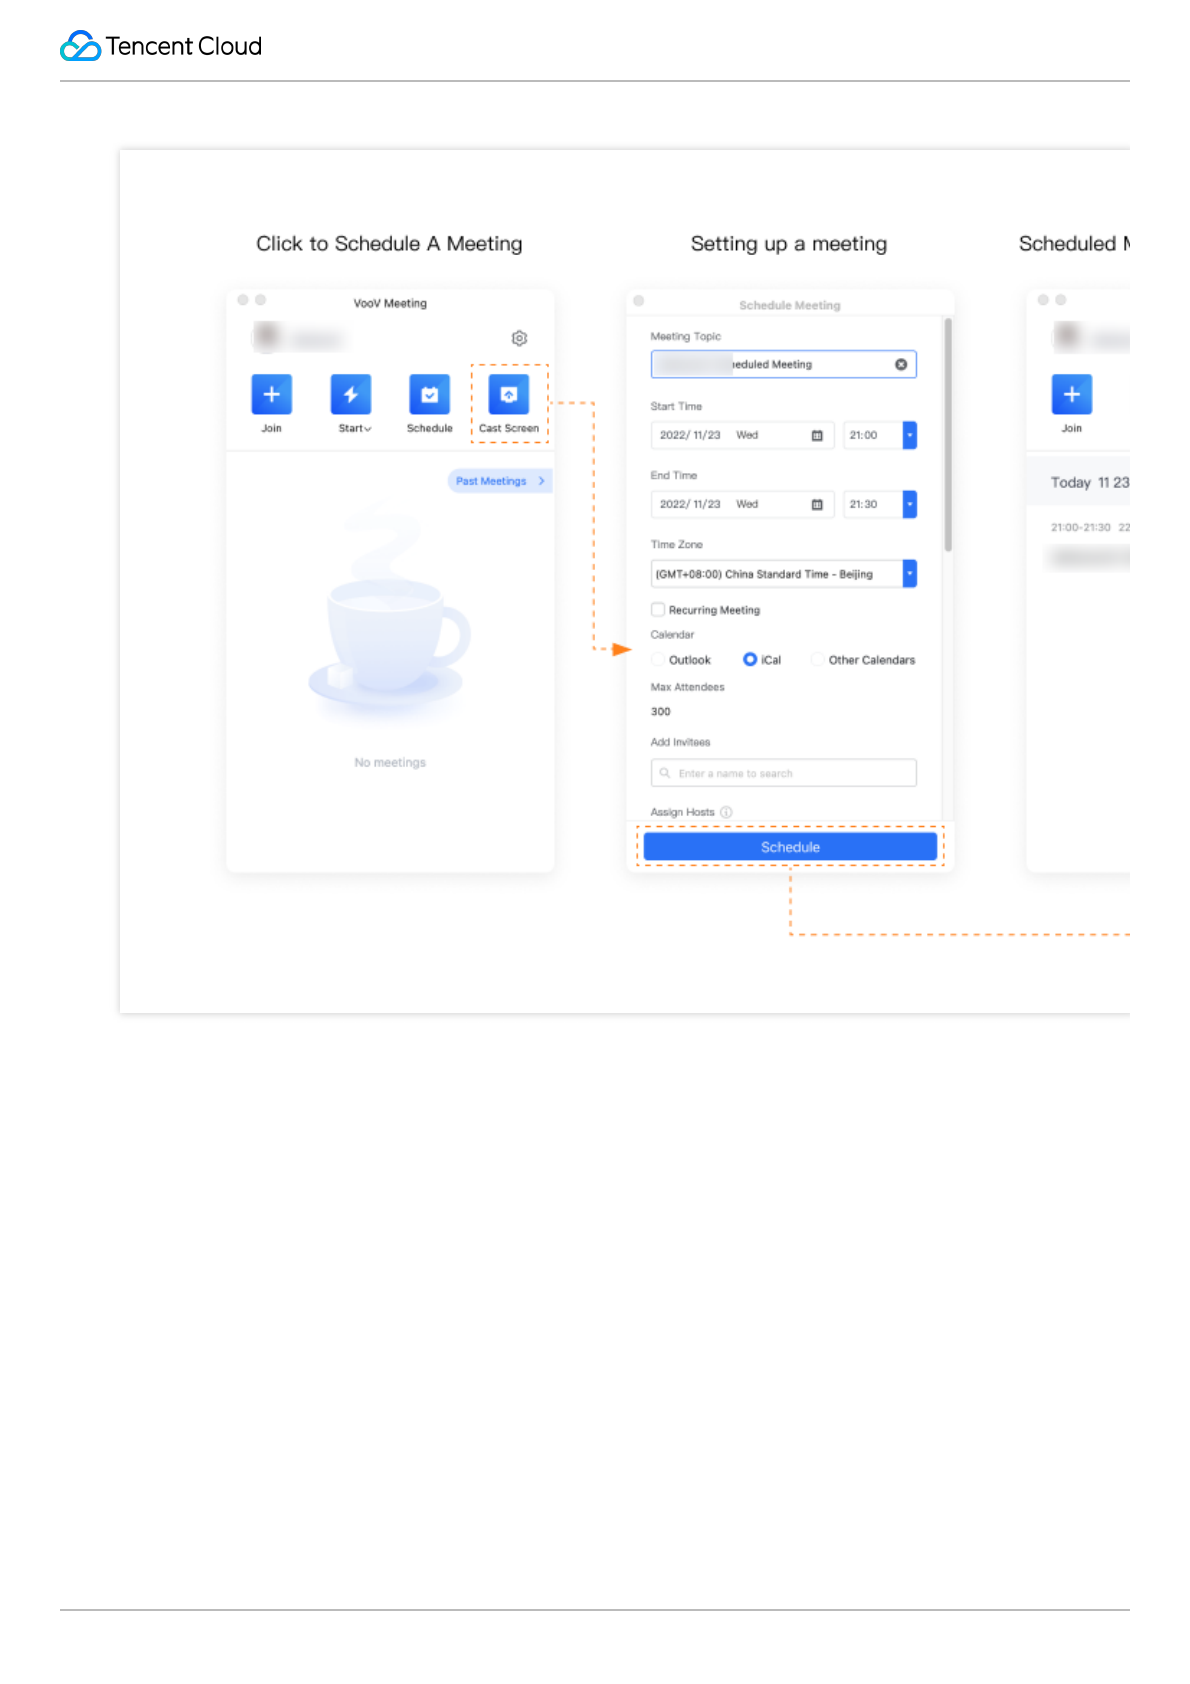
1. Log in to your account on the client homepage and click Schedule.
2. Enter the relevant meeting information and click Schedule.
Settings When Scheduling a Meeting
Calendar: you can select Outlook or Other Calendars to send email invitations.
Add Invitees: you can invite enterprise contacts to join the meeting, and the corresponding meeting name will be
displayed in the meeting list on the VooV Meeting client of the invitees, but you can't invite yourself.
Assign Hosts: you can specify the meeting host in advance. If the host is not set, the meeting creator will be the host
by default. You can set up to 10 host candidates, among whom the host will be determined by their order of entry. One
meeting can have only one host at any time, and you cannot assign yourself as the host.
Meeting Password: if you select Enable, users need to enter a password containing 4–6 digits to join the meeting.
Attendee Restriction: you can select Open to all or Enterprise users only. If you select the latter, non-enterprise
users cannot join the meeting.

Tencent VooV Meeting
©2013-2022 Tencent Cloud. All rights reserved. Page 9 of 110
Scheduling a Recurring Meeting
Last updated 2023-12-19 16:41:39
Feature Overview
The recurring meeting feature can schedule meetings automatically as configured to eliminate your need to schedule
meetings one by one.
Prerequisites
Logged-in user: Free or Enterprise Edition user.
Logged-in device: Windows, macOS, iOS, or Android.
Version: v1.7.0 or later.
Notes
After a recurring meeting is scheduled, you can view all meetings under it and view, modify, and cancel individual
meetings.
All meetings under a recurring meeting share the same meeting ID. To improve security, we recommend you use a
waiting room to filter attendees before a meeting starts.
Similar to the password of a scheduled meeting, the password of a recurring meeting can also be canceled or
changed.
You can select the end time of a recurring meeting and set up to 200 meetings under it.
The files of individual meetings under a recurring meeting can be aggregated to the entire recurring meeting.
Legacy versions don't support scheduling recurring meetings but can display them in the same way as in the recurring
meeting main window.
For a meeting minutes template file during recurring meeting scheduling:
If it is edited, it won't be deleted, and a new one will be created automatically for use in the next meeting.
If it isn't edited, it will be deleted, and a new one will be created automatically for use in the next meeting.
Attendees of recurring meeting and users who favorite it can delete it from the meeting list, which won't affect it.
Scheduling a Recurring Meeting
Scheduling a meeting on web

Tencent VooV Meeting
©2013-2022 Tencent Cloud. All rights reserved. Page 10 of 110
1. Log in to the [VooV Meeting official website] (https://voovmeeting.com/user-center/personal-information), hover over
Host a Meeting in the top-right corner, click Schedule a Meeting to enter the Schedule a Meeting page in
Account Center, and select Recurring Meeting.
2. Select the frequency and end time, click Schedule a Meeting, and a recurring meeting will be successfully
scheduled.
Scheduling a meeting on PC client
1. Click Schedule on the homepage to enter the scheduled meeting settings page and select Recurring Meeting.
2. Select the frequency and end time, click Schedule, and a recurring meeting will be successfully scheduled.
Scheduling a meeting on mobile client
1. Tap Schedule, select Public Meeting to enter the scheduled meeting settings page, and select Recurring
Meeting.
2. Select the frequency and end time, tap Done, and a recurring meeting will be successfully scheduled.

Tencent VooV Meeting
©2013-2022 Tencent Cloud. All rights reserved. Page 11 of 110
Joining a Meeting
Joining a Meeting on Clients
Last updated 2023-12-19 16:41:53
Feature Overview
You can join a meeting on the mobile or PC client.
Prerequisites
Logged-in user: Free or Enterprise Edition user
Logged-in device: Windows, macOS, iOS, or Android
Notes
Up to 10 meetings can be displayed in the Meeting ID drop-down list in the Join Meeting window.
After you join a meeting, the system will prompt you to select an audio connection method from the following:
Call Me (supported for Enterprise Edition only): VooV Meeting will actively call your meeting room phone number or
your personal landline or mobile number. We recommend you use this audio connection method in a meeting room or
large meeting to enjoy a better audio experience.
Call In: you can use a landline or mobile phone to dial the corresponding number to join the meeting, and the phone
rather than the PC mic and speaker will be used as your meeting audio source, which has a better call audio quality.
PC Audio: you can directly use the PC mic and speaker (headset) as the meeting audio connection method to join the
meeting, which is suitable for small meetings and is not limited by scenarios.
If you don't select an audio connection method, you cannot speak or hear other attendees during the meeting.
Joining a Meeting
On mobile client
Method 1: Join a meeting through meeting ID
1. Open the VooV Meeting app, tap Join, and enter the meeting ID and the corresponding password.
2. Turn on/off the camera and mic and tap Join Meeting.
Tencent VooV Meeting
©2013-2022 Tencent Cloud. All rights reserved. Page 12 of 110
Method 2: Join a meeting through shared link
1. If you have installed VooV Meeting and the received invitation message contains a link, you can tap the link and
verify your identity to join the meeting.
2. After you tap the link to enter the meeting detail page, if the meeting is a scheduled meeting as configured by the
meeting creator, you can tap Add to My Meeting List at the bottom to add the meeting to your meeting list in case
you forget the meeting ID in the future.
Method 3: Join a meeting on web pages in browser
1. Log in at [https://voovmeeting.com/r](https://voovmeeting.com/r) and enter the meeting ID to join the meeting.
Method 4: Join a meeting through one tap on your phone
1. Tap the invitation message for joining the meeting by phone to join the meeting.
2. Dial the VooV Meeting dial-in number in your country/region, enter the meeting ID, and press # as prompted to join
the meeting.
On PC client
1. Open the VooV Meeting PC client and click Join.
2. Enter the meeting ID and your name and turn on/off the camera and mic.
3. Click Join Meeting.
4. After entering the meeting, select PC Audio or Call In as the audio connection method (i.e., call mode) for the
meeting.

Tencent VooV Meeting
©2013-2022 Tencent Cloud. All rights reserved. Page 13 of 110
Joining a Meeting on Phone
Last updated 2023-12-19 16:42:03
Feature Overview
VooV Meeting allows you to join a meeting on phone without installing the client.
Prerequisites
A functional landline or mobile phone
Logged-in user: Free or Enterprise Edition user
Notes
In "Call In" mode, you can use a landline or mobile phone to dial the corresponding number instead of using the VooV
Meeting client to join a meeting, which has a more stable call audio quality. However, in this connection method, your
carrier will charge you for the local or international call according to applicable billing rules.
After you enter the attendee ID, the landline or mobile phone rather than the PC mic and speaker will be used as the
meeting audio source, which has a more stable call audio quality. If you don't enter the attendee ID but directly press #
to join the meeting, you will enter the meeting as an independent attendee. In the scenario in this document, you don't
need to enter the attendee ID and can directly enter # to join the meeting.
Pstn is currently reclaimed as a paid function, which can only be used by corporate accounts and purchased Pstn
capabilities.
How to Use
On landline phone
1. Call in and enter the meeting ID as prompted to join the meeting.
2. Dial by your location: you can find the applicable dial-in number at VooV Meeting International Dial-in Numbers.
3. Enter the meeting ID and press # for confirmation.
4. Enter the attendee ID and press # for confirmation. If you don't know the attendee ID, directly press # to join the
meeting.

Tencent VooV Meeting
©2013-2022 Tencent Cloud. All rights reserved. Page 14 of 110
5. If You have joined the meeting, and x attendees are in the meeting currently is prompted, you have joined
the meeting successfully.
Note:
if you already have a device in the meeting but want to use a landline or mobile phone as the audio source, you can
configure as instructed in Audio Selection and Testing.
On mobile phone
You can join a meeting in either of the following ways based on your scenario:
Method 1: through one tap on your mobile phone
Make sure that the received invitation message contains the one-tap meeting joining information; otherwise, select the
second method.
1. Tap the number below One tap mobile in the invitation message to make a call.
2. Enter the attendee ID and press # for confirmation as prompted. If you don't know the attendee ID, directly press #
to join the meeting.
3. If You have joined the meeting, and x attendees are in the meeting currently is prompted, you have joined
the meeting successfully.
Method 2: through dial-in number and meeting ID
1. Dial by your location: you can find the applicable dial-in number at VooV Meeting International Dial-in Numbers.
2. Enter the meeting ID and press # for confirmation.
3. Enter the attendee ID and press # for confirmation. If you don't know the attendee ID, directly press # to join the
meeting.
4. If You have joined the meeting, and x attendees are in the meeting currently is prompted, you have joined
the meeting successfully.
Note:
if you already have a device in the meeting but want to use a landline or mobile phone as the audio source, you can
configure as instructed in Audio Selection and Testing.

Tencent VooV Meeting
©2013-2022 Tencent Cloud. All rights reserved. Page 15 of 110
Mobile Client
Organizing Meetings
Last updated 2023-12-19 16:42:36
Organizing Meetings
Role: Organizer/Host
Scheduling a Meeting
Follow the steps to schedule a meeting:
1. Tap Schedule after logging in.
2. Enter the meeting topic and set the Start time and End time.
3. Enable Mute Attendees upon Entry.
4. Enable Screen Sharing Watermark to ensure data security.
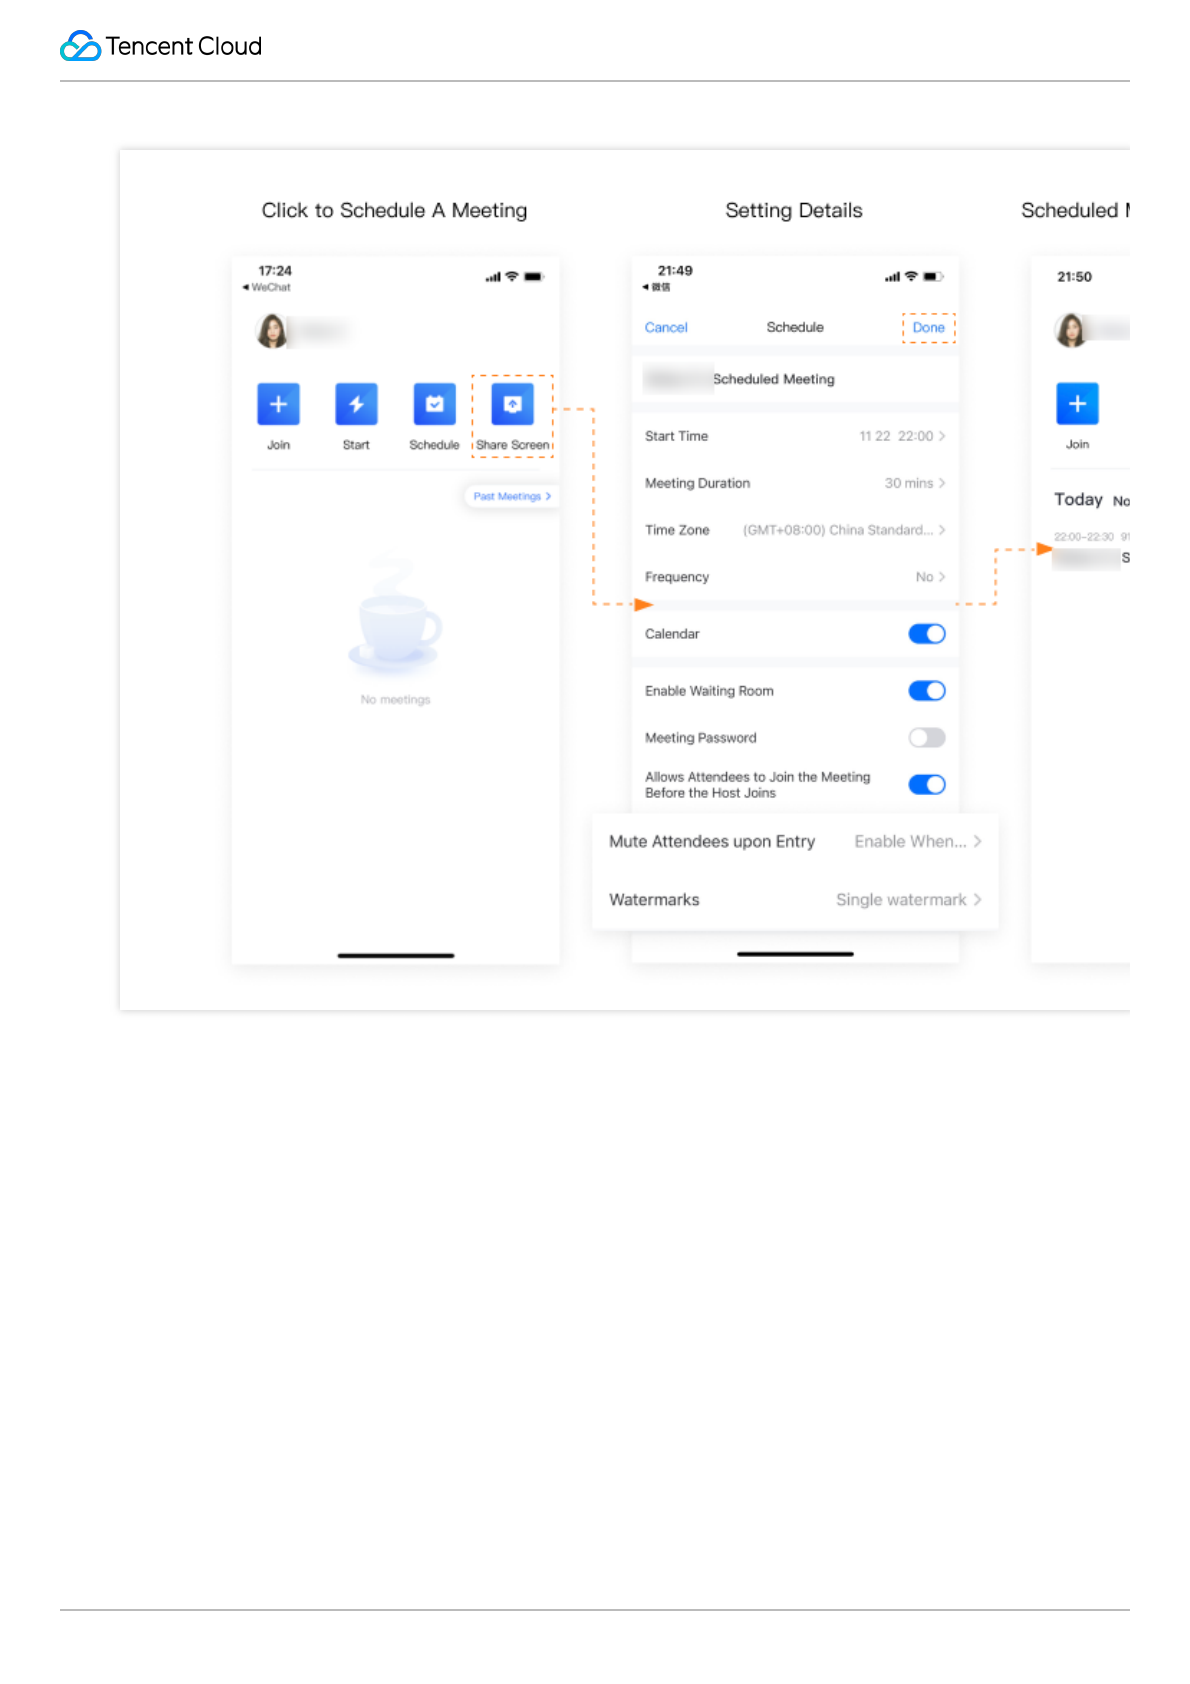
Tencent VooV Meeting
©2013-2022 Tencent Cloud. All rights reserved. Page 16 of 110
5. Once a meeting is scheduled successfully, it will appear on your meeting list.
6. Tap on the meeting entry on the list to enter the meeting.
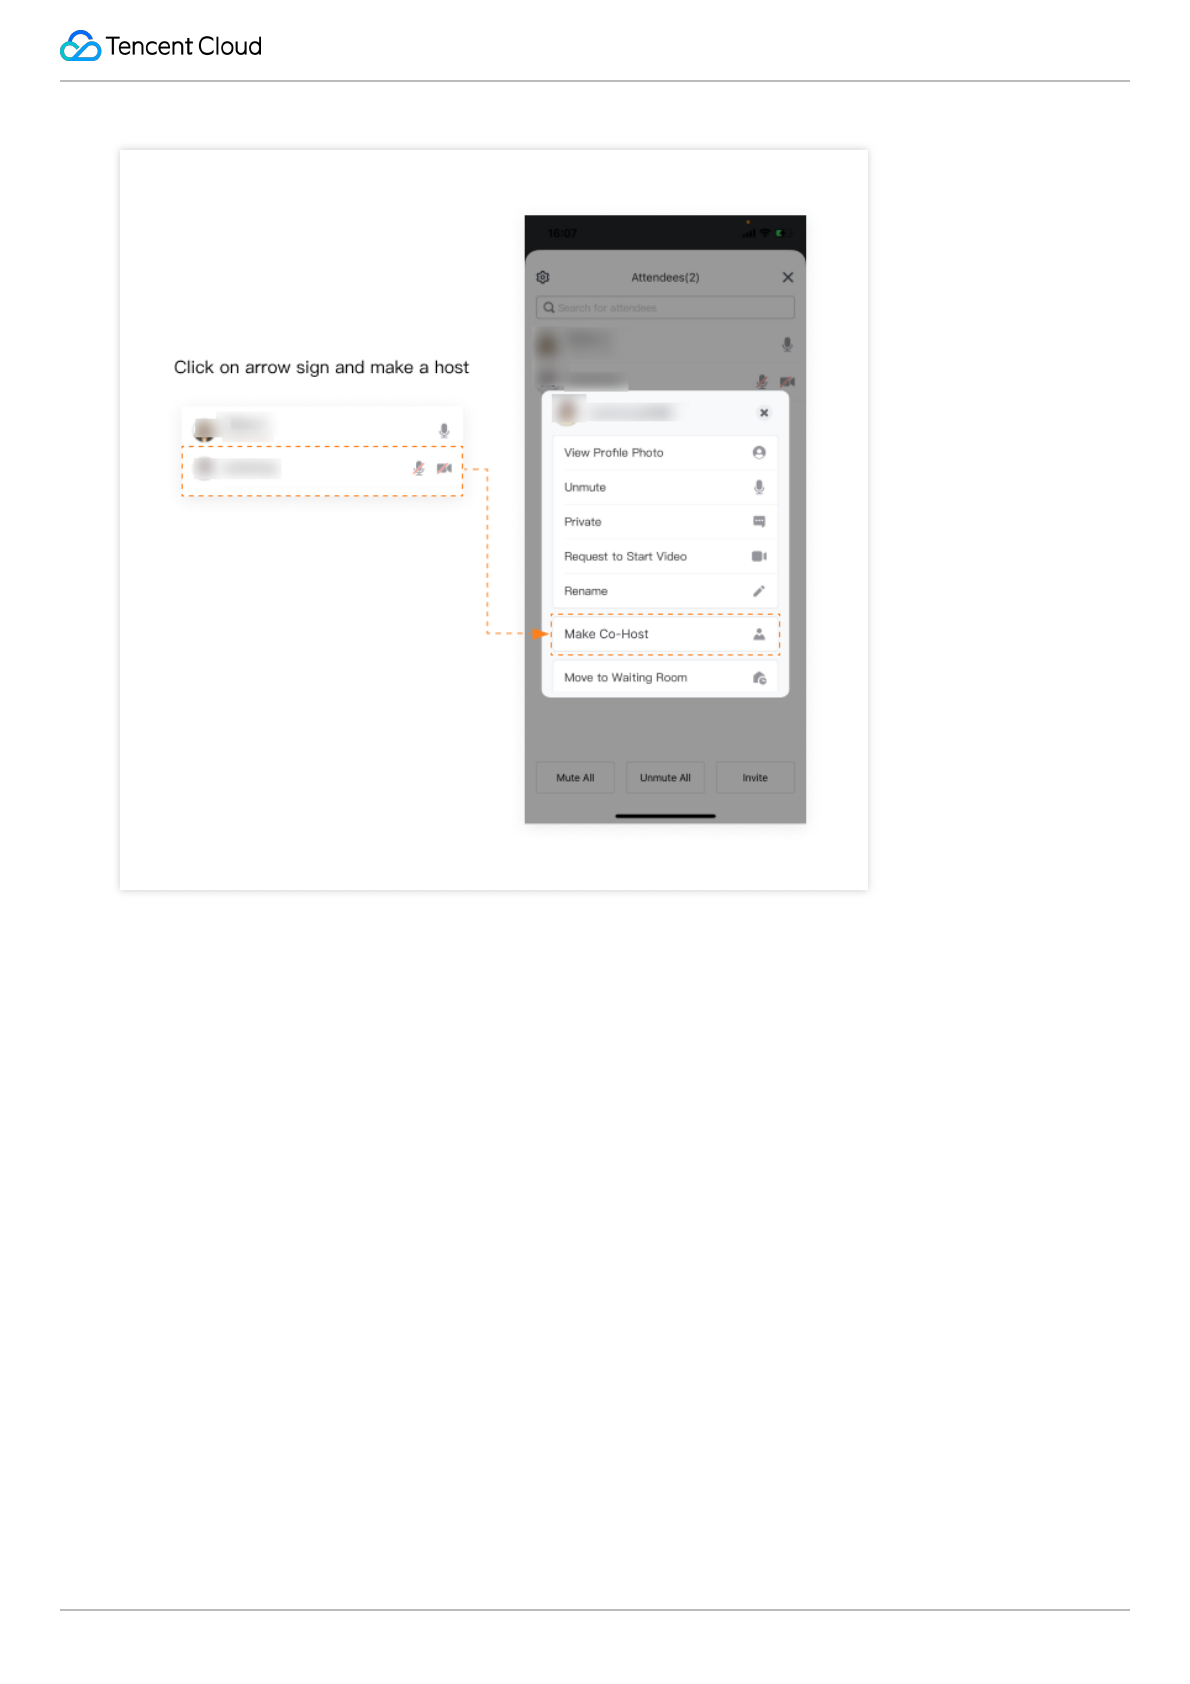
Set Up a Meeting Co-host
Co-hosts can mute, unmute, and rename attendees. They can also help hosts manage attendees for large-scale
online conferences.
1. Tap Attendees and select the attendee you want to set as a co-host.
2. Tap the attendee and select Make Co-host.
Tencent VooV Meeting
©2013-2022 Tencent Cloud. All rights reserved. Page 17 of 110
Tencent VooV Meeting
©2013-2022 Tencent Cloud. All rights reserved. Page 18 of 110
Inviting Attendees
Last updated 2023-12-19 16:45:27
Inviting Attendees
Role: Organizer/Co-Host/Attendee
Inviting Attendees
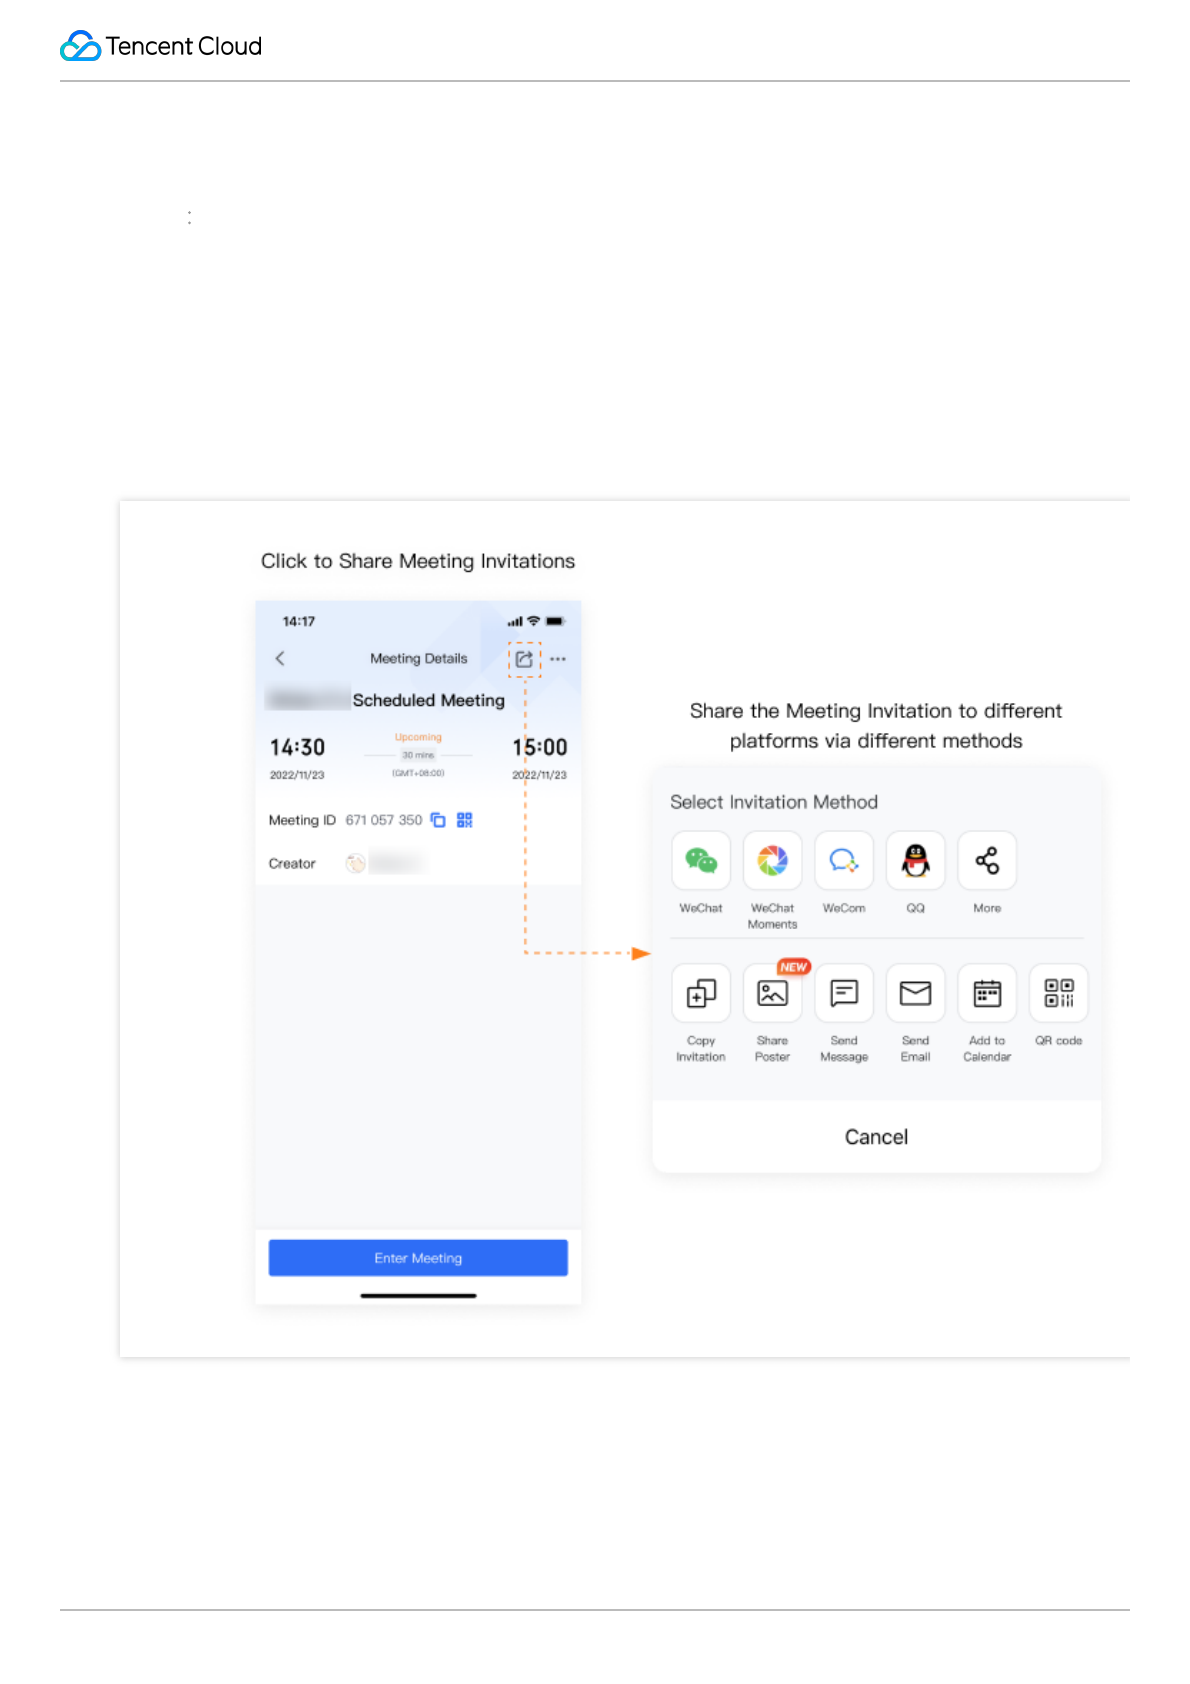
1. Before the Meeting Starts
There are two ways to invite attendees before the meeting starts.
Tencent VooV Meeting
©2013-2022 Tencent Cloud. All rights reserved. Page 19 of 110
a. Tap the icon highlighted in the orange box on the top right-hand corner. Select the method you wish to use to invite
attendees.
b. Tap the ellipsis icon to modify the meeting details. You can also invite attendees from this page.
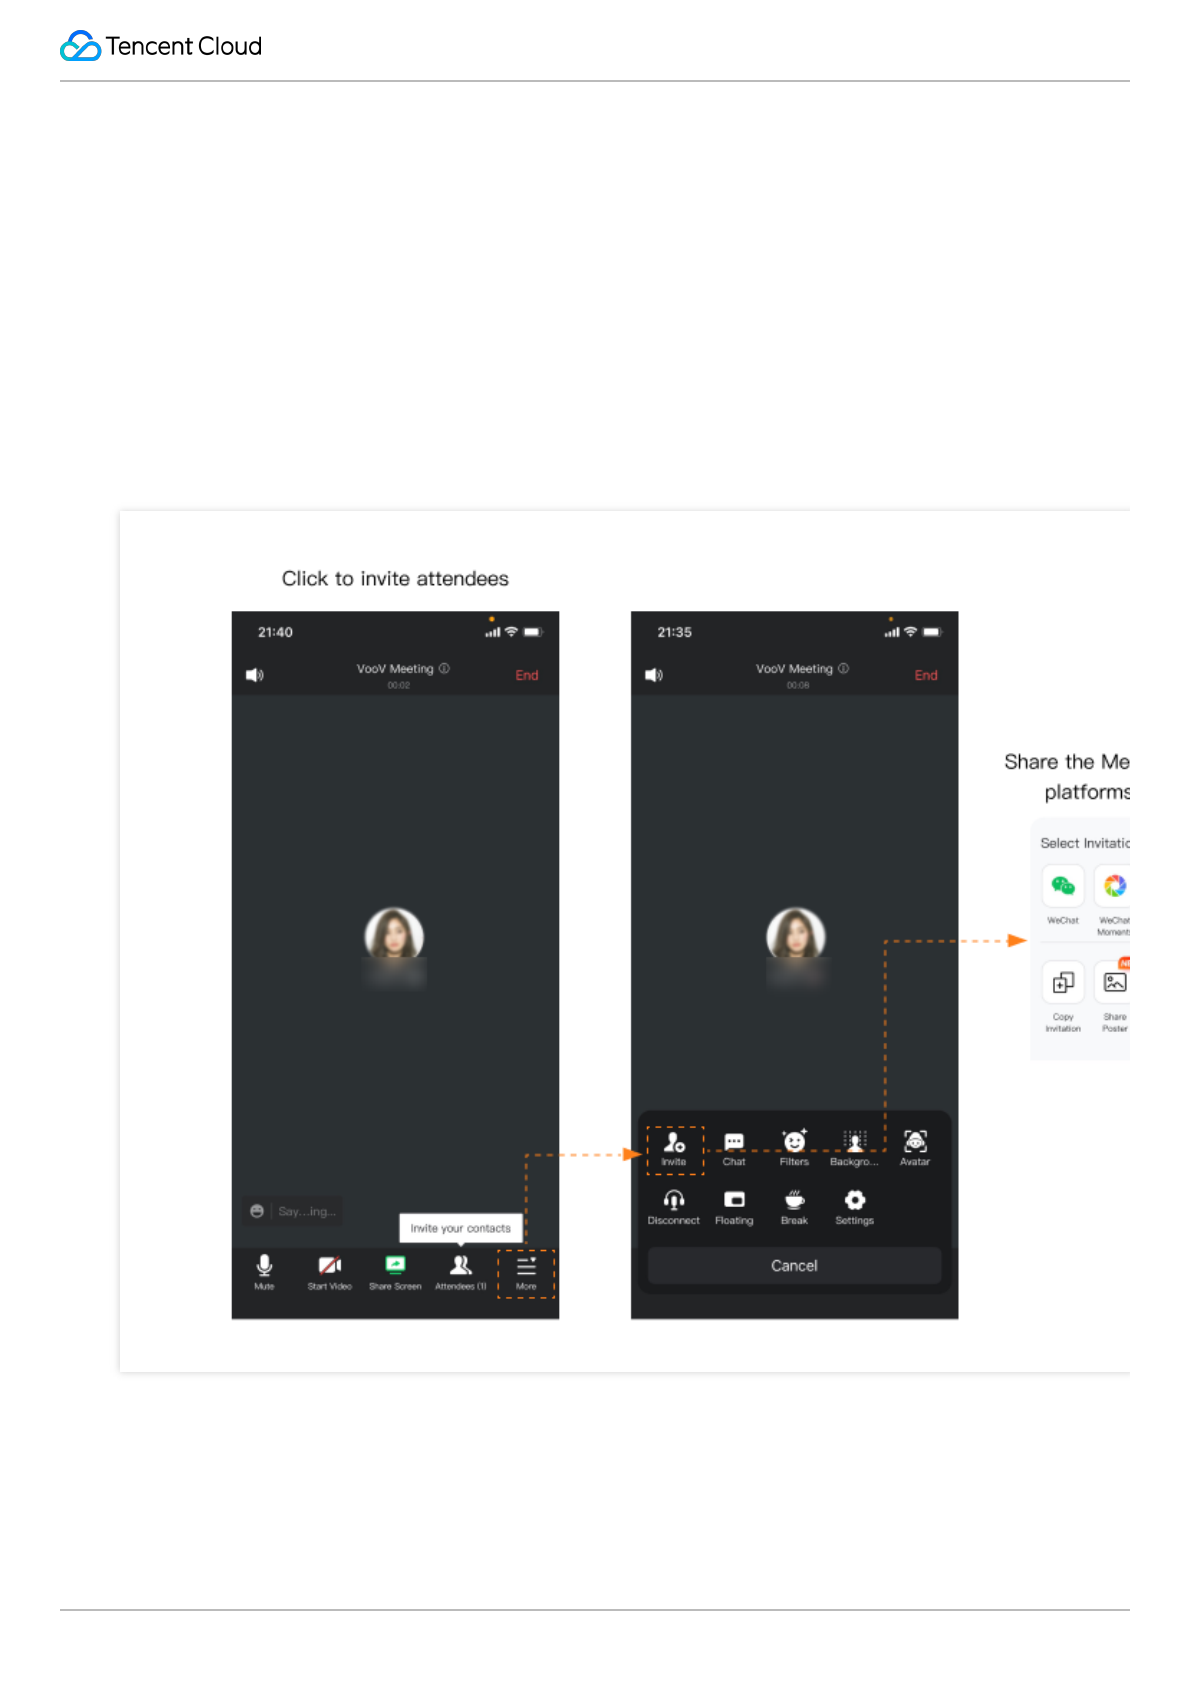
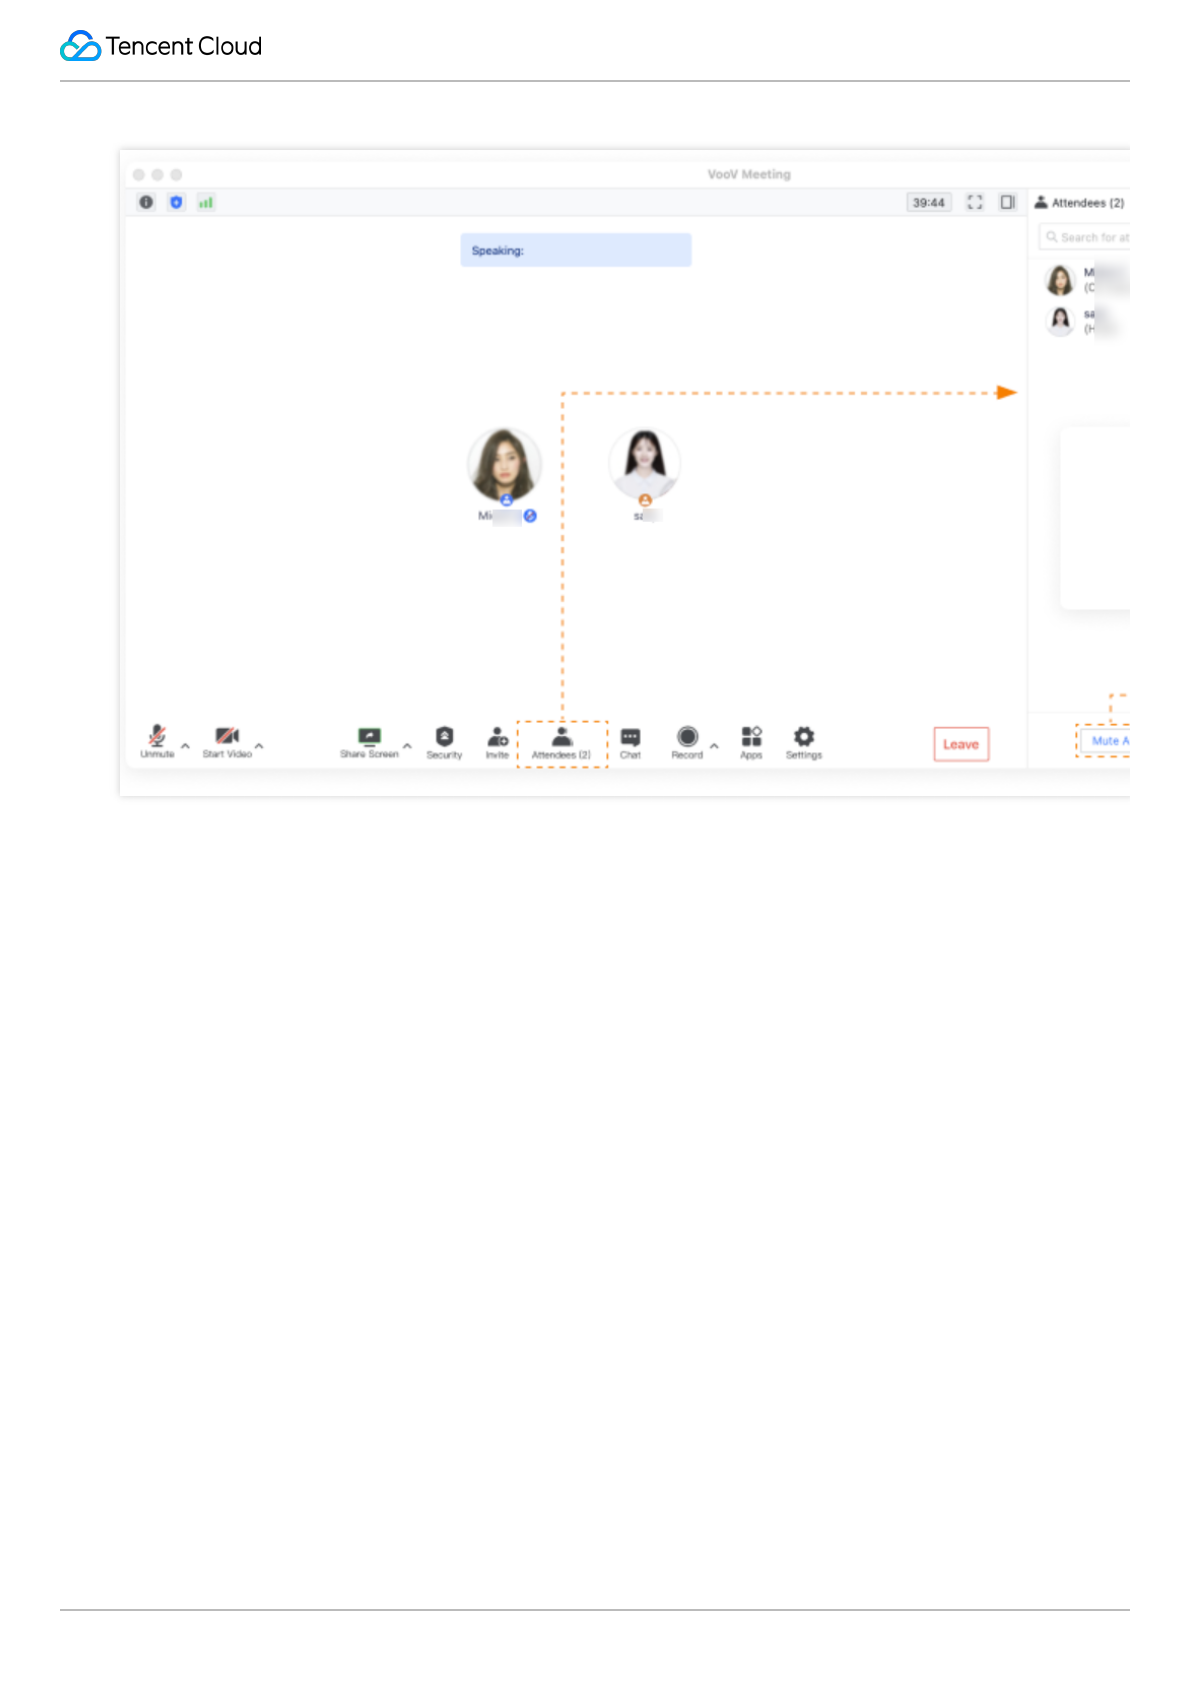
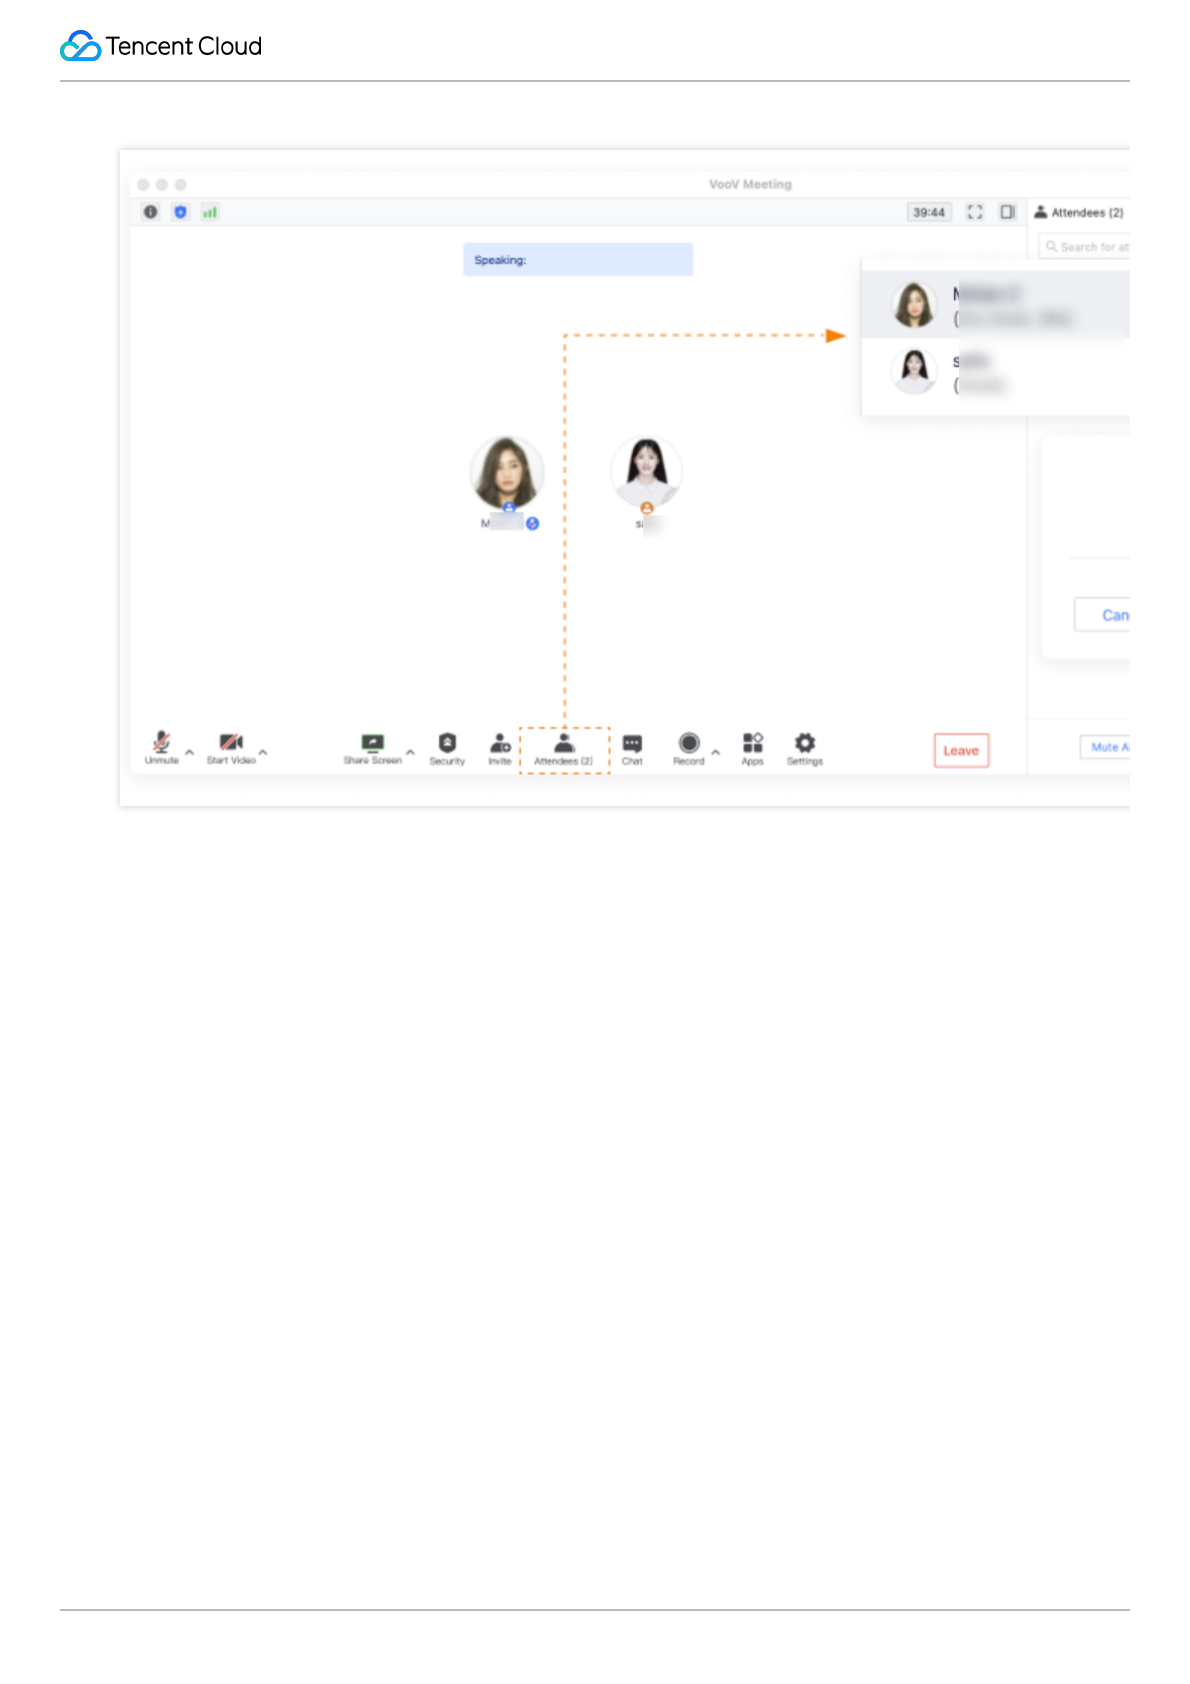
2. During the Meeting
An invitation will be generated once you complete the steps below. You can Copy Invitation and send it to invite
attendees.
a. Tap the ellipsis icon highlighted in the orange box at the bottom menu and select Invite.
b. Invite attendees via email, WeChat, SMS or other tools.
Tencent VooV Meeting
©2013-2022 Tencent Cloud. All rights reserved. Page 20 of 110
Meeting Controls
Role: Organizer/Co-Host/Attendee
Meeting Management & Control
The meeting host is allowed to mute or unmute anyone during the meeting. In addition, the meeting can be locked
once all of the invited attendees are joined. This feature ensures your meeting security.
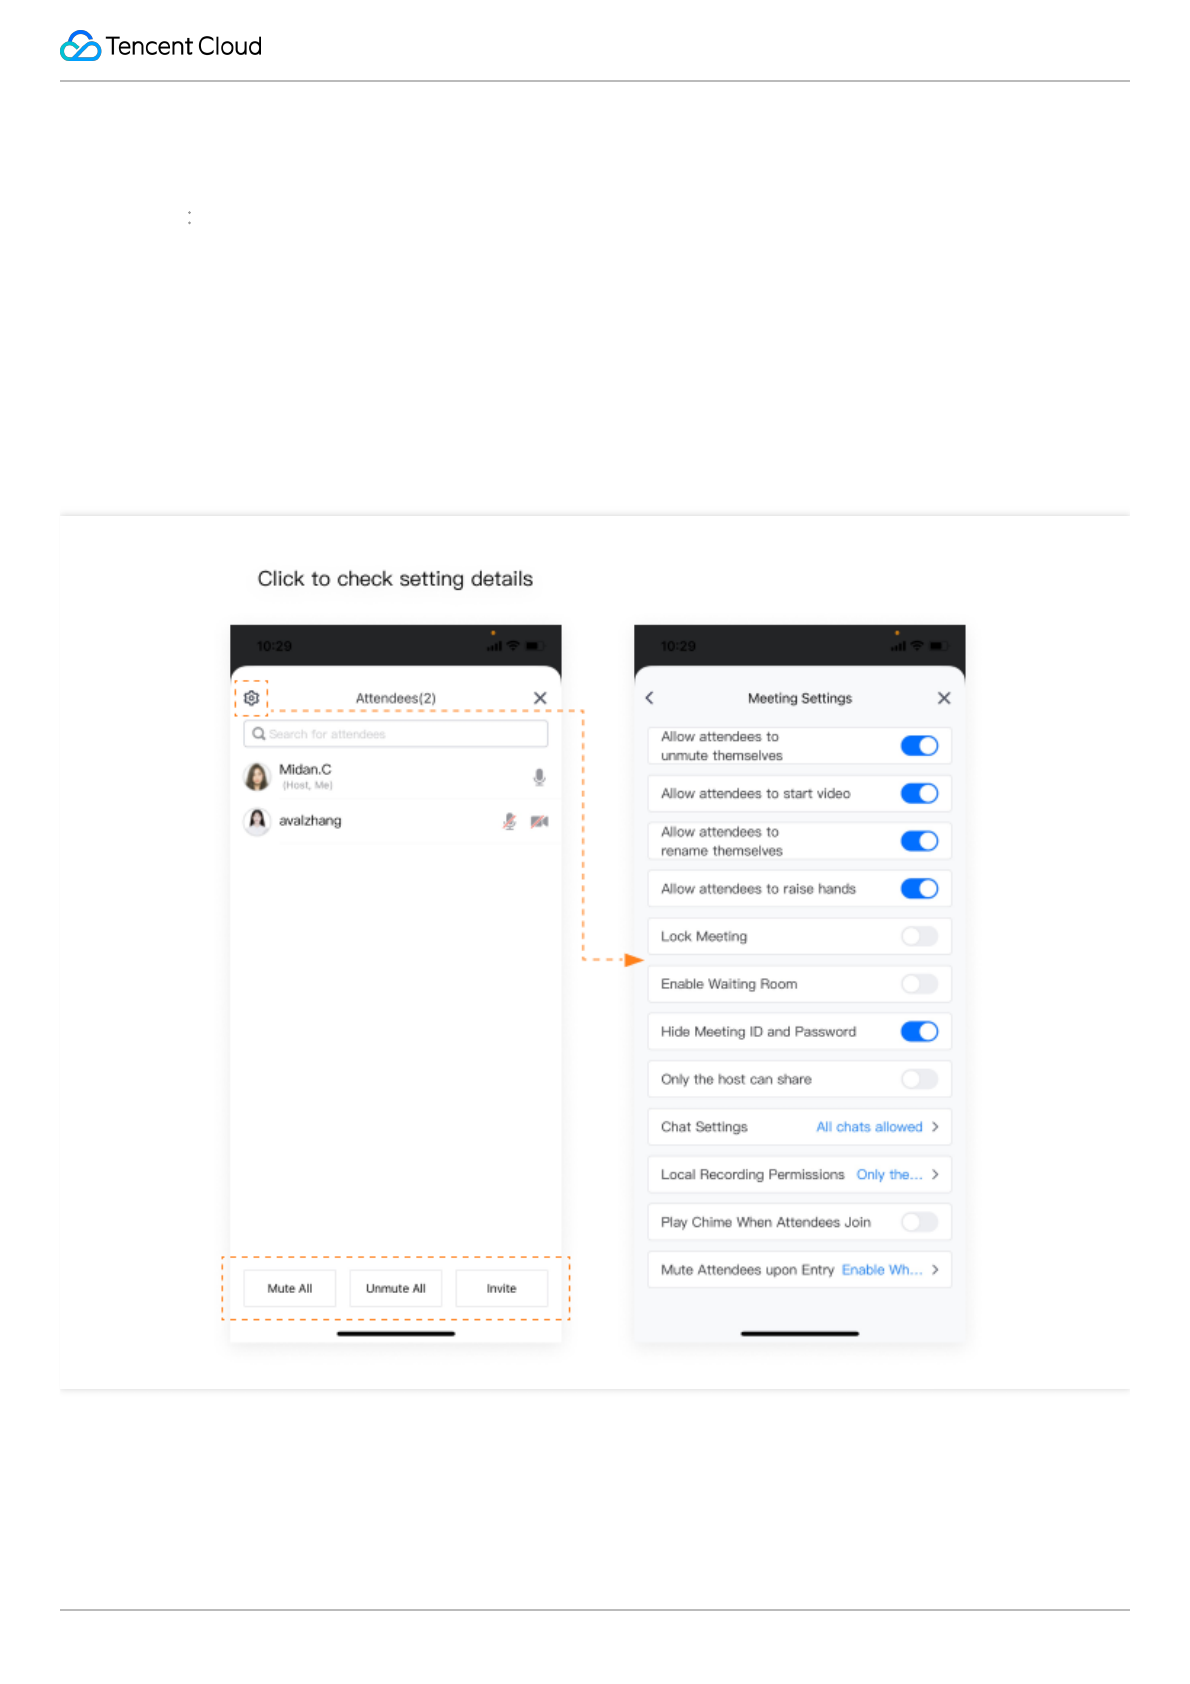
Meeting Controls
Last updated 2022-12-12 14:55:56

Tencent VooV Meeting
©2013-2022 Tencent Cloud. All rights reserved. Page 21 of 110
1. Tap Attendees and tap the icon on the top right-hand corner as shown above.
2. Decide if you want to mute attendees on entry or lock the meeting.
Enlarging the Video Screen
Double tap the video screen of an attendee to enlarge it.
Microphone Controls
Role: Organizer/Co-Host/Attendee
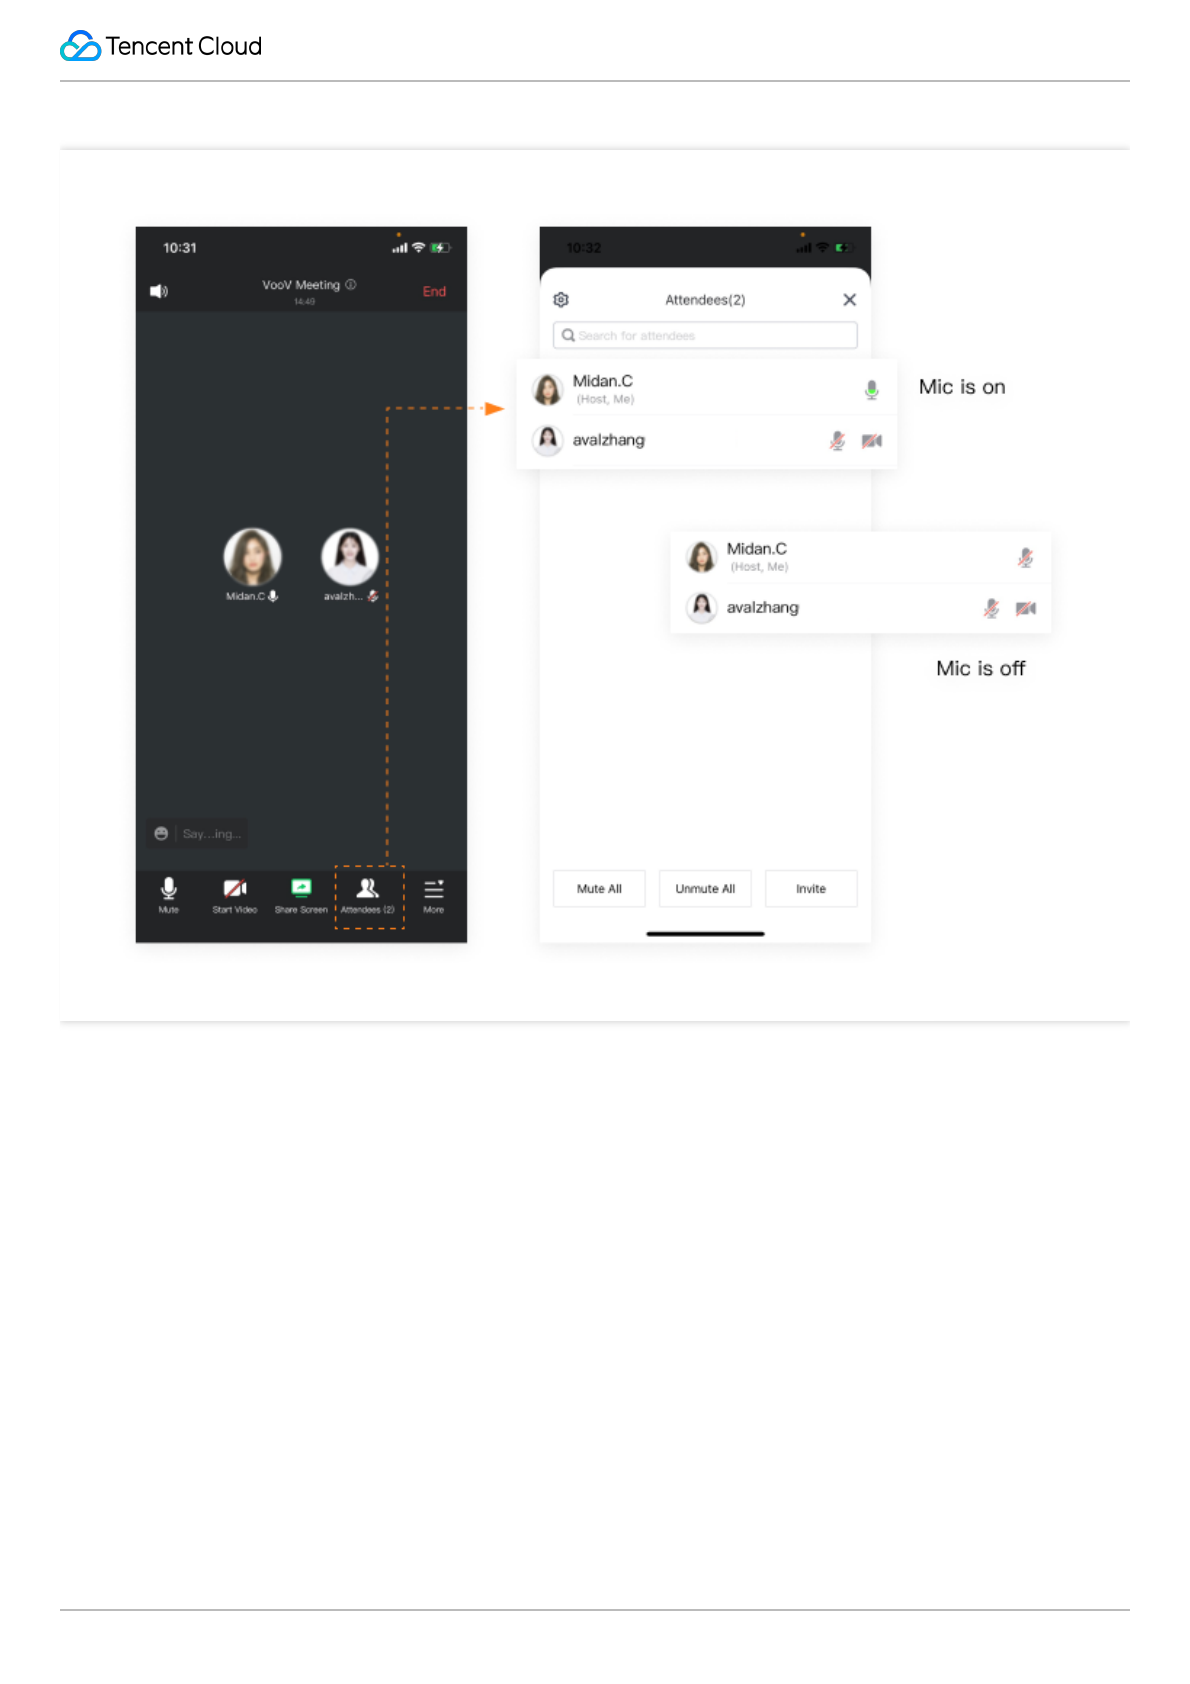
Checking the Mic Status of Attendees
You can check the mic status of each attendee. If an attendee is speaking, their mic icon will turn green.
1. Tap Attendees to check if attendees are muted or unmuted.
2. If the user's mic is enabled, the mic icon will be turned on.
Tencent VooV Meeting
©2013-2022 Tencent Cloud. All rights reserved. Page 22 of 110
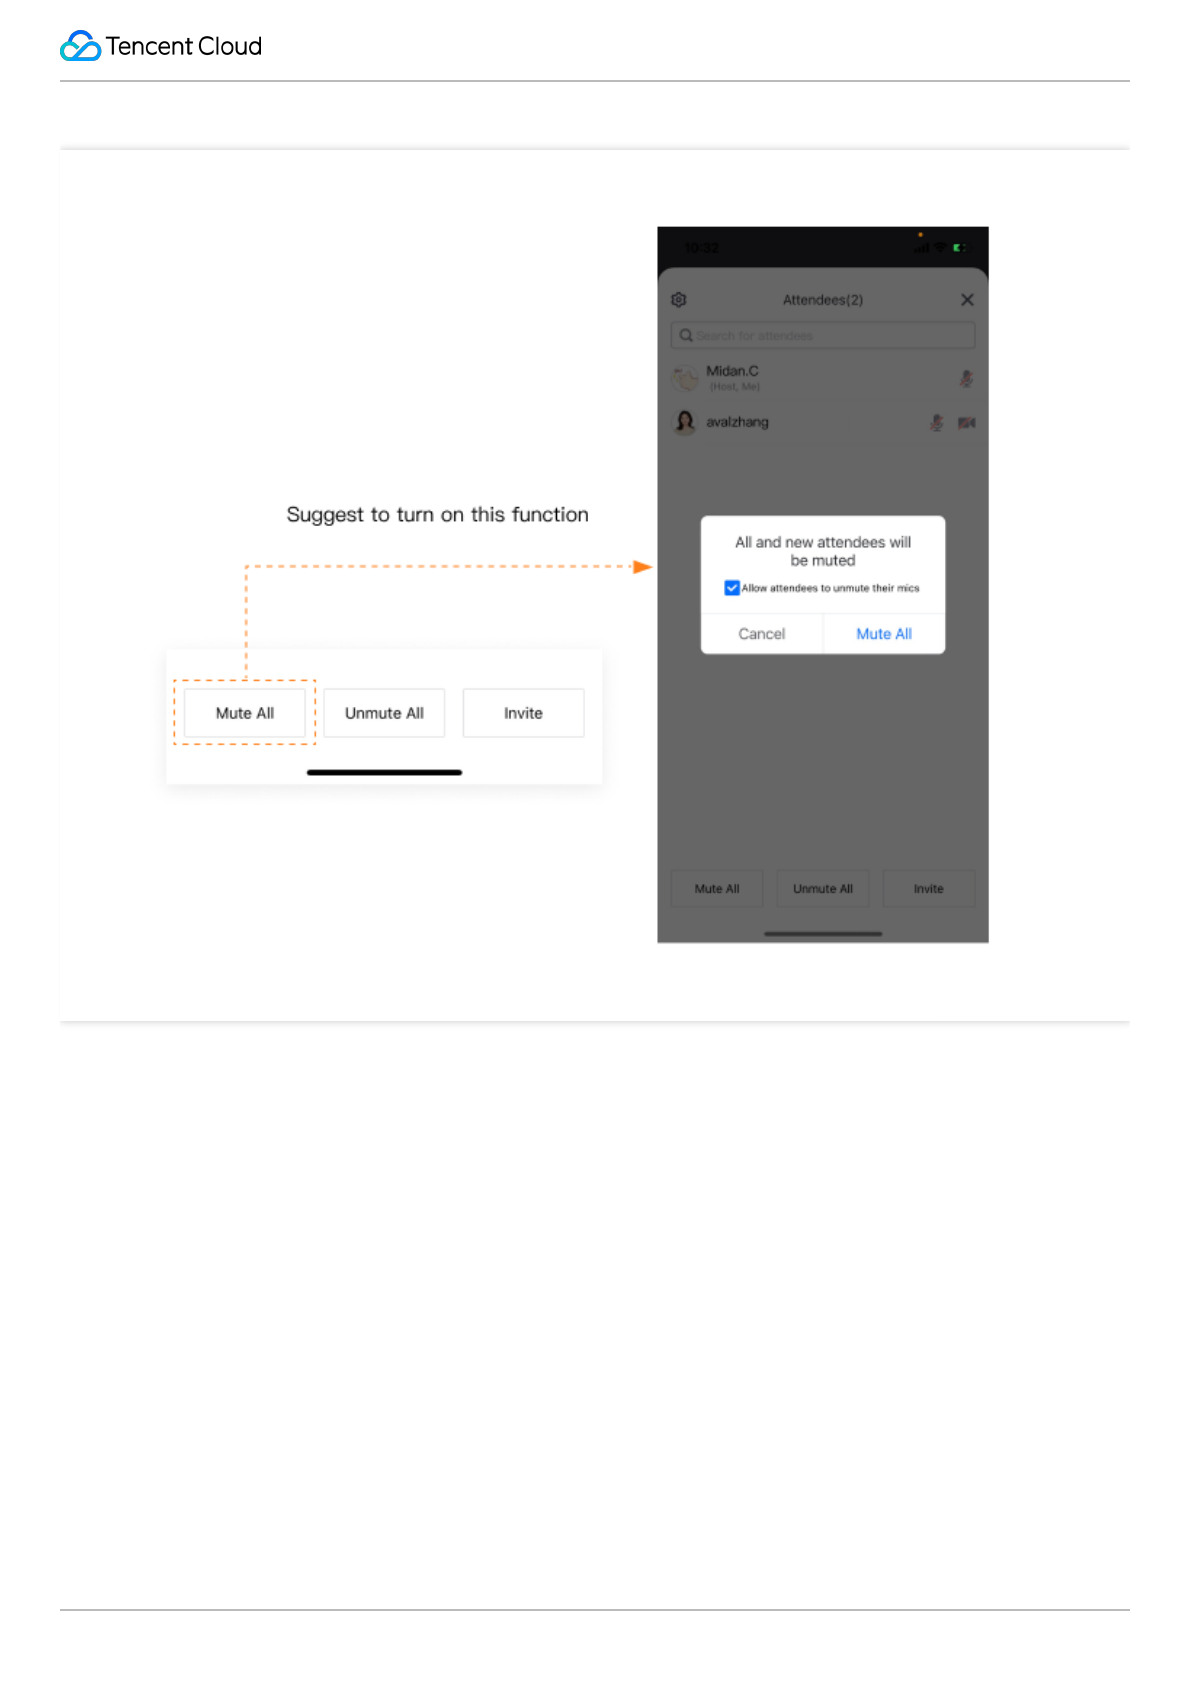
Muting and Unmuting Attendees
Hosts can mute or unmute attendees during the meeting. We recommend muting all attendees to reduce background
noise.
Tencent VooV Meeting
©2013-2022 Tencent Cloud. All rights reserved. Page 23 of 110
1. If the meeting organizer selected the "Mute All" option, all attendees will be muted by default until the meeting
organizer turns this option off. We suggest enabling Allow Attendees to Unmute Themselves when you Mute
All.
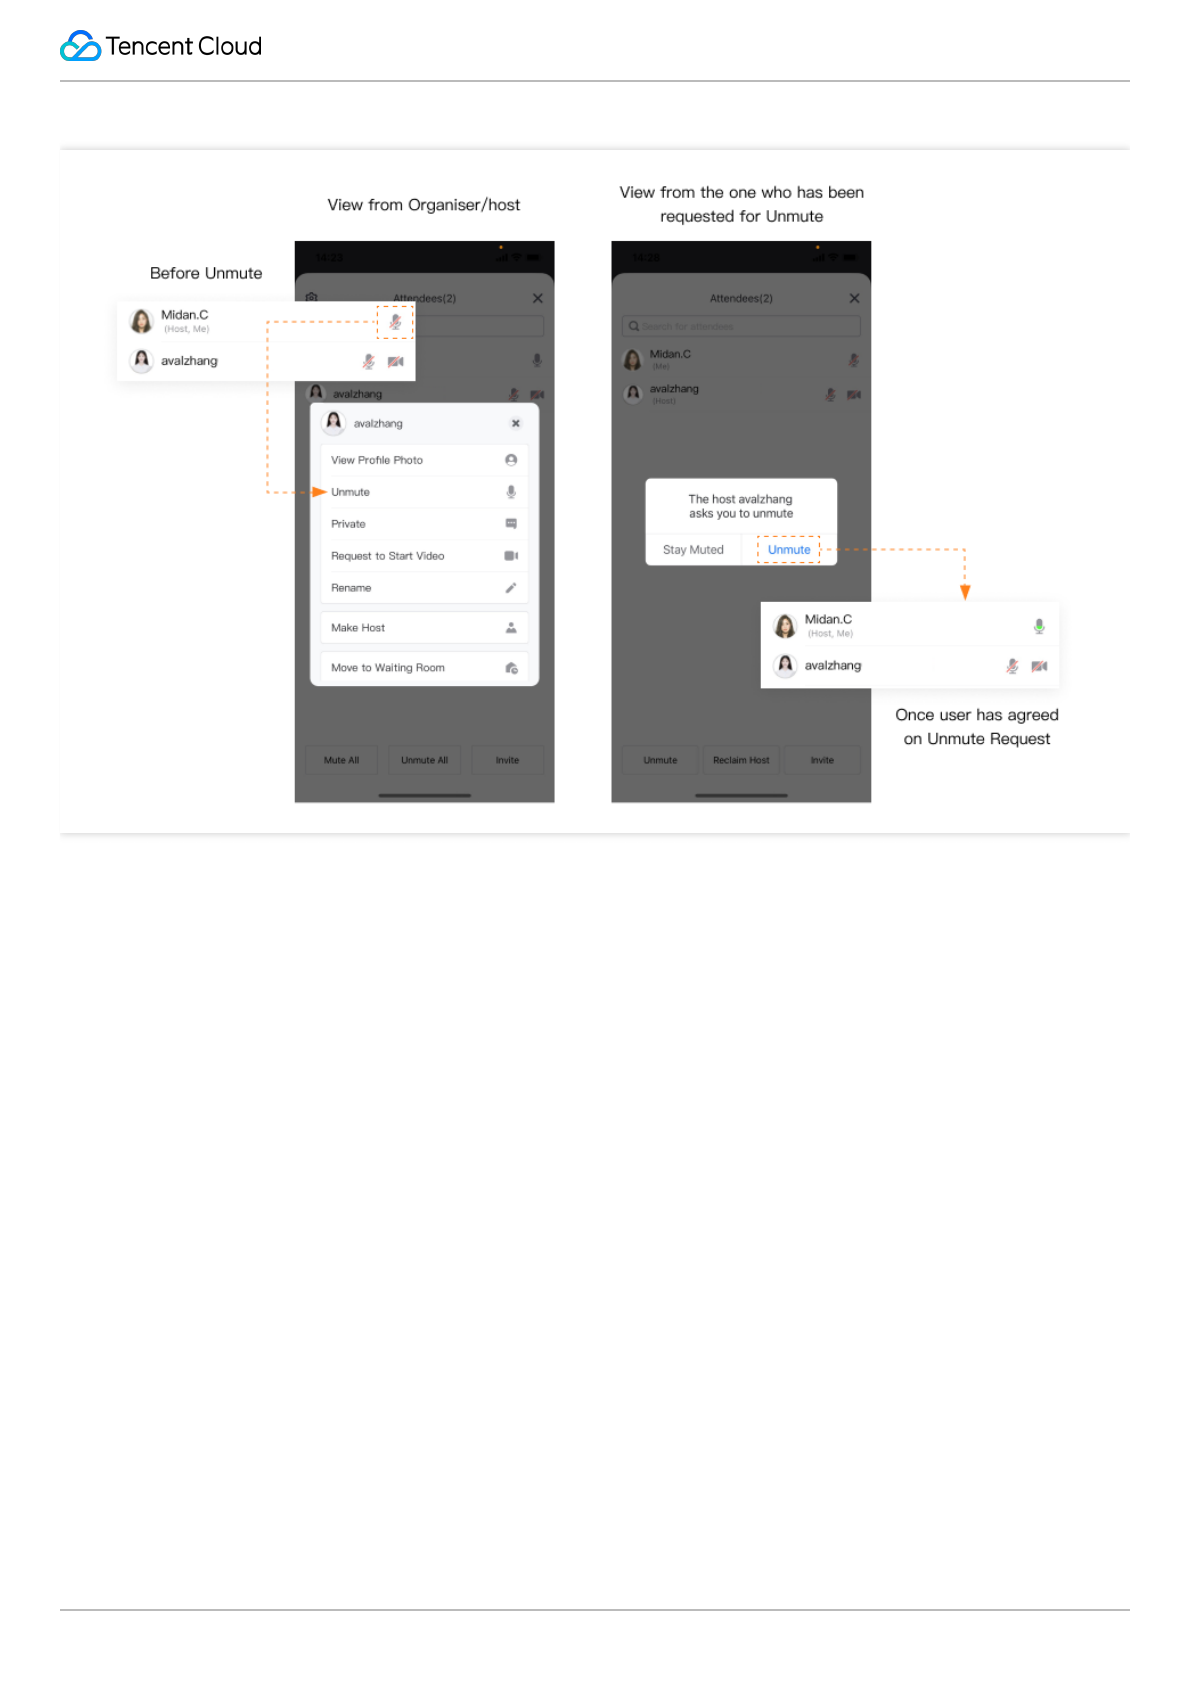
2. Hosts can unmute any attendee with their consent during online meetings.
Tencent VooV Meeting
©2013-2022 Tencent Cloud. All rights reserved. Page 24 of 110
Renaming Attendees
Role: Organizer/Co-Host/Attendee
Renaming Attendees
We suggest changing your alias before joining the meeting. This will help attendees recognize each other. This
especially applies to large-scale conferences with attendees from multiple organizations.
Tencent VooV Meeting
©2013-2022 Tencent Cloud. All rights reserved. Page 25 of 110
Both the host and co-host can rename attendees.
1. Host/Co-host can select an attendee from the list to change their display name.
2. Attendees can tap on their own names to Rename themselves.

Tencent VooV Meeting
©2013-2022 Tencent Cloud. All rights reserved. Page 26 of 110
PC Client
Organizing Meetings
Last updated 2023-12-19 16:45:52
Organizing Meetings
Role: Organizer/Host
Scheduling a Meeting
Follow the steps to schedule a meeting:
1. Click Schedule after logging in.
Tencent VooV Meeting
©2013-2022 Tencent Cloud. All rights reserved. Page 27 of 110
2. Enter the meeting topic and set the Start time and End time.
3. Enable Mute Attendees upon Entry
4. Enable Screen Sharing Watermark to ensure data security.
5. Once a meeting is scheduled successfully, it will appear on your meeting list.
6. Click the meeting entry on the list to enter the meeting.
Set Up a Meeting Co-host
Co-hosts can mute, unmute, and rename attendees. They can also help hosts manage attendees for large-scale
online conferences.
Tencent VooV Meeting
©2013-2022 Tencent Cloud. All rights reserved. Page 28 of 110
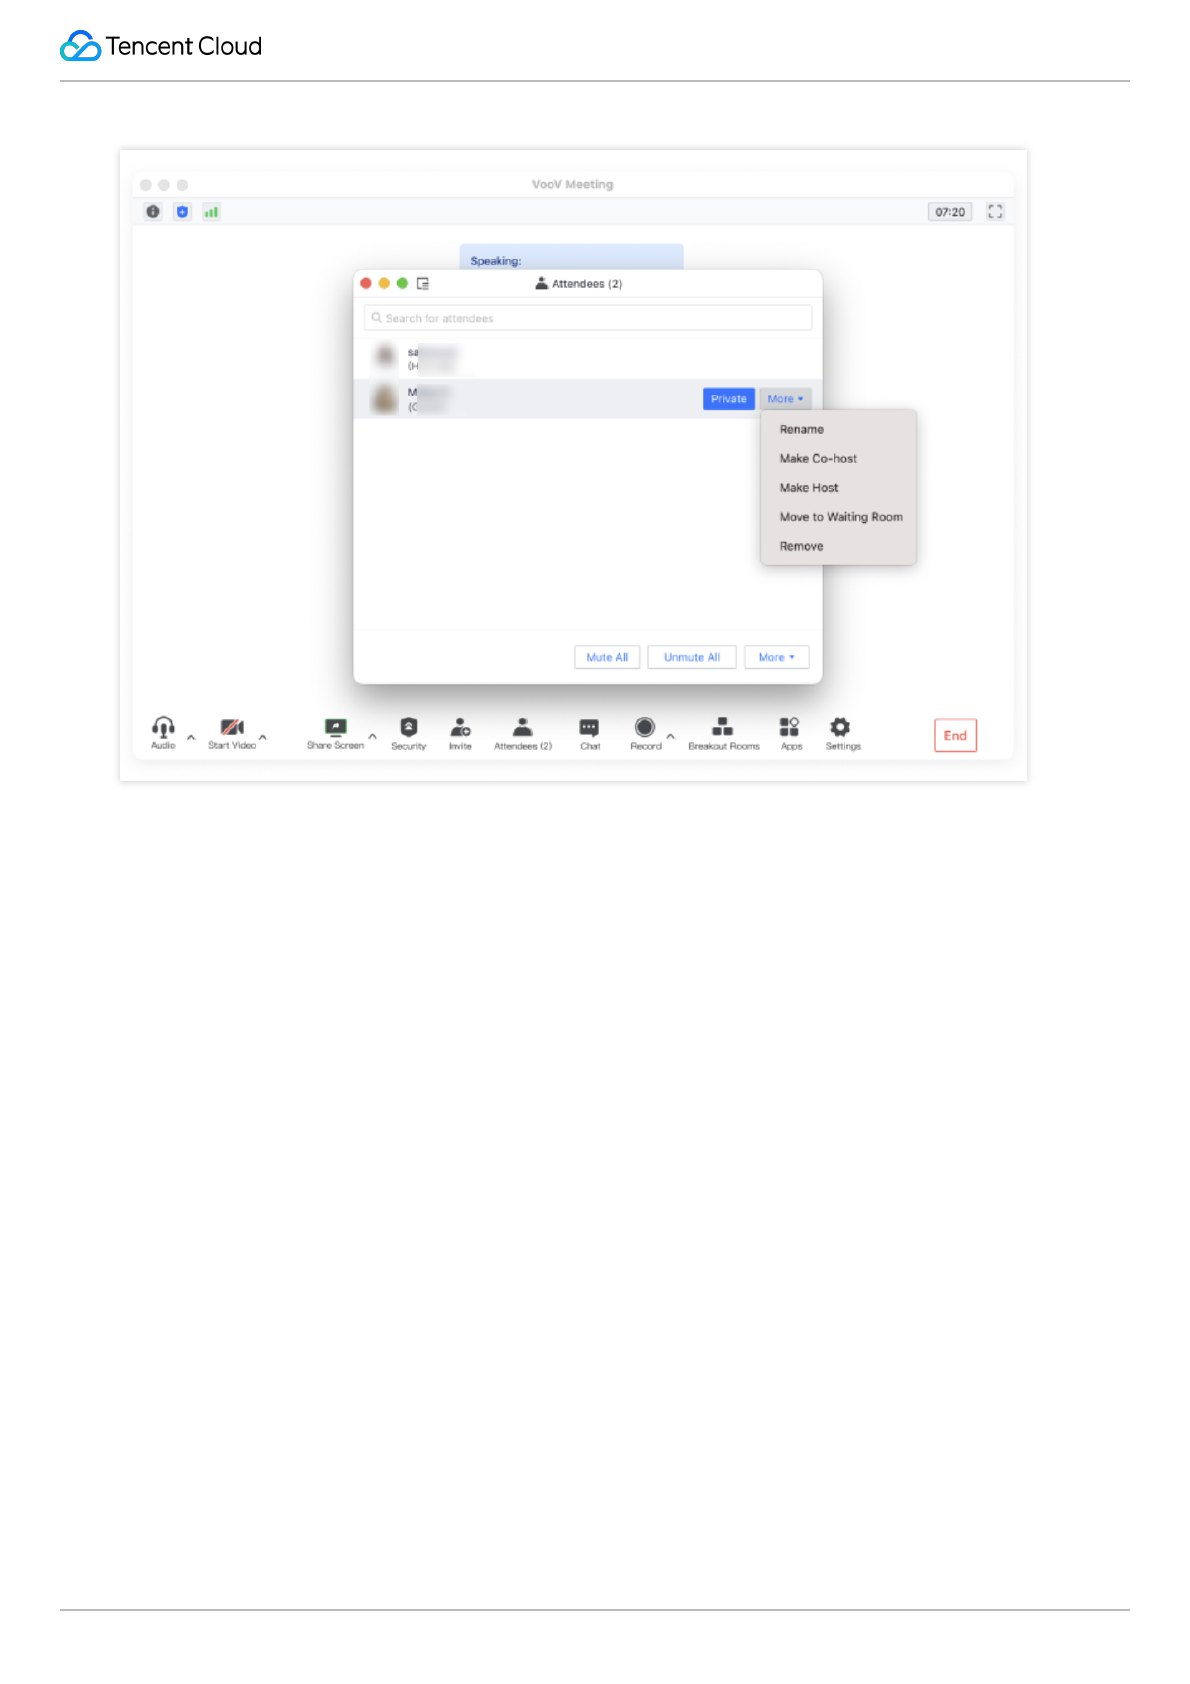
1. Click Attendees and select the attendee you want to set as a co-host.
2. Click More and select Make Co-host.
Tencent VooV Meeting
©2013-2022 Tencent Cloud. All rights reserved. Page 29 of 110
Inviting Attendees
Last updated 2023-12-19 16:46:00
Inviting Attendees
Role: Organizer/Co-Host/Attendee
Invite Attendees
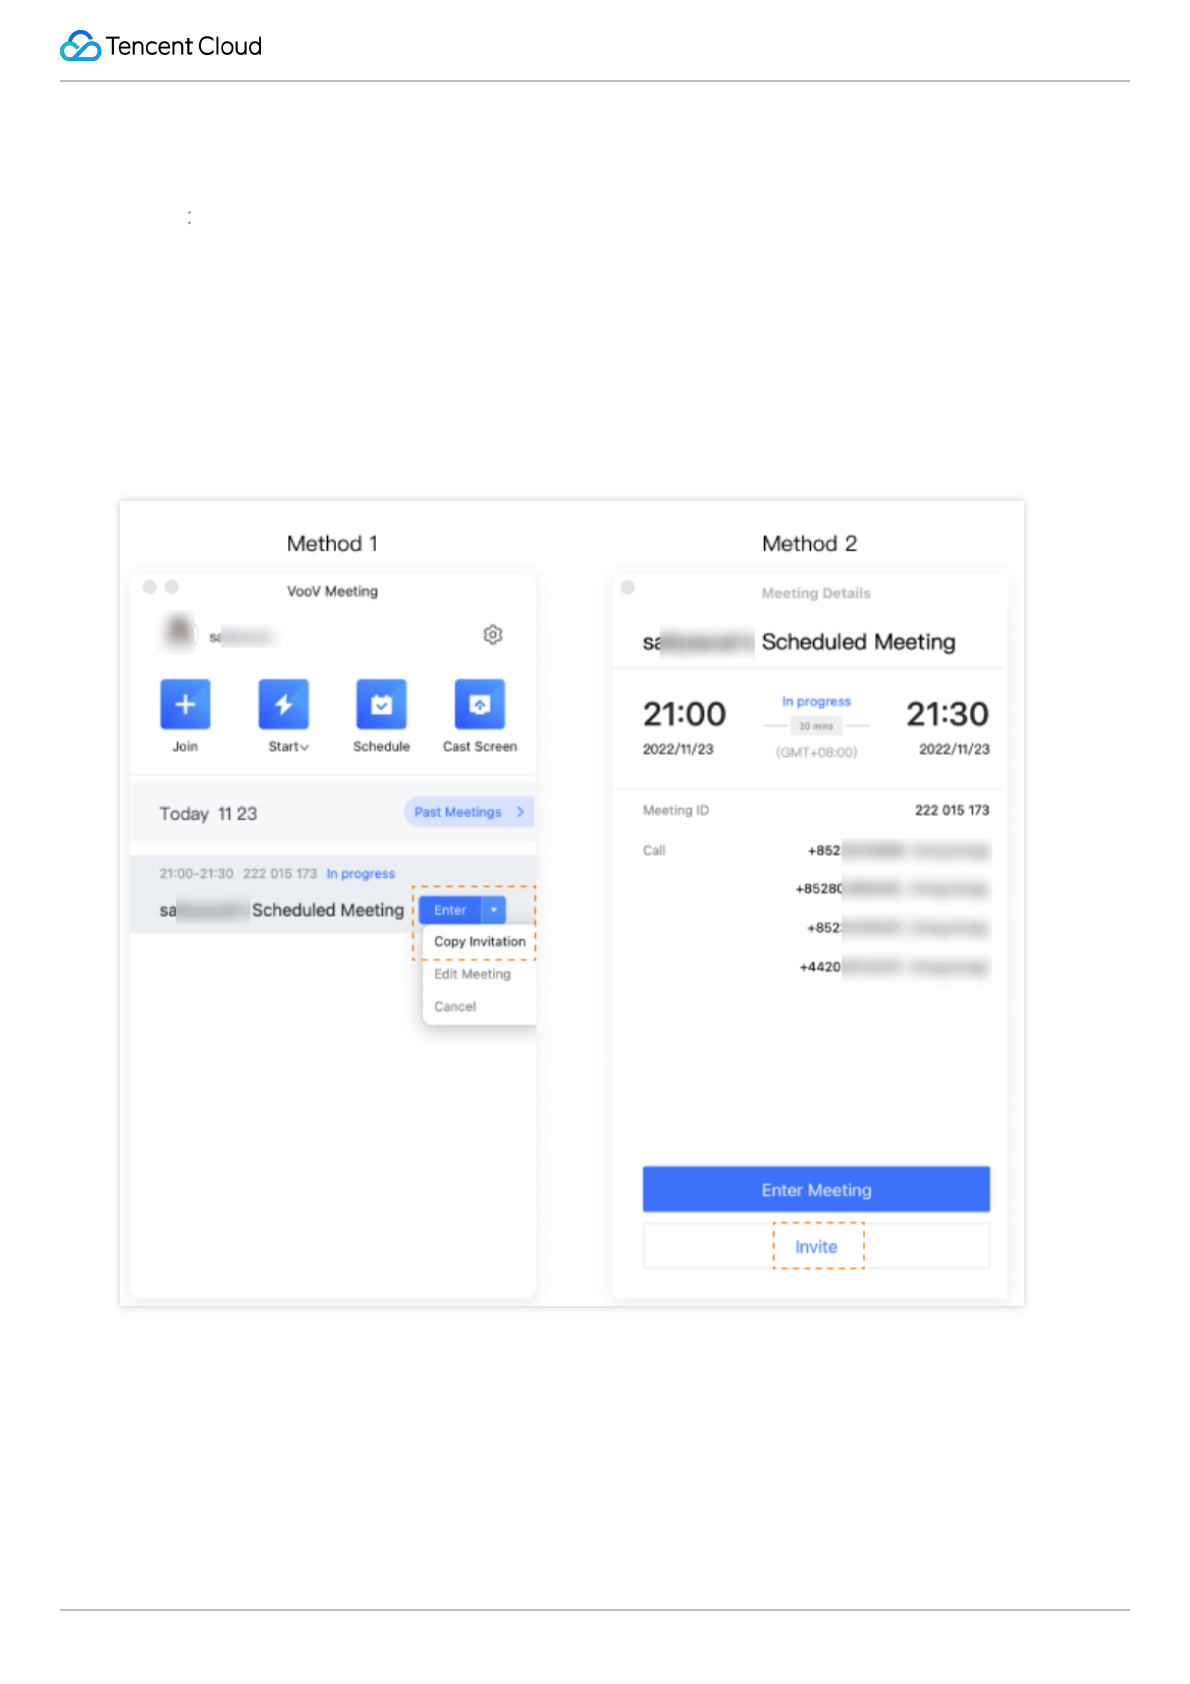
1. Before the Meeting Starts
There are two ways to invite attendees before the meeting starts.
a. Click the dropdown to the right of the meeting title and select Copy Invitation.
b. Double click the meeting title and select Invite.

Tencent VooV Meeting
©2013-2022 Tencent Cloud. All rights reserved. Page 30 of 110
c. You can click Edit Meeting to update the meeting time or other details.
2. During the Meeting
Click Invite on the toolbar to get the invitation information. You can copy the invitation and send it to invite
attendees.
a. Click Invite and Copy All or Copy Meeting ID and Link.
b. Send the invitation details via email, WeChat, SMS or other tools.
Tencent VooV Meeting
©2013-2022 Tencent Cloud. All rights reserved. Page 31 of 110
Meeting Controls
Last updated 2023-12-19 16:46:08
Meeting Controls
Role: Organizer/Co-Host/Attendee
Meeting Management & Control
The meeting host is allowed to mute or unmute anyone during the meeting. In addition, the meeting can be locked
once all of the invited attendees are joined. This feature ensures your meeting security.
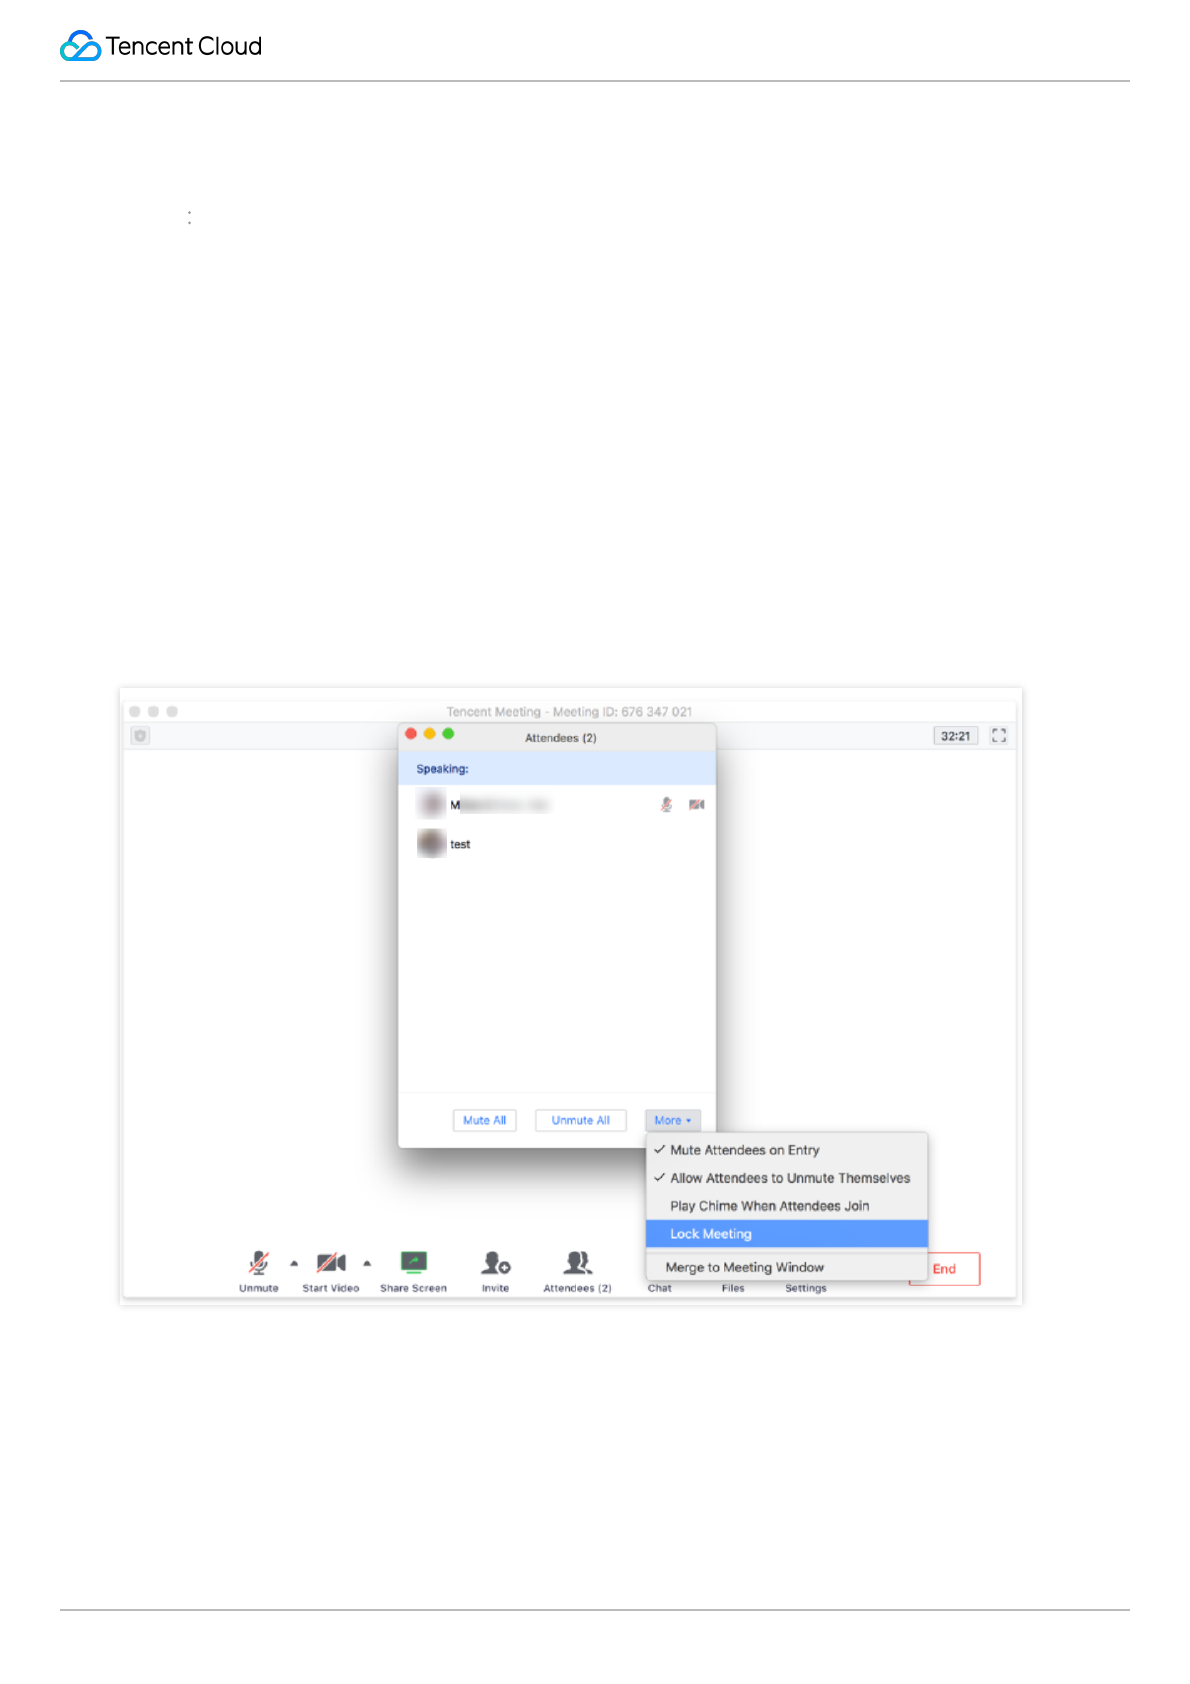
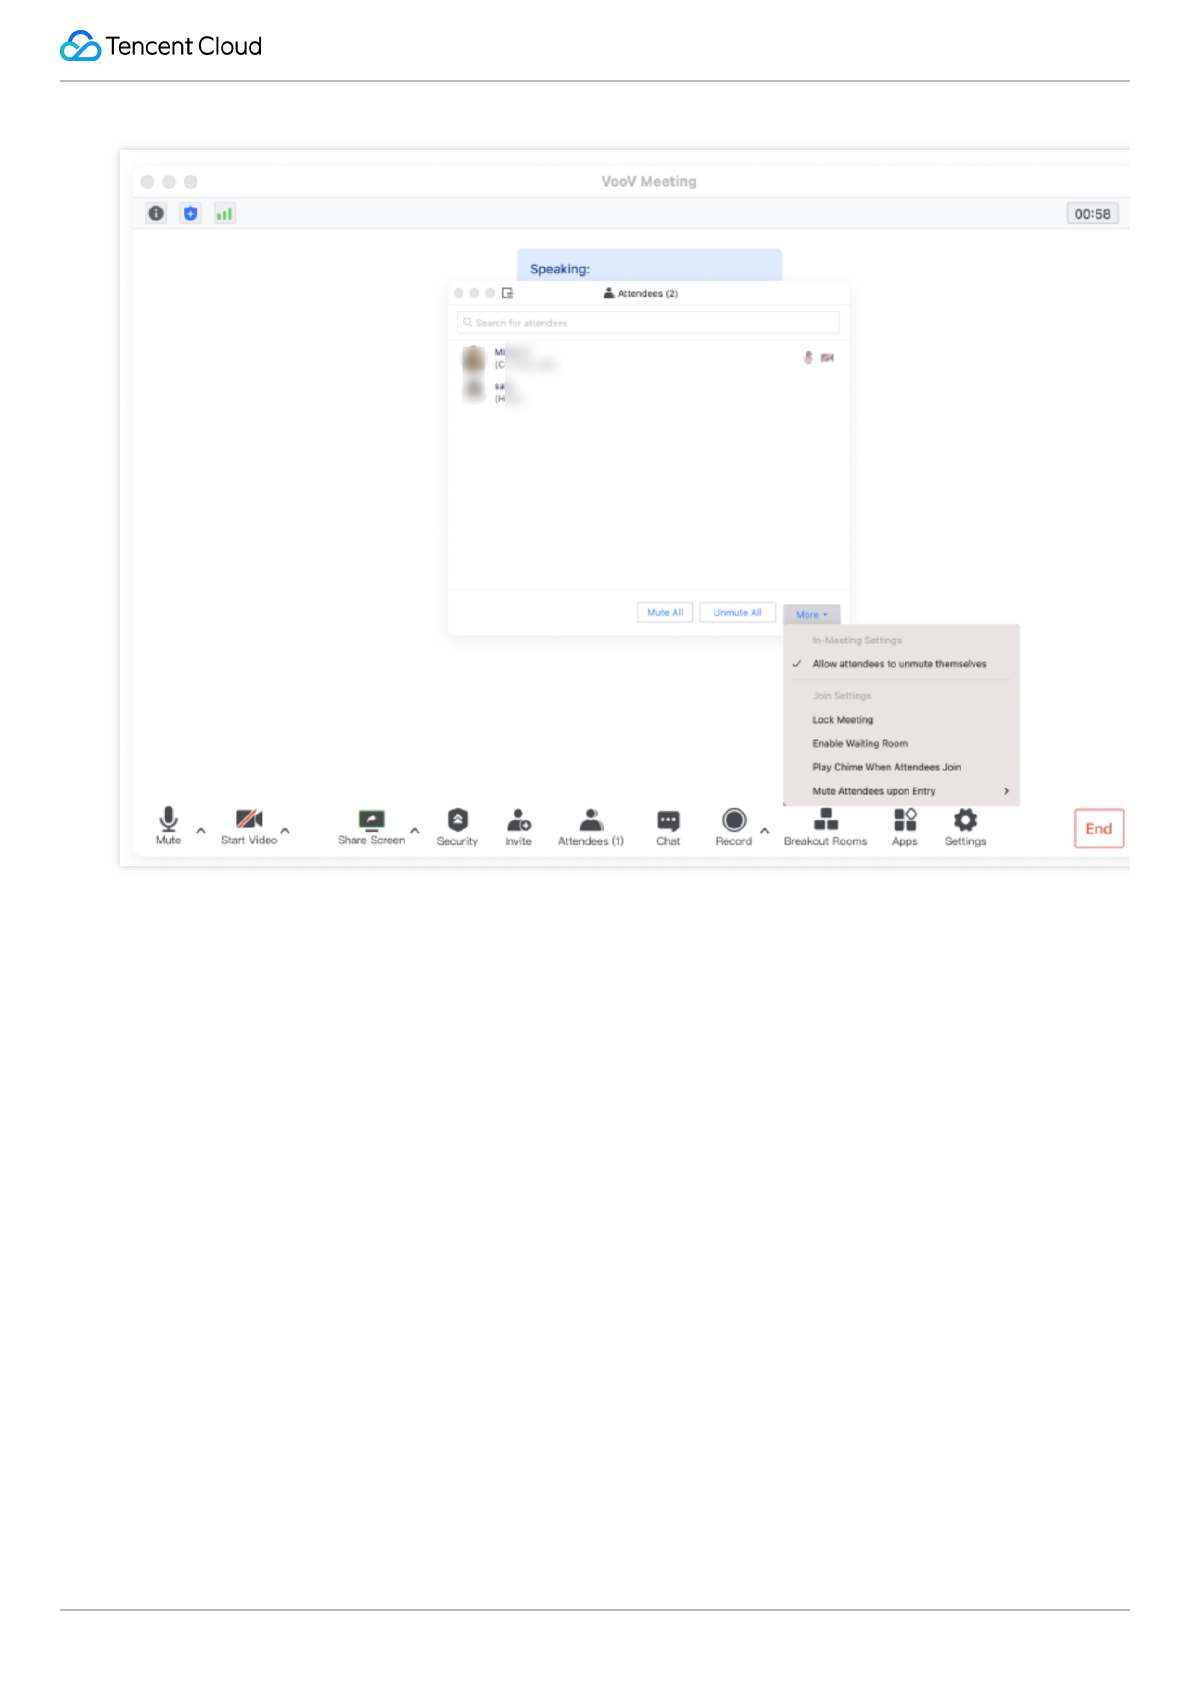
1. Click Attendees and click the More button on the Attendees panel.
2. Decide if you want to mute attendees on entry or lock the meeting.
Tencent VooV Meeting
©2013-2022 Tencent Cloud. All rights reserved. Page 32 of 110
Enlarging the Video Screen
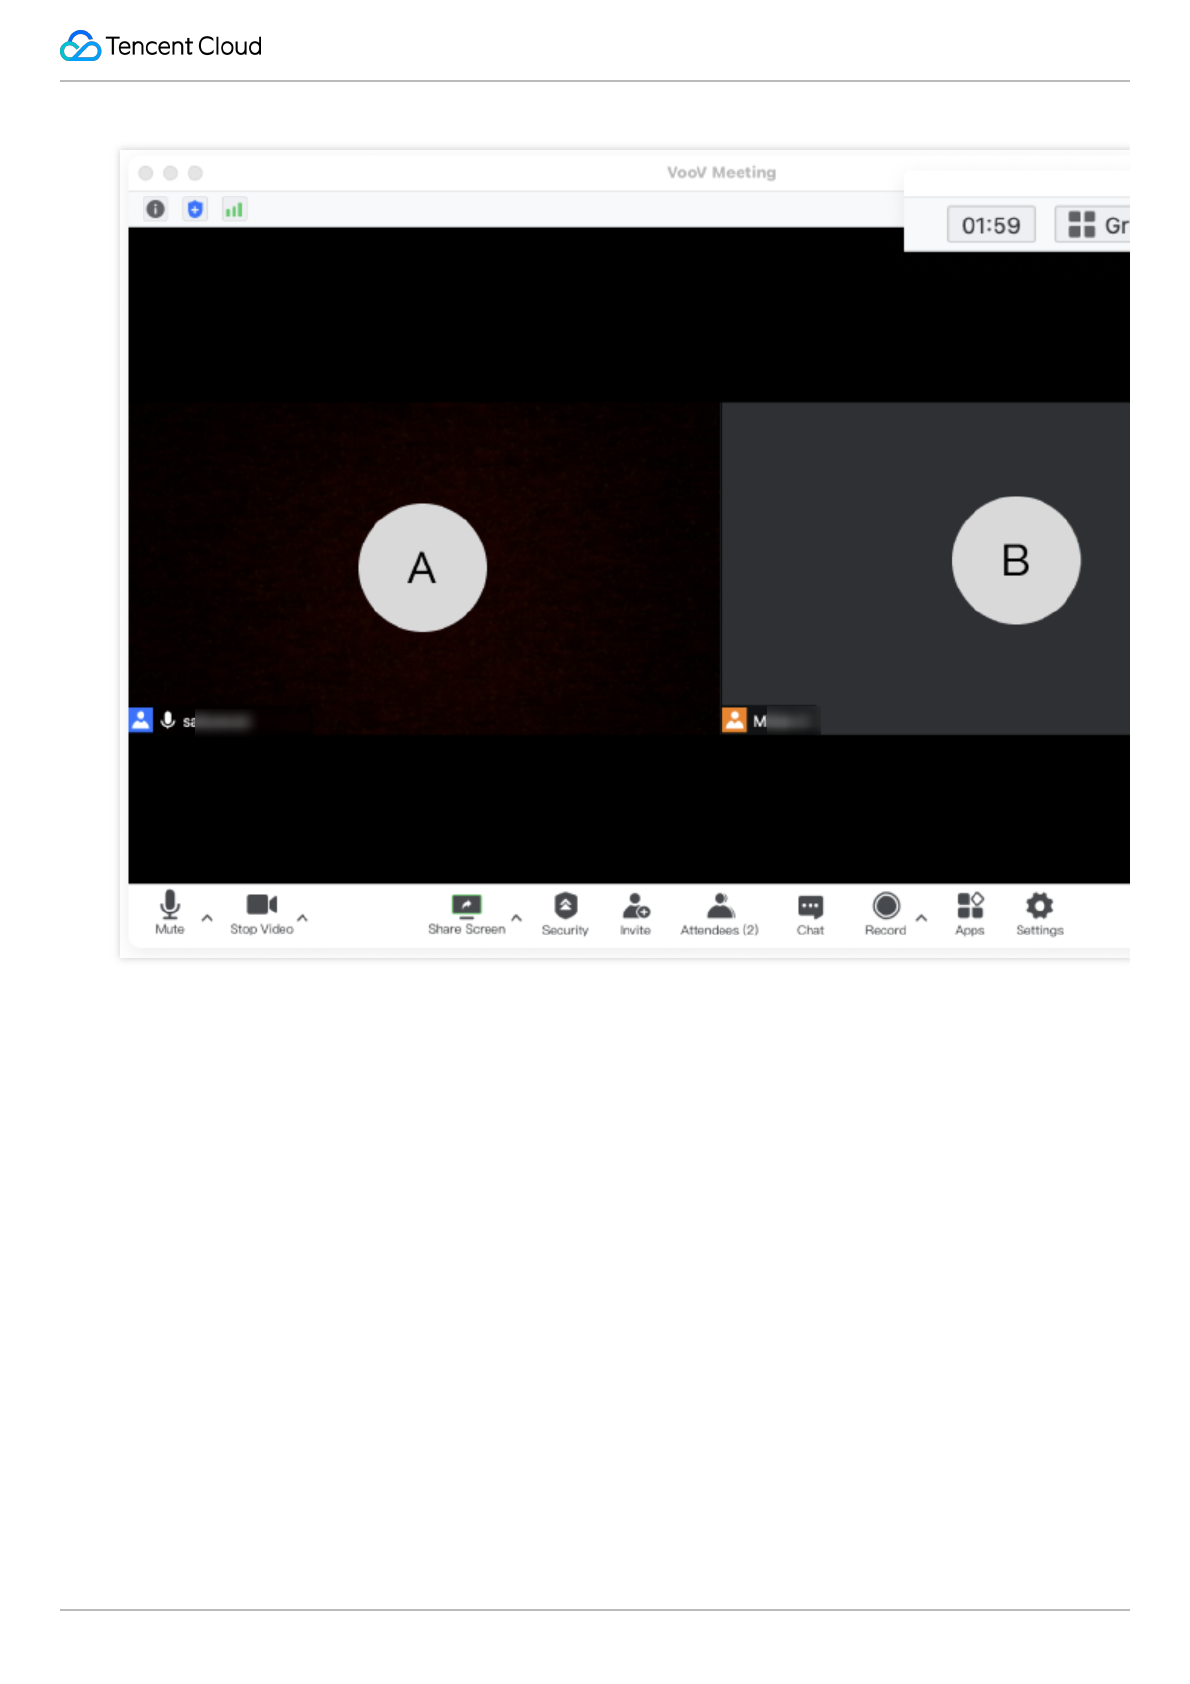
When the video is on, attendees can choose to show the videos in gallery view or to enlarge an individual screen.
1. Click the icon "Grid View" on the top right corner to display the videos side-by-side.
Tencent VooV Meeting
©2013-2022 Tencent Cloud. All rights reserved. Page 33 of 110
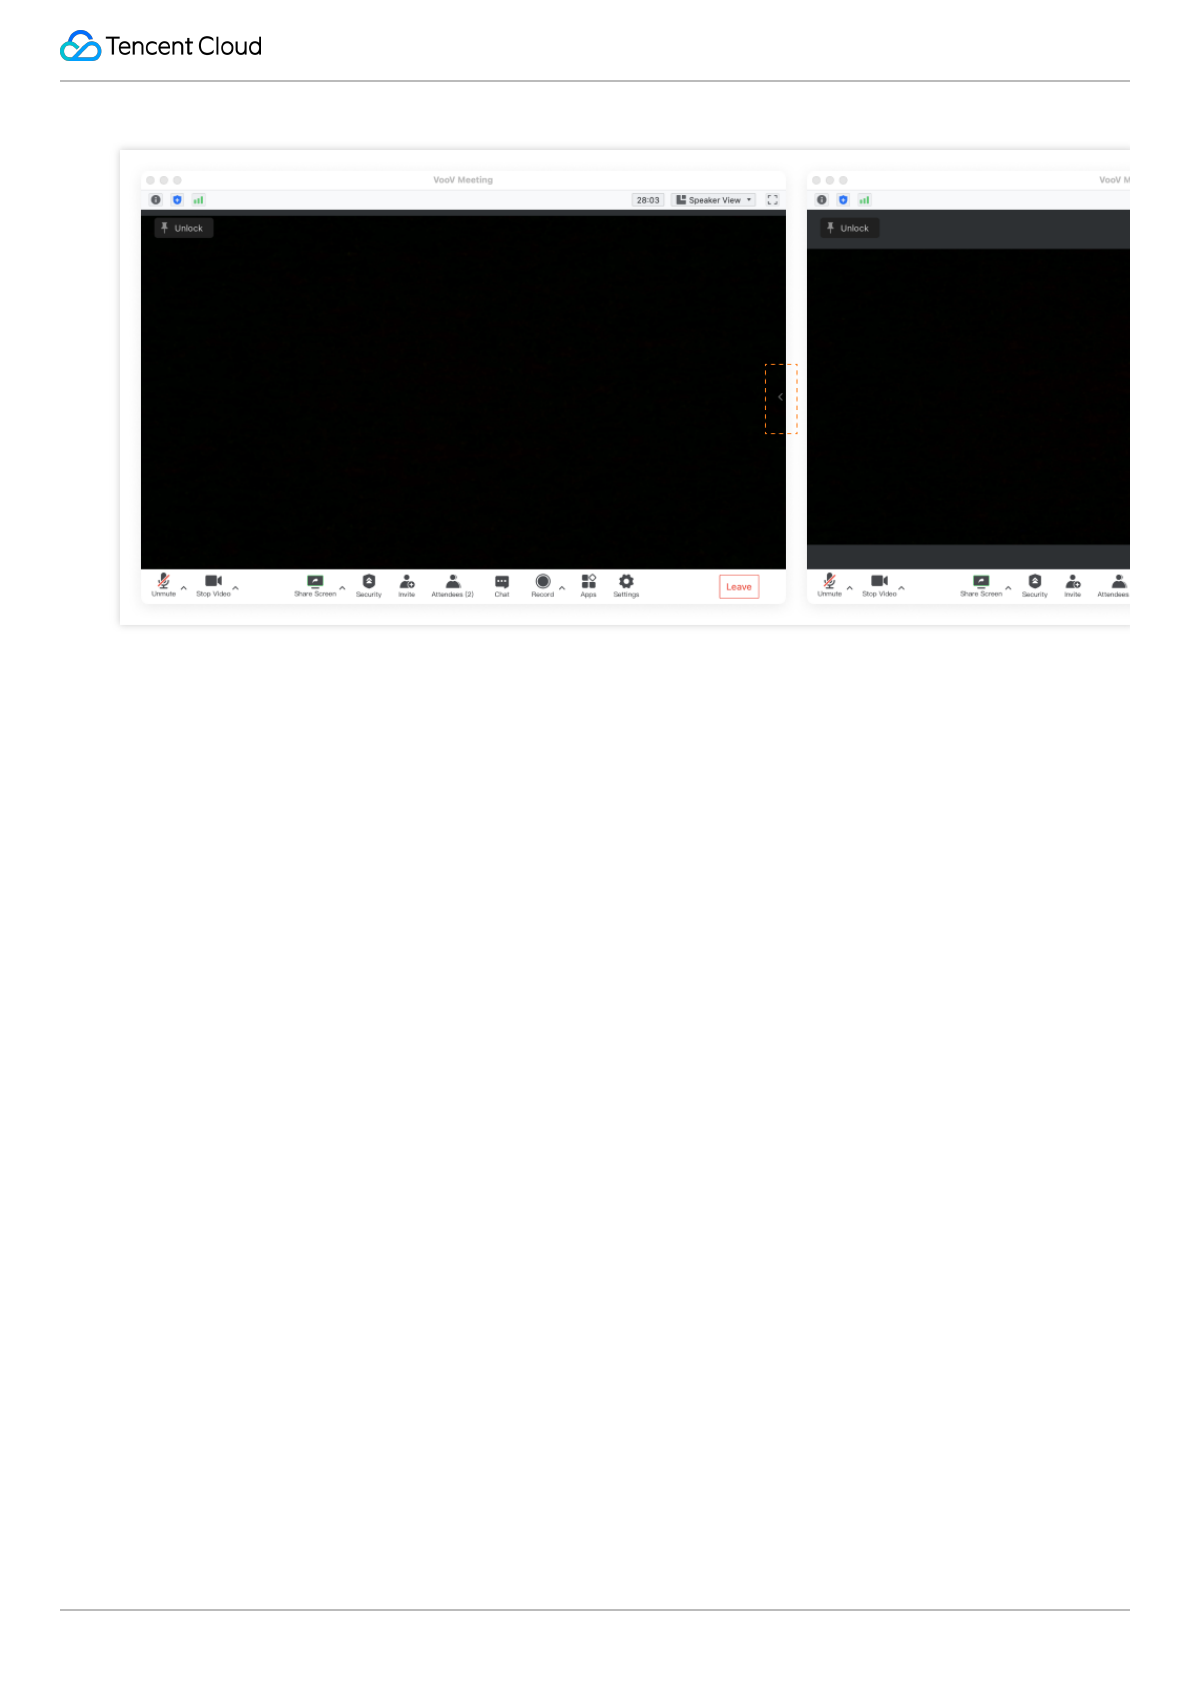
2. Double click the video screen of an attendee to enlarge it.
3. Decide if you want to display the video screen list from the drawer on the right side.
Tencent VooV Meeting
©2013-2022 Tencent Cloud. All rights reserved. Page 34 of 110
Microphone Controls
Role: Organizer/Co-Host/Attendee
Checking the Mic Status of Attendees
You can check the mic status of each attendee. If an attendee is speaking, their mic icon will turn green.
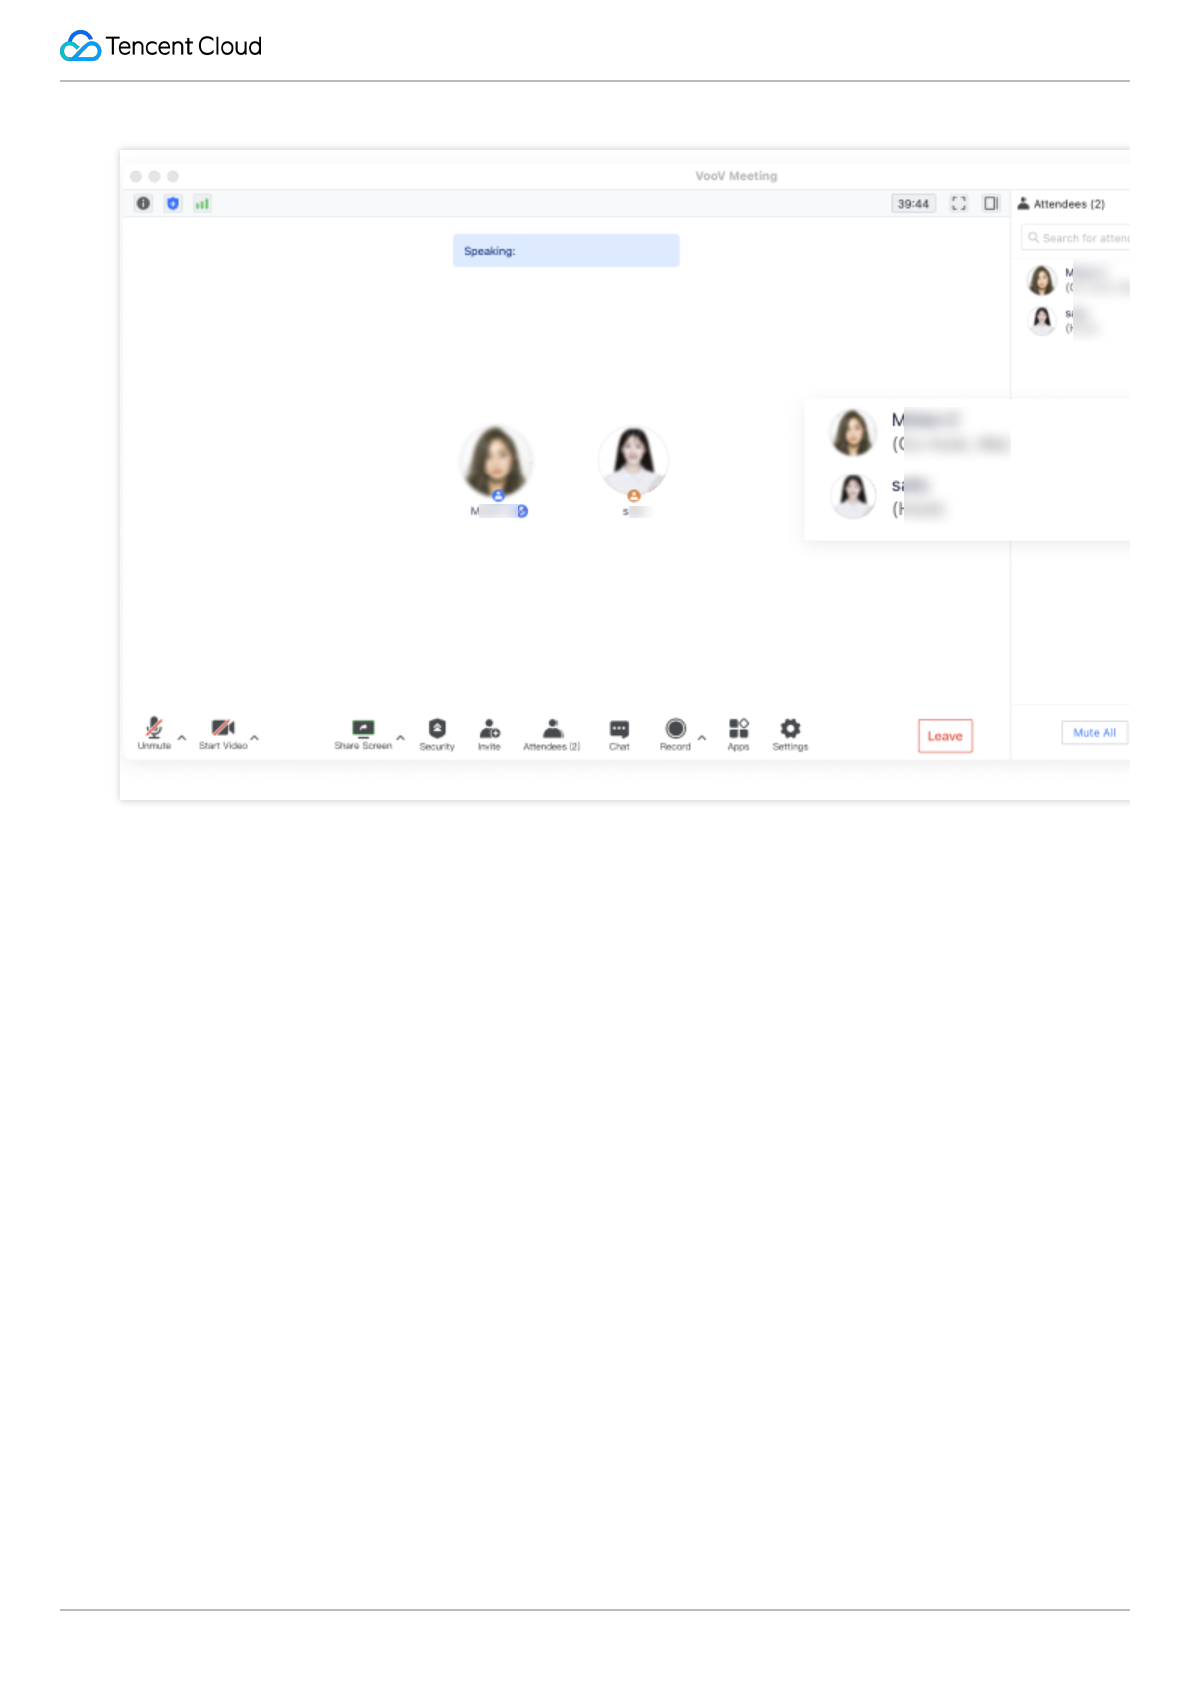
1. Click Attendees to check if attendees are muted or unmuted.
2. If the user's mic is enabled, the mic icon will be turned on.
Tencent VooV Meeting
©2013-2022 Tencent Cloud. All rights reserved. Page 35 of 110
Muting and Unmuting Attendees
Hosts are allowed to mute or unmute attendees during the meeting. We recommend muting all attendees to reduce
background noise.
1. If the meeting organizer selected the "Mute All" option, all attendees will be muted by default until the meeting
organizer turns this option off. We suggest enabling Allow Attendees to Unmute Themselves when you Mute All.
Tencent VooV Meeting
©2013-2022 Tencent Cloud. All rights reserved. Page 36 of 110
2. Hosts can unmute any attendee with their consent during online meetings.
Renaming Attendees
Role: Organizer/Co-Host/Attendee
Renaming Attendees
We suggest changing your alias before joining the meeting. This will help attendees recognize each other. This
especially applies to large-scale conferences with attendees from multiple organizations.
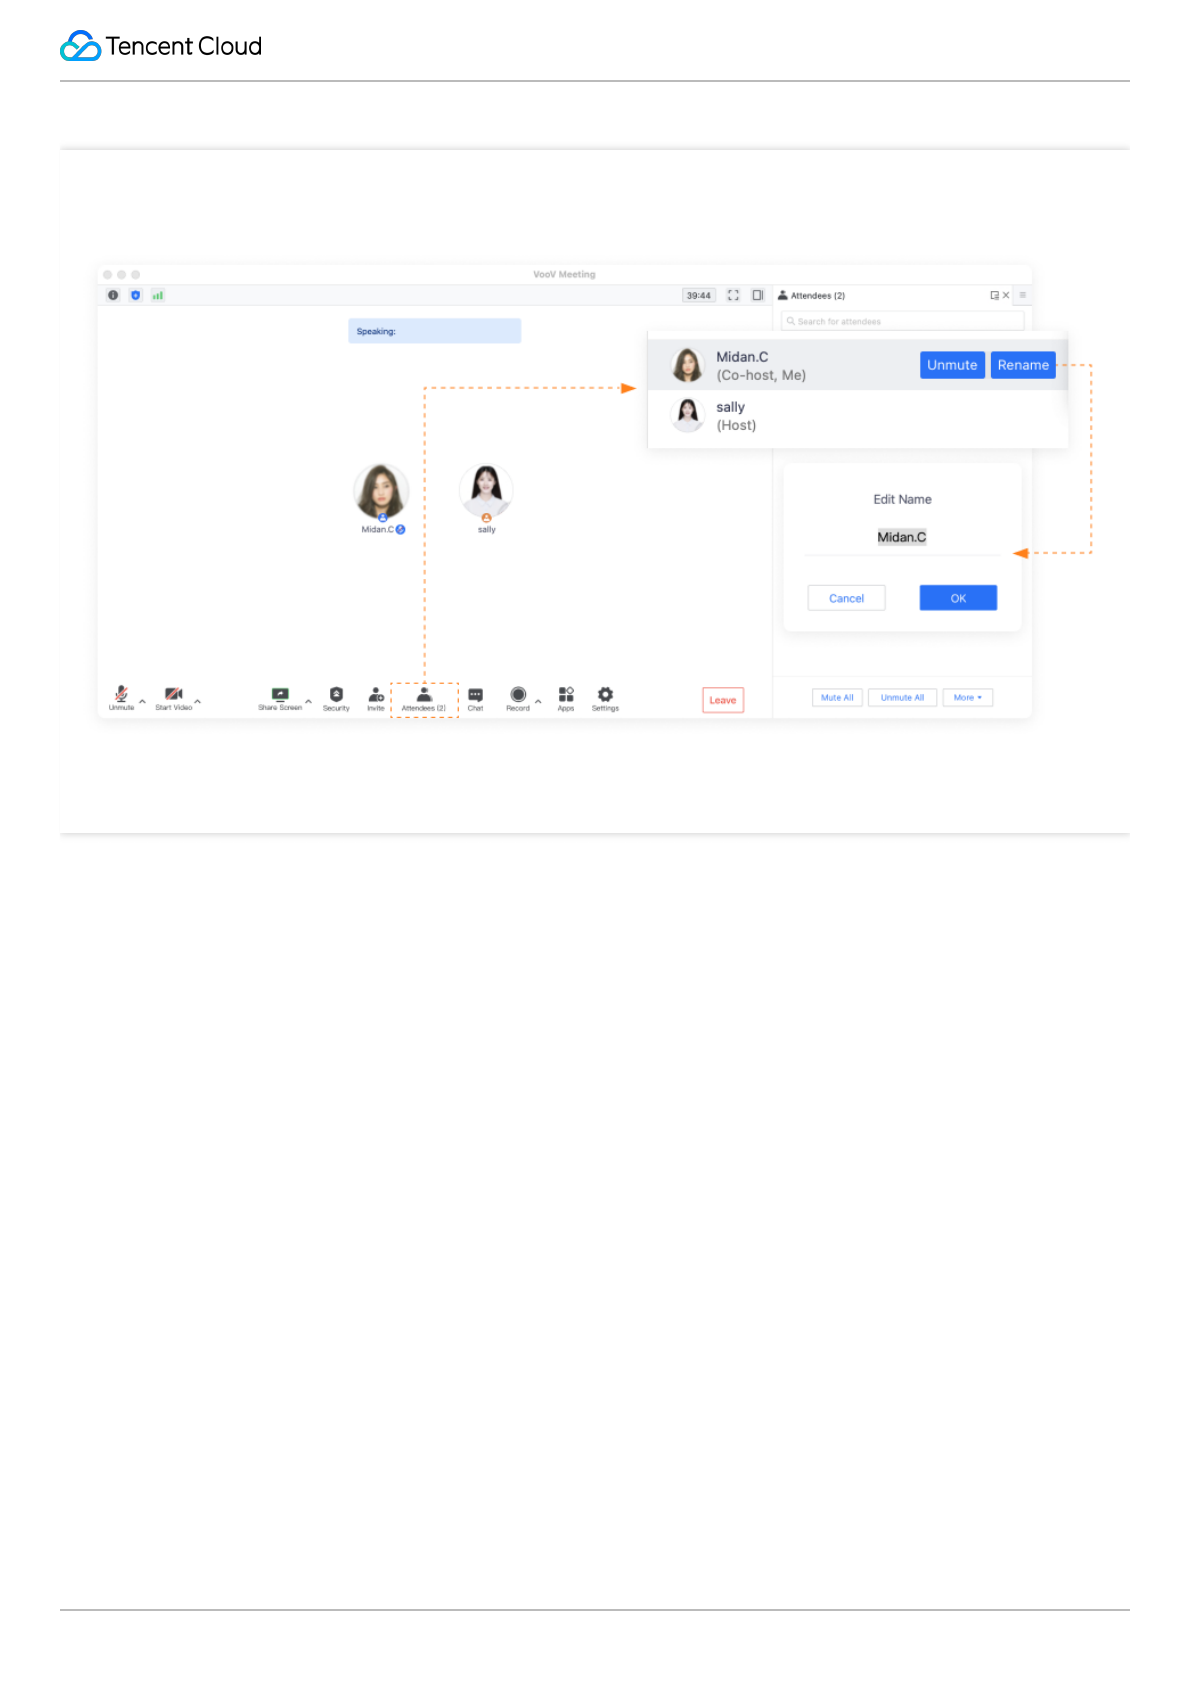
1. Select an attendee from the list to change their display name.
2. Click Rename to update their name.
3. Only the meeting organizer and co-host can rename others. Attendees can only rename themselves.
Tencent VooV Meeting
©2013-2022 Tencent Cloud. All rights reserved. Page 37 of 110

Tencent VooV Meeting
©2013-2022 Tencent Cloud. All rights reserved. Page 38 of 110
Meeting Control and Management
Host and Co-host Management
Last updated 2023-12-19 16:46:16
Feature Overview
A co-host can help the host manage attendees and their permissions such as renaming and muting/unmuting to
mitigate the pressure of the host and improve the meeting efficiency.
Prerequisites
Logged-in user: Free or Enterprise Edition user.
Logged-in device: Windows, macOS, iOS, or Android.
Notes
Attendees not logged in cannot be made host.
Free Edition: No longer provides the ability to set co-hosts.
Enterprise Edition: you can set up to 10 co-hosts. If the current meeting already has 10 co-hosts and the meeting
creator enters the meeting, the creator can become the 11th co-host, but no more co-hosts can be set.
A meeting can have only one host, and only the host can make other attendees co-hosts.
A co-host has fewer permissions than a host. Their main difference is that the host can assign roles to other attendees,
while the co-host cannot.
The co-host can be revoked by the host but cannot be proactively given up by the co-host.
If there is a co-host in the meeting and the host leaves the meeting without passing host controls, the co-host will
automatically become the host. If there are multiple co-hosts, the earliest one getting the co-host controls will
automatically become the host.
When the meeting creator enters or re-enters the meeting, the creator will become a co-host but can reclaim the host
controls without the consent of the current host. After the host controls are reclaimed, the original host will become an
attendee.
When a co-host who is not the meeting creator re-enters a meeting, the co-host will become an attendee.
If the meeting host and co-hosts perform conflicting or repeated operations on the same feature, the last operation that
is performed will take effect.
Role changes do not affect the current mic and camera status.

Tencent VooV Meeting
©2013-2022 Tencent Cloud. All rights reserved. Page 39 of 110
Becoming Meeting Host
The meeting creator will be the host by default.
The original host can pass the host controls.
A host can be specified on Enterprise Edition.
Passing Host Controls in Meetings
On PC client
1. Click Attendees on the meeting panel.
2. Select the target attendee, click More, and select Make Host in the drop-down list.
3. Click OK in the pop-up window.
On mobile client
1. Tap Attendees at the bottom of the meeting page, select the target attendee, and select Make Host in the pop-up
window.
2. Tap OK in the pop-up window.

Tencent VooV Meeting
©2013-2022 Tencent Cloud. All rights reserved. Page 40 of 110
Attendee List Management
Last updated 2023-12-19 16:46:36
Feature Overview
Users with host or co-host controls can control the meeting.
Prerequisites
Logged-in user: Free or Enterprise Edition user.
Logged-in device: Windows, macOS, iOS, or Android.
Notes
VooV Meeting provides two meeting roles of host and co-host for controlling meetings.
In a large-scale meeting, the host can set multiple co-hosts to help control and manage the meeting.
Guide
As host
Supported operations: Rename, Mute All, Unmute All, Lock Meeting, Enable Waiting Room, Mute Attendees upon
Entry, Allow Attendees to Unmute Themselves, Play Chime When Attendees Join, Merge to Main Window, Attendee
Restriction.
Supported operations on general attendees: Rename, Mute/Unmute, Stop Video, Make Co-host, Make Host, Move to
Waiting Room, and Remove.
Supported operations on co-hosts: Private Chat, Mute/Unmute, Stop Video, Revoke Co-host, and Make Host.
As co-host
Supported operations: Rename, Private Chat, Mute All, and Unmute All.
Supported operations on general attendees: Rename, Mute/Unmute, Stop Video, Move to Waiting Room, and
Remove.
As general attendee
Attendees can only rename themselves.

Tencent VooV Meeting
©2013-2022 Tencent Cloud. All rights reserved. Page 41 of 110
As meeting creator with co-host role
Supported operations: Rename, Mute All, Unmute All, Lock Meeting, Enable Waiting Room, Mute Attendees upon
Entry, Allow Attendees to Unmute Themselves, Play Chime When Attendees Join, Reclaim Host, Attendee
Restriction.

Tencent VooV Meeting
©2013-2022 Tencent Cloud. All rights reserved. Page 42 of 110
Meeting Security Control
Last updated 2023-12-19 16:46:46
Feature Overview
You can configure security settings before and during a meeting to protect meeting security.
Prerequisites
Logged-in user: Free or Enterprise Edition user.
Logged-in device: Windows, macOS, iOS, or Android.
Version: v1.5.5 or later.
Controlling Meeting Security
Before meeting (during meeting scheduling)
Set Password: you can set a password when scheduling the meeting, so that only users entering the correct password
can join the meeting.
Screen Sharing Watermark: if you want to protect the content to be shared, you can enable the screen sharing
watermark when scheduling the meeting to prevent the shared content from being screencaptured without permission.
Waiting Room: you can select Enable Waiting Room when scheduling the meeting to filter attendees.
Attendee Restriction (supported by Enterprise Edition): you can select Enterprise users only when scheduling the
meeting to allow only enterprises users to join the meeting.
During meeting
Lock Meeting: if you don't want irrelevant users to join the meeting in progress, you can select Attendees > More >
Lock Meeting after all attendees are in the meeting.
Waiting Room: during the meeting, you can select Enable Waiting Room in Security or Attendees > More to filter
external users.
Hide Meeting ID and Password: you can hide the meeting ID and password on the title bar. To view them, hover over
the meeting information icon in the top-left corner.
Initiate Sharing: after you select this option, all attendees can initiate sharing. The setting is synced to the All
attendees can share option in Share Screen of the toolbar.

Tencent VooV Meeting
©2013-2022 Tencent Cloud. All rights reserved. Page 43 of 110
Group and Private Chats: after you select this option, all attendees can start group and private chats freely. Its feature
is the same as All chats allowed in chat permissions.
Other security settings
Remove: if a stranger joins your meeting, you can remove them and select Do not allow the user to join the
meeting again.
Screen Sharing Watermark: if you want to protect the content to be shared, you can select Screen sharing
watermark settings and select Enable Watermark in the meeting to enable the screen sharing watermark so as to
prevent the shared content from being screencaptured without permission.

Tencent VooV Meeting
©2013-2022 Tencent Cloud. All rights reserved. Page 44 of 110
Controlling Hand Raise
Last updated 2023-12-19 16:46:56
Feature Overview
When the host mutes all attendees, if an attendee raises hand, the host can control and manage the attendee's
behaviors.
Prerequisites
Logged-in user: Free or Enterprise Edition user.
Logged-in device: Windows, macOS, iOS, or Android.
Notes
The current VooV Meeting version cannot record the name of the hand raiser and the number of hand raises.
VooV Meeting currently does not support adding text for hand raise.
Controlling Hand Raise
1. If the host enables Mute All and Attendees Cannot Unmute Themselves, when you click Unmute, you will
raise hand to apply to the host for unmuting.
2. When receiving the application, the host can click Attendees or click Raise Hand above Attendees to control
your hand raise.
3. If the host accepts your application, you are unmuted. If the host rejects your application or clicks Lower Hand, you
need to raise hand again to unmute yourself.

Tencent VooV Meeting
©2013-2022 Tencent Cloud. All rights reserved. Page 45 of 110
Viewing Past Meetings
Last updated 2023-12-19 16:47:06
Feature Overview
You can retain your own meeting records and find the chat content in meetings on the client and web.
Prerequisites
Logged-in user: Free or Enterprise Edition user.
Logged-in device: Windows, macOS, iOS, or Android.
Version: v1.7.5 or later.
Notes
Records of meetings ended in the last 30 days can be retained on web. The client has no such restrictions.
Meetings in the following status cannot be queried:
Deleted meeting.
Canceled meeting.
Scheduled meeting ended more than 30 days ago.
You can query meeting records such as chats in meetings.
Querying Past Meeting Details
On client
1. Open the homepage of the client and click Past Meetings.
2. Select the name of the target meeting and click View Details.
On web
1. Go to official website, log in and find Account Center.
2. Click Meeting List on the left sidebar and click Past Meetings in the top-left corner.
3. Select the name of the target meeting to view the meeting details.

Tencent VooV Meeting
©2013-2022 Tencent Cloud. All rights reserved. Page 46 of 110
Waiting Room
Last updated 2023-12-19 16:47:17
Waiting Room
Feature Overview
The waiting room can be used to keeping order when joining meeting and guarantee meeting security. After the
waiting room is enabled, all attendees require consent from the host or co-host before they can join the meeting, thus
eliminating the concerns over the leakage of meeting ID and improving the meeting efficiency.
Prerequisites
You are a Free, Enterprise Edition user
Windows/macOS/iOS/Android
v1.5.0 or above
Notes
1. If both Waiting Room and Attendees Can Join Before the Host are enabled, attendees will not be able to join
the meeting before the host.
2. The waiting room supports up to 3,000 attendees.
3. Attendees in the waiting room cannot chat or make video calls with each other, nor hear the meeting audio.
4. Panelists don't need to enter the waiting room; instead, they can join the meeting directly.
Enable Waiting Room on Client
Before meeting
Method 1. Personal Profile page
1. Click the Profile Photo icon.
2. Click Personal Meeting ID.

Tencent VooV Meeting
©2013-2022 Tencent Cloud. All rights reserved. Page 47 of 110
3. Select Enable Waiting Room in the meeting settings.
4. Then, the waiting room is enabled.
Method 2. Schedule Meeting page
1. Click Schedule.
2. Select Enable Waiting Room in the meeting settings.
3. Then, the waiting room is enabled.
Method 3. Start Meeting page
1. Click the triangle icon next to Start.
2. Click Personal Meeting ID > Settings to enable/disable the waiting room.
During meeting
1. Click Attendees.
2. Select Enable Waiting Room in More.
3. Then, the waiting room is enabled.
Enable Waiting Room on Web
1. Log in to the VooV Meeting official website and click Meeting List.
2. Click Schedule a Meeting and select Enable Waiting Room in Settings.
3. Then, the waiting room is enabled.
Send Chat Message to Waiting Room
In a meeting, the host/co-host can click Send to all attendees in the waiting room in Chat to send messages to
the attendees in the waiting room.
Manage Attendees in Waiting Room
1. Waiting room reminder: after the waiting room is enabled, every time an attendee joins the meeting, you will be
reminded that someone is waiting. Then, you can click View Waiting Room to view the waiting attendee; if you don't
want to receive reminders repeatedly, you can click Don't Remind Me Again, and you will no longer receive
reminders in the meeting.
2. Process waiting requests: you can click Attendees and select the Waiting column to view the waiting attendees.
You can admit or remove (reject) the request from each attendee.

Tencent VooV Meeting
©2013-2022 Tencent Cloud. All rights reserved. Page 48 of 110
3. Click Remove All or Admit All to remove or admit all the attendees in the waiting room.
4. If you don’t want an attendee to join the meeting again, you can select Do not allow the user to join the meeting
again when removing the attendee (or all attendees).
5. Move to waiting room: you can move attendees in the meeting to the waiting room in Attendees.
6. You can also set an attendee to be automatically admitted to the meeting without your approval needed.
7. If you don't select Attendees Can Join Before the Host when scheduling a meeting, all the attendees in the
waiting room will be admitted to the meeting only when the host/assigned host joins the meeting.

Tencent VooV Meeting
©2013-2022 Tencent Cloud. All rights reserved. Page 49 of 110
Mute New Attendees for Meetings with 6+
Attendees
Last updated 2023-12-19 16:47:28
Mute New Attendees for Meetings with 6+
Attendees
Feature Overview
This feature is enabled by default and applies to meetings with over 6 attendees. It helps avoid affecting the meeting
progress if new attendees are not muted.
Prerequisites
You are a Free, Pro, or Enterprise Edition user
Windows/macOS/iOS/Android
v2.7.0 or above
Notes
1. This feature is enabled by default if you use v2.7.0 or above.
2. Except that you can save the setting for muting new attendees on the Settings page, you need to configure this
setting again when scheduling other types of meetings.
3. This setting only applies to attendees, but not the host.
Setting "Mute New Attendees for Meetings with 6+ Attendees"
You can configure this setting on the following pages:
Schedule/Edit Meeting:

Tencent VooV Meeting
©2013-2022 Tencent Cloud. All rights reserved. Page 50 of 110
The Mute Attendees When They Join a Meeting option on the public meeting (including recurring meeting)
scheduling/editing page.
The Mute Attendees When They Join a Meeting option on the private meeting scheduling/editing page.
The Mute Attendees When They Join a Meeting option on the Settings page.
In meeting:
Attendees > More > Mute Attendees upon Entry is automatically enabled after the number of attendees exceeds
6.

Tencent VooV Meeting
©2013-2022 Tencent Cloud. All rights reserved. Page 51 of 110
Syncing Meetings from System Calendar
Last updated 2023-12-19 16:47:46
Sync VooV Meetings from System Calendar
Feature Overview
This feature syncs the meeting links saved in your system calendar to the VooV Meeting app and display them on the
homepage, making it easier for you to quickly find and join meetings.
Prerequisites
You are a Free, Enterprise Edition user
iOS/Android
v2.6.0 or above
Notes
1. Currently, this feature supports syncing the following types of meetings:
Meeting Status: upcoming/in progress.
Meeting Type: scheduled public meetings and recurring meetings.
2. The permission to read your calendar is required when you sync meetings for the first time, so you need to grant the
access to your system calendar.
3. Once enabled, meetings containing meeting links added to the system calendar in the last three months will be
verified and synced.
4. If a password-protected meeting is added, you need to enter the password first before you can join the meeting and
view the documents uploaded during the meeting on the details page.
Enabling "Sync VooV Meetings from system calendar"
1. Click your profile photo in the top-left corner of the homepage to enter your personal profile page, select Settings,
and find the Sync from calendar option.

Tencent VooV Meeting
©2013-2022 Tencent Cloud. All rights reserved. Page 52 of 110
2. Select the Sync from calendar option and enable Sync from system calendar automatically.

Tencent VooV Meeting
©2013-2022 Tencent Cloud. All rights reserved. Page 53 of 110
Collaboration and Interaction
Chat and Interaction
Chat in Meeting
Last updated 2023-12-19 16:47:57
Feature Overview
VooV Meeting allows attendees to chat in a meeting for efficient communication.
Prerequisites
Logged-in user: Free or Enterprise Edition user
Logged-in device: Windows, macOS, iOS, or Android
Basic Chat Features
Window settings: the chat window on PC supports merge and floating. When you click Chat to open the chat window
for the first time, it will be attached to the main window of the meeting by default, and you can also pop it out as a
floating window.
Message content: you can send text, images, and links. When you send a link, it will be automatically converted into
the form of URL and opened in the browser upon click.
Notifications: after you receive messages, you can preview them in the main window of the meeting, the messages will
be displayed as on-screen comments, and the number of messages will be displayed in the speech bubble.
Emoji: 21 emojis are available to make meetings more active.
Starting a Chat
Starting a chat on mobile client
1. In the meeting, tap Attendees > Select Attendees > Private or Tap More > Chat (select a specific attendee) to
start a chat with the attendee.
2. You can select different recipients as needed for private or public chat.
3. The host can set the chat permissions in the meeting.

Tencent VooV Meeting
©2013-2022 Tencent Cloud. All rights reserved. Page 54 of 110
Starting a chat on PC client
1. In the meeting, click Attendees > Select Attendees > More > Private or click Chat (send to a selected attendee)
to start a chat with the attendee.
2. You can select different recipients as needed for private or public chat.
3. The host can set the chat permissions in the meeting.
Starting a chat during screen sharing on PC client
1. During screen sharing, hover over the VooV Meeting at the top of the screen and click Attendees > Select
Attendees > More > Private or click Chat (send to a selected attendee) to start a chat with the attendee.
2. You can select different recipients as needed for private or public chat.
3. The host can set permissions for message recipients.
Chat Permissions Settings
The host can set chat permissions in the following steps:
1. In the meeting, click Security on the toolbar and set whether to allow attendees to chat in Attendee Permissions.
2. In the meeting, click Chat on the toolbar. Specifically, the host can set the following 4 chat permissions:
All chats allowed: attendees can start private chats with all attendees and send group chats to all attendees.
Group chats only: attendees can only send group chats to all attendees but cannot start private chats with all
attendees.
Chat with host only: attendees can start private chats with the host only but not with other attendees.
Block all attendees: attendees are blocked and cannot start private chats or send group chats to all attendees.
Chat History Retention after Meeting
You can view all the chat history in all meetings you attended in Past Meetings on the client.
If you don't manually delete a meeting, the chat history in it will be retained for 30 days.

Tencent VooV Meeting
©2013-2022 Tencent Cloud. All rights reserved. Page 55 of 110
Unmuting with Shortcut Key
Last updated 2023-12-19 16:48:24
Feature Overview
You can press and hold the space key to speak to temporarily unmute yourself.
Prerequisites
Logged-in user: Free or Enterprise Edition user
Logged-in device: Windows or macOS
Version: v2.8.0 or later
Notes
Pressing and holding the space key to unmute yourself is not a global feature. It will take effect only when the client is
active.
The Press and hold space key to unmute yourself option in the settings is selected by default and can be
disabled.
Prerequisites for the shortcut key to take effect:
The PC audio must be connected when the meeting window is focused.
The mic is currently turned off or you turn off the mic when speaking.
Time when the shortcut key will take effect: you can activate the space shortcut key when you press and hold it for
longer than 0.5s. It will be deactivated when you release it, the mic is disconnected exceptionally, or you leave the
meeting.
Using Shortcut Key
After the shortcut key has taken effect, you can unmute yourself to speak by pressing and holding the space key for
longer than 0.5s.

Tencent VooV Meeting
©2013-2022 Tencent Cloud. All rights reserved. Page 56 of 110
Whiteboard Sharing
Last updated 2023-12-19 16:48:34
Feature Overview
VooV Meeting offers a whiteboard feature which makes it easier for you to communicate with team members
efficiently.
Prerequisites
Free or Enterprise Edition users
Windows, macOS, iOS, or Android
v2.2.0 or later
System requirements
Windows/macOS
1. Windows 7 or later
2. macOS 10.11 or later
Android/iOS
1. Android 9.0 or later
2. iOS 12 or later (except iOS 13.0)
Notes
1. You can open the whiteboard/annotation toolbar when you share a whiteboard, window, or desktop on computer.
2. You can use the whiteboard toolbar when you share a whiteboard on mobile.
Enable Whiteboard Sharing
Windows/macOS
In a meeting, click Share Screen on the toolbar, select Whiteboard as the content for sharing, and click Share.
Android/iOS

Tencent VooV Meeting
©2013-2022 Tencent Cloud. All rights reserved. Page 57 of 110
In a meeting, tap Share Screen on the toolbar and select Share Whiteboard.
macOS
1. Select: you can select/click the added whiteboard content and adjust it.
Caution:
This feature lets you drag, zoom in/out, or switch content that is added with Pen, Highlighter, or Graphic. You can
also drag, edit text, change the text color or font size.
2. Spotlight: this feature creates a red point over the shared content, and you can control its movement over the
content.
3. Pen: this feature lets you mark the shared content.
Caution:
You can change the color and thickness of the pen.
4. Highlighter: this feature lets you mark the shared content.
Caution:
You can change the color and thickness of the highlighter.
5. Text: you can annotate the shared content with text.
6. Graphic: you can add graphics to the shared content.
Caution:
Currently, you can add five types of graphics, including quadrilateral, circle, triangle, line, and arrow, and change their
shape, thickness, and color.
7. Eraser: you can erase annotations.
8. Undo: this feature lets you undo annotations.
9. Redo: you can recover the annotations you just undid.
10. Clear: you can clear all people's annotations, your annotations, and attendees' annotations.
11. Save: you can save the content on the whiteboard locally and view it in meeting minutes.
12. Hide: you can collapse the toolbar.
Android/iOS
1. Collapse: you can hide the whiteboard toolbar.
2. Pen: you can mark on the whiteboard.
Caution:
You can change the color and thickness of the pen.
3. Highlighter: you can highlight the content on the whiteboard.
Caution:
You can change the color and thickness of the highlighter.
4. Arrow: you can add an arrow on the whiteboard.
5. Eraser: you can erase the content on the whiteboard.
6. Undo: this feature lets you undo the content on the whiteboard.

Tencent VooV Meeting
©2013-2022 Tencent Cloud. All rights reserved. Page 58 of 110
7. Redo: you can recover the annotations you just undid.
8. Save Whiteboard: you can save the content on the whiteboard locally and view it in meeting minutes.
9. Clear: you can clear all people's annotations, your annotations, and attendees' annotations.
10. Annotation Settings: you can set whether to Allow other attendees to annotate and Show annotator name.
Caution:
This feature is supported for Enterprise Edition users only.
11. Hide: this feature lets you hide the whiteboard and disable screen sharing.

Tencent VooV Meeting
©2013-2022 Tencent Cloud. All rights reserved. Page 59 of 110
Screen Sharing
Partial Screen Sharing
Last updated 2023-12-19 16:48:55
Overview
You can share partial screen, such as part of the application window or specific slide content area.
Prerequisites
Free or Enterprise Edition users
Windows, macOS
v2.20.0 or later
OS requirements: Windows 7 or later or macOS 10.11 or later
Notes
When you select a screen area, VooV Meeting will automatically detect the window based on the cursor position and
use it as the candidate area. You can also drag the cursor to select an area.
Before starting sharing, you can adjust the position and size of the area for sharing, which cannot be adjusted after
sharing starts. If you want to adjust the area position or size during sharing, you can select New Share to select an
area again.
To avoid affecting the watch experience of other attendees, the size of the selected screen sharing area must be
above 80 x 80 pixels.
If you use multiple monitors and select partial sharing, you cannot select an area across screens.
During sharing, all displayed content in the selected area will be shared. Avoid sharing an image area containing
private information such as information input, notification message, and personal account.
Selecting Screen Sharing Area
1. Click Share Screen to enter the Select Content to Share page.
2. Click Advanced, select and double-click Partial Sharing or select Partial Sharing and click Share to select the
shared area.
Tencent VooV Meeting
©2013-2022 Tencent Cloud. All rights reserved. Page 60 of 110
3. After the shared area is selected, the Cancel and Share buttons will be displayed. You can click Share to start
sharing the selected area or click Cancel to exit sharing.
Tencent VooV Meeting
©2013-2022 Tencent Cloud. All rights reserved. Page 61 of 110

Tencent VooV Meeting
©2013-2022 Tencent Cloud. All rights reserved. Page 62 of 110
Sharing External Video Source
Last updated 2023-12-19 16:49:07
Overview
VooV Meeting allows you to connect to an external video source device such as external PC camera, USB video
capture card, and image scanner as the second camera and share it to other attendees.
Prerequisites
Logged-in user: Free or Enterprise Edition user
Device: Windows 7 or later or macOS 10.11 or later
Notes
We recommend you test the availability of the external video device in advance. For the specific test method, see the
usage instructions provided by your device vendor. You can also check the compatibility between the device and
VooV Meeting in the video test of VooV Meeting.
Test before meeting
1. Click the profile photo to enter the personal profile page.
2. On the personal profile page, Click Settings > Video to enter the Video page.
3. Select the target device in the Device drop-down list.
4. After selection, check whether the video image is displayed normally.
Test during meeting
1. Click Settings on the toolbar during the meeting and click Video to enter the Video page.
2. Select the target device in the Device drop-down list.
3. After selection, check whether the video image is displayed normally.
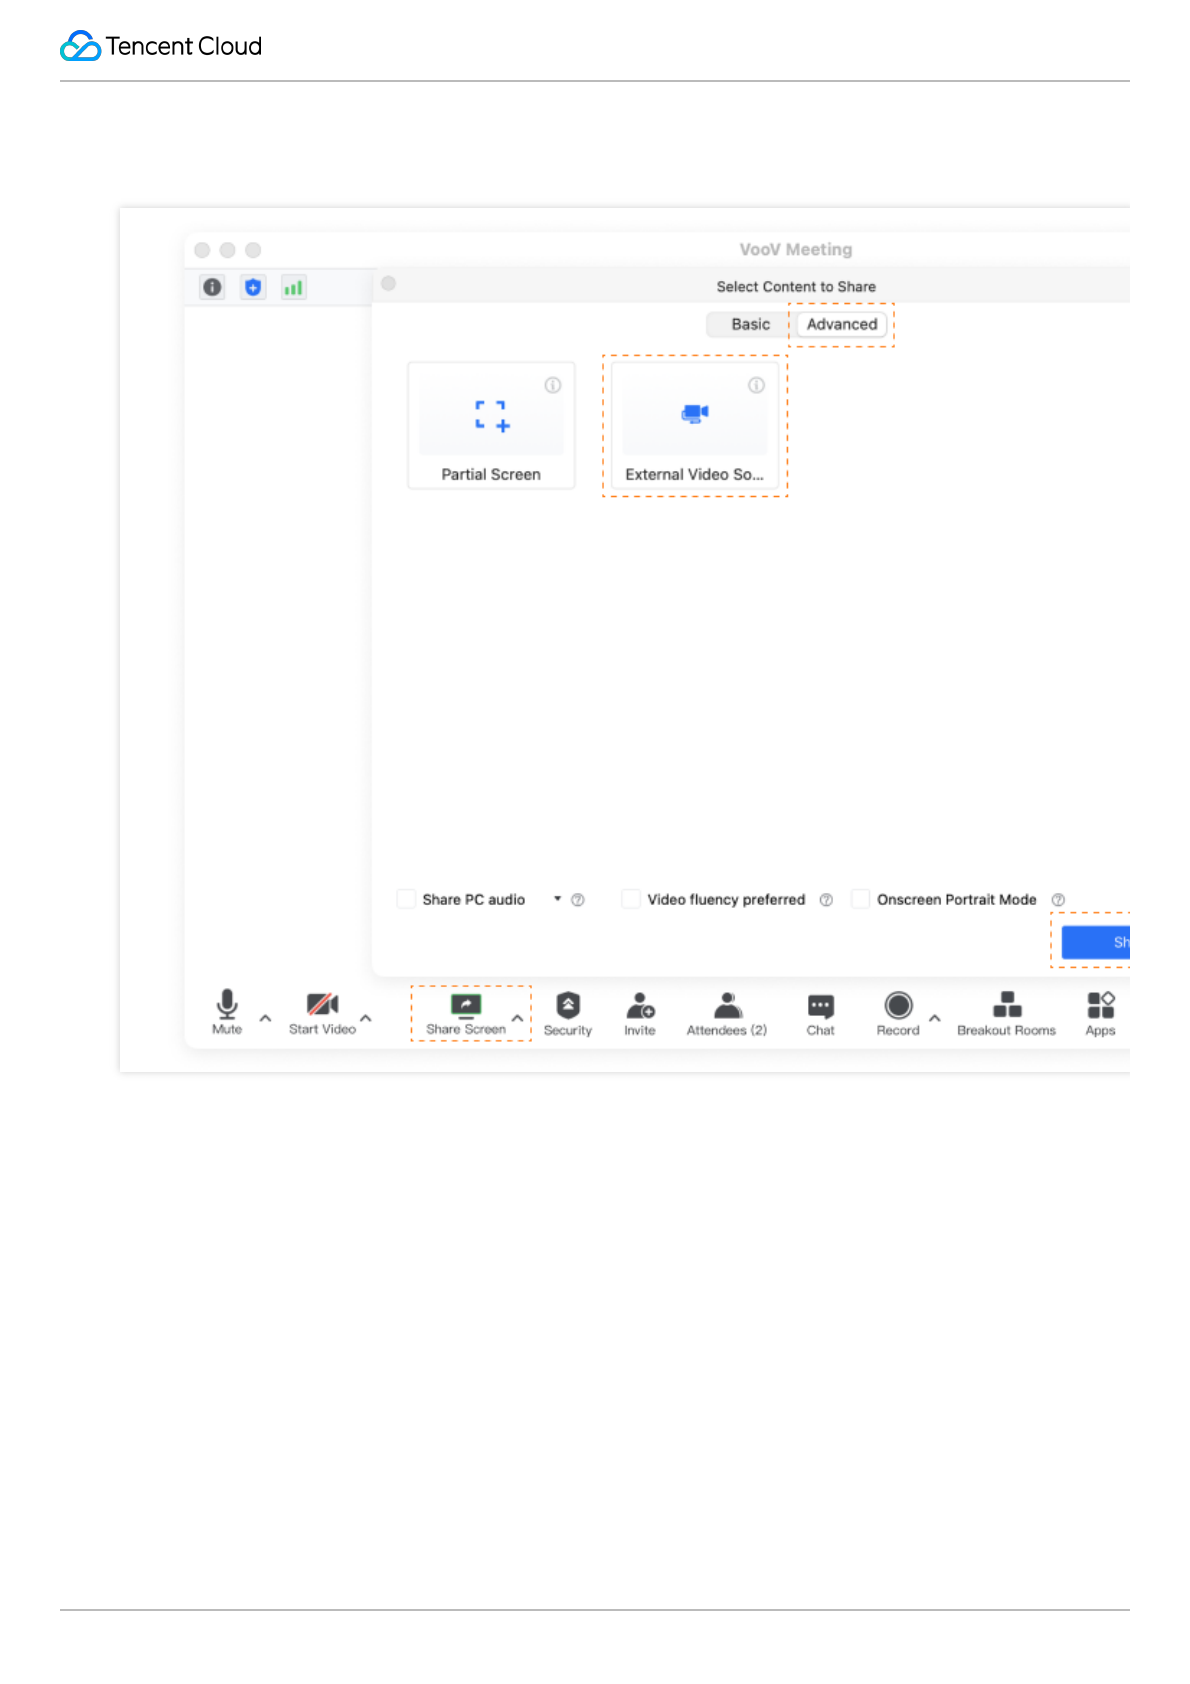
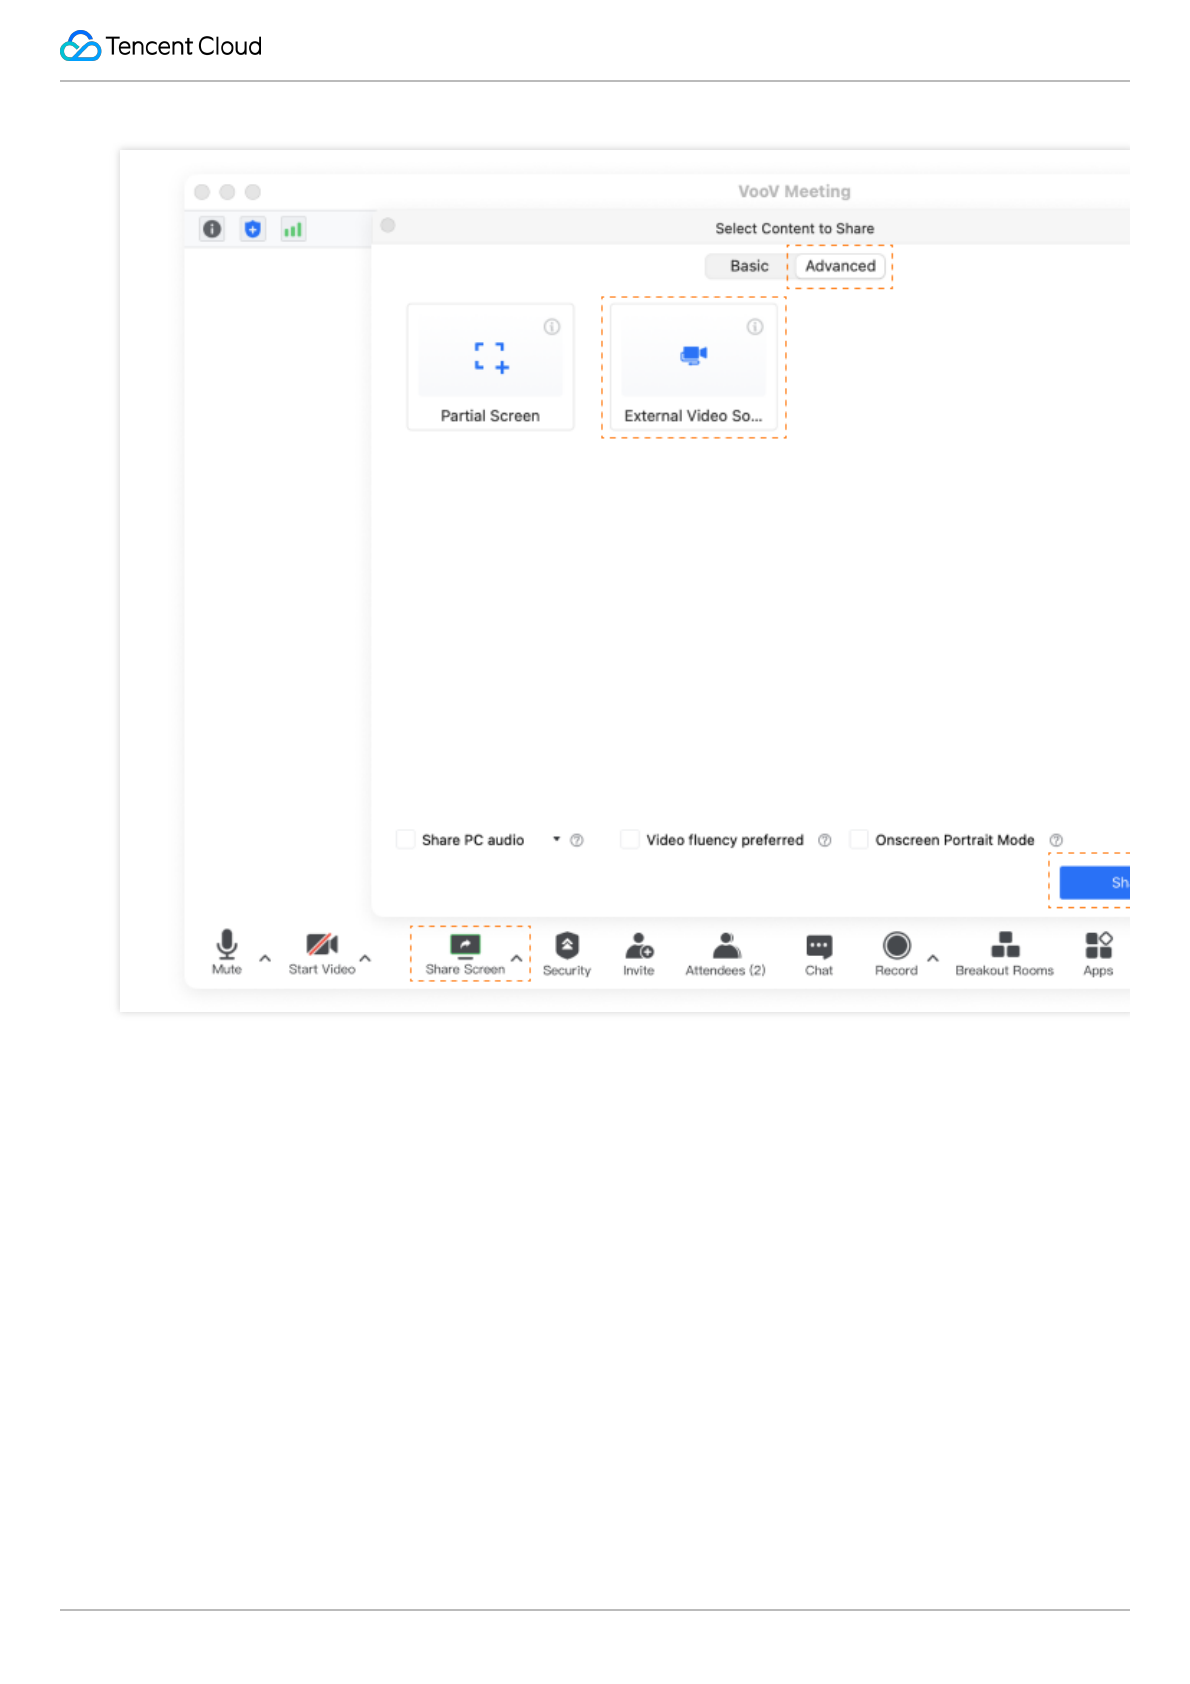
How to Use
An external device source is relative to a built-in device, which is generally an external camera, video capture card, or
image scanner. You can share your external video device to other attendees in the following steps:

Tencent VooV Meeting
©2013-2022 Tencent Cloud. All rights reserved. Page 63 of 110
1. After entering a meeting, select Share Screen and open the Advanced page in Select Content to Share.
2. Select External Video Source, select the target device from the identified video devices, and click Share to share
it as the second video image to other attendees.
3. During sharing, you can view the shared video image or switch between external video devices in the local preview
window, which will take effect immediately.

Tencent VooV Meeting
©2013-2022 Tencent Cloud. All rights reserved. Page 64 of 110
Share PC Audio During Screen Sharing
Last updated 2023-12-19 16:49:16
Share PC Audio During Screen Sharing
Feature Overview
In addition to sharing your current screen, the screen sharing feature also supports sharing the audio from your PC
with other attendees.
Prerequisites
Free or Enterprise Edition user
Windows/macOS
v2.2.0 or later
System requirements
Windows/macOS
1. Windows 7 or later
2. macOS 10.11 or later
Notes
1. The principle that "only one user can share only one screen part at any time during a meeting" also applies to
sharing PC audio only as it is also a form of "shared content".
2. When you share PC audio only, you cannot enable annotation, and the toolbar will not be collapsed to the top.
3. During screen sharing, you don't have to enable the mic, but you can also choose to enable Share PC audio.
4. When sharing PC audio, please check whether the volume level on your PC is 0, and if so, other attendees will not
hear your shared audio.
Share PC Audio During Screen Sharing
Windows/macOS

Tencent VooV Meeting
©2013-2022 Tencent Cloud. All rights reserved. Page 65 of 110
1. When selecting the content to be shared, select Share PC audio at the same time in the bottom-left corner of the
window to share the audio from your PC with other attendees while sharing the screen.
2. If you only want to share the audio from your PC, please select Only PC audio.

Tencent VooV Meeting
©2013-2022 Tencent Cloud. All rights reserved. Page 66 of 110
Annotate During Screen Sharing
Last updated 2023-12-19 16:49:25
Annotate During Screen Sharing
Feature Overview
The VooV Meeting client lets multiple users annotate the shared content (including whiteboard) at the same time.
Prerequisites
Enterprise Edition user
Windows/macOS/iOS/Android
v2.2.0 or later
System requirements
Windows/macOS
1. Windows 7 or later
2. macOS 10.11 or later
Android/iOS
1. Android 9.0 or later
2. iOS 12 or later (except iOS 13.0)
Notes
1. Free Edition users cannot enable the annotation feature, but they can annotate the shared content in meetings
started by Enterprise Edition users.
2. Mobile client users can annotate the content shared by desktop client users, but not vice versa.
Annotation Settings
Windows/macOS

Tencent VooV Meeting
©2013-2022 Tencent Cloud. All rights reserved. Page 67 of 110
During screen sharing (desktop/window/whiteboard), click the triangle icon on the right of the Annotate button on the
toolbar at the top and set whether to Allow other attendees to annotate and Show annotator name (enabled by
default).
Android/iOS
During whiteboard sharing, tap More on the toolbar, select Annotation Settings, and set whether to Allow other
attendees to annotate and Show annotator name.
Annotation
Windows/macOS
When watching the shared screen, click the triangle icon on the right of the Screen Sharing button to show the
Annotate option. Click it to show the annotation toolbar.
Android/iOS
When watching the shared screen, click More > Annotation to show the annotation toolbar and add annotations.

Tencent VooV Meeting
©2013-2022 Tencent Cloud. All rights reserved. Page 68 of 110
Screen Sharing Watermark
Last updated 2023-12-19 16:49:34
Feature Overview
To protect your shared content, VooV Meeting supports setting a watermark for your shared screen.
Prerequisites
Free or Enterprise Edition user
Windows/macOS/iOS/Android
v2.3.0 or later
System requirements
Windows/macOS
1. Windows 7 or later
2. macOS 10.11 or later
Android/iOS
1. Android 9.0 or later
2. iOS 12 or later (except iOS 13.0).
Notes
Set watermark
1. Only the host/co-host can set watermarks.
2. Free Edition users can set only a single watermark, while Enterprise Edition users can set a single watermark or
multiple watermarks.
3. If multiple watermarks are set for a meeting, only attendees using v2.3 or later will see multiple watermarks, while
users on lower versions will only see a single watermark.
Watermark content and display
1. The content of a watermark is the watching attendee's name in the meeting plus their mobile number.
2. When local recording or cloud recording is used to record the shared content, the watermark will not be recorded.

Tencent VooV Meeting
©2013-2022 Tencent Cloud. All rights reserved. Page 69 of 110
3. Android users cannot screencapture watermarked shared content, while the screencapturing operation performed
by iOS users when watching the watermarked shared content will be recorded by the system.
Screen Watermark Settings
Windows/macOS
1. When scheduling a meeting, enable Screen Sharing Watermark, and you will see the Set Watermark button,
and click it to enter the screen sharing watermark settings page. Select Single or Multiple, click Apply after
previewing it, and a screen watermark will be set. After the meeting is scheduled, the watermark will be displayed
when attendees watch the shared screen.
2. Click the triangle icon on the right of Share Screen in the meeting to show the Screen Sharing Watermark
Settings option. Click it to enter the screen sharing watermark settings page. Select Single or Multiple, click Apply
after previewing it, and the screen sharing watermark will take effect immediately.
Android/iOS
1. When scheduling a meeting, tap Screen Sharing Watermark to enter the Screen Sharing Watermark page.
Enable Screen Sharing Watermark, select Single or Multiple, return to the meeting scheduling page after
previewing it, and a screen watermark will be set. After the meeting is scheduled, the watermark will be displayed
when attendees watch the shared screen.
2. Tap More > Settings in the meeting, find Enable Screen Watermark on the settings page, and tap it to enter the
screen watermark settings page. Enable Screen Sharing Watermark, select Single or Multiple, return to the
settings page after previewing it, and a screen watermark will be set. The watermark will be displayed when attendees
watch the shared screen.

Tencent VooV Meeting
©2013-2022 Tencent Cloud. All rights reserved. Page 70 of 110
Speaker View Mode
Last updated 2023-12-19 16:49:43
Overview
When sharing PowerPoint slides, many users often use the Speaker View mode to locally display the Speaker View.
This document describes how to enable the speaker view when sharing the screen in VooV Meeting.
Notes
1. Microsoft Office PowerPoint 2016 is used below as an example. When you use only one monitor and enter the
Presenter View, the two windows Slide Show and Presenter View will appear. At this time, you can use VooV
Meeting to share the Slide Show and browse the Speaker View locally as desired.
2. When selecting the content to be shared, be sure to double check the name of each window.
3. Open the PowerPoint file, enter the "Presenter View" mode, and then share the screen in sequence.
How to Use
Windows:
1. Open the PowerPoint file you are going to share and press Alt + F5 to enter the "Presenter View" mode.
2. Click the Restore Down icon in the top-right corner of the Speaker View window to restore from "Full Screen"
mode to "Window" mode.
3. Switch to the VooV Meeting client, click Share Screen, and select the window titled "PowerPoint Slide Show - xxxx
(file name)" for sharing.
4. Switch to the "Presenter View" window to deliver the effect.
macOS:
1. Open the PowerPoint file you are going to share and press Option + Return to enter the "Presenter View" mode.
2. Switch to the VooV Meeting client, click Share Screen, and select the Slide Show window for sharing.
3. Switch to the Presenter View to deliver the effect.

Tencent VooV Meeting
©2013-2022 Tencent Cloud. All rights reserved. Page 71 of 110
Audio and Video Management
Live Streaming Management
Starting a Live Streaming
Last updated 2023-12-19 16:49:55
Feature Overview
Live streaming can relay the shared screen or video image in your current meeting to YouTube, so that more people
can watch your meeting.
Prerequisites
Logged-in device: Windows/macOS
Notes
The live content is delayed by about 20–30s. If the delay time exceeds the normal range, you can start live streaming
again.
Before live streaming
1. Only the host can control live streaming.
2. You can start live streaming only after getting the video content (at least one user in the meeting turns on video or
starts screen sharing).
3. You need to get the live streaming permission for your YouTube account here.
During live streaming
1. After live streaming starts, the live stream replay feature cannot be configured.
2. During live streaming, if all video images are disconnected, live streaming will also end.
3. Only video images can be live streamed, while user chats and files during the meeting cannot.
4. After live streaming ends, you can configure replay and manage the replay content in your YouTube channel.
Enabling Live Streaming

Tencent VooV Meeting
©2013-2022 Tencent Cloud. All rights reserved. Page 72 of 110
Step 1. Configure the client
1. Select Enable Live Streaming when scheduling a meeting.
2. In the meeting, turn on the video or start screen sharing to get the live video image.
3. Click Go Live on the toolbar to enter the live stream settings page and add a video image for live streaming.
4. Currently, up to 4 (1 big and 3 small) video images can be streamed.
5. Click Add on the left of the live stream layout and select an ongoing video image on the right to add it for live
streaming.
6. To replace a video image, click the layout frame of the video, deselect it in the ongoing video images on the right,
click the layout frame again, and add a new video image to the frame for replacement.
7. To remove a video image from live streaming, select the layout frame of the video image in the live stream layout
and deselect it in the ongoing video images on the right.
8. If there is only one video image currently (only one user in the meeting turns on the video or is sharing the screen), it
will be the main video image by default and placed to video image 1.
9. After configuring settings, click Next to open the browser to configure YouTube live streaming authorization and
relayed push.
Step 2. Configure YouTube authorization and relayed push
1. Log in to YouTube with your Google account in the browser.
2. Set the live stream title and whether to make it public.
3. Click Live Stream on YouTube and click Open VooV Meeting in the pop-up window.
4. The YouTube page will be redirected to automatically to play back the video or shared screen content in the
meeting.
Inviting Others to Watch Live Stream
Copy the live stream link on the live stream settings page or the YouTube URL in the browser and share to others.
Viewers can click the link to enter your live room in the browser to live watch the meeting.

Tencent VooV Meeting
©2013-2022 Tencent Cloud. All rights reserved. Page 73 of 110
Video Management
HD Video
Last updated 2023-12-19 16:50:08
Feature Overview
After HD video is enabled, VooV Meeting will provide 1080p HD video image to make your video image in the meeting
clearer and more vivid.
Prerequisites
Logged-in user: Enterprise Edition user
Logged-in device: Windows or macOS
Version: v1.6.0 or later
Hardware requirements:
CPU: Intel Core i7 4-core or higher (currently, AMD CPUs are not supported).
Camera: built-in or external camera supporting capturing image at a resolution of 1080p or higher.
Recommended bandwidth: 3–5 Mbps.
Notes
Enterprise Edition users can enable HD video. After HD video is selected, it will take effect immediately as long as the
hardware requirements are met.
If HD video is enabled, the client can encode and send videos with a resolution of up to 1080p and a frame rate of 15
FPS.
If HD video is disabled, the client can encode and send videos with a resolution of up to 720p and a frame rate of 30
FPS.
No matter on which edition (Enterprise, Business, or Free) the receiver client is, it can play back videos with a
resolution of up to 1080p and a frame rate of 15 FPS as long as the PC performance allows.
The average CPU utilization within 1 minute cannot exceed 30%; otherwise, the HD video quality cannot be
maintained.
Enabling HD Video

Tencent VooV Meeting
©2013-2022 Tencent Cloud. All rights reserved. Page 74 of 110
On the VooV Meeting homepage or in the window of a meeting in progress, click Settings > Video and select HD
Video, and HD video will take effect immediately.

Tencent VooV Meeting
©2013-2022 Tencent Cloud. All rights reserved. Page 75 of 110
Floating Window Display
Last updated 2023-12-19 16:50:27
Feature Overview
VooV Meeting supports floating window, making it easy for you to switch between tasks.
Prerequisites
Logged-in user: Free or Enterprise Edition user
Logged-in device: Windows, macOS, iOS, or Android
Version: v3.0.0 or later
Enabling Floating Window
Windows/macOS
During a meeting, click the Minimize icon to display the floating window, where you can choose to return to the main
panel or collapse the floating window.

Tencent VooV Meeting
©2013-2022 Tencent Cloud. All rights reserved. Page 76 of 110
Android/iOS
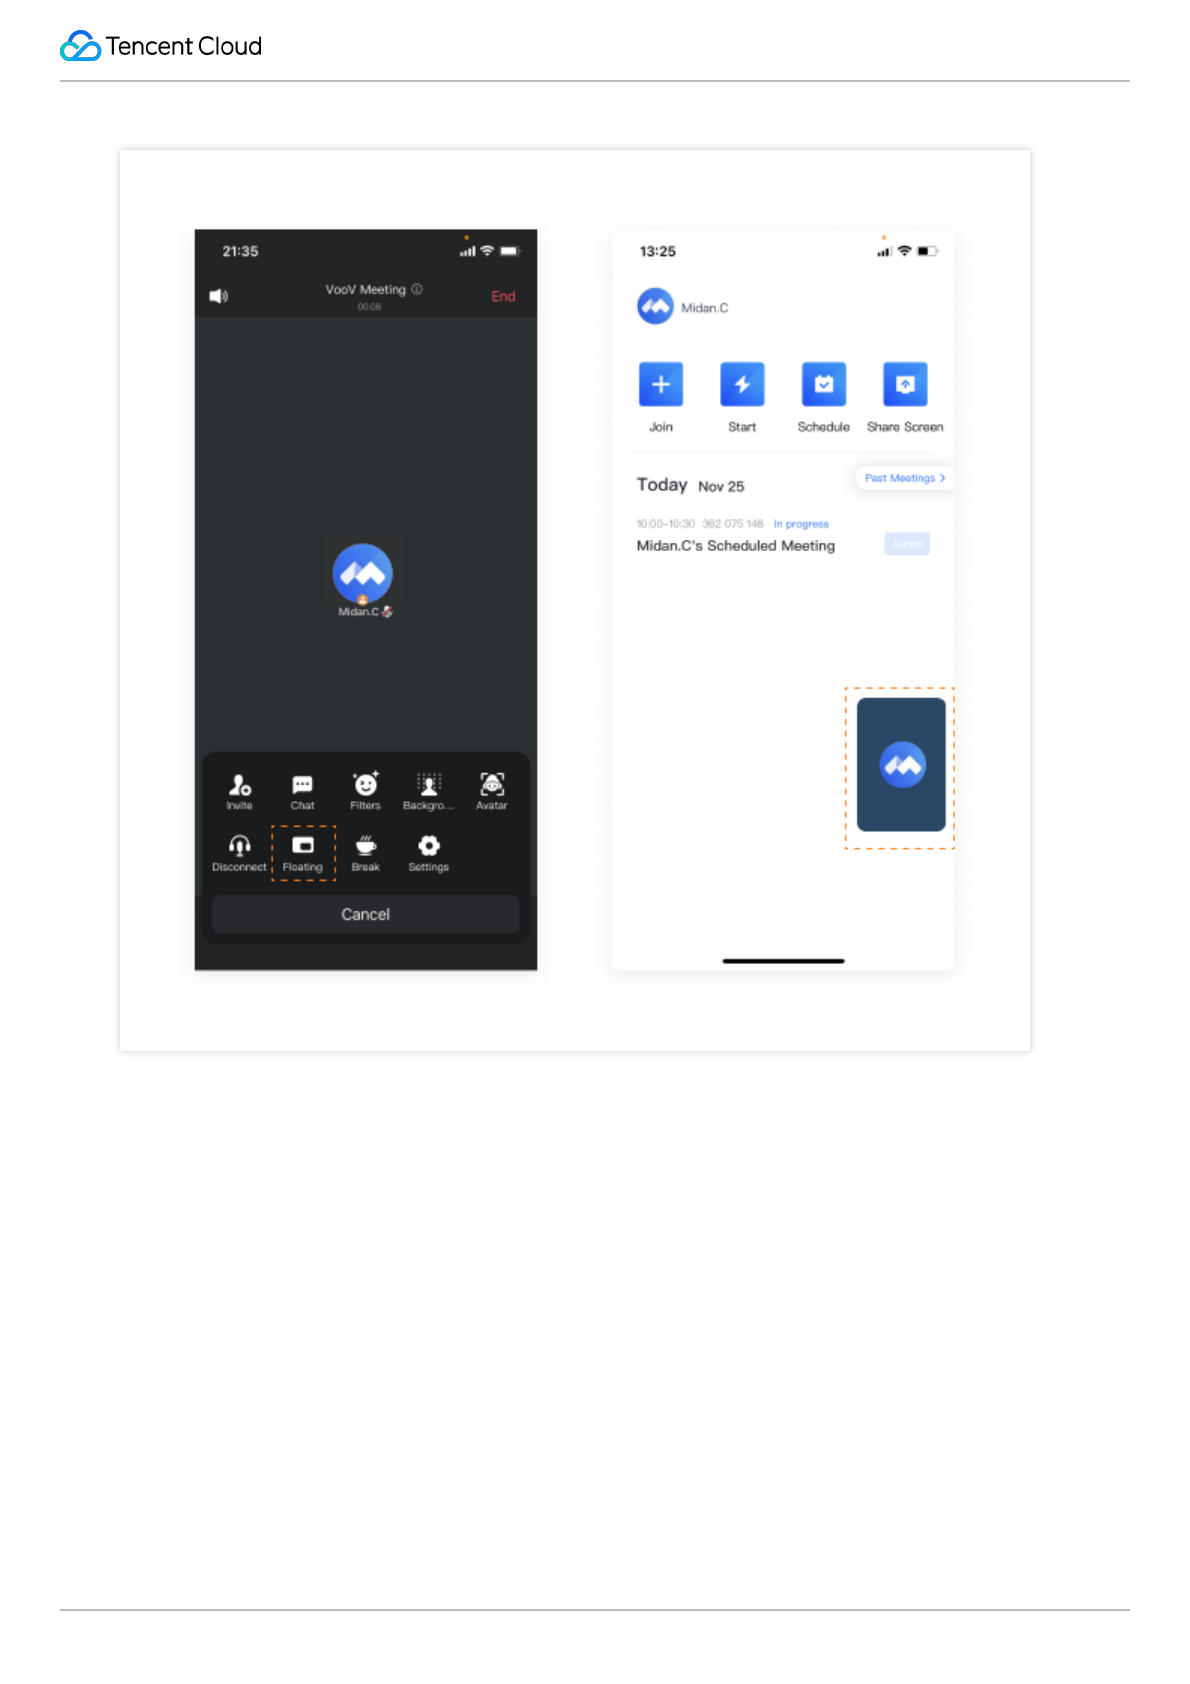
During a meeting, tap More > Floating to display the floating window. After getting the relevant system permissions,
you can display the floating window both in and outside the app on Android, while iOS supports floating window
display only in the app.
Tencent VooV Meeting
©2013-2022 Tencent Cloud. All rights reserved. Page 77 of 110

Tencent VooV Meeting
©2013-2022 Tencent Cloud. All rights reserved. Page 78 of 110
Multi-Monitor Mode
Last updated 2023-12-19 16:50:37
Overview
If your device is connected to multiple monitors, you can enable the multi-monitor mode to display VooV Meeting on
the extended monitors for a better meeting experience.
Prerequisites
Logged-in user: Free or Enterprise Edition user
Logged-in device: Windows
Version: v2.2.0 or later
Notes
VooV Meeting can be displayed on an extended monitor if the following requirements are met:
Two or more monitors are set for the PC.
The extended monitors are selected in Settings > System > Display > Multiple displays on Windows.
On the VooV Meeting homepage, go to Settings > General and enable Multi-Monitor Mode.
If extended monitors are disconnected, the multi-monitor mode will be automatically disabled.
Extended Display Mode
The secondary window does not have the toolbar and therefore has no meeting control features. It varies a lot in two
screen sharing scenarios as detailed:
If screen sharing is enabled:
You can switch to speaker view/full screen in the secondary window, and speaker spotlight is supported.
If the secondary window is on the monitor of the screen for sharing, after desktop/window sharing starts, the
secondary window will be moved to monitor 1. If monitor 1 is shared, the window will be moved to monitor 2 by default
(this rule also applies if two or more monitors are connected).
Suppose the secondary window is on monitor 1: if you select monitor 1 or a window on monitor 1 for sharing, the
secondary window will be automatically moved to monitor 2. After sharing ends, the secondary window will be
automatically restored to the original monitor no matter whether it is moved during sharing.

Tencent VooV Meeting
©2013-2022 Tencent Cloud. All rights reserved. Page 79 of 110
Suppose the secondary window is on monitor 1: if you select monitor 2 or a window on monitor 2 for sharing, the
position of the secondary window will not change. After sharing ends, the secondary window will be automatically
restored to the original monitor no matter whether it is moved during sharing.
Suppose over two monitors are connected and the secondary window is not on monitor 1: if you select the monitor
where the secondary window is for sharing, the secondary window will be automatically moved to monitor 1 to adapt to
the multi-monitor mode.
Suppose the whiteboard is being shared: the monitor displayed on the whiteboard will be the one where the screen
sharing selection pop-up window is.
If the whiteboard and the secondary window are on the same monitor:
If two monitors are connected, the secondary window will be automatically moved to the other monitor.
If over two monitors are connected: if the whiteboard is on monitor 1, the secondary window will be moved to monitor
2, otherwise, the secondary window will be moved to monitor 1.
If screen sharing is not enabled:
Only you yourself are in the meeting: your video image/profile photo will be displayed in the secondary window.
The meeting has two people: your video image/profile photo will be displayed in the secondary window, and the video
image/profile photo of the other people will be displayed in the main window (speaker spotlight does not take effect). If
the other people starts screen sharing, the secondary window will enter the speaker mode by default, and the layout
can be switched.
The meeting has over two people: the secondary window will display only the video image/profile photo of the single
speaker. If the attendees start screen sharing, the secondary window will enter the speaker mode by default, and the
layout can be switched.
You cannot switch to speaker view/full screen in the secondary window.
If an attendee is watching the shared screen, the screen sharing content will be displayed in the secondary window by
default.
Using Extended Monitor for Display
1. Make sure that your device has been connected to multiple monitors successfully.
2. Select the extended monitors in Settings > System > Display > Multiple displays on Windows.
3. On the VooV Meeting homepage, go to Settings > General and select Multi-Monitor Mode, and the settings will
take effect immediately and saved under the current account locally.
4. After configuring the above settings, you can view the corresponding video image in the secondary window.
Locking Video Image
Prerequisites for locking

Tencent VooV Meeting
©2013-2022 Tencent Cloud. All rights reserved. Page 80 of 110
The multi-monitor mode is enabled.
The meeting has at least 2 people.
If an attendee enables the camera during the meeting, the attendee will be locked on the screen.
Notes
If an attendee (including yourself) enables screen sharing during the meeting, the locking feature will be unavailable.
An attendee can be locked on multiple screens, but multiple attendees cannot be locked on the same screen.
Locking operation
In grid view
1. In grid view, click ... in the top-right corner or right-click the image, and options Lock video to screen 1 and Lock
video to screen 2 will be displayed.
2. Click the target option to lock the video image on the corresponding screen.
3. Right click the image in the grid view again or click ... and select Unlock video from screen N to unlock.
In speaker view
1. In speaker view, click ... in the top-right corner of a thumbnail or right-click the image, and options Lock video to
screen 1 and Lock video to screen 2 will be displayed.
2. Click the target option to lock the video image on the corresponding screen.
3. Right click the image in the speaker view again or click ... and select Unlock video from screen N to unlock.

Tencent VooV Meeting
©2013-2022 Tencent Cloud. All rights reserved. Page 81 of 110
Gaze Correction
Last updated 2023-12-19 16:50:47
Overview
The gaze correction feature can correct the gaze, so that your gaze can remain focused in the video image even when
you are not looking at the camera.
Prerequisites
Logged-in user: Free or Enterprise Edition user
Logged-in device: Windows or macOS
Version: v2.4.0 or later
Hardware requirements: this feature is supported only on models with a CPU of Intel Core i5 4-core or higher
Notes
Before using gaze correction, you can check whether your PC supports this feature in Settings > Video. If Gaze
Correction is grayed out, it indicates that the feature is not supported.
Gaze correction can take effect when the positive/negative offset of your face is within ±30° in the pitch, roll, and yaw
axes.
If there are multiple users in front of the camera, gaze correction will take effect only for the user whose head occupies
the largest proportion of the image.
After gaze correction is enabled, all attendees can view its effect.
Using Gaze Correction
1. Click the gear icon in the top-right corner of the homepage to enter the settings page and click Video to enter the
video page.
2. On the video page, select Gaze Correction, and this feature will take effect immediately. You can confirm the effect
in the video preview.
Tencent VooV Meeting
©2013-2022 Tencent Cloud. All rights reserved. Page 82 of 110
Virtual Background
Last updated 2024-03-18 16:08:35
Overview
Background is an application of the portrait segmentation technology. During a video meeting, VooV Meeting can
automatically recognize the attendees and replace their backgrounds with the specified image or video. On one hand,
the virtual background can protect the attendees' privacy; on the other hand, it can replace a real exhibition
background to facilitate themed promotion of the meeting and reduce the meeting costs. To get a better virtual
background experience, we recommend you use this feature in a simple scenario with even lighting. If you have a
green screen, you can use the green screen feature to further improve the virtual background effect.
Prerequisites
Logged-in user: Enterprise Edition user
Logged-in device: Windows, macOS, iOS, or Android
Version: v1.3.0 or later
Hardware requirements:
Hardware Requirements
Windows/macOS
Models with a CPU that supports AVX2 and has more than two cores (generally, CPUs
launched after 2013 meet such requirements).
iOS iPhone 6s or later and iPad Pro 1st gen launched in 2015 or later (not on iOS 10.3).
Android
Models with the following chips:
For Snapdragon 600 series, the chip model must be at least 670, such as vivo X23.
For Snapdragon 700 series, the chip model must be at least 710, such as vivo NEX.
For Snapdragon 800 series, the chip model must be at least 835, such as Mi MIX 2.
For Kirin 700 series, the chip model must be at least 710, such as Honor 20i.
For Kirin 800 series, the chip model must be at least 810, such as Honor 9X.
For Kirin 900 series, the chip model must be at least 955, such as Huawei P9.
Notes
Requirements for customized image or video:
Image:

Tencent VooV Meeting
©2013-2022 Tencent Cloud. All rights reserved. Page 83 of 110
Format: .jpg, .bmp, .png
Resolution: 4096 × 4096
Size: within 20 MB
Aspect ratio: 0.01–100. We recommend you use 16:9
Quantity: 19 images for Android/iOS each and 49 images for macOS/Windows each. The quantity includes the
numbers of blurred backgrounds, images in the system, and images uploaded by users.
Video:
Format: .mov and .mp4
Resolution: 1920 × 1080
Size: unlimited
To have a better virtual background experience, we recommend you use this feature in a simple
environment:
If the environment has few objects and monotonous background color, we recommend you use green screen.
A clearer camera is used for the video meeting.
The lighting in the meeting environment is even.
Avoid dressing in the same color as the background.
If video is used as the virtual background, do not block the camera:
After the camera is blocked, the capture frame rate will become too low and reduce the refresh rate, which will slow
down background loading.
Using Virtual Background
Windows/macOS
1. Go to the background settings page:
Click the Settings icon in the top-right corner on the meeting homepage to enter the settings page and click
Background&Beauty.
During the meeting, click Apps > Filters > Background&Beauty.
During the meeting, click Settings > Background&Beauty.
2. You can also select an image or video in the system as the meeting background or select Blur and view the
background in the preview window.
3. If you have installed a physical green screen, select I Have a Green Screen, and you can use the color picker to
select the background color to be removed in the preview window. If the picked color is not accurate, you can click
Reset to pick the recommended color.
4. To disable the background, select None.
Android/iOS
1. Go to the background settings page:

Tencent VooV Meeting
©2013-2022 Tencent Cloud. All rights reserved. Page 84 of 110
Tap the profile photo on the homepage to enter the account center page and tap Settings > Background.
During the meeting, tap More on the toolbar and tap Background.
2. You can select an image as the meeting background or select Blur and directly view the effect in the preview
window.
3. Tap + to upload an image as the meeting background. To delete it, select the image and tap Delete in the bottom-
left corner of the page.
4. To disable the background, select None.

Tencent VooV Meeting
©2013-2022 Tencent Cloud. All rights reserved. Page 85 of 110
Video Noise Cancellation
Last updated 2023-12-19 16:51:24
Overview
VooV Meeting supports video noise cancellation to reduce the video image noise in real time to make the image
clearer.
Prerequisites
Camera: built-in or external camera
Logged-in user: Free or Enterprise Edition user
Hardware requirements:
Hardware Requirements
Windows It should support the AVX mode and have more than 2 CPU cores.
macOS
In Metal mode, the OS X system version should be above 10.11. In AVX mode, the
number of CPU cores should be above 2.
iOS In Neon mode, it should be iPhone 7 or later or iPad Pro 12.9-inch 2nd gen or later.
Android It should support OpenCL in OpenCL mode and Neon in Neon mode.
How to Use
On PC client
1. Open VooV Meeting and join a meeting.
2. Click Settings on the toolbar during the meeting.
3. Select Video on the Settings page.
4. Select Video Noise Cancellation.
On mobile client
1. Open VooV Meeting and join a meeting.
2. Tap More > Settings on the bottom bar during the meeting.
3. Scroll down the Settings page and enable Video Noise Cancellation.

Tencent VooV Meeting
©2013-2022 Tencent Cloud. All rights reserved. Page 86 of 110
Audio Management
Audio Selection and Testing
Last updated 2023-12-19 16:51:40
Feature Overview
VooV Meeting supports "PC Audio" and "Call In" audio connection methods for your choice. Before or after joining a
meeting, test your audio device promptly to ensure that the device can be used normally.
Prerequisites
Mic: built-in mic of your device or an external USB, Bluetooth, or wired mic
Speaker: built-in speaker of your device or an external USB, Bluetooth, or wired speaker
Logged-in user: Free or Enterprise Edition user
Logged-in device:
Windows 7 or later
macOS 10.11 or later
Android 4.4 or later
iOS 10 or later
Notes
When you join a meeting on PC client, we recommend you test whether your audio devices can be used normally in
advance:
Test before meeting
Click the profile photo to enter the personal profile page.
Click Settings > Audio on the personal profile page.
Select the devices to be used in the Speaker and Mic drop-down lists.
After selection, click Test to test the speaker and mic respectively.
Test during meeting
Click Settings on the toolbar during the meeting.

Tencent VooV Meeting
©2013-2022 Tencent Cloud. All rights reserved. Page 87 of 110
Click Audio on the Settings page or click the arrow next to Mute/Unmute on the toolbar and select Audio Options
to enter the Audio page.
Select the devices to be used in the Speaker and Mic drop-down lists.
After selection, click Test to test the speaker and mic respectively.
Caution:
If you don't select an audio connection method, you cannot speak or hear other attendees during the meeting.
How to Use
PC audio
In "PC Audio" mode, you can directly use the PC mic and speaker (headset) as the meeting audio connection method
to join the meeting, which is suitable for small meetings and is not limited by scenarios. If you want to hold a large
meeting, we recommend you use "Call In" as the audio connection method, which has a better audio quality.
After entering a meeting, select PC Audio or Call In in the Select a Method to Connect to Meeting Audio pop-up
window.
You can also click the arrow on the right of Mute/Unmute in the toolbar of the meeting window and select PC Audio.
You can also select Use PC Audio by Default on the PC Audio tab in the Select a Method to Connect to
Meeting Audio pop-up window, so that you don't need to select the audio connection method again when joining a
meeting next time, and PC audio will be used by default.
PSTN Call in
In "Call In" mode, you can use a landline or mobile phone to dial the corresponding number to join a meeting, and the
phone rather than the PC mic and speaker will be used as your meeting audio source, which has a more stable call
audio quality. However, in this connection method, your carrier will charge you for the local or international call
according to applicable billing rules.
After you enter a meeting, the Select a Method to Connect to Meeting Audio window will pop up.
Click Call In in the pop-up window.
Select your country/region.
After selection, dial the number displayed on the page by using your landline or mobile phone.
After the call is connected, enter the meeting ID and press # for confirmation as prompted.
Enter your attendee ID and press # for confirmation.
If You have joined the meeting, and x attendees are in the meeting currently is prompted, you have joined the
meeting successfully.
If you use a mobile phone to dial the number, you can press and hold 0 to enter the + sign; on a VoIP phone, press
and hold " " to enter +; on a general landline phone, enter 0086 to indicate the +86 code. Then, enter the attendee ID
and press # for confirmation as prompted.

Tencent VooV Meeting
©2013-2022 Tencent Cloud. All rights reserved. Page 88 of 110
After you enter the attendee ID, the landline or mobile phone rather than the PC mic and speaker will be used as the
meeting audio source, which has a more stable call audio quality. If you don't enter the attendee ID but directly press #
to join the meeting, you will enter the meeting as an independent attendee, and howling may occur on the phone and
your original device in the meeting.
Caution:
Pstn is currently reclaimed as a paid function, which can only be used by corporate accounts and purchased Pstn
capabilities

Tencent VooV Meeting
©2013-2022 Tencent Cloud. All rights reserved. Page 89 of 110
Audio Mode
Last updated 2023-12-19 16:51:49
Feature Overview
VooV Meeting supports the audio mode on PC and mobile clients, which can be enabled if your network conditions
are poor or you want to reduce traffic and receive only the shared screen and audio.
Prerequisites
Mic: built-in mic of your device or an external USB, Bluetooth, or wired mic
Speaker: built-in speaker of your device or an external USB, Bluetooth, or wired speaker
Logged-in user: Free or Enterprise Edition user
Logged-in device:
Windows 7 or later
macOS 10.11 or later
Android 4.4 or later
iOS 10 or later
VooV Meeting version:
Windows/macOS client: v0.9.4 or later
Android/iOS client: v1.7.5 or later
Notes
You can set the audio mode only during a meeting. After it is enabled, you will receive only the audio streams and
shared screens of other attendees but not their video streams.
How to Use
On PC client
1. Open VooV Meeting and join a meeting.
2. Click Settings on the toolbar during the meeting.
3. On the Settings page, select General and enable Audio Mode.

Tencent VooV Meeting
©2013-2022 Tencent Cloud. All rights reserved. Page 90 of 110
On mobile client
1. Open VooV Meeting and join a meeting.
2. Tap More > Settings on the toolbar during the meeting.
3. Scroll down the settings page and toggle on Audio Mode.

Tencent VooV Meeting
©2013-2022 Tencent Cloud. All rights reserved. Page 91 of 110
Music Mode
Last updated 2023-12-19 16:52:21
Feature Overview
VooV Meeting supports the music mode. After it is enabled, the original audio will be rendered as detailed as possible.
If there is any music being played back in the environment, other attendees can hear it more clearly.
Prerequisites
Mic: built-in mic of your device or an external USB, Bluetooth, or wired mic
Speaker: built-in speaker of your device or an external USB, Bluetooth, or wired speaker
Logged-in user: Free or Enterprise Edition user
Logged-in device:
Windows 7 or later
macOS 10.11 or later
Android 4.4 or later
iOS 10 or later
Notes
The music mode conflicts with audio noise cancellation, and only one of them can be enabled at the same time. On the
PC client, if the music mode is enabled, the audio noise cancellation can only be Close.
How to Use
On PC client
1. Open VooV Meeting and join a meeting.
2. Click Settings on the toolbar during the meeting.
3. On the Settings page, select Audio and Music Mode and Professional Audio.
On mobile client
1. Open VooV Meeting and join a meeting.
2. Tap More > Settings on the toolbar during the meeting.

Tencent VooV Meeting
©2013-2022 Tencent Cloud. All rights reserved. Page 92 of 110
3. Scroll down the settings page and toggle on Music Mode.

Tencent VooV Meeting
©2013-2022 Tencent Cloud. All rights reserved. Page 93 of 110
Audio Noise Cancellation
Last updated 2023-12-19 16:52:32
Feature Overview
VooV Meeting supports audio noise cancellation. After it is enabled, other attendees can hear your voice more clearly
even in a noisy environment.
Prerequisites
Camera: built-in or external camera
Logged-in user: Free or Enterprise Edition user
Logged-in device:
Windows 7 or later
macOS 10.11 or later
Android 4.4 or later with support for OpenCL or NEON
iOS 10 or later
Notes
The music mode conflicts with audio noise cancellation, and only one of them can be enabled at the same time. On the
PC client, if the music mode is enabled, the level of audio noise cancellation can only be Close or Low.
How to Use
On PC client
1. Open VooV Meeting and join a meeting.
2. Click Settings on the toolbar during the meeting.
3. Click Audio on the settings page.
4. On the Audio page, find Audio Noise Cancellation and select a level (Close, Low, Medium, or High) in the drop-
down list. The higher the level, the stronger the noise cancellation effect. If you want to capture non-human sounds in
the environment, we recommend you set a relatively low level.
On mobile client

Tencent VooV Meeting
©2013-2022 Tencent Cloud. All rights reserved. Page 94 of 110
1. Open VooV Meeting and join a meeting.
2. Tap More > Settings on the toolbar during the meeting.
3. Scroll down the settings page and toggle on Audio Noise Cancellation.

Tencent VooV Meeting
©2013-2022 Tencent Cloud. All rights reserved. Page 95 of 110
Recording Management
Local Recording
Last updated 2023-12-19 16:54:28
Overview
Local recording helps you record meetings quickly and conveniently. It can save the meeting video and shared content
in your local folder.
Prerequisites
Logged-in user: Free or Enterprise Edition user
Logged-in device: Windows or macOS
Version: v2.3.0 or later
Notes
Recording process
During recording, you cannot change the recording file storage path.
If a meeting ends during recording or you are kicked out, recording will stop and the recording file will be converted
automatically.
The host and co-hosts are mutually exclusive in local and cloud recording, who share the same
start/pause/resume/end operations.
Recording permission
The VooV Meeting app does not support local recording but can control the recording permission.
If the permission is Allow selected attendees to record, Allow Recording/Forbid Recording are displayed in
Attendees > More.
If the permission is changed from Allow all attendees to record to Allow selected attendees to record, all
attendees can still keep their recording permission, the Attendees > More > Forbid Recording option will be
displayed for the host to disable recording for a specified attendee, and new attendees after the change cannot record
the meeting.

Tencent VooV Meeting
©2013-2022 Tencent Cloud. All rights reserved. Page 96 of 110
When the recording permission is Allow selected attendees to record, if you revoke the co-host role from an
attendee, the Allow Recording permission will be kept by default. When the recording permission is changed from
Allow selected attendees to record to Only the host can record, the attendees allowed to record will become
unable to record.
Before recording the meeting, you can click Record to check whether you have the recording permission, and if not,
apply to the host for it promptly.
Recording file
If a meeting has multiple recording segments, multiple recording files will be generated in chronological order. After a
recording is resumed, the recording content before pause will be merged with the content after resumption into one
recording file.
If a recording is interrupted due to any exception, you can find the recording file in Past Meetings and convert it to
watch the content before interruption.
Enabling Local Recording
Windows/macOS
1. Click Recording and select Local Recording during a meeting.
If you are muted, you can select Unmute or Record without audio when starting recording.
If you are not muted, recording will be started normally.
2. After recording is started:
Record at the toolbar will become *End.
The recording status will be displayed in the top-left corner of the main window, and the Pause Recording and End
Recording buttons will be displayed.
Pause Recording and End Recording options will be added to the menu expanded after you click the arrow button
on the right of End on the toolbar.
Pause Recording: you can click this button to pause the current recording, and the button will become Resume
Recording.
Resume Recording: you can click it to resume recording.
End Recording: you can click it to end and exit recording, and After the meeting ends, the recording file will be
automatically converted to MP4 format will be prompted.
The recording status will be displayed in the attendee list.
3. After a meeting ends, the system will automatically convert the recording file and then open its folder, so that you
can quickly view the recording file.
Local Recording Permissions (For Hosts/Co-hosts)

Tencent VooV Meeting
©2013-2022 Tencent Cloud. All rights reserved. Page 97 of 110
Windows/macOS
During a meeting, click the arrow icon on the right of Record at the toolbar, and three recording permissions will be
displayed: Only the host can record, Allow all attendees to record, and Allow selected attendees to record.
Only the host can record: this is the default option. If it is selected, only the hosts/co-hosts can enable recording.
Allow all attendees to record: all attendees can enable recording.
Allow selected attendees to record: after it is enabled, the hosts/co-hosts can enable recording and allow specified
attendees to enable recording in Attendees.
Forbid Recording: when Allow selected attendees to record is selected, the hosts/co-hosts can select an
attendee allowed to enable recording in Attendees and click Forbid Recording to revoke the recording permission.
Android/iOS
During a meeting, tap More > Settings, and find Recording Settings, three recording permissions will be displayed:
Only the host can record, Allow all attendees to record, and Allow selected attendees to record.
Only the host can record: this is the default option. If it is selected, only the hosts/co-hosts can enable recording.
Allow all attendees to record: all attendees can enable recording.
Allow selected attendees to record: after it is enabled, the hosts/co-hosts can enable recording and allow specified
attendees to enable recording in Attendees.
Forbid Recording: when Allow selected attendees to record is selected, the hosts/co-hosts can select an
attendee allowed to enable recording in Attendees and click Forbid Recording to revoke the recording permission.

Tencent VooV Meeting
©2013-2022 Tencent Cloud. All rights reserved. Page 98 of 110
Recording Layout and Content
Last updated 2023-12-19 16:54:42
Overview
VooV Meeting supports recording video image in multiple layouts.
Local Recording Layout and Content
Recording content in different meeting status
Pure audio: attendees only turn on their audio. If no users are speaking, the black background image will be
recorded. If a user is speaking, the black background image, speaker name, and speaker audio will be recorded.
Video: when all attendees turn on their video, their video images and audio will be recorded.
Video + audio: when some users turn on their video while others don't, the video images and audio will be recorded
for the former, while the black background image, username, and audio will be recorded for the latter.
Screen sharing: if Record the speaker thumbnail during screen sharing is not enabled in the settings, only the
shared screen and audio will be recorded; otherwise, the shared screen, speaker thumbnail, and audio will be
recorded.
Screen sharing paused:
Sharer: the last frame before the pause and audio will be recorded during the pause.
Viewer: the black screen and audio will be recorded during the pause.
When an application is being shared, screen sharing will be paused if you drag the application window, and the
recording content will be the same as that during screen sharing pause.
Recording content in different layouts
In a custom layout, content will be recorded in the grid view.
In grid view, the grid image will be recorded.
In speaker view, the large image of the speaker will be recorded, and image can be switched by speaker spotlight. If
the image is locked, only the locked image will be recorded.
The recording content will be directly switched upon layout, grid, or video attendee switch.

Tencent VooV Meeting
©2013-2022 Tencent Cloud. All rights reserved. Page 99 of 110
Recording File Conversion and Retention
Last updated 2023-12-19 16:54:51
Overview
Local recording of VooV Meeting supports the MP4 format, and recording files can be saved to a specified folder. After
a meeting is recorded, you can directly find the recording in Past Meetings, play it back, open its folder, or delete it.
Prerequisites
Logged-in user: Free or Enterprise Edition user
Logged-in device: Windows or macOS
Version: v2.3.0 or later
Notes
During recording, you cannot change the recording file storage path.
If you delete a recording in Past Meetings, the original local recording file will also be deleted.
Recording file format:
Recorded video file: .mp4
Temporary recording file: .wemta, .wemta.idx, .wemtv, and .wemtv.idx
Recorded audio file: .m4a
Resolution and frame rate of recorded video:
If Record the speaker thumbnail during screen sharing is not enabled in the settings, the resolution will be 1920
x 1080.
If Record the speaker thumbnail during screen sharing is selected, the resolution will be (1920 + 240) x 1080.
Here, the big image resolution is 1920 x 1080, and the thumbnail resolution is 240 x 1080.
Recording File Conversion and Retention
After a meeting ends, the system will automatically convert the recording file and then open its folder, so that you can
quickly view the recording.
If recording is interrupted due to an exception, you can find the recording of the meeting in Past Meetings and click
Convert to convert the temporary recording file (.wemta, .wemta.idx, .wemtv, or .wemtv.idx) into a video recording file

Tencent VooV Meeting
©2013-2022 Tencent Cloud. All rights reserved. Page 100 of 110
(.mp4).
After a meeting is recorded, you can directly find the recording in Past Meetings, play it back, open its folder, or
delete it.
Recording Settings
In the Settings page on the meeting homepage, you can specify the following configurations in Recording:
Save the recording file to (the folder can be directly opened): specify the folder for saving recording files.
Record the speaker thumbnail during screen sharing: after this is selected, if local recording is started during screen
sharing, the image of the shared screen and the speaker image will be recorded together.
Record audio files at the same time: after this is selected, the recorded audio will be output as a separate audio file
and saved in the folder.
Save temporary recording files: after this is selected, recording files before conversion will also be saved.

Tencent VooV Meeting
©2013-2022 Tencent Cloud. All rights reserved. Page 101 of 110
Account and Management
Web Account Center
Last updated 2023-12-19 16:55:01
You can log in to Account Center at the official website and view the personal information and relevant meeting
information.
Personal Information
Basic information
Your profile photo, display name, and personal meeting ID are displayed.
Account type
Your account type is displayed.
Account security
The mobile number and binding status are displayed.
Email:
If no email address is bound, you will be prompted to improve the security of your account.
If an email address is bound, it will be displayed.
Click More, and Account Cancellation will be displayed.
Caution:
Canceling your VooV Meeting account is an irrecoverable operation. After your account is canceled, you will not be
able to log in to or use it. Before canceling your account, make sure that:
The benefits you are entitled to under your account have been settled or properly dealt with, including but not limited to
paid account permissions and permissions for value-added services. Such permissions will be no longer available
after the cancellation of your account.
All files under your account have been properly saved, including but not limited to meeting recordings.
Your account is not involved in any disputes, including but not limited to complaints, reports, arbitration, and lawsuits.
Personal Meeting Room
Personal meeting room information
Personal Meeting ID (copyable)

Tencent VooV Meeting
©2013-2022 Tencent Cloud. All rights reserved. Page 102 of 110
Meeting Link
Join by Phone: PSTN numbers are displayed (copyable)
Meeting Password
Meeting settings
Enable Waiting Room
Attendees Can Join Before the Host
Enable Screen watermark
Mute Attendees upon entry
Enable When Attendees Exceed 6 People
Meeting List
The meeting list displays upcoming and past meetings.
Upcoming meetings
You can enter a meeting ID to search for a meeting.
The list displays the following parameters: start time, meeting topic, meeting ID, and operation.
If no meetings are scheduled and you want to schedule a meeting, you can click Schedule a Meeting to enter the
meeting scheduling page.
Past meetings
You can enter a meeting ID to search for a meeting.
The list displays the following parameters: start time, meeting topic, meeting ID, and operation.
Clicking Meeting Topic will redirect you to Meeting Details, where you can sync the meeting start time to your
calendar and view the meeting documents.
To schedule a meeting, you can click Schedule a Meeting to enter the meeting scheduling page.

Tencent VooV Meeting
©2013-2022 Tencent Cloud. All rights reserved. Page 103 of 110
Web Account Center-My Meetings
Last updated 2023-12-19 16:55:11
My Meetings
Personal Profile
Basic information
Your profile photo, display name, and personal meeting ID are displayed.
Account type
1. Your account type is displayed. If it is Free Edition, you can upgrade it to Pro or Enterprise Edition, which entitles
you to more features. Clicking Upgrade will redirect you to the upgrade page.
2. The duration per meeting is displayed: 9,999 minutes.
Account security
1. Your mobile number and its binding status are displayed.
2. Account Password: if it is set, you can click Change to change it. In this case, you must verify your identity with an
SMS verification code.
3. Bind WeChat: your bound WeChat ID is displayed.
4. Email Address: if it is not bound, you will be prompted to improve the security of your account; otherwise, the bound
email address is displayed.
5. You can click More to display the account cancellation option:
Note for account cancellation: canceling your VooV Meeting account is an irrecoverable operation. After your account
is canceled, you will not be able to log in to or use it. Before canceling your account, please make sure that:
5.1 The benefits you are entitled to under your account have been settled or properly dealt with, including but not
limited to paid account permissions and permissions for value-added services. Such permissions will be no longer
available after the cancellation of your account.
5.2 All files contained within your account have been properly saved, including but not limited to meeting recordings.
5.3 Your account is not involved in any disputes, including but not limited to complaints, reports, arbitration, and
lawsuits.
Personal Meeting Room

Tencent VooV Meeting
©2013-2022 Tencent Cloud. All rights reserved. Page 104 of 110
Personal meeting room info:
Personal meeting ID (copyable).
Meeting link.
Call: PSTN number is displayed (copyable).
Meeting password.
Meeting settings status:
Enable Waiting Room.
Attendees Can Join Before the Host.
Mute Attendees upon Entry.
Enable Screen Watermark.
Attendee settings: the scope of attendees is displayed.
Edit personal meeting room
Click Edit Meeting to edit personal meeting room settings:
1. You can set the password required for attendees to join meetings. It is optional and can contain 4–6 digits. If it is not
set, no password will be required for meeting joining.
2. Settings: you can select relevant meeting settings:
Enable Waiting Room.
Attendees Can Join Before the Host.
Mute Attendees upon Entry.
Enable Screen Watermark.
3. Mute Attendees upon Entry: Enable, Disable, or Mute New Attendees for Meetings with 6+ Attendees.
4. Assign Hosts.
5. Attendee settings: Open to all or Enterprise users only.
Note: if you modify your settings, all meetings started with your personal meeting ID will be modified as well.
Meeting List
The meeting list displays upcoming meetings, finished meetings, and meetings in progress.
Upcoming meetings
The list displays the following parameters:
Start Time.
Meeting Topic.
Meeting ID.
Operation.
If no meetings are scheduled and you want to schedule a meeting, you can click Schedule Meeting.

Tencent VooV Meeting
©2013-2022 Tencent Cloud. All rights reserved. Page 105 of 110
Clicking Schedule Meeting will redirect you to the meeting scheduling page.
Finished meetings
You can enter a meeting ID to search for a meeting.
The list displays the following parameters:
Start Time.
Meeting Topic.
Meeting ID.
Operation.
Clicking Meeting Topic will redirect you to Meeting Details, where you can sync the meeting start time to your
calendar and view the meeting documents.
To schedule a meeting, click Schedule Meeting.
Clicking Schedule Meeting will redirect you to the meeting scheduling page.
You can export the attendee list to an Excel file.
Meeting Document
You can select the meeting date:
The list displays the following parameters.
Meeting Topic.
Number of Documents.
Meeting ID.
Start Time.
If there are currently no meeting documents, you can schedule a meeting and upload documents.
Clicking Meeting Topic will redirect you to the meeting document details.

Tencent VooV Meeting
©2013-2022 Tencent Cloud. All rights reserved. Page 106 of 110
VooV Meeting Outlook Plugin
Last updated 2023-12-19 16:55:25
Feature Overview
VooV Meeting Outlook plugin lets you to schedule or start a meeting quickly in Microsoft Outlook.
Prerequisites
Free or Enterprise Edition user
Windows
v2.10.0 or later
Notes
1. You must install the VooV Meeting client before using Outlook plugin to schedule or start meeting.
2. When you reschedule or cancel meetings in Outlook calendar, updated changes will be synced to VooV Meeting
client. And if you reschedule or cancel meetings in VooV Meeting client, changes will also be synced to Outlook
calendar.
3. Before scheduling or editing a meeting with Outlook plugin, please make sure VooV Meeting is running.
Installing VooV Meeting Outlook Plugin
Windows
Install the Outlook plugin while download the VooV Meeting client by checking the option Install Outlook Plugin.
Go to Outlook calendar to check whether the plugin is installed after installation completes.
Scheduling a Meeting with Outlook plugin
1. Go to Outlook calendar, and click Schedule Meeting in the toolbar.
2. Wait for the VooV Meeting to be launched
Log in to VooV Meeting before configuring meeting settings.

Tencent VooV Meeting
©2013-2022 Tencent Cloud. All rights reserved. Page 107 of 110
Configure meeting settings, such as meeting passwords, file uploading permission, waiting room permission, muting
or unmuting attendees upon entry and meeting invitation email language. Click OK to submit the settings.
3. Enter email addresses of attendees and edit start and end time of meeting. Click Send to finish schedule.
Rescheduling or Canceling Meetings in Outlook Calendar
1. Find the meeting you want to reschedule or cancel in Outlook calendar and double click the meeting to view
meeting details.
2. Click Cancel Meeting in the toolbar of Outlook calendar.
3. Change meeting settings and reschedule meetings
Click Meeting Settings in the toolbar to change settings.
Change start and end time to reschedule meetings.
Click Send Update and your attendees will receive rescheduled meeting information.
Starting a Meeting with Outlook Plugin
1. Go to Outlook and find Start Meeting button in the toolbar.
2. Click dropdown arrow of the Start Meeting button, you can click Start Audio Meeting to start a meeting with audio
on and video off or click Start Video Meeting to start a meeting with both audio and video on.
3. Click Start Meeting to launch the client and start an audio or video meeting.

Tencent VooV Meeting
©2013-2022 Tencent Cloud. All rights reserved. Page 108 of 110
Joining a Meeting from Browser
Last updated 2023-12-19 16:55:43
Overview
VooV meeting lets you join a meeting from browser:
1. You can mute or unmute, turn on or off video, add invitees, view attendees, rename and leave meeting.
2. As a host, you can manage audio and video permissions of attendees, set up or revoke co-host, remove attendees
and end meeting.
This document describes how to join a meeting from browser.
Prerequisites
1. Log in to VooV Meeting on the web portal before joining a meeting from browser.
2. We recommend Google Chrome browser.
Joining a Meeting from Browser
Joining a Meeting
There are two ways to join a meeting from browser:
1. Open the meeting link in browser and Click Join From Browser to join the meeting.
2. Open the link [https://voovmeeting.com/user-center/join](https://voovmeeting.com/user-center/join) in browser,
enter meeting ID and click Join Meeting.
During a Meeting
1. Toolbar:
In the bottom of the page, you can mute or unmute, turn on or off video, add invitees, rename yourself and mute or
unmute attendees in attendees list.
In the lower-right corner of the page:
As a host or co-host, you can click End Meeting to leave or end meeting.
As attendees, you can click Leave Meeting to leave meeting.
2. Active Speaker.

Tencent VooV Meeting
©2013-2022 Tencent Cloud. All rights reserved. Page 109 of 110
In the upper middle part of the page displays active speaker, and you can drag and drop the box to anywhere in the
screen.
3. Layout.
When all attendees turn off video or do not share screen:
Thumbnails and name of all attendees are displayed.
When some attendees turn on video or share screen:
The video is in the large display and a trip of thumbnails are displayed in the right side. Click other attendees’ video in
the right side to switch the video display.
For attendees with video off, only thumbnails are displayed.
Meeting Management
Role: Host
1. You can rename yourself and mute or unmute all attendees.
2. You can mute or unmute all attendees.
3. You can mute or unmute selected attendee, set or revoke co-host, set or reclaim host, stop video, stop sharing and
remove attendee from meeting.
4. You can set or revoke co-host, stop video and stop sharing.
Role: Co-host
1. You can rename yourself.
2. You can mute or unmute all attendees.
3. You can mute or unmute selected attendee, stop video, stop sharing and remove the attendee from meeting.
Role: Attendee
You can mute or unmute yourself, rename yourself and leave meeting.
Role: Meeting creator as co-host
1. You can rename yourself, mute or unmute all attendees and revoke host privileges.
2. You can mute or unmute all attendees.
3. You can mute or unmute selected attendee, stop video, stop sharing and remove the attendee from meeting.
Leaving a Meeting or Ending a Meeting
Role: Host/Co-host
1. Click End Meeting at the lower right corner and click Leave Meeting in the pop-up window to leave the meeting.

Tencent VooV Meeting
©2013-2022 Tencent Cloud. All rights reserved. Page 110 of 110
2. Click End Meeting at the lower right corner and click End Meeting in the pop-up window to end the meeting.
Role: Attendee
Click End Meeting at the lower right corner and click Leave Meeting in the pop-up window to leave the meeting.
