
Last Updated 12/18/20
Page 1
Instructional Design Department
D2L Brightspace
Student Help
Kaltura Guide for Students
The Kaltura Media Platform is an all-in-one solution for recording, storing, and
submitting video assignments in D2L Brightspace. Your professors may require you to
submit a video presentation, take an interactive video quiz, or submit a video discussion
post.
In this guide:
• Learn Kaltura Media
• My Media and Course Media Gallery
• Recording videos with Kaltura
• Submitting video assignments
• Troubleshooting Kaltura
• Chromebook users
• Kaltura Video Quizzes
• Kaltura Virtual Classroom
Learn Kaltura Media
Learn the foundations of Kaltura Media by following along with Kaltura Basics, our on-
demand training video series.
Kaltura Learning has helpful training videos on Kaltura Capture and the video editing
tool.
See our knowledgebase articles on the IT Help Desk.
My Media and Course Media Gallery

Last Updated 12/18/20
Page 2
My Media is located on the NavBar of the Brightspace homepage. It can always be easily
accessed by clicking Video at the top of any Brightspace page. My Media is a repository
for all of your videos, which can then be distributed to any of your courses.
Every user has a personal, searchable repository for viewing and managing private
media content. The videos you record using Kaltura will be published to My Media.
The Course Media Gallery is a searchable gallery of media content of a particular course.
Basically, every video you create for a particular course gets stored here.
My Media and Course Media Gallery Resources:
• How to Use My Media and Course Media Gallery
• How to Upload a Video to Kaltura My Media
• How to Edit a Kaltura Video
Recording Videos with Kaltura
Kaltura is built into Brightspace. You can find it by clicking on Video on the Navbar. My
Media is the hub for all the video content you create. My Media is where you will launch
either Kaltura Express Capture or Kaltura Capture for video recording.
Kaltura Express Capture
Kaltura Express Capture enables recording content directly from the browser without the
need to install any additional software.
This is the only way you can create videos using Kaltura if you have a Chromebook.
• How to Record a Video with Kaltura Express Capture
Kaltura Capture
Kaltura Capture enables you to create high-quality recordings. You can record yourself
with a webcam, record your screen or presentation, or a combination of both. You have
to download this software to your computer.
Kaltura Capture is not compatible with Chromebooks. See the Chromebook Users
section for more information.
• How to Record a Video With Kaltura Capture
Last Updated 12/18/20
Page 3
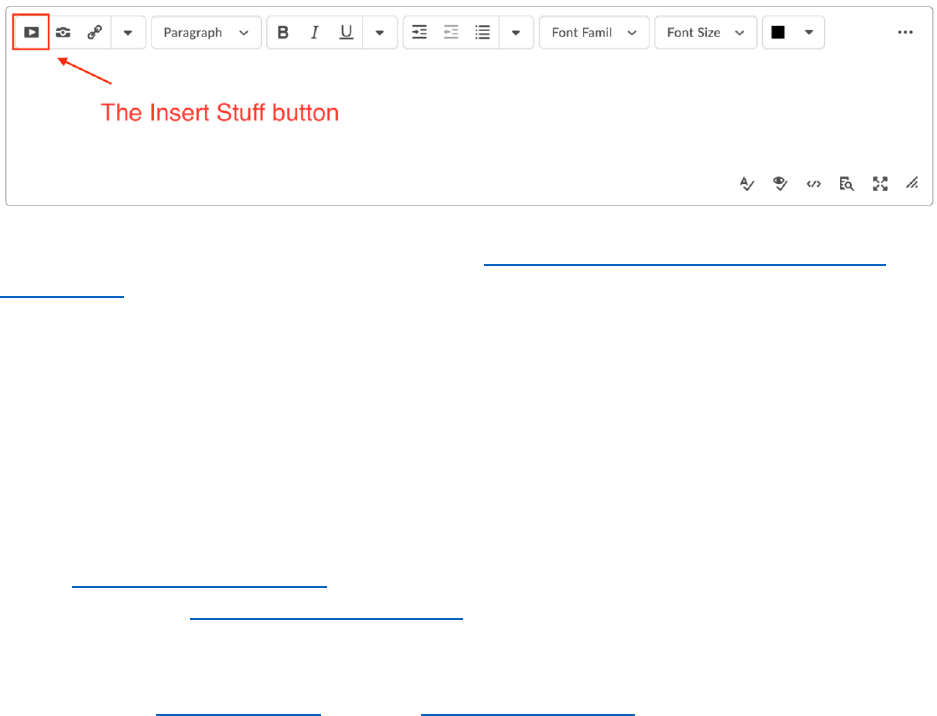
Submitting Video Assignments
Students can only submit Kaltura video assignments using the Insert Stuff button, which
is available on the textbox.
After recording your Kaltura video, follow the How to Submit Video Assignments on
Brightspace tutorial. The tutorial video shows you how to submit video assignments and
video discussion posts.
Troubleshooting Kaltura
If you run into any issues with Kaltura, before submitting a help desk, check out our
resources to troubleshoot first.
Troubleshooting Resources:
• Troubleshooting Kaltura page on mySMC [login required]
• Search the help desk knowledgebase
Submitting a Help Desk Ticket:
• Open a help desk ticket or email [email protected]u
• Someone on the team will typically respond within 24 hours; expect longer
turnaround times on the weekends
• Be as specific as possible and include any error messages or screenshots of the
problem
• Let us know what course you are having trouble with (e.g., ENGL 101 A) or
specific assignment
Chromebook Users
If you a Chromebook, you can only use Kaltura Express (web-based video recording) to
record videos. Kaltura Capture isn't compatible with Chromebooks.

Last Updated 12/18/20
Page 4
Chromebook users who need to record their desktop need to use an alternative
like Screencast-o-Matic. Screencast-o-Matic is a free screen recording, editing, and
storage solution.
Notes on Using Screencast-o-Matic:
• The free version of Screencast-o-Matic has limitations: you can record your
screen and/or webcam and do simple trimming; videos have to be shorter than
15 minutes and there will be a watermark
• Chromebook users can use Screencast-o-Matic for web screen recording because
Chromebooks can’t use Kaltura Capture for screen recording, but they can use
Kaltura Express Capture for webcam recordings
• Check out this tutorial on how to record a video using Screencast-o-Matic and
submitting it on Brightspace
• After you record your video to Screencast-o-Matic, you have a few options:
• Submit a link to the Screencast-o-Matic video on Brightspace (instructions)
• Download a Screencast-o-Matic video and upload it to your MY Media
before submitting on Brightspace (instructions)
Kaltura Interactive Video Quizzes
Your professor may require you to complete a Kaltura Interactive Video Quiz (IVQ). For
best results, use a laptop or desktop computer to complete the quiz. Always make sure
you are using Google Chrome or Mozilla Firefox when taking the quiz. Watch the Taking
a Kaltura Interactive Video Quiz tutorial before taking an IVQ.
Kaltura Virtual Classroom
Your professors may hold class sessions or office hours in the Kaltura Virtual Classroom.
Each Brightspace course has its own Kaltura Virtual classroom.
Inside the Virtual Classroom, you can engage with your professor and fellow students
through interactive tools like a whiteboard, screen sharing, breakout rooms, real-time
notes, live quizzes, and more.
Step 1: Prepare for Virtual Classroom Sessions
Your instructor may use Kaltura Virtual Classroom to host virtual class meetings or office
hours. Refer to the course syllabus or the class announcement posted on your D2L
Brightspace course for more information about how your instructor will use the Virtual
Classroom.
Before your first virtual class session, you must prepare your device. We recommend you
use a laptop or a desktop computer. Usually, a laptop has a built-in microphone and

Last Updated 12/18/20
Page 5
webcam. For a desktop, if there is no built-in camera or microphone, we recommend
purchasing a webcam and a microphone (or headphones with a mic).
To engage in live class participation, although it may not be required to show your
video, you will need to use a microphone to speak to your instructor or fellow students
during a live class meeting.
Step 2: Join the Virtual Class Meeting
Follow the instructions below to test out the technology for the Kaltura Virtual
Classroom before you attend a session.
First, perform a Quick Tech Check. If your internet or device does not pass the
requirements, contact your professor immediately. You may need to use an alternate
device or arrange to attend the live sessions in a different location with faster internet.
Second, review the Participant Guide, so you understand how the Kaltura Virtual
Classroom works.
Third, watch the Kaltura Virtual Classroom Overview for Student tutorial video to learn
how to use the application.
For More Information
Please contact the Instructional Design department at [email protected] if you
have questions about this guide. If you have questions or need help with Kaltura,
submit a help desk ticket, and someone from the ID or IT department will assist
you.
