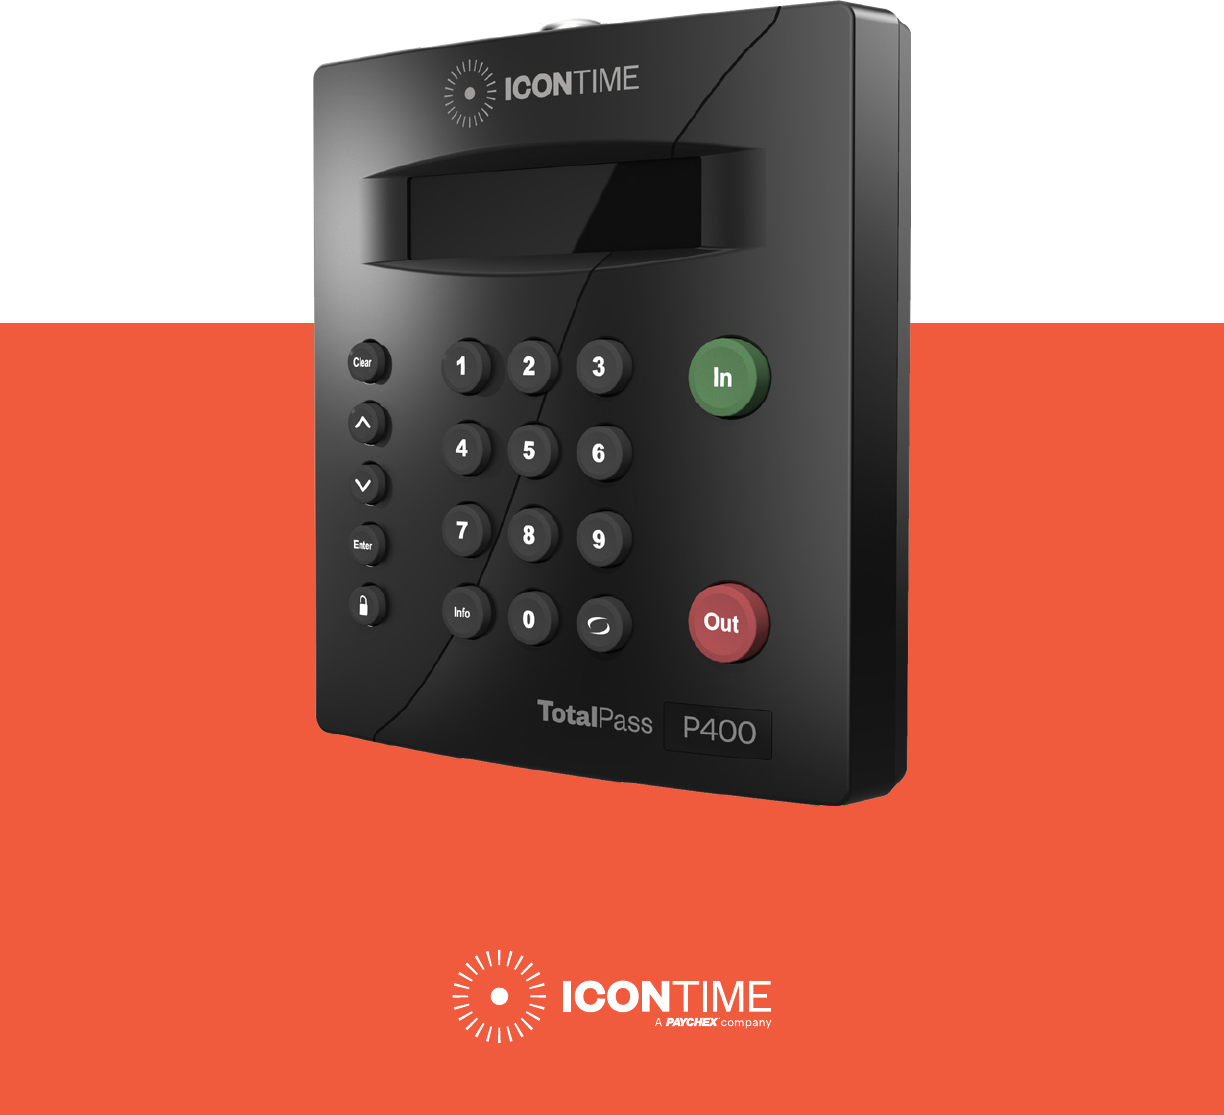
User Guide
TotalPass® P400

Copyright © 2020 IconTime. All rights reserved.
Reproduction of this document in whole or in part is strictly prohibited. This document may
contain typographical or copy errors. TotalPass, IconTime, the IconTime logo, and all other
IconTime product names mentioned in this document are registered trademarks of IconTime.
IconTime
9000 SW Gemini Drive, Bldg. 8
Beaverton, OR 97008
Contact Support: 1-800-847-2232 #1
Contact Sales: 1-800-847-2232 #3
www.icontime.com

© 2020 IconTime. All rights reserved. Page 3
Table of Contents
Chapter 1: Getting Familiar with Your Time Clock ...........................................................................................7
Everything you need to get your time clock up and running: ................................................................................................ 7
System Requirements .................................................................................................................................................................................8
Features ............................................................................................................................................................................................................... 8
Available TotalPass Upgrades ................................................................................................................................................................ 8
Connection / Setup ...................................................................................................................................................................................... 9
Logging In ............................................................................................................................................................................................................9
Support and Troubleshooting .............................................................................................................................................................10
Integration with Payroll ............................................................................................................................................................................10
Register your Time Clock ........................................................................................................................................................................10
Navigating the Time Clock Software ......................................................................................................................................................10
Home Page .........................................................................................................................................................................................................11
Lists Menu ..........................................................................................................................................................................................................11
Reports Menu ................................................................................................................................................................................................... 11
Payroll Menu ...................................................................................................................................................................................................... 11
Files Menu ..........................................................................................................................................................................................................12
Settings Menu .................................................................................................................................................................................................12
Help Menu .........................................................................................................................................................................................................12
Chapter 2: Setting Your Time Clock Preferences ..........................................................................................13
Setting Your Pay Preferences ..................................................................................................................................................................... 13
Setting Your Overtime Preferences ........................................................................................................................................................ 14
Setting Your Punch Preferences ............................................................................................................................................................... 14
Setting Your Device Preferences .............................................................................................................................................................. 16
Setting Your Alert Preferences (Requires Upgrade) ......................................................................................................................17
Alert Setup ....................................................................................................................................................................................................... 18
Creating Custom Fields .................................................................................................................................................................................. 18
Chapter 3: Setting Up Your Employees ........................................................................................................... 20
Employee List ......................................................................................................................................................................................................20
Make Employees Inactive.......................................................................................................................................................................20
Customizing the Columns ..................................................................................................................................................................... 20
Time Remaining Before Overtime .....................................................................................................................................................20
Adding Employees ............................................................................................................................................................................................. 21
Employee Information ............................................................................................................................................................................... 21
Employee Settings ..................................................................................................................................................................................... 21
Entry Method .................................................................................................................................................................................................. 21
Lunch Time Deduction ............................................................................................................................................................................ 22
Delete Employee’s Punches .................................................................................................................................................................. 22
© 2020 IconTime. All rights reserved. Page 4
Chapter 4: Clocking In and Out ......................................................................................................................... 23
Time Clock Keypad Functions ................................................................................................................................................................. 23
Punching In and Out ......................................................................................................................................................................................... 23
Keypad PIN Entry ........................................................................................................................................................................................ 24
Proximity Badge Entry.............................................................................................................................................................................. 24
Web Punch Entry .........................................................................................................................................................................................24
Tracking Paid Breaks ....................................................................................................................................................................................24
To transfer out of the break department and back to work: .............................................................................................. 24
Chapter 5: Generating Reports......................................................................................................................... 25
Reports Overview ............................................................................................................................................................................................. 25
Adding a Punch...................................................................................................................................................................................................25
Adding Non-Work Hours (Holiday and Non-Worked) .................................................................................................................. 26
Editing a Punch ................................................................................................................................................................................................... 27
Using Batch Edits............................................................................................................................................................................................... 27
Viewing Additional Reporting Details .................................................................................................................................................... 27
Using the Attendance Report .................................................................................................................................................................... 28
Using the Timecard Report ......................................................................................................................................................................... 29
Chapter 6: Sending to Payroll ...........................................................................................................................30
Create Payroll Export File ............................................................................................................................................................................. 30
QuickBooks Export Payroll process........................................................................................................................................................ 31
Configuring Payroll ........................................................................................................................................................................................... 32
QuickBooks Online Configuration ........................................................................................................................................................... 32
Chapter 7: Alternate Employee Entry Options ..............................................................................................34
Using Proximity Badges .................................................................................................................................................................................34
Assigning Proximity Badges to an Employee ..............................................................................................................................34
Punching In/Out Using Proximity Badges ....................................................................................................................................34
Web Punch Entry (Web Punch License purchase required).......................................................... 35
Locking the Time Clock Terminal Keypad ...................................................................................................................................35
Setting Up Your Employees for Web Punch ................................................................................................................................ 35
Punching In/Out Using Web Punch .................................................................................................................................................. 35
Clocking In/Out using GPS Location Tracking ...........................................................................................................................36
IP Address Restriction.............................................................................................................................................................................. 37
Setting Authorized IP Addresses by Employee ......................................................................................................................... 37
Running Reports with Web Punch ..................................................................................................................................................... 38
Chapter 8: Maintaining Your Time Clock ....................................................................................................... 39
Creating a Data Backup ................................................................................................................................................................................39
Data Backup from the Software Interface ....................................................................................................................................39
Data Backup to a USB Flash Drive .................................................................................................................................................... 39
Restore Time Clock Data Backup ...........................................................................................................................................................40
© 2020 IconTime. All rights reserved. Page 5
Restore a Time Clock Data Backup from the Software Interface ..................................................................................40
Restore a Time Clock Data Backup from a USB Flash Drive ............................................................................................40
Removing Data from Your Time Clock .................................................................................................................................................. 41
Updating Your Time Clock ............................................................................................................................................................................ 41
Updating Your Time Clock from the Software Interface ....................................................................................................... 41
Updating Your Time Clock Using a USB Flash Drive .............................................................................................................. 42
Auto-Update .................................................................................................................................................................................................. 42
Resetting Your Time Clock Password ...................................................................................................................................................43
Changing Your Time Clock Software Interface Password ..................................................................................................43
Resetting the Software Interface Password ............................................................................................................................... 43
Resetting the Supervisor Mode Security Code .............................................................................................................................44
Chapter 9: Time Clock Terminal Supervisor Mode ..................................................................................... 45
Log Into Supervisor Mode ............................................................................................................................................................................45
Parent Clock Supervisor Mode Settings .............................................................................................................................................45
View IP Address ...........................................................................................................................................................................................45
Network Settings ............................................................................................................................................................................................... 45
LAN Settings .................................................................................................................................................................................................. 45
Wi-Fi Settings ................................................................................................................................................................................................46
Assign Badges ..............................................................................................................................................................................................46
Set Date/Time...............................................................................................................................................................................................46
View Serial # ..................................................................................................................................................................................................46
View Version # .............................................................................................................................................................................................. 47
Download Backup ....................................................................................................................................................................................... 47
Restore Backup ........................................................................................................................................................................................... 47
Enable Upgrade............................................................................................................................................................................................ 47
Reset Password ........................................................................................................................................................................................... 47
Erase All Memory ........................................................................................................................................................................................ 47
Download Log .............................................................................................................................................................................................. 47
Chapter 10: Connecting to the Clock ..............................................................................................................48
Wi-Fi Connection ...............................................................................................................................................................................................48
Connecting Using the Clock Interface ........................................................................................................................................... 48
Connecting Using a WPS Button ........................................................................................................................................................49
Connecting Using a WPS with PIN .....................................................................................................................................................49
Connect to the Wireless Network .....................................................................................................................................................50
Connecting Using the Software Interface ....................................................................................................................................50
Ethernet Connection ................................................................................................................................................................................50
Chapter 11: Software Upgrades ........................................................................................................................ 52
Enabling Software Upgrades ......................................................................................................................................................................52
Employee Capacity Upgrades ................................................................................................................................................................... 52
© 2020 IconTime. All rights reserved. Page 6
Benefit Tracking Upgrade ............................................................................................................................................................................ 53
Benefit Tracking and Accruals ...........................................................................................................................................................53
Enhanced Overtime Preferences ...................................................................................................................................................... 53
Revision Zones..............................................................................................................................................................................................53
Enhanced Overtime Preferences ...................................................................................................................................................... 53
Non-Worked Hours and Benefit Time (Vacation, Sick, Personal) ......................................................................................... 53
Customizing Benefit Accrual Rules .................................................................................................................................................. 54
Accrual Summary Report ............................................................................................................................................................................ 55
Revision Zones ...................................................................................................................................................................................................55
Email Alerts Upgrade .....................................................................................................................................................................................56
Outgoing Email Settings (SMTP Server) .............................................................................................................................................. 56
Common SMTP Server Settings .............................................................................................................................................................. 58
Chapter 12: Configure for Remote Access ..................................................................................................... 59
System Requirements .................................................................................................................................................................................... 59
Step 1: Set Up the TotalPass on the Local Network ...................................................................................................................... 59
Step 2: Router Configuration ...................................................................................................................................................................... 59
Assign a Static IP Address to the Time Clock ...........................................................................................................................60
Set Up Port Forwarding on the Router ............................................................................................................................................60
Step 3: Connect to Your TotalPass Clock over the Internet ...................................................................................................... 61
Remote Connection Frequently Asked Questions ........................................................................................................................62
Troubleshooting Remote Connection Problems ............................................................................................................................62
Standard Remote Connection Setup Diagram ................................................................................................................................ 64
Connect Clocks Remotely with Multi-clock Diagram ..................................................................................................................64
Warranty Information ......................................................................................................................................... 65
FCC Part 15 ............................................................................................................................................................ 67

© 2020 IconTime. All rights reserved. Page 7
Chapter 1: Getting Familiar with Your Time Clock
Everything you need to get your time clock up and running:
Connecting your time clock and logging in for the first time
How to get help
Navigating through the software
Welcome
Thank you for choosing IconTime. We appreciate your business.
Our mission is to provide our customers with quality products and excellent customer service. We pride ourselves on being
innovators in the time and attendance industry, developing products that are easy to install, simple to operate, and reliable.
The TotalPass P400 system offers breakthrough web-enabled technology that brings the simplici-
ty of embedded software to your time and attendance system, without requiring Internet access.
This guide will help you set up the clock and use the many features to automate time and attendance,
streamline your payroll process, and generate reports that provide insight into labor costs.
© 2020 IconTime. All rights reserved. Page 8
System Requirements
For Network Access to the Time Clock
• Any Web browser on PC, Mac, tablet, or smartphone
• An available Ethernet port or wireless network
• Remote Internet access also requires Internet and port forwarding to port 9844 or port 80.
For Direct Connection to the Time Clock
• Use any Web browser on a PC or Mac where the time clock is directly connected to the computer.
• USB port on Windows PC or Ethernet port on Windows PC or Mac
Payroll Export Utilities
• Paychex Flex, SurePayroll, Paychex Preview, Paycom, Paylocity, ADP Workforce Now,
and QuickBooks Online exports are compatible with all operating systems.
• Windows Vista or above required for QuickBooks Plug-in* and the ADP Export.
* Only available with QuickBooks desktop versions.
Internet Connection Required for the following functionality:
• Email alerts, backups, or payroll reports
• Connecting multiple time clocks together
• Accessing the time clock from more than 1 computer (Network connection required)
Features
The TotalPass P400 was designed to streamline the time and attendance and payroll process. The TotalPass
software is built into the time clock and provides a wealth of features to save you time and improve accuracy.
• Capacity of 25 employees and upgradeable to 250 employees
• Pre-assigned employee PIN numbers included. Optional upgrades include Custom PIN Entry
(4-9 digits), Proximity Badges (sold separately), and Web Punch (sold separately).
• Configurable for remote Internet access
• Paid break tracking
• Export to QuickBooks, ADP, Paychex Flex, Paychex Preview, SurePayroll, Paycom, or CSV
• Automatic lunch time deduction
• Timecard, Attendance reports
• Enter Holiday and NonWorked Hours for one or more employees
Available TotalPass Upgrades
Benefit Tracking and Accruals
This upgrade allows you to automatically calculate vacation, sick, and personal time off.
© 2020 IconTime. All rights reserved. Page 9
Customize accrual rates and tracking per employee for maximum policy flexibility.
Upgrade Employee Capacity
Expand your system with your business; upgrade the employee capacity from
the standard 25 employees to 50, 100, or 250 employees.
Employee Web Punch Entry
Provide employees with a contact-free option to punch In / Out using a web browser on their computer, smart phone, or tablet.
Web Punch Entry licenses are available in sets of 5 and can be re-assigned to new employees
as needed. The time clock has a maximum capacity of 50 Web Punch licenses.
Email Alerts Upgrade
Automatically email you alerts as employees come and go, before they accumulate overtime,
and more. It also allows the Timecard report and backups to be emailed to one or more
recipients. The email server settings have to be configured for emails to be sent out.
Advanced Pack Upgrade
The Advanced Pack upgrade includes:
• Additional capacity to accommodate another of 25 employees, bringing the total system capacity to 50
• Department tracking and reports
• Supervisor logins, permission levels, and employee assignments
• Track notes by the punch, employee, or department
• Customized reports
• Customized employee ID (PIN) numbers
• Customized system prompts
• Employee input fields
• Connect multiple time clocks using the Multi-Clock feature
• Employee Web browser entry (for 5 Web Punch Licenses)
Connection / Setup
Refer to the TotalPass Quick Start Guide for instructions on setting up your employee
time clock’s connection and logging into your time clock for the first time.
Logging In
To log in and view employee information and punch details, enter the time clock’s assigned
Internet Protocol (IP) address into your internet browser address field.
You must enter the address exactly as displayed below. For example, if the assigned address is
192.168.2.103, enter that text directly into the address field, preceded with http://.

© 2020 IconTime. All rights reserved. Page 10
Note: If you are logging in using USB, navigate to http://totalpass.
timeclock or enter http://172.20.20.1 as the IP address.
Support and Troubleshooting
For your convenience, troubleshooting tips and how-tos can be found on
our technical support site at www.support.icontime.com.
This system includes a 30-day trial of our TotalPass P400 Customer Care Pack which includes unlimited
telephone, email, and remote assistance support. Support can be reached Monday through Friday from
7:30am to 4:30pm (PST) at (800) 847-2232 option 1 or via email at suppor[email protected].
Integration with Payroll
Built-in Exports
Your time clock includes a Paychex Flex, Paychex Preview, SurePayroll, Paycom, Paylocity, ADP Workforce
Now, QuickBooks Online, and QuickBooks (Pro, Premier, Enterprise) export formats. It also includes a CSV
Export option used for viewing time clock data in Excel or importing into other third-party payroll programs.
Desktop Installed Export Utilities
Exporting time clock data to PC versions of QuickBooks or ADP requires the
installation of an export utility program. Select the appropriate link below.
• QuickBooks – www.icontime.com/software/QB_Plug-in_Import.exe
• ADP – www.icontime.com/software/ADP_Export_1.0.12.exe
Register your Time Clock
The first time you log in to your time clock you will be prompted to register it. Register your time clock
to ensure that you receive email notification of free software updates, your manufacturer’s
1-year hardware warranty, and 30 days of free technical support.
Navigating the Time Clock Software
The time clock interface is designed to allow you to quickly and easily complete your tasks and
run your reports. In this section you will learn how to navigate through your time clock application.
Application navigation is done through six distinct menus: Home, Lists, Reports, Files, Settings, and
Help. Moving your cursor over each icon displays the individual drop-down menu items.
© 2020 IconTime. All rights reserved. Page 11
Home Page
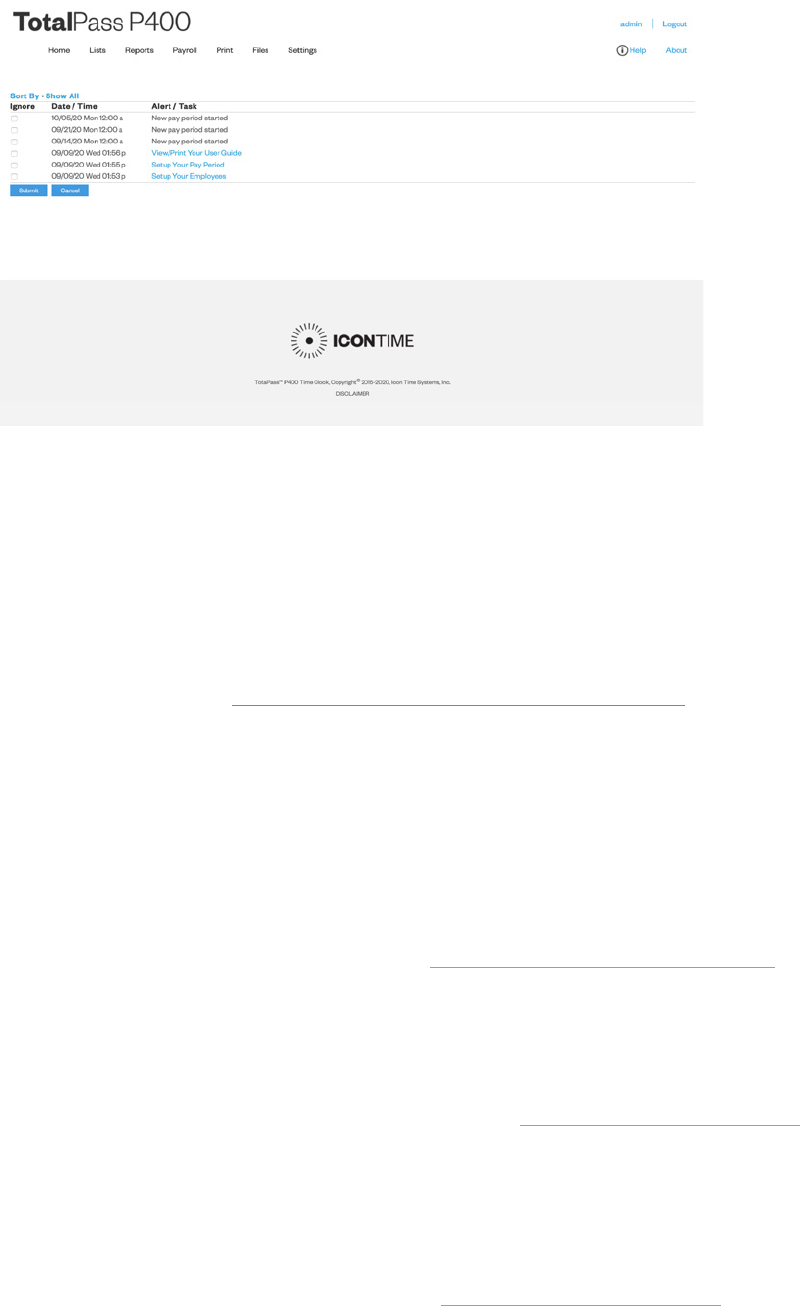
When you first log into your time clock application, the Home page displays automatically. The
Home page provides a quick glance at the activity on your time clock, including notifications of
custom alerts. The Home page also contains helpful links to configure your software.
Current Alerts
The Home page displays important system alerts and time clock activity alerts. For instructions on customizing
your alert settings, refer to “Setting Your Alert Preferences (Requires Upgrade)” in Chapter 2.
When you no longer want to be notified of a particular task or alert, check the box next to that
item in the IGNORE column, and click Submit. If you would like to see past alerts, click Show
All. To view the details of the alert, click the alert link in the ALERT/TASK list.
Lists Menu
Use the Lists menu for adding, modifying or deleting employees, departments, supervisors,
or enabling or disabling additional time clocks connected to the system.
For instructions on setting up employees, refer to: “Chapter 3: Setting Up Your Employees”.
Reports Menu
Your time clock comes with four reports that make it quick and easy to get the information you need to
complete your work and process payroll. Use the Reports menu to access the reports. For additional
information on generating and customizing reports, Refer to ”Chapter 5: Generating Reports”.
Payroll Menu
The Payroll menu allows you to create exports of your time clock data to be imported you’re your
payroll program for streamlining payroll day. In addition, within the Payroll menu, find options to email
the timecards to individual employees or as one report, to a manage. For additional information
on sending your time clock data to payroll, Refer to ”Chapter 5: Generating Reports”.

© 2020 IconTime. All rights reserved. Page 12
Files Menu
Use the Files menu to back up data, restore data back-ups, Delete Old Punches, and update your employee time clock.
Settings Menu
Use the Settings menu to customize your payroll, overtime, punch, device, and alert preferences. Before running
any reports, set your preferences as described in Chapter 2: Setting Your Time Clock Preferences.
Help Menu
The Help menu gives you quick access to the Help Center and to view the About Your Clock page for your time clock.
© 2020 IconTime. All rights reserved. Page 13
Chapter 2: Setting Your Time Clock Preferences
Before accurate reports can be generated and employee punch details are calculated
correctly, you must set your time clock rules and preferences:
Set up your pay period and overtime rules
Set up punch rounding
Set up Alert Preferences
Setting Your Pay Preferences
There are two ways to access your Pay Preferences:
• Click Setup Your Pay Period in the Alert/Task list
• Select Preferences from the Settings menu.
Follow the instructions below to set your Pay Preferences.
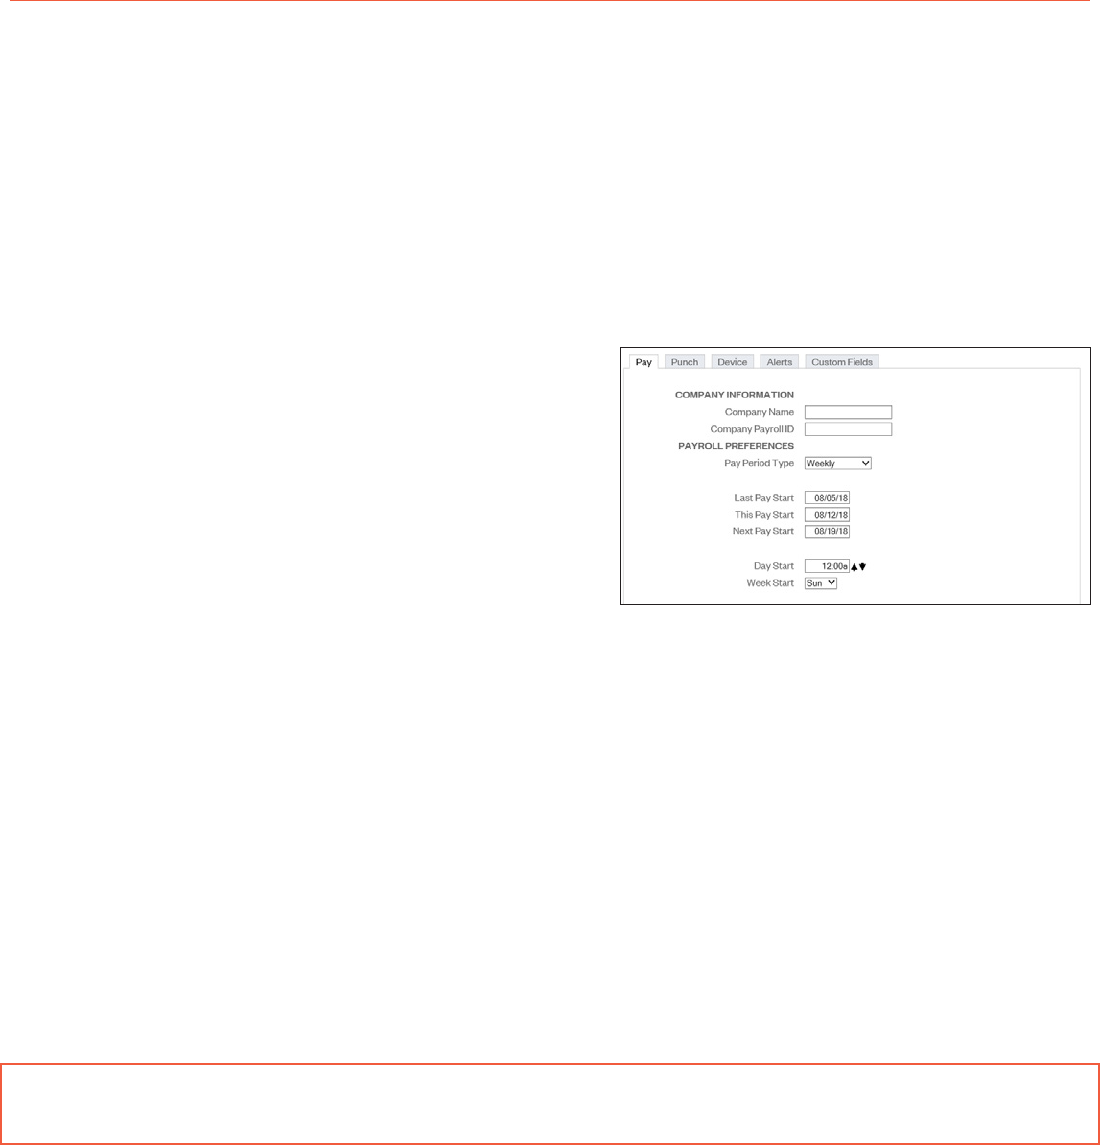
• Complete the Company Name field and, if applicable,
the Company Payroll ID field. These will be used
when emailing time.
• Select the applicable option from the Pay Period Type drop-down menu:
o Weekly - Employees are paid once per week
o Bi-Weekly - Employees are paid every two weeks
o Semi-Monthly - Employees are paid twice per month
o Monthly - Employees are paid once per month
• If you select the semi-monthly pay period, two additional date fields display that must be completed.
o Type the first day of the month that your pay period begins in the Start Semi-Monthly on field.
o Type the second day of the month that your pay period begins in the and on field.
• Click in the Last Pay Start field to open the calendar and select the date that your previous pay period started.
Tip: Use the << and >> arrows to select the year. Use the
< and > arrows to select the month.
• Click in the This Pay Start field to open the calendar and select the date that your current pay period started.
• Click in the Next Pay Start field to open the calendar and select the date that your next pay period will start.
• Type the time of day that your workday begins in the Day Start field. You only need to modify
this setting if your company has a 24-hour work schedule and needs to accommodate
© 2020 IconTime. All rights reserved. Page 14
overnight shifts; it is recommended that this setting remain at 12:00am.
• Select the day of the week that your work week begins from the Week Start drop-down
menu. The company’s weekly overtime calculations are based on this setting.
Setting Your Overtime Preferences
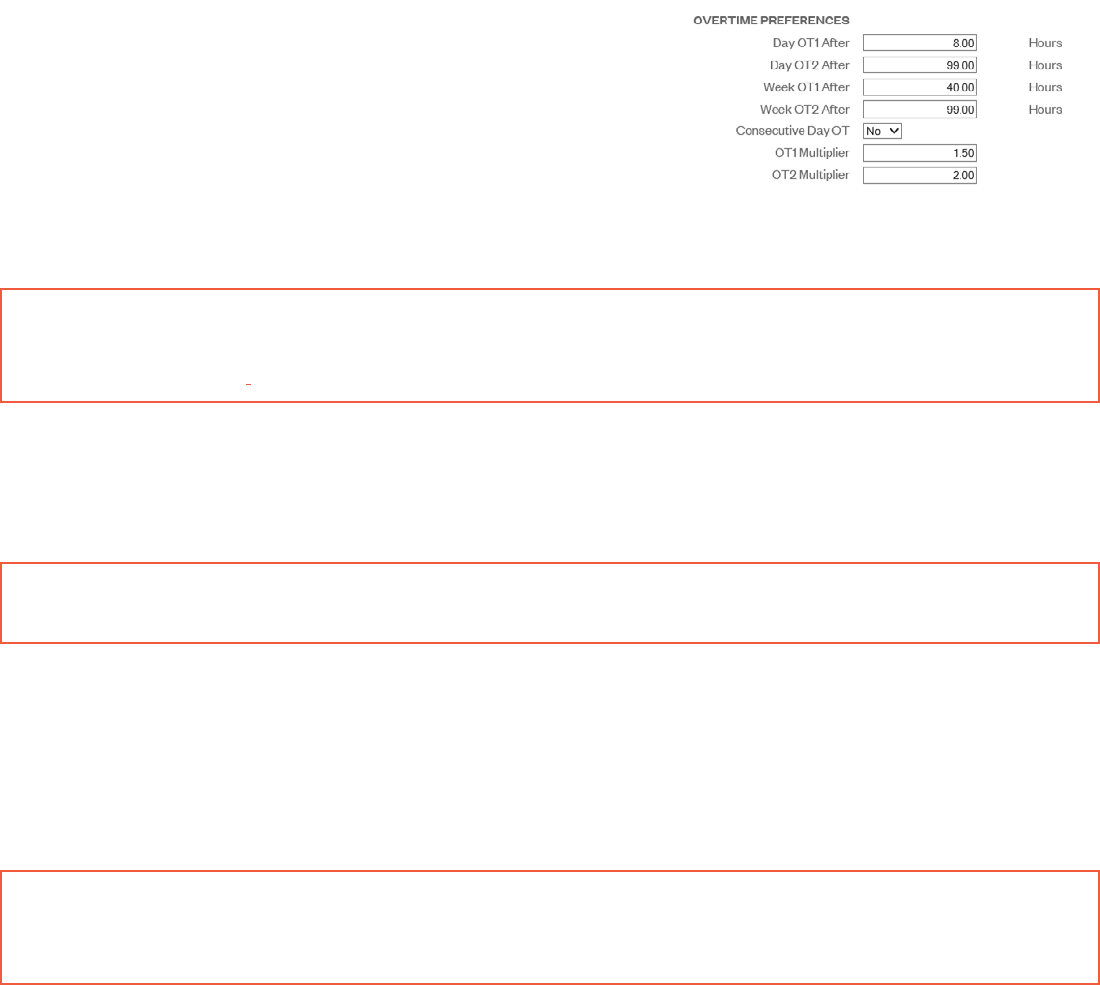
Your Overtime Preference settings are on the Pay tab under Payroll Preferences. The TotalPass
comes with two levels of daily and weekly overtime and consecutive day overtime.
Follow the instructions below to set your Overtime Preferences.
1. To set daily overtime rules, type the number of
hours an employee must work in one day before
they receive overtime pay in the Day OT1 After
and the Day OT2 After fields as required. If your
company does not pay daily overtime, type 99.
2. To set weekly overtime rules, type the number of
hours an employee must work in one week before
they receive overtime pay in the Week OT1 After
and the Week OT2 After fields as required. If your
company does not pay weekly overtime, type 99.
Note: Overtime (OT1) is calculated at time-and-a-half (1.5) the rate of pay and
double overtime (OT2) is calculated at two times the rate of pay (2.0).
With the Benefit Tracking Upgrade, these rates can be customized.
3. To set consecutive day overtime rules, change the Consecutive Day OT drop-down menu to Yes. This
option will pay OT1 and/or OT2 on the seventh consecutive day of work, regardless of hours worked
during the work week. This rule is most commonly used by unions and in California. If your company
does not pay consecutive day overtime, change the Consecutive Day OT drop-down menu to No.
Note: Making a change to the overtime options prompts the time clock to restart.
Doing so will make the time clock unavailable until the clock fully reboots.
Click Submit to save your settings and return to the Home page.
Setting Your Punch Preferences
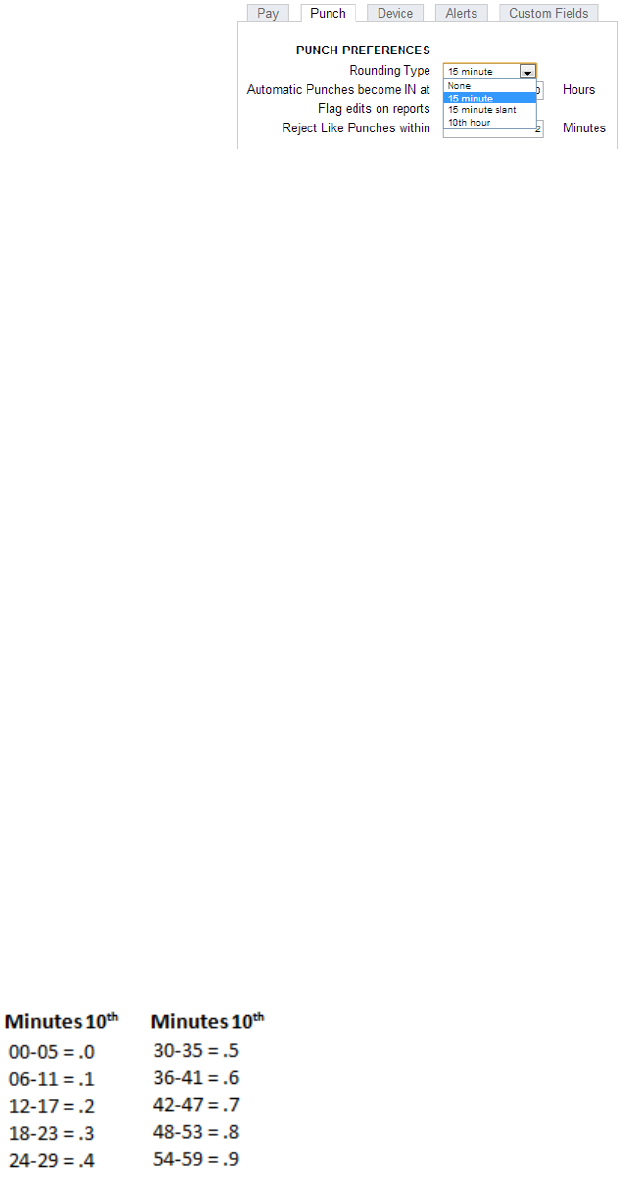
Select Settings | Preferences and click on the Punch tab. The Punch Preferences section displays.
Note: The rounding rule selected affects all punches system wide. The
original punch time remains unchanged on the employee time card.
The punch(shift) hours round according to the rounding rules set.
© 2020 IconTime. All rights reserved. Page 15
Follow the instructions below to set your Punch Preferences.
• Select the applicable rounding type from the Rounding Type
drop-down menu.
• None (No Rounding): Accumulates 100%
of all time registered on the clock.
• 15 Minute (7/8 Rounding): Rounds and calculates punches to the nearest quarter
hour (15 minutes). The split occurs in the middle of each quarter hour.
To illustrate: An In punch of 7 minutes 59 seconds rounds back
An In punch of 8 minutes 00 seconds rounds forward
Example: An In punch of 7:52 a.m. would calculate as 7:45 a.m.
An In punch of 7:53 a.m. would calculate as 8:00 a.m.
• 15 Minute Slant (10/5 In, 5/10 Out): Quarter hour rounding similar to above except the break point
occurs on the 5th minute or 10th minute depending on whether it is an In punch or an Out punch.
To illustrate: An In punch of 4 minutes 59 seconds rounds back
An In punch of 5 minutes 00 seconds rounds forward
An Out punch of 9 minutes 59 seconds rounds back
An Out punch of 10 minutes 00 seconds rounds forward
Example: An In punch at 7:49 a.m. would calculate as 7:45 a.m.
An In punch at 7:50 a.m. would calculate as 8:00 a.m.
An Out punch at 4:49 p.m. would calculate as 4:45 p.m.
An Out punch at 4:50 p.m. would calculate as 5:00 p.m.
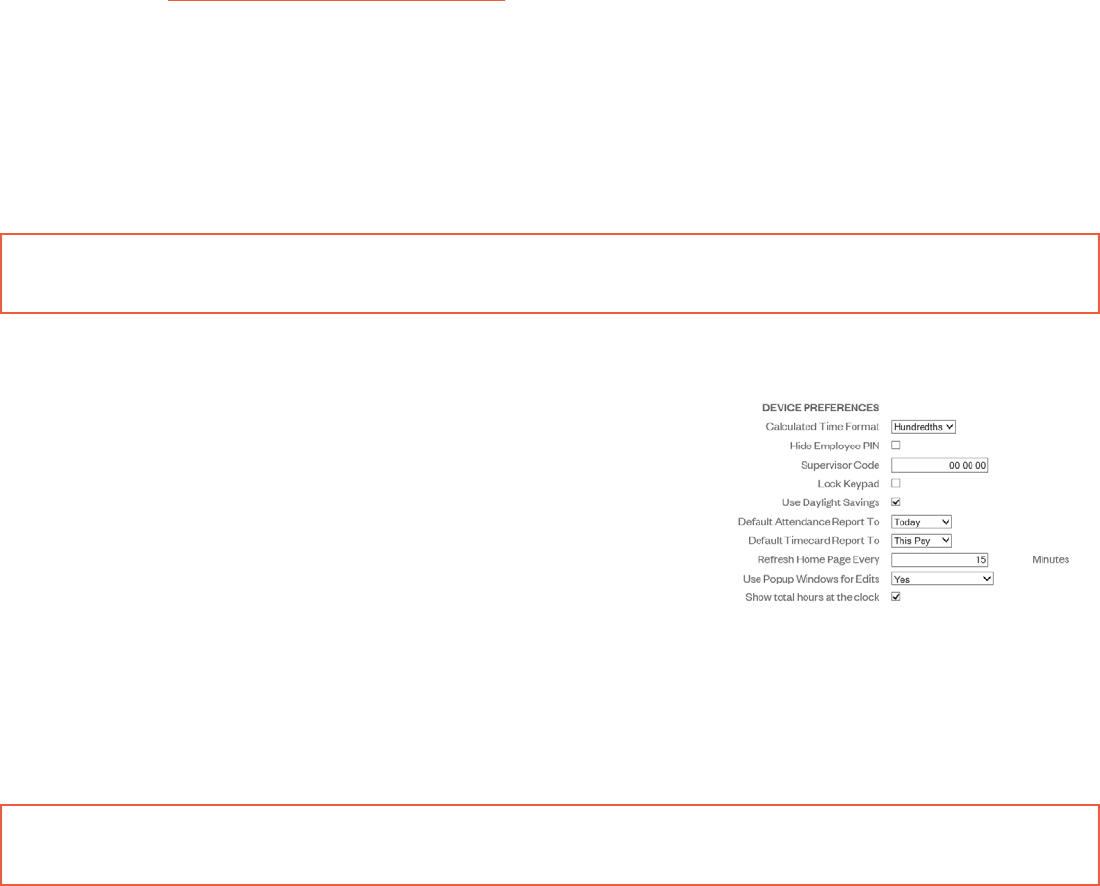
• 10th Hour: Rather than rounding the punch hours, this selection calculates
punches from the tenth hour point and advances each six minutes.
To illustrate: An In punch from :00 minutes after the hour to :05 after the hour
rounds to the top of the hour (.0).
An In punch from :30 minutes after the hour to :35 minutes
after the hour rounds to .5.
© 2020 IconTime. All rights reserved. Page 16
Example: An In punch at 7:30 a.m. would calculate at 7.5 a.m.
An Out punch at 4:05 p.m. would calculate as 4.0 p.m.
• The Automatic Punches become IN at field automatically makes the next punch an In punch after
a determined number of hours. This option is convenient if an employee forgets to punch Out.
This option is only used when an employee entry method is set to Automatic. Refer
to Chapter 3: Setting Up Your Employees, for additional information.
• Check the Flag edits on reports checkbox to flag manually edited punches
on reports. If checked, all edited punches are marked with E.
• Type the number of minutes in Reject Like Punches within to reject the same type of
punch at the time clock, within the minutes specified. The second punch is ignored.
• Click Submit to save your settings and return to the Home page.
Note: Making a change to the rounding options will prompt the time clock to restart.
Doing so will make the time clock unavailable until the clock fully reboots.
Setting Your Device Preferences
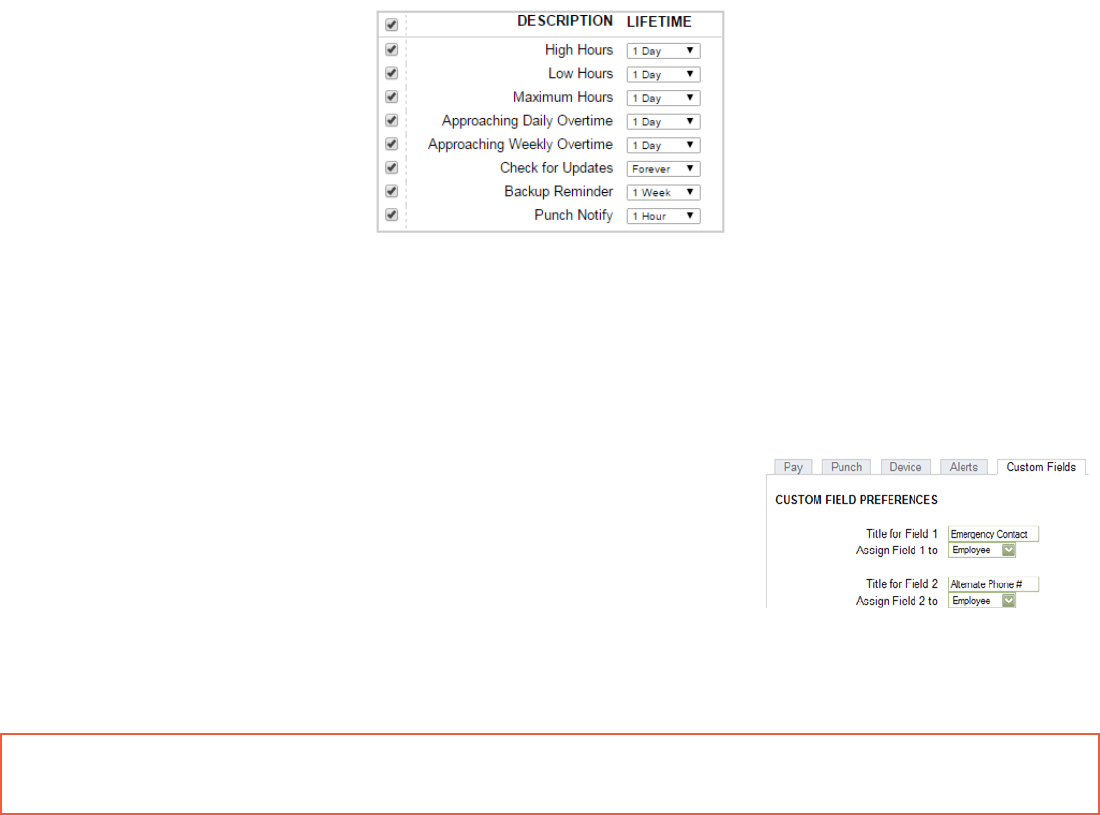
Select Settings | Preferences and click on the Device tab to
go to the Device Preferences screen. Important information
such as your Database Version, Software Version, and time
clock serial number will appear at the top of this section
Follow the instructions below to set your Device Preferences.
• Select to display minutes on your
reports in decimal or hh:mm (minutes)
format from the Calculated Time Format drop-down menu.
• Check the Hide Employee PIN checkbox to hide employee PINs (ID numbers) at the time
clock terminal, preventing coworkers from viewing another employee’s PIN.
• Type a unique 6-digit security code in the Supervisor Code field to secure the employee time clock.
Important: You need this code to access Supervisor Mode on the employee
time clock. The default supervisor code is 00 00 00.
• Check the Lock Keypad checkbox to lock the keypad and prevent keypad entry of
employee ID numbers (PIN) at the employee time clock. Use this option if you purchased
proximity badges and you do not want employees using the keypad.
• Check the Use Daylight Savings checkbox if you want the time clock
to automatically adjust time for daylight savings.
• Select the default time frame to view the Attendance Report screen from the Default Attendance Report To
drop-down menu.

© 2020 IconTime. All rights reserved. Page 17
• Select the default time frame to view the Timecards Report screen from the Default Timecard Report To
drop-down menu.
• Type the number of minutes to refresh the alerts on the Home page in the Refresh Home
Page Every field. If your system runs slow, type a larger number for the refresh time.
• Use Popup Windows for Edits includes 3 options:
• Yes - have a separate pop-up window display when editing a punch in a report screen.
• Yes with Batch Edits – uses the pop-up window described above. Report will not refresh with
each change submitted. You must refresh the page to see the report with the edited punches.
• No
• Check the Show total hours at the clock checkbox to display the
employee’s total daily hours after the employee punches out.
• Click Submit to save your settings and return to the Home page.
Multi-clock Preferences: Multi-clock refers to multiple time clocks connected together to share
one database. For additional information on setting up multi-clock preferences, refer to
Chapter 13: Multi-clock Configuration.
Setting Your Alert Preferences (Requires Upgrade)
• Select Settings | Preferences and click on the Alert tab
to setup the alert notices displayed on the Home page.
The Home page updates based on your time setting
for the Check Alerts Every field described below.
• Type the least amount of hours an employee can work
per shift in the Alert Low Hours at field. If an employee
works fewer hours than is specified, an alert generates.
To disable this alert, set the alert value to 0.
• Type the amount of hours an employee can work per shift in the Alert High Hours at field. If an employee
works a shift more than the hours specified, an alert generates. To disable this alert, set the alert value to 99.
• Type the maximum amount of hours an employee can work per shift in the Maximum Punch Time
at field. If an employee works a shift more than the hours specified, an alert generates and the
hours stop accumulating for that given shift. To disable this alert, set the alert value to 99.
• Alert Day Overtime OT at triggers an alert before employees reach daily overtime
by using the daily overtime value that you set under Overtime Preferences.
Example: If you have Day OT1 set to 8 hours and Alert Day Overtime OT set to 2 hours, an
alert posts to the Home page when the employee reaches 6 hours worked for the day.
• Alert Week Overtime OT at triggers an alert before employees reach weekly overtime
by using the weekly overtime value that you set under Overtime Preferences.
© 2020 IconTime. All rights reserved. Page 18
Example: If you have Week OT1 set to 40 hours and Alert Week Overtime OT set to 8 hours, an
alert posts to the Home page when the employee reaches 32 hours worked for the week.
• Type the number of minutes to check alerts in the Check Alerts Every field. New alerts are
checked and posted to the Home page based on the time entered here. To maximize system
speed and performance, we recommend setting this value to 10 minutes or more.
• Click Submit to save your settings and return to the Home page.
For additional Alert configuration, select Settings | Alert Setup.
Alert Setup
Using the Alert Preferences set earlier, select Settings | Alerts Setup, and follow
the instructions below to set up Home page and email alerts.
Using the Alert Preferences set earlier, select Settings | Alerts Setup, and follow
the instructions below to set up Home page and email alerts.
• Enabling/Disabling Alerts: To disable an alert, deselect the checkbox in the far left
column. This prevents the alert from being posted on the Home page
• Lifetime: Use the drop-down menus under the Lifetime column to select the amount of time the
alert remains on the Home page. After that time, the alert is automatically removed.
Creating Custom Fields
TotalPass offers 10 additional fields for tracking static information in Custom Fields.
In addition, Timecard Reports can be filtered based on the Custom Field
values assigned to an employee with Labor Distribution Reports.
Examples:
• Location
• Account
• Part-Time / Full-Time Status
ADP Export: Use the Custom Field to track the employee’s ADP Payroll ID. Refer to the ADP
Export User Guide installed with the ADP Payroll Export for instructions.
Custom Fields values can be added to the following locations.
• System: These fields display on the bottom of the Custom Fields page.

© 2020 IconTime. All rights reserved. Page 19
• Employee: These fields display on the bottom of each employee’s Edit Employee page.
• Department: These fields display on the bottom of the Edit a Department page
Follow the instructions below to set your Custom Fields.
• Type the title for the custom information in the Title for Field X field (X being the field number).
• Select where this custom field should display from the Assign Field X to drop-down menu (X being the field number).
• Click Submit to save your settings and return to the Home page.
• Go to the new custom field on the page specified and enter information as needed.
• For additional information on generating reports based on the custom field value
assigned to an employee, refer to Chapter 6: Generating Reports.
© 2020 IconTime. All rights reserved. Page 20
Chapter 3: Setting Up Your Employees
After setting up your pay period and other preferences, set up the employees in the system.
Adding employees
Setting up automatic lunch deductions
TotalPass P400 comes with a 25-employee limit and can be upgraded to handle up to 250 employees.
Employee List
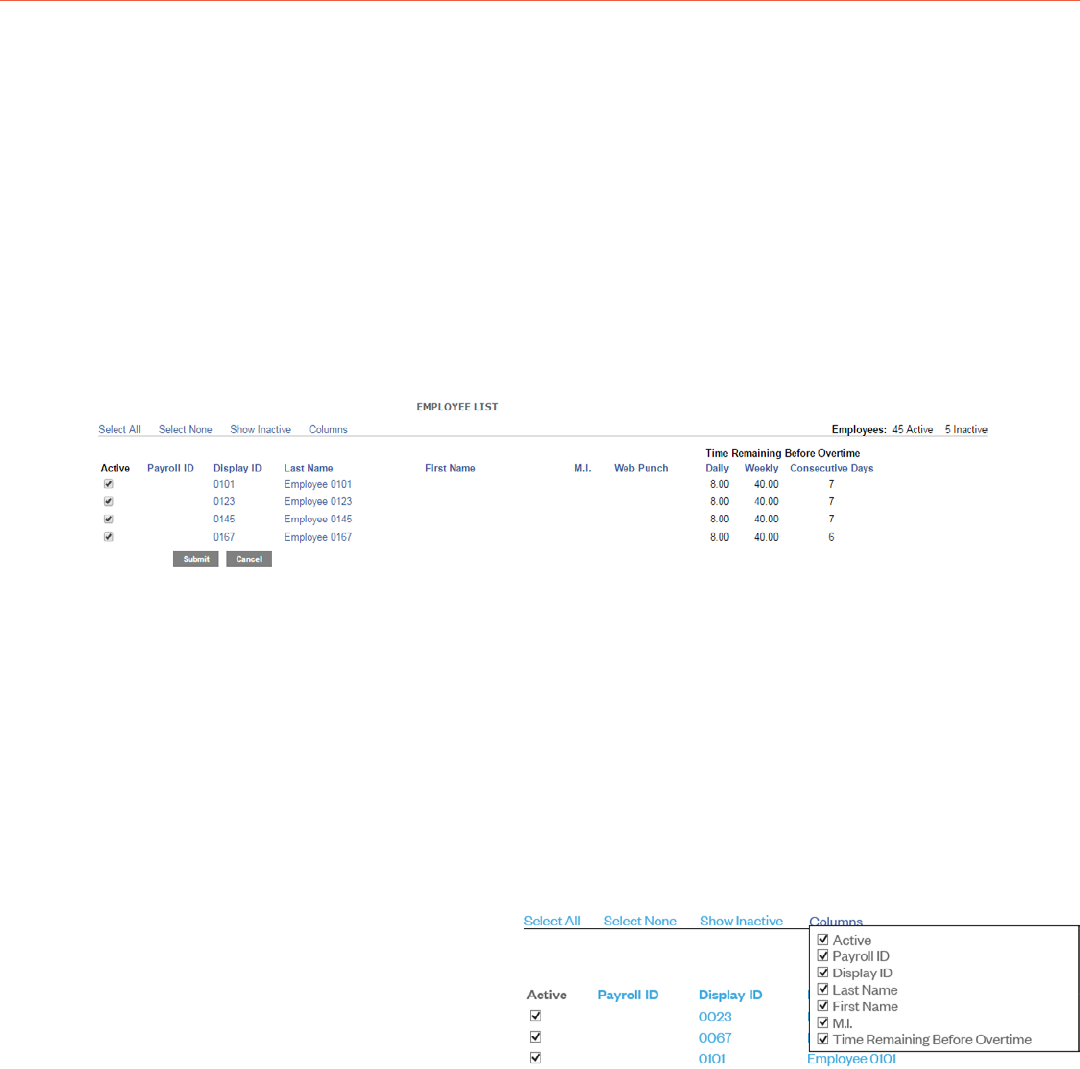
A list of your employees and their ID numbers are in the Lists Menu under Employees.
Click on the column header to sort by that particular column.
Make Employees Inactive
Making an employee inactive removes them from the Employee List and hides the employee
data from the reports. Their punch data remains stored in the time clock.
• To make an employee inactive, deselect the checkbox in the far left column, click Submit.
• To select all employees, and make them active, click on Select All.
• To make all employees inactive, click Select None.
• To show inactive employees, click on the Show Inactive option.
Customizing the Columns
• Select the Columns link to hide or show
columns on the Employee List.
• Click on the column header to
sort by a particular column.
Time Remaining Before Overtime
• The Daily column displays the number of hours left in the day before the employee starts earning daily overtime.
• The Weekly column displays the number of hours left in the week
before the employee starts earning weekly overtime.
• The Consecutive Days column displays the number of days left in the work week before the employee
starts earning consecutive day overtime (when this option is enabled in Pay Preferences).

© 2020 IconTime. All rights reserved. Page 21
To edit employee information, click the employee ID number in the Display
ID column. This displays the Edit an Employee screen.
Adding Employees
To add your employees individually, select an employee or one of the available
employee slots. Follow the instructions below to set up an employee.
Employee Information
• Payroll ID: (Optional) Enter the employee’s payroll ID # provided by the payroll
company. This Payroll ID will be used when generating payroll exports.
Note: This field is not required to be completed when using the
QuickBooks Plug-in or ADP Export Utility.
• First Name: Enter the employee’s first name.
• Middle Initial: Enter the first initial of the employee’s middle name.
• Last Name: Enter the employee’s last name.
• Display Name: Enter the name that the employee will see at the clock and on reports.
Note: Timecard Reports are sorted by Display Name.
• Address: Enter the employee’s address. This field is optional.
Employee Settings
• PIN/Badges: The employee PIN number is used to clock In or Out at the time clock.
• Active: All employees default to an active status. Deselect this checkbox to
make the employee inactive and to hide their name from reports.
• Track Paid Breaks: Select this box to track the employees time spent in their Paid Breaks.
• Wage: Specify a wage the employee is paid.
Entry Method
This option determines the procedure for punching in and out by the employee at the
employee time clock. Select the desired method from the drop-down menu.
Review the description of the time clock entry methods below and choose your entry method.
• Validated: The employee is required to either punch in or out at the employee time clock. The correct
option blinks on the time clock display. The employee is required to press the correct key at that time.
Example: If an employee forgets to punch out the day before, they will be required to punch
out first before they can punch in for their current shift. The punch information can be edited
© 2020 IconTime. All rights reserved. Page 22
in the software so the proper punch out time and date is recorded on the reports.
• Non Validated: In and Out displays under the employee’s name at the employee time clock. The employee is
required to press the correct key at that time, either In or Out. Either entry is accepted by the employee time clock.
• Automatic: This is also known as “Swipe and Go”. After the employee enters their PIN/badge number,
the time clock displays the employee name and the message, “Entry Recorded.” The employee is
not allowed to make any other selections at the time clock. This provides a simple and quick method
to punch at the time clock. You cannot make lunch overrides or hours adjustments to these types
of punches. Refer to the Adding a Punch section on page 44 for additional information.
Lunch Time Deduction
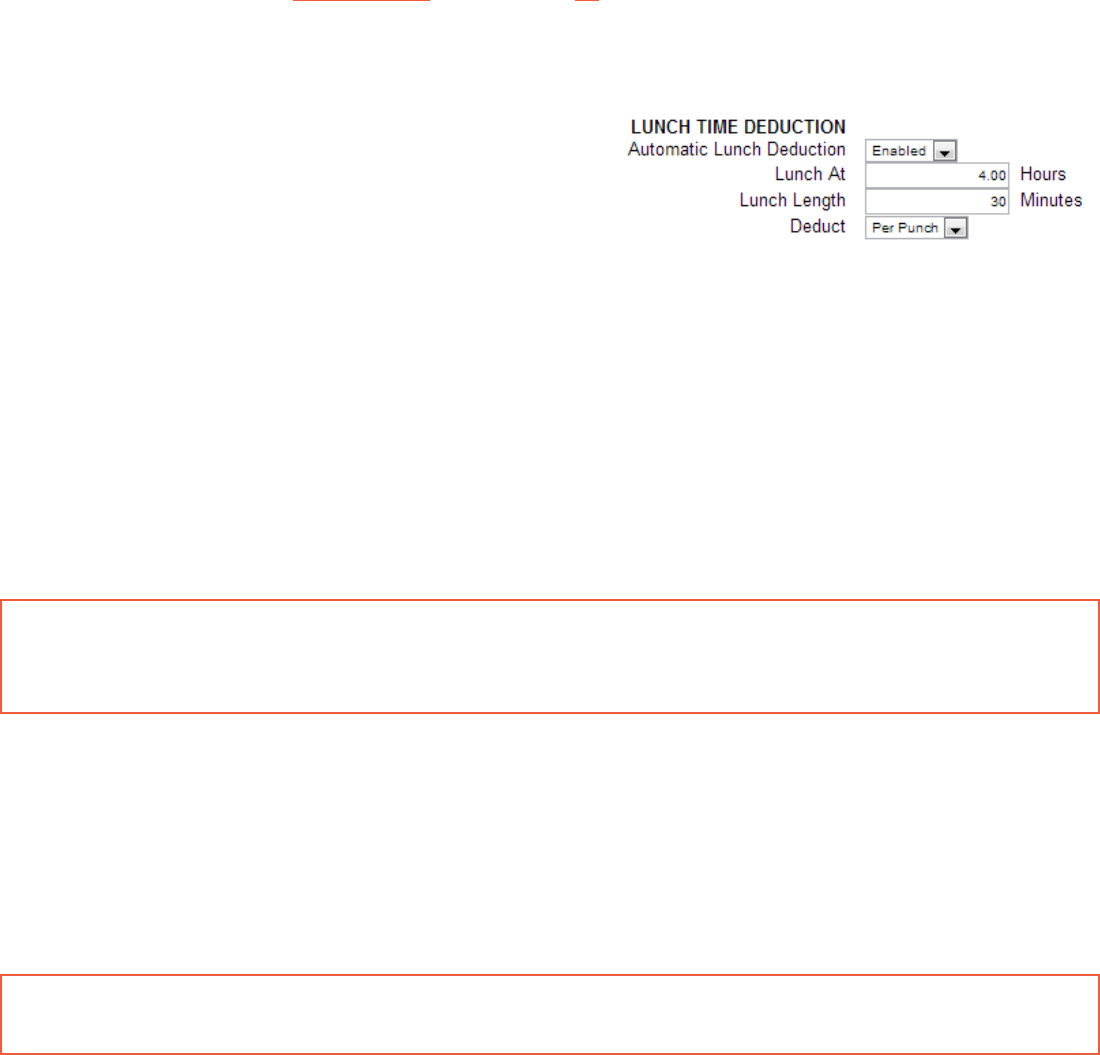
• Enable Automatic Lunch Deduction
to automatically deduct the employee
lunch time for the day or the punch pair.
• In the Lunch At field, enter the
number of hours the employee
is required to work before the
lunch period automatically deducts from the employee’s shift.
• Enter the amount of time in minutes to deduct for lunch (typically
30 to 60 minutes) in the Lunch Length field.
• Deduct:
o When Per Punch is selected the time worked from the last In punch is used to determine
whether the Lunch At threshold has been met. If an employee goes to break or punches Out
before the lunch time is deducted, the Lunch At calculation will start again once the employee
has clocked In. Selecting this option will allow lunch time to be deducted multiple times per day.
o When Per Day is selected, the total amount of the employee’s hours for the
day will be added up to determine whether the Lunch At threshold has been
met. Lunch deduction will occur once the threshold has been met.
Note: Only one lunch deduction will occur per day when Deduct is set
to Per Day. Manually entering a lunch deduction will prevent an
automatic lunch deduction from occurring that day.
Delete Employee’s Punches
Delete All Punches for this Employee: This is typically used when an employee
leaves the company and you want to re-use the employee ID (PIN).
• To delete the employee’s punches, click Delete all punches for this employee.
• Click OK.
Note: Before purging employee punches, we recommend that you save a backup
of your data. This allows you to view that employee’s data at a later date.
© 2020 IconTime. All rights reserved. Page 23
Chapter 4: Clocking In and Out
This section describes employee functionality at the clock including:
How to clock In and Out with a PIN, proximity badge, or through a web browser
Transfer to break
Time Clock Keypad Functions
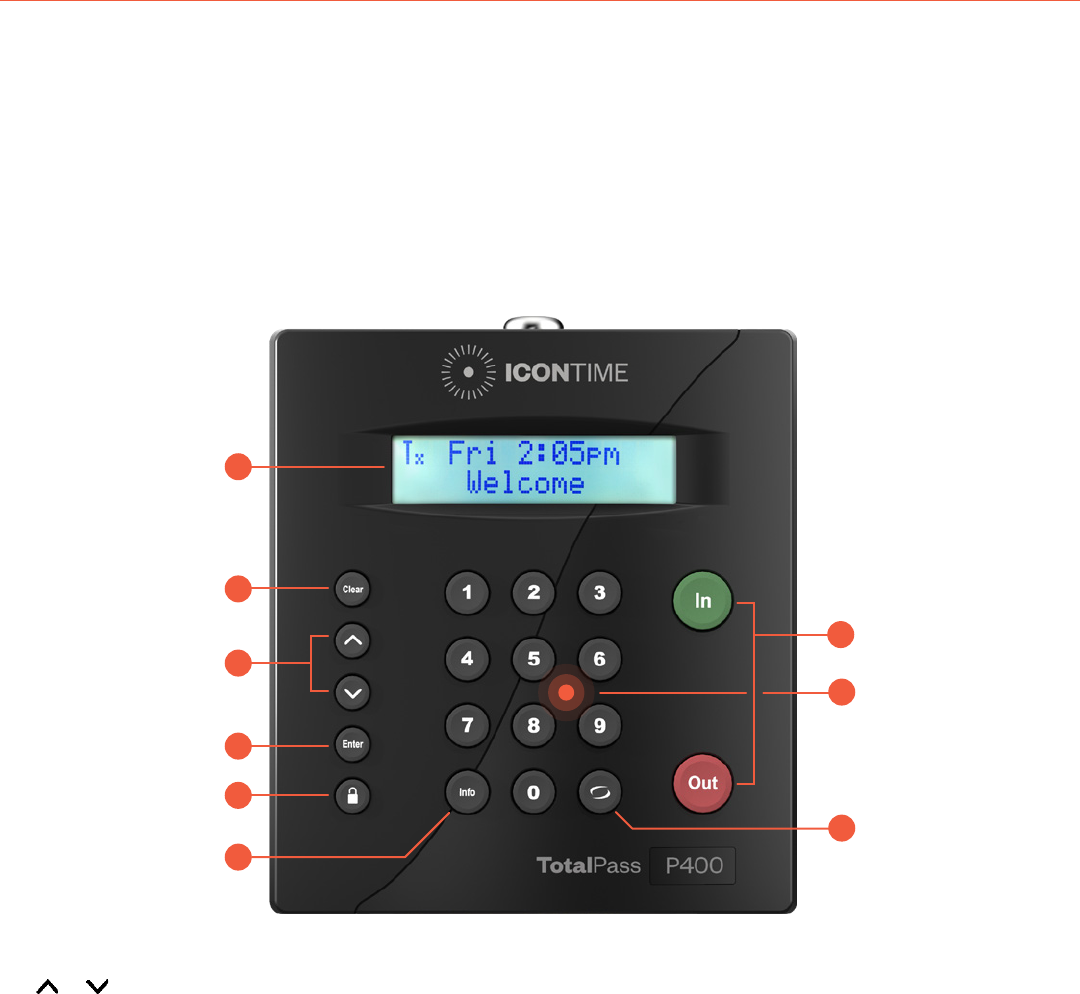
1. Clock Display
2. Clear - Returns user to the previous menu option.
3. or - Used to scroll up or down through menu options.
4. Enter - Selects and saves menu options.
5. Supervisor Mode - Allows supervisor to access advanced time clock terminal options.
6. Info - Displays daily and weekly hourly totals for the employee.
7. Break/Dept. Transfer - Used by the employee to transfer into a Department or Paid Break.
8. Built-in RFID Card Reader for scanning Proximity Badges
9. In/Out - Used by the employee to punch IN or OUT.
Punching In and Out
The employee procedure to punch In and Out at the time clock may vary depending on the entry method selected.
9
8
7
6
1
2
3
4
5

© 2020 IconTime. All rights reserved. Page 24
Keypad PIN Entry
Enter the pre-assigned 4-digit PIN and press Enter.
Proximity Badge Entry
For instructions on assigning proximity badges to your employee(s) and for instructions on clocking
In/Out using proximity badges, refer to Chapter 8: Alternate Employee Entry Options.
Web Punch Entry
For instructions on Web Punch Entry, refer to Page 39 Web Punch Entry
Tracking Paid Breaks
The TotalPass system allows for better management of employee paid breaks. Tracking paid breaks
allows you to better manage the time your employees are taking during their paid break periods.
Note: This option must be activated for each employee, as
discussed in Chapter 3: Setting Up Your Employees
To track time that an employee spends on their paid break, the employee must be assigned
to the break department and must transfer into the break department.
To transfer into the break department, follow the instructions below. The employee
must already be punched In to the employee time clock.
• Enter the assigned PIN/badge number on the time clock terminal, or wave the proximity badge in front of
the number pad.
• Instead of pressing Out, press the Break/Department Transfer key on the time clock.
• A message stating “Going To... Break” displays on the time clock. To clock into break, press Enter.
This punches the employee out of the work department and into the break department.
To transfer out of the break department and back to work:
• Enter your PIN/badge number at the time clock terminal, or wave the proximity badge in front of the number pad.
• Instead of pressing In or Out, press the Break/Department Transfer key on the time clock.
• A message stating Going To... Break displays on the time clock. Press Up or Down to select
the work department. To punch out of break and into work, press Enter. This punches
the employee out of the break department and into the work department.
© 2020 IconTime. All rights reserved. Page 25
Chapter 5: Generating Reports
Overview of the reporting options
Adding and editing punches
Entering Holiday and Non-work time
Reports in your application are designed to be intuitive to read and edit.; this creates
ease and simplicity when generating your reports on payroll day.
Reports Overview
TotalPass P400 comes with the following standard reports:
• Attendance Report displays all employee punch data sorted by date.
• Timecards Report displays punches and hours sorted by employee.
Adding a Punch
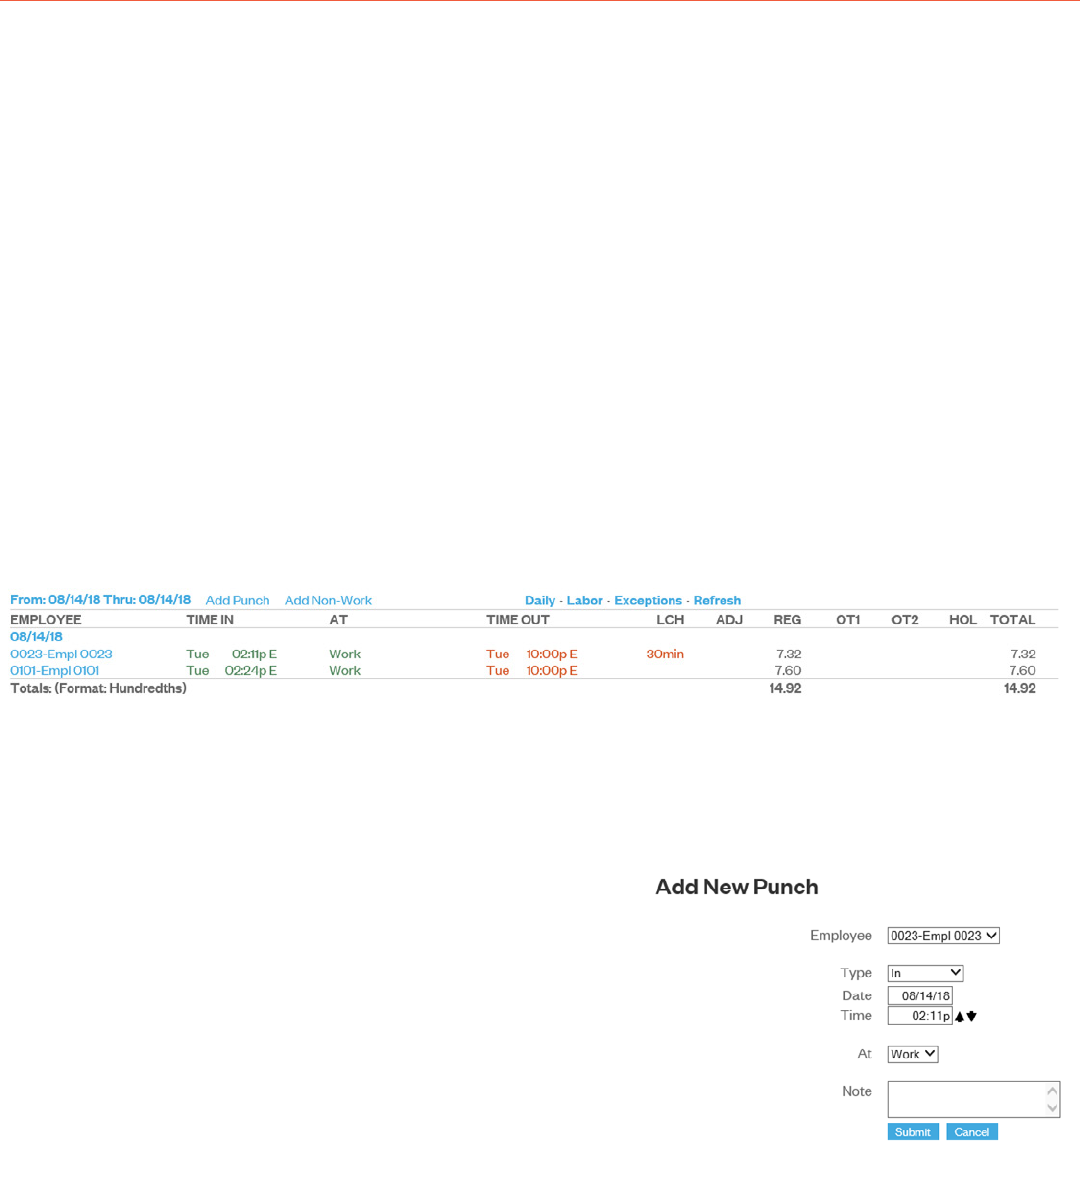
From a report screen, click Add Punch.
Perform the following when adding a punch:
• Confirm or select the correct employee.
• Select the punch type to add from the Type drop-down menu.
o Automatic allows the time clock to
select the appropriate punch type.
o When adding or editing an Automatic
punch in the TIME OUT column, change
the punch type from Automatic to Out,
to add a lunch or hours adjustment.
• Click in the Date field to use the calendar
to select the punch date.
• Type the time for the punch in the Time field. The
application assumes a.m. unless otherwise specified.
• For In punches, select the department from the Department drop-down menu.
• For an Out punch, you have the option to enter an additional lunch deduction. Type the
number of minutes for the employee lunch deductions in the Lunch field.
© 2020 IconTime. All rights reserved. Page 26
• For an Out punch, you have the option to enter an additional time adjustment. Type
positive or negative values to adjust time for the shift in the Adjust field.
• Type any applicable notes in the Note field. You have an additional option to print notes
that coincide with each particular punch. This feature is often used to track an event
that happened with that punch. A plus sign (+) accompanies that punch.
•
• Click Submit to save your changes.
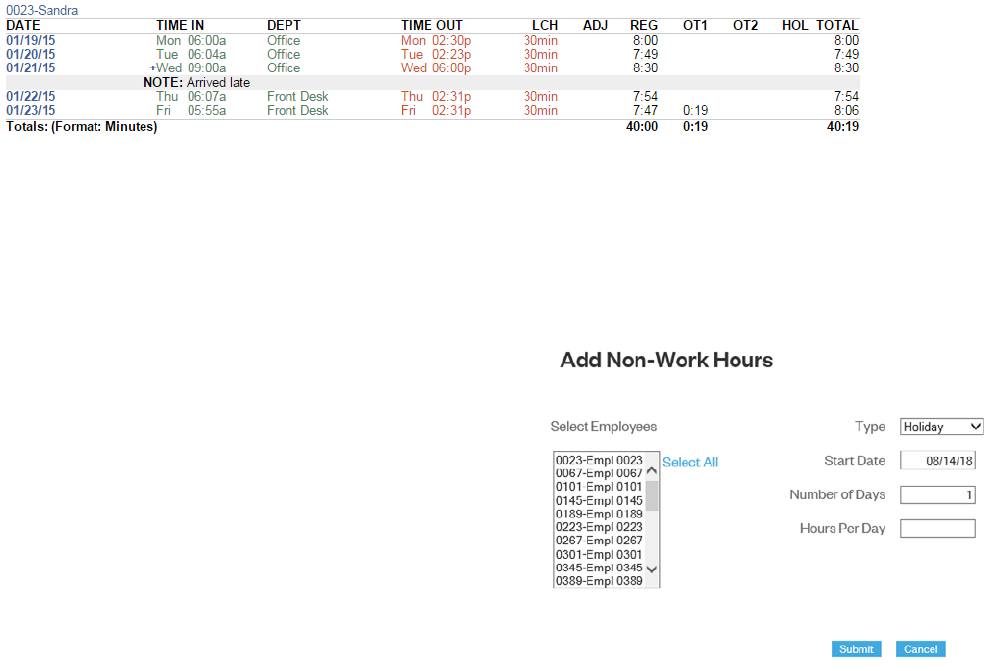
Adding Non-Work Hours (Holiday and Non-Worked)
A non-work punch is a punch where the employee was not actually working, but using benefit time like holiday or jury duty
Non-work hours can be assigned to one or more
employees across one or more days.
Perform the following when adding a non-work punch:
• Select Add Non-Work from the Timecard report.
• Select the employee(s) from the Select Employees list.
• Select the applicable punch type that you want
to add from the Type drop-down menu.
The available punch types are:
• NonWorked – used for employees working off site or other benefit time.
• Holiday
• Click in the Start Date field and use the calendar to select the date when the non-work hours should begin.
• Type the number of days to assign to the employee(s) in the Number of Days field.
• Type the number of hours to assign to the selected employee(s), for each day, in the Hours Per Day field.
• Type any applicable notes in the Note field. You have an additional option to print notes that
coincide with each particular punch. You can use a NOTE to describe the type of non-worked benefit
hours used. A plus sign (+) accompanies that punch. Click (+) to make the note visible.
• Click Submit, you will be directed to the Add Non-Work Hours Confirmation page.
• Review the information on the Add Non-Work Hours Confirmation page for accuracy.
• Click Submit to save your changes.
• Click Cancel to cancel the transaction.
© 2020 IconTime. All rights reserved. Page 27
• Click Back to go back to the Add Non-Work page and revise the data.
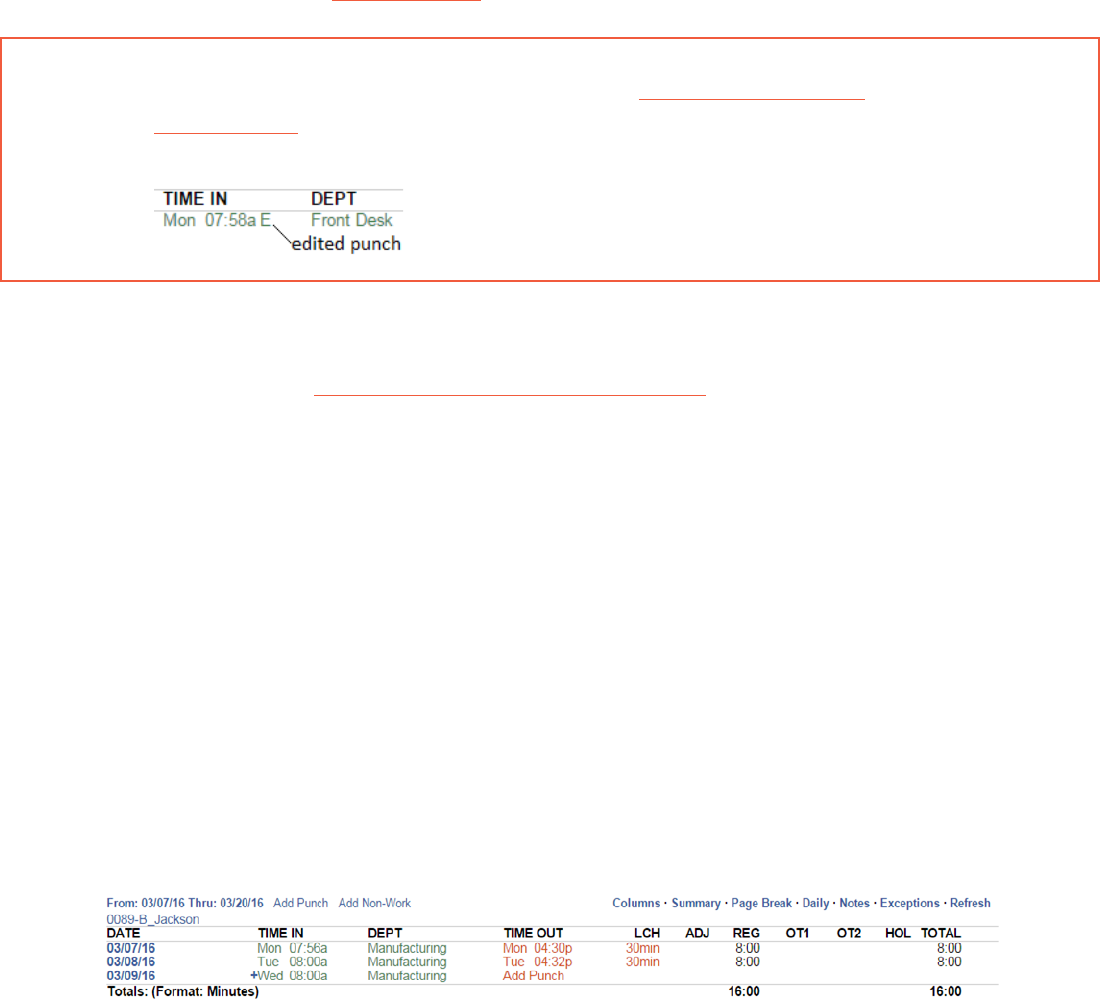
Editing a Punch
Modifying or editing a punch on the reports is simple.
• Click on the In or Out time you want to edit. Each punch entry on the report
is a link that will take you to the Edit a Punch window.
• Follow the instructions in the “Adding a Punch” section to edit your punch data.
Note: All edited and manually entered punches will be flagged on the
report with an ‘E’ next to the punch. Refer to “Setting Your Punch
Preferences” for instructions on disabling this option.
Using Batch Edits
Batch edits is an option selected in “Setting Your Device Preferences” on page 16.
To use Batch Edits with pop-up windows, follow the instructions below.
• Before editing punches, print the report for the pay period. Review which punches you need to edit.
• In the Report screen, click the applicable punch you want to edit or add.
• The Edit a Punch screen displays in a separate pop-up window.
• Make the desired punch edit, then click Submit.
• After editing all of the punches, click Refresh in the upper right of the
report screen. The edited data displays on the report.
Viewing Additional Reporting Details
Customizing your reports and viewing additional details on a report is uncomplicated.
The blue links in the reports are Web links that allow you to customize or view
details of your data. Some reports have additional detail options.
• Edit Employee Info: Click the employee’s name in the Employee column of the report to edit an employee’s details.
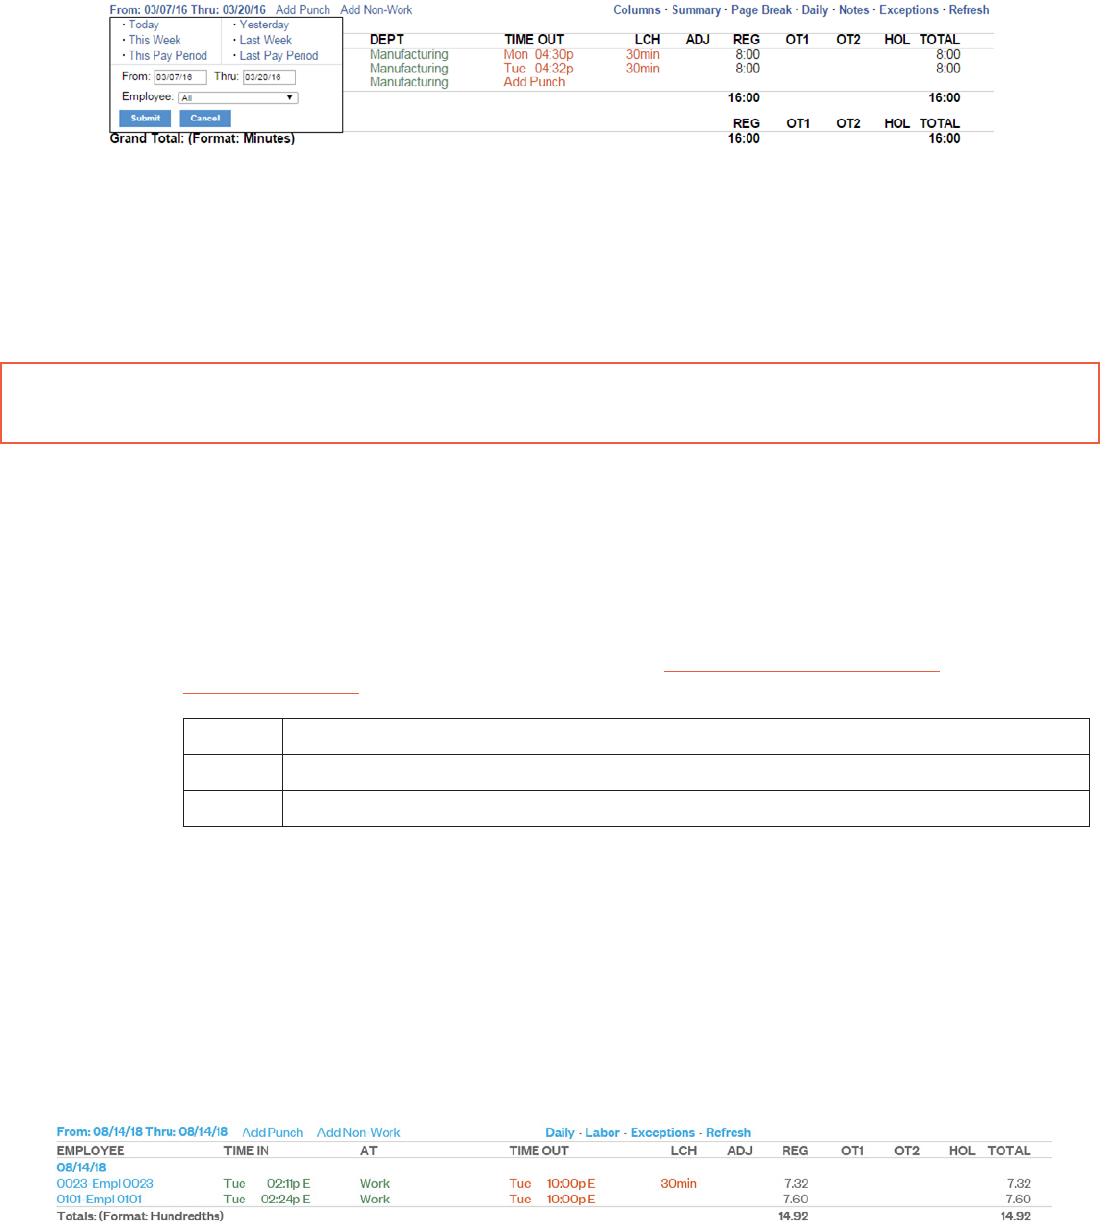
• Select a Report Time Period: To change the report timeframe, click the
date link at the top upper left of the Report screen.
© 2020 IconTime. All rights reserved. Page 28
o Click the appropriate predefined timeframe link or use the From and Thru
date fields to enter a custom timeframe to run the report.
o Click Submit after entering custom dates.
• Daily: This option displays the total hours worked for each day in a report. This is
convenient if the employee clocks in and out multiple times during the day.
Note: You can also click the date in the Employee column of the report to view daily
totals for a specific day. Click the date again to hide the information.
• Select Columns to customize which columns display on the report.
• The report font size will automatically adjust to fit the page.
• The Labor option will display the calculated labor cost (pay), entered
in the wage field in the Edit an Employee screen.
• Exceptions: Click this link to view punches that may require the attention of the payroll
manager. Exception types and settings are found under “Setting Your Alert Preferences
(Requires Upgrade)”. Descriptions of the exception flags are listed below.
H Punch pair reached the Alert High Hours
L Punch pair is below the Alert Low Hours
M Punch pair reached the Alert Maximum Time
Refresh: Click this link to update the report with all recent punch changes.
Using the Attendance Report
To view the Attendance Report, go to Reports | Attendance. The Attendance Report is designed to give you a quick at-
a-glance view of your employee’s daily attendance. Most companies use this report to view who has clocked In or Out
for the day.
Click on the date link in the upper left corner to choose the time period for
the report. From the resulting page, you can perform edits.

© 2020 IconTime. All rights reserved. Page 29
Using the Timecard Report
This report includes reporting options not available on the Attendance Report. The Timecard Report allows you to run
a report for one specific employee, or all employees. To view the Timecard Report, go to Reports | Timecards.
To filter by employee or date, click the date link at the top of the report:
• Click Summary at the top of the Timecard Report to display a summary of total hours without the punch detail.
• Click Page Break at the top of the Timecard Report to create a page break between employee timecards.
This also displays an employee signature line when you print timecards. This option is often used by
companies that keep a printed record of employee time and to show employee timecard approval.
• Click Export at the top of the report to download the report in comma-
delimited (CSV) format. The CSV export comes in two formats.
• CSV format includes relevant punch information for importing into payroll applications or editing in Microsoft Excel.
• CSV (Extended) format includes additional/internal punch information
used for integration with third-party applications.
© 2020 IconTime. All rights reserved. Page 30
Chapter 6: Sending to Payroll
TotalPass offers a few options for streamlining your payroll process
Creating an export file
Sending individual timecards
Create Payroll Export File
At the end of the pay period, compile employee data and transmit to payroll for processing.
The Payroll report option creates a payroll export file for the following platforms:
• Paychex Flex
• Sure Payroll
• Paychex Preview
• Paycom
• Paylocity
• ADP Workforce Now
• QuickBooks Online
• QuickBooks (Pro®, Premier, Enterprise)
The Payroll page allows you to download an
export file to your PC or to email a copy of the
Timecard report and the export file to one or more recipients. (Email requires the Email Alerts upgrade).
Note: Email functionality requires that the clock is connected via
Ethernet and that the SMTP Preferences be set.
To create the export file, go to Payroll | Export Payroll:
• Ensure that each of your employees has an assigned Payroll ID. Employees
without a Payroll ID will not be included in the payroll export file.
• Select Click here for a List of Employees without IDs.
• Customize the Payroll ID for each of the listed employees.
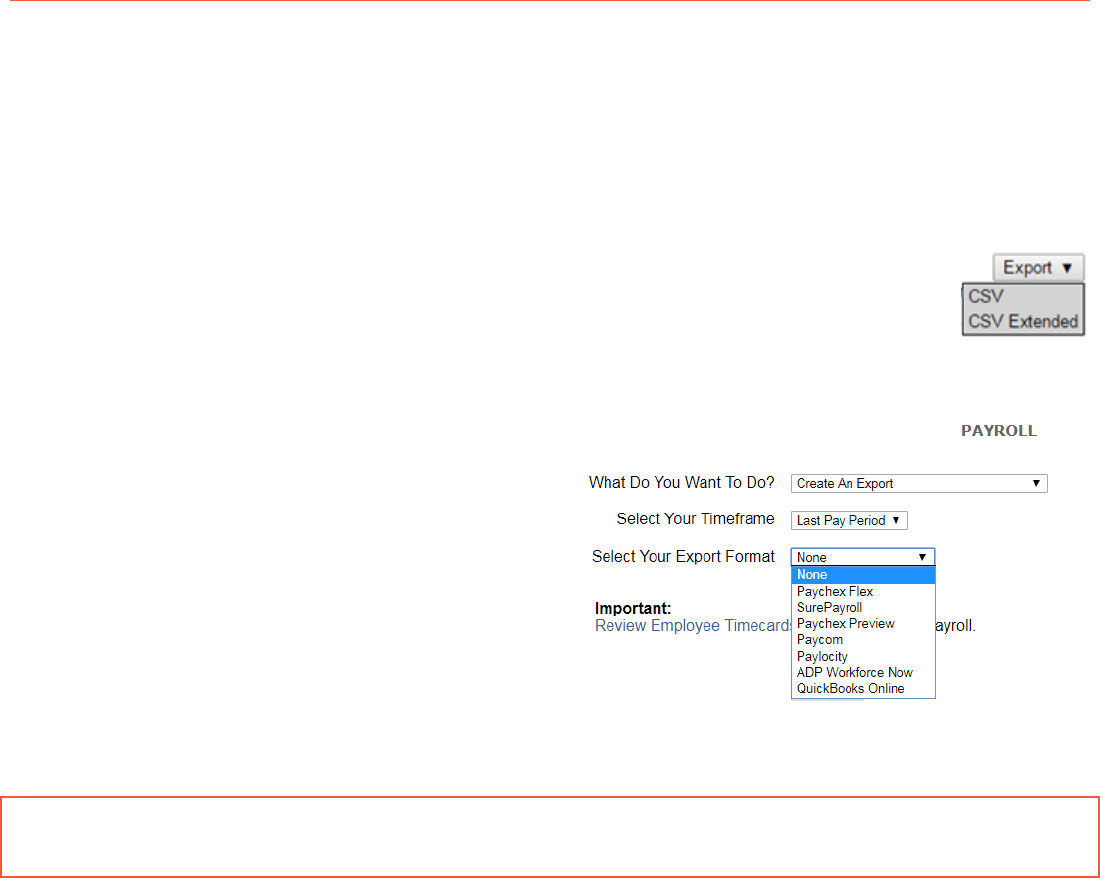
• Select Create An Export from the option What Do You Want to Do?
• Select the timeframe from the drop-down menu.
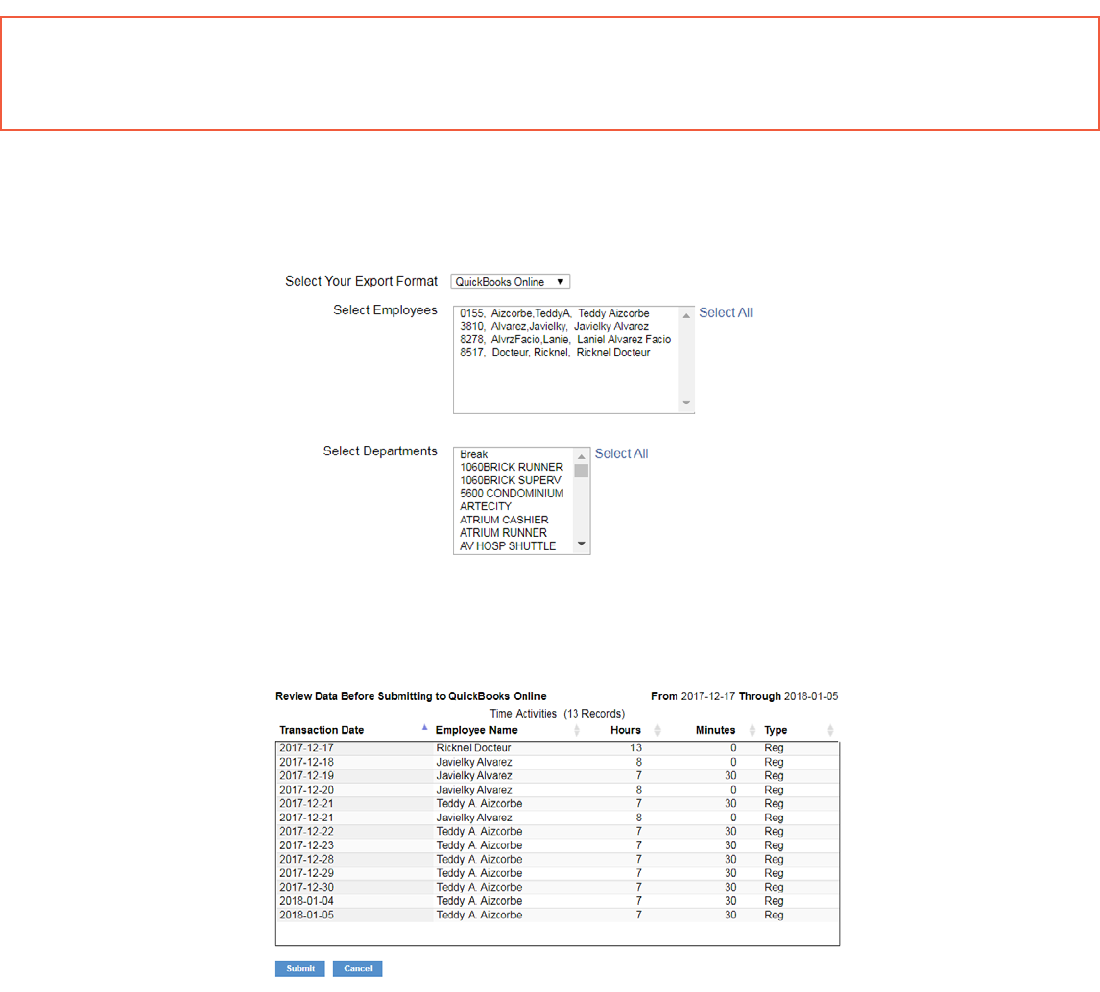
• Select your payroll provider in the Select your Export Format field.
o Paychex Flex
o SurePayroll
o Paychex Preview
o Paycom
o Paylocity
o ADP Workforce Now
o QuickBooks Online
© 2020 IconTime. All rights reserved. Page 31
• Press Submit.
Note: You are notified if any employees do not have an assigned Payroll
ID. The message and the option to view a list of these employees’
displays at the bottom of the Payroll report screen.
QuickBooks Export Payroll process
1. Users can use the Employees and Departments list boxes to filter and choose which employee hours are exported.
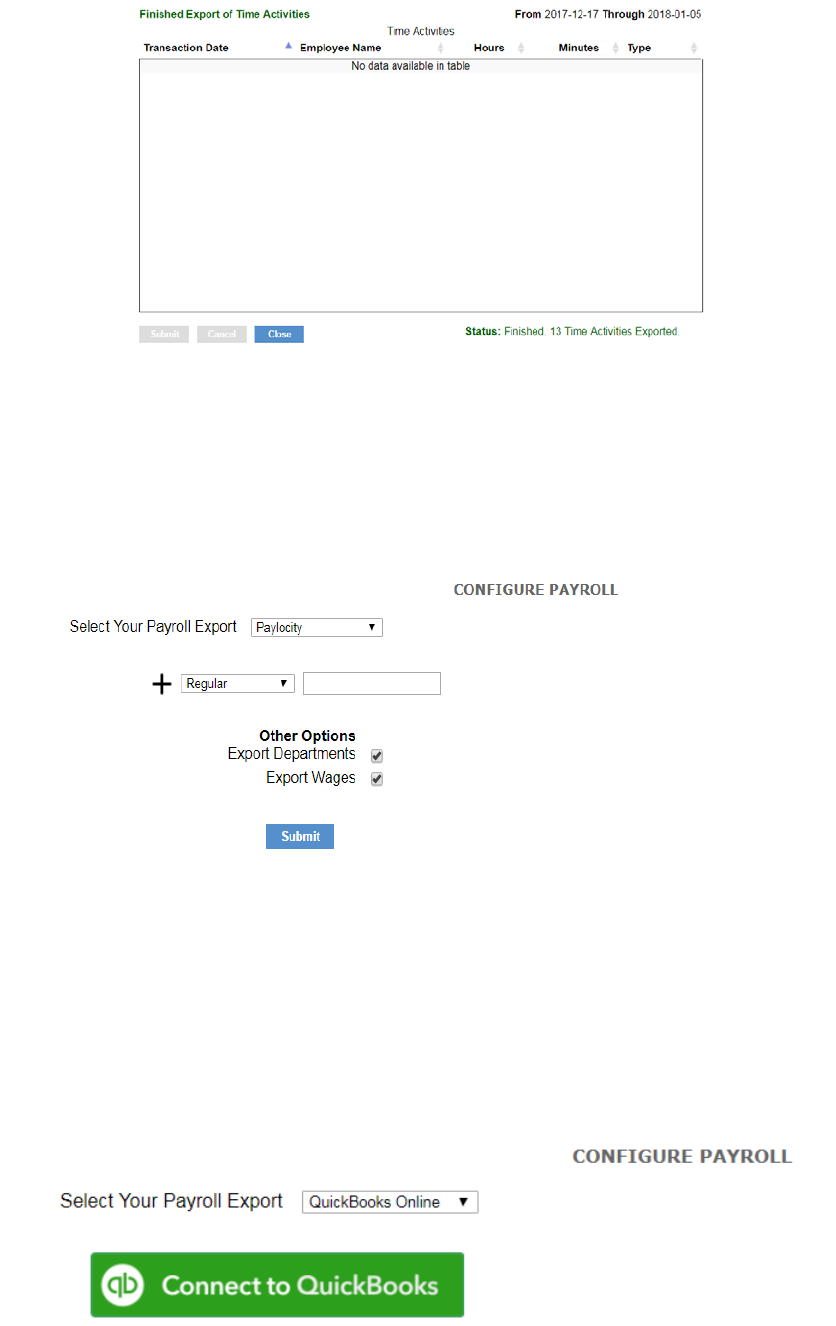
2. Users will be able to review the data before submitting to QuickBooks Online.
© 2020 IconTime. All rights reserved. Page 32
3. The final confirmation screen will have a total of the time activities exported.
Configuring Payroll
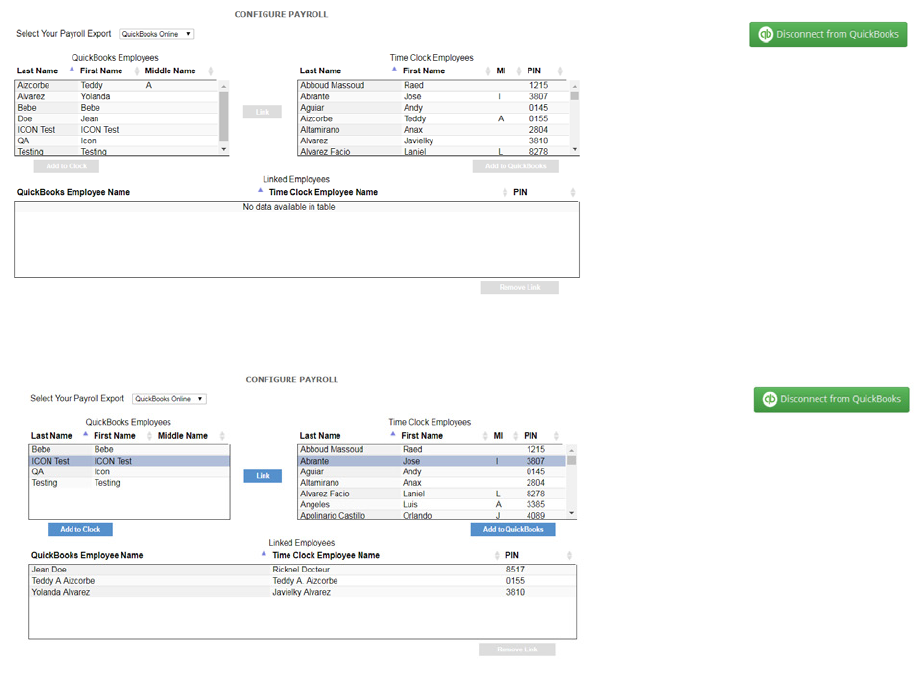
Navigate to Payroll | Configure Payroll
1. Users will be able to configure payroll specific pay/earning codes.
2. This applies to Paylocity, ADP Worforce Now, and QuickBooks Online
QuickBooks Online Configuration
QuickBooks configuration involves connecting to an online QuickBooks account and linking employees between
QuickBooks and the time clock, or adding them from one application to the other if they are not yet listed.
1. Within the Configure Payroll screen, select the QuickBooks Online payroll
export and then click on the Connect to QuickBooks button.
© 2020 IconTime. All rights reserved. Page 33
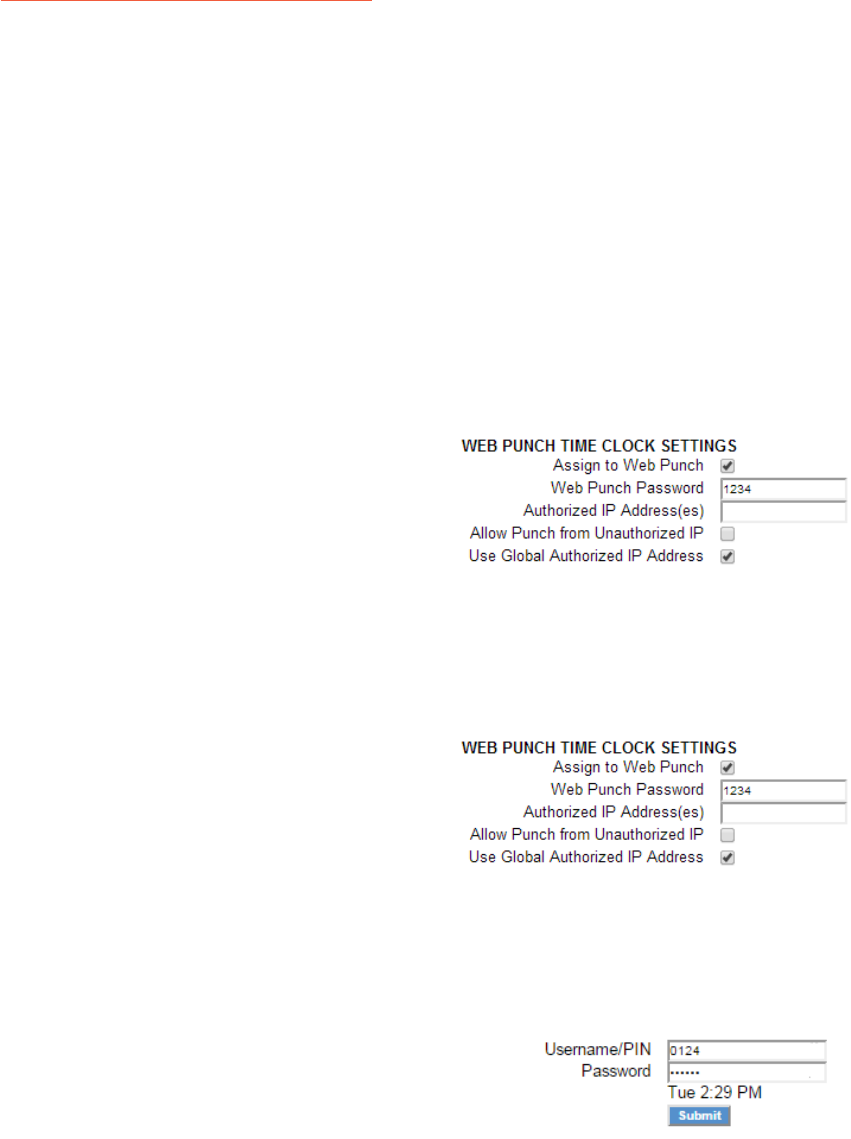
2. Select a QuickBooks employee and a time clock employee and click on the Link button to link them between
the two applications.
3. Linked employees will be displayed at the bottom in the Linked Employees list box.
1. Employees that don’t have a matching entry in either system can simply be added by
highlighting them and clicking on either Add to Clock, or Add to QuickBooks.
2. Linked employees can be unlinked by highlighting them and clicking Remove Link.

© 2020 IconTime. All rights reserved. Page 34
Chapter 7: Alternate Employee Entry Options
The TotalPass P400 offers various methods for employees to clock In/Out
Keypad with pre-assigned PIN (included)
Customized PIN 4-9 digits (not included with time clock, purchase required)
Proximity badge (not included with time clock, purchase required)
Web Punch Entry (not included with time clock, purchase required)
Using Proximity Badges
Proximity badges use the latest in RFID proximity technology and allow employees to clock In/Out by simply
waving the badge in front of the time clock keypad. There are many benefits to using proximity badges including;
minimizing buddy punching, quicker clock In, no PIN to memorize, and reduces touching the clock.
Proximity Badges can be purchased in boxes of 10 or 25 badges. These badges also conveniently fit into your
employee’s wallet or can be hung on a lanyard. Badges can be easily reassigned to a new employee if needed.
Assigning Proximity Badges to an Employee
Proximity Badges are assigned at the employee time clock terminal. Follow the
instructions below to assign your proximity badge to an employee.
• Enter into Supervisor Mode at your employee time clock terminal.
o Press on the time clock.
o Enter your security code - the default security code is “00 00 00”.
• Scroll through the options using Up or Down until you find the option Assign Badges and press Enter.
• The time clock display will prompt Enter ID Number. Use the keypad to
enter the ID number (PIN) of the employee and press Enter.
• Wave the badge in front of the time clock keypad (the 6 key is the optimal location to wave the badge). The clock will
display Assigned when the badge has been assigned to the employee.
The employee can now use the badge to punch In and Out. Repeat the steps above for each employee.
Note: To reassign a currently used badge, select the new employee in the Assign
Badges menu, enter the PIN of the new employee, and wave the badge. A Badge
Already Assigned message will appear. Press Enter to reassign the badge.
Punching In/Out Using Proximity Badges
Wave the badge next to the keypad of the time clock terminal to punch In or Out.
Follow the punch procedure established in “Punching In and Out”.
© 2020 IconTime. All rights reserved. Page 35
Web Punch Entry (Web Punch License purchase required)
With the Web Punch upgrade, the TotalPass P400 Time Clock allows you to capture your employees’ time
anytime, anywhere using a web browser from a device on the network (LAN, WAN) or internet.
For employees or supervisors to access the time clock application remotely over the Internet, additional
set up is required. Refer to “Chapter 12: Configure for Remote Access”, for more details.
The Web Punch Time Clock also offers advanced functionality like IP location restrictions
and GPS tracking to help better manage your employees’ punches.
Locking the Time Clock Terminal Keypad
This feature prevents entering a PIN before clocking In or Out.
• Select Settings | Preferences, then click the Device tab.
• Under Device Preferences, check the Lock Keypad checkbox and click Submit. By checking
this box, employees are no longer able to punch In or Out using their PIN number.
Setting Up Your Employees for Web Punch
Follow the instructions below to assign the employee to the Web Punch Time Clock.
• Select Lists | Employee List.
• Select an employee. The Edit an Employee screen displays.
• Check the Assign to Web Punch checkbox to
enable Web Punch for this employee.
• Type a password for the employee to use when punching In/Out on the
Web browser in the Web Punch Password field.
• Type the IP address that this employee may punch from in the Authorized IP Addess(es) field. Leave this field
blank to allow the employee to punch from any IP address.
• Check the Allow Punch from Unauthorized IP checkbox to
allow the employee to punch from an unauthorized IP address,
but have those punches flagged on the reports for review.
• Check the Use Global Authorized IP Address check-
box to allow an authorized IP address for all employees.
• Click Submit to save your settings. Repeat the steps above to assign additional employees to Web Punch entry.
If you exceed your Web Punch License limit, you will receive an error message stating that you do not have enough Web
Punch Licenses available.
Punching In/Out Using Web Punch
Employees assigned to the Web Punch Entry can punch In/
Out anytime, anywhere, using a web browser interface.
Follow the instructions below to punch in or out using the Web Punch Time Clock.
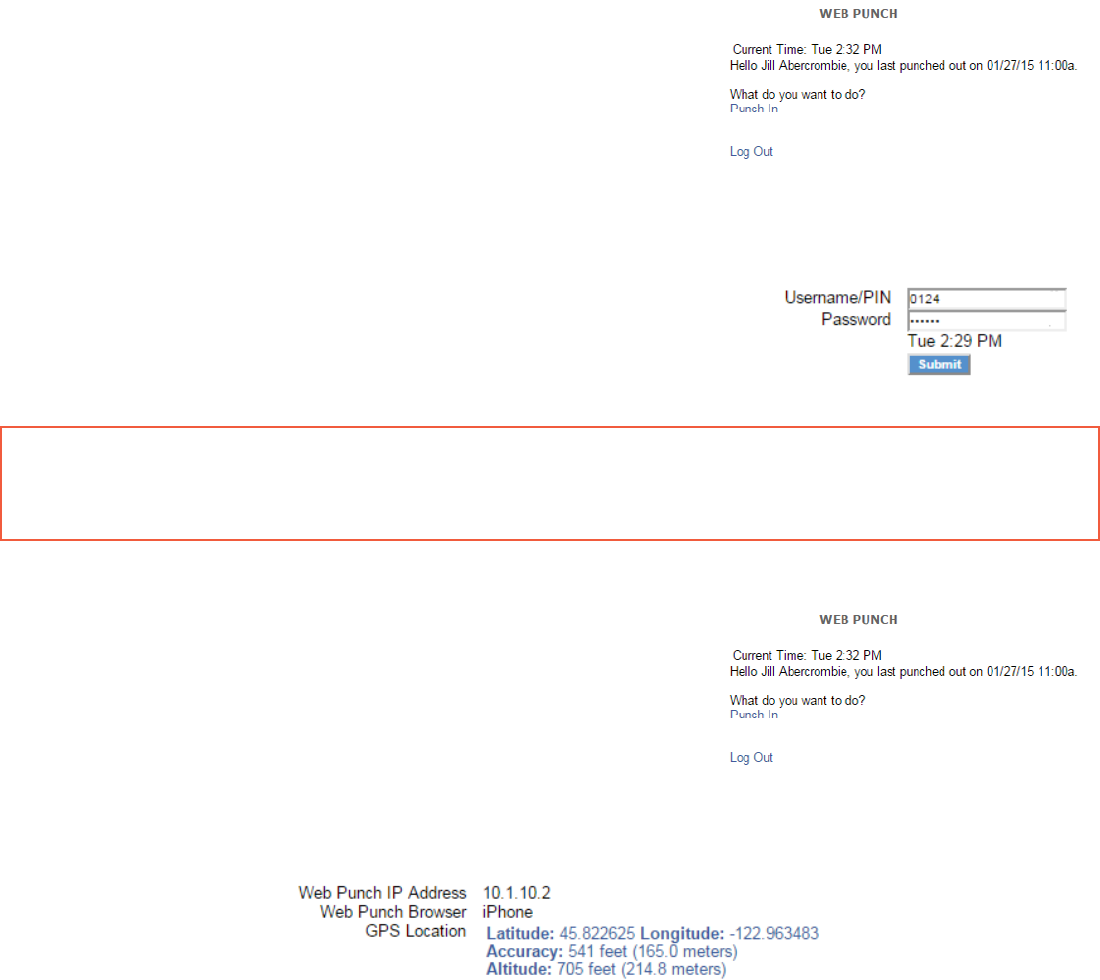
• Open the employee time clock Login page.
© 2020 IconTime. All rights reserved. Page 36
• Type the assigned PIN/badge number in the Username/PIN field.
• Type the employee’s assigned Web Punch password in the Password field.
• Click Submit. The employee Web Punch screen displays.
• Select the appropriate option (Punch In, Punch Out, or Department Change) to complete your punch.
• If the employee has the ability to change departments, select the department.
• Click Confirm.
• After punching In or Out, the Web Punch screen
lists the employee punch information.
o Week Hrs: Lists the total hours the
employee worked for the week.
o Day Hrs: Lists the total hours the
employee worked for the day.
o Punch Hrs: Lists the total hours the employee worked for that punch pair.
Clocking In/Out using GPS Location Tracking
If an employee clocks In/Out using a web browser, additional punch
information is available.
Note: A punch that includes GPS location information is flagged with
a ‘G’ on the reports. By clicking on that punch you can view
additional information provided by the phone’s GPS.
GPS Location
• Latitude/Longitude: The location of the
employee when they created the punch.
• Accuracy: The accuracy of the coordinates given
by the GPS.
Example: The accuracy of this punch is up to 372 feet.
In other words, the employee was within
a 372ft radius of the coordinates given.
• Speed: States how fast the employee was traveling when they created the punch.
By using Google Maps integration and clicking on the GPS link, you can view
the location of the employee at the time of the punch.

© 2020 IconTime. All rights reserved. Page 37
IP Address Restriction
Using IP Address Restriction, you can restrict employees from punching from unauthorized
locations. This information can be flagged and tracked on your reports.
IP address restrictions are enforced by setting authorized IP addresses globally (company-wide) and/or by employee.
Setting Authorized IP Addresses Globally
Global Authorized IP Address(es) assigns the IP address that all employees can use. To set this, follow the instructions below.
• Select Settings | Preferences and click the Device tab.
• In the Global Authorized IP Address(es) field, enter the IP address(es) of the computer (or
other web-enabled device) the employees are authorized to punch in/out on.
• The authorized IP address can be listed in the following ways.
• Any IP Address: Leave the field blank to allow employees to punch in/out from any IP address.
• Multiple IP Addresses: Put a comma between the authorized IP addresses
to allow the employee to punch from any IP address listed.
Example: 192.168.3.6, 192.168.3.78
• Range of IP Addresses: The employee can punch at computers
with an IP address that falls within the 30-45 range.
Example: 192.168.3.30-45
• Click Submit to save your changes.
Note: If an employee is not restricted to punch In/Out from the Global
Authorized IP Address, uncheck the Use Global Authorized IP
Address option in the employee’s Edit an Employee screen.
Setting Authorized IP Addresses by Employee
The employee’s Authorized IP Address(es) field assigns the IP address that a particular employee is
authorized to punch in/out. To set the authorized IP address(es), perform the following instructions.
• Go to the Employee List and select the employee.
• In the Authorized IP Address(es) field, enter the IP Address(es) of the computer (or
other web-enabled device) that the employee is authorized to punch In/Out.
• You can list the authorized IP address(es) in the following ways.
• Any IP Address: Leave the field blank to allow employees to punch in/out from any IP address.
• Multiple IP Addresses: Put a comma between the authorized IP addresses
to allow the employee to punch from any IP address listed.
Example: 192.168.3.6, 192.168.3.78
• Range of IP Addresses: The employee can punch at computers
© 2020 IconTime. All rights reserved. Page 38
with an IP address that falls within the 30-45 range.
Example: 192.168.3.30-45
• Check the Allow Punches from Unauthorized IP checkbox to allow employees to punch In/out from an
unauthorized IP address. Punches from unauthorized IP addresses are flagged with an X on the reports.
• Click Submit to save your changes.
Running Reports with Web Punch
On your reports, web punches are flagged with a W after the punch time. If a punch
comes from an unauthorized IP address, it is flagged with an X.
By clicking on the punch, additional information about that punch displays.
• Web Punch IP Address: Lists the IP address of the computer/device the employee punched in/out from.
• Web Punch Browser: Lists the web browser the employee used while punching in/out.

© 2020 IconTime. All rights reserved. Page 39
Chapter 8: Maintaining Your Time Clock
Learn to maintain your time clock for optimal performance
Backing up and restoring data to your time clock
Removing punches from your system
Resetting the time clock passwords
Creating a Data Backup
It is important to make a backup (copy) of your employee time clock data periodically. Backups help ensure
that your data is secured on a regular basis and can be restored if necessary. We recommend creating a
backup of your time clock data each pay period and prior to performing any updates to your time clock.
Data Backup from the Software Interface
Follow the instructions below to create a backup of your time clock’s data:
• To create a backup file, select Files | Create Backup.
• Click Submit to create a backup in the Save to Backup File screen. Click Save.
• A file name is automatically assigned for you. The file name includes the current date for easy reference.
Example: A typical file name might be icon-2020-08-15.db.
• If you prefer a different file name, enter the name in the File name field.
• Browse to the directory where you would like to save the file.
• Click Save.
• After the download is complete, click Close.
Data Backup to a USB Flash Drive
Creating a backup of your data can be simplified by saving your backup to a flash
drive — a data storage device with an integrated USB interface.
Follow the directions below to create a backup of your time clock data using a USB flash drive.
• Plug the USB flash drive into the bottom of the time clock.
• Enter into Supervisor Mode:
o Press on the time clock.
o Enter your security code - the default security code is “00 00 00”.
• Press Up or Down until the DOWNLOAD BACKUP option displays.

© 2020 IconTime. All rights reserved. Page 40
• Press ENTER.
The clock will display Backing up data and then Backup complete.
Note: The backup file saved on the USB flash drive is called backup.db. This file
can be renamed and transferred to a folder on your main computer.
Restore Time Clock Data Backup
On occasion you may need to restore historical data to your time clock. Follow the
instructions below to restore a backup of your time clock data.
Important: Restoring a backup file will OVERWRITE the current data on
the clock. Create a CURRENT backup of your data before
attempting to restore and view “historical” data.
Restore a Time Clock Data Backup from the Software Interface
• To restore a backup file, select Files | Restore Backup.
• Type your password in the Current Password field.
• Click Browse and navigate to the location of your backup file.
• Select the file in the Choose File window and click Open.
• Click Submit in the Restore Backup File screen to restore the backup file. A warning message will
display reminding you that your current data will be overwritten at the employee time clock.
• Click OK to continue. It may take several minutes to restore a backup file. The employee
time clock will display a Please Wait and then a Performing Restore message.
• After the restore is complete, you will be required to log back into the time clock to view the backup information.
Note: The backup is a proprietary file that cannot be used
or opened using any other program.
Restore a Time Clock Data Backup from a USB Flash Drive
Restoring a backup of your data is easy using your USB flash drive. Be sure to save a current backup file
before restoring another backup. Follow the directions below to restore a backup from a USB drive.
• Copy the backup file data to the root of the USB flash drive.
• Rename the file to backup.db and ensure the name is all in lower case letters.
• Connect the storage device to the bottom of the employee time clock.
• Enter Supervisor Mode on the employee time clock.
© 2020 IconTime. All rights reserved. Page 41
o Press on the time clock.
o Enter in your security code - the default security code is “00 00 00”.
• Press Up or Down until RESTORE BACKUP displays and press ENTER.
• If the file is found, Restoring Data, then Performing Restore displays. The time clock reboots.
• After the time clock reboots, log back into the employee time clock software to view your historical data.
Removing Data from Your Time Clock
Before removing punch data from your clock, be sure to save a backup of your existing data.
• Go to Files | Delete Old Punches.
• Select a date using the calendar in the Delete Punches Prior to field.
• Click Submit to remove all punches up to the date specified.
Note: When selecting a date, any data prior to that date will no
longer be available as part of your active database.
• Click Cancel to go back to the time clock Home page.
Updating Your Time Clock
Occasionally, IconTime releases new updates for your employee time clock. These updates
are provided for free and often include new features and improvements.
Note: Before performing updates to your employee time clock, we
recommend that you save a backup of your data. Refer to
Creating a Data Backup for instruction on how to do this.
Updating Your Time Clock from the Software Interface
Follow the instructions below to update your TotalPass Time Clock.
• Download the time clock update file from our website to your desktop.
• http://www.icontime.com/totalpassupdate
• From the Navigation menu, go to Files | System Update.
• In the System Update screen, type your time clock password in the Current Password field.
• Click Browse to locate and select the update.bin file in the File Upload screen.
• Click Open in the File Upload screen.
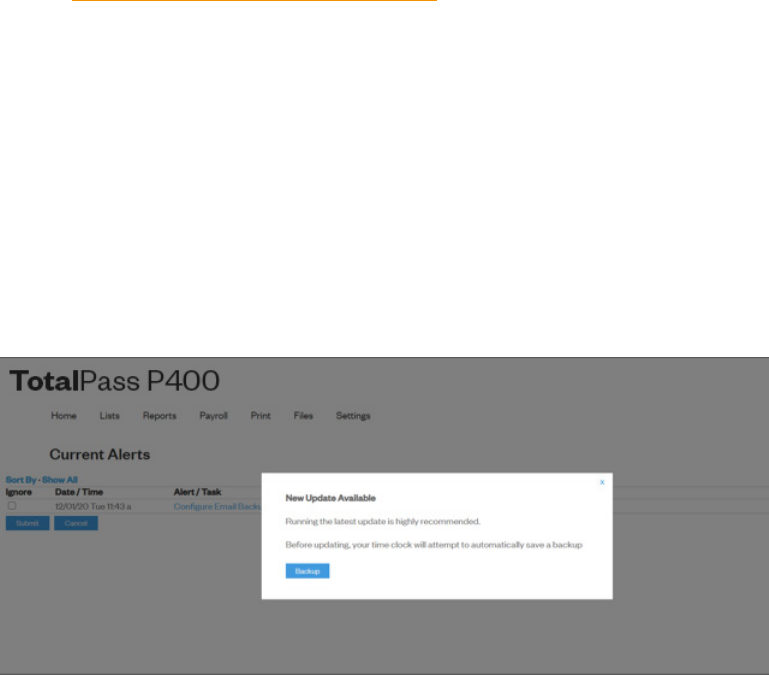
© 2020 IconTime. All rights reserved. Page 42
• Click Submit in the System Update screen.
• A “backup your data” pop-up window displays. If you already created a backup of your data,
disregard this message by clicking OK. Your time clock starts the update process, then
automatically reboots. Wait for this process to complete as it may take up to 15 minutes.
• When rebooting is complete, click Home to log back into your time clock.
Updating Your Time Clock Using a USB Flash Drive
Updating your time clock is even faster if you use a USB flash drive.
• Download the time clock update file from our website to the root directory on your storage device.
• http://www.icontime.com/totalpassupdate
• Connect the storage device to the bottom of the employee time clock. Your time clock begins
the update process and automatically reboots. Wait for this process to complete.
• When the reboot is complete, log back into your time clock.
Auto-Update
Clock Admins and supervisors with System Update permissions will receive a New Update
Available notification on the homepage with a recommendation to backup. They will be
able to update right from the clock once a local backup file has been created.
New Update Alert
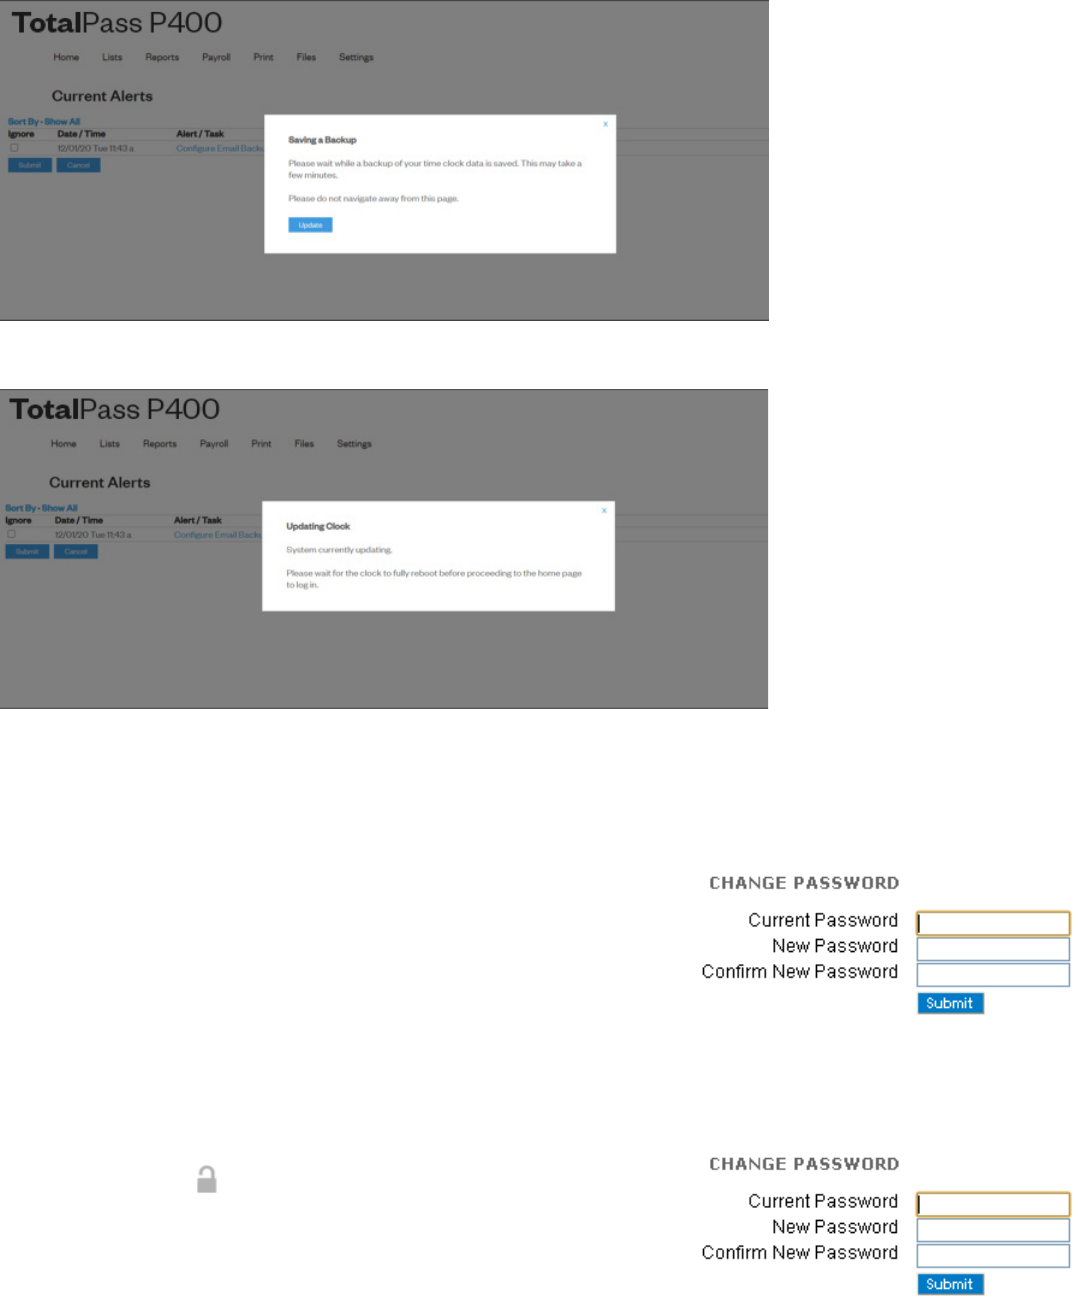
© 2020 IconTime. All rights reserved. Page 43
Saving a Backup
Updating Clock
Resetting Your Time Clock Password
Changing Your Time Clock Software Interface Password
You can change the password by going to Settings | Change Password
• Enter your current password in the Current Password field.
• Type your new password in the New Password field.
• Type your new password again in the Confirm New Password field.
• Click Submit.
Resetting the Software Interface Password
• Enter into Supervisor Mode:
o Press on the time clock terminal.
o Enter your security code - the default
security code is 00 00 00.
• Scroll through the options using Up or Down until you
find the option Reset Password and press Enter.
© 2020 IconTime. All rights reserved. Page 44
• Press In to reset the password or Out to cancel.
• Once the password is reset you will receive the message Password Set Successfully on the time clock display.
• At the time clock Login page enter the default login information, and click Submit.
o Default Username: admin
o Default Password: admin
• Change your password.
o Type the default administrator password.
o Type your new password.
o Type your new password.
o Confirm your new password.
Resetting the Supervisor Mode Security Code
The Supervisor Mode security code is set from the software interface. The default supervisor code is
00 00 00. It is recommended you change the default code to a new code using the steps below:
• Select Settings | Preferences from the Navigation menu.
• Click the Device tab.
• Type the supervisor code in the Supervisor Code field. This is required to
access Supervisor Mode on the employee time clock terminal.
• Click Submit to save your settings.

© 2020 IconTime. All rights reserved. Page 45
Chapter 9: Time Clock Terminal Supervisor Mode
Advanced Supervisor Mode Options
Customize Network Settings
Reset Software Admin Password
Log Into Supervisor Mode
• Enter into Supervisor Mode at your employee time clock terminal.
o Press on the time clock terminal.
o Enter your security code - the default security code is “00 00 00”.
• Scroll through the options using Up or Down.
• Press Enter, when you find the option you would like to view.
• To exit Supervisor Mode, press Clear.
Parent Clock Supervisor Mode Settings
View IP Address
Look up the IP address assigned to the clock. Also allows for assigning
a static IP address, subnet mask, gateway, and DNS.
Network Settings
LAN Settings
Set IP Address
Look up the Ethernet IP address assigned to the clock. Also allows for
assigning a static IP address, subnet mask, gateway, and DNS.
To assign a static IP address, follow the instructions under “Assign a Static IP Address to the Time Clock” .
• To erase all network settings and revert back to DHCP so that the router will
assign the IP address, set the IP address to 000.000.000.000.

© 2020 IconTime. All rights reserved. Page 46
Wi-Fi Settings
Set IP Address
Look up the Ethernet IP address assigned to the clock. Also allows for
assigning a static IP address, subnet mask, gateway, and DNS.
• To assign a static IP address, follow the instructions under ”Assign a
Static IP Address to the Time Clock” on page 60.
• To erase all network settings and revert back to DHCP so that the router will
assign the IP address, set the IP address to 000.000.000.000.
View Networks
Allows you to view wireless networks in range, connect to a wireless network, or switch to a different wireless
network. Refer to the “Wi-Fi Connection” on page 48 for instructions on connecting wirelessly.
WPS Setup
Allows you to connect to a wireless network using WPS. Refer to page 49 for instructions on using WPS connection.
Assign Badges
This option is used when assigning a proximity badge to an employee. Refer to
”Assigning Proximity Badges to an Employee” on page 34.
Set Date/Time
• From Supervisor Mode, scroll through the options using Up or Down
until you find the option Set Date/Time and press Enter.
• The Set Date option displays.
o The Month field flashes. Use Up or Down to select the current month, and press Enter.
o In the Day field, use Up or Down to select the current day of the month and press Enter.
o In the Year field, use Up or Down to select the current year and press Enter.
• The Set Time option displays.
o The Hour field flashes. Use Up or Down to select the current hour and press Enter.
o In the Minute field, use Up or Down to select the current minutes and press Enter.
o In the AM/PM field, use Up or Down to select either A for a.m. or P for p.m. and press Enter.
• Once the new time and date is set, Date/Time and Set Successfully displays on the time clock
display. You are taken back to Supervisor Mode menu. Press Clear to exit Supervisor Mode.
View Serial #
Shows the unique serial number assigned to the individual time clock terminal. The serial number is used
to activate your 30-day free support trial, verify warranty status, and purchase software upgrades.

© 2020 IconTime. All rights reserved. Page 47
View Version #
The version number refers to the software version currently installed on your time clock. Refer to page page 41
for instructions on Updating Your Time Clock and ensure that your time clock is running the latest version.
Download Backup
This option is used to back up your time clock data. Refer to “Data Backup to a USB Flash Drive” on page 39.
Restore Backup
This option is used to restore data into your time clock. Refer to
“Restore a Time Clock Data Backup from a USB Flash Drive” on page 40.
Enable Upgrade
This option is used to unlock additional upgrade features in your time clock.
Refer to ”Enabling Software Upgrades” on page 52.
Reset Password
If you forget your login password, this option is used to reset your password to default. Refer
to ”Changing Your Time Clock Software Interface Password” on page 43.
Erase All Memory
Erasing all memory resets the clock back to factory default. Follow the instructions below to Erase All Memory.
• From Supervisor Mode, scroll through the options using Up or Down until
you find the option Erase All Memory and press Enter.
• The time clock will display Erase All Memory IN=YES CLEAR=NO.
• Press IN to confirm and erase all the data in the clock and return it to factory defaults.
Download Log
Downloading a log file is used when you need our support team to help troubleshoot your system.

© 2020 IconTime. All rights reserved. Page 48
Chapter 10: Connecting to the Clock
Multiple connection options to access your time clock in no time:
Easily connect to your wireless network over Wi-FI.
For a fast and reliable connection, use the included Ethernet
cable to connect the time clock to your Network.
For simple access from one computer, connect using Direct Connect Ethernet or USB.
Wi-Fi Connection
TotalPass offers a few Wi-Fi connection options, for your convenience:
• Using the Clock Interface
• Using the Software Interface
• Using WPS, for extra fast set up
Connecting Using the Clock Interface
The first time that you turn your time clock on, if it detects a wireless network in range, it will prompt you to connect your
time clock to the wireless network. To return to this option, and connect to a wireless network, follow the instructions below.
1. Enter into Supervisor Mode at your employee time clock terminal.
• Press on the time clock.
• Enter your security code. The default security code is 00 00 00.
2. Use the up or down arrows to scroll until you find Network Settings.
3. Press Enter.
4. Find Wi-Fi Settings.
5. Press Enter.
6. Use the up or down arrows to scroll until you find View Networks.
7. Press Enter. A list of available wireless networks displays.
8. Use the up or down arrows to scroll until you find the appropriate network, then press Enter.
9. When prompted, enter the wireless network password using the up or down
arrows to find the first character of the password, then press Enter.

© 2020 IconTime. All rights reserved. Page 49
Note: The default mode for the password is alpha lower case. To change
the mode, press the Department Transfer icon on the bottom right
of the clock’s keypad. To erase a character, press Clear.
10. Repeat step 9 until all characters of the password have been entered. Connect to the Clock.
11. Press Enter. When connected, a confirmation displays with the IP address.
12. Write down the IP address.
13. Open a Web browser on your PC. Type the IP address in the Web browser URL bar, press Enter.
14. You should be directed to the time clock Login page.
Connecting Using a WPS Button
1. Enter into Supervisor Mode at your employee time clock terminal.
• Press on the time clock.
• Enter your security code. The default security code is 00 00 00.
2. Use the up or down arrows to scroll until you find Network Settings.
3. Press Enter.
4. Use the up or down arrows to scroll until you find Wi-Fi Settings.
5. Press Enter.
6. Use the up or down arrows to scroll until you find WPS Setup.
7. Press Enter.
8. Use the up or down arrows to scroll until you find Push.
9. Press Enter. Press the WPS key on your wireless router within 2 minutes.
10. When connected, a confirmation displays with the IP address.
11. Write down the IP address.
12. Open a Web browser on your PC. Type the IP address in the Web browser URL bar, press Enter.
13. You should be directed to the time clock Login page.
Connecting Using a WPS with PIN
Enable WPS PIN Connection on the Clock
1. Find the WPS PIN on the label on your router.
2. Enter into Supervisor Mode at your employee time clock terminal.
• Press on the time clock.
© 2020 IconTime. All rights reserved. Page 50
• Enter your security code. The default security code is 00 00 00.
3. Use the up or down arrows to scroll until you find Network Settings.
4. Press Enter.
5. Find Wi-FI Settings, press Enter.
6. Find WPS Setup, press Enter.
7. Find PIN, press Enter.
Connect to the Wireless Network
1. Use the up or down arrows to scroll until you find View Networks, press Enter.
2. Find your Network in the list, using the up or down arrow, press Enter.
3. When prompted, enter the WPS PIN number using the keypad, press Enter.
4. When connected, a confirmation displays with the IP address.
5. Write down the IP address.
6. Open a Web browser on your PC. Type the IP address in the Web browser URL bar, press Enter.
7. You should be directed to the time clock Login page.
Connecting Using the Software Interface
To connect your time clock to the wireless network using the software interface, it must
be connected to your network or computer using the Ethernet or USB cable.
1. Log into your time clock software interface, on either a Parent Clock or Child Clock.
2. Go to Settings | Network Settings. The Wi-FI Network Settings
screen displays the available wireless networks.
3. Click the appropriate network.
4. Type the password in the available field, then click Connect.
5. The network selected appears at the top of the list, with an indication
the time clock is “connected” to the wireless network.
Ethernet Connection
Connect your time clock directly to your network for a fast and reliable connection .
1. Plug one end of the Ethernet cable, provided in the package, to an
available port on your router, DSL modem or switch.
2. Connect the other end to the Ethernet port on your time clock.
3. Plug the time clock into the power. Wait for the time clock to fully boot up, it will display Enter ID Number.

© 2020 IconTime. All rights reserved. Page 51
Note: If there is a wireless network in range, you’ll be prompted to connect to
the wireless network. Press Clear to cancel and move to step 4.
4. Enter into Supervisor Mode at your employee time clock terminal.
• Press on the time clock.
• Enter your security code. The default security code is 00 00 00.

© 2020 IconTime. All rights reserved. Page 52
Chapter 11: Software Upgrades
Available upgrades that will allow your system to expand with your business
Increase employee and web punch entry capacity
Automate tracking and accruing benefit time
Automatically email alerts and backups
Software upgrades can be applied at any time. All software upgrade packs for your TotalPass
system can be unlocked immediately by simply entering the software key provided.
Enabling Software Upgrades
To purchase a software upgrade, you will need to provide us with your time clock serial number.
You can find the serial number in the About Your Clock page under the Help menu.
Once you have purchased the software upgrade, your reseller will provide you with the 9-digit software
upgrade code. Follow the instructions below to complete the software upgrade installation.
• Enter into Supervisor Mode at your time clock terminal.
o Press on the time clock terminal.
o Enter your security code - the default security code is “00 00 00”.
• Scroll through the options using Up or Down until you find the option Enable Upgrade and press Enter.
• Using the keypad, enter in the 9-digit software upgrade code and then press Enter.
• The time clock terminal will display the name of the upgrade.
• Press Clear to exit out of Supervisor Mode. Unplug the time clock from the power, plug it back in to reboot
the time clock. Once the time clock is fully rebooted, the new upgrade features are ready to use.
• If there is a problem, contact our technical support team at 1-800-847-2232#1 or suppor[email protected].
Once the upgrade has been installed, go the next section for instructions on setting up and customizing your
new upgrade features.
Employee Capacity Upgrades
The TotalPass P400 comes standard with a 25-employee limit.
You can upgrade the employee capacity of your time clock to the next available
level, including: 50, 100, or 250 employees per system.
The Web Punch employee entry allows employees to punch anytime, anywhere using a
web browser on your computer or smart phone on a LAN, WAN, or Internet.
Web Punch Time Clock upgrades are offered in packages of 5 employee licenses up to a maximum of 50. Web Punch
also offers advanced functionality like IP location restrictions and GPS tracking to help better manage your employee’s

© 2020 IconTime. All rights reserved. Page 53
punches. Refer to ”Chapter 7: Alternate Employee Entry Options” for instructions on setting up Web Punch.
Benefit Tracking Upgrade
For a one-time fee, the Benefit Tracking upgrade can help increase payroll efficiency and monitor labor costs.
Employee licenses for this upgrade can be reassigned as needed and include the following features:
Benefit Tracking and Accruals
• Track and manage Vacation, Sick, and Personal Time benefits.
• Automate maximum accrual amounts, yearly carryover, and borrowing of benefits.
Enhanced Overtime Preferences
Customize overtime multipliers; allows you to pay time-and-a-half, double time, or other custom defined overtime rates.
Revision Zones
Round punch (shift) hours to the start and end times of a specific shift. Employees will not get paid for
punching In early or Out late.
Enhanced Overtime Preferences
The additional Overtime options can be found under the Pay tab under Preferences in the Settings menu.
• Consecutive Day OT1 On ____ Days – determines when Consecutive Day Overtime should begin to accumulate.
• Example: If Consecutive Day OT On is set to 6 days, employees will receive Overtime 1 on the sixth
consecutive day of work. If the Consecutive Day OT1 After setting is set to 5 hours, the first 5 hours
worked on the sixth day are considered straight time and the rest of the hours will be Overtime 1 (OT1).
• Consecutive Day OT2 After - refer to the previous example.
If this entry is set to 8 hours, employees will receive Overtime 2 on the sixth
consecutive day of work for any hours over 8 in the day.
Note: Overtime regulations are different for each state and can change. Be sure to confirm
your state’s labor regulations for overtime and adjust these settings accordingly.
• OT1 Multiplier - enter the pay rate for Overtime 1 (usually 1.5).
• OT2 Multiplier - enter the pay rate for Overtime 2 (usually 2).
Note: Making a change to the overtime preferences will prompt the time clock to
restart. This will make the time clock unavailable until it fully reboots.
Non-Worked Hours and Benefit Time (Vacation, Sick, Personal)
The Benefit Tracking and Accruals feature allows you to track and manage Vacation, Sick, and Personal Time benefits.
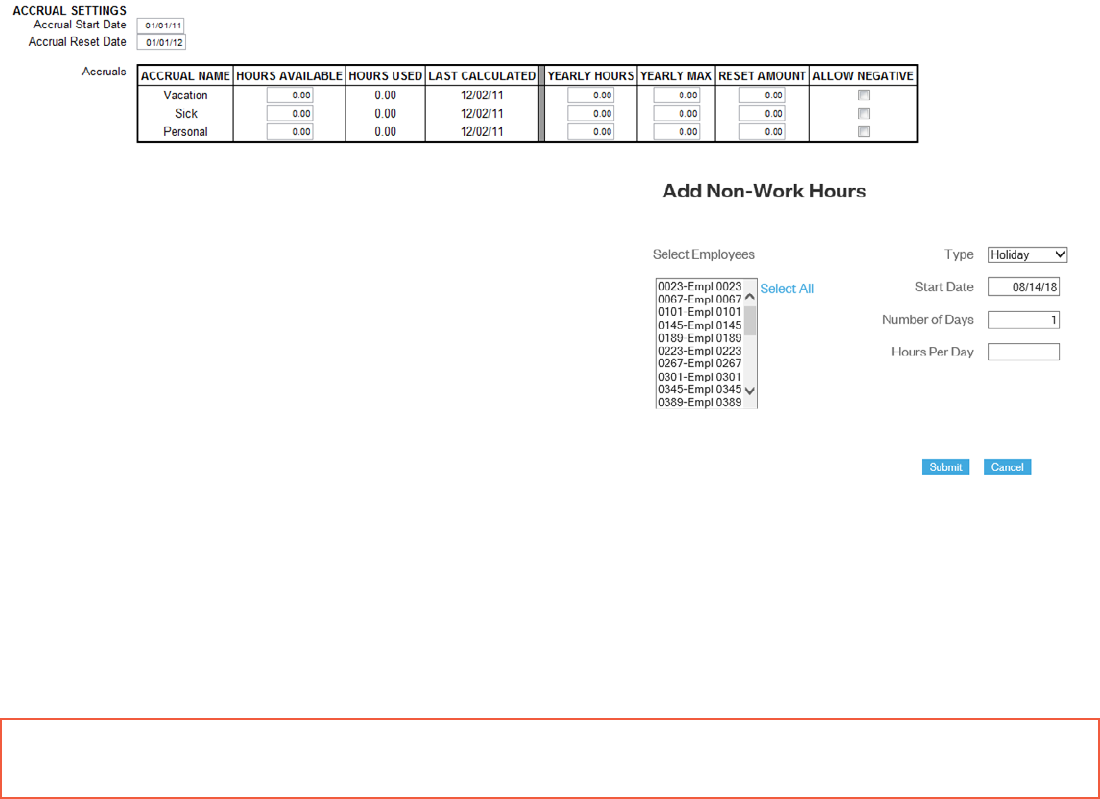
© 2020 IconTime. All rights reserved. Page 54
Customizing Benefit Accrual Rules
Benefit Tracking and Accruals allow you to automate maximum accrual amounts, yearly
carryover, and borrowing benefits. Benefit balances are available for each day of an employee’s
employment, letting you deliver real-time information to managers and employees. Accrual rates
and tracking are customized for each employee, which allows for maximum flexibility.
To customize an employee’s Benefit Accrual Rules, go to the Edit an Employee screen by selecting the employee name from
the Employee List.
• The Accrual Start Date allows you to set the date when
the employee is eligible to begin accruing the benefit.
• If your benefits renew/reset each year, enter the date
when this happens in the Accrual Reset Date field.
• If this is your first time setting up accrues and
your employee currently has Hours Available or a
benefit time balance, enter that balance here.
• Additional hours will be automatically accrued
each day according to the value set under Yearly
Hours. As the employee uses the accrued benefit,
the hours are automatically subtracted.
• The total hours that the
employee has used since the Accrue Reset date can be found in Hours Used.
• The Last Calculation displays the date when the benefit accrual balance was last calculated.
• Yearly Hours should be set to the total benefit hours the employee accrues in one year.
• The Yearly Max is the maximum number of benefit hours allowed to accumulate for the benefit each year. If you allow
vacation hours to carry over from one year into the next, post the annual earned amount plus the amount allowed
to carry over (the cap). If your company employs a “use it or lose it” policy, you should post the annual amount.
Note: This field should not be set to zero unless your benefits do no accrue.
Setting this value to zero will reset the Yearly Hours to zero each day.
• The Reset Amount is the quantity of hours that an employee is to receive at the beginning
of each new accrual year. Most companies would leave this field set to zero.
• If your company allows the employee to borrow benefit hours that they have not yet accrued, check the
Allow Negative box.
Using Accrued Benefit Hours (Vacation, Sick, Personal)
Follow the instructions below to use accrued benefit hours for the employee.
• Select Add Non-Work from Timecard or other report.
• Select the employee(s) from the Select Employees list.

© 2020 IconTime. All rights reserved. Page 55
• Select the applicable punch from the Type drop-down menu.
• The available punch types are:
o NonWorked (used for applying benefit hours other than the predefined categories below.)
o Holiday
o Vacation
o Sick
o Personal
• Click in the Start Date field and use the calendar to select the non-worked starting date.
• Type the number of consecutive non-worked days to assign for the selected employee(s) in the
Number of Days field.
• Type the number of hours to assign to the selected employee(s) each day in the Hours Per Day field.
• Click Submit, you will be directed to the Add Non-Work Hours Confirmation page.
• Review the information on the Add Non-Work Hours Confirmation page for accuracy.
o Click Submit to save your changes.
o Click Cancel to cancel the transaction.
o Click Back to go back to the Add Non-Work page and revise the data.
• If the employee does not have enough accrued time, an error page will appear.
Accrual Summary Report
To generate the Accrual Summary Report, go to the Reports icon and select Accrual Summary from the drop-down menu.
This report lists the total benefit accrual hours available and the hours used in real time, for each employee.
Revision Zones
After installing the Benefit Tracking upgrade, you can access the Revision Zones by going to
Lists | Departments and clicking on the individual department to add revision zones.
• In the In Revision Start Time field, enter a time in hh:mm:a/p format. For example, 7:30a.
• In the In Revision End Time field, enter a time in hh:mm:a/p format. For example, 8:00a.
Example: In the example above, if an employee clocks In between 7:30
a.m. and 8:00 a.m., the shift start time rounds to 8:00 a.m.
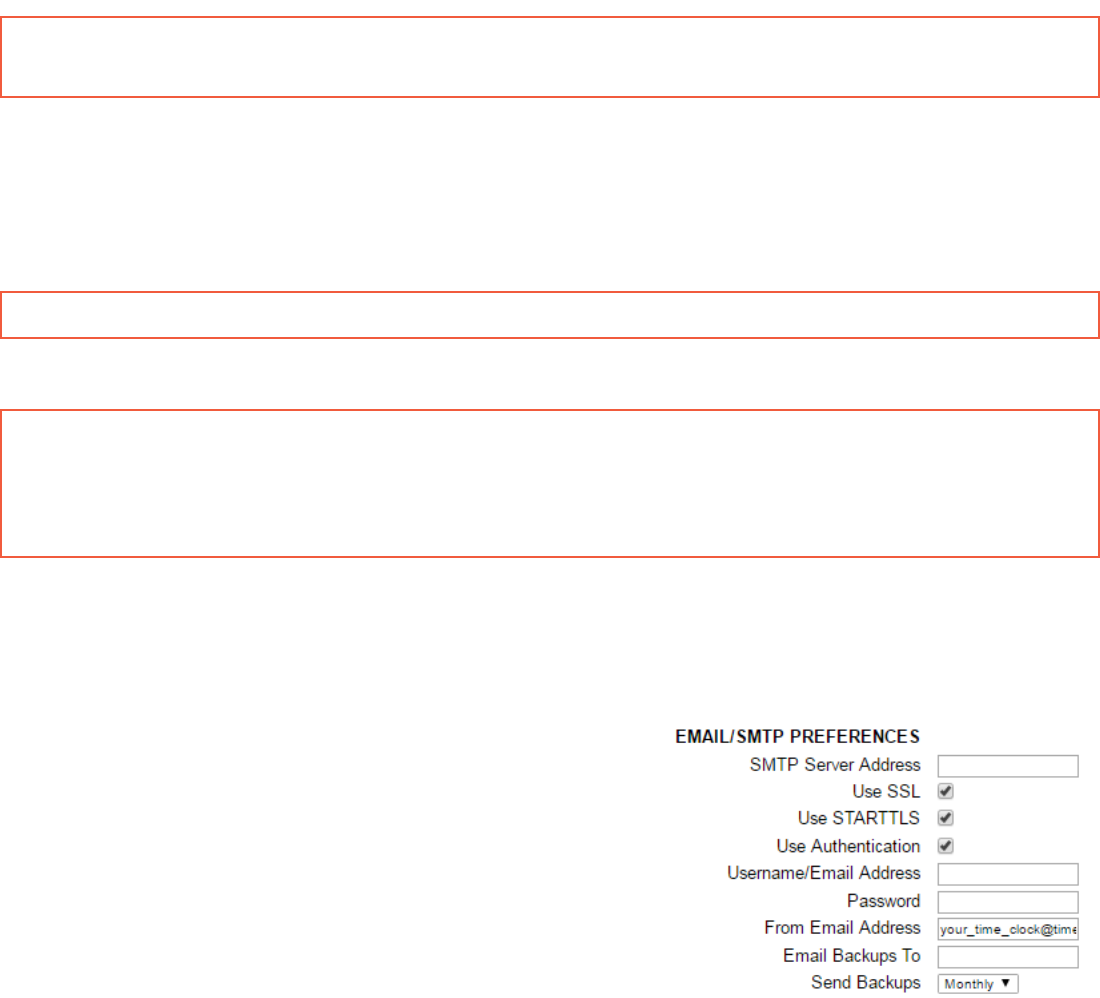
© 2020 IconTime. All rights reserved. Page 56
• In the Out Revision Start Time field, enter a time in hh:mm:a/p format. For example, 4:30p.
• In the Out Revision End Time field, enter a time in hh:mm:a/p format. For example, 5:00p.
Example: If an employee clocks Out between the Out Revision Start and End Time,
the shift end time rounds to the Out Revision Start Time, which is 4:30 p.m.
Note: Making a change to the revision zones will prompt the time clock to restart.
This will make the time clock unavailable until the clock fully reboots.
Email Alerts Upgrade
The TotalPass P400 application allows payroll reports and system alerts to be automatically e-mailed to
one or more supervisors. The system will send email alerts according to your set preferences for event such
as: approaching overtime, punch notifications, low hours, maximum hours, and backup reminders.
Note: A Network connection is required to use email functionality in the clock.
In addition, backups of your time clock data can be automatically emailed to one or more recipients, daily, weekly or monthly.
Important: To send emails, you must have a SMTP server available. Contact your network
administrator to find out if your company has a SMTP server. We recommend
using Google’s free Gmail account for companies that don’t have an available
SMTP Server. In order to use this service, you must have a Gmail account.
What is an SMTP Server? An SMTP server works like a postal assistant, handling the sending of emails from an email
client to an email server. It receives outgoing mail messages from users and routes them to the intended mail recipients.
Outgoing Email Settings (SMTP Server)
• To assign your SMTP server settings, go to Device Preferences
by clicking Settings | Preferences | Device find
Email/Backup Preferences.
• Type your complete SMTP e-mail server address in the SMTP
Server Address field. If you do not have this information,
contact your network administrator or your service provider.
• If you enable SSL, you may need to specify the
mail server port by entering a colon and then
the port number after the server address.
Example: smtp.gmail.com:587 connects to smtp.gmail.com and uses port 587. If
a port number is not defined, default port number 25 is used.
• Check the Use SSL checkbox to use data encryption when sending emails. Using SSL may be a
requirement for some SMTP server providers and may require that you define the SMTP port.
© 2020 IconTime. All rights reserved. Page 57
• Check the Use STARTTLS checkbox if you are using SSL and your SMTP service
provider requires that you first connect to the server using a secure connection.
• Check the Use Authentication checkbox if your SMTP server requires a username and password to send e-mails.
• Enter the Username or Email Address used to accees your SMTP service (email account).
• If you checked Use Authentication, enter the Password of your SMTP service,
• Type the e-mail address you want to display in the From field in your e-mail in the
From Email Address field. The default setting is Your_Time_Clock.
• Enter the email address where you would like a copy of your backups
automatically sent to in the Email Backups To field.
• Select how often you would like those backups emailed; never, daily, weekly, or monthly.
Emails will be sent at 2:30 am.
• Refer to Error! Reference source not found. on page 62 to complete the Automatic Backup setup.
• Click Submit to save your settings.
For your convenience, configuration settings for the most common SMTP Server providers are
located in the following section.
© 2020 IconTime. All rights reserved. Page 58
Common SMTP Server Settings
Refer to the list below to find the most common SMTP Servers and their configuration settings. If your Internet Service
Provider (ISP) is not on the list below, contact your ISP or Network Administrator for configuration instructions.
Live/Outlook/Live/Hotmail
SMTP Server Address: smtp.live.com:587
Use SSL: checked
Use STARTTLS: checked
Use Authentication: checked
Username/Email Address: Account email address (user@hotmail.com)
Password: account password
From Email Address: account email address
Gmail
SMTP Server Address: smtp.gmail.com:587
Use SSL: checked
Use STARTTLS: checked
Use Authentication: checked
Username/Email Address: Gmail account email address (user@gmail.com)
Password: Gmail account password
From Email Address: Gmail account email address
Comcast
SMTP Server Address: smtp.comcast.net:465
Use SSL: checked
Use STARTTLS: un-checked
Use Authentication: checked
Username/Email Address: Comcast username
Password: Comcast account password
From Email Address: Comcast account email address
Verizon
SMTP Server Address: outgoing.verizon.net:587
Use SSL: un-checked
Use STARTTLS: un-checked
Use Authentication: checked
Username/Email Address: Verizon username
Password: Verizon account password
From Email Address: Verizon account email address
Apple MobileMe / iCloud
SMTP Server Address: smtp.mac.com:587
Use SSL: user preference
Use STARTTLS: if user selects to use SSL above
Use Authentication: checked
Username/Email Address: MobileMe/iCloud username
Password: MobileMe/iCloud account password
From Email Address: MobileMe/iCloud account email address
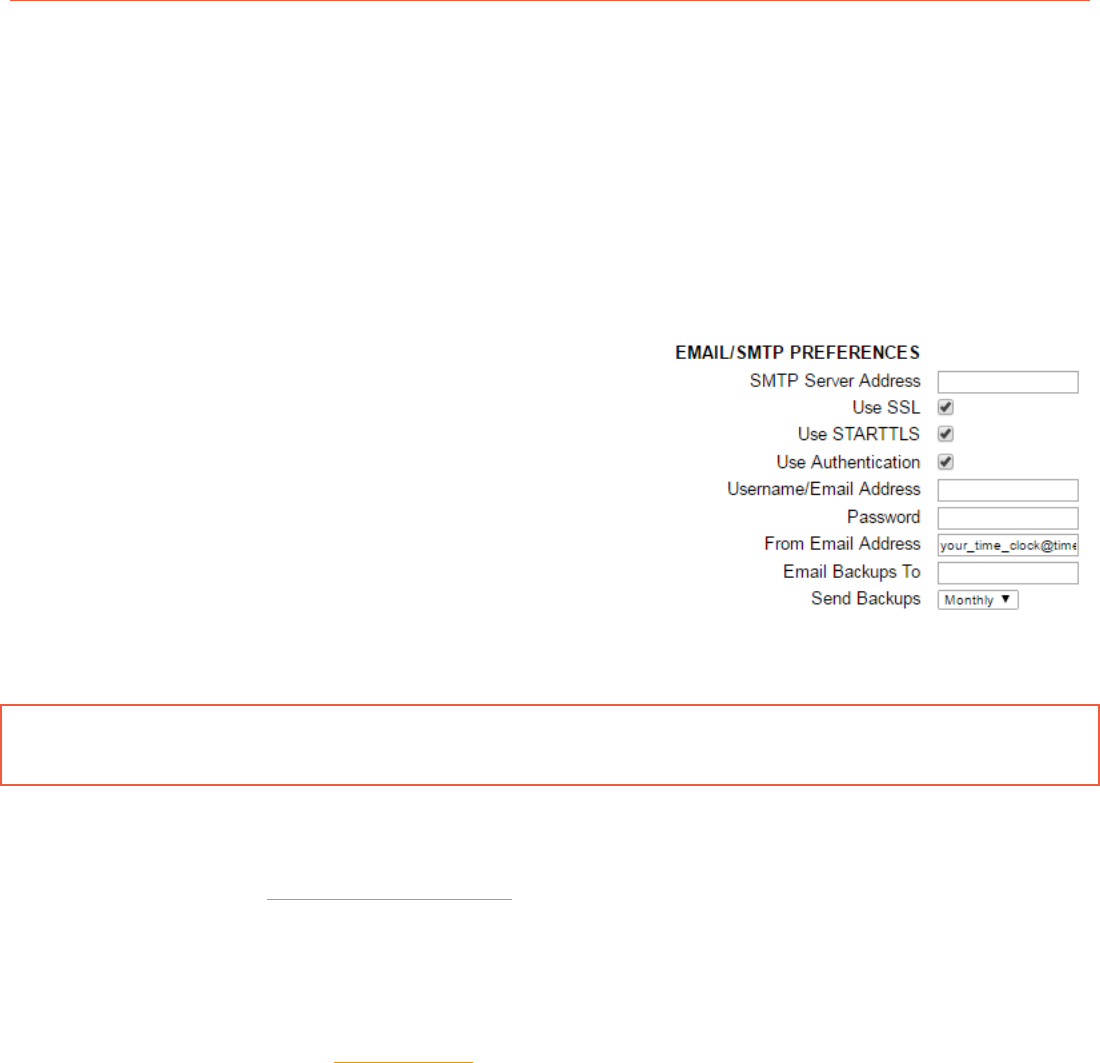
© 2020 IconTime. All rights reserved. Page 59
Chapter 12: Configure for Remote Access
You can upgrade your time clock so you can connect to your time clock away from the office to enable:
Working from home
Multiple locations
Employee remote punch
Follow the instructions below to set your time clock up with remote access, using Port Forwarding.
System Requirements
• A Broadband Internet connection (Cable, DSL,
T1, etc.) at the location of the clock.
• TotalPass connected to your network by
an Ethernet (i.e. CAT5) cable.
• A router with “Port Forwarding” functionality.
• Static public/external IP address, although not required,
is highly recommended. Contact your Internet Service
Provider for a static public/external IP address.
If your business performs PCI Security Scanning for credit card processing, setup can be complicated and may be
incompatible. Some customers choose to set up a separate network for their credit card processing system.
Note: For a nominal fee, IconTime offers an optional service to assist in setting
up port forwarding/remote connection to your time clocks.
Step 1: Set Up the TotalPass on the Local Network
Follow the instructions on the TotalPass Quick Start Guide to set up your time clock on the Local
Network. Once you are able to access the TotalPass software Home page from a PC inside your
internal/local network, you are ready to configure the system for remote access.
Step 2: Router Configuration
You will now configure your router for Port Forwarding. Port Forwarding allows computers and other network devices
to connect to a specific computer or service within a private local area network (LAN), through the Internet.
These instructions include general guidelines for configuring a router for Port Forwarding. Actual steps required may
vary with each router. For specific instructions on your particular router, please contact the router’s manufacturer.

© 2020 IconTime. All rights reserved. Page 60
Note: For instructions on configuring your specific router, go to the website
www.portforward.com and select your router brand and model.
Assign a Static IP Address to the Time Clock
In order for Port Forwarding to work correctly, assign a static IP address to the time clock along with the subnet mask,
gateway address and DNS address. Your Network Administrator should be able to provide you with this information.
• Determine an available IP address to be assigned to the time clock.
• Enter into Supervisor Mode at your employee time clock terminal.
o Press on the time clock.
o Enter your security code - the default security code is 00 00 00.
• Scroll through the options until you find the option Network Settings - press Enter.
• To set a LAN static IP address, press Enter on the LAN Settings option. To set Wifi static
IP address, scroll down to the Wifi Settings option and press Enter.
• The current IP address of the clock will appear. Press Enter again.
• Enter the desired IP address including leading zeros. Press Enter.
Example: 192.168.004.155
• Enter the Subnet Mask - press Enter.
Example: 255.255.255.000
• Enter the Gateway address - press Enter.
Example: 192.168.004.001
Note: If you an unsure of the gateway address, it is typically
the same IP address as your router.
• Enter the DNS address of your network - press Enter.
Example: 192.168.004.001
• Press Clear to exit out of Supervisor Mode.
Open a Web browser on a computer in the same local network. In the address bar, type
in the IP address of the clock to verify that you can log into the time clock.
Set Up Port Forwarding on the Router
These instructions are general guidelines for configuring a router for Port Forwarding. Actual steps required
may vary with each router. For instructions on configuring your specific router, go to the website www.
portforward.com and select your router brand and model, or contact your router’s manufacturer.
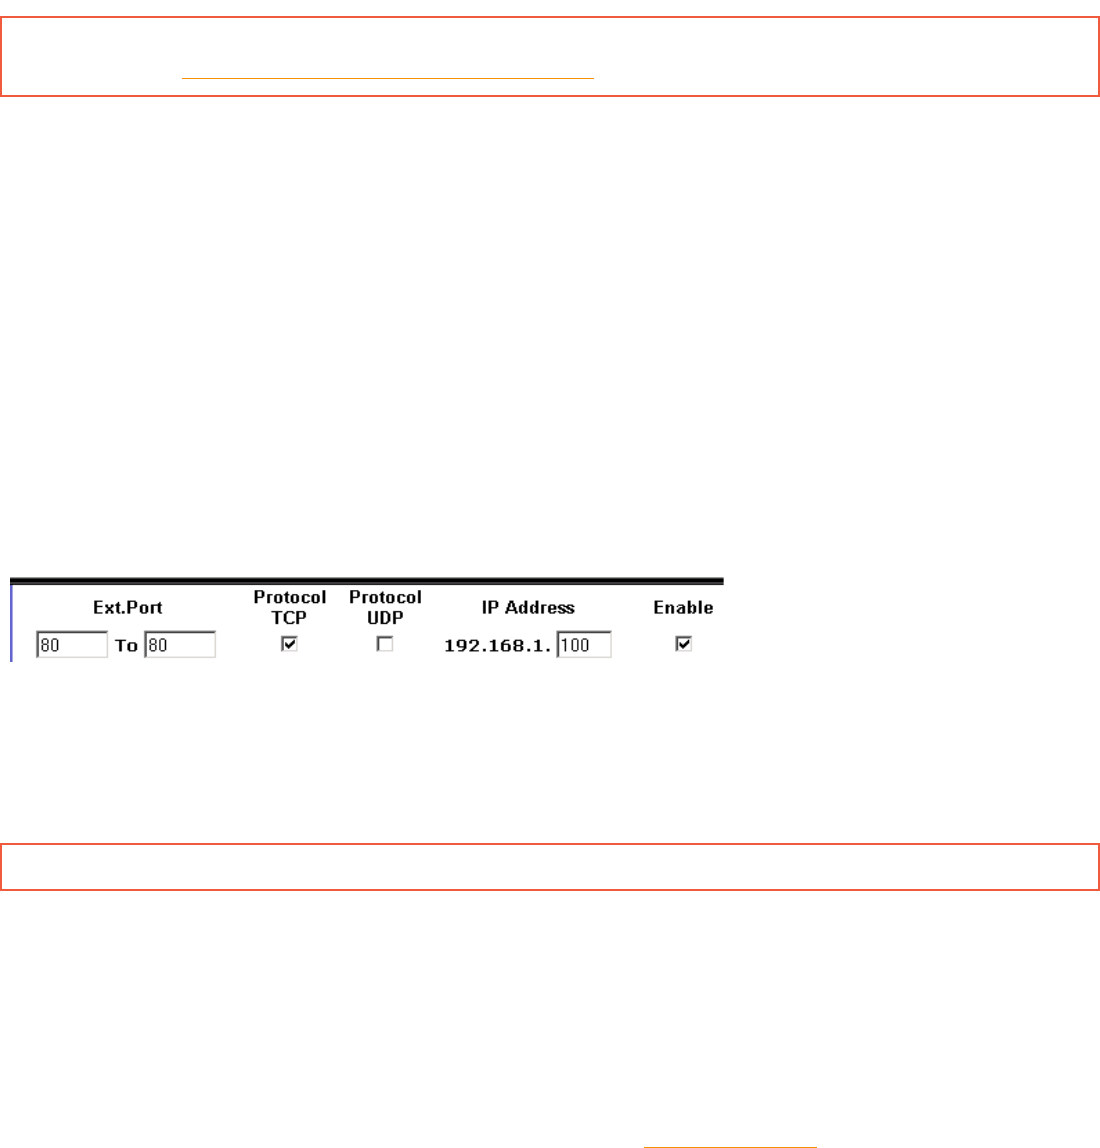
© 2020 IconTime. All rights reserved. Page 61
If you are using both a router and a cable modem router/DSL modem router, port forwarding must be configured on both the
router and cable modem router/DSL modem router. Alternatively you may contact your ISP to disable the router function on
your cable modem router/DSL modem router so that you only need to setup port forwarding on your main network router.
• Open your preferred web browser. Enter the internal/local IP address of your router in the address bar.
Examples: 192.168.1.1 and 192.168.0.1
Note: If you do not know your routers internal/local IP address, refer
to How To Find Your Routers IP Address guide.
• Enter the router’s username and password. Below are some default router logins
• Linksys Router – “admin” for both username and password
• Netgear Router – “admin” for username and “password” for password
• D-Link Router – “admin” for username and (leave blank) for the password
• 3Com Router – “admin” for both username and password
• Microsoft Broadband – “admin” for both username and password
• Look for a tab with a name like, “Port Forwarding” or “Applications and Gaming”. Each router is
different, if you are unable to find these settings, refer to your router’s instruction guide.
• Next, enter port 80 as the desired port. If port 80 is unavailable, you may enter port 9844 as an alternative.
o If your router asks you whether to open ports for TCP or UDP select TCP or both.
o Some routers offer port range option, such as; from port ___ to
port ___. Enter the same number into both fields.
• Next, enter the static IP address assigned to the clock.
• If there is a checkbox to “enable” the port forwarding rule, be sure to check the box.
• Make sure you click on the Save Settings button, or your changes will not take effect.
Note: You may need to reboot the router for changes to take effect.
Step 3: Connect to Your TotalPass Clock over the Internet
After your router is properly configured on port 80 or port 9844, follow the
steps below to connect to the clock through the Internet.
• Look up your external/public IP address in one of the following ways; (skip to step 2 if
you already know the external/public IP address provided by your ISP)
o On a computer on the same network as your clock, go to www.ipchicken.com.
Your external/public IP address will be displayed on the page.

© 2020 IconTime. All rights reserved. Page 62
o Use the Port Forwarding Tester link below to verify if port 80 or port 9844 is open. If
the port is not open, there is a setup issue on the clock or your router, remote access
will not be available: http://www.yougetsignal.com/tools/open-ports/
• From the remote location, type the external/public IP address into a browser’s address bar.
• If you opened port 80, simply enter the external/public IP address into the address bar.
• Example: http:// 68.213.205.154
• If you are forwarding to port 9844, log onto the time clock using your external/public IP address followed by :9844.
Example: http://68.213.205.154:9844
Remote Connection Frequently Asked Questions
Q. I have multiple locations, not connected over a Network (LAN). How do I connect a Child Clock to the
Parent Clock at my main office?
A. To connect the Child Clock to the Parent Clock remotely over the
Internet, you must forward an additional port, Port 10923.
Q. What port do I forward if SSL Data Encryption is enabled?
A. To access the time clock application remotely, while using the SSL data encryption option,
forward to Port 443. Do not use Port 80.
Q. My Internet Service Provider will not provide me with a Static external/public IP address.
Are there other options?
A. If you are unable to get a static external/public IP address from your ISP, you have two options:
• Use the dynamic external/public IP address. If this IP address changes,
you will need to use the new address in a remote web browser.
• Use a 3
rd
party dynamic DNS service provider.
Dynamic DNS allows you to use the same assigned name as a web link in your web
browser without concern about the actual public IP address of the router.
List of Dynamic DNS Service Providers:
• dyn.com
• no-ip.com
• dnsdynamic.org
• changeIP.com
Troubleshooting Remote Connection Problems
If you are unable to connect to your time clock using the external/public IP address

© 2020 IconTime. All rights reserved. Page 63
you will need to troubleshoot your connection and configuration.
• Restart your router.
• If you are using both a router and a cable modem router/DSL modem, ensure that port forwarding
has been configured on both the router and cable modem router/DSL modem router.
• The cable modem router/DSL modem router must port forward to the
local static IP address assigned to the secondary router.
• Alternatively you may contact your ISP to disable the router function
on your cable modem router/DSL modem router.
• Ensure that a static internal IP address has been assigned to the clock along with the proper subnet mask,
DNS address, and gateway address. Reboot the time clock to ensure any IP address changes take effect.
• Make sure port forwarding has been setup correctly in the router.
• Make sure that the correct external/public IP address is entered in the web browser.
• Make sure another device on the network is not using the same IP address as the time clock.
• Check the filter settings on the router to be sure that it is not interfering with the connection.
• Use an open port checker, like www.yougetsignal.com to check your external
IP address and detect the correct open ports on your network.
For additional troubleshooting steps refer to www.portforward.com. Select your router
by model name and number for specific port forwarding instructions.
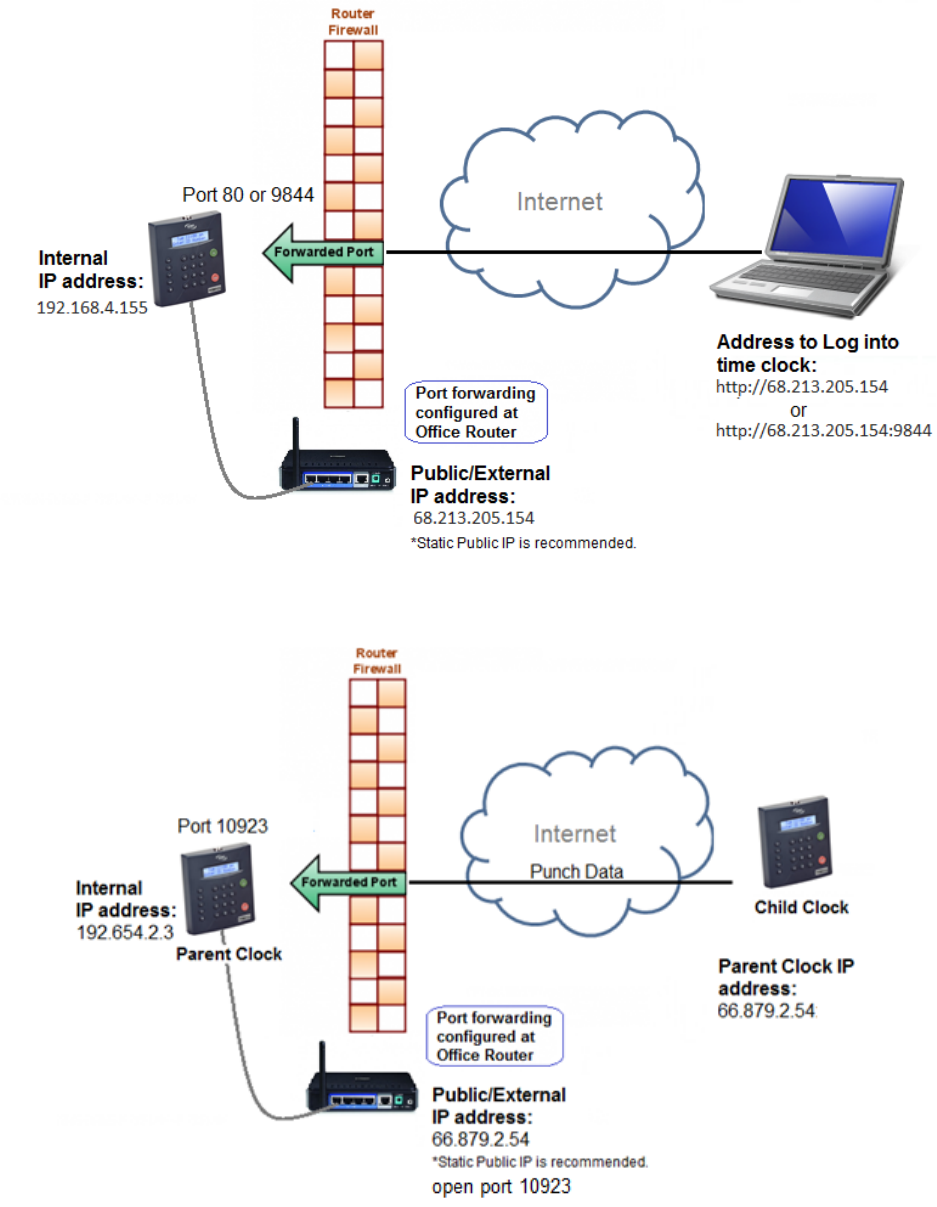
© 2020 IconTime. All rights reserved. Page 64
Standard Remote Connection Setup Diagram
Connect Clocks Remotely with Multi-clock Diagram

© 2020 IconTime. All rights reserved. Page 65
Warranty Information
IconTime, INC., a Paychex Company
Notice: The information contained in this document is subject to change without notice.
IconTime MAKES NO WARRANTY OF ANY KIND WITH REGARD TO THIS MATERIAL, INCLUDING,
BUT NOT LIMITED TO, THE IMPLIED WARRANTIES OF MERCHANTABILITY AND FITNESS FOR
A PARTICULAR PURPOSE. IconTime shall not be liable for errors contained herein, or for incidental
consequential damages in connection with the furnishing, performance, or use of this material.
ONE-YEAR LIMITED WARRANTY
IconTime, INC. offers the original purchaser a warranty for One (1) Year on Parts and Labor.
IconTime will repair and exchange parts for your unit free of charge in the USA in the event of a defect in materials
or workmanship, as follows:
PARTS
New or comparable rebuilt parts in exchange for defective parts for one (1) year beginning on the date of delivery.
LABOR
Mail-in service for One (1) year beginning on the date of delivery.
SERVICE
If adjustments or repair are required, purchaser must contact our customer service department
within the warranty period detailing the request. The purchaser must provide model, serial number,
and a copy of original purchase. If IconTime decides a product requires service, IconTime will issue
a Return Material Authorization Number (RMA). Products may be shipped to IconTime adequately
insured, in their original packaging or equivalent, with shipping charges prepaid. Risk of loss or
damage during shipping to IconTime is the sender’s responsibility. Once we receive the equipment,
it will be inspected, repaired as needed, tested, and returned via standard ground shipping to the
purchaser. Return shipping costs of the repaired or replaced unit will be paid by IconTime.
This warranty is extended only to the original purchaser. A purchase receipt or other proof
of date of original purchase will be required before warranty work is rendered.
This warranty only covers failures due to defects in materials or workmanship that occur during
normal use. It does not cover failures due to damage which occurs in shipment, or failures which
are caused by products not supplied by IconTime, or failures which result from accident, misuse,
abuse, neglect, mishandling, misapplication, alteration, faulty installation, modification or service
by anyone other than a factory service center, or damage that is attributable to acts of God.
No warranty is given for damages caused by external wiring indicating improper connection to power supply
or line wiring, or for damages caused by spikes, power surges, brown outs, lightning, static electricity, or radio
waves. Surge protectors are readily available to enhance and protect equipment performance following initial
installation.
IconTime SHALL NOT BE LIABLE FOR INCIDENTAL OR CONSEQUENTIAL DAMAGES RESULTING FROM THE
USE OF THIS PRODUCT, OR ARISING OUT OF ANY BREACH OF THIS WARRANTY. DURATION OF IMPLIED
WARRANTIES, IF ANY, IS LIMITED TO ONE (1) YEAR. Some states do not allow the exclusion of limitation
of incidental or consequential damages, or limitations on how long an implied warranty lasts, so the above
exclusions or limitations may not apply to you.

© 2020 IconTime. All rights reserved. Page 66
This warranty gives you specific legal rights and you may also have other rights that vary from state to state.
If a problem with your IconTime unit develops during the warranty period, contact IconTime SERVICE DIVISION,
at the address below.
There are no other express warranties except as listed above.
This document contains proprietary information that is protected by copyright. All rights
are reserved. No part of the document may be photocopied, reproduced, or translated
to another language without the prior written consent of IconTime, Inc.
Copyright © IconTime, INC. 2009-2020
All other trademarks belong to their respective owners.
IconTime Systems
9000 SW Gemini Drive, Bldg. 8
Beaverton, Oregon 97008
800.847.2232

© 2020 IconTime. All rights reserved. Page 67
FCC Part 15
This equipment has been tested and found to comply with the requirements for a Class B digital
device under Part 15 of the Federal Communications Commission (FCC) rules.
These requirements are intended to provide reasonable protection against harmful interference in a residential
installation. This equipment generates, uses, and can radiate radio frequency energy and, if not installed
and used in accordance with the instructions, may cause harmful interference to radio communications.
However, there is no guarantee that interference will not occur in a particular installation.
If this equipment does cause harmful interference to radio or television reception, which can be determined by turning the
equipment off and on, the user is encouraged to try to correct the interference by one or more of the following measures:
• Reorient or relocate the receiving antenna.
• Increase the separation between the equipment and receiver.
• Connect the equipment into an outlet on a circuit different from that to which the receiver is connected.
• Consult the dealer or an experienced technician for help.
Changes or modifications to this equipment not expressly approved by the party responsible
for compliance could void the user’s authority to operate the equipment.
To ensure safety of users, the FCC has established criteria for the amount of radio frequency
energy that can be safely absorbed by a user or bystander according to the intended usage of
the product. This product has been tested for compliance with the FCC criteria.
