
ENERGY STAR
®
Building Manual
1
6. Lighting
Revised November 2006
6.1 Overview 3
6.2 The Importance of Lighting 4
Lighting and Your Building 4
Lighting and People 6
6.3 A Whole-System Approach 7
6.4 Lighting Design 9
The Right Quantity of Light 9
The Right Quality of Light 10
Outdoor Lighting 11
6.5 Use Efficient Light Sources 12
Make Use of Daylight 13
Linear Fluorescent Lamps 15
Compact Fluorescent Lamps 18
High-Intensity Discharge Lamps 18
Other Light Sources 20
6.6 Use Efficient Luminaires 22
Direct Lighting 22
Indirect Lighting 23
6.7 Automatically Control Lighting 24
On-Off Controls 24
Dimming Controls 27
Commissioning Ensures the Benefits of Lighting Controls 30
6.8 Build In an Operations and Maintenance Plan 31
Plan for Group Relamping 32
Retrocommission Lighting Controls 34
Develop an O&M Manual 34
Dispose of Lamps Properly 35

6.1 Overview
A lighting upgrade is the second stage in the building upgrade process. The staged approach ac-
counts for the interactions among all the energy flows in a building (Figure 6.1) and produces
a systematic method for planning upgrades that maximize energy savings. When the staged ap-
proach is performed sequentially, each stage includes changes that will affect the upgrades per-
formed in subsequent stages, thus setting the overall process up for the greatest energy and cost
savings possible. In the staged approach to building upgrades, lighting upgrades come early in
the process because the lighting system has a significant impact on other building systems, af-
fecting heating and cooling loads and power quality.
Lighting consumes close to 35 percent of the electricity used in commercial buildings in the
United States and affects other building systems through its electrical requirements and the
waste heat that it produces. Upgrading lighting systems with efficient light sources, fixtures,
and controls can reduce lighting energy use, improve the visual environment, and affect the
sizing of HVAC and electrical systems.
Any goals for a lighting upgrade should be consistent with overall company goals and energy
policies. They should also include provisions for commissioning—to make sure that the installed
systems work as intended—and retrocommissioning, to make sure that the installed systems
continue to provide the intended benefits throughout their useful life (see U.S. Environmental
Protection Agency [EPA], “Guidelines for Energy Management Overview,” www.energystar.gov/
index.cfm?c=guidelines.guidelines_index). It is also important to remember that, as the EPA’s
guidelines point out, the upgrade is not an end point but a step along a path of continuous im-
provement. To ensure that a lighting upgrade leads to an effective and efficient system, follow
these key guidelines:
■ Design the system to get the appropriate amount of light for the tasks to be performed in
the space in question.
ENERGY STAR
®
Building Manual
3
6. Lighting
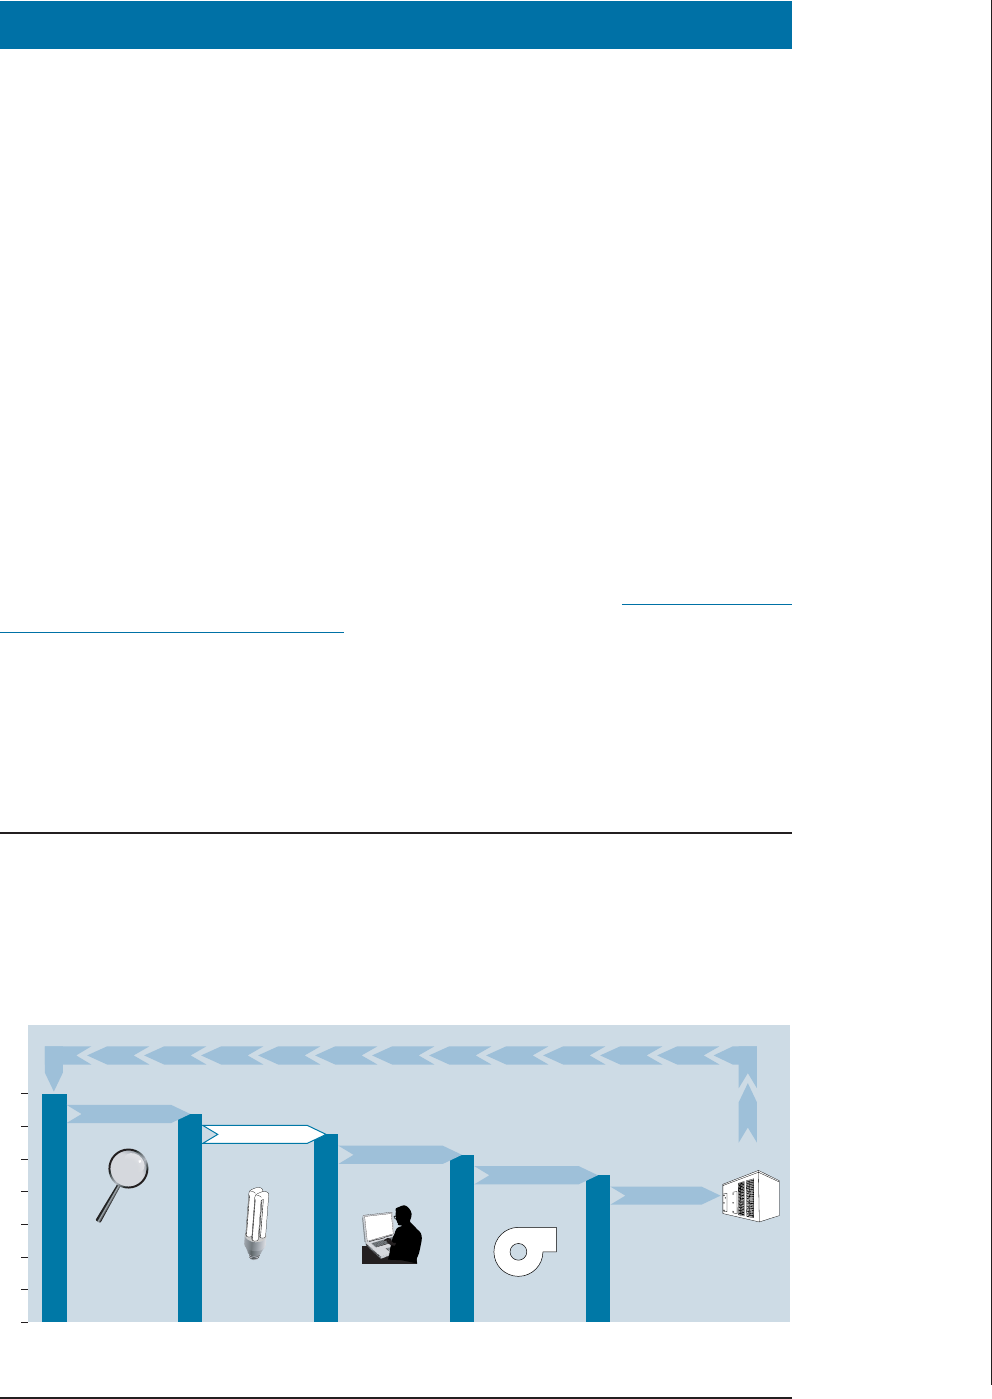
Figure 6.1: The staged approach to building upgrades
The staged approach to building upgrades accounts for the interactions among all the energy
flows in a building. Each stage includes changes that will affect the upgrades performed in sub-
sequent stages, thus setting the overall process up for the greatest energy and cost savings pos-
sible. Lighting upgrades come early in the process, because the lighting system affects heating
and cooling loads and power quality.
Air distribution
systems upgrade
Lighting
upgrade
HVAC upgrade
Supplemental
load reductions
Stages of an integrated upgrade approach
Base load
Retrocommissioning
New base load
Courtesy: E
SOURCE

■ Distribute that light to prevent glare.
■ Use daylight whenever possible but avoid direct sunlight, and install controls to reduce the
use of electric lights in response to daylight.
■ Use the most efficient light source for the application: high-performance fluorescent systems
as the primary light source for most commercial spaces; compact fluorescent lamps in place
of incandescent bulbs in most cases; and high-intensity discharge lamps where appropriate.
■ Use automatic controls to turn lights off or dim lights as appropriate.
■ Plan for and carry out the commissioning of all lighting systems to ensure that they are
performing as required, and create a schedule to retrocommission systems periodically.
■ Design lighting systems with ongoing maintenance in mind, and include a comprehensive
plan for group relamping, fixture cleaning, and proper disposal of old lamps and ballasts.
Dozens of companies have followed these steps to improve their lighting systems. To see de-
scriptions of buildings that have upgraded their lighting systems as part of an ongoing building
upgrade process, visit www.energystar.gov/index.cfm?fuseaction=labeled_buildings.
showUpgradeSearch&building_type_id=ALL&s_code=ALL&profiles=0&also_search_id=UP
GRADE, click on Stage 2, and submit.
6.2 The Importance of Lighting
Lighting uses about 18 percent of the electricity generated in the U.S., and another 4 to 5 per-
cent goes to remove the waste heat generated by those lights. Lighting in commercial buildings
accounts for close to 71 percent of overall lighting electricity use in the U.S. With good design,
lighting energy use in most buildings can be cut at least in half while maintaining or improving
lighting quality. Such designs typically pay for themselves in energy savings alone within a few
years, and they offer more benefits in terms of the potential for smaller and less costly cooling
systems and more-productive work environments.
Lighting and Your Building
Lighting is a significant expense in operating a building. It is the largest cost component of a
commercial building’s electricity bill (Figure 6.2) and a significant portion of the total energy
bill. When planning full-building upgrades, a lighting upgrade should come early in the process,
because it can affect heating and cooling loads and power quality, which can make a significant
difference in the specifications for other building systems.
Heating and cooling loads. Lighting systems produce large amounts of heat as well as
light. Lighting is typically the largest source of waste heat, often called “heat gain,” inside com-
mercial buildings. This internal heat gain may be useful when the building requires heating, but
it is counterproductive when the building requires cooling. Energy-efficient lighting adds less
heat to a space per unit of light output than inefficient lighting.
By reducing internal heat gain, efficient lighting also reduces a building’s cooling requirements.
Consequently, the existing cooling system may be able to serve future added loads. In addition,
when it comes time to replace a building’s cooling systems, the use of efficient lighting leads to
reduced cooling loads, which can allow replacement chillers to be smaller and hence less costly
to buy and operate.
ENERGY STAR
®
Building Manual
4
6. Lighting

The net annual effect on HVAC energy use at a site depends on the type of building, the climate,
the efficiency of heating and cooling systems, and the relative size of the heating and air-con-
ditioning loads. Large buildings that are dominated by internal loads and use far more air con-
ditioning than heating can experience a site energy HVAC bonus of 40 percent or more. This
means that each kilowatt-hour (kWh) of reduction in annual lighting energy use yields an ad-
ditional 0.4 kWh of annual reduction in HVAC energy by reducing cooling energy more than
it increases required heating energy.
For small, envelope-dominated buildings—especially those in cold climates—the net impact
may be an HVAC penalty, meaning that each kWh in lighting energy use increases HVAC en-
ergy by increasing the annual heating energy use more than it reduces cooling energy.
Lighting upgrades in most commercial buildings are likely to reduce cooling costs more than
they increase heating costs, but the precise effect on any given building can be determined by
computer simulation. Some simplified methods for approximating the effect are also available.
For example, see Lawrence Berkeley National Laboratory (LBNL), Interactions Between Lighting
and Space Conditioning Energy Use in U.S. Commercial Buildings, LBNL 39795,
http://enduse.lbl.gov/info/LBNL-39795.pdf
.
Improve power quality. Lighting also affects the power quality of a building’s electrical
distribution system. Poor power quality is a concern because it wastes energy, reduces elec-
trical capacity, and can harm equipment and the electrical distribution system itself. Upgrad-
ing to lighting equipment with clean power quality (high power factor and low harmonic
distortion) can improve the power quality in a building’s electrical system. Furthermore,
upgrading with higher-efficiency and higher-power-factor lighting equipment can also free
up valuable electrical capacity. This benefit alone may justify the cost of a lighting upgrade
(see sidebar).
ENERGY STAR
®
Building Manual
5
6. Lighting
Figure 6.2: Lighting share of commercial building electricity use
Lighting takes a larger share of a building’s electricity use than any other single end use—more
than 35 percent.
Courtesy: E SOURCE; data from
2005 Buildings Energy Data Book
Lighting
35%
Space cooling
16%
Office equipment
12%
Refrigeration
9%
Other
9%
Ventilation
8%
Space
heating
6%
Water
heating
4%
Cooking
1%

Lighting and People
A lighting upgrade is an investment not only in reducing electricity consumption but also in
improving the way a building supports its occupants. A building’s lighting directly affects the
comfort, mood, productivity, health, and safety of its occupants. Moreover, as the most visible
building system, it also directly affects the aesthetics and image of the building. Successful
lighting upgrades take into account the impact of energy-performance choices on building
occupants and seek to marry efficiency with improved lighting quality and architectural aes-
thetics wherever possible. Although such effects are difficult to quantify, comfort, mood, pro-
ductivity, health, safety, and other effects lighting has on people should be considered as part
of every lighting upgrade.
Productivity. Improved lighting enhances visual comfort, reduces eye fatigue, and improves
performance on visual tasks. Well-designed lighting may also increase productivity and reduce
absenteeism. For example, one lighting upgrade—at a mail-processing center in Reno, Ne-
vada—led to a 6 percent increase in worker output and a reduction in sorting errors. Most
lighting upgrades are cost-effective based on energy savings alone, but because costs associated
with a building’s occupants greatly outweigh other building costs (Figure 6.3), any lighting
change that improves the interior environment is worth investigating. Those effects are hard to
quantify, but research efforts are helping to pin down the benefits (see, for example, the work
of the Light Right Consortium, www.lightright.org
).
Safety. Lighting also contributes to the safety of occupants and the security of buildings. Emer-
gency lighting must be available during power outages, and minimum levels of light must be
available at night when most lighting is turned off. In addition, safety codes require exit signs
to highlight escape routes during fires or other emergencies. Outside lighting and indoor night
lighting deter crime by exposing intruders’ movements and permitting occupants to move safely
through the building or to cars. A visually safe environment will not expose people to excessive
levels of glare or large differences in luminance levels. Outdoor light levels may depend on local
ordinances, but can generally be fairly low—the guidelines laid out by the Illuminating Engi-
neering Society of North America (IESNA, www.iesna.org
) suggest 0.5 to 5.0 foot-candles, de-
pending on the level of activity and the potential hazards.
ENERGY STAR
®
Building Manual
6
6. Lighting
CASE STUDY: Lighting Upgrade Improves Electric Load
Columbia University found that upgrading lighting in two adjacent buildings on its campus
freed up enough electrical capacity to allow the wiring of all the lighting circuits into one
building’s electric service. Purchasing the transformers for that one system then became a
cost-effective way to place both structures on high-tension service, saving another 29 per-
cent on the two buildings’ electric bills. When the costs and savings of this option were
combined with those of the lighting upgrades, overall payback remained at about 2.5
years, but total savings nearly doubled, demonstrating the synergistic effects that can
result by using lighting upgrades for electric load management. This option was previously
unavailable because purchasing the transformers for both buildings yielded an unaccept-
ably high payback.

6.3 A Whole-System Approach
A comprehensive lighting upgrade achieves qualitative lighting objectives while maximizing ef-
ficiency and profitability. The process begins with the identification of the appropriate quality
and quantity of light for various areas of a facility; proceeds through the selection of the best
combination of light sources, luminaires, and controls; and includes provisions for maintenance
and periodic reviews to ensure that goals for efficiency and quality continue to be met. This
whole-system approach takes what is frequently regarded as a complex system of individual de-
cisions and unites them into a strategic plan that ensures that each opportunity is addressed and
balanced with other objectives (Figure 6.4).
Many lighting-efficiency efforts are oriented toward the installation of specific pieces of equip-
ment, such as electronic ballasts or compact fluorescent downlights. But as with many other
types of complex systems, the interactions among system elements in lighting equipment create
energy and power savings that can be greater than the sum of their parts. Table 6.1 illustrates
the effects of pursuing incrementally more-aggressive upgrades while maintaining profitability
and lighting quality and quantity. Starting with a system of fixtures containing four energy-
saver T12 lamps, an upgrade to standard T8 lamps and electronic ballasts can produce energy
savings of more than 25 percent; using high-performance T8 lamps boosts savings to more than
40 percent.
The next option begins to capture some system interactions. Each fixture is equipped with a
specular reflector and a new acrylic flat prismatic lens. Because these are significantly better at get-
ting light out of the fixture than the old white-painted luminaire and aged diffuser, the fixture
can be delamped by 50 percent—to two high-performance T8 lamps—and still provide virtually
the same amount of light for the task. Adding reflectors and new lenses to the fixtures enables
ENERGY STAR
®
Building Manual
7
6. Lighting
Figure 6.3: Annual operating costs per square foot in a typical office space
Salary costs far outweigh the costs for lighting in a typical office building, so even small im-
provements in worker productivity, absenteeism, or staff retention will quickly offset the costs
of a well-executed lighting upgrade.
Courtesy: E SOURCE; data from Right Light Consortium
Salaries and benefits
85.8%
Rent
11.0%
Utilities
1.7%
Cleaning and
maintenance
1.3%
Lighting
operating costs
0.2%
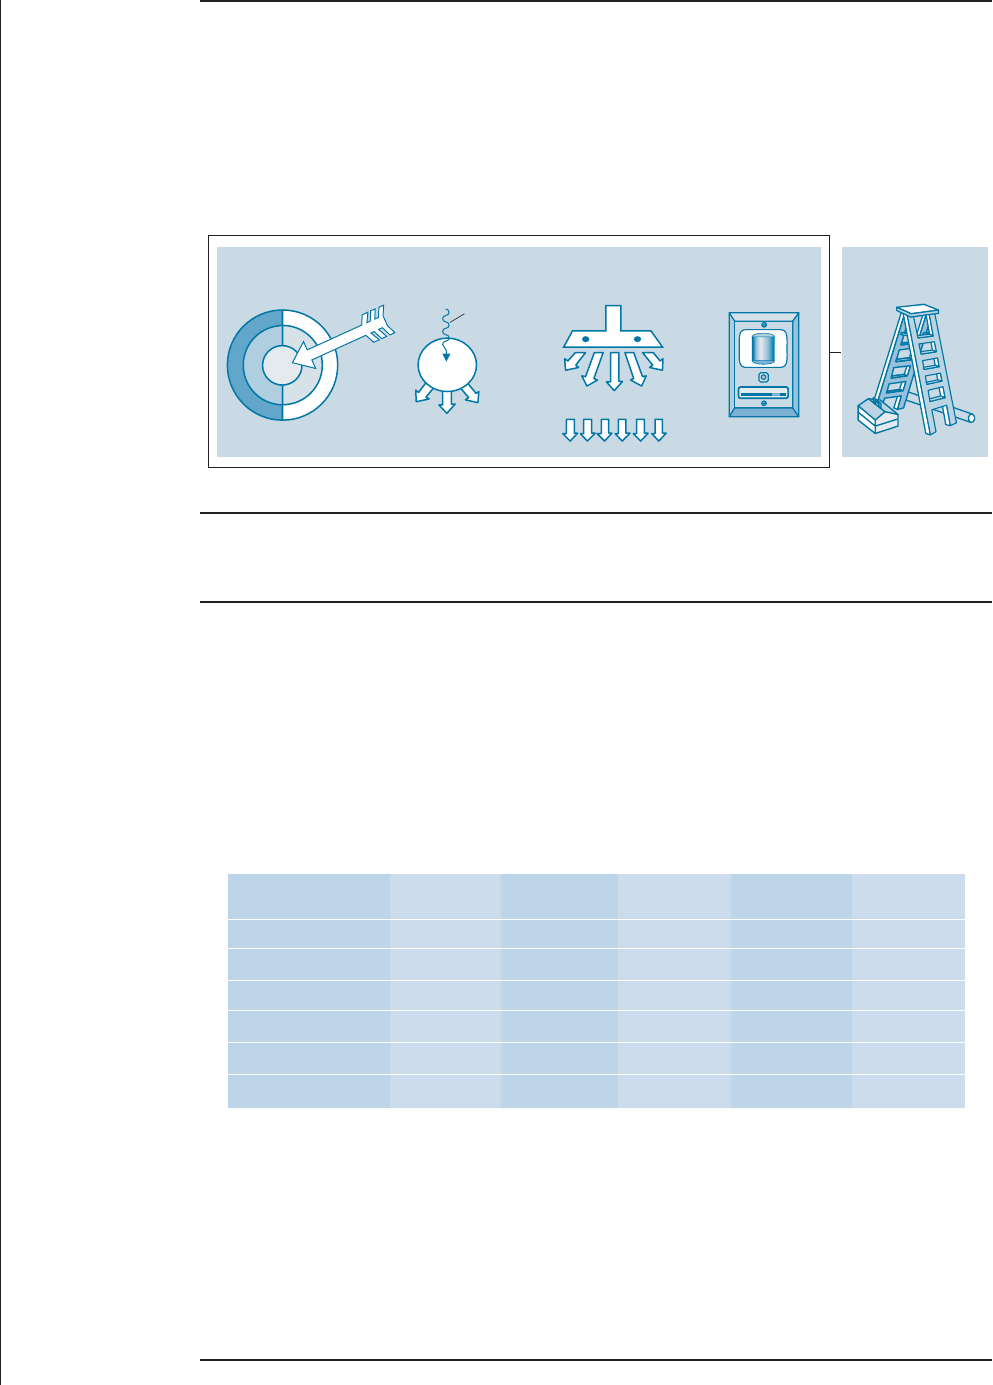
Figure 6.4: Comprehensive lighting upgrade strategy
A whole-system approach takes a complex system of individual decisions and unites them into
a strategic approach that ensures that each opportunity is addressed and balanced with other
objectives. The approach also includes provisions for monitoring and maintenance so that effi-
ciency is maintained and the lighting system accommodates any changes in the use or config-
uration of the space.
Table 6.1: Performance comparison of fluorescent retrofit options
Packages of lighting-efficiency measures such as high-performance lamps and ballasts, delamp-
ing, and controls achieve deep savings with attractive economics. In each case, it is assumed that
a minimum illumination level of 25 foot-candles is maintained and that lamps are replaced at
burnout.
ENERGY STAR
®
Building Manual
8
6. Lighting
Meet target
light levels
Just
right
Foo
t-cand
les delivered
Maximize source
efficiency
Power input
(watts)
Lamp
Lumens
Maximize luminaire
efficiency
Watts
Lumens
Foot-candles
Automatically
control lighting
Optimize for changing
tasks and space
Operations and
maintenance
T
o
o
d
a
r
k
T
o
o
b
r
i
g
h
t
Design
Source: EPA
Courtesy:
E
SOURCE
Lighting Technology Atlas
(2005)
Retrofit option
Case 1:
T8 lamps with
electronic ballasts
Case 2:
High-performance
T8s with electronic
ballasts
Case 3:
Case 2 + specular
reflector
+ lens + 50%
delamping
Case 4:
Case 3 + occupancy
sensing and
daylight
dimming
Average maintained
foot-candles
30 28 25 26
Power per fixture (W) 116 90 45 49
Annual energy use (kWh) 5,568 4,320 2,160 1,275
Energy savings (%) 26 42 71 83
Annual operating cost ($) 612 475 238 175
Upgrade cost ($) 1,165 1,320 1,560 2,150
Simple payback (years) 5.5 3.8 2.7 3.3
Base case:
Energy-saving
T12 lamps with
magnetic ballasts
25
156
7,507
NA
826
NA
NA
Notes: kWh = kilowatt-hour; NA = not applicable; W = watt.
Assumptions:
1. Fixture cleaning occurs at end of the rated life, base case. Assuming burn
hours of 4,000 hours per year and a 20,000-hour rated life, that works out
to five years between cleanings and a total dirt loss of 30 percent.
2. The specular reflector retrofit kit is designed to maintain the same spacing
ratio.
3. The existing diffuser has yellowed and gathered sufficient adhesive dirt
(which isn’t easily removed during routine cleaning) to reduce transmittance
by another 10 percent.
4. Energy costs: demand = $10 per kilowatt per month (all 12 months of the
year); consumption = 7¢ per kWh (all times of day).

delamping—a reduction in the number of lamps required per fixture—with little loss in light lev-
els, for a savings of 71 percent compared to the base case. Adding occupancy sensors and day-
lighting controls can boost savings to more than 80 percent compared to the base case, and more
than 50 percent compared to a system with standard-grade T8 lamps and electronic ballasts.
Another option is to replace existing fixtures with new fixtures, rather than upgrading the var-
ious elements. Upgrading the elements can be less costly and less disruptive to ongoing opera-
tions, but new fixtures are a good approach if you want to convert from direct to indirect
lighting, use a different type of light source (for example, replace high-intensity discharge light-
ing with fluorescent lighting), incorporate some of the advanced lighting control technologies,
or provide lower levels of ambient lighting while increasing task lighting levels.
6.4 Lighting Design
Successful lighting design begins with an assessment of occupants’ lighting needs, which depend
on the tasks performed in the workspace. The lighting system should be designed to provide the
quantity and quality of light responsive to those requirements. Chapter 10 of the IESNA Lighting
Handbook (9th edition), “Quality of the Visual Environment,” identifies several issues that should
be considered, including color, daylight availability, glare, and light distribution. Retrofits that
skip this assessment may perpetuate designs that have become inadequate because of workspace
rearrangements or changing tasks (for example, moving from paper-based to computer-based
tasks). The principles and guidance that apply to interior lighting are applicable to exterior light-
ing as well. Outdoor lighting that is designed and implemented properly should be cost-effective,
should control light by directing it where it is needed, should reduce glare and distribute illumi-
nation evenly, and should reduce light trespass.
The Right Quantity of Light
The quantity of light, or foot-candle illuminance level, that makes up an acceptable design de-
pends on the tasks being performed in the space. Chapter 10 of the IESNA Lighting Handbook
includes a “Lighting Design Guide” that provides recommended illuminances for seven general
application categories, divided into three sets of visual tasks (Table 6.2). The guide provides a
methodology for combining these seven recommended illuminance levels with 22 other criteria
to develop high-quality lighting for hundreds of different applications. IESNA also provides spe-
cific luminance recommendations for hundreds of indoor and outdoor activities in 17 recom-
mended practices for various lighting applications.
Keep in mind that the lighting level targets should be considered average maintained levels for
the task; they should not necessarily be applied uniformly as the ambient light level for the
entire space. Lighting levels should be customized through the use of supplemental task lighting
in areas requiring higher localized levels. Target lighting levels should be the sum of the ambient
and task lighting levels. This task-ambient lighting design approach creates flexibility to accom-
modate individual tasks or worker requirements, creates visual interest, and can save considerable
energy in comparison to a uniform ambient-level approach.
Room dimensions and finishes also affect the required light output and thus the energy con-
sumption of all interior lighting systems. As much as one-third of the energy used by a lighting
system depends on the surrounding interior features, including the ceiling height, number and
location of windows, and color and reflectivity of room surfaces and furnishings. Lighting de-
signers can work with architects and interior designers to ensure that features that enhance
ENERGY STAR
®
Building Manual
9
6. Lighting

lighting levels, such as light-colored finishes, are used wherever possible. This helps minimize
the required light output and therefore the energy consumption of the lighting system.
The Right Quality of Light
Lighting quality is the cornerstone of efficient lighting. The most efficient light sources mounted
in the best luminaires may save energy, but they will not produce much value for building own-
ers and occupants if they are applied improperly. Lighting designers can ensure high quality by
considering such classic elements of lighting design as luminance ratios and color qualities.
Luminance ratios and glare. The eye does not see absolute levels of illuminance (the
amount of light shining on a surface); it sees differences in luminance (the amount of light re-
flected back from a surface). Eyestrain and fatigue are caused when the eye is forced to adapt
continually to different luminances. Therefore, it is important not only to provide the right
level of light but also to ensure that light is evenly distributed across the task area. Balancing light
levels also ensures that task lighting levels will be adequate throughout the space. Uniformity
on vertical surfaces should also be maintained to avoid a gloomy, cave-like atmosphere.
IESNA recommends as good design practice an average luminance ratio of no more than 3 to
1 for close objects and 10 to 1 for distant objects and outdoor applications. In other words, the
difference in light level between the task area and the background should be less than a factor
of three. Although some designers use variation in illuminance as an organizing theme (for ex-
ample, to define hallways leading to open offices or as a highlighting strategy in retail areas),
large foot-candle variations within a workspace should be avoided.
Table 6.2: Recommended light levels
The 9th edition of the IESNA Lighting Handbook includes a “Lighting Design Guide” that pro-
vides recommended illuminances for seven general application categories divided into three
sets of visual tasks. The guide also provides a methodology for combining these illuminance lev-
els with 22 other criteria to develop high-quality lighting for hundreds of different applications.
ENERGY STAR
®
Building Manual
10
6. Lighting
Category Description
Illuminance
(foot-candles)
Public spaces
Simple orientation for short visits
Working spaces where simple visual tasks are performed
Performance of visual tasks of high contrast and large size
Performance of visual tasks of high contrast and small size
or low contrast and large size
Performance of visual tasks of low contrast and small size
Performance of visual tasks near threshold
Orientation and simple visual tasks in public spaces where reading and visual inspection rarely take
place and visual performance is not crucial. Higher levels recommended for tasks where visual performance
might be required.
Common visual tasks in commercial, industrial, and residential applications—where visual performance
is important. Recommended illuminance levels differ based on the visual tasks being illuminated. Higher
levels recommended for visual tasks with critical elements of low contrast or small size.
Special visual tasks including tasks with critical elements of very small or very low contrast. Visual
performance is critical. Recommended illuminance levels should be achieved with supplementary task
lighting. Higher recommended levels are often achieved by moving the light source closer to the task.
3
5
10
30
50
100
300–1,000
A
B
C
D
E
F
G
Courtesy:
E
SOURCE
Lighting Technology Atlas
(2005); adapted from
IESNA Lighting Handbook
, 9th edition

Glare is the most important quality factor. Glare results when luminance levels—or the differences
in luminance levels—are too high and objects appear too bright. Because glare creates discomfort,
loss of visual performance, and impaired visibility, it should be minimized wherever possible.
Direct glare is the presence of a bright surface (such as a bare lamp or the sun) in the field of view
that causes discomfort or loss in visual performance. This type of glare can be addressed with
“cutoff reflectors,” which prevent light from shining directly into an occupant’s eyes, or with
window shades that block direct sunlight.
A specific type of reflected glare called veiling reflection is a more challenging issue for the lighting
designer. A veiling reflection occurs when light strikes a task and produces shiny spots that over-
whelm the task. The decrease in contrast reduces visibility and can cause eyestrain. To combat
glare from veiling reflections, imagine that the occupant’s visual task is a mirror, and then do
not place bright fixtures such that they would appear in that mirror. Because it is difficult to pre-
dict exactly where workstations and tasks will be placed, one solution is to avoid direct lighting
fixtures entirely. This is partly why indirect lighting fixtures have become popular—they create
large areas of moderate brightness rather than small areas of high brightness that may be reflected
in such a way as to obscure visual tasks.
Color and spectral content of light sources. There are two common ways to describe
the color of light from a source: correlated color temperature (CCT) and color rendering index
(CRI). Both metrics should be considered when evaluating light sources.
Correlated color temperature, measured in degrees kelvin (K), refers to the temperature of a black-
body radiator emitting light of comparable color. The scale may seem intuitively backward: The
higher the color temperature, the “cooler” or bluer the light. The “right” color temperature for an
application may depend on the foot-candle level being maintained. Using lamps with high color
temperature at low light levels makes spaces appear cold and dim. Conversely, using lamps with
low color temperature at high levels of illumination will make a space look overly colorful. It is
particularly important to consider this in dimming applications, because a light source that looks
good at 50 foot-candles may not look as good at higher or lower illuminances. This issue is espe-
cially important in retail stores and restaurants, where the appearance of objects, people, and food
is very important. Another important consideration in selecting an appropriate color temperature
is the presence of daylight. For spaces that are daylit, 5,000 K may be the most appropriate CCT.
Color rendering index, measured on a scale of 0 to 100, describes the ability of a light source to
render a sample of eight standard colors relative to a reference source. A CRI of 100 means that
the source renders the eight standard colors in exactly the same way that the reference light
source renders the same colors. CRI is an average value, so it will not describe how a light source
renders a specific color. However, in general, high-CRI light sources render colors better than
low-CRI sources (Table 6.3). A CRI of 80 or greater is considered by the industry to provide
excellent color rendering.
Outdoor Lighting
Well-designed outdoor lighting is cost-effective, controls light by directing it where it is needed,
reduces glare, distributes illumination evenly, and reduces light trespass. The most common lamps
used for outdoor lighting are high-intensity discharge (HID) sources—metal halide and high-
pressure sodium. In recent years, compact fluorescent lamps (CFLs) and induction lamps have be-
come viable sources for outdoor lighting as well, offering good color quality and better control
options than HID sources. As costs come down and performance improves, light-emitting diodes
(LEDs) could become a good choice for outdoor lighting as well. Regardless of the light source,
however, the following points are important in the design of exterior lighting:
ENERGY STAR
®
Building Manual
11
6. Lighting

■ Pick the appropriate design illumination level. An average of 1 foot-candle (or less) is usually
sufficient. For more information, refer to the IESNA Lighting Handbook and several of its
recommended practices.
■ Use IESNA-cutoff luminaires or full-cutoff luminaires. These types of fixtures do not spread
light into the sky above the horizontal.
■ Use whiter light sources. Recent research, although not yet codified, shows that the whiter
light produced by metal halide and fluorescent lamps provides better “seeability” than an
equivalent amount of yellowish light from sodium lamps.
■ Provide controls. Use time clocks, photo cells, motion detectors, or pager controls to run the
lights only when needed or to dim them as appropriate.
Light pollution is a major concern in designing exterior lighting. Outdoor lighting ordinances
and codes encourage better-quality lighting that reduces glare, light trespass, and energy waste.
Many codes are now including the concept of e-zones to distinguish between different types of
lighting areas. For example, near national or state parks, wildlife refuges, or astronomical ob-
servatories, lighting levels should be much lower than in city centers. The ordinances and com-
munity standards vary, and local zoning departments should be contacted before implementing
an outdoor lighting project. (For more information, visit the web site of the International Dark
Sky Association, www.darksky.org
.)
6.5 Use Efficient Light Sources
Efficient lighting begins with the use of as much daylight as possible. After that, choose the
lamp/ballast/fixture combination that will maximize efficiency while balancing the considera-
tions of lighting quality and quantity described above. There is a wide variety of light sources
to choose from including fluorescent (linear and compact), high-intensity discharge (HID),
and newer sources such as induction lamps and light-emitting diodes (LEDs). These sources
vary widely in their efficacy, color quality, service life, and the applications for which they are
best suited (Table 6.4). Historically, fluorescent lighting has been used for high-quality, general-
purpose indoor diffuse lighting. HID lighting has been used for industrial and outside lighting.
However, technical advances and a flood of new products have led to some crossover in the way
Table 6.3: Typical CRI values for selected light sources
Light sources with a color rendering index (CRI) of 80 or higher are considered to provide ex-
cellent color rendering.
ENERGY STAR
®
Building Manual
12
6. Lighting
Note: a. T8 lamps with CRIs in the 90s offer lower efficacy than other T8 lamps. Courtesy: E SOURCE
Light source CRI range
Incandescent 100
Ceramic metal halide 85 to 94
T5 fluorescents 80s
T8 fluorescents 75 to 98
a
Quartz metal halide 65 to 70
T12 fluorescents 58 to 62
High-pressure sodium 22

these lamps are applied—fluorescent lighting is now the most effective choice for many indus-
trial and exterior lighting applications, while HID lighting (specifically metal halide) is now a
good choice for some interior uses.
Make Use of Daylight
The most efficient source of light is the sun, effectively providing up to 140 lumens (lm) of light
for each watt (W) of heat energy, which compares favorably with the 90 lm/W from an efficient
electric lighting system. Systems that use daylight to supplement electric lighting offer the po-
tential to cut energy use, reduce peak demand, and create a more desirable indoor environment.
However, it takes careful planning to achieve all the possible benefits from a daylighting system,
and a number of resources are available on the web to help in the effort (see sidebar). As an over-
all guide, follow these four basic principles to produce an effective daylighting system:
■ Bring in the light. Light can be brought into a building via conventional glazing, light
shelves, skylights, and clerestory windows (Figure 6.5) or with more advanced approaches
such as light pipes or specialized reflective materials.
Table 6.4: Typical properties of light-source upgrade alternatives
A variety of lamps are available for energy-efficient upgrades. Linear fluorescent lamps are the
most widely used, but each type has applications in which it can be an effective choice. The data
listed do not represent the full range of variations for each lamp type, but only the ranges for
the most effective choices.
ENERGY STAR
®
Building Manual
13
6. Lighting
Lamp type
Mean efficacy,
including ballast
(mean lm/W)
Lumen
maintenance
(%)
Rated life
(hours)
Color
rendering
index
Correlated color
temperature (K) Typical applications
Full-size fluorescent (T5,
high-performance T8)
80 to 97 92 to 93 20,000 to
30,000
80 to 85 2,700 to 6,500 General area lighting of all
kinds, including open and
closed offices, classrooms,
and high-bay areas
Compact fluorescent
43 to 71
a
86 6,000 to
12,000
80 to 85 2,700 to 6,500 Incandescent
replacements in table and
floor lamps, cans, wall
washers, and sconces
Quartz pulse-start
metal halide
60 to 80
a
65 to 75 20,000 65 to 70 2,900 to 4,200 Outdoor lighting, high-bay
lighting, and remote-source
lighting
Ceramic pulse-start
metal halide
60 to 80
a
80 20,000 85 to 94 2,900 to 4,200 Where color is critical,
including high-bay and
retail applications
High-pressure sodium
60 to 110
a
85 to 90 24,000 22 1,900 to 2,200 Outdoor lighting and in
high-bay applications
where color is not critical
Induction
50 to 60
a
70 at 60,000
hours; 55 at
100,000 hours
100,000 80 2,700 to 4,100 Where maintenance costs
are high, including roadways
and tunnels, parking
garages, escalator wells,
warehouses, and malls
LED 15 to 30 70
50,000
b
80 to 90 2,700 to 10,000 In color-based applications
such as exit signs, niche
applications such as outdoor
signage, task lamps, and
accent lighting
Lamp property
Courtesy: E SOURCENotes: K = kelvin; LED = light-emitting diode; lm/W = lumen per watt.
a. Higher efficacies for higher-wattage lamps.
b. Time at which output has degraded to 70 percent of initial output.
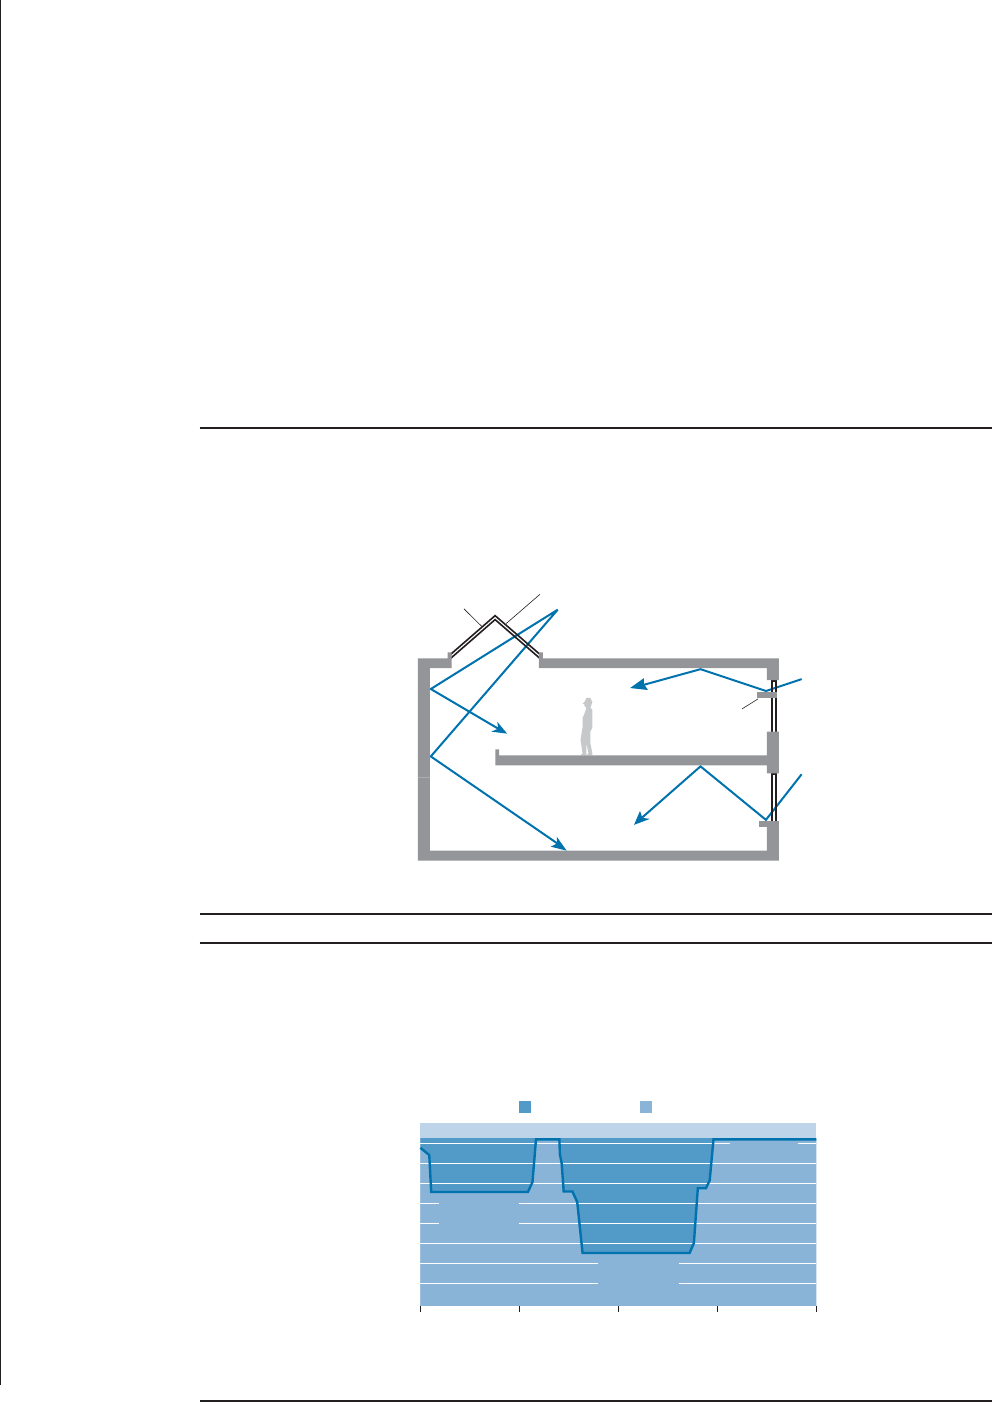
Figure 6.5: Simple daylighting techniques
A mix of top- and side-lighting, light shelves, high-reflectance ceilings, and wall diffusion pro-
vides fairly uniform deep-plan daylighting without the glare of direct sun.
Figure 6.6: Skylights cut lighting energy use
A grocery store in Valencia, California, used skylights and photocells to reduce lighting energy
use by 30 percent during a monitored two-week period.
■ Eliminate glare. Glare is the number-one killer of daylighting systems—direct sunlight can
cause very uneven luminance ratios that are distracting or even painful to occupants. Means
for combating glare include using translucent materials and bouncing direct light off sur-
faces such as painted walls, perforated metal, or fabrics.
■ Adjust electric lights as appropriate. Without lighting controls, daylighting will not save any
energy. Automatic controls that sense ambient daylight are the best approach, because they
ensure that electric lighting will be reduced when enough daylight is available. Figure 6.6
shows how an automatic daylight control system installed at a grocery store cut energy use
by 30 percent and decreased demand during peak hours.
■ Commission the system. Many daylighting systems fail to deliver the expected benefit because
they are not commissioned. Commissioning consists of adjusting photosensors and ensuring
proper sensor placement so that the electric lighting system responds properly to the pres-
ence of daylight.
ENERGY STAR
®
Building Manual
14
6. Lighting
Clear acrylic
glazing
White translucent acrylic glazing
Top-lighting
Side-lighting
Light shelf
Courtesy:
E
SOURCE
Lighting Technology Atlas
(2005)
Source: California Energy Commission, PIER program
Time of day
12 a.m. 6 a.m. 12 p.m. 6 p.m. 12 a.m.
0.2
0.4
0.6
0.8
1.0
1.2
1.4
1.6
1.8
Lighting density
in watts per square foot
Daily energy use on a clear summer day
Reduced
power, step 2
Full power
Reduced
power, step 1
Energy useEnergy savings

Properly planning and implementing a lighting control system will reduce the chances of over-
dimming, under-dimming, and rapid cycling—problems that frequently occur in daylighting
systems. These problems can often lead to users overriding the control system and eliminating
any savings that may have accrued.
Linear Fluorescent Lamps
Fluorescent lighting systems offer high efficacy, long life, and good light quality, and they gen-
erally have few operational limitations for most indoor lighting applications. They are the best
choice for general lighting in commercial, institutional, and industrial spaces with low to
medium ceiling height. In addition, the introduction of high-intensity fluorescent lamps and
fixtures makes fluorescent systems a leading choice for areas with high ceilings (more than 15
ENERGY STAR
®
Building Manual
15
6. Lighting
RESOURCES: Daylighting
A number of daylighting resources, including reference guides, case histories, and software,
are available free of charge on the web:
Daylight in Buildings: Source Book on Daylighting Systems and Components
http://gaia.lbl.gov/iea21
This comprehensive reference book, published by Lawrence Berkeley National Laboratory’s
Building Technologies Department, describes and evaluates new and innovative technolo-
gies for using daylight in buildings.
Daylight Dividends www.daylightdividends.org
The Lighting Research Center maintains a web site that provides information, including
case studies, aimed at building owners, architects, and engineers interested in the benefits
of natural light.
BetterBricks www.betterbricks.com/default.aspx?pid=lightinglabs
This organization sponsors a network of university-associated laboratories throughout the
northwest region of the United States. Its labs offer free analysis and consultation.
DesignLights Consortium www.designlights.org
This group offers guidelines on skylighting for warehouses and retail outlets and also pro-
vides case studies and software for skylight system design.
Wisconsin Daylighting Collaborative/Energy Center of Wisconsin www.daylighting.org
The collaborative provides case studies, training programs, demonstrations, and design
assistance.
Skycalc www.energydesignresources.com/resource/129
Skycalc is a Microsoft Excel–based software tool that assists designers in developing day-
lighting strategies that use skylights.
SPOT www.archenergy.com/SPOT/index.html
The Sensor Placement and Orientation Tool (SPOT) helps designers establish correct pho-
tosensor placement relative to a proposed daylighting electric lighting design. It also ana-
lyzes and predicts overall system performance prior to field installation and commissioning.

feet)—the type of application that used to be the exclusive domain of HID light sources (see
sidebar). A successful upgrade using fluorescent lamps requires careful consideration of options
for lamps (diameter, length, intensity, and phosphor blend) and ballasts (electronic versus mag-
netic, rapid-start or programmed rapid-start versus instant-start).
Picking the right fluorescent lamp. Manufacturers have introduced a wide array of linear
fluorescent lamp choices, including reduced-wattage, premium, and high-performance versions.
There are also choices of CCT, CRI, lamp diameter, light output level (standard, high-output,
or very high output), and starting method (rapid-start, programmed rapid-start, or instant-
start). For most general lighting upgrades, the best choices are:
■ T8 (eight-eighths of an inch in diameter) or T5 (five-eighths of an inch in diameter) lamps.
The most efficient T8s are the high-performance type, also commonly called “super T8s”
(Table 6.5). High-performance T8 lamps can be installed to replace T12 lamps and even
cost-effectively upgrade lower-quality T8s. An office building in Minneapolis owned and
managed by Hines upgraded more than 15,000 fixtures from T12 to T8 technology on its
way to achieving and maintaining ENERGY STAR status. A retrofit from standard T8
lamps to high-performance T8s in modular classrooms in California cut lighting power
from 116 W to 74 W and decreased air-conditioning loads in the confined classroom
spaces. High-performance T8 lamps provide their biggest boost in efficiency when they are
combined with high-performance ballasts. Reduced-wattage T8s, sometimes called “en-
ergy-saver” lamps, can also provide energy savings, but they have several shortcomings:
They can only operate in spaces where temperatures are kept at a minimum of 60° Fahren-
heit (F), they produce less light than full-wattage lamps, and they are not dimmable with
current ballast technology.
T5 lamps, on the other hand, come only in metric lengths, which means that they are not
a good retrofit option, unless fixtures are being replaced as well as lamps and ballasts. The
efficacy of T5s is similar to that of T8 lamps, but because they are smaller they provide
better optical control. T5 lamps also offer high lumen maintenance, putting out as much
as 97 percent of their original light output at 40 percent of rated life. T5 lamps also offer
better performance than T8s in enclosed fixtures and warm spaces because they are designed
for a higher operating temperature.
■ Four-foot lamps. The most common length for T8 lamps is four feet, which makes it the
cheapest and easiest length to buy and stock. Eight-foot lamps are slightly more efficient,
but they break more easily and can be difficult to transport.
CASE STUDY: Upgrade to Fluorescents
Improves Distribution Center Lighting
Demoula’s Market Basket supermarket chain converted the lighting in its main warehouse
distribution center in New England from high-intensity discharge to fluorescent equipment.
The new fixtures, each of which houses six high-output T5 lamps, replaced 400-watt mer-
cury vapor or high-pressure sodium fixtures on a one-for-one basis. The connected load
was reduced from 460 to 351 watts per fixture. When aisles are vacant, occupancy sensors
now turn off four of the lamps to drop the lighting energy by two-thirds (to 117 watts per
fixture). In addition to achieving over 50 percent energy savings, the new lighting is much
brighter, has better color, and offers instant-on and instant-restrike capabilities.
ENERGY STAR
®
Building Manual
16
6. Lighting

■ Standard light output. Standard-output lamps are more efficient and less costly than high-
output (HO) and very high output (VHO) systems, and they are available with a wider
range of color temperatures. T5HO lamps are often used for high-bay applications because
their high-intensity light is useful in large spaces.
■ CRI in the 80s. Light sources with a CRI in the 80s provide good color rendering—far
better than the old “cool-white” T12 lamps that provided a CRI in the 60s. Fluorescent
lamps with CRIs in the 90s are available, but they carry a substantial penalty in efficacy.
■ CCT of 3,500 K to 4,100 K. A CCT of 3,500 K is a good middle ground that can blend
acceptably with warmer incandescent lights or earth-tone color schemes; 4,100-K lamps
may blend better with cooler daylight, HID sources, or blue-gray color schemes.
Picking the right fluorescent ballast. Ballast choices can be equally bewildering. The
best choices for ballasts are:
■ Electronic (high-frequency). Electronic ballasts are about 12 percent more efficient than con-
ventional magnetic ballasts. They eliminate flicker and hum and are extremely cost-effective.
The most efficient units are high-performance ballasts as defined by the Consortium for En-
ergy Efficiency (www.cee1.org/com/com-lt/com-lt-specs.pdf
).
■ Instant-start. This is the most efficient type of ballast, but it yields the shortest lamp life in
applications with frequent on/off cycling. Instant-start ballasts are a good choice for lamps
that burn six hours or more per start.
■ Programmed-start. Programmed-start ballasts, also called programmed rapid-start ballasts,
represent the next step in the evolution of rapid-start technology. Their use increases lamp
life but carries some penalty in efficiency. They are the best choice in applications where
lights will frequently be turned on and off, as often happens when occupancy sensors are used.
■ Universal-input. Universal-input ballasts typically accept any input voltage between 120
and 277 volts. They make retrofitting easier and reduce stocking requirements, but provide
slightly lower efficiency than dedicated-voltage ballasts.
Finally, make sure that lamps and ballasts are compatible. Most lamps are only compatible with
one starting method; the major exception is high-performance T8s, which can use either rapid-
or instant-start ballasts.
Table 6.5: The T8 family tree
Linear T8 fluorescent lamps are available with a wide variety of characteristics. The high-
performance T8 lamps offer the highest output and the best color quality.
ENERGY STAR
®
Building Manual
17
6. Lighting
Notes: CRI = color rendering index; lm/W = lumens per watt; W = watt. Courtesy: E SOURCE; data from Consortium
for Energy Efficiency
Lamp type
700 series
800 series
High performance (super T8)
Energy saver
Reduced wattage
Reduced wattage
Nominal
power (W)
32
32
32
30
28
25
CRI
70s
Low 80s
High 80s
High 80s
High 80s
High 80s
Efficacy (lm/W)
<85
87 to 94
94 to 100
94 to 100
94 to 100
94 to 100

Compact Fluorescent Lamps
Use compact fluorescent lamps (CFLs) to replace incandescent lamps in downlights, sconces,
table lamps, task lights, and wall washers. They cost more initially than incandescent lamps do,
but quickly pay for themselves through energy and maintenance savings. The longer the annual
operating hours, the more attractive the economics of CFLs become, because more incandescent
relamping costs are being avoided per year.
CFLs come in two general forms—self-ballasted or pin-base. Self-ballasted CFLs—also known
as screw-base, screw-in, or integrally ballasted CFLs—can replace incandescent lamps without
modifications to the existing fixtures. They combine a lamp, ballast, and base in a single sealed
assembly that is discarded when the lamp or ballast burns out.
Pin-base CFLs, the type most commonly employed in commercial buildings, are used with a
separate ballast. They are available in lower-power versions, which can replace incandescent
lamps, and in higher-power versions, which can replace linear fluorescent lamps or HID lamps.
Pin-base systems feature a ballast and pin-base fluorescent lamp socket that is wired into a
fixture by the fixture manufacturer or as part of a retrofit kit. Because they are hardwired, ded-
icated systems, they eliminate the possibility that a user will return to using an inefficient in-
candescent bulb.
One of the most common uses of CFLs in commercial buildings is in recessed downlight cans.
A wide range of fixtures is now available for this fixture class, some with very good reflector de-
signs, good optical control, and dimming capabilities. Care must be taken in this application
to ensure that excess heat buildup does not shorten the lamp life.
When using CFLs, remember these key points:
■ Go for a 3:1 ratio. Lamp manufacturers often publish a 4:1 ratio for replacing incandescent
bulbs with CFLs (that is, a 25-W CFL can replace a 100-W incandescent lamp). A 3:1
ratio is more appropriate (a 25-W CFL can replace a 75-W incandescent lamp)—in prac-
tice, CFL output is lower than the nominal rating because of lumen degradation and the
effects of temperature and position on lamp output.
■ Limit the number of CFL types. CFLs are available in a wide variety of sizes and shapes—it
is useful to standardize on just a few types to reduce stocking requirements and confusion
at relamping time.
■ Use dedicated fixtures. To prevent the replacement of CFLs with incandescent bulbs when
it is time to relamp, use dedicated fixtures that will only accept pin-based CFLs.
■ Choose CFLs that have earned the ENERGY STAR. This rating from the EPA ensures reliability
as well as efficiency in self-ballasted CFLs (visit www.energystar.gov/index.cfm?c=cfls.pr_cfls
for more information).
High-Intensity Discharge Lamps
Wherever an intense point source of light is required, HID light sources are the primary alter-
native to high-wattage incandescent lamps. Although HID lamps can provide high efficacy in
a wide range of sizes, they have special requirements for start-up time, restrike time, safety, and
mounting position. The basic types of HID lamps include mercury vapor, metal halide, and
sodium, but mercury vapor lamps are an old, inefficient technology and should not be part of
any upgrade plans. The primary uses for HID lighting are outdoor lighting, high-bay lighting,
retail lighting, and remote-source lighting (Table 6.6).
ENERGY STAR
®
Building Manual
18
6. Lighting

Metal halide lamps. Metal halide lamps offer good color quality and efficacies of up to 100
lm/W. Were it not for several limitations, metal halide lamps might be considered the ideal
light source. The limitations include:
■ Long start-up times. Starting the lamps initially takes three to five minutes, and restarting
after a shutdown or power outage takes 10 to 20 minutes. The introduction of electronic
ballasts has reduced but not eliminated these delays (Table 6.7).
■ High UV output. Metal halide lamps produce relatively high levels of ultraviolet (UV) ra-
diation that must be controlled with shielding glass in the lamp or fixture. Protection from
possible explosion is also required.
■ Color shifting. The color of the light output from a metal halide lamp can shift, sometimes
dramatically and randomly. The use of electronic ballasts and ceramic metal halide lamps
reduces this effect.
■ Lamp position. The light output of metal halide lamps is sensitive to the position of the
lamp. (Sodium lamps are not position-sensitive.)
Table 6.6: Applications for HID light sources
Good color properties and a wide range of sizes make metal halide lamps the most versatile
high-intensity discharge (HID) light source.
Table 6.7: Metal halide warm-up and restrike times
Electronic ballasts have shortened warm-up and restrike times for pulse-start metal halide lamps
but have not eliminated them entirely.
ENERGY STAR
®
Building Manual
19
6. Lighting
Courtesy: E SOURCE
Outdoor signage
x
Application
Metal
halide
Ceramic
metal halide
High-pressure
sodium
Low-pressure
sodium
Interior, decorative
x
x
Downlights x x
Parking areas x x x
General outdoor
x
x
x
Roadways or tunnels
xx
x
Sports arenas
xx
High-bay spaces
(including hangars and warehouses)
xx x
Low-bay spaces (including supermarkets,
light industrial, or retail shops)
xx x
Courtesy: E SOURCE; data from Stan Walerczyk
Lamp/ballast type
Warm-up time
(minutes)
Restrike time
(minutes)
Probe-start/magnetic
4 to 5
10 to 20
Pulse-start/magnetic
2 to 3
3 to 5
Ceramic/magnetic 2 to 3
10 to 20+
Quartz pulse-start/electronic 1 to 3
2 to 4
Ceramic/electronic
1 to 3
10 to 20+

Several developments in technology have made metal halide systems more effective. Manufac-
turers introduced pulse-start technology in the late 1980s and early 1990s to improve on the
performance of older probe-start technology. More recently, electronic ballasts and ceramic
metal halide lamps have improved performance even further. Ceramic metal halide lamps offer
better CRI and lower lumen depreciation rates then the conventional quartz version. Electronic
ballasts improve efficiency and color stability, reduce lumen depreciation rates, and cut warm-
up and restrike times (Table 6.8). Many electronic ballasts are also dimmable.
Despite their limitations, metal halide lamps can be a good option in a number of applications,
including outdoor and high-bay lighting. Ceramic metal halide lamps are also a good choice
wherever color quality is critical, including retail lighting and some manufacturing operations.
For example, a retrofit of ceramic metal halide lamps with a CRI of 92 is helping maintenance
workers do their jobs better in the Alaska Airlines maintenance hangar at Seattle-Tacoma airport.
Sodium lamps. There are two types of sodium lamps: high-pressure sodium (HPS) and low-
pressure sodium (LPS). HPS lamps, which produce a yellowish light, vary widely in their efficacy
and color quality. Three basic grades are available, based on CRI: The lowest, with a CRI of
about 21, is typically used for outdoor lighting; general-purpose indoor units have a CRI of
around 60; and the less-common “white” versions boast a CRI up to 80 or higher. For this last
type of lamp, better color comes at the cost of lower efficacy and shorter lamp life. The most
common application of HPS lamps is for roadway and parking-lot lighting. The applications
of LPS lighting are extremely limited by the nearly monochromatic yellow light they produce.
One of the few applications for LPS lamps is outdoor lighting near observatories, where the nar-
row wavelength band can more easily be filtered from the view of the telescope.
Other Light Sources
Two other light sources bear consideration for some lighting upgrade applications: LEDs and
induction lamps.
LEDs. light-emitting diodes are solid-state electronic devices that create light. They offer several
advantages over conventional light sources, including long life and vibration resistance. Their
small size and the directional nature of their light output are also beneficial in some cases. These
characteristics have enabled LEDs to displace incandescent lamps in some applications, but ef-
ficiency still needs to improve significantly and costs need to decrease before LEDs are a cost-
effective replacement for higher-efficiency sources such as fluorescent lamps.
Table 6.8: Ceramics boost metal halide performance
Ceramic arc tubes boost the color quality and lumen maintenance of pulse-start metal halide
lamps.
ENERGY STAR
®
Building Manual
20
6. Lighting
Property
CRI 65 to 70 90 to 95
End-of-life lumen maintenance
with electronic ballast (%)
70
80
Quartz
metal halide
Ceramic
metal halide
Notes: CRI = color rendering index.
Data are for 250- to 400-watt lamps.
Courtesy: E SOURCE

The most successful early applications for LEDs have been those where they replace filtered in-
candescent bulbs, such as in traffic signals and exit signs, because the filtering of the emitted in-
candescent light makes an already inefficient source even less efficient. The efficacy of
incandescent lamps is relatively low: about 17 lumens per watt for a conventional 100-watt
bulb. When incandescent lamps are used to produce colored light, an absorptive filter is placed
in front of the white light source to absorb all colors except those that are required for the ap-
plication. When red light is needed for, say, an exit sign, this absorptive filter reduces the efficacy
of the incandescent lamp-plus-filter combination to less than 5 lm/W. With LEDs, the color
of the light they generate depends on the materials used to construct the LED, not on a filter.
Modern, high-brightness red LEDs operate with an efficacy of 20 to 30 lumens per watt, which
makes them much more efficient sources of red light than filtered incandescent lamps.
The other area where high-brightness LEDs have displaced other light sources is large outdoor
displays. And retail accent lighting is a growing area for LEDs, because LEDs provide the ability
to vary color, create sparkle, and aim the light precisely. Many facilities have already replaced
incandescent exit signs with LED signs, cutting the energy used by the signs by 80 percent or
more in the process. For information on ENERGY STAR–qualified exit signs, most of which
use LEDs, visit www.energystar.gov/index.cfm?c=exit_signs.pr_exit_signs
.
For general illumination, LEDs have great potential but are still under development. As of 2006
the most efficient white LEDs available offered an efficacy of about 30 lumens per watt in real-
world conditions—and producing white light with LEDs still costs far more than it does with
other light sources. (For updates on the status of LED lighting, visit the U.S. Department of
Energy’s “Solid State Lighting” web site, www.netl.doe.gov/ssl
.)
Induction lamps. Induction lamps, also called electrodeless lamps, consist of a high-frequency
power generator, a coupling device that generates a magnetic field (essentially an antenna), and
a glass housing that contains the gases and phosphor coating—no electrodes required. The main
advantages of induction lighting are the ability to produce a substantial amount of light in a rel-
atively compact package and a long lamp life due to the elimination of the electrodes. The
major drawback of induction lighting is high installed cost. In applications where maintenance
costs are high, though, induction lighting systems can be cost-effective.
Existing induction-lamp products are aimed at two distinct market niches. The higher-wattage
versions available (55 to 165 W) offer very long life (up to 100,000 hours) and can be a good
choice anywhere that relamping and maintenance are difficult or hazardous. These lamps have
been used in all of the following locations:
■ Escalator wells
■ High-ceilinged spaces, including atriums (such as over open mall areas) and in warehouses
and factories
■ Parking garages
■ Roadways, including bridges, tunnels, underpasses, and signs
■ Exterior pedestrian lighting
Lower-wattage induction lamps (20 and 23 watts) are also available as direct replacements for
medium-base incandescent and compact fluorescent lamps. They offer efficacies of about 50 lu-
mens per watt, CRIs of 82, and an expected life of 15,000 hours.
ENERGY STAR
®
Building Manual
21
6. Lighting
6.6 Use Efficient Luminaires
Many lighting projects use efficient lighting sources but fail to deliver the light in an efficient
manner. To make the best use of an efficient source, it is essential to consider the efficiency and
light distribution of the fixture that will deliver the light from the source. The fixture efficiency
is a measure of how much of the light produced by the light source actually gets out of the fix-
ture. It can vary from a low of about 50 percent to a high near 100 percent. In practice, fixture
efficiency can make a big difference in a lighting system’s overall efficiency—a fixture with an
efficiency of 90 percent will deliver 50 percent more of its light than one with an efficiency of
only 60 percent. To illustrate the impact improved efficiency can have, a designer who uses a
fixture with a 90 percent efficiency and needs 100 fixtures to provide adequate lighting would
have needed 150 fixtures to provide the same amount of light with the less-efficient fixture, all
else being equal. Lighting fixtures for commercial installations are classified as direct, indirect,
or indirect/direct (Figure 6.7).
Direct Lighting
The most common and lowest first-cost approach for general commercial lighting is direct
downlighting with 2-by-4 or 2-by-2 fluorescent fixtures. This design provides good illumination
for horizontal tasks, but it leaves ceilings and wall surfaces dark, creating a cave effect. It also
may cause glare for computer-based work, because the fixtures may use bright lamps or lenses
that can be reflected in computer screens. These fixtures may also be a source of direct glare into
an occupant’s eyes. The pattern of light distribution from a direct fixture is determined by the
reflectors and lenses or diffusers it uses.
Reflectors. Reflectors are inserts designed to reduce the internal light loss in fixtures by using
highly reflective surfaces to redirect light out of the fixture. They can be used in new fixtures or
installed in existing fixtures as part of an energy-savings retrofit strategy.
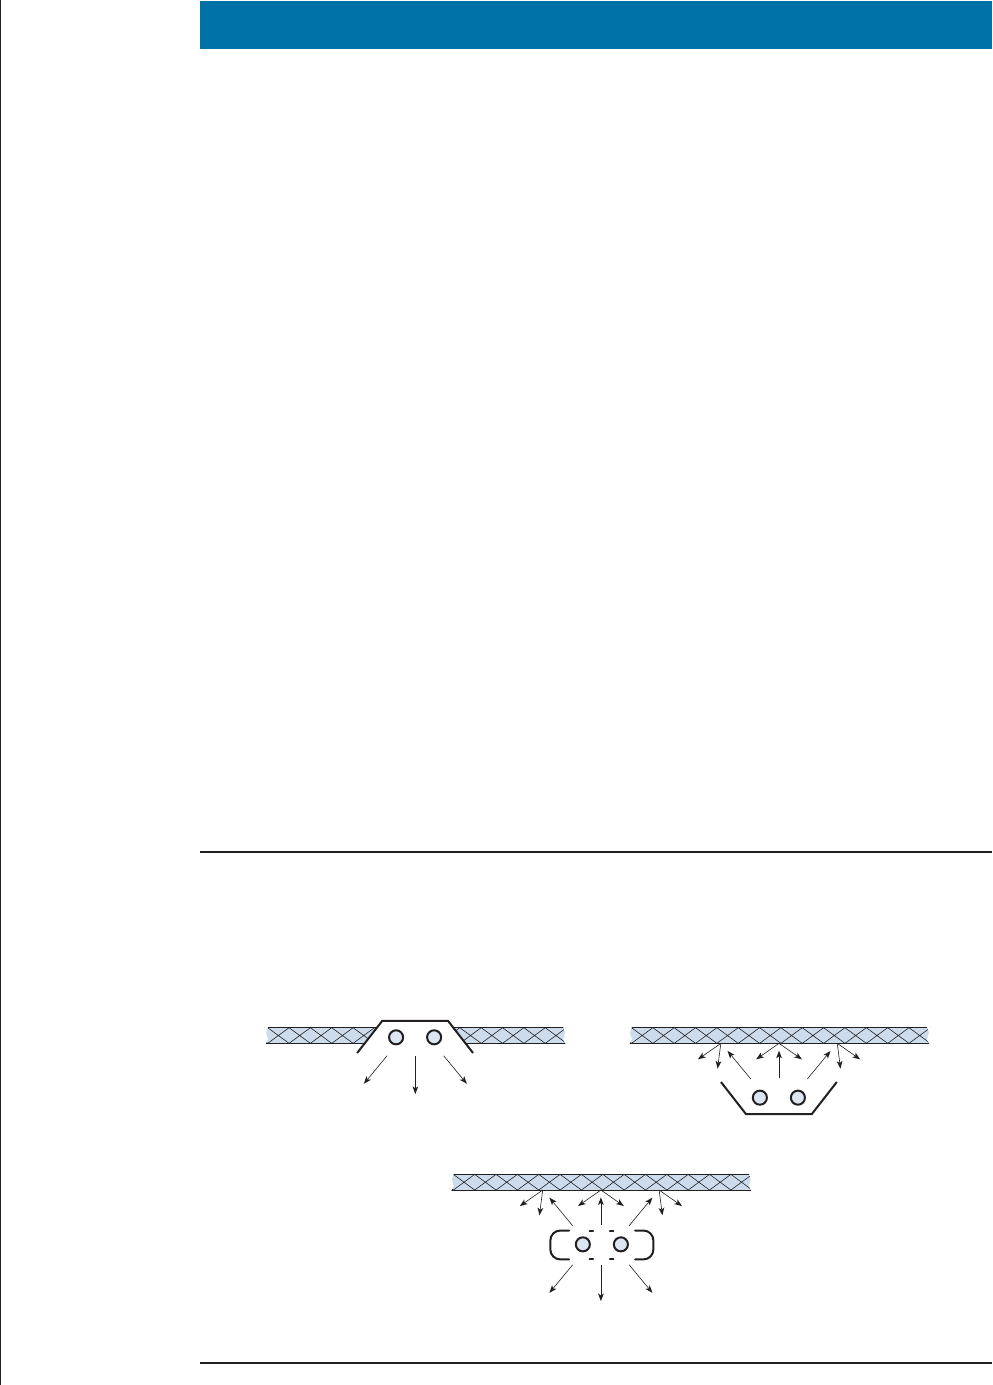
Figure 6.7: Fixtures have their ups and downs
Lighting fixtures may send all or most of their light downward (A), upward (B), or a mixture of
the two (C).
ENERGY STAR
®
Building Manual
22
6. Lighting
B. Indirect fixtureA. Direct fixture
C. Indirect/direct fixture
Courtesy:
E
SOURCE
Lighting Technology Atlas
(2005)

Most high-efficiency fixtures use specular reflectors, which perform like mirrors to aim light in
particular directions. The same fixture with a different reflector design can produce a very dif-
ferent distribution pattern. Light distribution also varies according to the horizontal orientation
of the fixture. Although a spherical HID fixture usually distributes its light in a uniform, circular
pattern, many of the more efficient fluorescent fixtures emit light differently along their length
than they do at the ends. This pattern can be used to improve system efficiency in applications
such as narrow warehouse aisles.
Specular reflectors can also be retrofitted into existing fixtures, providing a 12 to 16 percent ef-
ficacy improvement over new white-enamel diffuse reflectors. These retrofitted reflectors provide
more directional control than the white paint that is often employed, and they can be used to
widen or narrow the light distribution from the fixtures. In some cases, the use of reflectors
and high-efficiency sources enables delamping.
Lenses and diffusers. Most indoor commercial fixtures use some type of diffuser, lens, or
louver over the face of the fixture to block direct view of the lamp or to diffuse or redirect light.
Diffusers are simply semitranslucent plastic sheets that hide lamp images and diffuse light evenly
across the face of the fixture. Because they spread light in all directions and absorb a large
amount of light, diffusers are not only inefficient but also ineffective at controlling glare. Using
clear plastic lenses with small prismatic surface patterns instead of diffusers improves efficiency
and the distribution of light.
Louvers. Specular parabolic cube (or “paracube”) louvers can reduce the light loss that occurs
with translucent lenses. By employing highly reflective surfaces shaped to send light down to a
task (instead of bouncing it back and forth between parallel surfaces, as occurs with “eggcrate”-
style louvers), these devices block lamp images, reducing the potential for reflected glare in
computer screens or other shiny materials. Paracube louvers with openings smaller than 1 inch
are effective at reducing glare, but they absorb a great deal of light and dramatically reduce fix-
ture efficiency. Appropriate louver cube sizing (over 1.5 inches) typically requires a deeper fixture
and a different method of attachment than conventional shallow fixtures can provide. Large-
cell parabolic louvers can create an acceptable appearance and distribution, adding value to a
lighting upgrade.
Indirect Lighting
The best type of lighting system for glare control and visual comfort is an indirect or indirect/di-
rect system. Indirect lighting can make a space feel brighter with less light because it illuminates
the ceiling and top portions of walls. If the ceiling and walls are made of a light-colored material,
little light is lost with this approach. Indirect light works well within a task-ambient lighting
scheme and is also very appropriate for work areas that use computer terminals. Indirect lighting
is most useful in rooms with ceilings that are a bit higher than normal (10 feet or higher would
be ideal, but 9 feet is acceptable). For lower ceiling heights, recessed direct/indirect fixtures—
which provide a mixture of direct and indirect illumination—can be considered, or indirect
fixtures can be integrated into or mounted onto office furniture.
The introduction of T5 fluorescent lamps, which are thinner and provide a higher intensity of
light output than T8 lamps, has widened the applicability of indirect lighting. The high light
output of T5 lamps means that rows of indirect fixtures can be placed as much as 12 to 15 feet
apart on ceilings as low as 9 feet (some manufacturers claim that the fixtures can be used on ceil-
ings 8 feet 6 inches or lower) and still provide uniform ceiling illumination levels. Wider spacing
means that fewer fixtures need to be used in a given space and the overall cost for an installation
can be reduced accordingly.
ENERGY STAR
®
Building Manual
23
6. Lighting

Indirect lighting can also provide another benefit: The even illumination that it provides means
that a lower ambient lighting level may work for a given space. For example, 30 foot-candles of
indirect illumination may be sufficient in a location where 40 or 50 foot-candles of direct light-
ing would be required to provide a similar work environment.
6.7 Automatically Control Lighting
Reducing the connected load of the lighting system represents only one part of the potential for
maximizing energy savings. The other part is minimizing the use of that load through automatic
controls. Automatic controls switch or dim lighting based on time, occupancy, lighting-level
strategies, or a combination of all three. In situations where lighting may be on longer than
needed, left on in unoccupied areas, or used when sufficient daylight exists, consider installing
automatic controls as a supplement or replacement for manual controls.
The general control strategies used by lighting designers include:
■ Occupancy sensing, in which lights are turned on and off or dimmed according to occupancy;
■ Scheduling, in which lights are turned on and off according to a schedule;
■ Tuning, in which light output is reduced to meet current user needs;
■ Daylight harvesting, in which electric lights are dimmed or turned off in response to the
presence of daylight;
■ Demand response, in which power to electric lights is reduced in response to utility curtail-
ment signals or to reduce peak power charges at a facility; and
■ Adaptive compensation, in which light levels are lowered at night to take advantage of the
fact that people need and prefer less light at night than they do during the day.
These strategies can be accomplished by means of various control devices, including on-off con-
trols, dimming controls, and systems that combine the use of both types of equipment (Table 6.9).
These controls can be quite sophisticated, but in general they perform two basic functions: They
turn lights off when not needed, and they modulate light output so that no more light than nec-
essary is produced. The equipment required to achieve these functions varies in complexity from
simple timers to intricate electronic dimming circuits. Each of these technologies can be applied
individually to great effect or combined for even greater benefit. Whatever control strategy is em-
ployed, steps must also be taken to commission the system to make sure that it performs as ex-
pected, and plans must be made for retrocommissioning the system over time so that it continues
to perform that way.
On-Off Controls
The simplest way to reduce the amount of energy consumed by lighting systems is to turn lights
off when they are not needed. All electric lights come with a manual switch for that purpose,
but these switches are not used as often as they could be. As a result, the lighting industry offers
several automatic switches that either mark time or sense the presence of occupants.
Occupancy sensors. Occupancy sensors are most effective in spaces where people move in
and out frequently in unpredictable patterns: for example, private offices, lecture halls, audito-
riums, warehouses, restrooms, and conference rooms. Occupancy sensors are less likely to be ef-
fective in open-plan offices, where one or more people may be present throughout the day, or
ENERGY STAR
®
Building Manual
24
6. Lighting
in reception areas, lobbies, retail spaces, or hospital rooms. The savings achievable with occu-
pancy sensors, even in the most appropriate spaces, varies widely, depending on local conditions.
The three most common types of occupancy sensors are passive infrared (PIR), ultrasonic, and
those that combine the two technologies. PIR devices are the least expensive and most com-
monly used type of occupancy sensor. They detect the heat emitted by occupants and are trig-
gered by changes in infrared signals when, for example, a person moves in or out of the sensor’s
field of view. PIR sensors are quite resistant to false triggering and are best used within a 15-foot
radius (Figure 6.8).
Ultrasonic devices emit a sound at high frequency—above the levels audible to humans and an-
imals. The sensors are programmed to detect a change in the frequency of the reflected sound.
They cover a larger area than PIR sensors and are more sensitive. They are also more prone to
Table 6.9: Lighting control strategies and equipment
A number of different control strategies and a variety of equipment options are available to the
lighting designer.
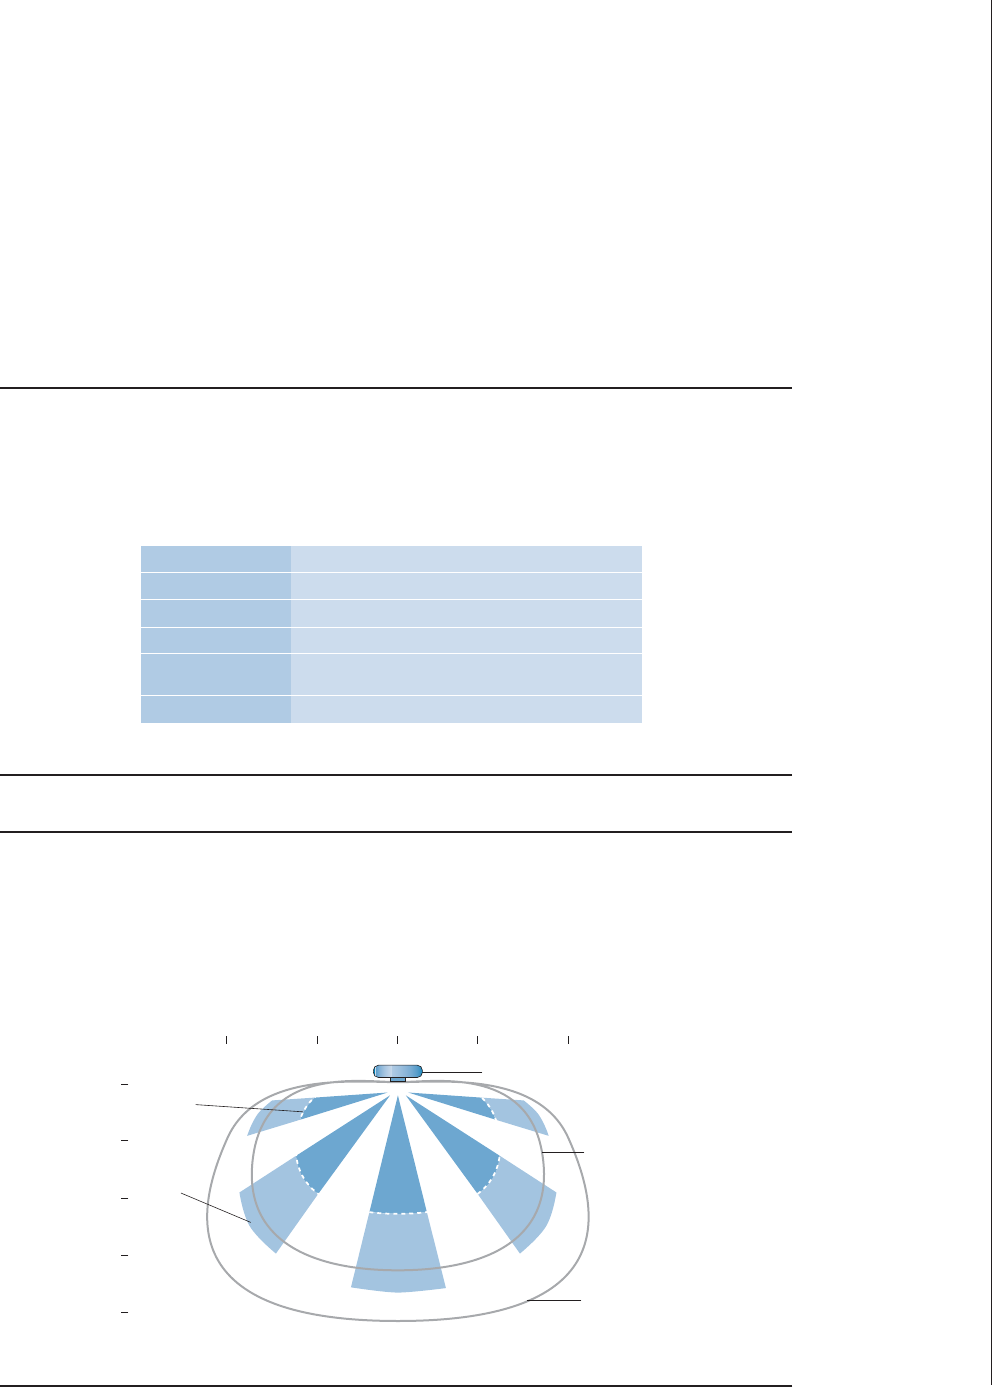
Figure 6.8: Occupancy sensor coverage patterns
Ultrasonic sensors can detect motion at any point within the contour lines. Infrared sensors “see”
only in the wedge-shaped zones, and they do not generally see as far as ultrasonic units. Some
sensors see farther straight ahead than to the side. The ranges shown here are representative;
some sensors may be more or less sensitive.
ENERGY STAR
®
Building Manual
25
6. Lighting
Strategy
Occupancy sensing
Scheduling
Tuning
Daylight harvesting
Demand response
Adaptive compensation
Equipment
Occupancy sensors—infrared, ultrasonic, dual technology
Timed switches, energy management systems
Continuous dimming, bilevel switching
Continuous dimming, bilevel switching, photosensors
Voluntary or automatic curtailment via utility signals,
dimmers, switches, energy management systems
Dimming, switching, timers, photocells
Courtesy: E SOURCE; data from
Advanced Lighting Guidelines
15'7' 7'015'
Wall-mounted sensor
0
5'
10'
15'
20'
Infrared sensor range
for detecting limb
motion
Infrared sensor range
for detecting full-
body motion
Ultrasonic sensor
range for detecting
limb motion
Ultrasonic sensor
range for detecting
full-body motion
Courtesy:
E
SOURCE
Lighting Technology Atlas
(2005)

false triggering. For example, ultrasonic sensors can be fooled by the air currents produced by
a person running past a door, moving curtains, or the on-off cycling of an HVAC system.
Hybrid devices that incorporate both PIR and ultrasonic sensors are also available. These take
advantage of the PIR device’s resistance to false triggering and the higher sensitivity of the ul-
trasonic sensor. Some hybrid sensors combine PIR with sensors for audible sound. That design
has proved useful in cases where the frequencies used in ultrasonic sensors interfere with equip-
ment such as hearing aids—a problem that is less frequent than it used to be because sensor
manufacturers have learned to use frequencies that minimize the issue.
Evaluating the economic feasibility of an installation is best done by monitoring lighting and
occupancy patterns. The use of inexpensive automatic datalogging systems will indicate the
total amount of time the lights are on when the space is vacant, the time of day the savings take
place, and the frequency of lamp cycling. Data can also be gathered through the use of recording
ammeters connected at lighting breaker panels; through random surveys, such as observing a
building’s exterior at night or interviewing custodial and security personnel; and through exist-
ing timers, scheduling controllers, and energy management systems. Whatever way the data is
gathered, it is important to account for seasonal variations in operation in order to avoid incor-
rectly extrapolating short-duration data to a full year. This information will help lead to an in-
formed decision on the economic feasibility of potential occupancy-control opportunities.
Sensor placement is also crucial to success (see sidebar). Wall-mounted sensors are suitable in
smaller rooms—offices, bathrooms, and equipment rooms that are only intermittently occupied.
In larger spaces or wherever the lighting load is higher, it is better to mount the sensor in the
ceiling. Some units can be mounted in the corner or on the wall near the ceiling (Table 6.10).
Timed switches. Timed switches operate based on either elapsed time after triggering or on
programmed schedules using clock time. Elapsed-time switches, also called timer switches, typ-
ically fit into or over a standard wall-switch box and allow occupants to turn lights on for a pe-
riod that is determined either by the occupant or by the installer. Lights go off at the end of that
interval unless the cycle has been restarted by the occupant or manually turned off sooner. Time
intervals typically range from 10 minutes to 12 hours. Elapsed-time switches are much simpler
to specify than occupancy sensors, are less prone to faulty user adjustment, and cost less.
CASE STUDY: Saving Energy with Occupancy Sensors
As part of a lighting upgrade at one of its facilities in Beverly Hills, California, Arden Realty
installed a variety of occupancy sensors. These included ceiling sensors in larger areas and
wall sensors in smaller offices. The wall sensors used infrared technology and the ceiling sen-
sors used the ultrasonic approach. Savings amounted to an estimated 3,920 kWh/year in
lighting electricity use and another 1,253 kWh/year in reduced cooling energy. Energy use
at the facility was also cut by more than 140,000 kWh/year by replacing T12 lamps with
T8 lamps, retrofitting reflectors in some fixtures, and replacing incandescent bulbs with
compact fluorescents. These lighting measures are part of a building upgrade that includes
a new energy management system and the use of variable-frequency drives on various
pumps and fans. Overall, Arden, the largest landlord of office buildings in Southern Califor-
nia, has performed more than 100 lighting retrofits, covering over 12 million square feet.
The efficiency improvements of these lighting upgrades have been a key element for many
Arden properties in earning the ENERGY STAR.
ENERGY STAR
®
Building Manual
26
6. Lighting

Elapsed-time switches may be mechanical or electronic. Mechanical units, typically set by the
user, are basically spring-wound kitchen timers connected to a relay, and so are subject to me-
chanical failures if used in high-traffic areas. Time intervals on electronic switches are typically
set by the installer using a hidden setscrew. These electronic devices look like conventional
toggle switches, so occupants are usually unaware of the presence of the device, which reduces
vandalism and theft. Elapsed-time switches are also an easy, economical means of complying
with energy codes that call for automatic lighting controls.
Clock switches control lights by turning them on and off at prearranged times, regardless of occu-
pancy. They are most useful in locations where occupancy follows a well-defined pattern, such as a
retail outlet. They are typically placed in electric closets that house lighting power panels. These de-
vices cost relatively little to install and can control large loads with a single set of contactors. Equip-
ment may consist of mechanical devices—motors, springs, and relays—or sophisticated electronic
systems that handle several schedules simultaneously. Mechanical switches may require correction
for daylight savings time or after a power failure unless battery backup is available, but battery
backup can triple the device’s price. Electronic devices routinely include battery backup and can be
easily programmed to adjust for shifts to and from daylight savings time or for holiday schedules.
One thing to note: If a space has fluorescent lighting, make sure that electronic switches do not
use a triac relay. Triacs may trickle a small amount of current to ballasts and lamps, even when
they are off, which may damage the lamps as well as waste energy.
Energy management systems (EMSs). An EMS performs the same function for lighting
as a clock switch, but with more sophistication and additional features. A typical EMS is de-
signed to handle a variety of loads, including HVAC, but pure lighting-management systems
are also available. Systems are now becoming available that combine on-off and dimming ca-
pabilities in an EMS. A common EMS feature is a sweep mode that automatically cycles lights
on or off, one section or floor at a time, signaling occupants that lights will soon be shut off.
Occupants can then override the shutdown in their area by pressing a local switch or by phoning
in a code to the EMS (see sidebar).
Dimming Controls
Dimming controls are usually used to match lighting levels with human needs and to save energy.
When combined with photosensors that measure local light levels, dimming controls can correct
for dirt buildup in fixtures and lamp lumen depreciation. Dimming controls are also used to mod-
ulate lamp output to account for incoming daylight. Dimming may be accomplished in either a
Table 6.10: Occupancy sensor applications
When using occupancy sensors, it is essential to place them correctly.
ENERGY STAR
®
Building Manual
27
6. Lighting
Type of sensor Applications
Ceiling mount Open partitioned areas, small open offices, file rooms,
copy rooms, conference rooms, restrooms, garages
Corner mount/wide view Large office spaces, conference rooms
Wall switch Private offices, copy rooms, closets
Narrow view Hallways, corridors, aisles
High mount/narrow view Warehouse aisles
Courtesy: E SOURCE

stepped or continuous fashion. Advanced dimming technologies, using individually addressable
ballasts and wireless technology, are also available.
Step dimming. Two means of step dimming are available: banks of lamps may be put on dif-
ferent switching circuits or ballasts designed specifically for step dimming may be applied. The
first method is often referred to as bilevel switching, even though more than two levels may ac-
tually be available. For example, in a system with three-lamp fluorescent fixtures, one switch may
operate the center lamp in each fixture, while another operates the outer lamps. This arrange-
ment makes three lighting levels possible (one lamp, two lamps, or three lamps lit), yet the term
“bilevel” is still used to describe it.
Step-dimming ballasts offer more light control and energy savings than nondimming ballasts
but cost less than the more versatile continuous-dimming ballasts. Step-dimming ballasts typ-
ically offer two or three lighting levels, and they can be used with occupancy sensors so that the
sensors are able to dim the lamps rather than turn them off, which can reduce on-off cycling
and extend lamp life. These units also offer a viable way to reduce lighting levels during non-
critical hours and to shed peak demand in common areas such as corridors.
Step-dimming ballasts are especially useful for HID lamps. These lamps typically require long
warm-up times, so they are not suited to being switched on and off by occupancy sensors. Better
results can be obtained by switching the lamps between low power and full power.
CASE STUDY: Turning Off Lights with an EMS
A lighting control system linked to an energy management system at a 250,000-square-foot
office building in Boston, Massachusetts, produced 112,500 kWh/year in energy savings.
Most of the work at the site is done in a single shift, Monday through Friday. An audit at
the start of an energy-efficiency upgrade found that the lights were frequently left on in
some areas during times when the spaces were unoccupied. Cleaning crews and security
guards were supposed to turn off the lights in unoccupied areas, but for various reasons that
was often overlooked. Sometimes after-hours or weekend workers would turn on the lights
but forget to turn them off when they left. The audit identified the general lighting in the
facility as an opportunity for energy savings, but the layout of the facility was not deemed
to be conducive to the use of occupancy sensors in all areas. Occupancy sensors were in-
stalled in private offices and restrooms, but high partitions and frequent rearranging of the
space made them impractical for the large open areas. Instead, an automatic lighting con-
trol system was installed as part of a comprehensive EMS being installed at the site.
The building was divided into 47 lighting “zones,” and a time schedule was assigned to
each zone. New electronic relays were installed on the lighting circuits and tied into the
EMS. The system turns the lights on and off at the designated times and allows for overrides
when necessary, ensuring that occupants are still in control when they need to be.
At each zone’s designated time, all the lights in that zone blink to alert any remaining oc-
cupants that all lights will go off in a few minutes. Anyone still working uses a phone to call
a designated number (to the EMS computer) to get an additional hour of light. When that
hour is up, if no further overrides are requested, the lights go out and stay out until the des-
ignated morning “lights on” time. Schedules for each zone can be changed easily if neces-
sary. The system can also be accessed by facility managers from remote locations.
ENERGY STAR
®
Building Manual
28
6. Lighting

Continuous dimming. Continuous-dimming controls adjust lighting levels over a wide
range. They offer more flexibility than step dimming and are used in a wide variety of applica-
tions, including mood-setting and daylight dimming.
Fluorescent lamps may be dimmed for two purposes: energy savings and architectural effect. En-
ergy-saving dimmers typically dim down to 20 percent, while architectural dimmers may reduce
light levels to 1 percent or less. Dimming ballasts are often used to reduce electric light output
whenever daylight is available. Dimming can also be used in load-shedding strategies—better
to have employees work briefly under slightly lower light levels than be forced to send them
home because of a power failure.
Dimming ballasts use either low-voltage or power-line control. Most ballasts are controlled by a sep-
arate, low-voltage circuit. This approach requires additional wiring, but the ballasts are compatible
with a wide variety of dimming controls. For example, low-voltage-controlled ballasts can easily be
connected to EMSs that offer 0- to 10-volt output channels. Power-line-controlled ballasts can dim
fluorescent lamps with standard incandescent wall dimmers installed directly on the line-voltage
switch leg—no extra wires necessary. The ballasts are not compatible with all dimmers, however, so
ballast and dimmer should be checked for compatibility. Personal dimming controls, which allow
individuals to control light levels in their own work areas, are also becoming more widely available.
Such dimming controls have been shown to cut energy use and increase worker satisfaction levels.
In recent years, it has become easier to dim compact fluorescent lamps as well as full-size fluo-
rescents. New screw-base, step-dimmable, and continuously dimmable CFLs provide dimming
capabilities down to the range of 10 to 20 percent, and these products work well with most ex-
isting incandescent dimmers. These lamps cost two to three times more than standard CFLs.
New pin-base CFL dimming products are on the market as well, providing opportunities to dim
lights to 5 percent of maximum output or even lower levels.
HID dimming is more limited because it is accompanied by color shifting, reduced CRI, in-
creased flicker, adverse impact on lamp life, and inadvertent lamp shutdown during line-voltage
variations. New electronic dimming ballasts for metal halide lamps are reducing the severity of
some of these effects, making HID dimming more feasible.
Building operators can achieve the highest levels of energy savings through a combination of
dimming and on-off strategies. However, the total savings achieved by implementing both
strategies will be less than the sum of the savings gained by implementation of each of the strate-
gies alone. The reason for this is simple: Take, for example, a system that combines occupancy
sensing and dimming. Dimming cannot save energy when occupancy sensors have already shut
off a lamp, and the occupancy sensors save less energy when they turn off lights that otherwise
would have been dimmed.
Addressable ballasts. Most dimming is accomplished by controlling banks of dimmable bal-
lasts together. Digitally controlled ballasts that use control protocols such as DALI (digitally ad-
dressable lighting interface), LonWorks, BACnet, or other proprietary protocols provide more
flexibility. Each ballast is assigned an identifier, or “address,” and can be controlled individually
or in clusters that can easily be regrouped. With some systems, two-way communications are
also possible. This capability not only gives users the ability to tailor local lighting conditions
to their individual needs, but may also give energy managers a tool for tracking and controlling
energy use and responding to load-shedding signals (see sidebar).
Some protocols, such as DALI, are designed for use over a dedicated low-voltage network, but
DALI-to-Ethernet converters are available so that DALI can be used in buildings with existing
ENERGY STAR
®
Building Manual
29
6. Lighting

ENERGY STAR
®
Building Manual
30
6. Lighting
Ethernet networks without the need to run additional control wires. Some digital ballasts include
a built-in DALI interface; others use another proprietary protocol. Conventional low-voltage
controlled-dimming ballasts can be added to digital lighting control systems via special interfaces
that connect to DALI systems and convert the DALI commands to standard 0- to 10-volt direct-
current control signals.
Wireless lighting controls. One of the difficulties that comes up when adding controls as
part of a lighting upgrade is the expense of running the wires. One promising solution is wireless
lighting controls. A typical wireless lighting control system consists of a set of sensors, actuators,
and controllers that communicate via radio waves rather than wires. Although wires are still
required for the lighting equipment itself, using radio waves instead of wires to transmit control
signals offers a number of potential advantages, both in terms of ease of installation and main-
tenance and in terms of flexibility. Wireless lighting controls have been available for a number
of years, but their use has been limited to a few niche markets such as high-end homes, confer-
ence rooms, and classrooms that often need a large variety of lighting scenes. These systems are
installed to provide amenities they’re not aimed at energy savings and they lack the reliability
and flexibility that would be needed in a commercial facility. Newer, more-capable wireless
systems, some of which are available today, may broaden the wireless lighting controls market
considerably if costs can be brought down. One promising technique uses a concept known as
a mesh network, which is a decentralized set of wireless nodes that are linked to one another to
form a self-organizing, self-healing network. Control is split up among the different nodes so
that there are multiple, redundant paths throughout the network. Each device on the network
is designed to transmit over short distances, which reduces power requirements and minimizes
the potential for interference. Leading players in the mesh network field are the Zigbee Alliance
(www.zigbee.org) and the Z-Wave Alliance (www.z-wavealliance.org/modules/start/).
Commissioning Ensures the Benefits
of Lighting Controls
Most lighting controls require commissioning to ensure that they operate as intended and are
properly adapted to local conditions. Specific steps depend on the types of controls installed:
■ For all systems, verify that sensors are placed according to construction drawings and make
adjustments for any unexpected obstructions.
■ For daylighting systems, calibrate the system after all furnishings and interior surface finishes
are in place. For help in commissioning daylighting systems, Architectural Energy Corp. has
CASE STUDY: System Controls and Tracks Lighting Use
A lighting control system based on the digitally addressable lighting interface (DALI) allows
the energy manager at the Harvard School of Public Health to control any of the lights in
the school’s refurbished office space using a personal computer and the Internet. He can
pinpoint the location of any failed lamps or ballasts and get up-to-the-minute reports on
lighting energy consumption. The system has allowed him to better manage energy use
and maintenance while keeping building occupants comfortable. All of the ballasts have
been set to operate partially dimmed as the default mode, so if occupants say that they
need more light, it takes just a few keystrokes to give it to them without having to add new
fixtures. The system can also be used to dim lights in response to load-shedding signals
from the local utility.
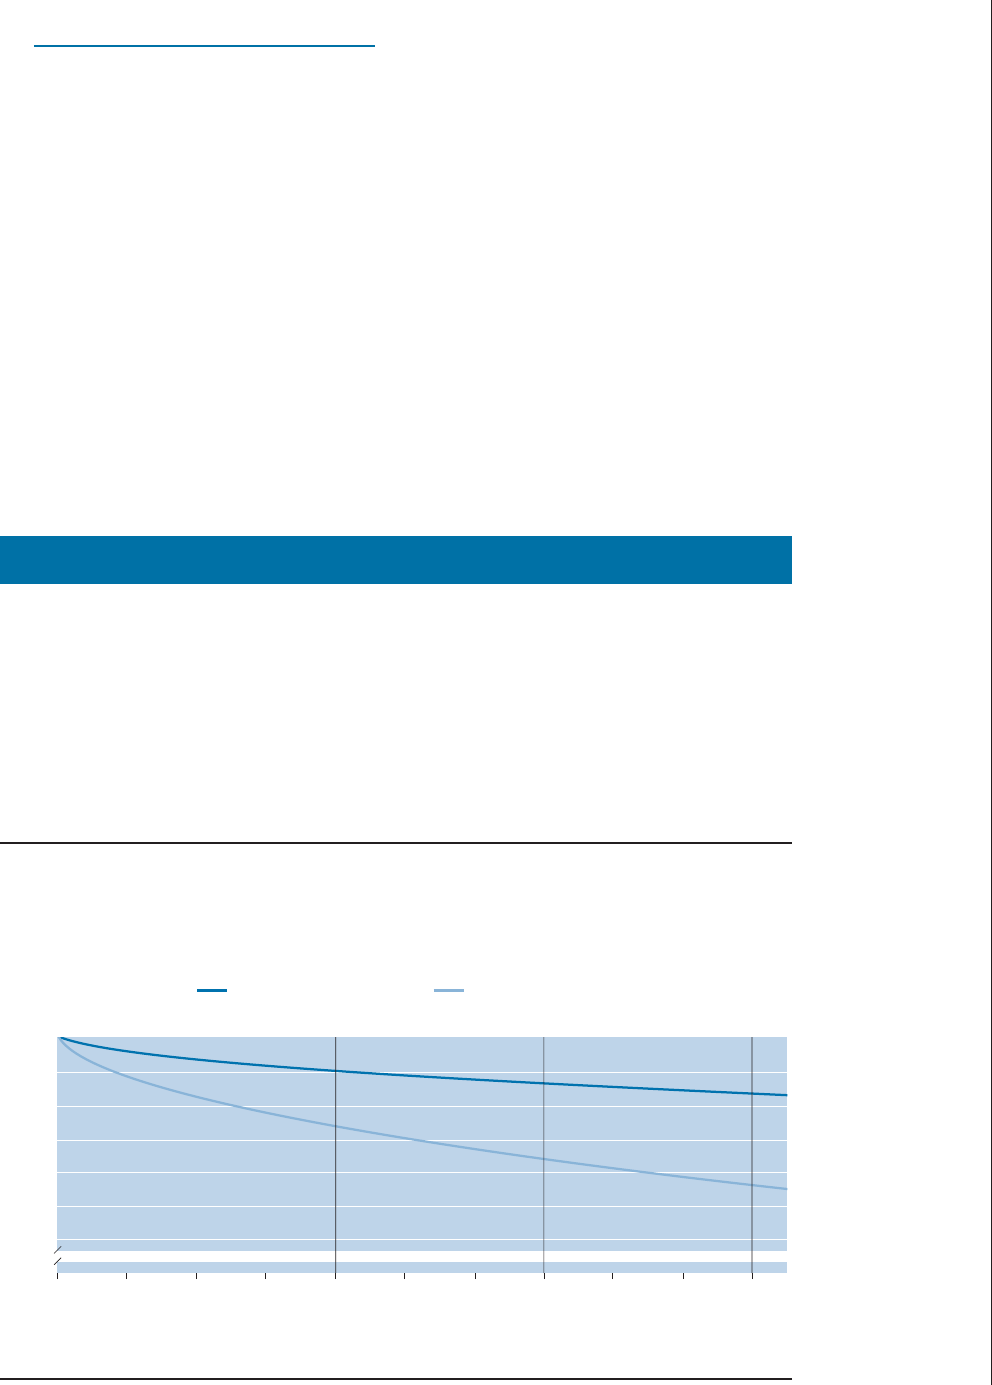
created the Sensor Placement and Orientation Tool. This tool is available free of charge at
www.archenergy.com/SPOT/index.html
.
■ For systems with occupancy sensors, check placement and orientation against construction
drawings and adjust the sensitivity and time delay of the sensor.
■ For scheduling systems, put in appropriate start and stop times for weekday, weekend, and
holiday operation and verify correct operation of overrides.
■ For manual dimming, check that the dimmer is installed as specified and that the upper lim-
its set are appropriate for the tasks being performed and the lower limits set do not cause
the lamps to flicker.
In addition, to decrease the chances that occupants will sabotage the controls, occupants and
maintenance personnel should be informed about the benefits of the systems and, where pos-
sible, involved in the design process. They should also be informed about how the controls
work and trained in the use of the override controls so that they can use them when needed and
not be tempted to override permanently. All control systems also need periodic maintenance to
ensure that they continue to work properly.
6.8 Build In an Operations and Maintenance Plan
A lighting upgrade can cut energy bills, improve the look of a facility, and boost employee
morale, but all those benefits can fade away if the new lighting systems are not well maintained.
All lighting systems experience a decrease in light output and efficiency over time, because:
■ Lamp light output decreases (lamp lumen depreciation) (Figure 6.9).
■ Dirt accumulates on fixtures (luminaire dirt depreciation). The IESNA issued new guidelines
in late 2003 for estimating the effect of dirt accumulation on luminaires. The document,
Figure 6.9: Typical lamp lumen depreciation curves
The slower rate of lumen depreciation of some lamps compared to others can translate to lower
installed wattage for an equal amount of maintained foot-candles.
ENERGY STAR
®
Building Manual
31
6. Lighting
70
75
80
85
90
95
100
0 2,000 4,000 6,000 8,000 10,000 12,000 14,000 16,000 18,000 20,000
Operating hours
Percentage of initial light output
Design output Output at relamping Rated life
0
Courtesy:
E
SOURCE
Lighting Technology Atlas
(2005); data from Philips Lighting Co.
T8 with rare-earth phosphors T12 with cool-white phosphors

“IESNA/NALMCO RP-36-03,” may be purchased from http://webstore.ansi.org/
ansidocstore/product.asp?sku=IESNA%2FNALMCO+RP-36-03.
■ Lamps burn out.
■ Control systems drift out of spec or are overridden by occupants.
For maximum effectiveness, maintenance should be addressed right from the start of the design
process in the following ways.
■ Design lighting systems with components that minimize light loss over time, are easy to maintain,
and use the fewest types of lamps. The process begins with the choice of lamp. To account for
lighting-system degradation, designers typically oversize initial light output by 35 percent
or more to “maintain” minimum target illumination levels when lamps are changed and fix-
tures cleaned. Proper design and maintenance—using high-quality lighting components
that suffer less degradation or degrade more slowly—can cut that excess nearly in half,
saving almost 15 percent in connected load. Minimizing that 35 percent safety factor in-
volves choosing lamps with minimum lumen depreciation. Maintenance costs can be fur-
ther minimized by limiting the number of different types of lamps that must be stocked and
by choosing lamps with maximum rated life to reduce burnout rate.
■ Train personnel in proper maintenance techniques, including cleaning and relamping. Knowl-
edge of the equipment; an understanding of the procedures; and an appreciation for the rel-
ative costs of energy, labor, and lamps are essential parts of instruction. Annual retraining
is also necessary to remind staff of proper procedure and to account for changes in equip-
ment and staff turnover. Retraining is especially important immediately after a lighting up-
grade. Such training should include hands-on work with new devices and a quiz to indicate
which employees may need further technical education. A variety of training and certifica-
tion programs are offered by national organizations for the design and maintenance of ef-
ficient lighting systems (see sidebar). Many utilities also sponsor local training programs.
Hiring a lighting-management company may simplify maintenance. Using an outside firm
can eliminate the need to train employees in lamp maintenance practices and cut the ne-
cessity of maintaining large stocks of extra lamps. In addition, a firm familiar with new
technologies can help a facility take advantage of the latest lighting-system improvements.
■ Control purchasing and inventory to ensure that only the right replacement components are
available. If the right ballast or lamp is not immediately available when an occupant com-
plains about a burnout, the need to provide a quick replacement will almost guarantee that
the wrong type is installed instead. Maintaining proper purchasing specifications and inven-
tory eliminates the possibility of using the wrong equipment.
Plan for Group Relamping
In many cases, the most cost-effective way to maintain a lighting system is a planned program
of group relamping, in which all lamps are replaced in the same operation. This practice is in
contrast to spot relamping, in which lamps are replaced only when they burn out.
■ On a per-lamp basis, group relamping requires much less labor than spot relamping because
the maintenance workers have all the required materials on hand and can move systemati-
cally from one fixture to the next. In addition, group relamping is normally done outside
working hours, which reduces disruption of normal activities.
■ It is an easy task to schedule and to delegate to outside contractors who have special equip-
ment and training.
ENERGY STAR
®
Building Manual
32
6. Lighting

ENERGY STAR
®
Building Manual
33
6. Lighting
■ Group relamping provides brighter and more-uniform lighting because it gets rid of lamps
before they are at the end of their lumen depreciation curve.
■ It offers increased control over the replacement lamps, reducing the probability of mixing
incompatible lamps, such as those with different color temperatures.
■ Other maintenance activities can be combined with group relamping, such as ballast and
reflector inspection and lens cleaning. It also provides an opportunity for retrofitting
reflectors, lamps, ballasts, or lenses as necessary.
RESOURCES: Training and Certification Programs
A number of organizations offer training and certification programs for the design and
maintenance of energy-efficient lighting systems.
Association of Energy Engineers (AEE)
Contact Leslie Walcker, CLEP Certification Administrator
Atlanta, Georgia
Tel 770-447-5093 ext 223
E-mail leslie@aeecenter.org
Web www.aeecenter.org/certification/clep
The AEE Certified Lighting Efficiency Professional (CLEP) program includes a two-day semi-
nar and a four-hour exam oriented toward design and specification of energy-efficient
lighting systems.
The interNational Association of Lighting Management Companies (NALMCO)
Des Moines, Iowa
Tel 515-243-2360
Fax 515-243-2049
E-mail [email protected]
Web www.nalmco.org/
The NALMCO Certified Lighting Management Consultant program is a preparatory course
and one-day test focusing on lighting systems specification and management.
National Council on Qualifications for the Lighting Professions (NCQLP)
Alexandria, Virginia
Tel 703-518-4370
Fax 703-706-9583
Web www.ncqlp.org
The NCQLP Lighting Certification program consists of a four-hour exam that focuses on
overall lighting knowledge as well as information-gathering and decision-making skills.
Other Certifying Agencies
Contact information by state can be found at www.boccentral.org.
Various energy-efficiency groups around the country, such as the Midwest Energy Effi-
ciency Alliance (MEEA) and Northeast Energy Efficiency Partnerships (NEEP), offer Building
Operator Certification programs. Certification requires 56 hours of classroom training and
approximately 16 hours of projects that encompass a wide variety of building elements,
including energy-efficient lighting practices.

Group relamping is normally done at about 60 to 80 percent of rated lamp life, depending on
variables such as labor costs, requirements for fixture cleaning, and the cost and mortality curves
of the lamps.
Economic comparisons typically show that group relamping has higher lamp costs but lower
labor costs than spot relamping. One such comparison shows a substantial overall savings from
group relamping (Table 6.11).
Retrocommission Lighting Controls
All lighting control systems need to go through periodic retrocommissioning where they are
checked to ensure that they continue to work as expected—occupancy sensors may become
obstructed by a new furniture arrangement, light sensors may require adjustment if interior
surfaces are changed to materials with new reflectance values, or a new building may go up next
door that changes incoming daylight patterns. Maintenance personnel should inspect the light-
ing controls at least annually to verify proper operation. Photoelectric controls need occasional
cleaning of the photosensitive surface.
Scheduling controls that use relays need to be checked periodically to ensure that they are not
permanently overridden. In cases where an override is found, determine the cause before simply
clearing the override setting—the override may have been an attempt to solve a problem that
has not yet been fixed.
Develop an O&M Manual
To deal with these factors and sustain an efficient, high-performance lighting upgrade, assemble
an operations and maintenance (O&M) manual. Use it as both the lighting-management policy
and a central operating reference for building-management and maintenance staff. This manual
should include the following information:
■ Facility blueprints.
■ Fixture and controls schedule.
■ Equipment specifications, including product cut sheets.
■ Equipment and service provider sources and contacts (include utility contacts).
Table 6.11: Economics of group versus spot relamping
Group relamping has higher lamp costs but much lower labor costs, providing, in this case, a
43 percent overall savings. Group relamping also provides additional benefits in lighting quality
and facility management.
ENERGY STAR
®
Building Manual
34
6. Lighting
Courtesy:
E
SOURCE
Lighting Technology Atlas
(2005)
Relamp cycle
(hours)
Average lamps
replaced per year
Average material
cost per year
Average labor
cost per year
Total average
cost per year
Spot relamping on
burnout
a
Difference
20,000
14,000
525
750
225
Group relamping at
70 percent of rated life
b
Notes: a. Assumes labor costs of $7.50 for relamping and cleaning, material cost
of $1.80 per lamp, and 3,500 hours per year operation.
b. Assumes labor costs of $1.90 for relamping and cleaning, material cost
of $1.80 per lamp, and 3,500 hours per year operation.
$4,883
$2,775
–$2,108
$3,938
$1,425
–$2,513
$945
$1,350
$4056,000

■ Fixture cleaning and relamping schedule with service tracking log.
■ Procedures for relamping, reballasting, and cleaning fixtures.
■ Procedures for the adjustment of photosensors and occupancy sensors.
■ Procedures for proper lamp and ballast disposal.
Review the O&M manual with the staff responsible for lighting maintenance. Make training
mandatory for all new maintenance personnel. Correct operation and maintenance should be
built into job descriptions and should become part of all annual performance reviews.
Dispose of Lamps Properly
A lighting upgrade will most likely require the removal and disposal of lamps and ballasts.
Group relamping every several years and occasional spot relamping as necessary will also create
additional lamp waste. Some of this waste may be hazardous and must be managed according
to applicable federal, state, and local requirements (see sidebar).
Many lamps contain mercury and are therefore considered hazardous waste under the Resource
Conservation and Recovery Act (RCRA), including fluorescent, HID, neon, mercury vapor, HPS,
and metal halide lamps. Visit the EPA’s RCRA web site at www.epa.gov/rcraonline
for more details.
To help deal with the problem of lamp disposal, the EPA initiated an outreach program in 2002
to promote the recycling of mercury lamps by commercial and industrial end users. The outreach
program aims to increase awareness of the proper disposal methods of these lamps in compliance
with federal and state universal waste rules. The National Electrical Manufacturers Association
(NEMA) supports the program and offers information on a web site designed specifically to ad-
dress lamp recycling issues (www.lamprecycle.org
).
RESOURCES: Disposal Contact and Resource Information
Lighting upgrades and ongoing maintenance will require the disposal of lamps and ballasts.
Here are some sources of information on the proper disposal of these items, which may
contain hazardous materials.
Resource Conservation and Recovery Act (RCRA)
Hotline 800-424-9346 (Washington, D.C., metro area: 703-412-9810)
Web www.epa.gov/rcraonline
RCRA provides information on disposal of lamps that contain hazardous materials.
National Electrical Manufacturers Association (NEMA)
Web www.lamprecycle.org
NEMA maintains a web site with guidelines and detailed information on lamp recycling.
Toxic Substances Control Act (TSCA)
Hotline 202-554-1401
E-mail [email protected]
Web www.epa.gov/pcb
The TSCA provides regulations and guidelines for disposal of ballasts that contain polychlo-
rinated biphenyls (PCBs).
ENERGY STAR
®
Building Manual
35
6. Lighting

For ballasts, the proper method of disposal depends on the type and condition of the ballasts.
Generally, ballasts manufactured after 1978 contain the statement “No PCBs,” meaning they
have not been found to contain polychlorinated biphenyls (PCBs). The disposal of PCBs is
regulated under the Toxic Substances Control Act (TSCA). Other factors controlling the dis-
posal of ballasts will depend on the regulations and recommendations in effect in the state in
which they are removed or discarded. Because disposal requirements vary from state to state,
check with regional, state, or local authorities for all applicable regulations.
The costs of handling and disposal of lamps and ballasts vary, but the expense is rarely a deal-
breaker in a lighting upgrade. Typically, disposal costs constitute a very small percentage of the
overall life-cycle costs of operating a lighting system. Investigate and budget for these disposal
costs, both as a first cost during the upgrade and as an ongoing O&M expense.
6.9 Summary
This chapter on the lighting stage of a building system upgrade has described opportunities for
improving a building’s lighting system in a cost-effective manner. To ensure a successful upgrade,
keep the following strategies in mind:
■ Design light (quantity and quality) that is tailored to task and occupant needs.
■ Specify equipment that maximizes system efficiency, not just component efficiency.
■ Use automatic controls to turn lights off or down when not needed.
■ Establish ongoing monitoring, maintenance, and disposal practices.
Bibliography
American Society of Heating, Refrigerating and Air-Conditioning Engineers Inc. (ASHRAE),
“Energy Standard for Buildings Except Low-Rise Residential Buildings,”
ANSI/ASHRAE/IESNA Standard 90.1-2004, 404-636-8400, www.ashrae.org.
California Energy Commission, “Guide Illuminates Modular Skylight Well Design,” Public
Interest Energy Research Buildings Program Technical Brief, CEC-500-2005-045-FS (2005),
www.esource.com/public/pdf/cec/CEC-TB-3.pdf.
Consortium for Energy Efficiency, “High-Performance T8 Specification” (March 2006),
www.cee1.org/com/com-lt/com-lt-specs.pdf.
EERE, 2005 Buildings Energy Data Book (U.S. Department of Energy, 2005).
Illuminating Engineering Society of North America (IESNA), “Recommended Practice for
Planned Indoor Lighting Maintenance,” IESNA/NALMCO RP-36-03 (2003).
Lawrence Berkeley National Laboratory (LBNL), Interactions Between Lighting and Space
Conditioning Energy Use in U.S. Commercial Buildings, LBNL 39795 (April 1998),
http://enduse.lbl.gov/info/LBNL-39795.pdf.
Lighting Research Center, Rensselaer Polytechnic Institute, “National Lighting Product Information
Program,” www.lrc.rpi.edu/programs/NLPIP/index.asp (accessed October 2006).
ENERGY STAR
®
Building Manual
36
6. Lighting

Light Right Consortium, “Lighting Quality & Office Worker Productivity,” brochure
(November 2003).
Navigant Consulting Inc., “U.S. Lighting Market Characterization, Volume 1: National Lighting
Inventory and Energy Consumption Estimate, Final Report” (September 2002), prepared for the
U.S. Department of Energy’s Office of Energy Efficiency and Renewable Energy (EERE) Building
Technologies Program, www.eere.energy.gov/buildings/info/documents/pdfs/lmc_vol1_final.pdf.
New Buildings Institute Inc., “Advanced Lighting Guidelines: 2003 Edition” (2003),
www.newbuildings.org/lighting.htm.
Rea, Mark S., ed., IESNA Lighting Handbook, 9th edition (IESNA, 2000).
Roberts, Victor, and Ira Krepchin, E Source Technology Atlas Series, Volume I: Lighting (E
SOURCE,
2005).
U.S. Environmental Protection Agency, “Guidelines for Energy Management Overview,”
www.energystar.gov/index.cfm?c=guidelines.guidelines_index (accessed October 2006).
ENERGY STAR
®
Building Manual
37
6. Lighting
