
ContentsContents
Text Analytics API Documentation
Overview
What is the Text Analytics API?
Language support
Pricing
What's new
Text Analytics FAQ
Quickstart
Samples
v3.0
C#
Python
Java
JavaScript
v3.1
C#
Python
Java
JavaScript
Responsible use of AI
Transparency notes
For Text Analytics
For Health
For Named Entity Recognition
(
NER
)
and Personally Identifying Information
(
PII
)
For Sentiment Analysis
For Key Phrase Analysis
For Language Detection
Integration and responsible use
Data, privacy, and security
How
-
to guides
Call the Text Analytics API
Language detection
Sentiment analysis and opinion mining
Key phrase extraction
Named entity recognition and PII
Text Analytics for health
Use containers
Install and run containers
Configure containers
Use container instances
Use kubernetes service
(
AKS
)
All Cognitive Services containers documentation
Enterprise readiness
Set up Virtual Networks
Use Azure AD authentication
Migrate to version 3 of the API
Concepts
Example user scenarios
Named entity types
Unicode encodings and text offsets
Data limits
Model versioning
Tutorials
Integrate Power BI to analyze customer feedback
Text Analytics in Power Apps
Sentiment analysis on streaming data using Azure Databricks
Use Flask to translate text, analyze sentiment, and synthesize speech
Extract information in Excel using Power Automate
Reference
Text Analytics API
v3.1

What is the Text Analytics API?
7/8/2021 • 5 minutes to read • Edit Online
Sentiment analysis
Key phrase extraction
Language detection
Named entity recognition
The Text Analytics API is a cloud-based service that provides Natural Language Processing (NLP) features for text
mining and text analysis, including: sentiment analysis, opinion mining, key phrase extraction, language
detection, and named entity recognition.
The API is a part of Azure Cognitive Services, a collection of machine learning and AI algorithms in the cloud for
your development projects. You can use these features with the REST API version 3.0 or version 3.1, or the client
library.
This documentation contains the following types of articles:
Quickstarts are step-by-step instructions that let you make calls to the service and get results in a short
period of time.
How-to guides contain instructions for using the service in more specific or customized ways.
Concepts provide in-depth explanations of the service's functionality and features.
Tutorials are longer guides that show you how to use this service as a component in broader business
solutions.
Use sentiment analysis (SA) and find out what people think of your brand or topic by mining the text for clues
about positive or negative sentiment.
The feature provides sentiment labels (such as "negative", "neutral" and "positive") based on the highest
confidence score found by the service at a sentence and document-level. This feature also returns confidence
scores between 0 and 1 for each document & sentences within it for positive, neutral and negative sentiment.
You can also be run the service on premises using a container.
Starting in the v3.1, opinion mining (OM) is a feature of Sentiment Analysis. Also known as Aspect-based
Sentiment Analysis in Natural Language Processing (NLP), this feature provides more granular information
about the opinions related to words (such as the attributes of products or services) in text.
Use key phrase extraction (KPE) to quickly identify the main concepts in text. For example, in the text "The food
was delicious and there were wonderful staff", Key Phrase Extraction will return the main talking points: "food"
and "wonderful staff".
Language detection can detect the language an input text is written in and report a single language code for
every document submitted on the request in a wide range of languages, variants, dialects, and some
regional/cultural languages. The language code is paired with a confidence score.
Named Entity Recognition (NER) can Identify and categorize entities in your text as people, places, organizations,

Text Analytics for health
Deploy on premises using Docker containers
Asynchronous operations
Typical workflow
Text Analytics for multiple programming experience levels
quantities, Well-known entities are also recognized and linked to more information on the web.
Text Analytics for health is a feature of the Text Analytics API service that extracts and labels relevant medical
information from unstructured texts such as doctor's notes, discharge summaries, clinical documents, and
electronic health records.
Use Text Analytics containers to deploy API features on-premises. These docker containers enable you to bring
the service closer to your data for compliance, security or other operational reasons. Text Analytics offers the
following containers:
sentiment analysis
key phrase extraction (preview)
language detection (preview)
Text Analytics for health
The /analyze endpoint enables you to use many features of the Text Analytics API asynchronously. Named
Entity Recognition (NER), Key phrase extraction (KPE), Sentiment Analysis (SA), Opinion Mining (OM) are
available as part of /analyze endpoint. It allows clubbing of these features in a single call. It allows sending up
to 125,000 characters per document. Pricing is same as regular Text Analytics.
The workflow is simple: you submit data for analysis and handle outputs in your code. Analyzers are consumed
as-is, with no additional configuration or customization.
1. Create an Azure resource for Text Analytics. Afterwards, get the key generated for you to authenticate
your requests.
2. Formulate a request containing your data as raw unstructured text, in JSON.
3. Post the request to the endpoint established during sign-up, appending the desired resource: sentiment
analysis, key phrase extraction, language detection, or named entity recognition.
4. Stream or store the response locally. Depending on the request, results are either a sentiment score, a
collection of extracted key phrases, or a language code.
Output is returned as a single JSON document, with results for each text document you posted, based on ID. You
can subsequently analyze, visualize, or categorize the results into actionable insights.
Data is not stored in your account. Operations performed by the Text Analytics API are stateless, which means
the text you provide is processed and results are returned immediately.
You can start using the Text Analytics API in your processes, even if you don't have much experience in
programming. Use these tutorials to learn how you can use the API to analyze text in different ways to fit your
experience level.
Minimal programming required:
Extract information in Excel using Text Analytics and Power Automate

Supported languages
Data limits
Unicode encoding
Next steps
Programming experience recommended:
Use the Text Analytics API and MS Flow to identify the sentiment of comments in a Yammer group
Integrate Power BI with the Text Analytics API to analyze customer feedback
Sentiment analysis on streaming data using Azure Databricks
Build a Flask app to translate text, analyze sentiment, and synthesize speech
This section has been moved to a separate article for better discoverability. Refer to Supported languages in the
Text Analytics API for this content.
All of the Text Analytics API endpoints accept raw text data. See the Data limits article for more information.
The Text Analytics API uses Unicode encoding for text representation and character count calculations. Requests
can be submitted in both UTF-8 and UTF-16 with no measurable differences in the character count. Unicode
codepoints are used as the heuristic for character length and are considered equivalent for the purposes of text
analytics data limits. If you use StringInfo.LengthInTextElements to get the character count, you are using the
same method we use to measure data size.
Create an Azure resource for Text Analytics to get a key and endpoint for your applications.
Use the quickstart to start sending API calls. Learn how to submit text, choose an analysis, and view
results with minimal code.
See what's new in the Text Analytics API for information on new releases and features.
Dig in a little deeper with this sentiment analysis tutorial using Azure Databricks.
Check out our list of blog posts and more videos on how to use the Text Analytics API with other tools
and technologies in our External & Community Content page.
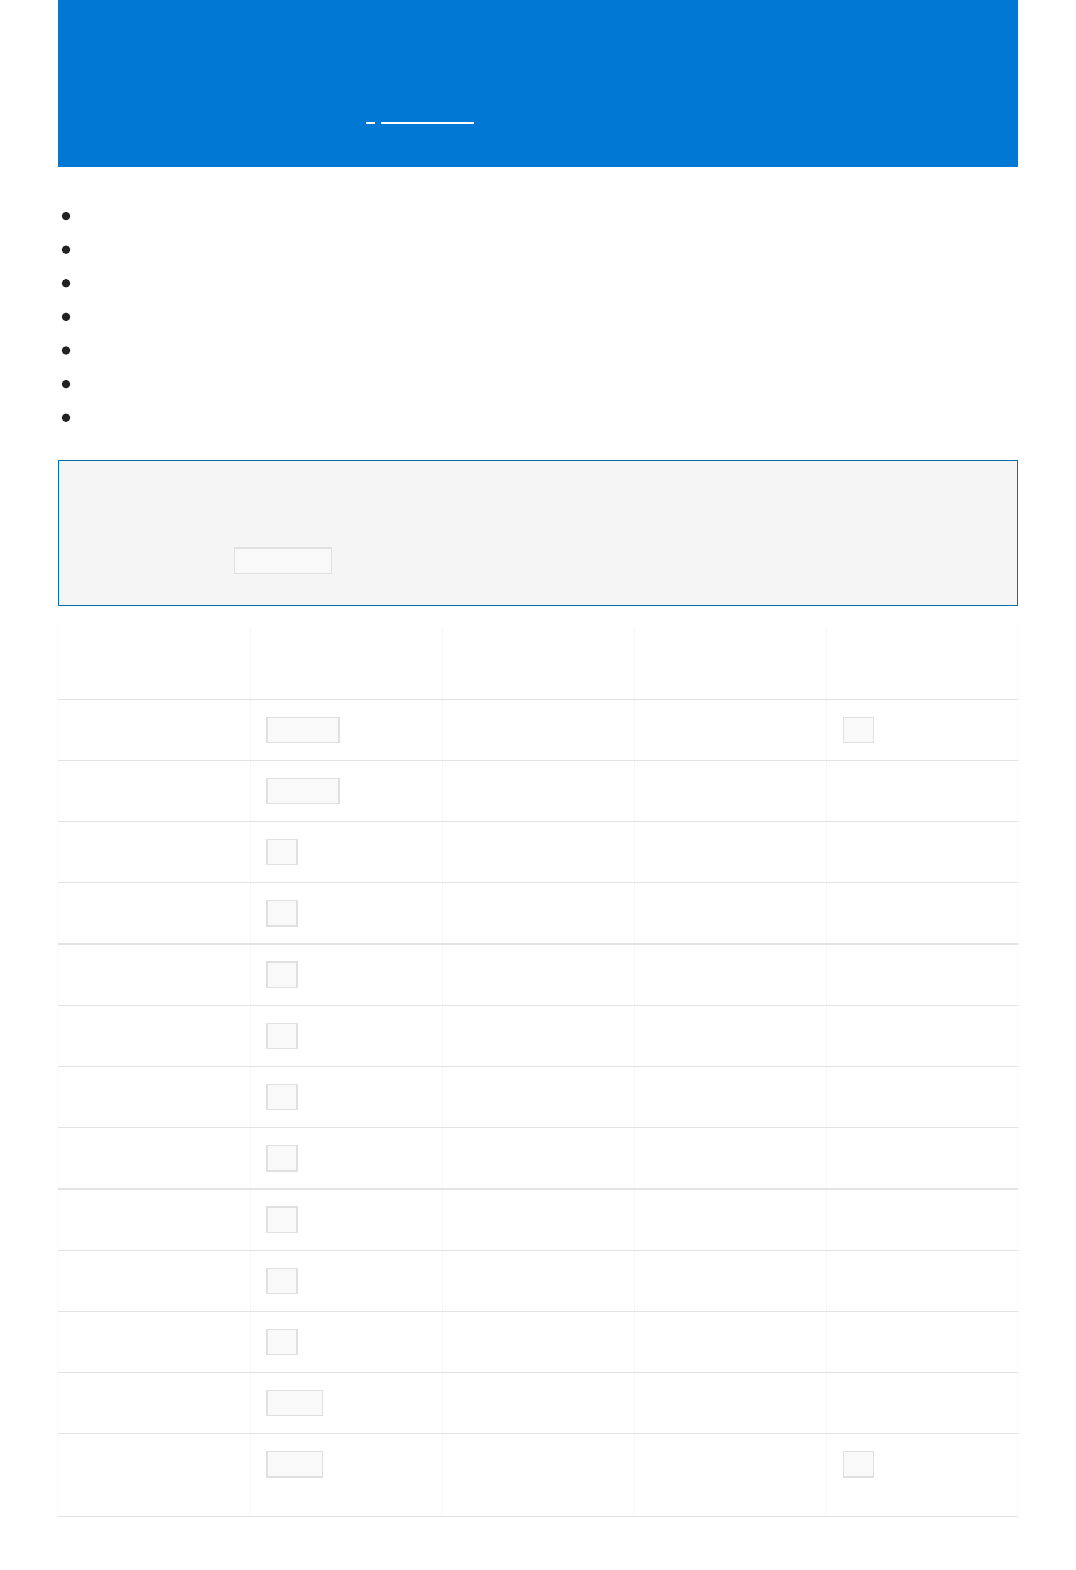
Text Analytics API v3 language support
7/8/2021 • 6 minutes to read • Edit Online
NOTENOTE
L ANGUAGEL ANGUAGE L ANGUAGE C O DEL ANGUAGE C O DE V3 SUP P ORTV3 SUP P ORT
STA RT ING V3 M O DELSTA RT ING V3 M O DEL
VERSION:VERSION: N OT ESN OT ES
Chinese-Simplified zh-hans ✓ 2019-10-01 zh also accepted
Chinese-Traditional zh-hant ✓ 2019-10-01
Dutch nl ✓ 2019-10-01
English en ✓ 2019-10-01
French fr ✓ 2019-10-01
German de ✓ 2019-10-01
Hindi hi ✓ 2020-04-01
Italian it ✓ 2019-10-01
Japanese ja ✓ 2019-10-01
Korean ko ✓ 2019-10-01
Norwegian (Bokmål) no ✓ 2020-04-01
Portuguese (Brazil) pt-BR ✓ 2020-04-01
Portuguese
(Portugal)
pt-PT ✓ 2019-10-01 pt also accepted
Sentiment Analysis
Named Entity Recognition (NER)
Key Phrase Extraction
Entity Linking
Text Analytics for health
Personally Identifiable Information (PII)
Language Detection
Languages are added as new model versions are released for specific Text Analytics features. The current model version for
Sentiment Analysis is 2020-04-01 .

Spanish es ✓ 2019-10-01
Turkish tr ✓ 2020-04-01
L ANGUAGEL ANGUAGE L ANGUAGE C O DEL ANGUAGE C O DE V3 SUP P ORTV3 SUP P ORT
STA RT ING V3 M O DELSTA RT ING V3 M O DEL
VERSION:VERSION: N OT ESN OT ES
Opinion mining
(
v3.1 only
)
Opinion mining
(
v3.1 only
)
L ANGUAGEL ANGUAGE L ANGUAGE C O DEL ANGUAGE C O DE
STA RT ING W IT H V3 M ODE LSTA RT ING W IT H V3 M ODE L
VERSION:VERSION: N OT ESN OT ES
English en 2020-04-01
See also
What is the Text Analytics API?
Model versions

What's new in the Text Analytics API?
7/12/2021 • 9 minutes to read • Edit Online
July 2021
GA release updatesGA release updates
June 2021
General API updatesGeneral API updates
Text Analytics for health updatesText Analytics for health updates
May 2021
General API updatesGeneral API updates
The Text Analytics API is updated on an ongoing basis. To stay up-to-date with recent developments, this article
provides you with information about new releases and features.
General availability for Text Analytics for health for both containers and hosted API (/health).
General availability for Opinion Mining.
General availability for PII extraction and redaction.
General availability for Asynchronous ( /analyze ) endpoint.
Updated quickstart examples with new SDK.
New model-version 2021-06-01 for key phrase extraction based on transformers. It provides:
The 2021-06-01 model version for Named Entity Recognition v3.x, which provides
Asynchronous (/analyze) operation and Text Analytics for health (ungated preview) is available in all regions.
Support for 10 languages (Latin and CJK).
Improved key phrase extraction.
Improved AI quality and expanded language support for the
Skill
entity category.
Added Spanish, French, German, Italian and Portuguese language support for the
Skill
entity category
You no longer need to apply for access to preview Text Analytics for health.
A new model version 2021-05-15 for the /health endpoint and on-premise container which provides
A new image for the Text Analytics for health container with tag 3.0.016230002-onprem-amd64 and model
version 2021-05-15 . This container is available for download from Microsoft Container Registry.
5 new entity types: ALLERGEN , CONDITION_SCALE , COURSE , EXPRESSION and MUTATION_TYPE ,
14 new relation types,
Assertion detection expanded for new entity types and
Linking support for ALLERGEN entity type
Custom question answering (previously QnA maker) can now be accessed using a Text Analytics resource.
Release of the new API v3.1-preview.5 which includes
Text Analytics for health and the Analyze asynchronous operations are now available in all regions
Asynchronous Analyze API now supports Sentiment Analysis (SA) and Opinion Mining (OM).
A new query parameter, LoggingOptOut , is now available for customers who wish to opt out of logging
input text for incident reports. Learn more about this parameter in the data privacy article.

March 2021
General API updatesGeneral API updates
Text Analytics for health updatesText Analytics for health updates
Text Analytics resource portal updateText Analytics resource portal update
February 2021
Release of the new API v3.1-preview.4 which includes
Changes in the Opinion Mining JSON response body:
Changes in the JSON response body of the hosted web API of Text Analytics for health:
Entity linking is now available as an asynchronous task in the /analyze endpoint.
A new pii-categories parameter is now available in the /pii endpoint.
aspects is now targets and opinions is now assessments .
The isNegated boolean name of a detected entity object for Negation is deprecated and
replaced by Assertion Detection.
A new property called role is now part of the extracted relation between an attribute and an
entity as well as the relation between entities. This adds specificity to the detected relation type.
This parameter lets you specify select PII entities as well as those not supported by default for
the input language.
Updated client libraries, which include asynchronous Analyze, and Text Analytics for health operations.
You can find examples on GitHub:
C#
Python
Java
JavaScript
Learn more about Text Analytics API v3.1-Preview.4
A new model version 2021-03-01 for the /health endpoint and on-premise container which provides
A new container image with tag 3.0.015490002-onprem-amd64 and the new model-version 2021-03-01 has
been released to the container preview repository.
A new Text Analytics for health container image with this same model-version is now available at
mcr.microsoft.com/azure-cognitive-services/textanalytics/healthcare . Starting April 26th, you will only be
able to download the container from this repository.
A rename of the Gene entity type to GeneOrProtein .
A new Date entity type.
Assertion detection which replaces negation detection (only available in API v3.1-preview.4).
A new preferred name property for linked entities that is normalized from various ontologies and
coding systems (only available in API v3.1-preview.4).
This container image will no longer be available for download from containerpreview.azurecr.io after
April 26th, 2021.
Learn more about Text Analytics for health
Processed Text RecordsProcessed Text Records is now available as a metric in the MonitoringMonitoring section for your Text Analytics
resource in the Azure portal.
The 2021-01-15 model version for the PII endpoint in Named Entity Recognition v3.1-preview.x, which
provides

January 2021
December 2020
November 2020
October 2020
The S0 through S4 pricing tiers are being retired on March 8th, 2021. If you have an existing Text Analytics
resource using the S0 through S4 pricing tier, you should update it to use the Standard (S) pricing tier.
The language detection container is now generally available.
v2.1 of the API is being retired.
Expanded support for 9 new languages
Improved AI quality of named entity categories for supported languages.
The 2021-01-15 model version for Named Entity Recognition v3.x, which provides
Expanded language support for several general entity categories.
Improved AI quality of general entity categories for all supported v3 languages.
The 2021-01-05 model version for language detection, which provides additional language support.
These model versions are currently unavailable in the East US region.
Learn more about about the new NER model
Updated pricing details for the Text Analytics API.
A new endpoint with Text Analytics API v3.1-preview.3 for the new asynchronous Analyze API, which
supports batch processing for NER, PII, and key phrase extraction operations.
A new endpoint with Text Analytics API v3.1-preview.3 for the new asynchronous Text Analytics for health
hosted API with support for batch processing.
Both new features listed above are only available in the following regions: West US 2 , East US 2 ,
Central US , North Europe and West Europe regions.
Portuguese (Brazil) pt-BR is now supported in Sentiment Analysis v3.x, starting with model version
2020-04-01 . It adds to the existing pt-PT support for Portuguese.
Updated client libraries, which include asynchronous Analyze, and Text Analytics for health operations.
You can find examples on GitHub:
C#
Python
Java
Learn more about Text Analytics API v3.1-Preview.3
Hindi support for Sentiment Analysis v3.x, starting with model version 2020-04-01 .
Model version 2020-09-01 for the v3 /languages endpoint, which adds increased language detection and
accuracy improvements.
v3 availability in Central India and UAE North.

September 2020
General API updatesGeneral API updates
Text Analytics for health container updatesText Analytics for health container updates
August 2020
General API updatesGeneral API updates
Text Analytics for health container updatesText Analytics for health container updates
Release of a new URL for the Text Analytics v3.1 public preview to support updates to the following Named
Entity Recognition v3 endpoints:
The following Text Analytics preview API endpoints were retired on September 4th, 2020:
/pii endpoint now includes the new redactedText property in the response JSON where detected
PII entities in the input text are replaced by an * for each character of those entities.
/linking endpoint now includes the bingID property in the response JSON for linked entities.
v2.1-preview
v3.0-preview
v3.0-preview.1
Learn more about Text Analytics API v3.1-Preview.2
The following updates are specific to the September release of the Text Analytics for health container only.
A new container image with tag 1.1.013530001-amd64-preview with the new model-version 2020-09-03 has
been released to the container preview repository.
This model version provides improvements in entity recognition, abbreviation detection, and latency
enhancements.
Learn more about Text Analytics for health
Model version 2020-07-01 for the v3 /keyphrases , /pii and /languages endpoints, which adds:
An HTTP 400 error will now be returned for v3 API requests that exceed the published data limits.
Endpoints that return an offset now support the optional stringIndexType parameter, which adjusts the
returned offset and length values to match a supported string index scheme.
Additional government and country specific entity categories for Named Entity Recognition.
Norwegian and Turkish support in Sentiment Analysis v3.
The following updates are specific to the August release of the Text Analytics for health container only.
New model-version for Text Analytics for health: 2020-07-24
New URL for sending Text Analytics for health requests:
http://<serverURL>:5000/text/analytics/v3.2-preview.1/entities/health (Please note that a browser cache
clearing will be needed in order to use the demo web app included in this new container image)
The following properties in the JSON response have changed:
type has been renamed to category
score has been renamed to confidenceScore
Entities in the category field of the JSON output are now in pascal case. The following entities have been
renamed:
EXAMINATION_RELATION has been renamed to RelationalOperator .
EXAMINATION_UNIT has been renamed to MeasurementUnit .
EXAMINATION_VALUE has been renamed to MeasurementValue .

July 2020
Text Analytics for health container
-
Public gated previewText Analytics for health container
-
Public gated preview
May 2020
Text Analytics API v3 General AvailabilityText Analytics API v3 General Availability
ROUTE_OR_MODE has been renamed MedicationRoute .
The relational entity ROUTE_OR_MODE_OF_MEDICATION has been renamed to RouteOfMedication .
The following entities have been added:
NER
AdministrativeEvent
CareEnvironment
HealthcareProfession
MedicationForm
Relation extraction
DirectionOfCondition
DirectionOfExamination
DirectionOfTreatment
Learn more about Text Analytics for health container
The Text Analytics for health container is now in public gated preview, which lets you extract information from
unstructured English-language text in clinical documents such as: patient intake forms, doctor's notes, research
papers and discharge summaries. Currently, you will not be billed for Text Analytics for health container usage.
The container offers the following features:
Named Entity Recognition
Relation extraction
Entity linking
Negation
Text Analysis API v3 is now generally available with the following updates:
Model version 2020-04-01
New data limits for each feature
Updated language support for Sentiment Analysis (SA) v3
Separate endpoint for Entity Linking
New "Address" entity category in Named Entity Recognition (NER) v3.
New subcategories in NER v3:
Location - Geographical
Location - Structural
Organization - Stock Exchange
Organization - Medical
Organization - Sports
Event - Cultural
Event - Natural
Event - Sports

Text Analytics API v3.1 Public PreviewText Analytics API v3.1 Public Preview
February 2020
SDK support for Text Analytics API v3 Public PreviewSDK support for Text Analytics API v3 Public Preview
Named Entity Recognition v3 public previewNamed Entity Recognition v3 public preview
The following properties in the JSON response have been added:
SentenceText in Sentiment Analysis
Warnings for each document
The names of the following properties in the JSON response have been changed, where applicable:
score has been renamed to confidenceScore
type has been renamed to category
subtype has been renamed to subcategory
confidenceScore has two decimal points of precision.
Learn more about Text Analytics API v3
New Sentiment Analysis feature - Opinion Mining
New Personal ( PII ) domain filter for protected health information ( PHI ).
Learn more about Text Analytics API v3.1 Preview
As part of the unified Azure SDK release, the Text Analytics API v3 SDK is now available as a public preview for
the following programming languages:
C#
Python
JavaScript (Node.js)
Java
Learn more about Text Analytics API v3 SDK
Additional entity types are now available in the Named Entity Recognition (NER) v3 public preview service as we
expand the detection of general and personal information entities found in text. This update introduces model
version 2020-02-01 , which includes:
Recognition of the following general entity types (English only):
PersonType
Product
Event
Geopolitical Entity (GPE) as a subtype under Location
Skill
Recognition of the following personal information entity types (English only):
Person
Organization
Age as a subtype under Quantity
Date as a subtype under DateTime
Email
Phone Number (US only)
URL

October 2019October 2019
Named Entity Recognition
(
NER
)
Named Entity Recognition
(
NER
)
Sentiment Analysis v3 public previewSentiment Analysis v3 public preview
Next steps
IP Address
A new endpoint for recognizing personal information entity types (English only)
Separate endpoints for entity recognition and entity linking.
Model version 2019-10-01 , which includes:
Expanded detection and categorization of entities found in text.
Recognition of the following new entity types:
Phone number
IP address
Entity linking supports English and Spanish. NER language support varies by the entity type.
A new endpoint for analyzing sentiment.
Model version 2019-10-01 , which includes:
Significant improvements in the accuracy and detail of the API's text categorization and scoring.
Automatic labeling for different sentiments in text.
Sentiment analysis and output on a document and sentence level.
It supports English ( en ), Japanese ( ja ), Chinese Simplified ( zh-Hans ), Chinese Traditional ( zh-Hant ), French (
fr ), Italian ( it ), Spanish ( es ), Dutch ( nl ), Portuguese ( pt ), and German ( de ), and is available in the
following regions: Australia East , Central Canada , Central US , East Asia , East US , East US 2 ,
North Europe , Southeast Asia , South Central US , UK South , West Europe , and West US 2 .
Learn more about Sentiment Analysis v3
What is the Text Analytics API?
Example user scenarios
Sentiment analysis
Language detection
Entity recognition
Key phrase extraction

Quickstart: Use the Text Analytics client library and
REST API
7/9/2021 • 77 minutes to read • Edit Online
IMPORTANTIMPORTANT
Prerequisites
Setting up
Create a new .NET Core applicationCreate a new .NET Core application
Use this article to get started with the Text Analytics client library and REST API. Follow these steps to try out
examples code for mining text:
Sentiment analysis
Opinion mining
Language detection
Entity recognition
Personal Identifying Information recognition
Key phrase extraction
The latest stable version of the Text Analytics API is 3.1 .
The code in this article uses synchronous methods and un-secured credentials storage for simplicity reasons. For
production scenarios, we recommend using the batched asynchronous methods for performance and scalability. See
the reference documentation below.
If you want to use Text Analytics for health or Asynchronous operations, see the examples on Github for C#, Python or
Java
Be sure to only follow the instructions for the version you are using.
Version 3.1
Version 3.0
v3.1 Reference documentation | v3.1 Library source code | v3.1 Package (NuGet) | v3.1 Samples
Azure subscription - Create one for free
The Visual Studio IDE
Once you have your Azure subscription, create a Text Analytics resource in the Azure portal to get your key
and endpoint. After it deploys, click Go to resourceGo to resource.
To use the Analyze feature, you will need a Text Analytics resource with the standard (S) pricing tier.
You will need the key and endpoint from the resource you create to connect your application to the
Text Analytics API. You'll paste your key and endpoint into the code below later in the quickstart.
You can use the free pricing tier ( F0 ) to try the service, and upgrade later to a paid tier for production.
Using the Visual Studio IDE, create a new .NET Core console app. This will create a "Hello World" project with a
single C# source file:
program.cs
.
Version 3.1
using Azure;
using System;
using System.Globalization;
using Azure.AI.TextAnalytics;
IMPORTANTIMPORTANT
private static readonly AzureKeyCredential credentials = new AzureKeyCredential("<replace-with-your-text-
analytics-key-here>");
private static readonly Uri endpoint = new Uri("<replace-with-your-text-analytics-endpoint-here>");
static void Main(string[] args)
{
var client = new TextAnalyticsClient(endpoint, credentials);
// You will implement these methods later in the quickstart.
SentimentAnalysisExample(client);
SentimentAnalysisWithOpinionMiningExample(client);
LanguageDetectionExample(client);
EntityRecognitionExample(client);
EntityLinkingExample(client);
RecognizePIIExample(client);
KeyPhraseExtractionExample(client);
Console.Write("Press any key to exit.");
Console.ReadKey();
}
Object model
Version 3.1
Version 3.0
Install the client library by right-clicking on the solution in the Solution ExplorerSolution Explorer and selecting ManageManage
NuGet PackagesNuGet Packages. In the package manager that opens select BrowseBrowse and search for Azure.AI.TextAnalytics .
Select version 5.1.0 , and then InstallInstall. You can also use the Package Manager Console.
Version 3.1
Version 3.0
Open the
program.cs
file and add the following using directives:
In the application's Program class, create variables for your resource's key and endpoint.
Go to the Azure portal. If the Text Analytics resource you created in the PrerequisitesPrerequisites section deployed successfully, click
the Go to ResourceGo to Resource button under Next StepsNext Steps. You can find your key and endpoint in the resource's key andkey and
endpointendpoint page, under resource managementresource management.
Remember to remove the key from your code when you're done, and never post it publicly. For production, consider using
a secure way of storing and accessing your credentials. For example, Azure key vault.
Replace the application's Main method. You will define the methods called here later.
The Text Analytics client is a TextAnalyticsClient object that authenticates to Azure using your key, and provides
functions to accept text as single strings or as a batch. You can send text to the API synchronously, or
asynchronously. The response object will contain the analysis information for each document you send.
If you're using version 3.x of the service, you can use an optional TextAnalyticsClientOptions instance to

Code examples
Authenticate the client
var client = new TextAnalyticsClient(endpoint, credentials);
Sentiment analysis
static void SentimentAnalysisExample(TextAnalyticsClient client)
{
string inputText = "I had the best day of my life. I wish you were there with me.";
DocumentSentiment documentSentiment = client.AnalyzeSentiment(inputText);
Console.WriteLine($"Document sentiment: {documentSentiment.Sentiment}\n");
foreach (var sentence in documentSentiment.Sentences)
{
Console.WriteLine($"\tText: \"{sentence.Text}\"");
Console.WriteLine($"\tSentence sentiment: {sentence.Sentiment}");
Console.WriteLine($"\tPositive score: {sentence.ConfidenceScores.Positive:0.00}");
Console.WriteLine($"\tNegative score: {sentence.ConfidenceScores.Negative:0.00}");
Console.WriteLine($"\tNeutral score: {sentence.ConfidenceScores.Neutral:0.00}\n");
}
}
OutputOutput
initialize the client with various default settings (for example default language or country/region hint). You can
also authenticate using an Azure Active Directory token.
Sentiment analysis
Opinion mining
Language detection
Named Entity Recognition
Entity linking
Key phrase extraction
Version 3.1
Version 3.0
Make sure your main method from earlier creates a new client object with your endpoint and credentials.
Version 3.1
Version 3.0
Create a new function called SentimentAnalysisExample() that takes the client that you created earlier, and call its
AnalyzeSentiment() function. The returned Response<DocumentSentiment> object will contain the sentiment label
and score of the entire input document, as well as a sentiment analysis for each sentence if successful. If there
was an error, it will throw a RequestFailedException .

Document sentiment: Positive
Text: "I had the best day of my life."
Sentence sentiment: Positive
Positive score: 1.00
Negative score: 0.00
Neutral score: 0.00
Text: "I wish you were there with me."
Sentence sentiment: Neutral
Positive score: 0.21
Negative score: 0.02
Neutral score: 0.77
Opinion mining
Create a new function called SentimentAnalysisWithOpinionMiningExample() that takes the client that you created
earlier, and call its AnalyzeSentimentBatch() function with IncludeOpinionMining option in the
AnalyzeSentimentOptions bag. The returned AnalyzeSentimentResultCollection object will contain the collection
of AnalyzeSentimentResult in which represents Response<DocumentSentiment> . The difference between
SentimentAnalysis() and SentimentAnalysisWithOpinionMiningExample() is that the latter will contain
SentenceOpinion in each sentence, which shows an analyzed target and the related assessment(s). If there was
an error, it will throw a RequestFailedException .

static void SentimentAnalysisWithOpinionMiningExample(TextAnalyticsClient client)
{
var documents = new List<string>
{
"The food and service were unacceptable, but the concierge were nice."
};
AnalyzeSentimentResultCollection reviews = client.AnalyzeSentimentBatch(documents, options: new
AnalyzeSentimentOptions()
{
IncludeOpinionMining = true
});
foreach (AnalyzeSentimentResult review in reviews)
{
Console.WriteLine($"Document sentiment: {review.DocumentSentiment.Sentiment}\n");
Console.WriteLine($"\tPositive score: {review.DocumentSentiment.ConfidenceScores.Positive:0.00}");
Console.WriteLine($"\tNegative score: {review.DocumentSentiment.ConfidenceScores.Negative:0.00}");
Console.WriteLine($"\tNeutral score: {review.DocumentSentiment.ConfidenceScores.Neutral:0.00}\n");
foreach (SentenceSentiment sentence in review.DocumentSentiment.Sentences)
{
Console.WriteLine($"\tText: \"{sentence.Text}\"");
Console.WriteLine($"\tSentence sentiment: {sentence.Sentiment}");
Console.WriteLine($"\tSentence positive score: {sentence.ConfidenceScores.Positive:0.00}");
Console.WriteLine($"\tSentence negative score: {sentence.ConfidenceScores.Negative:0.00}");
Console.WriteLine($"\tSentence neutral score: {sentence.ConfidenceScores.Neutral:0.00}\n");
foreach (SentenceOpinion sentenceOpinion in sentence.Opinions)
{
Console.WriteLine($"\tTarget: {sentenceOpinion.Target.Text}, Value:
{sentenceOpinion.Target.Sentiment}");
Console.WriteLine($"\tTarget positive score:
{sentenceOpinion.Target.ConfidenceScores.Positive:0.00}");
Console.WriteLine($"\tTarget negative score:
{sentenceOpinion.Target.ConfidenceScores.Negative:0.00}");
foreach (AssessmentSentiment assessment in sentenceOpinion.Assessments)
{
Console.WriteLine($"\t\tRelated Assessment: {assessment.Text}, Value:
{assessment.Sentiment}");
Console.WriteLine($"\t\tRelated Assessment positive score:
{assessment.ConfidenceScores.Positive:0.00}");
Console.WriteLine($"\t\tRelated Assessment negative score:
{assessment.ConfidenceScores.Negative:0.00}");
}
}
}
Console.WriteLine($"\n");
}
}
OutputOutput
Document sentiment: Positive
Positive score: 0.84
Negative score: 0.16
Neutral score: 0.00
Text: "The food and service were unacceptable, but the concierge were nice."
Sentence sentiment: Positive
Sentence positive score: 0.84
Sentence negative score: 0.16
Sentence neutral score: 0.00
Target: food, Value: Negative
Target positive score: 0.01
Target negative score: 0.99
Related Assessment: unacceptable, Value: Negative
Related Assessment positive score: 0.01
Related Assessment negative score: 0.99
Target: service, Value: Negative
Target positive score: 0.01
Target negative score: 0.99
Related Assessment: unacceptable, Value: Negative
Related Assessment positive score: 0.01
Related Assessment negative score: 0.99
Target: concierge, Value: Positive
Target positive score: 1.00
Target negative score: 0.00
Related Assessment: nice, Value: Positive
Related Assessment positive score: 1.00
Related Assessment negative score: 0.00
Press any key to exit.
Language detection
TIPTIP
static void LanguageDetectionExample(TextAnalyticsClient client)
{
DetectedLanguage detectedLanguage = client.DetectLanguage("Ce document est rédigé en Français.");
Console.WriteLine("Language:");
Console.WriteLine($"\t{detectedLanguage.Name},\tISO-6391: {detectedLanguage.Iso6391Name}\n");
}
OutputOutput
Version 3.1
Version 3.0
Create a new function called LanguageDetectionExample() that takes the client that you created earlier, and call its
DetectLanguage() function. The returned Response<DetectedLanguage> object will contain the detected language
along with its name and ISO-6391 code. If there was an error, it will throw a RequestFailedException .
In some cases it may be hard to disambiguate languages based on the input. You can use the countryHint parameter
to specify a 2-letter country/region code. By default the API is using the "US" as the default countryHint, to remove this
behavior you can reset this parameter by setting this value to empty string countryHint = "" . To set a different default,
set the TextAnalyticsClientOptions.DefaultCountryHint property and pass it during the client's initialization.

Language:
French, ISO-6391: fr
Named Entity Recognition (NER)
static void EntityRecognitionExample(TextAnalyticsClient client)
{
var response = client.RecognizeEntities("I had a wonderful trip to Seattle last week.");
Console.WriteLine("Named Entities:");
foreach (var entity in response.Value)
{
Console.WriteLine($"\tText: {entity.Text},\tCategory: {entity.Category},\tSub-Category:
{entity.SubCategory}");
Console.WriteLine($"\t\tScore: {entity.ConfidenceScore:F2},\tLength: {entity.Length},\tOffset:
{entity.Offset}\n");
}
}
OutputOutput
Named Entities:
Text: trip, Category: Event, Sub-Category:
Score: 0.61, Length: 4, Offset: 18
Text: Seattle, Category: Location, Sub-Category: GPE
Score: 0.82, Length: 7, Offset: 26
Text: last week, Category: DateTime, Sub-Category: DateRange
Score: 0.80, Length: 9, Offset: 34
Personally Identifiable Information (PII) recognition
Version 3.1
Version 3.0
Create a new function called EntityRecognitionExample() that takes the client that you created earlier, call its
RecognizeEntities() function and iterate through the results. The returned
Response<CategorizedEntityCollection> object will contain the collection of detected entities CategorizedEntity .
If there was an error, it will throw a RequestFailedException .
Create a new function called RecognizePIIExample() that takes the client that you created earlier, call its
RecognizePiiEntities() function and iterate through the results. The returned PiiEntityCollection represents
the list of detected PII entities. If there was an error, it will throw a RequestFailedException .
static void RecognizePIIExample(TextAnalyticsClient client)
{
string document = "A developer with SSN 859-98-0987 whose phone number is 800-102-1100 is building tools
with our APIs.";
PiiEntityCollection entities = client.RecognizePiiEntities(document).Value;
Console.WriteLine($"Redacted Text: {entities.RedactedText}");
if (entities.Count > 0)
{
Console.WriteLine($"Recognized {entities.Count} PII entit{(entities.Count > 1 ? "ies" : "y")}:");
foreach (PiiEntity entity in entities)
{
Console.WriteLine($"Text: {entity.Text}, Category: {entity.Category}, SubCategory:
{entity.SubCategory}, Confidence score: {entity.ConfidenceScore}");
}
}
else
{
Console.WriteLine("No entities were found.");
}
}
OutputOutput
Redacted Text: A developer with SSN *********** whose phone number is ************ is building tools with
our APIs.
Recognized 2 PII entities:
Text: 859-98-0987, Category: U.S. Social Security Number (SSN), SubCategory: , Confidence score: 0.65
Text: 800-102-1100, Category: Phone Number, SubCategory: , Confidence score: 0.8
Entity linking
Version 3.1
Version 3.0
Create a new function called EntityLinkingExample() that takes the client that you created earlier, call its
RecognizeLinkedEntities() function and iterate through the results. The returned
Response<LinkedEntityCollection> object will contain the collection of detected entities LinkedEntity . If there
was an error, it will throw a RequestFailedException . Since linked entities are uniquely identified, occurrences of
the same entity are grouped under a LinkedEntity object as a list of LinkedEntityMatch objects.

static void EntityLinkingExample(TextAnalyticsClient client)
{
var response = client.RecognizeLinkedEntities(
"Microsoft was founded by Bill Gates and Paul Allen on April 4, 1975, " +
"to develop and sell BASIC interpreters for the Altair 8800. " +
"During his career at Microsoft, Gates held the positions of chairman, " +
"chief executive officer, president and chief software architect, " +
"while also being the largest individual shareholder until May 2014.");
Console.WriteLine("Linked Entities:");
foreach (var entity in response.Value)
{
Console.WriteLine($"\tName: {entity.Name},\tID: {entity.DataSourceEntityId},\tURL:
{entity.Url}\tData Source: {entity.DataSource}");
Console.WriteLine("\tMatches:");
foreach (var match in entity.Matches)
{
Console.WriteLine($"\t\tText: {match.Text}");
Console.WriteLine($"\t\tScore: {match.ConfidenceScore:F2}");
Console.WriteLine($"\t\tLength: {match.Length}");
Console.WriteLine($"\t\tOffset: {match.Offset}\n");
}
}
}
OutputOutput

Linked Entities:
Name: Microsoft, ID: Microsoft, URL: https://en.wikipedia.org/wiki/Microsoft Data Source:
Wikipedia
Matches:
Text: Microsoft
Score: 0.55
Length: 9
Offset: 0
Text: Microsoft
Score: 0.55
Length: 9
Offset: 150
Name: Bill Gates, ID: Bill Gates, URL: https://en.wikipedia.org/wiki/Bill_Gates Data Source:
Wikipedia
Matches:
Text: Bill Gates
Score: 0.63
Length: 10
Offset: 25
Text: Gates
Score: 0.63
Length: 5
Offset: 161
Name: Paul Allen, ID: Paul Allen, URL: https://en.wikipedia.org/wiki/Paul_Allen Data Source:
Wikipedia
Matches:
Text: Paul Allen
Score: 0.60
Length: 10
Offset: 40
Name: April 4, ID: April 4, URL: https://en.wikipedia.org/wiki/April_4 Data Source:
Wikipedia
Matches:
Text: April 4
Score: 0.32
Length: 7
Offset: 54
Name: BASIC, ID: BASIC, URL: https://en.wikipedia.org/wiki/BASIC Data Source:
Wikipedia
Matches:
Text: BASIC
Score: 0.33
Length: 5
Offset: 89
Name: Altair 8800, ID: Altair 8800, URL: https://en.wikipedia.org/wiki/Altair_8800 Data
Source: Wikipedia
Matches:
Text: Altair 8800
Score: 0.88
Length: 11
Offset: 116
Key phrase extraction
Version 3.1
Version 3.0

static void KeyPhraseExtractionExample(TextAnalyticsClient client)
{
var response = client.ExtractKeyPhrases("My cat might need to see a veterinarian.");
// Printing key phrases
Console.WriteLine("Key phrases:");
foreach (string keyphrase in response.Value)
{
Console.WriteLine($"\t{keyphrase}");
}
}
OutputOutput
Key phrases:
cat
veterinarian
Extract health entities
C a u t i o nC a u t i o n
Create a new function called KeyPhraseExtractionExample() that takes the client that you created earlier, and call
its ExtractKeyPhrases() function. The returned <Response<KeyPhraseCollection> object will contain the list of
detected key phrases. If there was an error, it will throw a RequestFailedException .
To use the health operation, make sure your Azure resource is using the S standard pricing tier.
You can use Text Analytics to perform an asynchronous request to extract healthcare entities from text. The
below sample shows a basic example. You can find a more advanced sample on GitHub.
Version 3.1
Version 3.0

static async Task healthExample(TextAnalyticsClient client)
{
string document = "Prescribed 100mg ibuprofen, taken twice daily.";
List<string> batchInput = new List<string>()
{
document
};
AnalyzeHealthcareEntitiesOperation healthOperation = await
client.StartAnalyzeHealthcareEntitiesAsync(batchInput);
await healthOperation.WaitForCompletionAsync();
await foreach (AnalyzeHealthcareEntitiesResultCollection documentsInPage in healthOperation.Value)
{
Console.WriteLine($"Results of Azure Text Analytics \"Healthcare Async\" Model, version: \"
{documentsInPage.ModelVersion}\"");
Console.WriteLine("");
foreach (AnalyzeHealthcareEntitiesResult entitiesInDoc in documentsInPage)
{
if (!entitiesInDoc.HasError)
{
foreach (var entity in entitiesInDoc.Entities)
{
// view recognized healthcare entities
Console.WriteLine($" Entity: {entity.Text}");
Console.WriteLine($" Category: {entity.Category}");
Console.WriteLine($" Offset: {entity.Offset}");
Console.WriteLine($" Length: {entity.Length}");
Console.WriteLine($" NormalizedText: {entity.NormalizedText}");
}
Console.WriteLine($" Found {entitiesInDoc.EntityRelations.Count} relations in the current
document:");
Console.WriteLine("");
// view recognized healthcare relations
foreach (HealthcareEntityRelation relations in entitiesInDoc.EntityRelations)
{
Console.WriteLine($" Relation: {relations.RelationType}");
Console.WriteLine($" For this relation there are {relations.Roles.Count} roles");
// view relation roles
foreach (HealthcareEntityRelationRole role in relations.Roles)
{
Console.WriteLine($" Role Name: {role.Name}");
Console.WriteLine($" Associated Entity Text: {role.Entity.Text}");
Console.WriteLine($" Associated Entity Category: {role.Entity.Category}");
Console.WriteLine("");
}
Console.WriteLine("");
}
}
else
{
Console.WriteLine(" Error!");
Console.WriteLine($" Document error code: {entitiesInDoc.Error.ErrorCode}.");
Console.WriteLine($" Message: {entitiesInDoc.Error.Message}");
}
Console.WriteLine("");
}
}
}

Results of Azure Text Analytics "Healthcare Async" Model, version: "2021-05-15"
Entity: 100mg
Category: Dosage
Offset: 11
Length: 5
NormalizedText:
Entity: ibuprofen
Category: MedicationName
Offset: 17
Length: 9
NormalizedText: ibuprofen
Entity: twice daily
Category: Frequency
Offset: 34
Length: 11
NormalizedText:
Found 2 relations in the current document:
Relation: DosageOfMedication
For this relation there are 2 roles
Role Name: Dosage
Associated Entity Text: 100mg
Associated Entity Category: Dosage
Role Name: Medication
Associated Entity Text: ibuprofen
Associated Entity Category: MedicationName
Relation: FrequencyOfMedication
For this relation there are 2 roles
Role Name: Medication
Associated Entity Text: ibuprofen
Associated Entity Category: MedicationName
Role Name: Frequency
Associated Entity Text: twice daily
Associated Entity Category: Frequency
Use the API asynchronously with the Analyze operation
C a u t i o nC a u t i o n
using System.Threading.Tasks;
using System.Collections.Generic;
using System.Linq;
Version 3.1
Version 3.0
You can use the Analyze operation to perform asynchronous batch requests for: NER, key phrase extraction,
sentiment analysis, and PII detection. The below sample shows a basic example on one operation. You can find a
more advanced sample on GitHub.
To use the Analyze operation, make sure your Azure resource is using the S standard pricing tier.
Add the following using statements to your C# file.
Create a new function called AnalyzeOperationExample() that takes the client that you created earlier, and call its
StartAnalyzeBatchActionsAsync() function. The returned operation will contain an AnalyzeBatchActionsResult
object. As it is a Long Running Operation, await on the operation.WaitForCompletionAsync() for the value to be

static async Task AnalyzeOperationExample(TextAnalyticsClient client)
{
string inputText = "Microsoft was founded by Bill Gates and Paul Allen.";
var batchDocuments = new List<string> { inputText };
TextAnalyticsActions actions = new TextAnalyticsActions()
{
RecognizeEntitiesActions = new List<RecognizeEntitiesAction>() { new RecognizeEntitiesAction()
},
ExtractKeyPhrasesActions = new List<ExtractKeyPhrasesAction>() { new ExtractKeyPhrasesAction()
},
DisplayName = "Analyze Operation Quick Start Example"
};
AnalyzeActionsOperation operation = await client.StartAnalyzeActionsAsync(batchDocuments, actions);
await operation.WaitForCompletionAsync();
Console.WriteLine($"Status: {operation.Status}");
Console.WriteLine($"Created On: {operation.CreatedOn}");
Console.WriteLine($"Expires On: {operation.ExpiresOn}");
Console.WriteLine($"Last modified: {operation.LastModified}");
if (!string.IsNullOrEmpty(operation.DisplayName))
Console.WriteLine($"Display name: {operation.DisplayName}");
//Console.WriteLine($"Total actions: {operation.TotalActions}");
Console.WriteLine($" Succeeded actions: {operation.ActionsSucceeded}");
Console.WriteLine($" Failed actions: {operation.ActionsFailed}");
Console.WriteLine($" In progress actions: {operation.ActionsInProgress}");
await foreach (AnalyzeActionsResult documentsInPage in operation.Value)
{
RecognizeEntitiesResultCollection entitiesResult =
documentsInPage.RecognizeEntitiesResults.FirstOrDefault().DocumentsResults;
ExtractKeyPhrasesResultCollection keyPhrasesResults =
documentsInPage.ExtractKeyPhrasesResults.FirstOrDefault().DocumentsResults;
Console.WriteLine("Recognized Entities");
foreach (RecognizeEntitiesResult result in entitiesResult)
{
Console.WriteLine($" Recognized the following {result.Entities.Count} entities:");
foreach (CategorizedEntity entity in result.Entities)
{
Console.WriteLine($" Entity: {entity.Text}");
Console.WriteLine($" Category: {entity.Category}");
Console.WriteLine($" Offset: {entity.Offset}");
Console.WriteLine($" Length: {entity.Length}");
Console.WriteLine($" ConfidenceScore: {entity.ConfidenceScore}");
Console.WriteLine($" SubCategory: {entity.SubCategory}");
}
Console.WriteLine("");
}
Console.WriteLine("Key Phrases");
foreach (ExtractKeyPhrasesResult documentResults in keyPhrasesResults)
{
Console.WriteLine($" Recognized the following {documentResults.KeyPhrases.Count}
Keyphrases:");
foreach (string keyphrase in documentResults.KeyPhrases)
{
updated. Once the WaitForCompletionAsync() finishes, the collection should be updated in the operation.Value .
If there was an error, it will throw a RequestFailedException .
{
Console.WriteLine($" {keyphrase}");
}
Console.WriteLine("");
}
}
}
static async Task Main(string[] args)
{
var client = new TextAnalyticsClient(endpoint, credentials);
await AnalyzeOperationExample(client).ConfigureAwait(false);
}
OutputOutput
Status: succeeded
Created On: 3/10/2021 2:25:01 AM +00:00
Expires On: 3/11/2021 2:25:01 AM +00:00
Last modified: 3/10/2021 2:25:05 AM +00:00
Display name: Analyze Operation Quick Start Example
Total actions: 1
Succeeded actions: 1
Failed actions: 0
In progress actions: 0
Recognized Entities
Recognized the following 3 entities:
Entity: Microsoft
Category: Organization
Offset: 0
ConfidenceScore: 0.83
SubCategory:
Entity: Bill Gates
Category: Person
Offset: 25
ConfidenceScore: 0.85
SubCategory:
Entity: Paul Allen
Category: Person
Offset: 40
ConfidenceScore: 0.9
SubCategory:
IMPORTANTIMPORTANT
After you add this example to your application, call in your main() method using await . Because the Analyze
operation is asynchronous, you will need to update your Main() method to the async Task type.
The latest stable version of the Text Analytics API is 3.1 .
The code in this article uses synchronous methods and un-secured credentials storage for simplicity reasons. For
production scenarios, we recommend using the batched asynchronous methods for performance and scalability. See
the reference documentation below. If you want to use Text Analytics for health or Asynchronous operations, see the
examples on Github for C#, Python or Java
Version 3.1
Version 3.0
Reference documentation | Library source code | Package | Samples
Prerequisites
Setting up
Add the client libraryAdd the client library
<dependencies>
<dependency>
<groupId>com.azure</groupId>
<artifactId>azure-ai-textanalytics</artifactId>
<version>5.1.0</version>
</dependency>
</dependencies>
import com.azure.ai.textanalytics.TextAnalyticsAsyncClient;
import com.azure.core.credential.AzureKeyCredential;
import com.azure.ai.textanalytics.models.*;
import com.azure.ai.textanalytics.TextAnalyticsClientBuilder;
import com.azure.ai.textanalytics.TextAnalyticsClient;
import java.util.ArrayList;
import java.util.List;
import java.util.concurrent.TimeUnit;
import java.util.Arrays;
import com.azure.core.util.Context;
import com.azure.core.util.polling.SyncPoller;
import com.azure.ai.textanalytics.util.AnalyzeHealthcareEntitiesResultCollection;
import com.azure.ai.textanalytics.util.AnalyzeHealthcareEntitiesPagedIterable;
Azure subscription - Create one for free
Java Development Kit (JDK) with version 8 or above
Once you have your Azure subscription, create a Text Analytics resource in the Azure portal to get your key
and endpoint. After it deploys, click Go to resourceGo to resource.
To use the Analyze feature, you will need a Text Analytics resource with the standard (S) pricing tier.
You will need the key and endpoint from the resource you create to connect your application to the
Text Analytics API. You'll paste your key and endpoint into the code below later in the quickstart.
You can use the free pricing tier ( F0 ) to try the service, and upgrade later to a paid tier for production.
Version 3.1
Version 3.0
Create a Maven project in your preferred IDE or development environment. Then add the following dependency
to your project's
pom.xml
file. You can find the implementation syntax for other build tools online.
Create a Java file named TextAnalyticsSamples.java . Open the file and add the following import statements:
Version 3.1 preview
Version 3.0
In the java file, add a new class and add your Azure resource's key and endpoint as shown below.

IMPORTANTIMPORTANT
public class TextAnalyticsSamples {
private static String KEY = "<replace-with-your-text-analytics-key-here>";
private static String ENDPOINT = "<replace-with-your-text-analytics-endpoint-here>";
}
public static void main(String[] args) {
//You will create these methods later in the quickstart.
TextAnalyticsClient client = authenticateClient(KEY, ENDPOINT);
sentimentAnalysisWithOpinionMiningExample(client)
detectLanguageExample(client);
recognizeEntitiesExample(client);
recognizeLinkedEntitiesExample(client);
recognizePiiEntitiesExample(client);
extractKeyPhrasesExample(client);
}
Object model
Code examples
Authenticate the client
Go to the Azure portal. If the Text Analytics resource you created in the PrerequisitesPrerequisites section deployed successfully, click
the Go to ResourceGo to Resource button under Next StepsNext Steps. You can find your key and endpoint in the resource's key andkey and
endpointendpoint page, under resource managementresource management.
Remember to remove the key from your code when you're done, and never post it publicly. For production, consider using
a secure way of storing and accessing your credentials. For example, Azure key vault.
Add the following main method to the class. You will define the methods called here later.
Version 3.1
Version 3.0
The Text Analytics client is a TextAnalyticsClient object that authenticates to Azure using your key, and provides
functions to accept text as single strings or as a batch. You can send text to the API synchronously, or
asynchronously. The response object will contain the analysis information for each document you send.
Authenticate the client
Sentiment Analysis
Opinion mining
Language detection
Named Entity recognition
Entity linking
Key phrase extraction
Create a method to instantiate the TextAnalyticsClient object with the key and endpoint for your Text Analytics
resource. This example is the same for versions 3.0 and 3.1 of the API.
static TextAnalyticsClient authenticateClient(String key, String endpoint) {
return new TextAnalyticsClientBuilder()
.credential(new AzureKeyCredential(key))
.endpoint(endpoint)
.buildClient();
}
Sentiment analysis
NOTENOTE
static void sentimentAnalysisExample(TextAnalyticsClient client)
{
// The text that need be analyzed.
String text = "I had the best day of my life. I wish you were there with me.";
DocumentSentiment documentSentiment = client.analyzeSentiment(text);
System.out.printf(
"Recognized document sentiment: %s, positive score: %s, neutral score: %s, negative score: %s.%n",
documentSentiment.getSentiment(),
documentSentiment.getConfidenceScores().getPositive(),
documentSentiment.getConfidenceScores().getNeutral(),
documentSentiment.getConfidenceScores().getNegative());
for (SentenceSentiment sentenceSentiment : documentSentiment.getSentences()) {
System.out.printf(
"Recognized sentence sentiment: %s, positive score: %s, neutral score: %s, negative score:
%s.%n",
sentenceSentiment.getSentiment(),
sentenceSentiment.getConfidenceScores().getPositive(),
sentenceSentiment.getConfidenceScores().getNeutral(),
sentenceSentiment.getConfidenceScores().getNegative());
}
}
}
OutputOutput
Recognized document sentiment: positive, positive score: 1.0, neutral score: 0.0, negative score: 0.0.
Recognized sentence sentiment: positive, positive score: 1.0, neutral score: 0.0, negative score: 0.0.
Recognized sentence sentiment: neutral, positive score: 0.21, neutral score: 0.77, negative score: 0.02.
In your program's main() method, call the authentication method to instantiate the client.
Version 3.1
Version 3.0
In version 3.1 :
Sentiment Analysis includes Opinion Mining analysis which is optional flag.
Opinion Mining contains aspect and opinion level sentiment.
Create a new function called sentimentAnalysisExample() that takes the client that you created earlier, and call its
analyzeSentiment() function. The returned AnalyzeSentimentResult object will contain documentSentiment and
sentenceSentiments if successful, or an errorMessage if not.

Opinion mining
static void sentimentAnalysisWithOpinionMiningExample(TextAnalyticsClient client)
{
// The document that needs be analyzed.
String document = "Bad atmosphere. Not close to plenty of restaurants, hotels, and transit! Staff are
not friendly and helpful.";
System.out.printf("Document = %s%n", document);
AnalyzeSentimentOptions options = new AnalyzeSentimentOptions().setIncludeOpinionMining(true);
final DocumentSentiment documentSentiment = client.analyzeSentiment(document, "en", options);
SentimentConfidenceScores scores = documentSentiment.getConfidenceScores();
System.out.printf(
"Recognized document sentiment: %s, positive score: %f, neutral score: %f, negative score:
%f.%n",
documentSentiment.getSentiment(), scores.getPositive(), scores.getNeutral(),
scores.getNegative());
documentSentiment.getSentences().forEach(sentenceSentiment -> {
SentimentConfidenceScores sentenceScores = sentenceSentiment.getConfidenceScores();
System.out.printf("\tSentence sentiment: %s, positive score: %f, neutral score: %f, negative score:
%f.%n",
sentenceSentiment.getSentiment(), sentenceScores.getPositive(),
sentenceScores.getNeutral(), sentenceScores.getNegative());
sentenceSentiment.getOpinions().forEach(opinion -> {
TargetSentiment targetSentiment = opinion.getTarget();
System.out.printf("\t\tTarget sentiment: %s, target text: %s%n",
targetSentiment.getSentiment(),
targetSentiment.getText());
for (AssessmentSentiment assessmentSentiment : opinion.getAssessments()) {
System.out.printf("\t\t\t'%s' assessment sentiment because of \"%s\". Is the assessment
negated: %s.%n",
assessmentSentiment.getSentiment(), assessmentSentiment.getText(),
assessmentSentiment.isNegated());
}
});
});
}
OutputOutput
Document = Bad atmosphere. Not close to plenty of restaurants, hotels, and transit! Staff are not friendly
and helpful.
Recognized document sentiment: negative, positive score: 0.010000, neutral score: 0.140000, negative score:
0.850000.
Sentence sentiment: negative, positive score: 0.000000, neutral score: 0.000000, negative score: 1.000000.
Target sentiment: negative, target text: atmosphere
'negative' assessment sentiment because of "bad". Is the assessment negated: false.
Sentence sentiment: negative, positive score: 0.020000, neutral score: 0.440000, negative score: 0.540000.
Sentence sentiment: negative, positive score: 0.000000, neutral score: 0.000000, negative score: 1.000000.
Target sentiment: negative, target text: Staff
'negative' assessment sentiment because of "friendly". Is the assessment negated: true.
'negative' assessment sentiment because of "helpful". Is the assessment negated: true.
To perform sentiment analysis with opinion mining, create a new function called
sentimentAnalysisWithOpinionMiningExample() that takes the client that you created earlier, and call its
analyzeSentiment() function with setting option object AnalyzeSentimentOptions . The returned
AnalyzeSentimentResult object will contain documentSentiment and sentenceSentiments if successful, or an
errorMessage if not.
Language detection
TIPTIP
static void detectLanguageExample(TextAnalyticsClient client)
{
// The text that need be analyzed.
String text = "Ce document est rédigé en Français.";
DetectedLanguage detectedLanguage = client.detectLanguage(text);
System.out.printf("Detected primary language: %s, ISO 6391 name: %s, score: %.2f.%n",
detectedLanguage.getName(),
detectedLanguage.getIso6391Name(),
detectedLanguage.getConfidenceScore());
}
OutputOutput
Detected primary language: French, ISO 6391 name: fr, score: 1.00.
Named Entity Recognition (NER)
NOTENOTE
Create a new function called detectLanguageExample() that takes the client that you created earlier, and call its
detectLanguage() function. The returned DetectLanguageResult object will contain a primary language detected,
a list of other languages detected if successful, or an errorMessage if not. This example is the same for versions
3.0 and 3.1 of the API.
In some cases it may be hard to disambiguate languages based on the input. You can use the countryHint parameter
to specify a 2-letter country code. By default the API is using the "US" as the default countryHint, to remove this behavior
you can reset this parameter by setting this value to empty string countryHint = "" . To set a different default, set the
TextAnalyticsClientOptions.DefaultCountryHint property and pass it during the client's initialization.
Version 3.1
Version 3.0
In version 3.1 :
NER includes separate methods for detecting personal information.
Entity linking is a separate request than NER.
Create a new function called recognizeEntitiesExample() that takes the client that you created earlier, and call its
recognizeEntities() function. The returned CategorizedEntityCollection object will contain a list of
CategorizedEntity if successful, or an errorMessage if not.

static void recognizeEntitiesExample(TextAnalyticsClient client)
{
// The text that need be analyzed.
String text = "I had a wonderful trip to Seattle last week.";
for (CategorizedEntity entity : client.recognizeEntities(text)) {
System.out.printf(
"Recognized entity: %s, entity category: %s, entity sub-category: %s, score: %s, offset: %s,
length: %s.%n",
entity.getText(),
entity.getCategory(),
entity.getSubcategory(),
entity.getConfidenceScore(),
entity.getOffset(),
entity.getLength());
}
}
OutputOutput
Recognized entity: trip, entity category: Event, entity sub-category: null, score: 0.61, offset: 8, length:
4.
Recognized entity: Seattle, entity category: Location, entity sub-category: GPE, score: 0.82, offset: 16,
length: 7.
Recognized entity: last week, entity category: DateTime, entity sub-category: DateRange, score: 0.8, offset:
24, length: 9.
Personally Identifiable Information (PII) recognition
static void recognizePiiEntitiesExample(TextAnalyticsClient client)
{
// The text that need be analyzed.
String document = "My SSN is 859-98-0987";
PiiEntityCollection piiEntityCollection = client.recognizePiiEntities(document);
System.out.printf("Redacted Text: %s%n", piiEntityCollection.getRedactedText());
piiEntityCollection.forEach(entity -> System.out.printf(
"Recognized Personally Identifiable Information entity: %s, entity category: %s, entity subcategory:
%s,"
+ " confidence score: %f.%n",
entity.getText(), entity.getCategory(), entity.getSubcategory(), entity.getConfidenceScore()));
}
OutputOutput
Redacted Text: My SSN is ***********
Recognized Personally Identifiable Information entity: 859-98-0987, entity category: U.S. Social Security
Number (SSN), entity subcategory: null, confidence score: 0.650000.
Entity linking
Create a new function called recognizePiiEntitiesExample() that takes the client that you created earlier, and call
its recognizePiiEntities() function. The returned PiiEntityCollection object will contain a list of PiiEntity if
successful, or an errorMessage if not. It will also contain the redacted text, which consists of the input text with
all identifiable entities replaced with ***** .
Version 3.1
Version 3.0

static void recognizeLinkedEntitiesExample(TextAnalyticsClient client)
{
// The text that need be analyzed.
String text = "Microsoft was founded by Bill Gates and Paul Allen on April 4, 1975, " +
"to develop and sell BASIC interpreters for the Altair 8800. " +
"During his career at Microsoft, Gates held the positions of chairman, " +
"chief executive officer, president and chief software architect, " +
"while also being the largest individual shareholder until May 2014.";
System.out.printf("Linked Entities:%n");
for (LinkedEntity linkedEntity : client.recognizeLinkedEntities(text)) {
System.out.printf("Name: %s, ID: %s, URL: %s, Data Source: %s.%n",
linkedEntity.getName(),
linkedEntity.getDataSourceEntityId(),
linkedEntity.getUrl(),
linkedEntity.getDataSource());
System.out.printf("Matches:%n");
for (LinkedEntityMatch linkedEntityMatch : linkedEntity.getMatches()) {
System.out.printf("Text: %s, Score: %.2f, Offset: %s, Length: %s%n",
linkedEntityMatch.getText(),
linkedEntityMatch.getConfidenceScore(),
linkedEntityMatch.getOffset(),
linkedEntityMatch.getLength());
}
}
}
OutputOutput
Linked Entities:
Name: Microsoft, ID: Microsoft, URL: https://en.wikipedia.org/wiki/Microsoft, Data Source: Wikipedia.
Matches:
Text: Microsoft, Score: 0.55, Offset: 9, Length: 0
Text: Microsoft, Score: 0.55, Offset: 9, Length: 150
Name: Bill Gates, ID: Bill Gates, URL: https://en.wikipedia.org/wiki/Bill_Gates, Data Source: Wikipedia.
Matches:
Text: Bill Gates, Score: 0.63, Offset: 10, Length: 25
Text: Gates, Score: 0.63, Offset: 5, Length: 161
Name: Paul Allen, ID: Paul Allen, URL: https://en.wikipedia.org/wiki/Paul_Allen, Data Source: Wikipedia.
Matches:
Text: Paul Allen, Score: 0.60, Offset: 10, Length: 40
Name: April 4, ID: April 4, URL: https://en.wikipedia.org/wiki/April_4, Data Source: Wikipedia.
Matches:
Text: April 4, Score: 0.32, Offset: 7, Length: 54
Name: BASIC, ID: BASIC, URL: https://en.wikipedia.org/wiki/BASIC, Data Source: Wikipedia.
Matches:
Text: BASIC, Score: 0.33, Offset: 5, Length: 89
Name: Altair 8800, ID: Altair 8800, URL: https://en.wikipedia.org/wiki/Altair_8800, Data Source: Wikipedia.
Matches:
Text: Altair 8800, Score: 0.88, Offset: 11, Length: 116
Key phrase extraction
Create a new function called recognizeLinkedEntitiesExample() that takes the client that you created earlier, and
call its recognizeLinkedEntities() function. The returned LinkedEntityCollection object will contain a list of
LinkedEntity if successful, or an errorMessage if not. Since linked entities are uniquely identified, occurrences
of the same entity are grouped under a LinkedEntity object as a list of LinkedEntityMatch objects.
Create a new function called extractKeyPhrasesExample() that takes the client that you created earlier, and call its
extractKeyPhrases() function. The returned ExtractKeyPhraseResult object will contain a list of key phrases if
successful, or an errorMessage if not. This example is the same for version 3.0 and 3.1 of the API.

static void extractKeyPhrasesExample(TextAnalyticsClient client)
{
// The text that need be analyzed.
String text = "My cat might need to see a veterinarian.";
System.out.printf("Recognized phrases: %n");
for (String keyPhrase : client.extractKeyPhrases(text)) {
System.out.printf("%s%n", keyPhrase);
}
}
OutputOutput
Recognized phrases:
cat
veterinarian
Extract health entities
Version 3.1
Version 3.0
You can use Text Analytics to perform an asynchronous request to extract healthcare entities from text. The
below sample shows a basic example. You can find a more advanced sample on GitHub.

static void healthExample(TextAnalyticsClient client){
List<TextDocumentInput> documents = Arrays.asList(
new TextDocumentInput("0",
"Prescribed 100mg ibuprofen, taken twice daily."));
AnalyzeHealthcareEntitiesOptions options = new
AnalyzeHealthcareEntitiesOptions().setIncludeStatistics(true);
SyncPoller<AnalyzeHealthcareEntitiesOperationDetail, AnalyzeHealthcareEntitiesPagedIterable>
syncPoller = client.beginAnalyzeHealthcareEntities(documents, options, Context.NONE);
System.out.printf("Poller status: %s.%n", syncPoller.poll().getStatus());
syncPoller.waitForCompletion();
// Task operation statistics
AnalyzeHealthcareEntitiesOperationDetail operationResult = syncPoller.poll().getValue();
System.out.printf("Operation created time: %s, expiration time: %s.%n",
operationResult.getCreatedAt(), operationResult.getExpiresAt());
System.out.printf("Poller status: %s.%n", syncPoller.poll().getStatus());
for (AnalyzeHealthcareEntitiesResultCollection resultCollection : syncPoller.getFinalResult()) {
// Model version
System.out.printf(
"Results of Azure Text Analytics \"Analyze Healthcare Entities\" Model, version: %s%n",
resultCollection.getModelVersion());
for (AnalyzeHealthcareEntitiesResult healthcareEntitiesResult : resultCollection) {
System.out.println("Document ID = " + healthcareEntitiesResult.getId());
System.out.println("Document entities: ");
// Recognized healthcare entities
for (HealthcareEntity entity : healthcareEntitiesResult.getEntities()) {
System.out.printf(
"\tText: %s, normalized name: %s, category: %s, subcategory: %s, confidence score:
%f.%n",
entity.getText(), entity.getNormalizedText(), entity.getCategory(),
entity.getSubcategory(), entity.getConfidenceScore());
}
// Recognized healthcare entity relation groups
for (HealthcareEntityRelation entityRelation : healthcareEntitiesResult.getEntityRelations()) {
System.out.printf("Relation type: %s.%n", entityRelation.getRelationType());
for (HealthcareEntityRelationRole role : entityRelation.getRoles()) {
HealthcareEntity entity = role.getEntity();
System.out.printf("\tEntity text: %s, category: %s, role: %s.%n",
entity.getText(), entity.getCategory(), role.getName());
}
}
}
}
}
outputoutput

Poller status: IN_PROGRESS.
Operation created time: 2021-07-20T19:45:50Z, expiration time: 2021-07-21T19:45:50Z.
Poller status: SUCCESSFULLY_COMPLETED.
Results of Azure Text Analytics "Analyze Healthcare Entities" Model, version: 2021-05-15
Document ID = 0
Document entities:
Text: 100mg, normalized name: null, category: Dosage, subcategory: null, confidence score: 1.000000.
Text: ibuprofen, normalized name: ibuprofen, category: MedicationName, subcategory: null, confidence score:
1.000000.
Text: twice daily, normalized name: null, category: Frequency, subcategory: null, confidence score:
1.000000.
Relation type: DosageOfMedication.
Entity text: 100mg, category: Dosage, role: Dosage.
Entity text: ibuprofen, category: MedicationName, role: Medication.
Relation type: FrequencyOfMedication.
Entity text: ibuprofen, category: MedicationName, role: Medication.
Entity text: twice daily, category: Frequency, role: Frequency.
Use the API asynchronously with the Analyze operation
C a u t i o nC a u t i o n
static void analyzeActionsExample(TextAnalyticsClient client){
List<TextDocumentInput> documents = new ArrayList<>();
documents.add(new TextDocumentInput("0", "Microsoft was founded by Bill Gates and Paul Allen."));
SyncPoller<AnalyzeActionsOperationDetail, AnalyzeActionsResultPagedIterable> syncPoller =
client.beginAnalyzeActions(documents,
new TextAnalyticsActions().setDisplayName("Example analyze task")
.setRecognizeEntitiesActions(new RecognizeEntitiesAction())
.setExtractKeyPhrasesActions(
new ExtractKeyPhrasesAction().setModelVersion("latest")),
new AnalyzeActionsOptions().setIncludeStatistics(false),
Context.NONE);
// Task operation statistics details
while (syncPoller.poll().getStatus() == LongRunningOperationStatus.IN_PROGRESS) {
final AnalyzeActionsOperationDetail operationDetail = syncPoller.poll().getValue();
System.out.printf("Action display name: %s, Successfully completed actions: %d, in-process
actions: %d,"
+ " failed actions: %d, total actions: %d%n",
operationDetail.getDisplayName(), operationDetail.getSucceededCount(),
operationDetail.getInProgressCount(), operationDetail.getFailedCount(),
operationDetail.getTotalCount());
}
syncPoller.waitForCompletion();
Iterable<PagedResponse<AnalyzeActionsResult>> pagedResults =
syncPoller.getFinalResult().iterableByPage();
for (PagedResponse<AnalyzeActionsResult> perPage : pagedResults) {
Version 3.1
Version 3.0
You can use the Analyze operation to perform asynchronous batch requests for: NER, key phrase extraction,
sentiment analysis, and PII detection. The below sample shows a basic example on one operation. You can find a
more advanced sample on GitHub
To use the Analyze operation, make sure your Azure resource is using the S standard pricing tier.
Create a new function called analyzeBatchActionsExample() , which calls the beginAnalyzeBatchActions()
function. The result will be a long running operation which will be polled for results.

System.out.printf("Response code: %d, Continuation Token: %s.%n", perPage.getStatusCode(),
perPage.getContinuationToken());
for (AnalyzeActionsResult actionsResult : perPage.getElements()) {
System.out.println("Entities recognition action results:");
for (RecognizeEntitiesActionResult actionResult :
actionsResult.getRecognizeEntitiesResults()) {
if (!actionResult.isError()) {
for (RecognizeEntitiesResult documentResult : actionResult.getDocumentsResults()) {
if (!documentResult.isError()) {
for (CategorizedEntity entity : documentResult.getEntities()) {
System.out.printf(
"\tText: %s, category: %s, confidence score: %f.%n",
entity.getText(), entity.getCategory(),
entity.getConfidenceScore());
}
} else {
System.out.printf("\tCannot recognize entities. Error: %s%n",
documentResult.getError().getMessage());
}
}
} else {
System.out.printf("\tCannot execute Entities Recognition action. Error: %s%n",
actionResult.getError().getMessage());
}
}
System.out.println("Key phrases extraction action results:");
for (ExtractKeyPhrasesActionResult actionResult :
actionsResult.getExtractKeyPhrasesResults()) {
if (!actionResult.isError()) {
for (ExtractKeyPhraseResult documentResult : actionResult.getDocumentsResults()) {
if (!documentResult.isError()) {
System.out.println("\tExtracted phrases:");
for (String keyPhrases : documentResult.getKeyPhrases()) {
System.out.printf("\t\t%s.%n", keyPhrases);
}
} else {
System.out.printf("\tCannot extract key phrases. Error: %s%n",
documentResult.getError().getMessage());
}
}
} else {
System.out.printf("\tCannot execute Key Phrases Extraction action. Error: %s%n",
actionResult.getError().getMessage());
}
}
}
}
}
analyzeBatchActionsExample(client);
OutputOutput
After you add this example to your application, call it in your main() method.

Action display name: Example analyze task, Successfully completed actions: 1, in-process actions: 1, failed
actions: 0, total actions: 2
Response code: 200, Continuation Token: null.
Entities recognition action results:
Text: Microsoft, category: Organization, confidence score: 1.000000.
Text: Bill Gates, category: Person, confidence score: 1.000000.
Text: Paul Allen, category: Person, confidence score: 1.000000.
Key phrases extraction action results:
Extracted phrases:
Bill Gates.
Paul Allen.
Microsoft.
IMPORTANTIMPORTANT
Prerequisites
Setting up
Create a new Node.js applicationCreate a new Node.js application
mkdir myapp
cd myapp
You can also use the Analyze operation to perform NER, key phrase extraction, sentiment analysis and detect PII.
See the Analyze sample on GitHub.
The latest stable version of the Text Analytics API is 3.1 .
The code in this article uses synchronous methods and un-secured credentials storage for simplicity reasons. For
production scenarios, we recommend using the batched asynchronous methods for performance and scalability. See
the reference documentation below.
You can also run this version of the Text Analytics client library in your browser.
Be sure to only follow the instructions for the version you are using.
Version 3.1
Version 3.0
v3 Reference documentation | v3 Library source code | v3 Package (NPM) | v3 Samples
Azure subscription - Create one for free
The current version of Node.js.
Once you have your Azure subscription, create a Text Analytics resource in the Azure portal to get your key
and endpoint. After it deploys, click Go to resourceGo to resource.
To use the Analyze feature, you will need a Text Analytics resource with the standard (S) pricing tier.
You will need the key and endpoint from the resource you create to connect your application to the
Text Analytics API. You'll paste your key and endpoint into the code below later in the quickstart.
You can use the free pricing tier ( F0 ) to try the service, and upgrade later to a paid tier for production.
In a console window (such as cmd, PowerShell, or Bash), create a new directory for your app, and navigate to it.
Run the npm init command to create a node application with a package.json file.

npm init
Install the client libraryInstall the client library
npm install --save @azure/ai-text-analytic[email protected]
TIPTIP
"use strict";
const { TextAnalyticsClient, AzureKeyCredential } = require("@azure/ai-text-analytics");
IMPORTANTIMPORTANT
const key = '<paste-your-text-analytics-key-here>';
const endpoint = '<paste-your-text-analytics-endpoint-here>';
Object model
Version 3.1
Version 3.0
Install the @azure/ai-text-analytics NPM packages:
Want to view the whole quickstart code file at once? You can find it on GitHub, which contains the code examples in this
quickstart.
Your app's package.json file will be updated with the dependencies. Create a file named index.js and add the
following:
Version 3.1
Version 3.0
Create variables for your resource's Azure endpoint and key.
Go to the Azure portal. If the Text Analytics resource you created in the PrerequisitesPrerequisites section deployed successfully, click
the Go to ResourceGo to Resource button under Next StepsNext Steps. You can find your key and endpoint in the resource's key andkey and
endpointendpoint page, under resource managementresource management.
Remember to remove the key from your code when you're done, and never post it publicly. For production, consider using
a secure way of storing and accessing your credentials. For example, Azure key vault.
The Text Analytics client is a TextAnalyticsClient object that authenticates to Azure using your key. The client
provides several methods for analyzing text, as a single string, or a batch.
Text is sent to the API as a list of documents , which are dictionary objects containing a combination of id ,
text , and language attributes depending on the method used. The text attribute stores the text to be
analyzed in the origin language , and the id can be any value.
The response object is a list containing the analysis information for each document.

Code examples
Authenticate the client
const textAnalyticsClient = new TextAnalyticsClient(endpoint, new AzureKeyCredential(key));
Sentiment analysis
async function sentimentAnalysis(client){
const sentimentInput = [
"I had the best day of my life. I wish you were there with me."
];
const sentimentResult = await client.analyzeSentiment(sentimentInput);
sentimentResult.forEach(document => {
console.log(`ID: ${document.id}`);
console.log(`\tDocument Sentiment: ${document.sentiment}`);
console.log(`\tDocument Scores:`);
console.log(`\t\tPositive: ${document.confidenceScores.positive.toFixed(2)} \tNegative:
${document.confidenceScores.negative.toFixed(2)} \tNeutral:
${document.confidenceScores.neutral.toFixed(2)}`);
console.log(`\tSentences Sentiment(${document.sentences.length}):`);
document.sentences.forEach(sentence => {
console.log(`\t\tSentence sentiment: ${sentence.sentiment}`)
console.log(`\t\tSentences Scores:`);
console.log(`\t\tPositive: ${sentence.confidenceScores.positive.toFixed(2)} \tNegative:
${sentence.confidenceScores.negative.toFixed(2)} \tNeutral:
${sentence.confidenceScores.neutral.toFixed(2)}`);
});
});
}
sentimentAnalysis(textAnalyticsClient)
Client Authentication
Sentiment Analysis
Opinion mining
Language detection
Named Entity recognition
Entity linking
Personally Identifiable Information
Key phrase extraction
Version 3.1
Version 3.0
Create a new TextAnalyticsClient object with your key and endpoint as parameters.
Version 3.1
Version 3.0
Create an array of strings containing the document you want to analyze. Call the client's analyzeSentiment()
method and get the returned SentimentBatchResult object. Iterate through the list of results, and print each
document's ID, document level sentiment with confidence scores. For each document, result contains sentence
level sentiment along with offsets, length, and confidence scores.

OutputOutput
ID: 0
Document Sentiment: positive
Document Scores:
Positive: 1.00 Negative: 0.00 Neutral: 0.00
Sentences Sentiment(2):
Sentence sentiment: positive
Sentences Scores:
Positive: 1.00 Negative: 0.00 Neutral: 0.00
Sentence sentiment: neutral
Sentences Scores:
Positive: 0.21 Negative: 0.02 Neutral: 0.77
Opinion mining
Run your code with node index.js in your console window.
Version 3.1
Version 3.0
In order to do sentiment analysis with opinion mining, create an array of strings containing the document you
want to analyze. Call the client's analyzeSentiment() method with adding option flag
includeOpinionMining: true and get the returned SentimentBatchResult object. Iterate through the list of results,
and print each document's ID, document level sentiment with confidence scores. For each document, result
contains not only sentence level sentiment as above, but also aspect and opinion level sentiment.

async function sentimentAnalysisWithOpinionMining(client){
const sentimentInput = [
{
text: "The food and service were unacceptable, but the concierge were nice",
id: "0",
language: "en"
}
];
const results = await client.analyzeSentiment(sentimentInput, { includeOpinionMining: true });
for (let i = 0; i < results.length; i++) {
const result = results[i];
console.log(`- Document ${result.id}`);
if (!result.error) {
console.log(`\tDocument text: ${sentimentInput[i].text}`);
console.log(`\tOverall Sentiment: ${result.sentiment}`);
console.log("\tSentiment confidence scores:", result.confidenceScores);
console.log("\tSentences");
for (const { sentiment, confidenceScores, opinions } of result.sentences) {
console.log(`\t- Sentence sentiment: ${sentiment}`);
console.log("\t Confidence scores:", confidenceScores);
console.log("\t Mined opinions");
for (const { target, assessments } of opinions) {
console.log(`\t\t- Target text: ${target.text}`);
console.log(`\t\t Target sentiment: ${target.sentiment}`);
console.log("\t\t Target confidence scores:", target.confidenceScores);
console.log("\t\t Target assessments");
for (const { text, sentiment } of assessments) {
console.log(`\t\t\t- Text: ${text}`);
console.log(`\t\t\t Sentiment: ${sentiment}`);
}
}
}
} else {
console.error(`\tError: ${result.error}`);
}
}
}
sentimentAnalysisWithOpinionMining(textAnalyticsClient)
OutputOutput
Run your code with node index.js in your console window.

- Document 0
Document text: The food and service were unacceptable, but the concierge were nice
Overall Sentiment: positive
Sentiment confidence scores: { positive: 0.84, neutral: 0, negative: 0.16 }
Sentences
- Sentence sentiment: positive
Confidence scores: { positive: 0.84, neutral: 0, negative: 0.16 }
Mined opinions
- Target text: food
Target sentiment: negative
Target confidence scores: { positive: 0.01, negative: 0.99 }
Target assessments
- Text: unacceptable
Sentiment: negative
- Target text: service
Target sentiment: negative
Target confidence scores: { positive: 0.01, negative: 0.99 }
Target assessments
- Text: unacceptable
Sentiment: negative
- Target text: concierge
Target sentiment: positive
Target confidence scores: { positive: 1, negative: 0 }
Target assessments
- Text: nice
Sentiment: positive
Language detection
async function languageDetection(client) {
const languageInputArray = [
"Ce document est rédigé en Français."
];
const languageResult = await client.detectLanguage(languageInputArray);
languageResult.forEach(document => {
console.log(`ID: ${document.id}`);
console.log(`\tPrimary Language ${document.primaryLanguage.name}`)
});
}
languageDetection(textAnalyticsClient);
OutputOutput
ID: 0
Primary Language French
Named Entity Recognition (NER)
Version 3.1
Version 3.0
Create an array of strings containing the document you want to analyze. Call the client's detectLanguage()
method and get the returned DetectLanguageResultCollection . Then iterate through the results, and print each
document's ID with respective primary language.
Run your code with node index.js in your console window.

async function entityRecognition(client){
const entityInputs = [
"Microsoft was founded by Bill Gates and Paul Allen on April 4, 1975, to develop and sell BASIC
interpreters for the Altair 8800",
"La sede principal de Microsoft se encuentra en la ciudad de Redmond, a 21 kilómetros de Seattle."
];
const entityResults = await client.recognizeEntities(entityInputs);
entityResults.forEach(document => {
console.log(`Document ID: ${document.id}`);
document.entities.forEach(entity => {
console.log(`\tName: ${entity.text} \tCategory: ${entity.category} \tSubcategory:
${entity.subCategory ? entity.subCategory : "N/A"}`);
console.log(`\tScore: ${entity.confidenceScore}`);
});
});
}
entityRecognition(textAnalyticsClient);
OutputOutput
Document ID: 0
Name: Microsoft Category: Organization Subcategory: N/A
Score: 0.29
Name: Bill Gates Category: Person Subcategory: N/A
Score: 0.78
Name: Paul Allen Category: Person Subcategory: N/A
Score: 0.82
Name: April 4, 1975 Category: DateTime Subcategory: Date
Score: 0.8
Name: 8800 Category: Quantity Subcategory: Number
Score: 0.8
Document ID: 1
Name: 21 Category: Quantity Subcategory: Number
Score: 0.8
Name: Seattle Category: Location Subcategory: GPE
Score: 0.25
Personally Identifying Information (PII) recognition
Version 3.1
Version 3.0
Create an array of strings containing the document you want to analyze. Call the client's recognizeEntities()
method and get the RecognizeEntitiesResult object. Iterate through the list of results, and print the entity name,
type, subtype, offset, length, and score.
Run your code with node index.js in your console window.
Create an array of strings containing the document you want to analyze. Call the client's recognizePiiEntities()
method and get the RecognizePIIEntitiesResult object. Iterate through the list of results, and print the entity
name, type, and score.

async function piiRecognition(client) {
const documents = [
"The employee's phone number is (555) 555-5555."
];
const results = await client.recognizePiiEntities(documents, "en");
for (const result of results) {
if (result.error === undefined) {
console.log("Redacted Text: ", result.redactedText);
console.log(" -- Recognized PII entities for input", result.id, "--");
for (const entity of result.entities) {
console.log(entity.text, ":", entity.category, "(Score:", entity.confidenceScore, ")");
}
} else {
console.error("Encountered an error:", result.error);
}
}
}
piiRecognition(textAnalyticsClient)
OutputOutput
Redacted Text: The employee's phone number is **************.
-- Recognized PII entities for input 0 --
(555) 555-5555 : Phone Number (Score: 0.8 )
Entity linking
Run your code with node index.js in your console window.
Version 3.1
Version 3.0
Create an array of strings containing the document you want to analyze. Call the client's
recognizeLinkedEntities() method and get the RecognizeLinkedEntitiesResult object. Iterate through the list of
results, and print the entity name, ID, data source, url, and matches. Every object in matches array will contain
offset, length, and score for that match.

async function linkedEntityRecognition(client){
const linkedEntityInput = [
"Microsoft was founded by Bill Gates and Paul Allen on April 4, 1975, to develop and sell BASIC
interpreters for the Altair 8800. During his career at Microsoft, Gates held the positions of chairman,
chief executive officer, president and chief software architect, while also being the largest individual
shareholder until May 2014."
];
const entityResults = await client.recognizeLinkedEntities(linkedEntityInput);
entityResults.forEach(document => {
console.log(`Document ID: ${document.id}`);
document.entities.forEach(entity => {
console.log(`\tName: ${entity.name} \tID: ${entity.dataSourceEntityId} \tURL: ${entity.url}
\tData Source: ${entity.dataSource}`);
console.log(`\tMatches:`)
entity.matches.forEach(match => {
console.log(`\t\tText: ${match.text} \tScore: ${match.confidenceScore.toFixed(2)}`);
})
});
});
}
linkedEntityRecognition(textAnalyticsClient);
OutputOutput
Document ID: 0
Name: Altair 8800 ID: Altair 8800 URL: https://en.wikipedia.org/wiki/Altair_8800 Data
Source: Wikipedia
Matches:
Text: Altair 8800 Score: 0.88
Name: Bill Gates ID: Bill Gates URL: https://en.wikipedia.org/wiki/Bill_Gates Data Source:
Wikipedia
Matches:
Text: Bill Gates Score: 0.63
Text: Gates Score: 0.63
Name: Paul Allen ID: Paul Allen URL: https://en.wikipedia.org/wiki/Paul_Allen Data Source:
Wikipedia
Matches:
Text: Paul Allen Score: 0.60
Name: Microsoft ID: Microsoft URL: https://en.wikipedia.org/wiki/Microsoft Data Source:
Wikipedia
Matches:
Text: Microsoft Score: 0.55
Text: Microsoft Score: 0.55
Name: April 4 ID: April 4 URL: https://en.wikipedia.org/wiki/April_4 Data Source:
Wikipedia
Matches:
Text: April 4 Score: 0.32
Name: BASIC ID: BASIC URL: https://en.wikipedia.org/wiki/BASIC Data Source:
Wikipedia
Matches:
Text: BASIC Score: 0.33
Key phrase extraction
Run your code with node index.js in your console window.
Version 3.1
Version 3.0
Create an array of strings containing the document you want to analyze. Call the client's extractKeyPhrases()

async function keyPhraseExtraction(client){
const keyPhrasesInput = [
"My cat might need to see a veterinarian.",
];
const keyPhraseResult = await client.extractKeyPhrases(keyPhrasesInput);
keyPhraseResult.forEach(document => {
console.log(`ID: ${document.id}`);
console.log(`\tDocument Key Phrases: ${document.keyPhrases}`);
});
}
keyPhraseExtraction(textAnalyticsClient);
OutputOutput
ID: 0
Document Key Phrases: cat,veterinarian
Extract health entities
C a u t i o nC a u t i o n
method and get the returned ExtractKeyPhrasesResult object. Iterate through the results and print each
document's ID, and any detected key phrases.
Run your code with node index.js in your console window.
To use the health operation, make sure your Azure resource is using the S standard pricing tier.
You can use Text Analytics to perform an asynchronous request to extract healthcare entities from text. The
below sample shows a basic example. You can find a more advanced sample on GitHub.
Version 3.1
Version 3.0

async function healthExample(client) {
console.log("== Recognize Healthcare Entities Sample ==");
const documents = [
"Prescribed 100mg ibuprofen, taken twice daily."
];
const poller = await client.beginAnalyzeHealthcareEntities(documents, "en", {
includeStatistics: true
});
poller.onProgress(() => {
console.log(
`Last time the operation was updated was on: ${poller.getOperationState().lastModifiedOn}`
);
});
console.log(
`The analyze healthcare entities operation was created on ${
poller.getOperationState().createdOn
}`
);
console.log(
`The analyze healthcare entities operation results will expire on ${
poller.getOperationState().expiresOn
}`
);
const results = await poller.pollUntilDone();
for await (const result of results) {
console.log(`- Document ${result.id}`);
if (!result.error) {
console.log("\tRecognized Entities:");
for (const entity of result.entities) {
console.log(`\t- Entity "${entity.text}" of type ${entity.category}`);
}
if (result.entityRelations && (result.entityRelations.length > 0)) {
console.log(`\tRecognized relations between entities:`);
for (const relation of result.entityRelations) {
console.log(
`\t\t- Relation of type ${relation.relationType} found between the following entities:`
);
for (const role of relation.roles) {
console.log(`\t\t\t- "${role.entity.text}" with the role ${role.name}`);
}
}
}
} else console.error("\tError:", result.error);
}
}
healthExample(textAnalyticsClient).catch((err) => {
console.error("The sample encountered an error:", err);
});
OutputOutput

- Document 0
Recognized Entities:
- Entity "100mg" of type Dosage
- Entity "ibuprofen" of type MedicationName
- Entity "twice daily" of type Frequency
Recognized relations between entities:
- Relation of type DosageOfMedication found between the following entities:
- "100mg" with the role Dosage
- "ibuprofen" with the role Medication
- Relation of type FrequencyOfMedication found between the following entities:
- "ibuprofen" with the role Medication
- "twice daily" with the role Frequency
Use the API asynchronously with the Analyze operation
C a u t i o nC a u t i o n
Version 3.1
Version 3.0
You can use the Analyze operation to perform asynchronous batch requests for: NER, key phrase extraction,
sentiment analysis, and PII detection. The below sample shows a basic example on one operation. You can find
more advanced samples for JavaScript and TypeScript on GitHub.
To use the Analyze operation, make sure your Azure resource is using the S standard pricing tier.
Create a new function called analyze_example() , which calls the beginAnalyze() function. The result will be a
long running operation which will be polled for results.

async function analyze_example(client) {
const documents = [
"Microsoft was founded by Bill Gates and Paul Allen.",
];
const actions = {
recognizeEntitiesActions: [{ modelVersion: "latest" }],
extractKeyPhrasesActions: [{ modelVersion: "latest" }]
};
const poller = await client.beginAnalyzeActions(documents, actions, "en");
console.log(
`The analyze batch actions operation was created on ${poller.getOperationState().createdOn}`
);
console.log(
`The analyze batch actions operation results will expire on ${poller.getOperationState().expiresOn
}`
);
const resultPages = await poller.pollUntilDone();
for await (const page of resultPages) {
const entitiesAction = page.recognizeEntitiesResults[0];
if (!entitiesAction.error) {
for (const doc of entitiesAction.results) {
console.log(`- Document ${doc.id}`);
if (!doc.error) {
console.log("\tEntities:");
for (const entity of doc.entities) {
console.log(`\t- Entity ${entity.text} of type ${entity.category}`);
}
} else {
console.error("\tError:", doc.error);
}
}
}
}
for await (const page of resultPages) {
const keyPhrasesAction = page.extractKeyPhrasesResults[0];
if (!keyPhrasesAction.error) {
for (const doc of keyPhrasesAction.results) {
console.log(`- Document ${doc.id}`);
if (!doc.error) {
console.log("\tKey phrases:");
for (const phrase of doc.keyPhrases) {
console.log(`\t- ${phrase}`);
}
} else {
console.error("\tError:", doc.error);
}
}
}
}
}
analyze_example(textAnalyticsClient)
OutputOutput
The analyze batch actions operation was created on Fri Jun 18 2021 12:34:52 GMT-0700 (Pacific Daylight Time)
The analyze batch actions operation results will expire on Sat Jun 19 2021 12:34:52 GMT-0700 (Pacific
Daylight Time)
- Document 0
Entities:
- Entity Microsoft of type Organization
- Entity Bill Gates of type Person
- Entity Paul Allen of type Person
- Document 0
Key phrases:
- Bill Gates
- Paul Allen
- Microsoft
node index.js
IMPORTANTIMPORTANT
Prerequisites
Setting up
Install the client libraryInstall the client library
You can also use the Analyze operation to perform NER, key phrase extraction, sentiment analysis and detect PII.
See the Analyze samples for JavaScript and TypeScript on GitHub.
Run the application with the node command on your quickstart file.
The latest stable version of the Text Analytics API is 3.1 .
The code in this article uses synchronous methods and un-secured credentials storage for simplicity reasons. For
production scenarios, we recommend using the batched asynchronous methods for performance and scalability. See
the reference documentation below. If you want to use Text Analytics for health or Asynchronous operations, see the
examples on Github for C#, Python or Java
Be sure to only follow the instructions for the version you are using.
Version 3.1
Version 3.0
v3.1 Reference documentation | v3.1 Library source code | v3.1 Package (PiPy) | v3.1 Samples
Azure subscription - Create one for free
Python 3.x
Once you have your Azure subscription, create a Text Analytics resource in the Azure portal to get your key
and endpoint. After it deploys, click Go to resourceGo to resource.
To use the Analyze feature, you will need a Text Analytics resource with the standard (S) pricing tier.
You will need the key and endpoint from the resource you create to connect your application to the
Text Analytics API. You'll paste your key and endpoint into the code below later in the quickstart.
You can use the free pricing tier ( F0 ) to try the service, and upgrade later to a paid tier for production.
After installing Python, you can install the client library with:
Version 3.1
Version 3.0
pip install azure-ai-textanalytics==5.1.0
TIPTIP
Create a new python applicationCreate a new python application
IMPORTANTIMPORTANT
key = "<paste-your-text-analytics-key-here>"
endpoint = "<paste-your-text-analytics-endpoint-here>"
Object model
Code examples
Want to view the whole quickstart code file at once? You can find it on GitHub, which contains the code examples in this
quickstart.
Create a new Python file and create variables for your resource's Azure endpoint and subscription key.
Go to the Azure portal. If the Text Analytics resource you created in the PrerequisitesPrerequisites section deployed successfully, click
the Go to ResourceGo to Resource button under Next StepsNext Steps. You can find your key and endpoint in the resource's key andkey and
endpointendpoint page, under resource managementresource management.
Remember to remove the key from your code when you're done, and never post it publicly. For production, consider using
a secure way of storing and accessing your credentials. For example, Azure key vault.
Version 3.1
Version 3.0
The Text Analytics client is a TextAnalyticsClient object that authenticates to Azure. The client provides several
methods for analyzing text.
When processing text is sent to the API as a list of documents , which is either as a list of string, a list of dict-like
representation, or as a list of TextDocumentInput/DetectLanguageInput . A dict-like object contains a
combination of id , text , and language/country_hint . The text attribute stores the text to be analyzed in the
origin country_hint , and the id can be any value.
The response object is a list containing the analysis information for each document.
These code snippets show you how to do the following tasks with the Text Analytics client library for Python:
Version 3.1
Version 3.0
Authenticate the client
Sentiment Analysis
Opinion mining
Language detection
Named Entity recognition
Personally Identifiable Information recognition

Authenticate the client
from azure.ai.textanalytics import TextAnalyticsClient
from azure.core.credentials import AzureKeyCredential
def authenticate_client():
ta_credential = AzureKeyCredential(key)
text_analytics_client = TextAnalyticsClient(
endpoint=endpoint,
credential=ta_credential)
return text_analytics_client
client = authenticate_client()
Sentiment analysis
def sentiment_analysis_example(client):
documents = ["I had the best day of my life. I wish you were there with me."]
response = client.analyze_sentiment(documents=documents)[0]
print("Document Sentiment: {}".format(response.sentiment))
print("Overall scores: positive={0:.2f}; neutral={1:.2f}; negative={2:.2f} \n".format(
response.confidence_scores.positive,
response.confidence_scores.neutral,
response.confidence_scores.negative,
))
for idx, sentence in enumerate(response.sentences):
print("Sentence: {}".format(sentence.text))
print("Sentence {} sentiment: {}".format(idx+1, sentence.sentiment))
print("Sentence score:\nPositive={0:.2f}\nNeutral={1:.2f}\nNegative={2:.2f}\n".format(
sentence.confidence_scores.positive,
sentence.confidence_scores.neutral,
sentence.confidence_scores.negative,
))
sentiment_analysis_example(client)
OutputOutput
Entity linking
Key phrase extraction
Version 3.1
Version 3.0
Create a function to instantiate the TextAnalyticsClient object with your key AND endpoint created above.
Then create a new client.
Version 3.1
Version 3.0
Create a new function called sentiment_analysis_example() that takes the client as an argument, then calls the
analyze_sentiment() function. The returned response object will contain the sentiment label and score of the
entire input document, as well as a sentiment analysis for each sentence.

Document Sentiment: positive
Overall scores: positive=1.00; neutral=0.00; negative=0.00
Sentence: I had the best day of my life.
Sentence 1 sentiment: positive
Sentence score:
Positive=1.00
Neutral=0.00
Negative=0.00
Sentence: I wish you were there with me.
Sentence 2 sentiment: neutral
Sentence score:
Positive=0.21
Neutral=0.77
Negative=0.02
Opinion mining
Version 3.1
Version 3.0
In order to do sentiment analysis with opinion mining, create a new function called
sentiment_analysis_with_opinion_mining_example() that takes the client as an argument, then calls the
analyze_sentiment() function with option flag show_opinion_mining=True . The returned response object will
contain not only the sentiment label and score of the entire input document with sentiment analysis for each
sentence, but also aspect and opinion level sentiment analysis.

def sentiment_analysis_with_opinion_mining_example(client):
documents = [
"The food and service were unacceptable, but the concierge were nice"
]
result = client.analyze_sentiment(documents, show_opinion_mining=True)
doc_result = [doc for doc in result if not doc.is_error]
positive_reviews = [doc for doc in doc_result if doc.sentiment == "positive"]
negative_reviews = [doc for doc in doc_result if doc.sentiment == "negative"]
positive_mined_opinions = []
mixed_mined_opinions = []
negative_mined_opinions = []
for document in doc_result:
print("Document Sentiment: {}".format(document.sentiment))
print("Overall scores: positive={0:.2f}; neutral={1:.2f}; negative={2:.2f} \n".format(
document.confidence_scores.positive,
document.confidence_scores.neutral,
document.confidence_scores.negative,
))
for sentence in document.sentences:
print("Sentence: {}".format(sentence.text))
print("Sentence sentiment: {}".format(sentence.sentiment))
print("Sentence score:\nPositive={0:.2f}\nNeutral={1:.2f}\nNegative={2:.2f}\n".format(
sentence.confidence_scores.positive,
sentence.confidence_scores.neutral,
sentence.confidence_scores.negative,
))
for mined_opinion in sentence.mined_opinions:
target = mined_opinion.target
print("......'{}' target '{}'".format(target.sentiment, target.text))
print("......Target score:\n......Positive={0:.2f}\n......Negative={1:.2f}\n".format(
target.confidence_scores.positive,
target.confidence_scores.negative,
))
for assessment in mined_opinion.assessments:
print("......'{}' assessment '{}'".format(assessment.sentiment, assessment.text))
print("......Assessment score:\n......Positive={0:.2f}\n......Negative=
{1:.2f}\n".format(
assessment.confidence_scores.positive,
assessment.confidence_scores.negative,
))
print("\n")
print("\n")
sentiment_analysis_with_opinion_mining_example(client)
OutputOutput

Document Sentiment: positive
Overall scores: positive=0.84; neutral=0.00; negative=0.16
Sentence: The food and service were unacceptable, but the concierge were nice
Sentence sentiment: positive
Sentence score:
Positive=0.84
Neutral=0.00
Negative=0.16
......'negative' target 'food'
......Target score:
......Positive=0.01
......Negative=0.99
......'negative' assessment 'unacceptable'
......Assessment score:
......Positive=0.01
......Negative=0.99
......'negative' target 'service'
......Target score:
......Positive=0.01
......Negative=0.99
......'negative' assessment 'unacceptable'
......Assessment score:
......Positive=0.01
......Negative=0.99
......'positive' target 'concierge'
......Target score:
......Positive=1.00
......Negative=0.00
......'positive' assessment 'nice'
......Assessment score:
......Positive=1.00
......Negative=0.00
Press any key to continue . . .
Language detection
TIPTIP
Version 3.1
Version 3.0
Create a new function called language_detection_example() that takes the client as an argument, then calls the
detect_language() function. The returned response object will contain the detected language in
primary_language if successful, and an error if not.
In some cases it may be hard to disambiguate languages based on the input. You can use the country_hint parameter
to specify a 2-letter country code. By default the API is using the "US" as the default countryHint, to remove this behavior
you can reset this parameter by setting this value to empty string country_hint : "" .
def language_detection_example(client):
try:
documents = ["Ce document est rédigé en Français."]
response = client.detect_language(documents = documents, country_hint = 'us')[0]
print("Language: ", response.primary_language.name)
except Exception as err:
print("Encountered exception. {}".format(err))
language_detection_example(client)
OutputOutput
Language: French
Named Entity Recognition (NER)
NOTENOTE
def entity_recognition_example(client):
try:
documents = ["I had a wonderful trip to Seattle last week."]
result = client.recognize_entities(documents = documents)[0]
print("Named Entities:\n")
for entity in result.entities:
print("\tText: \t", entity.text, "\tCategory: \t", entity.category, "\tSubCategory: \t",
entity.subcategory,
"\n\tConfidence Score: \t", round(entity.confidence_score, 2), "\tLength: \t",
entity.length, "\tOffset: \t", entity.offset, "\n")
except Exception as err:
print("Encountered exception. {}".format(err))
entity_recognition_example(client)
OutputOutput
Version 3.1
Version 3.0
In version 3.1 :
Entity linking is a separate request than NER.
Create a new function called entity_recognition_example that takes the client as an argument, then calls the
recognize_entities() function and iterates through the results. The returned response object will contain the
list of detected entities in entity if successful, and an error if not. For each detected entity, print its Category
and Sub-Category if exists.

Named Entities:
Text: trip Category: Event SubCategory: None
Confidence Score: 0.61 Length: 4 Offset: 18
Text: Seattle Category: Location SubCategory: GPE
Confidence Score: 0.82 Length: 7 Offset: 26
Text: last week Category: DateTime SubCategory: DateRange
Confidence Score: 0.8 Length: 9 Offset: 34
Personally Identifiable Information (PII) recognition
def pii_recognition_example(client):
documents = [
"The employee's SSN is 859-98-0987.",
"The employee's phone number is 555-555-5555."
]
response = client.recognize_pii_entities(documents, language="en")
result = [doc for doc in response if not doc.is_error]
for doc in result:
print("Redacted Text: {}".format(doc.redacted_text))
for entity in doc.entities:
print("Entity: {}".format(entity.text))
print("\tCategory: {}".format(entity.category))
print("\tConfidence Score: {}".format(entity.confidence_score))
print("\tOffset: {}".format(entity.offset))
print("\tLength: {}".format(entity.length))
pii_recognition_example(client)
OutputOutput
Redacted Text: The employee's SSN is ***********.
Entity: 859-98-0987
Category: U.S. Social Security Number (SSN)
Confidence Score: 0.65
Offset: 22
Length: 11
Redacted Text: The employee's phone number is ************.
Entity: 555-555-5555
Category: Phone Number
Confidence Score: 0.8
Offset: 31
Length: 12
Entity linking
Create a new function called pii_recognition_example that takes the client as an argument, then calls the
recognize_pii_entities() function and iterates through the results. The returned response object will contain
the list of detected entities in entity if successful, and an error if not. For each detected entity, print its
Category and Sub-Category if exists.
Version 3.1
Version 3.0
Create a new function called entity_linking_example() that takes the client as an argument, then calls the
recognize_linked_entities() function and iterates through the results. The returned response object will contain
the list of detected entities in entities if successful, and an error if not. Since linked entities are uniquely

def entity_linking_example(client):
try:
documents = ["""Microsoft was founded by Bill Gates and Paul Allen on April 4, 1975,
to develop and sell BASIC interpreters for the Altair 8800.
During his career at Microsoft, Gates held the positions of chairman,
chief executive officer, president and chief software architect,
while also being the largest individual shareholder until May 2014."""]
result = client.recognize_linked_entities(documents = documents)[0]
print("Linked Entities:\n")
for entity in result.entities:
print("\tName: ", entity.name, "\tId: ", entity.data_source_entity_id, "\tUrl: ", entity.url,
"\n\tData Source: ", entity.data_source)
print("\tMatches:")
for match in entity.matches:
print("\t\tText:", match.text)
print("\t\tConfidence Score: {0:.2f}".format(match.confidence_score))
print("\t\tOffset: {}".format(match.offset))
print("\t\tLength: {}".format(match.length))
except Exception as err:
print("Encountered exception. {}".format(err))
entity_linking_example(client)
OutputOutput
identified, occurrences of the same entity are grouped under a entity object as a list of match objects.

Linked Entities:
Name: Microsoft Id: Microsoft Url: https://en.wikipedia.org/wiki/Microsoft
Data Source: Wikipedia
Matches:
Text: Microsoft
Confidence Score: 0.55
Offset: 0
Length: 9
Text: Microsoft
Confidence Score: 0.55
Offset: 168
Length: 9
Name: Bill Gates Id: Bill Gates Url: https://en.wikipedia.org/wiki/Bill_Gates
Data Source: Wikipedia
Matches:
Text: Bill Gates
Confidence Score: 0.63
Offset: 25
Length: 10
Text: Gates
Confidence Score: 0.63
Offset: 179
Length: 5
Name: Paul Allen Id: Paul Allen Url: https://en.wikipedia.org/wiki/Paul_Allen
Data Source: Wikipedia
Matches:
Text: Paul Allen
Confidence Score: 0.60
Offset: 40
Length: 10
Name: April 4 Id: April 4 Url: https://en.wikipedia.org/wiki/April_4
Data Source: Wikipedia
Matches:
Text: April 4
Confidence Score: 0.32
Offset: 54
Length: 7
Name: BASIC Id: BASIC Url: https://en.wikipedia.org/wiki/BASIC
Data Source: Wikipedia
Matches:
Text: BASIC
Confidence Score: 0.33
Offset: 98
Length: 5
Name: Altair 8800 Id: Altair 8800 Url: https://en.wikipedia.org/wiki/Altair_8800
Data Source: Wikipedia
Matches:
Text: Altair 8800
Confidence Score: 0.88
Offset: 125
Length: 11
Key phrase extraction
Version 3.1
Version 3.0
Create a new function called key_phrase_extraction_example() that takes the client as an argument, then calls
the extract_key_phrases() function. The result will contain the list of detected key phrases in key_phrases if
successful, and an error if not. Print any detected key phrases.
def key_phrase_extraction_example(client):
try:
documents = ["My cat might need to see a veterinarian."]
response = client.extract_key_phrases(documents = documents)[0]
if not response.is_error:
print("\tKey Phrases:")
for phrase in response.key_phrases:
print("\t\t", phrase)
else:
print(response.id, response.error)
except Exception as err:
print("Encountered exception. {}".format(err))
key_phrase_extraction_example(client)
OutputOutput
Key Phrases:
cat
veterinarian
Extract health entities
C a u t i o nC a u t i o n
You can use Text Analytics to perform an asynchronous request to extract healthcare entities from text. The
below sample shows a basic example. You can find a more advanced sample on GitHub.
To use the health operation, make sure your Azure resource is using the S standard pricing tier.
Version 3.1
Version 3.0

def health_example(client):
documents = [
"""
Patient needs to take 50 mg of ibuprofen.
"""
]
poller = client.begin_analyze_healthcare_entities(documents)
result = poller.result()
docs = [doc for doc in result if not doc.is_error]
for idx, doc in enumerate(docs):
for entity in doc.entities:
print("Entity: {}".format(entity.text))
print("...Normalized Text: {}".format(entity.normalized_text))
print("...Category: {}".format(entity.category))
print("...Subcategory: {}".format(entity.subcategory))
print("...Offset: {}".format(entity.offset))
print("...Confidence score: {}".format(entity.confidence_score))
for relation in doc.entity_relations:
print("Relation of type: {} has the following roles".format(relation.relation_type))
for role in relation.roles:
print("...Role '{}' with entity '{}'".format(role.name, role.entity.text))
print("------------------------------------------")
health_example(client)
OutputOutput
Entity: 50 mg
...Normalized Text: None
...Category: Dosage
...Subcategory: None
...Offset: 31
...Confidence score: 1.0
Entity: ibuprofen
...Normalized Text: ibuprofen
...Category: MedicationName
...Subcategory: None
...Offset: 40
...Confidence score: 1.0
Relation of type: DosageOfMedication has the following roles
...Role 'Dosage' with entity '50 mg'
...Role 'Medication' with entity 'ibuprofen'
Use the API asynchronously with the Analyze operation
C a u t i o nC a u t i o n
Version 3.1
Version 3.0
You can use the Analyze operation to perform asynchronous batch requests for: NER, key phrase extraction,
sentiment analysis, and PII detection. The below sample shows a basic example on one operation. You can find a
more advanced sample on GitHub.
To use the Analyze operation, make sure your Azure resource is using the S standard pricing tier.
Create a new function called analyze_batch_example() that takes the client as an argument, then calls the
begin_analyze_actions() function. The result will be a long running operation which will be polled for results.

from azure.ai.textanalytics import (
RecognizeEntitiesAction,
ExtractKeyPhrasesAction
)
def analyze_batch_example(client):
documents = [
"Microsoft was founded by Bill Gates and Paul Allen."
]
poller = client.begin_analyze_actions(
documents,
display_name="Sample Text Analysis",
actions=[RecognizeEntitiesAction(), ExtractKeyPhrasesAction()]
)
result = poller.result()
action_results = [action_result for action_result in list(result)]
first_action_result = action_results[0][0]
print("Results of Entities Recognition action:")
for entity in first_action_result.entities:
print("Entity: {}".format(entity.text))
print("...Category: {}".format(entity.category))
print("...Confidence Score: {}".format(entity.confidence_score))
print("...Offset: {}".format(entity.offset))
print("...Length: {}".format(entity.length))
print("------------------------------------------")
second_action_result = action_results[0][1]
print("Results of Key Phrase Extraction action:")
for key_phrase in second_action_result.key_phrases:
print("Key Phrase: {}\n".format(key_phrase))
print("------------------------------------------")
analyze_batch_example(client)
OutputOutput
Results of Entities Recognition action:
Entity: Microsoft
...Category: Organization
...Confidence Score: 1.0
...Offset: 0
...Length: 9
Entity: Bill Gates
...Category: Person
...Confidence Score: 1.0
...Offset: 25
...Length: 10
Entity: Paul Allen
...Category: Person
...Confidence Score: 1.0
...Offset: 40
...Length: 10
------------------------------------------
Results of Key Phrase Extraction action:
Key Phrase: Bill Gates
Key Phrase: Paul Allen
Key Phrase: Microsoft
------------------------------------------
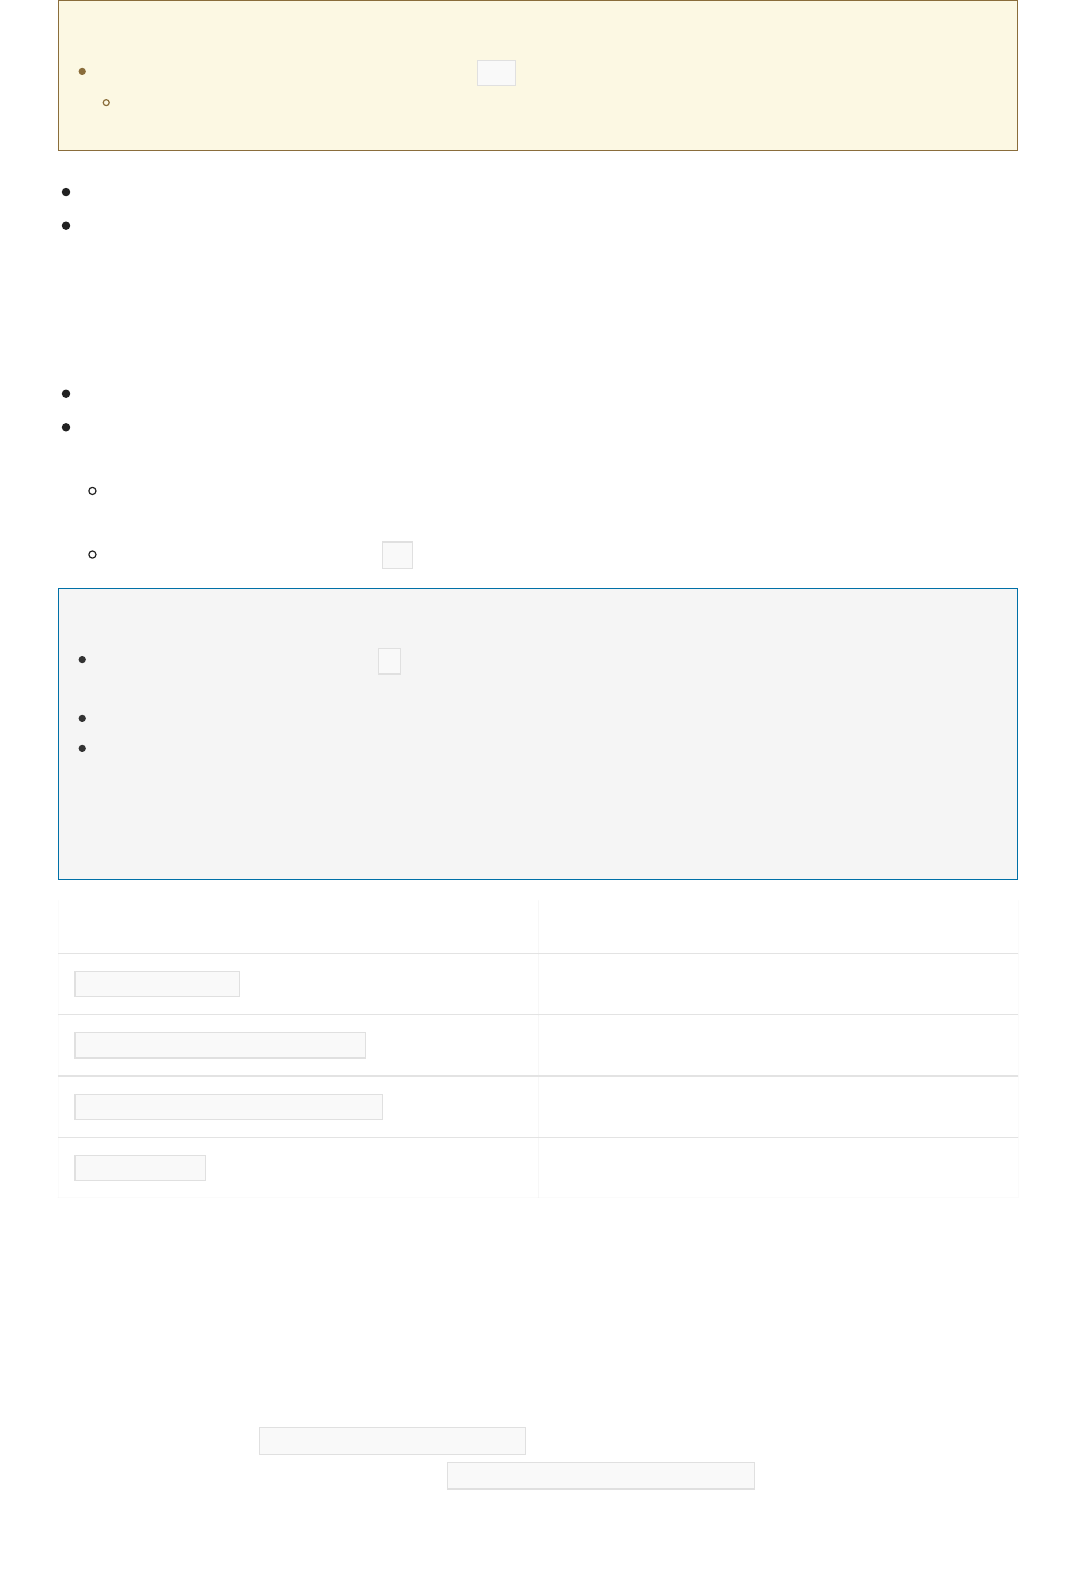
IMPORTANTIMPORTANT
Prerequisites
NOTENOTE
PA RA M ET E RPA RA M ET E R DESC RIP T IO NDESC RIP T IO N
-X POST <endpoint> Specifies your endpoint for accessing the API.
-H Content-Type: application/json The content type for sending JSON data.
-H "Ocp-Apim-Subscription-Key:<key> Specifies the key for accessing the API.
-d <documents> The JSON containing the documents you want to send.
Sentiment Analysis
The latest stable version of the Text Analytics API is 3.1 .
Be sure to only follow the instructions for the version you are using.
Version 3.1
Version 3.0
v3.1 Reference documentation
The current version of cURL.
Once you have your Azure subscription, create a Text Analytics resource in the Azure portal to get your key
and endpoint. After it deploys, click Go to resourceGo to resource.
You will need the key and endpoint from the resource you create to connect your application to the
Text Analytics API. You'll paste your key and endpoint into the code below later in the quickstart.
You can use the free pricing tier ( F0 ) to try the service, and upgrade later to a paid tier for production.
The following BASH examples use the \ line continuation character. If your console or terminal uses a different line
continuation character, use that character.
You can find language specific samples on GitHub.
Go to the Azure portal and find the key and endpoint for the Text Analytics resource you created in the prerequisites.
They will be located on the resource's key and endpointkey and endpoint page, under resource managementresource management. Then replace the
strings in the code below with your key and endpoint. To call the Text Analytics API, you need the following
information:
The following cURL commands are executed from a BASH shell. Edit these commands with your own resource
name, resource key, and JSON values.
1. Copy the command into a text editor.
2. Make the following changes in the command where needed:
3. Open a command prompt window.
a. Replace the value <your-text-analytics-key-here> with your key.
b. Replace the first part of the request URL <your-text-analytics-endpoint-here> with the your own
endpoint URL.

NOTENOTE
curl -X POST https://<your-text-analytics-endpoint-here>/text/analytics/v3.1/sentiment?opinionMining=true \
-H "Content-Type: application/json" \
-H "Ocp-Apim-Subscription-Key: <your-text-analytics-key-here>" \
-d '{ documents: [{ id: "1", text: "The customer service here is really good."}]}'
JSON responseJSON response
4. Paste the command from the text editor into the command prompt window, and then run the command.
version 3.1
version 3.0
The below example includes a request for the Opinion Mining feature of Sentiment Analysis using the
opinionMining=true parameter, which provides granular information about assessments (adjectives) related to targets
(nouns) in the text.

{
"documents":[
{
"id":"1",
"sentiment":"positive",
"confidenceScores":{
"positive":1.0,
"neutral":0.0,
"negative":0.0
},
"sentences":[
{
"sentiment":"positive",
"confidenceScores":{
"positive":1.0,
"neutral":0.0,
"negative":0.0
},
"offset":0,
"length":41,
"text":"The customer service here is really good.",
"targets":[
{
"sentiment":"positive",
"confidenceScores":{
"positive":1.0,
"negative":0.0
},
"offset":4,
"length":16,
"text":"customer service",
"relations":[
{
"relationType":"assessment",
"ref":"#/documents/0/sentences/0/assessments/0"
}
]
}
],
"assessments":[
{
"sentiment":"positive",
"confidenceScores":{
"positive":1.0,
"negative":0.0
},
"offset":36,
"length":4,
"text":"good",
"isNegated":false
}
]
}
],
"warnings":[
]
}
],
"errors":[
],
"modelVersion":"2020-04-01"
}

Language detection
curl -X POST https://<your-text-analytics-endpoint-here>/text/analytics/v3.1/languages/ \
-H "Content-Type: application/json" \
-H "Ocp-Apim-Subscription-Key: <your-text-analytics-key-here>" \
-d '{ documents: [{ id: "1", text: "This is a document written in English."}]}'
JSON responseJSON response
{
"documents":[
{
"id":"1",
"detectedLanguage":{
"name":"English",
"iso6391Name":"en",
"confidenceScore":1.0
},
"warnings":[
]
}
],
"errors":[
],
"modelVersion":"2021-01-05"
}
Named Entity Recognition (NER)
1. Copy the command into a text editor.
2. Make the following changes in the command where needed:
3. Open a command prompt window.
4. Paste the command from the text editor into the command prompt window, and then run the command.
a. Replace the value <your-text-analytics-key-here> with your key.
b. Replace the first part of the request URL <your-text-analytics-endpoint-here> with the your own
endpoint URL.
version 3.1
version 3.0

curl -X POST https://<your-text-analytics-endpoint-here>/text/analytics/v3.1/entities/recognition/general \
-H "Content-Type: application/json" \
-H "Ocp-Apim-Subscription-Key: <your-text-analytics-key-here>" \
-d '{ documents: [{ id: "1", language:"en", text: "I had a wonderful trip to Seattle last week."}]}'
JSON responseJSON response
{
"documents":[
{
"id":"1",
"entities":[
{
"text":"Seattle",
"category":"Location",
"subcategory":"GPE",
"offset":26,
"length":7,
"confidenceScore":0.99
},
{
"text":"last week",
"category":"DateTime",
"subcategory":"DateRange",
"offset":34,
"length":9,
"confidenceScore":0.8
}
],
"warnings":[
]
}
],
"errors":[
],
"modelVersion":"2021-01-15"
}
Detecting personally identifying informationDetecting personally identifying information
curl -X POST https://your-text-analytics-endpoint-here>/text/analytics/v3.1/entities/recognition/pii \
-H "Content-Type: application/json" \
-H "Ocp-Apim-Subscription-Key: <your-text-analytics-key-here>" \
-d '{ documents: [{ id: "1", language:"en", text: "Call our office at 312-555-1234, or send an email to
[email protected]"}]}'
JSON responseJSON response
1. Copy the command into a text editor.
2. Make the following changes in the command where needed:
3. Open a command prompt window.
4. Paste the command from the text editor into the command prompt window, and then run the command.
a. Replace the value <your-text-analytics-key-here> with your key.
b. Replace the first part of the request URL <your-text-analytics-endpoint-here> with the your own
endpoint URL.

{
"documents":[
{
"redactedText":"Call our office at ************, or send an email to *******************",
"id":"1",
"entities":[
{
"text":"312-555-1234",
"category":"PhoneNumber",
"offset":19,
"length":12,
"confidenceScore":0.8
},
{
"text":"[email protected]",
"category":"Email",
"offset":53,
"length":19,
"confidenceScore":0.8
}
],
"warnings":[
]
}
],
"errors":[
],
"modelVersion":"2021-01-15"
}
Entity linking
curl -X POST https://<your-text-analytics-endpoint-here>/text/analytics/v3.1/entities/linking \
-H "Content-Type: application/json" \
-H "Ocp-Apim-Subscription-Key: <your-text-analytics-key-here>" \
-d '{ documents: [{ id: "1", language:"en", text: "Microsoft was founded by Bill Gates and Paul Allen on
April 4, 1975."}]}'
JSON responseJSON response
{
"documents":[
{
"id":"1",
"entities":[
{
1. Copy the command into a text editor.
2. Make the following changes in the command where needed:
3. Open a command prompt window.
4. Paste the command from the text editor into the command prompt window, and then run the command.
a. Replace the value <your-text-analytics-key-here> with your key.
b. Replace the first part of the request URL <your-text-analytics-endpoint-here> with the your own
endpoint URL.
version 3.1
version 3.0

"bingId":"a093e9b9-90f5-a3d5-c4b8-5855e1b01f85",
"name":"Microsoft",
"matches":[
{
"text":"Microsoft",
"offset":0,
"length":9,
"confidenceScore":0.48
}
],
"language":"en",
"id":"Microsoft",
"url":"https://en.wikipedia.org/wiki/Microsoft",
"dataSource":"Wikipedia"
},
{
"bingId":"0d47c987-0042-5576-15e8-97af601614fa",
"name":"Bill Gates",
"matches":[
{
"text":"Bill Gates",
"offset":25,
"length":10,
"confidenceScore":0.52
}
],
"language":"en",
"id":"Bill Gates",
"url":"https://en.wikipedia.org/wiki/Bill_Gates",
"dataSource":"Wikipedia"
},
{
"bingId":"df2c4376-9923-6a54-893f-2ee5a5badbc7",
"name":"Paul Allen",
"matches":[
{
"text":"Paul Allen",
"offset":40,
"length":10,
"confidenceScore":0.54
}
],
"language":"en",
"id":"Paul Allen",
"url":"https://en.wikipedia.org/wiki/Paul_Allen",
"dataSource":"Wikipedia"
},
{
"bingId":"52535f87-235e-b513-54fe-c03e4233ac6e",
"name":"April 4",
"matches":[
{
"text":"April 4",
"offset":54,
"length":7,
"confidenceScore":0.38
}
],
"language":"en",
"id":"April 4",
"url":"https://en.wikipedia.org/wiki/April_4",
"dataSource":"Wikipedia"
}
],
"warnings":[
]
}
],
],
"errors":[
],
"modelVersion":"2020-02-01"
}
Key phrase extraction
curl -X POST https://<your-text-analytics-endpoint-here>/text/analytics/v3.1/keyPhrases \
-H "Content-Type: application/json" \
-H "Ocp-Apim-Subscription-Key: <your-text-analytics-key-here>" \
-d '{ documents: [{ id: "1", language:"en", text: "I had a wonderful trip to Seattle last week."}]}'
{
"documents":[
{
"id":"1",
"keyPhrases":[
"wonderful trip",
"Seattle"
],
"warnings":[
]
}
],
"errors":[
],
"modelVersion":"2021-06-01"
}
Clean up resources
Next steps
1. Copy the command into a text editor.
2. Make the following changes in the command where needed:
3. Open a command prompt window.
4. Paste the command from the text editor into the command prompt window, and then run the command.
a. Replace the value <your-text-analytics-key-here> with your key.
b. Replace the first part of the request URL <your-text-analytics-endpoint-here> with the your own
endpoint URL.
version 3.1
version 3.0
If you want to clean up and remove a Cognitive Services subscription, you can delete the resource or resource
group. Deleting the resource group also deletes any other resources associated with it.
Portal
Azure CLI
Explore a solution


How to call the Text Analytics REST API
7/8/2021 • 10 minutes to read • Edit Online
Create a Text Analytics resource
NOTENOTE
Change your pricing tier
Using the API synchronously
Using the API asynchronously
In this article, we use the Text Analytics REST API and Postman to demonstrate key concepts. The API provides
several synchronous and asynchronous endpoints for using the features of the service.
You will need a Text Analytics resource using a Standard (S) pricing tier if you want to use the /analyze or /health
endpoints. The /analyze endpoint is included in your pricing tier.
Before you use the Text Analytics API, you will need to create a Azure resource with a key and endpoint for your
applications.
1. First, go to the Azure portal and create a new Text Analytics resource, if you don't have one already.
Choose a pricing tier.
2. Select the region you want to use for your endpoint.
3. Create the Text Analytics resource and go to the “Keys and Endpoint” section under Resource
Management in the left of the page. Copy the key to be used later when you call the APIs. You'll add this
later as a value for the Ocp-Apim-Subscription-Key header.
4. To check the number of text records that have been sent using your Text Analytics resource:
a. Navigate to your Text Analytics resource in the Azure portal.
b. Click MetricsMetrics, located under MonitoringMonitoring in the left navigation menu.
c. Select
Processed text records
in the dropdown box for MetricMetric.
A text record is a unit of input text up to 1000 characters. For example, 1500 characters submitted as input text
will count as 2 text records.
If you have an existing Text Analytics resource using the S0 through S4 pricing tier, you should update it to use
the Standard (S) pricing tier. The S0 through S4 pricing tiers will be retired. To update your resource's pricing:
1. Navigate to your Text Analytics resource in the Azure portal.
2. Select Pricing tierPricing tier in the left navigation menu. It will be below RESOURCE MANAGEMENTRESOURCE MANAGEMENT.
3. Choose the Standard (S) pricing tier. Then click SelectSelect.
You can also create a new Text Analytics resource with the Standard (S) pricing tier, and migrate your
applications to use the credentials for the new resource.
You can call Text Analytics synchronously (for low latency scenarios). You have to call each API (feature)
separately when using synchronous API. If you need to call multiple features then check out below section on
how to call Text Analytics asynchronously.
The Text Analytics v3.1 API provides two asynchronous endpoints:
The /analyze endpoint for Text Analytics allows you to analyze the same set of text documents with
multiple text analytics features in one API call. Previously, to use multiple features you would need to
make separate API calls for each operation. Consider this capability when you need to analyze large sets

FEAT U R EF EAT URE SY N C H RO N OUSSY N C H RO N OUS A SY NC H RO NO U SA SY NC H RO NO U S
Language detection ✔
Sentiment analysis ✔ ✔*
Opinion mining ✔ ✔*
Key phrase extraction ✔ ✔*
Named Entity Recognition (including
PII and PHI)
✔ ✔*
Entity linking ✔ ✔*
Text Analytics for health (container) ✔
Text Analytics for health (API) ✔
TIPTIP
API request formats
Synchronous requestsSynchronous requests
EL E MEN TEL E M EN T VA LID VA LUESVA LID VA LUES REQU IRED?REQU IRED? USA GEUSA GE
id The data type is string, but
in practice document IDs
tend to be integers.
Required The system uses the IDs
you provide to structure
the output. Language
codes, key phrases, and
sentiment scores are
generated for each ID in the
request.
of documents with more than one Text Analytics feature.
The /health endpoint for Text Analytics for health, which can extract and label relevant medical
information from clinical documents.
See the table below to see which features can be used asynchronously. Note that only a few features can be
called from the /analyze endpoint.
* - Called asynchronously through the /analyze endpoint.
For detailed API technical documentation and to see it in action, use the following links. You can also send POST requests
from the built-in API test console. No setup is required, simply paste your resource key and JSON documents into the
request:
Latest stable API - v3.1
Previous stable API - v3.0
You can send both synchronous and asynchronous calls to the Text Analytics API.
Synchronous
Asynchronous
The format for API requests is the same for all synchronous operations. Documents are submitted in a JSON
object as raw unstructured text. XML is not supported. The JSON schema consists of the elements described
below.
text Unstructured raw text, up
to 5,120 characters.
Required For language detection, text
can be expressed in any
language. For sentiment
analysis, key phrase
extraction and entity
identification, the text must
be in a supported language.
language 2-character ISO 639-1 code
for a supported language
Varies Required for sentiment
analysis, key phrase
extraction, and entity
linking; optional for
language detection. There is
no error if you exclude it,
but the analysis is
weakened without it. The
language code should
correspond to the text
you provide.
EL E MEN TEL E M EN T VA LID VA LUESVA LID VA LUES REQU IRED?REQU IRED? USA GEUSA GE
{
"documents": [
{
"language": "en",
"id": "1",
"text": "Sample text to be sent to the text analytics api."
}
]
}
TIPTIP
Set up a request
TIPTIP
Endpoints for sending synchronous requestsEndpoints for sending synchronous requests
FEAT U R EF EAT URE REQU E ST T Y P EREQU E ST T Y P E RESOURC E E N DP OINT SRESO UR C E ENDP OIN T S
Language Detection POST <your-text-analytics-
resource>/text/analytics/v3.1/languages
Sentiment Analysis POST <your-text-analytics-
resource>/text/analytics/v3.1/sentiment
The following is an example of an API request for the synchronous Text Analytics endpoints.
See the Data and rate limits article for information on the rates and size limits for sending data to the Text Analytics API.
In Postman (or another web API test tool), add the endpoint for the feature you want to use. Use the table below
to find the appropriate endpoint format, and replace <your-text-analytics-resource> with your resource
endpoint. For example:
You can call v3.0 of the below synchronous endpoints by replacing /v3.1 with /v3.0/ .
https://my-resource.cognitiveservices.azure.com/text/analytics/v3.1/languages
Synchronous
Asynchronous
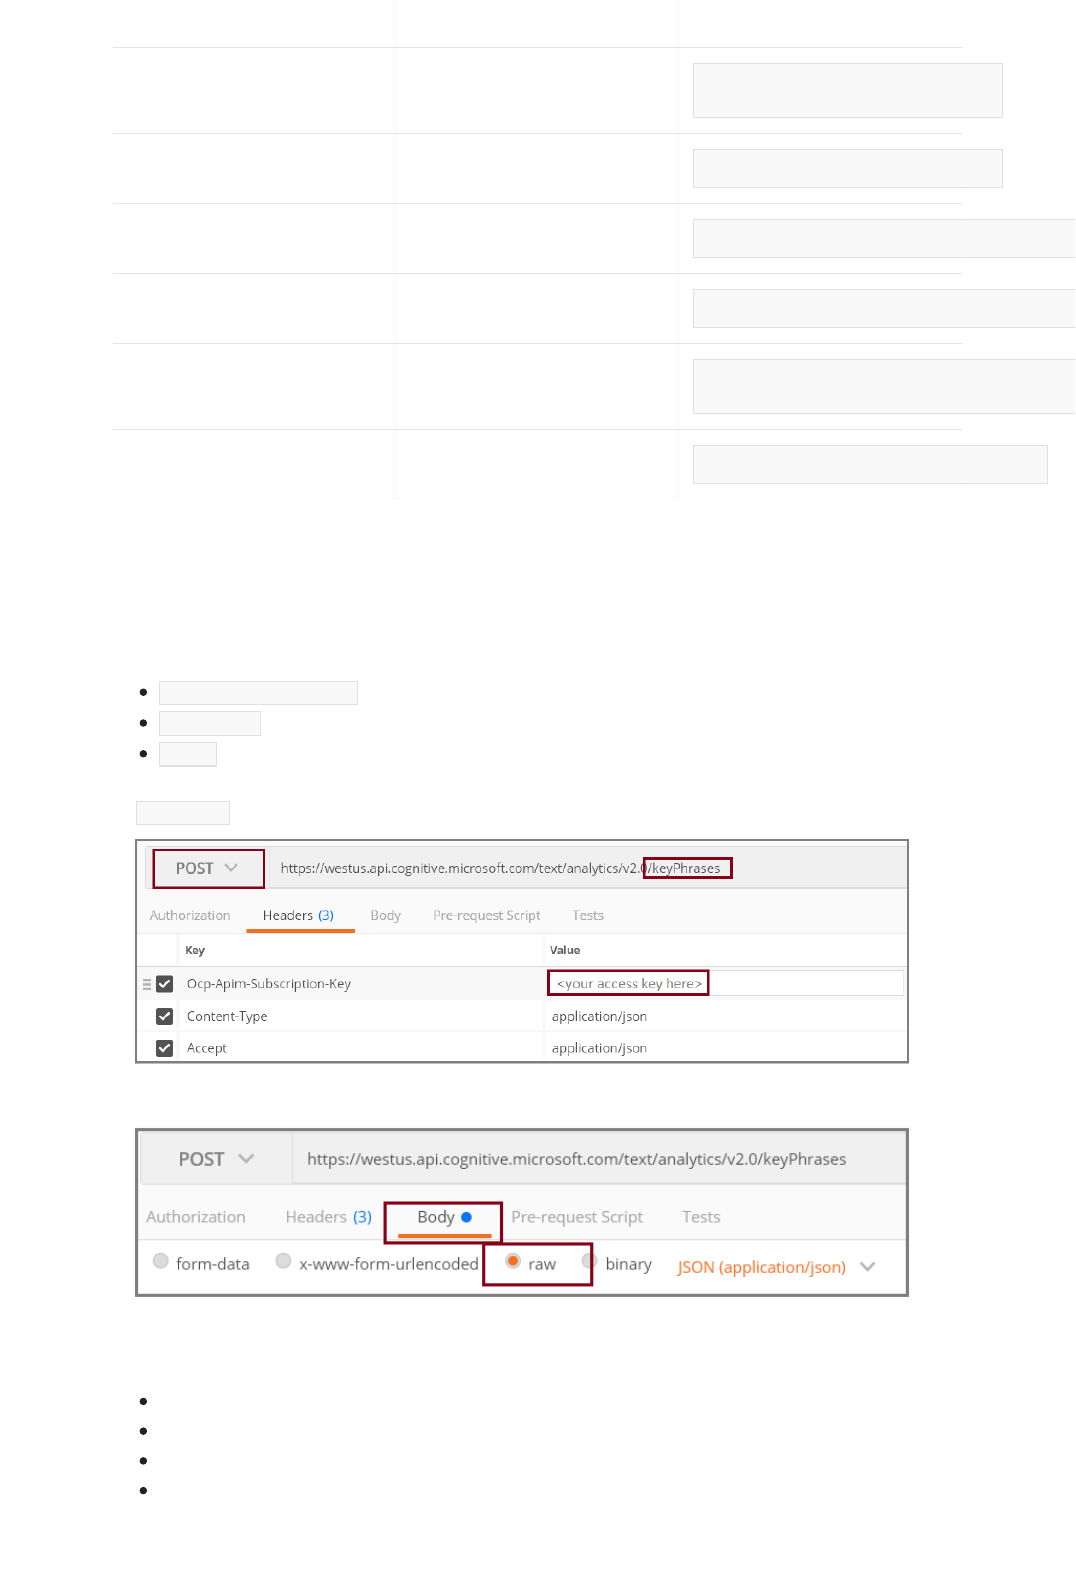
Opinion Mining POST <your-text-analytics-
resource>/text/analytics/v3.1/sentiment?
opinionMining=true
Key Phrase Extraction POST <your-text-analytics-
resource>/text/analytics/v3.1/keyPhrases
Named Entity Recognition - General POST <your-text-analytics-
resource>/text/analytics/v3.1/entities/recognition/general
Named Entity Recognition - PII POST <your-text-analytics-
resource>/text/analytics/v3.1/entities/recognition/pii
Named Entity Recognition - PHI POST <your-text-analytics-
resource>/text/analytics/v3.1/entities/recognition/pii?
domain=phi
Entity Linking POST <your-text-analytics-
resource>/text/analytics/v3.1/entities/linking
FEAT U R EF EAT URE REQU E ST T Y P EREQU E ST T Y P E RESOURC E E N DP OINT SRESO UR C E ENDP OIN T S
Send the request
After you have your endpoint, in Postman (or another web API test tool):
1. Choose the request type for the feature you want to use.
2. Paste in the endpoint of the proper operation you want from the above table.
3. Set the three request headers:
Ocp-Apim-Subscription-Key : your access key, obtained from Azure portal
Content-Type : application/json
Accept : application/json
If you're using Postman, your request should look similar to the following screenshot, assuming a
/keyPhrases endpoint.
4. Choose rawraw for the format of the BodyBody
5. Paste in some JSON documents in a valid format. Use the examples in the API request formatAPI request format section
above, and for more information and examples, see the topics below:
Language detection
Key phrase extraction
Sentiment analysis
Entity recognition

Example API responses
Example responses for synchronous operationExample responses for synchronous operation
See also
Submit the API request. If you made the call to a synchronous endpoint, the response will be displayed
immediately, as a single JSON document, with an item for each document ID provided in the request.
If you made the call to the asynchronous /analyze or /health endpoints, check that you received a 202
response code. you will need to get the response to view the results:
1. In the API response, find the Operation-Location from the header, which identifies the job you sent to the
API.
2. Create a GET request for the endpoint you used. refer to the table above for the endpoint format, and
review the API reference documentation. For example:
https://my-resource.cognitiveservices.azure.com/text/analytics/v3.1/analyze/jobs/<Operation-Location>
3. Add the Operation-Location to the request.
4. The response will be a single JSON document, with an item for each document ID provided in the
request.
Please note that for both asynchronous /analyze or /health operations, the results from the GET request in
step 2 above are available for 24 hours from the time the job was created. This time is indicated by the
expirationDateTime value in the GET response. After this time period, the results are purged and are no longer
available for retrieval.
Synchronous
Asynchronous
The synchronous endpoint responses will vary depending on the endpoint you use. See the following articles
for example responses.
Language detection
Key phrase extraction
Sentiment analysis
Entity recognition
Text Analytics overview
Model versions
Frequently asked questions (FAQ)
Text Analytics product page
Using the Text Analytics client library
What's new
Example: Detect language with Text Analytics
7/8/2021 • 5 minutes to read • Edit Online
TIPTIP
Preparation
{
"documents": [
{
"id": "1",
"text": "This document is in English."
},
{
"id": "2",
"text": "Este documento está en inglés."
},
{
"id": "3",
"text": "Ce document est en anglais."
},
{
"id": "4",
"text": "本文件为英文"
},
{
"id": "5",
"text": "Этот документ на английском языке."
}
]
}
The Language Detection feature of the Azure Text Analytics REST API evaluates text input for each document and
returns language identifiers with a score that indicates the strength of the analysis.
This capability is useful for content stores that collect arbitrary text, where language is unknown. You can parse
the results of this analysis to determine which language is used in the input document. The response also
returns a score that reflects the confidence of the model. The score value is between 0 and 1.
The Language Detection feature can detect a wide range of languages, variants, dialects, and some regional or
cultural languages. The exact list of languages for this feature isn't published.
If you have content expressed in a less frequently used language, you can try the Language Detection feature to
see if it returns a code. The response for languages that can't be detected is unknown .
Text Analytics also provides a Linux-based Docker container image for language detection, so you can install and run the
Text Analytics container close to your data.
You must have JSON documents in this format: ID and text.
The document size must be under 5,120 characters per document. You can have up to 1,000 items (IDs) per
collection. The collection is submitted in the body of the request. The following sample is an example of content
you might submit for language detection:

Step 1: Structure the request
TIPTIP
Step 2: POST the request
Step 3: View the results
For more information on request definition, see Call the Text Analytics API. The following points are restated for
convenience:
Create a POST request. To review the API documentation for this request, see the Language Detection API.
Set the HTTP endpoint for language detection. Use either a Text Analytics resource on Azure or an
instantiated Text Analytics container. You must include /text/analytics/v3.1/languages in the URL. For
example: https://<your-custom-subdomain>.cognitiveservices.azure.com/text/analytics/v3.1/languages .
Set a request header to include the access key for Text Analytics operations.
In the request body, provide the JSON documents collection you prepared for this analysis.
Use Postman or open the API testing consoleAPI testing console in the documentation to structure a request and POST it to the service.
Analysis is performed upon receipt of the request. For information on the size and number of requests you can
send per minute and second, see the data limits article.
Recall that the service is stateless. No data is stored in your account. Results are returned immediately in the
response.
All POST requests return a JSON-formatted response with the IDs and detected properties.
Output is returned immediately. You can stream the results to an application that accepts JSON or save the
output to a file on the local system. Then, import the output into an application that you can use to sort, search,
and manipulate the data.
Results for the example request should look like the following JSON document. Notice that it's one JSON
document with multiple items with each item representing the detection result for every document you submit.
Output is in English.
Language detection will return one predominant language for one document, along with it's ISO 639-1 name,
friendly name and confidence score. A positive score of 1.0 expresses the highest possible confidence level of
the analysis.

{
"documents": [
{
"id": "1",
"detectedLanguage": {
"name": "English",
"iso6391Name": "en",
"confidenceScore": 0.99
},
"warnings": []
},
{
"id": "2",
"detectedLanguage": {
"name": "Spanish",
"iso6391Name": "es",
"confidenceScore": 0.91
},
"warnings": []
},
{
"id": "3",
"detectedLanguage": {
"name": "French",
"iso6391Name": "fr",
"confidenceScore": 0.78
},
"warnings": []
},
{
"id": "4",
"detectedLanguage": {
"name": "Chinese_Simplified",
"iso6391Name": "zh_chs",
"confidenceScore": 1.0
},
"warnings": []
},
{
"id": "5",
"detectedLanguage": {
"name": "Russian",
"iso6391Name": "ru",
"confidenceScore": 1.0
},
"warnings": []
}
],
"errors": [],
"modelVersion": "2021-01-05"
}
Ambiguous contentAmbiguous content
In some cases it may be hard to disambiguate languages based on the input. You can use the countryHint
parameter to specify an ISO 3166-1 alpha-2 country/region code. By default the API is using the "US" as the
default countryHint, to remove this behavior you can reset this parameter by setting this value to empty string
countryHint = "" .
For example, "Impossible" is common to both English and French and if given with limited context the response
will be based on the "US" country/region hint. If the origin of the text is known to be coming from France that
can be given as a hint.
InputInput

{
"documents": [
{
"id": "1",
"text": "impossible"
},
{
"id": "2",
"text": "impossible",
"countryHint": "fr"
}
]
}
{
"documents":[
{
"detectedLanguage":{
"confidenceScore":0.62,
"iso6391Name":"en",
"name":"English"
},
"id":"1",
"warnings":[
]
},
{
"detectedLanguage":{
"confidenceScore":1.0,
"iso6391Name":"fr",
"name":"French"
},
"id":"2",
"warnings":[
]
}
],
"errors":[
],
"modelVersion":"2020-09-01"
}
The service now has additional context to make a better judgment:
OutputOutput
If the analyzer can't parse the input, it returns (Unknown) . An example is if you submit a text block that consists
solely of Arabic numerals.

{
"documents": [
{
"id": "1",
"detectedLanguage": {
"name": "(Unknown)",
"iso6391Name": "(Unknown)",
"confidenceScore": 0.0
},
"warnings": []
}
],
"errors": [],
"modelVersion": "2021-01-05"
}
Mixed
-
language contentMixed
-
language content
{
"documents": [
{
"id": "1",
"text": "Hello, I would like to take a class at your University. ¿Se ofrecen clases en español?
Es mi primera lengua y más fácil para escribir. Que diriez-vous des cours en français?"
}
]
}
{
"documents": [
{
"id": "1",
"detectedLanguage": {
"name": "Spanish",
"iso6391Name": "es",
"confidenceScore": 0.88
},
"warnings": []
}
],
"errors": [],
"modelVersion": "2021-01-05"
}
Summary
Mixed-language content within the same document returns the language with the largest representation in the
content, but with a lower positive rating. The rating reflects the marginal strength of the assessment. In the
following example, input is a blend of English, Spanish, and French. The analyzer counts characters in each
segment to determine the predominant language.
InputInput
OutputOutput
The resulting output consists of the predominant language, with a score of less than 1.0, which indicates a
weaker level of confidence.
In this article, you learned concepts and workflow for language detection by using Text Analytics in Azure
Cognitive Services. The following points were explained and demonstrated:

See also
Language detection is available for a wide range of languages, variants, dialects, and some regional or
cultural languages.
JSON documents in the request body include an ID and text.
The POST request is to a /languages endpoint by using a personalized access key and an endpoint that's
valid for your subscription.
Response output consists of language identifiers for each document ID. The output can be streamed to any
app that accepts JSON. Example apps include Excel and Power BI, to name a few.
Text Analytics overview
Using the Text Analytics client library
What's new
Model versions

How to: Sentiment analysis and Opinion Mining
7/8/2021 • 7 minutes to read • Edit Online
Sentiment Analysis versions and features
FE AT UR EFEAT URE SEN T IM EN T A N ALY SIS V3.0SEN T IM EN T A N A LY SIS V3. 0 SEN T IM EN T A N ALY SIS V3.1SEN T IM EN T A N A LY SIS V3. 1
Methods for single, and batch
requests
X X
Sentiment Analysis scores and labeling X X
Linux-based Docker container X
Opinion Mining X
Sentiment Analysis
SEN T EN C E SEN T IM E NTSEN T EN C E SEN T IM E NT RET URN ED DO C UM EN T LAB ELRET URN ED DO C UM EN T LAB EL
At least one positive sentence is in the document. The
rest of the sentences are neutral .
positive
At least one negative sentence is in the document. The
rest of the sentences are neutral .
negative
At least one negative sentence and at least one
positive sentence are in the document.
mixed
All sentences in the document are neutral . neutral
The Text Analytics API's Sentiment Analysis feature provides two ways for detecting positive and negative
sentiment. If you send a Sentiment Analysis request, the API will return sentiment labels (such as "negative",
"neutral" and "positive") and confidence scores at the sentence and document-level. You can also send Opinion
Mining requests using the Sentiment Analysis endpoint, which provides granular information about the
opinions related to words (such as the attributes of products or services) in the text.
The AI models used by the API are provided by the service, you just have to send content for analysis.
Sentiment Analysis in version 3.x applies sentiment labels to text, which are returned at a sentence and
document level, with a confidence score for each.
The labels are
positive
,
negative
, and
neutral
. At the document level, the
mixed
sentiment label also can be
returned. The sentiment of the document is determined below:
Confidence scores range from 1 to 0. Scores closer to 1 indicate a higher confidence in the label's classification,
while lower scores indicate lower confidence. For each document or each sentence, the predicted scores
associated with the labels (positive, negative and neutral) add up to 1. For more information, see the Text
Analytics transparency note.
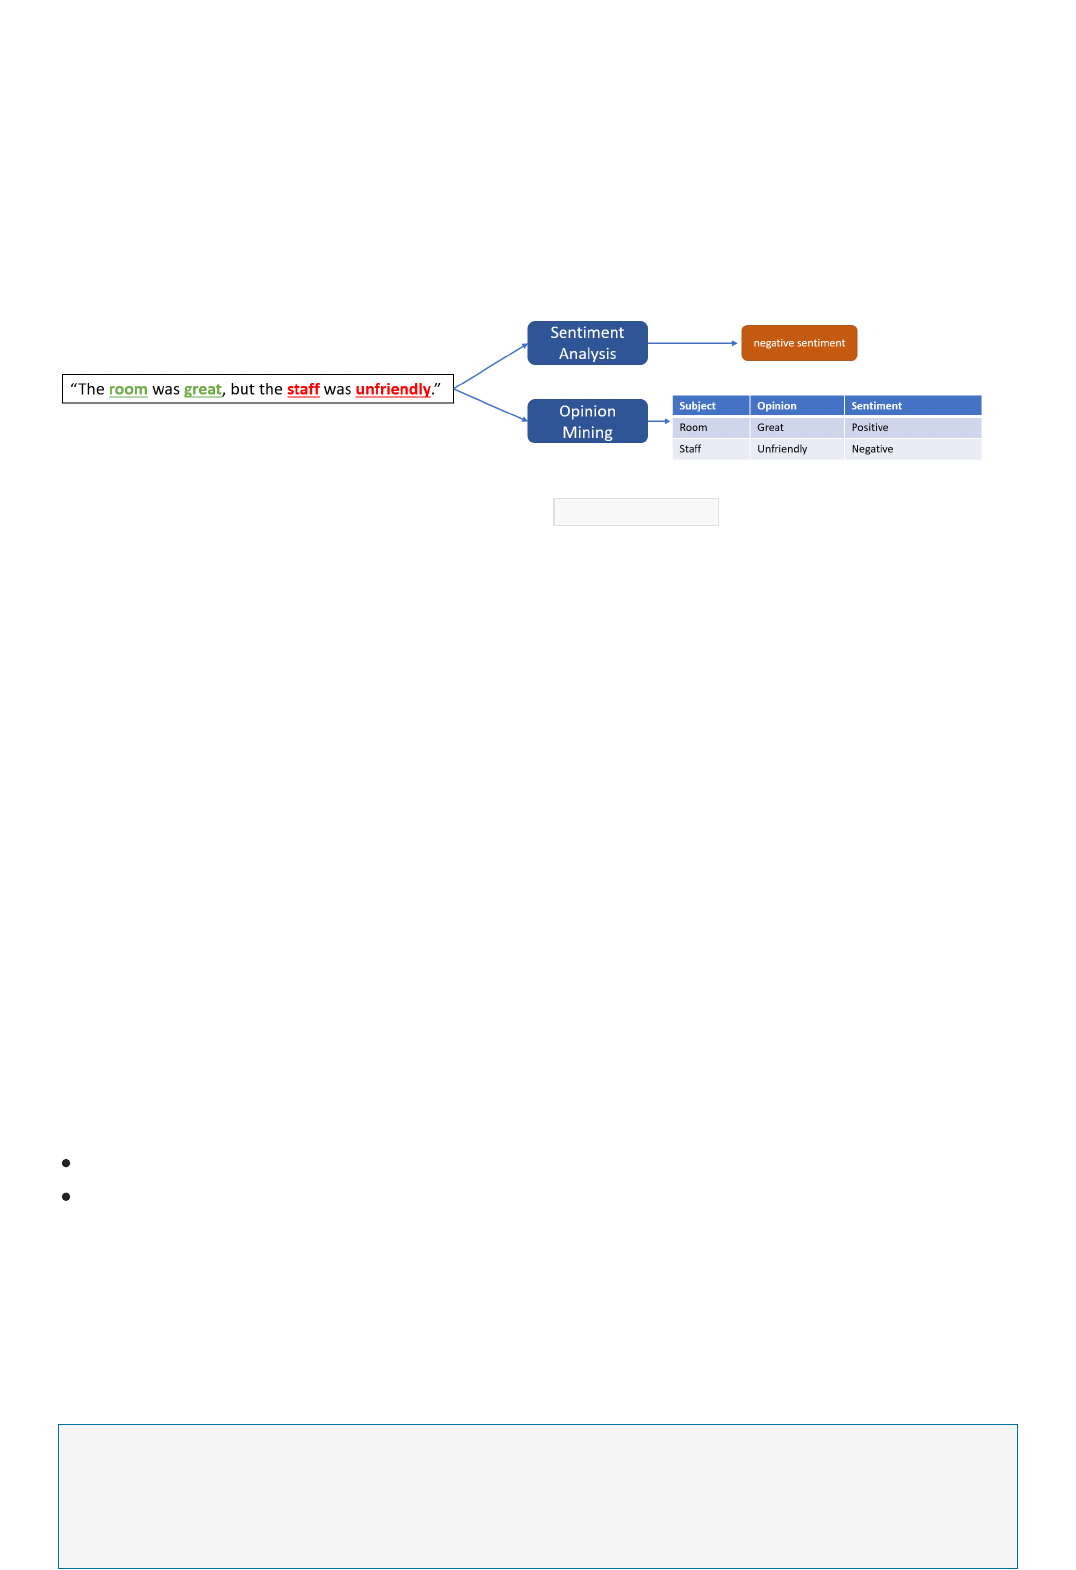
Opinion Mining
Sending a REST API request
PreparationPreparation
Structure the request
Request endpointsRequest endpoints
NOTENOTE
Opinion Mining is a feature of Sentiment Analysis, starting in version 3.1. Also known as Aspect-based
Sentiment Analysis in Natural Language Processing (NLP), this feature provides more granular information
about the opinions related to attributes of products or services in text. The API surfaces opinions as a target
(noun or verb) and an assessment (adjective).
For example, if a customer leaves feedback about a hotel such as "The room was great, but the staff was
unfriendly.", Opinion Mining will locate targets (aspects) in the text, and their associated assessments (opinions)
and sentiments. Sentiment Analysis might only report a negative sentiment.
To get Opinion Mining in your results, you must include the opinionMining=true flag in a request for sentiment
analysis. The Opinion Mining results will be included in the sentiment analysis response. Opinion mining is an
extension of Sentiment Analysis and is included in your current pricing tier.
Sentiment analysis produces a higher-quality result when you give it smaller amounts of text to work on. This is
opposite from key phrase extraction, which performs better on larger blocks of text. To get the best results from
both operations, consider restructuring the inputs accordingly.
You must have JSON documents in this format: ID, text, and language. Sentiment Analysis supports a wide range
of languages. For more information, see Supported languages.
Document size must be under 5,120 characters per document. For the maximum number of documents
permitted in a collection, see the data limits article under Concepts. The collection is submitted in the body of
the request.
Create a POST request. You can use Postman or the API testing consoleAPI testing console in the following reference links to
quickly structure and send one.
Version 3.1
Version 3.0
Sentiment Analysis v3.1 reference
Set the HTTPS endpoint for sentiment analysis by using either a Text Analytics resource on Azure or an
instantiated Text Analytics container. You must include the correct URL for the version you want to use. For
example:
You can find your key and endpoint for your Text Analytics resource on the Azure portal. They will be located on the
resource's Quick star tQuick star t page, under resource managementresource management.
Example request for Sentiment Analysis and Opinion MiningExample request for Sentiment Analysis and Opinion Mining
{
"documents": [
{
"language": "en",
"id": "1",
"text": "The restaurant had great food and our waiter was friendly."
}
]
}
Post the requestPost the request
View the resultsView the results
Sentiment Analysis and Opinion Mining example responseSentiment Analysis and Opinion Mining example response
IMPORTANTIMPORTANT
Version 3.1
Version 3.0
Sentiment AnalysisSentiment Analysis
https://<your-custom-subdomain>.cognitiveservices.azure.com/text/analytics/v3.1/sentiment
Opinion MiningOpinion Mining
To get Opinion Mining results, you must include the opinionMining=true parameter. For example:
https://<your-custom-subdomain>.cognitiveservices.azure.com/text/analytics/v3.1/sentiment?opinionMining=true
This parameter is set to false by default.
Set a request header to include your Text Analytics API key. In the request body, provide the JSON documents
collection you prepared for this analysis.
The following is an example of content you might submit for sentiment analysis. The request format is the same
for both v3.0 and v3.1 .
Analysis is performed upon receipt of the request. For information on the size and number of requests you can
send per minute and second, see the data limits section in the overview.
The Text Analytics API is stateless. No data is stored in your account, and results are returned immediately in the
response.
Output is returned immediately. You can stream the results to an application that accepts JSON or save the
output to a file on the local system. Then, import the output into an application that you can use to sort, search,
and manipulate the data. Due to multilingual and emoji support, the response may contain text offsets. See how
to process offsets for more information.
Version 3.1
Version 3.0
The following is a JSON example for using Opinion Mining with Sentiment Analysis, offered in v3.1 of the API. If you don't
request Opinion mining, the API response will be the same as the Version 3.0Version 3.0 tab.
Sentiment Analysis v3.1 can return response objects for both Sentiment Analysis and Opinion Mining.

{
"documents": [
{
"id": "1",
"sentiment": "positive",
"confidenceScores": {
"positive": 1,
"neutral": 0,
"negative": 0
},
"sentences": [
{
"sentiment": "positive",
"confidenceScores": {
"positive": 1,
"neutral": 0,
"negative": 0
},
"offset": 0,
"length": 58,
"text": "The restaurant had great food and our waiter was friendly.",
"targets": [
{
"sentiment": "positive",
"confidenceScores": {
"positive": 1,
"negative": 0
},
"offset": 25,
"length": 4,
"text": "food",
"relations": [
{
"relationType": "assessment",
"ref": "#/documents/0/sentences/0/assessments/0"
}
]
},
{
"sentiment": "positive",
"confidenceScores": {
"positive": 1,
"negative": 0
},
"offset": 38,
"length": 6,
"text": "waiter",
"relations": [
{
"relationType": "assessment",
"ref": "#/documents/0/sentences/0/assessments/1"
}
]
}
Sentiment analysis returns a sentiment label and confidence score for the entire document, and each sentence
within it. Scores closer to 1 indicate a higher confidence in the label's classification, while lower scores indicate
lower confidence. A document can have multiple sentences, and the confidence scores within each document or
sentence add up to 1.
Opinion Mining will locate targets (nouns or verbs) in the text, and their associated assessment (adjective). In the
below response, the sentence
The restaurant had great food and our waiter was friendly
has two targets:
food
and
waiter
. Each target's relations property contains a ref value with the URI-reference to the associated
documents , sentences , and assessments objects.
The API returns opinions as a target (noun or verb) and an assessment (adjective).

}
],
"assessments": [
{
"sentiment": "positive",
"confidenceScores": {
"positive": 1,
"negative": 0
},
"offset": 19,
"length": 5,
"text": "great",
"isNegated": false
},
{
"sentiment": "positive",
"confidenceScores": {
"positive": 1,
"negative": 0
},
"offset": 49,
"length": 8,
"text": "friendly",
"isNegated": false
}
]
}
],
"warnings": []
}
],
"errors": [],
"modelVersion": "2020-04-01"
}
Summary
See also
In this article, you learned concepts and workflow for sentiment analysis using the Text Analytics API. In
summary:
Sentiment Analysis and Opinion Mining is available for select languages.
JSON documents in the request body include an ID, text, and language code.
The POST request is to a /sentiment endpoint by using a personalized access key and an endpoint that's
valid for your subscription.
Use opinionMining=true in Sentiment Analysis requests to get Opinion Mining results.
Response output, which consists of a sentiment score for each document ID, can be streamed to any app that
accepts JSON. For example, Excel and Power BI.
Text Analytics overview
Using the Text Analytics client library
What's new
Model versions
Example: How to extract key phrases using Text
Analytics
7/8/2021 • 4 minutes to read • Edit Online
TIPTIP
Preparation
Example synchronous request objectExample synchronous request object
The Key Phrase Extraction API evaluates unstructured text, and for each JSON document, returns a list of key
phrases.
This capability is useful if you need to quickly identify the main points in a collection of documents. For example,
given input text "The food was delicious and there were wonderful staff", the service returns the main talking
points: "food" and "wonderful staff".
For more information, see Supported languages.
Text Analytics also provides a Linux-based Docker container image for key phrase extraction, so you can install and run
the Text Analytics container close to your data.
You can also use this feature asynchronously using the /analyze endpoint.
Key phrase extraction works best when you give it bigger amounts of text to work on. This is opposite from
sentiment analysis, which performs better on smaller amounts of text. To get the best results from both
operations, consider restructuring the inputs accordingly.
You must have JSON documents in this format: ID, text, language
Document size must be 5,120 or fewer characters per document, and you can have up to 1,000 items (IDs) per
collection. The collection is submitted in the body of the request. The following example is an illustration of
content you might submit for key phrase extraction.
See How to call the Text Analytics API for more information on request and response objects.

{
"documents": [
{
"language": "en",
"id": "1",
"text": "We love this trail and make the trip every year. The views are breathtaking and
well worth the hike!"
},
{
"language": "en",
"id": "2",
"text": "Poorly marked trails! I thought we were goners. Worst hike ever."
},
{
"language": "en",
"id": "3",
"text": "Everyone in my family liked the trail but thought it was too challenging for the
less athletic among us. Not necessarily recommended for small children."
},
{
"language": "en",
"id": "4",
"text": "It was foggy so we missed the spectacular views, but the trail was ok. Worth
checking out if you are in the area."
},
{
"language": "en",
"id": "5",
"text": "This is my favorite trail. It has beautiful views and many places to stop and rest"
}
]
}
Example asynchronous request objectExample asynchronous request object
{
"displayName":"MyJob",
"analysisInput":{
"documents":[
{
"id":"doc1",
"text":"It's incredibly sunny outside! I'm so happy"
},
{
"id":"doc2",
"text":"Pike place market is my favorite Seattle attraction."
}
]
},
"tasks": {
"keyPhraseExtractionTasks": [{
"parameters": {
"model-version": "latest"
}
}],
}
}
Step 1: Structure the request
Starting in v3.1 , You can send NER requests asynchronously using the /analyze endpoint.
For information about request definition, see How to call the Text Analytics API. The following points are restated
for convenience:

TIPTIP
Step 2: Post the request
Step 3: View results
Synchronous resultSynchronous result
Create a POSTPOST request. Review the API documentation for this request: Key Phrases API.
Set the HTTP endpoint for key phrase extraction by using either a Text Analytics resource on Azure or an
instantiated Text Analytics container. if you're using the API synchronously, you must include
/text/analytics/v3.1/keyPhrases in the URL. For example:
https://<your-custom-subdomain>.api.cognitiveservices.azure.com/text/analytics/v3.1/keyPhrases .
Set a request header to include the access key for Text Analytics operations.
In the request body, provide the JSON documents collection you prepared for this analysis.
Use Postman or open the API testing consoleAPI testing console in the documentation to structure a request and POST it to the service.
Analysis is performed upon receipt of the request. For information about the size and number of requests you
can send per minute or per second, see the data limits article.
Recall that the service is stateless. No data is stored in your account. Results are returned immediately in the
response.
All POST requests return a JSON formatted response with the IDs and detected properties. The order of the
returned key phrases is determined internally, by the model.
Output is returned immediately. You can stream the results to an application that accepts JSON or save the
output to a file on the local system, and then import it into an application that allows you to sort, search, and
manipulate the data.
An example of the output for key phrase extraction from the v3.1 endpoint is shown here:

{
"documents": [
{
"id": "1",
"keyPhrases": [
"trail",
"trip",
"views",
"hike"
],
"warnings": []
},
{
"id": "2",
"keyPhrases": [
"Worst hike",
"trails"
],
"warnings": []
},
{
"id": "3",
"keyPhrases": [
"less athletic",
"small children",
"Everyone",
"family",
"trail"
],
"warnings": []
},
{
"id": "4",
"keyPhrases": [
"spectacular views",
"trail",
"area"
],
"warnings": []
},
{
"id": "5",
"keyPhrases": [
"favorite trail",
"beautiful views",
"many places"
],
"warnings": []
}
],
"errors": [],
"modelVersion": "2021-06-01"
}
Asynchronous resultAsynchronous result
As noted, the analyzer finds and discards non-essential words, and it keeps single terms or phrases that appear
to be the subject or object of a sentence.
If you use the /analyze endpoint for asynchronous operation, you will get a response containing the tasks you
sent to the API.

{
"jobId": "fa813c9a-0d96-4a34-8e4f-a2a6824f9190",
"lastUpdateDateTime": "2021-07-07T18:16:45Z",
"createdDateTime": "2021-07-07T18:16:15Z",
"expirationDateTime": "2021-07-08T18:16:15Z",
"status": "succeeded",
"errors": [],
"displayName": "MyJob",
"tasks": {
"completed": 1,
"failed": 0,
"inProgress": 0,
"total": 1,
"keyPhraseExtractionTasks": [
{
"lastUpdateDateTime": "2021-07-07T18:16:45.0623454Z",
"taskName": "KeyPhraseExtraction_latest",
"state": "succeeded",
"results": {
"documents": [
{
"id": "doc1",
"keyPhrases": [],
"warnings": []
},
{
"id": "doc2",
"keyPhrases": [
"Pike place market",
"Seattle attraction",
"favorite"
],
"warnings": []
}
],
"errors": [],
"modelVersion": "2021-06-01"
}
}
]
}
}
Summary
See also
In this article, you learned concepts and workflow for key phrase extraction by using Text Analytics in Cognitive
Services. In summary:
Key phrase extraction API is available for selected languages.
JSON documents in the request body include an ID, text, and language code.
POST request is to a /keyphrases or /analyze endpoint, using a personalized access key and an endpoint
that is valid for your subscription.
Response output, which consists of key words and phrases for each document ID, can be streamed to any
app that accepts JSON, including Microsoft Office Excel and Power BI, to name a few.
Text Analytics overview Frequently asked questions (FAQ)
Text Analytics product page


How to use Named Entity Recognition in Text
Analytics
7/8/2021 • 8 minutes to read • Edit Online
Entity Linking
Named Entity Recognition (NER)
Personally Identifiable Information (PII)
Named Entity Recognition features and versions
FE AT UR EFEAT URE N ER V3. 0NE R V3.0 NER V3. 1N ER V3. 1
Methods for single, and batch
requests
X X
Expanded entity recognition across
several categories
X X
Separate endpoints for sending entity
linking and NER requests.
X X
Recognition of personal ( PII ) and
health ( PHI ) information entities
X
Redaction of PII X
The Text Analytics API lets you takes unstructured text and returns a list of disambiguated entities, with links to
more information on the web. The API supports both named entity recognition (NER) for several entity
categories, and entity linking.
Entity linking is the ability to identify and disambiguate the identity of an entity found in text (for example,
determining whether an occurrence of the word "Mars" refers to the planet, or to the Roman god of war). This
process requires the presence of a knowledge base in an appropriate language, to link recognized entities in
text. Entity Linking uses Wikipedia as this knowledge base.
Named Entity Recognition (NER) is the ability to identify different entities in text and categorize them into pre-
defined classes or types such as: person, location, event, product, and organization.
The PII feature is part of NER and it can identify and redact sensitive entities in text that are associated with an
individual person such as: phone number, email address, mailing address, passport number.
See language support for information.
Named Entity Recognition v3 provides expanded detection across multiple types. Currently, NER v3.0 can
recognize entities in the general entity category.
Named Entity Recognition v3.1 includes the detection capabilities of v3.0, and:

Sending a REST API request
PreparationPreparation
Structure the requestStructure the request
NOTENOTE
Request endpointsRequest endpoints
The ability to detect personal information ( PII ) using the v3.1/entities/recognition/pii endpoint.
An optional domain=phi parameter to detect confidential health information ( PHI ).
Asynchronous operation using the /analyze endpoint.
For more information, see the entity categories article, and request endpoints section below. For more
information on confidence scores, see the Text Analytics transparency note.
You must have JSON documents in this format: ID, text, language.
Each document must be under 5,120 characters, and you can have up to 1,000 items (IDs) per collection. The
collection is submitted in the body of the request.
Create a POST request. You can use Postman or the API testing consoleAPI testing console in the following links to quickly
structure and send one.
You can find your key and endpoint for your Text Analytics resource on the azure portal. They will be located on the
resource's Quick star tQuick star t page, under resource managementresource management.
Version 3.1
Version 3.0
Named Entity Recognition v3.1 uses separate endpoints for NER, PII, and entity linking requests. Use a URL
format below based on your request.
Entity linkingEntity linking
https://<your-custom-subdomain>.cognitiveservices.azure.com/text/analytics/v3.1/entities/linking
Named Entity Recognition version 3.1 reference for Linking
Named Entity RecognitionNamed Entity Recognition
General entities -
https://<your-custom-
subdomain>.cognitiveservices.azure.com/text/analytics/v3.1/entities/recognition/general
Named Entity Recognition version 3.1 reference for General
Personally Identifiable Information (PII)Personally Identifiable Information (PII)
Personal ( PII ) information -
https://<your-custom-subdomain>.cognitiveservices.azure.com/text/analytics/v3.1/entities/recognition/pii
You can also use the optional domain=phi parameter to detect health ( PHI ) information in text.
https://<your-custom-subdomain>.cognitiveservices.azure.com/text/analytics/v3.1/entities/recognition/pii?
domain=phi
Starting in v3.1 , The JSON response includes a redactedText property, which contains the modified input text
where the detected PII entities are replaced by an * for each character in the entities.
TIPTIP
Example requests
Example synchronous NER requestExample synchronous NER request
{
"documents": [
{
"id": "1",
"language": "en",
"text": "Our tour guide took us up the Space Needle during our trip to Seattle last week."
}
]
}
Example synchronous PII requestExample synchronous PII request
Named Entity Recognition version 3.1 reference for PII
The API will attempt to detect the listed entity categories for a given document language. If you want to specify
which entities will be detected and returned, use the optional piiCategories parameter with the appropriate
entity categories. This parameter can also let you detect entities that aren't enabled by default for your
document language. The following example would detect a French driver's license number that might occur in
English text, along with the default English entities.
If you don't include default when specifying entity categories, The API will only return the entity categories you specify.
https://<your-custom-subdomain>.cognitiveservices.azure.com/text/analytics/v3.1/entities/recognition/pii?
piiCategories=default,FRDriversLicenseNumber
Asynchronous operationAsynchronous operation
Starting in v3.1 , You can send NER and entity linking requests asynchronously using the /analyze endpoint.
Asynchronous operation -
https://<your-custom-subdomain>.cognitiveservices.azure.com/text/analytics/v3.1/analyze
See How to call the Text Analytics API for information on sending asynchronous requests.
Set a request header to include your Text Analytics API key. In the request body, provide the JSON documents
you prepared.
Version 3.1
Version 3.0
The following JSON is an example of content you might send to the API. The request format is the same for both
versions of the API.
The following JSON is an example of content you might send to the API to detect PII in text.

{
"documents": [
{
"id": "1",
"language": "en",
"text": "You can even pre-order from their online menu at www.contososteakhouse.com, call 312-555-
0176 or send email to order@contososteakhouse.com!"
}
]
}
Example asynchronous NER requestExample asynchronous NER request
{
"displayName":"MyJob",
"analysisInput":{
"documents":[
{
"id":"doc1",
"text":"It's incredibly sunny outside! I'm so happy"
},
{
"id":"doc2",
"text":"Pike place market is my favorite Seattle attraction."
}
]
},
"tasks": {
"entityRecognitionTasks": [
{
"parameters": {
"model-version": "latest"
}
}
],
"entityRecognitionPiiTasks": [{
"parameters": {
"model-version": "latest"
}
}]
}
}
Post the request
View results
If you use the /analyze endpoint for asynchronous operation, you will get a response containing the tasks you
sent to the API.
Analysis is performed upon receipt of the request. See the data limits article for information on the size and
number of requests you can send per minute and second.
The Text Analytics API is stateless. No data is stored in your account, and results are returned immediately in the
response.
All POST requests return a JSON formatted response with the IDs and detected entity properties.
Output is returned immediately. You can stream the results to an application that accepts JSON or save the
output to a file on the local system, and then import it into an application that allows you to sort, search, and
manipulate the data. Due to multilingual and emoji support, the response may contain text offsets. For more

Example responsesExample responses
Synchronous example resultsSynchronous example results
{
"documents": [
{
"id": "1",
"entities": [
{
"text": "tour guide",
"category": "PersonType",
"offset": 4,
"length": 10,
"confidenceScore": 0.94
},
{
"text": "Space Needle",
"category": "Location",
"offset": 30,
"length": 12,
"confidenceScore": 0.96
},
{
"text": "Seattle",
"category": "Location",
"subcategory": "GPE",
"offset": 62,
"length": 7,
"confidenceScore": 1.0
},
{
"text": "last week",
"category": "DateTime",
"subcategory": "DateRange",
"offset": 70,
"length": 9,
"confidenceScore": 0.8
}
],
"warnings": []
}
],
"errors": [],
"modelVersion": "2021-06-01"
}
information, see how to process text offsets.
Version 3 provides separate endpoints for general NER, PII, and entity linking. Version 3.1-pareview includes an
asynchronous Analyze mode. The responses for these operations are below.
Version 3.1
Version 3.0
Example of a general NER response:
Example of a PII response:

{
"documents": [
{
"redactedText": "You can even pre-order from their online menu at www.contososteakhouse.com,
call ************ or send email to ***************************!",
"id": "1",
"entities": [
{
"text": "312-555-0176",
"category": "PhoneNumber",
"offset": 81,
"length": 12,
"confidenceScore": 0.8
},
{
"text": "order@contososteakhouse.com",
"category": "Email",
"offset": 111,
"length": 27,
"confidenceScore": 0.8
},
{
"text": "contososteakhouse",
"category": "Organization",
"offset": 117,
"length": 17,
"confidenceScore": 0.45
}
],
"warnings": []
}
],
"errors": [],
"modelVersion": "2021-01-15"
}
Example of an Entity linking response:

{
"documents": [
{
"id": "1",
"entities": [
{
"bingId": "f8dd5b08-206d-2554-6e4a-893f51f4de7e",
"name": "Space Needle",
"matches": [
{
"text": "Space Needle",
"offset": 30,
"length": 12,
"confidenceScore": 0.4
}
],
"language": "en",
"id": "Space Needle",
"url": "https://en.wikipedia.org/wiki/Space_Needle",
"dataSource": "Wikipedia"
},
{
"bingId": "5fbba6b8-85e1-4d41-9444-d9055436e473",
"name": "Seattle",
"matches": [
{
"text": "Seattle",
"offset": 62,
"length": 7,
"confidenceScore": 0.25
}
],
"language": "en",
"id": "Seattle",
"url": "https://en.wikipedia.org/wiki/Seattle",
"dataSource": "Wikipedia"
}
],
"warnings": []
}
],
"errors": [],
"modelVersion": "2021-06-01"
}
Example asynchronous resultExample asynchronous result
{
"jobId": "f480e1f9-0b61-4d47-93da-240f084582cf",
"lastUpdateDateTime": "2021-07-06T19:03:15Z",
"createdDateTime": "2021-07-06T19:02:47Z",
"expirationDateTime": "2021-07-07T19:02:47Z",
"status": "succeeded",
"errors": [],
"displayName": "MyJob",
"tasks": {
"completed": 2,
"failed": 0,
"inProgress": 0,
"total": 2,
"entityRecognitionTasks": [
{
"lastUpdateDateTime": "2021-07-06T19:03:15.212633Z",
"taskName": "NamedEntityRecognition_latest",
"state": "succeeded",
"results": {
"documents": [

"documents": [
{
"id": "doc1",
"entities": [],
"warnings": []
},
{
"id": "doc2",
"entities": [
{
"text": "Pike place market",
"category": "Location",
"offset": 0,
"length": 17,
"confidenceScore": 0.95
},
{
"text": "Seattle",
"category": "Location",
"subcategory": "GPE",
"offset": 33,
"length": 7,
"confidenceScore": 0.99
}
],
"warnings": []
}
],
"errors": [],
"modelVersion": "2021-06-01"
}
}
],
"entityRecognitionPiiTasks": [
{
"lastUpdateDateTime": "2021-07-06T19:03:03.2063832Z",
"taskName": "PersonallyIdentifiableInformation_latest",
"state": "succeeded",
"results": {
"documents": [
{
"redactedText": "It's incredibly sunny outside! I'm so happy",
"id": "doc1",
"entities": [],
"warnings": []
},
{
"redactedText": "Pike place market is my favorite Seattle attraction.",
"id": "doc2",
"entities": [],
"warnings": []
}
],
"errors": [],
"modelVersion": "2021-01-15"
}
}
]
}
}
Summary
In this article, you learned concepts and workflow for entity linking using Text Analytics in Cognitive Services. In
summary:

Next steps
JSON documents in the request body include an ID, text, and language code.
POST requests are sent to one or more endpoints, using a personalized access key and an endpoint that is
valid for your subscription.
Response output, which consists of linked entities (including confidence scores, offsets, and web links, for
each document ID) can be used in any application
Text Analytics overview
Using the Text Analytics client library
Model versions
What's new

How to: Use Text Analytics for health
7/8/2021 • 9 minutes to read • Edit Online
IMPORTANTIMPORTANT
Features
Text Analytics for health is a capability provided “AS IS” and “WITH ALL FAULTS.” Text Analytics for health is not intended or
made available for use as a medical device, clinical support, diagnostic tool, or other technology intended to be used in
the diagnosis, cure, mitigation, treatment, or prevention of disease or other conditions, and no license or right is granted
by Microsoft to use this capability for such purposes. This capability is not designed or intended to be implemented or
deployed as a substitute for professional medical advice or healthcare opinion, diagnosis, treatment, or the clinical
judgment of a healthcare professional, and should not be used as such. The customer is solely responsible for any use of
Text Analytics for health. The customer must separately license any and all source vocabularies it intends to use under the
terms set for that UMLS Metathesaurus License Agreement Appendix or any future equivalent link. The customer is
responsible for ensuring compliance with those license terms, including any geographic or other applicable restrictions.
Text Analytics for health is a feature of the Text Analytics API service that extracts and labels relevant medical
information from unstructured texts such as doctor's notes, discharge summaries, clinical documents, and
electronic health records. There are two ways to utilize this service:
The web-based API (asynchronous)
A Docker container (synchronous)
Text Analytics for health performs Named Entity Recognition (NER), relation extraction, entity negation and entity
linking on English-language text to uncover insights in unstructured clinical and biomedical text.
Named Entity Recognition
Relation Extraction
Entity Linking
Assertion Detection
Named Entity Recognition detects words and phrases mentioned in unstructured text that can be associated
with one or more semantic types, such as diagnosis, medication name, symptom/sign, or age.

Supported languagesSupported languages
Using the Docker container
Using the client library
Sending a REST API request
PreparationPreparation
Structure the API request for the hosted asynchronous web APIStructure the API request for the hosted asynchronous web API
example.json
{
"documents": [
{
"language": "en",
"id": "1",
"text": "Subject was administered 100mg remdesivir intravenously over a period of 120 min"
}
]
}
Hosted asynchronous web API responseHosted asynchronous web API response
See the entity categories returned by Text Analytics for health for a full list of supported entities. For information
on confidence scores, see the Text Analytics transparency note.
Text Analytics for health only supports English language documents.
To run the Text Analytics for health container in your own environment, follow these instructions to download
and install the container.
The latest prerelease of the Text Analytics client library enables you to call Text Analytics for health using a client
object. Refer to the reference documentation, and see the examples on GitHub:
C#
Python
Java
You must have JSON documents in this format: ID, text, and language.
Document size must be under 5,120 characters per document. For the maximum number of documents
permitted in a collection, see the data limits article under Concepts. The collection is submitted in the body of
the request. If your text exceeds this limit, consider splitting the text into separate requests. For best results, split
text between sentences.
For both the container and hosted web API, you must create a POST request. You can use Postman, a cURL
command or the API testing consoleAPI testing console in the Text Analytics for health hosted API reference to quickly construct
and send a POST request to the hosted web API in your desired region. In the API v3.1 endpoint, the
loggingOptOut boolean query parameter can be used to enable logging for troubleshooting purposes. It's
default is TRUE if not specified in the request query.
Send the POST request to
https://<your-custom-subdomain>.cognitiveservices.azure.com/text/analytics/v3.1/entities/health/jobs Below is
an example of a JSON file attached to the Text Analytics for health API request's POST body:
Since this POST request is used to submit a job for the asynchronous operation, there is no text in the response

{
"jobId": "69081148-055b-4f92-977d-115df343de69",
"lastUpdateDateTime": "2021-07-06T19:06:03Z",
"createdDateTime": "2021-07-06T19:05:41Z",
"expirationDateTime": "2021-07-07T19:05:41Z",
"status": "succeeded",
"errors": [],
"results": {
"documents": [
{
"id": "1",
"entities": [
{
"offset": 25,
"length": 5,
"text": "100mg",
"category": "Dosage",
"confidenceScore": 1.0
},
{
"offset": 31,
"length": 10,
"text": "remdesivir",
"category": "MedicationName",
"confidenceScore": 1.0,
"name": "remdesivir",
"links": [
{
"dataSource": "UMLS",
"id": "C4726677"
},
{
"dataSource": "DRUGBANK",
"id": "DB14761"
},
{
"dataSource": "GS",
"id": "6192"
},
{
"dataSource": "MEDCIN",
"id": "398132"
},
{
"dataSource": "MMSL",
"id": "d09540"
},
{
"dataSource": "MSH",
"id": "C000606551"
object. However, you need the value of the operation-location KEY in the response headers to make a GET
request to check the status of the job and the output. Below is an example of the value of the operation-location
KEY in the response header of the POST request:
https://<your-custom-subdomain>.cognitiveservices.azure.com/text/analytics/v3.1/entities/health/jobs/<jobID>
To check the job status, make a GET request to the URL in the value of the operation-location KEY header of the
POST response. The following states are used to reflect the status of a job: NotStarted , running , succeeded ,
failed , rejected , cancelling , and cancelled .
You can cancel a job with a NotStarted or running status with a DELETE HTTP call to the same URL as the GET
request. More information on the DELETE call is available in the Text Analytics for health hosted API reference.
The following is an example of the response of a GET request. The output is available for retrieval until the
expirationDateTime (24 hours from the time the job was created) has passed after which the output is purged.

"id": "C000606551"
},
{
"dataSource": "MTHSPL",
"id": "3QKI37EEHE"
},
{
"dataSource": "NCI",
"id": "C152185"
},
{
"dataSource": "NCI_FDA",
"id": "3QKI37EEHE"
},
{
"dataSource": "NDDF",
"id": "018308"
},
{
"dataSource": "RXNORM",
"id": "2284718"
},
{
"dataSource": "SNOMEDCT_US",
"id": "870592005"
},
{
"dataSource": "VANDF",
"id": "4039395"
}
]
},
{
"offset": 42,
"length": 13,
"text": "intravenously",
"category": "MedicationRoute",
"confidenceScore": 0.99
},
{
"offset": 73,
"length": 7,
"text": "120 min",
"category": "Time",
"confidenceScore": 0.98
}
],
"relations": [
{
"relationType": "DosageOfMedication",
"entities": [
{
"ref": "#/results/documents/0/entities/0",
"role": "Dosage"
},
{
"ref": "#/results/documents/0/entities/1",
"role": "Medication"
}
]
},
{
"relationType": "RouteOfMedication",
"entities": [
{
"ref": "#/results/documents/0/entities/1",
"role": "Medication"
},
{
"ref": "#/results/documents/0/entities/2",

"ref": "#/results/documents/0/entities/2",
"role": "Route"
}
]
},
{
"relationType": "TimeOfMedication",
"entities": [
{
"ref": "#/results/documents/0/entities/1",
"role": "Medication"
},
{
"ref": "#/results/documents/0/entities/3",
"role": "Time"
}
]
}
],
"warnings": []
}
],
"errors": [],
"modelVersion": "2021-05-15"
}
}
Structure the API request for the containerStructure the API request for the container
curl -X POST 'http://<serverURL>:5000/text/analytics/v3.1/entities/health' --header 'Content-Type:
application/json' --header 'accept: application/json' --data-binary @example.json
example.json
{
"documents": [
{
"language": "en",
"id": "1",
"text": "Patient reported itchy sores after swimming in the lake."
},
{
"language": "en",
"id": "2",
"text": "Prescribed 50mg benadryl, taken twice daily."
}
]
}
Container response bodyContainer response body
{
You can use Postman or the example cURL request below to submit a query to the container you deployed,
replacing the serverURL variable with the appropriate value. Note the version of the API in the URL for the
container is different than the hosted API.
The following JSON is an example of a JSON file attached to the Text Analytics for health API request's POST
body:
The following JSON is an example of the Text Analytics for health API response body from the containerized
synchronous call:

"documents": [
{
"id": "1",
"entities": [
{
"offset": 25,
"length": 5,
"text": "100mg",
"category": "Dosage",
"confidenceScore": 1.0
},
{
"offset": 31,
"length": 10,
"text": "remdesivir",
"category": "MedicationName",
"confidenceScore": 1.0,
"name": "remdesivir",
"links": [
{
"dataSource": "UMLS",
"id": "C4726677"
},
{
"dataSource": "DRUGBANK",
"id": "DB14761"
},
{
"dataSource": "GS",
"id": "6192"
},
{
"dataSource": "MEDCIN",
"id": "398132"
},
{
"dataSource": "MMSL",
"id": "d09540"
},
{
"dataSource": "MSH",
"id": "C000606551"
},
{
"dataSource": "MTHSPL",
"id": "3QKI37EEHE"
},
{
"dataSource": "NCI",
"id": "C152185"
},
{
"dataSource": "NCI_FDA",
"id": "3QKI37EEHE"
},
{
"dataSource": "NDDF",
"id": "018308"
},
{
"dataSource": "RXNORM",
"id": "2284718"
},
{
"dataSource": "SNOMEDCT_US",
"id": "870592005"
},
{
"dataSource": "VANDF",

"id": "4039395"
}
]
},
{
"offset": 42,
"length": 13,
"text": "intravenously",
"category": "MedicationRoute",
"confidenceScore": 1.0
},
{
"offset": 73,
"length": 7,
"text": "120 min",
"category": "Time",
"confidenceScore": 0.94
}
],
"relations": [
{
"relationType": "DosageOfMedication",
"entities": [
{
"ref": "#/documents/0/entities/0",
"role": "Dosage"
},
{
"ref": "#/documents/0/entities/1",
"role": "Medication"
}
]
},
{
"relationType": "RouteOfMedication",
"entities": [
{
"ref": "#/documents/0/entities/1",
"role": "Medication"
},
{
"ref": "#/documents/0/entities/2",
"role": "Route"
}
]
},
{
"relationType": "TimeOfMedication",
"entities": [
{
"ref": "#/documents/0/entities/1",
"role": "Medication"
},
{
"ref": "#/documents/0/entities/3",
"role": "Time"
}
]
}
],
"warnings": []
}
],
"errors": [],
"modelVersion": "2021-03-01"
}

Assertion outputAssertion output
{
"offset": 381,
"length": 3,
"text": "SOB",
"category": "SymptomOrSign",
"confidenceScore": 0.98,
"assertion": {
"certainty": "negative"
},
"name": "Dyspnea",
"links": [
{
"dataSource": "UMLS",
"id": "C0013404"
},
{
"dataSource": "AOD",
"id": "0000005442"
},
...
Relation extraction outputRelation extraction output
Text Analytics for health returns assertion modifiers, which are informative attributes assigned to medical
concepts that provide deeper understanding of the concepts’ context within the text. These modifiers are divided
into three categories, each focusing on a different aspect, and containing a set of mutually exclusive values. Only
one value per category is assigned to each entity. The most common value for each category is the Default
value. The service’s output response contains only assertion modifiers that are different from the default value.
CERTAINTYCERTAINTY – provides information regarding the presence (present vs. absent) of the concept and how certain
the text is regarding its presence (definite vs. possible).
PositivePositive [Default]: the concept exists or happened.
NegativeNegative: the concept does not exist now or never happened.
Positive_PossiblePositive_Possible: the concept likely exists but there is some uncertainty.
Negative_PossibleNegative_Possible: the concept’s existence is unlikely but there is some uncertainty.
Neutral_PossibleNeutral_Possible: the concept may or may not exist without a tendency to either side.
CONDITIONALITYCONDITIONALITY – provides information regarding whether the existence of a concept depends on certain
conditions.
NoneNone [Default]: the concept is a fact and not hypothetical and does not depend on certain conditions.
HypotheticalHypothetical: the concept may develop or occur in the future.
ConditionalConditional: the concept exists or occurs only under certain conditions.
ASSOCIATIONASSOCIATION – describes whether the concept is associated with the subject of the text or someone else.
SubjectSubject [Default]: the concept is associated with the subject of the text, usually the patient.
Someone_ElseSomeone_Else: the concept is associated with someone who is not the subject of the text.
Assertion detection represents negated entities as a negative value for the certainty category, for example:
Text Analytics for Health recognizes relations between different concepts, including relations between attribute
and entity (for example, direction of body structure, dosage of medication) and between entities (for example,
abbreviation detection).
ABBREVIATIONABBREVIATION
BODY_SITE_OF_CONDITIONBODY_SITE_OF_CONDITION

BODY_SITE_OF_TREATMENTBODY_SITE_OF_TREATMENT
COURSE_OF_CONDITIONCOURSE_OF_CONDITION
COURSE_OF_EXAMINATIONCOURSE_OF_EXAMINATION
COURSE_OF_MEDICATIONCOURSE_OF_MEDICATION
COURSE_OF_TREATMENTCOURSE_OF_TREATMENT
DIRECTION_OF_BODY_STRUCTUREDIRECTION_OF_BODY_STRUCTURE
DIRECTION_OF_CONDITIONDIRECTION_OF_CONDITION
DIRECTION_OF_EXAMINATIONDIRECTION_OF_EXAMINATION
DIRECTION_OF_TREATMENTDIRECTION_OF_TREATMENT
DOSAGE_OF_MEDICATIONDOSAGE_OF_MEDICATION
EXAMINATION_FINDS_CONDITIONEXAMINATION_FINDS_CONDITION
EXPRESSION_OF_GENEEXPRESSION_OF_GENE
EXPRESSION_OF_VARIANTEXPRESSION_OF_VARIANT
FORM_OF_MEDICATIONFORM_OF_MEDICATION
FREQUENCY_OF_CONDITIONFREQUENCY_OF_CONDITION
FREQUENCY_OF_MEDICATIONFREQUENCY_OF_MEDICATION
FREQUENCY_OF_TREATMENTFREQUENCY_OF_TREATMENT
MUTATION_TYPE_OF_GENEMUTATION_TYPE_OF_GENE
MUTATION_TYPE_OF_VARIANTMUTATION_TYPE_OF_VARIANT
QUALIFIER_OF_CONDITIONQUALIFIER_OF_CONDITION
REL ATION_OF_EXAMINATIONREL ATION_OF_EXAMINATION
ROUTE_OF_MEDICATIONROUTE_OF_MEDICATION
SCALE_OF_CONDITIONSCALE_OF_CONDITION
TIME_OF_CONDITIONTIME_OF_CONDITION
TIME_OF_EVENTTIME_OF_EVENT
TIME_OF_EXAMINATIONTIME_OF_EXAMINATION
TIME_OF_MEDICATIONTIME_OF_MEDICATION
TIME_OF_TREATMENTTIME_OF_TREATMENT
UNIT_OF_CONDITIONUNIT_OF_CONDITION
UNIT_OF_EXAMINATIONUNIT_OF_EXAMINATION
VALUE_OF_CONDITIONVALUE_OF_CONDITION
VALUE_OF_EXAMINATIONVALUE_OF_EXAMINATION
VARIANT_OF_GENEVARIANT_OF_GENE
NOTENOTE
"relations": [
{
"relationType": "DosageOfMedication",
"entities": [
{
"ref": "#/results/documents/0/entities/0",
"role": "Dosage"
},
{
"ref": "#/results/documents/0/entities/1",
"role": "Medication"
}
]
},
{
"relationType": "RouteOfMedication",
"entities": [
{
"ref": "#/results/documents/0/entities/1",
"role": "Medication"
},
{
"ref": "#/results/documents/0/entities/2",
"role": "Route"
}
]
...
]
See also
Relations referring to CONDITION may refer to either the DIAGNOSIS entity type or the SYMPTOM_OR_SIGN entity
type.
Relations referring to MEDICATION may refer to either the MEDICATION_NAME entity type or the
MEDICATION_CLASS entity type.
Relations referring to TIME may refer to either the TIME entity type or the DATE entity type.
Relation extraction output contains URI references and assigned roles of the entities of the relation type. For
example:
Text Analytics overview
Named Entity categories
What's new
Install and run Text Analytics containers
7/22/2021 • 18 minutes to read • Edit Online
NOTENOTE
Prerequisites
Gathering required parameters
Endpoint URI Endpoint URI {ENDPOINT_URI}
Containers enable you to run the Text Analytic APIs in your own environment and are great for your specific
security and data governance requirements. The following Text Analytics containers are available:
sentiment analysis
language detection
key phrase extraction (preview)
Text Analytics for health
Entity linking and NER are not currently available as a container.
The container image locations may have recently changed. Read this article to see the updated location for this
container.
The free account is limited to 5,000 text records per month and only the FreeFree and StandardStandard pricing tiers are valid for
containers. For more information on transaction request rates, see Data Limits.
Containers enable you to run the Text Analytic APIs in your own environment and are great for your specific
security and data governance requirements. The Text Analytics containers provide advanced natural language
processing over raw text, and include three main functions: sentiment analysis, key phrase extraction, and
language detection.
If you don't have an Azure subscription, create a free account before you begin.
You must meet the following prerequisites before using Text Analytics containers. If you don't have an Azure
subscription, create a free account before you begin.
Docker installed on a host computer. Docker must be configured to allow the containers to connect with and
send billing data to Azure.
A Text Analytics resource with the free (F0) or standard (S) pricing tier.
On Windows, Docker must also be configured to support Linux containers.
You should have a basic understanding of Docker concepts.
There are three primary parameters for all Cognitive Services' containers that are required. The end-user license
agreement (EULA) must be present with a value of accept . Additionally, both an Endpoint URL and API Key are
needed.
The EndpointEndpoint URI value is available on the Azure portal
Overview
page of the corresponding Cognitive Service
resource. Navigate to the
Overview
page, hover over the Endpoint, and a Copy to clipboard icon will appear.
Copy and use where needed.
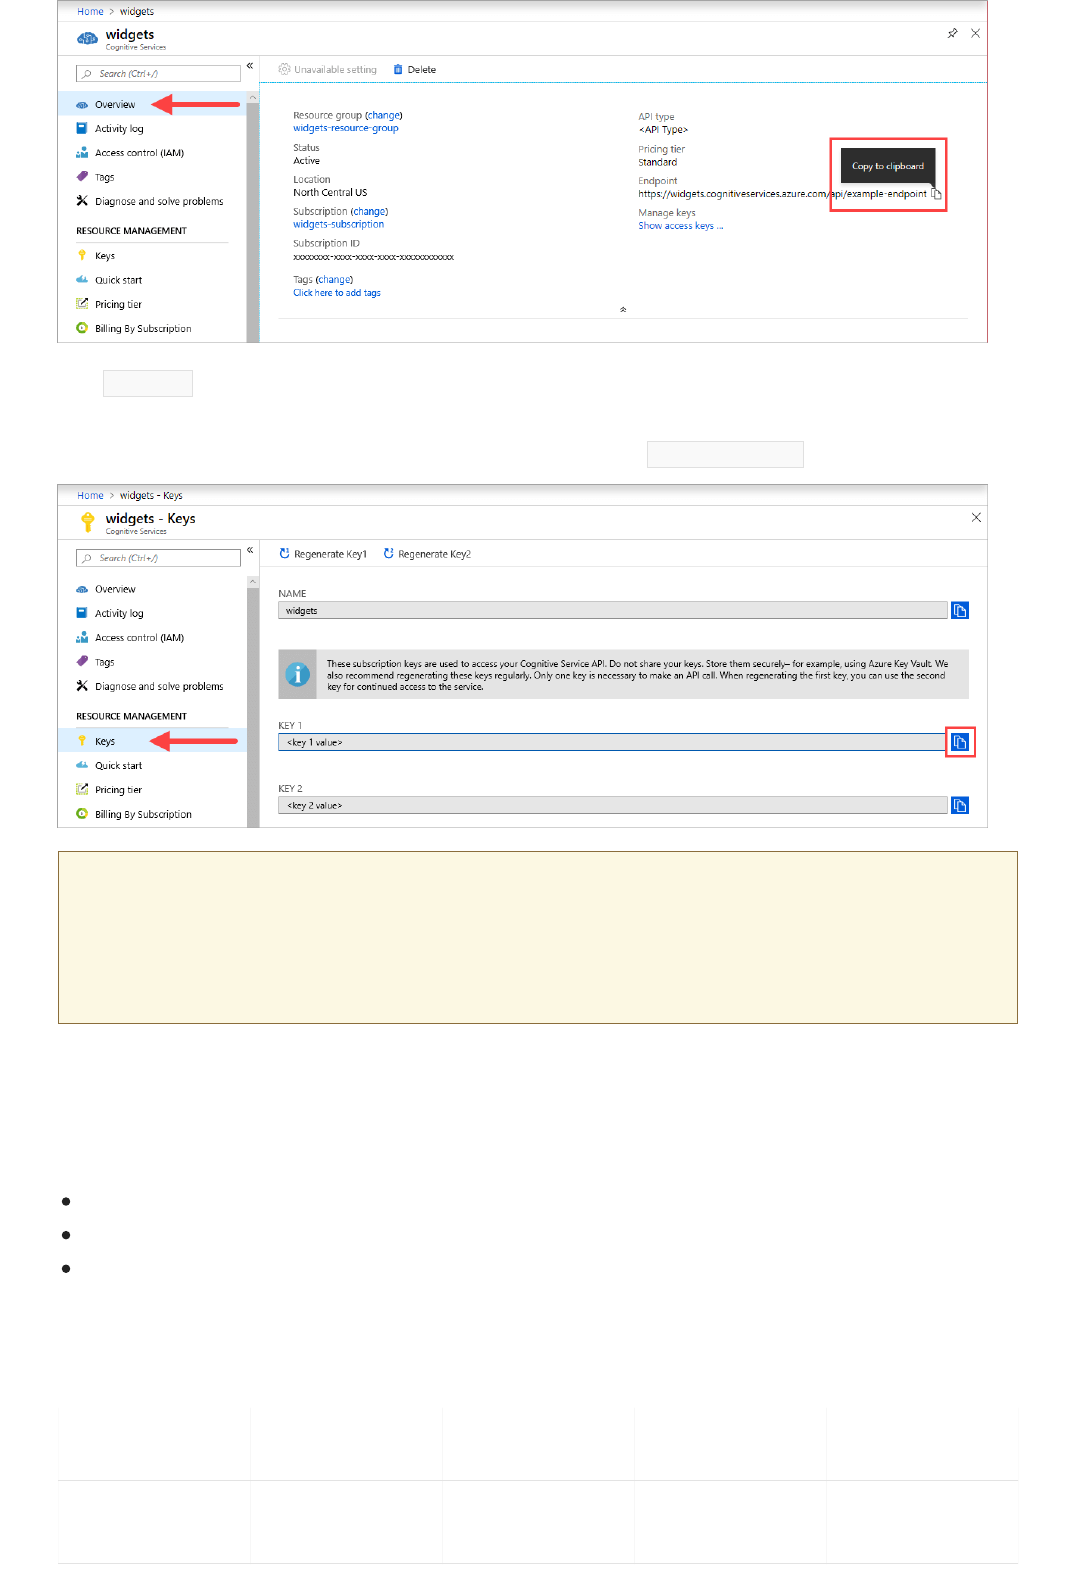
Keys Keys {API_KEY}
IMPORTANTIMPORTANT
Host computer requirements and recommendations
M INIM UM H O STM INIM UM H O ST
SP EC SSP EC S
REC OMMENDE DR EC OMMENDE D
H O ST SP EC SH O ST SP EC S M IN IM U M T P SM INIM UM T P S M A XIM UM T P SM A XIM UM T P S
LanguageLanguage
detectiondetection
1 core, 2GB memory 1 core, 4GB memory 15 30
This key is used to start the container, and is available on the Azure portal's Keys page of the corresponding
Cognitive Service resource. Navigate to the
Keys
page, and click on the Copy to clipboard icon.
These subscription keys are used to access your Cognitive Service API. Do not share your keys. Store them securely, for
example, using Azure Key Vault. We also recommend regenerating these keys regularly. Only one key is necessary to
make an API call. When regenerating the first key, you can use the second key for continued access to the service.
The host is a x64-based computer that runs the Docker container. It can be a computer on your premises or a
Docker hosting service in Azure, such as:
Azure Kubernetes Service.
Azure Container Instances.
A Kubernetes cluster deployed to Azure Stack. For more information, see Deploy Kubernetes to Azure Stack.
The following table describes the minimum and recommended specifications for the available Text Analytics
containers. Each CPU core must be at least 2.6 gigahertz (GHz) or faster. The allowable Transactions Per Second
(TPS) are also listed.

key phrasekey phrase
extractionextraction
(preview)(preview)
1 core, 2GB memory 1 core, 4GB memory 15 30
SentimentSentiment
AnalysisAnalysis
1 core, 2GB memory 4 cores, 8GB
memory
15 30
Text Analytics forText Analytics for
health - 1health - 1
document/requestdocument/request
4 core, 10GB
memory
6 core, 12GB
memory
15 30
Text Analytics forText Analytics for
health - 10health - 10
documents/requesdocuments/reques
tt
6 core, 16GB
memory
8 core, 20GB
memory
15 30
M INIM UM H O STM INIM UM H O ST
SP EC SSP EC S
REC OMMENDE DR EC OMMENDE D
H O ST SP EC SH O ST SP EC S M IN IM U M T P SM INIM UM T P S M A XIM UM T P SM A XIM UM T P S
Get the container image with docker pull
Docker pull for the Sentiment Analysis v3 containerDocker pull for the Sentiment Analysis v3 container
docker pull mcr.microsoft.com/azure-cognitive-services/textanalytics/sentiment:3.0-en
T EX T A N A LY T IC S C ON TA IN ERT EX T A N A LY T IC S C ON TA IN ER L A NGU AG E C ODEL ANGUAGE C O DE
Chinese-Simplified zh-hans
Chinese-Traditional zh-hant
Dutch nl
English en
French fr
German de
Hindi hi
CPU core and memory correspond to the --cpus and --memory settings, which are used as part of the
docker run command.
Sentiment Analysis
Key Phrase Extraction (preview)
Language Detection
Text Analytics for health
The sentiment analysis container v3 container is available in several languages. To download the container for
the English container, use the command below.
To download the container for another language, replace en with one of the language codes below.
Italian it
Japanese ja
Korean ko
Norwegian (Bokmål) no
Portuguese (Brazil) pt-BR
Portuguese (Portugal) pt-PT
Spanish es
Turkish tr
T EX T A N A LY T IC S C ON TA IN ERT EX T A N A LY T IC S C ON TA IN ER L A NGU AG E C ODEL ANGUAGE C O DE
TIPTIP
docker images --format "table {{.ID}}\t{{.Repository}}\t{{.Tag}}"
IMAGE ID REPOSITORY TAG
<image-id> <repository-path/name> <tag-name>
Run the container with docker run
IMPORTANTIMPORTANT
For a full description of available tags for the Text Analytics containers, see Docker Hub.
You can use the docker images command to list your downloaded container images. For example, the following command
lists the ID, repository, and tag of each downloaded container image, formatted as a table:
Once the container is on the host computer, use the docker run command to run the containers. The container
will continue to run until you stop it.
The docker commands in the following sections use the back slash, \ , as a line continuation character. Replace or
remove this based on your host operating system's requirements.
The Eula , Billing , and ApiKey options must be specified to run the container; otherwise, the container won't
start. For more information, see Billing.
The sentiment analysis and language detection containers use v3 of the API, and are generally available. The key
phrase extraction container uses v2 of the API, and is in preview.
If you're using the Text Analytics for health container, the responsible AI (RAI) acknowledgment must also be
present with a value of accept .
Sentiment Analysis
Key Phrase Extraction (preview)
Language Detection
Text Analytics for health

P LA C E H OL DERP L A C EH O LDER VA L UEVA L UE FO RM AT OR EX AM P L EFO RM AT O R E XA M PL E
{API_KEY}{API_KEY} The key for your Text Analytics
resource. You can find it on your
resource's Key and endpointKey and endpoint page,
on the Azure portal.
xxxxxxxxxxxxxxxxxxxxxxxxxxxxxxxx
{ENDPOINT_URI}{ENDPOINT_URI} The endpoint for accessing the Text
Analytics API. You can find it on your
resource's Key and endpointKey and endpoint page,
on the Azure portal.
https://<your-custom-
subdomain>.cognitiveservices.azure.com
docker run --rm -it -p 5000:5000 --memory 8g --cpus 1 \
mcr.microsoft.com/azure-cognitive-services/textanalytics/sentiment \
Eula=accept \
Billing={ENDPOINT_URI} \
ApiKey={API_KEY}
Run multiple containers on the same hostRun multiple containers on the same host
Query the container's prediction endpoint
Validate that a container is running
REQ UEST U RLREQUEST URL P URP OSEP UR PO SE
http://localhost:5000/ The container provides a home page.
To run the
Sentiment Analysis v3
container, execute the following docker run command. Replace the
placeholders below with your own values:
This command:
Runs a
Sentiment Analysis
container from the container image
Allocates one CPU core and 8 gigabytes (GB) of memory
Exposes TCP port 5000 and allocates a pseudo-TTY for the container
Automatically removes the container after it exits. The container image is still available on the host computer.
If you intend to run multiple containers with exposed ports, make sure to run each container with a different
exposed port. For example, run the first container on port 5000 and the second container on port 5001.
You can have this container and a different Azure Cognitive Services container running on the HOST together.
You also can have multiple containers of the same Cognitive Services container running.
The container provides REST-based query prediction endpoint APIs.
Use the host, http://localhost:5000 , for container APIs.
There are several ways to validate that the container is running. Locate the
External IP
address and exposed port
of the container in question, and open your favorite web browser. Use the various request URLs below to
validate the container is running. The example request URLs listed below are http://localhost:5000 , but your
specific container may vary. Keep in mind that you're to rely on your container's
External IP
address and exposed
port.
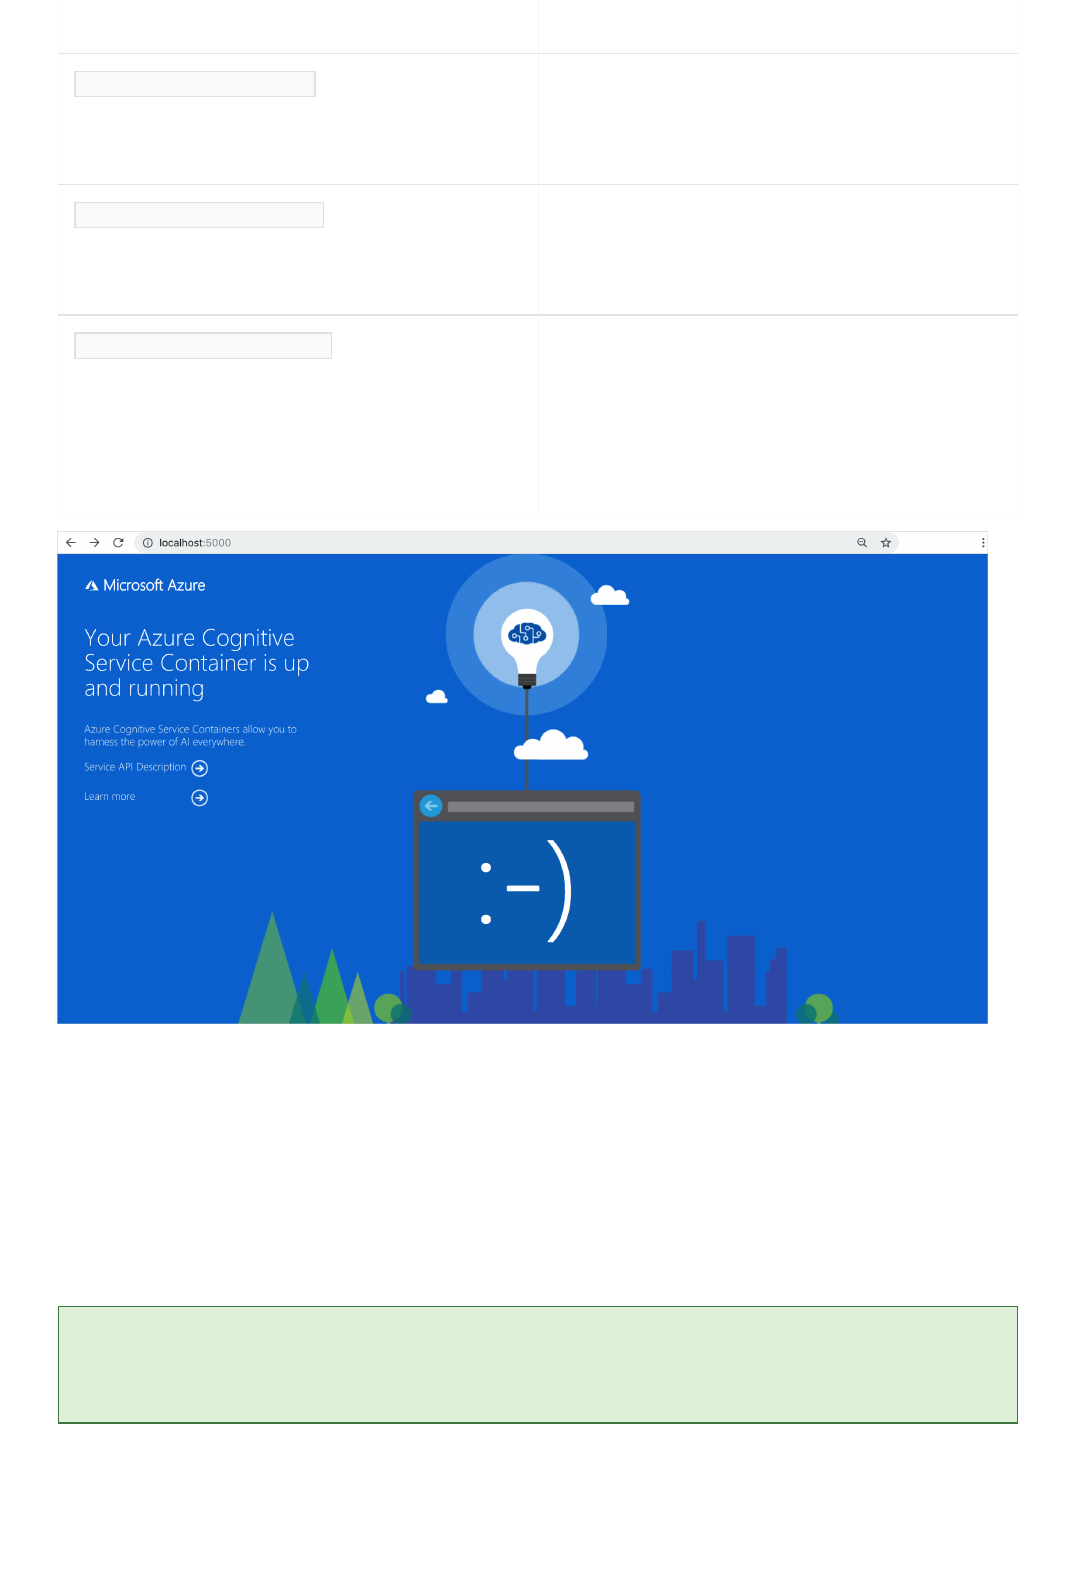
http://localhost:5000/ready Requested with GET, this provides a verification that the
container is ready to accept a query against the model. This
request can be used for Kubernetes liveness and readiness
probes.
http://localhost:5000/status Also requested with GET, this verifies if the api-key used to
start the container is valid without causing an endpoint
query. This request can be used for Kubernetes liveness and
readiness probes.
http://localhost:5000/swagger The container provides a full set of documentation for the
endpoints and a Tr y it outTr y it out feature. With this feature, you
can enter your settings into a web-based HTML form and
make the query without having to write any code. After the
query returns, an example CURL command is provided to
demonstrate the HTTP headers and body format that's
required.
REQ UEST U RLREQUEST URL P URP OSEP UR PO SE
Stop the container
Troubleshooting
TIPTIP
Billing
To shut down the container, in the command-line environment where the container is running, select Ctrl+C.
If you run the container with an output mount and logging enabled, the container generates log files that are
helpful to troubleshoot issues that happen while starting or running the container.
For more troubleshooting information and guidance, see Cognitive Services containers frequently asked questions (FAQ).
The Text Analytics containers send billing information to Azure, using a
Text Analytics
resource on your Azure
account.

Connect to AzureConnect to Azure
Billing argumentsBilling arguments
OP T IO NOP T IO N DESC RIP T IO NDESC RIP T IO N
ApiKey The API key of the Cognitive Services resource that's used to
track billing information.
The value of this option must be set to an API key for the
provisioned resource that's specified in Billing .
Billing The endpoint of the Cognitive Services resource that's used
to track billing information.
The value of this option must be set to the endpoint URI of
a provisioned Azure resource.
Eula Indicates that you accepted the license for the container.
The value of this option must be set to acceptaccept .
Summary
Queries to the container are billed at the pricing tier of the Azure resource that's used for the ApiKey .
Azure Cognitive Services containers aren't licensed to run without being connected to the metering / billing
endpoint. You must enable the containers to communicate billing information with the billing endpoint at all
times. Cognitive Services containers don't send customer data, such as the image or text that's being analyzed,
to Microsoft.
The container needs the billing argument values to run. These values allow the container to connect to the
billing endpoint. The container reports usage about every 10 to 15 minutes. If the container doesn't connect to
Azure within the allowed time window, the container continues to run but doesn't serve queries until the billing
endpoint is restored. The connection is attempted 10 times at the same time interval of 10 to 15 minutes. If it
can't connect to the billing endpoint within the 10 tries, the container stops serving requests. See the Cognitive
Services container FAQ for an example of the information sent to Microsoft for billing.
The docker run command will start the container when all three of the following options are provided with
valid values:
For more information about these options, see Configure containers.
In this article, you learned concepts and workflow for downloading, installing, and running Text Analytics
containers. In summary:
Text Analytics provides three Linux containers for Docker, encapsulating various capabilities:
Container images are downloaded from the Microsoft Container Registry (MCR).
Container images run in Docker.
You can use either the REST API or SDK to call operations in Text Analytics containers by specifying the host
URI of the container.
You must specify billing information when instantiating a container.
Sentiment Analysis
Key Phrase Extraction (preview)
Language Detection
Text Analytics for health

IMPORTANTIMPORTANT
Next steps
Cognitive Services containers are not licensed to run without being connected to Azure for metering. Customers need to
enable the containers to communicate billing information with the metering service at all times. Cognitive Services
containers do not send customer data (e.g. text that is being analyzed) to Microsoft.
See Configure containers for configuration settings.
Configure Text Analytics docker containers
7/22/2021 • 6 minutes to read • Edit Online
Configuration settings
REQ UIRE DREQ UIRE D SET T INGSET T IN G P UR PO SEPURP O SE
Yes ApiKey Tracks billing information.
No ApplicationInsights Enables adding Azure Application
Insights telemetry support to your
container.
Yes Billing Specifies the endpoint URI of the
service resource on Azure.
Yes Eula Indicates that you've accepted the
license for the container.
No Fluentd Writes log and, optionally, metric data
to a Fluentd server.
No HTTP Proxy Configures an HTTP proxy for making
outbound requests.
No Logging Provides ASP.NET Core logging
support for your container.
No Mounts Reads and writes data from the host
computer to the container and from
the container back to the host
computer.
IMPORTANTIMPORTANT
ApiKey configuration setting
Text Analytics provides each container with a common configuration framework, so that you can easily
configure and manage storage, logging and telemetry, and security settings for your containers. Several
example docker run commands are also available.
The container has the following configuration settings:
The ApiKey , Billing , and Eula settings are used together, and you must provide valid values for all three of them;
otherwise your container won't start. For more information about using these configuration settings to instantiate a
container, see Billing.
The ApiKey setting specifies the Azure resource key used to track billing information for the container. You must
specify a value for the ApiKey and the value must be a valid key for the
Text Analytics
resource specified for the
Billing configuration setting.
This setting can be found in the following place:
Azure portal: Text AnalyticsText Analytics resource management, under KeysKeys

ApplicationInsights setting
REQ UIRE DREQ UIRE D N A M EN A M E DATA T Y P EDATA T Y P E DE SC RIP T IO NDE SC RIP T IO N
No InstrumentationKey String The instrumentation key of
the Application Insights
instance to which telemetry
data for the container is
sent. For more information,
see Application Insights for
ASP.NET Core.
Example:
InstrumentationKey=123456789
Billing configuration setting
REQ UIRE DREQ UIRE D N A M EN A M E DATA T Y P EDATA T Y P E DE SC RIP T IO NDE SC RIP T IO N
Yes Billing String Billing endpoint URI. For
more information on
obtaining the billing URI,
see gathering required
parameters. For more
information and a complete
list of regional endpoints,
see Custom subdomain
names for Cognitive
Services.
Eula setting
REQ UIRE DREQ UIRE D N A M EN A M E DATA T Y P EDATA T Y P E DE SC RIP T IO NDE SC RIP T IO N
Yes Eula String License acceptance
Example:
Eula=accept
The ApplicationInsights setting allows you to add Azure Application Insights telemetry support to your
container. Application Insights provides in-depth monitoring of your container. You can easily monitor your
container for availability, performance, and usage. You can also quickly identify and diagnose errors in your
container.
The following table describes the configuration settings supported under the ApplicationInsights section.
The Billing setting specifies the endpoint URI of the
Text Analytics
resource on Azure used to meter billing
information for the container. You must specify a value for this configuration setting, and the value must be a
valid endpoint URI for a _
Text Analytics
resource on Azure. The container reports usage about every 10 to 15
minutes.
This setting can be found in the following place:
Azure portal: Text AnalyticsText Analytics Overview, labeled Endpoint
The Eula setting indicates that you've accepted the license for the container. You must specify a value for this
configuration setting, and the value must be set to accept .
Cognitive Services containers are licensed under your agreement governing your use of Azure. If you do not
have an existing agreement governing your use of Azure, you agree that your agreement governing use of

Fluentd settings
N A M EN AM E DATA T Y PEDATA T Y P E DE SC RIP T IO NDE SC RIP T IO N
Host String The IP address or DNS host name of
the Fluentd server.
Port Integer The port of the Fluentd server.
The default value is 24224.
HeartbeatMs Integer The heartbeat interval, in milliseconds.
If no event traffic has been sent before
this interval expires, a heartbeat is sent
to the Fluentd server. The default value
is 60000 milliseconds (1 minute).
SendBufferSize Integer The network buffer space, in bytes,
allocated for send operations. The
default value is 32768 bytes (32
kilobytes).
TlsConnectionEstablishmentTimeoutMs Integer The timeout, in milliseconds, to
establish a SSL/TLS connection with
the Fluentd server. The default value is
10000 milliseconds (10 seconds).
If UseTLS is set to false, this value is
ignored.
UseTLS Boolean Indicates whether the container should
use SSL/TLS for communicating with
the Fluentd server. The default value is
false.
Http proxy credentials settings
N A M EN AM E DATA T Y PEDATA T Y P E DE SC RIP T IO NDE SC RIP T IO N
HTTP_PROXY string The proxy to use, for example,
http://proxy:8888
<proxy-url>
HTTP_PROXY_CREDS string Any credentials needed to authenticate
against the proxy, for example,
username:password . This value mustmust
be in lower-casebe in lower-case.
<proxy-user> string The user for the proxy.
Azure is the Microsoft Online Subscription Agreement, which incorporates the Online Services Terms. For
previews, you also agree to the Supplemental Terms of Use for Microsoft Azure Previews. By using the container
you agree to these terms.
Fluentd is an open-source data collector for unified logging. The Fluentd settings manage the container's
connection to a Fluentd server. The container includes a Fluentd logging provider, which allows your container to
write logs and, optionally, metric data to a Fluentd server.
The following table describes the configuration settings supported under the Fluentd section.
If you need to configure an HTTP proxy for making outbound requests, use these two arguments:

<proxy-password> string The password associated with
<proxy-user> for the proxy.
N A M EN AM E DATA T Y PEDATA T Y P E DE SC RIP T IO NDE SC RIP T IO N
docker run --rm -it -p 5000:5000 \
--memory 2g --cpus 1 \
--mount type=bind,src=/home/azureuser/output,target=/output \
<registry-location>/<image-name> \
Eula=accept \
Billing=<endpoint> \
ApiKey=<api-key> \
HTTP_PROXY=<proxy-url> \
HTTP_PROXY_CREDS=<proxy-user>:<proxy-password> \
Logging settings
P RO VIDERPR OVIDER P UR PO SEPUR P O SE
Console The ASP.NET Core Console logging provider. All of the
ASP.NET Core configuration settings and default values for
this logging provider are supported.
Debug The ASP.NET Core Debug logging provider. All of the
ASP.NET Core configuration settings and default values for
this logging provider are supported.
Disk The JSON logging provider. This logging provider writes log
data to the output mount.
docker run --rm -it -p 5000:5000 \
--memory 2g --cpus 1 \
--mount type=bind,src=/home/azureuser/output,target=/output \
<registry-location>/<image-name> \
Eula=accept \
Billing=<endpoint> \
ApiKey=<api-key> \
Logging:Disk:Format=json
docker run --rm -it -p 5000:5000 \
--memory 2g --cpus 1 \
<registry-location>/<image-name> \
Eula=accept \
Billing=<endpoint> \
ApiKey=<api-key> \
Logging:Console:LogLevel:Default=Debug
Disk loggingDisk logging
The Logging settings manage ASP.NET Core logging support for your container. You can use the same
configuration settings and values for your container that you use for an ASP.NET Core application.
The following logging providers are supported by the container:
This container command stores logging information in the JSON format to the output mount:
This container command shows debugging information, prefixed with dbug , while the container is running:

N A M EN AM E DATA T Y PEDATA T Y P E DE SC RIP T IO NDE SC RIP T IO N
Format String The output format for log files.
Note:Note: This value must be set to json
to enable the logging provider. If this
value is specified without also
specifying an output mount while
instantiating a container, an error
occurs.
MaxFileSize Integer The maximum size, in megabytes (MB),
of a log file. When the size of the
current log file meets or exceeds this
value, a new log file is started by the
logging provider. If -1 is specified, the
size of the log file is limited only by the
maximum file size, if any, for the
output mount. The default value is 1.
Mount settings
OP T ION A LO PT IO NA L NA M EN AM E DATA T Y PEDATA T Y P E DE SC RIP T IO NDESC RIP T IO N
Not allowed Input String Text Analytics containers do
not use this.
Optional Output String The target of the output
mount. The default value is
/output . This is the
location of the logs. This
includes container logs.
Example:
--mount
type=bind,src=c:\output,target=/output
Next steps
The Disk logging provider supports the following configuration settings:
For more information about configuring ASP.NET Core logging support, see Settings file configuration.
Use bind mounts to read and write data to and from the container. You can specify an input mount or output
mount by specifying the --mount option in the docker run command.
The Text Analytics containers don't use input or output mounts to store training or service data.
The exact syntax of the host mount location varies depending on the host operating system. Additionally, the
host computer's mount location may not be accessible due to a conflict between permissions used by the docker
service account and the host mount location permissions.
Review How to install and run containers
Use more Cognitive Services Containers

Deploy and run container on Azure Container
Instance
4/29/2021 • 7 minutes to read • Edit Online
Prerequisites
IMPORTANTIMPORTANT
Create an Azure Container Instance resource using the Azure portal
With the following steps, scale Azure Cognitive Services applications in the cloud easily with Azure Container
Instances. Containerization helps you focus on building your applications instead of managing the
infrastructure. For more information on using containers, see features and benefits.
The recipe works with any Cognitive Services container. The Cognitive Service resource must be created before
using the recipe. Each Cognitive Service that supports containers has a "How to install" article for installing and
configuring the service for a container. Some services require a file or set of files as input for the container, it is
important that you understand and have used the container successfully before using this solution.
An Azure resource for the Azure Cognitive Service you're using.
Cognitive Service endpoint URLendpoint URL - review your specific service's "How to install" for the container, to find
where the endpoint URL is from within the Azure portal, and what a correct example of the URL looks
like. The exact format can change from service to service.
Cognitive Service keykey - the keys are on the KeysKeys page for the Azure resource. You only need one of the
two keys. The key is a string of 32 alpha-numeric characters.
A single Cognitive Services Container on your local host (your computer). Make sure you can:
Pull down the image with a docker pull command.
Run the local container successfully with all required configuration settings with a docker run
command.
Call the container's endpoint, getting a response of HTTP 2xx and a JSON response back.
All variables in angle brackets, <> , need to be replaced with your own values. This replacement includes the
angle brackets.
The LUIS container requires a .gz model file that is pulled in at runtime. The container must be able to access this model
file via a volume mount from the container instance. To upload a model file, follow these steps:
1. Create an Azure file share. Take note of the Azure Storage account name, key, and file share name as you'll need them
later.
2. export your LUIS model (packaged app) from the LUIS portal.
3. In the Azure portal, navigate to the Over viewOver view page of your storage account resource, and select File sharesFile shares.
4. Select the file share name that you recently created, then select UploadUpload. Then upload your packaged app.
Azure portal
CLI

SET T INGSET T ING VA L UEVA L UE
Subscription Select your subscription.
Resource group Select the available resource group or create a new one
such as cognitive-services .
Container name Enter a name such as cognitive-container-instance .
The name must be in lower caps.
Location Select a region for deployment.
Image type If your container image is stored in a container registry
that doesn’t require credentials, choose Public . If
accessing your container image requires credentials,
choose Private . Refer to container repositories and
images for details on whether or not the container image
is Public or Private ("Public Preview").
Image name Enter the Cognitive Services container location. The
location is what's used as an argument to the
docker pull command. Refer to the container
repositories and images for the available image names
and their corresponding repository.
The image name must be fully qualified specifying three
parts. First, the container registry, then the repository,
finally the image name:
<container-registry>/<repository>/<image-name> .
Here is an example,
mcr.microsoft.com/azure-cognitive-
services/keyphrase
would represent the Key Phrase Extraction image in the
Microsoft Container Registry under the Azure Cognitive
Services repository. Another example is,
containerpreview.azurecr.io/microsoft/cognitive-
services-speech-to-text
which would represent the Speech to Text image in the
Microsoft repository of the Container Preview container
registry.
OS type Linux
Size Change size to the suggested recommendations for your
specific Cognitive Service container:
2 CPU cores
4 GB
SET T INGSET T ING VA L UEVA L UE
1. Go to the Create page for Container Instances.
2. On the BasicsBasics tab, enter the following details:
3. On the NetworkingNetworking tab, enter the following details:
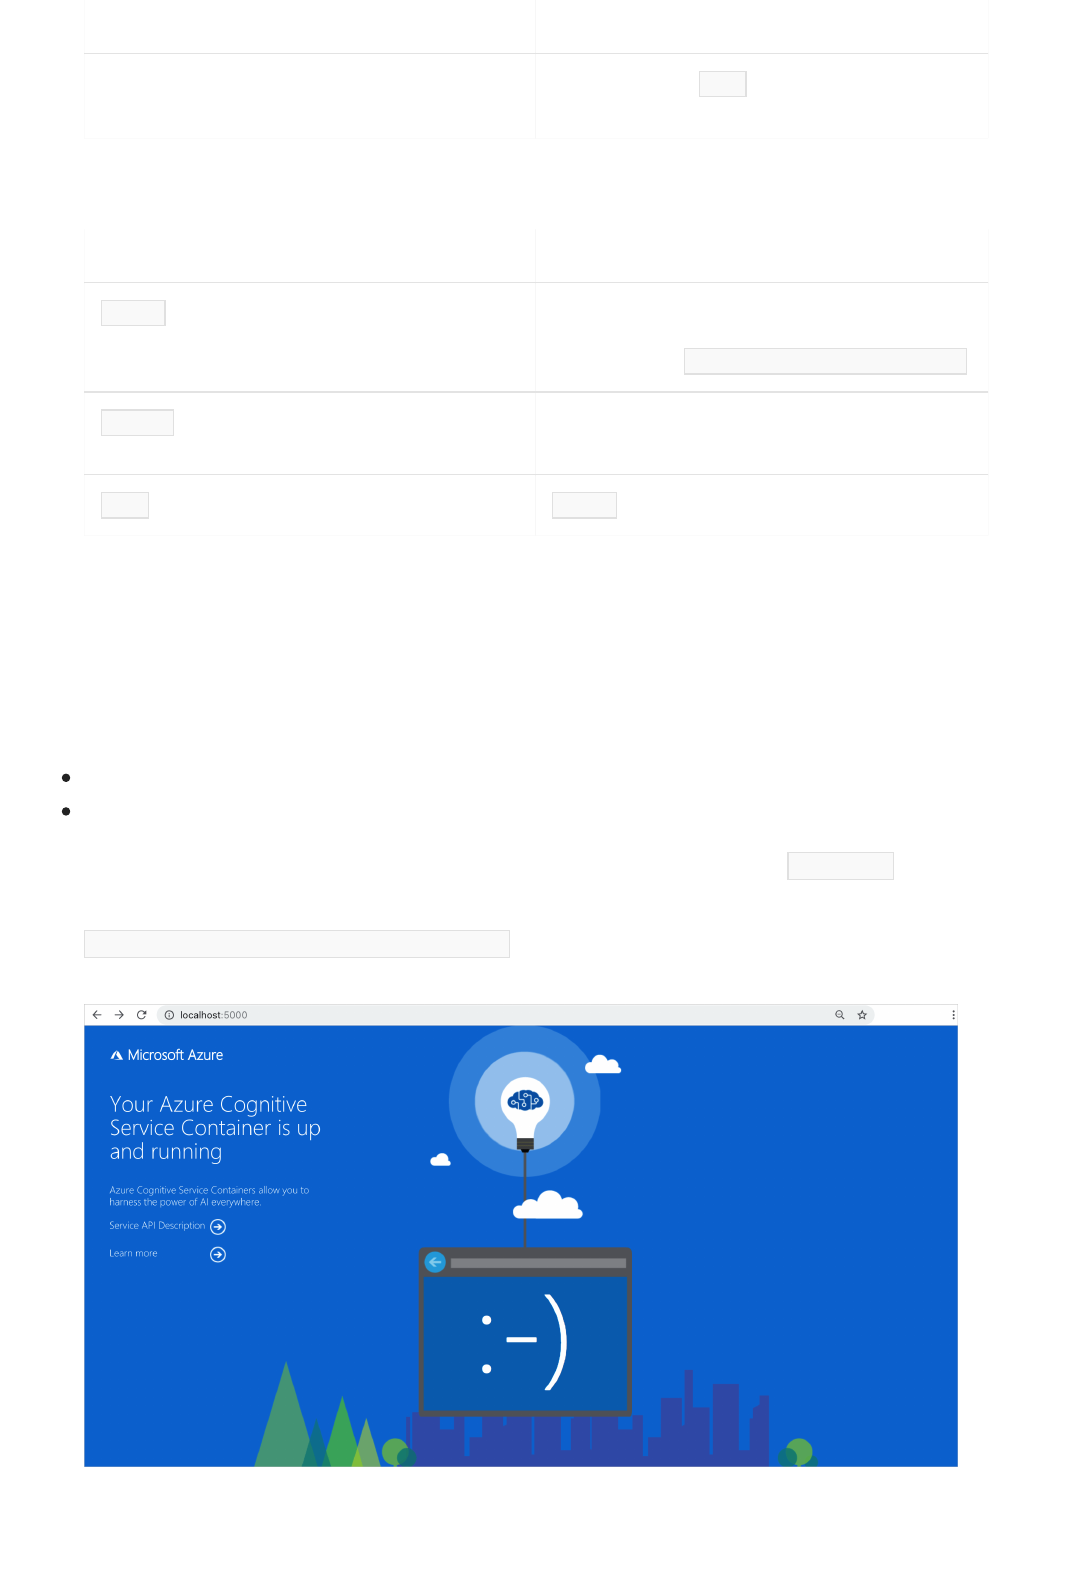
Use the Container Instance
Ports Set the TCP port to 5000 . Exposes the container on
port 5000.
SET T INGSET T ING VA L UEVA L UE
KE YKE Y VA L UEVA L UE
ApiKey Copied from the Keys and endpointKeys and endpoint page of the
resource. It is a 32 alphanumeric-character string with no
spaces or dashes, xxxxxxxxxxxxxxxxxxxxxxxxxxxxxxxx .
Billing Your endpoint URL copied from the Keys andKeys and
endpointendpoint page of the resource.
Eula accept
4. On the AdvancedAdvanced tab, enter the required Environment VariablesEnvironment Variables for the container billing settings of
the Azure Container Instance resource:
5. Click Review and CreateReview and Create
6. After validation passes, click CreateCreate to finish the creation process
7. When the resource is successfully deployed, it's ready
Azure portal
CLI
1. Select the Over viewOver view and copy the IP address. It will be a numeric IP address such as 55.55.55.55 .
2. Open a new browser tab and use the IP address, for example,
http://<IP-address>:5000 (http://55.55.55.55:5000 ). You will see the container's home page, letting you
know the container is running.
3. Select Ser vice API DescriptionSer vice API Description to view the swagger page for the container.
4. Select any of the POSTPOST APIs and select Tr y it outTr y it out. The parameters are displayed including the input. Fill

in the parameters.
5. Select ExecuteExecute to send the request to your Container Instance.
You have successfully created and used Cognitive Services containers in Azure Container Instance.

Deploy a Text Analytics container to Azure
Kubernetes Service
3/5/2021 • 12 minutes to read • Edit Online
Prerequisites
Create a Cognitive Services Text Analytics resource
Learn how to deploy the Azure Cognitive Services Text Analytics container image to Azure Kubernetes Service
(AKS). This procedure shows how to create a Text Analytics resource, how to create an associated sentiment
analysis image, and how to exercise this orchestration of the two from a browser. Using containers can shift your
attention away from managing infrastructure to instead focusing on application development.
This procedure requires several tools that must be installed and run locally. Don't use Azure Cloud Shell. You
need the following:
An Azure subscription. If you don't have an Azure subscription, create a free account before you begin.
A text editor, for example, Visual Studio Code.
The Azure CLI installed.
The Kubernetes CLI installed.
An Azure resource with the correct pricing tier. Not all pricing tiers work with this container:
Azure Text AnalyticsAzure Text Analytics resource with F0 or standard pricing tiers only.
Azure Cognitive Ser vicesAzure Cognitive Ser vices resource with the S0 pricing tier.
SE T T IN GSET T IN G VA L UEVA LUE
Name Enter a name (2-64 characters).
Subscription Select the appropriate subscription.
Location Select a nearby location.
Pricing tier Enter SS, the standard pricing tier.
Resource group Select an available resource group.
RESOURC E TA B IN P ORTA LRESOURC E TA B IN P ORTA L SE T T IN GSET T IN G VA L UEVA LUE
OverviewOver view Endpoint Copy the endpoint. It appears
similar to
https://my-
resource.cognitiveservices.azure.com/text/analytics/v3.0
.
1. Sign in to the Azure portal.
2. Select Create a resourceCreate a resource, and then go to AI + Machine LearningAI + Machine Learning > Text AnalyticsText Analytics. Or, go to Create
Text Analytics.
3. Enter all the required settings:
4. Select CreateCreate, and wait for the resource to be created. Your browser automatically redirects to the newly
created resource page.
5. Collect the configured endpoint and an API key:

Create an Azure Kubernetes Service cluster resource
NOTENOTE
KeysKeys API Key Copy one of the two keys. It's a 32-
character alphanumeric string with
no spaces or dashes: <
xxxxxxxxxxxxxxxxxxxxxxxxxxxxxxxx
>.
RESOURC E TA B IN P ORTA LRESOURC E TA B IN P ORTA L SE T T IN GSET T IN G VA L UEVA LUE
SE T T IN GSET T IN G VA L UEVA LUE
Subscription Select an appropriate subscription.
Resource group Select an available resource group.
Kubernetes cluster name Enter a name (lowercase).
Region Select a nearby location.
Kubernetes version Whatever value is marked as (default)(default).
DNS name prefix Created automatically, but you can override.
Node size Standard DS2 v2:
2 vCPUs , 7 GB
Node count Leave the slider at the default value.
SE T T IN GSET T IN G VA L UEVA LUE
HTTP application routing No
Networking configuration Basic
1. Go to Azure Kubernetes Service, and select CreateCreate.
2. On the BasicsBasics tab, enter the following information:
3. On the Node poolsNode pools tab, leave Vir tual nodesVir tual nodes and VM scale setsVM scale sets set to their default values.
4. On the AuthenticationAuthentication tab, leave Ser vice principalSer vice principal and Enable RBACEnable RBAC set to their default values.
5. On the NetworkingNetworking tab, enter the following selections:
6. On the IntegrationsIntegrations tab, make sure that Container monitoringContainer monitoring is set to EnabledEnabled, and leave LogLog
Analytics workspaceAnalytics workspace as the default value.
7. On the TagsTags tab, leave the name/value pairs blank for now.
8. Select Review and CreateReview and Create.
9. After validation passes, select CreateCreate.
If validation fails, it might be because of a "Service principal" error. Go back to the AuthenticationAuthentication tab and then go back
to Review + createReview + create, where validation should run and then pass.
Key Phrase Extraction
Language Detection

Deploy the Key Phrase Extraction container to an AKS clusterDeploy the Key Phrase Extraction container to an AKS cluster
Sentiment Analysis
az login
az aks get-credentials -n your-cluster-name -g -your-resource-group
Merged "your-cluster-name" as current context in /home/username/.kube/config
WARNINGWARNING
az account set -s subscription-id
code .
1. Open the Azure CLI, and sign in to Azure.
2. Sign in to the AKS cluster. Replace your-cluster-name and your-resource-group with the appropriate
values.
After this command runs, it reports a message similar to the following:
If you have multiple subscriptions available to you on your Azure account and the az aks get-credentials
command returns with an error, a common problem is that you're using the wrong subscription. Set the context of
your Azure CLI session to use the same subscription that you created the resources with and try again.
3. Open the text editor of choice. This example uses Visual Studio Code.
4. Within the text editor, create a new file named
keyphrase.yaml
, and paste the following YAML into it. Be
sure to replace billing/value and apikey/value with your own information.

apiVersion: apps/v1beta1
kind: Deployment
metadata:
name: keyphrase
spec:
template:
metadata:
labels:
app: keyphrase-app
spec:
containers:
- name: keyphrase
image: mcr.microsoft.com/azure-cognitive-services/keyphrase
ports:
- containerPort: 5000
resources:
requests:
memory: 2Gi
cpu: 1
limits:
memory: 4Gi
cpu: 1
env:
- name: EULA
value: "accept"
- name: billing
value: # {ENDPOINT_URI}
- name: apikey
value: # {API_KEY}
---
apiVersion: v1
kind: Service
metadata:
name: keyphrase
spec:
type: LoadBalancer
ports:
- port: 5000
selector:
app: keyphrase-app
kubectl apply -f keyphrase.yaml
deployment.apps "keyphrase" created
service "keyphrase" created
kubectl get pods
NAME READY STATUS RESTARTS AGE
keyphrase-5c9ccdf575-mf6k5 1/1 Running 0 1m
5. Save the file, and close the text editor.
6. Run the Kubernetes apply command with the
keyphrase.yaml
file as its target:
After the command successfully applies the deployment configuration, a message appears similar to the
following output:
7. Verify that the pod was deployed:
The output for the running status of the pod:
8. Verify that the service is available, and get the IP address.
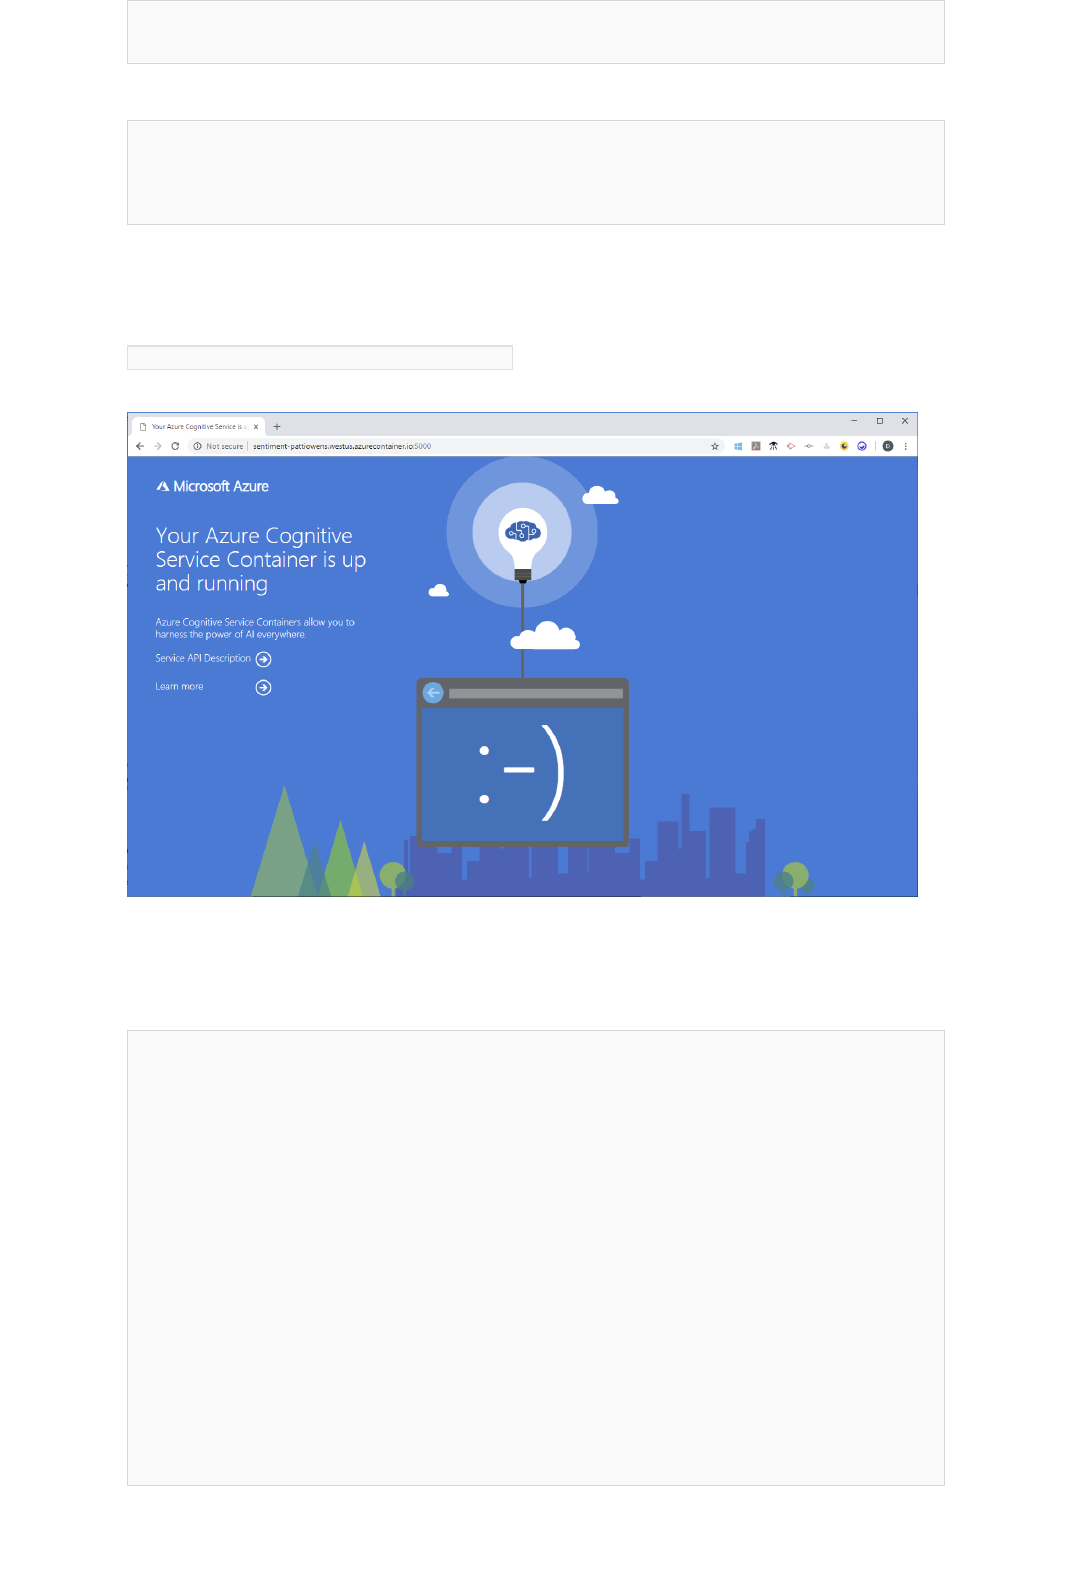
Verify the Key Phrase Extraction container instanceVerify the Key Phrase Extraction container instance
kubectl get services
NAME TYPE CLUSTER-IP EXTERNAL-IP PORT(S) AGE
kubernetes ClusterIP 10.0.0.1 <none> 443/TCP 2m
keyphrase LoadBalancer 10.0.100.64 168.61.156.180 5000:31234/TCP 2m
The output for the running status of the
keyphrase
service in the pod:
{
"documents": [
{
"id": "1",
"text": "Hello world"
},
{
"id": "2",
"text": "Bonjour tout le monde"
},
{
"id": "3",
"text": "La carretera estaba atascada. Había mucho tráfico el día de ayer."
},
{
"id": "4",
"text": ":) :( :D"
}
]
}
1. Select the Over viewOver view tab, and copy the IP address.
2. Open a new browser tab, and enter the IP address. For example, enter
http://<IP-address>:5000 (http://55.55.55.55:5000 ). The container's home page is displayed, which lets
you know the container is running.
3. Select the Ser vice API DescriptionSer vice API Description link to go to the container's Swagger page.
4. Choose any of the POSTPOST APIs, and select Tr y it outTr y it out. The parameters are displayed, which includes this
example input:
5. Replace the input with the following JSON content:

Next steps
{
"documents": [
{
"language": "en",
"id": "7",
"text": "I was fortunate to attend the KubeCon Conference in Barcelona, it is one of the best
conferences I have ever attended. Great people, great sessions and I thoroughly enjoyed it!"
}
]
}
{
"documents": [
{
"id": "7",
"keyPhrases": [
"Great people",
"great sessions",
"KubeCon Conference",
"Barcelona",
"best conferences"
],
"statistics": {
"charactersCount": 176,
"transactionsCount": 1
}
}
],
"errors": [],
"statistics": {
"documentsCount": 1,
"validDocumentsCount": 1,
"erroneousDocumentsCount": 0,
"transactionsCount": 1
}
}
6. Set showStatsshowStats to true .
7. Select ExecuteExecute to determine the sentiment of the text.
The model that's packaged in the container generates a score that ranges from 0 to 1, where 0 is negative
and 1 is positive.
The JSON response that's returned includes sentiment for the updated text input:
We can now correlate the document id of the response payload's JSON data to the original request payload
document id . The resulting document has a keyPhrases array, which contains the list of key phrases that have
been extracted from the corresponding input document. Additionally, there are various statistics such as
characterCount and transactionCount for each resulting document.
Use more Cognitive Services containers
Use the Text Analytics Connected Service
Configure Azure Cognitive Services virtual networks
6/15/2021 • 16 minutes to read • Edit Online
IMPORTANTIMPORTANT
NOTENOTE
Scenarios
Supported regions and service offerings
Azure Cognitive Services provides a layered security model. This model enables you to secure your Cognitive
Services accounts to a specific subset of networks. When network rules are configured, only applications
requesting data over the specified set of networks can access the account. You can limit access to your resources
with request filtering. Allowing only requests originating from specified IP addresses, IP ranges or from a list of
subnets in Azure Virtual Networks.
An application that accesses a Cognitive Services resource when network rules are in effect requires
authorization. Authorization is supported with Azure Active Directory (Azure AD) credentials or with a valid API
key.
Turning on firewall rules for your Cognitive Services account blocks incoming requests for data by default. In order to
allow requests through, one of the following conditions needs to be met:
The request should originate from a service operating within an Azure Virtual Network (VNet) on the
allowed subnet list of the target Cognitive Services account. The endpoint in requests originated from
VNet needs to be set as the custom subdomain of your Cognitive Services account.
Or the request should originate from an allowed list of IP addresses.
Requests that are blocked include those from other Azure services, from the Azure portal, from logging and
metrics services, and so on.
This article has been updated to use the Azure Az PowerShell module. The Az PowerShell module is the recommended
PowerShell module for interacting with Azure. To get started with the Az PowerShell module, see Install Azure PowerShell.
To learn how to migrate to the Az PowerShell module, see Migrate Azure PowerShell from AzureRM to Az.
To secure your Cognitive Services resource, you should first configure a rule to deny access to traffic from all
networks (including internet traffic) by default. Then, you should configure rules that grant access to traffic from
specific VNets. This configuration enables you to build a secure network boundary for your applications. You can
also configure rules to grant access to traffic from select public internet IP address ranges, enabling connections
from specific internet or on-premises clients.
Network rules are enforced on all network protocols to Azure Cognitive Services, including REST and
WebSocket. To access data using tools such as the Azure test consoles, explicit network rules must be
configured. You can apply network rules to existing Cognitive Services resources, or when you create new
Cognitive Services resources. Once network rules are applied, they're enforced for all requests.
Virtual networks (VNETs) are supported in regions where Cognitive Services are available. Currently multi-
service resource does not support VNET. Cognitive Services supports service tags for network rules
NOTENOTE
Change the default network access rule
WARNINGWARNING
Managing default network access rulesManaging default network access rules
configuration. The services listed below are included in the CognitiveSer vicesManagementCognitiveSer vicesManagement service tag.
Anomaly Detector
Computer Vision
Content Moderator
Custom Vision
Face
Form Recognizer
Immersive Reader
Language Understanding (LUIS)
Personalizer
Speech Services
Text Analytics
QnA Maker
Translator Text
If you're using LUIS or Speech Services, the CognitiveSer vicesManagementCognitiveSer vicesManagement tag only enables you use the service using
the SDK or REST API. To access and use LUIS portal and/or Speech Studio from a virtual network, you will need to use the
following tags:
AzureActiveDirector yAzureActiveDirector y
AzureFrontDoor.FrontendAzureFrontDoor.Frontend
AzureResourceManagerAzureResourceManager
CognitiveSer vicesManagementCognitiveSer vicesManagement
By default, Cognitive Services resources accept connections from clients on any network. To limit access to
selected networks, you must first change the default action.
Making changes to network rules can impact your applications' ability to connect to Azure Cognitive Services. Setting the
default network rule to denydeny blocks all access to the data unless specific network rules that grantgrant access are also applied.
Be sure to grant access to any allowed networks using network rules before you change the default rule to deny access. If
you are allow listing IP addresses for your on-premises network, be sure to add all possible outgoing public IP addresses
from your on-premises network.
You can manage default network access rules for Cognitive Services resources through the Azure portal,
PowerShell, or the Azure CLI.
Azure portal
PowerShell
Azure CLI
1. Go to the Cognitive Services resource you want to secure.
2. Select the RESOURCE MANAGEMENTRESOURCE MANAGEMENT menu called Vir tual networkVir tual network.
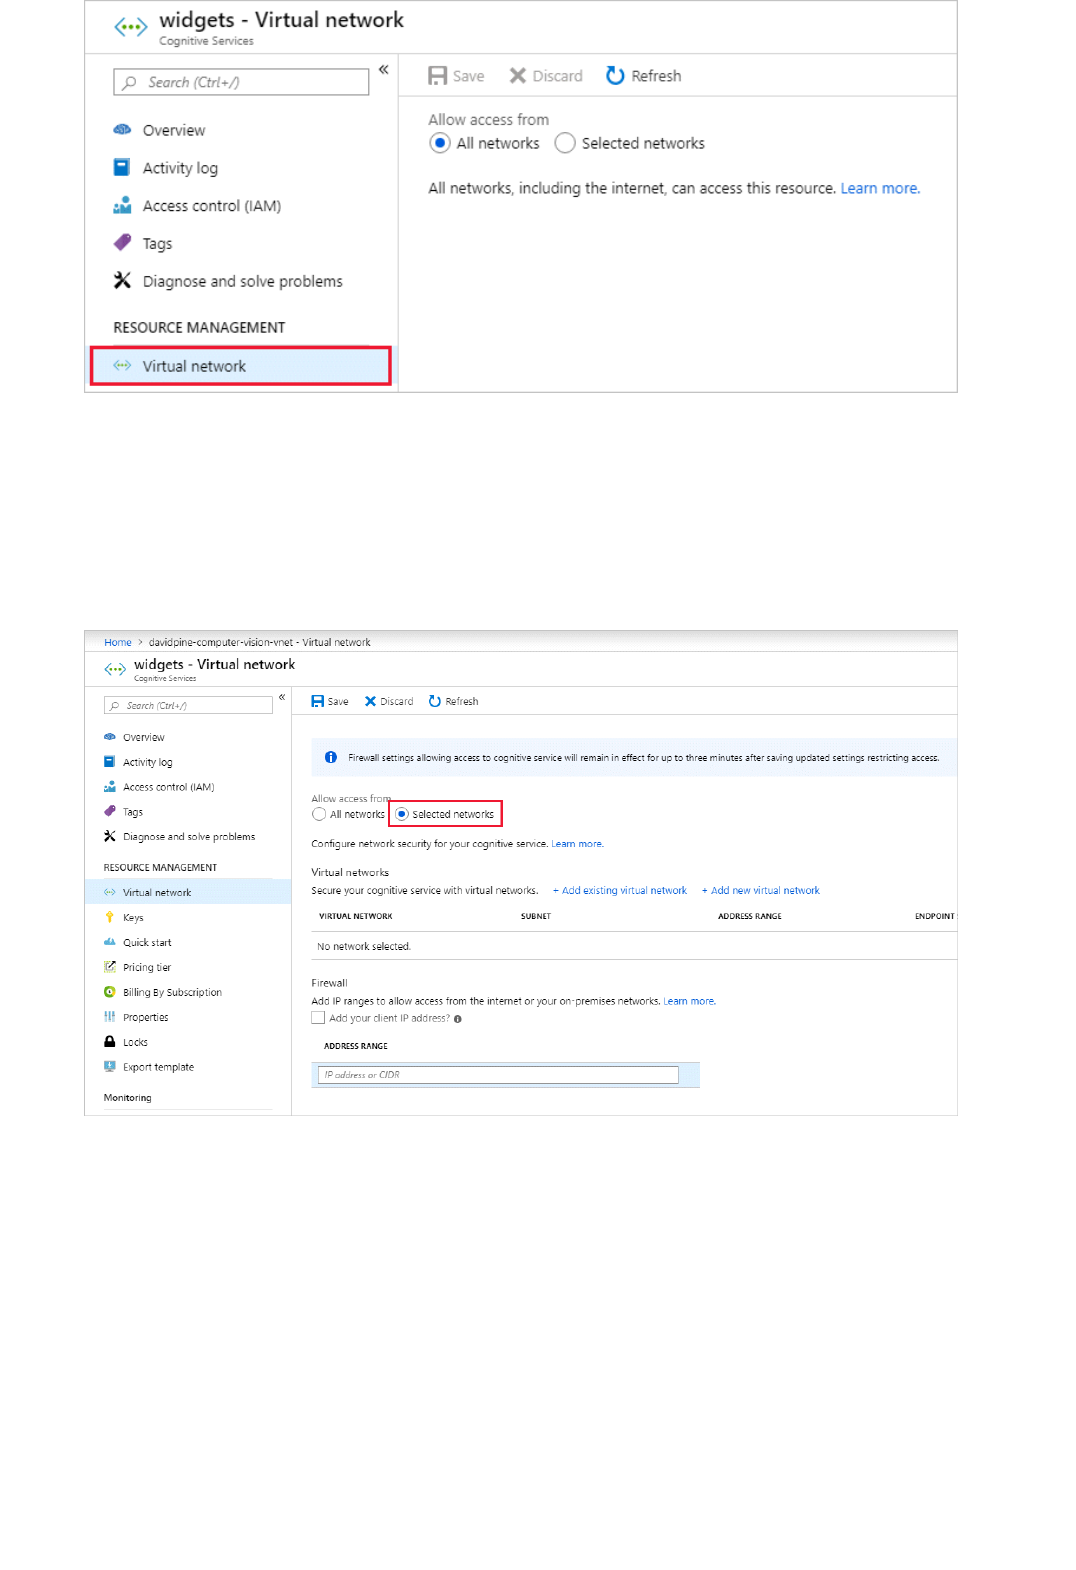
Grant access from a virtual network
3. To deny access by default, choose to allow access from Selected networksSelected networks. With the SelectedSelected
networksnetworks setting alone, unaccompanied by configured Vir tual networksVir tual networks or Address rangesAddress ranges - all
access is effectively denied. When all access is denied, requests attempting to consume the Cognitive
Services resource aren't permitted. The Azure portal, Azure PowerShell or, Azure CLI can still be used to
configure the Cognitive Services resource.
4. To allow traffic from all networks, choose to allow access from All networksAll networks.
5. Select SaveSave to apply your changes.
You can configure Cognitive Services resources to allow access only from specific subnets. The allowed subnets
may belong to a VNet in the same subscription, or in a different subscription, including subscriptions belonging
to a different Azure Active Directory tenant.
Enable a service endpoint for Azure Cognitive Services within the VNet. The service endpoint routes traffic from
the VNet through an optimal path to the Azure Cognitive Services service. The identities of the subnet and the
virtual network are also transmitted with each request. Administrators can then configure network rules for the
Cognitive Services resource that allow requests to be received from specific subnets in a VNet. Clients granted
access via these network rules must continue to meet the authorization requirements of the Cognitive Services
resource to access the data.
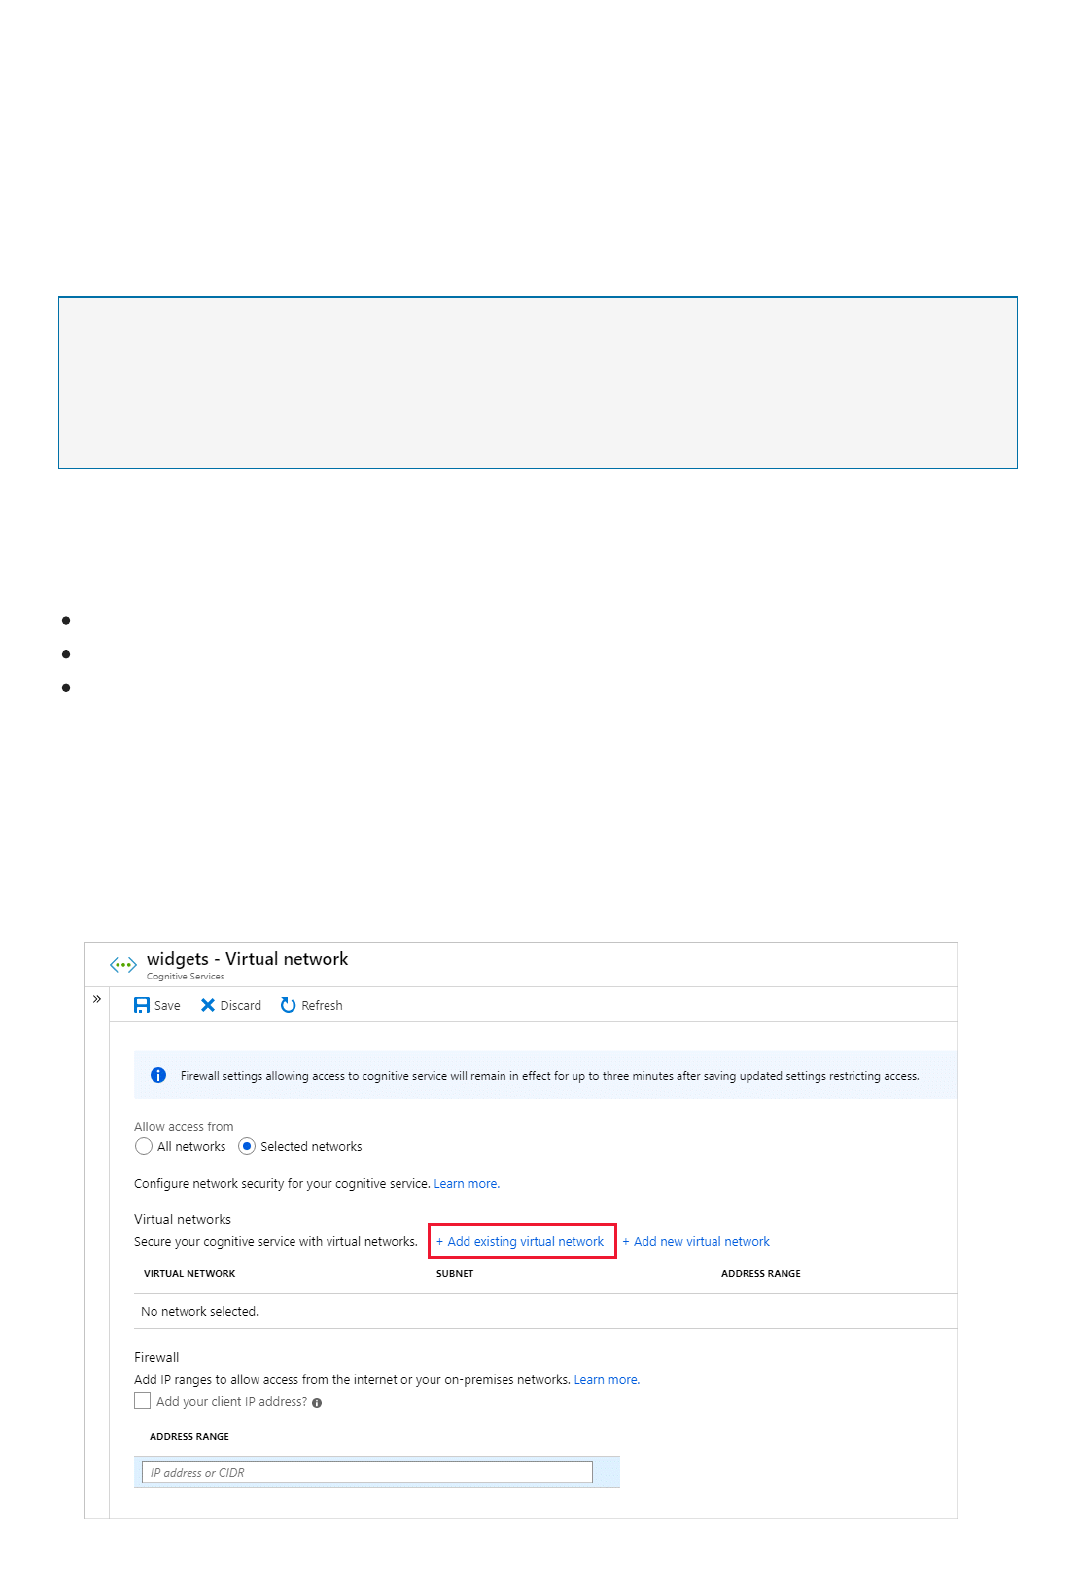
Required permissionsRequired permissions
NOTENOTE
Managing virtual network rulesManaging virtual network rules
Each Cognitive Services resource supports up to 100 virtual network rules, which may be combined with IP
network rules.
To apply a virtual network rule to a Cognitive Services resource, the user must have the appropriate permissions
for the subnets being added. The required permission is the default
Contributor
role, or the
Cognitive Services
Contributor
role. Required permissions can also be added to custom role definitions.
Cognitive Services resource and the virtual networks granted access may be in different subscriptions, including
subscriptions that are a part of a different Azure AD tenant.
Configuration of rules that grant access to subnets in virtual networks that are a part of a different Azure Active Directory
tenant are currently only supported through Powershell, CLI and REST APIs. Such rules cannot be configured through the
Azure portal, though they may be viewed in the portal.
You can manage virtual network rules for Cognitive Services resources through the Azure portal, PowerShell, or
the Azure CLI.
Azure portal
PowerShell
Azure CLI
1. Go to the Cognitive Services resource you want to secure.
2. Select the RESOURCE MANAGEMENTRESOURCE MANAGEMENT menu called Vir tual networkVir tual network.
3. Check that you've selected to allow access from Selected networksSelected networks.
4. To grant access to a virtual network with an existing network rule, under Vir tual networksVirtual networks, select AddAdd
existing vir tual networkexisting vir tual network.
5. Select the Vir tual networksVir tual networks and SubnetsSubnets options, and then select EnableEnable.
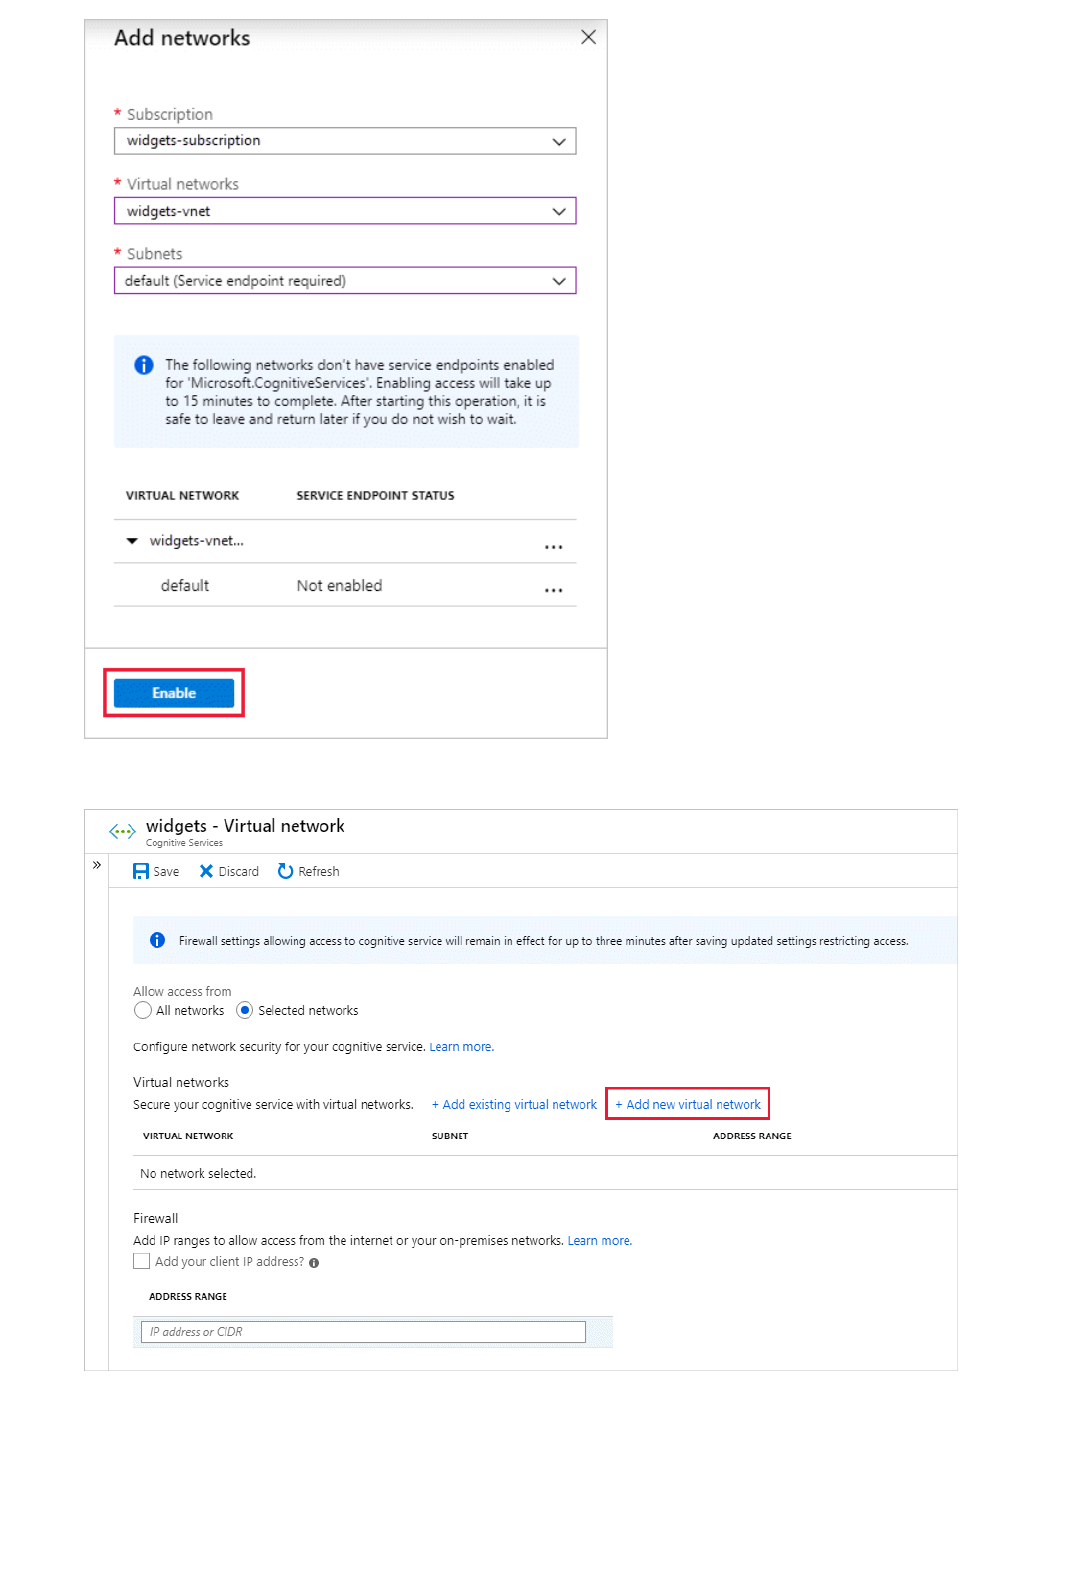
6. To create a new virtual network and grant it access, select Add new vir tual networkAdd new virtual network.
7. Provide the information necessary to create the new virtual network, and then select CreateCreate.
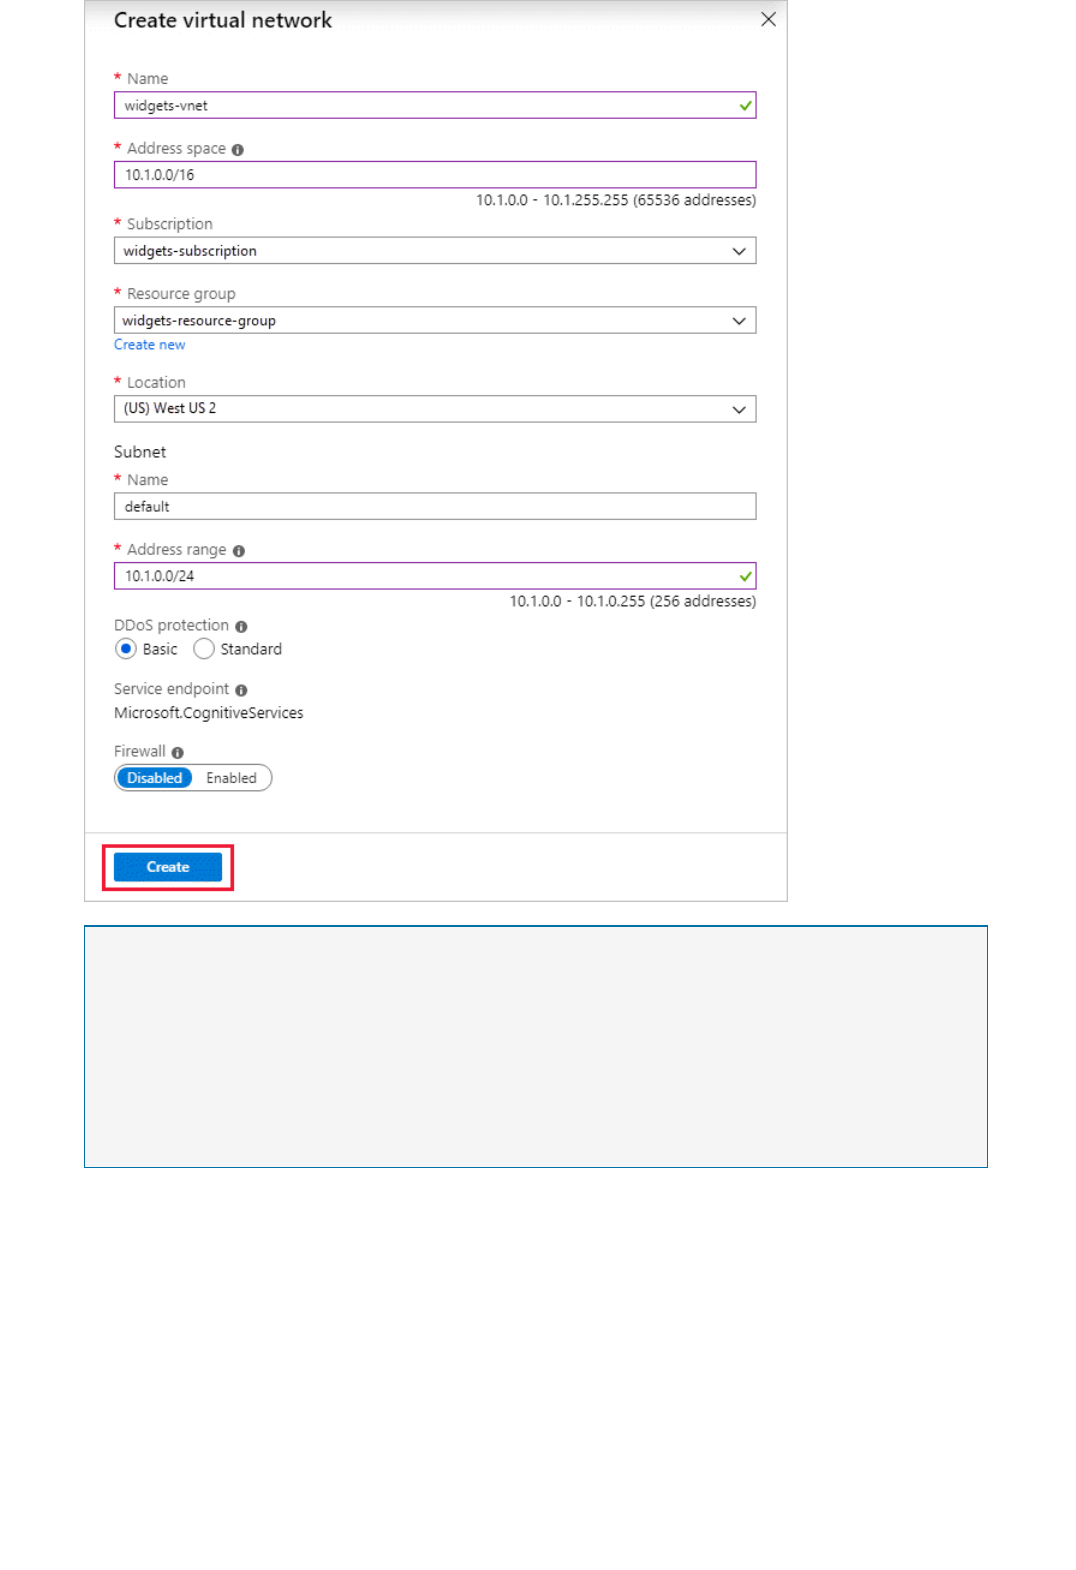
NOTENOTE
If a service endpoint for Azure Cognitive Services wasn't previously configured for the selected virtual network and
subnets, you can configure it as part of this operation.
Presently, only virtual networks belonging to the same Azure Active Directory tenant are shown for selection
during rule creation. To grant access to a subnet in a virtual network belonging to another tenant, please use
Powershell, CLI or REST APIs.
8. To remove a virtual network or subnet rule, select ...... to open the context menu for the virtual network or
subnet, and select RemoveRemove.
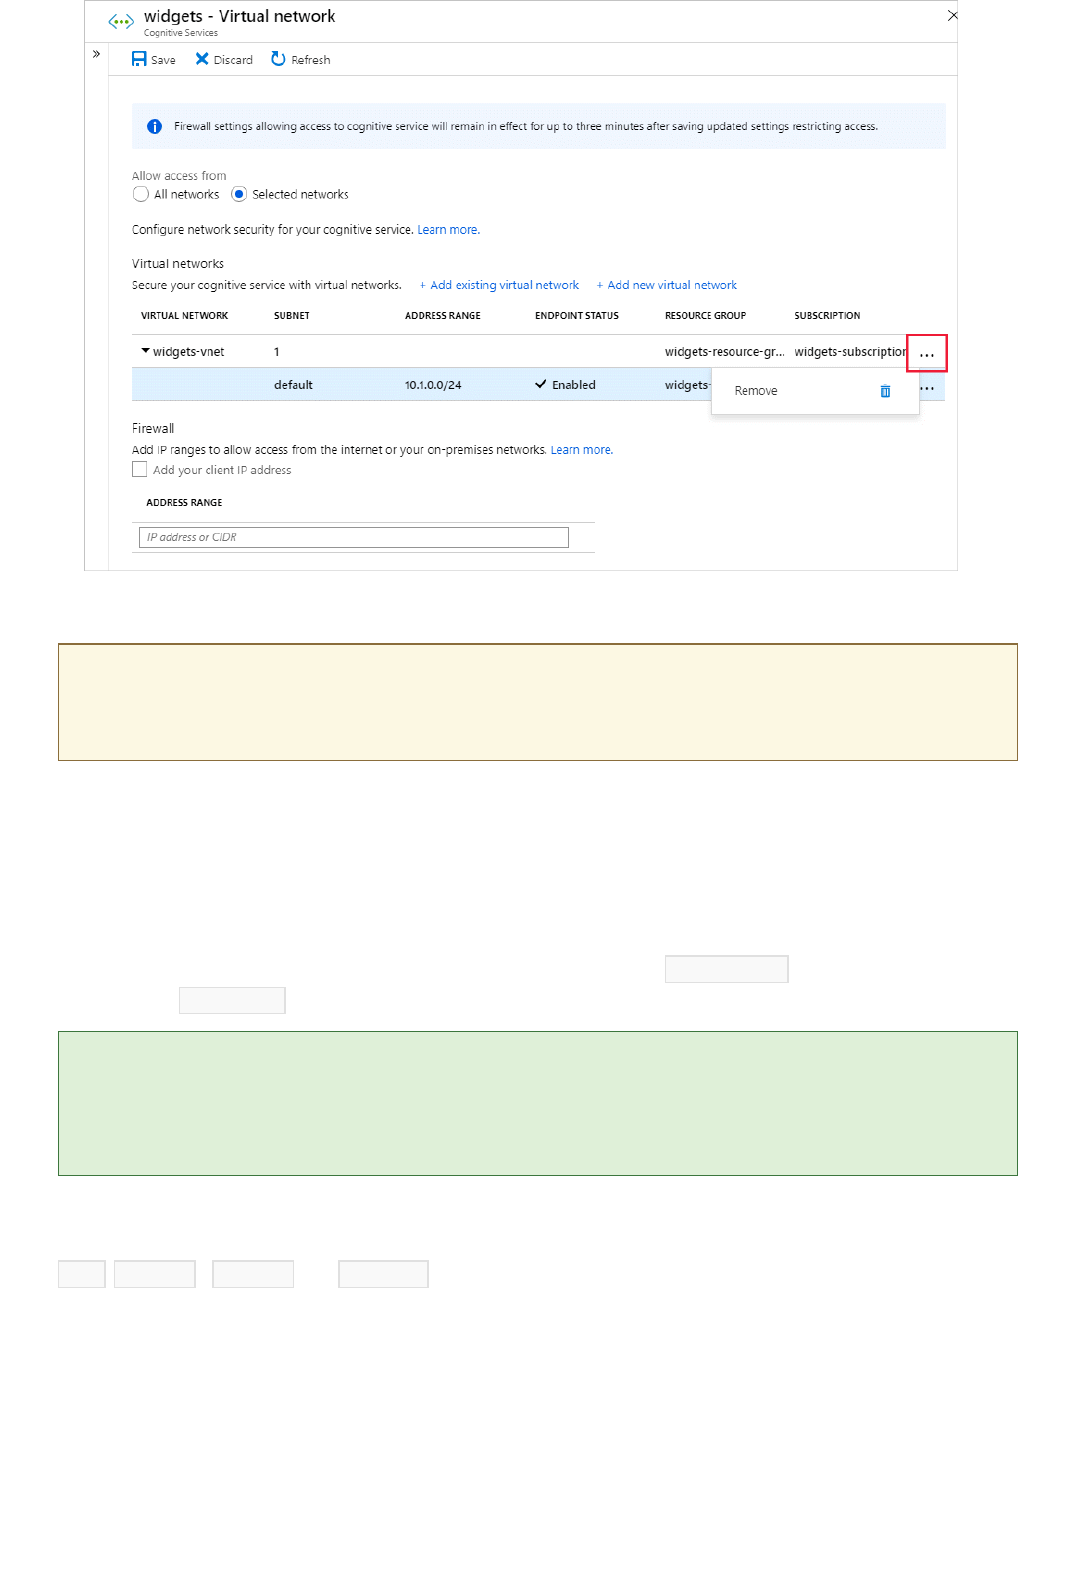
IMPORTANTIMPORTANT
Grant access from an internet IP range
TIPTIP
Configuring access from on
-
premises networksConfiguring access from on
-
premises networks
9. Select SaveSave to apply your changes.
Be sure to set the default rule to denydeny, or network rules have no effect.
You can configure Cognitive Services resources to allow access from specific public internet IP address ranges.
This configuration grants access to specific services and on-premises networks, effectively blocking general
internet traffic.
Provide allowed internet address ranges using CIDR notation in the form 16.17.18.0/24 or as individual IP
addresses like 16.17.18.19 .
Small address ranges using "/31" or "/32" prefix sizes are not supported. These ranges should be configured using
individual IP address rules.
IP network rules are only allowed for public internetpublic internet IP addresses. IP address ranges reserved for private
networks (as defined in RFC 1918) aren't allowed in IP rules. Private networks include addresses that start with
10.* , 172.16.* - 172.31.* , and 192.168.* .
Only IPV4 addresses are supported at this time. Each Cognitive Services resource supports up to 100 IP network
rules, which may be combined with Virtual network rules.
To grant access from your on-premises networks to your Cognitive Services resource with an IP network rule,
you must identify the internet facing IP addresses used by your network. Contact your network administrator
for help.
If you're using ExpressRoute on-premises for public peering or Microsoft peering, you'll need to identify the NAT
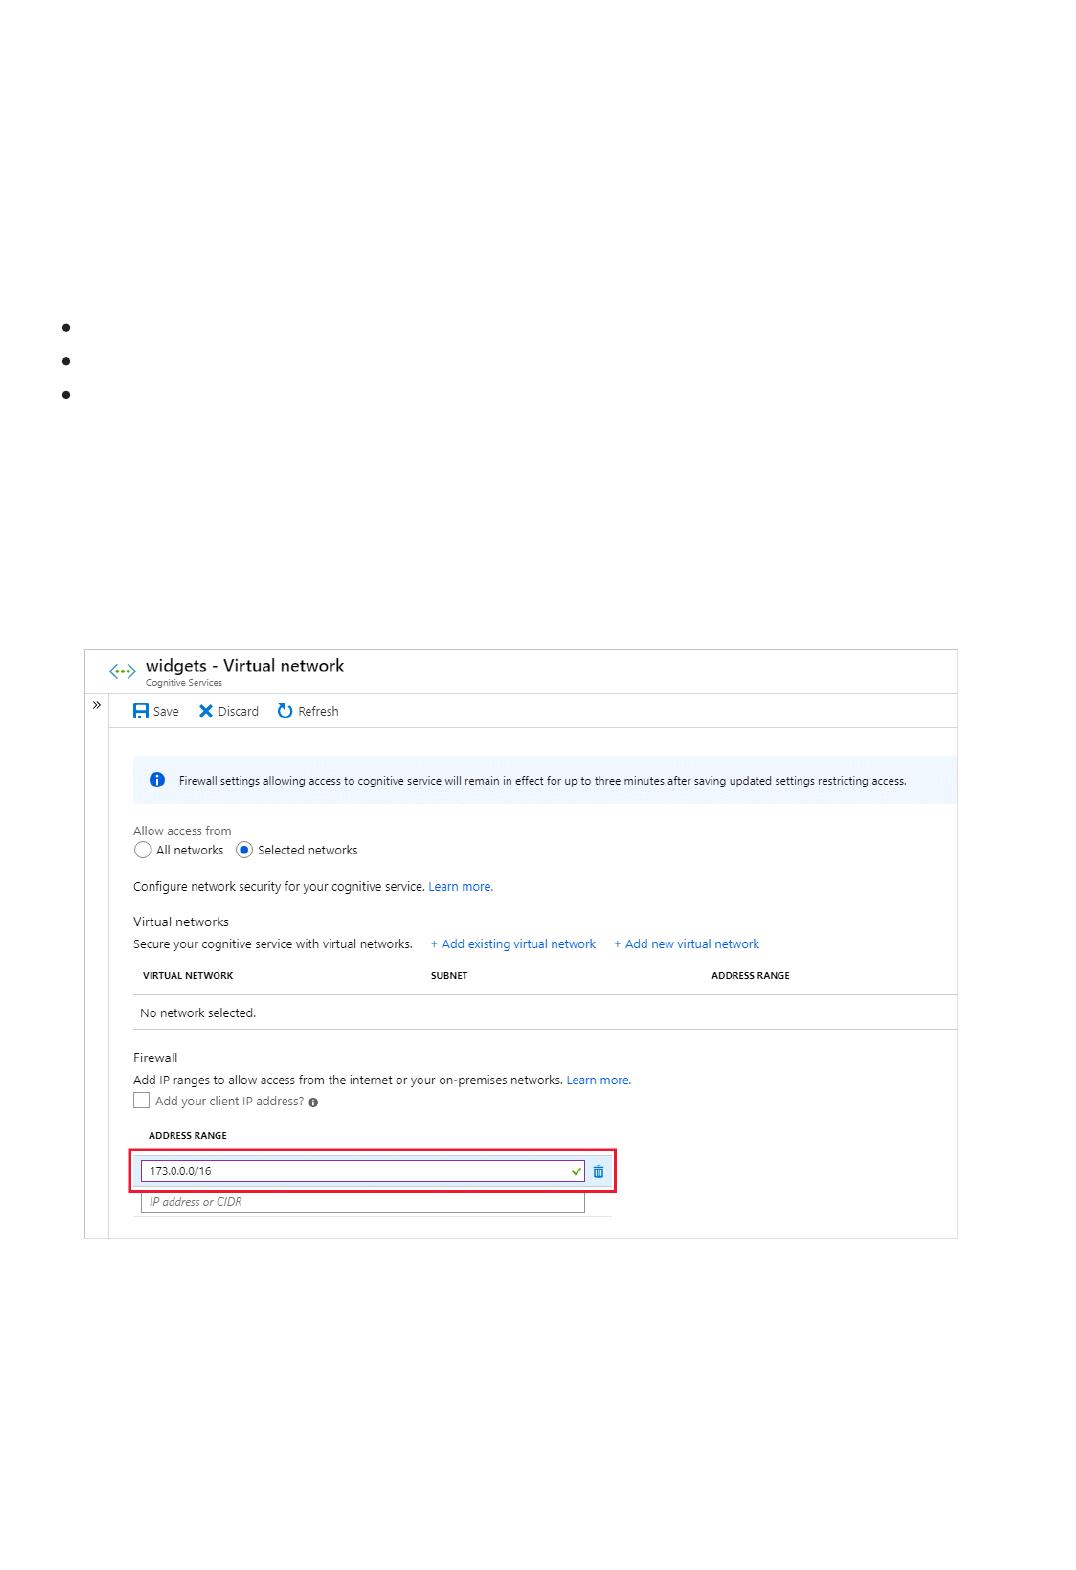
Managing IP network rulesManaging IP network rules
IP addresses. For public peering, each ExpressRoute circuit by default uses two NAT IP addresses. Each is applied
to Azure service traffic when the traffic enters the Microsoft Azure network backbone. For Microsoft peering, the
NAT IP addresses that are used are either customer provided or are provided by the service provider. To allow
access to your service resources, you must allow these public IP addresses in the resource IP firewall setting. To
find your public peering ExpressRoute circuit IP addresses, open a support ticket with ExpressRoute via the
Azure portal. Learn more about NAT for ExpressRoute public and Microsoft peering.
You can manage IP network rules for Cognitive Services resources through the Azure portal, PowerShell, or the
Azure CLI.
Azure portal
PowerShell
Azure CLI
1. Go to the Cognitive Services resource you want to secure.
2. Select the RESOURCE MANAGEMENTRESOURCE MANAGEMENT menu called Vir tual networkVir tual network.
3. Check that you've selected to allow access from Selected networksSelected networks.
4. To grant access to an internet IP range, enter the IP address or address range (in CIDR format) under
FirewallFirewall > Address RangeAddress Range. Only valid public IP (non-reserved) addresses are accepted.
5. To remove an IP network rule, select the trash can icon next to the address range.
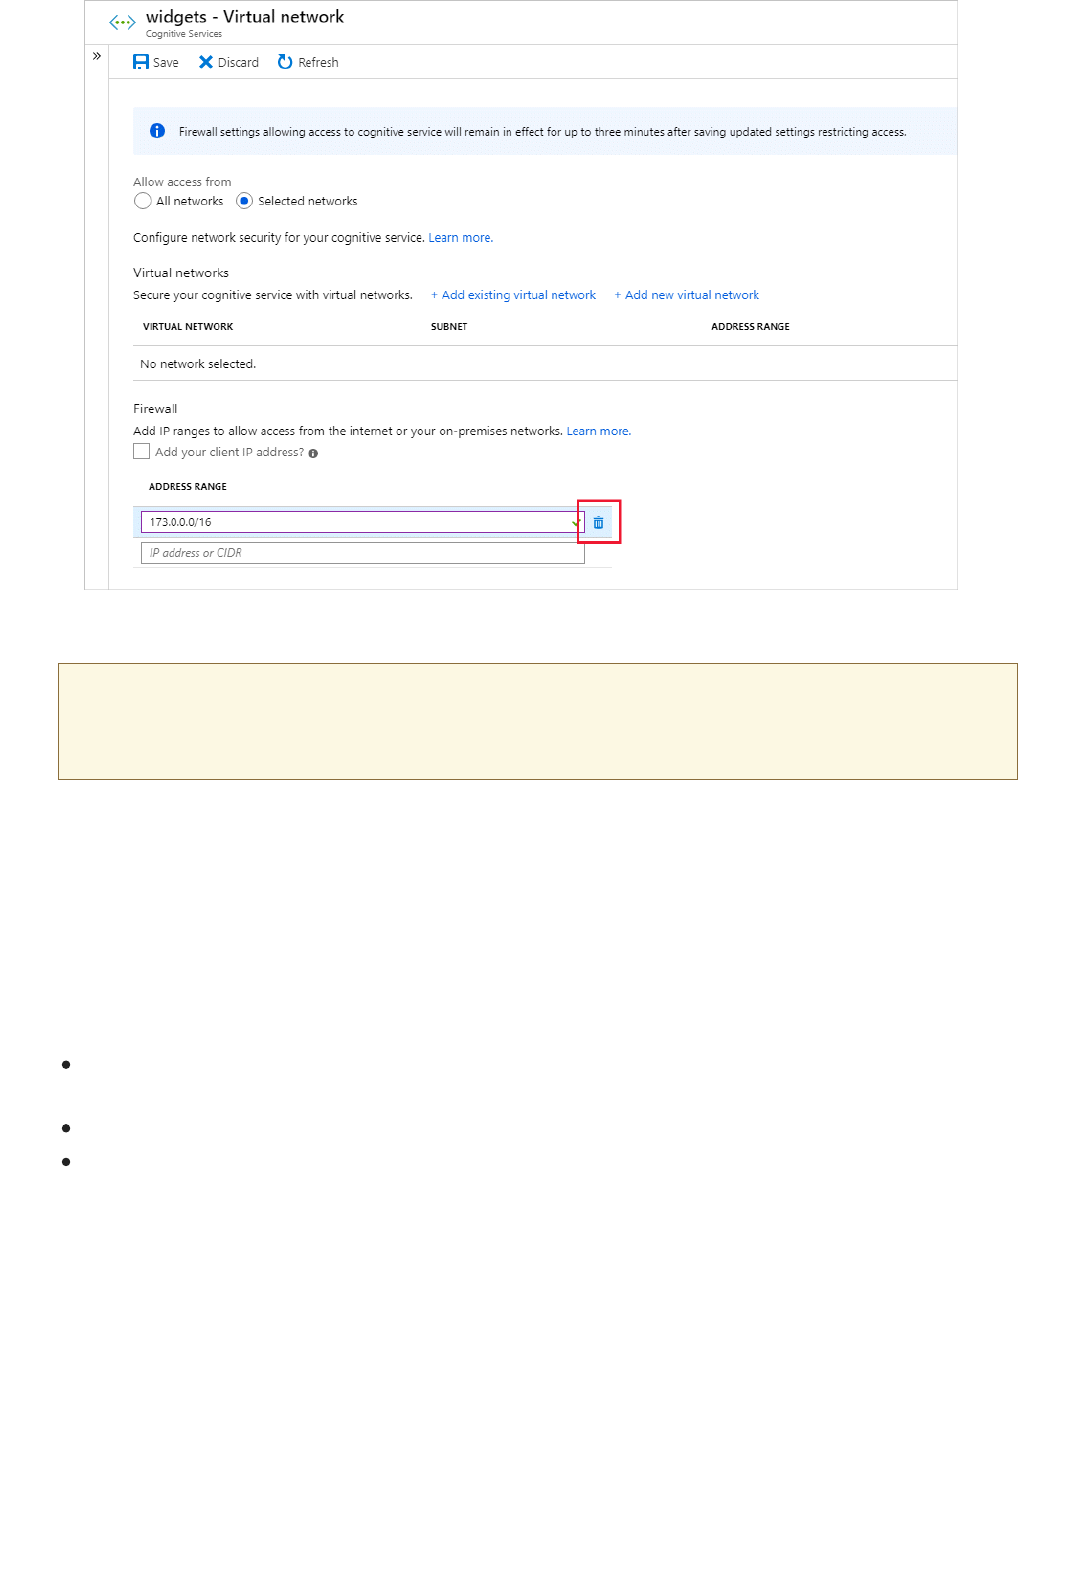
IMPORTANTIMPORTANT
Use private endpoints
Conceptual overviewConceptual overview
6. Select SaveSave to apply your changes.
Be sure to set the default rule to denydeny, or network rules have no effect.
You can use private endpoints for your Cognitive Services resources to allow clients on a virtual network (VNet)
to securely access data over a Private Link. The private endpoint uses an IP address from the VNet address space
for your Cognitive Services resource. Network traffic between the clients on the VNet and the resource traverses
the VNet and a private link on the Microsoft backbone network, eliminating exposure from the public internet.
Private endpoints for Cognitive Services resources let you:
Secure your Cognitive Services resource by configuring the firewall to block all connections on the public
endpoint for the Cognitive Services service.
Increase security for the VNet, by enabling you to block exfiltration of data from the VNet.
Securely connect to Cognitive Services resources from on-premises networks that connect to the VNet using
VPN or ExpressRoutes with private-peering.
A private endpoint is a special network interface for an Azure resource in your VNet. Creating a private endpoint
for your Cognitive Services resource provides secure connectivity between clients in your VNet and your
resource. The private endpoint is assigned an IP address from the IP address range of your VNet. The connection
between the private endpoint and the Cognitive Services service uses a secure private link.
Applications in the VNet can connect to the service over the private endpoint seamlessly, using the same
connection strings and authorization mechanisms that they would use otherwise. The exception is the Speech
Services, which require a separate endpoint. See the section on Private endpoints with the Speech Services.
Private endpoints can be used with all protocols supported by the Cognitive Services resource, including REST.
Private endpoints can be created in subnets that use Service Endpoints. Clients in a subnet can connect to one

Private endpointsPrivate endpoints
Connecting to private endpointsConnecting to private endpoints
Private endpoints with the Speech ServicesPrivate endpoints with the Speech Services
DNS changes for private endpointsDNS changes for private endpoints
TIPTIP
Cognitive Services resource using private endpoint, while using service endpoints to access others.
When you create a private endpoint for a Cognitive Services resource in your VNet, a consent request is sent for
approval to the Cognitive Services resource owner. If the user requesting the creation of the private endpoint is
also an owner of the resource, this consent request is automatically approved.
Cognitive Services resource owners can manage consent requests and the private endpoints, through the
'
Private endpoints
' tab for the Cognitive Services resource in the Azure portal.
When creating the private endpoint, you must specify the Cognitive Services resource it connects to. For more
information on creating a private endpoint, see:
Create a private endpoint using the Private Link Center in the Azure portal
Create a private endpoint using Azure CLI
Create a private endpoint using Azure PowerShell
Clients on a VNet using the private endpoint should use the same connection string for the Cognitive Services
resource as clients connecting to the public endpoint. The exception is the Speech Services, which require a
separate endpoint. See the section on Private endpoints with the Speech Services. We rely upon DNS resolution
to automatically route the connections from the VNet to the Cognitive Services resource over a private link.
We create a private DNS zone attached to the VNet with the necessary updates for the private endpoints, by
default. However, if you're using your own DNS server, you may need to make additional changes to your DNS
configuration. The section on DNS changes below describes the updates required for private endpoints.
See Using Speech Services with private endpoints provided by Azure Private Link.
When you create a private endpoint, the DNS CNAME resource record for the Cognitive Services resource is
updated to an alias in a subdomain with the prefix '
privatelink
'. By default, we also create a private DNS zone,
corresponding to the '
privatelink
' subdomain, with the DNS A resource records for the private endpoints.
When you resolve the endpoint URL from outside the VNet with the private endpoint, it resolves to the public
endpoint of the Cognitive Services resource. When resolved from the VNet hosting the private endpoint, the
endpoint URL resolves to the private endpoint's IP address.
This approach enables access to the Cognitive Services resource using the same connection string for clients in
the VNet hosting the private endpoints and clients outside the VNet.
If you are using a custom DNS server on your network, clients must be able to resolve the fully qualified domain
name (FQDN) for the Cognitive Services resource endpoint to the private endpoint IP address. Configure your
DNS server to delegate your private link subdomain to the private DNS zone for the VNet.
When using a custom or on-premises DNS server, you should configure your DNS server to resolve the Cognitive
Services resource name in the 'privatelink' subdomain to the private endpoint IP address. You can do this by delegating
the 'privatelink' subdomain to the private DNS zone of the VNet, or configuring the DNS zone on your DNS server and
adding the DNS A records.
For more information on configuring your own DNS server to support private endpoints, refer to the following
articles:


Authenticate requests to Azure Cognitive Services
7/22/2021 • 8 minutes to read • Edit Online
Prerequisites
Authentication headers
H EA DERH EADE R DESC RIP T IO NDESC RIP T IO N
Ocp-Apim-Subscription-Key Use this header to authenticate with a subscription key for a
specific service or a multi-service subscription key.
Ocp-Apim-Subscription-Region This header is only required when using a multi-service
subscription key with the Translator service. Use this header
to specify the subscription region.
Authorization Use this header if you are using an authentication token. The
steps to perform a token exchange are detailed in the
following sections. The value provided follows this format:
Bearer <TOKEN> .
Authenticate with a single-service subscription key
curl -X GET 'https://api.cognitive.microsoft.com/bing/v7.0/search?q=Welsch%20Pembroke%20Corgis' \
-H 'Ocp-Apim-Subscription-Key: YOUR_SUBSCRIPTION_KEY' | json_pp
Each request to an Azure Cognitive Service must include an authentication header. This header passes along a
subscription key or access token, which is used to validate your subscription for a service or group of services.
In this article, you'll learn about three ways to authenticate a request and the requirements for each.
Authenticate with a single-service or multi-service subscription key
Authenticate with a token
Authenticate with Azure Active Directory (AAD)
Before you make a request, you need an Azure account and an Azure Cognitive Services subscription. If you
already have an account, go ahead and skip to the next section. If you don't have an account, we have a guide to
get you set up in minutes: Create a Cognitive Services account for Azure.
You can get your subscription key from the Azure portal after creating your account.
Let's quickly review the authentication headers available for use with Azure Cognitive Services.
The first option is to authenticate a request with a subscription key for a specific service, like Translator. The keys
are available in the Azure portal for each resource that you've created. To use a subscription key to authenticate
a request, it must be passed along as the Ocp-Apim-Subscription-Key header.
These sample requests demonstrates how to use the Ocp-Apim-Subscription-Key header. Keep in mind, when
using this sample you'll need to include a valid subscription key.
This is a sample call to the Bing Web Search API:
curl -X POST 'https://api.cognitive.microsofttranslator.com/translate?api-version=3.0&from=en&to=de' \
-H 'Ocp-Apim-Subscription-Key: YOUR_SUBSCRIPTION_KEY' \
-H 'Content-Type: application/json' \
--data-raw '[{ "text": "How much for the cup of coffee?" }]' | json_pp
Authenticate with a multi-service subscription key
WARNINGWARNING
Supported regionsSupported regions
This is a sample call to the Translator service:
The following video demonstrates using a Cognitive Services key.
At this time, the multi-service key doesn't support: QnA Maker, Immersive Reader, Personalizer, and Anomaly Detector.
This option also uses a subscription key to authenticate requests. The main difference is that a subscription key
is not tied to a specific service, rather, a single key can be used to authenticate requests for multiple Cognitive
Services. See Cognitive Services pricing for information about regional availability, supported features, and
pricing.
The subscription key is provided in each request as the Ocp-Apim-Subscription-Key header.
When using the multi-service subscription key to make a request to api.cognitive.microsoft.com , you must
include the region in the URL. For example: westus.api.cognitive.microsoft.com .
When using multi-service subscription key with the Translator service, you must specify the subscription region
with the Ocp-Apim-Subscription-Region header.
Multi-service authentication is supported in these regions:
australiaeast
brazilsouth
canadacentral
centralindia
eastasia
Sample requestsSample requests
curl -X GET 'https://YOUR-REGION.api.cognitive.microsoft.com/bing/v7.0/search?q=Welsch%20Pembroke%20Corgis'
\
-H 'Ocp-Apim-Subscription-Key: YOUR_SUBSCRIPTION_KEY' | json_pp
curl -X POST 'https://api.cognitive.microsofttranslator.com/translate?api-version=3.0&from=en&to=de' \
-H 'Ocp-Apim-Subscription-Key: YOUR_SUBSCRIPTION_KEY' \
-H 'Ocp-Apim-Subscription-Region: YOUR_SUBSCRIPTION_REGION' \
-H 'Content-Type: application/json' \
--data-raw '[{ "text": "How much for the cup of coffee?" }]' | json_pp
Authenticate with an authentication token
NOTENOTE
eastus
japaneast
northeurope
southcentralus
southeastasia
uksouth
westcentralus
westeurope
westus
westus2
francecentral
koreacentral
northcentralus
southafricanorth
uaenorth
switzerlandnorth
This is a sample call to the Bing Web Search API:
This is a sample call to the Translator service:
Some Azure Cognitive Services accept, and in some cases require, an authentication token. Currently, these
services support authentication tokens:
Text Translation API
Speech Services: Speech-to-text REST API
Speech Services: Text-to-speech REST API
QnA Maker also uses the Authorization header, but requires an endpoint key. For more information, see QnA Maker: Get
answer from knowledge base.
WARNINGWARNING
Sample requestsSample requests
curl -v -X POST \
"https://YOUR-REGION.api.cognitive.microsoft.com/sts/v1.0/issueToken" \
-H "Content-type: application/x-www-form-urlencoded" \
-H "Content-length: 0" \
-H "Ocp-Apim-Subscription-Key: YOUR_SUBSCRIPTION_KEY"
curl -X POST 'https://api.cognitive.microsofttranslator.com/translate?api-version=3.0&from=en&to=de' \
-H 'Authorization: Bearer YOUR_AUTH_TOKEN' \
-H 'Content-Type: application/json' \
--data-raw '[{ "text": "How much for the cup of coffee?" }]' | json_pp
Authenticate with Azure Active Directory
The services that support authentication tokens may change over time, please check the API reference for a service
before using this authentication method.
Both single service and multi-service subscription keys can be exchanged for authentication tokens.
Authentication tokens are valid for 10 minutes.
Authentication tokens are included in a request as the Authorization header. The token value provided must be
preceded by Bearer , for example: Bearer YOUR_AUTH_TOKEN .
Use this URL to exchange a subscription key for an authentication token:
https://YOUR-REGION.api.cognitive.microsoft.com/sts/v1.0/issueToken .
These multi-service regions support token exchange:
australiaeast
brazilsouth
canadacentral
centralindia
eastasia
eastus
japaneast
northeurope
southcentralus
southeastasia
uksouth
westcentralus
westeurope
westus
westus2
After you get an authentication token, you'll need to pass it in each request as the Authorization header. This is
a sample call to the Translator service:
IMPORTANTIMPORTANT
Create a resource with a custom subdomainCreate a resource with a custom subdomain
Assign a role to a service principalAssign a role to a service principal
NOTENOTE
AAD authentication always needs to be used together with custom subdomain name of your Azure resource. Regional
endpoints do not support AAD authentication.
In the previous sections, we showed you how to authenticate against Azure Cognitive Services using a single-
service or multi-service subscription key. While these keys provide a quick and easy path to start development,
they fall short in more complex scenarios that require Azure role-based access control (Azure RBAC). Let's take a
look at what's required to authenticate using Azure Active Directory (AAD).
In the following sections, you'll use either the Azure Cloud Shell environment or the Azure CLI to create a
subdomain, assign roles, and obtain a bearer token to call the Azure Cognitive Services. If you get stuck, links
are provided in each section with all available options for each command in Azure Cloud Shell/Azure CLI.
The first step is to create a custom subdomain. If you want to use an existing Cognitive Services resource which
does not have custom subdomain name, follow the instructions in Cognitive Services Custom Subdomains to
enable custom subdomain for your resource.
Set-AzContext -SubscriptionName <SubscriptionName>
$account = New-AzCognitiveServicesAccount -ResourceGroupName <RESOURCE_GROUP_NAME> -name
<ACCOUNT_NAME> -Type <ACCOUNT_TYPE> -SkuName <SUBSCRIPTION_TYPE> -Location <REGION> -
CustomSubdomainName <UNIQUE_SUBDOMAIN>
1. Start by opening the Azure Cloud Shell. Then select a subscription:
2. Next, create a Cognitive Services resource with a custom subdomain. The subdomain name needs to be
globally unique and cannot include special characters, such as: ".", "!", ",".
3. If successful, the EndpointEndpoint should show the subdomain name unique to your resource.
Now that you have a custom subdomain associated with your resource, you're going to need to assign a role to
a service principal.
Keep in mind that Azure role assignments may take up to five minutes to propagate.
$SecureStringPassword = ConvertTo-SecureString -String <YOUR_PASSWORD> -AsPlainText -Force
$app = New-AzADApplication -DisplayName <APP_DISPLAY_NAME> -IdentifierUris <APP_URIS> -Password
$SecureStringPassword
New-AzADServicePrincipal -ApplicationId <APPLICATION_ID>
1. First, let's register an AAD application.
You're going to need the ApplicationIdApplicationId in the next step.
2. Next, you need to create a service principal for the AAD application.
Sample requestSample request
NOTENOTE
NOTENOTE
New-AzRoleAssignment -ObjectId <SERVICE_PRINCIPAL_OBJECTID> -Scope <ACCOUNT_ID> -RoleDefinitionName
"Cognitive Services User"
If you register an application in the Azure portal, this step is completed for you.
3. The last step is to assign the "Cognitive Services User" role to the service principal (scoped to the
resource). By assigning a role, you're granting service principal access to this resource. You can grant the
same service principal access to multiple resources in your subscription.
The ObjectId of the service principal is used, not the ObjectId for the application. The ACCOUNT_ID will be the
Azure resource Id of the Cognitive Services account you created. You can find Azure resource Id from "properties"
of the resource in Azure portal.
In this sample, a password is used to authenticate the service principal. The token provided is then used to call
the Computer Vision API.
$context=Get-AzContext
$context.Tenant.Id
NOTENOTE
$authContext = New-Object "Microsoft.IdentityModel.Clients.ActiveDirectory.AuthenticationContext" -
ArgumentList "https://login.windows.net/<TENANT_ID>"
$secureSecretObject = New-Object "Microsoft.IdentityModel.Clients.ActiveDirectory.SecureClientSecret"
-ArgumentList $SecureStringPassword
$clientCredential = New-Object "Microsoft.IdentityModel.Clients.ActiveDirectory.ClientCredential" -
ArgumentList $app.ApplicationId, $secureSecretObject
$token=$authContext.AcquireTokenAsync("https://cognitiveservices.azure.com/",
$clientCredential).Result
$token
1. Get your TenantIdTenantId:
2. Get a token:
If you're using Azure Cloud Shell, the SecureClientSecret class isn't available.
PowerShell
Azure Cloud Shell
3. Call the Computer Vision API:
$url = $account.Endpoint+"vision/v1.0/models"
$result = Invoke-RestMethod -Uri $url -Method Get -Headers
@{"Authorization"=$token.CreateAuthorizationHeader()} -Verbose
$result | ConvertTo-Json

Authorize access to managed identities
Enable managed identities on a VMEnable managed identities on a VM
See also
Alternatively, the service principal can be authenticated with a certificate. Besides service principal, user principal
is also supported by having permissions delegated through another AAD application. In this case, instead of
passwords or certificates, users would be prompted for two-factor authentication when acquiring token.
Cognitive Services support Azure Active Directory (Azure AD) authentication with managed identities for Azure
resources. Managed identities for Azure resources can authorize access to Cognitive Services resources using
Azure AD credentials from applications running in Azure virtual machines (VMs), function apps, virtual machine
scale sets, and other services. By using managed identities for Azure resources together with Azure AD
authentication, you can avoid storing credentials with your applications that run in the cloud.
Before you can use managed identities for Azure resources to authorize access to Cognitive Services resources
from your VM, you must enable managed identities for Azure resources on the VM. To learn how to enable
managed identities for Azure Resources, see:
Azure portal
Azure PowerShell
Azure CLI
Azure Resource Manager template
Azure Resource Manager client libraries
For more information about managed identities, see Managed identities for Azure resources.
What is Cognitive Services?
Cognitive Services pricing
Custom subdomains
Migrate to version 3.x of the Text Analytics API
7/8/2021 • 4 minutes to read • Edit Online
TIPTIP
Feature changesFeature changes
Steps to migrateSteps to migrate
REST APIREST API
Client librariesClient libraries
See also
If you're using version 2.1 of the Text Analytics API, this article will help you upgrade your application to use
version 3.x. Version 3.1 and 3.0 are generally available and introduce new features such as expanded Named
Entity Recognition (NER) and model versioning. Version of v3.1 is also available, which adds features such as
opinion mining and Personally Identifying Information detection. The models used in v2 or 3.1-preview.x will not
receive future updates.
Sentiment analysis
NER and entity linking
Language detection
Key phrase extraction
Want to use the latest version of the API in your application? See the sentiment analysis how-to article and quickstart for
information on the current version of the API.
Sentiment Analysis in version 2.1 returns sentiment scores between 0 and 1 for each document sent to the API,
with scores closer to 1 indicating more positive sentiment. Version 3 instead returns sentiment labels (such as
"positive" or "negative") for both the sentences and the document as a whole, and their associated confidence
scores.
If your application uses the REST API, update its request endpoint to the v3 endpoint for sentiment analysis. For
example: https://<your-custom-subdomain>.cognitiveservices.azure.com/text/analytics/v3.1/sentiment . You will
also need to update the application to use the sentiment labels returned in the API's response.
See the reference documentation for examples of the JSON response.
Version 2.1
Version 3.0
Version 3.1
To use the latest version of the Text Analytics v3 client library, you will need to download the latest software
package in the Azure.AI.TextAnalytics namespace. The Setting upSetting up section in the quickstart article lists the
commands you can use for your preferred language, with example code.
What is the Text Analytics API
Language support
Model versioning
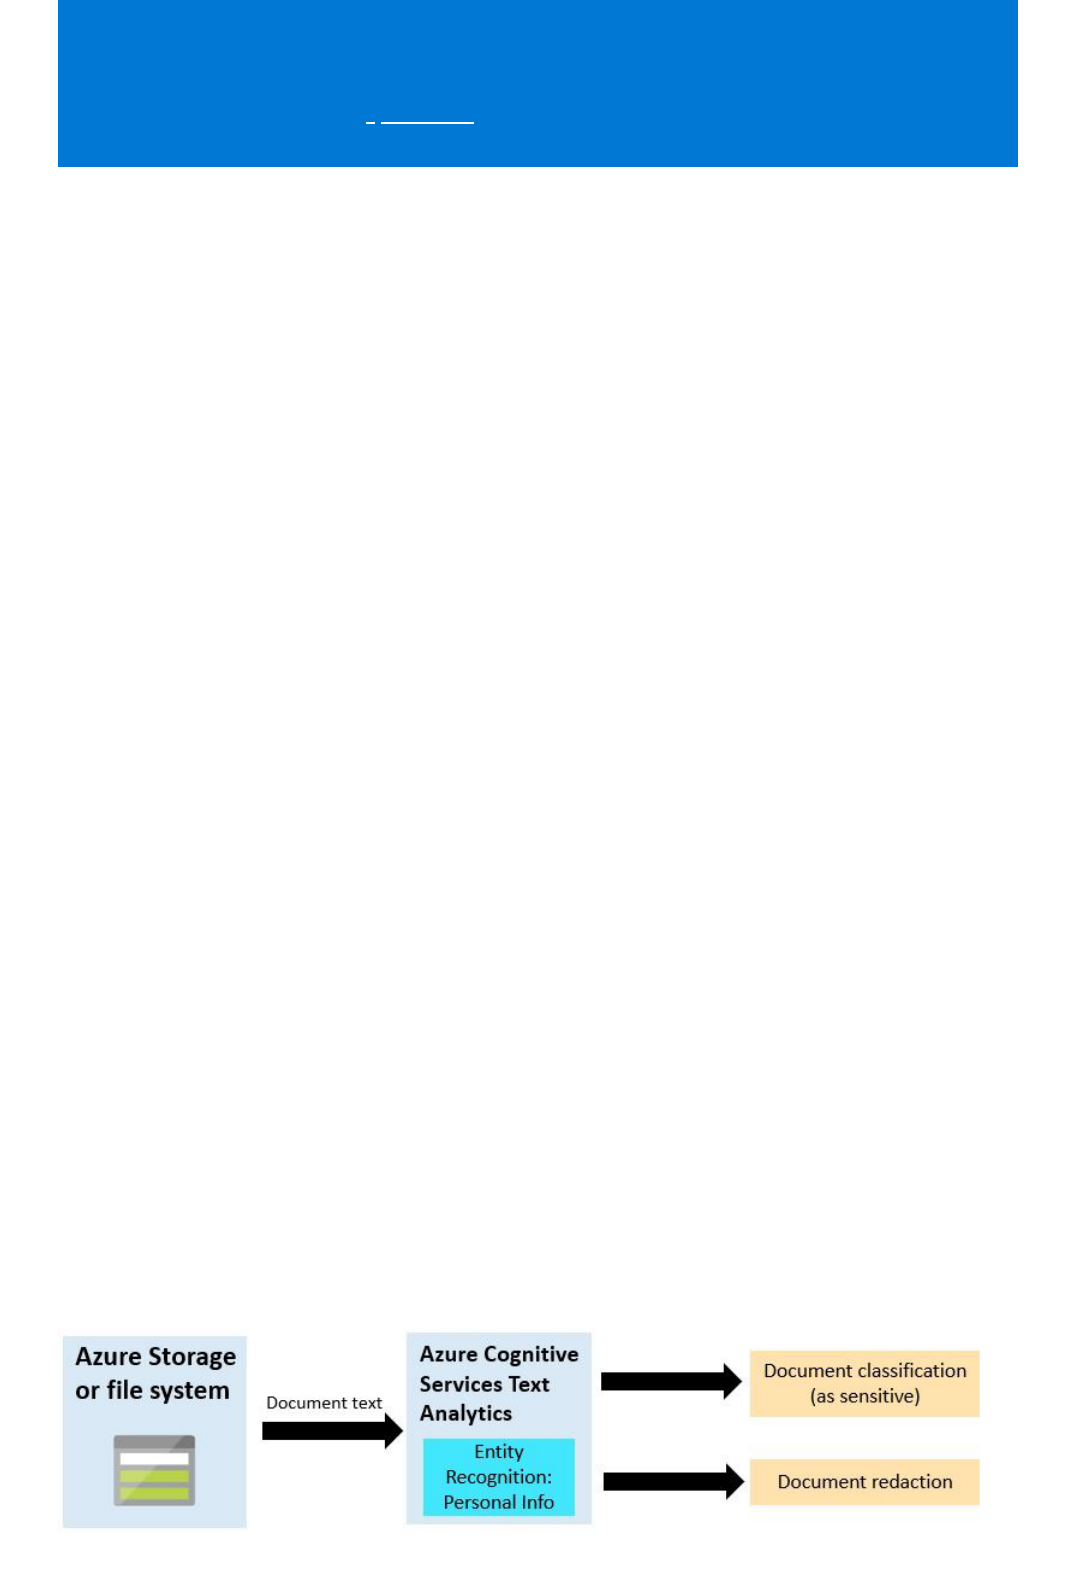
Example user scenarios for the Text Analytics API
3/5/2021 • 2 minutes to read • Edit Online
Analyze Survey results
Analyze recorded inbound customer calls
Process and categorize support incidents
Monitor your product's social media feeds
Classify and redact documents that have sensitive information
The Text Analytics API is a cloud-based service that provides advanced natural language processing over text.
This article describes some example use cases for integrating the API into your business solutions and
processes.
Draw insights from customer and employee survey results by processing the raw text responses using
Sentiment Analysis. Aggregate the findings for analysis, follow up, and driving engagements.
Extract insights from customer services calls using Speech-to-Text, Sentiment Analysis, and Key Phrase
Extraction. Display the results in Power BI dashboard or a portal to better understand customers, highlight
customer service trends, and drive customer engagement. Send API requests as a batch for reporting, or in real-
time for intervention. See the sample code on GitHub.
Use Key Phrase Extraction and Entity Recognition to process support requests submitted in unstructured textual
format. Use the extracted phrases and entities to categorize the requests for resource planning and trend
analysis.
Monitor user product feedback on your product's twitter or Facebook page. Use the data to analyze customer
sentiment toward new products launches, extract key phrases about features and feature requests, or address
customer complaints as they happen. See the example Microsoft Power Automate template.
Use Named Entity Recognition to identify personal and sensitive information in documents. Use the data to
classify documents or redact them so they can be shared safely.
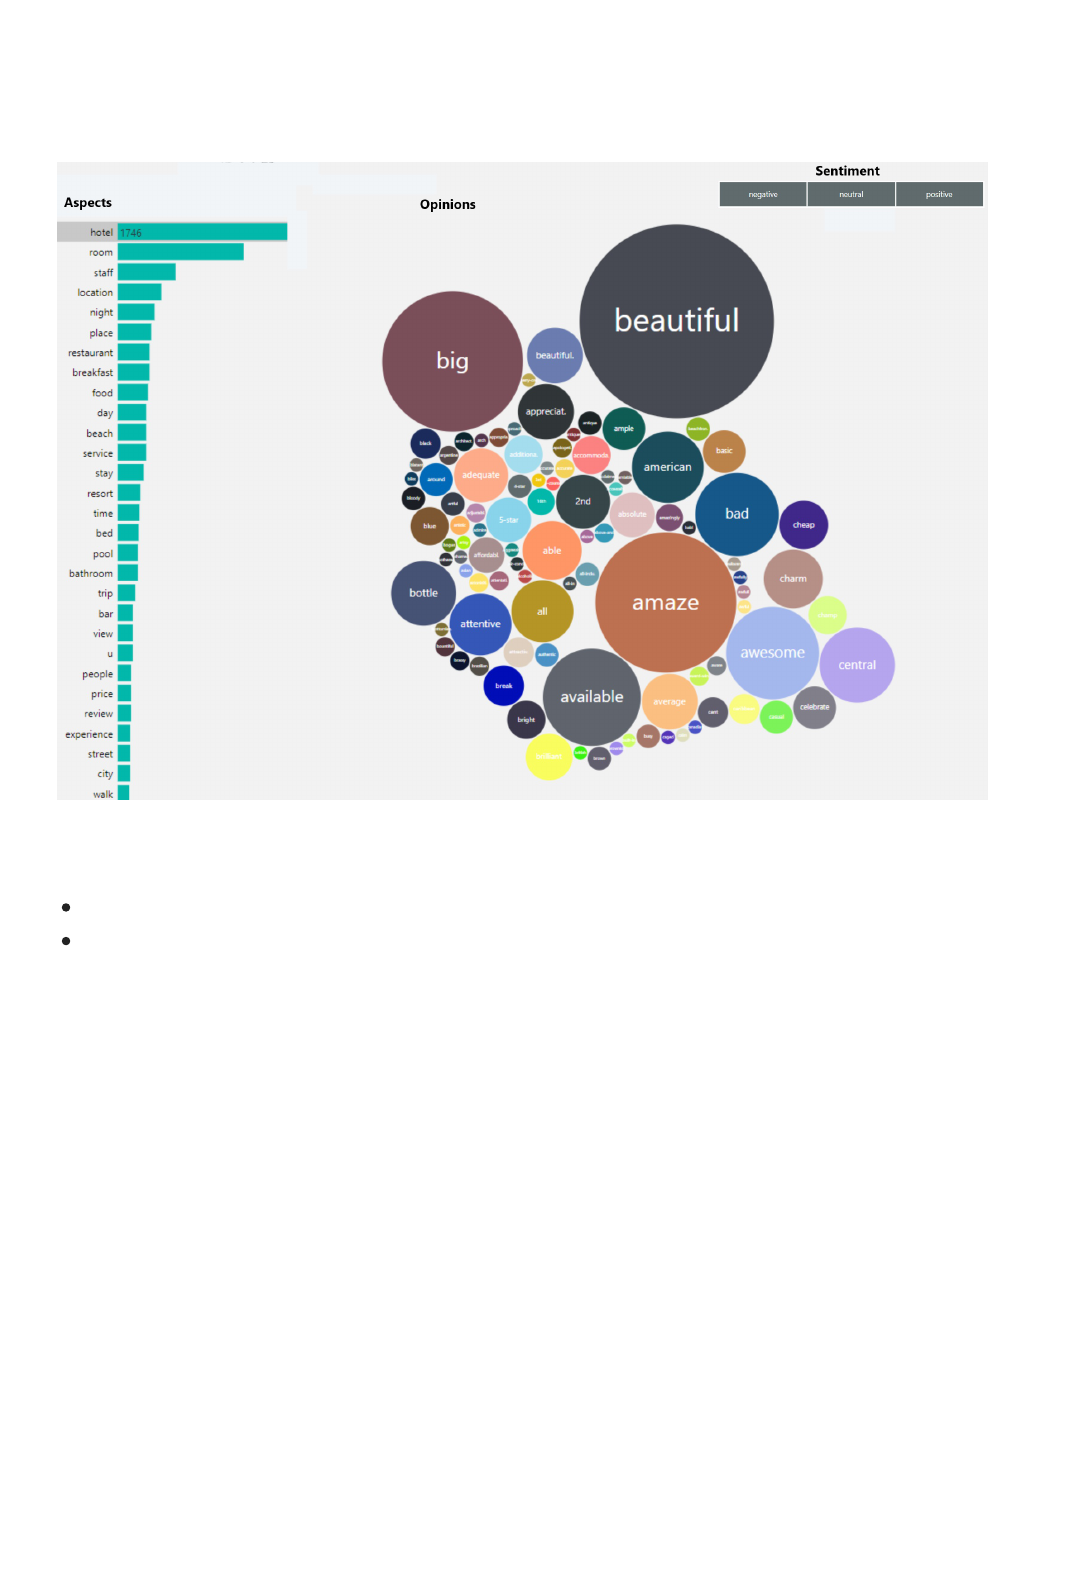
Perform opinion mining
Next steps
Group opinions related to specific aspects of a product or service in surveys, customer feedback, or wherever
text holds an opinion about an aspect. Use it to help guide product launches and improvements, marketing
efforts, or highlight how your product or service is performing.
What is the Text Analytics API?
Send a request to the Text Analytics API using the client library

Supported entity categories in the Text Analytics API
v3
7/8/2021 • 33 minutes to read • Edit Online
Entity categories
C AT EGORYC AT E GORY DESC RIP T IO NDESC RIP T IO N
Person Names of people.
PersonType Job types or roles held by a person.
Location Natural and human-made landmarks, structures,
geographical features, and geopolitical entities
Organization Companies, political groups, musical bands, sport clubs,
government bodies, and public organizations.
Event Historical, social, and naturally occurring events.
Product Physical objects of various categories.
Skill A capability, skill, or expertise.
Address Full mailing addresses.
Phone number Phone numbers.
Email Email addresses.
URL URLs to websites.
IP Network IP addresses.
Use this article to find the entity categories that can be returned by Named Entity Recognition (NER). NER runs a
predictive model to identify and categorize named entities from an input document.
NER v3.1 is also available, which includes the ability to detect personal ( PII ) and health ( PHI ) information.
Additionally, click on the HealthHealth tab to see a list of supported categories in Text Analytics for health.
You can find a list of types returned by version 2.1 in the migration guide
General
PII
Health
The NER feature for Text Analytics returns the following general (non identifying) entity categories. for example
when sending requests to the /entities/recognition/general endpoint.

DateTime Dates and times of day.
Quantity Numerical measurements and units.
C AT EGORYC AT E GORY DESC RIP T IO NDESC RIP T IO N
Category: PersonCategory: Person
Category: PersonTypeCategory: PersonType
Category: LocationCategory: Location
SubcategoriesSubcategories
This category contains the following entity:
EntityEntity
Person
DetailsDetails
Names of people.
Suppor ted document languagesSuppor ted document languages
ar , cs , da , nl , en , fi , fr , de , he ,
hu , it , ja , ko , no , pl , pt-br , pt - pt , ru , es , sv , tr
This category contains the following entity:
EntityEntity
PersonType
DetailsDetails
Job types or roles held by a person
Suppor ted document languagesSuppor ted document languages
en , es , fr , de , it , zh-hans , ja , ko , pt-pt , pt-br
This category contains the following entity:
EntityEntity
Location
DetailsDetails
Natural and human-made landmarks, structures, geographical features, and geopolitical entities.
Suppor ted document languagesSuppor ted document languages
ar , cs , da , nl , en , fi , fr , de , he , hu , it , ja , ko , no , pl , pt-br , pt-pt , ru , es , sv , tr
The entity in this category can have the following subcategories.
Entity subcategor yEntity subcategor y
Geopolitical Entity (GPE)
DetailsDetails
Cities, countries/regions, states.

Category: OrganizationCategory: Organization
SubcategoriesSubcategories
Category: EventCategory: Event
Suppor ted document languagesSuppor ted document languages
en , es , fr , de , it , zh-hans , ja , ko , pt-pt , pt-br
Structural
Manmade structures.
en
Geographical
Geographic and natural features such as rivers, oceans, and deserts.
en
This category contains the following entity:
EntityEntity
Organization
DetailsDetails
Companies, political groups, musical bands, sport clubs, government bodies, and public organizations.
Nationalities and religions are not included in this entity type.
Suppor ted document languagesSuppor ted document languages
ar , cs , da , nl , en , fi , fr , de , he , hu , it , ja , ko , no , pl , pt-br , pt-pt , ru , es , sv , tr
The entity in this category can have the following subcategories.
Entity subcategor yEntity subcategor y
Medical
DetailsDetails
Medical companies and groups.
Suppor ted document languagesSuppor ted document languages
en
Stock exchange
Stock exchange groups.
en
Sports
Sports-related organizations.
en
This category contains the following entity:
EntityEntity
Event

SubcategoriesSubcategories
Category: ProductCategory: Product
SubcategoriesSubcategories
DetailsDetails
Historical, social, and naturally occurring events.
Suppor ted document languagesSuppor ted document languages
en , es , fr , de , it , zh-hans , ja , ko , pt-pt and pt-br
The entity in this category can have the following subcategories.
Entity subcategor yEntity subcategor y
Cultural
DetailsDetails
Cultural events and holidays.
Suppor ted document languagesSuppor ted document languages
en
Natural
Naturally occurring events.
en
Sports
Sporting events.
en
This category contains the following entity:
EntityEntity
Product
DetailsDetails
Physical objects of various categories.
Suppor ted document languagesSuppor ted document languages
en , es , fr , de , it , zh-hans , ja , ko , pt-pt , pt-br
The entity in this category can have the following subcategories.
Entity subcategor yEntity subcategor y
Computing products
DetailsDetails
Computing products.
Suppor ted document languagesSuppor ted document languages
en

Category: SkillCategory: Skill
Category: AddressCategory: Address
Category: PhoneNumberCategory: PhoneNumber
Category: EmailCategory: Email
Category: URLCategory: URL
This category contains the following entity:
EntityEntity
Skill
DetailsDetails
A capability, skill, or expertise.
Suppor ted document languagesSuppor ted document languages
en , es , fr , de , it , pt-pt , pt-br
This category contains the following entity:
EntityEntity
Address
DetailsDetails
Full mailing address.
Suppor ted document languagesSuppor ted document languages
en , es , fr , de , it , zh-hans , ja , ko , pt-pt , pt-br
This category contains the following entity:
EntityEntity
PhoneNumber
DetailsDetails
Phone numbers (US and EU phone numbers only).
Suppor ted document languagesSuppor ted document languages
en , es , fr , de , it , zh-hans , ja , ko , pt-pt pt-br
This category contains the following entity:
EntityEntity
Email
DetailsDetails
Email addresses.
Suppor ted document languagesSuppor ted document languages
en , es , fr , de , it , zh-hans , ja , ko , pt-pt , pt-br
This category contains the following entity:
EntityEntity

Category: IPCategory: IP
Category: DateTimeCategory: DateTime
SubcategoriesSubcategories
URL
DetailsDetails
URLs to websites.
Suppor ted document languagesSuppor ted document languages
en , es , fr , de , it , zh-hans , ja , ko , pt-pt , pt-br
This category contains the following entity:
EntityEntity
IP
DetailsDetails
network IP addresses.
Suppor ted document languagesSuppor ted document languages
en , es , fr , de , it , zh-hans , ja , ko , pt-pt , pt-br
This category contains the following entities:
EntityEntity
DateTime
DetailsDetails
Dates and times of day.
Suppor ted document languagesSuppor ted document languages
en , es , fr , de , it , zh-hans , ja , ko , pt-pt , pt-br
Entities in this category can have the following subcategories
The entity in this category can have the following subcategories.
Entity subcategor yEntity subcategor y
Date
DetailsDetails
Calender dates.
Suppor ted document languagesSuppor ted document languages
en , es , fr , de , it , zh-hans , pt-pt , pt-br
Time
Times of day.
en , es , fr , de , it , zh-hans , pt-pt , pt-br
DateRange

Category: QuantityCategory: Quantity
SubcategoriesSubcategories
Date ranges.
en , es , fr , de , it , zh-hans , pt-pt , pt-br
TimeRange
Time ranges.
en , es , fr , de , it , zh-hans , pt-pt , pt-br
Duration
Durations.
en , es , fr , de , it , zh-hans , pt-pt , pt-br
Set
Set, repeated times.
en , es , fr , de , it , zh-hans , pt-pt , pt-br
This category contains the following entities:
EntityEntity
Quantity
DetailsDetails
Numbers and numeric quantities.
Suppor ted document languagesSuppor ted document languages
en , es , fr , de , it , zh-hans , ja , ko , pt-pt , pt-br
The entity in this category can have the following subcategories.
Entity subcategor yEntity subcategor y
Number
DetailsDetails
Numbers.
Suppor ted document languagesSuppor ted document languages
en , es , fr , de , it , zh-hans , pt-pt , pt-br
Percentage
Percentages
en , es , fr , de , it , zh-hans , pt-pt , pt-br
Ordinal numbers
Ordinal numbers.
en , es , fr , de , it , zh-hans , pt-pt , pt-br
Age

Next steps
Ages.
en , es , fr , de , it , zh-hans , pt-pt , pt-br
Currency
Currencies
en , es , fr , de , it , zh-hans , pt-pt , pt-br
Dimensions
Dimensions and measurements.
en , es , fr , de , it , zh-hans , pt-pt , pt-br
Temperature
Temperatures.
en , es , fr , de , it , zh-hans , pt-pt , pt-br
How to use Named Entity Recognition in Text Analytics

Text offsets in the Text Analytics API output
8/2/2021 • 2 minutes to read • Edit Online
Offsets in the API response
Extracting substrings from text with offsets
Offsets in API version 3.1
See also
Multilingual and emoji support has led to Unicode encodings that use more than one code point to represent a
single displayed character, called a grapheme. For example, emojis like and may use several characters to
compose the shape with additional characters for visual attributes, such as skin tone. Similarly, the Hindi word
is encoded as five letters and three combining marks.
Because of the different lengths of possible multilingual and emoji encodings, the Text Analytics API may return
offsets in the response.
Whenever offsets are returned in the API response, such as Named Entity Recognition or Sentiment Analysis,
remember:
Elements in the response may be specific to the endpoint that was called.
HTTP POST/GET payloads are encoded in UTF-8, which may or may not be the default character encoding on
your client-side compiler or operating system.
Offsets refer to grapheme counts based on the Unicode 8.0.0 standard, not character counts.
Offsets can cause problems when using character-based substring methods, for example the .NET substring()
method. One problem is that an offset may cause a substring method to end in the middle of a multi-character
grapheme encoding instead of the end.
In .NET, consider using the StringInfo class, which enables you to work with a string as a series of textual
elements, rather than individual character objects. You can also look for grapheme splitter libraries in your
preferred software environment.
The Text Analytics API returns these textual elements as well, for convenience.
In version 3.1 of the API, all Text Analytics API endpoints that return an offset will support the stringIndexType
parameter. This parameter adjusts the offset and length attributes in the API output to match the requested
string iteration scheme. Currently, we support three types:
1. textElement_v8 (default): iterates over graphemes as defined by the Unicode 8.0.0 standard
2. unicodeCodePoint : iterates over Unicode Code Points, the default scheme for Python 3
3. utf16CodeUnit : iterates over UTF-16 Code Units, the default scheme for JavaScript, Java, and .NET
If the stringIndexType requested matches the programming environment of choice, substring extraction can be
done using standard substring or slice methods.
Text Analytics overview
Sentiment analysis
Entity recognition

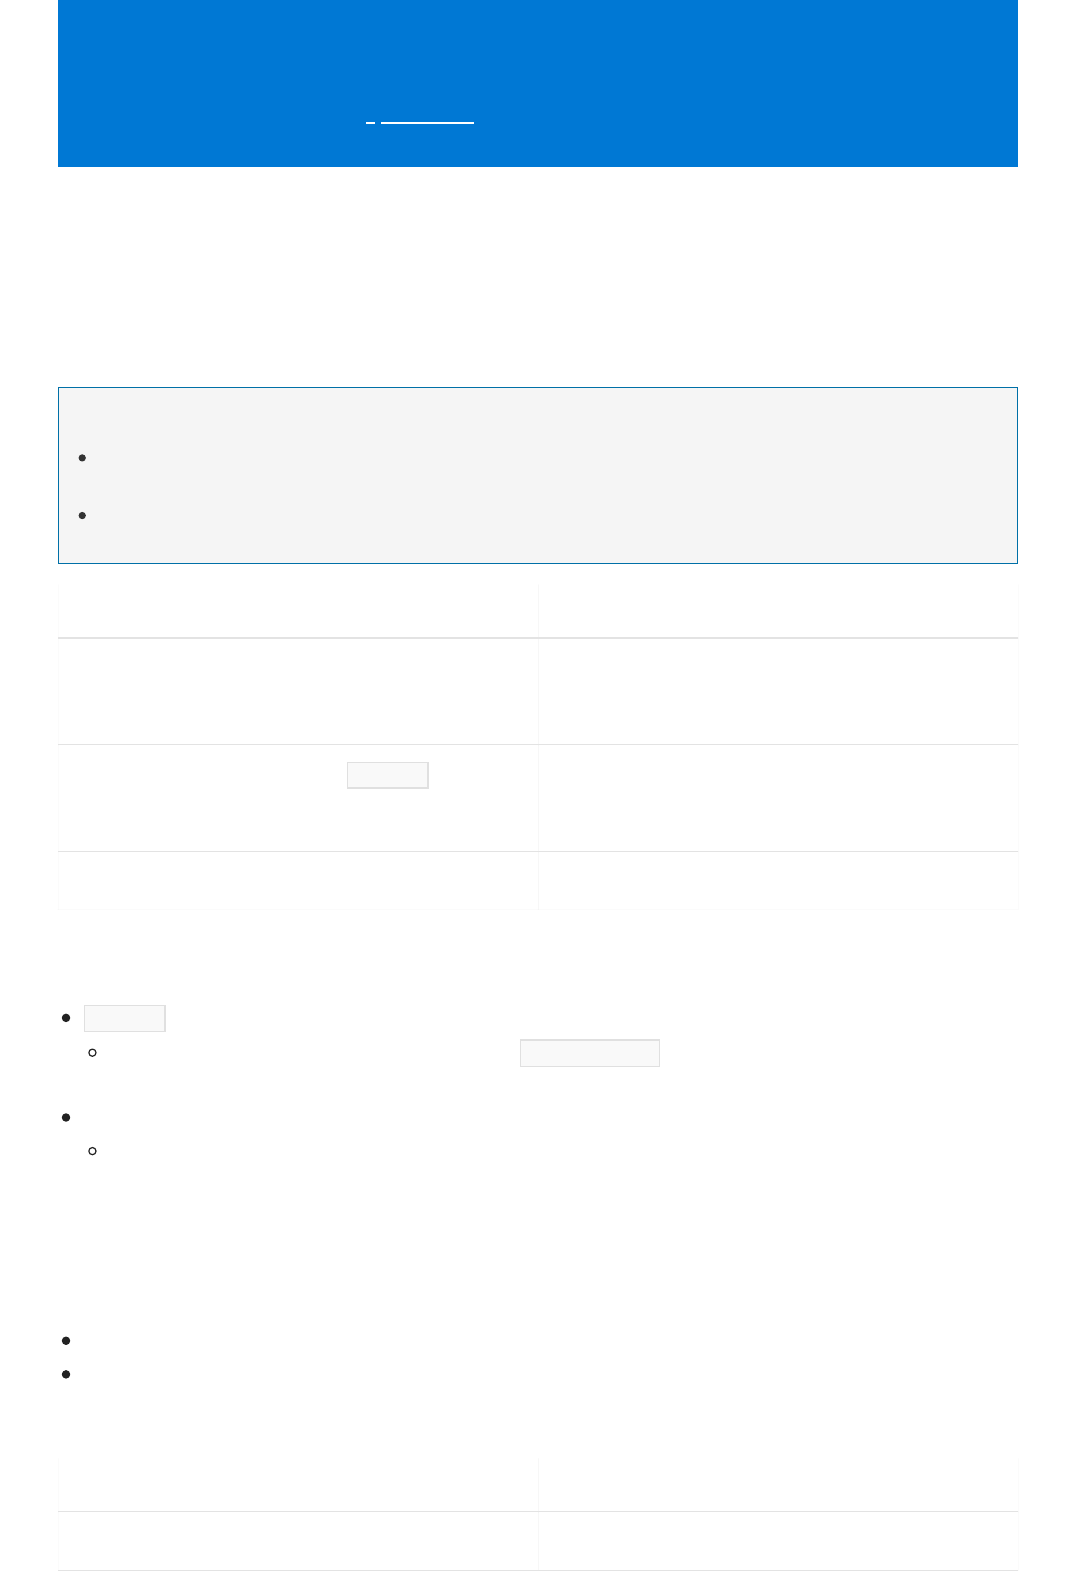
Data and rate limits for the Text Analytics API
3/5/2021 • 2 minutes to read • Edit Online
Data limits
NOTENOTE
L IM ITL IM IT VA L UEVA L UE
Maximum size of a single document 5,120 characters as measured by
StringInfo.LengthInTextElements. Also applies to Text
Analytics for health.
Maximum size of a single document ( /analyze endpoint) 125K characters as measured by
StringInfo.LengthInTextElements. Does not apply to Text
Analytics for health.
Maximum size of entire request 1 MB. Also applies to Text Analytics for health.
FE AT UR EFEAT URE M A X DO C UM EN T S P ER REQUESTM A X DOC UM EN T S P ER R EQU EST
Language Detection 1000
Use this article to find the limits for the size, and rates that you can send data to Text Analytics API. Note that
pricing is not affected by the data limits or rate limits. Pricing is subject to your Text Analytics resource's pricing
details.
If you need to analyze larger documents than the limit allows, you can break the text into smaller chunks of text before
sending them to the API.
A document is a single string of text characters.
If a document exceeds the character limit, the API will behave differently depending on the endpoint you're
using:
/analyze endpoint:
All other endpoints:
The API will reject the entire request and return a 400 bad request error if any document within it
exceeds the maximum size.
The API won't process a document that exceeds the maximum size, and will return an invalid
document error for it. If an API request has multiple documents, the API will continue processing them
if they are within the character limit.
The maximum number of documents you can send in a single request will depend on the API version and
feature you're using, which is described in the table below.
Version 3
Version 2
The following limits are for the current v3 API. Exceeding the limits below will generate an HTTP 400 error code.

Sentiment Analysis 10
Opinion Mining 10
Key Phrase Extraction 10
Named Entity Recognition 5
Entity Linking 5
Text Analytics for health 10 for the web-based API, 1000 for the container.
Analyze endpoint 25 for all operations.
FE AT UR EFEAT URE M A X DO C UM EN T S P ER REQUESTM A X DOC UM EN T S P ER R EQU EST
Rate limits
T IERT IER REQ UEST S P ER SEC O N DREQUEST S P ER SEC O ND REQUEST S P ER M INUT EREQ UEST S P ER M IN UT E
S / Multi-service 1000 1000
S0 / F0 100 300
S1 200 300
S2 300 300
S3 500 500
S4 1000 1000
See also
Your rate limit will vary with your pricing tier. These limits are the same for both versions of the API. These rate
limits don't apply to the Text Analytics for health container, which does not have a set rate limit.
Requests rates are measured for each Text Analytics feature separately. You can send the maximum number of
requests for your pricing tier to each feature, at the same time. For example, if you're in the S tier and send
1000 requests at once, you wouldn't be able to send another request for 59 seconds.
What is the Text Analytics API
Pricing details

Model versioning in the Text Analytics API
6/22/2021 • 2 minutes to read • Edit Online
Available versions
EN DPOINTE NDP OIN T SUP PORT E D VERSIONSSUP P OR T ED VE RSIO NS LAT EST VE RSIO NL AT EST VE RSIO N
/sentiment 2019-10-01 , 2020-04-01 2020-04-01
/languages 2019-10-01 , 2020-07-01 ,
2020-09-01 , 2021-01-05
2021-01-05
/entities/linking 2019-10-01 , 2020-02-01 2020-02-01
/entities/recognition/general 2019-10-01 , 2020-02-01 ,
2020-04-01 , 2021-01-15 ,
2021-06-01
2021-06-01
/entities/recognition/pii 2019-10-01 , 2020-02-01 ,
2020-04-01 , 2020-07-01 ,
2021-01-15
2021-01-15
/entities/health 2021-05-15 2021-05-15
/keyphrases 2019-10-01 , 2020-07-01 ,
2021-06-01
2021-06-01
Text Analytics for health
EN DPOINTE NDP OIN T C O NTA INE R IM A GE TA GC O NTA INE R IM A GE TA G M ODEL VERSIONM ODEL VERSION
/entities/health 3.0.016230002-onprem-amd64 or
latest
2021-05-15
/entities/health 3.0.015370001-onprem-amd64 2021-03-01
/entities/health 1.1.013530001-amd64-preview 2020-09-03
Version 3 of the Text Analytics API lets you choose the model version that gets used on your data. Use the
optional model-version parameter to select the version of the model in your API requests. For example:
<resource-url>/text/analytics/v3.0/sentiment?model-version=2020-04-01 . If this parameter isn't specified the API
will default to the latest stable version.
Use the table below to find which model versions are supported by each hosted endpoint.
You can find details about the updates for these models in What's new.
The Text Analytics for Health container uses separate model versioning than the above API endpoints. Please
note that only one model version is available per container image.

/entities/health 1.1.013150001-amd64-preview 2020-07-24
/domains/health 1.1.012640001-amd64-preview 2020-05-08
/domains/health 1.1.012420001-amd64-preview 2020-05-08
/domains/health 1.1.012070001-amd64-preview 2020-04-16
EN DPOINTE NDP OIN T C O NTA INE R IM A GE TA GC O NTA INE R IM A GE TA G M ODEL VERSIONM ODEL VERSION
Next steps
Text Analytics overview
Sentiment analysis
Entity recognition
Tutorial: Integrate Power BI with the Text Analytics
Cognitive Service
7/8/2021 • 12 minutes to read • Edit Online
Prerequisites
Load customer data
NOTENOTE
Microsoft Power BI Desktop is a free application that lets you connect to, transform, and visualize your data. The
Text Analytics service, part of Microsoft Azure Cognitive Services, provides natural language processing. Given
raw unstructured text, it can extract the most important phrases, analyze sentiment, and identify well-known
entities such as brands. Together, these tools can help you quickly see what your customers are talking about
and how they feel about it.
In this tutorial, you'll learn how to:
Use Power BI Desktop to import and transform data
Create a custom function in Power BI Desktop
Integrate Power BI Desktop with the Text Analytics Key Phrases API
Use the Text Analytics Key Phrases API to extract the most important phrases from customer feedback
Create a word cloud from customer feedback
Microsoft Power BI Desktop. Download at no charge.
A Microsoft Azure account. Create a free account or sign in.
A Cognitive Services API account with the Text Analytics API. If you don't have one, you can sign up and use
the free tier for 5,000 transactions/month (see pricing details to complete this tutorial.
The Text Analytics access key that was generated for you during sign-up.
Customer comments. You can use our example data or your own data. This tutorial assumes you're using our
example data.
To get started, open Power BI Desktop and load the comma-separated value (CSV) file FabrikamComments.csv
that you downloaded in Prerequisites. This file represents a day's worth of hypothetical activity in a fictional
small company's support forum.
Power BI can use data from a wide variety of web-based sources, such as SQL databases. See the Power Query
documentation for more information.
In the main Power BI Desktop window, select the HomeHome ribbon. In the External dataExternal data group of the ribbon, open
the Get DataGet Data drop-down menu and select Text/CSVText/CSV.
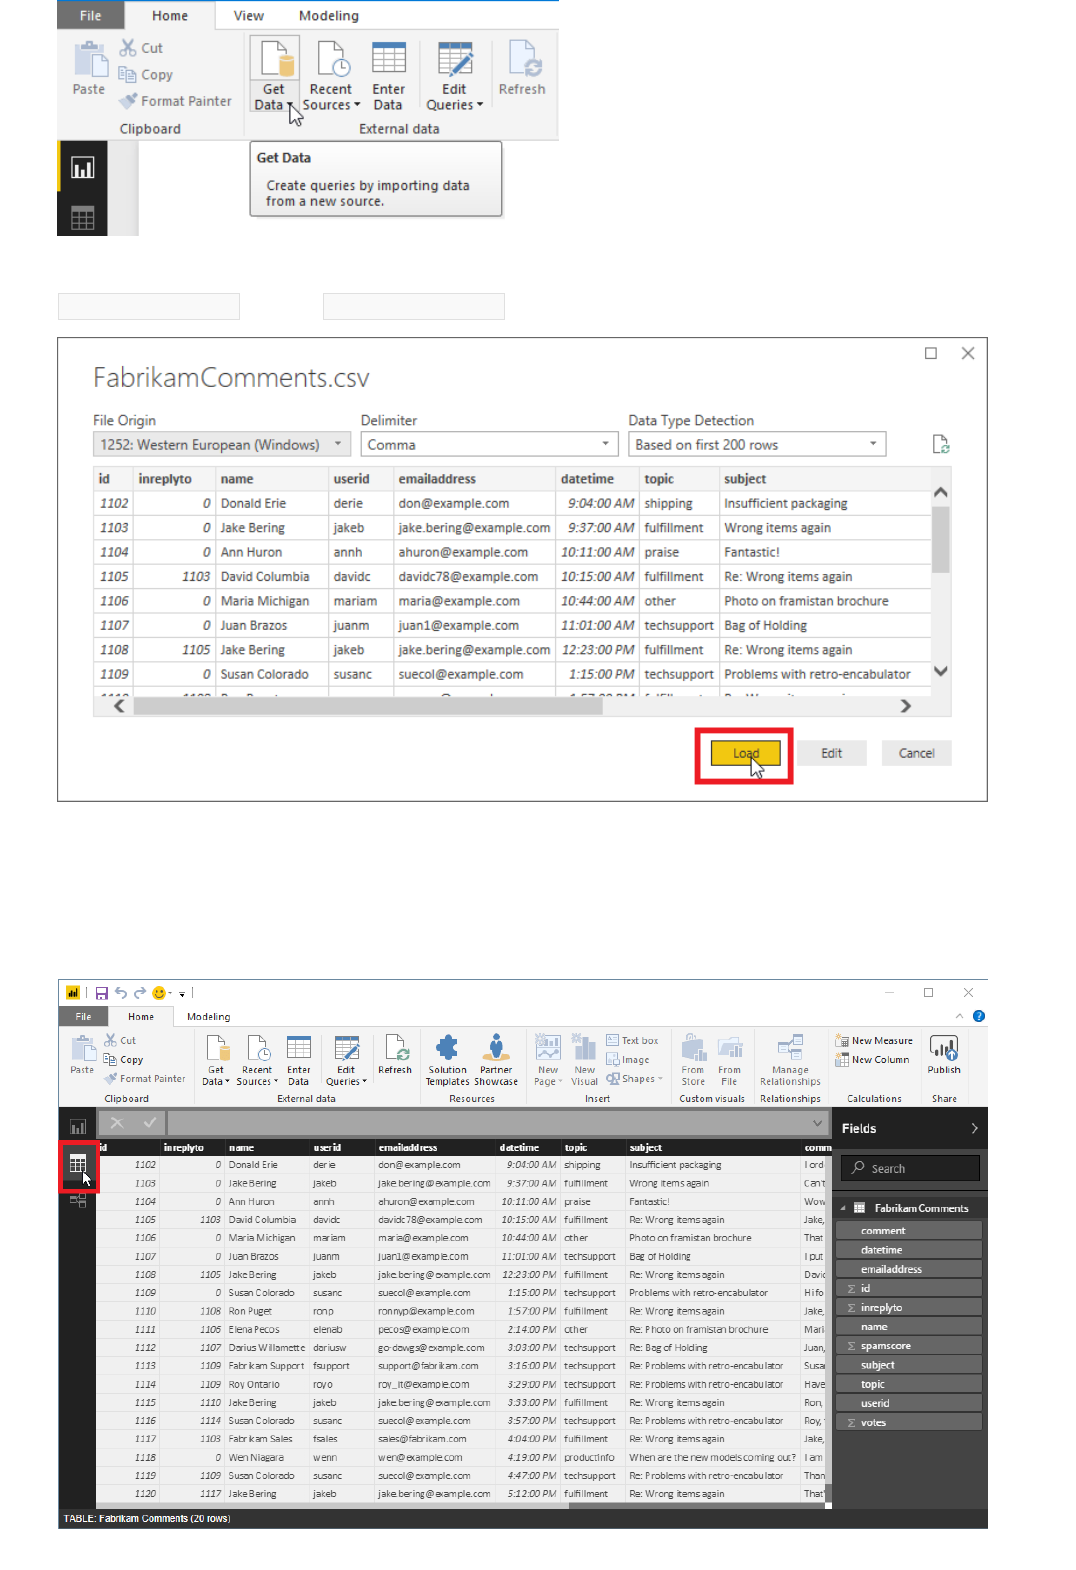
The Open dialog appears. Navigate to your Downloads folder, or to the folder where you downloaded the
FabrikamComments.csv file. Click FabrikamComments.csv , then the OpenOpen button. The CSV import dialog appears.
The CSV import dialog lets you verify that Power BI Desktop has correctly detected the character set, delimiter,
header rows, and column types. This information is all correct, so click LoadLoad.
To see the loaded data, click the Data ViewData View button on the left edge of the Power BI workspace. A table opens
that contains the data, like in Microsoft Excel.
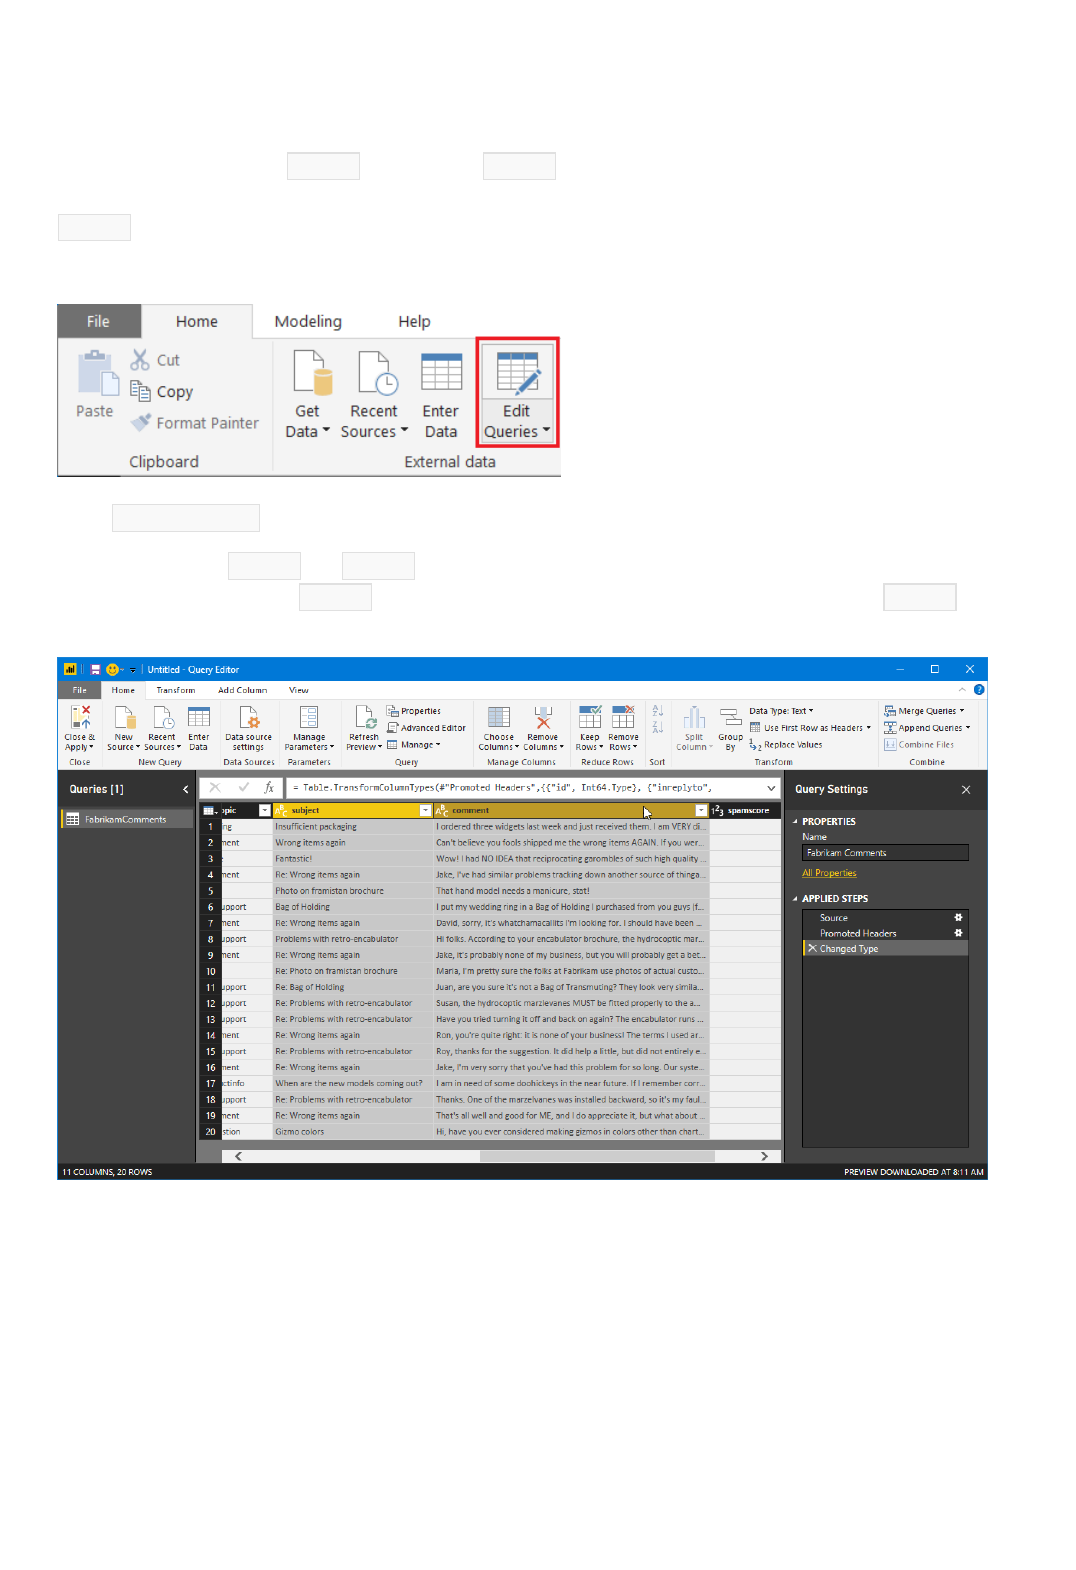
Prepare the data
You may need to transform your data in Power BI Desktop before it's ready to be processed by the Key Phrases
API of the Text Analytics service.
The sample data contains a subject column and a comment column. With the Merge Columns function in
Power BI Desktop, you can extract key phrases from the data in both these columns, rather than just the
comment column.
In Power BI Desktop, select the HomeHome ribbon. In the External dataExternal data group, click Edit QueriesEdit Queries.
Select FabrikamComments in the QueriesQueries list at the left side of the window if it isn't already selected.
Now select both the subject and comment columns in the table. You may need to scroll horizontally to see
these columns. First click the subject column header, then hold down the Control key and click the comment
column header.
Select the TransformTransform ribbon. In the Text ColumnsText Columns group of the ribbon, click Merge ColumnsMerge Columns. The Merge
Columns dialog appears.
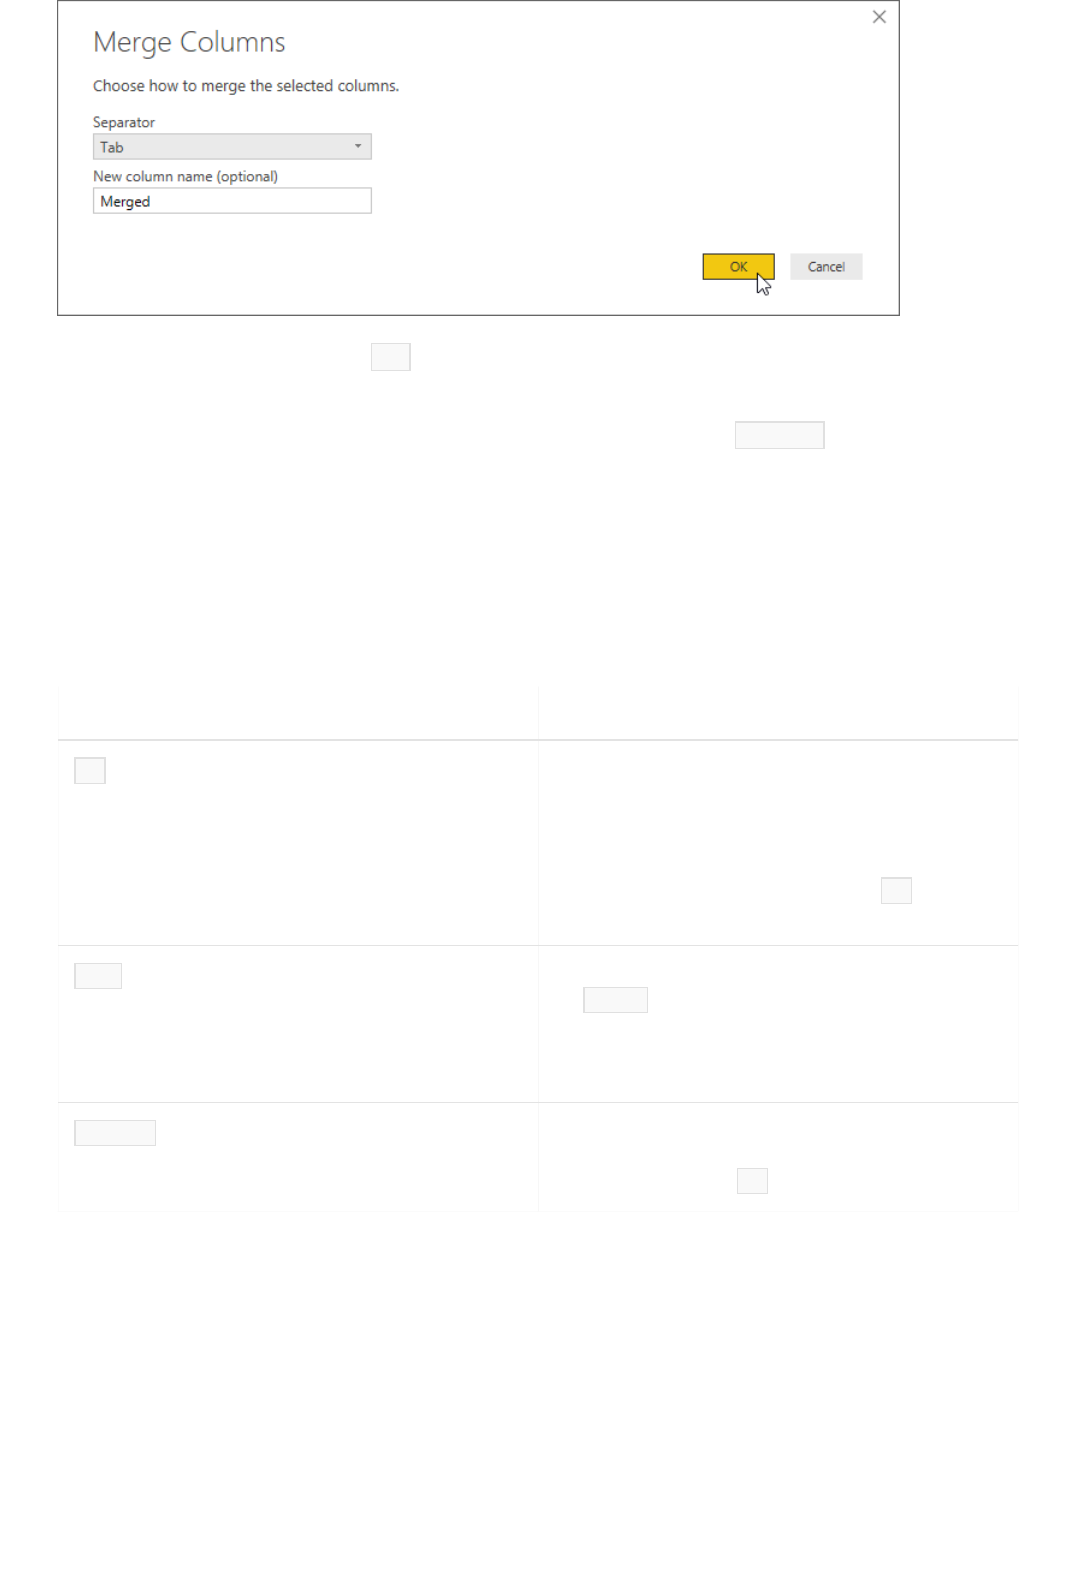
Understand the API
FIELDF IEL D DESC RIP T IONDESC RIP T IO N
id A unique identifier for this document within the request. The
response also contains this field. That way, if you process
more than one document, you can easily associate the
extracted key phrases with the document they came from. In
this tutorial, because you're processing only one document
per request, you can hard-code the value of id to be the
same for each request.
text The text to be processed. The value of this field comes from
the Merged column you created in the previous section,
which contains the combined subject line and comment text.
The Key Phrases API requires this data be no longer than
about 5,120 characters.
language The code for the natural language the document is written
in. All the messages in the sample data are in English, so you
can hard-code the value en for this field.
Create a custom function
In the Merge Columns dialog, choose Tab as the separator, then click OK.OK.
You might also consider filtering out blank messages using the Remove Empty filter, or removing unprintable
characters using the Clean transformation. If your data contains a column like the spamscore column in the
sample file, you can skip "spam" comments using a Number Filter.
The Key Phrases API of the Text Analytics service can process up to a thousand text documents per HTTP request.
Power BI prefers to deal with records one at a time, so in this tutorial your calls to the API will include only a
single document each. The Key Phrases API requires the following fields for each document being processed.
Now you're ready to create the custom function that will integrate Power BI and Text Analytics. The function
receives the text to be processed as a parameter. It converts data to and from the required JSON format and
makes the HTTP request to the Key Phrases API. The function then parses the response from the API and returns
a string that contains a comma-separated list of the extracted key phrases.

NOTENOTE
NOTENOTE
// Returns key phrases from the text in a comma-separated list
(text) => let
apikey = "YOUR_API_KEY_HERE",
endpoint = "https://<your-custom-subdomain>.cognitiveservices.azure.com/text/analytics" &
"/v3.0/keyPhrases",
jsontext = Text.FromBinary(Json.FromValue(Text.Start(Text.Trim(text), 5000))),
jsonbody = "{ documents: [ { language: ""en"", id: ""0"", text: " & jsontext & " } ] }",
bytesbody = Text.ToBinary(jsonbody),
headers = [#"Ocp-Apim-Subscription-Key" = apikey],
bytesresp = Web.Contents(endpoint, [Headers=headers, Content=bytesbody]),
jsonresp = Json.Document(bytesresp),
keyphrases = Text.Lower(Text.Combine(jsonresp[documents]{0}[keyPhrases], ", "))
in keyphrases
Use the custom function
Power BI Desktop custom functions are written in the Power Query M formula language, or just "M" for short. M is a
functional programming language based on F#. You don't need to be a programmer to finish this tutorial, though; the
required code is included below.
In Power BI Desktop, make sure you're still in the Query Editor window. If you aren't, select the HomeHome ribbon,
and in the External dataExternal data group, click Edit QueriesEdit Queries.
Now, in the HomeHome ribbon, in the New Quer yNew Quer y group, open the New SourceNew Source drop-down menu and select BlankBlank
Quer yQuer y.
A new query, initially named Query1 , appears in the Queries list. Double-click this entry and name it
KeyPhrases .
Now, in the HomeHome ribbon, in the Quer yQuer y group, click Advanced EditorAdvanced Editor to open the Advanced Editor window.
Delete the code that's already in that window and paste in the following code.
Replace the example endpoint below (containing <your-custom-subdomain> ) with the endpoint generated for your Text
Analytics resource. You can find this endpoint by signing in to the Azure portal, selecting your Text Analytics subscription,
and selecting Quick start .
Replace YOUR_API_KEY_HERE with your Text Analytics access key. You can also find this key by signing in to the
Azure portal, selecting your Text Analytics subscription, and selecting the Overview page. Be sure to leave the
quotation marks before and after the key. Then click Done.Done.
Now you can use the custom function to extract the key phrases from each of the customer comments and store
them in a new column in the table.
In Power BI Desktop, in the Query Editor window, switch back to the FabrikamComments query. Select the AddAdd
ColumnColumn ribbon. In the GeneralGeneral group, click Invoke Custom FunctionInvoke Custom Function.
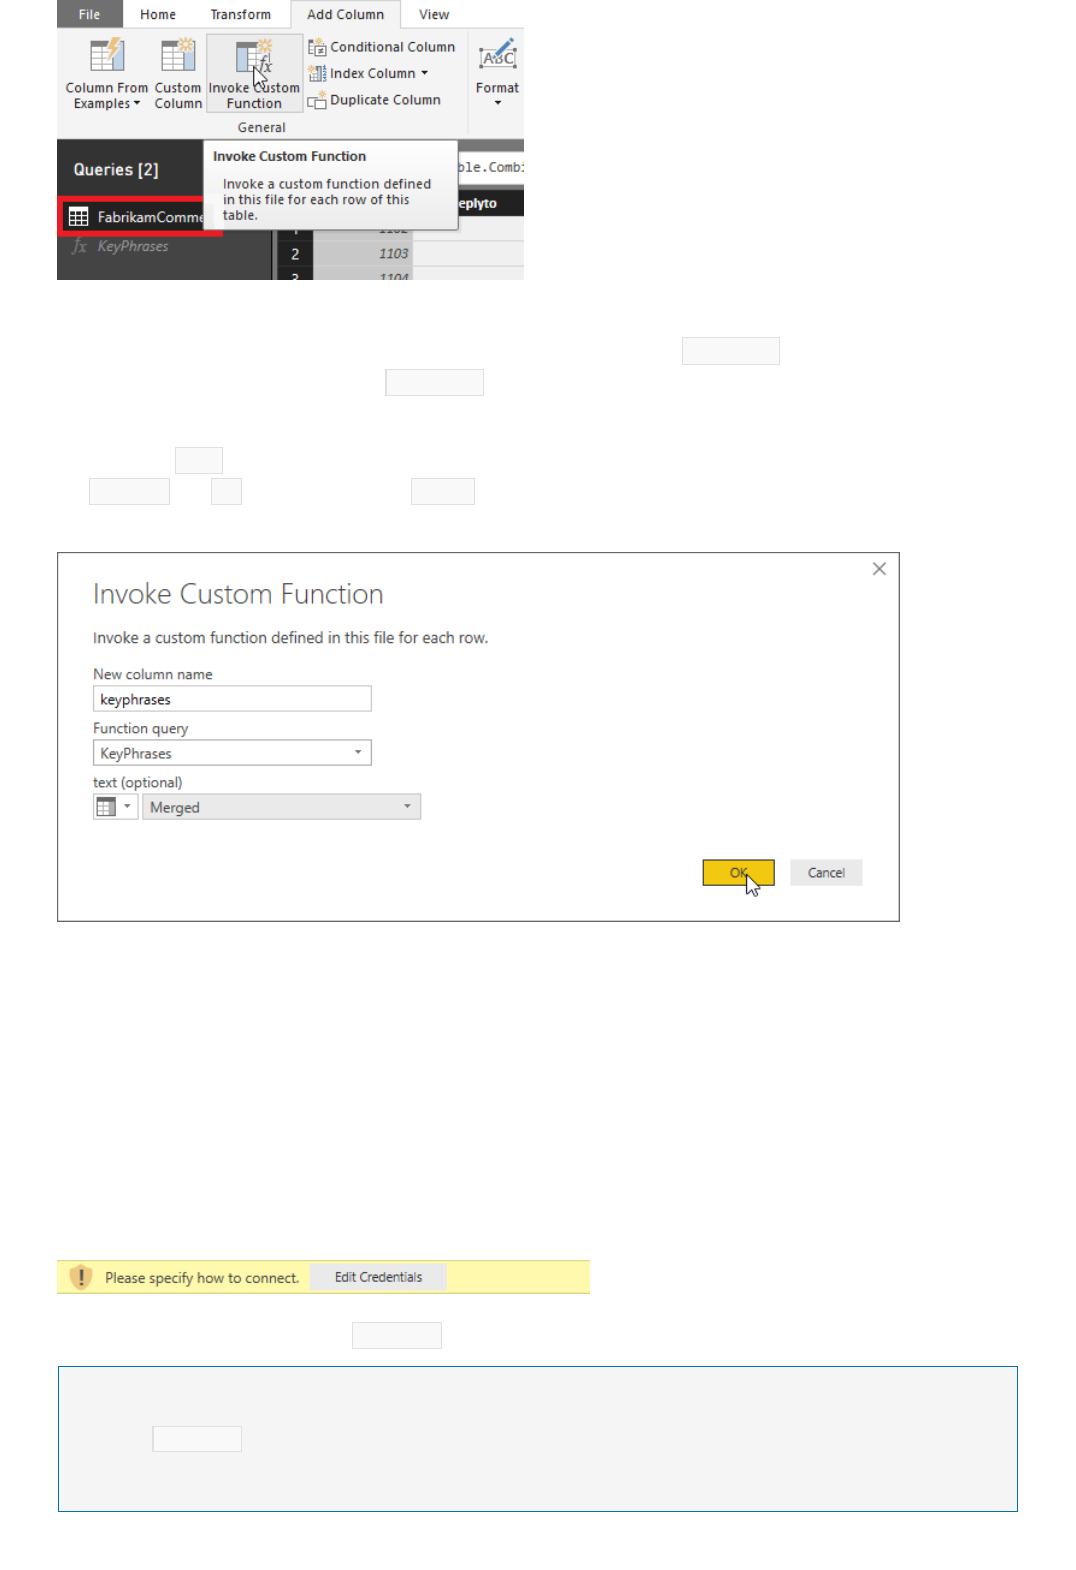
Authentication and privacy
NOTENOTE
The Invoke Custom Function dialog appears. In New column nameNew column name, enter keyphrases . In Function quer yFunction quer y,
select the custom function you created, KeyPhrases .
A new field appears in the dialog, text (optional)text (optional). This field is asking which column we want to use to provide
values for the text parameter of the Key Phrases API. (Remember that you already hard-coded the values for
the language and id parameters.) Select Merged (the column you created previously by merging the subject
and message fields) from the drop-down menu.
Finally, click OK.OK.
If everything is ready, Power BI calls your custom function once for each row in the table. It sends the queries to
the Key Phrases API and adds a new column to the table to store the results. But before that happens, you may
need to specify authentication and privacy settings.
After you close the Invoke Custom Function dialog, a banner may appear asking you to specify how to connect
to the Key Phrases API.
Click Edit Credentials,Edit Credentials, make sure Anonymous is selected in the dialog, then click Connect.Connect.
You select Anonymous because the Text Analytics service authenticates you using your access key, so Power BI does not
need to provide credentials for the HTTP request itself.
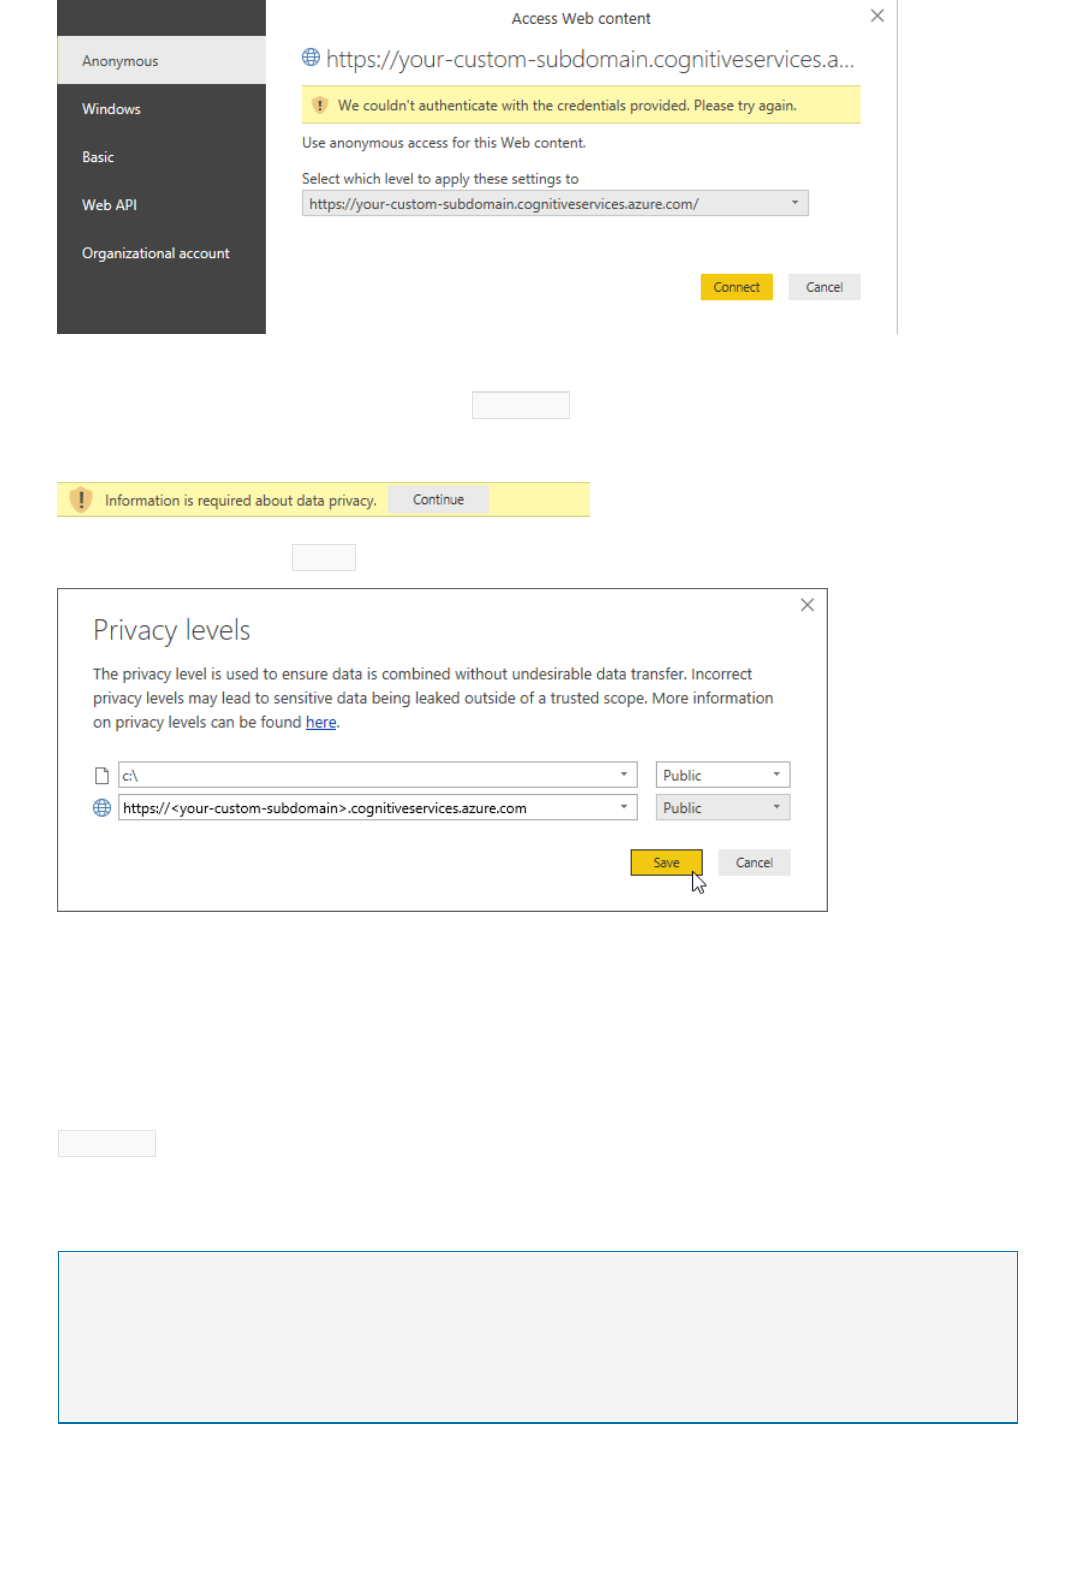
Create the word cloud
NOTENOTE
If you see the Edit Credentials banner even after choosing anonymous access, you may have forgotten to paste
your Text Analytics access key into the code in the KeyPhrases custom function.
Next, a banner may appear asking you to provide information about your data sources' privacy.
Click ContinueContinue and choose Public for each of the data sources in the dialog. Then click Save.Save.
Once you have dealt with any banners that appear, click Close & ApplyClose & Apply in the Home ribbon to close the Query
Editor.
Power BI Desktop takes a moment to make the necessary HTTP requests. For each row in the table, the new
keyphrases column contains the key phrases detected in the text by the Key Phrases API.
Now you'll use this column to generate a word cloud. To get started, click the Repor tRepor t button in the main Power
BI Desktop window, to the left of the workspace.
Why use extracted key phrases to generate a word cloud, rather than the full text of every comment? The key phrases
provide us with the
important
words from our customer comments, not just the
most common
words. Also, word sizing
in the resulting cloud isn't skewed by the frequent use of a word in a relatively small number of comments.
If you don't already have the Word Cloud custom visual installed, install it. In the Visualizations panel to the right
of the workspace, click the three dots (......) and choose Impor t From MarketImpor t From Market. If the word "cloud" is not among
the displayed visualization tools in the list, you can search for "cloud" and click the AddAdd button next the Word
Cloud visual. Power BI installs the Word Cloud visual and lets you know that it installed successfully.
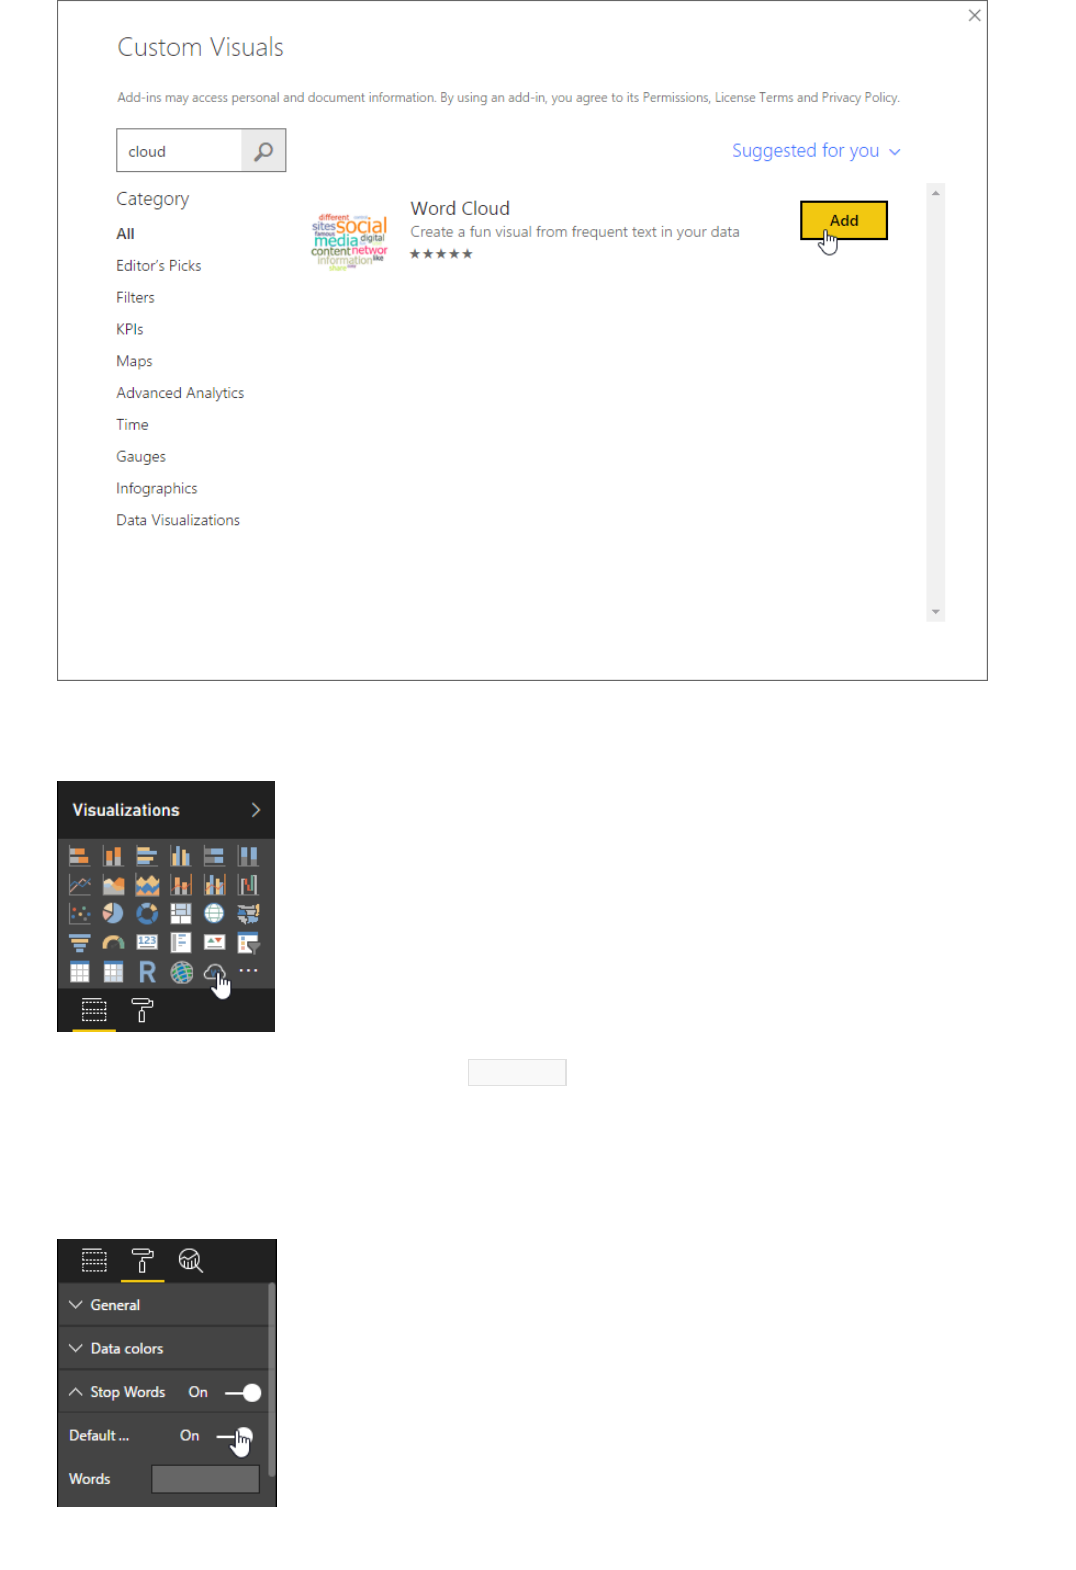
First, click the Word Cloud icon in the Visualizations panel.
A new report appears in the workspace. Drag the keyphrases field from the Fields panel to the Category field in
the Visualizations panel. The word cloud appears inside the report.
Now switch to the Format page of the Visualizations panel. In the Stop Words category, turn on Default StopDefault Stop
WordsWords to eliminate short, common words like "of" from the cloud. However, because we're visualizing key
phrases, they might not contain stop words.
Down a little further in this panel, turn off Rotate TextRotate Text and TitleTitle.
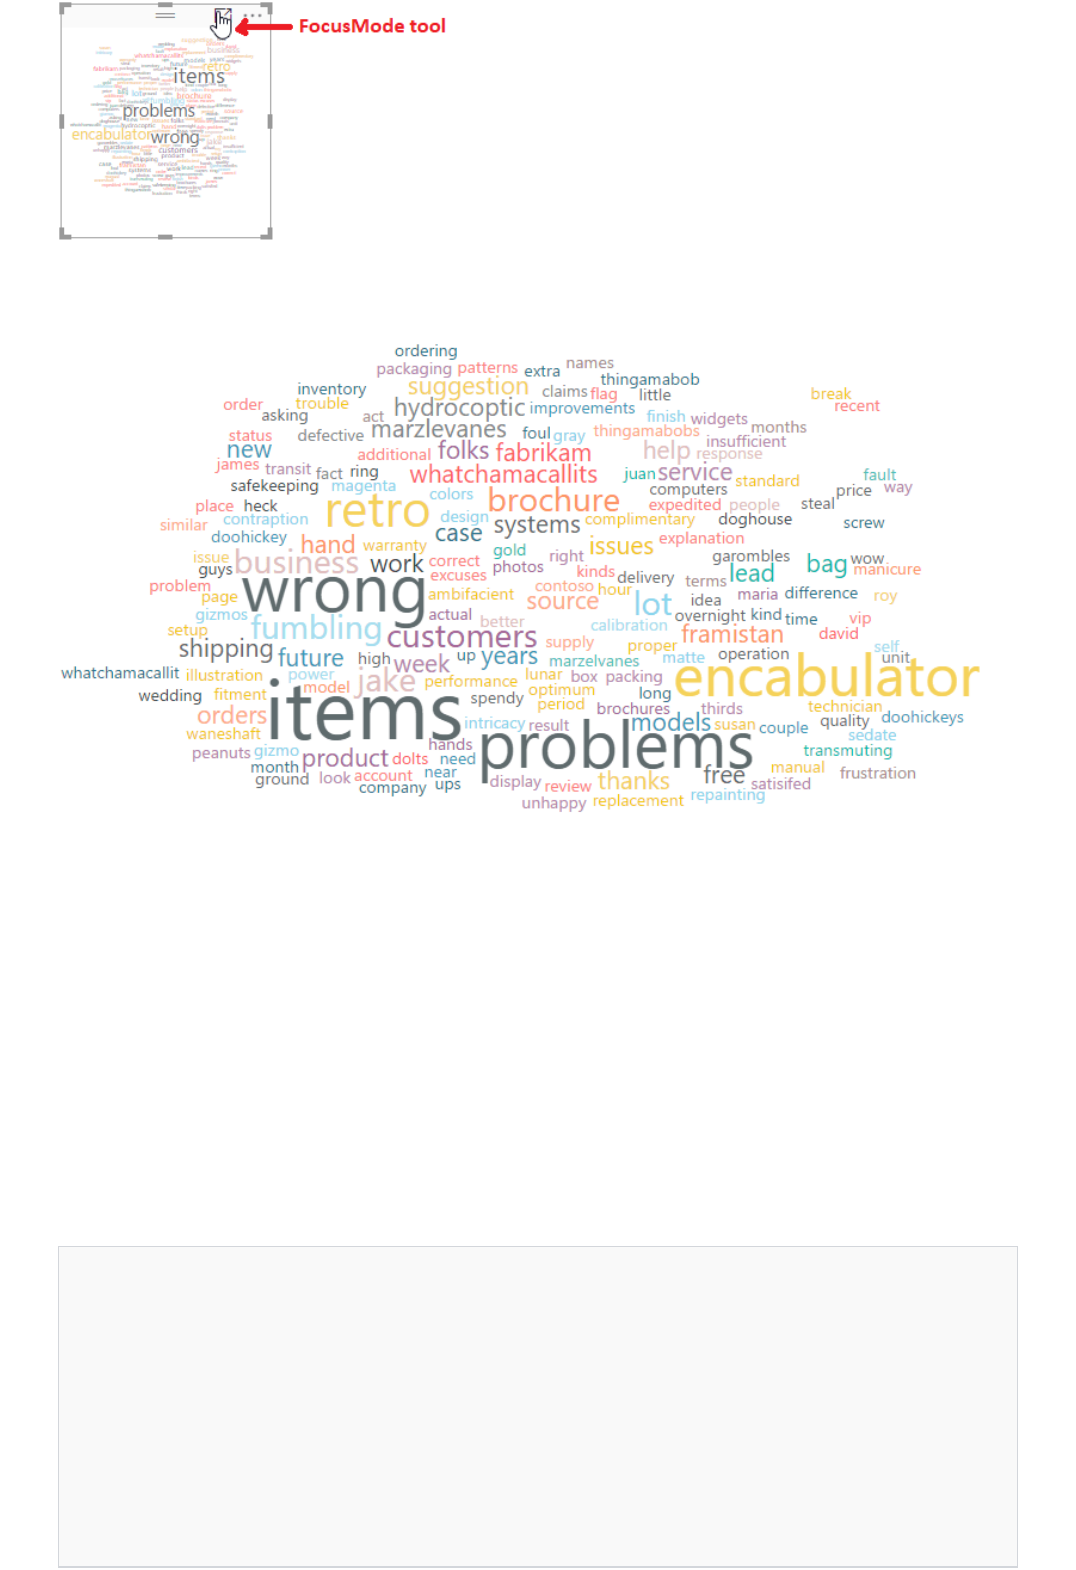
More Text Analytics services
// Returns the sentiment label of the text, for example, positive, negative or mixed.
(text) => let
apikey = "YOUR_API_KEY_HERE",
endpoint = "<your-custom-subdomain>.cognitiveservices.azure.com" & "/text/analytics/v3.1/sentiment",
jsontext = Text.FromBinary(Json.FromValue(Text.Start(Text.Trim(text), 5000))),
jsonbody = "{ documents: [ { language: ""en"", id: ""0"", text: " & jsontext & " } ] }",
bytesbody = Text.ToBinary(jsonbody),
headers = [#"Ocp-Apim-Subscription-Key" = apikey],
bytesresp = Web.Contents(endpoint, [Headers=headers, Content=bytesbody]),
jsonresp = Json.Document(bytesresp),
sentiment = jsonresp[documents]{0}[sentiment]
in sentiment
Click the Focus Mode tool in the report to get a better look at our word cloud. The tool expands the word cloud
to fill the entire workspace, as shown below.
The Text Analytics service, one of the Cognitive Services offered by Microsoft Azure, also provides sentiment
analysis and language detection. The language detection in particular is useful if your customer feedback isn't all
in English.
Both of these other APIs are similar to the Key Phrases API. That means you can integrate them with Power BI
Desktop using custom functions that are nearly identical to the one you created in this tutorial. Just create a
blank query and paste the appropriate code below into the Advanced Editor, as you did earlier. (Don't forget your
access key!) Then, as before, use the function to add a new column to the table.
The Sentiment Analysis function below returns a label indicating how positive the sentiment expressed in the
text is.
// Returns the two-letter language code (for example, 'en' for English) of the text
(text) => let
apikey = "YOUR_API_KEY_HERE",
endpoint = "https://<your-custom-subdomain>.cognitiveservices.azure.com" &
"/text/analytics/v3.1/languages",
jsontext = Text.FromBinary(Json.FromValue(Text.Start(Text.Trim(text), 5000))),
jsonbody = "{ documents: [ { id: ""0"", text: " & jsontext & " } ] }",
bytesbody = Text.ToBinary(jsonbody),
headers = [#"Ocp-Apim-Subscription-Key" = apikey],
bytesresp = Web.Contents(endpoint, [Headers=headers, Content=bytesbody]),
jsonresp = Json.Document(bytesresp),
language = jsonresp [documents]{0}[detectedLanguage] [iso6391Name] in language
// Returns the name (for example, 'English') of the language in which the text is written
(text) => let
apikey = "YOUR_API_KEY_HERE",
endpoint = "https://<your-custom-subdomain>.cognitiveservices.azure.com" &
"/text/analytics/v3.1/languages",
jsontext = Text.FromBinary(Json.FromValue(Text.Start(Text.Trim(text), 5000))),
jsonbody = "{ documents: [ { id: ""0"", text: " & jsontext & " } ] }",
bytesbody = Text.ToBinary(jsonbody),
headers = [#"Ocp-Apim-Subscription-Key" = apikey],
bytesresp = Web.Contents(endpoint, [Headers=headers, Content=bytesbody]),
jsonresp = Json.Document(bytesresp),
language jsonresp [documents]{0}[detectedLanguage] [iso6391Name] in language
NOTENOTE
// Returns key phrases from the text as a list object
(text) => let
apikey = "YOUR_API_KEY_HERE",
endpoint = "https://<your-custom-subdomain>.cognitiveservices.azure.com" &
"/text/analytics/v3.1/keyPhrases",
jsontext = Text.FromBinary(Json.FromValue(Text.Start(Text.Trim(text), 5000))),
jsonbody = "{ documents: [ { language: ""en"", id: ""0"", text: " & jsontext & " } ] }",
bytesbody = Text.ToBinary(jsonbody),
headers = [#"Ocp-Apim-Subscription-Key" = apikey],
bytesresp = Web.Contents(endpoint, [Headers=headers, Content=bytesbody]),
jsonresp = Json.Document(bytesresp),
keyphrases = jsonresp[documents]{0}[keyPhrases]
in keyphrases
Next steps
Here are two versions of a Language Detection function. The first returns the ISO language code (for example,
en for English), while the second returns the "friendly" name (for example, English ). You may notice that only
the last line of the body differs between the two versions.
Finally, here's a variant of the Key Phrases function already presented that returns the phrases as a list object,
rather than as a single string of comma-separated phrases.
Returning a single string simplified our word cloud example. A list, on the other hand, is a more flexible format for working
with the returned phrases in Power BI. You can manipulate list objects in Power BI Desktop using the Structured Column
group in the Query Editor's Transform ribbon.
Learn more about the Text Analytics service, the Power Query M formula language, or Power BI.

Tutorial: Build a Flask app with Azure Cognitive
Services
3/24/2021 • 24 minutes to read • Edit Online
TIPTIP
What is Flask?
Prerequisites
Create an account and subscribe to resources
In this tutorial, you'll build a Flask web app that uses Azure Cognitive Services to translate text, analyze
sentiment, and synthesize translated text into speech. Our focus is on the Python code and Flask routes that
enable our application, however, we will help you out with the HTML and JavaScript that pulls the app together. If
you run into any issues let us know using the feedback button below.
Here's what this tutorial covers:
Get Azure subscription keys
Set up your development environment and install dependencies
Create a Flask app
Use the Translator to translate text
Use Text Analytics to analyze positive/negative sentiment of input text and translations
Use Speech Services to convert translated text into synthesized speech
Run your Flask app locally
If you'd like to skip ahead and see all the code at once, the entire sample, along with build instructions are available on
GitHub.
Flask is a microframework for creating web applications. This means Flask provides you with tools, libraries, and
technologies that allow you to build a web application. This web application can be some web pages, a blog, a
wiki or go as substantive as a web-based calendar application or a commercial website.
For those of you who want to deep dive after this tutorial here are a few helpful links:
Flask documentation
Flask for Dummies - A Beginner's Guide to Flask
Let's review the software and subscription keys that you'll need for this tutorial.
Python 3.6 or later
Git tools
An IDE or text editor, such as Visual Studio Code or Atom
Chrome or Firefox
A TranslatorTranslator subscription key (you can likely use the globalglobal location.)
A Text AnalyticsText Analytics subscription key in the West USWest US region.
A Speech Ser vicesSpeech Ser vices subscription key in the West USWest US region.

IMPORTANTIMPORTANT
Set up your dev environment
Create a working directoryCreate a working directory
Create and activate your virtual environment with Create and activate your virtual environment with virtualenv
As previously mentioned, you're going to need three subscription keys for this tutorial. This means that you
need to create a resource within your Azure account for:
Translator
Text Analytics
Speech Services
Use Create a Cognitive Services Account in the Azure portal for step-by-step instructions to create resources.
For this tutorial, please create your resources in the West US region. If using a different region, you'll need to adjust the
base URL in each of your Python files.
Before you build your Flask web app, you'll need to create a working directory for your project and install a few
Python packages.
mkdir -p flask-cog-services/static/scripts && mkdir flask-cog-services/templates
cd flask-cog-services
1. Open command line (Windows) or terminal (macOS/Linux). Then, create a working directory and sub
directories for your project:
2. Change to your project's working directory:
Let's create a virtual environment for our Flask app using virtualenv . Using a virtual environment ensures that
you have a clean environment to work from.
virtualenv venv --python=python3
virtualenv venv
P LAT F ORMPL AT FORM SH EL LSH EL L C O M M AN DC O M M A ND
macOS/Linux bash/zsh source venv/bin/activate
1. In your working directory, run this command to create a virtual environment: macOS/Linux:macOS/Linux:
We've explicitly declared that the virtual environment should use Python 3. This ensures that users with
multiple Python installations are using the correct version.
Windows CMD / Windows Bash:Windows CMD / Windows Bash:
To keep things simple, we're naming your virtual environment venv.
2. The commands to activate your virtual environment will vary depending on your platform/shell:
NOTENOTE
Install requestsInstall requests
NOTENOTE
Install and configure FlaskInstall and configure Flask
Windows bash source venv/Scripts/activate
Command Line venv\Scripts\activate.bat
PowerShell venv\Scripts\Activate.ps1
P LAT F ORMPL AT FORM SH EL LSH EL L C O M M AN DC O M M A ND
After running this command, your command line or terminal session should be prefaced with venv .
3. You can deactivate the session at any time by typing this into the command line or terminal: deactivate .
Python has extensive documentation for creating and managing virtual environments, see virtualenv.
Requests is a popular module that is used to send HTTP 1.1 requests. There's no need to manually add query
strings to your URLs, or to form-encode your POST data.
pip install requests
1. To install requests, run:
If you'd like to learn more about requests, see Requests: HTTP for Humans.
Next we need to install Flask. Flask handles the routing for our web app, and allows us to make server-to-server
calls that hide our subscription keys from the end user.
pip install Flask
flask --version
export FLASK_APP=app.py
1. To install Flask, run:
Let's make sure Flask was installed. Run:
The version should be printed to terminal. Anything else means something went wrong.
2. To run the Flask app, you can either use the flask command or Python's -m switch with Flask. Before you
can do that you need to tell your terminal which app to work with by exporting the FLASK_APP
environment variable:
macOS/LinuxmacOS/Linux:
WindowsWindows:

Create your Flask app
What is a Flask route?What is a Flask route?
@app.route('/')
def index():
return render_template('index.html')
@app.route('/about')
def about():
return render_template('about.html')
Get startedGet started
set FLASK_APP=app.py
In this section, you're going to create a barebones Flask app that returns an HTML file when users hit the root of
your app. Don't spend too much time trying to pick apart the code, we'll come back to update this file later.
Let's take a minute to talk about "routes". Routing is used to bind a URL to a specific function. Flask uses route
decorators to register functions to specific URLs. For example, when a user navigates to the root ( / ) of our web
app, index.html is rendered.
Let's take a look at one more example to hammer this home.
This code ensures that when a user navigates to http://your-web-app.com/about that the about.html file is
rendered.
While these samples illustrate how to render html pages for a user, routes can also be used to call APIs when a
button is pressed, or take any number of actions without having to navigate away from the homepage. You'll see
this in action when you create routes for translation, sentiment, and speech synthesis.
from flask import Flask, render_template, url_for, jsonify, request
app = Flask(__name__)
app.config['JSON_AS_ASCII'] = False
@app.route('/')
def index():
return render_template('index.html')
1. Open the project in your IDE, then create a file named app.py in the root of your working directory. Next,
copy this code into app.py and save:
This code block tells the app to display index.html whenever a user navigates to the root of your web
app ( / ).
2. Next, let's create the front-end for our web app. Create a file named index.html in the templates
directory. Then copy this code into templates/index.html .

Translate text
Call the TranslatorCall the Translator
<!doctype html>
<html lang="en">
<head>
<!-- Required metadata tags -->
<meta charset="utf-8">
<meta name="viewport" content="width=device-width, initial-scale=1, shrink-to-fit=no">
<meta name="description" content="Translate and analyze text with Azure Cognitive Services.">
<!-- Bootstrap CSS -->
<link rel="stylesheet"
href="https://maxcdn.bootstrapcdn.com/bootstrap/4.0.0/css/bootstrap.min.css" integrity="sha384-
Gn5384xqQ1aoWXA+058RXPxPg6fy4IWvTNh0E263XmFcJlSAwiGgFAW/dAiS6JXm" crossorigin="anonymous">
<title>Translate and analyze text with Azure Cognitive Services</title>
</head>
<body>
<div class="container">
<h1>Translate, synthesize, and analyze text with Azure</h1>
<p>This simple web app uses Azure for text translation, text-to-speech conversion, and
sentiment analysis of input text and translations. Learn more about <a
href="https://docs.microsoft.com/azure/cognitive-services/">Azure Cognitive Services</a>.
</p>
<!-- HTML provided in the following sections goes here. -->
<!-- End -->
</div>
<!-- Required Javascript for this tutorial -->
<script src="https://code.jquery.com/jquery-3.2.1.slim.min.js" integrity="sha384-
KJ3o2DKtIkvYIK3UENzmM7KCkRr/rE9/Qpg6aAZGJwFDMVNA/GpGFF93hXpG5KkN" crossorigin="anonymous"></script>
<script src="https://ajax.googleapis.com/ajax/libs/jquery/3.3.1/jquery.min.js"></script>
<script src="https://cdnjs.cloudflare.com/ajax/libs/popper.js/1.12.9/umd/popper.min.js"
integrity="sha384-ApNbgh9B+Y1QKtv3Rn7W3mgPxhU9K/ScQsAP7hUibX39j7fakFPskvXusvfa0b4Q"
crossorigin="anonymous"></script>
<script src="https://maxcdn.bootstrapcdn.com/bootstrap/4.0.0/js/bootstrap.min.js"
integrity="sha384-JZR6Spejh4U02d8jOt6vLEHfe/JQGiRRSQQxSfFWpi1MquVdAyjUar5+76PVCmYl"
crossorigin="anonymous"></script>
<script type = "text/javascript" src ="static/scripts/main.js"></script>
</body>
</html>
flask run
3. Let's test the Flask app. From the terminal, run:
4. Open a browser and navigate to the URL provided. You should see your single page app. Press Ctrl + CCtrl + C
to kill the app.
Now that you have an idea of how a simple Flask app works, let's:
Write some Python to call the Translator and return a response
Create a Flask route to call your Python code
Update the HTML with an area for text input and translation, a language selector, and translate button
Write JavaScript that allows users to interact with your Flask app from the HTML
The first thing you need to do is write a function to call the Translator. This function will take two arguments:
text_input and language_output . This function is called whenever a user presses the translate button in your
app. The text area in the HTML is sent as the text_input , and the language selection value in the HTML is sent
as language_output .

Add a route to Add a route to app.py
1. Let's start by creating a file called translate.py in the root of your working directory.
2. Next, add this code to translate.py . This function takes two arguments: text_input and language_output .
import os, requests, uuid, json
# Don't forget to replace with your Cog Services subscription key!
# If you prefer to use environment variables, see Extra Credit for more info.
subscription_key = 'YOUR_TRANSLATOR_TEXT_SUBSCRIPTION_KEY'
location = 'YOUR_TRANSLATOR_RESOURCE_LOCATION'
# Don't forget to replace with your Cog Services location!
# Our Flask route will supply two arguments: text_input and language_output.
# When the translate text button is pressed in our Flask app, the Ajax request
# will grab these values from our web app, and use them in the request.
# See main.js for Ajax calls.
def get_translation(text_input, language_output):
base_url = 'https://api.cognitive.microsofttranslator.com'
path = '/translate?api-version=3.0'
params = '&to=' + language_output
constructed_url = base_url + path + params
headers = {
'Ocp-Apim-Subscription-Key': subscription_key,
'Ocp-Apim-Subscription-Region': location,
'Content-type': 'application/json',
'X-ClientTraceId': str(uuid.uuid4())
}
# You can pass more than one object in body.
body = [{
'text' : text_input
}]
response = requests.post(constructed_url, headers=headers, json=body)
return response.json()
3. Add your Translator subscription key and save.
Next, you'll need to create a route in your Flask app that calls translate.py . This route will be called each time a
user presses the translate button in your app.
For this app, your route is going to accept POST requests. This is because the function expects the text to
translate and an output language for the translation.
Flask provides helper functions to help you parse and manage each request. In the code provided, get_json()
returns the data from the POST request as JSON. Then using data['text'] and data['to'] , the text and output
language values are passed to get_translation() function available from translate.py . The last step is to
return the response as JSON, since you'll need to display this data in your web app.
In the following sections, you'll repeat this process as you create routes for sentiment analysis and speech
synthesis.
import translate
1. Open app.py and locate the import statement at the top of app.py and add the following line:
Now our Flask app can use the method available via translate.py .
2. Copy this code to the end of app.py and save:

Update Update index.html
@app.route('/translate-text', methods=['POST'])
def translate_text():
data = request.get_json()
text_input = data['text']
translation_output = data['to']
response = translate.get_translation(text_input, translation_output)
return jsonify(response)
Now that you have a function to translate text, and a route in your Flask app to call it, the next step is to start
building the HTML for your app. The HTML below does a few things:
Provides a text area where users can input text to translate.
Includes a language selector.
Includes HTML elements to render the detected language and confidence scores returned during translation.
Provides a read-only text area where the translation output is displayed.
Includes placeholders for sentiment analysis and speech synthesis code that you'll add to this file later in the
tutorial.
Let's update index.html .
<!-- HTML provided in the following sections goes here. -->
<!-- End -->
<div class="row">
<div class="col">
<form>
<!-- Enter text to translate. -->
<div class="form-group">
<label for="text-to-translate"><strong>Enter the text you'd like to translate:</strong>
</label>
<textarea class="form-control" id="text-to-translate" rows="5"></textarea>
</div>
<!-- Select output language. -->
<div class="form-group">
<label for="select-language"><strong>Translate to:</strong></label>
<select class="form-control" id="select-language">
<option value="ar">Arabic</option>
<option value="ca">Catalan</option>
<option value="zh-Hans">Chinese (Simplified)</option>
<option value="zh-Hant">Chinese (Traditional)</option>
<option value="hr">Croatian</option>
<option value="en">English</option>
<option value="fr">French</option>
<option value="de">German</option>
<option value="el">Greek</option>
<option value="he">Hebrew</option>
<option value="hi">Hindi</option>
<option value="it">Italian</option>
<option value="ja">Japanese</option>
<option value="ko">Korean</option>
<option value="pt">Portuguese</option>
<option value="ru">Russian</option>
<option value="es">Spanish</option>
<option value="th">Thai</option>
<option value="tr">Turkish</option>
1. Open index.html and locate these code comments:
2. Replace the code comments with this HTML block:

Create Create main.js
<option value="tr">Turkish</option>
<option value="vi">Vietnamese</option>
</select>
</div>
<button type="submit" class="btn btn-primary mb-2" id="translate">Translate text</button></br>
<div id="detected-language" style="display: none">
<strong>Detected language:</strong> <span id="detected-language-result"></span><br />
<strong>Detection confidence:</strong> <span id="confidence"></span><br /><br />
</div>
<!-- Start sentiment code-->
<!-- End sentiment code -->
</form>
</div>
<div class="col">
<!-- Translated text returned by the Translate API is rendered here. -->
<form>
<div class="form-group" id="translator-text-response">
<label for="translation-result"><strong>Translated text:</strong></label>
<textarea readonly class="form-control" id="translation-result" rows="5"></textarea>
</div>
<!-- Start voice font selection code -->
<!-- End voice font selection code -->
</form>
<!-- Add Speech Synthesis button and audio element -->
<!-- End Speech Synthesis button -->
</div>
</div>
The next step is to write some JavaScript. This is the bridge between your HTML and Flask route.
The main.js file is the bridge between your HTML and Flask route. Your app will use a combination of jQuery,
Ajax, and XMLHttpRequest to render content, and make POST requests to your Flask routes.
In the code below, content from the HTML is used to construct a request to your Flask route. Specifically, the
contents of the text area and the language selector are assigned to variables, and then passed along in the
request to translate-text .
The code then iterates through the response, and updates the HTML with the translation, detected language, and
confidence score.
1. From your IDE, create a file named main.js in the static/scripts directory.
2. Copy this code into static/scripts/main.js :

Test translationTest translation
flask run
TIPTIP
Analyze sentiment
//Initiate jQuery on load.
$(function() {
//Translate text with flask route
$("#translate").on("click", function(e) {
e.preventDefault();
var translateVal = document.getElementById("text-to-translate").value;
var languageVal = document.getElementById("select-language").value;
var translateRequest = { 'text': translateVal, 'to': languageVal }
if (translateVal !== "") {
$.ajax({
url: '/translate-text',
method: 'POST',
headers: {
'Content-Type':'application/json'
},
dataType: 'json',
data: JSON.stringify(translateRequest),
success: function(data) {
for (var i = 0; i < data.length; i++) {
document.getElementById("translation-result").textContent = data[i].translations[0].text;
document.getElementById("detected-language-result").textContent =
data[i].detectedLanguage.language;
if (document.getElementById("detected-language-result").textContent !== ""){
document.getElementById("detected-language").style.display = "block";
}
document.getElementById("confidence").textContent = data[i].detectedLanguage.score;
}
}
});
};
});
// In the following sections, you'll add code for sentiment analysis and
// speech synthesis here.
})
Let's test translation in the app.
Navigate to the provided server address. Type text into the input area, select a language, and press translate. You
should get a translation. If it doesn't work, make sure that you've added your subscription key.
If the changes you've made aren't showing up, or the app doesn't work the way you expect it to, try clearing your cache
or opening a private/incognito window.
Press CTRL + cCTRL + c to kill the app, then head to the next section.
The Text Analytics API can be used to perform sentiment analysis, extract key phrases from text, or detect the
source language. In this app, we're going to use sentiment analysis to determine if the provided text is positive,
neutral, or negative. The API returns a numeric score between 0 and 1. Scores close to 1 indicate positive
sentiment, and scores close to 0 indicate negative sentiment.
In this section, you're going to do a few things:

Call the Text Analytics APICall the Text Analytics API
Add a route to Add a route to app.py
Write some Python to call the Text Analytics API to perform sentiment analysis and return a response
Create a Flask route to call your Python code
Update the HTML with an area for sentiment scores, and a button to perform analysis
Write JavaScript that allows users to interact with your Flask app from the HTML
Let's write a function to call the Text Analytics API. This function will take four arguments: input_text ,
input_language , output_text , and output_language . This function is called whenever a user presses the run
sentiment analysis button in your app. Data provided by the user from the text area and language selector, as
well as the detected language and translation output are provided with each request. The response object
includes sentiment scores for the source and translation. In the following sections, you're going to write some
JavaScript to parse the response and use it in your app. For now, let's focus on call the Text Analytics API.
1. Let's create a file called sentiment.py in the root of your working directory.
2. Next, add this code to sentiment.py .
import os, requests, uuid, json
# Don't forget to replace with your Cog Services subscription key!
subscription_key = 'YOUR_TEXT_ANALYTICS_SUBSCRIPTION_KEY'
endpoint = "YOUR_TEXT_ANALYTICS_ENDPOINT"
# Our Flask route will supply four arguments: input_text, input_language,
# output_text, output_language.
# When the run sentiment analysis button is pressed in our Flask app,
# the Ajax request will grab these values from our web app, and use them
# in the request. See main.js for Ajax calls.
def get_sentiment(input_text, input_language):
path = '/text/analytics/v3.0/sentiment'
constructed_url = endpoint + path
headers = {
'Ocp-Apim-Subscription-Key': subscription_key,
'Content-type': 'application/json',
'X-ClientTraceId': str(uuid.uuid4())
}
# You can pass more than one object in body.
body = {
'documents': [
{
'language': input_language,
'id': '1',
'text': input_text
},
]
}
response = requests.post(constructed_url, headers=headers, json=body)
return response.json()
3. Add your Text Analytics subscription key and save.
Let's create a route in your Flask app that calls sentiment.py . This route will be called each time a user presses
the run sentiment analysis button in your app. Like the route for translation, this route is going to accept POST
requests since the function expects arguments.
1. Open app.py and locate the import statement at the top of app.py and update it:

Update Update index.html
Update Update main.js
import translate, sentiment
@app.route('/sentiment-analysis', methods=['POST'])
def sentiment_analysis():
data = request.get_json()
input_text = data['inputText']
input_lang = data['inputLanguage']
response = sentiment.get_sentiment(input_text, input_lang)
return jsonify(response)
Now our Flask app can use the method available via sentiment.py .
2. Copy this code to the end of app.py and save:
Now that you have a function to run sentiment analysis, and a route in your Flask app to call it, the next step is
to start writing the HTML for your app. The HTML below does a few things:
Adds a button to your app to run sentiment analysis
Adds an element that explains sentiment scoring
Adds an element to display the sentiment scores
<!-- Start sentiment code-->
<!-- End sentiment code -->
<button type="submit" class="btn btn-primary mb-2" id="sentiment-analysis">Run sentiment
analysis</button></br>
<div id="sentiment" style="display: none">
<p>Sentiment can be labeled as "positive", "negative", "neutral", or "mixed". </p>
<strong>Sentiment label for input:</strong> <span id="input-sentiment"></span><br />
</div>
1. Open index.html and locate these code comments:
2. Replace the code comments with this HTML block:
In the code below, content from the HTML is used to construct a request to your Flask route. Specifically, the
contents of the text area and the language selector are assigned to variables, and then passed along in the
request to the sentiment-analysis route.
The code then iterates through the response, and updates the HTML with the sentiment scores.
1. From your IDE, create a file named main.js in the static directory.
2. Copy this code into static/scripts/main.js :

Test sentiment analysisTest sentiment analysis
flask run
TIPTIP
Convert text-to-speech
//Run sentiment analysis on input and translation.
$("#sentiment-analysis").on("click", function(e) {
e.preventDefault();
var inputText = document.getElementById("text-to-translate").value;
var inputLanguage = document.getElementById("detected-language-result").innerHTML;
var outputText = document.getElementById("translation-result").value;
var outputLanguage = document.getElementById("select-language").value;
var sentimentRequest = { "inputText": inputText, "inputLanguage": inputLanguage};
if (inputText !== "") {
$.ajax({
url: "/sentiment-analysis",
method: "POST",
headers: {
"Content-Type":"application/json"
},
dataType: "json",
data: JSON.stringify(sentimentRequest),
success: function(data) {
for (var i = 0; i < data.documents.length; i++) {
if (typeof data.documents[i] !== "undefined"){
if (data.documents[i].id === "1") {
document.getElementById("input-sentiment").textContent = data.documents[i].sentiment;
}
}
}
for (var i = 0; i < data.errors.length; i++) {
if (typeof data.errors[i] !== "undefined"){
if (data.errors[i].id === "1") {
document.getElementById("input-sentiment").textContent = data.errors[i].message;
}
}
}
if (document.getElementById("input-sentiment").textContent !== ''){
document.getElementById("sentiment").style.display = "block";
}
}
});
}
});
// In the next section, you'll add code for speech synthesis here.
Let's test sentiment analysis in the app.
Navigate to the provided server address. Type text into the input area, select a language, and press translate. You
should get a translation. Next, press the run sentiment analysis button. You should see two scores. If it doesn't
work, make sure that you've added your subscription key.
If the changes you've made aren't showing up, or the app doesn't work the way you expect it to, try clearing your cache
or opening a private/incognito window.
Press CTRL + cCTRL + c to kill the app, then head to the next section.

Call the Text
-
to
-
Speech APICall the Text
-
to
-
Speech API
The Text-to-speech API enables your app to convert text into natural human-like synthesized speech. The service
supports standard, neural, and custom voices. Our sample app uses a handful of the available voices, for a full
list, see supported languages.
In this section, you're going to do a few things:
Write some Python to convert text-to-speech with the Text-to-speech API
Create a Flask route to call your Python code
Update the HTML with a button to convert text-to-speech, and an element for audio playback
Write JavaScript that allows users to interact with your Flask app
Let's write a function to convert text-to-speech. This function will take two arguments: input_text and
voice_font . This function is called whenever a user presses the convert text-to-speech button in your app.
input_text is the translation output returned by the call to translate text, voice_font is the value from the voice
font selector in the HTML.
1. Let's create a file called synthesize.py in the root of your working directory.
2. Next, add this code to synthesize.py .

Add a route to Add a route to app.py
import os, requests, time
from xml.etree import ElementTree
class TextToSpeech(object):
def __init__(self, input_text, voice_font):
subscription_key = 'YOUR_SPEECH_SERVICES_SUBSCRIPTION_KEY'
self.subscription_key = subscription_key
self.input_text = input_text
self.voice_font = voice_font
self.timestr = time.strftime('%Y%m%d-%H%M')
self.access_token = None
# This function performs the token exchange.
def get_token(self):
fetch_token_url = 'https://westus.api.cognitive.microsoft.com/sts/v1.0/issueToken'
headers = {
'Ocp-Apim-Subscription-Key': self.subscription_key
}
response = requests.post(fetch_token_url, headers=headers)
self.access_token = str(response.text)
# This function calls the TTS endpoint with the access token.
def save_audio(self):
base_url = 'https://westus.tts.speech.microsoft.com/'
path = 'cognitiveservices/v1'
constructed_url = base_url + path
headers = {
'Authorization': 'Bearer ' + self.access_token,
'Content-Type': 'application/ssml+xml',
'X-Microsoft-OutputFormat': 'riff-24khz-16bit-mono-pcm',
'User-Agent': 'YOUR_RESOURCE_NAME',
}
# Build the SSML request with ElementTree
xml_body = ElementTree.Element('speak', version='1.0')
xml_body.set('{http://www.w3.org/XML/1998/namespace}lang', 'en-us')
voice = ElementTree.SubElement(xml_body, 'voice')
voice.set('{http://www.w3.org/XML/1998/namespace}lang', 'en-US')
voice.set('name', 'Microsoft Server Speech Text to Speech Voice {}'.format(self.voice_font))
voice.text = self.input_text
# The body must be encoded as UTF-8 to handle non-ascii characters.
body = ElementTree.tostring(xml_body, encoding="utf-8")
#Send the request
response = requests.post(constructed_url, headers=headers, data=body)
# Write the response as a wav file for playback. The file is located
# in the same directory where this sample is run.
return response.content
3. Add your Speech Services subscription key and save.
Let's create a route in your Flask app that calls synthesize.py . This route will be called each time a user presses
the convert text-to-speech button in your app. Like the routes for translation and sentiment analysis, this route is
going to accept POST requests since the function expects two arguments: the text to synthesize, and the voice
font for playback.
import translate, sentiment, synthesize
1. Open app.py and locate the import statement at the top of app.py and update it:
Now our Flask app can use the method available via synthesize.py .

Update Update index.html
@app.route('/text-to-speech', methods=['POST'])
def text_to_speech():
data = request.get_json()
text_input = data['text']
voice_font = data['voice']
tts = synthesize.TextToSpeech(text_input, voice_font)
tts.get_token()
audio_response = tts.save_audio()
return audio_response
2. Copy this code to the end of app.py and save:
Now that you have a function to convert text-to-speech, and a route in your Flask app to call it, the next step is to
start writing the HTML for your app. The HTML below does a few things:
Provides a voice selection drop-down
Adds a button to convert text-to-speech
Adds an audio element, which is used to play back the synthesized speech
<!-- Start voice font selection code -->
<!-- End voice font selection code -->
1. Open index.html and locate these code comments:
2. Replace the code comments with this HTML block:

<button type="submit" class="btn btn-primary mb-2" id="text-to-speech">Convert text-to-speech</button>
<div id="audio-playback">
<audio id="audio" controls>
<source id="audio-source" type="audio/mpeg" />
</audio>
</div>
Update Update main.js
<div class="form-group">
<label for="select-voice"><strong>Select voice font:</strong></label>
<select class="form-control" id="select-voice">
<option value="(ar-SA, Naayf)">Arabic | Male | Naayf</option>
<option value="(ca-ES, HerenaRUS)">Catalan | Female | HerenaRUS</option>
<option value="(zh-CN, HuihuiRUS)">Chinese (Mainland) | Female | HuihuiRUS</option>
<option value="(zh-CN, Kangkang, Apollo)">Chinese (Mainland) | Male | Kangkang, Apollo</option>
<option value="(zh-HK, Tracy, Apollo)">Chinese (Hong Kong)| Female | Tracy, Apollo</option>
<option value="(zh-HK, Danny, Apollo)">Chinese (Hong Kong) | Male | Danny, Apollo</option>
<option value="(zh-TW, Yating, Apollo)">Chinese (Taiwan)| Female | Yating, Apollo</option>
<option value="(zh-TW, Zhiwei, Apollo)">Chinese (Taiwan) | Male | Zhiwei, Apollo</option>
<option value="(hr-HR, Matej)">Croatian | Male | Matej</option>
<option value="(en-US, AriaRUS)">English (US) | Female | AriaRUS</option>
<option value="(en-US, Guy24kRUS)">English (US) | Male | Guy24kRUS</option>
<option value="(en-IE, Sean)">English (IE) | Male | Sean</option>
<option value="(fr-FR, Julie, Apollo)">French | Female | Julie, Apollo</option>
<option value="(fr-FR, HortenseRUS)">French | Female | Julie, HortenseRUS</option>
<option value="(fr-FR, Paul, Apollo)">French | Male | Paul, Apollo</option>
<option value="(de-DE, Hedda)">German | Female | Hedda</option>
<option value="(de-DE, HeddaRUS)">German | Female | HeddaRUS</option>
<option value="(de-DE, Stefan, Apollo)">German | Male | Apollo</option>
<option value="(el-GR, Stefanos)">Greek | Male | Stefanos</option>
<option value="(he-IL, Asaf)">Hebrew (Isreal) | Male | Asaf</option>
<option value="(hi-IN, Kalpana, Apollo)">Hindi | Female | Kalpana, Apollo</option>
<option value="(hi-IN, Hemant)">Hindi | Male | Hemant</option>
<option value="(it-IT, LuciaRUS)">Italian | Female | LuciaRUS</option>
<option value="(it-IT, Cosimo, Apollo)">Italian | Male | Cosimo, Apollo</option>
<option value="(ja-JP, Ichiro, Apollo)">Japanese | Male | Ichiro</option>
<option value="(ja-JP, HarukaRUS)">Japanese | Female | HarukaRUS</option>
<option value="(ko-KR, HeamiRUS)">Korean | Female | Heami</option>
<option value="(pt-BR, HeloisaRUS)">Portuguese (Brazil) | Female | HeloisaRUS</option>
<option value="(pt-BR, Daniel, Apollo)">Portuguese (Brazil) | Male | Daniel, Apollo</option>
<option value="(pt-PT, HeliaRUS)">Portuguese (Portugal) | Female | HeliaRUS</option>
<option value="(ru-RU, Irina, Apollo)">Russian | Female | Irina, Apollo</option>
<option value="(ru-RU, Pavel, Apollo)">Russian | Male | Pavel, Apollo</option>
<option value="(ru-RU, EkaterinaRUS)">Russian | Female | EkaterinaRUS</option>
<option value="(es-ES, Laura, Apollo)">Spanish | Female | Laura, Apollo</option>
<option value="(es-ES, HelenaRUS)">Spanish | Female | HelenaRUS</option>
<option value="(es-ES, Pablo, Apollo)">Spanish | Male | Pablo, Apollo</option>
<option value="(th-TH, Pattara)">Thai | Male | Pattara</option>
<option value="(tr-TR, SedaRUS)">Turkish | Female | SedaRUS</option>
<option value="(vi-VN, An)">Vietnamese | Male | An</option>
</select>
</div>
<!-- Add Speech Synthesis button and audio element -->
<!-- End Speech Synthesis button -->
3. Next, locate these code comments:
4. Replace the code comments with this HTML block:
5. Make sure to save your work.

In the code below, content from the HTML is used to construct a request to your Flask route. Specifically, the
translation and the voice font are assigned to variables, and then passed along in the request to the
text-to-speech route.
The code then iterates through the response, and updates the HTML with the sentiment scores.
1. From your IDE, create a file named main.js in the static directory.
2. Copy this code into static/scripts/main.js :
// Convert text-to-speech
$("#text-to-speech").on("click", function(e) {
e.preventDefault();
var ttsInput = document.getElementById("translation-result").value;
var ttsVoice = document.getElementById("select-voice").value;
var ttsRequest = { 'text': ttsInput, 'voice': ttsVoice }
var xhr = new XMLHttpRequest();
xhr.open("post", "/text-to-speech", true);
xhr.setRequestHeader("Content-Type", "application/json");
xhr.responseType = "blob";
xhr.onload = function(evt){
if (xhr.status === 200) {
audioBlob = new Blob([xhr.response], {type: "audio/mpeg"});
audioURL = URL.createObjectURL(audioBlob);
if (audioURL.length > 5){
var audio = document.getElementById("audio");
var source = document.getElementById("audio-source");
source.src = audioURL;
audio.load();
audio.play();
}else{
console.log("An error occurred getting and playing the audio.")
}
}
}
xhr.send(JSON.stringify(ttsRequest));
});
// Code for automatic language selection goes here.
3. You're almost done. The last thing you're going to do is add some code to main.js to automatically select a
voice font based on the language selected for translation. Add this code block to main.js :

Test your appTest your app
// Automatic voice font selection based on translation output.
$('select[id="select-language"]').change(function(e) {
if ($(this).val() == "ar"){
document.getElementById("select-voice").value = "(ar-SA, Naayf)";
}
if ($(this).val() == "ca"){
document.getElementById("select-voice").value = "(ca-ES, HerenaRUS)";
}
if ($(this).val() == "zh-Hans"){
document.getElementById("select-voice").value = "(zh-HK, Tracy, Apollo)";
}
if ($(this).val() == "zh-Hant"){
document.getElementById("select-voice").value = "(zh-HK, Tracy, Apollo)";
}
if ($(this).val() == "hr"){
document.getElementById("select-voice").value = "(hr-HR, Matej)";
}
if ($(this).val() == "en"){
document.getElementById("select-voice").value = "(en-US, Jessa24kRUS)";
}
if ($(this).val() == "fr"){
document.getElementById("select-voice").value = "(fr-FR, HortenseRUS)";
}
if ($(this).val() == "de"){
document.getElementById("select-voice").value = "(de-DE, HeddaRUS)";
}
if ($(this).val() == "el"){
document.getElementById("select-voice").value = "(el-GR, Stefanos)";
}
if ($(this).val() == "he"){
document.getElementById("select-voice").value = "(he-IL, Asaf)";
}
if ($(this).val() == "hi"){
document.getElementById("select-voice").value = "(hi-IN, Kalpana, Apollo)";
}
if ($(this).val() == "it"){
document.getElementById("select-voice").value = "(it-IT, LuciaRUS)";
}
if ($(this).val() == "ja"){
document.getElementById("select-voice").value = "(ja-JP, HarukaRUS)";
}
if ($(this).val() == "ko"){
document.getElementById("select-voice").value = "(ko-KR, HeamiRUS)";
}
if ($(this).val() == "pt"){
document.getElementById("select-voice").value = "(pt-BR, HeloisaRUS)";
}
if ($(this).val() == "ru"){
document.getElementById("select-voice").value = "(ru-RU, EkaterinaRUS)";
}
if ($(this).val() == "es"){
document.getElementById("select-voice").value = "(es-ES, HelenaRUS)";
}
if ($(this).val() == "th"){
document.getElementById("select-voice").value = "(th-TH, Pattara)";
}
if ($(this).val() == "tr"){
document.getElementById("select-voice").value = "(tr-TR, SedaRUS)";
}
if ($(this).val() == "vi"){
document.getElementById("select-voice").value = "(vi-VN, An)";
}
});
Let's test speech synthesis in the app.
flask run
TIPTIP
Get the source code
Next steps
Navigate to the provided server address. Type text into the input area, select a language, and press translate. You
should get a translation. Next, select a voice, then press the convert text-to-speech button. the translation should
be played back as synthesized speech. If it doesn't work, make sure that you've added your subscription key.
If the changes you've made aren't showing up, or the app doesn't work the way you expect it to, try clearing your cache
or opening a private/incognito window.
That's it, you have a working app that performs translations, analyzes sentiment, and synthesized speech. Press
CTRL + cCTRL + c to kill the app. Be sure to check out the other Azure Cognitive Services.
The source code for this project is available on GitHub.
Translator reference
Text Analytics API reference
Text-to-speech API reference
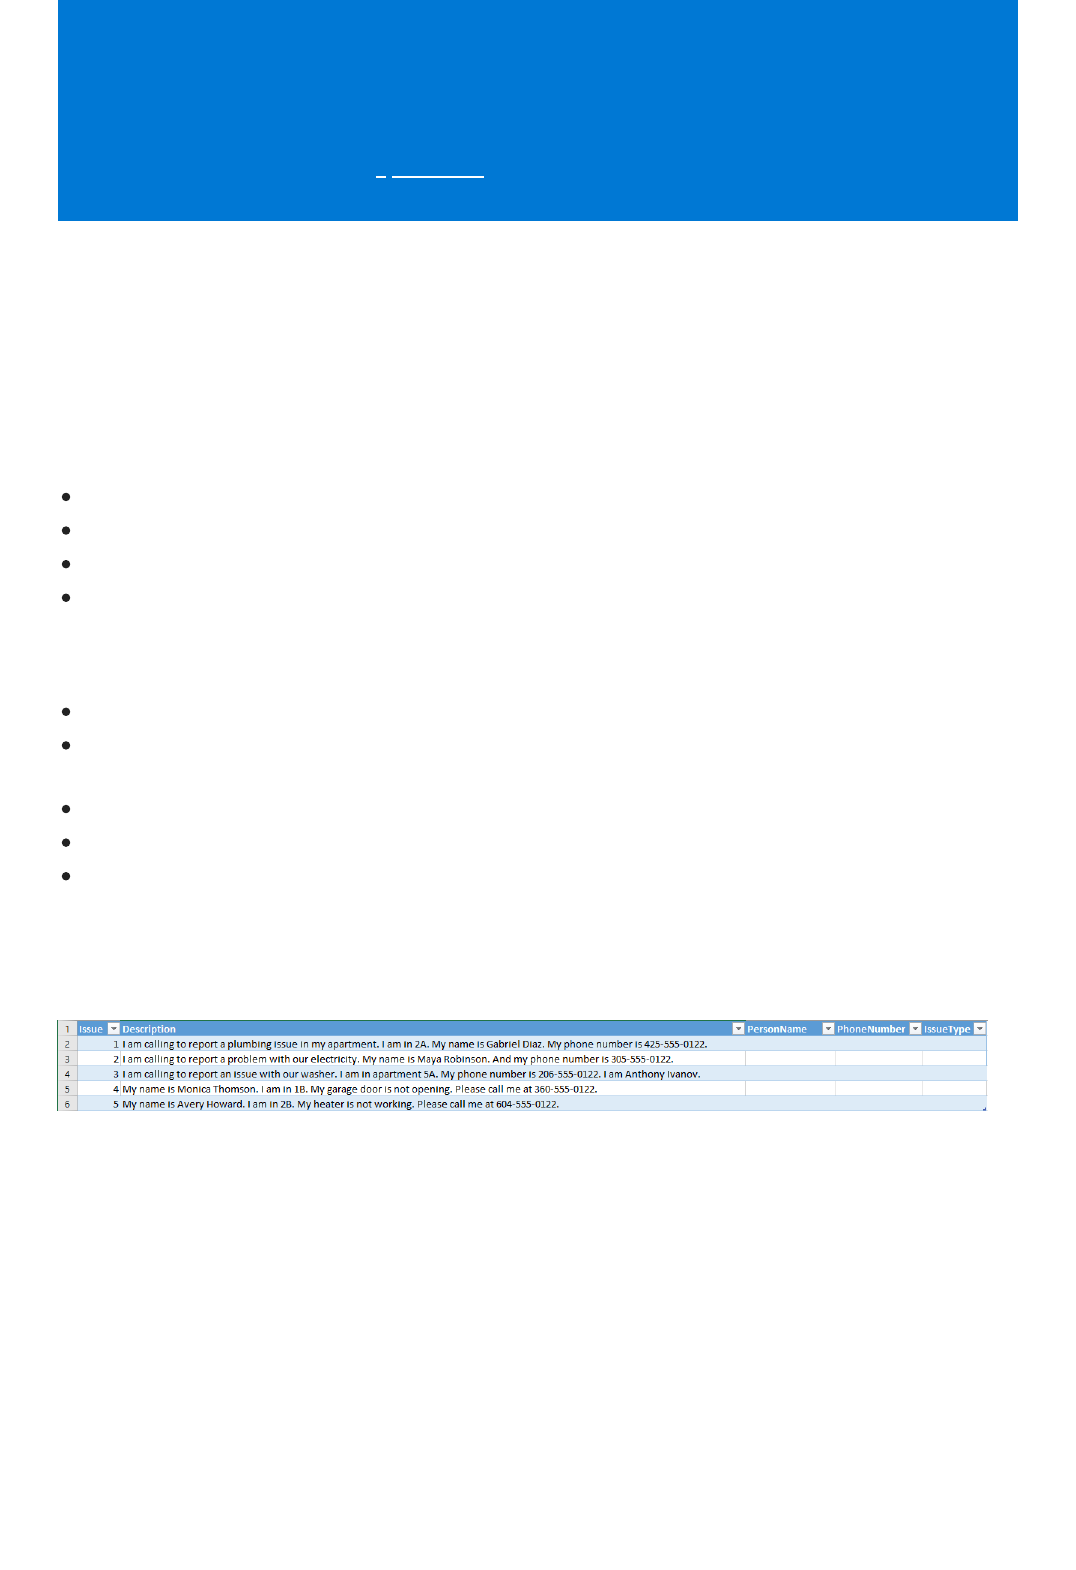
Extract information in Excel using Text Analytics and
Power Automate
5/13/2021 • 6 minutes to read • Edit Online
Prerequisites
Add the Excel file to OneDrive for Business
Create a new Power Automate workflow
In this tutorial, you'll create a Power Automate flow to extract text in an Excel spreadsheet without having to
write code.
This flow will take a spreadsheet of issues reported about an apartment complex, and classify them into two
categories: plumbing and other. It will also extract the names and phone numbers of the tenants who sent them.
Lastly, the flow will append this information to the Excel sheet.
In this tutorial, you'll learn how to:
Use Power Automate to create a flow
Upload Excel data from OneDrive for Business
Extract text from Excel, and send it to the Text Analytics API
Use the information from the API to update an Excel sheet.
A Microsoft Azure account. Create a free account or sign in.
A Text Analytics resource. If you don't have one, you can create one in the Azure portal and use the free tier to
complete this tutorial.
The key and endpoint that was generated for you during sign-up.
A spreadsheet containing tenant issues. Example data is provided on GitHub
Microsoft 365, with OneDrive for business.
Download the example Excel file from GitHub. This file must be stored in your OneDrive for Business account.
The issues are reported in raw text. We will use the Text Analytics API's Named Entity Recognition to extract the
person name and phone number. Then the flow will look for the word "plumbing" in the description to
categorize the issues.
Go to the Power Automate site, and login. Then click CreateCreate and Scheduled flowScheduled flow.
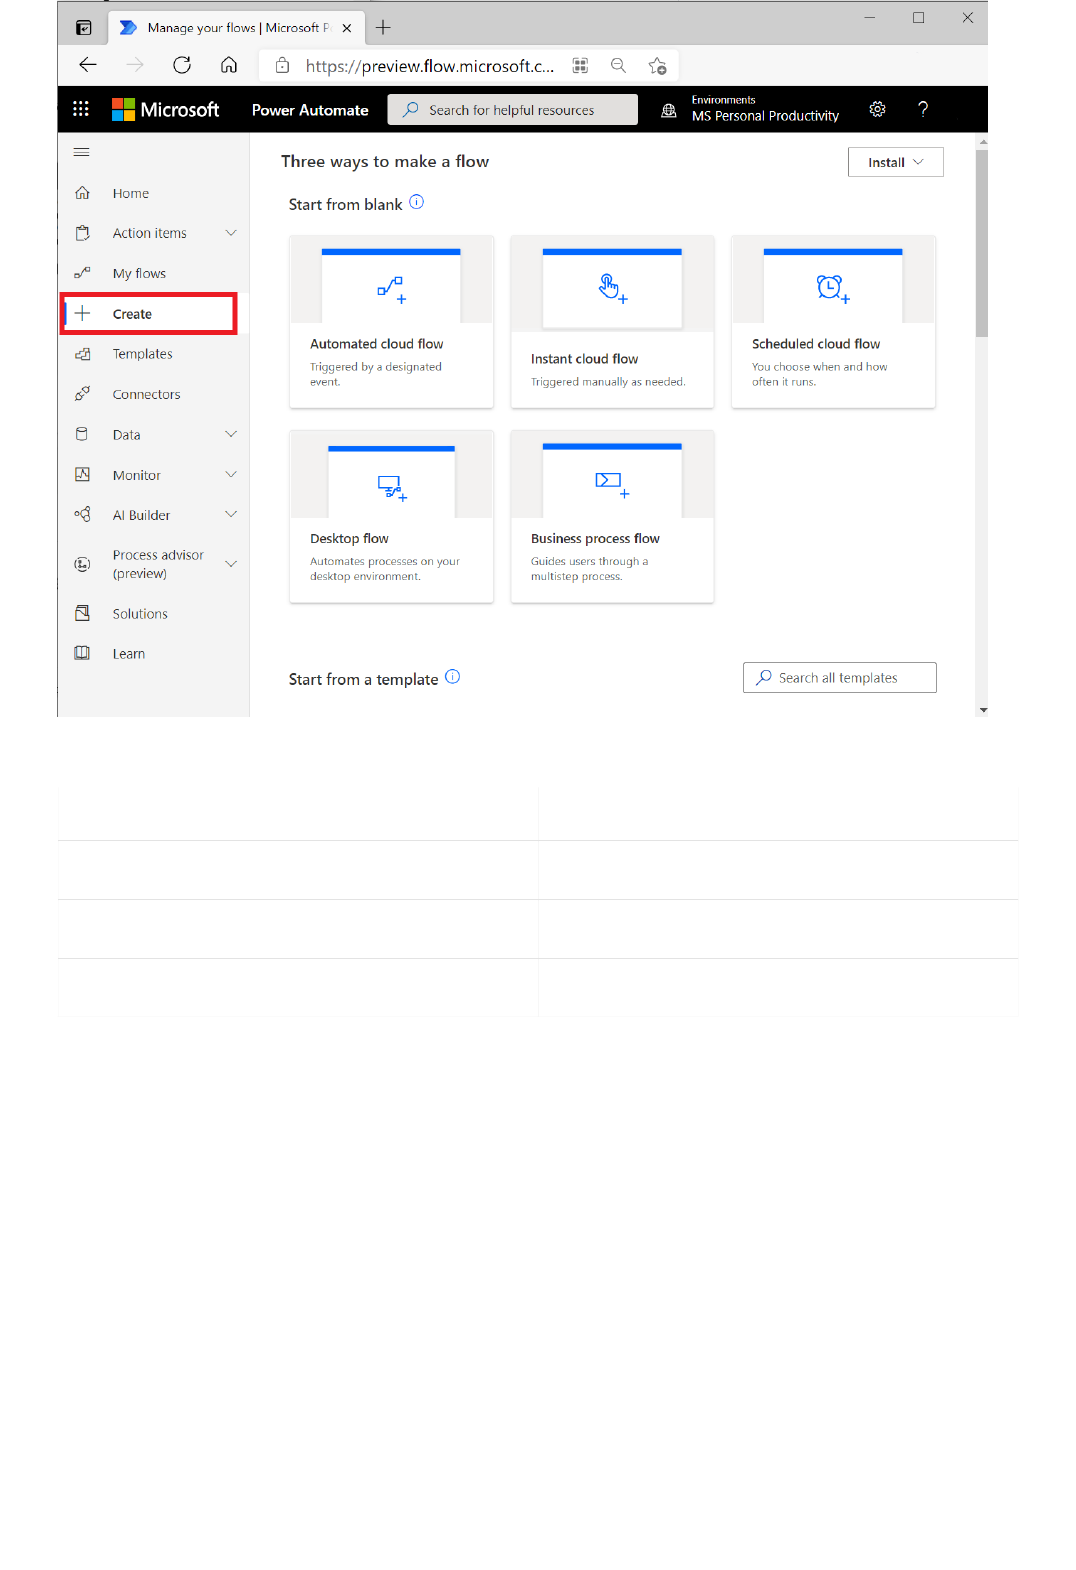
FIELDF IEL D VA L UEVA L UE
Flow nameFlow name Scheduled ReviewScheduled Review or another name.
Star tingStarting Enter the current date and time.
Repeat ever yRepeat ever y 1 hour1 hour
Add variables to the flow
On the Build a scheduled cloud flowBuild a scheduled cloud flow page, initialize your flow with the following fields:
Create variables representing the information that will be added to the Excel file. Click New StepNew Step and search for
Initialize variableInitialize variable. Do this four times, to create four variables.
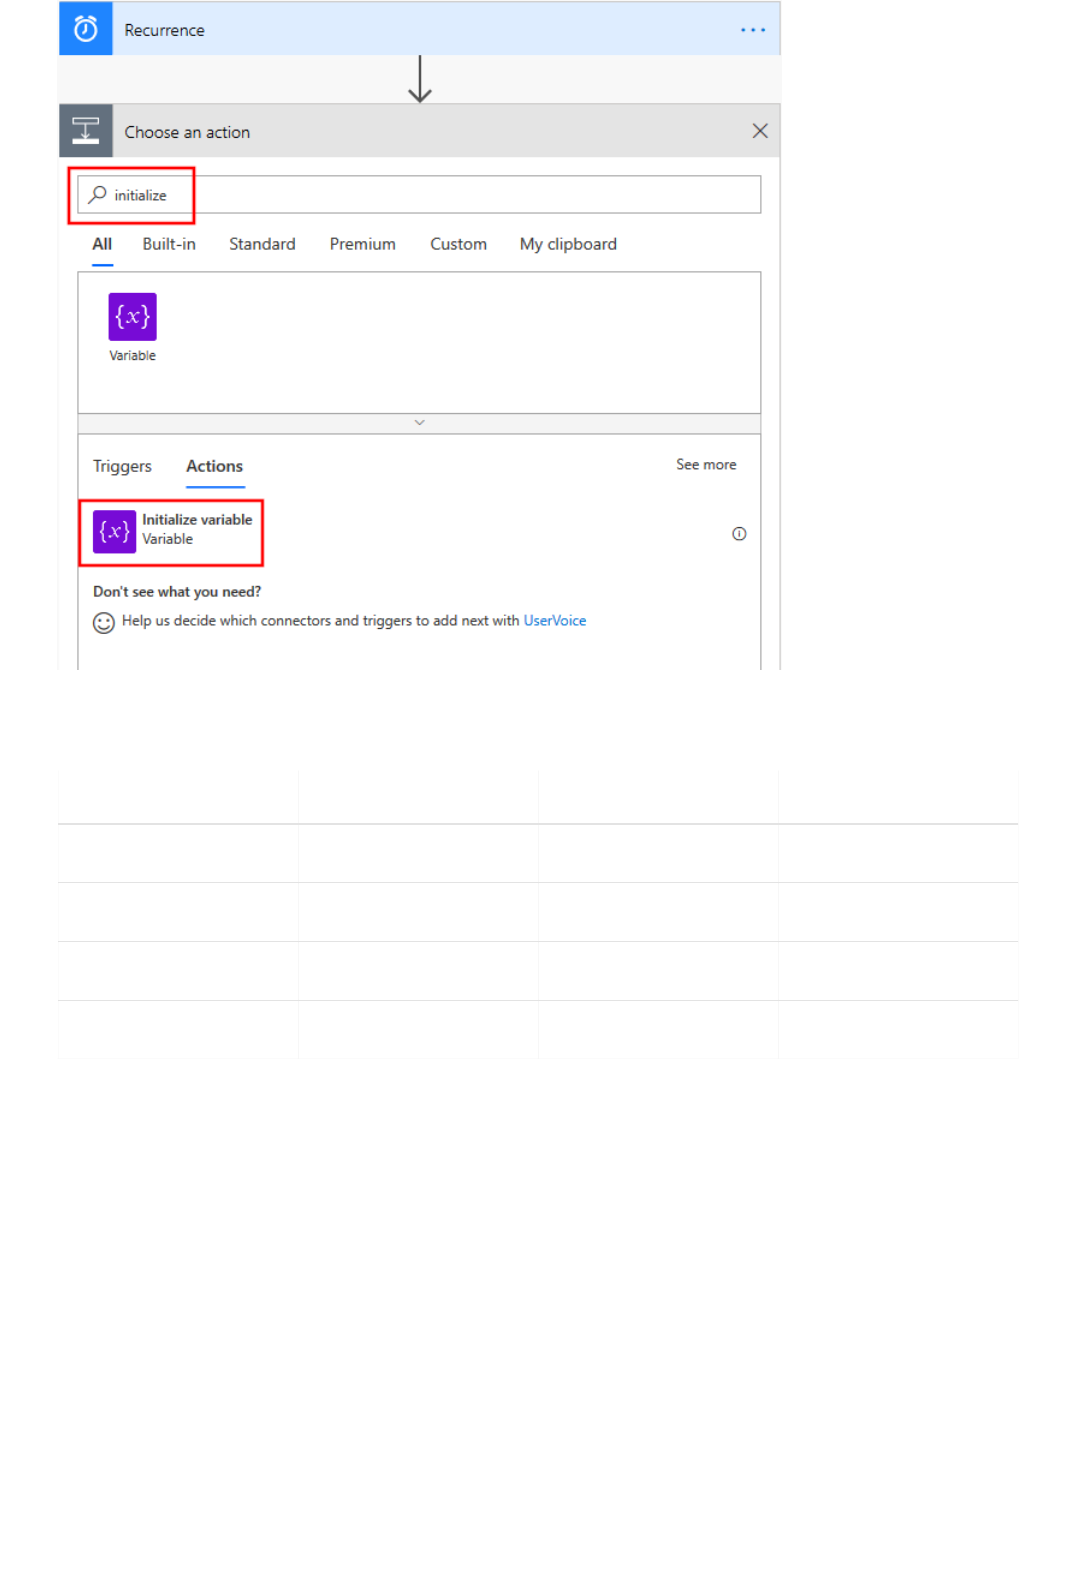
A C T IONAC T IO N NA M EN A M E T Y P ET Y PE VA L UEVALUE
Initialize variable var_person String Person
Initialize variable 2 var_phone String Phone Number
Initialize variable 3 var_plumbing String plumbing
Initialize variable 4 var_other String other
Add the following information to the variables you created. They represent the columns of the Excel file. If any
variables are collapsed, you can click on them to expand them.
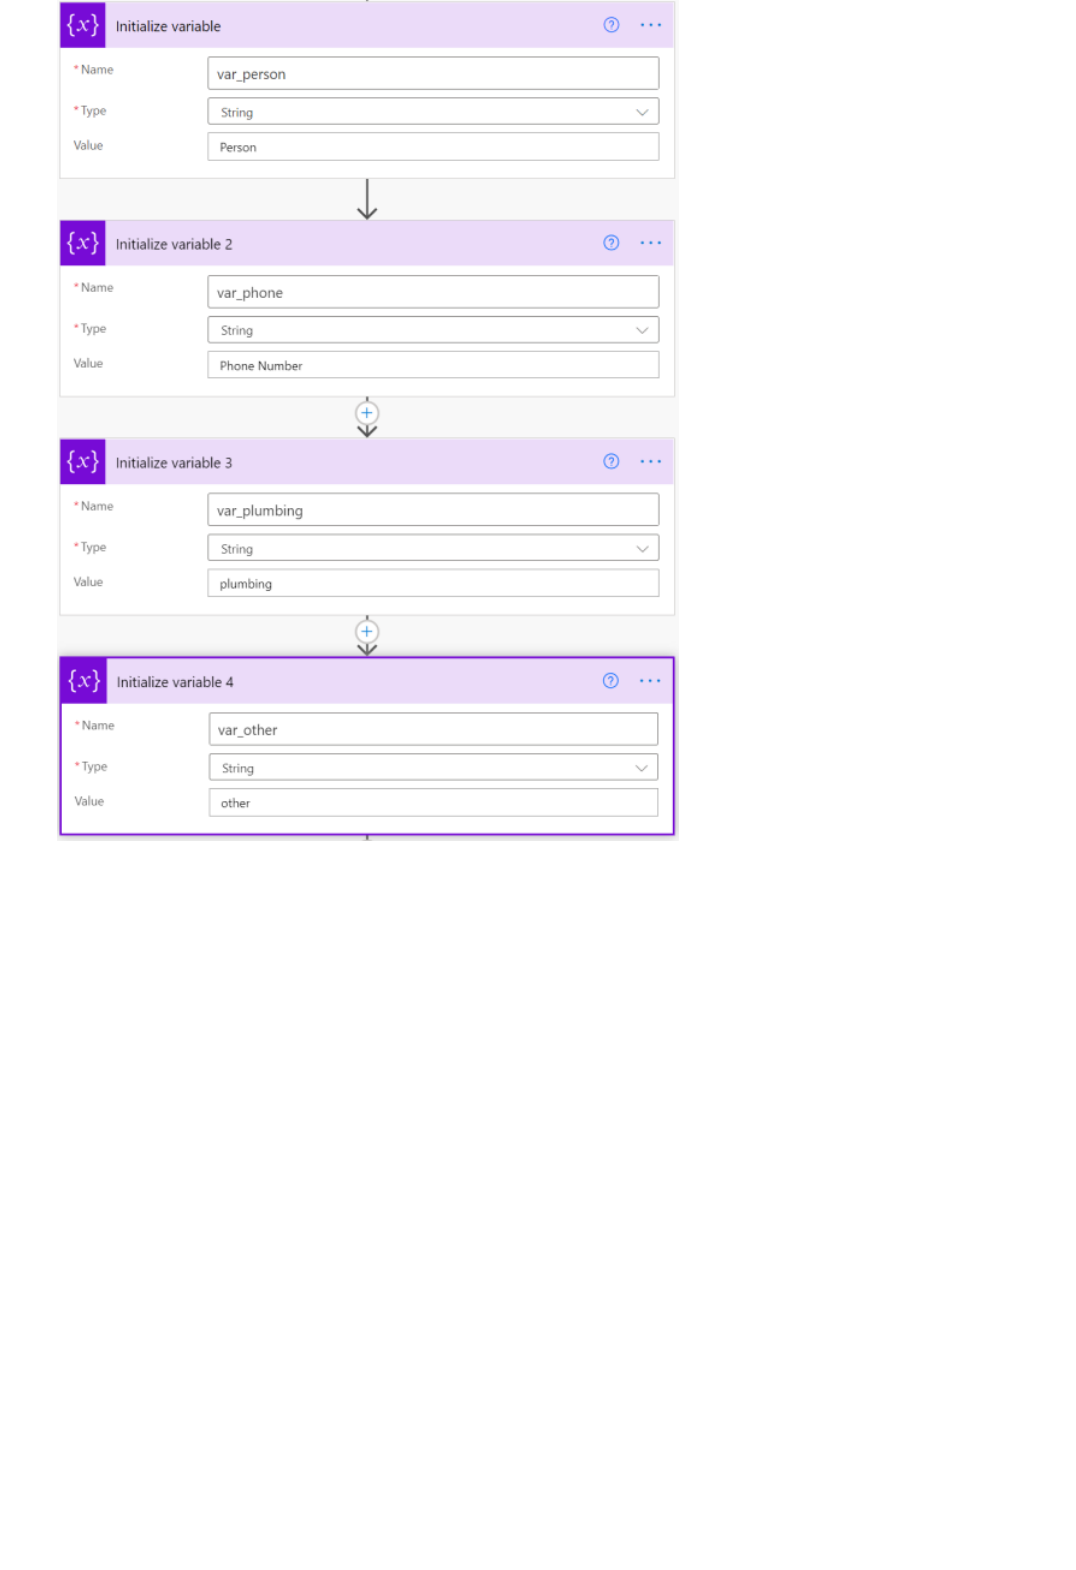
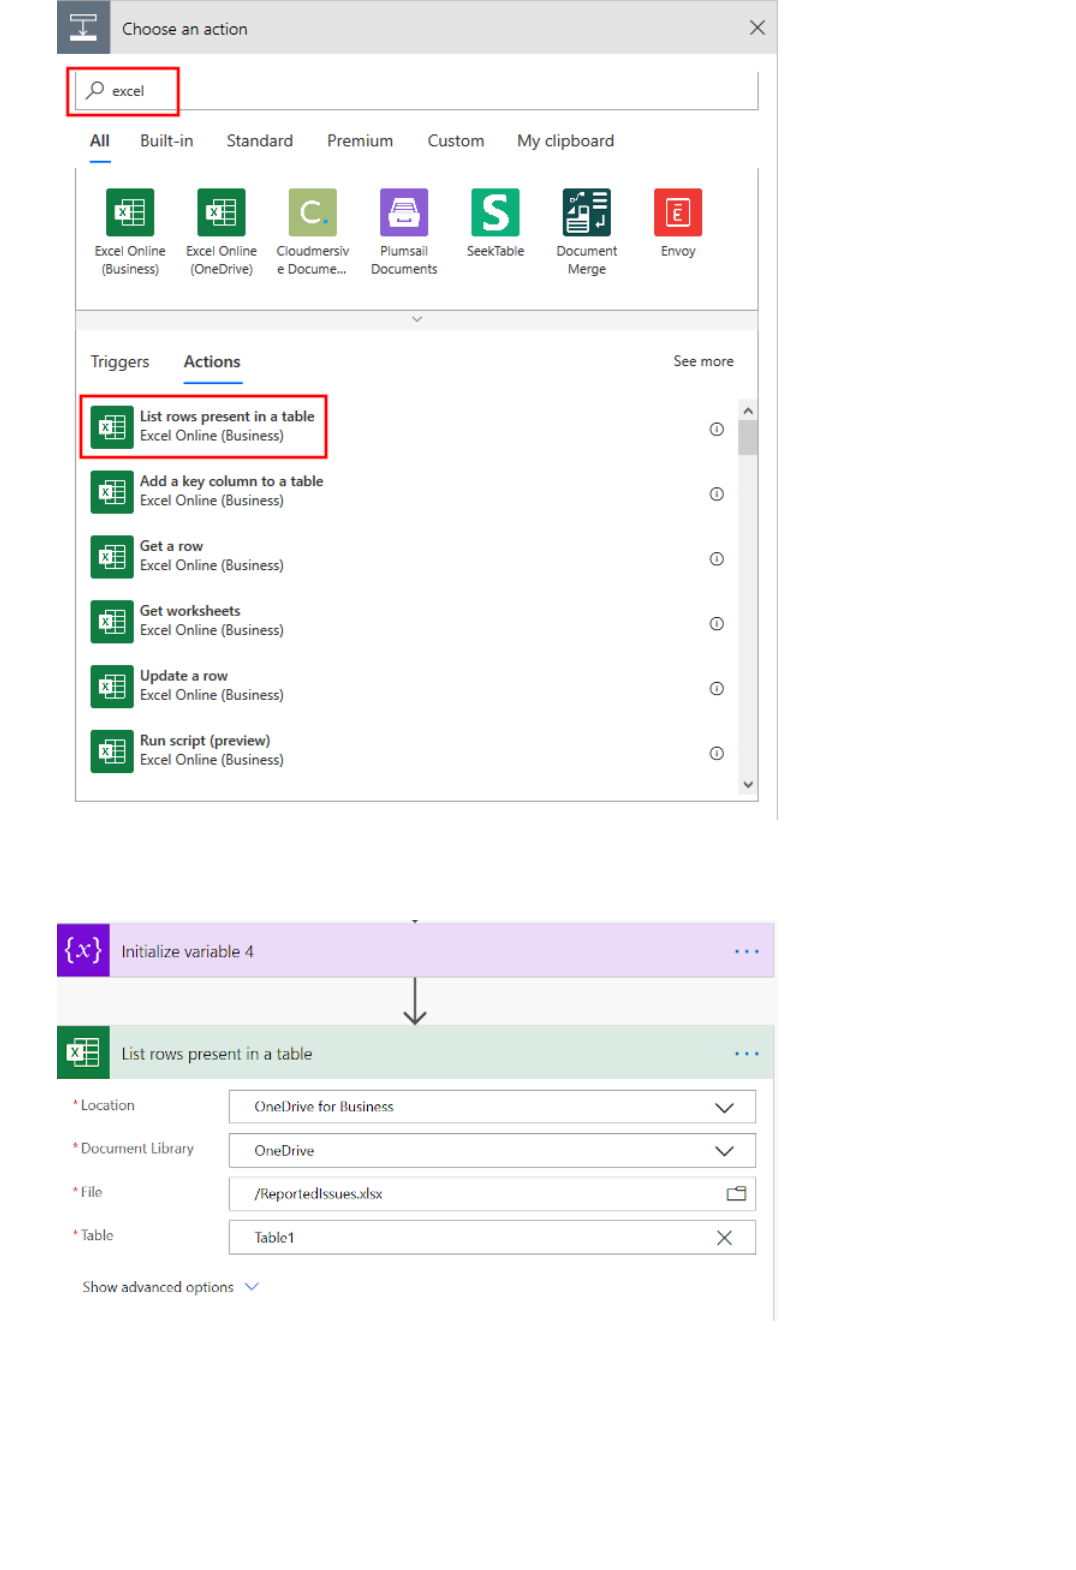
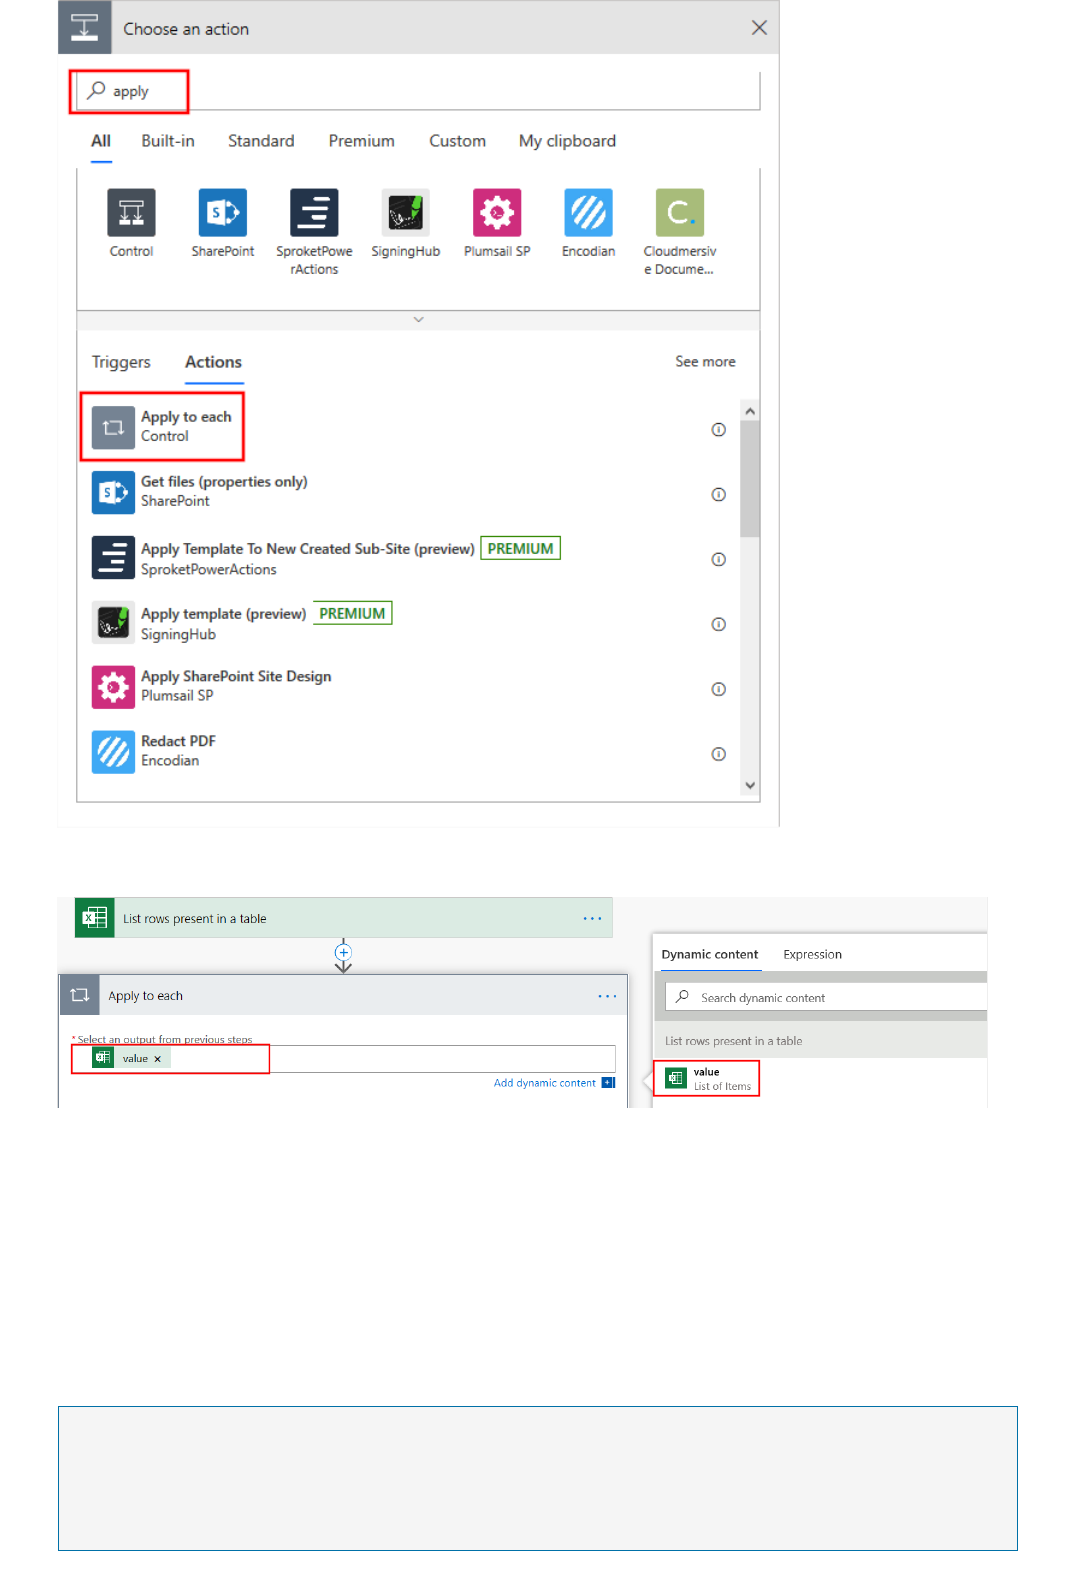
Send a request to the Text Analytics API
Create a Text Analytics connectionCreate a Text Analytics connection
NOTENOTE
Click on Select an output from previous stepSelect an output from previous step. In the Dynamic content box that appears, select valuevalue.
If you haven't already, you need to create a Text Analytics resource in the Azure portal.
In the Apply to eachApply to each, click Add an actionAdd an action. Go to your Text Analytics resource's key and endpointkey and endpoint page in the
Azure portal, and get the key and endpoint for your Text Analytics resource.
In your flow, enter the following information to create a new Text Analytics connection.
If you already have created a Text Analytics connection and want to change your connection details, Click on the ellipsis
on the top right corner, and click + Add new connection+ Add new connection.
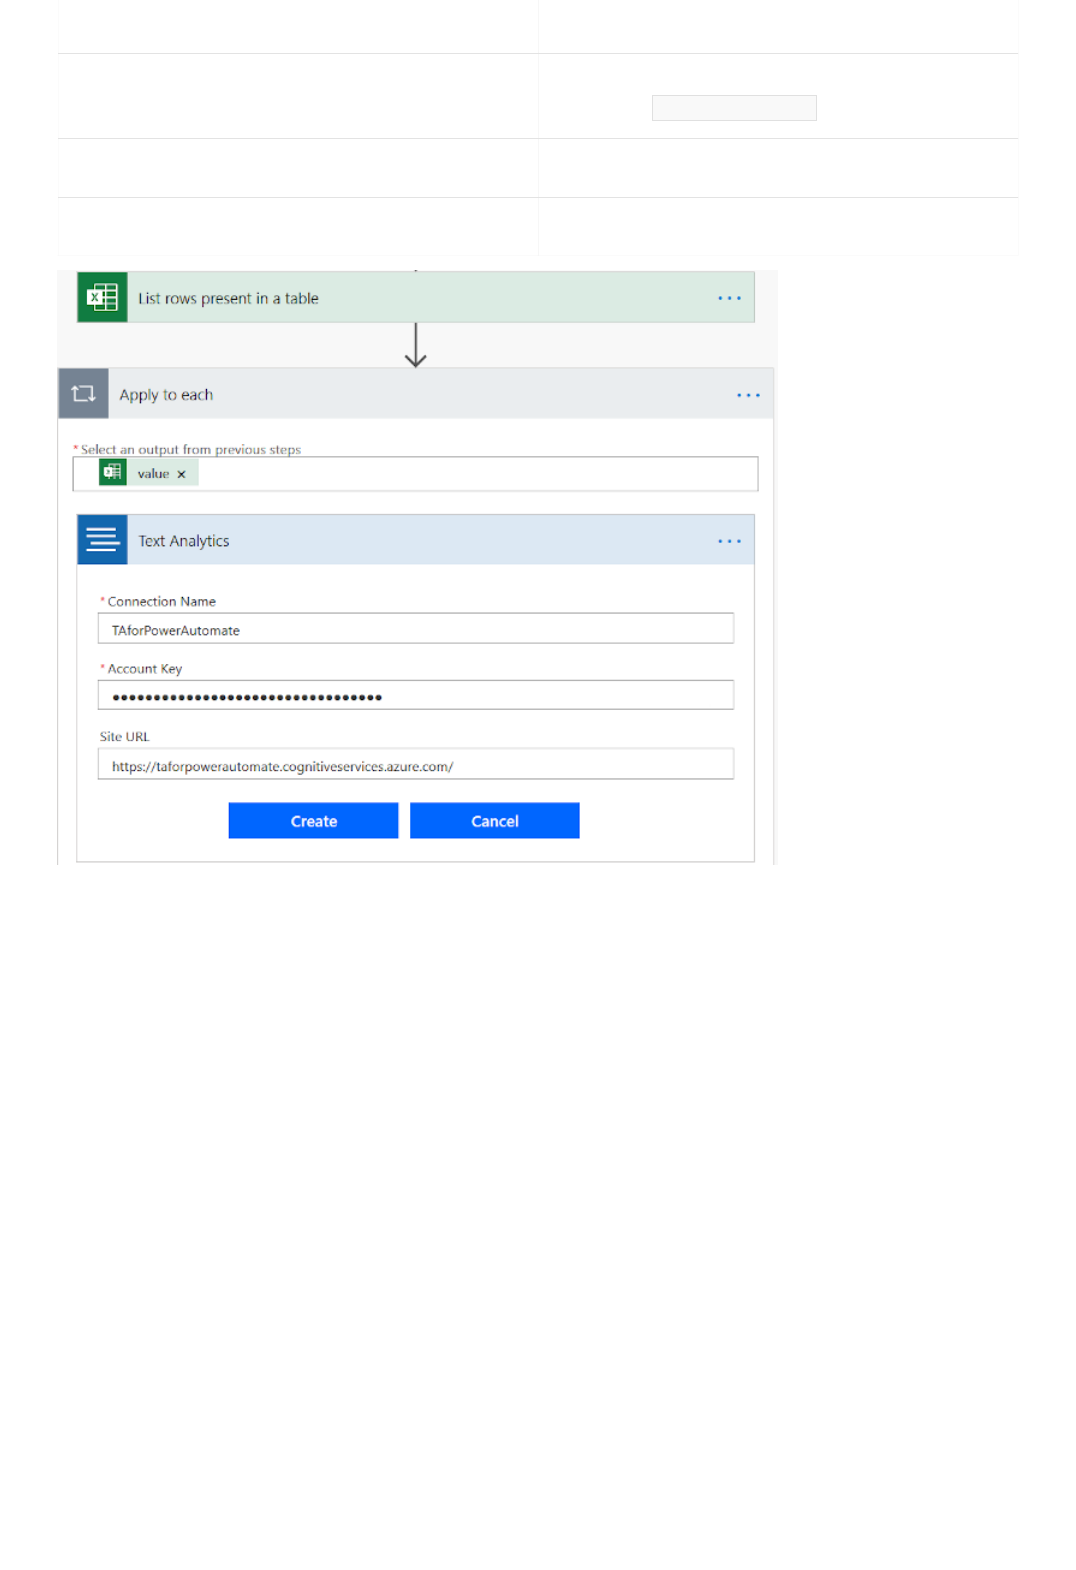
FIELDF IEL D VA L UEVA L UE
Connection Name A name for the connection to your Text Analytics resource.
For example, TAforPowerAutomate .
Account key The key for your Text Analytics resource.
Site URL The endpoint for your Text Analytics resource.
Extract the excel content
After the connection is created, search for Text AnalyticsText Analytics and select Named Entity RecognitionNamed Entity Recognition. This will
extract information from the description column of the issue.
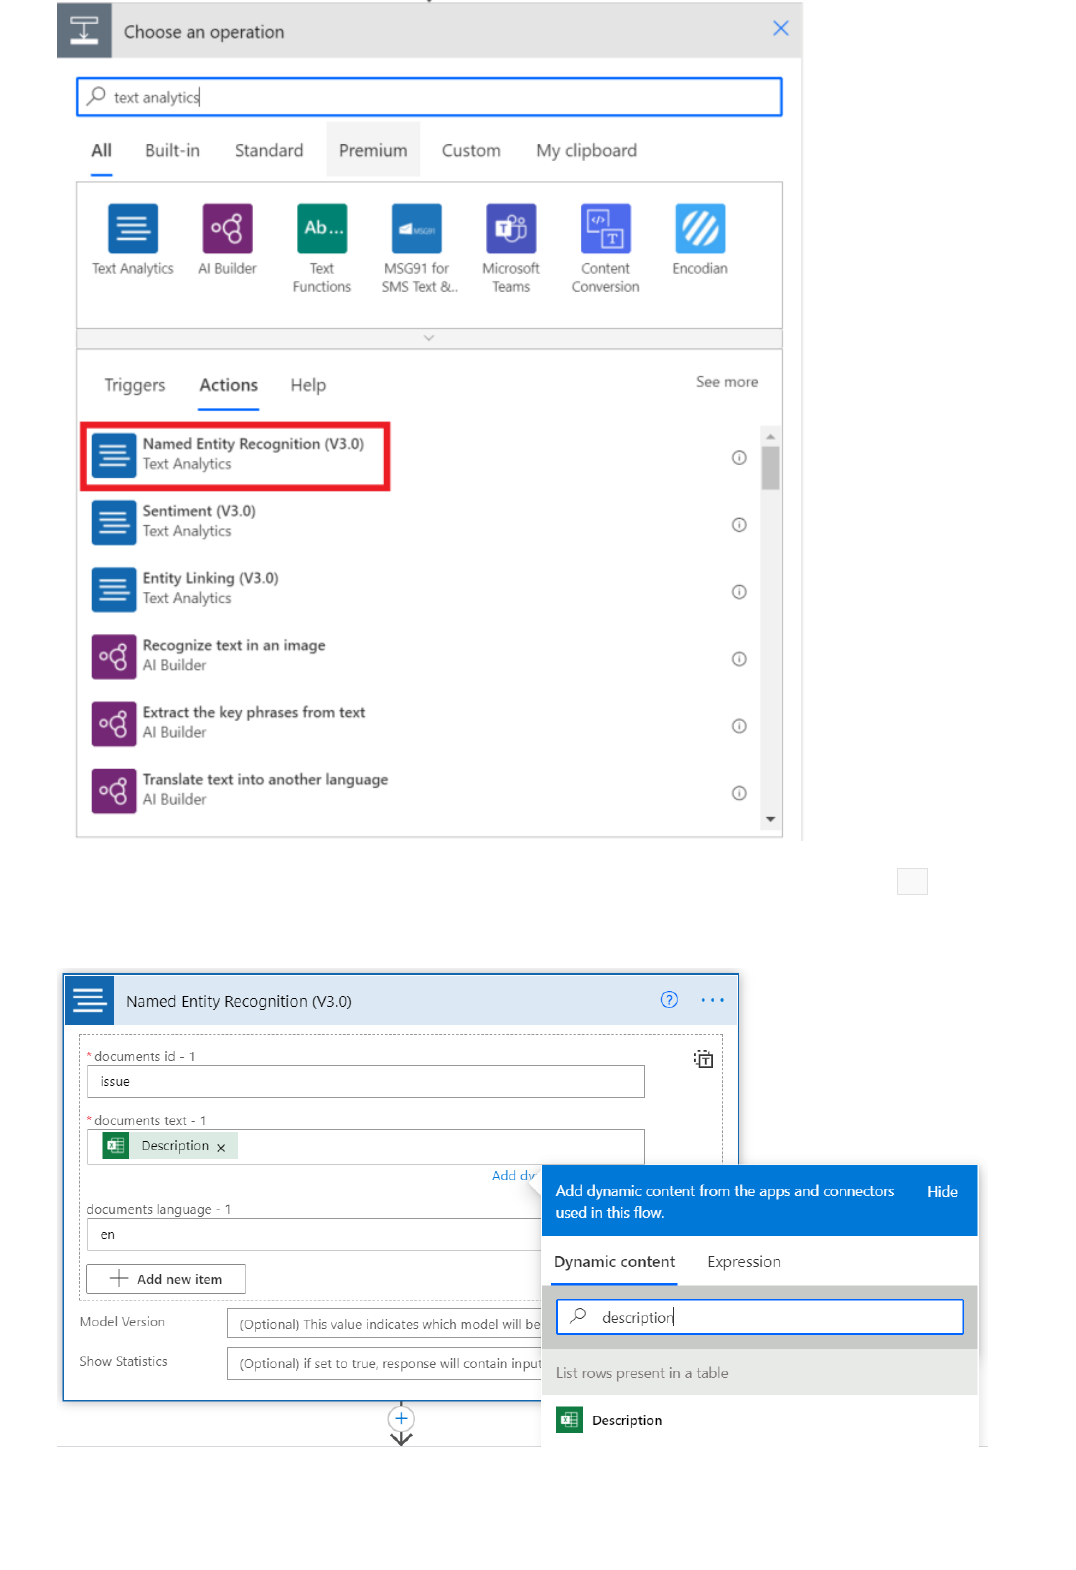
Click in the TextText field and select DescriptionDescription from the Dynamic content windows that appears. Enter en for
Language, and a unique name as the document ID (you might need to click Show advanced optionsShow advanced options).
Within the Apply to eachApply to each, click Add an actionAdd an action and create another Apply to eachApply to each action. Click inside the text
box and select documentsdocuments in the Dynamic Content window that appears.
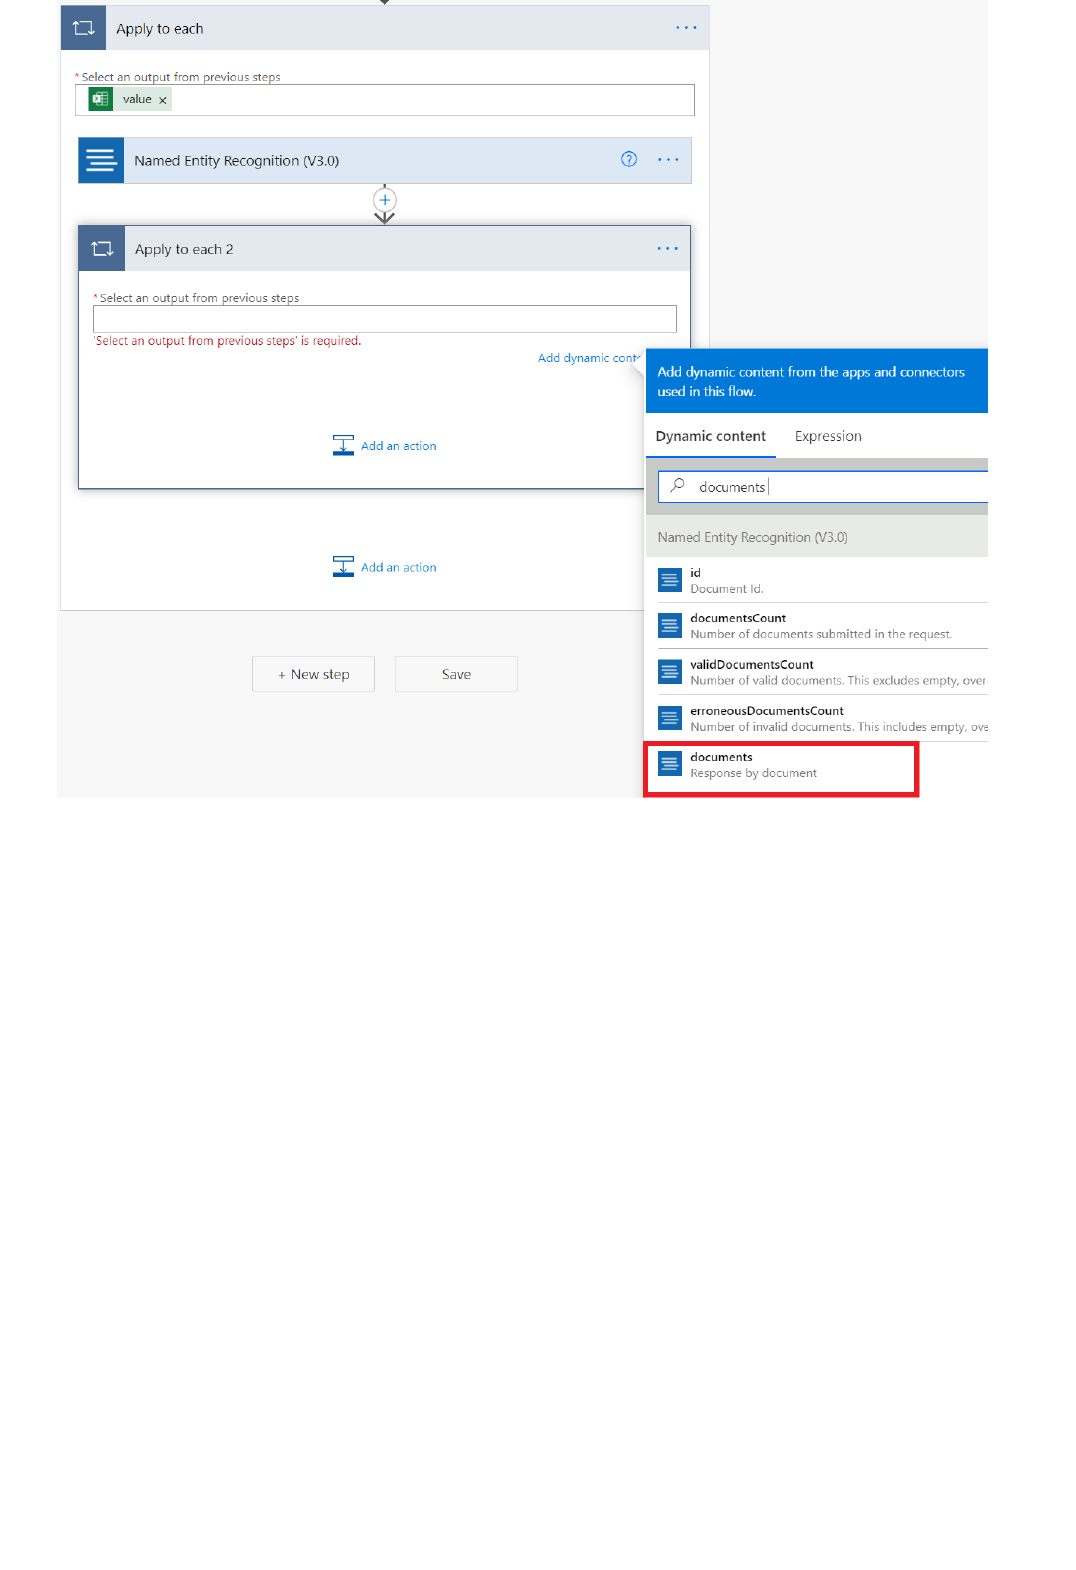
Extract the person name
Next, we will find the person entity type in the Text Analytics output. Within the Apply to each 2Apply to each 2 , click Add anAdd an
actionaction, and create another Apply to eachApply to each action. Click inside the text box and select EntitiesEntities in the Dynamic
Content window that appears.
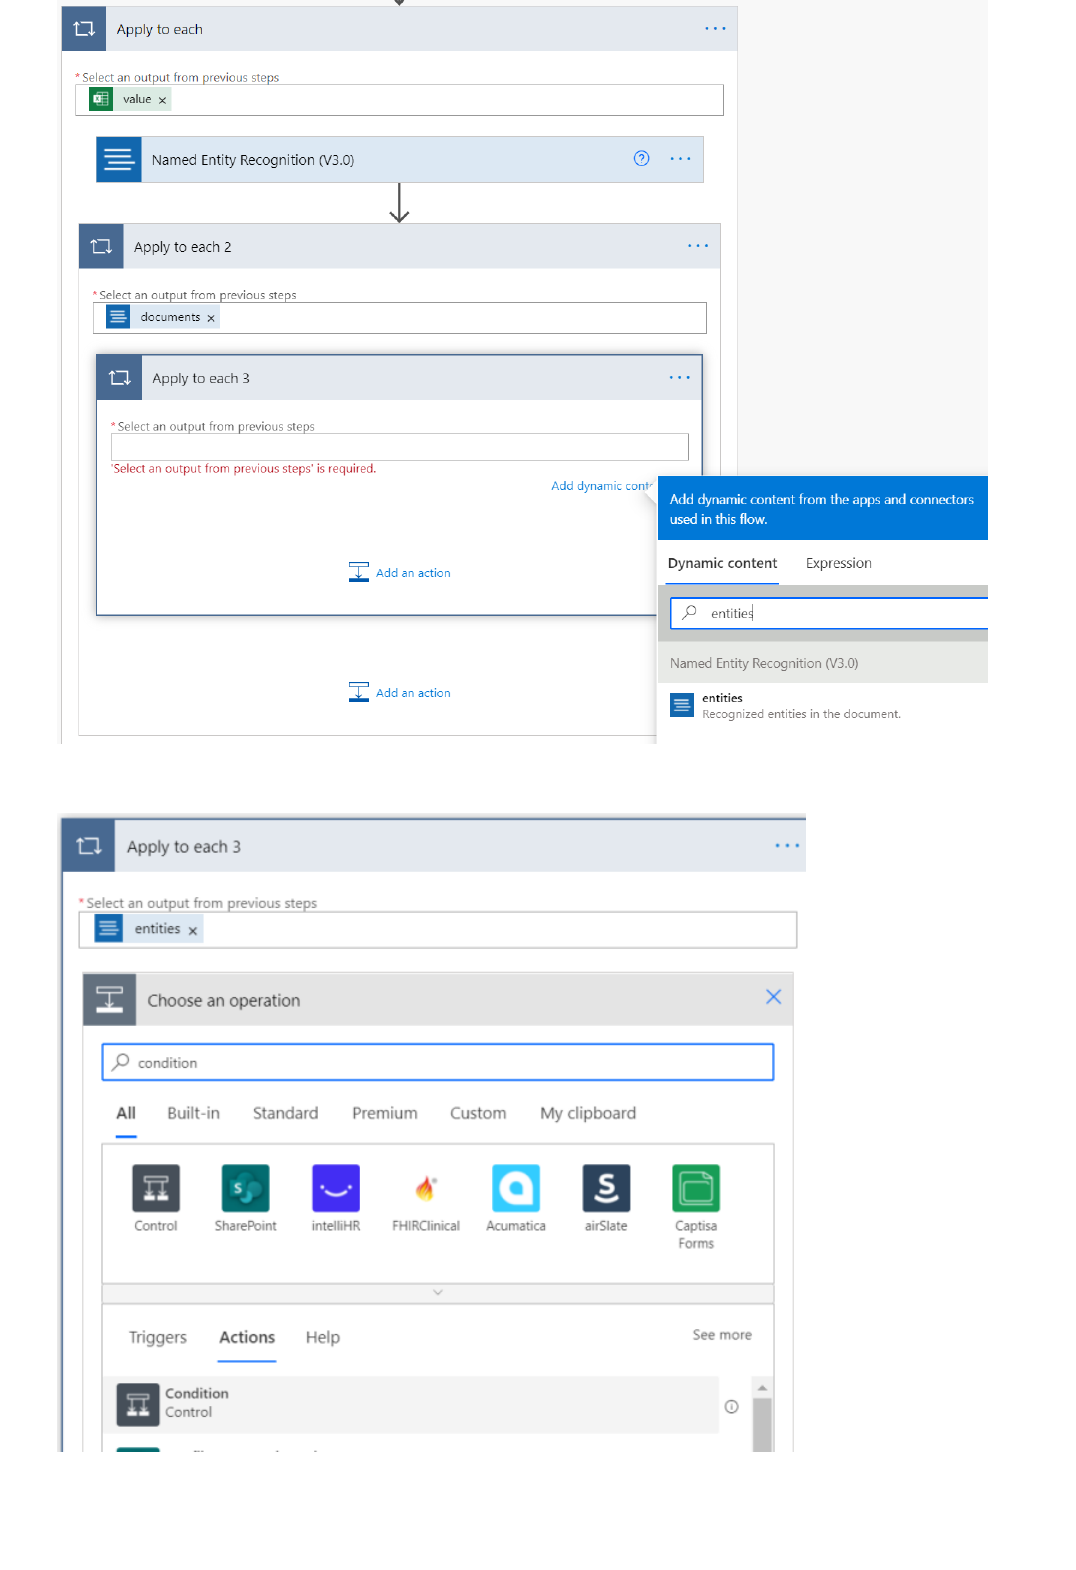
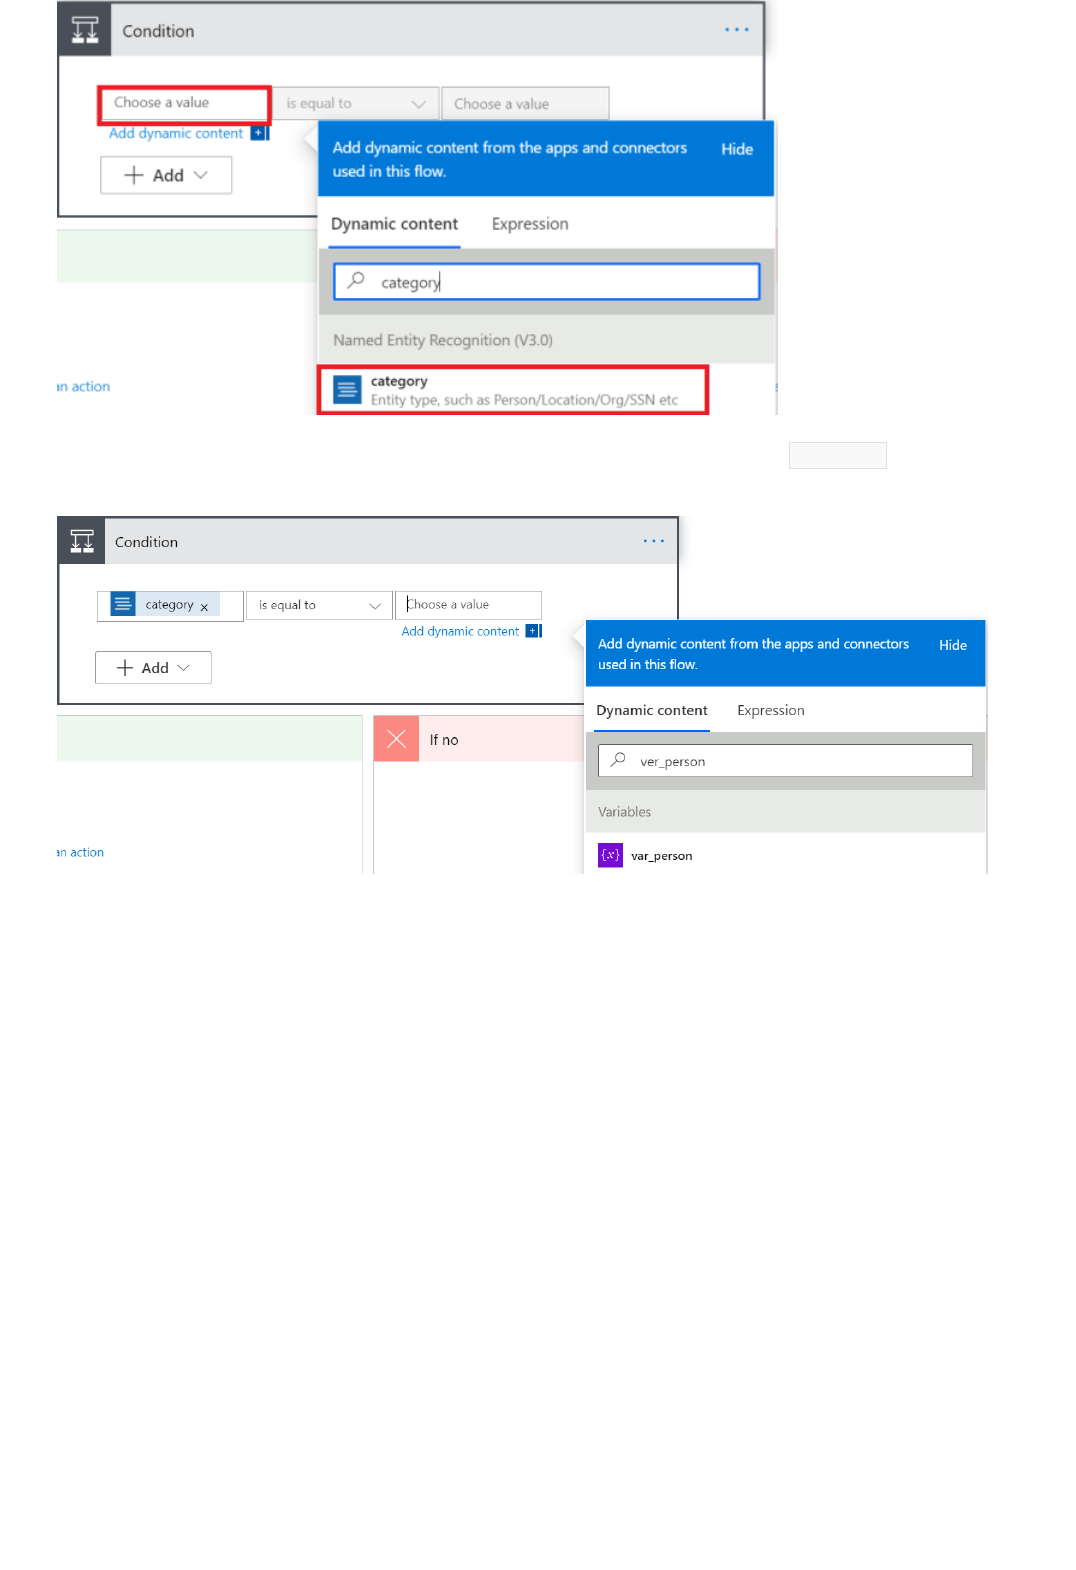
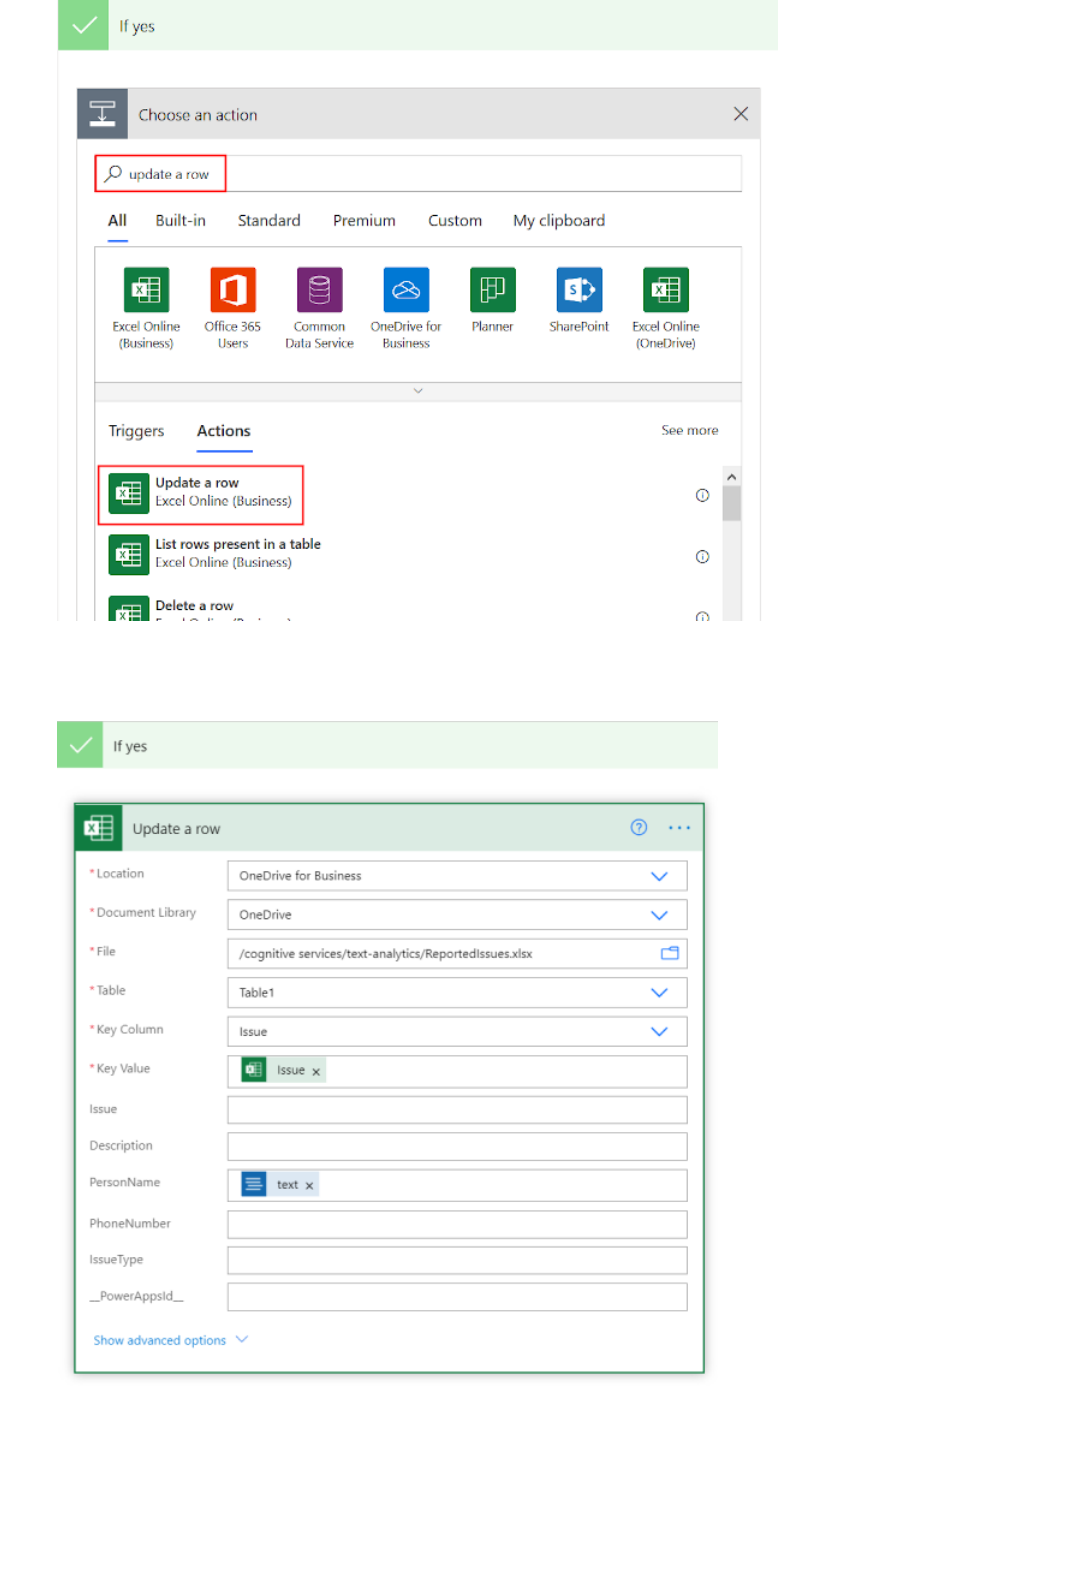
Get the phone number
Enter the Excel information, and update the Key ColumnKey Column, Key ValueKey Value and PersonNamePersonName fields. This will append
the name detected by the API to the Excel sheet.
Minimize the Apply to each 3Apply to each 3 action by clicking on the name. Then add another Apply to eachApply to each action to
Apply to each 2Apply to each 2, like before. it will be named Apply to each 4Apply to each 4. Select the text box, and add entitiesentities as the
output for this action.
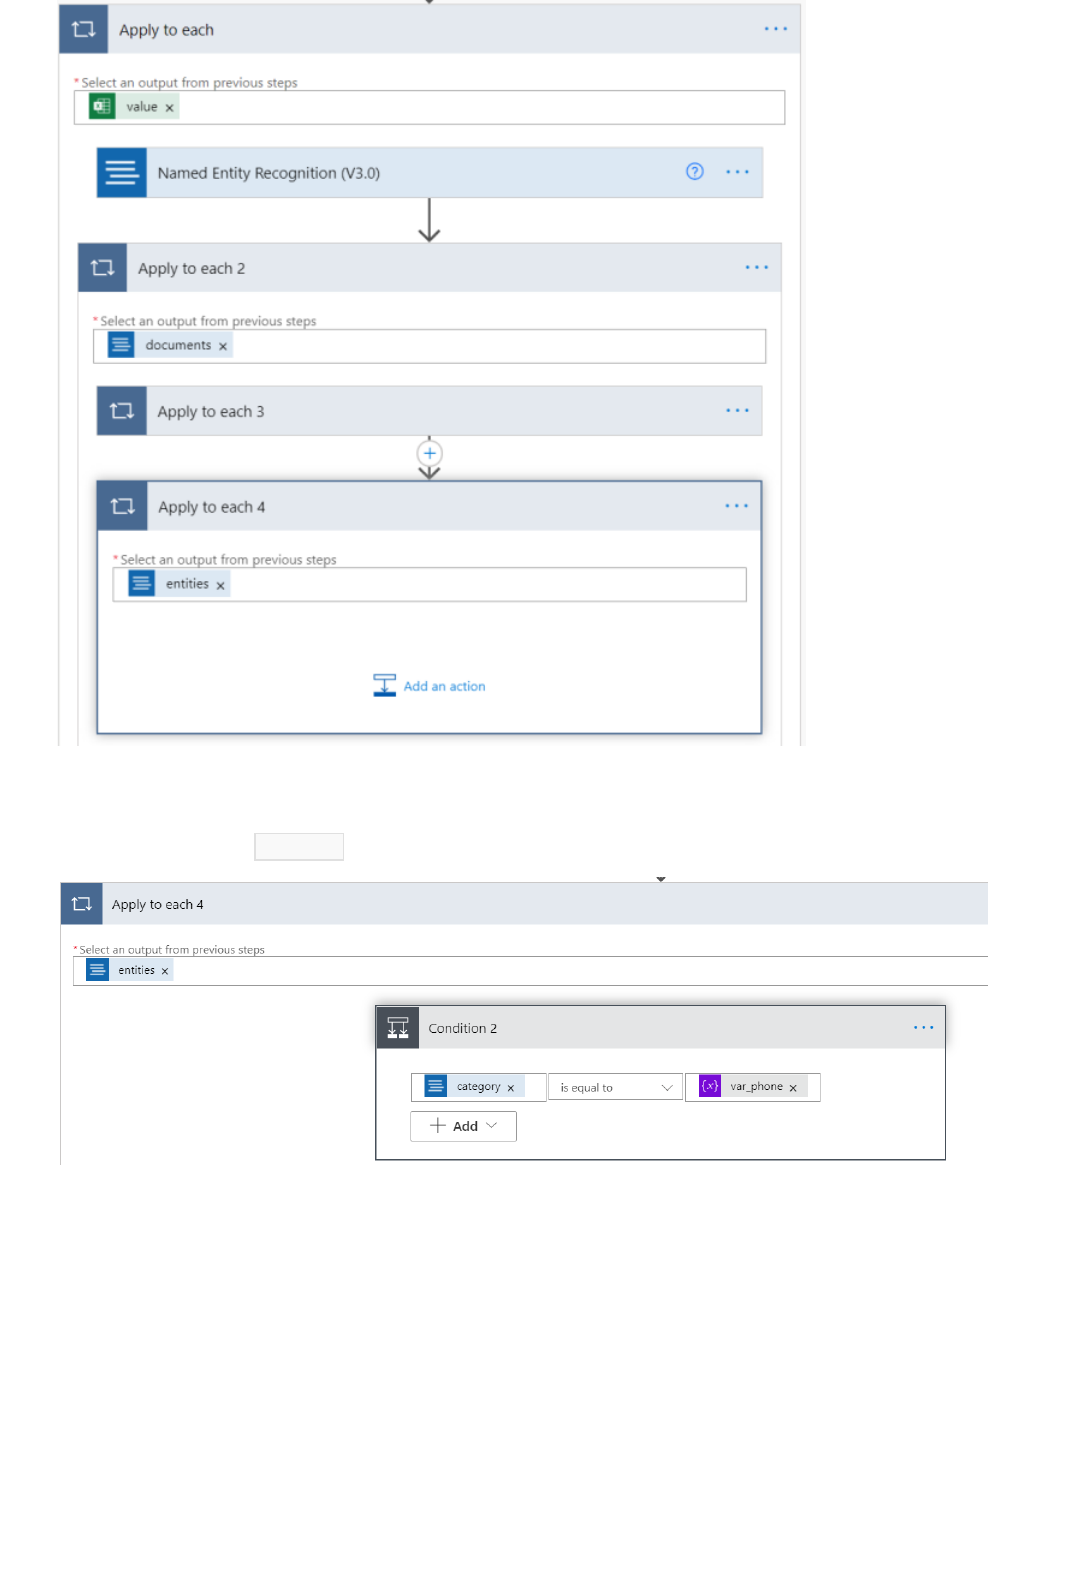
Within Apply to each 4Apply to each 4 , add a ConditionCondition control. It will be named Condition 2Condition 2. In the first text box, search
for, and add categoriescategories from the Dynamic content window. Be sure the center box is set to is equal tois equal to. Then, in
the right text box, enter var_phone .
In the If yesIf yes condition, add an Update a rowUpdate a row action. Then enter the information like we did above, for the
phone numbers column of the Excel sheet. This will append the phone number detected by the API to the Excel
sheet.
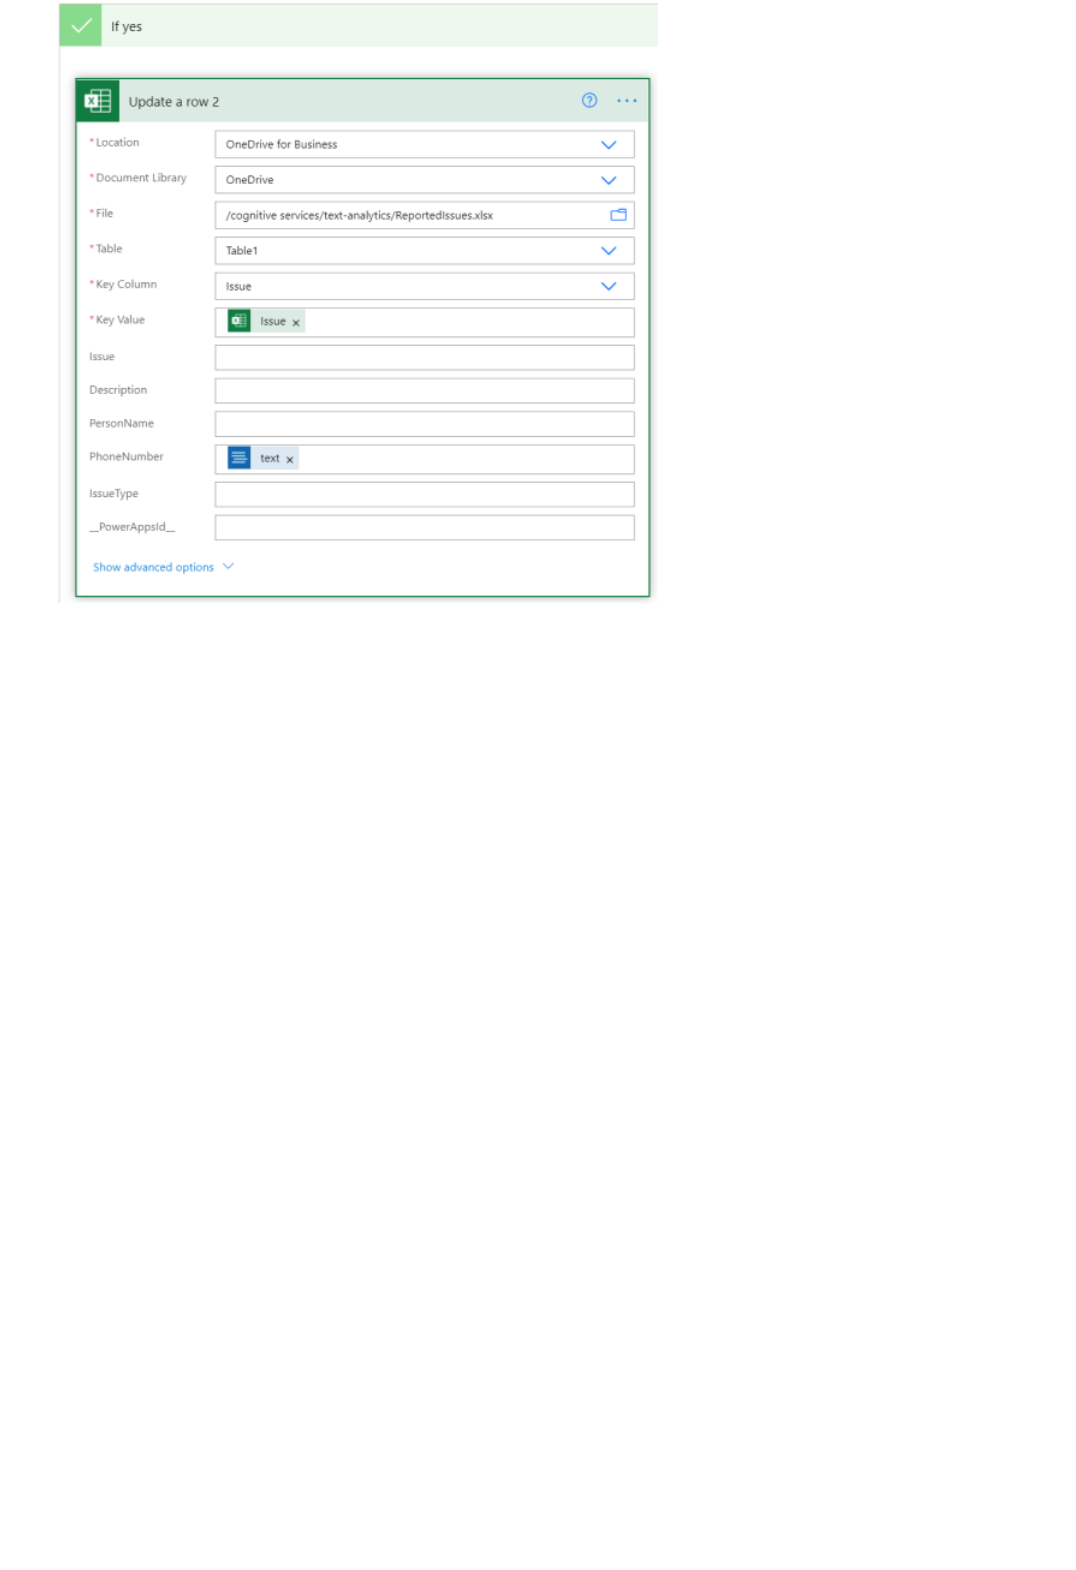
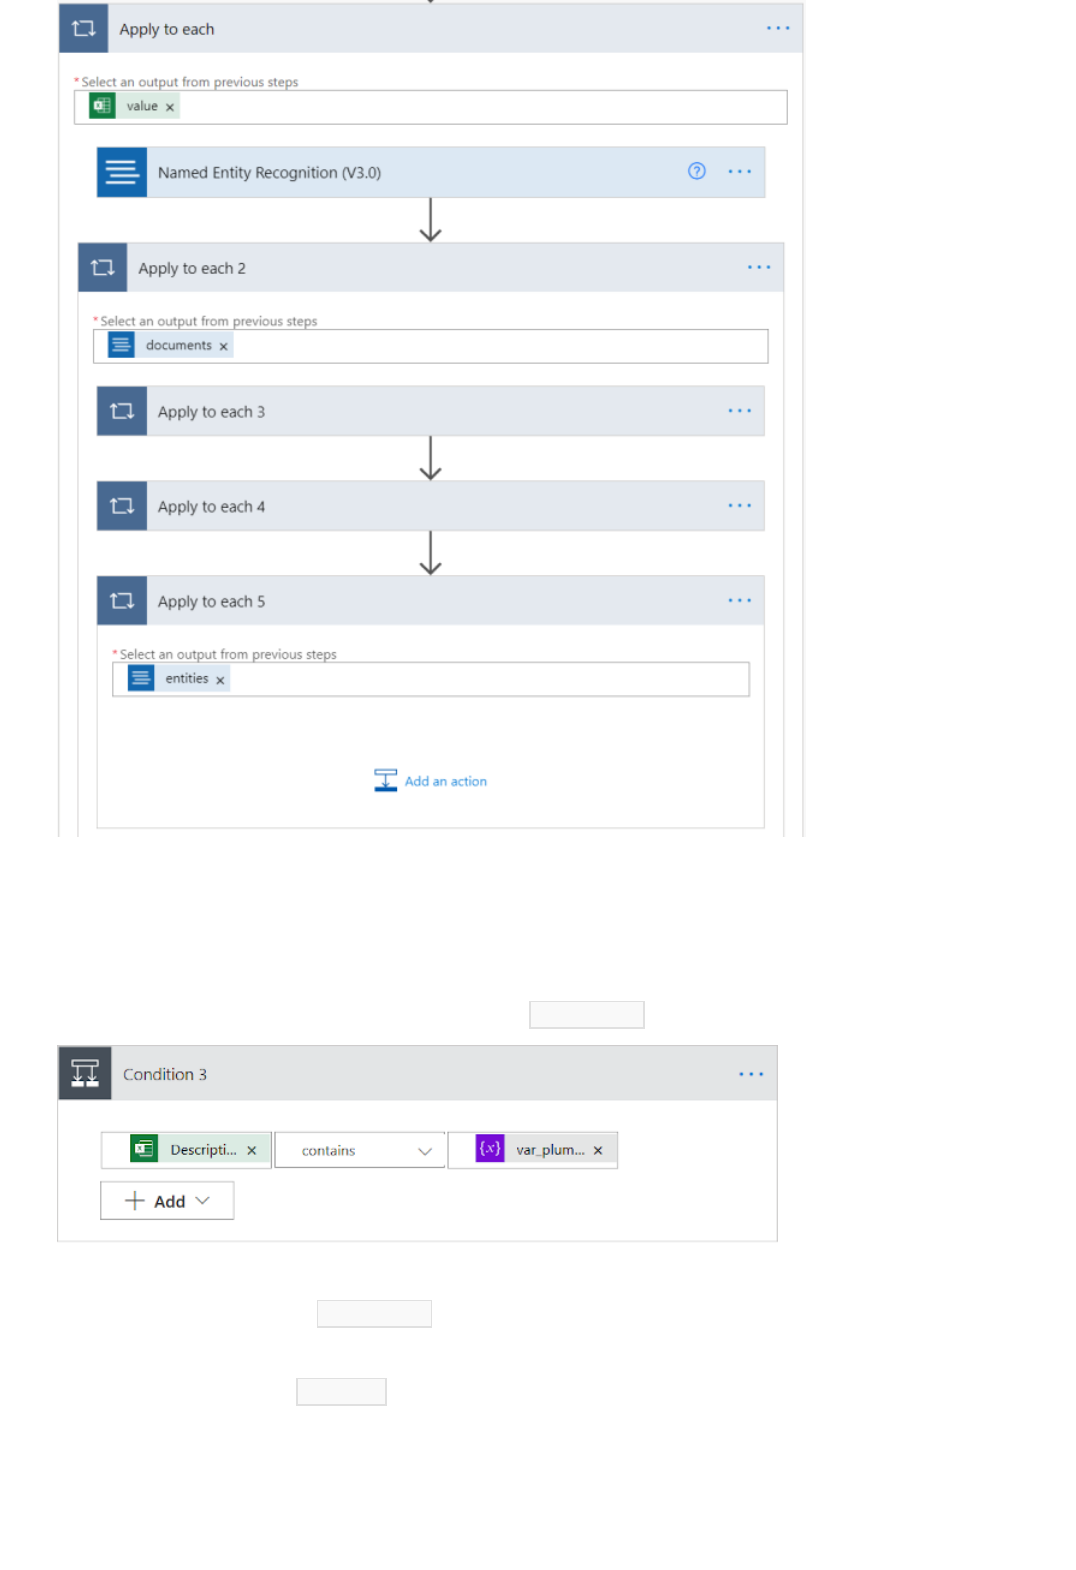
Next, the flow will check if the issue description from the Excel table row contains the word "plumbing". If yes, it
will add "plumbing" in the IssueType column. If not, we will enter "other."
Inside the Apply to each 4Apply to each 4 action, add a ConditionCondition Control. It will be named Condition 3Condition 3. In the first text box,
search for, and add DescriptionDescription from the Excel file, using the Dynamic content window. Be sure the center box
says containscontains. Then, in the right text box, find and select var_plumbing .
In the If yesIf yes condition, click Add an actionAdd an action, and select Update a rowUpdate a row. Then enter the information like before.
In the IssueType column, select var_plumbing . This will apply a "plumbing" label to the row.
In the If noIf no condition, click Add an actionAdd an action, and select Update a rowUpdate a row . Then enter the information like before. In
the IssueType column, select var_other . This will apply an "other" label to the row.
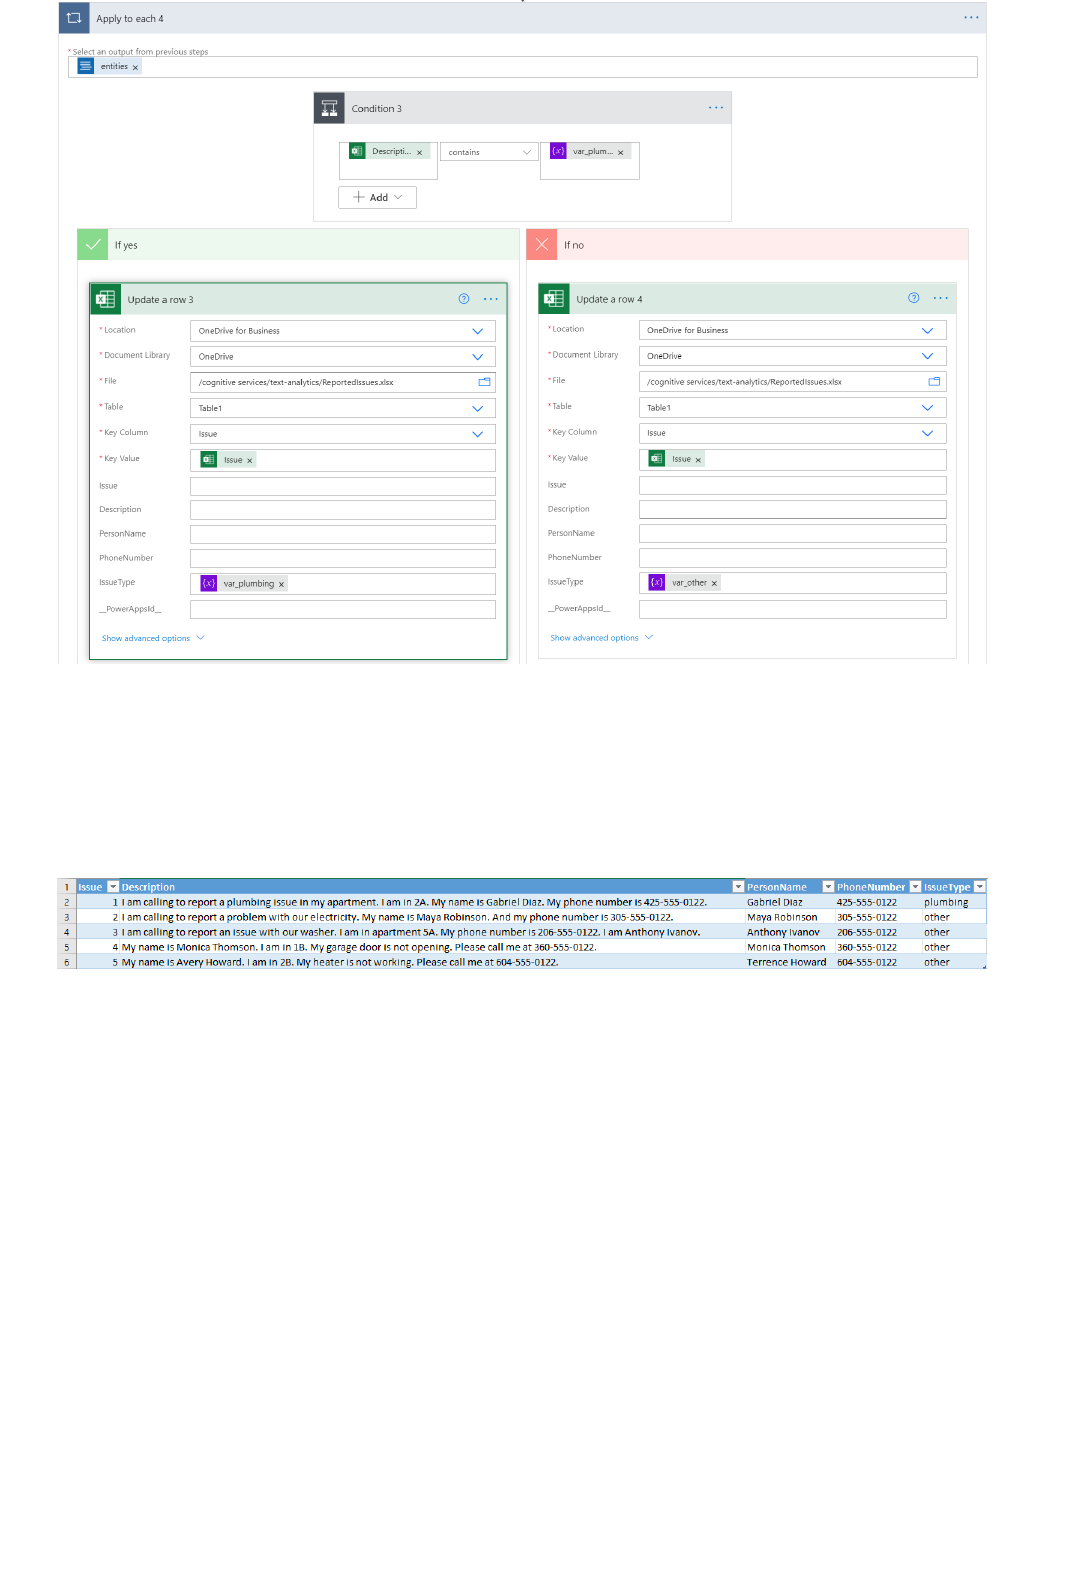

Azure Cognitive Services support and help options
3/20/2021 • 2 minutes to read • Edit Online
Create an Azure support request
Post a question on Microsoft Q&A
Are you just starting to explore the functionality of Azure Cognitive Services? Perhaps you are implementing a
new feature in your application. Or after using the service, do you have suggestions on how to improve it? Here
are options for where you can get support, stay up-to-date, give feedback, and report bugs for Cognitive
Services.
Explore the range of Azure support options and choose the plan that best fits, whether you're a developer just
starting your cloud journey or a large organization deploying business-critical, strategic applications. Azure
customers can create and manage support requests in the Azure portal.
Azure portal
Azure portal for the United States government
For quick and reliable answers on your technical product questions from Microsoft Engineers, Azure Most
Valuable Professionals (MVPs), or our expert community, engage with us on Microsoft Q&A, Azure's preferred
destination for community support.
If you can't find an answer to your problem using search, submit a new question to Microsoft Q&A. Use one of
the following tags when you ask your question:
Cognitive Services
VisionVision
Computer Vision
Custom Vision
Face
Form Recognizer
Video Indexer
LanguageLanguage
Immersive Reader
Language Understanding (LUIS)
QnA Maker
Text Analytics
Translator
SpeechSpeech
Speech service
DecisionDecision
Anomaly Detector

Post a question to Stack Overflow
Submit feedback on User Voice
Content Moderator
Metrics Advisor (preview)
Personalizer
For answers on your developer questions from the largest community developer ecosystem, ask your question
on Stack Overflow.
If you do submit a new question to Stack Overflow, please use one or more of the following tags when you
create the question:
Cognitive Services
VisionVision
Computer Vision
Custom Vision
Face
Form Recognizer
Video Indexer
LanguageLanguage
Immersive Reader
Language Understanding (LUIS)
QnA Maker
Text Analytics
Translator
SpeechSpeech
Speech service
DecisionDecision
Anomaly Detector
Content Moderator
Metrics Advisor (preview)
Personalizer
To request new features, post them on UserVoice. Share your ideas for making Cognitive Services and its APIs
work better for the applications you develop.
Cognitive Services
VisionVision
Computer Vision
Custom Vision
Face

Stay informed
Next steps
Form Recognizer
Video Indexer
LanguageLanguage
Immersive Reader
Language Understanding (LUIS)
QnA Maker
Text Analytics
Translator
SpeechSpeech
Speech service
DecisionDecision
Anomaly Detector
Content Moderator
Metrics Advisor (preview)
Personalizer
Staying informed about features in a new release or news on the Azure blog can help you find the difference
between a programming error, a service bug, or a feature not yet available in Cognitive Services.
Learn more about product updates, roadmap, and announcements in Azure Updates.
See what Cognitive Services articles have recently been added or updated in What's new in docs?
News about Cognitive Services is shared in the Azure blog.
Join the conversation on Reddit about Cognitive Services.
What are Azure Cognitive Services?

External & community content for the Text Analytics
Cognitive Service
5/4/2021 • 2 minutes to read • Edit Online
Blogs
Videos
Next steps
See also
Links in this article lead you to helpful web content developed and produced by partners and professionals with
experience in using the Text Analytics API.
Text Analytics API original announcement (Azure blog)
Using Text Analytics Key Phrase Cognitive Services API from PowerShell (AutomationNext blog)
R Quick tip: Azure Cognitive Services’ Text Analytics API (R Bloggers)
Sentiment analysis in Logic App using SQL Server data (TechNet blog)
Sentiment analysis with Dynamics 365 CRM Online (MSDN blog)
Power BI blog: Extraction of key phrases from Facebook messages: Part 1 and Part 2
Identify the sentiment of comments in a Yammer group with MS Flow (Microsoft tech community)
Logic App to detect sentiment and extract key phrases from your text
Sentiment Analysis using Power BI and Azure Cognitive Services
Text analytics extract key phrases using Power BI and Azure Cognitive Services
Are you looking for information about a feature or use-case that we don't cover? Consider requesting or voting
for it using the feedback tool.
StackOverflow: Azure Text Analytics API
StackOverflow: Azure Cognitive Services
