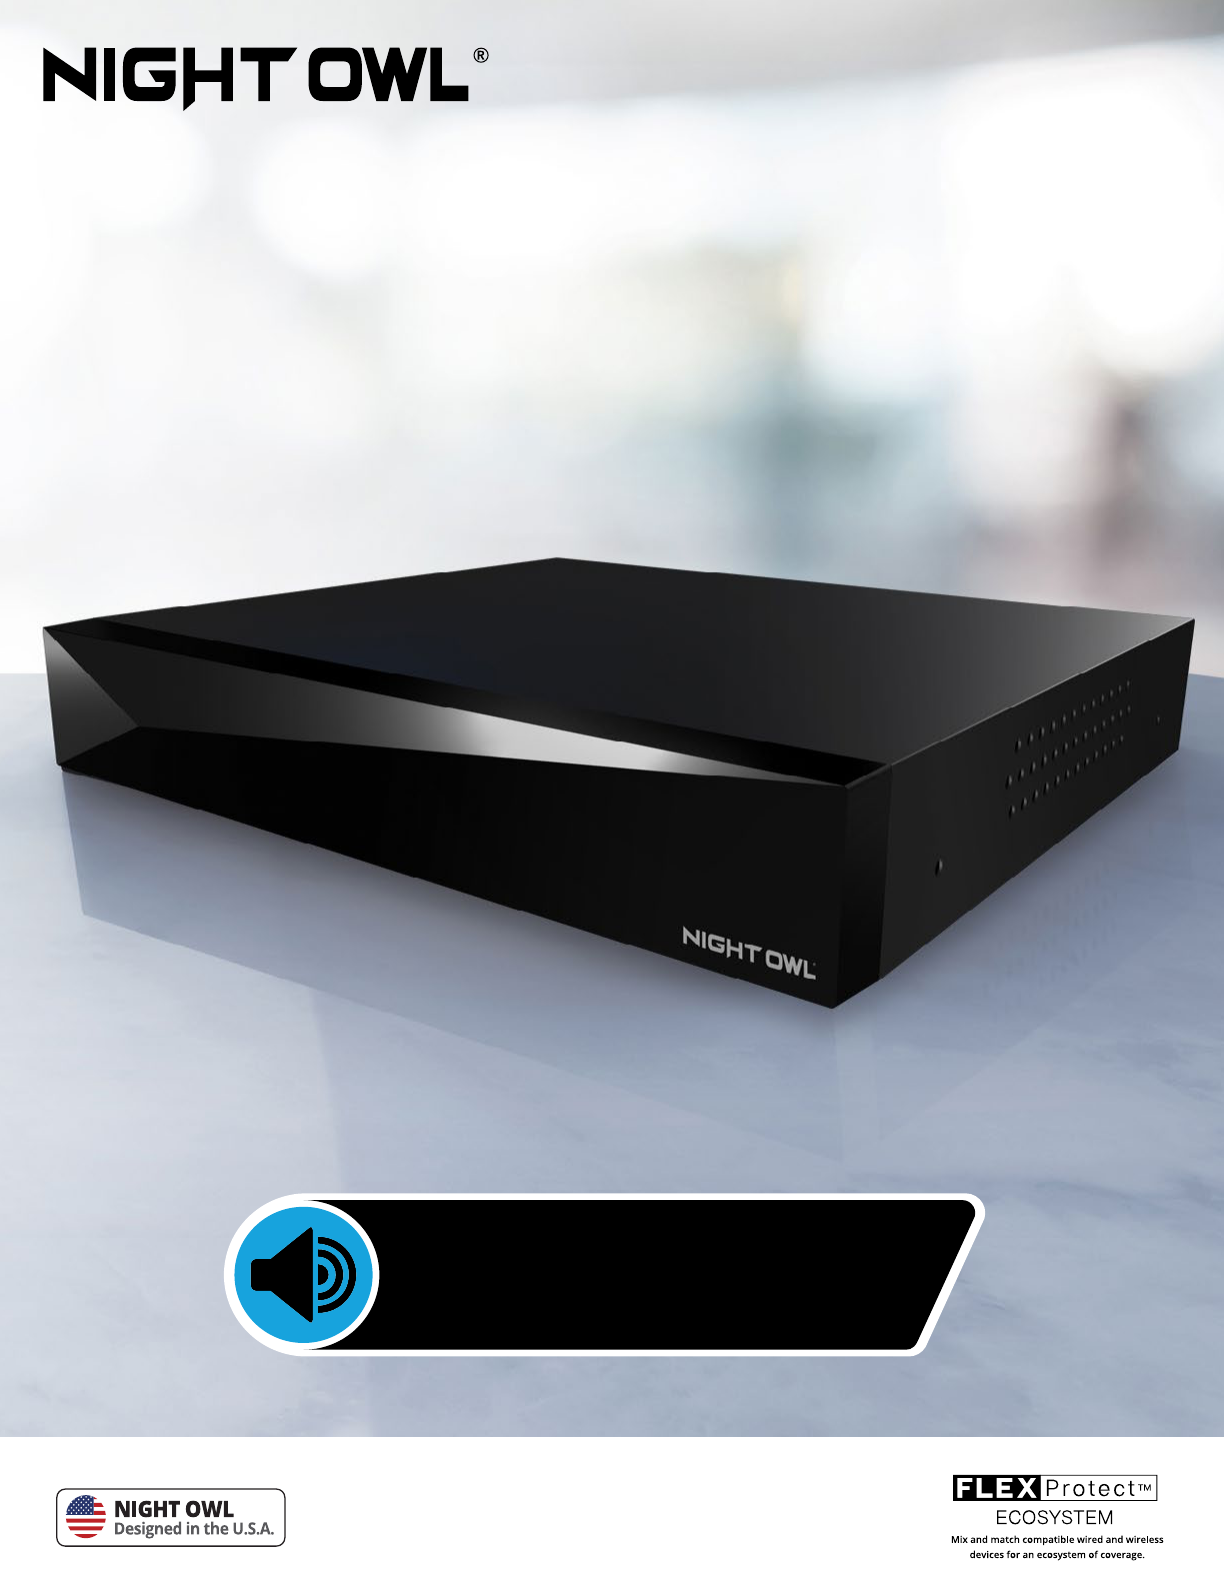
2-Way Audio DVR & Cameras
Use Existing DVR Cables*
INNOVATIVE TECHNOLOGY
2-Way Audio Recorder User’s Manual
Support.NightOwlSP.com
What Models Does This Manual Cover?
FTD2 Series
DVR Component Model #: DVR-FTD2-161
Camera Component Model #: CM-FTD4LS-B
CM-FTD4LS-D
FTD4 Series
DVR Component Model #: DVR-FTD4-8
DVR-FTD4-81
DVR-FTD4-82
Camera Component Model #: CM-FTD4LS-B
CM-FTD4LS-D
FTD8 Series
DVR Component Model #: DVR-FTD8-8
DVR-FTD8-81
DVR-FTD8-82
DVR-FTD8-16
DVR-FTD8-161
DVR-FTD8-162
Camera Component Model #: CM-FTD8LS-B
CM-FTD8LS-D
iii
We welcome you to the Night Owl family and thank you for choosing us to help safeguard
your home or business. All of our products are proudly designed and engineered right
here in the U.S.A. Night Owl complies with the U.S. government’s stance on protecting
our nation from companies that violate human rights and threaten our national security.
Unlike other brands, we are not on any national security threat lists, nor do we do
business with companies that are. We prioritize your privacy and safety because we value
both as much as you do.
Some Basic Info
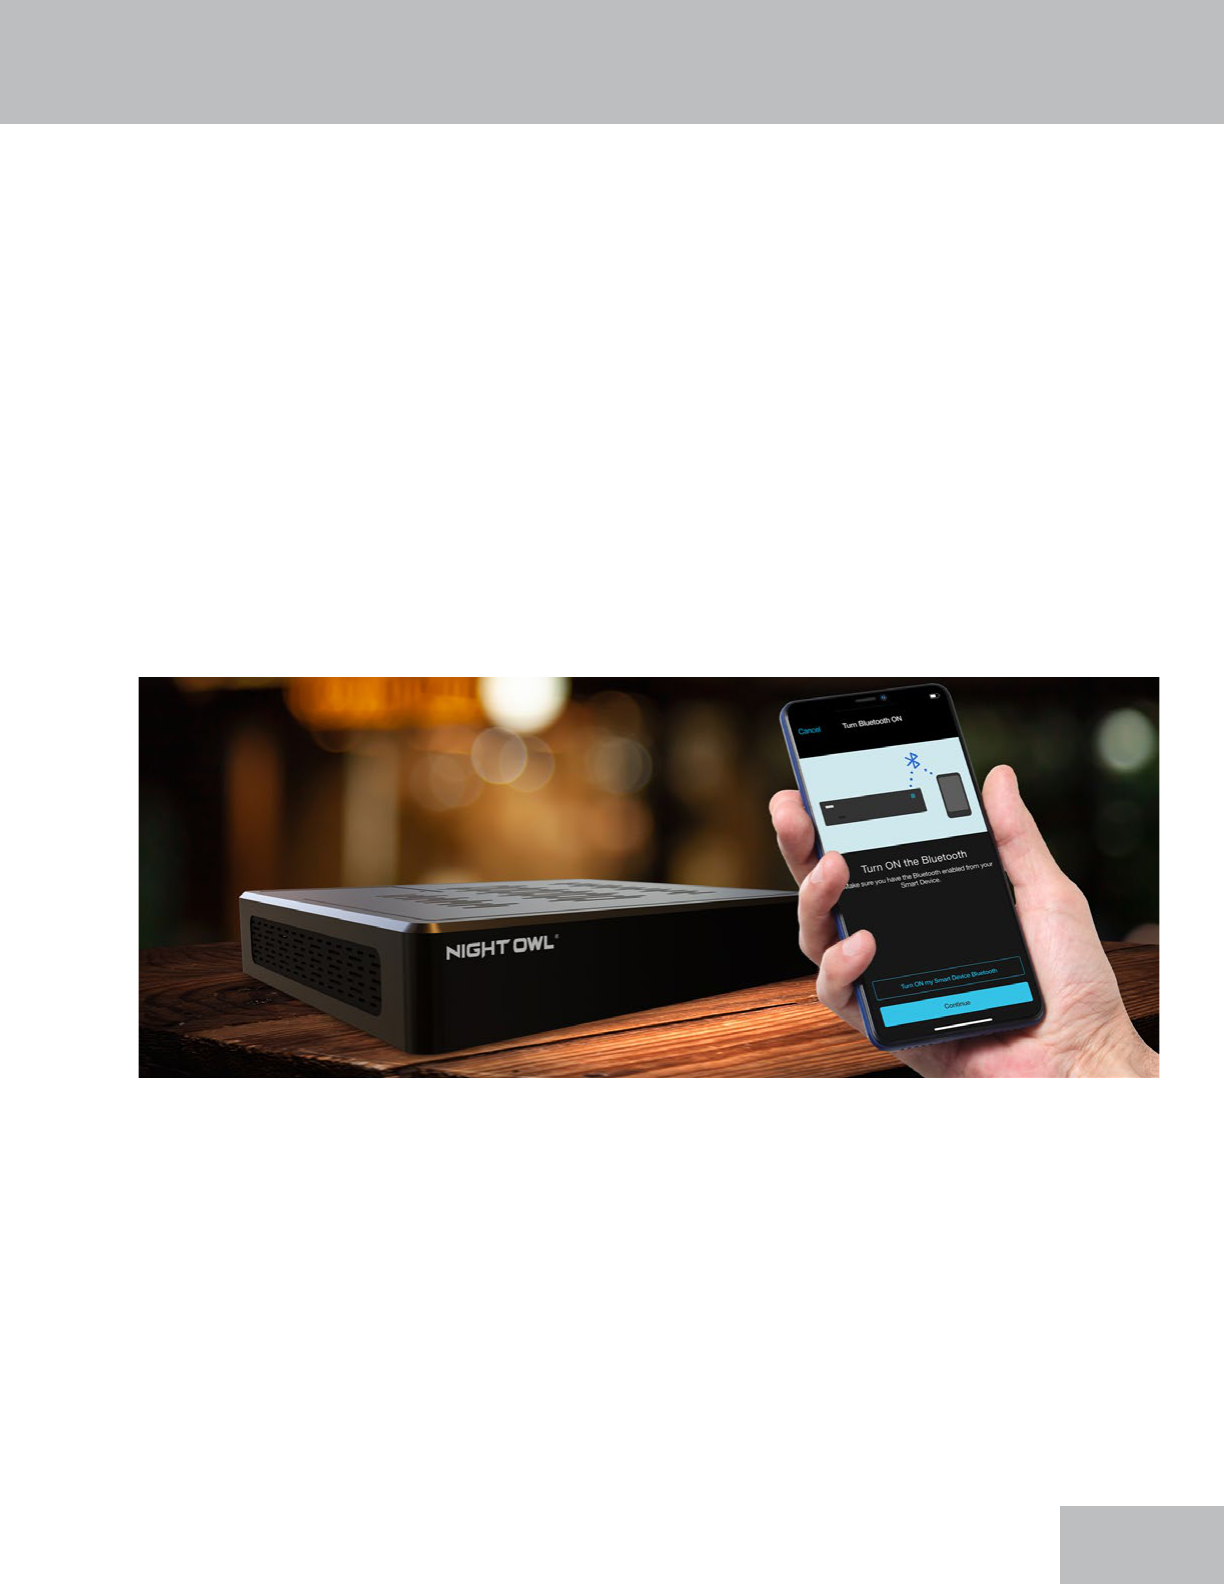
This manual covers the basic setup and functionality of our new 2-way audio recorders.
It will walk you through adding compatible cameras to your recorder using our new
Bluetooth
®
Wireless Setup, as well as your recorder’s menu options. With Bluetooth
®
,
setup is now easier than ever. A TV or monitor is no longer required. Once your system’s
hardware is connected and powered on, you can quickly nish the setup right from the
app on your Smart Device. If you prefer, you can still connect a TV or monitor and follow
along, it’s just not required.
Thank you for choosing Night Owl Security!
Is Internet Required?
While Internet is not required, it is STRONGLY RECOMMENDED. Without an Internet
connection, you can still use your device’s Bluetooth
®
Wireless Setup to get the product
easily setup and congured. However, you will not be able to view or access your system
remotely from a Smart Device or computer.
We STRONGLY RECOMMEND you connect your recorder to the Internet, at least for initial
setup, to search for the latest rmware. Keeping your rmware updated is vital for the
overall health of your system and allows our technical support team to assist you, should
you need support. If your recorder’s rmware is not up to date, our technical support
team will NOT be able to help. To ensure you are always running the latest rmware, we
encourage customers to stay connected to the Internet. If you are NOT connecting your
recorder to the Internet, please manually upgrade your rmware (See Firmware Version
section of this manual).
Warranty and Additional Help
By purchasing a Night Owl product, you receive a one (1) year warranty covering
manufacturing defects in material and workmanship. Please see the warranty section
of this manual for exclusions and additional details. Not all features and capabilities are
shared across all models. You may see features which are not applicable. Additionally, this
manual contains screen images that may not exactly match those on your TV/Monitor/
Smart Device.
System Requirements (for remote viewing)
Please be sure that your PC / MAC
®
complies with the following specications:
• PC Operating System: Windows
®
10 and above
• MAC Operating System: MAC OS X
®
10.9 and above
Please be sure that your mobile device complies with the following specications:
• Android™: 8.0 and above
• iOS
®
: 12.4 and above
We provide a database of self-help material on your product’s support
page on our support site. Simply visit Support.NightOwlSP.com and
enter your product’s Series (found on the support sticker on top of your
recorder) into the search bar. In addition to warranty and technical
support benets, you have access to our vast library of free instructional
How-to Videos. For all support videos, go to www.youtube.com/
nightowlsp to access Night Owl’s YouTube page (or click the image).
IMPORTANT: WHILE WE MAKE EVERY EFFORT TO PROVIDE ACCURATE INFORMATION,
INACCURACIES OR ERRORS MAY OCCUR. WE RESERVE THE RIGHT TO MAKE
CHANGES, CORRECTIONS, AND/OR IMPROVEMENTS TO THE INFORMATION
AND TO THE PRODUCTS, AT ANY TIME WITHOUT NOTICE.
iv

v
Table of Contents
FCC Warnings . . . . . . . . . . . . . . . . .vi
Safety Instructions . . . . . . . . . . . . . . 1
Initial Setup . . . . . . . . . . . . . . . . . . 2
Step 1. Verify Your Package Contents . . . . . . . 2
Recorder Description . . . . . . . . . . 3
How to Use a Wired USB Mouse . . . . . . 4
Step 2. Download the Night Owl Protect App and Create
and Verify Your Account . . . . . . . . .
4
Step 3. Connect Your System (Hardware) . . . . . . 6
Step 4. Congure Your System . . . . . . . . . 9
Option 1: Easy Bluetooth
®
Wireless Setup . . . 9
Option 2: Manual Setup (TV / Monitor) . . . . 13
Step 5. Install the Cameras . . . . . . . . . . . 16
Plan Your Installation . . . . . . . . . . 16
Install the Cameras . . . . . . . . . . . 16
Step 6. Additional Cameras . . . . . . . . . . 17
Adding Additional Wired BNC Cameras . . . . 17
Wi-Fi Expandability . . . . . . . . . . . 17
Compatibility . . . . . . . . . . 18
Connectivity . . . . . . . . . . . 19
Log in from a TV or Monitor . . . . . . . . 24
Log In with Night Owl Protect Account . . . . . . . 24
Log In with Local Password . . . . . . . . . . . 25
Log In Information Icon . . . . . . . . . . . . 26
Live View (Navigation Bar) . . . . . . . . . 27
Shut Down . . . . . . . . . . . . . . . . . 28
View Layouts . . . . . . . . . . . . . . . . 29
Playback. . . . . . . . . . . . . . . . . . 30
Exporting Recordings for
Long-Term Storage . . . . .
32
Formatting a USB Flash Drive or External Hard Drive . . 32
Exporting / Saving a Recording . . . . . . . . . . 34
System Info . . . . . . . . . . 36
About Menu . . . . . . . . . . . . . . . . 36
Device Name . . . . . . . . . . . . . 37
Firmware Version . . . . . . . . . . . 37
Language . . . . . . . . . . . . . . 39
Monitor Resolution . . . . . . . . . . . 39
Date and Time Menu . . . . . . . . . . . . .
40
Camera Menu . . . . . . . . . . . . . . . 41
Recording Settings . . . . . . . . . . . 43
Voice Alerts / Siren . . . . . . . . . . . 43
Copy Settings . . . . . . . . . . . . . 44
Remove Camera Option . . . . . . . . . 44
Account Menu. . . . . . . . . . . . . . . . 45
Storage Menu . . . . . . . . . . . . . . . . 46
Diagnostics Menu . . . . . . . . . . . . . . 47
Network Menu . . . . . . . . . . . . . . . 49
Help and Support Menu . . . . . . . . . . . . 51
Reset Menu . . . . . . . . . . . . . . . . 52
Resetting / Forgot Your Password . . . . 54
Reset Your Password from the Night Owl Protect App . . 54
Reset Your Password from the Web Portal . . . . . . 54
Forgot Your Local Password (Recorder Not Connected to
the Internet) . . . . . . . . . . . . .
55
Appendix. . . . . . . . . . . . . . . . . . . 56
Recorder Status Icon Denitions . . . . . . . . . 56
Channel Status Icon Denitions. . . . . . . . . . 56
Glossary . . . . . . . . . . . . . . . . . 57
User Information. . . . . . . . . . . . . . . 58
Warranty. . . . . . . . . . . . . . . . . . . 59
Table of Contents

vi
FCC Warnings
FCC
This device complies with Part 15 of the FCC Rules. Operation is subject to the
following two conditions: (1) this device may not cause harmful interference and (2)
this device must accept any interference received, including interference that may
cause undesired operation.
FCC Compliance Statement
These limits are designed to provide reasonable protection against frequency
interference in residential installation. This equipment generates, uses and can
radiate radio frequency energy and if not installed or used in accordance with the
instructions, may cause harmful interference to radio communication. However, there
is no guarantee that interference will not occur in television reception, which can be
determined by turning the equipment o and on. The user is encouraged to try and
correct the interference by one or more of the following measures:
• Reorient or relocate the receiving antenna.
• Increase the separation between the equipment and the receiver.
• Connect the equipment into an outlet on a circuit dierent from that to which
the receiver is connected.
• Consult the dealer or an experienced radio/TV technician for help.
CAUTION
The Federal Communications Commission warns the user that changes or modications to
the unit not expressly approved by the part responsible for compliance could void the user’s
authority to operate the equipment.

1
Safety Instructions
Use the provided power adapter.
Do not use this product with a power source that applies more than the specied voltage.
Never insert metal into the recorder case or its openings.
Inserting metal into the recorder case may cause electric shock.
Do not operate in wet or dusty areas.
Avoid placing the recorder in areas such as a damp basement or dusty attic.
Do not expose the recorder to rain or use near water.
If the recorder accidentally gets wet, unplug it and contact technical support immediately.
Keep product surfaces clean and dry.
To clean the outside case of the recorder, use a lightly dampened cloth. Do not use
cleaning solutions or solvents.
Do not install near any heat sources.
Do not install the recorder near any heat sources such as stoves, heat registers, radiators,
or electronics (including ampliers) that produce heat.
Unplug the recorder when moving it.
Make sure that the recorder is unplugged before you move it. When moving this device,
be sure to handle it with care.
Make sure there is good air circulation around the recorder.
This recorder uses an internal hard drive, that generates heat during operation for video
storage. Do not block the vents on the recorder as these vents reduce the generated heat
while the system is running. Place this product in a well-ventilated area.
Do not attempt to remove the top cover.
If you observe any abnormal operation, unplug the recorder immediately and contact
technical support. Do not attempt to open the recorder to diagnose the cause of the
problem. Removing the cover may void your warranty.
Handle the recorder carefully.
If you drop the recorder on any hard surface, it may damage the device. If the recorder
doesn’t work properly due to physical damage, contact an authorized dealer for repair.
It is recommended to use your recorder with an uninterruptible power supply (UPS).
Connecting your recorder and cameras to a UPS allows continuous operation even during
power outages. The run-time duration will depend on the rating of the UPS used.
CAUTION
You may be subjected to severe electrical shock if you remove the cover of the recorder.
Initial Setup
This portion of the manual will cover the initial setup and conguration of your
system. Again, our Bluetooth
®
Wireless Setup provides an A-Z setup right from the
convenience of your Smart Device without the need for a TV or monitor.
Night Owl STRONGLY RECOMMENDS that you complete the following sections in
the order that they are listed to quickly and easily set up your system:
• Step 1. Verify Your Package Contents
• Step 2. Download the Night Owl Protect App and Create and Verify Your Account
• Step 3. Connect Your System (Hardware)
• Step 4. Congure Your System
• Step 5. Install the Cameras
• Step 6. Additional Cameras
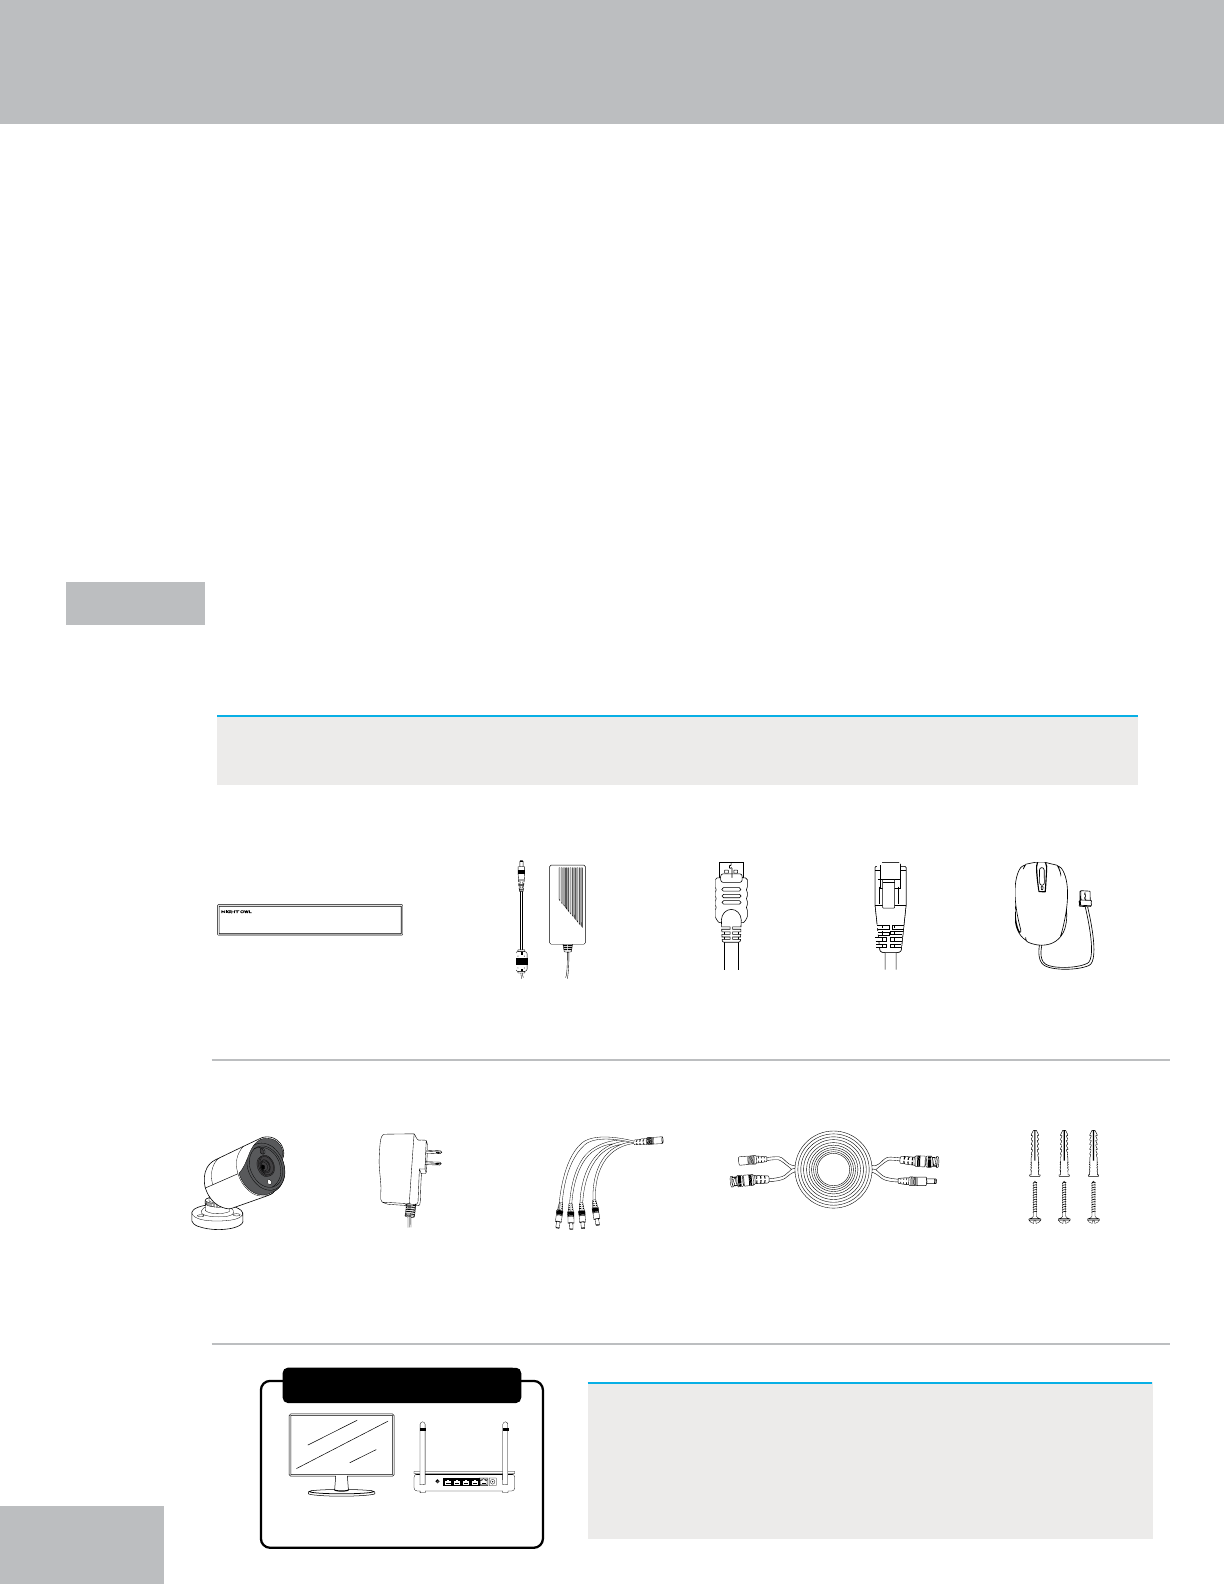
Package Contents - DVR / Accessories
Verify Your Package Contents
Before you begin to install your system, ensure you can identify all of the parts
listed in this section. Images may vary slightly based on your model number.
Step 1.
IMPORTANT: The exact components of your system, images and quantities may
vary depending on your model number.
2
DVR
(x1)
Camera(s)
DVR Power Adapter
(x1)
Camera Power
Adapter(s)
(1 per 4 Cameras)
6 ft. HDMI
(x1)
Power
Splitter(s)
(1 per 4 Cameras)
6 ft. Ethernet
(x1)
60 ft. Video/
Power Cables
(1 per Camera)
USB Mouse
(x1)
Mounting
Hardware
(Varies by Model)
Wired BNC Camera / Accessories
RESET
LAN1 LAN2 LAN3 LAN4 WAN
Items Not Included
NOTE: If connecting to a TV or Monitor (Not
Required), it must have a minimum
resolution of 1080p HD. Use all of the
included Night Owl accessories. Third-party
accessories may not work correctly.
Monitor
(Not required for
Bluetooth
®
Setup)
Router / Network
Access Point
Recorder Description
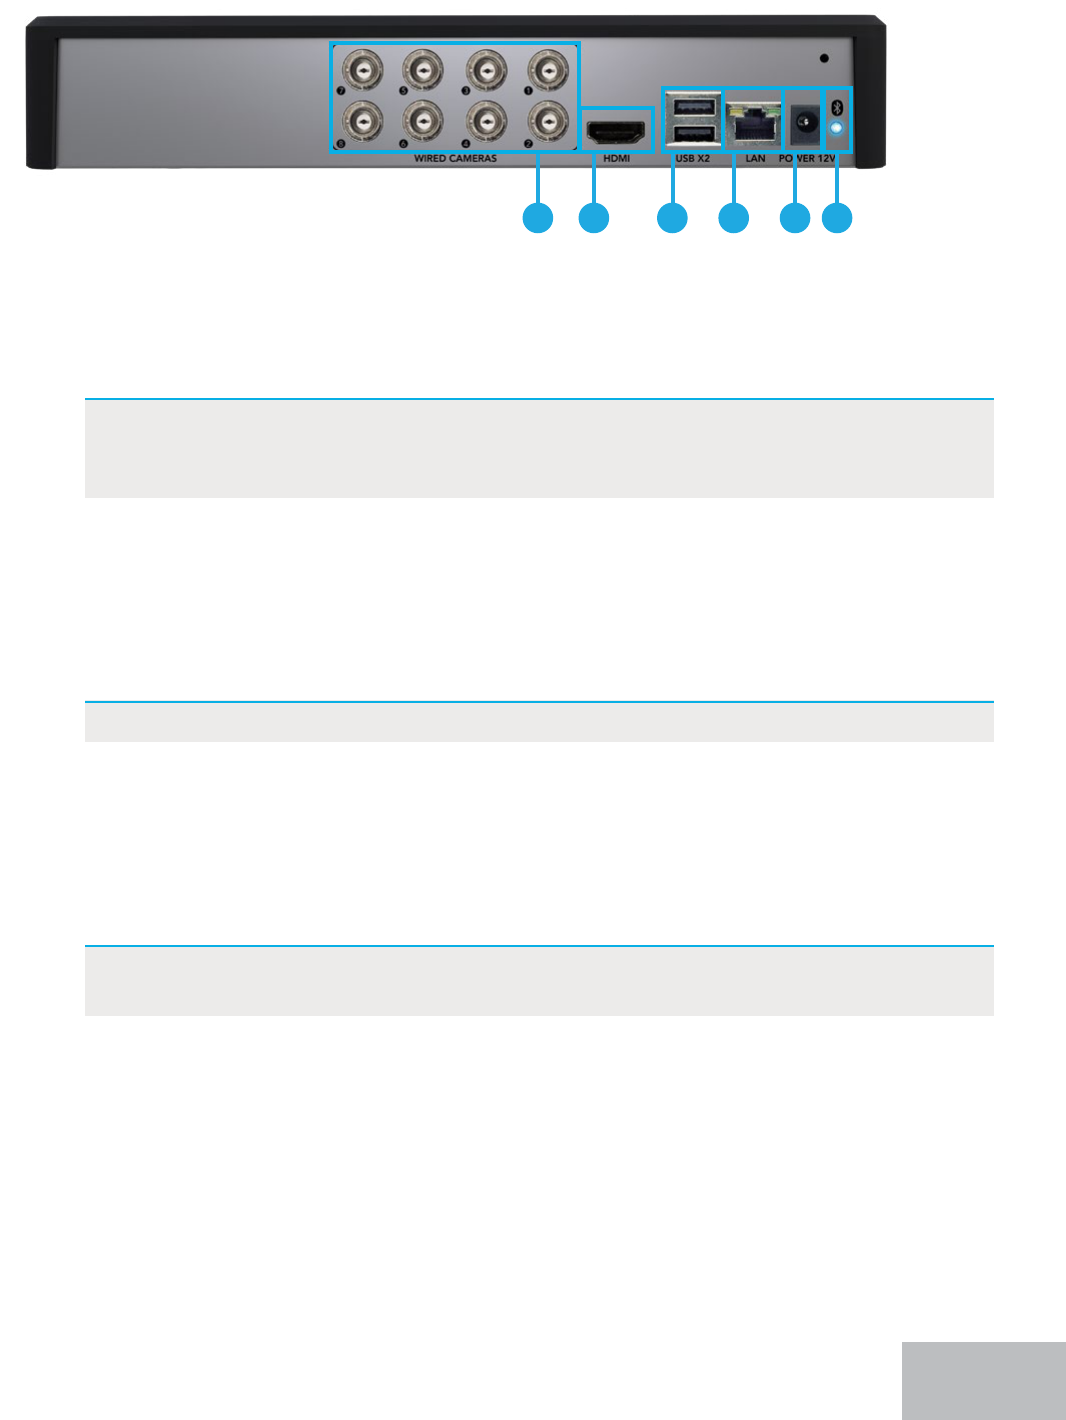
1. Video In (Wired BNC Cameras): Connect your cameras to one of the “Wired Cameras”
Video Input Ports using the provided video power cable. The number of ports will vary
based on your model number.
NOTE: The recorder automatically detects the camera. Before turning the
recorder on, make sure the cameras are connected to the recorder and a
power source.
2. HDMI: While not required, you may connect the recorder to a TV or monitor using the
provided HDMI cable for viewing and system access.
3. USB Ports: Connect a USB mouse to a USB port to navigate the recorder’s settings
when connected to a TV or monitor. Or connect a USB ash drive to a USB port for
video backup.
NOTE: DO NOT CONNECT two USB mice or two USB ash drives to the recorder.
4. LAN (Strongly Recommended): Connect your recorder to the Internet using an
Ethernet cable. Again, while not required, this is strongly encouraged to get the full use
and benet of your new system. You can connect the Ethernet cable to any working
network access point or router.
5. Power Input: Connect the recorder power adapter to this port to power the recorder.
NOTE: Connect and test all cameras locally before you install in their nal
location to ensure that all components function properly.
6. Bluetooth
®
Indicator Light: Once the recorder is powered on, this light should turn
blue to indicate that the recorder’s Bluetooth
®
is ready for use. The light will ash blue
when no device is linked and turn solid blue when a device is paired to the recorder.
1 2 3 4 5 6
3
How to Use a Wired USB Mouse
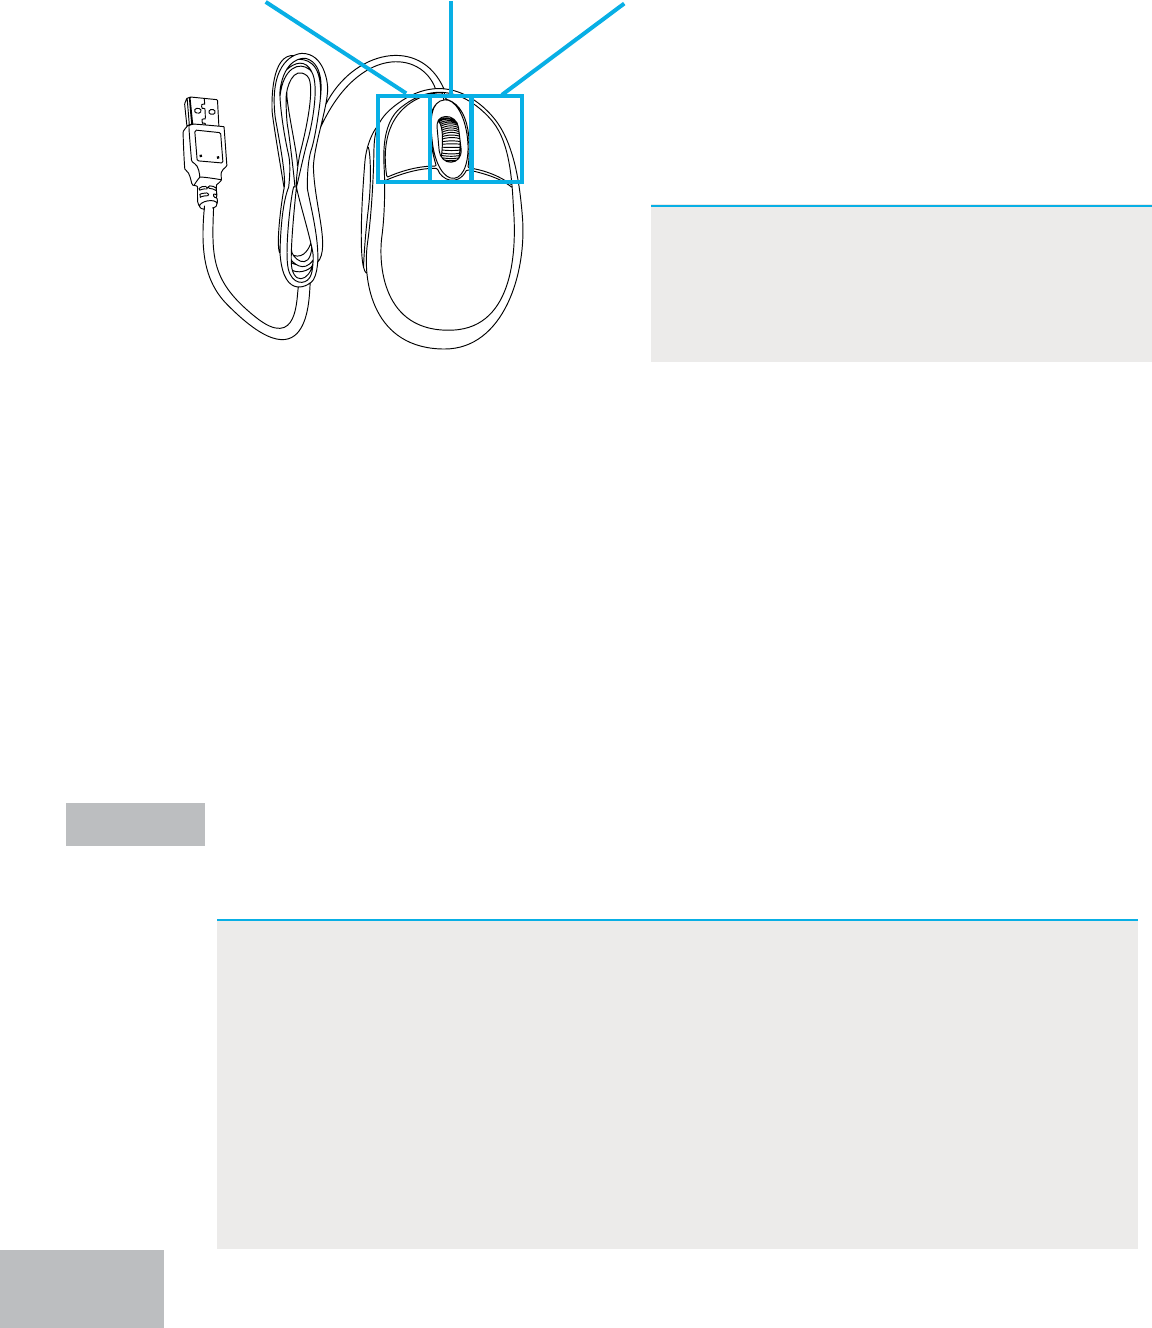
Left / Select Button Right / Menu ButtonScroll Wheel
Live Viewing:
Double-click the left button on any camera view in split-screen mode to bring it to full
screen display. Double-click again to return to split-screen mode. Right-click to show
the Tool Bar at the bottom of the screen. Left click on the Tool Bar or Menu to access
the device’s features.
In Setup:
Left click to make a selection. Right-click to cancel setup or return to the previous
screen (select models only).
To Enter Values:
Move the cursor to a blank eld and click the mouse. A virtual keyboard will appear
which supports numbers, letters, and symbols. The Shift function will access symbols
in addition to upper case letters.
Download the Night Owl Protect App and Create and Verify
Your Account
Step 2.
IMPORTANT: Night Owl STRONGLY RECOMMENDS that you download the Night
Owl Protect App and create an account. This will allow you to use
this system’s Bluetooth
®
Wireless Setup (preferred setup method),
which makes setting up the system much quicker and easier. A TV
or monitor is no longer required with this start-to-nish app-based
security. Once the system has been congured, you can use the
app to remotely access and view your system right from your Smart
Device or computer, from anywhere! An Internet connection is
required for remote access. With Single Sign-On you can conveniently
access multiple devices with one set of login credentials and with
2-Step Verication your data will be kept secure.
4
If you will be accessing your new Night Owl system from a TV or monitor, you will need
to connect the provided wired USB mouse. The mouse lets you navigate the menus
and adjust settings that appear on your TV or monitor screen.
IMPORTANT: To access the system from a
TV or monitor, you must use a
wired USB mouse. We cannot
guarantee compatibility or
functionality with wireless mice.
5
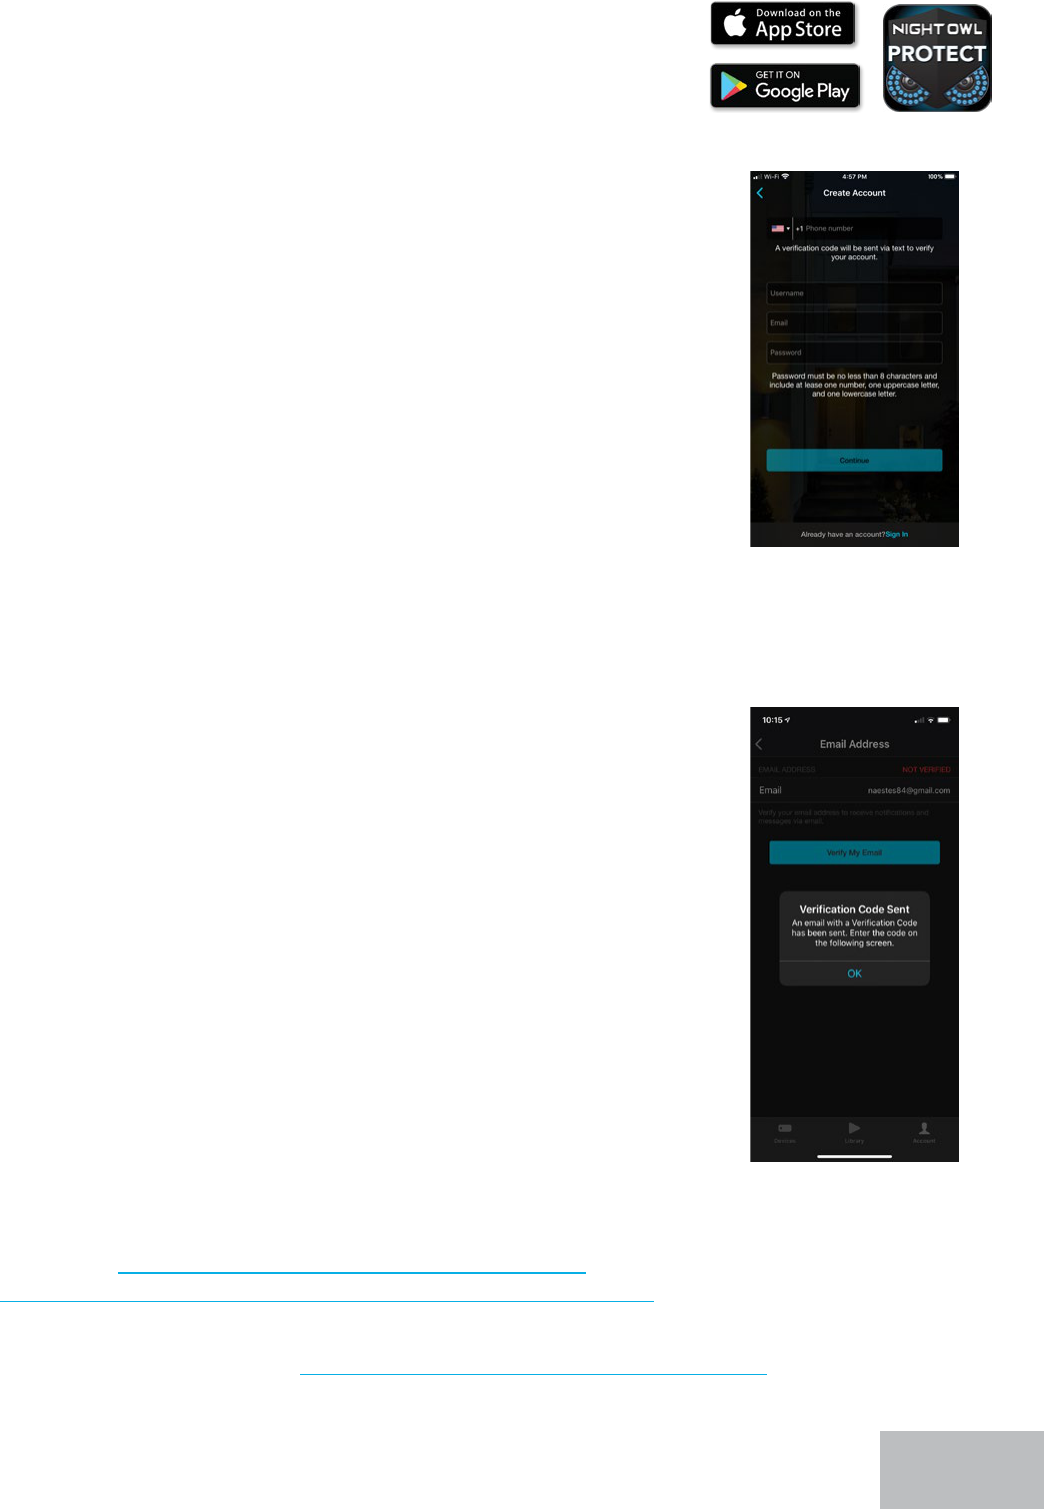
1. Download the Night Owl Protect App from the Apple App or
Google Play Store. If you have previously downloaded the
app and created an account, proceed to Initial Setup.
2. Follow the prompts on the Night Owl Protect App to create
your account. For security purposes, a verication code will
be sent to your mobile phone to verify the account being
created.
3. Finish creating your account and create a personal PIN
number that you will enter upon each login to the app.
4. Ensure you verify your email address. This will register you
in our technical support database, streamlining the support
process, to ensure we can quickly and eciently assist you
should you need help. It will also generate an email to you
with your product’s support links. To verify, tap Account >>>
your name >>> Email >>> and then follow the on-screen
prompts.
6. When nished, proceed to Step 3. Connect Your System (Hardware)
to begin connecting the components of your system.
5. For more information on the Night Owl Protect App,
click here: https://support.nightowlsp.com/hc/en-us/
articles/360044127354-Night-Owl-ProtectMobile-App-CMS
6
Connect Your System (Hardware)
Now that you have veried and familiarized yourself with the package contents of
your new system, it is time to get the hardware connected.
Step 3.
1. Visit Support.NightOwlSP.com
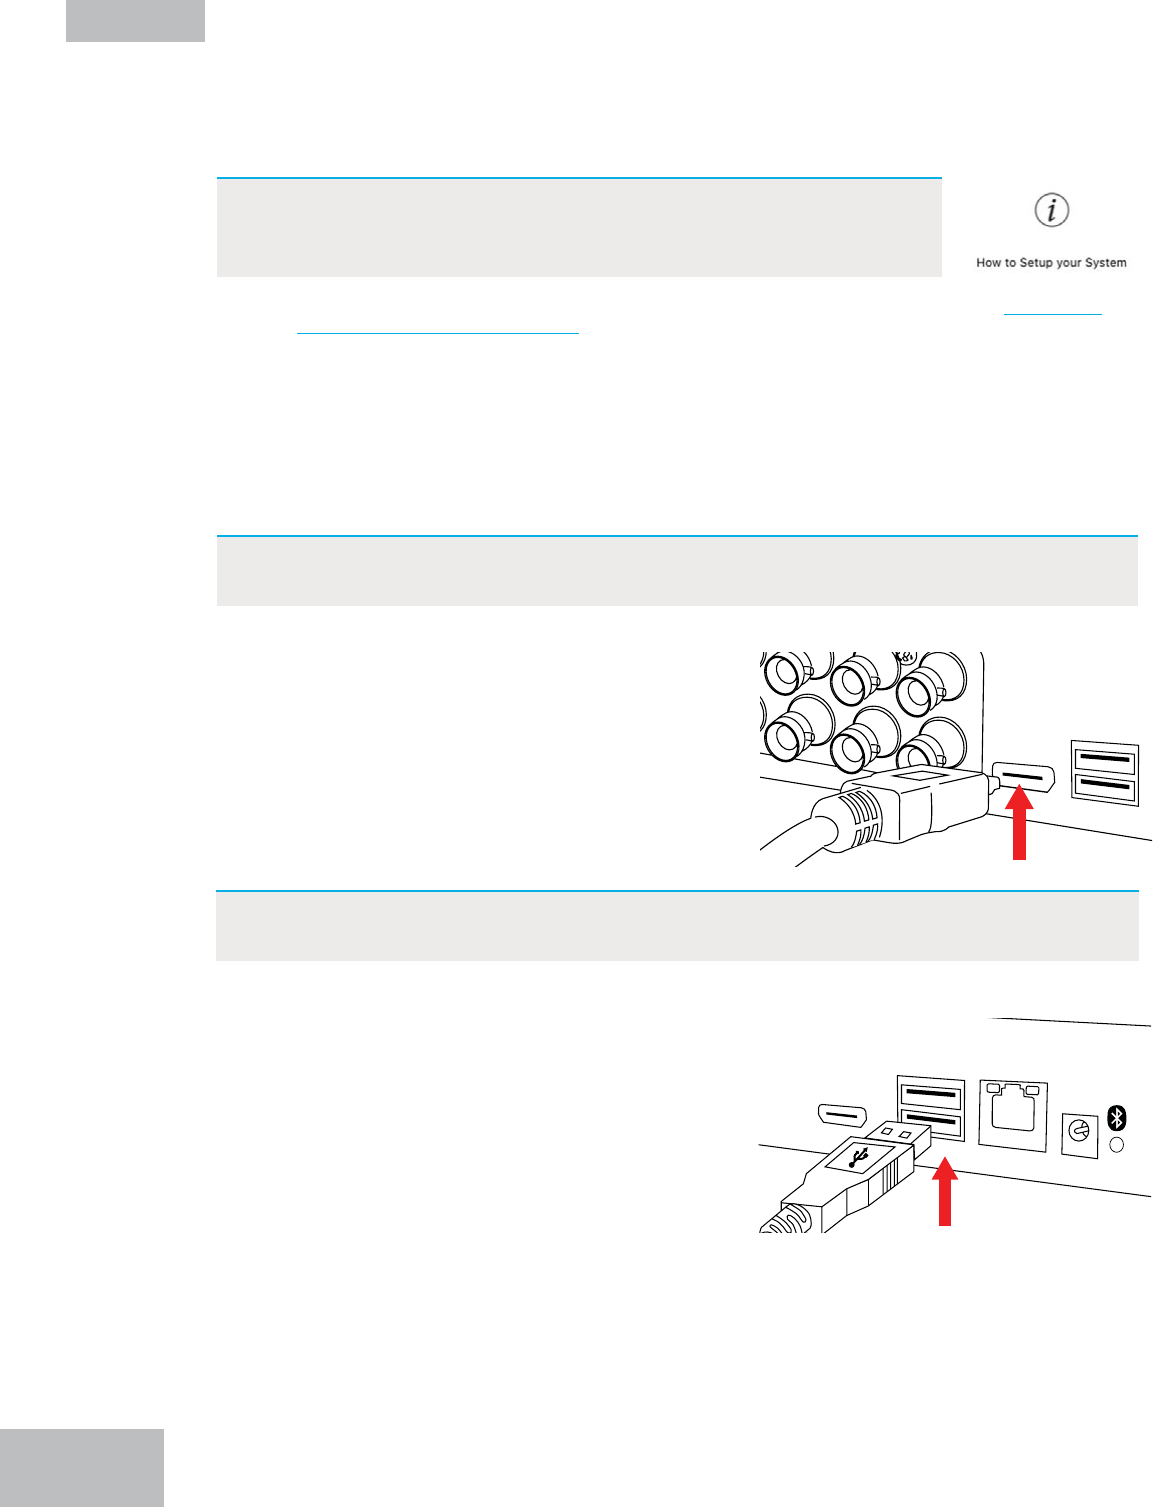
A. Plug one end of the included HDMI cable
into the HDMI port on the back of the DVR.
Plug the other end of the cable into your
TV or Monitor.
B. Plug the USB mouse into the USB port on
the back of the DVR.
3. Click “How to Setup your System”
2. Enter your Series (located on the support sticker on the top of your
recorder) into the search bar
IMPORTANT: If you will be using a TV or monitor for setup or viewing your cameras
(OPTIONAL), you will need to perform the two steps below:
TIP: Are you more of a visual person? If so, watch our
simple step-by-step instructional video covering
initial setup! To begin watching:
NOTE: To view cameras, TV or Monitor must be tuned to the same input the HDMI
is plugged into.
Click Here
7
Perform the following steps to get the rest of the hardware setup!
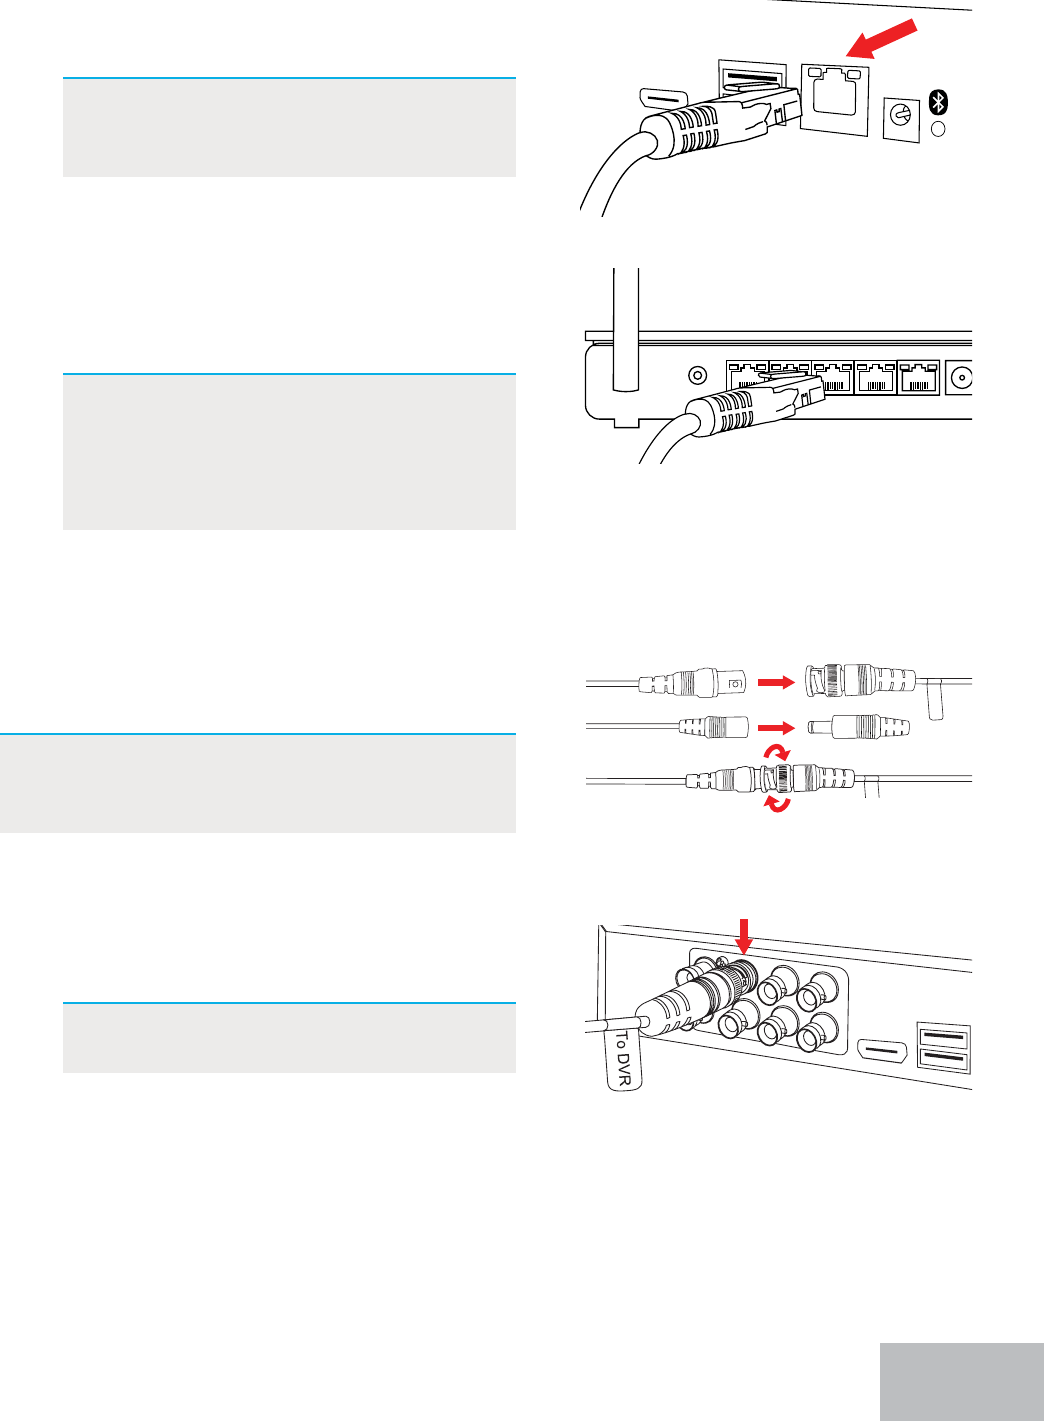
1. Plug one end of the included Ethernet cable
into the LAN port on the back of the DVR.
NOTE: Night Owl recommends
connecting to the Internet for
the best user experience.
2. Plug the other end of the Ethernet cable into
a port on the back of your router / network
access point.
NOTE: As long as your DVR is hardwired
using Ethernet cabling, you can
connect to any working network
access point. See your product
manual for more details.
4. Connect the video / power cable labeled TO
DVR ONLY to an open video input on the DVR.
NOTE: Make sure you twist and lock
BNC connectors.
3. Connect the end of the camera’s cable to
the end of a video / power cable labeled TO
CAMERA ONLY.
RESET
LAN1 LAN2 LAN3 LAN4 WAN
Router / Network Access Point
(Not Included)
From Camera Video / Power Cable
IMPORTANT: BEFORE installing, connect
and test each camera locally to
conrm they function properly.
To CAMERA
To C
A
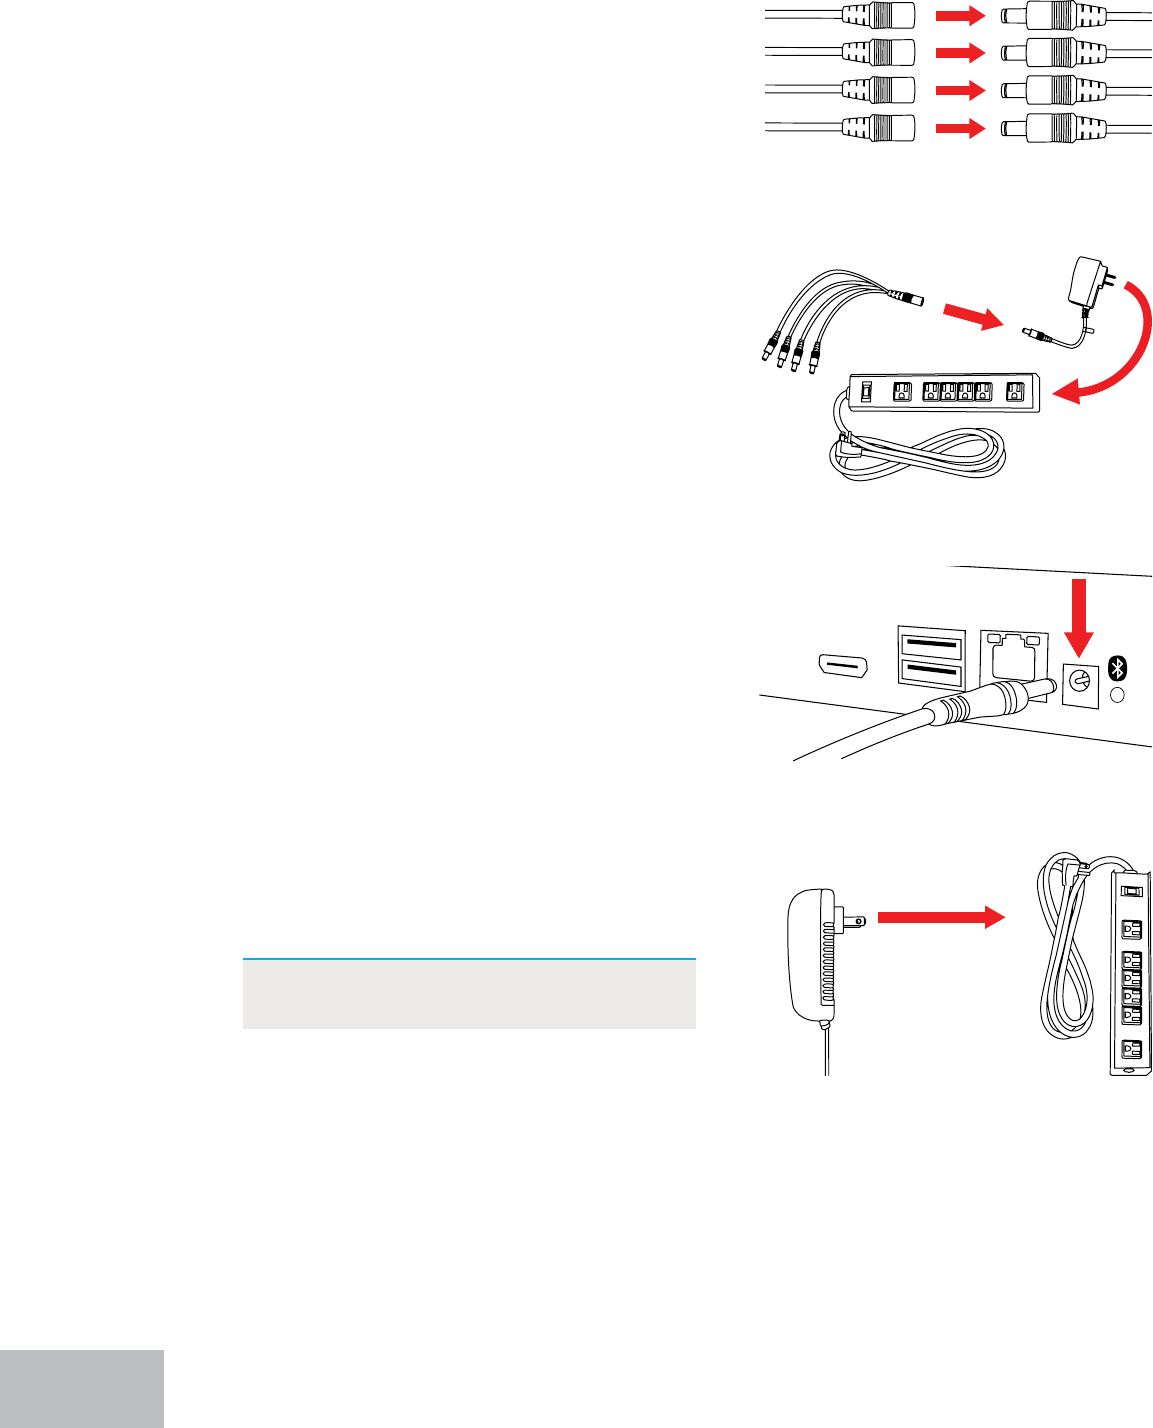
6. Connect the power splitter to the camera
power adapter and plug the adapter into a
surge protector or Uninterruptible Power
Supply (UPS).
7. Connect the DVR power adapter to the Power
Input on the rear of the DVR.
8. Plug the DVR power adapter into a surge
protector or Uninterruptible Power Supply
(UPS). Some systems beep upon booting up.
NOTE: Make sure the UPS or surge
protector is switched ON.
Camera Power
Adapter
Power
Splitter
Surge Protector
(Not Included)
Surge Protector
(Not Included)
8
5. Connect the red female power leads of the
video / power cables to the male power
splitter ends.Make sure you twist and lock
BNC connectors.
Power Cable
ConnectorsConnectors
Power Splitter
9
IMPORTANT: If you have a TV or monitor connected, you will see
setup information appear on the screen as you
complete the Bluetooth
®
setup. A TV or monitor is not
required for this setup but can be used for viewing.
Congure Your System
Now that you have the Night Owl Protect App downloaded, have created an account
and have your system’s hardware connected, it’s time to congure your system.
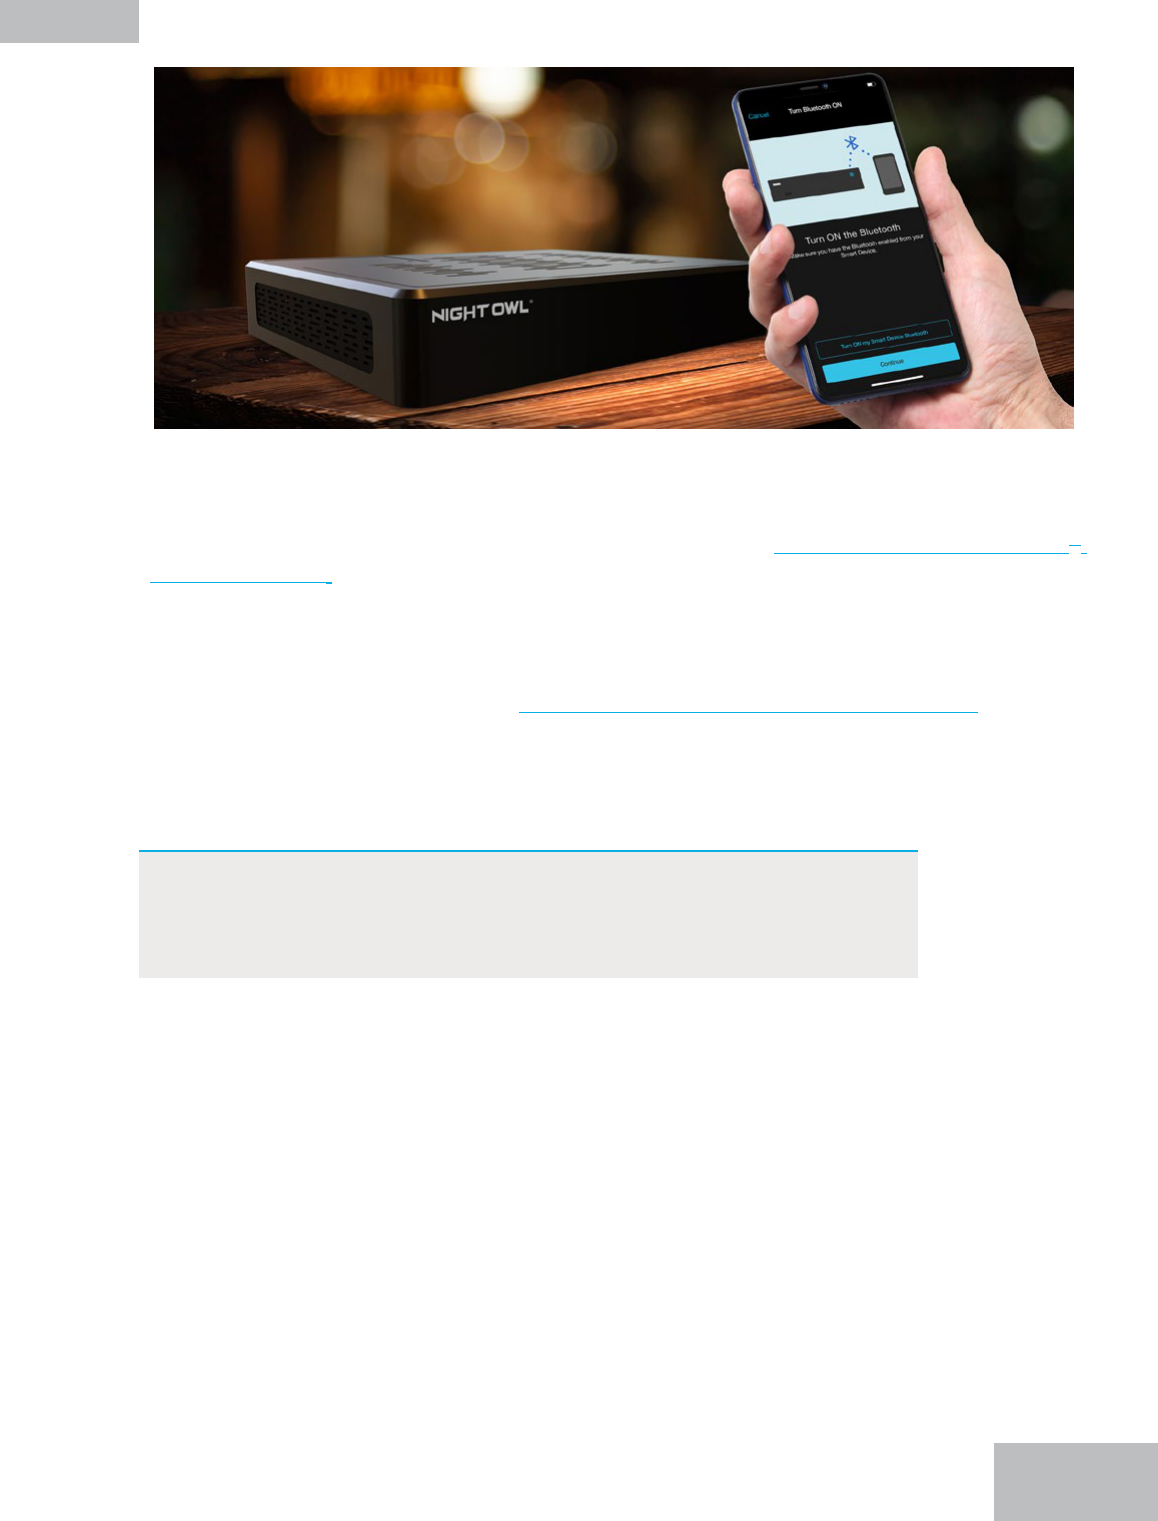
Again, we STRONGLY RECOMMEND using the preferred Option 1: Easy Bluetooth
®
Wireless Setup. This method is quick and easy and does not require you to connect
a TV or monitor or USB mouse. Instead, it lets you set up the recorder right from the
app using Bluetooth
®
.
You can still connect to a TV or monitor, it’s just not required. If you do not wish to use
Bluetooth
®
, you may perform an Option 2: Manual Setup (TV / Monitor). View the
options below based on your preference.
Step 4.
Option 1: Easy Bluetooth
®
Wireless Setup
10
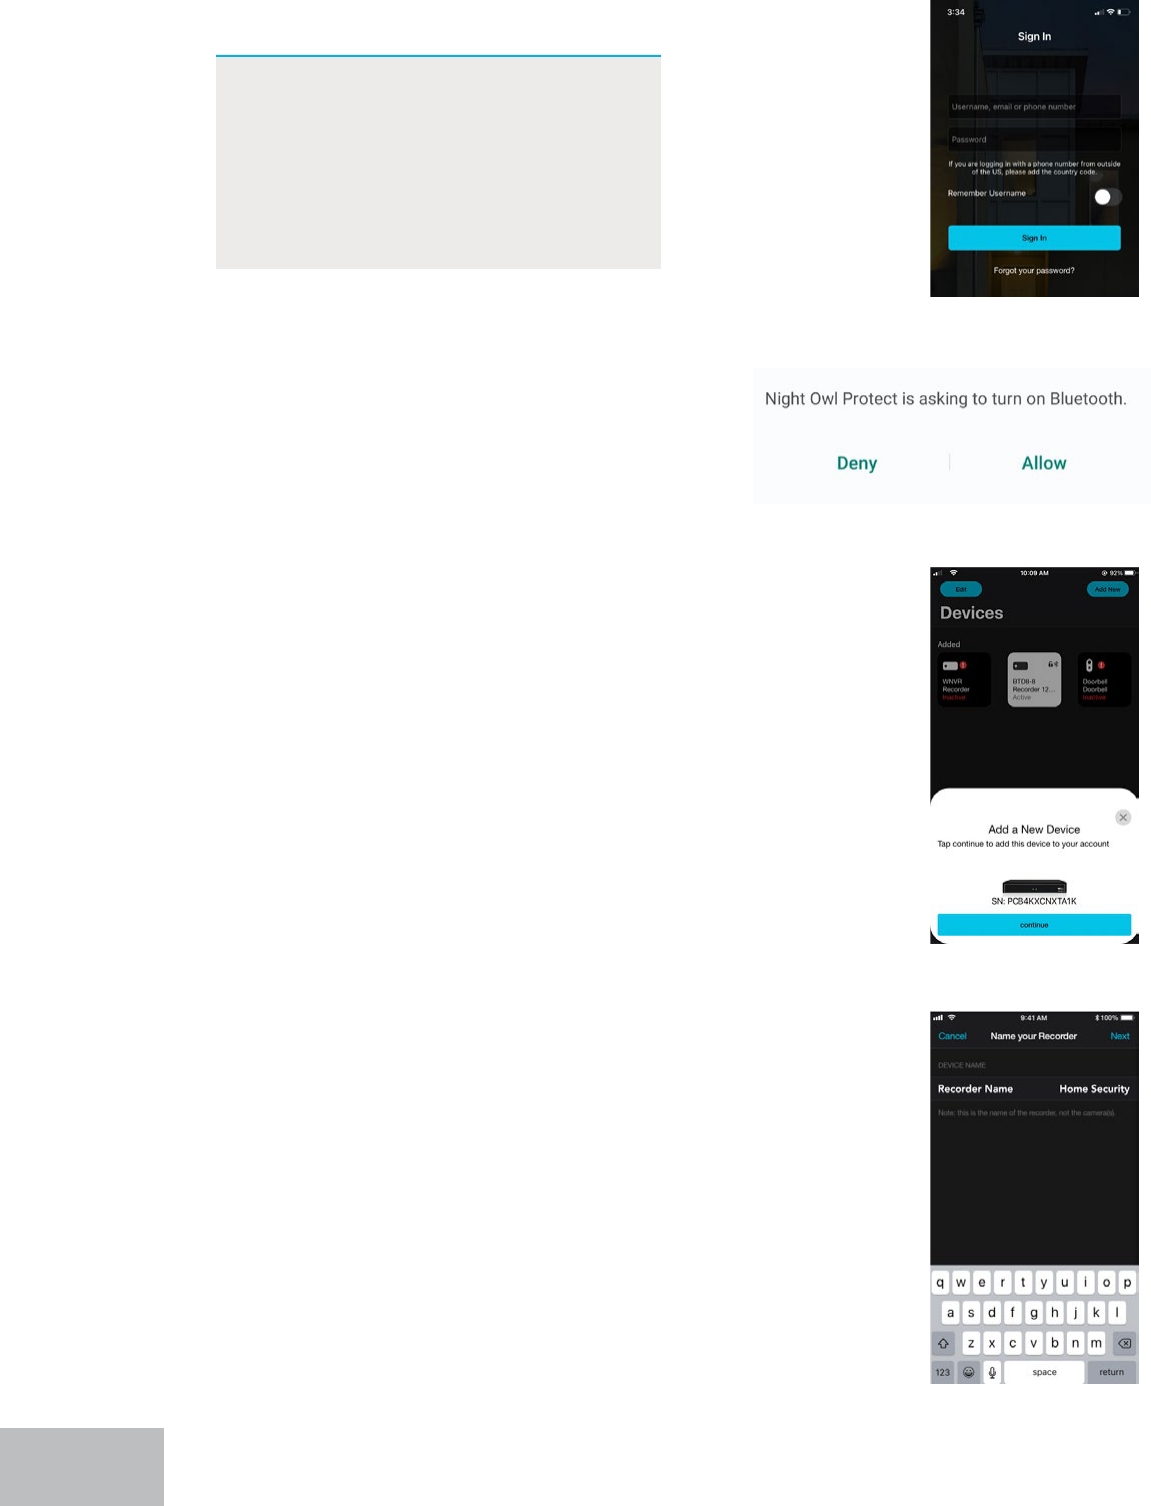
1. Sign In to the Night Owl Protect App.
3. With Bluetooth
®
enabled and the recorder
powered on, the app will use Bluetooth
®
to
scan for available devices that can be added.
The app will show a pop up asking if you
want to Add a New Device. Tap “Continue.”
4. Take a moment to name your new recorder.
For instance, if this system is for your home,
you could name it Home Security. Whatever
you name it is how it will appear in the app.
2. If your Smart Device’s (smartphone / tablet)
Bluetooth
®
is not enabled, you will be asked
to allow access.
NOTE: The screens in these steps may
vary slightly based on whether
you are using an iOS or Android
device. If a step is substantially
dierent or if the step only
applies to iOS or Android, we
will let you know.
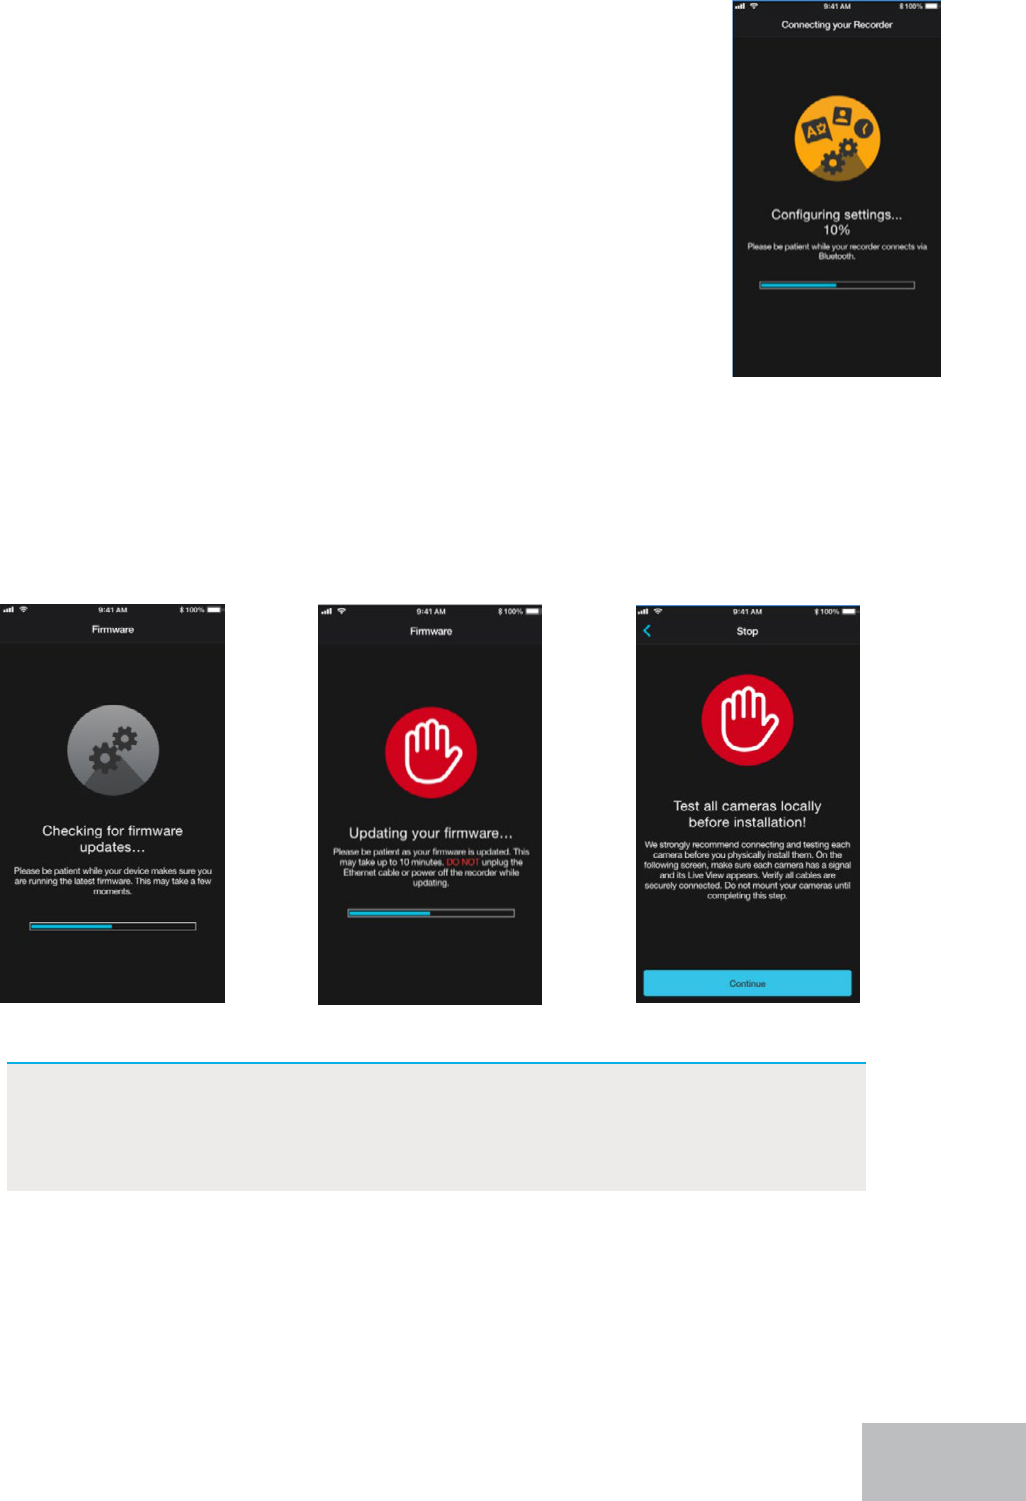
5. The app will now pair to your recorder using
Bluetooth
®
.
6. You may now proceed through the startup wizard right from the convenience of your
Smart Device. This process is simple! Just follow the prompts in the app and you will be
done in no time. Here are just a few screens you will see.
IMPORTANT: If you have not connected your recorder to the Internet, you
will not be able to access many features or update the rmware
from the app. We STRONGLY RECOMMEND connecting your
recorder to the Internet during the initial setup.
11
12
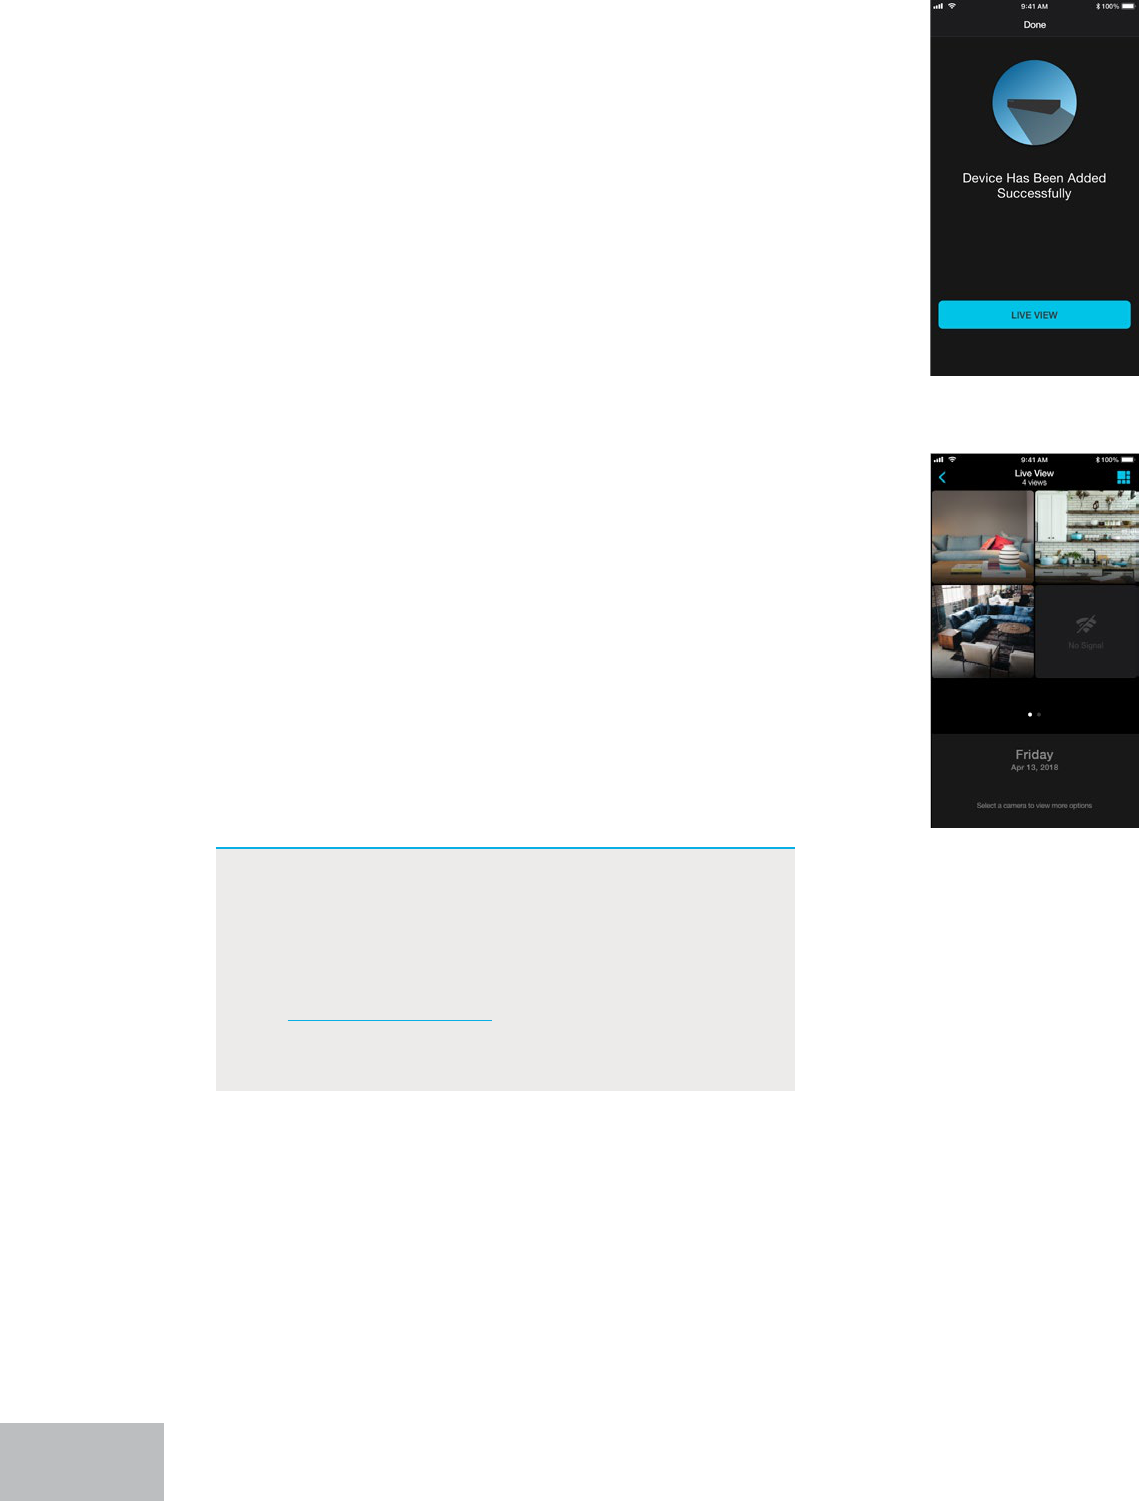
7. Now you will see a message stating the
device has been successfully added.
8. Tap “Live View” and enjoy live viewing,
playback, save and share and all the
additional features of your new system.
NOTE: If you have not connected your recorder
to the Internet, you will not be able to
live view or access your system remotely.
Additionally, your recorder’s rmware
will need to be manually updated (see
Firmware Version section of this manual). If
your rmware is not current, our technical
support agents cannot assist you.
13
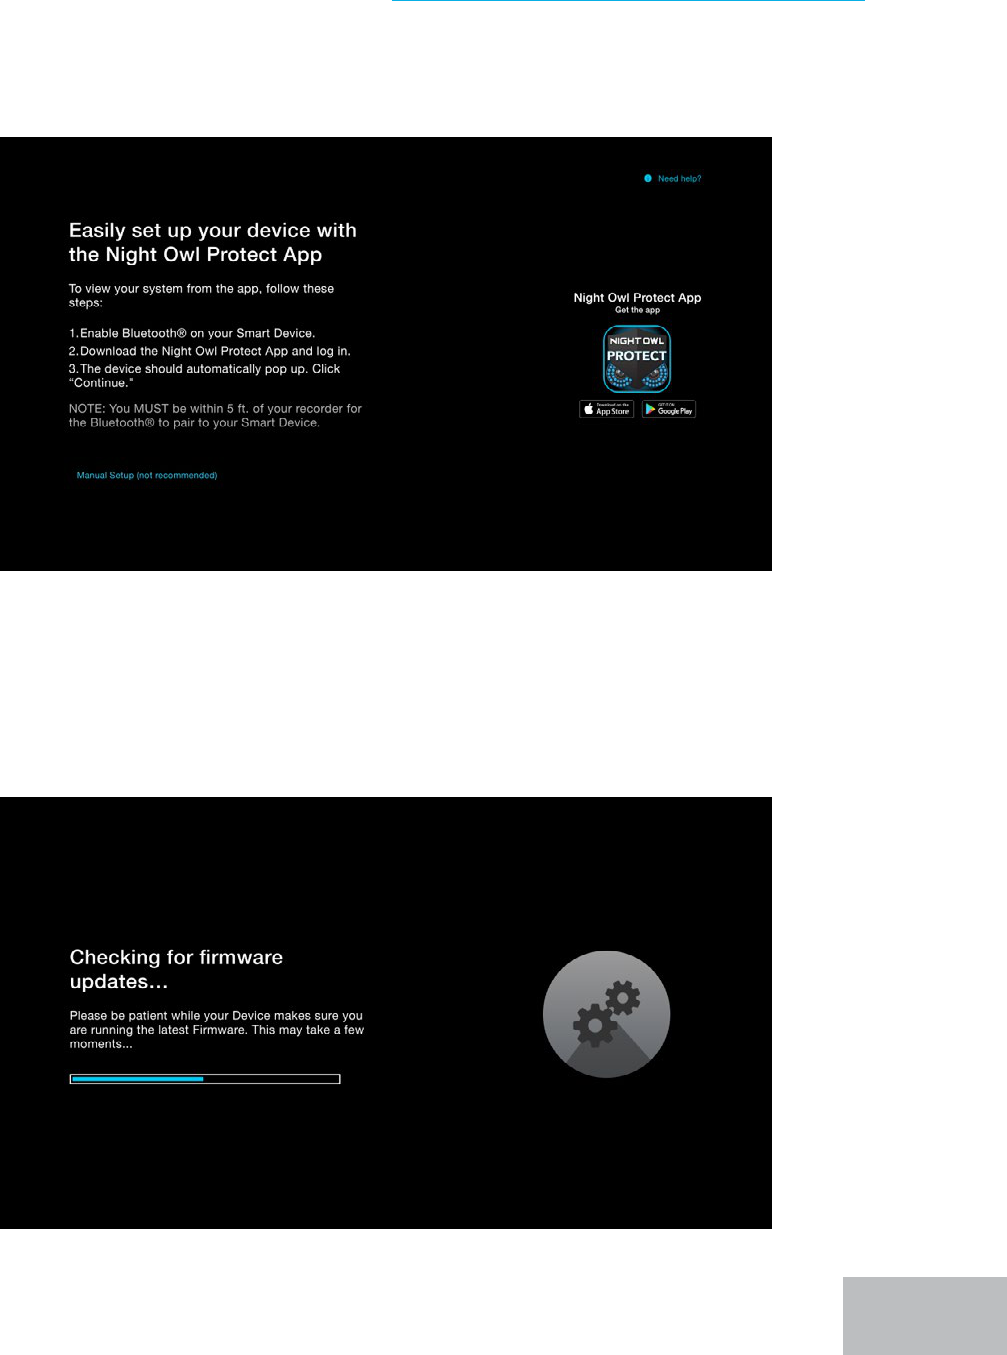
Option 2: Manual Setup (TV / Monitor)
While not preferred, you may perform a manual setup with your recorder
connected to a TV or monitor. With this type of setup, you must connect your
recorder to your TV or monitor using HDMI and connect the provided wired USB
mouse. These steps are covered in Step 3. Connect Your System (Hardware). The
startup wizard will appear on-screen and is easy to follow. Pay close attention to the
following screens.
When you see this screen, click “Manual Setup (not recommended)” to proceed.
We STRONGLY RECOMMEND connecting your recorder to the Internet. Even if you
will not be remotely viewing your system using our app, the rmware still needs
to be updated. The rmware not only ensures system health, but also updates the
system with the latest and greatest features. Additionally, the rmware must be
updated to receive live technical support.
14
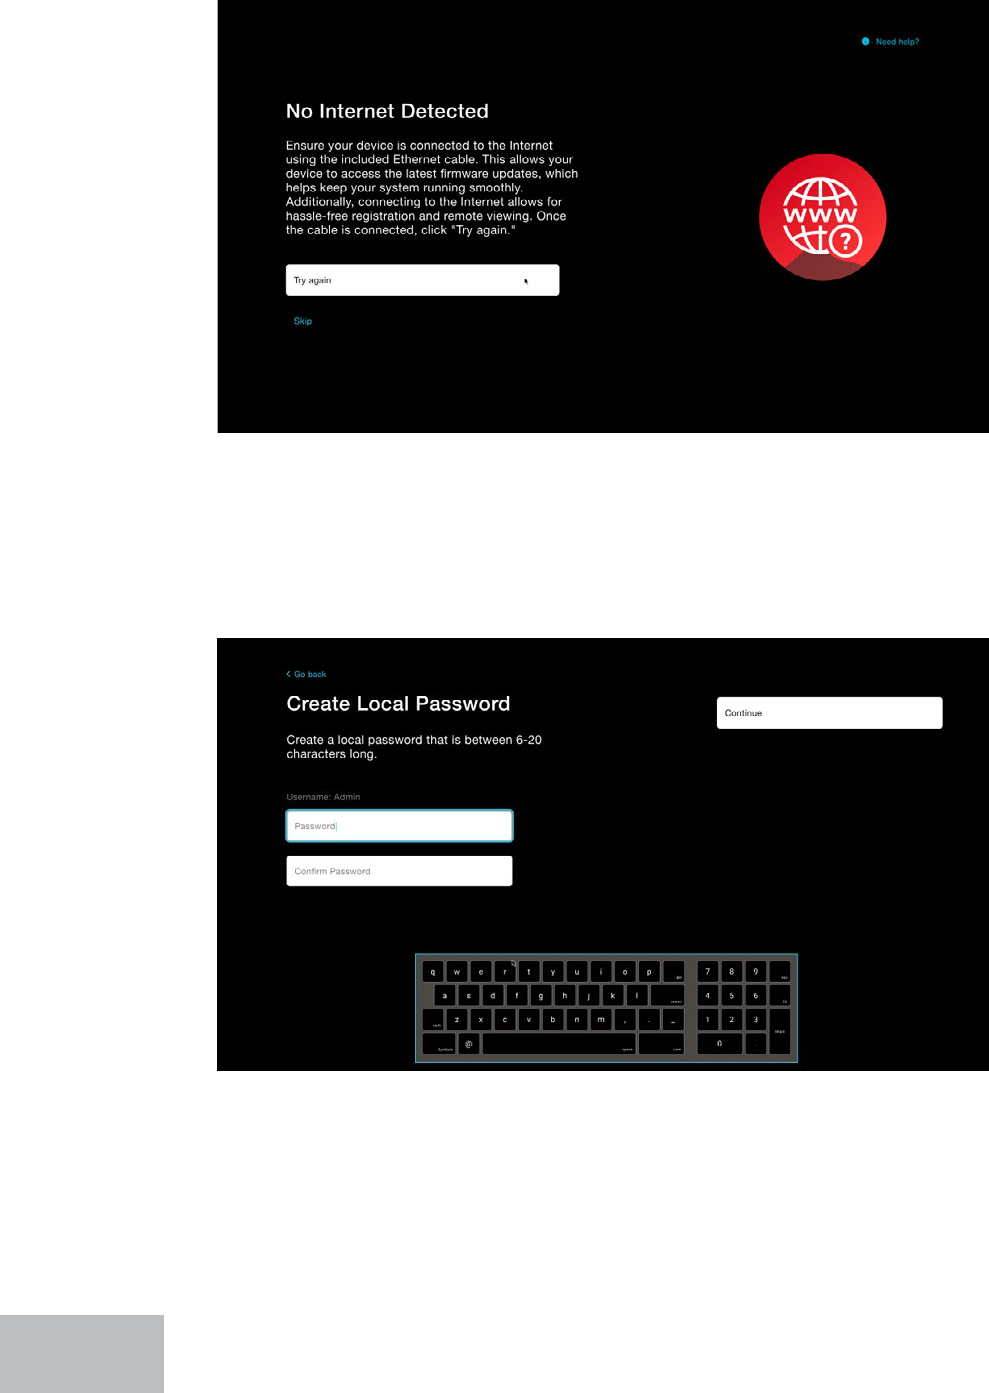
If your recorder is not connected to the Internet, you will see this screen. Again,
we STRONGLY RECOMMEND connecting to the Internet for initial setup. If you are
connected, please click “Try Again.” If not, click “Skip.”
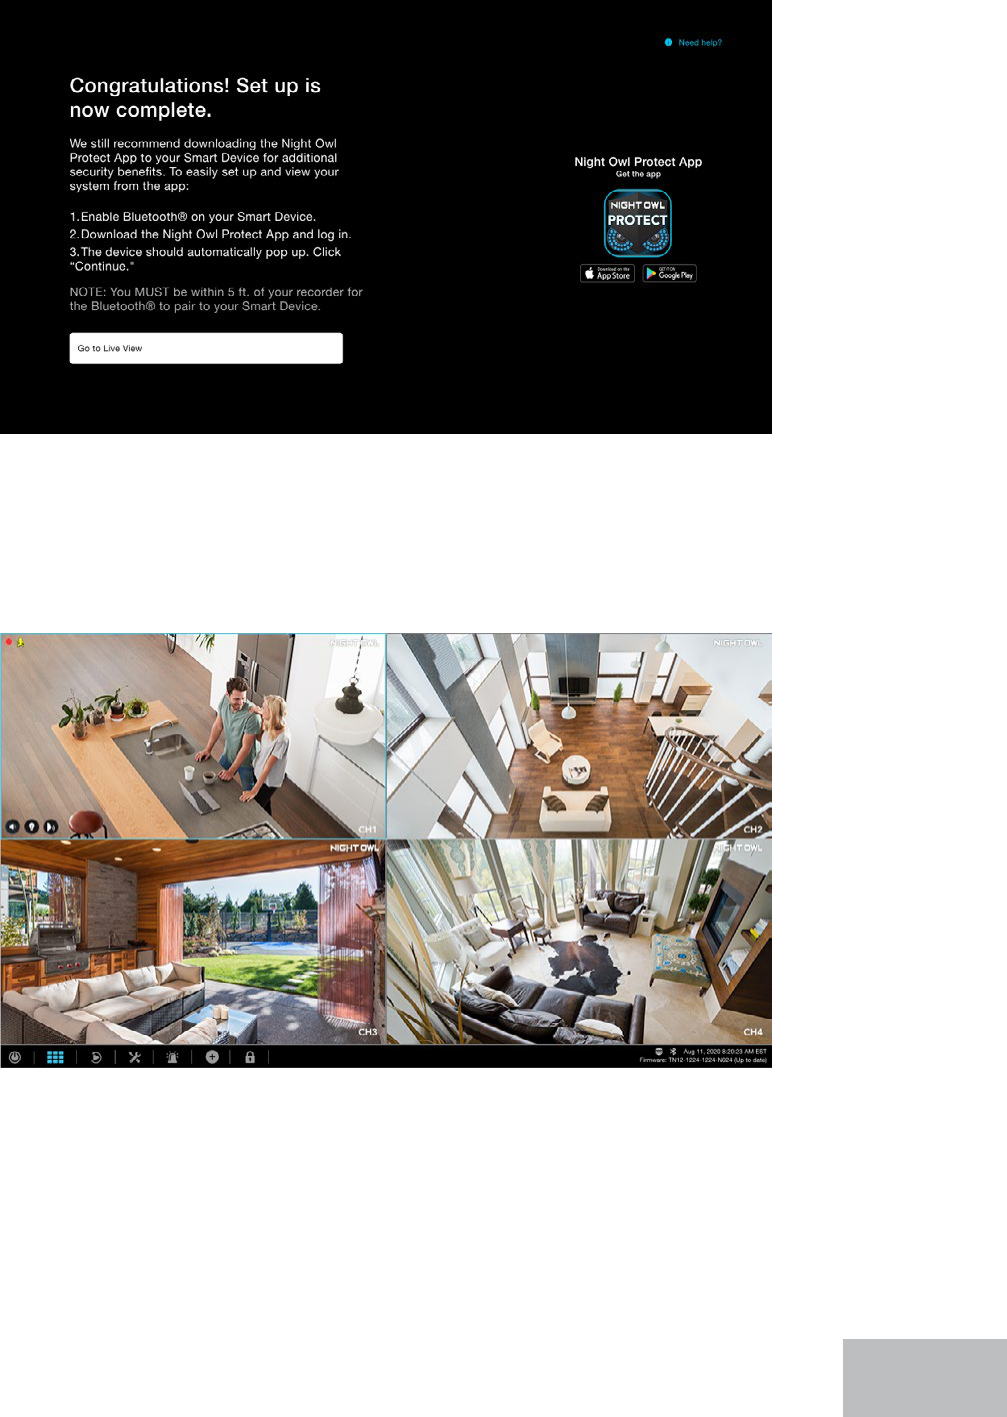
If you continue to proceed through the startup wizard without connecting to the
Internet, you will need to create a local password. This is the password you will use
to log in to the recorder from a TV or monitor.
15
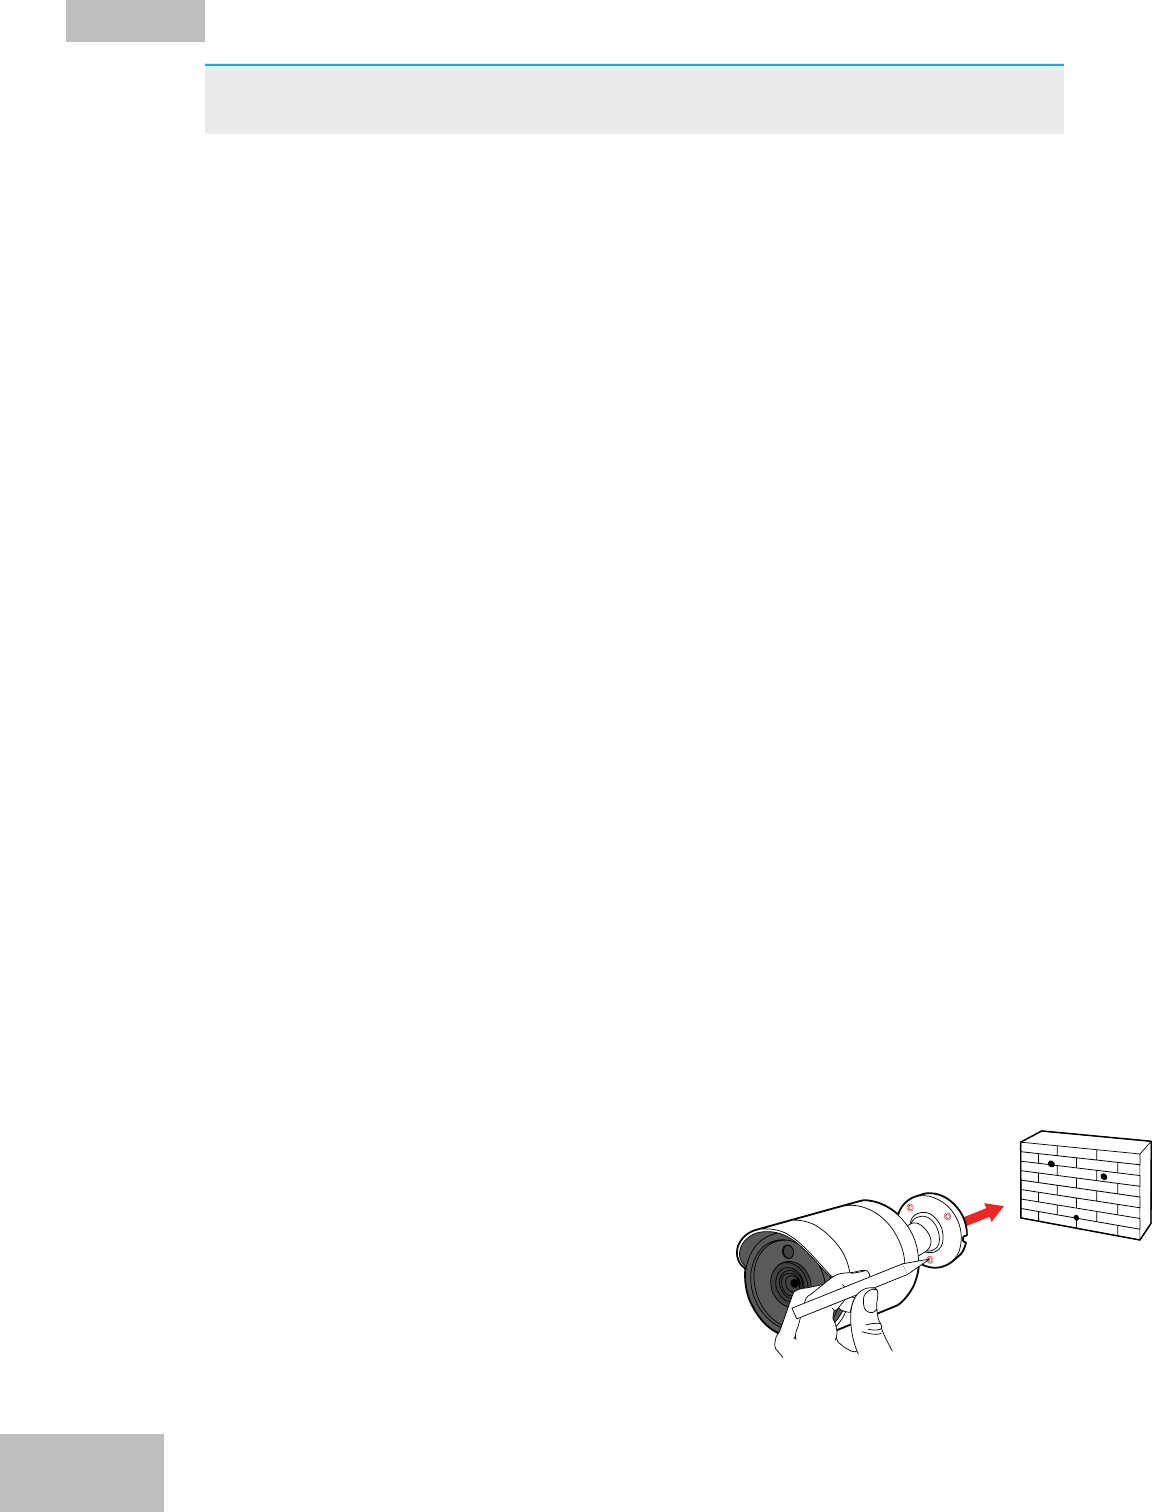
There are a number of other screens you will see in the startup wizard. Simply
follow the on-screen prompts until you get to this screen.
If you did not connect to the Internet or congure the recorder using Night Owl
Protect (recommended), you may still do so at a later time. To begin live viewing,
click “Go to Live View.”
Install the Cameras
Step 5.
16
IMPORTANT: Before you begin this step, if you have not already done so,
ensure all cameras work before nal installation.
Plan Your Installation
When planning your installation, keep the following pointers in mind:
Distance: The further the camera is from the recorder, the higher the chances
of signal degradation. Locate the camera’s power supply as close to the camera
as possible when the distance exceeds 200 ft. as the power level will drop over
extended distances, resulting in video degradation.
Electrical Interference: Do NOT place the cameras near high voltage wires or
other sources of electrical interference. Electrical interference degrades the quality
of the signal.
Outside Elements: Avoid direct exposure to weather. Do not place the camera
where rain or snow will hit the lens directly. Do not place the camera so that the sun
or bright light shines directly into the lens. Your camera is weatherproof, but it will
not work when submerged in water. Ensure that all power and video connections
are not directly exposed to water and are protected from the elements.
Mounting Surface: Ensure your mounting surface holds at least four times the
camera’s total weight.
Camera Angles: Use the Live View on your recorder or on the app via your
mobile device to verify that your camera will be at an ideal angle before
permanently installing.
Install the Cameras
While your cameras may vary in appearance, these steps will cover installation
basics.
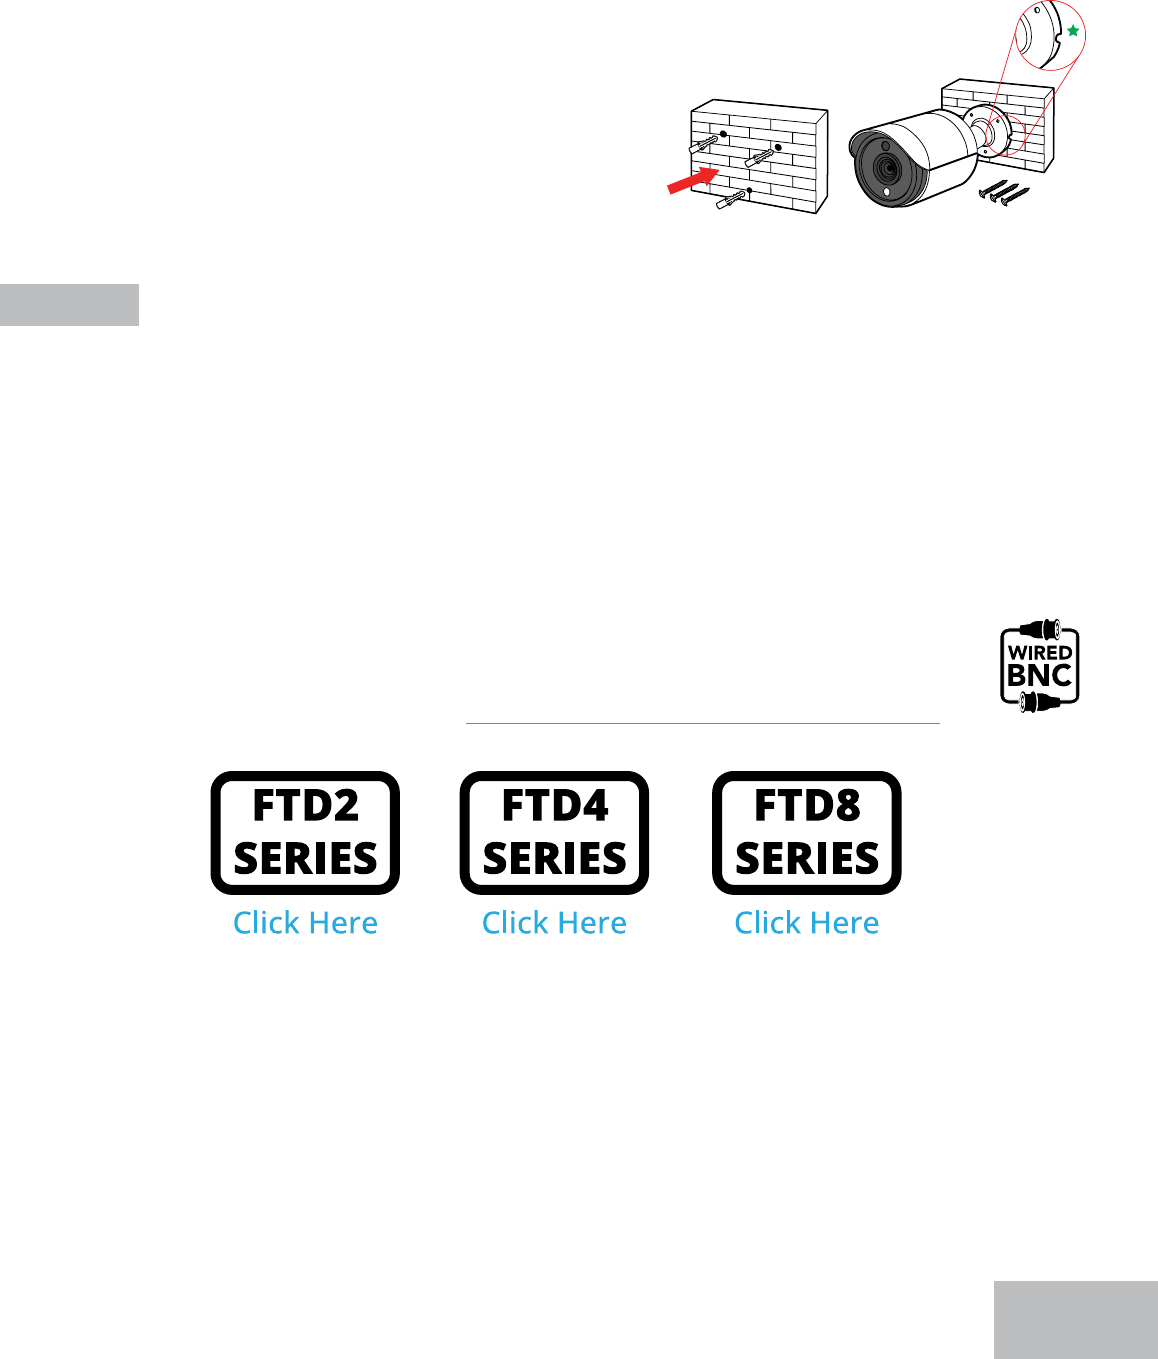
1. Use the holes in the base of each camera as
a template to mark the screw positions on
the surface where you plan to mount the
camera.
17
2. Using a drill bit slightly smaller than the
included screw anchors, drill into the
mounting surface using the guide marks.
3. Insert the screw anchors. Line up the camera
base holes with the screw anchors, insert
the screws through the base and tighten to
secure the camera in place. Ensure you feed
the camera wire through the indent in the
base as indicated by the green star in the
following illustration.
Additional Cameras
Step 6.
Need more coverage to boost your viewing area? How many wired cameras you can
add depends on the number of “CAMERA” ports (see the rear of the recorder) you
have. Additionally, your Bluetooth
®
wired recorder is Wi-Fi expandable. This means
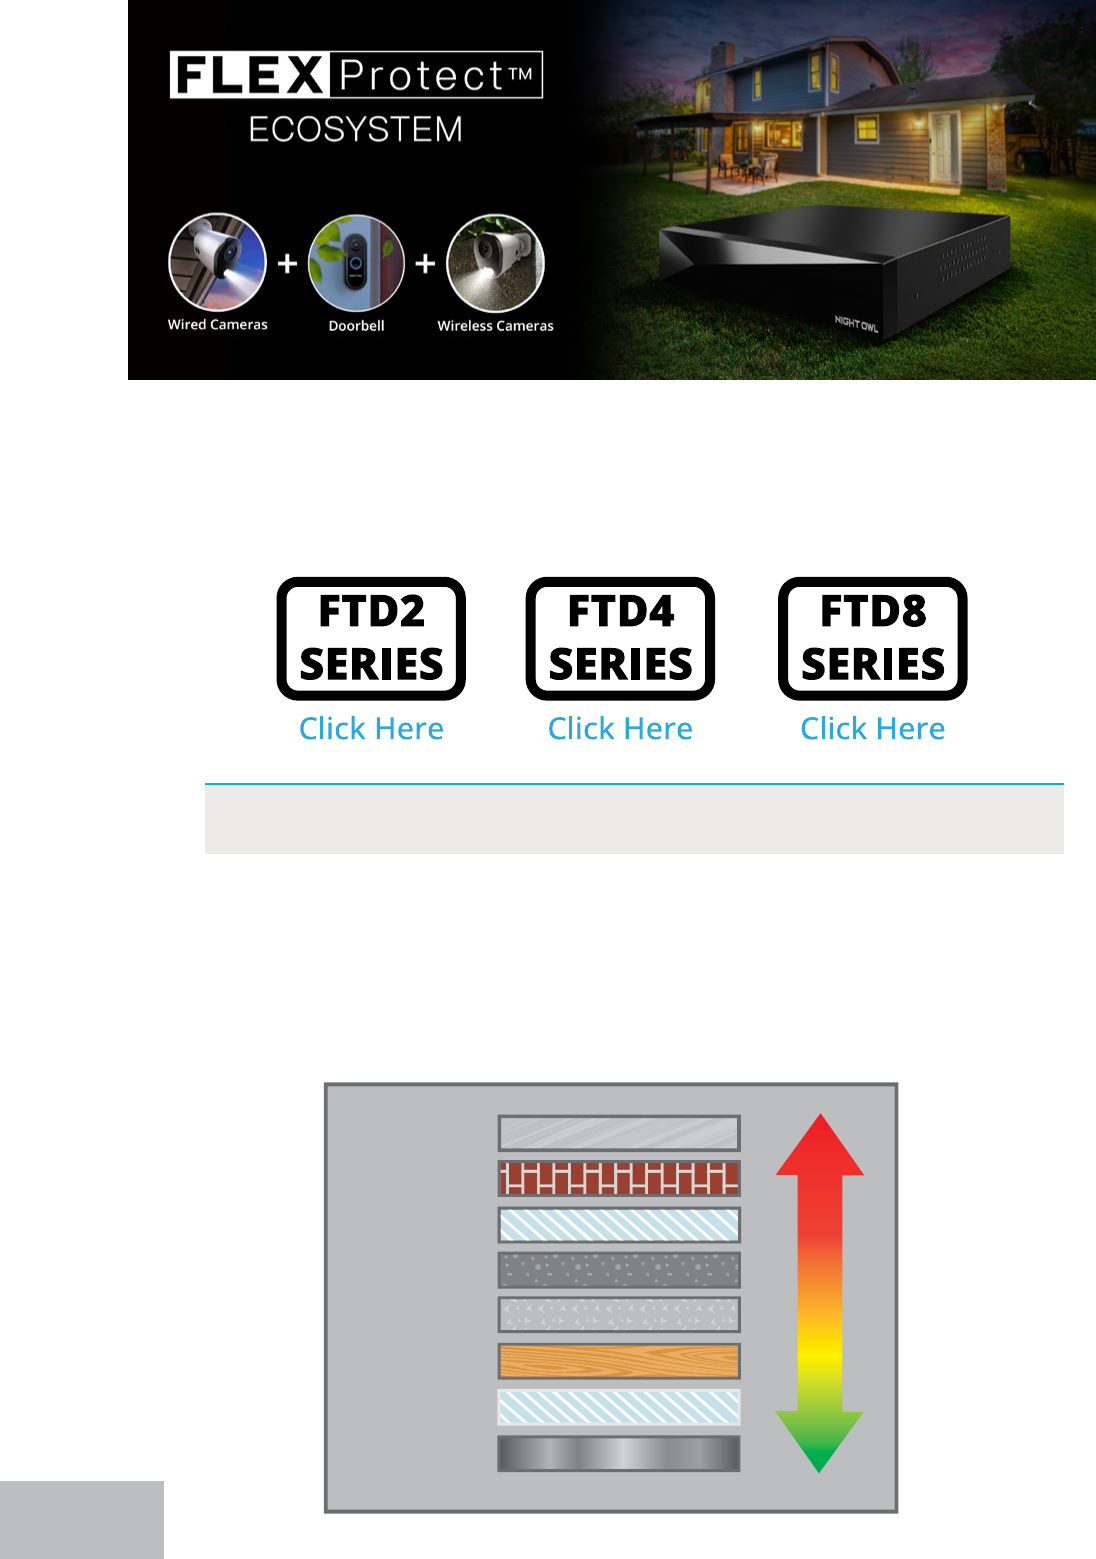
you can also add up to (4) compatible Wi-Fi devices to the recorder. Talk about
convenient!
If you have additional ports (a.k.a. channels) available, click your Series
(located on the support sticker on top of your recorder) below for a list of
wired BNC camera models that are compatible with your recorder. Simply
follow the instructions from Step 3: Connect Your System (Hardware).
a) Adding Additional Wired BNC Cameras
Your new wired recorder can hold up to 4 compatible Night Owl Wi-Fi devices.
Our compatible Wi-Fi IP cameras can be easily moved as your viewing needs
change. They simply need to be plugged into a power source and then paired to
your wired recorder, which is easily done. Our 1080p Smart Video Doorbell is also
compatible with your wired recorder and can help round out your coverage.
b) Wi-Fi Expandability
18
*Recorder and Wi-Fi devices will vary based on your model number. See compatibility below.
Compatibility
Click your Series (located on the support sticker on top of your recorder) below for a list
of Wi-Fi devices that are compatible with your recorder.
IMPORTANT: For Wi-Fi IP cameras, the cameras can be up to 300 ft. from the
recorder with clear line of sight.
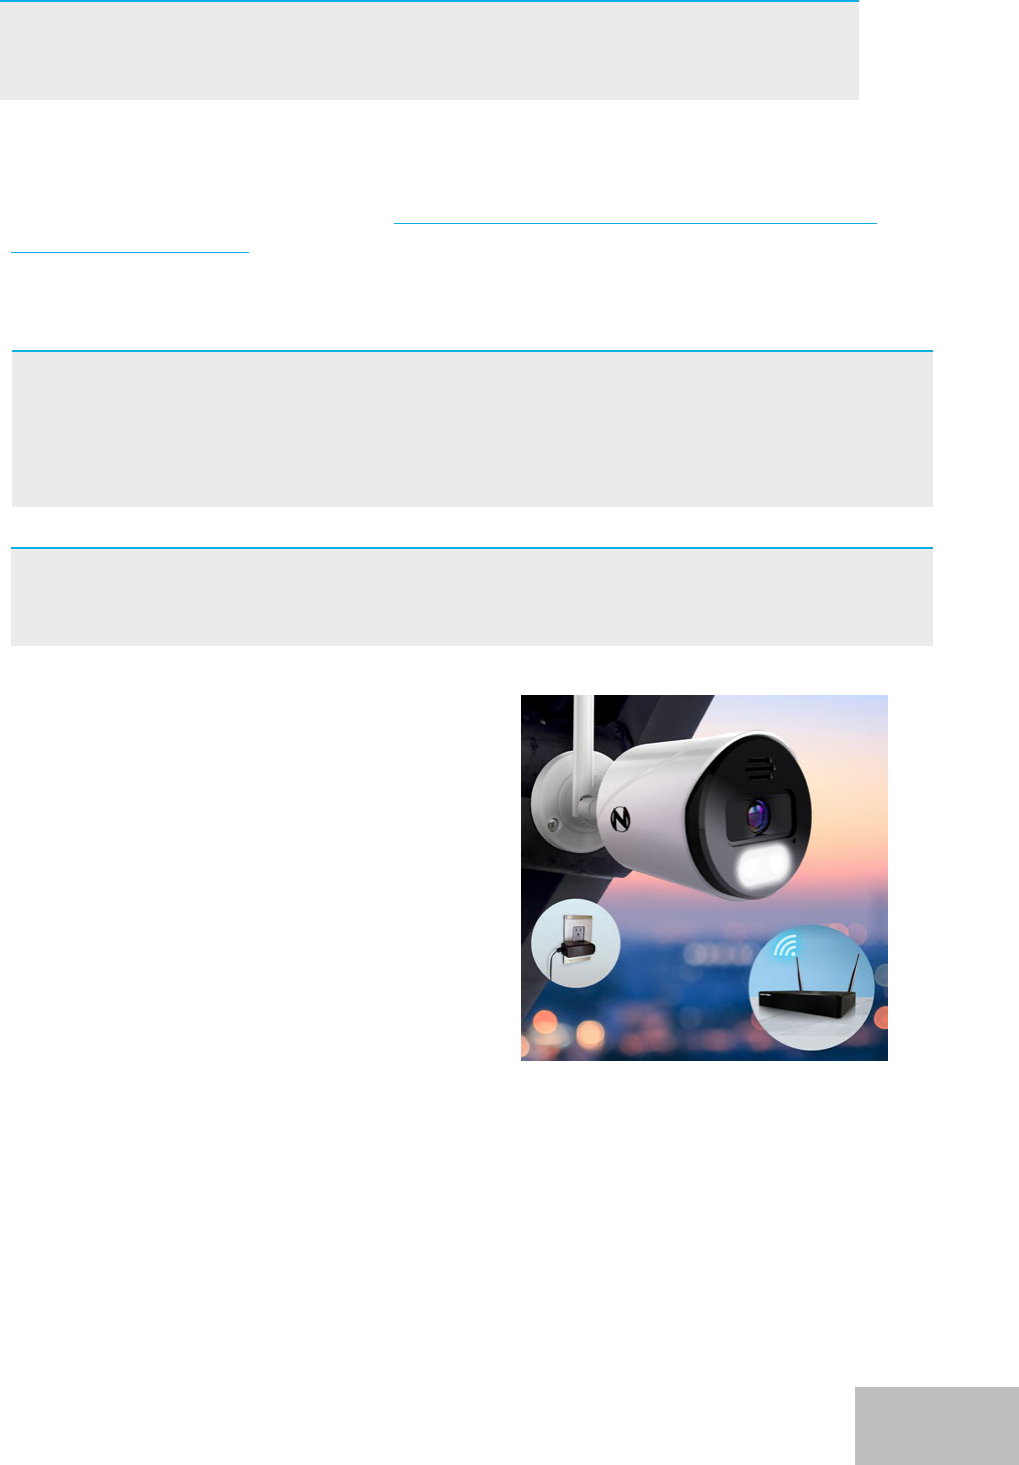
Obstacles: When your wireless signal is transmitted through various materials,
such as walls and windows, the signal strength is aected. Though the recorder
and Wi-Fi IP camera may be very close in proximity, you could still notice high signal
interference if the signal passes through certain obstacles. For instance, if the signal
passes through a concrete wall it will be severely weakened. Please reference the
chart below to see which obstacles highly aect your signal and which do not.
Strength of Transmission Signal
Concrete Wall
Brick Wall
Glass with
Metal
Dry Wall
Wood Door
Glass Window
Mirror
Cinderblock
Weak
Signal
Strong
Signal
Connectivity
IMPORTANT: To add a Wi-Fi IP camera or Smart Video Doorbell to your
Bluetooth
®
wired recorder both devices MUST be connected to
the same Internet (Local Area Network).
Adding a compatible Wi-Fi device is most easily achieved using the Night Owl
Protect App. Hopefully you downloaded the app earlier to use our Bluetooth
®
Wireless Setup. If not, please view Download the Night Owl Protect App and
Create Your Account section of this manual now. To add a Wi-Fi IP Camera or
Smart Video Doorbell follow these simple steps.
IMPORTANT: Ensure your Bluetooth
®
wired recorder has been added to your
Night Owl Protect account and is connected to the Internet. During
the setup process, your Wi-Fi IP camera or Smart Video Doorbell will
notify you regarding the device status using the device’s built-in audio
prompts.
NOTE: The screens in these steps may vary slightly based on whether you are
using an iOS or Android device. If a step is substantially dierent or if the
step only applies to iOS or Android, we will let you know.
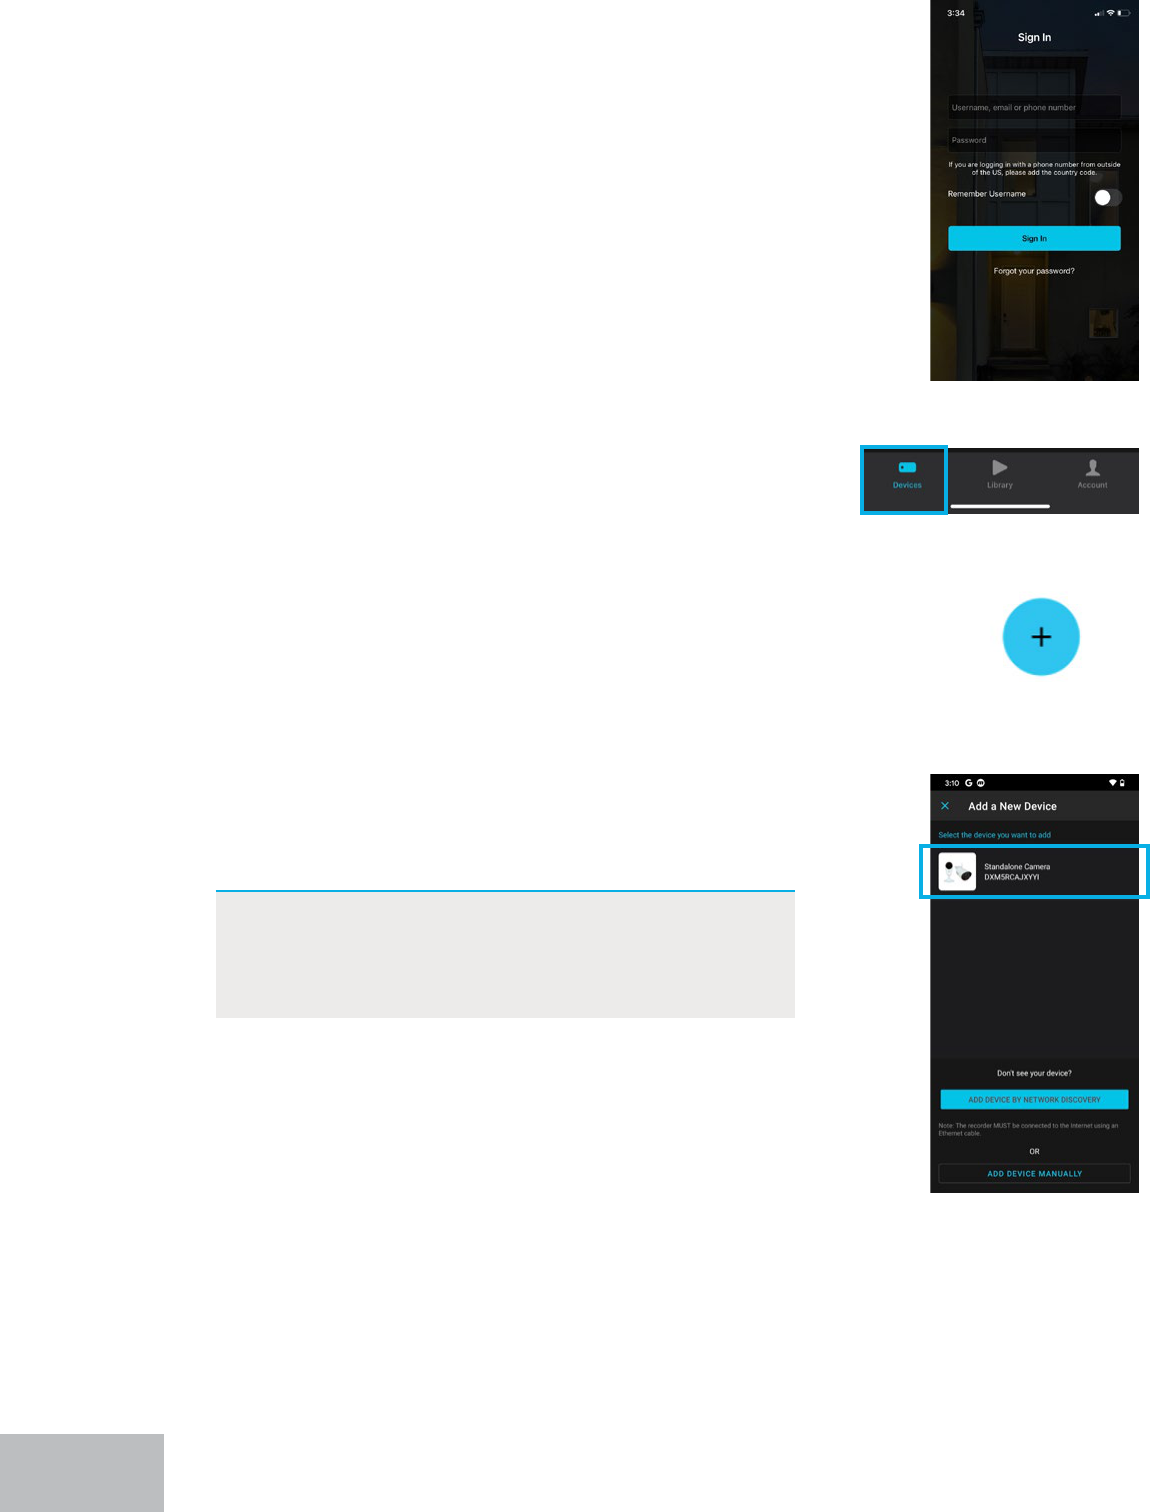
1. Power on your new Wi-Fi IP device using the
provided power adapter. Once paired, you
can install the device in the desired location.
19
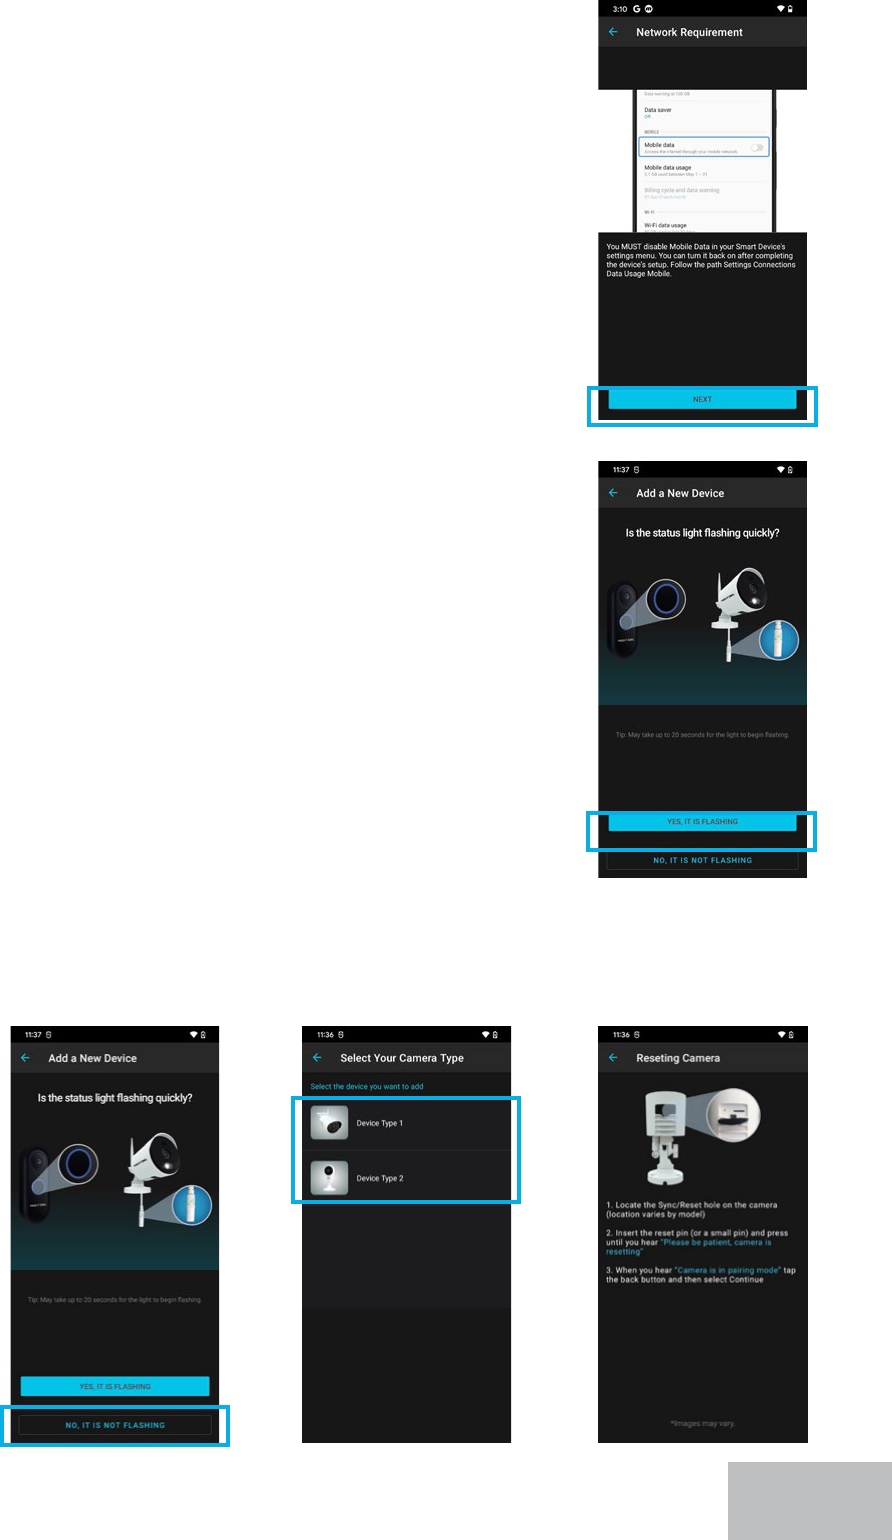
2. Log in to the Night Owl Protect App from your
Smart Device.
3. Tap on “Devices” icon within the App.
4. Next, tap on the “+” icon.
5. The app will search for the Wi-Fi device. Once it is
discovered, tap on the Wi-Fi device.
NOTE: As previously mentioned, please ensure
both your Wi-Fi IP device and recorder are
connected to the same Internet (Local Area
Network).
20
6. ANDROID ONLY - You will be asked to disable your Smart
Device’s mobile data while the app connects to the Wi-Fi
device. Please exit the app and temporarily disable the data.
You may turn it back on once the camera is connected. Once
disabled, return to the app and tap on “Next.”
7. You will now be asked if your Wi-Fi device’s status light is
ashing. A ashing status light indicates the camera is in
pairing mode. If ashing, tap “Yes, it is ashing.”
8. If the status light is not ashing, tap “No, It Is Not Flashing” and
then select your camera type. You will then see a screen with
simple reset instructions to get the camera back in pairing mode.
21
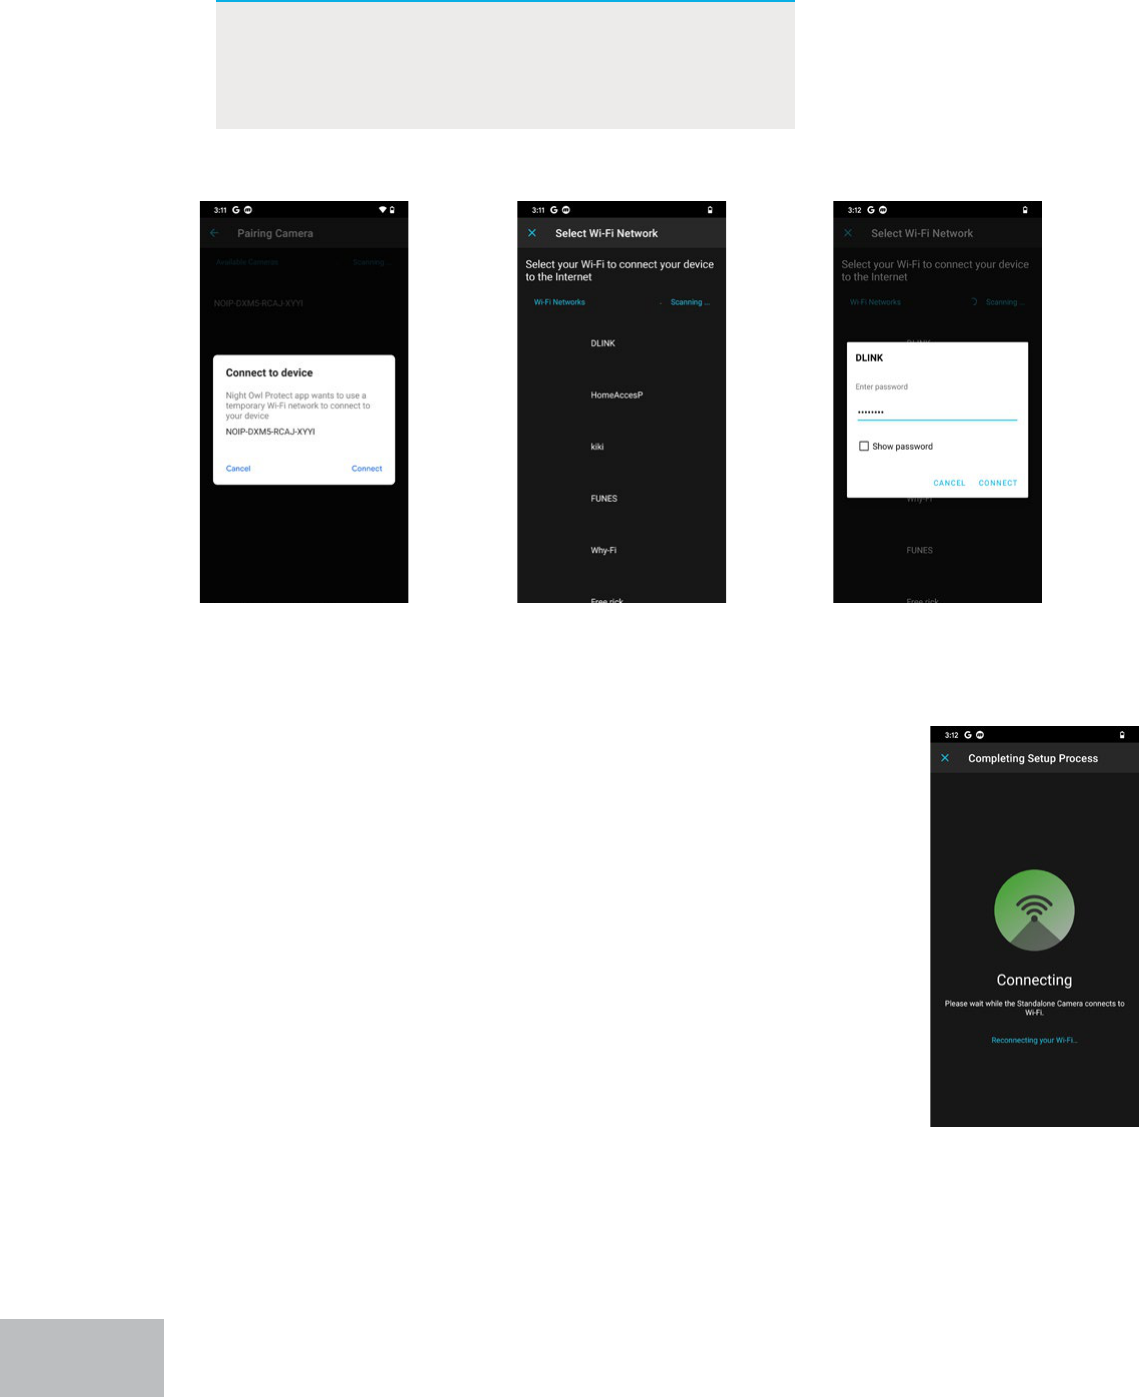
9. Please connect the camera using the temporary
NOIP network, then connect it to your Internet
(Local Area Network).
NOTE: The Wi-Fi IP device must be connected to
the same Internet (Local Area Network) your
recorder is connected to, in order to add the
Wi-Fi device to the recorder.
10. Your Wi-Fi device will now connect.
22

11. Once connected, you will hear “WooHoo! Setup
is complete!” You will then be asked if you would
like to add your new Wi-Fi device to your recorder.
Tap “Add Camera to My Recorder.”
12. Once added, please take a moment to name your
new Wi-Fi device. Then tap on “Live View.”
13. You can now begin viewing your new Wi-Fi device.
On the Device page for your recorder, you will see
this new device as an added camera.
23

Log In From a TV or Monitor
While setup was easily achieved right from your Smart Device using Bluetooth
®
,
many of the system’s advanced features and settings can be adjusted from a TV or
monitor. For customers who prefer accessing their system remotely, don’t worry.
You can access many of your system’s features and settings right from the app on
your mobile device.
However, there are some settings and features that are easily adjusted using a
connected TV or monitor (must be a minimum of 1080p resolution). You do not
have to keep your system connected to a TV or monitor permanently but can
connect your recorder temporarily using HDMI and your wired USB mouse to
navigate the screens. Once adjusted, feel free to disconnect the system from your
TV or monitor and continue viewing and accessing your system right from your
Smart Device or computer.
IMPORTANT: With your recorder connected using HDMI, make sure your TV or
monitor is switched to the correct HDMI input. Once there, you
should see your camera’s live view. Using the USB mouse, log in.
Log In with Night Owl Protect Account
If you have downloaded the Night Owl Protect App and created an account, use
your account credentials to log in to the recorder. The rst time you log in from a
TV or monitor using Night Owl Protect, your recorder MUST be connected to the
Internet so it can validate your credentials. Each subsequent log in can be made
without Internet (though not recommended).
24
A
B
C
D
F
G
E
A. Phone Number: (Option 1): Enter the phone number associated with your Night Owl
Protect Account.
B. Email/Username: (Option 2): Enter the email address or username associated with
your Night Owl Protect Account. To sign in with your email address, you MUST rst
have veried your email in the app. To do so: Sign into the app >>> click Account >>>
your name >>> Email >>> Verify My Email >>> and follow the simple on-screen steps.
C. Password: Enter your Night Owl Protect Account password.
D. Save my username: Checking this will save your username, making it easier to log in
next time.
E. Forgot Password?: Click here if you have forgotten your login password. See
Resetting/Forgot Your Password section for more information.
F. Device Logout Time: Choose how/when you are logged out of the system. You can
select Manual Logout (you manually log out when ready), 15 Minutes (auto log out
after 15 minutes) or 1 Hour (auto log out after 1 hour).
G. Server Status: Shows the status of your recorder’s Internet connection. Synced
means you are connected, whereas Oine means you are not connected.
Log In with Local Password
If you did not download the Night Owl Protect App and create an account, you
should have created a local password during the startup wizard (See Option 2:
Manual Setup (TV / Monitor)). When logging in, you will see the screen below.
25
A
B
C
D
E
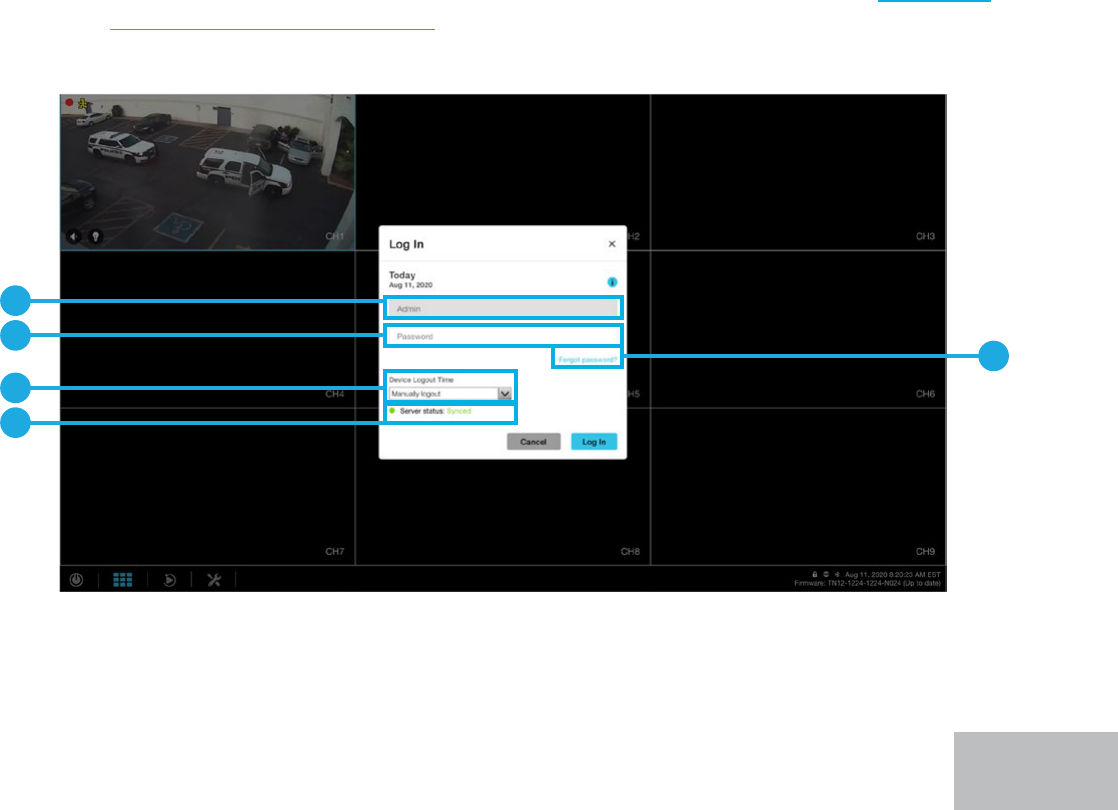
A. Username: Will have Admin entered, as this is the default username for the system.
B. Password: Enter the local password you created during the startup wizard.
C. Forgot Password?: Click here if you have forgotten your login password. See
Resetting/Forgot Your Password section for more information.
D. Device Logout Time: Choose how/when you are logged out of the system. You can
select Manual Logout (you manually log out when ready), 15 Minutes (auto log out
after 15 minutes) or 1 Hour (auto log out after 1 hour).
E. Server Status: Shows the status of your recorder’s Internet connection. Synced means
you are connected, whereas Oine means you are not connected.
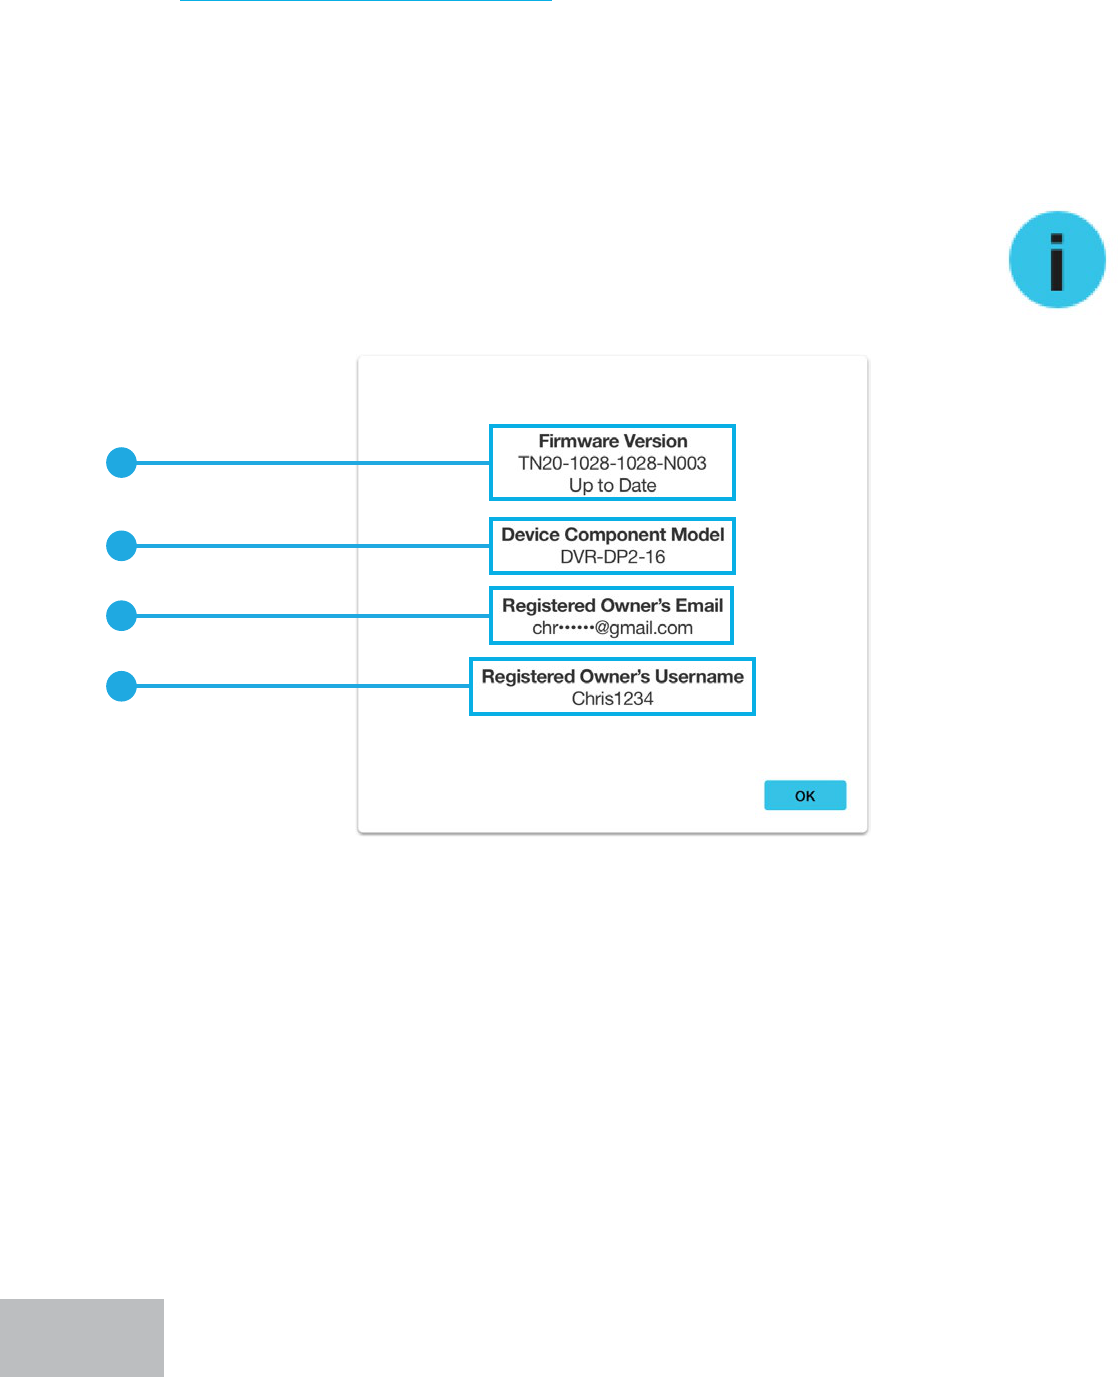
A. Firmware (FW) Version: Will provide the current FW version of the recorder as
well as the status (Up to Date or Firmware Not Up to Date). Keeping your FW up
to date is important for the overall health of your system, as well as eligibility for
technical support. If your system is not up to date, our technicians cannot provide live
assistance.
B. Device Component Model: Displays the component model number of your recorder.
This information is helpful when technical support is needed.
C. Registered Owner’s Email: Displays the email address the owner entered during
initial setup. If a manual setup was performed, no email address will be shown. If you
are oine, the email will not be populated.
D. Registered Owner’s Username: Displays the username the owner entered during
initial setup. If a manual setup was performed, Admin will be shown.
Log In Information Icon
Provides basic information regarding your system. Tap “OK” to
return to the previous screen.
26
A
B
C
D
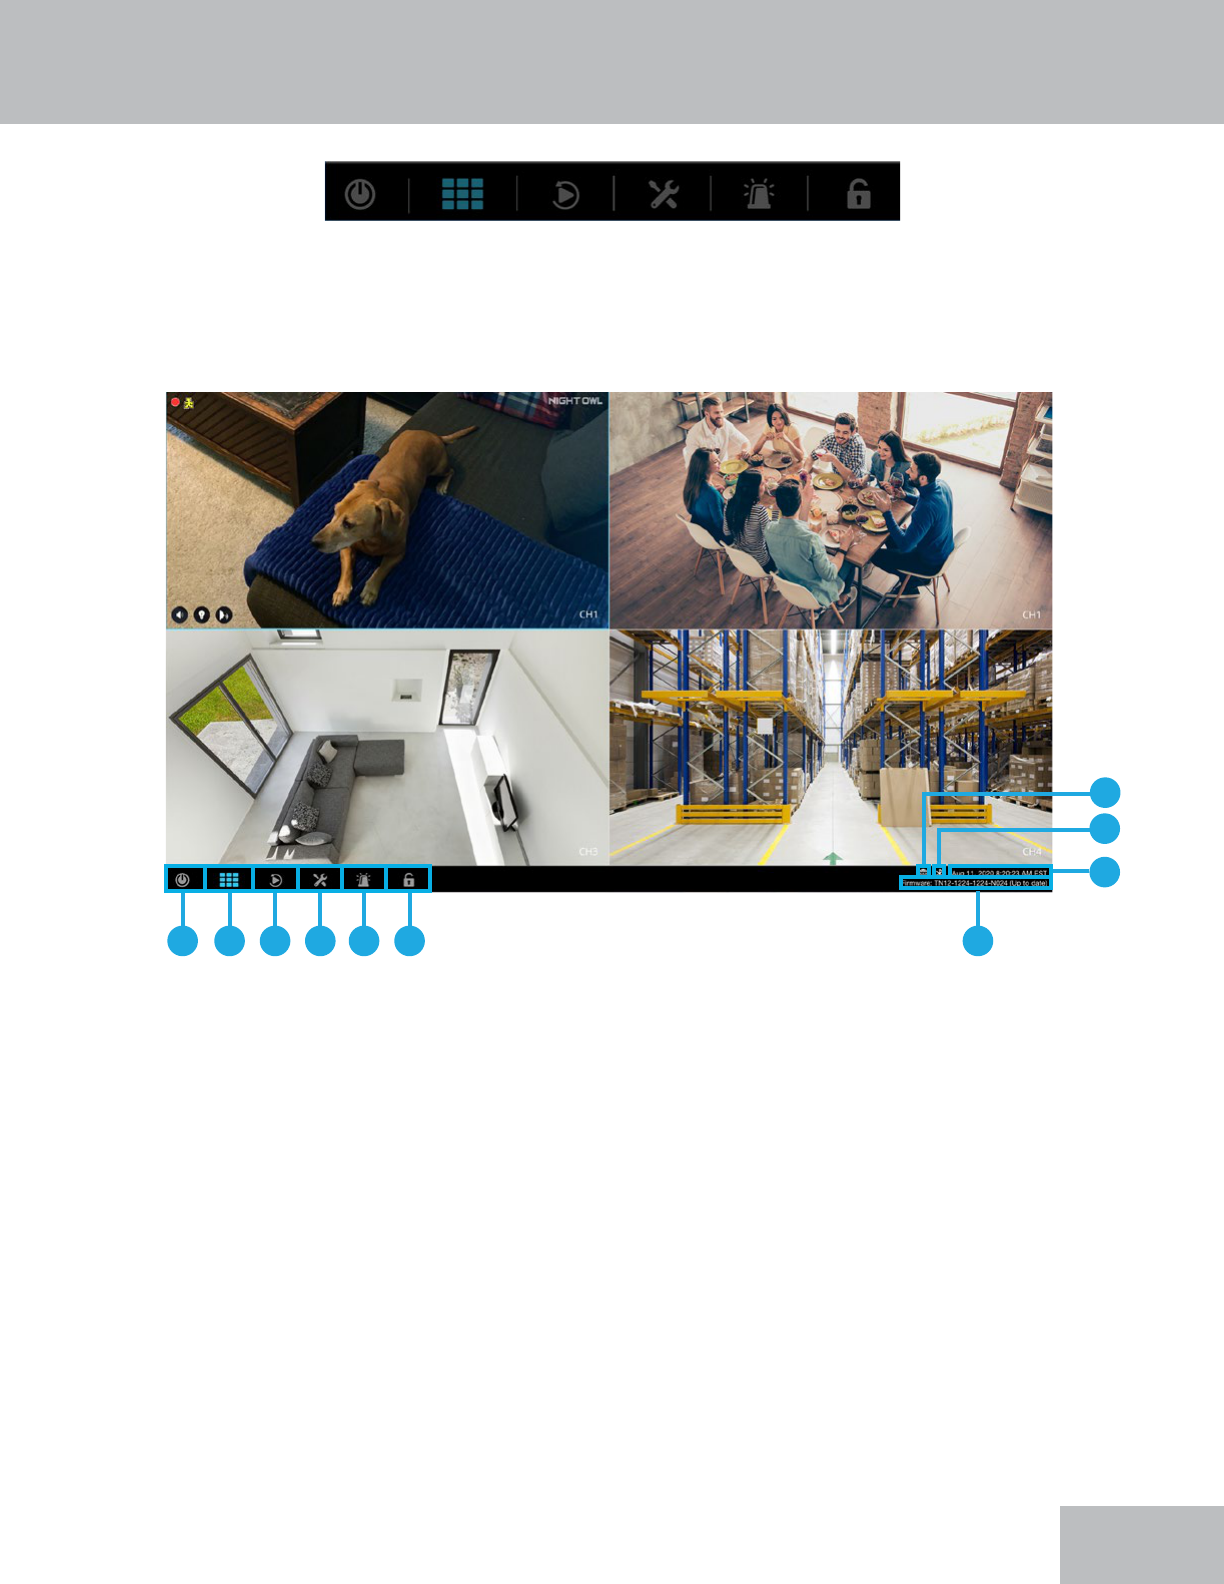
Live View (Navigation Bar)
The navigation bar provides quick access to some of your recorder’s most
commonly used features, such as view layouts and playback. See below for a quick
look into these features / menus.
A. Shut Down: Allows you to reboot or shut down your recorder.
B. View Layouts: Lets you adjust the view layout (camera appearance / arrangement) of
your connected cameras.
C. Playback: Click here to quickly access the playback menu to see your recordings.
D. System Info: Click here to access your system’s main menus. Will be covered in detail
in System Info section of this manual.
E. Panic: Will play a siren and will turn on the spotlight from all connected cameras for 30
seconds. May not apply to all models.
F. Lock/Unlock: Shows whether the system is locked or unlocked. If you have your
Smart Device paired to the recorder using the Night Owl Protect App, the recorder will
automatically unlock when you are within 8 ft. of it with your paired Smart Device. Talk
about convenient!
27
A B C D E F J
G
H
I
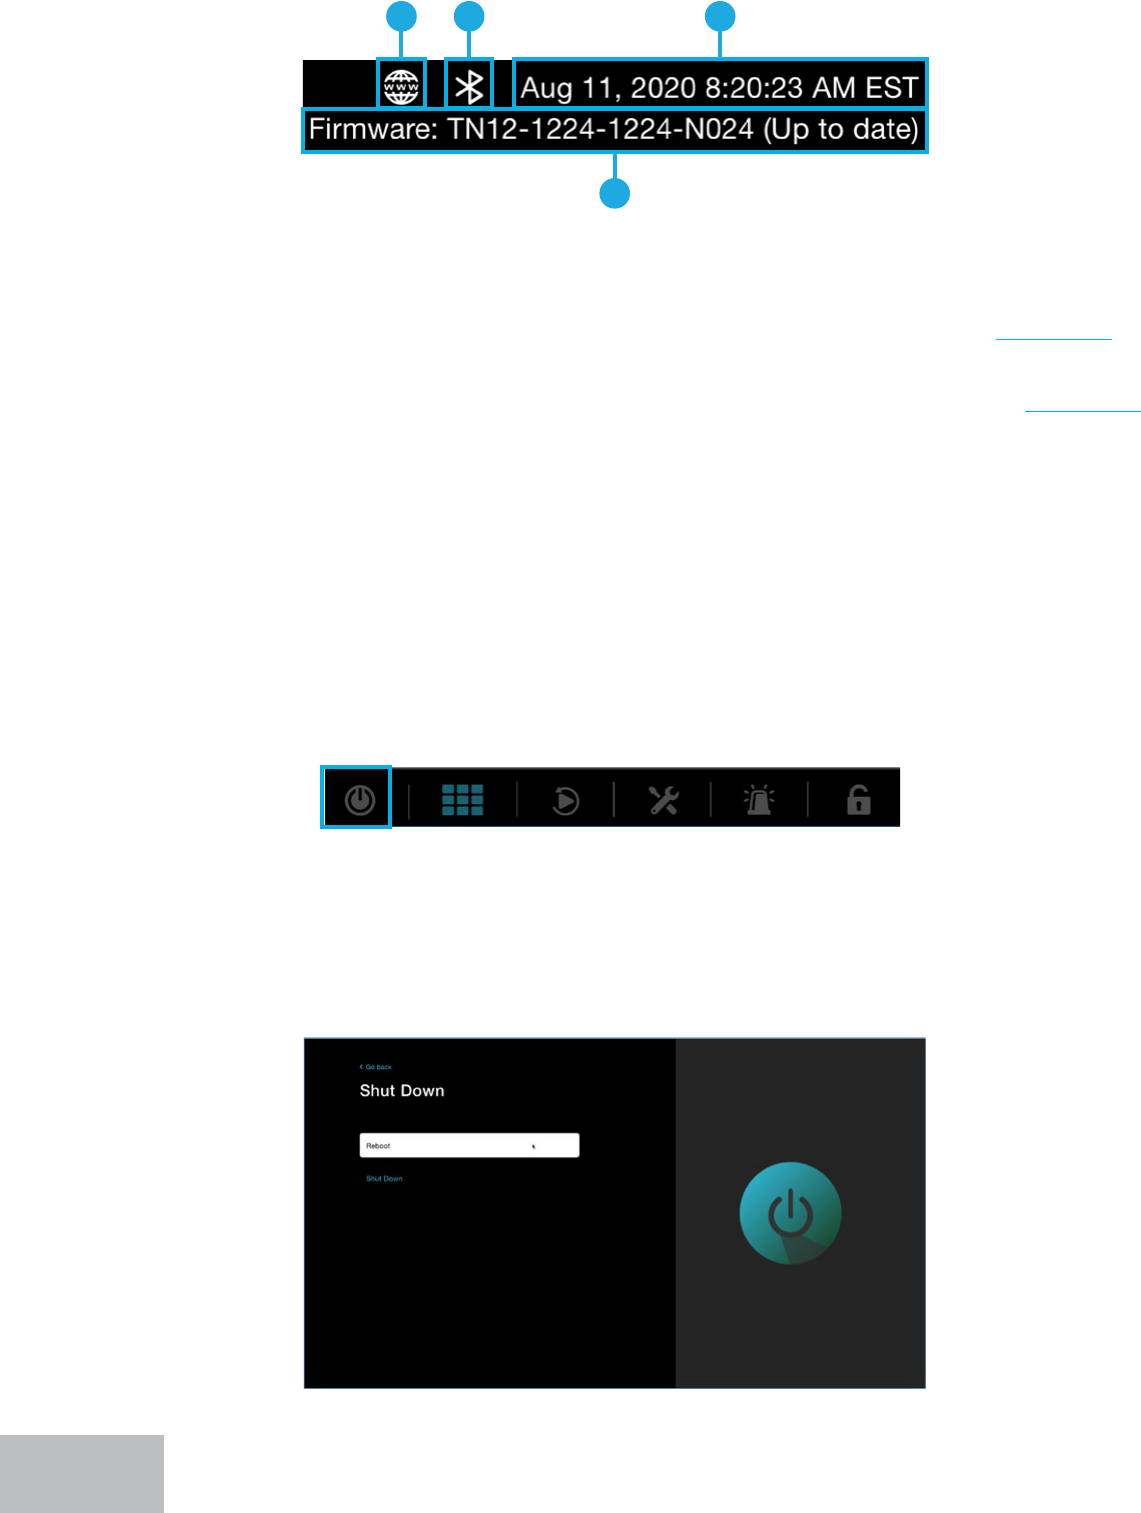
G. Internet Connected/Not Connected: Shows the current status of your recorder’s
Internet connection. If the icon is grayed out, you are not connected. See Appendix.
H. Bluetooth
®
: Shows whether you currently do or do not have a device paired to the
recorder using Bluetooth
®
. If the icon is grayed out, no device is paired. See Appendix.
I. Date & Time: Displays the current date and time.
J. Firmware Version: Displays your recorder’s current rmware version.
Additional Information (Right Side of Navigation Bar)
J
G H I
Click here to manually reboot or power down your recorder. For instance, you may
want to power down the recorder if you plan on moving it. The recorder has a hard
drive that spins and moving it when powered on may cause damage.
Shut Down
28
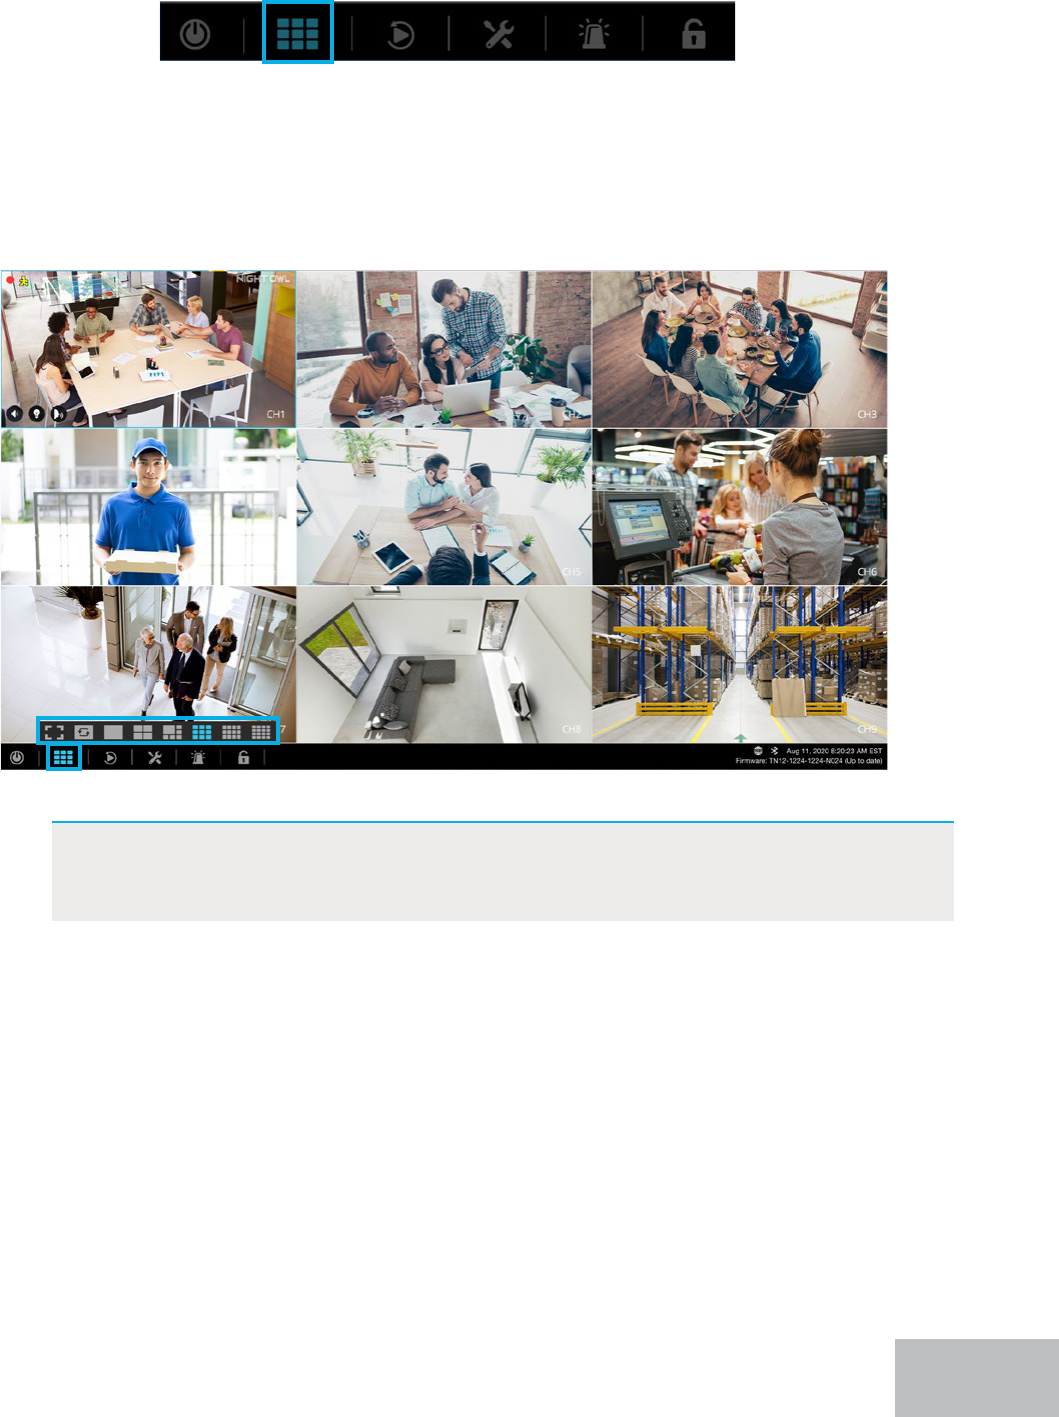
This option lets you adjust how many connected cameras appear on screen and
what order they appear in. You can easily adjust the layout using the preset options
or customize it to suit your viewing needs. Double click on any camera screen to
make it full screen. Then double click again to return to your set view layout.
IMPORTANT: With select models, you can even click and drag the cameras
to rearrange them on screen. This feature does not apply to all
recorder models.
View Layouts
29
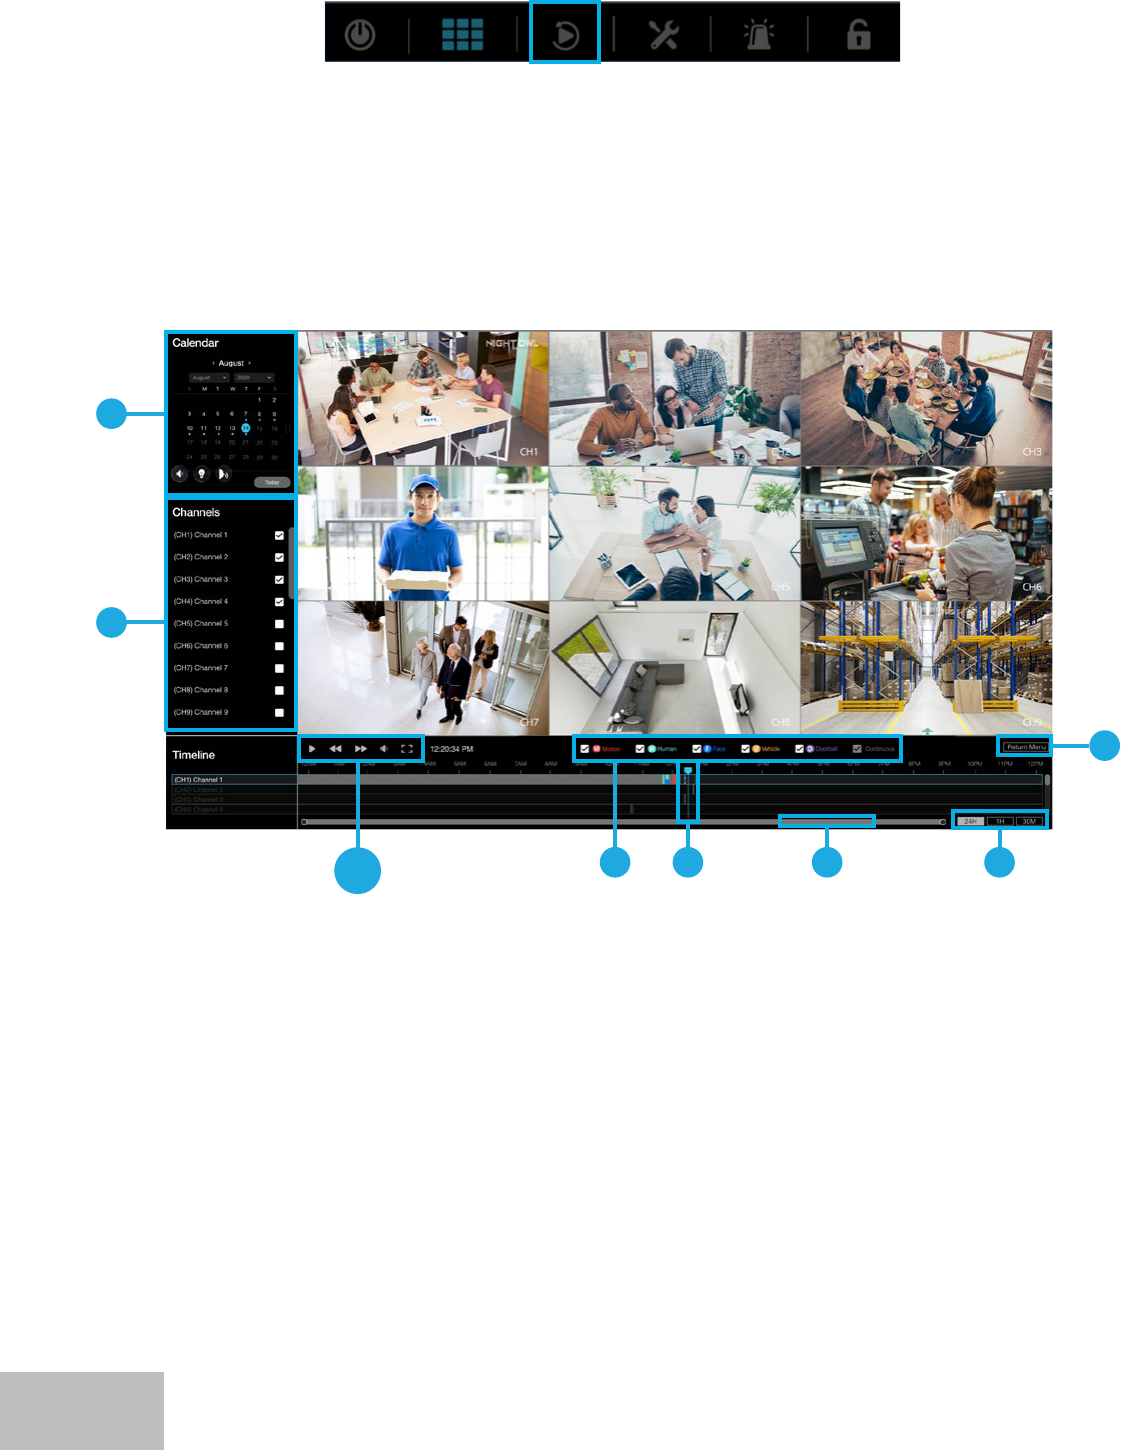
The Playback menu is where you go to access events and replay them. You can
easily search for, playback and save recordings right from the convenience of your
smartphone or tablet, using our free mobile app. However, you may nd it easier
to do this from a TV or monitor. Additionally, from a TV or monitor you can export
your recordings to a USB ash drive or external hard drive.
There are multiple means of ltering the recordings to nd the event you are looking for.
Read the options below for how to navigate the playback screen.
A. Search Detected Events by Date: Use the calendar to select the date(s) that have
video footage from the selected channel(s). Dates marked in blue have recordings.
B. Search Detected Events by Channel: From the channel list, select the channel(s) you
want to search for recordings.
Playback
30
A
B
H J KL
C-G
I
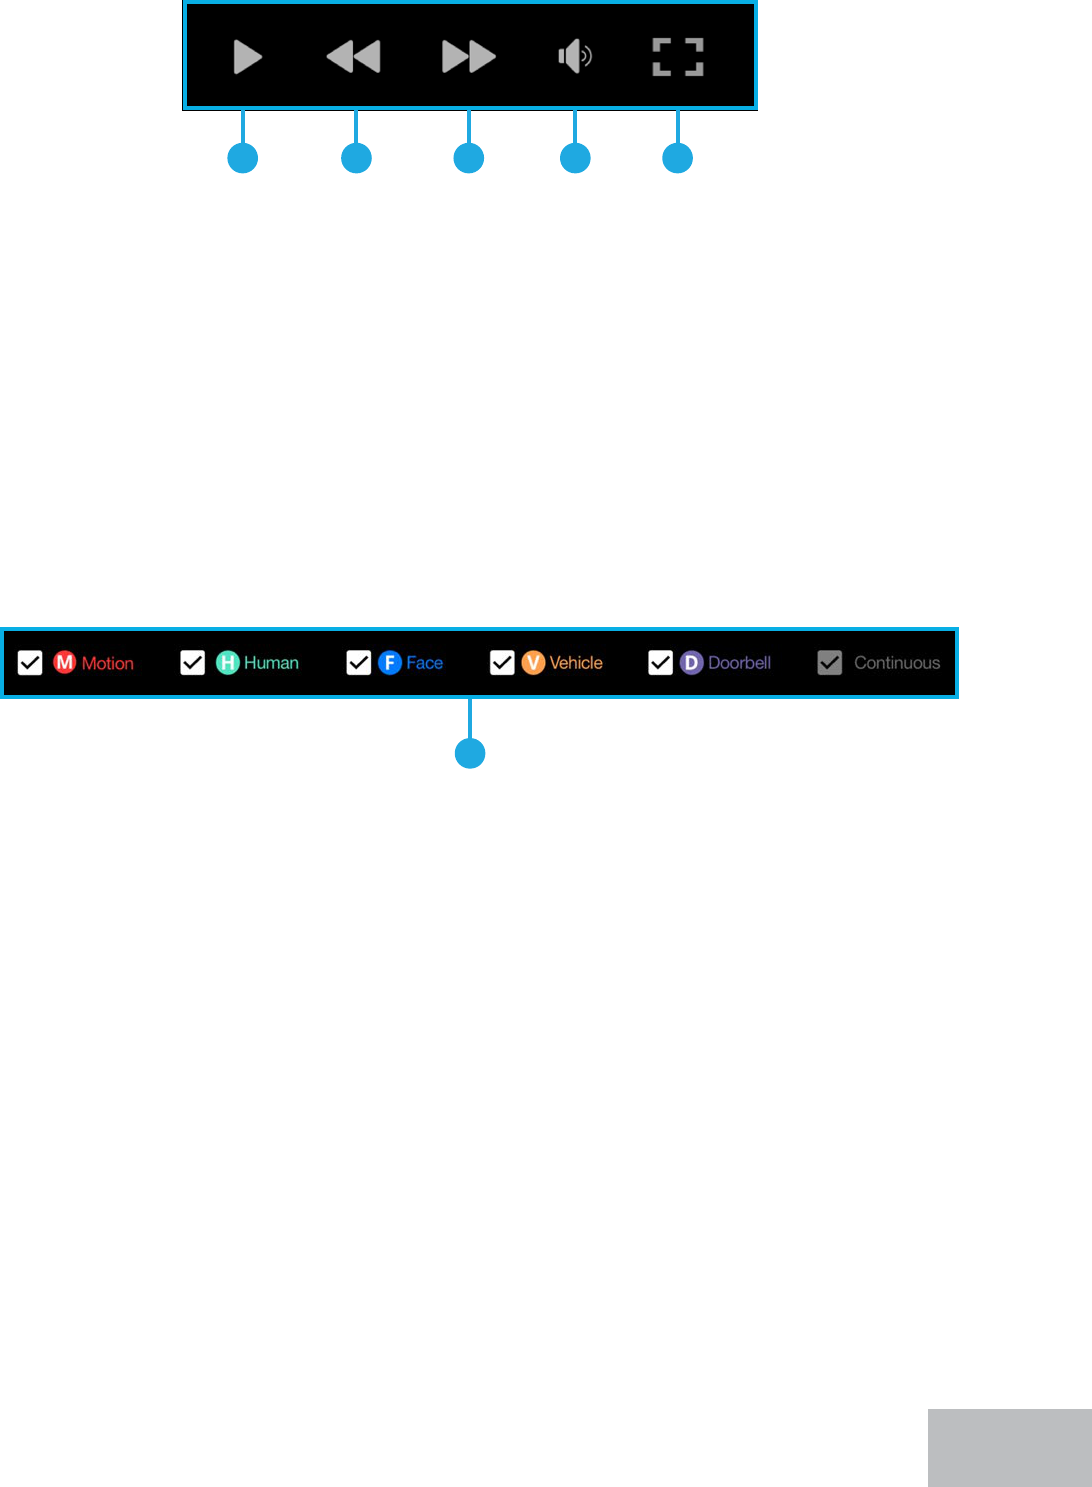
H. Event Filters: Recordings for the search criteria you entered will appear in the
timeline. Check the event lters to further narrow down the search based o the type
of event you are searching for, including; Motion events, Human Detection events,
Facial Capture events or Vehicle events. The event lters are color coded and will
appear this way in the timeline. Not all lters may apply, as this is based on the model
of the camera you have connected.
I. Return Menu: Click here to go back to the previous screen. You may also right-click to
return to the previous screen.
J. Time Indicator: This is the time currently playing in the timeline. You can click and
drag it to move forward or backward in the timeline.
K. Time Options: 24H will display 24 hours in the timeline. 1H will display 1-hour
segments starting from where the time indicator is currently located. 30M will display
30-minute segments starting from where the time indicator is currently located.
L. Scroll Bar: Click and drag one end to zoom in/out of the timeline to further home in
on where in the timeline you want to be, based on the time of the recording you are
looking for.
C. Play/Pause Button: Will begin playback of the selected channel and pause playback.
D. Rewind: Will begin rewinding the recordings.
E. Fast Forward: Will begin fast-forwarding through the recordings.
F. Audio: Will turn ON or OFF the audio on the selected channel(s). Only applies if the
connected camera is audio-enabled.
G. View Layout: Will display the view layout options for playback. The maximum number
of channels that can be played back at the same time will vary by model.
C D E F G
31
H
Exporting Recordings For Long-Term Storage
As your recorder accumulates recordings, it eventually becomes full. When this
happens, the oldest recordings stored are overwritten by the latest recordings. If
there are recordings that you want to save long-term, you need to export them to a
USB ash drive or external hard drive.
Before you can export recorded videos stored on the recorder’s Hard Disk Drive
(HDD), you must rst format your USB ash drive or External HDD to FAT32 / ExFat
as detailed in the section below.
This section provides formatting instructions for:
• Windows OS
• Mac
Format for Windows OS
WARNING
Formatting erases ALL data on the USB ash drive or external HDD.
IMPORTANT: DO NOT connect the recorder’s hard disk drive to your PC or Mac.
1. Insert an empty USD ash drive or connect an external HDD into a USB port on your
PC.
2. Press and hold the Window key + E and release when File Explorer appears.
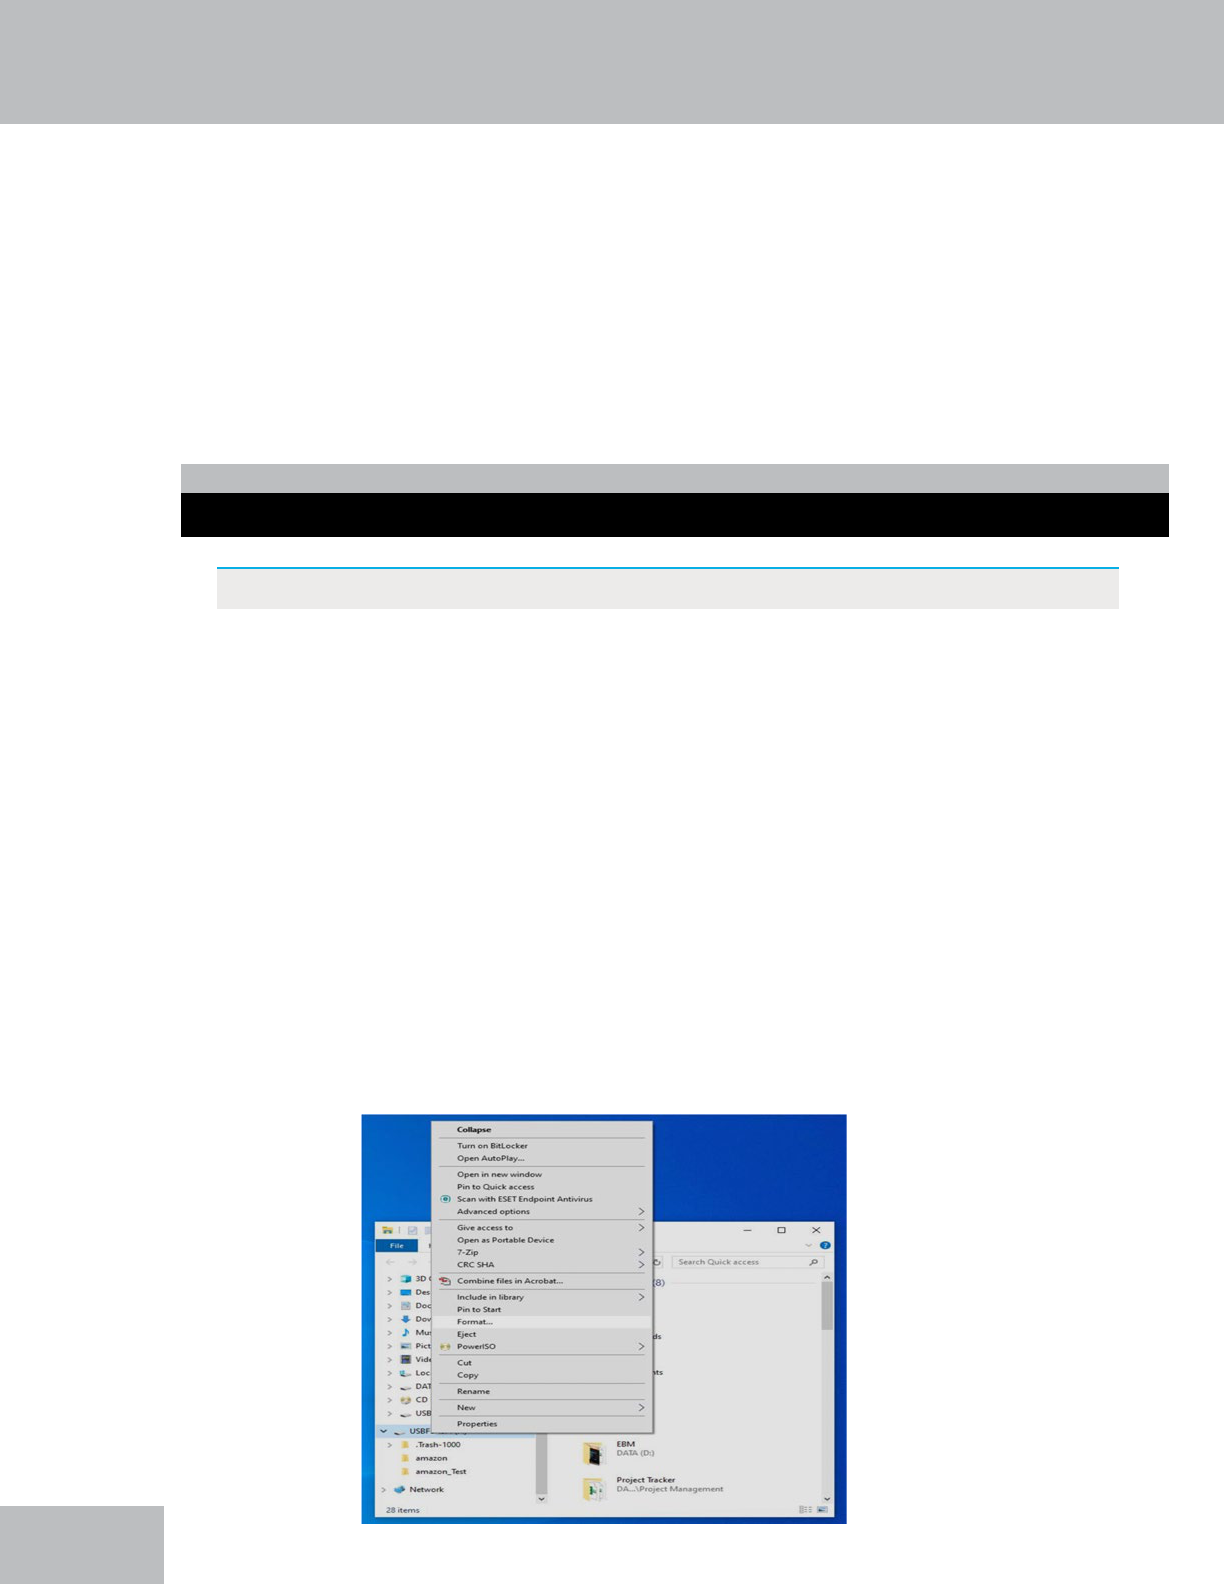
3. Right-click on your USB ash drive or external HDD on the left side of the File Explorer
and select Format.
4. In the File System eld select FAT32 and click Start.
5. Do not unplug the USB ash drive or external HDD until formatting is complete.
Formatting a USB Flash Drive or External Hard Drive
32
Format for Mac
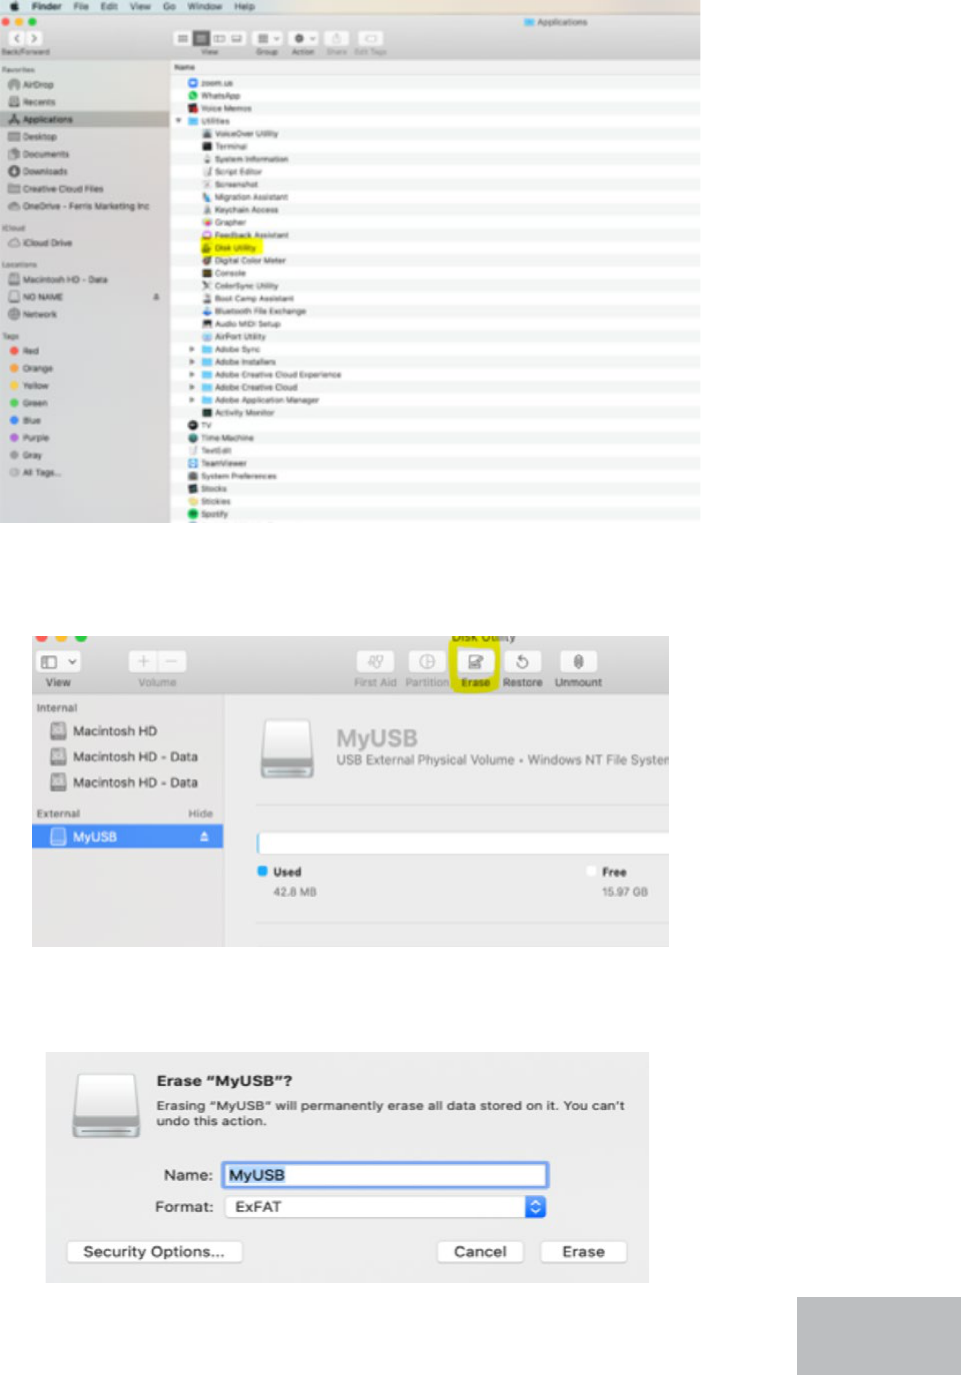
1. Insert the USB ash drive or connect the external HDD into your Mac.
2. Select Applications > Utilities and launch Disk Utility.
3. Select the USB ash drive or external HDD in the sidebar in Disk Utility and click Erase
in the Disk Utility Bar.
4. Create a name, click on the Format dropdown menu, and choose either MS-DOS
(FAT32) or ExFAT. Then click Erase.
33
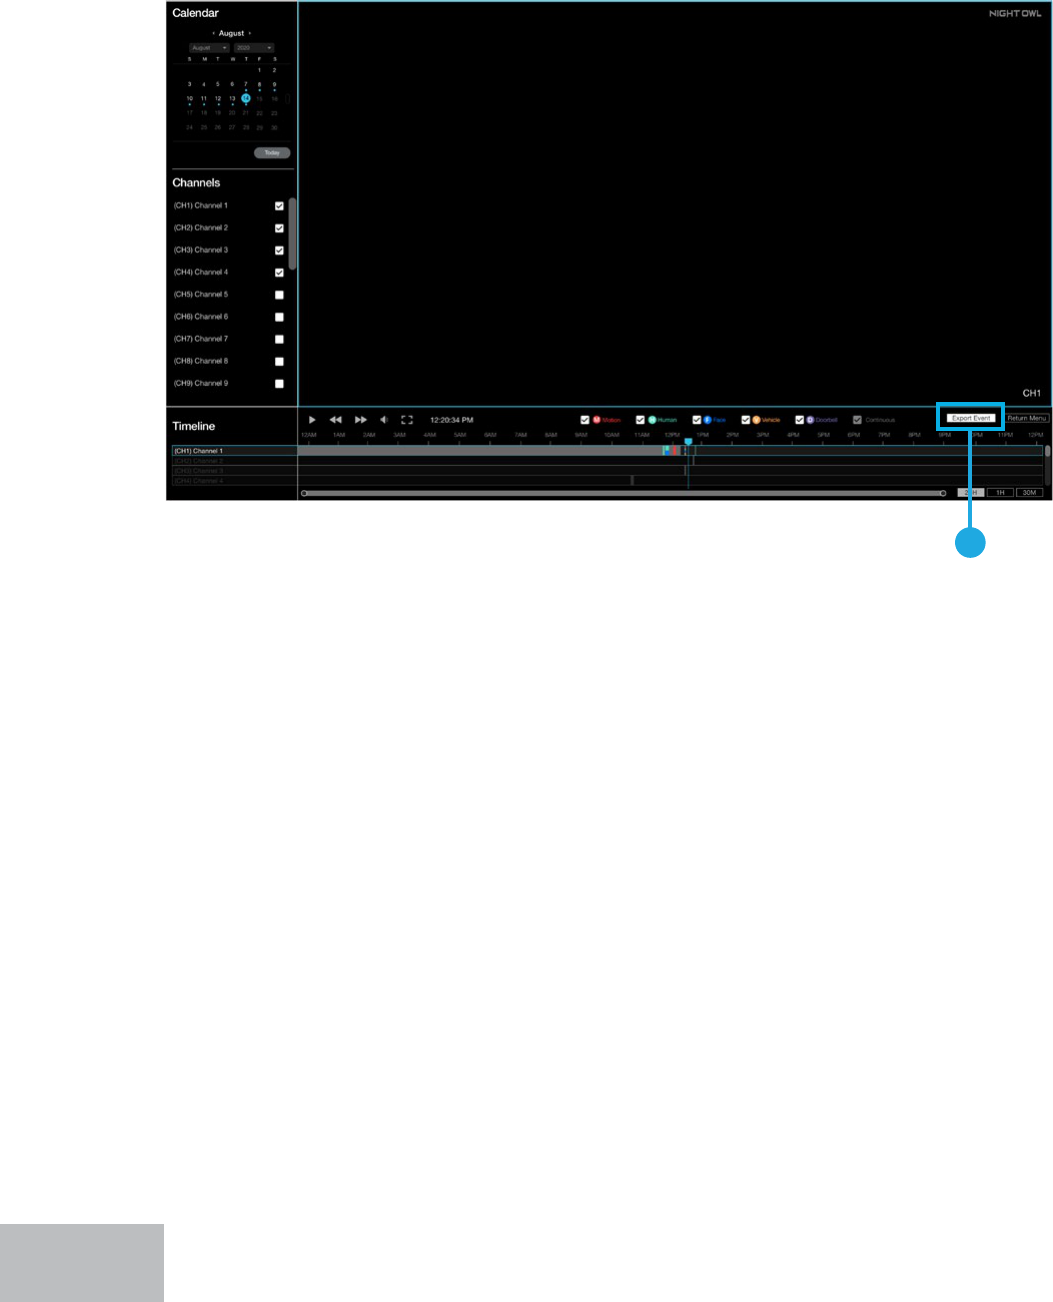
From within the playback menu, you will search for and playback your recordings.
When you have located a specic recording that you want to save long-term, simply
click on “Export Event.”
A
A. Export Event: When the time indicator is on an event, this tab will appear. Clicking
here lets you export the selected event to a connected storage device for long-term
storage.
Exporting / Saving a Recording
34
Export
Destination
A D
B E
F
G
H
C
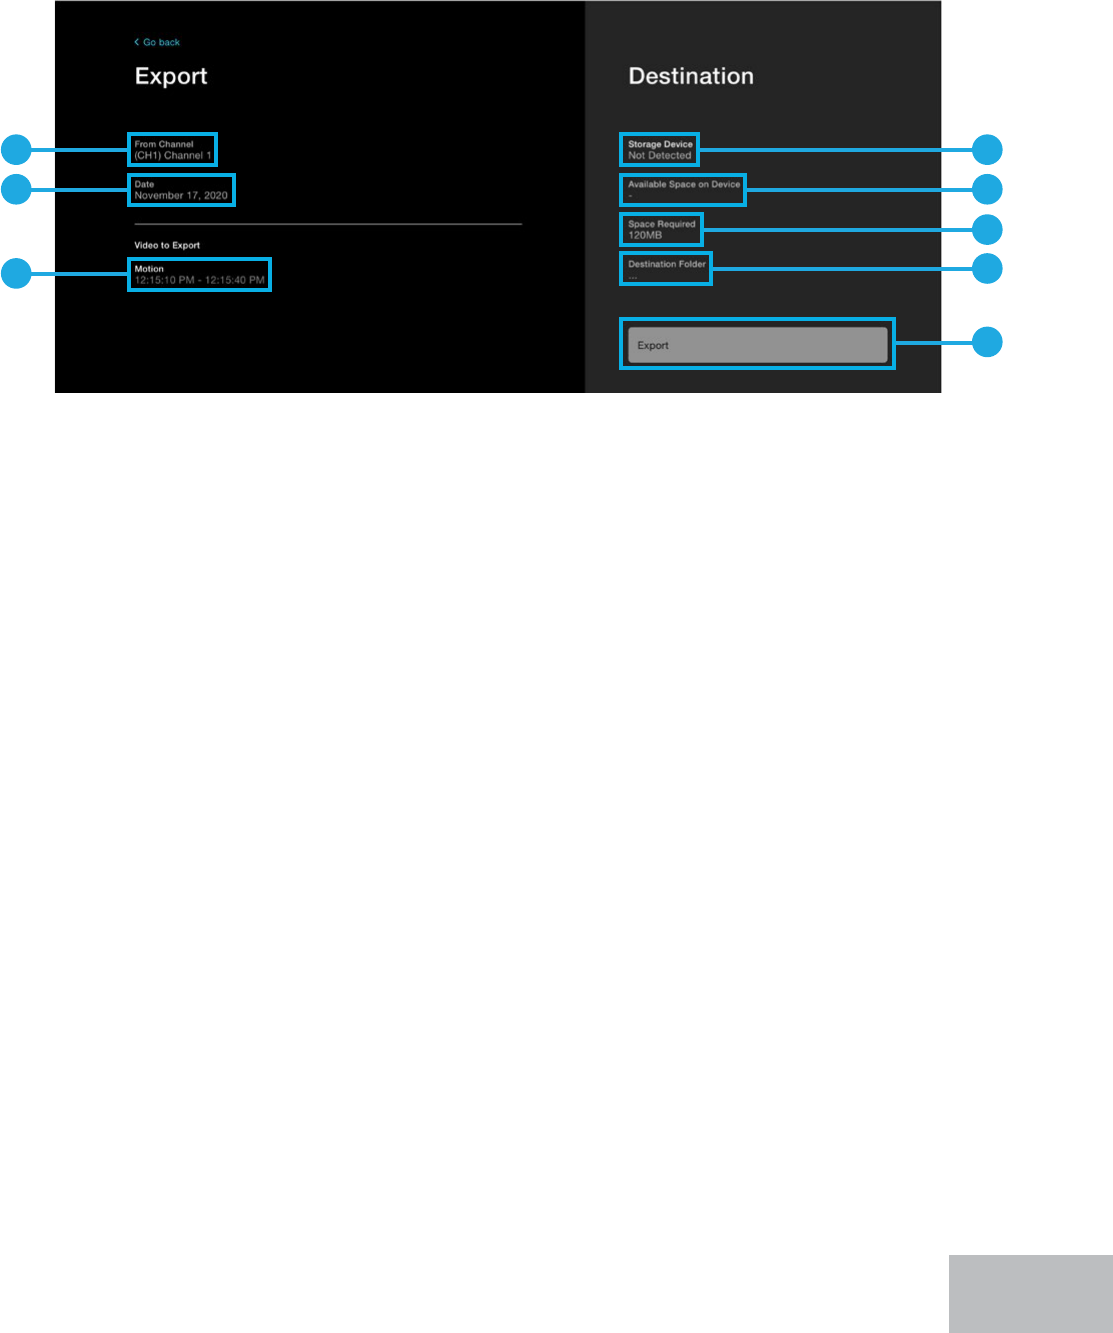
A. From Channel: What channel the recording has been captured from.
B. Date: Shows the date of the recording.
C. Event Information: Shows the type of event (Motion, Human Detection, Facial Capture
or Vehicle) as well as the start and end time of the event.
D. Storage Device: Will display the name of the external storage device connected. If
there is no device connected, it will display “Not detected.”
E. Available Space in Device: Will display the amount of available space on the
connected storage device.
F. Space Required: Shows the size of the recording you are exporting, i.e., how much
space you will need on the connected storage device.
G. Destination Folder: Allows you to choose which folder, on the connected storage
device, you want to save the recording to.
H. Export: Will begin exporting the recording. You will see a message appear on-screen
when the recording has been successfully exported.
When you click on “Export Event”, you will be taken to this screen. On the left under
Export, you will see information regarding the event you currently have selected.
On the right under Destination, you will see information regarding where you are
exporting/storing the recording.
35
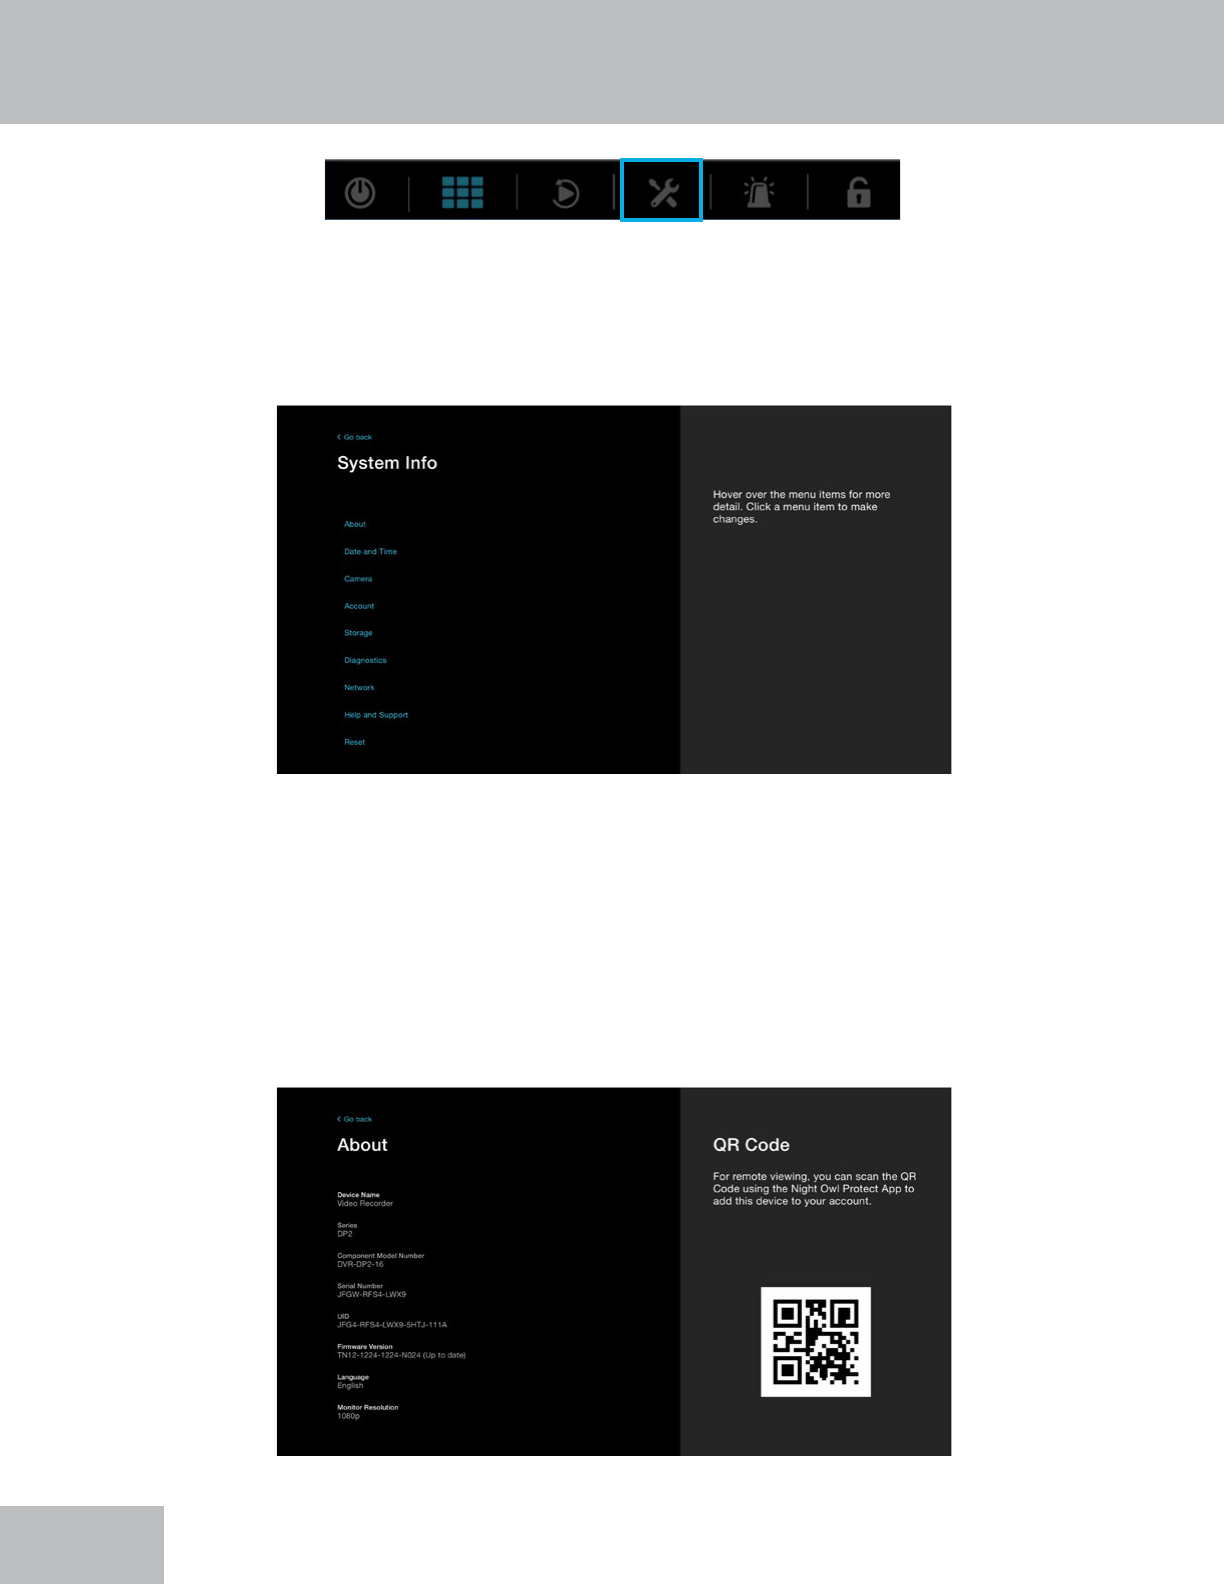
Clicking the System Info icon takes you to this screen where you can gain more
insight into your system and some of its settings. Hover your mouse over the menu
items to the left to learn more about that option and left-click one to proceed to
that menu. Clicking “Go back” will return you to the live view screen.
About Menu
The About menu will provide general information about your new system. From
this screen you can manually upgrade your rmware (if not connected to the
Internet), change the language of your system, adjust the resolution or even add
the recorder to the Night Owl Protect App, if you are ready to start remotely viewing
your system from a smartphone or tablet. Your system’s Series, Component Model
Number, Serial Number and UID are all listed for informational purposes.
System Info
36
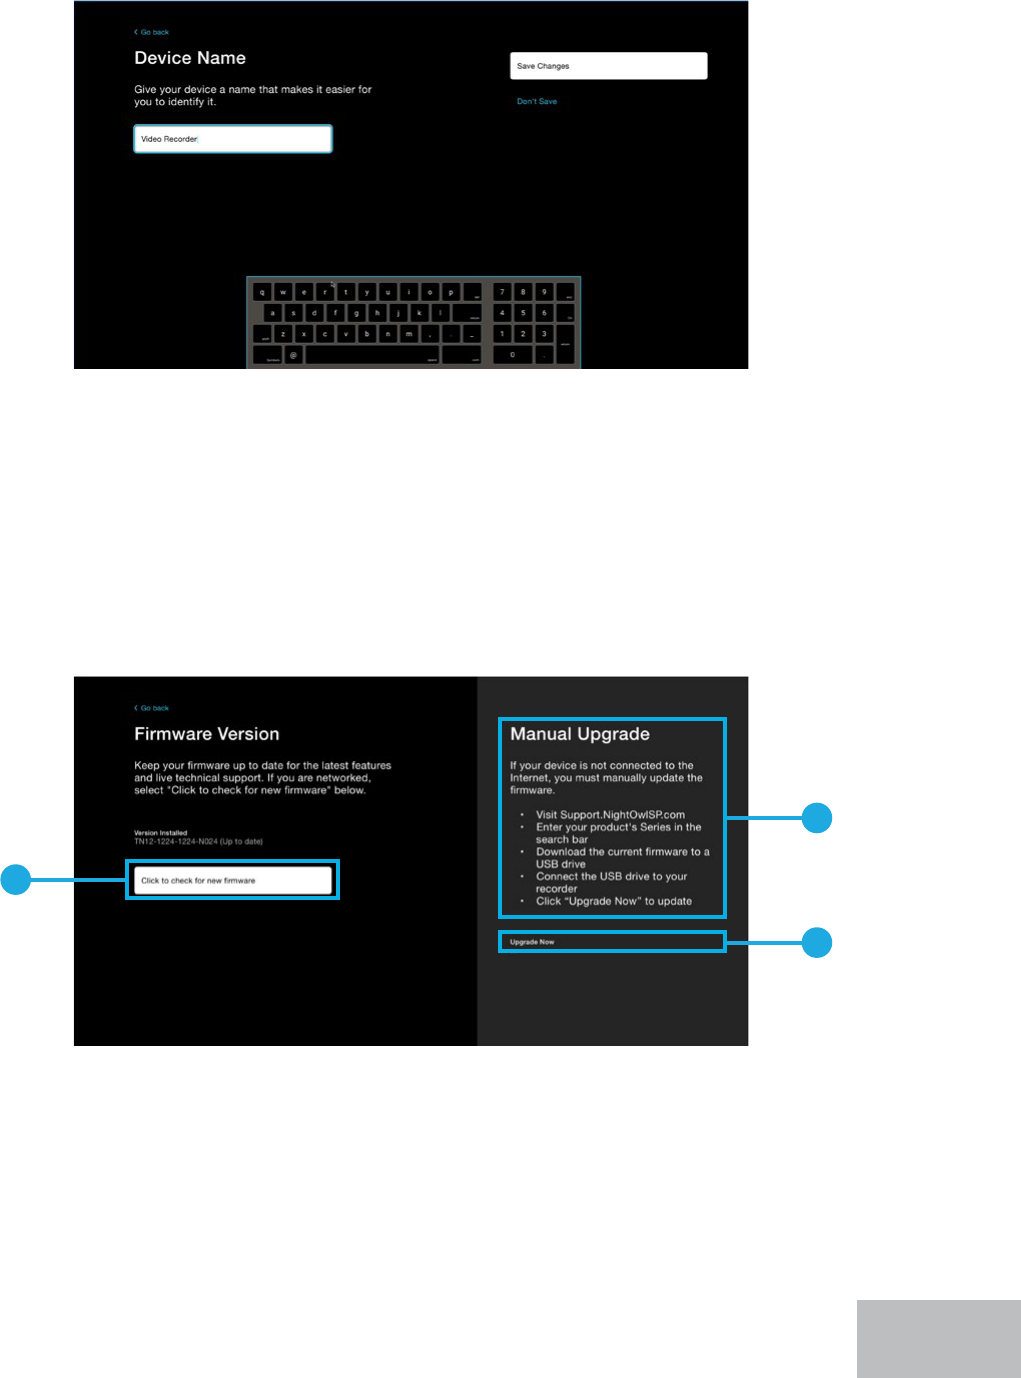
Device Name
Firmware Version
Use this menu to change the name of your recorder. It’s that easy! This may come
in handy if you have more than one security system and want to quickly identify
which is which. Ensure you save your changes.
This screen will allow you to check for new rmware and manually upgrade your
rmware. Manual upgrade is generally only needed if you do not have your
recorder connected to the Internet. It is crucial for the overall health of your system
that you always keep the rmware up to date. Updated rmware is frequently
released to provide your recorder with the latest and greatest features and to
enhance the overall use and function of your system. Additionally, if your rmware
is not current, our technical support team will be unable to provide live support.
A
B
C
A. Click to check for new rmware: The title says it all! Click here to perform a rmware
check. Your recorder MUST be connected to the Internet to perform this check.
B. Manual Upgrade: Read these easy instructions to perform a manual upgrade (no
Internet connection required).
C. Upgrade Now: When you click this, you will see the pop up below. Simply select the
rmware le you added to the USB ash drive (as instructed in the listed steps).
37
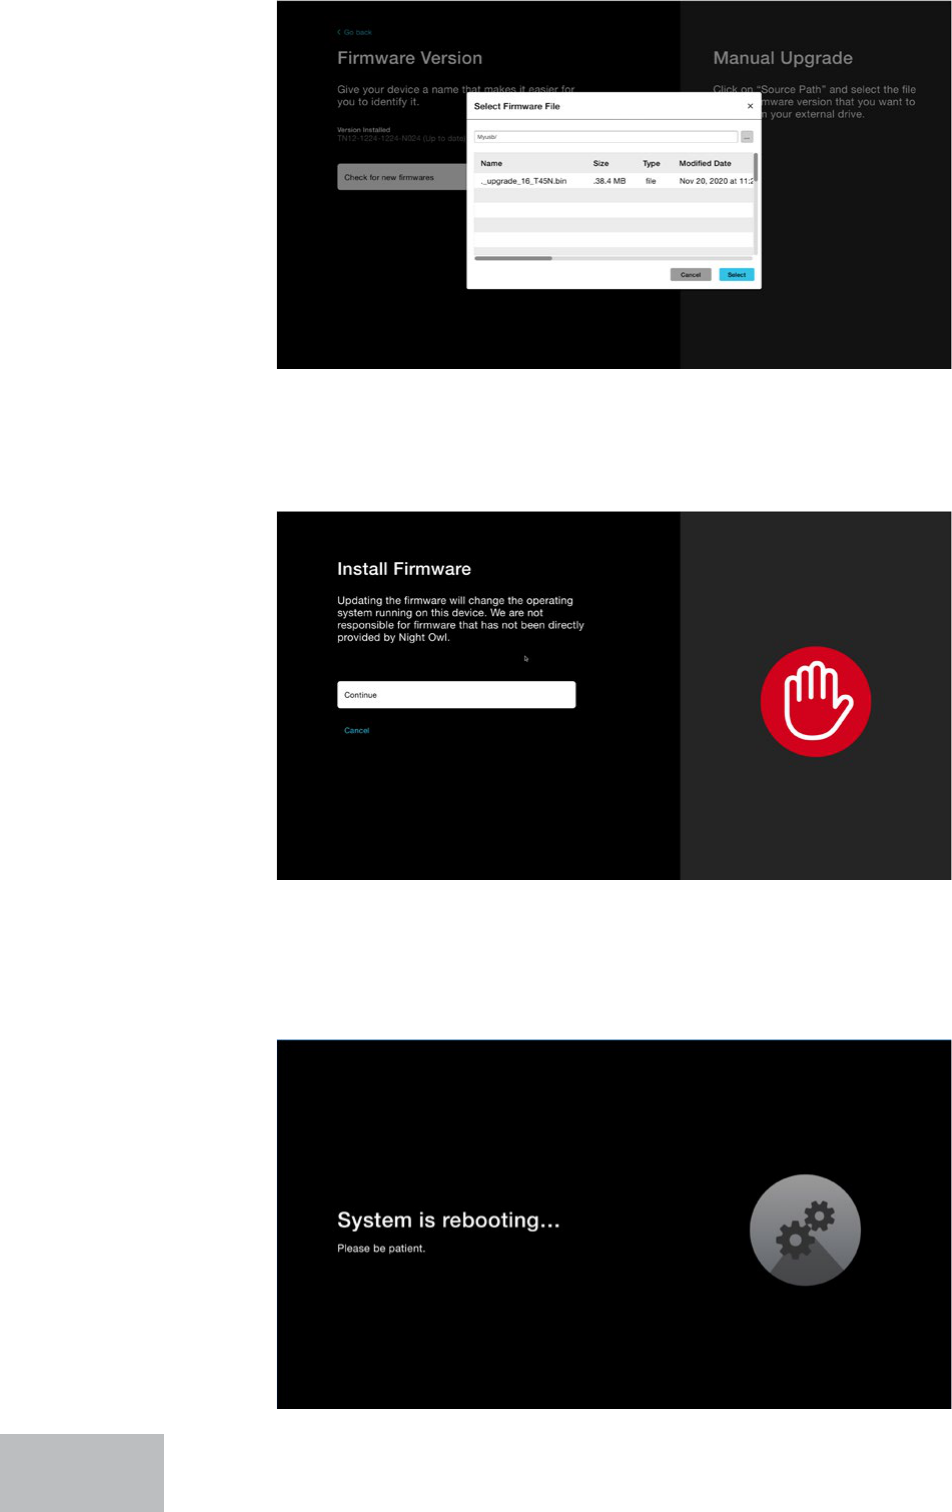
Whether you performed a search and found new rmware available or did a
manual upgrade, click “Continue” to proceed with the rmware update.
Your recorder will now update the rmware and reboot. Do NOT power o or
disconnect anything from your recorder as the rmware is being updated!
38
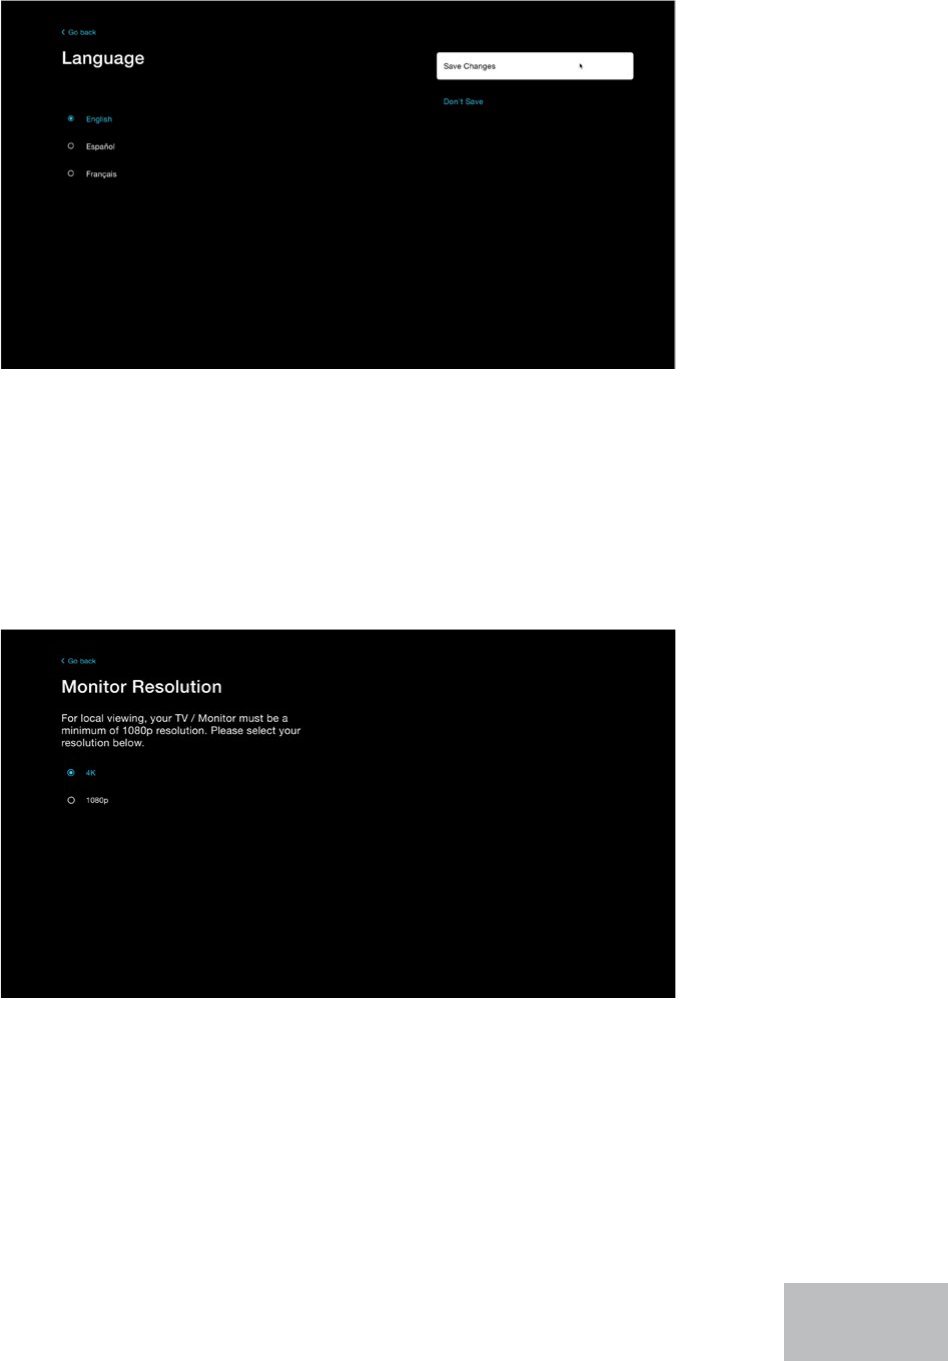
Language
Monitor Resolution
You can choose from English, Spanish or French. Be sure to save your changes
when nished. Your recorder, just like with the rmware update, will reboot to
display the new language.
Your TV or monitor must have a minimum resolution of 1080p. However, you can
switch between 1080p and 2K based on what type of system you have and what
type of monitor you have it connected to. Make sure you save your changes, as
prompted, when nished.
39
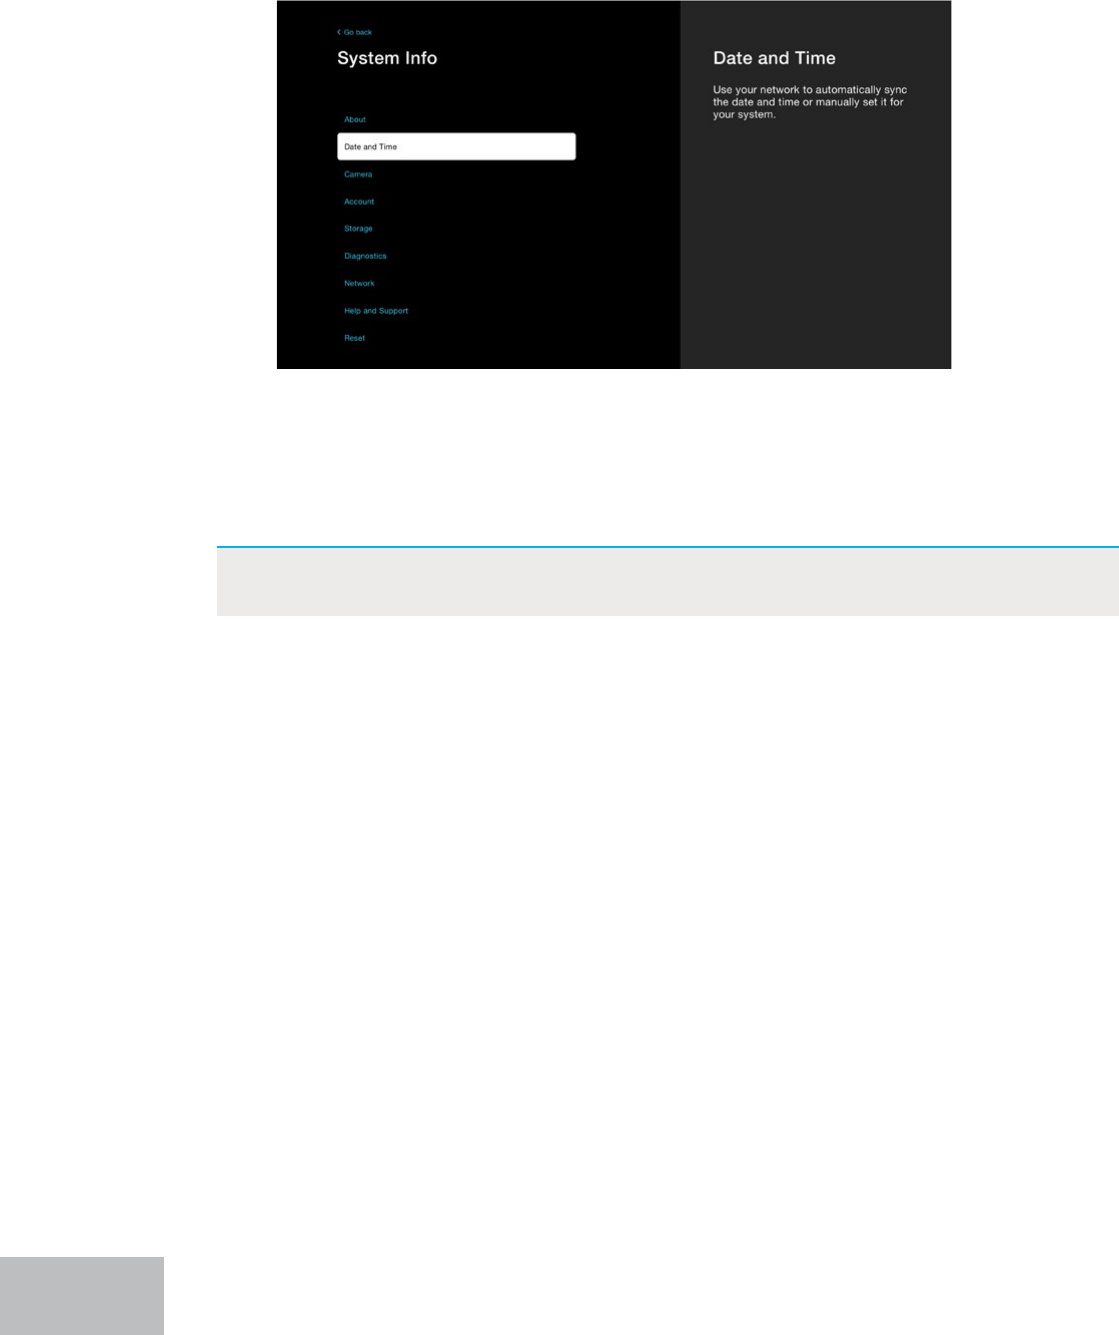
For automatic syncing, your recorder must be connected to your Internet. If you
adjust your settings, ensure you save your changes to have them take eect.
IMPORTANT: Your recordings are date and time stamped, so ensuring the date
and time are current is important.
Date & Time Menu
From this menu you can automatically sync the date and time for your system or
manually set it. Your recordings are date and time stamped, so ensuring the date
and time are current is important.
40
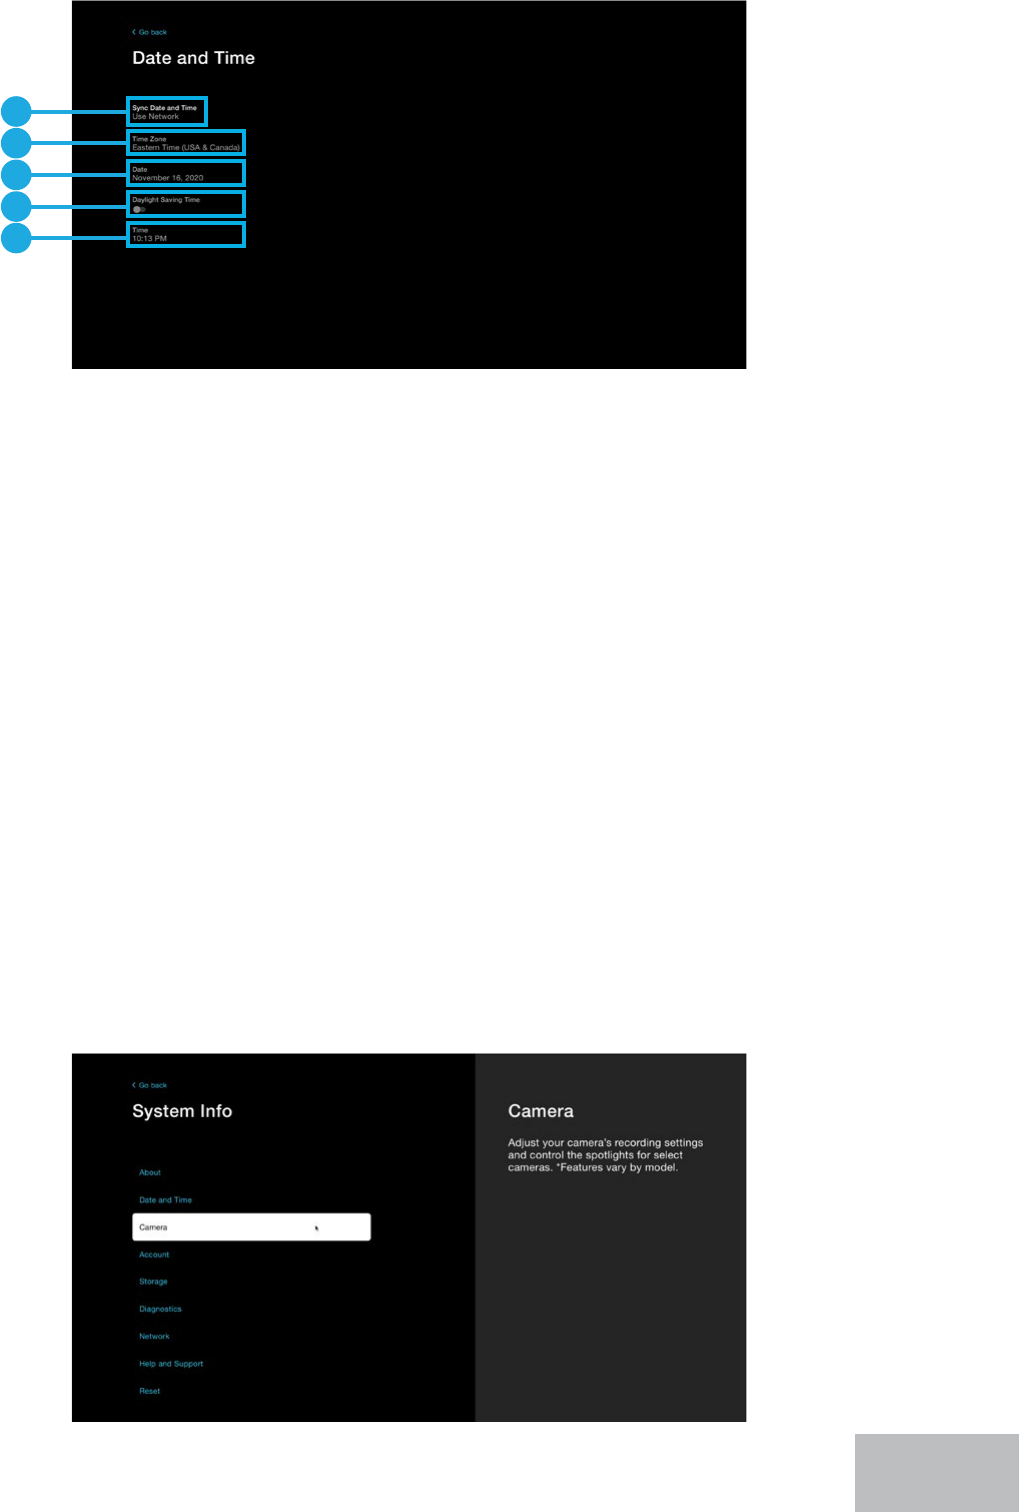
A. Sync Date and Time: You can click here to change the setting to “Use Network”
or “O”. When set to “Use Network” (Preferred Method) the date and time will
automatically adjust to the current date and time based upon your device’s IP address.
This requires an Internet connection. When set to “O” you can manually set the date
and time for your system (no Internet required).
B. Time Zone: When Sync Date and Time is set to “O” you can use this option to
manually set the time zone for your recorder.
C. Date: Lets you manually set the date for your recorder when Sync Date and Time is set
to “O.”
D. Daylight Savings Time: Lets you enable or disable Daylight Savings Time when Sync
Date and Time is set to “O.”
E. Time: Manually set the time for your recorder when Sync Date and Time eld is set to
“O.”
A
B
C
D
E
Camera Menu
Here you can adjust how and when the cameras record, as well as additional
settings such as the spotlights and sound settings. Not all features are applicable to
all models.
41
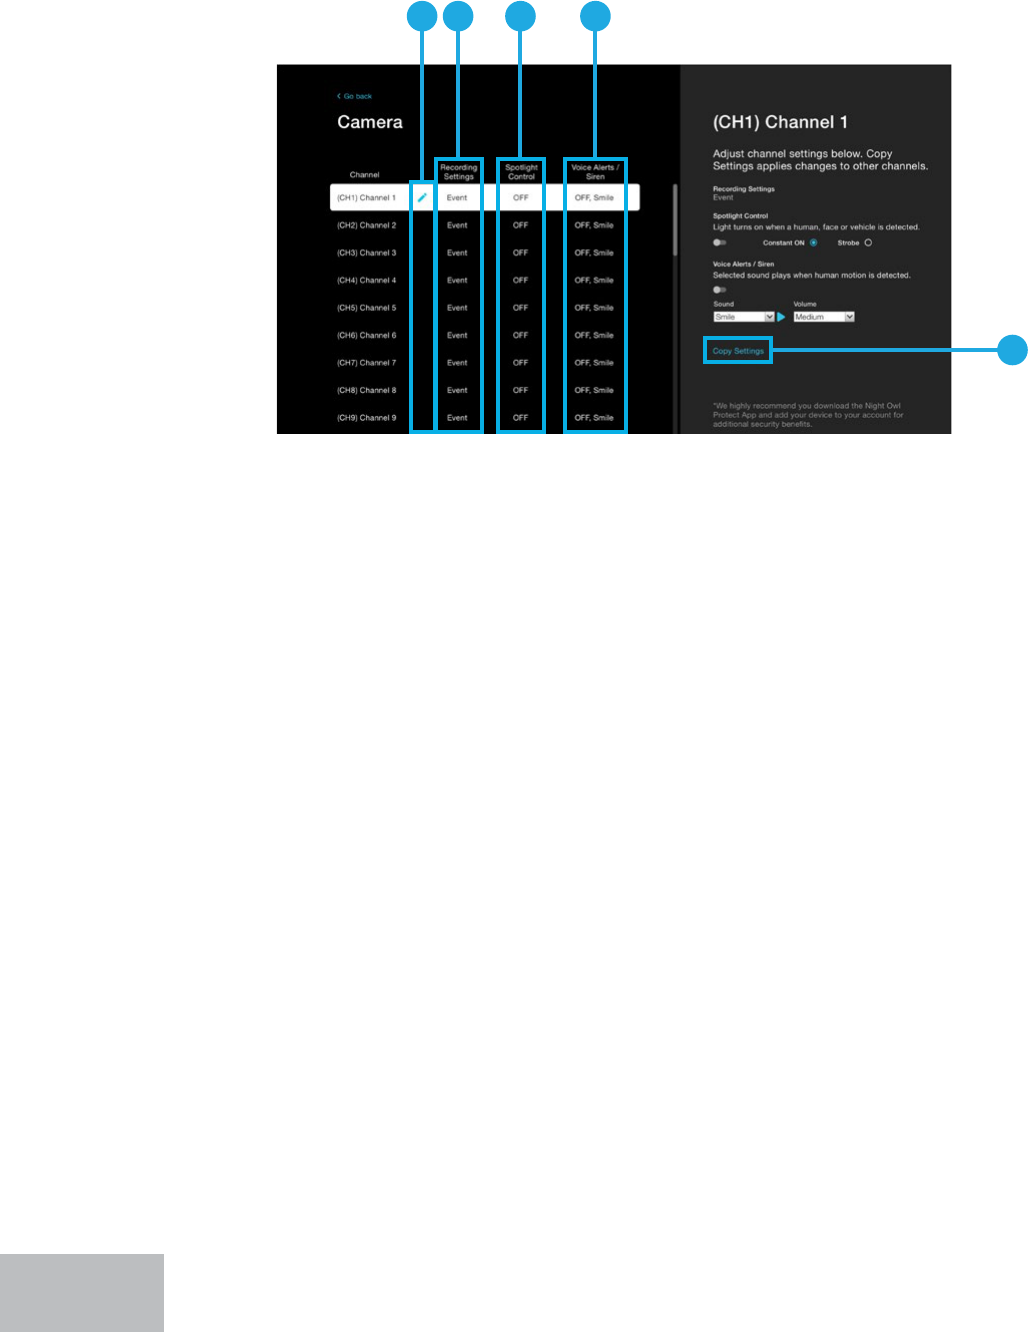
You can change the recording settings of a channel, adjust the spotlight settings (if
supported), update voice alerts and siren (if supported) and copy the changes made
to other channels. To change the settings of a channel, click the channel from the
left that you want adjusted and then its settings will appear on the right. From the
right-side menu, you can change the settings for that channel.
A. Pencil Icon: Lets you change the channel name to more easily identify the camera
connected to it. For instance, if this channel has a camera in your driveway, you could
rename it “Driveway Cam.”
B. Recording Settings: Adjust the recording settings of the selected channel.
C. Spotlight Control: Enable the spotlight to turn on when human, face or vehicular
motion is detected and choose whether the light is constant or strobing. *Only applies
to select models.
D. Voice Alerts / Siren: Adjust the sound type and volume for your voice alerts and siren.
*Only applies to select models.
E. Copy Settings: Lets you easily take the settings from the currently selected channel
and copy them over to another channel.
B C DA
E
42
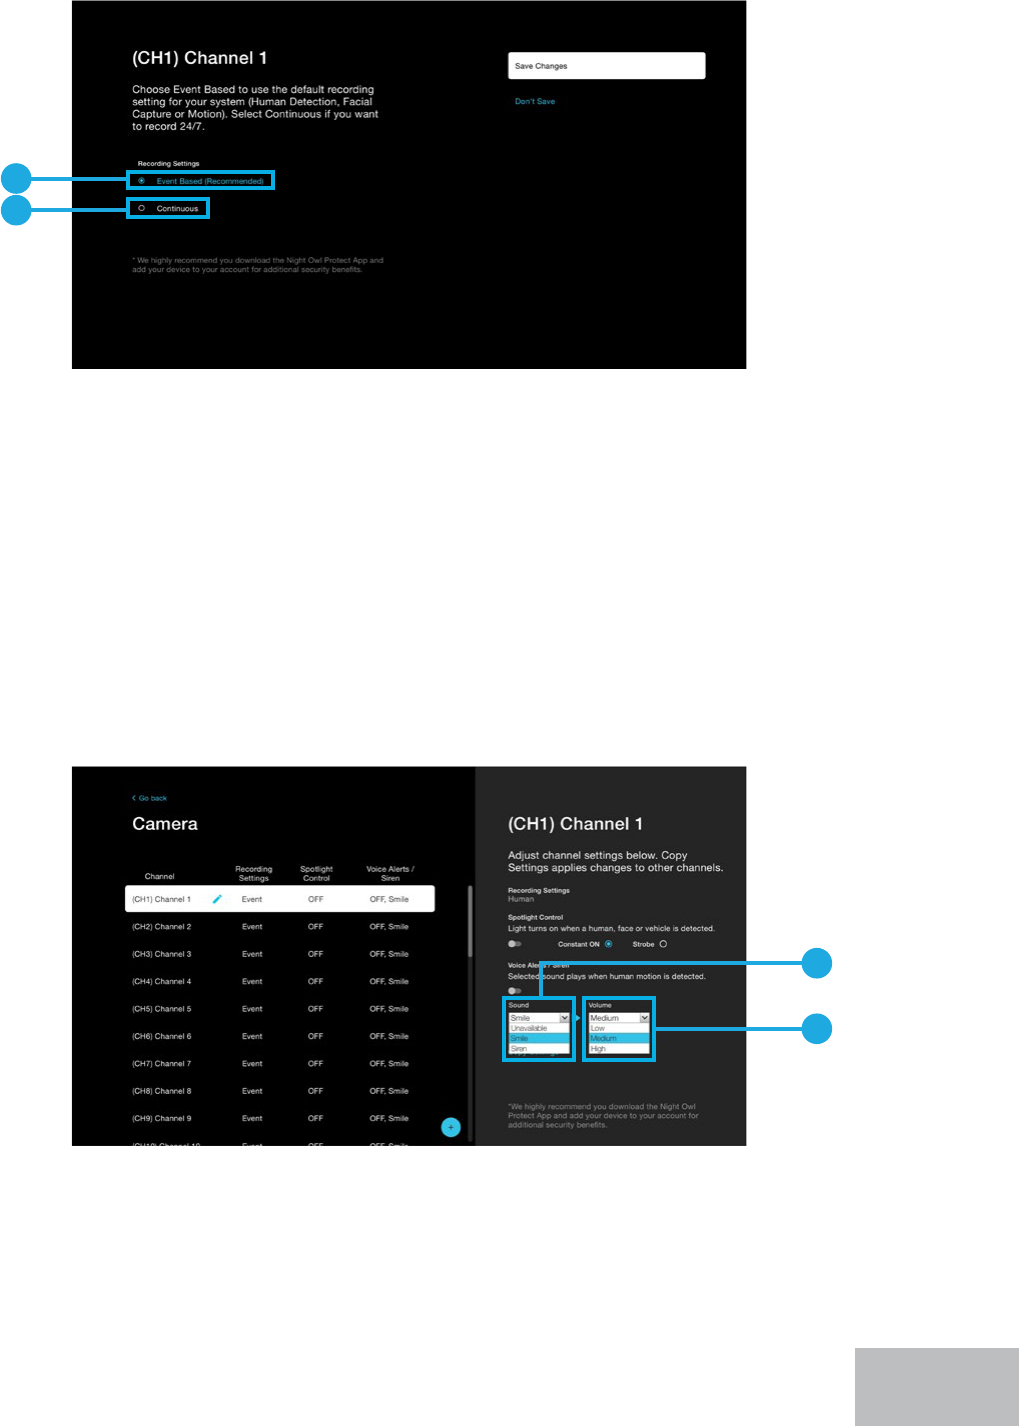
A. Event Based: Means the selected channel will record when human detection, facial
capture, vehicle detection or standard motion detection occurs. *Select features do
not apply to all models.
B. Continuous: Allows you to switch that channel to record 24/7. Please keep in mind,
recording continuously will eat through your available hard drive space at a much
faster rate.
A. Sound: Choose between (2) voice alerts or a siren. “Unavailable” is a preset voice alert
which can be used to tell someone near the selected camera you are not currently
available. “Smile” is a preset voice alert used to tell someone to smile, they are being
recorded. “Siren” will emit a loud siren from the camera to startle trespassers.
B. Volume: Choose the volume level for the selected preset voice alert or siren.
Voice Alerts / Siren
When enabled, you can easily adjust the type of message and volume. Again, this
feature may not be available for all models. Ensure you save your changes.
Recording Settings
When you click on “Recording Settings” from the right-side of the menu, you will be
taken to this screen. Ensure you save your changes.
A
B
A
B
43
B
A
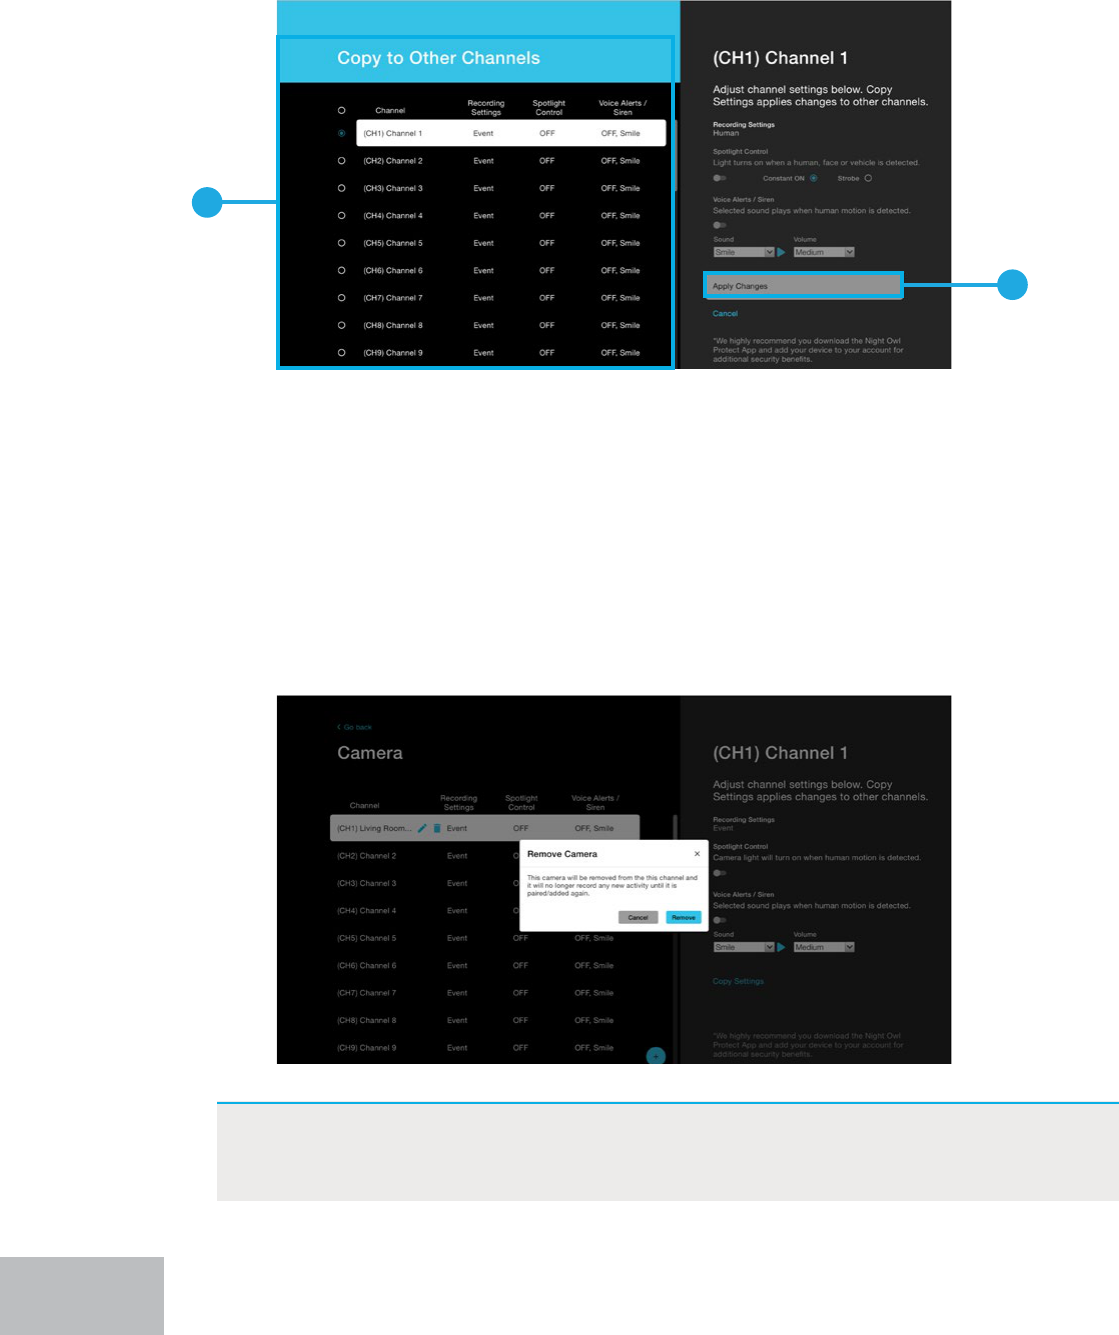
A. Copy to Other Channels: Select the other channel(s) you want to copy the settings to.
B. Apply Changes: Ensure you save your changes, so they take eect.
Copy Settings
Remove Camera Option
When you click on “Copy Settings” from the right-side of the Camera menu, you can
easily take the settings from the current channel and copy them to another. Ensure
you save your changes.
You can remove one of your paired Wi-Fi devices from the Camera menu. All you
need to do is click on the trash can icon on the left-side of the Camera menu for the
channel containing the Wi-Fi device you want removed.
IMPORTANT: Clicking “Remove” means the device in question will no longer
record any activity. You can re-pair the device to your recorder at a
later time to begin recording again.
44
Account Menu
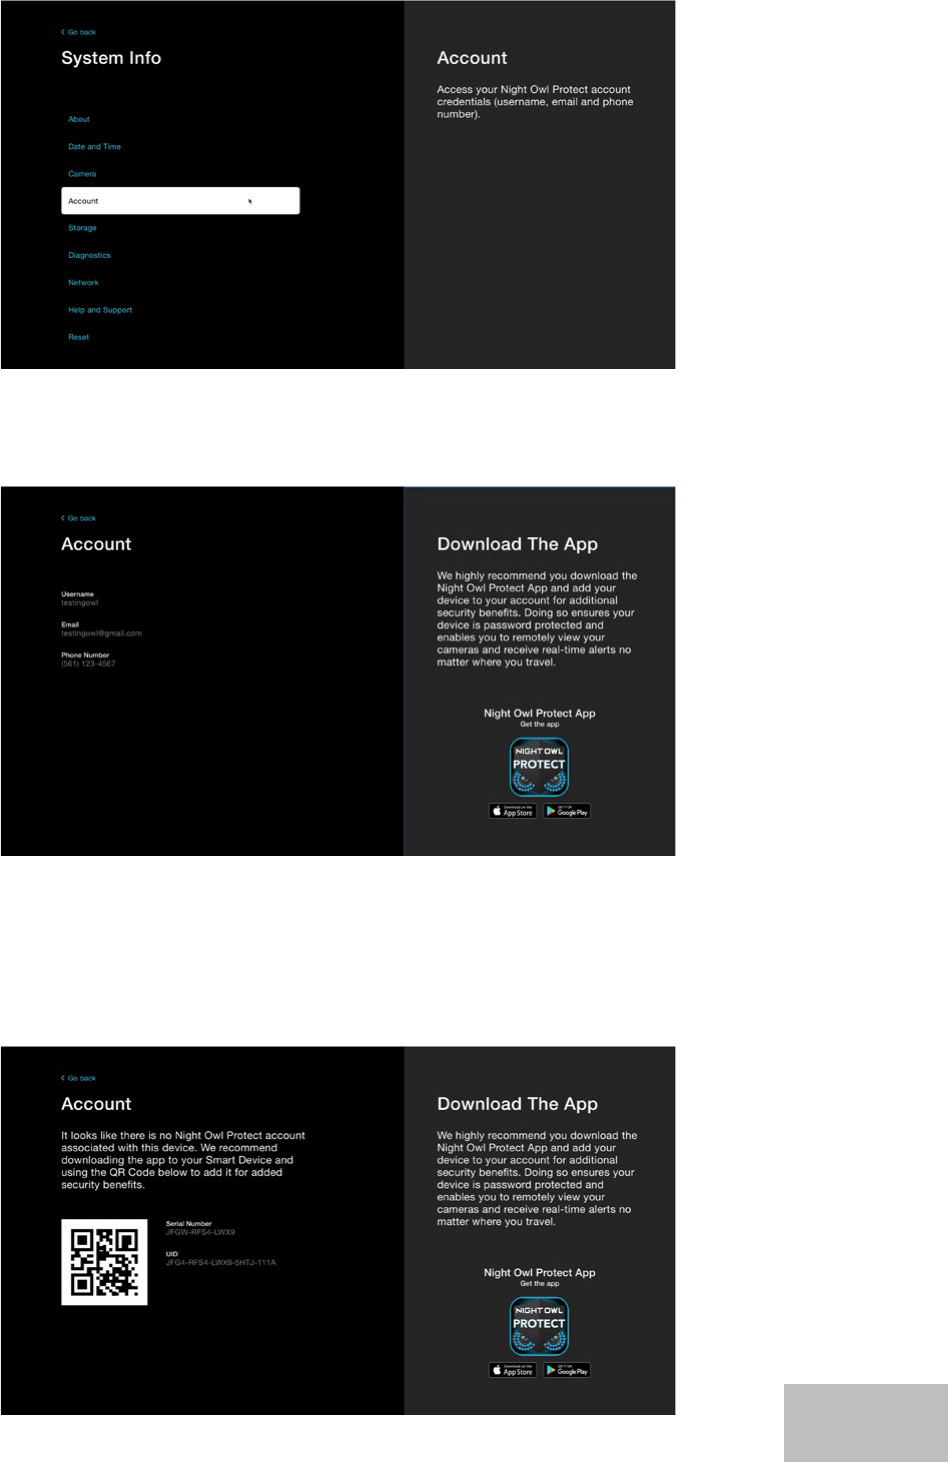
This menu provides access to your Night Owl Protect Account credentials.
If you have downloaded and congured the Night Owl Protect App, you will see the
screen below with the username, email and phone number linked to your account.
If you have not downloaded and congured the Night Owl Protect App, you will
see the screen below. We STRONGLY RECOMMEND you do so for added security
benets (like password protection) and to get the most out of your system such
as remote viewing with real-time alerts, preset voice alerts and siren capability
(select models).
45
Storage Menu
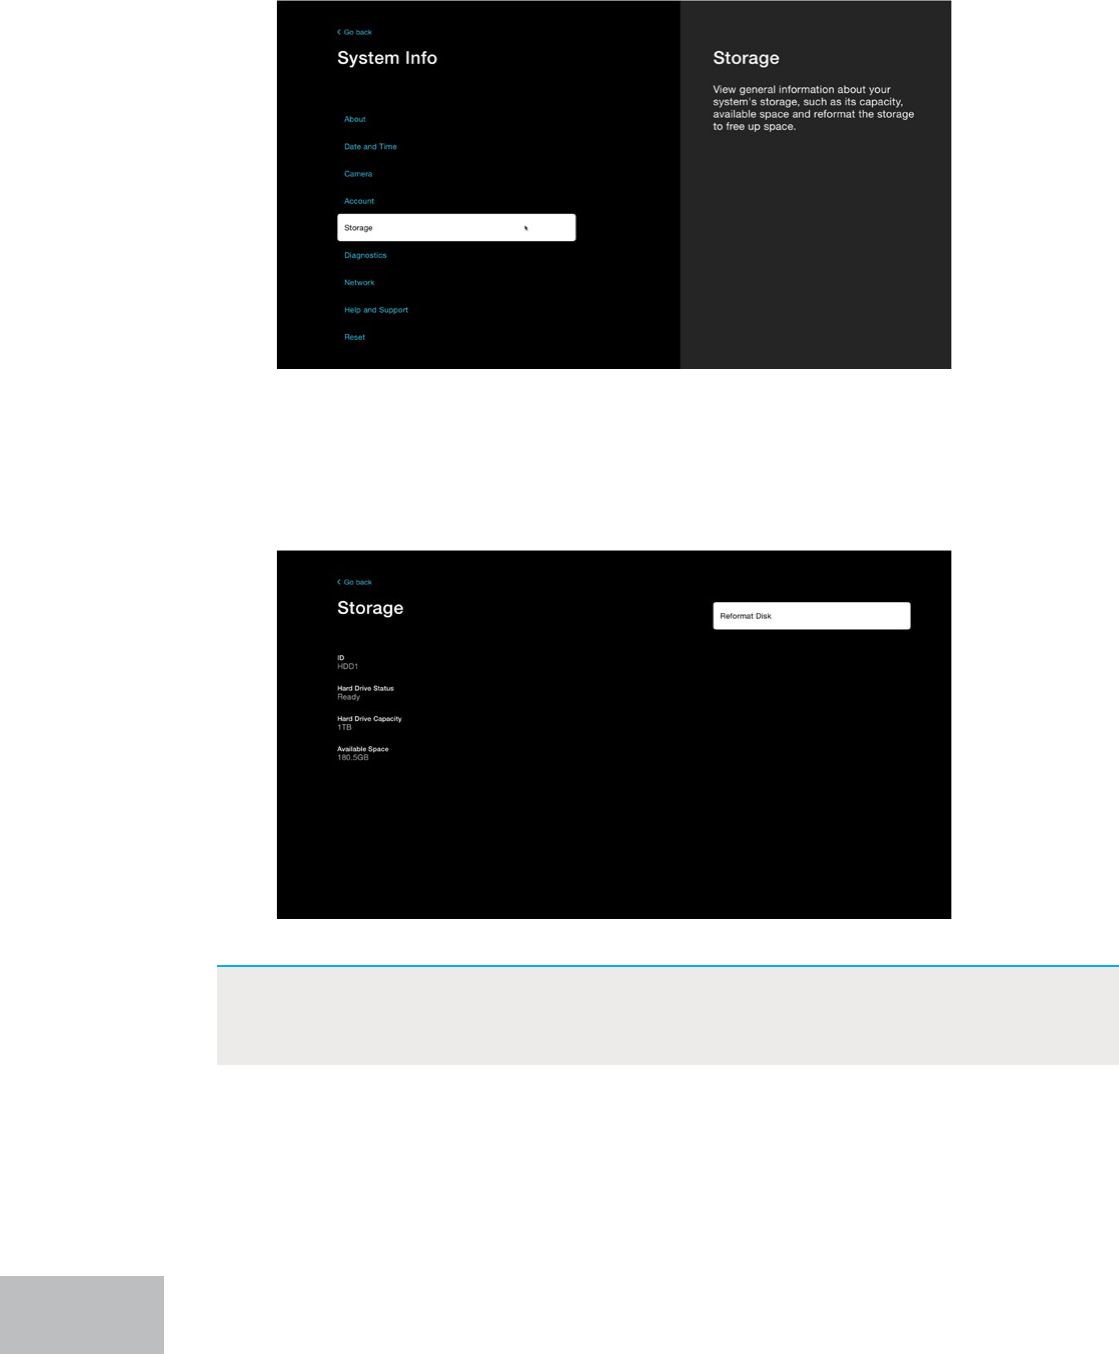
This menu provides information regarding your recorder’s storage, such as capacity
and available space. This is also where you will go if you need to reformat your hard
disk drive (HDD).
Your recorder is set to auto-overwrite by default, meaning older recordings will be
recorded over to make way for new recordings when the hard drive becomes full.
However, if you want to delete recordings (for whatever reason) you will need to
perform a disk reformat.
IMPORTANT: Before reformatting your disk, ensure you have saved / backed-up
all recordings you do not want to lose, as they will be permanently
erased during this process.
46
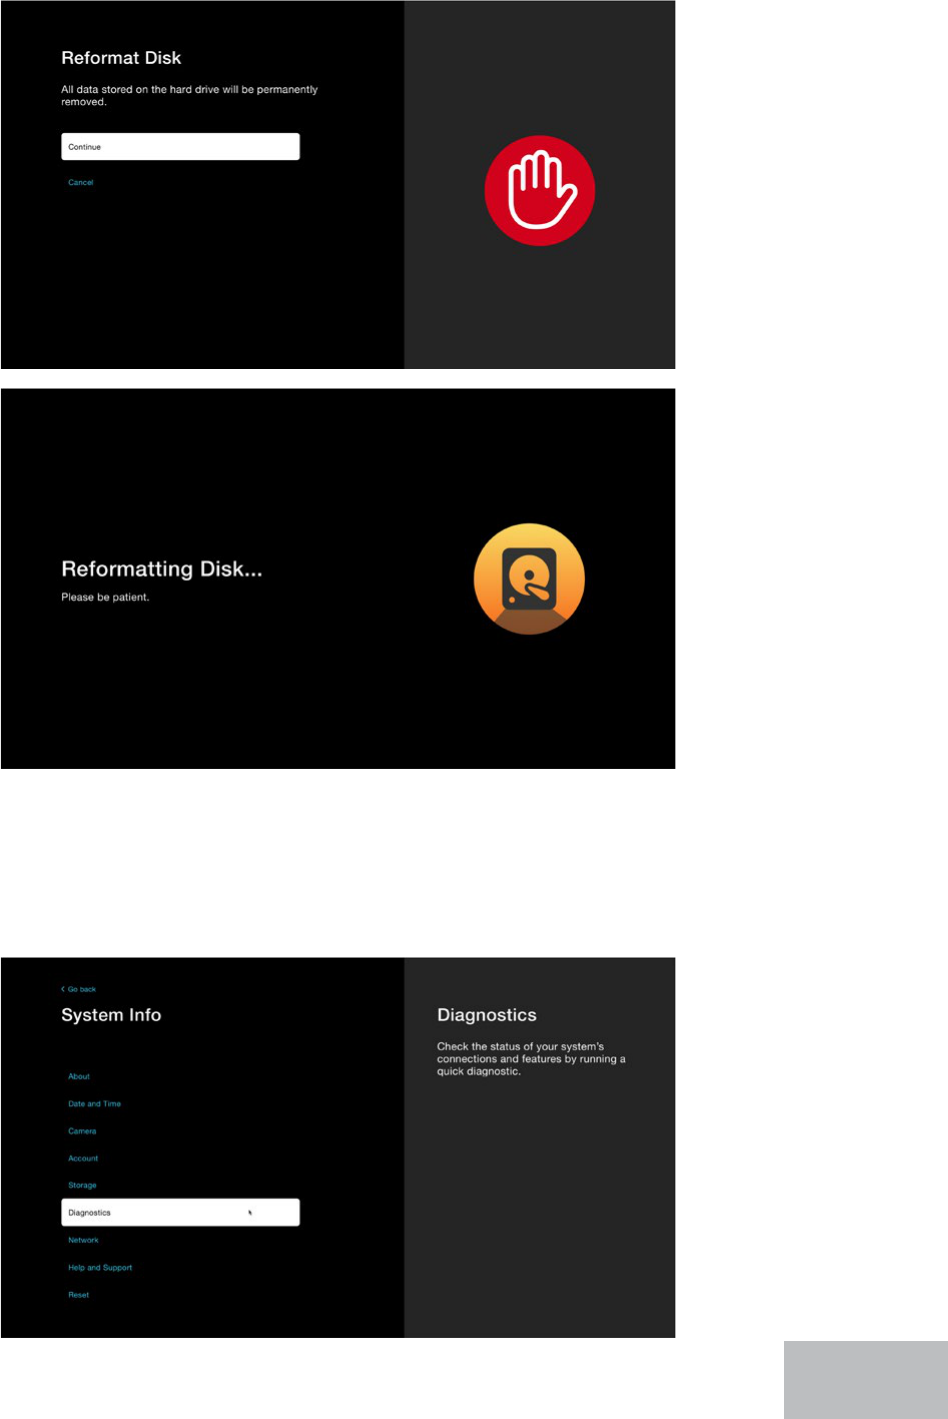
You will be advised that all data will be permanently removed and notied
regarding the status of the reformat. DO NOT disconnect or power down your
recorder during this process.
Diagnostics Menu
Here you can run a device health check and see the status of your connected
cameras and recorder.
47
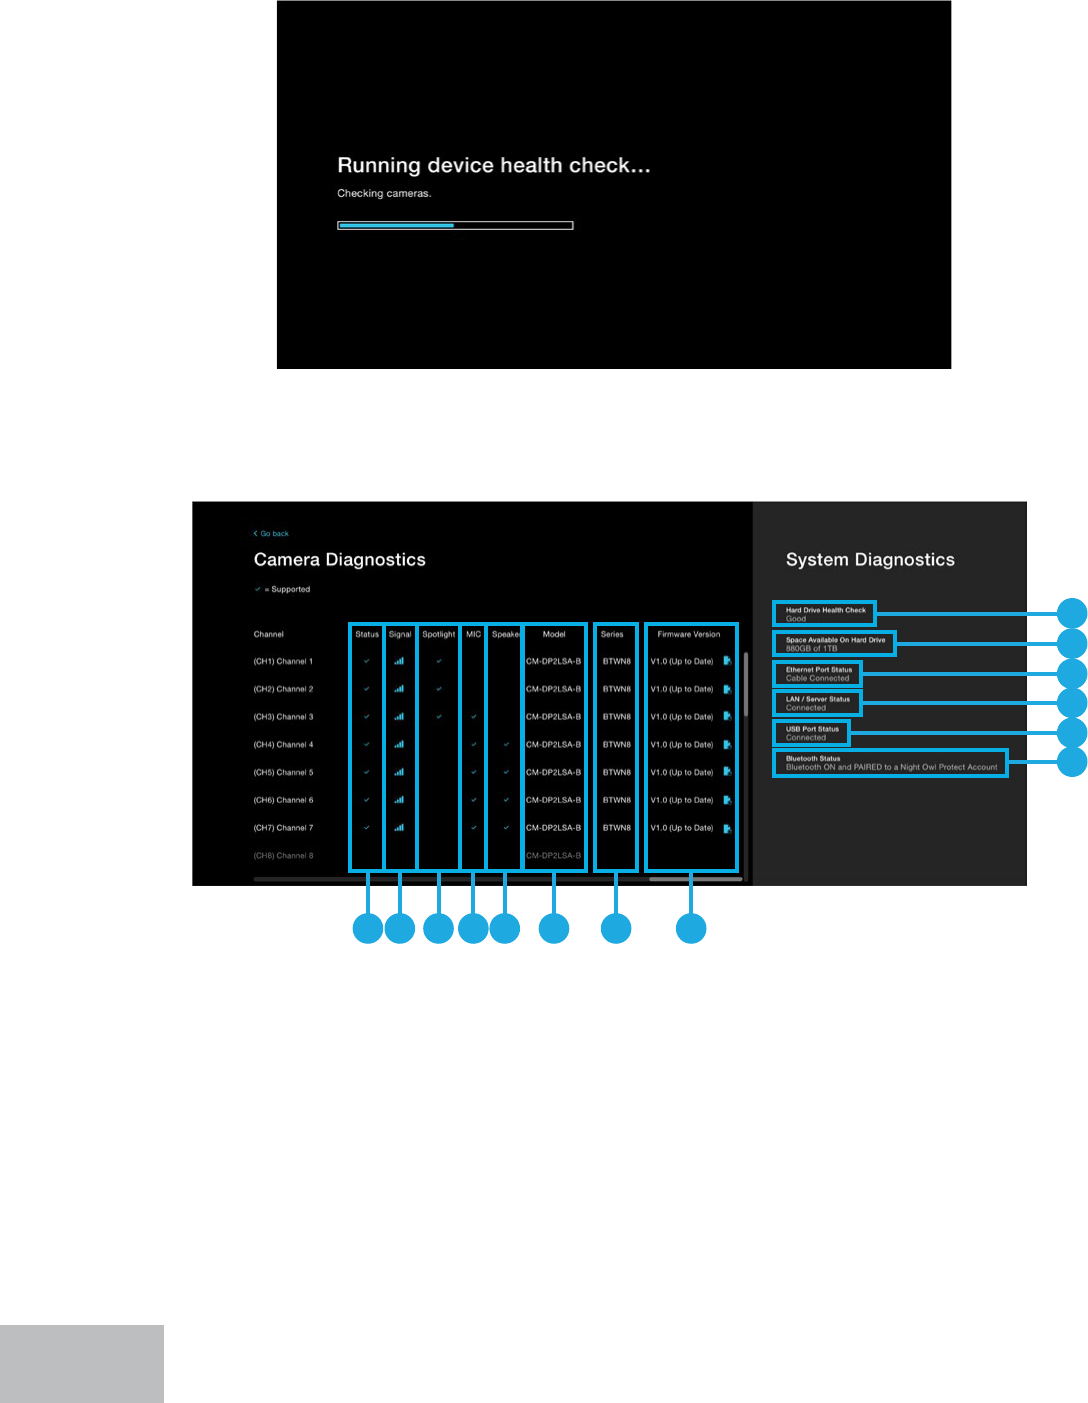
When you click on “Diagnostics” your system will begin running a device health
check. Please be patient while this check is run and DO NOT disconnect
anything for the recorder or your cameras.
When the check is nished, you will see the following screen which shows your
Camera Diagnostics and System Diagnostics.
A
B
C
D
E
F
A B C D E F G H
A. Status: Will display a checkmark if a camera is successfully connected to this channel.
B. Signal: Will display the signal strength of that channel.
C. Spotlight: Will display a checkmark if the camera connected to this channel has a
spotlight.
D. MIC: Will display a checkmark if the camera connected to this channel has a built-in
microphone.
E. Speaker: Will display a checkmark if the camera connected to this channel has a built-
in speaker.
Camera Diagnostics (use scroll bar to see all options)
48

A. Hard Drive Health Check: Will display the status of the hard drive. “Good” means the
hard drive is healthy and “Not Working” means the hard drive is having an issue.
B. Space Available On Hard Drive: Shows you the amount of remaining free space on
your hard drive.
C. Ethernet Port Access: Will display the status of the recorder’s Ethernet (LAN) port.
“Good” means it is healthy and “Not Working” means there may be an issue.
D. LAN / Server Status: Will let you know whether the recorder is currently connected to
the Internet.
E. USB Port Status: Will display the status of the recorder’s USB ports.
F. Bluetooth
®
Status: Will let you know whether the recorder’s Bluetooth
®
is ON or OFF.
System Diagnostics
F. Model: Will show you the model number of the camera connected to this channel.
G. Series: Will show the Series of the connected camera. Series is good to know for
support purposes and compatibility.
H. Firmware Version: Will display the current rmware version of the connected
camera. Click the icon next to the rmware version number to check for an update.
IMPORTANT: If the diagnostic shows “Not Working” and you are within the
warranty period for your product, you may need to contact
technical support for troubleshooting. Please ensure your
recorder’s rmware is up to date before reaching out, otherwise
our agents will not be able to provide live assistance.
IMPORTANT: We STRONGLY RECOMMEND you do not adjust these settings
unless you have advanced networking knowledge.
Network Menu
From this menu you can see and adjust network settings such as your IP address,
Network Type and Gateway. It is recommended you leave these settings as is, as
networking can be complicated and wrong changes can impact the performance of
your system.
49
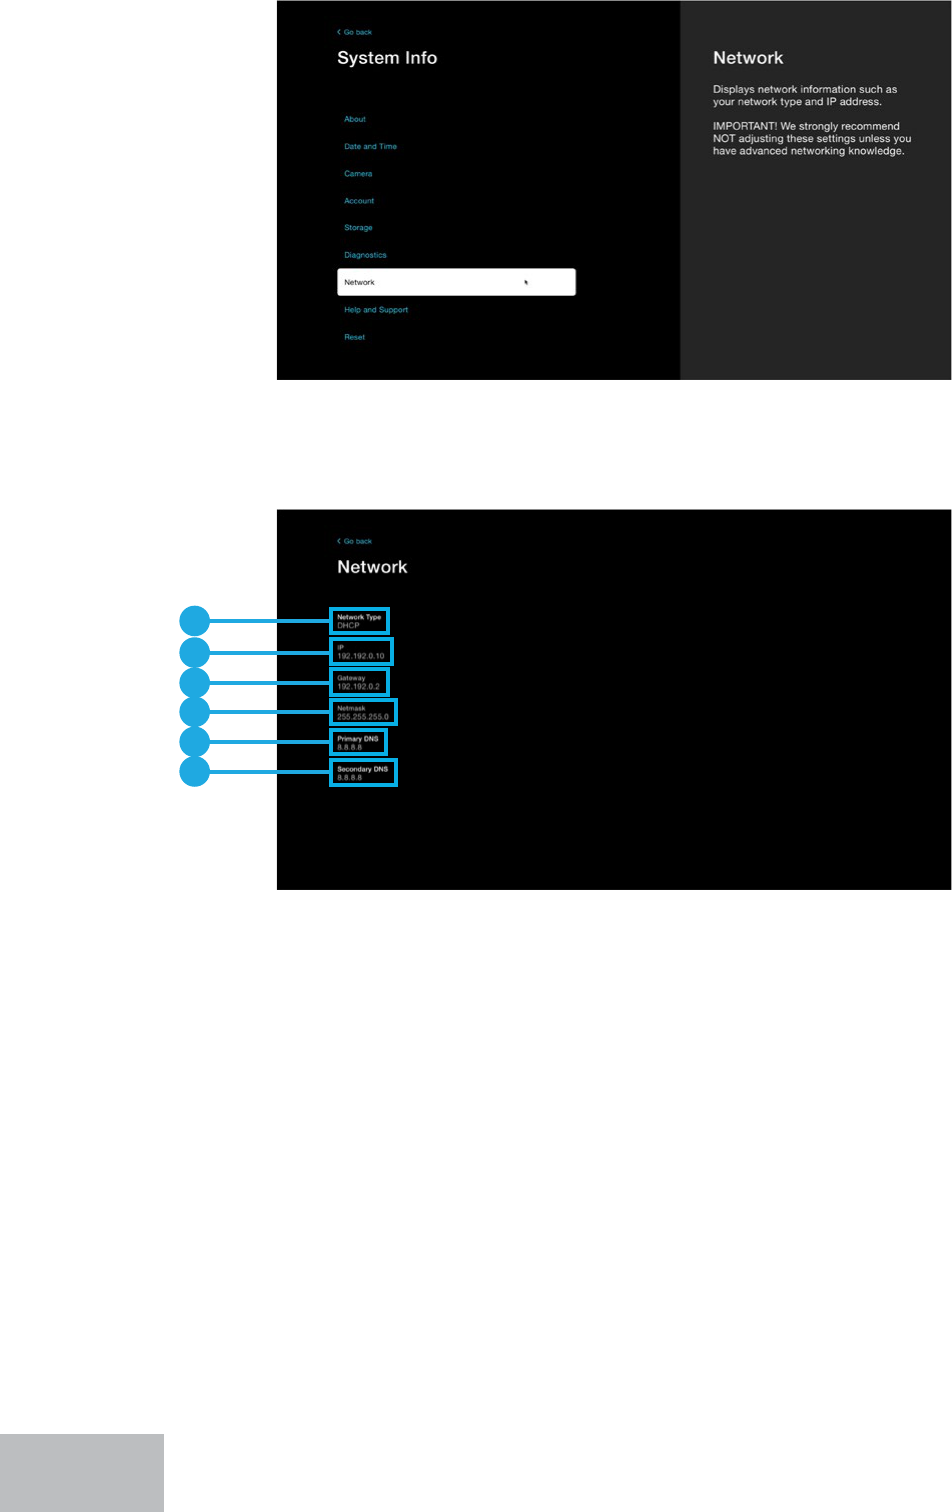
Below is a list of settings that can be changed. Again, we do not recommend
adjusting these settings unless you have advanced networking knowledge.
A. Network Type: DHCP (Dynamic Host Conguration Protocol) is the default setting, but
Static is an option.
B. IP: Change the IP address for your device.
C. Gateway: Change the Gateway for your device.
D. Netmask: Change the Netmask for your device.
E. Primary DNS: Change the Primary DNS (Domain Name System) for your device.
F. Secondary DNS: Change the Secondary DNS (Domain Name System) for your device.
A
B
C
D
E
F
50
Help and Support Menu
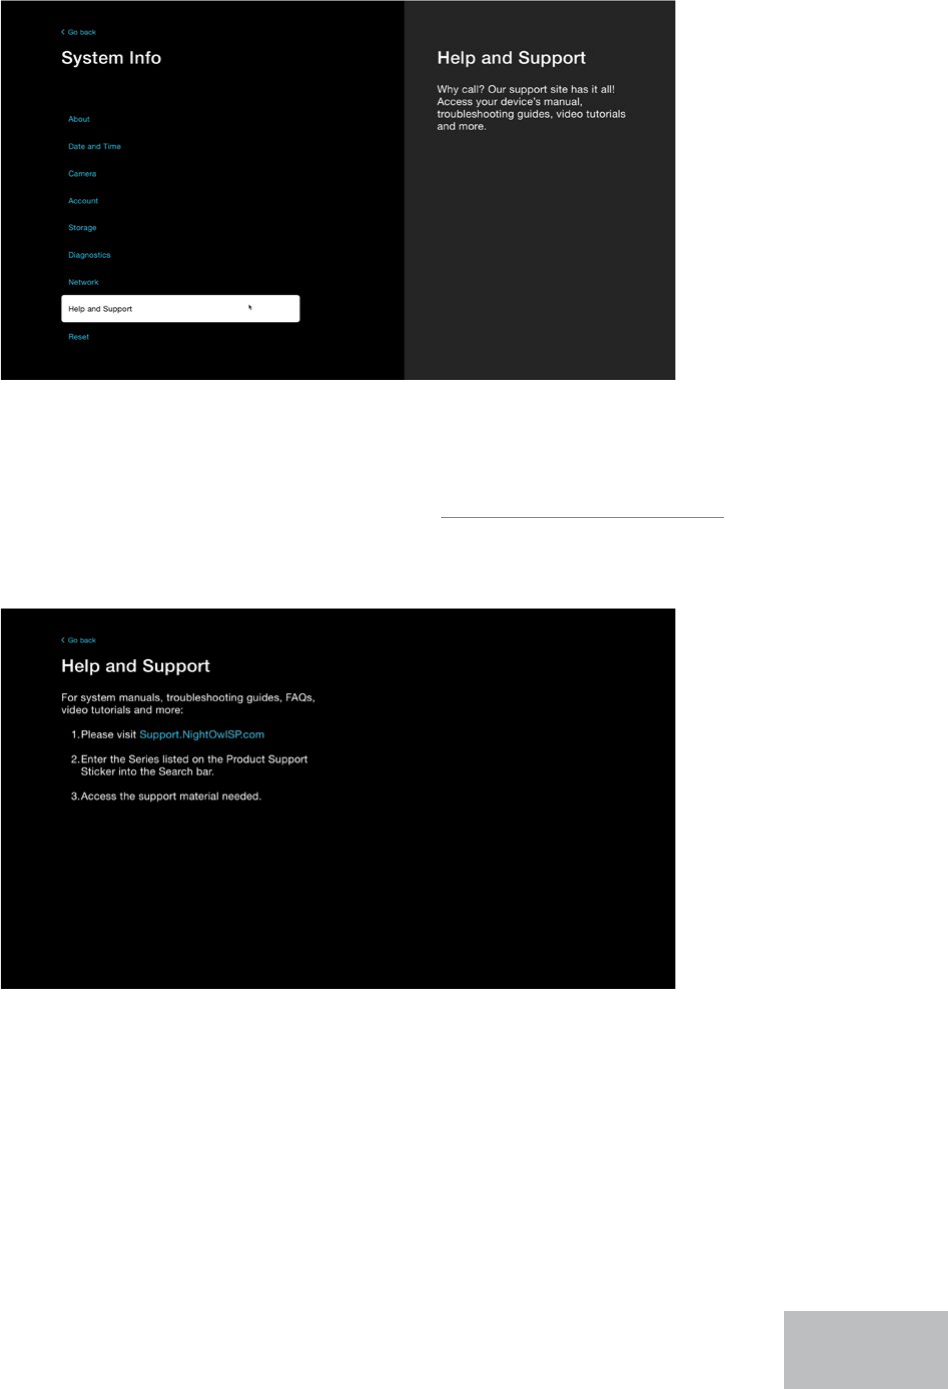
If you need more help with your system, don’t worry, we’ve got your covered.
For a wide range of troubleshooting material such as your product manual, FAQ’s,
how-to video tutorials and more, simply visit Support.NightOwlSP.com and enter
the Series listed on the top of your recorder.
51
Reset Menu
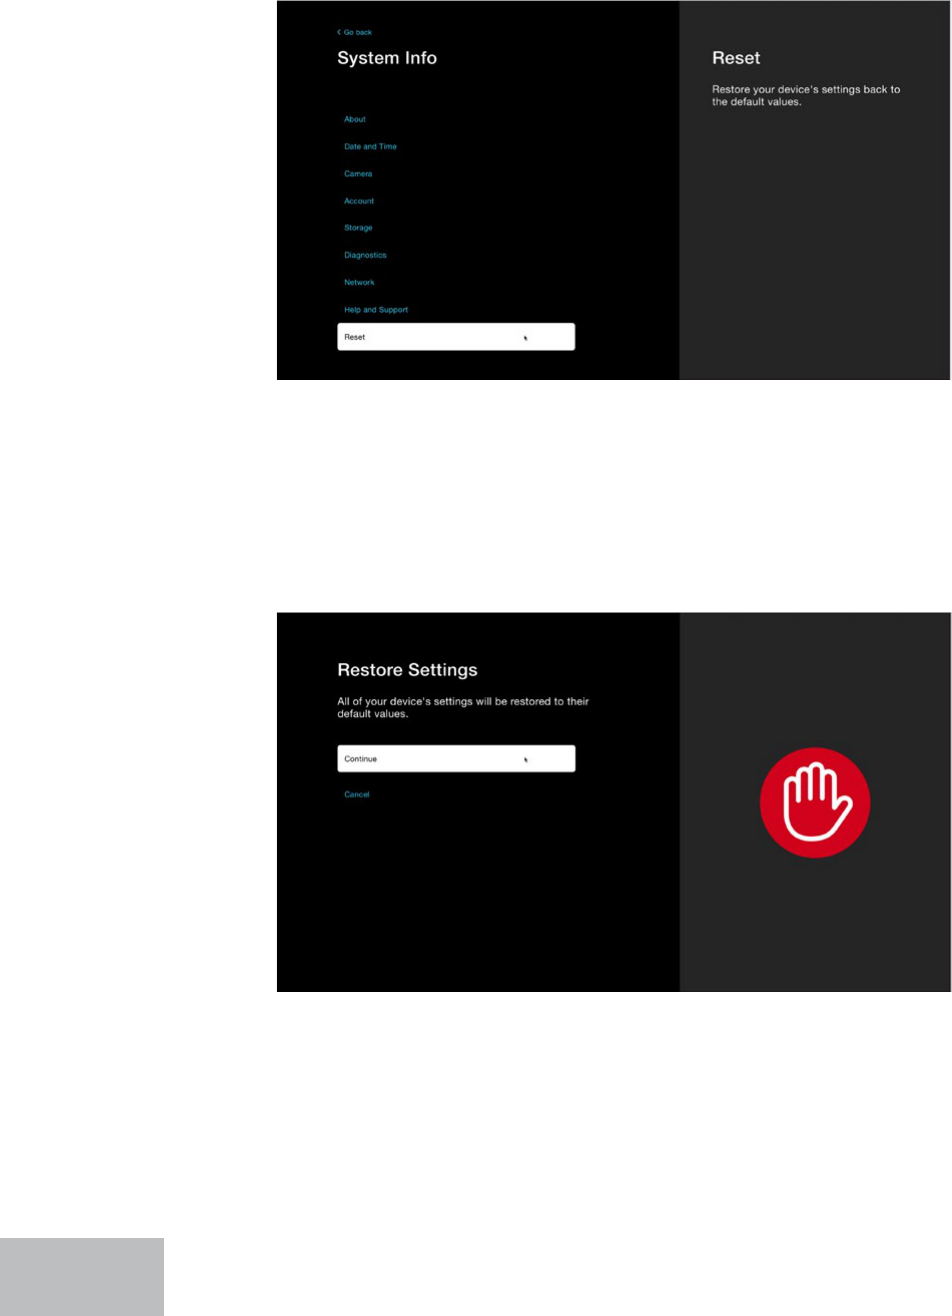
From this menu, you can restore the system’s settings to their default value or
perform a factory reset. Both options will permanently delete your recordings, so
please export any recordings you want saved before continuing.
Restoring your settings means the recorder will restore its default settings /
values. Any adjustments you have made to the settings will be reversed and all
recordings will be permanently deleted. Simply click “Continue.”
52
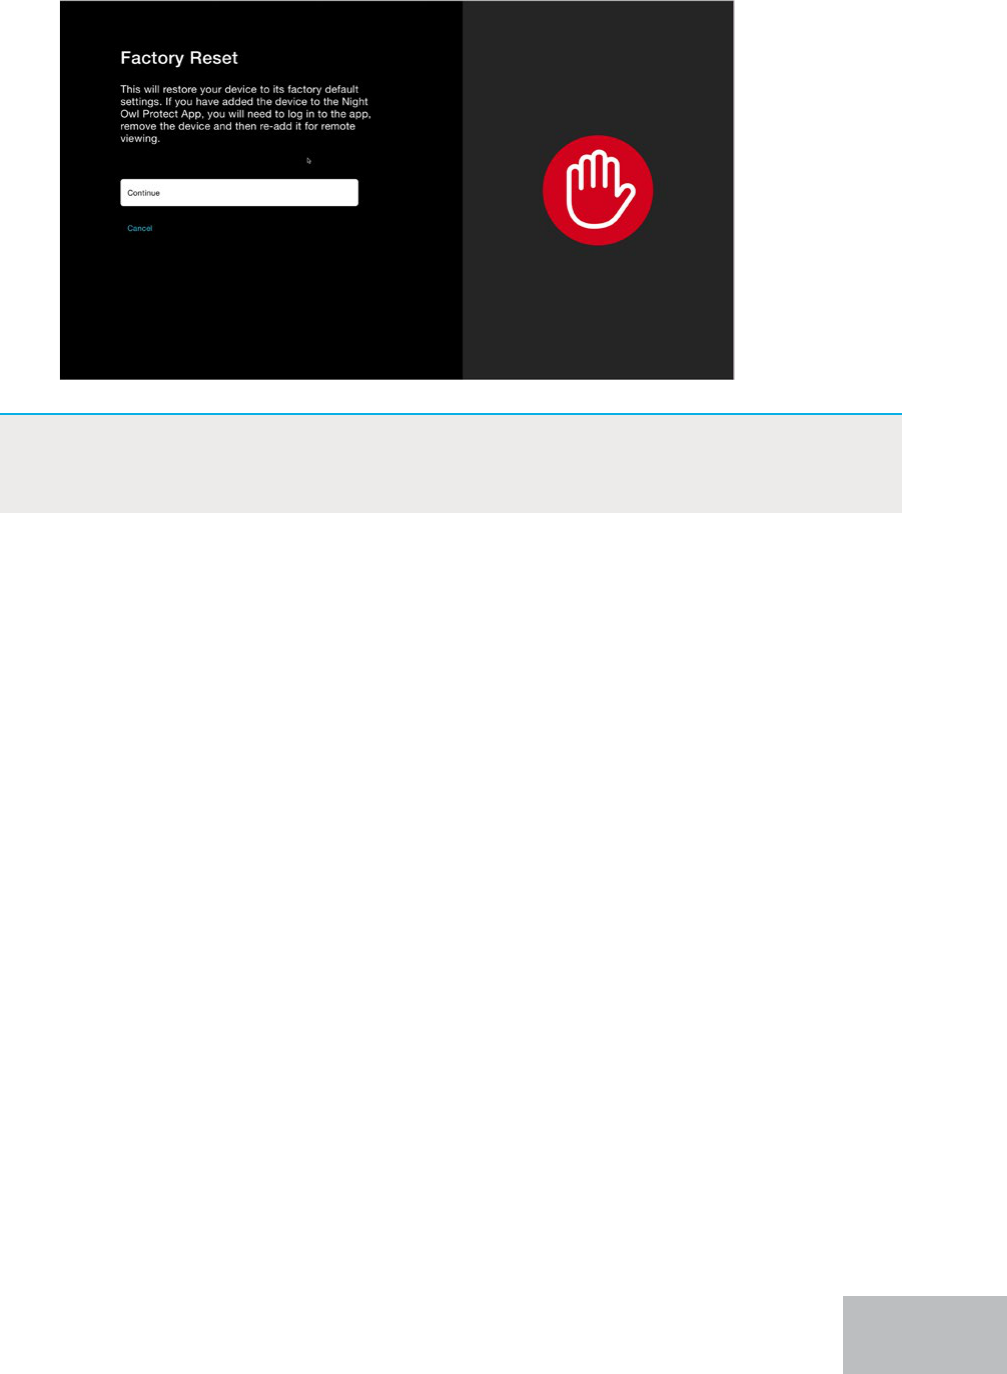
A Factory Reset will return the recorder to its default settings and remove the
Night Owl Protect App, if you have congured the recorder with your Night Owl
Protect Account. Simply click “Continue.”
IMPORTANT: If you perform a Factory Reset, you will need to log in to the Night
Owl Protect App, remove the recorder and then re-add the recorder
to restore remote viewing capabilities.
53

Resetting / Forgot Your Password
IMPORTANT: We value your privacy and work hard to keep your data secure. To
securely reset your password, you can do so from the Night Owl
Protect App or the Night Owl Web Portal.
Reset Your Password from the Night Owl Protect App
(Highly Recommended) The quickest and easiest way to reset your password
is through the Night Owl Protect App. Your recorder must be powered on and
connected to the Internet before you complete these steps.
Reset Your Password from the Web Portal
1. Tap “Account > your name > Change Password.”
2. Enter your current password in the Current Password eld >>> enter your new
password in the New Password eld >>> then re-enter your new password in the
Conrm Password eld.
3. Tap “Done” when you are nished.
1. Go to www.no-protect.com.
2. Enter your username, email, or phone number in the Username, email, or
phone number eld at the top of the screen. Then enter your password in the
Password eld at the top of the screen. Click “Log In.”
3. From the top-right of the screen, click the dropdown next to your account
name and select “Manage my Account.”
4. Click “Change Password.”
5. Enter your current password in the Current Password eld >>> enter your new
password in the New Password eld >>> then re-enter your new password in the
Conrm Password eld. Click “Change Password.”
If you forgot your password:
Tap “Forgot my password” from the app and directions for resetting will be sent
to your registered email address.
NOTE: If you were logged into the app using the FaceID or PIN, you will need to
log out to use Forgot my password. Do this by tapping “Account” then
“Log Out.”
If you forgot your password:
Go to www.no-protect.com and enter your phone number, username or email.
Then click “Forgot password?.” A temporary access code will be sent to your
registered email. Use the code to log in to the web portal and then update the
password, as this code is only good for 24 hours.
54
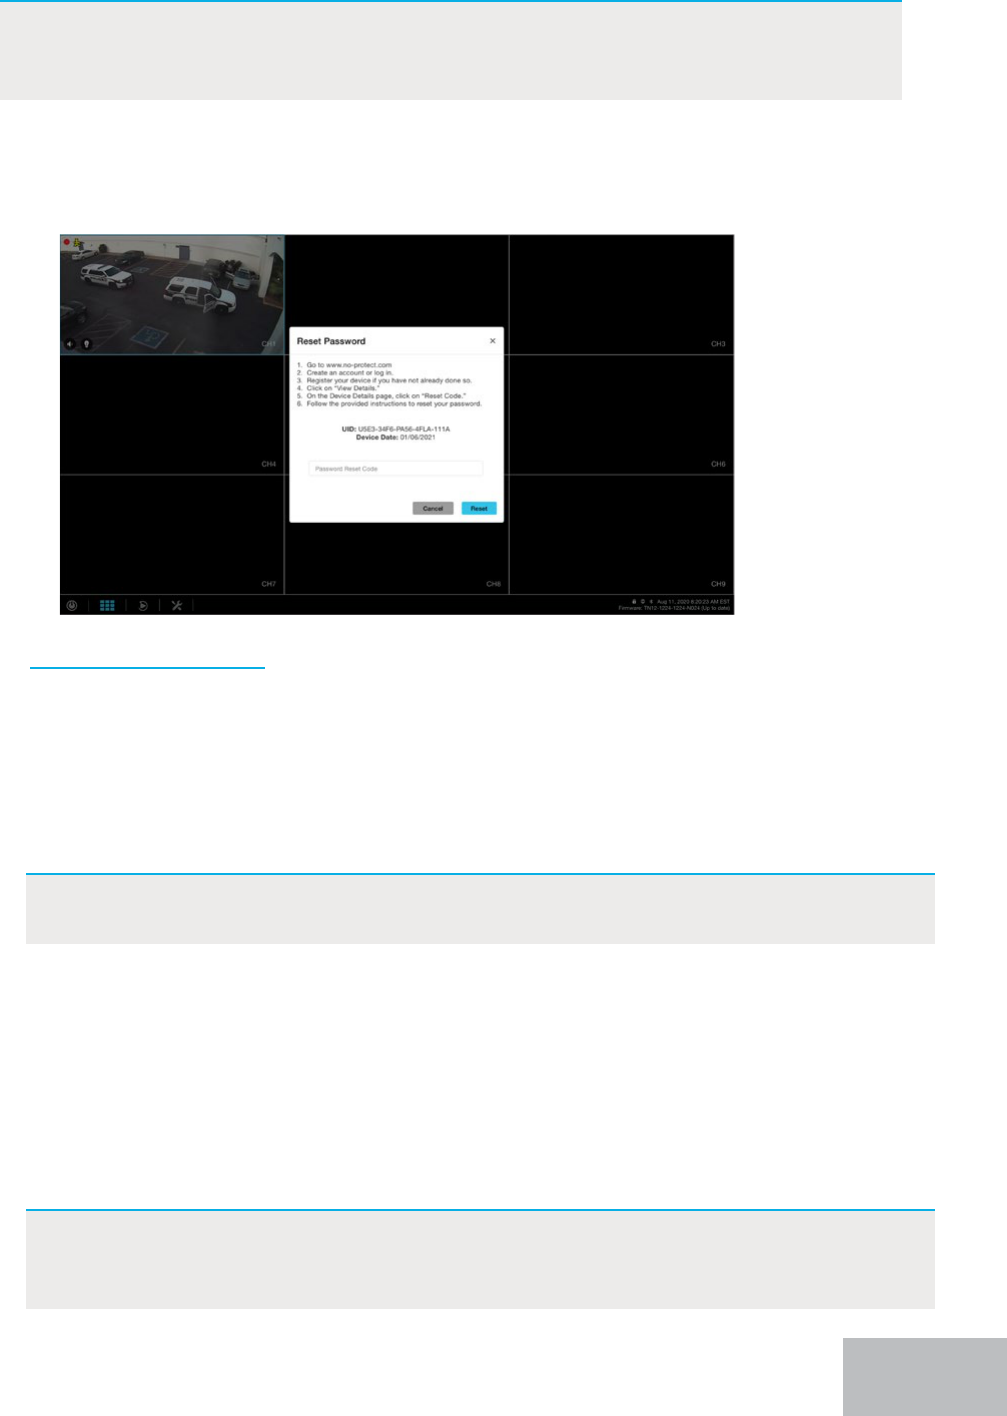
Forgot Your Local Password (Recorder Not Connected to the
Internet)
IMPORTANT: If you did not connect your recorder to the Internet during the
initial setup and instead chose to create a local password or if your
recorder is oine, follow the steps below.
1. With your recorder connected to a TV or monitor, access the Login screen and click
“Forgot password?” and follow the on-screen instructions.
2. Go to www.no-protect.com.
3. If you already created a Night Owl Protect account, simply log in. If not, create an
account.
4. If the device is showing Oine, but has already been registered, proceed to step 5.
If the device has not been registered, click “Register New Device” and follow the
prompts.
5. Once the device has been added to your My Devices page, click on “View Details”
followed by “Reset Code.”
6. Enter the date from the Reset Password screen (TV or monitor) and then click “Get
Code.”
7. You will be provided a temporary access code (ONLY good for 24 hours). Return to
your TV or monitor and enter this code to gain entry.
NOTE: The 1st 6 digits of the UID and the date can be found on the Reset
Password screen on your TV or monitor.
NOTE: If the UID and date you entered into the web portal were not correct, the
temporary access code will not work and you will need to remove the
device and re-register it.
55
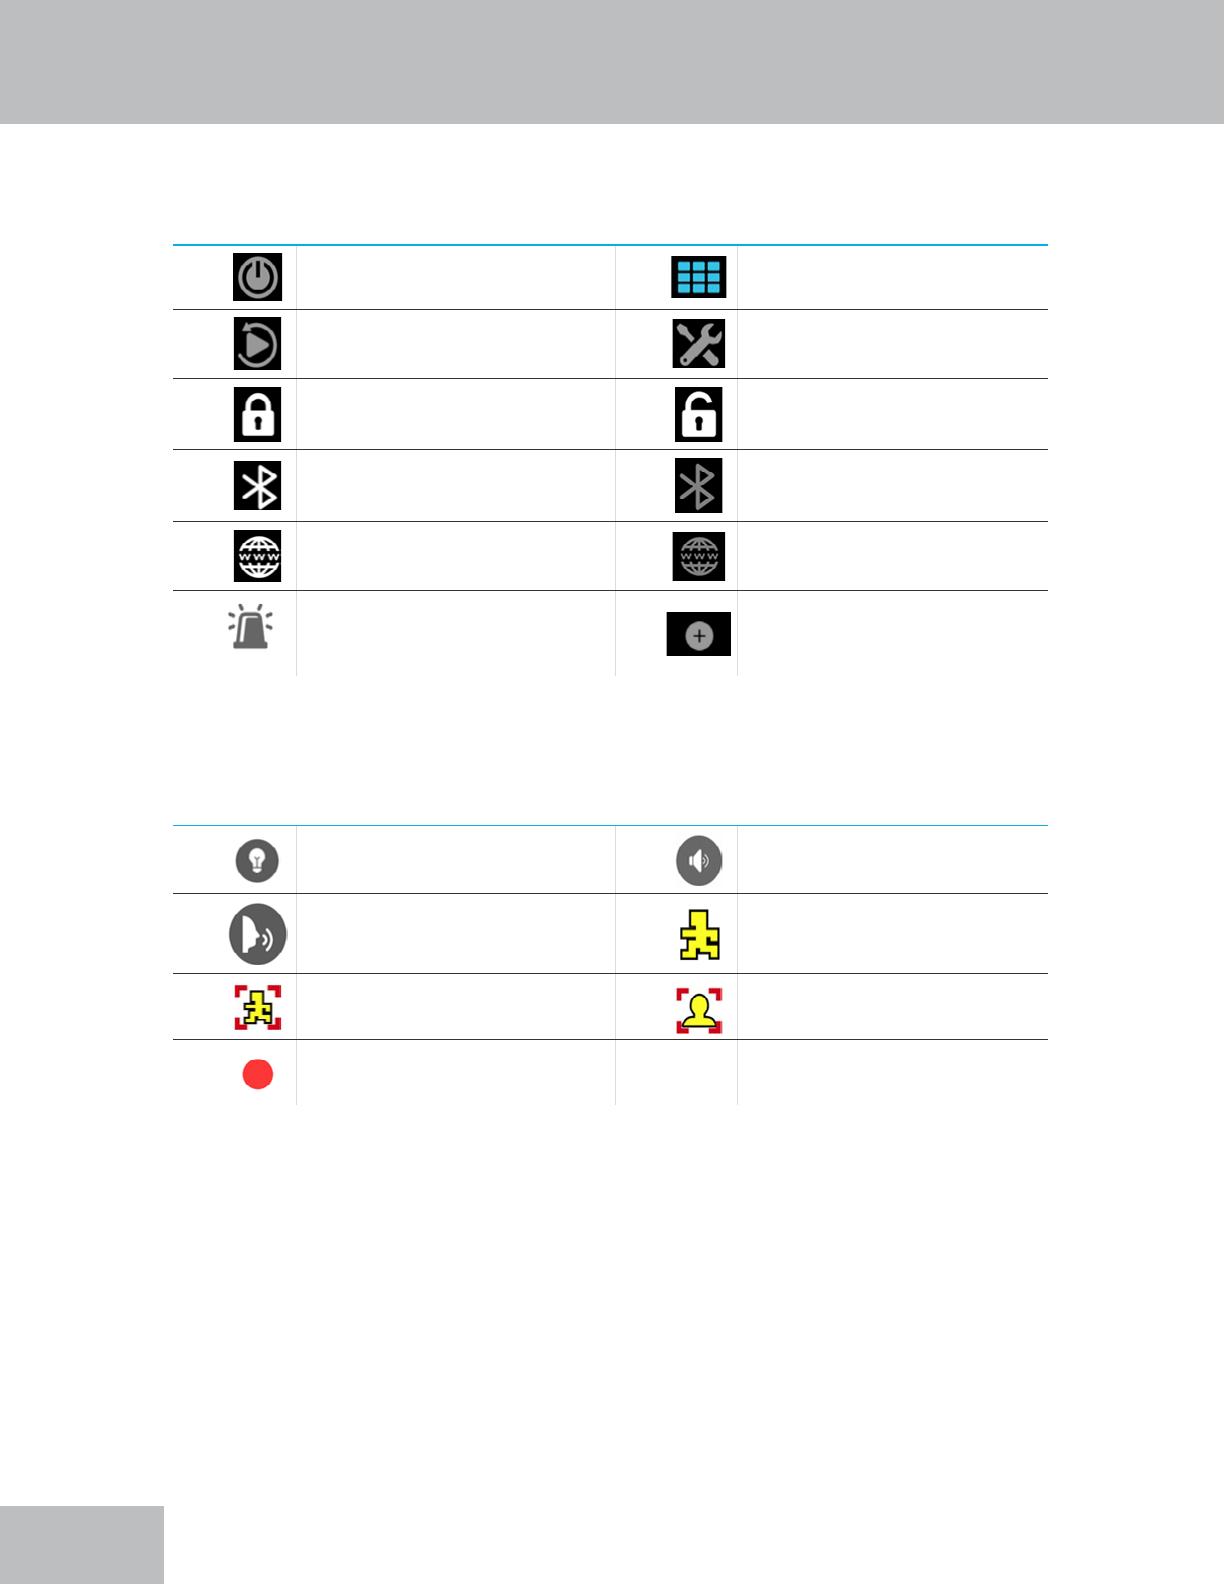
Recorder Status Icon Denitions
Will open Shut Down Menu.
Will display channel view layout
options.
Will go to the Playback Menu.
Will go to the System Info
Menu.
System is locked. System is unlocked.
Recorder is paired via
Bluetooth
®
.
Recorder is not paired via
Bluetooth
®
.
Internet is connected (online/
synced).
Internet is NOT connected
(online/synced).
Panic – Will turn on siren and
spotlight for all cameras.
Will take you to pairing screen
(if compatible).
Channel Status Icon Denitions
Click to turn spotlight on
(compatible cameras only).
Will display for cameras with
built-in microphone.
Will play voice alert / siren
(compatible cameras only).
Will display when motion is
detected by a camera.
Indicates human motion
(compatible cameras only).
Indicates a face was captured
(compatible cameras only).
Will display when a camera is
recording.
Appendix
56

AC Powered Wireless: Means the cameras wirelessly communicate with the recorder /
router, but must be powered on using the provided AC Camera Power Adapter.
BNC: Means the cameras are hardwired to the recorder using BNC coaxial cabling.
FTD2: 1080p HD Wired 2-Way Audio DVR System with Bluetooth® enabled recorder,
1080p Wired BNC Cameras, Smart Detection Technology and Built-in Motion-Activated
Spotlights.
FTD4: 2K HD Wired 2-Way Audio DVR System with Bluetooth
®
enabled recorder,
2K Wired BNC Cameras, Smart Detection Technology and Built-in Motion-Activated
Spotlights.
FTD8: 4K HD Wired 2-Way Audio DVR System with Bluetooth® enabled recorder,
4K Wired BNC Cameras, Smart Detection Technology and Built-in Motion-Activated
Spotlights.
HDD: Hard Disk Drive (local storage for the recordings).
DDNS: Dynamic Domain Naming System. Method for automatically updating
hostnames, addresses, URLs or other information on a given name server.
DHCP: Dynamic Host Conguration Protocol. A network protocol that allows a server
to automatically assign a device and IP address.
DVR: Digital Video Recorder.
Smart Detection Technology: System can use Human Detection, Facial Capture and
Vehicular Detection to reduce false alerts and record actual or meaningful events,
thereby saving hard drive space.
HD: High-Denition resolution.
HDD: Hard Disk Drive (local storage for the recordings).
IP: Internet Protocol. Protocol for standard communications across the Internet.
ISP: Internet Service Provider. An organization that provides services for accessing or
using the Internet.
NVR: Network Video Recorder.
PoE: Stands for Power over Ethernet.
UHD: Ultra High-Denition resolution.
UPS: Uninterrupted Power Supply. Device used to keep the recorder and cameras
powered when the main power supply is lost or disconnected.
Wired IP Cameras: Cameras are hardwired to the recorder using Ethernet cabling.
Wi-Fi NVR: Wireless Network Video Recorder with built-in Wi-Fi to communicate with
compatible Wi-Fi devices.
Glossary
57

Username: _______________________________________________________________________________________
Password: ________________________________________________________________________________________
Model Number: __________________________________________________________________________________
UID: ______________________________________________________________________________________________
Username: _______________________________________________________________________________________
Email Address: ___________________________________________________________________________________
Phone Number: __________________________________________________________________________________
Password: ________________________________________________________________________________________
PIN (App Only) ____________________________________________________________________________________
*this is the information used to access your Night Owl Protect Account.
NOTE: The UID is located on the support sticker on the top of your device.
General Recorder Information
Night Owl Protect Information
User Information
Be sure to write down all the important information below and place it in a
secure location.
58

NIGHT OWL, LLC (“Night Owl”) provides the following warranty to the original retail
purchaser only (the “Purchaser”) with respect to this product (the “Product”):
For a period of one (1) year after the date of sale, the Product shall be free from
manufacturing defects in material and workmanship. Product registration may be
required to submit a warranty claim. In the event that the Product is defective, the
Purchaser must i) contact Night Owl’s Technical Support Team, ii) provide Night
Owl with the proof of purchase showing the product is still under warranty and was
purchased from Night Owl directly or an Authorized Reseller and iii) return the Product
to Night Owl. In its sole discretion, Night Owl will either repair or replace the Product
at no additional cost to the Purchaser. Any replacement Product (or parts) will be
covered by the same warranty as the original Product through the expiration date of
the original warranty period.
Exclusions
This warranty does not apply to the following parts or upon the following events:
1. Bulbs, LEDS and batteries;
2. The Product was not used or installed in the manner described in the installation
instructions;
3. Negligent use of the Product or misuse or abuse of the Product;
4. Electrical short circuits or power surges;
5. Use of replacement parts not supplied by Night Owl;
6. Product is either tampered with, modied or repaired by another service
provider;
7. Product has not been maintained in accordance;
8. Accident, re, ood or other acts of God;
9. Failure to use Night Owl approved accessories;
10. Defects or damages arising by use of the Product in other than normal
conditions (including normal atmospheric, moisture and humidity conditions)
Except as otherwise prohibited by law, this warranty is in lieu of other warranties,
express or implied and Night Owl neither assumes no authorizes any person to
assume for it any other obligation or liability in connection with the sale or service of
the Product.
In no event shall Night Owl be liable for any special or consequential damages arising
from the use of the Product or arising from the malfunctioning or non-functioning
of the Product or for any delay in the performance of this warranty due to any cause
beyond its control. This warranty shall not apply to installation or the removal and re-
installation of products after repair.
Warranty
59

Night Owl does not make any claims or warranties of any kind whatsoever regarding
the Product’s potential, ability or eectiveness to prevent, minimize or in any way
aect personal or property damage or injury. Night Owl is not responsible for any
personal damage, loss or theft related to the Product or to its use for any harm,
whether physical or mental related thereto. Any and all claims or statements, whether
written or verbal, by salespeople, retailers, dealers or distributors to the contrary are
not authorized by Night Owl and do not aect this provision of this warranty.
Disclaimer
Certain uses, publication and/or distribution of video/audio recordings from security
cameras and/or audio devices are prohibited or restricted by federal, state and local
laws. When enabling and/or using audio recording features with your hidden security
camera, be sure to comply with the laws in your country, state and locality.
Mac and Mac OS X are registered trademarks of Apple Inc. Windows, Windows XP,
Windows Vista, Windows 7, Windows 8 and Windows 10 are registered trademarks of
Microsoft Corporation in the United States and/or other countries.
60
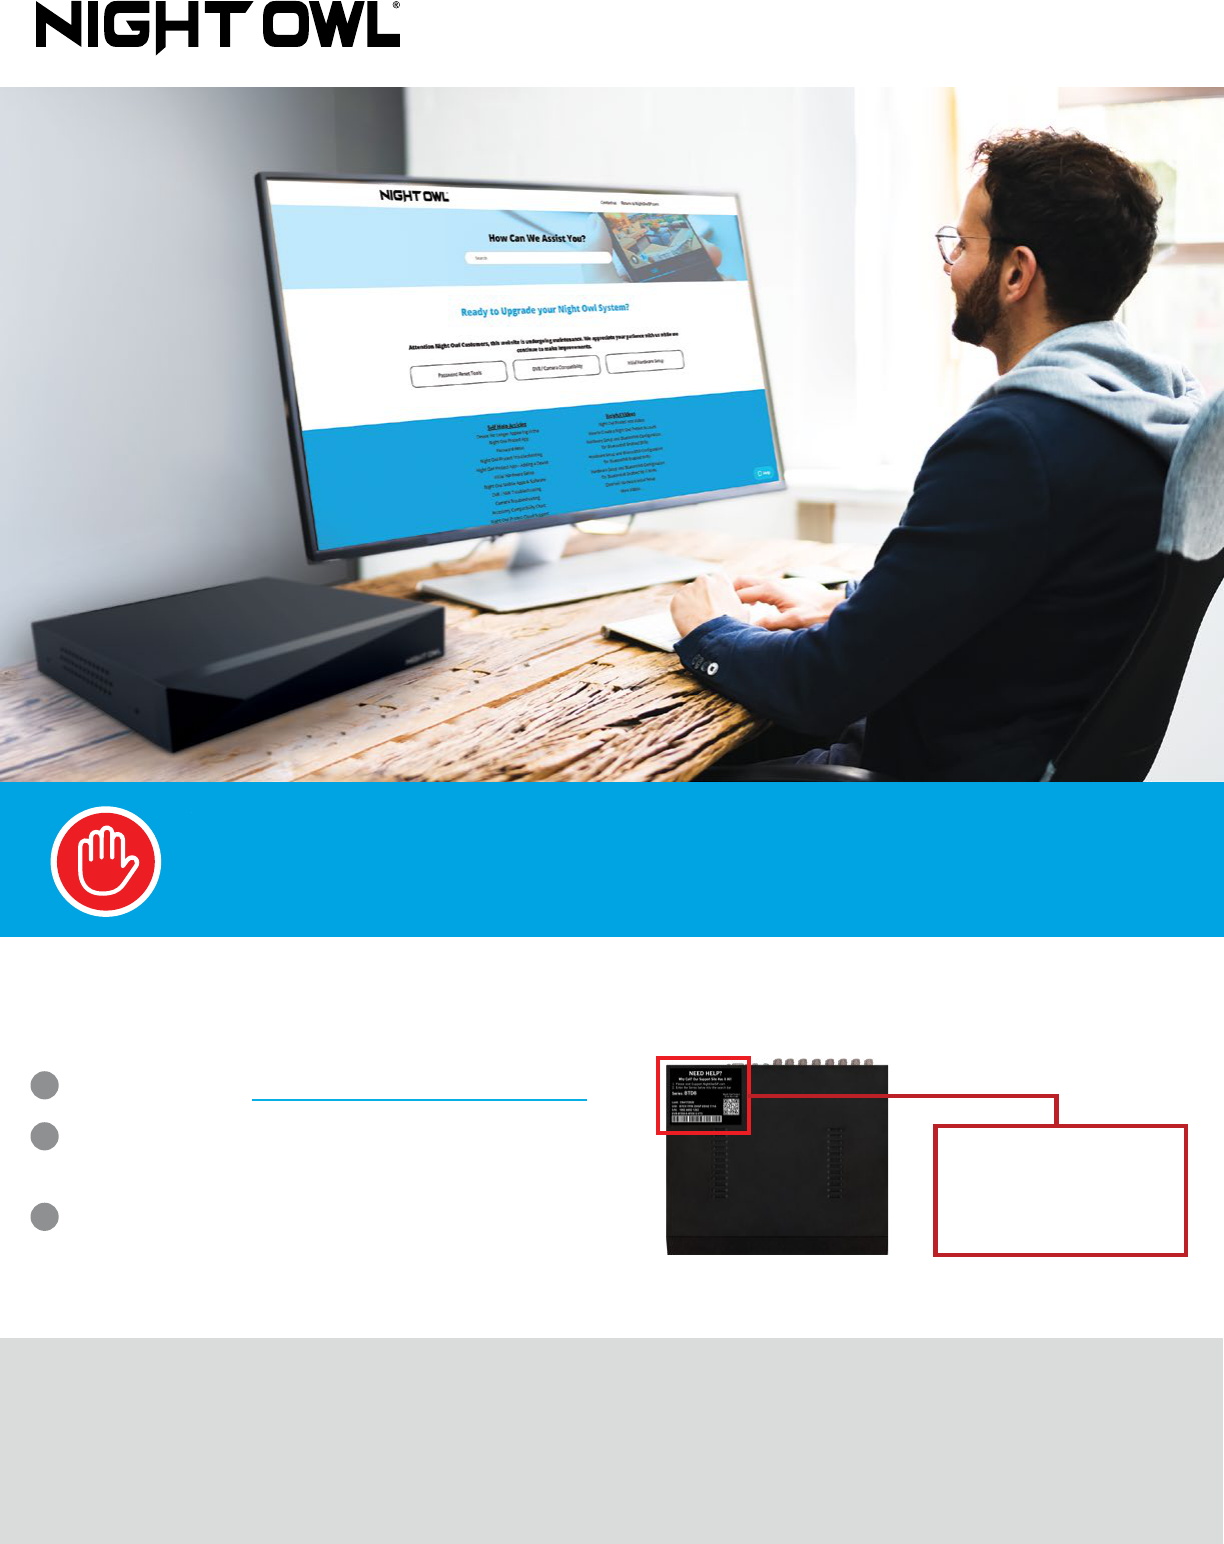
Please visit Support.NightOwlSP.com
Enter the Series listed on the Product
Support Sticker into the Search bar.
Access the support material needed.
1
2
3
For system manuals, troubleshooting guides, FAQs, video tutorials and more:
Rev 230814
iPhone, iPad, Mac and Mac OS X are registered trademarks of Apple Inc.
Windows, Windows XP, Windows Vista, Windows 7, Windows 8 and Windows 10
are registered trademarks of Microsoft Corporation in the United States and/or
other countries.
www.NightOwlSP.com
Need Help?
Why call? Our 24/7 online support site has it all!
Product support
information can be
found on the top
of your recorder
