AN-019
APPLICATION NOTE
TESTING ANDROID SMARTPHONES WITH CLIO
12.5 QC
by Daniele Ponteggia – d[email protected]
INTRODUCTION
In this application note we will show the playback test of Android devices using
minimal effort and tacking advantage of standard phone OS components and
procedures, without resorting to complex procedures such as rooting the device or
installing specific testing applications into the device.
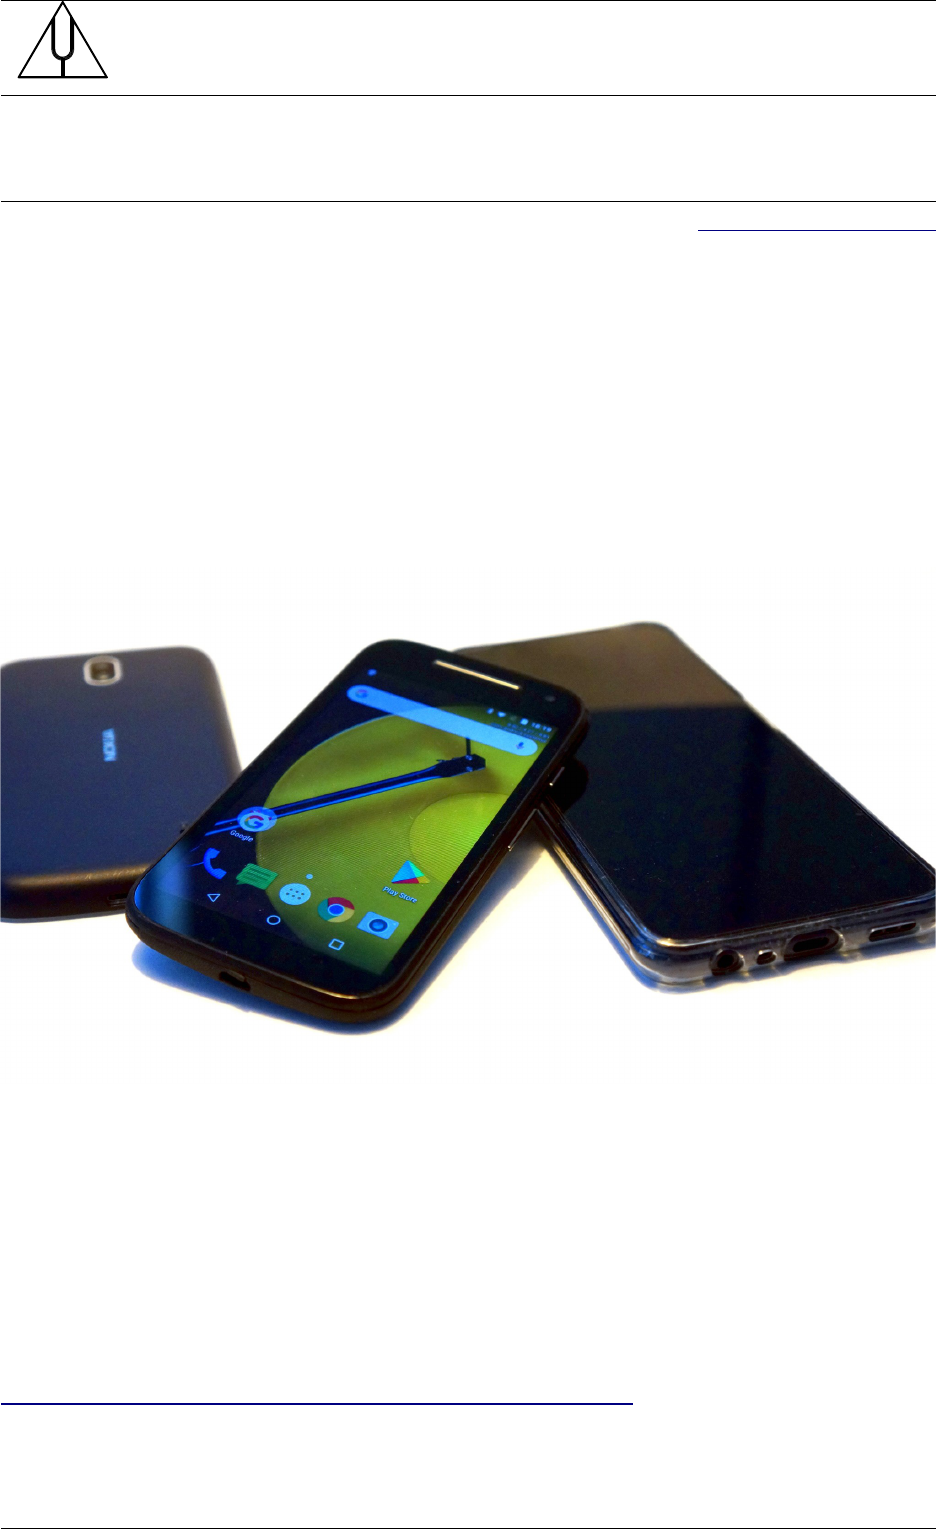
DEVICE UNDER TEST
The device under test shown in this application note is a Motorola Moto G5s Android
phone. But with minimum changes any recent Android device can be tested.
DUT SETUP
In this application we will use a very simple setup, connecting the DUT to the PC
using the USB cable.
The device under test is a standard Android phone which will be controlled through
Android Debug Bridge (adb) via USB. The DUT should be set up by activating the
Developer Options and connected via USB to the PC.
Instructions on how to configure the device with developer options are available on
developer.android.com at the following link:
https://developer.android.com/studio/debug/dev-options
Rev. 10/20 www.audiomatica.com
AUDIOMATICA

TESTING ANDROID SMARTPHONES WITH CLIO 12.5 QC
MEASUREMENT SETUP
The test of the device output requires the following setup:
– PC with CLIO 12.5 QC software
– CLIO fw-02 connected via USB
– MIC-02 microphone connected to CLIO fw-02 input A
– DUT connected to PC via USB
This setup is schematically reported in the following figure:
ANDROID PHONE
PC with CLIO 12.5 QC software
CLIO
fw-02
MIC-02
USB
CABLE
Connecting to the DUT via adb
The PC should feature Android Debug Bridge (adb) which is available through the
following link:
https://developer.android.com/studio/releases/platform-tools
A detailed description of adb is available here:
https://developer.android.com/studio/command-line/adb
Once the adb.exe software is installed and the DUT phone connected via USB it is
possible to test the connection using a terminal command
1
:
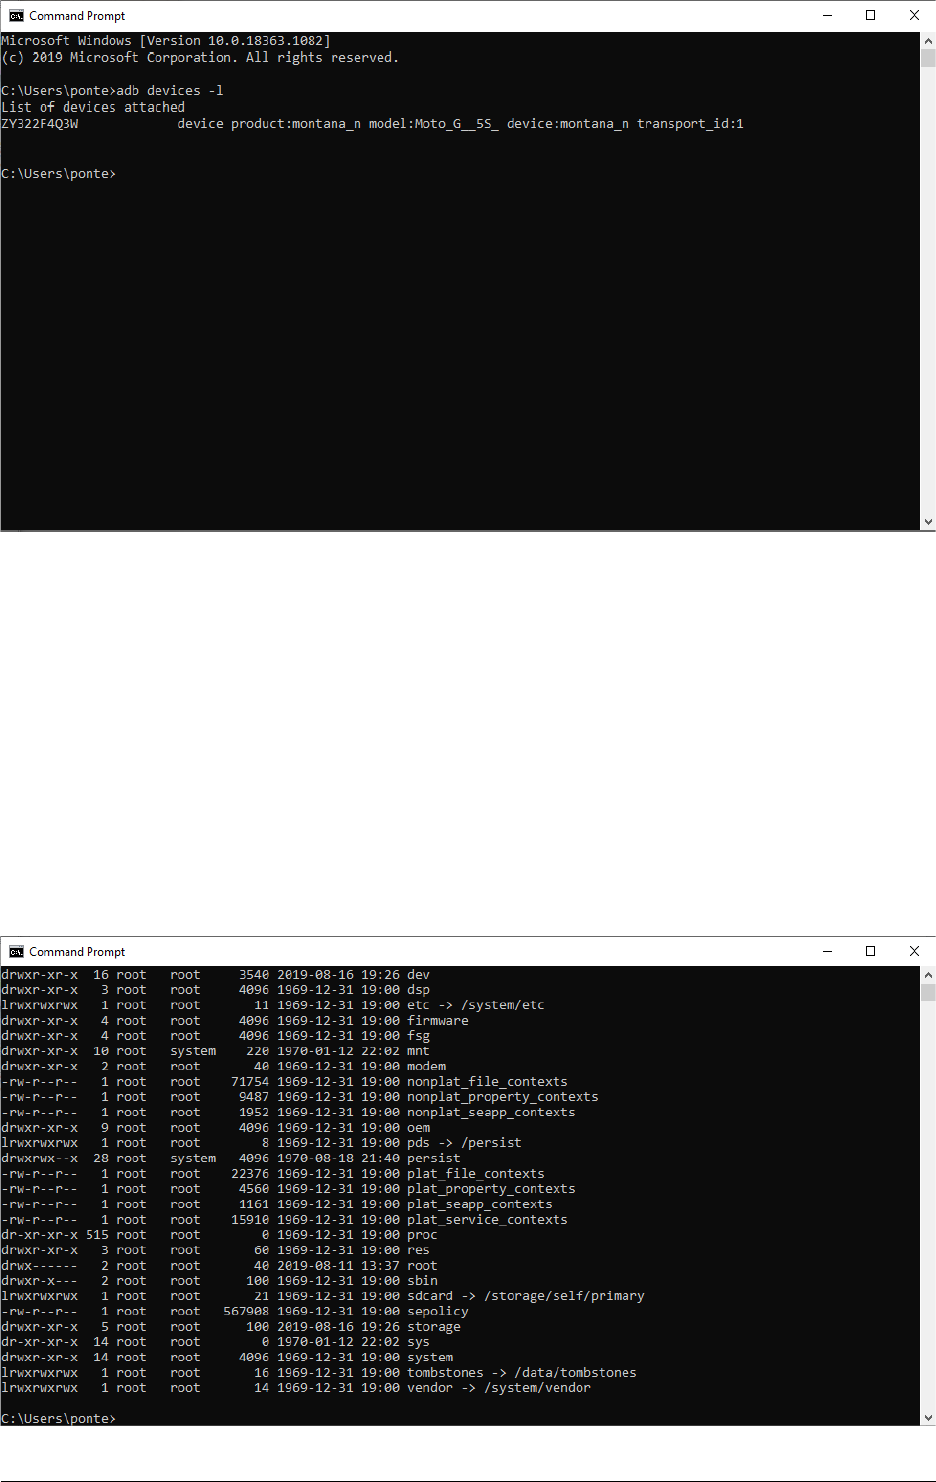
>adb devices -l
1 In the examples reported in this document the adb.exe executable PATH has been added
to the Windows environment.
2/22 www.audiomatica.com
TESTING ANDROID SMARTPHONES WITH CLIO 12.5 QC
This adb command should list all the attached Android devices. In our case only one
device is attached, a Motorola Moto G5s, and correctly listed.
There are several actions that can be performed using adb, in this application note
we will limit ourselves to two adb command: adb push and adb shell.
The first will be used to copy a wave file from the PC to the android device and the
latter gives remote access to the device own terminal shell. This will be used to
actively control the device without the need to physically access it.
Let's check if we can see the DUT file system contents using remote shell through
adb. The command:
>adb shell ls -l
remotely run the ls -l command on the device, and return the contents of the
root folder of the DUT:
3/22 www.audiomatica.com
TESTING ANDROID SMARTPHONES WITH CLIO 12.5 QC
According to Android documentation
2
and author's experience the /sdcard/ folder
should be present and accessible.
A part of the internal storage accessible using adb is usually automatically mounted
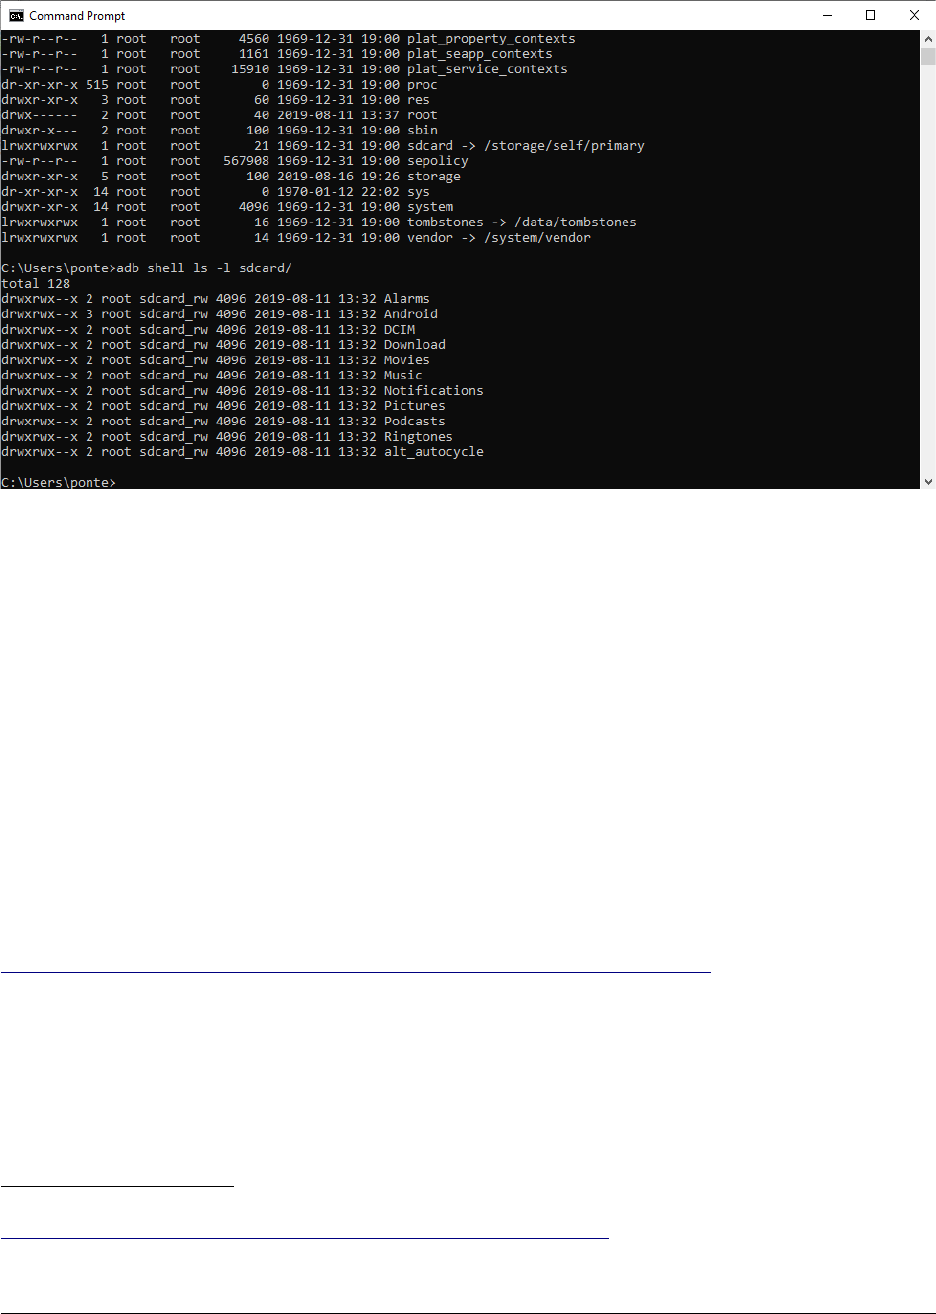
as sdcard/ into the file system, the contents can be listed using:
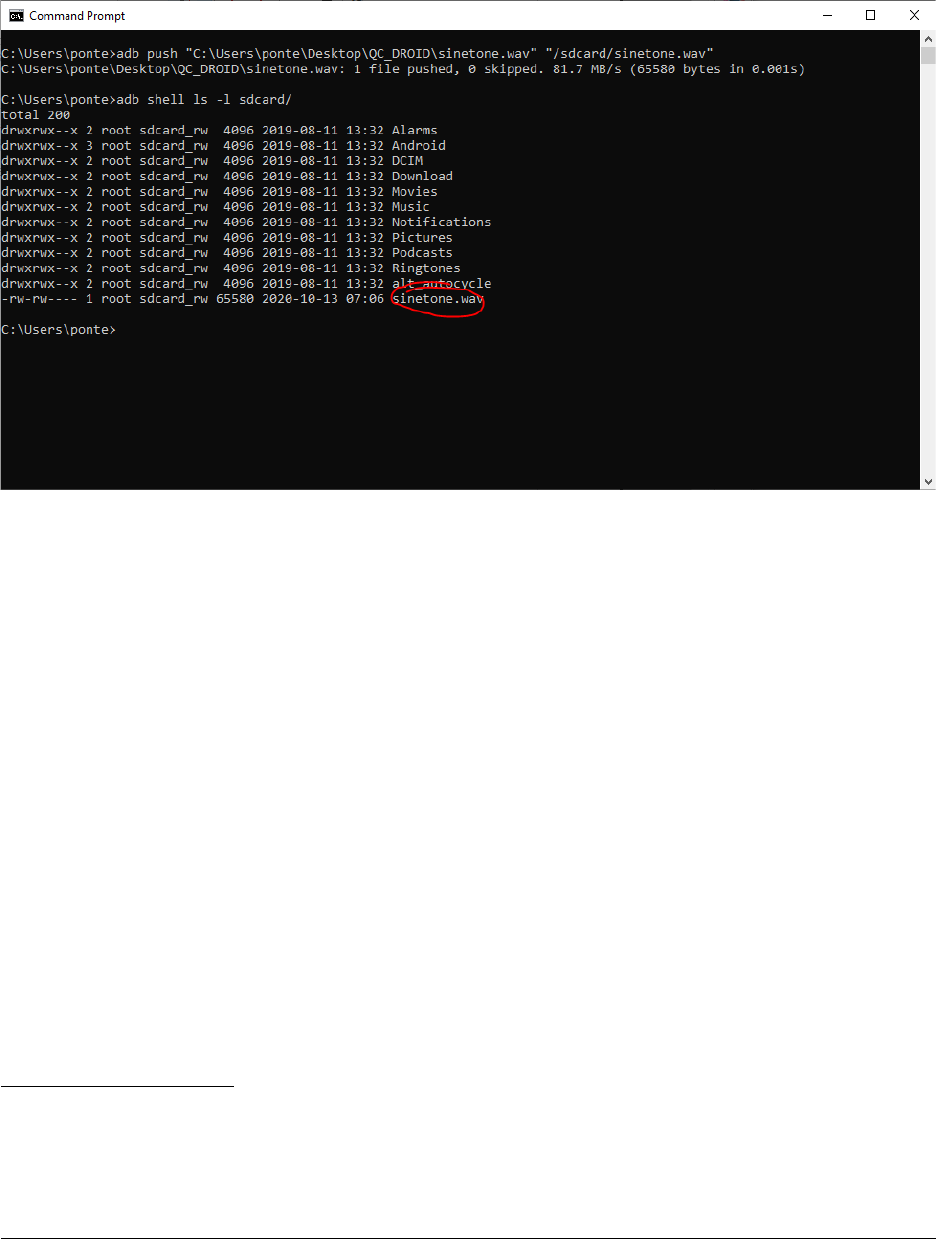
>adb shell ls -l sdcard/
As we can see in this case there are already several sub-folders created during SD
Card initialization from the Android OS installed on our device.
The /sdcard/ folder will be used to store the test signal which will be played by
device. We will get back soon to this point, before we need to introduce the testing
method.
Sending and reproducing an audio file using an Android device
The whole idea behind the remote testing of playback of an Android device is to
send an audio file containing the test signal to the device and instruct the
device to play the audio file. As simple as that.
In particular we will take advantage of Intents. Intents are similar to messages in
the Android OS and are normally used as an high level way of communication
between applications. A more detailed explanation is available browsing the Android
documentation:
https://developer.android.com/guide/components/intents-filters
“An Intent is a messaging object you can use to request an action from another
app component.”
In particular we will use an Explicit Intent to ask the device to play our audio file
containing the test signal.
“Explicit intents specify which application will satisfy the intent, by supplying either the
target app's package name or a fully-qualified component class name. You'll typically
2 As reported in the Android documentation available at the link
https://source.android.com/devices/storage/config-example in the typical configuration of
an Android device “Primary shared storage (/sdcard) is emulated on top of internal
storage.”. If it is not the case, a folder accessible from adb and applications should be found.
4/22 www.audiomatica.com
TESTING ANDROID SMARTPHONES WITH CLIO 12.5 QC
use an explicit intent to start a component in your own app, because you know the class
name of the activity or service you want to start. For example, you might start a new
activity within your app in response to a user action, or start a service to download a file
in the background.”.
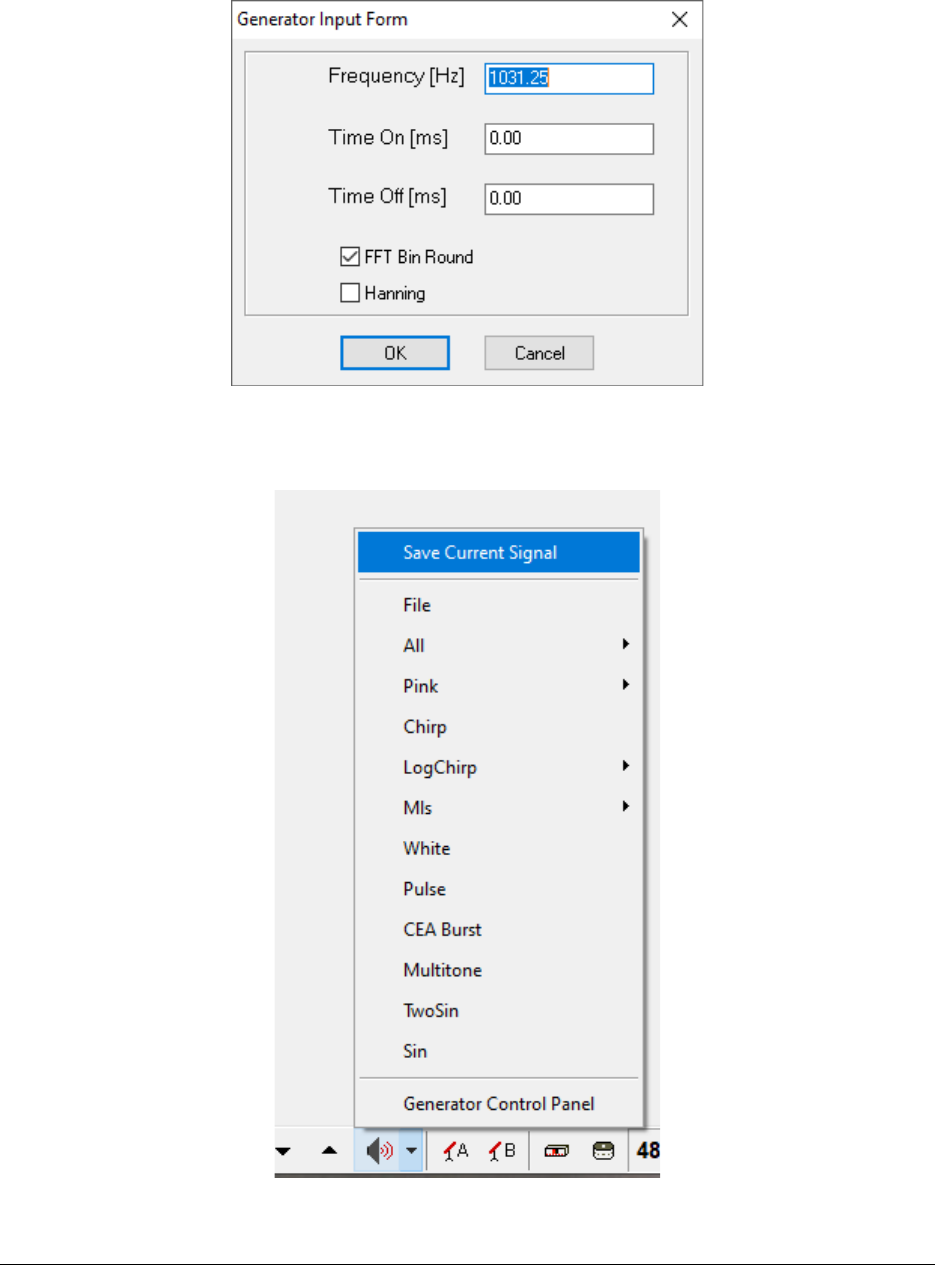
Let's prepare a simple test signal using our CLIO 12 system. We can start with a very
simple signal, a sinusodal tone. In CLIO select Sine from the generator and choose the
default values:
The CLIO system will generate a sinusoidal tone at about 1 kHz. If we select “Save
Current Signal” from the generator menu we can store this signal with a .wav
format.
We will call our file “sinetone.wav” and can be saved in a folder which we will use to
5/22 www.audiomatica.com
TESTING ANDROID SMARTPHONES WITH CLIO 12.5 QC
store also our QC testing script.
Now we can finally transfer the file to the device storage using the adb push
command:
>adb push "C:\Users\ponte\Desktop\QC_DROID\sinetone.wav"
"/sdcard/sinetone.wav"
Where the first path is the source and the second path is the destination.
If the transfer succeeds we should be now able to see our file listed in /sdcard/.
Now we can send an intent to the device, a message to instruct the Android OS to
play the file we just copied:
>adb shell am start -a android.intent.action.VIEW -d
file:///sdcard/sinetone.wav -t audio/* com.google.android.music
The intent can be interpreted as the following instruction sent to the device: open
the file sinetone.wav on /sdcard/ for “view” (listen in our case) using the Google
Play Music application”. This application is pre-installed among other Google
products in many Android devices
3
.
After a short time, to let the intent (message) to be processed by the Android
system, you should hear a beep coming from the device.
3 In this application note we decided to use the Google Play Music application as a playback
tool, but any application with the capability of reproducing audio wave files can be used.
In order to explicitly target an application we should use the package name to choose.
Another application we tested with success is the open source VLC for Android, whose
package name is org.videolan.vlc.
6/22 www.audiomatica.com

TESTING ANDROID SMARTPHONES WITH CLIO 12.5 QC
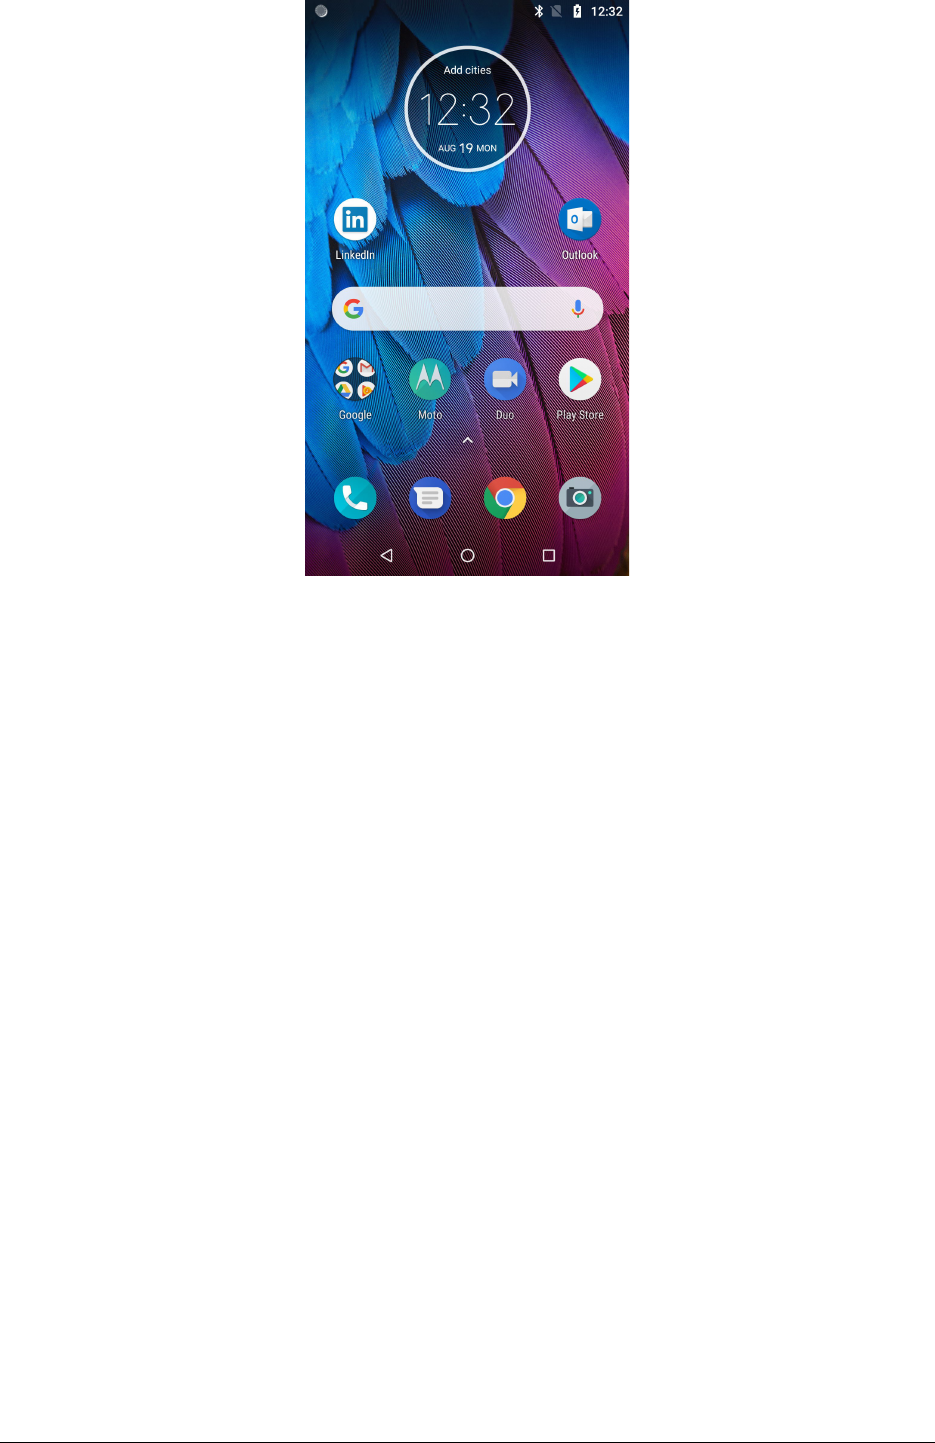
Device screen should look like the following screenshot:
If no sound is coming from the device, please check that the adb shell am start
command ended up without errors. Not all Android devices are able to reproduce a
48 kHz sampling rate mono 32 bit float audio .wav file
4
. This might depend on OS
version but also might be specific to the software installed in the device
5
.
There is also the chance that, depending on particular device settings, the device
might be locked or in another unknown state. In order to proceed with our testing
4 Which is the standard CLIO .wav file format.
5 Any recent Android device should be able to playback a .wav file as saved by CLIO. With
older devices, such happened during the research done for this article with an Android 6
device, we needed to make the file stereo in order to be reproduced. This is
device/OS/installed software specific, thus each case must be investigated on its own.
7/22 www.audiomatica.com
TESTING ANDROID SMARTPHONES WITH CLIO 12.5 QC
scenario we must assure that the device is unlocked and showing the home screen:
If this is not the case we can use specific adb commands to get the device to the
home screen.
Here is a partial list of useful adb commands:
Unlock >adb shell input keyevent 82
Swipe up >adb shell input touchscreen swipe 930 880 930 380
Home >adb shell input keyevent 3
Lock >adb shell input keyevent 26
Enter >adb shell input keyevent 66
Please check Android reference guide to get more detailed information.
In case of the device under test in this application note, if locked the following
command is able to unlock the device and bring the interface to the home screen:
>adb shell input keyevent 82 && adb shell input touchscreen swipe 930
880 930 380
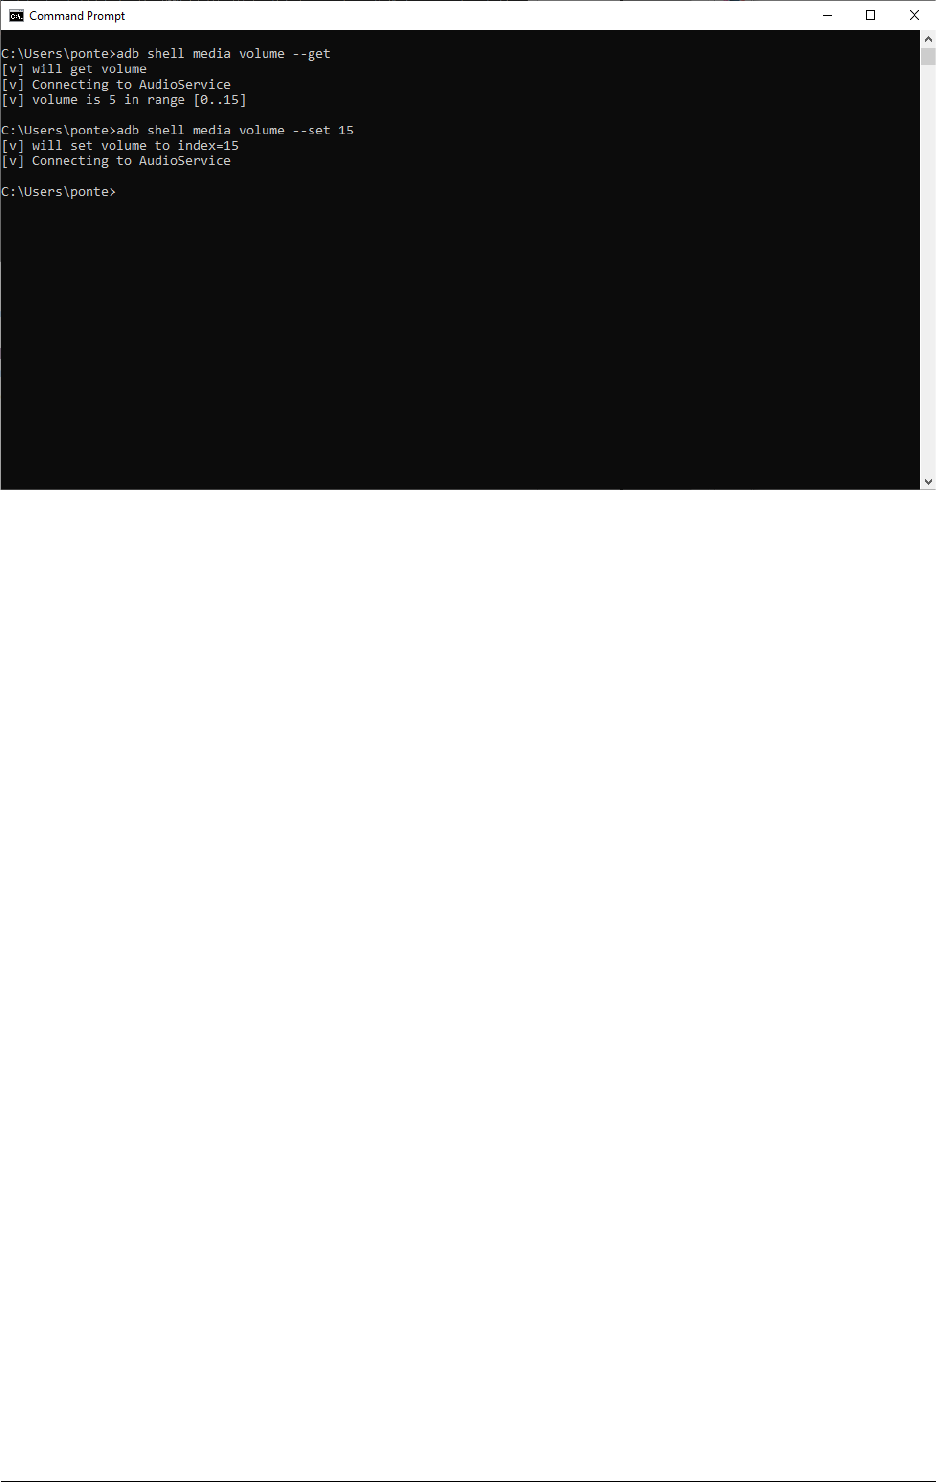
If there is still no sound the device volume should be checked. This can be done
physically setting the playback volume using the device controls, or via adb with
the followings command:
>adb shell media volume --get
>adb shell media volume --set 15
The --get option returns the current volume and the range of possible values, the
--set option allows to set the volume into the returned range.
8/22 www.audiomatica.com
TESTING ANDROID SMARTPHONES WITH CLIO 12.5 QC
We suppose now that at this point the device was able to play our beep using the
Google Music Play application.
After the playback triggered by the intent it can be seen on the device that the
playback application has been brought to the front of the interface, in order to
restore the previous state the app must be terminated using:
>adb shell am force-stop com.google.android.music
This will allow to prepare the device to get another playback (actually a VIEW)
intent.
Now that we have tested the possibility to upload a wave file, put our Android
device in a given state and ask to playback the file, we are ready to setup our
testing procedure.
We will use here two different methods:
1) measure the frequency response using MLS&LogChirp analysis
2) frequency response plus distortion and rub&buzz using Sinusoidal analysis.
But the approach illustrated above can be used to perform any measurement with
external playback scenario, as an example it is possible to upload a specific wave
file and then check the device response using FFT or Multimeter analysis.
9/22 www.audiomatica.com

TESTING ANDROID SMARTPHONES WITH CLIO 12.5 QC
FREQUENCY RESPONSE WITH LOGCHIRP
Using the connections between CLIO QC and the DUT described earlier we created a
simple test fixture to hold the microphone in front ot the Android phone:
First of all we need to prepare the stimulus signal to be reproduced by the device
under test.
Usually the LogChirp analysis require the stimulus to be synchronously played and
acquired by the measurement instrument. In this case this is not possible, since our
DUT has no line inputs we must limit ourselves to an asynchronous response
measurement. This will lead to an impulse response which can be transformed to a
magnitude frequency response, but losing the absolute phase term.
We need to reproduce the LogChirp signal from the DUT. The stimulus signal should
be available in form of a .wav file.
Open MLS&LogChirp Analysis and go to settings, select 64k Size:
Then press the GO button on the MLS&LogChirp analysis menu. This is a dummy
test. During the measurement the CLIO system generated the test sweep which we
want to use for the asynchronous response. To save the stimuli use the same
10/22 www.audiomatica.com
TESTING ANDROID SMARTPHONES WITH CLIO 12.5 QC
procedure used to store the sinusoidal tone, from the generator options select
“Save Current Signal”.
Now we will need the help of an external audio editor software. The stimulus signal
we saved is a single sinusoidal sweep, using CLIO Mls&LogChirp in asynchronous
mode requires the stimuli to be repeated until the DUT response acquisition is
done.
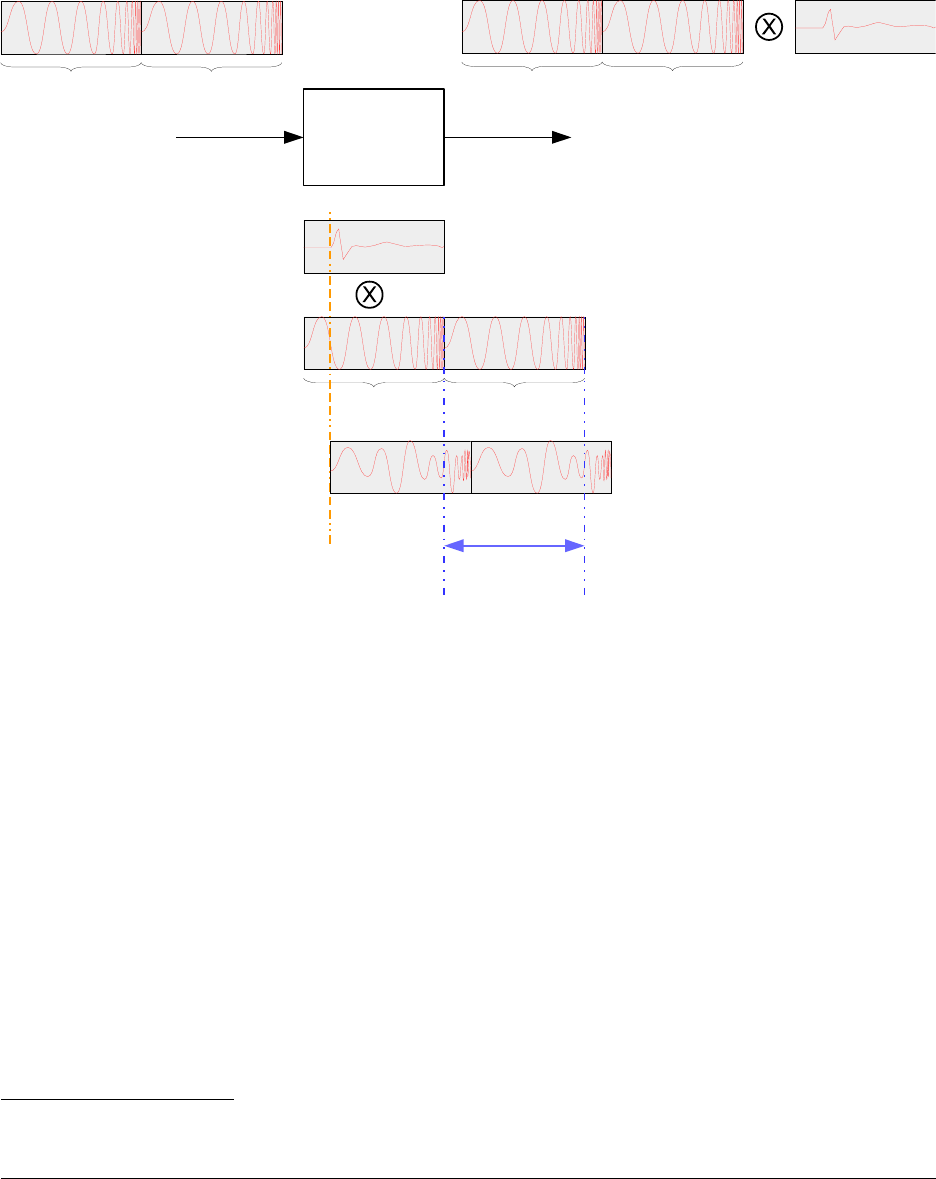
A brief explanation on how CLIO MLS&LogChirp acquisition is usually done is
necessary at this point. As users might have noticed CLIO usually play two sweeps
in LogChirp mode, the acquisition of the DUT output happens during the second
sweep.
This has several benefits, among them the fact that the response of the DUT is
precisely acquired even in presence of a large group delay
6
.
When working in asynchronous mode there is no chance to know when the
playback started, a simple solution is to play the stimuli in loop until the acquisition
is done. The absolute value of the delay can't be retrieved but the magnitude
frequency response is available.
6 This is often the case when measuring electro-acoustical devices where the delay
associated with time-of-flight is always present.
11/22 www.audiomatica.com
1
st
sweep
2
nd
sweep
DUT
1
st
sweep
2
nd
sweep
x(t) y(t)
h(t)
1
st
sweep
2
nd
sweep
=
h(t)
x(t)
y(t)
CLIO ACQUISTITION
TESTING ANDROID SMARTPHONES WITH CLIO 12.5 QC
As shown in the previous image, where only the stimulus is depicted, the actual
playback is managed by the DUT while CLIO is generating the sweep (which will not
be used, shown in grey) and acquiring the response.
The time between actual playback start and CLIO acquisition cannot be predicted,
as it depends among other things on the time which is required by the intent to
become an action on the app on the device.
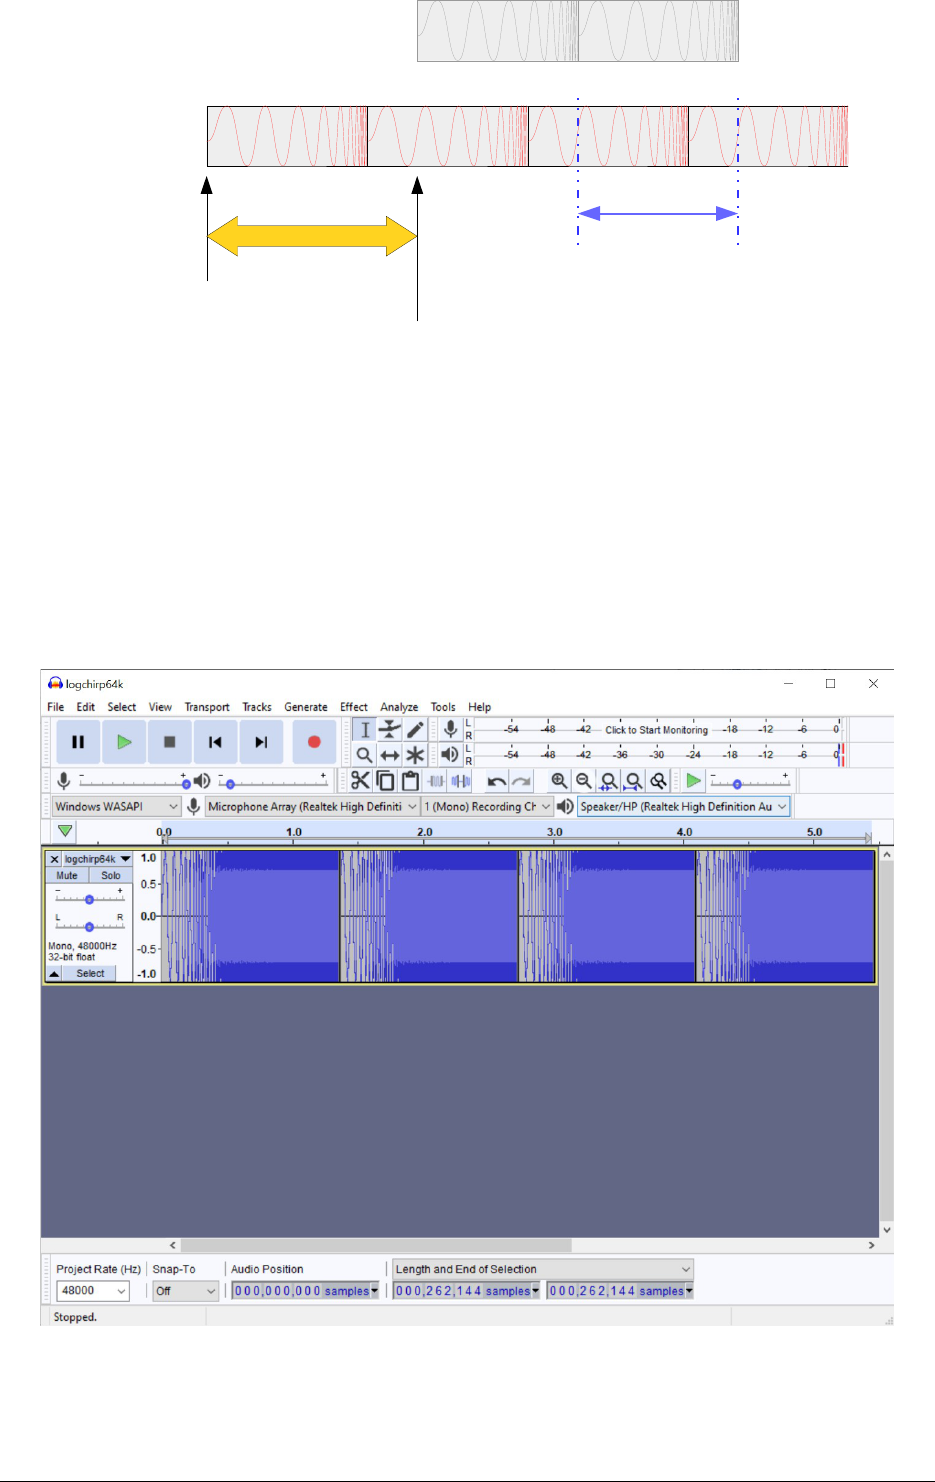
Let's go back to our wave file we saved from CLIO generator, our single sweep. We
need to create a wave file with the stimulus played in loop multiple times. This can
be easily done by cut and paste with the free software Audacity.
Let's save the looped chirp as “logchirp64k_x4.wav”. We can push the file to the
device SD using adb:
>adb push "C:\Users\ponte\Desktop\QC_DROID\logchirp64k_x4.wav"
"/sdcard/logchirp64k_x4.wav"
12/22 www.audiomatica.com
CLIO ACQUISITION
PLAYBACK START
CLIO MLS&LOGCHIRP GO
x(t)
x(t)
UNKNOWN
TESTING ANDROID SMARTPHONES WITH CLIO 12.5 QC
The file can be played as shown before with the intent:
>adb shell am start -a android.intent.action.VIEW -d
file:///sdcard/logchirp64k_x4.wav -t audio/* com.google.android.music
Do not forget to terminate the app after the playback:
>adb shell am force-stop com.google.android.music
It might happen that the wave file is partially or completely non reproduced or
distorted. This is because many mobile phones integrates loudspeaker protections
against possible damage to transducers, and sinusoidal sweeps are among the most
difficult signals to reproduce, due to the low crest factor. A simple solution to this
problem is to lower the output volume of the device to avoid to trigger the
protections and keep our DUT time-invariant.
In our case, to avoid problems, we set the output volume at 12 on a scale of 15:
>adb shell media volume --set 12
Let's try to measure the device frequency response. The procedure will involve
instructing the device to reproduce the test signal from terminal and then launching
the measurement in CLIO.
At this point we have all the elements to perform this manually. We should have a
terminal window and CLIO open with the MLS&LogChirp set up and ready to
measure.
1) Send Intent from terminal
>adb shell am start -a android.intent.action.VIEW -d
file:///sdcard/logchirp64k_x4.wav -t audio/* com.google.android.music
2) Wait for the playback to start
3) Start measurement in CLIO
4) Close app from terminal
>adb shell am force-stop com.google.android.music
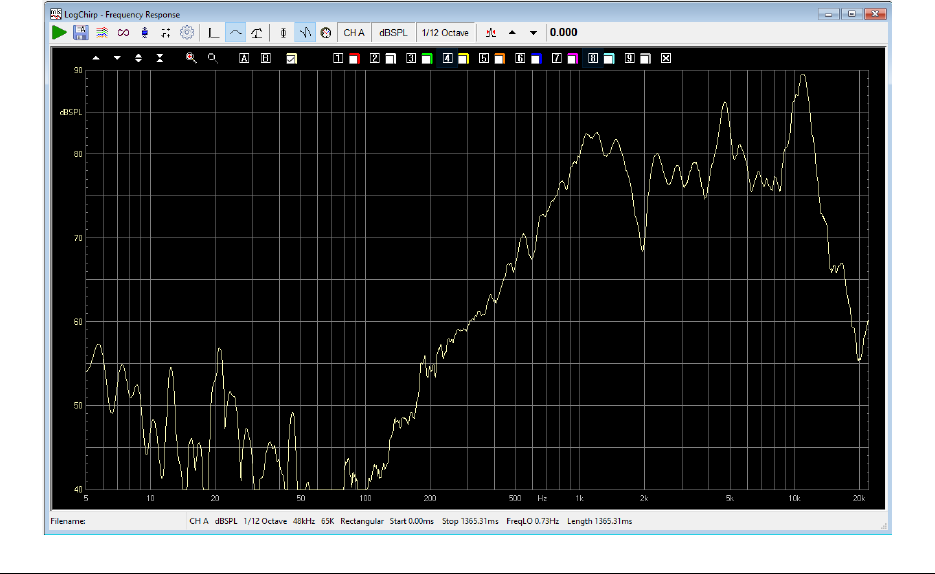
We should get the magnitude frequency response of our DUT:
13/22 www.audiomatica.com
TESTING ANDROID SMARTPHONES WITH CLIO 12.5 QC
Let's save the measurement file as “response.mls”.
The entire procedure can be automated using a simple QC script and two .bat files.
The script can be as follows:
[GLOBALS]
COMPANY=AUDIOMATICA SRL
TITLE=ANDROID PLAYBACK RESPONSE
[PERFORM]
EXTERNAL=INTENT.BAT
DELAY=1000
[MLS]
OUT=1.000 V
INA=-40
INB=0
REFERENCE=RESPONSE.MLS
LIMITS=NONE
[PERFORM]
EXTERNAL=STOP.BAT
Where intent.bat:
@echo off
adb shell am start -a android.intent.action.VIEW -d
file:///sdcard/logchirp64k_x4.wav -t audio/* com.google.android.music
and stop.bat are sending the adb commands:
@echo off
adb shell am force-stop com.google.android.music
Running the script will retrieve the frequency response of the device.
14/22 www.audiomatica.com
TESTING ANDROID SMARTPHONES WITH CLIO 12.5 QC
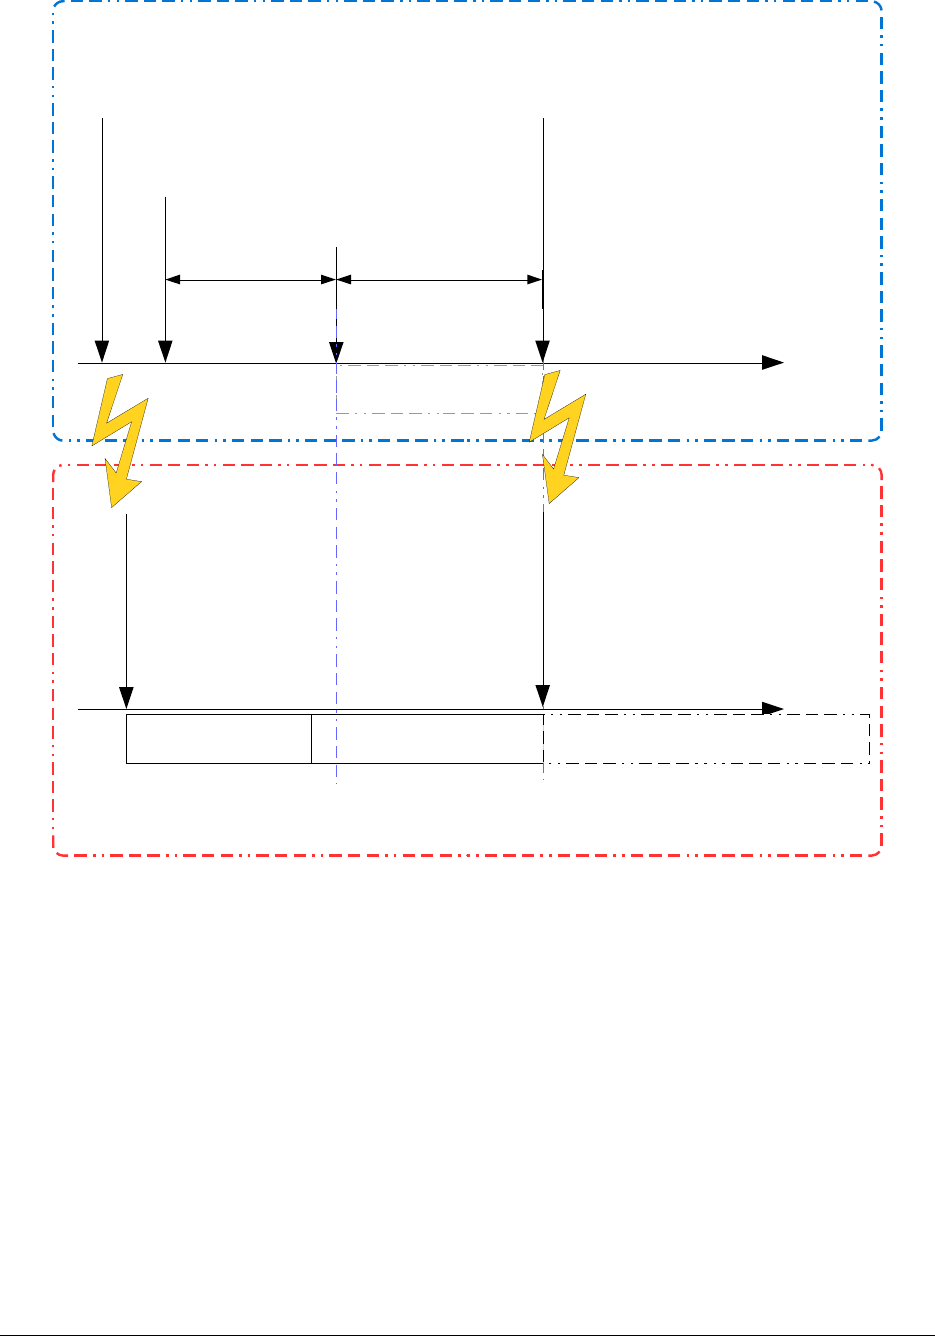
It might happen that the playback of the logchirp signal from the Android device
has not started when the measurement is started, this can be adjusted using the
DELAY=1000 command in the QC script. As shown in the following figure, the
unknown variable is the Android device latency, i.e. the time it takes the intent to
be processed and the test signal played by the invoked app.
[PERFORM]
EXTERNAL=INTENT.BAT
[PERFORM]
DELAY=1000
[MLS]
REFERENCE=RESPONSE.MLS
delay
CLIO logchirp
Adb intent
VIEW
adb_mls.qc
adb_mls.qc
CLIO 12
CLIO 12
Android Device
Android Device
LATENCY
MLS lenght
[PERFORM]
EXTERNAL=STOP.BAT
Adb
force-stop
Logchirp in loop
Please note that since due to the asynchronous nature of the measurement
executed with external stimuli, there is no possibility to window out the room
reflections.
It must also be taken into account that the device might be non-invariant and
change its characteristics during the test, thus different sweep lengths can give
slightly different results. But this lies in the non-invariant nature of the DUT.
15/22 www.audiomatica.com
TESTING ANDROID SMARTPHONES WITH CLIO 12.5 QC
FREQUENCY RESPONSE, DISTORTION AND
RUB&BUZZ WITH SINUSOIDAL
As we did for the LogChirp test a reference file which stores all the Sinusoidal
measurement settings should be created and the test signal saved as a .wav file.
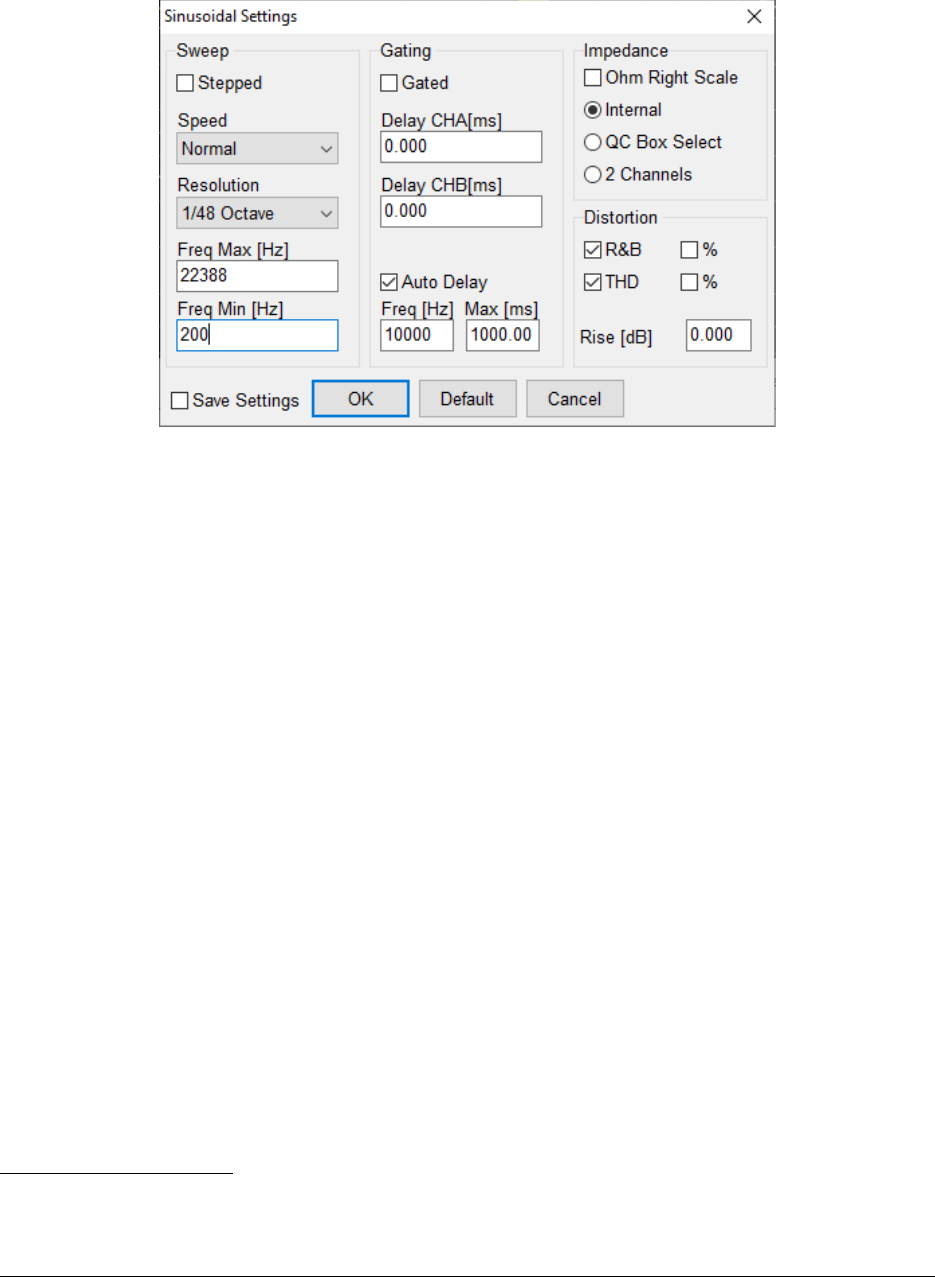
Let's open Sinusoidal analysis menu and go to the settings, choose the following:
Here we note that we selected the R&B and THD option, also note that the Auto
Delay option is set with Max [ms] at 1000 ms, which is the highest value the field
can accept. With the Auto Delay option CLIO system generates a pilot tone at a
given frequency, in this case we left the default value of 10 kHz, which is used by
to find the proper delay value.
The idea, as we did for the MLS&LogChirp test, is to copy the test signal to the
Android Device, send a VIEW intent to reproduce the test signal to the DUT, and
then execute the Sinusoidal measurement with CLIO. The measurement system is
unaware of the fact that the test signal is not generated in real time but instead
played by the DUT. Since the latency, i.e. the time interval between sending the adb
intent and the actual test signal reproduction, is unknown and not stable, a large
value for the Max Delay relaxes the overall timing of our QC test. The test timing
will be illustrated in detail later.
We select unit as dBSPL and limit the x-scale to start at 200 Hz and y-scale
between 20 and 120 dBSPL.
With the above settings we can run a dummy measurement. If we left the
microphone connected to CH A and phantom powered, as we did for the previous
example, the measurement will collect ambient noise
7
. The measurement settings
such as the measurement unit, smoothing and the graphic scales are stored with
the measurement. These settings are used during QC operations. To change the
settings it is needed to save the reference file again.
7 It is also possible to put the system in loop and measure the CLIO loopback response. In
this case please check that there are no cables connected to CLIO input and switch off
phantom power on measurement channel.
16/22 www.audiomatica.com

TESTING ANDROID SMARTPHONES WITH CLIO 12.5 QC
We save our dummy measurement as “sinusoidal.sin”.
Now we should follow the same procedure to save the sinusoidal test signal, using
the generator menu we choose “Save Current Signal” as “sinusoidal.wav”.
Let's have a look at the signal using CLIO Time Frequency Analysis tool. The
following figure shows the signal energy content through a color map with time on
x-axis and frequency on y-axis:
0
-5
-10
-15
-20
-25
dB
0
295 590 885
1180 1475 1770 2065 2360 2655 2950 ms
200
500
1k
2k
5k
10k
20k
200
Hz
Audiomatica Srl Time Frequency Analysis - Wavelet 10-21-2020 10.15.15 AM
Normalized Q 3.000 BW 0.333 octaves
The pilot tone at 10 kHz can be clearly seen at the beginning of the sinusoidal
downward frequency sweep.
17/22 www.audiomatica.com

TESTING ANDROID SMARTPHONES WITH CLIO 12.5 QC
We can copy the signal to the device storage:
>adb push "C:\Users\ponte\Desktop\QC_DROID\sinusoidal.wav"
"/sdcard/sinusoidal.wav"
We are ready to play the signal with our DUT through the adb command:
>adb shell am start -a android.intent.action.VIEW -d
file:///sdcard/sinusoidal.wav -t audio/* com.google.android.music
We should hear the device playing the usual sinusoidal sweep ranging from high
frequency down to low frequency, with a short beep at the beginning used for
synchronization.
In the case of the specific device under test in this application note we clearly hear
that the signal has a dropout. This happens due to the non-invariant nature of the
DUT which is engaging some form of transducer protection by limiting the output
power. This is not acceptable in our test, the only chance we have is to lower the
output volume, and achieve this with the adb command:
>adb shell media volume --set 9
Playing again the test signal at lower volume shows that there are no distortions or
drop-outs.
After each playback remember to restore the audio player app to prepare for a new
intent:
>adb shell am force-stop com.google.android.music
We are now ready to prepare a QC script to perform the measurement:
[GLOBALS]
COMPANY=AUDIOMATICA SRL
TITLE=ANDROID PLAYBACK RESPONSE PLUS THD AND RUB+BUZZ
[PERFORM]
EXTERNAL=INTENTSIN.BAT
DELAY=1000
[SIN]
OUT=1.000 V
INA=-40
INB=0
REFERENCE=SINUSOIDAL.SIN
LIMITS=LIMITS.LIM
[PERFORM]
EXTERNAL=STOP.BAT
Where intentsin.bat is invoking the intent to play the sinusoidal test signal:
@echo off
adb shell am start -a android.intent.action.VIEW -d
file:///sdcard/sinusoidal.wav -t audio/* com.google.android.music
The stop.bat is the same as in the previous example.
In this example we would like to show the response alongside THD
8
thus a simple
limits file (limits.lim) is needed:
[RELATIVE]
FREQJITTER=0.16
8 Rub'n'buzz curve is measured but not displayed.
18/22 www.audiomatica.com
TESTING ANDROID SMARTPHONES WITH CLIO 12.5 QC
[UPPER LIMIT DATA]
200 3
20000 3
[THD DISPLAY]
[THD UPPER LIMIT DATA]
200 55
5000 55
11000 45
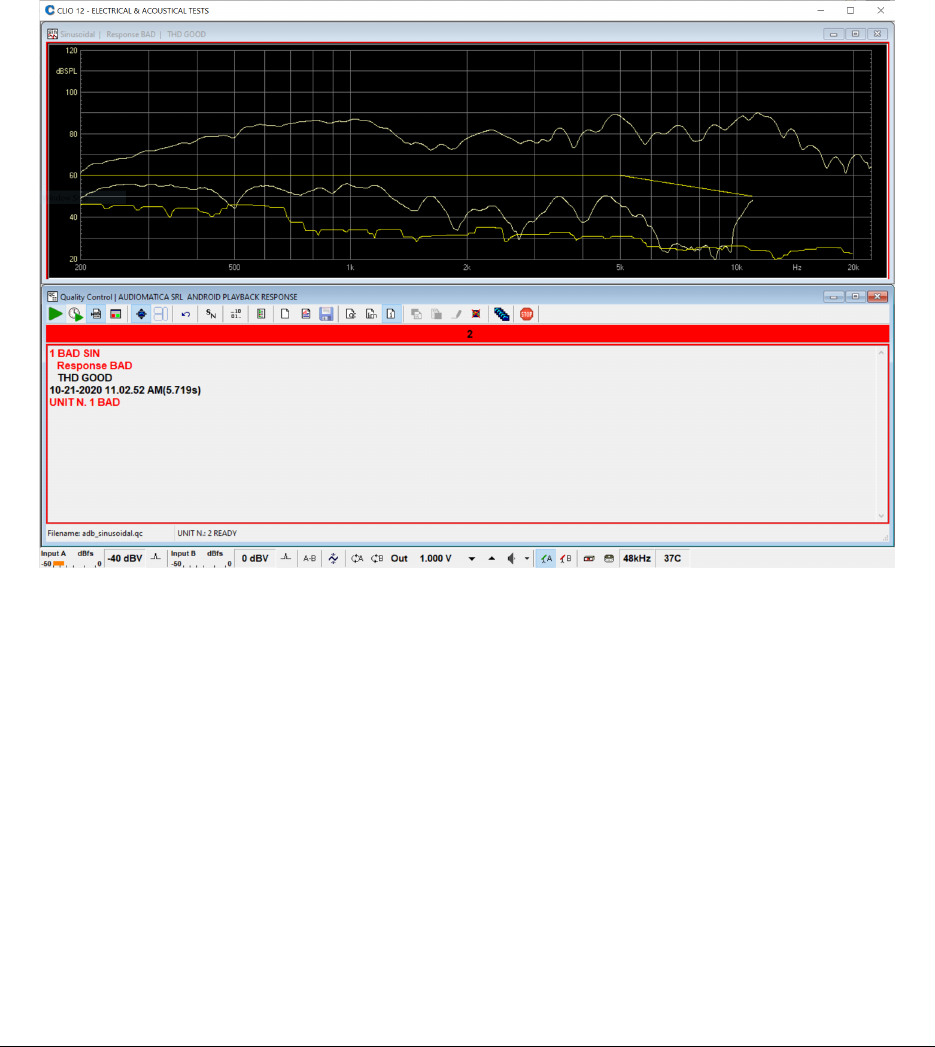
Let's run the QC test for the first time, this will lead to create the real reference
measurement, since the one we used was done without the DUT. This first
measurement will also help to understand if the QC script timing is correct and if
there are modifications of the script delay to be carried out.
We should probably get a BAD result, since the frequency response in the current
reference measurement is only noise. Nevertheless we should see the response and
THD curves:
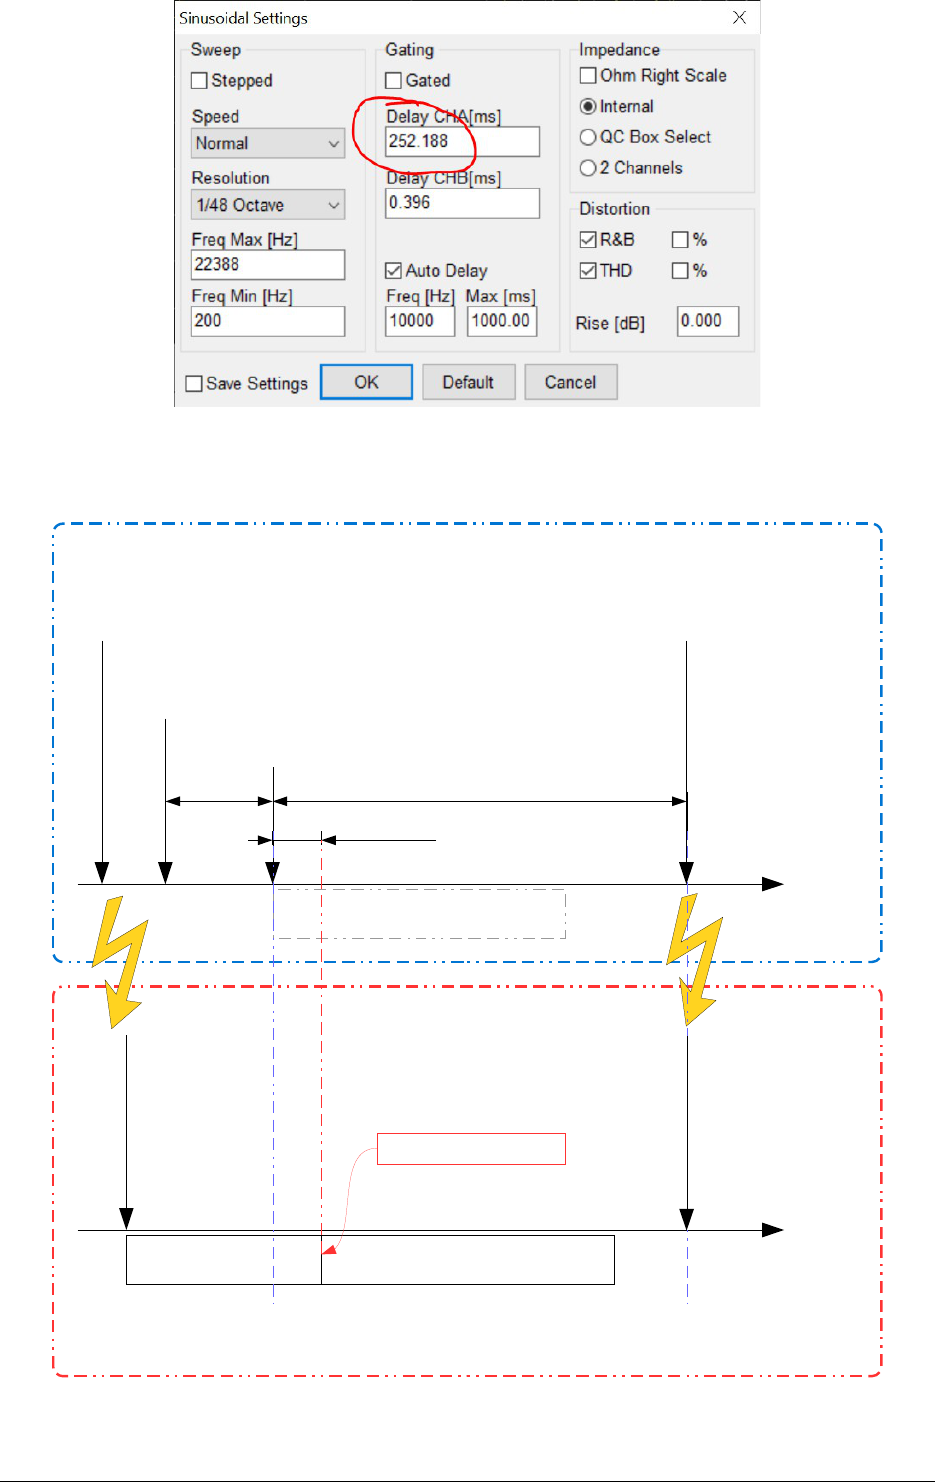
Now we can release the measurement from the QC menu, open the Sinusoidal
menu and inspect the settings.
19/22 www.audiomatica.com
TESTING ANDROID SMARTPHONES WITH CLIO 12.5 QC
Let's focus on the delay calculated by the Auto Delay procedure, this value in ms
gives us an idea of the timing of the script.
The following diagram can help to understand the timing of the whole procedure:
[PERFORM]
EXTERNAL=INTENTSIN.BAT
[PERFORM]
DELAY=1000
[SIN]
REFERENCE=SINUSOIDAL.SIN
LIMITS=LIMITS.LIM
delay
Sinusoidal Sweep
Adb intent
VIEW
adb_sinusoidal.qc
adb_sinusoidal.qc
CLIO 12
CLIO 12
Android Device
Android Device
Sinusoidal SweepLATENCY
Sinusoidal acquisition window
Delay CHA
Synchronization beep
[PERFORM]
EXTERNAL=STOP.BAT
Adb
force-stop
Here can be clearly seen that the DELAY=1000 introduced by the QC script is useful
to let the intent to be processed by the Android OS. Unfortunately the latency
20/22 www.audiomatica.com
TESTING ANDROID SMARTPHONES WITH CLIO 12.5 QC
introduced by the playback through intent is not completely predictable
9
, but a CH
A delay of about 250 ms tells us that the QC script delay value is sufficient and
leaves space for some uncertainty in the Android latency.
We can save the Sinusoidal response file overwriting the sinusoidal.sin reference
file
10
. From now on the reference frequency response will be the response measured
in the previous test.
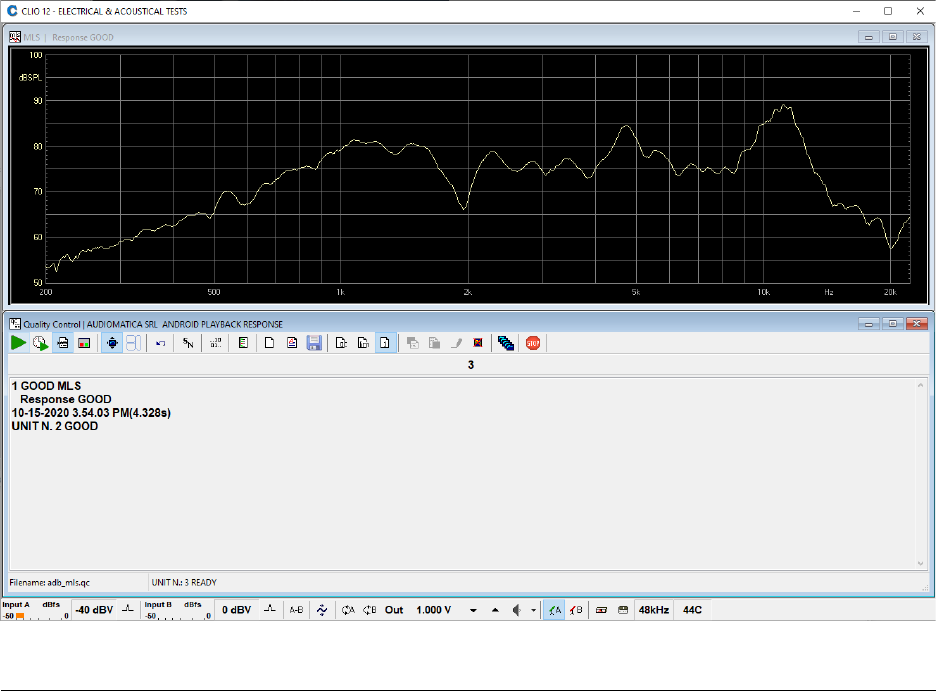
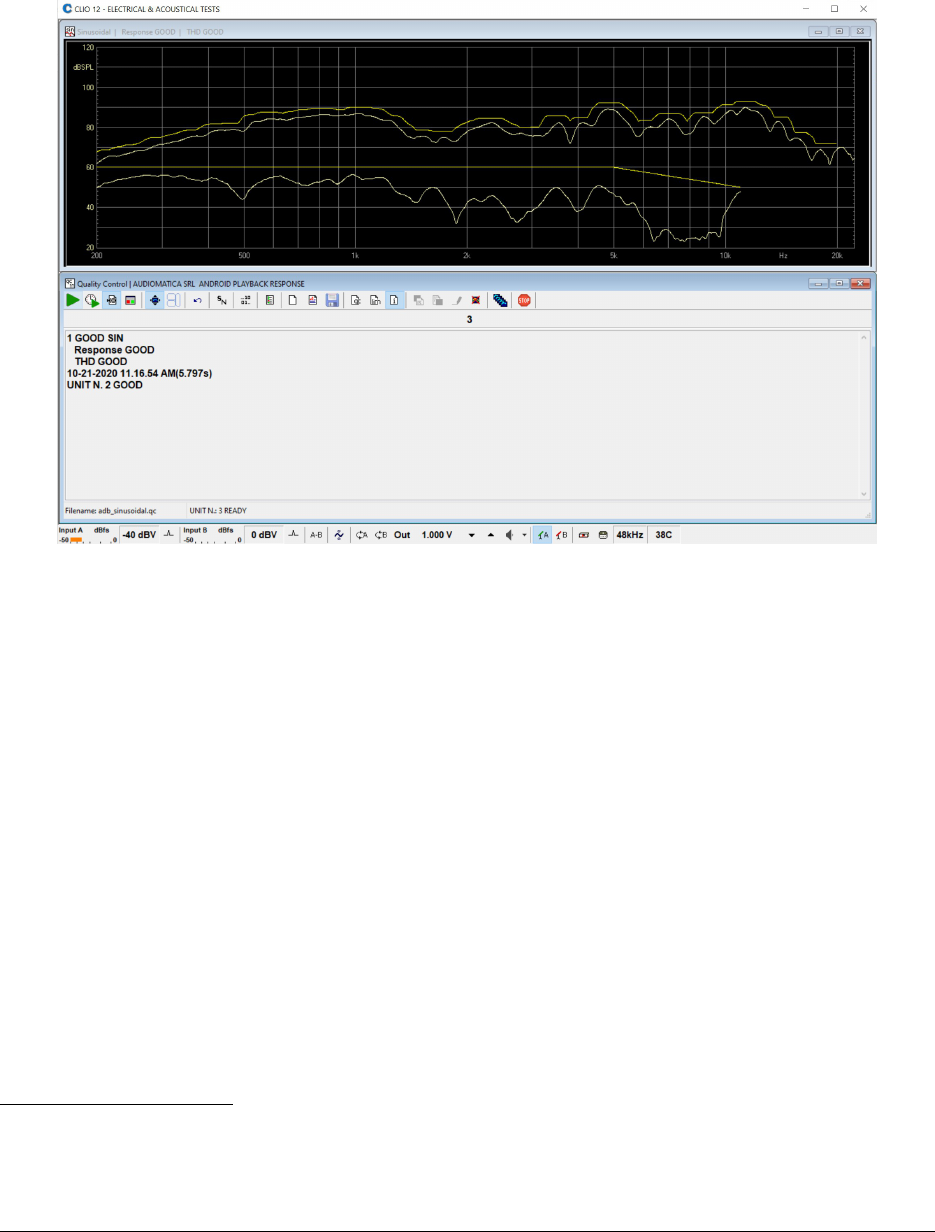
If we execute the QC script again, we should have a GOOD, with the two curves of
frequency response and THD.
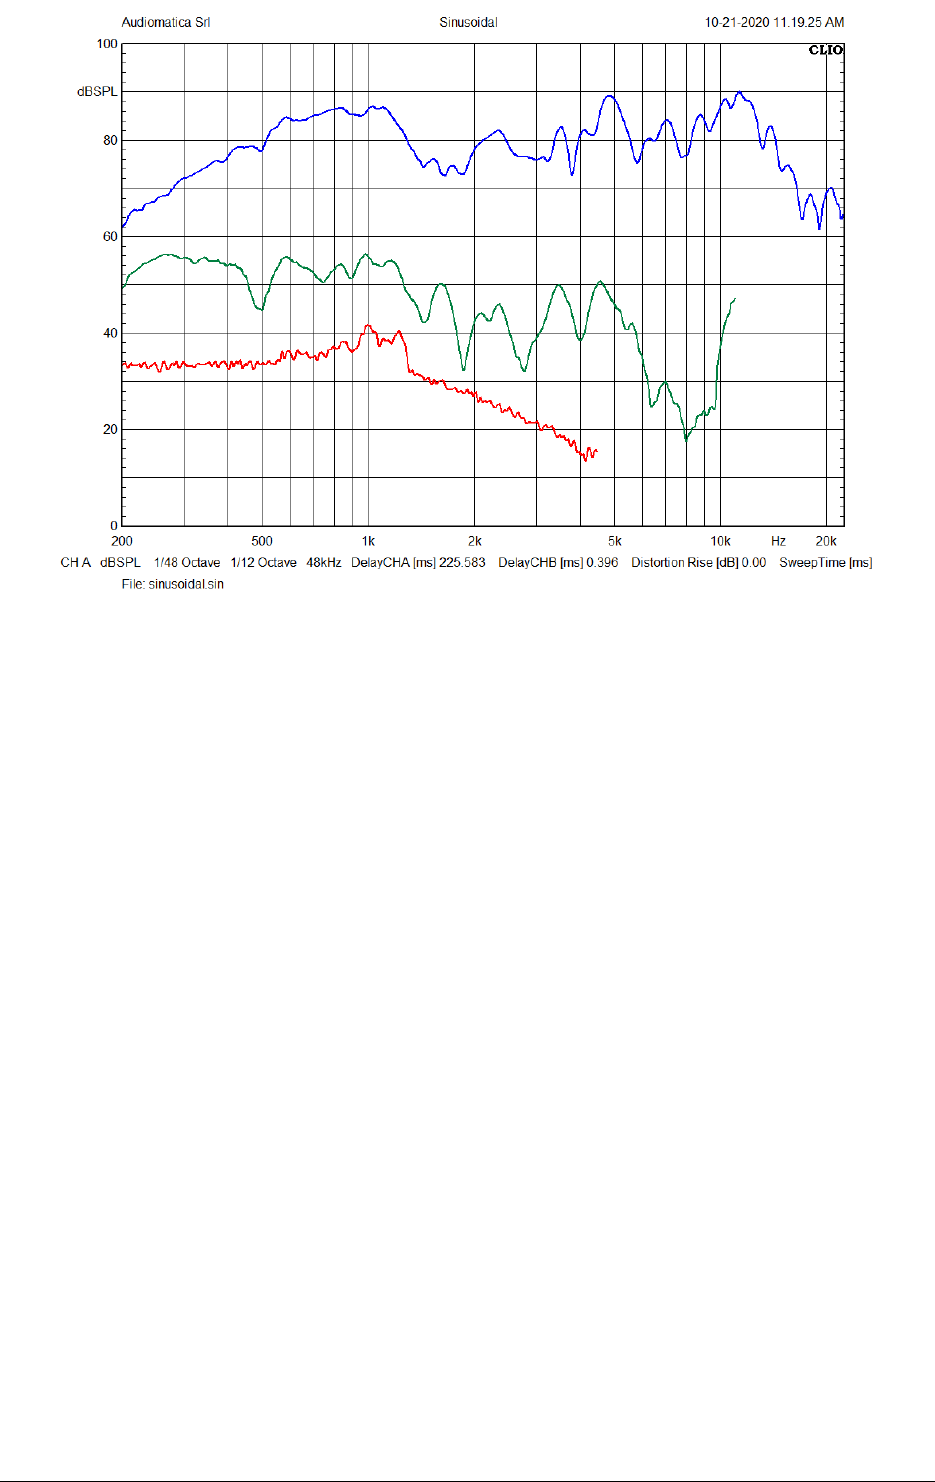
Even if not displayed in QC mode, the Rub+Buzz curve is measured and can be
seen by releasing the Sinusoidal measurement from the QC menu and inspecting it
(blue – magnitude frequency response; green – THD; red - Rub+Buzz):
9 Herein the term latency means the time between sending the adb intent and the start of
the test signal playback by the application on the device.
10 In this stage it is possible to adjust the x and y axis range of the frequency response
plot, the new settings will be saved with the measurement and applied to QC operations.
21/22 www.audiomatica.com
TESTING ANDROID SMARTPHONES WITH CLIO 12.5 QC
CONCLUSIONS
In this application note we have shown the possibility to test the playback of an
Android device through adb without the need to root the device or install a
vendor specific test application.
Albeit the methods herein shown are just a proof-of-concept, they can be applied to
real word use cases, such as the end of line test of Android devices, but can be also
useful in R&D applications.
While working on this application note we sadly found out that the Google Play
Music Application is going to be dismissed by Google following the closure of their
Play Music service which is transitioning to YouTube Music. For our purposes the
unavailability of the Google Play Music application which used to come preinstalled
in all Android devices using Google services is certainly a shame, but as wrote in
this report, any application which is able to playback a .wav file can be invoked
through explicit intent. We had success using VLC for Android as an example.
22/22 www.audiomatica.com
