
SEEDAndroid User Manual
SEEDAndroid User Manual
Copyright ©2016 Wenliang Du, Syracuse University. All rights reserved.
1 Overview
Using VirtualBox, we have created a pre-built virtual machine (VM) image for Android (Version 7.1). This
VM can be used for all our SEED labs that are based on Android. In this document we describe the
configuration of this VM, and give an overview of all of the software tools/apps that we have installed
on it. This VM is available to download from our SEED web page.
2 VM Configurations
2.1 Configuration of the VM
The main configuration of this VM is summarized in the following. If you are using VirtualBox, you can
adjust the configuration according to the resources of your Host machine (e.g. you can assign more
memory to this VM if your host machine has enough memory). Here is the minimal/recommended
configurations:
• Operating System: Android 7.1.2 (Nougat, API Level: 25) with Linux kernel v4.9.31
• Memory: 1024M RAM recommended
• Disk Space: 3GB – 15 GB dynamically allocated due to actual usage, 5GB or above is
recommended
2.2 Run Our Pre-built VM Image on VirtualBox
After download our VM, you can run it inside VirtualBox. We have written another manual called “How
to run SEEDAndroid on VirtualBox”. You can follow the instructions there to get Android running inside
VirtualBox. You can download the manual from our web site.
2.3 Network Setup
In most of our MobileSEED labs, we need to run multiple guest VMs, and these VMs should be able to
(1) reach out to the Internet, (2) communicate with each other. In order to achieve all these two goals,
we need to use a network adapter in VirtualBox called “NAT Network”. The improved Network Address
Translation (NAT Network) adapter works in a similar way to “local area network” or LAN. It enables
ATTENTION: Before using the Android VM, please at least read Section 3.1 about how to
release the mouse pointer. When you first use this VM, your mouse will be trapped into the
VM. To get out of it, you need to read the instructions in Section 3.1.
1
SEEDAndroid User Manual
VMs communication within the same local network as well as the communication to the Internet. The
instructions to set up this adapter are also included in “How to run SEEDAndroid on VirtualBox”.
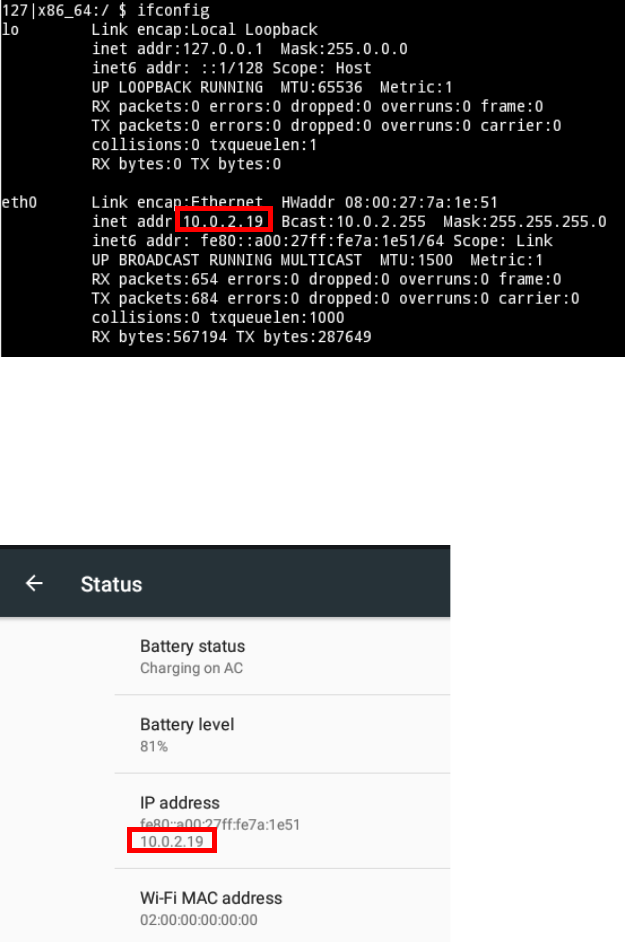
2.3 Find IP address of Android VM
For the environment setup, we need to know the IP address of the Android VM. There are two ways to
find IP address of our SEEDAndroid VM.
1) Using the Terminal Emulator App: Use the ifconfig command in the Terminal Emulator
application. Look for the interface eth0, you will get the IP address (see the following figure).
2) Using the Settings App: You can also use the Settings app to find the IP address. Go to the
Settings App -> About Tablet -> Status option. You will find one dialogue
box as shown in the following figure, from where you can get IP address of our SEEDAndroid
VM.
2
SEEDAndroid User Manual
3 Functionalities
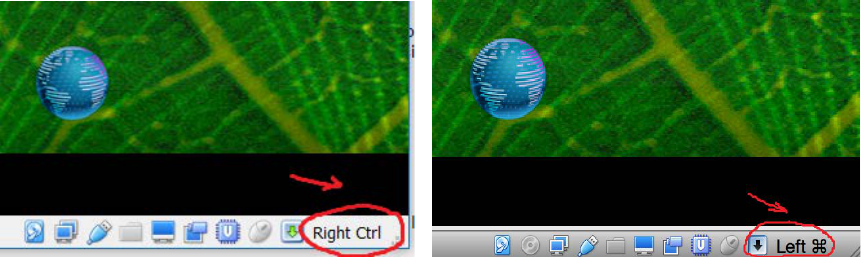
3.1 Capturing and releasing mouse
To interact with the Android OS, you have to click inside the VM window. As a consequence, the Host
OS's mouse pointer will disappear and the Android VM will trap your mouse pointer inside. If you don’t
know the right command, you cannot get your mouse pointer out of the Android VM.
To release the ownership of your mouse pointer from the Android VM, you need to press Host key
from your keyboard. This key is different on different OSes. For example, on Windows you can press the
“Right Control” key, while on MAC the “Left Command” key is used to as the default Host key. You can
find Host key for your OS at the right-bottom corner of your Android VM. As you can see in the following
images, in order to release ownership of mouse, there are different keys based on which OS you are
running (Windows/MAC).
The Host key for Windows (“Right Ctrl”) The Host key for MAC (“Left Command”)
3.2 Unfreeze the VM
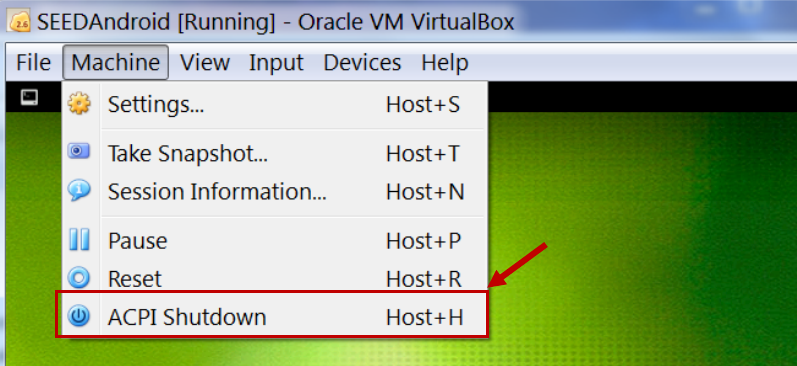
When you power on your SEEDAndroid VM, make sure to connect your laptop to the charger. This way,
your VM powers on with the “on-charge” option, and your VM will not freeze. If your VM does get
frozen, follow these steps to fix it:
After the VM becomes idle for a while, it seems that the VM freezes, and become non-interactive. The
reason is that the VM goes into the sleeping mode after a few minutes, just like the real devices. To
wake it up, on real devices, we have to push the power button; for the VM, we can click the following
menu item, which is equivalent to pushing the “power button”.
3
SEEDAndroid User Manual
3.3 Keyboard Shortcuts
There are several keyboard shortcuts that are quite useful while using this Android VM.
Common shortcuts:
• ESC = Go Back
• ALT+TAB = Show recent apps
• Host Key + H = Power Button (For windows)
• Host Key + U = Power Button (For MAC)
Screen rotation shortcuts:
• F9 (Press 2 times) = Normal view 0°/360°
• F10 (Press 2 times)= Rotate 180°
• F11 (Press 2 times)= Rotate 90° to the right
• F12 (Press 2 times)= Rotate 90° to the left
3.4 Android Debug Bridge (adb)
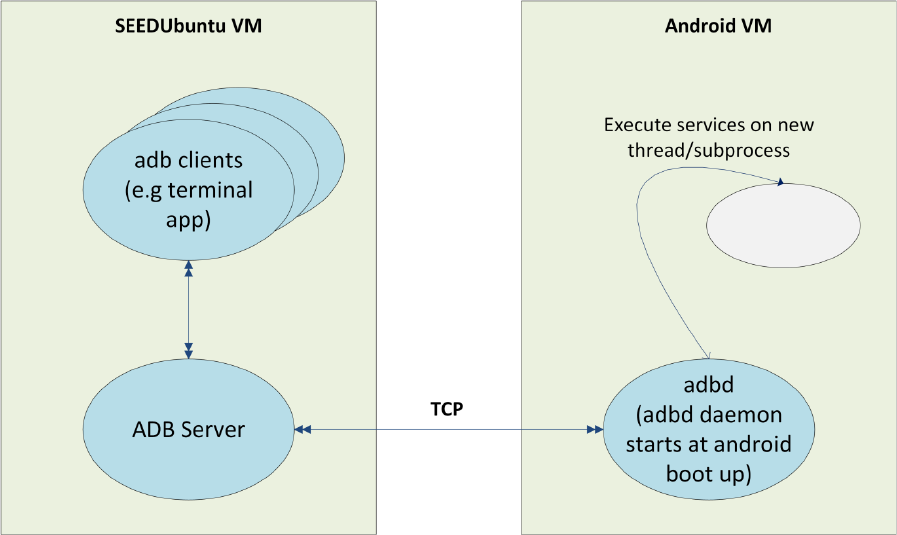
Most of our MobileSEED labs require communication between the Android VM and other VM e.g.
SEEDUbuntu16.04_x86 VM (SEEDUbuntu VM for short). In such case, adb is a very helpful command. We
have setup the adb server on our SEEDUbuntu VM which communicates with the adbd daemon running
inside Android. The general flow of how ADB server talks with the adbd daemon is shown in following
figure.
4
SEEDAndroid User Manual
Android Debug Bridge
Android Debug Bridge (adb) is a client-server program. You can invoke the adb client by issuing the adb
command. Once you have invoked the client, adb first checks if there's any ADB server process running
in the background; if not, adb starts a new server process. This server listens to the commands sent from
the adb client using the TCP port 5037 (by default).
The ADB server then scans through the odd-numbered ports in the range of 5555 to 5585 to find if there
is any attached physical Android device or emulator. If there is, the ADB server sets up connections to all
of these attached devices. Our Android VM is not attached to these ports on the local computer, so they
will not be discovered or connected by the ADB server; we need to manually connect to the Android
VM. The following commands can be used to communicate with our Android VM (although you can run
these commands from your host computer or other VM, it is more convenient to run them from our
SEEDUbuntu VM).
• adb connect <ip_address>
After knowing the IP address of the Android VM, this command is used to connect to the
adbd daemon in the Android VM.
• adb devices
Used to list all the connected Android VMs, physical Android devices, and emulators. Since
we are only interested in the Android VMs, for the adb commands listed below, we only
focus on Android VM, although the same commands can apply to other connected devices,
such as emulators and physical Android devices.
5
SEEDAndroid User Manual
• adb shell
Used to get the remote shell access of the connected Android VM.
• adb reboot
Used to restart the Android VM.
• adb install sample.apk
Used to install the sample.apk application on Android VM.
• adb uninstall sample.apk
Used to uninstall the sample.apk application from Android VM.
• adb pull <path on Android> <path on Ubuntu>
Used to transfer a file from Android VM to where the adb command is executed (i.e. the
Ubuntu VM).
• adb push <path on Ubuntu> <path on Android>
Similar to the pull command, the push command transfers a file to the Android VM from the
Ubuntu VM.
4 How to get root access on Android VM
Our Android VM is already rooted, which means you can gain the root privilege to do restricted tasks.
There are many ways to gain the root access. We list three methods in the followings:
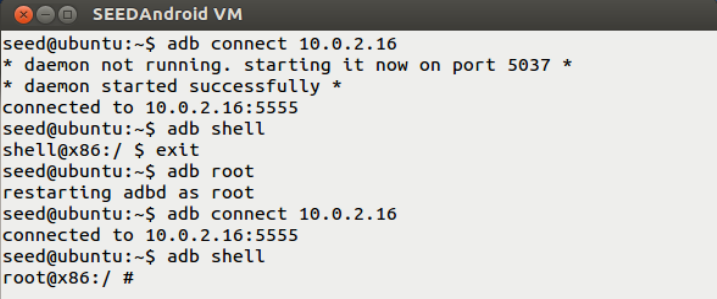
1) Using the “adb root” command from outside
When the adbd daemon is started, it runs with the root privilege. However, the daemon
reads some property values from the system and see whether the secure flag (ro.secure) is
set or not. If the flag is set, the adbd daemon will drop its root privileges and continues its
execution with the AID_SHELL user id (the id value is 2000). When the adbd daemon is
restarted due to the “adb root” command, this secure flag will be cleared, and the adbd
daemon will continue its execution as a root. We need to reconnect with the restarted
daemon using the “adb connect <ip_address>” command. Since this restarted adbd
daemon runs as a root, if you pass the “adb shell” command, it will give you a root shell.
See the following screenshot.
6
SEEDAndroid User Manual
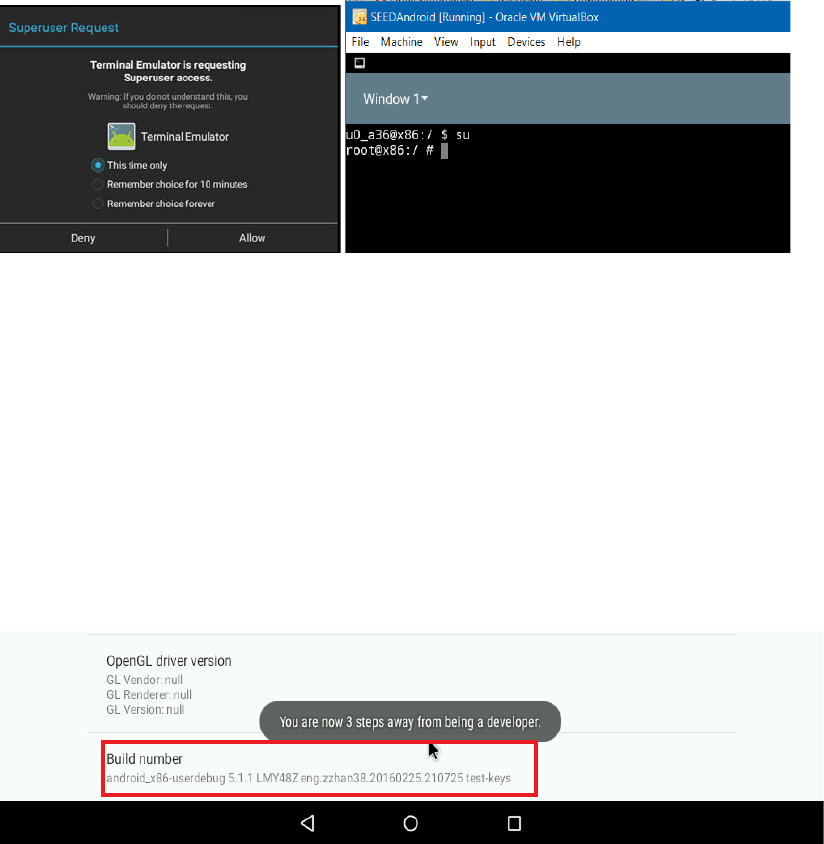
2) Using the su command from inside
Our Android VM already comes with a pre-installed su binary, along with the Superuser
manager app. We can simply type the su command in a terminal app. This command sends
a request to the manager app, which prompts the user to grant/deny the permission. If the
user approves, the manager app create a root shell process and gives the control of the
process to su. The prompt and results are shown in following figures.
Superuser prompt The su command and the root shell
3) Enabling option in SU
You can also change the level of root access by going into the Settings app. You need to
find out the root access option located in Settings App ->Developer options
-> Root Access. If you do not see the “Developer options” item in the Settings app, do
not panic. By default, this option is disabled, but you can enable it. Find the “Build number
option” located in Settings App -> About Tablet option; tap on it 7 times
(sounds weird, but we are not kidding). As shown in the following figure, you will get a
message saying "You are now a developer". This will enable the “Developer Options” in the
Settings app.
Enabling Developers Options
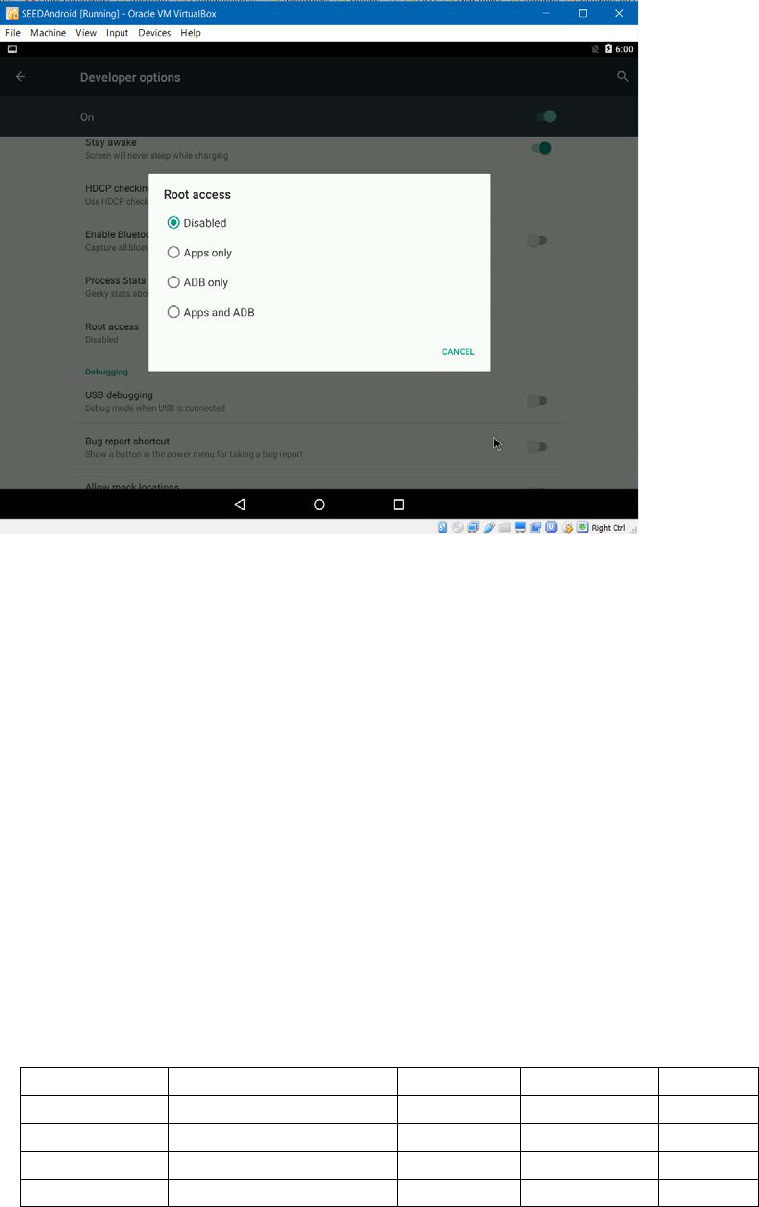
Once you see the “Developer Options”, you can click on it. Root access option will pop up a
dialogue box, from where you can select option related to your requirement. See the
following figure.
7
SEEDAndroid User Manual
There are generally 4 options included in the dialogue box. They are summarized in the
table below.
• Disable: By selecting this option, apps and ADB can't get root privilege to perform
their tasks. It will stop su daemon running in background.
• Apps only: This option will give the root privilege to any installed application. Apps
will get root access by running the su command internally.
• ADB only: This option will give the root privilege to ADB. It will stop any su
daemon running in the Android system. By intent, this switch should control
whether adb can gain the root privilege or not. However, since we built our VM
using the userdebug flag, some debug mechanism had been already compiled
into adbd, in our environment, “adb root” will always work no matter what status
this switch is.
• Apps and ADB: This option will give the root access to both apps and ADB by either
using “adb root” or the su command.
Table 1 Root Access Options
Switch
persist.sys.root_access
su daemon
su command
adb root
Disable
0
Stopped
Not work
Work
Apps only
1
Running
Work
Work
ADB only
2
Stopped
Not work
Work
Apps and ADB
3
Running
Work
Work
8
