
Oracle® Cloud
Using the PayPal Adapter with Oracle
Integration 3
F45598-05
April 2024
Oracle Cloud Using the PayPal Adapter with Oracle Integration 3,
F45598-05
Copyright © 2022, 2024, Oracle and/or its affiliates.
Primary Author: Oracle Corporation
This software and related documentation are provided under a license agreement containing restrictions on
use and disclosure and are protected by intellectual property laws. Except as expressly permitted in your
license agreement or allowed by law, you may not use, copy, reproduce, translate, broadcast, modify, license,
transmit, distribute, exhibit, perform, publish, or display any part, in any form, or by any means. Reverse
engineering, disassembly, or decompilation of this software, unless required by law for interoperability, is
prohibited.
The information contained herein is subject to change without notice and is not warranted to be error-free. If
you find any errors, please report them to us in writing.
If this is software, software documentation, data (as defined in the Federal Acquisition Regulation), or related
documentation that is delivered to the U.S. Government or anyone licensing it on behalf of the U.S.
Government, then the following notice is applicable:
U.S. GOVERNMENT END USERS: Oracle programs (including any operating system, integrated software,
any programs embedded, installed, or activated on delivered hardware, and modifications of such programs)
and Oracle computer documentation or other Oracle data delivered to or accessed by U.S. Government end
users are "commercial computer software," "commercial computer software documentation," or "limited rights
data" pursuant to the applicable Federal Acquisition Regulation and agency-specific supplemental
regulations. As such, the use, reproduction, duplication, release, display, disclosure, modification, preparation
of derivative works, and/or adaptation of i) Oracle programs (including any operating system, integrated
software, any programs embedded, installed, or activated on delivered hardware, and modifications of such
programs), ii) Oracle computer documentation and/or iii) other Oracle data, is subject to the rights and
limitations specified in the license contained in the applicable contract. The terms governing the U.S.
Government's use of Oracle cloud services are defined by the applicable contract for such services. No other
rights are granted to the U.S. Government.
This software or hardware is developed for general use in a variety of information management applications.
It is not developed or intended for use in any inherently dangerous applications, including applications that
may create a risk of personal injury. If you use this software or hardware in dangerous applications, then you
shall be responsible to take all appropriate fail-safe, backup, redundancy, and other measures to ensure its
safe use. Oracle Corporation and its affiliates disclaim any liability for any damages caused by use of this
software or hardware in dangerous applications.
Oracle®, Java, MySQL, and NetSuite are registered trademarks of Oracle and/or its affiliates. Other names
may be trademarks of their respective owners.
Intel and Intel Inside are trademarks or registered trademarks of Intel Corporation. All SPARC trademarks are
used under license and are trademarks or registered trademarks of SPARC International, Inc. AMD, Epyc,
and the AMD logo are trademarks or registered trademarks of Advanced Micro Devices. UNIX is a registered
trademark of The Open Group.
This software or hardware and documentation may provide access to or information about content, products,
and services from third parties. Oracle Corporation and its affiliates are not responsible for and expressly
disclaim all warranties of any kind with respect to third-party content, products, and services unless otherwise
set forth in an applicable agreement between you and Oracle. Oracle Corporation and its affiliates will not be
responsible for any loss, costs, or damages incurred due to your access to or use of third-party content,
products, or services, except as set forth in an applicable agreement between you and Oracle.
For information about Oracle's commitment to accessibility, visit the Oracle Accessibility Program website at
http://www.oracle.com/pls/topic/lookup?ctx=acc&id=docacc
.

Contents
Preface
Audience v
Documentation Accessibility v
Diversity and Inclusion v
Related Resources vi
Conventions vi
1
Understand the PayPal Adapter
PayPal Adapter Capabilities 1-1
What Application Version Is Supported? 1-2
Workflow to Create and Add a PayPal Adapter Connection to an Integration 1-2
2
Create a PayPal Adapter Connection
Prerequisites for Creating a Connection 2-1
Create a Connection 2-2
Configure Connection Properties 2-3
Configure Connection Security 2-4
Configure the Endpoint Access Type 2-4
Test the Connection 2-5
Upload a Certificate to Connect with External Services 2-5
3
Add the PayPal Adapter Connection to an Integration
Basic Info Page 3-1
Trigger Operations Page 3-1
Invoke Action Page 3-2
Invoke Operations Page 3-3
Summary Page 3-4
iii


Preface
This guide describes how to configure this adapter as a connection in an integration in Oracle
Integration.
Note:
The use of this adapter may differ depending on the features you have, or whether
your instance was provisioned using Standard or Enterprise edition. These
differences are noted throughout this guide.
Topics:
• Audience
• Documentation Accessibility
• Diversity and Inclusion
• Related Resources
• Conventions
Audience
This guide is intended for developers who want to use this adapter in integrations in Oracle
Integration.
Documentation Accessibility
For information about Oracle's commitment to accessibility, visit the Oracle Accessibility
Program website at
https://www.oracle.com/corporate/accessibility/
.
Access to Oracle Support
Oracle customers that have purchased support have access to electronic support through My
Oracle Support. For information, visit
https://support.oracle.com/portal/
or visit
Oracle
Accessibility Learning and Support
if you are hearing impaired.
Diversity and Inclusion
Oracle is fully committed to diversity and inclusion. Oracle respects and values having a
diverse workforce that increases thought leadership and innovation. As part of our initiative to
build a more inclusive culture that positively impacts our employees, customers, and
partners, we are working to remove insensitive terms from our products and documentation.
v

We are also mindful of the necessity to maintain compatibility with our customers'
existing technologies and the need to ensure continuity of service as Oracle's offerings
and industry standards evolve. Because of these technical constraints, our effort to
remove insensitive terms is ongoing and will take time and external cooperation.
Related Resources
See these Oracle resources:
• Oracle Cloud at
http://cloud.oracle.com
• Using Integrations in Oracle Integration 3
• Using the Oracle Mapper with Oracle Integration 3
• Oracle Integration documentation on the Oracle Help Center.
Conventions
The following text conventions are used in this document:
Convention Meaning
boldface
Boldface type indicates graphical user interface elements associated
with an action, or terms defined in text or the glossary.
italic Italic type indicates book titles, emphasis, or placeholder variables for
which you supply particular values.
monospace
Monospace type indicates commands within a paragraph, URLs, code
in examples, text that appears on the screen, or text that you enter.
Preface
vi

1
Understand the PayPal Adapter
Review the following conceptual topics to learn about the PayPal Adapter and how to use it
as a connection in integrations in Oracle Integration. A typical workflow of adapter and
integration tasks is also provided.
Topics:
• PayPal Adapter Capabilities
• What Application Version Is Supported?
• Workflow to Create and Add a PayPal Adapter Connection to an Integration
Note:
There are overall service limits for Oracle Integration. A service limit is the quota or
allowance set on a resource. See Service Limits.
PayPal Adapter Capabilities
The PayPal Adapter enables you to create an integration with the PayPal application.
The PayPal Adapter provides the following benefits:
• Supports connecting to private resources that are in your virtual cloud network (VCN)
with a private endpoint. See Connect to Private Resources in Provisioning and
Administering Oracle Integration 3 and Configure the Endpoint Access Type. This type of
connection does not use the connectivity agent.
• Provides invoke (target) connection support for performing the following types of actions
against the selected object and operation:
– Create or Update Information (create or update records in PayPal)
– Delete Information (delete invoicing records or a template from PayPal)
– Query Information (get records from PayPal)
• Provides trigger (source) connection support for performing various types of actions
against events from the following modules:
– Billing
– Catalog
– Checkout
– Invoicing
– Payment
• Provides invoke (target) connection support for performing various types of operations
against objects from the following modules:
1-1

– Add Tracking
– Catalog Products
– Invoicing
– Orders
– Payments
– Payouts
– Subscriptions
– Transaction Search
• Supports the following integration patterns:
– Batch Operation: Supported by the Payouts and Add Tracking modules.
– Invoke (outbound)
– Query (outbound)
• Support for PayPal APIs protected using OAuth 2.0 client credentials
authentication.
You can configure the PayPal Adapter as a trigger and an invoke connection in an
integration in Oracle Integration. The PayPal Adapter is one of many predefined
adapters included with Oracle Integration. See the Adapters page in the Oracle Help
Center.
What Application Version Is Supported?
For information about which application version is supported by this adapter, see the
Connectivity Certification Matrix.
Workflow to Create and Add a PayPal Adapter Connection
to an Integration
You follow a very simple workflow to create a connection with an adapter and include
the connection in an integration in Oracle Integration.
This table lists the workflow steps for both the adapter tasks and the overall integration
tasks, and provides links to instructions for each step.
Step Description More Information
1 Access Oracle Integration. Go to
https://instance_URL/ic/
home/
2 Create the adapter connections for the
applications you want to integrate. The
connections can be reused in multiple
integrations and are typically created by the
administrator.
Create a PayPal Adapter Connection
3 Create the integration. When you do this, you
add trigger (source) and invoke (target)
connections to the integration.
Create Integrations in Using
Integrations in Oracle Integration 3
and Add the PayPal Adapter
Connection to an Integration
Chapter 1
What Application Version Is Supported?
1-2

Step Description More Information
4 Map data between the trigger connection data
structure and the invoke connection data
structure.
Map Data in Using Integrations in
Oracle Integration 3
5 (Optional) Create lookups that map the
different values used by those applications to
identify the same type of object (such as
gender codes or country codes).
Manage Lookups in Using
Integrations in Oracle Integration 3
6 Activate the integration. Activate Integrations in Using
Integrations in Oracle Integration 3
7 Monitor the integration on the dashboard. Monitor Integrations in Using
Integrations in Oracle Integration 3
8 Track payload fields in messages during
runtime.
Assign Business Identifiers for
Tracking Fields in Messages and
Manage Business Identifiers for
Tracking Fields in Messages in Using
Integrations in Oracle Integration 3
9 Manage errors at the integration level,
connection level, or specific integration
instance level.
Manage Errors in Using Integrations
in Oracle Integration 3
Chapter 1
Workflow to Create and Add a PayPal Adapter Connection to an Integration
1-3
2
Create a PayPal Adapter Connection
A connection is based on an adapter. You define connections to the specific cloud
applications that you want to integrate. The following topics describe how to define
connections.
Topics:
• Prerequisites for Creating a Connection
• Create a Connection
• Upload a Certificate to Connect with External Services
Prerequisites for Creating a Connection
You must satisfy the following prerequisites to create a connection with the PayPal Adapter:
Creating an App and Obtaining the Client ID and Client Secret
To generate the client ID and client secret, you must create an app using the PayPal
Developer Dashboard.
1. Log in to your PayPal Developer Dashboard with the following URL:
https://developer.paypal.com/developer/applications
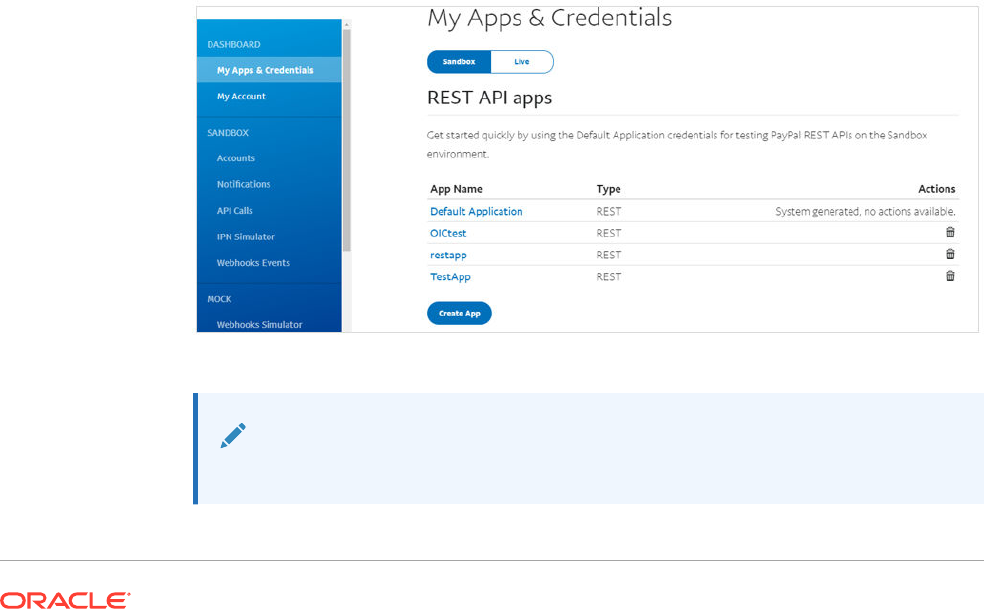
2. Click My Apps & Credentials.
Note:
You can use the toggle to switch between the sandbox and live environments.
2-1
3. Click Create App under the REST API apps section.
4. Enter a name for your app and click Create App. The app details page is
displayed.
5. Copy the client ID and client secret for your app.
You'll need to enter those values on the Connections page when you configure
security for your PayPal Adapter connection in Oracle Integration. See Configure
Connection Security.
Create a Connection
Before you can build an integration, you must create the connections to the
applications with which you want to share data.
To create a connection in Oracle Integration:
1. In the navigation pane, click Design, then Connections.
2. Click Create.
Note:
You can also create a connection in the integration canvas. See Define
Inbound Triggers and Outbound Invokes.
3. In the Create connection panel, select the adapter to use for this connection. To
find the adapter, scroll through the list, or enter a partial or full name in the Search
field.
4. Enter the information that describes this connection.
Element Description
Name Enter a meaningful name to help others find
your connection when they begin to create
their own integrations.
Identifier Automatically displays the name in capital
letters that you entered in the Name field. If
you modify the identifier name, don't include
blank spaces (for example,
SALES
OPPORTUNITY
).
Chapter 2
Create a Connection
2-2

Element Description
Role Select the role (direction) in which to use
this connection (trigger, invoke, or both).
Only the roles supported by the adapter are
displayed for selection. When you select a
role, only the connection properties and
security policies appropriate to that role are
displayed on the Connections page. If you
select an adapter that supports both invoke
and trigger, but select only one of those
roles, you'll get an error when you try to drag
the adapter into the section you didn't select.
For example, assume you configure a
connection for the Oracle Service Cloud
(RightNow) Adapter as only an invoke.
Dragging the adapter to a trigger section in
the integration produces an error.
Keywords
Enter optional keywords (tags). You can
search on the connection keywords on the
Connections page.
Description Enter an optional description of the
connection.
Share with other projects Note: This field only appears if you are
creating a connection in a project.
Select to make this connection publicly
available in other projects. Connection
sharing eliminates the need to create and
maintain separate connections in different
projects.
When you configure an adapter connection
in a different project, the Use a shared
connection field is displayed at the top of
the Connections page. If the connection you
are configuring matches the same type and
role as the publicly available connection, you
can select that connection to reference
(inherit) its resources.
See Add and Share a Connection Across a
Project.
5. Click Create.
Your connection is created. You're now ready to configure the connection properties,
security policies, and (for some connections) access type.
Configure Connection Properties
Enter connection information so your application can process requests.
1. Go to the Properties section.
2. In the PayPal environment field, select the environment (Sandbox or Live) from the
dropdown list.
Chapter 2
Create a Connection
2-3

Note:
You may encounter some stability issues in the PayPal sandbox because
it is not as stable as a live environment.
Configure Connection Security
Configure security for your PayPal Adapter connection by specifying the client ID and
client secret.
1. Go to the Security section.
2. In the Client Id field, enter the client ID that you obtained after performing the
steps in the prerequisites section. See Creating an App and Obtaining the Client
ID and Client Secret.
3. In the Client Secret field, enter the client secret that you obtained after performing
the steps in the prerequisites section. See Creating an App and Obtaining the
Client ID and Client Secret.
Configure the Endpoint Access Type
Configure access to your endpoint. Depending on the capabilities of the adapter you
are configuring, options may appear to configure access to the public internet, to a
private endpoint, or to an on-premises service hosted behind a fire wall.
• Select the Endpoint Access Type
• Ensure Private Endpoint Configuration is Successful
Select the Endpoint Access Type
Select the option for accessing your endpoint.
Option This Option Appears If Your Adapter
Supports ...
Public gateway
Connections to endpoints using the public
internet.
Private endpoint
Connections to endpoints using a private
virtual cloud network (VCN).
Note: To connect to private endpoints, you
must complete prerequisite tasks in the Oracle
Cloud Infrastructure Console. Failure to do so
results in errors when testing the connection.
See Connect to Private Resources in
Provisioning and Administering Oracle
Integration 3 and Troubleshoot Private
Endpoints in Using Integrations in Oracle
Integration 3.
Ensure Private Endpoint Configuration is Successful
• To connect to private endpoints, you must complete prerequisite tasks in the
Oracle Cloud Infrastructure Console. Failure to do so results in errors when testing
Chapter 2
Create a Connection
2-4

the connection. See Connect to Private Resources in Provisioning and Administering
Oracle Integration 3.
• When configuring an adapter on the Connections page to connect to endpoints using a
private network, specify the fully-qualified domain name (FQDN) and not the IP address.
If you enter an IP address, validation fails when you click Test.
• IPSec tunneling and FastConnect are not supported for use with private endpoints.
Test the Connection
Test your connection to ensure that it's configured successfully.
1. In the page title bar, click Test. What happens next depends on whether your adapter
connection uses a Web Services Description Language (WSDL) file. Only some adapter
connections use WSDLs.
If Your Connection... Then...
Doesn't use a WSDL The test starts automatically and validates the inputs you provided for the
connection.
Uses a WSDL A dialog prompts you to select the type of connection testing to perform:
• Validate and Test: Performs a full validation of the WSDL, including
processing of the imported schemas and WSDLs. Complete
validation can take several minutes depending on the number of
imported schemas and WSDLs. No requests are sent to the
operations exposed in the WSDL.
• Test: Connects to the WSDL URL and performs a syntax check on
the WSDL. No requests are sent to the operations exposed in the
WSDL.
2. Wait for a message about the results of the connection test.
• If the test was successful, then the connection is configured properly.
• If the test failed, then edit the configuration details you entered. Check for typos and
verify URLs and credentials. Continue to test until the connection is successful.
3. When complete, click Save.
Upload a Certificate to Connect with External Services
Certificates allow Oracle Integration to connect with external services. If the external service/
endpoint needs a specific certificate, request the certificate and then import it into Oracle
Integration.
If you make an SSL connection in which the root certificate does not exist in Oracle
Integration, an exception error is thrown. In that case, you must upload the appropriate
certificate. A certificate enables Oracle Integration to connect with external services. If the
external endpoint requires a specific certificate, request the certificate and then upload it into
Oracle Integration.
1. Sign in to Oracle Integration.
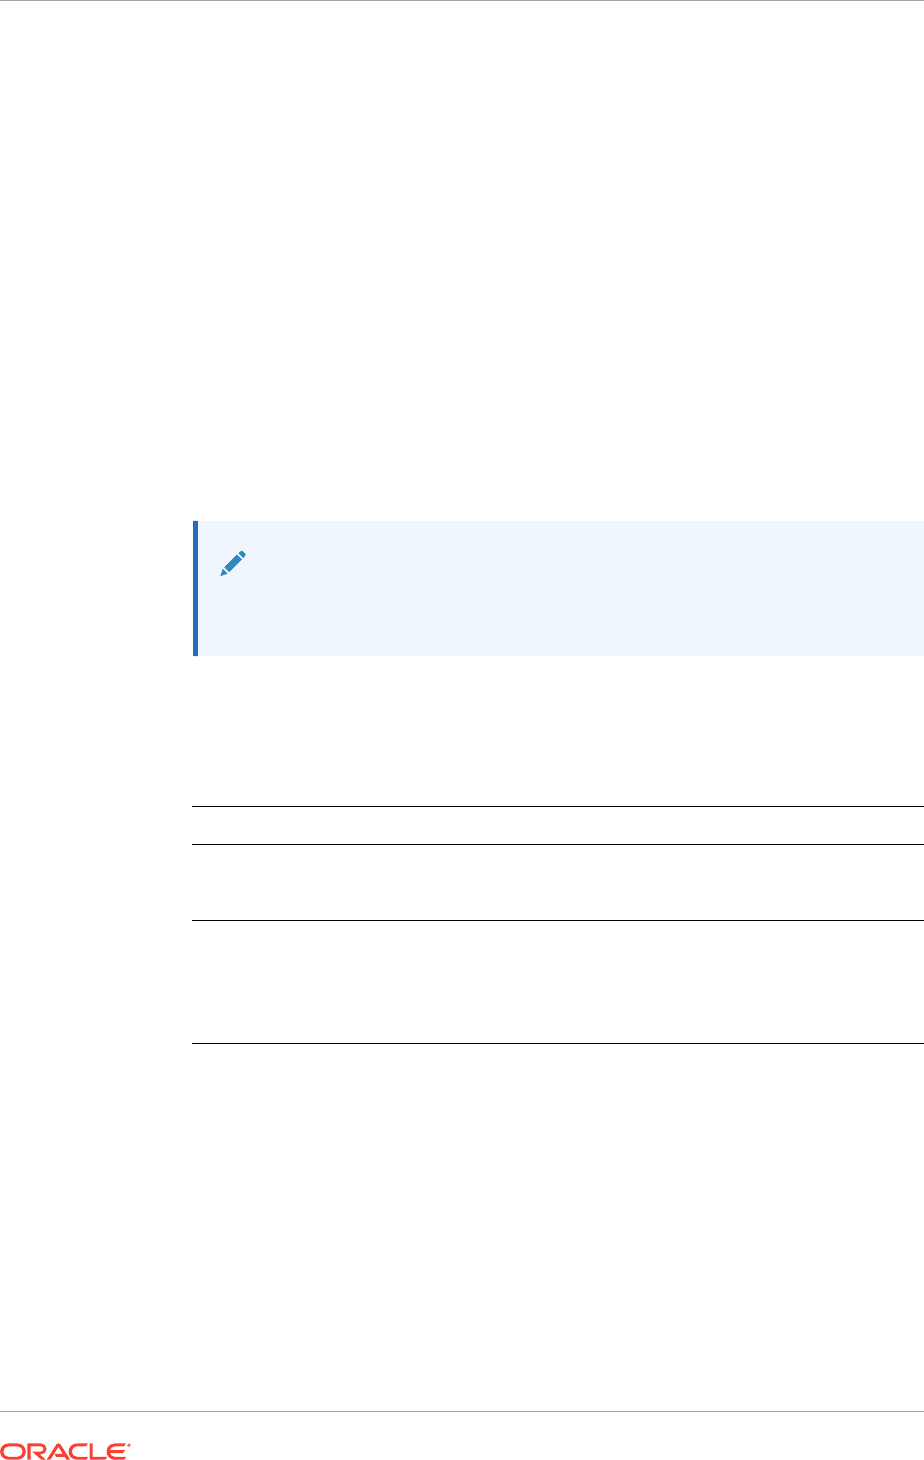
2. In the navigation pane, click Settings, then Certificates.
All certificates currently uploaded to the trust store are displayed on the Certificates page.
Chapter 2
Upload a Certificate to Connect with External Services
2-5
3. Click Filter to filter by name, certificate expiration date, status, type, category,
and installation method (user-installed or system-installed). Certificates installed
by the system cannot be deleted.
4. Click Upload at the top of the page.
The Upload certificate panel is displayed.
5. Enter an alias name and optional description.
6. In the Type field, select the certificate type. Each certificate type enables Oracle
Integration to connect with external services.
• Digital Signature
• X.509 (SSL transport)
• SAML (Authentication & Authorization)
• PGP (Encryption & Decryption)
• Signing key
Digital Signature
The digital signature security type is typically used with adapters created with the
Rapid Adapter Builder. See Learn About the Rapid Adapter Builder in Oracle
Integration in Using the Rapid Adapter Builder with Oracle Integration 3.
1. Click Browse to select the digital certificate. The certificate must be an
X509Certificate. This certificate provides inbound RSA signature validation. See
Implement Digital Signature Validation (RSA) in Using the Rapid Adapter Builder
with Oracle Integration 3.
2. Click Upload.
X.509 (SSL transport)
1. Select a certificate category.
a. Trust: Use this option to upload a trust certificate.
i. Click Browse, then select the trust file (for example,
.cer
or
.crt
) to
upload.
Chapter 2
Upload a Certificate to Connect with External Services
2-6

b. Identity: Use this option to upload a certificate for two-way SSL communication.
i. Click Browse, then select the keystore file (
.jks
) to upload.
ii. Enter the comma-separated list of passwords corresponding to key aliases.
Note:
When an identity certificate file (
.jks
) contains more than one private
key, all the private keys must have the same password. If the private
keys are protected with different passwords, the private keys cannot be
extracted from the keystore.
iii. Enter the password of the keystore being imported.
c. Click Upload.
SAML (Authentication & Authorization)
1. Note that Message Protection is automatically selected as the only available certificate
category and cannot be deselected. Use this option to upload a keystore certificate with
SAML token support. Create, read, update, and delete (CRUD) operations are supported
with this type of certificate.
2. Click Browse, then select the certificate file (
.cer
or
.crt
) to upload.
3. Click Upload.
PGP (Encryption & Decryption)
1. Select a certificate category. Pretty Good Privacy (PGP) provides cryptographic privacy
and authentication for communication. PGP is used for signing, encrypting, and
decrypting files. You can select the private key to use for encryption or decryption when
configuring the stage file action.
a. Private: Uses a private key of the target location to decrypt the file.
i. Click Browse, then select the PGP file to upload.
ii. Enter the PGP private key password.
b. Public: Uses a public key of the target location to encrypt the file.
i. Click Browse, then select the PGP file to upload.
ii. In the ASCII-Armor Encryption Format field, select Yes or No.
• Yes shows the format of the encrypted message in ASCII armor. ASCII
armor is a binary-to-textual encoding converter. ASCII armor formats
encrypted messaging in ASCII. This enables messages to be sent in a
standard messaging format. This selection impacts the visibility of message
content.
• No causes the message to be sent in binary format.
iii. From the Cipher Algorithm list, select the algorithm to use. Symmetric-key
algorithms for cryptography use the same cryptographic keys for both encryption
of plain text and decryption of cipher text. The following supported cipher
algorithms are FIPS-compliant:
• AES128
Chapter 2
Upload a Certificate to Connect with External Services
2-7

• AES192
• AES256
• TDES
c. Click Upload.
Signing key
A signing key is a secret key used to establish trust between applications. Signing
keys are used to sign ID tokens, access tokens, SAML assertions, and more. Using a
private signing key, the token is digitally signed and the server verifies the authenticity
of the token by using a public signing key. You must upload a signing key to use the
OAuth Client Credentials using JWT Client Assertion and OAuth using JWT User
Assertion security policies in REST Adapter invoke connections. Only PKCS1- and
PKCS8-formatted files are supported.
1. Select Public or Private.
2. Click Browse to upload a key file.
If you selected Private, and the private key is encrypted, a field for entering the
private signing key password is displayed after key upload is complete.
3. Enter the private signing key password. If the private signing key is not encrypted,
you are not required to enter a password.
4. Click Upload.
Chapter 2
Upload a Certificate to Connect with External Services
2-8

3
Add the PayPal Adapter Connection to an
Integration
When you drag the PayPal Adapter into the trigger or invoke area of an integration, the
Adapter Endpoint Configuration Wizard is invoked. This wizard guides you through
configuration of the PayPal Adapter endpoint properties.
The following sections describe the wizard pages that guide you through configuration of the
PayPal Adapter as a trigger and an invoke in an integration.
Topics:
• Basic Info Page
• Trigger Operations Page
• Invoke Action Page
• Invoke Operations Page
• Summary Page
Basic Info Page
You can enter a name and description on the Basic Info page of each adapter in your
integration.
Element Description
What do you want to call
your endpoint?
Provide a meaningful name so that others can understand the
responsibilities of this connection. You can include English alphabetic
characters, numbers, underscores, and hyphens in the name. You can't
include the following characters:
• No blank spaces (for example,
My Inbound Connection
)
• No special characters (for example,
#;83&
or
righ(t)now4
)
except underscores and hyphens
• No multibyte characters
What does this endpoint
do?
Enter an optional description of the connection’s responsibilities. For
example:
This connection receives an inbound request to
synchronize account information with the cloud
application.
Trigger Operations Page
Use the Operations page to select the module and event to perform in the PayPal application.
3-1

Element Description
Select Model
•
Billing: Configures billing and billing-related business
objects/events such as Billing Plan Created, Billing
Subscription Activated, and so on.
•
Invoicing: Configures invoicing and invoicing-related
business objects/events such as Invoicing Invoice Created,
Invoicing Invoice Refunded, and so on.
•
Payment: Configures payment and payment-related business
objects/events such as Payment Capture Completed,
Payment Authorization Voided, Payment Order Created, and
so on.
•
Checkout: Configures checkout and checkout-related
business objects/events such as Checkout Order Approved,
Checkout Order Voided, Checkout Buyer Approved, and so
on.
•
Catalog: Configures catalog products and catalog product-
related business objects/events such as Catalog Product
Created and Catalog Product Updated.
Select API Version
Select the API version to use.
Select Object
Select an object within the selected module.
Filter By Object Name
Type the initial letters of the object name to filter the display of
names in the list.
Select Event Select an event name, such as Payment Authorization Created.
Filter by Event Name
Type the initial letters of the event name to filter the display of
names in the list.
Invoke Action Page
Use the Action page to select the type of action to perform in PayPal. You can retrieve
information from the PayPal application or create or update records.
Element Description
Which action do you
want to perform in
PayPal?
•
Query: Retrieves information from the PayPal application
corresponding to the selected object and operation.
•
Create or Update: Creates new records or updates the
existing records in the PayPal application.
•
Delete: Deletes the invoicing records or templates from the
PayPal application.
Chapter 3
Invoke Action Page
3-2

Invoke Operations Page
Use the Operations page to select the module and operation to perform in the PayPal
application.
Element Description
Select Module
•
Add Tracking: Configures tracking and tracking-related business
objects/operations such as Show Tracking Information.
•
Catalog Products: Configures catalog products and catalog
product-related business objects/operations such as Create
Product, Show Product Details, and so on.
•
Invoicing: Configures invoicing and invoicing-related business
objects/events such as Send Invoice, Create Template, Delete
Template, Record Refund For Invoice, and so on.
Note: The Generate QA Code operation is not currently
supported by the PayPal Adapter.
•
Orders: Configures orders and order-related business objects/
operations such as Create Order, Authorize Payment For Order,
Show Order Details, and so on.
•
Payments: Configures payments and payment-related business
objects/operations such as Capture Authorized Payment, Void
Authorized Payment, Show Details For Authorized Payment, and
so on.
•
Payouts: Configures payouts and payout-related business objects/
operations such as Create Batch Payout, Cancel Unclaimed
Payout Item, Show Payout Batch Details, and so on.
•
Subscriptions: Configures subscriptions and subscription-related
business objects/operations such as List Plans, Show
Subscriptions Details, and so on.
•
Transaction Search: Configures transaction search and
transaction search-related business objects/operations such as
List Transactions and List All Balances.
Note: This module is supported only by the Query action.
Note: The Update Product and Update Order operations are not
currently supported by the PayPal Adapter.
Select API Version
Select the API version to use.
Select Object
Select an object within the selected action.
Filter By Object Name
Type the initial letters of the object name to filter the display of names in
the list.
Select Operation Select an operation name, such as Show Product Details.
Filter by Operation Name
Type the initial letters of the operation name to filter the display of
names in the list.
Chapter 3
Invoke Operations Page
3-3

Summary Page
You can review the specified adapter configuration values on the Summary page.
Element Description
Summary
Displays a summary of the configuration values you defined on
previous pages of the wizard.
The information that is displayed can vary by adapter. For some
adapters, the selected business objects and operation name are
displayed. For adapters for which a generated XSD file is
provided, click the XSD link to view a read-only version of the file.
To return to a previous page to update any values, click the
appropriate tab in the left panel or click Go back.
To cancel your configuration details, click Cancel.
Chapter 3
Summary Page
3-4

4
Implement Common Patterns Using the
PayPal Adapter
You can use the PayPal Adapter to implement the following common pattern.
Topics:
• Synchronize PayPal Products With the Salesforce Application
Note:
Oracle Integration offers a number of prebuilt integrations, known as recipes,
that provide you with a head start in building your integrations. You can start
with a recipe, and then customize it to fit your needs and requirements.
Depending upon the solution provided, a variety of adapters are configured in
the prebuilt integrations.
See the Recipes and Accelerators page on the Oracle Help Center.
Synchronize PayPal Products With the Salesforce Application
You can synchronize PayPal records such as a product with the Salesforce application. For
this pattern, you view details of the PayPal product in the Salesforce application.
1. Create an app-driven orchestrated integration.
2. Drag a PayPal Adapter into the integration as a trigger connection.
3. Configure the PayPal endpoint:
a. On the Basic Info page, provide an endpoint name, and click Next.
b. On the Operations page, select the Catalog module, the Product object, and the
Catalog Product Created event.
c. On the Summary page, review your selections, and click Done.
4. Drag a Salesforce Adapter into the integration canvas.
5. Configure the Salesforce Adapter endpoint:
a. On the Basic Info page, provide a name.
b. On the Action page, select Create, Update Or Delete Information.
c. On the Operations page, select Create as an operation and Account as a business
object.
d. Review your selections on the Summary page, and click Done.
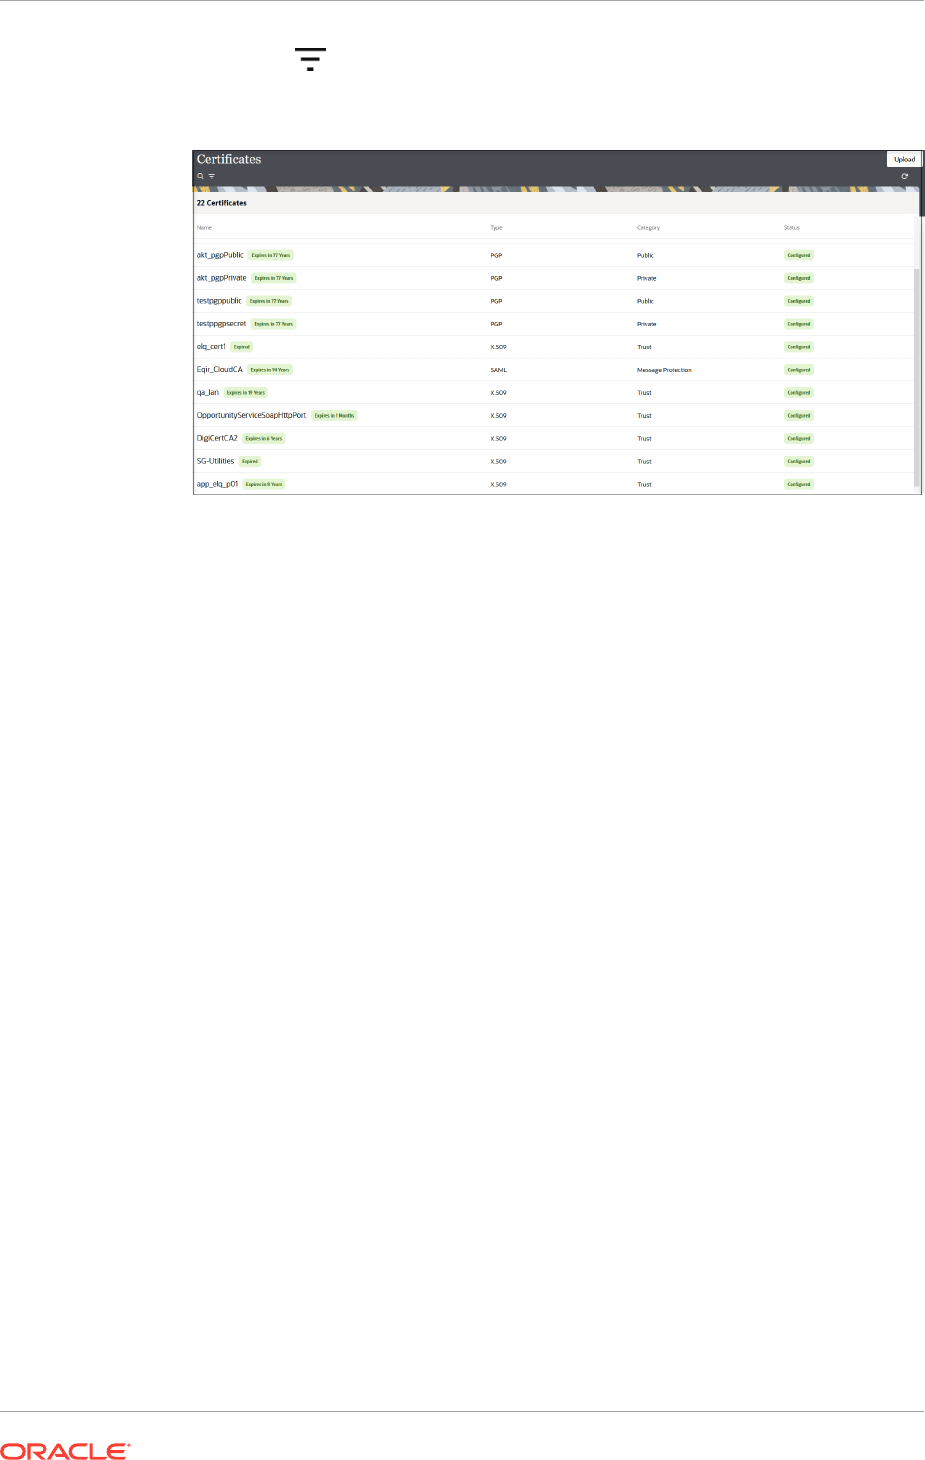
6. In the mapper, perform the required mapping. The completed integration looks as follows.
4-1
7. Save and close the integration.
8. Activate the integration.
The integration is triggered when the product creation event occurs and the same
account is created in the Salesforce application.
Chapter 4
Synchronize PayPal Products With the Salesforce Application
4-2
