
Preparation of Documents for Electronic
Submission to the Office of the Federal
Register
An Additional Help Document for ADS Chapter 516
New Edition Date: 04/19/2019
Responsible Office: M/MS/IRD
File Name: 516sae_041919

Page | 2 - 15
The Federal Register Document Submission Portal lets agencies securely submit
documents and emergency publication letters online. All Agency documents submitted
through the portal must have a valid signature. The Office of the Federal Register will
only accept documents signed using native Microsoft (MS) Word software that applies
the users Public Key Infrastructure (PKI) certificate to the document, guaranteeing the
authenticity of the signer and the document. Once applied, the document is protected
and cannot be edited without removing the digital signature.
In order to prepare documents for publication, there are a few required steps. The
metadata and macros must be removed from the Word document. Further, you must
add an Invisible Digital Signature. Instructions to achieve each step are provided below.
Federal Register Documents
Draft documents to the Office Federal Register (OFR) as usual (i.e., prepare
document(s) for publication).
Before submission, you must remove all metadata from the file(s).
How to Remove Metadata in Word
Metadata. Metadata is hidden information embedded in a Word document and can
include personal information about the author of the document. Metadata is not
accepted on OFR electronic documents.
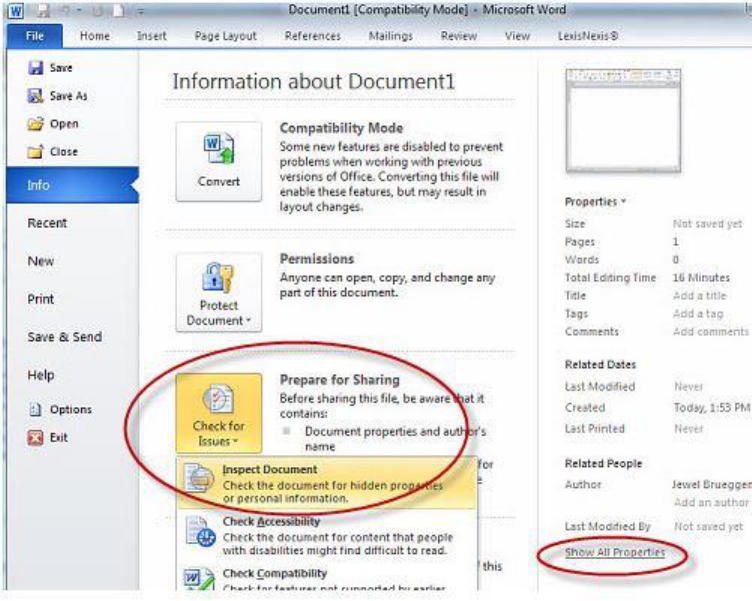
1) Click the File tab and click on Info, then Check for Issues and select Inspect
Document. Optionally, to view the Personal Information click on Show All
Properties to the right.
Page | 3 - 15
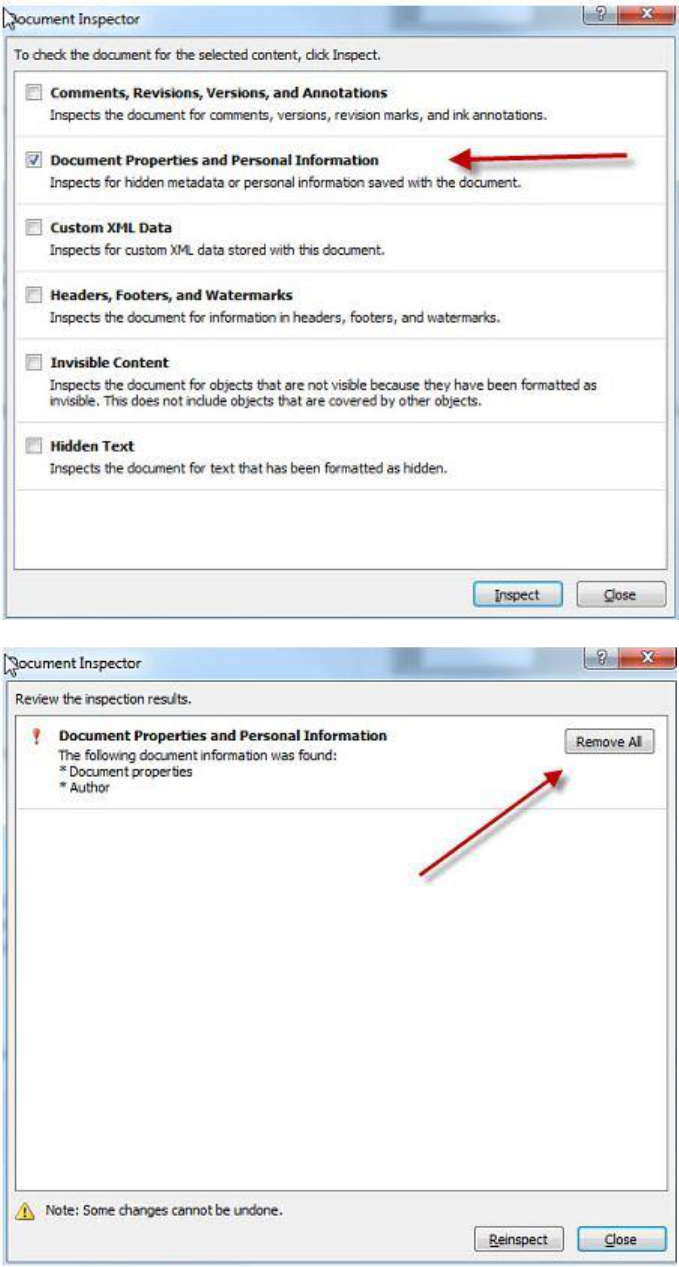
2) Select content you want Word to check for metadata. You must select
Document Properties and Personal Information. All other options are dictated
by what was used to draft your document.
Page | 4 - 15
3) If Word finds metadata, it will prompt you to Remove All. Click Remove All.
Page | 5 - 15
Documents cannot have any comments or remaining “tracked” changes
and the documents cannot have any enabled macros.
How to Remove Macros in Word
Macros. Macros are a set of computer instructions that will automatically run in Word,
usually used to generate or format content.
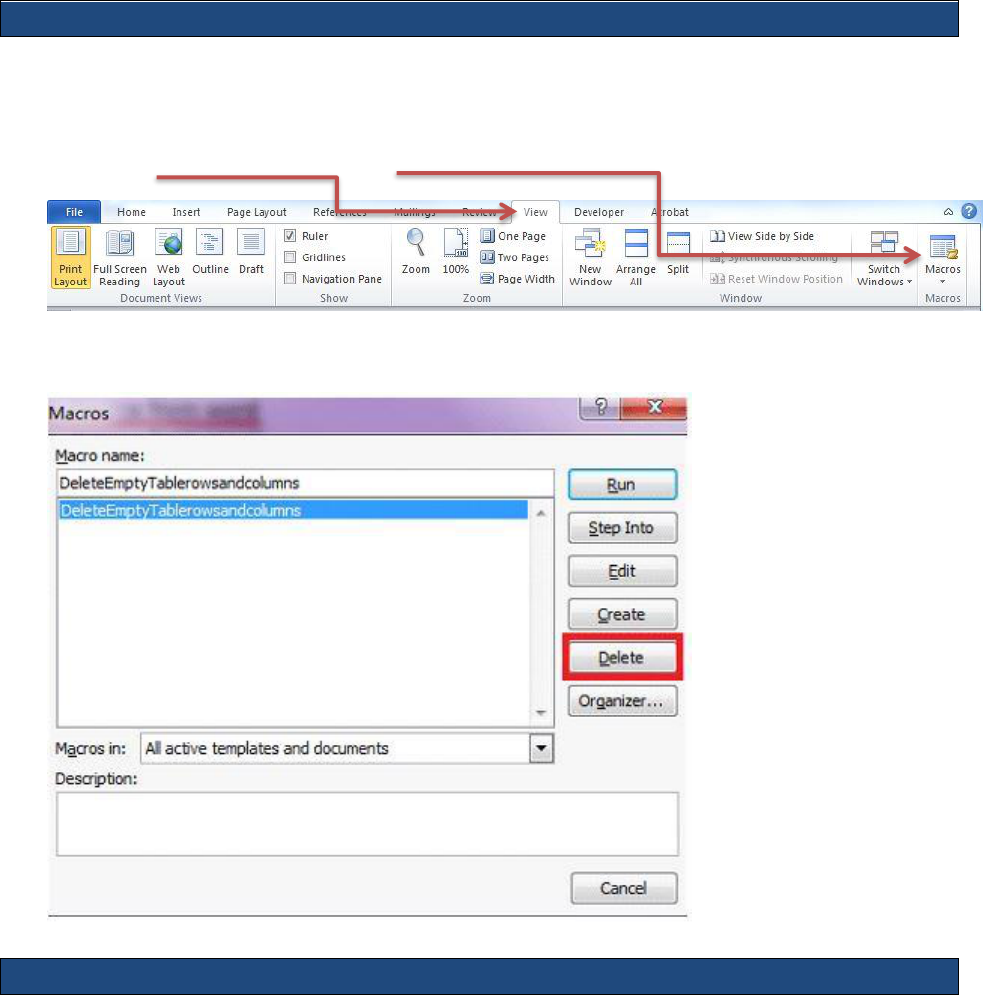
1) Click View tab and then click Macros in the Macros group and View Macros.
2) Select each macro from drop down box, and then click Delete.
Add Invisible Digital Signatures in MS Word
1) Open your MS Word document drafted for publication. Any changes must be
saved prior to signing.
2) Click the File tab.
3) Click Info.

Page | 6 - 15
4) Click Protect Document.
5) Click Add a Digital Signature.
6) Clicking Add a Digital Signature will open the dialogue box shown below. You
should then left click on the OK button.
Page | 7 - 15
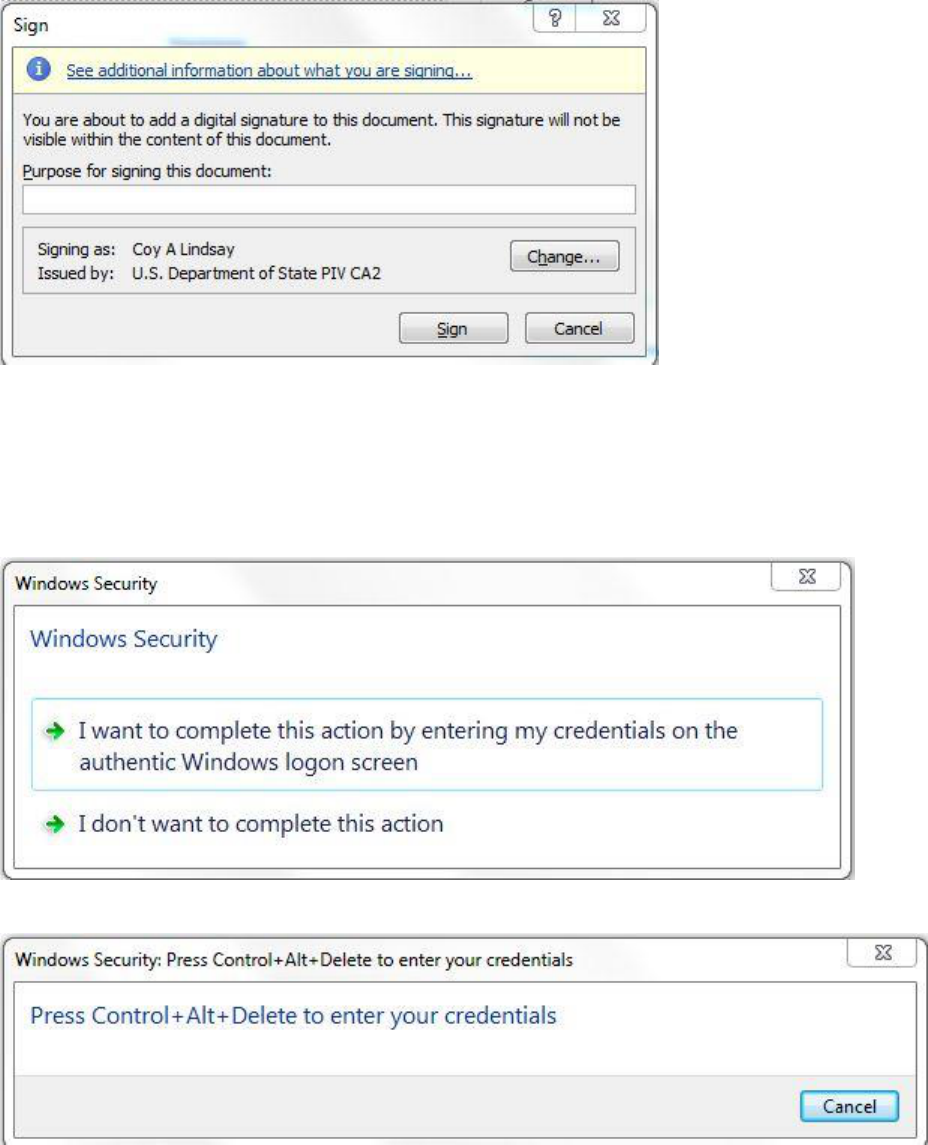
7) In the Sign dialog box:
8) In the Purpose for signing this document, type the purpose or leave blank.
9) To ensure the correct certificate is used, click the Change button.
10) Choose the option I want to complete this action by entering my credentials
on the authentic Windows logon screen.
11) Press Control + Alt + Delete.
Page | 8 - 15
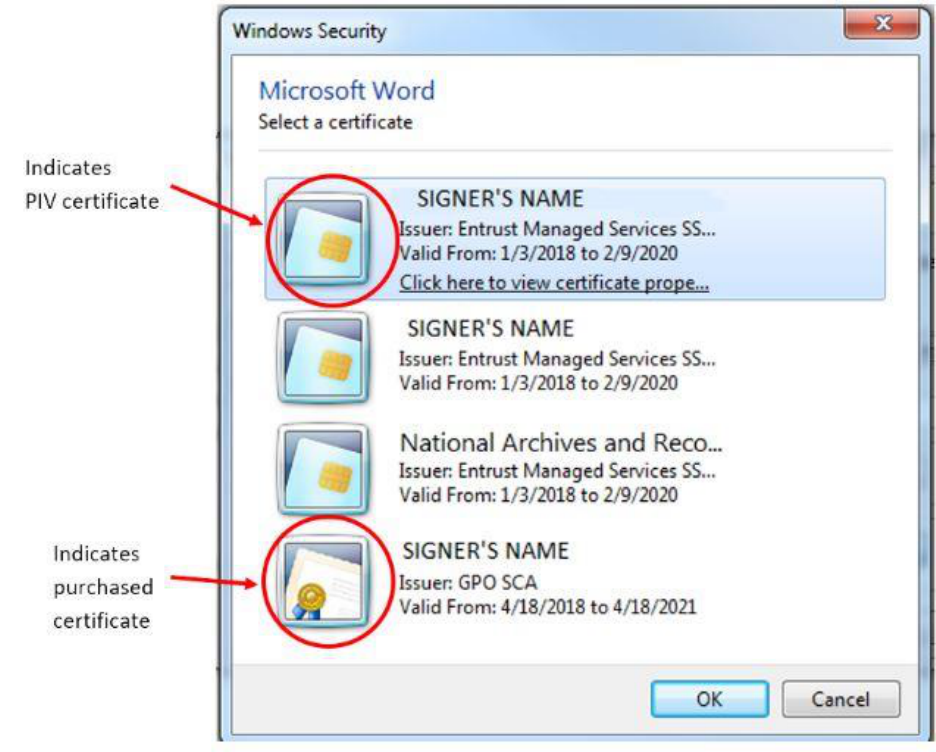
12) In the Certificate Selection box, there may be multiple certificates. Select the
first unexpired certificate with your name and then click here to view the
certificate properties.
Page | 9 - 15
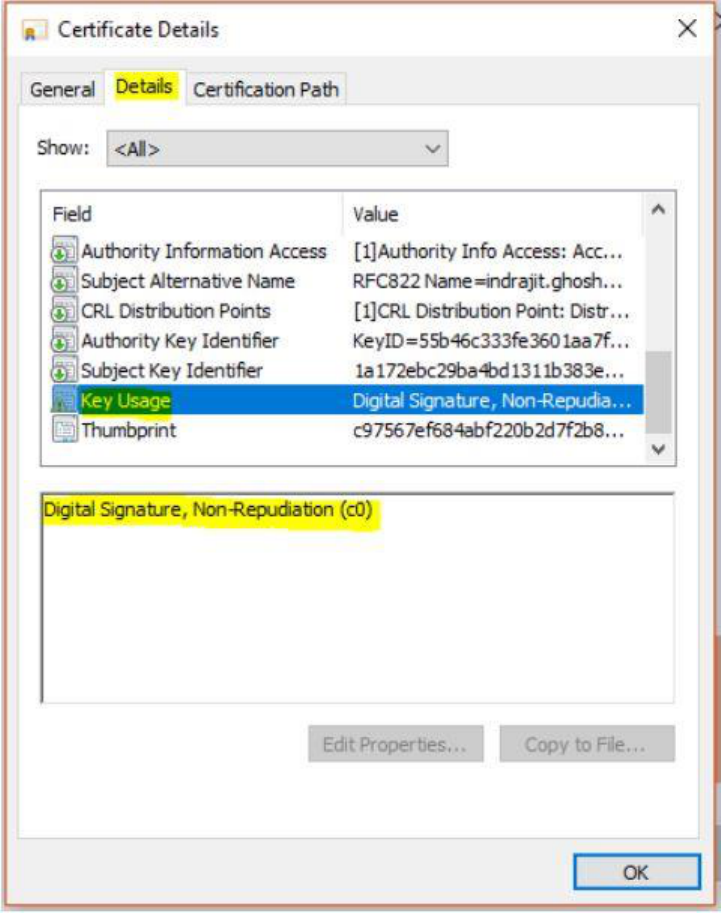
13) The Certificate Details box appears. Go to the Details tab and scroll down to
Key Usage. Single-click on it. The lower text box should now display “Digital
Signature, Non-Repudiation” (for PIV card certificate). If it does, then this is the
correct certificate. Click OK to close the window and proceed with signing.
14) If this is the wrong certificate, click OK; then, select another certificate and repeat
these steps until you find the correct certificate.
15) Click Sign.
Page | 10 - 15
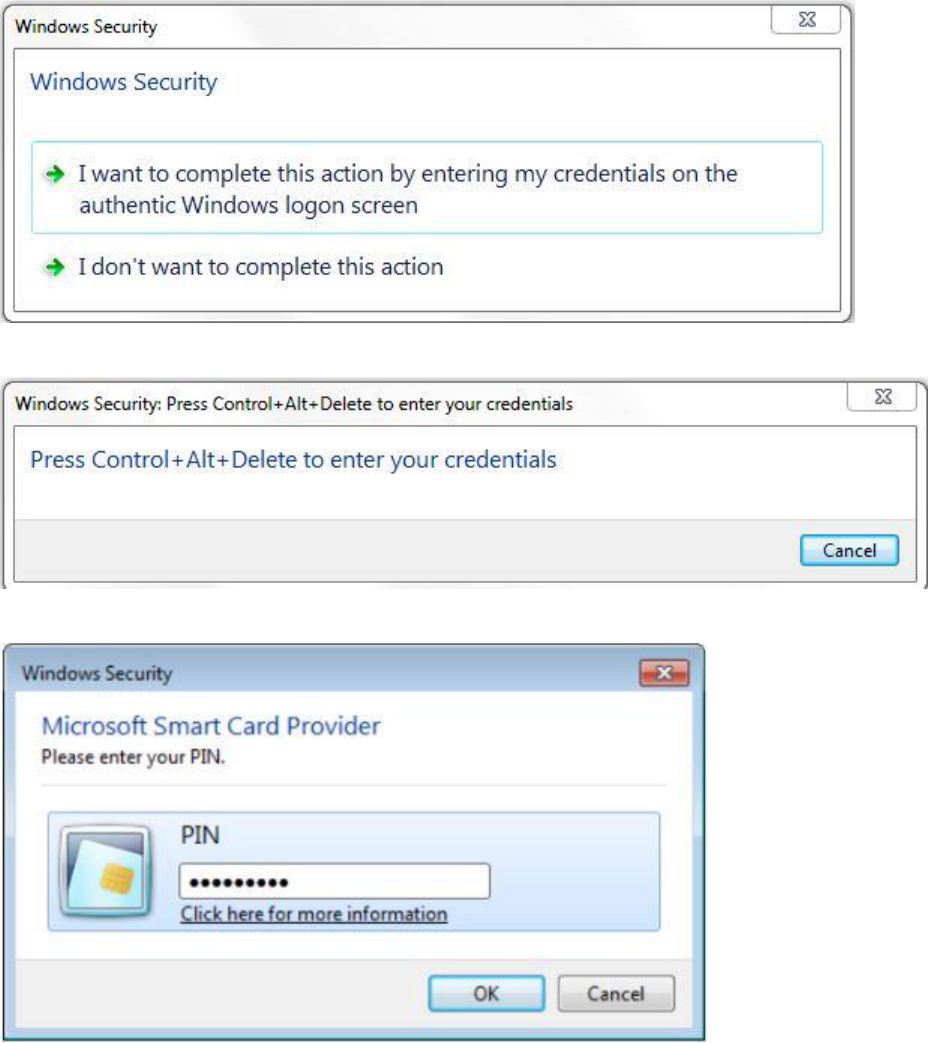
16) Choose the option I want to complete this action by entering my credentials
on the authentic Windows logon screen.
17) Press Control + Alt + Delete.
18) Follow the prompt to enter your 6-digit PIN; then, click OK.
Page | 11 - 15
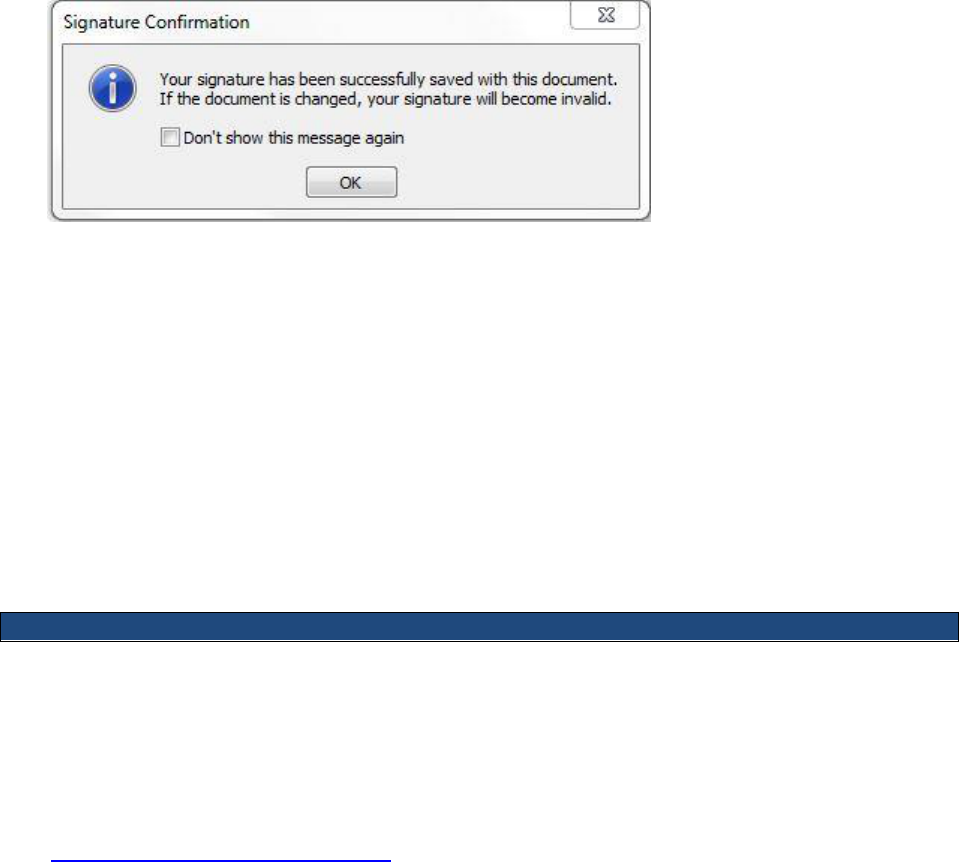
19) If the digital signature certificate and PIN are valid, the document is signed and
automatically saved under the filename. This is the file you submit to M/MS/IRD.
For multiple-signatory documents (e.g., dual-agency submissions), the first
signer forwards the signed document to the next signer, who repeats the signing
process on the already-signed file. (See Add Multiple Digital Signatories in MS
Word below.) All digital signatories must have their names and job titles typed in
the signature block of the document.
A digital signature can be removed if necessary. This might be useful if sudden
changes are needed or if a different signatory is desired. Remember: once the
document is digitally signed it is secure and cannot be edited. If anyone edits the
document after it has been signed but before it is uploaded to the Web portal,
OFR will reject the file for an invalid digital signature and you will need to re-
sign the document (See Remove Invisible Digital Signatures in MS Word below.)
Add Multiple Digital Signatories in MS Word
Multi-agency digital submissions are not only possible but recommended. Exactly like
paper-and-disk submissions, if multiple agencies are submitting a document for
publication, OFR receives only one document, signed by all agencies (e.g., if six
agencies are jointly issuing a rule, OFR does not accept six submissions of the same
rule). Regardless of the method of submission, the legal requirements are the same
(i.e., representatives from all issuing agencies must sign the document, as described in
the Document Drafting Handbook (DDH), 1.6). If one or more of the agencies are
unable or unwilling to digitally sign, the document must be submitted via the
conventional paper-and-disk procedure, as described in the DDH.
One of the issuing agencies should serve as the primary or lead coordinating agency.
Follow these steps for jointly-issued, digitally-signed documents:
1) Save the finalized version of the document as a MS Word file (.docx). Be sure
that the digital signatories’ names and job titles are pre-printed in the signature
block section of the document.
2) Coordinate among the issuing agencies the sequence of signing (i.e., determine
who will sign first and forward the signed file for the next signature). Determine

Page | 12 - 15
which agency will actually submit the signed file to OFR via the Web portal once
all signatures are completed.
3) The representative from the first agency digitally signs the file using the same
method as a single-agency submission. (See Add Invisible Digital Signatures in
MS Word above.) All signers must ensure that their names and job titles are pre-
printed in the signature block section of the document.
4) Email that signed file to the next agency for digital signature.
5) The representative from the next agency in sequence ensures that his/her name
and job title is pre-printed in the signature block section of the document and
then digitally signs the already-signed file. No changes can be made to the
signed file without removing the existing signature(s). If changes are required to
the Word document, the whole process starts anew with the corrected, unsigned
MS Word document.
6) If there are more issuing agencies, repeat steps 4 and 5 until all agencies have
digitally signed.
7) Once all agency signatures have been applied to the file, the file is sent to the
agency that will submit to OFR via the Web portal. From OFR’s perspective, it
doesn’t matter who submits the file; OFR is concerned with validating the digital
signatories.
8) The sending agency should include a special handling letter alerting OFR of the
multi-agency submission with several signatories. Be sure the special handling
letter is digitally signed as well. One signer is sufficient for the special handling
letter.
9) The sending agency logs into the Web portal, uploads the signed Word file and
special handling letter, and submits them.
10) The signatures are validated in the Web portal. OFR will also check all of the
digital signatories against their pre-printed signatures in the signature block
section of the document. The names must match exactly or meet the accepted
standards listed in the DDH. (See Step 1.)
WHAT IS THE SPECIAL HANDLING LETTER?
If you need anything special, such as delayed filing, emergency publication, or multi-
agency submission, you need to request it in a special handling letter when you send in
the document. Make sure you include a point of contact in your letter, especially if it is
someone other than your Liaison Officer.
Remove Invisible Digital Signatures in MS Word

Page | 13 - 15
1) Open the MS Word document that contains the invisible signature you want to
remove.
2) In the header, you may see the option to View Signatures. Click that button and
proceed to Step 5. If you do not see the option:
3) Click the File tab.
4) Click Info.
5) Click View Signatures. The Signatures pane appears.
6) Next to the signature name, click the arrow.
7) Click Remove Signature.
8) Click Yes.
View Signature Certificate in MS Word
You can check the details of the digital certificate(s) used to sign an MS Word document
(for example, the name assigned to the certificate or expiration date).
Open the signed MS Word document containing the certificate(s) you want to check, or
have the signer sign a document via the instructions provided in the Add Invisible Digital
Signatures in MS Word section above.
Page | 14 - 15
1) In the header, you may see the option to View Signatures. Click that button and
proceed to Step 5. If you don’t see this option:
2) Click the File tab.
3) Click Info.
4) Click View Signatures.
5) In the Signatures pane, hover over the name of the signer you want to check;
then, click the small down arrow.
6) Click on Signature Details. The signer’s name as applied to the certificate is
listed, along with the Certification Authority (CA).
7) Click the View button.
8) A pop-up window appears. Be sure that the General tab is selected. The valid
dates of the certificate are listed. More technical details, such as the certification
path and key usage values, are shown under other tabs.
FAQs
WHY DOES THE FILE NEED TO BE SUBMITTED AS A .DOC OR .DOCX?
OFR needs to edit the document, which is one of the reasons OFR does not accept
.pdfs.
IF OFR NEEDS TO EDIT THE DOCUMENT, THEN WHY DO I NEED TO DIGITALLY
SIGN IT?
When your document arrives, with your digital signature still intact, OFR is able to
confirm that:
1) Your name matches the name printed as the signer in the document; and
2) Since your signature is intact, the contents of the document have not been
tampered.
CAN I EDIT THE DOCUMENT AFTER I HAVE SIGNED IT? WHY OR WHY NOT?
No. Once the document has been digitally signed, you cannot edit the document. This
would invalidate the digital signature and require the document to be digitally signed
again.
Page | 15 - 15
WHAT IF THE ONLY PERSON WHO IS AUTHORIZED TO SIGN THE DOCUMENT IS
NOT AVAILABLE?
This is a business process question that is important for offices to consider.
Remember: no one is authorized to use someone else’s credentials to sign a document
digitally on someone else’s behalf. This applies to PIV card digital signing. So the signer
must apply their digital signature themselves. Your office may need to look at its
delegations of authority to ensure that the individuals necessary can be available to sign
documents when needed. The person whose name is on the document must be the
person whose digital signature is applied to the document. If the names do not match,
the document will be rejected.
Additionally, if there are problems with a document, the OFR will contact a liaison and
not the person who submitted the document (if that person is not a liaison).
Checklist for Electronic Submissions
If your document contains graphics, appendices, or annexes, include them in the
document where they should appear in print. Do not send them as separate files
in addition to your text.
Do not submit a read-only, encrypted, or password-protected file.
Do not submit a macro-enabled file.
When drafting your document, do not use the automatic formatting features of
your word-processing program.
Accept all tracked changes before submitting the electronic file.
Make sure there are no comments in the file before submitting.
Take the necessary precautions regarding the metadata before submitting the
file.
Save your document in Microsoft Word format.
Sending the Signed File to the OFR
CAN I STILL MAKE SPECIAL HANDLING REQUESTS DIGITIALLY?
Yes, you can still create handling letters and attach them to individual documents in the
Web portal. Remember: the special handling letter must be digitally signed, but the
signer of the document and the special handling letter do not need to be the same
person. For instance, a Director may sign the document, but a liaison can sign the
special handling letter.

Page | 16 - 15
HOW DO I GET THE SIGNED FILE TO THE OFR?
You will need to submit your document(s) to a Federal Register Liaison. Presently,
USAID has two, Coy Lindsay ([email protected]) and Paulette Murray
([email protected]). They will submit via the Web portal on your behalf.
516sae_041919
