
Shared:
Custom Fields
Setup Guide for Concur Standard Edition
Last Revised: February 28, 2023
Applies to these SAP Concur solutions:
Expense
Professional/Premium edition
Standard edition
Travel
Professional/Premium edition
Standard edition
Invoice
Professional/Premium edition
Standard edition
Request
Professional/Premium edition
Standard edition

ii Shared: Custom Fields Setup Guide for Concur Standard Edition
Last Revised: February 28, 2023
© 2004 - 2024 SAP Concur All rights reserved.
Table of Contents
Section 1: Overview .................................................................................................... 1
Section 2: Custom Fields ............................................................................................. 1
Basic and Advanced Views ........................................................................................ 2
Configuration-Dependent Columns ............................................................................. 3
Integrated Accounting Software Mapping .............................................................. 3
Alternate Account Codes..................................................................................... 3
Invoice Copy-Down ............................................................................................ 4
Access the Custom Fields Page .................................................................................. 5
Section 3: Configure Custom Fields ............................................................................. 6
Invoice Copy-Down ............................................................................................ 8
Add New Fields ........................................................................................................ 8
Add Multi-Level Lists .............................................................................................. 16
End-User Experience ........................................................................................ 17
Create Multi-Level Lists .................................................................................... 18
Move Fields ........................................................................................................... 21
Delete Fields ......................................................................................................... 22
Section 4: Edit List Items .......................................................................................... 24
Add List Items ....................................................................................................... 24
Edit List Items ....................................................................................................... 27
Filter Items on the Edit List Page ............................................................................. 27
Delete List Items ................................................................................................... 28
Import List Items ................................................................................................... 29
Download the List Import Spreadsheet ............................................................... 29
Populate the Spreadsheet ................................................................................. 30
Single-Level Lists and Multi-Level Lists ............................................................... 30
List Import Formatting Requirements ................................................................. 31
Upload the List Import Spreadsheet ................................................................... 32
View the Import Results ................................................................................... 33
View the Import Details .................................................................................... 34
Section 5: Manage Visibility ...................................................................................... 35
Default Visibility Settings ........................................................................................ 35
Visibility Settings ................................................................................................... 36
Help Me Decide ..................................................................................................... 37
Shared: Custom Fields Setup Guide for Concur Standard Edition iii
Last Revised: February 28, 2023
© 2004 - 2024 SAP Concur All rights reserved.
Revision History
Date Notes/Comments/Changes
February 28, 2023
Added a note on page 4 that custom fields that drive account
codes are limited to 10 list items.
May 21, 2022 Added information about vendor custom fields.
January 21, 2022
Updated the copyright year; no other changes; cover date not
updated
December 10, 2021 Updated instructions for Product Settings page
September 18, 2021
Added note re: existing list items are now included in the
downloaded template if fewer than 1000 exist.
February 25, 2021
Renamed the Authorization Request check box to Request on the
guide's title page; updated the copyright year; cover date not
updated
August 3, 2020
Update the Delete Fields procedure to reflect change to warning
message.
June 5, 2020 Updated to reflect Custom Fields page redesign.
January 15, 2020 Updated the copyright; no other changes; cover date not updated
October 8, 2019
Updated one instance of "payment request" to "invoice". (No date
change.)
June 8, 2019
Renamed the “Cost Tracking Setup Guide” to the “Custom Fields
Setup Guide”. Updated text and images throughout to reflect UI
name change from "Cost Tracking" to "Custom Fields".
February 12, 2019 Updated the copyright; no other changes; cover date not updated
December 5, 2018 Minor edits.
November 27, 2018
Updated to include the new Manage Custom Fields and Add
New Fields pages and workflow.
August 24, 2018 Clarified hidden field descriptions.
July 30, 2018 Updated guide to include new Edit List page.
June 19, 2018
Removed information about QuickBooks Connector and Financial
Integration, as content is now consolidated in the Shared:
QuickBooks Connector Setup Guide and Shared: QuickBooks
Integration Using Concur Financial Integration Service Setup
Guide.

iv Shared: Custom Fields Setup Guide for Concur Standard Edition
Last Revised: February 28, 2023
© 2004 - 2024 SAP Concur All rights reserved.
Date Notes/Comments/Changes
April 16, 2018
Changed the check boxes on the front cover; no other changes;
cover date not updated
February 26, 2018
Added a note regarding best practices for custom fields. It is best
to not allow personal, sensitive, or uniquely identifying
information in custom fields.
January 13, 2018 Updated QuickBooks Connector information.
Added:
• Configuration > Configure Data to Track > QuickBooks
Connector Clients Only > Connector with QuickBooks Online
Creates Fields Automatically
Updated:
• Configuration > Configure Data Entry Details > QuickBooks
and QuickBooks Connector Clients Only
Configuration > Configure List Items > QuickBooks and
QuickBooks Connector Clients Only
November 4, 2017
• Updated guide to include new Product Settings page, which
replaces the Setup Wizard.
March 18, 2017 Updated with menu option name change to access Setup Wizard.
December 15, 2016 Changed copyright and cover; no other content changes.
March 18, 2016
Updated graphics to reflect new editable field indicators; no other
content changes.
November 20, 2015
Updated graphics to reflect updated step names and instructional
text where applicable.
October 16, 2015 Updated graphics to reflect newly styled step numbers.
August 14, 2015
Added clarification regarding the use of the Is Billable field. The
Is Billable field requires a customer field mapping.
July 20, 2015 Added information about the QuickBooks List column.
June 12, 2015 Added information about Request.
April 10, 2015 Made general content updates.
January 22, 2015
Removed information about two user interfaces; no other content
changes
January 16, 2015
Updated the screen shots to the enhanced UI; no other content
changes
September 16, 2014
Added information about two user interfaces; no other content
changes
May 16, 2014
New document. (This content originated from the Expense Setup
Guide for Concur Standard.)

Shared: Custom Fields Setup Guide for Concur Standard Edition v
Last Revised: February 28, 2023
© 2004 - 2024 SAP Concur All rights reserved.
NOTE: Multiple SAP Concur product versions and UI themes are available, so this
content might contain images or procedures that do not precisely match your
implementation. For example, when SAP Fiori UI themes are implemented, home
page navigation is consolidated under the SAP Concur Home menu.

Section 1: Overview
Shared: Custom Fields Setup Guide for Concur Standard Edition 1
Last Revised: February 28, 2023
© 2004 - 2024 SAP Concur All rights reserved.
Custom Fields
Section 1: Overview
After reviewing expense, invoice, user, and vendor pages, you might find that some
data you need to track is missing from the default layouts. You can add a custom
field to these pages to capture the required data. For example, if you track your
costs by project, you can add a custom Project field to the desired pages in SAP
Concur solutions.
Section 2: Custom Fields
On the Custom Fields page, you can delete custom fields, define the order in which
custom fields display for users, save changes to custom fields, select the custom field
that drives alternate account codes for Concur Expense or Concur Invoice, and
search for custom and commonly used default fields.
From the Custo
m Fields page, you can access the following sub-pages:
• Add New Field: Enables you to add custom list, multi-level list, free-from
text, and checkbox fields.
• Edit List: Enables you to maintain custom list and multi-level list fields
• View Field: Provides a preview of checkbox and free-form text fields
• Manage Visibility (Advanced View): Enables you to configure the visibility of
your custom fields
When you
add a custom field, the field is added to SAP Concur pages , including the
user page (employee user profile in Concur), the Concur Invoice new vendor and
vendor details pages, and several pages in Concur Expense, Concur Request, and
Concur Invoice. You can configure whether the field is visible on the user, Concur
Expense, Concur Invoice, and Concur Request pages and whether the field is read-
only, required, or optional.
NOTE: Custom fields on the Concur Invoice vendor pages are not configurable. They
are visible and optional.
Section 2: Custom Fields
2 Shared: Custom Fields Setup Guide for Concur Standard Edition
Last Revised: February 28, 2023
© 2004 - 2024 SAP Concur All rights reserved.
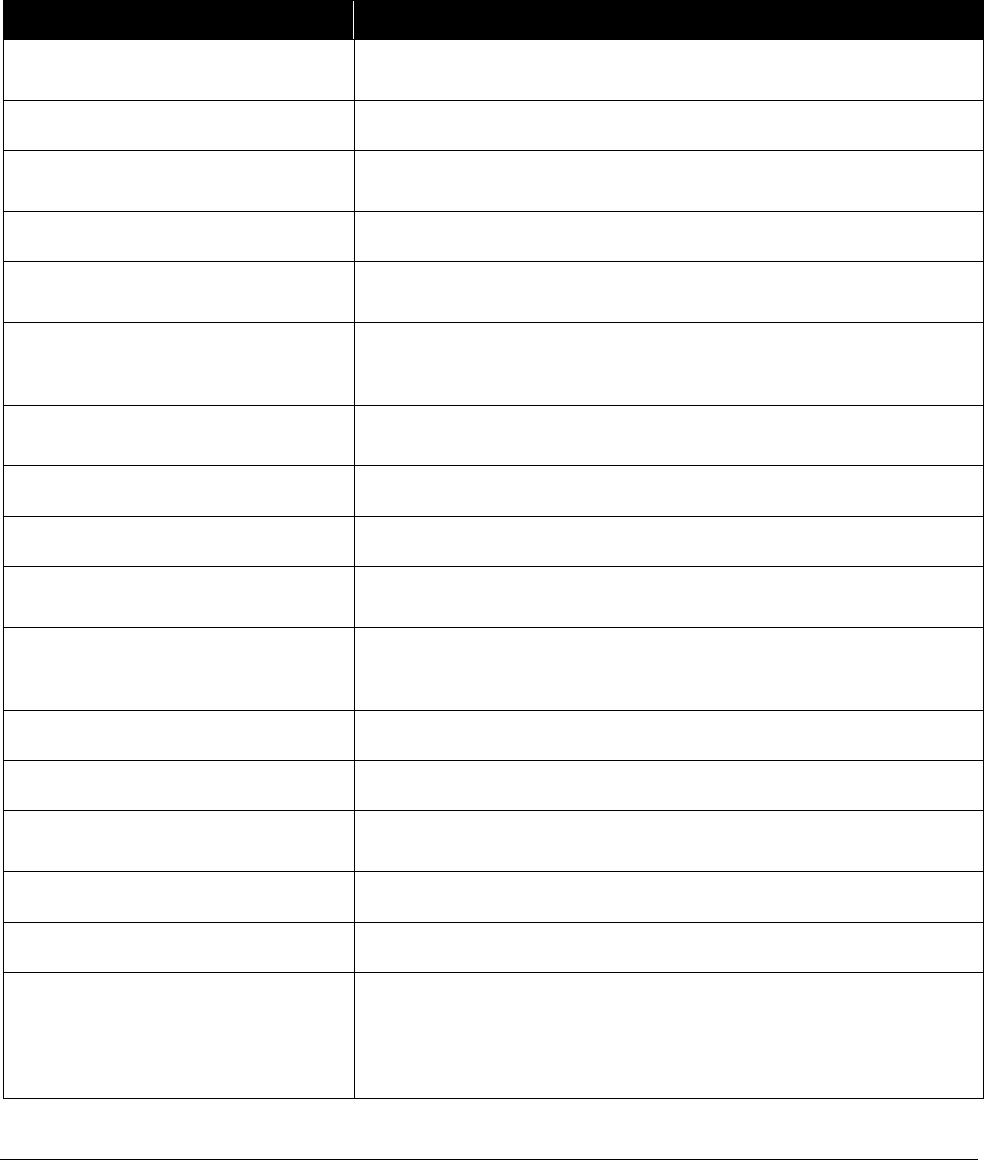
Basic and Advanced Views
The Custom Fields page can be displayed in Basic View or Advanced View.
Basic View
Advanced View
NOTE: The columns on the Custom Fields page in advanced view differ depending
on your configuration.
Section 2: Custom Fields
Shared: Custom Fields Setup Guide for Concur Standard Edition 3
Last Revised: February 28, 2023
© 2004 - 2024 SAP Concur All rights reserved.
Configuration-Dependent Columns
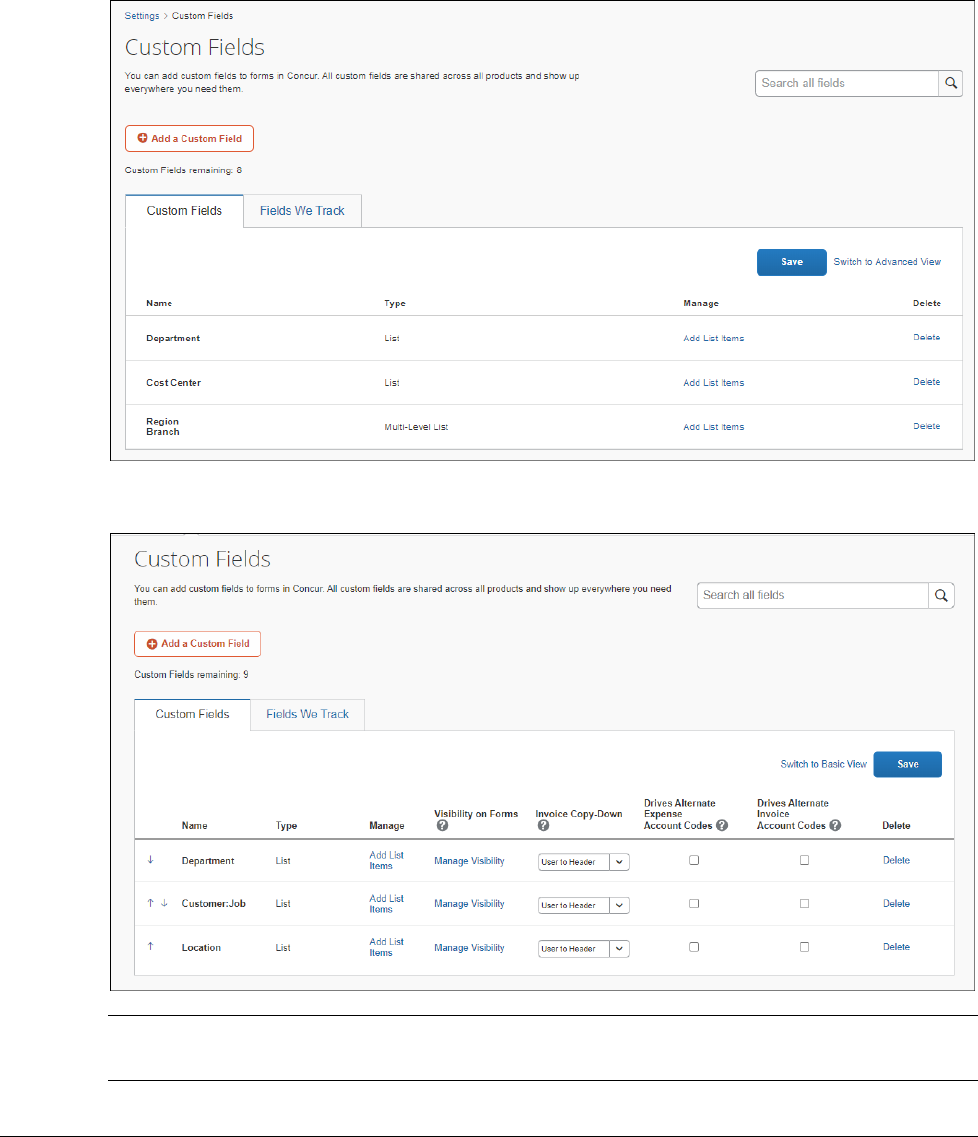
Integrated Accounting Software Mapping
If your SAP Concur entity is integrated with accounting software such as QuickBooks,
Sage Intacct, or Xero Accounting, an additional "mapping" column is included on the
Custom Fields page and fields that are mapped to the accounting software will be
designated by a green connection icon (
).
The mapping column can be used to choose which fields are linked to your
accounting software.
QUICKBOOKS CLIENTS ONLY
If you are using QuickBooks Financial Integration, you can create custom list fields to
map to the Class and Customer fields in QuickBooks (and a Location field if using
QuickBooks Online).
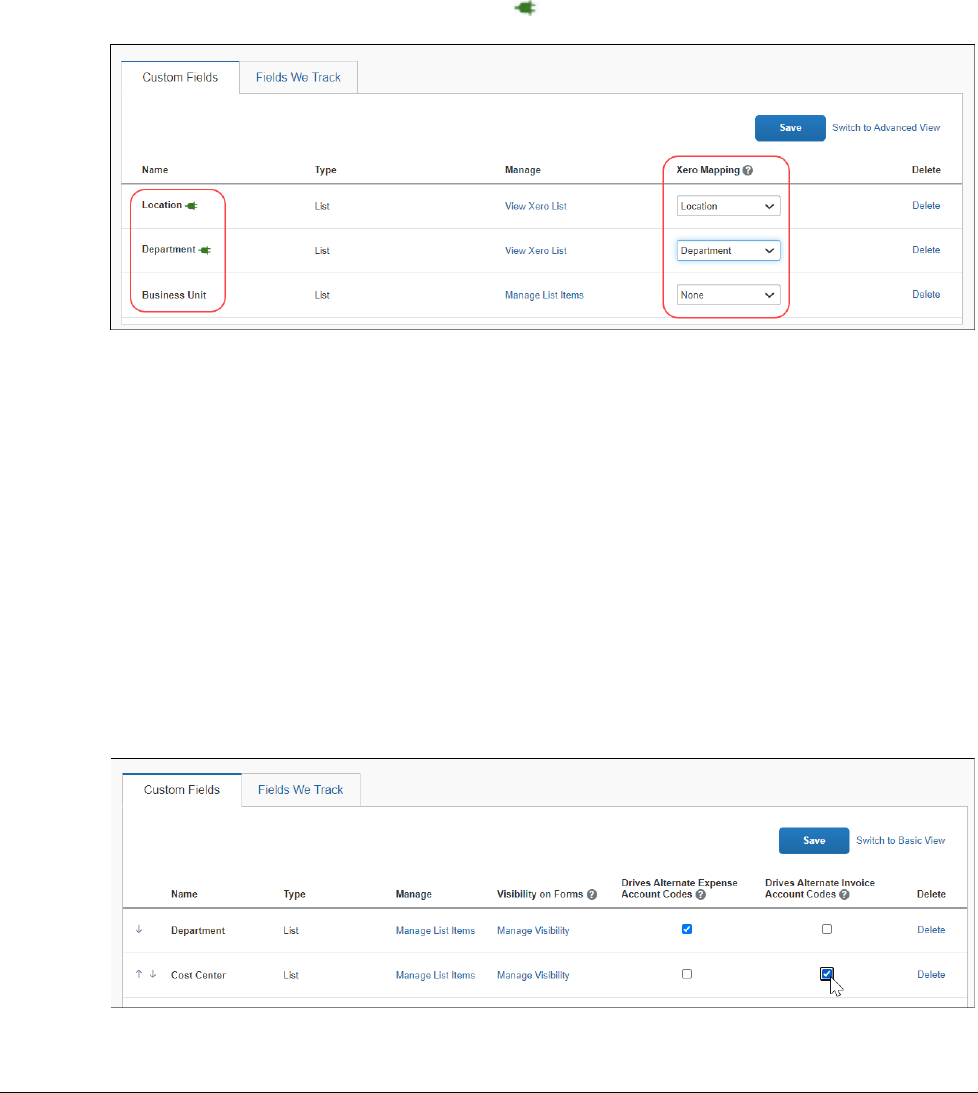
Alternate Account Codes
If you use alternate account codes, the option to choose which custom field drives
alternate account codes appears on the Custom Fields page in Advanced View.
You can choose one custom field to drive alternate account codes for Concur Expense
and one custom field to drive alternate account codes for Concur Invoice.
Section 2: Custom Fields
4 Shared: Custom Fields Setup Guide for Concur Standard Edition
Last Revised: February 28, 2023
© 2004 - 2024 SAP Concur All rights reserved.
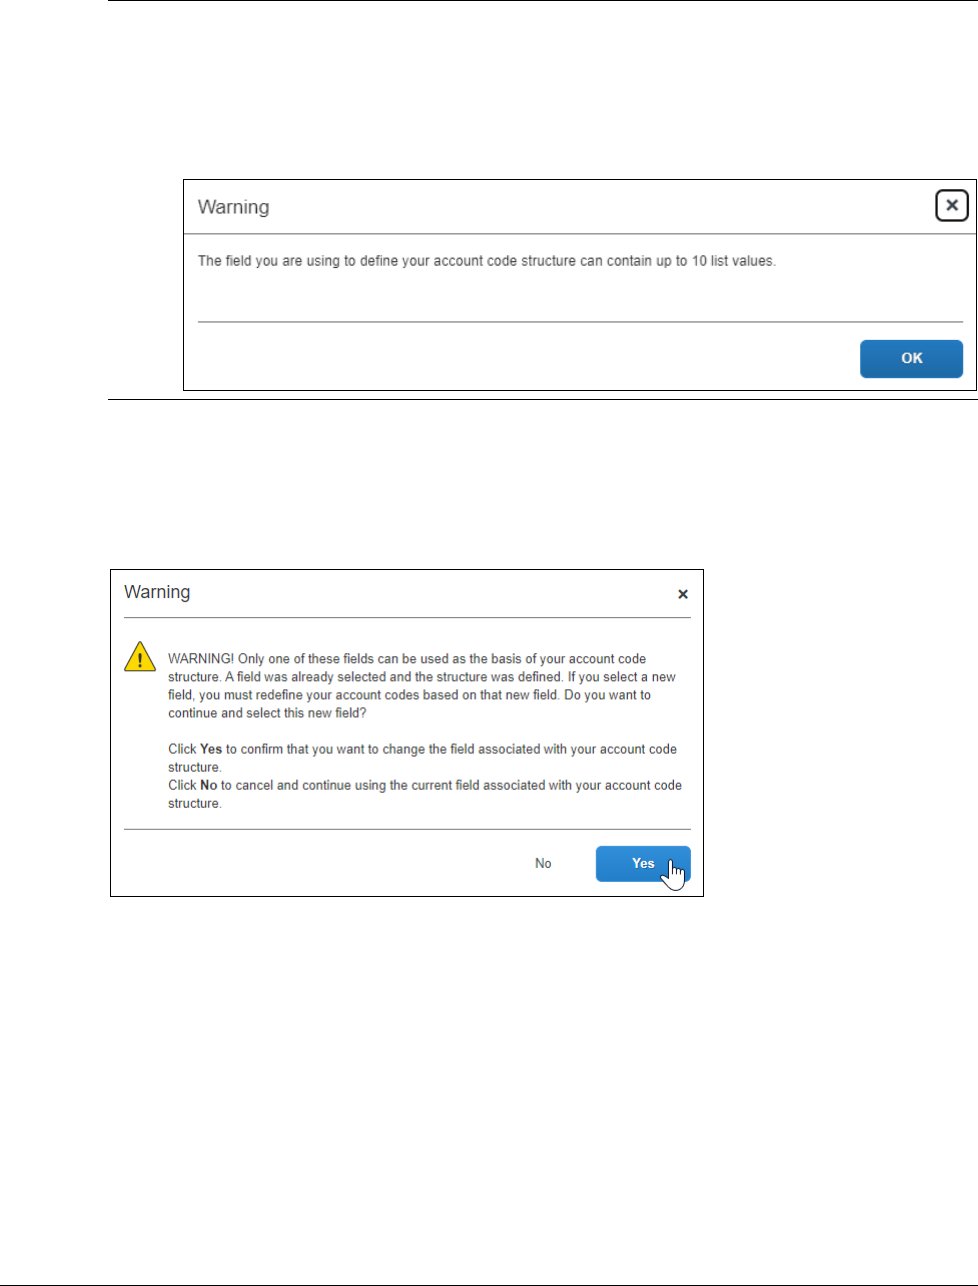
NOTE: The custom field you designate to drive alternate expense or invoice account
codes can have a maximum of ten list items. If you attempt to select a field
with more than ten lest items, the following message is returned:
“The field you are using to define your account code structure can contain up
to 10 list values”
If you change which custom field drives alternate account codes, you must redefine
your account codes based on the new selection.
After you select the new custom field, a warning is displayed. Click Yes to
acknowledge the warning or click No to cancel the change.
Invoice Copy-Down
If your SAP Concur solution includes Concur Invoice, the Invoice Copy-Down field
is included on the Custom Fields page in advanced view. The Invoice Copy-Down
field enables you to configure the copy-down source for custom fields on invoices.
Custom fields can be configured to copy from the user profile to the Invoice Header
or from the vendor record to the Invoice Header.

Section 2: Custom Fields
Shared: Custom Fields Setup Guide for Concur Standard Edition 5
Last Revised: February 28, 2023
© 2004 - 2024 SAP Concur All rights reserved.
Access the Custom Fields Page
To access the Custom Fields page:
1. Click Administration > Expense Settings or Expense & Invoice Settings
or Invoice Settings.
2. In the Product list, click Expense or Invoice or Request.
3. In the Capturing Spend section, on the Custom Fields tile, click Edit.

Section 3: Configure Custom Fields
6 Shared: Custom Fields Setup Guide for Concur Standard Edition
Last Revised: February 28, 2023
© 2004 - 2024 SAP Concur All rights reserved.
The Custom Fields page appears.
Section 3: Configure Custom Fields
After reviewing the default expense, invoice, request, user and vendor pages, you
might find that some data you need to track is missing. On the Add New Field
page, you can add a custom field to these pages to capture the data you need. You
can create up to 12 custom fields.
Typically, employees enter values for custom fields in their expense reports or
invoices. The custom field data can be part of your accounting extract or financial
posting from SAP Concur solutions to your accounting system.
By default, when you add a custom field, it is added to all available pages as
Optional. You can configure whether a custom field is visible and whether it can or
must be filled by the user on the Manage Visibility page.
NOTE: Custom fields on the Concur Invoice vendor pages are not configurable. They
are visible and optional.
The custom fields that you create appear on the following pages:
Expense:
• Expense Information page in Profile Settings
• Expense report header
• Expense entry page
• Expense entry allocation page
Section 3: Configure Custom Fields
Shared: Custom Fields Setup Guide for Concur Standard Edition 7
Last Revised: February 28, 2023
© 2004 - 2024 SAP Concur All rights reserved.
Invoice:
• Invoice Information page in Profile Settings
• Invoice header
• Invoice line item
• Vendor Manager New Vendor page
• Vendor Manager vendor details pages
Request:
• Request Information page in Profile Settings
• Request header
• Request allocation page
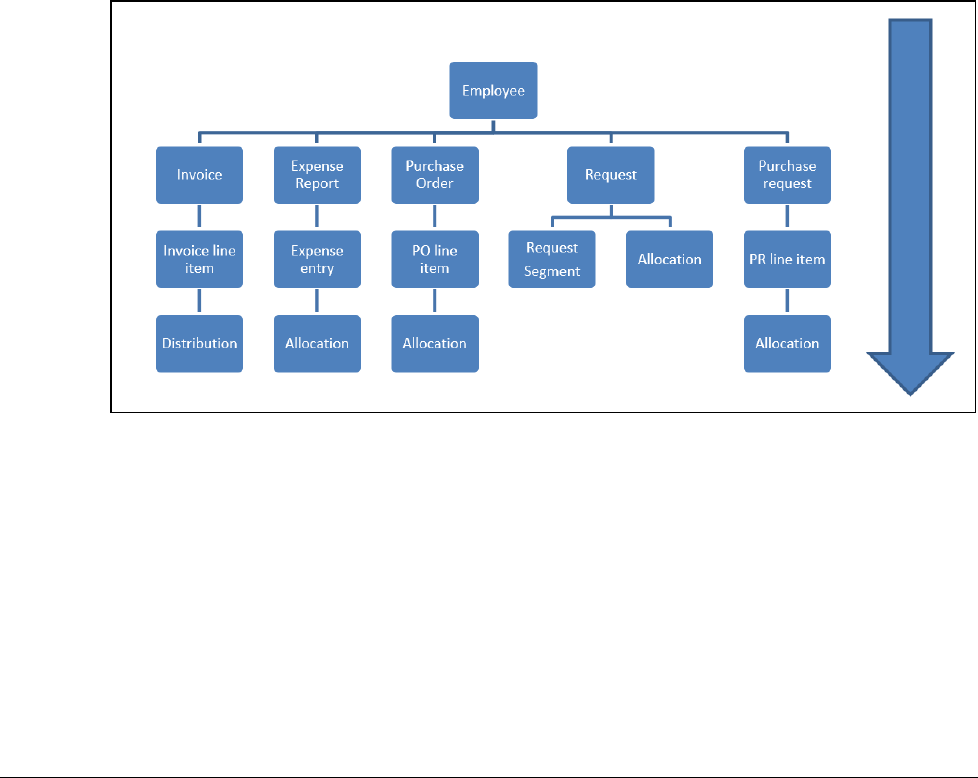
When an employee creates a new expense report or invoice, custom field values
copy down from the employee page into the expense report or invoice. This copy
down process occurs each time an employee creates a new expense report or
invoice.
Similarly, the value from the report or invoice copies down to new expenses or
invoice line items. A further level of copy down occurs when expenses or invoice line
items are allocated. The copied down values can be changed by the employee unless
you prevent it by making the field read-only or hidden on that form.
EXAMPLES
The following are examples of custom fields:
• You may want to assign a cost center to each employee and make sure their
expenses are tracked against that cost center. To do so, you would create a
Cost Center custom field, and make it Read-Only on the employee and
expense pages. Expense submitters will not be able to change the value.

Section 3: Configure Custom Fields
8 Shared: Custom Fields Setup Guide for Concur Standard Edition
Last Revised: February 28, 2023
© 2004 - 2024 SAP Concur All rights reserved.
• You are an advertising agency and you want to track whether expenses are
billable. On the Add New Field page, click Checkbox. In the Field Name
field, select Is Billable?, then click the Add button.
• You would like to track your expenses by department. On the Add New Field
page, click List. In the Field Name field, type or select Department, then
click Add. On the Add New Field confirmation page, click Add List Items to
access the Edit List page to enter your departments.
NOTE: Defining values for list fields helps control the data entered in the
fields, ensuring consistent reporting and saving your employees time
by avoiding mistyping commonly used list values.
Invoice Copy-Down
If your SAP Concur solution includes Concur Invoice, the Invoice Copy-Down field
is included on the Custom Fields page in Advanced View. The Invoice Copy-
Down field enables you to configure the copy-down source for custom fields on
invoices. Custom fields can be configured to copy from the user profile to the Invoice
Header or from the vendor record to the Invoice Header.
Add New Fields
The Add New Field page allows you to add the following field types:
• List
• Multi-Level List (refer to the Add Multi-Level Lists section in this document)
• Free-form Text
• Checkbox
You can add up to 12 custom fields, which can be created by typing in a custom field
name or choosing from a list of suggestions. When creating fields, it is a best
practice to plan what fields you need before creating the them. Please consider the
following:
• How many fields do you need?
• What field types are best for each field?
♦ Lists are more consistent and reportable, but you need to maintain them.
♦ Free-form text fields are useful if there are many values that change
often.
• W
hat labels or names best indicate the field's purpose?
♦ Field names or labels should be as clear as possible to provide proper
guidance to employees on what to enter in each.
♦ Field names can be a maximum of 64 characters long
• What values do you need to populate list fields?
• What order do you want each list field's values to display?
Section 3: Configure Custom Fields
Shared: Custom Fields Setup Guide for Concur Standard Edition 9
Last Revised: February 28, 2023
© 2004 - 2024 SAP Concur All rights reserved.
• Do you need a multi-level list (composed of two or more levels) to ensure
employee's select a value in the parent list before they can select a value in a
sub-level or child list?
! WARNING: Once you have created a field, you cannot change the filed name or
type of field. If you want to change the field name or type of field, you must
delete the existing field and recreate it.
If you delete a field, the data the field contains will be irreversibly deleted and
cannot be recovered. When you delete a field, a warning appears, and you must
confirm your understanding that all data associated with the field will also be
deleted.
To add a new field:
CREATE A LIST FIELD
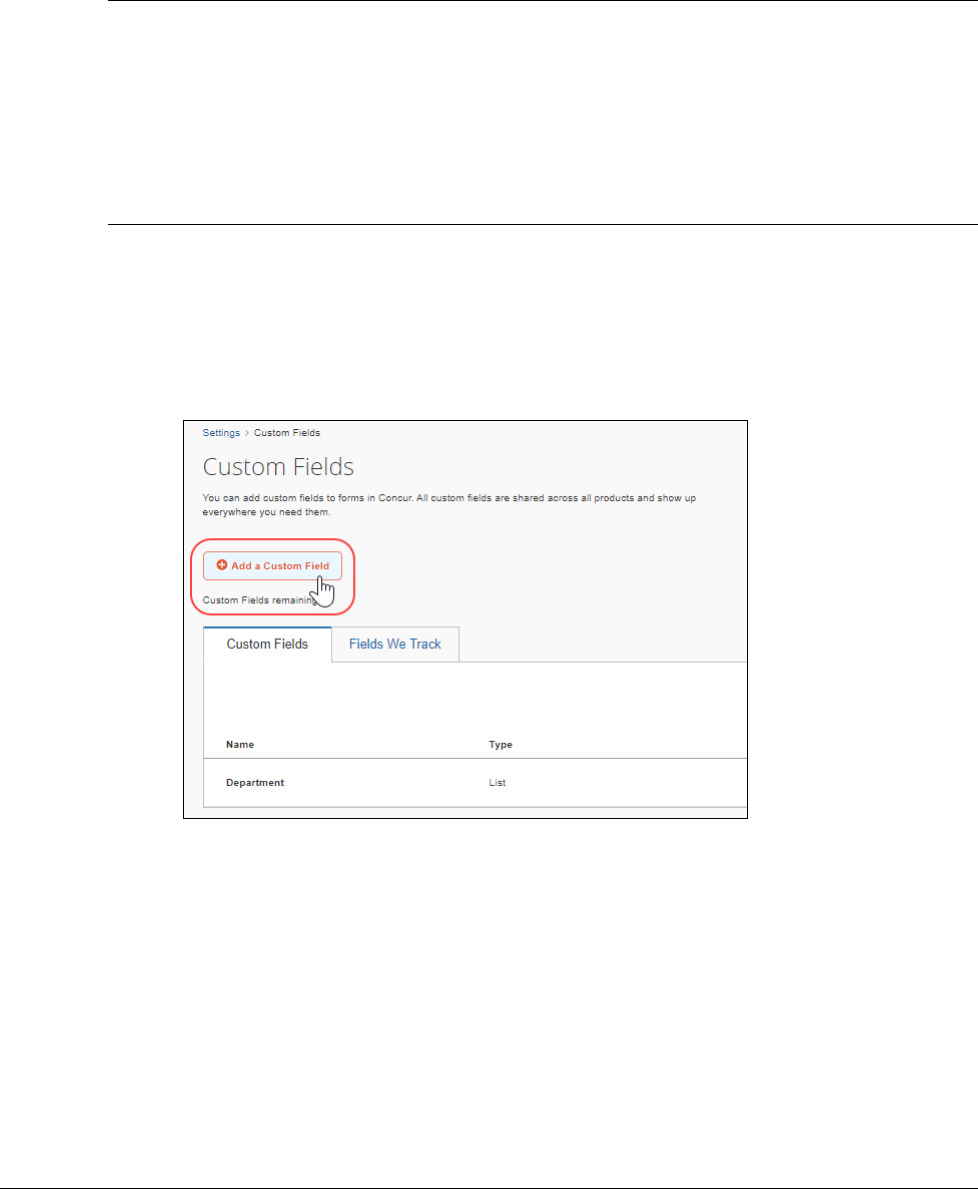
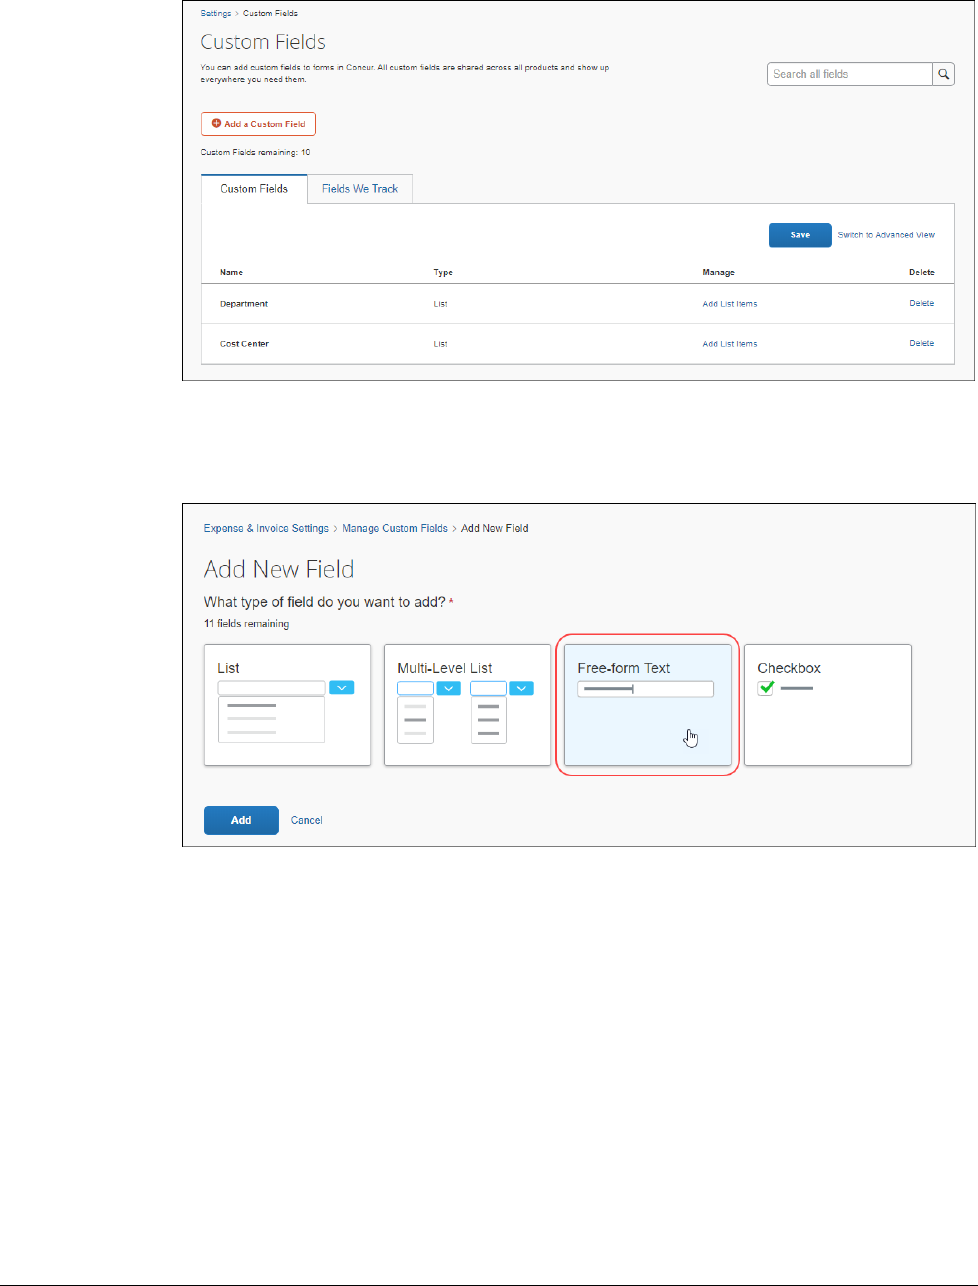
1. On the Custom Fields page, click Add a Custom Field to access the Add
New Field page.
Section 3: Configure Custom Fields
10 Shared: Custom Fields Setup Guide for Concur Standard Edition
Last Revised: February 28, 2023
© 2004 - 2024 SAP Concur All rights reserved.
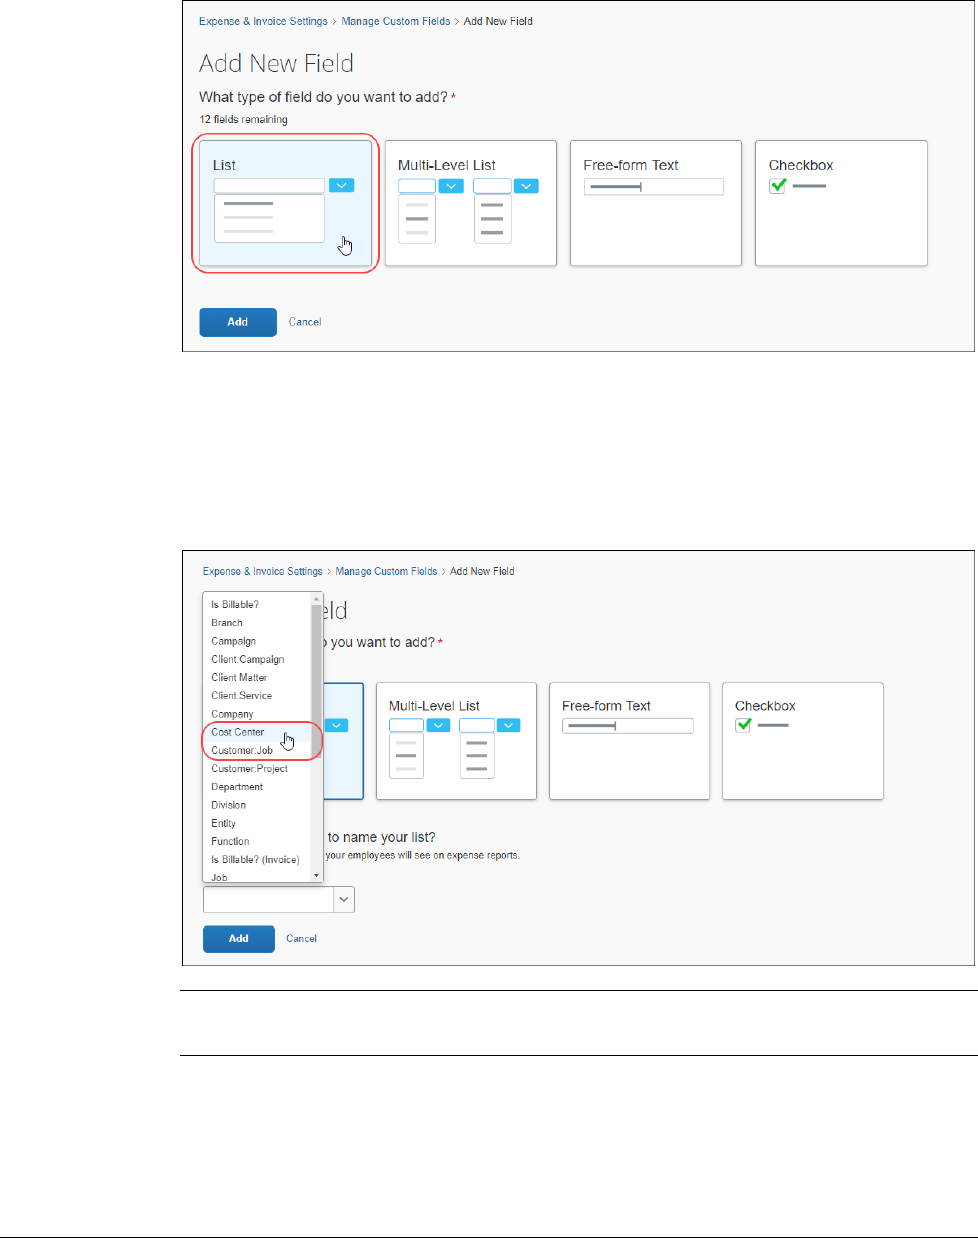
2. Click List.
To create a multi-level list, refer to the Add Multi-Level Lists procedure in this
document.
3. In the What would you like to name your list section? section, in the
Field Name list, select or type a field name to use as a label when the field is
displayed.
NOTE: Best practice is to not allow personal, sensitive, or uniquely identifying
information in custom fields.
4. Click Add.
Section 3: Configure Custom Fields
Shared: Custom Fields Setup Guide for Concur Standard Edition 11
Last Revised: February 28, 2023
© 2004 - 2024 SAP Concur All rights reserved.
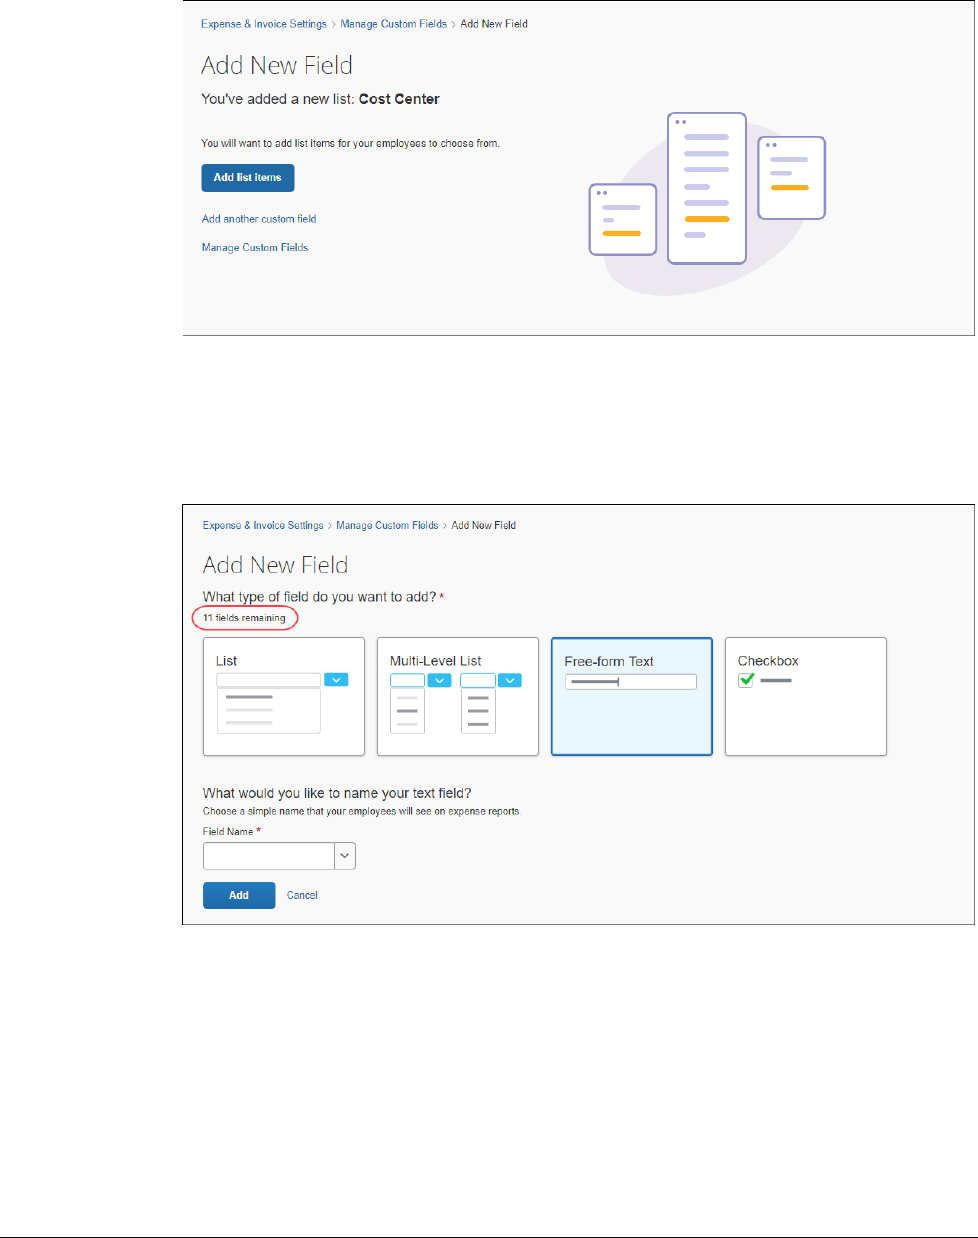
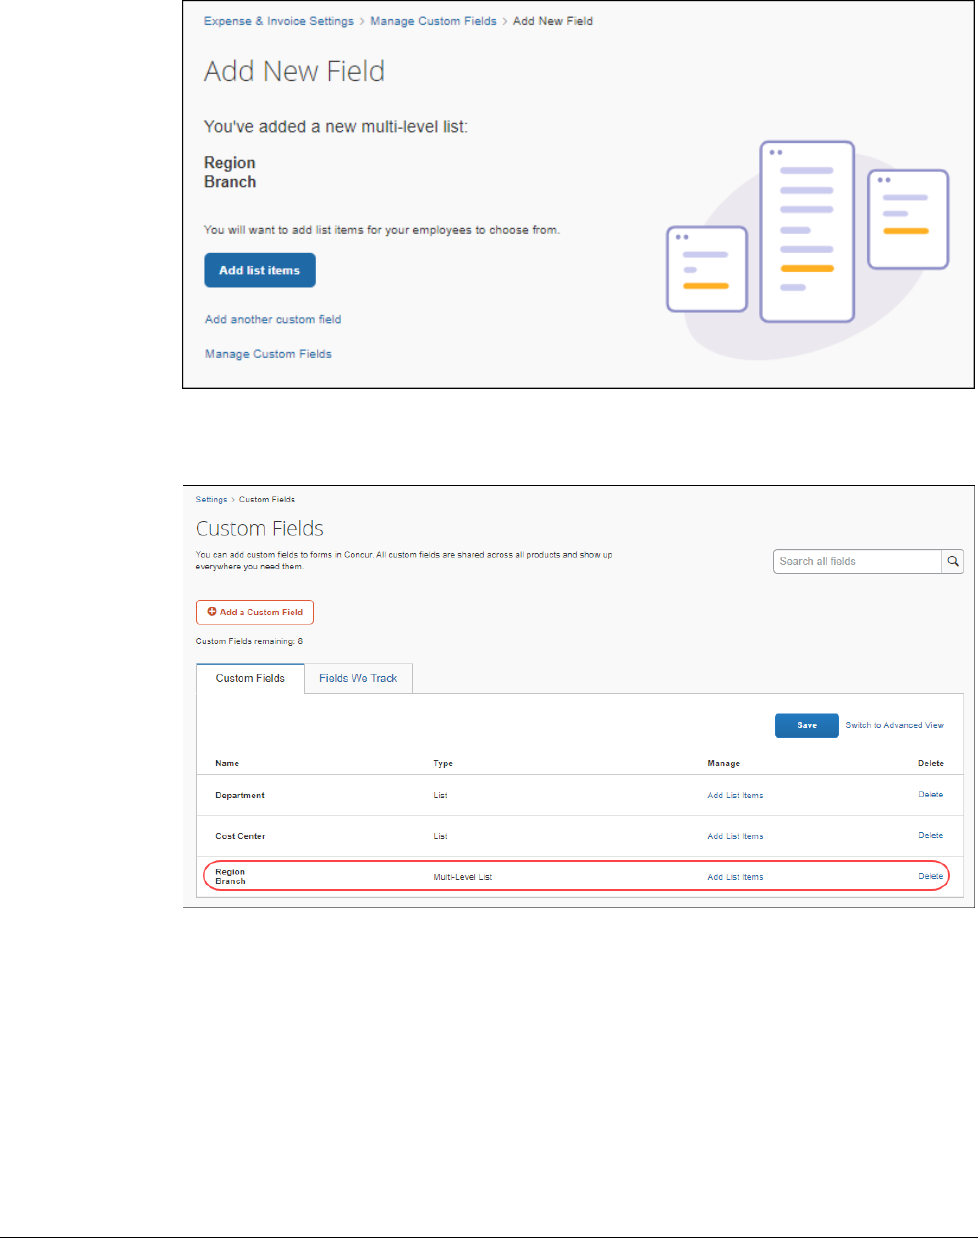
5. A message confirms the addition of the new field.
6. You can now choose to add list values to the field, add another custom field,
or return to the Custom Fields page.
7. If you choose to add another new field, an on-page message tracks how
many available custom fields you have remaining.
8. You can now choose to add another custom field or return to the Custom
Fields page where you can configure the new custom list field.
Section 3: Configure Custom Fields
12 Shared: Custom Fields Setup Guide for Concur Standard Edition
Last Revised: February 28, 2023
© 2004 - 2024 SAP Concur All rights reserved.
CREATE A FREE-FORM TEXT FIELD
1. On the Add New Field page, click Free-form Text.
Section 3: Configure Custom Fields
Shared: Custom Fields Setup Guide for Concur Standard Edition 13
Last Revised: February 28, 2023
© 2004 - 2024 SAP Concur All rights reserved.
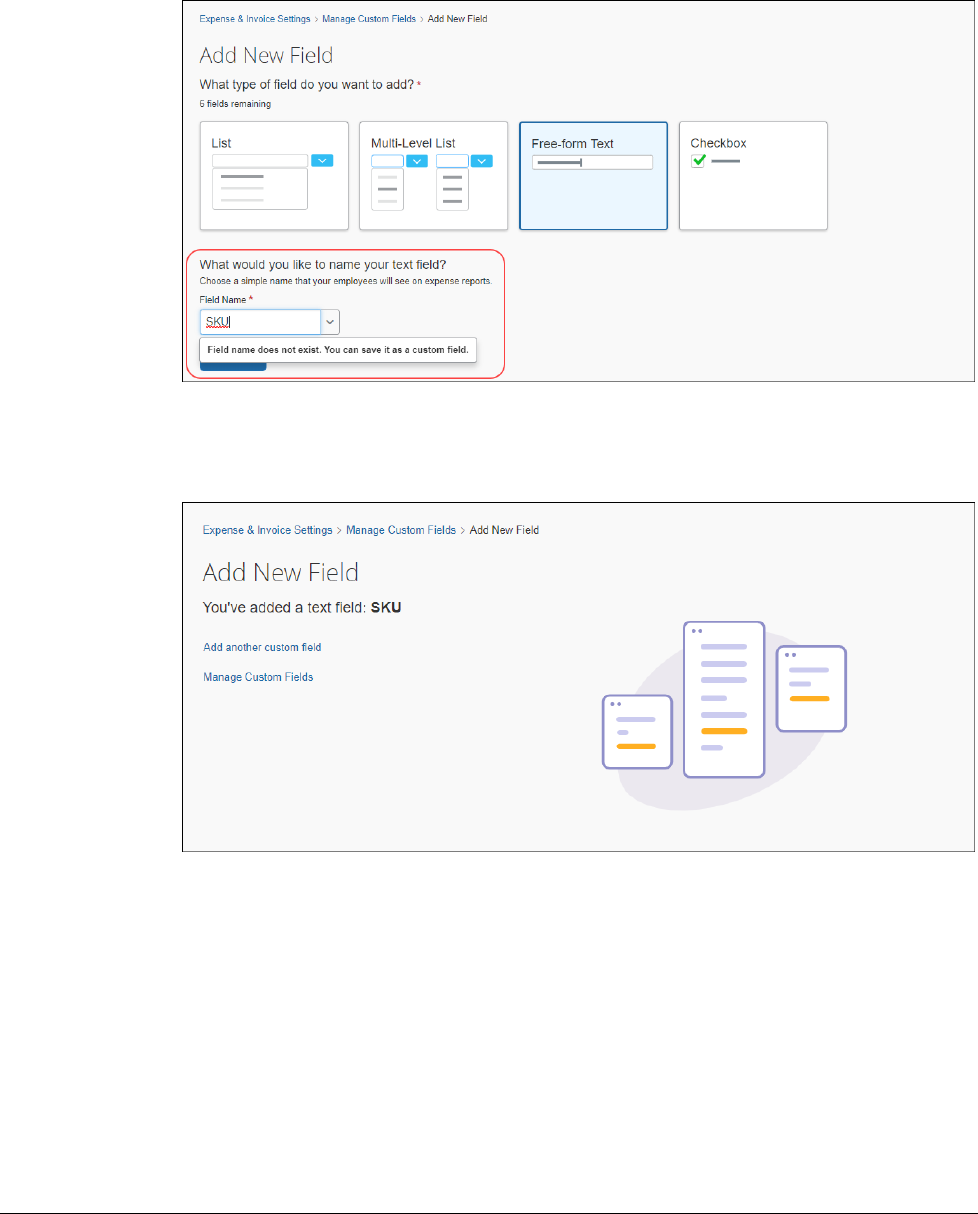
2. In the What would you like to name your text field? section, type in the
name of the custom field or select a field name from the list.
3. Click Add.
4. A message confirms the addition of the new text field.
5. You can now choose to add another custom field or return to the Custom
Fields page.
Section 3: Configure Custom Fields
14 Shared: Custom Fields Setup Guide for Concur Standard Edition
Last Revised: February 28, 2023
© 2004 - 2024 SAP Concur All rights reserved.
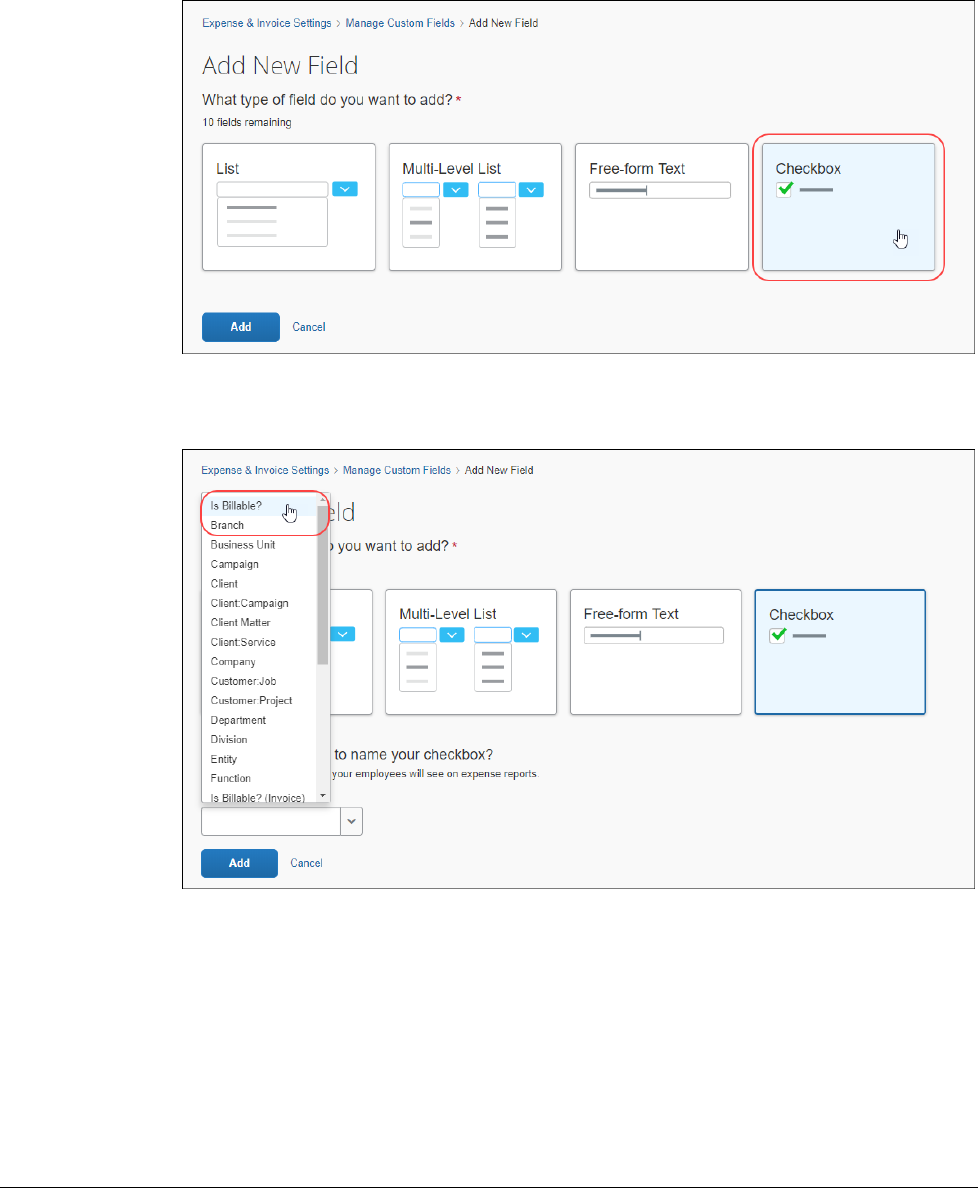
CREATE A CHECK BOX
1. On the Add New Field page, click Checkbox.
2. In the What would you like to name your checkbox? section, type in the
name of the custom field or select a field name from the list.
3. Click Add.
Section 3: Configure Custom Fields
Shared: Custom Fields Setup Guide for Concur Standard Edition 15
Last Revised: February 28, 2023
© 2004 - 2024 SAP Concur All rights reserved.
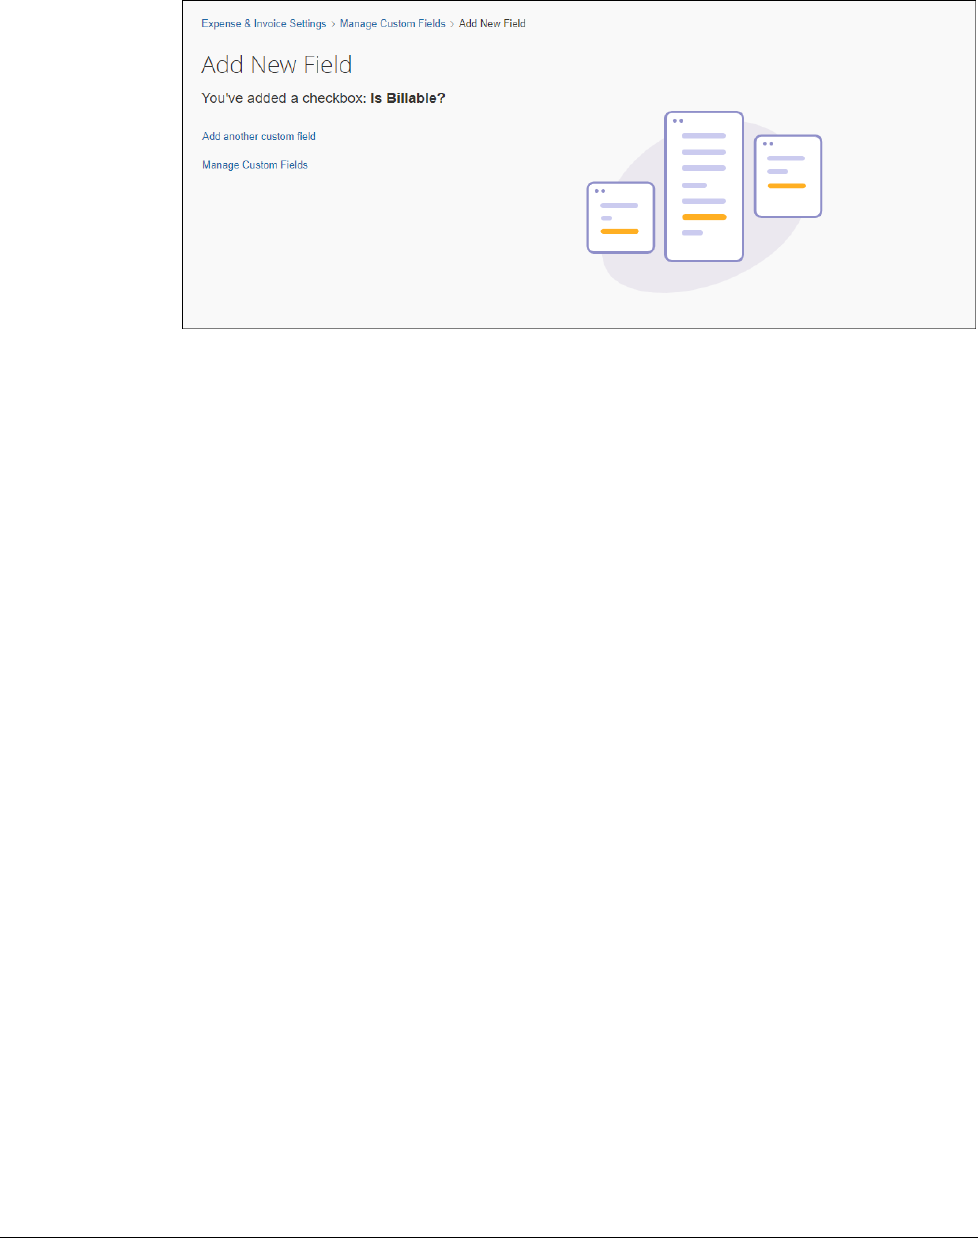
4. A message confirms the addition of the new check box.
5. You can now choose to add another custom field or return to the Custom
Fields page.
Section 3: Configure Custom Fields
16 Shared: Custom Fields Setup Guide for Concur Standard Edition
Last Revised: February 28, 2023
© 2004 - 2024 SAP Concur All rights reserved.
Add Multi-Level Lists
A multi-level list is a set of up to five list fields that depend on each other. The list
item selected in the first list field determines which items are available in the second
list field, and so on. Multi-level lists are configured on the Edit List page. Multi-level
lists display on the Custom Fields page in sequential order with an arrow pointing
up to the parent list level.
EXAMPLE
You want your employees to enter region and city information for their expenses.
You need the available branch to vary based on the region the users select. On the
Add New Field page, you will create a multi-level list with Region as the first or
parent list and Branch as a child list or sub-level list. Click Add to link the lists in
multi-level, hierarchy form. The fields will display on pages with the Region field
displaying first, and the Branch field displaying next. When creating expense
reports, users will not be able to select from the Branch list without first selecting
from the Region list.
NOTE: Multi-level lists are not compatible with QuickBooks IIF or QuickBooks
Connector.
NOTE: M
ulti-level list items appear in the transaction file as columns, one for each
field.
Section 3: Configure Custom Fields
Shared: Custom Fields Setup Guide for Concur Standard Edition 17
Last Revised: February 28, 2023
© 2004 - 2024 SAP Concur All rights reserved.
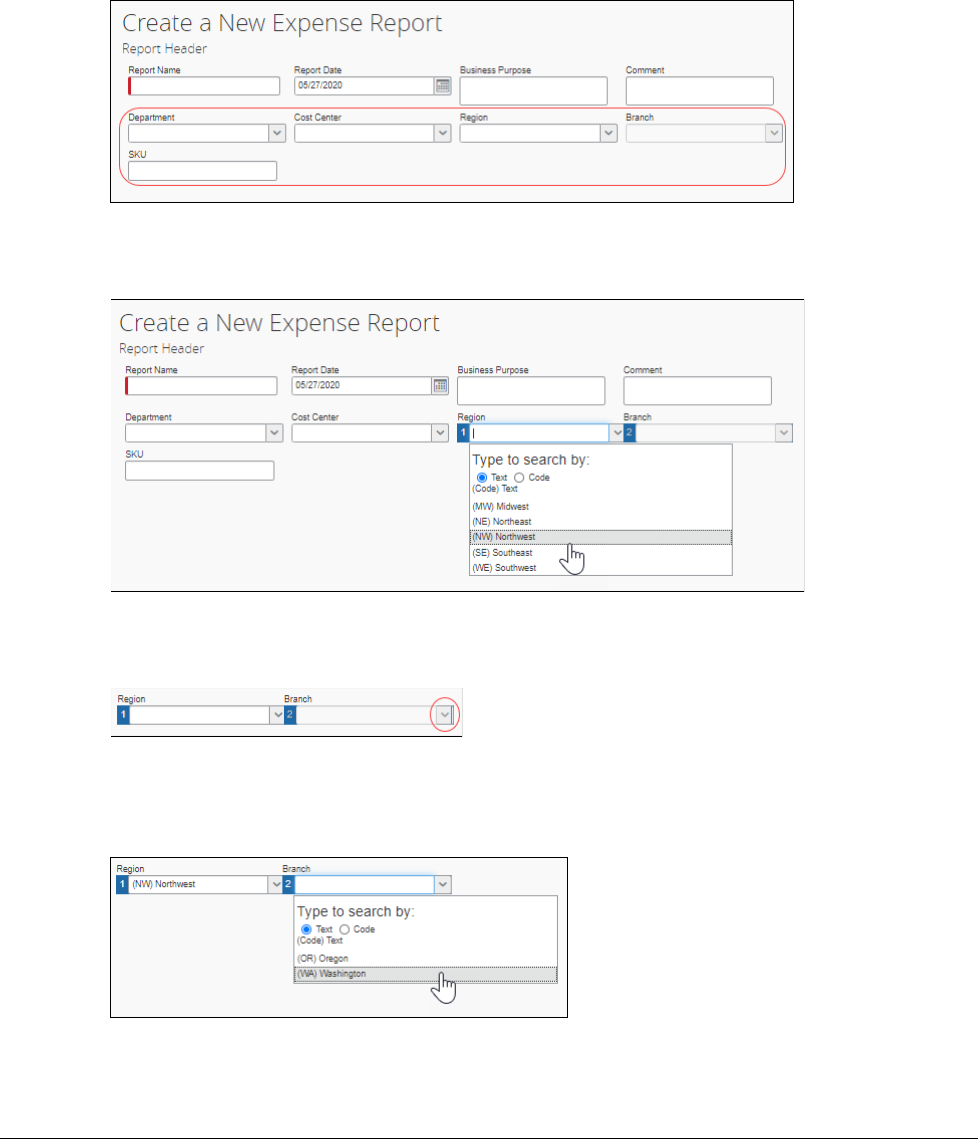
End-User Experience
By default, custom fields are included on the page when a user creates an expense
report, an invoice, requests a new vendor, updates vendor details, or updates their
employee profile.
When a user selects the first field in a multi-list hierarchy of fields, the fields are
numbered to indicate the order in which field data must be selected or entered.
Users cannot select a value for a subsequent field until the previous field is
populated. The list selection arrow is grayed out.
After a selection is made in a multi-list field, the next field in the hierarchy becomes
available and it is populated with the list items associated with the previous
selection.
Section 3: Configure Custom Fields
18 Shared: Custom Fields Setup Guide for Concur Standard Edition
Last Revised: February 28, 2023
© 2004 - 2024 SAP Concur All rights reserved.
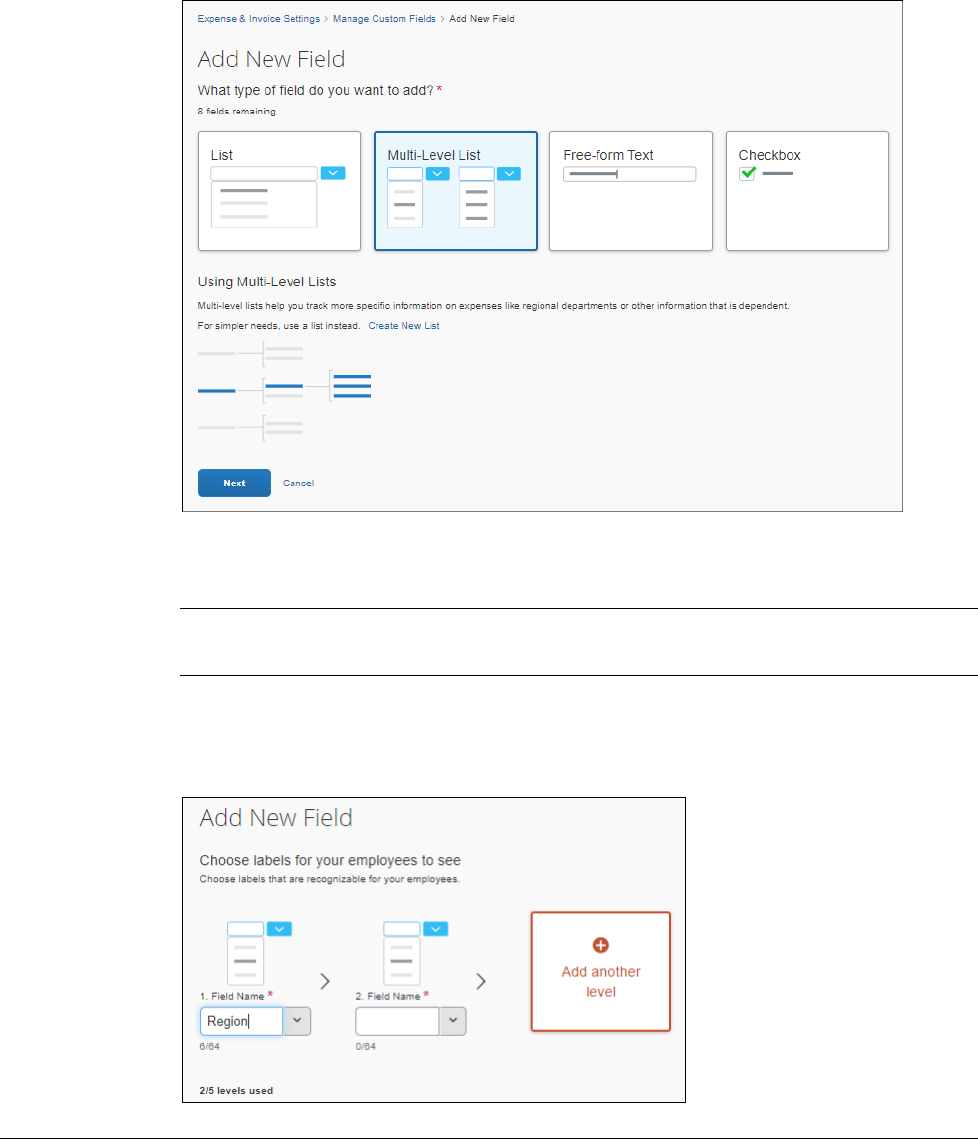
Create Multi-Level Lists
To create a multi-level list:
1. On the Add New Field page, click Multi-Level List.
2. In the Using Multi-Level Lists section, read the on-page information and
view the multi-level list diagram.
NOTE: If you do not need a multi-level list, you can click Create New List to
make a single level list field.
3. Click Next.
4. In the first Field Name field, type or select a field label for the parent list.
Section 3: Configure Custom Fields
Shared: Custom Fields Setup Guide for Concur Standard Edition 19
Last Revised: February 28, 2023
© 2004 - 2024 SAP Concur All rights reserved.
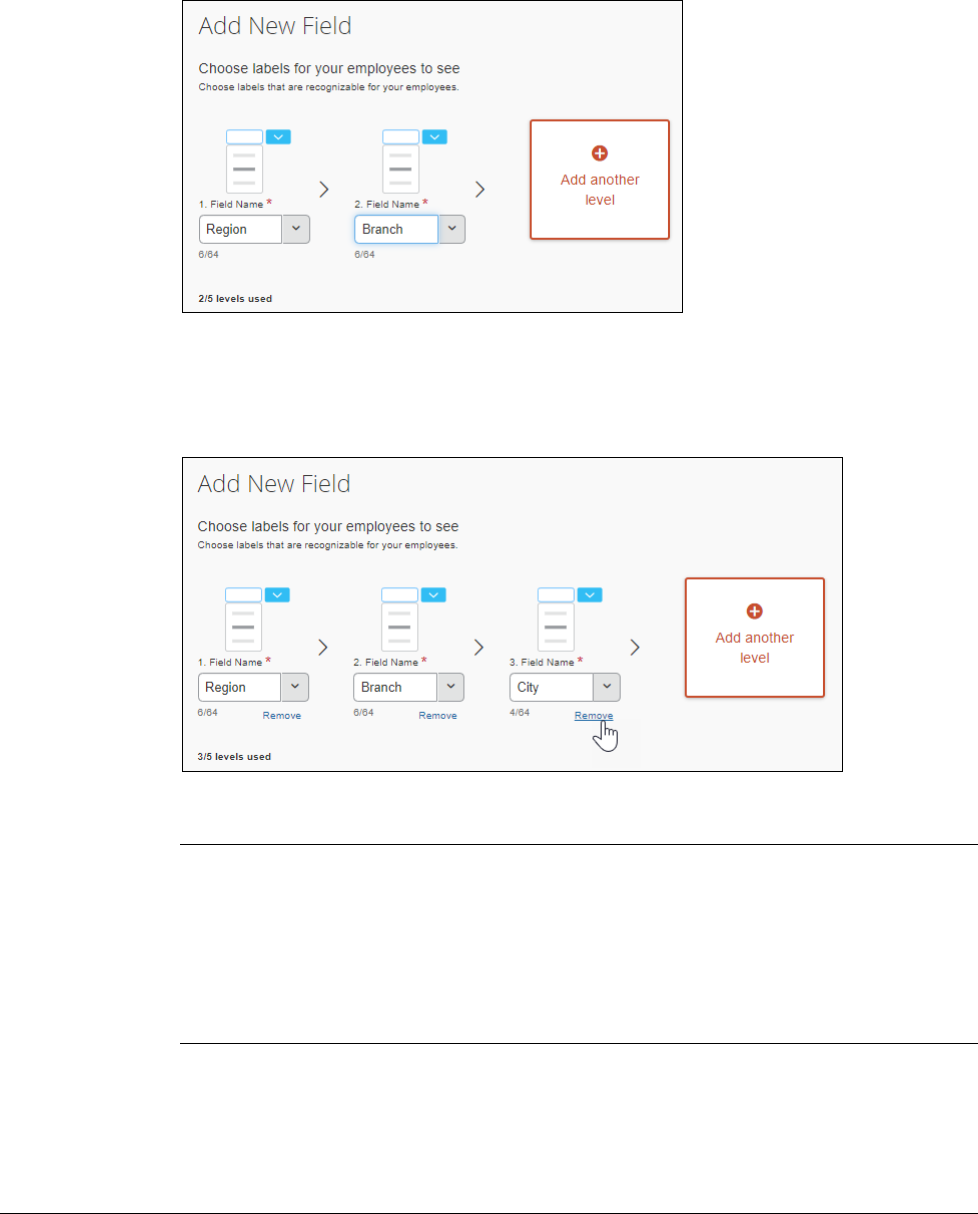
5. In the second Field Name field, type or select a field label for the sub-level
list.
6. If you need to add more list levels, click Add another level. You can add up
to five list levels.
7. Click Remove to remove a list level.
8. Once you have created the desired structure, click Add.
! WARNING: If you want to change or rename the levels later, you will
have to delete the multi-level list field and create a new one.
If you delete a field, the data the field contains will be irreversibly
deleted and cannot be recovered. When you delete a field, a warning
appears, and you must confirm your understanding that all data
associated with the field will also be deleted.
Section 3: Configure Custom Fields
20 Shared: Custom Fields Setup Guide for Concur Standard Edition
Last Revised: February 28, 2023
© 2004 - 2024 SAP Concur All rights reserved.
9. Click Add list items to add list selections for the new fields.
The new multi-level list fields appear in a single row on the Custom Fields
page.
Section 3: Configure Custom Fields
Shared: Custom Fields Setup Guide for Concur Standard Edition 21
Last Revised: February 28, 2023
© 2004 - 2024 SAP Concur All rights reserved.
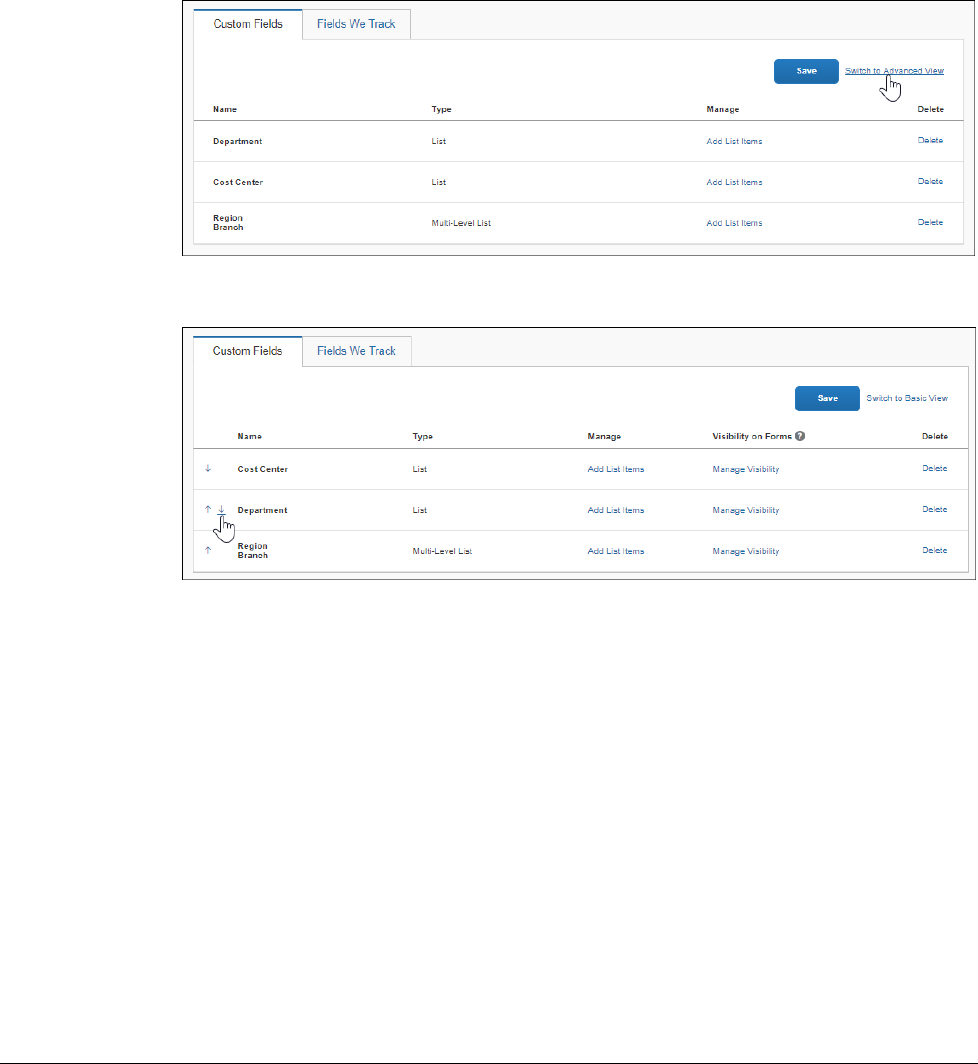
Move Fields
After you create the necessary custom fields, you can change the order in which they
display on the Custom Fields page by switching to Advanced View.
To move fields:
1. On the Custom Fields page, click Switch to Advanced View.
2. Click on the up or down arrow to the left of the field you want to move.
Section 3: Configure Custom Fields
22 Shared: Custom Fields Setup Guide for Concur Standard Edition
Last Revised: February 28, 2023
© 2004 - 2024 SAP Concur All rights reserved.
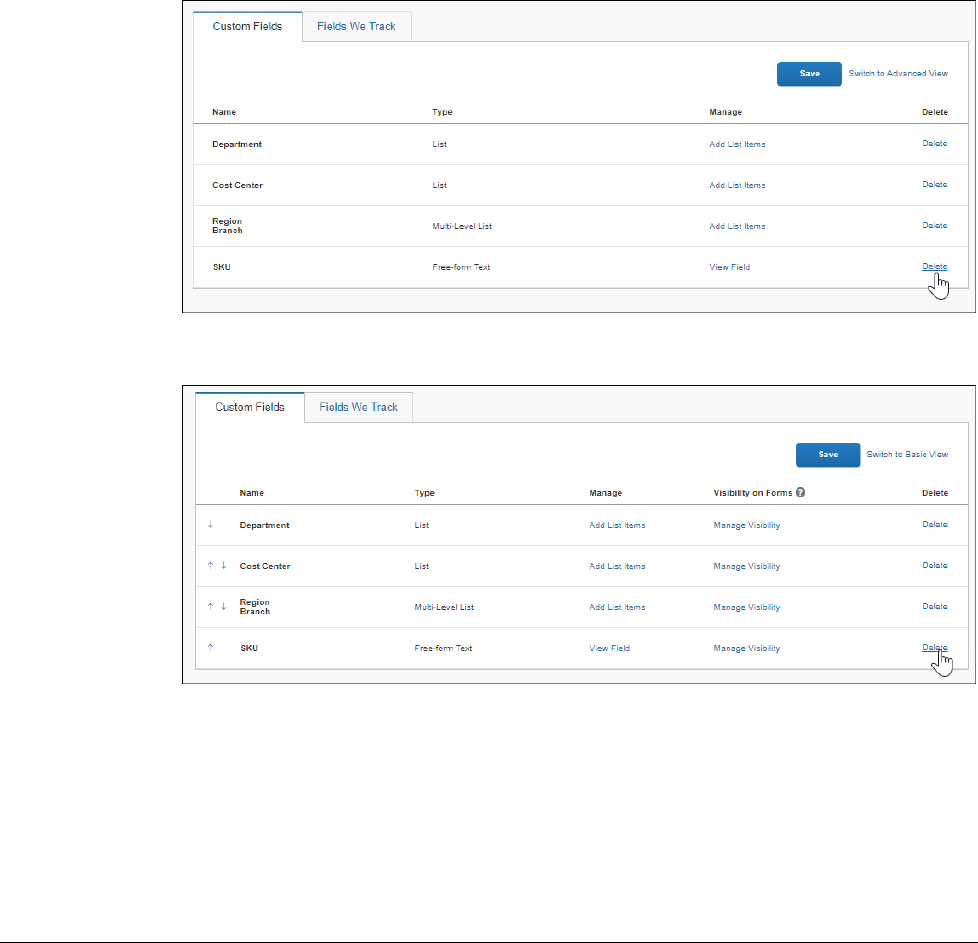
Delete Fields
If you delete a field, the data the field contains will be irreversibly deleted and
cannot be recovered. When you delete a field, a warning appears, and you must
confirm your understanding that all data associated with the field will be deleted
before the field can be deleted.
To delete a field:
1. On the Custom Fields page, in either Basic View or Advanced View, click
Delete in the row for the field you want to delete.
Basic View
Advanced View
Section 3: Configure Custom Fields
Shared: Custom Fields Setup Guide for Concur Standard Edition 23
Last Revised: February 28, 2023
© 2004 - 2024 SAP Concur All rights reserved.
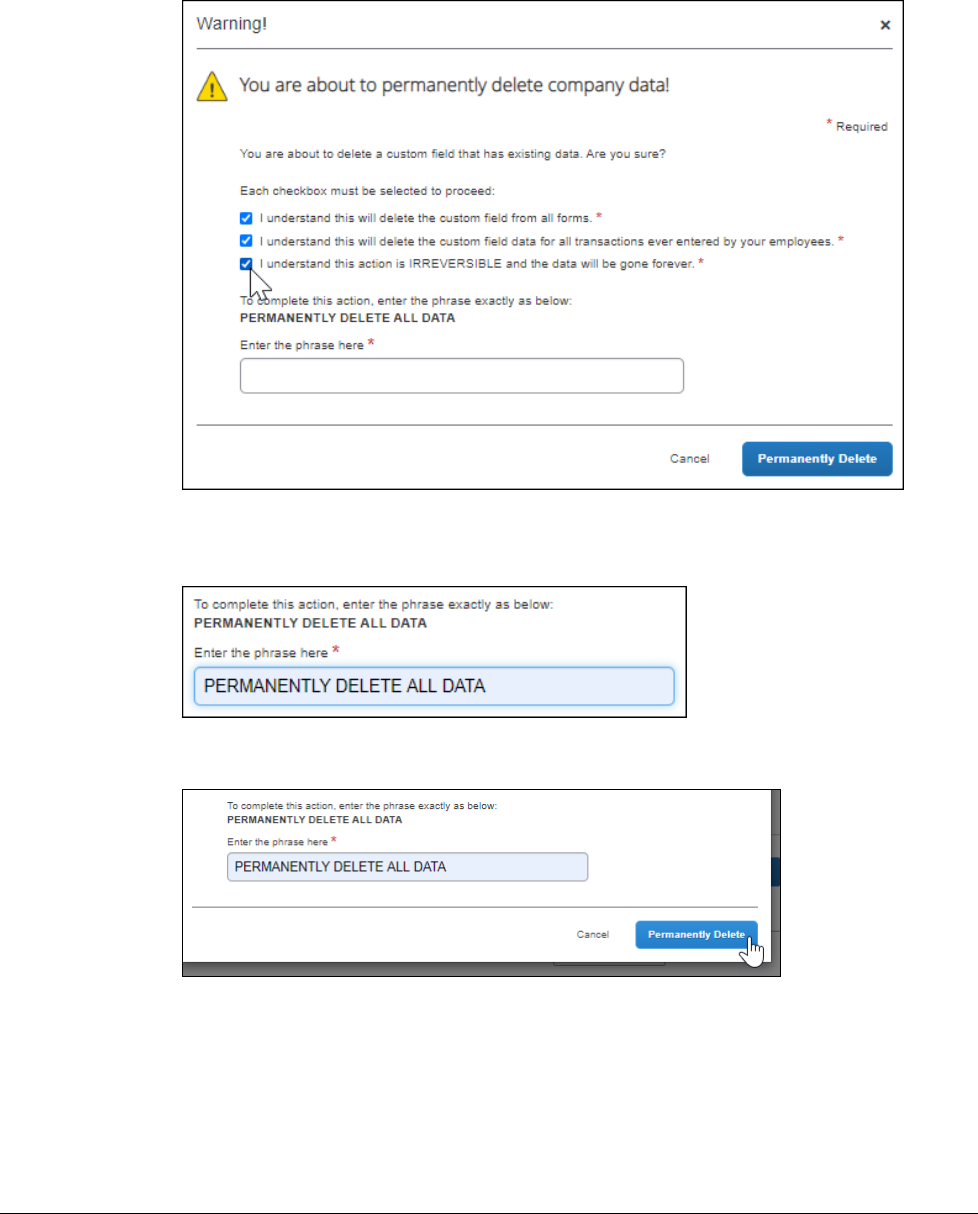
2. Read the warning messages and check each box to confirm that you
understand your data will be permanently deleted and cannot be recovered.
3. Enter the phrase “PERMANENTLY DELETE ALL DATA” exactly as it appears in
the text field.
4. Click Permanently Delete.
Section 4: Edit List Items
24 Shared: Custom Fields Setup Guide for Concur Standard Edition
Last Revised: February 28, 2023
© 2004 - 2024 SAP Concur All rights reserved.
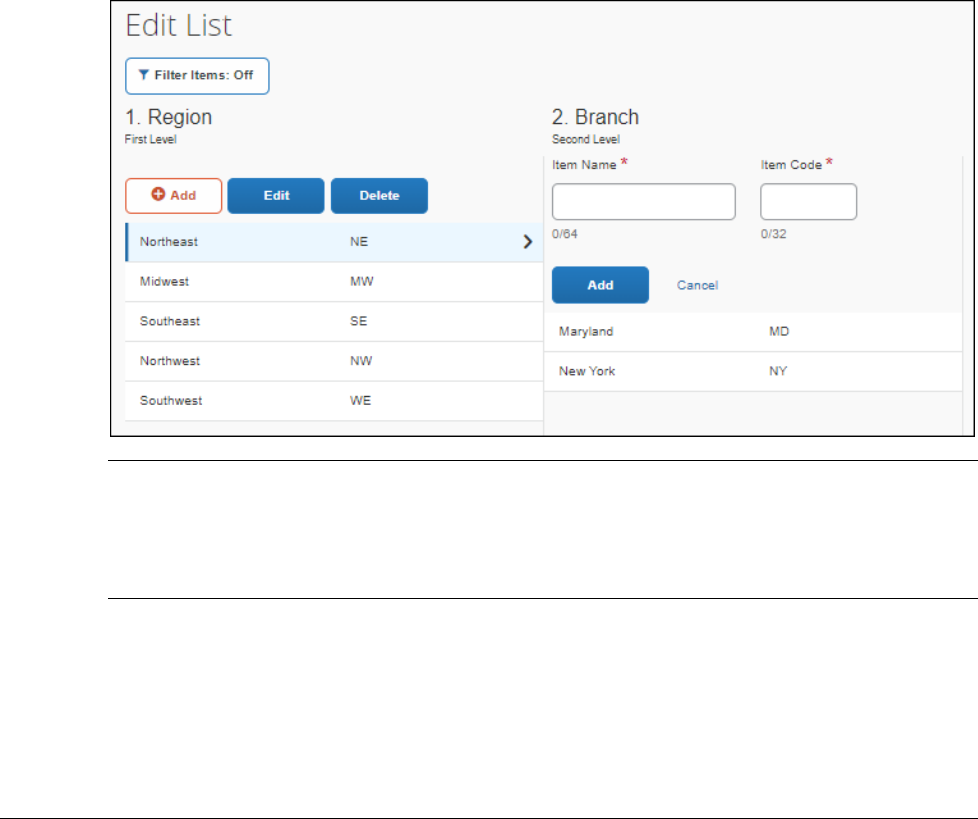
Section 4: Edit List Items
On the Edit List page, you can enter list items that will appear in the fields. Only
fields selected and configured as lists display on this page. Adding list items prevents
users from entering invalid or misspelled values in the field.
EXAMPLE
Your employees often forget to enter the project name in the correct format on their
expense reports. The administrator can enter the project names in a list field, either
by typing them in or importing a spreadsheet. Users can only select valid project
names when filling out the Project field. If the Project field is also set as Required,
users must select a valid project name from the list before submitting the report.
Lists can also be populated by importing a spreadsheet. Each list item must have
both an item name and an item code.
Add List Items
Before you create a list-type field, it is a best practice to plan what list items will be
included in the list and the order you want them to display.
If you use alternate account codes, you must create the list items for the account
code driver field manually.
To add a list item:
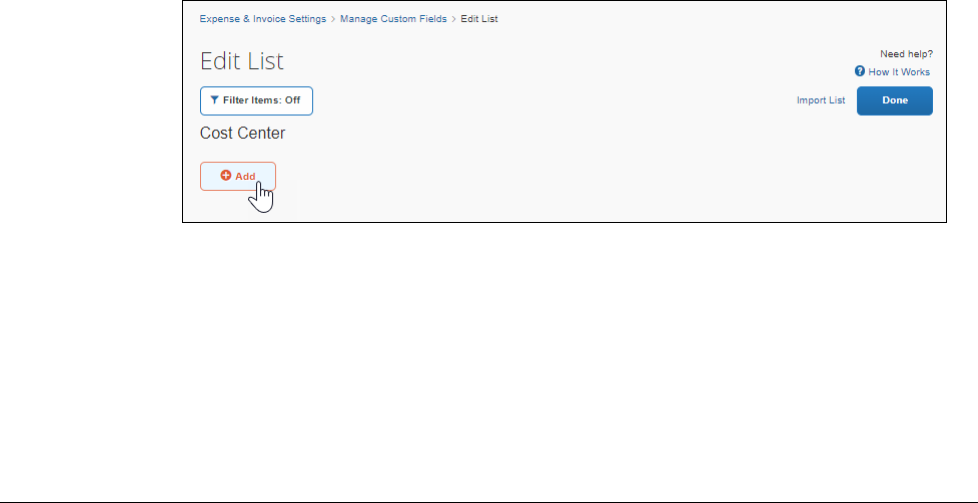
1. On the Add New Field or Custom Fields page, click Add List Items.
2. On the Edit List page, click Add at the parent level to add the list values.
Section 4: Edit List Items
Shared: Custom Fields Setup Guide for Concur Standard Edition 25
Last Revised: February 28, 2023
© 2004 - 2024 SAP Concur All rights reserved.
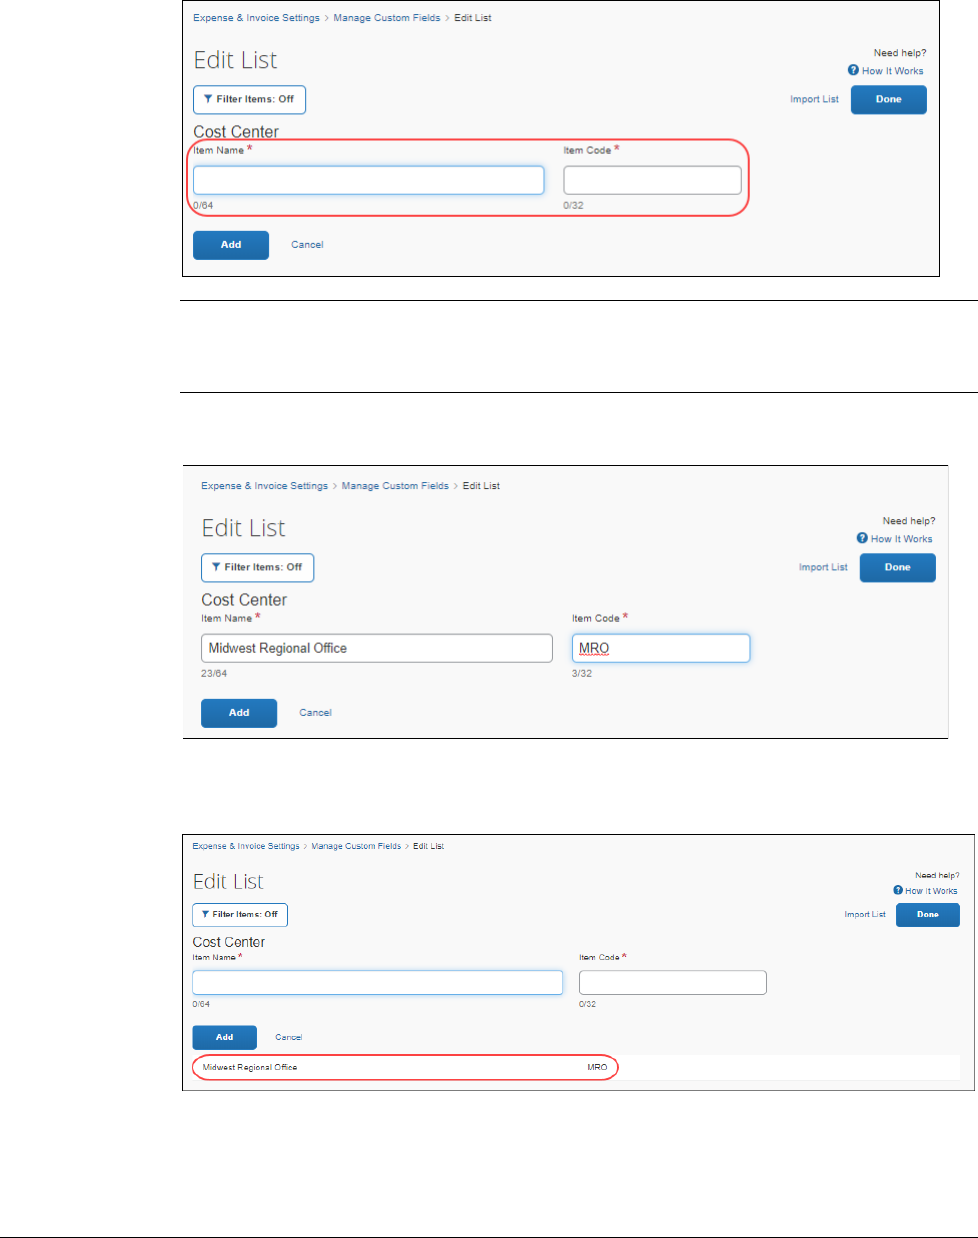
The Item Name and Item Code fields appear.
NOTE: Each list item must have both an item name and an item code. If your
list does not use codes, type the item name value in the Item Code
field.
3. Enter the item name and item code in the Item Name and Item Code fields.
4. Click Add to save the list values. The list item information appears. An on-
page validation confirms the action.
5. Repeat these steps for each list item you need to add.
Section 4: Edit List Items
26 Shared: Custom Fields Setup Guide for Concur Standard Edition
Last Revised: February 28, 2023
© 2004 - 2024 SAP Concur All rights reserved.
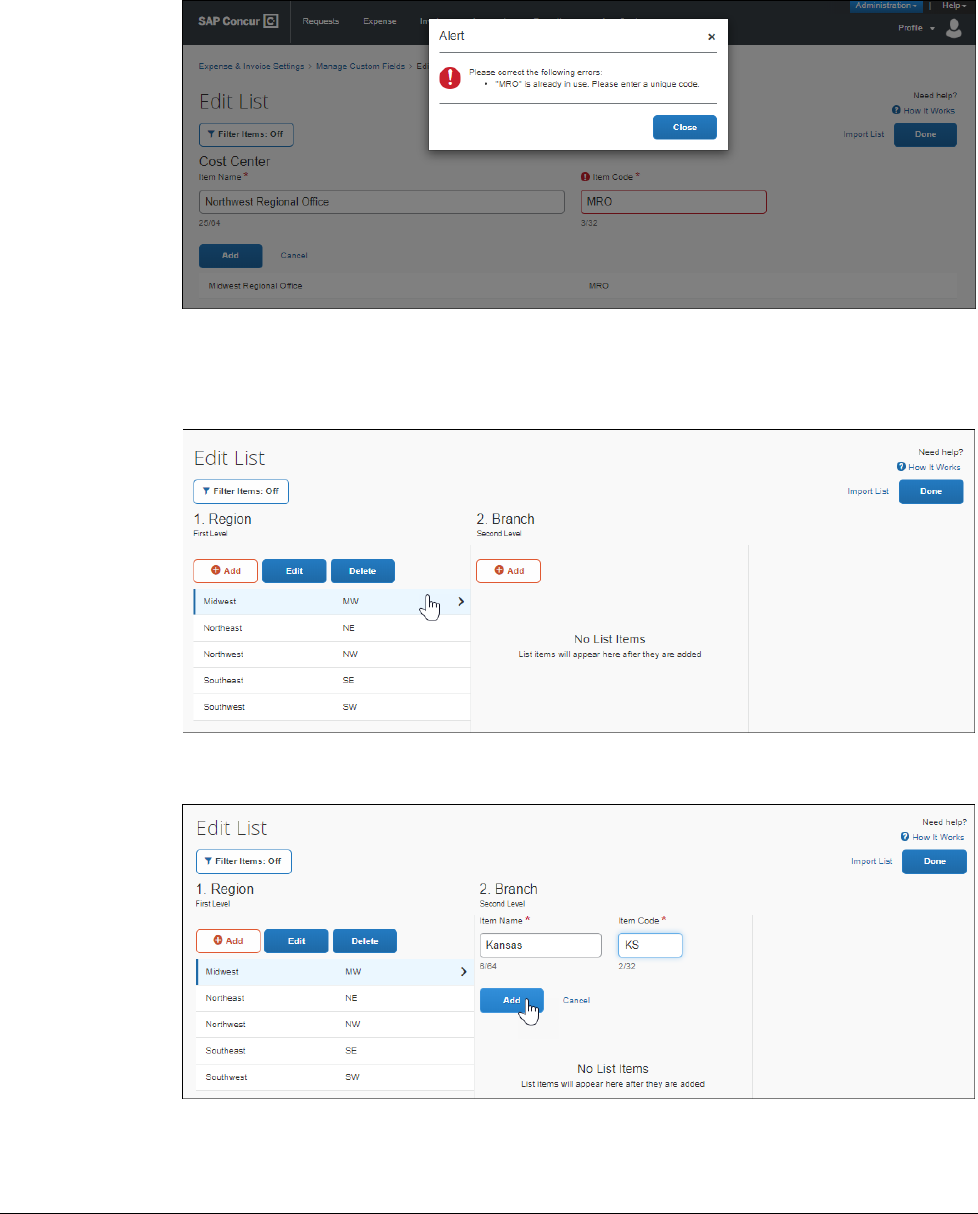
The system displays an alert if an error or conflict occurs. For example, a alert
appears if an item name or code is already in use.
6. If you are adding an item to a sub-level list in a multi-level list, select the
parent item on the left to enable the sub-level list to which you want to add a
list item.
7. Click Add to display the Item Name and Item Code fields.
8. Add the desired list item (Item Name) and corresponding item code.
9. Click Add.
Section 4: Edit List Items
Shared: Custom Fields Setup Guide for Concur Standard Edition 27
Last Revised: February 28, 2023
© 2004 - 2024 SAP Concur All rights reserved.
10. Repeat for each list item.
11. Click Done to return to the Manage Custom Fields page.
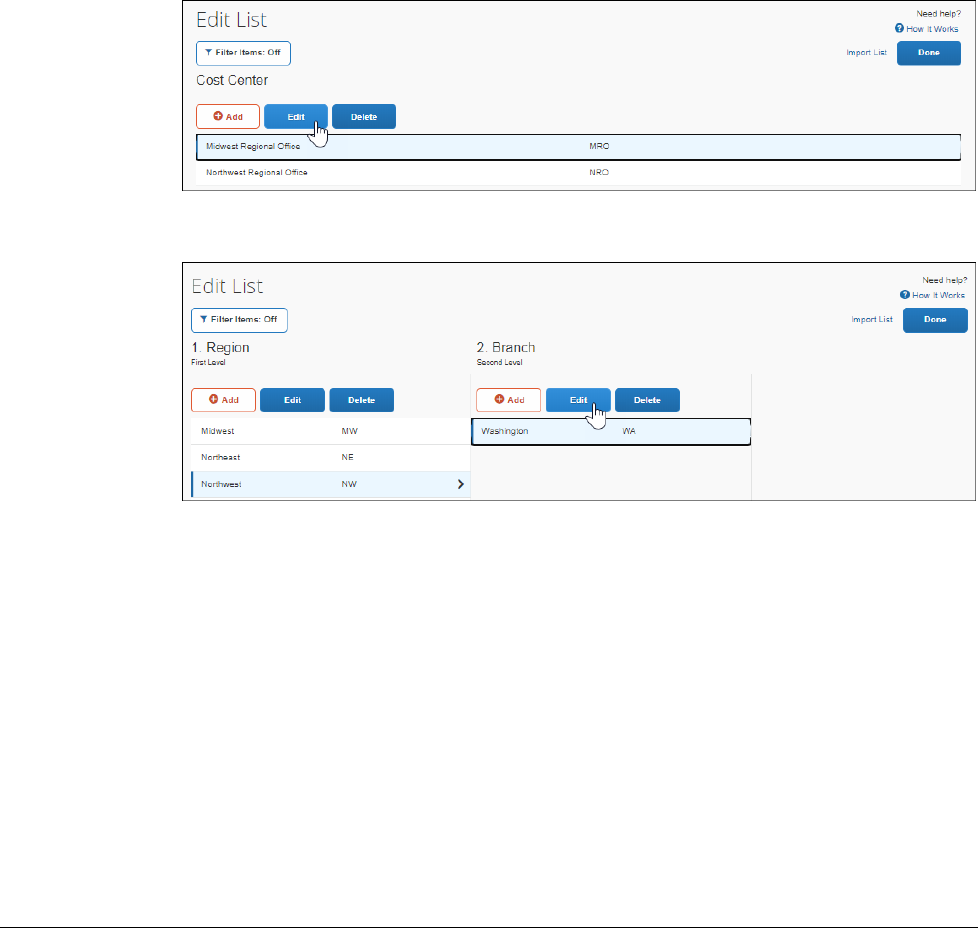
Edit List Items
To edit a list item:
1. On the Custom Fields page, click Manage List Items.
2. On the Edit List page, click the desired list item, and then click Edit.
Single-level List
Multi-level List
3. Type in the new information.
4. Click Save.
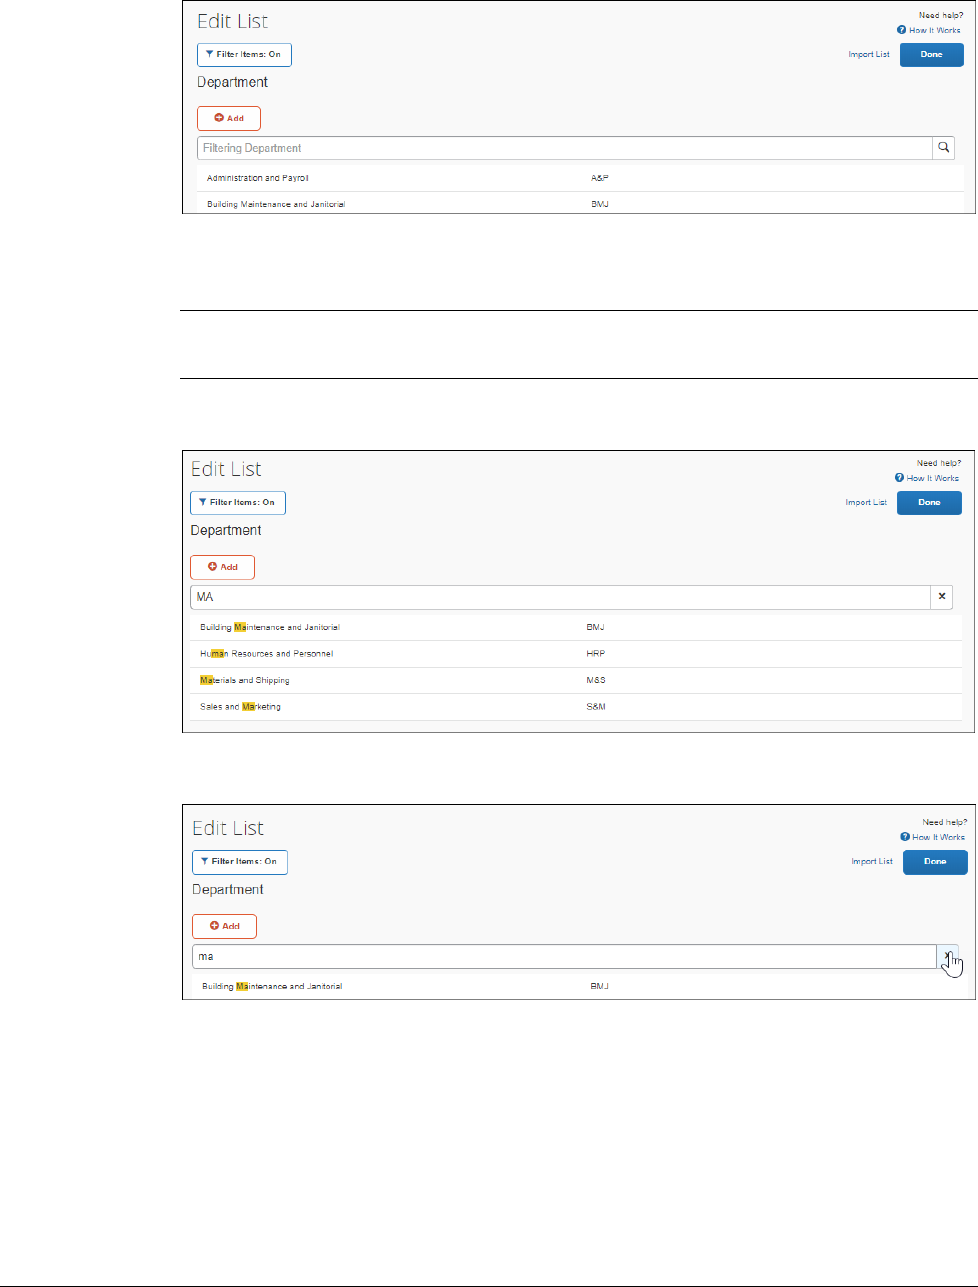
Filter Items on the Edit List Page
To filter list items on the Edit List page:
1. Click Filter Items to display the Filtering field(s).
Section 4: Edit List Items
28 Shared: Custom Fields Setup Guide for Concur Standard Edition
Last Revised: February 28, 2023
© 2004 - 2024 SAP Concur All rights reserved.
2. In the Filtering field, for the list level you want to search, type all or part of
the list item name or code you want to display.
NOTE: You do not need to use wildcards when you filter by part of a name or
code.
3. Press Enter. The search results appear with the search term highlighted.
4. Click X to clear the search results.
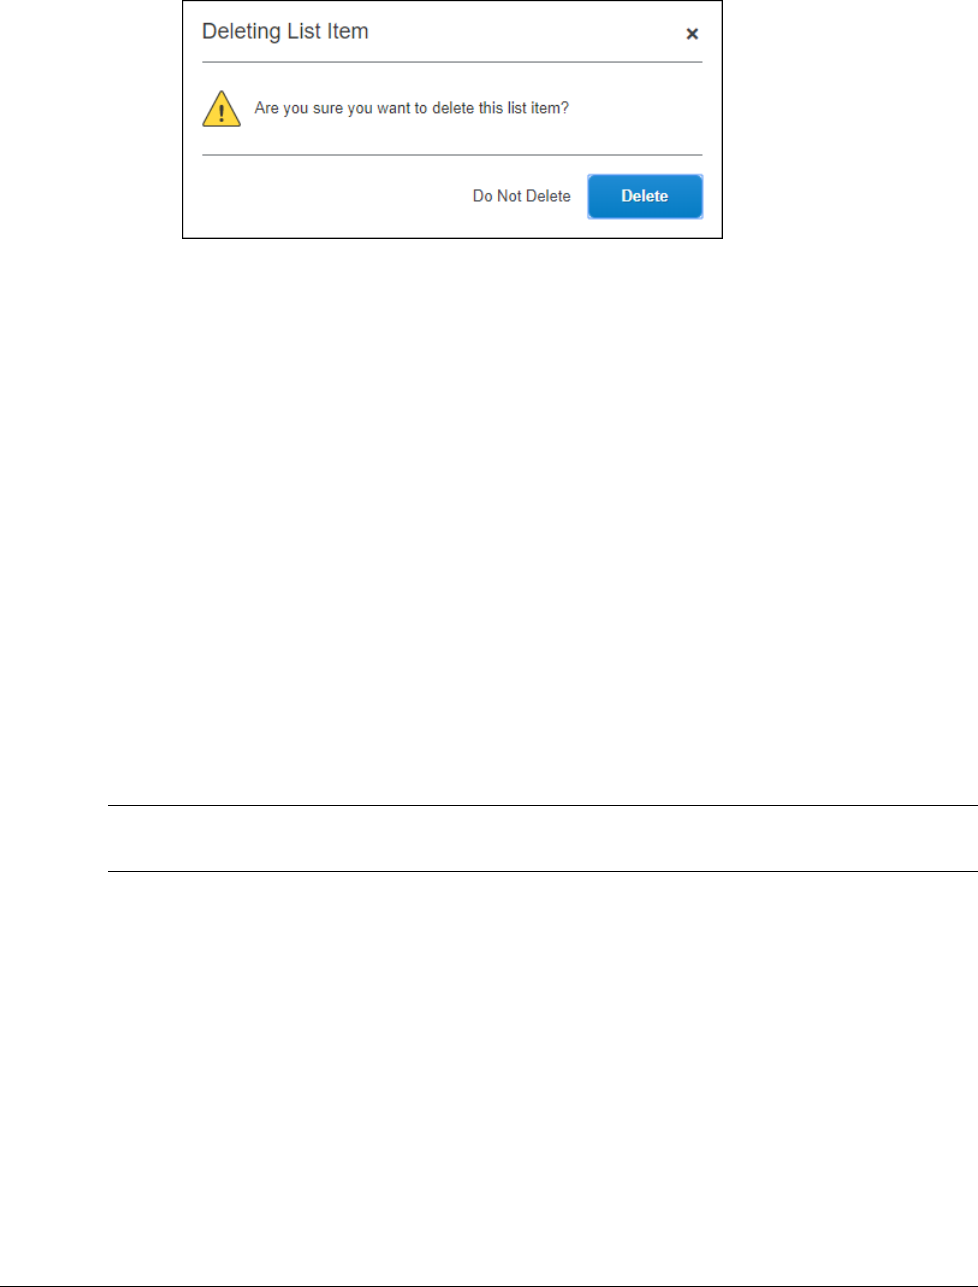
Delete List Items
To delete a list item:
1. On the Edit List page, click the desired list item.
2. Click Delete.
Section 4: Edit List Items
Shared: Custom Fields Setup Guide for Concur Standard Edition 29
Last Revised: February 28, 2023
© 2004 - 2024 SAP Concur All rights reserved.
3. In the message box, click Delete.
Import List Items
The List Import process has the following steps:
1. Download the list data spreadsheet.
2. Populate the list data spreadsheet.
3. Upload the list data spreadsheet.
4. View the initial field validation results.
5. View the import results.
Download the List Import Spreadsheet
The administrator can download the Concur List Import Template for the list data
import.
NOTE: On entities with fewer than 1000 preexisting list items, the existing list items
are included in the downloaded template.
To download the list data spreadsheet:
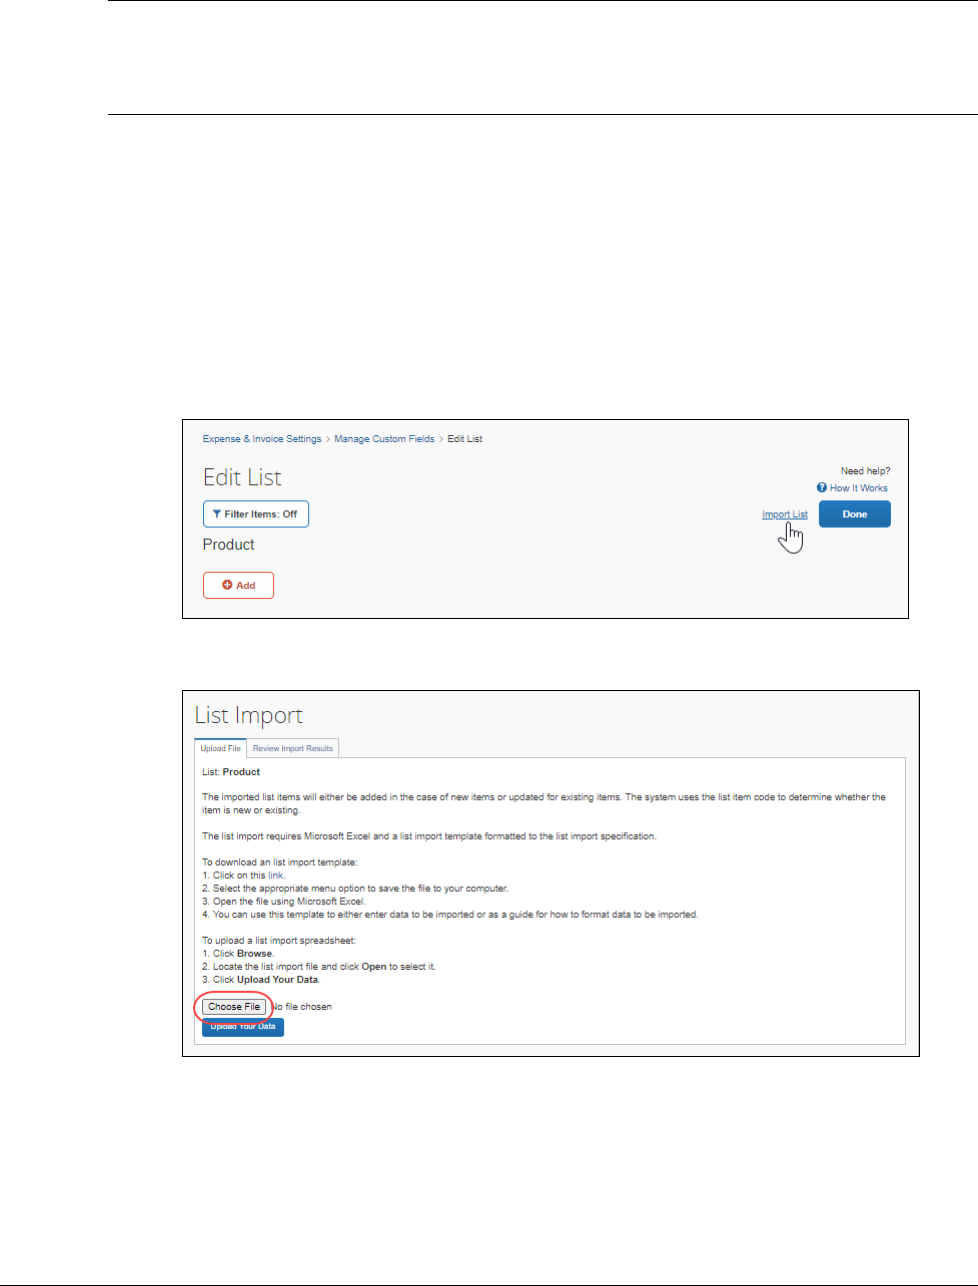
1. On the Custom Fields page, click Add List Items or Manage List Items.
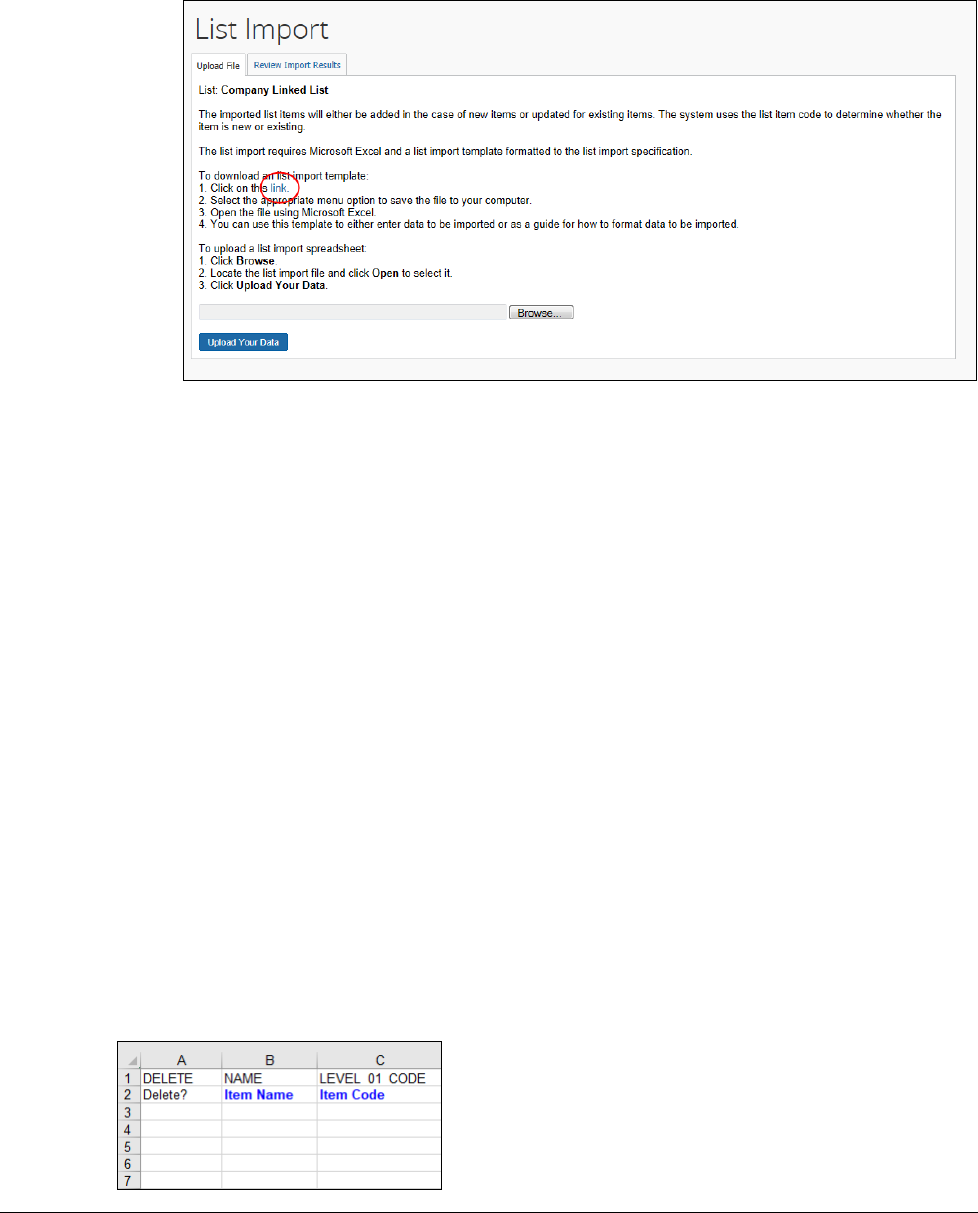
2. On the Edit List page, click the Import List link. The List Import page
appears.
Section 4: Edit List Items
30 Shared: Custom Fields Setup Guide for Concur Standard Edition
Last Revised: February 28, 2023
© 2004 - 2024 SAP Concur All rights reserved.
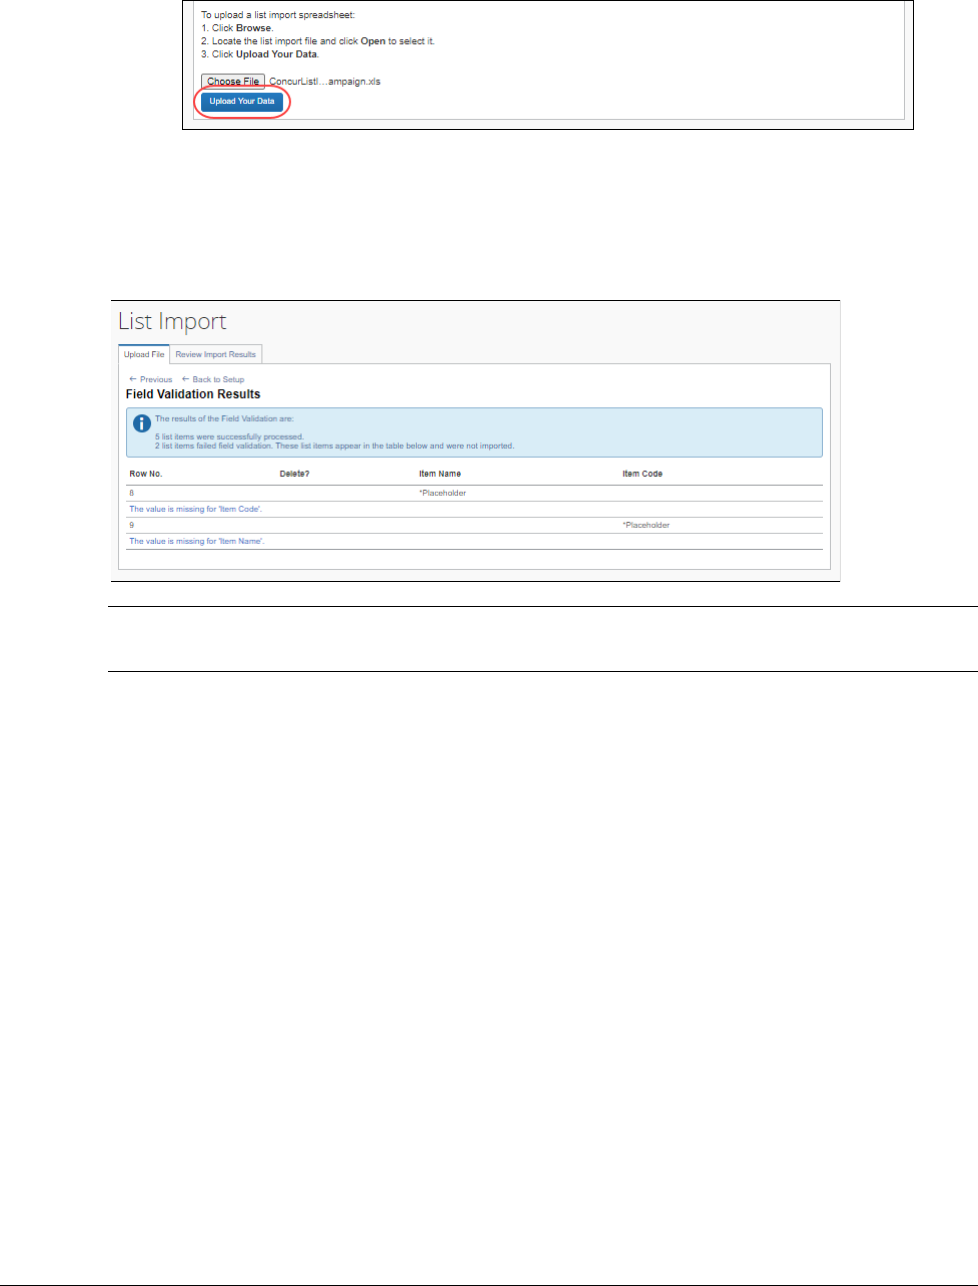
3. On the Upload File tab, click the word link to download the Concur List
Import Template (ConcurListImportTemplate.xls).
4. Depending on which browser you are using, the file might be downloaded to
the default download location for your browser or you might be prompted to
choose a download location.
Populate the Spreadsheet
Data can be entered directly in the template spreadsheet to import, or the template
can be used as a guide for creating a list import spreadsheet.
Single-Level Lists and Multi-Level Lists
The spreadsheet for a single level list requires the item name and item code for each
list item you want to add or delete through the import. These are the same values
you would enter if you were creating the list items manually within Custom Fields in
Product Settings.
The spreadsheet for a multi-level list requires the item name for the list item you
want to add or delete, the item code for that list item, and the item code(s) for any
list items that precede the added/deleted list item in the list hierarchy.
SINGLE-LEVEL LIST EXAMPLE
For a single-level list named Client, the downloaded spreadsheet contains 3 columns
and 2 rows.
Section 4: Edit List Items
Shared: Custom Fields Setup Guide for Concur Standard Edition 31
Last Revised: February 28, 2023
© 2004 - 2024 SAP Concur All rights reserved.
The first column, DELETE, can be used to delete existing list items by entering a ‘Y’
in the DELETE column followed by the item name and code for the list item you
want to delete.
The second and third columns can be used to add list items by leaving the Delete
column blank and entering the item name and code for the list items you want to
add.
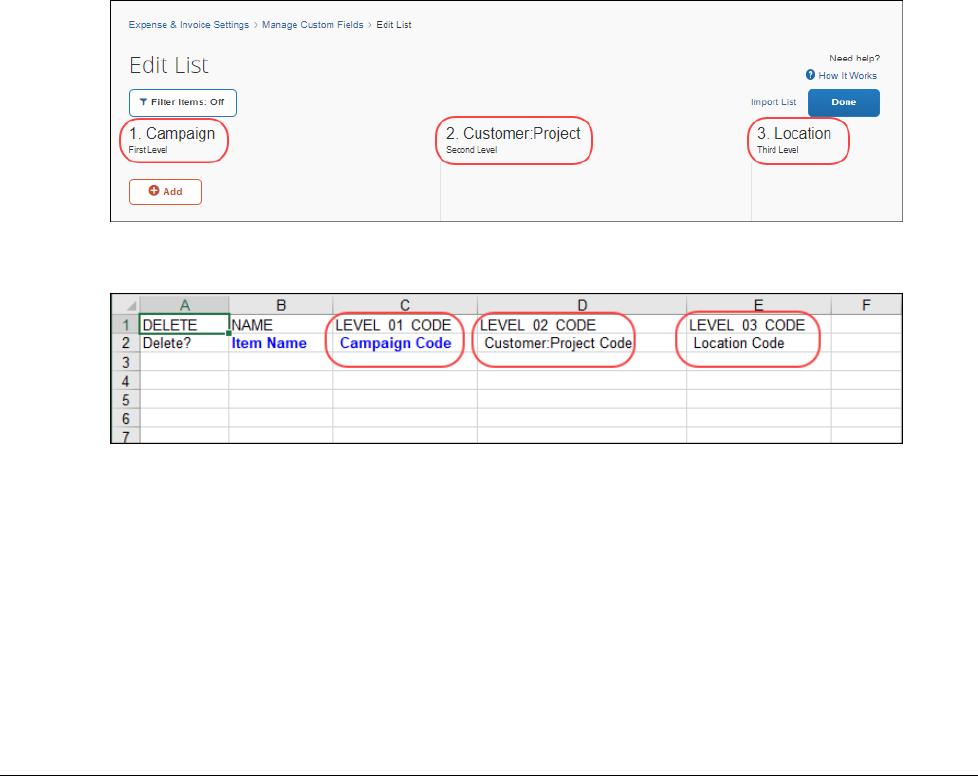
EXAMPLE
For a multi-level list, the downloaded spreadsheet contains the DELETE column, the
item name column, and columns for each level in the list hierarchy. For example, the
spreadsheet for a multi-level list with 3 levels will contain the DELETE column, the
NAME (Item Name) column, and three Item Code columns: LEVEL 01 CODE,
LEVEL 02 CODE, and LEVEL 03 CODE.
The name of the list that corresponds to each level in the hierarchy appears in the
second row of the downloaded spreadsheet.
Three-Level Multi-List in Custom Fields
Downloaded Spreasheet for Three-Level Multi-List
List Import Formatting Requirements
The Concur List Import Spreadsheet has the following formatting requirements:
• Do not delete the values in the spreadsheet header rows.
• All cells in the spreadsheet must have a format of Text or Number before
being uploaded. The cells' format settings default to General.
Section 4: Edit List Items
32 Shared: Custom Fields Setup Guide for Concur Standard Edition
Last Revised: February 28, 2023
© 2004 - 2024 SAP Concur All rights reserved.
NOTE: If you use the Replace feature in Excel, be aware that it may not maintain the
required cell formatting. Testing has shown that cells formatted as text
become general format after using Replace. If the cells are not formatted as
text, the import will fail.
If you use this feature, always verify the cell formatting when you are done. If
necessary, select the appropriate cells and change the formatting.
Upload the List Import Spreadsheet
The list import spreadsheet is uploaded in the List Import window.
To upload the list data spreadsheet:
1. On the Edit List page, click Import List.
2. In the List Import window, click Choose File.
3. Select the file you want to upload and select the list import spreadsheet, and
then click Open.
4. In the List Import window, click Upload Your Data.
Section 4: Edit List Items
Shared: Custom Fields Setup Guide for Concur Standard Edition 33
Last Revised: February 28, 2023
© 2004 - 2024 SAP Concur All rights reserved.
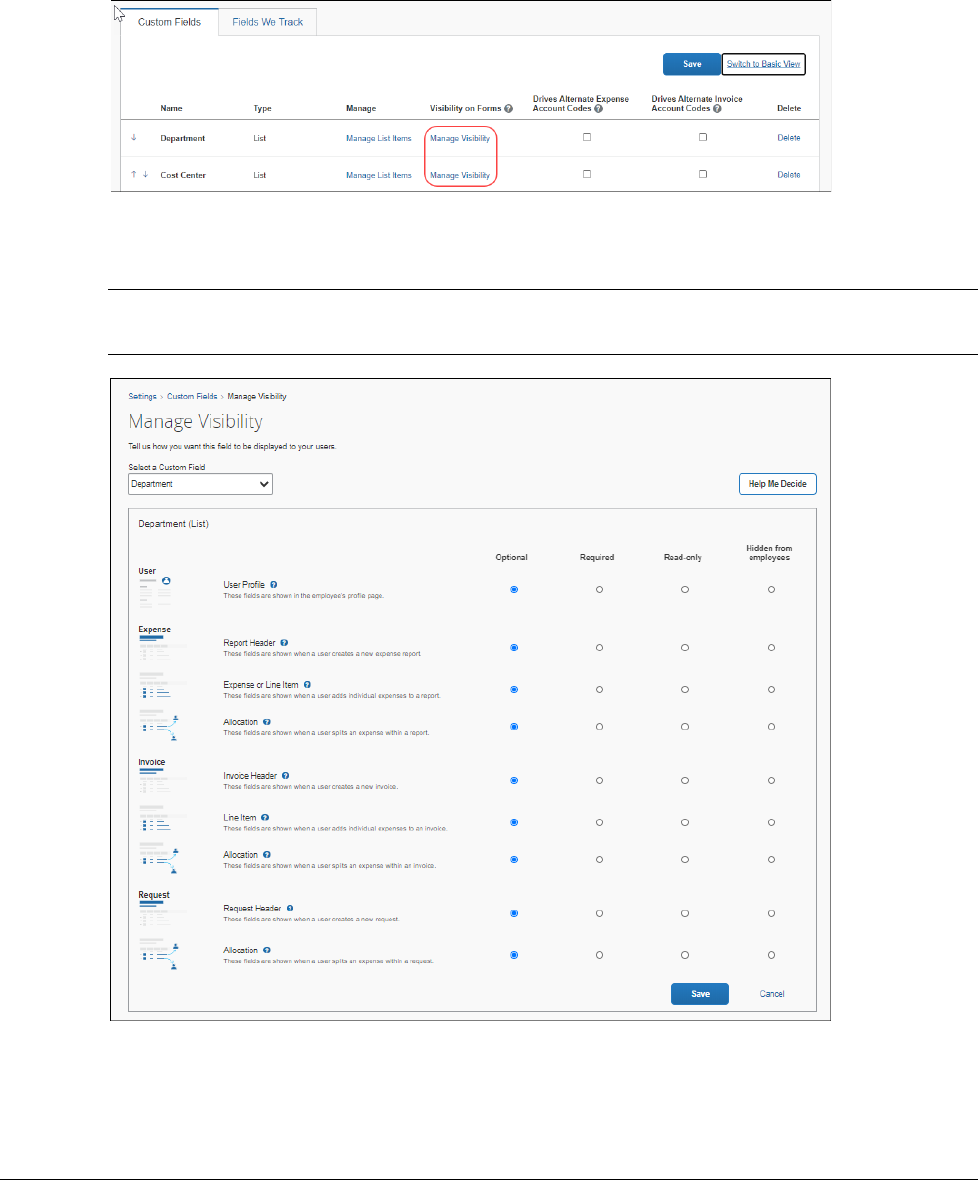
FIELD VALIDATION RESULTS
After the upload file is processed, the Field Validation Results page appears. If
any list items failed the import, the Field Validation Results page list which rows in
the table failed to import and provides information about why the import failed.
NOTE: You can correct the errors in the file you uploaded and reupload the file. The
previous imported list items do not need to be removed.
On the List Import page, click Previous to return to the List Import page, or click
Back to Setup to return to the Edit List page.
View the Import Results
Once the administrator clicks Upload Your Data, the eligible records are queued for
import. The system processes these as soon as possible. It may take the system a
few minutes to process queued records. Provided there are no further errors in
processing the records, the system proceeds with the import.
The administrator can use the Review Import Results tab to view the status of the
import as well as the import details, including any errors generated. Once the
administrator selects the date, the page displays the status of all imports on that
date, the number of records processed, and the number of records rejected. This list
is sorted in descending order by time, starting when the administrator initially
imported the file.
The Review Import Results window displays any errors that may have occurred
during the import.
To view import results:
1. Click Review Import Results.

Section 4: Edit List Items
34 Shared: Custom Fields Setup Guide for Concur Standard Edition
Last Revised: February 28, 2023
© 2004 - 2024 SAP Concur All rights reserved.
2. In the Date field, type the desired date.
3. Click Search.
The window displays all files imported on the specified date, and 10 days prior.
The Review Import Results window allows administrators to view details about
processed records from a file. Here the administrator can view details about:
• Records with Errors: The window displays the row number in the
spreadsheet with the error that prevented the record from being imported.
The Description and Action To Take columns provide the information
necessary to correct the issue. These records must be corrected in this file
and then re-uploaded.
• Records with Warnings: The window displays the row number in the
spreadsheet where the system successfully imported the record. If there is an
issue, the administrator should investigate. The Description and Action To
Take columns provide the warning information. The administrator should
consider the warning and decide whether the issue warrants further
investigation. The administrator can review the import information using the
List Management user interface and make any necessary modifications.
Alternatively, the administrator can review the list record directly in the
spreadsheet file, make any necessary edits there, and then re-upload the
corrected file.
• Records without Warnings or Errors: The window displays the row
number in the spreadsheet where the system successfully imported the
record.
View the Import Details
To view import details:
1. In the Review Import Results window, under Details, click an icon
associated with the list template in the desired row.
2. The page refreshes, displaying all records with errors.
3. Select the type of issue to display. The details can be filtered to show records
imported without errors or warnings, records with warnings, records with
errors, or all records.
4. Review the Description and Action To Take columns for details about any
records with errors.
Section 5: Manage Visibility
Shared: Custom Fields Setup Guide for Concur Standard Edition 35
Last Revised: February 28, 2023
© 2004 - 2024 SAP Concur All rights reserved.
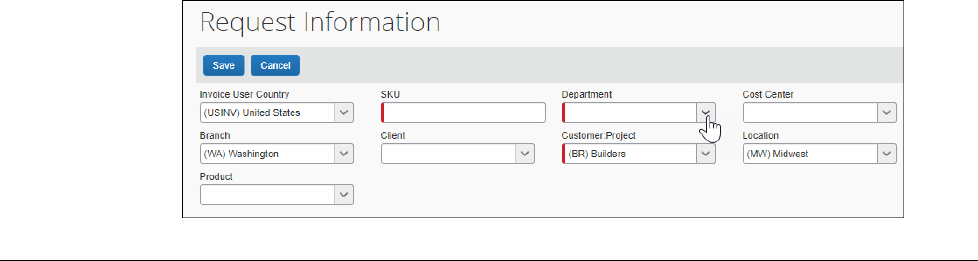
Section 5: Manage Visibility
The Manage Visibility page is only accessible in Advanced View.
On the Manage Visibility page, you can configure which pages your custom fields
appear on and define whether visible fields are required, optional, or read-only.
NOTE: Custom fields on the Concur Invoice vendor pages are not configurable. They
are visible and optional.
Default Visibility Settings
When you create a new custom field, it is set to Optional by default. A field set to
Optional is visible on the page and the user can add data to or interact with the
Section 5: Manage Visibility
36 Shared: Custom Fields Setup Guide for Concur Standard Edition
Last Revised: February 28, 2023
© 2004 - 2024 SAP Concur All rights reserved.
field, but the field is not required, and the page can be saved without entering data
or interacting with the field.
Depending on which SAP Concur products you are using, by default, custom fields
will appear on the following pages:
Expense:
• Expense Information page in Profile Settings
• Expense report header
• Expense report line item
• Expense report allocation
Invoice:
• Invoice Information page in Profile Settings
• Invoice header
• Invoice line item
• Vendor Manager New Vendor page
• Vendor Manager vendor details pages
Request:
• Request Information page in Profile Settings
• Request header
• Request allocation
Visibility Settings
On the Manage Visibility page, you can set a custom fields visibility and behavior
on each available page to one of the following:
• Optional: The field is visible on the page and the user can populate it, but it
is not required and the page can be saved whether or not the user populates
the field.
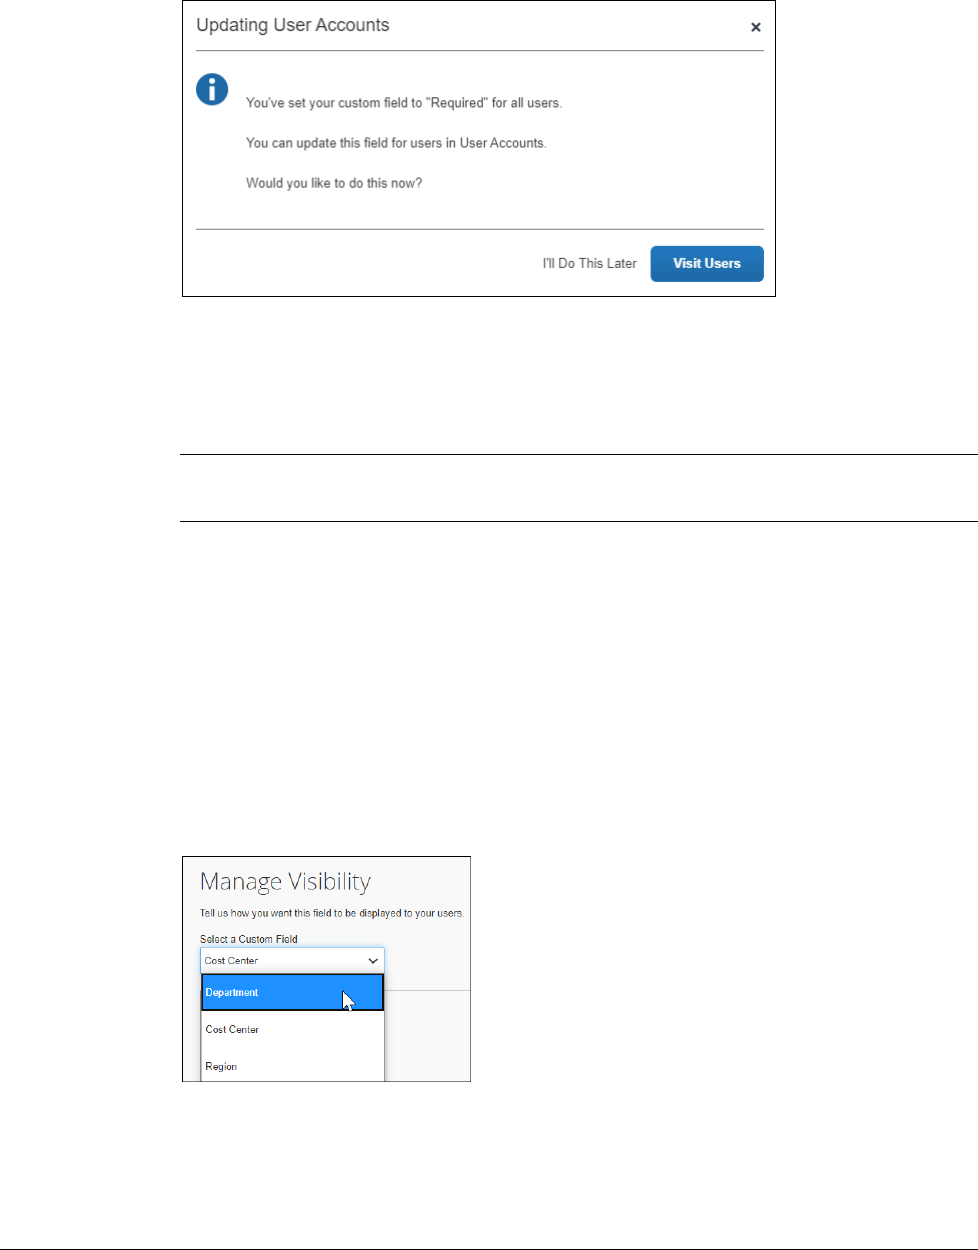
• Required: The field is visible on the page and the page cannot be saved if
the field is not populated. Required fields display with a red bar on the left
side of the field.
Section 5: Manage Visibility
Shared: Custom Fields Setup Guide for Concur Standard Edition 37
Last Revised: February 28, 2023
© 2004 - 2024 SAP Concur All rights reserved.
When you set a field to Required, the following prompt appears:
If you click Visit Users, the Users page opens.
• Read-only: The field is visible on the page, but users cannot change the
contents or state of the field.
• Hidden from employees: The field does not appear on the page.
NOTE: If a field is hidden on all pages, it is only visible to administrators in
the User Information section on the Users page in Product Settings.
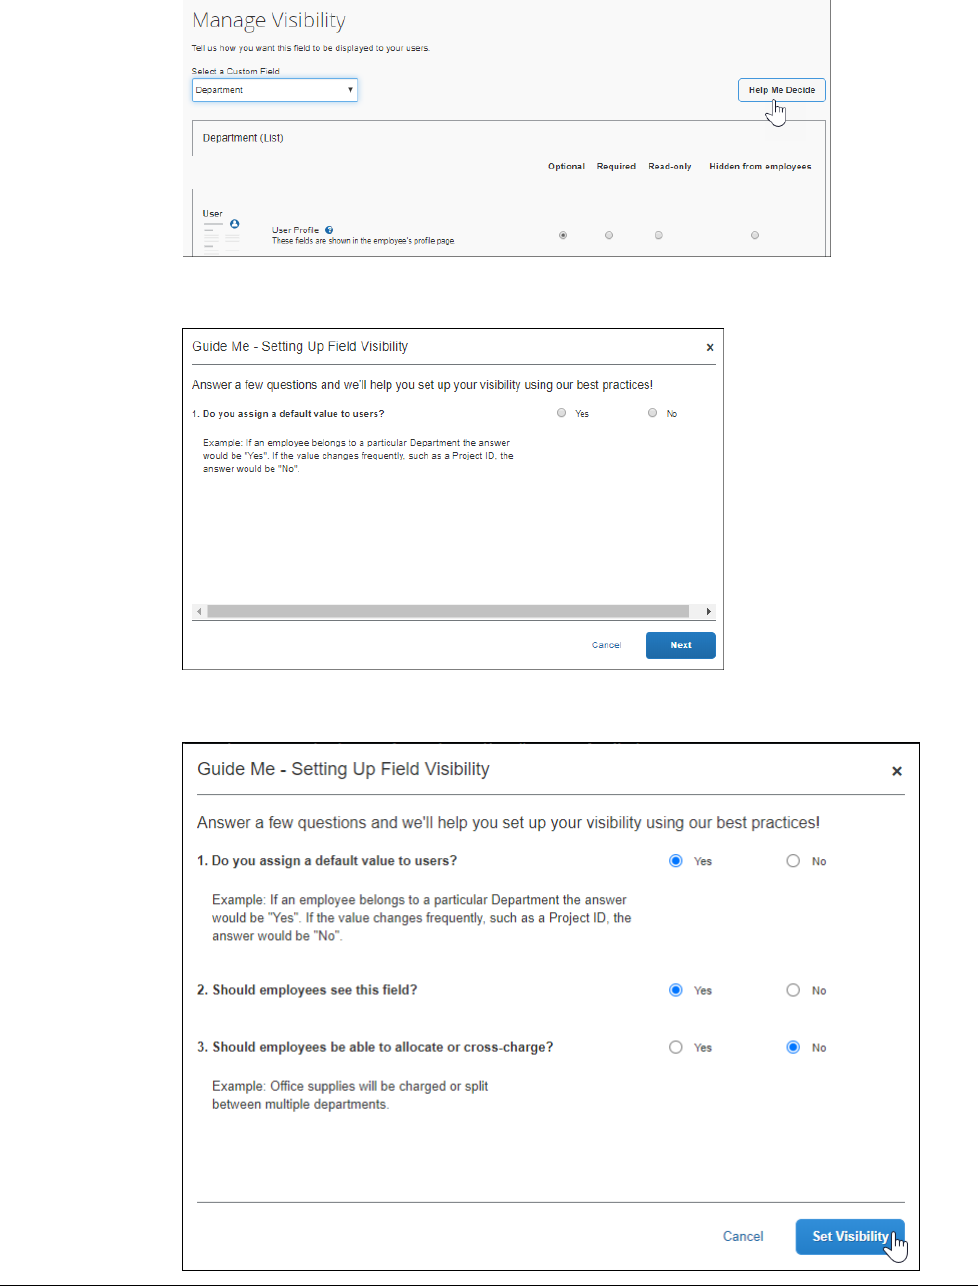
Help Me Decide
The Manage Visibility page includes a Help Me Decide feature. This feature helps
you set the visibility levels for your custom fields.
To use the Help Me Decide feature:
1. In Advanced View, click on Manage Visibility.
2. On the Manage Visibility page, select the custom field you want assistance
with in the Select a Custom Field list.
3. Click Help me Decide.
Section 5: Manage Visibility
38 Shared: Custom Fields Setup Guide for Concur Standard Edition
Last Revised: February 28, 2023
© 2004 - 2024 SAP Concur All rights reserved.
The Guide Me – Setting Up Field Visibility page appears.
4. Answer the questions that appear and then click Set Visibility.

Section 5: Manage Visibility
Shared: Custom Fields Setup Guide for Concur Standard Edition 39
Last Revised: February 28, 2023
© 2004 - 2024 SAP Concur All rights reserved.
A confirmation message appears.
5. Click OK.
☼
