
CREATING A REPORT
TEMPLATE TO USE IN
MAGICDRAW
version 17.0.1
user guide
No Magic, Inc.
2011

All material contained herein is considered proprietary information owned by No Magic, Inc. and is not to be
shared, copied, or reproduced by any means. All information copyright 1998-2011 by No Magic, Inc. All
Rights Reserved.

CONTENTS
1.Introduction.........................................................................................................................4
1.1 What is a template?...............................................................................................................4
2.Creating Your First Template...............................................................................................4
(i)Getting the Value from a MagicDraw Element in a Template...............................................................4
(ii)Importing a Template to MagicDraw Using Report Wizard..................................................................6
3.Velocity Template Language...............................................................................................7
(i)Velocity Variable.................................................................................................................................. 7
(ii) Velocity Directives.............................................................................................................................. 8
(iii)#macro statement............................................................................................................................ 11
4.Report Wizard Directives..................................................................................................12
(i)#forrow Directive................................................................................................................................ 12
(ii)#forcol Directive................................................................................................................................14
(iii)#forpage Directive............................................................................................................................ 15
5.Linking Report Templates to MagicDraw..........................................................................16
5.1 How MagicDraw add its Elements to Velocity Context.........................................................16
5.2 Supported File Types...........................................................................................................20
6.Exercise: Building a Simple Class Diagram Report..........................................................25

CREATING A REPORT TEMPLATE TO USE IN
MAGICDRAW
1. Introduction
This user guide demonstrates how to create a report template using Report Wizard and use it in MagicDraw.
To make the most of Report Wizard, you need to understand Apache Velocity and MagicDraw elements.
Report Wizard uses Apache Velocity, this means that you will need to know how to create a Velocity template
and that every rule that applies to Velocity will also apply to MagicDraw Report Wizard.
Velocity is a Java-based template engine that processes templates and references Java objects to produce
output documents. A basic Velocity template can contain static text, layouts, conditional statements, and
placeholders for each referenced Java object. When a template is being read by Velocity, conditional
statements will be processed and placeholders will be replaced with the value from the referenced Java
objects. You can use Velocity, for example, to generate web pages, emails, and read XML documents, but
with Report Wizard it is now possible to use Velocity to read other types of templates, such as Rich Text
Format documents. This user guide covers some basic aspects of Velocity, MagicDraw elements, and
Report Wizard directives.
1.1 What is a template?
A template, in Velocity, is a text file that tells Velocity how the output should look like. It contains a document
page style, layout, header, footer, and static text just like any other templates that come with most of the
Word Processor programs. However, a Velocity template also contains specific placeholders for Java
objects and Velocity Template Language scripts which will tell the Velocity Engine what and how to print the
information in the output.
2. Creating Your First Template
Before creating a template you need to know a few basic things, such as how (i) to get the value from the
MagicDraw element inside a template and (ii) to import the template you have created to MagicDraw.
(i) Getting the Value from a MagicDraw Element in a Template
To get the value from the MagicDraw Element inside a template:
1. First you need to know the element type and attributes. Open the Specification dialog to see the
type and attributes (Figure 1):
Copyright © 1998-2011 No Magic, Inc.
4
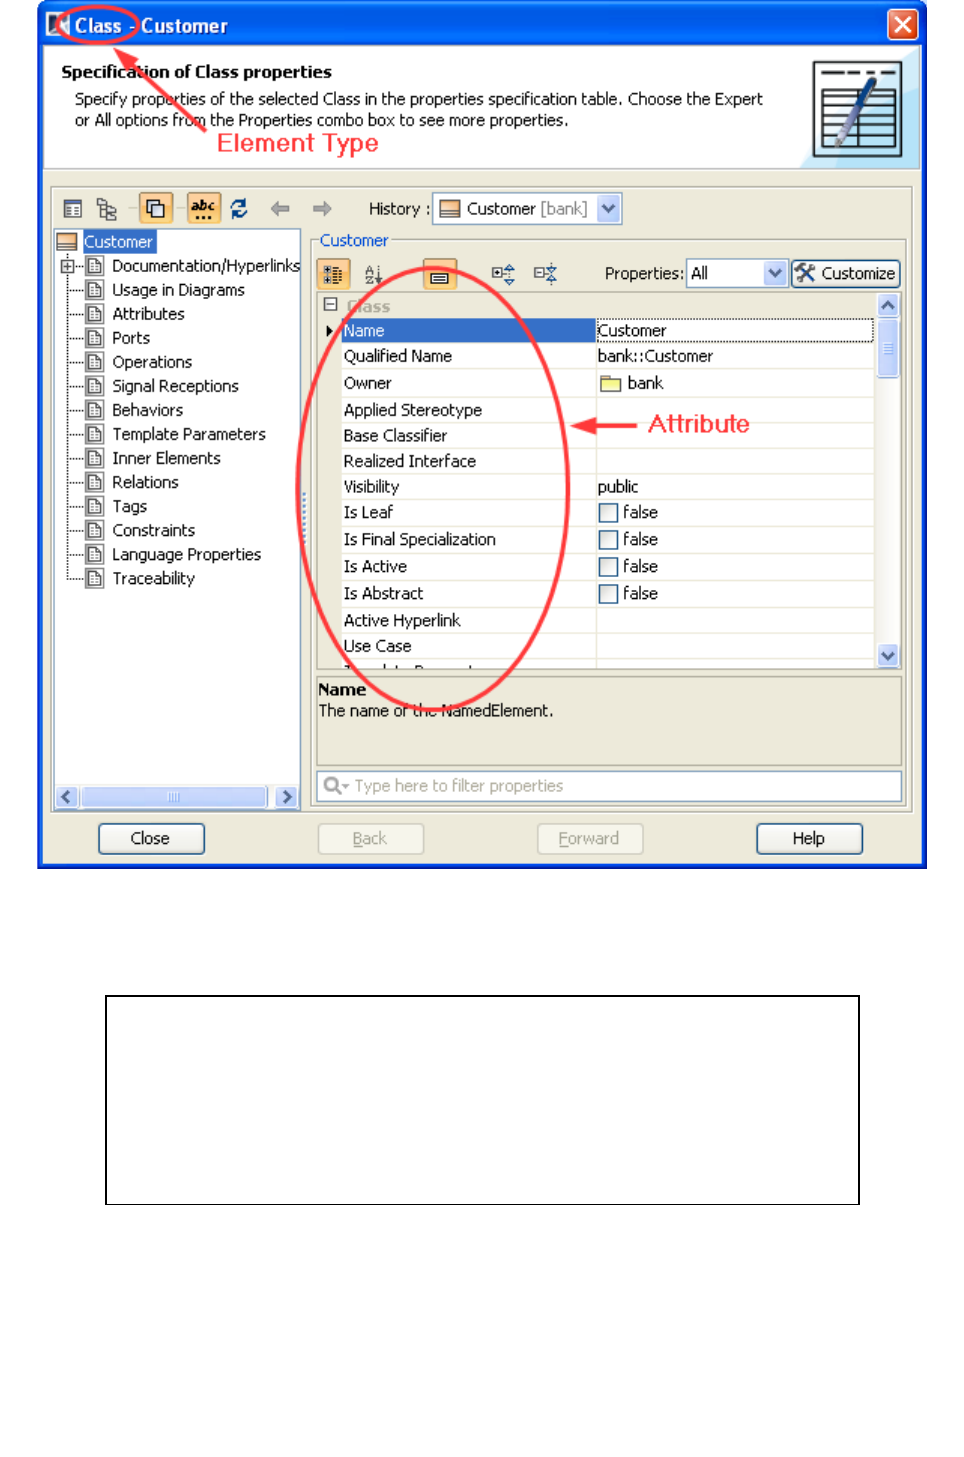
Figure 1 – Specification of a Class Element Called “Customer”
2. Open Microsoft Word and type, for example:
#foreach ($class in $Class)
Name: $class.name
Owner: $class.owner.name
Visibility: $class.visibility
Is Abstract: $class.isAbstract
#end
The above example shows that $Class is an array which contains all the Class elements in the Selected
Element Scope (see Report Wizard User Guide for more information), $class is the individual Class
element inside the array. To access the value of a property in $class, type: $class followed by “.” and the
attribute’s name (“.name”, “.visibility”, and “.isAbstract” are the names of the $class attribute). The syntax
for accessing the attribute value can be represented by: $[Referenced object].[Attribute’s name].
Copyright © 1998-2011 No Magic, Inc.
5
When you generate the output of the template for a project with a single Class element (Figure 1), the result
will be as shown in Figure 2:
Name: Customer
Owner: com
Visibility: public
Is Abstract: false
Figure 2 – The Output
(ii) Importing a Template to MagicDraw Using Report Wizard
Once a template has been created, you will need to import it to MagicDraw by using Report Wizard.
To import a template to MagicDraw using Report Wizard:
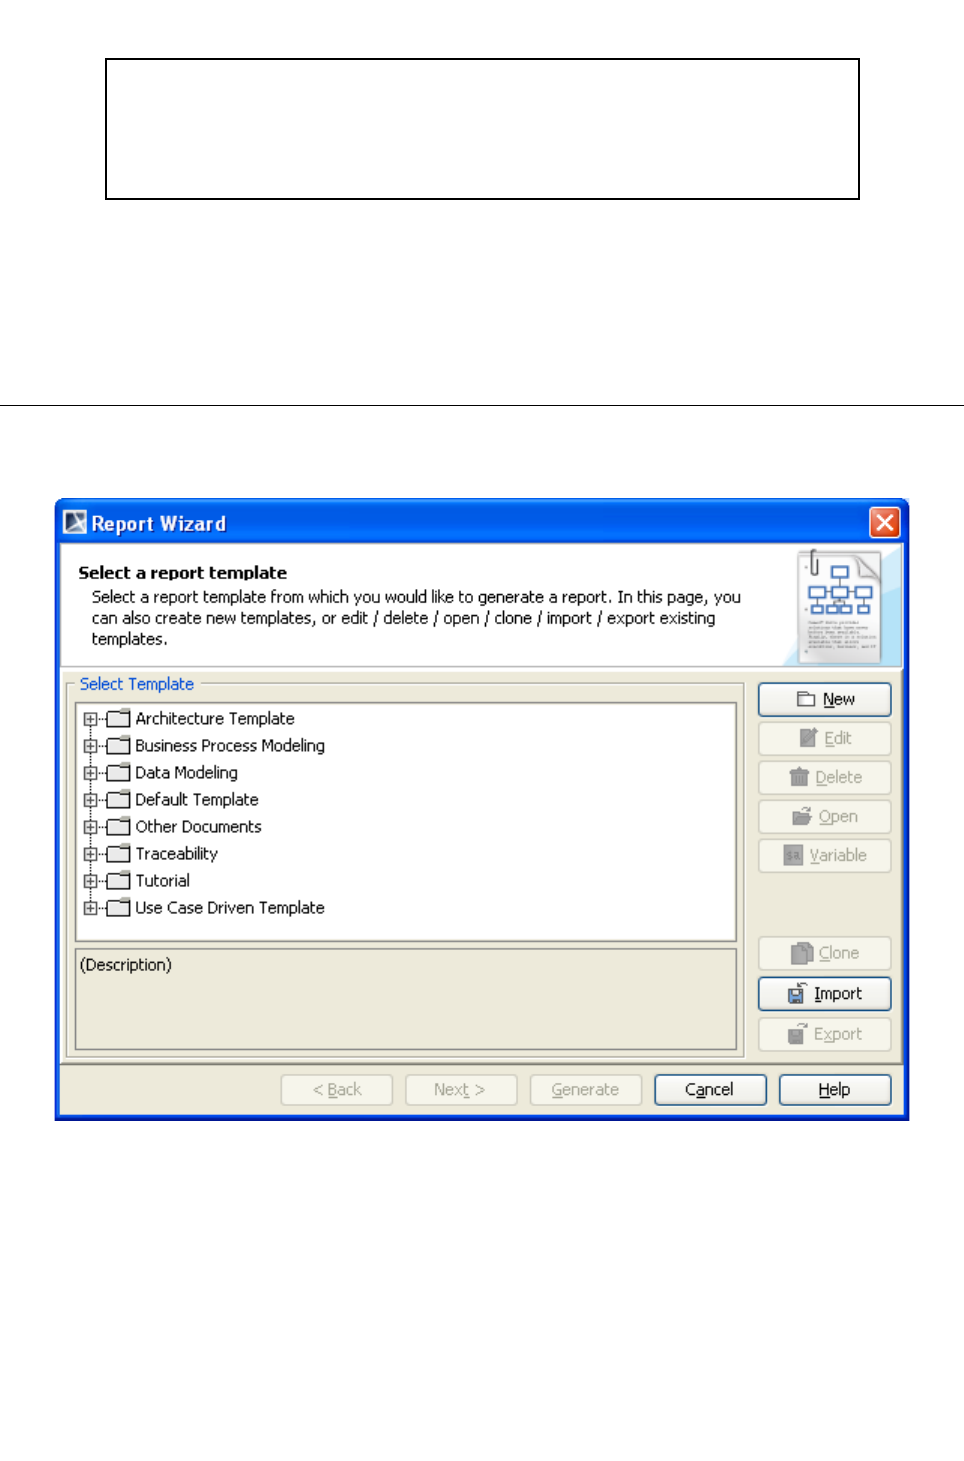
1. Click Tools > Report Wizard… on the MagicDraw main menu.
2. Click the New button on the Select Template wizard page.
Figure 3 – Select Template Wizard Page
3. Type the name, description, and select a category, and then click the “…” button.
Copyright © 1998-2011 No Magic, Inc.
6
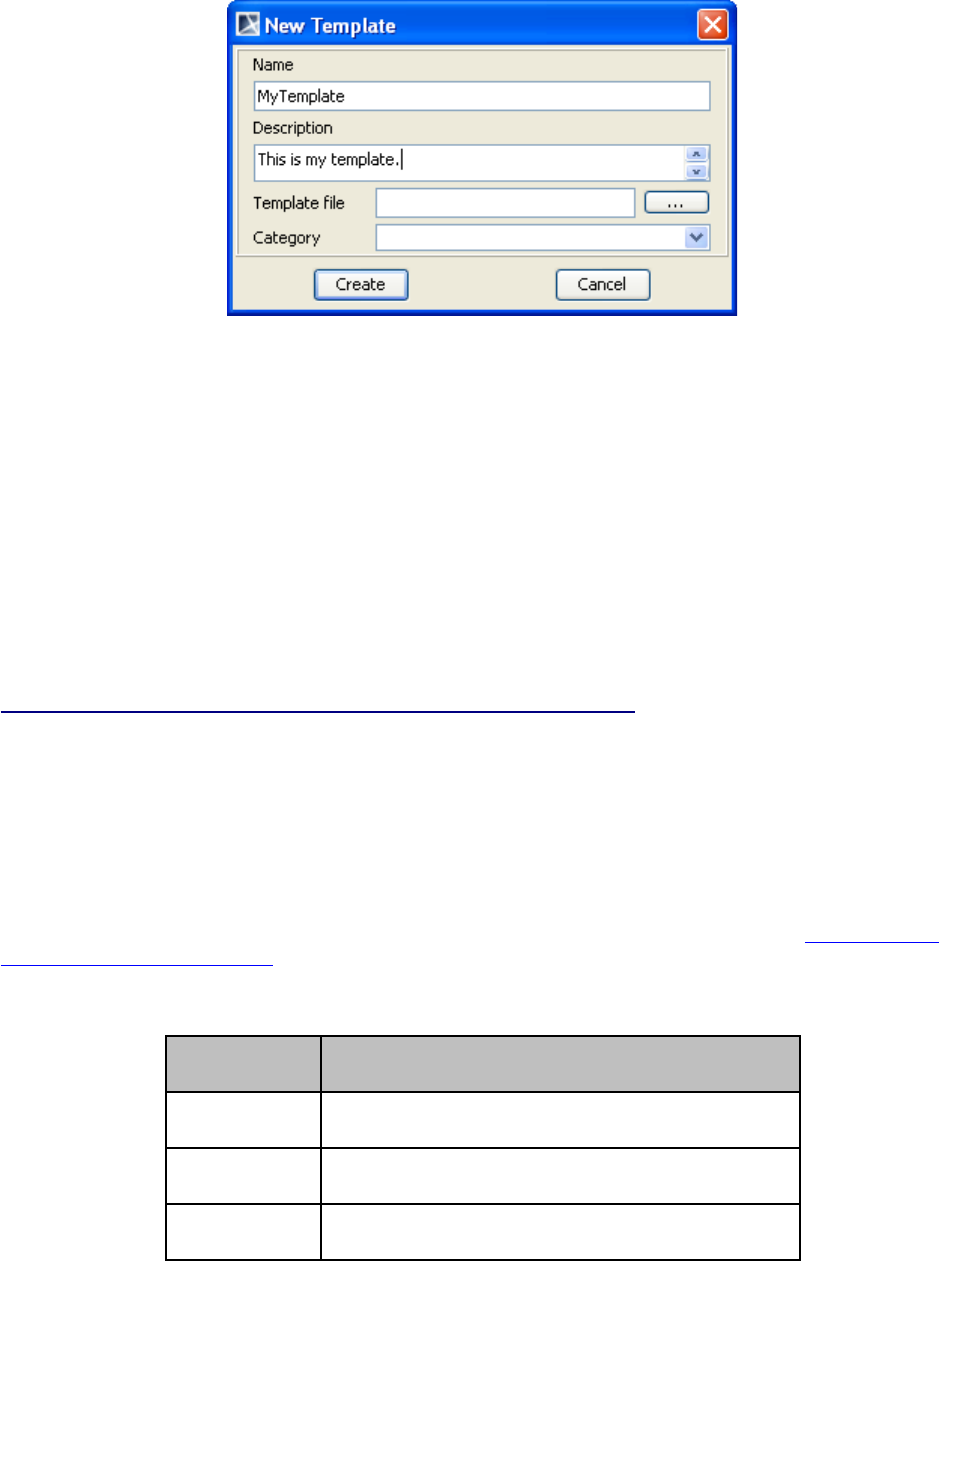
Figure 4 – New Template Dialog
4. Locate the template file that you have created and click Select.
5. Click Create to import the template.
To generate a report based on the template, select the template (in this case, as shown in Figure 4
MyTemplate would be selected) and follow the steps as instructed by the wizard. See Report Wizard User
Guide for more information.
3. Velocity Template Language
Velocity Template Language is a scripting language used only by Velocity Engine to determine how the
output should look like. This section is divided into two parts: (i) Velocity Variable and (ii) Velocity Directive.
For more information on the Velocity Template Language, visit
http://velocity.apache.org/engine/releases/velocity-1.6.2/user-guide.html.
(i) Velocity Variable
A Velocity variable can be either a referenced Java object or a declared variable inside a template. A
Velocity variable begins with $ followed by the name of the variable. Depending on what is added to the
Velocity Context (MagicDraw automatically adds its element to the Velocity Context) the variable can either
be a local variable or a reference to a Java object.
To declare a local variable inside a template, type: $ followed by a string beginning with an alphabet. A
referenced Java object variable is provided by Report Wizard as shown in Table 1 (see the Linking Report
Wizard template to MagicDraw section for a complete list of variables).
Table 1 Partial List of MagicDraw Specific Variables
Variable Name Return Value
$Class Contains a list of class elements.
$UseCase Contains a list of use case elements.
$Diagram Contains a list of diagram elements.
If a Velocity variable is a reference to a Java object, you can call its methods and value by:
i. Directly calling the object method with the Velocity variable, for example, $object.method().
This is useful if you want to use a Java object’s method to process data and print it out.
Copyright © 1998-2011 No Magic, Inc.
7

ii. Calling the object properties, for example, $object.name.
Velocity allows you to call the referenced Java object’s method directly like you would in Java. This is very
useful as you can create methods in Java that can help you create a more flexible Velocity template. For
instance, if you need to perform a complex operation, such as sorting a list according to certain variables,
you can create a sorting method in Java, and then call that method from a Java object.
Report Wizard provides a collection of complex statements in standard tool methods. You can find more
information on the standard tool in the Helper Modules section, Report Wizard User Guide. You can also
create your own custom tool, deploy, and use it inside a template. For more information on the custom tool,
see Appendix A: Report Extensions, Report Wizard User Guide.
(ii) Velocity Directives
A Velocity directive is a keyword used by Velocity to perform certain tasks such as looping, controlling the
output of the document based on values from MagicDraw, etc. With directives you can make dynamic
templates and you can do more than just printing out MagicDraw elements and attributes. A Velocity
directive begins with # and followed by the directive name. Some of the frequently used Velocity directives
are as follows:
i) #if, #elseif, and #else: these directives are used to decide whether or not text should be
included in the output based on the conditional statement.
ii) #set: this directive is used to assign a value to a variable.
iii) #foreach: this directive is used to iterate through a list of variables.
iv) #macro: this directive is used as a means to create a reusable script. It is especially useful if you
need to call a certain line of scripts repeatedly.
#set statement
In Velocity, you can declare a variable and set its value by using the #set directive, for example:
##String
#set ($var = "abc")
##Boolean
#set($var2 = true)
##Value
#set($var3 = 10)
The above example shows that $var has a string value, $var2 has a Boolean value, and $var3 has a
numerical value. The #set directive can also set an array to a declared Velocity variable. To assign an array
to a variable type, for example:
#set($var = ["a", "b", "c"])
#if, #elseif, and #else statement
The #if directive allows you to include text when generating a document, on condition that the if-statement is
true, for example:
#if( $condition )
Hello World
#end
Copyright © 1998-2011 No Magic, Inc.
8

The variable: $condition is evaluated to determine whether it is true, which will happen under certain
circumstances:
i) $condition is a Boolean (true/false) which has a true value
ii) $condition is not 'null'.
iii) $condition is a comparison which is evaluated and returns 'true'.
iv) $condition is a compound logical statement which is evaluated and returns 'true'.
If $condition returns 'true', the content between the #if and #end statements becomes the output. In this
case, if $condition is true, the output will be: "Hello World". Conversely, if $condition returns 'false', there
will be no output.
The #elseif or #else element can be used with the #if element. Note that Velocity Engine will stop at the first
expression that is found to be true. The following example shows you how to add #elseif and #else to the #if
statement:
#if( $condition )
Content 1
#elseif( $condition2 )
Content 2
#elseif( $condition3 )
Content 3
#else
Content 4
#end
From the above example, let us assume that $condition1 is false, $condition2 is true, and $condition3 is
true. The output for this conditional block will be Content 2 because $condition2 comes before
$condition3 even though both of them are true.
Comparing Values and Logical Operators
So far, $condition in the #if directive is assumed to be a Boolean value, however just like Java, Velocity
supports the syntax to compare (greater than (>), less than (<), and is equal to (==)) two variables and the
Logical Operators (logical AND (&&), logical OR (||), and logical NOT (!)) which will return a Boolean value.
In Velocity, the equivalent operator (“==”) can be used to compare string, value, and objects. Note that the
semantics of the equivalent operator (“==”) are slightly different than those of Java where the equivalent
operator (“==”) can only be used to test object equality. In Velocity the equivalent operator (“==”) can be used
to directly compare numbers, strings, or objects. When comparing two objects with different classes, the
string that represents the objects is compared. The following example compares two variables to see
whether or not they are equal:
#set ($var1 = "cat")
#set($var2 = "dog")
#if ($var1 == $var2)
Var1 equals Var2.
#else
Var1 does not equal Var2
#end
Copyright © 1998-2011 No Magic, Inc.
9
The comparison operators (“<” and “>”) is the same as the ones used in Java. The following example shows
how to use the comparison operators to compare two values in which the #if statement will be evaluated
'true' and “Var1 is less than Var2” will be printed out in the generated report:
#set ( $var1 = 6 )
#set ( $var2 = 7 )
#if ( $var1 < $var2 )
Var 1 is less than Var2
#end
The logical AND, in Velocity, is represented by && and it must have at least two arguments. To write a
conditional statement with the logical AND type, for example:
#if( $var1 < $var3 && $var3 > $var2 )
Content 1
#end
To better understand the above example, let us assume that $var1 < $var3 is argument 1 and $var3 >
$var2 is argument 2 (argument 1 and argument 2 will be evaluated separately and will return true/false).
The #if() directive will be evaluated 'true' if both argument 1 and argument 2 are true. If argument 1 is
false, the expression will be evaluated false and argument 2 will not be evaluated.
If argument 1 is true, Velocity Engine will then check the value of argument 2. If the value is true, the entire
expression is true and Content 1 becomes the output. If the value is false then there will be no output as the
entire expression is false.
Logical OR operators work the same way as Logical AND, except for one of the references that needs to be
evaluated 'true' for the entire expression to be considered true, for example:
#set ($var1 = 1)
#set ($var2 = 2)
#set ($var3 = 3)
#if( $var1 < $var3 || $var3 < $var2 )
Content 1
#end
To better understand the above example, let us assume that $var1 < $var3 is argument 1 and $var3 < $var2
is argument 2. According to the example, argument 2 is false because $var2 is less than $var3 not the other
way around. Since argument 1 is true, Velocity Engine does not need to look at argument 2, it is either true
or false, the expression will be true, and Content 1 will be the output. Basically, a Logical OR operator
requires only one argument to be true (either argument 1 or argument 2) to make an expression true. In the
case that both argument 1 and argument 2 is false, there will be no output because the expression is false.
With Logical NOT operators, there is only one argument:
#set ( $bool = false )
#if( !$bool )
Copyright © 1998-2011 No Magic, Inc.
10
Content 1
#end
As shown in the above example, !$bool is evaluated true and Content 1 is the output. But if $bool is true,
then !$bool is false and there will be no output.
#foreach statement
The #foreach directive will iterate through a list of variables and assign it to a local variable, for example:
#foreach ($localClass in $Class)
$localClass.name
#end
The above example shows that $Class is a list of class elements in MagicDraw. The #foreach directive will
iterate through the $Class list and assign the value in the list to $localClass in each iteration. The code
between #foreach and #end will be processed and the result will print the class name in each iteration. For
example, if $Class contains class elements named “a”, “b”, and “c”, the output from the above example will
be:
a
b
c
(iii) #macro statement
Under certain circumstances, you might find that you often repeat several lines of a VTL code in multiple
areas inside your template. To solve this problem, Velocity provides the #macro directive that allows you to
repeat a segment of VTL codes. The first thing you have to do is to declare or create the macro itself, for
example:
#macro (HelloWorld)
Hello World! It is such a beautiful world!
#end
Then within the template, you can call this macro and it will print “Hello World! It is such a beautiful world!”
To call this macro type, for example:
#HelloWorld()
When the macro in the above example is passed on to the Velocity Template Engine, “Hello World” It is such
a beautiful world!” will be printed out as a result. You may wonder why this is important, but imagine having
to print a note with 10 lines of text in different parts of the document. The Velocity macro helps you save the
space and time. It also allows you to pass the value from a variable on to a method parameter as you would
using a Java method. To do this you have to create a macro, for example:
Copyright © 1998-2011 No Magic, Inc.
11
#macro( myMacro $color $somelist )
#foreach( $something in $somelist )
$something is $color.
#end
#end
In the above example, you have created a macro called “myMacro” that accepts two variables, the first
variable is supposed to be a string and the second variable called “somelist” is supposed to be a list (note
that when creating a macro that accepts variables always remember what types of variables it accepts,
otherwise an error will occur during report generation). To call myMacro type, for example:
#set ($list = [“A Rose”, “Blood”, “Strawberry”])
#set ($color = “red”)
#myMacro($color $list)
The above example shows that “myMacro” has been called and there are two variables in the brackets,
$color and $list, separated by a space. The result of the example:
A Rose is red.
Blood is red.
Strawberry is red.
4. Report Wizard Directives
Report Wizard introduces three directives: (i) #forrow, (ii) #forcol, and (iii) #forpage to allow you to use
Velocity to generate outputs other than web documents. With these directives, you can eliminate problems
that usually occur when using Velocity to generate an rtf document, for example, #foreach generates broken
rows in a table.
i. #forrow
This directive is used in Rich Text Format, OpenDocument Text, and OpenDocument Spreadsheet
documents. Whenever #forrow iterates through a list, it creates a row in the table.
ii. #forcol
This directive is used only in OpenDocument Spread Sheet. Whenever #forcol iterates through a list,
it creates a column in the table.
iii. #forpage
This directive is used in Rich Text Format document, OpenDocument Text, OpenDocument
Spreadsheet, and OpenDocument Presentation. Whenever #forpage iterates through a list, it creates
a new page for a Rich Text Format document and OpenDocument Text, a new sheet for
OpenDocument Spreadsheet, or a new slide for OpenDocument Presentation.
(i) #forrow Directive
The Velocity Template Language does not support loops inside the table structure. However, the Report
Wizard engine introduces a new custom syntax to allow loops in the table structure in order to clone the table
rows. In the following example we will create a table that will print out the name of a Use Case element and
its owner in a table.
Copyright © 1998-2011 No Magic, Inc.
12
To use the #forrow directive:
1. Open Microsoft Word or OpenOffice.org Writer.
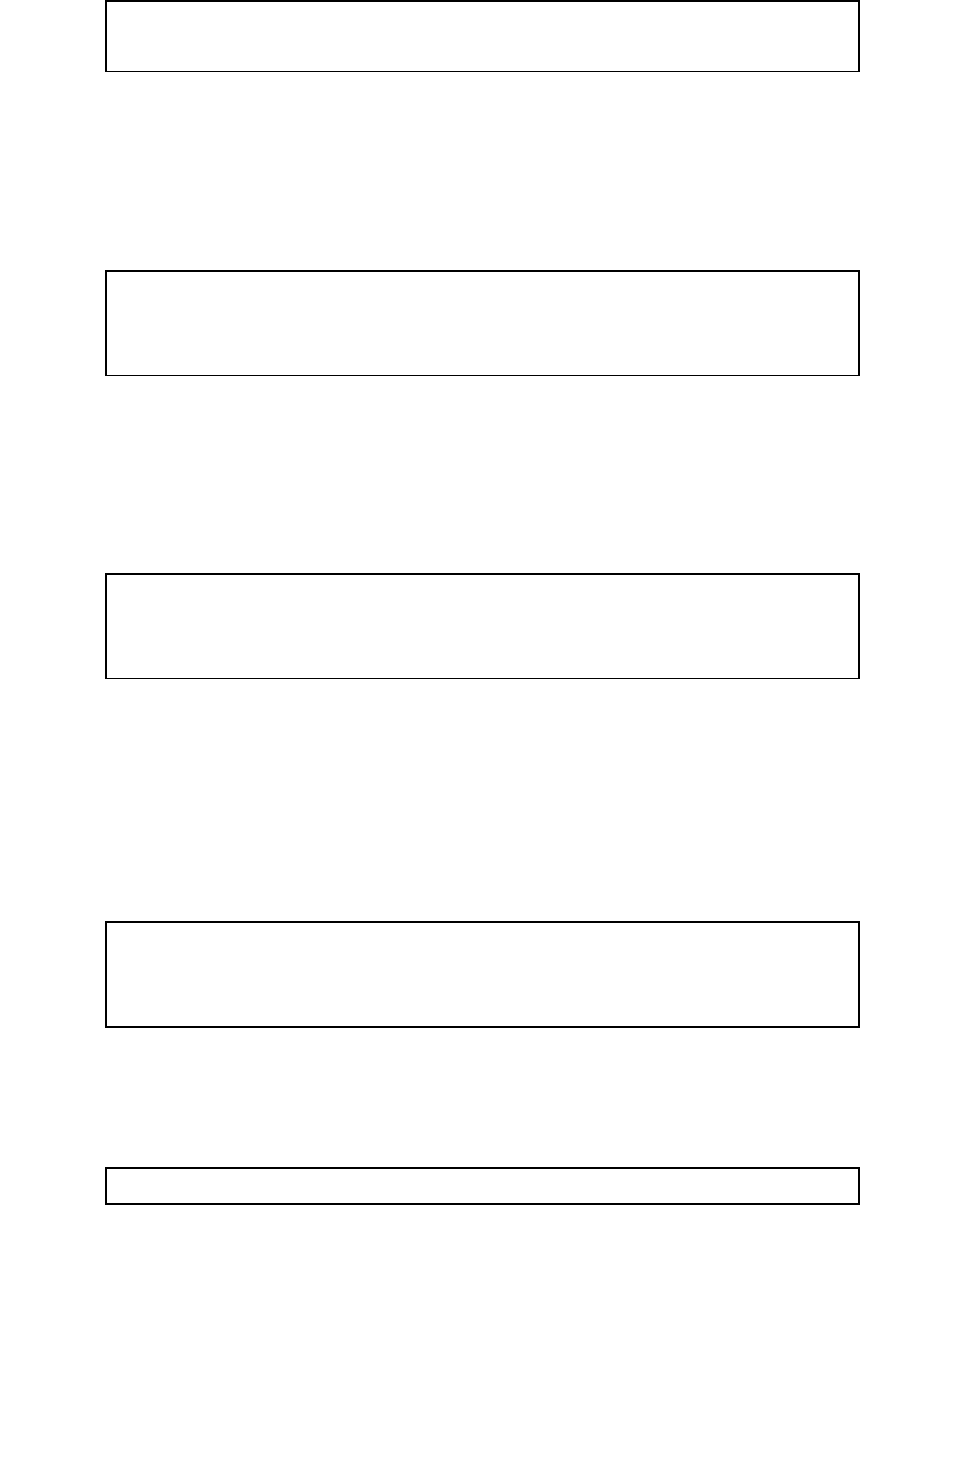
2. Create a two-column and two-row table.
Figure 5 – Creating a Table in Microsoft Word
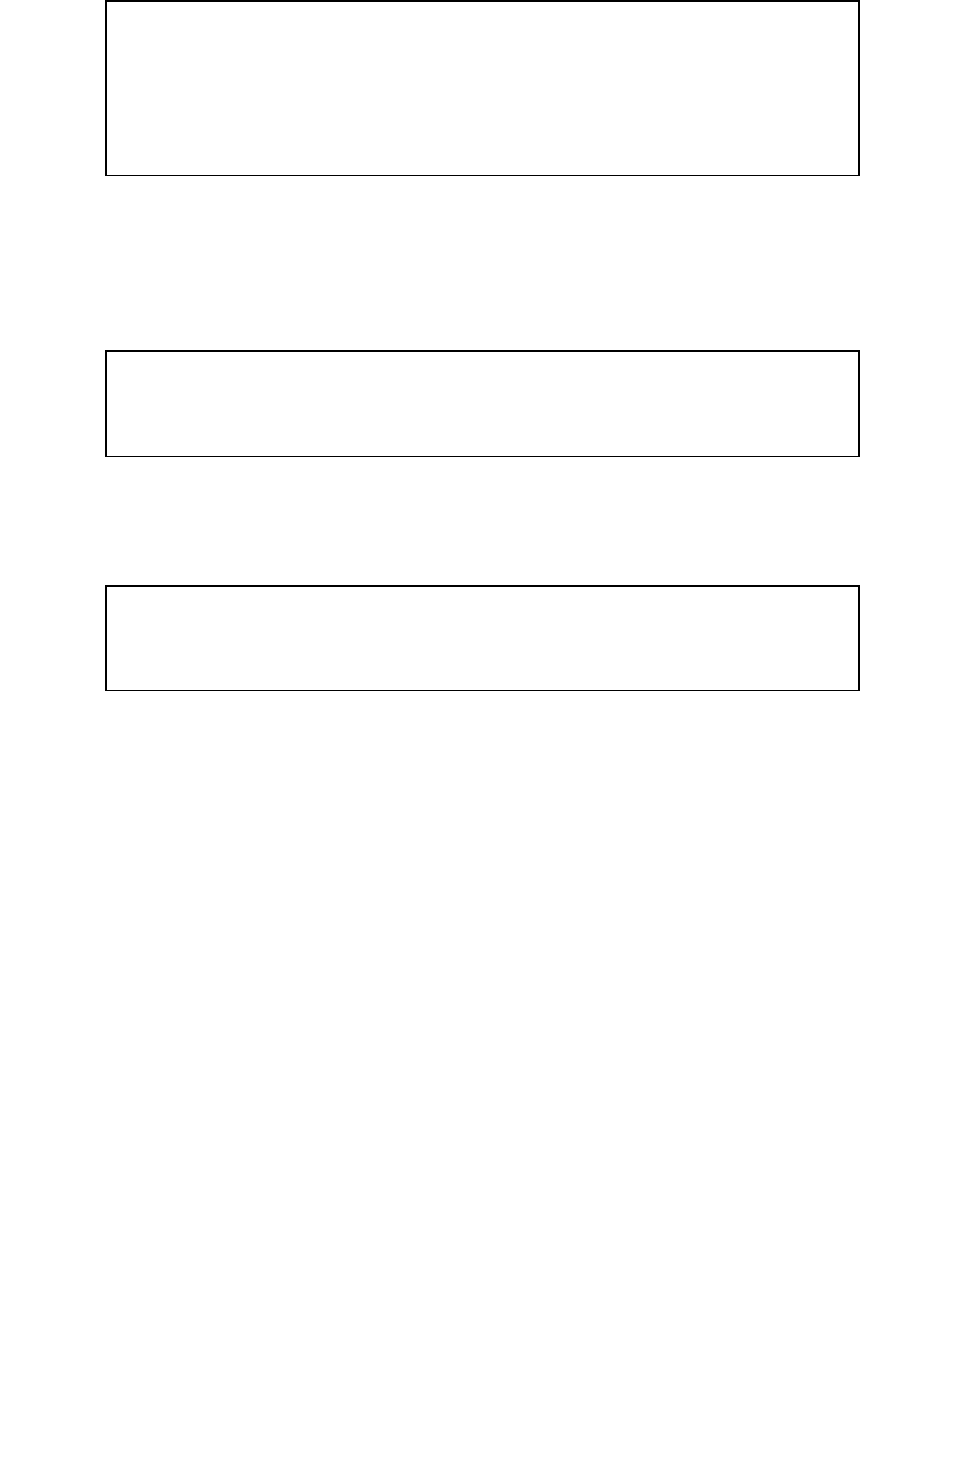
3. In the second row, first column type: “#forrow ($uc in $UseCase) $uc.name” and in the second
row, second column type: “$uc.owner.humanName #endrow”.
Figure 6 – Adding the #forrow Directive.
4. Save the template and import it to Report Wizard.
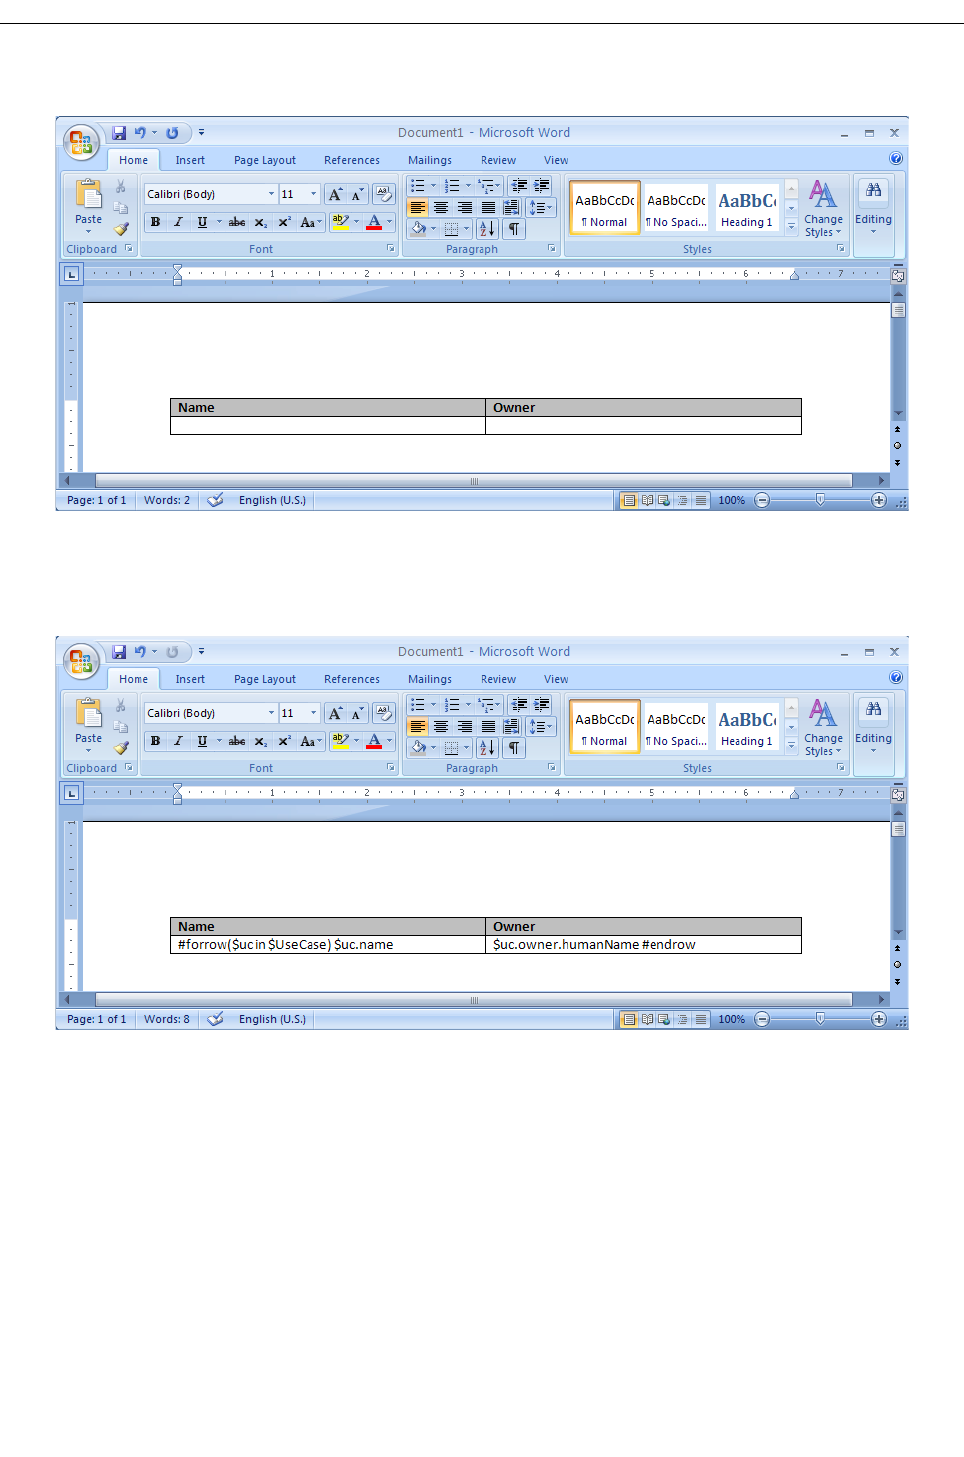
5. Generate a Use Case report. The report will be as shown in Figure 7.
Copyright © 1998-2011 No Magic, Inc.
13
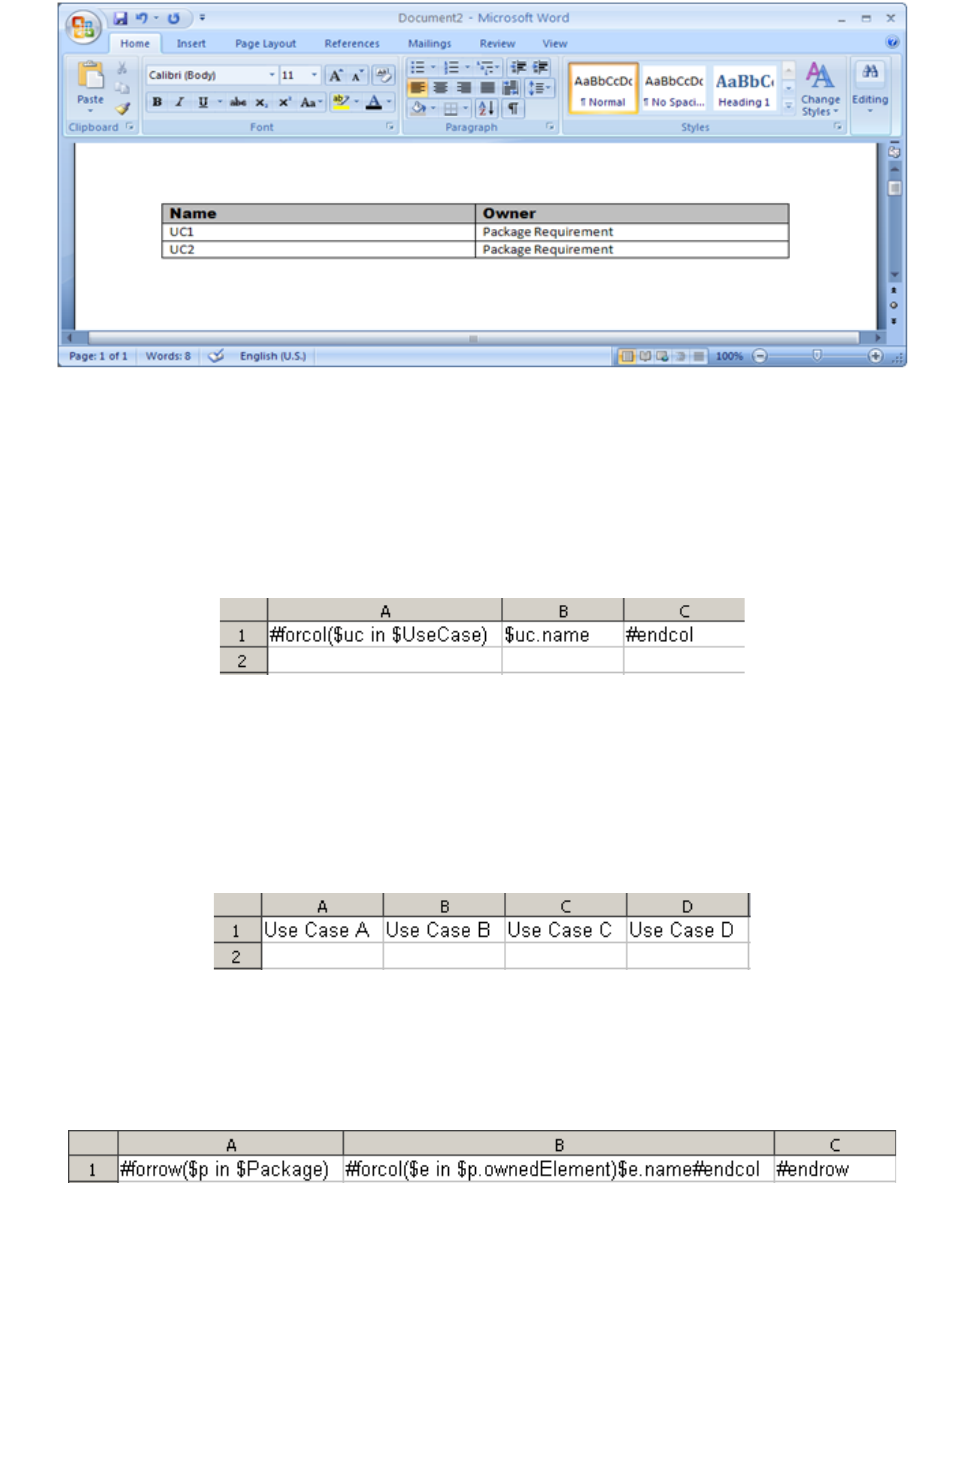
Figure 7 – Generated Report.
(ii) #forcol Directive
This directive is designed only for the OpenDocument Spreadsheet template. This directive allows loops over
the column.
Figure 8 – Using #forcol in Spreadsheet.
Based on the example shown in Figure 8, the engine will generate a report with different columns for each
Use Case name. The output from this example will be as shown in Figure 9:
Figure 9 – OpenDocument Spreadsheet #forcol Output.
You can combine both #forrow and #forcol and produce a more complex output report (Figure 10).
Figure 10 – Using #forcol and #forrow.
Figure 11 shows the output generated from the Magic Library sample project.
Copyright © 1998-2011 No Magic, Inc.
14
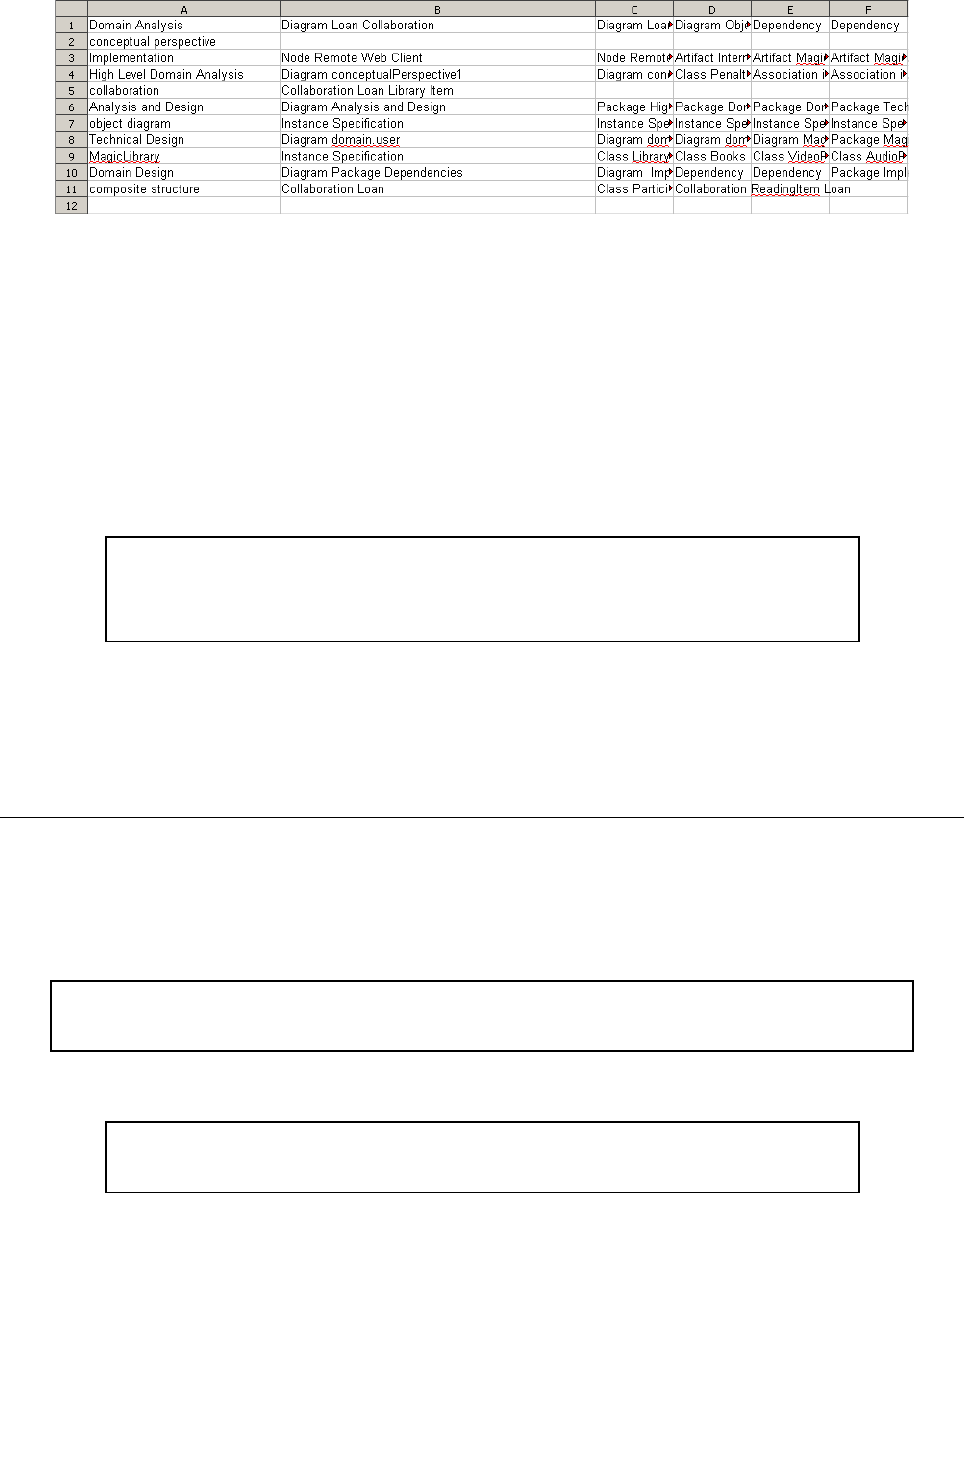
Figure 11 – OpenDocument Spreadsheet #forrow and #forcol Output Report
(iii) #forpage Directive
The #forpage directive is used to create a new slide in OpenOffice.org Impress and to create a new page in
RTF documents. The implementation of this directive is the same as that of #forrow:
#forpage($dia in $Diagram)
$uc.name
#endpage
The above example will create many pages each containing a Use Case element’s name. The number of
pages created depends on the number of Use Case elements in the $UseCase list.
In ODP, #forpage is created as a means to create a new slide.
To create a new slide for presentation:
1. Open OpenOffice.org Impress.
2. Create two text boxes.
3. Type in one of the text boxes:
#forpage($dia in $Diagram)
$dia.name
and type in the other text box:
$dia.image
#endpage
The result will be shown as in Figure 12.
Copyright © 1998-2011 No Magic, Inc.
15
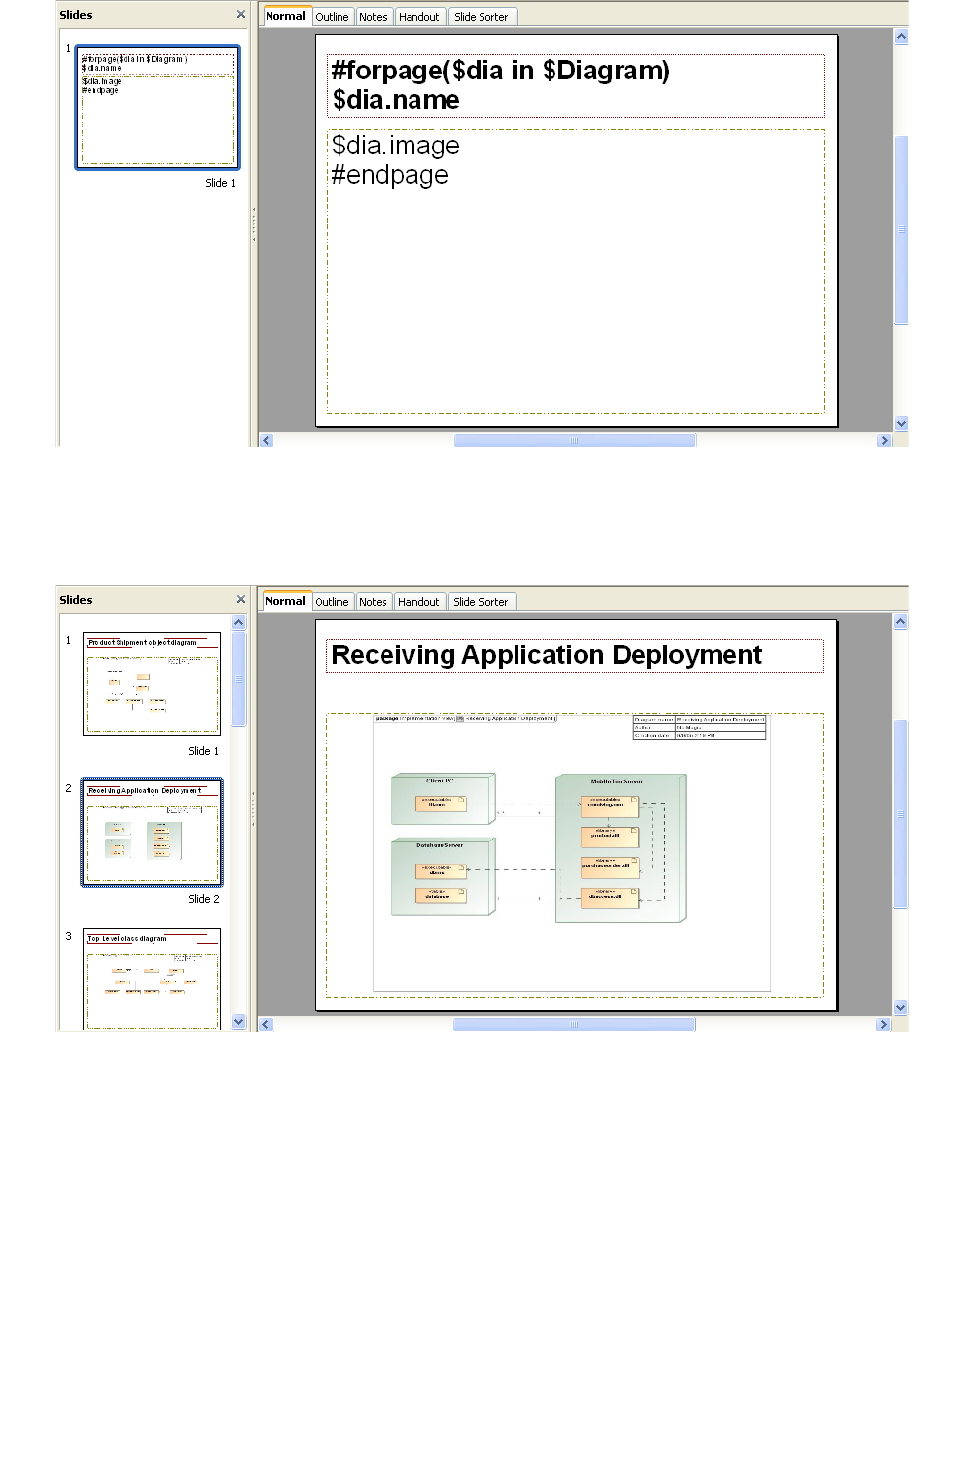
Figure 12 – Using #forpage in OpenOffice.org Impress.
The result of the generated report will be shown as in Figure 13.
Figure 13 – Generated result.
5. Linking Report Templates to MagicDraw
By now you should know how to write a basic template that makes a simple reference to a MagicDraw
element. But how will you know if the element is being referenced or not? This section shows you how
elements are referenced and how to call them.
5.1 How MagicDraw add its Elements to Velocity Context
In Velocity, whenever you want to reference to a Java object you need to manually add the object to the
Velocity template and name it. In Report Wizard, however, this process is done automatically. What you need
to understand is how it is done as it will help you to call the MagicDraw elements.
Copyright © 1998-2011 No Magic, Inc.
16

In MagicDraw, all MagicDraw elements such as Class, Use Case, Activity, etc. are the sub-classes of
elements. During report generation, the report engine will get all the elements from a project within a
selected scope that you have defined in Report Wizard, and then classify and add them to a list of the same
type. The list will then be added to the Velocity Context with its type as its name. For instance, in a project
where there are two types of Element, Class, and Use Case, all the elements that are identified as Classes
will be kept in the same list and the list will be added to the Velocity Context and labeled as “Class” during
report generation. This process also applies to the Use Case elements. To reference to a specific Class
element, first you will have to make a reference to $Class (list of Class elements), and then iterate through
the list to find that particular Class element by using the #foreach, #forrow, #forcol, or #forpage directive,
followed by the #if directive to search for the name of the class.
This section will use part of the “Inventory Control System.mdzip” file in
<install.root>/samples/casestudies as an example to show you how to reference to MagicDraw elements.
Figure 14 – Use Case and Actor
You need to know the elements inside the “Use Case View” package before using it (Figure 14). To do this,
follow the instructions in the previous section, “Creating your first template.” The “Use Case View” package
contains three element types: (i) Actor, (ii) UseCase, and (iii) Diagram that you can call in the template by
typing “$Actor,” “$UseCase,” and “$Diagram” respectively.
In this example you will create a report that will print the names of the Actors, UseCases, and diagram
image.
To create a report with the Actor, Use Cases, and diagram image names:
1. Open Microsoft Word or OpenOffice.org Writer.
2. Use the #foreach directive to iterate through $Actor, $UseCase, and $Diagram as shown in
Figure 15.
Copyright © 1998-2011 No Magic, Inc.
17
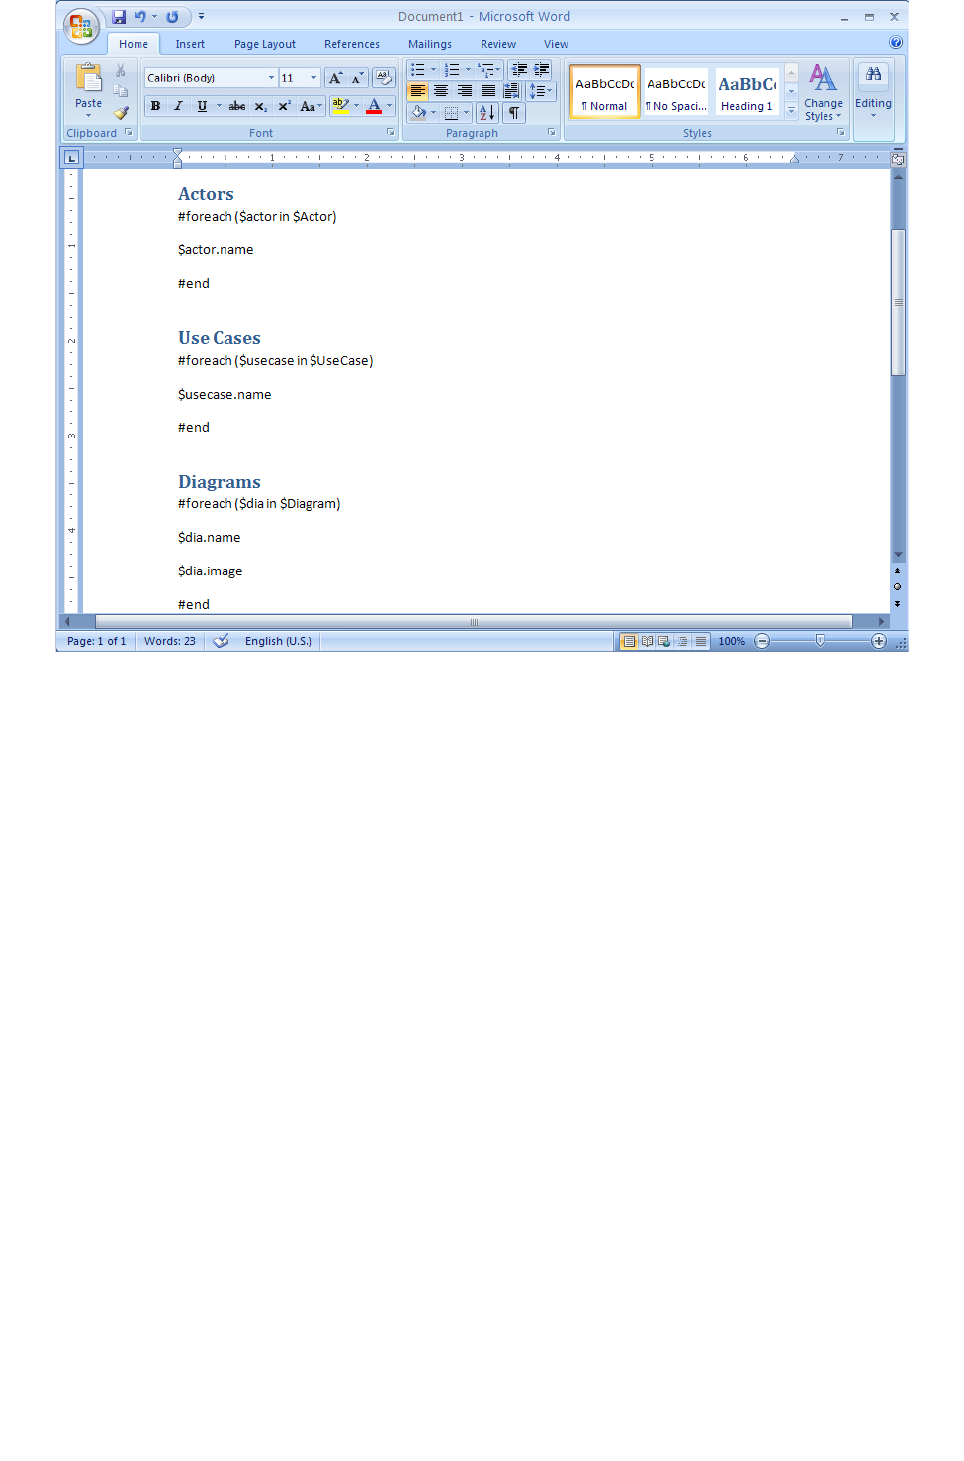
Figure 15 – A Rich Text Format Template
3. Add the template to MagicDraw by using Report Wizard.
4. When the “Inventory Control System.mdzip” project is open, open the Report Wizard dialog and
select your template.
5. Select the element scope so it covers only the “Use Case View” package
Copyright © 1998-2011 No Magic, Inc.
18
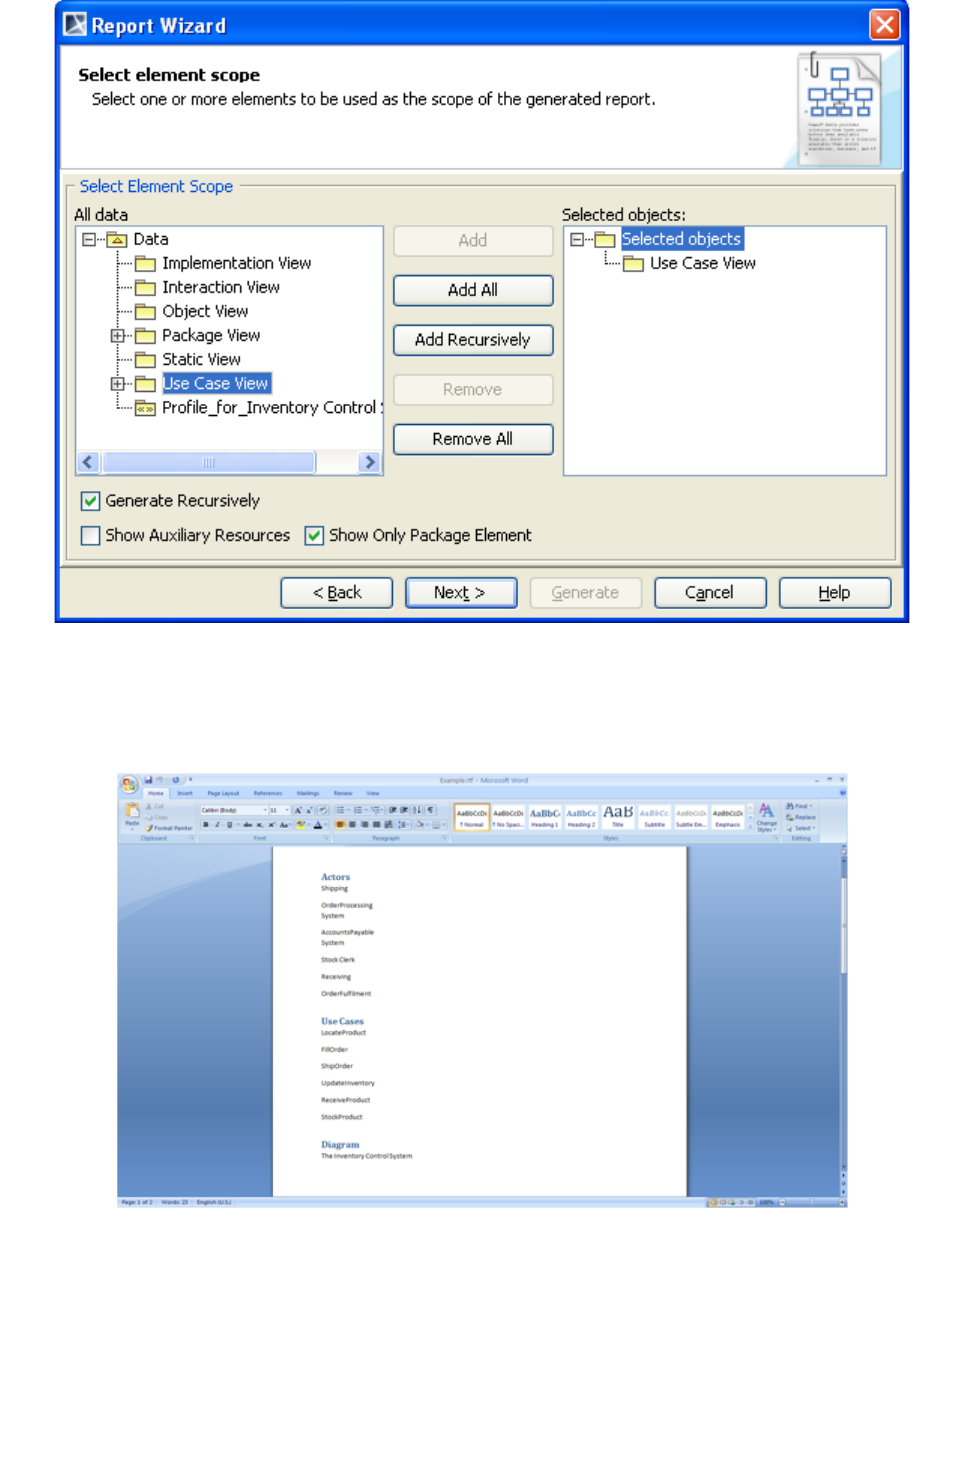
Figure 16 – Select Element Scope Wizard Page
6. Complete all steps in the Report Wizard dialog and generate the report. The output will be as
shown in Figure 17.
Figure 17 – Partial Output
Figure 17 shows a partial report output; a full report will print all the names of the Actors, Use Cases,
and the Use Case diagrams.
Copyright © 1998-2011 No Magic, Inc.
19

5.2 Supported File Types
Besides generating Rich Text Format templates and Rich Text Format reports, Report Wizard also generates
other types of document:
1. *.html – Hyper Text Markup Language
2. *.rtf – Rich Text Format
3. *.odt – OpenDocument Text
4. *.ods – OpenDocument Spreadsheet
5. *.odp – OpenDocument Presentation
6. *.xml – Extensible Markup Language
7. *.txt – Text
To create a template for a specific type of document, simply open the editor that is specially designed for that
particular type of document, and then save the template making sure that the filename extension is the same
as that of the type of document.
To create a template for an HTML, text, or XML document:
1. Open a text editor.
2. Add the code to the text file.
3. Save the template file (with a correct filename extension).
4. Add the template to Report Wizard.
Note:
When you generate a report from a particular template, Report Wizard will automatically create an HTML,
text, or XML document depending on the template filename extension given.
#forrow, #forcol, and #forpage do not support HTML, text, and XML.
To create a template for a Rich Text Format or OpenDocument Text document:
1. Open OpenOffice.org Writer or Microsoft Word for both *.odt and *.rtf. (To save a file as an *.odt
file in Microsoft Word, an add-on is required. You can get the add-on at http://odf-
converter.sourceforge.net/.)
2. Add the Velocity Template Language codes to the template file.
3. Save the template file.
4. Add the template to MagicDraw.
When generating a document from either *.rtf or *odt, Report Wizard will apply the text format used in writing
the Velocity code. For instance:
#set($var = "Hello World")
$var
$var
$var
Copyright © 1998-2011 No Magic, Inc.
20
As shown in the above example, the generated output will be:
Hello World
Hello World
Hello World
To create a template for an OpenDocument Presentation:
1. Open OpenOffice.org Impress.
2. Add the code to the template file.
3. Save the template file.
4. Add the template to Report Wizard.
A presentation document is a special document template. It does not contain a content order. It uses a text
box to insert text as the content of the document. A text box is an image structure (an image structure keeps
the position of each image in x, y coordinates). You can change the position of a text box or place it in the
same position as others (Figure 15).
Figure 18 – Writing VTL in a Text Box in OpenOffice.org Impress
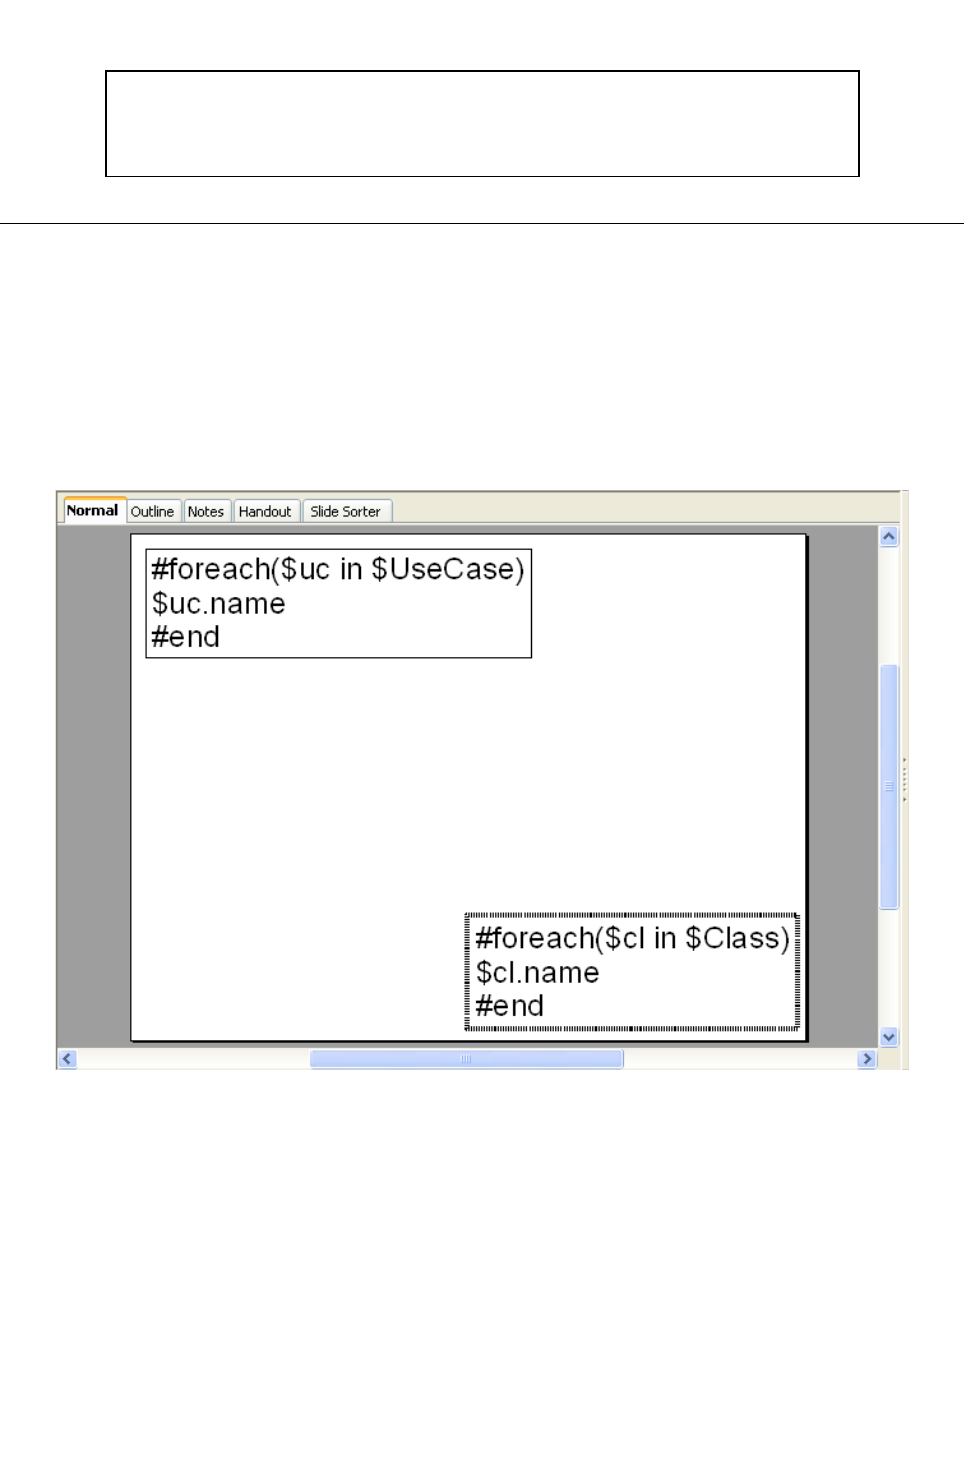
There are 3 rules to follow when using the #if-#elseif-#else, #foreach, #forpage, and #macro directives in
an *.odp document:
1. VTL statements that maintain a sequence order, such as #if and #foreach, must begin and end the
statements inside the same text box (Figure 19).
Copyright © 1998-2011 No Magic, Inc.
21
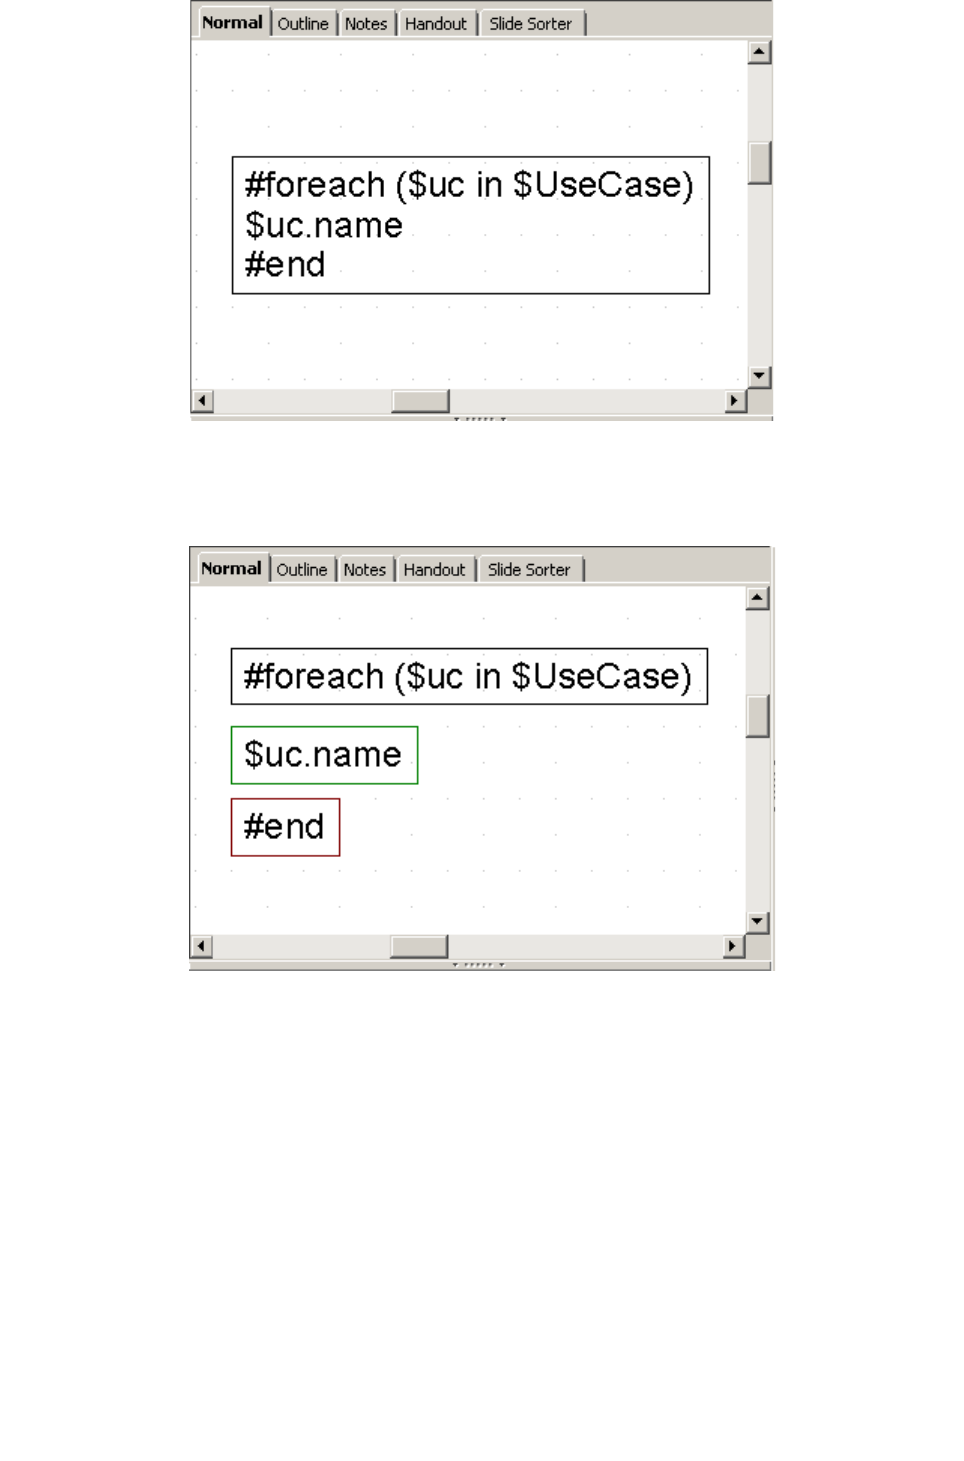
Figure 19 – Valid Usage of a Multi-line Statement in ODP
Do not split the statements into several text boxes (Figure 20) as this will cause an error.
Figure 20 – Invalid Usage of a Multi-line Statement in ODP
2. A #macro statement must be declared in the same text box (Figure 21):
Copyright © 1998-2011 No Magic, Inc.
22

Figure 21 – Valid Usage of Macro Statement in ODP
3. The #forpage statement is different from the others as it does not contain any order. It can begin
and end the statement in different text boxes. Its value can also be used in different text boxes as
shown in Figure 22:
Figure 22 – Valid Usage of the #forpage Statement in ODP
To use a structured statement such as #if, #macro, or #foreach with the #forpage statement, make
sure that the statement is in the same text box as shown in Figure 23:
Copyright © 1998-2011 No Magic, Inc.
23

Figure 23 – Valid usage of #if and #foreach with #forpage statement
As shown in Figure 23, the generated result will be:
Figure 24 – The generated output
To create a template for an OpenDocument Spreadsheet:
1. Open OpenOffice.org Calc.
2. Add the code to the template file.
3. Save the template file.
4. Add the template to Report Wizard.
All multiline directives such as #if-#else-#elseif, #foreach, and #macro must be used under the following
conditions:
Copyright © 1998-2011 No Magic, Inc.
24

1. The beginning and end of a statement must be declared within a single cell. A #macro statement
must be declared in a single cell.
Figure 25 – Valid Usage of the #foreach Statement in ODS
You can use #foreach in a single cell record only. To create data for multiple rows, use the #forrow
directive instead (Figure 26).
Figure 26 – Usage of #forrow
You can use #forcol to create data for multiple columns (Figure 27). You can use the statement in
conjunction with #forrow.
Figure 27 – Usage of #forcol
6. Exercise: Building a Simple Class Diagram Report
In this exercise you will learn how to create a simple Class Diagram report. A Class Diagram report must
contain:
1. A class diagram’s name.
2. A diagram.
3. A table that describes the class (we will call it a class description table) based on the diagram
shown.
4. The table must have the following structure:
Class Name
Documentation:
Attributes
Attribute Type 1 Name
Attribute Type 2 Name
Attribute Type 3 Name
Attribute Type 4 Name
Copyright © 1998-2011 No Magic, Inc.
25
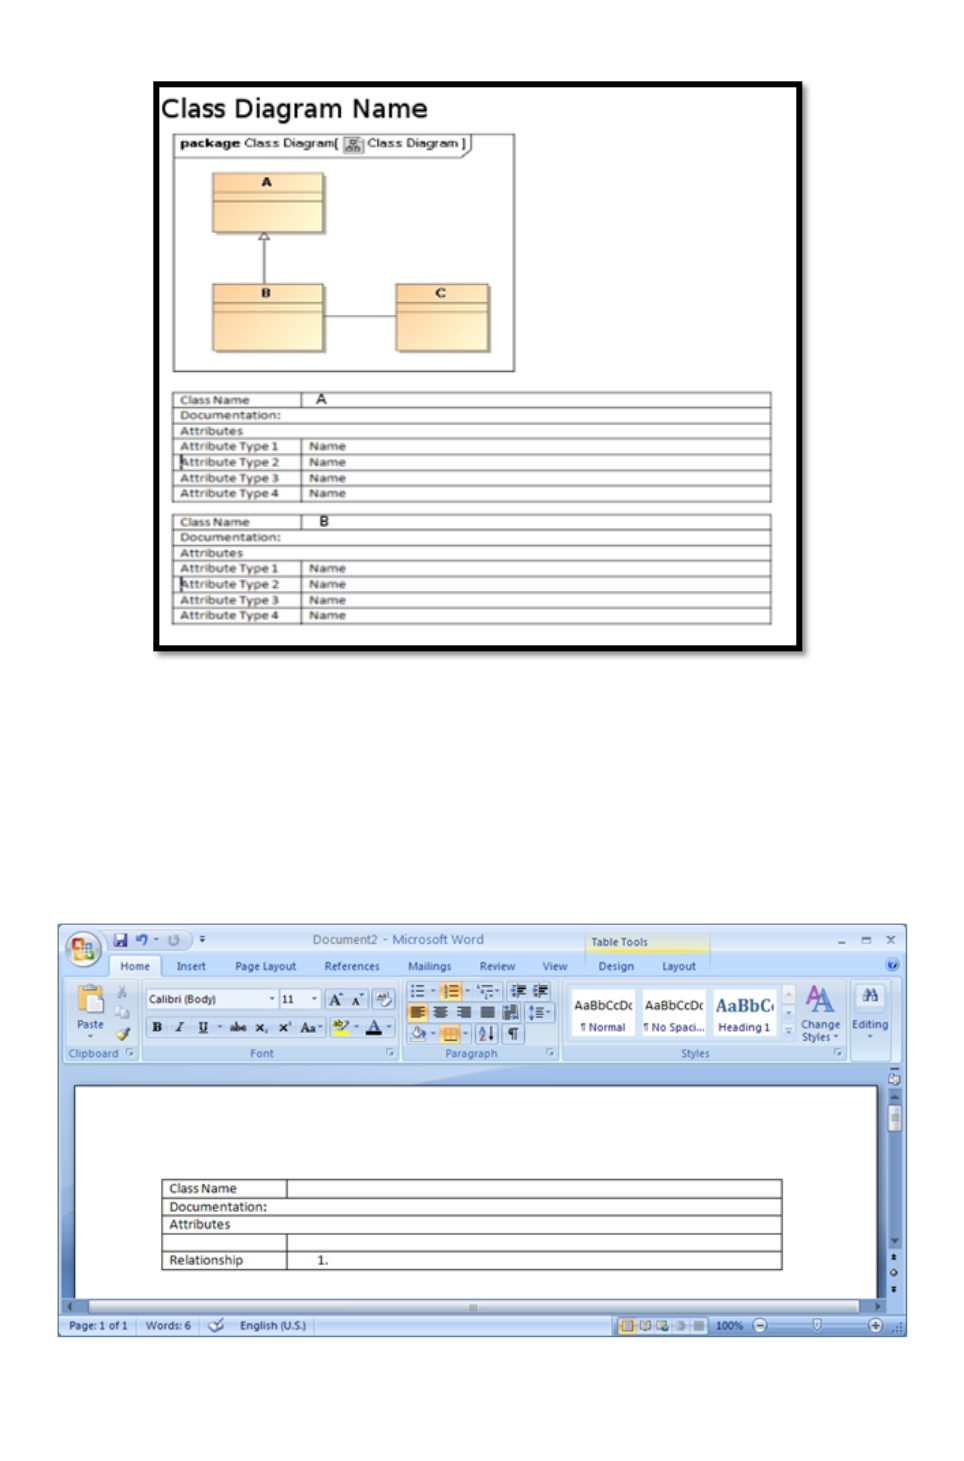
5. The layout of the report should look like the following example (Figure 28):
Figure 28 – Basic Class Diagram Layout
Instructions
The first and basically the most essential step in creating a report is to setting up the document and its
layout:
1. Open Microsoft Word.
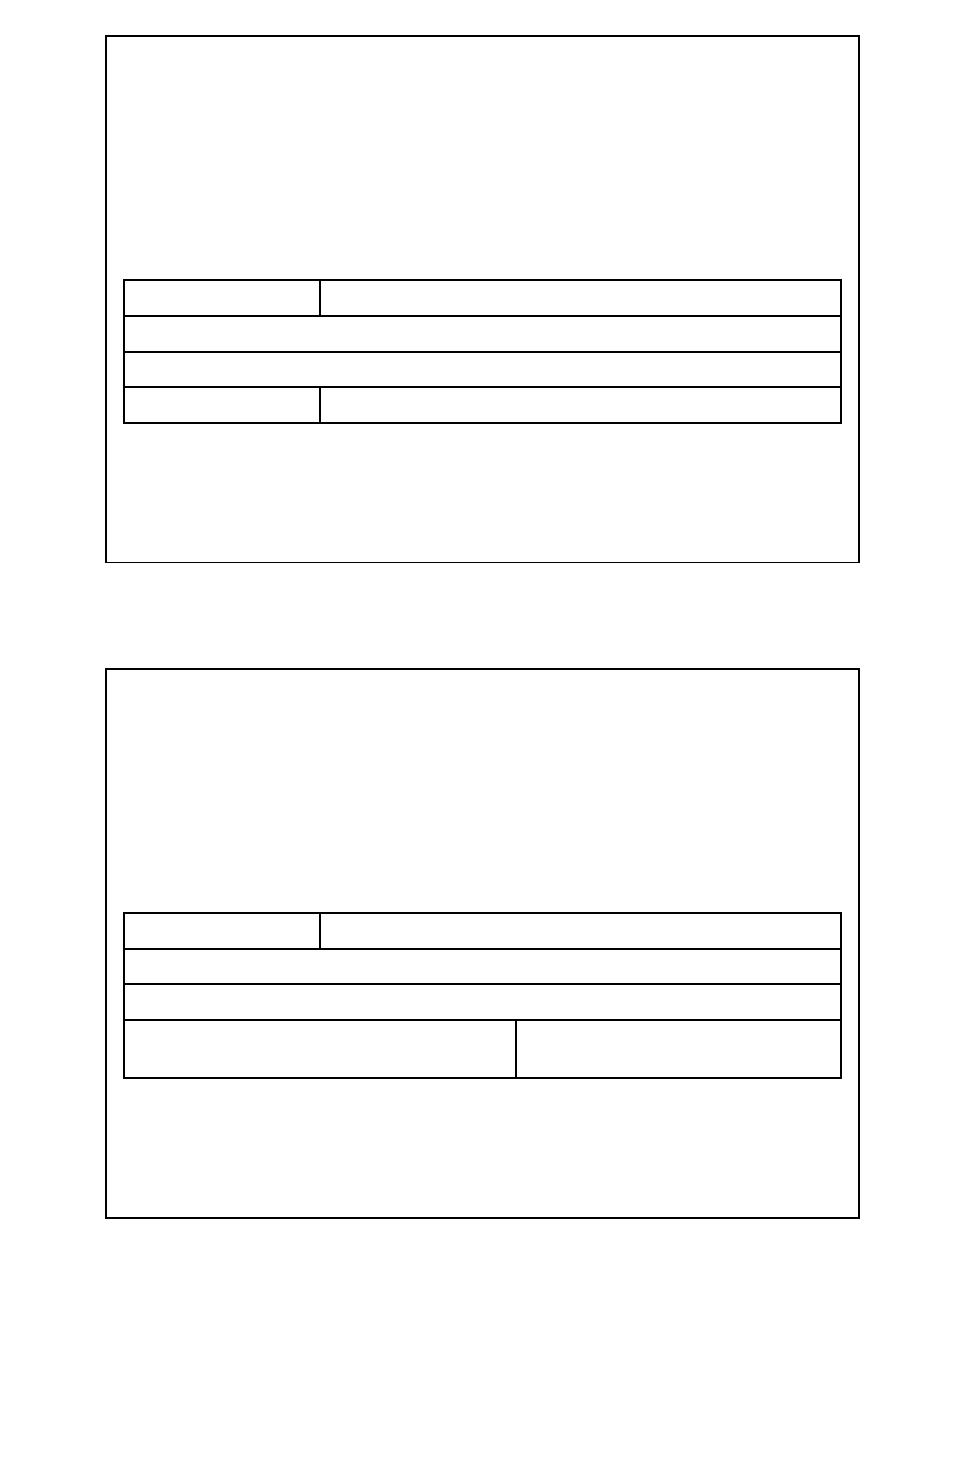
2. Create a table that will be used as the basic layout for a class description table. The result will be
as shown in Figure 29:
Figure 29 – Basic Document Layout
Copyright © 1998-2011 No Magic, Inc.
26

According to the example of the basic document layout in Figure 29, a diagram will be shown at the top of
the report followed by a class description table. This means that each diagram in the Class diagrams list has
a class description table that describes each component in the diagram. Follow the following steps to create
the document template:
Iterate through a list of diagrams.
1. Print the diagram and its name.
2. Get a list of class elements that are displayed in the diagram.
3. Iterate through the list of class elements.
4. Create a class description table for each class element in the list.
The above steps contain two #foreach loops: (i) the outer loop that iterates through a list of diagrams and (ii)
the inner loop that iterates through a list of Class elements. The list of diagrams in a MagicDraw project is
represented by $Diagram. At the top of the page of the word document type:
#foreach ($diagram in $Diagram)
**Codes in between **
#end
$Diagram is a list of all the diagrams in a MagicDraw project. This means that a project will be in the list if it
contains more than one type of diagram. To filter out other types of diagrams, add the #if directive with a
conditional statement to test whether or not $diagram is a class diagram:
# foreach ($diagram in $Diagram)
#if($diagram.diagramType == "Class Diagram")
$diagram.name
$diagram.image
**Codes in between **
#end
#end
Next you need to get all the elements contained in the diagram by using $report. $report is a standard tool
containing helpful methods such as getDiagramElements() that returns a list of elements inside a
diagram.
#foreach ($diagram in $Diagram)
#if($diagram.diagramType == "Class Diagram")
$diagram.name
$diagram.image
#set($eList = $report.getDiagramElements($diagram))
** Codes in between **
#end
#end
In the above example $eList has been assigned with a list of Elements inside $diagram. Now you need to
create an inner loop that will cover the table you have created earlier. You will need to filter out the elements
inside the diagram whose type is not Class element.
Copyright © 1998-2011 No Magic, Inc.
27
#foreach ($diagram in $Diagram)
#if($diagram.diagramType == "Class Diagram")
$diagram.name
$diagram.image
#set($eList = $report.getDiagramElements($diagram))
#foreach($e in $eList)
#if($e.elementType == "class")
Class Name
Documentation:
Attributes
#end
#end
#end
#end
Enter the information of the class in the table by calling its attributes, etc:
#foreach ($diagram in $Diagram)
#if($diagram.diagramType == "Class Diagram")
$diagram.name
$diagram.image
#set($eList = $report.getDiagramElements($diagram))
#foreach($e in $eList)
#if($e.elementType == "class")
Class Name $e.name
Documentation: $e.documentation
Attributes
#forrow($att in $e.attribute)
$att.type.name
$att.name#endrow
#end
#end
#end
#end
The above example shows that the Class Name and Documentation values are obtained by referencing to
the name and documentation attributes of $e. Use the #forrow directive as the attribute to print rows of the
class attribute type ($att.type.name) and the class attribute name ($att.name). Then save the file as Rich
Text Format. Open MagicDraw and draw a simple class diagram as shown in Figure 30.
Copyright © 1998-2011 No Magic, Inc.
28
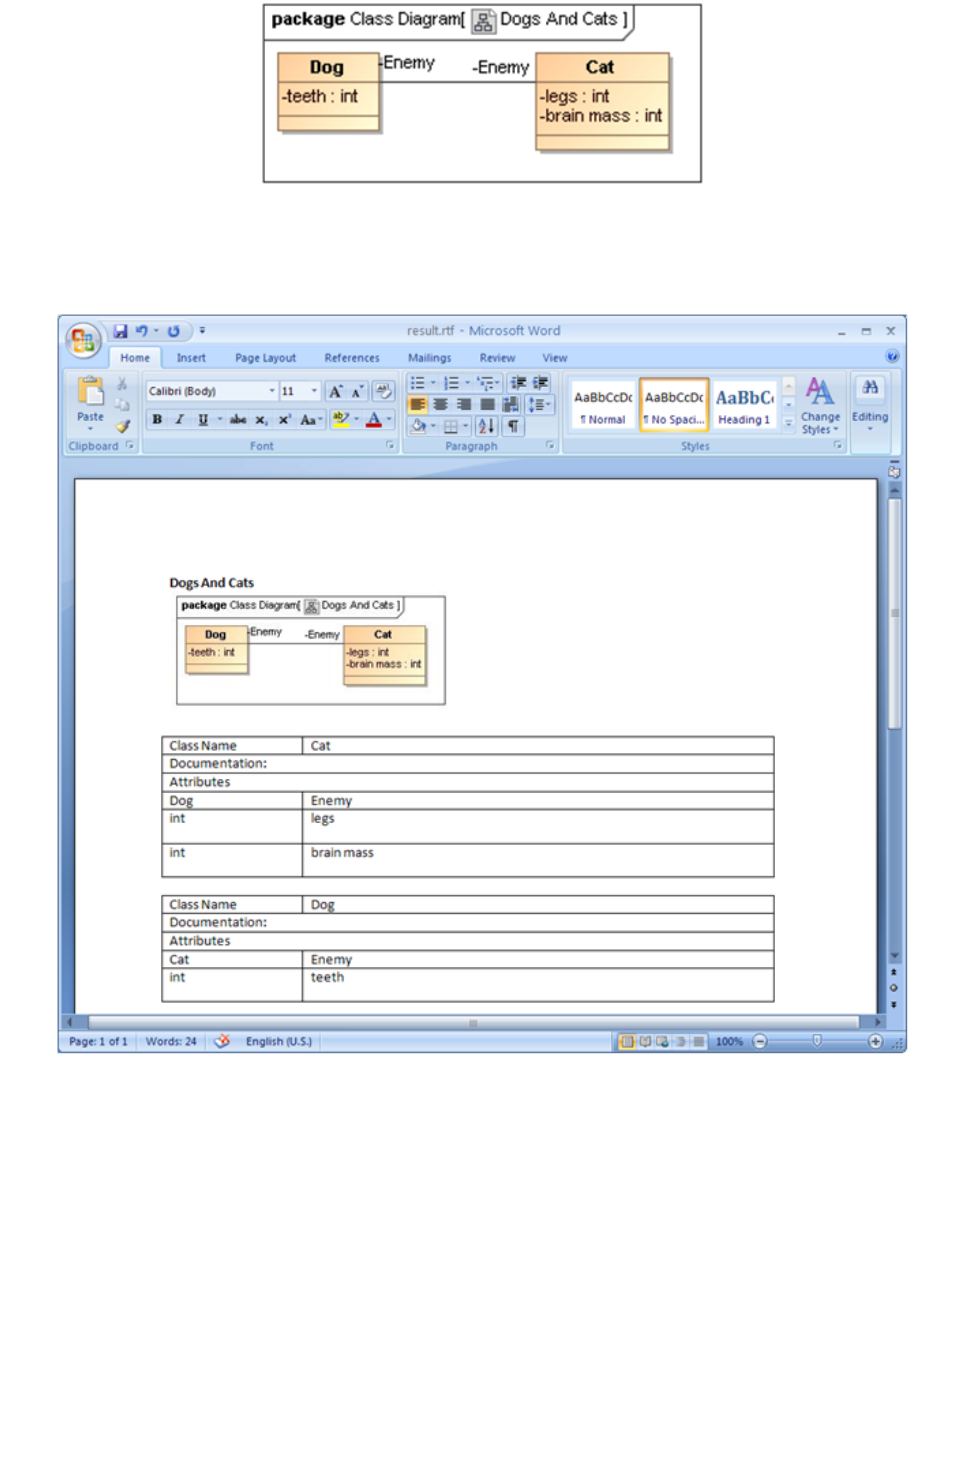
Figure 30 – A Simple Class Diagram
Add the template to Report Wizard and generate a class diagram report using this template. Figure 31
shows the result of the generated report.
Figure 31 – Generated Report
Copyright © 1998-2011 No Magic, Inc.
29
