
User guide
2 3
TABLE OF CONTENTS
THE BASICS
Phone overview...........................................................................................................................................................................4
Navigating your phone..............................................................................................................................................................7
Installing the battery ..................................................................................................................................................................8
Removing the battery and SIM card.........................................................................................................................................9
Turning your phone on and off ...............................................................................................................................................12
Home screen ............................................................................................................................................................................12
Phone status Icons.....................................................................................................................................................................12
Notifications ..............................................................................................................................................................................14
CONVENIENT FEATURES
Vibrate mode ............................................................................................................................................................................15
Sound off ...................................................................................................................................................................................15
Quick Volume adjustment ........................................................................................................................................................15
Capturing a screenshot ............................................................................................................................................................15
Switching between calls ...........................................................................................................................................................15
Three Way calling ....................................................................................................................................................................16
Caller ID ....................................................................................................................................................................................16
ENTERING TEXT
Text input....................................................................................................................................................................................16
Text input modes .......................................................................................................................................................................16
MAKING CALLS
Making calls from home screen ..............................................................................................................................................16
Making calls from contacts ......................................................................................................................................................17
Answering calls .........................................................................................................................................................................17
Rejecting/Ending calls..............................................................................................................................................................17
RECENT CALLS
Making calls using call Log .....................................................................................................................................................17
Creating or updating contacts using call log .........................................................................................................................18
Deleting recent call records .....................................................................................................................................................18
Deleting all recent call records ................................................................................................................................................18
CONTACTS
Adding a new contact ..............................................................................................................................................................19
Adding a new contact from recent calls .................................................................................................................................19
Deleting a contact.....................................................................................................................................................................19
Editing a contact ...................................................................................................................................................................... 20
Contact list ................................................................................................................................................................................ 20
Starting a number with pauses ............................................................................................................................................... 20
Favorites ....................................................................................................................................................................................21
Groups .......................................................................................................................................................................................21
Speed dials .............................................................................................................................................................................. 22
In Case of emergency (ICE) ................................................................................................................................................... 23
MESSAGE
Message ................................................................................................................................................................................... 23
INTERNET
Entering a URL.......................................................................................................................................................................... 24
Navigating through the internet ............................................................................................................................................. 25
CAMERA
Taking a photo ......................................................................................................................................................................... 26
Sharing content ........................................................................................................................................................................ 26
Assigning pictures .................................................................................................................................................................... 27
MUSIC
Playing a song ........................................................................................................................................................................ 27
Music player ............................................................................................................................................................................ 28
RINGTONES
Ringtones ................................................................................................................................................................................. 28
MY VERIZON
My Verizon ..............................................................................................................................................................................29
VERIZON CLOUD
Verizon cloud ........................................................................................................................................................................... 29
TOOLS
Calender ..................................................................................................................................................................................29
Alarm ....................................................................................................................................................................................... 30
2 3
World clock ..............................................................................................................................................................................31
Timer .........................................................................................................................................................................................31
Stopwatch ............................................................................................................................................................................... 32
Calculator ................................................................................................................................................................................ 32
Notepad ................................................................................................................................................................................... 32
File manager ............................................................................................................................................................................ 32
WIRELESS & NETWORK
Airplane mode ......................................................................................................................................................................... 33
Wi-Fi .......................................................................................................................................................................................... 34
Bluetooth................................................................................................................................................................................... 35
Cellular networks ..................................................................................................................................................................... 35
Emergency alerts ..................................................................................................................................................................... 36
ACCESSIBILITY
Readouts ................................................................................................................................................................................... 36
Font size ....................................................................................................................................................................................36
Color correction ....................................................................................................................................................................... 37
Mono audio ............................................................................................................................................................................. 37
TTY mode.................................................................................................................................................................................. 37
SOUND SETTINGS
Volume ...................................................................................................................................................................................... 38
Phone ringtones ....................................................................................................................................................................... 39
Vibration pattern ...................................................................................................................................................................... 39
Notification sounds .................................................................................................................................................................. 39
Alarm sound ............................................................................................................................................................................. 39
Keypad Volume........................................................................................................................................................................40
Keypad tone .............................................................................................................................................................................40
Vibration on keypress off ........................................................................................................................................................ 40
Battery tone .............................................................................................................................................................................. 40
Emergency tone ....................................................................................................................................................................... 40
DISPLAY
Brightness level..........................................................................................................................................................................41
Wallpaper .................................................................................................................................................................................41
Display backlight ......................................................................................................................................................................41
Keypad backlight......................................................................................................................................................................41
Font size .....................................................................................................................................................................................41
Main clock ................................................................................................................................................................................41
PHONE SETTINGS
Language.................................................................................................................................................................................. 42
Navigation keys ....................................................................................................................................................................... 42
Storage ..................................................................................................................................................................................... 42
USB connection ....................................................................................................................................................................... 42
Location .................................................................................................................................................................................... 43
Security ..................................................................................................................................................................................... 43
Reset .......................................................................................................................................................................................... 43
Date and time...........................................................................................................................................................................44
CALL SETTINGS
Flip open/close ........................................................................................................................................................................ 44
Auto Answer ............................................................................................................................................................................. 45
Quick responses ...................................................................................................................................................................... 45
Speed dial ................................................................................................................................................................................ 45
Voicemail .................................................................................................................................................................................. 45
Blocked calls ............................................................................................................................................................................ 45
Fixed Dialing numbers .............................................................................................................................................................46
Call forwarding ........................................................................................................................................................................ 46
Call timer .................................................................................................................................................................................. 46
Assisted Dialing........................................................................................................................................................................ 46
ABOUT PHONE
About Phone............................................................................................................................................................................. 46
SOFTWARE UPDATE
Software Update ..................................................................................................................................................................... 47
FCC REGULATIONS
FCC Regulations ...................................................................................................................................................................... 47
Hearing Aid Compatibility (HAC) regulations for Mobile phones ..................................................................................... 48
4 5
The Basics
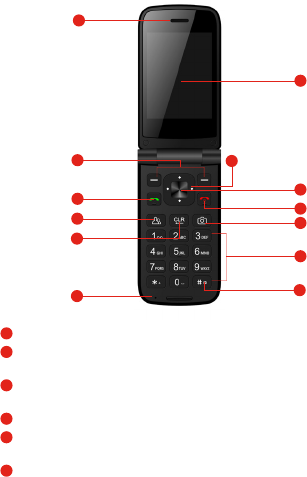
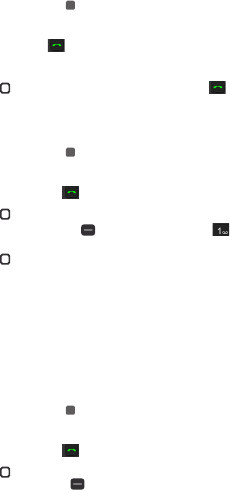
Phone Overview -- Open View
1
Earpiece - Allows you to hear the caller and automated prompts.
2
Soft Keys - Allows you to select the corresponding command at the lower left or right displayed in
the screen.
3
Send Key - Allows you to make and answer calls. Press from standby mode to access your call
history (all calls, missed calls, dialed calls and received calls).
4
Contacts - Access the contacts list.
5
Clear Key - Quick press deletes spaces and characters | hold to delete entire text entry | press to
back out of menus, one level at a time.
6
Microphone - Transmit your voice to caller or for voice activated functions (e.g., Voice commands).
Earpiece
SEND
Contacts
Menu/OK
END/PWR
Camera
Numeric
Keypad
Home screen
Navigation
Clear
Microphone
Soft Keys
2
1
3
4
5
6
7
8
13
9
10
11
Vibrate
Mode Key
12
4 5
7
Navigation Key - To scroll through menu items and highlight fields or objects.
8
Menu/OK - To select options and menu options
9
End/Power key - Turns th power on/off, end calls and exits menus. Also returns to home screen.
10
Camera - Allows you to access the camera.
11
Numeric Keypad - From the home screen pressing numeric keys allows to access to default
shortcuts. Keys will also allow entering phone numbers and alphabetical text.
12
Vibrate mode key - Allows you to set Vibrate mode from standby mode (the Home screen), press
and hold for about 3 seconds.
13
Home screen - Displays messages, indicator icons and active functions.
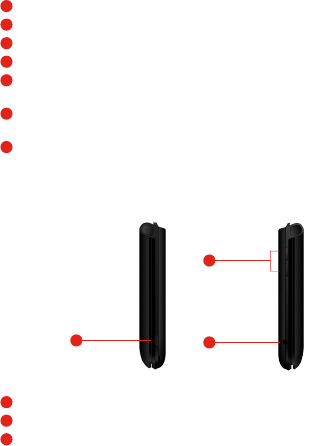
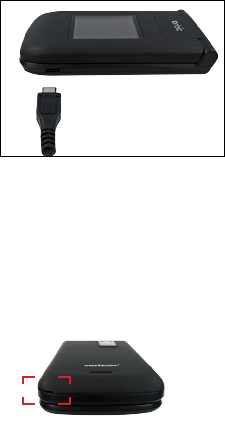
Side View
Charger
Port
14
Volume
Keys
15
16
Headset
Jack
14
USB/Charger Port - Connects the phone to the USB charger, or other compatible accessories.
15
Volume Key - Allows you to adjust the volume.
16
Headset Jack - Allows you to plug in an optional 3.5mm headset for convenient, hands-free
conversations or other compatible listening devices.
6 7
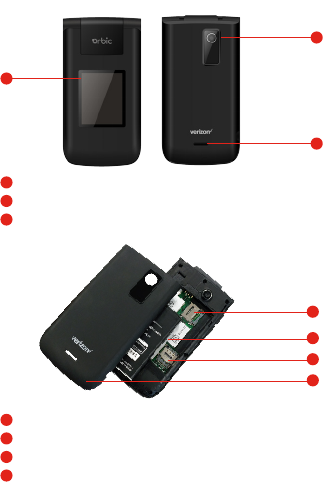
Front/Back View
Exterior
Screen
17
18
19
Camera
Speaker
17
Exterior Screen - Displays messages and notifications.
18
Camera - Camera Lens
19
Speaker - Allows you to hear sounds emitted from your phone as well as media content (e.g., music
and ringtones).
20
Micro SD Card Slot - Allows you to insert an optional microSD card for external memory storage.
21
Battery- 1400 mAh battery
22
SIM Card Slot - Nano SIM card slot
23
Back Cover - Protects the internal components of your phone.
20
21
22
23
Micro SD
Card Slot
Battery
SIM Card Slot
Back Cover
6 7
Note:
• It’s important to fully charge the battery before using the phone for the first time.
• Battery life and signal strength are significant factors (among others) that affect your phone’s ability to
send/receive calls or data transfer.
TIP - If you hold the phone enclosing the lower edge, you may interfere with the antenna’s ability to
receive a clear signal which affects call quality for voice or data transfer.
Navigating your Phone
You can navigate within your phone’s software by pressing the key that corresponds with the action you
want to take or using the Navigation key to scroll and the OK key to select a highlighted item.
For example:
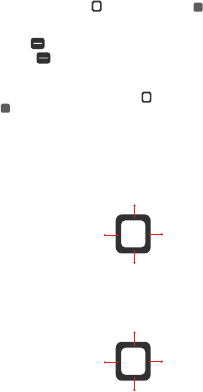
• Press the Left soft key
to select the item displayed at the bottom left of the screen.
• Press the Right soft key
to select the item displayed at the bottom right of the screen.
• Press the keypad key that corresponds to the item you want in a displayed list.
• Press the top, bottom or sides of the Navigation key
to move the cursor, then press the center of the
Navigation key (the OK key) to select the item displayed at the bottom center of the screen.
Navigating Keys
Navigate through your phone’s software using your phone’s 4-way directional Navigation key to scroll
and select items. Its outer bottom can be pressed up, down, left or right to move within the current screen
to browse through menus and lists, then its center can be pressed to select the highlighted item.
From the Home screen, pressing the Navigation key up, down, left or right launches corresponding
application. Shortcut menu presents a secondary list of shortcuts that you can customize to include your
favorite features. You can customize all of these shortcuts. For more information, see Key shortcuts on
page 68.
Left Right
Down
Up
Gallery
Notifications
Webpage searching
Quick settings
8 9
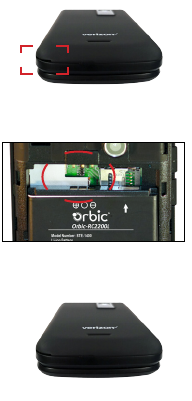
Installing the battery
Step 1. Remove the back cover
With the phone facing down, insert your fingernail into the cutout located on the bottom of the back
cover and gently lift the cover.
Step 2. Insert the battery
Insert the battery, making sure the gold contacts line up. Push in and press down gently to secure.
Step 3. Replace the back cover
Place the back cover over the back of the phone and then press down along the edges to secure.
8 9
Step 4. Charge the phone
Before turning on your phone, charge it fully. Insert the small end of the USB cable into the phone.
Insert the larger end into the charger and plug the charger into an outlet.
WARNING! Use only approved chargers with your phone. Incompatible chargers or tampering
with the charging port could damage your phone and void the warranty.
TIP: Extend your battery’s life:
Conserve battery power by adjusting the settings on select applications:
Lower Screen brightness.
Reduce Backlight time.
Turn Bluetooth and Wi-Fi off when not in use.
Removing the Battery and SIM Card
1. With the phone facing down, insert your fingernail into the cutout located on the bottom of the
back cover and gently lift the cover.

10 11
2. Use the fingertip cutout at the bottom of the battery compartment to lift the battery out.
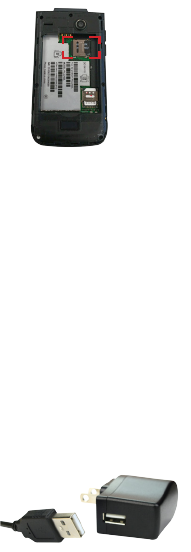
Removing the SIM card
The SIM card is pre-installed in your phone. If you need to replace your SIM
card, refer to the following instructions.
1. Turn the phone off, then remove the back cover and the battery (as demonstrated in the previous
instructions).
2. Locate the slot for the SIM card and gently slide the SIM card tray down to unlock tray.
3. Your SIM is now accessible by opening the tray.
Inserting and Removing a Memory Card
Inserting a microSD card
1. Remove the back cover (as demonstrated in the previous instructions).
2. Position the microSD card (sold separately) with the label side facing up and the gold contacts
toward the slot (at the upper-right side of the phone), then carefully slide the SD tray to the right to
unlock it, then place the SD card in pace and lock the tray by sliding left.
10 11
NOTES
• The microSD card can be easily damaged by improper operation. Please be careful when
inserting, removing, or handling it.
• The device can support up to a 128GB microSD card.
To remove the microSD card
6. Follow the steps on page 10, Inserting a micro SD card (1,2).
Charging Your Phone
Your phone comes with a USB cable and a charger adapter. You can connect them together and
charge from a power outlet, or you can use the USB cable alone to charge from your computer.
Correctly orient the plugs before insertion to avoid damaging your cable, adapter, and/or ports.
NOTE
Please use only an approved charging accessory to charge your Orbic phone. Improper handling
of the charging port, and use an incompatible charger, may cause damage to your device and void
the warranty.
1. The USB/Charger port is located at the right side of the phone. Correctly orient the cable’s plug
with the port before plugging it in.
2. Correctly orient the USB cable with the charger adapter and connect them. Refer to the image
below to correctly connect the USB cable and the adapter.
USB Cable
Charger Adapter

12 13
3. Plug the charger adapter into a power outlet to begin charging.
Turning your phone on and off
To turn your phone on or off, press and hold the End/Power key.
Home Screen
The Home screen is your starting point to access all of the features on your phone using simple key
presses.
Customizing the Home screen
You can customize your Home screen wallpaper and clock format using the Settings app. From the
Home screen, press the OK key Menu, Tools & Settings, OK, press the 2 key, then press the 4 key
to select Display settings.
Wallpaper: Press the 2 key to select Wallpaper, select a background image from pre-loaded images
or your own pictures, press Select, Done.
Clock Format: Press the 6 to select Main clock, select On or Off, then press OK.
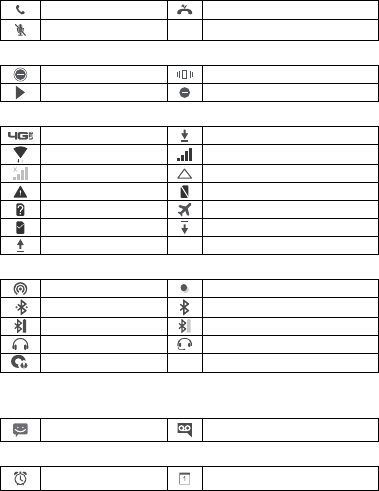
Phone’s status icons
The Status Bar appears at the top of every screen. It displays icons indicating that you’ve received
notifications (on the left) and icons indicating the phone’s status (on the right), along with the current
time.
The following icons may appear in the Status Bar.
Status Bar
Shows phone status information,
including the time, signal strength,
battery status, and notification icons.
12 13
Call icons
Call Missed call
Microphone muted
Sound icons
Silent mode Vibrate mode
Music playing Alarm only
Network icons
4G LTE connected Download successful
Wi-Fi connected Signal strength
No signal Roaming
Emergency Alert No SIM card
Unknown SIM card Airplane mode
SIM card activated Downloading
Uploading
Connectivity icons
Mobile Hotspot on USB connected
Bluetooth connected Bluetooth on
Bluetooth headset battery full Bluetooth headset battery low
Headset connected Headset with microphone connected
Internal storage full
NOTE: Bluetooth headset icons are compatible with Bluetooth headset device approved by Orbic.
Messaging icons
Message New voicemail
Alarm and Calendar icons
Alarm set Calender
14 15
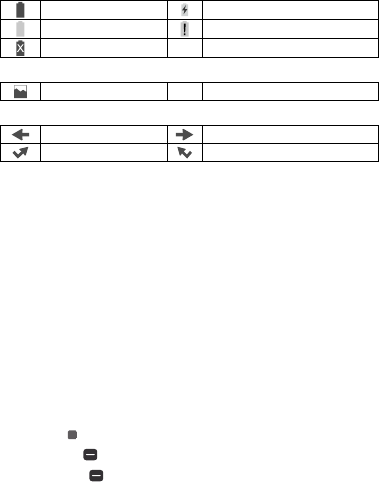
Battery icons
Full battery Charging battery
Low battery Empty battery
Not Charging
Other icons
Gallery
Call logs icons
Incoming call Outgoing call
Missed call Rejected call
Notifications
Notification icons report the arrival of new messages, calendar events, alarms, as well as ongoing
events, such as when you’re on a call. When you receive a notification, the notification icon will be
displayed in the Status Bar. You can open the Notifications view to view a list of all of your recent
notifications. Depending on your settings, you may hear a notification sound, see a notification light,
and/or the phone may vibrate.
To open the Notifications view
From the Home screen, press the Down Navigation key to open the Notification view. The
Notifications view displays a list of your current notifications, organized into ongoing and event-
based notifications.
To respond to a notification
Open the Notifications view. Your current notifications are listed in the view, each with a brief
description.
Press the OK key option to open and view the details of the highlighted notification.
Press the Left soft key option to dismiss or delete a highlighted notification.
Press the Right soft key Options to clear all notifications or access options for a highlighted
notification.
14 15
Convenient Features
Vibrate mode
Sets the phone to vibrate instead of ringing.
From the Home screen, press and hold the Vibrate mode key , then OK. To return to Normal
mode, press and hold the Vibrate mode key again, and then OK.
Sounds off
Quickly deactivate your phone’s sounds when you’re in a place where phone sounds would be
disruptive.
From the Home screen, press and hold the Volume down key to set vibrate mode, press the Volume
down key once more to set Alarm only, and then press Volume down key one more time to select
All sounds off, Set. To return to normal sounds mode, press and hold the Volume up key until the
desired volume level is reached.
Quick volume adjustment
Quickly adjust ringer and earpiece volumes by pressing the Volume key on the left side of the phone.
Press the Volume up key to increase and the Volume down key to decrease the volume.
NOTE: The earpiece volume can only be adjusted during a call. You can also disable keypad
sounds through the Sound & Notifications Settings menu.
Capturing a Screenshot
Press and hold the Volume down key and the End/Power key at the same time for 2 seconds to
capture a screenshot of the current screen.
With a micro SD card installed. From the home screen, press the Navigation key up to open
Browser, options, press the 5 Key.
To view the captured image, from Home screen press the OK key Menu, then Gallery.
Switching Between Current Calls
When on a call, a beep will alert you that another call is coming in and display Caller ID detail on
the screen.
• Press Send key to answer the call. This action puts the first call on hold.
• Press Send key again to return to the first call.
Three Way call
You can talk with two people at the same time with a three-way conversation on your wireless phone.
16 17
1. While on the first call, press the Right Soft Key Options, select New call and then Dialer and
dial the 10-digit number of the second person.
2. Press the Send key . The first person is automatically put on hold while the call is made.
3. When the second person answers, press the Right soft key Options, then press the 2 key
Merge calls to create a conference call.
4. To end both conversations completely, press the End/Power key .
Note: Call Waiting and Three Way calling are network supported services. Options may vary. Additional changes may
occur. Contact your service provider for additional information.
Caller ID
Caller ID displays the number and/or name and picture (if applicable) of the person calling when
your phone rings.
Entering text
Text input
The following key functions are available to help with text entry:
Right soft key : Press to see message screen.
Options, select new message, Select
Press left soft key to change the text input mode
Next: Select different options to display other matching words in the database in KT9 Word mode.
Shift: Press to change capitalization (Lowercase, Initial cap, Caps lock)
Key Space: Press to insert a space.
Clear: Press to delete a single space or character. Press and hold to delete entire words.
Key Punctuation: Press to insert punctuation symbols when using Abc text input mode.
Text Input Modes
In a text field, press the Left soft key to select a text input mode: T9 Word / abc / Abc / ABC /
123 /Symbols
Making Phone Calls
Placing a Call from Home Screen: Press keypad to input number and press the call key to
initiate a call.
16 17
Place a Call from Contacts: Press Menu key, scroll down using Navigation button and press call
key to initiate call.
Answering or Rejecting a Call
When you receive a call the caller ID information will be show. If the phone is closed , it will
automatically answer the call once you flip it open.
If the phone is already flipped open, you can:
Answering Calls: Select Answer or press call key, to answer the call.
Rejecting/Ending Calls: Select ignore or press end key, to ignore or end call.
Recent Calls
The Recent Calls app is a list of the last phone numbers or Contact entries for calls you placed,
accepted, or missed. It’s continually updated as new numbers are added to the beginning of the list
and the oldest entries are removed from the bottom of the list.
1. , Press key to the list of recent calls
2. Use the Navigation key to scroll left/right to display your call records by call type:
Missed calls: Calls you did not answer.
Received calls: Answered calls and Rejected calls
Dialed calls: Outgoing calls.
All calls: All calls that you missed, received, and dialed.
3. Calls display the date, time and contact or phone number. If the number is saved as a contact, the
call record includes icons to indicate the type of number.
4. Use the Navigation key to highlight a call, then choose from these options:
Press the Left soft key Message to send a message.
Press the OK key View to view additional call details.
Press the Right soft key Options for these options:
– Add to Contacts: Save the caller’s phone number as a new contact.
– Delete: Delete the highlighted call record.
– Delete multiple: Select all calls you want to delete.
– Lock: Block or unblock calls from the highlighted phone number.
– Add to call rejection: Save number to add it to call rejection.
18 19
Making calls using Call logs
1. From the Home screen, press the OK key , Menu, then press up left Call History.
OR
From the Home screen, press Send key to view the call logs screen.
2. Find a call from All calls, Missed calls, Dialed calls, or Received calls.
3. Use the Navigation key to highlight a call record, and then press Send key .
Creating or updating Contacts using Call logs
1. From the Home screen, press the OK key , Menu, then press up/ left Call history, OK.
OR
From the Home screen, press the Send key to view your Call logs.
2. Use the Navigation key to find and highlight a call record (from All calls, Missed calls, Dialed
calls, or Received calls), press the Right soft key Options, then press the 1 key Add to
Contacts.
3. Use the Navigation key to highlight number:
1.Add contacts, Select, Create new contact, Select, add contact information then press the OK
key to Save.
Or to update contact, 1.Contact details, Select, Edit, make changes and then press the OK key
to Save.
4. Save the number to a contact entry, as necessary.
Deleting Recent calls records
1. From the Home screen, press the OK key , Menu, then press up/left, Call history
OR
From the Home screen, press the Send key to view your Call logs.
2. Use the Navigation key to find and highlight a call record (from All calls, Missed calls, Dialed
calls, Received calls), press the Right soft key , Options, then select the 2 Delete, Select, Yes.
Deleting all Recent calls records
18 19
1. From the Home screen, the OK key , Menu, then press up/left. Call history
OR
From the Home screen, press the Send key to view your Call logs.
2. Press the Right soft key , Options, then select 3. Delete multiple, Select, with the navigation key
select calls you want to delete, press Select on each one, press Delete, Yes.
Press the Right soft key , Options, then select 1.Select all, Select, Delete, Yes.
4. Press the Left soft key , Delete, Yes to delete one by one.
Contacts
The Contacts app allows you to store names, phone numbers and other information in your phone’s
memory.
Adding a new contact
Allows you to add a new contact to your Contacts list.
NOTE: Using this method, the number is saved as a new Contact, not into an existing Contact.
1. From the Home screen, Press the OK key , Menu and then press up/right, Contacts.
OR
Press the Left soft key Contacts.
2. Press the Right soft key Options.
3. Press the 1 key New contact.
4. Enter the contact’s name.
5. Press Down Navigation key to scroll to the phone number type field, then enter the number.
7. Use the Navigation key to scroll to other fields and enter additional contact information as
necessary, then press the OK key , Save to save the entry.
Adding a new contact from Recent calls
1. From the Home screen, press the Send key to display your recent calls.
2. Use the Navigation key to highlight a recent call entry.
3. Press the Right soft key Options. use the Navigation key to select 1. Add to contacts,
Navigation key to Select, 1.Create new contact, Navigation key to Select.

20 21
4. Enter the name and use the Navigation key to scroll and enter the contact’s information as
necessary.
5. When the entry is complete, press the OK key Save to save the entry.
Deleting a Contact
1. From the Home screen, press the Left soft key , Contacts.
2. Use the Navigation key to highlight an entry.
3. Press the Right soft key Options. Use the Navigation key to select 2. Delete, Navigation
key to Select, Yes.
Editing a Contact
To make changes to an existing contact.
1. From the Home screen, press the Left soft key Contacts.
2. Use the Navigation key to highlight a Contact entry, then press the OK key View.
3. Press the OK key Edit to make changes.
4. Use the Navigation key to highlight the field you want to change.
5. Make the changes, then press the OK key Save to update your contact entry.
Contacts list
When you open the Contacts app, your Contacts list is displayed. In Case of Emergency contacts is
displayed above your list of contacts. Add up to 3 emergency entries from your Contacts list. These
are entries that someone can contact on your behalf in the event of an emergency, whether or not
the phone is locked.
1. From the Home screen, press the Left soft key Contacts.
2. Use the Navigation key to scroll through your Contacts alphabetically. Press the Right soft key
, Options to select one of the following:
1. Add new contact | 2. Delete multiple | 3. Import/export | 4. Share | 5. Speed dial setup |
6. Remove duplicate | 7. Settings
• Press the Left soft key Message to send a message.
• Press the OK key View to view the entry details.
Storing a number with pauses
Pauses allow you to enter additional series of numbers to access automated systems such as Voice
mail or credit billing numbers. Pause types are:

20 21
Wait (;) The phone dials the phone number, but does not advance to the next series of digits
until the user releases the pause. When the prompt, “Send the following tones?” appears, use the
Navigation key to highlight Yes, then press the OK key Select.
2-Sec Pause (,) The phone waits two seconds before dialing the next series of digits.
1. From the Home screen, enter the phone number, then press the Right soft key Options.
2. Use the Navigation key to highlight Add 2-sec pause or Add wait, then press the OK key
Select.
3. Enter the additional number(s) (e.g., pin number, credit card number, etc.).
4. When you’re finished, press the Right soft key Options.
5. Press the 1 key Add to Contacts.
6. Choose Create contact or Update contact.
7. Use the Navigation key to scroll and enter the contact’s information as necessary.
8. When the entry is complete, press the OK key Save to save the entry.
Favorites
Allows you to add Contact entries to your list of Favorites to easily view, call, or send messages.
1. From the Home screen, press the Left soft key Contacts.
2. Use the Navigation key to highlight Favorites and then press the OK key View.
3. Press the OK key Add.
4. Use the Navigation key to scroll through your contacts alphabetically and press the OK key
Select for each of the entries to add.
5. Press the Left soft key Done. Once you have added Contacts to your Favorites list, the
following options will become available in the Favorites menu:
OK key : View
Left soft key : Message
Right soft key : Options to access 1.Add / 2.Remove
Groups
Allows you to view your grouped Contacts, add a new group, change the name of a group, or
delete a group.

22 23
1. From the Home screen, press the Left soft key Contacts.
2. Use the Navigation key to highlight Groups, then press the OK key View.
3. View a Group
Use the Navigation key to highlight a group, then press the OK key View.
Add a New Group
Press the Left soft key 1. New Group to add a new group to the list. Enter a name and press the
OK key Save.
Options when viewing a group
Press the Right soft key Options to select one of the following:
1.Edit / 2.Delete
Press Left soft key Options to select Message, use the Navigation key to scroll and select
contacts, Done. Start text
Adding contacts to a group
1. Open your Contacts list, select Groups, Ok key to View, then use the Navigation key to
highlight the group name.
Press the OK key View, then press the Right soft key and press 1 key Edit.
Press the Right soft key Options, then press the 1key Add contacts.
2. Highlight the desired contact(s), then press the OK key Select.
3. Press Left soft key Done.
Speed Dials
Speed dials are 1- or 2-digit shortcuts you assign to specific contact entries to allow you to quickly
call the contact.
Assigning a Speed dial
1 From the main keypad press any number for 3 seconds to set up the speed dial then press OK
key .
2. Use the Navigation key to highlight a slot, then press the OK key .
3. Use the Navigation key to highlight a phone number, then press the OK key Set
4. Set the Speed Dial digit using the Navigation key to highlight it, then press the OK key .

22 23
Removing a Speed dial
1. From the Home screen, press the Left soft key Contacts.
2. press the Right soft key Options.
3. Press the 5 key Speed dial setup.
4. Use Navigation key to highlight a speed dial contact, press the Left soft Remove
5. Press the Left/Right soft key Yes / No
In Case of Emergency (ICE)
In Case of Emergency contacts is displayed above your list of contacts. Add up to 5 emergency
entries from your Contacts list. These are entries that someone can contact on your behalf in the
event of an emergency, whether or not the phone is locked.
Assigning emergency contacts
1. From the Home screen, press the Left soft key Contacts.
2. Use the Navigation key to highlight In Case of Emergency, then press the OK key View.
3. Use the Navigation key to highlight Contacts name, then press the OK key Set.
4. Use the Navigation key to highlight each desired contact, then press the OK key Set
5. Use the Navigation key to highlight a contact, then press OK to View.
To unassign an ICE contact
1. From the ICE Contacts screen, press the Right soft key Remove, then press Yes or No to
remove.
2. Entering your ICE emergency info
1. From the Home screen, press the Left soft key Contacts.
2. Use the Navigation key to highlight In Case of Emergency, then press the OK key View.
3. Use the Navigation key to highlight Personal info, then press the OK key VIEW
4. Press the OK key Edit.
5. Enter information that would be helpful in an emergency (e.g., your Health record, Allergies), then
press the OK key Save.
Message
The Message app is preloaded on your phone which allows you to send messages (Text, Picture,
and Voice). Depending on the type of message, you choose to send, you can also attach files to
your messages including pictures, sounds, voice recordings and name cards.

24 25
1. From the Home screen, press the OK key Menu, then using the Navigation key select Message .
or
From the Home screen, press the Right soft key Message.
2. View conversation threads and send messages.
Use the Navigation key to highlight a conversation thread, then press the OK key to view it.
Press the Right soft key Option, Press Ok key to Select New message to start a new message,
enter the information required (recipient, text, content, etc.), then press the OK key .
Press the Right soft key Options to select threads, access Message settings, and more.
Browser
The Browser app allows you to access news, sports, weather, and email from your device.
Accessibility and selections within this feature are dependent upon your service provider. For specific
information on Internet access through your phone, contact your service provider.
From the Home screen, press the OK key Menu, then press down, left Browser ok
Press the Left soft key Tabs to view your open tabs and allow you to switch between them.
Press the OK key View to go to the web address.
Press the Clear key to go back to the previous page in your browsing history.
Press the Right soft key Options for these options:
History – History: View recently-viewed pages.
1. Refresh: Reload the current web page.
2. Bookmark page: Save the URL of the current page as a bookmark.
3. Top
4. Screenshot
5. Share page – Share: The current URL is copied allowing you to share it using Message or you
can save it to your clipboard.
7. Add page – New tab: Create a new tab.
8. Home Go to your home URL.
9. Add Bookmarks: Quickly and easily access saved bookmarks or create a favorite bookmark page.

24 25
Entering a URL
Manually enter a URL (web address) to go directly to the web page you want. Or, you can use the
Navigation key to select one of the suggestions that appear as you begin to type.
1. From the Home screen, press the OK key Menu, then press down, left Browser, OK .
2. Press the Up Navigation key to move the cursor to the URL Address field, and enter the web
address.
3. Press the OK key Go to go to the web address.
Navigating through the Internet
On-screen items appear in one of the following ways:
Links embedded in content
You can act on options or links on a web page by moving the cursor over it, then pressing the OK
key .
Scrolling
Use the Navigation key to scroll in any direction on the page.
NOTE: When you press and hold the OK key on a web page, you can conveniently use the scroll page function to scroll.
Fast scrolling
Press and hold the Navigation key to quickly move the cursor up and down on the current screen.
Soft keys
Use the Soft keys (just below the display screen) to access special functions that apply to the
current selection (when available). They may change depending on the page and/or selection.
Entering Text, Numbers, or Symbols
When prompted to enter text, you can enter the necessary characters from your phone’s keypad
using the text mode of your choice (KT9Word, abc, Abc, ABC, 123, or symbols).
• To enter an uppercase character, press the (star) key
• To insert a space 0 key
•To insert symbols, press the Hash tag key
Deleting Text/Number Entered
When entering text or numbers, press the Clear key to clear the last number, letter, or symbol.

26 27
Initiating a Phone Call From the Internet
You can make a phone call from the Internet if the site you’re using supports the feature. Using the
Navigation key , place the cursor over the phone number you want to call, press the OK key
Go to go to the call screen, then press the OK key Call to make a call.
Changing between tabs
1. While viewing a web page, press the Left soft key Tabs.
2. Use the Navigation key to highlight an open tab (indicated by a blue border), then press the
OK key Select.
Closing tabs
1. While viewing a web page, press the Left soft key Tabs.
2. Press the Right soft key Close tab
Camera
You can use the Camera to take and share pictures
1. From the Home screen, press the camera Key
•Press the Right soft key Options to access (Take photo), Size, Self-timer, Auto review, Shutter
sound, Storage
• Press the Left soft key Gallery to open the Gallery app.
Taking a photo
1. From the Home screen, press the Camera Key
2. Hold the phone and point the lens towards the subject of the photo.
3. Press the OK key to take a photo. Your picture will be automatically saved to the Gallery
Gallery
The Gallery app presents all of the pictures stored in your phone,
1. From the Home screen, press the OK key Menu.
2. Press left Gallery, OK key .
• Use the Navigation key to highlight one of the thumbnail images, then press the OK key
View to open the picture

26 27
• Press the Right soft key Options to access Send, Set as, Delete, Crop, Details
• Press the Left soft key Guide options (full screen, rotate, zoom)
Sharing content
You can select one (or more) photos to share. After selecting the file(s), select Share to open the
available sharing options (such as Message, Email, or Bluetooth), then complete as necessary.
1. From the Home screen, press the OK key Menu.
2. Press the left Gallery .
3. Use the Navigation key to highlight a desired photo.
4. Press the Right soft key Options, then press the 1 key Send.
5. Use the Navigation key to select a sharing option.
6. Press the OK key OK then complete the sending method as necessary.
Assigning pictures
After taking a picture, assign it as a picture ID for a Contacts entry or as the background image
(wallpaper) for your Home screen.
1. From the Home screen, press the OK key Menu.
2. Press left Gallery .
3. Use the Navigation key to highlight a desired photo.
4. Press the Right soft key Options, then press the 2 key Set as.
5. Use the Navigation key to select Wallpaper or Contact photo, press the OK key to Select.
• Wallpaper Assigns the picture as the background image. Crop the image as necessary.
• Contacts Assigns the picture to a Contact entry as a picture ID. Crop the image as necessary.
6. Use Left and Right Soft keys to adjust the crop box, then press the OK key Done.
Music
Your phone has a music player that lets you play all of your favorite tracks.
Use the USB cable that came with your phone to transfer music files to your phone or download
music files directly to your phone.

28 29
Playing a song
1. From the Home screen, press the OK key Menu, then press the Media center.
2. Press the 2 key Music player.
3. Use the Navigation key to select a song in the Music library.
•Scroll up and down through categories.
4. Press the OK key to View then press the OK key Play to play the song.
Music player
1. From the Home screen, press the OK key Menu, then press the Media center.
2. Press the 2 key Music.
3. Use the Navigation key to select a song in the Music library.
• Repeat: Set the repeat mode (Off, One song, or All songs).
• Shufe On: Set the shufe mode (toggle it on or off).
• Add to playlist: Create or update playlists to organize your music les into sets of songs, which
you can play in the order you set or in a shuffle.
• Share: Share the selected song using Message. You can also transfer a selected song using
Bluetooth.
• Set as ringtone: Set the selected song as your phone ringtone.
• Delete: Delete the selected song.
• Details: View information about the selected song.
Ringtones
Allows you to set the default ringtone for your phone.
1. From the Home screen, press the OK key Menu, then press right , down, press OK key
2. Press the 2 key Settings
3. Press 3 Sound settings
4. Press 3 Phone ringtone,
5. Use the Navigation key to highlight a ringtone.
Press the OK key to Set it as your phone’s default ringtone.

28 29
My Verizon
Check your subscription information ranging from your payment plan to your software upgrade or
other available services.
1. From the Home screen, press the OK key Menu, using the Navigation key select Verizon apps,
press OK
2. Press the 1 key My Verizon.
3. Sign in to your Verizon account.
Verizon Cloud
Verizon Cloud offers secure online storage to back up your contacts and sync them with your other
Cloud-connected devices. For more info, go to http://vzw.com/cloud
1. From the Home screen, press the OK key Menu, using the Navigation key select Verizon apps,
press OK .
2. Press the 2 key Cloud.
3. Your Verizon Cloud history is displayed.
• Press the Left soft key to back up now
• Press the Right soft key to turn off
Calendar
The Calendar app allows you to keep your agenda convenient and easy to access. Simply store
your appointments and your phone will alert you with a reminder you set.
1. From the Home screen, press the OK key down, right,Tools & Settings.
2. Press the 1 key Tools
3. Press the 2 key Calendar.
4. Use the Navigation key to highlight the scheduled day.
5. Press the Left soft key New event.
6. Enter the Event name, then scroll down to set the remaining settings.
7. Highlight a Calendar setting field, then press the Left soft key Set.
For each Calendar event you can set:

30 31
•Event name • Time zone
•Location • Repeat / Repeat ends
•All day check box •Reminders
•Date and time •Reminder sound
•Description
8. Use the Navigation key
to highlight the setting you want, then press the OK key Save when
the Calendar entry is complete.
Editing, deleting and sharing calendar entries
1. Open the Calendar app, use the Navigation key to select the day you want to view, then press
the OK key View.
2. Press the OK key View again (if the day has multiple events, select the entry first).
Press the Left soft key Edit to edit the calendar entry.
Press the Right soft key Options, then press 1. Go to, 2. View mode, 3. Delete, 4. Search event,
5. Settings
Alarm
The Alarm app allows your phone to function as an alarm clock. At the alarm time, your alarm will
be displayed on the screen and the alarm will sound.
To stop the alarm sound, open the flip, then press the Left soft key to Dismiss
or the Right soft key Snooze.
1. From the Home screen, press the OK key right, down, Tool & settings, select OK.
2. Press the 1 key Tools
3. Press the 3 key Alarm.
4. Press the Left soft key , New Alarm to add an alarm for the first time.
5. Use the Navigation key to highlight the information you want to set, then press the Left soft key
Set to view your setting choices.
6. Enter the alarm information including:
• Turn On/Off • Set Time
• Repeat • Snooze
• Type • Alarm tone
• Volume

30 31
7. Press the OK key Save after setting all of the Alarm fields as necessary.
How to delete alarms
1. From the Alarm clock list, press the Right soft key Options.
2. Press the 1 Key to turn off
3. Press the 2 key to delete the highlighted alarm
4. Press the 3 Key to Delete all alarms
5. Press Left/Right soft keys to select Yes or No
How to edit alarms
1. From the Alarm clock list, use the Navigation key to highlight the alarm you want to edit.
2. Press the OK key Edit and make your changes as necessary. Press OK to Save.
World Clock
Allows you to determine the current time in another time zone or country.
1. From the Home screen, press the OK key Tools & Settings, Menu.
2. Press the 1 key Tools .
3. Press the 6 key World clock.
4. press the OK key to add.
5. Enter a city or state in the search bar, then use the Navigation key to highlight the city or state
you want to add.
6. Press the OK key Select.
7. Press Left soft key Done
Timer
The Timer app alerts you with an audible signal when a set amount of time has passed.
1. From the Home screen, press the OK key Tools & Settings, Menu.
2. Press the 1 key Tools
3. Press the 4 key Timer.
4. Press Right soft key Options, 1.Add, use the Navigation key to enter the amount of time you
want to set, then press OK key to Set.

32 33
5. Press the OK key Start to start the timer.
6. Press Left soft key to Reset, OK key to Stop/Start
Stopwatch
The Stopwatch app allows you to use your phone as a typical stopwatch.
1. From the Home screen, press the OK key right, down, Tools & Settings, Menu.
2. Press the 1 key Tools
3. Press the 5 key Stopwatch.
4. Press the OK key Start to initiate the stopwatch.
• Press the Left soft key Split to record Split times.
5. Press the OK key to Stop/Pause timing.
6. After time has stopped, press the Right soft key Reset.
Calculator
The Calculator app allows you to perform simple mathematical calculations.
1. From the Home screen, press the OK key right, down, Tools & Setting, Menu.
2. Press the 1key Tools .
3. Press the 1 key Calculators.
4. Press the 1 key Calculator
5. Enter the numbers to get the value you want. To clear entered items, press the CLR key Clear.
6. Use the Navigation key to enter an operation between numbers and press the OK key
for the result.
NOTE: To insert a decimal, press the Star key . To DEL , press CLR . To insert + , press Hash tag key .
Press the Up Navigation key for +.
Press the Down Navigation key for --.
Press the Right Navigation key for ÷.
Press the Left Navigation key for X.
32 33
Notepad
Allows you to add, read, edit, and erase notes to yourself.
1. From the Home screen, press the OK key right, down, Tools & Settings, Menu.
2. Press the 1 key Tools
3. Press the 7 key Notepad.
• Press the Left soft key New note to write a new note, then press the OK key Save when
you’re finished.
• Use the Navigation key to highlight an existing note, press the OK key View, then press
the OK key Edit.
• Press the Right soft key Options to access Edit, Delete, Send, Search.
File Manager
Use the File manager app to easily view and manage your folders and files stored in your phone.
When you open File manager, all of your phone’s internal storage file folders are displayed.
1. From the Home screen, press the OK key Media Center Menu, press OK key .
2. Press the 3 key File manager.
• Use the Navigation key to select content within a folder, then press the OK key Open to
open it. Repeat until you access the content you’re looking for.
• Press the Clear key to back out one level at a time.
4. Use the Navigation key to select a folder, then press the OK key to open the folder and
view its contents.
5. Press the Right soft key Options to access Copy, Move, Delete, Sort, Rename, Add folder,
and Details.
Wireless & networks
The Wireless & networks menu allows you to configure and manage your device’s wireless radio
communications.
1. From the Home screen, press the OK key right, down, Tools & Settings Menu.
2. Press the 2 key Settings .
3. Press the 1 key Wireless & networks.

34 35
Airplane mode
1. From the Wireless & networks menu screen, press the 1 key Airplane mode.
2. Use the Navigation key to highlight On or Off, then press the OK key to Set.
3. Press the Clear key to exit.
Wi-Fi
1. From the Wireless & networks menu screen, press the 2 key Wi-Fi.
2. Use the Navigation key to highlight a Wi-Fi network, then press the
OK key Connect to connect to it.
NOTE: Press the Left soft key Turn On/Off Wi-Fi.
3. Press the Right soft key Options to access the following Options to manage your Wi-Fi
connections.
• Press the 1 key Add network: Allows you to manually add a Wi-Fi network by entering its name
(SSID), security, and password.
•Press the 2 key Saved networks: Displays your saved Wi-Fi networks allowing you to manage
them. This menu will be shown when a Wi-Fi network is added via using 2 key Add Wi-Fi menu.
• Press the 3 key Advanced: Provides additional specic Wi-Fi connection settings:
• Press the 1 key Show Wi-Fi pop-up: Enable this option to display
•Press the 2 key Wi-Fi notication: Enable this option to be notied if Wi-Fi networks are available
nearby.
• Press the 3 key Avoid bad Wi-Fi connections: Enable this option to use the mobile network when
the connected Wi-Fi network doesn’t have a signal.
• Press the 4 key Keep Wi-Fi on when screen is off: Allows you to set the Wi-Fi status when the
screen is off.
• Press the 5 key Install certicates: Allows you to install certicates from storage.
• Press the 6 key WPS Push button: Provides information to connect to a secured Wi-Fi network
with a WPS button.
• Press the 7 key WPS Pin Entry: Provides the WPS PIN to connect to a secured Wi-Fi network.
Bluetooth
1. From the Wireless & networks menu screen, press the 3 key Bluetooth

34 35
2. Press Ok key to Select. Turn on to pair and connect with other Bluetooth devices. All Bluetooth
devices that are within your phone’s range will be listed. Use the Navigation key to highlight a
device to pair and connect.
3. Press the Right soft key Options to access the following options:
• Press the 1 key to Refresh Bluetooth
• Press the 2 key Rename my device: Allows you to change your phone name for easy
identification when pairing and connecting.
• Press the 3 key Show received les Displays a list of the les received via a Bluetooth device.
Tethering & Mobile HotSpot
1. From the Wireless & networks menu screen, press the 4 key Tethering & Mobile HotSpot.
2. Select the tethering method you want to use.
• Press the 1 key USB tethering Enable this option to allow you to connect via USB. This option is
gray when not connected via USB.
• Press the 2 key Set up Mobile Hotspot: Allows you to enter the SSID and security information
for your mobile hotspot. Press ok key to save, then ok to confirm.
• Press the 3 key Connected devices
Cellular networks
1. From the Wireless & networks menu screen, press the 5 key Cellular networks to set various
network settings.
2. Select an available network setting and set it to your preferences.
• Press the 1 key Mobile data access: Enable this option to allow data access over the mobile
network.
• Press the 2 key Data usage: Allows you to manage your mobile data usage (e.g., disconnect
from the mobile network to stop using mobile data and exclusively use a Wi-Fi network
connection for data instead). Its options include Data usage (viewed on a graph), Limit data
usage, Data usage alert and Monthly usage cycle.
• Press the 3 key Data roaming access: Enable this option to allow data roaming.
• Press the 4 key Network mode: Allows you to search for networks as well as set automatic
network selection.

36 37
• Press the 5 key Access Point Names
• Press the 6 key Network operators.
Emergency alerts
1. From the Wireless & networks menu screen, press the 6 key Emergency alerts to view emergency
alerts and customize your emergency alerts settings.
2. Press the left soft key Settings to view and change its settings.
Accessibility
The Accessibility menu provides settings to make your phone easier for you to use based on your
personal capabilities and/or limitations.
1. From the Home screen, press the OK key right and down to Tools & Settings.
2. Press the 2 key Accessibility.
Readout
1.
From the Accessibility menu screen, press the 1 key Readout, press OK key to Select, turn On/Off.
Speech rate
1. From the Accessibility menu screen, press the 2 key
2. Use the Navigation key to select Slow, Normal or Fast
Speech pitch
1. From the Accessibility menu screen, press the 3 key
2. Use the Navigation key to select Very low, Low, Normal, High, or Very High
Font size
1. From the Accessibility menu screen, press the 4 key Font size.
2. Use the Navigation key to select Normal or Large
Color inversion
1. From the Accessibility menu screen, press the 5 key Color inversion to allow you to invert the
screen colors for higher contrast.
2. Use the Navigation key to select On or Off, then press the OK key .

36 37
Color correction
1. From the Accessibility menu screen, press the 6 key Color correction to allow you to adjust the
screen’s hue and contrast.
2. Press 1 Key to select On/Off
3. Press 2 Key Correction mode to select Deuteranomaly (red-green), Protanomaly (red-green), or
Tritanomaly (blue-yellow), then press the OK key to Set.
Persistent alerts
1. From the Accessibility menu screen, press the 7 Key Persistent alert
2. Select set it to your preference(s) using the Navigation key to highlight your choice Audible
tone or Vibrate, then press Left soft key to Turn On
Mono audio
1. From the Accessibility menu screen, press the 8 key Mono audio to allow you to set the phone to
play the same sounds through both earpieces of a connected device so you can hear everything
with just one ear.
2. Use the Navigation key to select On or Off, then press the OK key to Set.
TTY mode
Allows you to attach a TTY device enabling you to communicate with parties also using a TTY
device. A phone with TTY support is able to translate typed characters to voice. Voice can also be
translated into characters and then displayed on the TTY.
1. From the Accessibility menu screen, press the 9 key TTY mode.
2. Use the Navigation key to highlight a TTY mode, then press the OK key OK to select it:
• TTY Off: Users send and receive without TTY equipment.
• TTY Full: Users who cannot talk or hear send and receive a text message through TTY equipment.
• TTY HCO: Users who can hear but cannot talk send a text message and receive voice through
TTY equipment.
• TTY VCO: Users who can talk but cannot hear receive a text message and send voice through
TTY equipment.

38 39
Mode User Capability
Transmission/
Receiving Mode
When making
communications with
a non-TTY terminal
TTY Off
TTY Full
For hearing/verbally
impaired
Text message
transmission, text
message receiving
Operator required
TTY + HCO For verbally impaired Audible
Text message
transmission,
voice receiving
Operator required
TTY + VCO For hearing impaired Able to talk
Voice transmission, text
message receiving
Operator required
Connecting TTY Equipment and a Terminal
1. Connect a TTY cable to the TTY connection on the phone (TTY connection location is the same
as a headset jack).
2. Access the phone’s Settings menu and set the desired TTY mode.
3. After setting a TTY mode, check the screen of the phone for the TTY icon.
4. Connect the TTY equipment to the power source and turn it on.
5. Make a phone connection to the desired number.
6.
When connection is made, use the TTY equipment to type in and send a text message or send voice.
7. The voice or text message from the receiver end will appear on the TTY equipment display.
Sound settings
1. From the Home screen, press the OK key Menu, right, down
2. Press the OK key to select Tool & Settings
3. Press the 2 Key settings.
4. Press the 3 Key Sound settings
Volume
1. From the settings menu screen, press the 1 key Master Volume.
2. Select a Volume setting and set the level to your preference using the Volume key up-down and
OK key
38 39
Also vibrate for calls off
1. From the Sound settings menu screen, press the 1 key Also vibrate for calls.
2. Use the Navigation key to select On or Off, then press the OK key Set to select it.
3. Press the Clear key to exit.
Phone Ringtone
1. From the Sound settings menu screen, press the 1 key
Phone Ringtone to set the ringtone for calls.
2. Use the Navigation key to highlight a desired ringtone, then press the OK key Set to select it.
Press up and down to listen to a highlighted ringtone.
Press the Clear key to exit.
Vibration pattern
1. From the Sound settings menu screen, press the 4 key Vibration pattern.
2. Use the Navigation key to select Off or Pattern1 to 5, then press the OK key
Set to select it.
3. Press the Clear key to exit.
Notification sounds
1. From the Sound settings menu screen, press the 5 key Notification sound to set the sound played
for new notifications.
2. Use the Navigation key to highlight a desired sound, then press the OK key Set to select it.
• Press the up and down to listen to a highlighted ringtone.
• Press the ok Key to set.
3. Press the Clear key to exit.
Alarm Sound
1. From the Sound settings menu screen, press the 6 key Alarm sound.
2. Use the Navigation key up and down to select , then press the OK key Set to select it.
3. Press the Clear key to exit.
Keypad Volume
40 41
1. From the Sound settings menu screen, press the 7 key Keypad Volume
2. Use the Navigation key to select then press volume side key to set up, then press OK key
Set to select it.
3. Press the Clear key to exit.
Keypad Tone
1. From the Sound settings menu screen, press the 8, Keypad tone
2. Use the Navigation key to select type then press OK key Set to select it.
3. Press the Clear key to exit.
Vibration on keypress off
1. From the Sound settings menu screen, press the 9 key, Vibrate on keypress
2. Use the Navigation key to select On or Off, then press the OK key Set to select on , off
3. Press the Clear key to exit.
Battery charging tone
1. From the Sound settings menu screen, press the 0 key ,Battery charging tone
2. Use the Navigation key to select On or Off, then press the OK key Set to select on , off
3. Press the Clear key to exit.
Battery charged tone
1. From the Sound & notifications menu screen, press the * key ,Battery charged tone
2. Use the Navigation key to select On or Off, then press the OK key Set to select on , off
3. Press the Clear key to exit.
Emergency tone
Allows you to view emergency alerts and customize your emergency alerts settings.
From the Sound settings menu screen, press the # key Emergency tone.
Off: Allows you to disable the alert related with emergency dialing.
Alert: Allows you to set an alert tone same as the volume level on your phone.
Vibrate: Enable this option to emit the vibration instead of providing an alert tone.

40 41
Display
1. From the Home screen, press the OK key Menu.
2. Press the right, down, Tool & Settings .
3. Pres the 2 key, Settings .
4. Press the 4 key, Display settings.
Brightness level
1. From the Display menu screen, press the 1 key, Brightness level.
2. Use the Navigation key to adjust it, then press the OK key Set.
Wallpaper
1. From the Display menu screen, press the 2 key, Wallpaper.
2. Select a Wallpaper type and highlight your preference using the Navigation key , then press
the OK key Select (crop and save the image, if necessary).
Press the 1 key Preloaded
Press the 2 key Gallery.
Display backlight
1. From the Display settings menu screen, press the 3 key, Display backlight to set the amount of time
before the screen times out due to inactivity to conserve your battery power.
2. Use the Navigation key to highlight your choice, then press the OK key Set.
Key backlight
1. From the Display settings menu screen, press the 4 key, Key backlight to set how long the keypad
remains lit.
2. Use the Navigation key to highlight your choice, then press the OK key Set.
Font size
1. From the Display settings menu screen, press the 5 key Font size to set the font used for the phone
software.
2. Use the Navigation key to highlight your choice, then press the OK key, Set.
Main Clock
1. From the Display settings menu screen, press the 6 key Main clock to set clock displayed on the
Home screen.

42 43
2. Use the Navigation key to highlight your choice, then press the OK key , Set.
Phone Settings
The Phone settings menu allows you to designate specific settings to customize how you use your phone.
1. From the Home screen, press the OK key , Menu.
2. Press the right, down, Tools & Settings
3. Press the 2 key Settings .
4. Press the 5 key Phone settings.
Language
1. From the Phone settings menu screen, press the 1 key, Language to set the language for your
phone’s software.
2. Use the Navigation key to select your choice, then press the OK key, Set to select it.
3. Press the Clear key to exit.
Navigation Keys
Shortcuts are available from the Home screen. Simply press the Navigation key up, down, right or
left to open one. You can change the shortcut for each key and also change the shortcuts provided
from the Shortcut menu (the Right Navigation key by default).
Setting Navigation key shortcuts
1. From the Phone settings menu screen, press the 2 key, Navigation keys
2. Use the Navigation key to highlight a shortcut key you want to set.
3. Press the up, down to see the available shortcuts. Use the Navigation key to highlight one, then
press the OK key Set to select it.
Storage
1. From the Phone settings menu screen, press the 3 key Storage to view your phone’s storage
memory information (in text and on a bar graph).
USB connection
You can connect your phone to your PC to charge it and transfer items to the PC from the phone
(and vice versa).
Transferring music and photos.
1. From the Phone settings menu screen, press the 4 key USB mode.

42 43
2. Use the Navigation key to highlight Media device, then press the OK key OK.
3. Connect your phone to a PC using the USB cable included with your phone.
4. You can now view the mass storage content on your PC and transfer files.
5. After transferring files, return to the Phone settings menu, press the
4 key USB connection and change the setting to Charging before disconnecting the USB cable.
Location
1. From the Phone settings menu screen, press the 5 key Location to set the GPS (Global Positioning
System: Satellite assisted information system) mode.
2. Use the Navigation key to highlight On or E911 only then press the OK key Set to select it
NOTES
• GPS satellite signals are not always received by the phone, especially under bad atmospheric and
environmental conditions, indoors, etc.
• When in Airplane Mode, services supporting Location On functionality will be suspended.
Security
1. From the Phone settings menu screen, press the 6 key Security to allow you to secure your phone
electronically by PIN, encryption or SIM card lock.
2. Select the security option you want to activate.
• 1 key Screen lock type: Allows you to set a PIN to secure your phone from unintentional and/
or unauthorized use.
• 2 key Screen lock time: immediately
• 3 key call restrictions.
• 4 key Reset phone.
• 5 key Encrypt data
• 6 Key Others
Reset
1. From the Security menu screen, press the 4 key Reset phone.
2. Reset phone allows you to erase all data from you r phone’s internal storage and restore the
phone to default system settings.

44 45
3.Use Navigation key to scroll down and see currently accounts signed.
4. Press OK key select to Reset phone.
5. Press Ok to select Erase Everything.
Date & time
1. From the Phone settings menu screen, press the 7 key Date & time.
2. Select date & time options and set them as necessary.
NOTE: By default the Auto-date & time and Auto-time zone options are enabled. To activate the
manual setting option(s), turn off the Auto option(s), then select Set date, Set time and/or Select
time zone.
• Turn on the Auto-date & time option to use the date/time provided by the network, or select Set
date and/or Set time to manually set them.
• Turn on the Auto-time zone option to use the time zone provided by the network, or select Select
time zone to set it manually.
• Use 24-hours format: Turn the Use 24-hour format ON to display the time using the 24-hour
format (e.g., 13:00 instead of 1:00 PM).
Call settings
1. From the Home screen, press the OK key Menu.
2. Press right, down, Tools & Settings.
3. Press 2 key Settings.
3. Press the 6 key Call settings.
Answer options
1. From the Call settings menu screen, press the 1 key Any key answer. Set on, off to set how the
phone will answer an incoming call.
2. Use the Navigation key to select the setting(s) you want to use, then press the OK key Set
to select.
NOTE: Auto with hands-free is available when any external device is connected to your phone or
speaker is set to on.
Flip open / close
1. From the Call settings menu screen, press the 2 key, press 1 key - Open to answer and press
2 key - Close to end on

45
Auto Answer
1. From the Call settings menu screen, press the 3 key Auto answer
2. Use the Navigation key to highlight
1. Hands free
2. Speakerphone
Quick responses
1. From the Call settings menu screen, press the 4 key to Quick responses
2. Use the Navigation key to highlight a quick message.
Speed dial
1. From the Call settings menu screen, press the 5 key Speed dial setup to add, view, change, move
and remove your speed dial numbers.
2. Use the Navigation key to highlight a speed dial.
Press the OK key Set to set up a new speed dial from numbers in your Contacts list.
Press the OK key Select to add a speed dial.
Press the Right soft key Remove or OK key to Replace an existing speed dial.
Voice mail
1. From the Call settings menu screen, press the 6 key Voice mail.
2. Select a Voice mail option.
Press the 1 key Voicemail number to see Voicemail service carrier .
Press the 2 key Sound to set the sound played when new voice mail arrives.
Press the 3 key Vibrate to set when to vibrate for voice mail notifications.
Blocked calls
1. From the Call settings menu screen, press the 7 key Blocked calls to allow you to view and
manage your Blocked calls list.
2. Select the action you want.
Press the OK key Add to add numbers. Manually enter a number.
Press the Right soft key Remove to delete blocked number.

46 47
Auto redial
1. From the Call settings menu screen, press the 8 key Auto redial to allow you to set the length of
time the phone waits before automatically redialing a number when the attempted call fails.
2. Use the Navigation key to highlight the desired setting, then press the OK key Set.
Fixed dialing numbers
1. From the Call settings menu screen, press the 9 key.
2. Press desired number selection: (1) Enable FDN, (2) Change PIN2 or (3) FDN list.
Call forwarding
1. From the Call settings menu screen, press the 0 key Call forwarding to allow an incoming call to
be redirected to a mobile telephone or other telephone number.
2. Press the 1 key On to enable Call forwarding and enter the designated telephone number.
3. Press the 2 key Off to disable Call forwarding.
Call Timer
1. From the Call settings menu screen, press the * key Call timer to view call durations for the Last
call, Dialed calls, Received calls, All calls, Lifetime calls.
2. Use the Navigation key to highlight a call type, then press the OK key Reset to reset its
counter to zero.
Assisted dialing
1. From the Call settings menu screen, press the # key.
2. Press desired number selection: (1) Assisted dialing On/Off, (2) Current country or (3) Reference
country
About phone
View information about your phone including My phone number, Status, Network, Hardware
information, and Software information.
1. From the Home screen, press the OK key Menu.
2. Press right and down Tools &Settings
3. Press 2.Settings .
3. Press the 7 key About phone.

47
Software update
This feature gives your phone the ability to upgrade to the latest software and keeps your phone
operating with the latest features without visiting a Verizon Wireless Communications Store for
the upgrade. You can either be notified automatically that there is an updated version of software
available for your phone, or you can manually check to see if there are any updates available for
you to download.
1. From the Home screen, press the OK key Menu.
2. Press right and down Tools & Settings.
3. Press 2 key Settings
3. Press the 8 key Software update.
The two options shown will be Check for updates and Show update History.
Press the 1 key Check for updates to check if any new software updates are available to download.
If a newer software version is available.
You can begin the download immediately by pressing the OK key Download.
Press the 2 key Show update history and see information on the last successful update. If updates
have not yet been performed, status information will be unavailable.
FCC Regulations:
This mobile phone complies with part 15 of the FCC Rules. Operation is subject to the following two
conditions: (1) This device may not cause harmful interference, and (2) this device must accept any
interference received, including interference that may cause undesired operation.
This mobile phone has been tested and found to comply with the limits for a Class B digital device,
pursuant to Part 15 of the FCC Rules. These limits are designed to provide reasonable protection
against harmful interference in a residential installation. This equipment generates, uses and can
radiated radio frequency energy and, if not installed and used in accordance with the instructions,
may cause harmful interference to radio communications. However, there is no guarantee
that interference will not occur in a particular installation If this equipment does cause harmful
interference to radio or television reception, which can be determined by turning the equipment off
and on, the user is encouraged to try to correct the interference by one or more of the following
measures:
-Reorient or relocate the receiving antenna.
-Increase the separation between the equipment and receiver.
-Connect the equipment into an outlet on a circuit different from that to which the receiver is connected.
-Consult the dealer or an experienced radio/TV technician for help.
FCC Note:
4948
Caution: Changes or modifications not expressly approved by the party responsible for compliance
could void the user‘s authority to operate the equipment.
RF Exposure Information (SAR)
This phone is designed and manufactured not to exceed the emission limits for exposure to radio
frequency (RF) energy set by the Federal Communications Commission of the United States.
During SAR testing, this device was set to transmit at its highest certified power level in all tested
frequency bands, and placed in positions that simulate RF exposure in usage against the head with n
o
separation, and near the body with the separation of 10 mm. Although the SAR is determined at the
highest certified power level, the actual SAR level of the device while operating can be well below
the maximum value. This is because the phone is designed to operate at multiple power levels so
as to use only the power required to reach the network. In general, the closer you are to a wireless
base station antenna, the lower the power output.
The exposure standard for wireless devices employing a unit of measurement is known as the
Specific Absorption Rate, or SAR. The SAR limit set by the FCC is 1.6W/kg.
This device is complied with SAR for general population /uncontrolled exposure limits in ANSI/IEEE
C95.1-1992 and had been tested in accordance with the measurement methods and procedures
specified in IEEE1528.
The FCC has granted an Equipment Authorization for this model phone with all reported SAR levels
evaluated as in compliance with the FCC RF exposure guidelines. SAR information on this model
phone is on file with the FCC
and can be found under the Display Grant section of www.fcc.gov/oet/
ea/fccid after searching on FCC ID: 2ABGH-RC2200L.
For this device, the highest reported SAR value for usage against the head is 0.7 W/kg, for usage
near the body is 1.27 W/kg.
While there may be differences between the SAR levels of various phones and at various positions,
they all meet the government requirements.
SAR compliance for body-worn operation is based on a separation distance of 10 mm between
the unit and the human body. Carry this device at least 10 mm away from your body to ensure RF
exposure level compliant or lower to the reported level. To support body-worn operation, choose the
belt clips or holsters, which do not contain metallic components, to maintain a separation of 10 mm
between this device and your body.
RF exposure compliance with any body-worn accessory, which contains metal, was not tested and
certified, and use such body-worn accessory should be avoided.
Hearing Aid Compatibility (HAC) regulations
for Mobile phones
In 2003, the FCC adopted rules to make digital wireless telephones compatible with hearing aids
and cochlear implants. Although analog wireless phones do not usually cause interference with
hearing aids or cochlear implants, digital wireless phones sometimes do because of electromagnetic
energy emitted by the phone’s antenna, backlight, or other components. Your phone is compliant
with FCC HAC regulations (ANSI C63.19- 2011). While some wireless phones are used near some
4948
hearing devices (hearing aids and cochlear implants), users may detect a buzzing, humming, or
whining noise. Some hearing devices are more immune than others to this interference noise and
phones also vary in the amount of interference they generate. The wireless telephone industry has
developed a rating system for wireless phones to assist hearing device users in finding phones that
may be compatible with their hearing devices. Not all phones have been rated. Phones that are
rated have the rating on their box or a label located on the box. The ratings are not guarantees.
Results will vary depending on the user’s hearing device and hearing loss. If your hearing device
happens to be vulnerable to interference, you may not be able to use a rated phone successfully.
Trying out the phone with your hearing device is the best way to evaluate it for your personal needs.
This phone has been tested and rated for use with hearing aids for some of the wireless technologies
that it uses. However, there may be some newer wireless technologies used in this phone that have
not been tested yet for use with hearing aids. It is important to try the different features of this phone
thoroughly and in different locations, using your hearing aid or cochlear implant, to determine if
you hear any interfering noise. Consult your service provider or the manufacturer of this phone for
information on hearing aid compatibility. If you have questions about return or exchange policies,
consult your service provider or phone retailer.
M-Ratings: Phones rated M3 or M4 meet FCC requirements and are likely to generate less
interference to hearing devices than phones that are not labeled. M4 is the better/higher of the
two ratings.
T-Ratings: Phones rated T3 or T4 meet FCC requirements and are likely to be more usable with a
hearing device’s telecoil (“T Switch” or “Telephone Switch”) than unrated phones. T4 is the better/
higher of the two ratings. (Note that not all hearing devices have telecoils in them.)
Your phone meets the M3/T4 level rating.
Hearing devices may also be rated. Your hearing device manufacturer or hearing health
professional may help you find this rating. For more information about FCC Hearing Aid
Compatibility, please go to https://www.fcc.gov/accessibility
This phone has been tested and rated for use with hearing aids for some of the wireless
technologies that it uses. However, there may be some newer wireless technologies used in this
phone that have not been tested yet for use with hearing aids. It is important to try the different
features of this phone thoroughly and in different locations, using your hearing aid or cochlear
implant, to determine if you hear any interfering noise. Consult your service provider or the
manufacturer of this phone for information on hearing aid compatibility. If you have questions
about return or exchange policies, consult your service provider or phone retailer.
50 51
50 51

User guide
